

Page 1
XtC
Model Year 2001
Owners Manual
October 2000.
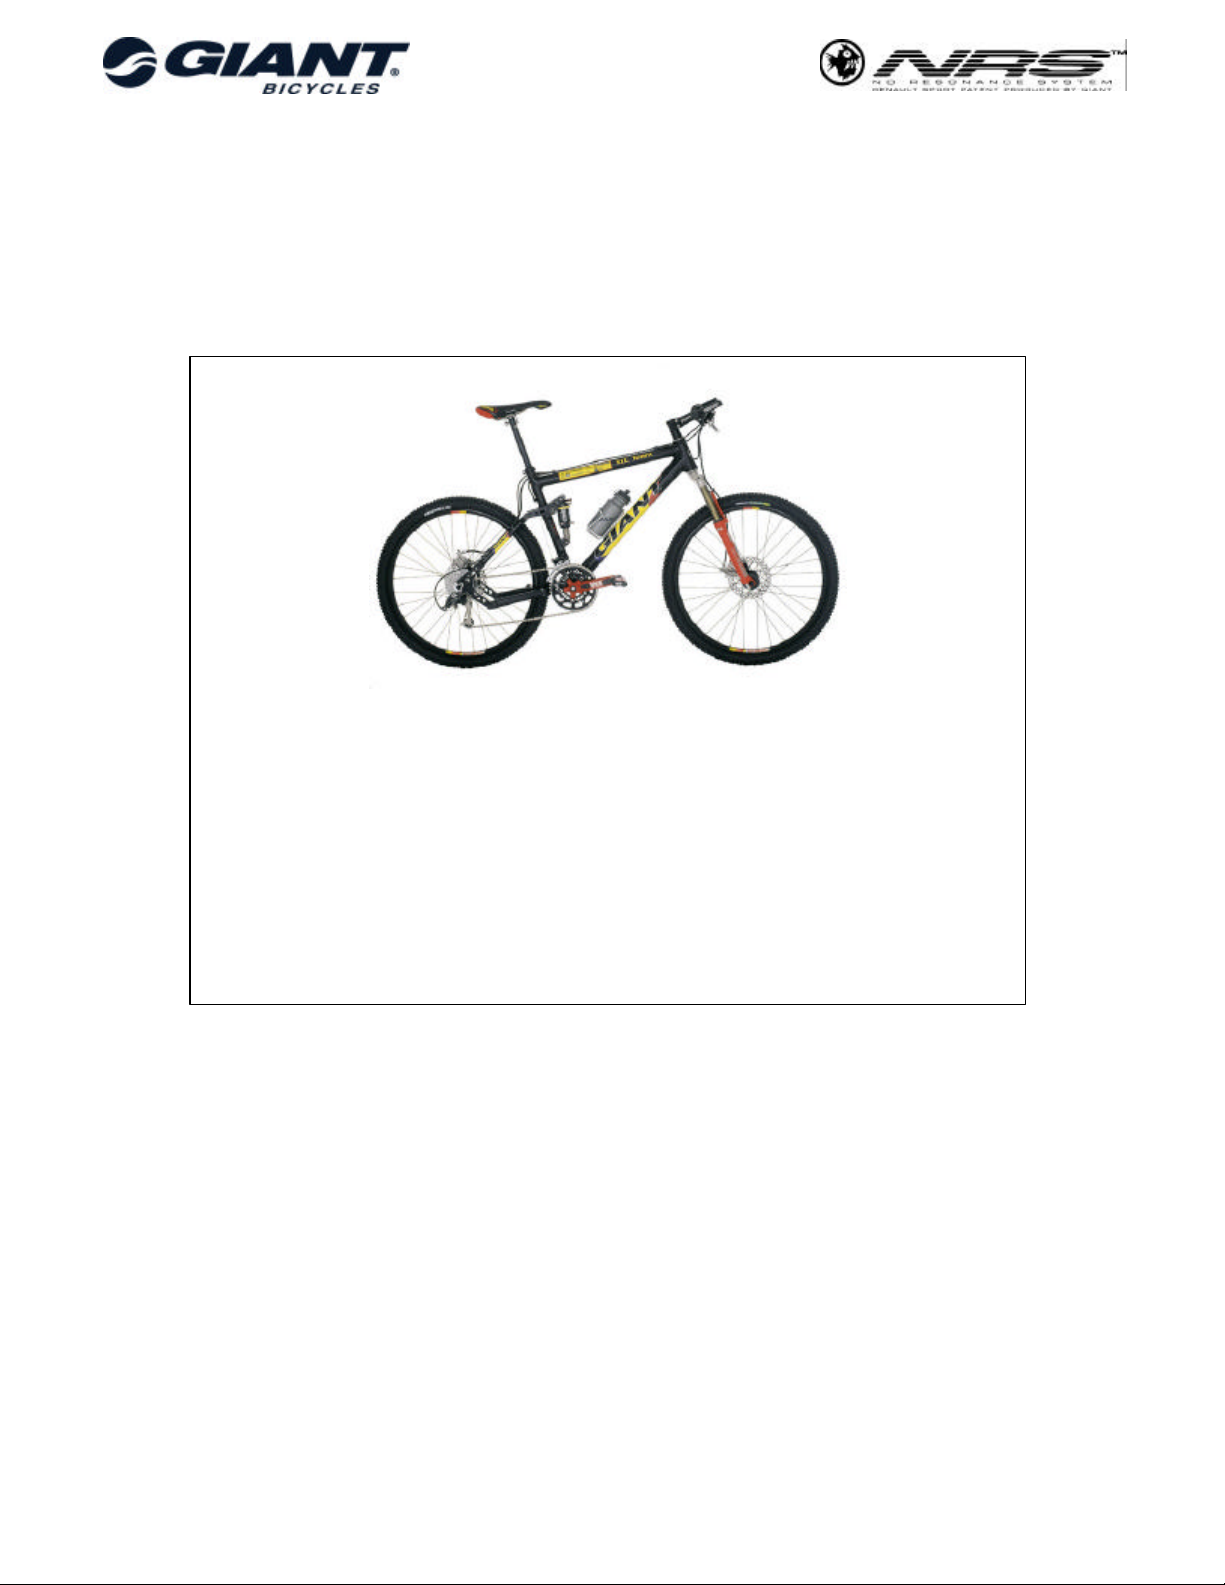
PROFESSIONAL CROSS COUNTRY BIKE
• Unique 4 bar linkage design.
• NRSTM (No Resonance System) suspension with “no-SAG” set-up.
• Sealed bearings on main pivots:
BB shell - chain stays / Linkage plates - seat tube / Seat stays - linkage plates.
• Rising suspension + “no-SAG” result in “no bobbing” and “no power loss”.
• Sensitive rear shock works even on the smallest bumps.
• Lightest Full Suspension competition XC team bike.
• 2 rear shock positions (XtC Team, XtC Mt. Snow and XtC Big Bear only).
• Rear wheel travel: 3~3¾ inches (XtC Team, XtC Mt. Snow and XtC Big Bear only)
3¾ inches (XtC Mammoth and XtC Napa).
• Front wheel travel: 3 inches.
Contents:
1. Sizing.
2. Rear suspension
2-1. NRSTM rear suspension system
2-2. Selecting rear travel
(only XtC Team, XtC Mt. Snow and XtC Big Bear).
2-3. Selecting air pressure, “Zero-SAG” adjustment
2-4. Rear suspension tuning
2-5. Rebound damping adjustment
(only XtC Team, XtC Mt. Snow and XtC Big Bear)
2-6. Removing the rear shock assembly or pivots
2-7. Air pressure adjustment range.
3. Cleaning and maintenance.
- Pag. 1. -
Page 2
1. Sizing.
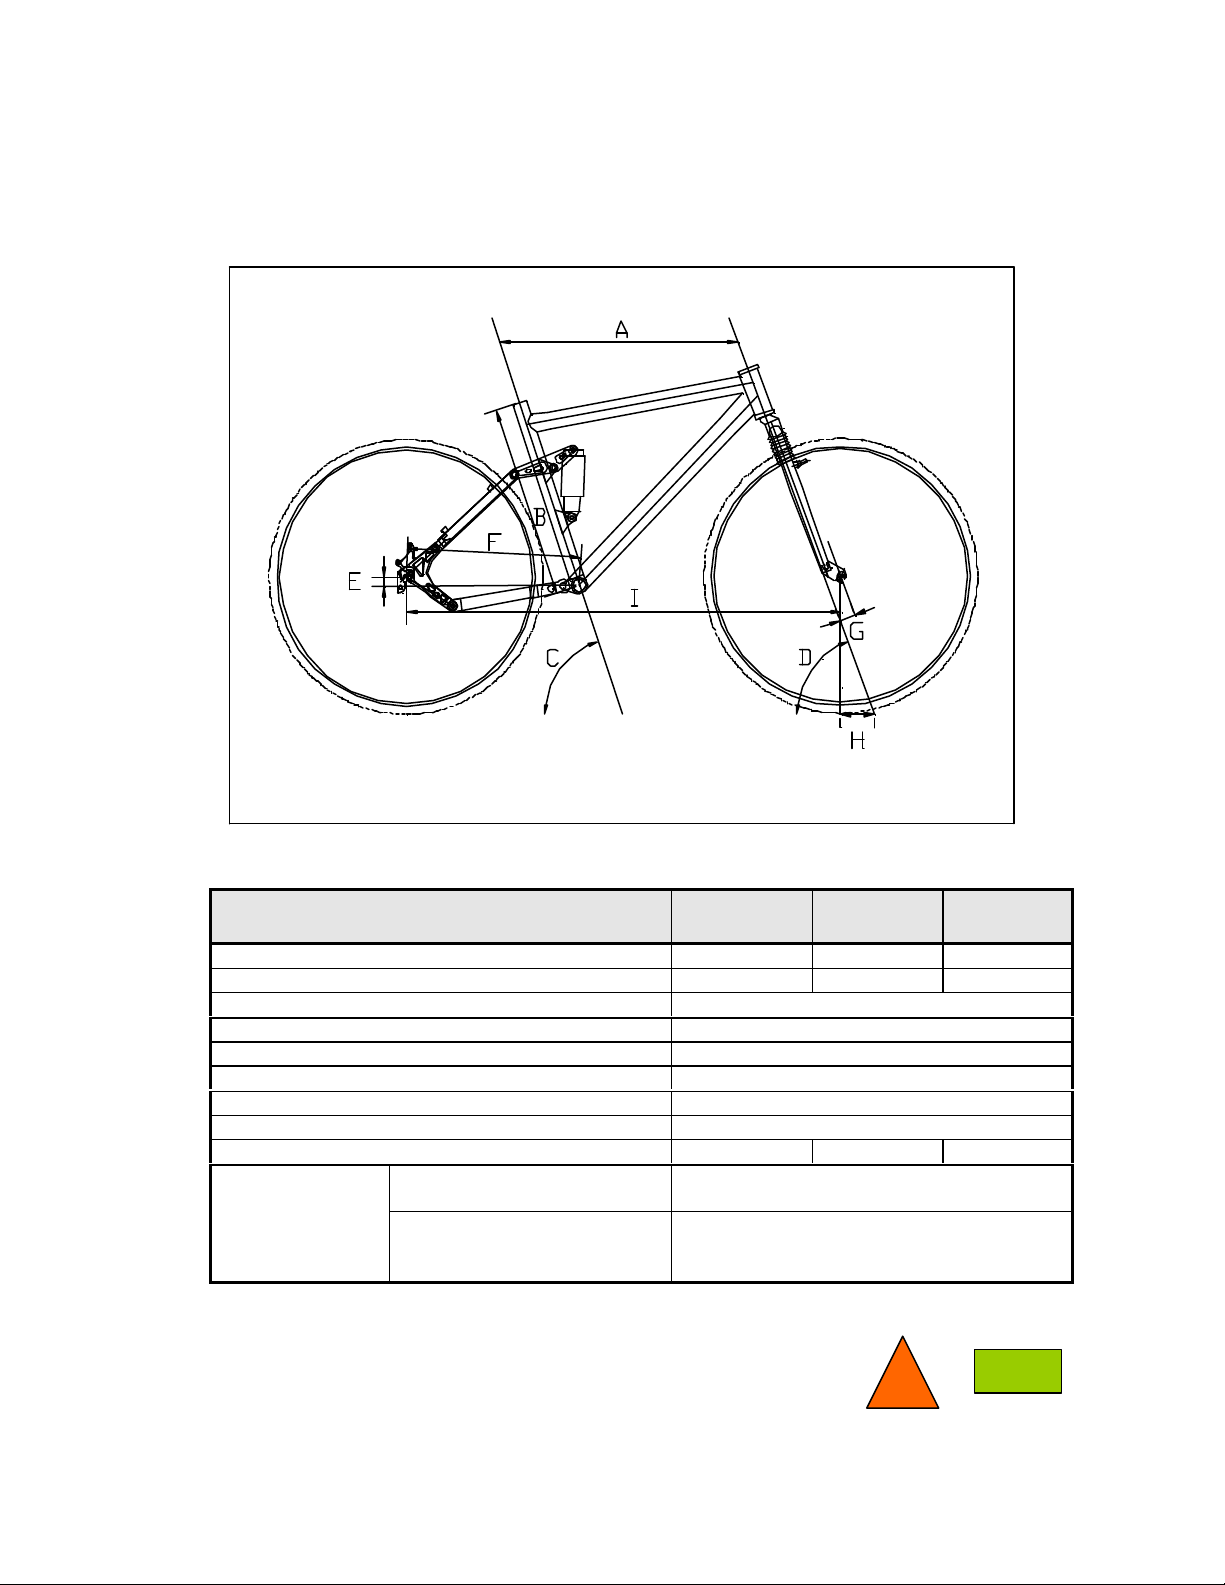
The actual frame measurements and geometries are listed below.
The XtC bikes are designed for Cross-Country racing, but are suitable for all round use as well.
Figure 1.
Size S - 16½” M - 18½” L - 20½”
A. Top Tube [mm.] (measured horizontally) 575 590 605
B. Seat Tube [mm.] 420 470 520
C. Seat Tube Angle 72 degrees
D. Head Tube Angle 70 degrees
E. B.B. Drop [mm.] 22
F. Chain stays [mm.] 425
G. Fork Rake [mm.] 38
H. Trail [mm.] 82
I. Wheel Base [mm.] 1047 1064 1081
Rear Travel
XtC Mammoth
XtC Napa
XtC Team
XtC Mt. Snow
XtC Big Bear
3¾”
3” or 3¾”
TOP
INDEX
- Pag. 2. -
Page 3
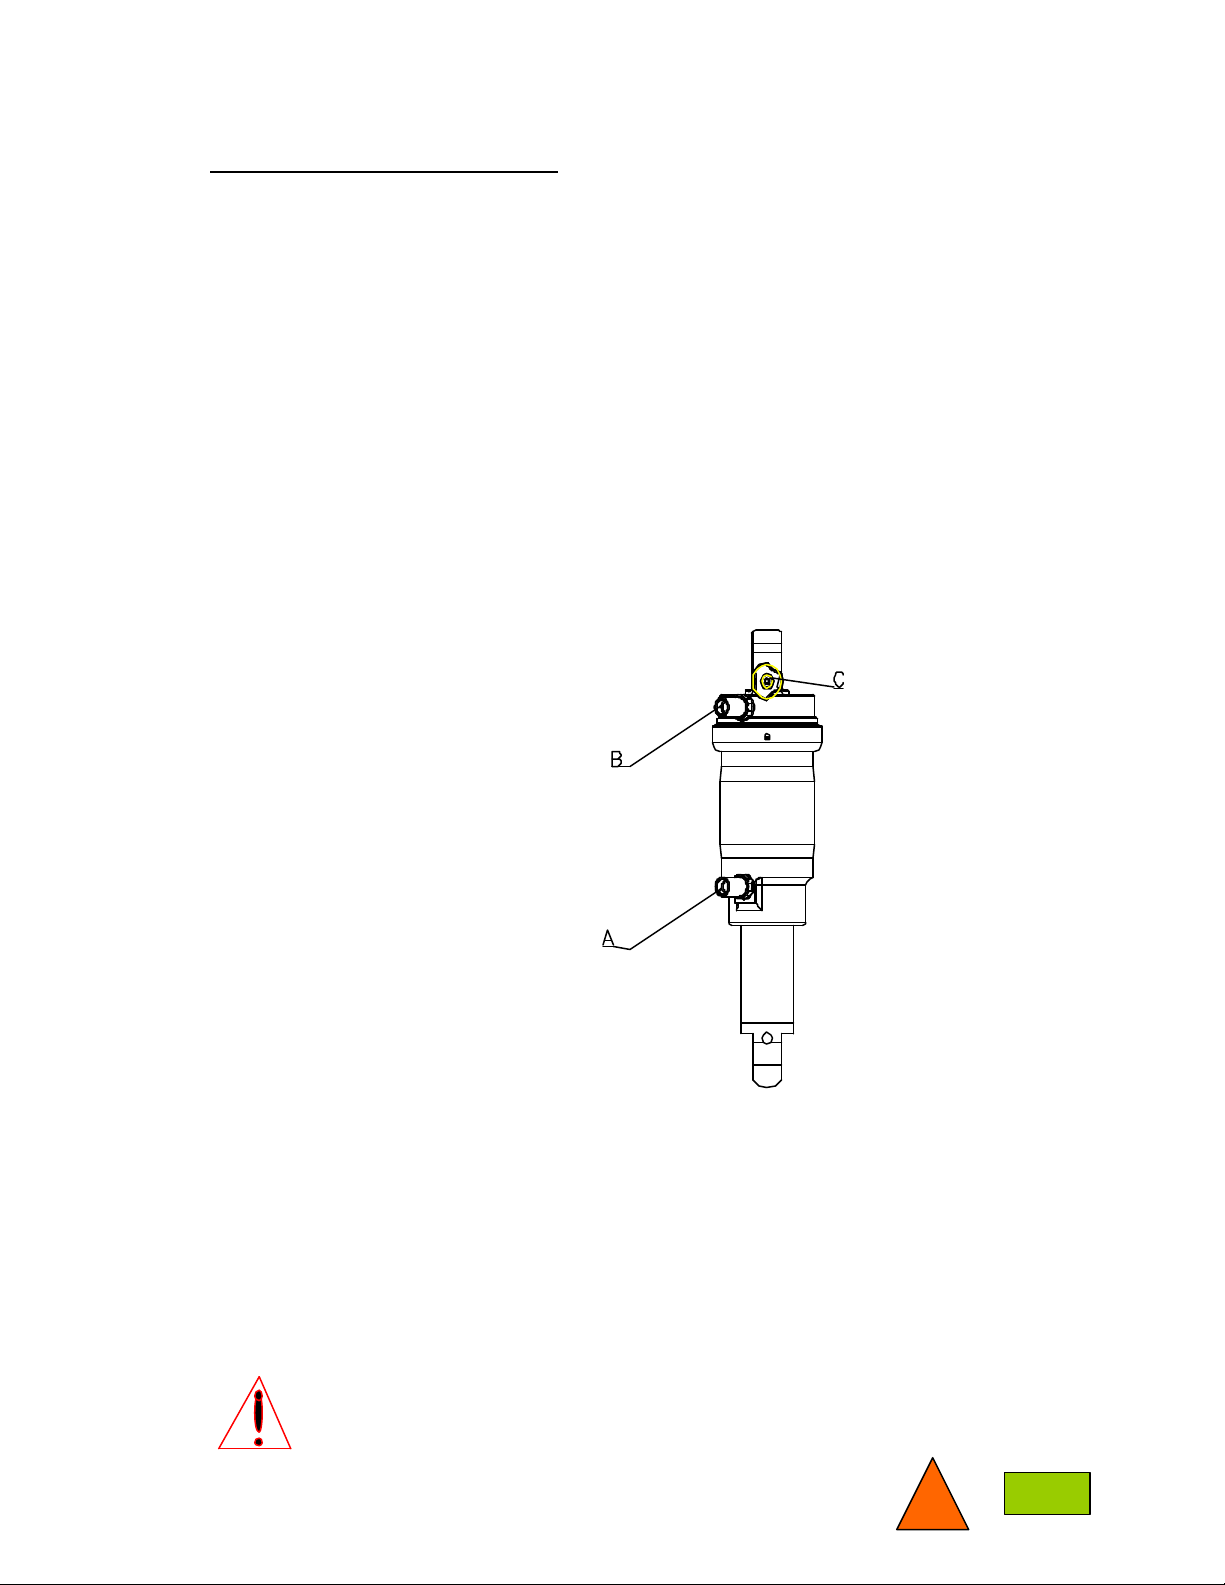
Figure 2.
2. Rear suspension.
2-1. NRSTM rear suspension system.
NRSTM (No Resonance System) bikes are equipped with dedicated RockShox SID rear shocks.
These SID shocks have separated “positive” air chambers (spring) and “negative” air chambers
(spring). The positive springs’ main function is to absorb the shock impact.
The negative spring (which is much smaller) makes the positive spring function smoothly and prevents
a harsh top out feeling when the shock returns to its original position.
Both air chambers have a valve to change the air pressure with a shock pump. By independently
inflating both chambers the NRSTM system can be set up in such a way that maximum efficiency,
comfort and control easily can be obtained. Note: the NRSTM system should not be set up with a
negative air pressure which is almost as high as the positive air pressure. Doing so, the “zero-SAG”
setting cannot be achieved.
XtC bikes with NRSTM system come with a shock pump with gauge free of charge!
Please use this pump to inflate the rear shock!
Air pressures have to be checked before every ride, slight air loss might occur over a few days
standing.
The drawing below shows the rear shock, air damping type (SID made by RockShox, special version
for Giant XtC).
A. Negative air valve
B. Positive (compression) air valve
C. Rebound damping adjustment knob
(only XtC Team, XtC Mt. Snow and
XtC Big Bear )
The RockShox SID rear shocks used in XtC Team, XtC Mt. Snow and XtC Big Bear have a rebound
damping adjustment knob to control the extension or rebound of the shock.
The rear shocks are serviceable and must be returned for service, only to an authorised RockShox
dealer (or call the RockShox distributor in your country) once a year or more often if the bike is used in
extreme conditions.
This service is not necessarily free of charge!
ALL SERVICE AND MAINTENANCE OF THE REAR SHOCKS SHOULD ONLY BE
PERFORMED WITH PROPER TOOLS BY AN AUTHORISED ROCKSHOX DEALER
OR BY THE ROCKSHOX DISTRIBUTOR IN YOUR COUNTRY.
TOP
- Pag. 3. -
INDEX
Page 4

2-2. Selecting rear travel (only XtC Team, XtC Mt. Snow and XtC Big Bear).
XtC Mammoth and XtC Napa have just one possibility to assemble the rear shock unit: the so called
“Marathon” setting. This setting has been developed to insure maximum control: fixed maximum rear
wheel travel of 3¾ ”, with relatively low shock rebound speed.
XtC Team, XtC Mt. Snow and XtC Big Bear models however, have 2 possibilities to mount the rear
shock unit, the so called “Pro Racing” settings.
These “Pro Racing” settings offer the rider the choice of 2 different rear suspension characteristics,
depending on personal preference, how fast or slow the course is and how high or low the shock
impacts are. These 2 characteristics are more aggressive than “Marathon” setting and purely
developed for hard core racing.
Position “1” of the “Pro Racing” setting results in a 3” maximum rear wheel travel, with a high rebound
speed.
Position “2” of this “Pro Racing” setting results in a 3¾” maximum rear wheel travel, but the suspension
characteristics are not the same as “Marathon setting”: rebound speed higher than “Marathon” setting,
but lower than “Pro Racing” position “1”.
The ideal setting cannot be prescribed by Giant, but here are some tips:
Position “1” with 3” travel may be an option for fast races or courses with relatively low shock impact
(smooth terrain). Because in this setting the rear shock unit doesn’t need such a high “positive” air
pressure, it’s also recommended for heavier riders, say 80 kg. or more.
Position “2” with 3¾ ” travel may be more suitable for slower and very technical races or courses with
relatively high shock impact (rough terrain). In this position the rear shock unit needs a higher “positive”
air pressure, so it’s less suitable for heavier riders.
Figure 3.
Position “2”
Position “1”
- Pag. 4. -
Page 5

How to change the position of the rear shock:
1. Use a 5 mm. Allen-key to remove the bolt that holds the upper end of the shock to the linkage
plates. Take note of the position of each part when removing, to insure proper re-assembly.
2. Pivot the top of the shock towards the desired shock mounting holes in the linkage plates.
See figure 3 which holes to use for position “1” or position “2”.
3. Re-install all parts in reversed order.
The threads of fixing bolt should be cleaned and re-set using LoctiteTM Primer (#7649) and
LoctiteTM blue Removable Threadlock (#242) or similar material.
Recommended tightening torque of the fixing bolt: 12~15 Nm.
WARNING: IMPROPER (DIS)ASSEMBLY MAY RESULT IN DAMAGE TO THE
BICYCLE OR IN AN ACCIDENT WHICH CAN CAUSE SERIOUS
INJURY OR DEATH.
TOP
INDEX
2-3. Selecting air pressure, “zero-SAG” adjustment.
WARNING: IMPROPER ADJUSTMENT OF REAR SUSPENSION SHOCKS CAN RESULT IN
UNSTABLE CONDITIONS OR LOSS OF CONTROL.
How to set up the rear shock correctly with “zero-SAG”, in order to maximise the efficiency, comfort &
control of an NRSTM bike.
Do as follows:
1. Try the air pump on the valves and make sure the air pressure opens the valves, air goes into the
air chamber and does not stay in the pump hose.
2. Try to find out your exact body weight including cycling gear (clothing, helmet, shoes, cycling
bag…….).
3. Check the following table to find the correct “positive” and “negative” air pressures, depending on
your weight:
“PRO RACING” setting
position “2”
3¾” travel
Positive
air pressure
position “1”
3” travel
Positive
air pressure
95 psi
105 psi
115 psi
125 psi
135 psi
145 psi
155 psi
165 psi
175 psi
190 psi
205 psi
Body Weight
50 kg. / 110 lbs.
55 kg. / 121 lbs.
60 kg. / 132 lbs.
65 kg. / 143 lbs.
70 kg. / 154 lbs.
75 kg. / 165 lbs.
80 kg. / 176 lbs.
85 kg. / 187 lbs.
90 kg. / 198 lbs.
95 kg. / 209 lbs.
100 kg. / 220 lbs.
“MARATHON” setting
single position
XtC Team, XtC Mt. Snow, XtC Big Bear
3¾” travel
XtC Mammoth, XtC Napa
Negative
air
pressure
Positive
air pressure
50 psi 120 psi 120 psi
50 psi 135 psi 135 psi
50 psi 145 psi 145 psi
50 psi 155 psi 155 psi
50 psi 165 psi 165 psi
50 psi 175 psi 175 psi
50 psi 195 psi 195 psi
50 psi 205 psi 205 psi
50 psi 220 psi 220 psi
50 psi 230 psi 230 psi
50 psi 250 psi 250 psi
- Pag. 5. -
Page 6

4. Inflate the air chambers until the correct pressures have been reached.
Start with the negative spring (LOWER VALVE, on the small diameter of the shock) and next the
positive spring (TOP VALVE on the large diameter of the shock).
5. These shock pressures enable you to set up the shock 95% correctly. It is impossible to take into
consideration deviations in the air pump gauge and the rear shock. Therefore we suggest making
the following simple steps, which offer two more ways to achieve the 100% correct setting. The
finishing touch to get to the “zero-SAG” setting will give the optimal efficiency and the best
performance.
It is important to understand that the shock should be delicately set on the edge of “zero-SAG” and
not with too high positive pressure. Therefore this procedure goes from a little bit too low positive
air pressure to just enough positive air pressure to achieve “zero-SAG”.
6. Put the bike against a wall and make sure there is a zip tie or O-ring around the rear shock piston.
7. Sit on the bike (during stand still). Pull the zip tie against the stop of the rear shock piston. Sit still
on the saddle, without bobbing. Make sure you sit on the bike like you normally would. Push gently
one of the pedals, like you would do during real riding (while keeping the front wheel locked with
the front brake).
8. Shift your body weight gently from the saddle to the front fork and try to dismount without causing
too much movement in the bike.
9. Check the zip tie. Did it slide down on the piston? If yes, this means there is some “SAG”.
REMEMBER: FOR MAXIMUM EFFICIENCY THE NRSTM SYSTEM SHOULD ALWAYS BE SET
UP WITH ZERO “SAG” !!!
10. Increase the pressure of the positive spring in repetitive steps of 5 or 10 psi. following the points 7,
8 and 9 until “zero-SAG” is reached.
11. It is essential to set up the NRSTM system with zero “SAG”. Here’s the final check: ride the bike with
NRSTM system with a relatively high RPM on a nicely paved road. In case the bike tends to “bob”
with small motions, then increase the positive spring by another 10 psi. Now try again and the
result should be, that the bike does not “bob” anymore, whether sitting on the saddle or climbing or
sprinting out of the saddle.
12. Note: the air pump which is supplied free of charge with the XtC bike is equipped with an escape
valve (the black knob below the gauge) to de-pressurise the shock when the pressure is too high.
13. Note: the shock setting should be checked regularly (at least every 2 weeks). Of course the
simplest way to check is the asphalt paved road test with high RPM (see point no. 11).
14. Note: by putting the pump on the shock, the valve is opened and always some air pressure will be
lost (between 10 and 15 psi.). By taking the air pump from the valve no air pressure will be lost.
A small amount of air can be heard escaping, this is between the valve and the gauge.
15. Note: when the shock is set up for the first time and has to be inflated from 0 psi., the temperature
in the air chamber will rapidly rise. Afterwards the temperature inside will drop slowly. Together with
the drop in temperature some air pressure will be lost. Therefore the pressure has to be checked
again after approx. 15 minutes.
16. Note: air shocks are sensitive to big temperature changes. Especially in winter when the bike is
taken outside, the air pressure setting has to be checked again outside.
17. Once you understand the routine of correctly setting up the NRSTM suspension system, and have
experienced what the bike can do for you (MORE POWER), you can then try to slightly modify the
air shock setting to your own personal needs. Riding tests can be made with the pressure of the
negative spring under two conditions:
A. always maintain the same big difference (same ratio) between positive and negative spring like
the final setting in step 11, and
B. always maintain the “ZERO-SAG” principle.
Have fun!
- Pag. 6. -
TOP
INDEX
Page 7

2-4. Rear suspension tuning.
By adjusting the air pressure, the RockShox SID rear shocks can be tuned to your particular weight,
riding style and terrain. This shock has been designed to be tuned for soft, plush descent riding, for the
long climbs, or a combination of both.
Different riders require different performance characteristics from their suspension.
(A). Heavier or more aggressive rider needs a stiffer compression damping (spring), a higher air
pressure.
(B). Lighter rider needs softer compression damping (spring), a lower air pressure.
All Giant XtC dual suspension bicycles are equipped with front and rear shock absorbers that offer
some sort of adjustment and tuneability. Adjustment of suspension is subjective and cannot be 100%
prescribed by Giant. If help is needed, please contact your Giant dealer.
When experimenting with set up, remember that front suspension reacts differently to bump force input
than the rear shock.
When tuning suspension, always make one change at a time and write it down. This takes patience
and time, but allows you to understand how each change affects the ride. Use a familiar trail to make
small adjustments at a time. To understand the tuning range it may also help if the bike is ridden from
one extreme to the other (e.g. maximum vs. minimum rebound).
WARNING: THE REAR SHOCK UNIT IS SERVICEABLE.
THIS SERVICE MUST BE PERFORMED WITH PROPER TOOLS BY AN
AUTHORISED ROCKSHOX DEALER OR BY ROCKSHOX. NOONE
ELSE SHOULD DISASSEMBLE OR OTHERWISE MODIFY THE
SHOCK UNIT OR ATTACHMENTS. DOING SO WILL NOT ONLY VOID
ALL WARRANTIES BUT CAN LEAD TO SERIOUS INJURY OR DEATH.
TOP
INDEX
2-5. Rebound damping adjustment (only XtC Team, XtC Mt. Snow and XtC Big Bear).
The SID rear shock includes a red rebound damping adjustment knob (figure 2). Rebound is the
extension or return of the shock. Rebound damping adjustment allows you to control the rate at which
the shock extends after it is compressed. The shock's rebound is quickest when the adjustment knob is
in the full anti-clockwise position. Rebound is slowest when the adjustment knob is in the full clockwise
position.
Setting rebound:
When you are setting rebound, a good starting point is the “curb” test. Be sure this is done after you set
up your “Zero-Sag”.
1. Set your rebound adjuster fully anti-clockwise.
2. Ride the bike off the curb sitting in the saddle and count the number times the shock bounces. You
want to achieve one bounce.
3. Turn the rebound adjuster a quarter turn clockwise and ride off the curb again. Continue to do this
until one bounce is achieved.
4. Record the number of turns from the fully closed (full anti-clockwise) position.
TOP
INDEX
- Pag. 7. -
Page 8

2-6. Removing the rear shock assembly or pivots.
It is necessary to periodically check the rear shock unit and the suspensions’ pivot points for damage or
wear. The rear shock unit should be returned to an authorised RockShox dealer or to the RockShox
distributor in your country to inspect and repair.
(Note: this is not covered under the terms of the warranty).
WARNING: DO NOT TRY TO DISASSEMBLE OR TO REPLACE THE REAR
SHOCK OR PIVOTS BY YOURSELF!
IMPROPER (DIS)ASSEMBLY MAY RESULT IN DAMAGE TO THE
BICYCLE OR IN AN ACCIDENT WHICH CAN CAUSE SERIOUS
INJURY OR DEATH. ONLY AN AUTHORISED GIANT DEALER
SHOULD DISASSEMBLE THE REAR SHOCK OR PIVOTS.
TOP
INDEX
2-7. Air pressure adjust range.
Positive air chamber: there may be a decal on the shock, showing air pressure range:
“140-180 psi. compression spring rate”.
Negative air chamber: there may be a decal on the shock, showing air pressure range:
“set negative spring to approx. 20 psi. of compression spring”.
THIS MUST BE IGNORED !!!
PLEASE USE THE AIR PRESSURES AS SPECIFIED IN THIS MANUAL.
To increase or control the air pressure of the shock, a special air pump is needed.
A pump is supplied with each XtC bike.
(See figure 4: the pump on the picture may be a different one from the pump that comes with the
bikes).
Figure 4.
- Pag. 8. -
TOP
INDEX
Page 9

3. Cleaning and maintenance.
Proper maintenance of a Giant XtC dual suspension bicycle is important to insure years of trouble free
safe riding and enjoyment.
We recommend taking this bike to your authorised Giant dealer for periodic service and inspection of
suspension systems. Parts such as seals, elastomer bumpers and bearings can be adversely affected
by use, dirt and ultraviolet radiation. The bike should be returned to an authorised Giant dealer for rear
shock inspection and adjustment once a year or more often if the bike is used in extreme conditions.
(Note: this is not covered under the terms of the warranty and is not necessarily free of charge!).
DO NOT use high-pressure water or air hoses to clean bike. This can force dirt into areas that may
cause damage.
DO NOT lubricate any of the pivot points. These are high quality self lubricating TeflonTM or similar
surfaced pivots.
See also the manuals of the suppliers of the suspension fork, rear shock (RockShox SID), and other
parts that come with this XtC bike.
INDEX
- Pag. 9. -
 Loading...