

Page 1
WARP
Model Year 2001
Owners Manual
November 2000
Dual Suspension bike
• Aluminium frame material
• Cantilever rear suspension system with 4" rear travel.
• Coil spring oil damping rear shock
CONTENTS
1. Sizing
2. Rear suspension system
2-1. Rear suspension tuning
2-2. SAG Adjustment
2-3. Changing the coil spring
2-4. Removing the rear shock assembly
3. Cleaning and maintenance
Page 2
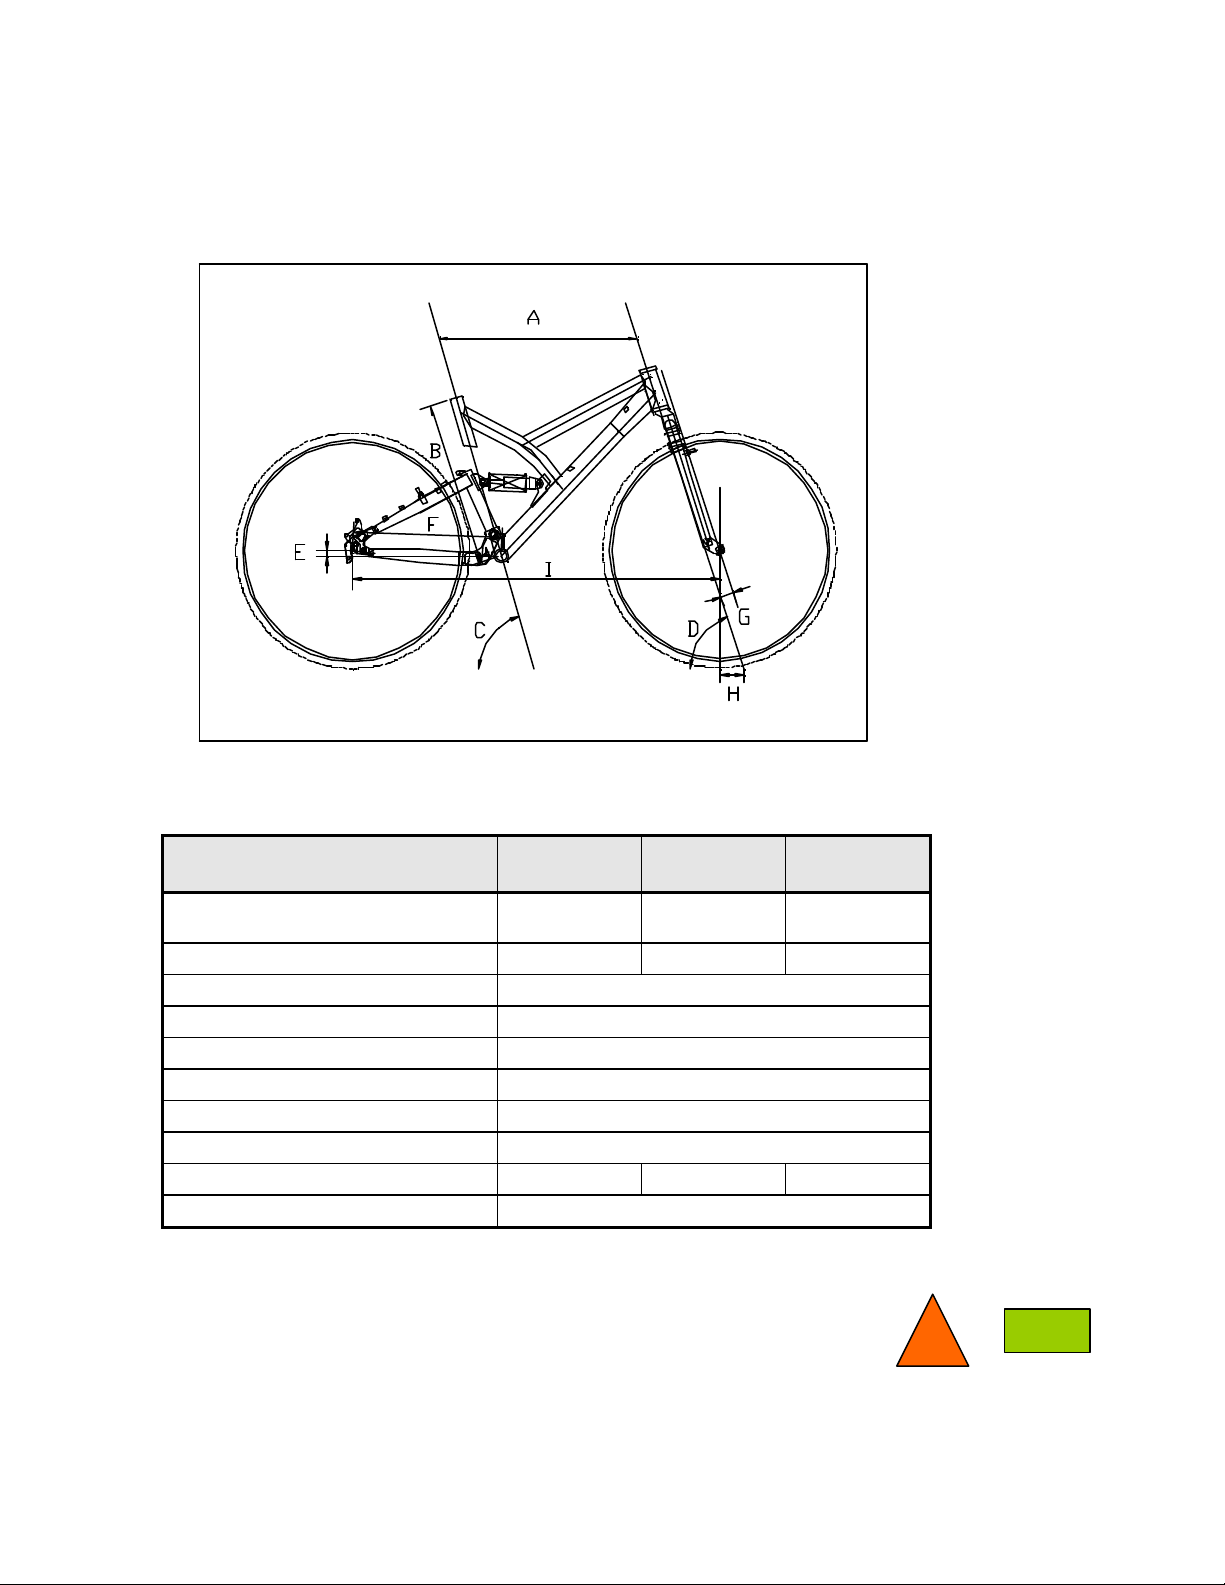
1. SIZING.
The actual frame measurements and geometries are listed below.
The WARP bikes are designed for sports and recreational use. Rear travel 4”.
Size S - 16.5” M - 18.5” L - 20.5”
Top Tube
A
(measured horizontally) [mm.]
B Seat Tube [mm.] 420 470 520
C Seat Angle 73 degrees
D Head Angle 71 degrees
E B.B. Drop [mm.] 15
F Chain Stay [mm.] 430
G Fork Rake [mm.] 38
H Trail [mm.] 76
I Wheel Base [mm.] 1047 1069 1091
Rear Travel [mm.] 105
560 580 600
TOP
INDEX
Page 3

2. REAR SUSPENSION SYSTEM
WARNING: Improper adjustment of rear suspension shocks can result in unstable conditions
or loss of control.
The drawing below shows the rear shock.
a
g
b
c
d
e
f
a. Rear Eyelet
b. Pre-load Spring Washer
c. Bumper
d. Pre-load Spring
e. Knurled Compression Ring
f. Front Eyelet
g. Rebound damping adjust knob
The suspension for the Giant Warp dual suspension bicycles is provided by Giant GTM-7 “coil-spring”
shocks. The shock has a pre-load spring to control compression and an internal oil piston to control rebound.
The shock has a compression adjustment ring to”pre-load” the spring (procedures for when and how to adjust
this spring are explained under “Adjusting SAG & Rear Suspension Tuning”).
Note: These rear shocks are NOT serviceable.
Different riders require different performance characteristics from their suspension:
(A). Heavier or more aggressive rider needs a stiffer spring and medium and/or heavier (slower) damping.
(B). Lighter rider needs softer springs and lighter damping.
Page 4

All Giant WARP dual suspension bicycles are equipped with front and rear shock absorbers that offer some
sort of adjustment and tuneability. Adjustment of your suspension is subjective and cannot be prescribed by
Giant. If you need help, contact your Authorised Giant dealer. When experimenting with the set up, remember
that the front suspension reacts differently to bump force input than the rear shock.
WARNING:
THERE ARE NO SERVICEABLE PARTS INSIDE THE SHOCK UNIT.
DO NOT DISASSEMBLE OR OTHERWISE MODIFY THE SHOCK UNIT OR ATTACHMENTS.
DOING SO WILL NOT ONLY VOID ALL WARRANTIES BUT CAN LEAD TO SERIOUS INJURY
OR DEATH.
TOP
INDEX
2-1. Rear suspension tuning.
To adjust the pre-load on the coil-spring shock is simple. Looking at the front of the shock, facing the rear of
the bicycle, follow these procedures:
For a firmer ride while descending, hill climbing or smooth surfaces, turn the pre-load adjusting ring clockwise
to compress or load the spring.
For a softer ride while riding cross country, turn the pre-load adjusting ring counter-clockwise to relax or
unload the spring
WARNING:
NEVER COMPRESS THE SPRING SO FAR AS TO LEAVE LESS THAN ½” OF THREADS
SHOWING. IF THE PRE-LOAD YOU REQUIRE ALLOWS LESS THAN ½” OF THREADS
SHOWING (BETWEEN KNURLED COMPRESSION RING AND THE PRE-LOAD SPRING
WASHER) YOU MAY REQUIRE A HIGHER RATED SPRING. CONTACT YOUR GIANT
DEALER FOR OPTIONAL REPLACEMENT SPRING.
Standard shock spring rates and recommended rider weight ranges.
Below is a chart showing the standard spring rates, and the recommended spring rates for different riders’
weight (Shock model GTM-7, length 165 mm.).
Spring rate Range weight rider
650 lb/in 50∼70 kg (110∼154 lb)
800 lb/in 70∼90 kg (154∼198 lb)
1000 lb/in 90∼110 kg (198∼242 lb)
Softer and stiffer spring rates are available for all rear suspension shocks through your Authorised Giant
dealer.
For service in your country please contact a local Authorised Giant dealer or the Giant Importer in your
country.
TOP
INDEX
Page 5

2-2. “SAG” adjustment.
SAG is the amount of coil spring pre-compression that is required to compensate for the riders weight and
allow the bicycle to perform as it was designed to.
To properly set the SAG, you will need a screw driver, measuring-tape and/or calliper.
Step 1. Prepare the bicycle. Set the saddle to the correct height for your riding style.
Attach all accessories, water bottles etc. that you would normally ride with.
Step 2. Prepare yourself. Dress as you would for a normal ride, including helmet, cycling bag, etc.
Step 3. Measure the distance (L) between the main cylinder and the Pre-load spring washer of the rear
shock.
L
Step 4. Use a screw driver or the like to slide the bumper of the shock against the main cylinder of the rear
suspension.
Bumper Cylinder
Step 5. Sit on the bicycle with your feet on the pedals in your normal riding position.
Step 6. Come off from your bike without causing too much movement in the bike.
Check the rear shock and you will see that the bumper has been moved along the piston. Measure
the distance between the main cylinder and the bumper. This distance should be approx. 1/3 ~ ¼ of
the dimension L measured during step 3. Adjust the (pre-load adjusting ring) compression ring (as
described in the rear suspension tuning section) and repeat steps 4 - 6 until you have reached this.
WARNING:
NEVER COMPRESS THE SPRING SO FAR AS TO LEAVE LESS THAN ½” OF THREADS
SHOWING (BETWEEN KNURLED COMPRESSION RING AND THE PRE-LOAD SPRING
WASHER). IF THE PRE-LOAD YOU REQUIRE ALLOWS LESS THAN ½” OF THREAD
SHOWING YOU MAY REQUIRE A HIGHER RATED SPRING. CONTACT YOUR
AUTHORISED GIANT DEALER FOR OPTIONAL REPLACEMENT SPRING.
TOP
INDEX
Page 6

2-3. Changing the coil spring.
WARNING:
Do not try to disassemble or to replace the rear shock coil spring by yourself!
Improper (dis)assembly may result in damage to the bicycle or in an accident which can cause serious injury
or death. Only an authorised Giant dealer should replace the coil spring.
2-4. Removing the rear shock assembly.
It is necessary to periodically check rear shock unit and the suspensions’ pivot points for damage or wear.
WARNING:
DO NOT TRY TO DISASSEMBLE OR TO REPLACE THE REAR SHOCK BY YOURSELF!
IMPROPER (DIS)ASSEMBLY MAY RESULT IN DAMAGE TO THE BICYCLE OR IN AN
ACCIDENT WHICH CAN CAUSE SERIOUS INJURY OR DEATH. ONLY AN AUTHORISED
GIANT DEALER SHOULD DISASSEMBLE THE REAR SHOCK.
TOP
INDEX
3. CLEANING AND MAINTENANCE
Proper maintenance of GIANT WARP dual suspension bicycle is important to insure years of trouble free safe
riding and enjoyment.
We recommend taking this bike to your authorised Giant dealer for periodic service and inspection of
suspension systems. Parts such as seals, elastomer bumpers and bearings can be adversely affected by
use, dirt and ultraviolet radiation.
The rear shock unit should be returned to an authorised Giant dealer every year for inspection.
DO NOT use high-pressure water or air hoses to clean bike. This can force dirt into areas, which may cause
damage.
TM
DO NOT lubricate any of the pivot points. These are high quality self lubricating Teflon
pivots.
or similar surfaced
INDEX
 Loading...