

Page 1
Version 1.2
Page 2

TABLE OF CONTENTS
Introduction...........................................................................2
Shock Basics & Terminology ................................................ 3
General Maintenance ............................................................5
XTC NRS..............................................................................6
AC/All Conditions ................................................................ 8
Warp DS ................................................................................12
Protege/Cypress DS/MTX 250 DS .......................................15
Prodigy/Prodigy DX ............................................................. 17
DH T eam/DH Comp .............................................................20
Giant Bicycle Limited Warranty ...........................................22
Contact Numbers...................................................................24
NOTE: This manual is a suppliment for full-suspension bicycles. It is
not a stand alone Owner’s Manual and it should be r ead in conjunction
with the Owner’s Manual that came with your bicycle. Both manuals
contain important information regarding the safety and operation of
your bicycle.
1
Page 3

INTRODUCTION
Congratulations on your purchase of a Giant full suspension bicycle. W e at Giant
Bicycle, Inc. are very proud of the bicycles we sell and are sure you will be happy
with the performance of your new full suspension bicycle. Full suspension bicycles
represent the latest in design and engineering and require special care. The pivots
and links that are designed into your frameset allow movement and are high tolerance
precision mechanisms. While Giant Bicycle engineers have strived to use the highest
quality, most durable and lowest maintenance materials in these mechanisms, there
are certain guidelines you must follow to attain optimal performance and proper
wear characteristics from these mechanisms. For that reason, it is important that
you take the time to read the following guidelines and the sections of the supplement
that pertain to your bicycle.
2
Page 4

Shock Basics & Terminology
Compression Damping:
Compression damping aids in preventing the shock from bottoming out over big
hits by absorbing some of the energy of the bump. While all shocks have
compression damping, the ability to adjust it is only available on higher end coil
shocks. Increasing the compression damping will make the shock compress more
slowly when you hit a bump. When you increase the compression damping, you
will effectively make the bike ride “higher” in the suspension travel curve and
the shock will not be as supple over small bumps. Increased compression
damping is usually reserved for high speed riding where “big hits” are
encountered. For most off road riding conditions, the compression damping is
kept low . It is also a personal preference that can be experimented with to find
the optimal performance level for your style of riding and terrain.
Rebound Damping:
Rebound damping controls the rate of speed that the shock returns to its original
position after your wheel hits an obstacle. The rebound damping prevents the
shock from springing back so quickly that it can cause the bike to “buck” after
hitting an obstacle. It also prevents the shock from topping out or rapid shock
unloading. If the rebound damping is set too high the shock will “pack up”, or
not extend to its full length over successive hits. This will cause the bike to
eventually ride “lower” in the shock’ s range of travel. The rebound damping is
critical to the proper tracking of the wheel. With no rebound damping, the wheel
may react too quickly to any encountered bump. A low setting is desirable for
very rough broken terrain. A higher setting will help the shock react more
smoothly where smooth, large gradual compressions are encountered as opposed
to smaller repetitive hits. Increased damping will aid in control in high speed
situations where a fast rebound of the shock may not coincide with the terrain.
Standard Setting: Ride the bicycle off a curb and the shock should bounce once.
If not, adjust damping knobs.
Spring Rate: The amount of force required to deflect a spring a given distance.
Usually the amount of force in lbs. to compress the spring one inch.
Sag: Compression of the suspension caused by the riders weight.
Rebound: The extension or return stroke of the shock or fork.
Preload: The amount a spring is compressed on an extended shock or fork.
3
Page 5

Compression Stroke: The motion of the shock or fork in response to an impact.
Bottoming Out: When all the suspension travel has been used.
T opping Out: When all the suspension travel is available.
4
Page 6

GENERAL MAINTENANCE
1) Do not use high-pressure water sources to wash or rinse your bicycle. Highpressure water will force its way into the pivots and blow away lubricants as
well as force contaminants into the mechanism. This can cause premature
wear. Instead, use household dish soap and a soft nylon bristled brush to
clean your bicycle and use a light spray to rinse. This is the same technique
used by our race team mechanics while working on our team members’
bikes. T owel dry and re-apply lube where necessary.
2) While we strongly recommend that an Authorized Giant Dealer perform
maintenance on the suspension, we realize that you may do some of your
own maintenance. If you disassemble the pivots of your Giant bicycle,
please note:
a) Do not use harsh solvents on the pivots. Use soapy water or a citrus
based degreaser instead.
b) Do not use cleaners that contain any type of abrasive no matter how
gentle. Wipe the individual components of the pivot clean with a fresh,
soft, low lint rag or towel.
c) Re-apply a small amount of high grade, low viscosity silicon or Teflon
based lubricant to the pivot or bushing surface. Do not use a petroleum
based lubricant or white lithium grease.
d) Be extra careful to not get lubricant on the threads of the pivot parts.
3) Components that thread directly into the frameset or other component need
to have blue LoctiteTM applied to the threads. It is very important that
LoctiteTM only be applied to the threads and not contaminate the pivot or
bushing surface. Use of any other color LoctiteTM besides blue will void your
warranty. These steps will assure you of a smooth working pivot that will not
become loose under normal riding conditions.
4) If you have purchased a complete bicycle, it must be assembled by an
Authorized Giant Dealer in order for the warranty to be valid. If you
purchased a frameset, the dealer must “de-burr” the bottom bracket threads
prior assembly to assure proper bottom bracket installation. Giant Bicycle,
Inc. is not responsible for damage to the frame due to incorrect assembly .
5) WARNING: With exception of the Giant DH model bicycles,
all Giant bicycles are engineered for single crown forks only.
Use of dual crown forks on any Giant bicycle besides the DH
models will void the warranty and may result in frame failure,
which can cause injury or death. Giant Bicycle, Inc. is not
responsible for damages to the bike and rider resulting from
the use of dual crown forks.
5
Page 7
XTC NRS
Your new XTC NRS bicycle is the result of collaboration between Giant Bicycle
Manufacturing and Renault Sport Formula One suspension engineers.
This frameset is built for cross country riding. It is a full suspension mountain
bike that sprints and climbs like a hardtail with the control and comfort of a dual
suspension.
The NRS or “No Resonance System” requires a “No Sag” set up. This is
different than other suspension systems, which incorporate sag. To get the most
from your XTC NRS bicycle, please follow the following set-up guidelines.
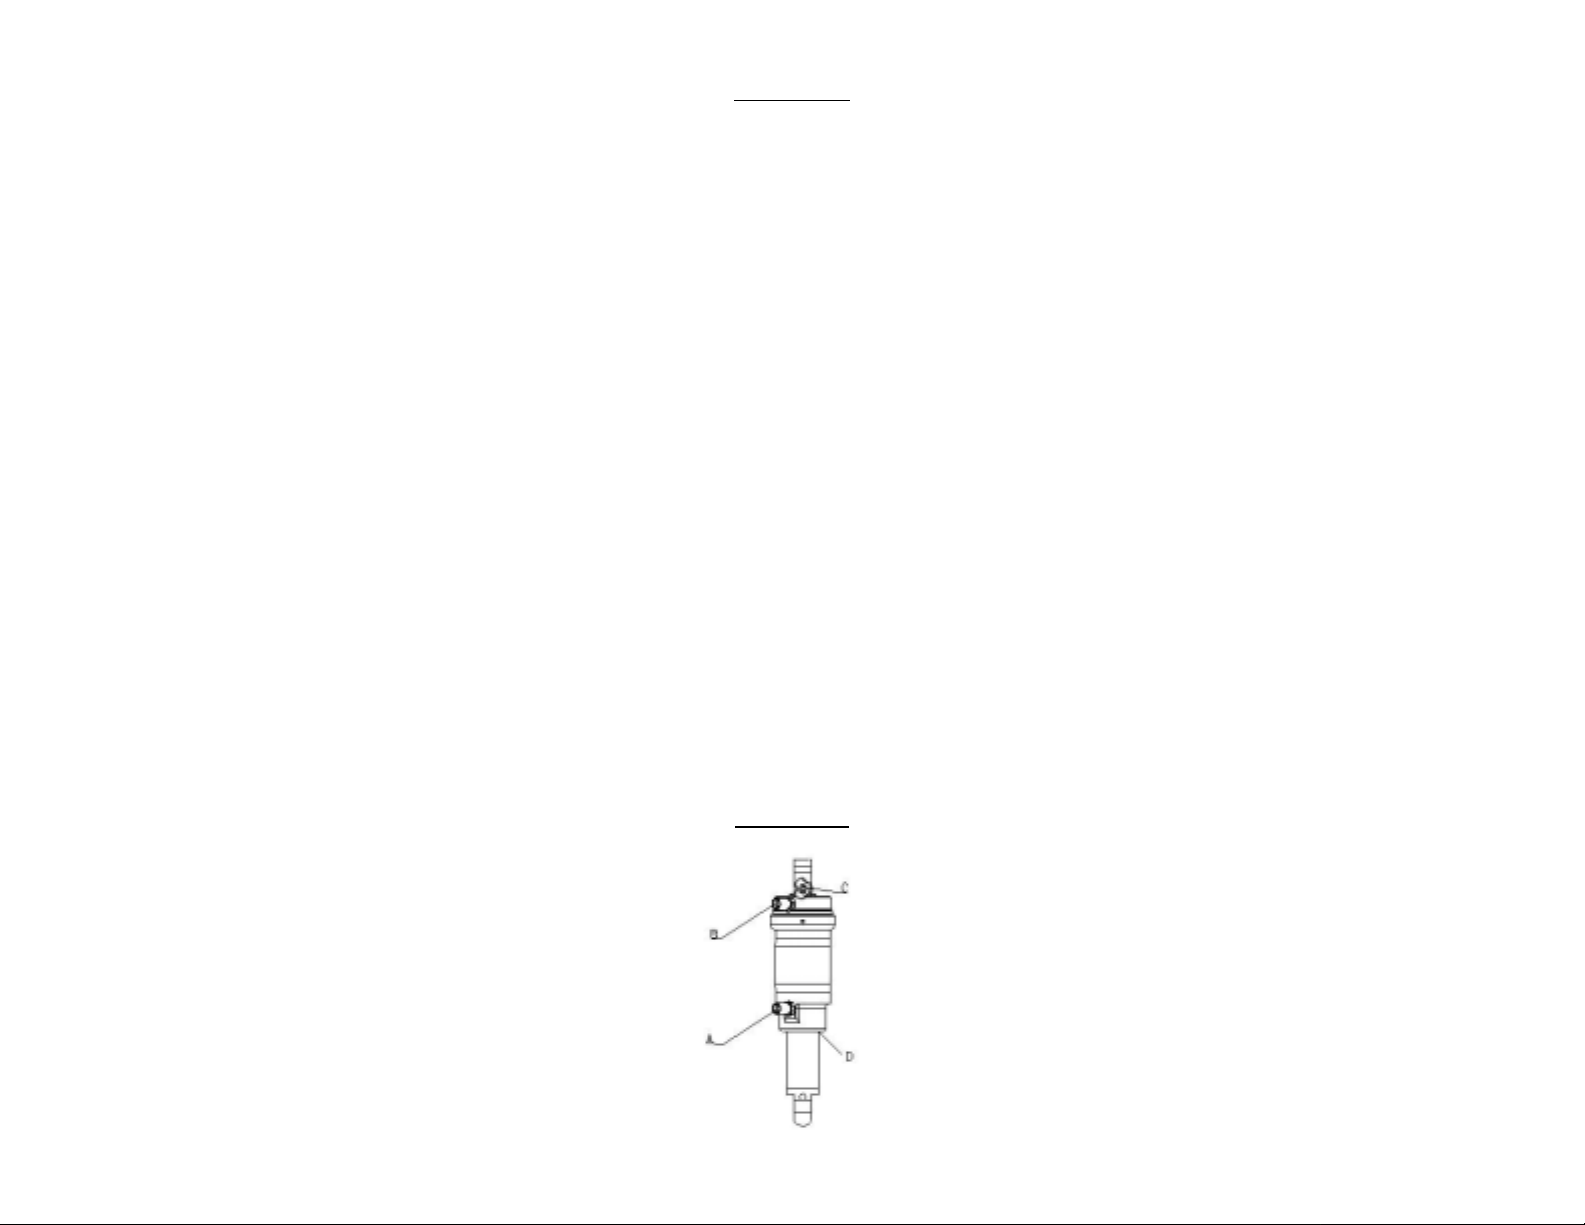
“No Sag” Setup (See Drawing #1):
1) As a starting point, set the positive air chamber (B) on the rear shock at
10psi over the rider’s riding weight. This is the weight while wearing all
your riding gear . (For example, if the rider’ s weight is 160 lbs set the shock
at 160 psi + 10 psi = 170 psi)
2) To measure the travel, you can position the rubber “O” ring (D) on the shaft
of the shock to measure the amount of compression/movement.
3) Set the negative air chamber (A) at 50psi.
4) The rider should be able to sit on the bike at rest without compressing the
rear shock. If the rider compresses the suspension, add 10 psi to the positive
air chamber (B) and retry setup.
4) Tune rebound damping (C) to personal tastes(see Shock Basics and
Terminology).
5) If you have difficulty setting up the suspension, please see your Authorized
Giant Dealer for assistance.
Drawing #1
6
Page 8
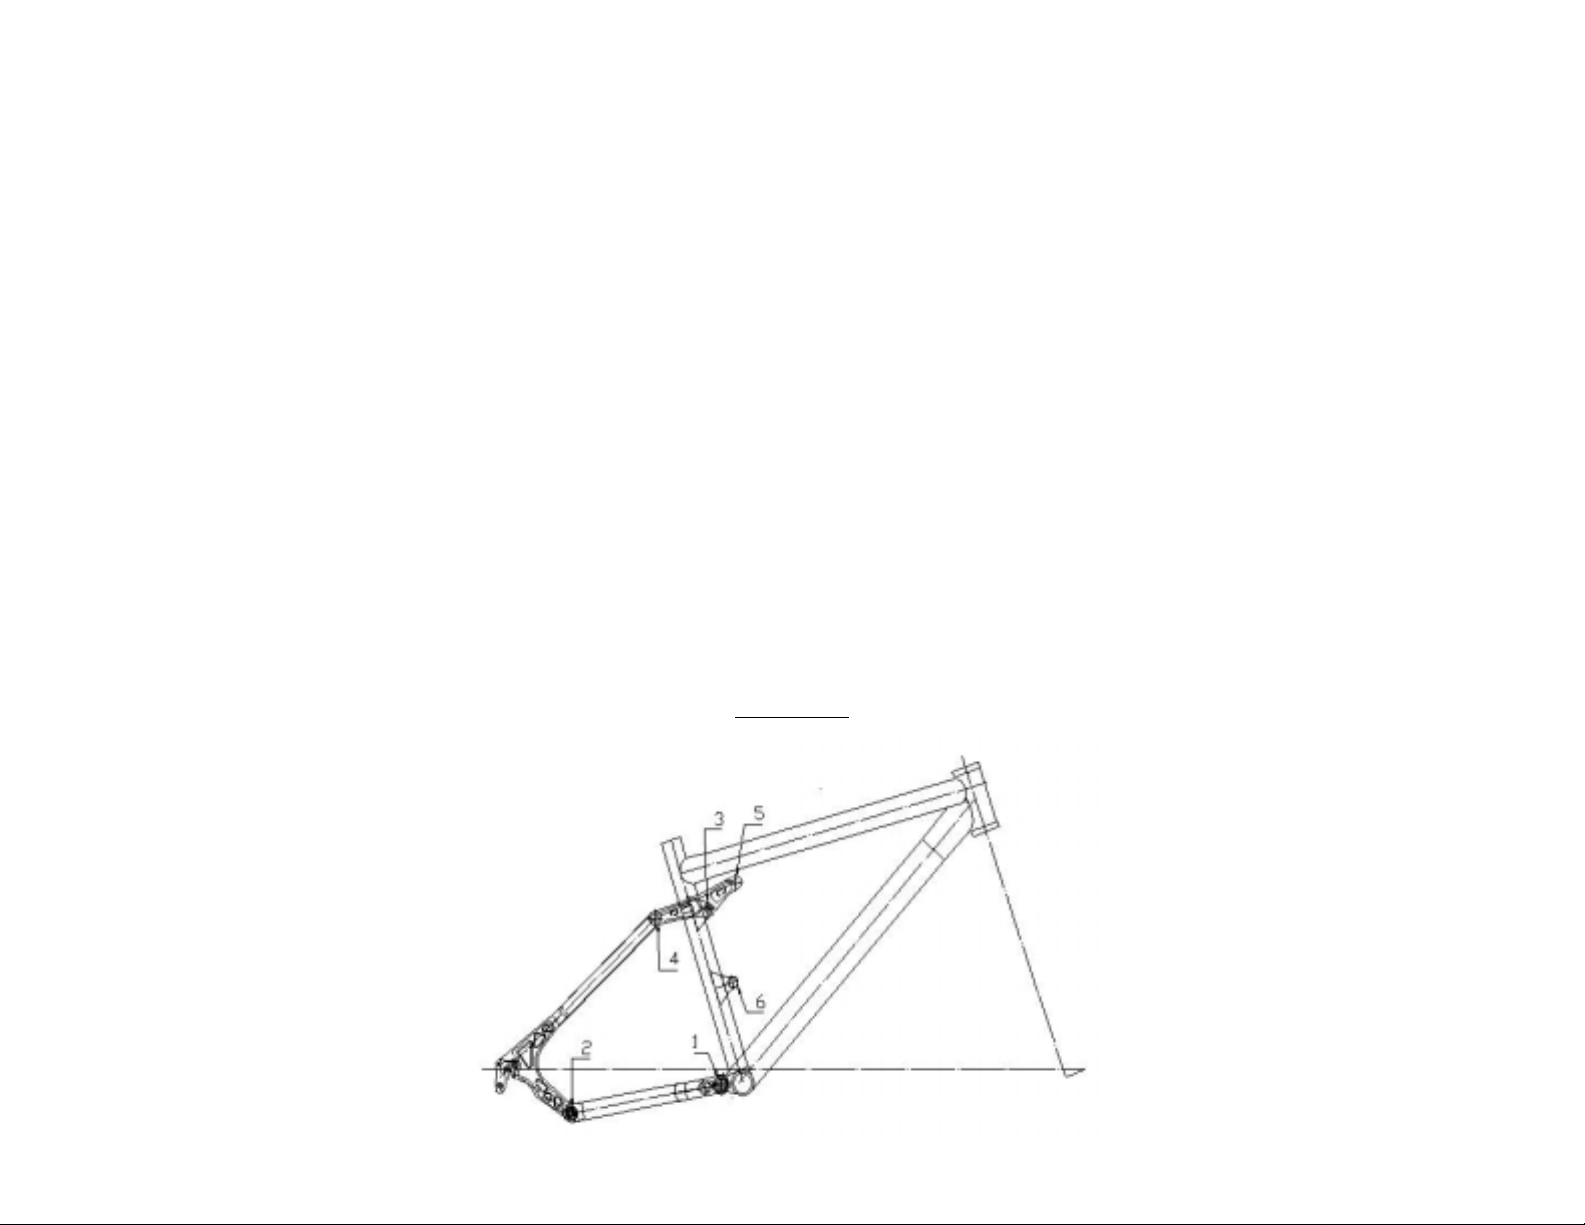
Maintenance (See Drawing #2):
Before every ride, it is important that you inspect the frame pivots and links for
any looseness or play.
1) If there is play, make sure that the pivot bolts are tightened to the
appropriate torque value (see below).
2) If the pivot bolt is not tightened to the apporpriate torque value, unthread the
bolt enough to expose the receiving threads on frameset or linkage.
3) Put one drop of blue LoctiteTM on the exposed receiving threads.
4) Tighten the bolt to the appropriate torque value.
5) Wipe off excess blue LoctiteTM on the back of the threads.
6) If there is still play in the pivot or linkage, please see your Authorized Giant
Dealer to have your bike inspected for any needed repairs.
Torque values:
1. Main swingarm pivot (bottom bracket) = 120-150 Kgf/cm. or 105-130 in-lbs.
2. Chainstay pivot = 120-150 Kgf/cm or 105-130 in-lbs.
3. Main linkage pivot (seat tube) = 120-150 Kgf/cm. or 105-130 in-lbs.
4. Seatstay pivot = 120-150 Kgf/cm. or 105-130 in-lbs
5. Upper shock mount = 120-150 Kgf/cm. or 105-130 in-lbs.
6. Lower shock mount = 100-120 Kgf/cm. or 86-105 in-lbs.
Drawing #2
7
Page 9

AC/All Conditions
The Giant AC bike is positioned between the NRS superlight cross country bike
and our heavy duty W orld Champion DH Team bike in performance
characteristics. The AC bike is capable of climbing and decending the most
technical of trails. With three travel settings for the rear suspension, you are sure
to find a setting that suits your riding style. Please follow the guidelines below in
setting up and maintaining your Giant AC bike.
Setup for AC1 & AC2 (See Drawing #3):
1) Set the pre-load on the rear shock so it compresses 12mm while the rider is
sitting on the bike (in riding gear). T o measure the travel, position the rubber
top out bumper (C) on the shaft of the shock to measure the amount of
compression/movement.
2) If the shock moves less than 12mm, reduce the pre-load on the spring by
turning the spring preload collar (E) counter-clockwise.
3) If the shock moves more than 12mm, increase the pre-load on coil spring by
turning the spring preload collar (E) clockwise.
4) If you need to turn the shock collar more than six turns from the zero
preload setting to achieve the proper amount of pre-load, you need a heavier
spring. See your Authorized Giant Dealer for the appropriate spring.
5) Tune rebound (G) and compression damping (H) to personal tastes(see
Shock Basics and T erminology).
6) If you have difficulty with set-up, please see your Authorized Giant Dealer.
Drawing #3
8
Page 10

Setup for AC Air (See Drawing #4):
1) For initial setup, set the positive air chamber (B) to the rider’s weight set the
negative air chamber (A) to the riders weight minus 20 psi. (for example if
the rider weight is 150 lbs, set the positive air chamber to 150 psi. and the
negative air chamber to 130 psi.). It is important that the positive air
chamber is set first. NOTE: The negative air chamber can never have
more air pressur e than the positive air chamber. This will result in
poor bicycle performance and cause premature wear of the shock.
2) To measure the travel, you can position the rubber “O” ring (D) on the shaft
of the shock to measure the amount of compression/movement.
3) If the shock moves less than 12mm, reduce the air pressure by 10 psi. in the
negative air chamber (A) followed by the positive air chamber (B).
4) If the shock moves more than 12mm, increase the air pressure by 10 psi. in
the positive air chamber (B) followed by the negative air chamber (A).
5) Tune rebound damping (C) to personal tastes(see Shock Basics and
Terminology).
6) If you have difficulty with set-up, please see your Authorized Giant Dealer.
Drawing #4
9
Page 11

Travel settings:
Your AC bicycle gives you the ability to change the travel from 4.5” to 5.15” to
6” with minimal effort. This is accomplished with three positions of the upper
shock pivot bolt (see Drawing # 5).
To change the travel (See Drawing #5):
1. Using a 6 mm Allen wrench, remove the upper shock mounting bolt.
2. Pivot the shock backward or forward to align the eyelet with one of the three
holes. The forward most position is 4.5” travel, the middle position is 5.15”
travel, and the rear position is 6” travel.
3. Install the bolt and tighten to the proper torque of 100-120 Kgf/cm (86-95
in.-lbs.).
4. After any adjustment is made to travel, you will need to readjust all air
pressure or spring preload settings described in the preceding sections.
Drawing #5
10
Page 12

Maintenance (See Drawing #6):
Before every ride, it is important that you inspect the frame pivots and links for
any looseness or play.
1) If there is play, make sure that the pivot bolts are tightened to the
appropriate torque value (see below).
2) If the pivot bolt is not tightened to the apporpriate torque value, unthread
the bolt enough to expose the receiving threads on frameset or linkage.
3) Put one drop of blue LoctiteTM on the exposed receiving threads.
4) Tighten the bolt back to the appropriate torque value. W ipe off excess blue
LoctiteTM on the back of the threads.
5) If there is still play in the pivot or linkage, you may need a new pivot kit.
Please see your Authorized Giant Dealer to have your bike inspected for any
needed repairs.
T orque settings:
1. Main swingarm pivot/BB = 90-110 Kgf-cm or 78-95 in-lbs.
2. Bottom seatstay pivot = 90-110 Kgf-cm or 78-95 in-lbs.
3. T op seatstay pivot = 90-110 Kgf-cm or 78-95 in-lbs.
4. Main linkage pivot = 90-110 Kgf-cm or 78-95 in-lbs.
5. T op shock mount =100-120 Kgf-cm or 86-104 in-lbs.
6. Bottom shock mount/BB = 90-110 Kgf-cm or 78-95 in-lbs.
Drawing #6
11
Page 13

WARP DS
The Warp DS Series is a great all purpose dual suspension cross country bike.
The Warp DS offers 4” and 5” of rear wheel travel that works equally well on
climbs as it does on descents. Please follow the guidelines below in setting up
your Warp DS.
Settings (See Drawing #7):
1) The shock should be set to sag 10mm or 1/4 of its stroke while the rider is
seated on the bike in riding gear.
2) To measure the travel, you can position the rubber top out bumper (B) on
the shaft to the top of the shock (B1) to measure the amount of compression/
movement.
3) If the shock compresses less than 12mm. You need to reduce the pre-load on
the spring by turning the spring collar (C) counter-clockwise.
4) If the shock compresses more than 12mm, you need to increase the pre-load
on the spring by turning the spring collar (C) clockwise.
5) If you need to turn the spring collar more than 6 turns from zero preload
setting to achieve the proper pre-load, you need to get a heavier spring from
your Authorized Giant Dealer.
6) Tune rebound adjustment (A) to your personal tastes(see Shock Basics and
Terminology).
7) If you have difficulty tuning the shock, please see your Authorized Giant
Dealer.
Drawing #7
12
Page 14

Spring Rate:
etaRgnirpS thgieWrediR
ni/bl056)bl451-011(gk07-05
ni/bl008)bl891-451(gk09-07
ni/bl0001)bl242-891(gk011-09
Travel Settings:
Your Warp DS Series frame gives you the ability to change the travel from 4” to
5” with minimal effort. This is accomplished by two positions for the rear shock
pivot bolt.
To change the travel (See Drawing #8):
1. Using a 5mm Allen wrench, remove the rear shock mounting bolt.
2. Pivot the shock up or down to align the eyelet with one of the two holes.
The upper position is 4” travel and the lower position is 5” travel.
3. Install the bolt and tighten to the proper torque of 90-110 Kgf/cm. (78-95 inlbs.).
4. After any adjustment is made to travel, you will need to readjust your spring
preload setting as described in the preceding section.
Maintenance (See Drawing #8):
The Warp DS Series frame is designed to be as maintenance free as possible.
However, before every ride, it is important that you inspect the frame pivots for
any looseness or play.
1. If there is play, remove the main pivot bolt, clean, and apply blue LoctiteTM.
2. Reinstall pivot bolt to appropriate torque value (see below).
3. If there is still play in the main pivot, please see your Authorized Giant
Dealer to have your bike inspected for any needed repairs
13
Page 15

T orque settings:
1. Main pivot bolt = 180-210 Kgf/cm. or 155-183 in-lbs.
2. Rear shock mount = 90-110 Kgf/cm. or 78- 95 in-lbs.
3. Front shock mount = 90-110 Kgf/cm. or 78- 95 in-lbs.
Drawing #8
14
Page 16

Protege/Cypress DS/MTX 250 DS
The Protege/Cypress DS/MTX 250 DS incorporates a simple yet effective
suspension system that will smooth out your daily rides. Please follow the
guidelines below to setup your Protege/Cypress DS/MTX 250 DS.
Setup (See Drawing #9):
1) The shock should be set to sag 10mm or 1/4 of its stroke while the rider is
seated on the bike in riding gear.
2) To measure the travel you can position the rubber top out bumper (B) on the
shaft to the top of the shock (B1) to measure the amount of compression/
movement.
3) If the shock compresses less than 10mm. You need to reduce the pre-load on
the spring by turning the spring collar (C) counterclockwise.
4) If the shock compresses more than 10mm, you need to increase the pre-load
on the spring by turning the spring collar (C) clockwise.
5) If you need to turn the spring collar more than 6 turns to achieve the proper
pre-load, you need to get a heavier spring from you Authorized Giant
Dealer.
6) If you have difficulty tuning the shock, please see your Authorized Giant
Dealer.
Drawing #9
15
Page 17

Maintenance (See Drawing #10):
The Protege/Cypress DS/MTX 250 DS frame is designed to be as maintenance
free as possible. However, before every ride, it is important that you inspect the
frame pivot for any play .
1) If there is play , remove the main swingarm pivot bolt, clean, and apply blue
LoctiteTM.
2) Reinstall pivot bolt to appropriate torque value.
3) If there is still play in the pivot, please see your Authorized Giant Dealer to
have your bike inspected for any needed repairs
Torque Settings:
1. Main Swingarm Pivot = 100-120 Kgf-cm. or 86-105 in-lbs.
2. Rear Shock Pivot = 100-120 Kgf-cm. or 86-105 in-lbs.
3. Front Shock Pivot = 100-120 Kgf-cm. or 86-105 in-lbs.
Drawing #10
16
Page 18

Prodigy/Prodigy DX
The Giant Prodigy series is a simple yet effictive suspension system that is
equally at home on the road as well as on the bike trails. Please follow the
guidelines below to setup your Prodigy series bicycle.
Setup for Spring Shock (See Drawing #11):
1) The shock should be set to sag 10mm or 1/4 of its stroke while the rider is
seated on the bike in riding gear.
2) To measure the travel, you can position the rubber top out bumper (B) on
the shaft to the top of the shock (B1) to measure the amount of compression/
movement.
3) If the shock compresses less than 10mm. You need to reduce the pre-load on
the spring by turning the spring collar (C) counter-clockwise.
4) If the shock compresses more than 10mm, you need to increase the pre-load
on the spring by turning the spring collar (C) clockwise.
5) If you need to turn the spring collar more than 6 turns from zero preload
setting to achieve the proper pre-load, you need to get a heavier spring from
your Authorized Giant Dealer.
6) Tune rebound adjustment (A) to your personal tastes(see Shock Basics and
Terminology).
7) If you have difficulty tuning the shock, please see your Authorized Giant
Dealer.
Drawing #11
17
Page 19

Setup for Air Shock (See Drawing #12):
1) For initial setup, set the positive air chamber (A) to the rider’s weight.
2) To measure the travel, you can position the rubber “O” ring on the shaft to
the top of the shock to measure the amount of compression/movement.
3) If the shock moves less than 10mm, reduce the air pressure in the positive
air chamber (A).
4) If the shock moves more than 10mm, increase the air pressure in the positive
air chamber (A).
5) If you have difficulty with set-up, please see your Authorized Giant Dealer.
Drawing #12
18
Page 20

Maintenance (See Drawing #13):
The Prodigy Series frame is designed to be as maintenance free as possible.
However, before every ride, it is important that you inspect the frame pivot for
any looseness or play.
1. If there is play, remove the main pivot bolt, clean, and apply blue LoctiteTM.
2. Reinstall pivot bolt to appropriate torque value (see below).
3. If there is still play in the pivot, please see your Authorized Giant Dealer to
have your bike inspected for any needed repairs
T orque settings:
1. Main pivot = 180-210 Kgf/cm. or 155-183 in-lbs.
2. Rear shock mount = 90-110 Kgf/cm. or 78- 95 in-lbs.
3. Front shock mount = 90-110 Kgf/cm. or 78- 95 in-lbs.
Drawing #13
19
Page 21

DH Team/DH Comp
The Giant DH series are downhill specific bicycles made for both the
recreational and competitive downhill riders. They are race proven machines
used on the World Championship MTB circuit. Please follow the guidelines
below to set up your Giant DH series bicycle.
Setup (See Drawing #14):
1) Set the pre-load on the rear shock so it compresses 18mm while the rider is
sitting on the bike (in riding gear). T o measure the travel, you can position
the rubber top out bumper (C) on the shaft at the top of the shock to measure
the amount of compression/movement.
2) If the shock moves less than 18mm, reduce the pre-load on the spring by
turning the spring preload collar (E) counter-clockwise.
3) If the shock moves more than 18mm, increase the pre-load on coil spring by
turning the spring preload collar (E) clockwise.
4) If you need to turn the shock collar more than six turns from the zero
preload setting to achieve the proper amount of pre-load, you need a heavier
spring. See your Authorized Giant Dealer for the appropriate spring.
5) Tune rebound (G) and compression damping (H) to personal tastes(see
Shock Basics and T erminology).
6) If you have difficulty with set-up, please see your Authorized Giant Dealer.
Drawing #14
20
Page 22

Maintenance (See Drawing #15):
Before every ride, it is important that you inspect the frame pivots and links for
any looseness or play.
1) If there is play, make sure that the pivot bolts are tightened to the
appropriate torque value (see below).
2) If the pivot bolt is not tightened to the apporpriate torque value, unthread
the bolt enough to expose the receiving threads on frameset or linkage.
3) Put one drop of blue LoctiteTM on the exposed receiving threads.
4) Tighten the bolt back to the appropriate torque value. W ipe off excess blue
LoctiteTM on the back of the threads.
5) If there is still play in the pivot or linkage, you may need a new pivot kit.
Please see your Authorized Giant Dealer to have your bike inspected for any
needed repairs.
T orque settings:
1. Main pivot = 200-230 Kgf-cm or 172-198 in-lbs.
2. Front triangle/U-link = 100-120 Kgf-cm or 86-103 in-lbs.
3. Small links/chain stays = 100-120 Kgf-cm or 86-103 in-lbs.
4. U-link/small links: bolt = 100-110 Kgf-cm or 86-95 in-lbs.
U-link/small links: cap = 60-80 Kgf-cm or 52-69 in-lbs.
5. Lower shock mount = 100-120 Kgf-cm or 86-104 in-lbs.
6. Upper shock mount = 90-120 Kgf-cm or 78-103 in-lbs.
7. Dropout = 80-90 Kgf-cm or 69-86 in-lbs.
8. T-type bolt (rear axle) = 100-110 Kgf-cm or 86-95 in-lbs.
Drawing #15
21
Page 23

Giant Bicycle Limited Warranty
Giant Bicycle, Inc. (“Giant”) warrants the steel frame and rigid steel fork of each
new Giant-brand bicycle to be free from defects in material and workmanship
for as long as the original purchaser owns the bicycle. All Aluminum and
Carbon Fiber frames and rigid forks as well as suspension frames are warranted
to be free from defects in materials and workmanship for the original owner for a
period of 5 years from the date of purchase. All other original components and
all Giant brand repair parts, replacement parts and accessories are warranted to
be free from defects in material or workmanship for a period of one year from
the original date of purchase.
REQUIRED ASSEMBLY WHEN PURCHASED
An Authorized Giant Dealer is required to assemble your Giant brand bicycle,
without charge, at the time of purchase.
FREE 60-DAY REPAIR LABOR
If your Giant brand bicycle is found to be defective in materials, workmanship,
or assembly within 60 days of purchase, it will be repaired for you without
charge for labor or materials. To receive this service, simply bring your Giant
brand bicycle to the Authorized Giant Dealer from whom the bicycle was
purchased.
LIMITED REMEDY
Unless otherwise provided, the sole remedy under the above warranty or any
implied warranty is limited to the replacement of defective parts with those of
equal or greater value at the sole discretion of Giant. Unless covered by the free
60-day repair labor period, you will be responsible for labor costs associated
with warranty replacements. IN NO EVENT SHALL GIANT BICYCLES, INC.
BE RESPONSIBLE FOR INCIDENT AL OR CONSEQUENTIAL DAMAGES,
WHETHER BASED ON CONTRACT, WARRANTY, NEGLIGENCE, OR
PRODUCT LIABILITY, OR ANY OTHER THEORY, INCLUDING, WITHOUT LIMITATION, PERSONAL INJURY DAMAGES, PROPERTY DAMAGE, OR ECONOMIC LOSSES.
Some states do not allow the exclusion or limitation of incidental or consequential damages, so the above limitation or exclusion may not apply to you.
22
Page 24

EXCLUSIONS
THE ABOVE WARRANTY, OR ANY IMPLIED WARRANTY, DOES NOT
COVER NORMAL WEAR AND TEAR, AND ALL WARRANTIES ARE
VOID IF THE BICYCLE IS USED FOR OTHER THAN NORMAL ACTIVITIES. INCLUDING, BUT NOT LIMITED TO THE FAILURE TO FOLLOW
THE OWNER’S MANUAL OR USING THE BICYCLE FOR COMMERCIAL
ACTIVITIES OR IN COMPETITIVE EVENTS, INCLUDING BUT NOT
LIMITED TO BICYCLE RACING, BICYCLE MOTORCROSS RACING,
STUNT RIDING, RAMP JUMPING OR SIMILAR ACTIVITIES, AND
TRAINING FOR SUCH ACTIVITIES OR EVENTS.
GIANT , MAKES NO OTHER WARRANTIES, EXPRESS OR IMPLIED. ALL
IMPLIED WARRANTIES, INCLUDING THE W ARRANTIES OF MERCHANT ABILITY AND FITNESS FOR A PARTICULAR PURPOSE, ARE
LIMITED IN DURATION TO THAT OF THE EXPRESS WARRANTIES
STATED ABOVE. Some states do not allow limitations on how long an implied
warranty lasts, so the above limitation may not apply to you. This warranty gives
you specific legal rights, and you may also have other rights which vary from
state to state.
WHAT YOU SHOULD DO
Bring your bicycle along with a purchase receipt or other proof of the date of
purchase to an Authorized Giant Dealer or write to the Customer Service
Department at:
Giant Bicycle, Inc.
3587 Old Conejo Rd.
Newbury Park, CA 91320
23
Page 25

Contact Numbers
Giant Bicycle, Inc. 1-800-US-GIANT www .giant-bicycle.com
Rock Shox 1-800-677-7177 www.rockshox.com
Marzocchi 1-800-227-5579 www.marzocchi.com
Manitou 1-800-423-0273 www.answerproducts.com
24
Page 26

© 2002 Giant Bicycle, Inc. Giant and it’s symbol are trademarks of Giant Bicycle, Inc. All Rights Reserved.
Printed in Taiwan.
25
 Loading...