

Page 1
AC TEAM
Model Year 2001
Owners Manual
October 2000.
ALL CONDITIONS MOUNTAIN BIKE
• Multi purpose, extreme riding mountain bike
• (Semi-) downhill, Dual Slalom
• Frame compatible for chain tension device (included), bash ring, 2.2” tires
• MPH hydraulic disc brakes
• Front fork with lock out
• Coil over rear shock unit (included)
• Sealed bearings on all pivots
• 3 rear shock positions
• Rear wheel travel: 6~5¼~4½ inches, front wheel travel: 125 mm.
Contents:
1. Introduction.
2. Sizing.
3. Rear suspension
3-1. Adjusting travel
3-2. Coil over shock
3-3. Rear suspension tuning
3-4. “SAG” adjustment
3-5. Damping adjustment
3-6. Changing the coil spring
3-7. Removing the rear shock assembly or pivots.
4. Chain tension device
4-1. Assembly.
5. Cleaning and maintenance.
- Pag. 1. -
Page 2

1. Introduction.
Giant’s products are designed to provide years of recreation and enjoyment. The GIANT AC has been
designed primarily as “full time” cross-country bike, with all-conditions features.
However, in order to fully understand all the bicycle features, you must read this bicycle manual, the
suspension fork and rear shock manuals provided by Giant and parts suppliers. If you do not
understand any information in the manuals or if you misplace any of them, please contact your
authorised Giant dealer immediately.
Please take the time to read and understand this material to help limit the possibility of serious injury.
ALWAYS read and follow all instructions in this manual.
WARNING: Giant AC frames are designed for single crown front forks. Use of “dual” or “triple” crown
forks on any Giant AC bicycle will void the warranty. Giant is not responsible for damages to the bike
and rider resulting from the use of dual or triple crown forks.
INDEX
- Pag. 2. -
Page 3
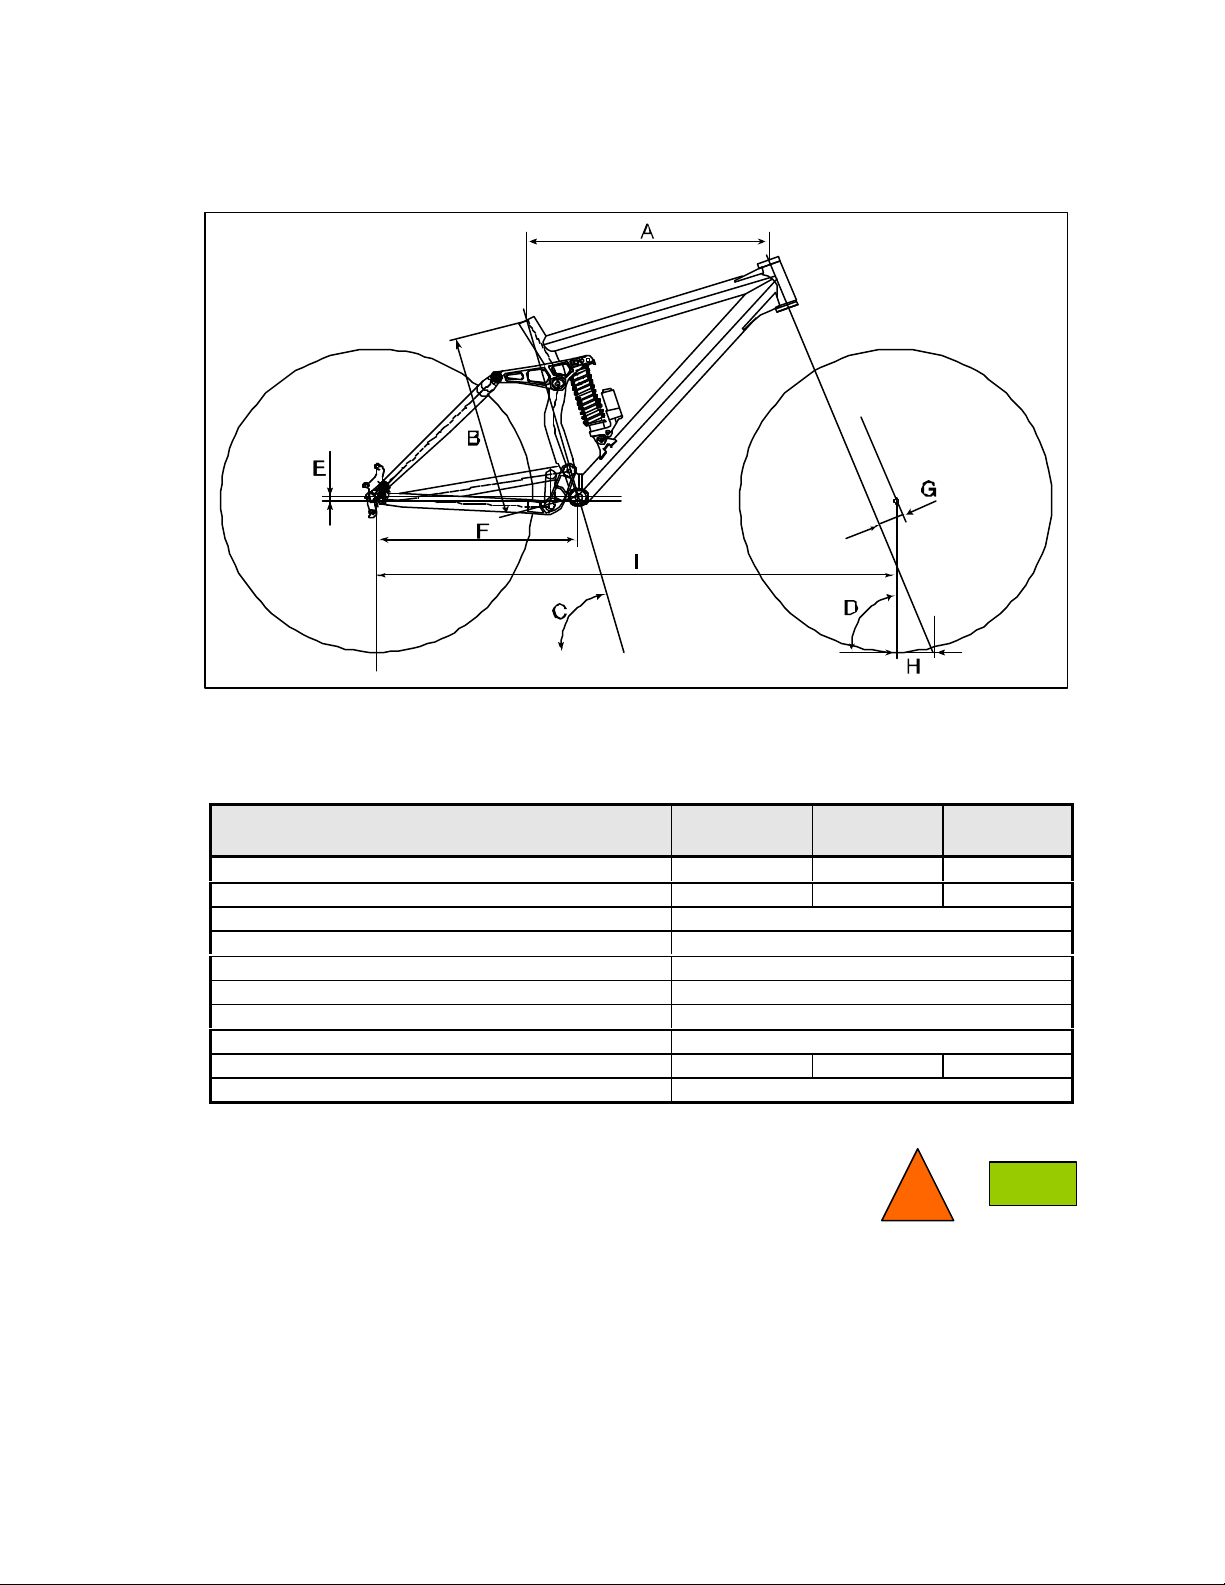
2. Sizing.
Figure 1.
The actual frame measurements and geometries are listed below.
Size S - 17” M - 18” L - 19”
A. Top Tube [mm.] (measured horizontally) 565 585 605
B. Seat Tube [mm.] 430 455 480
C. Seat Tube Angle 72 degrees
D. Head Tube Angle 68½ degrees
E. B.B. Drop [mm.] -6
F. Chain stays [mm.] 430
G. Fork Rake [mm.] 43
H. Trail [mm.] 84
I. Wheel Base [mm.] 1100 1115 1135
Rear Travel 6~5¼~4½ ”
TOP
INDEX
- Pag. 3. -
Page 4

3. Rear suspension.
The rear suspension for your Giant AC bicycle is provided by a RockShox Pro Deluxe coil spring
shock. For a description of the RockShox Pro Deluxe coil spring shock, refer to section 3-2.:
Coil over shock.
When tuning suspension, always make one change at a time and write it down. This takes patience,
but allows you to understand how each change affects your ride. Use a familiar trail to make these
small adjustments. To understand the tuning range it may also help if you ride one extreme to the other
(low vs. spring tension or maximum vs. minimum rebound). Keeping a record lets you know what
changes you have tried that work and suggests what changes you might try. Ask a shop or local riders
what they have found works well. These resources are typically your best bet.
WARNING: Improper adjustment of rear suspension shock can result in unstable conditions
or loss of control.
INDEX
3-1. Adjusting travel.
Your Giant AC bicycle gives you the ability to change the travel from 4½ ” to 5¼” to 6” with minimal
effort. This is accomplished by three positions for the upper shock pivot bolt (see figure 2 below).
To change the travel:
1. Using a 6 mm. Allen-key, remove the upper shock mounting bolt.
2. Pivot the shock backward or forward to align the eyelet with one of the three holes.
The forward most position is for 4½ ” travel.
The middle position is for 5¼” travel.
The position closest to the seat tube is for 6” travel.
3. The threads of fixing bolt should be cleaned and re-set using LoctiteTM Primer (#7649) and
LoctiteTM blue Removable Threadlock (#242) or similar material.
Install the bolt and tighten to the proper torque of 10-12 Nm.
4. After any adjustment is made to travel, you will need to readjust all spring pre-load settings
described in the following sections.
WARNING: Improper (dis-)assembly may result in damage to the bicycle or in an accident
which can cause serious injury or death.
Figure 2.
- Pag. 4. -
TOP
INDEX
Page 5

3-2. Coil over shock.
Figure 3.
The drawing below shows a coil over type rear shock (Pro Deluxe made by RockShox).
A. Upper eyelet
B. Pre-load spring washer
C. Bumper
D. Pre-load spring
E. Spring pre-load collar
F. Lower eyelet
G. External rebound adjuster
H. Compression adjustment knob
H
The shock has a pre-load spring to set “SAG” and external knobs to control compression and rebound
settings. The shock has a knurled pre-load adjustment ring to ”pre-load” the spring.
Different riders require different performance characteristics from their suspension.
A. Heavier riders need a stiffer spring and more compression damping.
B. Lighter riders need a softer spring and lighter compression damping.
Below is a chart showing the standard spring rates, and the recommended spring rates for different
weight riders.
Giant frame size Rider weight range Spring rate
17” - 18” 60-75 kg. 500 lbs./in.
19” 75-90 kg. 600 lbs./in.
Frame sizes 17” and 18” come with 500 lbs./in. Springs and frame size 19” with 600 lbs./in.
Softer and stiffer spring rates (50 lbs./in. increments) are available for these rear suspension shocks
either through your authorised Giant dealer or directly from the manufacturer.
If you need to change your spring, contact your local authorised Giant dealer or the Giant importer in
your country.
All Giant AC dual suspension bicycles are equipped with front and rear suspension that offer multiple
adjustment and tuneability. Adjustment of your suspension is subjective and cannot be fully prescribed
by Giant. If you need help, contact your local authorised Giant dealer.
- Pag. 5. -
Page 6

The rear shocks are serviceable and must be returned for maintenance, repair or service, only to an
authorised RockShox dealer (or call the RockShox distributor in your country) once a year or more
often if the bike is used in extreme conditions.
This service is not necessarily free of charge!
WARNING: All service and maintenance of the rear shocks should only be performed
with proper tools by an authorised RockShox dealer or by the RockShox distributor in
your country.
TOP
INDEX
3-3. Rear suspension tuning.
To adjust the pre-load on the coil-spring shock is simple.
For a firmer ride while descending or hill climbing on smooth surfaces, turn the spring pre-load collar
against to compress or load the spring.
For a softer ride while riding cross country, turn the spring pre-load collar away from the spring to relax
or unload the spring.
WARNING: Turn the spring pre-load collar away from the spring and stop turning just as
the spring feels loose on the shock. This is zero pre-load. Do not exceed 2.5 full turns
of the threaded spring collar from zero pre-load. Too much spring tension will cause
the spring to fail.
If the pre-load required exceeds 2.5 full turns of the spring pre-load collar from zero preload, you may require a higher rated spring. Contact your authorised Giant dealer or the
manufacturer of the shock for an optional replacement spring.
WARNING: Never set the spring pre-load collar so there is no pre-load on the spring. If
the required pre-load adjustment ring setting results in no pre-load on the spring or proper
adjustment can not be achieved, you may require a lower rated spring. Contact your
authorised Giant dealer or the manufacturer of the shock for an optional replacement
spring.
TOP
INDEX
3-4. “SAG” adjustment.
SAG is the amount of coil spring pre-compression that is required to compensate for the riders weight
and allow the bicycle to perform as it was designed to.
To properly set the SAG, you will need a screw driver, measuring-tape and/or calliper.
Step 1. Prepare the bicycle. Set the saddle to the correct height for your riding style.
Attach all accessories, water bottles etc. that you would normally ride with.
Step 2. Prepare yourself. Dress as you would for a normal ride, including helmet, cycling bag, etc.
Step 3. Push the bumper against the pre-load spring washer with a flat screw driver.
Measure the distance (L) between the main cylinder and the bumper of the rear shock.
Turn the spring pre-load collar away from the spring and stop turning just as the spring feels
loose on the shock. This is zero pre-load.
- Pag. 6. -
Page 7

Step 4. Use a screw driver to slide
the bumper of the shock
against the main cylinder of
the rear suspension.
Step 5. Sit on the bicycle with your
feet on the pedals in your
normal riding position.
Step 6. Come off from your bike
without causing too much
movement in the bike.
Check the rear shock and
you will see that the bumper
has been moved along the
piston. Measure the
distance between the main
cylinder and the bumper.
This distance should be
approx. 1/3 ~ ¼ of the
dimension L measured during
step 3. Adjust the spring pre-load
collar and repeat steps 4 - 6 until
you have reached this.
Figure 4.
L
TOP
INDEX
3-5. Damping adjustment.
The Pro Deluxe rear shock includes a red rebound damping adjustment knob and a blue compression
damping adjustment knob.
Rebound adjustment:
The rebound controls the extension or return of the shock. The shock's rebound is quickest when the
adjustment knob is in the full anti-clockwise position. Rebound is slowest when the adjustment knob is
in the full clockwise position.
Symptoms of too much rebound damping:
Slow shock return, where the shock feels good through the first few bumps and gets harder as you
continue, means there is too much rebound damping. In addition, while braking, the rear wheel will
tend to skip over the bumps (“pack up”). To adjust it for more consistency and better braking, turn the
rebound knob a half turn anti-clockwise and test it again.
Symptoms of too little rebound damping:
Too little rebound damping is when the shock returns too fast and the bike seems to want to “buck you
off” or the rear wheel skips easily over bumps. Turn the rebound knob a half turn clockwise to slow the
rebound down for more consistency and better braking through the bumps.
Compression adjustment:
Compression damping aids in preventing the shock from bottoming out over big hits by absorbing some
of the energy of the bump.
Increasing the compression damping by turning the adjustment know clockwise will make the shock
compress more slowly when you hit a bump and compresses. With increased compression damping
the shock will not be as supple over small bumps and is usually reserved for high speed riding where
big hits are encountered.
Usually the compression damping is kept at a low level for most off road riding conditions.
- Pag. 7. -
TOP
INDEX
Page 8

3-6. Changing the coil spring.
WARNING: Do not try to disassemble or to replace the rear shock coil spring by yourself!
Improper (dis)assembly may result in damage to the bicycle or in an accident which can cause serious
injury or death. Only an authorised Giant dealer should replace the coil spring.
TOP
INDEX
3-7. Removing the rear shock assembly or pivots.
It is necessary to periodically check the rear shock unit and the suspensions’ pivot points for damage or
wear. The rear shock unit should be returned to an authorised RockShox dealer or to the RockShox
distributor in your country to inspect and repair.
(Note: this is not covered under the terms of the warranty).
WARNING: Do not try to disassemble or to replace the rear shock or pivot by yourself!
Improper (dis-)assembly may result in damage to the bicycle or in an accident which can
cause serious injury or death. Only an authorised Giant dealer should disassemble the rear
shock or pivots.
TOP
INDEX
- Pag. 8. -
Page 9

4. Chain tension device.
Figure 5.
Nr. Description Qty. Nr. Description Qty.
1 Body 1 6 Bolt M6x20 mm. 2
2 Roller 2 7 Nut M6 3
3 Shaft 2 8 Washer M6 3
4 Roller bearing 6x19 mm. 2 9 Taper bolt M6x15 mm. 3
5 Washer M8 2 10 Roller bearing 7x22 mm. 2
4-1. Assembly.
The AC chain tension device is designed to be easily installed and removed to/from the frame. It can
be installed with all 3 chain rings (chain on the largest ring) or a single chain ring on the crank arm.
To insure proper chain and (rear) shifting function, keep the chain line at 57mm.
Installation:
1. Insert the taper bolt (9) through the bottom bracket shell mount and body (1). The bolt must come
in from the non-drive (LH) side.
2. Install washer (5) and nut (10) and tighten firmly.
3. Repeat step 1 and 2 for additional bolt assemblies.
4. With the chain in the largest sprocket on the rear cassette, the upper roller’s groove should just rub
the top of the chain.
5. The lower roller’s groove should have the chain wrap smoothly around it after exiting the
chain wheel (about 7 o’clock position).
6. Do not put any tension on the top of the chain, the bottom roller will supply the chain tension.
The top roller serves only as a guide.
Warning! Rollers need to be tightened on both sides simultaneously before each use.
Check and adjust all hardware.
- Pag. 9. -
TOP
INDEX
Page 10

5. Cleaning and maintenance.
Proper maintenance of a Giant AC dual suspension bicycle is important to insure years of trouble free
safe riding and enjoyment.
We recommend taking this bike to your authorised Giant dealer for periodic service and inspection of
suspension systems. Parts such as seals, elastomer bumpers and bearings can be adversely affected
by use, dirt and ultraviolet radiation. The bike should be returned to an authorised Giant dealer for rear
shock inspection and adjustment once a year or more often if the bike is used in extreme conditions.
(Note: this is not covered under the terms of the warranty and is not necessarily free of charge!).
DO NOT use high-pressure water or air hoses to clean bike. This can force dirt into areas that may
cause damage.
DO NOT lubricate any of the pivot points. These are high quality self lubricating Teflon
surfaced pivots.
See also the manuals of the suppliers of the suspension fork, rear shock, and other parts that come
with this AC bike.
TM
or similar
INDEX
- Pag. 10. -
 Loading...