

Page 1

User Guide
1
Page 2

Page Intentionally Left Blank
2
Page 3

Table of Contents
TABLE OF CONTENTS 3
INTRODUCTION 5
W
ELCOME
COMMUNICATIONS REGULATION INFORMATION 7
CARING FOR WMP 8
BEFORE YOU BEGIN 9
Q
UICK START GUIDE
WIRELESS MEDIA PLAYER MUSIC CONTROLS 11
TURNING YOUR WIRELESS MEDIA PLAYER ON AND OFF 12
DISABLE WIRELESS MEDIA PLAYER KEYS 13
FINDING MUSIC 13
CHARGING YOUR WIRELESS MEDIA PLAYER 18
CHARGING WITH THE AC POWER ADAPTER 18
CHARGING WITH THE USB CABLE 19
TRANSFERRING MUSIC TO YOUR WIRELESS MEDIA PLAYER 20
USING WINDOWS MEDIA PLAYER 10 20
USING WINDOWS EXPLORER 21
5
11
WIRELESS FEATURES 29
SUPPORTED NETWORK CONFIGURATIONS 29
C
ONFIGURING WIRELESS ACCESS
HOT SPOT LOCATOR 31
CONNECTING TO INTERNET SERVICES 32
MANAGING INTERNET SERVICE ACCOUNTS 33
P
LAYER TO PLAYER AND WIRELESS FILE SHARING
MANAGING PLAYLISTS ON YOUR WIRELESS MEDIA PLAYER 41
“MY F
AVORITES
CREATING A NEW PLAYLIST 41
MODIFYING AN EXISTING PLAYLIST 42
DELETING A PLAYLIST 42
BOOKMARKS 44
CREATING A BOOKMARK 44
UPDATING AND RESTORING BOOKMARKS 45
DELETING BOOKMARKS 45
VIEWING BOOKMARKS 46
” P
LAYLIST
31
38
41
LISTENING TO THE FM RADIO 22
SHORTCUT BARS 22
FM R
ADIO CONTROLS
TUNING MODES 23
MANUALLY STORING PRESETS 26
CLEARING PRESETS 26
AUTO LOADING PRESETS 26
USING THE BUILT-IN FM TRANSMITTER 27
SELECTING AN FM TRANSMIT FREQUENCY 27
STORING FM TRANSMIT PRESETS 27
USING FM TRANSMIT PRESETS 28
A
DJUSTING THE
STEREO VS. MONO 28
23
FM T
RANSMIT VOLUME
28
PLAYER PREFERENCES 47
FM TRANSMITTER 47
A
47
UDIO
DISPLAY 49
SONIQSTART 50
USB 50
SUPPORT TOOLS 50
ABOUT 51
EQUALIZER 52
SELECTING AN EQUALIZER PRESET 52
ADJUSTING THE EQUALIZER 52
3
Page 4

USING YOUR WIRELESS MEDIA PLAYER AS A USB HARD DISK
53
LISTENING TO PROGRAMS FROM AUDIBLE.COM 54
AUDIBLE.COM PROGRAM CONTROLS 54
SECTION NAVIGATION 54
AUTOMATIC BOOKMARKING 55
APPENDIX A – CONFIGURING A LAPTOP FOR AD-HOC
NETWORKING 56
CONFIGURING THE LAPTOP TO USE THE NEW AD-HOC NETWORK 57
APPENDIX B – TECHNICAL SPECIFICATIONS 58
APPENDIX C – LICENSE AGREEMENT 61
CONTACT US 64
4
Page 5

Introduction
Welcome
Congratulations! Thank you for purchasing the Tao WMP™ Wireless Media Player. Advanced features found only on
WMP are now at your fingertips. Your music, your way! WMP now provides access to your music through wireless
technology. WMP’s 20 GB hard drive will store more than 5000 songs for you that can be refreshed when you wish
through wireless synchronization. WMP includes:
Note: Tao does not supply a software CD with this product. All of the software and documents are stored on the internal
hard drive for WMP.
Thank you for purchasing a Tao WMP MP3 Player. The latest technology in portable audio!
• MP3/WMA P l ayer
• FM Stereo Receiver
• FM Transmitter
• USB Connectivity
• Behind-the-head Headphones
• Backlit LCD Display
• AC Power Adaptor (120/220V)
• Long Lasting Rechargeable Battery
• Deluxe Carrying Case
5
Page 6

Tao WMP Wireless Media Player
Information in this document is subject to change without notice and does not represent a commitment on the part of
Tao LLC. No part of this manual may be reproduced or transmitted in any form or by any means, electronic or
mechanical, including photocopying or recording, for any purpose without written permission of Tao, LLC. The software
described in this document is furnished under a license agreement and ma y be used or copied only in accordance with
the terms of the license agreement. It is against the law to copy the software on any other medium except as specifically
allowed in the license agreement. The licensee may make one copy of the software for backup purposes.
The Software License Agreement is located in Appendix C – License Agreement of this document.
Copyright 2005 Giant International (USA), Ltd. All rights reserved.
July 2005
Microsoft, MS-DOS, and Windows are registered trademarks of Microsoft Corporation. All rights reserved.
All other products are trademarks or registered trademarks of their respective owners.
6
Page 7

Communications Regulation Information
FCC Compliance Statement
This MP3 Player complies with Part 15 of the FCC rules. Operation is subject to the following two conditions: (1) This device may not cause harmful interference, and (2) this device
must accept any interference received, including interference that may cause undesired operation. See instructions if interference to radio or television reception is suspected.
Radio and Television Interference
This device generates, uses, and can radiate radio-frequency energy. If not installed and used properly – it may cause interference with radio and television reception.
This equipment has been tested and found to comply with the limits for a Class B digital device in accordance with the specification in Part 15 of the FCC rules. These specifications
are designed to provide reasonable protection against such interference in a residential installation. However, there is no guarantee that interference will not occur in a particular
installation. You can determine whether your MP3 Player system is causing interference by turning it off. If the interference stops, it was probably caused by the MP3 Player or one
of the peripheral devices.
If your MP3 Player system does cause interference to radio or television reception, try to correct the interference by using one or more of the following measures:
If necessary, consult a Tao-authorized service provider or Tao. See the servi ce a nd support information available in this users guide. Or, consult an experienced radio/television
technician for additional suggestions.
Important:
This product was tested for EMC compliance under conditions that include use of Tao peripheral devices and Tao shielded cables and connectors between MP3 Player system
components. It is importan t that you use Tao peripheral devices and shielded cables and connectors between system component s to reduce the possibility of causing interference to
radios, television sets, and other electronic devices. You can obtain Tao peripheral devices and the proper shielded cables and connectors through a Tao-authorized dealer. For nonTao peripheral devices, contact the manufac t urer or dealer for assistance.
FCC Radiation Exposure Statement:
This equipment complies with FCC radiation exposure limits set forth for an uncontrol led environment. This equipment should be installed and operated with minimum distance 1.5cm
between the radiator & your body.
Industry Canada Statement
This Class B device meets all requirements of the Canadian interference-causing eq uipment regulations.
Cet appareil numérique de la classe B respecte toutes les exigences du Règlement sur le matéteriel brouilleur du Canada.
European Community
Complies with European Directives 72/23/EEC and 89/336/EEC.
• Turn the television or radio antenna until the interference stops.
• Move the computer to one side or t he other of the television.
• Move the computer farther away from the television or radio.
• Plug the computer into an outlet that is on a different circuit from the television or radio. (That is, make certain the computer and the television or radio are on circuits
controlled by different circuit breakers or fuses.)
Changes or modifications to this product not auth orized by Tao LLC could void the EMC compliance and negate your authority to operate this product.
7
Page 8

Caring for WMP
Safety and Handling
Caring for your MP3 Player –
1. Do not store or use WMP in areas exceeding 45° C, or 113° F
2. Do not subject WMP to excessive force or impact
3. Keep WMP away from excessive moisture
4. Do not expose WMP to heat or flame
5. Keep WMP away from strong magnetic fields
6. Please do not dismantle
7. Store WMP out of direct sunlight
8. Do not crush or puncture
Caring for WMP’s Battery –
observe the following precautions:
Although WMP is quite robust, please observe safety and handling instructions:
WMP contains a long-lasting Lithium-ion battery that is NOT removable. Please
1. Do not attempt to remove WMP’s internal battery. Please contact our Technical Support
personnel for service of the battery.
2. WMP’s battery must be disposed of according to local env ironmental regulations.
8
Page 9

Before You Begin
Package Contents –
• WMP 20G Gig MP3 Player
• Stereo Headphones
• USB Cable
• AC Power Adapter
• Quick Start Guide
• Deluxe Carry Case
• Limited Warranty
Website Information –
• WMP Software and Firmware Updates
• Online Technical Support
The following items are included with your WMP purchase:
Visit the WMP website (www.TaoLife.com) for additional information and support, including:
• Troubleshooting
• FAQs
• How-To Tutorials
• Documentation
• Accessories
• Product Information
9
Page 10

•
Documentation & Software –
Host PC are included on the WMP player hard-drive. See 錯誤! 找不到參照來源。 in this document for
installation instructions.
The documentation and software necessary for your WMP player and
Minimum System Requirements – The following is required as a minimum for your WMP host PC operations:
• Microsoft® Windows® 2000, or Windows® XP
• Intel® Pentium II 200 MHz, AMD®-K6-2® 200 MHz or better processor (Pentium III 450 MHz or higher
recommended)
• USB 1.1 or 2.0 port connection
• 64 MB RAM (128 MB recommended)
• 20 MB free hard disk space (more if storing music files)
• Internet connection for Internet content downloading and website support
• Installed Mouse
• SVGA graphics adapter (256 colors, 800 x 600 resolution or better)
• 802.11 B Wireless Access Point required for wireless PC to player transfers
10
Page 11

Quick Start Guide
Wireless Media Player Music Controls
Main Menu Press and hold the Select key
Play a Song Press the Select key
Change the volume Press the Up key once, then use
Right/Left to adjust volume up/down
One step: press and hold Up/Down
Pause a song Press the Select key
Skip to the next song Press the Right key
Start a song over Press the Left key
Play the previous song Press the Left key twice
Fast-Forward Press and hold the Right key
Rewind Press and hold the Left key
11
Page 12

Shortcut Bars
Shortcut bars provide convenient access to the most commonly used functions. For example, changing the volume is
done using the Volume shortcut bar. Shortcut bars are accessed by pressing the Up and Down keys. Press the Up key
to go through the shortcut bar list in a pre-defined order. Press the Down key to go through the list in the opposite order.
The following shortcut bars are available from the Audio Player application:
•
Volume (line-out)
•
FM Transmitter Volume
• FM Transmit Frequency (select)
• FM Transmit Mode (select)
•
Add Song to My Favorites Playlist
• Shuffle On/Off
• Equalizer Preset (select)
•
Playlist/Bookmark
The shortcut bar list can be customized by turning shortcut bars on and off from the Preferences – Audio – Shortcut
Bars menu.
Turning Your
The power button is located on the lower right side of the player.
Press the power button to turn the player on.
To turn the player off, press the power button and select from the list of options. By default, the player will go into standby.
From standby mode, the player will turn back on very quickly. However, if the player will not be used for an extended
period of time it is recommended to power off the unit. The battery will maintain a charge for a longer period of time when
the unit is powered off.
Wireless Media Player
On and Off
12
Page 13
Disable Wireless Media Player Keys
If you want to prevent accidental key presses you can disable the Wireless Media Player keys by pressing the power
button and selecting the Lock Keypad menu option. To enable the Wireless Media Player keys press the power button
again and select Unlock Keypad.
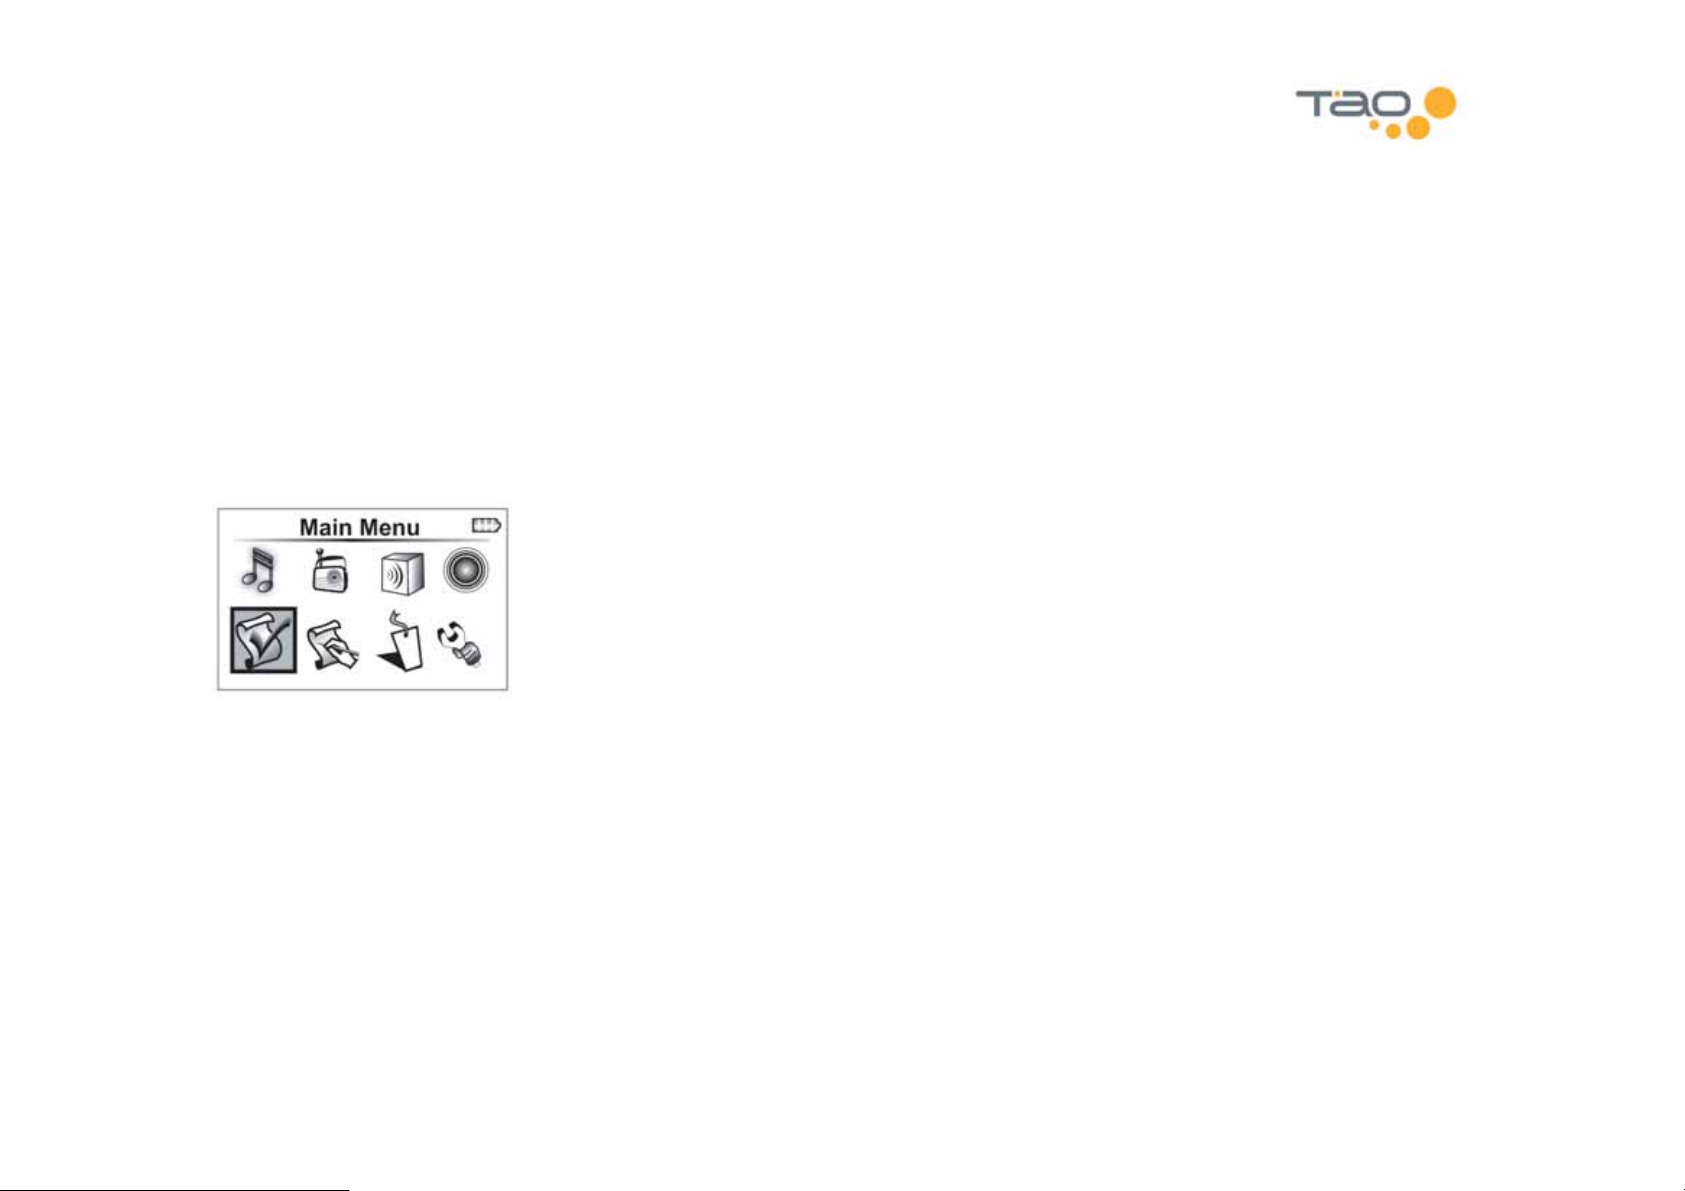
Finding Music
The playlist menu is used to find songs by title, artist, album, genre, or playlist.
To access the playlist menu, press and hold the Select key to access the main menu. Then highlight the Playlist menu
item and press Select.
To play a particular album, select the album name and press Select. The album will begin playing at the first song.
13
Page 14
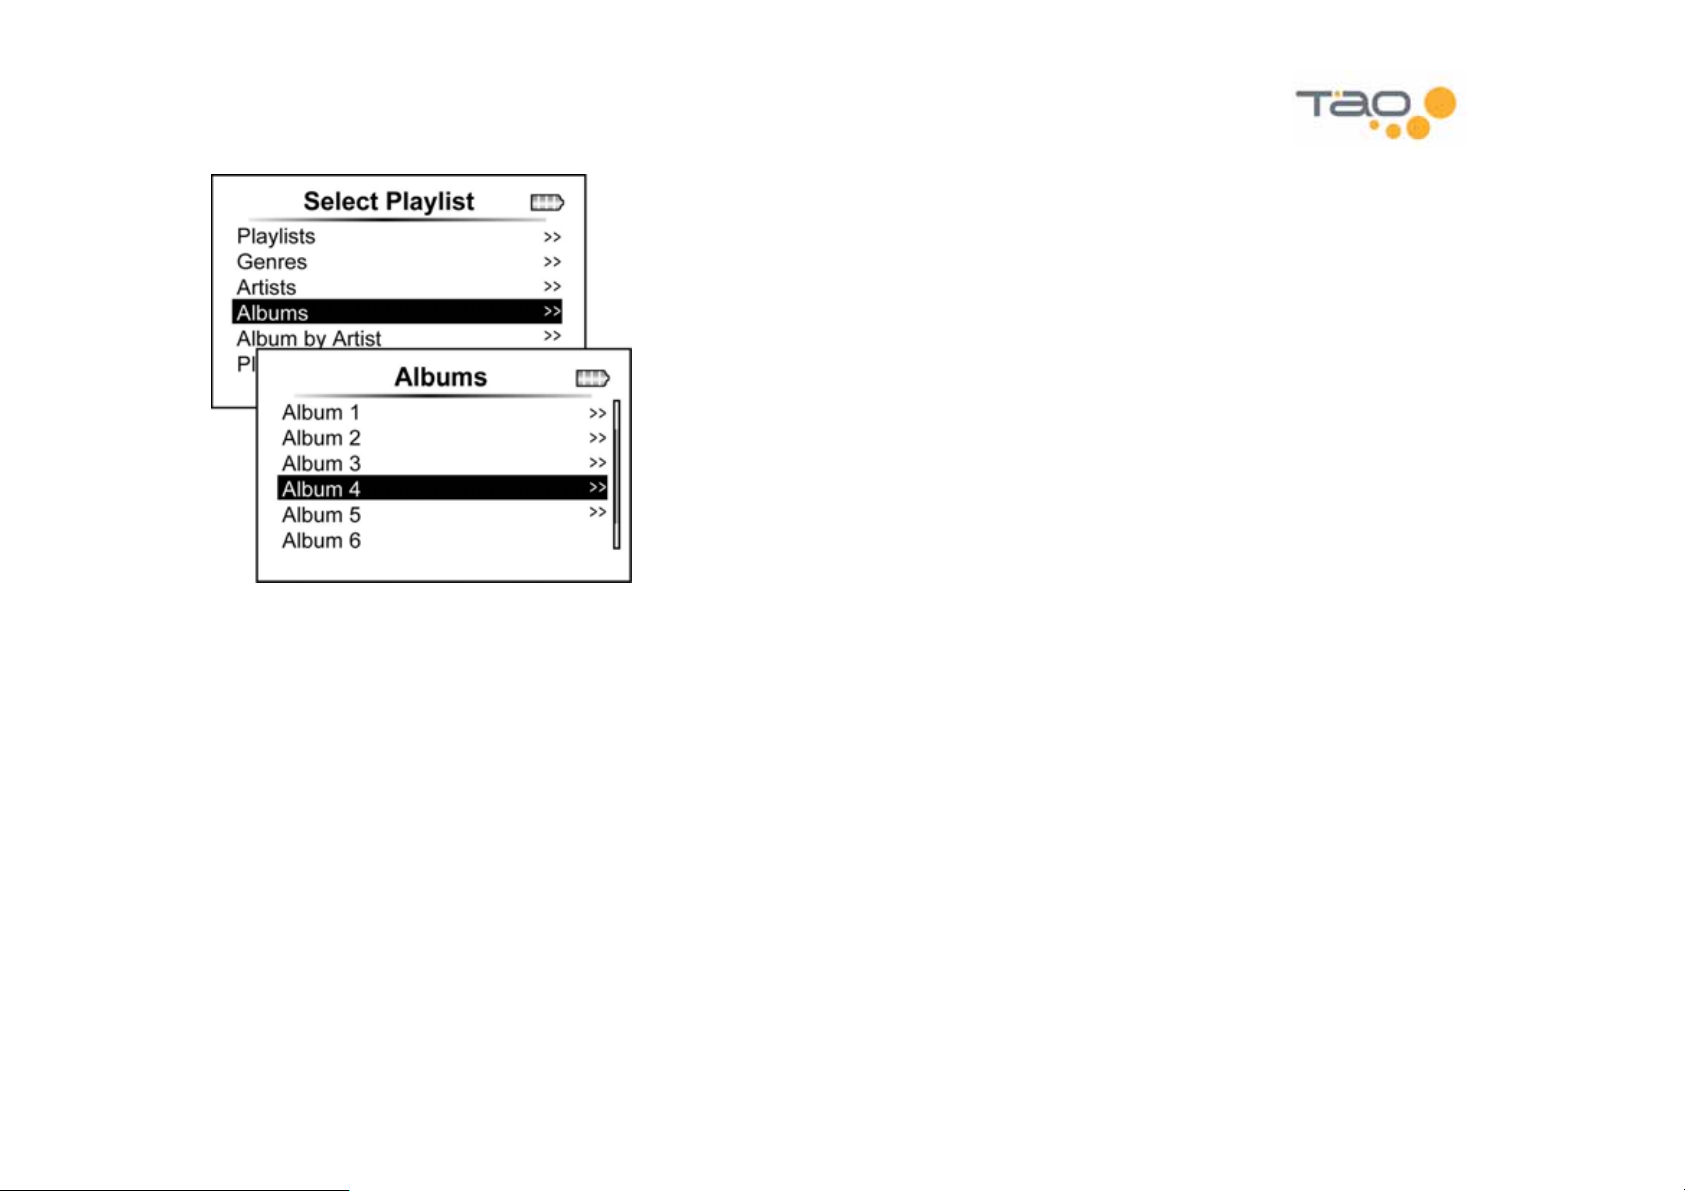
The chevron symbol to the right of a menu item means you can see songs in a particular playlist by pressing the Right key.
For example, if you wanted to play a particular song from an album, you could press the Right key from the Album
selection.
14
Page 15
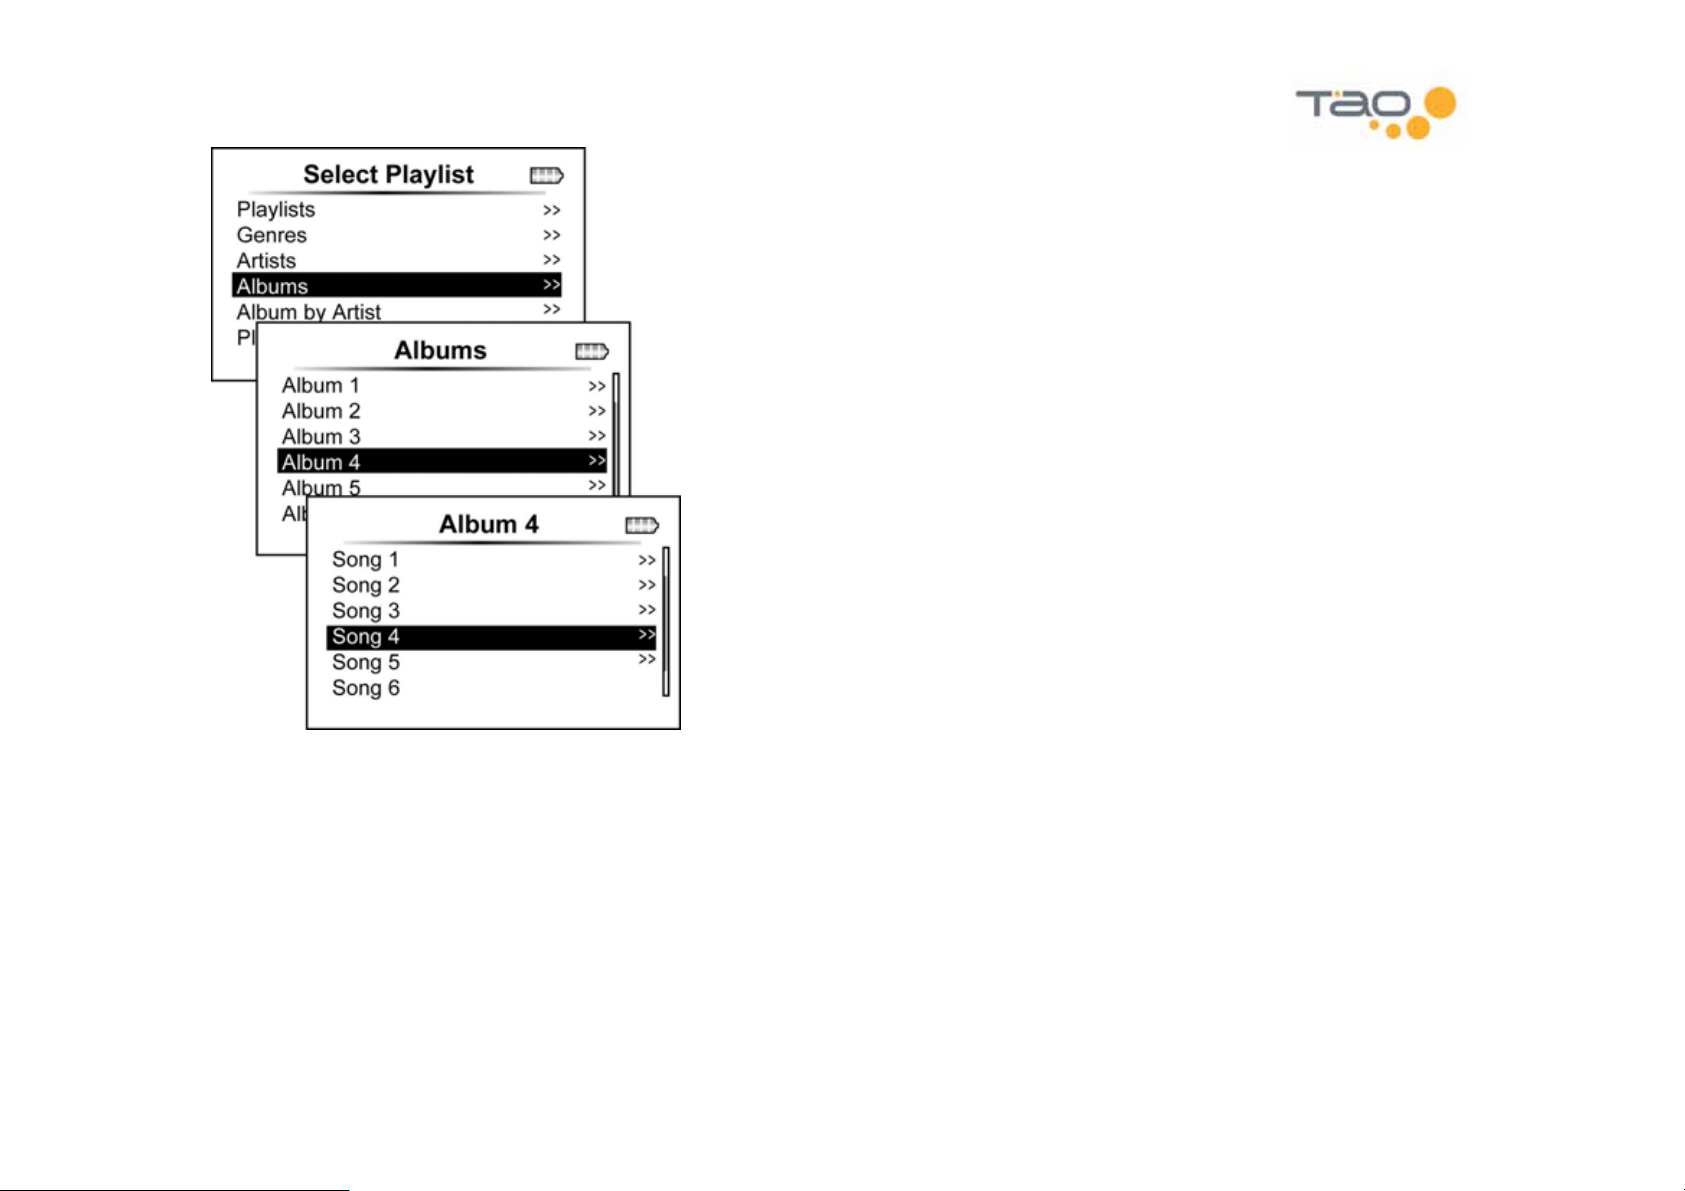
Pressing the Select key on the selected song will play the album starting with the selected song.
Quickly Navigating Within Huge Lists
Your Wireless Media Player can hold thousands of songs. Some of the menu lists you encounter can be very long. This
section describes how you can quickly find what you are looking for within very long lists.
15
Page 16
1.1.1.1 Accelerated Scrolling
By pressing and holding the Up/Down keys you can scroll up and down through a list. The longer you hold the key down,
the faster you will scroll through the list.
1.1.1.2 Quick Navigation
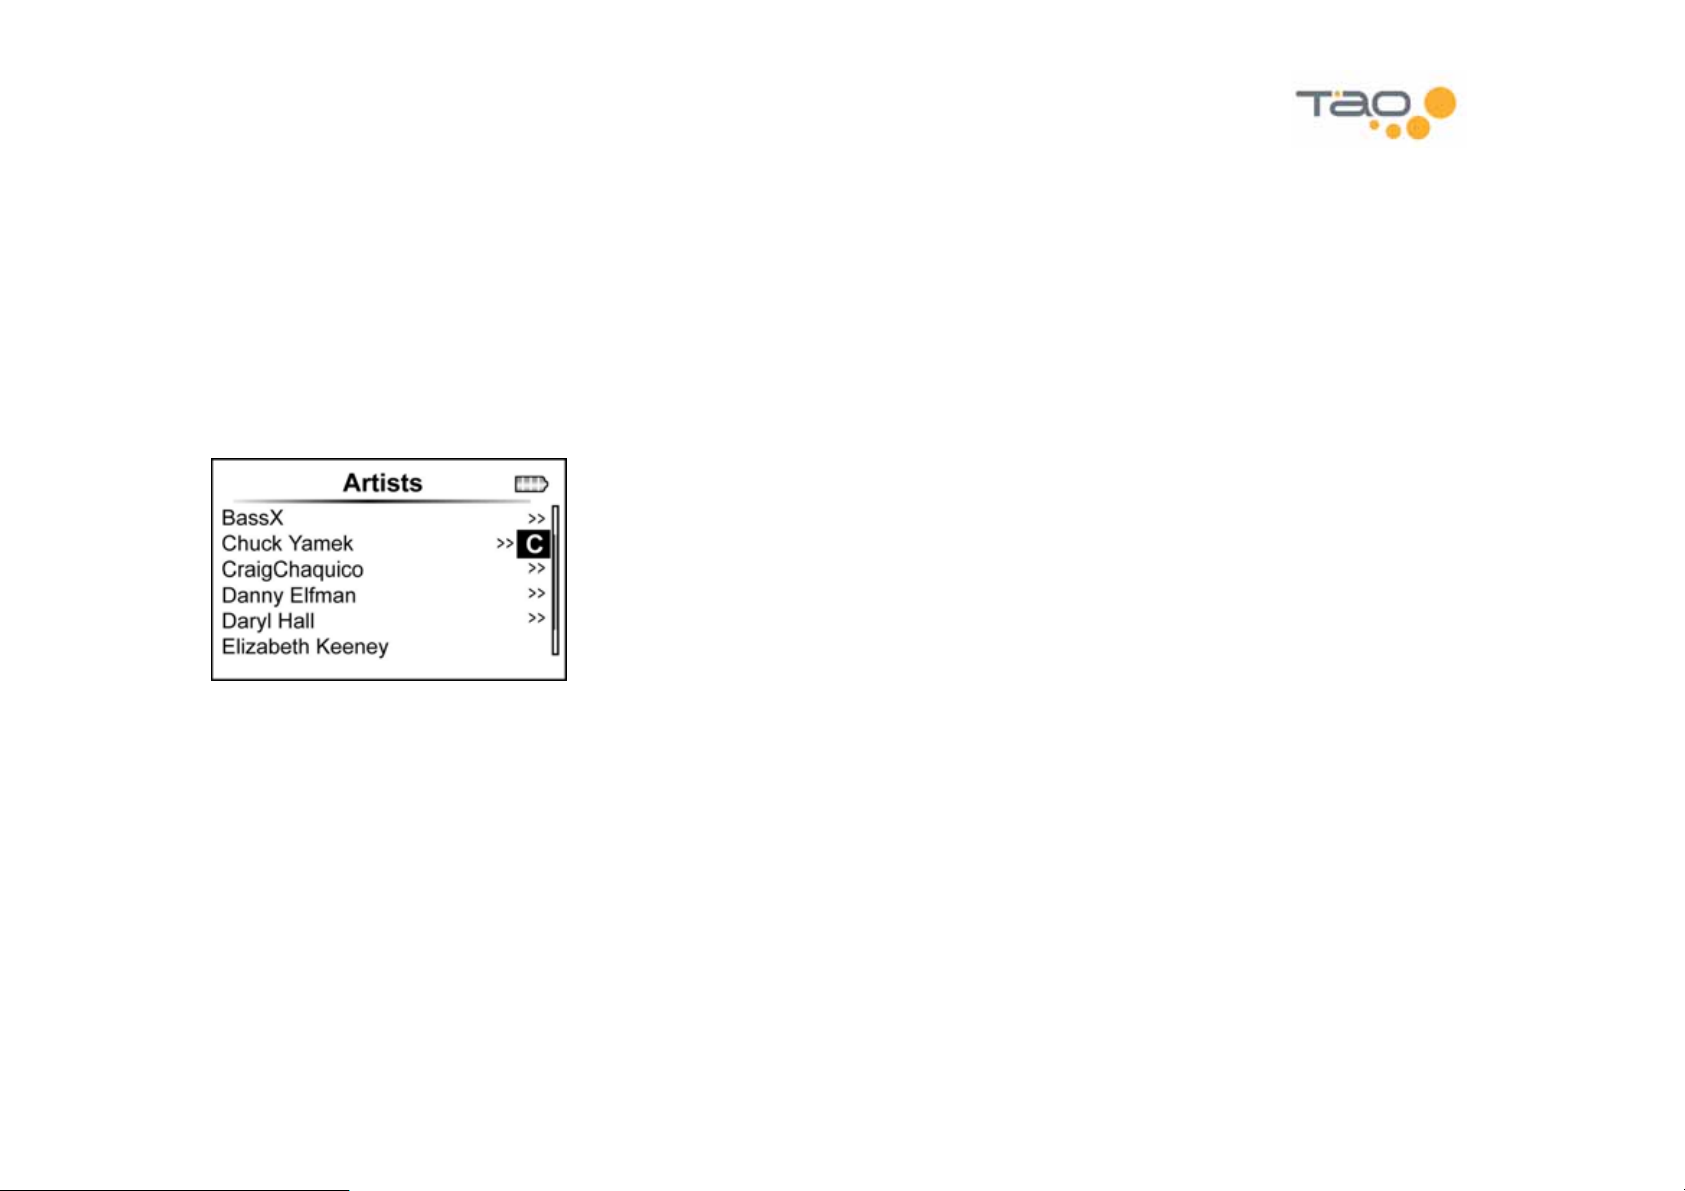
Within alphabetically sorted lists you can press and hold the Right key to enter into quick navigation mode. Once enabled,
you can quickly navigate by the letters of the alphabet using the Up/Down keys. For example, to find your favorite artist
beginning with the letter 'S' you could enter into the Artist menu, press and hold the Right key, then use the Down key to
find artists beginning with the letter 'S'.
From quick navigation mode if you press the Right key a second time you can now navigate alphabetically by the second
letter. For example, by 'Sa', 'Sb', 'Sc', etc. At the second level the Up/Down keys will wrap within list entries beginning with
the first letter (e.g., 'S').
Quick navigation mode allows you to navigate with up to three letters.
Pressing the Select key immediately exits quick navigation mode. Pressing the Left key decreases the level by one.
Quick navigation can be used on the following alphabetically sorted lists:
• User defined playlists
Genres
•
16
Page 17

• Songs within a particular genre
• Artists
Songs by a particular artist
•
• Albums
• All tracks
Songs within user defined playlists and songs within albums are in general not sorted alphabetically. Therefore quick
navigation mode is not supported within these lists.
17
Page 18
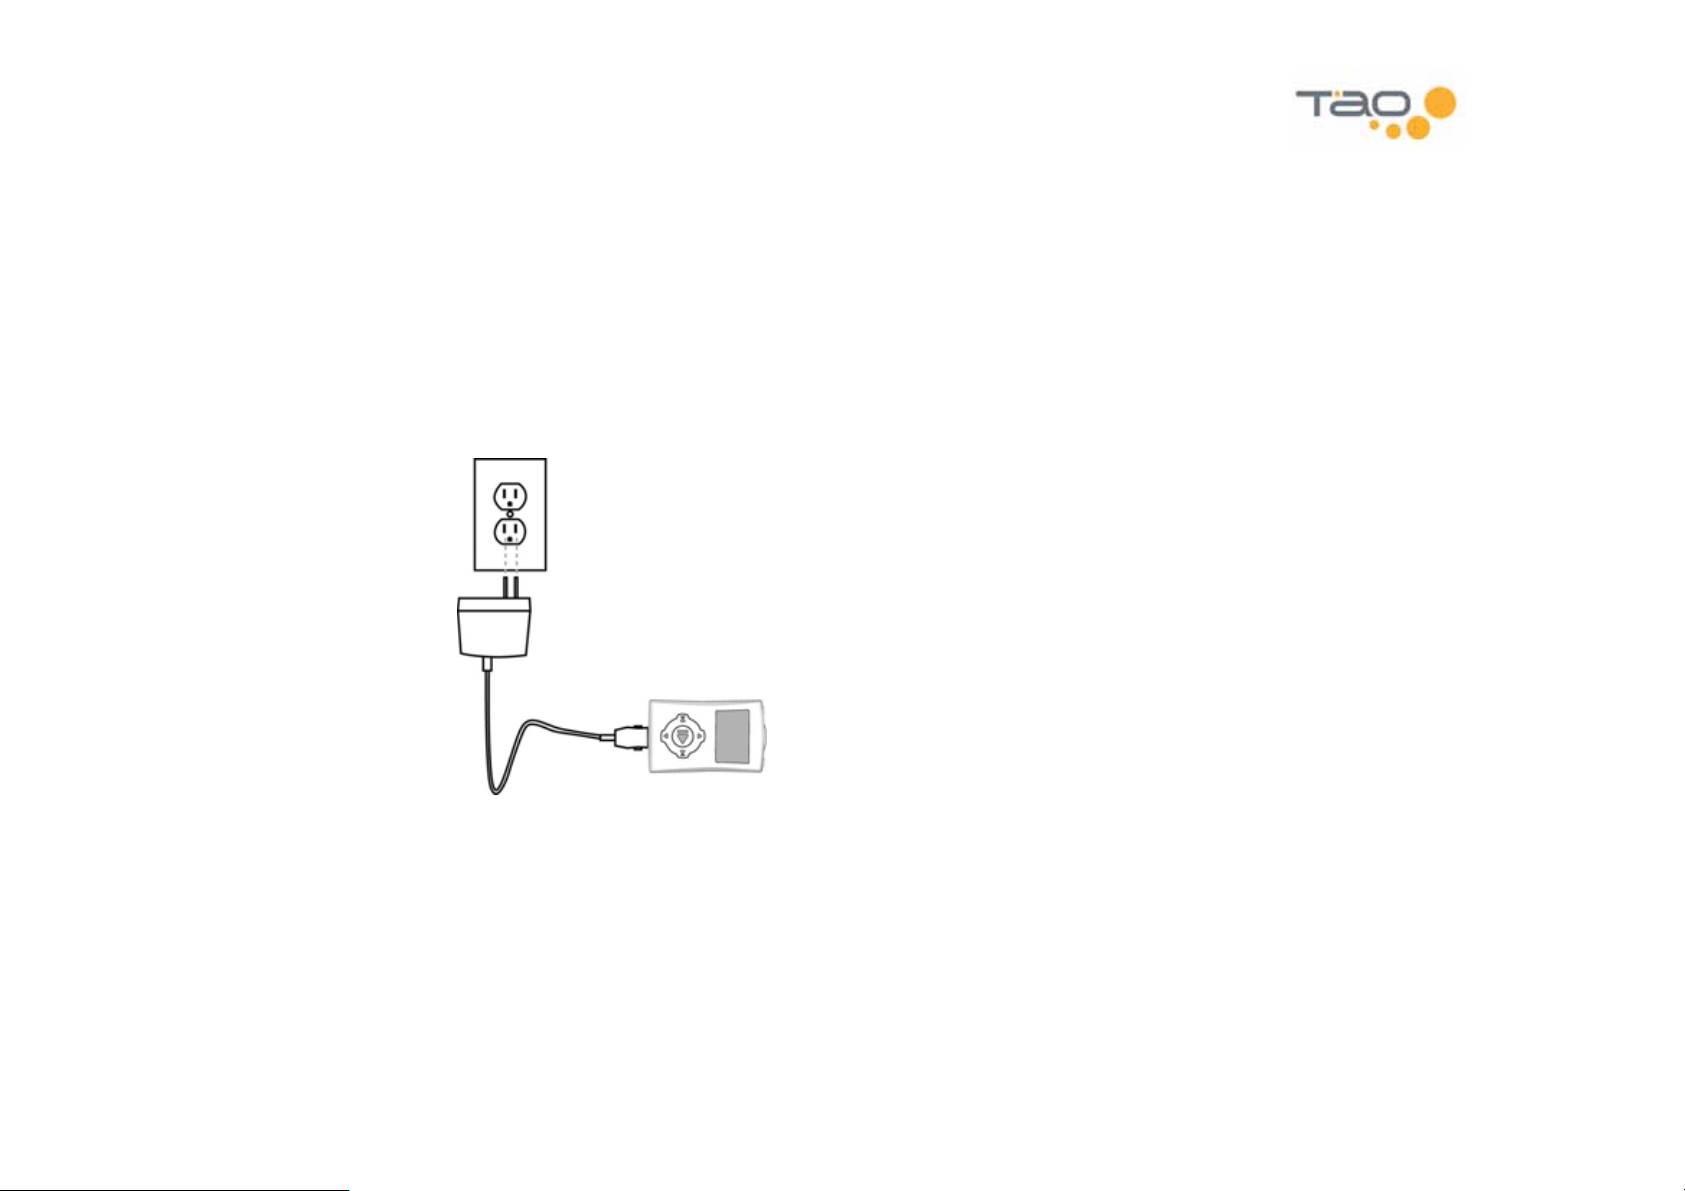
Charging your
Your Wireless Media Player can be charged using the supplied AC power adapter, or the supplied USB cable.
Wireless Media Player
Charging with the AC Power Adapter
Connect the AC power adapter to the adapter port on the player and into a wall outlet. The dome light at the top of the
player will show red while the player is charging.
18
Page 19
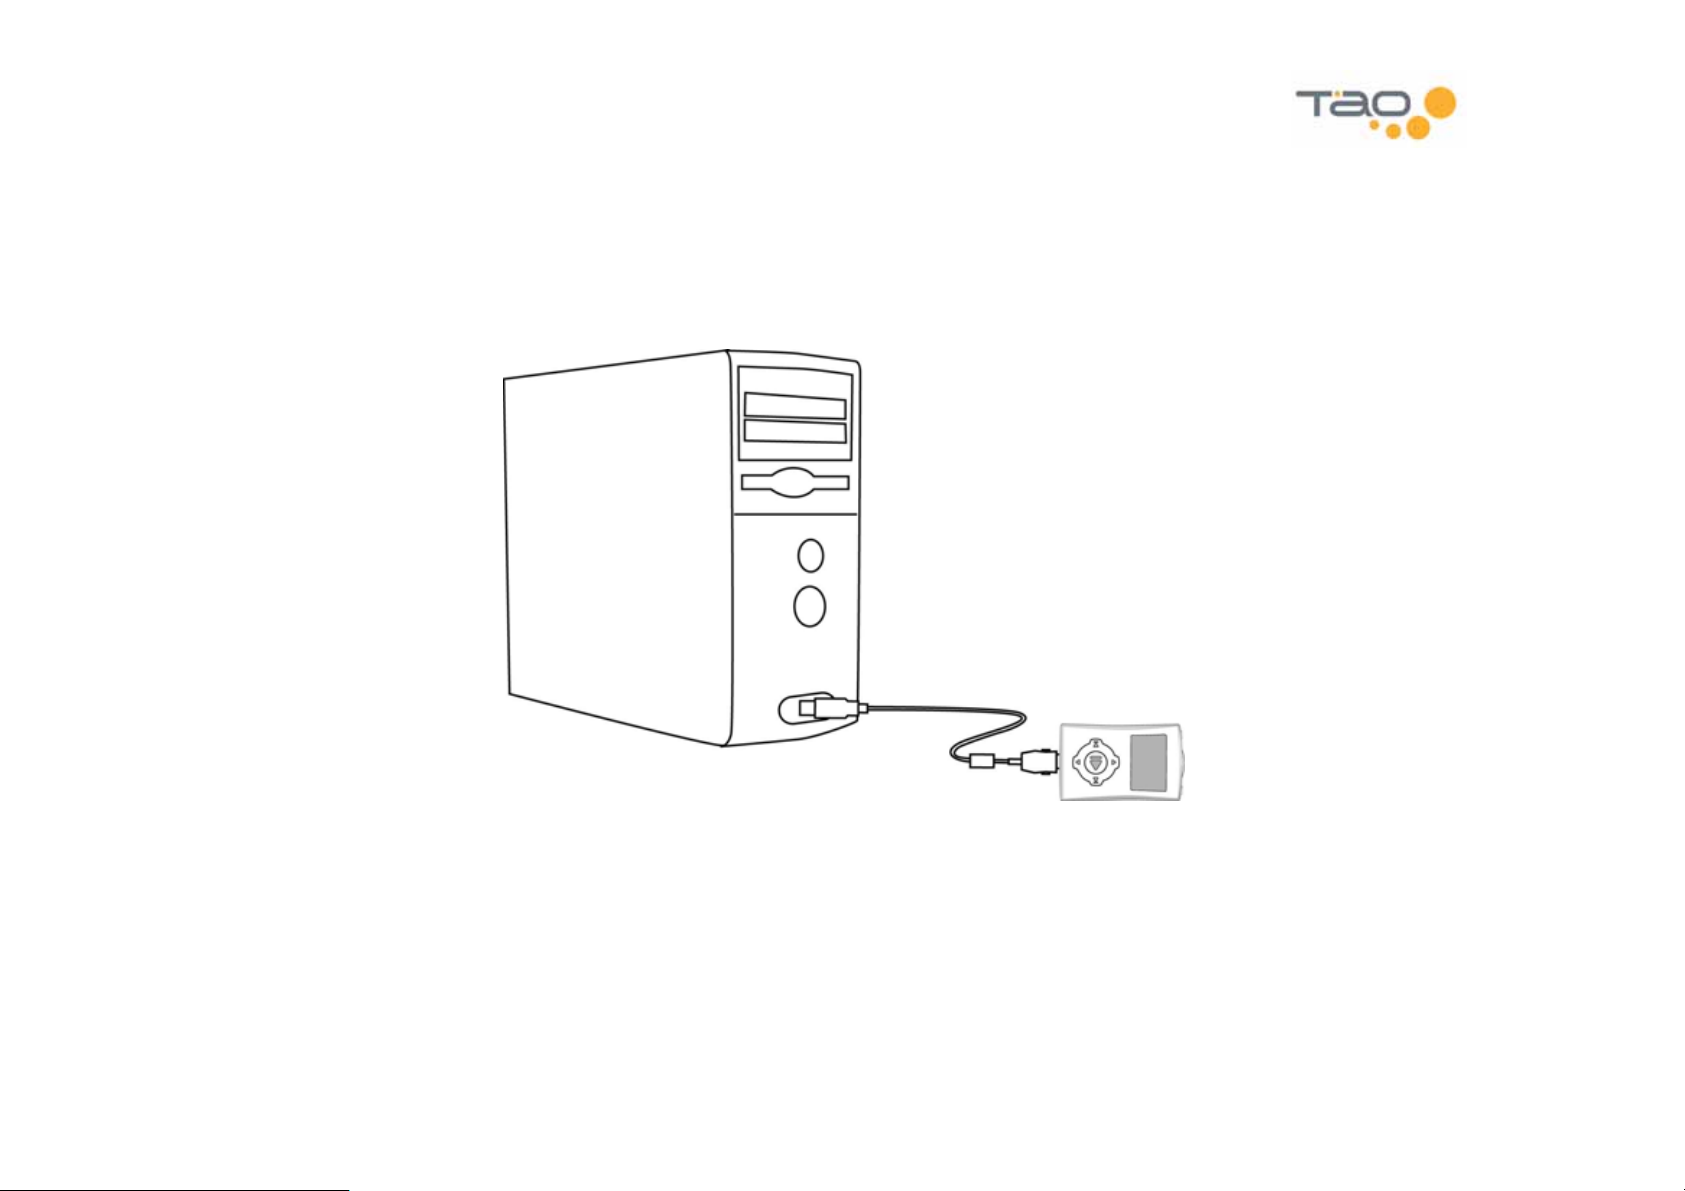
Charging with the USB Cable
Connect the USB cable to the USB port on the player and to your PC. The dome light at the top of the player will show
red while the player is charging.
19
Page 20

Transferring Music to Your
This section will tell you how to transfer music to your player using the supplied USB cable.
Wireless Media Player
Using Windows Media Player 10
Windows Media Player 10 can be used to transfer individual songs, artist, albums and playlists to your Wireless Media
Player.
Step 1: Connect the USB cable to the USB port on the player and to your PC.
Step 2
Click Start – All Programs – Accessories – Entertainment – Windows Media Player
Step 3
list. Repeat for all the music you wish to transfer.
Step 4: Click the Sync menu from Windows Media Player 10. Then choose the
list.
Step 5: Click Start Sync to transfer the music from your Sync list to the player.
Step 6: After the transfer is complete, disconnect the USB cable and enjoy your music.
Please refer to the Windows Media Player 10 documentation for more information.
: Open Windows Media Player 10.
: Locate the music you wish to transfer to your Wireless Media Player and Right-Click on it. Select
Wireless Media Player
from the download
Add to – Sync
20
Page 21

Using Windows Explorer
Windows Explorer can be used to transfer music to your Wireless Media Player.
Step 1
Step 2: Open Windows Explorer.
Click
Step 3: From Windows Explorer – My Computer – Audio Devices locate the Wireless Media Player icon.
Step 4: Use Windows Explorer to drag and drop your favorite music onto your Wireless Media Player.
Step 5
music.
: Connect the USB cable to the USB port on the player and to your PC.
Start – All Programs – Accessories – Windows Explorer
: After you are done dragging files onto your Wireless Media Player, disconnect the USB cable and enjoy your
21
Page 22

Listening to the FM Radio
Select FM Stereo from the main menu to listen to the FM radio.
Note: The FM radio uses your headphone as the antenna.
Shortcut Bars
Most of the functions described in this chapter are accessible via shortcut bars. Use the Up/Down keys from the FM
Stereo application to access the shortcut bars. The following shortcut bars are available:
• Volume
• Store Preset
•
Clear Preset
• Tuning Mode (select)
• Auto Load Presets
22
Page 23

FM Radio Controls
Listen/mute the radio Press the Select key
Change the volume Press the Up key once, then use Right/Left to adjust volume up/down
Tuning Modes
The radio supports four tuning modes described in this section.
To select a tuning mode, press the Up key until the Mode shortcut bar appears. Then use the Left/Right keys to navigate
through the tuning mode options. Press the Select key to select the desired tuning mode.
Manual Tuning
Manual tuning allows you to manually tune up and down the dial.
Tune to next frequency Press the Right key
23
Page 24

Tune to next frequency Press the Right key
Tune to previous frequency Press the Left key
Note: Press and hold the Next/Previous key to accelerate movement up and down the dial.
Preset Tuning
Preset tuning mode allows you to quickly switch between your radio station presets.
Tune to next station preset Press the Right key
Tune to previous station preset Press the Left key
24
Page 25

Seek Tuning
Seek tuning allows you to find available stations up and down the radio dial.
Seek to next available station Press the Right key
Seek to previous available station Press the Left key
Scan Tuning
Scan tuning allows you to find available stations, listen to them for a short time, and then automatically go to the next
station.
25
Page 26

Scan to next available station Press the Right key
Scan to previous available station Press the Left key
Stop at current station Press the Select key
Manually Storing Presets
Up to 14 station presets can be stored. Select a radio station you want to store, then press the Up key until the
Preset shortcut bar appears. Use the Left/Right keys to select a preset location. Press Select to save the current station
at the selected preset location.
Store
Clearing Presets
Any previously stored preset can be cleared using the Clear Preset shortcut bar. Press the Up key until the Clear Preset
shortcut bar appears, then use the Left/Right keys to select the preset you want to clear. Press the Select key to clear the
selected preset.
Auto Loading Presets
The auto load preset feature provides a quick way to find available stations and to store them as presets. Press the Up
key until the Auto Load Presets shortcut bar appears. Then press the Select key to start auto load. The player will scan
up and down the dial for stations with a strong signal. When finished, a list of available stations will be displayed. Use the
Up/Down keys to listen to the stations. To set a station as a preset, press the Right key and a checkmark will appear next
to the station. When you are satisfied press the Select key and all selected stations will be stored as presets.
26
Page 27

Using the Built-In FM Transmitter
The built-in Wireless Media Player FM transmitter allows you to transmit your favorite music to your car radio or home
stereo receiver. Simply tune your radio to an unused frequency of the FM band, unplug your headphones and enjoy your
music.
Note: The FM transmitter is automatically enabled whenever you unplug your headphones and automatically disabled
when you plug your headphones back in.
Selecting an FM Transmit Frequency
The Wireless Media Player can be configured to transmit on virtually all FM transmit frequencies.
Press and hold the Select button to access the main menu. From the main menu, select Preferences – FM Transmitter.
From the FM Transmitter menu the current transmit frequency is displayed. Highlight and select the Set Frequency
menu item to change the transmit frequency.
You can use the Left/Right keys to manually select an appropriate FM transmit frequency. The Wireless Media Player
immediately begins transmitting on the selected frequency.
Storing FM Transmit Presets
Up to four FM transmit frequencies can be stored in presets. To store an FM transmit preset, select the desired transmit
frequency then press the Up key twice. Now use the Left/Right keys to select one of the four preset locations. Press the
Select key to store the current frequency in the selected preset location.
27
Page 28

Using FM Transmit Presets
The FM transmit preset can be adjusted from the Audio Player application via the FM Tx Frequency shortcut bar. From
the Audio Player application, press the Up key until the FM Tx Frequency shortcut bar appears. Then use the Left/Right
keys to select from the stored preset locations.
Note: the FM Tx Frequency shortcut bar can be enabled or disabled from the Preferences – Audio – Shortcut Bars
menu item.
Adjusting the FM Transmit Volume
FM transmit volume can be adjusted from the Audio Player application via the FM Tx Volume shortcut bar. From the
Audio Player application, press the Up key until the FM Tx Volume shortcut bar appears. Then use the Left/Right keys to
adjust the FM transmit volume level.
Stereo vs. Mono
The Wireless Media Player FM transmitter is capable of transmitting in both stereo and mono. Certain types of audio files
(audio books for example) can benefit from mono transmission.
Stereo vs. mono transmission can be adjusted from the Audio Player application via the FM Tx Mode shortcut bar. From
the Audio Player application, press the Up key until the FM Tx mode shortcut bar appears. Then use the Left/Right keys
to select between stereo and mono.
Note: the FM Tx Mode shortcut bar can be enabled or disabled from the Preferences – Audio – Shortcut Bars menu
item.
28
Page 29

Wireless Features
Your Wireless Media Player contains a built-in 802.11.b wireless network adapter. This section tells you how to use the
features utilizing the adapter.
Supported Network Configurations
There are two basic wireless network configurations supported by your Wireless Media Player: Infrastructure, and Ad-Hoc.
Infrastructure Networks
Infrastructure networks involve the use of a device called a Wireless Access Point, or WAP for short. The WAP provides
the ability to connect your Wireless Media Player to your PC and the internet. The following diagram illustrates:
A WAP is configured with an SSID (Service Set Identifier) and a network key (i.e., a password) used to prevent
unauthorized access to the network. Your Wireless Media Player must be configured with the appropriate SSID’s and
network keys for each WAP you will be using. See section “Configuring Wireless Access Points” for more information.
29
Page 30

Ad-Hoc Networks
Ad-Hoc networks allow two or more wireless devices to communicate without the need for a Wireless Access Point (WAP).
This is useful in the following scenarios.
1.1.1.3 Player to Player
In this scenario, one
Wireless Media Player
establishes an ad-hoc network allowing another
Wireless Media Player
to join
the network and share files directly from player to player. The following diagram illustrates:
Please see the section “Player to Player and Wireless File Sharing” for more information.
1.1.1.4 Player to Laptop
In this scenario, a laptop computer with a wireless network card establishes an ad-hoc network allowing a Wireless Media
Player to join the network and share files from player to laptop. The following diagram illustrates:
Please see Appendix A for details on how to configure an ad-hoc network on a laptop computer.
30
Page 31

Network Privacy
Your Wireless Media Player supports both WEP (Wired Equivalent Privacy) and WPA PSK (Wireless Protected Access
Pre Shared Key) network privacy methods.
For WEP, 64-bit and 128-bit keys are supported.
For WPA, a pass-phrase from 8 to 63 characters is supported.
Configuring Wireless Access
To configure wireless access on your Wireless Media Player, simply try to connect to a wireless network. If the Wireless
Media Player detects it does not have the proper configuration it will prompt you to enter an appropriate network key as
required by the network. For example, if you try to connect to a network enabled for WPA, the player will prompt you to
enter a WPA network key (i.e., pass-phrase). The network configuration information will be saved on the player for future
use.
Hot Spot Locator
The Hot Spot Locator feature is used to find wireless networks in your area.
Select Hot Spot Locator from the main menu to enter the hot spot application.
31
Page 32

Scanning and Connecting to Hot Spots
From the Hot Spot application, select Scan for Hot Spots to start scanning for wireless networks. Once the scan
completes (around 5 seconds) a list of networks will be displayed. For each network, the display will indicate the network
name, the network privacy employed by the network, and the signal strength.
Use the Up/Down keys to select the desired network. Press the Select key to connect to the selected network.
Note: if the selected network has not been configured, and the network requires a key (WEP or WPA) you will be
prompted to enter a key before you can connect.
Once connected to a wireless network a number of options are available:
•
You can connect to any of the available internet services (provided the internet is accessible from the network).
• You can view detailed information about your network connection (e.g., your IP address and signal strength).
Connecting to Internet Services
Internet services include a variety of on-line audio content stores such as Audible.com. Using the wireless capabilities of
your Wireless Media Player you can keep your timely subscription content up to date without having to connect your
player to your PC.
Note: before you can access internet services directly from your Wireless Media Player, you must add an internet service
account. Please see the section titled “Managing Internet Service Accounts” for more detail.
To access internet services select SoniqSync from the main menu.
32
Page 33

From the SoniqSync menu, select Connect to Internet.
From this menu, select the desired service to download your purchased content directly to your player.
Audible.com
Audible.com provides access to your subscriptions and books.
1.1.1.5 Get New Subscrip tions
The Get New Subscriptions option provides a one-step method to sync your latest subscription issues to your player. Old
issues are automatically replaced with the latest issues. Playlists are automatically created for each of your subscriptions.
1.1.1.6 Browse My Library
The Browse My Library option allows you to download individual subscription issues and books. Playlists are
automatically created for each downloaded program.
Managing Internet Service Accounts
From the SoniqSync menu, select SoniqSync Setup – Service Accounts to manage your internet service accounts.
33
Page 34

Listing Your Accounts and Changing Your Password
The List Accounts menu provides a list of your currently active accounts, and allows you to change your password on an
existing account. To change your password:
Step 1: Select an account from the list.
Step 2: Select Edit Password.
Step 3: Enter the new password using the keyboard interface.
Step 4: Save the new password.
Step 5: It is recommended you go to the SoniqSync Setup – Service Accounts – Test Account menu to verify your
password change is correct.
Adding a New Account
The Add Account menu is used to enter your account username and password information so you can purchase and
download content from your existing account directly from your Wireless Media Player.
Note: creating an account for a new service must be done from your PC. From your PC you will establish your username
and password and enter your billing information. Billing information is not stored on your Wireless Media Player.
Adding an account to your Wireless Media Player requires access to a wireless network that is connected to the internet.
Follow the steps outlined below:
Step 1: The player will scan for wireless networks. Select an appropriate wireless network from the list of available
networks.
Step 2: Your Wireless Media Player will download a list of available services supported by your player. Select the
appropriate service.
34
Page 35

Step 3: Enter your username and password that you have previously established.
Step 4
: Your Wireless Media Player will contact the service using your username and password to verify your account
information has been entered correctly. If your account information could not be verified, you will need to re-enter your
username and password.
Note to Audible users: your Wireless Media Player will be activated for Audible playback as part of account verification.
Step 5
: Your account has now been successfully added.
Deleting an Account
The Delete Account menu is used to delete an account from your Wireless Media Player. Some types of service
accounts require internet access. For example, Audible accounts require internet access in order to deactivate the player.
Follow these steps to delete an account:
Step 1: Select account to delete from the list.
Step 2: Confirm you want to delete the account.
Step 3: If the service requires internet access, the player will scan for wireless networks. Select an appropriate wireless
network from the list.
Step 4: Your Wireless Media Player will contact the service and perform player deactivation for the account.
Step 5: Your account has now been successfully deleted.
35
Page 36

Testing an Account
The Test Account menu provides a way to verify your username and password for an account. Testing an account on
your Wireless Media Player requires access to a wireless network that is connected to the internet. Follow the steps
outlined below:
Step 1: Select an account from the list.
Step 2: The player will scan for wireless networks. Select an appropriate wireless network from the list of available
networks.
Step 3: Your Wireless Media Player will contact the service using your username and password to verify your account
information is correct.
Note to Audible users: your Wireless Media Player will be activated for Audible playback as part of account verification.
Automated Scheduled Sync
Your Wireless Media Player can be configured to perform automated scheduled syncs to download new content from
service accounts over a wireless network. Each service account may be scheduled independently at a specific time of
day. The actions that can be performed during a sync operation depend upon the type of service.
The intent of this feature is to allow you to automatically download new content to your player, so that you have fresh
content each day. There are several criteria that must be satisfied to successfully perform an automated scheduled sync:
• You must leave your Wireless Media Player in standby, or leave it on and plugged into the AC power adapter. If
your player is in standby, it will wake up at the specified time, perform the desired actions, and go back into
standby. The player cannot wake up if it is powered off.
• You Wireless Media Player must be within range of your wireless access point, and must have access to the
internet.
• You must choose an appropriate time after the desired content will be available. For example, if Audible.com
makes the daily Wall Street Journal available at 5am, you need to make sure you schedule your sync to occur after
that time.
36
Page 37

1.1.1.7 Audible.com
An audible.com service account can be scheduled to download new subscription issues and/or new books to your
Wireless Media Player.
To schedule an Audible account for the first time, follow these steps:
Step 1: From the SoniqSync Setup – Scheduled Sync menu, select the appropriate Audible account.
Step 2
: Select “Yes” to setup the schedule.
Step 3: Select the actions you want to perform: Refresh Subscriptions and/or Refresh New Books.
Step 4: Select the time of day you want to sync to run.
Step 5
: Save the schedule.
To modify an existing schedule for an audible account, follow these steps:
Step 1: From the SoniqSync Setup – Scheduled Sync menu, select the appropriate Audible account.
Step 2
: Select “Yes” to modify the existing schedule.
Step 3: Modify the actions you want to perform.
Step 4: Select a new time of day.
Step 5: Save the schedule.
To disable a schedule for an audible account, follow these steps:
Step 1: From the SoniqSync Setup – Scheduled Sync menu, select the appropriate Audible account.
37
Page 38

Step 2: Select “Yes” to modify the existing schedule.
Step 3: Select “Disable Schedule”.
Step 4
: Select “Yes” to disable the schedule.
Step 5: Save the schedule.
Player to Player and Wireless File Sharing
Your Wireless Media Player is able to share its hard disk, and to browse remote shares on a Microsoft Windows
compatible network.
Player to Player File Sharing
Player to player file sharing provides the ability for one player to receive files from another player. One player acts as the
receiver, while the other player acts as the sender. The receiving player is responsible for establishing the ad-hoc
network and for sharing its inbox folder on the network. The sending player connects to the ad-hoc network and sends
files to the receiving player’s inbox. When the receiving player disconnects it automatically processes the files within its
inbox folder. Music files are automatically moved to the appropriate artist/album directory structure. Other files types are
automatically moved to the My Documents directory structure.
From the receiving player:
Step 1: From the SoniqSync application, select Wireless File Sharing – Receive File(s).
Step 2: Select a share password. Shares are protected by a simple 4-digit pin number.
Step 3: Connect to an existing wireless network, or establish an ad-hoc network. Ah-hoc networks are established using
the receiving player name.
38
Page 39

Step 4: Setup the sending player and wait to receive the files.
Step 5
From the sending player:
Step 1: From the SoniqSync application, select Wireless File Sharing – Send File(s).
Step 2
Step 3: Enter the 4-digit pin number to access the receiving player’s inbox share.
Step 4: Select and send local files to the receiving player’s inbox.
Step 5: Disconnect from the network when finished.
: Press cancel when the sender is done. The receiving player will automatically scan for new files.
: Connect to the network where the receiving player has shared its inbox.
Sharing Your
Sharing your Wireless Media Player hard disk makes it available on the Microsoft Windows Network and is compatible
with other computers that can access the Microsoft Windows Network (e.g., PC’s running Windows, PC’s running Linux
with Samba, etc).
You can share your
other computers to both read from and write to your hard disk.
Follow these steps to share your Wireless Media Player hard disk:
Step 1: From the SoniqSync application, select Wireless File Sharing – Share Hard Disk.
Step 2: Select read-only access or full-access.
Step 3: Select the share password. Shares are protected by a simple 4-digit pin number.
Wireless Media Player
Wireless Media Player
hard disk read-only, or you can share it will full access. Full access allows
Hard Disk on the Network
39
Page 40

Step 4: Connect to an existing wireless network, or establish an ad-hoc network. Ah-hoc networks are established using
the receiving player name. Your player hard disk is now shared on the network.
Step 5: Press cancel to disconnect from the network. The player will automatically scan for new files.
Browsing Remote Shares from Your Wireless Media Player
Your Wireless Media Player can browse remote file shares from other computers on a Microsoft Windows Network. You
can transfer files from your player to a remote share, or copy files from a remote share to your player hard disk.
Follow these steps to browse a remote file share:
Step 1: From the SoniqSync application, select Wireless File Sharing – Browse Remot e Shares.
Step 2: Connect to an existing wireless network. The player will scan for available domains and workgroups.
Step 3
other players) on the selected domain or workgroup.
Step 4
Step 5: Select a folder share from the list.
Step 6: Copy files to/from the selected folder share.
: Select a domain or workgroup from the list. The player will scan for available network devices (computers and
: Select a device from the list. The player will scan for available folder shares on the device.
40
Page 41

Managing Playlists on your
A playlist is simply a named list of audio files, for example, “Rock Classics”. Your Wireless Media Player has a number of
built-in features that allow you to create new playlists and manipulate existing playlists right from the player.
Wireless Media Player
“My Favorites” Playlist
The “My Favorites” playlist is a special built-in playlist. A shortcut bar is available from the Audio Player application that
allows you to quickly add (or remove) the currently playing song to (or from) your “My Favorites” list. Press the Up key
until the Favorite? shortcut bar appears. Then use the Left/Right keys to select Yes (add to My Favorites) or No (remove
from My Favorites).
Creating a New Playlist
Follow these steps to create a new playlist:
Step 1: From the main menu, select Edit Playlists – Create Playlist.
Step 2: Enter the name for the new playlist using the on-screen keyboard. Highlight and select the Enter key when you
are finished. This will bring you to the edit playlist screen.
Step 3: From the edit playlist screen, highlight and select the add symbol (+) to add songs to the playlist. You can add
complete albums, artists and genres. You can also add individual tracks from albums, artists and genres.
Step 4
Step 5: From the edit playlist screen you can review the songs in the playlist, delete individual songs from the playlist, and
change the order of songs in the playlist.
: Backup to the edit playlist screen when you are done adding songs to the playlist.
41
Page 42

Step 6: When you have the playlist just the way you want it, highlight and select the Save symbol from the edit playlist
screen. The new playlist will be saved to disk.
The new playlist will now be listed in the Select Playlist – Playlist menu.
Modifying an Existing Playlist
Follow these steps to modify an existing playlist:
Step 1: From the main menu, select Edit Playlists – Modify Playlist.
Step 2: Select a playlist to modify.
Step 3
: Use the edit playlist screen to add new songs, delete existing songs, and re-order songs within the playlist.
Step 4: When you have the playlist just the way you want it, highlight and select the Save symbol from the edit playlist
screen. The modified playlist will be saved to disk.
Deleting a Playlist
There are two options for deleting playlists:
1. Delete Playlist Only – this option only deletes the named playlist. The audio files pointed to by the playlist are not
deleted from the disk.
2. Delete Playlist and Tracks – this option deletes the named playlist and all audio files pointed to by the playlist. This
option is useful to free up disk space on your player
42
Page 43

Follow these steps to delete a playlist:
Step 1
: From the main menu, select
Edit Playlists – Delete Playlist
.
Step 2: Select a playlist to delete.
Step 3: Select delete playlist option. The playlist, and optionally the audio files, will be deleted from your player’s hard
disk.
43
Page 44

Bookmarks
A bookmark is used to remember your current position with a playlist and your current settings. Each bookmark is given a
name and stores the following information:
•
Playlist name. This can be one of your user defined playlists, an album, artist or genre.
• Currently playing track within the playlist.
• Current playback position within the track.
•
Shuffle on/off setting
• Headphone volume setting
• FM transmitter volume setting
•
FM transmit frequency
• Equalizer setting
New bookmarks can be created, existing bookmarks can be updated and restored, and bookmarks can be deleted.
Creating a Bookmark
Follow these steps to create a new bookmark:
Step 1: From the main menu, select Bookmarks – Create Bookmark.
Step 2
you are finished.
The bookmark will be saved to disk. Bookmark information is t aken fr om the current state of the Audio Player application.
: Enter the name for the new bookmark using the on-screen keyboard. Highlight and select the Enter key when
44
Page 45

Updating and Restoring Bookmarks
Updating a bookmark re-saves the bookmark with the current state of the Audio Player application. Restoring a bookmark
sets the state of the Audio Player application to the state saved within the bookmark. When you restore a bookmark,
playback will be restored to the last saved state. You must manually update the bookmark to save the new state.
Follow these steps to update an existing bookmark:
Step 1: From the main menu, select Bookmarks – Update Bookmark.
Step 2: Select the bookmark you wish to update from the list.
The bookmark will be updated and saved to disk.
To restore a bookmark, follow these steps:
Step 1: From the main menu, select Bookmarks – Restore Bookmark.
Step 2: Select the bookmark you wish to restore.
The Audio Player application will be restored to the state of the bookmark.
Deleting Bookmarks
Follow these steps to delete an existing bookmark:
Step 1
: From the main menu, select
Bookmarks – Delete Bookmark
Step 2: Select the bookmark you wish to delete from the list.
The bookmark will be deleted. Note that deleting a bookmark does not change the state of the Audio Player application.
.
45
Page 46

Viewing Bookmarks
To view your bookmarks follow these steps:
Step 1: From the main menu, select Bookmarks – View Bookmarks.
Step 2: Select a bookmark from the list.
Step 3: View the currently saved state of the bookmark.
46
Page 47

Player Preferences
This section is a reference for all the preference settings on your Wireless Media Player.
From the main menu, select the Preferences menu to access player preferences.
FM Transmitter
FM Transmitter settings are accessed from the Preferences – FM Transmitter menu.
Set Frequency Used to adjust the FM transmit frequency and setup FM transmit frequency presets.
Volume Used to set the FM transmit volume level.
Mode Used to select between stereo/mono FM transmission.
Audio
Audio player settings are accessed from the Preferences – Audio menu.
Shuffle Used to turn shuffle on and off.
EQ Preset Used to select an equalizer preset: Rock, Pop, Jazz, Classical, Dance, Heavy, Disco, Soft,
3D/Live, Hall, Speech, Custom and Off.
47
Page 48

EQ Adjust Used to adjust an equalizer preset:
Bass Boost On or off
Bass Increase/decrease bass level
Treble Increase/decrease treble level
3D Stereo Increase/decrease separation between left and right channels
Bass Cutoff Set cutoff frequency: low (130Hz) or high (200Hz)
Treble Cutoff Set cutoff frequency: low (4kHz) or high (8kHz)
3D Lower Cutoff Set lower cutoff frequency: low (200Hz) or high (500Hz)
3D Upper Cutoff Set upper cutoff frequency: low (1.5kHz) or high (2.2kHz)
-6dB Attenuation Reduce volume by 6dB
Shortcut Bars Used to customize shortcut bars:
Volume The “HP & FM” setting indicates there will be separate volume controls
for lineout (headphones) and FM transmit volume. This setting is useful
when using the dock accessory with lineout audio. The “HP Only” setting
indicates there will only be one volume control. When headphones are
plugged-in, the volume will control lineout. When headphones are
unplugged the volume will control FM transmit level.
FM TX Frequency Enable/disable the FM TX Frequency shortcut bar when headphones are
unplugged.
FM TX Mode Enable/disable the FM TX Mode shortcut bar when headphones are
unplugged.
Audible Section Enable/disable the Section Navigation shortcut bar when playing an
Audible.com program.
Favorites Enable/disable the My Favorites shortcut bar.
Shuffle Enable/disable the Shuffle shortcut bar.
Equalizer Enable/disable the Equalizer Preset shortcut bar.
Playlist Enable/disable the Playlist/Bookmark shortcut bar.
Help Enable/disable the Help shortcut bar.
48
Page 49

Display
Display settings are accessed from the Preferences – Display menu.
Contrast Adjusts display contrast: 1 (low) to 30 (high).
Menu Hold Time Controls how long you need to press and hold the Play key before the main menu appears. Short
means that a short press/hold brings up the main menu. Long means you have to press/hold for
a longer time.
Backlight (Battery) Controls the backlight when operating on battery power:
Backlight Timeout When enabled the backlight will turn off after the specified number of
seconds (see below). When disabled, the backlight stays on.
Timeout After When backlight timeout is enabled, controls how long the backlight will
stay on when no keys are pressed.
Intensity Backlight intensity: 0 (dim) to 15 (bright).
Backlight (Power) Controls the backlight when operating on battery power:
Backlight Timeout When enabled the backlight will turn off after the specified number of
seconds (see below). When disabled, the backlight stays on.
Timeout After When backlight timeout is enabled, controls how long the backlight will
stay on when no keys are pressed.
Intensity Backlight intensity: 0 (dim) to 15 (bright).
Dome Light Controls activity lights in the dome:
Audio Activity
Lights
Wireless Activity
Lights
When enabled, lights will flash when audio is playing.
When enabled, lights will flash when data is being transmitted and
received on the wireless interface.
49
Page 50

SoniqStart
SoniqStart settings are accessed from the Preferences – SoniqStart menu.
SoniqStart is a feature of your Wireless Media Player that can automatically turn-on your player when your car starts, and
turn-off your player when you turn-off your car. This feature requires the optional automotive 12V adapter accessory.
Detect Engine On If enabled, the player will automatically come out of standby when it detects the engine is on.
Detect Engine Off If enabled, the player will automatically go into standby when it detects the engine is off.
USB
USB settings are accessed from the Preferences – USB menu.
USB Auto Connect This setting controls the default value for USB connect message box that appears when you plug-
in the USB cable. If enabled, the USB message box will default to connect. When disabled, the
USB message box will default to do not connect.
USB Connect Mode This setting controls type of USB device the player will be when connected to your PC. The
options are: MTP (audio device), or USB (hard disk with drive letter).
Support Tools
Support tools are accessed from the
Reset Factory
Defaults
Format Hard Disk Reformats your hard disk. All contents will be lost. There are two options for format:
Restores all preference settings to the original factory values.
1. Quick Format – this option does a format at the file system level. It is faster than a full
format.
2. Full Format – this option low-level (sector) format of the disk.
Preferences – Support Tools
menu.
50
Page 51

About
The About screen is accessed from the Preferences – About menu.
Name Player name
Tracks Number of tracks on your player
Capacity Total disk capacity
Available Free space available
Version Firmware version
MAC Player MAC address
Model Player model name
51
Page 52

Equalizer
Your Wireless Media Player contains a high quality EQ to allow you to tailor the sound to your listening taste. There are a
number of EQ presets available for the most common music genres. These particular settings have been tuned by the
factory, but you can modify them to suite your own tastes.
Selecting an Equalizer Preset
EQ presets are available via the Equalizer shortcut bar from the Audio Player application. From the Audio Player
application press the Up key until the Equalizer shortcut bar appears. Then use the Left/Right keys to select an EQ
setting from the available presets. The EQ preset can also be selected from the Preferences – Audio – EQ Preset menu.
Adjusting the Equalizer
From the Preferences – Audio – EQ Preset menu item, select a preset. Then select the EQ Adjust menu to adjust the
EQ settings for the selected preset.
Please refer to the Audio section of the Player Preferences chapter for more information on adjusting the EQ.
52
Page 53

Using your
Your Wireless Media Player can operate in one of two modes over USB:
1. MTP Audio Device – compatible with Windows Media Player 10, and Windows Explorer.
2. USB Hard Disk – shows up as a drive letter on your computer.
Both of the above modes are support by the Microsoft Windows XP operating system. Other operating systems will only
support the USB Hard Disk mode.
Using the USB Hard Disk mode, you can use your Wireless Media Player as a hard disk, to store and transfer data and
music files.
To enable this mode, simply connect the USB cable to the USB port on your player and to your PC. When the player
USB connect screen is displayed, choose the USB Hard Disk mode option.
To automatically enable USB Hard Disk mode when connecting the USB cable, use the Preferences – USB – USB
Connect Mode menu and select USB as the default mode. Now, whenever you connect the USB cable, the player will
connect as a USB hard disk.
Wireless Media Player
as a USB Hard Disk
53
Page 54

Listening to Programs from Audible.com
Your Wireless Media Player is able to play spoken word audio programs from Audible.com. You can use Windows Media
Player 10, Windows Explorer or SoniqSync to transfer Audible files to your Wireless Media Player.
Note: your Wireless Media Player can play Audible.com formats 2 and 3. Formats 1 and 4 are not supported.
Audible.com Program Controls
Some of your Wireless Media Player music controls operate differently when playing an Audible.com program. The
following table lists the differences:
Skip to the next section in the program Press the Right key
Skip to the previous section in the
program
Skip to the next program Press Select to pause playback, then press the Right key
Skip to the previous program Press Select to pause playback, then press the Left key
Start a program over Press the Left key until the first section starts playing
Press the Left key twice
Section Navigation
Most Audible.com programs are divided into sections. You can use the Section Navigation shortcut bar to start playing at
a particular section. From the Audio Player application, press the Up key until the Section Navigation shortcut bar
appears. Then use the Left/Right keys to pick a section. Press the Select key to start playing the section.
54
Page 55

Automatic Bookmarking
Your Wireless Media Player automatically remembers your position within an Audible.com program. However, if you are
listening to a multi-part book, the player does not automatically remember which part you were last playing. Use the
bookmarking feature in this case. See the chapter on “Bookmarks” for more details.
55
Page 56

Appendix A – Configuring a Laptop for Ad-Hoc Networking
This procedure assumes you are using Windows XP Professional.
For additional information on configuring your laptop for an ad-hoc connection, select Start – Help and Support –
Networking and the Web – Networking – Wireless networking – 802.1x wireless networking – Set up automatic
wireless network configuration or use the search utility to find Set up automatic wireless network configuration.
Step 1: From your laptop, select Start – Settings – Network Connections.
Step 2
: Right-click
Wireless Network Connection
Step 3: Click the Wireless Networks tab. Note that the Use Windows to Configure my wireless network settings must
be selected.
Step 4: Click the Add button in the Preferred networks panel.
Step 5: Supply an SSID (user-defined) in the Network name (SSID) field.
Step 6
: Set
Network Authentication
to
Open
Step 7: Set Data encryption to one of the following options:
• WEP – Indicates a network key is used to encrypt your data while it is transmitted over the network.
• WPA/PSK – Indicates a network key is used to encrypt your data while it is transmitted over the network.
More secure than WEP
• Disabled – Indicates your data is not encrypted while it is transmitted over the network.
Step 8: Select This is a computer-to-computer (ad hoc) network; wireless access points are not used.
, and select
.
Properties
.
56
Page 57

Step 9: Click OK to exit the Wireless network properties dialog and save your changes. Note that the newly added adhoc network must be the top-most ad-hoc network in the Preferred networks panel.
Configuring the Laptop to use the new Ad-Hoc Network
Step 1: Click the Advanced button on the Wireless Network Connection Properties dialog.
Step 2
Step 3: Click Close to exit the Advanced dialog.
Step 4: Click OK to exit the Wireless Network Connections Properties dialog and save your changes.
: Select
Computer-to-computer (ad hoc) networks only
.
57
Page 58

Appendix B – Technical Specifications
Platform Specifications:
File Support
Playback Formats • MP3 (at 8,16,22.05,24,32,44.1 and 48 kHz)
• MP3 VBA
• WMA (at 16, 22.05, 24, 32, 44.1, and 48 kHz)
Software
Operating System • WinCe.Net 5.0
58
Page 59

Hardware Specification:
Size • 2.60 in (W) x 4.20 in (H) x 0.75 in (D) or 107 mm x 106 mm x 19 mm
Weight • 6.2 oz or 176 gms
Memory • 32 MB SDRAM buffer
Capacity • 20 GB hard drive
Wireless Interface • Automatic rate scaling: 1, 2, 5.5, 11 Mbps
Communication Interfaces • USB 2.0 High Speed
• 802.11B
Battery type • Lithium-ion Polymer battery (non-removable)
Battery Life Up to 10 hours of continuous playback from a fully charged battery. Based on continuous playback of
tracks encoded at 128 kbps. Playback time may be reduced by:
• playing tracks encoded at bit-rates greater than 128Kbps
• playing WMA music files
• transmitting music
• long LCD backlight timeout setting
• wireless sync or transfer process
Battery Charging • About 5 hours
59
Page 60

FM Receiver • Frequenc y Band: 87.9 – 107.9 M Hz, digital tuned
• Modulation: FM Stereo
• Distortion: 0.5%
• Frequency Response: 50 – 15,000 Hz (+/- 3 dB)
• Stereo Separation: 30 dB
• Scan, Seek
Headphone Output • Rated Impedance: 32 ohms
• Power Output: 45 mW
• Frequency Response: 20 – 20,000 Hz (+/- 3 dB)
• THD: -75 dB
Analog Line Output • Rated Impedance: 10 Kohms
• Frequency Response: 20 – 20,000 Hz (+/- 3 dB)
• THD: -75 dB
Digital Output • SPDIF
• Coax interface in docking station accessory
FM Transmitter • Frequency Band: 88.1 – 107.9 MHz, digital tuned
• Modulation: FM Stereo
• Transmit Power: FCC Part 15 limited
• Range: Up to 30 ft
• Frequency Response: 30 – 15,000 Hz
• Stereo Separation: > 35 dB
• Signal Distortion: 0.6 %
• Automatic Free Band Scan
60
Page 61

Appendix C – License Agreement
Giant International (USA), Ltd.
End-User Software License
July, 2005
PLEASE READ THIS DOCUMENT CAREFULLY BEFORE INSTALLING THE
SOFTWARE ON THE ACCOMPANYING MEDIA OR USING THE ACCOMPANYING
PLAYER. THE FOLLOWING IS A LEGAL AGREEMENT BETWEEN YOU, AS
LICENSEE OF THE SOFTWARE ON THE ACCOMPANYING MEDIA AND INSTALLED
ON THE PLAYER ACCOMPANYING THIS AGREEMENT, AND TAO, LLC. BY
INSTALLING OR USING THE SOFTWARE, YOU AGREE TO BE BOUND BY THE
TERMS OF THIS AGREEMENT. IF YOU DO NOT AGREE TO THE TERMS OF THIS
AGREEMENT, DO NOT INSTALL OR USE THE SOFTWARE AND INDICATE YOUR
LACK OF AGREEMENT BELOW, AT THE END OF THIS AGREEMENT. THEN
PROMPTLY RETURN THE SOFTWARE, ALL RELATED DOCUMENTATION AND
ACCOMPANYING ITEMS TO THE PLACE OF ACQUISITION FOR A REFUND. AS
USED HEREIN, SOFTWARE INCLUDES ALL RELATED DOCUMENTATION AND
ACCOMPANYING ITEMS INCLUDING, BUT NOT LIMITED TO, THE EXECUTABLE
PROGRAMS, DRIVERS, LIBRARIES AND DATA FILES ASSOCIATED WITH SUCH
PROGRAMS.
1) Grant of License
of this Agreement. You own the disk or other media on which the Software is originally
or subsequently recorded or fixed; but as between you and Tao (and, to the extent
applicable, its licensors), Tao retains all title to and ownership of the Software and
reserves all rights not expressly granted to you. The license under this Section 1 is
conditioned upon your compliance with all of your obligations under this Agreement.
Tao grants to you the right to use all or a portion of this Software provided that (a) the
Software is not distributed for profit; (b) the Software is used only in conjunction with
the particular Tao product with which or for which it was sold ; (c) the Software may
NOT be modified; (d) all copyright notices and other legal notices are maintained on the
Software; and (e) the licensee/end-user agrees to be bound by the terms of this
Agreement.
2) For Use on a Single Computer
a single user at any time. You may transfer the machine-readable portion of the Software
from one computer to another computer, provided that (a) the Software (including any
portion or copy thereof) is erased from the first computer and (b) there is no possibility
that the Software will be used on more than one co mputer at a ti me. For player so ftware,
the single computer is the CPU of the player unit.
3) Stand-Alone Basis
Software and the functions it provides are accessible only to persons who are physically
. The Software is licensed, not sold, to you for use only under the terms
. The Software may be used only on a single computer by
. You may use the Software only on a stand-alone basis, such that the
present at the location of the computer on which the Software is loaded. You may not
allow the Software or its functions to be accessed remotely, or transmit all or any portion
of the Software through any network or communication line.
4) Copyright
States copyright laws and international treaty provisions. You may not remove the
copyright notice from any copy of the Software or any copy of the written materials, if
any, accompanying the Software.
5) One Archival Copy
of the Software for backup purposes only in support of your use of the Software on a
single computer, provided that you reproduce on the copy all copyright and other
proprietary rights notices included on the originals of the Software.
6) No Merger or Integration
integrate any portion of the Software with, any other program, except to the extent
expressly permitted by the laws of the jurisdiction where you are located. Any portion of
the Software merged into or integrated with another program, if any, will continue to be
subject to the terms and conditions of this Agreement, and you must reproduce on the
merged or integrated portion all copyright and other proprietary rights notices included in
the originals of the Software.
7) Transfer of License
you transfer all portions of the Software or copies thereof, (b) you do not retain any
portion of the Software or any copy t hereof, and (c) the transferee reads and agrees to be
bound by the terms and conditions of this Agreement.
8) Limitations on Using, Copying, and Modifying the Software
expressly permitted by this Agreement or by the laws of the jurisdiction where you
acquired the Software, you may not use, copy or modify the Software. Nor may you sublicense any of your rights under this Agreement. You may use the Software for your
personal use only, and not for public performance or for the creation of publicly
displayed audiovisual works.
9) Decompiling, Disassembling, or Reverse Engineering
Software contains trade secrets an d other proprietary information of Tao and its licensors.
Except to the extent expressly permitted by this Agreement or by the laws of the
jurisdiction where you are located, you may not decompile, disassemble or oth erwise
reverse engineer the Software, or engage in any other activities to obtain underlying
information that is not visible to the user in connection with normal use of the Software.
In particular, you agree not for any purpose to transmit the Software or display the
Software’s object code on any computer screen or to make any hardcopy memory dumps
of the Software’s object code. If you believe you require information related to the
. The Software is owned by Tao and/or its licensors and is protected by United
. You may make one archival copy of the machine-readable portion
. You may not merge any portion of the Software into, or
. You may transfer your license of the Software, provided that (a)
. Except to the extent
. You acknowledge that the
61
Page 62

interoperability of the Software with other programs, you shall not decompile or
disassemble the Software to obtain such information, and you agree to request such
information from Tao at the address listed below. Upon receiving such a request, Tao
shall determine whether you require such information for a legitimate purpose and, if so,
Tao will provide such information to you within a reasonable time and on reasonable
conditions. In any event, you will notify Tao in writing of any information derived from
reverse engineering or such other activities, and the results thereof will constitute the
confidential information of Tao that may be used only in connection with the Software.
10) Termination
it at any time by returning the Software (including any portions or copies thereof) to Tao
or the place where you purchased the Software or related products. The license will also
terminate automatically without any notice from Tao if you fail to co mply with any ter m
or condition of this Agreement. You agree upon such termination to return the Software
(including any portions or copies thereof) to Tao. Upon termination, Tao may also
enforce any rights provided by law. The provisions of this Agreement that protect the
proprietary rights of Tao will continue in force after termination.
11) No Warranty
meet your requirements or that the operation of the Software will be uninterrupted, errorfree or free from malicious code. For the purposes of this paragraph, “malicious code”
means any program code designed to contaminate other computer programs or computer
data, consume computer resources, modify, destroy, record, or transmit data, or in some
other fashion usurp the normal operation of the computer, computer system, or computer
network, including viruses, Trojan horses, droppers, worms, logic bombs, and the like.
. The license granted to you is effective until terminated. You may terminate
. Tao does not warrant that the functions contained in the Software will
14) LIMITATION OF REMEDIES AND DAMAGES
LICENSORS BE LIABLE FOR ANY INDIRECT, INCIDENTAL, SPECIAL,
PUNITIVE OR CONSEQUENTIAL DAMAGES, OR FOR ANY BODILY INJURY
(INCLUDING DEATH) TO ANY PERSONS CAUSED BY TAO’S NEGLIGENCE,
OR FOR ANY LOST PROFITS, LOST SAVINGS, LOSS OF USE, LOST REVENUES
OR LOST DATA ARISING FROM OR RELATING TO THE SOFTWARE OR THIS
AGREEMENT, EVEN IF TAO OR ITS LICENSORS HAVE BEEN ADVISED OF
THE POSSIBILITY OF SUCH DAMAGES. IN NO EVENT WILL TAO’S LIABILITY
OR DAMAGES TO YOU OR ANY OTHER PERSON EVER EXCEED THE
AMOUNT PAID BY YOU TO USE THE SOFTWARE, REGARDLESS OF THE
FORM OF THE CLAIM. Some countries/states do not allow the limitation or exclusion
of liability for incidental or consequential damages, so the above limitation or exclusion
may not apply to you.
15) PRODUCT RETURNS
AUTHORIZED TAO DISTRIBUTOR OR DEALER, YOU MUST PREPAY SHIPPING
AND EITHER INSURE THE SOFTWARE OR ASSUME ALL RISK OF LOSS OR
DAMAGE IN TRANSIT.
16) U.S. Government Restricted Rights
provided with restricted rights. Use, duplication or disclosure by the U.S. Government is
subject to restrictions as set forth in subdivision (b)(3)(ii) of the Rights in Technical Data
and Computer Software Clause at 252.227-7013. If you are using the Software outside of
the United States, you will comply with the applicable local laws of your country, U.S.
export control law, and the English version of this Agreement.
. IF YOU MUST SHIP THE SOFTWARE TO TAO OR AN
. All Software and related documentation are
. IN NO EVENT W ILL TA O O R IT S
12) Indemnification by You
Agreement, you hereby indemnify, hold harmless and defend Tao from and against any
and all claims or lawsuits, including attorney’s fees and costs that arise, result fro m or a re
connected with the use or distribution of the Software in violation of this Agreement.
13) NO WARRANTY
OF ANY KIND, EITHER EXPRESS OR IMPLIED, INCLUDING, BUT NOT
LIMITED TO, ANY IMPLIED WARRANTIES OF MERCHANTABILITY OR
FITNESS FOR A PARTICULAR PURPOSE, TITLE OR NONINFRINGEMENT. TAO
IS NOT OBLIGATED TO PROVIDE ANY UPDATES, UPGRADES OR TECHNICAL
SUPPORT FOR THE SOFTWARE. Further, Tao shall not be liable for the accuracy of
any information provided by Tao or third party technical support personnel, or any
damages caused, either directly or indirectly, by acts taken or omissions made by you as a
result of such technical support. You assume full responsibility for the selection of the
Software to achieve your intended results, and for the installation, use and results
obtained from the Software. You also assume the entire risk as it applie s to the quality
and performance of the Software. Should the Software prove defective, you (and not Tao,
or its distributors or dealers) assume the entire cost of all necessary servicing, repair or
correction. Some countries/states do not allow the exclusion of implied warranties, so the
above exclusion may not apply to you. Tao disclaims all warranties of any kind if the
Software was customized, repackag ed or altered in any w ay by an y third p arty oth er than
Tao.
. If you use or distribute the Software in violation of this
. THE SOFTWARE IS PROVIDED AS-IS WITHOUT WARRANTY
17) Contractor/Manufacturer. The Contractor/Manufacturer for the Software is: SoniqCast,
LLC, 4400 Baker Road, Minnetonka, MN 55343.
18) General
. This Agreement is binding on you as well as (if you represent an entity) any
employees, employers, contractors and agents, and on any successors and assignees.
Neither the Software nor any information derived therefrom may be exported except in
accordance with the laws of the U.S. or other applicable provisions. This Agreement is
governed by the laws of the State of Minnesota (except to the extent federal law governs
copyrights and federally registered trademarks). This Agreement is the entire agreement
between us and you agree that Tao will not have any liability for untrue statement or
representation made by it, its agents or anyone else (whether innocently or negligently)
upon which you relied upon entering this Agreement, unless such untrue statement or
representation was made fraudulently. This Agreement supersedes any other
understandings or agreements, including, but not limited to, advertising, with respect to
the Software. If any provision of this Agreement is deemed invalid or unenforceable by
any country or government agency having jurisdiction, that particular provision will be
deemed modified to the extent necessary to make the provision valid and enforceable,
and the remaining provisions will remain in full force and effect. For questions
concerning this Agreement, ple ase cont act Tao at the addr ess stated above. Fo r question s
on product or technical matters, contact the Tao technical support center nearest you.
62
Page 63

19) The Software and related products include certain software components and notices from
third party licensors. As to these, the following notices and provisions apply, which are
in addition to or supersede any inconsistent notices or provisions herein:
a) Portions utilize Microsoft Windows Media Technologies. Copyright © 1 999-2002
Microsoft Corporation. All Rights Reserved.
b) Portions of this software contain material that is © 1994-1999 DUNDAS
SOFTWARE LTD., all rights reserved. Portions of this software contain material
that is © 1997-2000 DUNDAS SOFTWARE LTD., all rights reserved. Portions of
this software contain material that is © 1997-2001 DUND AS SOFTWARE LTD.,
all rights reserved.
c) Portions of this software contain material that is Copyright © 2004 Alan Stern. All
rights reserved. Redistribution and use in source and binary forms, with or without
modification, are permitted provided that the following conditions are met: (1)
redistributions of source code must retain the above copyright notice, this list of
conditions, and the following disclaimer, without modification, (2) redistributions
in binary form must reproduce the above copyright notice, this list of conditions and
the following disclaimer in the documentation and/or other materials provided with
the distribution, (3) the names of the above-listed copyright holders may not be
used to endorse or promote products derived from this software without specific
prior written permission. CERTAIN PARTS OF THIS SOFTWARE IS
PROVIDED BY THE COPYRIGHT HOLDERS AND CONTRIBUTORS "AS IS"
AND ANY EXPRESS OR IMPLIED WARRANTIES, INCLUDING, BUT NOT
LIMITED TO, THE IMPLIED WARRANTIES OF MERCHANTABILITY AND
FITNESS FOR A PARTICULAR PURPOSE ARE DISCLAIMED. IN NO EVENT
SHALL THE COPYRIGHT OWNER OR CONTRIBUTORS BE LIABLE FOR
ANY DIRECT, INDIRECT, INCIDENTAL, SPECIAL, EXEMPLARY, OR
CONSEQUENTIAL DAMAGES (INCLUDING, BUT NOT LIMITED TO,
PROCUREMENT OF SUBSTITUTE GOODS OR SERVICES; LOSS OF USE,
DATA, OR PROFITS; OR BUSINESS INTERRUPTION) HOWEVER CAUSED
AND ON ANY THEORY OF LIABILITY, WHETH ER IN C ONTRA CT, ST RICT
LIABILITY, OR TORT (INCLUDING NEGLIGENCE OR OTHERWISE)
20) Copyright Information for User s of Tao Products
YOU MUST INDICATE BY RESPONSE BELOW WHETHER YOU AGREE OR
DISAGREE WITH THE ABOVE TERMS. IF YOU DO NOT AGREE, PLEASE FOLLOW
THE INSTRUCTIONS ABOVE FOR RETURN OF THE SOFTWARE AND OTHER ITEMS
ACCOMPANYING IT. IF YOU DO NOT AGREE, YOU WILL NOT BE ABLE TO
PROCEED WITH NORMAL INSTALLATION AND USE OF THE SOFTWARE AND/OR
PLAYER.
Copyright © 2005 Giant International (USA), Ltd.
and its licensors. All Rights Reserved.
ARISING IN ANY WAY OUT OF THE USE OF THIS SOFTWARE, EVEN IF
ADVISED OF THE POSSIBILITY OF SUCH DAMAGE.
In addition, such third party licensors may by notices presented by or with their Software
impose other terms and conditions on the use of such Software. Your acceptance of this
Agreement includes acceptance of any terms imposed by such third party licensors, even
where these are not fully set forth in this agreement.
. Certain Tao products allow you
to reproduce files, including material for which you own the copyright or are
authorized to copy by the copyright owner or by exemption in applicable law.
Unless you own the copyright or have such authorization, by copying or assisting
copying you may be violating copyright law and may be subject to payment of
damages and other remedies. If you are uncertain about your rights, you should
contact your legal advisor. It is your responsibility when using a Tao product to
ensure there is no infringement of applicable laws on copyright whereby the copying
of certain materials may require the prior consent of the copyright owners. Tao
disclaims any liability with regard to any illegal use of the Tao product and Tao
shall in no event be liable with regard to the origin of any data stored in a
compressed audio or video file. You acknowledge and agree that the exportation or
use of MP3 Codecs or other similar programs in real-time public broadcasting
(terrestrial, satellite, cable or other media) or broadcasting via Internet or other
networks, such as but not limited to intranets etc., in pay-audio or pay-on-demand
applications, may be subject to legal restrictions.
63
Page 64

Contact Us
Information in this document is subject to change without notice and does not represent a commitment on the part of
Giant International (USA), Ltd. No part of this manual may be reproduced or transmitted in any form or by any means,
electronic or mechanical, including photocopying or recording, for any purpose without written permission of Giant
International (USA), Ltd. The software described in this document is furnished under a license agreement and may be
used or copied only in accordance with the terms of the license agreement. It is against the law to copy the software on
any other medium except as specifically allowed in the license agreement. The licensee may make one copy of the
software for backup purposes.
A copy of the Software License Agreement is located in the WMP™ User Guide.
© Copyright 2005 Giant International (USA), Ltd. and its licensors. All rights reserved.
Version 1.0
July 2005
Microsoft, MS-DOS, and Windows are registered trademarks of Microsoft Corporation. All rights reserved.
All other products are trademarks or registered trademarks of their respective owners.
Contact Us:
To contact Tao Technical Support, visit www.TaoLife.com
.
Thank you for choosing
64
Page 65

Page Intentionally Left Blank
65
 Loading...