

Page 1

Giant Telecom Limited – Operator Manual for 5860 – Version 02 29Jun2004
Operator Manual
for
5860
(5.8G Digital Cordless Phone)
Page 1of 49
Page 2

Giant Telecom Limited – Operator Manual for 5860 – Version 02 29Jun2004
Revision History
Version Date Initialised by Changes
01 17Feb2004 Kw Sit due to
Creation from Concept documents
request from
Dick Si
Page 2of 49
Page 3

Giant Telecom Limited – Operator Manual for 5860 – Version 02 29Jun2004
Table of Contents
1 Introduction...................................................................................... 7
2 Feature List ....................................................................................... 7
3 Setup and Power Up.....................................................................10
3.1 Normal Power Up ..............................................................................................10
3.2 Handset Power On/Off......................................................................................10
4 Basic Function Access Elements...............................................11
4.1 Handset...............................................................................................................11
4.1.1 Hard key functions................................ .................................................12
4.1.2 Icons used...............................................................................................12
4.1.3 Top Text Line ................................ .........................................................13
4.1.4 Center Te xt Line....................................................................................13
4.1.5 Bottom Text Line....................................................................................13
4.1.6 Msg/Inuse LED.......................................................................................13
4.2 Base................................ .....................................................................................13
4.2.1 Page Key................................ .................................................................13
4.2.2 Msg/Inuse LED.......................................................................................13
4.2.3 Charge LED ............................................................................................13
5 Standby...........................................................................................13
5.1 PP is not registered at any FP (before registration and after power up)..13
5.2 PP is registered, but the PP is searching for a FP.......................................13
5.3 PP registered and Located to a FP: ...............................................................14
5.3.1 Icons........................................................................................................14
5.3.1.1 Battery low/Battery critical .............................................................14
5.3.1.2 Ringer off..........................................................................................14
5.3.1.3 Keyboard locked................................ .............................................14
5.3.1.4 Icon Blink Cadence Definitions................................ .....................15
5.3.2 Top Text Line ................................ .........................................................15
5.3.2.1 Handset-Name Set .........................................................................15
5.3.2.2 Handset-Name Not Set..................................................................15
5.3.3 Middle Text Line .....................................................................................15
5.3.3.1 No new calls....................................................................................15
5.3.3.2 New calls..........................................................................................15
5.3.3.3 Critical battery .................................................................................15
5.3.3.4 Alarm ................................................................................................16
5.3.4 Bottom Text Line....................................................................................16
5.3.4.1 Clock Set..........................................................................................16
5.3.4.2 Clock Not Set ..................................................................................16
5.3.4.3 Alarm Set................................ .........................................................16
6 Registration....................................................................................17
6.1 Auto Registration...............................................................................................17
7 Call handling ..................................................................................17
7.1 Outgoing External Call......................................................................................17
7.1.1 Post dialing................................ .............................................................17
7.1.2 Pre-dialing...............................................................................................18
7.1.3 Redialing................................ .................................................................18
7.1.4 Display during call................................ .................................................19
7.1.5 Terminating a call ..................................................................................19
7.1.6 Temp tone dial .......................................................................................20
7.2 Incoming external Call ......................................................................................20
7.3 Internal Call Control...........................................................................................20
Page 3of 49
Page 4

Giant Telecom Limited – Operator Manual for 5860 – Version 02 29Jun2004
7.4 Transferring External Call................................ .................................................21
7.4.1 CLIP Transference................................................................................21
7.4.2 Call Time Display...................................................................................22
7.5 Conference Call................................ .................................................................22
7.5.1 Conference Call Status................................ .........................................22
7.5.2 Conference Call Termination...............................................................22
7.6 Handset Speakerphone (Optional)................................ .................................23
7.7 Headset...............................................................................................................23
7.8 Audio....................................................................................................................23
7.8.1 Setting the handset volume................................ .................................24
7.8.2 Setting the hands free volume................................ .............................24
7.8.3 Setting the Headset volume................................ .................................24
7.9 Muting..................................................................................................................24
7.10 Out Of Range Warning................................ .....................................................24
8 Caller ID operation................................ .........................................24
8.1 Incoming call indication .....................................................................................24
8.1.1 Rules for displaying call information...................................................25
8.2 Call waiting ................................ .........................................................................25
8.2.1 Signaling call waiting................................ .............................................25
8.2.2 Accepting call waiting /off hook CLIP ................................ .................25
8.3 Call Waiting / Call Waiting Deluxe ..................................................................26
8.4 Stutter Dial Tone Check...................................................................................27
9 Other Features...............................................................................27
9.1 Identification of a parallel line occupancy (for a not seized line)................27
9.2 Identification of line occupancy (for a seized line)........................................27
9.3 Battery low warning...........................................................................................27
9.4 Display illumination (Back-lighted LCD/Keypad)..........................................27
9.5 Key Lock................................ .............................................................................27
9.6 Paging................................ .................................................................................28
10 Menu Setting ..................................................................................28
11 Phone Book directory ................................ ...................................31
11.1 Browse Directory ...............................................................................................31
11.2 Use Number.......................................................................................................32
11.3 Edit Entry................................ .............................................................................32
11.4 Delete Entry ........................................................................................................32
11.5 Store Entry..........................................................................................................32
11.5.1 Enter Name .............................................................................................32
11.5.2 Enter Number................................ .........................................................33
11.5.3 Distinctive Ringing................................ .................................................34
12 CLIP list...........................................................................................34
12.1 Browse CLIP List...............................................................................................35
12.2 Use the Record..................................................................................................35
12.3 Copy to Phone Book................................ .........................................................35
12.4 Delete Entry ........................................................................................................35
12.5 Delete List...........................................................................................................35
13 Setting the ringer volume................................ .............................35
13.1 Setting the handset ringer volume to zero................................ .....................35
14 Setting the melody – External/Internal/Paging/Alarm..............35
15 Setting Key Tone...........................................................................35
16 Setting Alert Tone On/Off................................ .............................35
17 Alarm Setting..................................................................................36
Page 4of 49
Page 5

Giant Telecom Limited – Operator Manual for 5860 – Version 02 29Jun2004
18 Setting Date -Time..........................................................................36
19 Auto Talk................................ .........................................................37
20 Any Key Answer............................................................................37
21 Direct Call.......................................................................................37
22 Handset Name Setting..................................................................37
23 Call Display Setting.......................................................................38
24 Language Setting ..........................................................................38
25 Reset Handset................................ ................................................38
26 Change Handset Pin.....................................................................38
27 Register Handset...........................................................................38
28 Select Base.....................................................................................38
29 Deregister Handset ........................................................................38
30 Base Ringer Volume.....................................................................38
31 Base Ringer Melody................................ ......................................38
32 Base Reset................................ ......................................................38
33 Change Dial mode................................ .........................................38
34 Change Flash Time ........................................................................39
35 Prefix dialing (Optional)................................ ................................39
36 Call barring.....................................................................................39
37 Change Base PIN...........................................................................39
38 Walkie Talkie (Optional)................................ ................................39
38.1 Entering Walkie Talkie-mode ...........................................................................39
38.2 Making a call.......................................................................................................39
38.3 Exit Walkie Talkie-mode...................................................................................39
39 Factory default Values ..................................................................39
40 General Operation Notes..............................................................40
40.1 Graphics used....................................................................................................40
40.2 Display................................ .................................................................................41
40.2.1 Menu........................................................................................................41
40.2.2 Detailed display of numbers/names ...................................................42
40.2.3 GUI timeout control ...............................................................................42
40.2.4 Navigation...............................................................................................42
40.2.5 Base Settings................................ .........................................................42
40.3 Visual signaling ..................................................................................................42
40.3.1 Prompts...................................................................................................42
40.3.2 Warnings / confirmation prompts concept................................ .........42
40.4 Acoustic signaling..............................................................................................43
40.4.1 Ringing tones ................................ .........................................................43
40.4.2 Acoustic signaling of incoming calls ...................................................43
40.4.3 Acoustic sounds................................ .....................................................43
40.5 Editors................................ .................................................................................43
40.5.1 Time/Date Editor....................................................................................43
40.5.1.1 Entering the editor........................................................................43
40.5.1.2 User Input ......................................................................................44
40.5.1.3 Moving the cursor .........................................................................44
40.5.1.4 Reaching the end of an editable area.......................................44
40.5.2 PIN editor................................................................................................44
40.5.2.1 Entering the editor........................................................................44
Page 5of 49
Page 6

Giant Telecom Limited – Operator Manual for 5860 – Version 02 29Jun2004
40.5.2.2 User Input ......................................................................................44
40.5.2.3 Moving the cursor .........................................................................44
40.5.2.4 Reaching the end of an editable area.......................................44
40.5.3 Number and Name Editor .....................................................................45
40.5.3.1 Entering the editor........................................................................45
40.5.3.2 User Input ......................................................................................45
40.5.3.3 Moving the cursor .........................................................................45
40.5.3.4 Reaching the end of an editable area.......................................45
40.5.4 Text Input................................................................................................45
40.5.4.1 Text Input Mode Switching..........................................................46
40.6 Timers..................................................................................................................47
41 Consumer Information…………………………………………………… 45
42 Warning (FCC Part 15)….....................................................................46
43 Warranty…………………………………………………………………….46
Page 6of 49
Page 7

Giant Telecom Limited – Operator Manual for 5860 – Version 02 29Jun2004
1 Introduction
5860 is a 5.8G Digital Cordless phone system which allow
multiple handsets and bases.
2 Feature List
Features Ability Comments, short description
Max # of handset 6
Max # of base 4
Battery 3*AAA 600mA Battery pack
Battery level indication Yes
Battery low warning Yes
Power Consumption 9 hour talk
130 hour standby
Range 50 M indoor
300 M outdoor
Out of range warning Yes Based on RSSI measurements. Please be
LCD 3 row, 16 digit,
5x7dots
alphanumeric
+ 1 line icons
Back-lighted LCD Yes
Back-lighted keypad Yes
CLIP FSK(I + II) CLIP
20 call logs with
names
Call Waiting Deluxe Able to access special network function during
Stutter dial tone detect Yes
Last Number Redial 5 levels Redial list
Memory dialing Phone book
40 entries
Ring Melody 6 Polyphonic (midi). Placed in code (size of all
Ring Melody 3 Polyphonic (midi). Placed in eeprom (eeprom
Ring Volume 6 + Off
Handset Msg LED Yes
Ear-piece volume
control
Yes During call.
aware that this feature is very difficult to
optimise to satisfactory per formance for the
user.
Also support double height fonts
The CLIP list is placed in the base, and can be
accessed by one handset at a time.
Caller party name, absence reason and
message waiting are also decoded.
NameLength : 48 chracters stored.
NumberLength : 22 digits stored.
7-10-11 display format supported.
type II CID reception.
Phone book in handset (With number matching
with the CLIP).
Name Length = 16 characters stored.
Number Length = 22digits stored.
melodies max 30Kbyte).
size depends on melody) (eeprom driver limits
the size of a melody to 4Kbyte pr. melody).
Page 7of 49
Page 8

Giant Telecom Limited – Operator Manual for 5860 – Version 02 29Jun2004
Mute Yes
Pre-fix dialing Yes (Optional) Number placed in eeprom to be dialled as
extension at every call. Eeprom selectable.
The NumberLength = 22 digits max.
Base Ringer Yes Requires a buzzer. Not polyphonic.
Page key Yes
Call barring Yes Users can enter a phone number, which is then
not able to be called. Exception for emergency
numbers.
Intercom call Yes Call by handset name.
3-party Conf. Yes Line, and two handsets
Walkie Talkie Yes (optional) Eeprom selectable.
Headset jack Yes
Belt clip Yes Mechanical
HS speakerphone Yes, (Optional) Switching algorithm, eeprom selectable.
Distinctive Ring Yes Output different ring tone for different caller .
Real time clock Yes Updated by CLIP and also manual adjustable
Clock Alarm Yes Including Clock
Multi-language Yes Support 8 languages.
FLASH function Yes User programmable flash time
Tone pulse selection Yes
Handset power on/off Yes
Fast/Slow charge Yes Able to switch to slow charge to avoid overheat
Auto answer on/off Yes User selectable function
Direct call Yes Sometimes called baby call.
Call timer display Yes Can be disabled by users
Key tone selection 3+Off
Key lock Yes by press and hold ‘#’
Handset name Yes Display the name of a handset and also use
handset name for starting intercom call.
Reset to default Yes Able to reset user selectable features to default
values.
Handset settings menu
Yes
Base settings menu Yes
Auto registration Yes By placing handset in base station cradle.
Any key answer Yes
3 Important Safety Instructions
BEFORE USING YOUR TELEPHONE EQUIPMENT, BASIC SAFETY PRECAUTIONS
SHOULD ALWAYS BE FOLLOWED TO REDUCE THE RISK OF FIRE, ELECTRIC SHOCK
AND INJURY TO PERSON, INCLUDING THE FOLLOWING
1. Read and understand all instructions.
2. Follow all warnings and instructions marked on the product.
3. Unplug this product from the wall outlet before cleaning. Do not use liquid cleaners or aerosol
cleaners. Use a damp cloth for cleaning.
4. Do not use this product near water, for example, near a bath tub, wash bowl, kitchen sink, laundry
tub, in a wet basement, or near a swimming pool.
5. Do not place this product on an unstable cart, stand, or table. The product may fall, causing serious
damage to the product.
Page 8of 49
Page 9

Giant Telecom Limited – Operator Manual for 5860 – Version 02 29Jun2004
6. Slots and openings in the cabinet and the back or bottom are provided for ventilation. To protect it
from overheating, these openings must not be blocked or covered. The openings should never be
blocked by placing the product on the bed, sofa, rug, or other similar surface. This product should
never be placed near or over a radiator or heat register. This product should not be placed in a builtin installation unless proper ventilation is provided.
7. This product should be operated only from the type of power source indicated on the marking label.
If you are not sure of the type of power supply to your home, consult your dealer or local power
company.
8. Do not allow anything to rest on the power cord. Do not locate this product where the cord will be
damaged by persons walking on it.
9. Do not overload wall outlet extension cords, as this can result in the risk of fire or electric shock.
10. Never push objects of any kind into this product through cabinet slots as they may touch dangerous
voltage points or short out parts that could result in a risk of fire or electric shock. Never spill liquid
of any kind on this product.
11. To reduce the risk of electric shock, do not disassemble this product. Instead, when some repair work
is required, take the unit to a qualified technician. Opening or removing covers may expose you to
dangerous voltages or other risks. Incorrect reassembly can cause electric shock when the appliance
is subsequently used.
12. Unplug this product from the wall outlet and refer servicing to qualified service personnel under the
following conditions:
a. When the power supply cord or plug is damaged or frayed.
b. If liquid has been spilled into the product.
c. If the product has been exposed to rain or water.
d. If the product does not operate n ormally by following the operating instructions. Adjust only those
controls, that are covered by the operating instructions because improper adjustment of other controls
may result in damage and will often require extensive work by a qualified technician to restore the
product to normal operation.
e. If the product has been dropped or cabinet has be damaged.
f. If the product exhibits a distinct change in performance.
13. Avoid using a telephone (other than a cordless type) during an electrical storm. There may be a
remote risk of electrical shock from lightning.
14. Do not use the telephone to report a gas leak in the vicinity of the leak.
15. This power unit is intended to be correctly oriented in a vertical or floor mount position.
16. Plug the adaptor to the socket-outlet which near the equipment and shall be easily accessible.
SAVE THESE INSTRUCTIONS
4 Safety Instructions for Handset Battery Pack
CAUTION:
Danger of explosion if battery is incorrectly replaced. Use only an approved battery pack in the handset of your
Cordless Telephone. To reduce the risk of fire or injury, always do the following when replacing, discarding, or
charging battery, When handling the batteries, be careful not to short the battery with conducting materials such
as rings, bracelets, and keys. T he Battery or conducting material may overheat and cause burns. Use only the
following type and size of battery pack:
FOR HANDSET UNIT:
GP60AAAH3BMX Z 3.6V 600mAh GPI INTERNATIONAL LIMITED
CONTAINS NICKEL-METAL HYDRIDE BATTERY. BATTERY MUST
BE RECYCLED OR DISPOSED OF PROPERLY
1. Do not dispose of the battery in a fire. The cell may explode. Check with local
codes for possible special disposal instructions.
Page 9of 49
Page 10

Giant Telecom Limited – Operator Manual for 5860 – Version 02 29Jun2004
2. Do not open or mutilate the battery. Released electrolyte is corrosive and may cause damage to the
eyes or skin. It may be toxic if swallowed.
3. Exercise care in handling batteries in order not to short the battery with conducting materials such
as rings, bracelets and keys. The battery or conductor may overheat and cause burns.
4. Charge the batteries provided with or identified for use with this product only in accordance with the
instructions and limitations specified in this manual.
5. Observe proper polarity orientation between the battery(ies) and battery charger.
6. Do not mix old and new batteries in this product.
7. Do not mix batteries of different sizes or from different manufacturers in this product.
SAVE THESE INSTRUCTIONS
Install and Charge the Battery Pack
1 Open the battery compartment by sliding the cover down.
2 Plug the Battery Pack connector into the Handset socket, then place the battery pack and wires in the compartment.
3 Slide the battery cover back into place
4 If you are wall mounting the phone, locate the wall bracket supplied with your phone.
5 Snap the bracket into place on the back of the Base. Next, carefully line up the slots on the wall mount bracket with the
studs on the telephone wall plate, and carefully mount the telephone on the wall.
6 Connect the power supply to a live outlet. Make sure the outlet is not controlled by a switch. DO NOT connect the
telephone line cord to the phone jack until the Handset is fully charged.
7 Place the Handset in the Base cradle. The Handset and Base communicate with each other automatically. This is the
Registration process, and it may take up to 60 seconds.
8 Allow the Handset to charge for a day for the initial charge . The CHARGE indicator on the Base will glow while the
Handset is charging. For subsequent charges, 8 to 10 hours is sufficient.
5 Setup and Power Up
5.1 Normal Power Up
- Connect the telephone line to the base units and the telephone sockets on
the wall
- Connect the power adaptor between the base units and the power sockets
- Plug in the battery pack into the handset compartment
- If the handset units show battery low/empty condition, place the handsets on
the base charging cradles for some time before usage.
5.2 Handset Power On/Off
- At any time in the idle mode, Long Press C / / to make handset
power off. There is no further response in the handset, except Long Press C /
/ again.
- During Handset Power Off, Long Press C / / to turn on the handset
again.
Page 10of 49
Page 11
Giant Telecom Limited – Operator Manual for 5860 – Version 02 29Jun2004
Page
Msg /
Headse
Menu
3
R
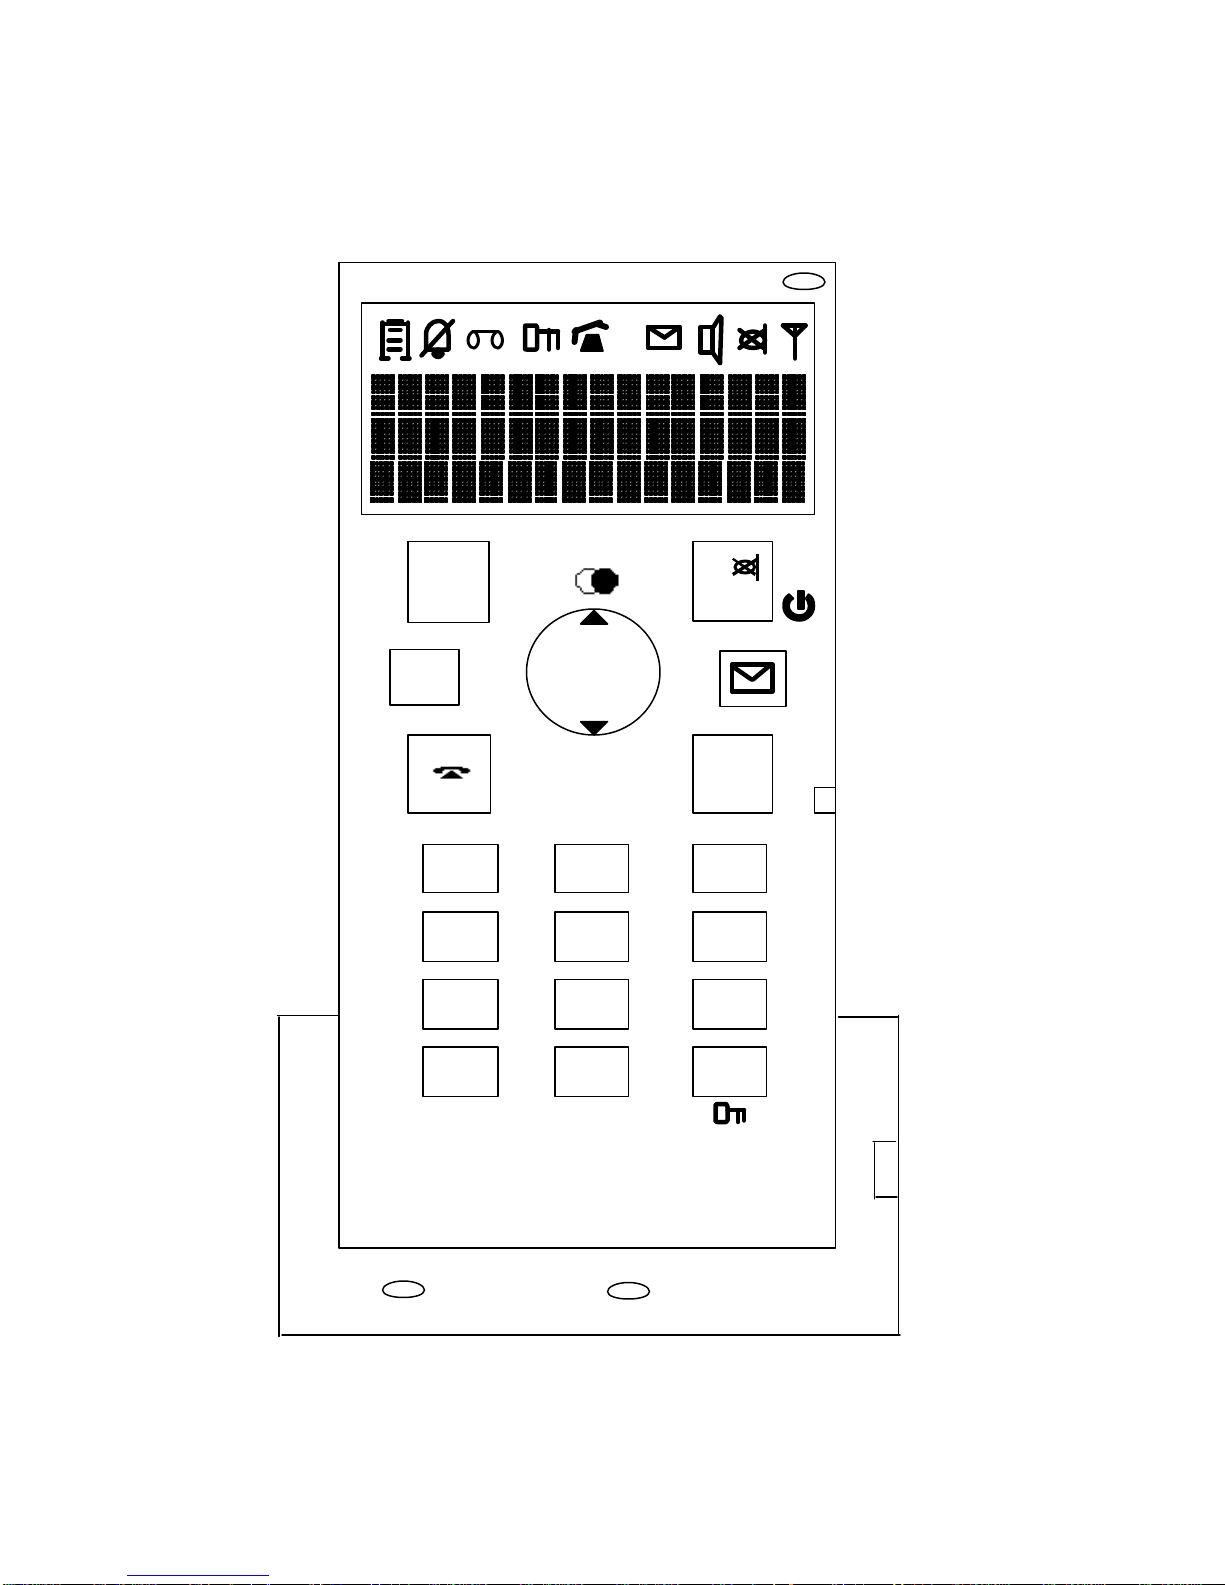
Basic Function Access Elements
5.3 Handset
EXT
INT
/OK
&
4
1 2 3
4 5 6
7 8 9
* 0 #
Charge LED
Figure 1
Inuse LED
C/
INT
X
t
Jack
Key
Msg / In -use LED
Page 11of 49
Page 12

Giant Telecom Limited – Operator Manual for 5860 – Version 02 29Jun2004
5.3.1 Hard key functions
The following functions shall be available via the existing keys:
Key Symbol Key Description
On/Off hook
Menu/Ok Menu / Ok
5 /
Move Up (browsing/editing) / Access re-dial list / Insert
pause.
6
3/ &
/ INT Move Right / Internal Call key
4
X
Move Down (browsing/editing)
Move Left / Access Phone Book
Hands-free if it is enabled
Change Volume if Hands-free is disabled
Clear/Delete / Mute Mic / On/Off function
C / /
[0..9],[A..Z] Numeric/Alphanumeric Keys
* * / Change to DTMF
# / # / Keypad Lock function
R
Flash function
Access to CID records
Table 1
5.3.2 Icons used
Icon Symbol Icon Description
Battery status symbol
Indication of incoming external call
EXT
Indication of online states (line is seized)
Indication of incoming internal call
INT
Aerial information
“Message Waiting”
Hands free mode on
Microphone muted
Ringer volume off
AM icon (not used for this model)
Keypad locked
Page 12of 49
Page 13

Giant Telecom Limited – Operator Manual for 5860 – Version 02 29Jun2004
N o t
R e g i s t e r e d
S e a r c h i n g
5.3.3 Top Text Line
The top Line is used for the name of the handset and Menu wording.
5.3.4 Center Text Lin e
The center line is used for Missed Call and critical battery status.
5.3.5 Bottom Text Line
The bottom line of the display is used for clock/date -information, PP -number
and alarm status.
5.3.6 Msg/Inuse LE D
- This will be on whenever an external call is ongoing.
- Flashes with the ringer cadence from the line when an incoming external call
is received.
- Flashing when “Message Waiting” has been received.
5.4 Base
5.4.1 Page Key
This is used for Paging
5.4.2 Msg/Inuse LE D
It has the same function as Msg/InUse Led in Handset
5.4.3 Charge LED
This LED in placed on FP.
- Indicates if a PP is placed in the charger.
6 Standby
6.1 PP is not registered at any FP (before registration and after power up)
6.2 PP is registered, but the PP is searching for a FP
The text “Searching” is shown and the aerial icon is flashing. The PP cannot make or
receive calls in this state.
Page 13of 49
Page 14

Giant Telecom Limited – Operator Manual for 5860 – Version 02 29Jun2004
K e n n e t h
1 1 4 : 1 5
2 2 / 0 4
K e n n e t h
1 1 4 : 1 5
2 2 / 0 4
K e n n e t h
1 1 4 : 1 5
2 2 / 0 4
K e n n e t h
1 1 4 : 1 5
2 2 / 0 4
Note : For above two cases, the Arial Icon blink is TON = T
= T15.
OFF
6.3 PP registered and Located to a FP:
The PP index and name (if it has one) will be shown. If the dat e and time are set in
the base, it will also be shown. The aerial icon is steady on. Calls can be setup to and
from the PP.
The time is displayed in 24-hour format. The symbol (:) separating the hours from the
minutes is steady on. The time/date will always be shown if time is set in the base.
6.3.1 Icons
6.3.1.1 Battery low/Battery critical
The icon will act the same way in both cases. The special case about critical is
shown later in this section.
6.3.1.2 Ringer off
6.3.1.3 Keyboard locked
Page 14of 49
Page 15

Giant Telecom Limited – Operator Manual for 5860 – Version 02 29Jun2004
K e n n e t h
1 1 4 : 1 5
2 2 / 0 4
1 1 4 : 1 5
2 2 / 0 4
K e n n e t h
1 1 4 : 1 5
2 2 / 0 4
K e n n e t h
N e w
C a l l 1 1 4 : 1 5
2 2 / 0 4
6.3.1.4 Icon Blink Cadence Definitions
Icon Context Blink On Time Blink Off Time
Battery Battery Low/Critical 0.5 Sec 0.5 Sec
Arial
Not Registered 0.5 Sec 0.5 Sec
Searching 0.5 Sec 0.5 Sec
Out Of Range indication 2 Sec 0.5 Sec
6.3.2 Top Text Line
6.3.2.1 Handset-Name Set
6.3.2.2 Handset-Name Not Set
6.3.3 Middle Text Line
6.3.3.1 No new calls
6.3.3.2 New calls
6.3.3.3 Critical battery
Have priority above Missed Call information.
Page 15of 49
Page 16

Giant Telecom Limited – Operator Manual for 5860 – Version 02 29Jun2004
K e n n e t h C h A r g e
B a t t e r y
1 1 4 : 1 5
2 2 / 0 4
K e n n e t h A l a r m
1
A 1 4 : 1 5
2 2 / 0 4
K e n n e t h
1 1 4 : 1 5
2 2 / 0 4
K e n n e t h
1 - - : - -
- - / - -
K e n n e t h
1
A 1 4 : 1 5
2 2 / 0 4
6.3.3.4 Alarm
Have priority above all other information in Bottom Text Line
6.3.4 Bottom Text Line
6.3.4.1 Clock Set
6.3.4.2 Clock Not Set
6.3.4.3 Alarm Set
Page 16of 49
Page 17

Giant Telecom Limited – Operator Manual for 5860 – Version 02 29Jun2004
3 4 7
7 Registration
The handset will only be active at one base stati on at a time. It is possible for the
user to choose which base the handset should lock to in the the registration menu.
Registration to a new base can be made by registration menu or by Auto registration
7.1 Auto Registration
Placing a PP in the cradle of a FP will automatically initiate a registration of the PP to
this FP. The PP initiates a registration through the Air interface similar to a manual
registration. For an automatic registration AC-code = [0000].
8 Call handling
8.1 Outgoing External Call
8.1.1 Post dialing
Press [ ] and the ‘Phone’ icon will be on.
The ‘EXT’ icon will be on after the PSTN line is connected.
The ‘Msg/Inuse LED’ in both handset and base will be on.
Dial the number. If the number is longer than max length of the display, the digits will
appear in the second line.
2 9 5 1 1 3 6 7 0 1 3 5 3 4 7 9
Page 17of 49
Page 18

Giant Telecom Limited – Operator Manual for 5860 – Version 02 29Jun2004
3 4 7
L e e 9 3 4 2 1 2 6 7
L e e
? 9 3 4 2 1 2 6 7
8.1.2 Pre-dialing
A user may enter the number before seizing the line as shown;
2 9 5 1 1 3 6 7 0 1 3 5 3 4 7 9
The digits will be cleared after T3 of no key press.
Press [C] to delete the last input digit. Long press on the [C] key clear all digits.
After the desired number is entered, press [ ] to seize line and the entered number
will be dialed out.
When you press the [ ] key long (“Insert Pause“) a 'P' is inserted at the current
cursor position.
8.1.3 Redialing
During standby mode and no digit has been entered, press [ ] will show the last
dialed number.
2 3 7 8 9 0 0 1
The entries is sorted in chronological order. If the number is in the phonebook, it will
be represented with name as well.
A l f r e d
If the number is longer than the length of the display, the character ‘..’ will be shown
at the end of the number indicating there are still more digits at the right.
A l f r e d
User can browse other redial numbers by pressing [? ] and [? ]. When 'wrapping'
(going from last entry to first or first entry to last) a double beep will be sounded.
Page 18of 49
Page 19

Giant Telecom Limited – Operator Manual for 5860 – Version 02 29Jun2004
3 4 7
3 4 7
0 : 0 0 : 0 1
Press [ ] to dial the number for that entry or press [OK] to append the number to
the pre-dial buffer.
Alternatively, redialing may also be done after the external line is connected. After
seizing the line, press [ ] and the last dialed number will be shown. Similarly, press
[ ? ] and [? ] to select and then press [ ] to dial out the selected number. the redialnumber will be appended to the digits already dialed.
8.1.4 Display during call
- The ‘Phone’ icon will be on.
- The ‘EXT’ icon will be on after the PSTN line is connected. (In case that another
handset is connected with the PSTN line, an error tone will be generated and
handset returns to idle.)
- The ‘Msg/Inuse LED’ will be on in both handset and base.
If the number is longer than the maximum digits in display, the digits will appear in
the second line.
2 9 5 1 1 3 6 7 0 1 3 5 3 4 7 9
- Press [R]-key to flash the line to perform some PABX function and a digit ‘R’ will be
shown on the LCD. Long press [ ] to add a pause and a digit ‘P’ will be shown.
The number is dialed after the ‘Flash’ will not be stored in the redial memory.
- After T9 of no further key press, the call timer will be shown in the second line while
the dial number shown in the first line.
The max time that can be shown is 9:59:59. When reaching this the timer will stop.
2 9 5 1 1 3 6 7 0 1 3 5 3 4 7 9
8.1.5 Terminating a call
To terminate the call, press [ ]. The ‘Msg/Inuse LED’ in both handset and base
will go off. The last call time will remain for T10.
Putting the handset on cradle can also terminate the call. In that case, the call time
will also be displayed for T10.
Page 19of 49
Page 20

Giant Telecom Limited – Operator Manual for 5860 – Version 02 29Jun2004
0 : 1 0 : 3 1
1 1 4 : 1 5
2 2 / 0 4
Wo n g H e l e n
K w o n g
V i n c e n t
L e e
8.1.6 Temp tone dial
A user may like to change to DTMF dialing during the call if the call has been setup
for pulse dialing.
Pressing [*] for more than T1, during active call, activates DTMF dialing. This is only
enabled for the duration of the present call.
A digit ‘d’ will be shown on the display, indicating the ‘Change to DTMF’ command is
sent out.
8.2 Incoming external Call
When receiving an external call, all handsets will ring. The ‘EXT’ icon will flash.
The In -use/Msg LED in both handset and base will flash according to the ring
cadence.
If the network provider support caller ID, the caller’s number will be shown. (See the
section of Caller ID operation for details.)
Press [ ] to seize line.
User may like to reject the call by press and hold [C] for T1. In doing so, the ring tone
in handset will stop and the ‘EXT’ icon will remain flashing until the incoming call is
dropped. During this time, pressing the [ ] will still seize line.
If auto-answer function is enabled, the line can also be automatically connected after
the handset is lifted up from base. For preventing accidental line disconnection, in
this case the users cannot press [ ] to go on-hook within T11.
8.3 Internal Call Control
Internal call is initiated from a PP by depressing the [INT] key from the idle state.
INT
> B o b
A name list is displayed and with the [5][6] – keys select the PP you want to call.
Pressing the [ ] to call the selected PP.
The called PP will ring with the ‘INT’ icon flashing.
When the other PP takes the call the internal connection is established and the Call
time is displayed.
Page 20of 49
Page 21

Giant Telecom Limited – Operator Manual for 5860 – Version 02 29Jun2004
0 : 1 0 : 3 1
INT
To release an internal connection, press [ ]. The connection is released on both
PP's and they return to Idle display. The release may be initiated from both sides.
After call release the call time is displayed for T10.
8.4 Transferring External Call
Transferring an external call is in the following called "Call Transfer" (CT) .
Start condition is that a PP is in an active external call.
A CT may either be attended or unattended. The two types of transfer is initiated in
the same manner :
CT is initiated from PP1 by pressing [INT] Key. PP1 is making an internal call and the
PSTN connection is put on hold.
Attended CT :
PP1 is waiting for one of the other PP's to answer the call. When the other PP (PP2)
answers the call, the two PP’s now have a connection with the external line on hold.
The PP initiating the CT, may press R to start a 3-party conference, Ext line – PP1 –
PP2.
If PP1 and PP2 is in a connection with the line on hold, and PP2 is releasing the
internal call to PP1, PP1 retrieves the line by pressing [ ] once.
If PP1 and PP2 is in a connection with the line on hold, and PP1 is releasing the
connection the line is transferred to PP2 automatically.
If no PP answer the CT attempt from PP1, the call is retrieved by PP1 pressing [ ]
key twice, first press is to terminate the internal call and second is to retrieve the
external connection on hold.
Unattended CT :
PP1 is releasing the connection to the base after initiating the internal call and the
other PP's are being paged. PP1 is not paged, since it is the initiator of the CT. When
a PP answer the Call the external call is automatically transferred to this connection.
If no PP's answers the CT, PP1 is called back by the FP after T12.
8.4.1 CLIP Transference
Attended CT :
Page 21of 49
Page 22

Giant Telecom Limited – Operator Manual for 5860 – Version 02 29Jun2004
0 : 0 2 : 5 0
When PP1 releases its connection to complete the CT, the CLIP, if present, is
transferred to PP2.
CLIP is displayed as for a normal external call with CLIP.
Unattended CT :
When PP2 takes the call the CLIP, if present, is transferred to PP2.
CLIP is displayed as for a normal external call with CLIP.
8.4.2 Call Time Display
The counter will start local in the HS at 0, show the call time of HS not from the line.
8.5 Conference Call
Start condition is that a PP is in an active external call.
The way to make a conference is similar to the description for "Attended Call
Transfer". The conference state is indicated by an audible signal in the earpiece on
both PPs and on the external PSTN connection.
8.5.1 Conference Call Status
- The second internal party is unable to make an outgoing call (en-bloc dialling,
standard dialling).
- No additional handset may be added to a conference call in progress between the
two internal parties and the external participant.
- When initiated a call transfer, it is not possible to switch between the parties.
INT - INT - EXT conference --> only controlled by on / off hook keys.
Display during a conference call:
INT
8.5.2 Conference Call Termination
Conference Call is terminated when one of the PP's involved presses the [ ] key.
The other parties involved stay connected and the status change to an external call.
The operation of CLIP transference is similar to the Attended Call Transfer described
in 8.4.1 CLIP Transference.
Conference termination is indicated by an audible sound.
Page 22of 49
Page 23

Giant Telecom Limited – Operator Manual for 5860 – Version 02 29Jun2004
If both involved PP's presses [ ] key, the first step is to terminate the conference
and the second step is to release the external connection.
8.6 Handset Speakerphone (Optional)
- If Handset speakerphone option is available in the normal internal/external
Call, press X to start handset speakerphone. The operation is similar to
press which turns on the receiver, instead of the handset speakerphone.
- During Speakerphone mode, press X to toggle between speakerphone and
normal talk mode
Press again to stop speakerphone and go on -hooked again.
8.7 Headset
When Headset is plugged in during internal/external Call, the audio will be
routed to the headset instead of the receiver.
HEADSET OPERATION
Your cordless Handset is equipped with a 2.5 mm. Headset Jack for use with an
optional accessory headset. Contact the local store to choose a suitable headset,
refer contact to page 49.
Once you have a compatible Headset, locate the headset jack located on the side of
the Handset. First, remove the protective rubber cover. Plug the headset cord into
the jack. Do not force the connection.
When a Headset is connected, the microphone on the Handset is muted to limit the
effect of background noise.
Your cordless Handset is also equipped with a Belt Clip. Align the pins located on
the inside edge of the clip with the notches on the sides of the Handset. The belt clip
should snap securely int o place.
8.8 Audio
Audio can be routed to three different outputs in the handset device: earpiece,
speakerphone and headset (through the jack-stick). The following rules will apply:
1. When hands free mode is on, the audio will always be routed to the
speakerphone.
2. When the hands free mode is off, if a headset is plugged into the jack stick,
audio will be routed to the headset.
3. If no headset is plugged in, and the hands free mode is off, the audio will be
routed to the earpiece.
Page 23of 49
Page 24

Giant Telecom Limited – Operator Manual for 5860 – Version 02 29Jun2004
K e n n e t h
1 1 4 : 1 5
2 2 / 0 4
8.8.1 Setting the handset volume
While in call and the audio is routed to the earpiece, press 'up' or 'down'.
If press 'up', the volume level will be increased one step and a menu showing the
current level will be shown.
If press 'down', the volume level will be decreased one step and a menu sh owing the
current level will be shown.
In the menu there is a timeout of T3, the display will then return to show call info.
8.8.2 Setting the hands free volume
While in call and the audio is routed to the speakerphone, press 'up' or 'down'.
If press 'up', the volume level will be increased one step and a menu showing the
current level will be shown.
If press 'down', the volume level will be decreased one step and a menu showing the
current level will be shown.
In the menu there is a timeout of T3, the display will then return to show call info.
8.8.3 Setting the Headset volume
While in call and a headset is connected and speakerphone is off, press 'up' or
'down'.
If press 'up', the volume level will be increased one step and a menu showing the
current level will be shown.
If press 'down', the volume level will be decreased one step and a menu showing the
current level will be shown.
In the menu there is a timeout of T3, the display will then return to show call info.
8.9 Muting
During External/Internal Call Conversation, press C / / to mute the
microphone input. The icon is turned on.
Press C / / again to unmute. The icon is turned off.
8.10 Out Of Range Warning
The “Out Of Range” warning is alerted through a distinctive sound in the Speaker in
idle and through a sound in earpiece when in an active call.
9 Caller ID operation
9.1 Incoming call indication
If the network provider supports clip information, the caller’s number will be shown
during incoming call.
If the network does not send out the date-time information and the clock in the base
has not been updated, the date-time digits will show ‘--:-- --/--‘.
Page 24of 49
Page 25

Giant Telecom Limited – Operator Manual for 5860 – Version 02 29Jun2004
S
mi t h 2 3 5 7 7 4 9 0
- - : - -
- - / - -
J o h n
If the caller’s number matches with a phone book entry, the name stored in the
phone book will be displayed instead.
When the LCD cannot display all information in one screen, the ‘Up/down’ icon will be
shown and user s can press [? ] and [? ] to view the content.
9.1.1 Rules for displaying call information
General:
Name on Line 1, number on Line 2. Name and number can be substituted with
reason for absence. Reason for absence can be either “Unavailable” or “Private”.
1. CLIP and corresponding directory entry available:
Number and name from the phonebook will be displayed.
2. CLIP and no corresponding directory entry available:
CLIP will be displayed. (truncated, if CLIP exceeds the line)
3. Reason for absence of CLIP:
Reason for absence of CLIP will be displayed.
9.2 Call waiting
Call waiting is sounded when an internal call is active between two handsets.
To accept the waiting call, first the ongoing call has to be finished by a push on the
on-hook key before the waiting call can be accepted via off -hook key (follows normal
incoming call procedure).
9.2.1 Signaling call waiting
Call waiting is supported for new external call when in active external or internal call.
A beep is generated in the earpiece when receiving an incoming external call during
active external or internal call.
Additionally to acoustic signaling there will be a call waiting screen with the CLIP
information.
9.2.2 Accepting call waiting /off hook CLIP
The off hook clip will be shown for T13 at most, and then the displ ay will return to
original clip.
If the user toggles back and forth between two external calls by using the flash
function, the PP does not try to model the state of the exchange. The CLIP
information will not be shown in this case, as the PP cannot surely decide which
caller is the one available at the line all the time.
Page 25of 49
Page 26

Giant Telecom Limited – Operator Manual for 5860 – Version 02 29Jun2004
C a l l
A n n o u n c e
me n t D r o p C a l l
CLIP -> OFFHOOK -CLIP (T13) -> CLIP -> (FLASH-Key) No CLIP
9.3 Call Waiting / Call Waiting Deluxe
Call Waiting
When you receive a Call Waiting alert tone in the earpiece (or Handset Speakerphone), the
‘waiting’ call can be answered by pressing the FLASH key. Pressing FLASH clears the second
line in the display. If the ‘waiting’ call is not answered, the display will return to normal ongoing
call presentation after 15 seconds.
Call Waiting Deluxe (Call Waiting ID)
When the handset is in conversation and receiving a type 2 caller Id number, a
special “CallWaiting Deluxe” menu becomes available.
From this menu the user has several options.
The options in the menu will change dependent of the state of the current call:
Call Waiting state (when you are in conversation and receive Call Waiting ID information):
??Forward call (to voicemail, for example)
??Play an Announcement (that you are currently on another call)
??Drop the incoming call
??Answer call (terminating the first call)
??Put current call on hold while answering the ‘call waiting’ call
??Conference
Held Call state (conversation with call on hold):
??Return to the call on hold
??Drop the call on hold
??3 -way conference with both callers
Conference Call state:
??Drop First call
??Drop Last call
When in conversation and receiving a type 2 CID the menu can be accessed by
pressing the [Menu] - key on the handset.
Display example where the handset is in CallWaitingState:
> F o r w a r d
Use the ? and ? scroll keys to highlight the desired action.
The action can be selected by pressing the [Ok] -key.
After selection the handset returns to normal call display.
The “CallWaiting menu” can be aborted by pressing the [C]-key.
The type “CallWaiting Deluxe” is always accessible while in external
conversation.
The switching functionality though is depending on support from the PSTN
service provider.
For more information on Call Waiting options, contact BellSouth Customer Support.
Page 26of 49
Page 27

Giant Telecom Limited – Operator Manual for 5860 – Version 02 29Jun2004
9.4 Stutter Dial Tone Check
The unit can also detect Dial tone and/or Stutter dial tone in order to determine
the message waiting status (ie the message waiting LED indicator)
10 Other Features
10.1 Identification of a parallel line occupancy (for a not seized line)
If the line is not seized by the system, line occupancy (for example through
seize by a parallel switched device) is detected.
All the handsets reflect this situation by turning on 'In use LED'.
10.2 Identification of line occupancy (for a seized line)
The Ext icon appears at all the handsets if one at the same base registered
handset seizes the line. (Display shown for both occupancy by parallel
equipment and for occupancy by parallel handset.)
10.3 Battery low warning
Battery condition is checked all the time when handset is on.
Battery charging Icon behaviour during Charging. If discharging, reverse.
When the battery status is battery low/Battery Critical, the empty battery icon
blinks. No further operation is allowed. It is in Standby condition. The handset
should be placed on base cradle for charging.
10.4 Display illumination (Back-lighted LCD/Keypad)
Display illumination is activated:
• when any key is pressed
• when an incoming call (internal, external)
• when alarm.
Switching off:
• After T2 the display illumination is switched off. (Any of the above actions will restart
the timer)
10.5 Key Lock
This is accessed by Long Press # key during the idle mode.
During Key lock mode, there is no response to all keys, except Talk key during
external/internal incoming call or except emergency call sequence(eg 110).
During Key Lock mode, Long Press # key to disable key lock.
Page 27of 49
Page 28

Giant Telecom Limited – Operator Manual for 5860 – Version 02 29Jun2004
K e n n e t h
No
10.6 Paging
Pressing the "Paging key” at the base unit transmits a page call to all handsets.
The page call is signalled at the handsets with the selected ringer melody used for
internal connections.
The page call could be ended as follows:
• Pressing the off-hook key at the handset.
• Pressing the hands free key.
• After T3.
• Pressing the "Paging key" of the base again.
Paging Display:
INT
The PP name is displayed and the INT icon is displayed.
All called handsets are thereafter switched to standby mode.
Remark:
If any internal or external linking is active, a page call can’t be started.
The page call must be acoustically signalised even if the ringer volume is set to 0. In
this case the ringer volume will be 3.
If any other key (except off -hook or hands free on handset or paging key on base
station) is pressed during paging call, not hing happens.
External incoming call terminates the paging call.
11 Menu Setting
Press Menu/OK Key during Standby to access Main Menu.
The Main Menu has the following selection structures.
Menu Level 1 Menu Level 2
Phonebook Edit Entry
Delete Entry
Menu Level 3 Menu Level 4
Special Ring No
Melody 1
Melody 2
Melody 3
Melody 4
Melody 5
Melody 6
Melody 7
Melody 8
Melody 9
Page 28of 49
Page 29

Giant Telecom Limited – Operator Manual for 5860 – Version 02 29Jun2004
No
No
New Entry
Call List Copy to Phonebook
Delete Entry
Delete List
Audio Settings Ringer Volume
Ringer Melody External Melody Melody 1
Yes
Special Ring No
Melody 1
Melody 2
Melody 3
Melody 4
Melody 5
Melody 6
Melody 7
Melody 8
Melody 9
Yes
Yes
Melody 2
Melody 3
Melody 4
Melody 5
Melody 6
Melody 7
Melody 8
Melody 9
Internal Melody Melody 1
Melody 2
Melody 3
Melody 4
Melody 5
Melody 6
Melody 7
Melody 8
Melody 9
Paging Melody Melody 1
Melody 2
Melody 3
Melody 4
Melody 5
Melody 6
Melody 7
Melody 8
Melody 9
Alarm Melody Melody 1
Melody 2
Melody 3
Melody 4
Melody 5
Melody 6
Page 29of 49
Page 30

Giant Telecom Limited – Operator Manual for 5860 – Version 02 29Jun2004
Melody 7
Melody 8
Melody 9
Tones Key Tones Off
Pattern 1
Pattern 2
Pattern 3
Off
Confirmation Tones On
Off
Warning Tones On
Off
Call Waiting Tones On
Off
Range Alarm On
Off
Set Alarm On
Off
Set Time
Auto Talk On
Off
Any Key Answer On
Off
Direct Call On
Off
Display Handset Name
Call Display Time
Number
Language English
German
French
Italian
Dutch
Spanish
Portuguese
Turkey
Advanced Settings Reset Handset
Change PIN
Register Handset
Select Base Automatic
Base 1
Base 2
Base 3
Base 4
Deregister Handset Base 1
Base 2
Base 3
Base 4
Base setings
Audio Ringer Volume
Page 30of 49
Page 31
Giant Telecom Limited – Operator Manual for 5860 – Version 02 29Jun2004
L e e
? 9 3 4 2 1 2 6 7
Ringer Melody Melody 1
Melody 2
Melody 3
Melody 4
Melody 5
Melody 6
Melody 7
Melody 8
Melody 9
Base Reset Reset To Default Yes
No
Additional Features Dial Mode Tone
Pulse
Flash Time 80ms
100ms
120ms
180ms
250ms
300ms
600ms
800ms
Prefix Dial No
Call Ba rring Number On
Off
Base PIN
Walkie Talkie
Call Deluxe
12 Phone Book directory
The local directory can both be accessed pressing [&] and through the Menu.
If the directory is empty, pressing [&] should output error tone.
12.1 Browse Directory
The entries is sorted in alphabetic order.
If a melody is attached to the number, a melody icon will be shown to the right.
A l f r e d
Users may like to press a digit [1] – [0] and [? ][? ] key to locate the desired entry.
For example, press [8 TUV] to locate the entry with the name started with ‘T’. Press
[8 TUV] again to locate the name started with ‘U’. If [6 MNO] is then pressed, the
name started with ‘M’ will be shown.
Page 31of 49
Page 32

Giant Telecom Limited – Operator Manual for 5860 – Version 02 29Jun2004
< E n t e r
N a
me > 1 1 4 : 1 5
2 2 / 0 4
1 1 4 : 1 5
2 2 / 0 4
1 1 4 : 1 5
2 2 / 0 4
12.2 Use Number
Press [ ] to dial the number for that entry or press [OK] to append the number to
the pre-dial buffer.
Recalling a number from the directory after line seizure is also possible by pressing
[ &/3]. The procedure is similar as before except that pressing [OK] or [ ] would
dial out the number for that entry.
12.3 Edit Entry
To edit the current entry in the phone book directory, the user select “Edit Entry” from
the menu. The procedure is similar as “New Entry” except the previous data is
available. We need to edit the Name/Number/Special_Ring for the record.
12.4 Delete Entry
To delete the current entry in the phone book directory, the user select “Delete Entry”
from the menu. After press Menu/OK again, the user needs to double confirm Yes/No
again before actual deletion.
12.5 Store Entry
To make a new entry in the phone book directory, the user select ‘Store Entry’ from
the menu.
12.5.1 Enter Name
When no name have been put in, 'Enter Name' will be displayed.
The character can be entered by pressing a digit ‘1’ to ‘0’ for different number of
times. After T8 of no key press, the cursor will be advanced by one position. Once a
digit is entered, the word ‘Enter Name’ is cleared.
A l F A e d _
When editing the name, users may also like to move the cursor using [&/3] or [?
/R].
A l f A e d
Press [OK] after the name is correctly entered.
Page 32of 49
Page 33

Giant Telecom Limited – Operator Manual for 5860 – Version 02 29Jun2004
< E n t e r
P h o n e
N o > 1 1 4 : 1 5
2 2 / 0 4
12.5.2 Enter Number
If no number is in the pre-dial buffer the user have to enter both number and name.
If a number in pre-dial, the user will only have to enter name. The number in pre-dial
is automatically copied to directory.
When no number have been put in, 'Enter Number' will be displayed.
A l f A e d
Page 33of 49
Page 34

Giant Telecom Limited – Operator Manual for 5860 – Version 02 29Jun2004
9 3 4 5 1 1 4 : 1 5
2 2 / 0 4
S p e c i a l
R i n g ?
?N o
S p e c i a l ? ?
M e l o d y
1 ? ? M e l o d y
2 ? ? M e l o d y
3 ? ? M e l o d y
4 ? ? M e l o d y
5 ? ? M e l o d y
6 ? ? M e l o d y
7 ? ? M e l o d y
9 ?
Once a digit is entered, the word ‘Enter Number’ is cleared.
A l f A e d
Press [C] to clear the last digit. Press [OK] to confirm the entered number. Then the
user is required to enter name .
12.5.3 Distinctive Ringing
The handset is able to give specific ringer melody for different caller. The user can
then select a specific ringer melody for that entry by pressing [&/3] or [4/INT].
If any melody type is selected other than ‘No Special’, a ‘Melody’ icon will be
indicated at the right when displaying the recall memory. See ‘Recall memory’
13 CLIP list
This list is kept at the base station and can be accessed by the PP via the menu clip
list menu. Only one PP can access the list at a time.
All received CLIP information is stored in the CLIP List in the following manner :
The list will be ordered according to when the call took place (newest first, oldest
last).
If a new unanswered call comes from a subscriber that is already logged in the list,
the CLIP information will be inserted as the newest entry, and the previous entry from
that subscriber will be removed from the list.
When the CLIP list is full and a new entry needs to be made, the oldest entry will be
removed from the list, to make place for the new information.
The CLIP list can both be accessed pressing [ ] and through the Menu.
If the list is empty, pressing [ ] should output error tone.
Page 34of 49
Page 35

Giant Telecom Limited – Operator Manual for 5860 – Version 02 29Jun2004
13.1 Browse CLIP List
Press UP and Down to browse the list
13.2 Use the Record
Press Talk to dial out the number on the record
13.3 Copy to Phone Book
Press MENU/OK to select “Copy to PhoneBook”. It goes to Phone Book edition
mode with the CLIP name/number as the entry of PhoneBook name/number.
13.4 Delete Entry
Press MENU/OK to Select “Delete Entry”. It needs to double confirm before
deletion.
13.5 Delete List
It deletes all read/old CLIP records. Press MENU/OK to Select “Delete List”. It
needs to double confirm before deletion.
14 Setting the ringer volume
The ringer volume is set in the menu. The external melody will be played when
entering the menu and each time the level is changed to give an audible
indication of the current level.
The ringer melody is set in the menu. The current selected melody will be played
when entering the menu and each time the level is changed.
14.1 Setting the handset ringer volume to zero
It is possible to set the ringer volume to zero. In this case no melody will be
played. The 'ringer off' icon will be set on when the setting is accepted.
Notice that User selectable Ringer Volume is for External and Internal Ringer
Only. Paging/Alarm Ringer is in fixed level.
15 Setting the melody – External/Internal/Paging/Alarm
There will be a ringer a specific melody for both internal and external calls.
The external melody is used if the number is not found in the phonebook and
requires a specific melody to be used.
The ringer melody is set in the menu. The current selected melody will be played
when entering the menu and each time the selection is changed.
The melody will be played in the menu with the current ringer volume. If the
ringer volume is set to zero, the melody will be played with volume 1 (lowest
volume).
16 Setting Key Tone
There is distinctive key tone pattern.
The tone pattern is set in the menu. The current selected pattern will be played
when entering the menu and each time the selection is changed.
17 Setting Alert Tone On/Off
The Alert tone includes Confirmation/Warning/Call Waiting/Out of Range Tones.
The alert tone can be set as On/Off in the menu.
Page 35of 49
Page 36

Giant Telecom Limited – Operator Manual for 5860 – Version 02 29Jun2004
m ? On ? ?Of f
?T I
me 0 7 : 3 0
m On
T I
me 0 7 : 3 0
K e n n e t h
1
A 1 4 : 1 5
2 2 / 0 4
A L A R M 1 1 4 : 1 5
2 2 / 0 4
18 Alarm Setting
After selecting ‘Set Alarm’ in the menu, users will be required to set the alarm on/off
by pressing [&/ 3] or [4/INT].
A l a r
Press [ ? ] to change the time for activating the alarm.
A l a r
Enter the time in 24-hour mode and then press [OK] to confirm the setting. If alarm is
set to on and the time in the handset is valid, an alarm icon will be on during standby
mode.
When the set time is reached, the alarm tone will be sounded and the following
screen can be seen:
Users are able to stop the alarm by pressing any key.
19 Setting Date-Time
The date-time information will be lost after the base has lost its power.
There are two ways to update the ‘Date-time’ information. If the telephone network
provides the date-time information in the caller ID message, receiving a caller ID
message can update the date-time information.
Page 36of 49
Page 37

Giant Telecom Limited – Operator Manual for 5860 – Version 02 29Jun2004
[ - - / - - ] T i
me
[ - - : - - ]
[ 2 2 / 0 4 ] T i
me 1 4 : 1 5
2 4 / 0 5
T i
me
[ 1 4 : 1 5 ]
The other way is to select ‘Date-Time’ from the menu and then users can enter the
date and time in the format of ‘DD/MM’ and ‘HH: MM’.
If the date -time information has not been updated before, the following screen can be
seen.
D a t e
If the date -time information has already been there, users can still change the date
and time information as follows;
D a t e
Press [ ? ] to change the time in 24 hours format.
D a t e
The clock starts running as soon as the time and/or the date has been set.
Remark: The base distributes the data to all registered and reachable handsets when
it receives it.
20 Auto Talk
This is a PP setting. When enabled the PP answers an incoming call by pressing
any key. When in an active call the key has normal operation.
21 Any Key Answer
This is a PP setting. When enabled the PP answers an incoming call by pressing
any key. When in an active call the key has normal operation.
22 Direct Call
This is a PP setting. Select “Direct Call” Setting in Menu. Then set On/Off. If Set
On, set the Direct call number. If Direct call number is set, press an y key in
standby and then dial out the direct call number.
23 Handset Name Setting
This is a PP setting. Select “Display” and “Handset Name” Setting in the Menu.
Then set the Name character for the handset. If the name is programmed, the
standby will display the handset name in the middle text line.
Page 37of 49
Page 38

Giant Telecom Limited – Operator Manual for 5860 – Version 02 29Jun2004
M o d e
24 Call Display Setting
This is a PP setting. Select “Display” and “Call display ” setting in the menu.
Select either “Time” or “Number”. If Time is selected, there is Call time display
during the call and certain time after the call. If Number is selected, there is no
call time display, just the number.
25 Language Setting
This is a PP setting. Select “Display” and “Language” in the menu. Then select
“appropriate” language. After selection, the menu wording will be changed to
corresponding language.
26 Reset Handset
All handset parameters are reset to default values. It can be accessed by
“Advanced Setting” and “Reset Handset”. See table of default values.
27 Change Handset Pin
It can be accessed by “Advanced Setting” and “Change Pin”.
28 Register Handset
It can be accessed by “Advanced Setting” And “Register Handset”.
After selection, put the handset on the corresponding base station.
29 Select Base
One handset can register to maximum 4 base. We can set handset to use one
fixed base or select any one of the available bases automatically.
It is set by selecting “Advanced Setting” and “Select Base”
30 Deregister Handset
This can be accessed by selecting “Advanced Setting ” and “Deregister Handset”.
It allows de-register the handset to certain base.
31 Base Ringer Volume
The procedure of changing base ringer volume is the same as changing the
handset ringer volume
32 Base Ringer Melody
The procedure of changing base ringer melody is the same as changing the
handset ringer melody
33 Base Reset
This is a FP setting to reset base parameter. It is accessed by “Base Setting ” and
“Base Reset”. See the table of default values for detail.
34 Change Dial mode
After selecting ‘Dial Mode’ from the menu, users can choose Tone or pulse
dialing mode.
D I a l
Page 38of 49
Page 39

Giant Telecom Limited – Operator Manual for 5860 – Version 02 29Jun2004
?T o n e ?
?P u l s e ?
35 Change Flash Time
This is as FP setting to change the Flash time. It is accessed by “Base Setting ”
and “Additional Features” and “Flash Time”
36 Prefix dialing (Optional)
The FP may be setup to add a pre-fix number to every number dialed on the PSTN
Line.
The Prefix dialing feature is eeprom selectable.
The Prefix dial number may be setup through a base menu. When selecting the
menu the Base PIN must be supplied prior to getting access to altering the prefix
dialing number.
The Prefix dial number base menu is only available if the feature is enabled via the
eeprom.
37 Call barring
It shall be possible to enter a phone number that will not be possible to be called
afterwards.
38 Change Base PIN
It can be accessed by “Base Setting”, and “Base Pin”.
39 Walkie Talkie (Optional)
It will be possible to put handset in walkie/talkie-mode. This enables the user to make
a call between two handsets without being locked to a base.
39.1 Entering Walkie Talkie-mode
Walkie talkie-mode is entered through a menu in the handset.
After choosing “Walkie talkie” the user is prompted for groupID.
The handsets need to have same groupID to be able to connect to eachother.
39.2 Making a call
To make a call in walkie talkie-mode, the user ho ok off with [ ] or [Int/OK].
Handsets need to have the same groupID to be able to call eachother.
When hooking off in this mode, all other handsets with same groupID within range
will ring.
39.3 Exit Walkie Talkie -mode
Walkie talkie-mode is terminated through the menu. The handset will return to idle.
40 Factory default Values
Functional Settings Possible Range Factory
Default
Handset Paramters
Page 39of 49
Page 40

Giant Telecom Limited – Operator Manual for 5860 – Version 02 29Jun2004
V o l u
me
L o w H I g h
Phone Book
-
40 records
Null
- 22 digits per record
- 16 characters per
record
Audio Setting – Ringer Volume Off + 1 to 6 3
Audio Setting – Ringer Melody – External 1 to 9 1
Audio Setting – Ringer Melody – Internal 1 to 9 2
Audio Setting – Paging Melody 1 to 9 3
Audio Setting – Alarm Melody 1 to 9 4
Audio Setting – Key Tones Off + 1 to 3 1
Audio Setting – Confirmation tone On/Off On
Audio Setting – Warning Tone On/Off On
Audio Setting – Call Waiting Tone On/Off On
Audio Setting – Out of Range Tone On/Off On
Alarm Setting On/Off + Alarm Date/Time Off + Null
Auto Talk On/Off On
Any Key Answer On/Off On
Direct Call On/Off + 22 digits Off
Display – Handset Name 16 characters Null
Display – Call display Time / Number Time
Display – Language English/French/Spanish/
English
Germany/Italy/Dutch/
Portuguese/Turkey
Advanced Setting – Pin 0000
Advanced Setting – Select Base Automatic, 1 to 4 Automatic
Base Parameters
Call List - 20 records
Null
- 22 digits per record
- 48 characters per
record
Time Setting Date/Time Null
Base Setting – Audio – Ringer Volume Off + 1 to 6 3
Base Setting – Audio – Ringer Melody 1 to 9 5
Base Setting – Additional Feature – Dial mode Tone/Pulse Tone
Base Setting – Additional Feature – Flash Time 100/300/600ms 100ms
Base Setting – Additional Feature – Prefix Off + 22 digit Off
Base Setting – Call barring Off + 22 digit Off
Base Setting – Base Pin 0000
41 General Operation Notes
41.1 Graphics used
Handset volume
R e c e I v e r
Page 40of 49
Page 41

Giant Telecom Limited – Operator Manual for 5860 – Version 02 29Jun2004
V o l u
me L o w H I g h
V o l u
me
L o w H I g h
V o l u
me OF F
D I r e c t o r y
H a n d s e t
M e n u
Speaker volume
S p e a k e r
Ringer volume handset (Level 0 to 6, 0 for off).
R I n g e r
R I n g e r
41.2 Display
41.2.1 Menu
All texts in menus are left aligned with a one digit offset to make room for an arrow
that points at the active menu item.
All menu/shortcut functions have to be activated when the handset is in idle mode.
User may enter the menu by pressing [Menu].
>
To change the item for selection, press [?] or [?] until the desired menu-item is
active. A user may then press [OK] or [ 4] to confirm the selection.
At any stage of menu operation, a user may go back one level in the menu by
pressing [C]. Pressing and holding [C] for T1 at any time can return to standby
immediately.
Page 41of 49
Page 42

Giant Telecom Limited – Operator Manual for 5860 – Version 02 29Jun2004
41.2.2 Detailed display of numbers/names
When showing clip, if the number and name is too long to be displayed on screen, as
much as possible will be shown and it will be possible to scroll up and down to see
the rest.
In phonebook and redial list if number is too long, ‘..’ will be added to the end to
indicate that the number is longer than the display. There is no way to see the whole
number unless it is copied to pre-dial editor.
41.2.3 GUI timeout control
All local procedures are terminated automatically after a period T3 has elapsed
following the last entry.
Advisory and confirmation messages are displayed for a period T4 and error
messages for a period T5. By pressing any key the message disappears.
41.2.4 Navigation
The lists, menus and editors are navigated by using navigation hard-keys (up and
down keys).
When in menu, right-key accepts the active menu-item and left-key steps one step
back.
41.2.5 Base Settings
The base station itself monitors the menu settings in the base. If more than one
handset tries to change a menu item at the same time, only the first handset is
authorized to continue with the procedure. In the remaining handsets the procedure
is rejected.
The base menu will only be available at the PP if it is registered to a Giant base.
41.3 Visual signaling
41.3.1 Prompts
Prompts consist of a cursor and an input request. In some cases (e.g. PIN/date/time
entry), they also remain visible in the display after the user has pressed a key. In
other cases (e.g. name and number entered in the directory) the input overwrites the
prompt.
41.3.2 Warnings / confirmation prompts concept
Warnings are centered in the display and allow the user to cancel the action
(pressing any key).
An example of a confirmation prompt could be when the entire directory is deleted.
Page 42of 49
Page 43

Giant Telecom Limited – Operator Manual for 5860 – Version 02 29Jun2004
H a n d s e t
T I
me D a t e
[ - - / - - ] T I
me
[ - - : - - ]
41.4 Acoustic signaling
41.4.1 Ringing tones
Same ringing tones as 2G4 LowCost will be used in the base.
Handset will use polyphonic ringer melodies.
41.4.2 Acoustic signaling of incoming calls
Signalling of external incomin g calls has first priority.
Calls are signalled acoustically (ringer) and visually (display). Menu will be cancelled
as a result (e.g. navigating through the menu, editing procedures).
Only when an incoming call arrives while the PP is already engaged in a call, the PP
will not ring but call waiting will be signalled.
41.4.3 Acoustic sounds
Same acoustic sounds as 2G4 LowCost will be used in both handset and base
(Positive and negative confirmation tones).
41.5 Editors
This section defines the principles for inputting data:
• Editor for inputting fixed masks (e.g. Date/Time/PIN).
• Editor for inputting numbers and text (e.g. Name/Directory; …).
41.5.1 Time/Date Editor
the time/date editor has a fixed number of digits and a fixed format.
For the editor the following rules apply:
The cursor position is displayed by means of a flashing underscore.
The fixed editing area is always enclosed in square brackets.
S e t
Editors must have a default. If no valid default ‘-‘ will be displayed.
41.5.1.1 Entering the editor
Upon entering the editor, the cursor is always positioned at the first digit.
Page 43of 49
Page 44

Giant Telecom Limited – Operator Manual for 5860 – Version 02 29Jun2004
P I N
[ - - - - - - - - ]
41.5.1.2 User Input
The editor is organized with a wrap around and is always in overwrite mode.
41.5.1.3 Moving the cursor
The hard key [&/3] enables navigation to the left side in the editor field
The hard key [ 4/INT] enables navigation to the right side in the editor field
41.5.1.4 Reaching the end of an editable area
In mask editors a wrap around is implemented, i.e. once the last position has been
reached, the cursor r eturns to the first and overwrites it if necessary.
41.5.2 PIN editor
A PIN (Personal Identification Number) can consist of between 4 and 8 digits. Entry
of the PIN is concealed, i.e. asterisks are displayed as wildcards. Consequently, “-“
characters are entered for digits that have not yet been entered.
The cursor position is displayed by means of a flashing underscore.
If the PIN was entered incorrectly and OK key is pressed, an advisory message is
displayed for a period of T5 and a negative confirmation tone is sounded. PP returns
to the menu from where it started.
41.5.2.1 Entering the editor
Upon entering the editor, the cursor is always positioned at the first digit.
41.5.2.2 User Input
In System PIN characters that have already been entered can be deleted by pressing
the [C] key. In system PIN the default “-“ character is represented again at any press
of [C] key.
41.5.2.3 Moving the cursor
It is not possible to move the cursor in this editor.
41.5.2.4 Reaching the end of an editable area
Once the last position has been reached, the cu rsor becomes hidden. Only if the [C]
key is pressed will the last digit be deleted and the cursor will appear.
Page 44of 49
Page 45

Giant Telecom Limited – Operator Manual for 5860 – Version 02 29Jun2004
41.5.3 Number and Name Editor
This editor is used for inputting numbers and text (e.g. for editing directory entries).
41.5.3.1 Entering the editor
Upon entering the cursor is always positioned at the first position in the editor.
41.5.3.2 User Input
If text or a number is entered, the character is inserted at the current cursor position.
The cursor moves one position to the right.
Deleting of a character takes place by pressing the [C] key. The character to the left
of the cursor is deleted. If cursor is at the first position in the editor, the character at
the cursor position is deleted.
A long key press on the [C] key results in the whole text or number being cleared.
If editor is empty, a key press on the [C] key leaves the editor.
41.5.3.3 Moving the cursor
The hard key [&/3] enables navigation to the left side in the editor field.
The hard key [ 4/INT] enables navigation to the right side in the editor field.
41.5.3.4 Reaching the end of an editable area
In the case of name and number editors no more characters are accepted when the
max number of characters defined is reached (negative confirmation beep, no
overwriting).
The same applies to input between the individual characters (= input mode).
If cursor is at last position, a deleting operation at the last position deletes the current
character. Another press on the [C] key deletes the character to the left of the cursor.
41.5.4 Text Input
Several characters have been assigned to all of the keys in the alphanumeric 12 -key
keypad; these characters can be called up by pressing the relevant key more than
once.
The function implemented here is time-controlled: each time a key is pressed before
a timeout of T8, the next character assigned to the key is displayed in the current
input position.
When the key is held down for a period longer than T6, a rotation with a timer of T7 is
started within the character set; the required character is then selected by releasing
the key being held down in time.
Page 45of 49
Page 46

Giant Telecom Limited – Operator Manual for 5860 – Version 02 29Jun2004
When a period of T8 has elapsed without another key being pressed, the character
currently being displayed is automatically accepted and the input position moves on
to the next position.
When a new key is pressed before T8. The current character is accepted, the cursor
is moved to the next position the first character on the new key is displayed on the
cursor position.
41.5.4.1 Text Input Mode Switching
In editors the pressing [5] key toggles between capital, lower case letters and
numeric mode.
The toggling between capital, lower case letters and numeric mode is context (editor
mode) dependant.
Editor mode
Small letters (a) abc -> Abc Abc -> 123
Capital letters (A) Abc -> 123 123 -> abc
Numeric mode (123) 123 -> abc abc -> Abc
Strokes at [ 5]key
First Second
Note: Table is only valid for input in multitap mode (keys are pressed without key
press timeout)
The modes “abc” and “123” will be permanent states. The “Abc” mode will be
temporary, after a character in capital letter mode has been entered (“A”) the device
switches into small letter mode (“bc”).
Pressing the [5] key a second time switches to number input (provided that lower
case letters is the adjusted mode).
That is the following input modes are available:
No. Mode Description
1 abc Keypad input mode is alphanumeric and lowercase.
2 Abc Keypad input mode is alphanumeric. Only the next character entered will be upper
case, automatic switchover to lowercase (“abc”) mode will occur after the first capital
character has been accepted.
3 123 Keypad input mode is numeric.
Lower case letters are set by default.
Exceptions: Upper case letters are automatically activated in an editor for the first
letter after a blank line and at the start of text and after punctuation marks ( .!?:¿¡).
The editor stays in upper case if a blank is put in after a pun ctuation mark.
Upper case letter mode is cancelled if no upper case letters exist for the selected
character. If the initial, automatically capitalized character of a line or word is deleted,
Page 46of 49
Page 47

Giant Telecom Limited – Operator Manual for 5860 – Version 02 29Jun2004
the “new” initial character is not automatically converted to upper case letters (for
example, “Peter” changes to “eter” and not “Eter”).
If a character is inserted in front of the initial, automatically capitalized character of a
line or word, the “new” initial character is automatically capitalized and the “old”
character remains as a capital letter (e.g. “ Be” changes to “ABe” and not “Abe”).
41.6 Timers
Name Value Description
T1 2 sec. Time for long key press.
T2 10 sec. Display illumination time.
T3 30 sec. User inactive. Cancel user action.
T4 2 sec. Time for confirmation messages to be shown.
T5 5 sec. Time for error messages to be shown.
T6 1,5 sec. Start character rotation time.
T7 1 sec. Character rotation time.
T8 1 sec. Character accept time.
T9 5 sec. Time after which to show call time.
T10 5 sec. Time for post call info.
T11 3 sec. Minimum off-hook time when lifting handset from
base.
T12 30 sec. Call back after blind transfer.
T13 30 sec. time for off-hook clip to be shown.
T14 2 sec Arial Icon On-time for “Out of Range” warning
indication.
T15 0,5 sec Arial Icon Off-time for “Out of Range” warning
indication.
T16 120 sec Timeout for registration.
42 Consumer Information
1. This equipment complies with Part 68 of the FCC rules and the requirements adopted by the ACTA. On the
back of this equipment is a label that contains, among other information, a product identifier in the format
US:DDKW400BWWI58XX. If requested, this number must be provided to the telephone company.
2. An applicable certification jacks Universal Service Order Codes (USOC) for the equipment is provided
(i.e., RJ11C) in the packaging with each piece of approved terminal equipment.
3. A plug and jack used to connect this equipment to the premises wiring and telephone network must comply
with the applicable FCC part 68 rules and requirements adopted by the ACTA. A compliant telephone cord
and modular plug is provided with this product. It is designed to be connected to a compatible modular jack
that is also compliant. See installation instructions for details in section (2).
4. The REN is used to determine the number of devices that may be connected to a telephone line. Excessive
RENs on a telephone line may result in the devices not ringing in response to an incoming call. In most but
not all areas, the sum of RENs should not exceed five (5.0). To be certain of the number of devices that
may be connected to a line, as determined by the total RENs, contact the l ocal telephone company. The
REN for this product is part of the product identifier that has the format US:DDKW400BWWI58XX. The
digits represented by 00 are the REN without a decimal point (e.g., 03 is a REN of 0.3). The REN is
separately shown on the label too.
5. If this equipment causes harm to the telephone network, the telephone company will notify you in advance
that temporary discontinuance of service may be required. But if advance notice isn’t practical, the
telephone company will notify the customer as soon as possible. Also, you will be advised of your right to
file a complaint with the FCC if you believe it is necessary.
Page 47of 49
Page 48

Giant Telecom Limited – Operator Manual for 5860 – Version 02 29Jun2004
6. The telephone company may make changes in its facilities, equipment, operations or procedures that could
affect the operation of the equipment. If this happens the telephone company will provide advance notice
in order for you to make necessary modifications to maintain uninterrupted service.
7. Please follow instructions for repairing if any (e.g. battery replacement section); otherwise do not alternate
or repair any parts of device except specified.
8. Connection to party line service is subject to state tariffs. Contact the state public utility commission,
public service commission or corporation commission for information.
9. This equipment is hearing aid compatible.
NOTICE:
1) If your home has specially wired alarm equipment connected to the telephone line, ensure the installation of
this phone does not disable your alarm equipment. If you have questions about what will disable alarm
equipment, consult your telephone company or a qualified installer.
2) According to telephone company reports, AC electrical surges, typically resulting from lightning
strikes, are very destructive to telephone equipment connected to AC power sources. To minimize
damage from these types of surges, a surge arrestor is recommended.
Should you experience trouble with this equipment, please contact Customer Support for service information. If
the equipment is causing harm to the telephone network, the telephone company may request that you disconnect
the equipment until the problem is resolved.
43 WARNING: Changes or modification s to this unit not expressly
approved by the party responsible for compliance could void the
user's authority to operate the equipment.
CAUTION: To maintain compliance with the FCC's RF exposure guidelines place the base unit at least 20 cm
from nearby persons.
NOTE: This equipment has been tested and found to comply with the limits for a Class B digital device,
pursuant to Part 15 of the FCC Rules. These limits are designed to provide reasonable protection against harmful
interference in a residential installation. This equipment generates, uses and can radiate radio frequency energy
and, if not installed and used in accordance with the instructions, may cause harmful interference to radio
communications. However, there is no guarantee that interference will not occur in a particular installation. If
this equipment does cause harmful interference to radio or television reception, which can be determined by
turning the equipment off and on, the user is encouraged to try to correct the interference by one or m ore of the
following measures:
• Reorient or relocate the receiving antenna.
• Increase the separation between the equipment and receiver.
• Connect the equipment into an outlet on a circuit different from that to which the receiver is connected.
• Consult the dealer or an experienced radio /TV technician for help.
Verge Customer Support: 1- 800-211-7837
44 Limited Warranty
WHAT DOES OUR WARRANTY COVER?
* Any defect in material and workmanship.
FOR HOW LONG AFTER THE ORIGINAL PURCHASE?
* To the original purchaser only – ONE YEAR.
WHAT WILL VERGE DO?
* At our option, repair or replace your unit.
HOW DO I ARRANGE FOR SERVICE, WHETHER IN OR OUT OF WARRANTY?
* Call Customer Support for Return Authorization at 1-800-211-7837.
Page 48of 49
Page 49

Giant Telecom Limited – Operator Manual for 5860 – Version 02 29Jun2004
* Carefully pack your unit. Include all accessories provided with the product. We recommend
using the original carton and packing materials.
* Include a copy of the sales receipt or other evidence of date of original purchase (if
purchase was within the last 12 months).
* Print you name, address and phone number, along with a description of the defect, and
include this in the package.
* Include payment for any service or repair not covered by warranty, as determined by Verge.
WHAT DOES OUR WARRANTY NOT COVER?
a) Batteries
b) Damage from misuse, neglect or acts of nature (lightning, floods, power surges, etc.)
c) Products which may be have been modified or incorporated into other products
d) Products purchased and/or operated outside of the US, its territories, or Canada
e) Products services by the owner or a service facility not expressly authorized by Verge
f) Products purchased more than 12 months from the current date
g) Units purchased in “AS IS” condition, or units purchased as “Distressed Merchandise”
HOW DOES STATE OR PROVINCIAL LAW RELATE TO THIS WARRANTY?
* This warranty gives you specific rights. You may also have other rights which vary from state
to state or province to province.
For service information, in and out of warranty, call Customer Support at:
1- 800-211-7837
Verge c/o Wave Industries
123 SE 2nd Avenue
Portland, OR 97214
Page 49of 49
 Loading...