

Gianni Ferrari GSR200 Operator's Manual
MANUALE D’USO E
MANUTENZIONE
OPERATOR’S MANUAL
NOTICE D’UTILISATION
BETRIEBSANLEITUNG
GEBRUIKSAANWIJZING
MANUAL DEL OPERADOR
KÄYTTÄJÄN KÄSIKIRJA
BETJENINGSVEILEDNING
BRUKSANVISNING

Gonzaga 26/02/2018
DICHIARAZIONE DI CONFORMITÀ CE - MANUALE D’USO E MAUTENZIONE
COPIA CONFORME ALL’ORIGINALE
EC DECLARATION OF CONFORMITY - OPERATOR’S MANUAL
TRUE COPY
Il sottoscritto Sig. Ferrari Claudio, in qualità di legale rappresentante delle “Officine Bieffebi
S.p.A.”
The undersigned Mr. Claudio Ferrari, legal representative of “Officine Bieffebi S.p.A.”
DICHIARA - DECLARES
che la presente DICHIARAZIONE DI CONFORMITÀ CE ed il MANUALE D’USO E
MANUTENZIONE sono copie conformi all’originale, fornite su richiesta del destinatario per
la macchina
this EC DECLARATION OF CONFORMITY and OPERATOR’S MANUAL are true copies
provided on consignee request for the following machine:
- marca – brand: GIANNI FERRARI
- modello – model: GSR200
- numero di serie – serial number: 1711006BG
in quanto la documentazione originale è stata smarrita o comunque non più fruibile.
because the original documents was lost or no longer usable.
Officine Bieffebi S.p.A. non si assume alcuna responsabilità in merito ad eventuali
modifiche e/o manomissioni che nel frattempo siano state eseguite sulla macchina,
invalidando la dichiarazione di conformità CE e/o compromettendo la completa
corrispondenza tra quanto dichiarato sul manuale d’uso e manutenzione e l’effettivo stato
della macchina.
Officine Bieffebi S.p.A. declines all responsibility for any modification and/or tampering with
the machine that in the meantime would have invalidated the EC declaration of conformity
and/or would have compromised the agreement between the actual state of machine and
the content of the operator’s manual.
Ferrari Claudio


pag.
9 .......MANUALE D’USO E MANUTENZIONE IT
ISTRUZIONI ORIGINALI
20 ......................... OPERATOR’S MANUAL EN
Translation of the originals instructions
32 ......................... NOTICE D’UTILISATION FR
Traduction de la notice originale
44 .......................... BETRIEBSANLEITUNG DE
Übersetzung der Originalbetriebsanleitung
56 ........................GEBRUIKSAANWIJZING NL
Vertaling van de oorspronkelijke gebruiksaanwijzing
68 .....................MANUAL DEL OPERADOR ES
Traducción del manual original
80 .......................KÄYTTÄJÄN KÄSIKIRJA FI
Alkuperäisten ohjeiden käännös
92 ..................... BETJENINGSVEILEDNING DA
Oversættelse af den originale brugsanvisning
102 ............................... BRUKSANVISNING SV
Översättning av original manual
ILLUSTRAZIONI E SCHEMI
ILLUSTRATIONS AND DIAGRAMS
ILLUSTRATIONS ET SCHÉMAS
BILDER UND ZEICHNUNGEN
ILLUSTRATIES EN DIAGRAMMEN
ILUSTRACIÓNES Y ESQUEMAS
VAROITUSTARRAT JA KUVAT
DIAG RAMTEGNINGER
113 .......................................... ILLUSTRATIONER
3

DICHIARAZIONE “CE” DI CONFORMITÀ
1711006BG
GSR200
1703021119182
“EC” DECLARATION OF CONFORMITY
DECLARATION “CE” DE CONFORMITE
“EG”-KONFORMITÄTSERKLÄRUNG
“EG”-VERKLARING VAN OVEREENSTEMMING
DECLARACION “CE” DE CONFORMIDAD
KONEIDEN EY-VAATIMUSTENMUKAISUUSVAKUUTUS
“EF”-OVERENSSTEMMELSESERKLÆRINGEN
PRODUKTÖVERENSSTÄMMELSE ENLIGT FABRIKANTEN
Il fabbricante, the Manufacturer, le fabricant, der Hersteller,
de Fabrikant, el fabricante, valmistaja, Producenten, Tillverkaren :
OFFICINE BIEFFEBI S.p.A.
Via dell’Artigianato, 7 - GONZAGA (MN) - ITALY
DICHIARA CHE LA MACCHINA
DESIGNAZIONE DELLA MACCHINA: MACCHINA MULTIFUNZIONE
CERTIFIES THAT THE MACHINE
DESIGNATION OF THE MACHINE: MULTI-FUNCTION MACHINE
CERTIFIE QUE LA MACHINE
DÉSIGNATION DE LA MACHINE: MULTI-FONCTIONS
ERKLÄRT DASS DIE MASCHINE
BEZEICHNUNG DER MASCHINE: AUSTAUSCHBARE ANBAUGERÄT
VERKLAART DAT DE MACHINE
AANWIJZING VAN DE MACHINE: MULTIFUNCTIONELE MACHINE
DECLARA QUE LA MÁQUINA
DESIGNACIÓN DE LA MÁQUINA: MÁQUINA MULTIFUNCIÓN
ILMOITTAA, ETTÄ MONITOIMIKONE
TYYPPIMERKINTÄ: MONITOIMIKONE
ERKLÆRER AT DENNE MASKINEN
UDPEGNING AF MASKINEN: MULTIFUNKTIONSMASKINE
INTYGAR ATT MASKINEN
MASKINTYP: MULTIFUNKTIONSMASKINEN
Marca, Brand, Marque, Brand, Merk, Marca, Merkki, Mærke, Fabrikat: ..............GIANNI FERRARI
Modello, Model, Modèle, Typ, Model, Modelo, Malli, Type, Modell: ....................................................................
Numero di serie, Serial number, Numero de série,
Seriennummer, Serienummer, Numero de serie,
Valmistenumero, Løbenummer, Serienummer: ............................................................................................................
Numero di serie motore, Engine Serial Number,
Numéro de série moteur, Motorseriennummer,
Motornummer, Numero de serie motor,
Sarjanumero moottorin, Løbenummer motor,
Serienummer hos motorn: .........................................................................................................
4

E’ CONFORME ALLE DISPOSIZIONI PERTINENTI DELLE SEGUENTI DIRETTIVE EUROPEE:
—
Direttiva “Macchine” 2006/42/CE (e successive modiche ed integrazioni) e alle disposizioni nazionali di attuazione (*).
(*) Procedura di valutazione della conformità: Allegato VIII
— Direttiva 2014/30/EU: requisiti essenziali di sicurezza e di salute relativi alla compatibilità elettromagnetica delle ap-
parecchiature ( e successive modiche ed integrazioni).
IT
– Inoltre, si precisa che, il sottoscritto Ferrari Claudio in qualità di presidente della ditta “OFFICINE BIEFFEBI S.p.A.” con sede
in via dell’ Artigianato 7, 46023, Gonzaga (Mn) - ITALY è il responsabile a costituire e a custodire il fascicolo tecnico.
COMPLIES WITH THE FOLLOWING PERTINENT EUROPEAN DIRECTIVES:
—
Machine directive 2006/42/CE (and following amendments and integrations) and national execution measures(*).
(*) Compliance evaluation procedure: enclosure VIII
— Machine directive 2014/30/EU: Essential safety and health requirements of electromagnetic compatibility of
equipment (and further amendments and integrations).
EN
– Furthermore it is stipulated that Claudio Ferrari in quality of President and depositary of the technical dossier of the company
OFFICINE BIEFFEBI S.p.A. via dell’ Artigianato 7, 46023, Gonzaga (Mn) - ITALY is responsible for the production and the
follow up of the technical manual.
RÉPOND AUX EXIGENCES PRÉVUES PAR LES DIRECTIVES EUROPÉENNES:
—
Directive sur les machines n°2006/42/CE (y compris ses amendements et rajouts) et ses mesures d’exécution nationale. (*)
(*) Procédure d’évaluation de la mise en conformité : annexe VIII
— Directive sur les machines n°2014/30/EU: Exigences essentielles en matière de protection et de santé sur la compa-
tibilité électromagnétique (CEM) des équipements (ainsi que tout autre amendement et rajout).
FR
– En outre, il est stipulé que Claudio Ferrari, en qualité de Président et dépositaire du dossier technique de la société OFFICINE
BIEFFEBI S.p.A. via dell’ Artigianato 7, 46023, Gonzaga (Mn) - ITALIE est responsable de la rédaction et du suivi du manuel
technique.
DEN FOLGENDEN EUROPÄISCHEN RICHTLINIEN ENTSPRICHT:
— Maschinenrichtlinie 2006/42/EG (in der geltenden Fassung) und den nationalen Durchführungsbestimmungen (*).
(*) Verfahren für die Bewertung der Konformität: Anlage VIII
— Richtlinie 2014/30/EU: Grundlegende Sicherheits- und Gesundheitsanforderungen hinsichtlich der elektroma-
gnetschen Verträglichkeit von Geräten (in der geltenden Fassung).
DE
– Des weiteren wird darauf hingewiesen, dass der Unterzeichnete, Ferrari Claudio, in seinem Amt als Präsident der Firma
„OFFICINE BIEFFEBI S.p.A.“ mit Sitz in Via dell’Artigianato 7, 46023, Gonzaga (Mn) - ITALIEN für die Verfassung und Aufbe-
wahrung der technischen Unterlagen verantwortlich ist.
VOLDOET AAN DE VOLGENDE EUROPESE RICHTLIJNEN:
—
Machine richtlijn 2006/42/CE (en de volgende wijzigingen en integraties) en de nationale uitvoeringsmaatregelen.(*)
(*) Met inachtneming van evaluatieprocedure: bijlage VIII
— Machine richtlijn 2014/30/EU: Essentiële veiligheids- en gezondheidseisen van de elektromagnetische compatibili-
teit van de uitrusting (en verdere wijzigingen en integraties).
NL
– Voorts is bepaald dat Claudio Ferrari in de kwaliteit van de president en de bewaarder van het technisch dossier van Officine
BIEFFEBI SpA Via dell ‘Artigianato 7, 46023, Gonzaga (Mn) - Italië verantwoordelijk is voor de productie en het naleven van
de technische handleiding.
ES CONFORME A LAS DISPOSICIONES PERTINENTES DE LAS SIGUIENTES DIRECTIVAS EUROPEAS:
—
Directiva “Máquinas” 2006/42/CE (y posteriores modicaciones e integraciones) y a las disposiciones nacionales de aplicación (*).
(*) Procedimiento de valoración de la conformidad: Anexo VIII
— Directiva 2014/30/EU: requisitos esenciales de seguridad y de salud relativos a la compatibilidad electromagnética
de los equipos (y posteriores modicaciones e integraciones).
ES
–
Además, se precisa que el abajo firmante Ferrari Claudio, en calidad de presidente de la sociedad “OFFICINE BIEFFEBI S.p.A.” con
sede en via dell’Artigianato 7, 46023, Gonzaga (MN) - ITALIA, es el responsable de constituir y custodiar el expediente técnico.
5

ON YHDENMUKAINEN SEURAAVIEN EUROOPPALAISTEN DIREKTIIVIEN KANSSA:
13/12/2017
—
Konedirektiivi 2006/42/EY (ja myöhemmät muutokset ja lisäykset) ja kansalliset säädökset (*).
(*) Yhdenmuakaisuuden arviointiproseduuri: Liite VIII
— Direktiivi 2014/30/EU: laitteiden elektromagneettiseen yhteensopivuuteen liittyvät turvallisuutta ja terveyttä koskevat
vaatimukset ( ja myöhemmät muutokset ja lisäykset).
FI
– Lisäksi ilmoittaa, että allekirjoittaja Ferrari Claudio yrityksen “OFFICINE BIEFFEBI S.p.A.” osoitteessa via dell’ Artigianato 7,
46023, Gonzaga (MN) - ITALY johtaja, on vastuussa teknisen asiakirja-aineiston kehittämisestä ja säilyttämisestä.
ER I OVERENSSTEMMELSE MED FØLGENDE RELEVANTE EUROPÆISKE DIREKTIVER:
—
Maskindirektiv 2006/42/CE (og yderligere tillæg) og nationale effektuerende mål. (*)
(*) Evalueringsprocedure: bilag VIII
— Maskindirektiv 2014/30/EU: Afgørende sikkerheds- og sundhedskrav for materiellets elektromagnetiske kompatibi-
litet (og yderligere tillæg)
DA
– Endvidere er der stillet som betingelse at Claudio Ferrari i egenskab af direktør og depositar for den tekniske afdeling i firmaet
OFFICINE BIEFFEBI S.p.A. via dell’ Artigianato 7, 46023, Gonzaga (Mn) Italy er ansvarlig for < og opfølgningen af den teknis-
ke vejledning.
ÖVERENSTÄMMER MED FÖLJANDE RELEVANTA EUROPEISKA DIREKTIV:
— Maskindirektiv 2006/42/CE (och ytterligare tillägg) och nationellt effektuerade mål. (*)
(*) Evalueringsprocedur: bilaga VIII
— Maskindirektiv 2014/30/EU: Avgörande säkerhets- och hälsokrav för utrustningens elektromagnetiska kompatibili-
tet (och ytterligare tillägg)
SV
– Vidare är det så att Claudio Ferrari i egenskap av direktör för den tekniske avdelningen inom OFFICINE BIEFFEBI S.p.A. via
dell’ Artigianato 7, 46023, Gonzaga (Mn) Italien är ansvarig för produktion och uppföljning av tekniska manualer.
Fatto a - Made in - Fait à - Innet gebildet - Fabricado en
Made in - Gefabriceert in - Valmistettu - Tillverkad i
lì - on - le - den - en fecha - Den - Op - Päiväys - Den
...................................................................
6
GONZAGA (MN) ITALY
FERRARI CLAUDIO
PRESIDENT OF
OFFICINE BIEFFEBI S.P.A.
Firma - Signature - Signature - Unterschrift - Firma
Underskift - Handtekening - Allekirjoitus - Namnteckning

7

REGISTRAZIONE DEL PRODOTTO
Compili on-line il modulo di REGISTRAZIONE PRODOTTO sul sito www.gianniferrari.com registrando il suo
nuovo prodotto Gianni Ferrari® renderà immediatamente attiva la garanzia del costruttore. Inoltre la registrazione
aiuterà la Gianni Ferrari a fornirle un servizio più veloce ed efciente.
Grazie alla registrazione potrà ricevere, se lo desidera, informazioni relative a novità, iniziative e aggiornamenti
per ottenere il massimo dal suo nuovo prodotto Gianni Ferrari®.
Per l’attivazione della garanzia del costruttore, la registrazione dovrà essere effettuata entro 15 giorni dall’acquisto.
CONDIZIONI GENERALI DI GARANZIA
Il prodotto Gianni Ferrari® che ha acquistato è stato progettato e costruito con tecnologie all’avanguardia per
garantirle elevata qualità ed afdabilità nel tempo.
Prima della consegna, il Rivenditore Gianni Ferrari® ha eseguito una serie di controlli e veriche, fornendole
altresì una serie di informazioni sul corretto utilizzo e manutenzione del prodotto.
Le principali operazioni svolte dal Rivenditore prima di congegnarle la macchina sono:
- controlli, veriche tecniche e regolazioni per la messa in opera;
- controllo dei livelli degli oli e degli altri liquidi;
- consegna del manuale d’uso e manutenzione, completo del certicato di conformità;
- consegna della documentazione del motore;
- illustrazione del funzionamento del prodotto;
- illustrazione del funzionamento dei dispositivi / organi di sicurezza;
- illustrazione dell’importanza delle manutenzioni programmate;
- illustrazione delle condizioni generali di garanzia.
1. DURATA DELLA GARANZIA
La presente garanzia del Costruttore non incia in alcun modo i diritti legali dell’Acquirente nei confronti del Venditore (Rivenditore) e fornisce indicazioni supplementari a quelle offerte dal Venditore (Rivenditore) nell’ambito
del contratto di vendita. Senza pregiudizio per le garanzie previste dalla legislazione locale applicabile, e salvo
che la legge non preveda un periodo di tempo più lungo, la Gianni Ferrari garantisce il prodotto nuovo per il
periodo di 2 anni.
La durata della garanzia del motore è indicata sulla documentazione del motore stesso.
2. COPERTURA DELLA GARANZIA
Durante la decorrenza della garanzia, la Gianni Ferrari si impegna, attraverso il proprio Rivenditore, a
riparare o sostituire gratuitamente il componente riconosciuto difettoso, nella fabbricazione o nel materiale,
dal proprio staff tecnico. L’intervento di riparazione o di sostituzione del componente difettoso non prolunga
né rinnova il periodo di garanzia. La garanzia copre il prodotto solo se ne è stato fatto uso conforme al
manuale d’uso e manutenzione fornito a corredo del prodotto.
Il motore è coperto da una propria garanzia, indicata sulla documentazione del motore stesso.
3. ESCLUSIONE DALLA GARANZIA
La garanzia decade se il difetto è causato da:
- incuria;
- cattivo uso o uso improprio;
- maltrattamento;
- uso e manutenzione non corrispondente nei tempi e nei modi alle disposizioni sul manuale d’uso e
manutenzione;
- incidenti;
- utilizzo di ricambi non originali;
- modiche non autorizzate dalla Gianni Ferrari e/o utilizzo di accessori e attrezzature non autorizzate;
- abbinamento di macchina ed attrezzo non autorizzato dalla Gianni Ferrari.
Danni causati da urti, sassi o corpi estranei nell’area di lavoro non potranno essere riconosciuti in garanzia.
La normale usura dei materiali di consumo come ltri, oli, candele, pneumatici, cinghie, lame ecc. non è coperta
dalla garanzia.
La Gianni Ferrari considererà le eventuali domande di garanzia solo se il PRODOTTO risulta già REGISTRATO sul
portale www.gianniferrari.com e la registrazione è completa di copia del DOCUMENTO D’ACQUISTO.
Si raccomanda di registrare il prodotto entro 15 giorni dall’acquisto.
8

NOTE PER LO SMALTIMENTO DEL PRODOTTO VALIDE PER LA COMUNITÀ EUROPEA ........................... 10
INDICE
0. TARGHETTA CE ......................................................................................................................................... 10
1. NUMERO DI SERIE .................................................................................................................................... 10
2. AI NOSTRI CLIENTI ................................................................................................................................... 10
3. DESTINAZIONE D’USO ............................................................................................................................. 10
4. USI PREVEDIBILI NON CONSENTITI ........................................................................................................ 10
5. RESPONSABILITA’ DELL’OPERATORE ..................................................................................................... 11
6. NORME DI SICUREZZA............................................................................................................................. 11
6.1 PENDENZE .................................................................................................................................................................... 12
6.2 TRASPORTO E SCARICO.............................................................................................................................................. 12
7. CARATTERISTICHE TECNICHE ................................................................................................................ 13
7.1 PESO MACCHINA ......................................................................................................................................................... 13
7.2 ATTREZZATURE COMPATIBILI ...................................................................................................................................... 13
7.3 RUMOROSITA’ .............................................................................................................................................................. 13
7.4 VIBRAZIONI ................................................................................................................................................................... 13
8. COMANDI E STRUMENTI......................................................................................................................... 13
9. MONTAGGIO DELL’ATTREZZATURA ........................................................................................................ 14
9.1 MONTAGGIO DEL PIATTO RASAERBA ......................................................................................................................... 14
9.2 MONTAGGIO DELLA LAMA NEVE ................................................................................................................................ 14
10. UTILIZZO COMANDI E STRUMENTI ....................................................................................................... 14
10.1 AVANZAMENTO - RETROMARCIA .............................................................................................................................. 14
10.2 FRENO DI STAZIONAMENTO ...................................................................................................................................... 14
10.3 BY-PASS ...................................................................................................................................................................... 14
10.4 ACCELERATORE A MANO .......................................................................................................................................... 14
10.5 PRESA DI FORZA ........................................................................................................................................................ 14
10.6 SOLLEVAMENTO PIATTO DI TAGLIO .......................................................................................................................... 14
10.7 RUBINETTO COMBUSTIBILE ...................................................................................................................................... 14
10.8 REGOLAZIONE ALTEZZA DI TAGLIO .......................................................................................................................... 14
11. SCHEMA ELETTRICO.............................................................................................................................. 14
11.0 LEGENDA COLORI ...................................................................................................................................................... 14
11.1 BRIGGS & STRATTON ................................................................................................................................................. 15
12. AVVIAMENTO MOTORE .......................................................................................................................... 15
13. MOVIMENTAZIONE DELLA MACCHINA ................................................................................................. 15
14. TAGLIO DELL’ERBA ................................................................................................................................. 15
14.1 SCARICO POSTERIORE DELL’ERBA .......................................................................................................................... 15
14.2 MULCHING .................................................................................................................................................................. 15
15. ARRESTO MOTORE ................................................................................................................................ 15
16. RIFORNIMENTO ...................................................................................................................................... 15
17. MANUTENZIONE ORDINARIA ................................................................................................................ 16
17.1 RABBOCCO OLIO MOTORE ....................................................................................................................................... 16
17.2 SCARICO OLIO MOTORE ........................................................................................................................................... 16
17.3 BATTERIA .....................................................................................................................................................................16
17.4 FUSIBILI ....................................................................................................................................................................... 16
17.5 FILTRO ARIA ................................................................................................................................................................ 16
17.6 FILTRO OLIO MOTORE................................................................................................................................................ 16
17.7 FILTRO CARBURANTE ................................................................................................................................................ 16
17.8 PRESSIONE PNEUMATICI ........................................................................................................................................... 16
17.9 KIT VERTICALIZZAZIONE PIATTO ................................................................................................................................ 16
17.10 PULIZIA DELLA MACCHINA ...................................................................................................................................... 16
17.11 INGRASSAGGIO .......................................................................................................................................................... 16
17.12 SOSTITUZIONE E/O MANUTENZIONE LAME ............................................................................................................ 16
17.13 CAMBIO OLIO TRANSAXLE ........................................................................................................................................ 16
17.14 FILTRO TRANSAXLE ................................................................................................................................................... 16
18. MANUTENZIONE STRAORDINARIA ....................................................................................................... 16
19. INATTIVITA’ DELLA MACCHINA .............................................................................................................. 16
20. ETICHETTE DI SICUREZZA ..................................................................................................................... 17
21. NOTE GENERALI ..................................................................................................................................... 17
22. TABELLA MANUTENZIONI ...................................................................................................................... 17
23. TABELLA D’INDIVIDUAZIONE DEI GUASTI ............................................................................................17
IT
9

NOTE PER LO SMALTIMENTO DEL PRODOTTO VALIDE PER LA COMUNITÀ EUROPEA
Non smaltire il prodotto come rifiuto solido urbano ma smaltirlo negli appositi centri di raccolta.
Abbandonando il prodotto nell’ambiente si potrebbero creare gravi danni all’ambiente stesso. Nel
caso il prodotto contenga delle batterie è necessario rimuoverle prima di procedere allo smaltimento. Queste ultime debbono essere smaltite separatamente in altri contenitori in quanto contenenti sostanze altamente tossiche. Il simbolo rappresentato in figura rappresenta il bidone dei
rifiuti urbani ed è tassativamente vietato riporre l’apparecchio in questi contenitori.
0. TARGHETTA CE
L’etichetta è puramente indicativa, fare riferimento a quella apposta sulla macchina.
1) Indirizzo fabbricante
2) Modello
3) Massa
1. NUMERO DI SERIE
Vedi figura 0.
4) Motore
5) Anno di costruzione
6) Designazione della macchina
Vedi figura 1.
2. AI NOSTRI CLIENTI
- Siamo orgogliosi di averLa come cliente.
- Prima della messa in funzione l’operatore dovrà studiare attentamente questo manuale per una migliore com-
prensione della macchina e per i suggerimenti in esso indicati per il suo uso e manutenzione.
Le motrici GSR possono essere equipaggiate con svariate attrezzature; è quindi importante che l’utente studi,
oltre al presente manuale, anche quello relativo all’attrezzatura che si intende montare sulla propria motrice.
- Le macchine sono state studiate e realizzate per il miglior lavoro nelle più disparate condizioni; come sempre
la qualità del lavoro è in relazione alla manutenzione ordinaria eseguita.
- Per specifiche informazioni e consigli d’uso non contenute in questo libretto si rivolga al Rivenditore, il quale
sarà lieto di aiutarla rispondendo alle Sue domande sull’uso e manutenzione di queste macchine.
QUESTO SIMBOLO E’ USATO PER RICHIAMARE LA VOSTRA ATTENZIONE SULLE PRECAUZIONI
DI SICUREZZA CHE DEVONO ESSERE ESEGUITE DALL’OPERATORE PER EVITARE INCIDENTI.
QUANDO VEDETE QUESTO SIMBOLO FATE ATTENZIONE, NE VA DELLA SICUREZZA VOSTRA E
DEGLI ALTRI.
3. DESTINAZIONE D’USO
La macchina appartenente alla serie GSR, è una macchina multi-funzione destinata prevalentemente ad un uso
professionale. Tra le possibili destinazioni d’uso si possono citare:
- Piatto rasaerba mulching
- Turbina da neve
- Lama neve
Decliniamo ogni responsabilità se la motrice viene equipaggiata con accessori e attrezzature diverse da quelle
indicate in questo manuale. Utilizzare parti e accessori studiati esclusivamente dalla Nostra azienda per lo specifico modello da Voi acquistato.
4. USI PREVEDIBILI NON CONSENTITI
Non sono consentiti gli usi non indicati all’interno del paragrafo “Destinazione d’uso”.
L’uso di altre attrezzature non riportate in questo manuale è da ritenersi “uso improprio” e pericoloso perché non
coperto dalla nostra analisi dei rischi.
Non è ammesso trasportare altre persone (oltre al conducente), cose o animali sulla macchina.
E’ assolutamente vietato l’uso delle macchine senza aver consultato il presente libretto.
E’ fatto assoluto divieto di eseguire trasformazioni e modifiche sulla macchina non previste da questo libretto.
E’ fatto assoluto divieto l’uso della macchina non in perfette condizioni, quindi prima dell’uso intervenite eseguendo le operazioni di controllo e manutenzione consigliate.
Non permettere l’uso a bambini e adolescenti.
Non utilizzare la macchina quando si è a piedi scalzi o si indossano sandali.
E’ assolutamente vietato l’uso della macchina come montacarichi.
Non accendete mai il motore della macchina in luogo chiuso o senza adeguata ventilazione. I fumi di scarico
sono tossici.
Non permettete che si sviluppino fiamme o scintille vicino al serbatoio del carburante o alla batteria.
Mai parcheggiare la macchina in discesa.
E’ tassativamente vietato utilizzare la macchina senza l’attrezzatura correttamente montata.
E’ fatto assoluto divieto manomettere i sigilli di controllo di velocità della macchina.
Non utilizzare la macchina in condizioni di meteo avverse, in particolare in presenza di lampi.
10

5. RESPONSABILITA’ DELL’OPERATORE
E’ responsabilità dell’operatore leggere attentamente il manuale e capire il corretto procedimento operativo delle
macchine, di lubrificare e di mantenere la stessa secondo le istruzioni di questo manuale.
L’operatore è responsabile del controllo della sua macchina e della sostituzione e riparazione delle parti soggette
a continua usura che potrebbero causare danni ad altre persone.
L’operatore è responsabile dei danni cagionati a terzi, a se stesso e a cose, dall’uso improprio della macchina ed
in contrasto alle indicazioni riportate su questo manuale.
La macchina deve essere utilizzata e sottoposta a manutenzione esclusivamente da persone a conoscenza delle
caratteristiche specifiche e che abbiano compreso le norme di sicurezza.
Mai consentire l’uso della macchina a bambini e adolescenti. Eventuali normative locali possono fissare un’età
minima per l’operatore.
Utilizzare solo attacchi, parti e accessori studiati e forniti dalla Nostra azienda per lo specifico modello da Voi
acquistato; per informazioni rivolgersi al vostro Rivenditore.
E’ fatto quindi assoluto divieto di eseguire trasformazioni e modifiche sulla macchina non previste da questo
libretto.
L’OPERATORE NELL’USO DELLA MACCHINA DEVE OSSERVARE SCRUPOLOSAMENTE LE NORME DI SICUREZZA CONTENUTE IN
QUESTO LIBRETTO, LE NORME DI PREVENZIONE DEGLI INFORTUNI, ALTRE NORME DI SICUREZZA GENERICHE, LE DISPOSIZIONI
DI MEDICINA DEL LAVORO.
IT
6. NORME DI SICUREZZA
IL PRUDENTE OPERATORE E’ IL MIGLIORE OPERATORE
Molti incidenti possono essere evitati osservando le precauzioni indicate in questo libretto.
PARTE GENERALE
1) Leggete attentamente il manuale in ogni sua parte. E’ fatto assoluto divieto l’utilizzo della macchina al perso-
nale che non abbia letto e compreso il presente manuale.
2) Ogni volta prima dell’uso ispezionate la macchina in ogni sua parte e prestate attenzione a malfunzionamen-
ti, bulloni e viti allentate, coltelli, e altre parti danneggiate o non ben fissate. E’ fatto assoluto divieto l’uso della
macchina non in perfette condizioni, quindi prima dell’uso intervenite eseguendo le operazioni di controllo e
manutenzione consigliate.
3) Familiarizzate con tutte le parti ed i controlli della macchina prima della messa in moto.
4) L’uso della macchina è consentito a una sola persona adulta e consapevole. Non permettere l’uso a bambini
e adolescenti.
Evitate di utilizzare la macchina in condizioni fisiche non idonee.
5) Tenere persone e cose a distanza di sicurezza come prescritto successivamente.
6) Utilizzate solo parti e accessori forniti da Noi e non permettete nessuna modifica o trasformazione. Per
informazioni contattate il Vs. Rivenditore.
7) Riapplicare di nuovo tutte le decalcomanie di sicurezza e ammonimento danneggiate, illeggibili o mancanti.
Controllate la lista delle decalcomanie nella apposita sezione di sicurezza. Mantenere pulite le decalcomanie
da fango, sporcizia e polvere.
8) Tenete mani, piedi e voi stessi lontani da ogni parte in movimento.
9) Non usate la macchina senza protezioni e coperchi nella giusta posizione e in buone condizioni.
Non impiegare la macchina se i dispositivi di sicurezza non sono in perfetta efficienza.
Non manomettere mai per alcun motivo i dispositivi di sicurezza.
10) Se colpite o agganciate un oggetto fermate immediatamente la macchina, disattivare la presa di forza,
spegnere il motore, appoggiate l’attrezzatura a terra e controllatela in ogni sua parte. Prima di ripartire assicuratevi di aver ripristinato le condizioni per un funzionamento ottimale della macchina.
11) Quando non utilizzate la macchina, disattivate la PTO* (*Presa di forza che mette in azione l’attrezzatura),
abbassate l’attrezzatura facendola appoggiare a terra, spegnete il motore e togliete la chiave.
12) Prima di eseguire le operazioni di manutenzione sulla macchina assicurarsi che la stessa sia spenta. Se si
deve intervenire sull’impianto elettrico, scollegare i cavi di tensione dai poli della batteria.
13) Utilizzate la macchina e le attrezzature ad una velocità compatibile con le esigenze di sicurezza e le caratte-
ristiche del modello usato.
14) Usate estrema prudenza utilizzando la macchina sui pendii. Riducete al minimo la velocità.
15) Nell’uso e manutenzione della macchina indossare un abbigliamento adeguato: occhiali, guanti, calzature
antinfortunistiche e antiscivolo e altri indumenti di protezione.
16) Utilizzare la macchina in condizioni di visibilità buone.
11

17) Tutti i conducenti dovrebbero ricevere una formazione professionale e pratica. Tale formazione dovrebbe
mettere in risalto:
- la necessità di prestare attenzione e di essere concentrati quando si lavora con le macchine con conducen-
te seduto.
- il controllo di una macchina che slitta lungo un pendio non potrà essere ristabilito azionando i freni.
Le principali ragioni della perdita di controllo sono:
a) insufficiente aderenza delle ruote;
b) guida troppo veloce;
c) frenata inadeguata;
d) tipo di macchina inadatto al lavoro richiesto;
e) mancata consapevolezza dell’effetto delle condizioni del terreno, in particolare dei pendii;
f) attacco non corretto delle attrezzature e conseguente mal ripartizione dei carichi.
18) Durante le fasi di lavoro, indossare sempre calzature resistenti e pantaloni lunghi. Non utilizzare la macchina
quando si è a piedi scalzi o si indossano sandali.
19) Ispezionare a fondo l’area nella quale deve essere utilizzata la macchina e rimuovere tutti gli oggetti che
potrebbero essere lanciati dalla macchina.
20) Disinnestare sempre la presa di forza durante le fasi di trasferimento della macchina.
21) Ogni volta che l’utilizzatore lascia, anche temporaneamente, la macchina deve azionare il freno di staziona-
mento.
22) Durante la fase di retromarcia prestare molta attenzione a ostacoli ed in particolare a persone.
23) E’ compito del datore di lavoro valutare e adottare i dispositivi di protezione individuale più idonei.
6.1 PENDENZE
- Non utilizzare la macchina con pendenze longitudinali superiori a 15°.
- Non utilizzare la macchina con pendenze laterali superiori a 10°.
- Durante le fasi di lavoro non affrontare pendenze di nessun tipo (laterali e longitudinali) con il piatto e il cesto
alzato.
- Non fermare o avviare improvvisamente la macchina durante la salita o la discesa lungo un pendio.
- Mantenere bassa la velocità della macchina sui pendii e durante le curve strette.
- Prestare attenzione ad eventuali dossi, buche o altri pericoli nascosti. Se il terreno è irregolare, la macchina
può ribaltarsi più facilmente.
- Non operare in prossimità di banchine, fossi o argini; la macchina potrebbe ribaltarsi improvvisamente se una
ruota supera il bordo di questi ultimi, oppure se la banchina cede.
6.2 TRASPORTO E SCARICO
La macchina è pesante e può provocare seri danni da schiacciamento.
Caricarla e scaricarla con cautela utilizzando rampe di carico.
Trasportare la macchina su un rimorchio omologato. Durante il trasporto, applicare il freno di stazionamento, e
fissare la macchina con dispositivi omologati come cinghie, catene o funi.
N.B.: Se la macchina è imballata e posta sopra al proprio pallets è possibile movimentarla con il muletto.
PORTATA MINIMA 440 kg
IMPORTANTE:
Il freno di stazionamento non è sufciente a bloccare la macchina durante il trasporto. Fissare
adeguatamente la macchina al veicolo con dispositivi omologati.
Vedi figura 6.1
Vedi figura 6.2
12

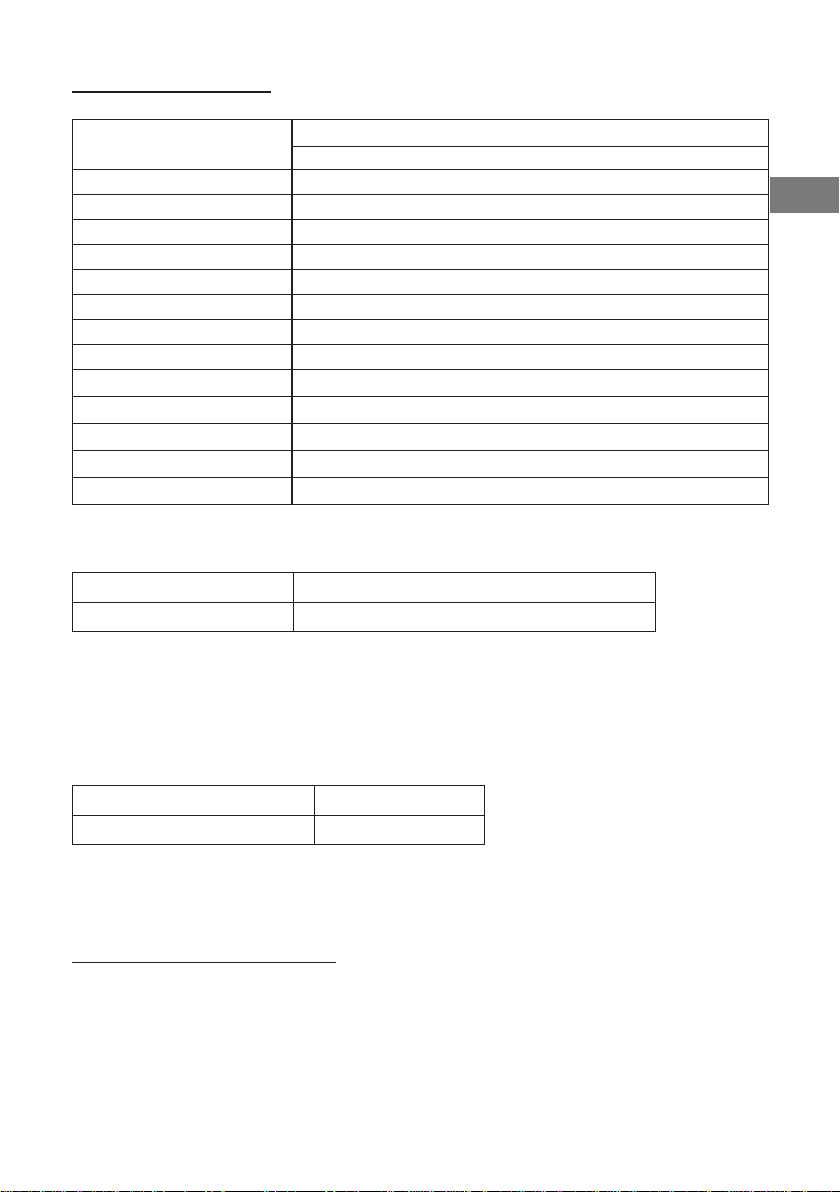
7. CARATTERISTICHE TECNICHE
Motore
Potenza (HP)
Cilindrata (cm3)
N° Cilindri
Ruote motrici
Tipo di avanzamento
Freno di servizio
Freno di stazionamento
Velocità max (km/h)
Capacità serbatoio
carburante (l)
Lame
Rotazione lame
Regolazione altezza di taglio (cm)
Larghezza taglio effettiva (mm)
7.1 PESO MACCHINA
Modello Massa a serbatoio vuoto (kg)
GSR200
Vedi figura 7.
GSR200
BRIGGS & STRATTON
20
627
2
Anteriori
Idrostatico
Idrostatico
Meccanico a disco
8
19
3 x 88001000005
Rotanti per mezzo di frizione elettromagnetica
2 ÷ 8
1120
385
IT
7.2 ATTREZZATURE COMPATIBILI
Piatto rasaerba mulching
Lama neve
Turbina da neve
7.3 RUMOROSITA’
Potenza acustica
Pressione acustica
posto operatore
102 dB (A) ± 1,5
90 dB (A) ± 1,5
7.4 VIBRAZIONI
• Vibrazione delle membra superiori: ...........................................................................................< 2,5 m/s2.
• Vibrazione del corpo: .................................................................................................................< 0,5 m/s2.
8. COMANDI E STRUMENTI
Il sistema di guida della macchina è composto dai seguenti comandi:
1) Volante
2) Freno di stazionamento
3) Regolazione longitudinale sedile
4) By-Pass
5) Regolazione altezza di taglio
Vedi figura 8.
6) Inserimento PTO
7) Leva acceleratore
8) Leva sollevamento attrezzatura
9) Interruttore luci
10) Chiave avviamento
11) Rubinetto combustibile
12) Pedale avanzamento Retromarcia
13) Starter
14) Contaore
13
9. MONTAGGIO DELL’ATTREZZATURA
9.1 MONTAGGIO DEL PIATTO RASAERBA
1) Fare accoppiare i bracci di sollevamento della motrice con gli attacchi presenti sull’attrezzatura.
2) Infilare i puntalini di sicurezza e le relative copiglie antisfilamento.
3) Allentare tendicinghia
4) Montare la cinghia.
9.2 MONTAGGIO DELLA LAMA NEVE
1) Fare accoppiare i bracci di sollevamento della motrice con gli attacchi presenti sull’attrezzatura.
2) Infilare i puntalini di sicurezza e le relative copiglie antisfilamento.
Vedi figura 9.1
Vedi figura 9.2
10. UTILIZZO COMANDI E STRUMENTI
10.1 AVANZAMENTO - RETROMARCIA
10.2 FRENO DI STAZIONAMENTO
10.3 BY-PASS
ATTENZIONE:
Evitare il traino della macchina per lunghi tratti con by-pass inserito.
Vedi figura 10.3
Vedi figura 10.1
Vedi figura 10.2
10.4 ACCELERATORE A MANO
10.5 PRESA DI FORZA
10.6 SOLLEVAMENTO PIATTO DI TAGLIO
Prestare attenzione a possibili schiacciamenti, utilizzare le apposite maniglie di sollevamento.
10.7 RUBINETTO COMBUSTIBILE
10.8 REGOLAZIONE ALTEZZA DI TAGLIO
Vedi figura 10.4
Vedi figura 10.5
Vedi figura 10.6
Vedi figura 10.7
Vedi figura 10.8
11. SCHEMA ELETTRICO
11.0 LEGENDA COLORI
A Azzurro
B Bianco
C Arancio
G Giallo
H Grigio
L Blu
M Marrone
N Nero
R Rosso
S Rosa
V Verde
Z Viola
QUESTO SIMBOLO INDICA
LA MASSA
14
11.1 BRIGGS & STRATTON
RIF. DESCRIZIONE
A Interruttore avviamento
B Avvisatore acustico cesto pieno
C Interruttore PTO
Interruttore fari lavoro
D
E Faro lavoro
F Faro lavoro
G Frizione lame
H Micro cesto pieno
L Motorino avviamento
M Connessioni motore
N Micro cofano chiuso
N1 Micro sicurezza ancata sinistra
N2 Micro stop allarme freno
O Micro cesto chiuso
P Micro sedile
12. AVVIAMENTO MOTORE
1) Prendere posto correttamente sul sedile.
2) Assicurarsi che il freno di stazionamento sia completamente inserito.
3) Inserire lo starter per la partenza a motore freddo e girare la chiave di accensione sulla posizione “ON”.
4) Girare la chiave di accensione verso il simbolo per accendere il motore.
5) Disinserire lentamente lo starter una volta che il motore è acceso.
13. MOVIMENTAZIONE DELLA MACCHINA
1) Regolare la leva acceleratore.
2) Disinserire il freno di stazionamento.
3) Selezionare la velocità desiderata mediante il pedale posto sul lato DX.
4) Azionando il volante si comandano le ruote anteriori.
N.B.: Per arrestare le macchina é sufciente rilasciare il pedale di avanzamento o retromarcia; una volta
ferma, inserire il freno di stazionamento.
ATTENZIONE: Finchè non sarete esperti nella guida, avanzate a velocità ridotta. Mantenere sempre persone e animali ad almeno 3 mt. di distanza.
Vedi figura 11.1
Vedi figura 12.
R Micro freno a mano
M1_R1
Relè consenso avviamento da PTO
M1_R2
Relè sicurezze PTO
M1_R3
Relè consenso avviamento da sicurezze
M1_R4
Relè arresto motore da chiave
M1_R6
Relè PTO
M2_R3
Relè arresto motore da sicurezze
M2_R1
Relè arresto motore da sedile
Q Diodo soppressore su interrutore PTO
S Massa impianto
T Contaore
V Diodo soppressore su frizione lame
Y Fusibile PTO
Z Fusibile protezione impianto
R8 Teleruttore avviamento
Vedi figura 13.
14. TAGLIO DELL’ERBA
14.1 SCARICO POSTERIORE DELL’ERBA
14.2 MULCHING
Vedi figura 14.2
Vedi figura 14.1
15. ARRESTO MOTORE
1) Arrestare la macchina.
2) Disinnestare la PTO
3) Inserire il freno di stazionamento.
4) Portare il motore al n° minimo dei giri.
5) Girare la chiave di accensione dalla posizione “ON” alla posizione “STOP”.
16. RIFORNIMENTO
Il rifornimento del carburante deve essere eseguito in luoghi aperti o sufficientemente ventilati, con motore spento e in assenza di fiamme o scintille. Assicurarsi inoltre che il carburante sia quello indicato.
AVVERTENZA: IL CARBURANTE E’ ALTAMENTE INFIAMMABILE.
CONSERVARE IL CARBURANTE IN APPOSITI RECIPIENTI. FARE RIFORNIMENTO DI CARBURANTE SOLAMENTE ALL’APERTO E NON FUMARE DURANTE QUESTA OPERAZIONE. AGGIUNGERE CARBURANTE PRIMA DI AVVIARE IL MOTORE. NON TOGLIERE MAI IL TAPPO DEL SERBATOIO NE’ AGGIUNGERE
CARBURANTE QUANDO IL MOTORE E’ IN FUNZIONE O QUANDO E’ CALDO.
In caso di fuoriuscita del carburante, non tentare di avviare il motore ma allontanare la macchina dall’area dove è
avvenuta la fuoriuscita evitando di creare fonti di accensione finchè non si sono dissipati i vapori. Rimettere a posto
correttamente i tappi del serbatoio e del contenitore del carburante.
Non immagazzinare mai la macchina con carburante nel serbatoio all’interno di un edificio dove i vapori possono raggiungere una
fiamma libera o una scintilla. Lasciare raffreddare il motore prima di immagazzinare la macchina in un qualunque ambiente chiuso.
Vedi figura 16.
15
IT

17. MANUTENZIONE ORDINARIA
Dovendo eseguire operazioni di manutenzione, impiegare esclusivamente ricambi originali, per garantire alla
macchina sempre la massima affidabilità.
Prima di eseguire le operazioni di manutenzione, prendere visione completa delle indicazioni fornite nel paragrafo
3 “Norme di Sicurezza”.
Verificare periodicamente la funzionalità di tutti i comandi e controlli della macchina.
17.1 RABBOCCO OLIO MOTORE
• BRIGGS & STRATTON
Consultare il Manuale Uso e Manutenzione del motore.
OIL SHELL HELIX PLUS 10W-40
17.2 SCARICO OLIO MOTORE
17.3 BATTERIA
Il liquido della batteria non deve essere controllato o rabboccato.
Vedi figura 17.1
Vedi figura 17.2
17.4 FUSIBILI
17.5 FILTRO ARIA
Controlli periodici.
17.6 FILTRO OLIO MOTORE
Consultare il Manuale Uso e Manutenzione del motore.
17.7 FILTRO CARBURANTE
17.8 PRESSIONE PNEUMATICI
Se i pneumatici anteriori sono gonfiati ad una pressione diversa, le lame taglieranno l’erba ad altezza diversa.
17.9 KIT VERTICALIZZAZIONE PIATTO
17.10 PULIZIA DELLA MACCHINA
17.11 INGRASSAGGIO
Vedi Tabella manutenzioni.
17.12 SOSTITUZIONE E/O MANUTENZIONE LAME
17.13 CAMBIO OLIO TRANSAXLE
- Olio 20W-50
17.14 FILTRO TRANSAXLE
Vedi figura 17.4
Vedi figura 17.5
Vedi figura 17.6
Vedi figura 17.7
Vedi figura 17.8
Vedi figura 17.9
Vedi figura 17.10
Vedi figura 17.11
Vedi figura 17.12
Vedi figura 17.13
Vedi figura 17.14
18. MANUTENZIONE STRAORDINARIA
Per la manutenzione straordinaria della macchina rivolgersi esclusivamente ad un’officina di assistenza autorizzata.
19. INATTIVITA’ DELLA MACCHINA
Se si verifica il caso in cui la macchina GSR debba rimanere inutilizzato per parecchio tempo, è conveniente
eseguire alcune operazioni per garantire l’efficienza al suo riutilizzo e la durata nel tempo dello stesso:
- Eseguire tutte le indicazioni fornite nel manuale uso e manutenzione del motore per predisporre lo stesso in
“fuori servizio”.
- Smontare la batteria, ricaricarla e deporla in un luogo asciutto e areato.
- Pulire accuratamente la motrice avendo un occhio di riguardo dove si sono formate incrostazioni dovute a
residui di terriccio e di erba.
- Eseguire le operazioni di “manutenzione ordinaria” descritte precedentemente e, se necessario, eseguire anche
la “manutenzione straordinaria”.
- Parcheggiare la motrice in un luogo asciutto e areato, coprendola con un adeguato telo di protezione non
impermeabile.
- Durante il periodo di inattività, mantenere sempre alla pressione indicata i pneumatici e, periodicamente, variare
16
il punto d’appoggio dei pneumatici con il suolo.
- Svuotare il serbatoio carburante.
- Chiudere il rubinetto combustibile.
20. ETICHETTE DI SICUREZZA
Vedi figura 20.
21. NOTE GENERALI
A) Per interventi tecnici non contemplati nel seguente manuale,interpellare un nostro centro assistenza auto-
rizzato
B) Conservare il libretto uso e manutenzione in luogo adatto a mantenerlo inalterato.Il presente manuale può
essere modificato senza preavviso, ne ulteriori obblighi, al fine di includere variazioni e miglioramenti alle
unità già inviate. É vietata la riproduzione o la traduzione di qualsiasi parte di questo libretto senza preavviso
scritto del propietario.
IT
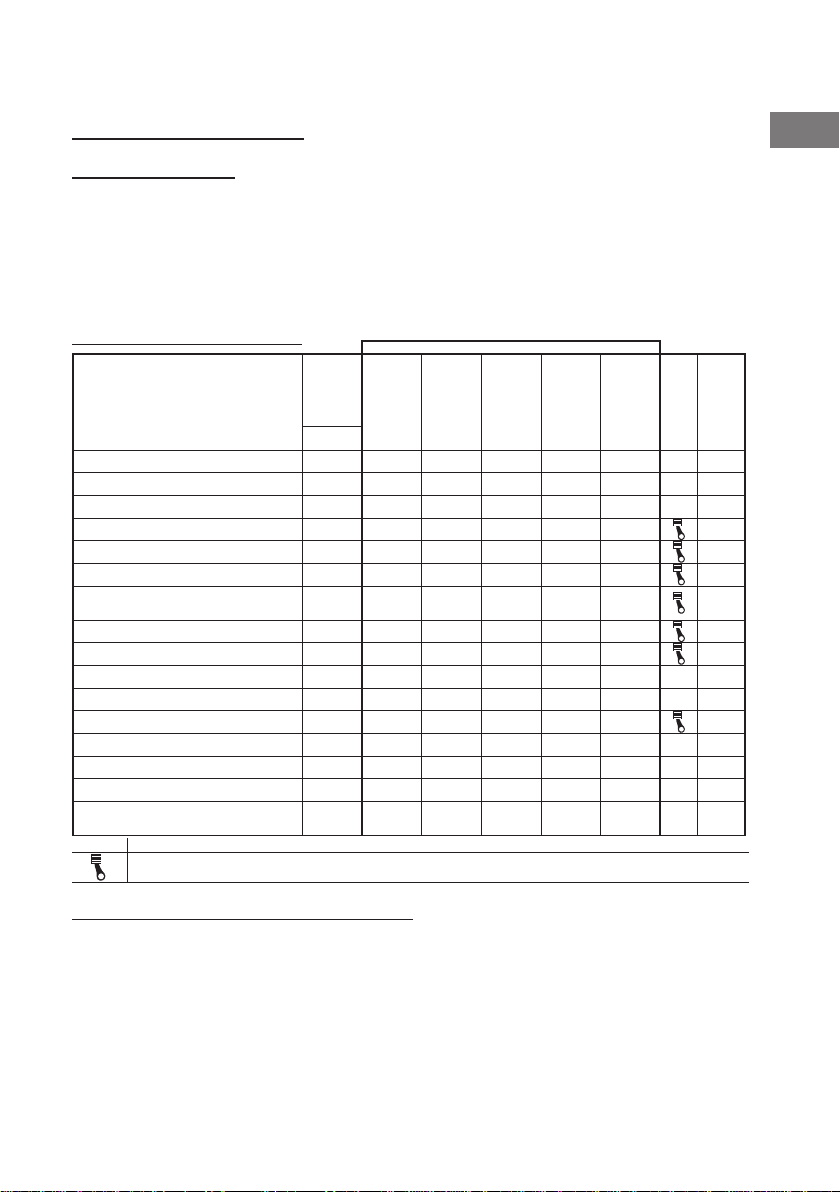
22. TABELLA MANUTENZIONI
OPERAZIONI PRINCIPALI
DI MANUTENZIONE
PULIZIA GENERALE DI MASSIMA
PULIZIA GENERALE ACCURATA
INGRASSAGGIO
PULIZIA FILTRO ARIA
LIVELLO OLIO MOTORE
CAMBIO OLIO MOTORE
CAMBIO CARTUCCIA FILTRO
OLIO MOTORE
CAMBIO FILTRO CARBURANTE
CAMBIO FILTRO ARIA
CAMBIO FILTRO TRANSAXLE
CAMBIO OLIO TRANSAXLE
MANUTENZIONE MOTORE
CONTROLLO CONDIZIONI LAME
CONTROLLO PRESSIONE PNEUMATICI
CONTROLLO MOLLA TENDICINGHIA
CONTROLLO SERRAGGIO BULLONI
RUOTE
+
In caso di condizioni di lavoro particolarmente gravoso la periodicità deve essere inferiore.
Manutenzione motore: consultare il manuale Uso e Manutenzione del motore.
CONTROLLO
ORE
5
5
50
50
INIZIALE
X
X
X
X
GIORNALIERO
+
+
INTERVALLO
OGNI
50
ORE
SETTIMANALE
X
X
+
X
X
X
X
OGNI
100
ORE
X
X
X
OGNI
250
ORE
X
X
NOTE FIG.
17.10
17.10
17.11
17.5
17.1
17.2
17.6
17.7
17.5
17.14
17.13
17.12
17.8
91
±2
17.8
Nm
23. TABELLA D’INDIVIDUAZIONE DEI GUASTI
Qualora il problema non fosse elencato in questa tabella, rivolgersi al concessionario autorizzato.
Se una volta controllate tutte le cause possibili elencate nella tabella il problema dovesse persistere, rivolgersi
al concessionario autorizzato.
17

Motore
PROBLEMA CAUSA/SOLUZIONE
Scarse prestazioni del motore
Il motore non si avvia
Il motore si avvia con difficoltà
Il motore gira in modo irregolare
Il motore perde colpi sotto carico
Fuoriuscita di fumo nero dal tubo di scarico
Impianto elettrico
PROBLEMA CAUSA/SOLUZIONE
Il motorino d’avviamento non si avvia
Macchina
PROBLEMA CAUSA/SOLUZIONE
A motore in funzione la macchina non si sposta
18
Sporcizia nell’impianto di alimentazione o combustibile vecchio, filtro combustibile e dell’aria sporco.
Operatore non a bordo.
Freno di stazionamento disinserito
Cofano motore è sollevato o non chiuso corret-
tamente.
Il rubinetto d’arresto del combustibile è CHIUSO.
Il combustibile è esaurito o non è del tipo cor-
retto.
Il filtro del combustibile è ostruito.
Problema all’impianto elettrico. Fare riferimento a
“Impianto elettrico”, in questo capitolo.
L’uso dello starter è scorretto.
Il filtro del combustibile è ostruito.
Il combustibile è vecchio o non è del tipo corretto
Lo starter non è completamente spento.
La tubazione o il filtro del combustibile sono intasati.
Il combustibile è stantio o sporco.
L’iniettore del combustibile è otturato.
L’elemento del filtro dell’aria è ostruito
Problema all’impianto elettrico. Fare riferimento a
“Impianto elettrico”, in questo capitolo.
Lo starter non è completamente spento.
Il combustibile è stantio o sporco.
Il filtro del combustibile è ostruito.
Lo starter non è completamente spento.
l’elemento del filtro dell’aria è sporco.
Freno di stazionamento disinserito.
La batteria non è carica.
Il fusibile è bruciato.
Operatore non a bordo.
Bypass del transaxle è in posizione di innesto.
Cinghia di trasmissione rotta o danneggiata.

NOTE
IT
19

PRODUCT REGISTRATION
Fill in the PRODUCT REGISTRATION online form on the website www.gianniferrari.com
By registering your new Gianni Ferrari® product you will immediately activate the manufacturer’s warranty. In
addition to that, registration will help Gianni Ferrari provide you with a faster and more efcient service.
Thanks to the registration you will receive, if you wish, news, initiatives and updates that will help you to get the
most out of your new Gianni Ferrari® product.
For the activation of the manufacturer’s warranty, registration must be made within 15 days of purchase.
GENERAL WARRANTY CONDITIONS
The Gianni Ferrari® product you purchased has been designed and built with state-of-the-art technologies to
ensure high quality and reliability over time.
Prior to delivery, Gianni Ferrari® Dealer has carried out a number of checks and verications, and providing you
with all information on the correct use and maintenance of the product.
The main operations carried out by the dealer before delivery of the machine are:
- checks, technical inspections and adjustments before commissioning;
- checking of the levels of oils and other uids;
- delivery of the operating and maintenance manual together with the certicate of conformity;
- delivery of engine documentation;
- description of product operation;
- description of the operation of the safety devices/equipment;
- description of the importance of scheduled maintenance;
- description of the general warranty conditions.
1. WARRANTY DURATION
This manufacturer’s warranty does not in any way affect the Buyer’s legal rights vis-à-vis the Seller and provides
further indications in additional to those offered by the Seller under the sales contract. Without prejudice to the
assurances provided by applicable local legislation and unless the law provides for a longer period of time, Gianni Ferrari’s warranty on new products lasts 2 years.
Please refer to the engine documentation for the duration of the engine warranty.
2. SCOPE OF THE WARRANTY
During the warranty period, Gianni Ferrari undertakes, through its own Dealer, to have any component suffering
from a material or workmanship defect material repaired or replaced free of charge by the technical staff. Repair
or replacement of a defective component does not extend or renew the warranty period. The warranty covers
the product only if it is used in compliance with the use and maintenance manual provided with the product.
The engine is covered by its own warranty, which is indicated on the documentation of the engine itself.
3. NOT COVERED BY THE WARRANTY
The warranty is void if the defect is caused by:
- negligence or lack of care;
- misuse or improper use;
- mishandling;
- use and maintenance non-compliant with the times and modalities stated in the use and manual maintenance;
- accidents;
- use of non-original spare parts;
- changes and modications not authorized by Gianni Ferrari and/or use of unauthorized accessories and
equipment;
- combination of machine and attachment not authorized by Gianni Ferrari
Damage caused by bumps, stones, or foreign objects in the work area is not covered by the warranty.
The normal wear of consumables such as lters, oils, spark plugs, light globes, tyres, belts, blades etc is not
covered by the warranty.
Gianni Ferrari will consider any warranty claims only if the PRODUCT is already REGISTERED on the portal
www.gianniferrari.com and the registration is complete with a copy of the PURCHASE DOCUMENT.
We recommended registering the product within 15 days of purchase.
20

NOTES FOR THE DISPOSAL OF THE PRODUCT VALID FOR THE EUROPEAN COMMUNITY .................... 22
INDEX
0. NAMEPLATE CE ........................................................................................................................................ 22
1. SERIAL NUMBER ...................................................................................................................................... 22
2. TO OUR COSTUMERS .............................................................................................................................. 22
3. INTENDED PURPOSE ............................................................................................................................... 22
4. FORBIDDEN FORESEEABLE USE ............................................................................................................ 22
5. USER’S RESPONSIBILITY ........................................................................................................................ 23
6. SAFETY STANDARDS ...............................................................................................................................23
6.1 SLOPES ......................................................................................................................................................................... 24
6.2 TRANSPORT AND UNLOADING ................................................................................................................................... 24
7. TECHNICAL FEATURES ............................................................................................................................ 25
7.1 MACHINE WEIGHTS ...................................................................................................................................................... 25
7.2 COMPATIBLE IMPLEMENTS ......................................................................................................................................... 25
7.3 NOISE ............................................................................................................................................................................ 25
7.4 VIBRATIONS .................................................................................................................................................................. 25
8. CONTROLS AND INSTRUMENTS ............................................................................................................. 25
9. ASSEMBLING THE EQUIPMENT .............................................................................................................. 26
9.1 ASSEMBLING THE MULCHING PLATE ........................................................................................................................ 26
9.2 ASSEMBLING THE SNOW BLADE ............................................................................................................................... 26
10. USING CONTROLS AND INSTRUMENTS .............................................................................................. 26
10.1 FORWARD - REVERSE ................................................................................................................................................ 26
10.2 PARKING BRAKE ......................................................................................................................................................... 26
10.3 BY-PASS ...................................................................................................................................................................... 26
10.4 HAND THROLLE .......................................................................................................................................................... 26
10.5 P.T.O ............................................................................................................................................................................. 26
10.6 PLATE HEIGHT ADJUSTMENT .................................................................................................................................... 26
10.7 FUEL TAP ..................................................................................................................................................................... 26
10.8 PLATE HEIGHT ADJUSTMENT .................................................................................................................................... 26
11. WIRING DIAGRAM................................................................................................................................... 26
11.0 COLOUR PALETTE ...................................................................................................................................................... 26
11.1 BRIGGS & STRATTON ................................................................................................................................................. 27
12. STARTING THE ENGINE .......................................................................................................................... 27
13. DRIVING THE MACHINE ......................................................................................................................... 27
14. CUTTING GRASS .................................................................................................................................... 27
14.1 REAR DISCHARGE OF THE GRASS ........................................................................................................................... 27
14.2 MULCHING .................................................................................................................................................................. 27
15. STOPPING THE ENGINE ......................................................................................................................... 27
16. TANK FILLING ..........................................................................................................................................27
17. ORDINARY MAINTENANCE .................................................................................................................... 28
17.1 ADD MOTOR OIL ......................................................................................................................................................... 28
17.2 ENGINE OIL REPLACEMENT ...................................................................................................................................... 28
17.3 BATTERY ...................................................................................................................................................................... 28
17.4 FUSES .......................................................................................................................................................................... 28
17.5 AIR FILTER ................................................................................................................................................................... 28
17.6 ENGINE OIL FILTER ..................................................................................................................................................... 28
17.7 CARBURANT FILTER ................................................................................................................................................... 28
17.8 TYRE PRESSURE ........................................................................................................................................................ 28
17.9 DECK VERTICAL POSITIONING KIT ........................................................................................................................... 28
17.10 CLEANING THE MACHINE ........................................................................................................................................ 28
17.11 GREASING ................................................................................................................................................................. 28
17.12 CHANGING/MAINTENANCE BLADES ...................................................................................................................... 28
17.13 TRANSAXLE OIL CHANGE........................................................................................................................................ 28
17.14 TRANSAXLE FILTER CHANGE .................................................................................................................................... 28
18. EXTRAORDINARY MAINTENANCE ......................................................................................................... 28
19. INACTIVITY OF THE MACHINE ............................................................................................................... 28
20. SAFETY STICKERS ................................................................................................................................. 29
21. NOTES ..................................................................................................................................................... 29
22. TABLE MAINTENANCES ......................................................................................................................... 29
23. TROUBLESHOOTING .............................................................................................................................. 29
EN
21
NOTES FOR THE DISPOSAL OF THE PRODUCT VALID FOR THE EUROPEAN COMMUNITY
Do not dispose the product as a solid urban waste but dispose it by dropping it at a dumping site.
By salvage dumping the product you risk to pollute the nature. If the product is provided with a
battery, you must dump the battery in a separate container as the battery contains highly toxic substances. The above shown figure represent a local garbage bin. It is absolutely forbidden to throw
the product in such a bin.
0. NAMEPLATE CE
The label is for guidance only, refer to the one affixed to the machine.
1) Manufacturer’s address
2) Model
3) Weight
1. SERIAL NUMBER
See figure 0.
4) Engine
5) Construction’s year
6) Designation of the machine
See figure 1.
2. TO OUR COSTUMERS
We are pleased to welcome you as one of our customers. To ensure best possible performance of your machine
as well as for useful tips for using and maintaining it, we kindly ask you to read through carefully the User’s
Manual.The machines GSR can be fitted with various equipments: it is therefore important that the user studies,
in addition to this manual, also the manual referring to the equipment that he intends to mount on his machine.
The machine has been designed to give best performance under difficult conditions. Its working performance largely
depends of course on its maintenance. Should queries arise that have not been dealt with in these instructions,
then please contact your dealer who will be able to assist you further.
THIS SIGN IMPLIES THAT SAFETY REGULATIONS MUST BE COMPLIED WITH AT ALL TIMES BY THE
USER SO AS TO AVOID ACCIDENTS. PLEASE, BE CAREFUL WHEN YOU SEE THIS SIGN. IT IS FOR
YOUR AND OTHER PEOPLE’S SAFETY.
3. INTENDED PURPOSE
The machine belonging to the GSR range, is a multi-function machine mostly used professionally
The most common possibilities of use are:
- Mulching mower deck
- Snow blower
- Snow blade
We decline any responsibility if the machine is used with any implement different to those mentioned in this
manual.
4. FORBIDDEN FORESEEABLE USE
Any use not mentioned in paragraph “Intended Purpose” is not allowed.
The use of any implement not mentioned in this manual is considered as improper and dangerous as not controlled by us for risks of use.
Transportation of persons (except the driver), objects or animals is not allowed.
It is absolutely forbidden to use the machine without having read this manual.
Transformations and modifications to the machine not mentioned in this manual are absolutely not allowed.
It is absolutely not allowed to use the machine if it is not in perfect working condition therefore precede to all
necessary controls and maintenance recommended.
Do not allow children and adolescents to use the machine.
Do not use the machine with sandals or bare-foot.
It is absolutely forbidden to use the machine as a hoist.
It is forbidden to use the machine with badly assembled implements.
Never start the engine in a closed room. Exhaust fumes are poisonous.
Before carrying out maintenance operations on the machine make sure that the same is off.
Before intervening on the electrical installation, disconnect the power cables from the battery terminals.
Be careful that flames or sparks do not get near the petrol tank.
Never park on slopes.
It is strictly forbidden to tamper with the machine’s speed control seals.
Do not use the machine in bad weather, especially in the presence of lightning.
22

5. USER’S RESPONSIBILITY
It is imperative that the user reads through this manual carefully so as to become acquainted with its working
procedure, maintenance of parts and proper lubrication according to our instructions.The user is also responsible
for checking, repairing and for possible replacement of wornout parts which could cause injuries.The user is responsible for damages caused to third parties by improper use. The machine must be used and maintained only
by persons with a good knowledge of its specific features and who have fully understood the safety rules.
Never let children or minors near the machine. Local laws, if any, may state a minimum age for the operator. Never
take passengers. Only factory approved attachments and accessories are permitted.
It is strictly prohibited to do any alterations or reconstructions to the machine which are not mentioned in this
manual.
WHEN USING THE MACHINE, THE OPERATOR MUST SCRUPULOUSLY OBSERVE THE SAFETY RULES CONTAINED IN
THIS MANUAL, THE RULES FOR THE PREVENTION OF ACCIDENTS, OTHER GENERAL SAFETY RULES, THE PROVISIONS
OF WORK MEDICINE.
EN
6. SAFETY STANDARDS
ONLY A CAREFUL USER IS A GOOD USER
If you follow the Safety Instructions in the manual you can avoid accidents.
MAIN PART
1) Read through carefully each section of these instructions. It is strictly forbidden the use of the machine to the
staff who have not read and understood this manual.
2) Check the machine before every use for defect, for e.g. loose screws and bolts, loosened or damaged blades
or other parts which are not secure. It is absolutely forbidden to use the machine in improper conditions.
Therefore, before starting your machine go through the control and service instructions as recommended.
3) Before starting the machine acquaint yourself with all the parts and with the checking system.
4) The machine should only be used by adults with experience. Don’t let children use it.
Avoid using the machine if you do not feel physically fit for the job.
5) Keep people within a certain security distance as explained hereafter.
6 Only use original parts and accessories. Do not make any changes thereto.
For information, please consult your dealer.
7) Replace lost or damaged safety stickers or warning labels. Chek the list of safety stickers in the “SAFETY
PRE CAUTIONS” section of this manual. Wipe dust and dirt off the stickers.
8) Keep hands and feet, as well as your body away from the moving parts.
9) Never use the machine without protection and covers in the right position and perfect condition.
Do not use the machine if its safety devices are not perfectly efficient.
For no reason, tamper with the machine safety devices.
10) Should an object have been run over or got stuck, stop immediately. Turn off the engine and remove the
ignition key. Disengage the P.T.O., put the attachment onto the ground and inspect it. Do not start using the
machine until you are sure that it is in perfect working order.
11) When you have finished working with the machine, disengage the P.T.O.*, put the attachment lower down
so that it touches the ground, turn off the engine and remove the key.
12) Before carrying out maintenance operations on the machine make sure that the same is off.
Before intervening on the electrical installation, disconnect the power cables from the battery terminals.
13) Machine speed should be suited to the ground you are working on.
14) Working on slopes requires extreme caution and reduced speed.
15) In the use and maintenance of the machine must wear protective clothing: goggles, gloves, safety shoes and
sturdy shoes and other protective clothing.
16) Only use the machine with good visibility.
23

17) All drivers should receive a professional and practical training. Such training should highlight the following:
-
the necessity of paying attention and being concentrated when working on machines where the driver is sitting.
- a machine sliding down a slope can be brought again under control by pulling the brakes. The main causes
for the loss of control are:
a) insufficient grip of the wheels;
b) driving too fast;
c) inadequate braking;
d) type of machine unsuitable for the job required;
e) lack of awareness of the effect of the condition of the ground, particularly of slopes ;
f) the equipments are wrongly attached and the loads are consequently badly distributed.
18) During the phases of work, always wear strong shoes and long trousers. Do not use the machine when you
are bare-footed or wearing sandals.
19) Inspect thoroughly the area where the machine is to be used and remove all the object that could be thrown
by the machine.
20) Always disengage the P.T.O.* when transferring the machine.
21) Every time the user leaves, even temporarily, the machine must apply the parking brake.
22) During the step of reversing pay close attention to obstacles and in particular to persons.
23) It is the duty of the employer to evaluate and adopt the most suitable individual protection devices.
6.1 SLOPES
- Do not use the machine on longitudinali slopes of more than 15°.
- Do not use the machine on lateral slopes higher of more than 10°.
- Do not proceed on slopes of any kind (lateral or longitudinal) with the deck and basket lifted.
- Do not stop or start suddenly the machine when going up or down a slope.
- Proceed with low speed on slopes or narrow curves.
- Pay attention to any road humps, potholes or other hidden dangers. If the ground is irregular,
the machine can overturn more easily.
- Do not operate in the proximity of shoulders, ditches or river banks; the machine could suddenly overturn if a
wheel goes beyond the edge of the latter, or if the shoulder cedes.
6.2 TRANSPORT AND UNLOADING
The machine is heay and can cause serious crushing damages.
Load and unload it with care and use loading ramps.
Transport the machine on a homologated trailer. During transport, use the the parking brake and fix the machine
with homologated devices, such as belts, chains or ropes.
N.B.: If the machine is packed and mounted on its pallet, it is possible to move it with a forklift.
CAPACITY 440 kg
IMPORTANT:
The parking brake is not sufcient for locking the machine during transport. Fix appropriately
the machine to the vehicle with homologated devices.
See figure 6.1
See figure 6.2
24
7. TECHNICAL FEATURES
See figure 7.
Engine
Engine power (HP)
Displacement (cm3)
N° of cylinders
Driving wheels
Type of progress
Service brake
Parking brake
Max speed (km/h)
Fuel tank (l)
Blades
Rotating blades
Cutting height regulation (cm)
Width of cut (mm)
7.1 MACHINE WEIGHTS
Model Mass with empty tank (kg)
GSR200
7.2 COMPATIBLE IMPLEMENTS
Mulching mower deck
Snow blower
Snow blade
GSR200
BRIGGS & STRATTON
20
627
2
Front
Hydrostatic
Hydrostatic
Disk brake
8
19
3 x 88001000005
Rotating by electromagnetic clutch
2 ÷ 8
1120
385
EN
7.3 NOISE
Noise level
Noise pressure at operator’s seat
102 dB (A) ± 1,5
90 dB (A) ± 1,5
7.4 VIBRATIONS
• Exposition of acceleration of superior limbs: ............................................................................< 2,5 m/s2.
• Exposition of body acceleration: ...............................................................................................< 0,5 m/s2.
8. CONTROLS AND INSTRUMENTS
The machine includes the following controls:
1) Steering wheel
2) Parking brake
3) Adjusting the longitudinal seat
4) By-pass lever
5) Plate height adjustment
6) P.T.O. and turbine engagement
9) Acelerator
8) Lever for lifting the equipment
9) Light switch
10) Switch key
See figure 8.
11) Fuel tap
12) Forward speed pedal - reverse gear
13) Engine choke control
14) Hourmeter
25
9. ASSEMBLING THE EQUIPMENT
9.1 ASSEMBLING THE MULCHING PLATE
1) Let the lifting arms of the engine couple with the attachments present on the equipment
2) Insert the locking pins and the safety split pins
3) Loosen the belt tensioner.
4) Mount the belt.
9.2 ASSEMBLING THE SNOW BLADE
1) Let the lifting arms of the engine couple with the attachments present on the equipment.
2) Insert the locking pins and the safety split pins.
See figure 9.1
See figure 9.2
10. USING CONTROLS AND INSTRUMENTS
10.1 FORWARD - REVERSE
10.2 PARKING BRAKE
10.3 BY-PASS
IMPORTANT:
Avoid towing the machine for long stretches with inserted by-pass.
See figure 10.3
10.4 HAND THROLLE
10.5 P.T.O
See figure 10.5
See figure 10.1
See figure 10.2
See figure 10.4
10.6 PLATE HEIGHT ADJUSTMENT
Pay attention to possible crushing, use the special lifting handles.
10.7 FUEL TAP
See figure 10.7
10.8 PLATE HEIGHT ADJUSTMENT
See figure 10.6
See figure 10.8
11. WIRING DIAGRAM
11.0 COLOUR PALETTE
A Sky-blue
B White
C Orange
G Yellow
H Grey
L Blue
M Brown
N Black
R Red
S Pink
V Green
Z Violet
THIS SIMBOL INDICATE
THE EARTH
26
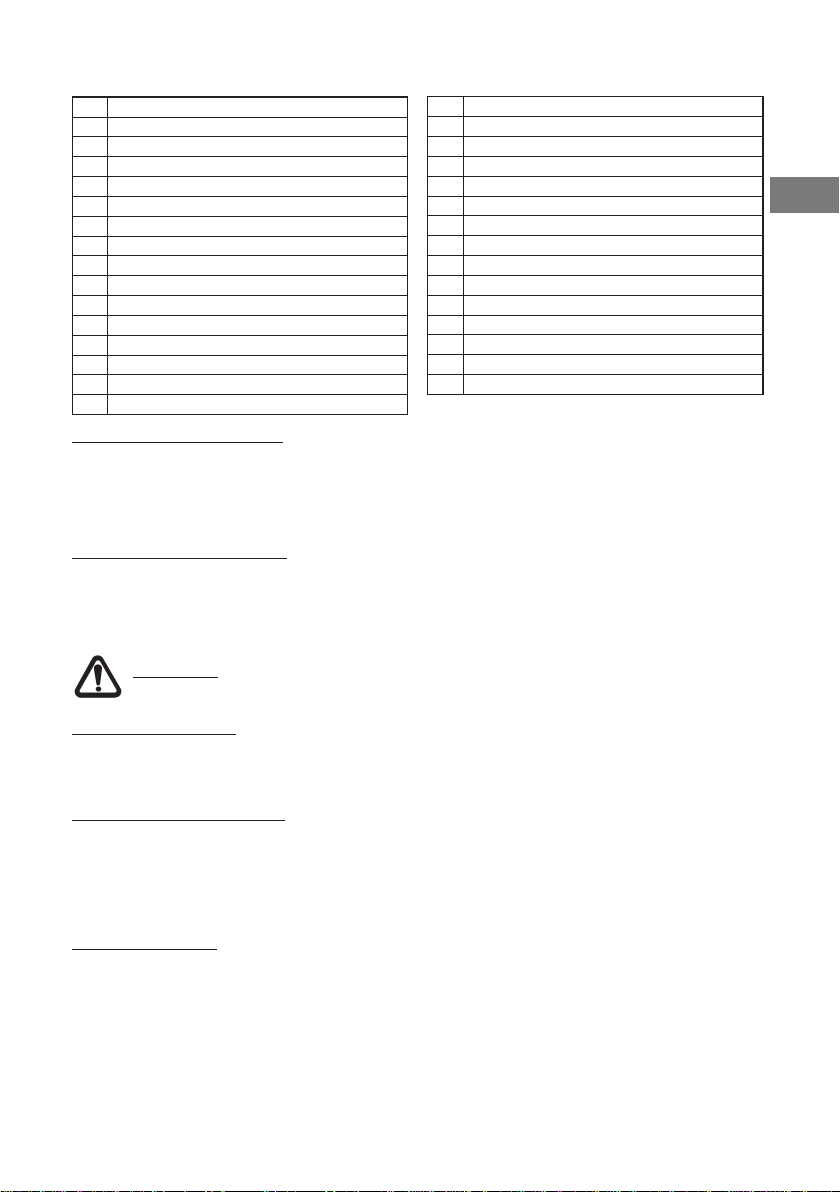
11.1 BRIGGS & STRATTON
REF. Description
A Ignition switch
B Basket full warning buzzer
C PTO switch
Working lights switch
D
E Working light
F Working light
G Blade clutch
H Basket full micro-switch
L Starter motor
M Engine connections
N Bonnet closed micro-switch
N1 Left side safety micro-switch
N2 Brake alarm stop micro-switch
O Basket closed micro-switch
P Seat micro-switch
12. STARTING THE ENGINE
1) Take your place correctly on seat
2) Make sure that the parking brake in enturely engaged
3) Set engine choke control to for cold starts and turn the ignition key to the “ON” position
4) Turn the ignition key onto the symbol to start the motor
5) Slowly return choke to run position once the engine has started
13. DRIVING THE MACHINE
1) Set throttle lever.
2) Disengage the parking brake.
3) Selelect the desired speed though the pedal fitted on the right side.
4) By moving the steering wheel one steers the front wheel.
N.B.: To stop the machine, just release the forward or reverse pedal; once stopped, engage the parking brake.
IMPORTANT: To being drive at slow speed, for safety reasons make sure that people and animals are at least 3 meters away
See figure 11.1
See figure 12.
See figure 13.
R Hand brake micro-switch
M1_R1
Enable PTO start relay
M1_R2
PTO safety relays
M1_R3
Enable start from safety devices relay
M1_R4
Stop engine using key relay
M1_R6
PTO relay
M2_R3
Stop engine from safety devices relay
M2_R1
Stop engine from seat relay
Q Suppressor Diode on PTO Switch
S System earth
T Timer
V Suppressor diode on blade clutch
Y PTO fuse
Z System protection fuse
R8 Ignition contactor switch
EN
14. CUTTING GRASS
14.1 REAR DISCHARGE OF THE GRASS
14.2 MULCHING
See figure 14.2
See figure 14.1
15. STOPPING THE ENGINE
1) Stop the machine.
2) Declutch the PDP.
3) Engage the parking brake.
4) Reduce the motor revolution on minimum.
5) Turn the ignition key from “ON” position to “STOP” position.
16. TANK FILLING
Only fill the tank in open air or in a sufficiently ventilated room. The engine must be turned off and no flames or sparks
should be made. Check that carburant is the one indicated by the label on the tank.
WARNING: CARBURANT IS HIGHLY INFLAMMABLE.
KEEP THE CARBURANT IN JERRYCANS. FILL THE TANK WITH PETROL ONLY IN OPEN AIR AND DO NOT
SMOKE DURING THIS OPERATION. ADD CARBURANT BEFORE STARTING THE ENGINE. NEVER REMOVE
THE TANK LID NOR ADD CARBURANT WHEN THE ENGINE IS WORKING OR IS HOT.
In case of carburant escape, do not try to start the engine but move the machine away from the place where the escape
took place and avoid creating ignition sources until carburant fumes have dissipated. Replace the correct lids on the
tank and the jerrycan. Never store the machine with carburant in the tank inside a building where the fumes might reach
some free flames or sparks. Let the engine cool down before storing the machine in any closed environment.
See figure 16.
27

17. ORDINARY MAINTENANCE
If you have to carry out maintenance operations, use only original spare parts, to ensure the same maximum
reliability to the machine. Before carrying out any maintenance work, read carefully the indications given in the
paragraph 3 “Safety rules”. Periodically check the functionality of all machine’s commands and controls.
17.1 ADD MOTOR OIL
• BRIGGS & STRATTON
Consult the Use and Maintenance manual of the motor.
OIL SHELL HELIX PLUS 10W-40
17.2 ENGINE OIL REPLACEMENT
See figure 17.1
See figure 17.2
17.3 BATTERY
The battery fluid does not need checking or topping up.
17.4 FUSES
17.5 AIR FILTER
Periodical checks.
17.6 ENGINE OIL FILTER
Consult the use and maintenance manual of the motor.
17.7 CARBURANT FILTER
17.8 TYRE PRESSURE
If the front tires are inflated at different pressure, the blades will mow the grass at different heights
17.9 DECK VERTICAL POSITIONING KIT
17.10 CLEANING THE MACHINE
17.11 GREASING
See tab. maintenance.
17.12 CHANGING/MAINTENANCE BLADES
See figure 17.4
See figure 17.5
See figure 17.6
See figure 17.7
See figure 17.8
See figure 17.9
See figure 17.10
See figure 17.11
See figure 17.12
17.13 TRANSAXLE OIL CHANGE
- Oil 20W-50
17.14 TRANSAXLE FILTER CHANGE
See figure 17.13
See figure 17.14
18. EXTRAORDINARY MAINTENANCE
For the extraordinary maintenance of the machine, contact only an authorised service center.
19. INACTIVITY OF THE MACHINE
In case the GSR machine has to remain idle for a long period of time, it is convenient to carry out some operations to ensure its efficiency when reused and the duration of the same for years:
- Carry out all the indications given in the use and maintenance manual of the motor prearrange the same for
“out of service”.
- Remove the battery, recharge it and store it in a dry and ventilated place.
- Clean carefully the engine with an eye in particular where there are incrustations due to soil and grass residues.
- Carry out the of “ordinary maintenance” operations described above and,if necessary, carry out also the “extraordinary maintenance”.
- Park the engine in a dry and ventilated place and cover it with a suitable non-impermeable protection sheet.
- During the period of inactivity, always maintain the pressure indicated for the tyres and, periodically, change the
28
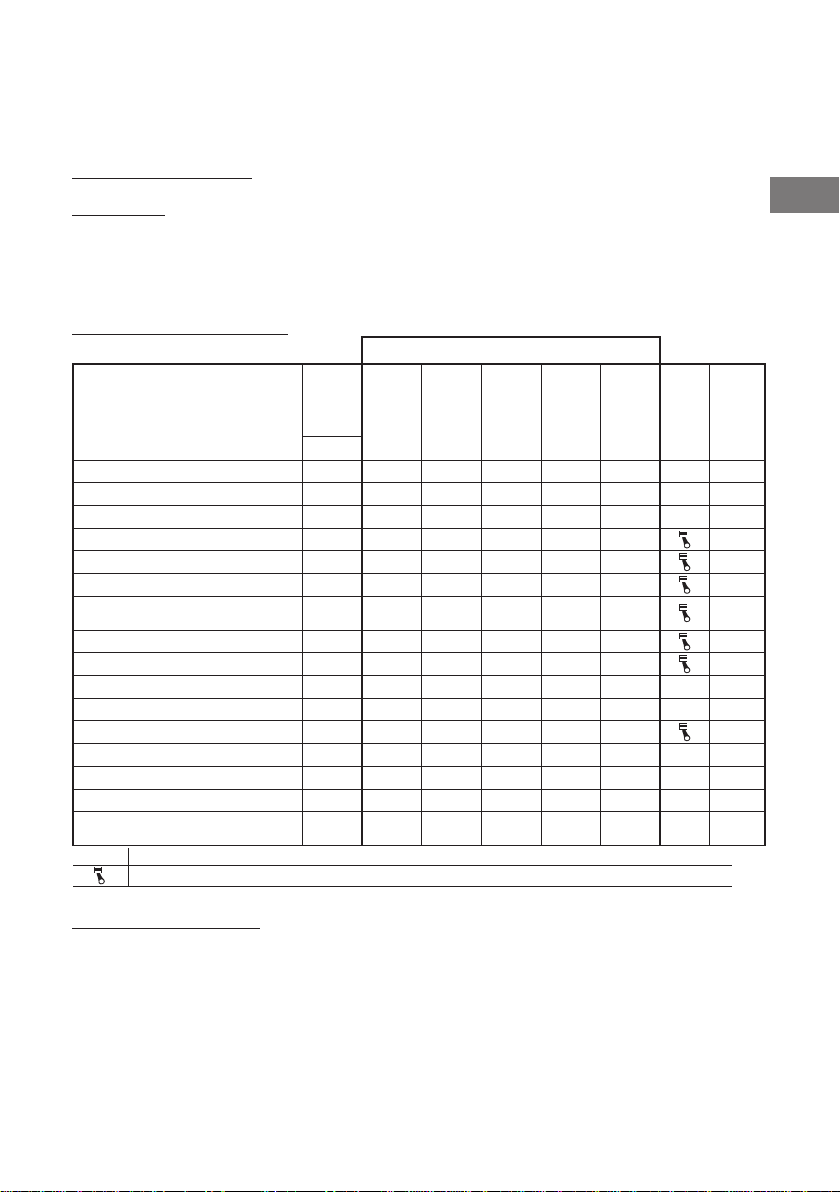
resting point of the tyres on the ground.
- Clear a tank of fuel.
- Closed fuel tap.
20. SAFETY STICKERS
See figure 20.
21. NOTES
A) Please contact our authorised dealer for anything that is not dealt with in this manual.
B) Always keep this technical handbook in a safe place for future reference. It can be modified without prior
notice or any additional obligations in order to improve the product. Reproduction or translation of any part
of this manual is not allowed without the owner’s prior written consent.
22. TABLE MAINTENANCES
INTERVAL
MAIN MAINTENANCE OPERATIONS
OVERHALL CLEANING
ACCURATE GENERAL CLEANING
GREASING
AIR FILTER CLEANING
MOTOR OIL LEVEL
MOTOR OIL CHANGE
MOTOROIL FILTER CARTRIDGE
CHANGE
CARBURATEUR FILTER CHANGE
AIR FILTER CHANGE
TRANSAXLE FILTER CHANGE
TRANSAXLE OIL CHANGE
MOTOR MAINTENANCE
MOWER BLADES CHECK
TYRES PRESSURE CHECK
CHECK BELT TENSIONER SPRING
WHEEL BOLTS TIGHTENING CHECK
+
In case of particularly heavy working conditions, these operation must be carried more frequently.
Motor maintenance: check the motor operating and maintenance manual.
FIRST
CHECK
HOURS
5
5
50
50
DAILY
X
+
X
X
+
X
EVERY
WEEKLY
HOURS
X
X
X
X
EVERY
100
EVERY
250
HOURS
50
HOURS
X
X
X
X
+
X
X
X
NOTES
91
±2
Nm
FIG.
17.10
17.10
17.11
17.5
17.1
17.2
17.6
17.7
17.5
17.14
17.13
17.12
17.8
17.8
EN
23. TROUBLESHOOTING
If you are experiencing a problem that is not listed in this chart, see your authorized dealer for service. When you have checked
all the possible causes listed and you are still experiencing the problem, see your authorized dealer.
29
 Loading...