

InstructionManual
Model Reference: GCAF506M
IM-GCAF506M16092015
Turbo Air Fryer

Introduction
Thank you for choosing the Cucina by Giani Turbo Air Fryer. All products brought to
you by Giani are manufactured to the highest standards of performance and safety.
Before use, please read this manual. It gives important instructions about safety, use
and maintenance of your appliance.
Remove all packaging material. You may wish to keep the packaging for future use
or storage for your appliance. Alternatively, dispose of accordingly.
Index
Important Safety Instructions............................
Product Overview...............................................
Technical Information........................................
Control Panel......................................................
Opening and Closing the Lid.............................
Preparations For Use.........................................
Accessories........................................................
Using Your Turbo Air Fryer................................
Cooking Guide....................................................
Cleaning..............................................................
Caution................................................................
Storage................................................................
After Sales Support............................................
Product Guarantee.............................................
1
02
04
05
05
06
06
07
09
10
10
11
11
12
12

Important Safety Instructions
Please read ALL instructions before using this appliance and keep safe for future
reference.
When using electrical appliances, basic safety precautions should always be
followed, including the following:
1. This appliance is for domestic use only. It should not be used for commercial
purposes.
2. Only use this appliance for its intended domestic use. Giani Ltd will not accept
any liability if the appliance is subject to improper use, or failure to comply with
these instructions.
3. Do not use outdoors or on wet surfaces.
4. Do not handle the plug or appliance with wet hands.
5. Do not immerse the main body in water. Avoid any liquids entering the appliance
as this will cause an electric shock or will short circuit the appliance.
6. This a
ppliance can be used by children aged from 8 years and above and persons
with reduced physical, sensory or mental capabilities, or lack of experience and
knowledge, if they have been given supervision or instruction concerning the use
of the appliance in a safe way and understand the hazards involved.
7. Children should not play with the appliance.
8. Cleaning and user maintenance should not be performed by children without
supervision.
9. This product is not a toy.
10. Do not use the appliance if any parts appear to be faulty, missing or damaged.
11. Do not use the appliance if it has been dropped or damaged in any way.
12. Do not leave the appliance unattended when connected to
the mains supply.
13. Do not operate this appliance when it is empty.
14. Check to ensure that your electricity supply matches that shown on the rating
plate.
15. Only use the attachments/accessories supplied with the product or
recommended by Giani.
16. If the supply cord is damaged, it must be replaced by a qualified service agent in
order to avoid a hazard.
17. Keep the appliance and its power supply cord away from heat or sharp edges
that could cause damage.
18. Keep the power supply cord away from any parts of the appliance that may
become hot during use.
19. Always use the appliance on
a stable, heat resistant surface.
20. Do not place the appliance against a wall or directly next to another appliance.
Leave at least 20cm of free space around the appliance when in use.
21. Do not cover the air inlet or the air outlet whilst the appliance is operating.
22. During use, hot steam is released through the air outlet openings. Keep your
hands and face at a safe distance from the steam outlet openings.
23. The surface of the appliance may get hot during operation.
24. Do not touch hot surfaces. Always use the handles provided.
25. Take care when removing the accessories or the cooking pot. Always use oven
gloves.
26. Do not move the appliance when it is in use or when it is still hot.
27. Do not touch
any parts of the appliance that may become hot as this could cause
injury.
2
28. Do not cover the appliance.
29. Do not disconnect the appliance from the mains power supply by pulling the
cord, switch it off and remove the plug by hand.
30. Do not store in direct sunlight or high humidity conditions.
31. Always unplug the appliance after use and before any cleaning or user
maintenance.
32. All parts and accessories are not suitable for cleaning in a dishwasher.
33. Always ensure the appliance has cooled fully after use before performing any
cleaning or user maintenance or storing away.
34. Use of an extension cord with the appliance is not recommended.
35. This appliance should not be operated by means
of an external timer or separate
remote control system.
36. Keep the appliance away from flammable materials.
3
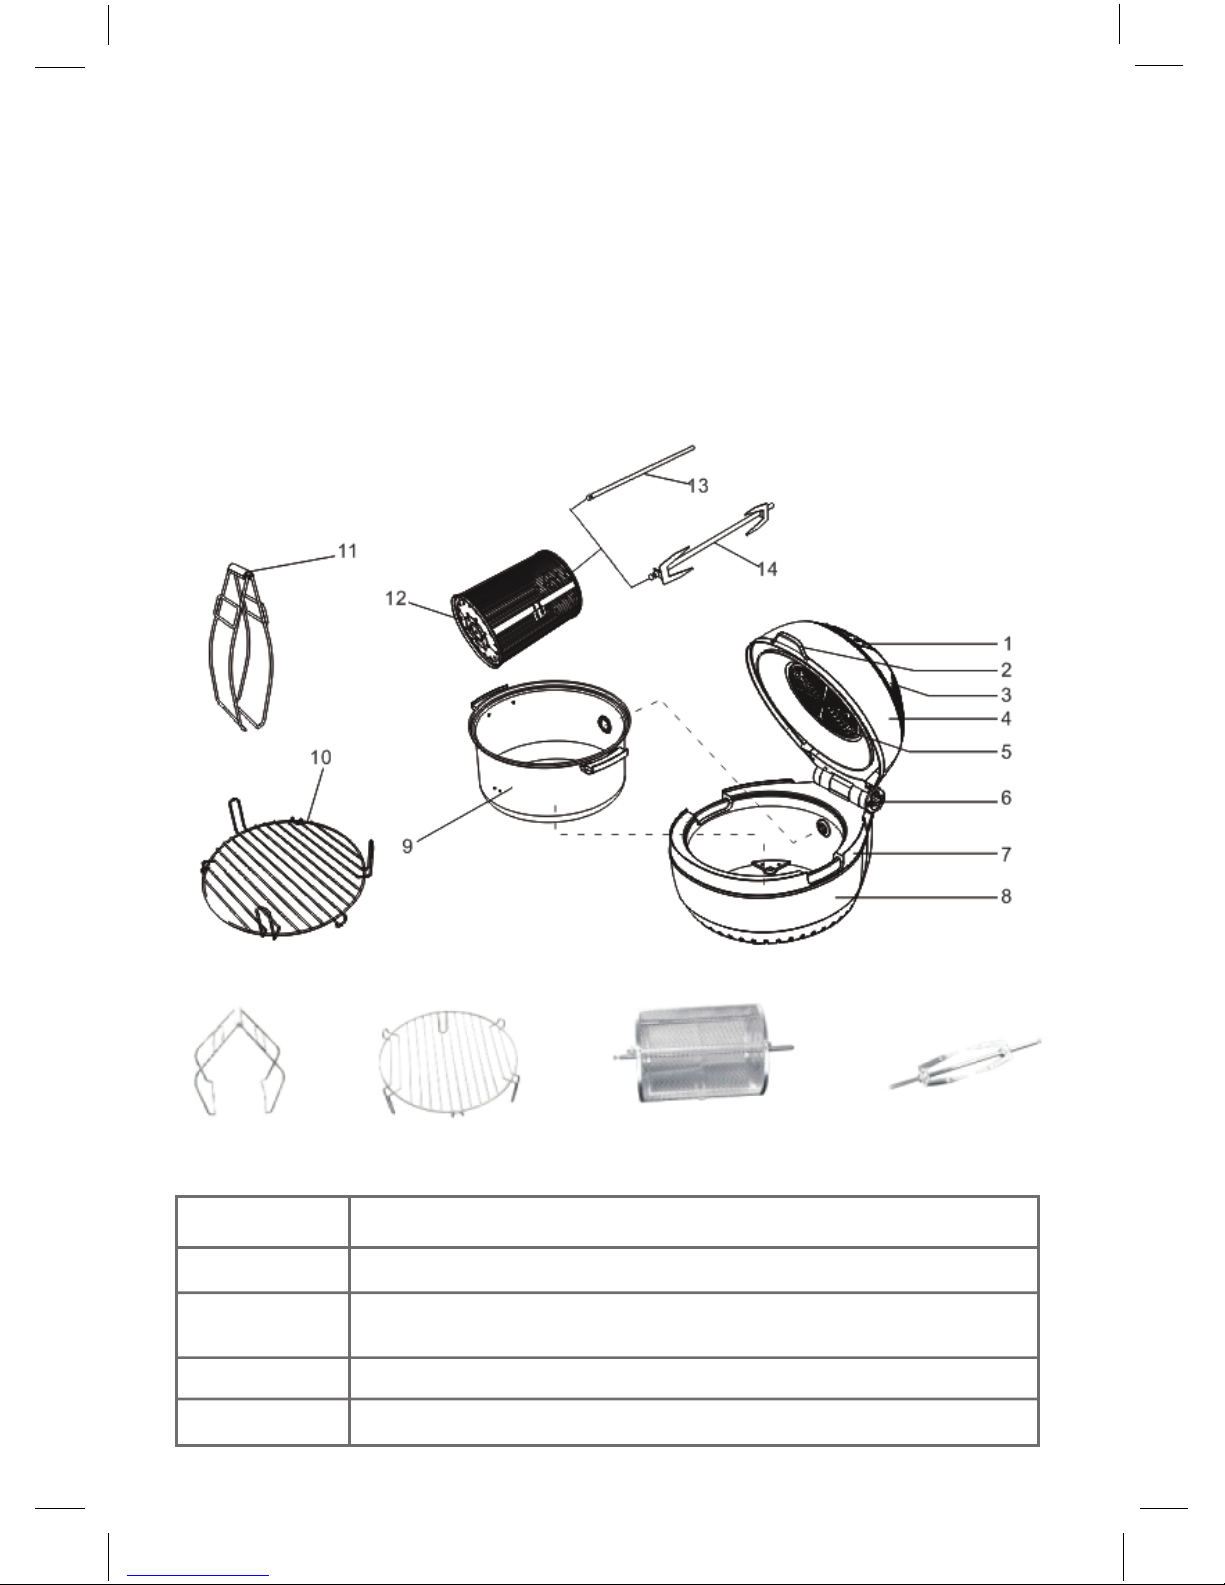
Product Overview
1. Control Panel
2. Lid Handle
3. Air Inlet & Outlet Vents
4. Transparent Cover
5. Heating Fan
6. Lid Locking Switch
7. Spindle Hole
4
8. Base
9. Cooking Bowl
10. Revsible Cooking Rack
11. Tongs
12. Baking Cage
13. Spindle
14. Chicken Fork / Rotisserie
Tong Reversible Cooking Rack Baking Cage
Item Description
Tong Used for picking up hot or cold food.
Baking Ideal for cooking chips, wedges, fish fingers and other smaller foods.
Fork Ideal for cooking bigger meats such as whole chickens and steaks.
Reversible
Cooking Rack
Low Setting: Ideal for cooking larger foods such as meat and veg.
High Setting: Ideal for cooking smaller/flatter foods such as pizza.
Fork / Rotisserie
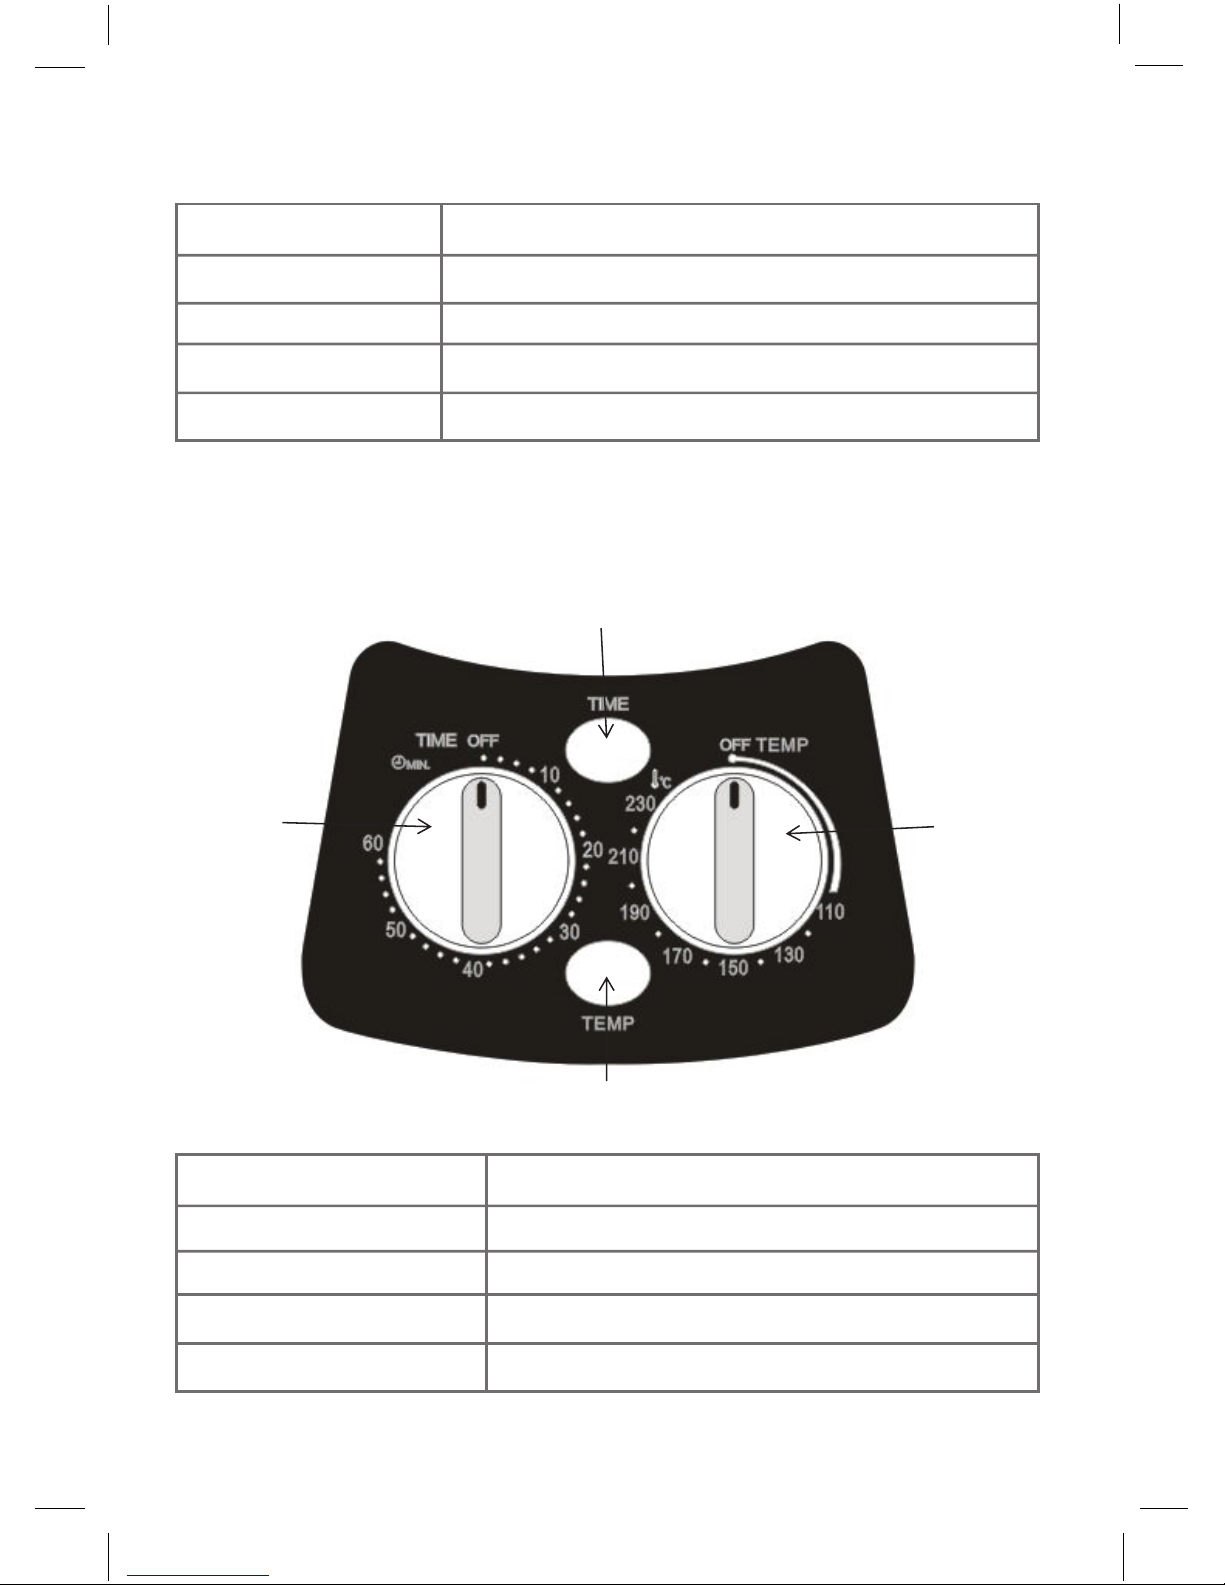
Technical Information
Control Panel
5
Voltage 220-240V
Rated Power 1300W
Time Setting Range 1-60 minutes
Capacity 10 Litres
Temp Range 110 - 230 C
Item Number Function
1 - Red Light Time Light Indicator
3 - Time Switch Set To The Required Cooking Time
4 - Temperature Switch Set To The Required Cooking Temperature
2 - Green Light Temperature Light Indicator
1
2
3
4
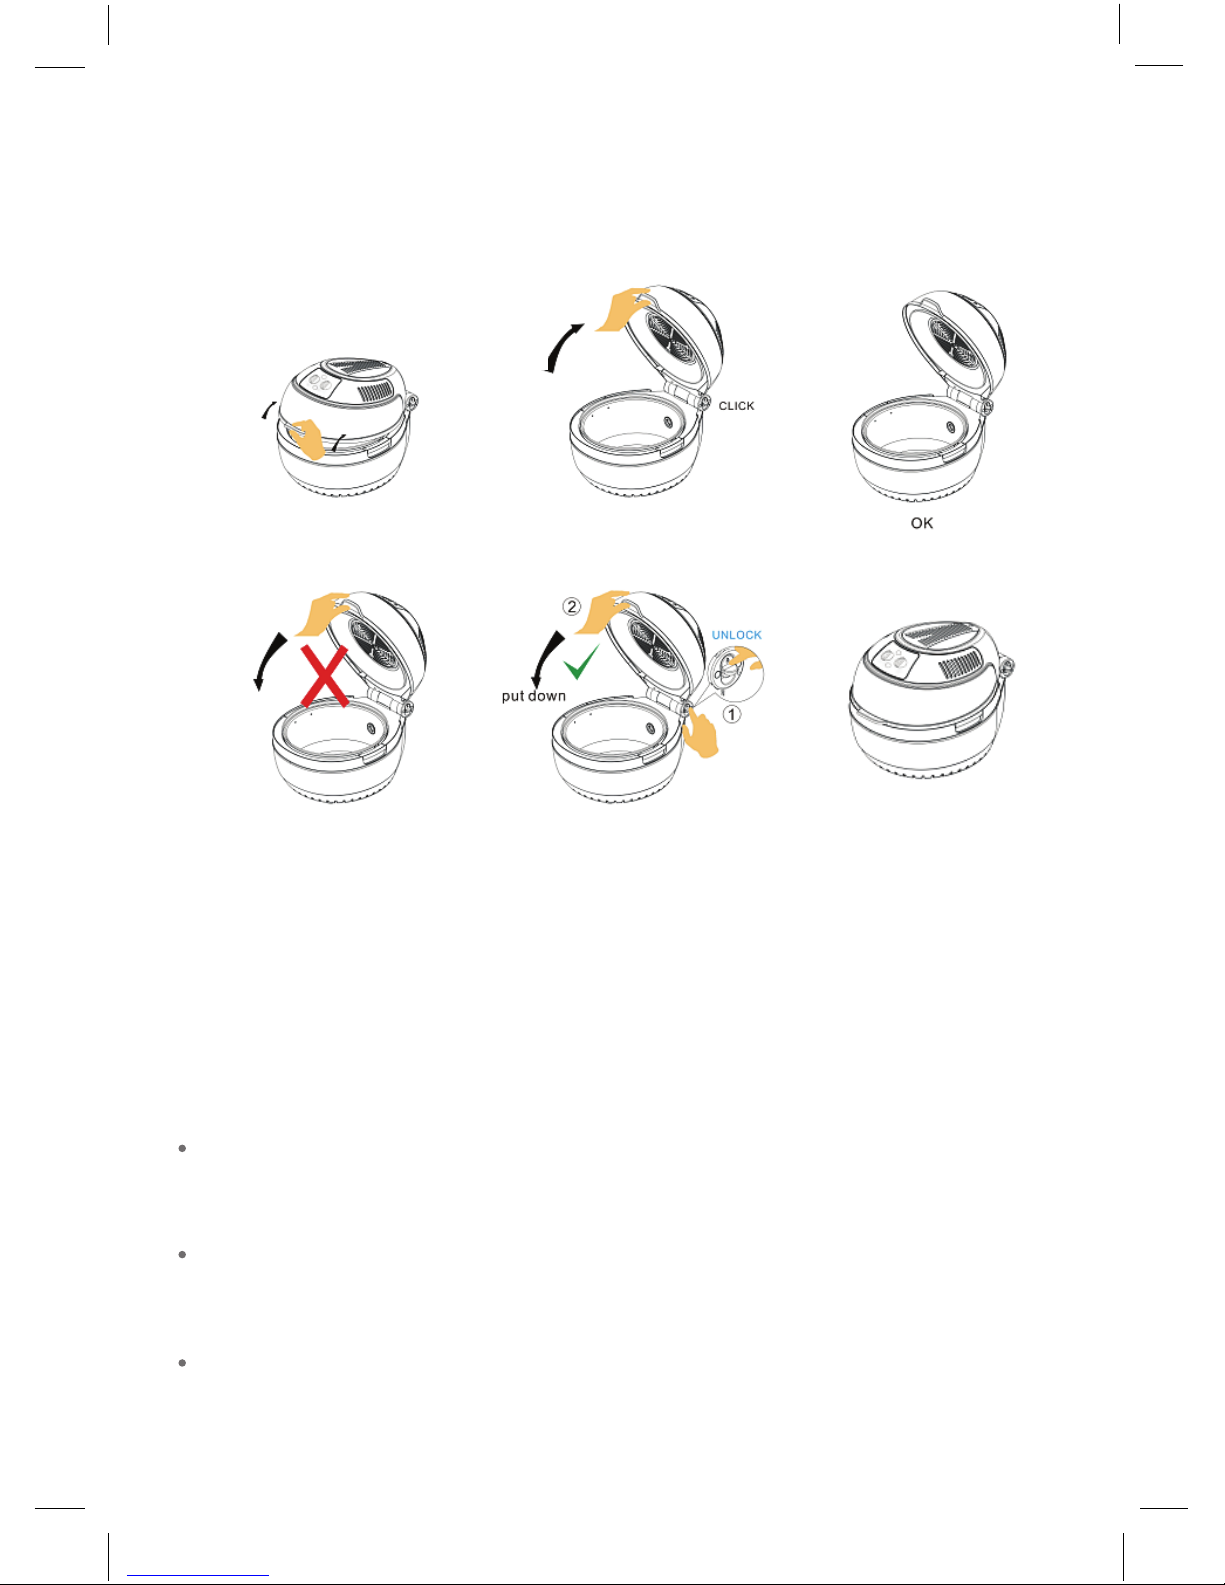
Opening and Closing the Lid
Below is the correct method for opening and closing the cookig lid for the Turbo Air
Fryer.
Warning
Before opening the lid, make sure the cooking process of the Turbo Air Fryer has
stopped. Always press the lid locking switch before attempting to close the lid.
TAKE CARE TO AVOID ANY HOT STEAM.
Preparations For Use
Before using your Turbo Air Fryer for the first time:
Carefully unpack the unit and remove all the packaging materials. Position the
products on a flat, heat-resistant non-flammable surface. Do not immerse the
appliance into water or any other liquids.
Remove any dust that may have accumulated on the Air Fryer during packaging /
transportation. Clean all with a soft sponge and warm soapy water.
Ensure they are fully dry before use.
During the first use, the appliance may give off a slight odour. This is not harmful
and will disappear quickly.
6
To Open
(a)
(b) (c)
To Close
(a)
(b)
(c)

(7) (8)
(1)
(2) (3)
(4) (5) (6)
Accessories
Extreme caution must be used when moving the hot dish; we suggest you use the
Tongs provided. Use oven gloves to carry the inner bowl when the Turbo Air Fryer
has been in use.
Chicken Fork / Rotisserie
1. Slide one chicken fork over the spindle. (Fig1)
2. Position the chicken fork 1-2cm away from the groove on the spindle. Tighten
the screw by hand to secure it in position. (Fig 2)
3. Insert the spindle through the centre of the chicken. (Fig 3/4)
4. Slide the other chicken fork onto the spindle. (Fig 5)
5. Push the fork firmly into the chicken so that both chicken forks grip the chicken.
Tighten the screw on the chicken fork by hand to secure it in position. (Fig 6)
6. Using the Tongs provided fit the spindle into the hole in the inner bowl until it is
located correctly. Lowe
r the other end of the spindle into the inner bowl and
locate into position. (Fig 7/8)
7

Baking Cage & Tongs
1. Slide the Baking Cage onto the spindle and position centrally. (Fig 1)
2. Tighten the screw by hand to secure it in position. (Fig 2)
3. Add the food to be cooked into the baking cage and close the lid. (Fig 3/4)
4. Using the Tongs provided. (Fig 5)
5. Fit the spindle into the hole in the inner bowl until it is located correctly. Lower the
other end of the spindle into the inner bowl and locate into position. (Fig 6/7)
8
(1) (2)
(3) (4)
(5) (6) (7)

Using Your Turbo Air Fryer
Prepare your ingredients and add to the recommended accessory inside the
cooking chamber.
According to your cooking requirements, place the Low Rack or Steamer Tray
(additional accessory) into the non-stick bowl before putting food inside. Keep
the food approximately 15-20mm away from the bowls edge to allow maximum
hot air circulation. If using the Baking Cage, put the food inside the Cage before
placing it inside the container.
Close the lid correctly as detailed on Page 6. Plug the mains plug into your power
socket and make sure that the food does not touch the underside of the lid.
Set the temperature dial to the required temperature.
Set the timer dial to the cooking time required for the recipe.
The Turbo Air Fryer will begin to cook.
The timer light will illuminate when cooking until the time runs down.
The temperature light will illuminate when the Turbo Air Fryer is heating up. It will
cycle on and off to maintain the set temperature.
After using your Turbo Air Fryer, the fan inside the appliance will continue running
to cool the Fryer down.
Extreme caution must be used when opening the lid and moving any hot food.
DO NOT turn the Fryer on without any food inside.
9

Cooking Guide
The cooking times are a guide line only.
These will vary depending on the quantity and size of the food being cooked.
You should add a longer time to cook frozen foods.
The maximum weight of food to be cooked at any one time should not be more than
5kg.
Cleaning
Completely clean and dry all parts after every use.
Unplug the Fryer and allow it to cool down completely before any cleaning. This may
take up to 30 minutes.
Once the Fryer has cooled completely, remove the cooking bowl and clean the
bowl thoroughly with warm soapy water.
For self-cleaning, add half an inch of water with mid detergent into the non-stick
bowl and close the lid.
Set the temperature to 60 C, set the timer for 15 minutes and allow the residue to
soften as it heats. When the time has elapsed, allow the Turbo Air Fryer to cool
completely before continuing to clean.
To clean the Fan Cover, unplug the appliance and allow to cool. Wipe with a damp
cloth.
Do not put any parts into a dishwasher for cleaning.
Time
(mins)
Temp
C
Food
Recommended Accessory
25-30 mins
20-25 mins
15-20 mins
5-8 mins
10-15 mins
10-15 mins
10-15 mins
10-15 mins
10-15 mins
12-15 mins
12-16 mins
5-8 mins
12-15 mins
5-8 mins
15-20 mins
Roast Chicken
Chips
Steamed Fish
Cashew Nuts
Coffee Beans
Chicken Wings
Cake
Skewer
Pizza
Eggs
Steak
Toast
Rice
Shrimp
Bread
200
230
230
200
230
200
180
200
200
180
190
230
200
200
180
Fork or Low Rack
Baking Cage
High Rack & Steamer
(additional accessory)
Baking Cage
Baking Cage
Baking Cage/High Rack & Baking Tray
Low Rack or Baking Pan
(additional accessory)
Skewer Rack (additional accessory)
High Rack
High Rack
High Rack
Low Rack
Low Rack/Rice Pot (not included)
High Rack
Low Rack
10

Caution
NEVER immerse the cord or the plug into water or any other liquids.
If scrubbing is required, use a nylon or polyester mesh pad.
DO NOT use a steel cleaning pad or any other abrasive material cleaing methods.
NEVER use solvents or cleaning powders.
DO NOT get any liquids inside the head/lid.
Storage
Allow the unit to cool completely before storing. Store the appliance in a dry location.
DO NOT place any heavy items on top of the Turbo Air Fryer during storage as this
may cause damage to the Fryer.
11

After Sales Support
If the power cord is damaged, it MUST be replaced by a qualified electrician.
If you need help using your Air Fryer, please contact Giani Ltd:-
Telephone: 0161 480 6204
Email: info@gianiuk.co.uk
Website: www.gianiuk.co.uk
(replacement instruction manuals are available to download).
12
Product Guarantee (UK Only)
If your appliance ceases to function within 1 year from the date of purchase, the retailer
will replace it free of charge, provided:
This guarantee does not affect your statutory rights.
Giani UK Ltd - SK2 6RH
You have not misused, neglected or damaged it
It has not been modified (except by Giani Ltd)
It was not purchased second hand
It has not been used commercially
You have not fitted a plug incorrectly
You can supply proof of purchase, indicating the price you paid and where and when
the appliance was purchased.
2011/65/EU
IMPORTANT INFORMATION FOR CORRECT DISPOSAL OF THE APPLIANCE IN ACCORDANCE WITH
EC DIRECTIVE 2002/96/EC
At the end of its working life, the appliance must NOT be disposed of as urban waste.
It must be taken to a special local authority differentiated waste collection centre or to a dealer providing
this service.
Disposing of a household appliance separately avoids possible negative consequences for the
environment and health deriving from inappropriate disposal and enables the constituent materials to be
recovered to obtain significant savings in energy and resources. As a reminder of the need to dispose of
ousehold appliances separately, the product is marked with a crossed-out wheeled dustbin.
 Loading...