

GHL Systems netAccess L-50, netAccess L-100, netAccess L-200, netAccess L-300, netAccess L-350 User Manual
...Page 1

User Manual
netAccess L-200 Series
Payment Routers
Page 2

i | Page
COPYRIGHT NOTICE
Information contained in this document is subject to change without notice.
THIS DOCUMENT IS THE PROPRIETARY PRODUCT OF GHL SYSTEMS BHD. ANY UNAUTHORIZED DISCLOSURE,
USE, REPRODUCTION, MODIFICATION, DISTRIBUTION, OR TRANSFER OF THIS DOCUMENT IS STRICTLY
PROHIBITED. COPYRIGHT (C) GHL SYSTEMS BHD 2009. ALL RIGHTS RESERVED.
No part of this publication may be reproduced, stored in a retrieval system, or transmitted, in any form or by
any means, electronic, mechanical, photocopying, recording, or otherwise, without the prior written
permission of GHL Systems Bhd.
RESTRICTED RIGHTS LEGEND
This Document and any materials accompanying the Document, if any, (the “Products”) are commercial
documentation and commercial product developed exclusively at private expense, and in all respects are
proprietary data belonging solely to GHL Systems Berhad, except otherwise stated.
All product names mentioned herein are for identification purposes only and may be trademarks and/or
registered trademarks of their respective companies and/or institutions.
2009 by GHL Systems Berhad. All rights reserved. GHL, the GHL logo, netAccess, netAccess L-200 series and
other GHL Systems Berhad products and services mentioned herein as well as their respective logos are
trademarks or registered trademarks of GHL Systems Berhad in Malaysia and in several other countries all over
the world. All other product and service names mentioned are the trademarks of their respective companies.
Data contained in this document serves informational purposes only. National product specifications may vary.
Document Version: 2.5
Date of Publication: November 2009
Page 3

ii | Page
Document History
Version
Date
Author
Description
2.0
May 2009
Cristina Yap
Document Creation.
2.1
May 2009
Cristina Yap
Updated web configuration graphics
2.2
May 2009
Cristina Yap
1. Changed logo.
2. Updated to new Web Configuration pages screen shots.
2.3
June 2009
Cristina Yap
1. Added Document History page.
2. Updated weight and dimensions in Technical
Specifications.
3. Parameters changed in some sections due to updated
Web Configuration pages.
4. Updated to latest Web Configuration pages.
2.4
June 2009
Cristina Yap
1. Updated Systems Configuration to take out XMPP
configuration.
2.5
Sept 2009
Cristina Yap
1. Added cautionary note for ID naming.
(pg. 24)
2. Expanded Pattern Configuration. (pg. 27-29)
3. Expanded Dependencies Configuration. (pg. 30)
4. Added Chapter 4: Deployment Scenarios and Sample
Configurations (pg 31-40)
5. Updated Appendix B: Pattern Matching Conventions (pg
41-44)
Page 4

iii | Page
Table of Contents
Chapter 1: Introduction to netAccess L-Series ............................................... 1
Introduction to netAccess L-Series ................................................................................ 1
The netAccess L-200 series ............................................................................................ 1
L-Series devices - Features at a glance ........................................................................... 2
NetAccess L-200 Series Front/Back View ....................................................................... 3
Status Lights ................................................................................................................. 4
Technical Specifications ................................................................................................ 5
Chapter 2: System Configuration Guide ........................................................ 6
Getting Started ............................................................................................................. 6
Login Page .................................................................................................................... 7
Default Page ................................................................................................................. 9
Configuring the netAccess L-Series device ................................................................... 11
System Tools Buttons ................................................................................................. 11
Device Information Tab............................................................................................... 12
System Tools Tab ........................................................................................................ 12
System Tools - Settings Tab ......................................................................................... 12
Upgrade Tab ............................................................................................................... 17
PING Test Tab ............................................................................................................. 18
Device Restart Tab ...................................................................................................... 19
Logout ........................................................................................................................ 19
Chapter 3: NetRouter Configuration Guide ................................................. 20
Configuring the NetRouter Services ............................................................................. 20
GPRS Settings ............................................................................................................. 21
RS232 Settings ............................................................................................................ 22
RS 485 Settings ........................................................................................................... 23
TCP/IP Settings Page ................................................................................................... 24
Default Settings for the TCP/IP channels ..................................................................... 25
Pattern Configuration ................................................................................................. 27
Dependencies Configuration ....................................................................................... 30
Chapter 4: Deployment Scenarios and Sample Configurations ................... 31
Pre-requisite conditions .............................................................................................. 31
Scenario 1: L-50 serving 3 PSTN Terminals ............................................................. 32
Scenario 2: L-200 Optimus converts PSTN to GSM/GPRS ........................................ 33
Scenario 3: L-100 as a Port Extender ...................................................................... 34
Scenario 4: L-100 as a Wireless Concentrator ......................................................... 35
Scenario 5: L-200 in a Multi-lane Deployment with Dual GPRS ............................... 36
Scenario 6: L-300 or L-350 VPN connection over GPRS ........................................... 37
High Availability Configurations .................................................................................. 38
Scenario 7: 3 levels of failover connections ............................................................ 39
Scenario 8: L-200 Dual SIM GPRS failover............................................................... 40
Appendix A: Cable Specifications ................................................................. 41
Cable 1: Serial cable for terminals (Verifone) ............................................................... 41
Cable 2: Serial cable for terminals (Sagem) .................................................................. 41
Page 5

iv | Page
Cable 3: Console cable for netAccess L-Series .............................................................. 42
Appendix B: Pattern Matching Conventions ................................................ 43
Pattern Matching Operators ....................................................................................... 43
Examples of Patterns .................................................................................................. 44
Page 6
netAccess L-200 Series Manual 1 | Page
Chapter 1:
Introduction to
netAccess L-Series
Introduction to netAccess L-Series
The netAccess L-Series is a family of versatile financial payment routers, capable of
supporting multiple payment devices in a LAN environment, providing a variety of
connectivity options to provide high availability connection to the main payment backbone.
With its compact form factor, the L-Series device can be placed discreetly at payment
counters or cash registers to connect several payment devices to the payment host.
The netAccess L-200 series
The L-200 series is designed for a medium sized merchant environment to connect up to 10
terminals using the usual transports such as RS232, RS485 and TCP/IP through a single GPRS
channel. The L-200 model supports 2 SIM cards to ensure the communications are not
affected by failure of the primary mobile network. The device will automatically switch from
primary SIM to the secondary SIM if the primary network goes down.
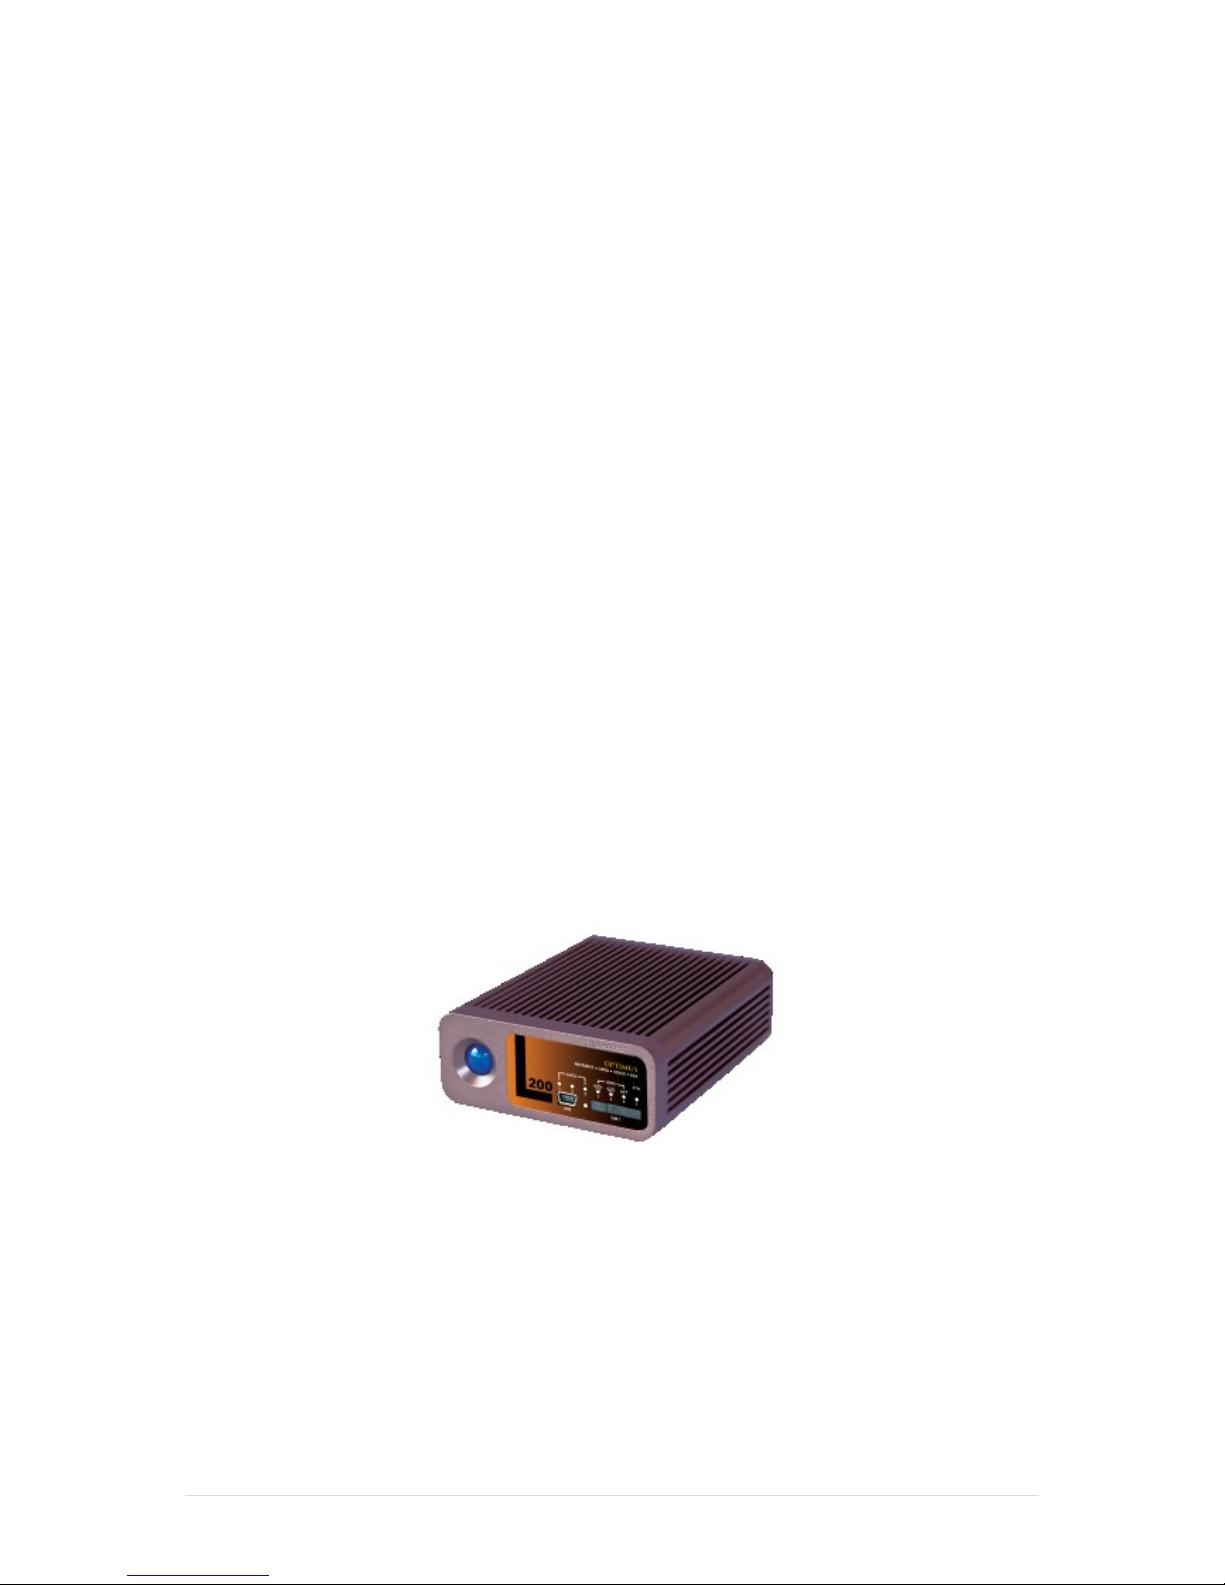
Figure 1: netAccess L-200
Page 7
netAccess L-200 Series Manual 2 | Page
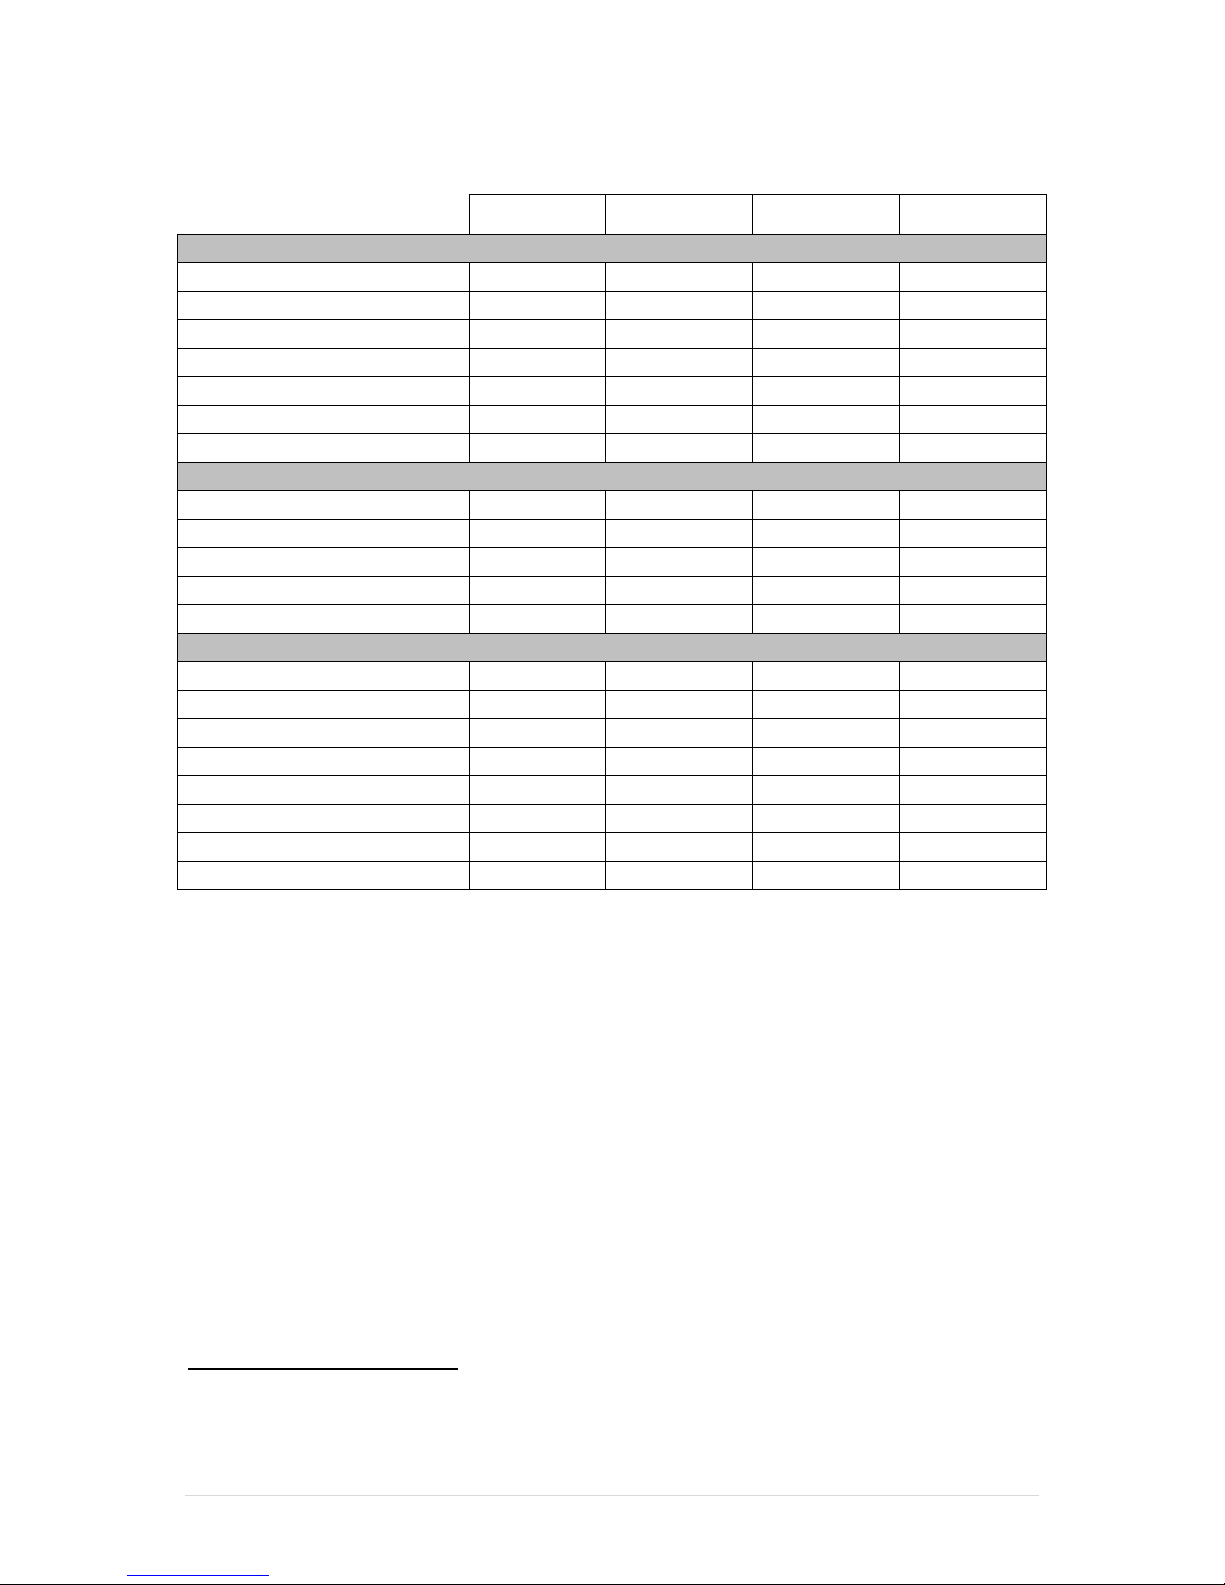
L-Series devices - Features at a glance
L-100
L-200
L-300
L-350
Hardware/Interface Ports
RS232 Ports
3 / 21
3 / 21
3 / 2 / 11
3 / 2 / 11
RS485 Ports
0 / 11
0 / 11
0 / 1 / 21
0 / 1 / 21
Ethernet Ports
1 1 2
2
GPRS SIM slots
1 2 1
2
WiFi
N/A
N/A
Optional
Built -in AP
HSDPA
N/A
N/A
Optional
Optional
SD Card slot
No
Yes
Yes
Yes
Uplink/Downlink channels
Maximum downlink devices
5
10
15
30
Maximum uplink channels2
8 8 10
10
RS485 (downlink)
5
10
15
30
TCP/IP (downlink)
5
10
15
30
DSL
External
External
External
External
Device Functions
Web-based Configuration
Yes
Yes
Yes
Yes
Pattern Matching
Yes
Yes
Yes
Yes
Intelligent Failover
Yes
Yes
Yes
Yes
SSL support
Yes
Yes
Yes
Yes
VPN support
No
No
Yes
Yes
SNMP support
Yes
Yes
Yes
Yes
XMPP support
Yes
Yes
Yes
Yes
Gateway functionality
Yes
Yes
Yes
Yes
1
RS485 module is an option. The device can have any combination of RS232 and RS485 ports but the total of
ports is 3.
2
Number of uplink channels supported varies based on device CPU load.
Page 8
netAccess L-200 Series Manual 3 | Page
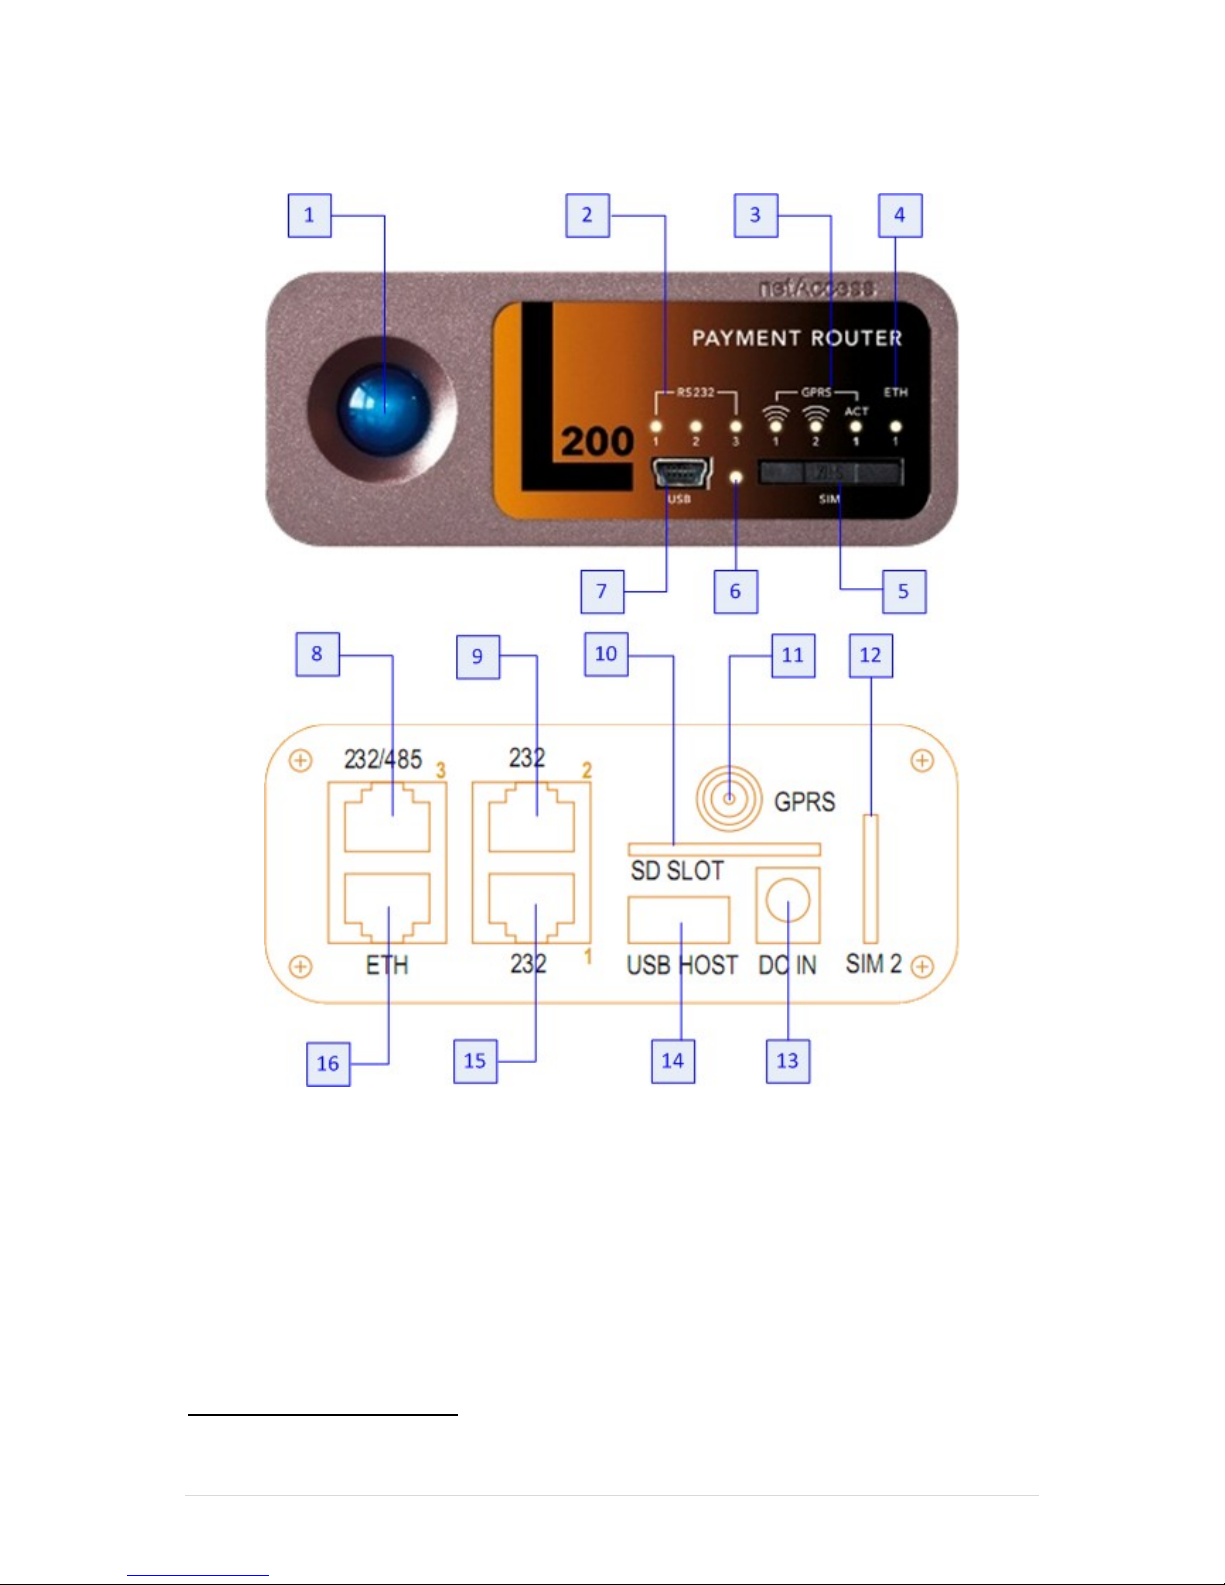
NetAccess L-200 Series Front/Back View
Legend:
1. Ready LED
2. RS232 Activity LEDs3
3. GPRS Signal and activity LEDs
4. Ethernet Activity LED
5. SIM #! Tray slot
6. SIM Eject button
7. USB Slave Port
8. RS232_3 or RS485 port
(depends on model option)
9. RS232_2 port
10. SD Card slot
11. GPRS Antenna connector
12. SIM #2 slot (no tray)
13. Power DC In socket
14. USB Host Port
15. RS232_1 port
16. Ethernet port
3
If RS485 is present, it is represented by RS232_3
Page 9

netAccess L-200 Series Manual 4 | Page
Status Lights
The Status Lights on the front panel indicate the operational status of the device.
Status LED
State of LED / Colour
Description
Power
Solid / Blue
All modules and connections OK
Slow Blink / Blue
Startup in progress
RS232/RS485 Activity
Fast Blink / Orange
Data transmission in progress
PSTN Activity
Fast Blink / Orange
Data transmission in progress
WiFi Activity
Fast Blink / Orange
Data transmission in progress
GPRS Signal Strength
Off
SIM not active4
On / Orange
Connecting/Registering to GPRS network
1 blink / Orange
Weak Signal
2 blinks / Orange
Average Signal
3 blinks / Orange
Good Signal
4 blinks / Orange
Excellent Signal
GPRS Activity
Fast Blink / Orange
Data transmission in progress
1 blink/ 1 sec
Searching for GPRS network
1 blink / 3 secs
Registered to GPRS network
GPRS Activity (HSDPA)
Normal blink / Orange
Data transmission in progress
Ethernet Activity
Fast blink / Orange
Ethernet network is up
4
Theactivesimwillshowalight,theinactiveSIM’sLEDwillbeoff.
Page 10

netAccess L-200 Series Manual 5 | Page
Technical Specifications
L-100 Series
L-200 Series
L-200 Optimus
L-3xx Series
Connectivity
RS232 Serial
RS485 Serial
(optional)
GPRS
TCP/IP
RS232 Serial
RS485 Serial
(optional)
GPRS
TCP/IP
RS232 Serial
GPRS
TCP/IP
PSTN
RS232 Serial
RS485 Serial
(optional)
GPRS / HSDPA
TCP/IP
PSTN
Ports
RS232/RS4855
RS232 x2
Ethernet
USB Slave
USB Host
RS232/RS4855
RS232 x2
Ethernet
USB Slave
USB Host
SD Card Slot
RS232
POS/PBX
Phone/Fax
Ethernet
USB Slave
USB Host
SD Card Slot
RS232/RS4856
RS232 x2
Ethernet x 2
USB Slave
USB Host
SD Card Slot
Status
Indicators
RS232 Activity x 3
GPRS Signal
Strength
GPRS Activity
Ethernet Activity
RS232 Activity x 3
GPRS Signal
Strength x 2
GPRS Activity
Ethernet Activity
POS/PBX Activity
x 3
GPRS Signal
Strength x 2
GPRS Activity
Ethernet Activity
RS232 Activity x 3
GPRS Signal
Strength x 2
GPRS Activity
Ethernet Activity
Dimensions
W x L x H
(cm)
12.5 x 10.1 x 4.1
12.5 x 10.1 x 4.1
12.5 x 10.1 x 4.1
13.8 x 12.5 x 4.1
Weight (g)
510
580
650
675
Power Source
(Standard)
DC 12V 1A
DC 12V 1A
DC 12V 1A
DC 12V 1A
Power Source
(Minimum)
DC 7V 1.5A
DC 7V 1.5A
DC 9V 1.4A
DC 7V 2A
Power Source
(Maximum)
DC 40V 0.3A
DC 40V 0.3A
DC 20V 0.6A
DC 40V 0.3A
Operating
Conditions
-5 to 55 °C
20-80 humidity
-5 to 55 °C
20-80 humidity
-5 to 55 °C
20-80 humidity
-5 to 55 °C
20-80 humidity
5
If the RS485 port is present then the third RS232 port is not available.
6
The L-3xx series supports combinations of total of 3 S232 and RS485 ports.
Page 11
netAccess L-200 Series Manual 6 | Page
Chapter 2:
System Configuration
Guide
Getting Started
The netAccess L-Series devices are preconfigured with default system parameter values.
These need to be customized to the production environment during deployment. This
section guides the user through the System Configuration Pages.
Configuration Interface
The netAccess L-Series devices are configured through a web-based interface.
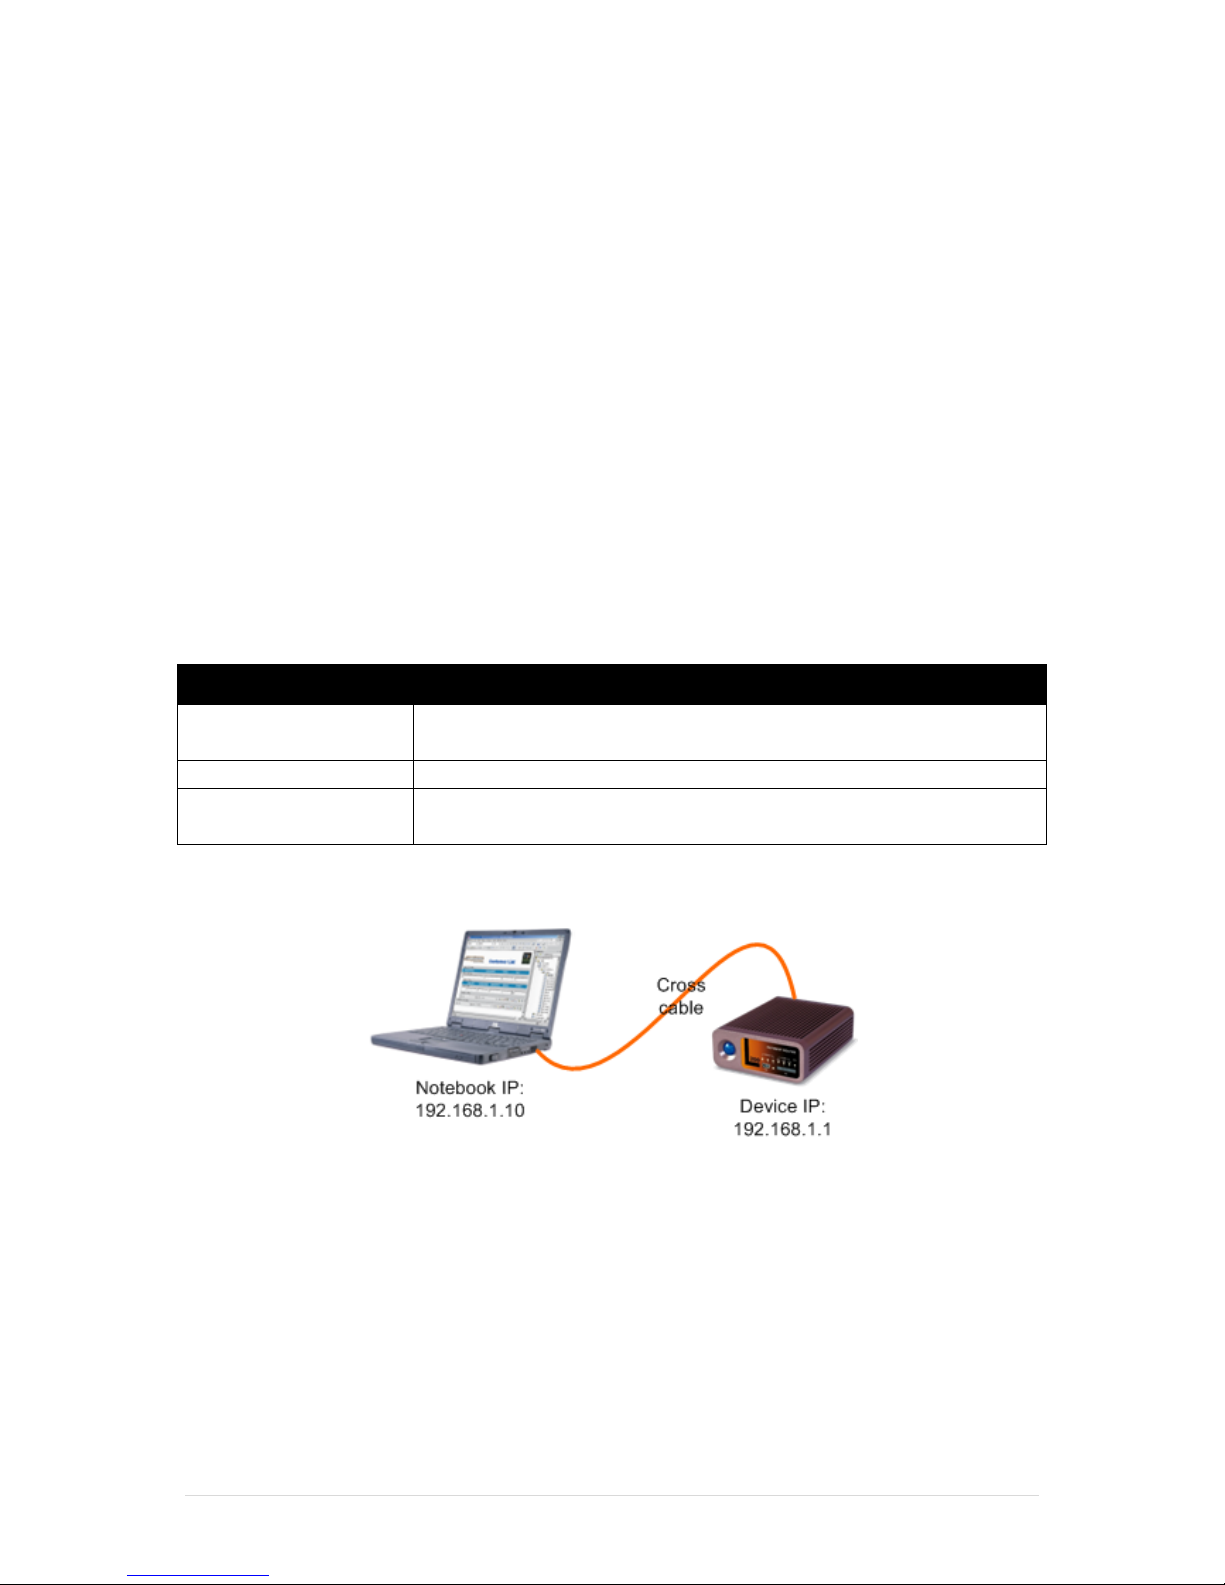
Requirements for configuration:
Item
Description
Computer
Notebook or desktop with LAN port and running TCP/IP protocol
with IP Address: 192.168.1.10
LAN Connection
Cross cable plugged into TCP/IP port of L device
Web Browser
Recommended web browser to use is Internet Explorer (version
6.0 and above) with the resolution of 1024 x 768
Figure 2: Connection from Notebook to netAccess L-Series device
Page 12
netAccess L-200 Series Manual 7 | Page
Connecting to the netAccess L-Series device
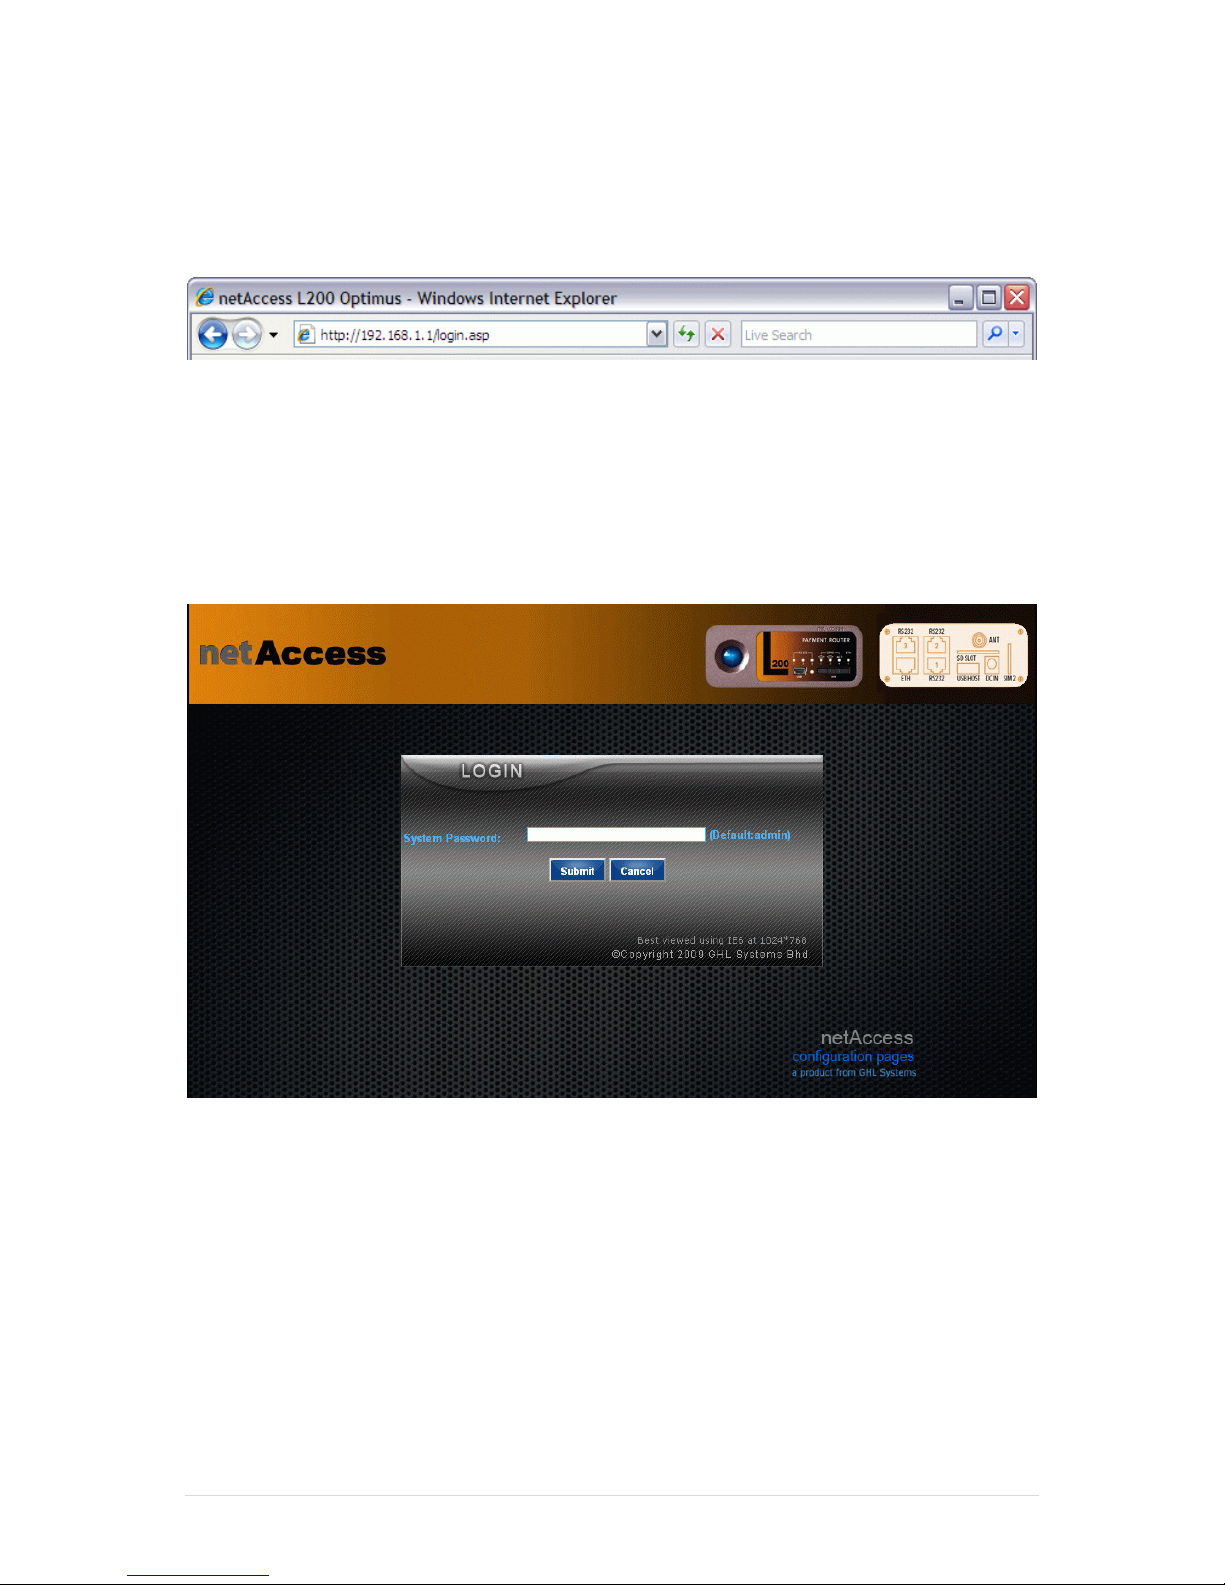
The default IP for netAccess L-Series devices is 192.168.1.1. Access the web configuration
page by entering the IP into the Address Bar of the Web Browser:
Figure 3: Enter the netAccess L-Series default IP into the Address Bar (Internet Explorer)
Press ENTER to access the Login Page and begin configuring the netAccess L device.
Login Page
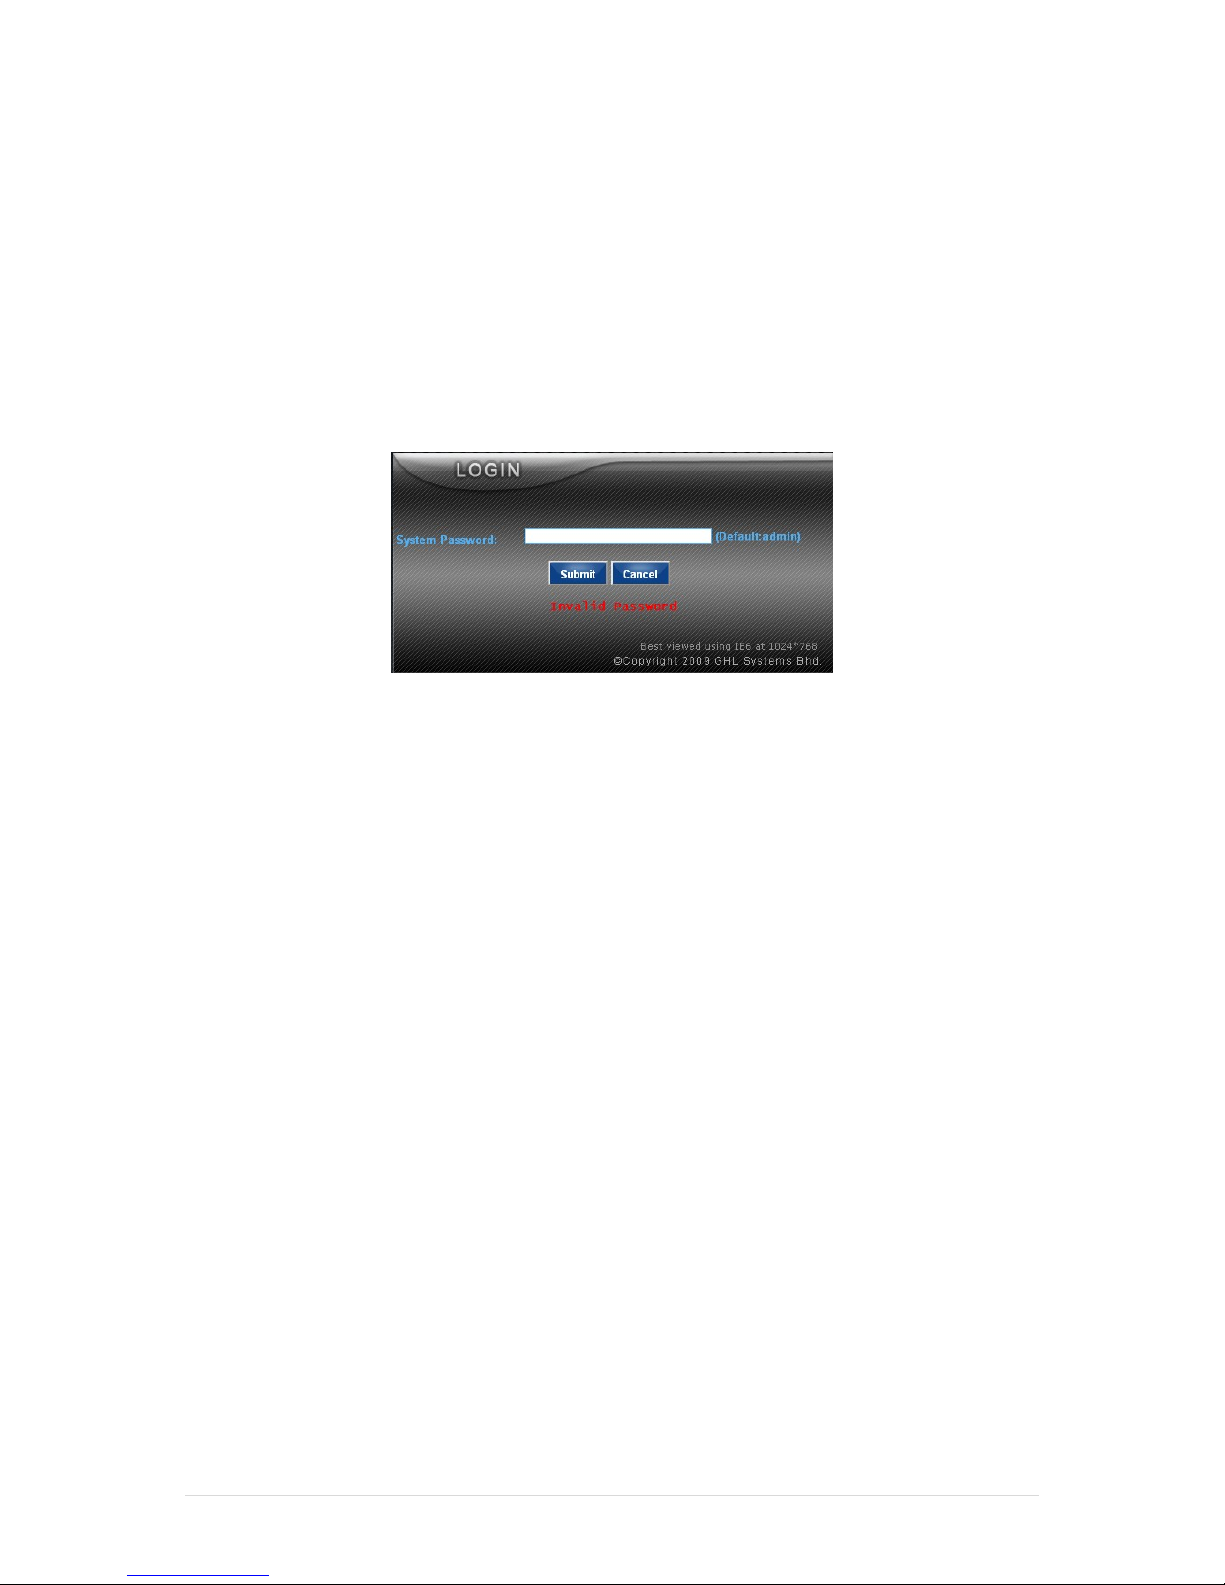
The Login Page is displayed upon connection to the netAccess L-Series device:
Figure 4: Login page for netAccess L-200
Page 13
netAccess L-200 Series Manual 8 | Page
Logging in
Key in the password in the input box and click Submit to enter the configuration pages. The
default System Password is admin.
The default password can be changed once logged into the configuration pages.
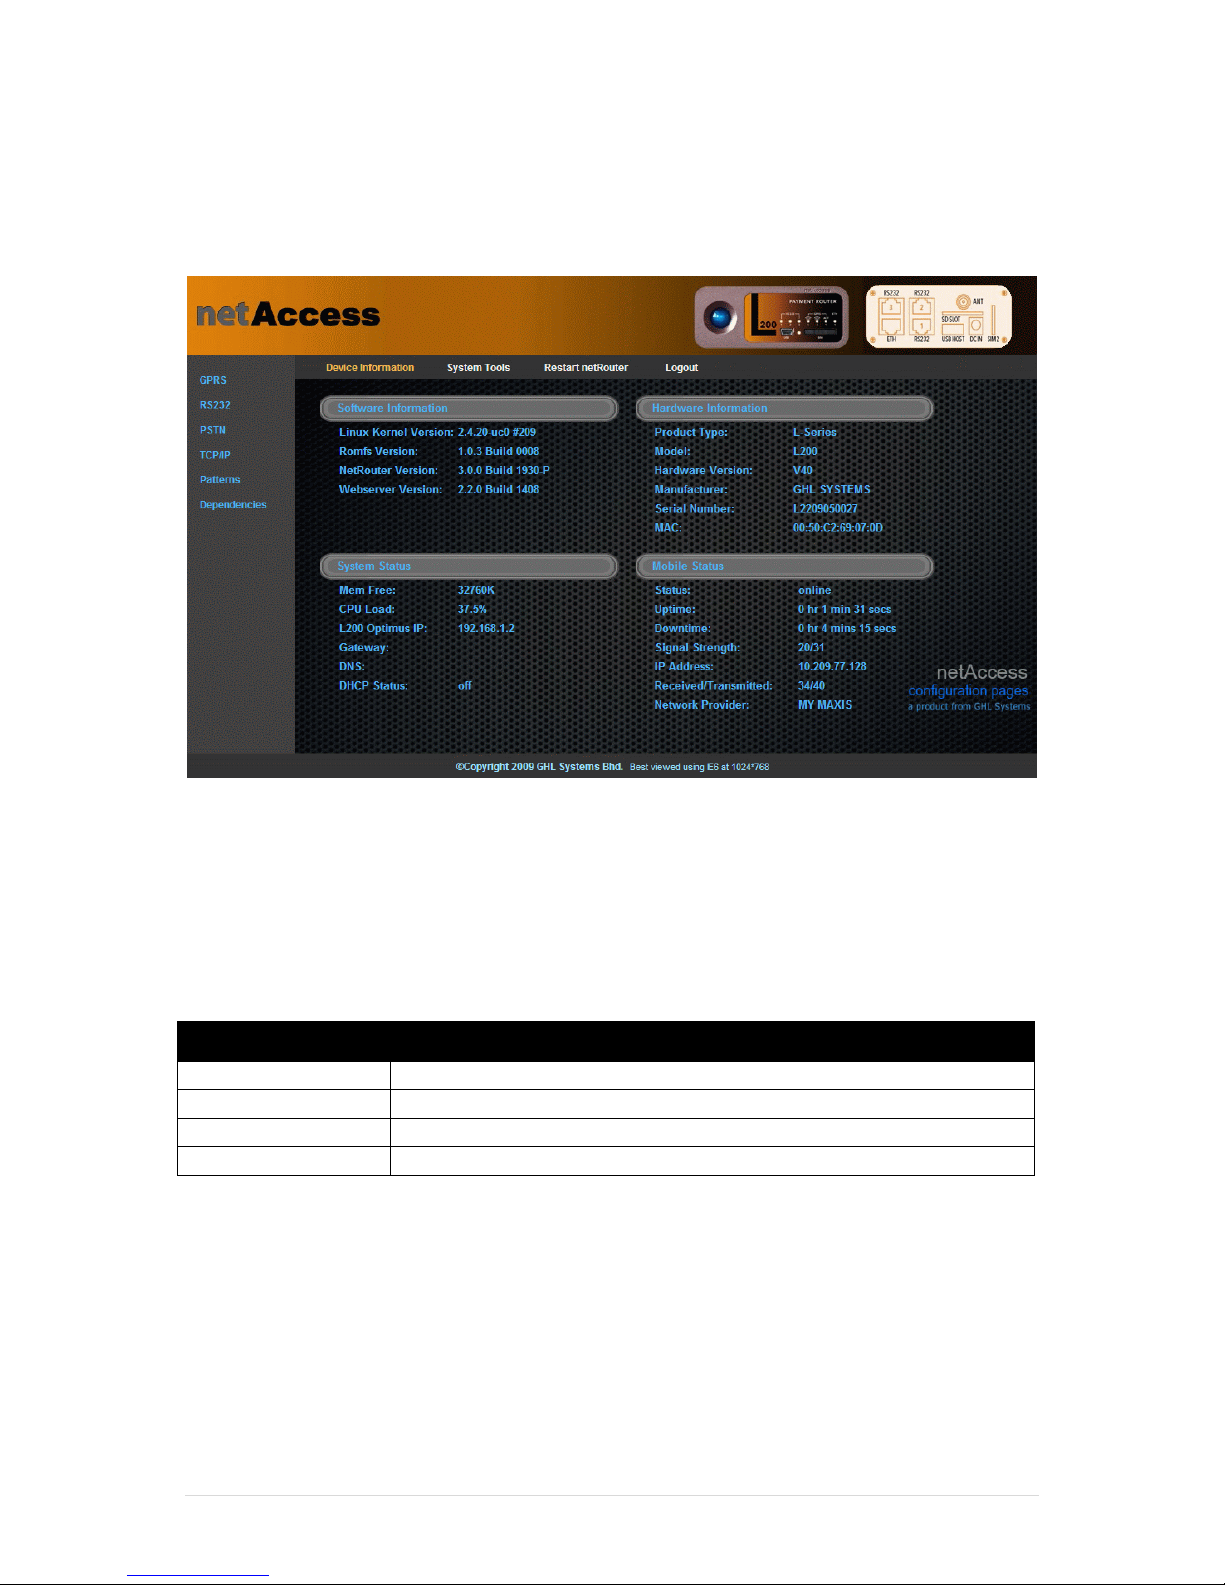
Wrong password entered
If a wrong password is entered, thesystemwilldenyaccessanddisplay“Invalid Password”:
Figure 5: Invalid Password Error
Page 14
netAccess L-200 Series Manual 9 | Page
Default Page
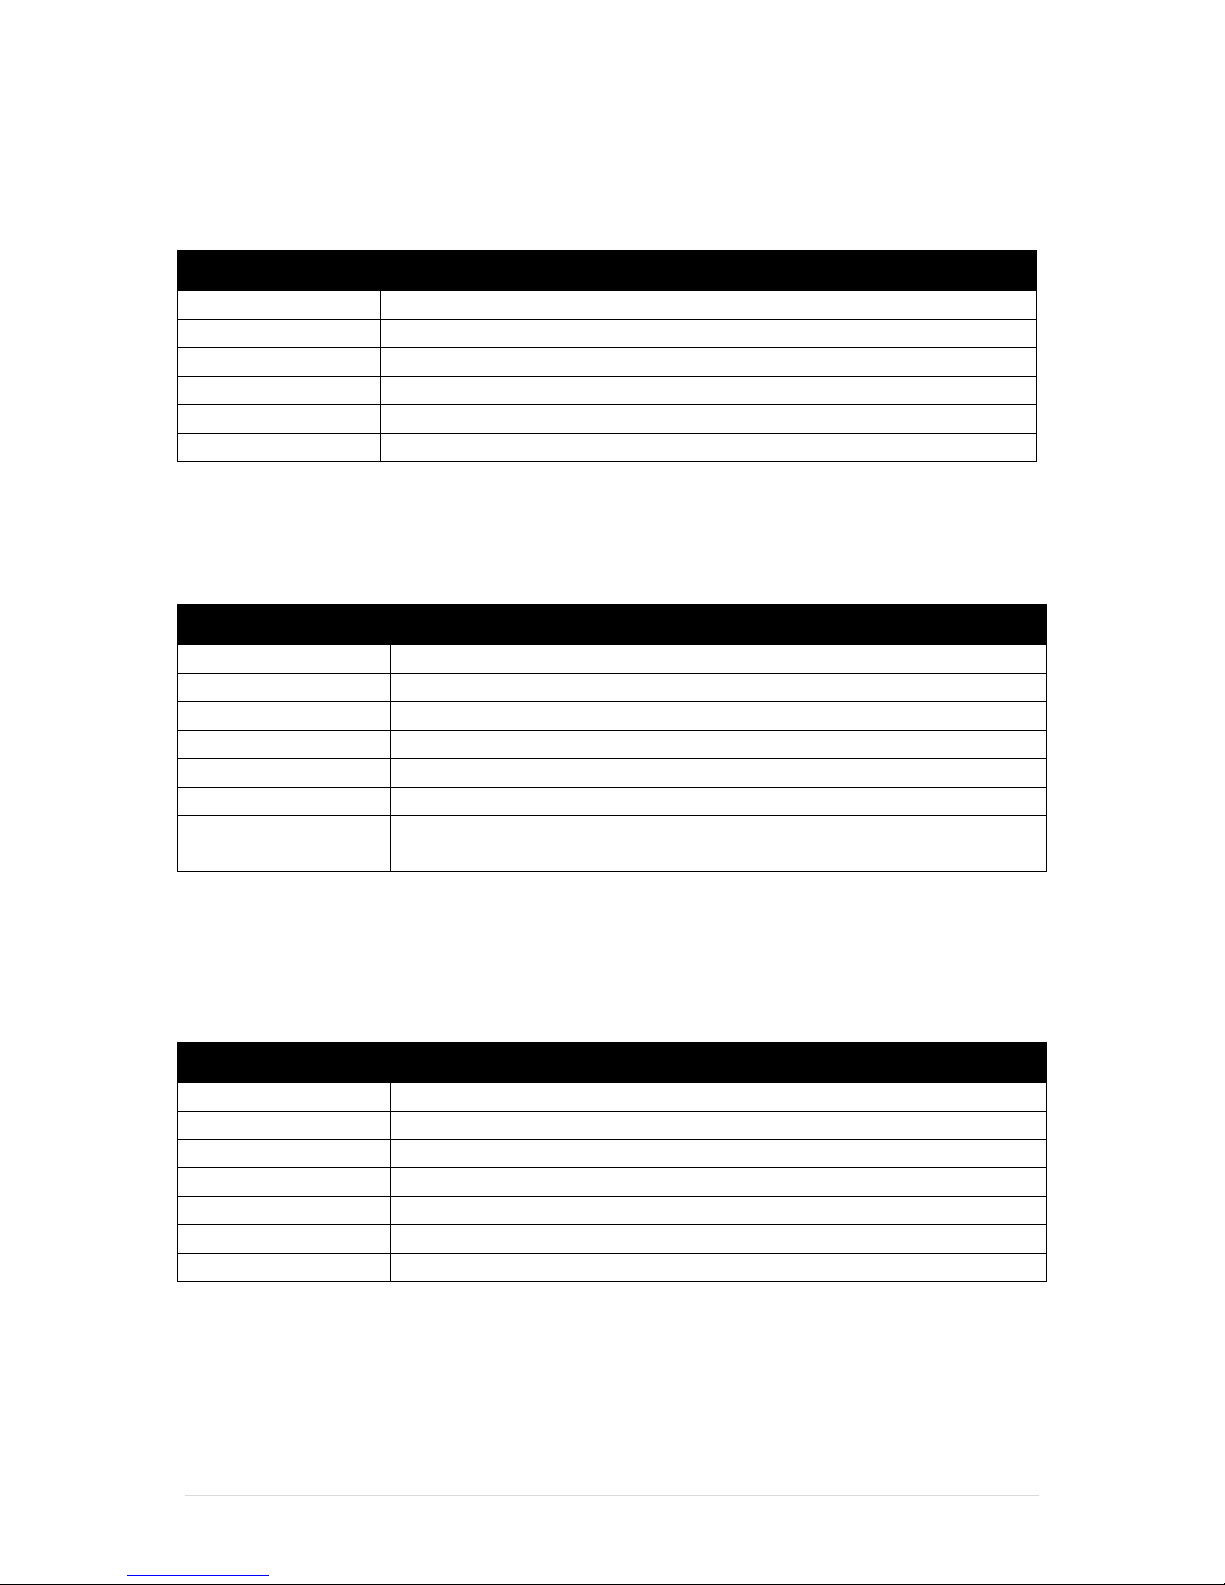
The default page is displayed upon successful login. It shows the information about the
system configuration, parameters and status of the netAccess L-200 series device.
Figure 6: netAccess L-200 Default Page shows the status and information of the device
Clicking on the Device Information button will display this same screen.
Software Information
This section displays the Software Information of the device:
Item
Description
Linux Kernal Version
Reports the version of the Linux Kernal
ROMFS Version
Reports the Build version of the ROM
NetRouter Version
Reports the Build version of the NetRouter firmware
Web server Version
Reports the Build version of the Web server application
Page 15
netAccess L-200 Series Manual 10 | Page
Hardware Information
This section displays the Hardware Information of the device:
Item
Description
Product Type
netAccess L-Series of Payment Routers
Model
Model of the device – L-350
Hardware Version
Version of the netAccess L-Series Hardware
Manufacturer
GHL Systems
Serial Number
Serial number of the netAccess L-Series device
MAC
MAC Address of the network port of the netAccess L-Series device
System Status
This section displays the System Status Information of the device:
Item
Description
Mem Free
Free memory of the system
CPU Load
% Load on the CPU
ETH1 IP
IP Address of first Ethernet port (ETH1). Default: 192.168.1.1
Gateway1
Gateway IP of first Ethernet port (ETH1).
ETH2 IP
IP Address of second Ethernet port (ETH2). Default is blank.
Gateway2
Gateway IP of second Ethernet port (ETH2).
DHCP Status
Indicates if the DHCP server on the netAccess L-Series device is
turned on or off, default is off
Mobile Status
This section displays the status of the active SIM card on the device:
(Note: This could be GPRS or HPDPA)
Item
Description
Status
Status of the active SIM Card
Uptime
Uptime of the connection
Downtime
Downtime of the connection
Signal Strength
Strength of the signal
IP Address
IP address of the GPRS connection
Received / Transmitted
Number of bytes received and transmitted
Service Provider
Name of service provider of the SIM
Page 16
netAccess L-200 Series Manual 11 | Page
Configuring the netAccess L-Series device
The netAccess L-Series devices may be configured on two levels:
Level
Notes
System
System wide configuration such as IP Address, configuration files
and System Firmware updates. System configurations are set using
the System Tools button.
System configuration changes require a System restart for changes
to take effect.
NetRouter
Configuration of NetRouter Services and Features such as Uplink
connections, GPRS connectivity parameters, Routing Patterns and
Service Dependencies. NetRouter configurations are set using the
menu bar at the side.
NetRouter configuration changes require the NetRouter services to
be restarted for the changes to take effect.
System Tools Buttons
The System Tools Buttons are located right underneath the title bar of the configuration
pages:
Figure 7: System Tools Button bar
The System Tools Buttons provide access to the configuration pages of the netAccess L-200
series device System Parameters:
Item
Description
Device Information
Displays or refreshes the Device Information Page.
System Tools
Tools for configuring and managing the system.
Restart netRouter
Restart the netRouter services.
Logout
Log out of the management console.
Page 17
netAccess L-200 Series Manual 12 | Page
Device Information Tab
This tab displays the Device Information Page, which was described in the previous chapter.
System Tools Tab
The System Tools Button gives access to the system configuration pages:
Page
Description
Setting Tab
Settings for the following items:
Ethernet Setting (System IP settings)
Admin Setting (Change system password)
Time Setting (Change system time)
Download Tab
Download system logs and configuration file.
Upgrade Tab
Load new configuration or system image files into the device.
Ping Test Tab
PING other hosts in the network.
Restart
Restart the netAccess L-200 series device.
IMPORTANT NOTICE:
Any changes to the System Settings (except for Admin password changes and time changes)
requires a system restart.
System Tools - Settings Tab
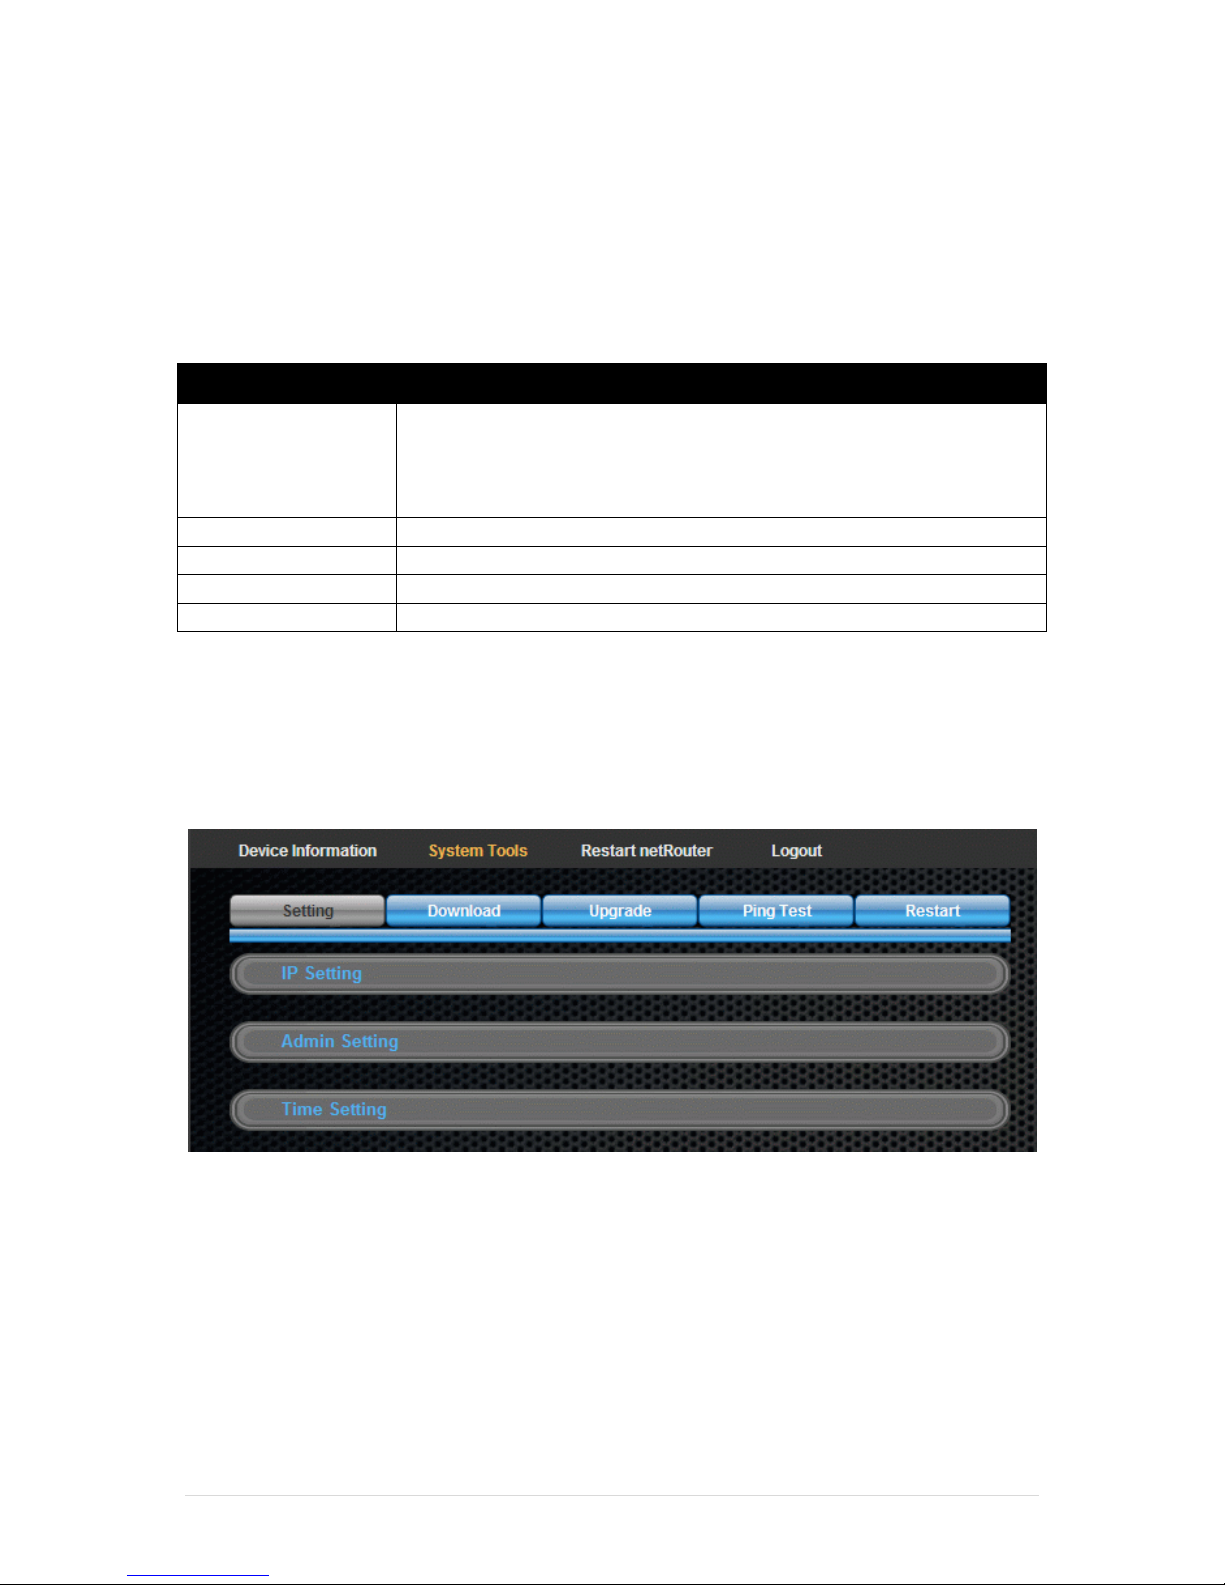
Figure 8: The System Tools Setting tab
Page 18
netAccess L-200 Series Manual 13 | Page
Ethernet Settings
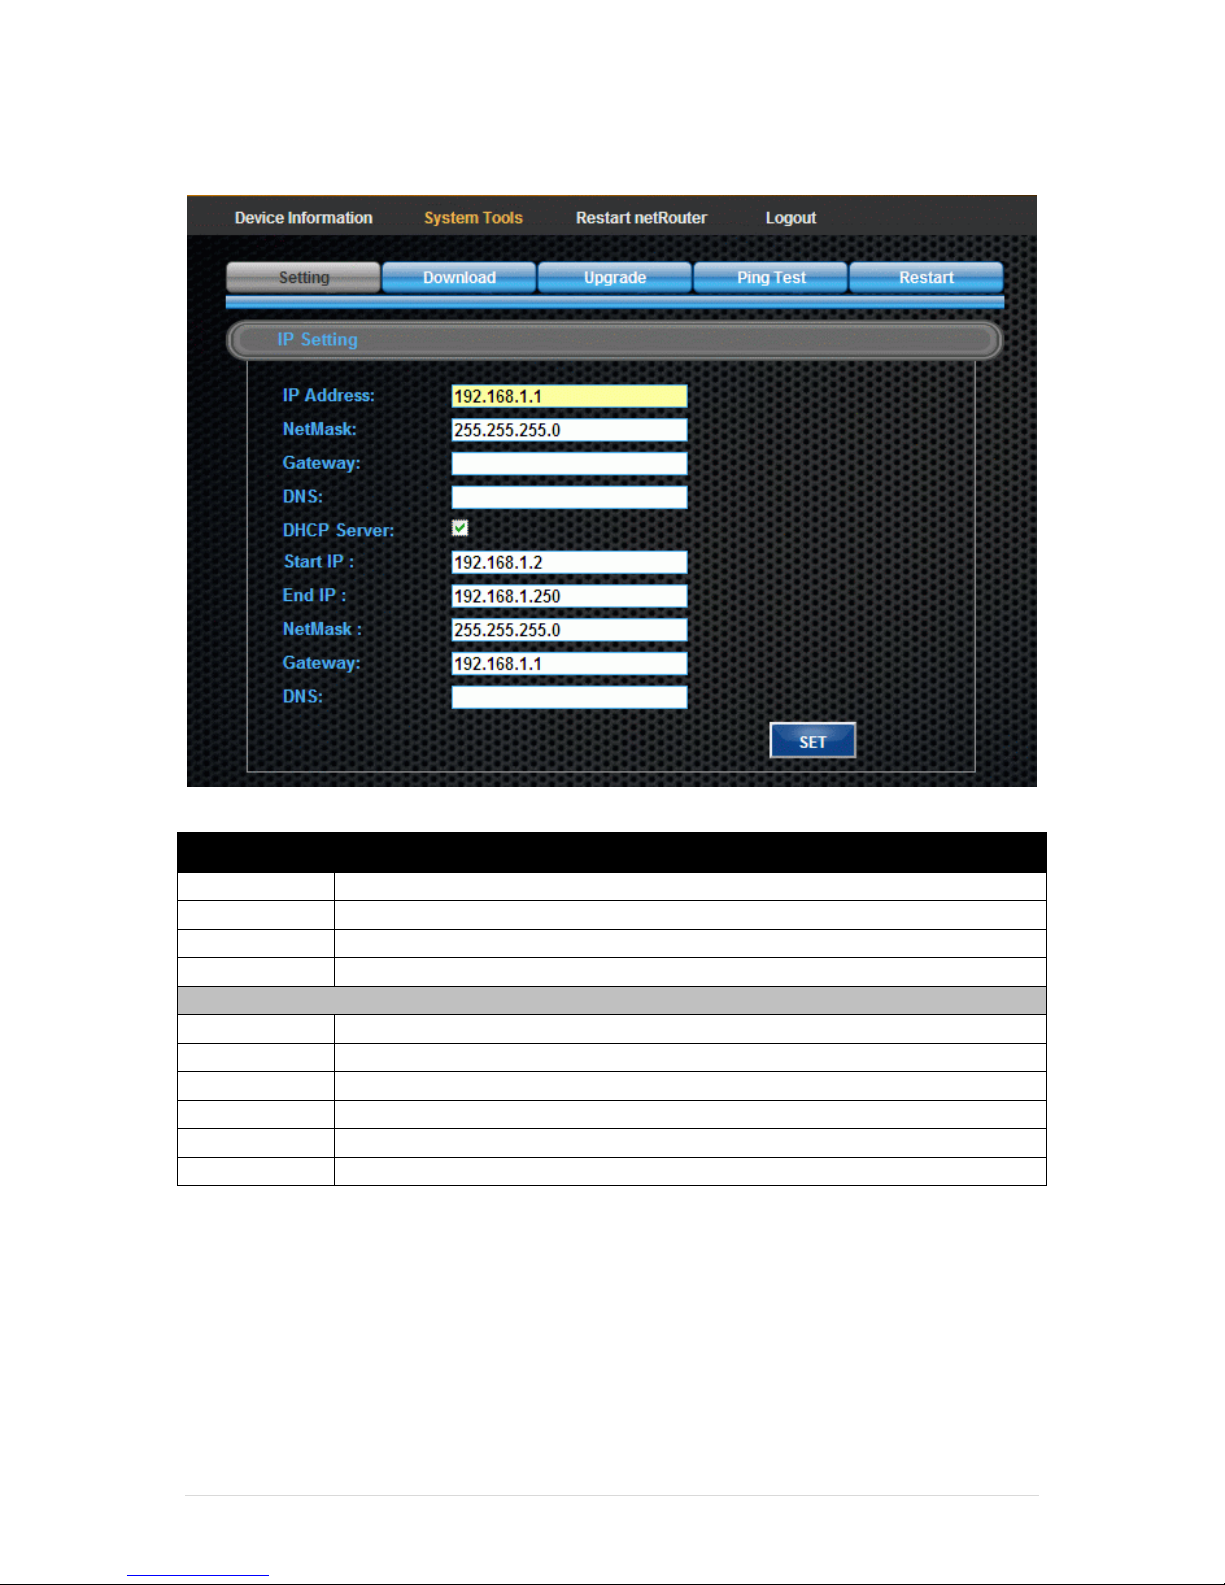
Figure 9: System Tools – Settings Tab - Ethernet Setting
Field
Description
IP Address
IP Address of the Ethernet Port.
Netmask
Subnet mask for the Ethernet Port.
Gateway
Gateway for the Ethernet Port.
DHCP Server
Check this to enable a DHCP server on this Port.
DHCP Options
Start IP
Start of IP range to be dispensed by the DHCP server on this Ethernet Port.
End IP
End of IP range to be dispensed by the DHCP server on this Ethernet Port.
NetMask
Subnet Mask of the DHCP range.
Gateway
Gateway for the DHCP range (Set this to the IP address for that Port).
DNS
DNS setting for the DHCP range
Set
Click on SET button to save the configuration
Important Notice: After changing the IP settings, the netAccess L-Series device must be
restarted for the new IP settings to take effect.
Page 19
netAccess L-200 Series Manual 14 | Page
Admin Settings
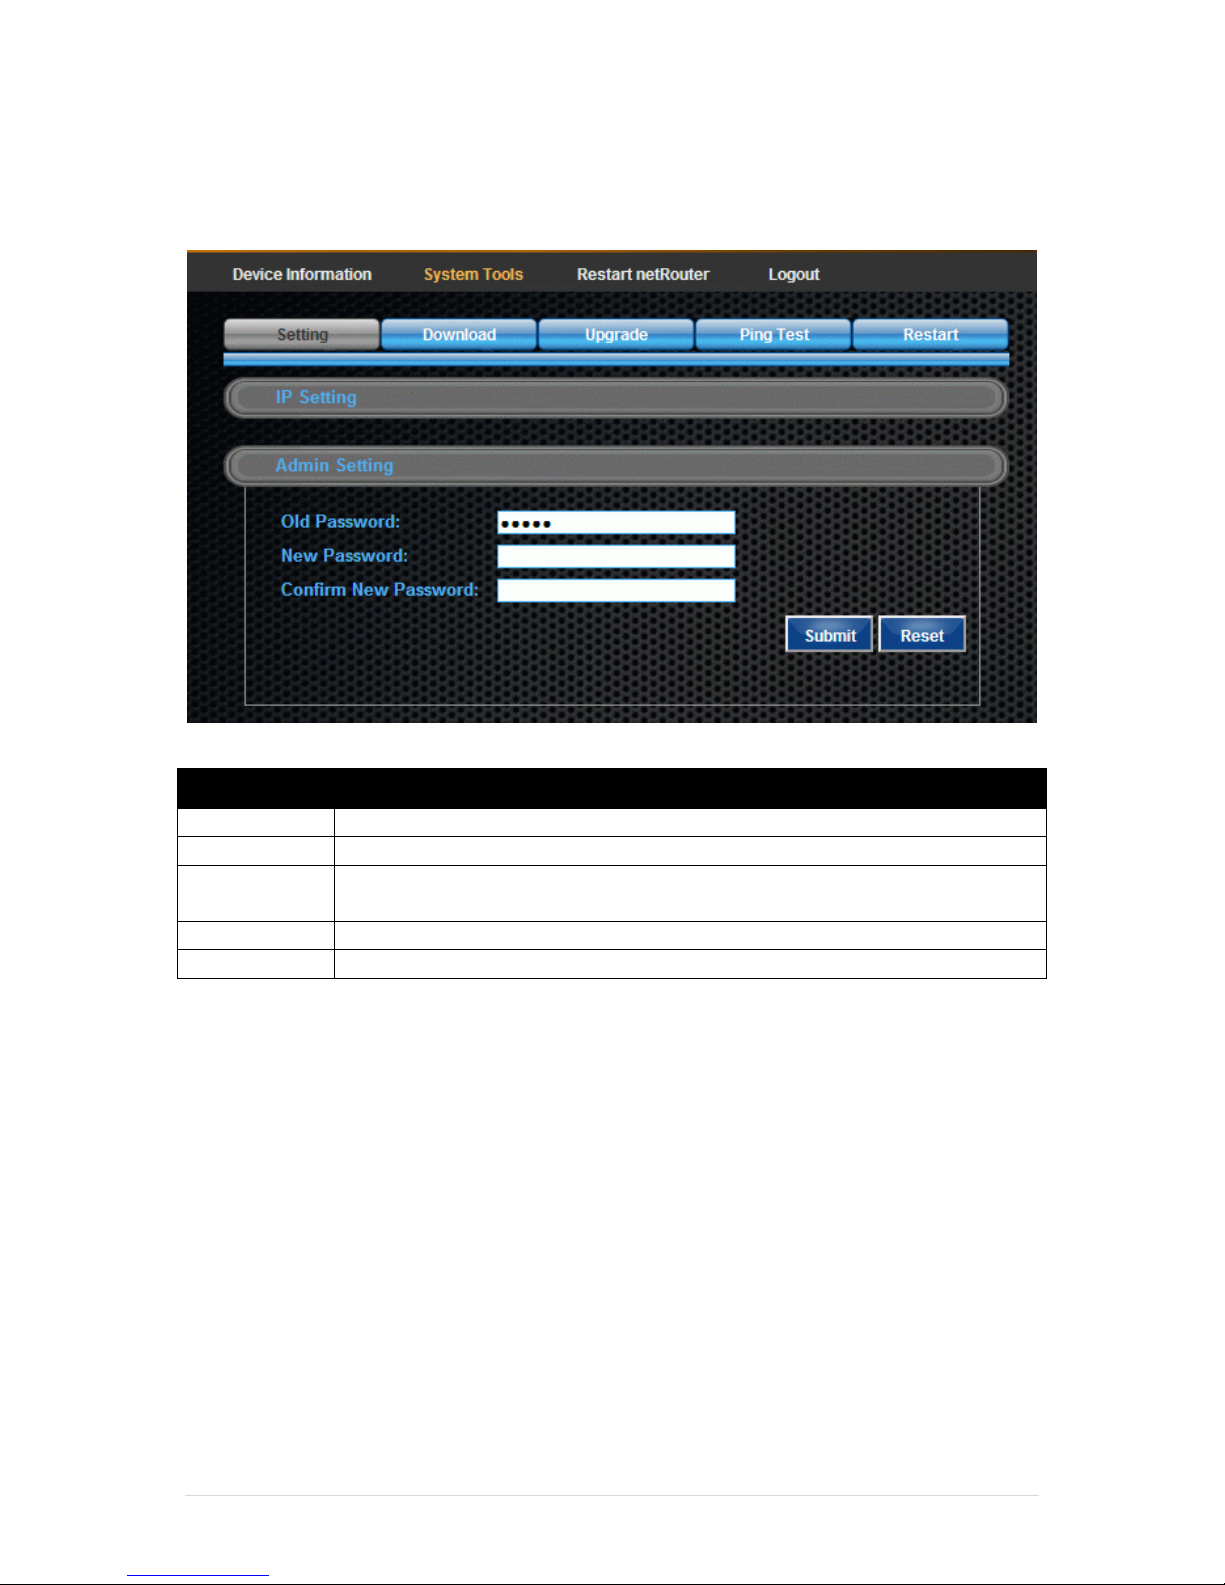
This option isusedtochangethedefaultpassword(‘admin’)toanewpassword.
Figure 10: System Tools – Settings Tab - Admin Setting
Field
Description
Old Password
Key in the old password. The dfault password is admin.
New Password
Key in the new password. Password will not be displayed.
Confirm New
Password
Key in the new password again to verify the password keyed in above.
SUBMIT
Submit button saves the new password
RESET
Reset button clears all the fields
Follow these steps to change the system password:
1. Key in the old password in the Old Password input box.
2. Key in the new password in the New Password input box.
3. Key in the new password again in the Confirm New Password input box. This ensures
that the password has been entered correctly as the passwords will not be displayed.
4. Click SUBMIT to save the new password.
5. Apromptwillappearaskingtheuserto‘ConfirmChanges?’
6. Click on YES and the password will be updated. A message will appear stating
“Passwordupdatedsuccessfully”.
Note: There is no need to restart the system after a password change.
Page 20
netAccess L-200 Series Manual 15 | Page
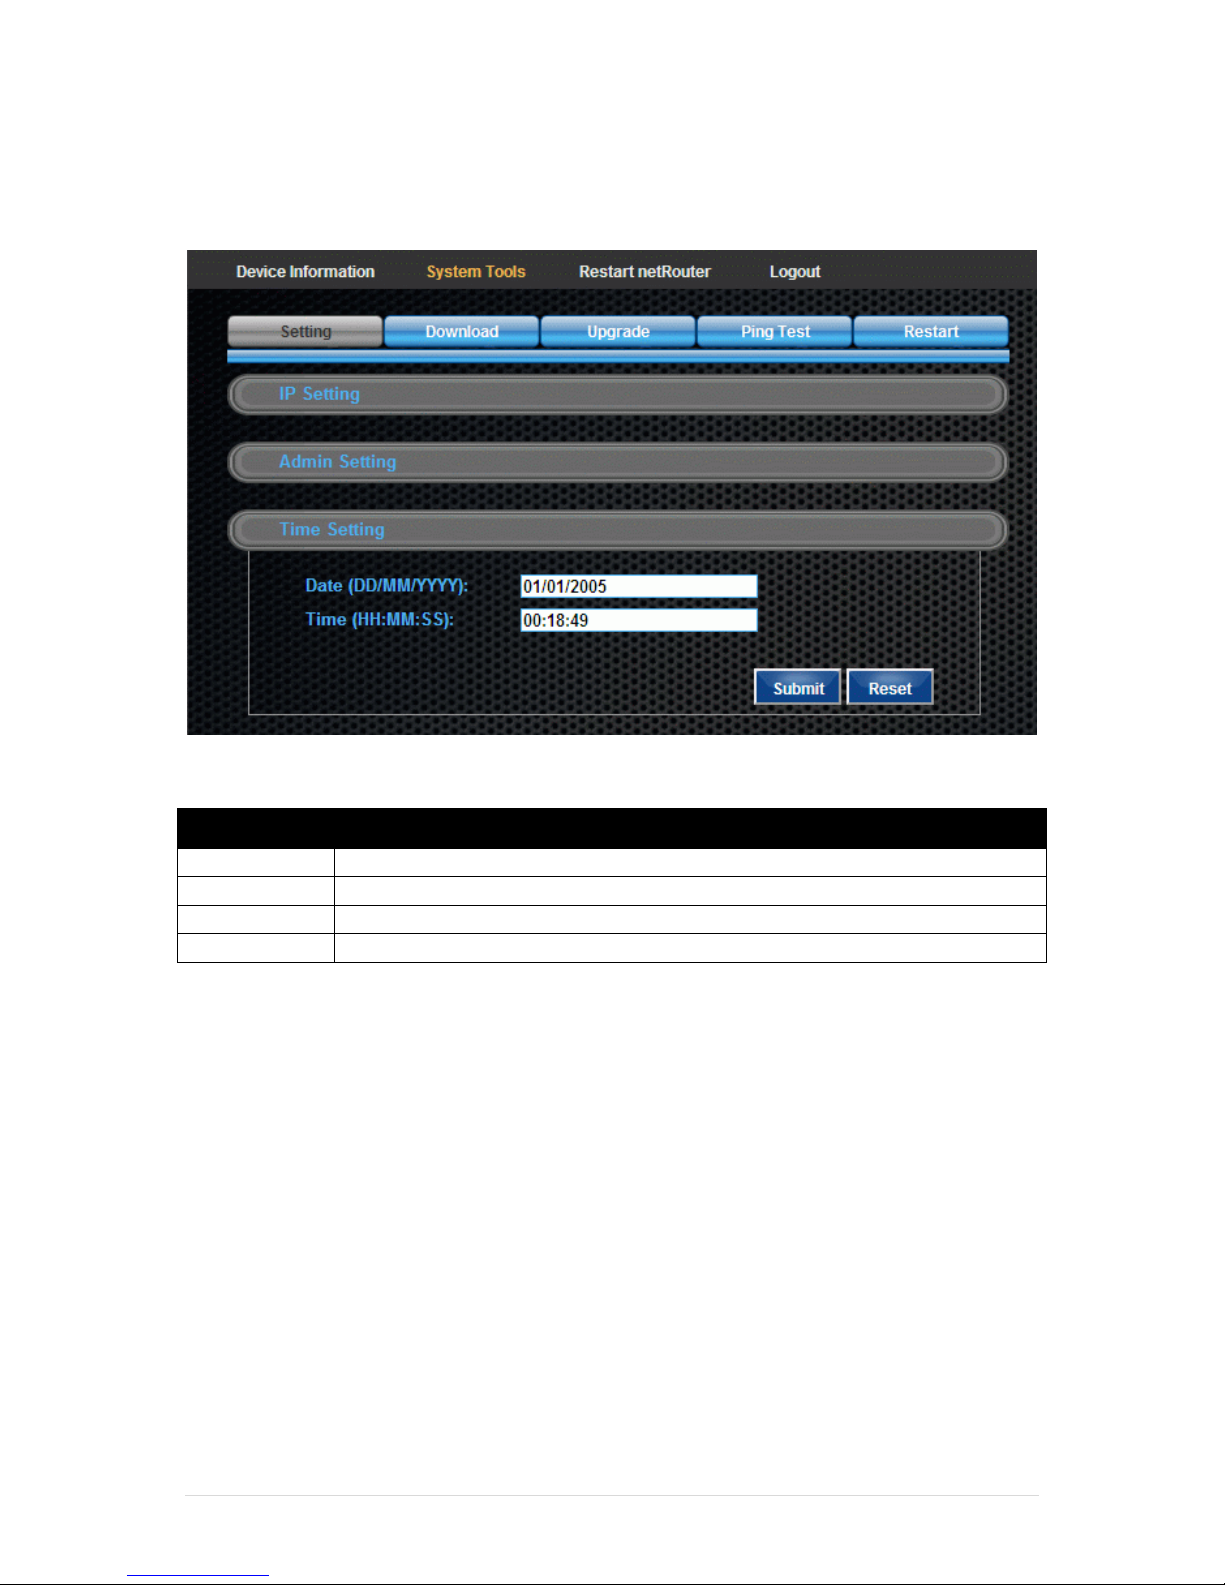
Time Setting
This option is used to change the date and time on the device.
Figure 11: System Tools – Settings Tab - Time Setting
Field
Description
Date
Key in the date in (DD/MM/YYYY format.
Time
Key in the time in HH:MM:SS format.
SUBMIT
Submit button saves the date/time.
RESET
Reset button clears all the fields.
Note: There is no need to restart the system after a password change.
Page 21
netAccess L-200 Series Manual 16 | Page
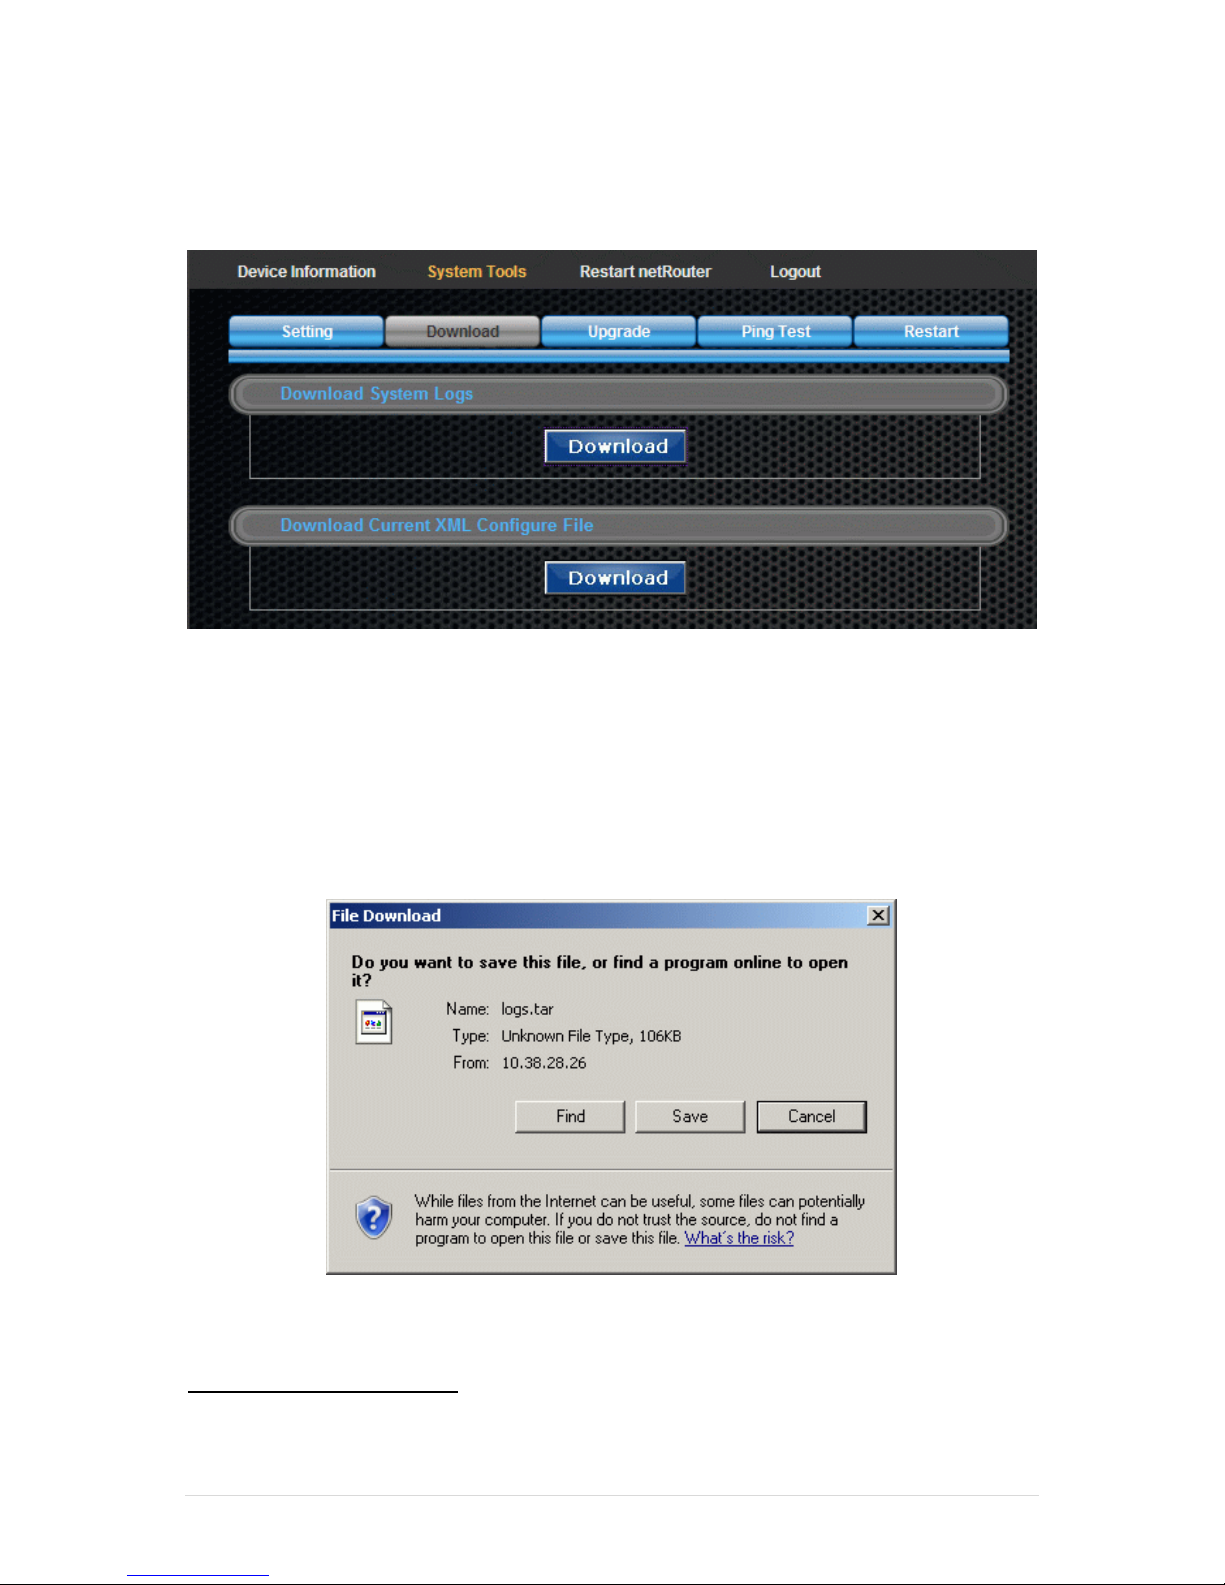
Download Tab
This tab allows the user to download the system logs and the current configuration file.
Figure 12: System Tools – Download Tab
Download System Logs
The netAccess L-Series devices have the capability to retain logs for troubleshooting
purposes. The Log files have a file size limit of 512 KB. The Logs will be overwritten once this
maximum size has been reached.
Click on the Download button to download the system logs. The logs will be compressed in
tar7 format.
Figure 13: File Download dialogue box
Click on the Save button to save it to the hard drive.
7
Files compressed in .tar format may be opened using programs such as WinRAR, WinZip or other compatible
compression programs.
Page 22
netAccess L-200 Series Manual 17 | Page
Download Current NetRouter configuration file
Click on the Download button in the section marked Download Current XML configuration
file to save the current XML configuration file to disk. The file name will be
netrouter_config.xml.
Upgrade Tab
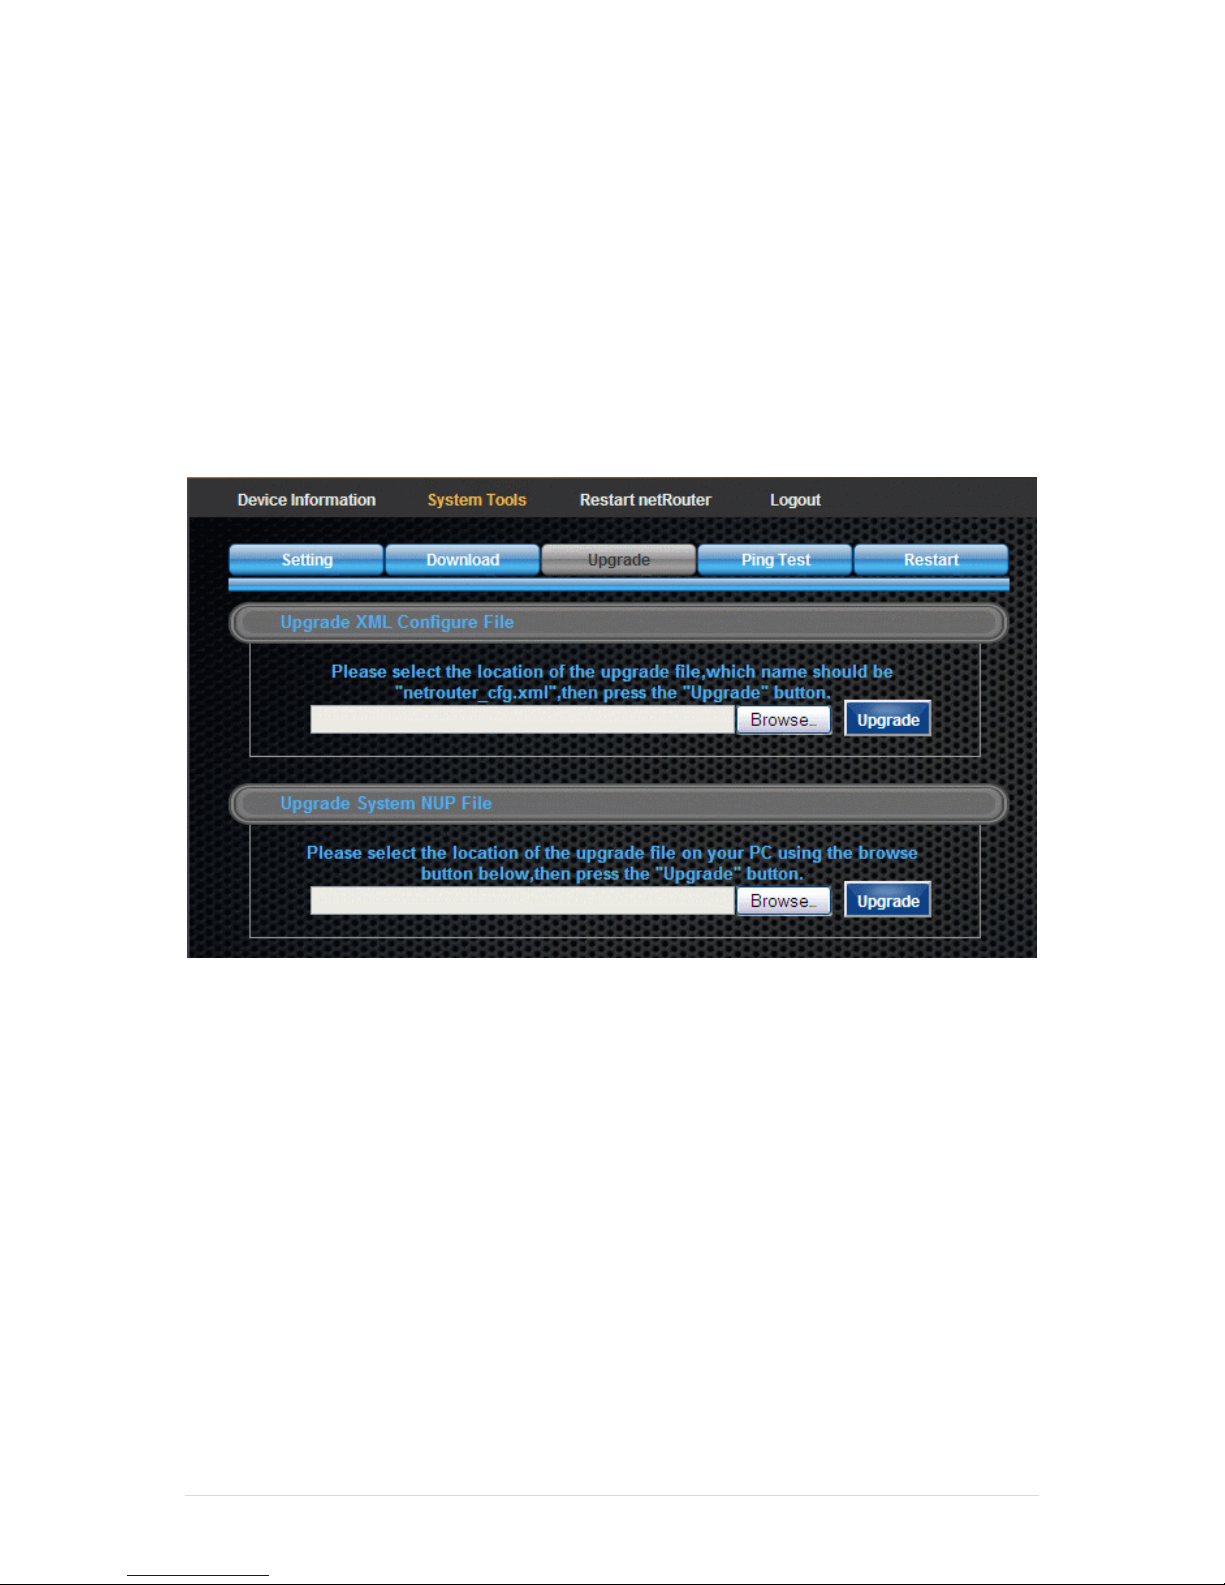
This tab allows the user to upgrade the System Image or update the NetRouter
configuration file.
Figure 14: System Tools – Upgrade Tab
Upgrade NetRouter Configuration File
The netAccess L-Series configuration is stored in XML format. The device may be quickly and
easily configured by loading a pre-configured XML file.
Follow the steps below to update the configuration XML file
1. Click Browse to select the new XML file from a location on the configuration
computer. The file name must be netrouter_cfg.xml.
2. Click Apply to save the configuration file to the device.
3. Once complete, the netAccess L-200 series device will automatically restart for the
new settings to take effect.
Page 23
netAccess L-200 Series Manual 18 | Page
Updating the System Image File
The netAccess L-200 series device may be upgraded by uploading a System Image File.
Follow these steps to update the System Image File
1. Click Browse to select the new XML file from a location on the configuration
computer. The file name will be named {SystemVersionNumber}.NUP.
2. Click Apply to apply the System Image File to the device.
3. Once complete, the L-200 device will automatically restart.
IMPORTANT NOTE: The device must be restarted in order to have the new System Image
take effect.
PING Test Tab
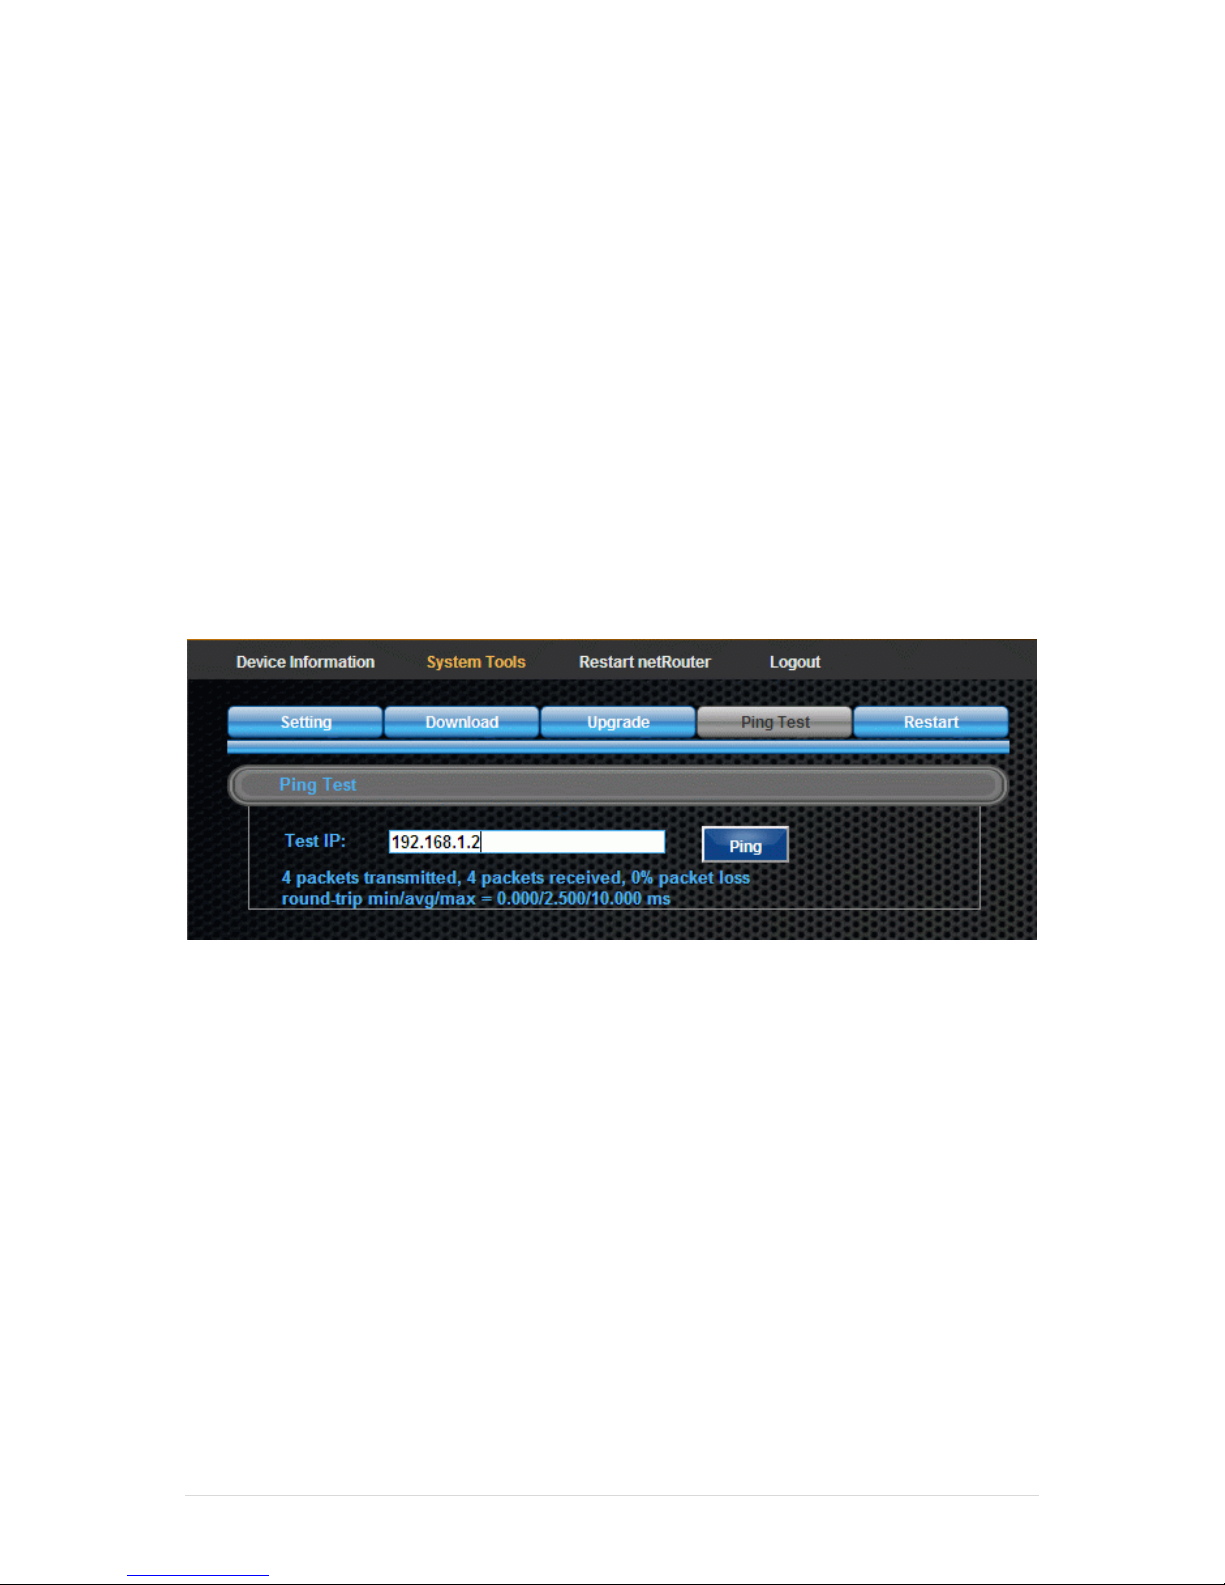
This function allows the user to test the IP network connectivity of the netAccess L-200
series device.
Figure 15: System Tools – Ping test
To use, enter the IP to be tested and click on PING.
4 PING packets will be transmitted to the Test IP and the response recorded. The results will
be displayed below the input box.
Page 24
netAccess L-200 Series Manual 19 | Page
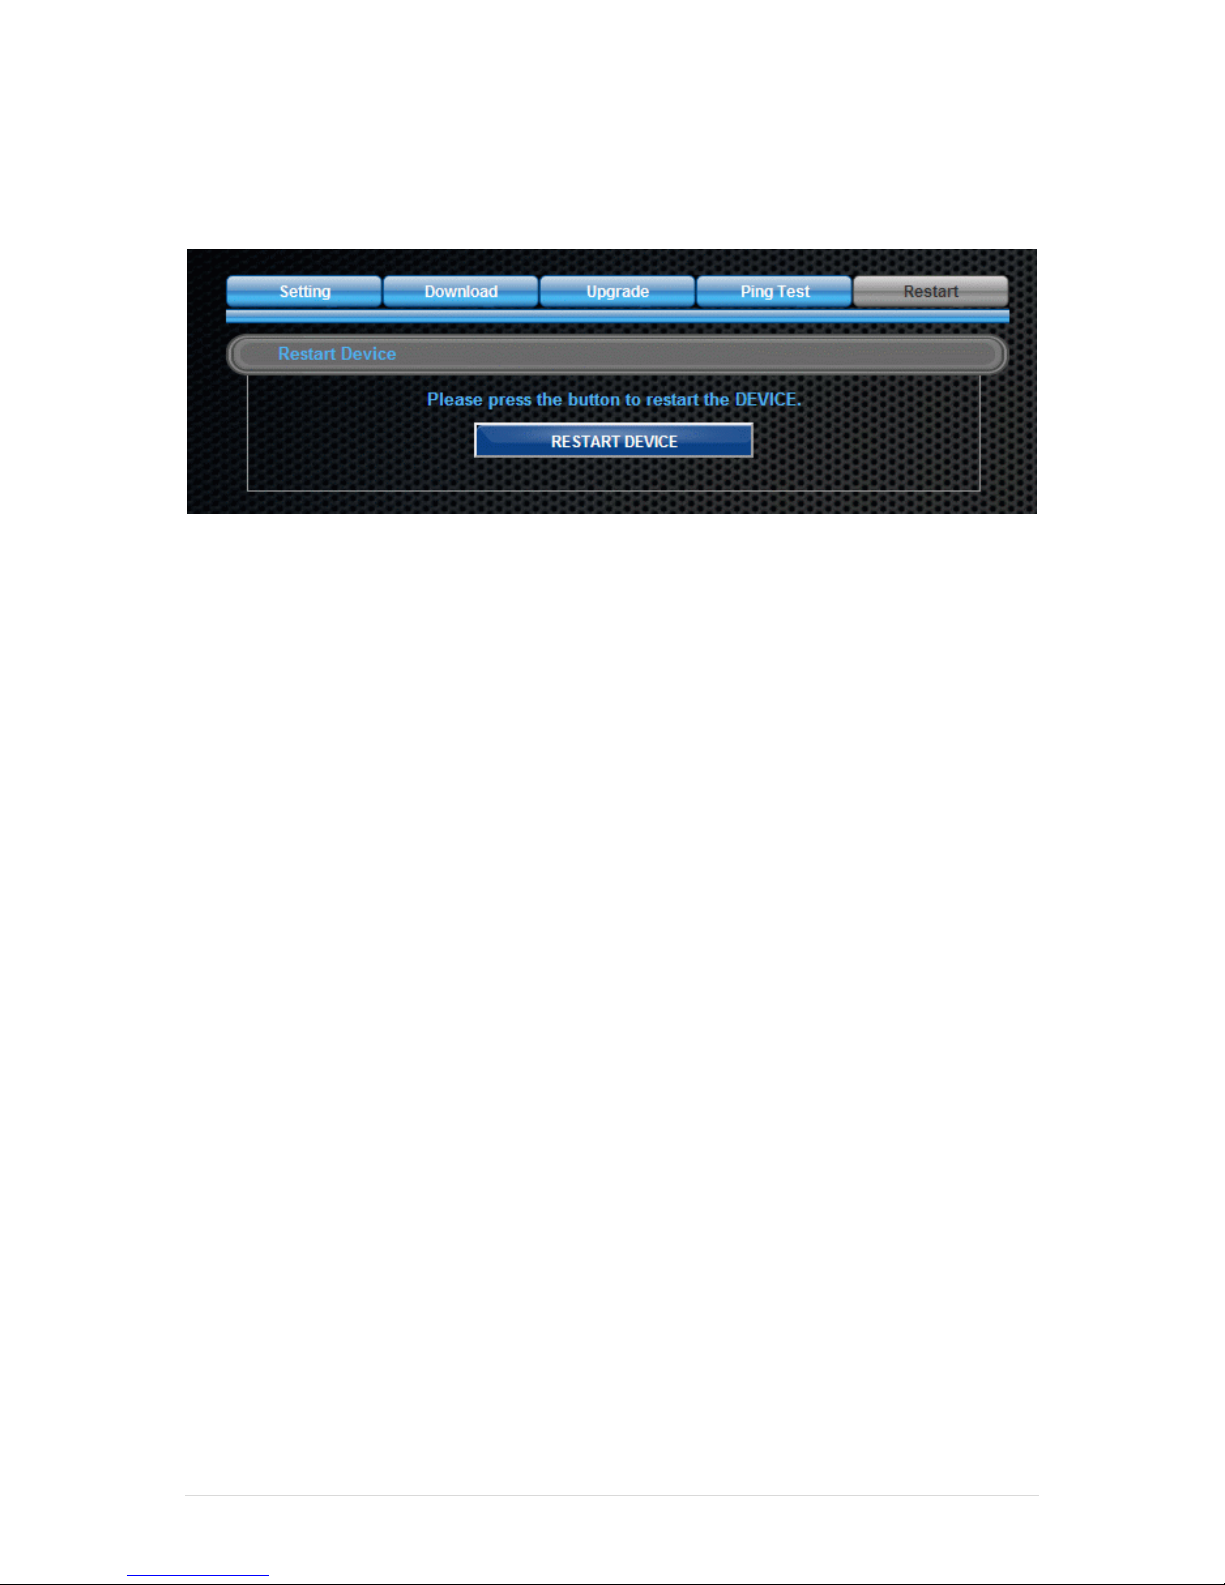
Device Restart Tab
Restart the netAccess L-200 series device from this page.
Figure 16: System Tools - Restart Device Tab
The netAccess L-200 series device MUST be restarted after any changes that affect the
device such as IP configuration, XMPP configuration or updates of the System Image. The
exception to the rule is that admin password changes or date/time changes do not require
the device to be restarted.
Logout
Clicking on the Logout menu button will exit the configuration pages and return the user to
the Login Screen.
Page 25
netAccess L-200 Series Manual 20 | Page
Chapter 3:
NetRouter
Configuration Guide
Configuring the NetRouter Services
Once the System configuration is complete, the next step is to configure the NetRouter
services of the netAccess L-Series device.
The NetRouter configuration includes the configuration of the Uplink and Downlink channel
communications, Routing Patterns and Service Dependencies.
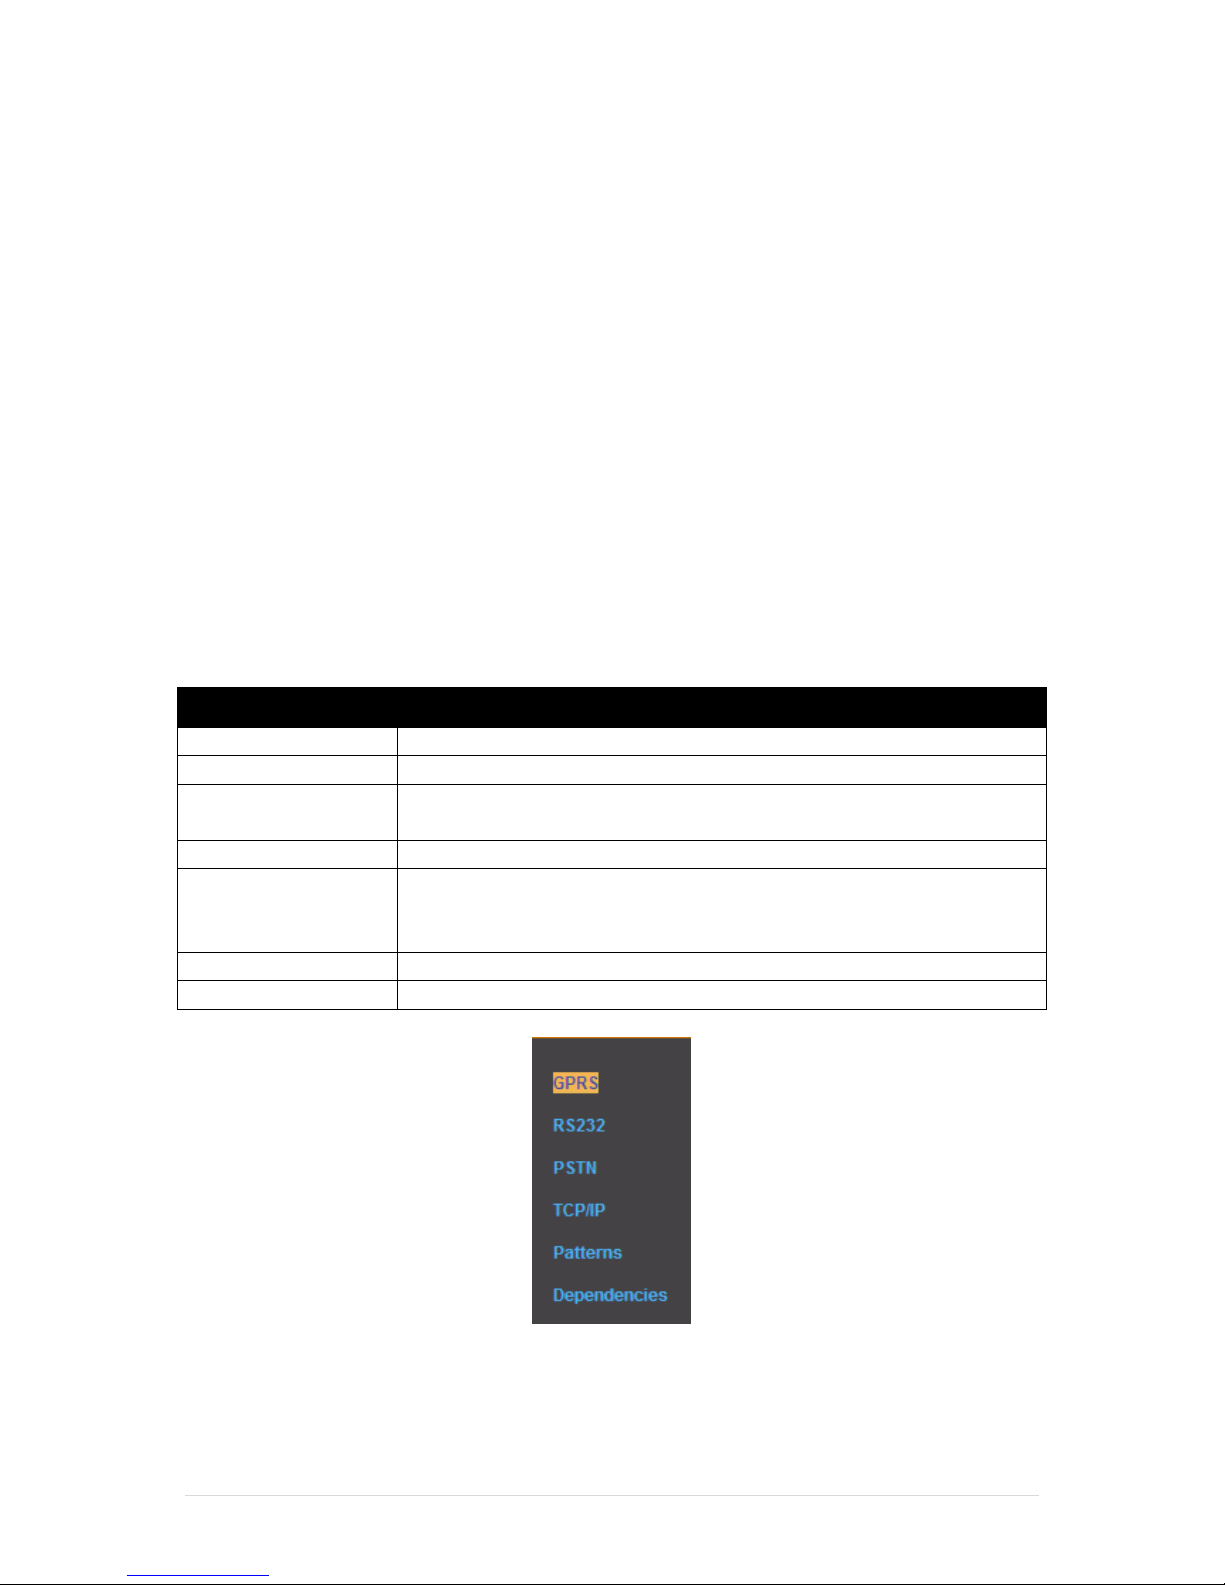
The NetRouter configuration menu is found at the Side-Menu bar and contains the following
items:
Item
Description
Mobile Settings
Configure mobile communications settings
RS232 Settings
Configure RS232 communications settings
RS485 Settings
Configure RS485 communications settings
(Available only if RS485 module is present)
PSTN
Configure PSTN communications settings
TCP/IP Settings
Configure TCP/IP settings for the NetRouter uplink/downlink
channels (not to be confused with the system TCP/IP settings in
earlier section)
Patterns
Define routing pattern definitions
Dependencies
Define system service dependencies
Figure 17: NetRouter configuration Menu Bar
Page 26
netAccess L-200 Series Manual 21 | Page
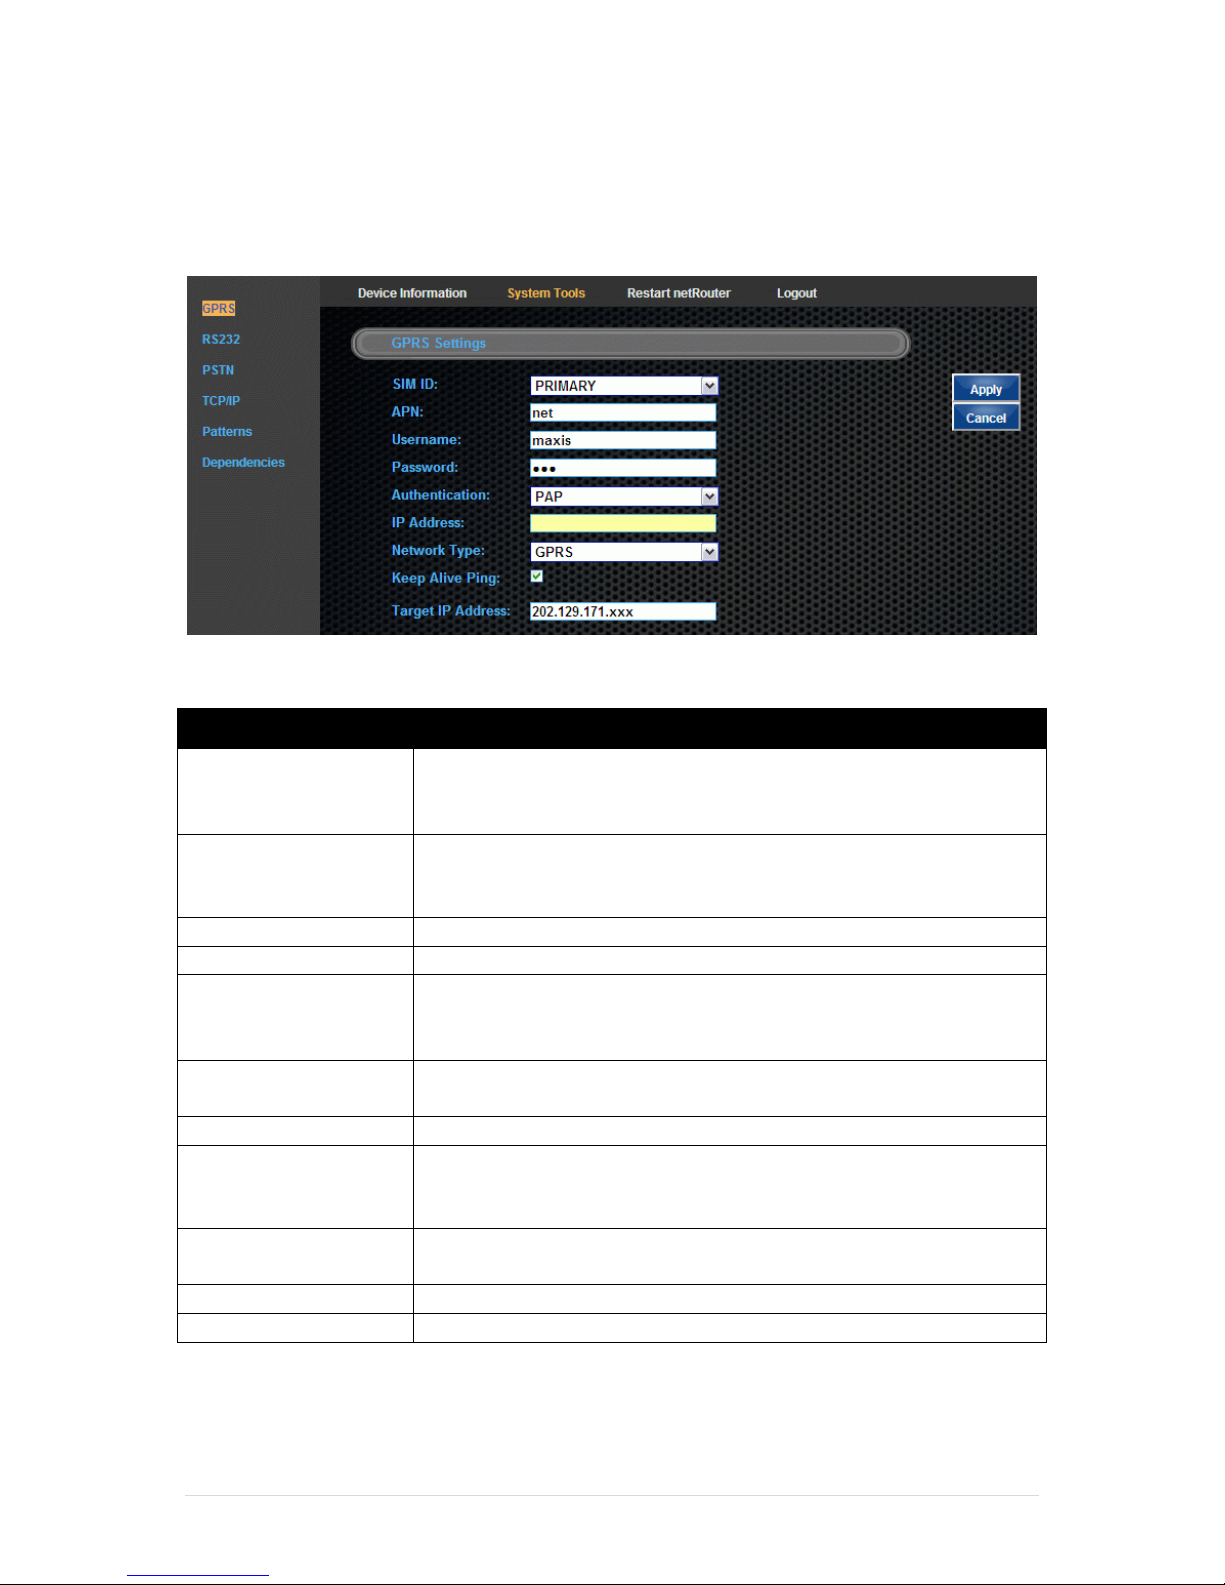
GPRS Settings
Click on GPRS Settings on the Left Menu Bar. This page sets the communications parameters
for the mobile communcations channel.
Figure 18: GPRS Settings Page
Setting
Description
SIM ID
This device support 2 SIMS:
Primary – SIM in Slot 1
Secondary – SIM in Slot 2
APN
Access Point Name - the name used to identify a general packet
radio service (GPRS) bearer service in the GSM mobile network.
Mobile network provider dependent.
Username
Mobile network provider dependent.
Password
Mobile network provider dependent.
Authentication mode
Mobile network provider dependent. Options are:
PAP
CHAPS
IP Address
Depends on mobile network provider. Required if IP is not
dynamically assigned by the provider. Usually left blank.
Network Type
The netAccess L-200 series supports GPRS or HSDPA
Keep Alive Ping
Keep Alive Ping is used to ensure that the connection between the
netAccess L-Series device and the host is active. Click on the box to
check it and turn on Keep Alive Ping.
Ping IP
This option appears if Keep Alive Ping is turned on. Enter the IP to
PING for Keep Alive Ping packets.
Apply
Click to save the settings.
Cancel
Click to exit without saving.
Click on the APPLY button to save these settings.
Note: The NetRouter service needs to be restarted before the settings take effect.
Page 27
netAccess L-200 Series Manual 22 | Page
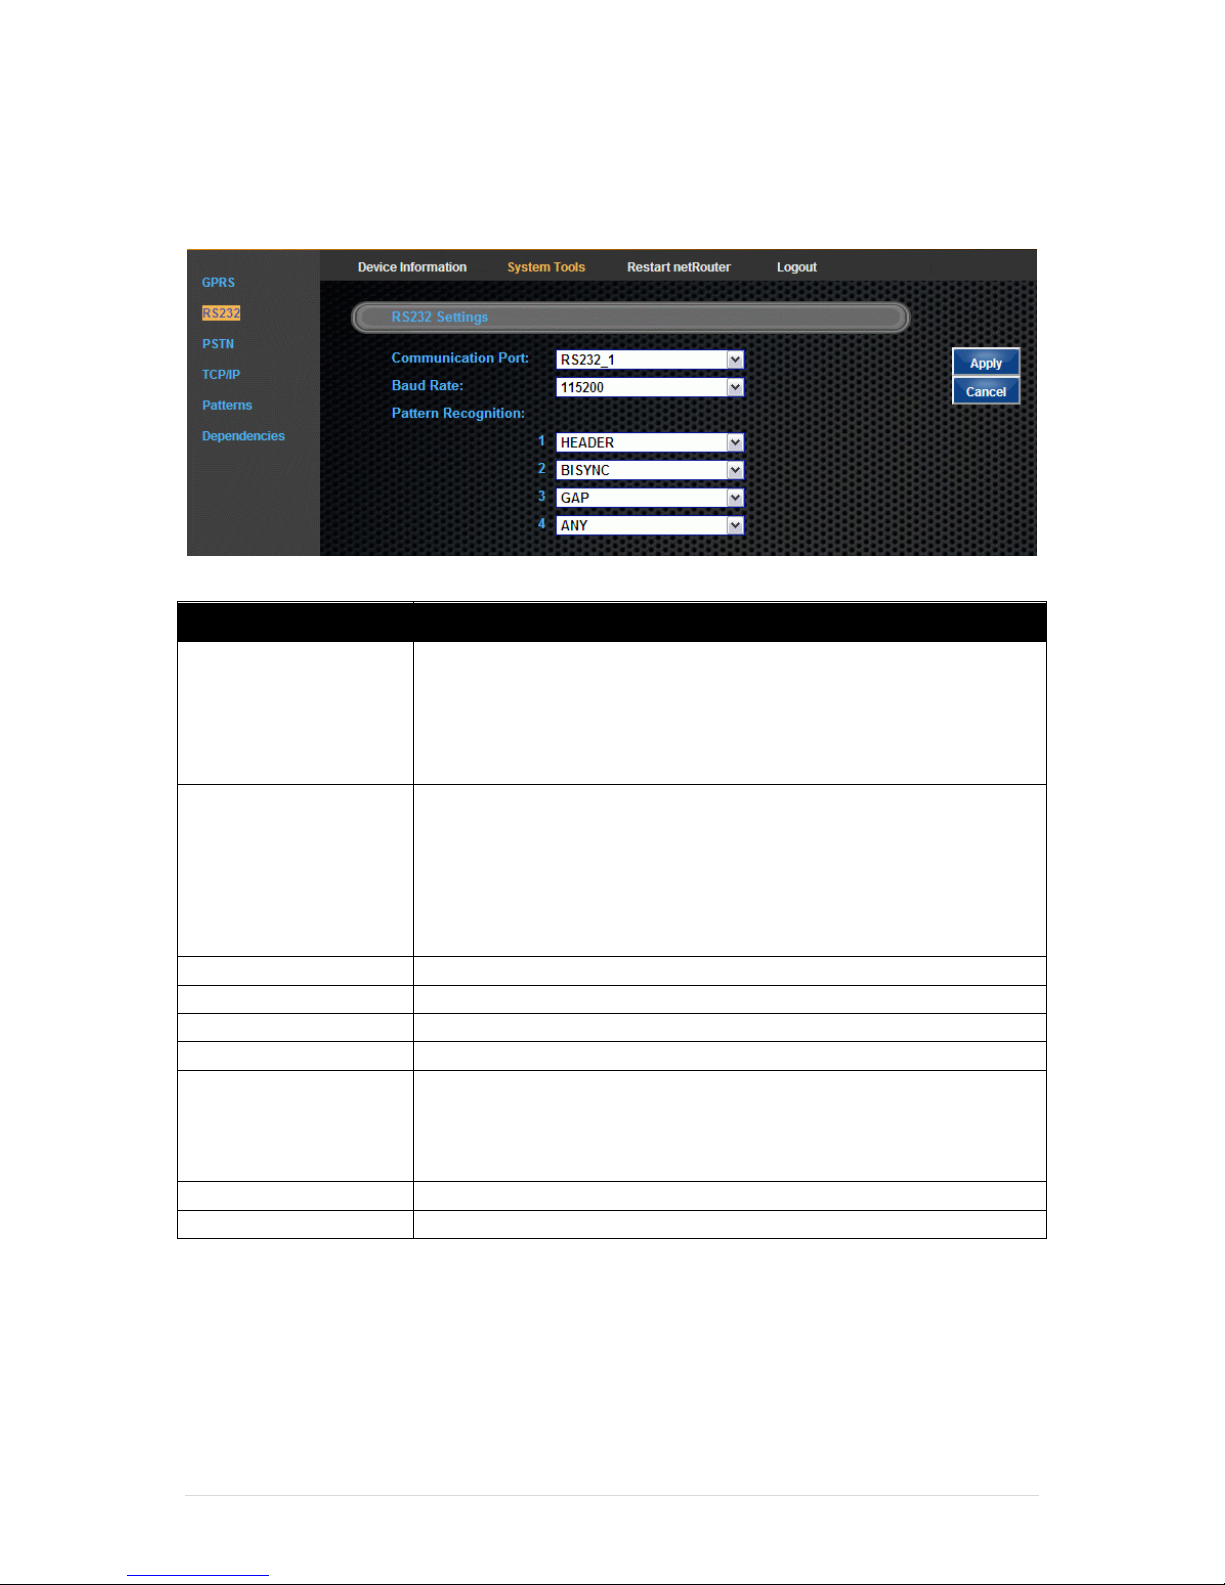
RS232 Settings
This page controls the communications parameters for the RS232 ports.
Figure 19: RS232 Settings Page
Setting
Description
Communications Port
Choose which COM port to configure
RS232_1
RS232_2
RS232_3*
* Not available on models with RS485.
Baud Rate
This COM port will communicate at this speed
115200 (default)
57600
38400
19200
9600
Data Bit
Number of bits in the data connection. Default: 8 bits.
Parity
Parity setting for the connection. Default: None.
Stop Bit
Number of Stop bits. Default: 1 bit.
Flow Control
Type of flow control for the data connection. Default: None.
Pattern Recognition
Patterns may be standard or custom-built from the Patterns
Definitions page. The netAccess L-Series device can route
transactions through this channel based on the Pattern
Recognition definition.
Apply
Click to save the settings.
Cancel
Click to exit without saving.
Click on the APPLY button to save these settings.
Note: The NetRouter service needs to be restarted before the settings take effect.
Page 28
netAccess L-200 Series Manual 23 | Page
RS 485 Settings
(Available only if RS485 module is present)
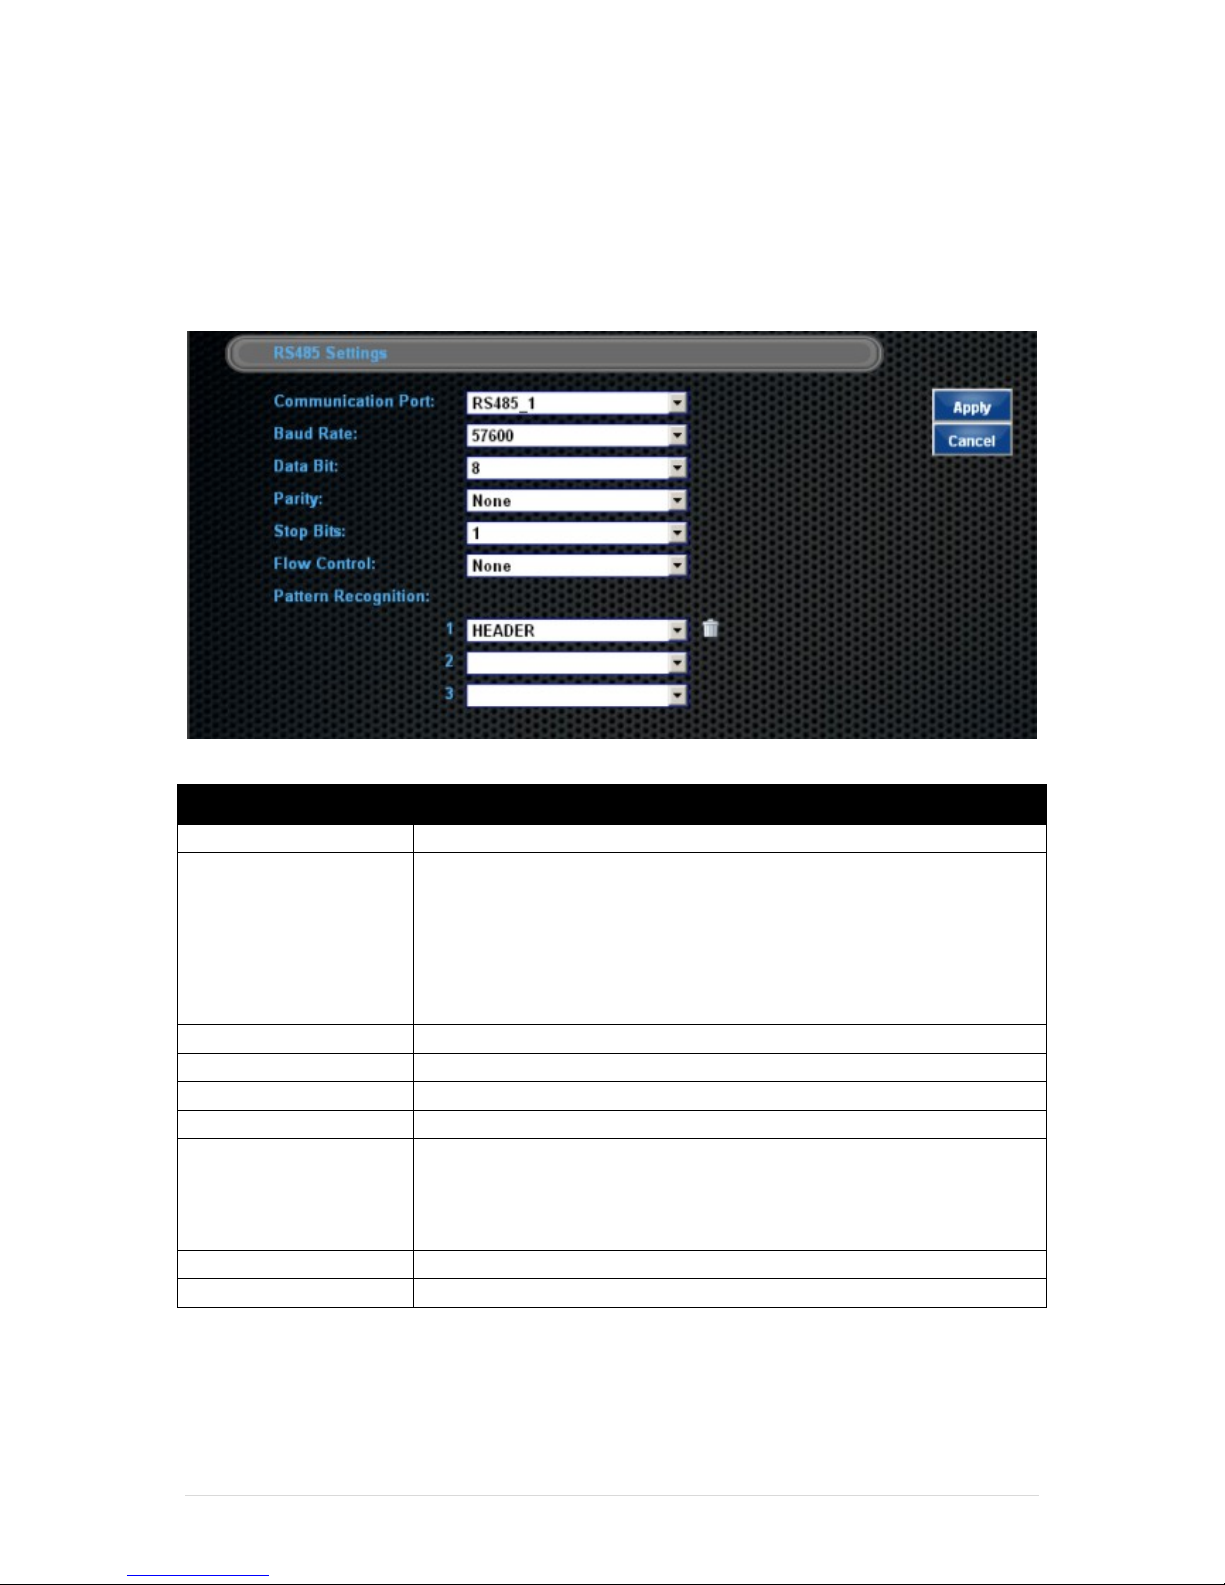
This page controls the the communications parameters for the RS485 port. Depending on
the configuration of the netAccess L-Series device, this option may not be present in models
where there is no RS485 module present.
Figure 20: RS485 Settings Page
Setting
Description
Communications Port
The RS485 port uses the proprietary ESLP protocol by default.
Baud Rate
This COM port will communicate at this speed
115200
57600(Default)
38400
19200
9600
Data Bit
Number of bits in the data connection. Default: 8 bits.
Parity
Parity setting for the connection. Default: None.
Stop Bit
Number of Stop bits. Default: 1 bit.
Flow Control
Type of flow control for the data connection. Default: None.
Pattern Recognition
Patterns may be standard or custom-built from the Patterns
Definitions page. The netAccess L-Series device can route
transactions through this channel based on the Pattern
Recognition definition.
Apply
Click to save the settings.
Cancel
Click to exit without saving.
NOTE: IF the RS 485 option is present, then the netAccess L-Series device will have one less
RS232 port.
Click on the APPLY button to save these settings.
Note: The NetRouter service needs to be restarted before the settings take effect.
Page 29
netAccess L-200 Series Manual 24 | Page
TCP/IP Settings Page
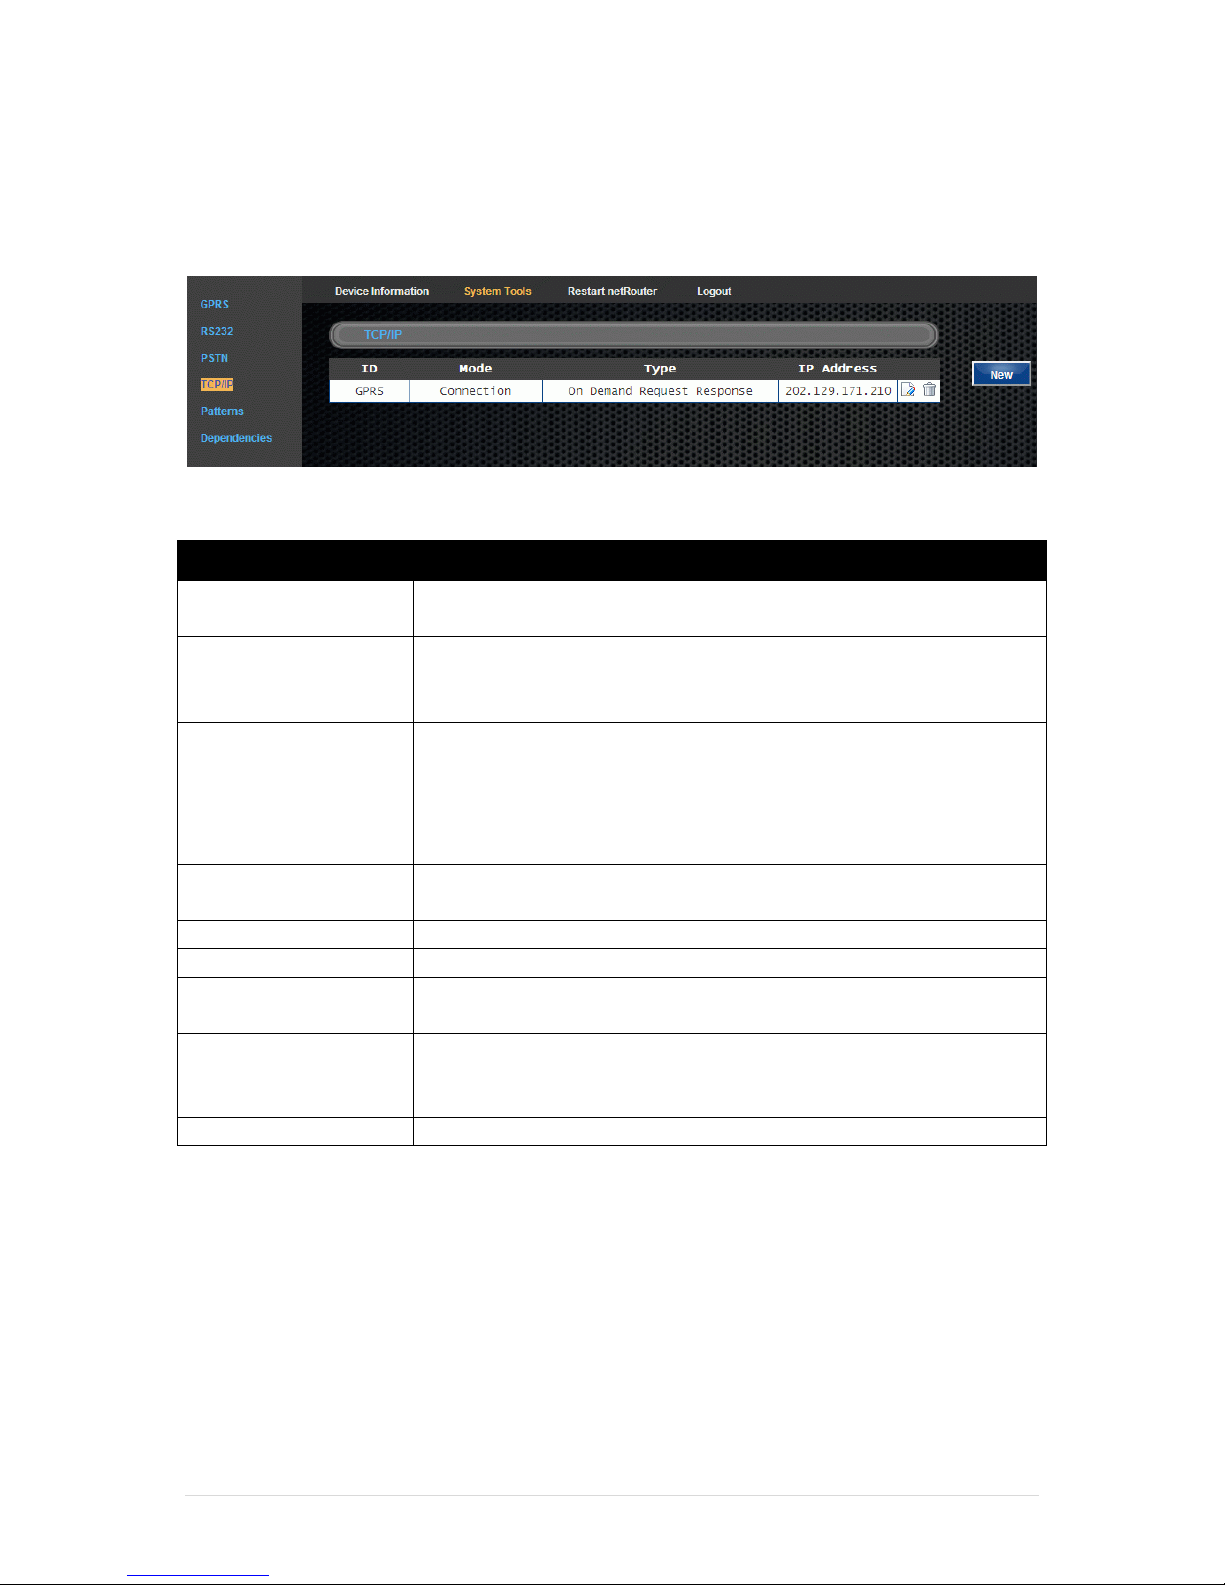
This page configures the TCP/IP communications parameters for the uplink/downlink
channels.
Figure 21: TCP/IP Channels Settings Page
IP Setting
Description
ID
Descriptive label to describe the IP channel.
Important Note: ID may NOT contain any spaces.
Mode
Mode of the particular channel:
Listen – incoming channel
Connection – outgoing channel
Type
Defines the type of connection:
On Demand Request Response (count packet timeout fr
last request, count idle timeout fr last response)
On Demand (idle timeout only)
Permanent
IP
This is the IP of the destination of the connection. If it is listener,
the IP is 0.0.0.0 .
Port
Port for the channel.
Idle timeout (ms)
How long to wait (idle) before dropping connection.
Connection timeout
(ms)
How long to attempt connection before flagging a connection
timeout.
Pattern Recognition
Routing information using pattern recognition. If a transaction
matches the pattern, it will be sent through that channel,
depending on the preference settings.
New
Click to create a new TCP/IP Channel
To edit any of the default IP channels, click on the (edit) icon.
To delete any of the IP channels, click on the (trash) icon.
Page 30
netAccess L-200 Series Manual 25 | Page
Types of connections
The following table explains the Connection Types:
Connection Type
Description
On Demand Request Response
Connection is established when a Request message is
received. System will wait for a Response message from
the host. The connection idle counter will begin from the
time when system receives the Response message and
drop the connection when the Idle Timeout has been
reached.
On Demand
Connection is established when a Request message is
received. The connection idle counter will begin from the
time when last activity was detected on the connection
and drop the connection when the Idle Timeout has been
reached. It may mean that the connection will timeout
without waiting for the response.
Permanent
The connection is always on.
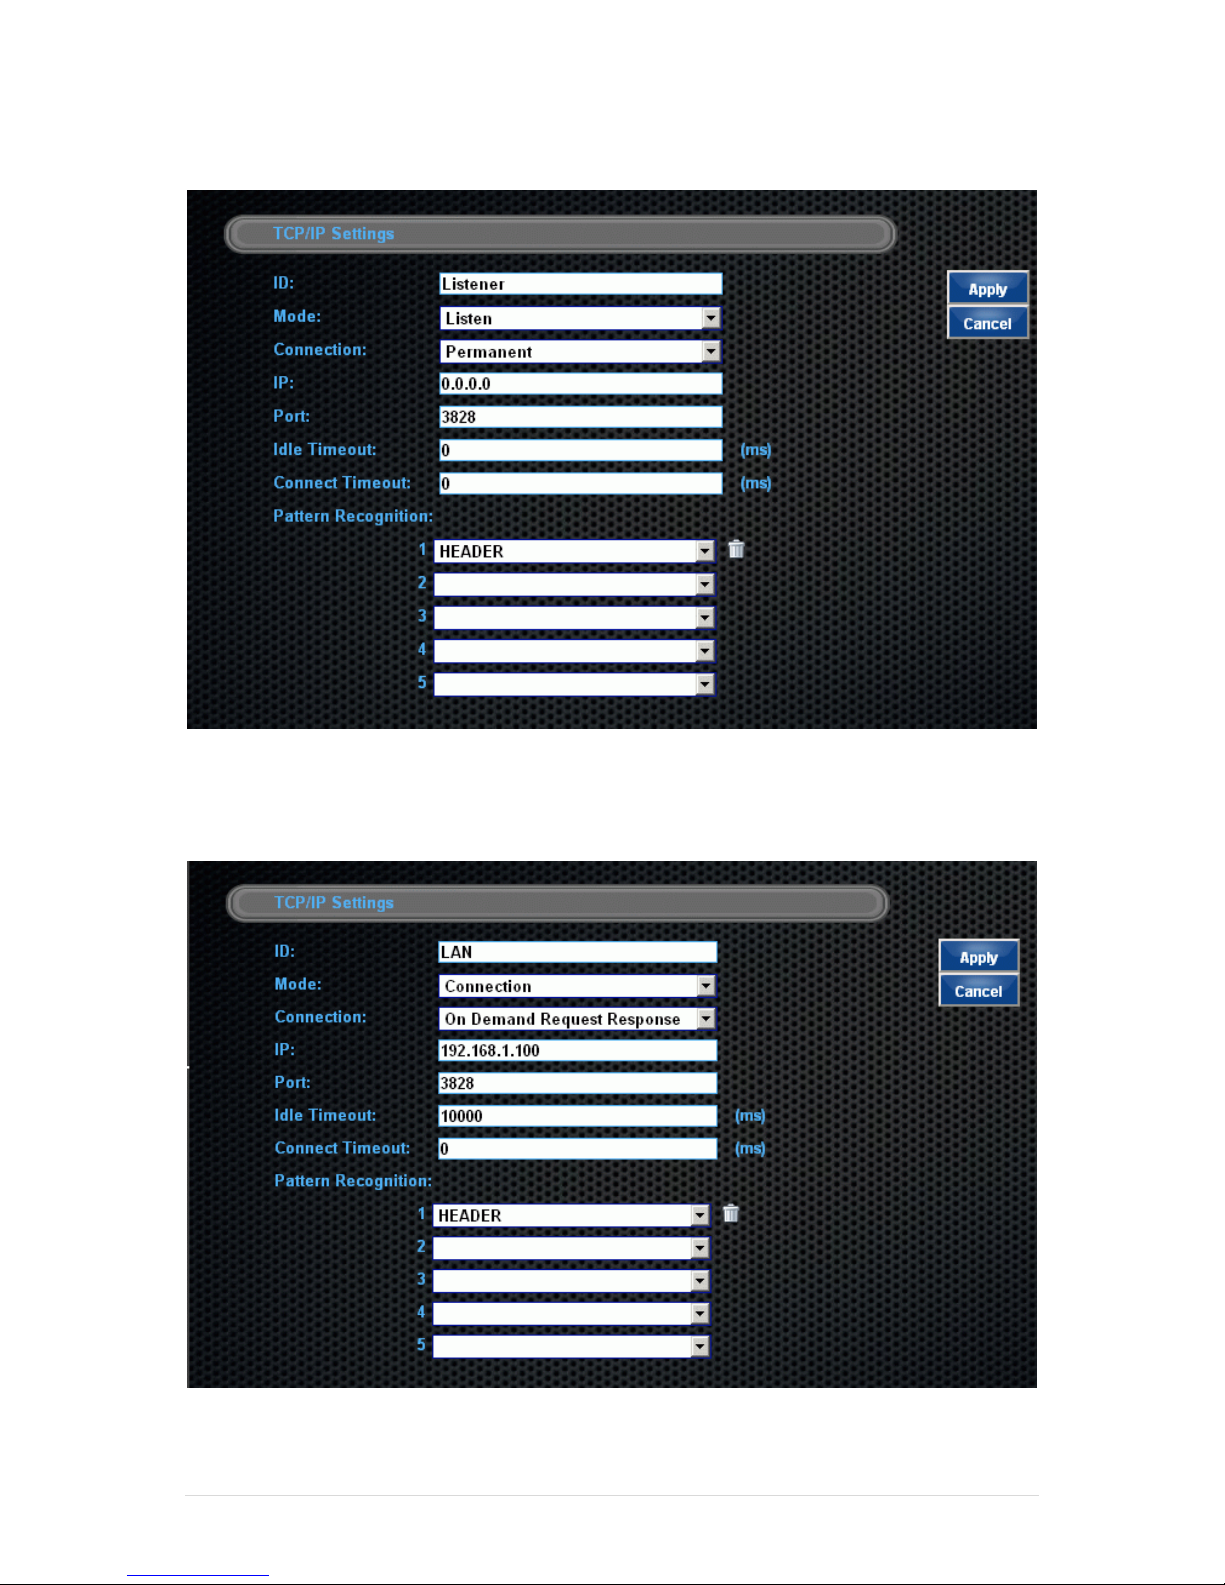
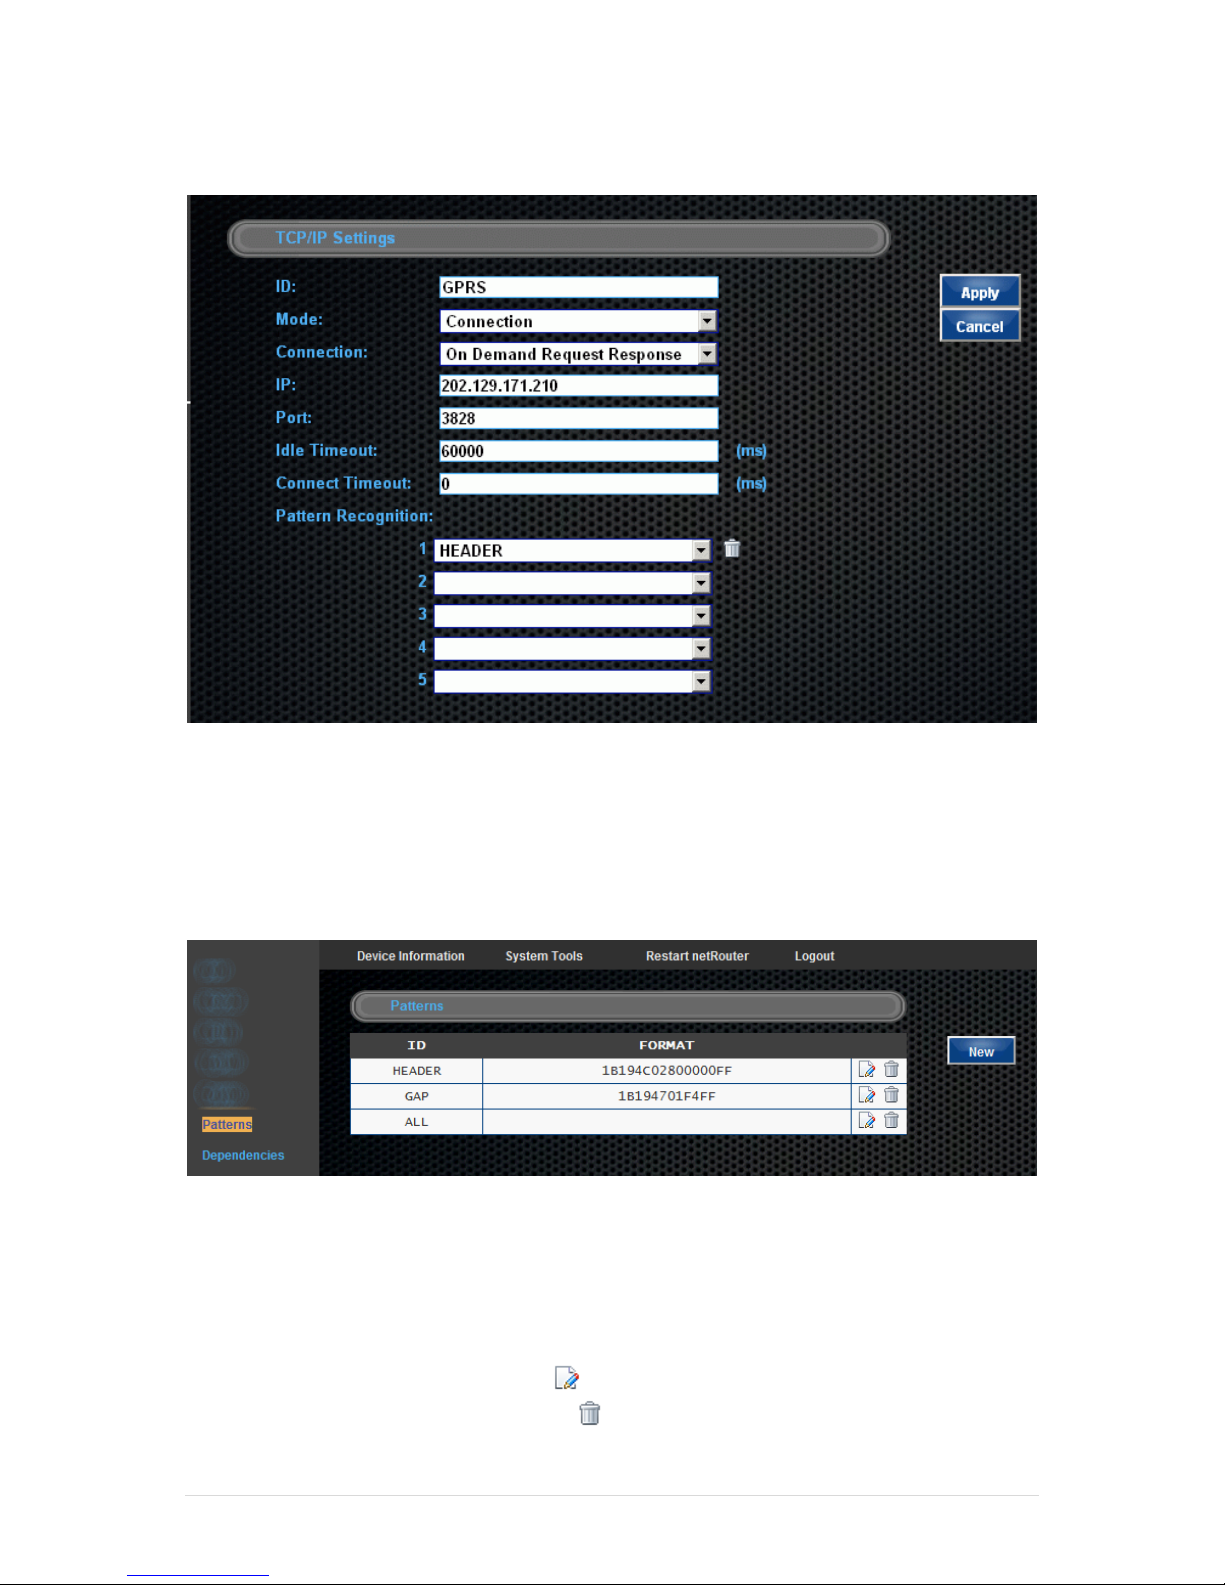
Default Settings for the TCP/IP channels
Listener
LAN
GPRS
Description
For connections from
downlink
Connection to host over
TCP/IP (e.g. ADSL or
router connection)
Connection to host
over GPRS
ID
Listener
LAN
GPRS
Mode
Listen
Connection
Connection
Type
Permanent
On Demand Request
Response
On Demand Request
Response
IP
0.0.0.0
192.168.1.100
202.129.171.210
Port
3828
3828
3828
Idle Timeout
0
10000
60000
Connect Timeout
0 0 0
Pattern Recognition
HEADER
HEADER
HEADER
Note: The settings above are default settings. The IP and ports for uplink connections will
differ according to the final deployed environments.
Page 31
netAccess L-200 Series Manual 26 | Page
The Listener IP channel
Figure 22: Settings for TCP/IP Listener channel
The LAN Connection channel
Figure 23: Settings for LAN on-demand uplink channel
Page 32
netAccess L-200 Series Manual 27 | Page
The GPRS Connection channel
Figure 24: Settings for GPRS on-demand uplink channel
Pattern Configuration
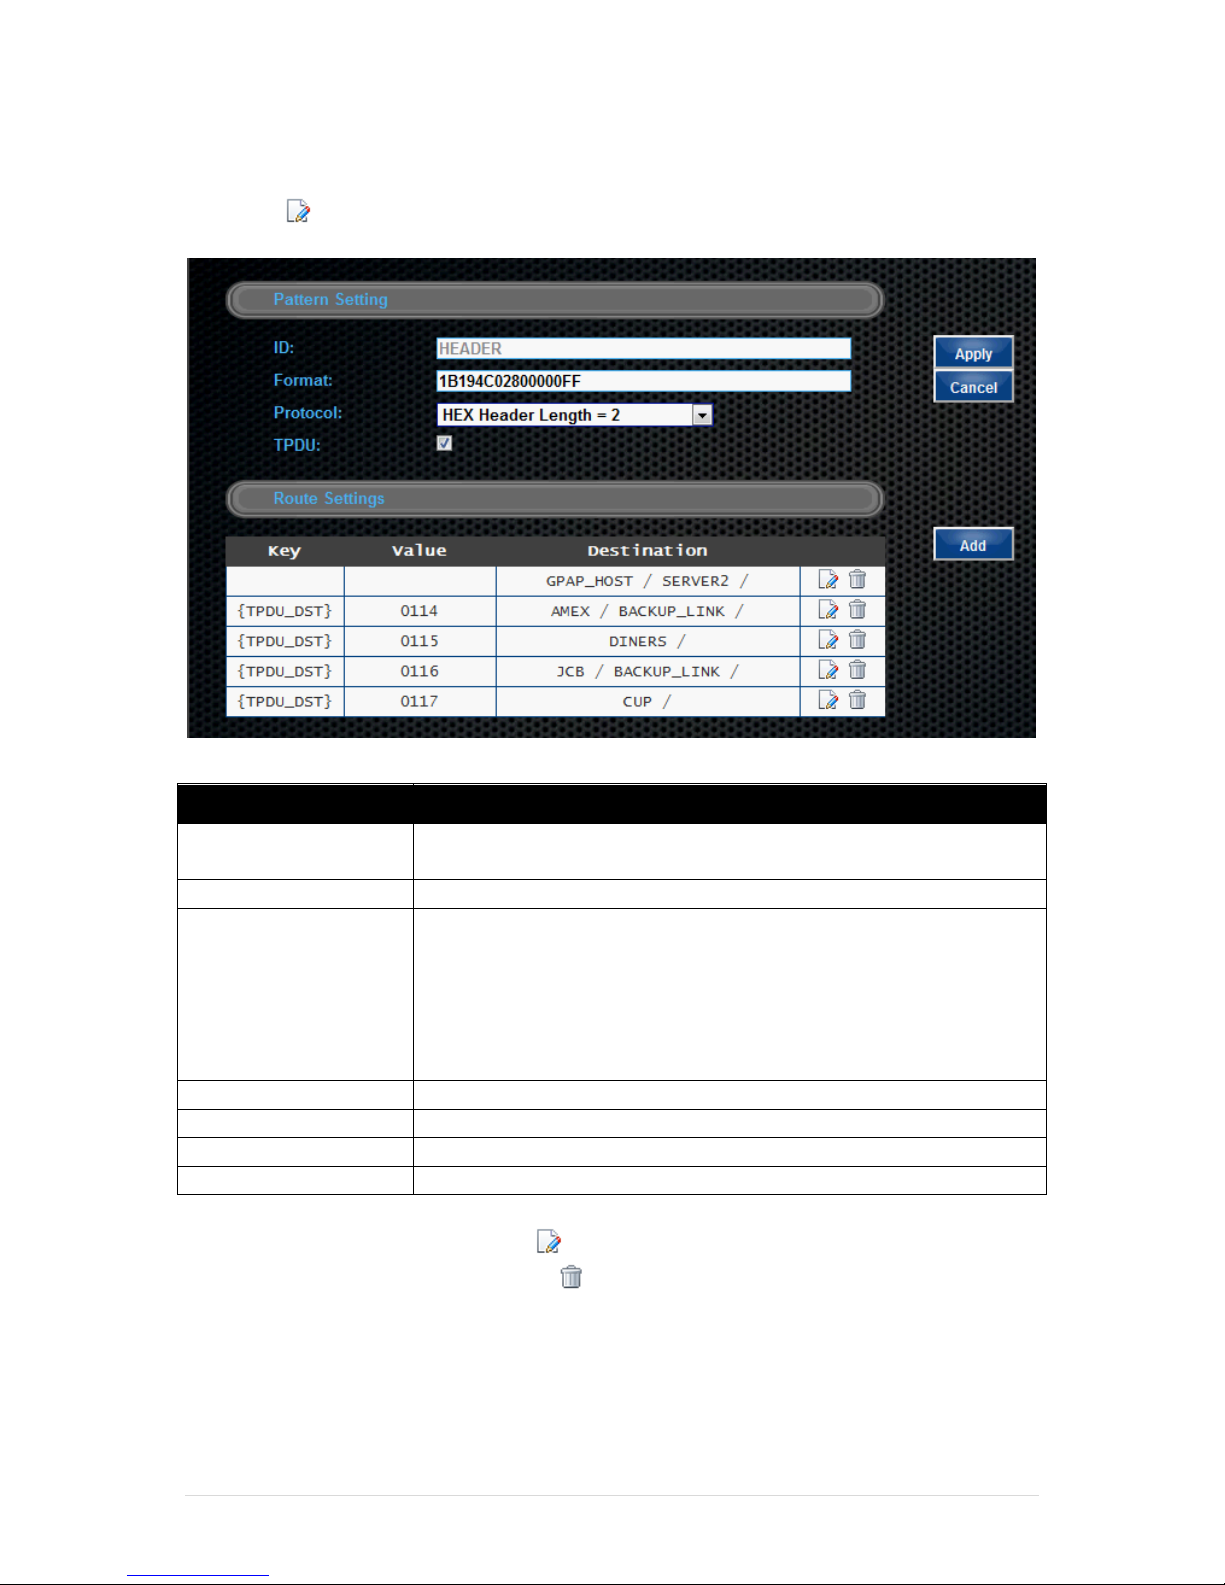
The Patterns for routing transactions based on certain message characteristics can be
defined here. For more details on creating the Routing Patterns, see Appendix B.
Figure 25: Pattern Configuration Page
Patterns defined on the netAccess L-Series devices ensure that the messages received from
downlink devices have been received in good condition and then routes the messages
according to the routes defined within the pattern.
To edit any of the patterns, click on the icon.
To delete any of the patterns, click on the icon.
Page 33
netAccess L-200 Series Manual 28 | Page
Pattern definition
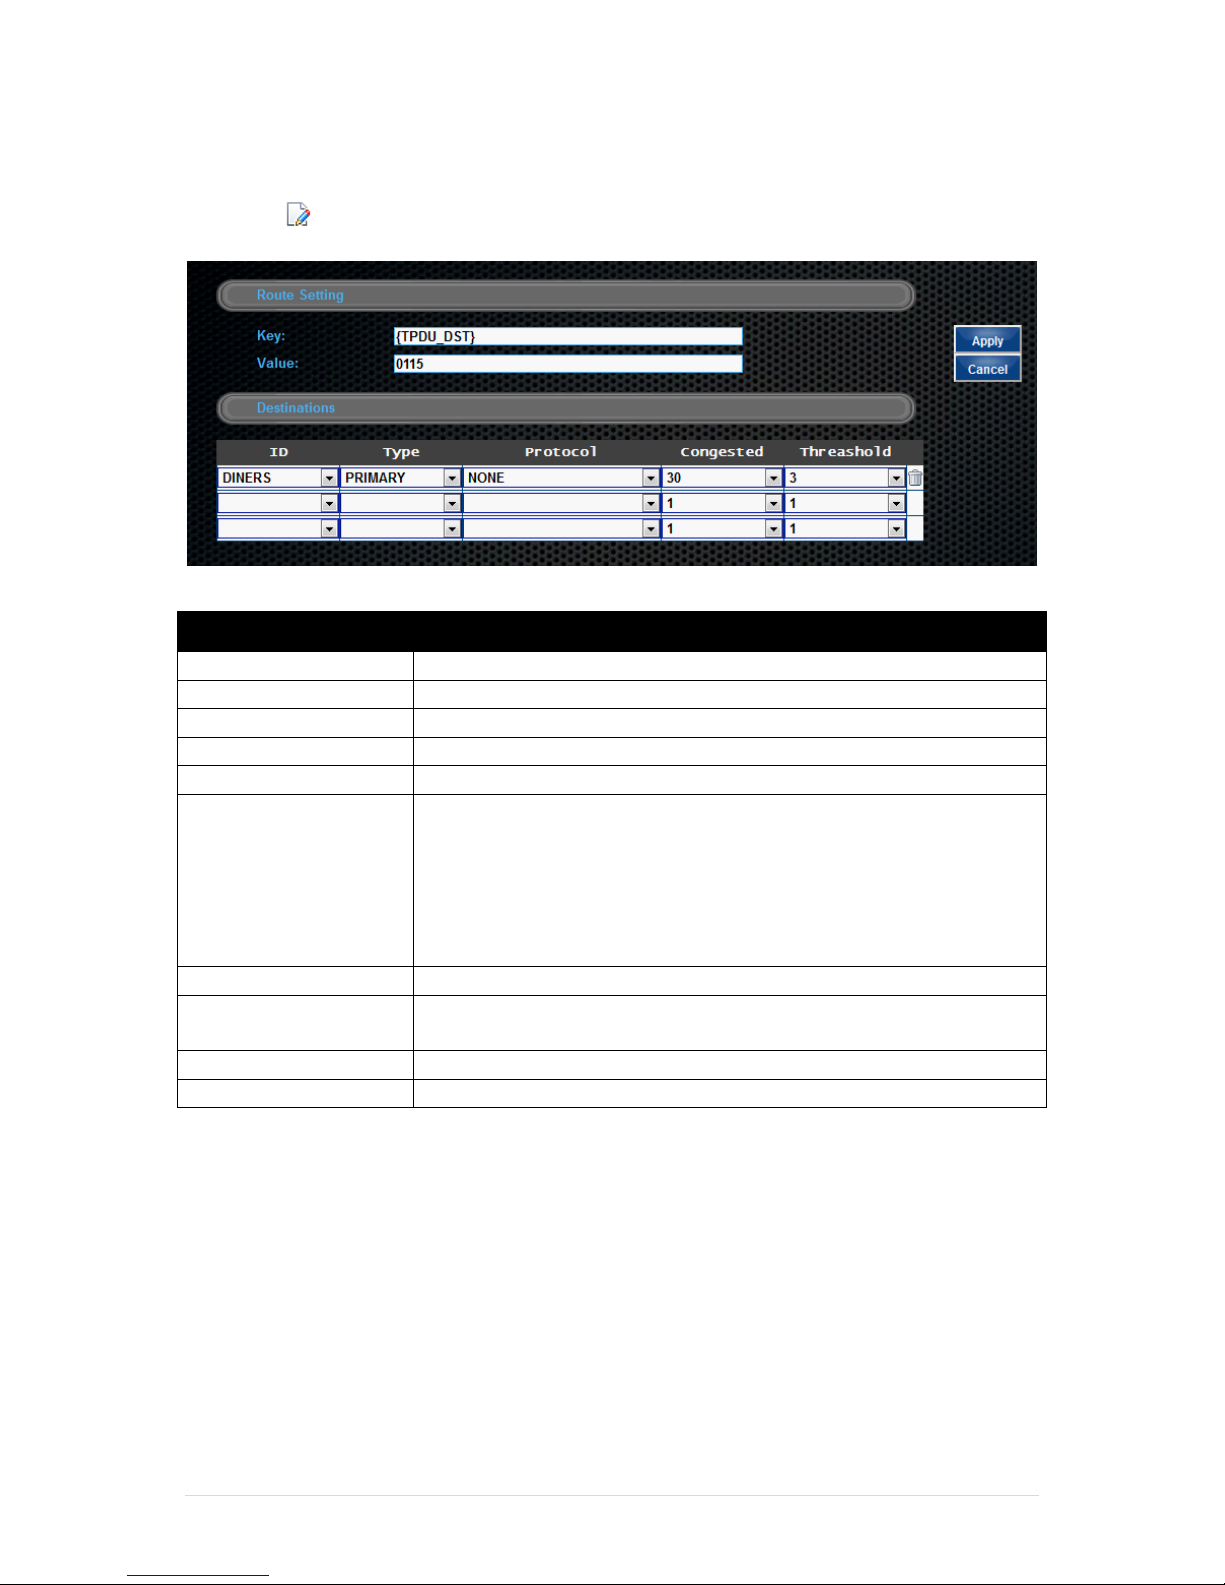
When the icon for a Pattern Format is clicked, the Pattern Definition page is displayed:
Figure 26: Pattern definitions Page
Setting
Description
ID
Descriptive label to describe the pattern.
Important Note: ID may NOT contain any spaces.
Format
Definition of the Pattern
Protocol
Defines the header of the Pattern message:
HEX Header Length = 2
BCD Header Length = 2
HEX Length LRC = 2
BCD Length LRC = 2
NONE
TPDU
Check box to indicate this message is routed using TPDU
Route Settings
TPDU definition for routing. Click ADD button to add a new route.
Apply
Click to apply settings.
Cancel
Click to cancel.
To edit any of the routes, click on the icon.
To delete any of the routes, click on the icon.
Page 34
netAccess L-200 Series Manual 29 | Page
Routes Definition
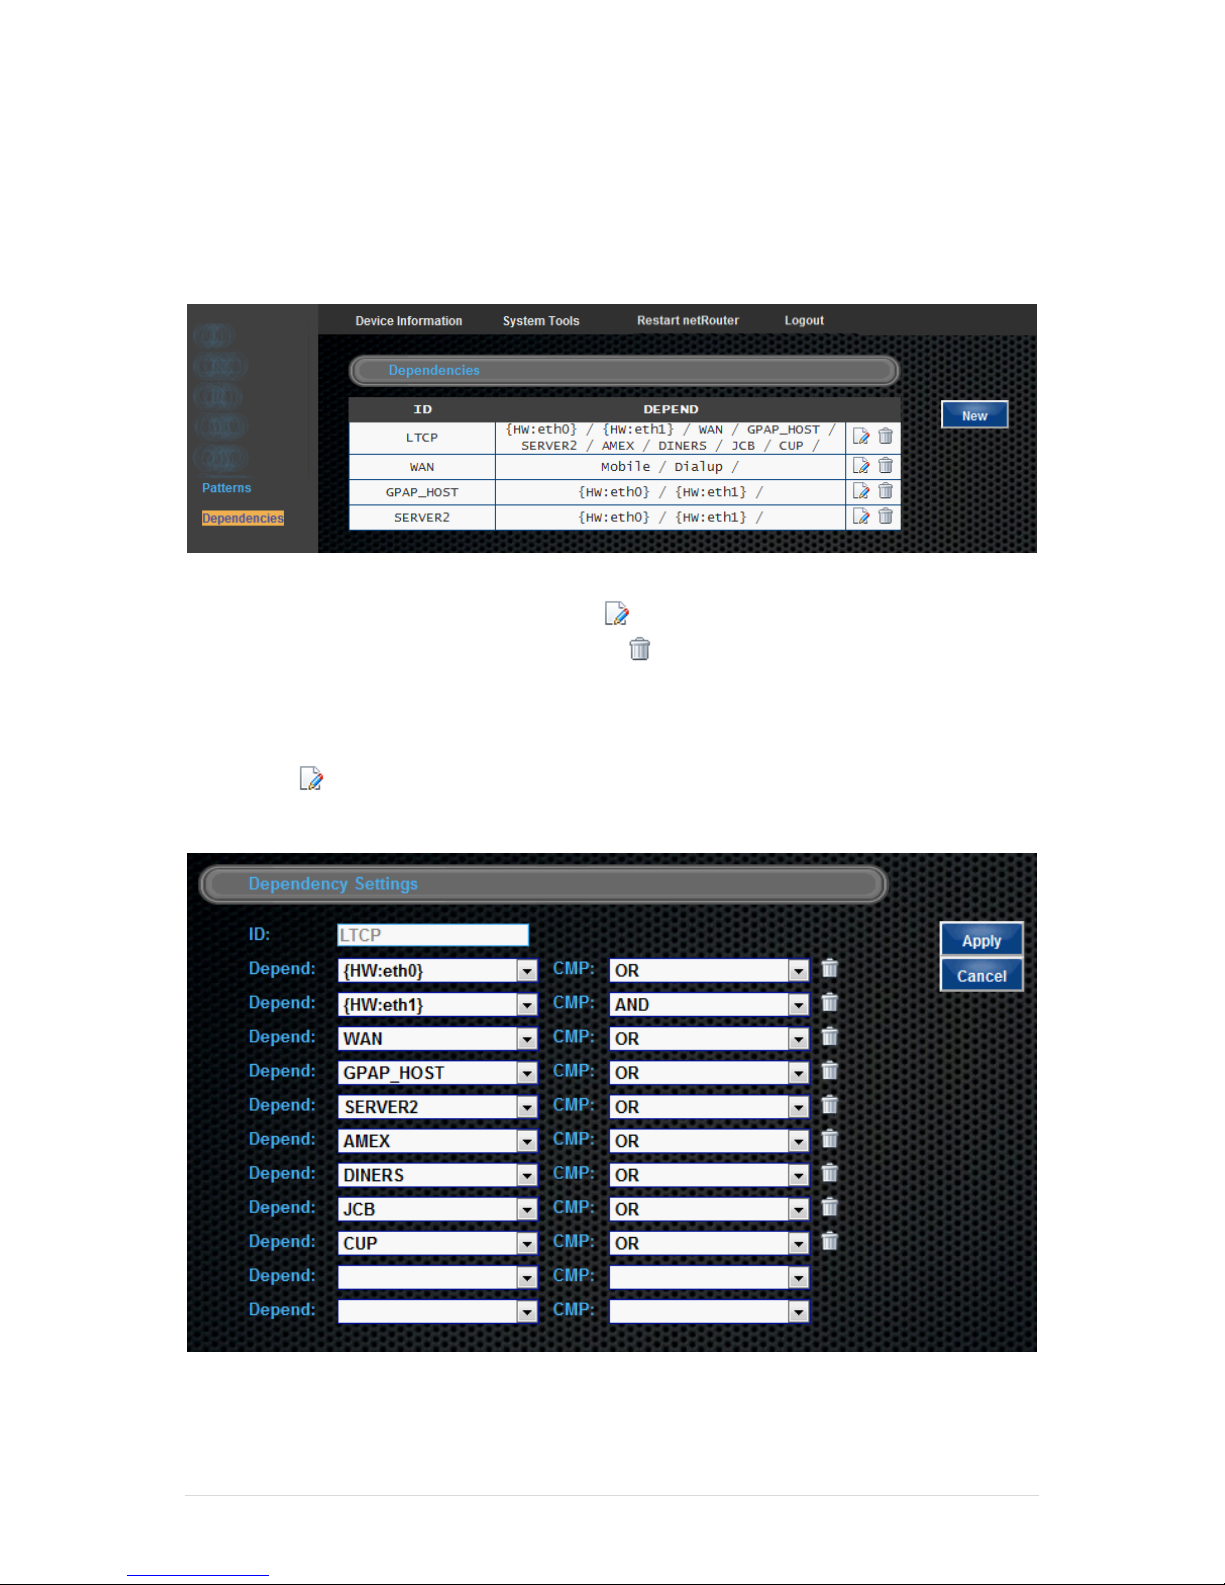
When the icon for a Route Setting is clicked, the Route Definition page is displayed:
Figure 27: Route definitions Page
Setting
Description
Key
If using TPDU routing, value is {TPDU_DST} otherwise it is blank.
Value
Value of the TPDU
Destinations
Defines the destination for that TPDU
ID
ID of the destination, as defined in the TCP/IP Uplink page
Type
Type of destination (default PRIMARY)
Protocol
Defines the header of the Pattern message:
HEX Header Length = 2
BCD Header Length = 2
HEX Length LRC = 2
BCD Length LRC = 2
NONE
Congested
Number of transactions in the queue
Threashold
Number of transactions exceeding the queue before the next
destination is engaged.
Apply
Click to apply settings.
Cancel
Click to cancel.
Page 35
netAccess L-200 Series Manual 30 | Page
Dependencies Configuration
The L device has several services running that depend on other services. This screen allows
the user to define dependencies for the services. If a depended service is not available then
that particular Channel will not be usable.
Figure 28: Dependencies configuration Page
To edit any of the dependencies, click on the icon.
To delete any of the dependencies, click on the icon.
Dependencies Definition
When the icon for a Dependency is clicked, the Dependencies Definition page is
displayed:
Figure 29: Dependencies configuration Page
Page 36

netAccess L-200 Series Manual 31 | Page
Chapter 4:
Deployment Scenarios
and Sample Configurations
Common usage scenarios for the netAccess L-Series devices
Scenario
Applicable models
Description
Mobile Telephony
Converter
L-50
L-200 Optimus
Allow up to 3 PSTN terminals to connect to the
host through GPRS. The L-200 Optimus also
supports one telephone connection in addition
to 3 terminals.
Port Extender
L-100
L-200
L-300
L-350
Allow up to 3 RS232 devices OR more RS485
devices to be connected to the payment router,
all at the same time. Number of devices
connected depends on the model.
Wireless
transaction
concentrator
L-50
L-100
L-200
L-200 Optimus
L-300
L-350
Transactions from EDC terminals (RS232, RS485,
TCP/IP, PSTN) are channeled through the device
to share a single WIRELESS (i.e. GPRS) connection
to the host. The higher end models support ADSL
or Leased Line connections.
Multi-lane
deployment
L-200
L-300
L-350
For larger merchants, transactions from EDC
terminals (using RS485 or TCP/IP) are channeled
through the device to share the connection to
the host. Certain models have dual SIM capability
to ensure high availability of the connection.
VPN secure tunnel
L-300
L-350
The L-3xx series of devices can establish secure
VPN connections to provide higher security for
the link.
High Availability
L-200
L-200 Optimus
L-300
L-350
Multiple transport channels to the uplink (host
side) ensures highest availability of the
connection.
Pre-requisite conditions
In order for transactions to be accepted via GPRS or ADSL, the Bank must have a Port open
on a public Internet IP. For better security, it is recommended to be a forwarded port on the
bank’sInternetfacingfirewall(usingNAT).
Page 37
netAccess L-200 Series Manual 32 | Page
Scenario 1: L-50 serving 3 PSTN Terminals
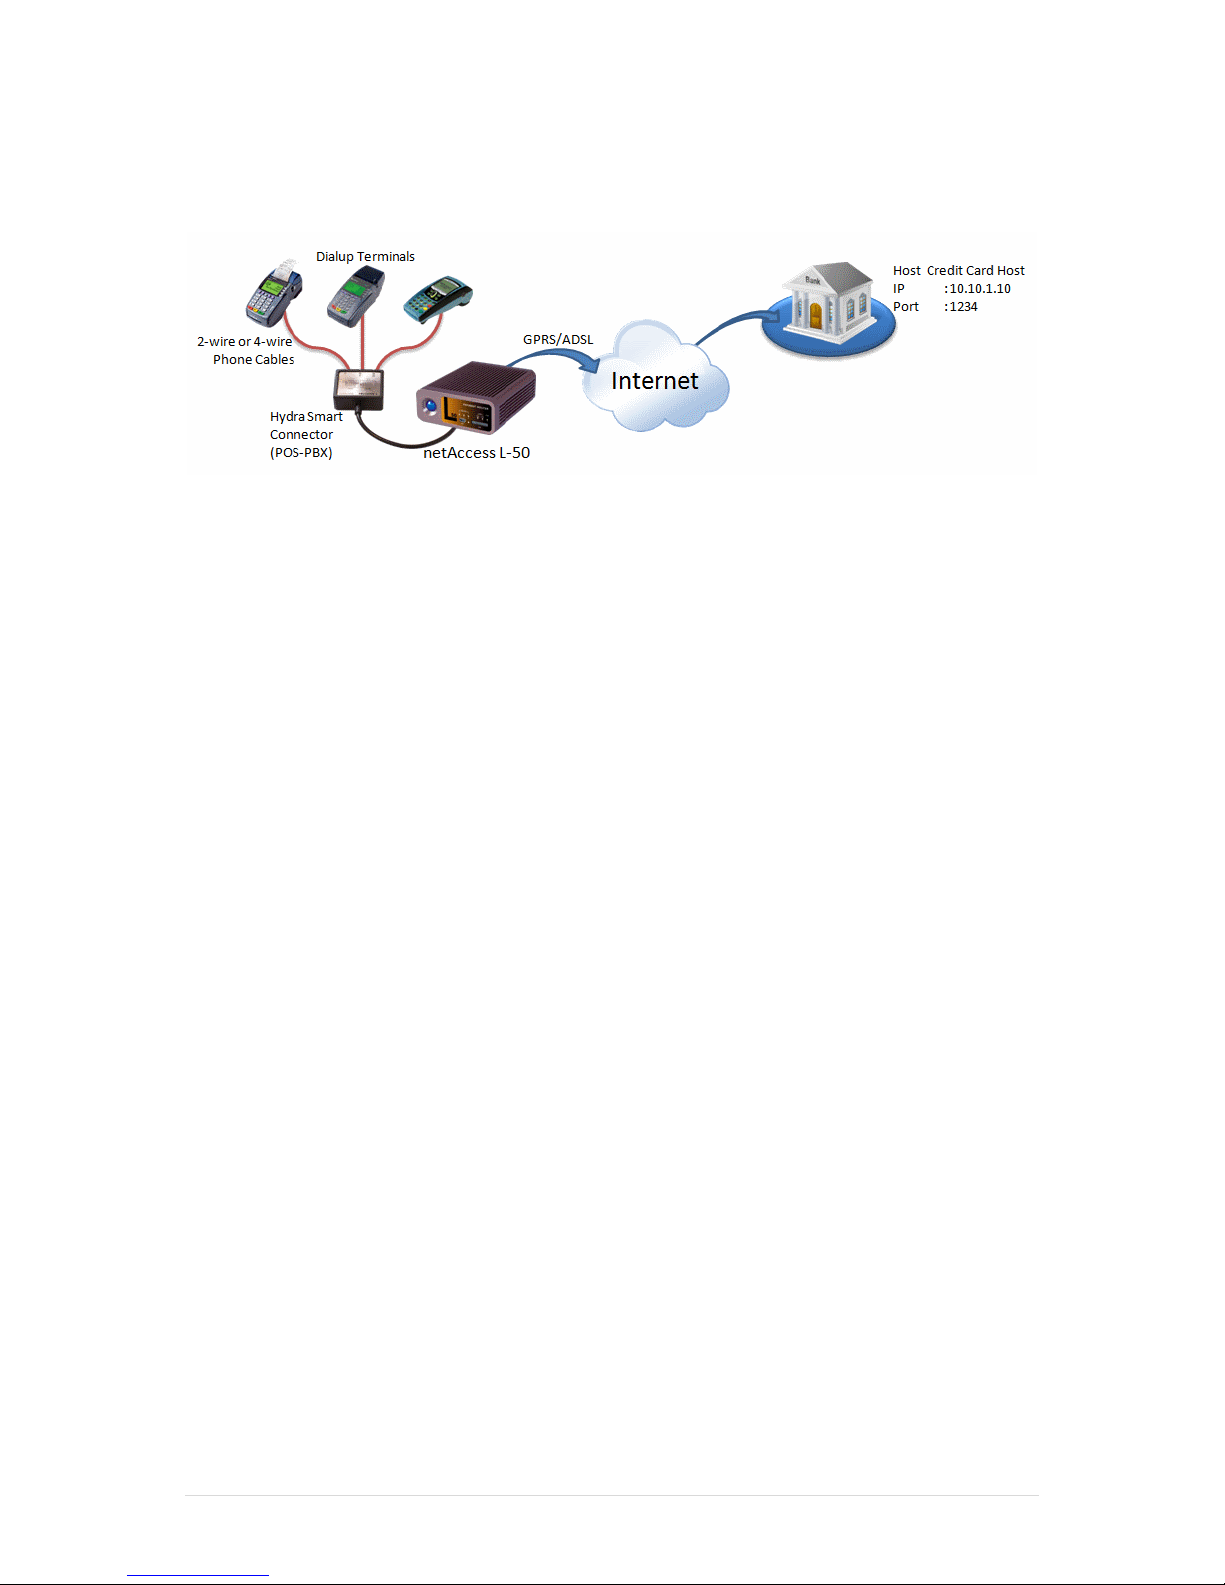
Figure 30: Deployment of L-50 POS-PBX
Setup:
A merchant with 3 PSTN terminals can use the L-50 to connect all 3 terminals to the
acquiring bank using GPRS. Instead of having 3 separate phone lines or splitting a single
phone line into 3 extensions, all 3 terminals are connected to the POS-PBX Hydra Smart
Connector plugged into the L-50. The terminals dial normally and the L-50 will convert the
signal into TCP/IP protocol and send it to the host over GPRS for approval.
Advantages:
Single GPRS connection serves up to 3 terminals.
Terminal application does not have to be changed.
Cost savings in terms of line rental and call charges: For a low fixed cost, a 2 MB
GPRS package from the mobile operator is sufficient to cater for a moderately busy
outlet that does around 100 transacations a day or 4000 transactions a month.
Note: Transactions are assumed to be an average 500 bytes in size.
Considerations:
The L-50 can only support one outgoing connection at any given time so it is not
suitable for high volume sites. It is intended to allow the merchant to share one
GPRS connection among 3 PSTN terminals with no modifications required on the
terminal.
Page 38
netAccess L-200 Series Manual 33 | Page
Scenario 2: L-200 Optimus converts PSTN to GSM/GPRS
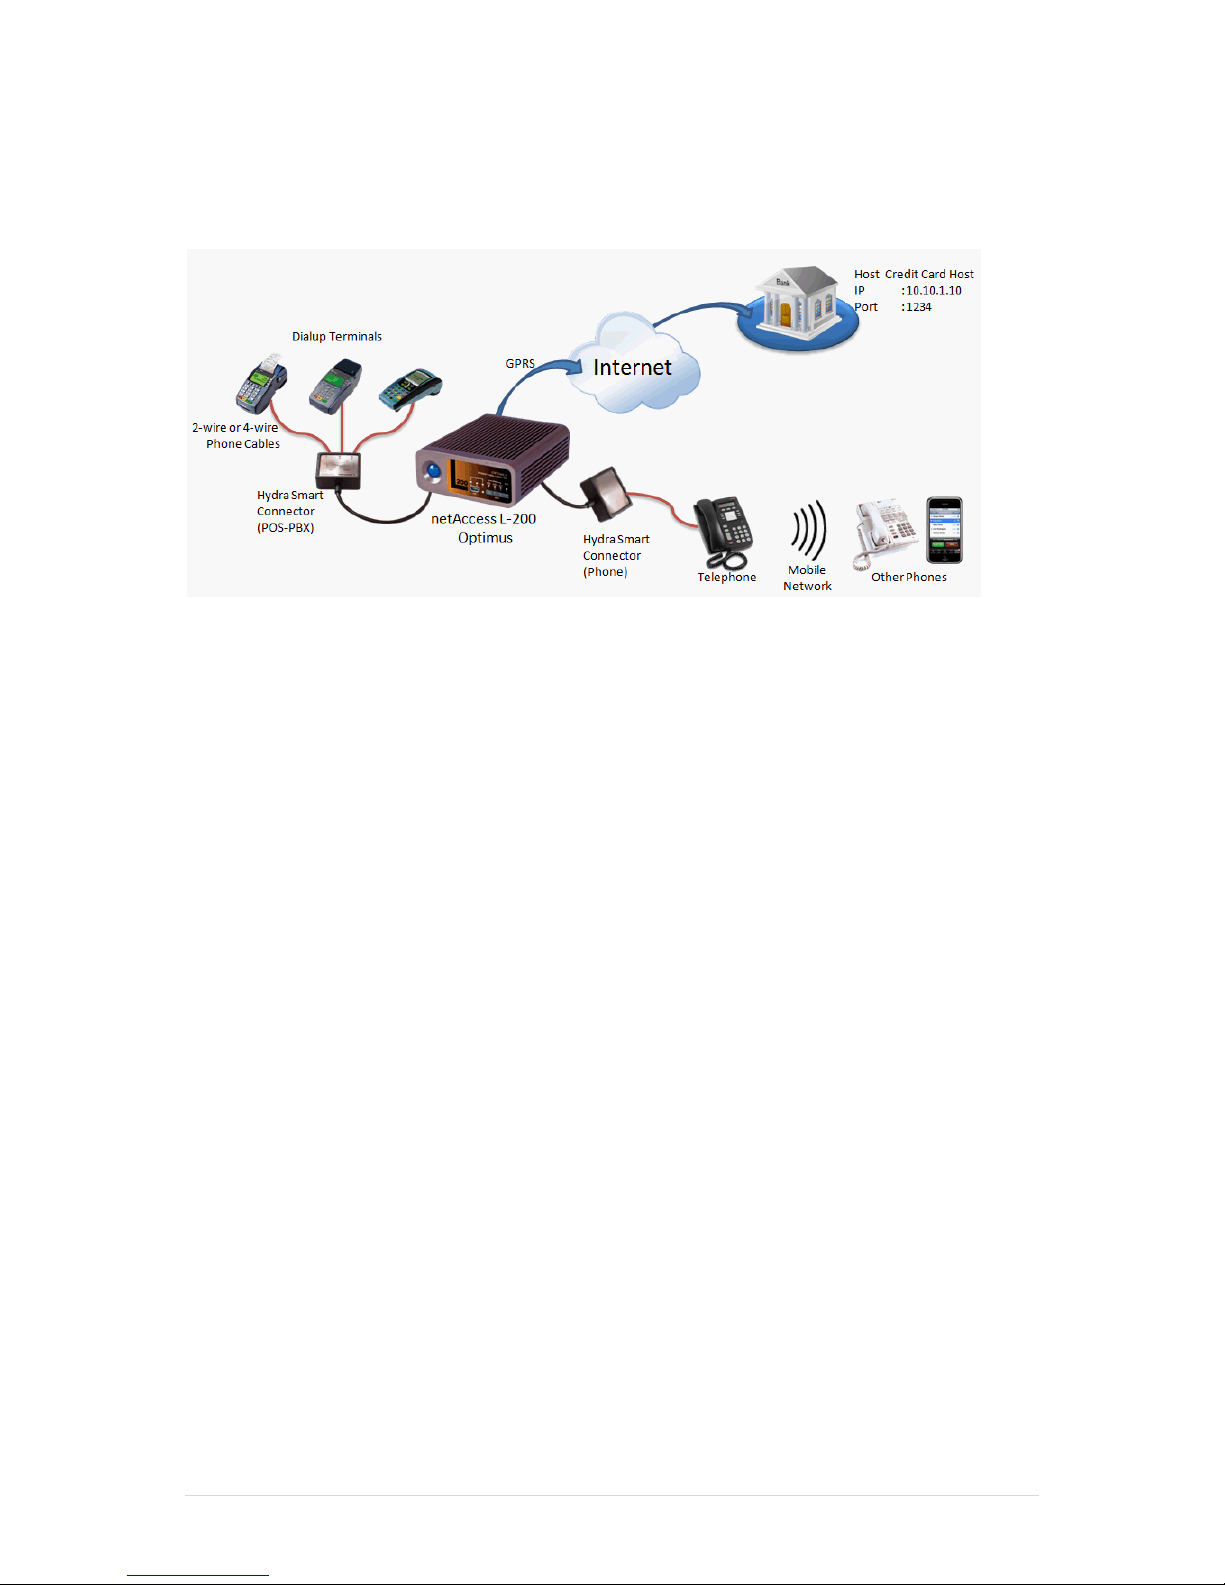
Figure 31: L-200 Optimus connects up to 3 terminals and one telephone
Setup:
A merchant with 3 PSTN terminals can use the L-200 Optimus to connect all 3 terminals to
the acquiring bank using GPRS. Instead of having 3 separate phone lines or splitting a single
phone line into 3 extensions, all 3 terminals are connected to the POS-PBX Hydra Smart
Connector plugged into the L-200 Optimus. The terminals dial normally and the L-200
Optimus will convert the signal into TCP/IP protocol and send it to the host over GPRS for
approval. In addition to that, with the netAccess L-200 Optimus, he can also connect a
telephone set to the device, while using a single mobile telephone SIM card to fulfill his
communcations needs.
Advantages:
Single GPRS connection serves up to 3 terminals and one single-line phone.
Terminal application does not have to be changed.
Cost savings in terms of line rental and call charges: For a low fixed cost, a 2 MB
GPRS package from the mobile operator is sufficient to cater for a moderately busy
outlet that does around 100 transacations a day or 4000 transactions a month.
Note: Transactions are assumed to be an average 500 bytes in size.
Considerations:
The L-200 Optimus can only support one outgoing connection at any given time.
Transactional data takes precedence over voice calls – therefore, if a voice call is in
progress when a transaction is initiated, the phone set will beep 3 times and the
voice call will disconnect in 3 seconds.
Page 39
netAccess L-200 Series Manual 34 | Page
Scenario 3: L-100 as a Port Extender
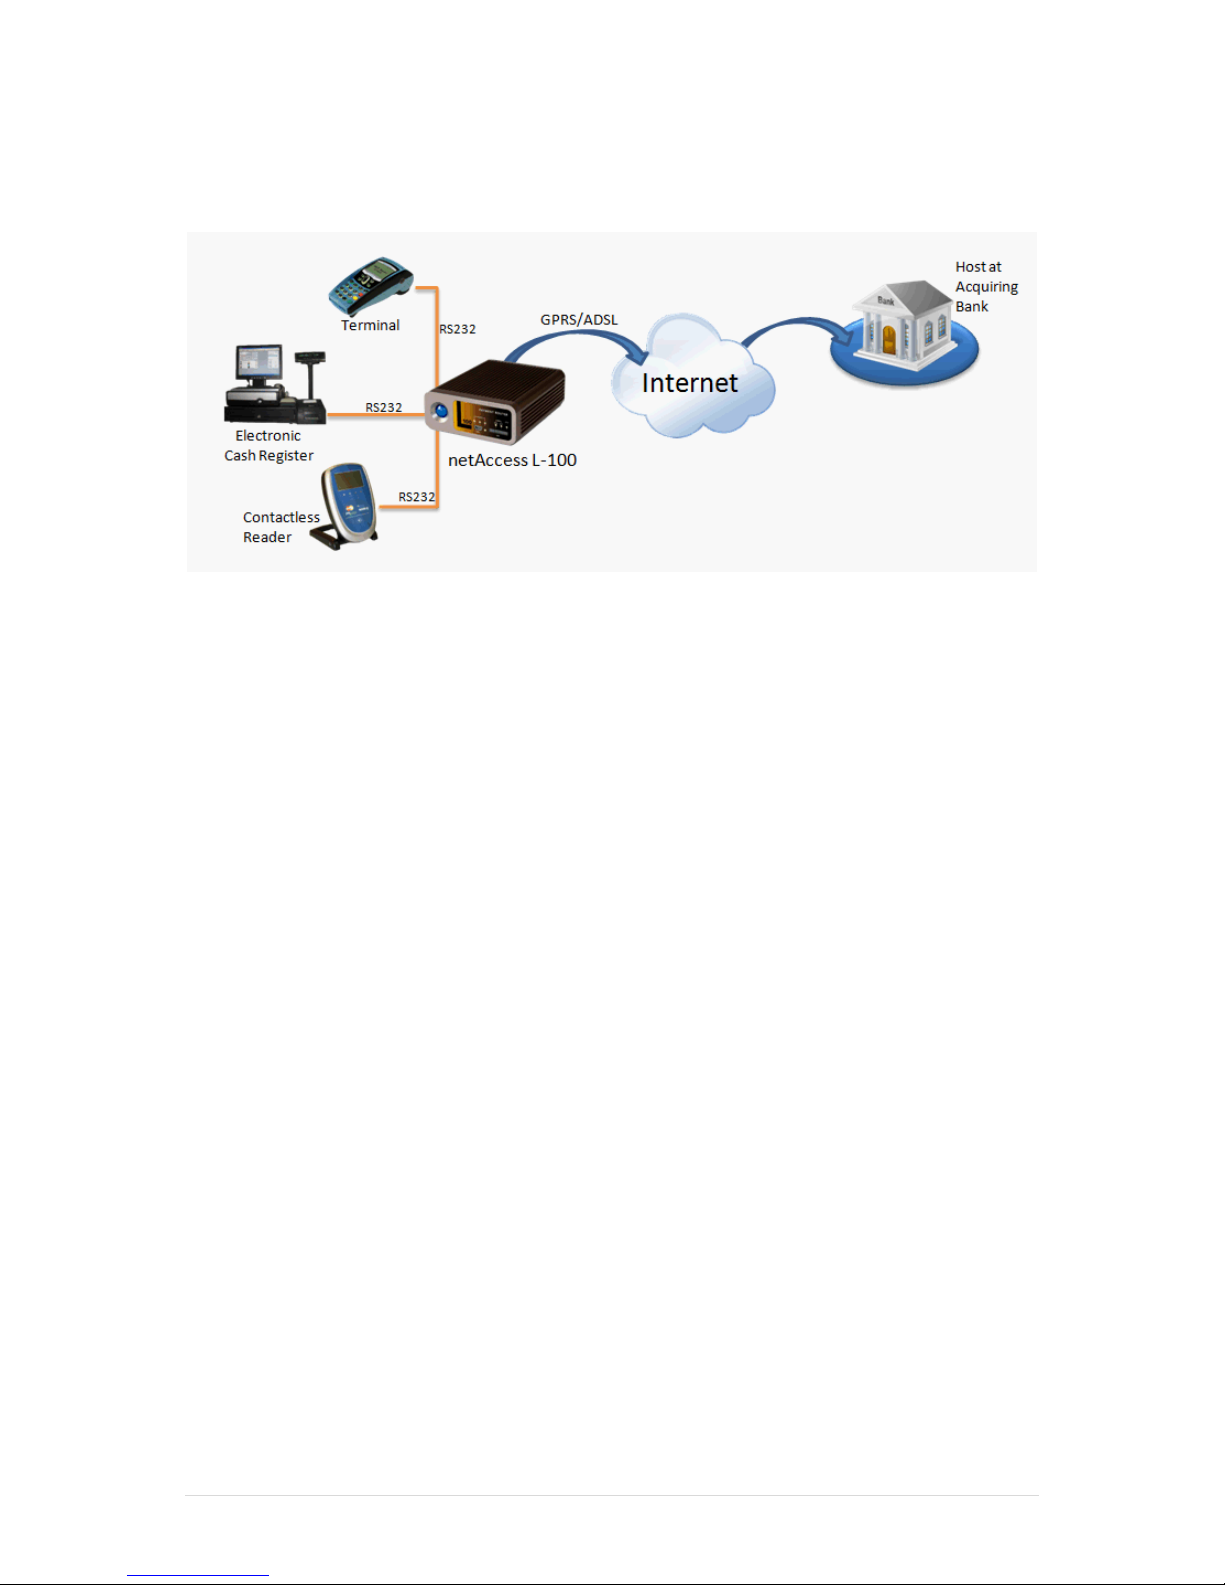
Figure 32: L-100 with 3 connected RS232 devices
Setup:
The netAccess L-100 can be used to extend the number of RS232 ports available for a retail
POS setup to overcome the limited number of serial RS232 ports for device integration. The
Electronic Cash Register (ECR) is connected using RS232 to a Terminal and a Contactless
Reader. Purchases are totaled on the ECR. The amount to pay appears on the ECR and is also
displayed on the Contactless Reader. The customer has a choice of Contactless or
Credit/Debit Card (Contact Cards). The payment is processed by the terminal and sent
through the netAccess L-100 to the Acquiring Host over GPRS or ADSL for authorization and
the response returned to the terminal and ECR.
Advantages:
Allows up to 3 RS232 devices to be connected together.
If using TCP/IP terminals, the L-100 supports up to 5 TCP/IP terminals
If using RS485 terminals, the L-100 supports up to 5 RS485 terminals
Cost savings in terms of line rental and call charges – For a low fixed cost, a 2 MB
GPRS package from the mobile operator is sufficient to cater for a moderately busy
outlet that does around 100 transacations a day or 4000 transactions a month.
Suitable for small merchants who want an integrated, cost-saving setup.
Existing RS232 terminals can be reused for this setup, no need to upgrade to TCP/IP
or GPRS terminals.
TCP/IP terminals can be placed further away than RS232 terminals, useful for a
second or third counter.
Considerations:
Connection is via GPRS or ADSL or Leased Line only – all three cannot be used
concurrently.
Although the L-100 supports up to 5 device connections, RS232 connections are
limited to 3 devices only.
Page 40
netAccess L-200 Series Manual 35 | Page
Scenario 4: L-100 as a Wireless Concentrator
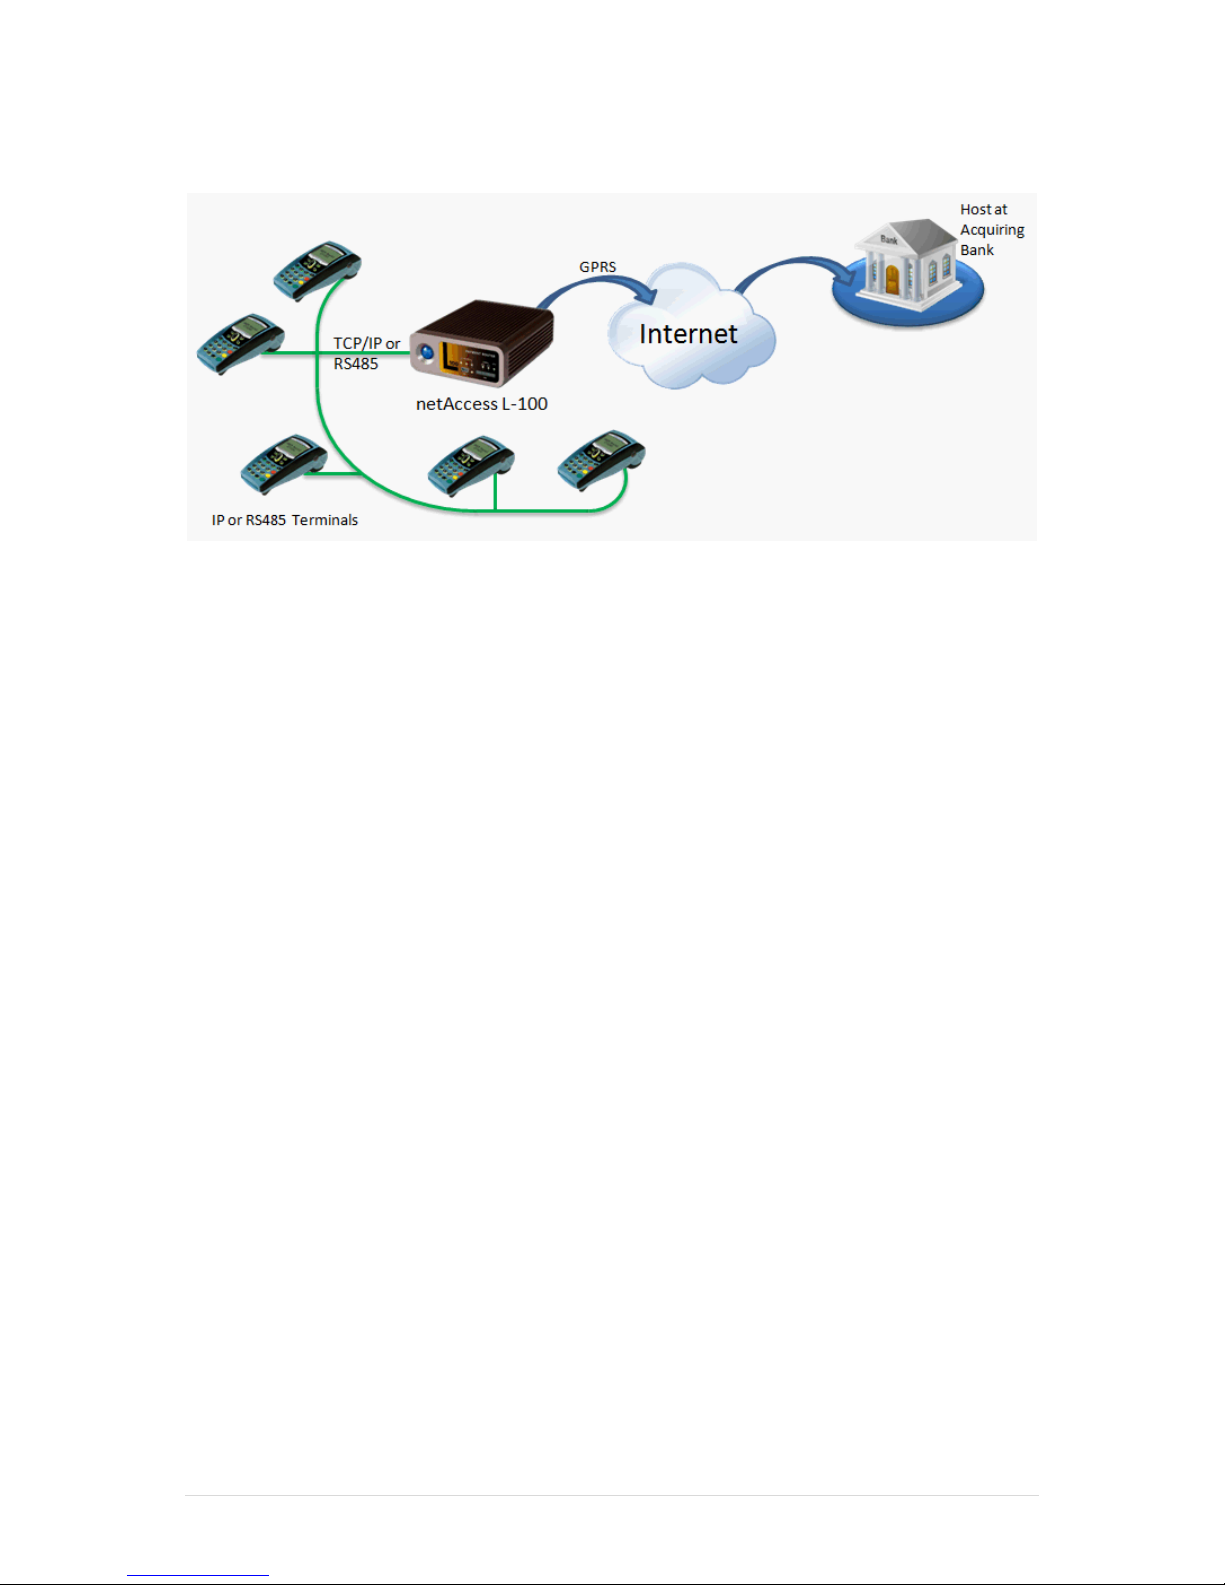
Figure 33: Five RS485 or TCP/IP terminals connected to Acquiring Host via GPRS
Setup:
The netAccess L-100 can connect 5 RS485 serial terminals or 5 TCP/IP terminals to the
Acquiring Host over GPRS. The L-100 acts as a transaction concentrator that channels all the
transactions through a single GPRS connection to the Acquiring Host.
This setup is useful for offsite, temporary locations such as road shows or concourse
promotions run by merchants outside of their premises or medium sized merchants wanting
to save on communications costs.
Advantages:
The L-100 supports up to 5 TCP/IP terminals OR 5 RS485 terminals.
The L-100 acts as a transaction concentrator – transactions from multiple terminals
are channeled through a single GPRS or ADSL connection to the host.
Does not require PSTN lines or other wired communications, suitable for temporary
setups such as road shows.
Both TCP/IP and RS485 protocols support longer cable lengths compared to RS232 –
paymentpointscanbemorespreadoutforcustomers’convenience.
Cost savings in terms of line rental and call charges – For a low fixed cost, a 2 MB
GPRS package from the mobile operator is sufficient to cater for a moderately busy
outlet that does around 100 transacations a day or 4000 transactions a month.
Suitable for small to medium sized merchants.
Considerations:
Connection is via GPRS or ADSL or Leased Line only – all three cannot be used
concurrently.
The L-100 supports a maximum of 5 device connections only, which can be a
combination of RS232 (maximum 3 devices), RS485 and TCP/IP. If more than 5
connections are required, consider using either the L-300 or L-350 devices.
Page 41
netAccess L-200 Series Manual 36 | Page
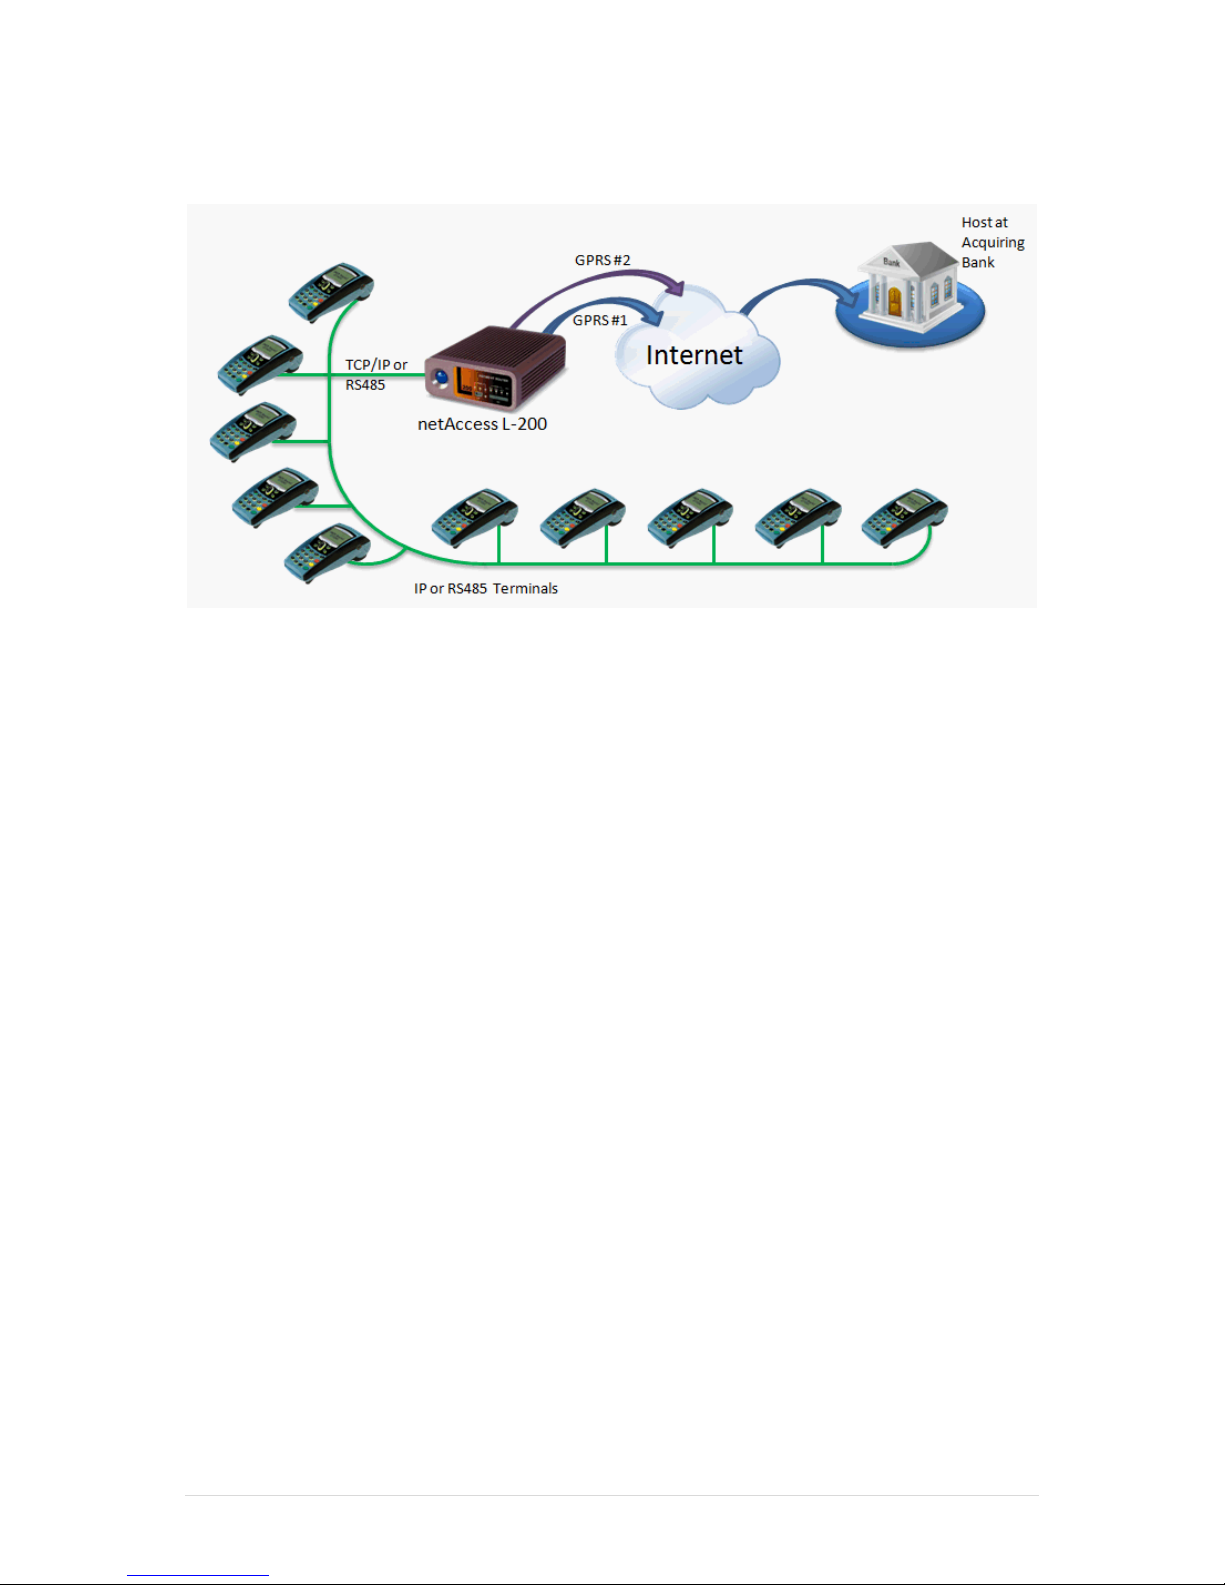
Scenario 5: L-200 in a Multi-lane Deployment with Dual GPRS
Figure 34: L-200 with 10 connected RS485 or TCP/IP terminals via GPRS
Setup:
The netAccess L-200 can connect 10 serial (RS485 or TCP/IP) terminals to the Acquiring Host
over GPRS. Higher avaialability is provided by second GPRS SIM. Like the L-100, it is a
transaction concentrator that channels all the transactions through a single GPRS
connection to the Acquiring Host, with the addition of a backup SIM card. If GPRS #1 goes
down, GPRS #2 will take over automatically. Only one SIM is active at any time. This setup is
useful for medium sized merchants who have multiple payment counters who cannot
tolerate downtime due to network problems.
Advantages:
The L-200 supports up to 10 TCP/IP terminals or 10 RS485 terminals.
The L-200 acts as a transaction concentrator – transactions from multiple terminals
are channeled through a single GPRS or ADSL connection to the host.
Does not require PSTN lines or other wired communications, except as backup.
Both TCP/IP and RS485 protocols support longer cable lengths compared to RS232 –
paymentpointscanbemorespreadoutforcustomers’convenience.
Cost savings in terms of line rental and call charges –A GPRS data package from the
mobile provider is a fixed cost compared to the variable costs of PSTN lines.
Dual SIM provides robust connectivity.
Suitable for small to medium sized multi-lane merchants.
Connection is via GPRS or ADSL or Leased Line only – all three cannot be used
concurrently.
Considerations:
The L-200 supports a maximum of 10 device connections only, which can be a
combination of RS232 (maximum 3 devices), RS485 and TCP/IP. If more than 10
connections are required, consider using either the L-300 or L-350 devices.
Page 42
netAccess L-200 Series Manual 37 | Page
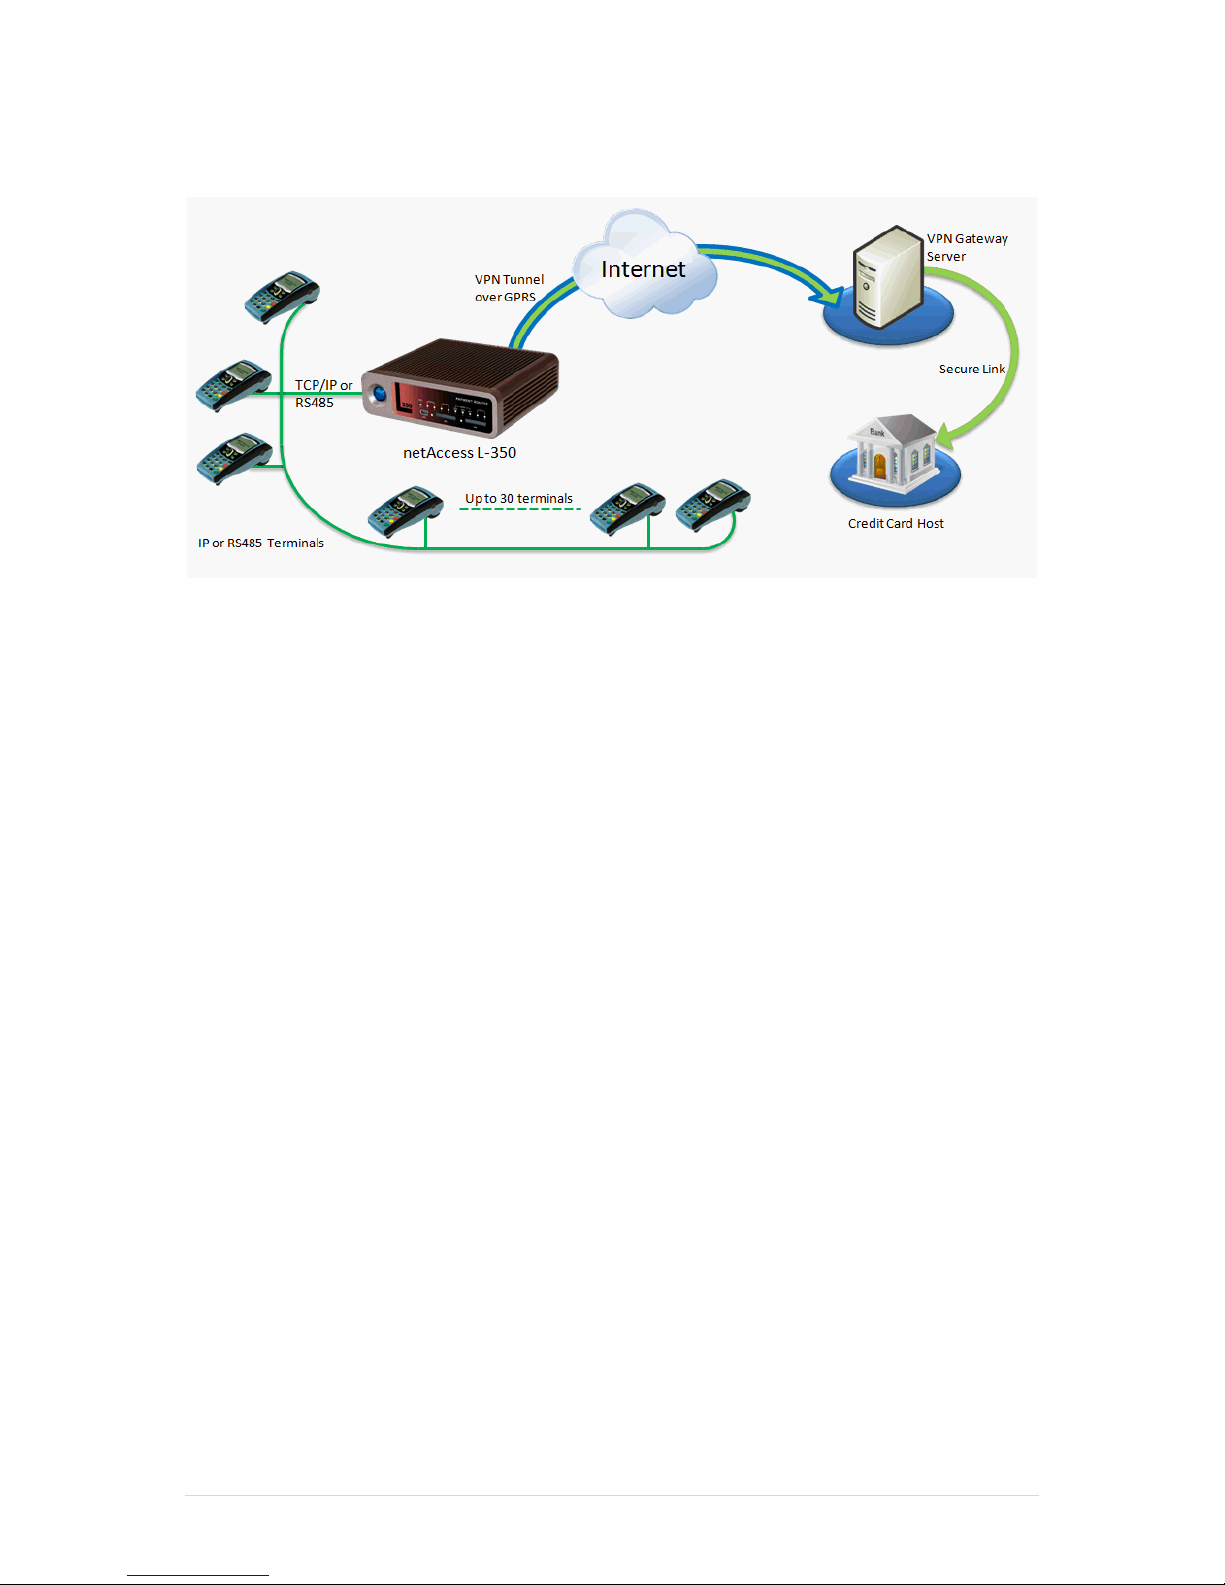
Scenario 6: L-300 or L-350 VPN connection over GPRS
Figure 35: L-350 connected to host through VPN tunnel on GPRS
Setup:
The netAccess L-300/L-350 is capable of establishing a VPN tunnel over GPRS. This requires a
VPN Gateway server to be located in the Acquirer’s premises and this server must have
access to the Host.
Advantages:
Up to a maximum of 15 (for L-300) or 30 (for L350) devices can be connected.
Suitable for multi-lane environments or large merchant.
VPN tunnel provides higher level of security over Public Internet (GPRS).
L-350 comes with Dual SIM for redundant GPRS link.
Cost savings in terms of line rental and call charges –A GPRS data package from the
mobile provider is a fixed cost compared to the variable costs of PSTN lines.
Lower cost than traditional Leased Line connections.
Considerations:
A key management infrastructure will be required to manage the keys for the VPN
encryption. The key management infrastructure needs to support key revocation
and key rollover.
Page 43

netAccess L-200 Series Manual 38 | Page
High Availability Configurations
The netAccess L-Series devices are designed to ensure the connection to the acquiring host
is robust and stable. This high availability is managed by the NetRouter service. The
NetRouter service is configured with a list of available uplink channels, in the order of
preference. (Usually in the order of cost or speed). A typical uplink channel preference list
looks like this:
1) ADSL or Leased Line8
2) GPRS
3) PSTN
The NetRouter service uses a combination of channel-specific failure detection mechanisms
andan“x-consecutive-transaction-timeouts”algorithm to detect when a channel is down.
Whenanuplinkchannelisdetectedas“down”,theNetRouterservicewillroutesubsequent
transactions to the next available channel defined in its failover list. The downed channel is
polled periodically until the connection is re-established. The connection is monitored and
once stabilized, it is marked as “up”, and subsequent transactions are routed through it
once more.
There are two types of channels:
Channel Type
Example
Notes
Permanent Links
Leased Line, ADSL, GPRS
Connection is permanent and may be
monitored by network monitoring
systems for link failure.
On-Demand Links
Dialup – either ISDN or
PSTN
Connection established when needed.
Failure detected only when used.
Usually only used as backup link in case
a permanent link goes down.
8
Additional hardware is required to support ADSL or Leased Line connections. This may include routers.
Page 44
netAccess L-200 Series Manual 39 | Page
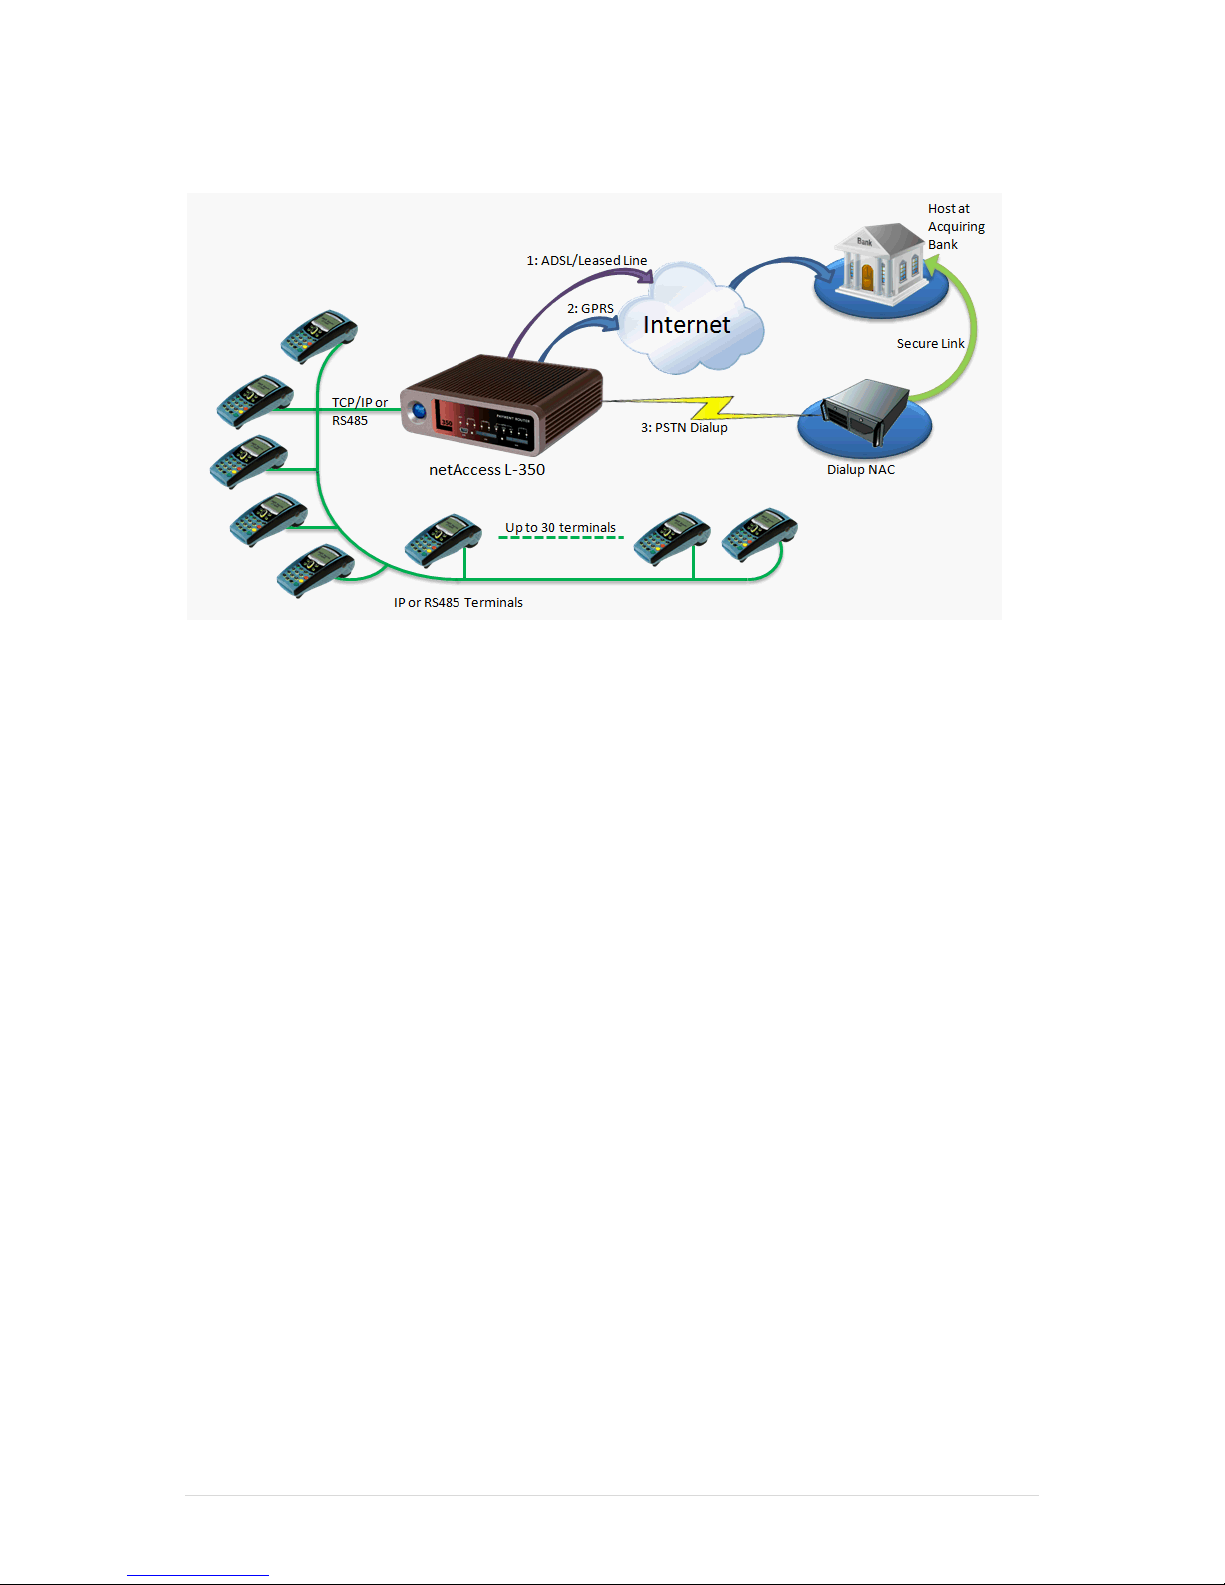
Scenario 7: 3 levels of failover connections
Figure 36: L-350 with 3 levels of connection failover
Setup:
The netAccess L-300/L-350 can be configured for multiple levels of channel failover. In
the example above, the primary channel is Leased line or ADSL, followed by GPRS
followed by PSTN Dialup on demand. For the netAccess L-350 – an additional GPRS link
can be configured to backup the primary GPRS link. If the Leased Line or ADSL is down,
the GPRS will take over. If the GPRS fails, then the netAccess L-300 or L350 will initiate a
PSTN dialup to the Acquirer NAC and establish a low-speed connection to carry the
transactions. Depending on the configuration, the PSTN connection may be held (this
will be expensive) or dropped after an idle period and re-initiated upon the next
transaction received.
Advantages:
Up to maximum of 15 (for L-300) or 30 (for L-350) devices connected
Suitable for multi-lane environments or large merchant
L-350 comes with Dual SIM for redundant GPRS link
Cost savings in terms of line rental and call charges –A GPRS data package from the
mobile provider is a fixed cost compared to the variable costs of PSTN lines.
Lower cost than traditional Leased Line connections
Multiple channels ensure high availability of the acquiring host
Page 45
netAccess L-200 Series Manual 40 | Page
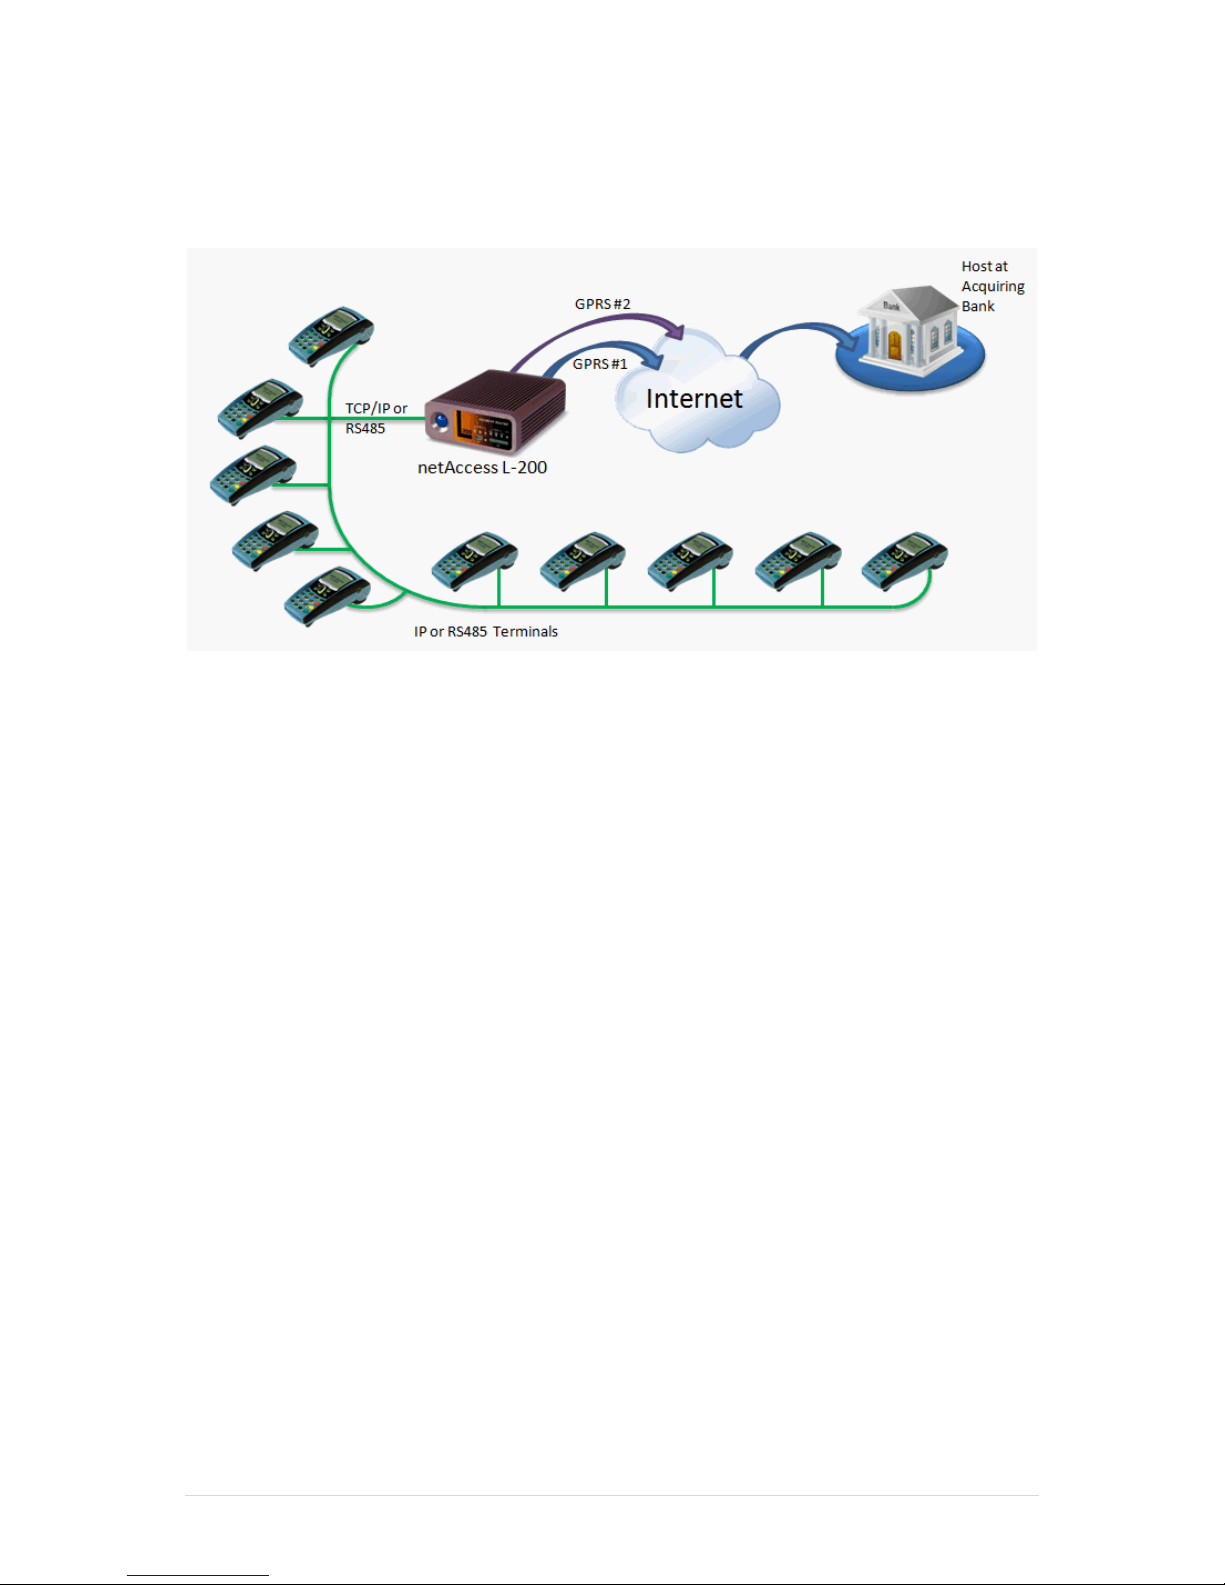
Scenario 8: L-200 Dual SIM GPRS failover
Figure 37: L350 with Dual SIM GPRS failover
Setup:
The netAccess L-200/L-350 supports Dual SIMs and can be configured to two levels of GPRS
channel failover. For models that support dual SIMs, an additional GPRS link can be
configured to backup the first GPRS link. If the main GPRS link is down, the second GPRS
channel will be activated to take over the link.
Advantages:
Up to maximum of 10 (for L-200) or 30 (for L350) devices connected
Cost savings in terms of line rental and call charges –A GPRS data package from the
mobile provider is a fixed cost compared to the variable costs of PSTN lines.
Lower cost than traditional Leased Line connections
Dual GPRS channels ensure high availability of the acquiring host with lower cost
than Leased Line connections
Considerations:
Dual SIM cards will double the cost of connectivity, but this is balanced against loss
of business due to loss of connectivity. Also, the operating cost of two SIM cards is
still less than the cost of a Leased Line.
Page 46
netAccess L-200 Series Manual 41 | Page
Appendix A:
Cable Specifications
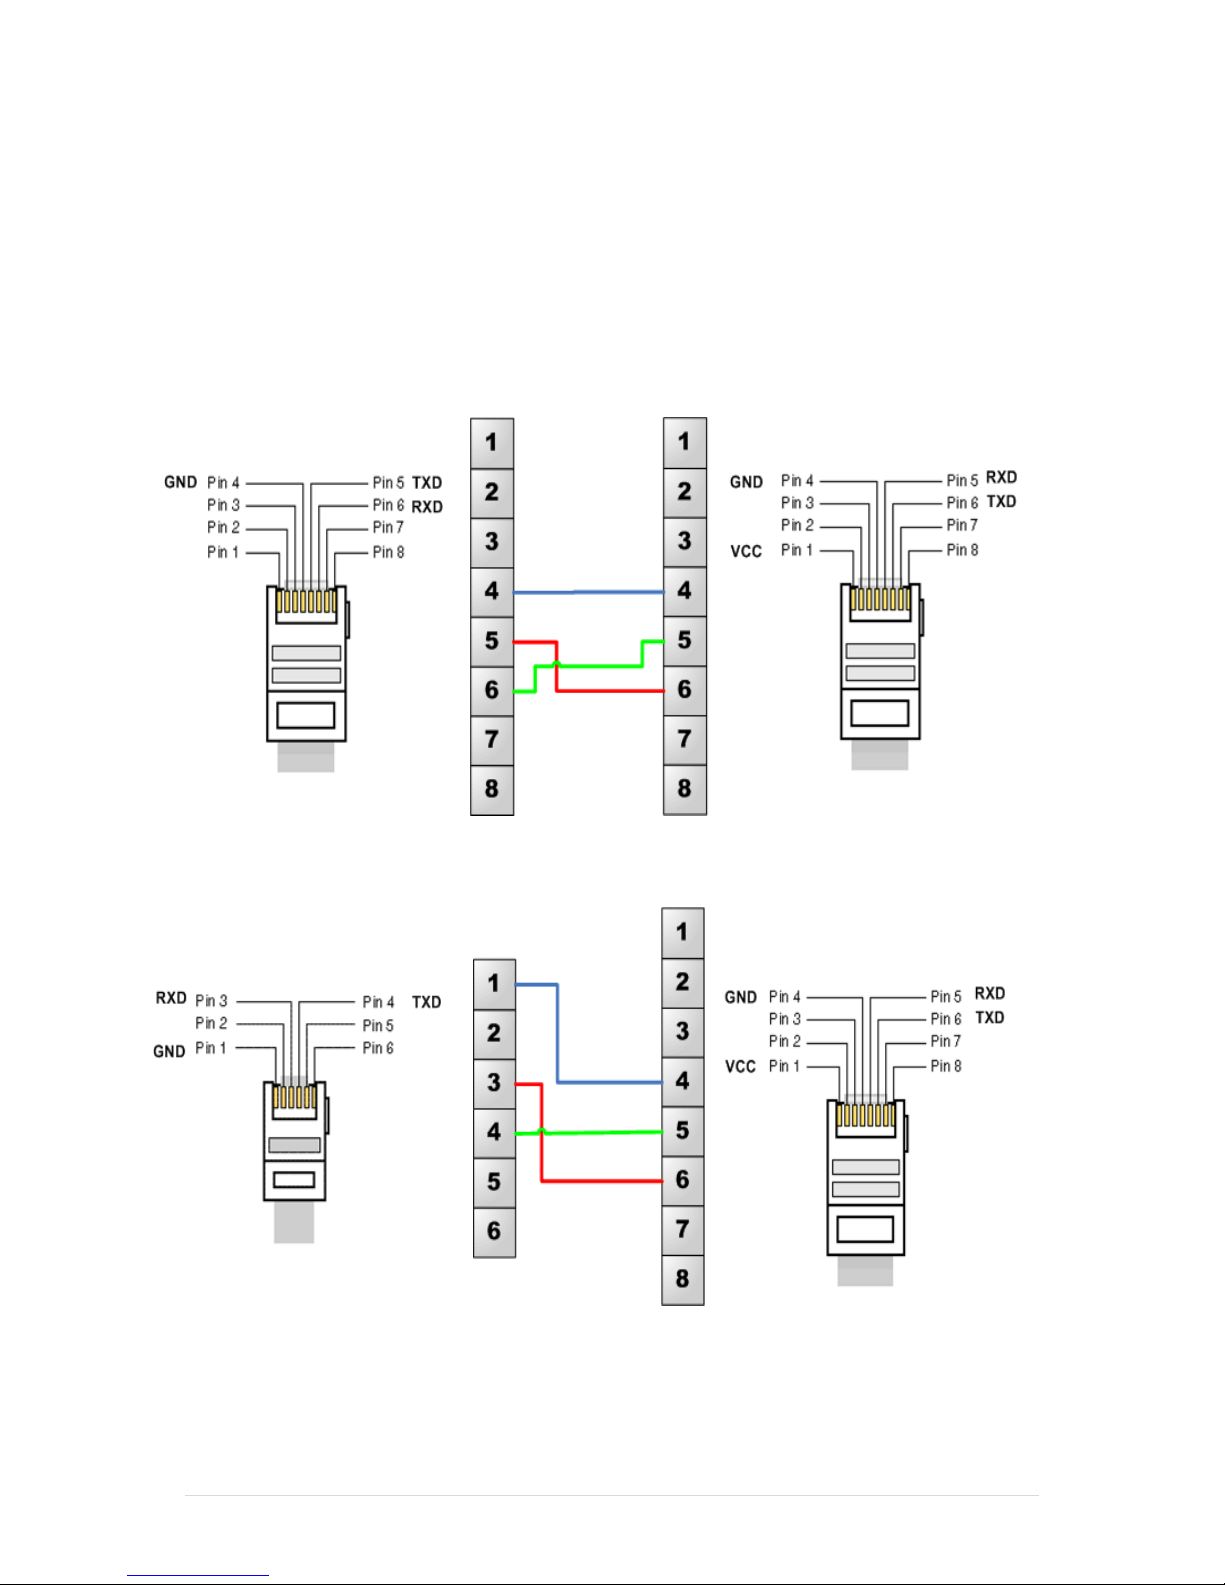
This section shows some of the commonly used cable configurations for various devices
connected to the netAccess L-Series devices.
Cable 1: Serial cable for terminals (Verifone)
Cable 2: Serial cable for terminals (Sagem)
Page 47
netAccess L-200 Series Manual 42 | Page
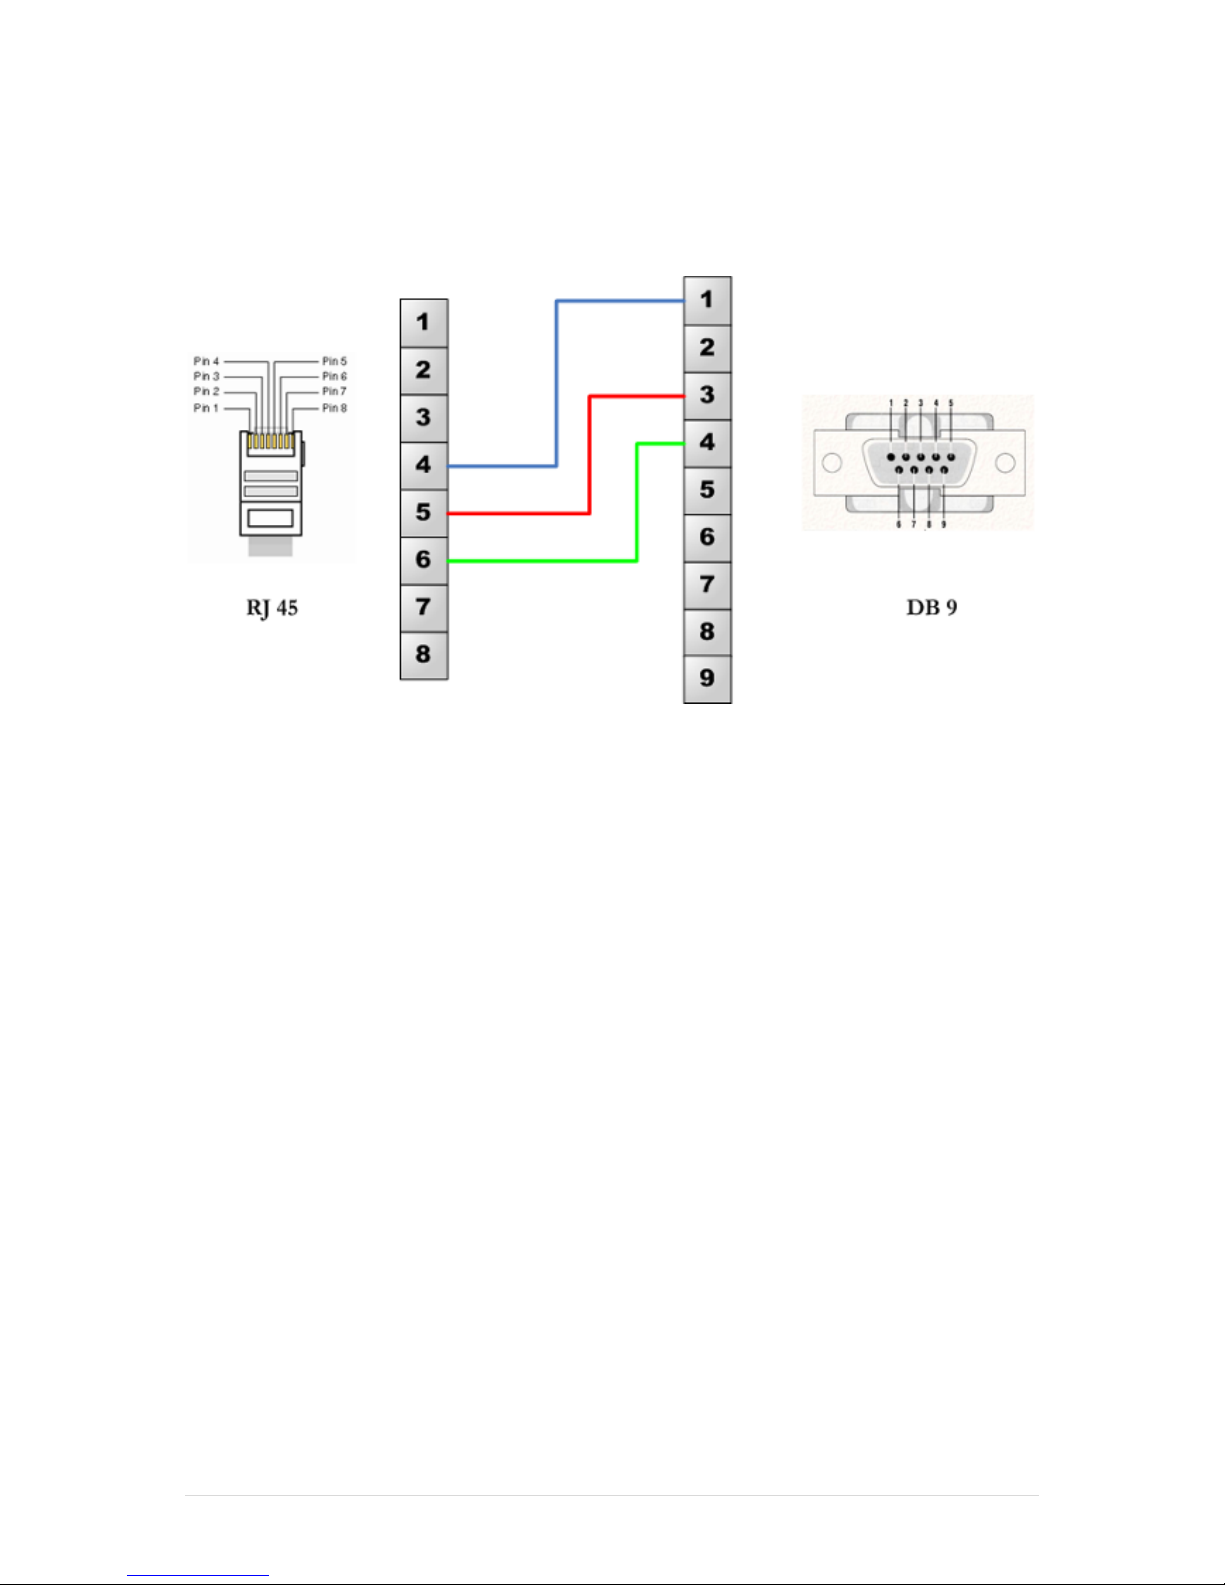
Cable 3: Console cable for netAccess L-Series
This cable is used for connecting to the console port of the netAccess L-Series for
troubleshooting and downloading of the System Software.
Note: A USB to Serial adapter will be needed for computers or notebooks without a Serial
Port. These adapters are available commercially in most computer hardware stores.
Page 48

netAccess L-200 Series Manual 43 | Page
Appendix B:
Pattern Matching
Conventions
Pattern matching strings are used to parse or filter route incoming messages for products
built on the netRouter engine. Based on the pattern, the message is then routed to an
assigned connection. A pattern matching string can be made up of a combination of
different patterns, with the pattern to be matched defined between the Pattern Header
string and Pattern Trailer string.
A pattern matching string consists of the following components:-
1B19 FF
Protocol Header
Pattern Header
Data Fields
Pattern Trailer
Protocol Trailer
Pattern Matching Operators
The following operators can be used to build a Pattern Matching string.
Operator
HEX Code
Description
*
2A
Universal wildcard character. Use this to represent
everything.
Example: ABC*EFG
It allows anything of any length between the ABC and
EFG
?
3F
Single wildcard character. Use this to represent a
single character of any type.
Example: ABC??EFG.
It allows anything with 2 bytes in between ABC and
EFG
Data
Header
Length
4Cxxxx
Data header length indicates that there is a header
that indicates length of the data field.
Example 1: 4C0280
There is a header length of 2 bytes (0280 in
Hexadecimal code) The message would look
something like:
00 0A 30 31 32 33 34 35 36 37 38 39
Where 000A (first 2 bytes) indicates there is 10 bytes
of data after the 2 byte header.
Example 2: 4C0240
There is a header length of 2 bytes (0240 in BCD code)
Page 49

netAccess L-200 Series Manual 44 | Page
Operator
HEX Code
Description
The message would look something like:
00 10 30 31 32 33 34 35 36 37 38 39
Where 0010 (first 2 bytes) indicates there is 10 bytes
of data after the 2 byte header.
Fixed Data
Length
46xxxx, where xxxx
is length of data
Allows the device to route data of a fixed length.
Example: 46000A
The pattern above will cause the device to route the
message once all 10 bytes have been received without
waiting for further input.
Skip header
length
5380
The pattern to skip the data stated by the header
length (Do I have to define header length first?)
Skip Fixed
Length
5340
The pattern to skip the data stated by a fixed length
(can’tseemtosetthelength)
Replace
Data
5200xxyyzz where
Xx - position to
replace,
Yy – number of
bytes to replace,
zz – value to
replace
The pattern to replace the TPDU Source Data
Example: 5200060101
The Position is 6 bytes from the header, number of
bytes to replace is 1 and the replace value is 01:
00 03 60 05 58 00 00 -> 00 03 60 05 58 00 01
Examples of Patterns
Users should be able to configure the routing by reasonable mixing of the supported
pattern. Here are typical configuration patterns for pattern matching:
Rule for combining Patterns:
Each pattern should start with the Pattern Header (1B19) and end with the Pattern Trailer
(FF)
Patterns can be combined one after the other, in the sequence of processing.
ISO8583
Used for: Normal Credit / Debit Transactions
Definition: <HeaderLength 2 bytes Hex>
Pattern String:
1B 19
4C
02 80
00 00
FF
Pattern Header
Header Length
10 bytes
Filler
Pattern Trailer
Page 50

netAccess L-200 Series Manual 45 | Page
Visa PayWave 1
Used for: Terminal To Contactless Reader
Definition:
02 ? 0B 01 0E 01 ? <HeaderLength 2 byte hex><data (skip header length)>[CRC 2 bytes] 03
Pattern String:
02
1B19 3F FF
0B010E01
1B19 3F
4C02800000
53 80
3F 3F
FF
03
Data
Pattern 1:
? wildcard
Data
Pattern 2:
? wildcard
Pattern 3:
Header 2
byte, HEX
Pattern 4:
Skip
header
length
Pattern 5:
CRC 2
bytes
Close
Pattern
Data
Or:
021B193FFF0B010E011B193F4C0280000053803F3FFF03
Example of the message:
02010B010E01300006000000010000CA8D03
Parsing of data:
02 = Fixed Data
01 = Running number
0B01 = Fixed Source ID
0E01 = Fixed Destination ID
Visa PayWave 2
Used for: Contactless Reader to Terminal
Definition:
02?0E010B01?<HeaderLength 2 byte hex><data(skip header length)>[CRC 2 bytes] 03
Pattern String:
02
1B19 3F FF
0E010B01
1B19 3F
4C02800000
53 80
3F 3F
FF
03
Data
Pattern 1:
? wildcard
Data
Pattern 2:
? wildcard
Pattern 3:
Header 2
byte, HEX
Pattern 4:
Skip
header
length
Pattern 5:
CRC 2
bytes
Close
Pattern
Data
Or
021B193FFF0E010B011B193F4C0280000053803F3FFF03
Page 51

netAccess L-200 Series Manual 46 | Page
Bi-sync.
Definition:
02<Header Length 2 byte BCD><data (skip header length)> [LRC] 03
Pattern String:
02
1B19
4C 0240
0000
53 80
3F
FF
03
Data
Pattern
start
Pattern 1:
Header 2
byte, BCD
Pattern 2:
Skip header
length
Pattern
3: LRC
Close
Pattern
Data
Or
021B194C0240000053803FFF03
 Loading...