

Page 1
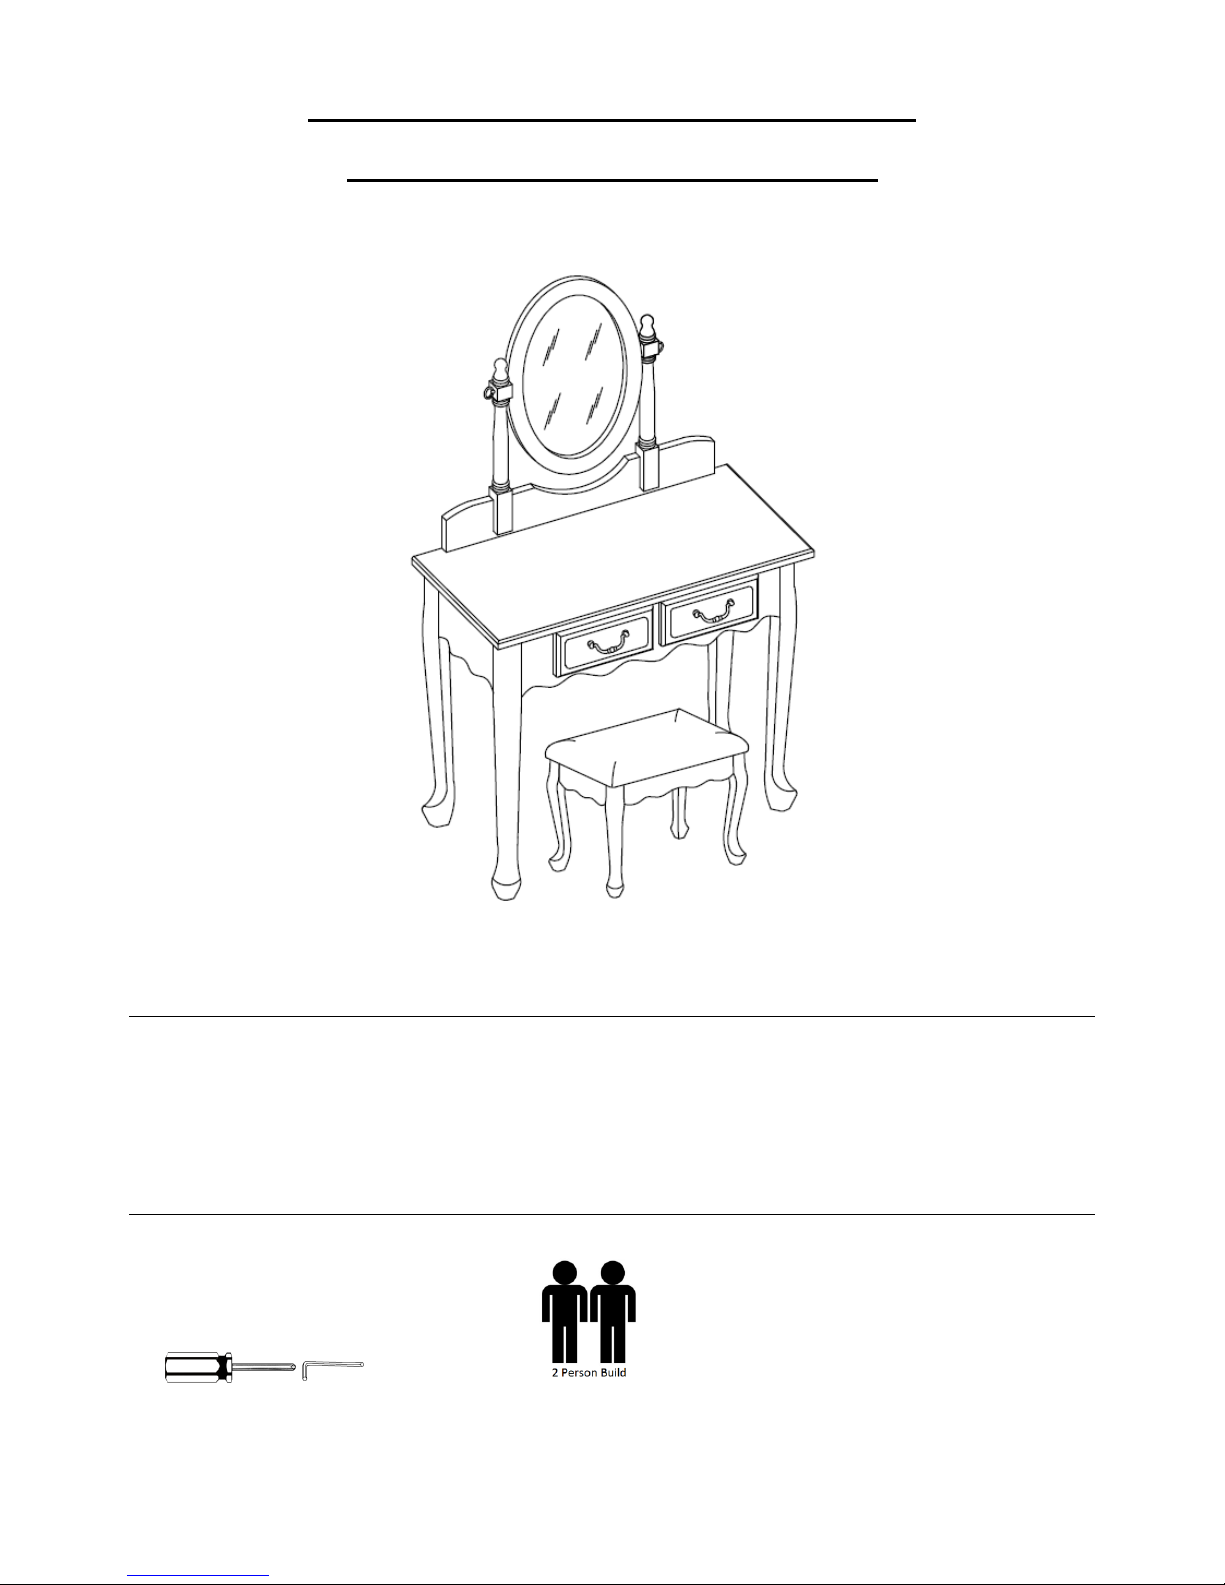
MIRRORED DRESSER & STOOL
ASSEMBLY INSTRUCTIONS
Batch no.: WMI 14713
Page 1 of 7
Thank you for purchasing the MIRRORED DRESSER & STOOL. Please read the
instructions carefully to ensure safe operation of the product.
W805 x D405 x H1300mm/Black,Ivory
PLEASE READ this sheet prior to assembly to familiarise yourself with the various stages of construction.
Carefully open the pack supplied and check the contents against the parts and fittings check list. Do not destroy
any of the packaging until you are certain that you have all the necessary parts for the assembly.
CAUTION: There are small components used in the construction of this unit. These loose items should be kept
away from young children whilst assembling your unit to avoid the danger of choking hazards.
Tools Required
Page 2

MIRRORED DRESSER & STOOL
ASSEMBLY INSTRUCTIONS
Batch no.: WMI 14713
Page 2 of 7
IMPORTANT - READ CAREFULLY - RETAIN THESE INSTRUCTIONS FOR
FUTURE REFERENCE.
INFORMATION
Due to the size of this product we recommend that it is assembled in the room intended for use.
When you are ready to start, make sure that you have the right tools, plenty of space and a clean, dry area
for assembly.
Unwrap all packaging materials and place the components on top of the carton box or on a clean floor to
prevent it from scratching.
Check the pack and make sure you have all the parts listed.
Ensure that this product is fully assembled as illustrated before use.
Check all screws or bolts are tightened and inspect regularly
Tools not included.
WARNINGS
This product should only be used on firm, level ground.
Keep small parts out of reach of children.
Make sure the legs remain in contact with the ground.
Do not use power tools to construct this product.
Do not tighten screws until fully assembled.
Do not over tighten screws or bolts.
Do not use this product if parts are missing, damaged or worn.
Do not sit or stand on the dresser.
If a glass component is chipped or broken, stop using the product and consult the manufacturer or supplier.
Do not lean on the vertical mirror surface.
Do not strike the glass with hard or pointed items.
CARE INFORMATION
Never use scourers, abrasives or chemical cleaners.
To clean wipe with a sponge and warm soapy water. Do not use solvent based cleaners or detergents as
they can bleach or damage the product.
When cleaning glass panels or mirrors use a damp cloth with washing up liquid or soft soap if necessary;
do not use washing powders or any other substances containing abrasives since these substances scratch
glass.
Page 3
MIRRORED DRESSER & STOOL
ASSEMBLY INSTRUCTIONS
Batch no.: WMI 14713
Page 3 of 7
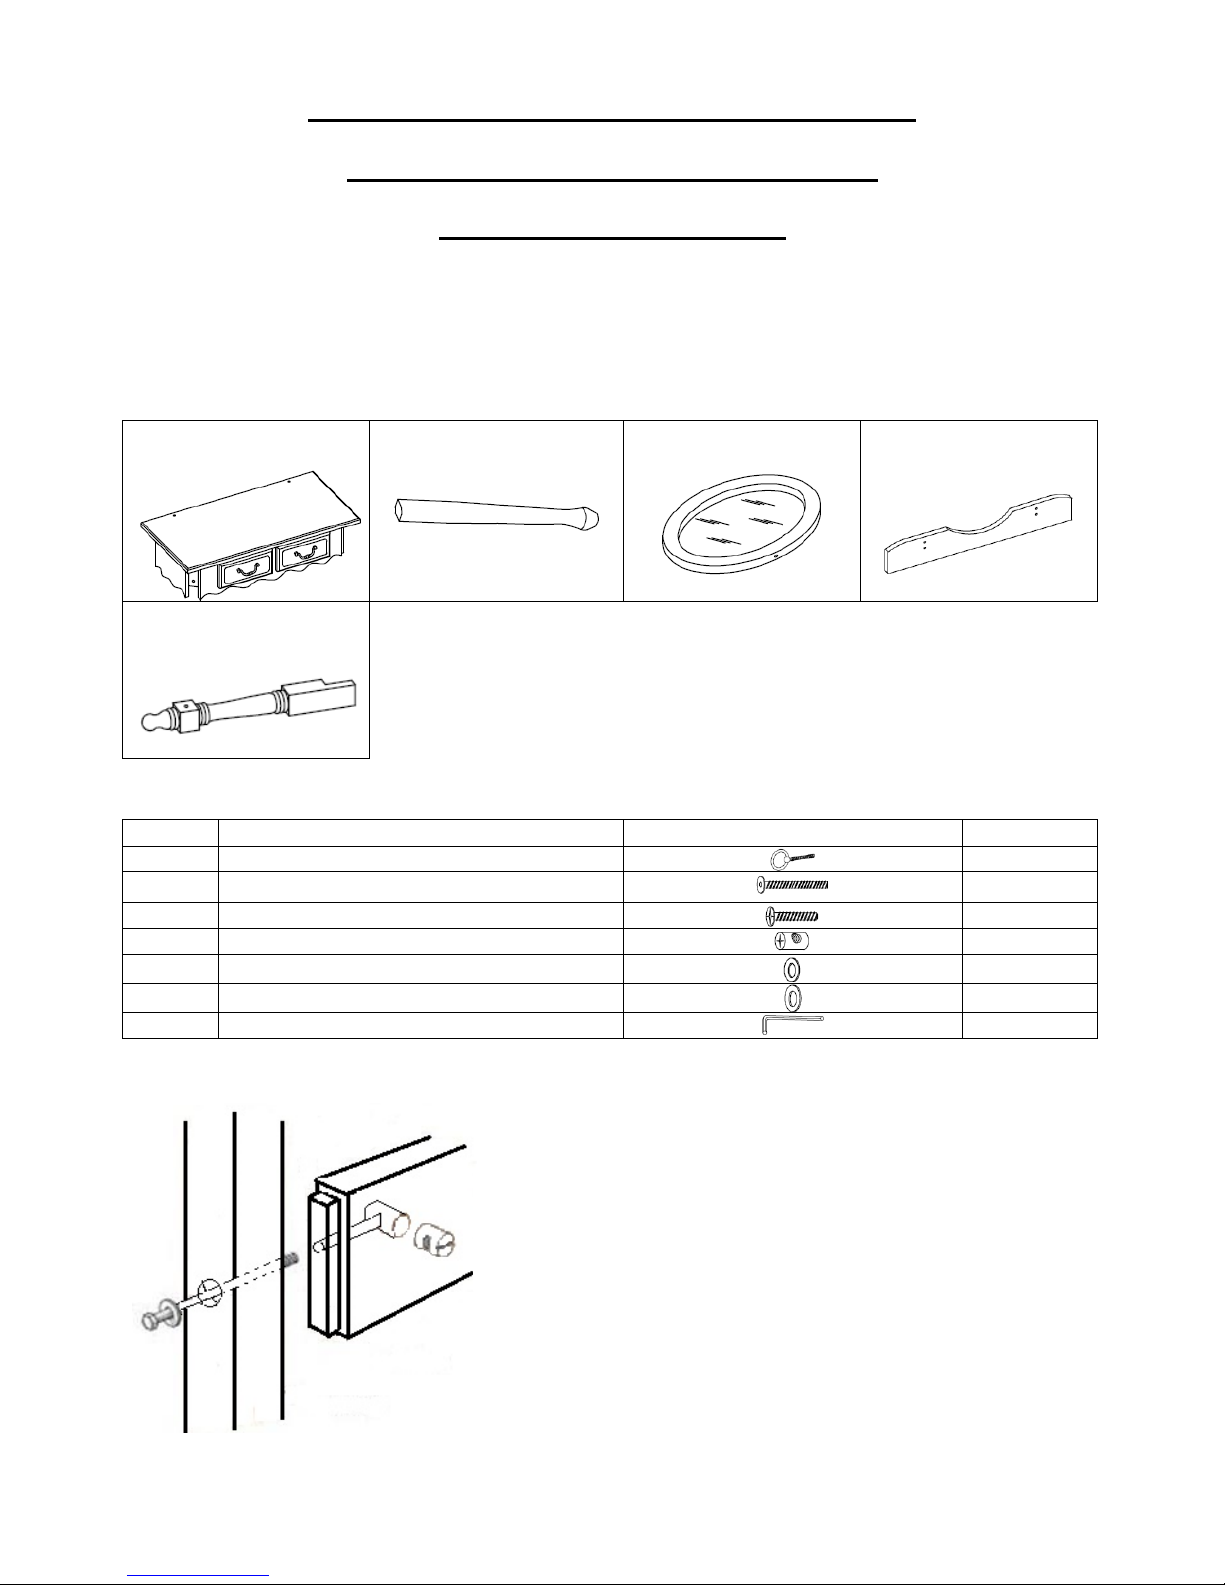
Parts and Fittings Checklist
Please check the pack contents before assembling this product. If any components are missing, please
contact your retailer.
The fittings pack contains small items that should be kept away from small children.
Parts (Dresser)
1. DRESSER TOP – 1
Piece
2. DRESSER LEG – 4
Pieces
3. MIRROR – 1 Piece
4. MIRROR BASE
SUPPORT – 1 Piece
5. MIRROR SUPPORT
– 2 Pieces
Fittings (Dresser)
Code
Item
Quantity
A
Mirror Bolt (5/16”xØ33x50mm)
2
B
Large Bolt (1/4”x50mm)
10
C
Small Bolt (M4x30mm)
4
D
Barrel Nut (1/4”x13x9.5mm)
2
E
Small Washer (1/4”x13x1.5mm)
6
F
Large Washer (5/16”x19x2.0mm)
8
G
4mm Allen Key
1
General Hints & Tips
The barrel nut must be inline with the
bolt. After insertion the bolt will thread
through the nut to secure.
Page 4
MIRRORED DRESSER & STOOL
ASSEMBLY INSTRUCTIONS
Batch no.: WMI 14713
Page 4 of 7
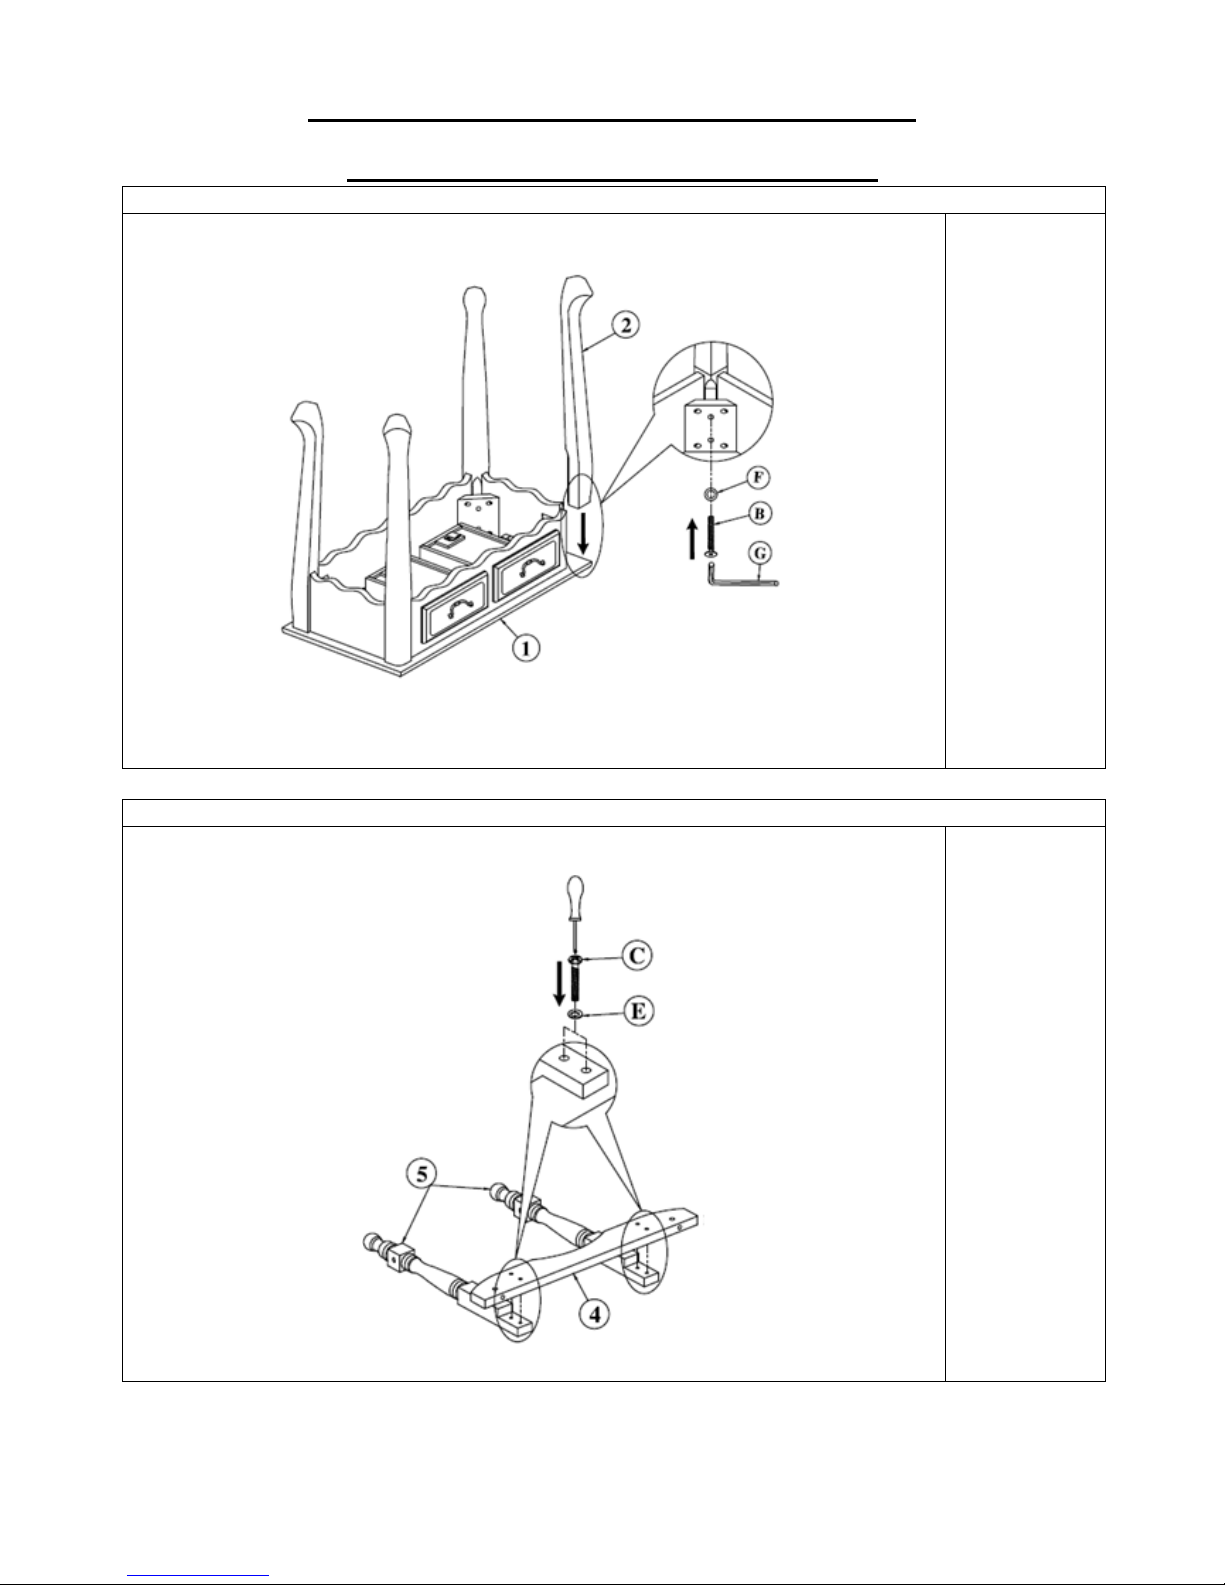
STEP 1
PARTS
REQUIRED
1. Dresser Top x
1
2. Dresser Leg x
4
B. Large Bolt x 8
F. Large
Washer x
8
G. 4mm Allen
Key x 1
STEP 2
PARTS
REQUIRED
4. Mirror Base
Support x 1
5. Mirror
Support x 2
C. Small Bolt x 4
E. Small
Washer x 4
Page 5
MIRRORED DRESSER & STOOL
ASSEMBLY INSTRUCTIONS
Batch no.: WMI 14713
Page 5 of 7
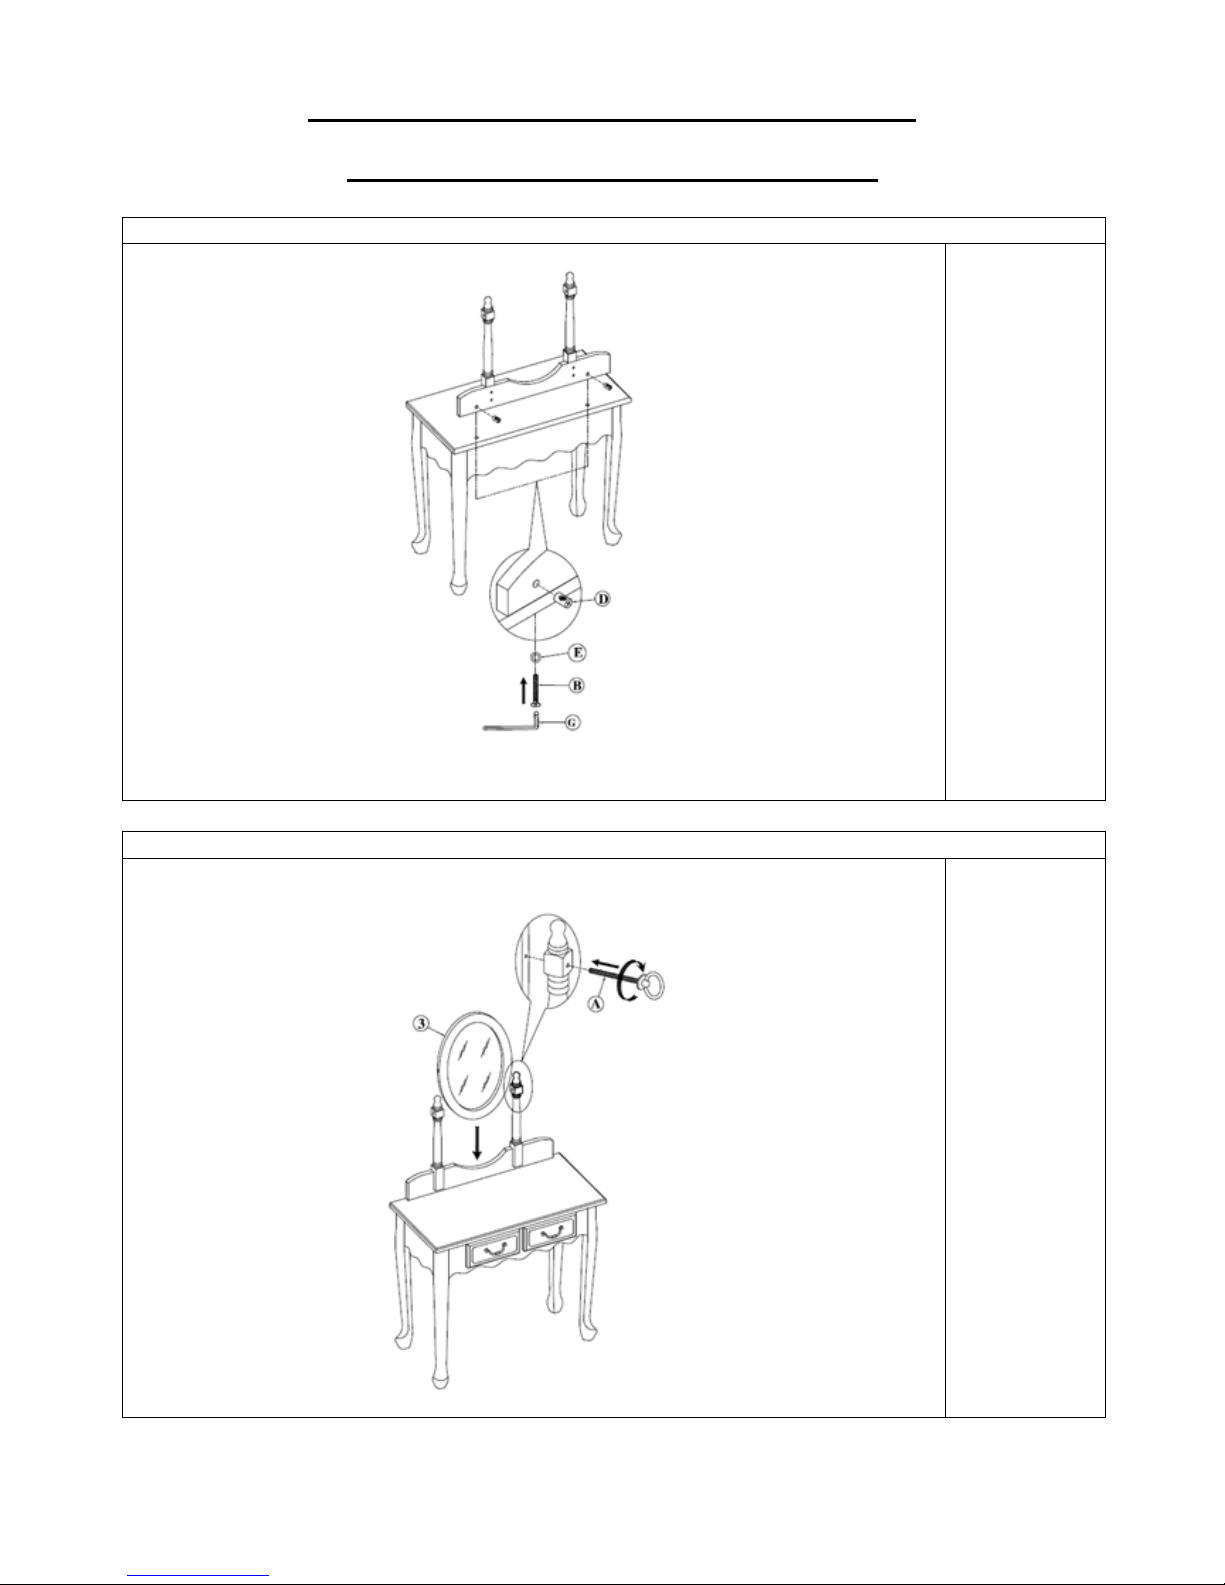
STEP 3
Ensure the barrel nut is lined up with the bolt when fitting
PARTS
REQUIRED
B. Large Bolt x 2
D. Barrel Nut x 2
E. Small
Washer x 2
G. 4mm Allen
Key x 1
STEP 4
PARTS
REQUIRED
3. Mirror x 1
A. Mirror Bolt x
2
Page 6
MIRRORED DRESSER & STOOL
ASSEMBLY INSTRUCTIONS
Batch no.: WMI 14713
Page 6 of 7
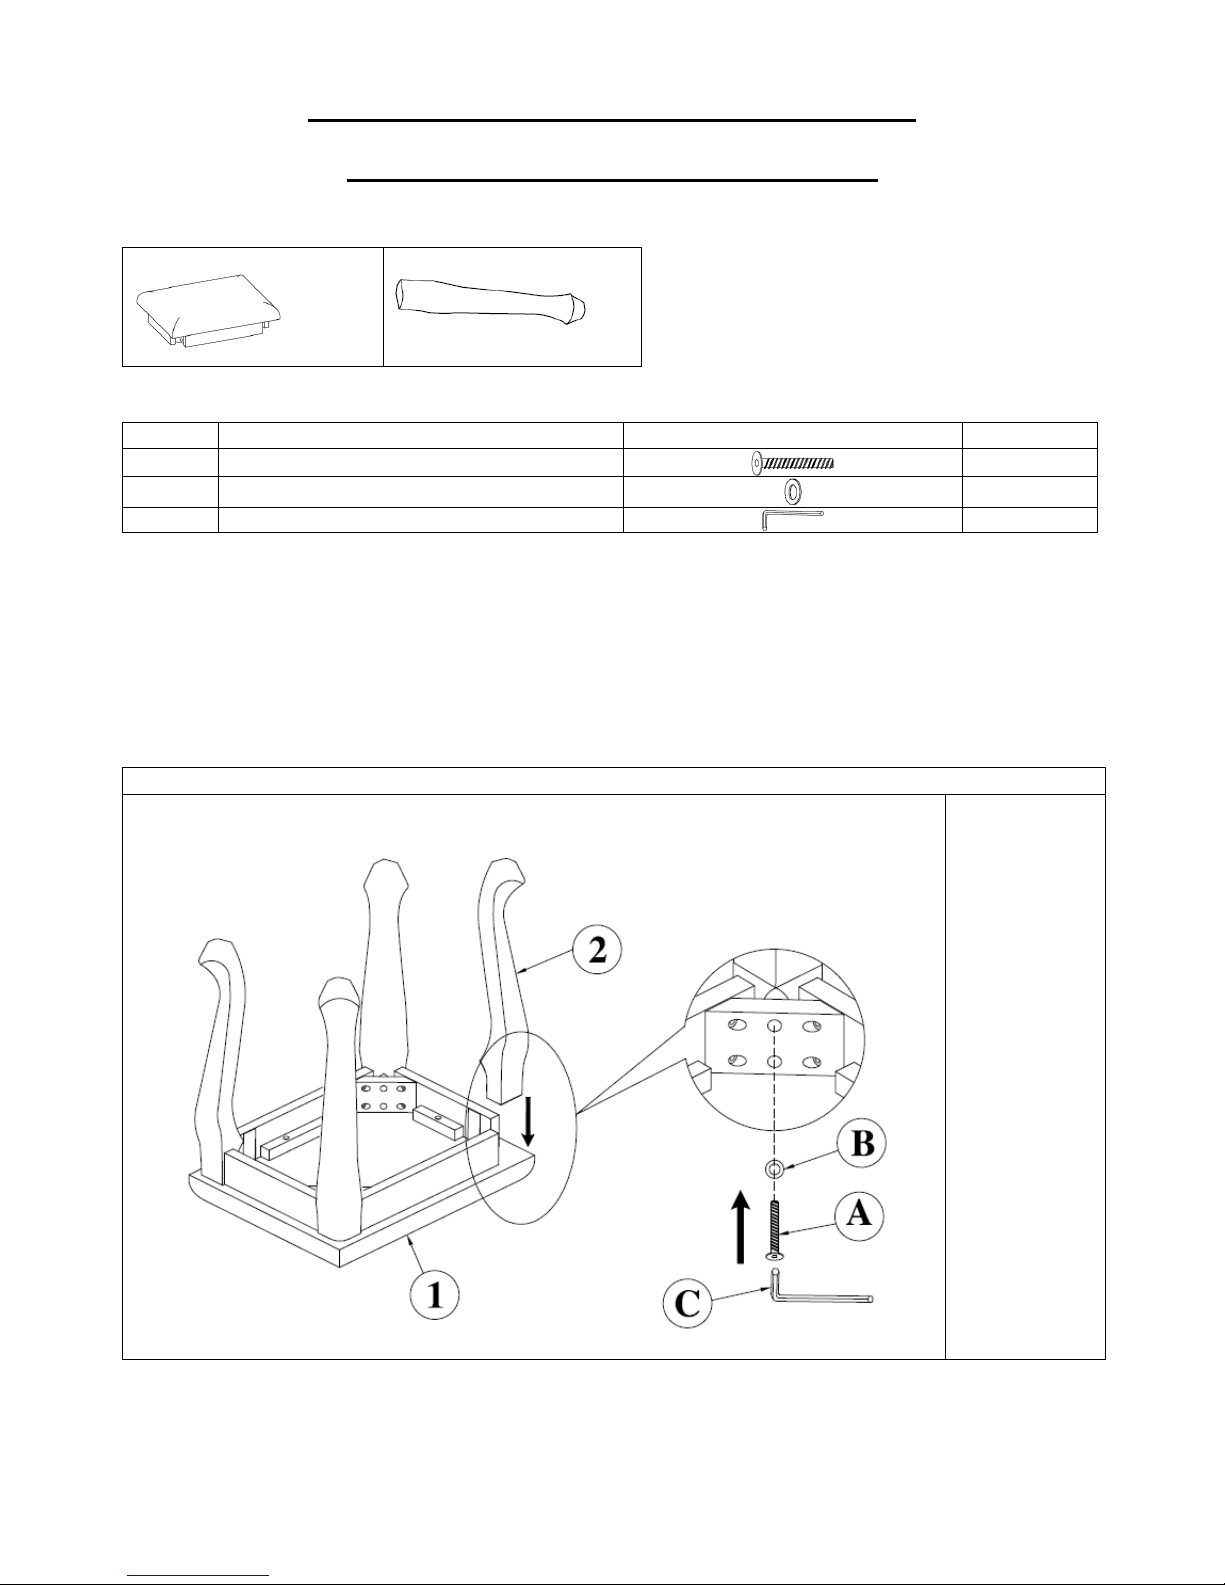
Parts (Stool)
1. SEAT – 1 Piece
2. LEG – 4 Pieces
Fittings (Stool)
Code
Item
Quantity
A
Bolt (1/4”x50mm)
8
B
Washer (5/16”x19x2.0mm)
8
C
4mm Allen Key
1
STEP 1
PARTS
REQUIRED
1. Seat x 1
2. Leg x 4
A. Bolt x 8
B. Washer x 8
C. 4mm Allen
Key x 1
Page 7
MIRRORED DRESSER & STOOL
ASSEMBLY INSTRUCTIONS
Batch no.: WMI 14713
Page 7 of 7
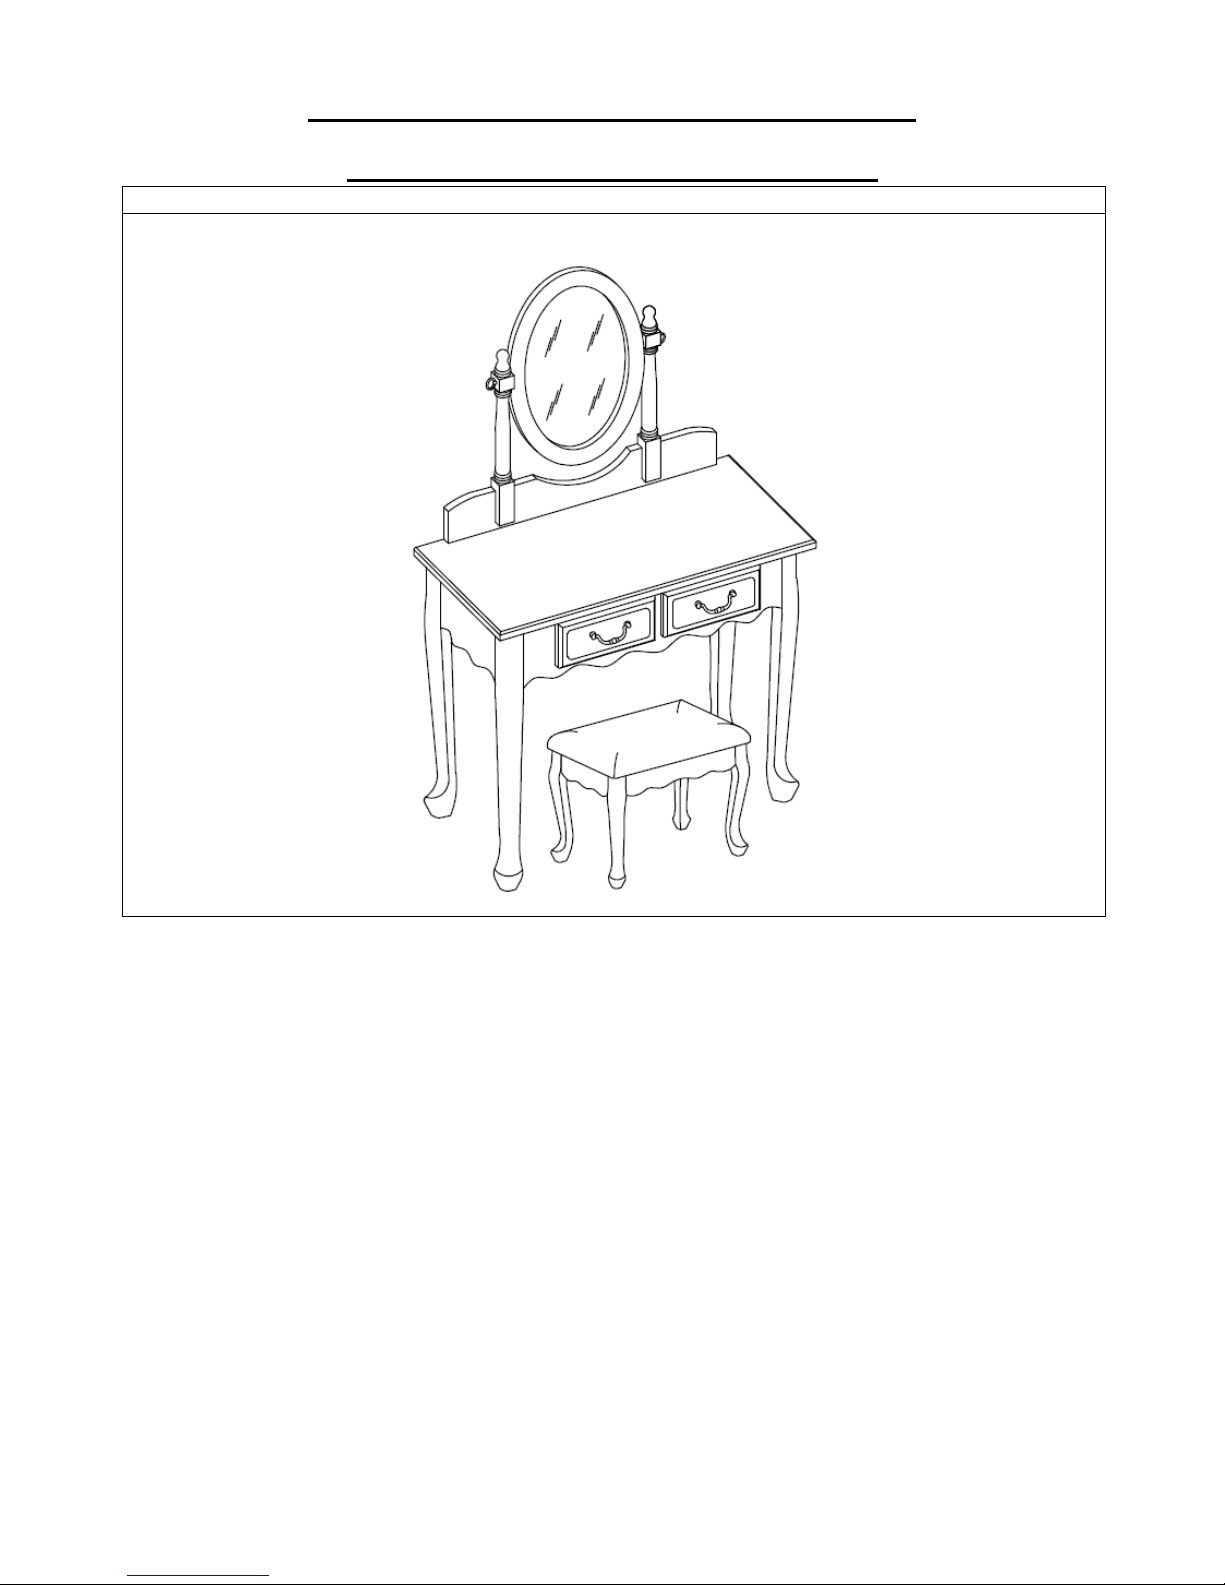
COMPLETE
 Loading...