

Page 1
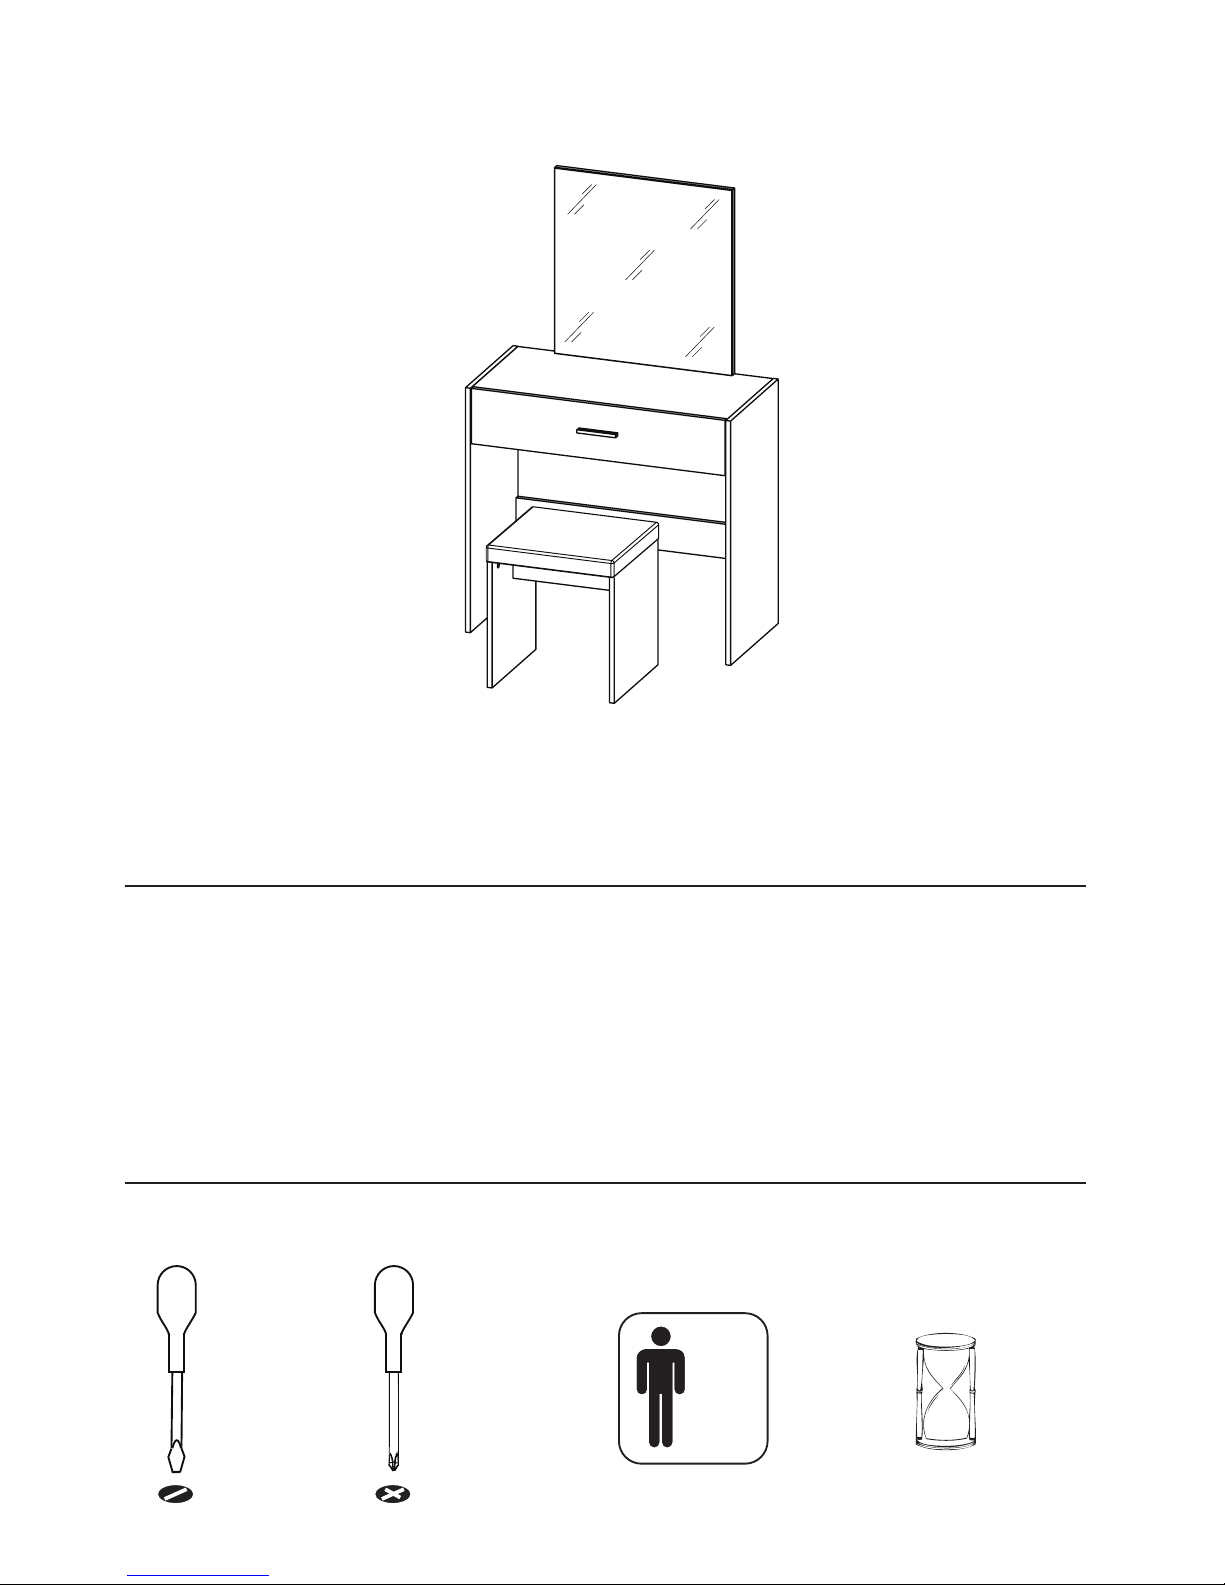
Dressing Table Size: 82 x 39 x 132 cm (WDH)
Stool Size:
Colours available:
40 x 29.5 x 44.5 cm (WDH)
White, Oak, Black or Walnut
Page 1 of
12
PLEASE READ this sheet prior to assembly to familiarise yourself with the various stages of construction.
Carefully open the pack supplied and check the contents against the parts and fittings check list. Do not
destroy any of the packaging until you are certain that you have all the necessary parts for the assembly.
CAUTION: There are small components used in the construction of this unit. These loose items should be
kept away from young children whilst assembling your unit to avoid the danger of choking.
Tools Required
Number of people
x1
1 Hour
Set Up
DRESSING TABLE _STOOL SET - ASSEMBLY INSTRUCTIONS
Thank you for purchasing the Dressing Table & Stool set.Please read the
instructions carefully to ensure safe operation of this product.
Page 2

IMPORTANT - READ CAREFULLY - RETAIN THESE INSTRUCTIONS FOR
FUTURE REFERENCE.
Page 2 of
12
INFORMATION
CARE INFORMATION
Never use scourers, abrasives or chemical cleaners.
To clean, wipe with a damp sponge and warm soapy water.
Do not use solvent based cleaners or detergents as they can bleach or damage the product.
WARNINGS
This product is designed to hold 10 Kg spread evenly over the whole unit.
Do not exceed this weight.
We recommend that this unit is assembled in the room intended for use.
When you are ready to start, make sure that you have the right tools, plenty of space and
a clean, dry area for assembly.
Unwrap all packaging materials and place the components on top of the carton box or on
a clean floor to prevent any accidental scratching.
Check the pack and make sure you have all the parts listed.
Ensure that this product is fully assembled as illustrated before use.
Check all screws or bolts are tightened and inspect regularly
Tools not included unless specified in parts list.
This product should only be used on a firm and level floor.
Keep small parts out of reach of children.
Make sure the legs remain in contact with the floor.
Please stand item close to a wall and use the anti-tilt strap (S) to prevent any accidents.
DO NOT
DO NOT
DO NOT
DO NOT
DO NOT
DO NOT
use power tools to construct this product.
tighten screws until all parts are assembled or as advised in this guide.
over-tighten screws or bolts.
use this product if parts are missing, damaged or worn.
sit or stand on the product.
stand on the Stool
DRESSING TABLE_STOOL SET - ASSEMBLY INSTRUCTIONS
Page 3
Page 3 of
12
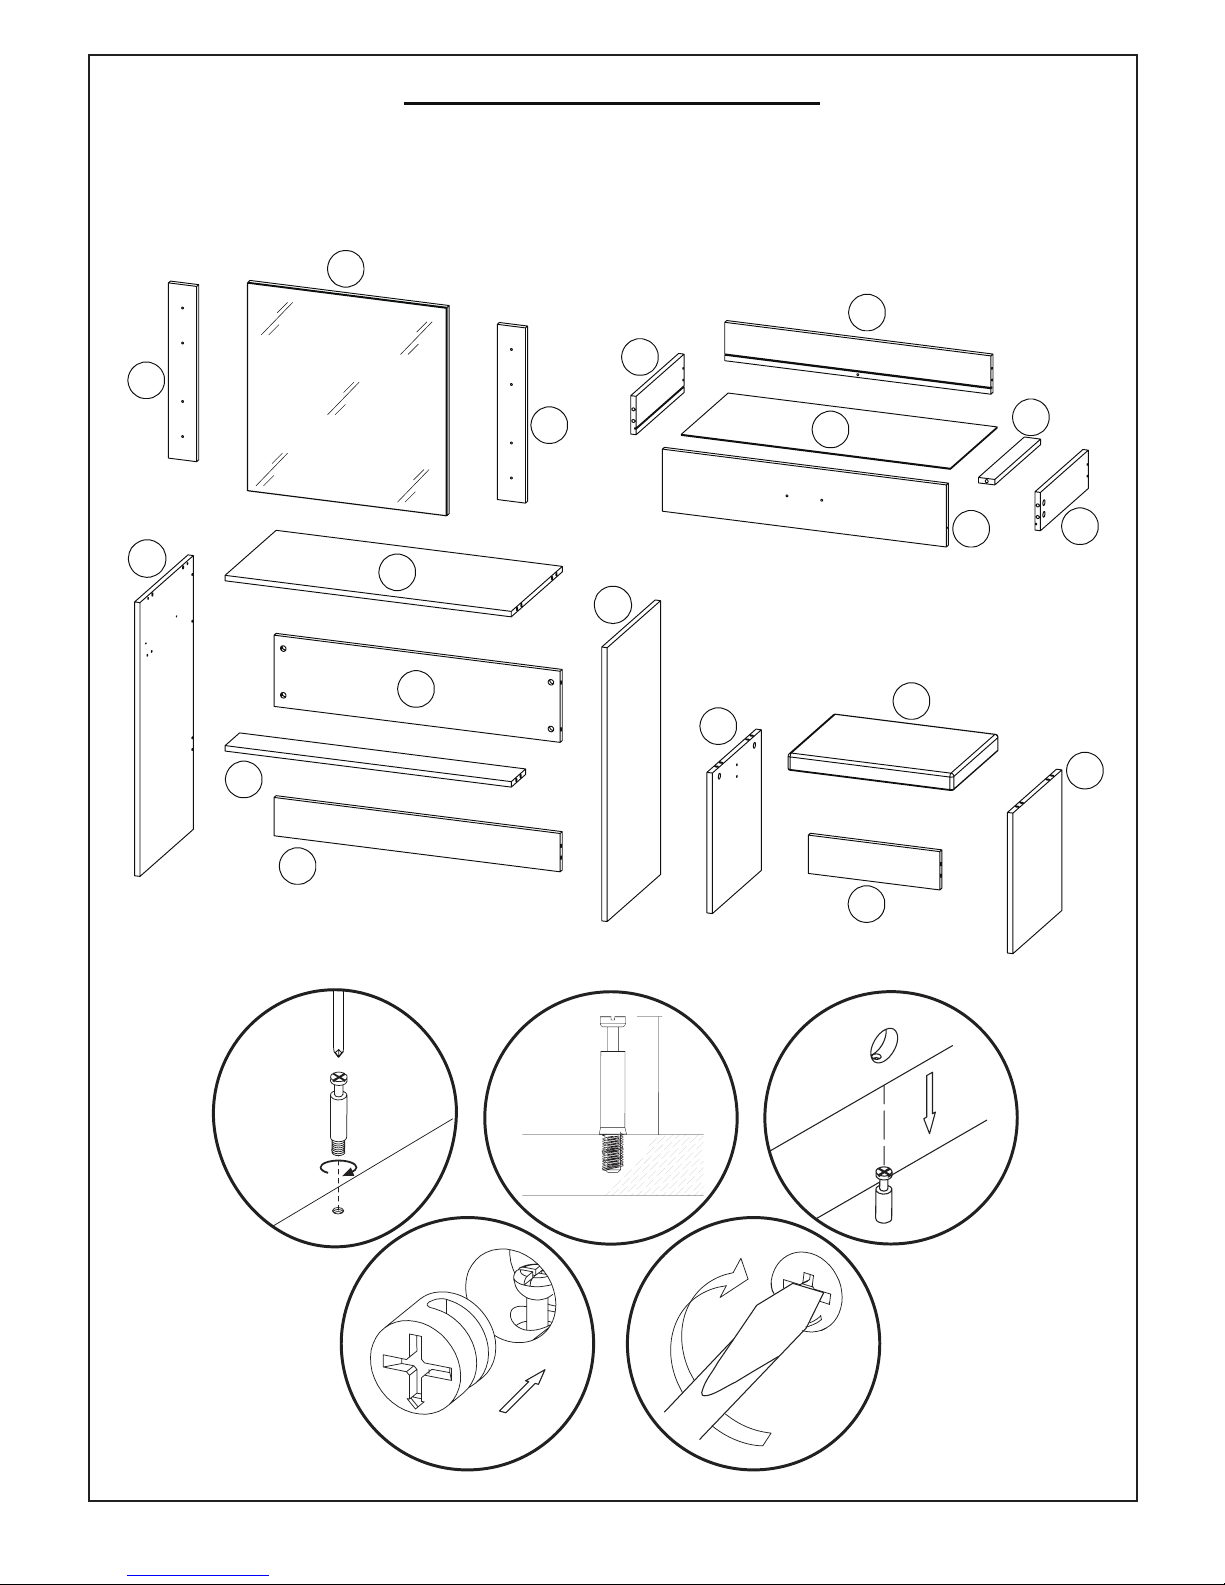
Parts and Fittings Checklist
Please check the pack contents before assembling the product. If any components
are missing, please contact your retailer.
The fittings pack contains small items that should be kept away from children.
5
4
1
2
5
6
7
7
8
9
10
11
12
13
14
15
15
16
3
General Hints & Tips
A
26mm
A
A
B
Tighten
Stop when
Level
DRESSING TABLE_STOOL SET - ASSEMBLY INSTRUCTIONS
Page 4
Page 4 of
12
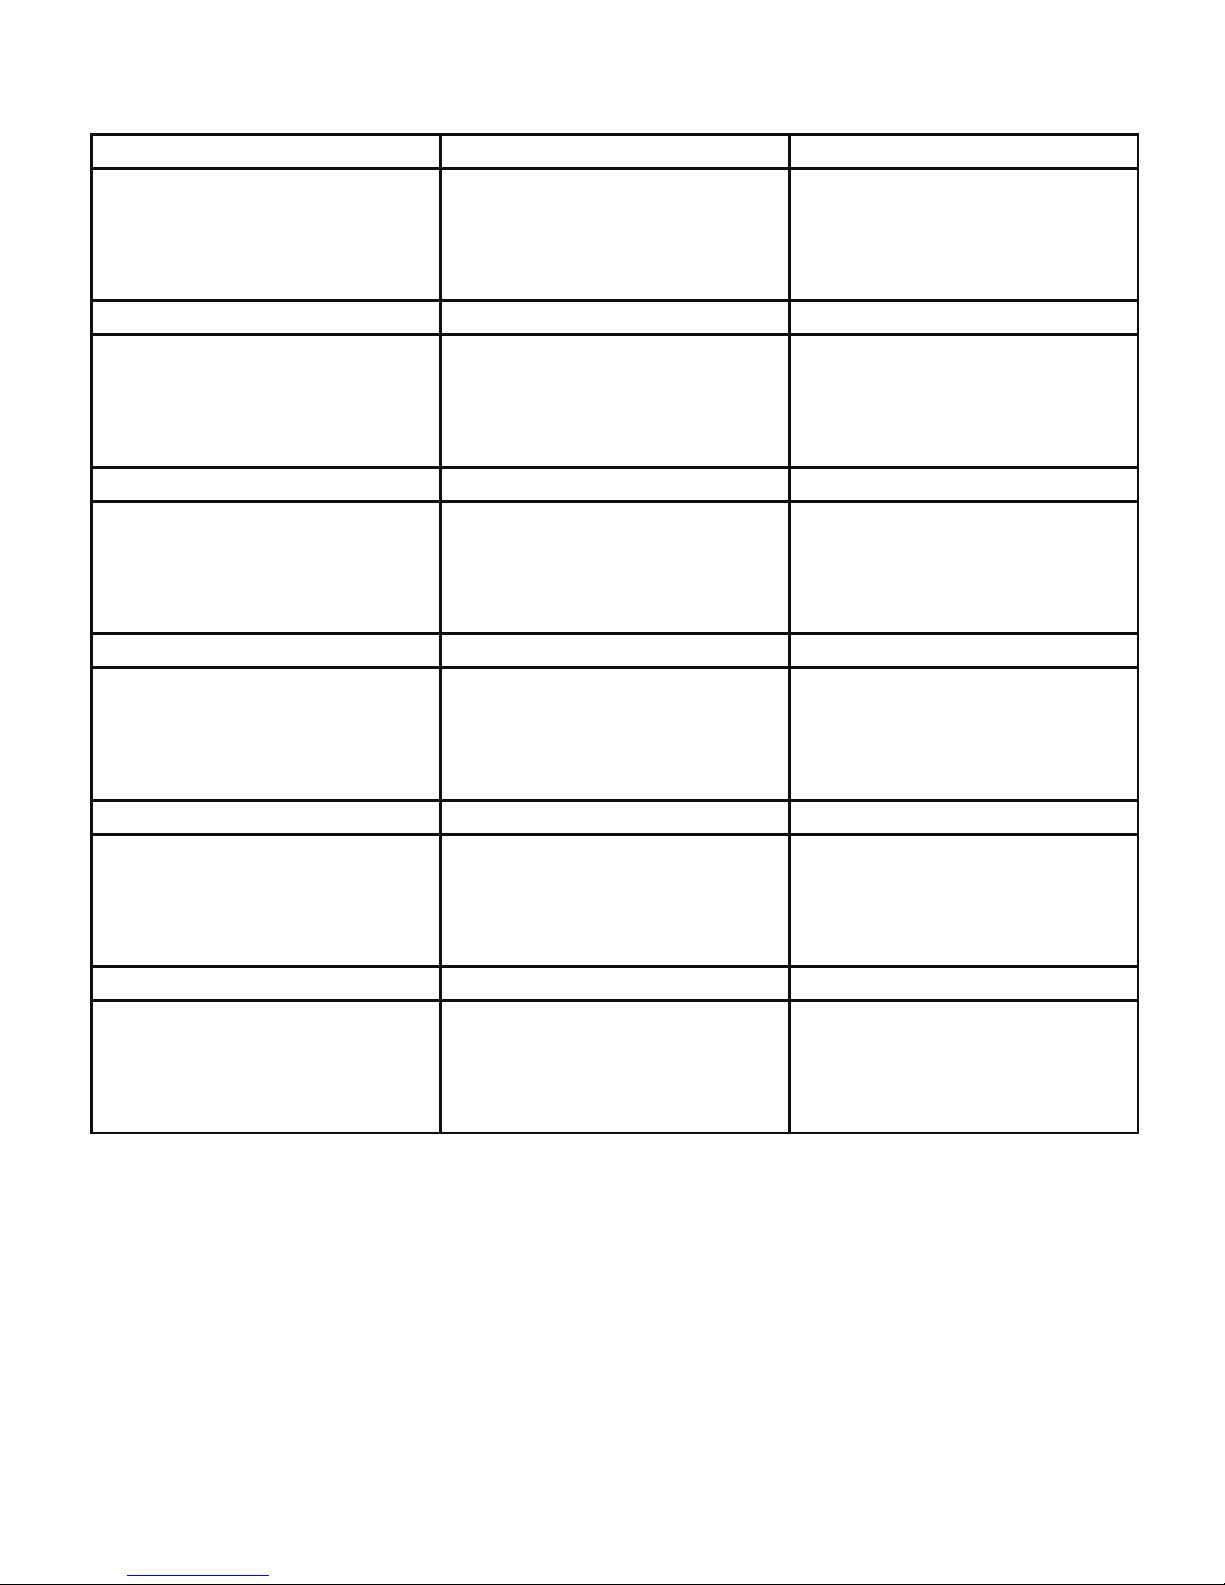
All parts are packed in one carton
Size: 361 x 105 x15 mm
Carton No: 1/1
Description:
Cross Rail for Stool
Qty: 1
Carton No: 1/1 Carton No: 1/1 Carton No: 1/1
16
Qty: 1 Qty: 1 Qty: 2
Size: 334.5 x 45 x 15 mm
Size: 400 x 295 x 40 mm
Size: 390 x 286 x 15 mm
131415
Description:
Drawer Base Support
Description: Cushion for Stool
Description:
Side Panels for Stool
Size: 350 x 105 x 15 mm Size: 736 x 105 x 15 mm Size: 743 x 343 x 3 mm
Carton No: 1/1
Carton No: 1/1
Carton No: 1/1
Description: Drawer RH Side
Description: Drawer Back
Description: Drawer Base
Qty: 1
Qty: 1
Qty: 1
Carton No: 1/1 Carton No: 1/1 Carton No: 1/1
10 11 12
Qty: 2 Qty: 1 Qty: 1
Size: 790 x 105 x 15 mm
Size: 784 x 170 x 15 mm
Size: 350 x 105 x 15 mm
789
Description: Cross Rail
Description: Drawer Front
Description: Drawer LH Side
Size: 570 x 520 x 18 mm Size: 790 x 195 x 15 mm
Carton No: 1/1
Carton No: 1/1
Description: Mirror
Description: Back Panel
Qty: 1
Description: Mirror supporting Rails
Qty: 2
Size: 480 x 78 x 15 mm
Carton No: 1/1
Qty: 1
Carton No: 1/1
4 5 6
Carton No: 1/1
2
3
Description: LH Side Panel
Description: RH Side Panel
Qty: 1 Qty: 1
Size: 750 x 390 x 15 mm
Size: 750 x 390 x 15 mm
Carton No: 1/1
1
Description: Top Panel
Qty: 1
Size: 790 x 373 x 15 mm
DRESSING TABLE _STOOL SET - ASSEMBLY INSTRUCTIONS
Page 5
8
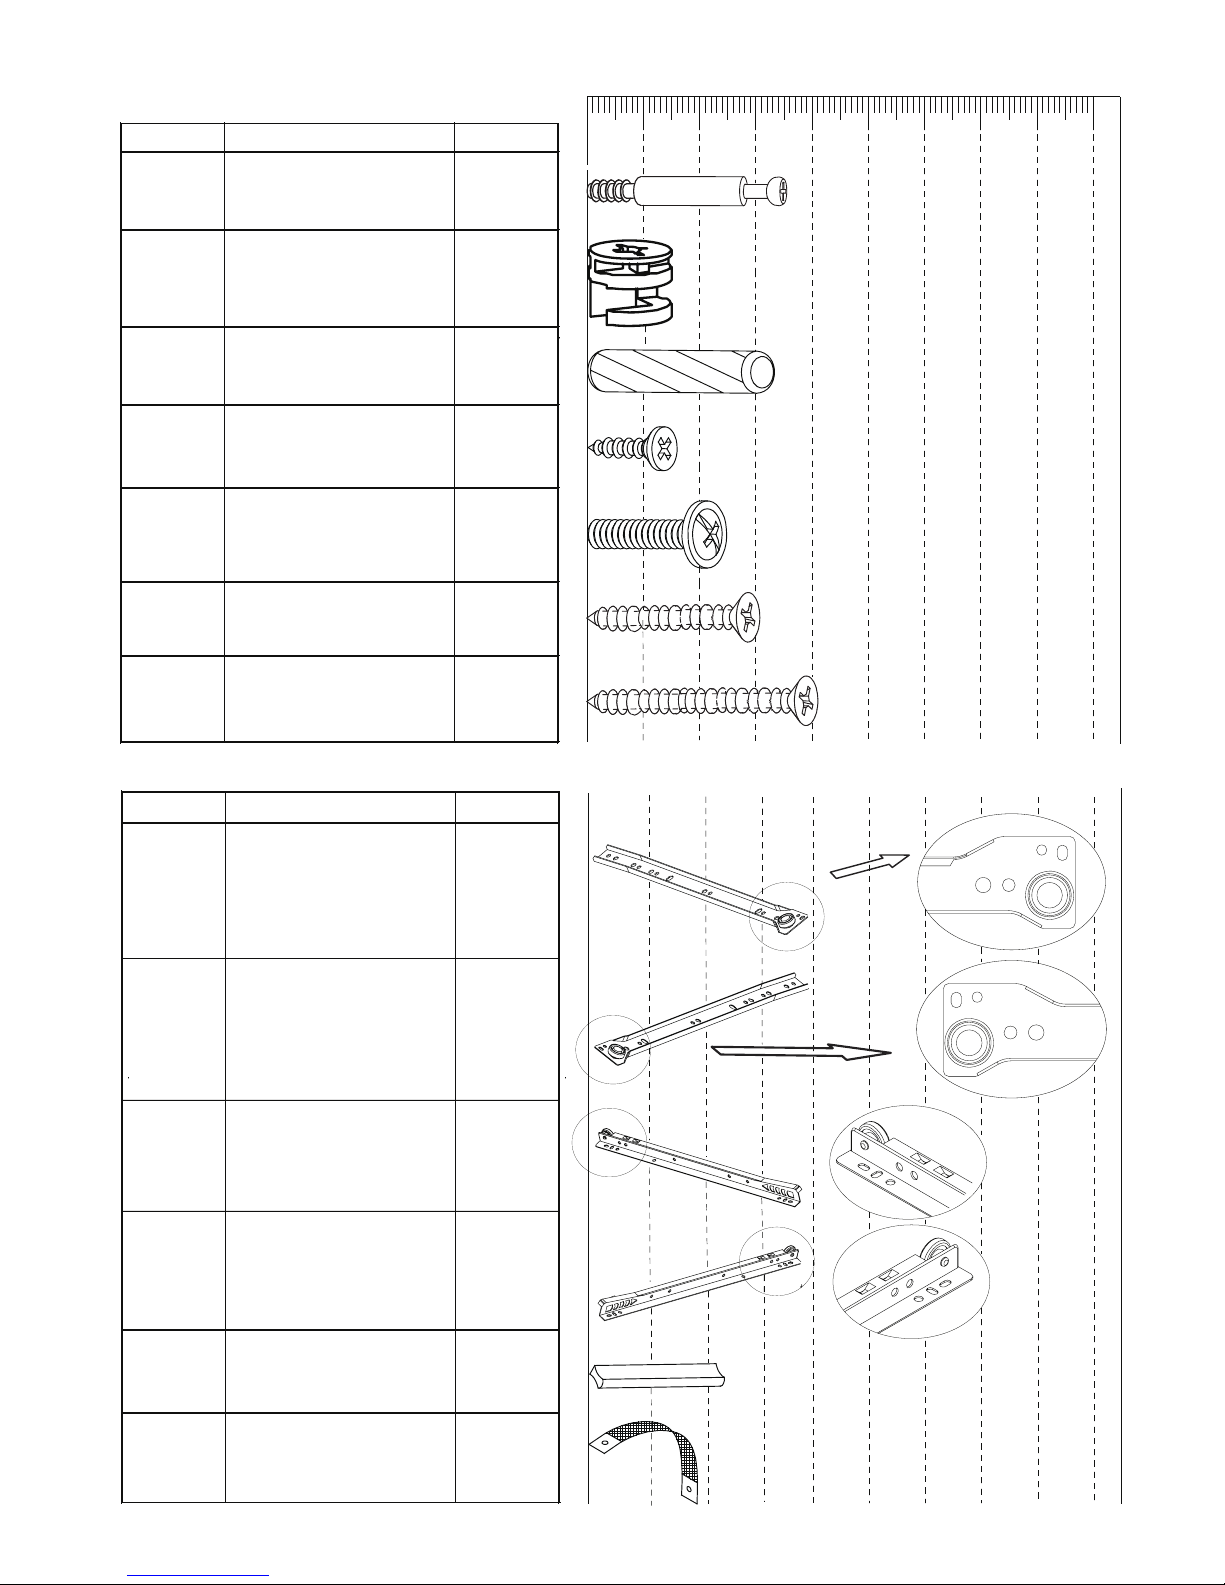
G
Screw for Fitting
Mirror (3.5x28mm)
4
H
Screw for Drawer Part
(3.5x40mm)
Screw for Fitting Runner
(3x12mm)
30A
30B
8C
E
9
2F
Item QuantityCode
Fittings (to scale)
Bolt for Fitting Handle
(M4x18mm)
Cam Lock
Dowel (8x30mm)
Cam Bolt
(35mm overall)
10 20 30 40 50 60 70 80
Page 5 of
12
Fittings (not to scale)
L
R
QuantityCode
1J
1K
L 1
1
1
M
N
Item
Outer Drawer
Runner - Right
Outer Drawer
Runner - Left
Inner Drawer
Runner - Right
Inner Drawer
Handle
Runner - Left
L
R
S 1
Anti-tilt Strap
and Anti-tilt Strap
DRESSING TABLE_STOOL SET - ASSEMBLY INSTRUCTIONS
Page 6
Page 6 of
12
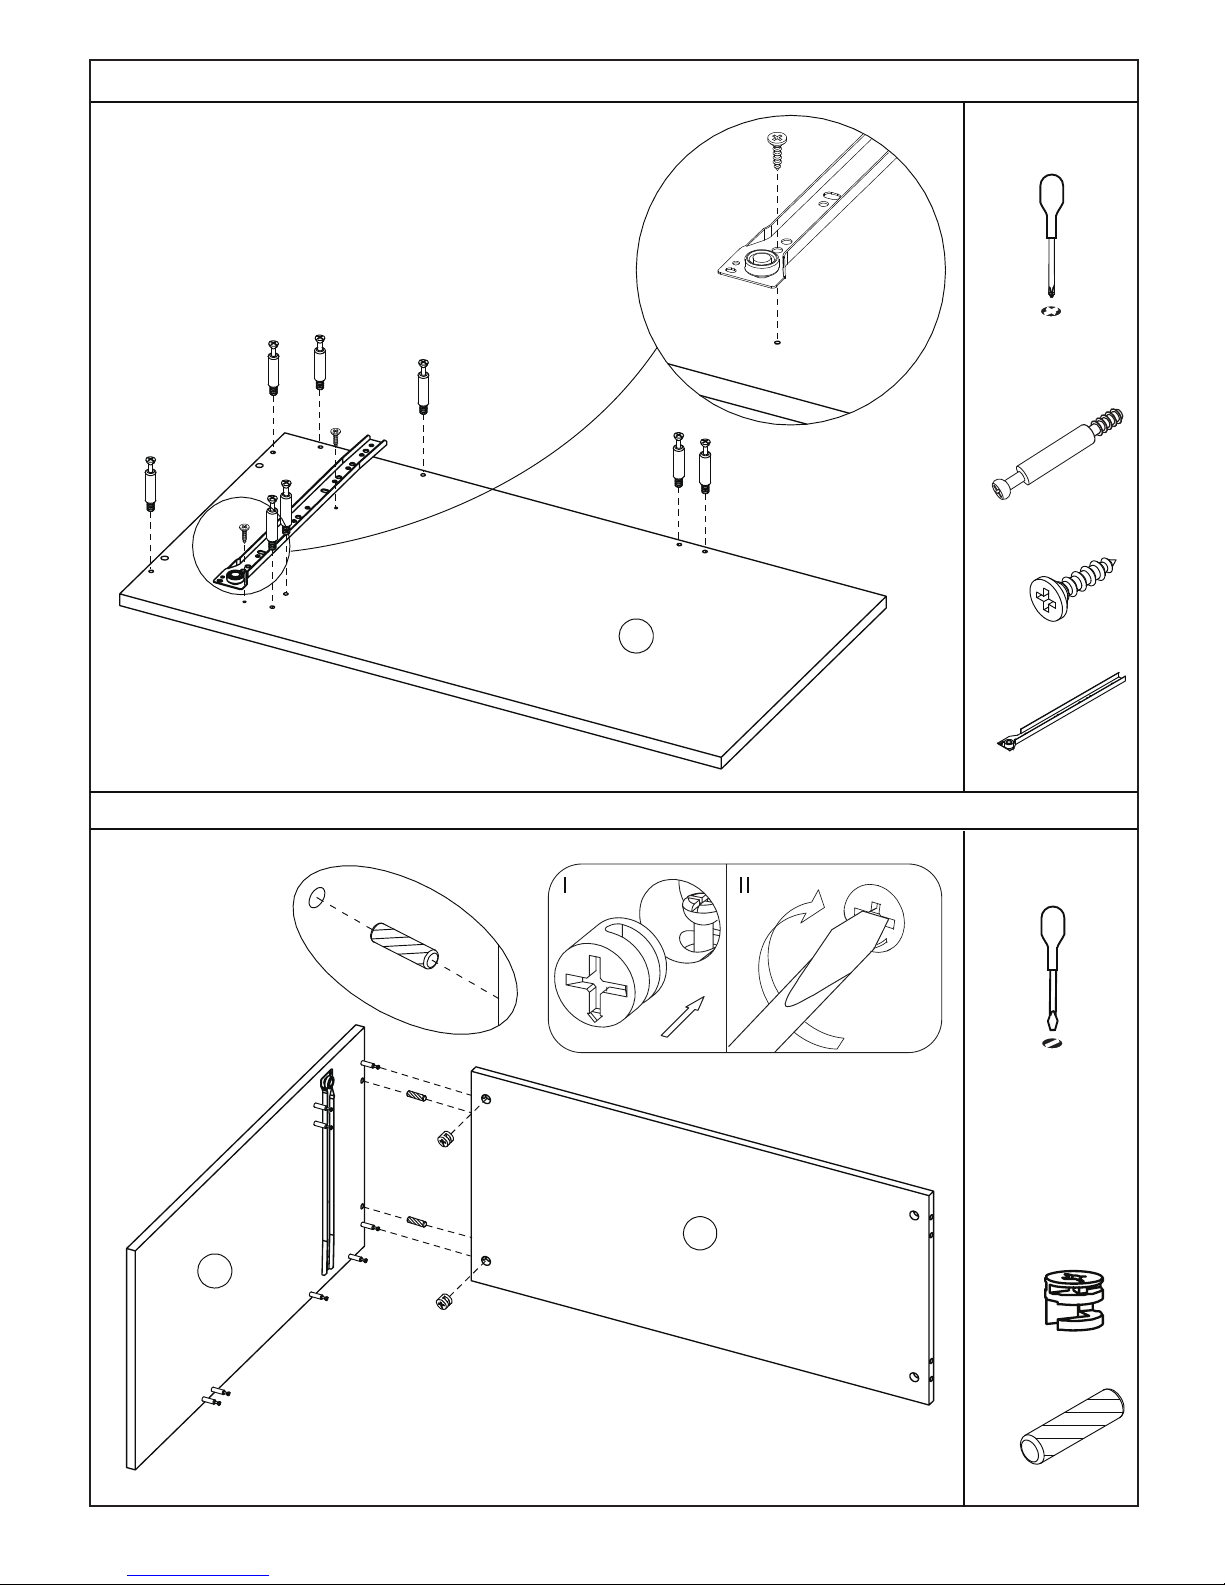
STEP 2
Fittings required
For this step:
Tools required
A x8
E x2
K x1
Fittings required
For this step:
Tools required
A
A
A
A
A
E
K
E
A
A
A
E
K
B x2
C x2
Tighten
B
B
C
C
B
C
1
2
2
DRESSING TABLE-STOOL SET - ASSEMBLY INSTRUCTIONS
STEP 1
Page 7
Page 7 of
12
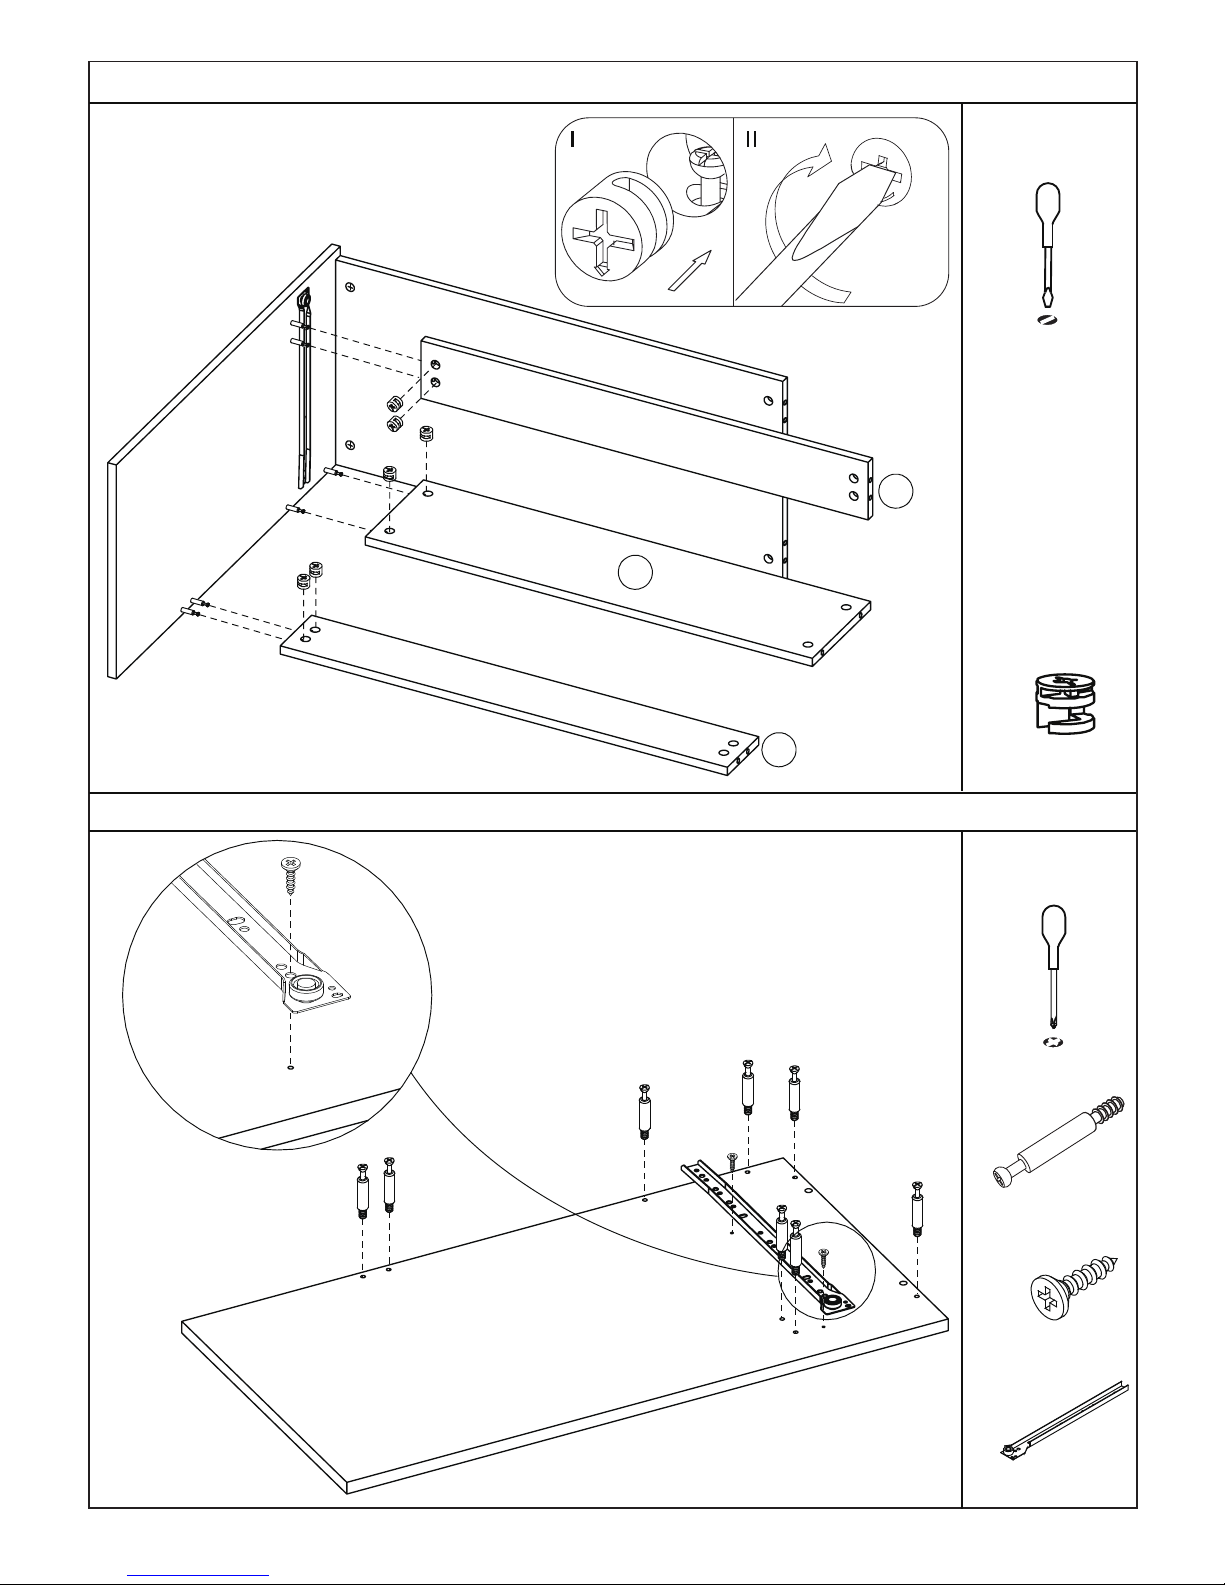
STEP 4
Fittings required
For this step:
Tools required
B x6
E x2
J x1
Fittings required
For this step:
Tools required
A
A
A
A
A
E
J
E
A
A
A
E
J
A x8
Tighten
B
B
B
B
B
6
7
7
DRESSING TABLE_STOOL SET - ASSEMBLY INSTRUCTIONS
STEP3
Page 8
Page 8 of
12
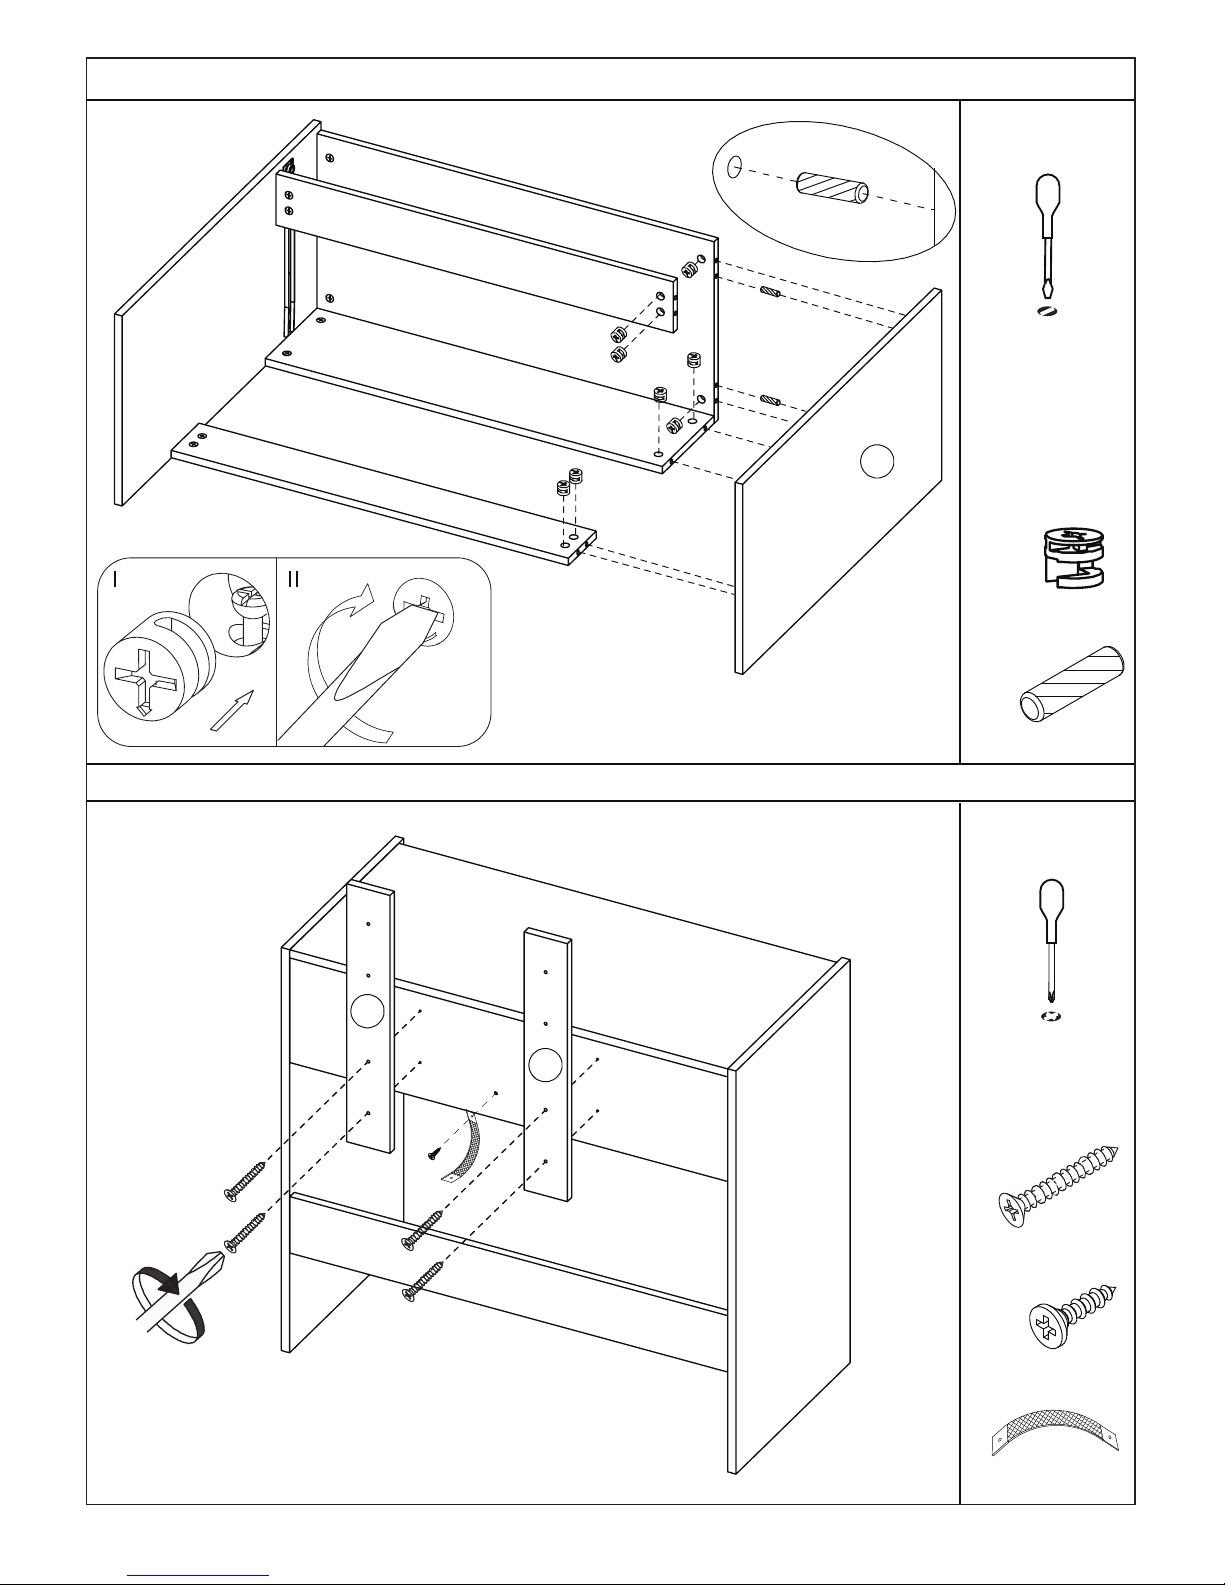
STEP 6
Fittings required
For this step:
Tools required
G x4
Fittings required
For this step:
Tools required
Tighten
B
B x8
C x2
B
B
B
B
G
G
G
G
B
B
C
C
C
3
5
5
E
S
E x1
S x1
DRESSING TABLE_STOOL SET - ASSEMBLY INSTRUCTIONS
STEP 5
Page 9
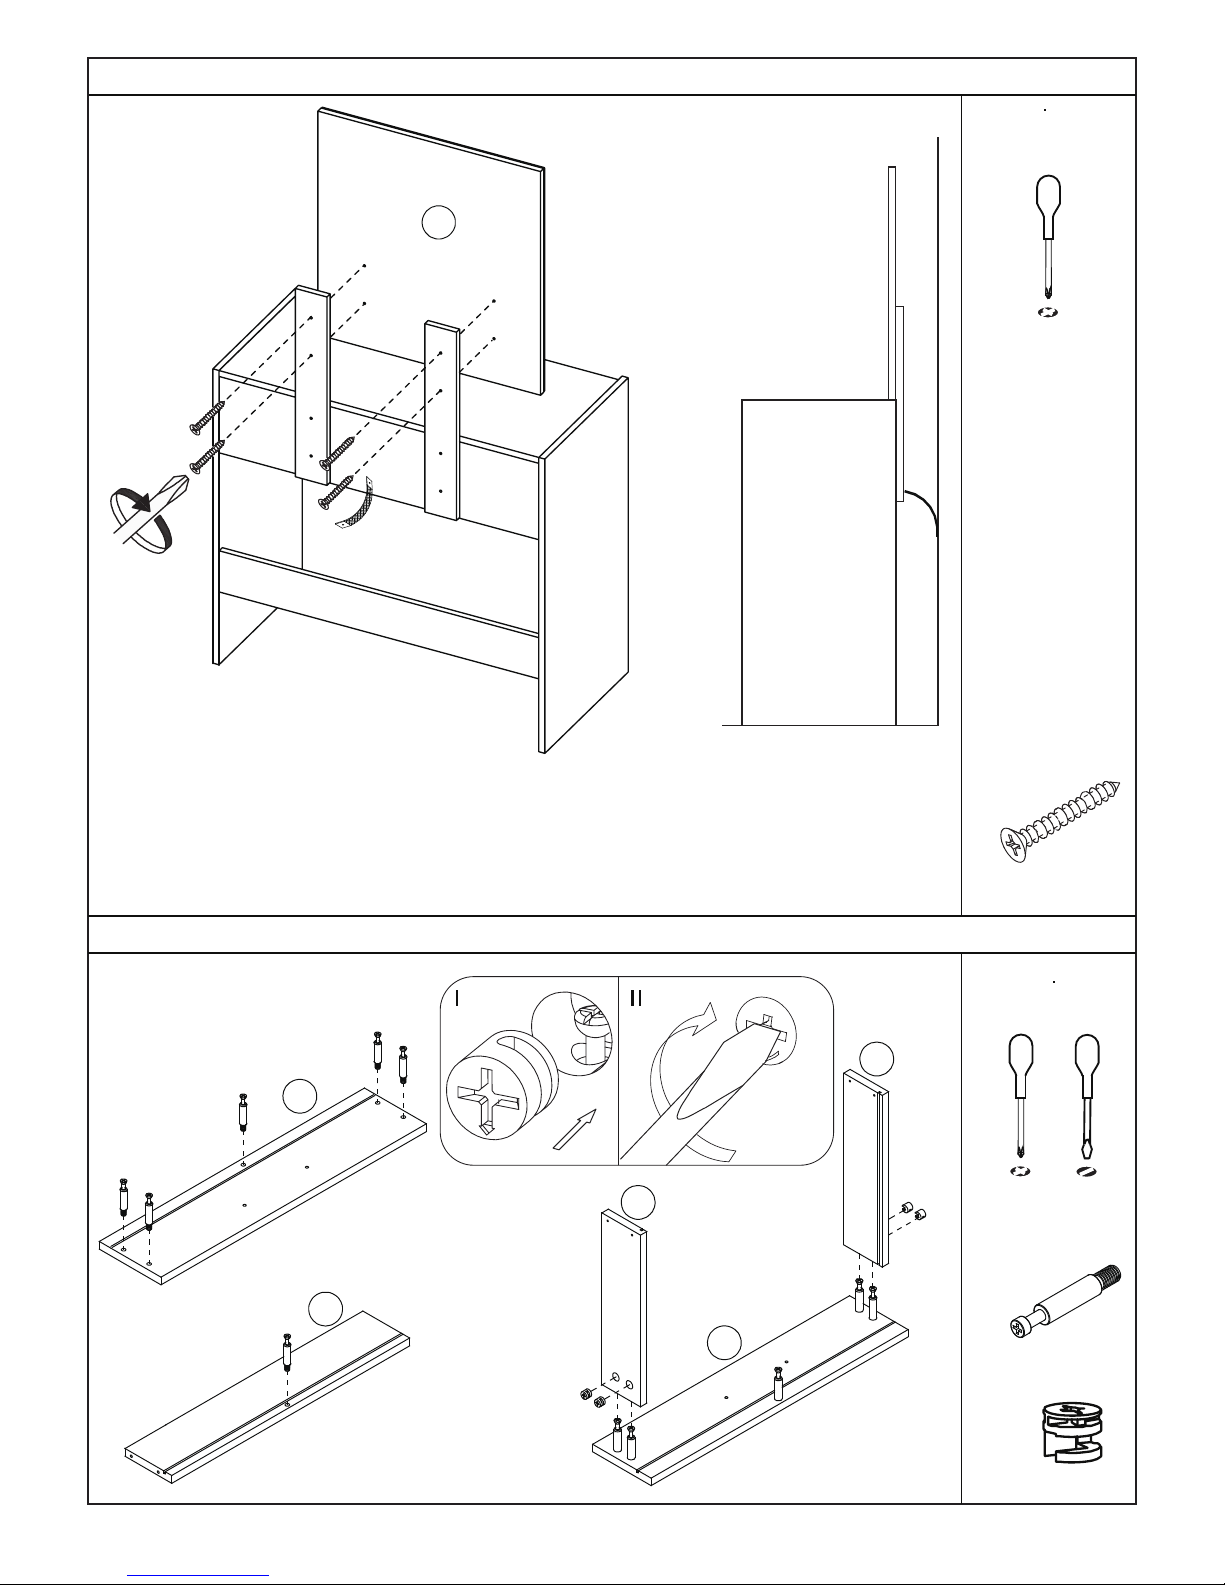
STEP 7
Fittings required
For this step:
Tools required
Fittings required
STEP 8
For this step:
Tools required
B x4
A x6
Page 9 of
12
Tighten
B
A
A
B
B
B
B
A
A
A
A
11
10
9
8
8
G
G
G
G
G x4
4
If standing the Dressing Table close to a wall, we recommend the use of the wall strap provided (S) to
avoid accidents and possible fatal injuries if the item falls or tips over.
If in doubt about fixing to the wall, for instance because your wall is a cavity construction rather than a
solid wall, please consult a qualified trades-person to gain help, to fix device securely.
Warning: Always ensure the area to be drilled is free from hidden electrical wires, water and
gas pipes.
DRESSING TABLE _STOOL SET - ASSEMBLY INSTRUCTIONS
Page 10
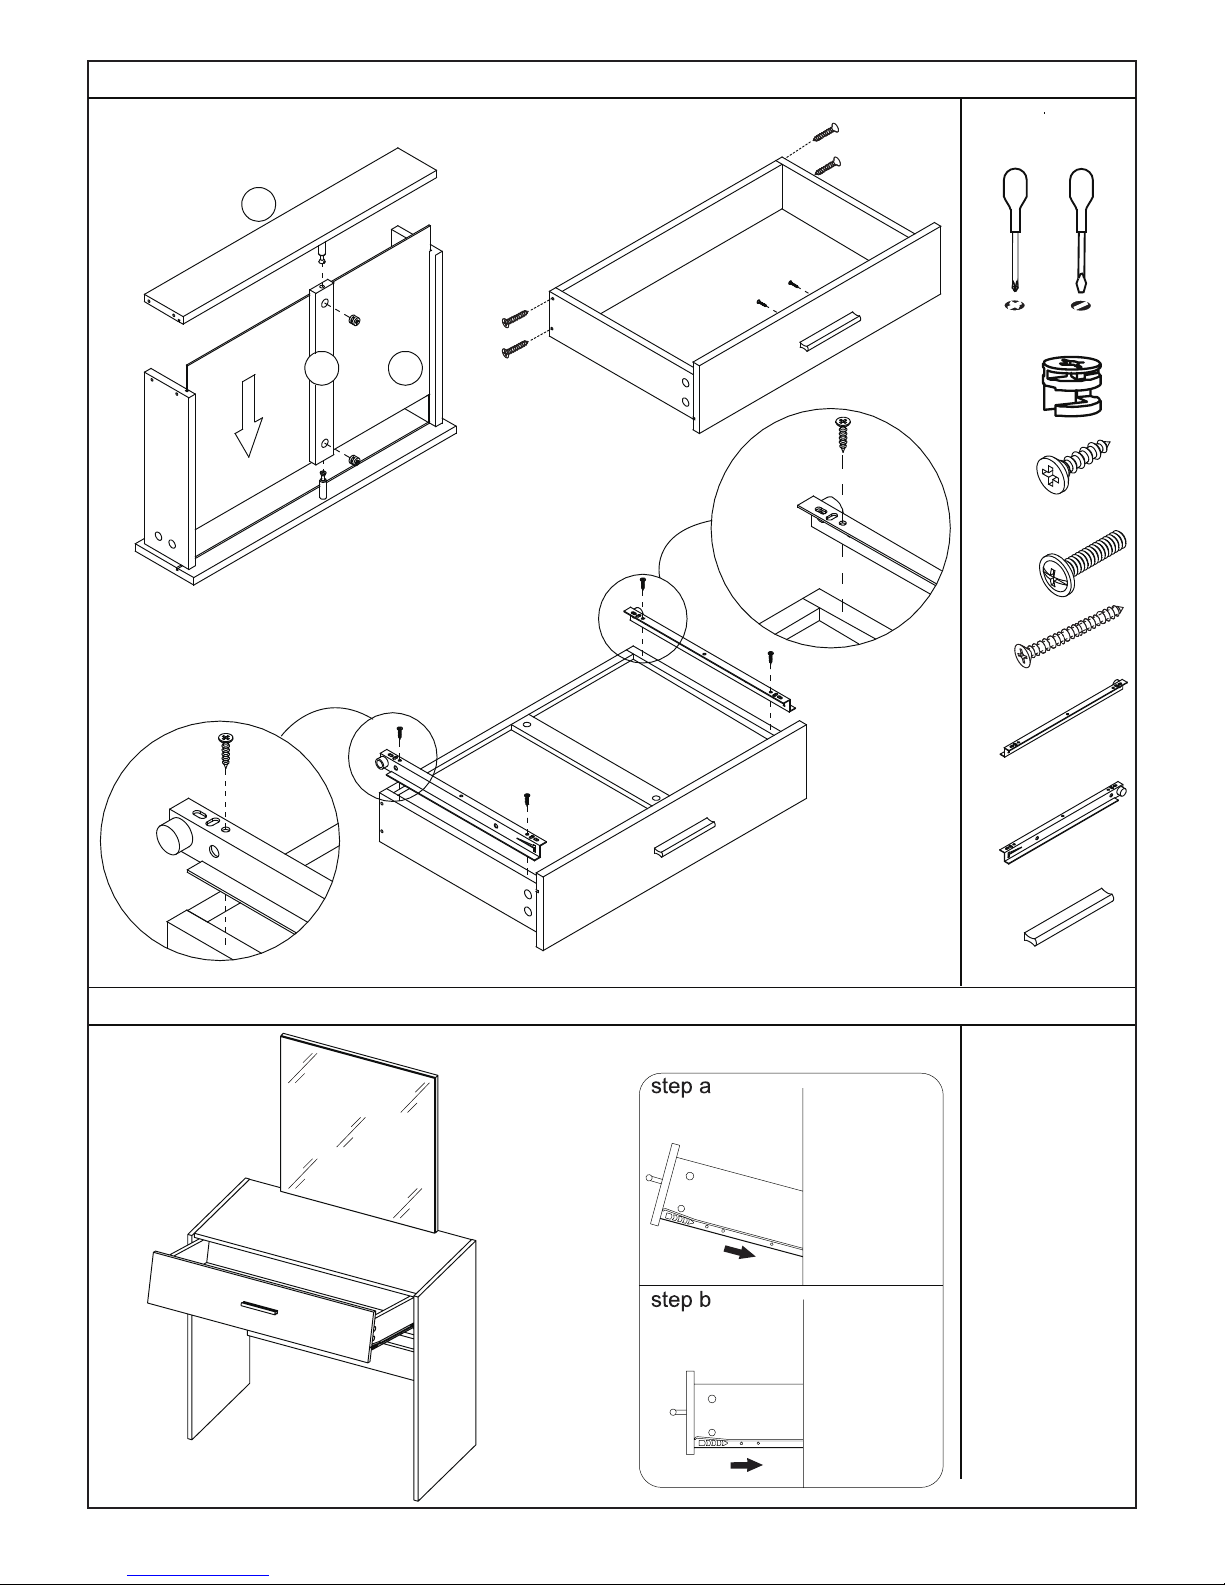
STEP 10
Page 10 of
12
STEP 9
For this step:
Tools required
Fittings required
L
E
F
E
E
E
M
L
E
N
F
B
B
11
12
13
E
M
E x4
F x2
L x1
N x1
M x1
B x2
H x4
H
H
H
H
DRESSING TABLE_STOOL SET - ASSEMBLY INSTRUCTIONS
Page 11
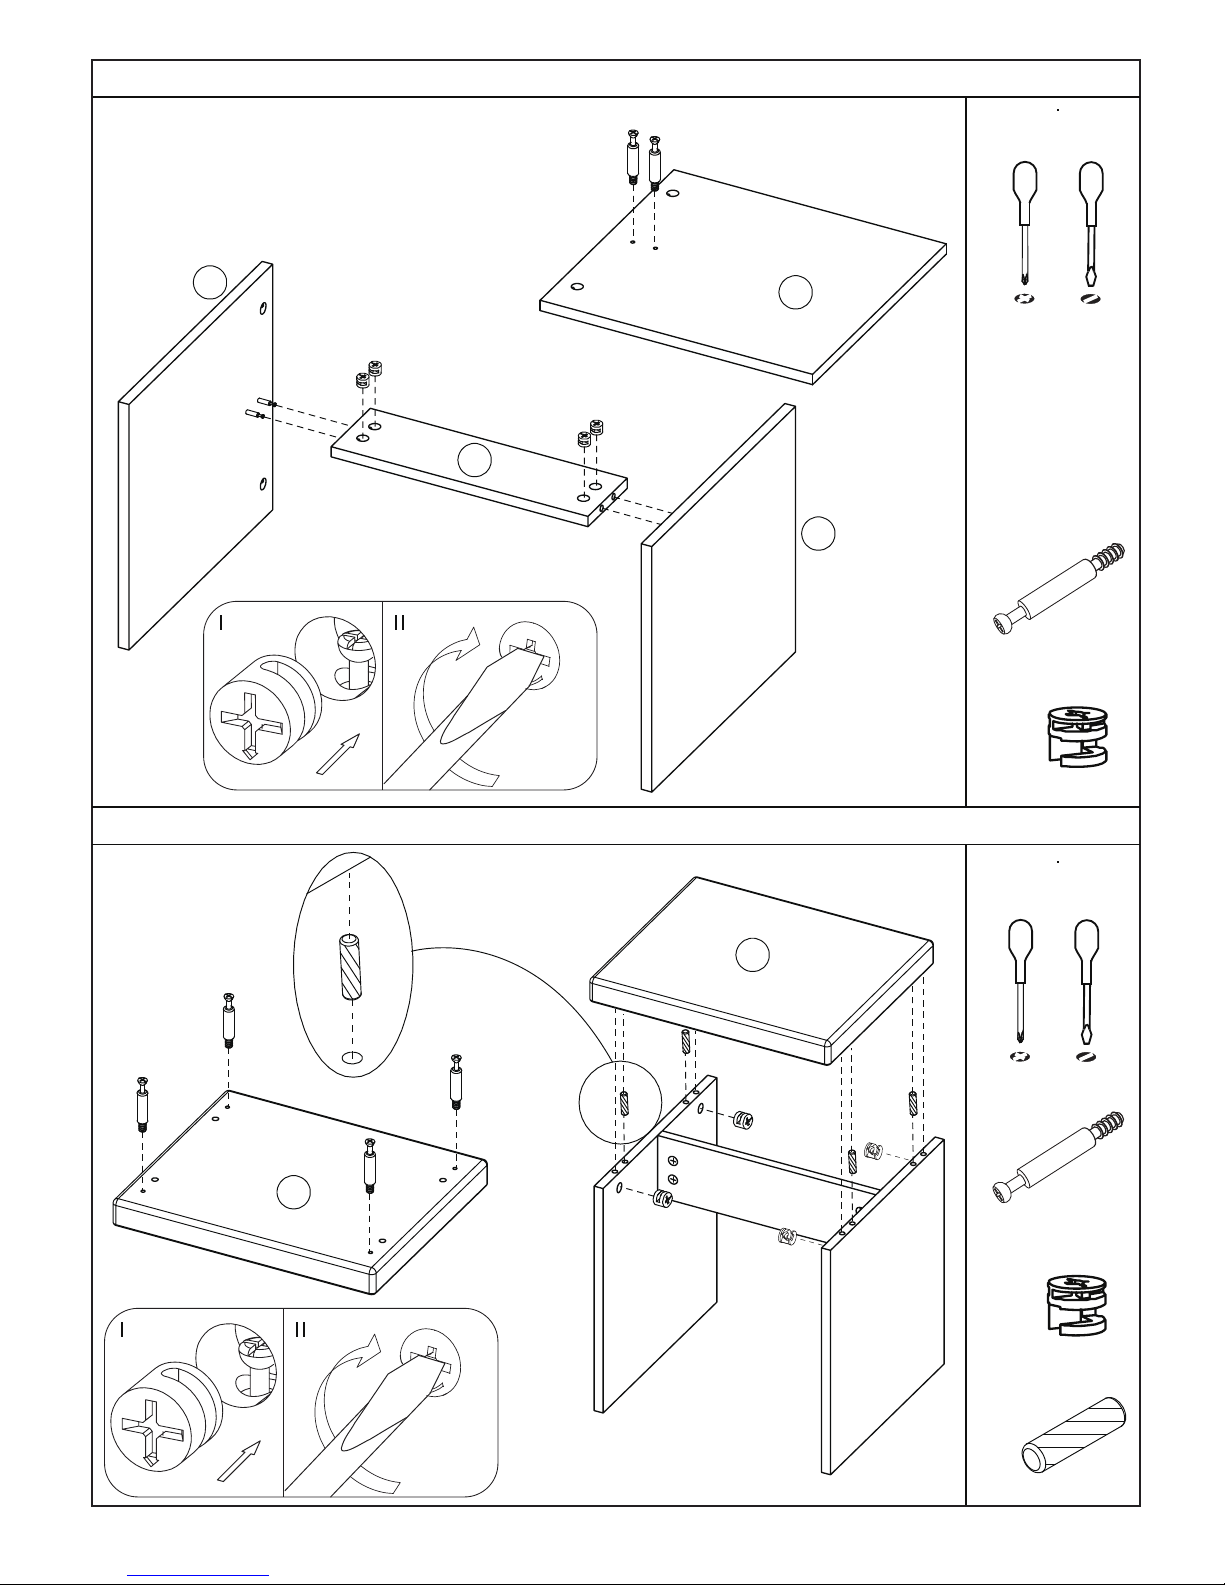
STEP 11
STEP 12
For this step:
Tools required
Page 11 of
12
Tighten
B
Tighten
B
C
C
C
C
C
A
A
B
B
A
A
A
A
Fittings required
For this step:
Tools required
B x4
A x4
Fittings required
B x4
A x4
C x4
B
B
B
B
14
14
15
15
15
x2
16
DRESSING TABLE _STOOL SET - ASSEMBLY INSTRUCTIONS
Page 12
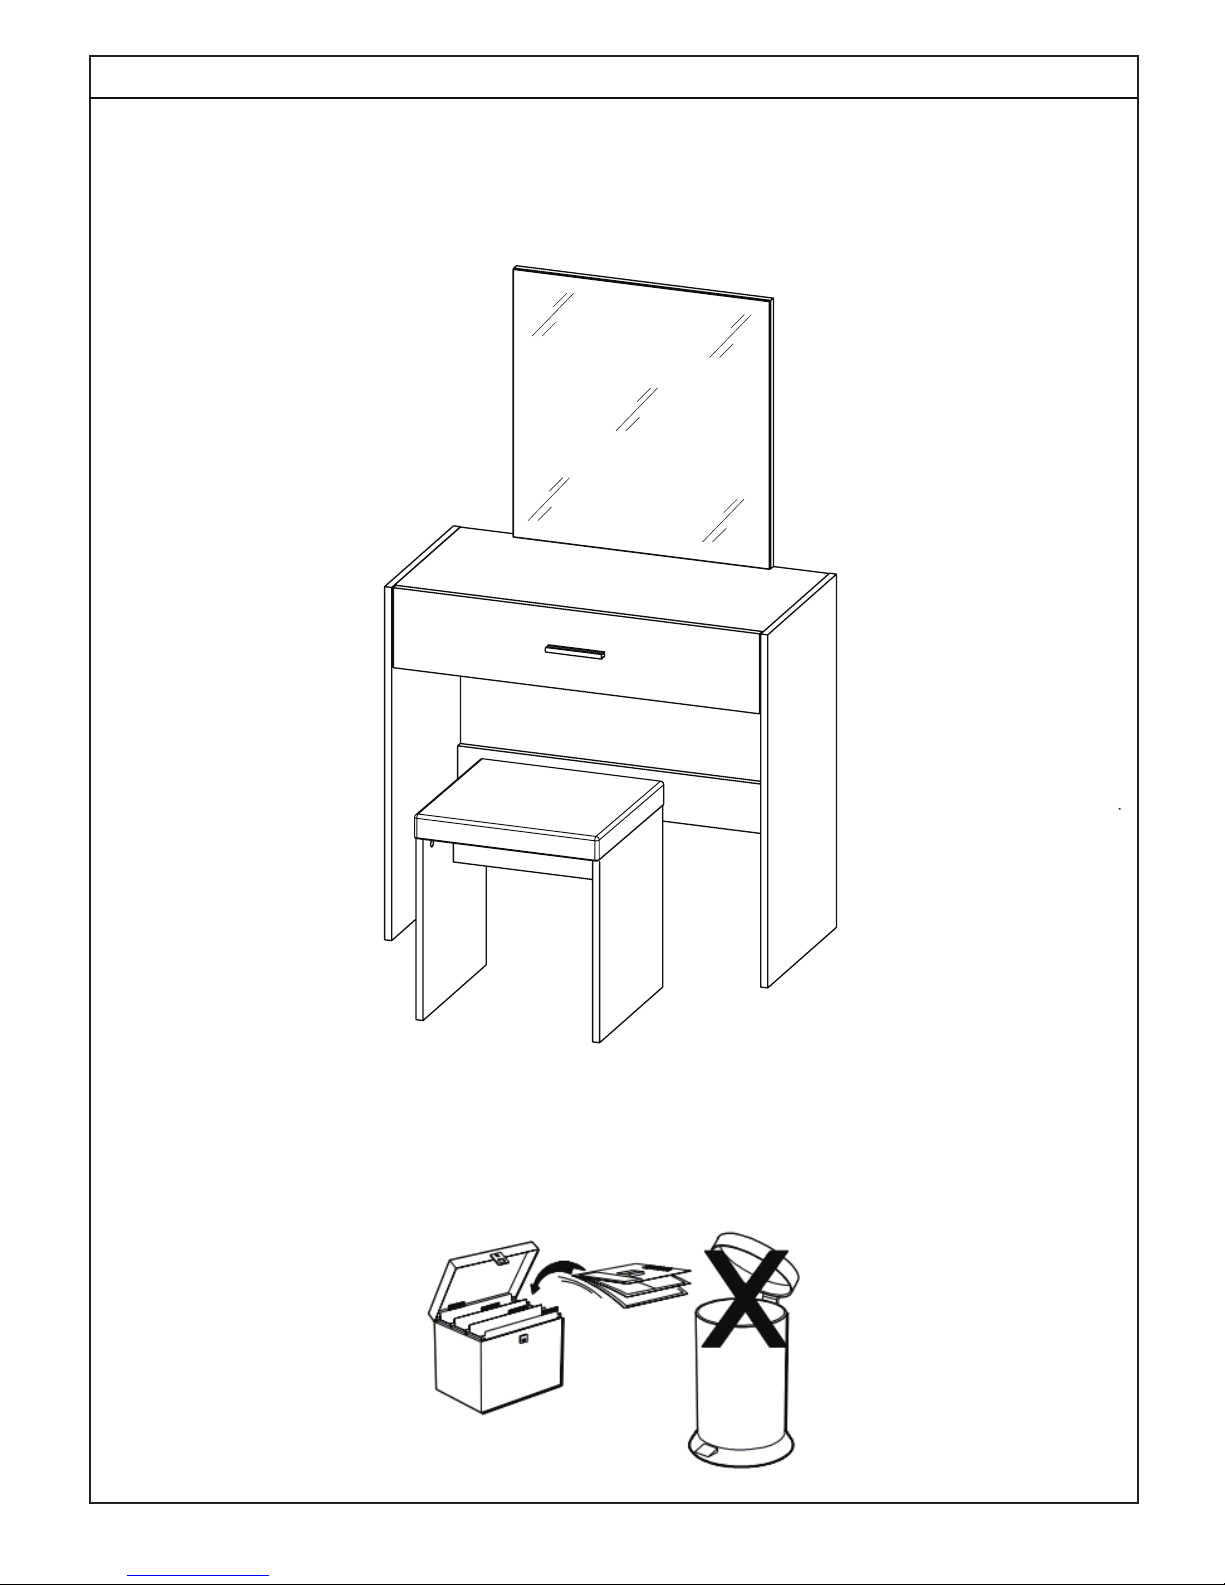
Your Ottawa Dressing Table/Stool is now comple tely assembled.
Periodically check to ensure that the components are in their proper position, free from damage.
Also, make sure the connectors are tight and secure.
Keep instructions for future reference
Page 12 of
12
DRESSING TABLE _STOOL SET - ASSEMBLY INSTRUCTIONS
Assembly Completed
 Loading...