

Page 1

CORSAI
R
18
0
MANUAL V1.1 12/05/13
Page 2

CORSAIR 180
MANUAL
2
IMPORTANT NOTICES 03
ASSEMBLING OF THE PARAMOTOR 05
HARNESS AND DISTANCE BARS 07
ASSEMBLING OF THE PROPELLER 10
ASSEMBLY INSPECTION 11
TECHNICAL DATA OF THE ENGINE 12
CARBURETOR – FUEL AND OIL 14
IGNITION AND ELECTRIC 15
JOYSTICK 17
PRE-FLIGHT CHECK 18
SPARE PARTS LIST 19
DIAGNOSING AND STARTING A FLOODED ENGINE 26
REGULAR CHECKS AND MAINTENANCE 28
TERMS OF GUARANTEE 29
WARRANTY ZERTIFICATE 30
Page 3

CORSAIR 180
MANUAL
3
IMPORTANT NOTICES
* * C O N G R A T U L A T I O N S * *
Thank you for choosing an excellent paramotor. Please take the time to read this
manual carefully, with this manual we will try to give advice on the maintenance and
operation that will help you have a reliable paramotor and to preserve your
investment.
Furthermore, we invite you to give this manual with the paramotor if you sell it, so it
can be useful for the next owner as well. The manufacturer and the resellers are
ready to answer your questions and, if necessary, to solve problems, because the
safety of yourself and the others is the most important thing for us. When you will
receive the motor, it will already have overcome a test of 1 hour in the factory,
verifying the operation of all the components and the operation to every speed. All
the paramotors are tested before the delivery. We reserve the right to change
specifications, components, details of the motor, in relationship to the model in
production without incurring in some obligation. The reliability, the performances and
the duration of your paramotor will also depend on your understanding of the correct
maintenance and operation of the engine. This manual describes the paramotor, its
installation, use and control.
This PPG is not covered by product liability insurance. Do not start it or fly it
unless you are willing to assume all risks inherent in the sport of Powered
Paragliding and all responsibility for any property damage, injury or death
which may result from the use of this product.
Page 4

CORSAIR 180
MANUAL
4
You must be aware that any engine can fail and breakdown at any moment,
this could lead a landing in less than ideal areas with the possibility of injury to
the pilot or other people. Any powered paramotor must only fly in permitted
areas, and never to fly low above a crowd of people. Inhabited zones, water,
and areas that are difficult to land should be avoided, always remember that
the engine could stop.
Some atmospheric conditions can cause the engine to perform differently than
normal. Before beginning every flight, you must test the paramotor on the
ground. Start the engine on a flat surface that is free from stones, sand or
small parts that could be sucked in by the propeller. Be sure any persons
nearby are well clear off the thrust from the propeller and not near the
propeller at any time the motor is running. A good safety distance is 50 meters
for all directions of projection of the propeller and 20 meters for the others
directions.
Do not use a paramotor that has not been correctly maintained or not been
used for some time, or if you know that is not in good condition. The use of
not original spare parts can make the paramotor dangerous and immediately
voids the warranty. Changes to the reduction or propellers can reduce safety
and reliability of the aircraft. Before every use or test, check the condition of
the propeller and the torque of bolts of the propeller. If the propeller is
damaged do not use it, this can lead to a breakup of the propeller in rotation
or to strong vibrations that will transmit to the motor and may cause damage
or loosen bolts or components.
Never use the motor without propeller or without reduction drive.
Page 5

CORSAIR 180
MANUAL
5
FRAME
The frame consists of:
- a.) central module
- b.) cage
- c.) 2x long supports
- d.) 4x middle supports
Top position: long supports
Middle position: middle supports
Bottom position: middle supports
Assemble the complete cage and
close all velcro straps
ASSEMBLING OF THE PARAMOTOR
Page 6

CORSAIR 180
MANUAL
6
Insert assembled cage first in top position
after that insert middle and bottom position.
Close bottom velcro straps on both sides.
Close netting with carabineer on both sides.
Page 7

CORSAIR 180
MANUAL
7
Harness has to be connected with the special
buckles.
Connect harness with both buckles to the frame.
ASSEMBLING OF THE HARNESS AND THE DISTANCE BARS
Page 8

CORSAIR 180
MANUAL
8
Fix the distance bars with the nut.
Distance bars are moveable vertically and
horizontally.
Fix the shoulder strap correctly to the harness.
Page 9
CORSAIR 180
MANUAL
9
ADJUSTING OF THE HARNESS
The best way to familiarize yourself with the harness and your personal flying
position is to use a simulator.
Sit in the harness and adjust the shoulder straps correctly. The weight should be
constantly shared on the shoulders. Find your seat position and adjust the straps
accordingly to sit relaxed.
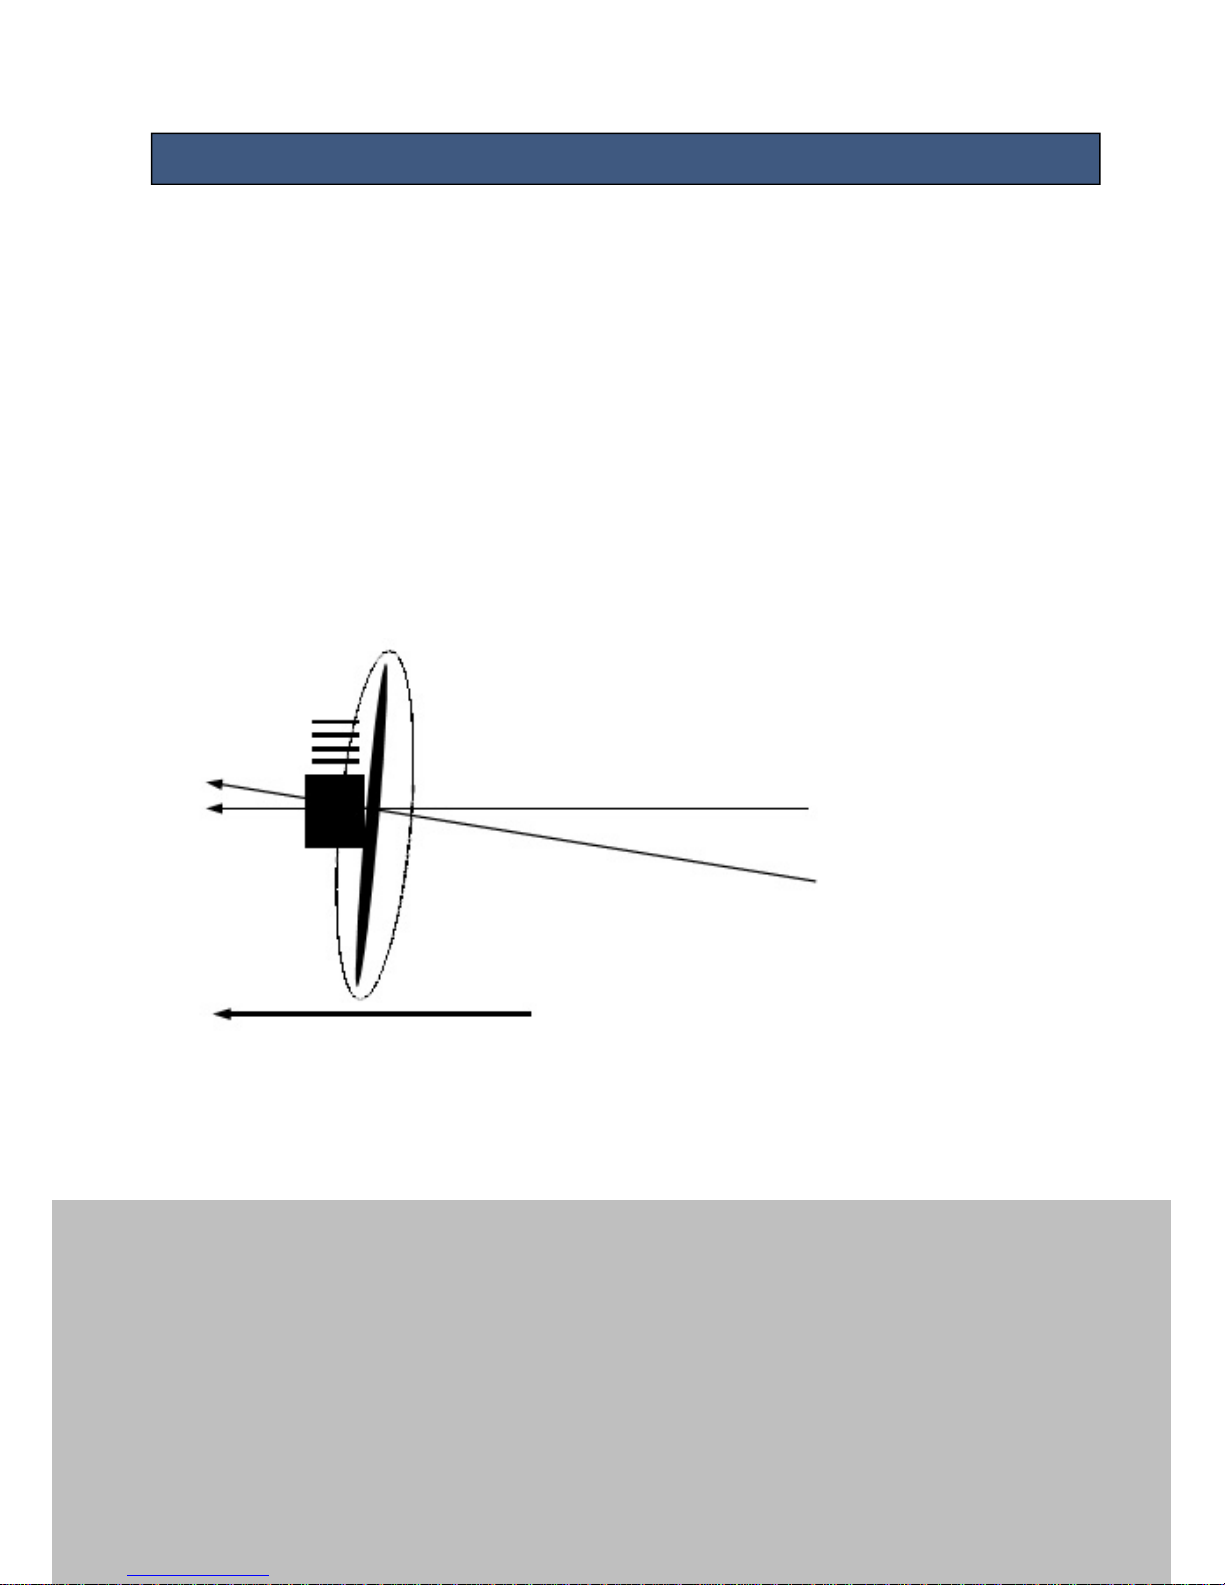
The shoulder straps are adjusted depending on pilot weight. The flight position is
optimal when the propeller shaft line is 5 ° to a maximum of 10 ° below the horizontal
line.
horizontal line
propeller shaft line
Page 10

CORSAIR 180
MANUAL
10
On the CORSAIR 180 paramotor is mounted a HELIX carbon propeller
Mount the propeller with the six M8 screw with a torque of 10Nm.
Please use only original propellers otherwise you lose your warranty.
ASSEMBLING OF THE PROPELLER
Page 11

CORSAIR 180
MANUAL
11
It is very important to fully inspect the assembly of your paramotor to find and
remedy any potential problem areas before proceeding.
The inspection should contain, at a minimum, the following items:
Review each assembly step above
Examine all nuts, bolts, and fasteners for security
Check the harness for correct mounting, that all straps are secure, that
there are no twists on any straps
Examine prop cage for correct assembly, that it is strong, the netting is
tight and on the correct side
Check that nothing can get in the prop. The prop should clear the cage
by same distance at all points.
Check the fuel tank and fuel delivery system.
Check for correct mounting of prop, and correct torque of prop bolts.
ASSEMBLY INSPECTION
Page 12
CORSAIR 180
MANUAL
12
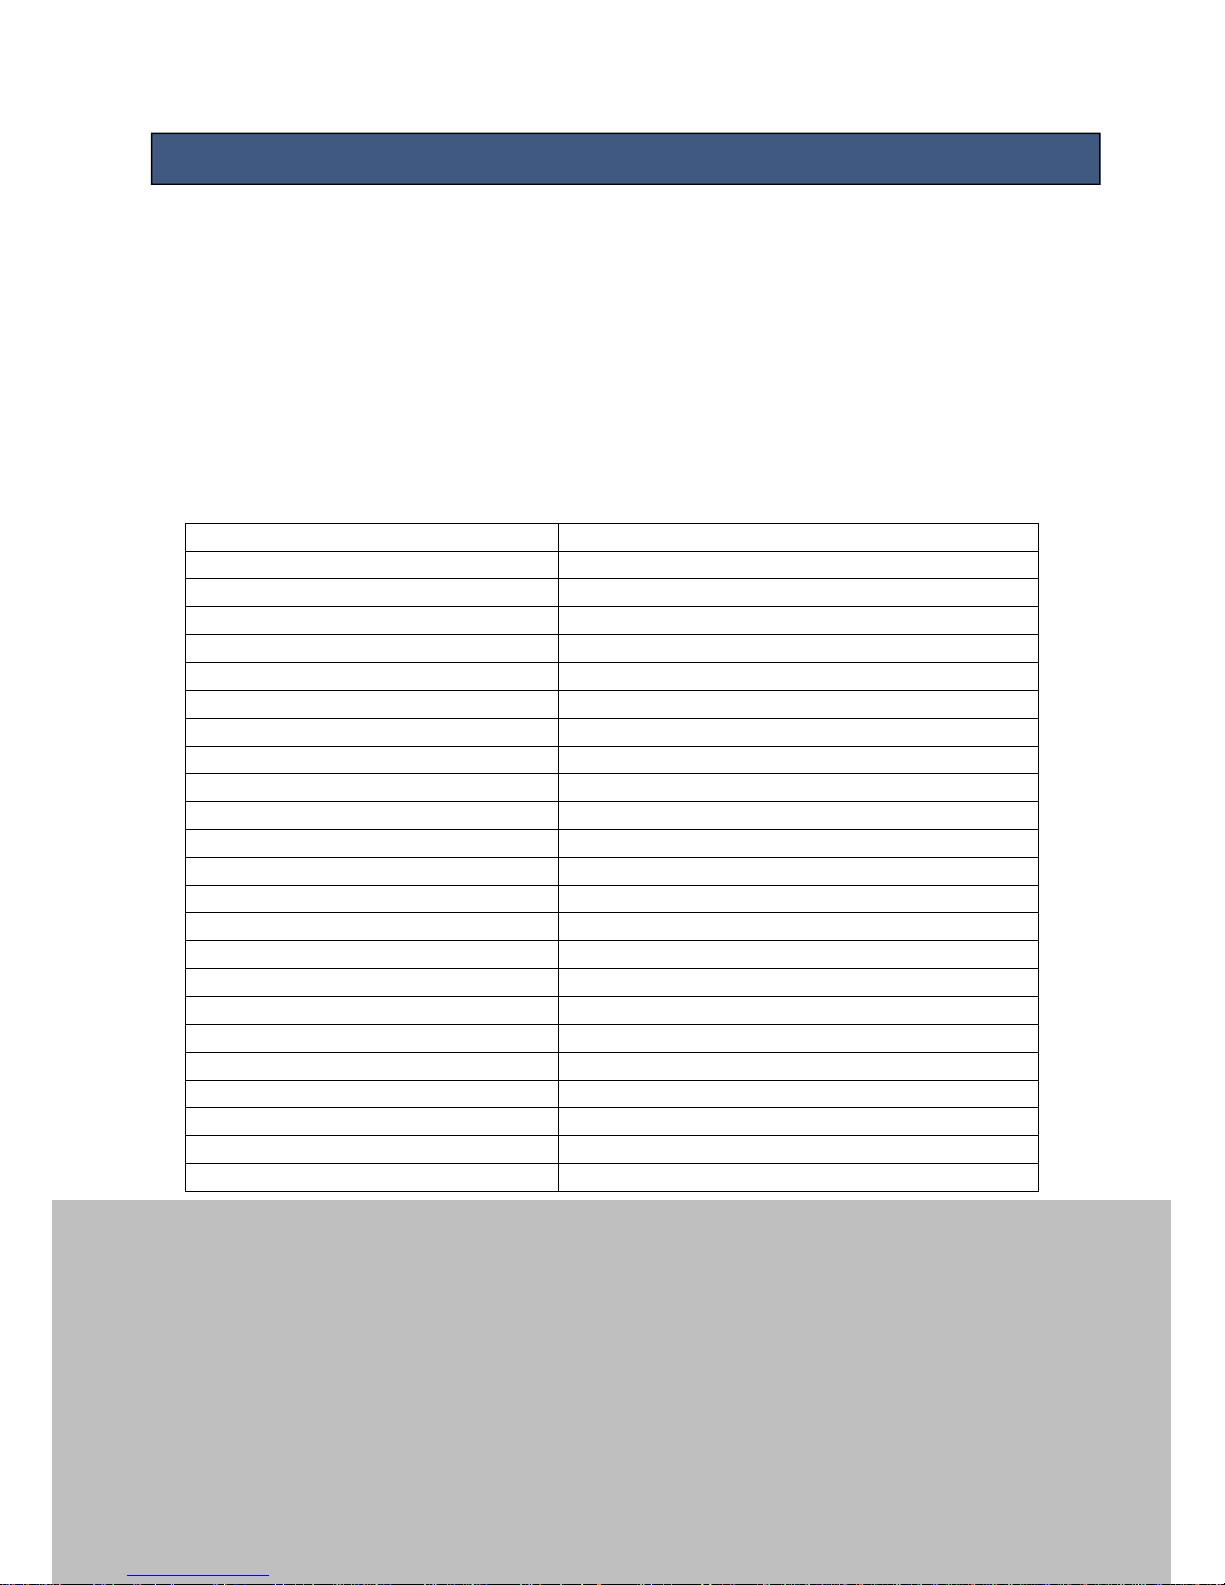
TECHNICAL DATA OF THE ENGINE
Engine 1 Cylinder 2-Stroke Engine
Cooling By Air
Bore 65 mm
Swept Volume 172.5 cm³
Power 25 PS bei 7900 U/Min
Thrust 70 kg
Cylinder Aluminium with Nikasil Coating
Compression 11 : 1
Piston HQ graphite , 2 rings chromed
Carburetor Walbro
Air-Filter Air box
Ignition Induktiv IDI
Spark Plug NGK BR9ES
Spark Plug Cap 5k Ω
Reduction Poly V-Belt
Reduction Ratio 1:2.88
Propeller Helix H30F 1,25m L-M-09-2
Starter Manual Starter
Exhaust Stainless steel with silencer
Consumption 3.0-3.5 L/hour at 30 kg Thrust
Weight Engine 16 kg
Propeller Direction Counter Clockwise
Tank 12 L
Total Weight of Paramotor 28.7 kg
Page 13
CORSAIR 180
MANUAL
13
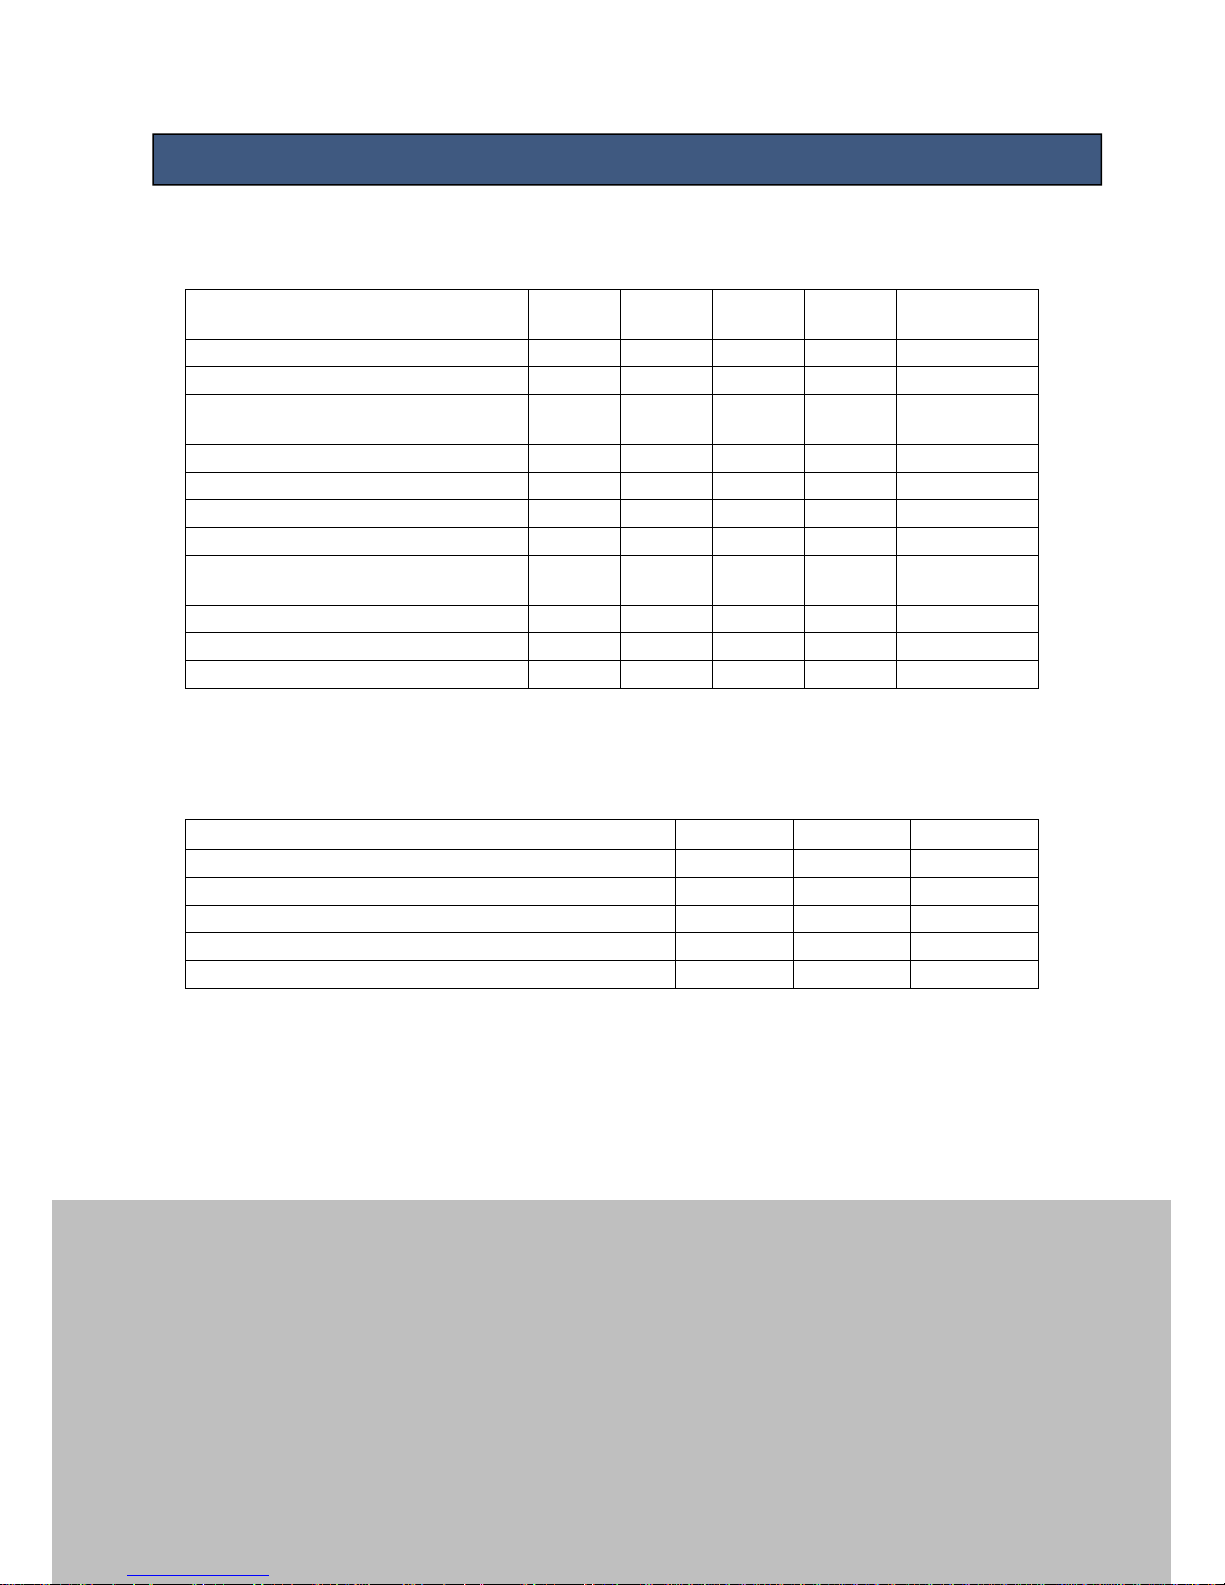
TIGHTENING TOURQUE
TIGHTENING TOURQUE VALUE
FOR ENGINE BOLTS AND SREWS
M N.m Kgf.m Lbf.ft
Locking
compound
HEAD NUTS 7 14 1,4 10,36
CRANKSHAFT NUT – CLUTCH SIDE 12 60 6 44,4
CRANKSHAFT NUT – IGNITION
SIDE
10 40 4 29,6
PROPELLER CENTRAL SCREW 10 40 4 29,6 Loctite 243
SPARK PLUS 20 2 14,8
CRANKCASE SCREWS 6 8 0,8 5,92
CARBURETOR LOCKING SCREWS 6 8 0,8 5,92
INTAKE MANIFOLD LOCKING
SCREWS
6 8 0,8 5,92
MUFFLER STUDS NUTS 6 10 1 7,4 Loctite 270
SILENCER LOCKING SCREWS 8 15 1,5 11,1 Loctite 243
MUFFLER LOCKING SCREWS 8 15 1,5 11,1 Loctite 243
STANDARD TIGHTENING TORQUE VALUES N.m Kgf.m Lbf.ft
5 mm Bolts and nuts 6 0,6 4,44
6 mm Bolts and nuts 10 1 7,40
8 mm Bolts and nuts 25 2,5 18,50
10 mm Bolts and nuts 45 4,5 33,30
12 mm Bolts and nuts 55 5,5 40,70
Page 14
CORSAIR 180
MANUAL
14
CARBURETOR – FUEL AND OIL
IMPORTANT INFORMATION
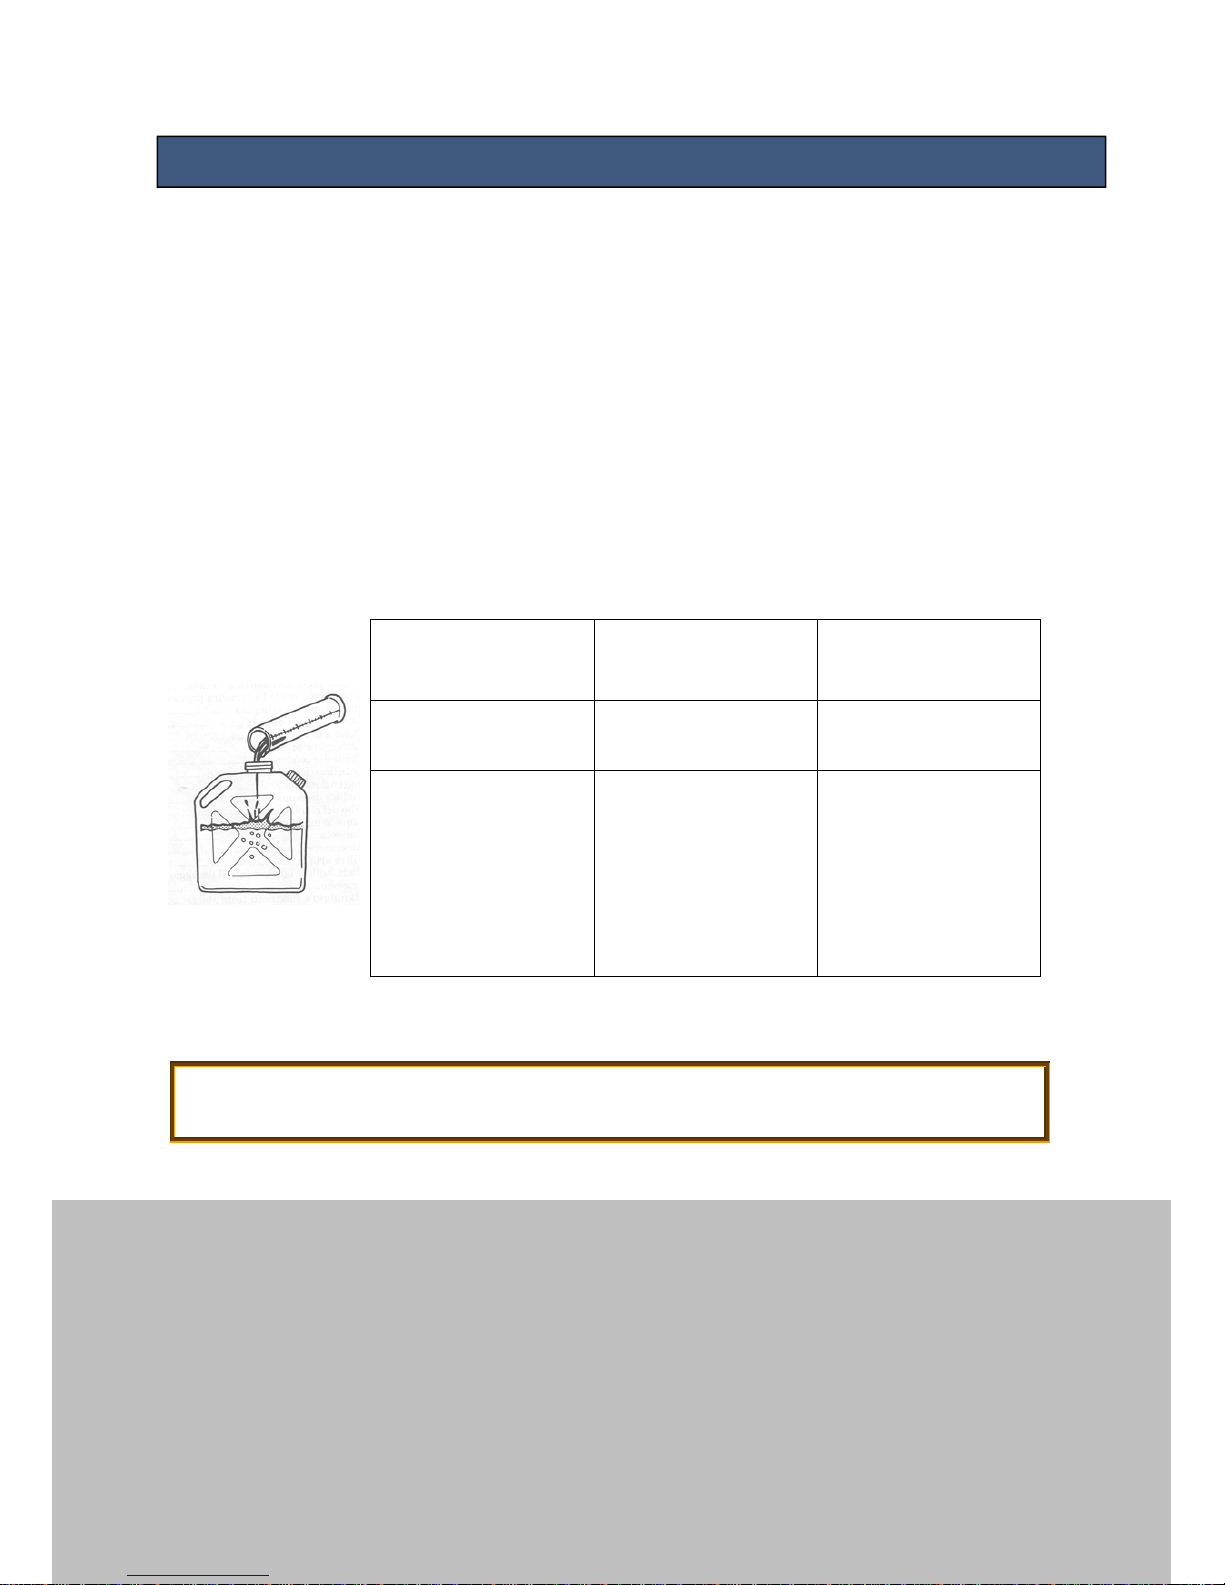
We recommend using super gasoline and full synthetic oil (Castrol TTS) at 2%.
Mix fresh fuel and oil before each flying session. Store your fuel/oil mixture in
an approved, sealed container. Dispose of fuel/oil mixture that is older than 1
month.
During running in we recommend using 2.5% oil mixture and use only full
power during starting.
Mixture table:
The fuel oil mixture should not be older than 1 month!
fuel 95/98 octan
full synthetic oil
Castrol TTS
full synthetic oil
Castrol TTS
LITER
1:40 (2.5%)during
running in time
ml
1:50 (2%)
normal use
ml
0,5
1
2
3
4
5
10
13 ml
25 ml
50 ml
75 ml
100 ml
125 ml
250 ml
10 ml
20 ml
40 ml
60 ml
80 ml
100 ml
200 ml
Page 15

CORSAIR 180
MANUAL
15
IGNITION AND ELECTRIC
Spark Plug: NGK BR9ES
Page 16

CORSAIR 180
MANUAL
16
Page 17

CORSAIR 180
MANUAL
17
JOYSTICK
We supply with this paramotor a special build joystick which is a novum in the
paramotor market.
Since it’s important to know how to stop the engine once it’s started, let’s cover
“Stopping the Engine” first. To stop the engine, simply depress the “STOP” button
and hold it until the engine comes to a complete stop.
Page 18
CORSAIR 180
MANUAL
18
PRE-FLIGHT CHECK
THE FOLLOWING POINTS SHOULD BE CARRIED OUT BEFORE EACH START!
01 VISUAL INSPECTION OF CAGE AND FRAME FOR FRACTURES
02 PROPELLER HUB WITHOUT CLEARANCE?
03 REDUCTION GEAR LEAK-PROOF ?
04 EXAMINATION OF EXHAUST AND MOTOR RUBBER ELEMENTS!
05 PETROL FILTER UNPOLLUTED?
06 MOTOR, CARBURETOR AND TANK ARE LEAK-PROOF?
07
SUFFICIENT SUPPLY OF FUEL AND OIL IN FUEL (DON’T USE
MIXTURE OLDER THAN 1 MONTH) ?
08 PILOT SUSPENSION UNDAMAGED ?
09 CANOPY UNDAMAGED ?
10 GAS LEVER POSITION – CHECK THE FREE MOVEMENT!
11 VENTILATED TANK LID ON TANK?
12
PROPELLER CLEAR – START PARMOTOR – NO PERSONS NEAR
BY STARTING THE PARAMOTOR
13 CARRY OUT A TEST AT FULL THROTTL E AFTER WARMING UP!
14 TEST THE SWITCH-OFF FUNCTION!
15 PILOT PROPERLY HOOKED IN?
16 WIND DIRECTION AND WIND FORCE?
17 TAKE OFF AREA CLEAR ?
18 TEST FOR LEAKS?
Page 19
CORSAIR 180
MANUAL
19
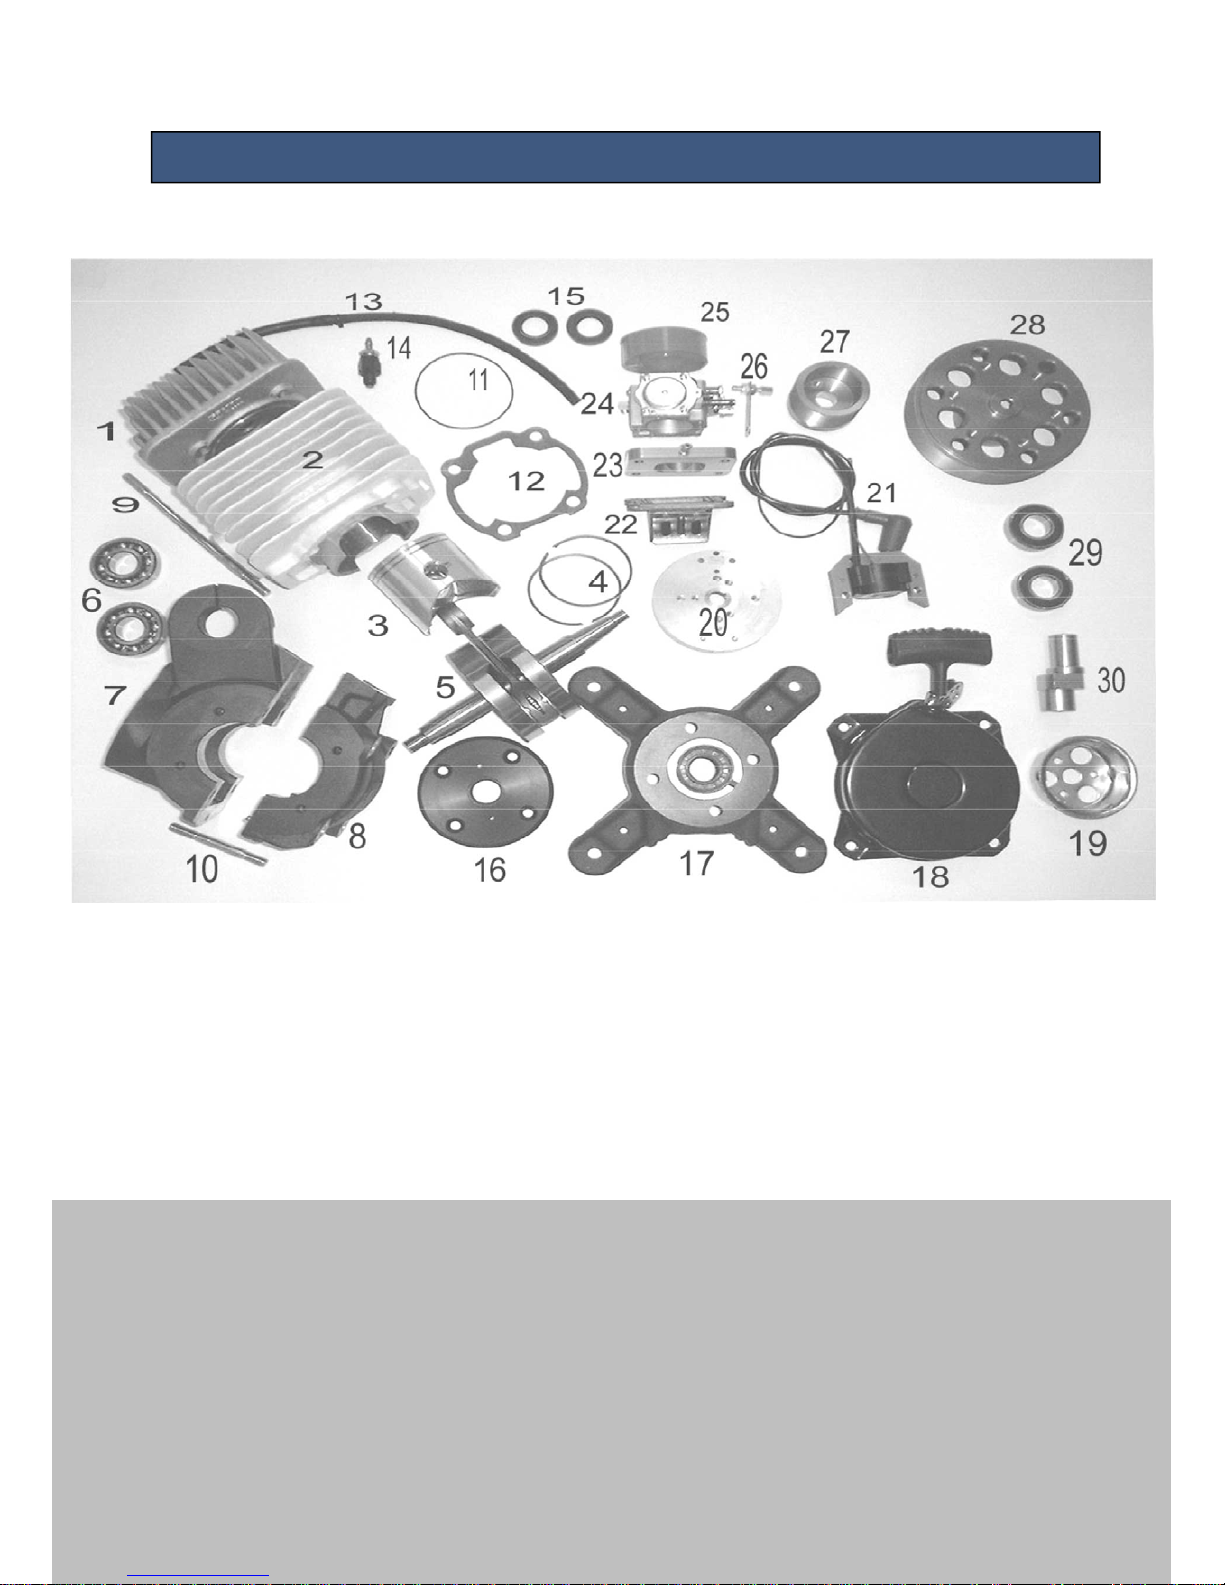
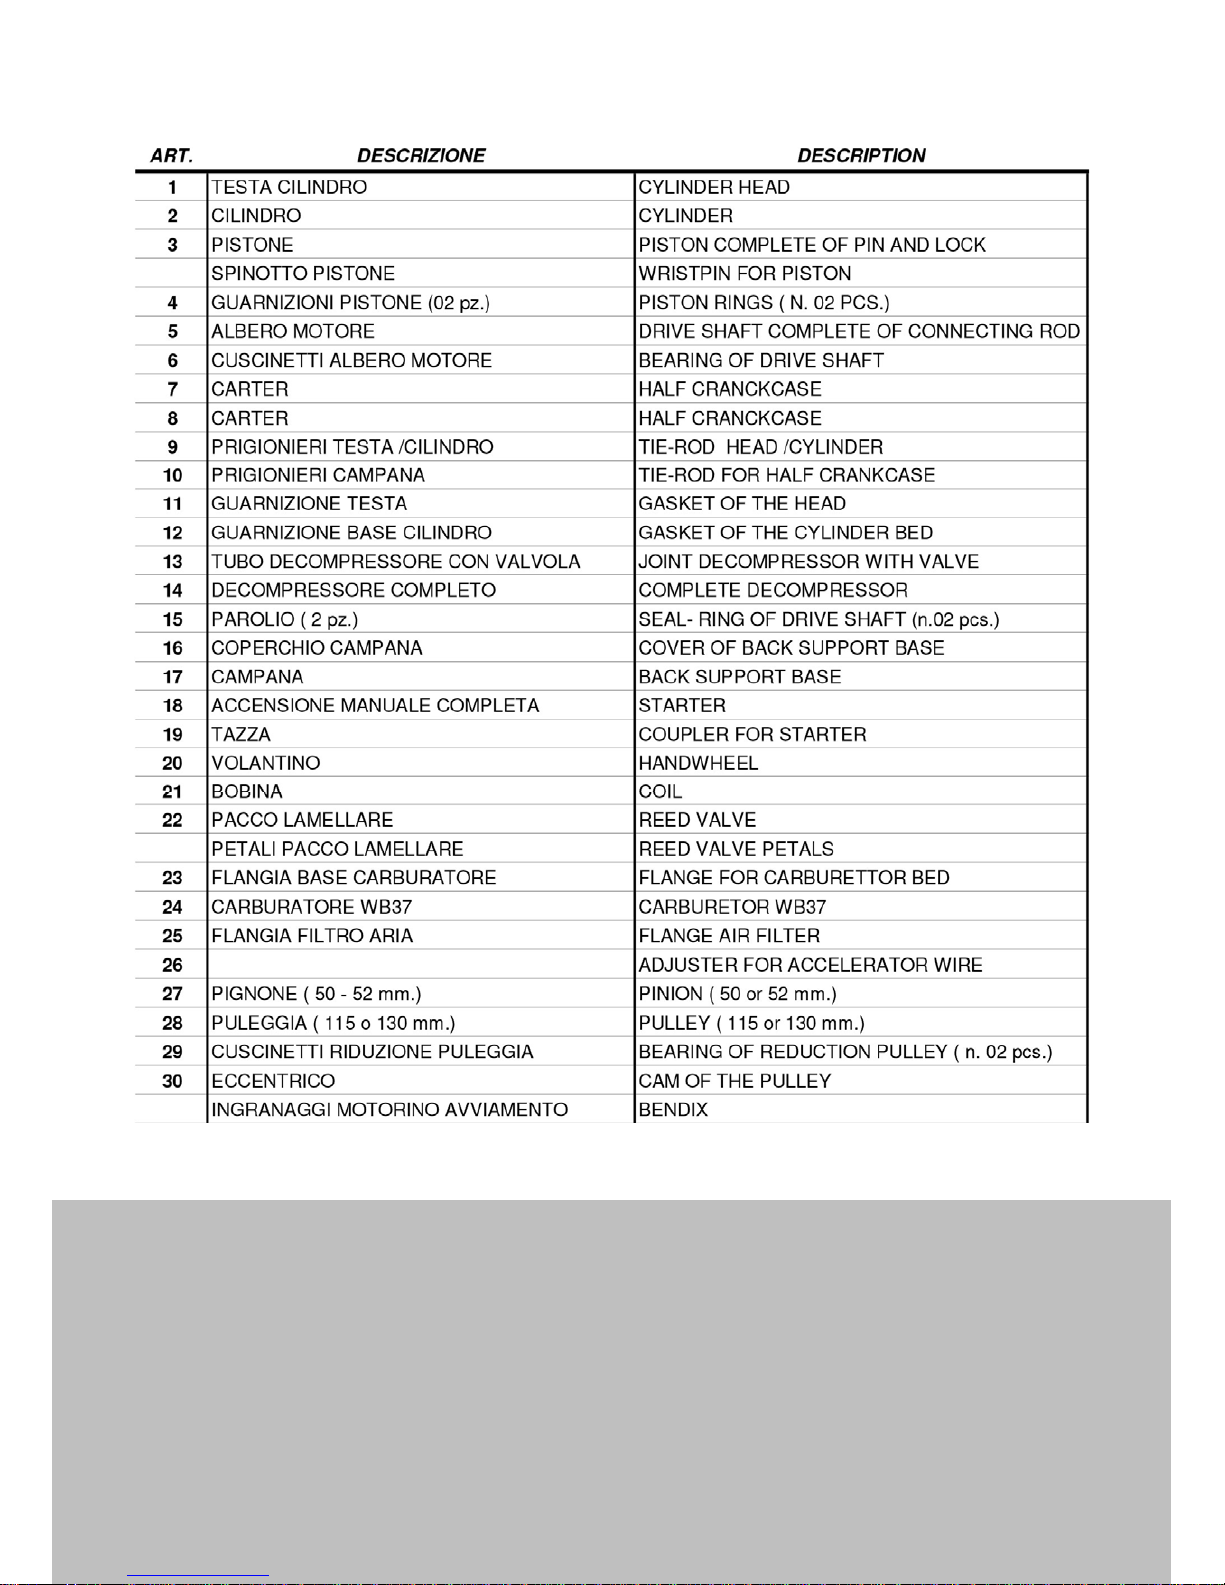
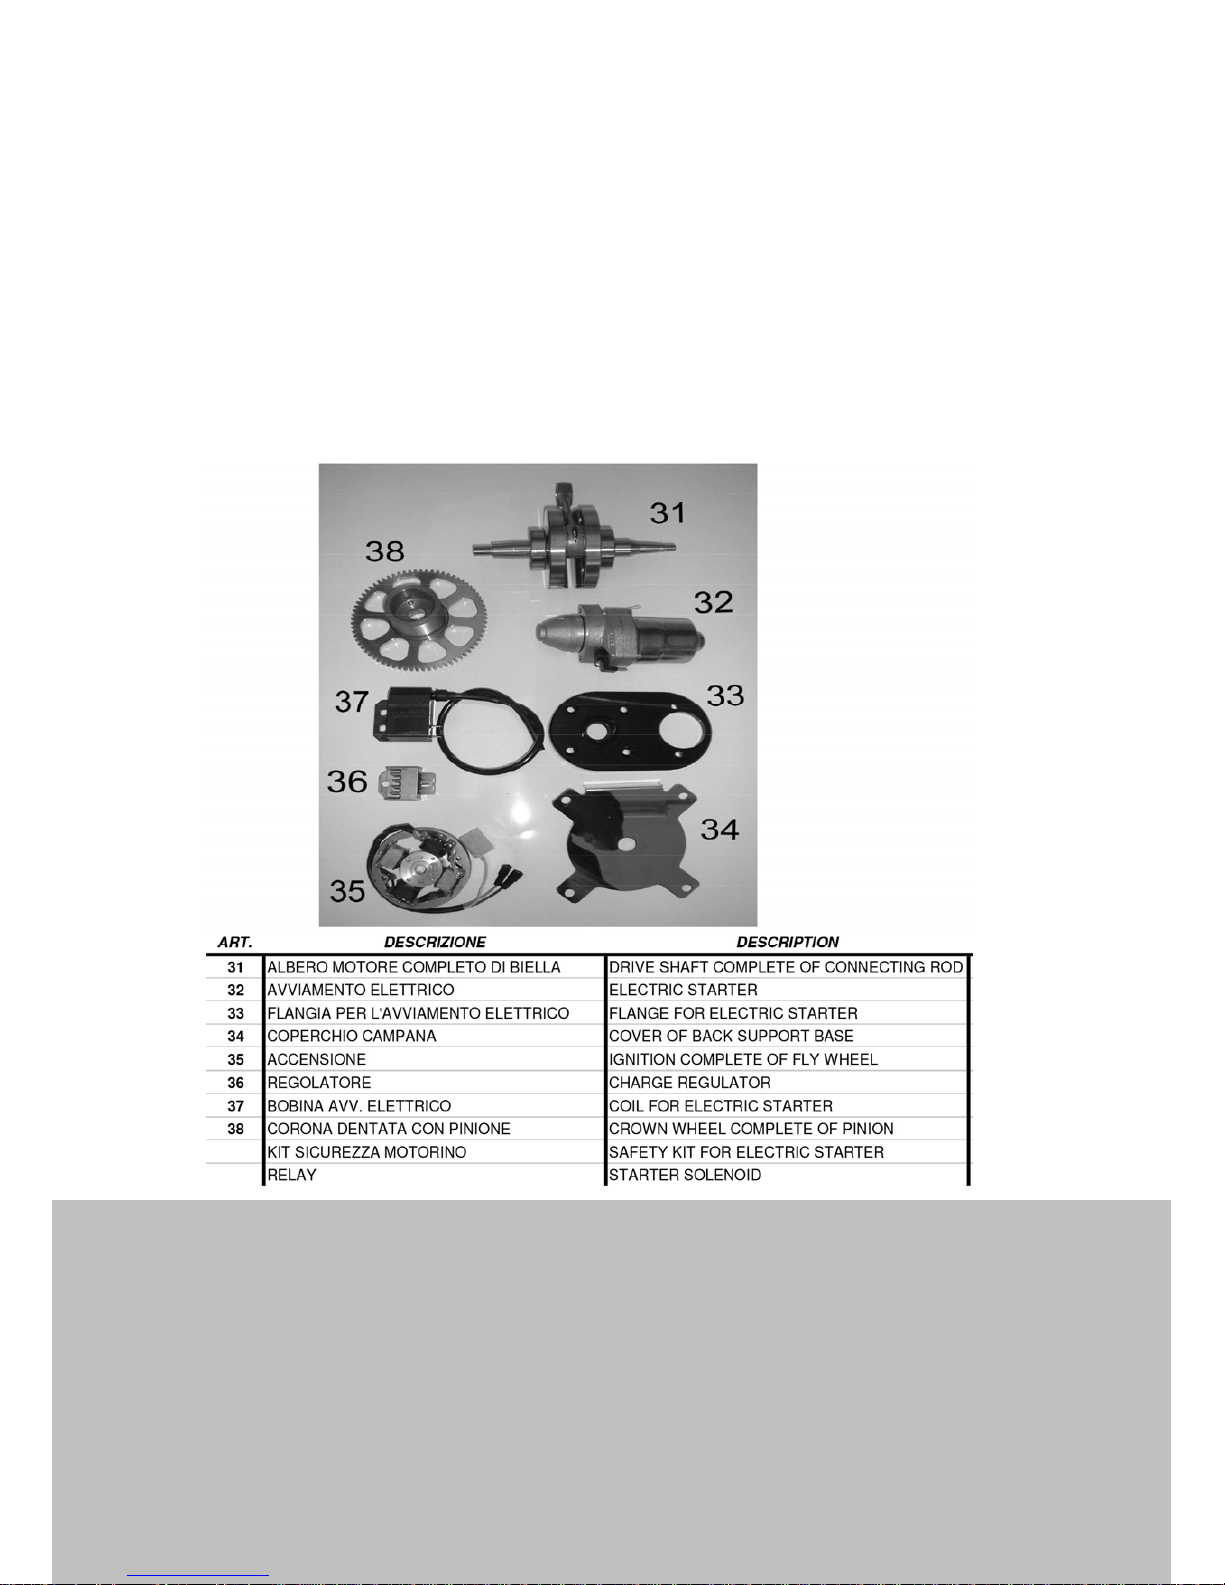
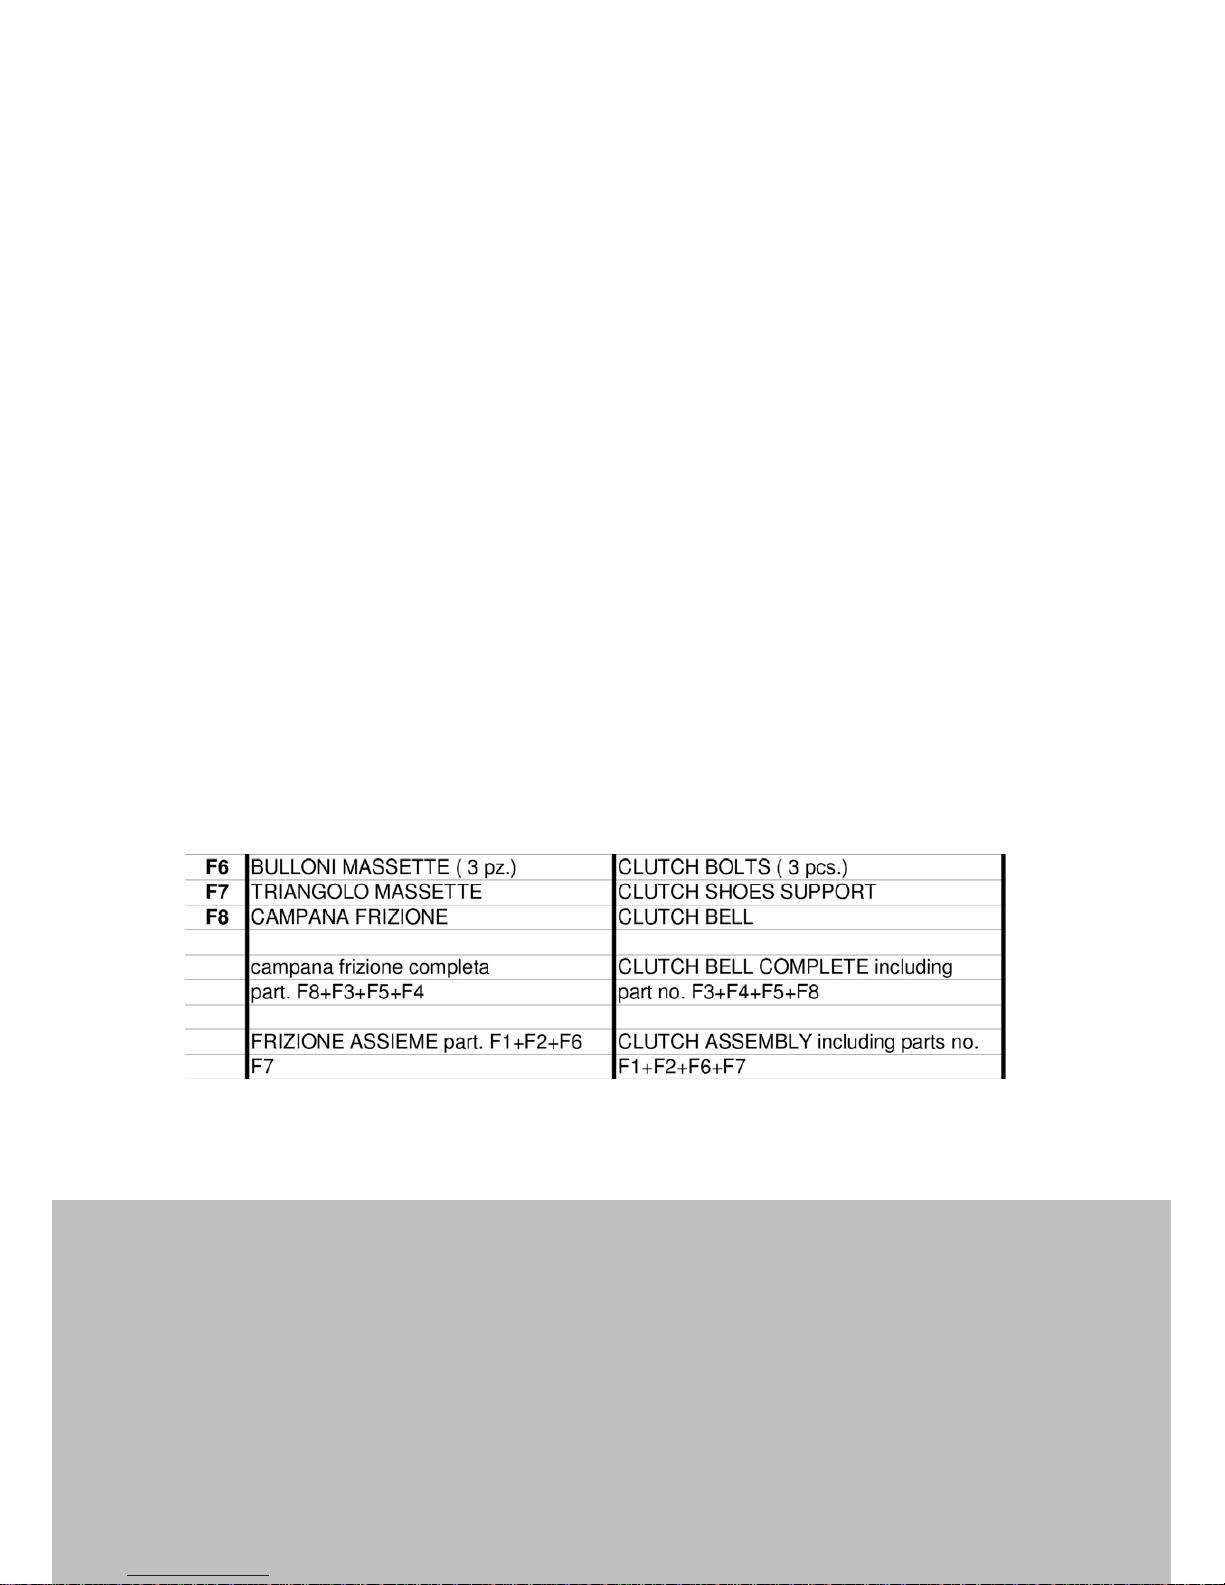
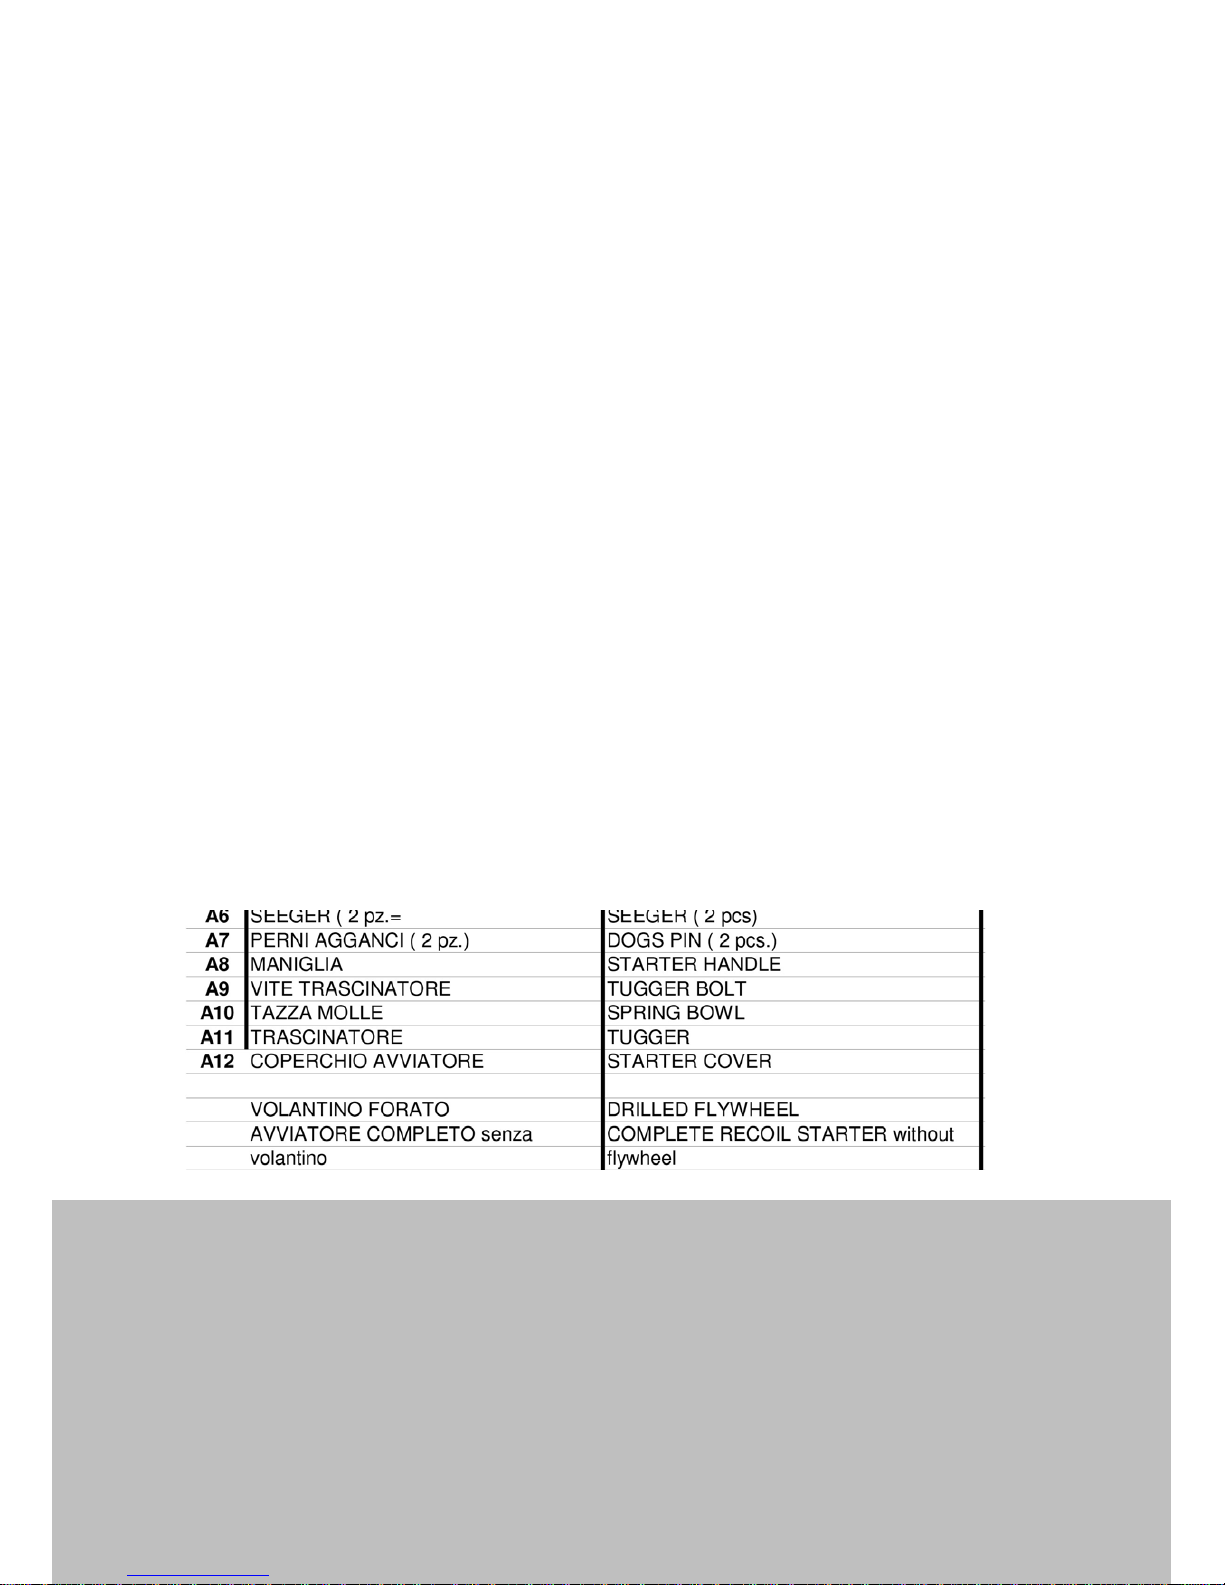
SPARE PARTS LIST
Page 20
CORSAIR 180
MANUAL
20
Page 21

CORSAIR 180
MANUAL
21
Page 22
CORSAIR 180
MANUAL
22
Page 23
CORSAIR 180
MANUAL
23
Page 24

CORSAIR 180
MANUAL
24
Page 25
CORSAIR 180
MANUAL
25
Page 26
CORSAIR 180
MANUAL
26
DIAGNOSING AND STARTING A FLOODED ENGINE
A flooded engine can be identified by the smell of unburned gasoline coming from
the exhaust pipe, or by periodic weak firing and puffs of black smoke during starting
attempts. If you have a flooded engine, follow the procedure below:
Remove the spark plug and thoroughly dry it. (Note another indication of a
flooded engine is a spark plug that is dripping with gas).
With the spark plug removed push the starter button for a few seconds while
holding the throttle in the full-open position. This will remove excess fuel from
the engine.
Install the dry spark plug, and start using the normal procedure.
WARNING! Ensure you have placed the spark plug cap away from all fuel sources
before pulling the starter cord or a fire could occur!
WARNING! Do not use a flooded engine procedure whereby you hold the throttle
wide-open and then attempt to start the engine. If the engine starts, the prop would
rapidly spin to full RPM and damage or injury would most likely occur!
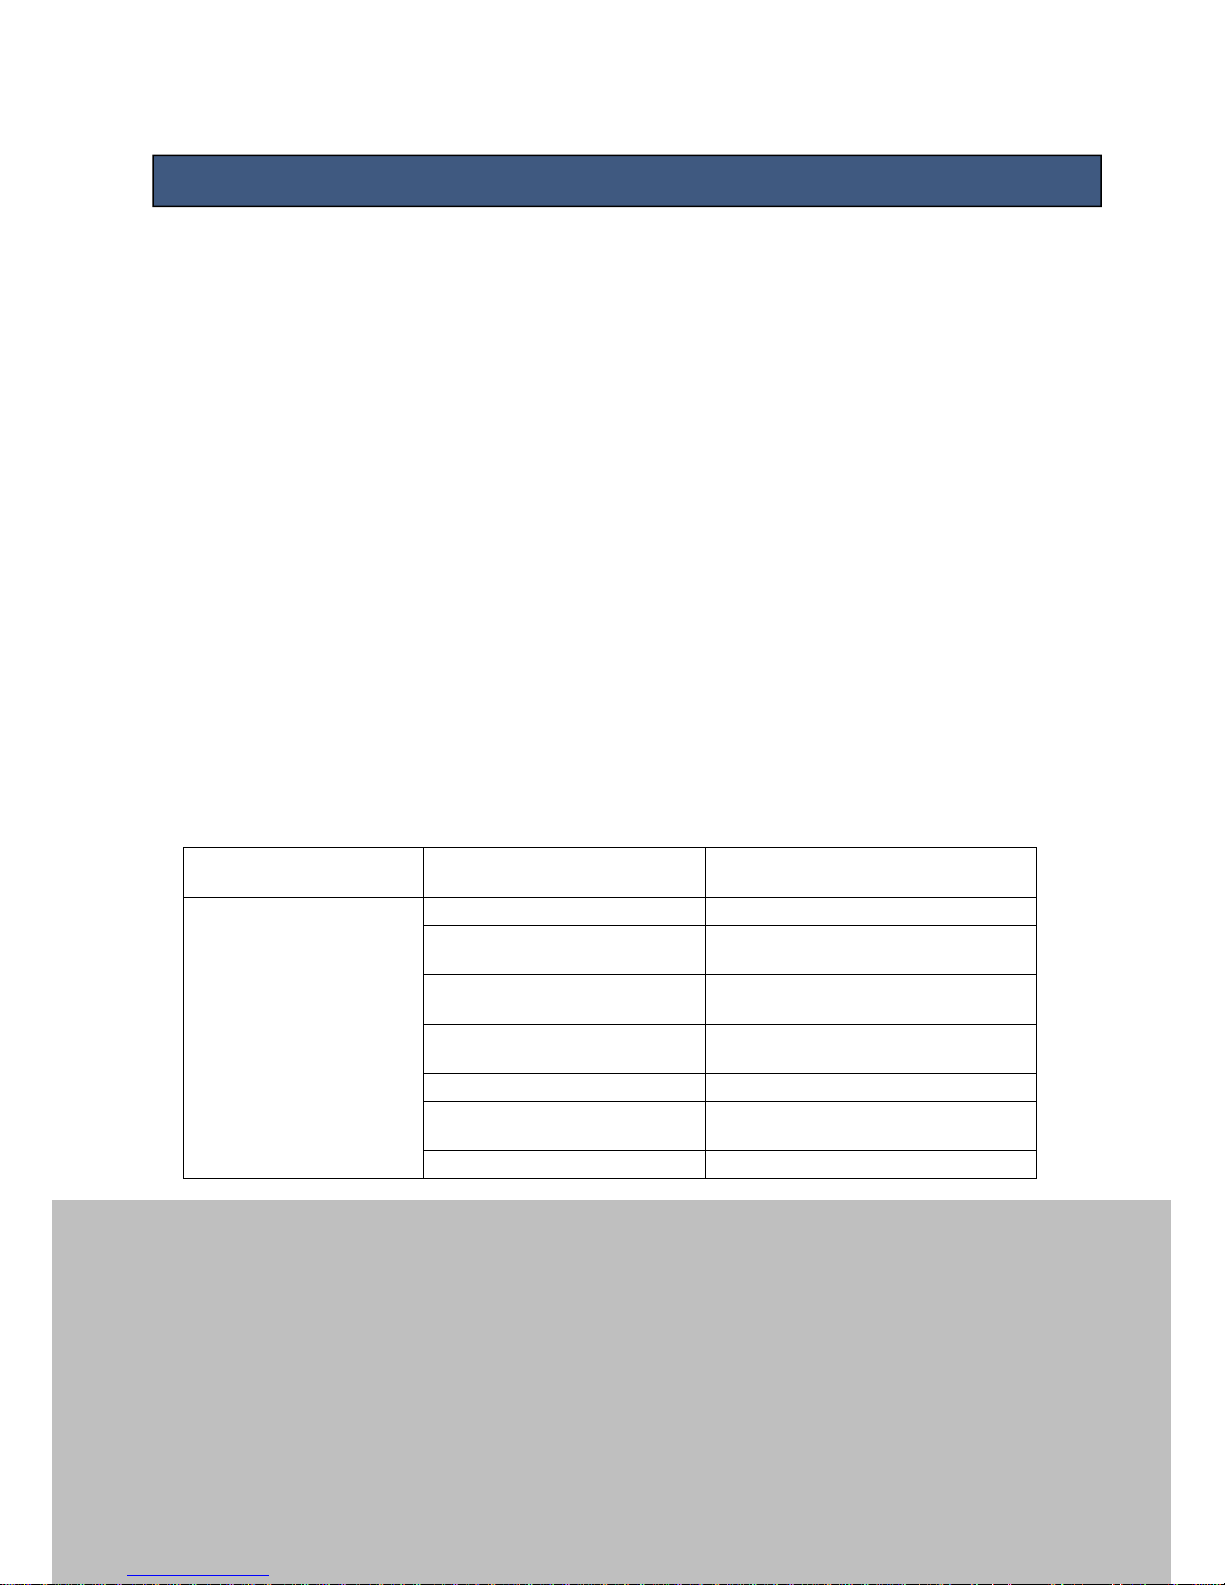
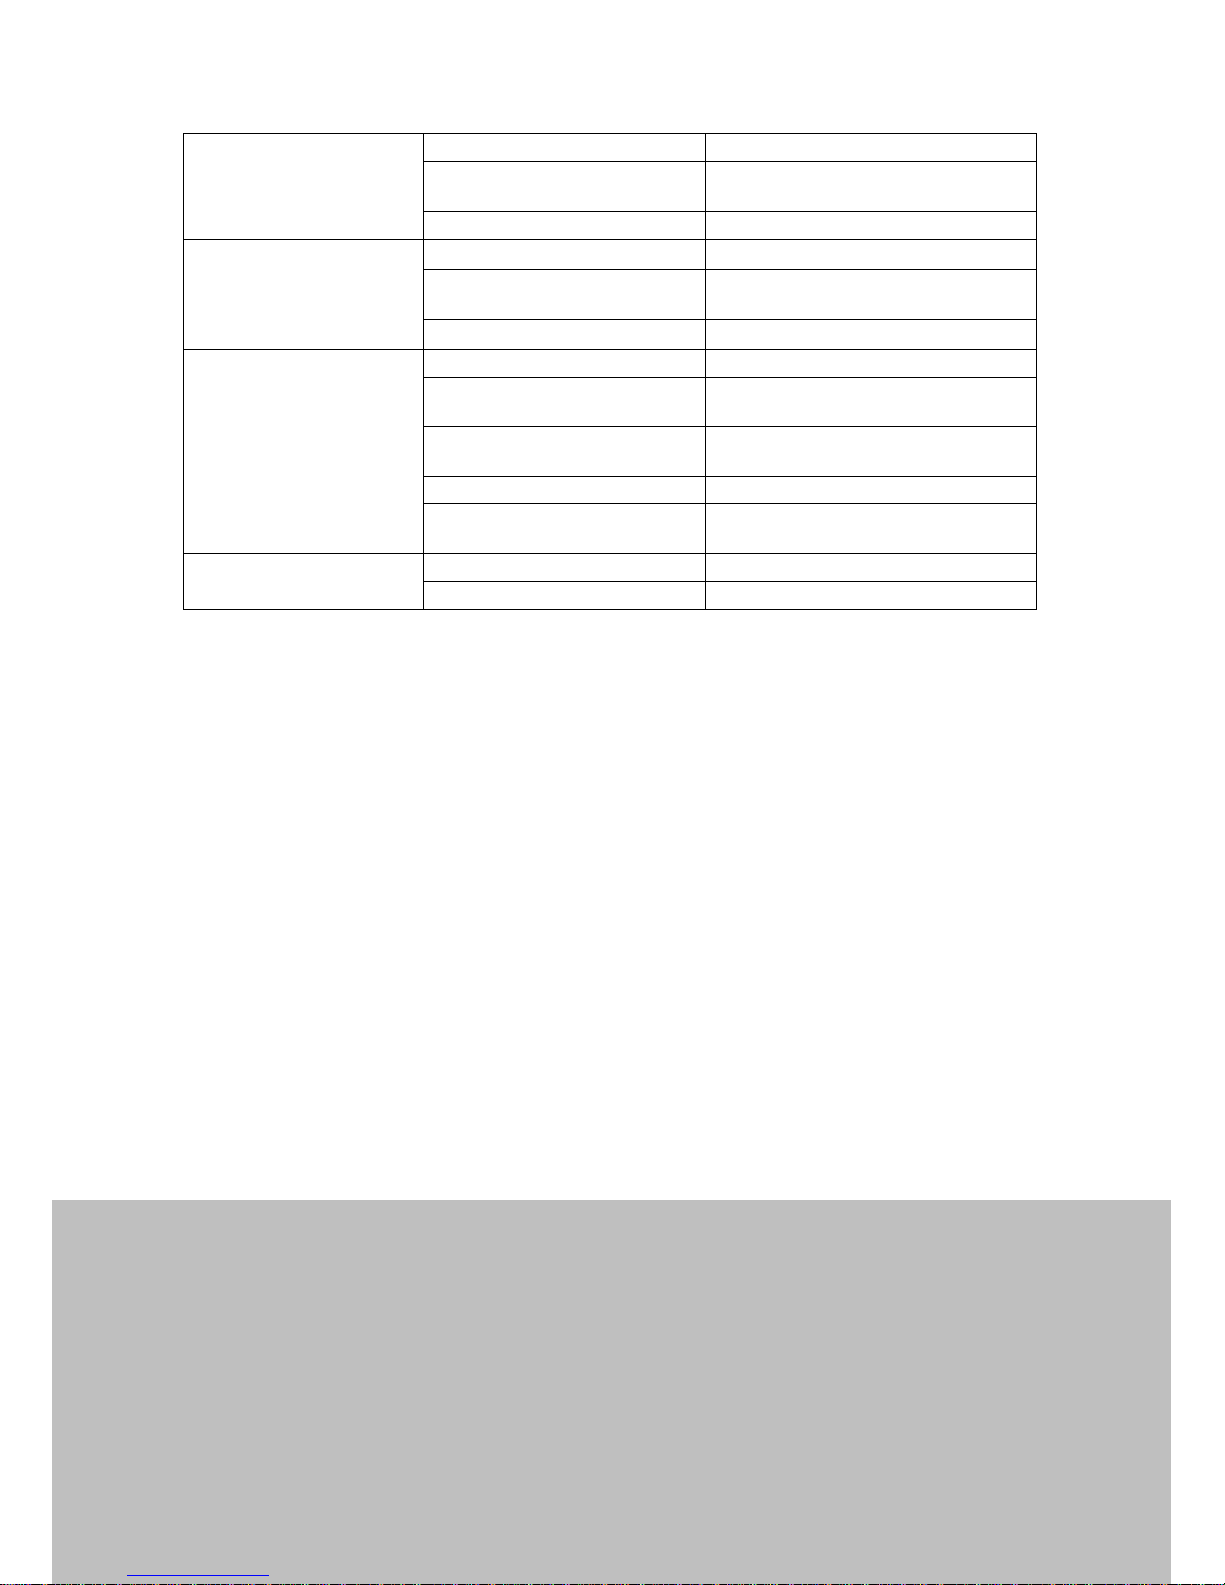
ENGINE PROBLEMS
DIAGNOSTIC
REASON REMEDY
The engine doesn’t start Out of petrol Add petrol
Petrol doesn’t reach the
carburetor
Check the fuel system circuit
Old or wrong petrol
Empty the tank and the fuel system
circuit and replace the petrol
Flooded engine
Remove the spark plug, start the
engine, dry or replace the spark plug.
Defective spark plug Replace it
Blockened spark plug or wet
Clean and dry the spark plug or
replace it
Earthened switching off cable Check the wiring
Page 27
CORSAIR 180
MANUAL
27
Spark plug hood Check it
Carburetor has problems
Clean and check it, eventually
replace the diaphragm
No spark Check the ignition, coil and wiring
The engine doesn’t idle
Dirty carburetor Calibrate the carburetor
Out-of-adjustment screws
Clean and check it, eventually
replace the diaphragm
Defective spark plug Replace it
The engine doesn’t reach
the maximum rpm
Wrong carburetion Calibrate the carburetor
The carburetor has problems
Clean and check it, eventually
replace the diaphragm
The reed valve has problems
Replace the reeds or the whole reed
valve
Dirty air filter Clean or replace it
Dirty exhaust system
Clean or replace the deadening
material
Engine revved up when
idling
Out-of-adjustment screws Calibrate the carburetor
Air through the gaskets Replace the gaskets and seals
Page 28

CORSAIR 180
MANUAL
28
REGULAR CHECKS AND MAINTENANCE
At every use
Check the bolts and screw tightening
Check the silent-block conditions
After the first 10 hours Check carburetion
Every 25 hours
Replace the spark plug
Clean the air filter
Replace the muffler springs
Every 100 hours or every year
Replace the air filter
Replace the starter rope
Replace the diaphragm and clean it
Replace the silent-block
Replace the fuel system pipes
Replace the reed valves
Every 100 hours
Check the piston and piston rings
Replace the pin and rollers cage
Decarbonise and clean the decompression hole
Replace the silencer deadening material
Replace reduction gear belt
Every 200 hours
Replace the piston and piston rings
Replace the reed valve
Every 400 hours
Replace all the bearings and seals
Replace the crankshaft
Page 29

CORSAIR 180
MANUAL
29
TERMS OF GUARANTEE
G-Force Paramotors will warrant their product to be free from defects in materials
and workmanship for a period of twelve (12) months from the date of purchase.
This warranty applies to the product in normal usage situations only. The dealer,
from whom you purchased the product or G-Force Paramotors will repair the product
free-of-charge.
To obtain warranty service please contact your dealer or G-Force Paramotors and
then either bring the product in or have it shipped. Shipping charges are the
responsibility of the purchaser.
This warranty does not apply even during the warranty period, and the purchaser
shall pay repair or replacement charges if:
The cause of malfunction is due to misuse, neglect, negligence, etc.
This includes seize of the engine due by an improper carburetor
adjustment or improper fuel/oil mix
The malfunction is caused by incorrect pilot operation, i.e. a crash,
whack, dork, bang, splat, ding, prong, bend, tweak, trip, fall, bounce or
any other piloting eventuality.
The malfunction is caused by lack of normal maintenance or
modification, i.e. loose parts falling off and breaking the propeller.
The malfunction is caused by an Act of God, including but not limited to
fire, earthquake, hurricane, flood or other natural calamity.
Purchaser has no warranty-certificate
Page 30

CORSAIR 180
MANUAL
30
WARRANTY ZERTIFICATE
Name of buyer:
Model: ______________________________________
Date of purchase: ______________________________________
Address: ______________________________________
This warranty certificate is valid 1 year after purchase. Please read this manual
carefully. For further question please ask your dealer or direct G-Force Paramotors.
DEALER G-Force Paramotors
________________ ________________________
G-Force Paramotors
Paurach 55, A-8332 Edelsbach
Tel.: +43 (0) 664 91 55 160
 Loading...