

Page 1

User Manual
TDC-5502C
5M PIXEL DIGITAL CAMERA
Page 2

CONTENTS
I. GETTING TO KNOW YOUR
CAMERA............................................
1.CONFIGURATION & INSTALLATION........ 2
2. MONITOR SCREEN DISPLAY................ 3
3. PREPARATION BEFORE CAPTURE ....... 3
4. SHOOTING........................................ 4
5. VIDEO & AUDIO RECORDING:.............. 9
6. AUDIO INPUT & OUTPUT....................11
7. IMAGE REVIEW................................ 12
8. OTHER SETTINGS............................ 17
2
II. SOFTWARE & DOWNLOAD........
1. PC-CAM DRIVER INSTALLATION ...... 22
III. MAINTENANCE ..........................
1. CAMERA......................................... 24
2. BATTERY ........................................ 25
3. MEMORY CARD ............................... 27
4. SECURITY ...................................... 29
22
24
Page 3

Ⅳ. LIMITED WARRANTY:.............32
Ⅴ. FCC.............................................
43
1
Page 4
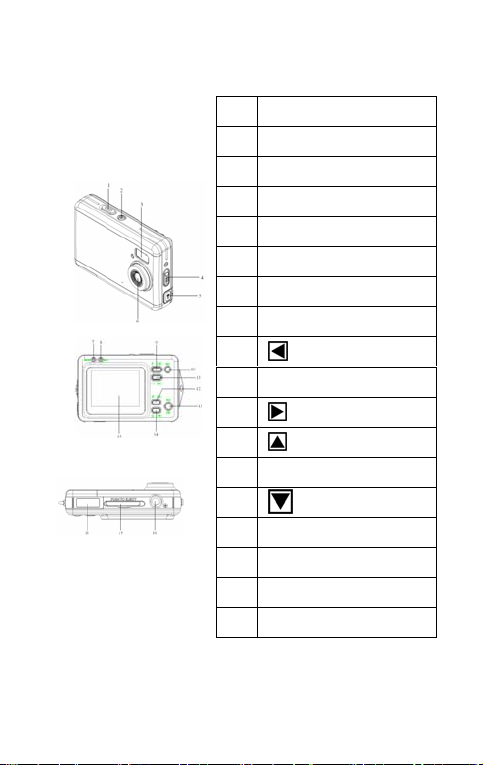
I Getting to know your camera
1. Configuration
& installation
1 SHOOT/OK button
2 POWER button
3 Flash light
4 MACRO button
5 USB jack
6 Lens
7 MACRO light
8 BUSY light
9
10 MENU button
11
12
13 MODE button
14
15 TFT monitor screen
16 Tripod socket
17 SD card slot
18 Battery cover
LEFT/flash
RIGHT/DISP
UP
DOWN
2
Page 5
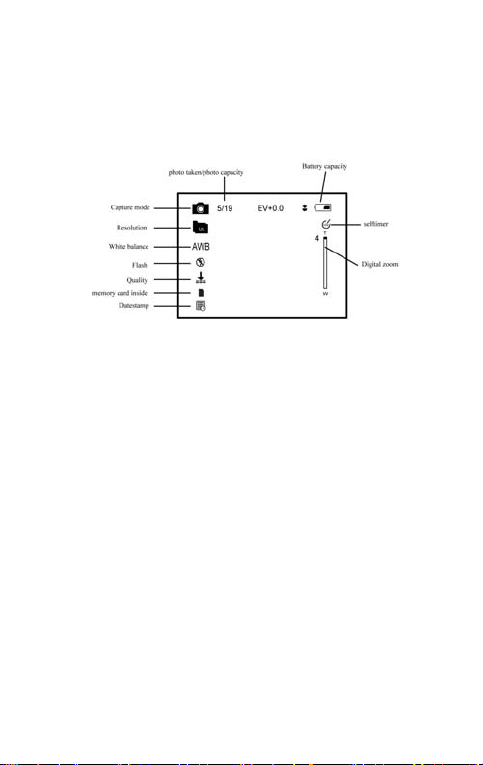
2. Monitor screen display
3. Preparation before capture
3.1 Battery
It’s optional to use AAA alkaline batteries or
rechargeable batteries.
Open the battery cover and load the batteries
according to the polarity indicated on the
battery door.
3.2 Insert the memory card
Insert the memory card to the card slot
carefully. Check the right direction before
3
Page 6

insert the memory card.
Attention: If you can not insert the SD card,
take it out and insert again.
4. Shooting
1): Move the slide cover to display the lens;
2): Press POWER button to enter default
capture mode;
3): Press the shutter button to take pictures.
Note:
z Do not take the memory card or battery
out when camera is saving the image,
otherwise, the image won't be saved
completely.
z The screen will power off automatically if
the camera is not in working status for
30 minutes. Press any key to restart the
screen.
In capture
menu for 2 options: ”Image” mode and “Setup”
mode:
mode, press “MENU” to enter main
4
Page 7

Select “Image”, the following settings are:
Resolution, Quality, White Balance, Color
Effect, Exposure, Date Stamp, Self timer, and
Burst Snapshot
A. Resolution:
a) Press the DOWN button
“resolution” mode, then press RIGHT
button
2048*1536 , 1600*1200 , 1280*960 ,
640*480;
Press the UP/DOWN button
select the resolution;
c) Double press “MENU” to confirm and exit.
B. Quality:
a) Press the DOWN button
“Quality” and press the RIGHT button
options: “Super”, “Fine”, “ Normal”.
b) Press the UP/DOWN button
select the image quality.
c) Double press “MENU” to confirm and exit.
for 5 options : 2592*1944,
5
to select
to
to select
for 3
to
Page 8

C. White Balance:
a) Press the DOWN button
“White Balance”, press the RIGHT button
for 5 options: Auto, Day Light, Tungsten,
Fluorescent and Cloudy;
b) Press the UP/DOWN button
select the proper mode;
c) Double press “MENU” to confirm and exit.
D. Color Effect:
a) Press the DOWN button
“Color Effect”, press the RIGHT button
options: “Color”, “Sepia”, “Monochrome”.;
b) Press the UP/DOWN button
select the color you desired;
c) Double press “MENU” to confirm and exit.
E. Exposure:
a) Press the DOWN button
“Exposure”, press the RIGHT button
b) Press the LEFT/RIGHT button to
to select
to
to select
for 3
to
to select
;
6
Page 9

adjust the exposure from -2.0 to +2.0; then
press “MENU” to confirm and exit.
F: Date Stamp:
The date will be showed at the lower right
corner of the image when viewing the image
.
a) Press the UP/DOWN button
select “Date Stamp”, press the RIGHT
button
b) Press the UP/DOWN button to
select “Enable” or “Disable”;
c) Double press “MENU” to confirm and exit.
G: Self timer:
a) Press the UP/DOWN button
select “Self timer”, press the RIGHT button
to select: “Disable”, “10SEC”, “20SEC”;
b) Press the UP/DOWN button
select the time you desired;
c) Double press “MENU” to confirm and exit.
;
7
to
to
to
Page 10
Note: set “Disable” if you want to
cancel the self timer..
H: Burst Snapshot:
a) Press the UP/DONW button to
select “Burst Snapshot”, press the RIGHT
button
b) Press the UP/DOWN button to
c) Double press “MENU” to confirm and exit.
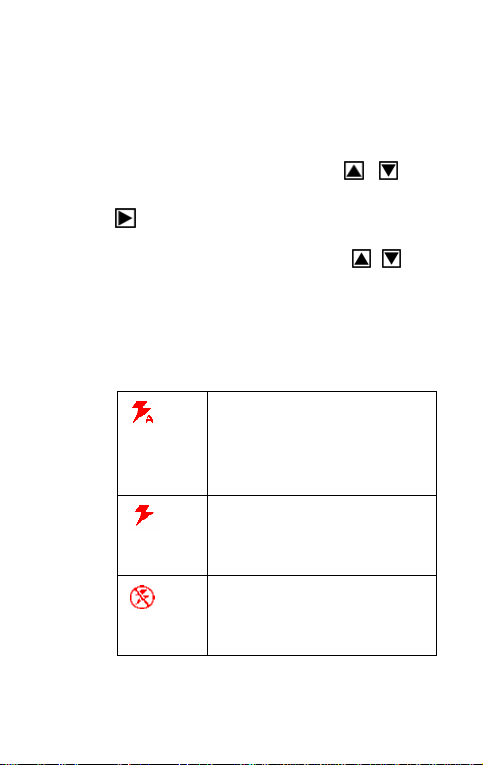
Flashlight
select “Single” or “Burst”;
Auto: Automatically turn
on/off according to the
light
Flash on: Force on the
flash
Flash off: Force off the
flash
8
Page 11

In capture mode, press the LEFT button
enter above three modes in cycle.
● Flash will be charged automatically between
shooting and the screen turn into black
when charging. The next image can be
shot only the charge is completed.
●If shooting with flash under a bright
environment, the facular in the image will
cause the incorrect exposure.
Note: The flash does not work in “Burst
snapshot” mode.
Digital zoom
To view the zoom effected by LCD.
Note: digital zoom may affect the quality of
image. The higher digital zoom multiples, the
lower of the image quality, maximum 4X digital
zoom available.
In the camera/video mode, press the
UP/DOWN button
zoom;
to select digital
to
5. Video & audio recording:
9
Page 12

1): Press “MODE” till the icon ” “appears
on the upper left of screen;
2): Press shutter to start recording;
3): Press shutter again to stop recording the
video.
4): In the video mode press “MENU” to enter
the main menu for 2 options: “video” and
“setup”.
5): There are 4 Options available for “video”
mode: “ Resolution”, “Frame rate”, “White
balance” and “Audio”.
A: Video Resolution:
a) Press the UP/DOWN button
select “Resolution”, press the RIGHT button
for 2 options: 640*480 or 320*240;
b) Press the UP/DOWN button to
select resolution.
c) Double press “MENU” to confirm and exit.
B: Frame rate:
10
to
Page 13

a) Press the UP/DOWN button
select “Frame rate”, press the RIGHT button
for 2 options: 30 fps or 15 fps;
b) Press the UP/DOWN button to
select the frame rate you desired;
c) Double Press “MENU” to confirm and exit.
C: White balance
Same as the setting under the capture mode
(See page 4).
D: Audio Recording: .
a) Press “MENU” under video mode, press the
UP/DOWN button
press the RIGHT button
or “Disable”;
b) The video with voice recorded when select”
Enable” the video without voice recorded
when select “ Disable”;
c) Double press “MENU” to confirm and exit.
6. Audio input & output
to select “Audio”,
to select “Enable”
to
11
Page 14

6.1 Audio input
a): Power on;
b): Press “MODE” to select Audio record
Mode ( )
c): Press shutter to start recording, the time of
recording will display on the screen;
d): Press shutter again to stop record.
6.2 Audio playback
Please note that this camera do not support
the speaker; the volume is only available
when connecting with TV or PC to playback
7. Image review
7.1 Still image review
a): Press “MODE” to playback mode.
b): Press the LEFT/RIGHT button
review the images.
c): Press the LEFT/RIGHT button
show previous or next image or video file.
12
to
to
Page 15

7.2 Play video
a): Power on and press “MODE” to playback
mode.
b): Press the LEFT/RIGHT button to
select video files;
c): Press shutter to play video file and press
shutter again to end playing;
d): Press LEFT/RIGHT button
show previous or next image or video file.
7.3 Play video file on TV
You can play video file on TV by connecting
the cable:
a): Power on and connect the camera and TV
by the AV cable;
b): Power on TV and switch to AV mode;
c): Press LEFT/RIGHT button
to play, FF or SP to watch video file.
Note:
z The camera screen will automatically
13
to
to select
Page 16

power off when the cable connected to
the camera;
z The battery will also be used when the
camera connected to TV;
z The TV system may affect the image
quality, please adjust the system of the
camera complied with the TV
system(see P.15 for TV output setting)
z Please adjust the TV setting if the image
does not display at the center of TV
screen; this is not the failure of the
camera.
Note: Please use the cable attached to
connect with the camera and TV.
7.4:Image review setup:
Under image playback mode, press “MENU”
to enter the main menu for 2 options: “play”
and “Setup”.
There are 8 Options in “play” mode: Delete
Current, Delete All, lock, thumbnail, set logo,
rotate, slideshow and set DPOF.
14
Page 17

7.4.1. Delete image
a) Press the UP/DOWN button
select delete current or delete all.
b) Select “Delete Current” to delete current
the image. Press RIGHT button to confirm
and exit.
c) Select “Delete All” to delete all the images.
Press RIGHT button to confirm and exit.
7.4.2: Lock image
a) Press the UP/DOWN button
select “lock”, press the RIGHT button
select “lock current”, “lock all”, “unlock current”,
“unlock all”;
b) Press the UP/DOWN button
select the necessary operation;
c) Double press “MENU” to confirm and exit.
Note: The locked image cannot be
deleted.
7.4.3: Thumbnail
to
to
to
to
15
Page 18

a) Press “MENU” button in image playback
mode, then press UP/DOWN button to
select “thumbnail”, press the RIGHT button
to enter thumbnail mode;
b) Press “MENU” key to delete the selected
image.
c) Press the LEFT/RIGHT/UP/DOWN button
to select image and press
shutter to restore the original size.
7.4.4: Rotate
Press “mode” button in image playback mode,
then press UP/DOWN button
“Rotate”, press the RIGHT button
rotate mode: 90º, 180º and 270º, press
UP/DOWN button
degree you are needed, then press “Menu” to
confirm and exit.
7.4.5:Slideshow:
to select the rotate
to select
to enter
Press the UP/DOWN button
“slide show” and press the RIGHT button
to set slideshow;
16
to select
Page 19

Press shutter to return the normal playback
mode.
8. Other settings
A: Language (Abc):
a) Power on and press “MENU” to enter
“Image” and “Setup”;
b) Press RIGHT button
c) Press the UP/DOWN button to
select “Language(Abc), then press the right
button
the UP/DOWN button
language; then double press “MENU” to
confirm and exit.
B: Auto Power Off
a) Power on and press “MENU” to enter
“Setup”;
b) Press the UP/DOWN button
“Auto Power Off”;
c) Press the RIGHT button
“Disable”, “60Sec”, “120Sec”;
to enter “Language (Abc)”, press
to select “Setup”;
to select needed
to enter
to select
17
Page 20

d) Press the UP/DOWN button
select power off time, and then double press
“MENU” to confirm and exit
C: TV Output
a) Power on and press “MENU” to enter
“Setup”;
to
b) Press the UP/DOWN button
“TV Output”;
c) Press the RIGHT button
“NTSC,PAL” ;
d) Press the UP/DOWN button
select the proper TV mode; then press
“MENU” to confirm.
d) Press “MENU” again to exit.
D: Play Logo
a) Press the UP/DOWN button
select “Play Logo”, press the RIGHT button
to select “Enable” or “Disable”;
b) Press the UP/DOWN button to
select the operation you are needed; then
18
to enter
to show
to
to
Page 21

double press “MENU” to confirm and exit.
Note: No startup screen displayed when you
select “Disable”
E: Light Frequency
a) Power on and press “MENU” to select
“Setup”;
b) Press the UP/DOWN button
“Light Frequency”;
c) Press the RIGHT button
or 60Hz then double press “MENU” to
confirm and exit.
F: Date/Time
This camera can record the shooting date and
time base on the Date/Time function.
a) Power on and press “MENU” to enter
“Setup”;
b) Press the UP/DOWN button
“Date/Time”; then press the RIGHT button
to enter
19
select
to select: 50Hz
to enter
Page 22

c) Press the UP/DOWN button
date/time;
d) Repeat the operation to change the date
and time and then double press “MENU” to
confirm and exit.
G: Buzzer
a) Power on and press “MENU” to select
“Setup”;
to set
b) Press the UP/DOWN button
“Buzzer”; and then press “MENU” to confirm
and exit.
H. Format
a) Power on and press “MENU” to select
“Setup”;
b) Press the UP/DOWN button
“Format”;
c) Press the RIGHT button
format the camera memory or SD card.
d) Double press “MENU” to confirm and exit.
20
select
select
; select” Yes” to
Page 23

I. Default setting
a) Power on and press “MENU” to select
“Setup”;
b) Press the UP/DOWN button select
“Default setting”;
c) Press the RIGHT button
“load” or “NO”, select “load” to back to default
setting.
d) Double press “MENU” to confirm and exit.
J. USB Mode
Select “PC Camera” model when you use this
camera as a PC camera.
Select “Mass Storage” when you download,
delete or upload file, it can also be used
as the removable disk.
Mode switch:
a) Power on and press “MENU” to enter
“Setup”;
b) Press the UP/DOWN button
21
to select:
to
Page 24

select “USB Mode”;
c) Press the LEFT/RIGHT button
select “mass storage” or “PC camera” ; then
double press “MENU” to confirm and exit.
K. Firmware version
a) Power on and press “MENU” to enter
“Setup”;
b) Press the UP/DOWN button
select “Firmware version”;
c) Press the RIGHT button
display the firmware version and update date.
to enter, it will
to
to
d) Press “MENU” again to exit.
II. Software & download
1. PC-CAM driver installation
Insert the CD into the CD-ROM of your PC, An
interface appears as follows, Click the “Install
Camera Driver” to install the camera driver.
22
Page 25

2. How to use PC-CAM function
1. Power on the camera, Press “mode”
button to Select “PC camera”
2. Double click the icon “my computer” on
the desktop of PC
3. Double click the icon “ ” Then you
can start to use the pc-cam function
3. Image download
Set the USB mode to “mass storage”, and
23
Page 26

then the camera becomes a removable
storage device:
a): Connect the USB cable with PC and the
camera;
b): Double click the icon “my computer” on the
desktop of PC;
c): Double click “
d): Double click “DCIM” file folder;
e): Copy all the files to your PC.
Note: do not take out the SD card or the
batteries when you copy the files to PC,
otherwise the files might be destroyed or lost.
” icon
III. Maintenance
Always keep your camera and accessories in
proper condition.
1. Camera
Use dry, soft and clean clothes to wipe out the
fingerprint and the dust on the lens and LCD.
Do not use rough cloths or abrasive of laundry
24
Page 27

to avoid the surface scrape of the camera.
Do not put the camera in the sun or under the
high-temperature environment (such as high
temperature tool bag, trolley case and so on).
Wait few minutes before use when you bring
the camera from a low temperature
environment to a warm environment.
2. Battery
Energy management
The energy status of the power can be
displayed on LCD as below:
low half Empty
The factors influence the lifetime of the
battery:
The used frequency and time of LCD;
The used frequency of flashlight;
25
Page 28

Quantity of image shooting
Temperature (it will shorten the lifetime of
the battery when the camera is used in
low temperature environment).
Note:
z Manganese battery is not allowed for this
camera;
z Don’t take out the battery when power on,
otherwise it will affect the internal
settings and functions of the camera;
z The following situation will affect the
lifetime of the battery:
z LCD turn on;
z LCD in playback status for a long
time.
Please replace new battery when battery low,
and follow the battery instruction on when
using.
Please take out the battery if you won’t use the
camera for a long time.
26
Page 29

Don’t insert the leakage, eroded or inflated
battery into the camera.
Note: if you use rechargeable battery, please
full charge the battery before using the battery.
3. Memory card
The format is necessary in the following
situations:
a): Unformatted SD card;
b): Repeat format card when it do not working
in camera properly although it has been
formatted before;
c): It is important to format the card first when
it will be used in another camera.
Note: please confirm the card keep “unlock”
status before insert the card into camera. All
data will be deleted and unable to recover
when the card is formatted, please backup the
data before formatting.
Memory card format
a. Confirm the card status in “unlock” mode;
27
Page 30

b. Insert the card before power on;
c. Press “MENU”; enter “setup”:
d. Press the UP/DOWN button
enter “format”;
e. Select “yes” to start format;
f. Double press “MENU” to exit.
Note: do not pull out the card or take out the
battery to avoid any failure of the card.
The card available to this camera:
z Standard SD card(8 MB –2GB)
z 3V(3.3V)card(8 MB –2GB)
z 5V card is not available
z The camera may be unable to
recognize the non-standard card or
formatted by another device (such
as another camera). Please format
the card in this camera before use.
28
to
Page 31

4. Security
To avoid the danger of electric shock, do not
open the camera or fix the camera by yourself.
Keep the camera in dry condition, the humidity
may cause the failure of the camera.
Stop use the camera immediately if the
camera affected with damp. It is necessary to
dry the camera in the air before reuse the
camera.
IV. Specifications & system requirement:
1 . Specifications of the camera
sensor 5 Mega pixels CMOS
Image
resolution
storage
2592 x 1944, 2048 x 1536,
1600 x 1200,
1280 x 960, 640x 480
Internal Flash Memory 32MB
SDRAM, External SD card(8MB to
2GB)
29
Page 32

File format
Capture Single/Burst
Video VGA 640x480 ,QVGA 320X240
snapshot
speed
Self timer 10 sec / 20 sec
zoom 4 x digital zoom
JPEG, EXIF 2.2, DCF1.1,
MJPEG(AVI)
Electronic shutter:1/2 ~ 1/2000 sec
White
balance
exposure Auto
flash mode flash off ,flash on,flash Auto
illumination Auto
PC-Camer 640 x 480
interface USB1.1
TV output NTSC / PAL
Auto 、 Daylight 、 Tungsten 、
Fluorescent, Cloudy
30
Page 33

TFT
power
2.0” TFT LCD monitor screen
2 AAA alkaline batteries、
rechargeable batteries
OSD
language
focal range f=8.25mm
aperture F=3.0
Auto 60sec / 120sec
System WIN98SE / 2000 / ME / XP / Vista
Weight
Dimensions Approx. 85 x 56 x 22mm (3.3 x 2.2
English/French/German/Spanish/T
C/Italian/Portuguese
Approx. 85g(3.0oz)(without
batteries and SD card)
x 0.86 in)
Note: The product design and the
specifications are subject to change without
prior notice.
2. System required:
Windows 98SE / 2000 / ME / XP / Vista
CPU: Pentium III 800MHz and upper
31
Page 34

Memory:64 MB and upper memory
Disk space:At least 128 MB space free
Ⅳ. Limited Warranty:
This form describes the protection you will
have under this Limited Warranty.
LIMITED WARRANTY PERIOD:
This Limited Warranty begins on the date of
purchase of the Covered Product and
continues for a period of six months.
WHAT IS COVERED
Meijer will pay the cost of labor and repair or
replacement parts in the event Your Covered
Product fails to operate as a result of a
mechanical or electrical failure caused by
defects in workmanship and/or materials. A
mechanical or electrical failure caused by a
direct result of a power surge is also covered.
Parts will be replaced with those of like kind
32
Page 35

and quality, and may be new or
remanufactured. If the Covered Product
cannot be repaired, if the cost of the repair
exceeds the original purchase price of if parts
are not available due to the age of the
Covered Product of discontinued by the
manufacturer, the Covered Product will be
replaced with a product of similar features.
NOT INCLUDE ANY CANADIAN
Coverage under this Limited Warranty is
limited to the United States of America,
including the District of Columbia. It does not
include any include any Canadian or U.S.
Territories including Guam, Puerto Rico, of
U.S. Virgin Islands.
WHAT IS NOT COVERED
z PRODUCTS NOT ORIGINALLY COVERED
BY A MANUFACTURER’S WARRANTY;
z ITEMS THAT ARE STILL COVERED BY
33
Page 36

THE MANUFACTURER’S WARRANTY,
REGARDLESS OF WHETHER THE
MANUFACTURER HONORS SUCH
WARRANTY;
z PERIODIC CHECKUPS AND/OR
PREVENTIVE MAINTENANCE AS
DIRECTED BY THE MANUFACTURE
EXCEPT AS PROVIDED HEREIN;
z INHERENT PRODUCT EDFECTS THAT
ARE THE RESPONSIBILITY OF THE
MANUFACTURER OR PARTS FAILURE
DUE TO A MANUFACTURER’S RECALL;
z ANY AND ALL PRE-EXISTING
CONDITIONS THAT OCCUR PRIOR TO
THE EFFECTIVE DATE OF THIS LIMITED
WARRANTY AND/OR ANY COSTS TO
REPAIR ANY PRODUCT SOLD “AS-IS”
INCLUDING BUT NOT LIMITED TO FLOOR
MODELS, DEMONSTRATION MODELS,
ETC.;
34
Page 37

z PARTS OR REPAIRS DUE TO NORMAL
WEAR AND TEAR AND ITEMS NORMALLY
DESIGNED TO BE PERIODICALLY
REPLACED BY THE PURCHASER
DURING THE COVERED PRODUCT’S
LIFE, INCLUDING BUT NOT LIMITED TO
BATTERIES, LIGHT BULBS, ETC.;
z DAMAGE FROM ACCIDENT, ABUSE,
MISUSE, MISHANDLING,
INTERODUCTION OF FOREIGN OBJECTS
INTO THE COVERED PRODUCT,
UNAUTHORIZED MODIFICATIONS OR
ALTERATIONS TO A COVERED PRODUCT,
FAILURE TO FOLLOW THE
MANUFACTURER’S INSTRUCTIONS, AND
EXTERNAL CAUSES INCLUDING THIRD
PARTY ACTIONS, FIRE, THEFT, INSECTS,
ANIMALS, EXPOSURE TO WEATHER
CONDITIONS, WINDSTORM, SAND, DITR,
HAIL, EARTHQUAKE, FLOOD, WATER,
35
Page 38

ACTS OF GOD OR CONSEQUENTIAL
LOSS OF ANY NATURE;
z LOSS OR DAMAGE CAUSED BY WAR,
INVASION OR ACT OF FOREIGN ENEMY,
HOSTILITIES, CIVIL WAR, REBELLION,
RIOT, STRIKE, LABOR DISTURBANCE,
LOCKOUT, OR CIVIL COMMOTION;
z INCIDENTAL, CONSEQUENTIAL OR
SECONDARY DAMAGES OR DELAY IN
RENDERING SERVICE UNDER THIS
LIMITED WARRANTY, OR LOSS OF USE
DURING THE PERIOD THAT THE
COVERED PRODUCT IS AT AN
AUTHORIZED SERVICE CENTER OR
OTHERWISE AWAITING PARTS;
z ANY PRODUCT USED IN A COMMERCIAL
SETTING OR RENTAL BASIS;
z FAILURES THAT OCCUR OUT SIDE OF
THE 50 STATES OF THE UNITED STATES
OF AMERICA, INCLUDING THE DISTRICT
36
Page 39

OF COLUMBIA;
z NONFUNCTIONAL OR AESTHETIC PARTS
INCLUDING BUT NOT LIMITED TO
PLASTIC PARTS, KNOBS, ROLLERS,
BASKETS, SCRATCHES, PEELING AND
DENTS;
z UNAUTHORIZED REPAIRS AN/OR PARTS;
z COST OF INSTALLATION, SET-UP,
DIAGNOSTIC CHARGES, REMOVAL OR
REINSTALLATION OF THE COVERED
PRODUCT, EXCEPT AS PROVIDED
HEREIN;
z ACCESSORIES USED IN CONJUNCTION
WITH A COVERED PRODUCT;
z ANY LOSS OTHER THAN A COVERED
BREAKDOWN OF THE COVERED
PRODUCT;
z SERVICE WHERE NO PROBLEM CAN BE
FOUND;
z BREAKDOWNS WHICH ARE NOT
37
Page 40

REPORTED WITHIN THE TERM OF THIS
LIMITED WARRANTY;
z IMPROPER INSTALLATION OF
COMPONENTS OR PERIPHERALS;
z CORRUPTION OF ANY RECORDING
MEDIA, INCLUDING ANY PROGRAM,
DATA OR SETUP INFORMATION
RESIDENT ON ANY HARD DRIVES AND
INTERNAL OR EXTERNAL REMOVABLE
STORAGE DEVICES, AS A RESULT OF
THE MALFUNCTIONING OR DAMAGE OF
AN OPERATION PART, OR AS A RESULT
OF ANY REPAIRS OR REPLACEMENT
UNDER THIS LIMITED WARRANTY;
z DAMAGE TO CLOTHING;
z COLOR FADING OF PICTURE FOR ANY
TELEVISION;
z BURNED-IN PHOSPHOR (INCLUDING
IMAGE GHOSTING), PIXEL BURNOUT
NOT IN ACCORDANCE WITH THE
38
Page 41

MANUFACTURER’S SPECIFICATIONS.
WHAT TO DO WHEN YOUR PRODUCT
FAILS TO OPERATE:
z Call the 24-hour customer service
toll-free number at (866) 845-9634.
Many oversights, which are not covered under
this Limited Warranty, can be due to simple
circumstances such as the Covered Product
not being switched on, being unplugged, or a
fuse blown at the junction box. For a Covered
Product that uses batteries as the primary
power supply, or a remote control unit, please
check that the batteries do not need replacing
or recharging.
SERVICE DELIVERABLES:
39
Page 42

There is no deductible required to obtain
service for Your Covered Product.
OTHER PROVISIONS:
Limited of Liability:
The limit of liability under this Limited Warranty
is the least of the cost of (1) the purchase
price of the Covered Product excluding tax
and delivery costs or (2) authorized repairs not
to exceed the purchase price of the Covered
Product or (3) replacement of the Covered
Product with similar features or (4)
reimbursement for authorized repairs or
replacement. Upon replacement, there is no
longer any obligation for the replaced product
under this Limited Warranty.
Limitations of Implied Warranty:
All Implied Warranties which may arise under
40
Page 43

state law, including all Implied Warranties of
Merchantability or Fitness for a particular
purpose, are limited to the duration of this
Warranty and do not cover incidental or
consequential damages. Some states do not
allow limitations on how long an Implied
Warranty last or the exclusion of incidental or
consequential damages, so the above
limitations or exclusions may not apply to you.
This Warranty gives you specific legal rights,
and you may also have other rights which vary
from state to state.
Transferability and Renewals:
This Limited Warranty is not transferable or
renewable.
Subrogation:
If we pay for a loss, we may require you to
assign your rights of recovery against others.
41
Page 44

We will not pay for a loss if you impair theses
rights to recover. Your rights to recover from
others may not be waived.
Arbitration:
In the event of a disagreement between you
and us concerning costs, either of us may
make a written demand for arbitration. This
must be done within sixty (60) days the say
you filed your claim. Each of us will select an
arbitrator. The two arbitrators will select an
umpire. Each of us will pay the expenses of
the arbitrator we select. The expenses of the
umpire will be shared equally. Unless both of
us agree otherwise, arbitration will take place
in the county and state in which you live. Local
rules apply. A majority decision will be binding.
42
Page 45

FCC part 15.19
This device complies with Part 15 of the
FCC Rules. Operation is subject to the
following two conditions: (1) this device
may cause harmful interference, and (2)
this device must accept any interference
received, including interference that may
cause undesired operation.
FCC part 15.21
Warning: Changes or modifications to this
unit not expressly approved by the
part
responsible for compliance could void the
user’s authority to operate the equipment.
FCC part 15.105
NOTE: This equipment has been tested
and found to comply with the limits for a
Class B digital device, pursuant to Part 15
43
Page 46

of the FCC Rules. These limits are
designed to provide reasonable
protection against harmful interference in
a residential installation. This equipment
generates, uses, and can radiate radio
frequency energy and if not installed and
used in accordance with the instructions,
may cause harmful interference to radio
communications. However, there is no
guarantee that interference will not occur
in a particular installation. If this
equipment does cause harmful
interference to radio or television
reception, which can be determined by
turning the equipment off and on, the user
is encouraged to try to correct the
interference by one or more of the
following measures:
44
Page 47

-
- Reorient or relocate the receiving
antenna.
- Increase the separation between
the equipment and receiver.
- Connect the equipment into an
outlet on a circuit different from that
to which the receiver is connected.
- Consult the dealer or an
experienced radio TV technician
for help
45
Page 48

GFM guarantee
If you are not totally satisfied with this GFM product, you
may return it to any Meijer store for a full refund within 6
months (180days) of purchase when accompanied by a
receipt.
For customer support please call (866) 845-9436 or go
to www.gfmproducts.com
Dist. by Wholesale Merchandisers, Inc.,
2929 Walker, NW,
Grand Rapids, MI 49544
Made in China
46
 Loading...