

Page 1
Instruction Manual
DV150
Digital Camera
Page 2

1
Content
Section 1 Getting to Know Your Camera ............................. 2
Section 2 Getting Up and Running ...................................... 5
Section 3 Record Mode ......................................................... 7
Section 4 Playback Mode.................................................... 28
Section 5 Listening to MP3 Music ...................................... 38
Section 6 Reading eBook ................................................... 40
Section 7 Viewing MPEG4 Movie on PC ............................ 42
Section 8 Viewing Pictures and Movies on a TV ............... 43
Section 9 Video File Converter ........................................... 44
Section 10 Burning the Recorded Clip onto DVD ............. 48
Section 11 Transferring Data to a Computer ..................... 50
Section 12 Specifications and System Requirements ...... 52
Page 3

2
Section 1
Overview
Note
Partial memory of the build-in 64MB memory is used
for Firmware code
Getting to Know Your Camera
The camera with VGA advanced sensor can take DVD-Quality MPEG-4 movies. By way of
using MPEG-4 technology, more videos can be taken within certain amount of memory. Your
camera features outstanding video quality, especially in low light condition. With a color LCD
monitor, users can compose images and examine them easily.
Exposure and color balance can either be adjusted automatically or allowed to be changed
manually. An 2x digital zoom increases user control over the movies and pictures you take.
The camera is also ideally suited for using as a PC camera hooked up to your home computer
via high speed USB 2.0 port
Build-in 64 MB memory allows you to take pictures and movies without memory card. The
memory card slot allows users to increase the storage capacity up to 1GB.
Standard Accessories
Unpack the package and make sure all standard accessories listed are included:
Camera
USB Cable
AV Cable
Quick Guide
CD-ROM ( Driver, Arcsoft Software and User Manual)
Earphone
Strap
Pouch
Remote Control (Optional)
Page 4
3
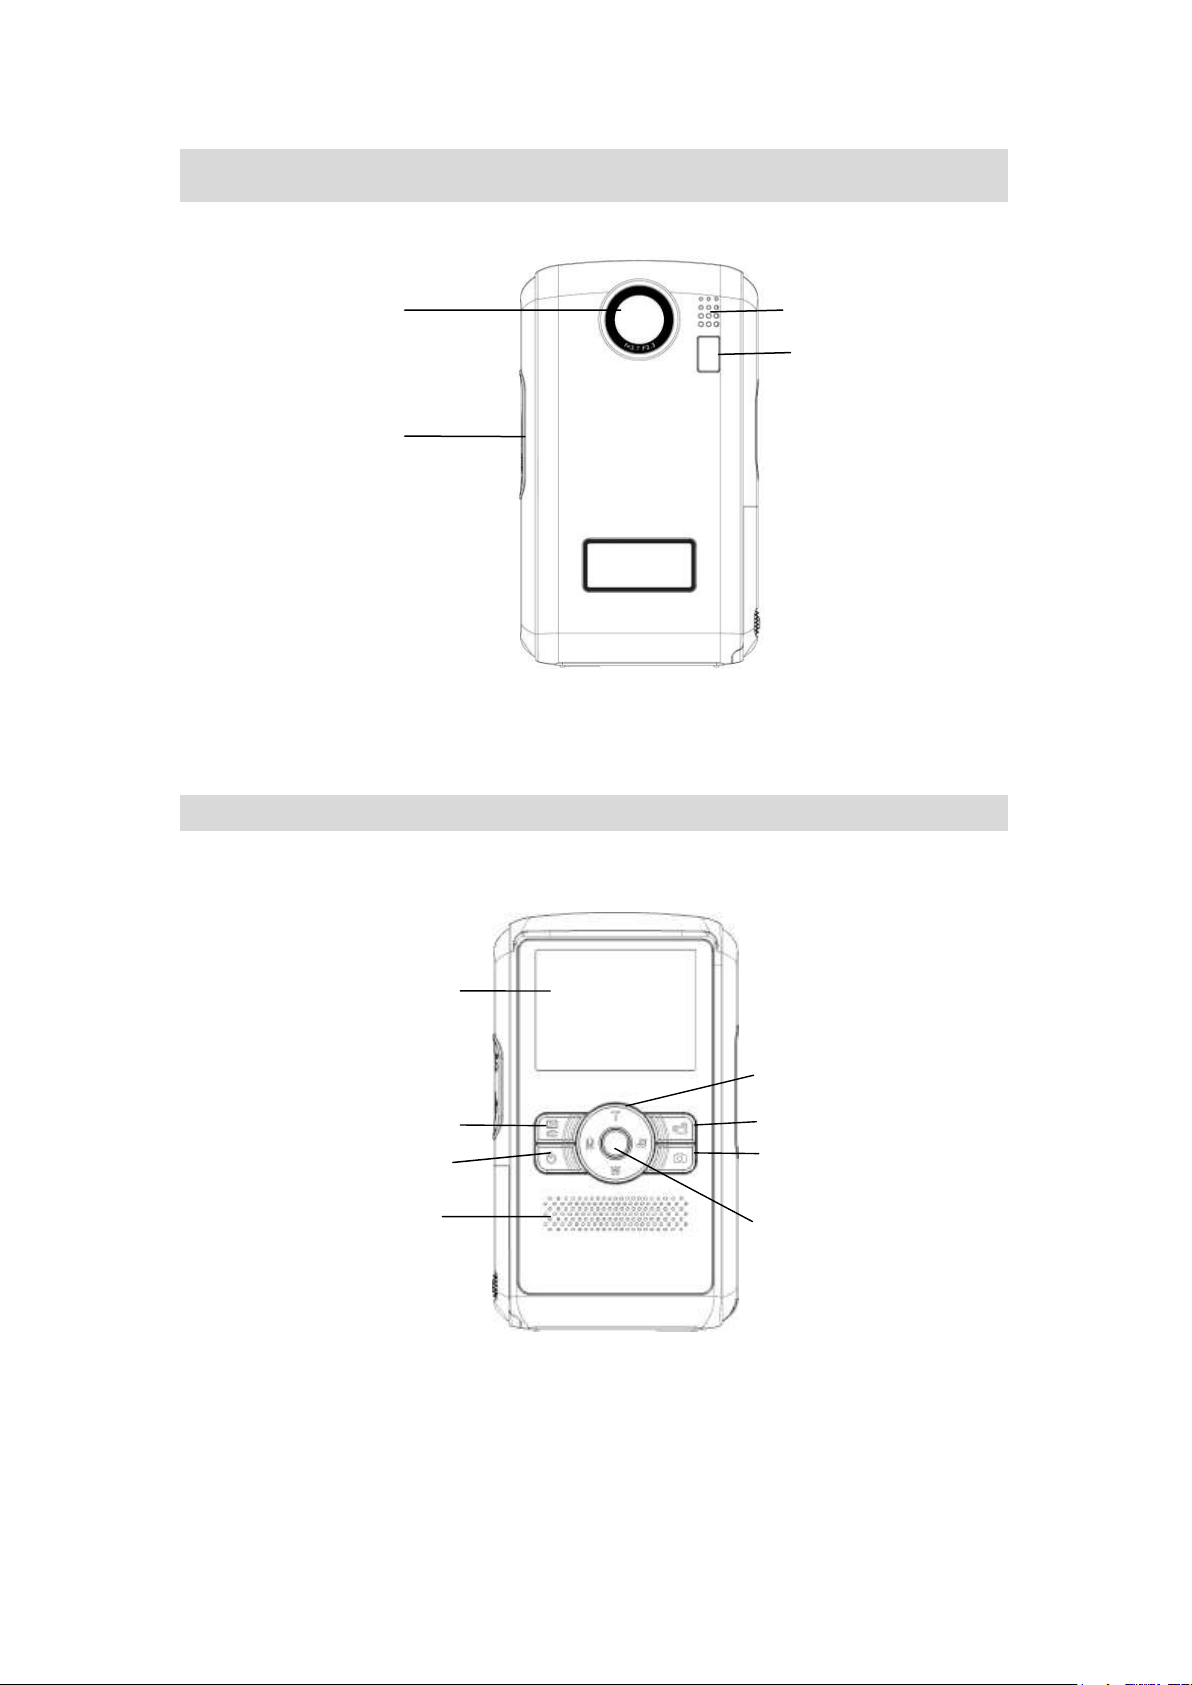
Front View
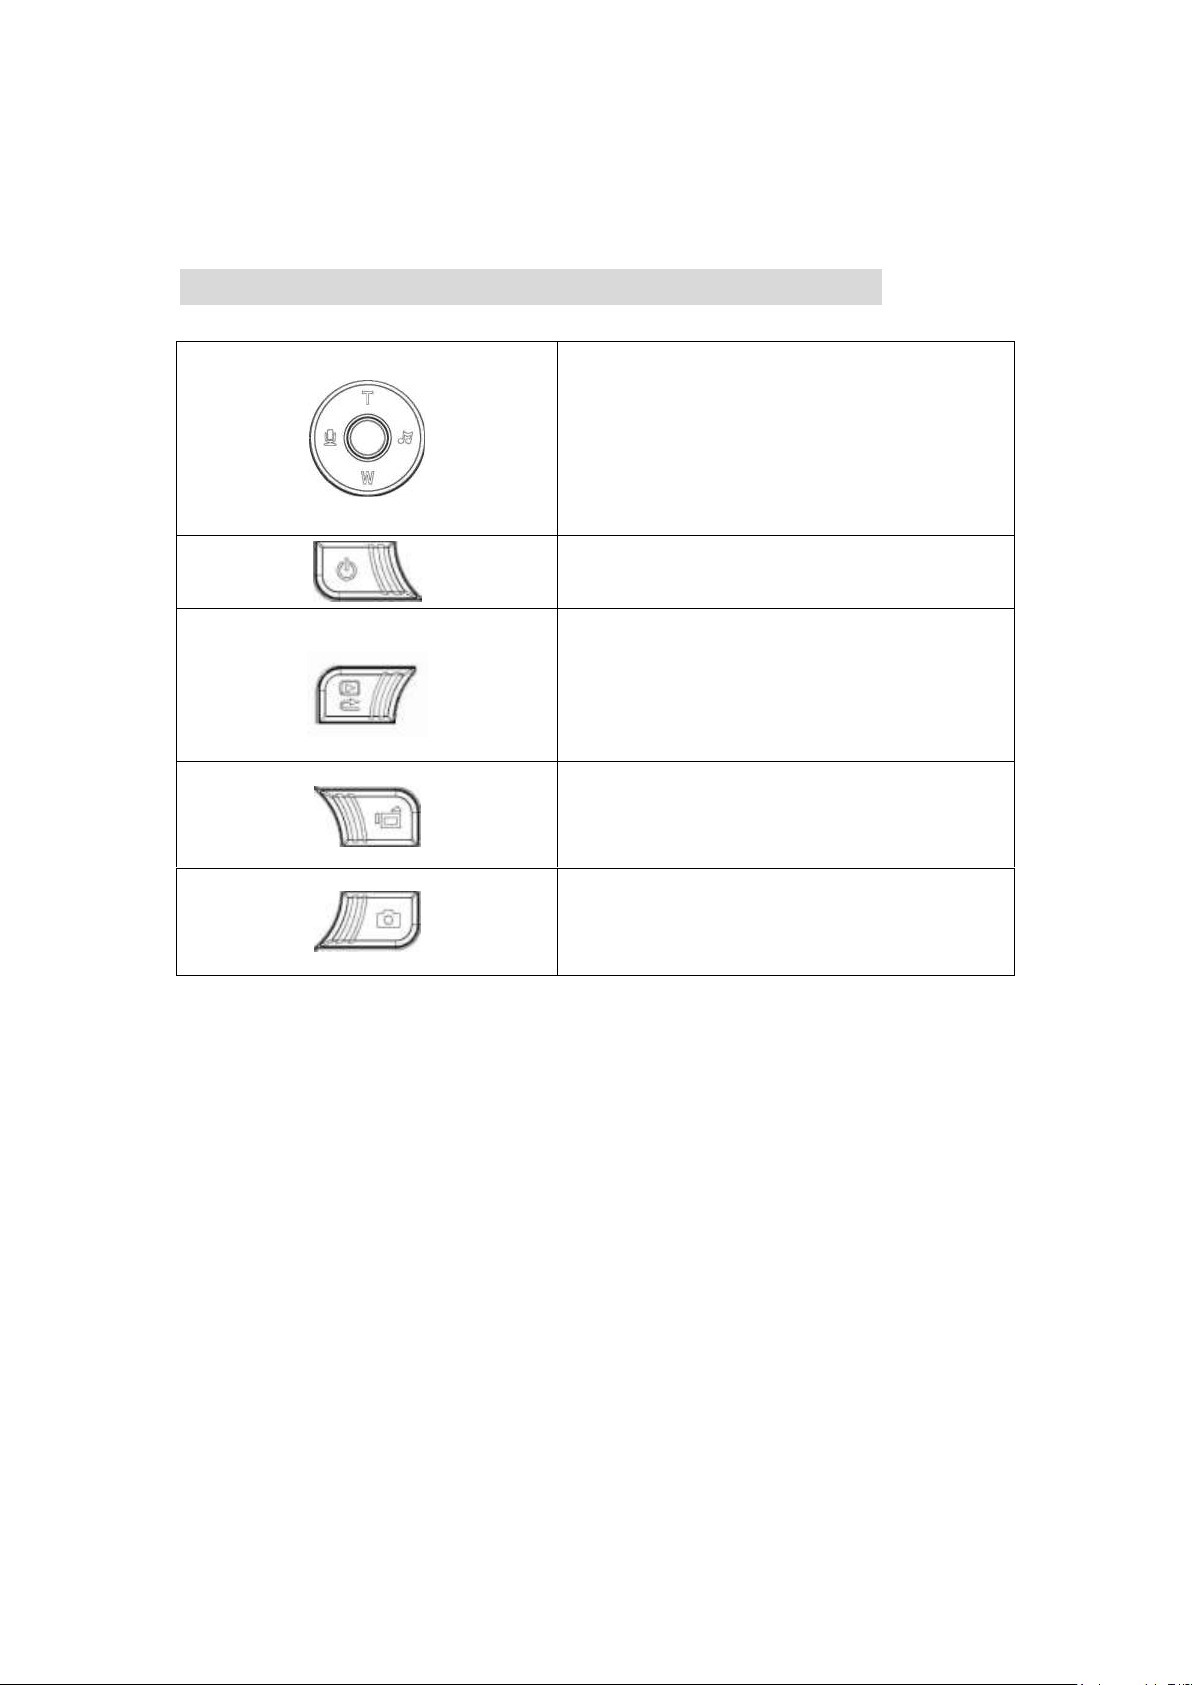
KeyPad illustration
RECORD/PLAY Button
LCD Panel
Power Button
Movie Shutter Button
Picture Shutter Button
Speaker
Direction Buttons
Enter Button
Microphone
Lens
SD card slot
LED Light
Page 5
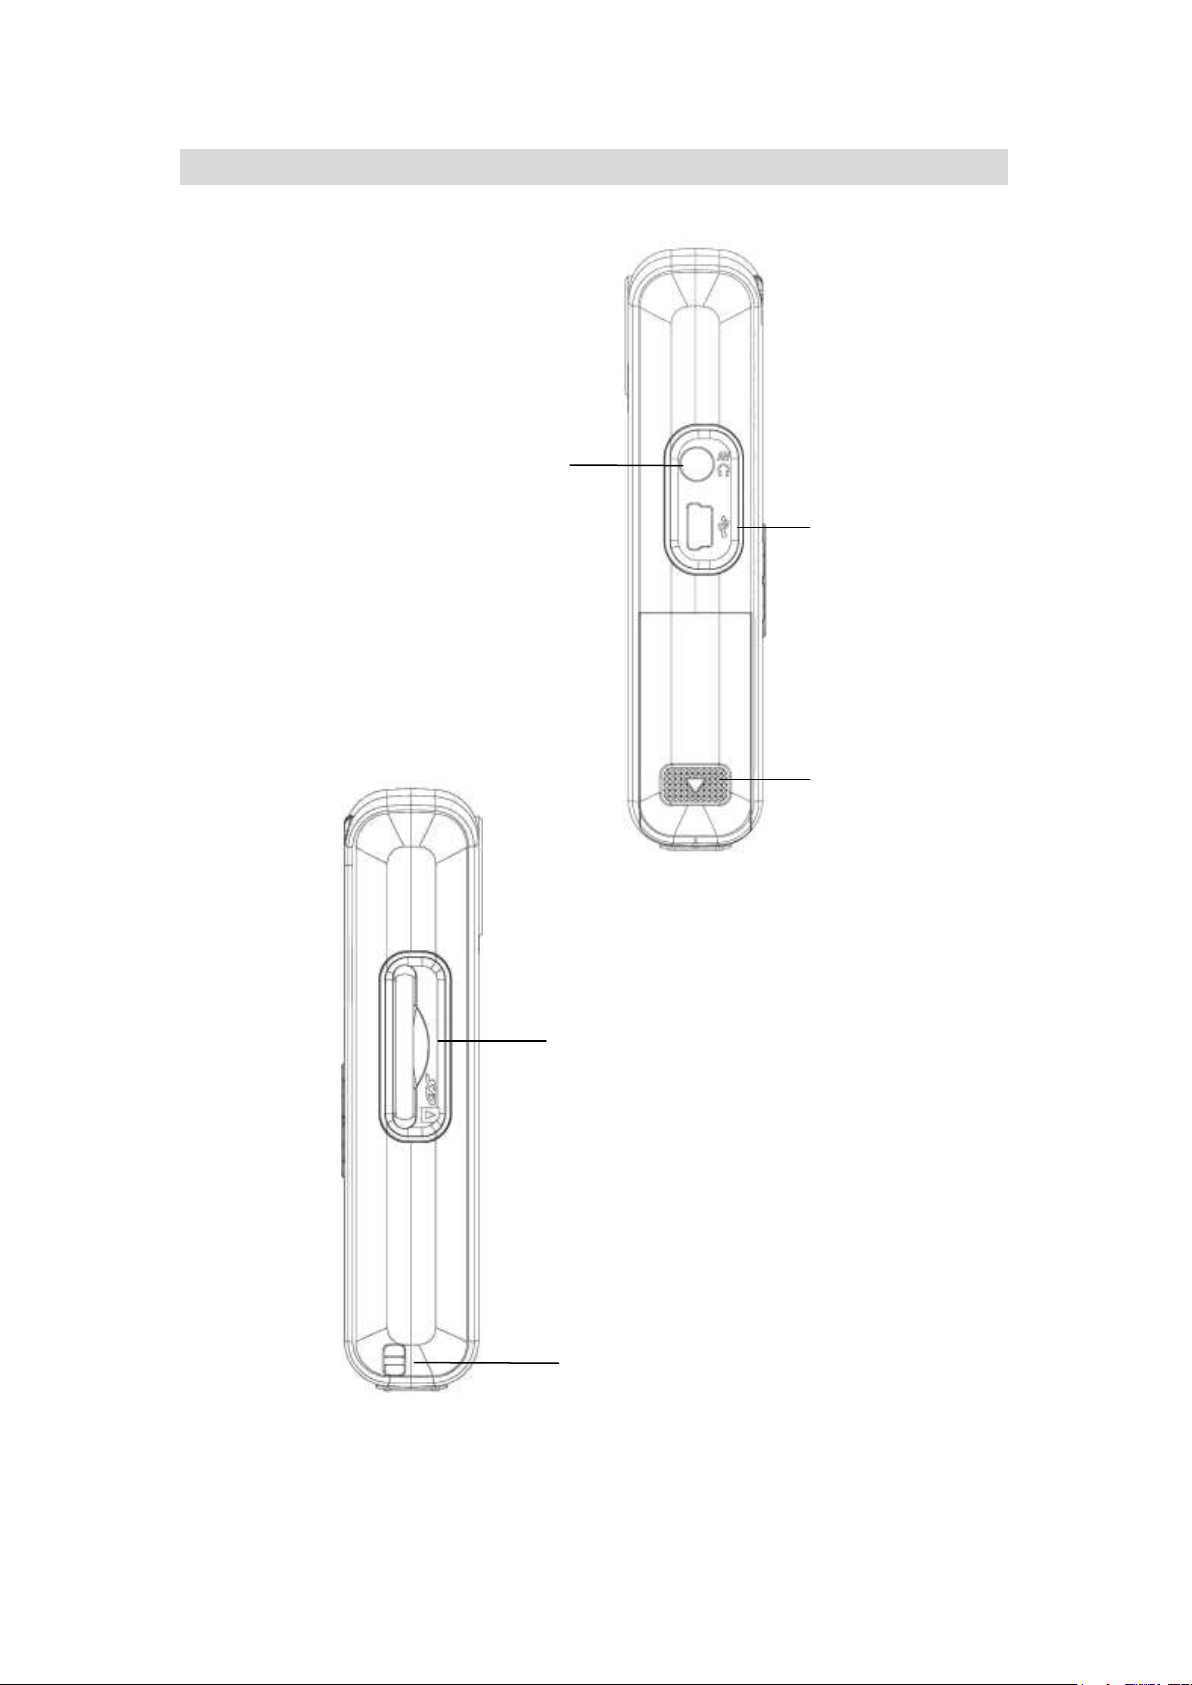
4
Side View
Mini USB2.0 port
Battery Cover
TV Out Port
SD card slot
Strap Hole
Page 6
5
Section 2
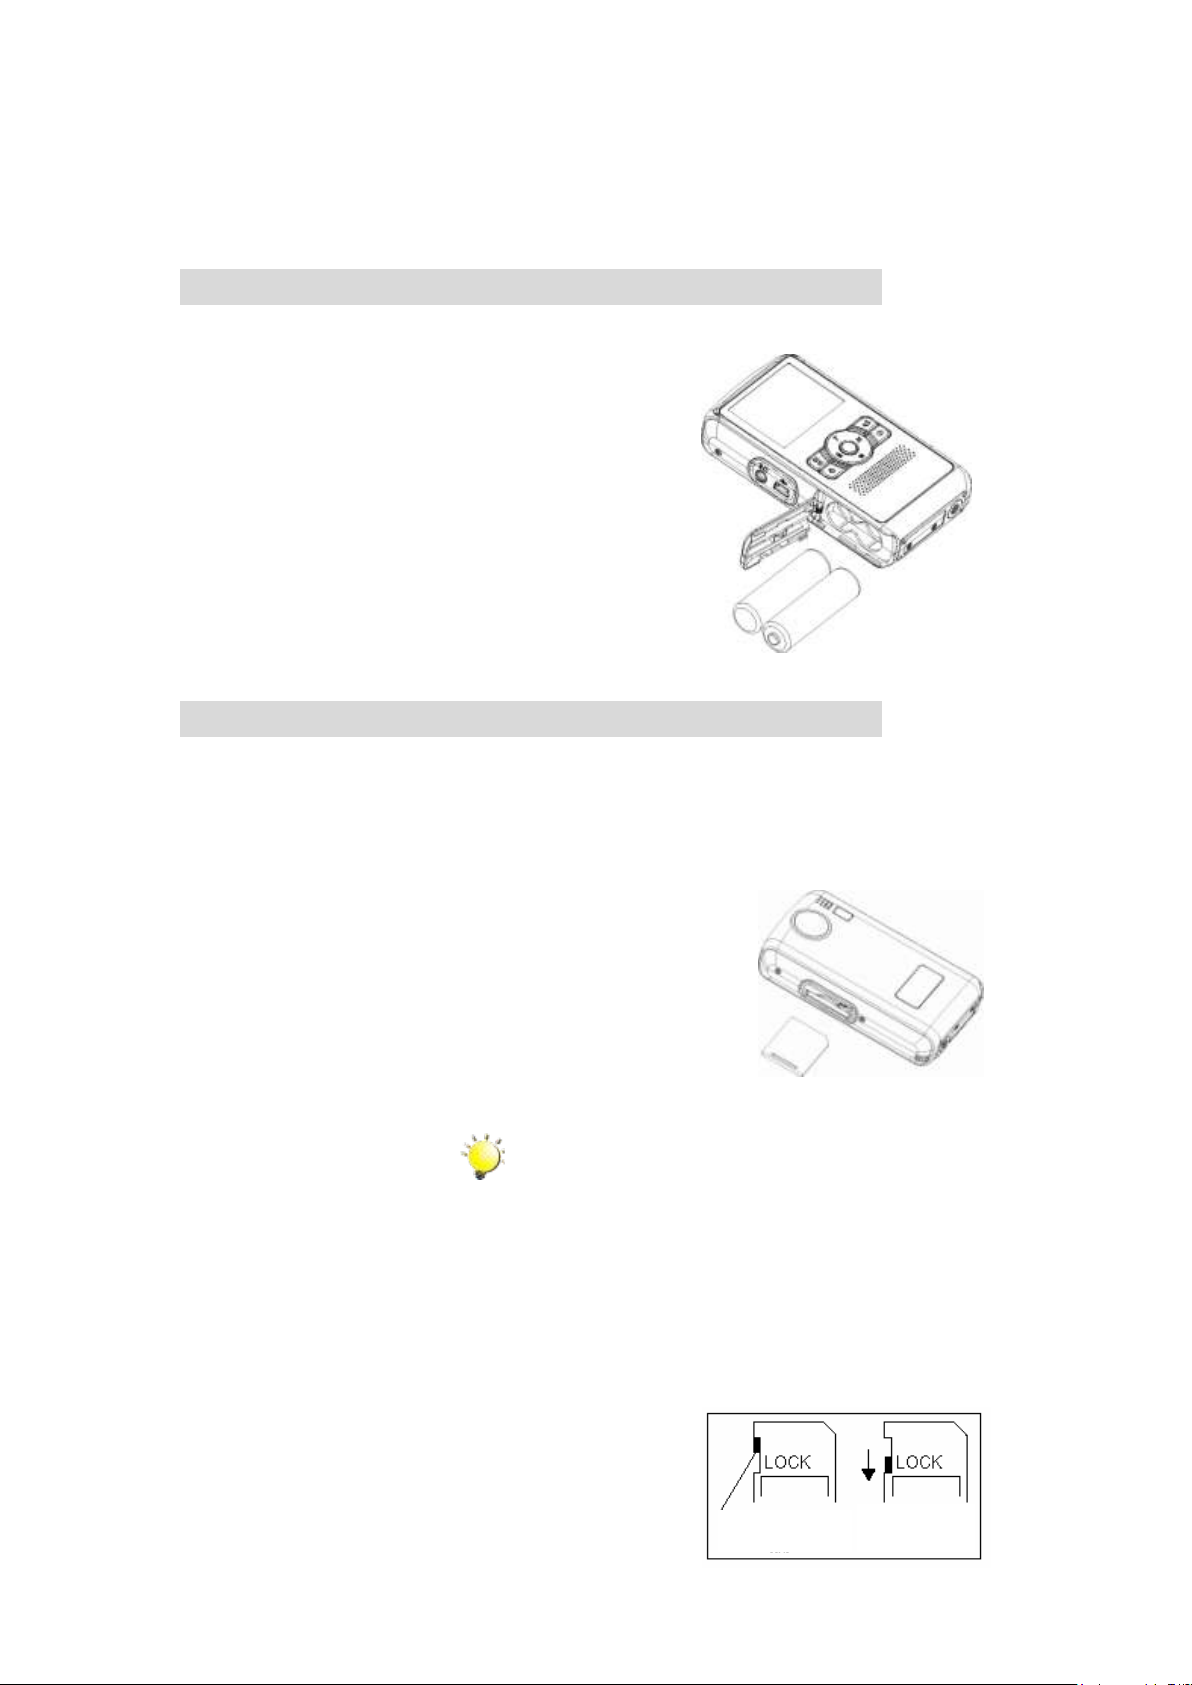
Loading the Battery
Before using the camera, users must load AA battery 2
pieces.
1. Open the battery cover.
2. Insert the batteries according to the correct polarity
marks ( + or -)
3. Close the battery cover firmly.
Inserting and Removing an SD Card(Optional)
1. Insert the memory card into the right position.
2. To remove an installed SD card, press the card inwards to
release it.
3. When the card pops out, gently remove it from its slot.
Note
When a memory card is inserted, movies and pictures
are saved on card rather than on the built-in memory.
Writeable position
Write-Protected
Position
Writeable position
Write-Protected
Position
Getting Up and Running
The camera comes with internal memory which allows you to store pictures, movies, voice
recordings and music. You can expand the memory capacity by using an optional SD or MMC
memory card up to 1GB. To insert a memory card, refer to the figure as below:
Protecting Data on an SD Card
SD card is read-only by locking the SD card. No pictures, movies and voice can be recorded
when the SD card is locked. Make sure the lock is on writeable position before recording any
media.
Page 7

6
Turning the Camera On and Getting Started
To turn on the camera:
Turning the Camera Off
Press Power Button for one second to turn on it.
To take a movie, press the Movie Shutter Button ( ).
To take a picture, press the Picture Shutter Button ( ).
To record the voice, press the left Button of Direction Buttons and press the Movie Shutter
Button ( ) to start voice recording.
To view stored movies, pictures, listen to stored MP3 and voice recordings, or read eBook,
press RECORD/PLAY Button once to switch to Playback Mode. Press a second time to
return to Record Mode.
To turn off the Camera, you can press the Power Button for one second.
Page 8
7
Section 3
Button Function
Right Button : MP3 Music Mode
Left Button : Voice Recording Mode
Up / Down Button : Tele / Wide Button, Digital
Zoom in and out.;
Enter Button : Menu ON
Power Button: Press down for one second to turn
on or turn off the camera.
RECORD/PLAY Button functions:
1. Switch between Record /Playback Mode.
2. Return to the previous page.
Movie Shutter Button:
1. Start to take movie, or record voice.
2. To stop recording, press it again.
Picture Shutter Button: Start to take picture
Record Mode
Page 9
8
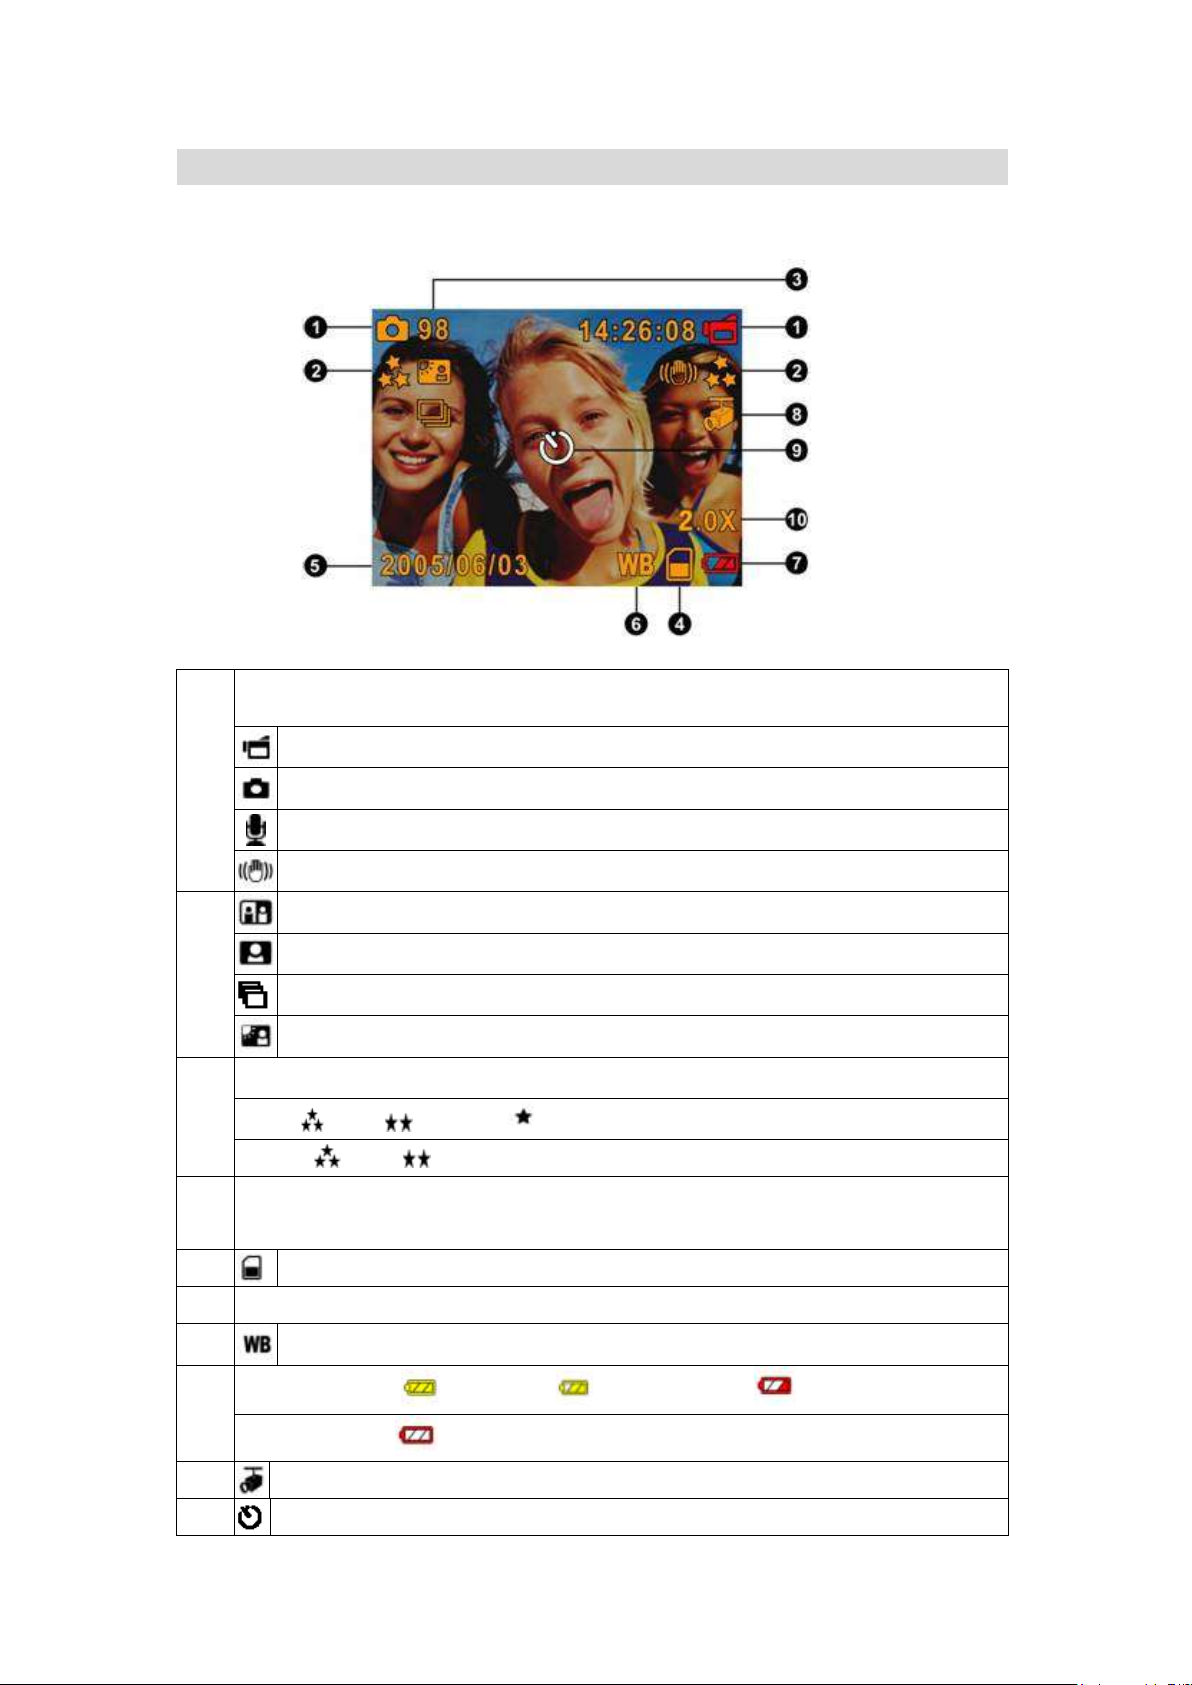
LCD Monitor Information
(1)
Record Mode
Movie Record Mode
Picture Record Mode
Voice Record Mode
Motion Stabilization
Two in One Mode
Photo Frame
Multi-snap Mode
Backlight Mode
(2)
Resolution
Movie : High / Standard/ Low
Picture: High / Standard
(3)
Number of images or recording time of movie that can still be taken at current
resolution.
(4)
SD card inserted
(5)
Date/Time : YYYY/MM/DD HH: MM
(6)
White Balance
(7)
Battery indicator: full power / medium power / low power /
power empty
(8)
Motion Detection
(9)
Selftimer enabled
Descriptions indicated on the graphic below describe the icons that appear on the LCD when
the device is operating.
Page 10
9
(10)
2X digital zoom
MPEG4 Movie Recording
Quality
High Quality
Standard Quality
Low Quality
Picture Recording
Image Quality
High Quality
Standard Quality
Voice Recording
1. Press Left Button ( ) of Direction Buttons to switch to
Voice Record Mode.
2. Press Movie Shutter Button ( ) to record voice.
3. Press Movie Shutter Button ( ) again to stop.
4. Press RECORD/PLAY Button to view the recorded
voice.
Using Digital Zoom
Press Movie Shutter button ( ) to start recording. When a movie is recording, a time
indicator will display on LCD monitor. To stop recording, press Movie Shutter Button ( )
again. Press RECORD/PLAY Button to view the recorded movie.
Three resolution settings are available:
Press the Picture Shutter Button ( ) to take a picture.
Press RECORD/PLAY Button to view the picture.
Two resolution settings are available:
The digital zoom magnifies images, when recording movies or taking pictures.
1. To zoom in/out, press the Tele/Wide Button.
2. The digital zoom can be set from 1x to 2x and the magnification ratio is shown on the
LCD monitor.
Page 11
10
Options for Record Mode
Movie Mode
Camera Mode
Voice Pen
Effect
Setting
Resolution
Exposure
Sharpness
White Balance
Stabilization
Motion Detect
Night Mode
Exit
Resolution
Exposure
Two in One
Photo Frame
Selftimer
Sharpness
White Balance
Multi-snap
Backlight
Date Printing
Night Mode
Exit
Enter
Exit
Normal
B/W
Classic
Negative
Exit
Sound
Start-up Screen
Time Setting
Format Card
TV System
Language
Default Setting
Exit
Operations for Record Mode
Operation
Screen
1. Press Enter Button when in Movie/Picture Record
Mode.
2. Use Right/Left Buttons to move between main menu
options, which are Movie Mode, Camera Mode,
Voice Pen, Effect, and Setting. Submenu will pop out
while move to each main option.
3. Press Enter Button to validate sub option you select.
4. Select Exit option to exit submenu.
Enter Button
Page 12

11
Default Setting and Validation
Validation
Default Factory Setting
Resolution
Always
High for Movie
Standard for Picture
Exposure
One Time
0EV
Sharpness
One Time
Level 5
White Balance
One Time
Auto
Stabilization
Always
Off
Motion Detect
One Time
Off
Two in One
One Time
Off
Photo Frame
One Time
Off
Selftimer
One Time
Off
Multi-snap
One Time
Off
Backlight Mode
One Time
Off
Date Printing
Always
Off
Night Mode
Always
Off
Effect
One Time
Normal
Sound
Always
On
Format Card
One Time
Off
TV System
Always
Depends on shipping area
Language
Always
Depends on shipping area
Volume
Always
Level 6
Movie Mode submenu Setting
The following table indicates the camera’s default setting as well as its validation.
1. Always: The setting always keeps valid.
2. One Time: The setting is only valid either once or until camera powers off.
Record main menu includes camera setting and other advanced settings. You can use
Right/Left Buttons to move between options and press Enter Button to validate the setting.
Movie Resolution
To change Movie Resolution:
1. In Movie/Picture Record Mode, press Enter Button to switch to record menu screen.
2. Use Right/Left Buttons to select Movie Mode. Submenu of Movie Mode will pop out on the
screen.
Page 13
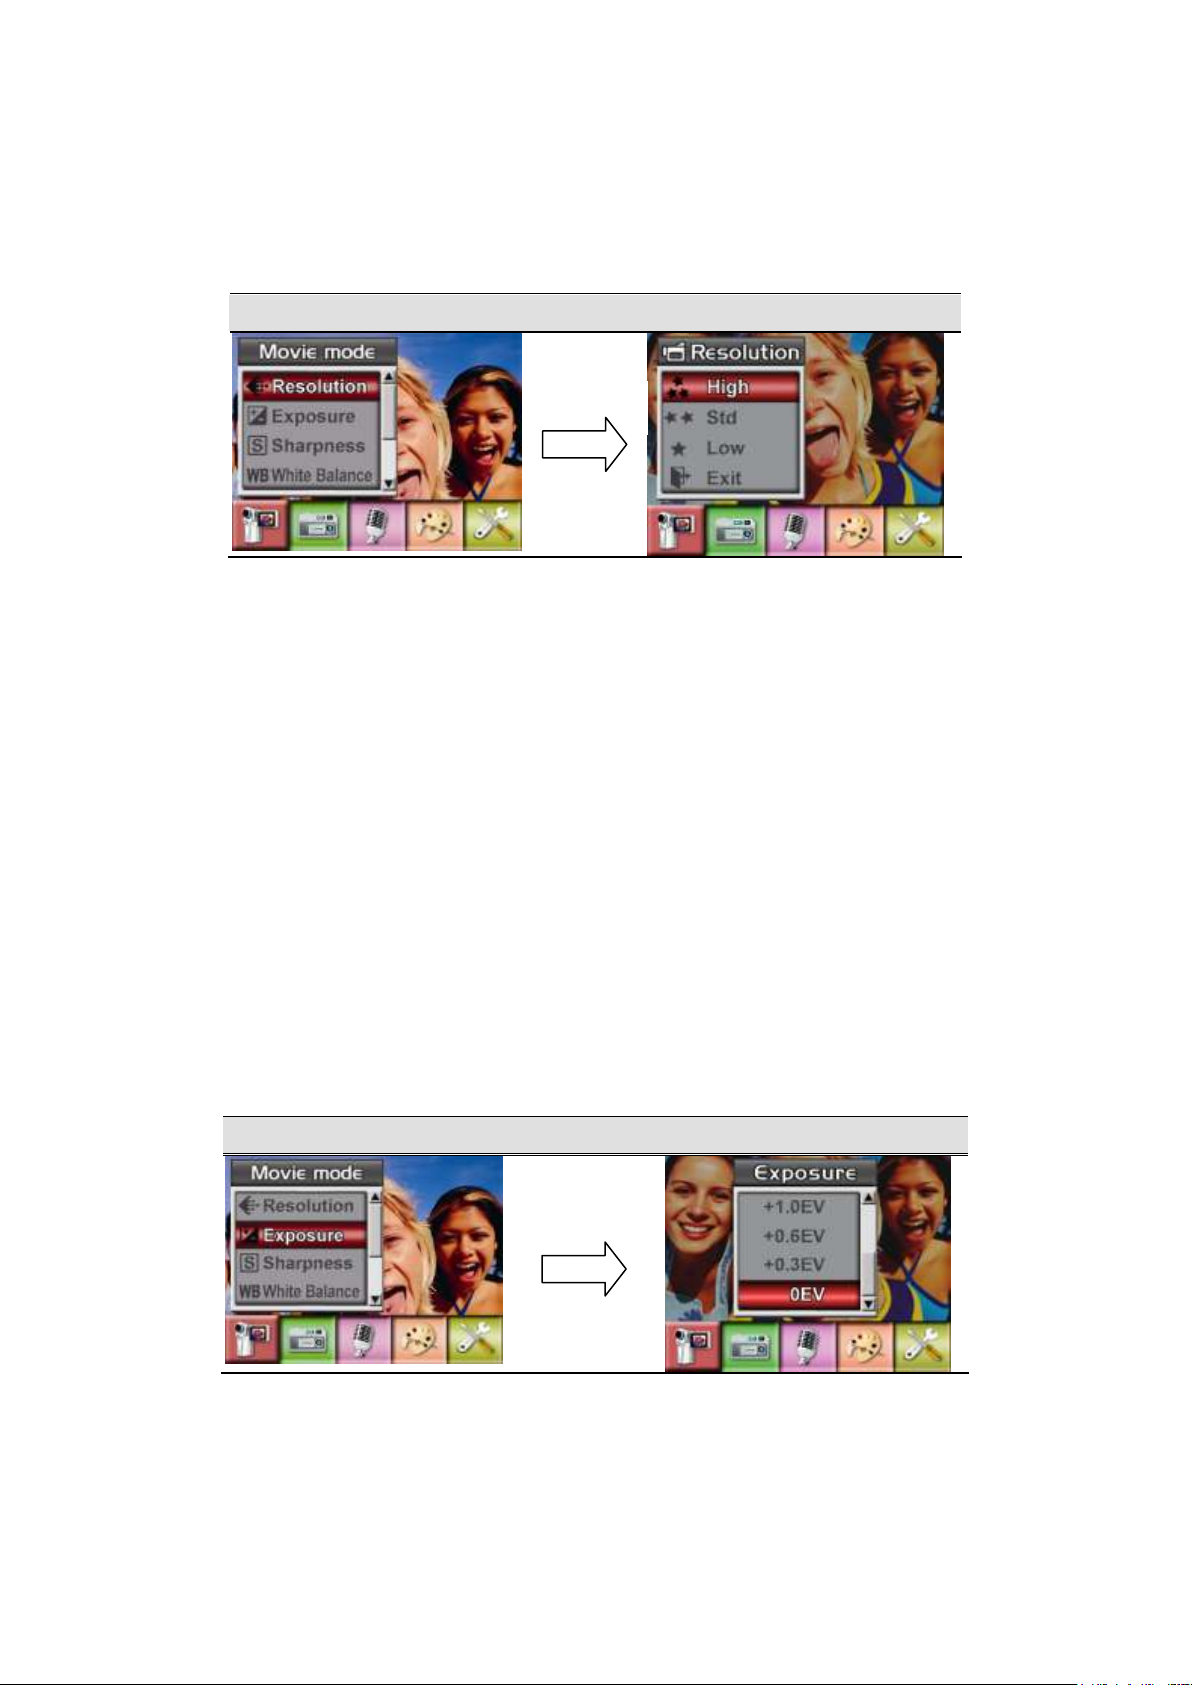
12
3. Use Up/Down Buttons to select Resolution then press Enter Button to switch to Resolution
Display Screen
Video Resolution Option
Display Screen
Exposure Option
Enter Button
Enter Button
submenu.
4. Use Up/Down Buttons to move between three settings.
5. Press Enter Button to validate the setting and exit.
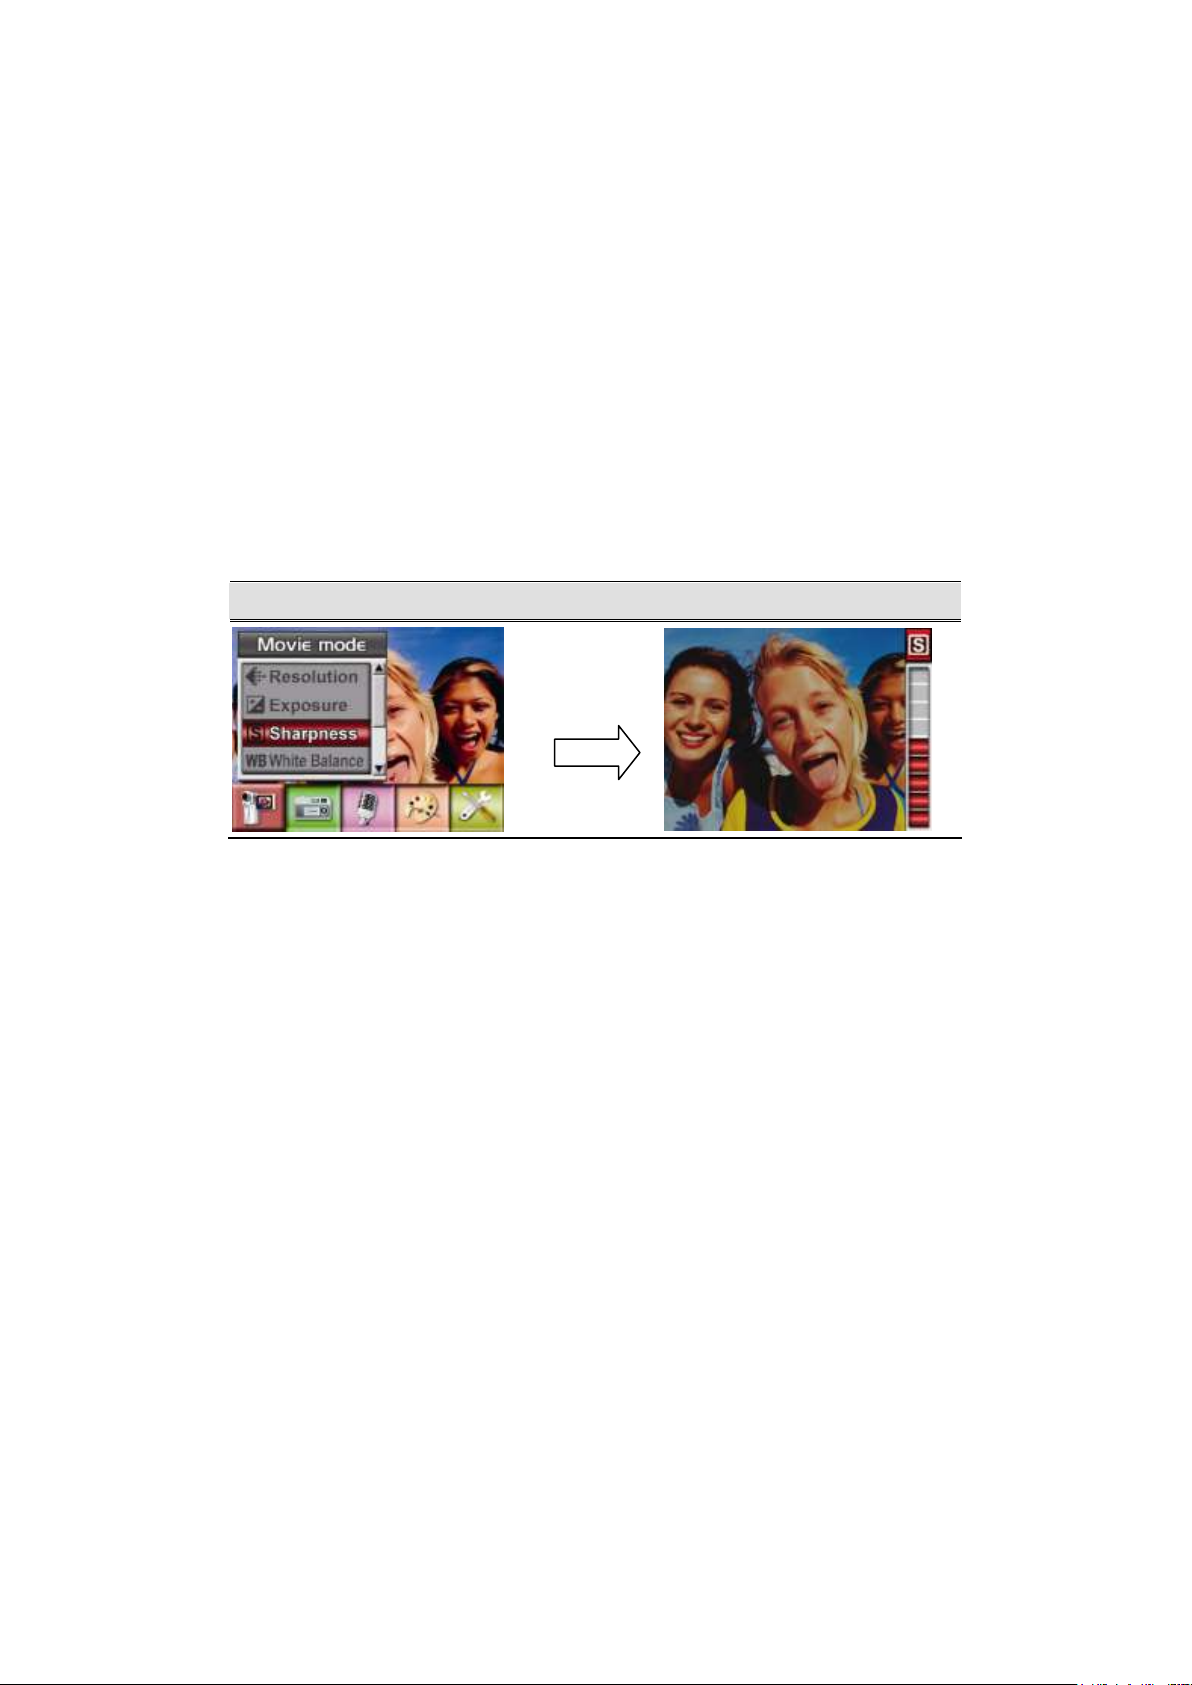
Exposure
The camera adjusts image exposure automatically. In certain circumstances you may wish to
adjust the exposure compensation setting.
To change Exposure setting:
1. In Movie/Picture Record Mode, press Enter Button to switch to record menu screen.
2. Use Right/Left Buttons to select Movie Mode. Submenu of Movie Mode will pop out on the
screen.
3. Use Up/Down Buttons to move to Exposure Option. Press the Enter Button and then
Exposure Submenu will pop out on the screen.
4. Use Up/Down Buttons to choose preferred EV value. The change can be previewed
immediately.
5. Press Enter Button to validate the setting and exit.
Page 14
13
Sharpness
Display Screen
Change Sharpness Setting
Enter Button
You can soften and sharpen images to achieve different effects.
To change Sharpness setting:
1. In Movie/Picture Record Mode, press Enter Button to switch to record menu screen.
2. Use Right/Left Buttons to select Movie Mode. Submenu of Movie Mode will pop out on the
screen.
3. Use Up/Down Buttons to select Sharpness then press Enter Button to switch to Sharpness
submenu.
4. Use Up/Down Buttons to move between nine levels. The change can be previewed
immediately.
5. Press Enter Button to validate the setting and exit.
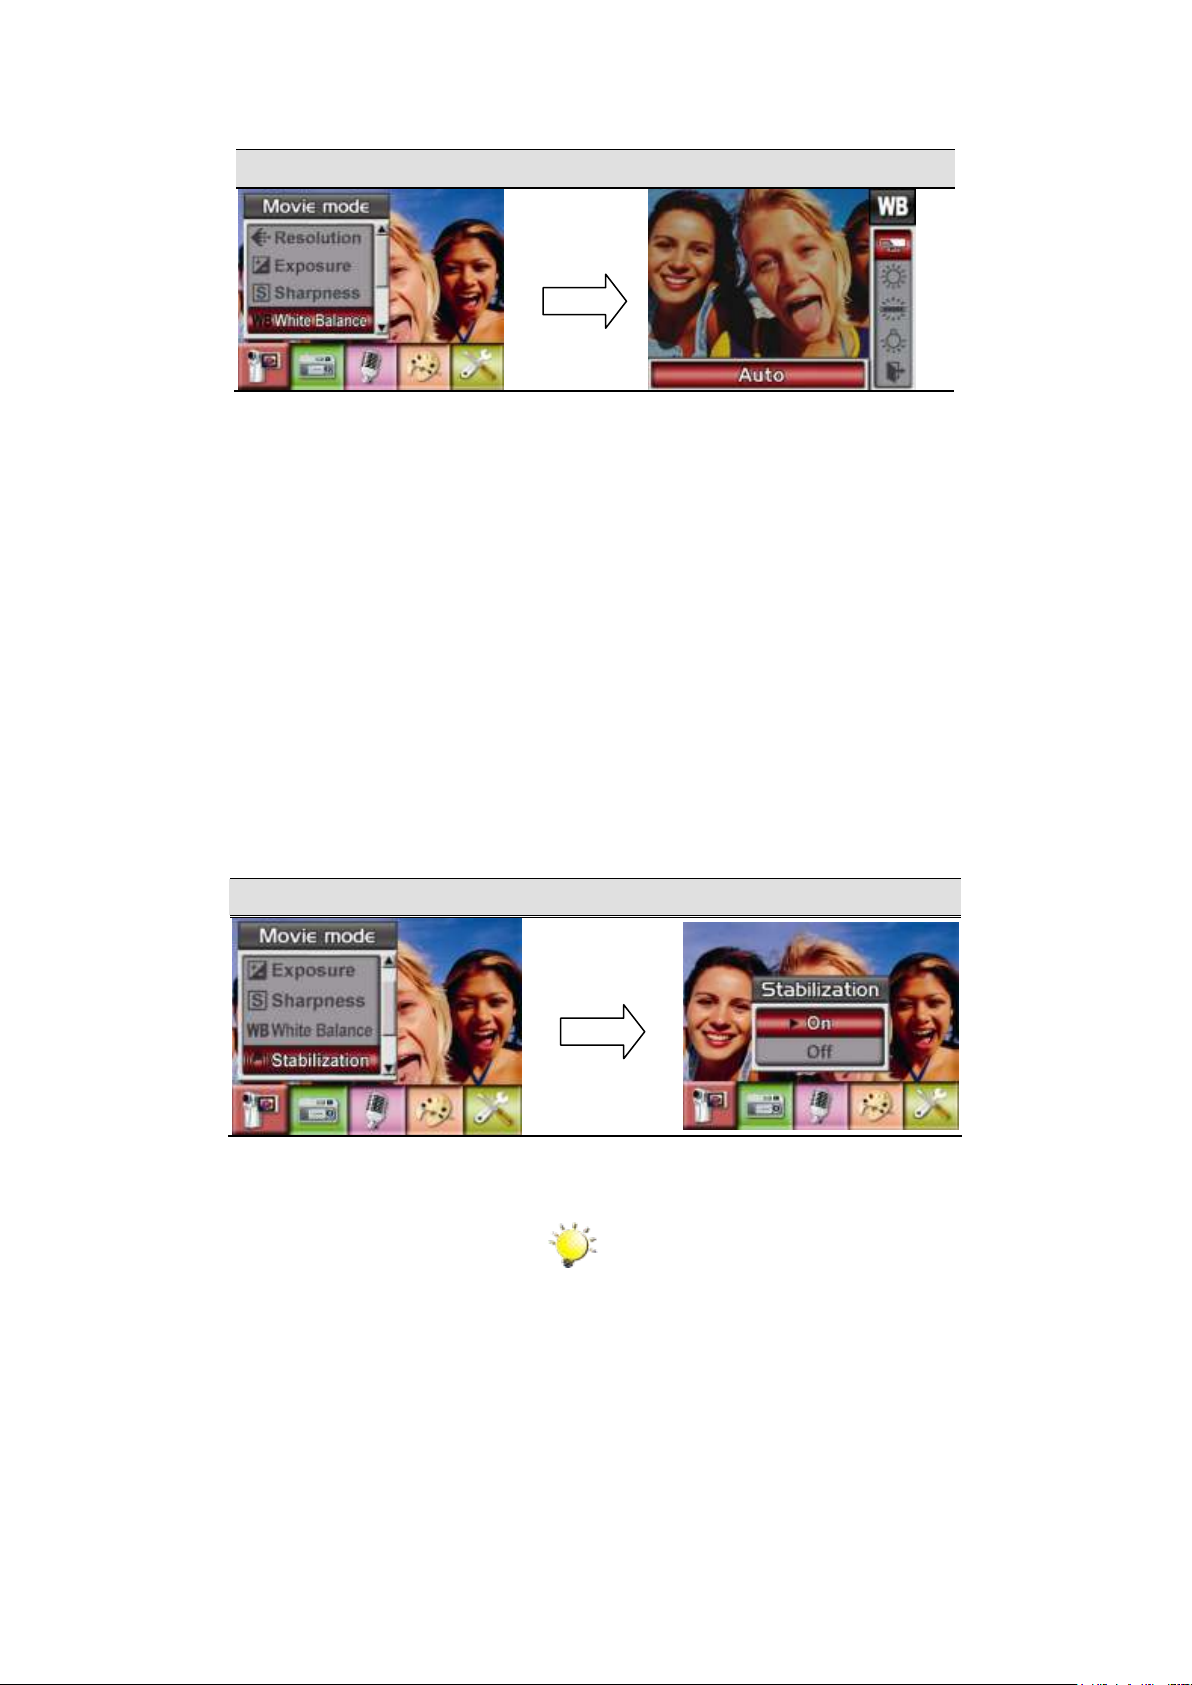
White Balance
The camera adjusts the color balance of images automatically. Three manual white balance
settings are available:
1. Auto (Default): The camera automatically adjusts white balance.
2. Daylight: Under outdoors
3. Fluorescent: Under fluorescent light condition.
4. Tungsten: Under tungsten light condition.
To change White Balance Setting:
1. In Movie/Picture Record Mode, press Enter Button to switch to record menu screen.
2. Use Right/Left Buttons to select Movie Mode. Submenu of Movie Mode will pop out on the
screen.
3. Use Up/Down Buttons to select White Balance, then press Enter Button to switch to White
Balance submenu.
4. Use Up/Down Buttons to move between four settings. The change can be previewed
immediately.
5. Press Enter Button to validate the setting and exit.
Page 15
14
Display Screen
W/B Option
Stabiization
Stabilization Option
Note
1. The captured screen will be smaller when
stabilization is enabled.
2. Digital Zoom is disabled when
stabilization is activated.
Enter Button
Enter Button
Stabilization
To enable Stabilization:
1. In Movie/Picture Record Mode, press Enter Button to switch to record menu screen.
2. Use Right/Left Buttons to select Movie Mode. Submenu of Movie Mode will pop out on the
screen.
3. Use Up/Down Buttons to select Stabilization then press Enter Button to switch to
Stabilization submenu.
4. Use Up/Down Buttons to choose ON or OFF.
5. Press Enter Button to validate the setting and exit.
Page 16
15
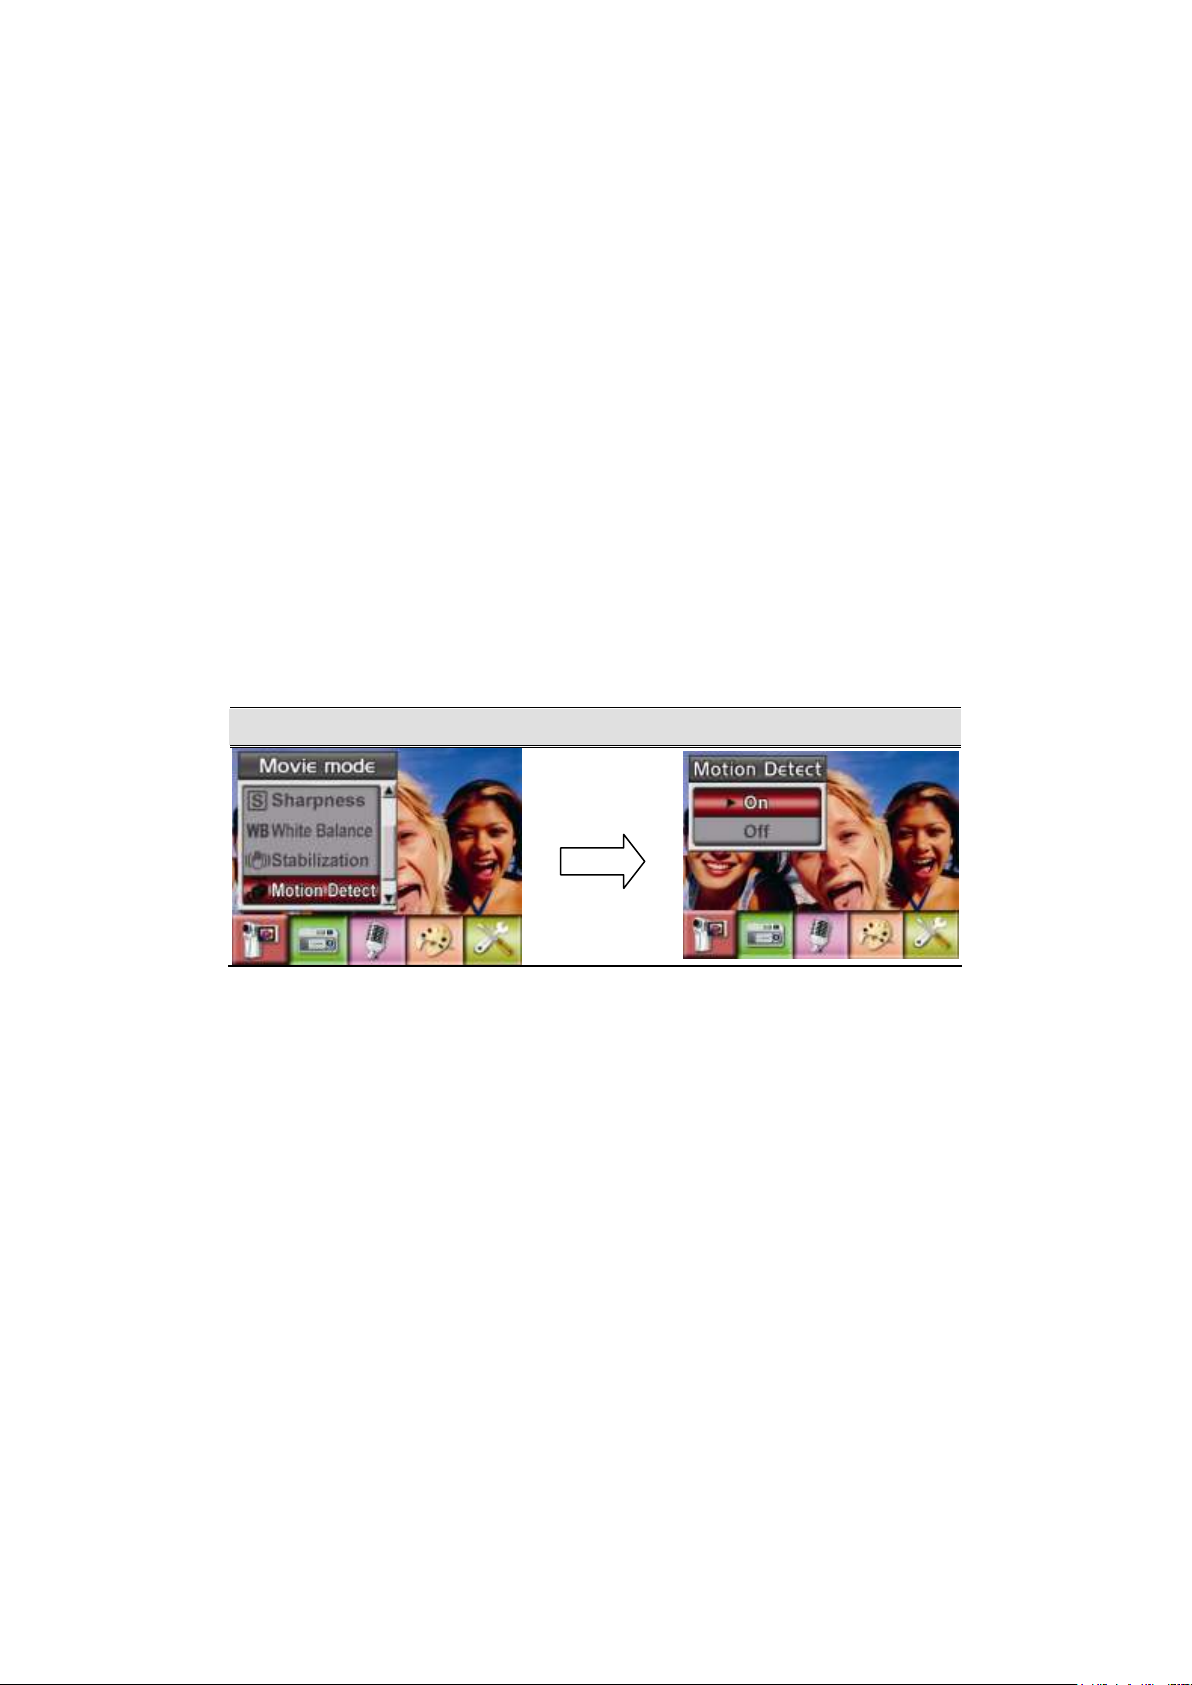
Motion Detection
Motion Detect
Motion Detect Option
Enter Button
To enable Motion Detection:
1. In Movie/Picture Record Mode, press Enter Button to switch to record menu screen.
2. Use Right/Left Buttons to select Movie Mode. Submenu of Movie Mode will pop out on
the screen.
3. Use Up/Down Buttons to select Motion Detect then press Enter Buttons to switch to
Motion Detect submenu.
4. Use Up/Down Buttons to choose ON or OFF.
5. Press Enter Button to validate the setting and exit.
6. Camera will start to record video once if there is a movement for 3 consecutive seconds.
Stop recording if there is no movement for 3 seconds.
Night Mode
With the camera set at Night Mode, you can take movie of evening or night scenes.
To enable Night Mode:
1. In Movie/Picture Record Mode, press Enter Button to switch to record menu screen.
2. Use Right/Left Buttons to select Movie Mode. Submenu of Movie Mode will pop out on the
screen.
3. Use Up/Down Buttons to select Night Mode then press Enter Button to switch to Night
Mode submenu.
4. Use Up/Down Buttons to choose ON or OFF.
5. Press Enter Button to validate the setting and exit.
Page 17
16
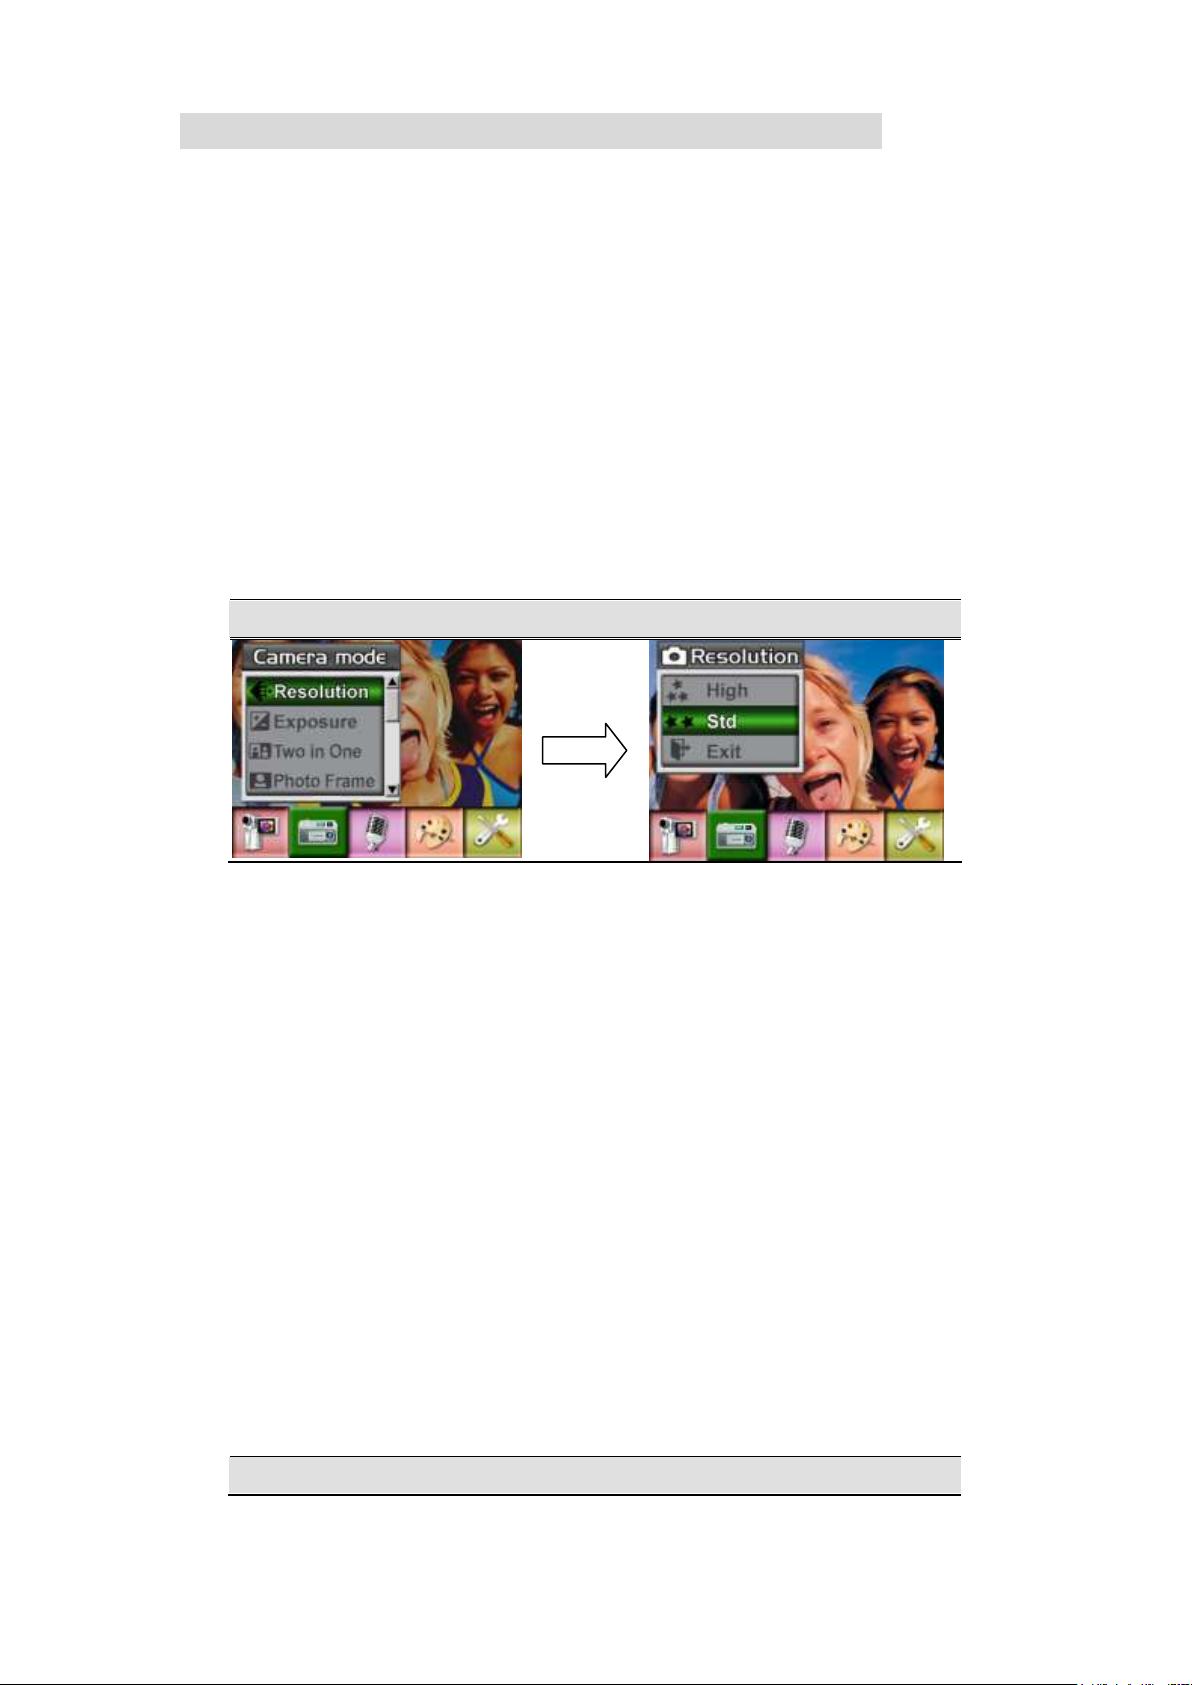
Camera Mode Setting
Display Screen
Video Resolution Option
Display Screen
Exposure Option
Enter Button
Picture Resolution
To change Picture Resolution:
1. In Movie/Picture Record Mode, press Enter Button to switch to record menu screen.
2. Use Right/Left Buttons to select Camera Mode. Submenu of Camera Mode will pop out on
the screen.
3. Use Up/Down Buttons to select Resolution then press Enter Button to switch to Resolution
submenu.
4. Use Up/Down Buttons to move between two settings.
5. Press Enter Button to validate the setting and exit.
Exposure
The camera adjusts image exposure automatically. In certain circumstances you may wish to
adjust the exposure compensation setting.
To change Exposure setting:
1. In Movie/Picture Record Mode, press Enter Button to switch to record menu screen.
2. Use Right/Left Buttons to select Camera Mode. Submenu of Camera Mode will pop out on
the screen
3. Use Up/Down Buttons to move to Exposure Option. Press the Enter Button and then
Exposure Submenu will pop out on the screen.
4. Use Up/Down Buttons to choose preferred EV value. The change can be previewed
immediately.
5. Press Enter Button to validate the setting and exit.
Page 18

17
Display Screen
Two in One Option
Enter Button
Two in One ( Picture Record Mode Only)
With camera set to Two in One mode, you can combine two snapshots into one picture. To
enable Two in One:
1. In Movie/Picture Record Mode, press Enter Button to switch to record menu screen.
2. Use Right/Left Buttons to select Camera Mode. Submenu of Camera Mode will pop out on
the screen.
3. Use Up/Down Buttons to select Two in One then press Enter Button to switch to Two in One
submenu.
4. Use Up/Down Buttons to choose ON or OFF.
5. Press Enter Button to validate the setting and exit.
Page 19

18
1. Press Picture Shutter Button to
take first picture.
2. Press Picture Shutter Button to
take second picture.
3. Press the RECORD/PLAY
Button to view the Two in One
picture.
Display Screen
Photo Frame Option
Enter Button
Photo Frame (Picture Record Mode Only)
Your camera features popular electronic photo frame. You can take your picture with preferred
electronic photo frame. To enable Photo Frame:
1. When in Camera Mode, use Up/Down Buttons to select Photo Frame option, then press
2. Use Up/Down Buttons to locate preferred photo frame. Then select Set option and press
Enter Button to switch to Photo Frame submenu.
Enter Button to validate the setting and exit.
Page 20

19
Display Screen
Selftimer Options
Display Screen
Change Sharpness Setting
Enter Button
Enter Button
Selftimer (Picture Record Mode Only)
The Selftimer allows you to take pictures with a ten-second time delay. When the Selftimer is
activated, the Selftimer LED on the front of the camera beneath the flash light will blink. The
speed of blinking will increase just before the picture is taken.
To enable Selftimer:
1. When in Camera Mode, use Up/Down Buttons to select Selftimer, then press Enter Button
to switch to Selftimer submenu.
2. Use Up/Down Buttons to choose On or Off.
3. Press Enter Button to validate the setting and exit.
Sharpness
You can soften and sharpen images to achieve different effects.
To change Sharpness setting:
1. When in Camera Mode, use Up/Down Buttons to select Sharpness Option, then press
Enter Button to switch to Sharpness submenu.
2. Use Up/Down Buttons to select Sharpness then press Enter Button to switch to Sharpness
submenu.
3. Use Up/Down Buttons to move between nine levels. The change can be previewed
immediately.
4. Press Enter Button to validate the setting and exit.
Page 21

20
Display Screen
W/B Option
Enter Button
Enter Button
White Balance
The camera adjusts the color balance of images automatically. Three manual white balance
settings are available:
1. Auto (Default): The camera automatically adjusts white balance.
2. Daylight: Under outdoors
3. Fluorescent: Under fluorescent light condition.
4. Tungsten: Under tungsten light condition.
To change White Balance Setting:
1. In Movie/Picture Record Mode, press Enter Button to switch to record menu screen.
2. Use Right/Left Buttons to select Camera Mode. Submenu of Camera Mode will pop out on
the screen.
3. Use Up/Down Buttons to select White Balance, then press Enter Button to switch to White
Balance submenu.
4. Use Up/Down Buttons to move between four settings. The change can be previewed
immediately.
5. Press Enter Button to validate the setting and exit.
Multi-snap (Picture Record Mode Only)
With the camera set to Multi-snap Mode, you can take five continuous pictures.
To enable Multi-snap:
1. When in Camera Mode, use Up/Down Buttons to select Multi-snap, then press Enter Button
to switch to Multi-snap submenu.
Page 22

21
2. Use Up/Down Buttons to choose On or Off.
Display Screen
Multi-snap Option
Display Screen
Backlight Option
Enter Button
Enter Button
3. Press Enter Button to validate the setting and exit.
Backlight (Picture Record Mode Only)
With the camera set to backlight Mode, you can take shots when bright light is behind the
subject.
To enable Backlight:
1. When in Camera Mode, use Up/Down Buttons to select Backlight, then press Enter Buttons
to switch to Backlight submenu.
2. Use Up/Down Buttons to choose On or Off.
3. Press Enter Button to validate the setting and exit.
Page 23

22
Date Printing
Display Screen
Date Printing Option
Note
Date would be shown on the printed picture
once date printing is enabled.
Voice Pen
Enter Button
To enable Date Printing:
1. When in Camera Mode, use Up/Down Buttons to select Date Printing, then press Enter
Buttons to switch to Date Printing submenu.
2. Use Up/Down Buttons to choose On or Off.
3. Press Enter Button to validate the setting and exit.
Night Mode
With the camera set at Night Mode, you can take picture of evening or night scenes.
To enable Night Mode:
1. In Movie/Picture Record Mode, press Enter Button to switch to record menu screen.
2. Use Right/Left Buttons to select Movie Mode. Submenu of Movie Mode will pop out on the
screen.
3. Use Up/Down Buttons to select Night Mode then press Enter Button to switch to Night
Mode submenu.
4. Use Up/Down Buttons to choose ON or OFF.
5. Press Enter Button to validate the setting and exit.
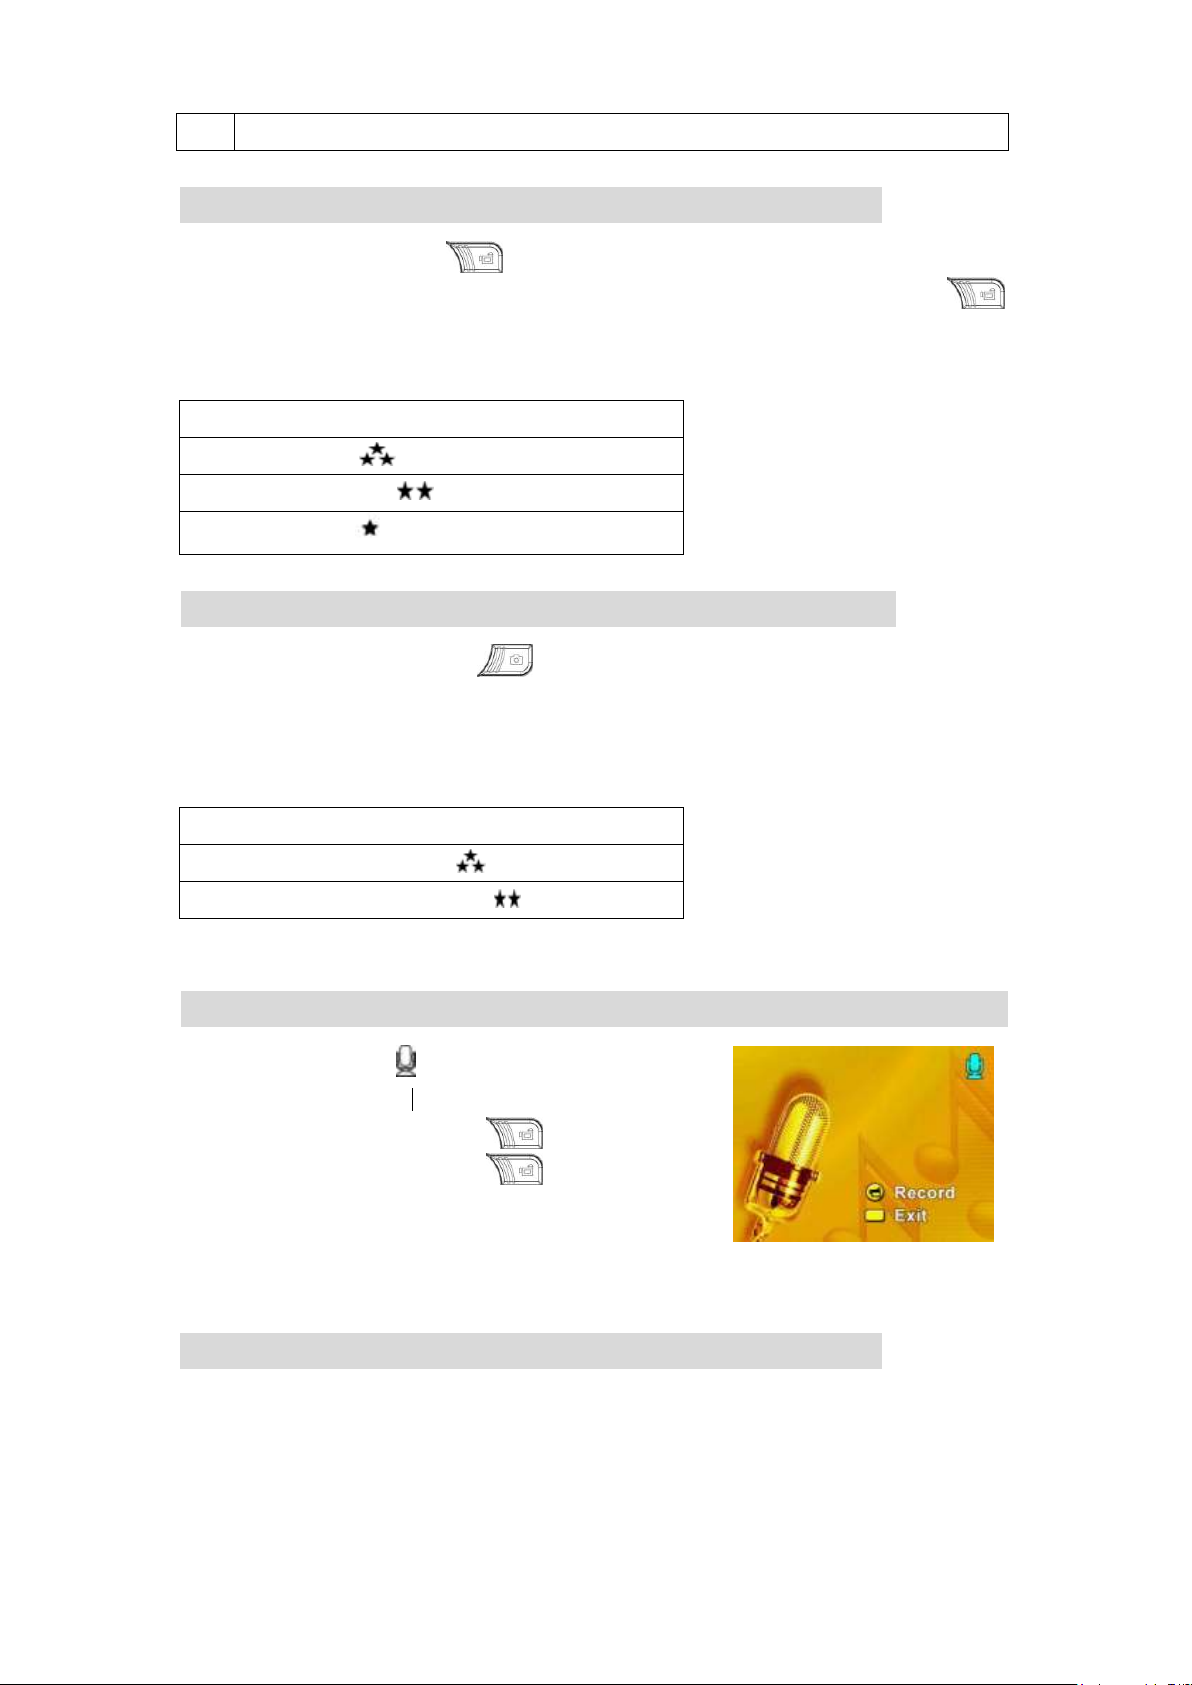
To enable voice recording:
1. In Movie/Picture Record Mode, press Enter Button to switch to record menu screen. Or
press left button ( ) of Direction Button to switch to Voice Record Mode.
2. Use Right/Left Buttons to move to Voice Option. Then Voice Submenu will pop out on the
screen.
3. Use Up/Down Button to move between Enter and Exit Option.
Page 24

23
4. Choose Enter option to enable voice recording and press Enter Button to validate the setting
Display Screen
Voice Pen Option
Effect Setting
Display Screen
Setting Menu
Enter Button
and exit.
There are four modes which are Normal, B/W, Classic and Negative.
To change Effect setting:
1. In Movie/Picture Record Mode, press Enter Button to switch to record menu screen.
2. Use Right/Left Buttons to move to Effect Option. Then Effect Submenu will pop out on the
screen.
3. Use Up/Down Buttons to move between four settings. The change can be previewed
immediately.
4. Press Enter Button to validate the setting and exit.
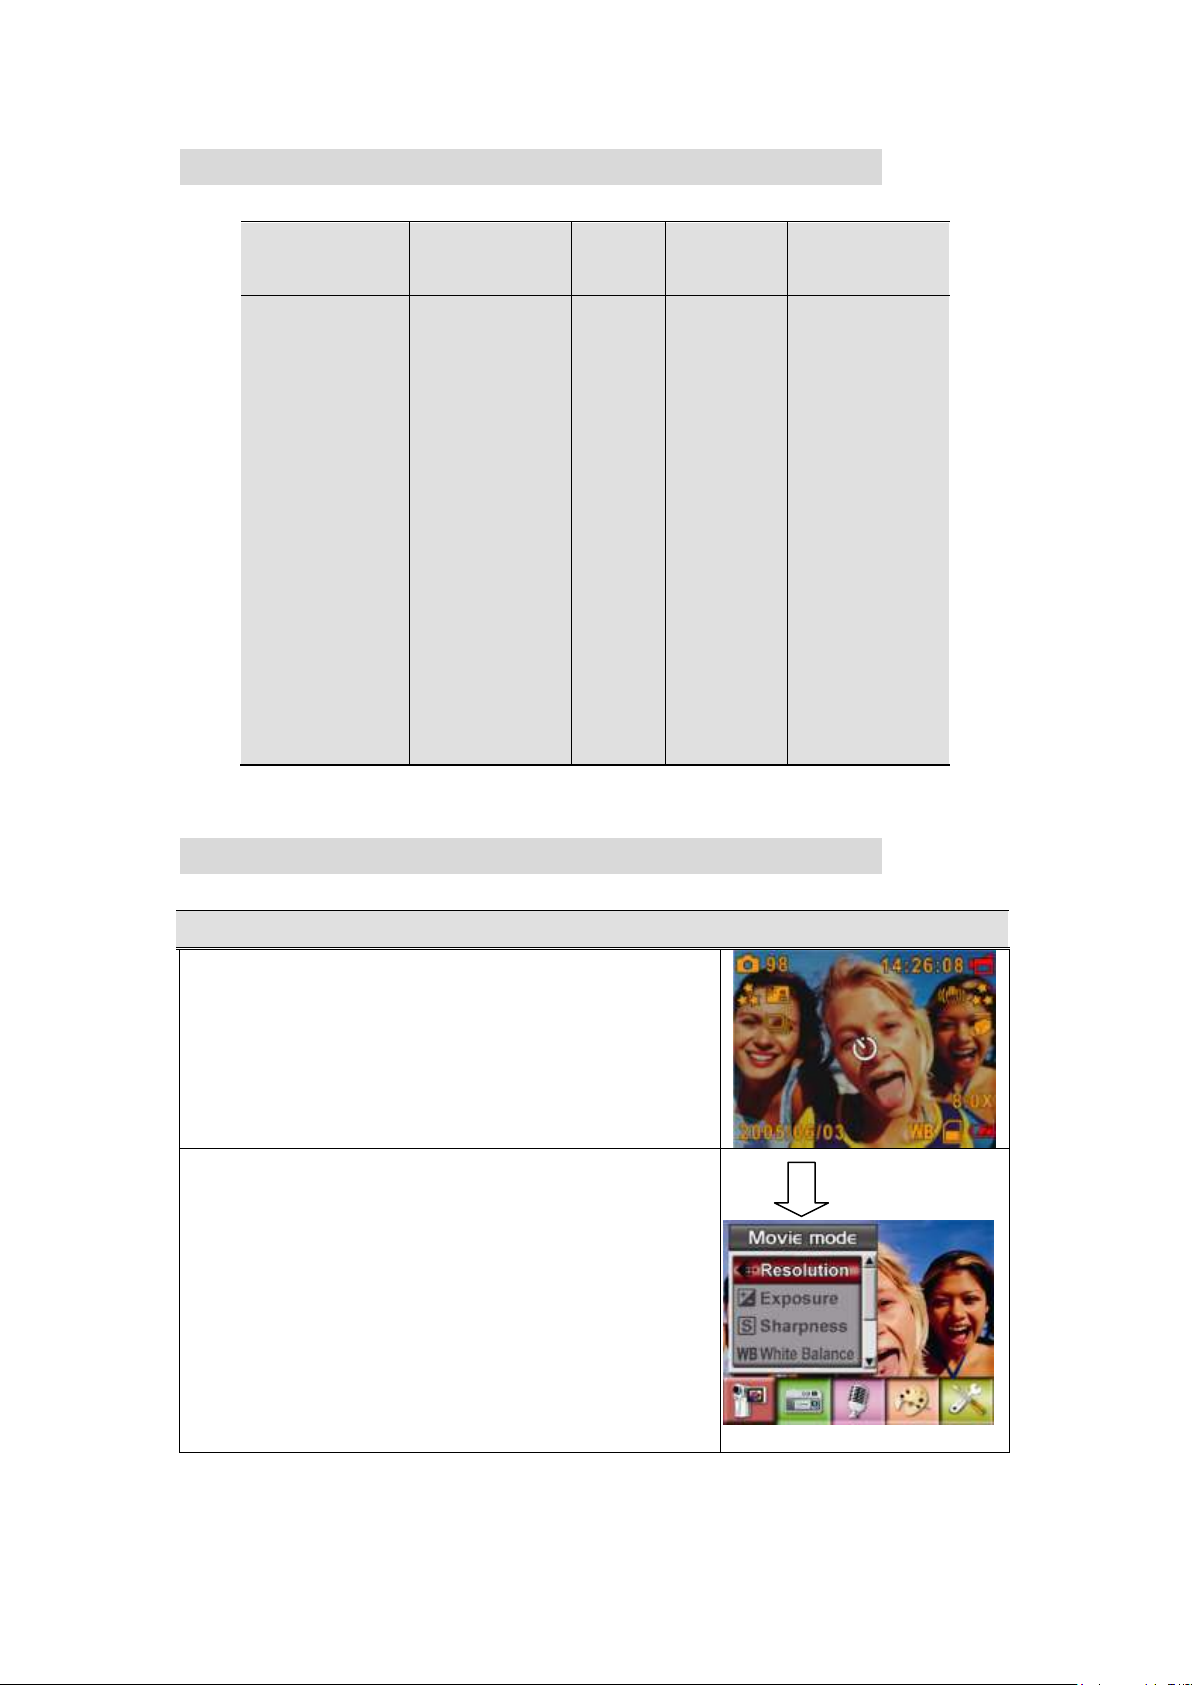
The Setting submenu contains options for configuring your camera set up.
To change advanced setting:
1. In Movie/Picture Record Mode, press Enter Button to switch to record menu screen.
2. Use Right/Left Buttons to move to Setting option, then Setting Submenu will pop out on the
Page 25

24
screen.
Display Screen
Setting Option
Sound (operation sound)
Start-Up Screen
Time Setting
Format Card
TV System
Language
Default Setting
Submenu
Display Screen
Sound Setting
Sound
Submenu
Display Screen
Start-Up Screen
Start-Up Screen
3. Use Up/Down Buttons to move between settings.
Sound Setting
Enable or disable KeyPad tone and operation sound by using Up/Down Buttons, the press
Enter Button to validate the setting.
Start-up Screen
Customize the Start-Up Screen with your favorite pictures. Press Right/Left Buttons to select
the picture you want and press Enter Button to validate the setting and exit.
If you do not want to customize the start up screen, press Left/Right Buttons and select No
)
Page 26

25
Start-Up Screen.
No Start-Up Screen
Page 27

26
Time Setting
Submenu
Display Screen
Time Setting
Time Setting
Submenu
Display Screen
Format Card Options
Format Card
Note
All the data will be erased if the SD card is
formatted. Make sure all the data is
duplicated to PC before formatting SD
card.
Move between Date, Time, Set and Exit by using Left/Right Buttons.
Adjust date and time by using Up/Down Buttons, then select Set to validate each change.
Select Exit to leave Time Setting without any change.
Format Card
Yes:Format the SD Card / built-in memory
No (Default):Do not format SD Card / built in memory
Page 28

27
TV System
Submenu
Display Screen
TV System Option
TV System
Submenu
Display Screen
Language
Submenu
Display Screen
Default Setting Options
Default Setting
Ensure that the appropriate TV standard of your area is selected – either NTSC or PAL.
Wrong TV system setting may cause image flicker.
NTSC standard: USA, Canada, Japan, South Korea and Taiwan etc.
PAL standard: UK, Europe, China, Australia, Singapore and Hong Kong etc.
Selecting Interface Language
Default Setting
To restore the default factory setting, select this option.
Page 29

28
Section 4
Operation
Display Screen
Press RECORD/PLAY Button to switch from Record
Mode to Playback Mode Main Menu.
There are five options in the Playback Mode, movie,
picture, voice, music, and eBook.
Direction Buttons can be used to select the specific
option.
Press Enter Button to view movies/pictures, listen to
voice/music, or read eBook.
Note
When any recorded movie, picture, voice,
music, or eBook is stored in the camera, a folder
will be shown on the respective playback mode.
Button Functions
Right Button : Go to the next movie/ picture.
Left Button : Go to the previous movie/ picture.
Up Button : Invalid
Down Button : Information ON/OFF
Enter Button : Enter to movie, picture, voice,
music or e-Book option menu.
RECORD/PLAY Button functions:
1. Switch between Record and Playback modes.
2. Return to the previous page.
Movie Shutter Button:
Start playing the recorded movie or voice
Playback Mode
Press RECORD/PLAY Button to switch from Record Mode to Playback Mode.
The Playback Mode is for viewing and managing movies and pictures as well as listening to
voice and music, or read eBook on the built-in memory or on an optional memory card.
The Direction Buttons have the following functions in Movie and Picture Playback Modes.
Page 30

29
LCD Monitor Information
(1)
Mode Indicator
Movie Playback Mode
Picture Playback Mode
Voice Playback Mode
Music Playback Mode
eBook Playback Mode
(2)
Resolution Indicator
High Resolution
Standard Resolution
Low Resolution
(3)
Indicate the selected movie/picture is locked.
Indicate the single movie/voice/MP3 is being repeated.
Indicate all of the movies/voices/MP3 are being repeated.
Indicate the slide show is playing.
(4)
Current Number/ Total number of movie, picture, voice, or MP3.
Indicators on the LCD screen while in Playback Mode:
Page 31

30
Movie Playback
Operation
Display Screen
1. Use Direction Buttons to select the Movie option.
2. Press Enter Button to go to Movie Playback Mode.
3. Use Right/Left Buttons to go to the next or last movie.
4. Press Movie Shutter Button to play and press it again to
pause.
5. While playing movie, press Right/Left Buttons to fast
forward/backward, then release the button to stop.
6. Use Up/Down Buttons to adjust volume.
7. Press Enter Button to go to the movie option menu.
8. Use Direction Buttons to select six options, Delete,
Thumbnail, Lock, Repeat One, Repeat All, or Exit.
Page 32

31
Delete Movies
Operation
Display Screen
1. Use Direction Buttons to select the Delete option ( ).
2. Press Enter Button to go to the Delete menu.
3. Use Right/Left Buttons to select the movie.
4. Use Up Button to delete all movies and Down Button to
delete single movie.
5. Before a movie is deleted, a confirmation screen will
appear; choosing “Yes” will execute the operation and
“No” to cancel the operation.
6. Press Enter Button to exit.
Note
If a memory card is fitted, you can delete only
those movies stored on the card.
Note
Movies on a written-protected memory card
cannot be deleted.
Note
The delete function will only erase unlocked
movies. Locked movies must be unlocked
before being deleted.
Page 33

32
Thumbnail Function
Operation
Display Screen
1. Use Direction Buttons to select the Thumbnail option
( ).
2. Press Enter Button to view nine thumbnail movies.
3. To play a movie, use Direction Buttons to select the
movie and press Enter Button to view.
Operation
Display Screen
1. Use Direction Buttons to select the Lock option ( ).
2. Press Enter Button to go to the Lock menu.
3. Use Right/Left Buttons to select the movie.
4. Use Up Button to lock/unlock all movies and Down Button to
lock/unlock single movie.
5. Before a movie is locked/unlocked, a confirmation screen
will appear; choosing “Yes” will execute the operation, “No”
will cancel the operation.
6. Press Enter Button to exit.
Lock Movies
Single or all movies can be locked. This function can prevent the movies from being deleted
accidentally.
Page 34

33
Repeat Movies
Operation
Display Screen
1. Use Direction Buttons to select the Repeat One option ( )
or Repeat All option ( ).
2. Press Enter Button to start repeating.
Picture Playback
Operation
Display Screen
1. Use Direction Buttons to select the Picture option.
2. Press Enter Button to go to Picture Playback Mode.
3. Use Right/Left Buttons to go to the next or last picture.
4. Press Enter Button to go to the picture option menu.
5. Use Direction Buttons to select five options, Delete,
Thumbnail, Lock, Slideshow, or Exit.
This function automatically repeats playing single movie or all movies in order.
Page 35

34
Delete Picture
Operation
Display Screen
1. Use Direction Buttons to select the Delete option ( ).
2. Press Enter Button to go to the Delete menu.
3. Use Right/Left Buttons to select the picture.
4. Use Up Button to delete all pictures and Down Button to
delete single picture.
5. Before a picture is deleted, a confirmation screen will
appear; choosing “Yes” will execute the operation, “No”
will cancel the operation.
6. Press Enter Button to exit.
Note
If a memory card is fitted, you can delete only
those pictures stored on the card.
Note
Pictures on a written-protected memory card
cannot be deleted.
Note
The delete function will only erase unlocked
pictures. Locked pictures must be unlocked
before being deleted.
Page 36

35
Thumbnail Function
Operation
Display Screen
1. Use Direction Buttons to select the Thumbnail option ( ).
2. While selecting Thumbnail option, press Enter Button to
view nine thumbnail pictures.
3. To view a picture, use Direction Buttons to select the picture.
4. Press Enter Button to view the selected picture.
Operation
Display Screen
1. Use Direction Buttons to select the Lock option ( ).
2. Press Enter Button to go to the Lock menu.
3. Use Right/Left Buttons to select the picture.
4. Use Up Button to lock/unlock all pictures and Down
Button to lock/unlock single picture.
5. Before a picture is locked/unlocked, a confirmation
screen will appear; choosing “Yes” will execute the
operation, “No” will cancel the operation.
6. Press Enter Button to exit.
Lock Pictures
Single or all pictures can be locked. This function can prevent the pictures from being deleted
accidentally.
Page 37

36
Make Slide Show
Operation
Display Screen
1. Use Direction Buttons to select the Slide option ( ).
2. Press Enter Button to start the slide show; Press it again
to stop.
Voice Playback
Right/ Left Buttons:Select the last or next voice.
Up/Down Buttons: Adjust the voice playback
volume.
Enter Button:Switch to voice option menu.
Operation
Display Screen
1. Use Direction Buttons to select the Voice option.
2. Press Enter Button to go to Voice Playback Mode.
This function automatically repeats all pictures in order.
Direction Buttons Function
In Voice Playback Mode, the Direction Buttons have the following functions:
Page 38

37
3. Use Right/Left Buttons to go to the next or last
voice recording.
4. Press Movie Shutter Button to start playing back
the selected voice. Press it again to stop.
5. Use Up/Down Buttons to adjust the volume.
6. Press Enter Button to go to the voice playback
option menu.
7. Use Up Button to select Delete option and Down
Button to select Repeat option.
8. Press Down Button once to repeat single voice;
Press twice to repeat all voice recording.
9. Press it again to disable the repeat function.
10. The repeat icons will be different while selecting
Repeat One option and Repeat All option.
11. To delete a voice, use Right/Left Buttons to select
the voice.
12. Use Up Button to delete all voice recordings and
Down Button to delete single voice recording.
13. Before a voice is deleted, a confirmation screen
will appear; choosing “Yes” will execute the
operation, “No” will cancel the operation.
14. Press Enter Button to exit.
Page 39

38
Section 5
MP3 Music
Transfer MP3 Music to the camera
Listen to MP3 Music
Operation
Display Screen
1. In Playback Mode, use Direction Buttons to select the
Music option
2. Use Up/Down Buttons to locate MP3 you want to play,
or press Right/Left Buttons to jump to the next/previous
page. There is an icon in the front for those MP3
with Lyrics display.
Listening to MP3 Music
MP3 is a compressed audio file format. The MP3 music can be downloaded from some MP3
web sites. This DV includes the feature of MP3 play with lyrics display. To enable this function,
make sure both .mp3 and .lrc files with the same file name are copied to the memory.
1. Install the camera driver on your computer.
2. Connect your camera to the computer USB port.
3. The Red LED will light when the camera is connected to the computer and in Mass
Storage Mode.
4. Transfer MP3 music to My Computer\Removable Disk\MP3.
5. Transfer .lrc file to My Computer\Removable Disk\MP3 if you have .lrc file
6. Once all the music is transferred, disconnect the USB cable from the PC.
Page 40

39
3. Press Movie Shutter or Enter Button to play MP3
4. Press Movie Shutter Button again to stop playing.
5. Press Up/Down Buttons to adjust volume.
6. Press Enter Button to go to repeat menu.
7. Press Down Button once to repeat current MP3( ).
8. Press Down Button twice to repeat all MP3( ).
9. Press it again to disable the repeat function
10. Press Enter Button to exit.
Listen to MP3 Music with earphone
MP3 stored in the camera can be played either by built-in speaker, or Earphone, or TV.
When the earphone cable is plugged in the camera, the option menu of Earphone/TV pops out
on the LCD Screen. Choose earphone or TV and press Enter Button to validate the setting.
Page 41

40
Section 6
eBook
Transfer eBooks to the camera
Read eBooks
Operation
Display Screen
1. In Playback Mode, use Direction Buttons to select the
eBook option
2. Use Up/Down Buttons to select eBook you want to
read, or press Right/Left Buttons to jump to the
next/previous page. There is an icon in the front for
those eBooks with bookmark added.
Reading eBook
An eBook is an electronic edition of a physical book. eBooks in your camera have many
features that traditional paper books do not: you have the freedom to control the look and feel
of your eBook through colors, your own bookmarks, carrying your eBooks anywhere with your
camera.
1. Install the camera driver on your computer.
2. Connect your camera to the computer USB port.
3. The Red LED will light when the camera is connected to the computer and in Mass
Storage Mode.
4. Transfer eBooks, .txt file format only, to My Computer\Removable Disk\eBook.
5. Once all the files is transferred, disconnect the USB cable from the PC.
Page 42

41
3. Press Enter Button to read the eBook.
4. Press Up/Down Buttons to scroll up/down the text
5. Select to jump to the first page
6. Select to jump to the last page
7. Select to change the color of text and
background.
8. Select to auto scroll down the text.
9. Select to add a bookmark.
Page 43

42
Section 7
MPEG4 Movie
View MPEG4 Movie on PC
Share MPEG4 Movie
Viewing MPEG4 Movie on PC
MPEG4, the multimedia format and compression standards, is a cutting-edge compression
technology developed by MPEG (Motion Picture Expert Group). It not only enhances the
image quality but also improves the efficiency of recording capacity.
MPEG4 is adopted in this camera to take DVD-quality MPEG4 movies. The MPEG4 movie
format of AVI is used in this camera.
When playing an MPEG4 movie for the first time, MPEG4 Video Codec Xvid should be
installed in PC. To do this:
(1) Insert the CD-ROM into the computer’s CD-ROM drive. Click “Install Device Driver” ( Install
MPEG4 Video Codec Xivd) and follow the on-screen instructions to complete the
installation.
(2) Start video player such as Widows Media Player to view MPEG4 AVI Movies.
You can share the recorded MPEG4 movies to your friends via internet or CD. Make sure
MPEG4 Video Codec Xvid is installed in your friends’ PC. MPEG4 Video Codec Xvid is
available in the provided CD or can be downloaded from Internet.
Page 44

43
Section 8
1. Connect one end of the AV cable to your camera’s AV Out port.
2. Connect the other end of the cable to a television.
3. The option menu of Earphone/TV pops out on the LCD Screen.
4. Choose TV option and press Enter Button to validate the setting.
5. The steps for viewing stored pictures and movie on a TV are exactly the same as for
viewing them on the LCD monitor.
Note
The LCD monitor does not work when the
camera is connected to a television.
Viewing Pictures and Movies on a TV
You can view stored movies and pictures on a television. To connect to a television:
Page 45

44
Section 9
Video File Converter
Bundled software CD contains Acrsoft Media Converter that features video file converter to
convert multiple video formats into MPEG4 Xvid compatible format with your camera. In this
way, you can convert any format of video files and playback your favorite movies on your
camera.
To convert a video file:
(1) Install Arcsoft Media Converter ( Refer to section 11)
(2) Click Start Select Programs Acrsoft Media Converter Media Converter
(3) Media Converter main Screen will appear on your desktop.
(4) Follow Step 1 and click “Select Media”
Page 46

45
(5) Select the video file you want to convert.
(6) Follow Step 2 and click “Select Destination” to choose the location you want to store the
converted video file.
Page 47

46
(7) Click “ Convert” to start video converting.
Page 48

47
(8) Task Report window will pop out after the task is completed.
(9) Before transferring the converted file to your camera, rename the converted file to
“ Clip0001.avi”. (Please note: if Clip0001.avi exists in the camera, then the converted file
has to be renamed to clip0002.avi)
(10) Connect your camera to PC and transfer the converted video to “My
Computer\Removable Disk\DCIM\200Movie” in your camera. (Refer to Section 10
Transferring Data to a Computer)
(11) After transferring the converted video to the camera, press RECORD/Play Button to
enjoy your favorite movie.
Page 49

48
Section 10
Burning the Recorded Clip onto DVD
Bundled software CD contains ArcSoft Showbiz DVD also feathers burning the movie clip into
DVD. You can preserve your precious movies on DVD to share with family and friends. To
create a DVD:
(1) Install Arcsoft Showbiz DVD ( Refer to section 11)
(2) Click Start Select Programs Acrsoft Showbiz DVD Showbiz DVD
(3) Showbiz DVD main Screen will appear on your desktop.
(4) Drag Video File to “ Drag Video Here”
Page 50

49
(5) Click ” Create ”
(6) Click “ Start “ to start DVD burning
Page 51

50
Section 11
Installing the Digital Camera Driver
1. Insert the CD-ROM into the computer’s CD-ROM drive. The auto-run screen will
appear.
2. Click “Install Device Driver”. Follow the on-screen instructions to complete the
installation. Depending on your operating system, you may have to restart your
computer after installing the driver.
Connecting Your Camera to a Computer
Transferring Data to a Computer
Before connecting this camera to a computer for the first time, you should install a driver on the
computer. The driver is on the CD-ROM disc provided in the package. To install the driver:
You can transfer pictures, movies or voice recordings stored on your camera to a computer
and send them in emails to friends or post them on websites. To do this you should:
1. Install the camera driver on your computer.
2. Connect the computer and camera with the supplied mini USB 2.0 cable.
3. Default mode is Mass Storage Mode when the camera connects to PC
4. Transfer pictures or movies or MP3 or voice recordings
Mass Storage Device Mode
The RED LED will light up when the camera is connected to the computer. Movies,
pictures and voice recordings can be found on your computer at “My
Computer\Removable Disk\DCIM\”. Under this mode, you can read, delete, move, or copy
any movie/picture/voice recording you want. Use the bundled Arcsoft application software
to edit the movies or pictures.
PC Camera Mode
When in Mass Storage Device Mode, press RECORD/PLAY Button to switch to PC
Camera Mode. Under this mode, you can implement live video conference meetings or
use video email over the Internet.
Page 52

51
Installing Bundled Software
1. Insert the CD-ROM into your computer’s CD-ROM drive. The autorun screen appears.
2. Select the piece(s) of software you want to install from the list, then click Install
Application Software. Follow the on-screen instructions to complete the installation.
The CD-ROM supplied with this camera contains 5 pieces of software.
Acrsoft PhotoImpression is a user-friendly application that helps you read,
edit and organize images.
Acrsoft Show Biz allows you to edit movies and is equally easy to use.
Arcsoft Media Converter can convert multiple video formats into MPEG4
Xvid compatible format with your camera
Acrobat Reader is a popular program that you need to have installed to read
the User’s Manual. Many computer users will find they already have this
software installed on their computer.
MPEG4 Video Codec Xvid, this decode software has to be installed for
correctly viewing the movies you record.
The detail information can be found in online help of all the bundled software.
To install the bundled software:
Page 53

52
Section 12
Specification
Image Sensor
VGA Advanced Sensor
Operation Modes
Movie Record、Picture Record、Voice
Record、e-Book、MP3 Player、PC Camera、
Mass Storage Device
Lens
F2.3 (f = 3.7 mm)
Digital Zoom
2X Digital Zoom
Shutter
Electronic
LCD monitor
2" LTPS TFT LCD
Storage Media
Built-in 64MB Memory (partial memory is
used for Firmware code);
SD/MMC Card Slot support (up to 1GB)
Image Resolution
640*480, VGA
320*240, QVGA
Movie Resolution
VGA 640x480 pixels 30 fps
QVGA 320X240 pixels 30 fps
White Balance
Auto/Manual (Daylight, Fluorescent,
Tungsten)
Exposure
Auto/Manual
Selftimer
10 second delay
File Format
Picture: JPEG
Movie : AVI (Xvid)
Voice : WAV
Music : MP3
Image play
Single Image/Thumbnails/Slideshow
PC Interface
Mini USB 2.0 Port
TV out
NTSC/PAL Selectable
Battery
AA*2 Battery
Dimension
108mm×60mm×22.5mm
Weight
83g(without battery)
Specifications and System Requirements
Page 54

53
System Requirement
Windows 98SE/2000/ME/XP
Pentium MMX、Celeron or AMD Athlon®
CPU
64MB RAM
CD ROM
500MB free HDD space
Available USB port
16-bit Color Display
Page 55

54
Simple Troubleshooting
1. How to shoot correctly?
First properly adjust focus, and then press the shutter button. On the LCD the center
shows a “funnel” which records the image. Firmly hold your camera before the
“funnel” disappears, you can then get a clear picture.
2. When recording, the “Zoom In/Out” button is inactive?
If the “Motion Stabilization ” function is activated when recording, the “Zoom
In/Out” button for digital zooming will be disabled.
3. The files on the memory card do not playback smoothly when the symbol “!” or
“funnel” appears?
The “!” means the file is not supported and the “funnel” indicates the file will not
readout smoothly. Delete these files and you can then playback normally. It is
recommended that you format the memory card before using it and avoid placing
files of different formats in same playback folder. Create different folders.
Page 56

55
This form describes the protection You will have under this Limited Warranty.
LIMITED WARRANTY PERIOD:
This Limited Warranty begins on the date of purchase of the Covered Product and continues for a period of six months.
WHAT IS COVERED:
Meijer will pay the cost of labor and repair or replacement parts in the event Your Covered Product fails to operate as a result of a
mechanical or electrical failure caused by defects in workmanship and/or materials. A mechanical or electrical failure caused by a
direct result of a power surge is also covered. Parts will be replaced with those of like kind and quality, and may be new or
remanufactured. If the Covered Product cannot be repaired, if the cost of the repair exceeds the original p urchase price or if parts
are not available due to the age of the Covered Product or discontinued by the manufacturer, the Covered Product will be replaced
with a product of similar features.
WHERE YOU ARE COVERED:
Coverage under this Limited Warranty is limited to the United States of America, including the District of Columbia. It does not
include any Canadian or U.S. Territories including Guam, Puerto Rico, or U.S. Virgin Islands.
WHAT IS NOT COVERED:
PRODUCTS NOT ORIGINALLY COVERED BY A MANUFACTURER’S WARRANTY;
ITEMS THAT ARE STILL COVERED BY THE MANUFACTURER’S WARRANTY, REGARDLESS OF WHETHER THE MANUFACTURER
HONORS SUCH WARRANTY;
PERIODIC CHECKUPS AND/OR PREVENTIVE MAINTENANCE AS DIRECTED BY THE MANUFACTURER EXCEPT AS PROVIDED
HEREIN;
INHERENT PRODUCT DEFECTS THAT ARE THE RESPONSIBILITY OF THE MANUFACTURER OR PARTS FAILURE DUE TO A
MANUFACTURER’S RECALL;
ANY AND ALL PRE-EXISTING CONDITIONS THAT OCCUR PRIOR TO THE EFFECTIVE DATE OF THIS LIMITED WARRANTY
AND/OR ANY COSTS TO REPAIR ANY PRODUCT SOLD “AS-IS” INCLUDING BUT NOT LIMITED TO FLOOR MODELS,
DEMONSTRATION MODELS, ETC;
PARTS OR REPAIRS DUE TO NORMAL WEAR AND TEAR AND ITEMS NORMALLY DESIGNED TO BE PERIODICALLY
REPLACED BY THE PURCHASER DURING THE COVERED PRODUCT’S LIFE, INCLUDING BUT NOT LIMITED TO BATTERIES,
LIGHT BULBS ETC;
DAMAGE FROM ACCIDENT, ABUSE, MISUSE, MISHANDLING, INTRODUCTION OF FOREIGN OBJECTS INTO THE COVERED
PRODUCT, UNAUTHORIZED MODIFICATIONS OR ALTERATIONS TO A COVERED PRODUCT, FAILURE TO FOLLOW THE
MANUFACTURER’S INSTRUCTIONS, AND EXTERNAL CAUSES INCLUDING THIRD PARTY ACTIONS, FIRE, THEFT, INSECTS,
ANIMALS, EXPOSURE TO WEATHER CONDITIONS, WINDSTORM, SAND, DIRT, HAIL, EARTHQUAKE, FLOOD, WATER, ACTS
OF GOD OR CONSEQUENTIAL LOSS OF ANY NATURE;
LOSS OR DAMAGE CAUSED BY WAR, INVASION OR ACT OF FOREIGN ENEMY, HOSTILITIES, CIVIL WAR, REBELLION, RIOT,
STRIKE, LABOR DISTURBANCE, LOCKOUT, OR CIVIL COMMOTION;
Page 57

56
INCIDENTAL, CONSEQUENTIAL OR SECONDARY DAMAGES OR DELAY IN RENDERING SERVICE UNDER THIS LIMITED
WARRANTY, OR LOSS OF USE DURING THE PERIOD THAT THE COVERED PRODUCT IS AT AN AUTHORIZED SERVICE
CENTER OR OTHERWISE AWAITING PARTS;
ANY PRODUCT USED IN A COMMERCIAL SETTING OR RENTAL BASIS;
FAILURES THAT OCCUR OUTSIDE OF THE 50 STATES OF THE UNITED STATES OF AMERICA, INCLUDING THE DISTRICT OF
COLUMBIA;
NONFUNCTIONAL OR AESTHETIC PARTS INCLUDING BUT NOT LIMITED TO PLASTIC PARTS, KNOBS, ROLLERS, BASKETS,
SCRATCHES, PEELING AND DENTS;
UNAUTHORIZED REPAIRS AND/OR PARTS;
COST OF INSTALLATION, SET-UP, DIAGNOSTIC CHARGES, REMOVAL OR REINSTALLATION OF THE COVERED PRODUCT,
EXCEPT AS PROVIDED HEREIN;
ACCESSORIES USED IN CONJUNCTION WITH A COVERED PRODUCT;
ANY LOSS OTHER THAN A COVERED BREAKDOWN OF THE COVERED PRODUCT;
SERVICE WHERE NO PROBLEM CAN BE FOUND;
BREAKDOWNS WHICH ARE NOT REPORTED WITHIN THE TERM OF THIS LIMITED WARRANTY;
IMPROPER INSTALLATION OF COMPONENTS OR PERIPHERALS;
CORRUPTION OF ANY RECORDING MEDIA INCLUDING ANY PROGRAM, DATA OR SETUP INFORMATION RESIDENT ON
ANY HARD DRIVES AND INTERNAL OR EXTERNAL REMOVABLE STORAGE DEVICES, AS A RESULT OF THE
MALFUNCTIONING OR DAMAGE OF AN OPERATING PART, OR AS A RESULT OF ANY REPAIRS OR REPLACEMENT UNDER
THIS LIMITED WARRANTY;
DAMAGE TO CLOTHING ;
COLOR FADING OF PICTURE FOR ANY TELEVISION;
BURNED–IN PHOSPHOR (INCLUDING IMAGE GHOSTING), PIXEL BURNOUT NOT IN ACCORDANCE WITH THE
MANUFACTURER’S SPECIFICATIONS.
WHAT TO DO WHEN YOUR PRODUCT FAILS TO OPERATE:
Call the 24 –hour customer service toll –free number at (866) 845-9436.
Many oversights, which are not covered under this Limited Warranty, can be due to simple circumstances such as the Covered
Product not being switched on, being unplugged, or a fuse blown at the junction box. For a Covered Product that uses batteries as
the primary power supply, or a remote control unit, please check that the batteries do not need replacing or recharging.
SERVICE DELIVERABLES:
There is no deductible required to obtain service for Your Covered Product.
OTHER PROVISIONS:
Limit of Liability:
The limit of liability under this limited warranty is the least of the cost of (1) the purchase price of the Covered Product excluding
tax and delivery costs or (2) authorized repairs not to exceed the purchase price of the Covered Product or (3) replacement of the
Page 58

57
Covered Product with similar features or (4) reimbursement for authorized repairs or replacement. Upon replacement, there is no
longer any obligation for the replaced product under this Limited Warranty.
Limitations of Implied Warranty:
All Implied Warranties which may arise under state law, including all Implied Warranties of Merchantability or Fitness for a
particular purpose, are limited to the duration of this Warranty and do not cover incidental or consequential damages. Some states
do not allow limitations on how long an Implied Warranty lasts or the exclusion of incidental or consequential damages, so the
above limitations or exclusions may not apply to You. This Warranty gives You specific legal rights, and You may also have the other
rights which vary from state to state.
Transferability and Renewals:
This Limited Warranty is not transferable or renewable.
Subrogation:
If We pay for a loss, We may require You to assign Us Your rights of recovery against others. We will not pay for a loss if You
impair these rights to recover. Your rights to recover from others may not be waived.
Arbitration:
In the event of a disagreement between You and Us concerning costs, either of us may make a written demand for arbitration. This
must be done within sixty (60) days after the day You filed Your claim. Each of us will select an arbitrator. The two arbitrators will
select an umpire. Each of us will pay the expenses of the arbitrator We select. The expenses of the umpire will be shared equally.
Unless both of us agree otherwise, arbitration will take place in the country and state in which You live. Local rules apply. A majority
decision will be binding.
Page 59

58
FCC part 15.21
Warning: Changes or modifications to this unit not expressly approved by
the party responsible for compliance could void the user’s authority to
operate the equipment.
FCC part 15.105
NOTE: This equipment has been tested and found to comply with the
limits for a Class B digital device, pursuant to Part 15 of the FCC Rules.
These limits are designed to provide reasonable protection against
harmful interference in a residential installation. This equipment
generates, uses, and can radiate radio frequency energy and, if not
installed and used in accordance with the instructions, may cause harmful
interference to radio communications. However, there is no guarantee
that interference will not occur in a particular installation. If this
equipment does cause harmful interference to radio or television
reception, which can be determined by turning the equipment off and on,
the user is encouraged to try to correct the interference by one or more
of the following measures:
- Reorient or relocate the receiving antenna.
- Increase the separation between the equipment and receiver.
- Connect the equipment into an outlet on a circuit different from that to which the
receiver is connected.
- Consult the dealer or an experienced radio TV technician for help.
Page 60

59
Dist. by Wholesale Merchandisers, Inc.,
2929 Walker, N.W.,
Grand Rapids, MI 49544
Made in China
 Loading...