

Page 1
9. Shoot and playback
1) Capture: Switch the record mode to the capture mode, and press the shutter key to capture;
2) Video recording: Switch the record mode to the video recording mode, press the shutter key to start to
carry out video recording, and then press the shutter key once more to stop video recording.
3) Audio recording: Switch the record mode to the audio recording mode, press the shutter key to start to
carry out audio recording, and then press the shutter key once more to stop audio recording;
4) Playback: In the playback mode, select the photo, video, audio recording, MP3 or E-book mode, and then
select a file to play.
10. Connecting to a computer
1) Set the USB mode as memory in the setting menu;
2) Plug the USB cable into the video camera USB port;
3) Connect the other end of the USB cable to a computer. At the moment, the computer displays a new
driver letter, and you can copy media files in the video camera to the computer;
4) Never plug in or pull out the USB cable during the transmission of files.
. 4 .
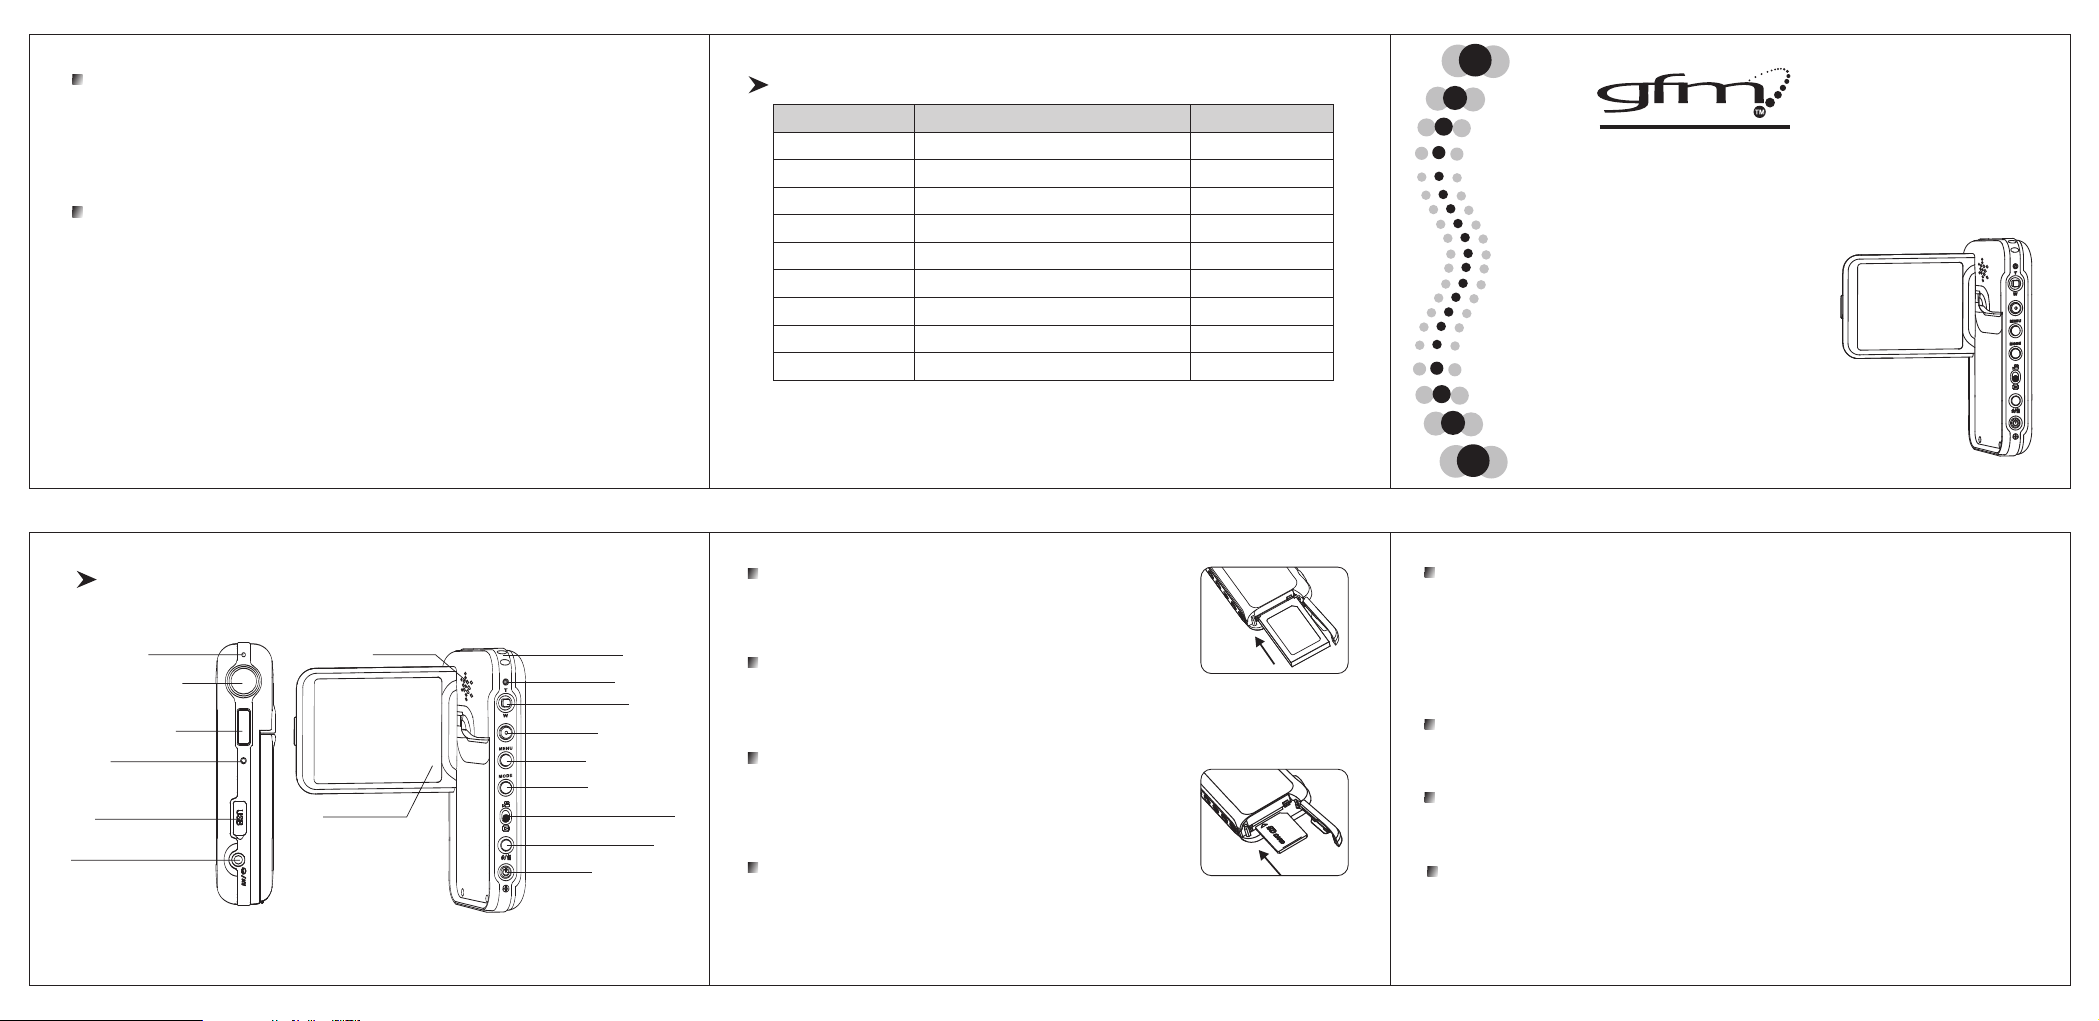
Packing List
S/N
1
2
3
4
5
6
7
8
9
“ Thi s devi ce c omp lie s wi th P art 1 5 of th e FC C Ru les . Ope ratio n is su bje ct t o th e fol lowin g two
con ditio ns: (1) This devi ce may not cause har mfu l i nterf erenc e, an d (2) this dev ice must acce pt a ny
int erfer ence re ceive d, incl uding i nterf erenc e that ma y cause u ndesi red ope ratio n.”
Description
Digital Camcorder
Lithium ion battery
Strap
Camera Pouch
USB Cable
AV-Cable
Rapid Guide
Driver CD
AC-Adaptor
Qty
1
1
1
1
1
1
1
1
1
Quick St ar t Operating Guideline
DD747
Digit al Camcorder
. 5 .
Parts and N ames
Microphone
Lens
Flash
Self-timer indicator
USB port/charger port
Earphone/video output port
Speaker
Display screen
Hang rope button
Status indicator
Five-way joysticks
Shutter key
Menu key
Mode key
Record/playback switch key
Flash switch/delete key
Power key
1. Installing the battery
1) Pull the battery compartment cover in the direction as shown on the
battery compartment cover and open it;
2) Load the battery;
3) Slide and close the battery compartment cover.
2. Taking out the battery
1) Turn off the power supply;
2) Pull the battery compartment cover in the direction as shown on the battery compartment cover and open it;
3) Push the battery lock to make the battery bounce out, and take out the battery;
4) Slide and close the battery compartment cover.
3. Installing the SD card
1) Turn off the power supply;
2) Pull the battery compartment cover in the direction as shown on the battery
compartment cover and open it;
3) Insert the SD card (with its unfilled corner forward) till a snap sound is heard;
4) Close the battery compartment cover.
4. Taking out the SD card
1) Turn off the power supply;
2) Pull the battery compartment cover in the direction as shown on the battery compartment cover and open it;
3) Press the SD card inwards, and it will automatically pop up;
4) Take out the SD card, and close the battery compartment cover.
5. Charging the battery
1) Load the battery.
2) Check that the machine is turned off.
3) Use the attached charger to connect it to the power supply.
4) Plug the other end of the charger into the USB port of this machine to charge. At the moment, the charge
indicator is red, and the charging process begins.
5) Wait till the charge indicator turns to green. When the indicator becomes green, this indicates that the
battery is fully charged. This process requires about 3 hours in most cases.
6) This machine does not support charge during its startup.
6. Turning on and turning off the video camera
1) Turn-on: Press the Power key at OFF status, and the system will start up automatically and the turn-on
finishes;
2) Turnoff: Press the Power key at On status, and the system will shut off automatically and the turnoff finishes.
7. Operating the LCD
1) Open the LCD;
2) Adjust the angle of the display in a rotation manner in accordance with the angle required by record or play.
Maximum rotation angle: Switching: 90°; Forward: 180°; Backward: 90°.
8. Selecting operation mode
1) Pull the Record/playback key to carry out switchover between the record mode and the playback mode;
2) In the record or playback mode, press the mode key to switch over operation modes in turn:
Record mode: video recording → capture → audio recording → video recording
Playback mode: photo → video → audio recording → MP3 → E-book → photo
. 3 .. 2 .. 1 .
Page 2

User Manual
DD747
Digital Camcorder
Page 3

Preface
Thank you for your deep love and concern with the products of our company. Before
operation, please read this User's Manual carefully so as to ensure that you may enjoy all
functions of this machine and to ensure long-term, steady, and normal operation of this
machine. Furthermore, please keep this User's Manual properly for future reference.
Copyright
Without prior written permission of this company, it is not allowed to duplicate, propagate, or
transcribe any part of this publication in any shape or form and electronics, mechanics,
magnetics, optics, chemistry, manual, or any other mode, or to store any part of it into a
retrieval system or translate any part into any language or computer language. The names
of brands or products quoted in this manual are trademarks or registered trademarks of
respective companies.
Statement
Final right to interpret relevant contents in this manual belongs to our company. Contents of
this manual are subject to change without further notice. This company will neither present a
guarantee for the data nor undertake any responsibility for possible errors in the document.
This User's Manual shall only serve as a reference for operating the machine. Products of
our company are under consecutive improvement and upgrade, and you are welcome to
make better opinions and suggestions.
1
Page 4

Table of Contents
1. Product Introduction .......................................................................................... 3
2. Preparations for the Operation of Machine........................................................ 4
2.1 How to use the display ................................................................................. 4
2.2 Installing the battery and the SD card .......................................................... 4
2.3 Formatting the card ...................................................................................... 6
2.4 Selecting the language................................................................................. 7
2.5 Setting the date and time ............................................................................. 7
2.6 How to charge .............................................................................................. 7
3. Use this Machine ............................................................................................... 8
3.1 Capture ........................................................................................................8
3.2 Setting the shooting parameters .................................................................. 8
3.3 Video Recording......................................................................................... 10
3.4 Setting the Video Recording Parameters................................................... 11
3.5 Audio Recording ......................................................................................... 12
3.6 Playback photos......................................................................................... 13
3.7 Playing Videos ...........................................................................................13
3.8 Playing audio record ..................................................................................14
3.9 Playing MP3 files........................................................................................ 15
3.10 E-book function ........................................................................................ 15
3.11 Deleting files............................................................................................. 16
3.12 Quick delete ............................................................................................. 16
3.13 Rotecting files........................................................................................... 17
3.14 Printing a photo ........................................................................................ 17
3.15 Using Continuous Play............................................................................. 18
3.16 Setting Auto Off........................................................................................ 18
3.17 Beep......................................................................................................... 18
3.18 Startup screen.......................................................................................... 19
3.19 Memory options........................................................................................ 19
3.20 Restoring to the default settings............................................................... 19
3.21 Activating Digital Zoom.............................................................................20
4. Computer Related Functions........................................................................... 20
4.1 File transfer between the camera and PC.................................................. 20
4.2 PC-Camera function................................................................................... 21
4.3 TV output.................................................................................................... 21
5. Use precautions............................................................................................... 23
6. Troubleshooting ............................................................................................... 24
7. Specifications................................................................................................... 25
8. Safety use and disposal .................................................................................. 26
9. Summary of icon indications............................................................................ 27
2
Page 5
1. Product Introduction
This machine you select and purchase is a type of digital video equipment which
integrates high quality digital video camera, digital camera, high quality MP3, digital voice
recorder, e-book and PC-Cam, and it may allow you to taste endless unprecedented
digital video enjoyment.
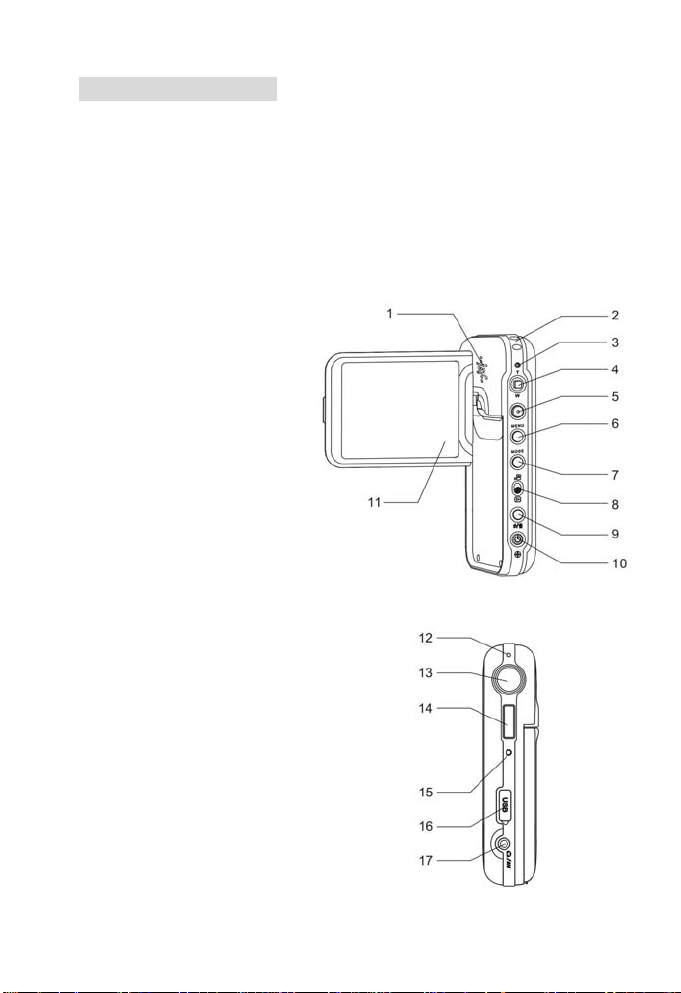
Parts and Names
1) Speaker
2) Hang rope button
3) Status indicator
4) Five-way joysticks
(Up/Down/Left/Right/Confirm keys)
5) Shutter key
6) Menu key
7) Mode key
8) Record/playback switch key
9) Flash lamp switch/delete key
10) Power key
11) Display screen
12) Microphone
13) Lens
14) Flash lamp
15) Self-timer indicator
16) USB port/charger port
17) Earphone/video output port
3
Page 6
2. Preparations for the Operation of Machine
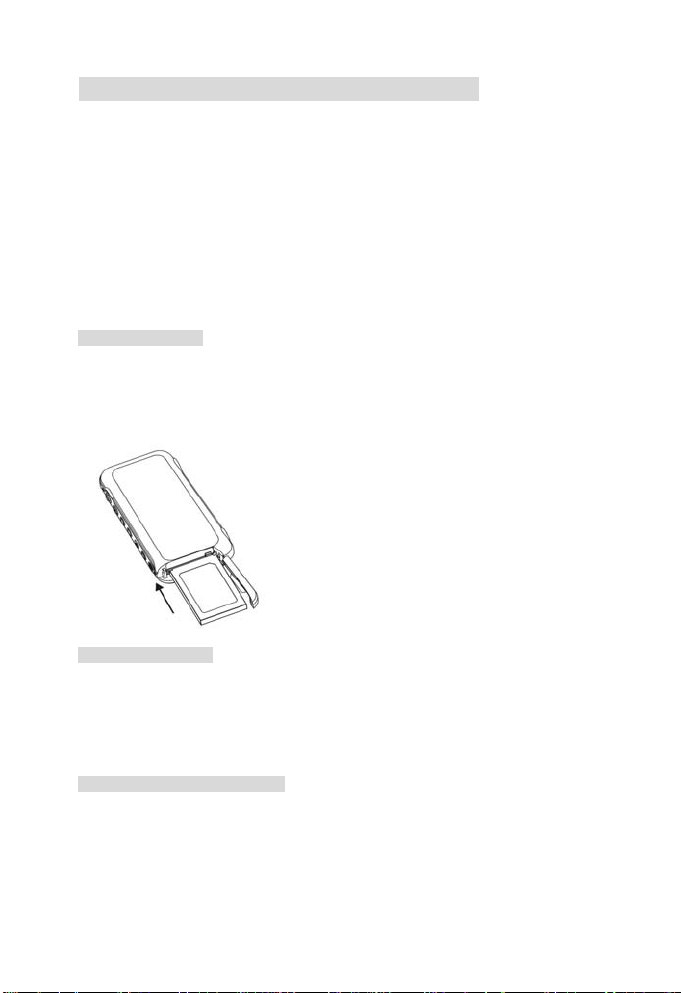
2.1 How to use the display
During the spot recording, you can view both an image on the LCD monitor and the
previous video through the monitor.
1) Turn on LCD
2) Adjust the angle of LCD monitor according to the recording/playing angle required.
The monitor can be rotated to the maximum angles as follows: vertical 90° and horizontal
270°. Don’t rotate in reverse direction.
2.2 Installing the battery and the SD card
Installing the battery
1) Check at first that the power supply is turned off.
2) Slide the battery compartment cover to open it.
3) Install the battery. Pay attention to the direction of battery installation.
4) Close the battery compartment cover.
Taking out the battery
1) Check at first that the power supply is turned off.
2) Slide the Battery compartment cover to open it.
3) Press the battery rack, and then take it out.
4) Close the battery compartment cover.
Dealing with the battery correctly:
1) If the battery is kept in the machine for a long time, the electric quantity of battery will
reduce even if the machine is not operated. Furthermore, long-term contact between
the battery and this machine will lead to excessive discharge, and the battery may not
be used again even if it is recharged later. So take out the battery when not using this
machine. If the battery needs to store for a long time, please discharge the battery
4
Page 7

completely before storage. And please store the battery in a cool and dry place with
relatively stable temperature (the recommended temperature is 15-25℃, and the
recommended humidity is 40-60%).
2) Do not use batteries other than the battery attached with this machine because they
may fail to supply enough power to support its operation.
3) In case the lithium battery attached with this machine is cooled in a low-temperature
(10℃ or lower) environment, the operating hours will reduce in accordance with its
characteristics, and the machine may fail to operate normally; in such a case, please
warm up the battery adequately before operation.
4) Excessively high or low temperature may lead to reduction of the service life of the
battery.
5) Battery has its specific life span. In case the operation hours of the charged battery
reduce violently, this indicates that its service life becomes due, and please replace it
with a new one.
6) When the machine is turned on, please do not remove/install the battery or plug
in/unplug the power cord.
Installing the SD card
1) Check at first that the power supply is turned off.
2) Open the SD card cover (i.e. the battery compartment cover).
3) Insert the SD card with its unfilled corner forward till a snap sound is heard.
4) Close the SD card cover (i.e. the battery compartment cover).
Taking out the SD card
1) Check at first that the power supply is turned off.
2) Open the SD card cover (i.e. the battery compartment cover)
3) Push the SD card inwards, and it will automatically pop up.
4) Close the SD card cover (i.e. the battery compartment cover).
5
Page 8

Safe use of the memory card:
1) If a new SD card is used, please format it first. Please refer to the next section.
2) This machine is provided with a built-in memory. Images can be stored in the built-in
memory or SD memory card if SD memory card is used. Please notice that all
operations may have influence upon the built-in memory card only in case the SD
memory card is not inserted. If the SD memory card is inserted, you may select the
memory you desire from the setting menu.
3) When the memory card is being read, please do not take out the card, turn off the
power supply, or expose it to vibration or impact.
4) Please don't place the card in a place with high temperature or direct sunshine, or a
place exposed to electromagnetic wave or static electricity. Please don't have it
crooked, fallen out, or violently shaken.
5) Please don't allow dirt, dust or water to get into the terminals on the rear of the card,
and do not touch it with your finger.
6) The SD card is equipped with a write-protect switch, just slide the switch to the
position 【LOCK】 to avoid deleting the content in the card by accident.
7) Electric interference, static electricity, or the fault in memory card may damage the
data stored in the card. Therefore it is advisable to store important data in personal
computer.
2.3 Formatting the card
If a new memory card is used or the existing memory card gets instable (failure in
shooting or playback etc.), the card can be formatted for reuse. Please operate
according to the following procedures.
1) Install the memory card correctly.
2) Press 【Power】 key lightly to start up the machine.
3) Press the 【Menu】key and then press 【Right】key to enter 【Set】,and press the
Down key to select 【Format】.
6
Page 9

4) Press the Right key to select 【Yes】 in the pop-up dialog box, and press 【Enter】
so as to finish the formatting operation.
Caution:
1) When you format the card, all data in the memory will be deleted.
2) Please don't format the card with a personal computer. Otherwise, the machine may
not identify the card.
2.4 Selecting the language
1) Press 【Power】 key lightly to start up the machine
2) Press 【Menu】 key, then press 【Right】 key to enter 【Settings】 menu.
3) Press 【Down】 key to select 【Language】.
4) Use 【Left】【Right】keys to select the menu language you desire, and press 【Enter】
key.
2.5 Setting the date and time
1) Press 【Power】 key lightly to start up the machine.
2) Press 【Menu】 key, then press 【Right】 key to enter 【Settings】 menu.
3) Press 【Down】 key to select 【Clock】.
4) Press the 【Right】key to access the clock setting page, and then use 【Up】【Down】
【Left】【Right】 key to set correct date and time.
5) When setting is finished, just press 【Enter】key.
2.6 How to charge
If the battery power is inadequate, you may recharge it in accordance with the following
procedures:
1) Load the battery.
2) Check that the machine is turned off.
3) Use the attached charger to connect it to the power supply.
4) Plug the other end of the charger into the USB port of this machine to charge. Here
the charge indicator is red, and the charging process begins.
5) Wait till the charge indicator turns green. When the indicator turns green, this indicates
that the battery is fully charged. This process requires about 3 hours in most cases.
6) This machine does not support charge during its startup.
7
Page 10

3. Use this Machine
3.1 Capture
1) Press 【Power】 key to start up, turn 【Record/playback switch】 key to recording
status, and the machine enters the default Capture Mode
to switch to Capture Mode
2) Press 【Shutter】 lightly to finish taking a photo.
.
3.2 Setting the shooting parameters
You may set each parameter in Capture Mode .
Set different Capture Modes
You may select any of the several Capture Modes: 【Single Shot】 【Self-Shot】
【Continuous】 【Panorama】.
1) Press 【Menu】 key to enter the menu setting.
2) Press 【Down】 key to select 【Capture Mode】.
3) Press 【Left】 【Right】keys to select one mode.
4) Press 【Enter】 key to escape from the menu.
, or use 【Mode】 key
Setting the size and quality of photo
1) Press 【Menu】key to enter 【Capture】 menu setting.
8
Page 11

2) Press 【Down】 key to select 【Photo size】.
3) Press 【Left】 【Right】keys to select among the sizes.
4) Press 【Down】 key to select 【Photo quality】.
5) Press 【Left】 【Right】keys to select among the quality options.
6) Select one and press 【Enter】 key to escape from the menu.
* If the maximum pixel is selected, only single shot is supported for this pixel.
Setting WB mode
In different light environment, you may select different WB options so as to achieve
better photo effect.
1) Press 【Menu】 key to enter 【Capture】 menu setting.
2) Press 【Down】 key to select 【White Balance】.
3) Press 【Right】key to enter【WB】setting page.
4) Press 【Left】 【Right】keys to select among the WB modes.
5) Press 【Enter】 to escape from the white balance setting page.
6) Press 【Enter】 key to escape from the menu setting. The icon of corresponding WB
mode will be displayed on the screen.
Adjusting the Exposure Compensation
1) Press 【Menu】 key to enter 【Capture 】 menu setting mode.
2) Press 【Down】 key to select 【Exposure compensation】.
3) Press 【Right】key to enter【Exposure compensation】setting page.
4) Press 【Left】 【Right】keys, and select one among the exposure compensation modes:
【-2.0】【-1.7】【-1.3】【-1.0】【-0.7】【-0.3】【0.0】【+0.3】【+0.7】【+1.0】
【+1.3】【+1.7】【+2.0】.
5) Press 【Enter】to escape from【Exposure compensation】setting page.
6) Press the 【Enter】 key to escape from the menu setting. The icon of corresponding
exposure compensation mode will be displayed on the screen.
9
Page 12

Starting Up the Date Stamp
1) Press 【Menu】 key to enter 【Capture】menu setting mode.
2) Press 【Down】 key to select 【Date Stamp】.
3) Press 【Left】 or 【Right】 key to select 【On】 or 【Off】.
4) Press 【Enter】 key to escape from the menu setting.
Setting the Photometry Mode
1) Press 【Menu】 key to enter 【Capture 】 menu setting mode.
2) Press 【Down】 key to select 【Photometry Mode】
3) Press 【Left】 【Right】 keys to select among the following Photometry Modes:
【Center Weight】【Spot】【Matrix】
4) Press 【Enter】 to escape from the menu setting.
Selecting the Optimum Shot
1) Press 【Menu】 key to enter 【Capture】 menu setting mode.
2) Press 【Down】 key to select 【Optimum Shot】.
3) Press 【Right】 key to enter the optimum shot page.
4) Press【Left】【Right】keys to select the scenery you desire.
5) Press 【Enter】 to escape from Optimum Shooting page.
6) Press 【Enter】 to escape from the menu setting.
Switching the Flash Mode
Press 【Flash】 key to select one of strobe modes among: 【Auto Flash】【Fill-in Flash】
【Flash Off】.
3.3 Video Recording
1) Press 【Power】 key to start up the machine. Turn 【Record/playback switch】 key
to record status.
2) Press 【Mode】 key to switch to Recording Mode
.
3) Press 【Shutter】 key to start video recording.
10
Page 13

4) Press 【Shutter】 key again to stop video recording.
5) One photo can be taken in real time if 【Enter】 key is pressed during the video
recording. No photo can be browsed. Photos can be memorized automatically.
3.4 Setting the Video Recording Parameters
You may set each parameter in Video Recording Mode .
Setting the Video Size
1) Press 【Menu】 key to enter 【Video recording】 menu setting mode.
2) Press 【Down】 key to select 【Video size】.
3) Press【Left】【Right】keys to select the video size setting you desire.
4) Press 【Enter】 to escape from the menu setting.
Setting the Video Quality
1) Press 【Menu】key to enter 【Video recording】 menu mode .
2) Press 【Down】 key to select 【Video quality】
3) Press【Left】【Right】keys to set the video quality you desire.
4) Press 【Enter】 to escape from【Video recording】menu mode .
Setting WB mode
1) Press 【Menu】 key to enter 【Video recording】 menu setting.
2) Press 【Down】 key to select 【White Balance】.
3) Press【Right】key to enter【WB】setting page.
4) Press【Left】【Right】keys to select the WB mode you desire.
5) Press 【Enter】 to escape from the white balance setting page.
6) Press the 【Enter】 key to escape from the menu setting. The icon of corresponding
WB mode will be displayed on the screen.
Adjusting the Exposure Compensation
1) Press 【Menu】 key to enter 【Video recording 】 menu setting mode.
11
Page 14

2) Press 【Down】 key to select 【Exposure compensation】.
3) Press 【Right】key to enter【Exposure compensation】setting page.
4) Press 【Left】【Right】keys, and select among the following exposure compensation
modes:【-2.0】【-1.7】【-1.3】【-1.0】【-0.7】【-0.3】【0.0】【+0.3】【+0.7】【+1.0】
【+1.3】【+1.7】【+2.0】
5) Press【Enter】to escape from【Exposure compensation】setting page.
6) Press 【Enter】to escape from the menu setting. The icon of corresponding exposure
compensation mode will be displayed on the screen.
Setting the Photometry Mode
1) Press 【Menu】 key to enter 【Video recording】 menu setting mode.
2) Press 【Down】 key to select 【Photometry Mode】
3) Press 【Left】 【Right】 keys to select among the following photometry modes:
【Center Weight】 【Spot】 【Matrix】
4) Press the 【Enter】 key to escape from the menu setting.
Starting Up the Anti-shake Function
1) Press 【Menu】 key to enter 【Video recording】 menu setting mode.
2) Press 【Down】 key to select 【Anti-shake】.
3) Press 【Left】 or 【Right】 key to select 【On】 or 【Off】.
4) Press 【Enter】 to escape from the menu setting.
Starting Up the Dynamic Shooting Function
1) Press 【Menu】 key to enter 【Video recording】 menu setting mode.
2) Press 【Down】 key to select 【Motion Detection】.
3) Press 【Left】 or 【Right】 key to select 【On】 or 【Off】.
4) Press 【Enter】 to escape from the menu setting.
3.5 Audio Recording
1) Press 【Power】 key to start up the machine. Turn 【Record/playback switch】key to
record status.
12
Page 15

2) Press 【Mode】 key to switch to audio recording mode .
3) Press 【Shutter】 key to start audio recording.
4) Press 【Shutter】 key again to stop audio recording.
3.6 Playback photos
1) Press 【Power】 key lightly to start up the machine.
2) Turn 【Record/playback switch】 key to playback status. Press and hold 【Mode】 key
till the icon is displayed on the left upper corner of the screen.
a. Press Up, Down, Left and Right keys to select the picture that you want to see, and
press 【Enter】 key to view the selected picture.
b. When a picture is shown at the big picture mode, press Up key and Magnification
icon will be displayed at this time. Then use Up and Down keys to magnify or minify
the picture.
c. Press 【Enter】 key at the status of magnification. Use Up, Down, Left and Right
keys to move and check every part of the picture. Press 【Enter】 key to switch over
the display status of magnification and minification.
d. Use Left and Right keys to select the previous or next picture when the big picture
mode displays.
e. Press【Enter】key to back to the thumbnail mode when the big picture mode
displays;
3.7 Playing Videos
1) Gently press 【Power】 key to turn on the camera. Turn 【Record/playback switch】
key to the playback mode.
2) Press and hold 【Mode】key till the icon is displayed on the left upper corner of the
screen
.
13
Page 16

3) Use 【Up】【Down】【Left】【Right】keys to select the video recording you want to play
back, press【Enter】key, and you may see the screen-size videos.
4) When the big picture mode displays, press Shutter key to play back videos; press
【Enter】 key to back to the thumbnail display mode; press Left and Right keys to
select the previous or next video;
5) During the play, press Up and Down keys to adjust the volume when playback; press
Left、Right keys to skip backward or forward; press 【Enter】 key to pause; press
【Shutter】 key to stop playing.
Note: To play video or movie that is not captured with this camera, use the supplied
video conversion software to convert it on a PC first and then copy it to the directory
\dcim\100media (i.e. the directory where photos are stored) to play it as normal.
3.8 Playing audio record
1) Gently press the 【On/Off】 key to turn on the camera. Turn the 【Record/Playback】
button to Playback Mode.
2) Press and hold the 【Mode】 key until the icon
corner of the screen.
3) Use the 【Up】, 【Down】, 【Left】 or 【Right】 key to select the audio file for playback,
and then press the 【OK】 key.
4) Under large view, press the shutter key to play the audio record. Press the 【OK】 key
to return to the thumbnail view. Press the left or right direction key to select the
previous audio record or next audio record respectively and play it.
5) During playback, press the 【OK】 key to pause, and the 【Shutter】 key to stop
playing.
6) The camera will automatically return to the state before playing after a file is finished.
is displayed on the upper left
14
Page 17

3.9 Playing MP3 files
1) Gently press the 【On/Off】 key to turn on the camera. Turn the 【Record/Playback】
button to Playback Mode.
2) Press the 【Mode】 key for several consecutive times to enter into the MP3 screen.
3) Press the【Up】 or 【Down】 key to select the song desired and then press the 【OK】
key to play it.
4) Press the 【Shutter】 key to select Play/Pause; press the 【Left】 or 【Right】 key
to select the previous/next song.
5) During playback, press the Up or Down key to adjust the volume. Press the 【Menu】
key to set up the Playback mode.
6) Press the 【OK】 key to exit the Playback screen.
7) Press the 【Mode】 to select the Playback mode.
8) To delete a song, select the song to be deleted from the song list and then press the
【Flash】 key to enter into the Delete screen. Select 【Ye s】 and press the 【OK】
key to delete it.
3.10 E-book function
1) Gently press the 【On/Off】 key to turn on the camera. Turn the 【Record/Playback】
button to Playback Mode.
2) Press the 【Mode】 key for several consecutive times to enter into the E-book List
screen.
15
Page 18

3) Press the 【Up】 or 【Down】 key to select the e-book desired and then press the
【Shutter】 key to read it.
4) Press the 【Up】 or 【Down】 key to wrap a line (one line at a time); press the 【Left】
or 【Right】 key to scroll up or down one page.
5) Press the 【Shutter】 key to exit the Playback screen.
6) Press the 【Mode】 to select the Playback mode.
Note: Attention: The e-book must be TXT format, choose encoding Unicode, save in
DBC case font, some fonts can not be supported. Moreover, the file should be saved in
the TXT file catalog so that it could be recognized correctly by this machine.
3.11 Deleting files
During photo, video and audio record playback, you can use the menu to delete files.
Follow the steps below:
1) Gently press the 【On/Off】 key to turn on the camera.
2) Turn the 【Record/Playback】 button to the Playback state until the icon
is displayed on the upper left corner of the screen.
3) Press the 【Menu】 key to enter into the 【Playback】 menu.
4) Press the 【Down】 key, and select 【Delete One】 or 【Delete All】.
5) Press the 【Right】 key to enter into the Confirm Delete screen.
6) Press the 【Left】 key to select 【OK】.
7) Select 【Yes 】 and press the 【OK】 key to delete the selected file or all files.
8) Select 【No】 and press the 【OK】 key to exit the Delete screen.
/ /
3.12 Quick delete
You can also use the 【Flash】 key to delete a file quickly.
1) Turn the 【Record/Playback】 button to the Playback state until the icon
is displayed on the upper left corner of the screen.
16
/ /
Page 19

2) Select the photo, video or audio record to be deleted and press the 【Flash】 key to
enter into the Delete screen.
3) Select 【Yes 】 and press the 【OK】 key to delete the file.
3.13 Protecting files
You can protect the photo, video or audio files from being deleted accidentally. To delete
them, disable write-protect first.
1) Gently press the 【On/Off】 key to turn on the camera.
2) Turn the 【Record/Playback】 button to the Playback state until the icon
is displayed on the upper left corner of the screen.
3) Press the 【Menu】 key to enter into the 【Playback】 menu.
4) Press the 【Down】 key to select 【Protect】.
5) Press the 【Right】 key to enter into the File Protect Confirm screen.
6) Press the 【Left】 key to select 【OK】.
7) Press the 【OK】 key to enable write-protect.
8) To disable write-protection, select 【Cancel】.
9) Press the 【OK】 key to disable write-protect.
3.14 Printing a photo
You can print a photo during playback mode .
Firstly, you need to set the USB Mode to PBRIDGE. Follow the steps below:
1) Gently press the 【On/Off】 key to turn on the camera.
2) Press the 【Menu】 key and then press the 【Right】 key to enter into the 【Setup】
menu.
3) Press the 【Down】 key to select 【USB Mode】.
4) Press the 【Left】 or 【Right】 key to select 【PBRIDGE】.
5) Press the 【OK】 key to exit the menu.
Then follow the steps below:
1) Insert one end of the supplied USB cable into the printer interface.
2) Turn the 【Record/Playback】 button to the Playback state until the icon
displayed on the upper left corner of the screen.
3) Select the photo to be printed, and press the 【OK】 key to display it in large view.
17
/ /
is
Page 20

4) Insert the other end of the USB cable into the USB jack of the camera.
5) Press the 【Menu】 key to enter into the playback screen.
6) Press the 【Down】 key to select 【Print】.
7) Press the 【Right】 key to enter into the Print interface.
8) Press the 【Right】 key to start printing.
3.15 Using Continuous Play
You can select Continuous Play during photo, video or audio playback. Follow the steps
below:
1) Gently press the 【On/Off】 key to turn on the camera.
2) Turn the 【Record/Playback】 button to the Playback state until the icon
is displayed on the upper left corner of the screen.
3) Press the 【Menu】 key to enter into the 【Playback】 menu.
4) Press the 【Down】 key to select 【Continuous Play】.
5) Press the 【Right】 key to start continuous play.
6) To exit continuous play, simply press the 【Menu】 key.
/ /
3.16 Setting Auto Off
1) Gently press the 【On/Off】 key to turn on the camera.
2) Press the 【Menu】 key and then press the 【Right】 key to enter into the 【Setup】
menu.
3) Press the 【Down】 key to select 【Auto Off】.
4) Press the 【Left】 or 【Right】 key to select the Auto Off time desired.
5) Press the 【OK】 key to exit the menu.
3.17 Beep
1) Gently press the 【On/Off】 key to turn on the camera.
2) Press the 【Menu】 key and then press the 【Right】 key to enter into the 【Setup】
menu.
3) Press the 【Down】 key to select 【Beep】.
4) Use the 【Left】 or 【Right】 key to select 【On】 or 【Off】.
5) Press the 【OK】 key to exit the menu.
18
Page 21

3.18 Startup screen
1) Gently press the 【On/Off】 key to turn on the camera.
2) Press the 【Menu】 key and then press the 【Right】 key to enter into the 【Setup】
menu.
3) Press the 【Down】 key to select 【Startup Screen】.
4) Use the 【Left】 or 【Right】 key to turn Startup Screen 【On】 or 【Off】.
5) Press the 【OK】 key to exit the menu.
3.19 Memory options
During shooting or playback, you can set up memory options. There are two options:
【Camera】 and 【SD Card】.
1) Gently press the 【On/Off】 key to turn on the camera.
2) Press the 【Menu】 key and then press the 【Right】 key to enter into the 【Setup】
menu.
3) Press the 【Down】 key to select 【Memory】.
4) Use the 【Left】 or 【Right】 key to select 【Camera】 or 【SD Card】.
5) Press the 【OK】 key to exit the menu.
If 【Camera】 is selected as memory option, the directory shown when connected with a
PC is the directory of the built-in memory; if 【SD Card】 is selected, this will be the
directory of the SD Card.
3.20 Restoring to the default settings
Follow the steps below to restore to the default settings:
1) Gently press the 【On/Off】 key to turn on the camera.
2) Press the 【Menu】 key and then press the 【Right】 key to enter into the 【Setup】
menu.
3) Press the 【Down】 key to select 【Default Settings】.
4) Press the 【Right】 key to enter into the 【Default Settings】 screen.
5) Press the 【Left】 key, select 【OK】 and then press the 【OK】 key to restore to
the default settings.
6) If you select 【Cancel】, press the 【OK】 key to exit the Default Settings screen.
7) Press the 【OK】 key to exit the menu.
19
Page 22

3.21 Activating Digital Zoom
1) Press the 【Menu】 and the 【Right】 key to enter into the 【Setup】 menu.
2) Press the 【Down】 key to select 【Digital Zoom】.
3) Press the 【Left】 or 【Right】 key to select 【On】 or 【Off】.
4) Press the 【Enter】 key to exit the menu setup.
Digital Zoom
During video recording, you can use digital zoom to adjust the distance and size of the
image. A maximum 8x zoom can be used.
1)【Up】 key: Zoom in the image.
2)【Down】 key: Zoom out the image.
4. Computer Related Functions
Minimum system requirements
◇ Computer with MMX Pentium 233MHz or higher processor
◇ Operating system: Windows 98/98SE/2000/ME/XP/VISTA
◇ At least 64MB RAM and 100MB available hard disk space
◇ USB port
◇ CD-ROM drive
◇ Compatible display with over 800×600 pixels and 16-bit colors (24-bit colors
recommended)
◇ Applicable operating system: Windows98, ME, 2000 XP, VISTA, MAC OS 9.X & 10.1
(only removable disk mode supported).
Installing the driver
Insert the supplied CD and follow the wizard to install the driver.
4.1 File transfer between the camera and PC
Setting the USB Mode to Removable Disk
Firstly, you need to set the USB Mode of the camera to Removable Disk. Follow the
steps below:
1) Gently press the 【On/Off】 key to turn on the camera.
2) Press the 【Menu】 key and then press the 【Right】 key to enter into the 【Setup】
20
Page 23

menu.
3) Press the 【Down】 key to select 【USB Mode】.
4) Press the 【Left】 or 【Right】 key to select 【Removable Disk】.
5) Press the 【OK】 key to exit the menu.
File transfer
1) Open the camera’s USB cover and insert the supplied USB cable into the USB jack of
the camera, with the other end connected to a PC.
2) Open the Removable Disk icon in the PC to view the files.
3) Under the DCIM and MP3 file folders in the Removable Disk, you can find your photo,
video, audio record and MP3 files. Simply copy them to the PC, or copy the
audio/video files from the PC to the corresponding file folder.
4) Unplug the cable and disconnect the camera.
4.2 PC-Camera function
Setting the unit as PC-Camera
Firstly, you need to set the USB Mode of the camera to PC-Camera mode. Follow the
steps below:
1) Gently press the 【On/Off】 key to turn on the camera.
2) Press the 【Menu】 key and then press the 【Right】 key to enter into the 【Setup】
menu.
3) Press the 【Down】 key to select 【USB Mode】.
4) Press the 【Left】 or 【Right】 key to select 【PC-Camera】.
5) Press the 【OK】 key to exit the menu.
Connecting to a PC
1) Open the camera’s USB cover and insert the USB cable into the USB jack of the
camera, with the other end connected to a PC.
2) Set the camera as PC-Camera in the chat tool.
3) When finish, unplug the cable.
Note: Please install the driver of this camera correctly prior to using this function.
4.3 TV output
Before connecting to a TV, please select an appropriate TV system.
Setting video system options
Firstly, you need to select an appropriate video system: PAL or NTSC.
21
Page 24

1) Gently press the 【On/Off】 key to turn on the camera.
2) Press the 【Menu】 key and then press the 【Right】 key to enter into the 【Setup】
menu.
3) Press the 【Down】 key to select 【Video System】.
4) Press the 【Left】 or 【Right】 key to select 【PAL 】 or 【NTSC】.
5) Press the 【OK】 key to exit the menu.
Connecting
1) Set the TV system of your country of residence.
2) Insert one end of the A/V cable into the A/V jack of the camera, and the other end into
the corresponding jack of the TV.
3) Turn on the camera and a menu containing a list of output equipments will be
displayed. Select TV. Now the LCD of the camera will be switched off and display of
the camera will be switched to the TV.
4) When video output is finished, press the 【On/Off】 key to turn off the camera and then
directly unplug the A/V cable.
22
Page 25

5. Use precautions
● Do not use the camera outside the following ambient condition ranges: Temperature:
O℃ to 40℃, relative humidity: 10%~80%. Do not use or store the camera in any of the
following circumstances:
Places under direct sunshine;
Humid or dusty places;
Places close to air conditioner, electric radiator or other heat sources;
Inside of a closed vehicle under direct sunshine;
Places subject to vibrations;
Places adjacent to magnetic equipment, radio transmitter or high voltage line.
● In case the machine gets wet, wipe it up with dry cloth as soon as possible.
● Saline matter in seawater may cause serious damage to the camera.
● Do not clean the camera with organic solvent such as alcohol.
● To prevent electric shock, do not disassemble or repair the machine by yourself.
● Water can cause a fire or electric shock. For this reason, please keep the machine in a
dry place.
● When it is raining or snowing, do not use the camera in outdoor conditions.
● Do not use the camera in water.
● In case any foreign object or water drop gets into the camera, immediately turn off the
power supply and take out the battery. Once the foreign object is removed or water drop
wiped off, send the camera to maintenance center for inspection and repair.
● Transfer the data to a computer as soon as possible to prevent loss of important data.
● The camera will get hot after long time of use. This does not indicate a fault.
● Turn on and use the camera once every 6 months even if you do not intend to use it.
● Do not start up the camera while the earphone is in your ears in order to avoid any harm
to your hearing.
23
Page 26

6. Troubleshooting
Symptom Cause Solution
Fail to turn on
the camera
The camera is
power off
during use
Consumption
of battery
power is too
fast
The camera
does not shoot
after the
Shutter button
is pressed
Image is fuzzy Dirty lens Clean the lens with clean velveteen
No flash Flash of the camera is Off
Incorrect
date/time is
displayed
Photo during
playback is
abnormal
Image is too
bright or too
dark
LCD is not
clear
Can not
download the
image to a
computer
The clip shot
cannot be
played on a
computer
MP3 files
copied to the
camera cannot
be played
Check whether the battery is
installed correctly.
Check whether the battery is
fully charged
Check whether you have set
Auto Off; if so, the camera will
be automatically switched off
when it is not used for a period
of preset time
External temperature is too
low
Check whether the battery is
fully charged.
Check whether the battery is
scrapped.
The camera is not set to
Shooting Mode.
The Shutter button is not fully
pressed
The camera is set to
Continuous Shooting mode
The date/time is not set. The
camera still uses the default
time
The photo may have been
damaged
Exposure compensation value
is incorrect
The LCD is dirty Clean the LCD with clean velveteen
The cable is not connected
properly.
The operating system is not
Windows
98/98SE/2000/ME/XP, or the
computer does not have a
USB port.
Windows 98 USB driver is not
installed.
Version of the media player is
too low
Incorrect file format
Incorrect copying directory
Install the battery into the camera in
the correct direction.
Fully charge the battery with a
charge.
Set Auto Off as required
Do not use the camera at extreme
temperatures.
Charge the battery with an AC
adapter
If working time of the camera is still
short after the battery is fully
charged, replace the battery with a
new one.
Switch to the Shooting Mode by
pressing the Shooting Mode key and
Preview Mode key.
Press the Shutter button fully
Set the Flash mode to “Auto”
Disable Continuous Shooting
Reset the date/time
Backup with a PC
Reset exposure compensation
Check cable connection.
Install Windows 98/98SE/
2000/ME/XP and USB port.
Install Window 98 USB driver.
Please download and install the
latest media player (Windows Media
Player 9 or higher)
Copy MP3 files of correct format
s to the \MP3 directory
24
Page 27

7. Specifications
1. SENSOR 1/2.5" 5-Mega-pixel (2592×1944) CMOS
2. Lens Fixed-focus lens
Photo pixels 3648×2736 (Interpolated 10 Mega), 2560×1920 (5 Mega),
3.
4. Shutter Electronic shutter
5. Image format JPEG
Video recording
6.
quality
Video recording
7.
duration
8. Audio recording WAV file format
9. Audio VIDEO mono, MP3 stereo
MP4 movie
10.
playback
11. LCD 2.5" color LTPS LCD, 153,000 pixels (640×240)
Exposure Auto Exposure
12.
13. White balance Auto, Daylight, Cloudy, Fluorescent, Tungsten
14. Zoom 8x Digital Zoom
Self timer 10s
15.
Flash Auto, Forced Off, Forced On
16.
Flash range 1.5m
17.
Date printing You can select to print date on a photo
18.
Built-in memory Built-in 64MByte NAND flash memory, with 32M available for
19.
Auto off Optional among 3 minutes (default)/5 minutes/8 minutes/Off
20.
Direct printing
21.
specification
External memory
22.
interface
23. Video output NTSC and PAL (As selected by user)
24. Built-in speaker Available, mono
Built-in
25.
microphone
26. Multi-function port Mini USB port, USB 2.0 High Speed
A/V port φ3.5mm earphone jack/AV OUT audio port, shared
27.
Battery
28.
specifications
External
dimensions
29.
(length × width ×
thickness mm)
2048×1536 (3 Mega), 1280×960 (1.3 Mega), 640×480 (0.3
Mega)
Optional
VGA MPEG4 30fps, AVI file format, Electronic Anti-shock
Shooting, with sound
Limited by storage space only, video compression ratio and
resolution are optional
Max. VGA 30fps supported
In manual mode, EV compensation range is -2.0EV~+2.0EV
at 1/3 step
use
after the camera is not used
PictBridge
SD card
Available, mono
Rechargeable lithium battery 3.7V 950mAh
112.5mm×58mm×25mm
25
Page 28

8. Safety use and disposal
Note:
◆ Mix use of batteries or chargers can cause explosion. Please follow the instructions for
disposing used battery.
◆ Please note that the power plug should be disconnected when not in use. Safety features
have been fully considered for this product, and the plug can be unplugged at any time in
case of emergency. However, to prevent possible fire hazard, be sure to unplug the power
plug when a long unused time is expected.
◆ Also unplug the power plug before a storm to protect against lightning.
Scrap disposal
1. Scrapped electronic products must be disposed separately from home refuse.
2. Proper disposal of scrapped electronic products is good for preventing environmental
pollution or harm to human health.
3. You can obtain more help for disposing scrapped electronic products at the shop where you
purchased this product.
Disposing scrapped battery
Used battery must not be thrown into home refuse bin! It must be put into scrapped-battery
recycle bin.
26
Page 29

9. Summary of icon indications
Three shooting options: Still Movie Audio recording
Battery status:
Still modes:
Flash modes:
Image quality:
White balance:
Metering method:
Size of movie clip:
MP3 play:
Others:
Single shooting Self shooting Continuous shooting
Panoramic mode
Auto Off Forced On
Fine Normal Basic
Daylight Cloudy Fluorescent Tungsten, Auto WB
when no display
Center-weighted metering Spot metering Matrix
metering
QVGA VGA
Loop One Loop All Shuffle Normal
SD card Time stamp Night scene
27
Page 30

GFM Guarantee
If you are not totally satisfied with this GFM product, you may return it to any Meijer store for a full
refund within 6 months (180 days) of purchase when accompanied by a receipt.
For customer support, please call (866) 845-9436 or go to www.gfmproducts.com.
Dist. by Wholesale Merchandisers, Inc.,
2929 Walker, NW,
Grand Rapids, MI 49544
Made in China
28
 Loading...