

Page 1

User Manual
CDC500C3GF
5MP Digital Camera
Page 2

Table of contents
Introduction ................................................................................................... 3
Overview..................................................................................................3
Features................................................................................................... 3
Package contents..................................................................................... 4
Computer system requirement for windows ............................................. 4
Getting to know on your camera .............................................................. 5
Icons on your LCD.................................................................................... 6
Prepare your camera for using..................................................................... 7
Battery installation....................................................................................7
Installing SD Memory Card ...................................................................... 8
OSD in every mode................................................................................ 10
How to operate your camera .......................................................................11
Power on/off............................................................................................11
System setting up....................................................................................11
Camera Mode ........................................................................................ 18
Video Mode............................................................................................ 20
Playback Mode....................................................................................... 21
Software installation....................................................................................25
1
Page 3

Install PhoTags Express......................................................................... 25
Register online ....................................................................................... 27
Browse CD............................................................................................. 28
Every thing you need to get the most from your photos......................... 28
Downloading photos...................................................................................30
Download photos directly from windows ................................................ 30
Download photos using PhoTags Express............................................. 31
Owner manual for PhoTags Express ......................................................... 36
Specifications.............................................................................................. 37
GFM Guarantee............................................................................................ 39
2
Page 4

Introduction
Overview
Thanks for purchasing this digital camera. Everything you need to take
quality photos is included with your camera. Please read this manual carefully
first in order to get the most out of your digital camera.
Features
z Digital Video VGA&QVGA.
z 8.0 Mega pixels camera with choice of 5 digital camera resolutions-
8M,5M,3M,1.3M,VGA.
z 2.0 inch Color LCD monitor
z 4x digital zoom
z Built-in SDRAM Memory
z SD Memory Card Slot accepts SD/MMC cards.
z Built-in flash
z PhoTags Express software for managing and enhancing your photos,
printing, sending photos by e-mails and much more.
3
Page 5

Package contents
z Camera
z PhoTags Express CD
z USB cable
z User’s manual
z Strap
z Pouch
z AC Adapter
● Li-ion Battery
Computer system requirement for windows
To be able to download photos to your PC you will need the following
minimum configuration:
z Pentium processor or above with Windows 98SE / 2000 / XP / Vista
z 64MB RAM, 128MB free disk space or more
z CD-ROM driver
z Recommended screen resolution 1024x768 pixels or greater
z 64K color or higher display adaptor
4
Page 6
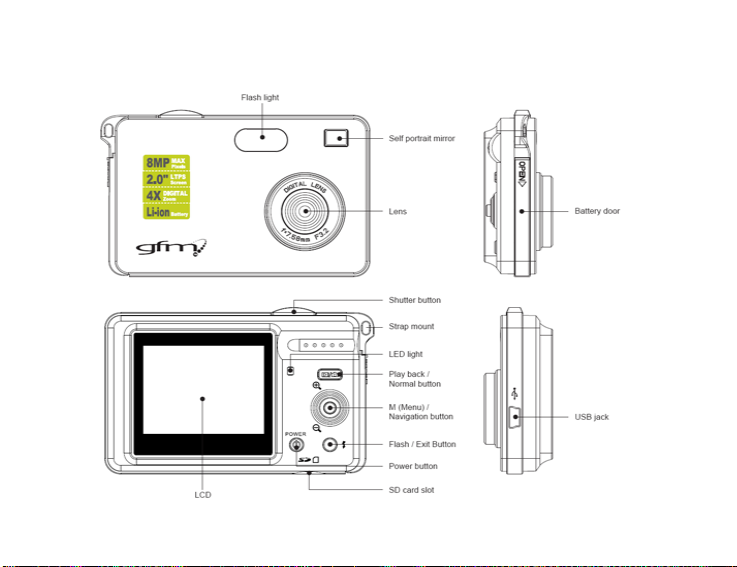
Getting to know on your camera
5
Page 7
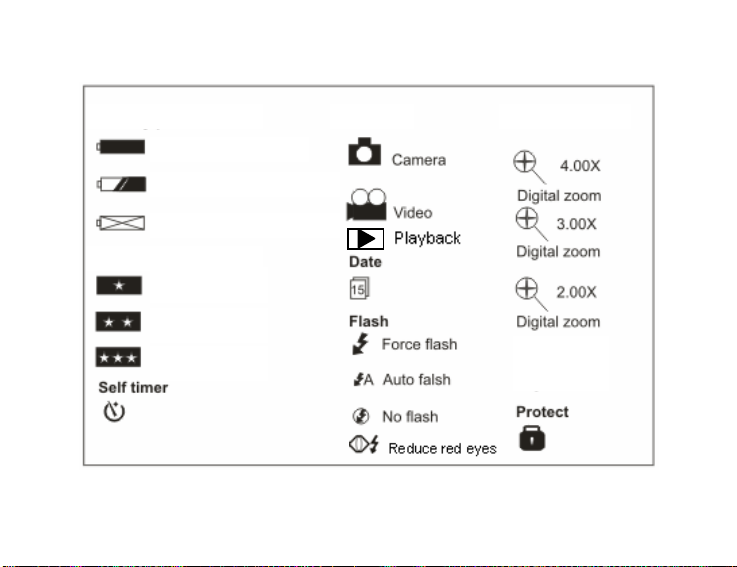
Icons on your LCD
our LCD
Battery power lever
Full battery power
Medium battery power
Low battery power
Photo quality
Economy
Standard
Fine
Mode Digital Zoom
6
Page 8
Prepare your camera for using
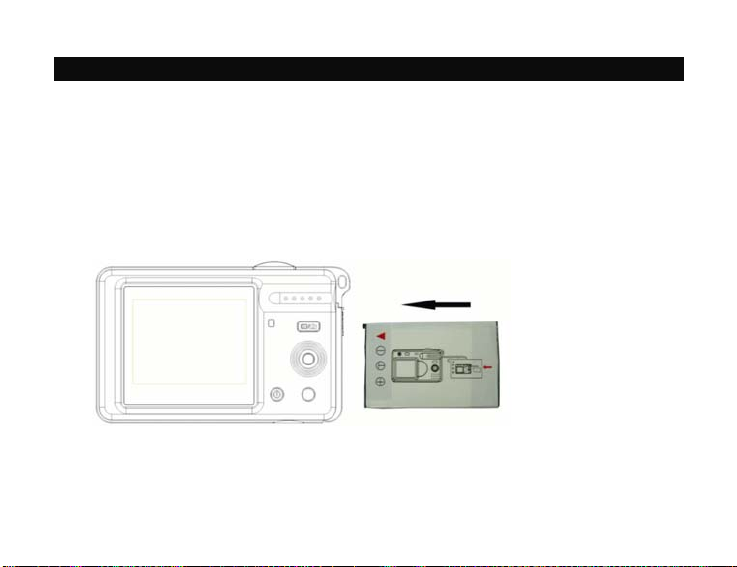
Battery installation
Your camera requires lithium battery (3.7V). Insert the battery into the
camera:
1. Slide the cover of the battery compartment open.
2. Please make sure that the correct battery is inserted with the correct
polarity facing up.
3. Please refer to the diagram below for the correct insertion method.
4. Close battery door.
7
Page 9

Note: 1. When the Low Battery icon is flashing o n the LC D screen,
you need to charge your battery:
a. Turn off your camera.
b. Connect your camera to the PC correctly.
c. The LED light will be on, it indicate the battery is charged.
d. The battery is full charging when the LED light is off.
2. If you don’t intend to use your camera for an extended period,
remove the battery for safety.
Installing SD Memory Card
Your camera has a memory card slot that enables you to insert any SD
compatible memory card. Adding a memory card will allow you to take more
photos and videos before you have to transfer photos/videos to a PC. Photos
and videos stored in this manner will not be lost regardless of any change in
battery power.
1. Locate the Memory card slot( on the bottom of the camera) as illustrated
below.
2. Insert the memory card into the slot, label side down and metal contacts
up.
3. Push the card in until you feel it “click” into position. The top of the card
8
Page 10

should be flush with the surface of the camera. A “C” icon will be display
on the LCD screen. Indication that an external memory card is installed.
4. Once an external memory card is inserted in the camera all the images
taken will be stored on the external memory card.
9
Page 11
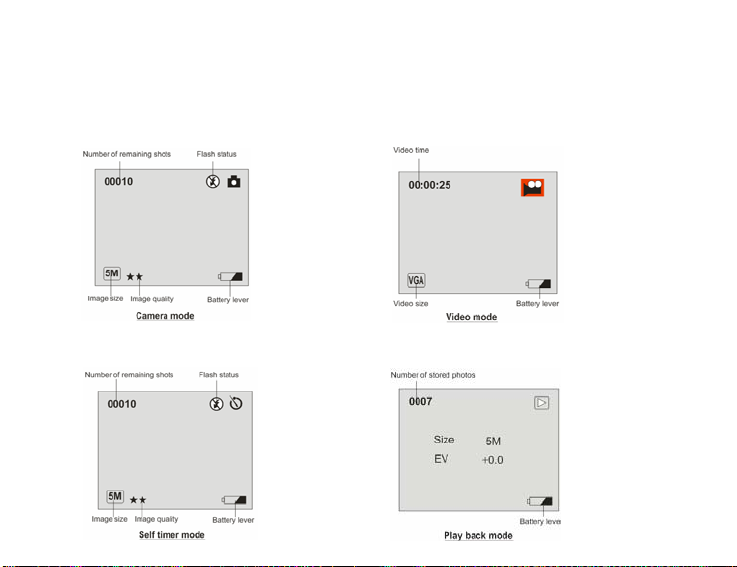
OSD in every mode
There are four modes in your camera: Camera mode, Video mode, Self timer
mode and Play back mode.
Camera mode: Video mode:
Self timer mode: Play back mode:
10
Page 12

How to operate your camera
Power on/off
1. Press and hold the Power button to start the camera. The LCD will light up
and the camera will sound a beep. It confirms that your camera is on and ready
for using.
2. Press and hold the power button about 3 seconds to turn off the camera.
System setting up
Power on your camera, the camera will be in the camera mode, press M button
to have some individual settings:
A. Capture menu
You can set image size, image quality, white balance and sharpness per your
request.
z Image Size
There are 5 resolutions for choosing: VGA, 1.3M, 3M, 5M, 8M.
1. Press M button.
2. Select “Size” by pressing M button up/downward.
3. Press M button.
4. Press M button again to confirm your selection. Or press Flash/Exit
button to exit the menu without any changing.
11
Page 13

z Image quality
You can set quality you want: Fine, Standard, Economy.
1. Press M button
2. Select “Quality” by pressing M button up/downward.
3. Press M button.
4. Press M button up/downward to select: Fine/Standard/Economy. Or press
Flash/Exit button to exit the menu without any changing.
z EV
This setting allows you to control the brightness of your images.
1. Press M button.
2. Select “EV” by pressing M button up/downward.
3. Press M button.
4. Press M button up/downward to select your value from +2 to -2.
5. Press M button to confirm your selection. Or press Flash/Exit button to
exit the menu without any changing.
12
Page 14

z White Balance
This setting allows the camera to adjust the color of your photos according to
the color of your light source.
1. Press M button.
2. Select “White Balance” by pressing M button upward/downward.
3. Press M button.
4. Press M button up/downward to select:
Auto/Daylight/Cloudy/Tungsten/Fluorescent.
5. Press M button to confirm your selection. Or press Flash/Exit button to
exit the menu without any changing.
z Sharpness
This setting allows you to adjust the sharpness of your images, making edges
more or less distinct.
1. Press M button.
2. Select “Sharpness” by pressing M button up/downward.
3. Press M button.
4. Press M button up/downward to select: Hard/Normal/Soft.
5. Press M button to confirm your selection. Or press Flash/Exit button to
exit the menu without any changing.
13
Page 15

B. Set up menu
1. Press M button.
2. Press M button rightward to select Set up menu.
z Light Frequency
Fluorescent light oscillation can affect the quality of your photos. Set the
camera for the correct frequency for the country that you are in. your camera
has 2 Frequency settings: 60HZ and 50HZ.
To change the frequency:
1. Press M button downward to select Light Freq.
2. Press M button.
3. Press M button up/downward to select 50/60HZ.
4. Press M button to confirm your selection. Or press Flash/Exit button to
exit the menu without any changing.
14
Page 16

z Date Time
PhoTags Express software makes it possible for you to keep track of the dates
of your photos. The date yo u shot the image is re corded by the ca mera and w ill
appear automatically on the photo when you download it to your computer
using the PhoTags Express software.
The date function can be turned on and off both in camera and PhoTags
Express software.
1. Press M button downward to select Date Time.
2. Press M button.
3. Press M button up/downward to select: On Photo/Off Photo.
4. Press M button to confirm your selection. Or press Flash/Exit button to
exit the menu without any changing.
In step 3, select the Set Time option to set:
Year/Month/Day/Hour/Minute/Second
1. Press M button up/downward to select
Year/Month/Day/Hour/Minute/Second.
15
Page 17

2. Press M button right/leftward to set the value.
3. Press M button to confirm. Or press Flash/Exit button to exit the menu
without any changing.
z Auto Off
The Auto Off is a special battery-saving feature which allows the camera to
turn itself off when not in use.
You can choose how long time the LCD screen will remain on while idle before
automatically shutting off.
1. Press M button up/downward to select Auto Off.
2. Press M button.
3. Press M button up/downward to select: 1Min/2Min/3Min/Off.
4. Press M button to confirm. Or press Flash/Exit button to exit the menu
without any changing.
z TFT State
If you want to save power and keep the camera is on, then you can realize it
via this function.
1. Press M button up/downward to select TFT State.
2. Press M button.
16
Page 18

3. Press M button up/downward to select Clear/Close/Normal.
4. Press M button to confirm. Or press Flash/Exit button to exit the menu
without any changing.
z Beep
You will hear beep sound when you click any button in every mode. You can
switch on or off it per your request.
1. Press M button up/downward to select Beep.
2. Press M button.
3. Press M button up/downward to select On/Off.
4. Press M button to confirm. Or press Flash/Exit button exit the menu
without any changing.
z Format
This function reformats the memory card and will erase all files in memory
including files that have protected.
1. Press M button up/downward to select Format.
2. Press M button.
3. Press M button up/downward to select Cancel/Execute.
4. Press M button to confirm. Or press Flash/Exit button to exit the menu
17
Page 19

Note: Formatting will delete all data in your camera or SD card including
protected files, it’s decided by the device selected. Please make sure
that you want to delete all date in camera or SD card, otherwise once
the data is deleted, it cannot be resumed.
z Sys. Reset
You can reset the system value to camera default.
1. Press M button up/downward to select Sys. Reset.
2. Press M button.
3. Press M button up/downward to select Cancel/Execute.
4. Press M button to confirm. Or press Flash/Exit button to exit the menu
without any changing.
Camera Mode
Taking photos
Hold the camera steady and press the Shutter button to take photo. There
will be a short delay while the camera saves the photo to memory.
After each photo is shot (when the camera returns to icon mode) the numbers
of photos left to at this resolution is displayed at the top left of the LCD screen.
18
Page 20

When the ca mera’s memory is (photo capacity) is full. The LCD screen will
display “MEMORY FULL”. If you attempt to take a photo when the memory is
full, the camera will beep continuously.
Digital zoom
You can magnify subject up to 4 times using the digital zoom. Press M button
upward to zoom in the subject up to 4X. Press M button downward to zoom out
back.
Flash
In low light conditions, it is best to use the built-in flash. You can also use the
flash to compensate for back conditions.
To set flash
1. Press Flash/Exit button, the
means the flash function has been “forced on” (manual flash). If the flash
is not ready, a red LED will light up and the
Wait until the flash is ready before taking a photo. A low battery warning
will appear on the LCD screen if there is insufficient battery power to
operate the flash.
2. Press Flash/Exit button repeatedly, select
icon will appear on the LCD screen. This
icon will flash repeatedly.
icon app ears on the LCD
19
Page 21

screen. This will activate the automatic flash.
3. Press Flash/Exit button repeatedly, select
screen. This will activate the reduction red eyes function.
4. Press Flash/Exit button repeatedly until the
turn off the flash function.
Self-timer
You can include yourself in a photo by using this feature to delay the time
between your pressing the Shutter and when the photo is actually taken.
1. Press the M button leftward repeatedly to exchange Self-timer and
Camera mode. The icon
2. Press Shutter button to start a 10 second count down (the count down will
appear on the LCD). After 10 seconds, a photo is taken.
Video Mode
Press M button rightward repeatedly to exchange Video and Camera mode.
will appear on the LCD screen.
icon app ear on the LCD
icon appears. This will
The icon
You can take VGA/QVGA pixels digital video clips with your camera. Without
will appear on the LCD screen.
20
Page 22

an SD memory card, the limited internal memory in your camera is provided for
test the video limited.
The maximum available recording time is displayed on the top left of the LCD
screen.
1. Press the Shutter button to start recording. Elapsed recording time will be
displayed on the top left of the LCD screen.
2. To stop/save recording, press the Shutter button again.
Note: 1. The video will be saved in AVI (Audio Video Interleave) format and
can be played by either with Windows Media Player or Apple Quick
Time. Shooting time varies depending on the available space in your
camera’s memory.
2. For the other functions in Video mode, please refer to relevant option
in System setting up.
Playback Mode
Press Playback/Normal button to Playback mode. The icon
the LCD screen. You can review the photos and videos you have recorded. In
playback mode
Press M button: You can Erase, Protect, Thumbnail view and Rotate your
photos and you can protect and delete video clips in playback mode.
will appear on
21
Page 23

Erase
1. Press M button up/downward to select Erase.
2. Press M button.
3. Press M button up/downward to select:
Delete this: to delete current photo.
Delete all: to delete all unprotected photos.
4. Press M button to confirm. Or press Flash/Exit button to exit the menu
without any changing.
Protect
1. Press M button up/downward to select Protect.
2. Press M button.
3. Press M button up/downward to select:
This: protect current photo you are viewing.
All: protect all photos in the memory.
4. Press M button and select:
Set: to execute protection function.
Cancel: exit without change.
5. Press M button to confirm. Or press Flash/Exit button to exit the menu
without any changing.
22
Page 24

Note: 1. When you protect the photo, a
bottom of the LCD screen.
2. You can not delete protect photos except format or unprotect.
Thumbnail
1. Press M button up/downward to select Thumbnail.
2. Press M button to view all files in thumbnail mode.
3. Press M button return to full screen display.
You can also realize this function by pressing Flash/Exit button:
1. Press Flash/Exit button once to turn off the icons on the LCD screen.
2. Press Flash/Exit button twice to Thumbnail display mode.
3. Press Flash/Exit button three times to normal full screen display.
Note: you can not manipulate files from the Thumbnails view.
Single Image Display
1. Press Flash/Exit button until you see the full screen display if you are not
in the mode.
2. Press M button right/leftward to browse the files in your camera.
icon will appear on the left
23
Page 25

Rotate
1. Press M button up/downward to select Rotation.
2. Press M button.
3. Press M button up/downward to select the degrees you want to rotate.
4. Press M button to confirm. Or press Flash/Exit button to exit the menu
without any changing.
For Setup in Playback mode, please refer to Setup menu in System setting
up.
24
Page 26

Software installation
NOTE: Make sure that your camera is not connected to the computer.
Insert software CD to your computer. After a few seconds, there will be shown
an installing main window on the screen.
You can “Install AP”, “Browse CD”, “Exit”, in this installing main window.
Install PhoTags Express
Click on the “Install AP” to start installing process. The language window
will be shown on the screen and you can choose the language you want to
use.
25
Page 27

Choose your language
And then the installer window will be shown as below.
Click to start installing
After you click “Install PhoTags Express” button, there will be showing some
windows that help you to finish the installing. You are only required to follow the
description and click the buttons that it’s defaulted by the software.
26
Page 28

Register online
Click “Register online” button to have a registration. Or you can directly click
“Continue” for registration next time.
After this step, the main window will appear on the screen.
27
Page 29

Browse CD
Click “Browse CD” on the main window, you can see what is included in
the CD.
Every thing you need to get the most from your photos
1. Select photos
Select the ph otos that you download from your camera. And edit it in
the software.
2. Edit photos
Click the “Enhance photos”, “Add captions” from the main window to
edit your ideal photos.
3. Share photos
Share your photos via “E-mail”,
“Printing”, and “Create HTML web” to
uploading online.
4. Workshop
Create “Calendars”, two sides
“Greeting cards” and “Postcards” on standard photo paper. You can
28
Page 30

purchase “Album” and “Video CD”. Two additional workshop project online at
any time and create Photo Album and slide shows on CD that
can be viewed on your PC and VCD for viewing on your TV using your DVD
player.
29
Page 31

Downloading photos
Turn on your camera, Change your camera mode to Playback and connect
your camera to the computer correctly with USB cable, the screen will be
shown a window (Removable Disk H:) as below:
NOTE: Now you can copy the photos to your computer with two method as
below:
Download photos directly from windows Choose “copy pictures to a folder on my computer” on the Removable Disk (H:) window. After you click “OK”, there will be shown some windows on
30
Page 32

the screen step by step, you are only required to follow the description and
click the buttons that are defaulted by the system to finish transferring.
Or you can:
1. Click on the START button in Windows.
2. Click on the MY COMPUTER Icon on the desktop.
3. Your memory card will appear as a REMOVABLE STORAGE DEVICE.
4. Click on the REMOVABLE STORAGE DEVICE to view the images. The
images are stored in the subfolder called DCM100.
5. You can now copy and paste the images to any directory you choose.
Download photos using PhoTags Express
a. Double click the PhoTags Express icon
the application.
b. Click the “Get Photos” button on the main window.
c. The “Get Photos” wizard mode will appear on the screen, you can
select “custom copy” to download photos with your individuation.
Or you can select “Express” option to download all photos to the
computer without the option of selecting photos. In this mode you will
31
on the desktop to l aunch
Page 33

not see a preview of the photos transferred.
Custom copy
This mode is used to manually select the photos you wish to copy to your
computer.
The “Device selection” mode will appear. Both your camera and the memory
card will each appear in the “Active Devices” list
Select “Custom copy” click “Next” to continue.
Note: At this moment, you can select “Express” option to copy all photos to
your computer
32
Page 34

Select your photos click “Next” to continue.
Add active captions to the picture. With this feature you can add a date,
keywords and categories. Click “Next” to continue.
33
Page 35

Choose a position where you want to place the photos. Click “Finish” to copy
the photos to the location you selected.
34
Page 36

Note:
All of the picture you imported will appear in the “Select Photos” main
window. And now, you can edit your photos per your idea, and then download
it to your computer. For how to edit the photos, you can refer to the Quick Start
guide in the PhoTags Express.
35
Page 37

Owner manual for PhoTags Express
You can edit, printing, sharing photos with PhoTags Express. You can operate
it as following step to know how to use PhoTags Express:
1. Launch the PhoTags Express.
2. Click “tour” button on the main window to view how to use the photags
Express in detail.
Attention:
If PhoTags Expr ess can not upgrade the DirectX automatically, you can
manually install the DirectX in the CD before using the
Camera, othe rwise ,if the edition of DirectX in the windows operation is less
than 8.1,then the AVI file can not be played.
Click here
36
Page 38

Specifications
‧Image Sensor
‧Image Resolution
‧LCD Display
‧Internal Memory
‧External Memory
‧Lens
‧Zoom
‧Optical Viewfinder
‧Exposure
‧White Balance
‧Self-timer
‧File Format
5.0 Mega Pixels CMOS Sensor
Digital Camera:3532x2304pixels (8MP Interpolation),
2592X1944pixels(5M), 2048X1536 pixels(3M),
1280x1024pixels(1.3M) , 640X480 pixels(VGA)
Vi
deo: 640*480(VGA),320*240pixels(QVGA)
2.0 Inch LTPS TFT
Internal SDRAM (16MB) for buffer
Standard quality: 15pcs (8M), 22pcs(5M), 30pcs (3M), 58pcs
(1.3M), 153pcs (VGA)
Fine quality: 12pcs (8M), 17pcs (5M), 24pcs (3M), 45pcs(1.3M),
123pcs (VGA)
Economy quality: 20pcs (8M), 26pcs (5M), 36pcs (3M), 68pcs
(1.3M), 181pcs (VGA)
SD/MMC card
f=7.58mm, F3.2
4X Digital Zoom
N/A
-2.0EV ~ +2.0EV
Sunny, Cloudy, Tungsten, Fluorescent
10s
JPEG/AVI(No audio)
37
Page 39

‧Flash
‧Interface
‧TV out
‧Microphone
‧System Requirements
‧Accessories
‧Battery
‧Working Temperature 0-40 ℃
38
Build-in Auto /Force/ Red eye reduce /Off
USB 1.1
N/A
N/A
Windows 98 SE/ 2000/ XP/ Vista
USB Cable, Software CD, User's manual, Gallus, hop-pocket
Li-ion Rechargeable
Page 40

GFM Guarantee
If you are not totally satisfied with this GFM product, you may return it to
any Meijer store for a full refund within 6 months (180 days) of purchase
when accompanied by a receipt.
For customer support, please call (866) 845-9436 or go to
www.gfmproducts.com.
Dist. by Wholesale Merchandisers, Inc.,
2929 Walker, NW,
Grand Rapids, MI 49544
Made in China
39
 Loading...