

Page 1

Respons TMS Valve
Installation Instructions
Part # T9033
P.O. Box 1017 Riverwood NSW 2210
Ph: +612 9534 0099 Fax: +612 9534 3999
Website: www.gfb.com.au Email: sales@gfb.com.au
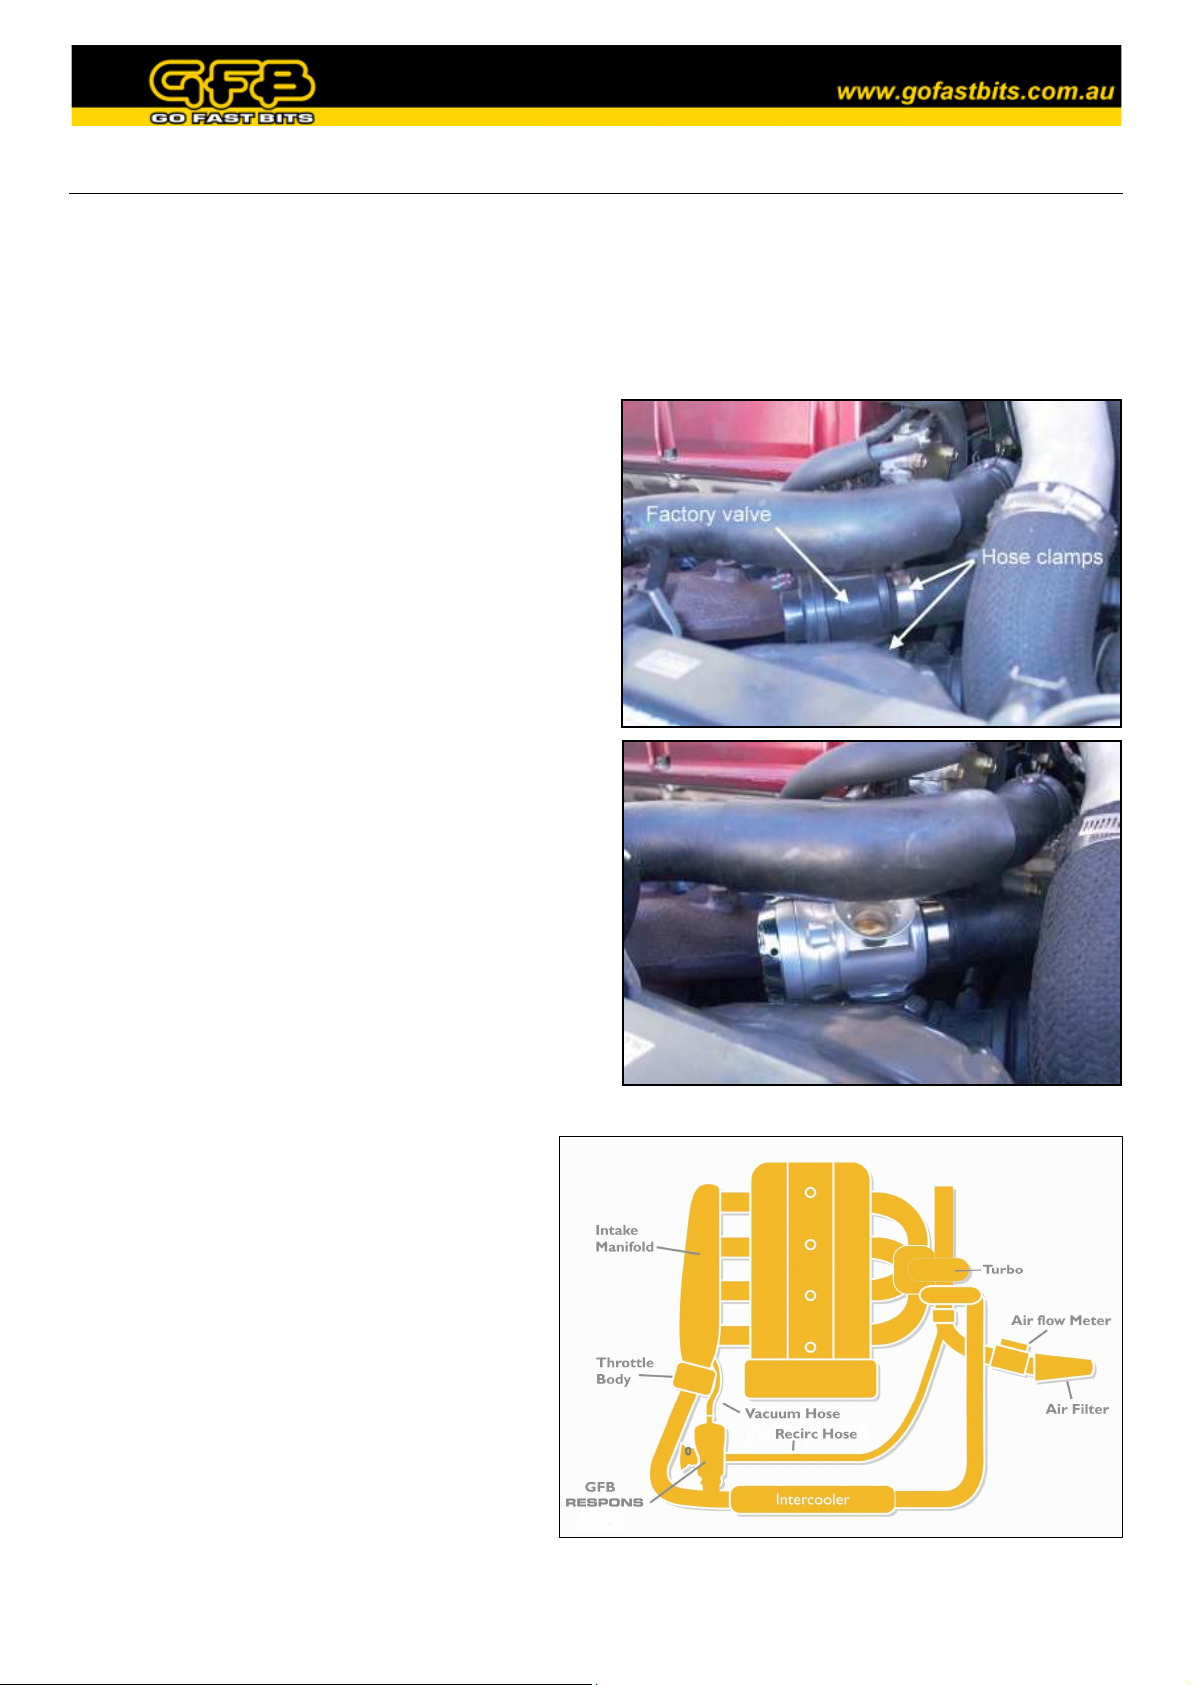
Page 2
Installation Instructions for GFB Respons (part # T9033)
T9033 is suitable for custom hose-mount installations (1.25” I.D. hose inlet and outlet), and is
also a direct factory replacement for:
• Mitsubishi Lancer EVO I-X
• Mitsubishi Lancer Ralliart
• Mitsubishi Lancer GSR (4G93)
• Mitsubishi Ralliart Colt
For typical Mitsubishi installations:
1. Locate the factory diverter valve, and if
necessary, remove any intercooler hoses in order
to gain access to the valve – in most cases this
isn’t necessary. Loosen the two hose clamps
with a 10mm socket, then pull the valve free
from the two large hoses.
2. Open the small hose clip that retains the vacuum
hose using a pair of pliers. Slide the vacuum hose
off the valve (if it is difficult to remove, try
pushing the end of the hose off carefully with a
flat screwdriver instead of pulling it).
3. Check the orientation of the factory valve
vacuum nipple, and compare it to the GFB
Respons. The Respons cap can be removed and
re-fitted in any one of 4 orientations if required
for a better fit.
4. Push the base of the GFB valve into the hose so
that it is in the same orientation as the factory
valve. Then push the plumb back outlet into the
turbo intake pipe. Tighten both hose clamps.
5. Re-connect the vacuum hose onto the nipple and
replace the hose clip.
For custom hose mounting, a location for the
Respons must be found on the piping between
the turbo outlet and the throttle body, and a
suitable adaptor must be welded in that location.
A hose to connect the Respons recirc outlet
must also be fitted to the piping before the turbo
(after the airflow meter if one is installed).
NOTE: GFB recommends mounting the BOV
closer to the throttle body rather than the turbo,
since some factory turbo piping can cause
pressure drops which may affect the
performance of the valve. If an intercooler is
used, it is preferable to mount the valve after the
intercooler, before the throttle.
Page 3

Spring Adjustment
Contrary to popular belief, the spring pre-load DOES NOT need to be adjusted to suit different
boost levels. The valve will stay shut under full throttle conditions regardless of boost pressure or
spring pre-load.
Rather, the spring pre-load affects how easily the valve opens
when you lift the throttle, and how long it stays open when it
vents. Adjusting the spring is a simple matter of ensuring the
valve opens enough to release the air, but not long enough to
cause idling problems. The guide below will walk you
through the steps involved.
The screw in the centre of the head is the spring adjuster
(shown opposite). Use the supplied 5mm hex key for this
screw.
The softest spring setting is achieved when the top of the adjustment screw is 3mm above the head
of the valve. Do not set the screw more than 3mm above the head.
• Set the spring to the softest setting, and move the noise adjusting ring to at least 50%
atmosphere venting so you can see the piston through the trumpet
• Start the car and let it warm up to normal operating temperature. Make sure the A/C is off
• Give the engine a good hard rev, and watch the piston - WARNING: Keep your face away
from the trumpet opening when revving the engine. View the piston from an angle away
from the blast of air. The piston should lift and vent with a “whoosh”, then close slowly and
smoothly. The harder you stab the throttle, the further the piston will open (note: it will only
open fully when driving, as the turbo does not generate boost until the engine is under load).
• If the piston stays open too long, and does not close before the revs drop back to idle, the
engine will “stumble”. If this happens, wind the adjustment screw in the “+” direction one
turn at a time until the engine returns smoothly to idle after revving
• For the final fine-tune, take the car for a drive. Watch the tacho as you pull up to a stop - if
the revs dip below idle and then rise again, tighten the spring another 1-2 turns
• If a loud flutter is heard when lifting off sharply after accelerating hard above 3500RPM,
wind the adjustment screw in the “-“ direction one turn at a time until the noise disappears.
Note that it is not uncommon to hear a slight fluttering at low RPM, particularly if you
partially spool the turbo and lift off slowly. This is a result of the different way in which this
valve operates compared to the factory unit, and is perfectly normal and not detrimental to
the turbo
A video example of setting up the spring pre-load can be seen at:
http://www.youtube.com/watch?v=iqQR5WUF9lc
Page 4

Adjusting the Noise
The unique patented venting bias adjustment feature on
the GFB Respons lets you vary the amount of air vented
to atmosphere or recirc, thereby changing the volume of
the sound.
Turning the venting bias adjuster (figure 3) fully anticlockwise means all the air will vent through the trumpet,
which is the loudest setting.
Turning the adjuster clockwise from this position will
begin to open up more of the recirc outlet, until a ratio of
50/50 is reached. As you turn the adjuster further clockwise, the recirc port is fully open and the
trumpet port will begin to close. When the adjuster reaches the maximum clockwise position, the
trumpet is completely closed, and the valve will operate like a factory recirculating bypass valve.
Typically, most engines will allow 100% atmosphere venting with no problems, provided the spring
pre-load is adjusted correctly. However, some combinations of modifications can result in
backfiring when the valve vents to atmosphere, in which case the solution is simply to dial back the
amount of air vented to atmosphere until the problem is resolved – this is one of the key benefits of
the venting bias adjustment feature.
Do not be afraid to experiment with the spring and noise settings, no harm will come to the engine
if wrong setting is used.
Maintenance
GFB blow-off valves are designed to be as maintenance-free as possible. In most cars the small
amount of crankcase and rocker-cover oil vapor that is directed into the intake system is enough to
keep the piston well lubricated. However, if you notice the sound of the valve changing over time
(e.g. slow response time, intermittent operation), or if you can see that the piston is not moving
smoothly, it may require a clean and re-lube.
Put a rag under the valve to catch any parts that may drop, or better yet, remove the Respons from
the car entirely. Remove the four screws holding on the cap, taking care as the spring will try to
push the cap off as the last screw is removed. Remove the spring and the brass piston, and wipe any
grime from the inside of the valve and the piston with a rag. Apply normal engine oil to the piston
and the inside of the bore, and re-assemble.
Technical Support
If you experience any issues during installation or use of your GFB Respons that are not answered
in these instructions, please contact the GFB tech support team on +612 9534 0099, or email
support@gfb.com.au.
This product is intended for racing use only, and it is the owner’s responsibility to be aware of the legalities of fitting this product in his
or her state/territory regarding noise, emissions and vehicle modifications.
GFB products are engineered for best performance, however incorrect use or modification of factory systems may cause damage to or
reduce the longevity of the engine/drive-train components.
GFB recommends that only qualified motor engineers fit this product. Warranty is for the period of one year from the date of
purchase and is limited only to the repair or replacement of GFB products provided they are used as intended and in accordance with
all appropriate warnings and limitations. No other warranty is expressed or implied.
 Loading...