

Page 1
QUICK START
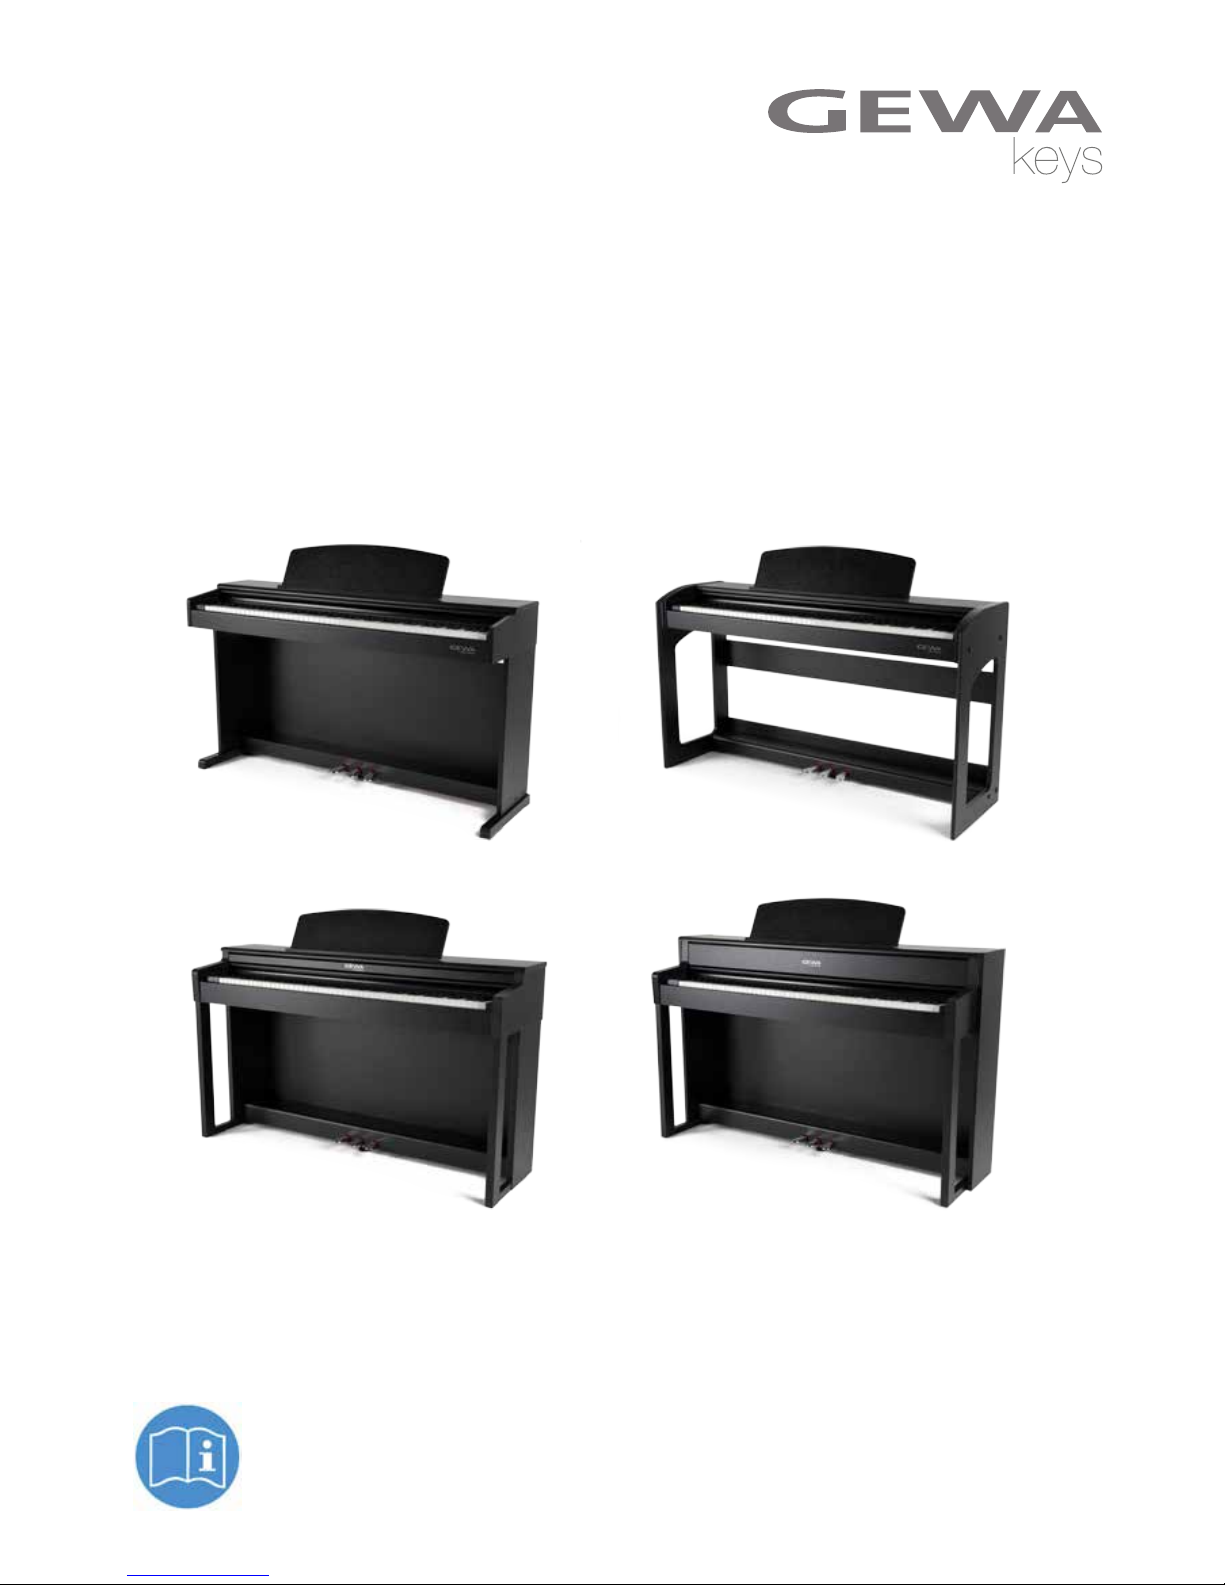
GEWA Digital Piano DP300G | DP340G | UP360G | UP380G/WK
gewakeys.com/service/downloads
Die vollständige Bedienungsanleitung für ihr Modell nden sie unter:
Please follow the download link to the complete user’s manual:
Page 2

Manufacturer:
GEWA music GmbH
Werkstraße 1
08626 Adorf
GERMANY
www.gewamusic.com
Version 1.0
Stand 11.04.2019
Page 3

3
DEUTSCHENGLISH
1 SICHERHEITSINFORMATIONEN ....................................................................................................................... 4
1.1 Zeichenerklärung ........................................................................................................................................ 4
1.2 Bestimmungsgemäß verwenden ................................................................................................................. 5
1.3 Unsachgemäßer Gebrauch ........................................................................................................................ 5
1.4 Vorsichtsmaßnahmen .................................................................................................................................. 6
1.5 CE-Zeichen ................................................................................................................................................ 7
1.6 Entsorgung ................................................................................................................................................. 7
2 LIEFERUMFANG ................................................................................................................................................. 8
3 MONTAGEANLEITUNG ................................................................................................................................... 12
4 ERSTE SCHRITTE ...................................................................................................................................... 20, 24
4.1 Die Bedienelemente Ihres Digitalpianos ............................................................................................ 20, 24
4.2 Bedientasten und Pedale ................................................................................................................... 21, 25
4.3 Spieltisch / Anschlüsse Unterseite/Rückseite .................................................................................... 22, 26
4.4 Bluetooth Audio .......................................................................................................................................... 27
1 SAFETY INFORMATION ................................................................................................................................... 28
1.1 Key ............................................................................................................................................................ 28
1.2 Intended use ............................................................................................................................................. 29
1.3 Improper use ............................................................................................................................................ 29
1.4 Precautions ............................................................................................................................................... 30
1.5 CE mark .................................................................................................................................................... 31
1.6 Disposal ................................................................................................................................................... 31
2 DELIVERY .......................................................................................................................................................... 32
3 ASSEMBLY INSTRUCTIONS ........................................................................................................................... 36
4 FIRST STEPS .............................................................................................................................................. 44, 48
4.1 Control elements of your digital piano .............................................................................................. 44, 48
4.2 Control buttons and pedals ................................................................................................................ 45, 49
4.3 Keyboard / Connections panel / Back ................................................................................................ 46, 50
4.4 Bluetooth Audio .......................................................................................................................................... 51
INHALTSVERZEICHNIS | CONTENTS
Page 4
4
DEUTSCH
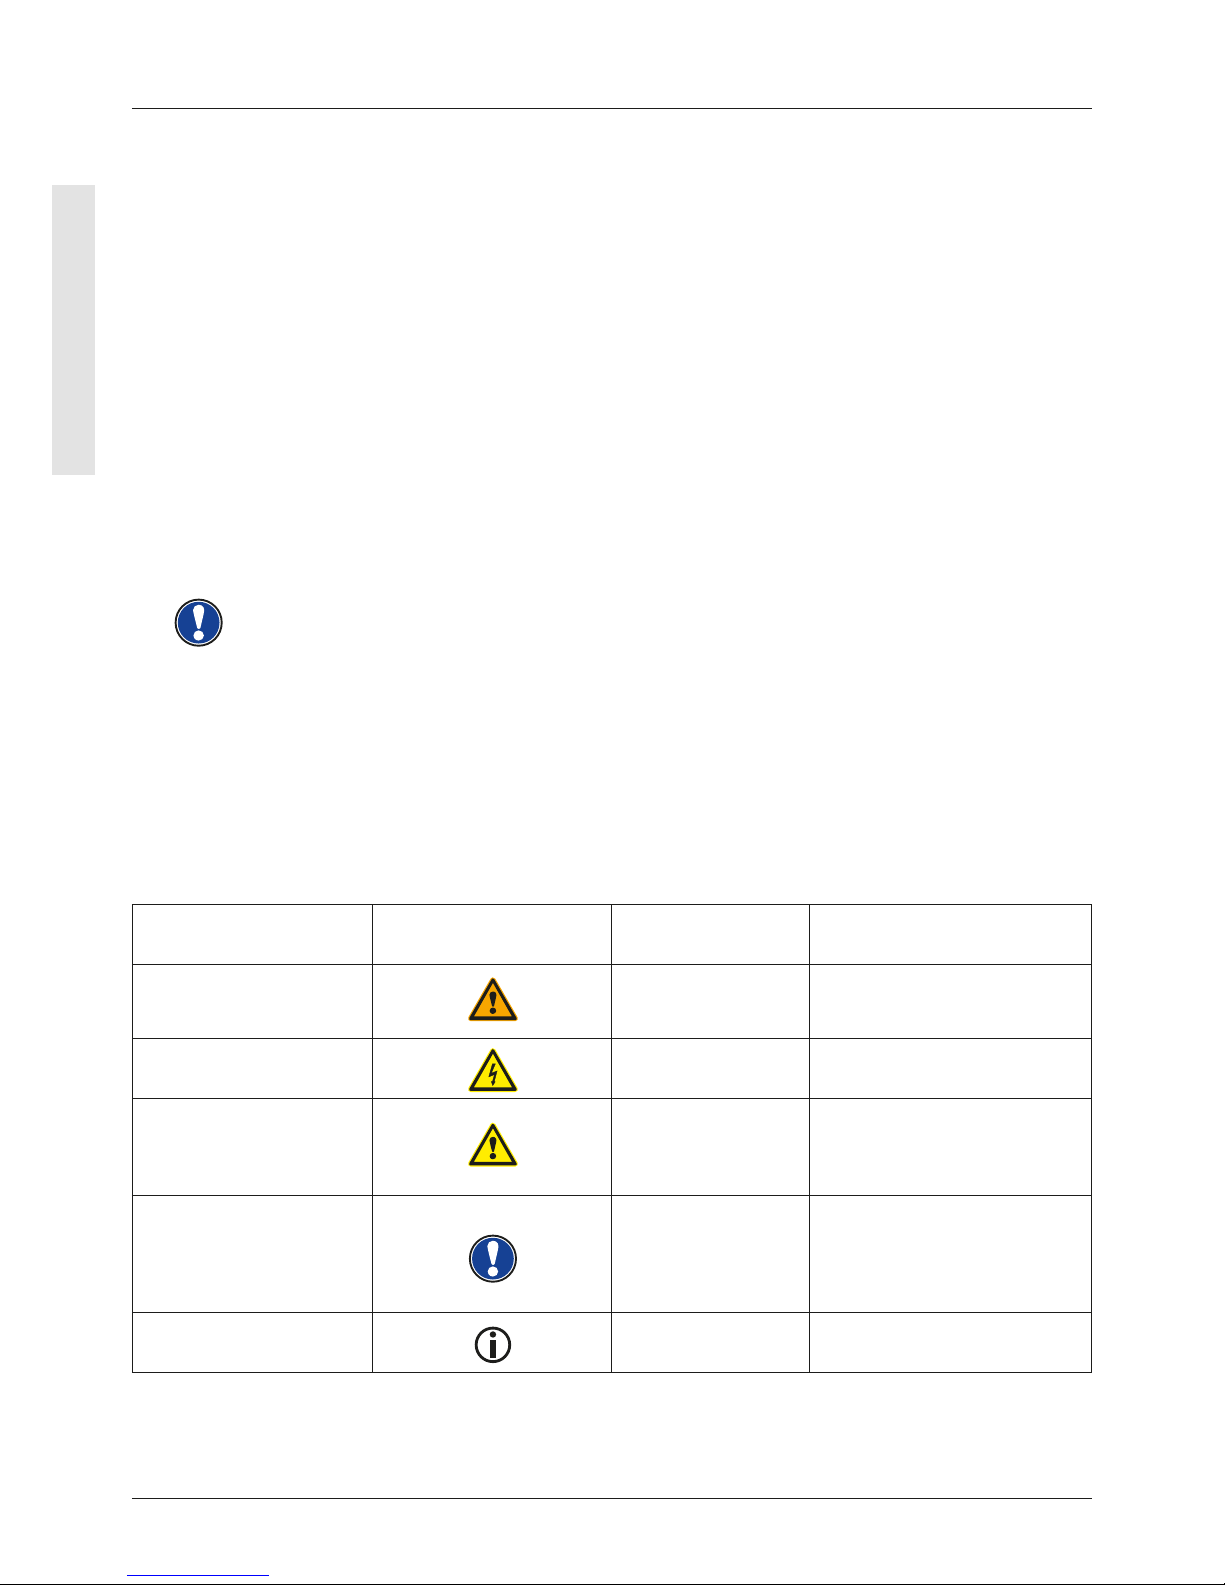
Gefahrenstufe Symbol Bedeutung Denition
Schwere Verletzungen
WARNUNG
Schwerste bis tödliche
Verletzungen bei
Missachtung
Schwere Verletzungen
durch Elektroschlag
WARNUNG
Zusatz zur Kennzeichnung der
Gefahr durch Elektroschock.
Leichtere Verletzungen
und Sachschäden
VORSICHT
Leichte Verletzungen und/oder
Sachschäden können bei
Missachtung des
Sicherheitshinweises erfolgen.
Hinweis
HINWEIS
Wichtige Information im
Umgang mit dem Gerät
Tipp
TIPP
Anwendungstipps
SICHERHEITSINFORMATIONEN
ZEICHENERKLÄRUNG
Sehr geehrter Kunde,
vielen Dank, dass Sie sich für ein Digitalpiano der GEWA music entschieden haben!
Sie haben ein hochwertiges Digitalpiano ausgewählt, das Ihnen ein beeindruckendes
Klangerlebnis und viel Freude bereiten wird.
Zusätzliche Funktionen erweitern die Möglichkeiten Ihres Digitalpianos weit über das
Klavierspiel hinaus.
Ihre Sicherheit ist uns sehr wichtig!
Lesen Sie deshalb bitte die Sicherheitsinformationen aufmerksam und sorgfältig durch
und beachten Sie diese genau. Bewahren Sie diese Bedienungsanleitung auf und
übergeben Sie die Bedienungsanleitung an den jeweiligen Benutzer.
1 SICHERHEITSINFORMATIONEN
Der Hersteller haftet nicht für Personen- oder Sachschäden, die aus einem
unsachgemäßen Gebrauch des Geräts resultieren!
Verwenden Sie Ihr Digitalpiano nur gemäß den hier aufgeführten Bestimmungen!
1.1 ZEICHENERKLÄRUNG
In dieser Bedienungsanleitung kommen folgende Zeichen für die Kennzeichnung von
Gefahren und Hinweisen zum Einsatz:
HINWEIS
Page 5

5
DEUTSCH
1.2 BESTIMMUNGSGEMÄSS VERWENDEN
Das Digitalpiano ist zur Verwendung in trockenen Räumen vorgesehen.
• Es können Geräte zur Audiowiedergabe (als Eingang oder Ausgang) oder
zur Datenkommunikation angeschlossen werden. Die jeweiligen technischen
Spezikationen müssen aber eingehalten werden (siehe dazu den Abschnitt „Technische
Daten“).
• Der elektrische Anschluss darf nur an vorschriftsmäßig installierte Stromversorgungen
erfolgen. Die Netzspannung des Typenschilds muss mit der Netzspannung des
Verwendungslandes übereinstimmen.
• Das Digitalpiano ist nur im nachfolgend beschriebenen originalen Lieferzustand zu
verwenden. Umbauten jeglicher Art sind nicht zulässig und bewirken den sofortigen
Verlust des Gewährleistungsanspruchs.
• Das Digitalpiano muss auf sicher befestigten und für das Gewicht geeigneten, stabilen
und ebenen Böden oder Plattformen aufgestellt werden.
1.3 UNSACHGEMÄSSER GEBRAUCH – BEISPIELE:
• Verwendung im Freien oder Regen
• Verwendung in feuchten Räumen
• Anschluss an falsche Versorgungsspannung oder nicht vorschriftsmäßig installierte
elektrische Stromversorgungen.
• Verwendung in unmittelbarer Nähe von elektrischen oder elektronischen Geräten wie
Stereoanlagen, Fernsehgeräten, Radios oder Mobiltelefonen.
• Diese Geräte können Störungen verursachen und die Tonqualität beeinträchtigen.
• Zu lange elektrische Anschlussleitungen können ebenfalls die Tonqualität beeinträchtigen.
• Transport und Aufstellung an Orten oder in Fahrzeugen mit starker Vibration,
Staubbelastung und bei starker Hitzeeinwirkung (z. B. bei direkter Sonneneinstrahlung).
Der Hersteller übernimmt keine Haftung für Schäden aus folgenden Gründen:
• Missachtung der Sicherheitshinweise
• Unsachgemäße Handhabung
• Einsatz mit nicht zu den nachfolgend gelisteten technischen Daten passenden
angeschlossenen Geräten
HINWEIS
SICHERHEITSINFORMATIONEN
BESTIMMUNGSGEMÄSS VERWENDEN
Page 6
6
DEUTSCH
SICHERHEITSINFORMATIONEN
VORSICHTSMASSNAHMEN
1.4 VORSICHTSMASSNAHMEN
Befolgen Sie unbedingt die hier genannten Vorsichtsmaßnahmen. Missachtung der
Vorsichtsmaßnahmen kann schwerwiegende Folgen haben:
• Schwere Verletzung oder sogar tödliche Unfälle
• Elektrische Schläge
• Kurzschlüsse
• Beschädigungen
• Feuer
Es sind weitere Gefährdungen denkbar, deshalb stellt dies keine abschließende
Aufzählung dar.
WARNUNG Tödliche Stromschläge
• Schon geringe elektrische Ströme können zu schweren Verletzungen und Tod führen!
• Nie das Digitalpiano öffnen.
• Nie beschädigte Netzkabel verwenden.
• Verlegen Sie Netzkabel so, dass Beschädigungen ausgeschlossen sind.
• Nie mit Wasser oder Flüssigkeiten gefüllte Gefäße (Vasen, Gläser etc.) auf dem Spieltisch
abstellen.
• Nie Wasser oder Flüssigkeiten in das Digitalpiano oder die Tastatur schütten.
• Nie das Digitalpiano mit nassem Lappen reinigen.
• Nie den Netzstecker mit nassen Händen einstecken oder aus der Steckdose
herausziehen. Dabei nie am Kabel ziehen, es kann beschädigt werden.
• Gelangt versehentlich eine Flüssigkeit in das Digitalpiano, ziehen Sie sofort den
Netzstecker. Lassen Sie das Digitalpiano anschließend von Ihrem GEWA-Kundendienst
überprüfen.
WARNUNG Bei ungewöhnlichen Ereignissen
• Schalten Sie das Digitalpiano aus oder ziehen Sie den Netzstecker, wenn:
- es während der Verwendung des Digitalpianos zu einem plötzlichen Tonausfall kommt,
- das Digitalpiano einen ungewöhnlichen Geruch oder Rauch erzeugt.
• Lassen Sie das Digitalpiano dann unbedingt von Ihrem GEWA-Kundendienst überprüfen.
WARNUNG Brandschutz
• Offene Flammen wie Kerzen oder Öllichter können umkippen und einen Brand
verursachen.
• Nie Gegenstände mit offenen Flammen auf dem Digitalpiano abstellen!
Page 7
7
DEUTSCH
SICHERHEITSINFORMATIONEN
CE-ZEICHEN
VORSICHT Schaden am Digitalpiano
• Unpassende elektrische Spannungen können das Digitalpiano beschädigen.
• Betreiben Sie das Digitalpiano nur im (wie auf dem jeweiligen Typenschild angegebenen)
zulässigen Spannungsbereich.
• Verwenden Sie nur das mitgelieferte Netzkabel.
• Verlegen Sie das Netzkabel niemals in der Nähe von Wärmequellen, etwa Heizkörpern
oder Heizstrahlern.
• Biegen oder knicken Sie das Netzkabel nicht übermäßig und beschädigen Sie es nicht
auf andere Weise.
• Verlegen Sie das Netzkabel so, dass niemand darauf treten, darüber stolpern oder
etwas darüber rollen kann.
• Stellen Sie keine Gegenstände auf das Netzkabel.
• Prüfen Sie den Netzstecker in regelmäßigen Abständen und entfernen Sie eventuell
vorhandenen Staub oder Schmutz.
VORSICHT Schäden am Digitalpiano durch Gewitter
• Gewitter können elektrische Überspannungen erzeugen, die elektrische Geräte
beschädigen können.
• Ziehen Sie bei Gewitter oder längerem Nichtgebrauch (Reise) den Netzstecker aus der
Steckdose.
1.5 CE-ZEICHEN
Dieses Gerät erfüllt die Anforderungen der EU Richtlinien: Directive 2014/53/EU
EN55020:2007+A11:2011
EN55024:2010
EN55032:2012
EN61000-3-2:2014
EN61000-3-3:2013
EN301489-17:V2.2.1
EN301489-17:V3.2.0
EN62479:2010
EN300328:V2.1.1
Die Konformität mit den o. a. Richtlinien wird durch das CE-Zeichen auf dem Gerät
bestätigt. Die Konformitätserklärung kann unter folgender Adresse eingesehen werden:
GEWA music GmbH, Werkstraße 1, 08626 Adorf, GERMANY
1.6 ENTSORGUNG
Zum Entsorgen bringen Sie das Altgerät bitte zur Sammelstelle Ihres kommunalen
Entsorgungsträgers (z. B. Entsorgungsbetrieb, Recyclinghof).
Das nebenstehende Symbol bedeutet, dass das Altgerät getrennt vom Hausmüll zu
entsorgen ist. Nach dem Elektro- und Elektronikgerätegesetz sind Besitzer von Altgeräten
gesetzlich gehalten, alte Elektro- und Elektronikgeräte einer getrennten Abfallerfassung
zuzuführen.
Helfen Sie bitte mit und leisten einen Beitrag zum Umweltschutz, indem Sie das Altgerät
nicht in den Hausmüll geben.
Page 8
8
DEUTSCH
LIEFERUMFANG
DP300G
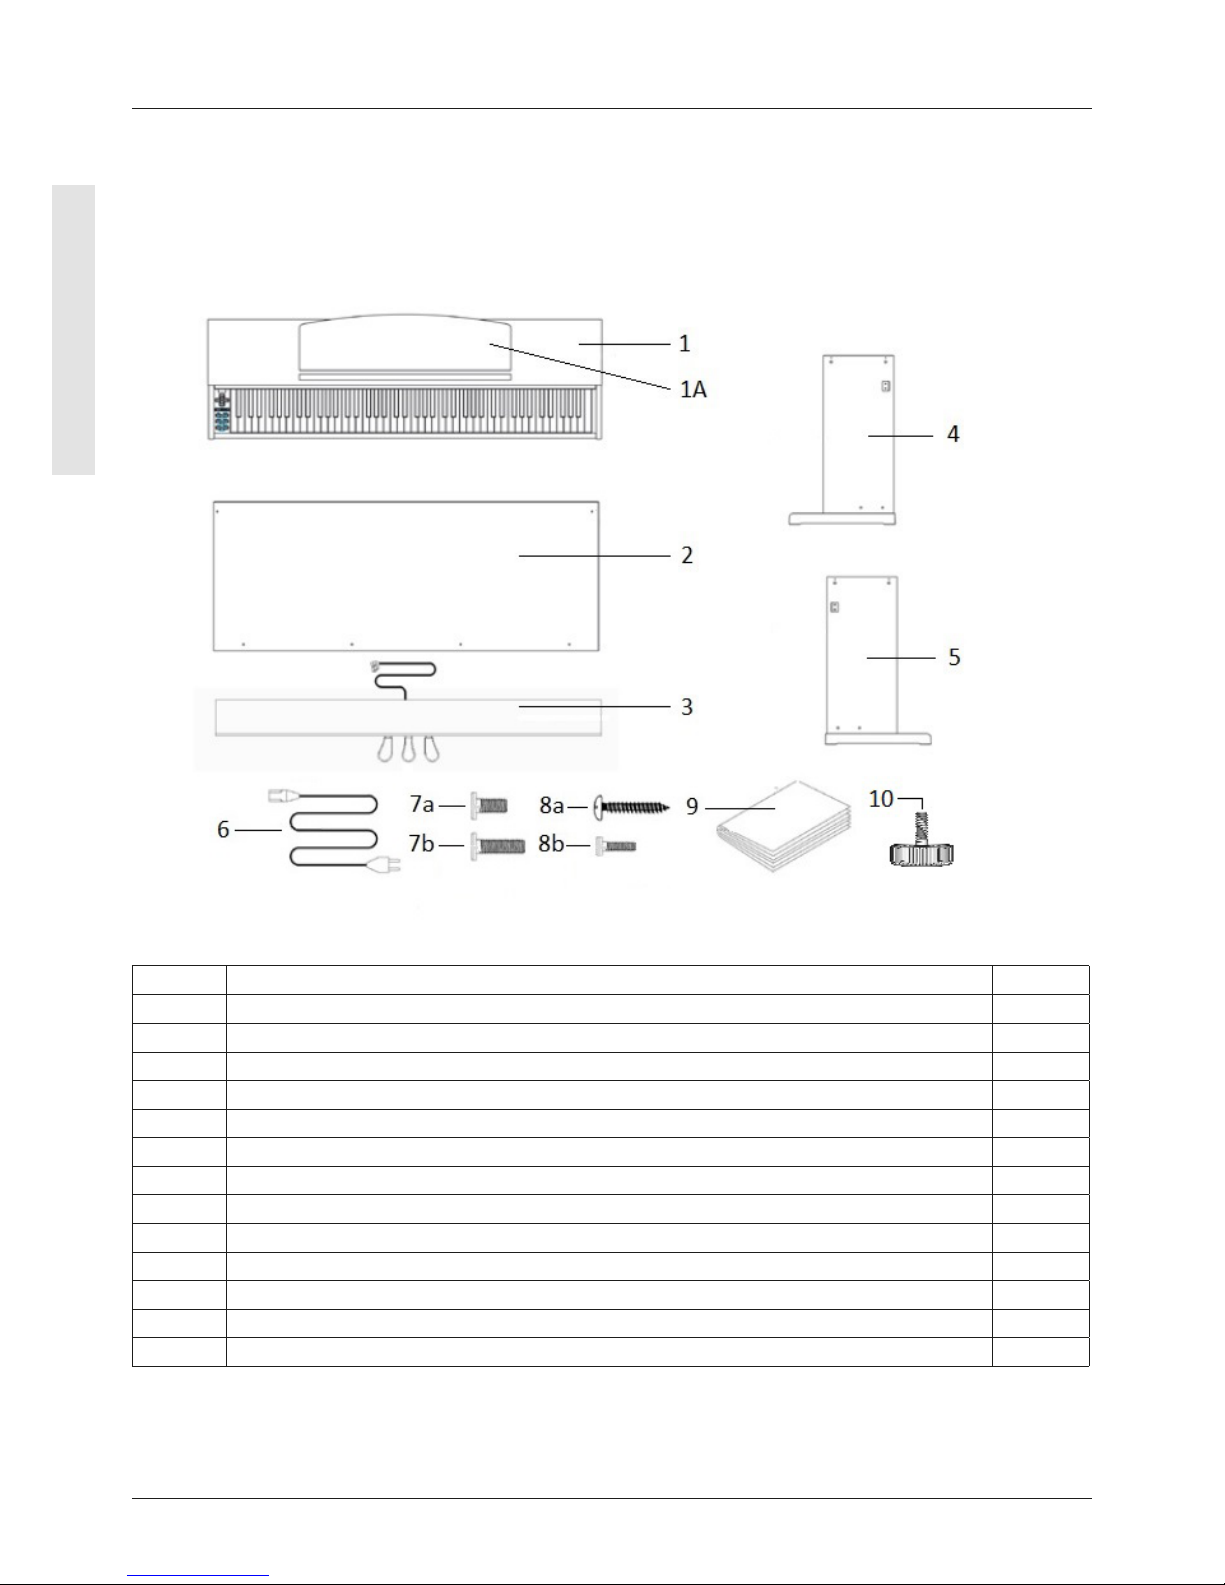
2 LIEFERUMFANG DP300G
Kontrollieren Sie den Verpackungsinhalt auf Vollständigkeit, bevor Sie mit der Montage
beginnen.
Pos. Bezeichnung Menge
1 Spieltisch mit Klaviatur und Klaviaturabdeckung 1
1a Notenablage 1
2 Rückwand 1
3 Pedalboard 1
4 Seitenteil links 1
5 Seitenteil rechts 1
6 Anschlusskabel Stromversorgung 1
7a Kreuzschlitzschraube M6 x 16 4
7b Kreuzschlitzschraube M6 x 35 4
8a Kreuzschlitz Holzschraube 3,5 x 18 4
8b Kreuzschlitzschraube M4 x 10 mit Unterlegscheibe und Federring 2
9 Quick Start Guide 1
10 Stellschraube 1
Page 9
9
DEUTSCH
LIEFERUMFANG
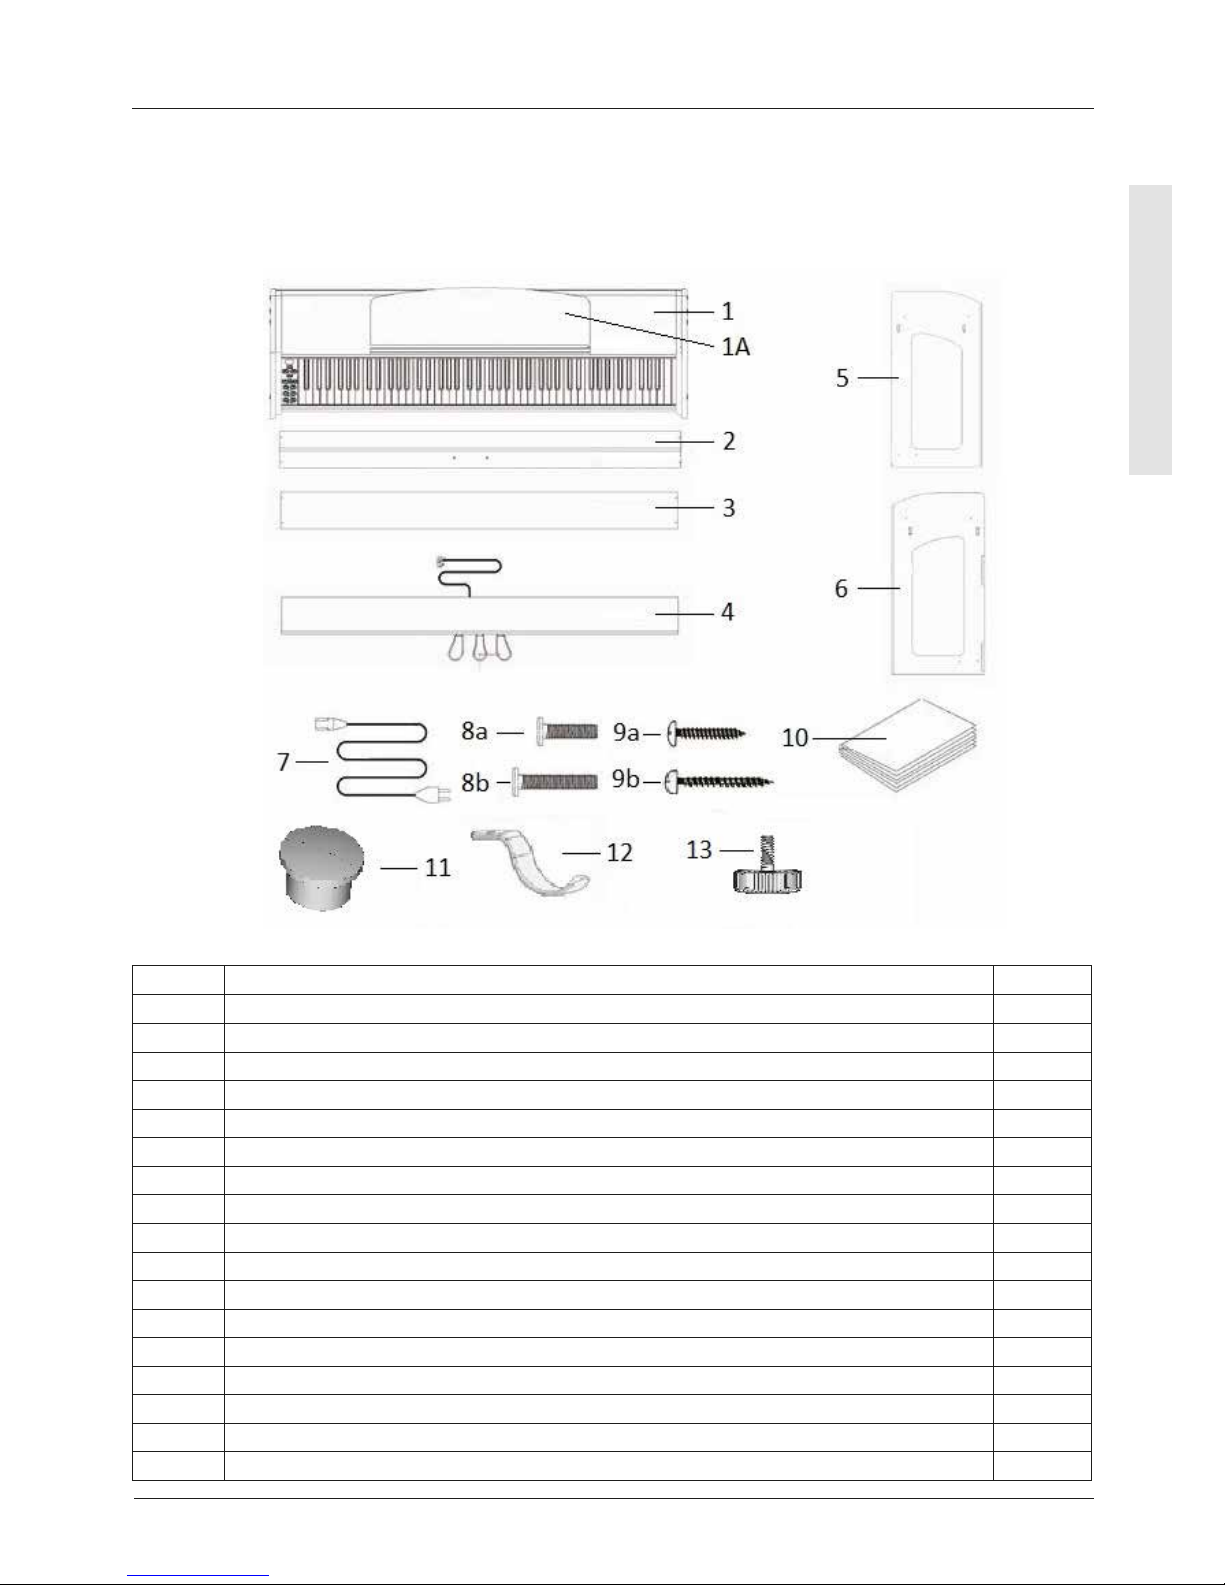
DP340G
Pos. Bezeichnung Menge
1 Spieltisch mit Klaviatur und Klaviaturabdeckung 1
1a Notenablage 1
2 Verstrebung Pedalboard 1
3 Verstrebung Rückwand oben 1
4 Pedalboard 1
5 Seitenteil rechts 1
6 Seitenteil links 1
7 Anschlusskabel Stromversorgung 1
8a Kreuzschlitzschraube M6 x 16 (Kopfhörerbügel) 1
8b Kreuzschlitzschraube M6 x 35 8
9a Kreuzschlitz-Holzschraube 3,5 x 25 8
9b Kreuzschlitz-Holzschraube 3,5 x 30 2
10 Quick Start Guide 1
11 Gummiabdeckung 8
12 Kopfhörerbügel 1
13 Stellschraube 1
o. Abb. Kabelclips 2
LIEFERUMFANG DP340G
Kontrollieren Sie den Verpackungsinhalt auf Vollständigkeit, bevor Sie mit der Montage
beginnen.
Page 10
10
DEUTSCH
LIEFERUMFANG
UP360G
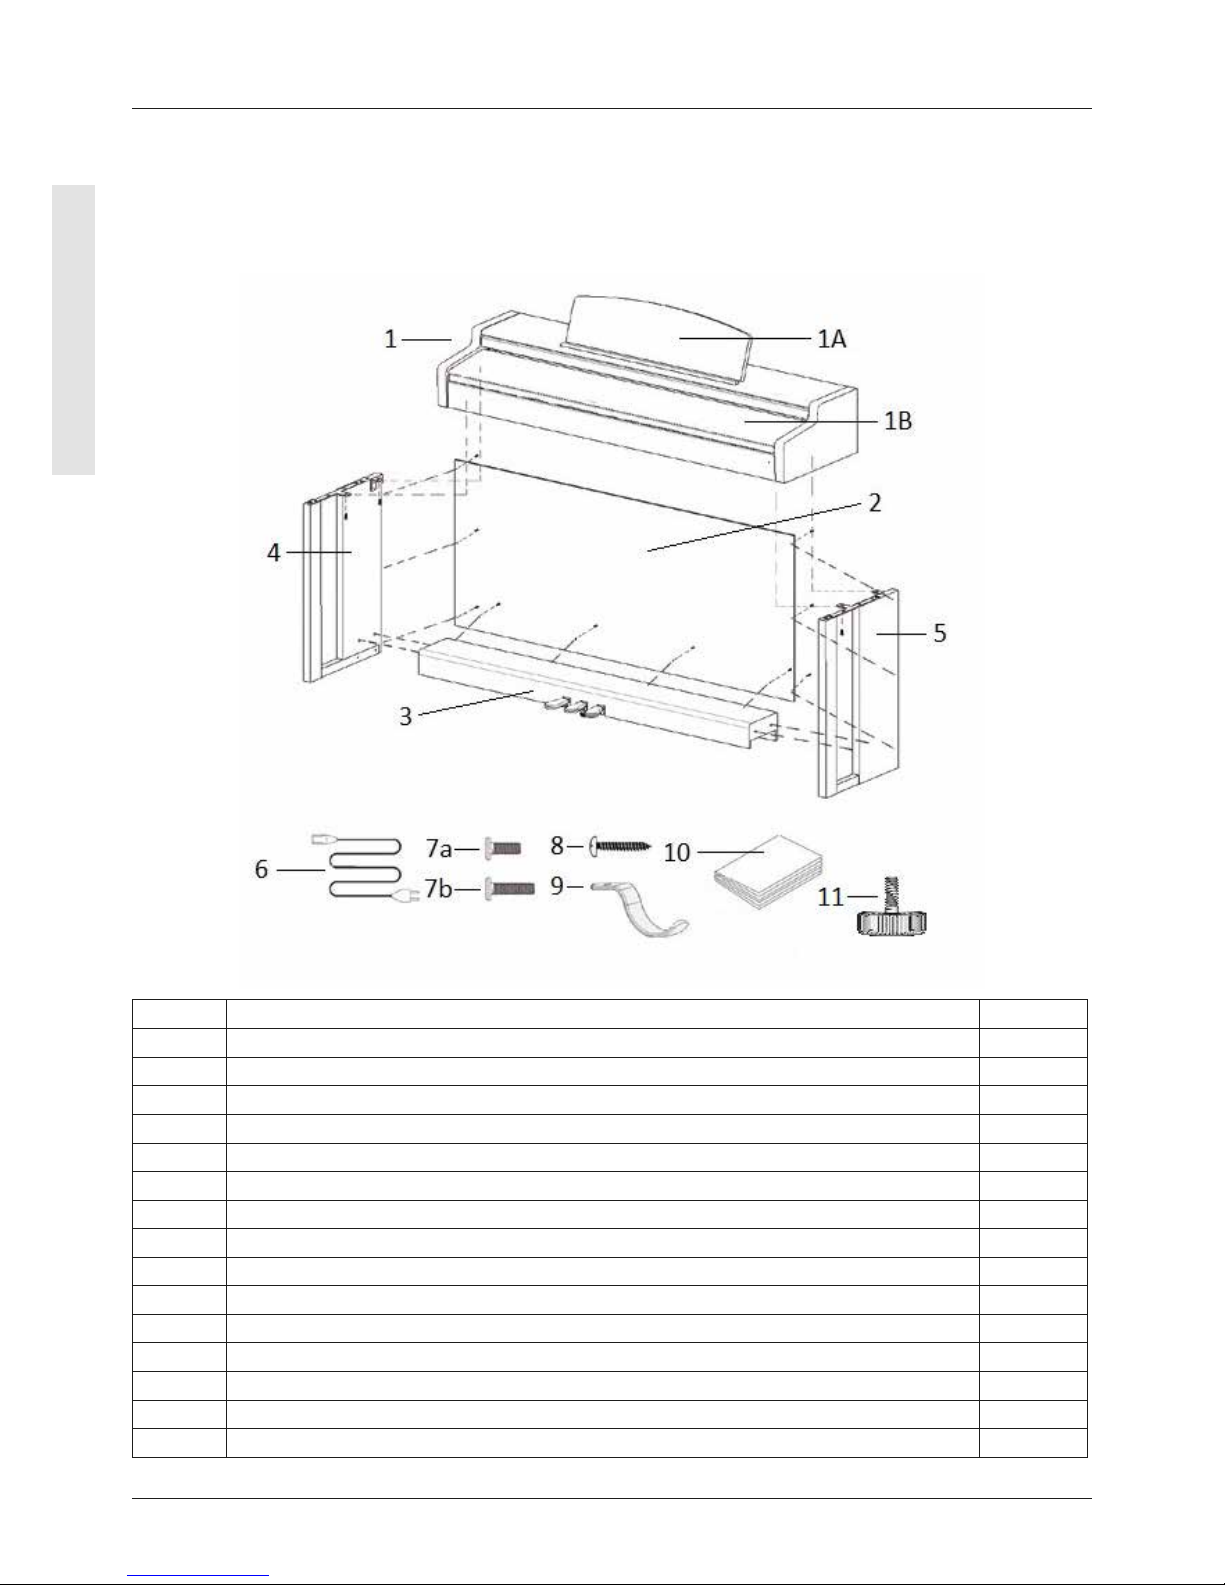
LIEFERUMFANG UP360G
Kontrollieren Sie den Verpackungsinhalt auf Vollständigkeit, bevor Sie mit der Montage
beginnen.
Pos. Bezeichnung Menge
1 Spieltisch mit Klaviatur 1
1A Notenablage 1
1B Tastaturabdeckung 1
2 Rückwand 1
3 Pedalboard 1
4 Seitenteil links 1
5 Seitenteil rechts 1
6 Anschlusskabel Stromversorgung 1
7a Kreuzschlitzschraube M6 x 16 5
7b Kreuzschlitzschraube M6 x 30 4
8 Kreuzschlitz-Holzschraube 3,5 x 30 10
9 Kopfhörerbügel 1
10 Quick Start Guide 1
11 Stellschraube 1
o.Abb. Kabelclips 2
Page 11
11
DEUTSCH
LIEFERUMFANG
UP380G / UP380WK
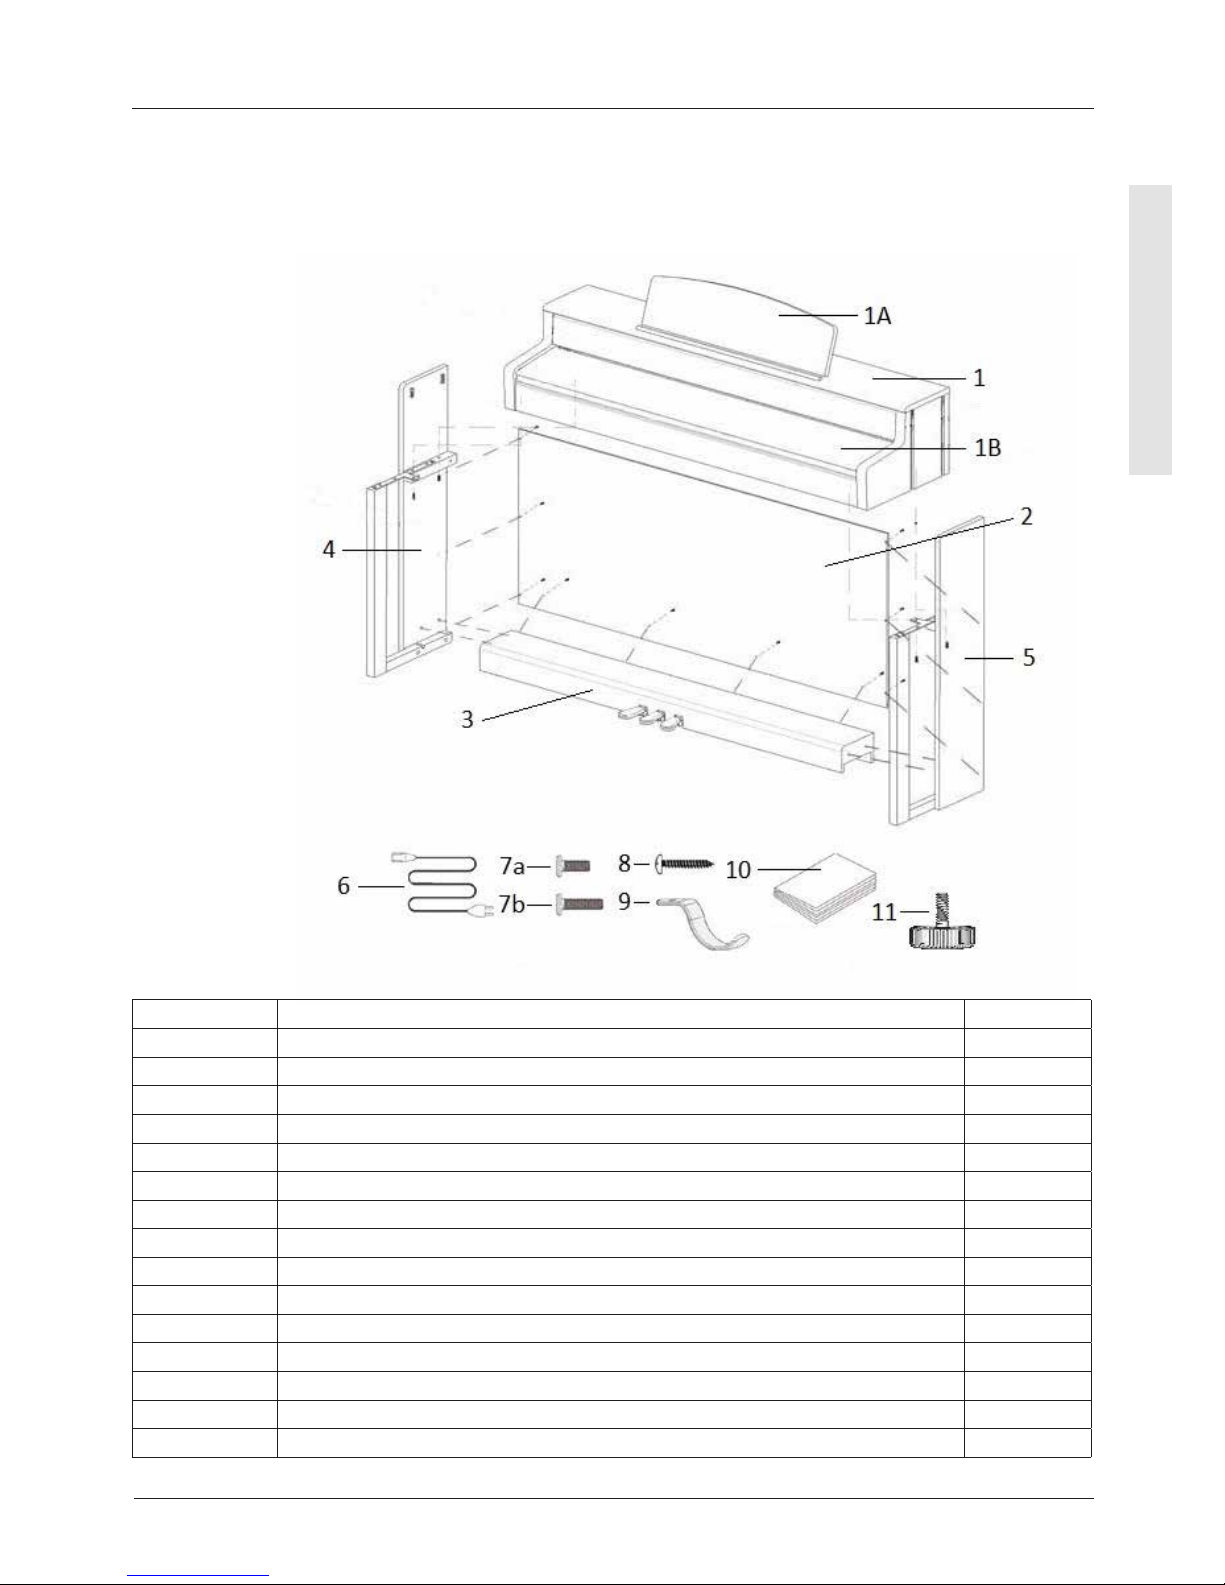
LIEFERUMFANG UP380G / UP380WK
Kontrollieren Sie den Verpackungsinhalt auf Vollständigkeit, bevor Sie mit der Montage
beginnen.
Pos. Bezeichnung Menge
1 Spieltisch mit Klaviatur 1
1A Notenablage 1
1B Tastaturabdeckung 1
2 Rückwand 1
3 Pedalboard 1
4 Seitenteil links 1
5 Seitenteil rechts 1
6 Anschlusskabel Stromversorgung 1
7a Kreuzschlitzschraube M6 x 16 3
7b Kreuzschlitzschraube M6 x 30 6
8 Kreuzschlitz-Holzschraube 3,5 x 30 10
9 Kopfhörerbügel 1
10 Quick Start Guide 1
11 Stellschraube 1
o.Abb. Kabelclips 2
Page 12
12
DEUTSCH
8
8
8
8
7
7
7
7
7
7
7
7
7
7
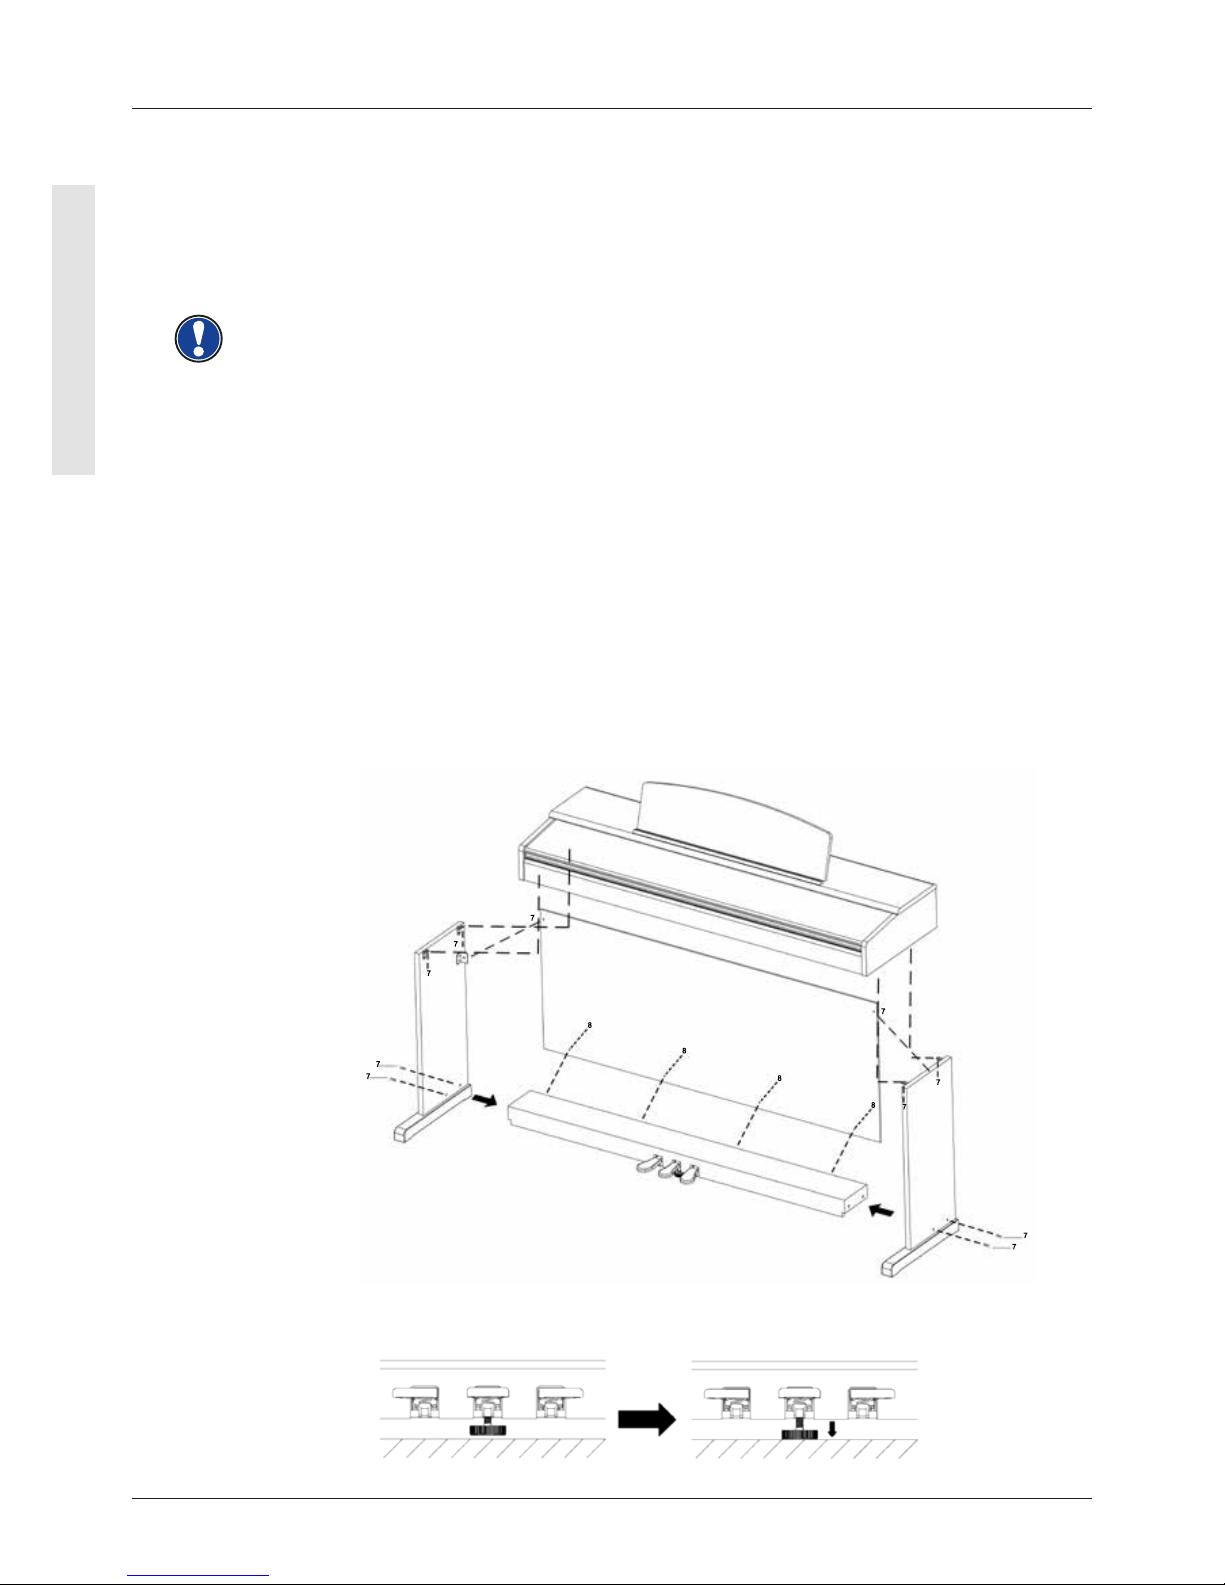
3 MONTAGEANLEITUNG DP300G
In diesem Abschnitt erfahren Sie, wie Sie Ihr Digitalpiano richtig aufstellen.
Sie benötigen für die Montage:
• Einen Kreuzschlitzschraubendreher Größe 2
• Eine weitere Person
Ziehen Sie die Kreuzschlitzschrauben erst fest an, wenn alle Teile Ihres Digitalpianos
vormontiert und ausgerichtet sind.
So montieren Sie Ihr neues Digitalpiano:
1. Lösen und falten Sie das zusammengelegte Pedalkabel auseinander (ohne Abbildung).
Schrauben Sie die Stellschraube ( 10 ) in die Pedalleiste ein.
2. Verbinden Sie die Seitenteile (4 und 5) mithilfe der Kreuzschlitzschrauben (7b) mit
dem Pedalboard
3. Im Anschluss befestigen Sie die Rückwand (2) mit den 4 Kreuzschlitz Holz-
schrauben (8a) am Pedalboard und mit jeweils einer Kreuzschlitzschraube (8b) an den
Seitenteilen.
4. Danach können Sie den Spieltisch ( 1 ) von oben aufsetzen. Achten Sie darauf, dass
der Spieltisch passend auf die Metallwinkel der Seitenteile aufgesetzt wird. Anschließend
muss der Spieltisch mit den 4 Kreuzschlitzschrauben ( 7a ) von unten verschraubt
werden.
5. Richten Sie dann bitte Ihr Digitalpiano aus und ziehen alle Schrauben fest.
HINWEIS
MONTAGEANLEITUNG
DP300G
6. Stellen Sie Ihr Digitalpiano an den gewünschten Ort und drehen Sie die Stellschraube
( 10 ) unter dem Pedalboard (3) so weit heraus, dass diese den Boden berührt.
Page 13
13
DEUTSCH
MONTAGEANLEITUNG
DP300G
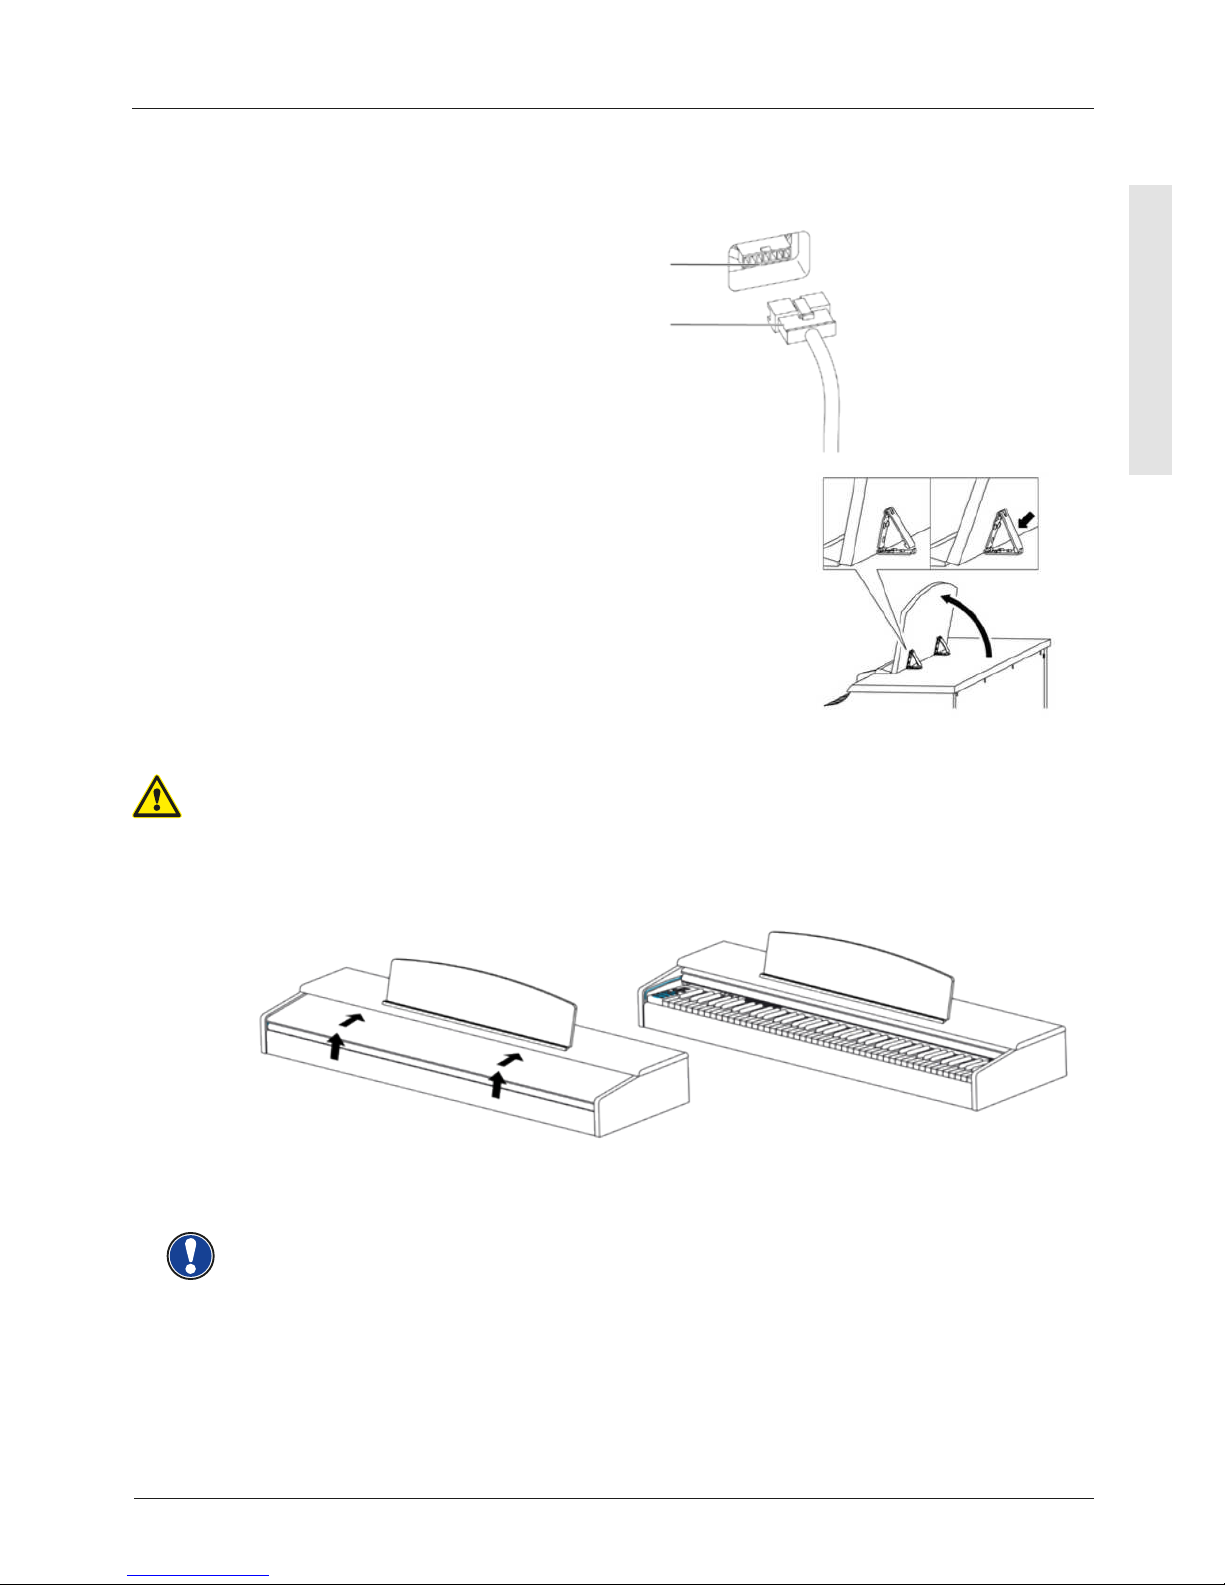
7. Stecken Sie das Pedalkabel seitenrichtig (ohne Verwendung von großer Kraft) in die
Pedalkabelbuchse an der Unterseite des Spieltischs (1) und stecken Sie das
Stromkabel (6) an der Rückseite des Pianos an die Buchse Power (ohne Bild).
8. So stellen Sie die Notenablage auf
ÖFFNEN DER KLAVIATURABDECKUNG
Bitte benutzen sie zum Öffnen der Klaviaturabdeckung stets beide Hände.
Öffnen Sie die Klaviaturabdeckung wie auf der Skizze gezeigt. Gehen Sie zum Schließen
in umgekehrter Reihenfolge vor.
VORSICHT
Pedalkabel
Pedalkabelbuchse
BENUTZUNG MIT KEYBOARDSTATIV
Es ist möglich, Ihr Digitalpiano auch ohne den mitgelieferten Spieltisch
auf einem Keyboardstativ (nicht im Lieferumfang enthalten) zu nutzen.
Achten Sie auf festen Stand des Statives und setzen Sie das Digitalpiano mittig auf.
Das Stativ sollte, wenn möglich, die Lautsprecher an der Unterseite des Pianos nicht
abdecken. Zum Anschluss eines handelsüblichen Sustain/Dämpfer Pedals steht an der
Rückseite des Spieltisches eine 6,3 mm Klinkenbuchse zu Verfügung. Diese ist mit Sustain
beschriftet.
HINWEIS
Page 14
14
DEUTSCH
MONTAGEANLEITUNG
DP340G
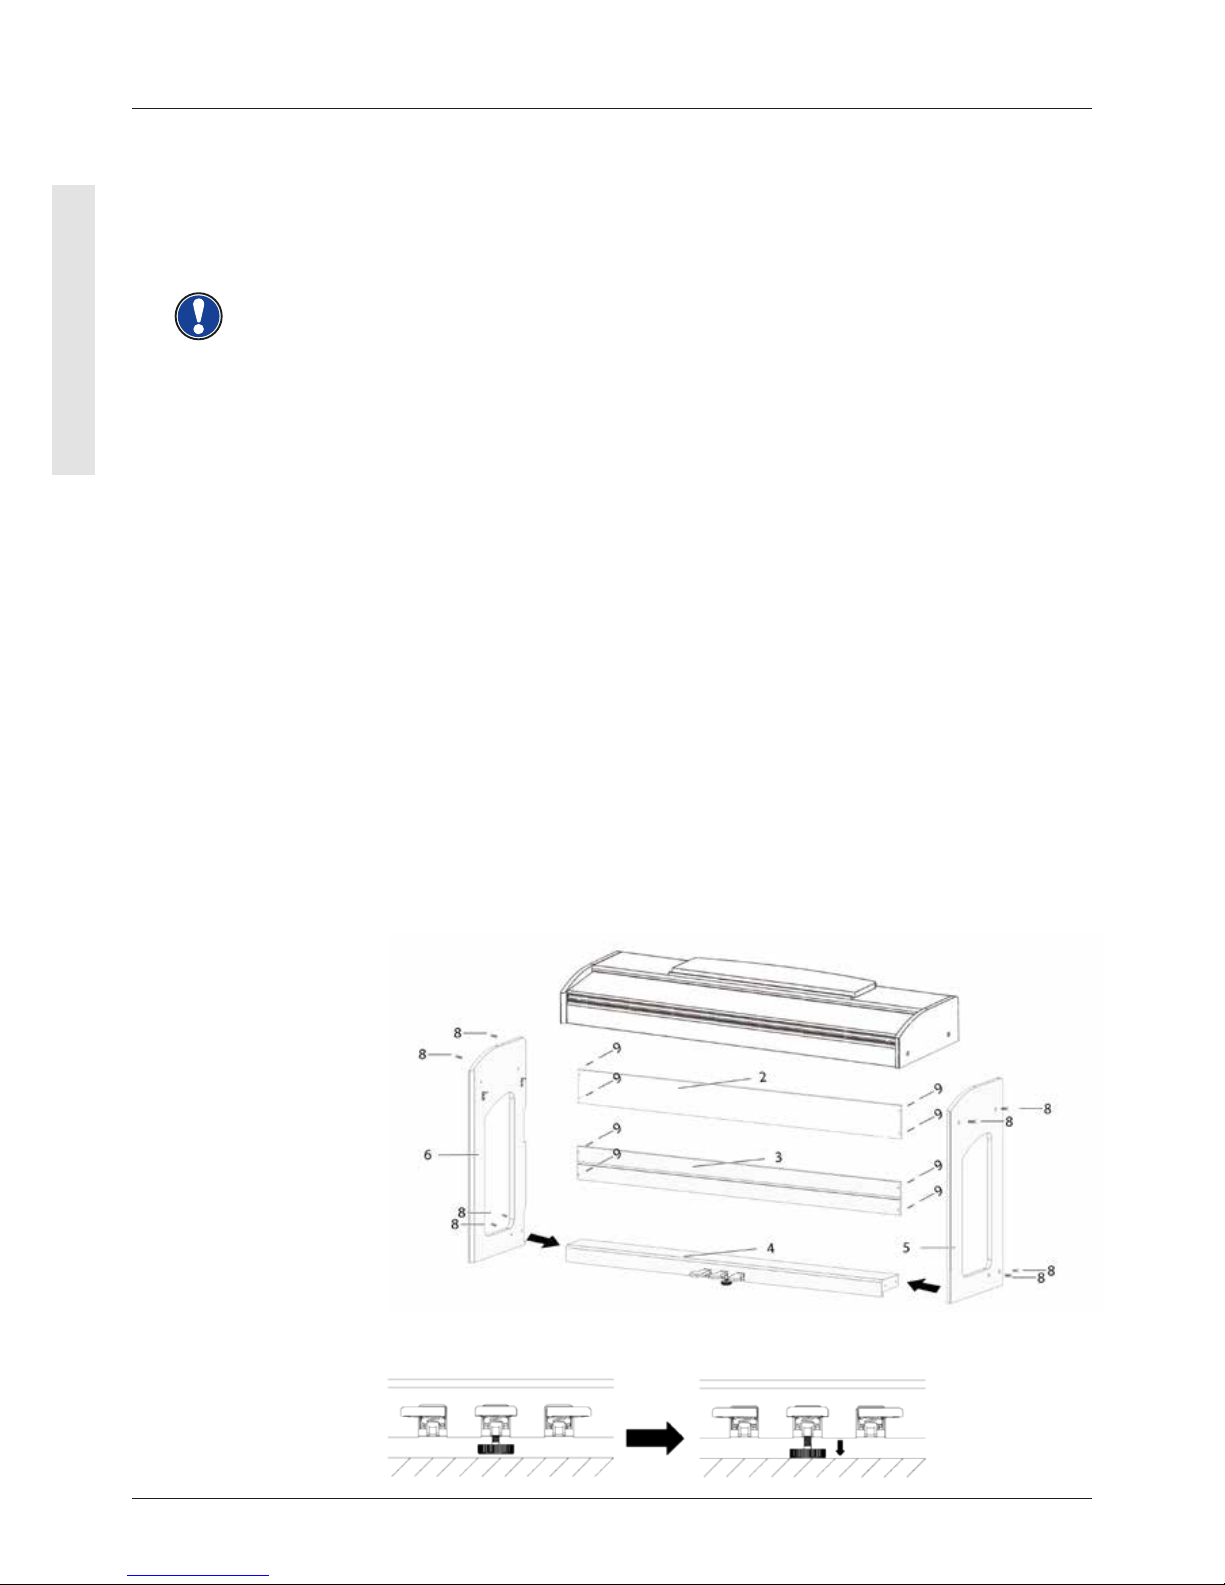
MONTAGEANLEITUNG DP340G
In diesem Abschnitt erfahren Sie, wie Sie Ihr Digitalpiano richtig aufstellen.
Sie benötigen für die Montage:
• Einen Kreuzschlitzschraubendreher Größe 2
• Eine weitere Person
Ziehen Sie die Kreuzschlitzschrauben erst fest an, wenn alle Teile Ihres Digitalpianos
vormontiert und ausgerichtet sind.
So montieren Sie Ihr neues Digitalpiano:
1. Lösen und falten Sie das zusammengelegte Pedalkabel auseinander (ohne Abbildung).
Schrauben Sie die Stellschraube ( 13 ) in die Pedalleiste ein.
2. Verbinden Sie die Seitenteile ( 5 und 6 ) mithilfe der Kreuzschlitzschrauben M6 ( 8b ) mit
dem Pedalboard ( 4 ).
3. Setzen Sie nun die Verstrebung Pedalboard ( 2 ) ein. Achten Sie darauf, dass
das Pedalboard in die dafür vorgesehene Nut eingeführt wird. Anschließend befestigen
Sie es an den Seitenteilen mit 4 Schrauben (9a) und 2 Schrauben (9b) in der Mitte der
Verstrebung.
4. Im Anschluss befestigen Sie die Verstrebung Rückwand ( 3 ) ebenfalls mit Kreuz-
schlitzholzschrauben ( 9a ).
5. Danach können Sie den Spieltisch von oben einsetzen. Zur Stabi-
lisierung muß dieser gleichmäßig auf den fest montierten Winkeln
der Seitenteile auiegen. Anschließend muss der Spieltisch ( 1 ) mit den vier
Kreuzschlitzschrauben ( 8b ) verbunden und verschraubt werden.
6. Schrauben Sie jetzt den Kopfhörerhalter (12) mithilfe der dafür vorgesehenen
Kreuzschlitzschraube ( 8a ) an der linken Unterseite des Spieltisches an.
7. Richten Sie dann bitte Ihr Digitalpiano aus und ziehen alle Schrauben fest.
8. Abschließend stecken Sie die Gummiabdeckungen ( 11 ) bei allen Bohrungen an den
Seitenteilen ( 5 und 6 ) als Abschluss auf.
HINWEIS
9. Stellen Sie Ihr Digitalpiano an den gewünschten Ort und drehen Sie die Stellschraube
( 13 ) unter dem Pedalboard (4) so weit heraus, dass diese den Boden berührt.
Page 15
15
DEUTSCH
MONTAGEANLEITUNG
DP340G
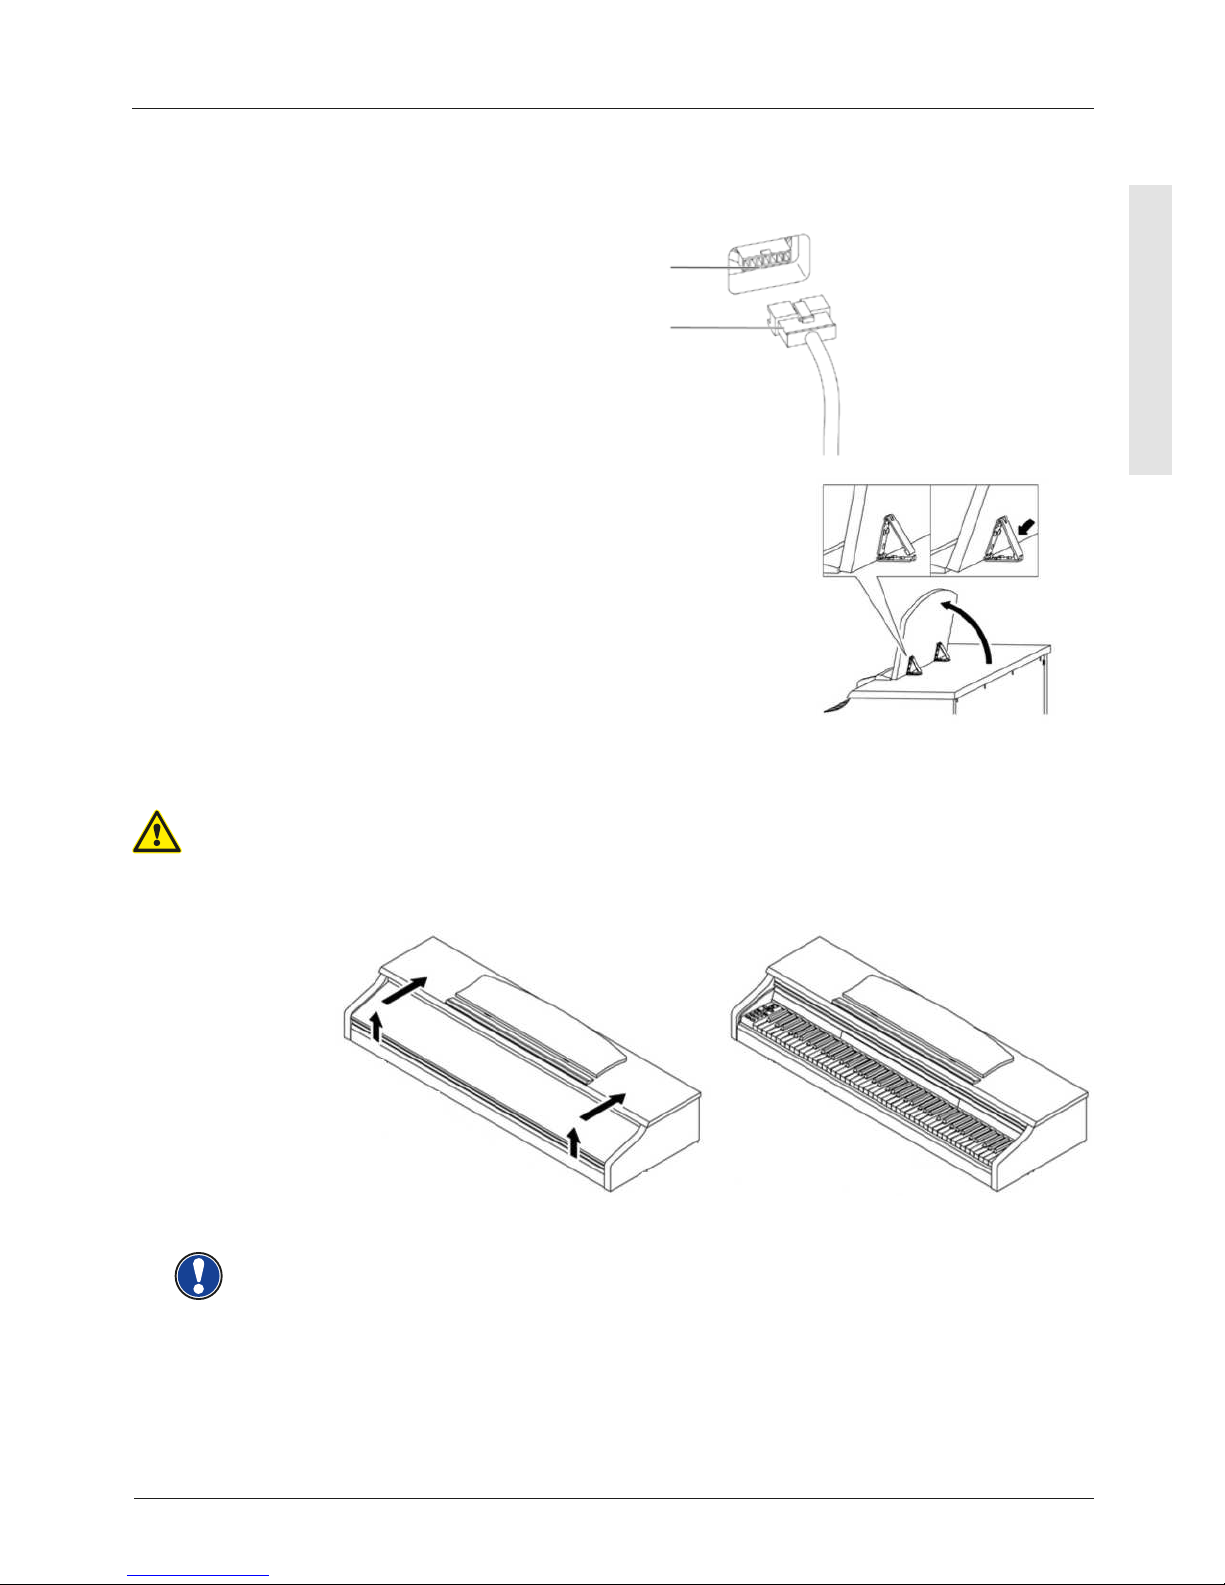
10. Stecken Sie das Pedalkabel seitenrichtig (ohne Verwendung von großer Kraft) in die
Pedalkabelbuchse an der Unterseite des Spieltischs (1) und stecken Sie das
Stromkabel ( 7) an der Rückseite des Pianos an die Buchse Power (ohne Bild).
11. So stellen Sie die Notenablage auf
ÖFFNEN DER KLAVIATURABDECKUNG
Bitte benutzen Sie zum Öffnen der Klaviaturabdeckung stets beide Hände.
Öffnen Sie die Klaviaturabdeckung wie auf der Skizze gezeigt. Gehen Sie zum Schließen
in umgekehrter Reihenfolge vor.
VORSICHT
Pedalkabel
Pedalkabelbuchse
BENUTZUNG MIT KEYBOARDSTATIV
Es ist möglich, Ihr Digitalpiano auch ohne den mitgelieferten Spieltisch
auf einem Keyboardstativ (nicht im Lieferumfang enthalten) zu nutzen.
Achten Sie auf festen Stand des Statives und setzen Sie das Digitalpiano mittig auf.
Das Stativ sollte, wenn möglich, die Lautsprecher an der Unterseite des Pianos nicht
abdecken. Zum Anschluss eines handelsüblichen Sustain/Dämpfer Pedals steht an der
Unterseite des Spieltisches eine 6,3 mm Klinkenbuchse zu Verfügung. Diese ist mit Sustain
beschriftet.
HINWEIS
Page 16
16
DEUTSCH
MONTAGEANLEITUNG
UP360G
HINWEIS
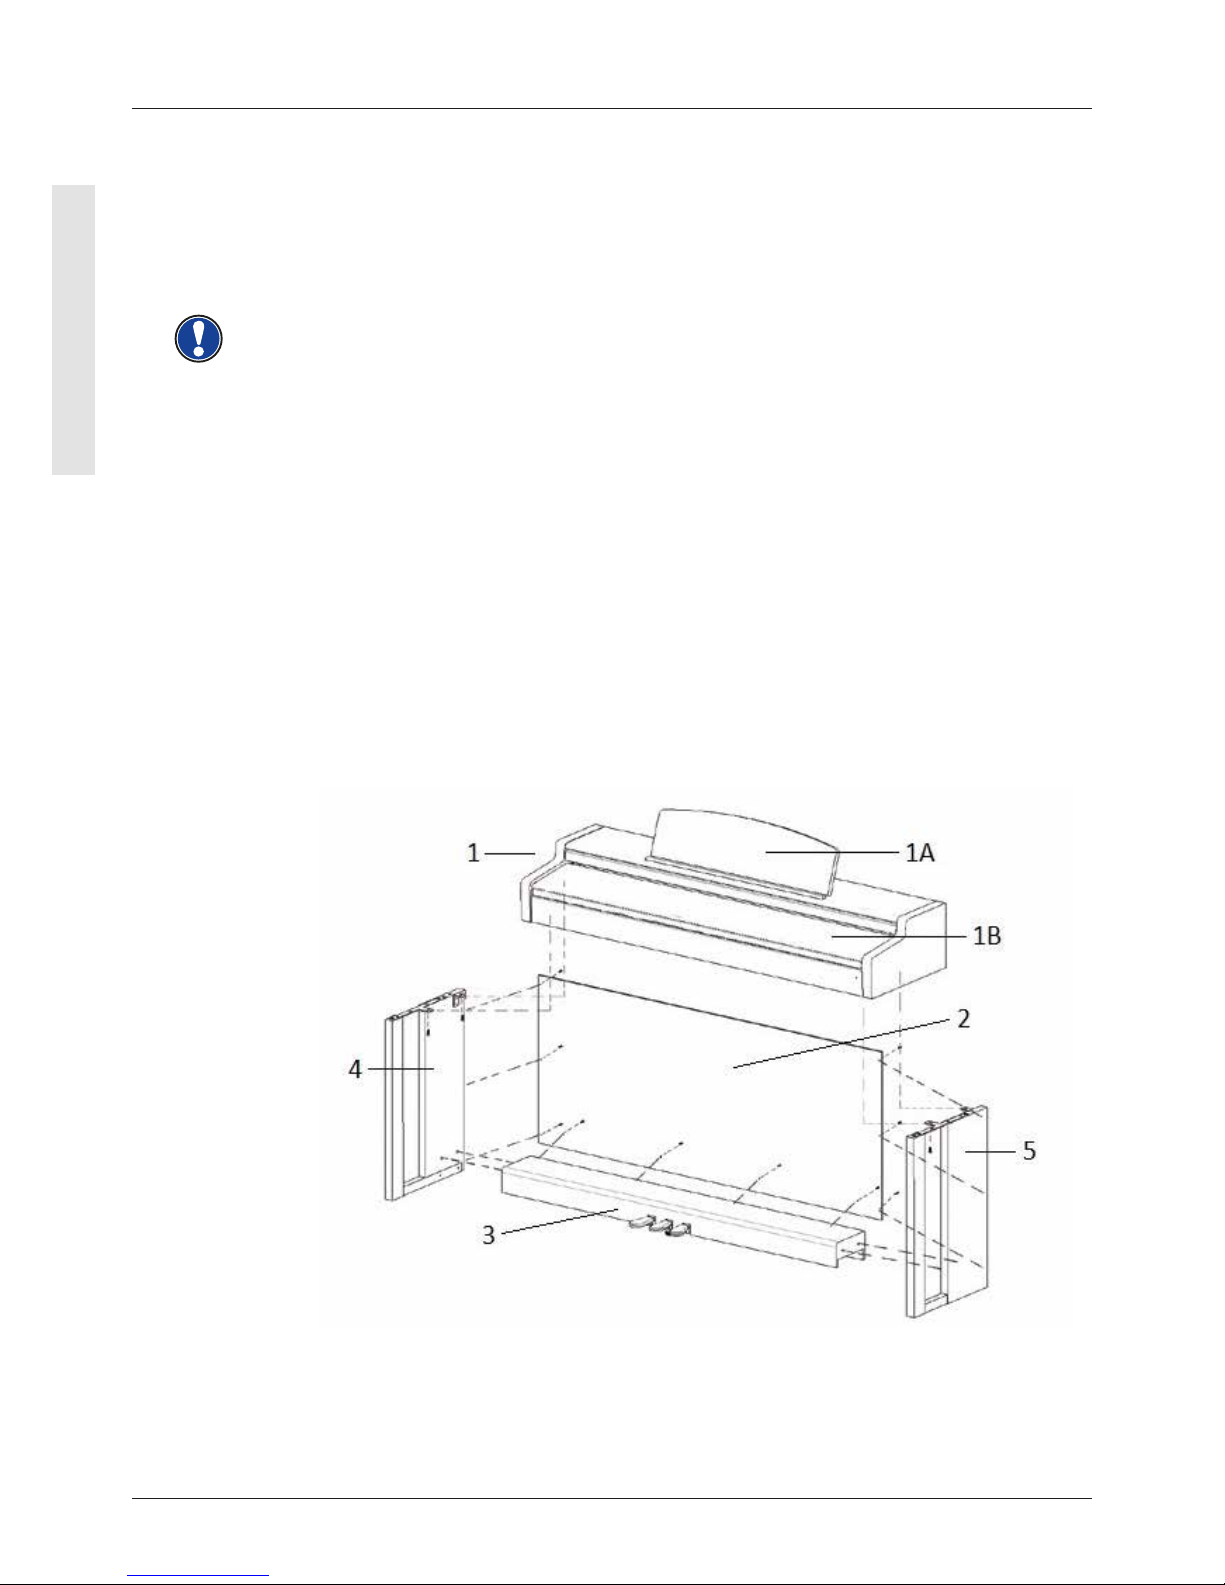
7. Stellen Sie Ihr Digitalpiano an den gewünschten Ort, und drehen die Stellschraube
( 11 ) unter dem Pedalboard (3) so weit heraus, dass diese den Boden berührt.
8. Stellen Sie Ihr Digitalpiano an den gewünschten Ort, und drehen die Stützschraube
unter dem Pedalboard (3) so weit heraus, dass diese den Boden berührt.
MONTAGEANLEITUNG UP360G
In diesem Abschnitt erfahren Sie, wie Sie Ihr Digitalpiano richtig aufstellen.
Sie benötigen für die Montage:
• Einen Kreuzschlitzschraubendreher Größe 2
• Eine weitere Person
Ziehen Sie die Kreuzschlitzschrauben erst fest an, wenn alle Teile Ihres Digitalpianos
vormontiert und ausgerichtet sind.
So montieren Sie Ihr neues Digitalpiano:
1. Lösen und falten Sie das zusammengelegte Pedalkabel auseinander (ohne Abbildung).
Schrauben Sie die Stellschraube ( 11 ) in die Pedalleiste ein.
2. Verbinden Sie die Seitenteile ( 4 und 5 ) mithilfe der Kreuzschlitzschrauben M6 ( 7b )
mit dem Pedalboard ( 3 ).
3. Im Anschluss befestigen Sie die Rückwand ( 2 ) ebenfalls mit Kreuzschlitzholz-
schrauben ( 8 ).
4. Setzen Sie nun den Spieltisch von oben auf das Untergestell. Achten Sie darauf, dass
die Winkel der Seitenteile in die Vertiefungen des Spieltisches geführt werden.
Befestigen Sie anschließend den Spieltisch mit 4 Schrauben (7a).
5. Schrauben Sie jetzt den Kopfhörerhalter (9) mithilfe der dafür vorgesehenen
Kreuzschlitzschraube ( 7a ) an der linken Unterseite des Spieltisches an.
6. Richten Sie dann bitte Ihr Digitalpiano aus und ziehen alle Schrauben fest.
Page 17
17
DEUTSCH
MONTAGEANLEITUNG
UP360G
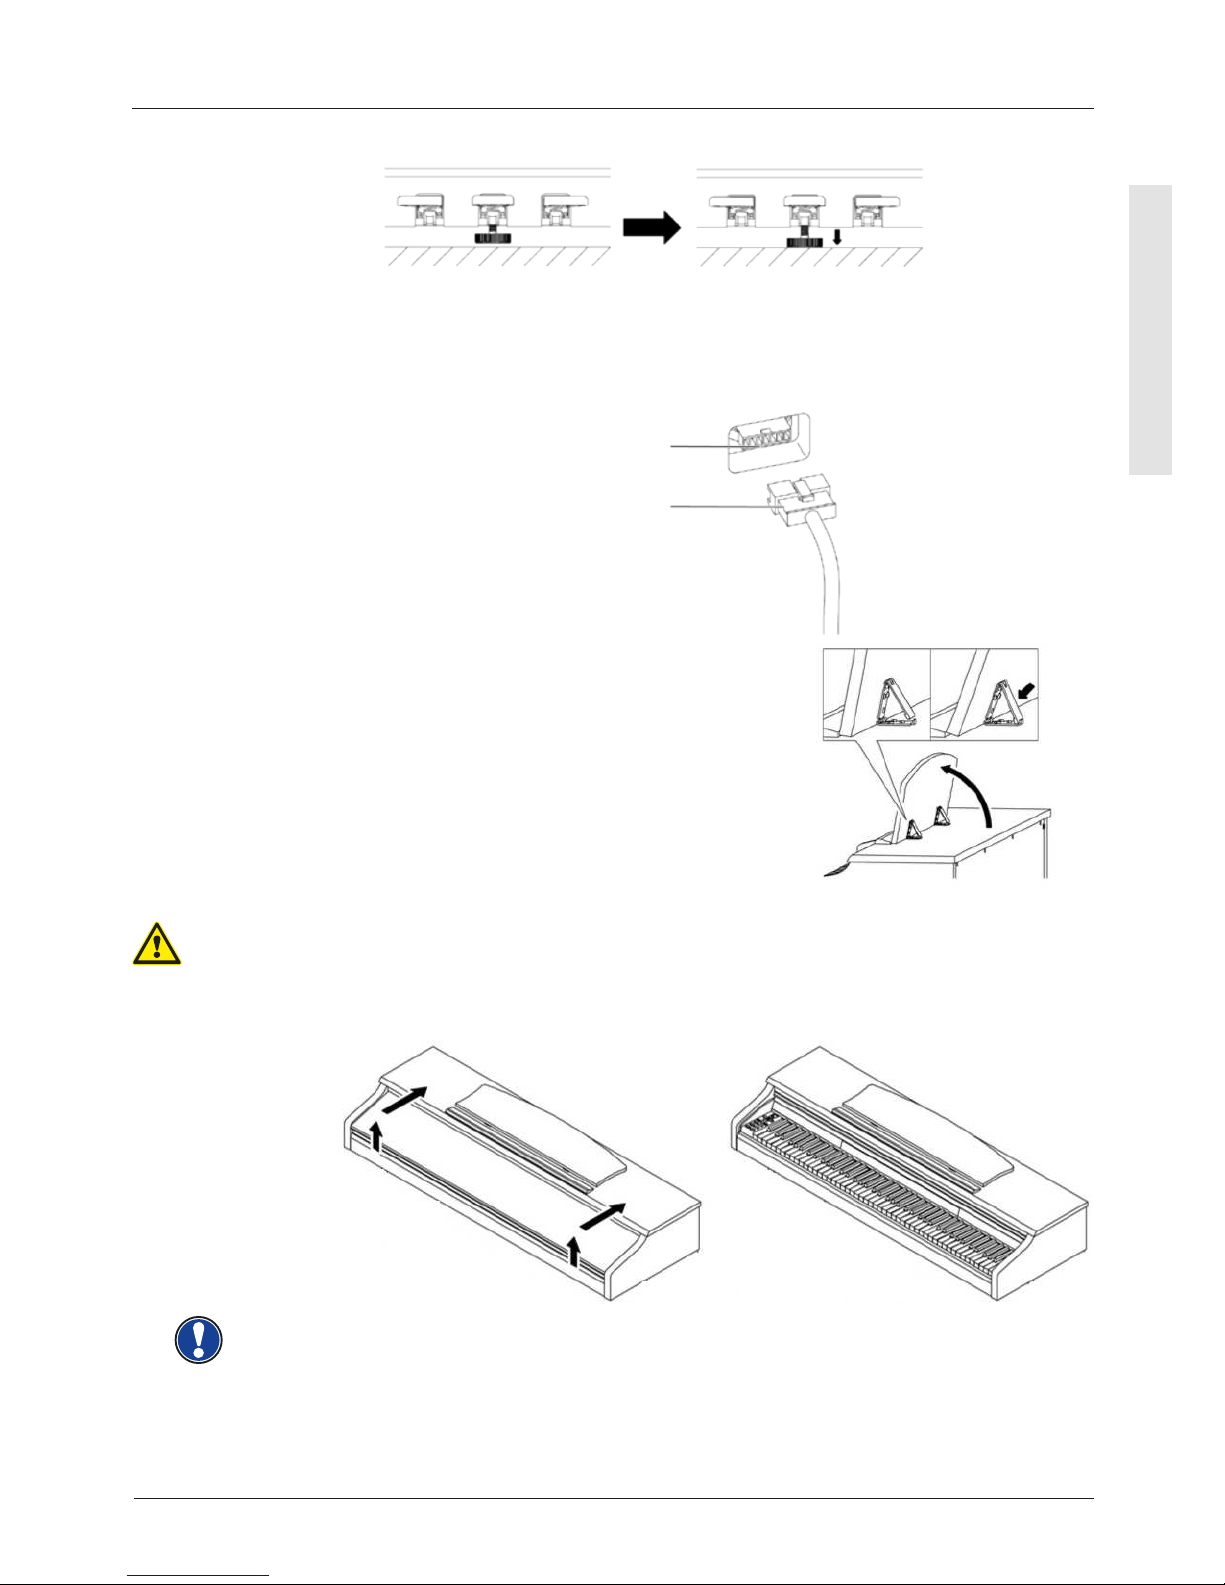
9. Stecken Sie das Pedalkabel seitenrichtig (ohne Verwendung von großer Kraft) in die
Pedalkabelbuchse an der Unterseite des Spieltischs (1) und stecken Sie das
Stromkabel ( 6 ) an der Unterseite des Pianos an die Buchse Power (ohne Bild).
10. So stellen Sie die Notenablage auf
ÖFFNEN DER KLAVIATURABDECKUNG
Bitte benutzen Sie zum Öffnen der Klaviaturabdeckung stets beide Hände.
Öffnen Sie die Klaviaturabdeckung wie auf der Skizze gezeigt. Gehen Sie zum Schließen
in umgekehrter Reihenfolge vor.
VORSICHT
Pedalkabel
Pedalkabelbuchse
BENUTZUNG MIT KEYBOARDSTATIV
Es ist möglich, Ihr Digitalpiano auch ohne den mitgelieferten Spieltisch, auf einem
Keyboardstativ (nicht im Lieferumfang enthalten) zu nutzen. Achten Sie auf festen Stand
des Statives und setzen Sie das Digitalpiano mittig auf. Das Stativ sollte, wenn möglich,
die Lautsprecher an der Unterseite des Pianos nicht abdecken. Zum Anschluss eines
handelsüblichen Sustain/Dämpfer Pedals steht an der Unterseite des Spieltisches eine
6,3 mm Klinkenbuchse zu Verfügung. Diese ist mit Sustain beschriftet.
HINWEIS
Page 18
18
DEUTSCH
MONTAGEANLEITUNG
UP380G / UP380WK
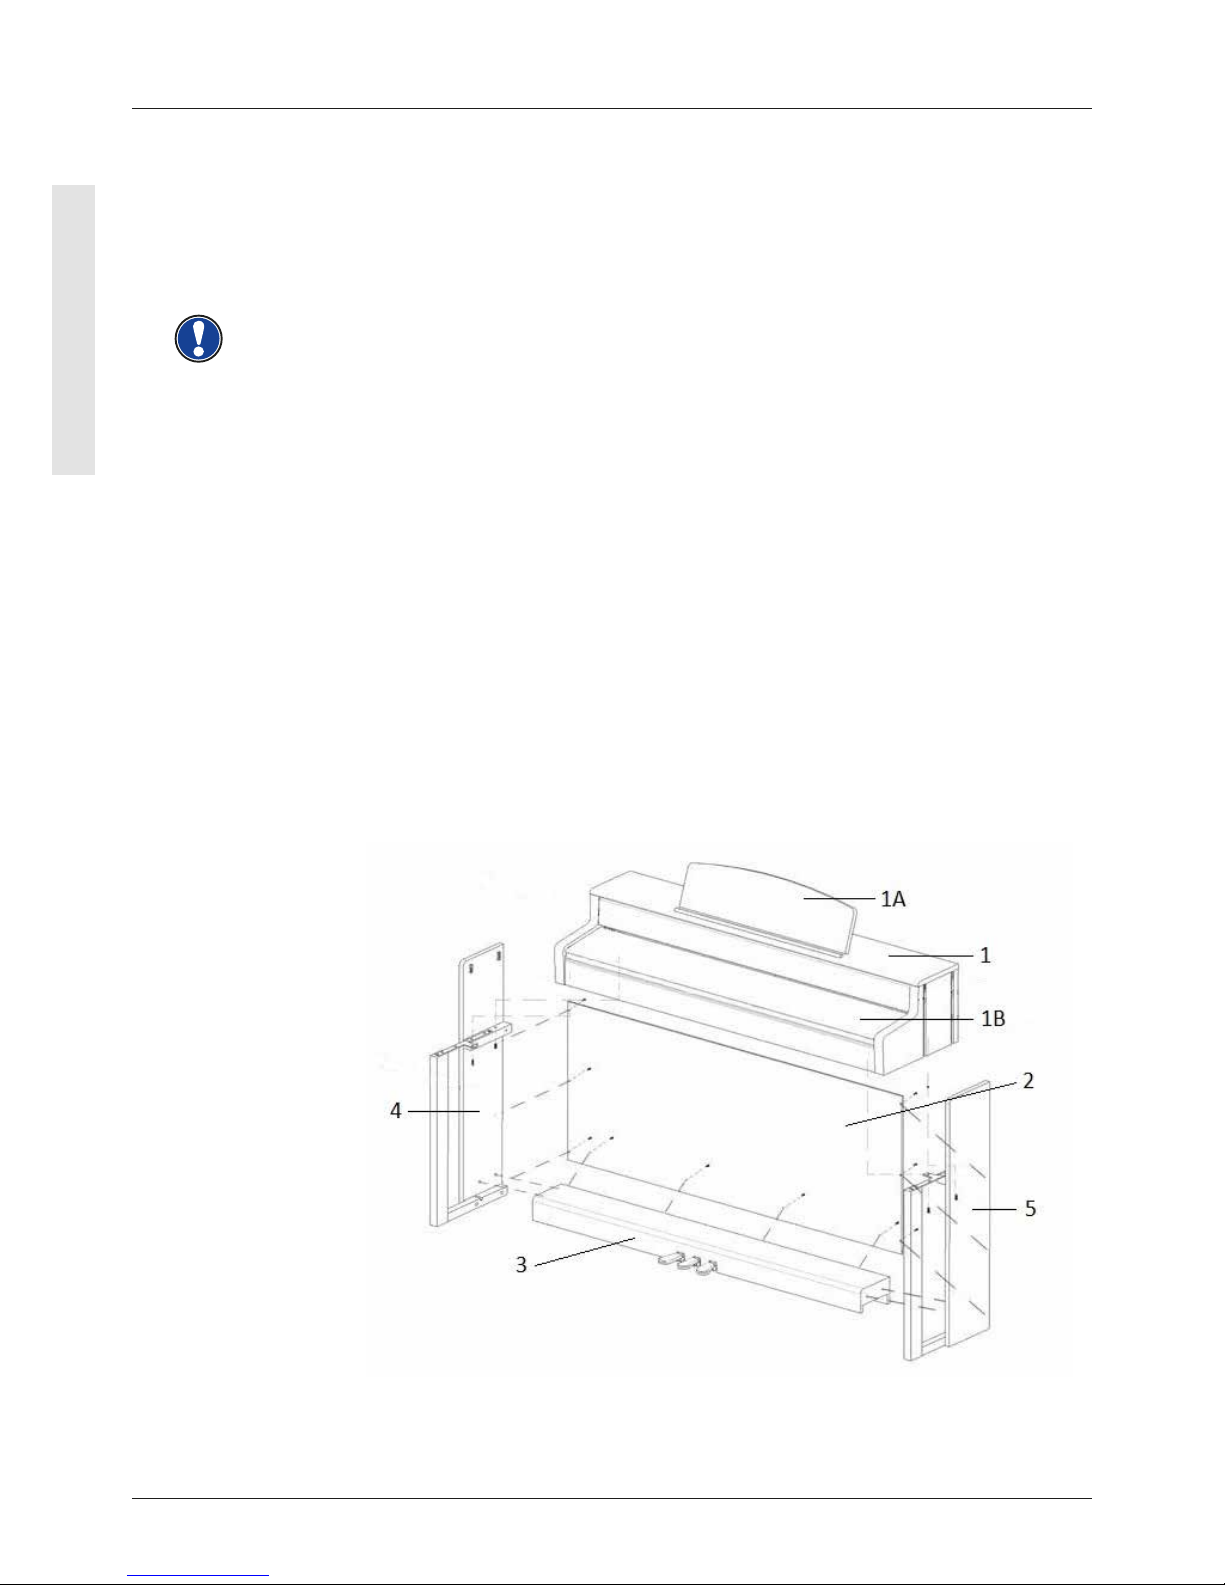
MONTAGEANLEITUNG UP380G / UP380WK
In diesem Abschnitt erfahren Sie, wie Sie Ihr Digitalpiano richtig aufstellen.
Sie benötigen für die Montage:
• Einen Kreuzschlitzschraubendreher Größe 2
• Eine weitere Person
Ziehen Sie die Kreuzschlitzschrauben erst fest an, wenn alle Teile Ihres Digitalpianos
vormontiert und ausgerichtet sind.
So montieren Sie Ihr neues Digitalpiano:
1. Lösen und falten Sie das zusammengelegte Pedalkabel auseinander (ohne Abbildung).
Schrauben Sie die Stellschraube ( 11 ) in die Pedalleiste ein.
2. Verbinden Sie die Seitenteile ( 4 und 5 ) mithilfe der Kreuzschlitzschrauben ( 7b )
mit dem Pedalboard ( 3 ).
3. Im Anschluss befestigen Sie die Rückwand ( 2 ) ebenfalls mit Kreuzschlitzholz-
schrauben ( 8 ).
4.
Setzen Sie nun den Spieltisch (1) gleichmäßig von oben auf das Untergestell. Die
Metallführungen an den Seitenteilen müssen dabei in die jeweilige Nut und das
Gegenstück geführt werden. Daraufhin müssen die Winkel, welche an den Seitenteilen
fest montiert sind, in die Fräsung am Spieltisch (1) gesetzt werden. Befestigen Sie
anschließend den Spieltisch mit 2 Schrauben M6 x 16 (7a) und 2 Schrauben M6 x 30 (7b).
5. Schrauben Sie jetzt den Kopfhörerhalter (9) mithilfe der dafür vorgesehenen
Kreuzschlitzschraube ( 7a ) an der linken Unterseite des Spieltisches an.
6. Richten Sie dann bitte Ihr Digitalpiano aus und ziehen alle Schrauben fest.
HINWEIS
7. Stellen Sie Ihr Digitalpiano an den gewünschten Ort, und drehen die Stellschraube
( 11 ) unter dem Pedalboard (3) so weit heraus, dass diese den Boden berührt.
Page 19
19
DEUTSCH
MONTAGEANLEITUNG
UP380G / UP380WK
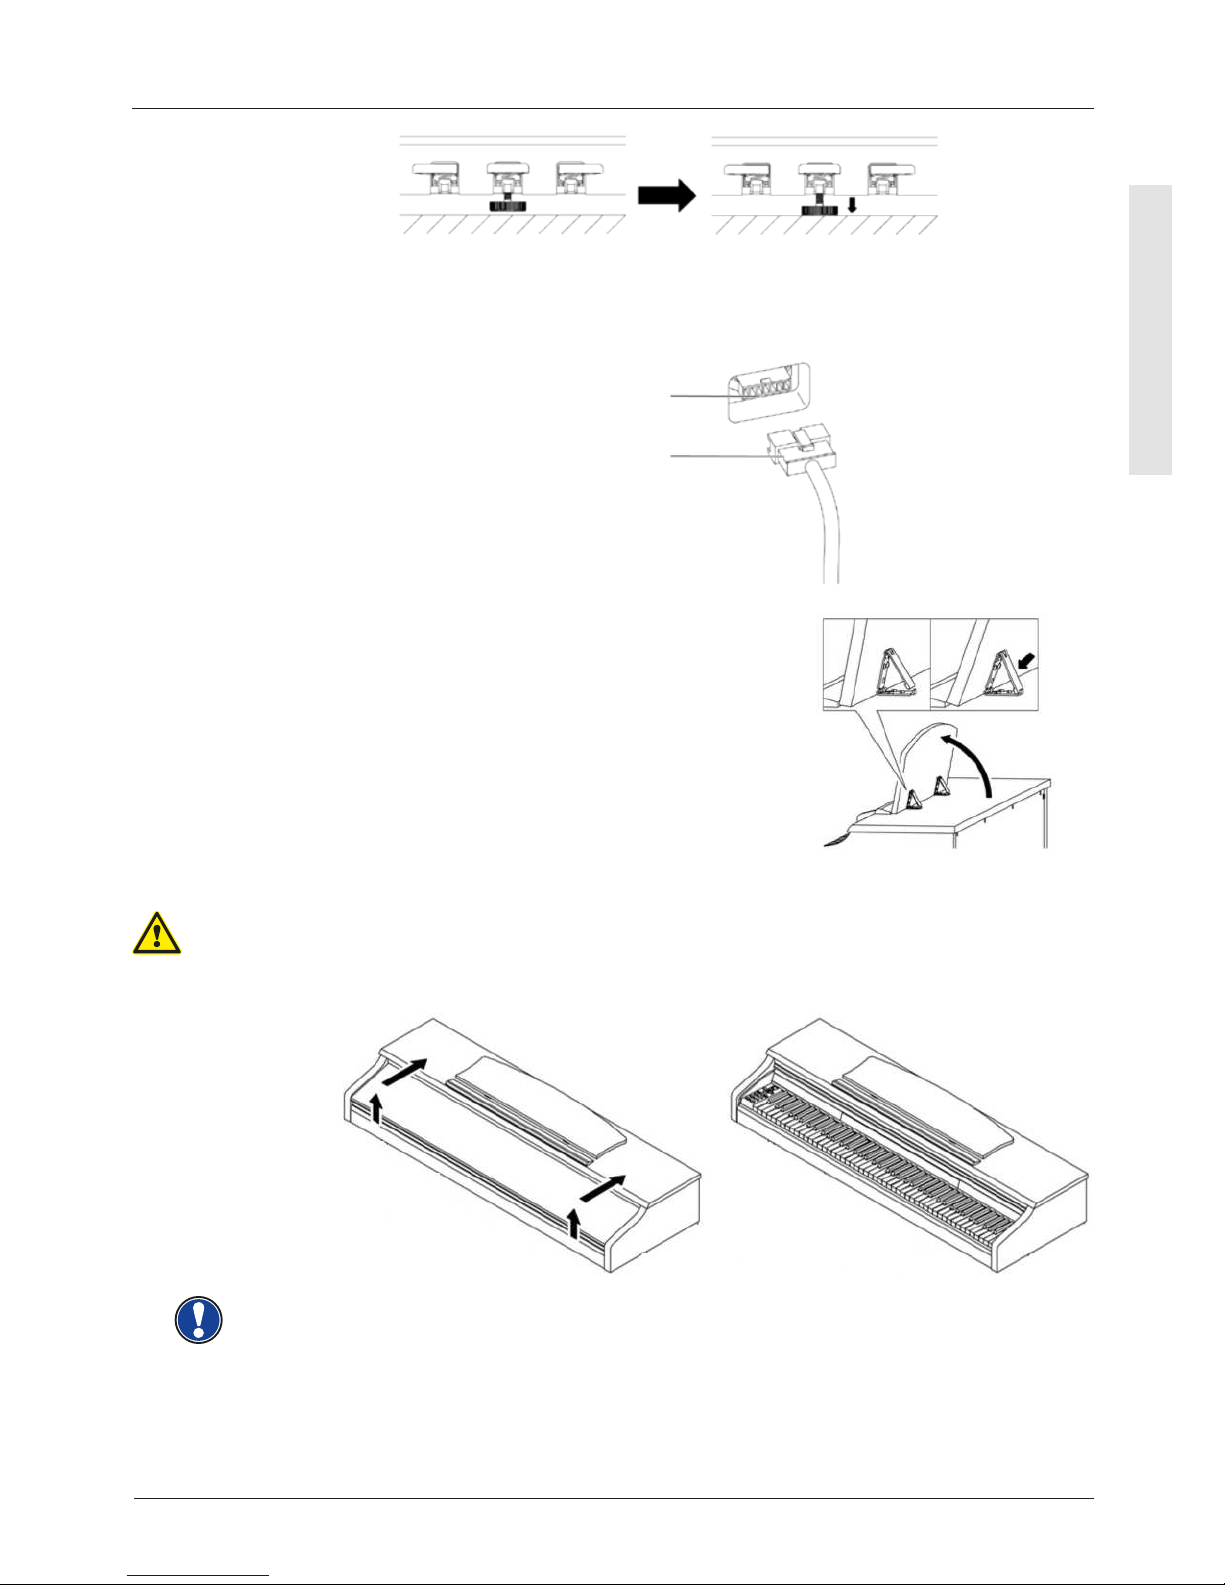
8. Stecken Sie das Pedalkabel seitenrichtig (ohne Verwendung von großer Kraft) in die
Pedalkabelbuchse an der Unterseite des Spieltischs (1) und stecken Sie das
Stromkabel ( 6) an der Unterseite des Pianos an die Buchse Power (ohne Bild).
9. So stellen Sie die Notenablage auf
ÖFFNEN DER KLAVIATURABDECKUNG
Bitte benutzen Sie zum Öffnen der Klaviaturabdeckung stets beide Hände.
Öffnen Sie die Klaviaturabdeckung wie auf der Skizze gezeigt. Gehen Sie zum Schließen
in umgekehrter Reihenfolge vor.
Pedalkabel
Pedalkabelbuchse
VORSICHT
BENUTZUNG MIT KEYBOARDSTATIV
Es ist möglich, Ihr Digitalpiano auch ohne den mitgelieferten Spieltisch, auf einem
Keyboardstativ (nicht im Lieferumfang enthalten) zu nutzen. Achten Sie auf festen Stand
des Statives und setzen Sie das Digitalpiano mittig auf. Das Stativ sollte, wenn möglich,
die Lautsprecher an der Unterseite des Pianos nicht abdecken. Zum Anschluss eines
handelsüblichen Sustain/Dämpfer Pedals steht an der Unterseite des Spieltisches eine
6,3 mm Klinkenbuchse zu Verfügung. Diese ist mit Sustain beschriftet.
HINWEIS
Page 20
20
DEUTSCH
4 ERSTE SCHRITTE DP300G / DP340G
In diesem Abschnitt machen wir Sie mit den Bedienelementen Ihres Digitalpianos vertraut.
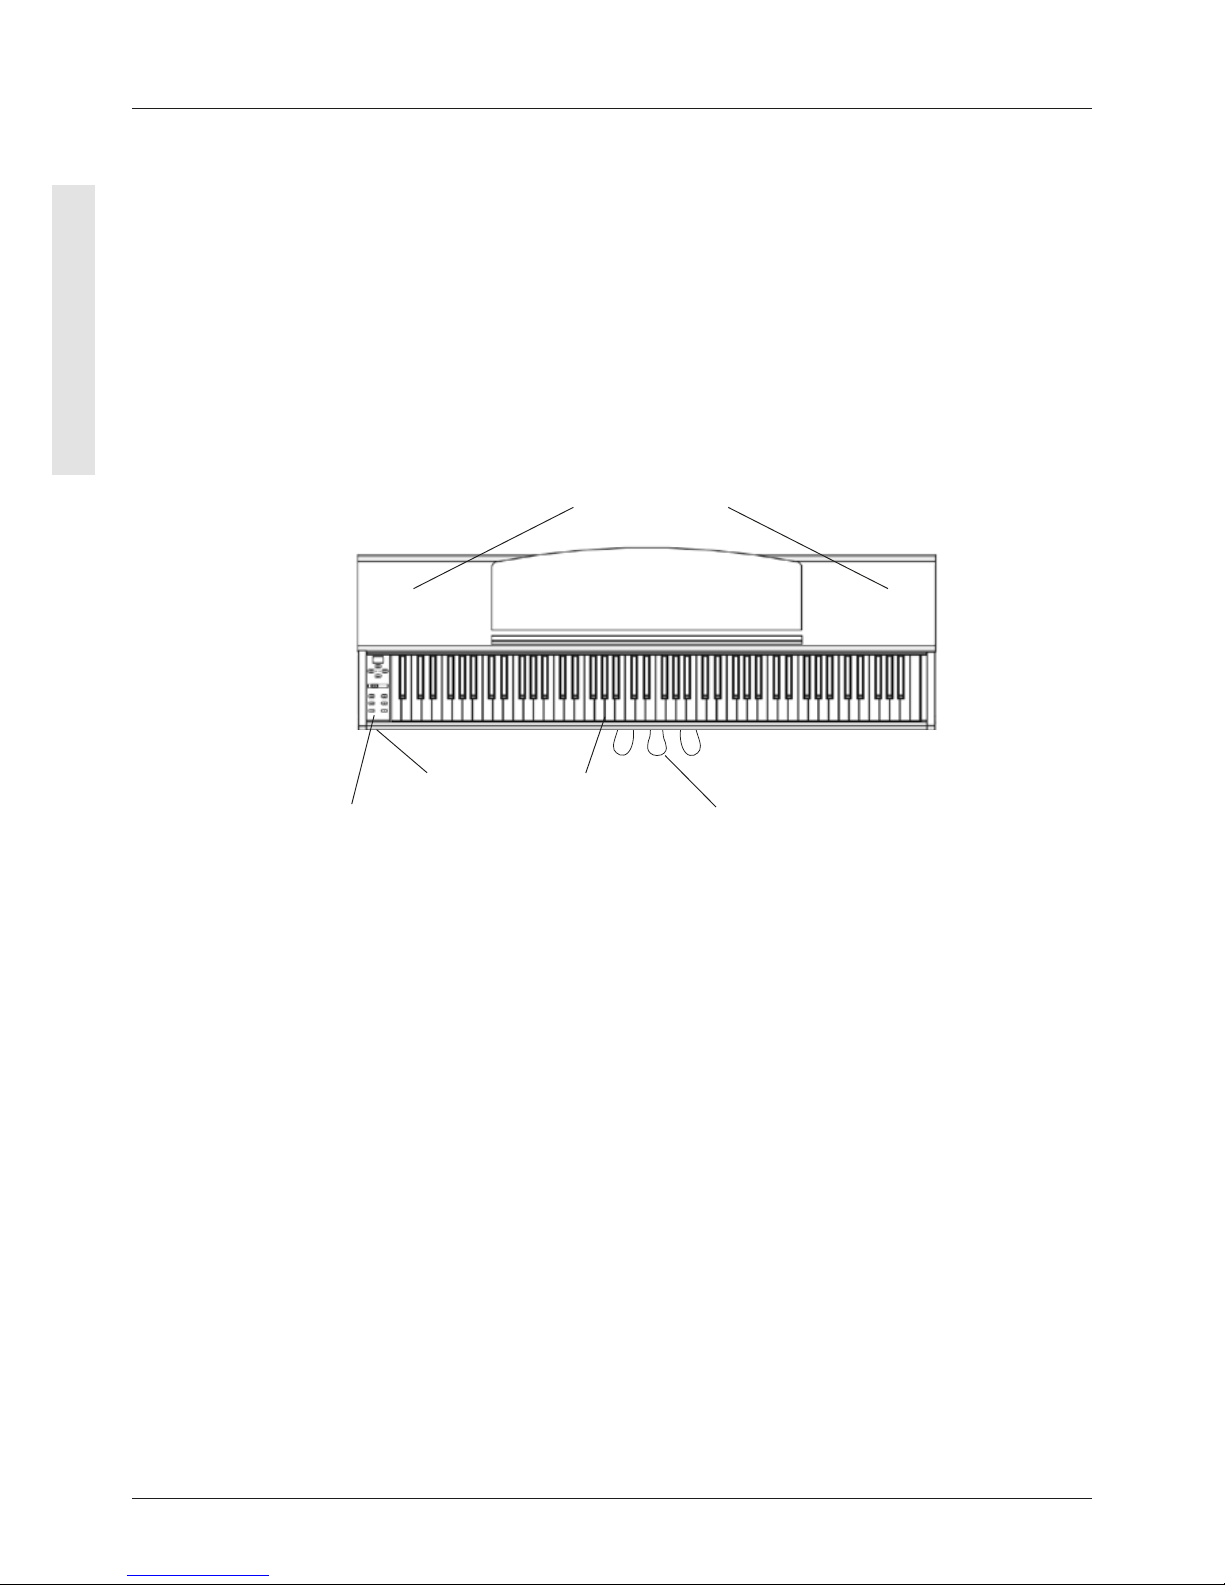
4.1 DIE BEDIENELEMENTE IHRES DIGITALPIANOS
Ihr GEWA Digitalpiano verfügt über folgende Bedienelemente:
ERSTE SCHRITTE
DP300G / DP340G
Bedienpanel
Ansicht A
Indikator LED Klaviatur
Pedale
Ansicht B
Lautsprecher
Page 21
21
DEUTSCH
P 1
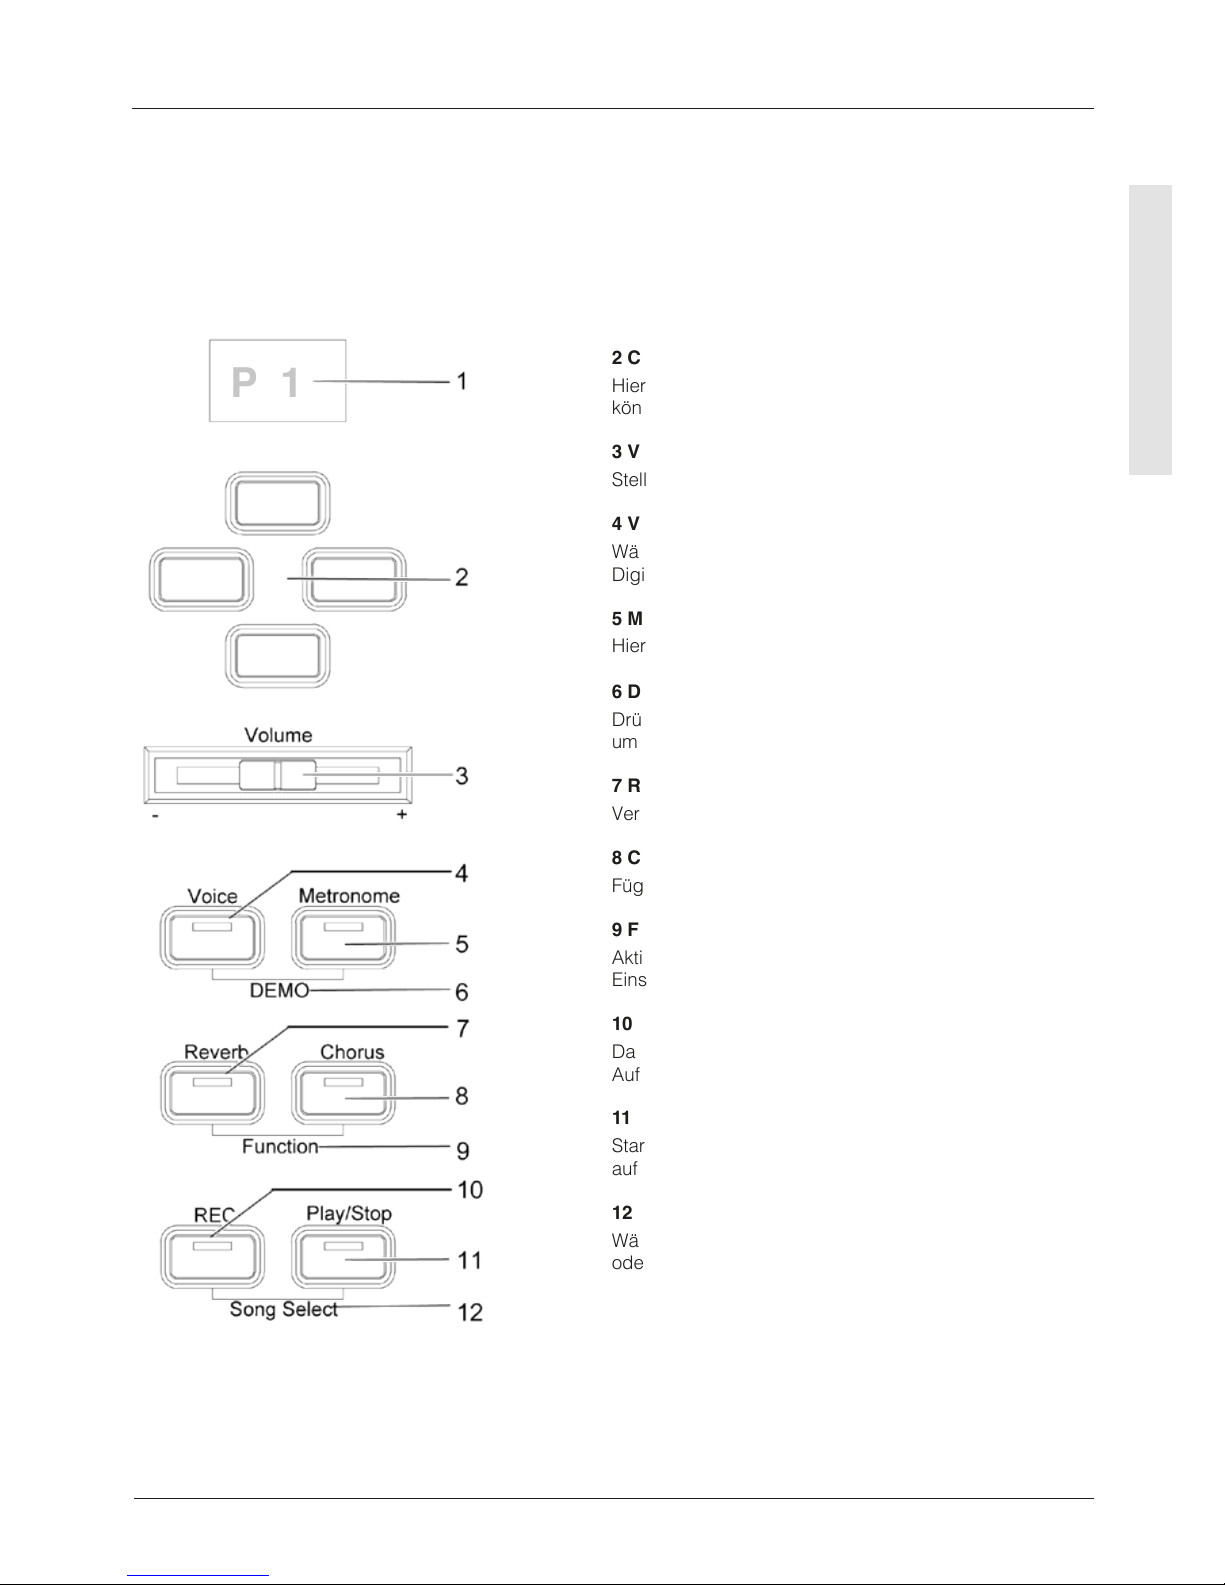
4.2 DIE BEDIENTASTEN UND PEDALE
Ansicht A 1 Display
Zeigt Ihnen Informationen zu den getätigten Einstellungen.
2 Cursortasten
Hier navigieren Sie in den jeweiligen Funktionen und
können Einstellungen vornehmen.
3 Volume
Stellen Sie die Lautstärke ein.
4 Voice
Wählen Sie unter den verschiedenen Klängen Ihres
Digitalpianos aus.
5 Metronome
Hier schalten Sie das Metronom ein- bzw. aus.
6 DEMO
Drücken Sie die Voice- und Metronome-Taste gleichzeitig,
um zu der DEMO-Funktion zu gelangen.
7 Reverb
Verändern Sie den simulierten Raumklang.
8 Chorus
Fügen Sie dem Klang Effekte hinzu.
9 Function
Aktivieren Sie das Function Menü, um verschiedene
Einstellungen vorzunehmen.
10 REC
Damit versetzen Sie Ihr GEWA Digital Piano in den
Aufnahmemodus.
11 Play/Stop
Starten bzw. Stoppen der Wiedergabe von
aufgenommenen Musikstücken.
12 Song Select
Wählen Sie hier einen Speicherplatz zum Aufnehmen
oder Abspielen eines Songs.
ERSTE SCHRITTE
DP300G / DP340G
Page 22
22
DEUTSCH
ERSTE SCHRITTE
DP300G / DP340G
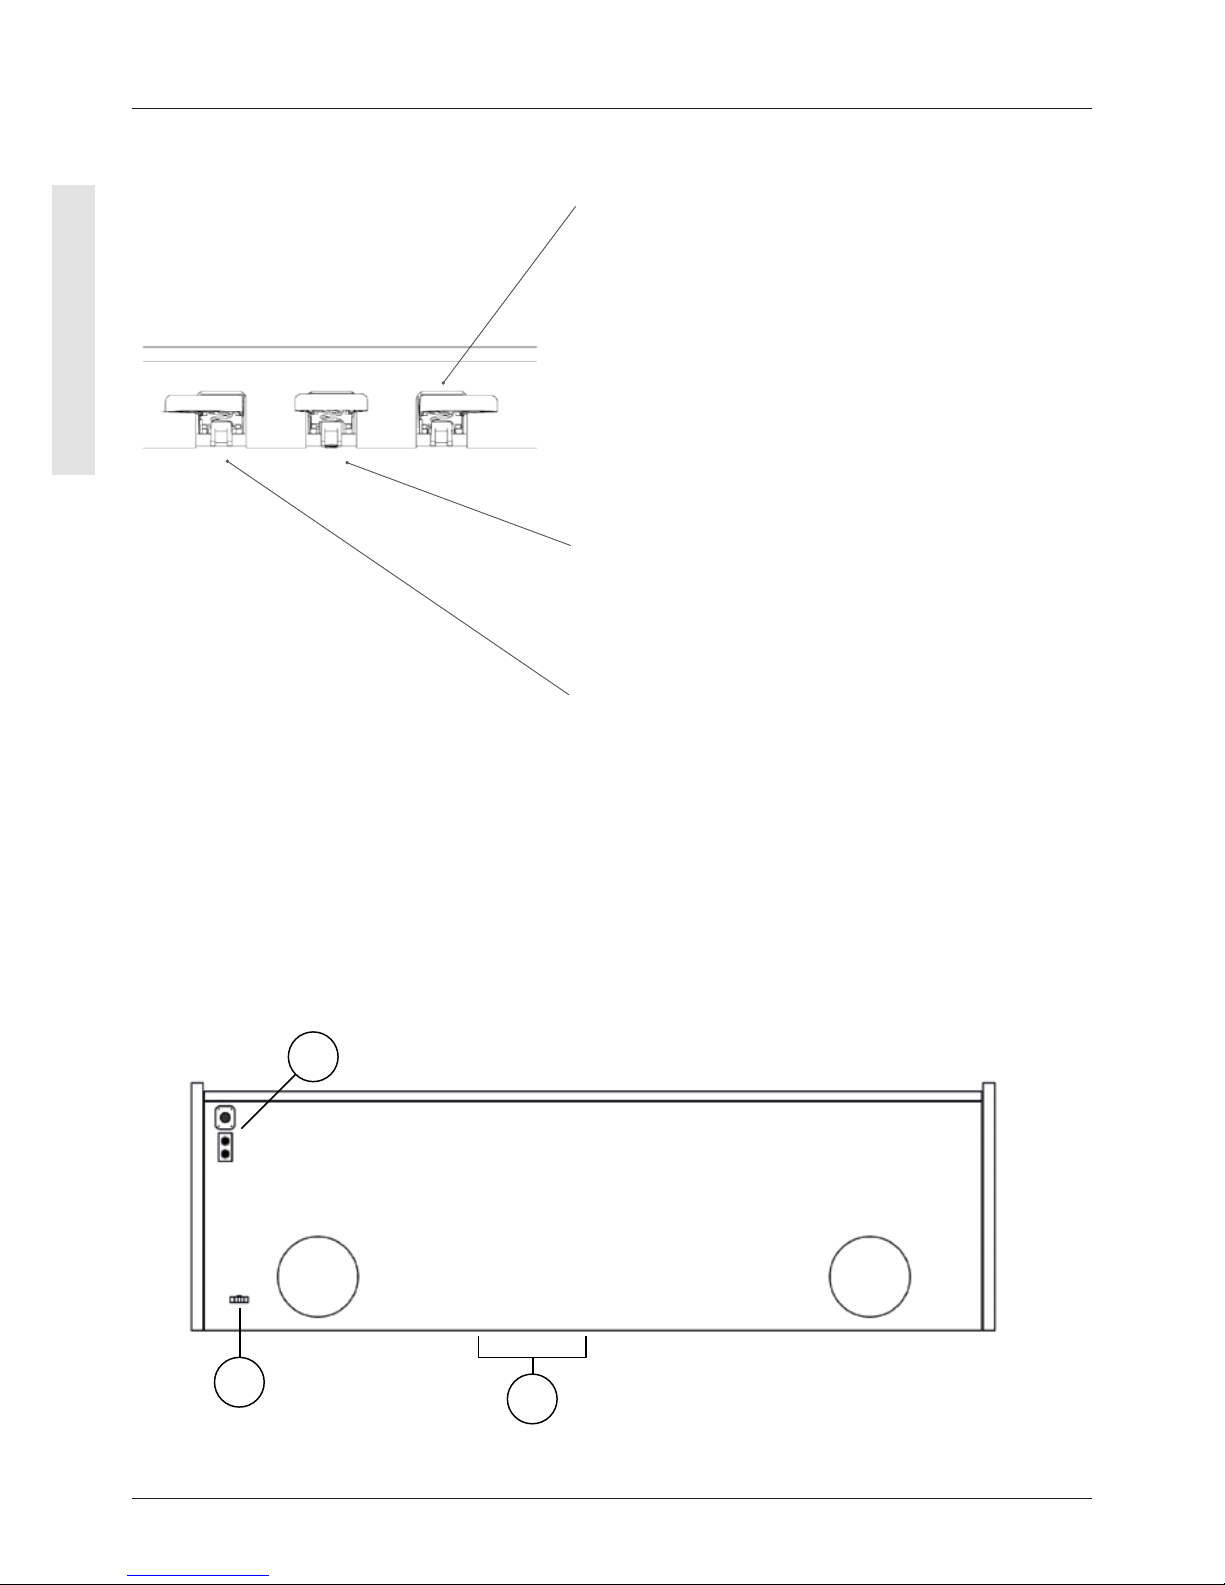
Ansicht B
Forte Pedal (rechts)
Beim Betätigen des Forte- oder Sustain- Pedals eines
akustischen Flügels werden alle auf den Saiten liegenden
Dämpfer angehoben. Dadurch klingen alle gespielten Töne
auch nach dem Loslassen der Tasten weiter.
Zudem können auch die Saiten der nicht angeschlagenen
Töne frei schwingen, sodass deren Resonanzfrequenzen
angeregt werden. Dies führt zu einem volleren Klang.
Mit dem Pedal des Gewa Pianos ist auch ein Halbpedalspiel möglich. Dabei werden die simulierten Dämpfer nur
leicht angehoben und die gespielten Töne klingen schneller
ab, als bei ganz durchgedrücktem Pedal.
Piano Pedal (links)
Beim Betätigen des Piano- oder Una-Corda Pedals wird das
Verschieben der Klaviermechanik um wenige Millimeter nach
rechts simuliert. Durch die veränderte Anschlagsposition
der Hämmer entsteht eine andere Klangfarbe und ein etwas
leiserer Ton.
Sostenuto Pedal (Mitte)
Das Sostenuto Pedal hat eine ähnliche Funktion wie das
Forte Pedal. Allerdings werden hierbei nur die Töne der
Tasten gehalten, die im Moment der Betätigung des Pedales
angeschlagen sind. Alle anderen Töne werden normal
abgedämpft.
A
B
C
Übersicht
4.3 SPIELTISCH / ANSCHLÜSSE / UNTERSEITE
Laut-
sprecher
Laut-
sprecher
Page 23
23
DEUTSCH
ERSTE SCHRITTE
DP300G / DP340G
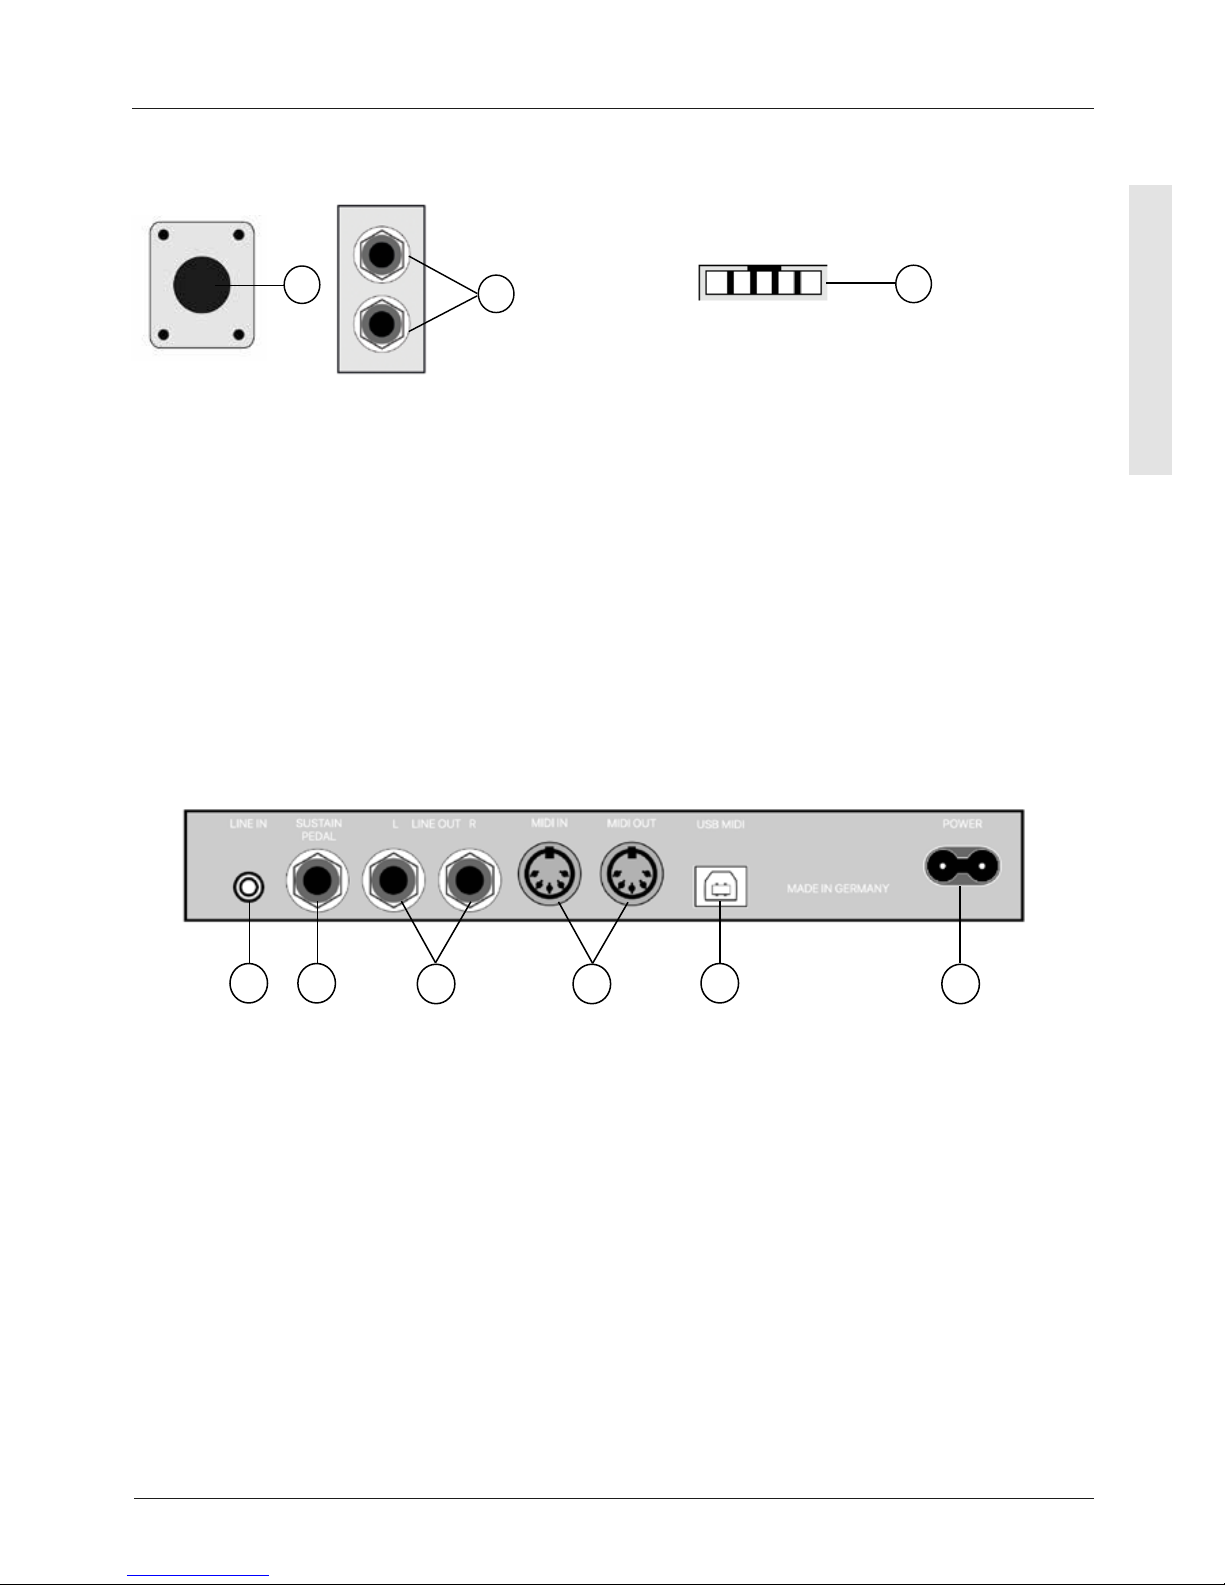
A1 Power On/Off Schalten Sie hier Ihr Digitalpiano ein und aus.
A2 Kopfhörerausgänge Sie können hier bis zu zwei Kopfhörer anschließen.
B Pedalkabelbuchse Hier wird das Pedalkabel angeschlossen.
A1
A2
B
Ansicht A Ansicht B
C1 C2 C3 C4 C5 C6
SPIELTISCH / ANSCHLÜSSE / RÜCKSEITE
Ansicht C
C1 LINE IN Diese 3,5 mm Klinkenbuchse dient zum Anschluss
externer Klangerzeuger wie z.B. MP3-Player.
C2 SUSTAIN An diese 6,3 mm Klinkenbuchse können Sie ein
handelsübliches Sustain Pedal anschließen, wenn Sie Ihr
Digitalpiano ohne den mitgelieferten Fuß nutzen möchten.
C3 LINE OUT L/R Dieser Anschluss ist in die Stereokanäle L(inks) und
R(echts) unterteilt. Verbinden Sie diese Ausgänge mit
einem Empfangsgerät (z.B. Verstärker, Aufnahmegerät,…)
via 6,3 mm Klinkenkabel.
C4 MIDI IN/OUT Schließen Sie hier MIDI-Geräte an, um die MIDI Funktionen
Ihres Digitalpianos zu nutzen.
C5 USB-B Anschluss Verbinden Sie über diesen Anschluss Ihr Digitalpiano mit
Ihrem PC.
C6 Netzanschluss Schließen Sie das Digitalpiano mithilfe des mitgelieferten
Netzkabels an die Stromversorgung an.
Page 24
24
DEUTSCH
ERSTE SCHRITTE
UP360G / UP380G / UP380WK
ERSTE SCHRITTE UP360G / UP380G / UP380WK
In diesem Abschnitt machen wir Sie mit den Bedienelementen Ihres Digitalpianos vertraut.
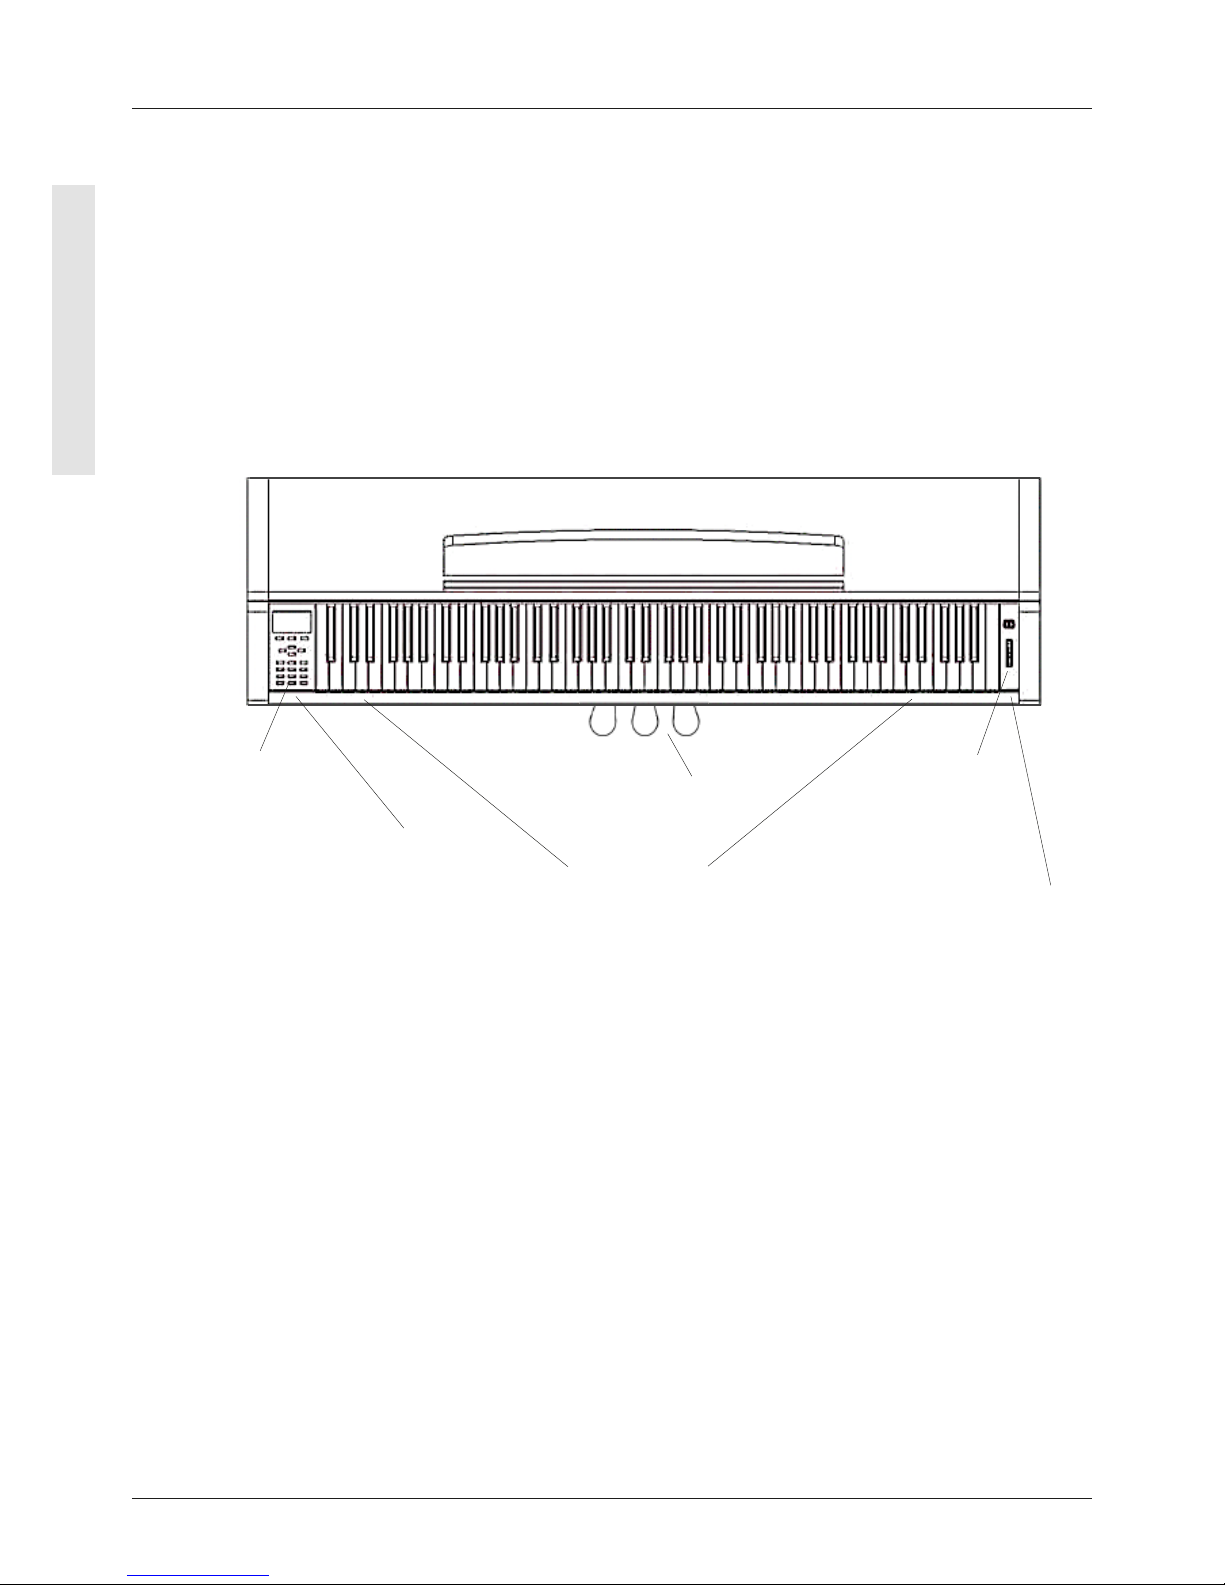
4.1 DIE BEDIENELEMENTE IHRES DIGITALPIANOS
Ihr GEWA Digitalpiano verfügt über folgende Bedienelemente:
Notenhalter
Bedienpanel
Ansicht A
Volume Regler
On/off Schalter
Ansicht A
Lautsprecher
Pedale
Ansicht B
Kopfhöreranschlüsse
USB Port
Kopfhörerhalter
LED Indikator
Page 25
25
DEUTSCH
ERSTE SCHRITTE
UP360G / UP380G / UP380WK
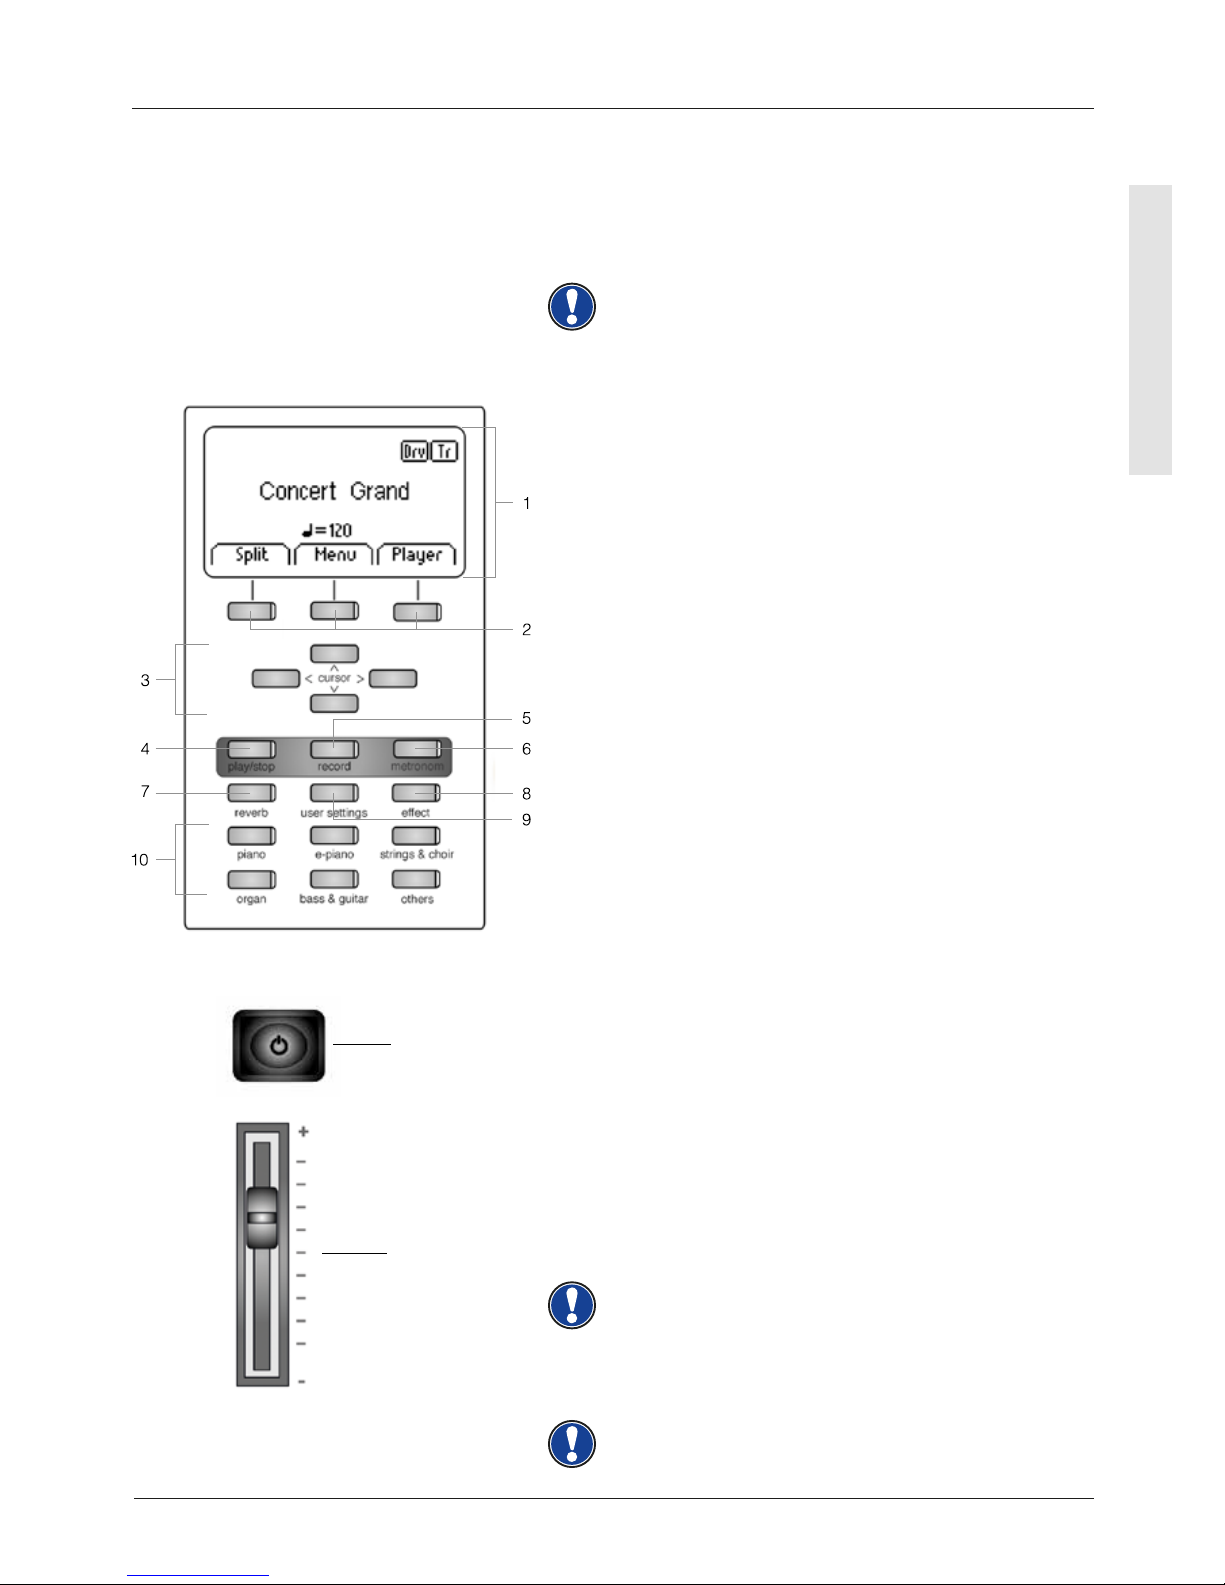
4.2 BEDIENTASTEN
Ansicht A 1 Display
Zeigt Ihnen Informationen zu den getätigten Einstellungen.
HINWEIS: Das aktuell gewählte Menü ist stets schwarz
hinterlegt.
2 Softbuttons
Damit können Sie im Display zugewiesene Funktionen
aufrufen.
3 Cursortasten
Hier navigieren Sie in den jeweiligen Funktionen und
können Einstellungen vornehmen.
Aufnahmefunktionen
4 play/stop
Starten bzw. Stoppen der Wiedergabe von
aufgenommenen Musikstücken.
5 record
Damit versetzen Sie Ihr GEWA Digital Piano in den
Aufnahmemodus.
6 metronom
Hier schalten Sie das Metronom ein- bzw. aus.
7 reverb
Verändern Sie den simulierten Raumklang.
8 effect
Fügen Sie dem Klang Effekte hinzu.
9 user settings
In dieser Sektion können Sie eigene Einstellungen
abspeichern und wieder zurückladen
10 Gruppen Klangwahlschalter
Mit diesen Schaltern können Sie die verschiedenen
Klänge Ihres GEWA UP360G auswählen und spielen
11 on/off Schalter
Mit diesem Schalter schalten Sie Ihr GEWA Digital Piano
ein bzw. aus. Halten Sie den Schalter etwa 3 Sekunden
gedrückt, um Ihr Digitalpiano auszuschalten.
HINWEIS: Der Schalter rastet nicht ein. Leichtes Drücken
genügt
12 Lautstärkeregler
Hiermit bestimmen Sie die Lautstärke Ihres GEWA Digital
Pianos.
HINWEIS: Bevor Sie einschalten empehlt es sich, diesen
Regler mittig zu stellen.
11
on/off
12
volume
Page 26
26
DEUTSCH
ERSTE SCHRITTE
UP360G / UP380G / UP380WK
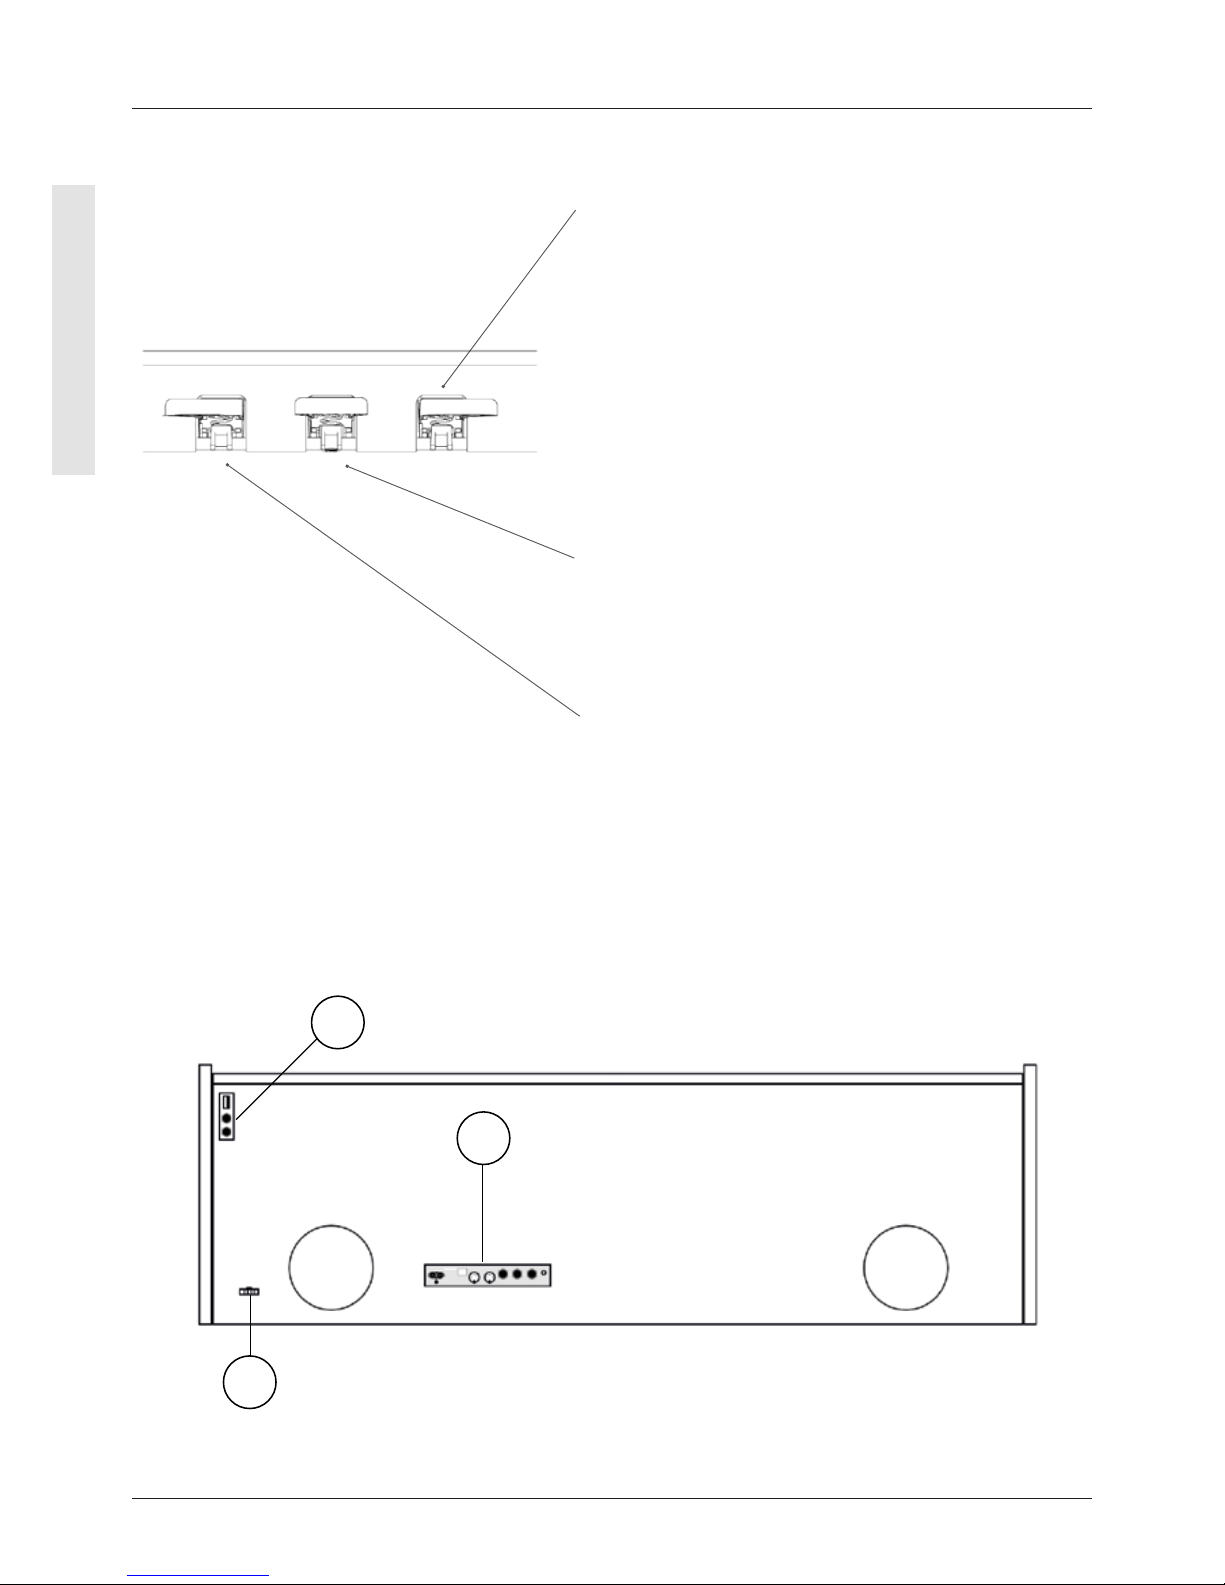
Ansicht B
Forte Pedal (rechts)
Beim Betätigen des Forte- oder Sustain- Pedals eines
akustischen Flügels werden alle auf den Saiten liegenden
Dämpfer angehoben. Dadurch klingen alle gespielten Töne
auch nach dem Loslassen der Tasten weiter.
Zudem können auch die Saiten der nicht angeschlagenen
Töne frei schwingen, sodass deren Resonanzfrequenzen
angeregt werden. Dies führt zu einem volleren Klang.
Mit dem Pedal des Gewa Pianos ist auch ein Halbpedalspiel möglich. Dabei werden die simulierten Dämpfer nur
leicht angehoben und die gespielten Töne klingen schneller
ab, als bei ganz durchgedrücktem Pedal.
Piano Pedal (links)
Beim Betätigen des Piano- oder Una-Corda Pedals wird das
Verschieben der Klaviermechanik um wenige Millimeter nach
rechts simuliert. Durch die veränderte Anschlagsposition
der Hämmer entsteht eine andere Klangfarbe und ein etwas
leiserer Ton
Sostenuto Pedal (Mitte)
Das Sostenuto Pedal hat eine ähnliche Funktion wie das
Forte Pedal. Allerdings werden hierbei nur die Töne der
Tasten gehalten, die im Moment der Betätigung des Pedales
angeschlagen sind. Alle anderen Töne werden normal
abgedämpft
4.3 ANSCHLÜSSE AM SPIELTISCH
A
B
C
Übersicht
Laut-
sprecher
Laut-
sprecher
Page 27
27
DEUTSCH
ERSTE SCHRITTE
UP360G / UP380G / UP380WK
4.4 BLUETOOTH AUDIO
Herstellen einer Bluetooth-Verbindung zu Ihrem GEWA Digitalpiano.
Suchen Sie auf Ihrem Smartphone oder Tablet via Bluetooth nach „GEWA Digital Piano“.
Betätigen Sie hierzu den Softbutton „Menü“ und drücken Sie auf „BT-Pair“, um das Piano
für andere Geräte sichtbar zu machen. Geben Sie den 4-stelligen Pin „4392“ ein, um eine
Verbindung herzustellen.
Weitere Informationen entnehmen Sie der Bedienungsanleitung.
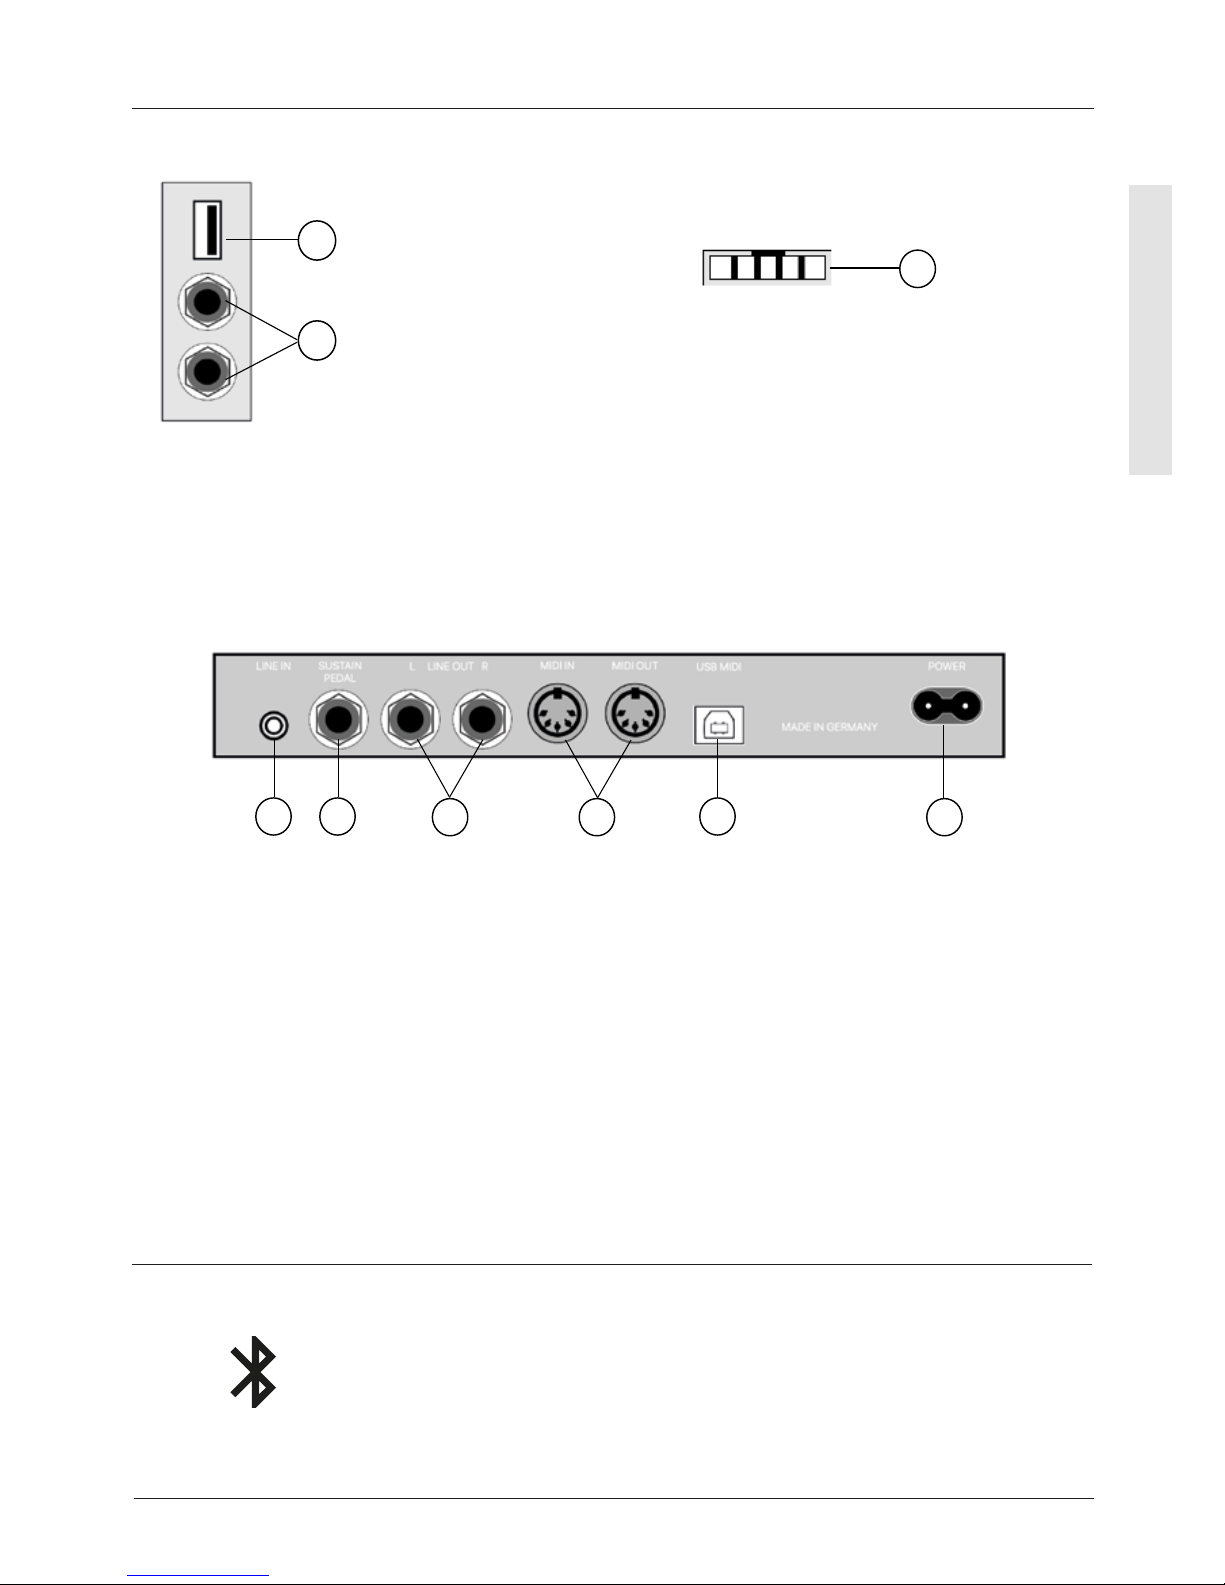
A1 USB IN/OUT Schließen Sie hier bei Bedarf einen USB-Stick oder ein anderes
USB-Gerät an.
A2 Kopfhörerausgänge Sie können hier bis zu zwei Kopfhörer anschließen.
B Pedalkabelbuchse Hier wird das Pedalkabel angeschlossen.
B
Ansicht A Ansicht B
A1
A2
C1 C2
C3 C4
C5
C6
Ansicht C
C1 LINE IN Diese 3,5 mm Klinkenbuchse dient zum Anschluss externer
Klangerzeuger (z.B. MP3-Player).
C2 SUSTAIN An diese 6,3 mm Klinkenbuchse können Sie ein handelsübliches
Sustain Pedal anschließen, wenn Sie Ihr Digitalpiano ohne den
mitgelieferten Fuß nutzen möchten.
C3 LINE OUT L/R Dieser Anschluss ist in die Stereokanäle L(inks) und R(echts)
unterteilt. Verbinden Sie diese Ausgänge mit einem
Empfangsgerät (z.B. Verstärker, Aufnahmegerät,…) via 6,3 mm
Klinkenkabel.
C4 MIDI IN/OUT Schließen Sie hier MIDI-Geräte an, um die MIDI-Funktionen Ihres
Digitalpianos zu nutzen.
C5 USB-B Anschluss Verbinden Sie über diesen Anschluss Ihr Digitalpiano mit Ihrem
PC.
C6 Netzanschluss Schließen Sie das Digitalpiano mithilfe des mitgelieferten
Netzkabels an der Stromversorgung an.
Page 28
28
ENGLISH
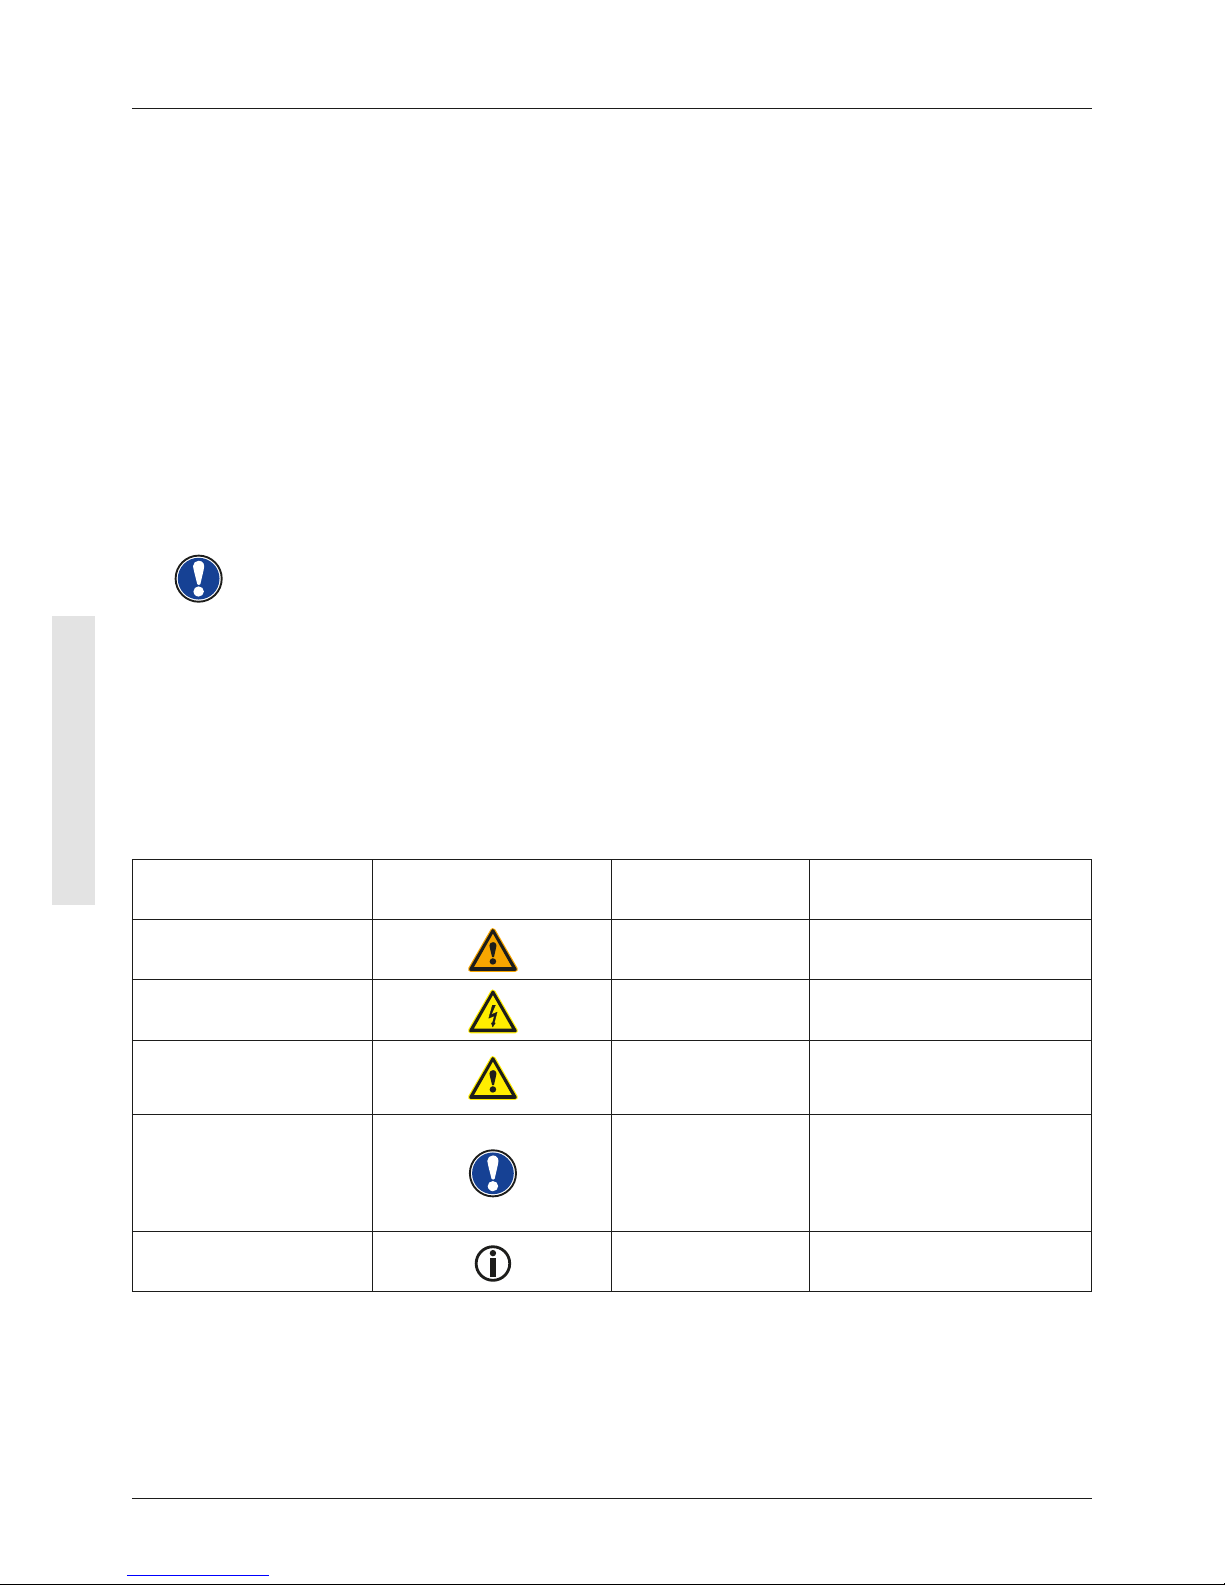
Level of danger Symbol Importance Denition
Severe injury
WARNING
Severe to fatal injuries if
disregarded
Severe injury through
electric shock
WARNING
Additional symbol for danger of
electric shock
Slight injury and property
damage
CAUTION
Slight injury and / or property
damage can occur if the safety
instructions are disregarded.
Note
NOTE
Crucial information concerning
the handling of the device
Tip
TIP
Application tips
Dear Customer,
Thank you for choosing a digital piano from GEWA music!
You have chosen a high-quality digital piano that will give you an impressive sound
experience and lots of fun.
Additional functions extend the capabilities of your digital piano far beyond piano
playing.
Your safety is very important to us!
Please read the safety information carefully and pay close attention to it. Retain this
manual and hand it over to the respective user.
1 SAFETY INFORMATION
The manufacturer is not liable for personal injury or property damage resulting from
improper use of the device!
Only use your digital piano as directed!
1.1 KEY
The following symbols are used in this operating manual to identify hazards and notes
NOTE
SAFETY INFORMATION
KEY
Page 29

29
ENGLISH
1.2 INTENDED USE
The digital piano is intended for use in dry rooms.
• Devices for audio playback (as input or output) or for data communication can be
connected. However, the respective technical specications must be complied with
(see the section „Technical data“).
• The electrical connection may only be made to correctly installed power supplies,
fullling the respective regulations. The mains voltage on the identication plate must
correspond to the mains voltage of the country of use.
• The digital piano is only to be used in the original delivery condition described below.
Conversions of any kind are not permitted and cause the immediate loss of the warranty
claim.
• The digital piano must be placed on securely fastened and weight-suitable, stable and
level oors or platforms.
1.3 IMPROPER USE – EXAMPLES:
• Use outdoors or in rain
• Use in damp rooms
• Connection to incorrect supply voltage or improperly installed electrical power supplies.
• Use in close proximity to electrical or electronic equipment such as stereos, televisions,
radios or mobile phones.
• These devices may cause interference and affect the sound quality
• Electrical leads that are too long can also affect sound quality.
• Transport and installation in places or vehicles with strong vibration, dust and strong heat
e.g. direct sunlight
The manufacturer accepts no liability for damage for the following reasons:
• Disregard of the safety instructions
• Improper handling
• Use with devices that are not compatible with the technical data listed below
NOTE
SAFETY INFORMATION
INTENDED USE
Page 30
30
ENGLISH
SAFETY INFORMATION
PRECAUTIONS
1.4 PRECAUTIONS
Please follow the the precautions listed here. Disregard of precautionary measures can
have serious consequences:
• Severe injury or even fatal accidents
• Electric shock
• Short circuit
• Damage
• Fire
Other threats are conceivable; this is not an exhaustive list.
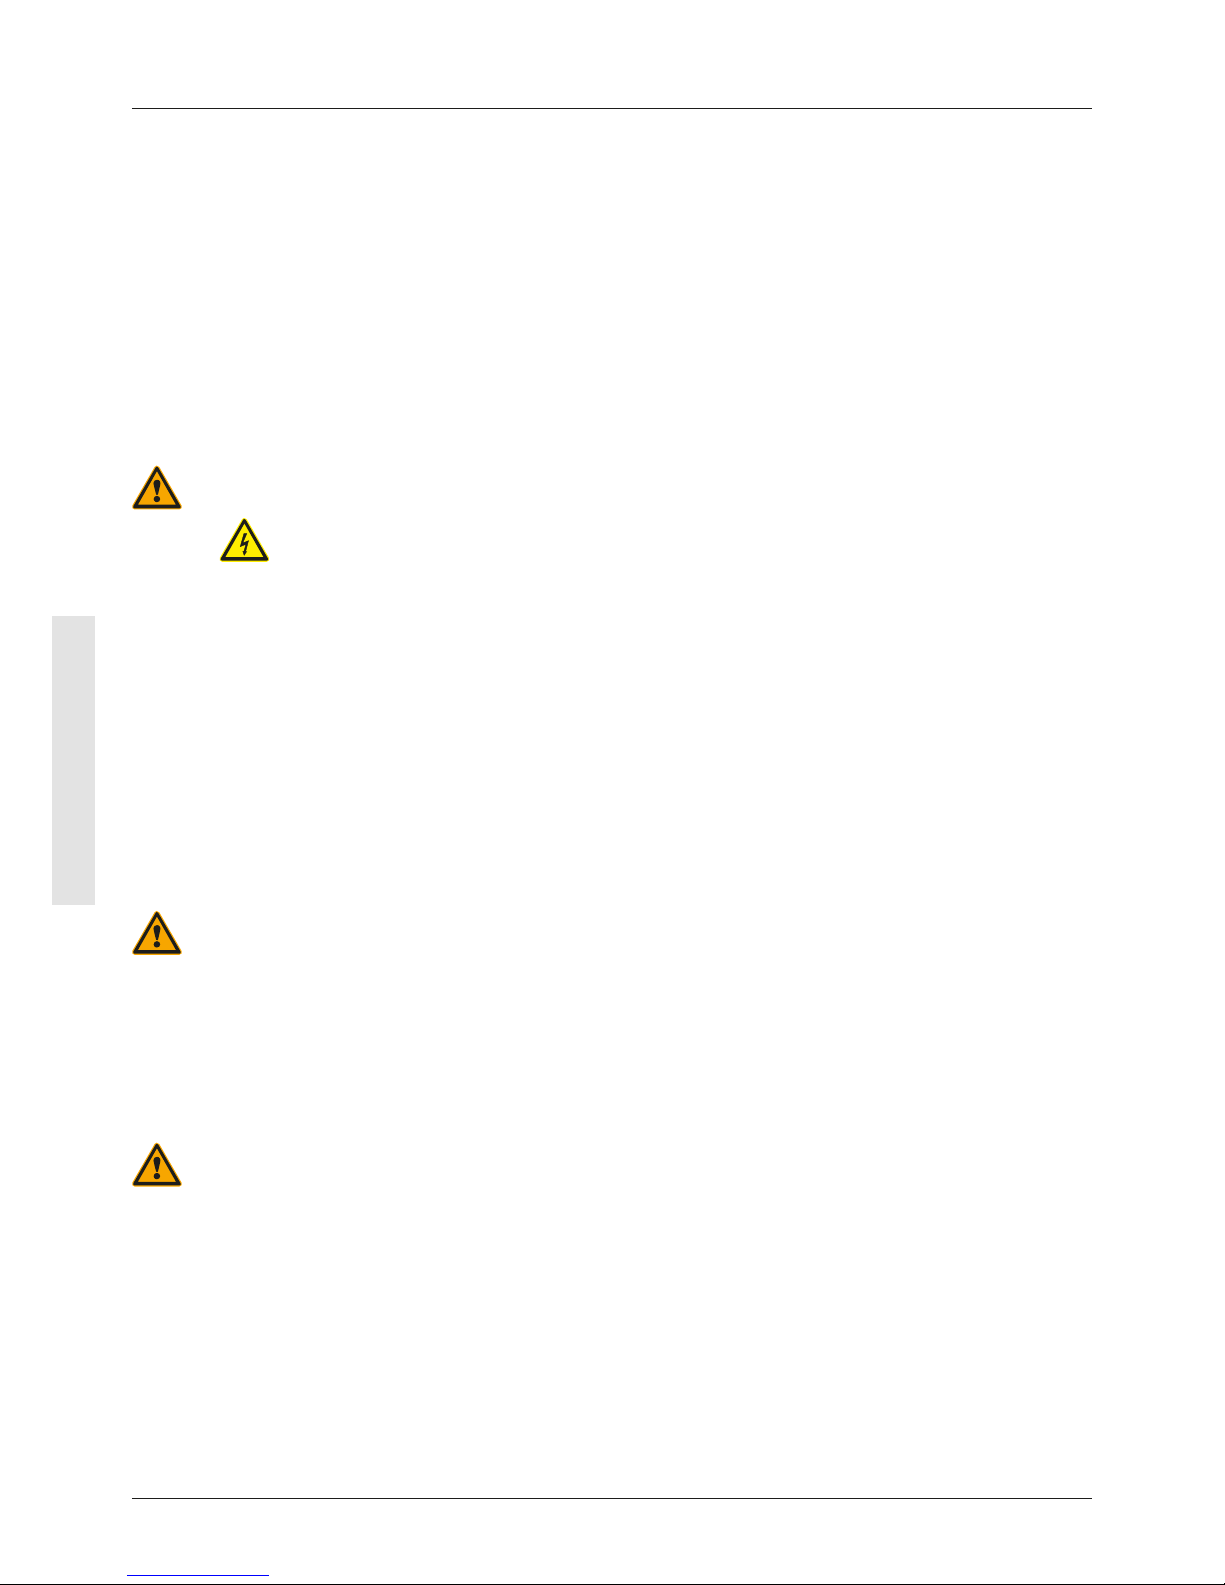
WARNING Fatal electric shocks
• Even low electrical currents can lead to serious injuries and death
• Never open the digital piano’s casing
• Never use damaged power cables
• Lay the power cable in such a way that it can not be damaged
• Never place containers (vases, glasses etc) lled with water or uids on the piano
• Never pour water or liquids on to the digital piano or keyboard
• Never clean the digital piano with a wet cloth
• Never plug in or pull out the mains plug with wet hands. Never pull on the cable; it can
cause damage.
• If liquid accidentally gets into the digital piano, immediately unplug the power.
Then have your digital piano checked by your GEWA service representative.
WARNING Unusual circumstances
• Turn off the digital piano or unplug the power cable if:
- There is a sudden loss of sound while using the digital piano
- The digital piano generates an unusual smell or smoke
• Be sure to have the digital piano checked by your GEWA service representative
WARNING Protection against re
• Open ames such as candles or tealights can tip over and cause a re
• Never place objects with open ames on the digital piano!
Page 31
31
ENGLISH
SAFETY INFORMATION
CE MARK
CAUTION Damage to the digital piano
• Inappropriate electrical voltages can damage the digital piano
• Only operate the digital piano in the permissable voltage range (as indicated on the
respective identication plate).
• Only use the supplied power cable.
• Never place the power cable near to sources of heat, such as radiators or freestanding
heaters.
• Do not bend or kink the power cable, or damage it in any other way.
• Lay the power cable so that nobody can step on it, trip on it or roll over it.
• Do not place objects on the power cable.
• Regularly check the power cable and remove any dust or dirt that may be present.
CAUTION Damage to the digital piano through thunderstorms
• Thunderstorms can generate electrical surges that can damage electrical equipment.
• In the event of a thunderstorm or long periods of non-use (such as travel), unplug the
appliance from the mains.
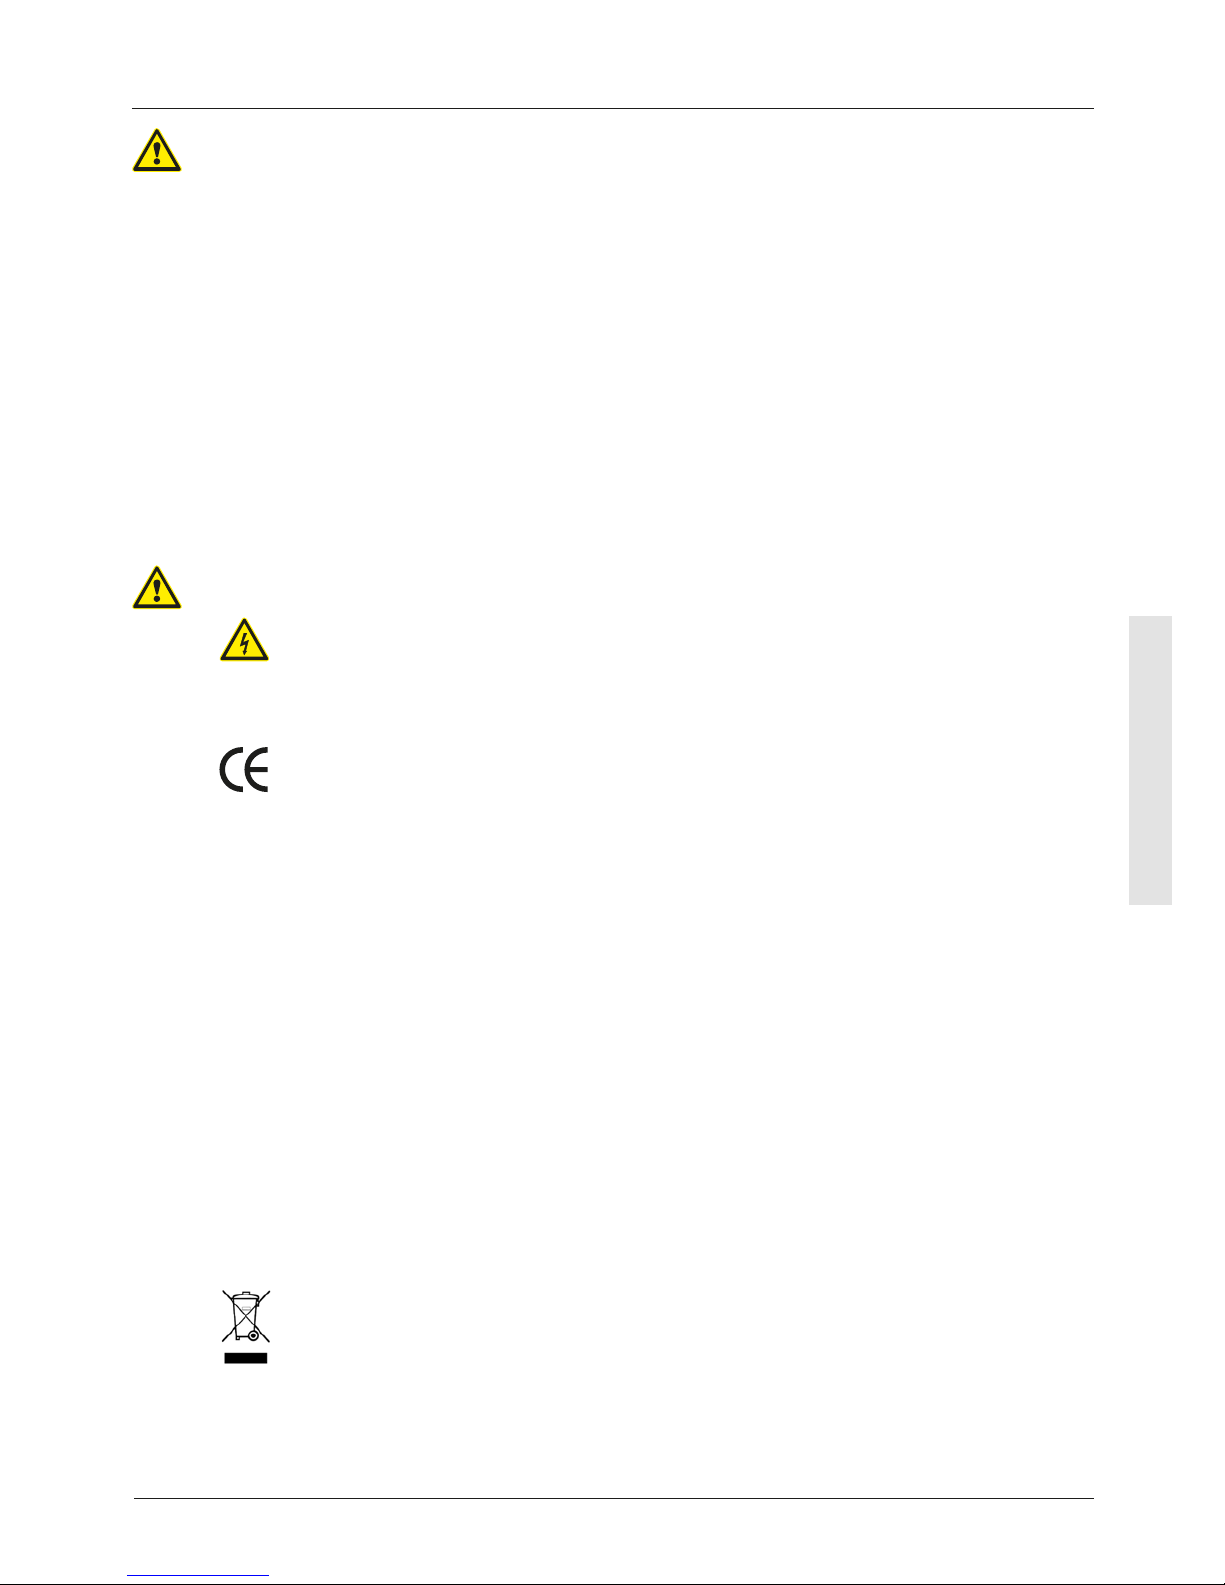
1.5 CE MARK
CE MARK
This device complies with EU directive requirements: Directive 2014/53/EU
EN55020:2007+A11:2011
EN55024:2010
EN55032:2012
EN61000-3-2:2014
EN61000-3-3:2013
EN301489-17:V2.2.1
EN301489-17:V3.2.0
EN62479:2010
EN300328:V2.1.1
The conformity with the regulations listed above is conrmed by the CE sign on the device.
The declaration of conformity can be viewed at the following address:
GEWA music GmbH, Werkstraße 1, 08626 Adorf, GERMANY
1.6 DISPOSAL
To dispose of the old device, please take it to your local waste management authority
(e.g. disposal company or recycling centre).
The adjacent symbol indicates that the device must be disposed of separately from
household waste. In accordance with the Electrical and Electronic Equipment Act, owners
of old appliances are legally required to dispose of old electrical and electronic appliances
at a separate and designated waste disposal point.
Please help in contributing to protect the environment by not disposing of the old device
in household waste.
Page 32
32
ENGLISH
DELIVERY
DP300G
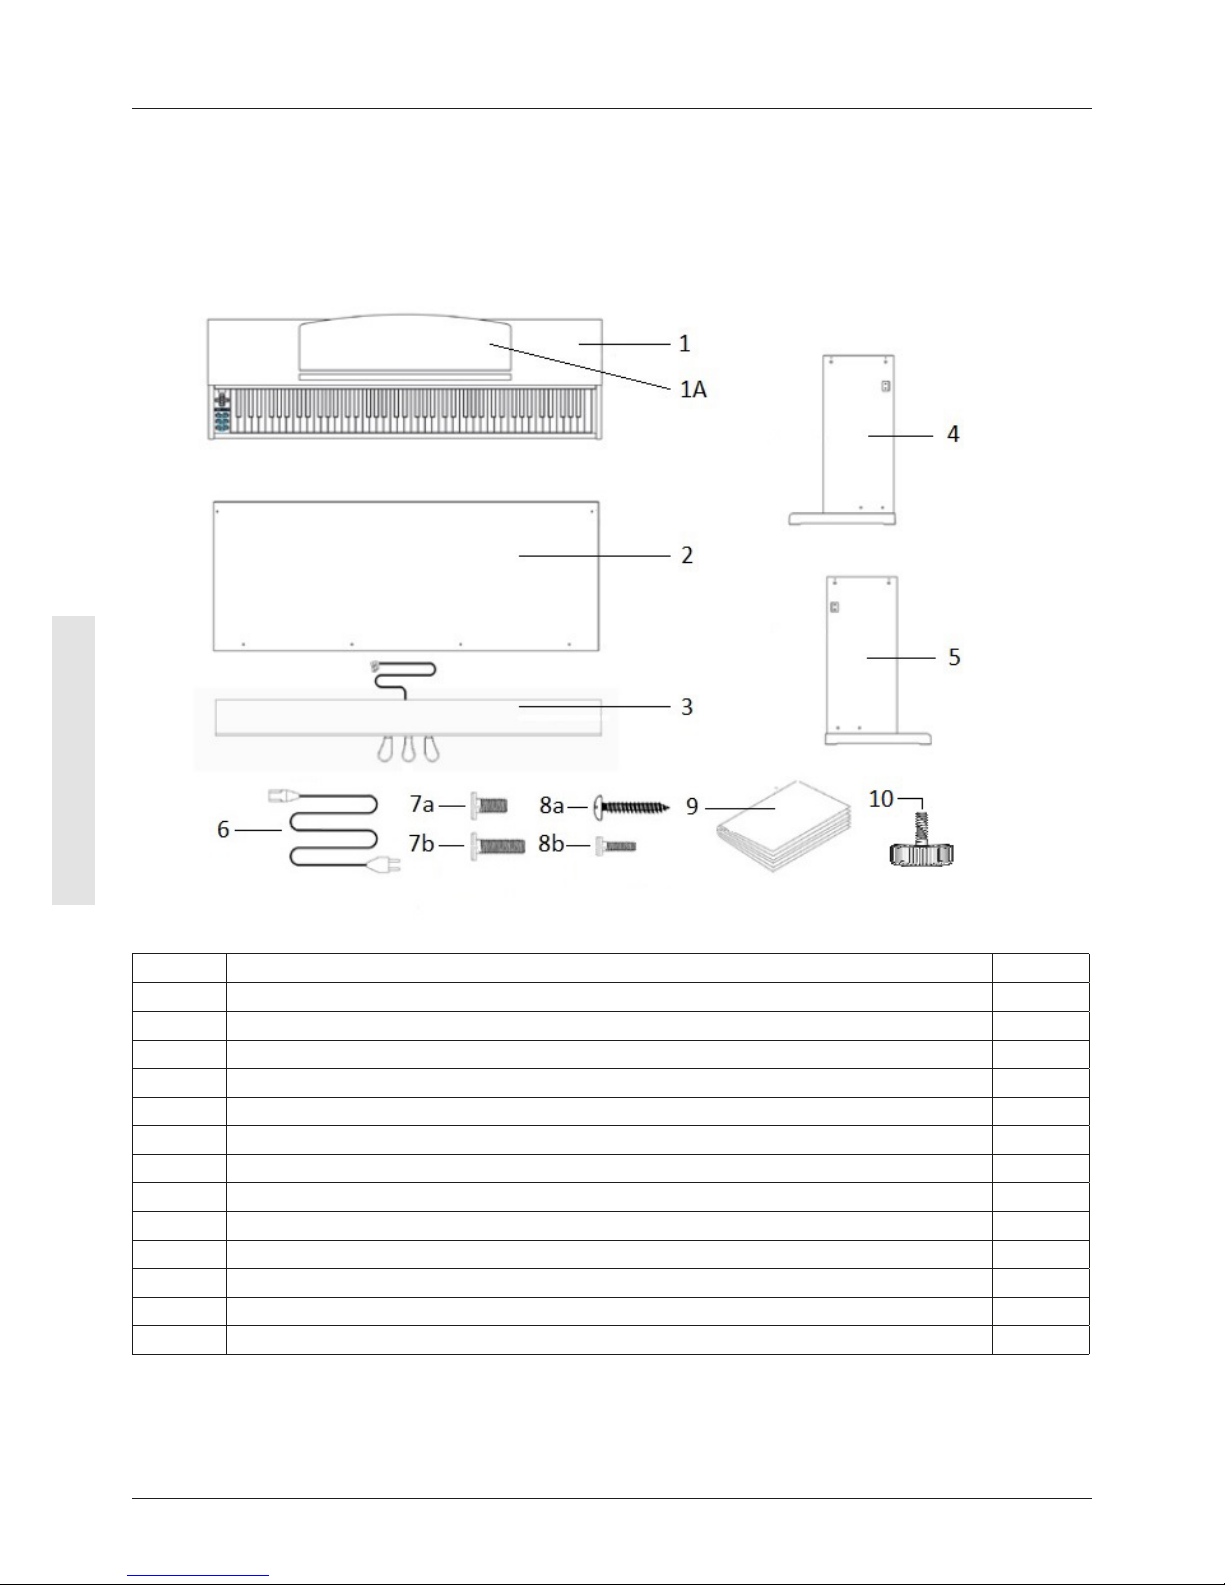
2 DELIVERY DP300G
Check that the contents of the package is complete before commencing with assembly.
No. Description Quantity
1 Keyboard and keyboard lid 1
1a Music desk 1
2 Rear panel 1
3 Pedal board 1
4 Left side panel 1
5 Right side panel 1
6 Connecting cable power supply 1
7a Phillips screw M6 x 16 4
7b Phillips screw M6 x 35 4
8a Phillips wood screw 3.5 x 18 4
8b Phillips screw M4 x 10 with washer and spring washer 2
9 Quick Start Guide 1
10 Adjustment screw 1
Page 33
33
ENGLISH
DELIVERY
DP340G
DELIVERY DP340G
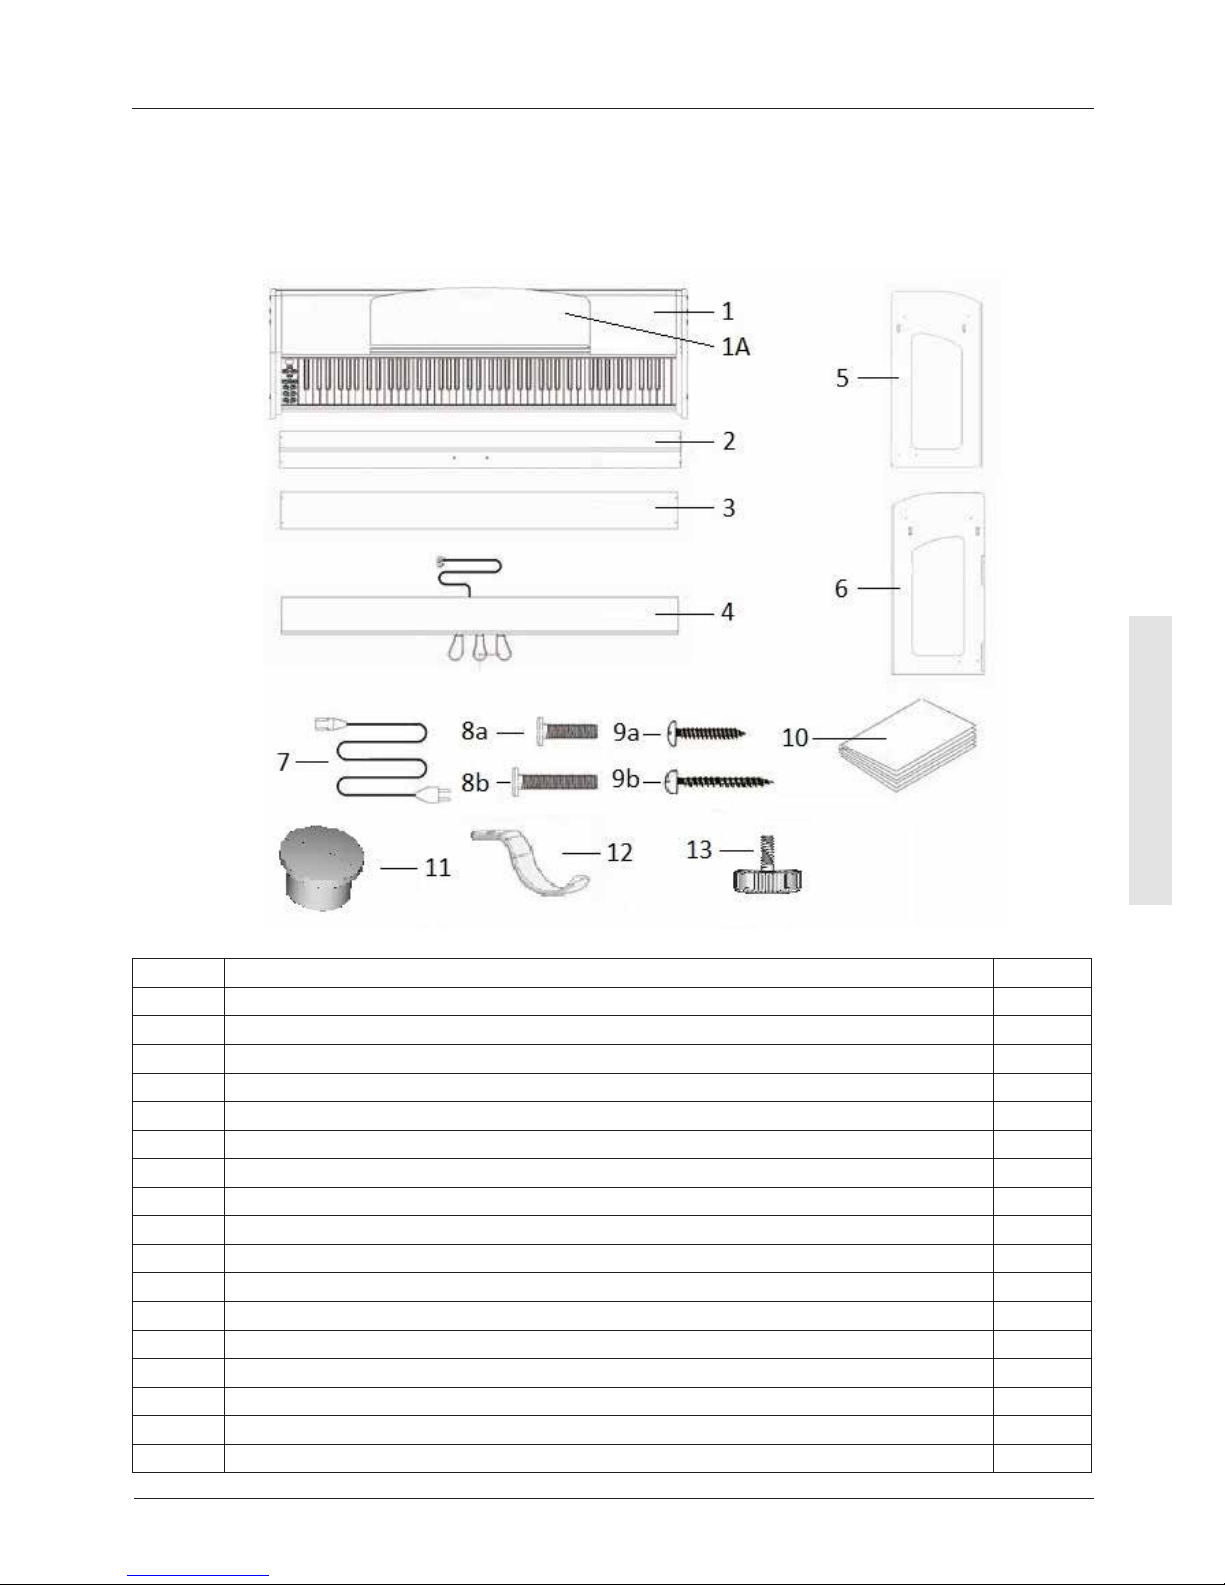
Check that the contents of the package is complete before commencing with assembly.
No. Description Quantity
1 Keyboard with keyboard cover 1
1a Music desk 1
2 Brace pedalboard 1
3 Brace back panel, above 1
4 Pedalboard 1
5 Right side panel 1
6 Left side panel 1
7 Connecting cable power supply 1
8a Phillips screw M6 x 16 (headphone hanger) 1
8b Phillips screw M6 x 35 8
9a Phillips wood screw 3.5 x 25 8
9b Phillips wood screw 3.5 x 30 2
10 Quick Start Guide 1
11 Rubber cover 8
12 Headphone hanger 1
13 Adjustment screw 1
not shown
Cable clips 2
Page 34
34
ENGLISH
DELIVERY
UP360G
DELIVERY UP360G
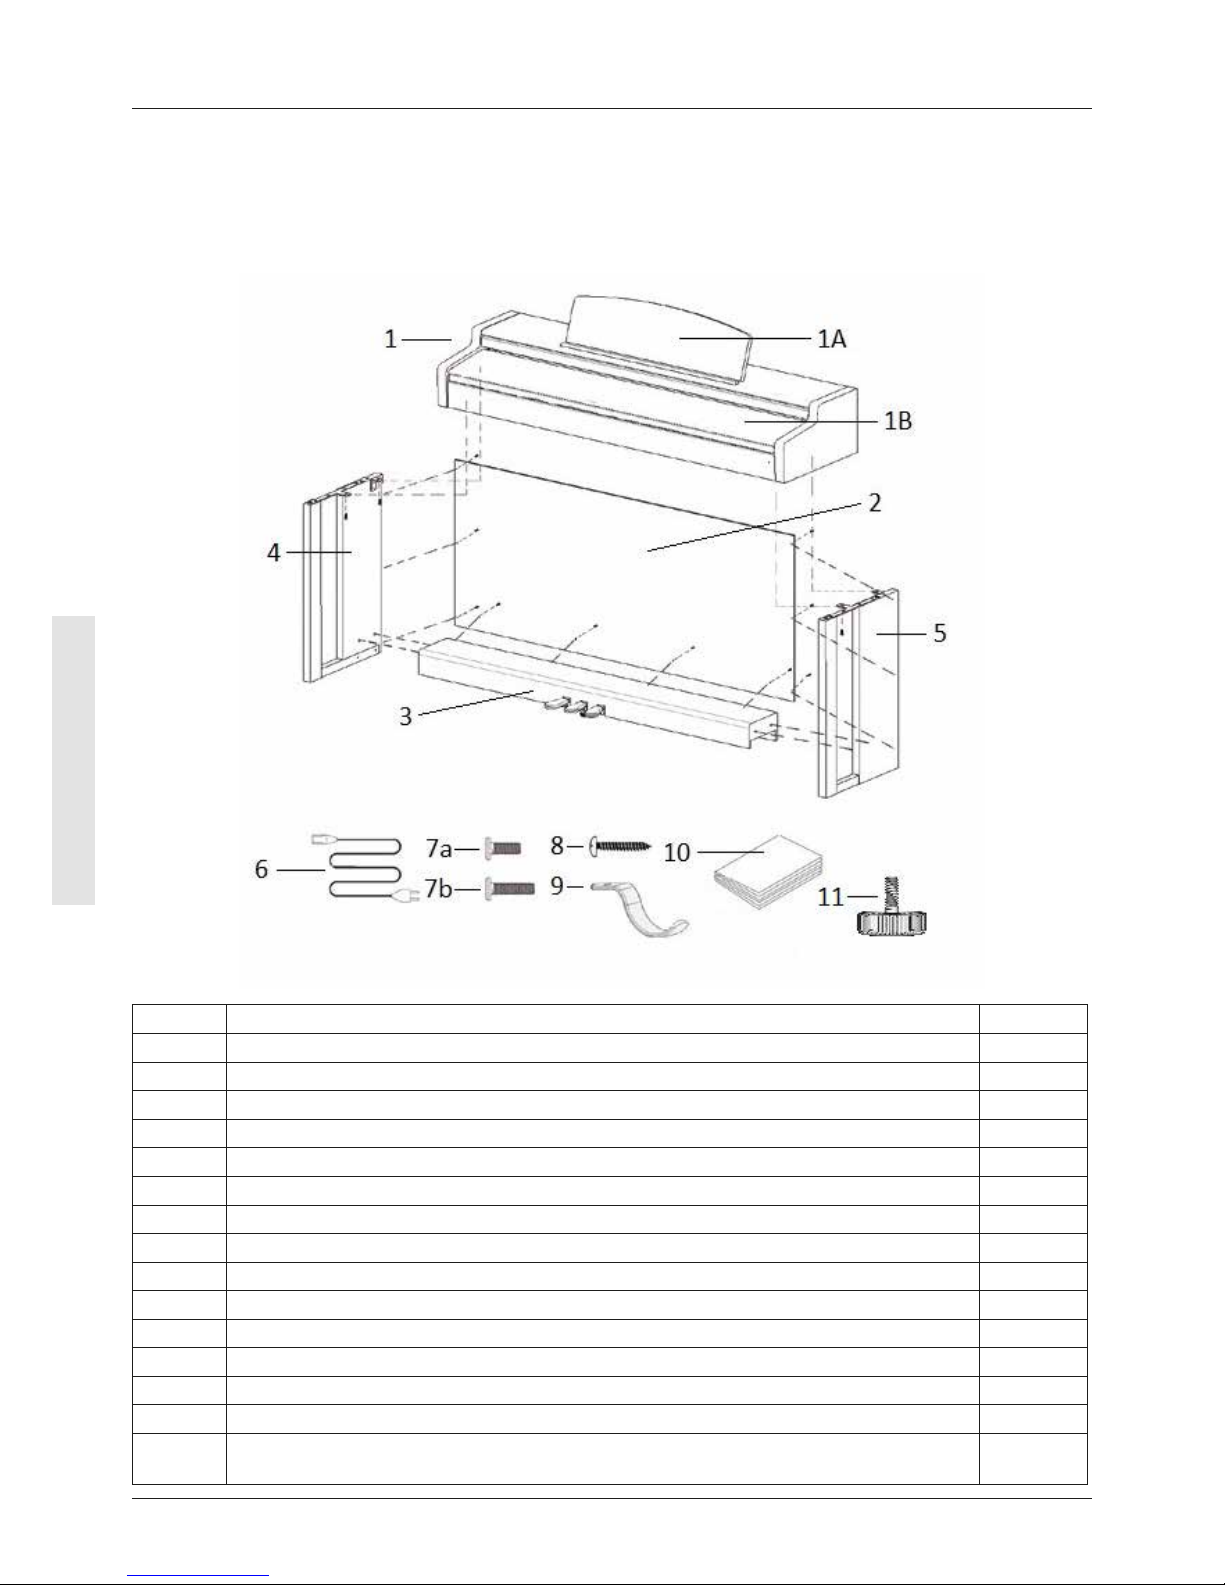
Check the content of the package for completeness before starting with the assembly.
Pos. Description Pcs.
1 Keyboard 1
1A Music desk 1
1B Rollable keyboard lid 1
2 Rear panel 1
3 Pedal board 1
4 Left side panel 1
5 Right side panel 1
6 Power cable 1
7a Phillips screw M6 x 16 5
7b Phillips screw M6 x 30 4
8 Phillips wood screw 3.5 x 30 10
9 Headphone hanger 1
10 Quick Start Guide 1
11 Adjustment screw 1
not
shown
Cable clips 2
Page 35
35
ENGLISH
DELIVERY
UP380G / UP380WK
DELIVERY UP380G / UP380WK
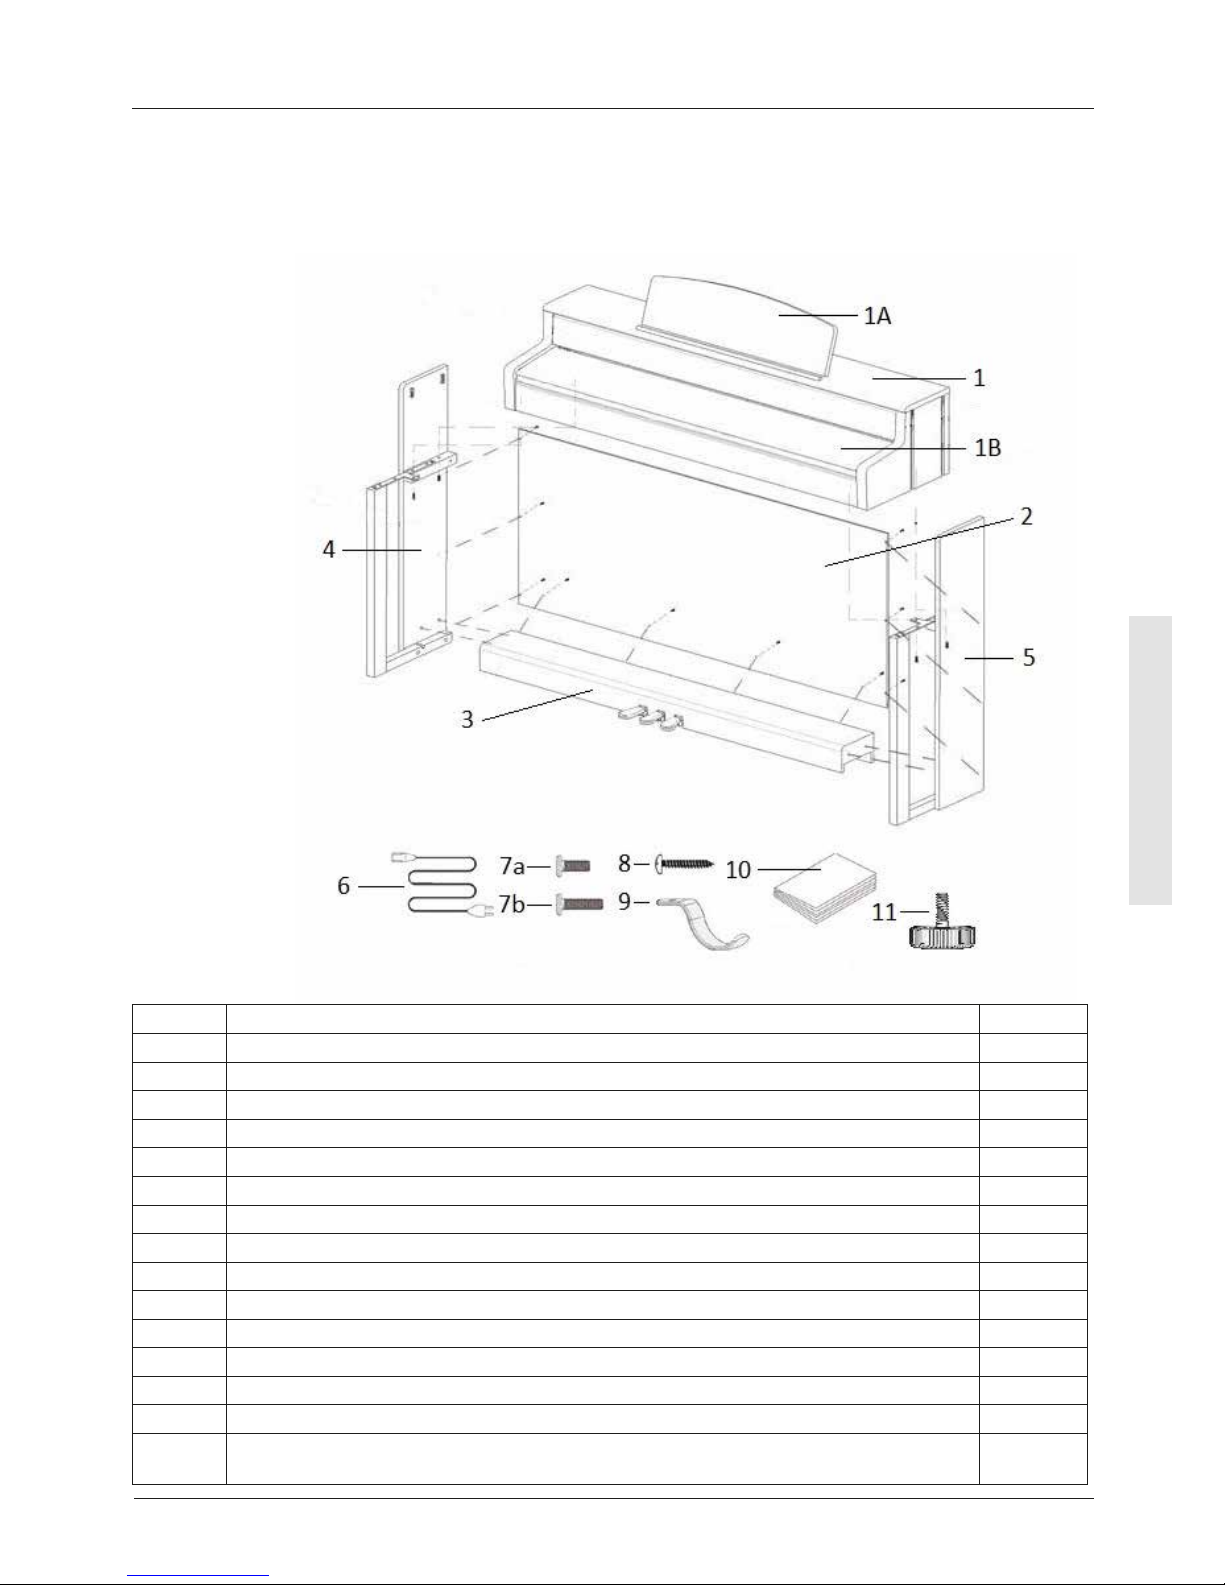
Check the content of the package for completeness before starting with the assembly.
Pos. Description Pcs.
1 Keyboard 1
1A Music desk 1
1B Rollable keyboard lid 1
2 Rear panel 1
3 Pedal board 1
4 Left side panel 1
5 Right side panel 1
6 Power cable 1
7a Phillips screw M6 x 16 3
7b Phillips screw M6 x 30 6
8 Phillips wood screw 3.5 x 30 10
9 Headphone hanger 1
10 Quick Start Guide 1
11 Adjustment screw 1
not
shown
Cable clips 2
Page 36
36
ENGLISH
8
8
8
8
7
7
7
7
7
7
7
7
7
7
ASSEMBLY INSTRUCTIONS
DP300G
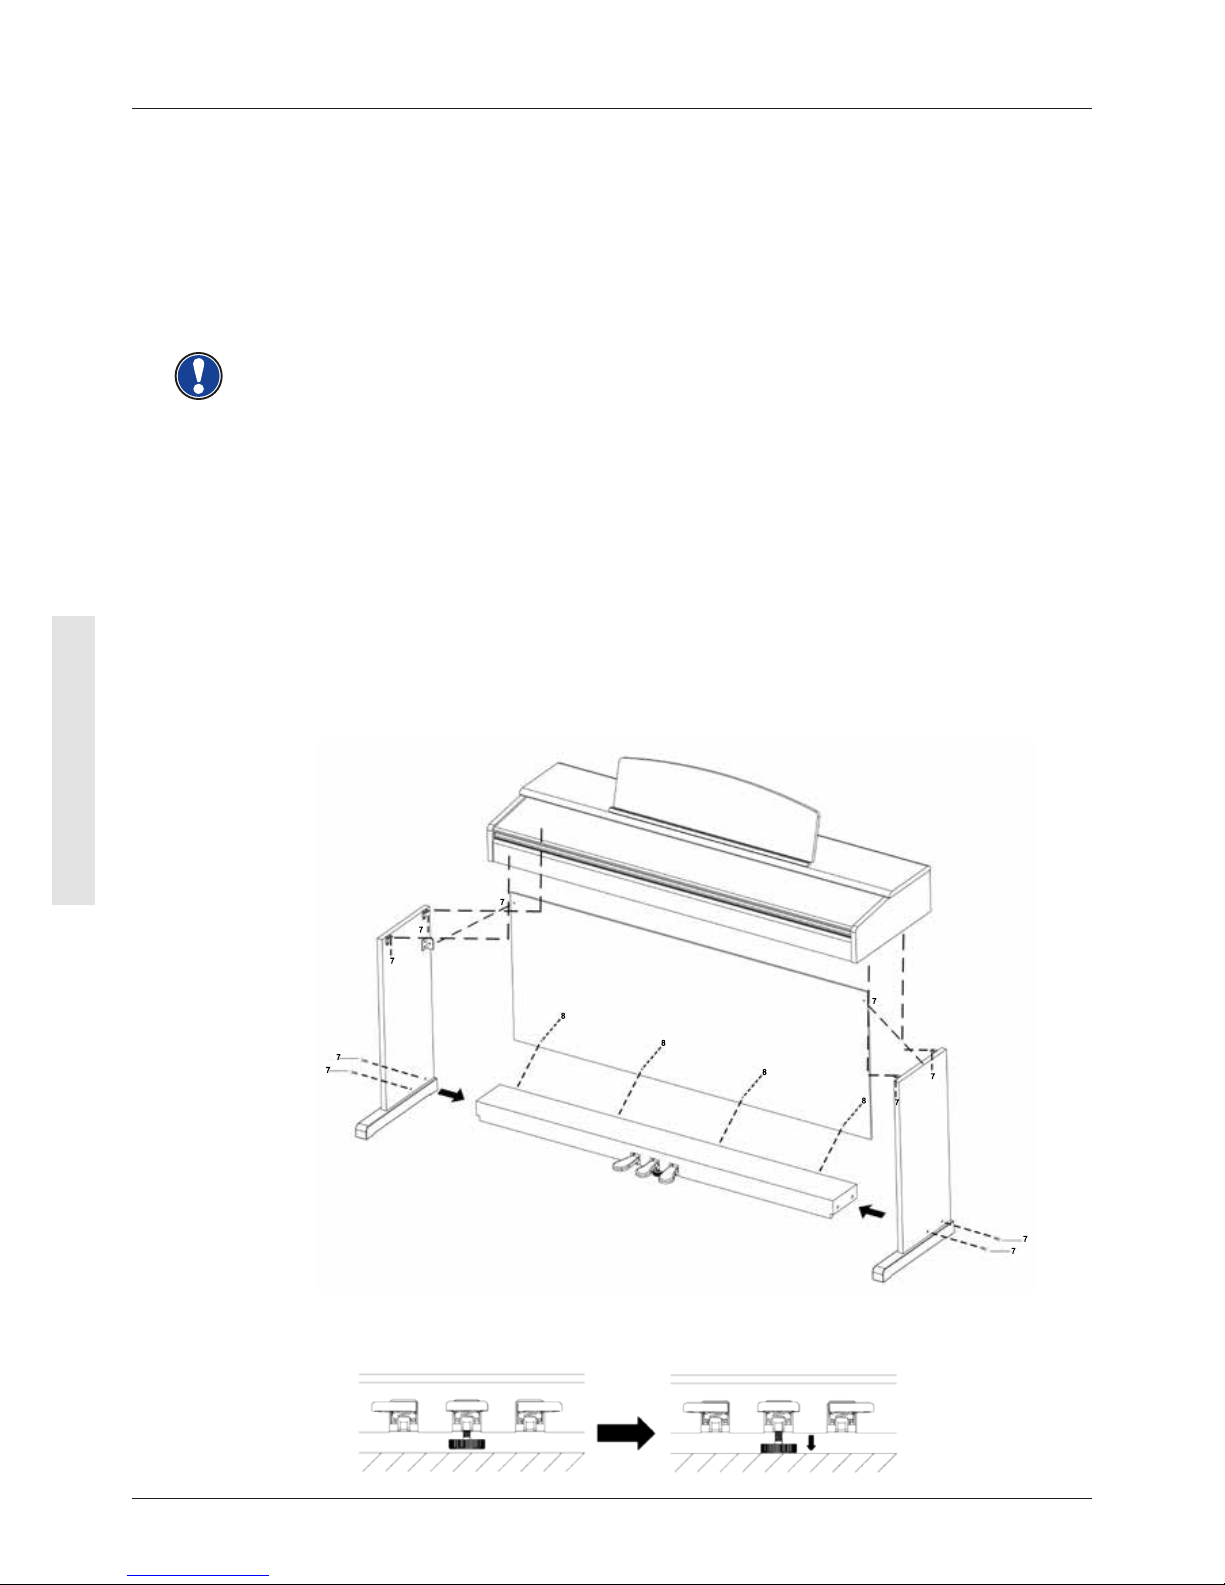
3 ASSEMBLY INSTRUCTIONS DP300G
This section tells you how to correctly set up your digital piano. For assembly you will
need:
• A size 2 phillips screwdriver
• Another person
Do not tighten the phillips screws until all parts of your digital piano have been pre-
assembled and aligned.
How to assemble your digital piano:
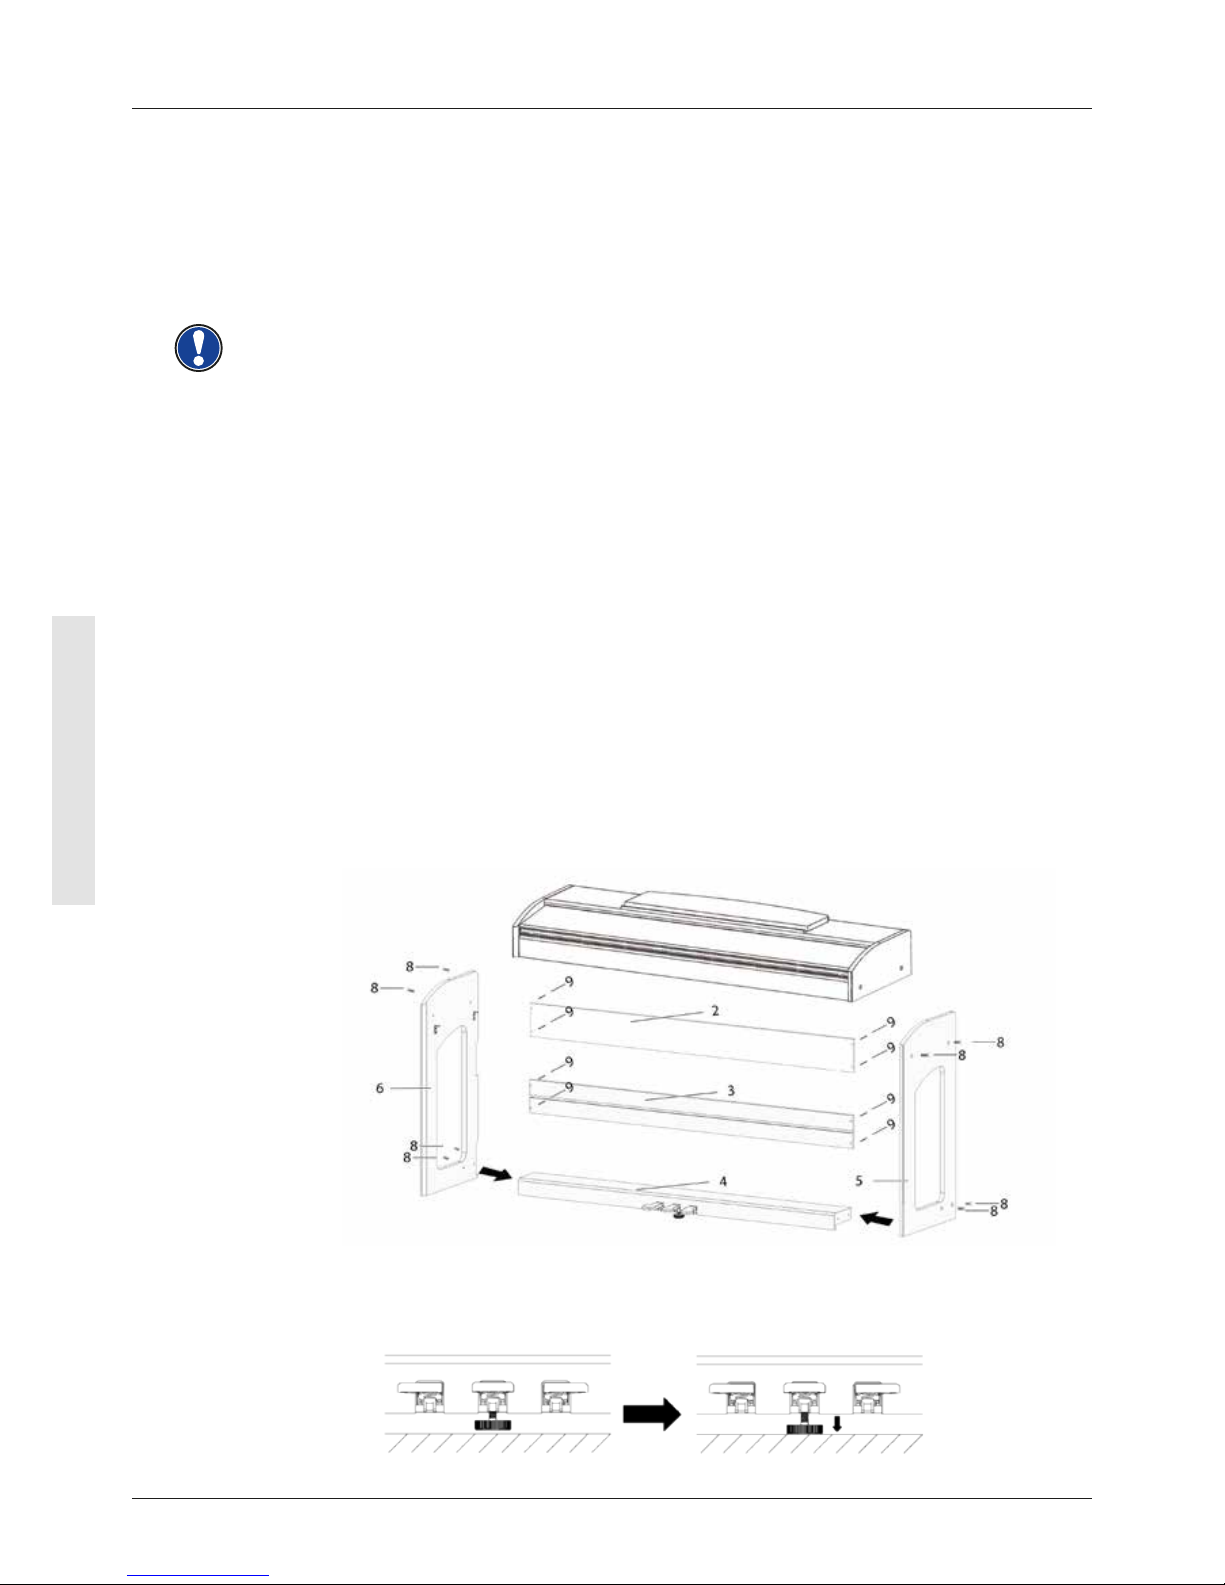
1. Unfold the pedal cable (not shown) and screw the adjustment screw ( 10 ) into the
pedal board ( 3 ).
2. Connect the side panels (4 and 5) with the pedal board using the phillips screw (7b)
3. Attach the rear panel ( 2 ) with the 4 phillips wood screws ( 8a ) to the pedal board. Then
connect it to the side panels by using the phillips screws ( 8b ).
4. Then you can place the keyboard on the top. Ensure that it is tted to the metal angle of
the side panels. 4 phillips screws (7a) must be screwed into the keyboard from below.
5. Then align your digital piano and tighten all of the screws.
NOTE
6. Place your digital piano at the desired location and make sure that the adjustment
screw ( 10 ) touches the oor as shown below.
Page 37
37
ENGLISH
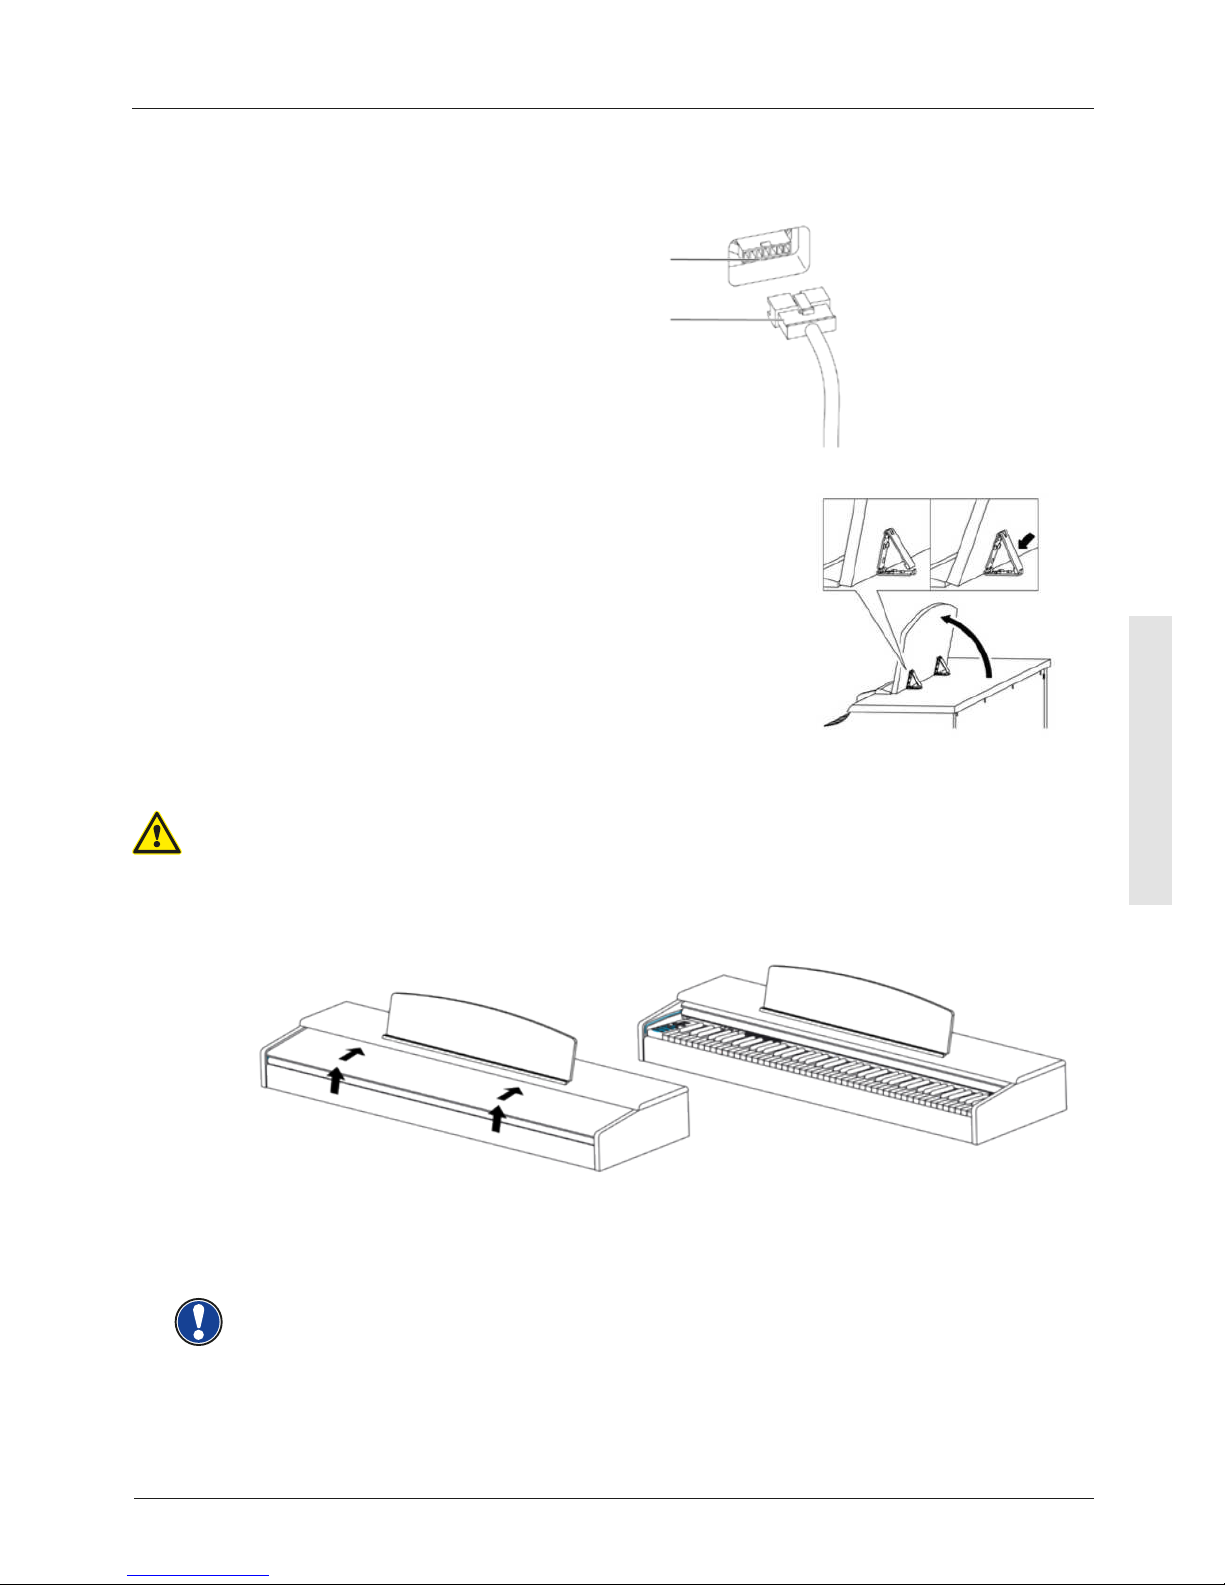
7. Insert the pedal cable true to side into the pedal cable socket on the underside of the
keyboard ( 1 ). It should slide easily into the socket. Then plug the power cable ( 6 )
into the power socket on the back of the piano (not shown).
8. Set up the music desk as shown below.
OPENING THE KEYBOARD LID
Please always use both hands to open the keyboard lid.
Open the keyboard cover as shown in the diagram. Proceed in reverse order to close it.
ASSEMBLY INSTRUCTIONS
DP300G
Pedal cable
Pedal cable socket
CAUTION
USE WITH A KEYBOARD STAND
It is also possible to use a keyboard stand instead of the supplied rack. In this case place
the keyboard stand on level ground and position the piano centrally on top. If possible,
the speakers on the bottom of the piano should not be covered or partly touched by the
stand. For the connection with a standard sustain pedal you can use the 6.3mm jack socket
labeled ‘sustain’ on the rear panel.
NOTE
Page 38
38
ENGLISH
ASSEMBLY INSTRUCTIONS DP340G
This section tells you how to correctly set up your digital piano. For assembly you will
need:
• A size 2 phillips screwdriver
• Another person
Do not tighten the phillips screws until all parts of your digital piano have been pre-
assembled and aligned.
How to assemble your digital piano:
1. Unfold the pedal cable (not shown) and screw the adjustment screw ( 13 ) into the
pedal board ( 4 ).
2. Connect the side panels (5 and 6) with the pedal board using the phillips screw (7b)
3. Now insert the pedal board brace ( 2 ). Make sure that the pedalboard is inserted
into the groove provided. Then attach it to the side panels with 4 screws (9a) and
2 screws (9b) in the middle of the brace.
4. Then x the back panel brace (3) with phillips wood screws as well (9a).
5. Then you can attach the keyboard from above. For stability, this must rest evenly on the
xed angles on the side panels. Then the keyboard (1) must be connected and xed
with the four phillips screws (8b).
6. Now screw the headphone hanger (12) on to the left underside of the keyboard by
using the phillips screw ( 8a )..
7. Then align your digital piano and tighten all the screws.
8. Finally, t the rubber covers (11) into all holes in the side panels ( 5 and 6).
NOTE
ASSEMBLY INSTRUCTIONS
DP340G
9. Place your digital piano at the desired location and make sure that the adjustment
screw ( 13 ) touches the oor as shown below.
Page 39
39
ENGLISH
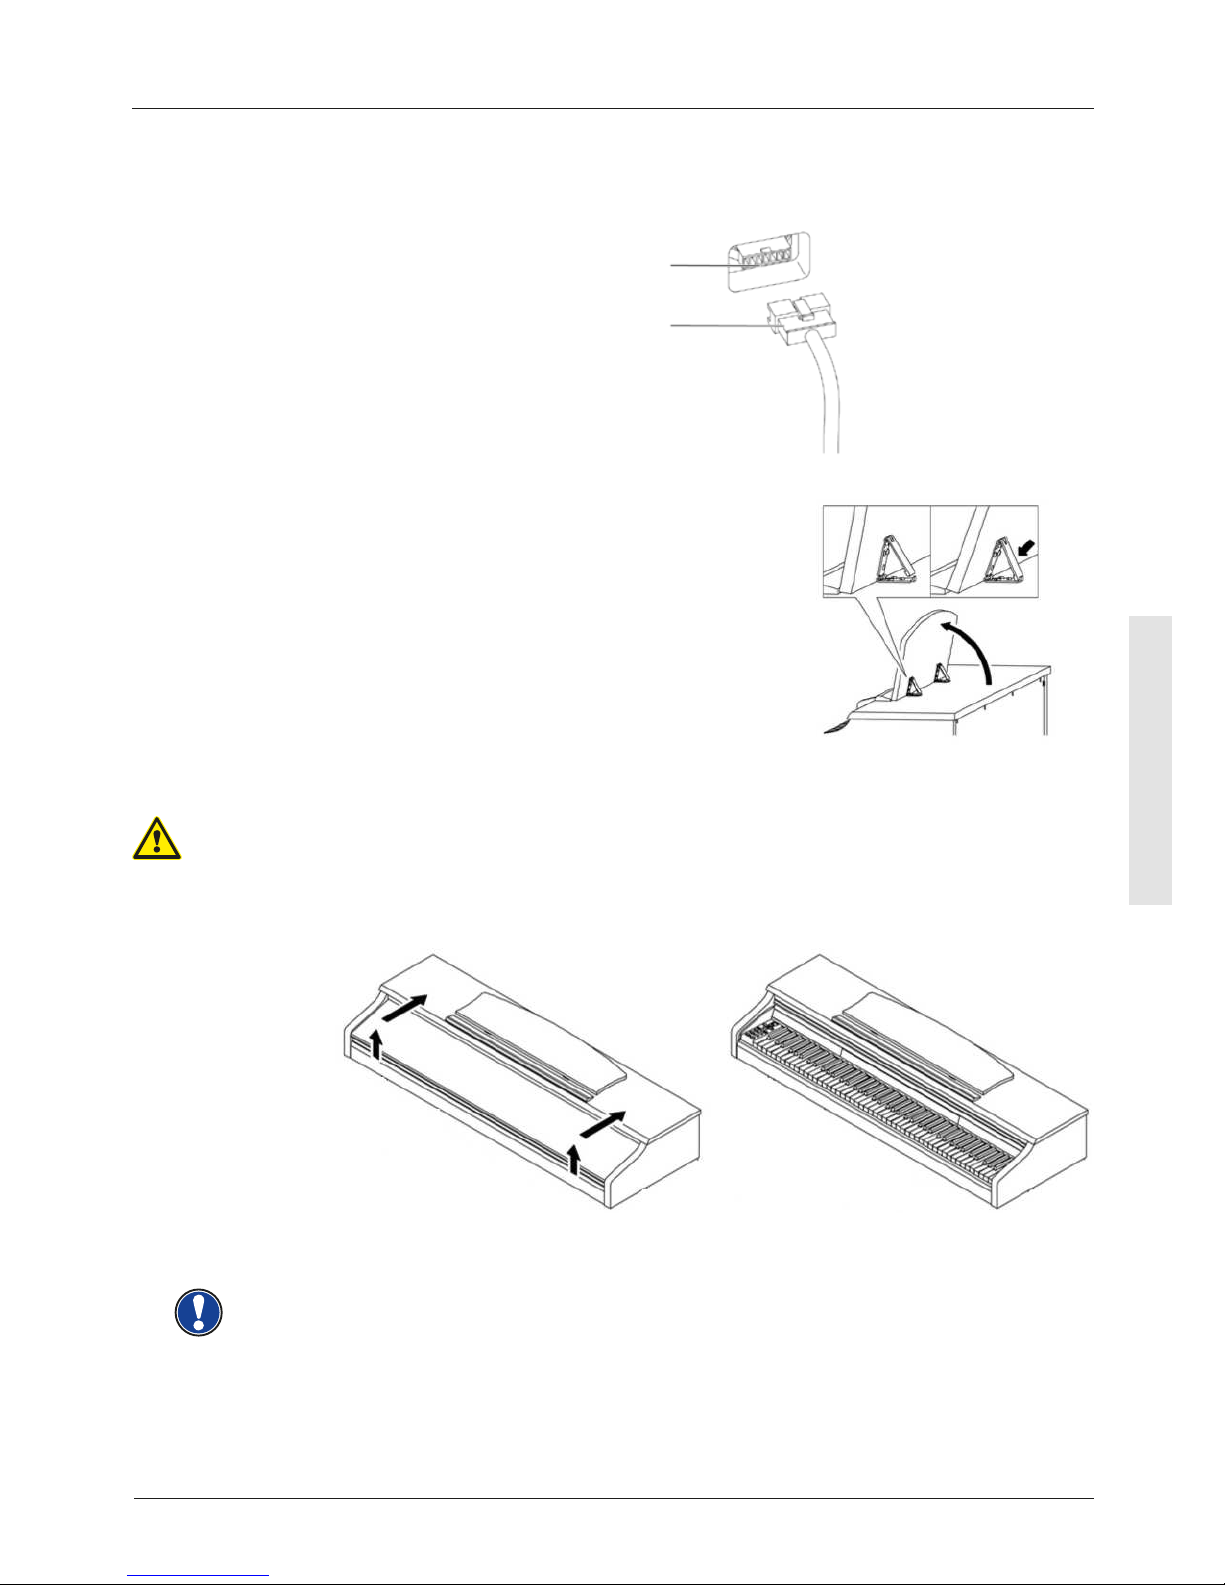
10. Insert the pedal cable true to side into the pedal cable socket on the underside of the
keyboard ( 1 ). It should slide easily into the socket. Then plug the power cable ( 7 )
into the power socket on the back of the piano (not shown).
11. Set up the music desk as shown below.
OPENING THE KEYBOARD LID
Please always use both hands to open the keyboard lid.
Open the keyboard cover as shown in the diagram. Proceed in reverse order to close it.
Pedal cable
Pedal cable socket
CAUTION
ASSEMBLY INSTRUCTIONS
DP340G
USE WITH A KEYBOARD STAND
It is also possible to use a keyboard stand instead of the supplied rack. In this case place
the keyboard stand on level ground and position the piano centrally on top. If possible,
the speakers on the bottom of the piano should not be covered or partly touched by the
stand. For the connection with a standard sustain pedal you can use the 6.3mm jack socket
labeled ‘sustain’ on the rear panel.
NOTE
Page 40
40
ENGLISH
3 ASSEMBLY INSTRUCTIONS UP360G
In this section we will show you how to easily set up your GEWA digital piano.
For the assembly you need:
• size 2 Phillips screwdriver
• second assisting person
Do not rmly tighten the recessed head screws until all parts of your digital piano are
aligned. Make sure you assemble your digital piano on level ground.
Now lets start assembling your GEWA digital piano:
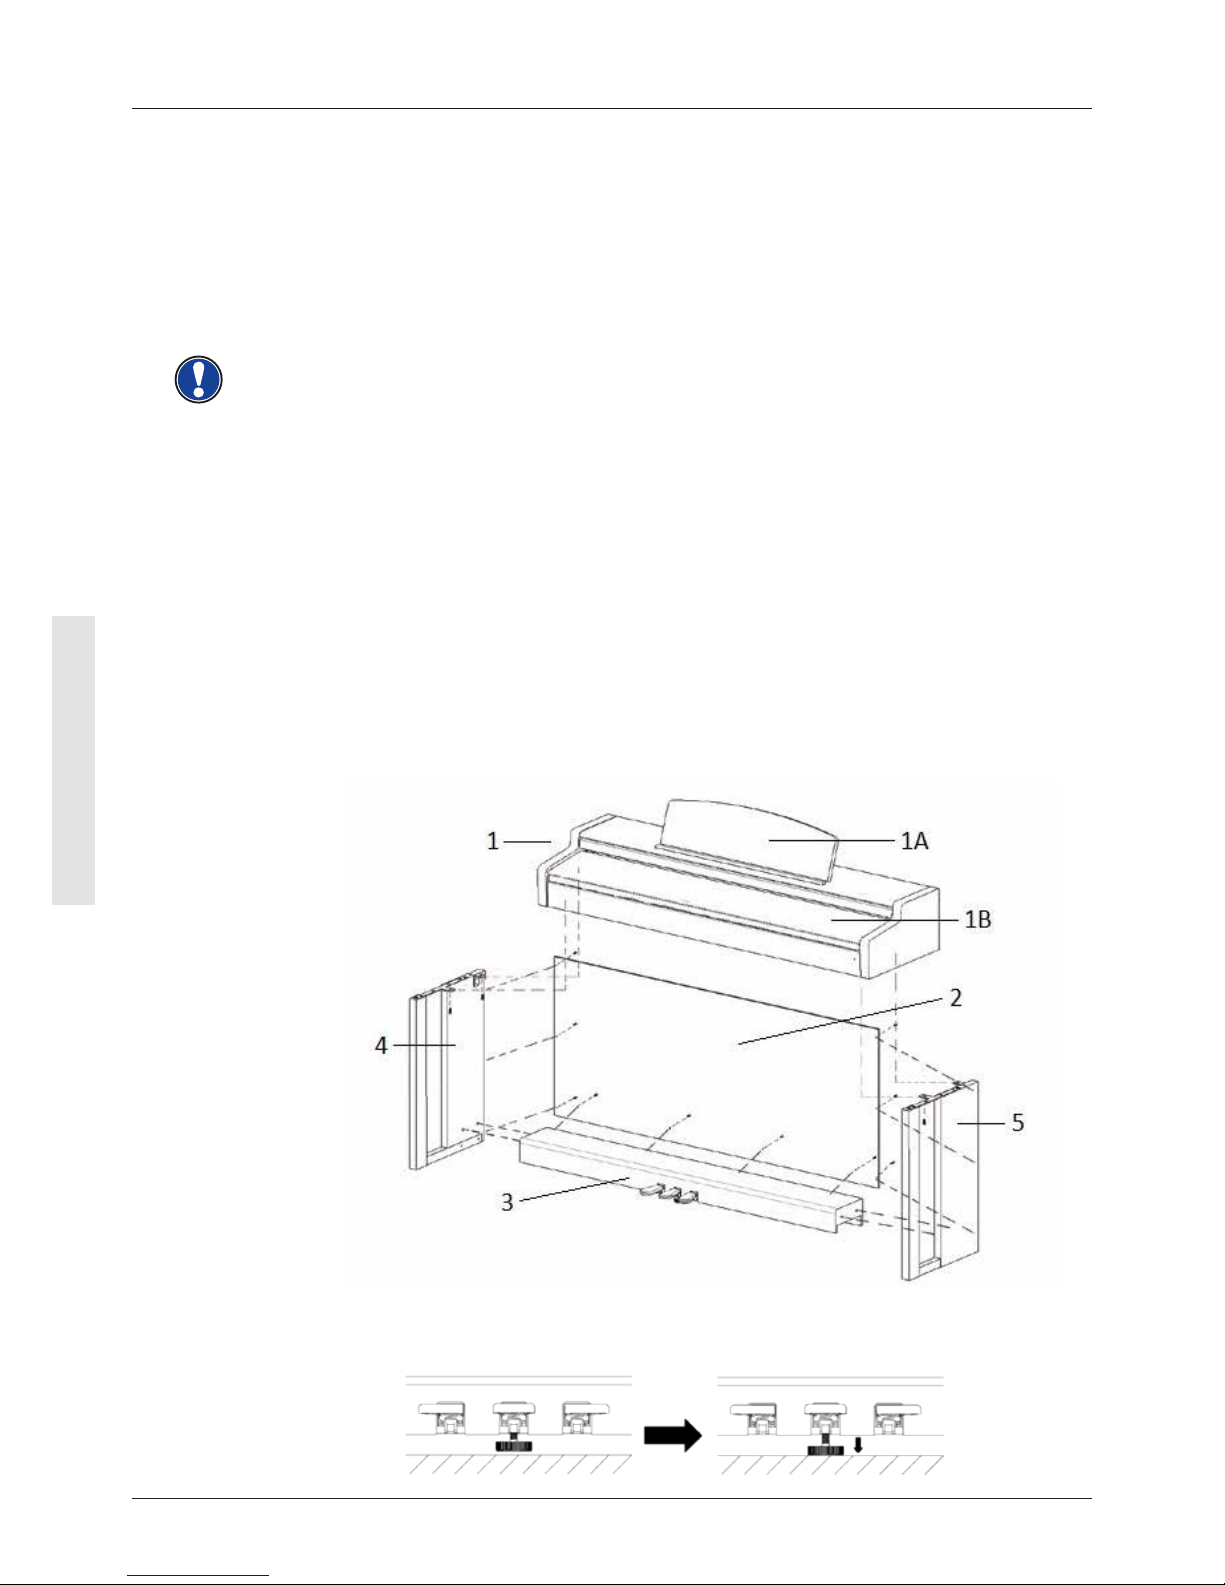
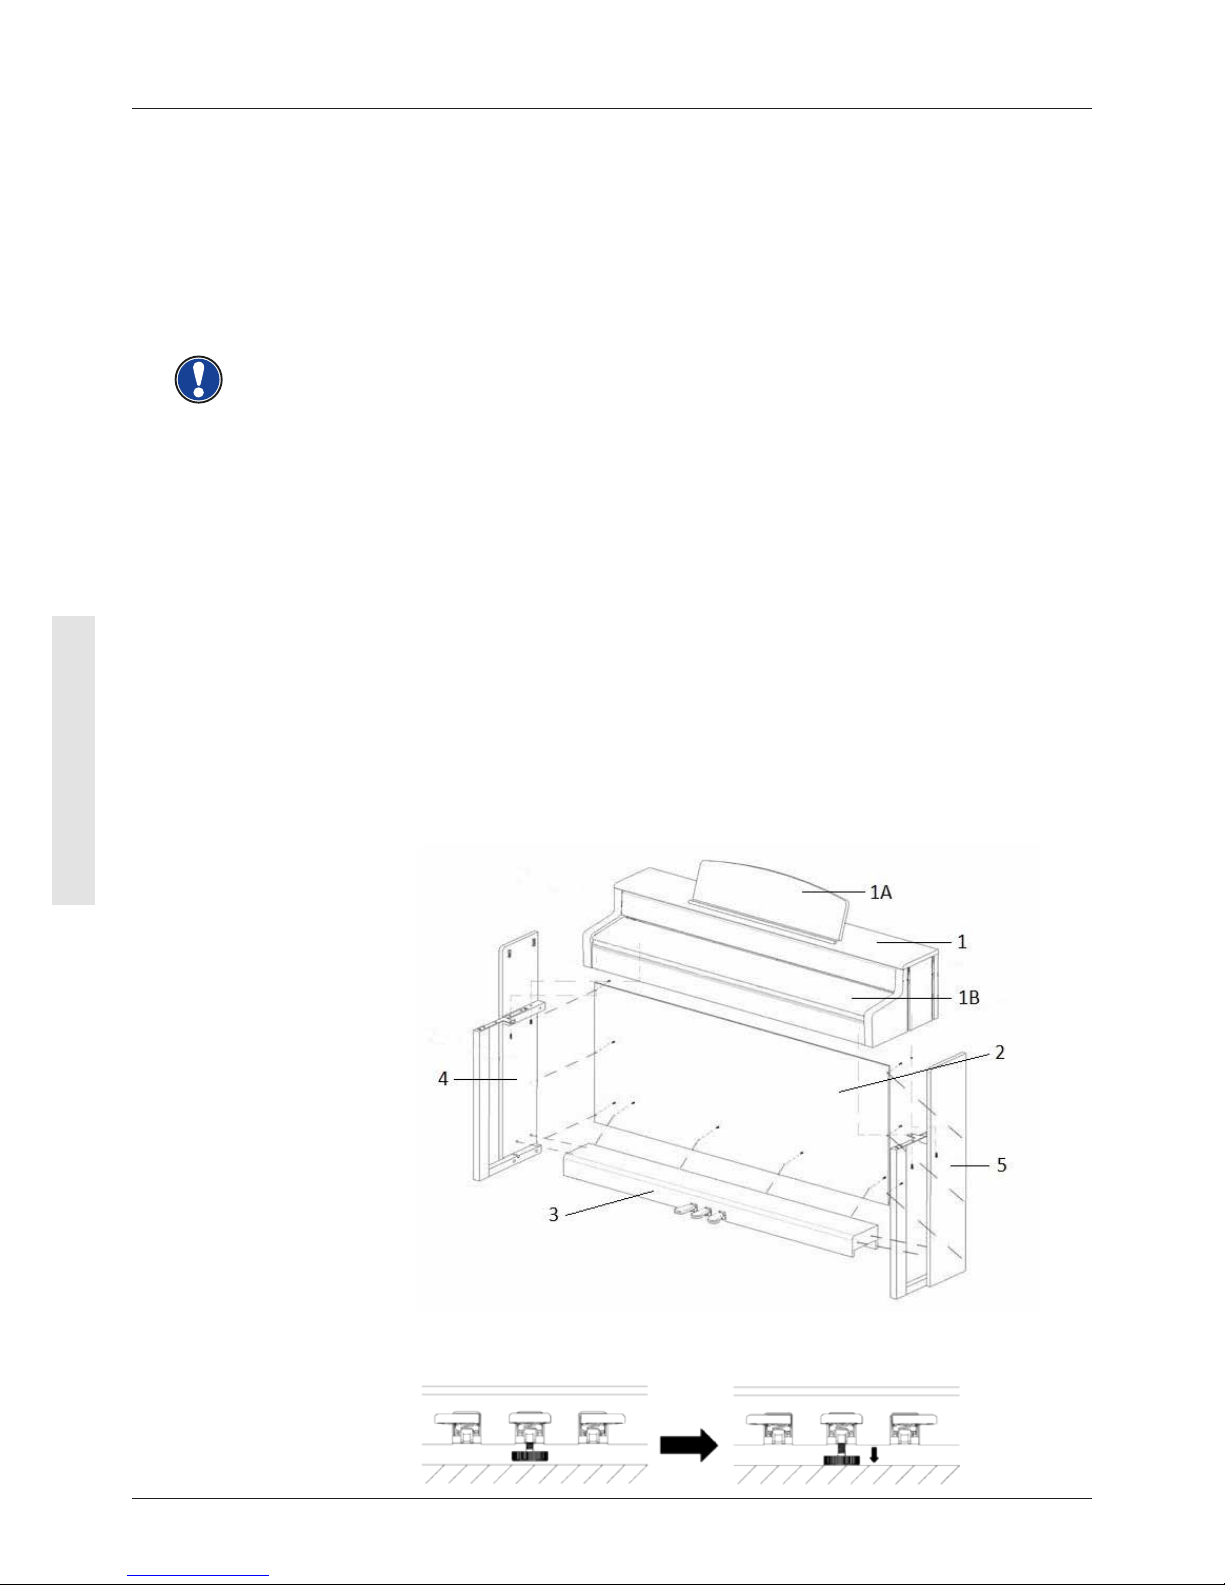
1. Unfold the pedal cable (not shown) and screw the adjustment screw ( 11 ) into the
pedal board ( 3 ).
2. By using the phillips screws ( 7b ), connect the side panels ( 4 and 5 ) to the pedal
board.
3. Then attach the rear panel (2) with phillips wood screws (8).
4. Now place the keyboard onto the base from above. Make sure that the angels of the
side panels are guided into the millings of the keyboard. Then secure the keyboard with
4 screws ( 7a ).
5. Now screw the headphone hanger (9) onto the left underside of the keyboard by using
a phillips screw ( 7a ).
6. Then align your digital piano and tighten all of the screws.
ASSEMBLY INSTRUCTIONS
UP360G
NOTE
7. Place your digital piano at the desired location and make sure that the adjustment
screw ( 11 ) touches the oor as shown below.
Page 41
41
ENGLISH
ASSEMBLY INSTRUCTIONS
UP360G
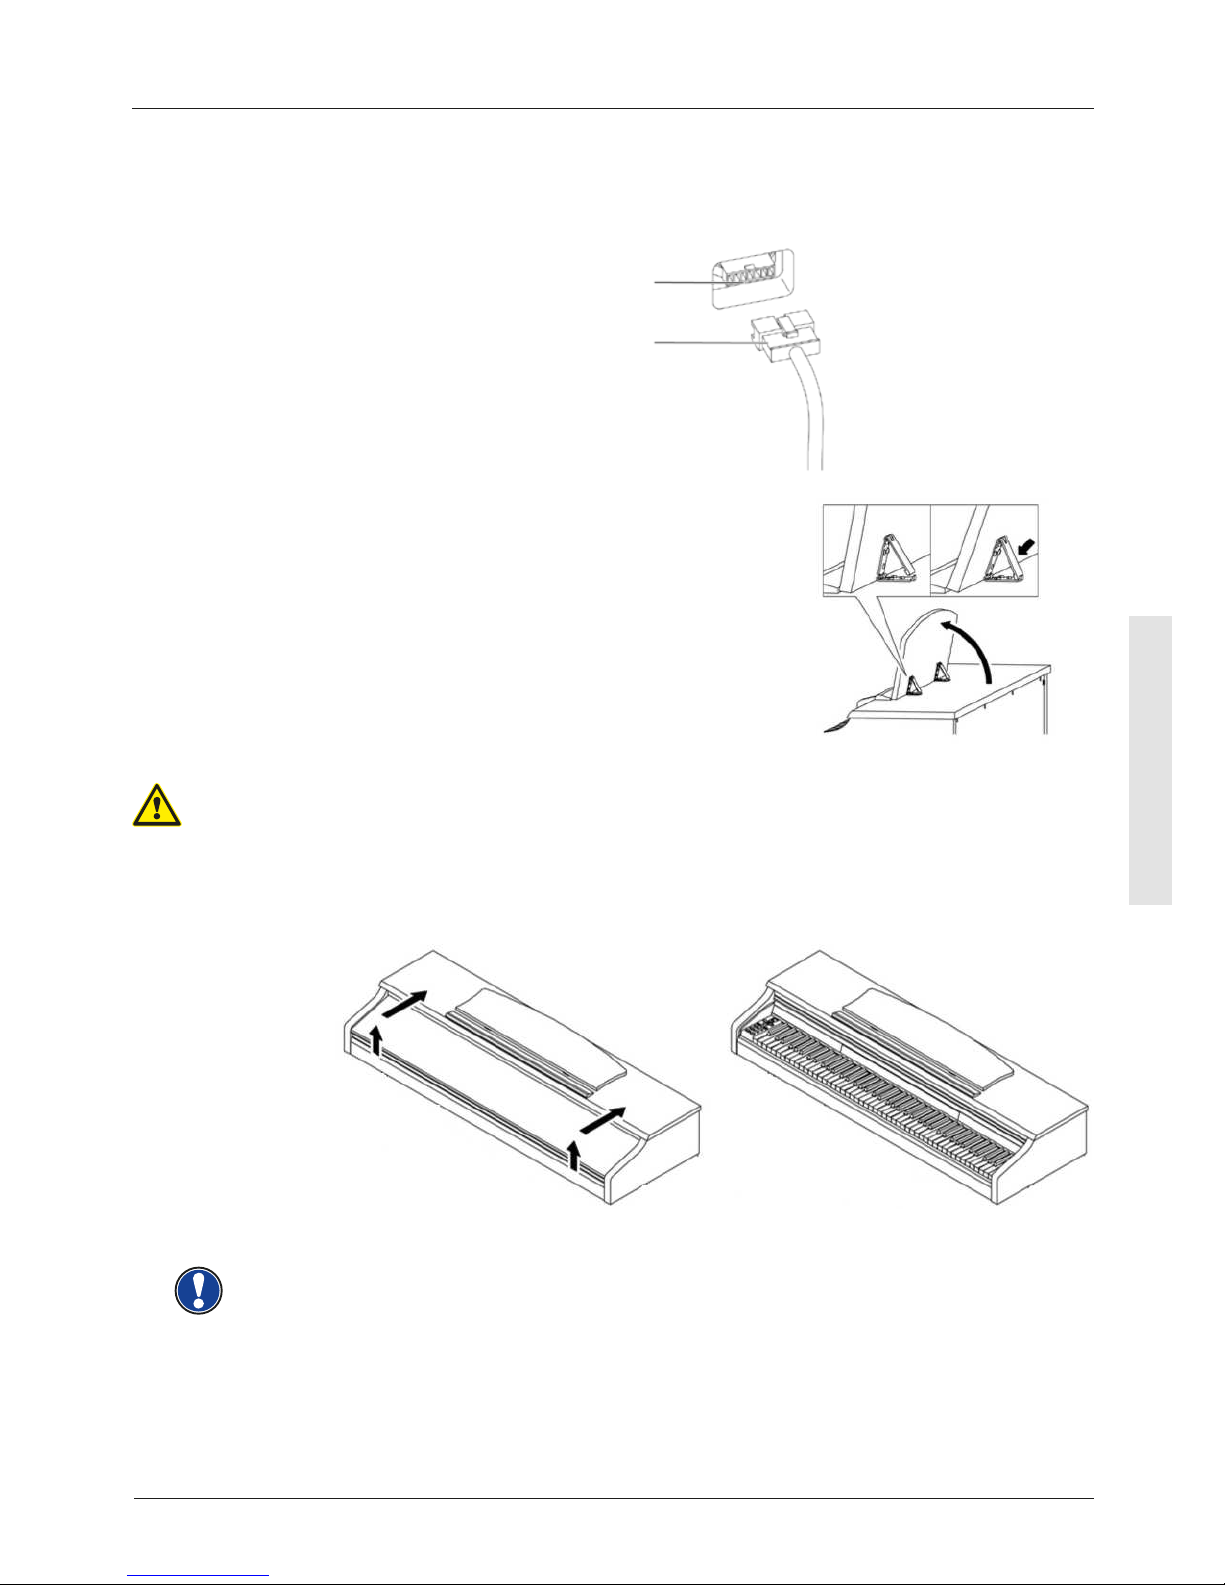
8. Insert the pedal cable true to side into the pedal cable socket on the underside of the
keyboard ( 1 ). It should slide easily into the socket. Then plug the power cable ( 6 )
into the power socket which is also located on the underside (not shown).
9. Set up the music desk as shown below.
THIS IS HOW TO OPEN THE KEYBOARD LID
Please make sure to always use both hands to open or close the lid.
To open the lid please follow below drawing. In the opposite way the lid can then be
closed again
CAUTION
Pedal cable
Pedal connector
USE WITH A KEYBOARD STAND
It is also possible to use a keyboard stand instead of the supplied rack. In this case place
the keyboard stand on level ground and position the piano centrally on top. If possible,
the speakers on the bottom of the piano should not be covered or partly touched by the
stand. For the connection with a standard sustain pedal you can use the 6.3mm jack socket
labeled ‘sustain’ on the rear panel.
NOTE
Page 42
42
ENGLISH
ASSEMBLY INSTRUCTIONS
UP380G / UP380WK
NOTE
ASSEMBLY INSTRUCTIONS UP380G / UP380WK
In this section we will show you how to easily set up yourGEWA digital piano.
For the assembly you need:
• size 2 Phillips screwdriver
• second assisting person
Do not rmly tighten the recessed head screws until all parts of your digital piano are
aligned. Make sure you assemble your digital piano on level ground.
Now lets start assembling your GEWA digital piano
1. Unfold the pedal cable (not shown) and screw the adjustment screw ( 10 ) into the
pedal board ( 3 ).
2. By using the phillips screws ( 7b ), connect the side panels ( 4 and 5 ) to the pedal
board ( 3 ).
3. Then attach the rear panel (2) with phillips wood screws ( 8 ).
4. Now place the keyboard ( 1 ) onto the base from above. The metal guides of the side
panels have to slide into the respective groove and the counterpart. Make sure that
the angels of the side panels are guided into the millings of the keyboard. Then secure
the keyboard with 2 screws ( 7a ) and 2 screws ( 7b ).
5. Now screw the headphone hanger ( 9 ) onto the left underside of the keyboard by
using a phillips screw ( 7a ).
6. Then align your digital piano and tighten all of the screws.
7. Place your digital piano at the desired location and make sure that the adjustment
screw ( 11 ) touches the oor as shown below.
Page 43
43
ENGLISH
ASSEMBLY INSTRUCTIONS
UP380G / UP380WK
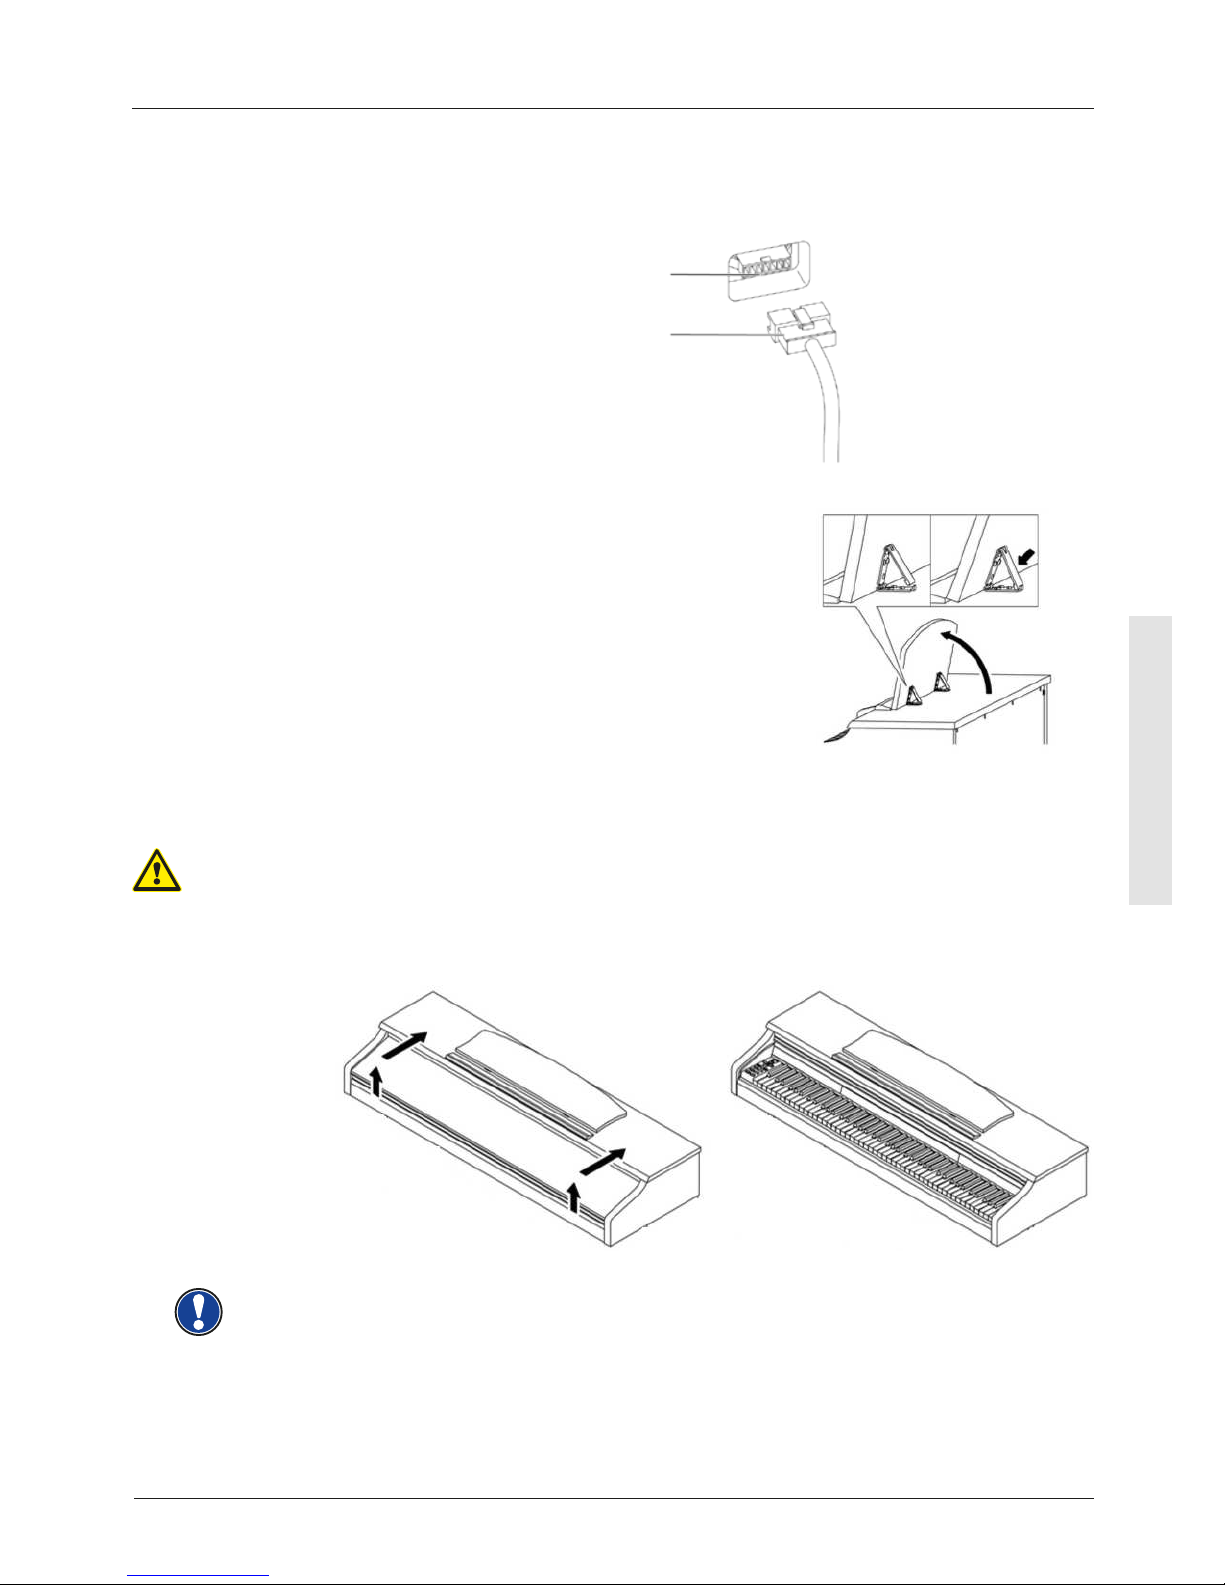
8. Insert the pedal cable true to side into the pedal cable socket on the underside of the
keyboard ( 1 ). It should slide easily into the socket. Then plug the power cable ( 6 )
into the power socket which is also located on the underside (not shown).
9. Set up the music desk as shown below.
THIS IS HOW TO OPEN THE KEYBOARD LID
Please make sure to always use both hands to open or close the lid.
To open the lid please follow below drawing. In the opposite way the lid can then be
closed again
CAUTION
Pedal cable
Pedal connector
USE WITH A KEYBOARD STAND
It is also possible to use a keyboard stand instead of the supplied rack. In this case place
the keyboard stand on level ground and position the piano centrally on top. If possible,
the speakers on the bottom of the piano should not be covered or partly touched by the
stand. For the connection with a standard sustain pedal you can use the 6.3mm jack socket
labeled ‘sustain’ on the rear panel.
NOTE
Page 44
44
ENGLISH
4 FIRST STEPS DP300G / DP340G
In this section, we familiarise you with the controls on your digital piano.
4.1 THE CONTROL ELEMENTS OF YOUR DIGITAL PIANO
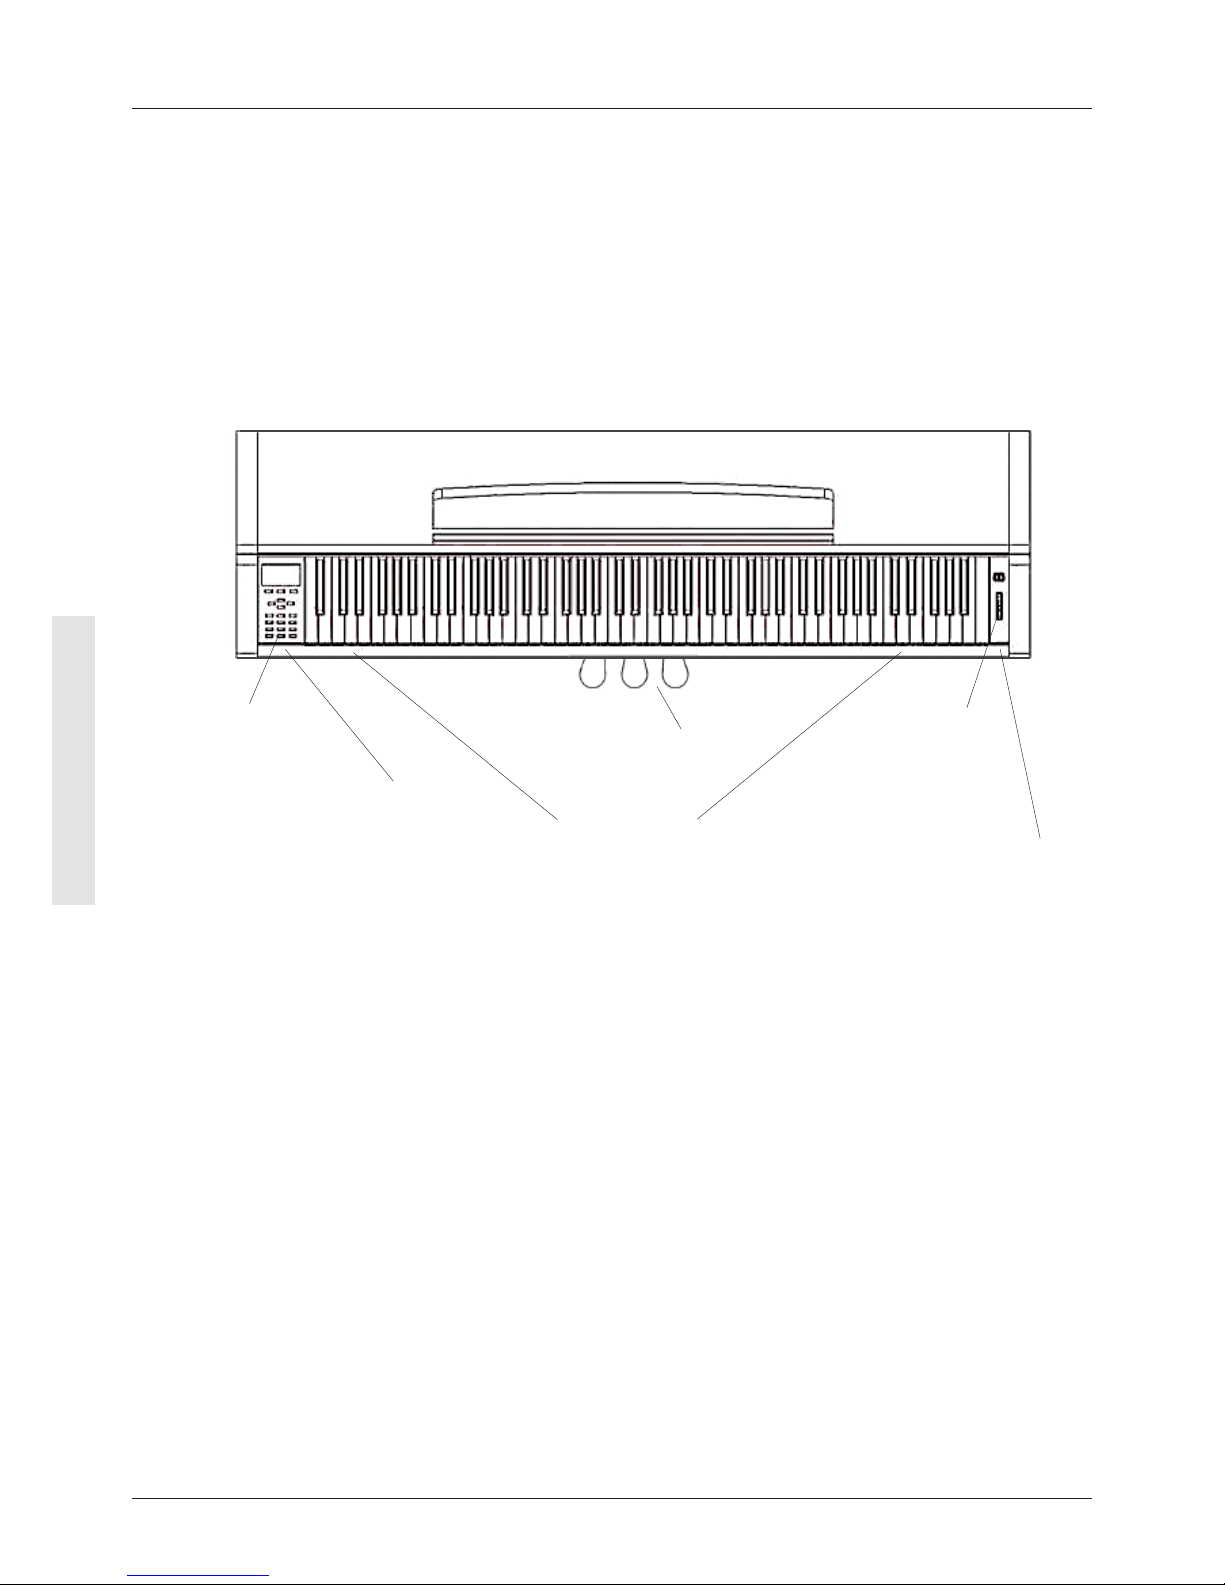
Your GEWA digital piano has the following controls:
FIRST STEPS
DP300G / DP340G
Control Panel
Diagram A
Indicator LED Keyboard
Pedals
Diagram B
Speakers
Page 45
45
ENGLISH
P 1
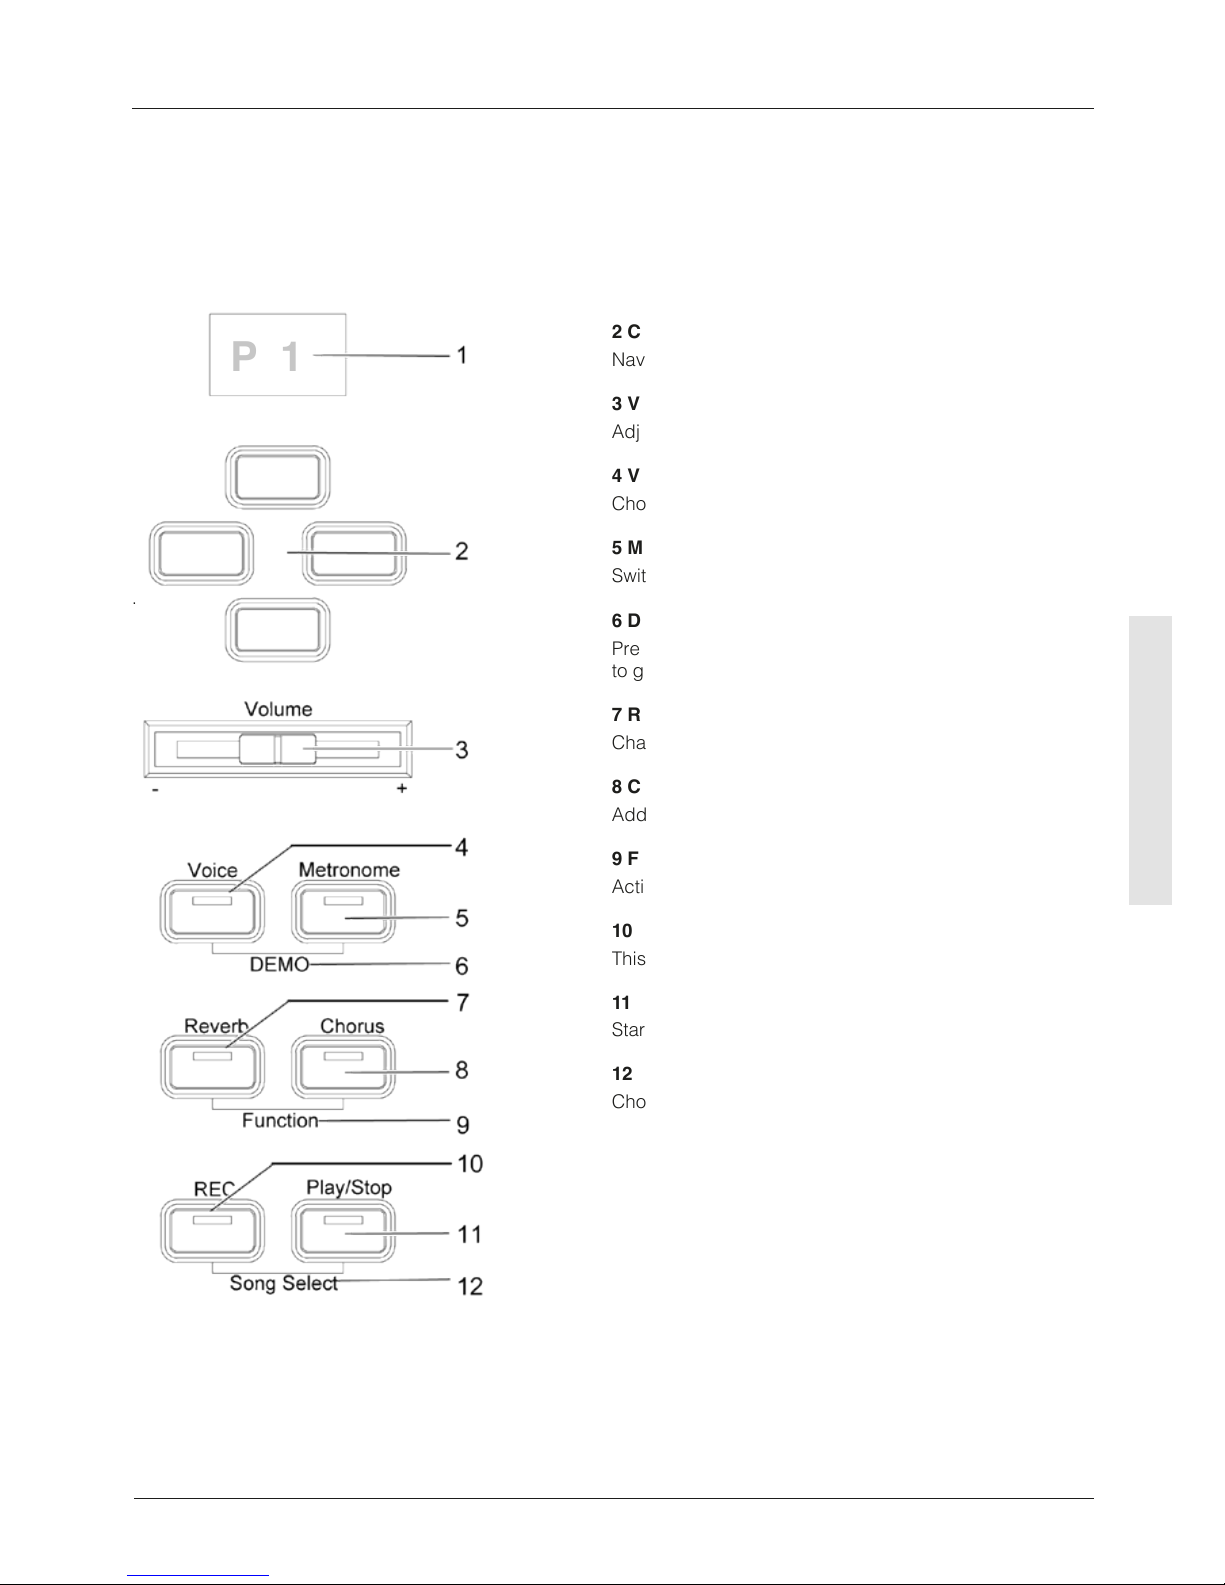
4.2 CONTROL BUTTONS AND PEDALS
Diagram A 1 Display
Shows information about the chosen settings.
2 Cursor keys
Navigate through the functions here and adjust settings.
3 Volume
Adjusts the volume.
4 Voice
Choose from your digital piano’s different sounds.
5 Metronome
Switch the metronome on or off here
.
6 DEMO
Press the Voice and Metronome buttons at the same time
to get to the DEMO function.
7 Reverb
Change the simulated room sound.
8 Chorus
Add effects to the sound.
9 Function
Activate the function menu to change various settings.
10 REC
This puts your GEWA digital piano into Recording mode.
11 Play/Stop
Start and Stop recorded music playback.
12 Song Select
Choose a memory space to record or play a song.
FIRST STEPS
DP300G / DP340G
Page 46
46
ENGLISH
FIRST STEPS
DP300G / DP340G
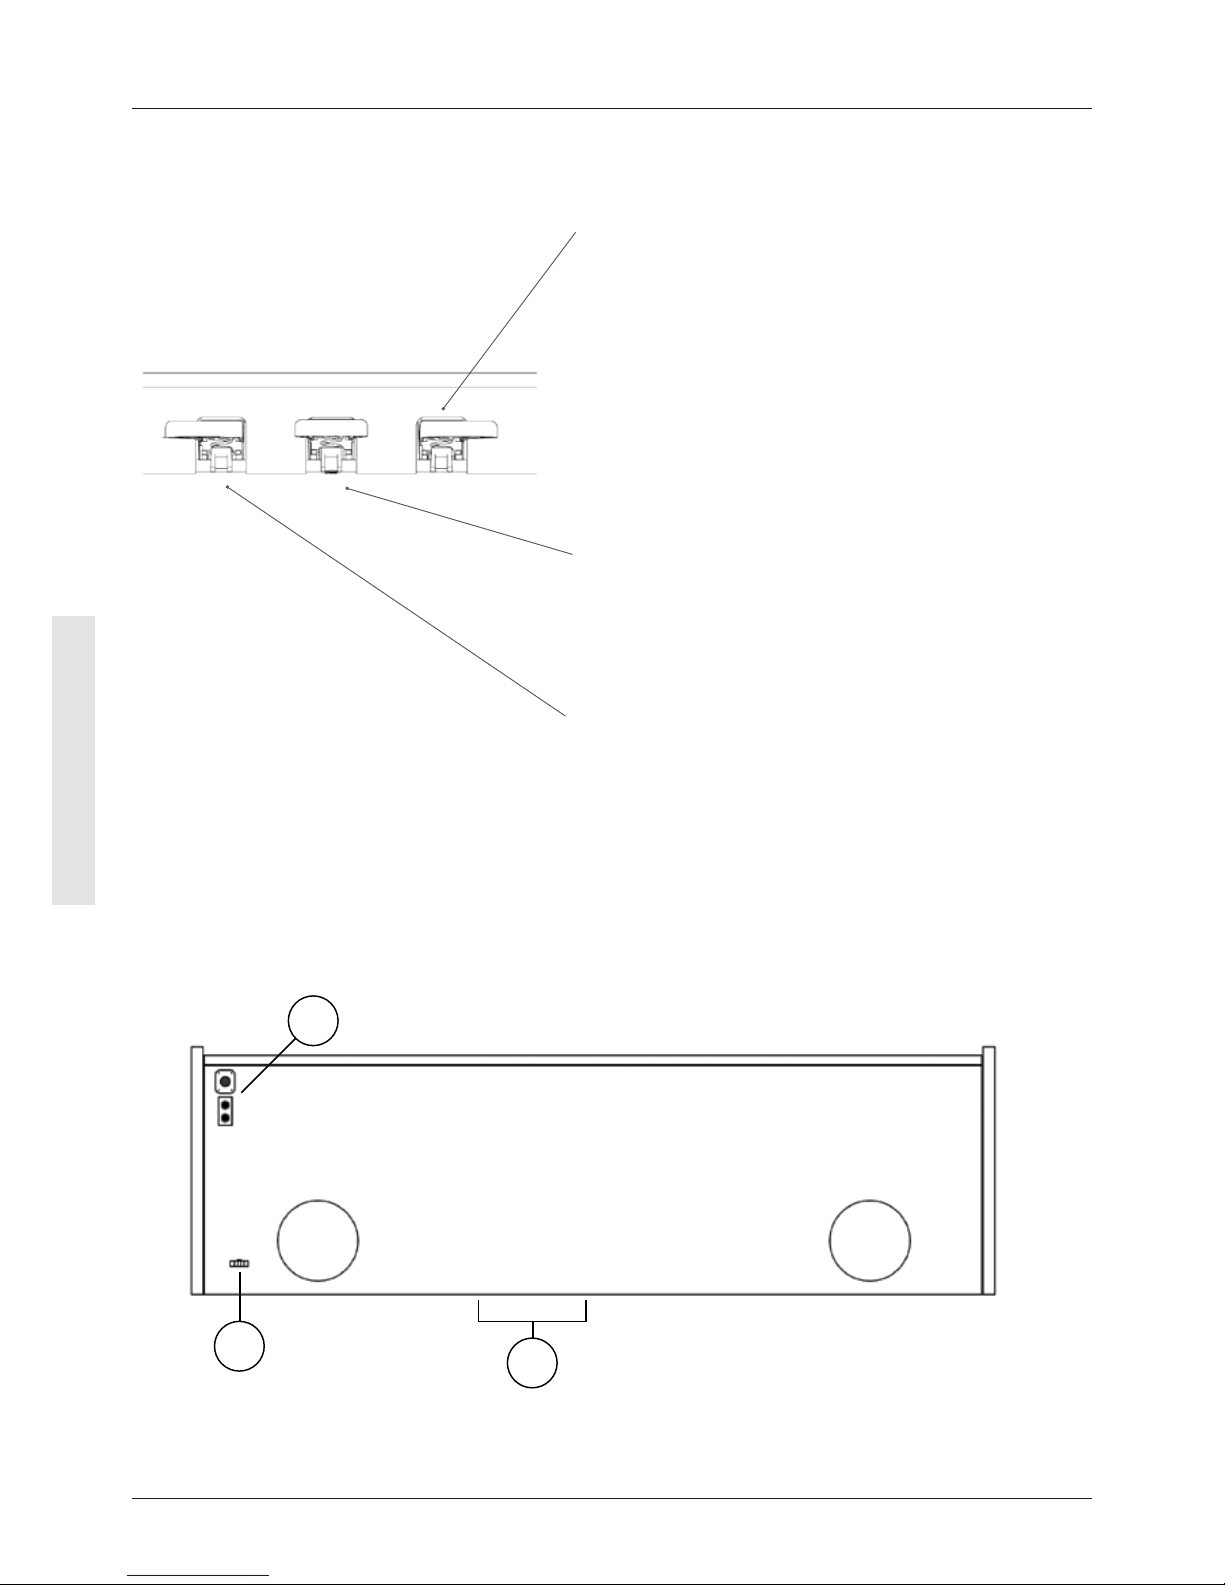
Diagram B
Sustain Pedal (right side)
The Sustain- or Damper Pedal on an acoustic grand piano
lifts up all the dampers that sit on the strings. Thereby all
played notes continue to sustain after the keys are released.
Furthermore, all the other strings can freely resonate, so their
frequencies contribute to a richer sound.
All this is simulated by the pedal of your Gewa piano. It is also
possible to play with half pedal, which means the simulated
dampers are only lifted slightly, so that the sustaining notes
are decaying faster than with the pedal fully depressed.
Piano Pedal (left side)
When the Piano- or Una Corda Pedal is being operated, the
Gewa Piano simulates shifting the keyboard action slightly
to the right. The altered striking line of the imaginary piano
hammers results in a differently colored tone and a slightly
softer volume.
Sostenuto Pedal (middle position)
The Sostenuto Pedal resembles the Sustain Pedal. The only
difference is that only those notes are sustaining whose keys
were being depressed at the moment of actuating the pedal.
All the other notes are dampened as usual.
A
B
C
4.3 KEYBOARD / CONNECTIONS / UNDERSIDE
Speakers Speakers
General View
Page 47
47
ENGLISH
FIRST STEPS
DP300G / DP340G
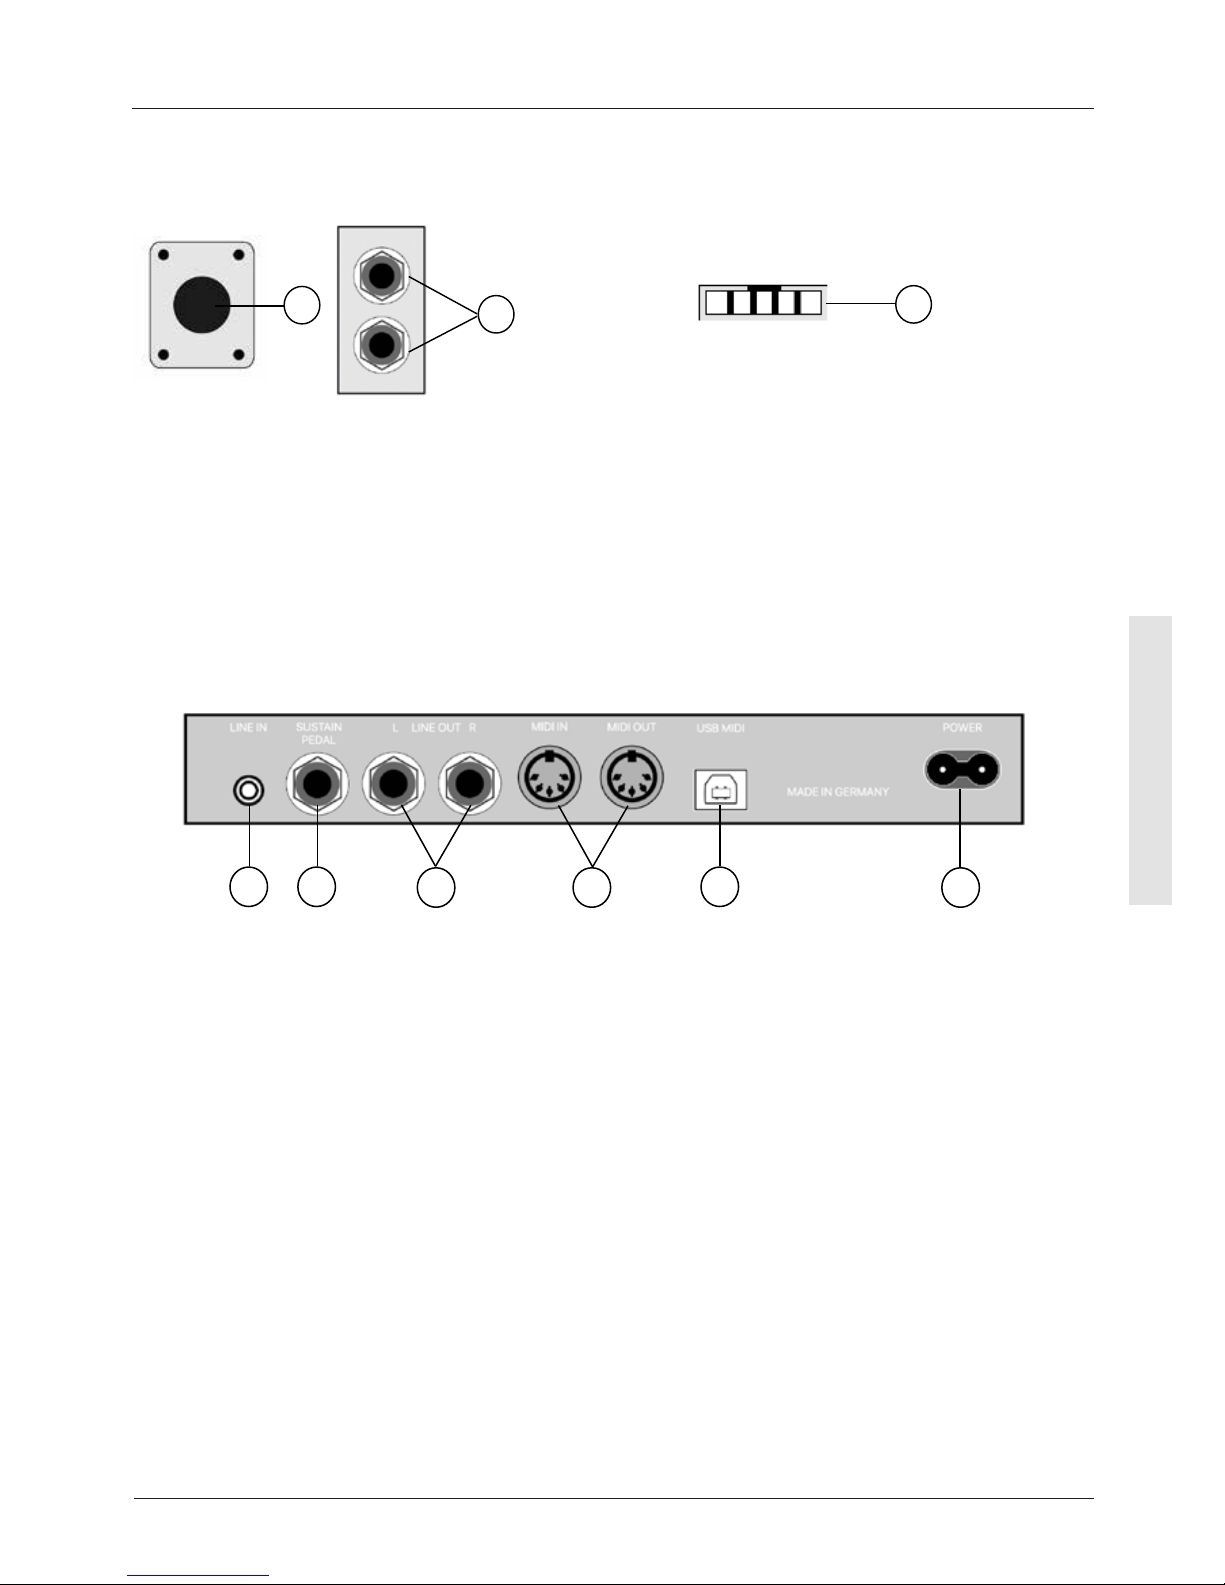
A1 Power On/Off Turn your digital piano on and off.
A2 Headphone sockets Connect one or two sets of headphones here.
B Pedal cable socket Connect the pedal cable here.
A1
A2
B
Diagram A Diagram B
C1 C2 C3 C4 C5 C6
KEYBOARD / CONNECTIONS REAR PANEL
Diagram C
C1 LINE IN This port is for external sound source playback (e.g. MP3
players) through the speaker system via a 3.5 mm jack socket.
C2 SUSTAIN You can connect a standard sustain pedal to this 6.3 mm
jack socket, if you want to use your digital piano with an
external stand.
C3 LINE OUT L/R This connection is split into the stereo channels L(eft) and
R(ight). Using 6.3 mm jack cables, you can connect these
outputs to a receiver, e.g. an amplier or a recorder
.
C4 MIDI IN/OUT Connect MIDI devices here.
C5 USB-B Connection Connect your digital piano with your PC via this connection.
C6 Power Supply Connect your digital piano to the power supply here, using
the power cable.
Page 48
48
ENGLISH
FIRST STEPS
UP360G / UP380G / UP380WK
GETTING STARTED UP360G / UP380G / UP380WK
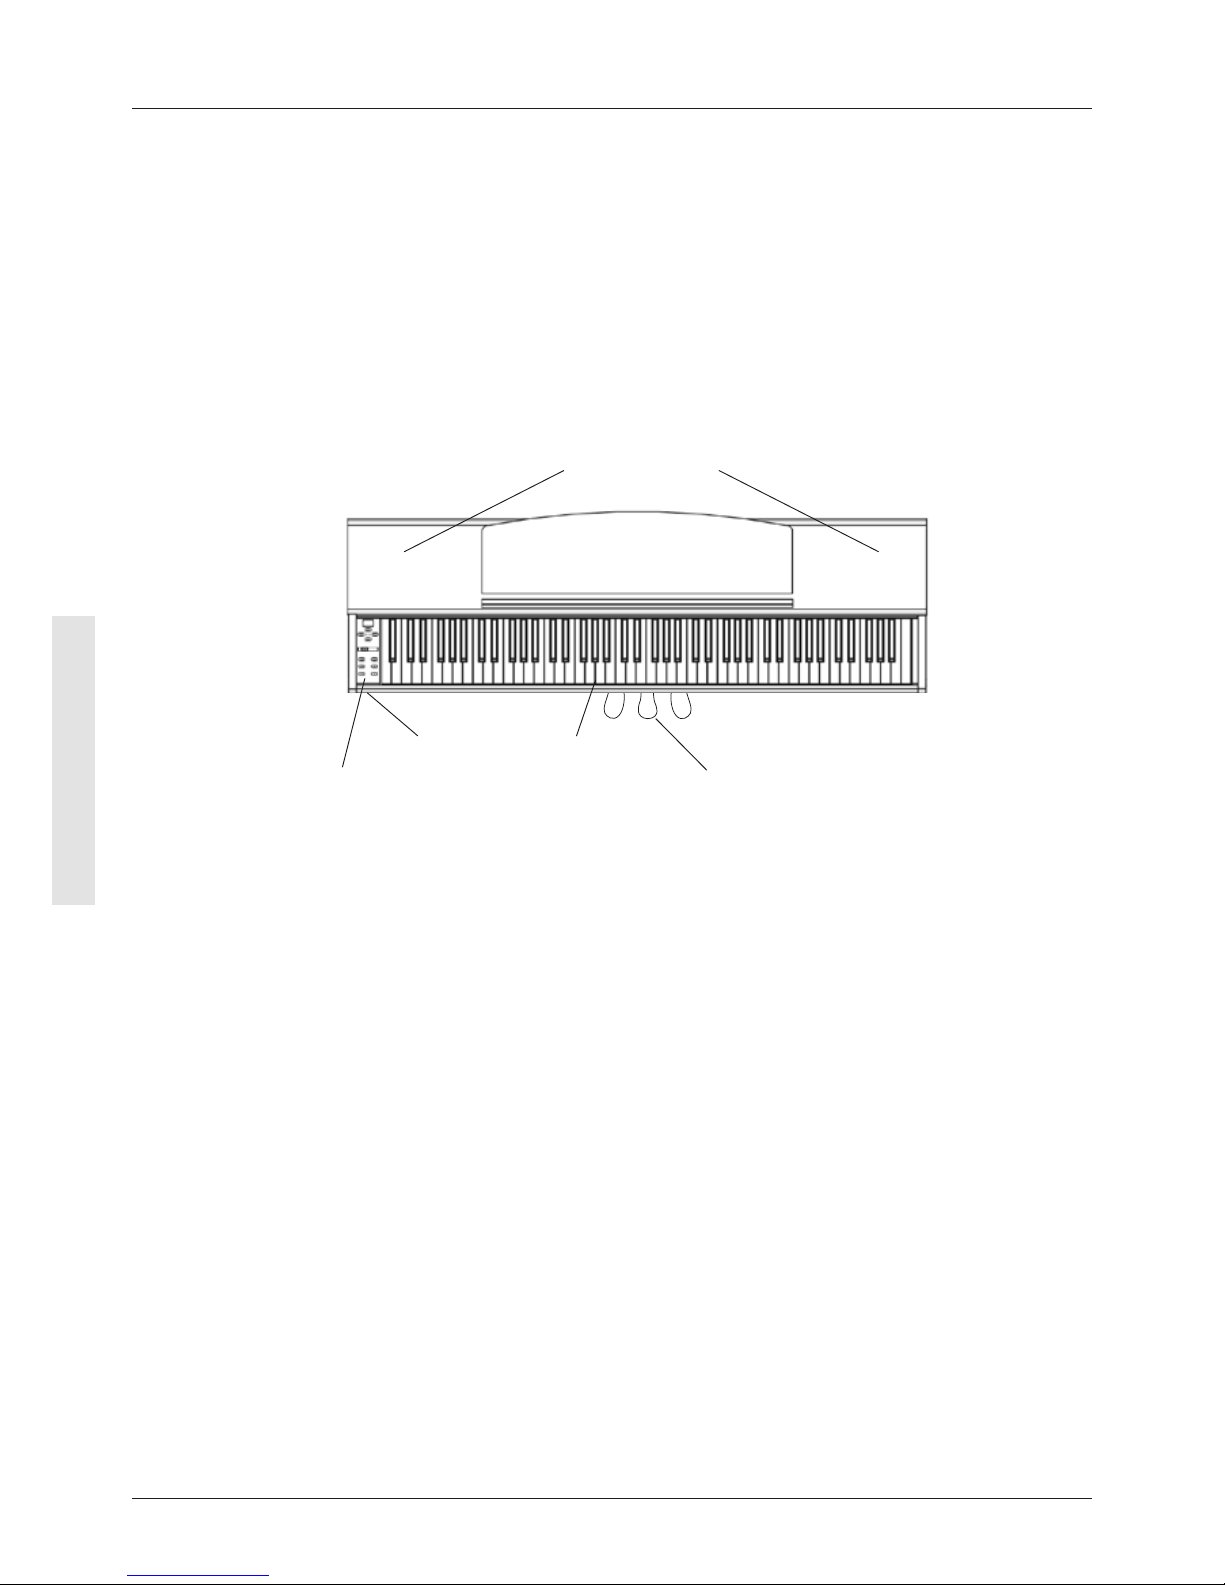
Now let‘s have a look on to the controls of your GEWA digital piano
4.1 THE CONTROLS OF YOUR DIGITAL PIANO
Your GEWA digital piano features the following controls:
Music desk
Control panel
Volume switch
Power On/off
Speakers
Pedals
Headphone sockets
USB Port
Headphone hanger
LED Indicator
Page 49
49
ENGLISH
FIRST STEPS
UP360G / UP380G / UP380WK
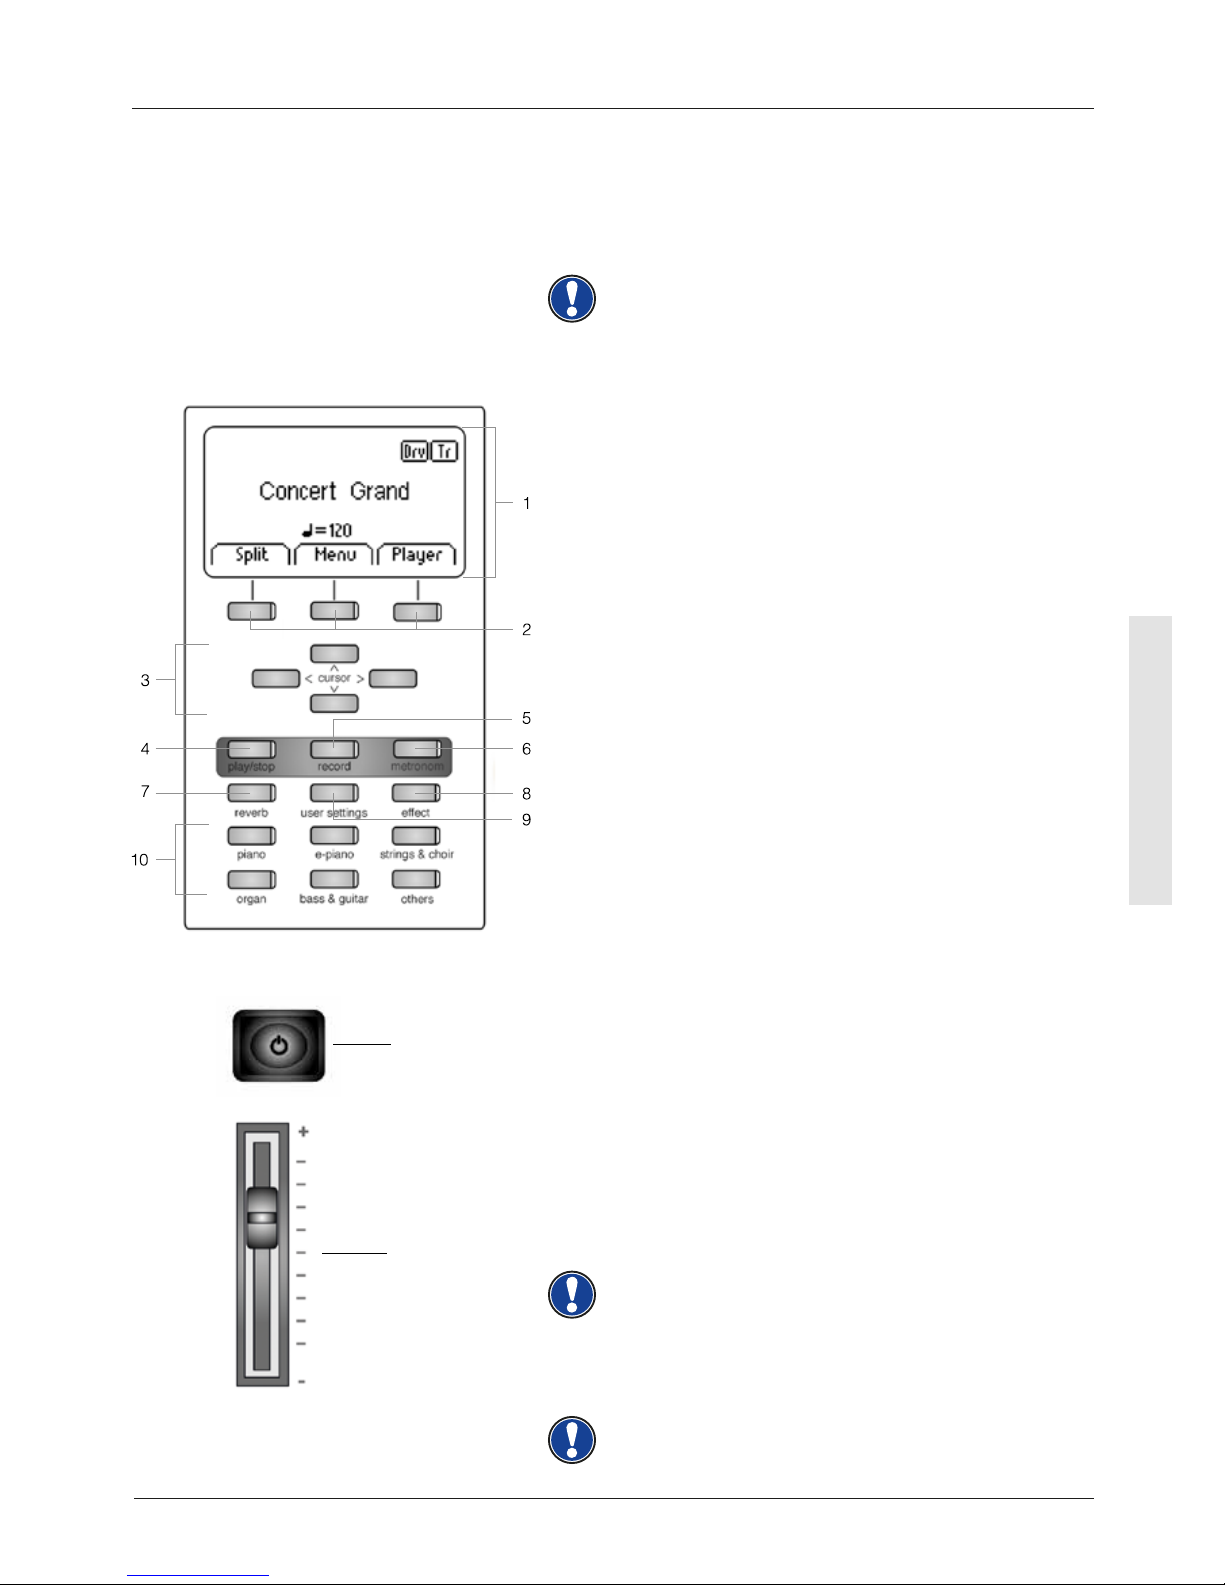
4.2 FUNCTION KEYS
Diagram A 1 Display
Provides settings and status information.
NOTE: The current activated menu is always displayed
with a black background.
2 Soft buttons
These allow you to select functions that are shown in the
display.
3 Cursor buttons
Navigation to and within functions and function groups
Recording related buttons
4 play/stop
Start / Stop for recorded pieces of music.
5 record
This sets your GEWA Digital Piano to record standby mode
6 Metronome and metronome functions
With this button the metronome can be switched on/off
and edited.
7 Reverb button
Turns the reverb on/off and, when longer depressed,
enters the edit mode
8 Chorus and other effects
Turns the Chorus and other effects on/off and, when
longer depressed, enters the edit mode
9 User settings
In this section you can save and reload your individual
settings.
10 Sound selection switches
These switches allow you to select and play the different
sounds on your GEWA digital piano.
11 Power On/Off
This switch turns your GEWA digital piano on or off. Press
and hold the switch for about 3 seconds to turn off your
digital piano.
NOTE: The switch does not engage. Light pressure is
enough.
12 Volume switch
This switch determines the volume of your GEWA digital
piano.
NOTE: Before switching on, it is advisable to set this
control to the middle.
11
on/off
12
volume
Page 50
50
ENGLISH
FIRST STEPS
UP360G / UP380G / UP380WK
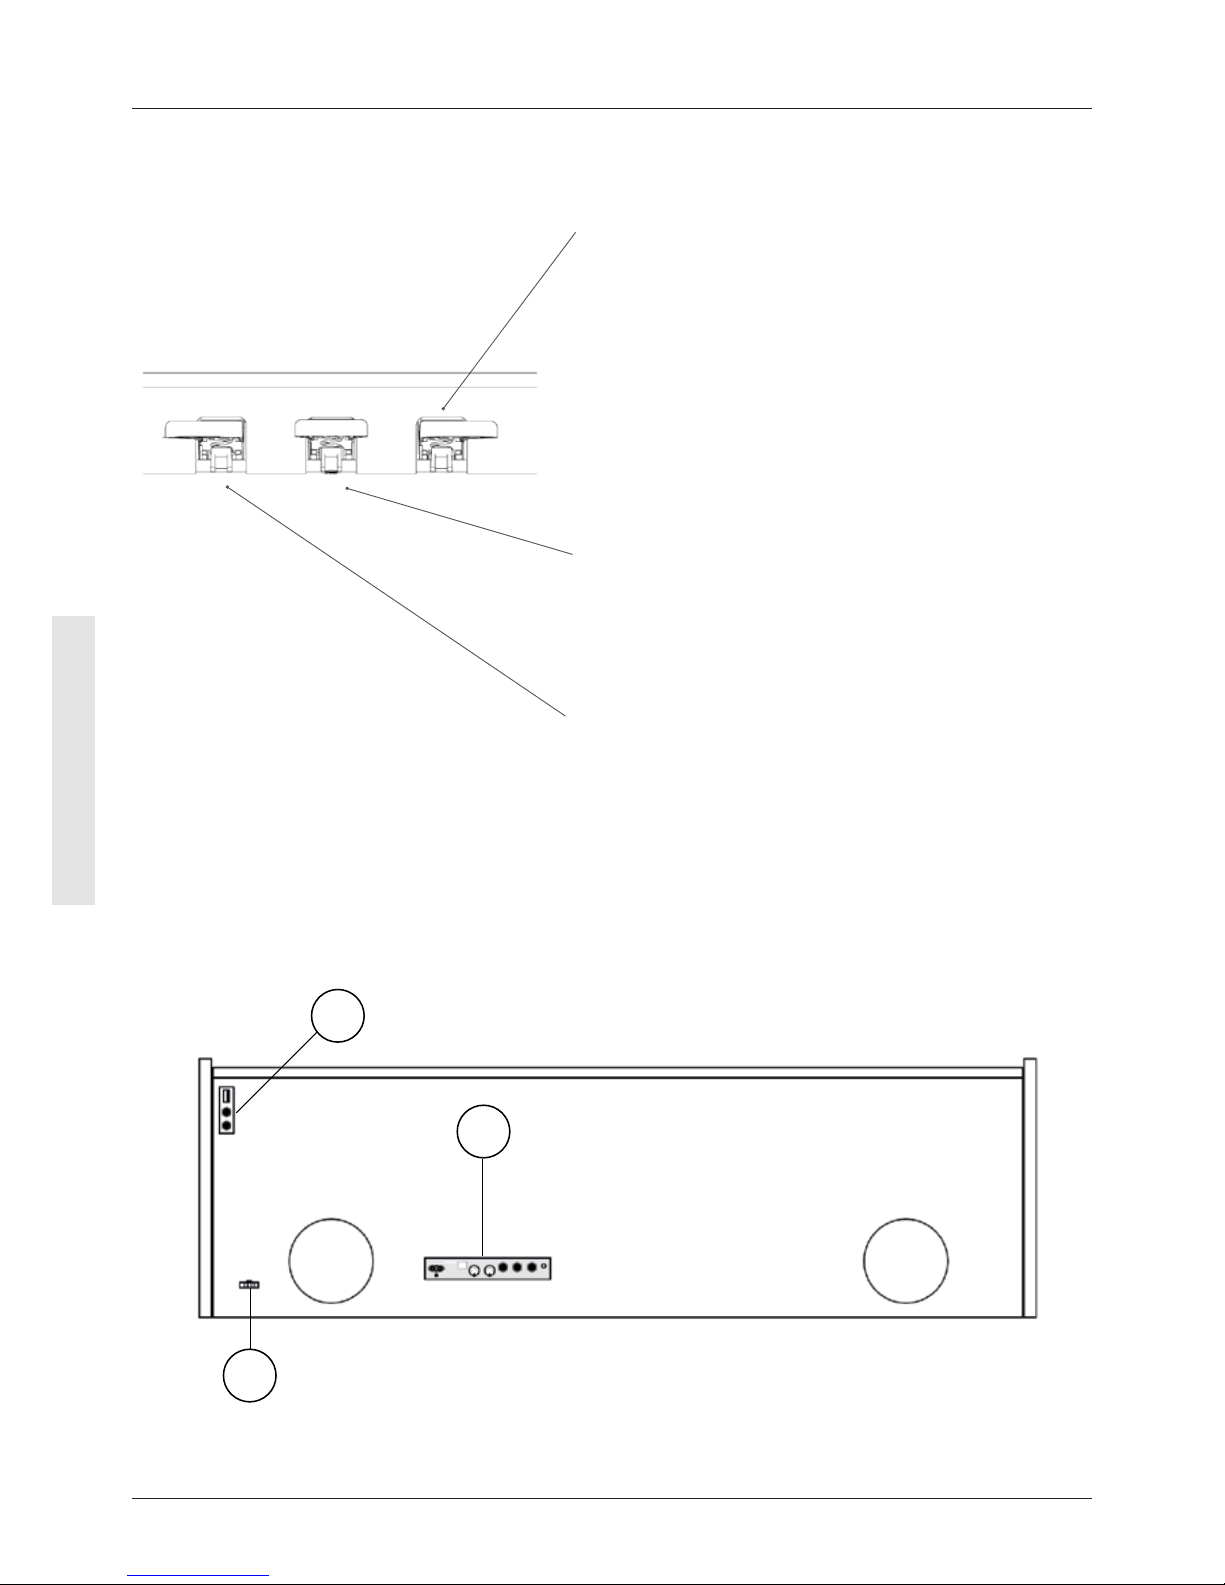
Diagram B
Sustain Pedal (right side)
The Sustain- or Damper Pedal on an acoustic grand piano
lifts up all the dampers that sit on the strings. Thereby all
played notes continue to sustain after the keys are released.
Furthermore, all the other strings can freely resonate, so their
frequencies contribute to a richer sound.
All this is simulated by the pedal of your Gewa piano. It is also
possible to play with half pedal, which means the simulated
dampers are only lifted slightly, so that the sustaining notes
are decaying faster than with the pedal fully depressed.
Piano Pedal (left side)
When the Piano- or Una Corda Pedal is being operated, the
Gewa Piano simulates shifting the keyboard action slightly
to the right. The altered striking line of the imaginary piano
hammers results in a differently colored tone and a slightly
softer volume.
Sostenuto Pedal (middle position)
The Sostenuto Pedal resembles the Sustain Pedal. The only
difference is that only those notes are sustaining whose keys
were being depressed at the moment of actuating the pedal.
All the other notes are dampened as usual.
4.3 KEYBOARD CONNECTIONS
A
B
C
General View
Speaker Speaker
Page 51
51
ENGLISH
FIRST STEPS
UP360G / UP380G / UP380WK
4.4 BLUETOOTH AUDIO
Learn how to connect your GEWA Digital Piano with another device via Bluetooth here.
Search for „GEWA Digital Piano“ in the Bluetooth section of your smartphone or tablet.
Press the Menu Softbutton and activate „BT Pair“ to make the piano visible to the device.
Enter the PIN Code “4392“ to conrm the connection.
Further information can be found in the User Manual.
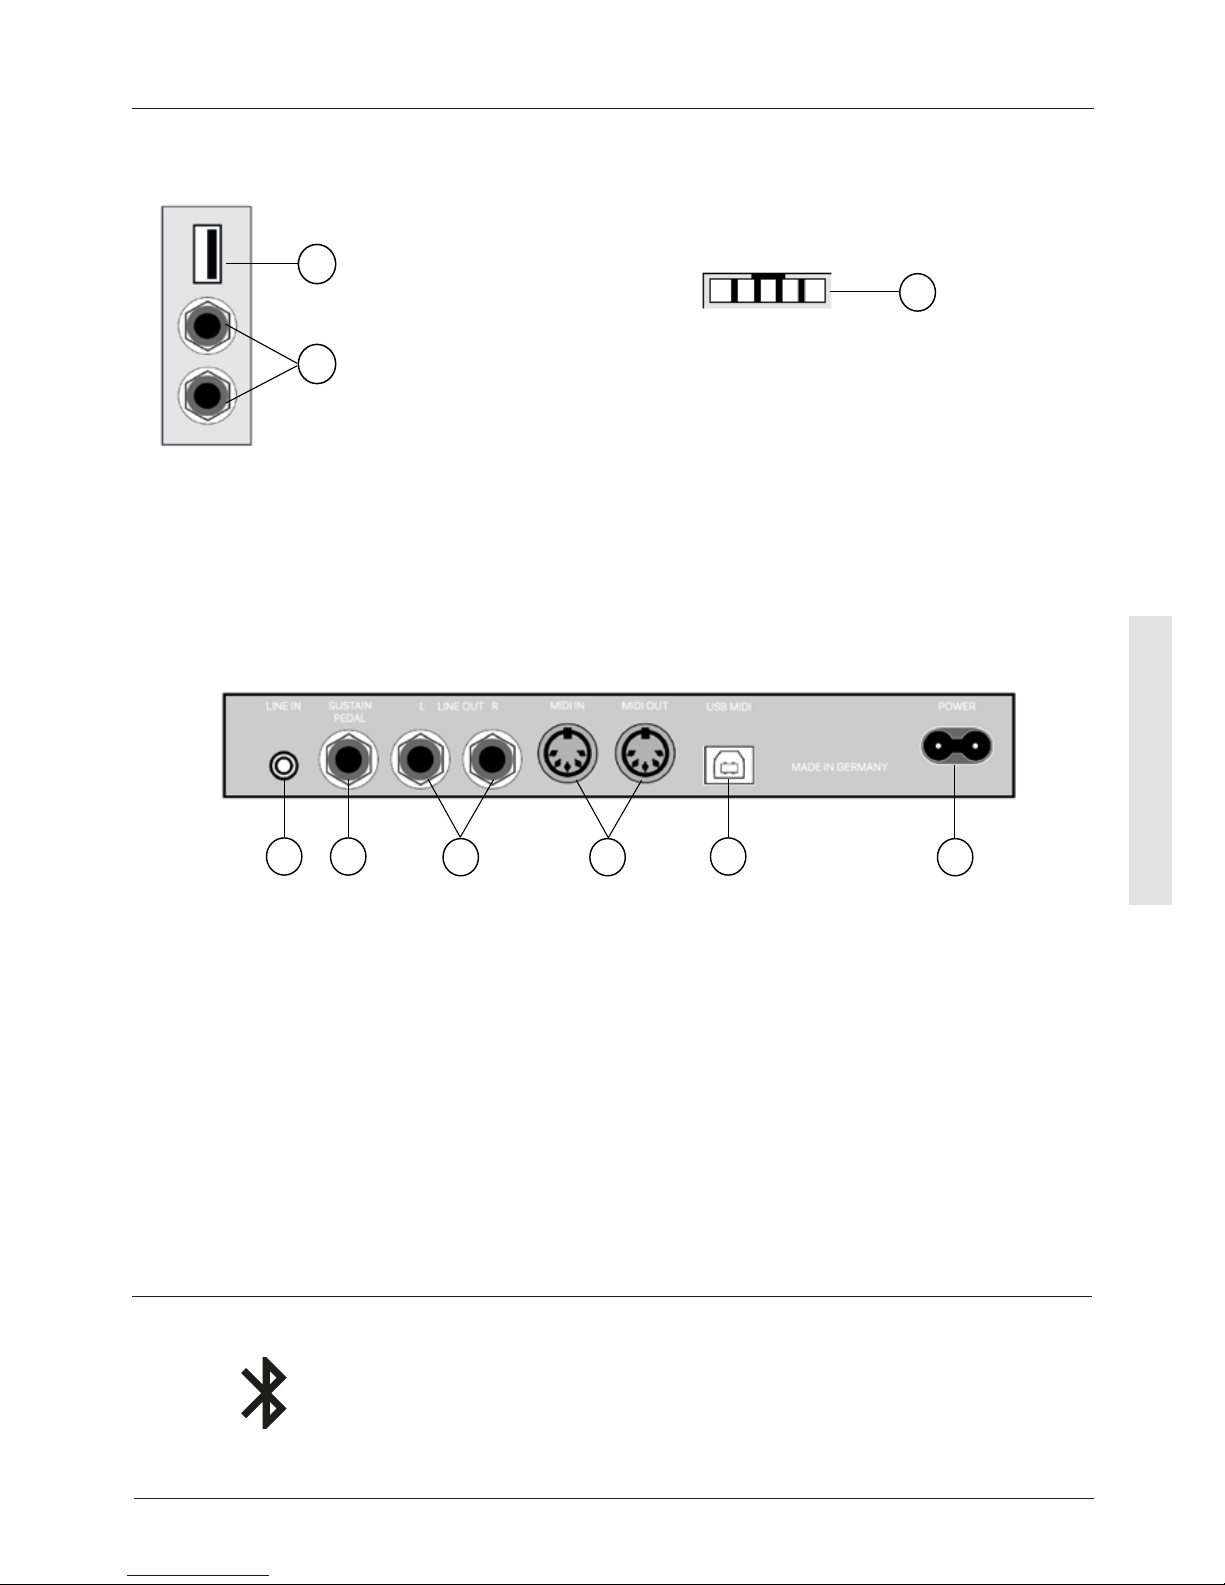
A1 USB IN/OUT Connect a USB stick or another USB device here.
A2 Headphone sockets Connect one or two sets of headphones here.
B Pedal cable socket Connect the pedal cable here.
B
Diagram A Diagram B
A1
A2
C1 C2
C3 C4
C5
C6
Diagram C
C1 LINE IN This port is for external sound source playback (e.g. MP3
players) through the speaker system via a 3.5mm jack
socket.
C2 SUSTAIN You can connect a standard sustain pedal to this 6.3mm
jack socket, if you want to use your digital piano with an
external stand.
C3 LINE OUT L/R This connection is split into the stereo channels L(eft) and
R(ight). Using 6.3mm jack cables, you can connect these
outputs to a receiver, e.g. an amplier or a recorder .
C4 MIDI IN/OUT Connect MIDI devices here.
C5 USB-B Connection Connect your digital piano with your PC via this connection.
C6 Power Supply Connect your digital piano to the power supply here, using
the power cable.
Page 52

52
Page 53

53
Page 54

54
Page 55

55
Page 56

Manufacturer:
GEWA music GmbH
Werkstraße 1
08626 Adorf
GERMANY
www.gewamusic.com
Version 1.0
changes and errors excepted
 Loading...