


www.gev.de
T
P
O
A
N
I
N
T
O
D
E
V
O
M
E
R
O
T
T
S
I
W
T
TEST/HUSH
T
W
I
S
T
T
O
T
I
G
H
T
E
N
04832
# 04832
RWM 4832

A C
30 - 50 cm
6 m
> 20°
2
> 50 cm
> 20 cm
D
> 50 cm
EB
F
> 4 m
G
H
T
P
O
A
N
I
N
T
O
D
2
E
V
O
1
3
M
E
R
O
T
T
1
S
I
W
T
TEST/HUSH
T
2
W
I
S
T
T
O
T
I
G
H
T
E
N

Rauchwarnmelder RWM 4832
Dieser Rauchwarnmelder ist konzipiert, um eine Frühwarnung bei der
Entstehung eines Brandes zu geben. Alarm wird ausgelöst sobald Rauch
in das Innere des Gerätes eindringt. Flammen werden vom Gerät nicht
wahrgenommen. Ein Großteil der Brände findet nachts statt. Da der Mensch
während des Schlafes nichts riecht, jedoch bei Geräuschen erwacht, schützen
Rauchwarnmelder wirksam und frühzeitig vor der drohenden Gefahr.
Einsatzbereiche: Wohnungen, Wohnhäuser
Alarmsignal: Akustisches Signal mit ca. 85 dB/3 m
Informationen zum Verhalten im Brandfall erhalten Sie auf Anfrage von Ihrer
Feuerwehr. Viele Wehren und Brandversicherungen halten entsprechende
Merkblätter bereit und weisen darin auch auf die Notwendigkeit von
Rauchwarnmeldern hin.
Montageort
Für eine umfassende Abdeckung von Haushalten sollten Rauchwarnmelder
in allen Räumen, Korridoren, Lagerbereichen, Keller- und Speicherräumen
installiert werden. Eine minimale Absicherung wird erreicht durch je einen
Rauchwarnmelder im Flur und im Treppenbereich auf jeder Etage und in
jedem Schlafbereich Abb. A. In Häusern mit mehreren Wohneinheiten sollte
jede Familie ihre eigenen Rauchwarnmelder installieren.
• Nicht in Badezimmern oder Garagen montieren. In Küchen nur,
falls ein Mindestabstand von 4 Metern von Herden und ähnlichen
Emissionsquellen möglich ist.
• Nicht in stark zuggefährdeter Umgebung, z. B. in der Nähe von
Entlüftungsschächten installieren. Die Luftbewegung
verhindern, dass der Rauch den Melder erreicht.
• Nicht in sehr staubigen Bereichen bzw. in Bereichen mit
sehr hoher Luftfeuchtigkeit montieren.
• Nicht in Spitzecken montieren, da sich hier im Brandfalle rauchfreie
Luft ansammeln könnte. Bei Räumen mit Dachneigung über 20° und
einer Gesamtraumhöhe bis 6 m, ist ein Abstand von 30 - 50 cm von
der Spitze einzuhalten.
Bei einer Dachneigung bis 20° kann der Melder an der
Dachschrägen montiert werden Abb. B.
• Mindestens 50 cm Abstand halten von Wänden, Deckenbalken
(Unterzügen) Abb. C und Leuchten Abb. D.
• Melder mittig an der Decke montieren, mindestens 4 m Abstand
halten von oenen Kaminen und Herden Abb. F.
•
Räume über 60 m2 und Flure länger als 10 m benötigen mehrere Melder.
könnte u. U.
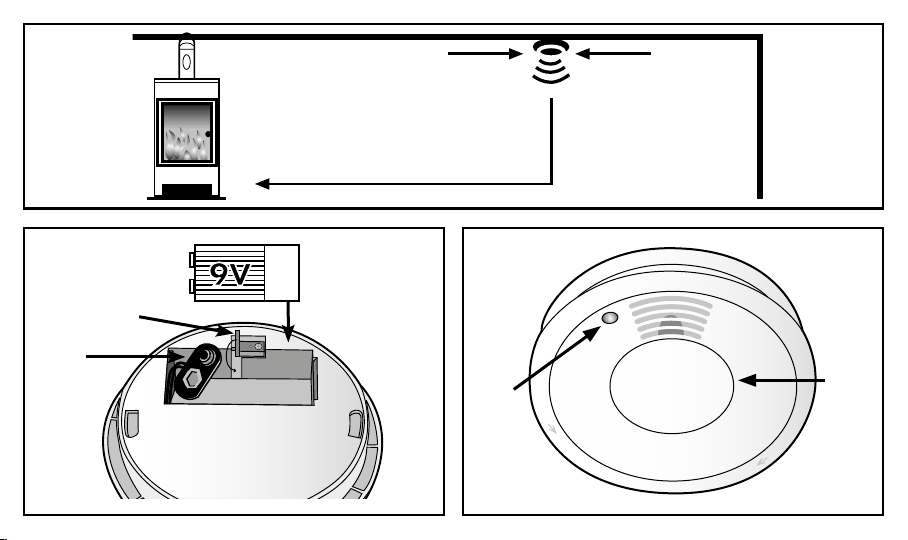
Montage/Inbetriebnahme
Befestigen Sie die Montageplatte mit den beiliegenden Schrauben und
Dübeln an der Decke Abb. E. Verbinden Sie die beiliegende Batterie mit dem
Anschluss-Clip Abb. G1. Ist die Batterie richtig angeschlossen, blinkt die LED
(Abb. H1) ca. alle 43 Sek. kurz auf. Führen Sie einen Funktionstest durch (siehe
Test/Wartung). Plazieren Sie den Melder auf der Montageplatte und drehen ihn
im Uhrzeigersinn, bis er einrastet. Die Montagesperre (Abb. G2) verhindert,
dass der Melder ohne eingelegte Batterie montiert werden kann.
Test/Wartung
Drücken Sie auf die Prüftaste Abb. H2, bis der Alarm ertönt. Es wird dabei die
Funktion der Rauchkammer, der Auswerteelektronik und der Batterie geprüft.
Bei ordnungsgemäßer Funktion ist der Alarm laut und pulsierend. Der Test
sollte 1 x monatlich und nach jedem Batterietausch durchgeführt werden.
Das Gerät führt alle 43 Sek. einen Selbsttest durch. Sie erkennen dies am
kurzen Aufblinken der LED Abb. H1. Bei einer Fehlfunktion piept der Melder
ca. alle 43 Sek. abwechselnd zum Aufblinken der roten LED.
Hinweis: Der Zeitraum zwischen den Pieptönen kann auch erheblich länger
sein als 43 Sek. Um die Fehlfunktion zu beheben, entnehmen Sie die Batterie
für eine Dauer von 10 Min.
Nachdem Sie die Batterie wieder angeschlossen haben, drücken Sie die
Prüftaste Abb. H2 bis der Alarm ertönt. Sollte dies keine Abhilfe schaen, muss
der Melder ausgetauscht werden.
Sinkt die Batteriespannung unter den Mindestwert, piept der Melder ca. alle 43
Sek. gleichzeitig mit dem LED-Blitz, bis zu ca. 30 Tage lang, um Sie an den
fälligen Batteriewechsel zu erinnern.
Das Gerät sollte bei Bedarf etwa 2 x jährlich trocken abgewischt und von außen
mit dem Staubsauger abgesaugt werden.
Besondere Hinweise
• Setzen Sie die Batterie polrichtig in das Gerät.
• Testen Sie das Gerät nach jedem Batterietausch.
• Hitzemelder bzw. Rauchwarnmelder ersetzen keine Versicherungen.
• Bei Tiefschlaf bzw. unter Alkohol- oder Drogeneinfluss ist der Alarm
unter Umständen nicht wahrnehmbar.
• In Räumen über 60 m
empfiehlt sich der Einsatz von mehreren Meldern.
• Verbrauchte Batterien gehören nicht in den Hausmüll!
Bitte entsorgen Sie die Batterie über den Handel, der sie einem
Recycling-Verfahren zuführt.
4
2
bzw. in Fluren, die länger als 10 m sind,

• Bei technischen Problemen wenden Sie sich bitte an den Hersteller
oder Ihren Fachhändler.
Tauschen Sie den Melder 10 Jahre nach der Montage aus.
Batterie- und Akkuhinweise
Altbatterien dürfen nicht mit dem unsortierten Hausmüll entsorgt
werden. Besitzer von Altbatterien sind gesetzlich zur Rückgabe
verpflichtet und können diese unentgeltlich bei den Verkaufsstellen
zurückgeben. Batterien enthalten umwelt- und gesundheitsschädliche Stoe
und müssen daher fachgerecht entsorgt werden.
Recycling-Hinweise
Dieses Gerät darf nicht mit dem unsortierten Hausmüll entsorgt
werden. Besitzer von Altgeräten sind gesetzlich dazu verpflichtet,
dieses Gerät fachgerecht zu entsorgen. Informationen erhalten Sie von
Ihrer Stadt- bzw. Gemeindeverwaltung.
Technische Daten
Typbezeichnung RWM 4832
Batteriebetrieb 9 V Block, inklusive
Signallautstärke ca. 85 dB/3m
Relative Luftfeuchtigkeit
nicht kondensierend 10 % - 93 %
Betriebstemperaturbereich 0 °C bis + 40 °C
Zulassung EN 14604:2005/AC:2008
Abmessungen Ø 102 mm, Höhe 36 mm
Richtiges Verhalten im Brandfall
!
Ruhe bewahren! Alarmieren Sie die Feuerwehr.
Folgende Hinweise sind für die Feuerwehr wichtig:
• Wie ist Ihr Name? (Name, Telefonnummer)
• Wo brennt es? (Adresse)
• Was ist passiert? (Ausmaß)
• Wie viele Verletzte gibt es?
• Warten Sie auf Rückfragen des Gesprächspartners.
Warnen Sie alle Mitbewohner.
Helfen Sie älteren, kranken und behinderten Personen.
Schließen Sie alle Fenster und Türen.
Benutzen Sie keinen Aufzug.
Sollten Sie Zweifel haben, ob es sich um einen echten Alarm oder um einen
Fehlalarm handelt, verhalten Sie sich so, als ob es wirklich brennt.
1134-CPR-207
5
EN 14604:2005/AC:2008 Technische und optische Änderungen ohne Ankündigung vorbehalten.
DEGBFRITPL

Smoke alarm RWM 4832
This Smoke alarm has been designed to provide an early warning in the event
of fire. As soon as smoke enters the device, an alarm is triggered. The device
does not detect flames. Many fires occur at night. As we have no sense of
smell while sleeping but wake up when we hear a noise, Smoke alarms are an
eective way of providing an early warning of the danger.
Field of application: apartments, houses
Alarm signal: acoustic signal with approx. 85 dB/3 m
Contact your local fire service or insurance company for information about what
to do in the event of fire. These establishments can provide you with relevant
leaflets underlining the importance of installing Smoke alarms.
Mounting location
For optimum protection of your home, install Smoke alarms in all rooms,
corridors, basements, cellars and store rooms. To ensure minimum protection
of your home, install one Smoke alarm in the corridor, one in the staircase on
each floor and one in each bedroom Fig. A. In flats with several apartments,
each family should install their own Smoke alarm.
• Do not install the detector in the bathroom or garage.
Only install it in the kitchen if it can be mounted at least 4 metres
away from the oven and similar heat sources.
• Do not install the detector in drafty areas, e.g. near a ventilator shaft
where the circulation of air could prevent the smoke from reaching
the detector.
• Do not install the detector in dusty environments or rooms
with high ambient humidity.
• Do not install the detector in the loft as, in the event of fire,
smoke-free air can accumulate in this area. In areas with roofs
which slope by more than 20° and which have a total ceiling height
of up to 6 m, observe a distance of 30-50 cm from the highest
point. On roofs which slope by less than 20°, mount the detector on
the pitched roof area Fig. B.
• Observe a minimum distance of 50 cm from walls, ceiling joints
(beams) Fig. C and lights Fig. D.
• Mount the detector in the centre of the ceiling, maintaining
a distance of at least 4 m from open fireplaces and ovens Fig. F.
• Several detectors need to be installed in rooms of over
2
and corridors measuring over 10 m.
60 m
Mounting/Operation
Fix the mounting plate to the ceiling using the screws and dowels provided
Fig. E. Connect the battery (provided) to the battery clip Fig. G1. The LED
(Fig. H1) will flash briefly approx. every 43 seconds to indicate that the battery
has been fitted correctly. Perform a function test (see Test/Maintenance).
Position the detector on the mounting plate and turn in a clockwise direction
until it clicks into place. The mounting lock (Fig. G2) prevents the detector from
being mounted if the battery is not fitted correctly.
Performance check/Maintenance
Press the test key (Fig. H2) until the alarm is enabled.
This tests correct operation of the smoke chamber, pulsating electronics and
battery. If everything is operating correctly, the alarm will be loud and pulsating.
Perform a test at least once a month and every time you replace the batteries.
The device automatically performs a test every 43 seconds. The LED Fig. H1
flashes briefly to indicate this. If the detector is faulty, the red LED will flash
approx. every 43 seconds alternately with the audible signal.
Note: The interval between each audible signal may be slightly longer than 43
seconds. To correct the fault, remove the batteries for 10 minutes. Reconnect
the battery and press the test key Fig. H2 until the alarm is activated. If this
does not correct the problem, replace the detector.
If the battery voltage falls below the minimum value, the detector will beep
approx. every 43 seconds and, simultaneously, the LED will flash for approx.
30 days to remind you to replace the batteries. When necessary (usually about
twice a year) wipe the device with a clean, dry cloth and clean with a vacuum
cleaner.
Additional notes
• Make sure the battery is fitted correctly.
• Always test the device after replacing the battery.
• The use of heat and Smoke alarms does not exempt you from your
obligation to insure your property.
• You may not hear the alarm if you are a deep sleeper or under the influence
of alcohol or drugs.
• We recommend that several detectors be used in rooms of over 60 m
corridors of over 10 m.
• Disposing of used batteries in household waste is strictly forbidden.
Dispose of batteries in shops with
recycling facilities.
• In the event of technical problems, contact the
manufacturer or your specialist dealer.
6
2
or

Replace the detector every 10 years.
Battery and rechargeable battery information
Used batteries must not be disposed of as unsorted household
waste. Used batteries must be recycled and may be returned free-of-
charge to the place of sale. Batteries contain substances which are
harmful to the environment and to human health and must therefore be
disposed of correctly.
Recycling instructions
This device must not be disposed of with unsorted house hold waste.
Owners of old devices are required by law todispose of this device
correctly. Contact your town council for further information.
Technical information
Model name RWM 4832
Battery operation 9 V block battery, included
Signal volume approx. 85 dB/3 m
Relative humidity 10 % - 93 %
Operating temperature range 0 °C to +40 °C
Approval EN 14604:2005/AC:2008
Dimensions Ø 102 mm, height 36 mm
Subject to technical and design changes without prior notice.
Correct action in the event of a fire
Keep calm! Alert the fire service.
!
It is important that the fire service is told the following information:
• Your name (name, phone number)
• The location of the fire (address)
• What has happened (extent of fire)
• How many people are injured
• Then wait to see if the operator has any questions.
Alert all the people who live with you.
Help aged, sick and disabled persons.
Close all windows and doors.
Do not use lifts.
If you have any doubts as to whether or not it is a genuine alarm, still act as
if there is a real fire.
1134-CPR-207
7
EN 14604:2005/AC:2008
DEGBFRITPL

Détecteur de fumée RWM 4832
Ce détecteur de fumée constitue un système d’alerte incendie ecace. Une
alarme se déclenche dès que de la fumée s’introduit dans l’appareil, qui ne
détecte pas les flammes. La plupart des incendies ont lieu la nuit. Or, notre
odorat ne fonctionne pas pendant que nous dormons. En revanche, les bruits
nous réveillent, c’est pourquoi les détecteurs de fumée s’avèrent ecaces en
cas de danger.
Lieux d’installation possibles : appartements, maisons
Alarme : signal sonore de 85 dB/3 m environ
Pour connaître les comportements à adopter en cas d’incendie, consultez votre
assureur ou les pompiers responsables de votre secteur. Ils vous fourniront des
documents informatifs soulignant l’utilité des détecteurs de fumée.
Lieu de montage et positionnement
Pour une protection optimale de votre foyer, placez des détecteurs de fumée
dans toutes les pièces, couloirs, celliers, caves et greniers. Pour une protection
de base, installez des détecteurs de fumée dans les couloirs, dégagements
et cages d’escalier de tous les étages ainsi que dans chaque chambre fig.
A. Dans les bâtiments comportant plusieurs habitations, chaque foyer doit
disposer de ses propres détecteurs.
• N’installez de détecteur ni dans la salle de bain, ni dans le garage. Dans la
cuisine, vous devez impérativement respecter une distance minimale de 4 m
entre le détecteur et les appareils de type four, cuisinière, etc.
• N’installez pas de détecteur dans les espaces sujets aux courants d’air, par
exemple à proximité de conduits d’aération. En eet, il peut arriver que l’air
entraîne la fumée, l’empêchant d’atteindre le détecteur.
• N’installez pas de détecteur dans les pièces très poussiéreuses ou
très humides.
Ne montez pas vos détecteurs dans des angles très fermés
•
en cas d’incendie, c’est l’air pur qui se dirige vers ce type d’espace,
et non la fumée. Dans les combles présentant une hauteur jusqu’à
6 m et une inclinaison des pans supérieure à 20°, il convient de
respecter une distance de 30 à 50 cm entre le détecteur et le haut
de la pièce. Le détecteur peut être monté sur un pan du toit dès lors
que l’inclinaison de celui-ci ne dépasse pas 20° fig. B.
• Une distance minimale de 50 cm doit séparer l’appareil des parois,
solives (sommiers) fig. C et luminaires fig. D.
• Installez les détecteurs au centre du plafond, en respectant une distance
minimale de 4 m vis-à-vis des fours et cheminées ouvertes fig. F.
• Les pièces de plus de 60 m² et les couloirs de plus de 10 m de long
exigent la pose de plusieurs détecteurs.
: en eet,
Montage/Mise en service
Fixez la plaquette de montage au plafond au moyen des vis et chevilles fournies
fig. E. Raccordez la pile fournie au connecteur prévu à cet eet fig. G1. Une
fois la pile correctement positionnée, la LED (fig. H1) s’allume toutes les
43s environ. Procédez à un test de fonctionnement (cf. Tests/ Maintenance).
Placez le détecteur de fumée sur la plaquette de montage et tournez-le dans
le sens des aiguilles d’une montre jusqu’à ce qu’il s’y emboîte. Un dispositif de
verrouillage (fig. G2) empêche le montage du détecteur en l’absence de pile.
Tests/Maintenance
Maintenez le bouton de test enfoncé (fig. H2) jusqu’à ce que l’alarme retentisse.
Le test vérifie le bon fonctionnement de la chambre de détection, du système
de surveillance électronique et de la pile. Si l’appareil fonctionne bien, le signal
d’alarme est puissant et répétitif. Procédez à ce test une fois par mois et après
chaque changement de pile. Le détecteur procède à un test automatique toutes
les 43 s. Cette opération se manifeste par un court clignotement de la LED
(fig. H1). En cas de dysfonctionnement, le détecteur émet un bip toutes les
43 secondes environ, en alternance avec le clignotement de la LED rouge.
Remarque : il peut arriver que l’intervalle entre les bips soit nettement plus
long que 43 s. Pour y remédier, retirez la pile pendant 10 min. Une fois la pile
à nouveau raccordée, appuyez sur le bouton de test fig. H2 jusqu’à ce que
l’alarme retentisse. Si cette opération ne résout pas le problème, remplacez le
détecteur. Si la pile passe en deçà du niveau de charge minimal, le détecteur
émet un toutes les 43 secondes tandis que la LED clignote simultanément, et
ce, pendant une durée maximale de 30 jours, afin de vous rappeler qu’il faut
remplacer la pile.
Lorsque cela s’avère nécessaire, essuyez l’appareil avec un chion sec et
aspirez les poussières (deux fois par an environ).
Attention
• Lorsque vous installez une pile, prenez garde à la polarité.
•
Procédez à un test de l’appareil après tout changement de piles.
• Les détecteurs de chaleur et de fumée ne vous dispensent en aucun
cas de l’obligation de souscrire une assurance adéquate.
• L’alarme peut ne pas être perçue par une personne profondément
endormie ou sous l’emprise de la drogue ou de l’alcool.
• Dans les pièces de plus de 60 m² et les couloirs de plus de 10 m de
long, il est recommandé d’installer plusieurs détecteurs.
• Il est interdit de jeter les piles avec les ordures ménagères ! Remettez les
piles usagées à un organis me qui se chargera de leur recyclage.
• Pour toute question d’ordre technique, merci de vous adresser soit
au fabricant, soit à votre revendeur.
8

Remplacez chaque détecteur après 10 ans d’utilisation.
Remarques concernant les piles et les batteries
Les piles usagées ne doivent en aucun cas être jetées avec les
ordures ménagères. Leurs propriétaires ont en eet l’obligation légale
de les ramener à leur point de vente, où elles seront reprises
gratuitement. Les piles contiennent des substances dangereuses pour
l’environnement et la santé et doivent être recyclées selon la réglementation
en vigueur.
Remarques concernant le recyclage
Cet appareil ne doit en aucun cas être jeté avec les ordures ménagères.
Les propriétaires d’équipements électriques ou électroniques usagés
ont en eet l’obligation légale de les déposer dans un centre de
collecte sélective. Informez-vous auprès de votre municipalité sur les
possibilités de recyclage.
Données techniques
Désignation RWM 4832
Alimentation par piles pile monobloc 9 V, compris
Volume du signal env. 85 dB/3 m
Humidité relative 10 % - 93 %
Plage detempératures admises
Certification EN 14604:2005/AC:2008
Dimensions Ø 102 mm, hauteur 36
0 °C à + 40 °C
Comportement à adopter en cas d‘incendie
Restez calme ! Appelez les pompiers.
!
Informations utiles pour les pompiers :
• Votre nom et votre numéro de téléphone
• Lieu de l‘incendie (adresse)
• Description du sinistre
• Nombre de blessés
• Répondez aux questions de votre interlocuteur.
Prévenez tous les habitants du logement.
Aidez les personnes âgées, malades ou handicapées.
Fermez toutes les portes et fenêtres.
N‘empruntez pas l‘ascenseur.
Lorsque vous ignorez s‘il s‘agit ou non d‘une fausse alerte, procédez comme
si un incendie avait bien lieu.
DEGBFRITPL
Sous réserve de modifications techniques et optiques sans préavis.
1134-CPR-207
9
EN 14604:2005/AC:2008

Rilevatore di fumo RWM 4832
Questo rivelatore di fumo è stato studiato per la segnalazione tempestiva e
sicura dell’inizio di un incendio. L‘allarme scatta non appena il fumo raggiunge
l‘interno del dispositivo. Il dispositivo non rileva la presenza di fiamme. La
maggior parte degli incendi si sviluppa di notte. L‘uomo non può percepire
odori durante il sonno, ma può essere svegliato da rumori: i rilevatori di fumo
scattano tempestivamente e rappresentano un‘arma di difesa ecace contro
questo tipo di pericolo.
Ambito d’uso: Appartamenti, abitazioni
Segnale d’allarme: Segnale acustico di circa 85 dB/3 m
Informazioni relative al comportamento da adottare nel caso di incendio sono
reperibili presso i vigili del fuoco o la propria compagnia di assicurazioni.
Queste organizzazioni hanno sempre disponibile materiale informativo nel
quale viene anche evidenziata la necessità di segnalatori di fumo.
Luogo di installazione
Per una copertura totale della casa installare i rilevatori di fumo in tutte le stanze,
i corridoi e nei locali adibiti a cantina o deposito. Un valore minimo di sicurezza
è garantito installando un rilevatore di fumo in corridoio, uno nel vano scale e
uno ad ogni piano e in ogni zona notte. Fig. A In condomini composti da più
unità abitative è preferibile che ogni famiglia installi i propri rilevatori di fumo.
• Non installare il dispositivo in bagno o in garage. Installare in cu cina
solo se c‘è una distanza minima di 4 metri dai fornelli e da altre
emissioni di calore.
• Non installare nelle vicinanze di cappe o dispositivi di ventilazio ne.
Il flusso d‘aria potrebbe in questo caso compromettere la cor retta
rilevazione di fumo.
• Non installare in ambienti molto polverosi o umidi.
• Non installare negli angoli della stanza: in caso di incendio in sti
punti si raccoglie aria priva di fumo. Mantenere una distanza di
30-50 cm dallo spigolo in stanze il cui sotto ha una pendenza
superiore ai 20° e un‘altezza fino a 6 m. Con una inclinazione
del tetto fino ai 20° è possibile installare il rilevatore sul sotto in
pendenza Fig. B.
• Mantenere una distanza di almeno 50 cm da pareti, travi del sof fitto
Fig. C e lampade Fig. D.
• Installare il rilevatore centralmente rispetto al sotto e mantenere
muna distanza di almeno 4 m da camini aperti e fornelli Fig. F.
• Stanze con una superficie superiore agli 60 m² e corridoi più lunghi
di 10 m necessitano di più rilevatori.
Performance check/Maintenance
Fissare la piastra di montaggio al sotto con le viti e i bulloni forniti Fig E.
Collegare la batteria fornita con la presa. Fig G1 Se la batteria è correttamente
installata, il LED (Fig. H1) lampeggia brevemente ogni 43 secondi. Eseguire un
test funzionale (vedere Test/Manutenzione). Posizionare il rilevatore sulla piastra
di montaggio e girare in senso orario fino a quando non è inserito in posizione.
Il dispositivo di blocco del montaggio (Fig. G2) impedisce l’installazione del
segnalatore senza batteria.
Test/Manutenzione
Premere il pulsante di controllo (Fig. H2) fino a quando scatta l‘allarme.
In questo modo sarà testata la funzione della camera a fumo, dell‘elettronica di
controllo e delle batterie. Nel caso di funzionamento corretto l’allarme è forte
e intermittente. Il test deve essere eettuato una volta al mese e dopo ogni
sostituzione della batteria.
Il dispositivo esegue un test automatico ogni 43 secondi. Si riconosce dal breve
lampeggiare del LED Fig. H1. In caso di malfunzionamento il rilevatore emette
un suono ogni 43 secondi alternandosi al lampeggiare del LED rosso.
Nota: L‘intervallo tra i segnali acustici può essere anche molto più lungo di
43 secondi. Per eliminare il malfunzionamento scollegare la batteria ogni 43
secondi. Dopo aver reinserito la batteria, premere il pulsante di controllo Fig.
H2 fin a quando non viene emesso il segnale di allarme. Se il problema non
dovesse risolversi, sostituire il rilevatore Se la carica della batteria scende sotto
al valore minimo, come promemoria della necessità di sostituire la batteria, il
segnalatore emette un segnale acustico simultaneamente al lampeggiamento
del LED, per un periodo di circa 30 giorni, con una frequenza massima di una
segnalazione al minuto.
All’occorrenza pulire il dispositivo 2 volte l’anno con un panno asciutto ed
esternamente con l‘aspirapolvere.
Indicazioni speciali
• Quando si inserisce la batteria fare attenzione alla polarità corretta.
• Dopo ogni sostituzione della batteria eseguire un controllo del
funzionamento.
• La presenza di un segnalatore di calore o di fumo non esime dagli
obblighi assicurativi.
• A volte, nel caso di sonno profondo, o trovandosi sotto l’influenza di
alcol o droghe, gli allarmi non vengono uditi.
• Si consiglia di installare più segnalatori in ambienti superiori a 60 m²
e in corridoi con lunghezze superiori ai 10 m.
10

• Le batterie usate non devono essere smaltite con i rifiuti domestici!
Portare le batterie esauste ai centri di raccolta anché possano
esser riciclate.
• Nel caso di problemi di carattere tecnico rivolgersi al costruttore o
rivenditore autorizzato.
Sostituire il rilevatore 10 anni dopo l‘installazione.
Remarques concernant les piles et les batteries
Les piles usagées ne doivent en aucun cas être jetées avec les
ordures ménagères. Leurs propriétaires ont en eet l’obligation légale
de les ramener à leur point de vente, où elles seront reprises
gratuitement. Les piles contiennent des substances dangereuses pour
l’environnement et la santé et doivent être recyclées selon la réglementation
en vigueur.
Indicazioni per il riciclaggio
Questo dispositivo non deve essere smaltito come rifiuto
indierenziato. Chi possiede un vecchio dispositivo è vincolato per
legge allo smaltimento conformemente alle normative in vigore. Per
ulteriori informazioni rivolgersi all’amministrazione comunale.
Dati tecnici
Descrizione tipo RWM 4832
Batteria batteria da 9 V, compresa
Volume del segnale ca. 85 dB/3 m
Umidità relativa dell’aria 10 % - 93 %
Ambito temperatura
di esercizio da da 0 °C a +40 °C
Approvazione EN 14604:2005/AC:2008
Dimensioni Ø 102 mm, altezza 36 mm
La ditta si riserva il diritto di apportare variazioni tecniche ed estetiche senza preavviso.
Comportamento corretto in caso di incendio
Mantenere la calma. Avvertire i vigili del fuoco.
!
Le seguenti indicazioni sono importanti per i vigili del fuoco:
• Il vostro nome (Nome, numero di telefono)
• Luogo dell’incendio (Indirizzo)
• Dinamica dell’incendio (entità)
• Numero di eventuali feriti
• Attendere le domande dell’interlocutore
Avvertire tutti coloro che vivono con voi.
Aiutare le persone più anziane, malate e disabili.
Chiudere tutte le finestre e le porte.
Non utilizzare l’ascensore.
Nel dubbio che si possa trattare di un falso allarme, comportarsi come se la
presenza dell‘incendio fosse confermata.
1134-CPR-207
11
EN 14604:2005/AC:2008
DEGBFRITPL

Czujnik dymu RWM 4832
Koncepcja niniejszej czujki dymu polega na zapewnieniu wczesnego
ostrzegania w przypadku powstania pożaru. Alarm zostaje uruchomiony z
chwilą przedostania się dymu do wnętrza urządzenia. Urządzenie nie reaguje
na płomienie. Większość pożarów zdarza się w nocy. Ponieważ człowiek
podczas snu nie wyczuwa zapachów, natomiast budzi się słysząc odgłosy,
czujki dymu chronią skutecznie i odpowiednio wcześnie przed grożącym
niebezpieczeństwem.
Zakres zastosowania: mieszkania, domy mieszkalne
Sygnał alarmowy: sygnał dźwiękowy o natężeniu ok. 85dB/3m
Informacje o postępowaniu w przypadku pożaru można uzyskać, zwracając
się z zapytaniem do straży pożarnej. Liczne służby ratunkowe i firmy
ubezpieczające od pożaru mają przygotowane odpowiednie ulotki, w których
zwraca się uwagę na konieczność stosowania czujek pożaru.
Miejsce montażu
Dla zapewnienia pewnej ochrony, czujki dymu powinny być zainstalowane
we wszystkich pomieszczeniach, korytarzach, miejscach służących do
magazynowania oraz w piwnicy i na strychu. Minimalna ochrona jest osiągana
przez zastosowanie po jednej czujce dymu w korytarzu i przy schodach
na każdym piętrze oraz we wszystkich sypialniach, zob. rys. A. W domach
wielorodzinnych każda rodzina powinna zainstalować własne czujki dymu.
• Czujek nie należy montować w łazienkach lub garażach. Montaż w kuchni
jest dopuszczany tylko w przypadku, gdy jest możliwezapewnienie
minimalnej odległości 4 metrów od kuchennej i podobnych źródeł emisji.
• Czujek nie należy montować w miejscach narażonych na silne przeciągi, np.
w pobliżu szybów wentylacyjnych, Ruch powietrza może w niektórych
warunkach uniemożliwiać docieranie dymu do czujki.
• Czujek nie należy montować w miejscach silnie zakurzonych lub
o bardzo dużej wilgotności powietrza.
• Czujek nie należy montować w narożnikach, gdyż w miejscach tych
podczas pożaru może gromadzić się wolne od dymu powietrze. W
pomieszczeniach o nachyleniu dachu powyżej 20° i o całkowitej wysokości
do 6 m należy zachować odległość 30 - 50cm od narożnika.
• W przypadku dachów nachylonych pod kątem mniejszym niż 20° czujkę
można montować na skosach dachu, zob. rys. B.
• Należy zachować odległość co najmniej 50cm od ścian, belek sufitowych
(stropowych, rys. C ) i opraw oświetleniowych, zob. rys. D.
• Czujkę należy montować pośrodku sufitu, zachowując odległość co
najmniej 4 m od nieosłoniętych kominków i kuchenek (rys. F).
• W pomieszczeniach o powierzchni ponad 60 m2 i w korytarzach o długości
większej niż 10m wymagane jest zastosowanie wielu czujek.
Montaż i przekazanie do eksploatacji
Przymocuj płytę montażową za pomocą dostarczonych w zestawie wkrętów i
kołków do sufitu (rys. E). Podłącz dostarczoną w zestawie baterię do zacisków
(rys. G1). Jeśli bateria została prawidłowo podłączona, czerwona dioda LED
(rys. H1) błyska krótko co ok. 43sekundy. Przeprowadź próbę działania (patrz
punkt „Test/konserwacja”). Umieść czujkę na płycie montażowej i obróć w
kierunku zgodnym z ruchem wskazówek zegara aż do zatrzaśnięcia. Blokada
montażowa (rys. G2) uniemożliwia zamontowanie czujki bez włożonej baterii.
Test/ostrzeżenie
Naciskaj przycisk kontrolny rys. H2, aż będzie słyszalny alarm. Sprawdzane
jest wówczas działanie komory dymnej, elektronicznych układów analizujących
i baterii. Przy prawidłowym działaniu układów alarm jest głośny i pulsujący. Test
należy przeprowadzać raz w miesiącu i po każdej wymianie baterii.
Urządzenie co 43 sekundy przeprowadza test samoczynny. Można to
rozpoznać po krótkim błyśnięciu diody LED (rys. H1). W przypadku
nieprawidłowego działania czujka co 43 sekundy piszczy, naprzemiennie z
błyskaniem czerwonej diody LED.
Uwaga: okres pomiędzy piskami może być również znacznie dłuższy niż 43
sekundy Aby wyeliminować nieprawidłowe działanie, należy na 10 minut wyjąć
baterię.
Po ponownym podłączeniu baterii naciskaj przycisk kontrolny (rys. H2), aż
będzie słyszalny alarm. Jeśli to nie pomoże, należy wymienić czujkę.
Jeśli napięcie baterii spadnie poniżej minimum, czujka piszczy co 43 sekundy
równocześnie z błyskiem diody LED, nawet przez ok. 30 dni, przypominając o
konieczności wymiany baterii.
Urządzenie w razie potrzeby należy przecierać mniej więcej dwa razy w roku na
sucho i czyścić z kurzu za pomocą odkurzacza.
Szczególne wskazówki
• Włóż baterię do urządzenia, zachowując jej prawidłową biegunowość.
• Po każdej wymianie baterii sprawdź urządzenie.
• Czujki ciepła lub dymu nie zastępują ubezpieczenia.
• W przypadku głębokiego snu lub pod wpływem alkoholu bądź środków
odurzających może się zdarzyć, że alarm nie zostanie usłyszany.
• W pomieszczeniach o powierzchni powyżej 60m
których długość przekracza 10m, zaleca się zastosowanie większej liczby
czujek.
• Zużytych baterii nie wolno wyrzucać razem z odpadami z gospodarstwa
12
2
lub na korytarzach,

domowego! Baterię można zutylizować poprzez sprzedawcę, który
przekaże ją do recyklingu.
• W przypadku problemów technicznych należy zwrócić się do producenta
lub sprzedawcy.
Po upływie 10 lat od zamontowania czujkę należy wymienić.
Uwagi dotyczące baterii i akumulatorów
Zużytych baterii nie wolno usuwać razem z niesortowanymi
odpadami domowymi. Posiadacze zużytych baterii są ustawowo
zobowiązani do ich zwrotu i mogą dokonać tego nieodpłatnie w
punktach zakupu. Baterie zawierają substancje szkodliwe dla środowiska
naturalnego i zdrowia, stąd muszą podlegać specjalistycznej utylizacji.
Uwagi dotyczące recyklingu
Niniejszego urządzenia nie wolno usuwać razem z niesortowanymi
odpadami domowymi. Posiadacze zużytego sprzętu są ustawowo
zobowiązani do zapewnienia prawidłowej utylizacji urządzeń.
Odpowiednie informacje można uzyskać u odpowiednich władz
miejskich lub gminnych.
Dane techniczne
Oznaczenie typu RWM 4832
Zasilanie bateryjne bateria 9V, w zestawie
Głośność sygnału ok. 85dB/3m
Względna wilgotność
powietrza, bez kondensacji 10 % - 93 %
Zakres temperatur pracy 0°C do 40°C
Dopuszczenie EN 14604:2005/AC:2008
Wymiary Ø 102 mm, wysokość 36 mm
Prawidłowe zachowanie się podczas pożaru
!
Zachowaj spokój! Zawiadom straż pożarną.
Dla straży pożarnej istotne są następujące wskazówki:
• Jak się nazywasz (imię i nazwisko, numer telefonu)?
• Gdzie jest pożar (adres)?
• Co się wydarzyło (skala zdarzenia)?
• Ile osób jest poszkodowanych?
• Oczekuj na pytania ze strony rozmówcy.
Powiadom wszystkich współlokatorów.
Pomóż osobom starszym, chorym i niepełnosprawnym.
Zamknij wszystkie okna i drzwi.
Nie korzystaj z windy.
W razie wątpliwości, czy alarm jest prawdziwy czy fałszywy, postępuj tak,
jakby występował prawdziwy pożar.
DEGBFRITPL
Zastrzegamy sobie możliwość dokonania niezapowiedzianych zmian technicznych i optycznych.
13
1134-CPR-207
EN 14604:2005/AC:2008

14

15

Typ: RWM 4832
EN 14604:2005/AC:2008
1134-CPR-207
17
DoP-Nr.: DK01470200
https://www.gev.de/gev/dop/a2009004832.pdf
GEV GmbH
Heidehofweg 16
25499 Tangstedt
Germany
www.gev.de
service@gev.de
Hotline: +49 (0)180/59 58 555
Max. 14 Ct./Min aus dem deutschen Festnetz.
Mobil max. 42 Ct./Min.
International calls may vary.
BA01552400
 Loading...