

www.gev.de
04467
# 04467
Q10 Rauchwarnmelder FMR 4467
A
B
> 50 cm
1/4
1/4
> 50 cm
C
> 50 cm
1/4 1/4
D D1
0,5 - 1 m
> 20°
0,5 - 1 m
> 20°
> 20°
E
F
ø
3,5 mm
ø
3,5 mm
G
G1
OFF
ON
OFF
ON

Q10 Rauchwarnmelder FMR 4467
Mit dem Kauf dieses Artikels haben Sie sich für ein qualitativ
hochwertiges GEV-Produkt entschieden. Bitte lesen Sie diese
Bedienungsanleitung sorgfältig durch, um ein einwandfreies
Funktionieren zu gewährleisten. Bewahren Sie diese Anleitung
sorgfältig auf, um gegebenenfalls später nachlesen zu können.
Das Produkt ist nur für den sachgemäßen Gebrauch (wie
in dieser Bedienungsanleitung beschrieben) bestimmt.
Änderungen, Modifikationen oder Lackierungen dürfen
nicht vorgenommen werden, da sonst die Funktion des
Rauchwarnmelders beeinträchtigt wird und jeglicher
Gewährleistungsanspruch entfällt.
Der Q10 Rauchwarnmelder FMR 4467 ist ein fotoelektronischer
Rauchwarnmelder zur frühzeitigen und zuverlässigen
Branderkennung in privaten Wohnhäusern, Wohnungen und
Räumen mit wohnungsähnlicher Nutzung zur Erfüllung der
gesetzlichen Rauchwarnmelderpflicht. Nachts brennt es am
häufigsten. Im Schlaf ist der Geruchssinn bei Menschen nicht
aktiv und Rauch kann nicht wahrgenommen werden. Daher
schützt ein Rauchwarnmelder wirksam und frühzeitig vor der
drohenden Gefahr. Alarm wird ausgelöst sobald Rauch in das
Innere des Gerätes eindringt. Flammen werden vom Gerät nicht
wahrgenommen.
Um die Wartungs- und Betriebskosten niedrig zu halten, wurde
der Q10 Rauchwarnmelder FMR 4467 mit einer fest eingebauten
Lithium-Batterie für eine extreme Langlebigkeit von 10 Jahren
ausgelegt. Ein Batterietausch ist nicht erforderlich. Nach Ablauf der
Batterielebensdauer von 10 Jahren wird der Q10 Rauchwarnmelder
FMR 4467 einfach ausgetauscht. Eine Alarmabschaltung für ca.
10 Min. erfolgt durch einen kurzen Druck auf die Taste (Abb. G1).
Dabei wird der Q10 Rauchwarnmelder FMR 4467 in einen weniger
empfindlichen Zustand versetzt und zeigt dies durch Blinken der
roten LED ca. alle 10 Sek. an. Ist die Rauchdichte zu groß, wird der
Alarm erneut ausgelöst.
Achtung: Der Melder darf nicht übermäßig großer Hitze ausgesetzt
werden, um eine mögliche Gefährdung durch die Batterie zu
vermeiden. Der Melder verfügt über eine Alarmerinnerung. Nach
einer Alarmabschaltung blinkt die grüne LED 3-mal in 43 Sekunden
und stoppt erst nach 24 Stunden.
Montageort
Um eine optimale Absicherung von Haushalten zu erreichen,
sollten Rauchwarnmelder in allen Räumen, Fluren, Keller- und
Vorratsräumen installiert werden. Eine Grundabsicherung
wird schon durch den Einsatz von Rauchwarnmeldern in allen
Schlafräumen, Kinderzimmern, Fluren und auf den Fluchtwegen
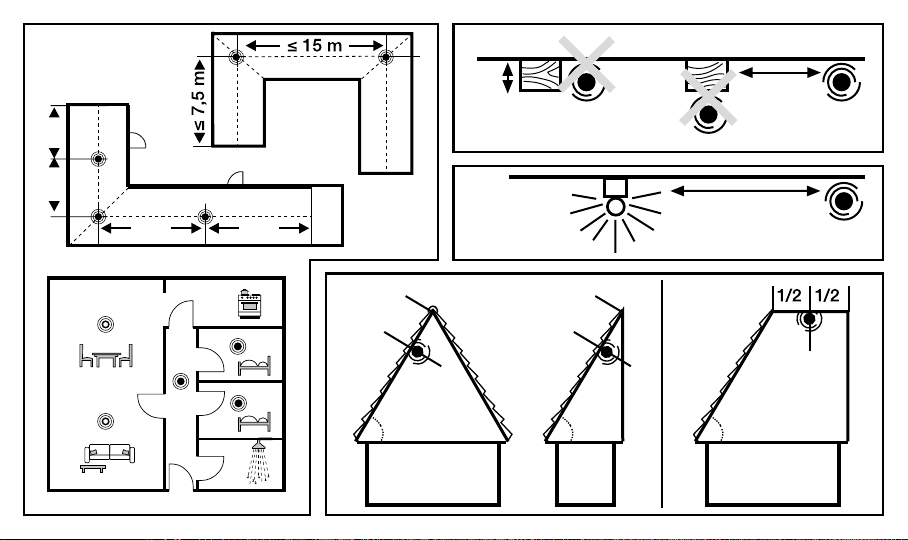
sämtlicher Etagen erreicht (Abb. A).
Hinweis:
• Melder mittig an der Decke montieren.
• In Badezimmern (hohe Luftfeuchtigkeit), Garagen (Abgase),
in stark zugluftgefährdeter Umgebung (auch z.B. Lüftungs auslass Lüftungseinlass) und in Spitzecken auf dem Dachboden
sollten Rauchwarnmelder nicht installiert werden (Abb. D).
• Bei einer Dachneigung ≤ 20° kann der Melder mittig wie bei
horizontalen Decken montiert werden.
• Bei einer Dachneigung > 20° muss der Melder mindestens 0,5 m
und max. 1 m von der Deckenspitze entfernt montieren werden
(Abb. D).
• Wenn die anteiligen Dachschrägen einen Dachwinkel > 20°
haben und die horizontale Decke ≤ 1 m breit ist, dann sollte der
Melder mind. 0,5 m und max. 1 m von der Deckenspitze an der
Dachschräge montiert werden (Abb. D). Sollte aber die
horizontale Decke breiter als 1 m sein, dann kann der Melder
mittig an der Decke montiert werden (Abb. D1).
• Halten Sie mindestens 50 cm Abstand von Wänden, Deckenbalken
(Unterzügen), Einrichtungsgegenständen und Leuchten (Abb. B-C).
Sind Deckenbalken (Unterzüge) vorhanden, gilt folgendes:
Höhe ≤ 20 cm: Deckenfelder bleiben unberücksichtigt. Melder darf
auch auf dem Deckenbalken (Unterzug) montiert werden.
4 5

Höhe > 20 cm und Deckenfeld > 36 m²: Je Deckenfeld > 1 Melder
montieren.
Höhe > 20 cm und Deckenfeld ≤ 36 m²: Deckenfelder bleiben
unberücksichtigt. Melder darf auch auf dem Deckenbalken
(Unterzug) montiert werden.
• Räume über 60 m² und Flure länger als 15 m benötigen mehrere
Melder (Abb. A).
• Halten Sie eine maximale Einbauhöhe von 6 m ein. Bei höheren
Decken empfehlen wir mehrere Melder in verschiedenen Ebenen
zu montieren.
• Wird ein Raum durch ein Podest oder eine Galerie in der Höhe
unterteilt, so ist unterhalb dieser Einrichtungen dann ein Melder
erforderlich, wenn sowohl deren Fläche 16 m² als auch deren
Länge und Breite jeweils 2 m übersteigen.
• Halten Sie mindestens 4 m Abstand von oenen Kaminen,
Herden, etc. ein.
Montage/Inbetriebnahme
• Passen sie die Art der Befestigung dem Montageuntergrund an,
um Verletzungen zu vermeiden.
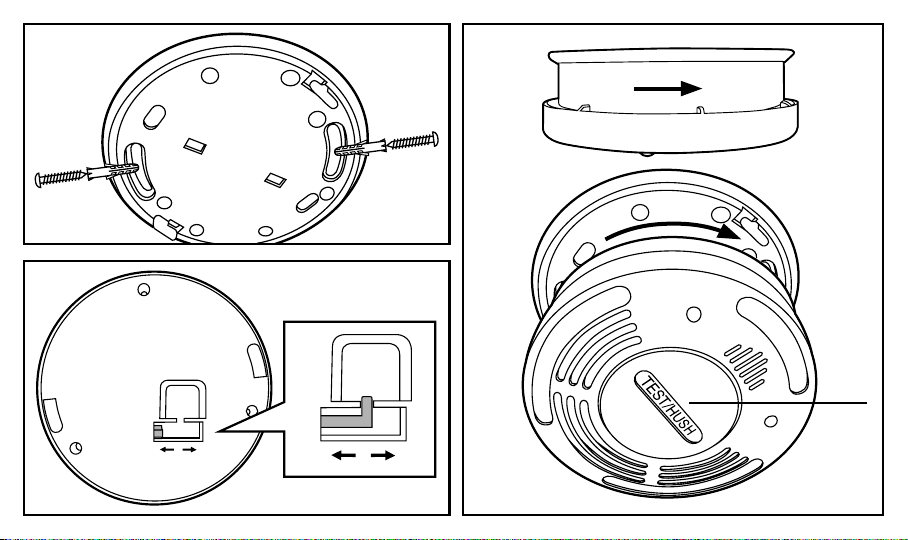
• Montieren Sie zuerst den Sockel möglichst mittig an der Decke
(Abb. E).
• Schützen Sie die Geräte vor Bohrstaub.
• Ziehen Sie den roten Sicherungsstift der Batterie aus seiner
Position OFF in Richtung ON, drehen Sie ihn zur Fixierung auf die
Seite und drücken Sie ihn dabei in die vorgesehene Kerbe (Abb. F).
• Setzen Sie den Melder auf den Sockel und drehen Sie ihn im
Uhrzeigersinn, bis er einrastet (Abb. G).
•
Führen Sie die Testfunktion aus, indem Sie die Test/Ruhe Taste so lange gedrückt halten, bis ein lauter und pulsierender
Alarmton ertönt (siehe auch Test/Wartung). Der Melder
ist nun einsatzbereit und befindet sich nach einem Test
immer zunächst in der Stummschaltung mit einer geringen
Raucherkennungs empfindlichkeit.
Sekunden. Nach ca. 10 Minuten wird dieser Modus automatisch
beendet und der Rauchwarnmelder befindet sich im Modus der
Die rote LED blinkt nun alle 10
normalen Raucherkennung. Sie können die Stummschaltung
jederzeit manuell beenden, indem Sie die Test/Ruhe-Taste
solange gedrückt halten, bis ein Signalton ertönt.
• Bei technischen Problemen wenden Sie sich an den
Hersteller oder Distributor in Ihrem Land.
Bedienung
Die Test/Ruhe-Taste (Abb. G1) hat zwei Funktionen:
1. Stummschaltung des Alarmsignals für ca. 10 Min. durch
kurzen Tastendruck bei Alarmauslösung oder vorbeugend,
um einen Alarm zu verhindern. Während dieser 10 Min.
blinkt die rote LED alle 10 Sek. Ist die Rauchdichte zu groß,
wird der Alarm erneut ausgelöst.
2. Testfunktion des Melders durch Tastendruck, bis ein lauter
und pulsierender Alarmton ertönt.
Test/Wartung
Bei der Testfunktion wird der Melder komplett gemäß EN
14604 geprüft: Funktionsprüfung der Batterie, elektronischer
Rauchkammertest, Prüfung der Elektronik, etc. Ein Test sollte
mindestens 1x jährlich durchgeführt werden. Drücken Sie dazu
die Taste (Abb. G1) solange, bis ein lauter und pulsierender
Alarmton ertönt (ca. 85 dB/3m), danach können Sie die Taste
loslassen.
Das Gerät sollte bei Bedarf etwa 1 x jährlich trocken abgewischt
und von außen mit einem Staubsauger vorsichtig abgesaugt
werden.
Achten Sie auf Einrichtungsgegenstände im Umkreis
von 0,5 m, die den Raucheintritt eventuell behindern
können. In diesem Fall muss der Montageort überprüft und
gegebenenfalls neu festgelegt werden oder die entsprechenden
Einrichtungsgegenstände müssen entfernt werden.
Der Melder führt permanent einen automatischen
durch. Hierbei werden unter anderem die Elektronik, die
Spannung und der Innenwiderstand der Batterie, die
Rauchkammerfunktion, etc. überprüft. Die ordnungsgemäße
5
Selbsttest
DEGBFRITPL

Funktion und Betriebsbereitschaft wird mit einem kurzen
Blinkzeichen der roten LED ca. alle 5 Min. signalisiert.
Tauschen Sie den Rauchwarnmelder bei einer mechanischen
Beschädigung oder im Falle einer nicht rücksetzbaren
Störungsmeldung, spätestens jedoch 10 Jahre nach
Inbetriebnahme, aus. Ein Batteriewechsel ist nicht möglich.
Hinweis:
Sollte der Melder einer zu großen Staubmenge oder z.B.
Wasserdampf ausgesetzt werden, kann dies zu einer
Alarmauslösung führen. Stellen Sie den Alarm durch kurzen
Tastendruck wieder aus. Der Melder geht nun für ca. 10 min in
den Modus der Stummschaltung mit geringer Empfindlichkeit.
Sollte der Alarm danach immer wieder ausgelöst werden, weil
der Rauchwarnmelder durch Verunreinigungen einen bleibenden
Schaden erlangt hat, tauschen Sie diesen gegen einen neuen
Melder aus.
Batterie- und Akkuhinweise
Dieses Gerät enthält eine fest eingebaute Lithium-Batterie
vom Typ CR 123A. Altbatterien dürfen nicht mit dem
unsortierten Siedlungsabfall entsorgt werden. Besitzer von
Altbatterien sind gesetzlich zur Rückgabe verpflichtet und können
diese unentgeltlich bei den Verkaufsstellen zurückgeben. Batterien
enthalten umwelt- und gesundheitsschädliche Stoe und müssen
daher fachgerecht entsorgt werden.
Recycling-Hinweise
Dieses Gerät darf nicht mit dem unsortierten Hausmüll
entsorgt werden. Besitzer von Altgeräten sind gesetzlich
dazu verpflichtet, dieses Gerät fachgerecht zu
entsorgen. Informationen erhalten Sie von Ihrer Stadt- bzw.
Gemeindeverwaltung.
Richtiges Verhalten im Brandfall
Ruhe bewahren!
!
Alarmieren Sie die Feuerwehr.
Folgende Hinweise sind für die Feuerwehr wichtig:
• Wie ist Ihr Name? (Name, Telefonnummer)
• Wo brennt es? (Adresse)
• Was ist passiert? (Ausmaß)
• Wie viele Verletzte gibt es?
• Warten Sie auf Rückfragen des Gesprächspartners.
• Warnen Sie alle Mitbewohner.
• Helfen Sie älteren, kranken und behinderten Personen.
• Schließen Sie alle Fenster und Türen.
• Benutzen Sie keinen Aufzug. Sollten Sie Zweifel haben, ob
es sich um einen echten Alarm oder um einen Fehlalarm
handelt, verhalten Sie sich so, als ob es wirklich brennt.
Technische Daten
Typbezeichnung: Q10 Rauchwarnmelder FMR 4467
Batteriebetrieb: 3 Volt Lithium CR 123A
fest eingebaut
Batterielebensdauer: 10 Jahre bei
bestimmungsgemäßem Gebrauch
Signallautstärke: 85 dB/3 m
Relative Luftfeuchtigkeit: 95 % nicht kondensierend
Arbeitstemperaturbereich: -10 °C bis +40 °C
Zulassung: EN 14604:2005/AC:2008
CPR-Nummer: 0832-CPR-F2162
VdS-Nummer: G217093
Abmessungen: Ø 102 mm, Höhe 32 mm
Technische und optische Änderungen ohne Ankündigung
vorbehalten.
6 7

Funktionstabelle
Rote LED Grüne LED Ton Erläuterung Abhilfe
Blinkt ca. alle 5 min - - Betriebsbereitschaft/
Blitzt ca. 2 x pro
Sek.
Blitzt ca. alle
10 Sek.
Blitzt ca. alle
10 Sekunden
- Pulsierender Alarmton Alarmauslösung des Melders
- Kein Ton Alarm-Stummschaltung für
- 3 kurze Pieptöne in
43 Sekunden
Blitzt ca. alle 5 min - Ton alle 43 Sekunden Störungssignal des Melders
- Blitzt 3 x alle 43
Sekunden für 24
Stunden
Kein Ton Alarm Erinnerung für die
Normalmodus/
Melder arbeitet fehlerfrei und
ist bereit zur Rauchdetektion.
bei Rauchdetektion.
10 ± 1 Min. ist aktiviert.
Fehlfunktion /Störung der
Sensorik/Ende der Lebenszeit
bei einer leeren Batterie.
nächsten 24 Stunden.
7
Vorbeugende Stummschaltung
des Alarmsignals für 10 ± 1 Min.
durch kurzen Tastendruck.
Stummschaltung des Alarmsignals
für 10 ± 1 Min. durch kurzen
Tastendruck.
Stummschaltung kann aufgehoben
werden durch die Testfunktion:
Langer Tastendruck (min. 3 Sek.),
bis ein lauter und pulsierender
Alarmton ertönt.
Austausch des Gerätes
Austausch des Gerätes
Durch Drücken der StummschaltTaste kann die Alarmerinnerung
beendet werden.
DEGBFRITPL
Q10 smoke alarm device FMR 4467
By purchasing this device you have chosen a high-quality GEV
product. Please read through these operating instructions
carefully in order to ensure that the device functions correctly.
Keep these instructions in a safe place so that you can refer to
them later if necessary. Use this product only as intended (as
described in this user manual).
Do not alter, modify or paint the device, as this will render any
warranties null and void as well as reducing the function of the
smoke alarm device.
The Q10 smoke alarm device FMR 4467 is a photoelectronic smoke
alarm device used for early and reliable fire detection in private
residential buildings, apartments and rooms with similar purposes
in compliance with the statutory obligation to install smoke alarm
devices. Fires occur most frequently at night. The human sense
of smell is not active during sleep making it impossible to detect
smoke. Smoke alarm devices therefore act as an eective and
prompt safeguard against imminent danger. An alarm is triggered
as soon as smoke enters the device. The device does not detect
flames.
To keep maintenance and operating costs low, the Q10 smoke
alarm device FMR 4467 was designed with an integrated lithium
battery to enable an extremely long service life of ten years. There
is no need to change the battery. Once the ten-year battery life has
expired, the Q10 smoke alarm device FMR 4467 is simply replaced.
The alarm can be switched o for approx. 10 minutes by briefly
pressing the button (Fig. G1). This action switches the Q10 smoke
alarm device FMR 4467 to a less sensitive status. This status is
indicated by the red LED flashing approx. every ten seconds. If the
smoke is too dense, the alarm is triggered again.
Please note: To prevent the battery from posing a hazard, the
smoke alarm device must not be exposed to excessive heat. The
detector is equipped with an alarm memory. After the alarm has
been triggered, the green LED will blink 3 times every 43 seconds
and stop after 24 hours.
Installation position
For optimum protection of your home, install smoke alarm devices
in all rooms, corridors, basements and store rooms. Basic protection
can be achieved by installing smoke alarm devices in all bedrooms,
playrooms, corridors and escape routes on all floors (Fig. A).
Note:
• Mount the smoke alarm device in the centre of the ceiling.
• Smoke alarm devices should not be installed in bathrooms
(high humidity), garages (exhaust gases), in very
draughty environments (inc. ventilation inlets/outlets) or in ceiling
peaks within an attic (Fig. D).
• On roofs with a slope of ≤ 20°, the smoke alarm device can be
mounted in the centre of the ceiling in the same way as for
horizontal ceilings.
• For roofs with a slope of > 20°, the smoke alarm device must be
mounted at least 0.5 m and a maximum of 1 m away from the
peak of the ceiling (Fig. D).
• If the sloping sections of the roof have a roof angle of > 20°
and the horizontal ceiling is ≤ 1 m wide, the smoke alarm device
must be mounted on the slanted section at a minimum of 0.5 m
and a maximum of 1 m away from the peak of the ceiling
(Fig. D). However, if the horizontal ceiling is wider than 1 m, the
smoke alarm device can be mounted in the centre of the ceiling
(Fig. D1).
• Please maintain a distance of at least 50 cm from walls, ceiling
beams (joists), fittings and lights (Fig. B-C). If ceiling beams
(joists) are present, the following requirements apply:
Height ≤ 20 cm: Ceiling panels not taken into consideration.
Detector can also be fitted on the ceiling beam (joist).
Height > 20 cm and ceiling panel area > 36 m²: Install > 1 detector
per ceiling section.
Height > 20 cm and ceiling section ≤ 36 m²: Ceiling panels not
8 9

taken into consideration. Detector can also be fitted on the ceiling
beam (joist).
• Rooms of over 60 m² and corridors longer than 15 m require
several smoke alarm devices (Fig. A).
• Ensure that smoke alarm devices are installed at a maximum height
of 6 m. For higher ceilings, we recommend installing several
smoke alarm devices at various levels
• If the height of a room is divided by a landing or a balcony, a
smoke alarm device must be installed underneath these facilities if
they cover an area of over 16 m² and have a length and width
greater than 2 m.
• Install smoke alarm devices a minimum of 4 m away from open
fireplaces, stoves, etc.
Installation/Commissioning
• To prevent injuries, ensure that the type of attachment is suitable
for the mounting surface.
• Mount the base of the smoke alarm device on the ceiling as
centrally as possible (Fig. E).
• Protect the device from dust when drilling holes.
• Pull the red battery safety tab from its OFF position in the
direction of ON, turn it sideways to fix it and press it into the
intended slot (Fig. F).
• Mount the smoke alarm device on its base and turn it in a
clockwise direction until it clicks into place (Fig. G).
• Carry out the test function by pressing and holding the test/silent
button until a loud, pulsating alarm signal sounds (see also Test/
Maintenance). The alarm is now ready for use and after testing,
first starts in silent mode with lower sensitivity to smoke. The red
LED now flashes every 10 seconds. After 10 minutes, this mode
will finish and the smoke alarm will be in normal smoke detection
mode. You can end silent mode manually at any time by pressing
and holding the test/silent button until a signal sounds.
• In the event of any technical problems, contact the
manufacturer
or your local distributor.
Operation
The test/silent button (Fig. G1) has two functions:
1. Temporarily silence the alarm for approx. 10 min by
briefly pressing the button when the alarm is triggered or
preventatively to stop an alarm from sounding. During these
10 minutes, the red LED flashes every 10 seconds. If the
smoke is too dense, the alarm is triggered again.
2. Test the function of the smoke alarm device by pressing the
button until a loud, pulsating alarm sounds.
Test/Maintenance
When the test function is selected, a complete test of the
smoke alarm device is performed in accordance with EN
14604, which includes a battery function test, electronic smoke
chamber test, electronics test, etc. A test must be performed at
least once every year. To do so, press the button (Fig. G1) until
a loud, pulsating alarm sounds (approx. 85 dB/3 m), then you
can let go of the button.
When necessary (around once a year), wipe the device with a
clean, dry cloth and carefully clean the outside with a vacuum
cleaner.
Take note of any fittings within a radius of 0.5 m that may
prevent smoke from entering the smoke alarm device. If such
fittings are present, the mounting location must be reviewed
and changed if necessary or the fittings must be removed.
The smoke alarm device continuously performs automatic
self-testing processes. This includes testing the electronics,
checking the voltage and internal resistance of the battery, and
testing the smoke chamber function, etc. Correct functionality
and operational readiness is indicated by a brief flashing signal
from the red LED approx. every 5 minutes.
9
DEGBFRITPL

In the event of mechanical damage or a fault message that cannot
be reset, replace the smoke alarm device. The smoke
alarm device must be replaced no later than 10 years after
commissioning. The battery cannot be changed.
Note:
If the smoke alarm device is exposed to excessive quantities of
dust or steam, the alarm may be triggered. Switch the alarm o
again by briefly pressing the button. The alarm will now go into
silent mode for around 10 min where it will be less sensitive. If
the alarm now triggers repeatedly because it has experienced
lasting damage from dirt or dust, replace it with a new smoke
alarm device.
Notes regarding batteries and battery packs
This device contains an integrated lithium type CR 123A battery.
Used batteries must not be disposed of as unsorted household
waste. Used batteries must be recycled and may be returned free-
of-charge to the place of sale. Batteries contain substances
which are harmful to the environment and to human health and
must therefore be disposed of correctly.
Recycling instructions
This device must not be disposed of with unsorted household
waste. Used devices must be disposed of correctly. Contact your
!
local town council for more information.
Correct action in the event of a fire
Keep calm!
Alert the fire service.
It is important that the fire service is told the following information:
• Your name (name, phone number)
• The location of the fire (address)
• What has happened (extent of fire)
• How many people are injured
• Then wait to see if the operator has any questions.
• Alert all the people who live with you.
• Help aged, sick and disabled persons.
• Close all windows and doors.
• Do not use lifts. If you have any doubts as to whether or not it is
a genuine alarm, still act as if there is a real fire.
Technical data
Model name:
Battery operation: Integrated 3 volt lithium
CR 123A battery
Battery life: 10 years when used as intended
Signal volume: 85 dB/3 m
Relative humidity: 95%, non-condensing
Operating temperature range: -10 °C to +40 °C
Approval: EN 14604:2005/AC:2008
CPR number: 0832-CPR-F2162
VdS number: G217093
Dimensions: Ø 102 mm, height 32 mm
Technical and design features may be subject to change.
10 11
Q10 smoke alarm device FMR 4467

Table of functions
Red LED Green LED Sound Description Solution
Flashes briefly
approximately
every 5 min
Flashes approx.
twice per second
Flashes approx.
every 10 seconds
Flashes approx.
every 10 seconds
Flashes approx.
every 5 min
- Flashes 3x
- - Ready/normal mode
- Intermittent alarm
signal
- No signal Temporary silencing of the
- 3 short beeps in 43
- Tone every 43
every 43
seconds for 24
hours
seconds
seconds
No signal Alarm memory for the next 24
Smoke alarm device is working
correctly and is ready for
smoke detection.
Alarm is triggered when
smoke is detected.
alarm
is activated for 10 ± 1 min.
Error/sensor fault/end of life Replace the device
Fault signal emitted by the
smoke alarm device when
battery is discharged
hours
11
Briefly press the button to
temporarily silence the alarm
preventatively for 10 ± 1 minutes.
Temporarily silence the alarm for
10 ± 1 minutes by briefly pressing
the button.
Silent mode can be cancelled by
initiating the test function: Press
and hold the button (min. 3 sec.)
until a loud, pulsating alarm signal
sounds.
Replace the device
The alarm memory can be
cancelled by pressing the silencing
button.
DEGBFRITPL

Q10 Détecteur de fumée FMR 4467
En achetant cet article, vous avez choisi un produit GEV de haute
qualité. Pour l‘utiliser dans les meilleures conditions, veuillez lire
attentivement ce mode d‘emploi. Conservez soigneusement ce
document en vue d‘une consultation future.
Ce produit ne doit être utilisé que dans les conditions prévues par
le présent mode d‘emploi. Toute modification du produit (ajout,
peinture, etc.) serait de nature à entraver le fonctionnement du
détecteur de fumée et entraînerait l‘annulation de la garantie.
Le modèle Q10 Détecteur de fumée FMR 4467 est un détecteur de
fumée photoélectrique permettant de détecter le plus tôt possible
et avec fiabilité les débuts d‘incendie dans les habitations privées
(maisons, appartements, etc.), dans le cadre de l‘application de
la législation en matière de protection contre les incendies. C‘est
la nuit que les incendies sont les plus fréquents. Chez l‘homme
l‘odorat est inactif pendant le sommeil et la fumée peut ne pas
être perçue. Devant la menace d‘un feu, un détecteur de fumée
vous protège donc ecacement et rapidement. Une alarme se
déclenche dès que de la fumée s‘introduit dans l‘appareil. Celui-ci
ne détecte pas les flammes.
Afin de maintenir les coûts de maintenance et d‘utilisation au
plus bas, le Q10 Détecteur de fumée FMR 4467 est équipé d‘une
pile lithium intégrée d‘une durée de vie pouvant atteindre 10 ans.
Il convient de remplacer le Q10 Détecteur de fumée FMR 4467
lorsqu‘elle est déchargée. L‘alarme peut être désactivée pour une
durée de 10 min environ en appuyant brièvement sur le bouton
(fig. G1). Ainsi, le Q10 Détecteur de fumée FMR 4467 est placé
dans un état de faible sensibilité, indiqué par le clignotement de la
LED rouge toutes les 10 secondes environ. Si la densité de fumée
devient trop importante, l‘alarme se déclenche de nouveau.
Attention: Ne pas exposer le détecteur à une chaleur excessive afin
d‘éviter tout endommagement lié à la pile. Le détecteur dispose d‘un
rappel d‘alarme. Après la désactivation d‘une alarme, la LED verte
clignote 3 fois en 43 secondes pendant une période de 24 heures.
Lieu de montage et positionnement
Pour atteindre une protection optimale de votre foyer, placez
des détecteurs de fumée dans toutes les pièces, les couloirs, les
caves et les greniers. Pour une protection de base, installez des
détecteurs de fumée dans toutes les chambres, notamment celles
des enfants, dans les couloirs et les issues de secours de tous les
étages (fig. A).
Remarque:
• Montez le détecteur au centre du plafond.
• N‘installez pas de détecteur dans les salles de bain
(humidité élevée), garages (gaz d‘échappement),
espaces soumis à des courants d‘air (par exemple en raison
d‘une entrée ou d‘une sortie d‘aération), ni sur les parois d‘un
grenier formant un angle aigu (fig. D).
• Le détecteur peut être monté sous rampant de façon centrée,
comme sur un plafond horizontal, à condition que l‘inclinaison
du rampant soit ≤ 20°.
• Si l‘inclinaison du rampant est > 20°, le détecteur doit être monté
à une distance comprise entre 0,5 m et 1 m du sommet du
rampant (fig. D).
• Si l‘inclinaison du rampant est > 20° et que la largeur du plafond
horizontal est ≤ 1 m, le détecteur doit être monté sur le rampant,
à une distance comprise entre 0,5 m et 1 m du sommet du
rampant (fig. D). Cependant, si la largeur du plafond horizontal
est supérieure à 1 m, le détecteur peut être monté au plafond de
façon centrée (fig. D1).
• Une distance minimale de 50 cm doit séparer l‘appareil des
parois, solives (sous-poutres), éléments d‘aménagement et
luminaires (fig. B et C). Dans une configuration avec des solives
(sous-poutres), les conditions suivantes s‘appliquent :
Hauteur ≤ 20 cm : Les détecteurs de plafond ne sont pas visibles.
Le détecteur doit être monté sur la solive (sous-poutre).
Hauteur > 20 cm et panneaux > 36 m² : Monter au minimum 1
détecteur par panneau.
12 13

Hauteur > 20 cm et panneaux ≤ 36 m² : Les détecteurs de plafond
ne sont pas visibles. Le détecteur doit être monté sur la solive
(sous-poutre).
• Les pièces de plus de 60 m² et les couloirs de plus de 15 m de
long nécessitent la pose de plusieurs détecteurs (fig. A).
• Veillez à respecter une hauteur de montage maximale de 6 m.
Si la hauteur des plafonds dépasse 6 m, nous vous conseillons
d‘installer plusieurs détecteurs.
• Si une pièce est coupée en deux dans la hauteur par une estrade
ou une mezzanine, il est nécessaire de placer un détecteur sous
cet aménagement si ce dernier présente une surface supérieure
à 16 m², ainsi qu‘une longueur et une largeur supérieures à 2 m.
• Veuillez respecter une distance minimale de 4 m par rapport aux
cheminées ouvertes, équipements de cuisine, etc.
Montage/Mise en service
• Veillez à adapter le type de fixation au support de montage, afin
d‘éviter toute blessure.
• Installez d‘abord le socle de l‘appareil, de préférence au centre
du plafond (fig. E).
• Protégez les appareils de la poussière dégagée lors du perçage.
• Tirez sur la tige de sécurité rouge de la pile, qui se trouve en
position OFF, en direction de la position ON, puis faites-la
tourner de manière à la fixer sur le côté et appuyez dessus pour
l‘insérer dans l‘encoche prévue à cet eet (fig. F).
• Placez le détecteur sur le socle et faites-le tourner dans le sens
des aiguilles d‘une montre jusqu‘à ce qu‘il s‘y emboîte (fig. G).
• Utilisez la fonction de test en appuyant sur le bouton Test/
Veille jusqu‘à entendre un signal d‘alarme puissant et répétitif
(voir également Test/Maintenance). Le détecteur est désormais
fonctionnel. Après un test, il se trouve en mode silence avec une
sensibilité de détection de la fumée réduite. La LED rouge
clignote toutes les 10 secondes. Après environ 10 minutes, ce
mode est automatiquement désactivé et le détecteur passe en
mode de détection de fumée normal. Vous pouvez à tout
moment désactiver manuellement le mode silence en appuyant
sur le bouton Test/Veille jusqu‘à entendre un signal d‘alarme.
• Pour toute question d‘ordre technique, merci de vous
adresser au fabricant ou à votre revendeur.
Utilisation
Le bouton Test/Veille (fig. G1) permet d‘activer deux fonctions:
1. Activation de la fonction silence du signal d‘alarme pendant
environ 10 minutes en appuyant brièvement sur le bouton
en cas de déclenchement de l‘alarme ou préventivement
afin d‘éviter son déclenchement. Pendant ce délai d‘environ
10 minutes, la LED rouge clignote toutes les 10 secondes.
Si la densité de la fumée devient trop importante, l‘alarme se
déclenche à nouveau.
2. Fonction de test du détecteur en appuyant sur le bouton
jusqu‘au déclenchement d‘un signal d‘alarme sonore
puissant et répétitif.
Tests/Maintenance
La fonction de test permet de vérifier intégralement le
fonctionnement du détecteur conformément à la norme EN
14604 : Test de fonctionnement de la pile, test électronique de
la chambre de détection, vérification du circuit électronique,
etc. Il convient d‘eectuer un test au moins une fois par an.
Pour cela, maintenez le bouton enfoncé (fig. G1) jusqu‘à ce
qu‘un signal sonore puissant et répétitif retentisse (environ 85
dB/3 m). Vous pouvez alors relâcher le bouton.
Au besoin, essuyez l‘appareil avec un chion sec et aspirez
avec soin les poussières (une fois par an environ).
Attention : les meubles présents dans un périmètre de 0,5 m
ne doivent pas gêner la détection de fumée. Si c‘est le cas,
vérifiez ou modifiez l‘emplacement du détecteur, ou déplacez
les meubles concernés.
Le détecteur procède à un test automatique continu. Cela
permet notamment de vérifier le circuit électronique, la tension
et la résistance interne de la batterie, le fonctionnement de la
chambre de détection, etc. Le fonctionnement normal et le bon
13
DEGBFRITPL

état de service du détecteur sont indiqués par un bref clignotement
de la LED rouge toutes les 5 minutes environ.
En cas d‘endommagement mécanique ou d‘indication d‘un défaut
irréversible, ou au plus tard 10 ans après la mise en service,
remplacez le détecteur. La pile n‘est pas remplaçable.
Remarque
En cas d‘exposition du détecteur à une grande quantité
de poussière ou, par exemple, à de la vapeur, l‘alarme
risque de se déclencher. Désactivez l‘alarme en appuyant
brièvement sur le bouton-poussoir. Le détecteur passe alors en
mode silence avec une sensibilité réduite pendant environ 10
minutes. Si l‘alarme continue de se déclencher car le détecteur de
fumée a été endommagé de façon irréversible par des impuretés,
remplacez le détecteur par un modèle neuf.
Remarques concernant les piles et les batteries
Cet appareil est équipé d‘une pile au lithium montée à
demeure du type CR 123A. Les piles et accumulateurs usagés
ne doivent en aucun cas être jetés avec les déchets municipaux.
Leurs propriétaires ont en eet l‘obligation légale de les ramener
dans leur point de vente, où ils seront repris gratuitement. Les piles
contiennent des substances dangereuses pour l‘environnement
et la santé et doivent être recyclées selon la réglementation en
vigueur.
Remarques concernant le recyclage
Cet appareil ne doit en aucun cas être jeté avec les ordures
ménagères. Les propriétaires d‘équipements électriques
ou électroniques usagés ont en eet l‘obligation légale de
les déposer dans un centre de collecte sélective. Informez-vous
auprès de votre municipalité sur les possibilités de recyclage.
Comportement à adopter en cas d‘incendie
Restez calme !
!
Appelez les pompiers.
Informations utiles pour les pompiers :
• Quel est votre nom ? (nom, numéro de téléphone)
• Où se situe l‘incendie ? (adresse)
• Que s‘est-il passé ? (ampleur)
• Combien y a-t-il de blessés ?
• Répondez aux questions de votre interlocuteur.
• Prévenez tous les colocataires.
• Aidez les personnes âgées, les malades et les infirmes.
• Fermez toutes les portes et fenêtres.
• N‘empruntez pas l‘ascenseur. Même si vous ignorez s‘il s‘agit
d‘une vraie ou d‘une fausse alerte, procédez comme si
un incendie avait bien lieu.
Caractéristiques techniques
Désignation: Q10 Détecteur de fumée FMR 4467
Alimentation par piles: Pile au lithium CR 123A 3 V
montée à demeure
Durée de vie de la pile: 10 ans pour une utilisation conforme
Volume du signal: 85 dB/3 m
Taux d‘humidité relative: 95 % sans condensation
Plage de température de
fonctionnement: -10 °C à +40 °C
Certification: EN 14604:2005/AC:2008
Numéro CPR: 0832-CPR-F2162
Numéro VdS: G217093
Dimensions: Ø 102 mm, hauteur 32 mm
Des modifications techniques et esthétiques peuvent être
apportées sans notification préalable.
14 15

Fonctions
LED rouge Grüne LED Son Explication Solution
Clignote toutes les
5 minutes environ
Clignote 2 fois par
seconde environ
Clignote environ
toutes les 10
secondes.
Clignote environ
toutes les 10
secondes
Clignote environ
toutes les 5
minutes
- Clignote
- - Appareil prêt à l‘emploi /
- Sirène répétitive Déclenchement de l‘alarme
- Absence de son La fonction silence de l‘alarme
- 3 signaux sonores
- Signal sonore toutes
3 fois toutes
les 43 secondes
pendant
24 heures
courts en 43
secondes
les 43 secondes
Absence de son Rappel d‘alarme pour les
Mode normal / Détecteur
fonctionnant parfaitement
et prêt pour la détection de
fumée.
en raison de la détection de
fumée.
est activée pendant environ
10 minutes (±1 minute).
Dysfonctionnement / Panne du
capteur / Fin du cycle de vie
Signal de dysfonctionnement
du détecteur en cas de pile
déchargée.
24 prochaines heures.
15
Activation préventive de la
fonction silence du signal d'alarme
pendant environ 10 minutes (±1
minute) en appuyant brièvement
sur le bouton.
Activation de la fonction silence
du signal d'alarme pendant
environ 10 minutes (±1 minute)
en appuyant brièvement sur le
bouton.
Le mode silence peut être
désactivé à l'aide de la fonction
de test : Pression longue sur le
bouton (3 s min.) jusqu'à ce qu'un
puissant signal sonore retentisse
par intermittence.
Remplacement de l'appareil
Remplacement de l'appareil
Vous pouvez désactiver le rappel
d'alarme en appuyant sur la
touche du mode silence.
DEGBFRITPL

Q10 Rilevatore di fumo FMR 4467
Acquistando il presente articolo, avete scelto un prodotto GEV
di pregiata qualità. Leggere attentamente le istruzioni d‘uso per
garantire un funzionamento impeccabile. Conservare con cura
le istruzioni per un‘eventuale consultazione successiva.
Il prodotto è destinato solo all‘utilizzo previsto (come descritto
nelle presenti istruzioni per l‘uso). Non è consentito eseguire
variazioni, modifiche o verniciature, pena l‘annullamento
della garanzia e per non compromettere il funzionamento del
rilevatore di fumo.
L‘Q10 Rilevatore di fumo FMR 4467 è un rilevatore di fumo
fotoelettrico per la rilevazione preventiva ed ecace degli incendi
in abitazioni private, appartamenti e camere con finalità analoghe
a soddisfare gli obblighi legali concernenti i rilevatori di fumo. La
notte è il momento più frequente in cui si verificano incendi. Durante
il sonno l‘olfatto non è attivo negli esseri umani e il fumo non può
essere percepito. Pertanto, un rilevatore di fumo è in grado di
fornire una protezione ecace e preventiva dal pericolo imminente.
L‘allarme viene attivato non appena il fumo entra all‘interno del
dispositivo. Le fiamme non sono percepite dal dispositivo.
Per mantenere bassi i costi di manutenzione e di esercizio, il Q10
Rilevatore di fumo FMR 4467 è stato progettato con una batteria
a litio, fissa installata, per una durata prolungata per ben 10
anni. Non è necessario sostituire la batteria. Trascorsa la durata
di esercizio di 10 anni l‘Q10 Rilevatore di fumo FMR 4467 verrà
semplicemente sostituito. L‘allarme viene disattivato premendo
brevemente il tasto (fig. G1) per ca. 10 min. In questa operazione
l‘Q10 Rilevatore di fumo FMR 4467 viene spostato in uno stato
meno sensibile, ciò viene indicato dal lampeggiamento del LED
rosso ogni 10 secondi. Se l‘indice di oscuramento è eccessivo,
l‘allarme viene nuovamente attivato.
Attenzione: Per evitare il possibile danneggiamento della batteria, il
rilevatore non deve essere sottoposto ad un calore eccessivamente
elevato. Il rilevatore dispone di una memoria allarmi. Dopo la
disattivazione di un allarme, il LED verde lampeggia 3 volte per 43
secondi e si ferma dopo 24 ore.
Posizione di montaggio
Per una protezione ottimale della casa, i rilevatori di fumo devono
essere installati in tutte le camere, nei corridoi, nelle cantine e
nei magazzini. Si raggiunge una sicurezza base già con l‘uso di
rilevatori di fumo in tutte le camere da letto, nelle camerette per
bambini, nei corridoi e nelle vie di fuga di tutti i piani (fig. A).
Nota:
• Installare il rilevatore al centro del sotto.
• Non installare il rilevatore di fumo nei bagni (umidità
dell‘aria elevata), nei garage (gas discarico), in ambienti
con correnti d‘aria elevate (anche per l‘ingresso o lo scarico di
ventilatori) e in angoli sul solaio (fig. D).
• Nei tetti con pendenza ≤ 20° è possibile montare il rilevatore al
centro come per i sotti orizzontali.
• Nei tetti con pendenza > 20° il rilevatore deve essere montato a
una distanza min. di 0,5 m e max. di 1 m dal vertice del sotto
(fig. D).
• Se l‘inclinazione massima proporzionale ha un angolo tetto > 20°
e i sotti orizzontali hanno una larghezza di ≤ 1 m, il rilevatore
deve essere montato a min. 0,5 m e max. 1 m dal vertice del
sotto sull‘inclinazione del tetto (fig. D). Se invece il sotto
orizzontale è più largo di 1 m, il rilevatore può essere montato al
centro del sotto (fig. D1).
• Mantenere una distanza min. di 50 cm da pareti, travi del sotto
(travi principali), mobili e luci (fig. B - C). Se sono presenti travi
sul sotto, vale quanto segue:
Altezza ≤ 20 cm: Non vengono considerati i solai. Il rilevatore può
essere installato anche sulla trave.
Altezza > 20 cm e solaio > 36 m²: Per ogni solaio montare > 1
rilevatore.
Altezza > 20 cm e solaio ≤ 36 m²: Non vengono considerati i solai.
Il rilevatore può essere installato anche sulla trave.
16 17

• Le camere di oltre 60 m² e i corridoi lunghi più di 15 m richiedono
più rilevatori (fig. A).
• Adottare un‘altezza di montaggio massima di 6 m. Per sotti più
alti si consiglia il montaggio di più rilevatori a diversi livelli.
• Se un ambiente viene suddiviso in altezza con un pianerottolo
o una galleria, sarà necessario montare un rilevatore sotto queste
strutture, qualora la relativa superficie sia superiore a 16 m²
come anche la rispettiva larghezza e lunghezza superino i 2 m.
• Mantenere una distanza di min. 4 m da camini e focolai aperti.
ecc.
Montaggio/messa in funzione
• Adeguare il tipo di fissaggio al fondo di montaggio, per evitare
lesioni.
• In primo luogo, montare la base di attacco possibilmente al
centro del sotto (fig. E).
• Proteggere le apparecchiature dalla polvere di foratura.
• Portare il perno di sicurezza rosso della batteria dalla posizione
OFF in direzione ON, girarlo per fissarlo sul lato e premerlo nella
tacca prevista (fig. F).
• Posizionare il rilevatore sulla base di attacco e ruotarlo in senso
orario fino quando non scatta in posizione (fig. G).
• Eseguire il test tenendo premuto il tasto Test/Riposo fin quando
non viene emesso un potente segnale acustico a intermittenza
(vedere anche Test/Manutenzione). Il rilevatore è ora pronto per
l‘utilizzo e, dopo un test, è sempre in mute con una sensibilità
di rilevamento del fumo ridotta. Il LED rosso lampeggia ogni
10 secondi. Dopo circa 10 minuti, questa modalità termina
automaticamente e il rilevatore di fumo entra nella modalità di
rilevamento normale. È possibile interrompere la funzione mute
manualmente in qualsiasi momento tenendo premuto il tasto
Test/Riposo fin quando non viene emesso un segnale acustico.
• In caso di problemi tecnici, rivolgersi al produttore o al distributore
disponibile nel proprio paese.
Utilizzo
Il tasto Test/Riposo (fig. G1) ha due funzioni:
1. Funzione mute del segnale di allarme per ca. 10 min. con
una breve pressione del tasto in caso di attivazione
dell‘allarme o, preventivamente, per impedire un allarme.
Durante questi 10 minuti, il LED rosso lampeggia ogni 10
sec. ca. Se l‘indice di oscuramento è eccessivo, l‘allarme
viene nuovamente attivato.
2. Funzione test del rilevatore con pressione del tasto fin
quando non viene emesso un potente segnale acustico a
intermittenza.
Test/manutenzione
Nella funzione test il rilevatore viene verificato completamente
a norma EN 14604: Controllo di funzionamento della batteria,
test elettronico della camera a fumo, controllo dell‘elettronico
ecc. Eseguire un test min. 1 volta l‘anno. Tenere premuto il
tasto (fig. G1) fin quando non viene emesso un potente segnale
acustico a intermittenza (ca. 85 dB/3 m), quindi rilasciare il tasto.
L‘unità deve essere asciugata, a seconda delle esigenze, circa
1 volta l‘anno e ripulita dall‘esterno con attenzione con un
aspirapolvere.
Prestare attenzione ai mobili nel raggio di 0,5 m, per evitare
eventualmente la penetrazione di fumo. In tal caso verificare il
punto di montaggio e se necessario determinarlo nuovamente
o allontanare i mobili interessati.
Il rilevatore esegue costantemente un test automatico. Durante
questo test vengono verificati, tra l‘altro, l‘elettronica, la
tensione e la resistenza interna della batteria, il funzionamento
della camera a fumo. Il regolare funzionamento e la
disponibilità al funzionamento vengono segnalati con un breve
lampeggiamento del LED rosso ogni 5 min. ca.
Sostituire il rilevatore di fumo in caso di danno meccanico o in
caso di un messaggio di errore non ripristinabile, comunque al
massimo ogni 10 anni dalla messa in funzione.
17
DEGBFRITPL

Non è possibile sostituire la batteria.
Nota:
Se il rilevatore dovesse essere esposto a una quantità
eccessiva di polvere o, ad esempio, di vapore, ciò potrebbe
provocare l‘innesco di un allarme. Disattivare nuovamente l‘allarme
premendo brevemente il tasto. Il rilevatore entra in modalità mute
con una sensibilità ridotta per ca. 10 minuti. Se l‘allarme continua
a scattare per il fatto che il rilevatore di fumo ha subito un danno
permanente a causa della sporcizia, sostituirlo.
Note su batterie e accumulatori
Questo dispositivo è provvisto di una batteria a litio integrata
del tipo CR 123A. Le batterie usate non devono essere smaltite
come rifiuti urbani indierenziati. Chi possiede batterie usate
è tenuto per legge a restituirle al punto di vendita. Le batterie
contengono sostanze nocive per l‘ambiente e per la salute e
devono pertanto essere smaltite conformemente alle normative in
vigore.
Istruzioni per il riciclaggio
Il presente dispositivo non deve essere smaltito come
rifiuto domestico indierenziato. Chi possiede un vecchio
dispositivo è vincolato per legge allo smaltimento conformemente
alle normative in vigore. Per ulteriori informazioni rivolgersi
all‘amministrazione comunale.
Comportamento corretto in caso di incendio
Mantenere la calma!
!
Comunicare l‘allarme ai vigili del fuoco.
Per i vigili del fuoco sono rilevanti le seguenti informazioni:
• Come si chiama? (nome, numero di telefono)
• Dove è scoppiato l‘incendio? (indirizzo)
• Cosa è successo? (entità dell‘evento)
• Quanti feriti ci sono?
• Attendere le domande dell‘interlocutore.
• Avvisare tutti i coinquilini.
• Aiutare anziani e persone aette da malattie o handicap.
• Chiudere tutte le porte e le finestre.
• Non usare l‘ascensore. Se avete dei dubbi se si tratti di un falso
allarme o meno, assumere un comportamento simile
ad un reale caso di incendio.
Dati tecnici
Denominazione del tipo: Q10 Rilevatore di fumo FMR 4467
Funzionamento a batteria: CR 123A Al litio da 3 volt integrata
Durata della batteria: 10 anni con uso conforme
alle disposizioni
Volume del segnale: 85 dB/3 m
Umidità relativa: 95 % non condensante
Gamma delle temperature
di esercizio: da -10 °C a +40 °C
Autorizzazione: EN 14604:2005/AC:2008
Numero CPR: 0832-CPR-F2162
Numero VdS: G217093
Dimensioni: Ø 102 mm, altezza 32 mm
L‘azienda si riserva il diritto di apportare modifiche tecniche ed
estetiche senza preavviso.
18 19

Tabella delle funzioni
LED rosso LED verde Segnale acustico Nota esplicativa Rimedio
Lampeggia ogni
5 minuti ca.
Lampeggia ca.
2 volte al secondo
Lampeggia ogni
10 secondi ca.
Lampeggia ogni
10 secondi ca.
Lampeggia ogni
5 minuti ca.
- Lampeggia
- - Disponibilità al funzionamento/
- Segnale acustico
intermittente
- Nessun suono Allarme-mute attivato
- 3 brevi segnali
- Segnale acustico ogni
3 volte ogni
43 secondi per
24 ore
acustici per 43
secondi
43 secondi
Nessun suono Memoria allarmi per le
modalità normale/
Il rilevatore funziona
regolarmente ed è pronto a
rilevare la presenza di fumo.
Attivazione dell‘allarme del
rilevatore in caso di
rilevamento di fumo
per 10 ± 1 minuti.
Mancato funzionamento /
errore dei sensori / fine del
ciclo di vita
Segnale di errore del rilevatore
con batteria scarica.
prossime 24 ore.
19
Funzione mute preventiva del
segnale di allarme per 10 ± 1
minuti con breve pressione del
tasto.
Funzione mute del segnale di
allarme per 10 ± 1 minuti con
breve pressione del tasto.
Con la funzione di test è possibile
disattivare il mute: lunga pressione
del tasto (min 3 sec.) fin quando
non viene emesso un potente
segnale acustico a intermittenza.
Sostituzione del dispositivo
Sostituzione del dispositivo
La memoria allarmi può essere
terminata premendo il tasto mute.
DEGBFRITPL

Q10 Detektor dymu FMR 4467
Zakupili Państwo wysokiej jakości produkt firmy GEV. Proszę
uważnie przeczytać niniejszą instrukcję obsługi, aby zapewnić
prawidłowe funkcjonowanie urządzenia. Niniejszą instrukcję
obsługi należy zachować w celu wykorzystania jej w przyszłości.
Produkt nadaje się tylko do użytku zgodnego z przeznaczeniem
(w sposób opisany w niniejszej instrukcji obsługi). Nie wolno
przeprowadzać zmian i modyfikacji ani lakierować detektora
dymu, gdyż w przeciwnym razie będzie to miało niekorzystny
wpływ na jego działanie i spowoduje wygaśnięcie wszelkich
roszczeń z tytułu gwarancji.
Urządzenie Q10 Detektor dymu FMR 4467 jest fotoelektronicznym
detektorem dymu do niezawodnego, wczesnego wykrywania
pożarów w prywatnych posiadłościach, mieszkaniach i
pomieszczeniach o charakterze mieszkalnym, który pozwala
spełnić ustawowy obowiązek stosowania detektorów dymu.
Nocą występuje największe prawdopodobieństwo pojawienia się
pożaru. W trakcie snu zmysł węchu u człowieka jest nieaktywny,
przez co dym nie jest wyczuwany. Dlatego też czujnik dymu
zapewnia skuteczną i wczesną ochronę przed grożącym
niebezpieczeństwem. Alarm jest aktywowany wówczas, kiedy
dym dostanie się do środka urządzenia. Urządzenie nie jest
przystosowane do wykrywania płomieni.
W celu obniżenia kosztów konserwacji i eksploatacji w Q10
Detektorze dymu FMR 4467 wbudowana jest na stałe bateria litowa
o wysokiej trwałości 10 lat. Wymiana baterii nie jest konieczna. Po
upływie 10 lat użytkowania baterii następuje wymiana czujnika Q10
Detektor dymu FMR 4467. Alarm można wyłączyć na około 10 min,
naciskając krótko przycisk (rys. G1). Na ten czas czułość czujnika
Q10 Detektor dymu FMR 4467 zostanie obniżona, na co będzie
wskazywać miganie czerwonej diody LED w odstępach co 10 s. W
przypadku zbyt dużego zadymienia alarm uruchomi się ponownie.
Uwaga: Aby uniknąć potencjalnego zagrożenia spowodowanego
przez baterię, czujnik nie może być narażany na nadmiernie
wysoką temperaturę. Sygnalizator posiada funkcję przypominania
o alarmie. Po wyłączeniu alarmu zielona dioda LED miga trzykrotnie
co 43 sekundy i wyłącza się dopiero po upływie 24 godzin.
Miejsce montażu
Aby zapewnić optymalne zabezpieczenie gospodarstw domowych,
należy zamontować detektory dymu we wszystkich pokojach, na
korytarzach, w piwnicach i magazynach. Minimalne zabezpieczenie
zapewniają detektory dymu we wszystkich sypialniach, pokojach
dla dzieci, korytarzach i na drogach ewakuacyjnych każdej
kondygnacji (rys. A).
Wskazówka:
• Umieścić detektor na środku sufitu.
• Nie należy instalować detektorów dymu w łazienkach
(wysoka wilgotność powietrza), w garażach (spaliny), w
otoczeniu narażonym na przeciągi (również np. przy
wylocie/wlocie wentylacji) oraz przy szczycie na poddaszu (rys. D).
• W przypadku nachylenia dachu ≤20° detektor można
zamontować na środku sufitu podobnie jak w przypadku dachów
poziomych.
• W przypadku nachylenia dachu >20° należy zamontować
detektor w odległości min. 0,5 m i maks. 1 m od szczytu sufitu (rys. D).
• W przypadku, gdy częściowe skosy dachu mają kąt nachylenia
>20°, a poziomy sufit ma szerokość ≤1 m, montować detektory w
odległości min. 0,5 m i maks. 1 m od szczytu sufitu na jego skosie
(rys. D). W przypadku gdy poziomy sufit jest szerszy niż 1 m,
detektor można zamontować w jego centralnym punkcie (rys. D1).
• Należy zachować minimalny odstęp 50 cm od ścian, belek
stropowych (podciągów), elementów wyposażenia wnętrz
i lamp (rys. B–C). Jeżeli występują belki stropowe (podciągi),
zastosowanie znajdują poniższe wskazówki:
Wysokość ≤20 cm: pola sufitu pozostają nieuwzględnione. Detektor
może być również zamontowany na belce stropowej (podciągu).
Wysokość >20 cm, pole sufitu >36 m²: na każde pole sufitu
zamontować >1 detektor.
20 21

Wysokość >20 cm, pole sufitu ≤36 m²: pola sufitu pozostają
nieuwzględnione. Detektor może być również zamontowany na
belce stropowej (podciągu).
• W pomieszczeniach o powierzchni powyżej 60 m² i na
korytarzach o długości powyżej 15 m należy zamontować kilka
detektorów (rys. A).
• Należy zachować maksymalną wysokość montażu, wynoszącą
6 m. W przypadku wyższych sufitów zaleca się montowanie kilku
czujników na różnych poziomach.
• Jeżeli wysokość pomieszczenia jest podzielona przez podest lub
galerię, których powierzchnia jest większa niż 16 m², a długość
i szerokość przewyższa 2 m, wymagany jest pod nimi montaż
detektora.
• Zachować co najmniej 4 m odstępu od otwartych kominków,
kuchenek itd.
Montaż/uruchomienie
• Aby uniknąć obrażeń, dopasować rodzaj mocowania do podłoża
montażowego.
• Najpierw zamontować cokół jak najbliżej środka sufitu (rys. E).
• Zabezpieczyć urządzenia przed pyłem powstającym podczas
wiercenia.
• Wysunąć czerwony kołek zabezpieczający baterii z położenia
OFF w kierunku ON i obrócić go w bok w celu zablokowania,
wsuwając go przy tym w przewidziane wycięcie (rys. F).
• Nałożyć detektor na cokół i obracać zgodnie z ruchem
wskazówek zegara tak, aby zatrzasnął się w blokadzie (rys. G).
• Przeprowadzić funkcje testowe, wciskając przycisk testu/
wyciszenia tak długo, aż rozlegnie się głośny pulsujący sygnał
alarmowy (patrz również część Test/konserwacja). Detektor
jest teraz gotowy do użytku, a po przeprowadzeniu testu zawsze
znajduje się w stanie wyciszenia z niewielką czułością
wykrywania dymu. Czerwona dioda LED miga co 10 sekund. Po
około 10 minutach tryb ten zostanie zakończony automatycznie,
a detektor dymu przejdzie w tryb normalnego wykrywania dymu.
Wyciszenie można w każdej chwili wyłączyć ręcznie,
przytrzymując wciśnięty przycisk testowania/wyciszenia do
momentu, aż rozlegnie się sygnał dźwiękowy.
• W razie problemów technicznych zwrócić się do producenta
lub dystrybutora w danym kraju.
Obsługa
Przycisk testowania/wyciszenia (rys. G1) ma dwie funkcje:
1. Wyciszenie sygnału alarmowego na ok. 10 min poprzez
krótkie naciśnięcie przycisku podczas trwania alarmu lub
zapobiegawczo, aby nie dopuścić do jego wyzwolenia. W
ciągu tych 10 min co ok. 10 s miga czerwona dioda
LED. Jeżeli zadymienie będzie zbyt duże, alarm włączy się
ponownie.
2. Test detektora przez naciśnięcie i przytrzymanie przycisku
do momentu, aż rozlegnie się głośny, pulsujący sygnał
alarmowy.
Test/konserwacja
Podczas testu czujnik jest całkowicie sprawdzany zgodnie z
normą EN 14604: sprawdzenie działania baterii, elektroniczny
test komory dymowej, sprawdzenie układu elektronicznego itd.
Test powinien być przeprowadzany minimum raz w roku. W
tym celu należy przytrzymać przycisk (rys. G1) do momentu,
aż rozlegnie się głośny, pulsujący sygnał alarmowy (ok. 85 dB
przy odl. 3 m), następnie można puścić przycisk.
W razie potrzeby należy raz w roku przetrzeć urządzenie na
sucho i ostrożnie odkurzyć z zewnątrz odkurzaczem.
Należy zwrócić uwagę na elementy wyposażenia w obrębie 0,5
m, które mogą utrudniać dotarcie dymu do czujnika. W takim
wypadku należy sprawdzić miejsce montażu i ewentualnie
ustalić nowe lub usunąć odpowiednie elementy wyposażenia.
Czujnik samoczynnie i nieprzerwanie przeprowadza
automatyczny test. Podczas autotestu sprawdzany jest
układ elektroniczny, napięcie i opór czynny wewnętrzny
baterii, działanie komory dymowej itd. Prawidłowe działanie i
gotowość do pracy sygnalizowane są przez miganie czerwonej
21
DEGBFRITPL

diody LED co ok. 5 min.
Detektor dymu należy wymienić w przypadku uszkodzenia
mechanicznego lub pojawienia się komunikatu o zakłóceniach,
którego nie można skasować, jednak najpóźniej po 10 latach od
uruchomienia urządzenia. Wymiana baterii nie jest możliwa.
Wskazówka:
Jeśli detektor będzie narażony na działanie dużej ilości pyłu
lub np. pary wodnej, może dojść do wyzwolenia alarmu.
Wyłączyć alarm, naciskając krótko przycisk. Detektor
przełączy się na ok. 10 min w tryb wyciszenia z niską czułością.
W przypadku ponownego wyzwalania alarmu na skutek trwałego
uszkodzenia detektora dymu przez zanieczyszczenia, należy
wymienić go na nowy.
Informacje o bateriach i akumulatorach
W urządzenie wbudowana jest na stałe bateria litowa
typu CR 123A. Starych baterii nie wolno wyrzucać razem z
niesortowanymi odpadami komunalnymi. Posiadacze starych
baterii są ustawowo zobowiązani do ich zwrotu i mogą nieodpłatnie
przekazać je do punktów sprzedaży. Baterie zawierają substancje
szkodliwe dla środowiska i zdrowia, dlatego należy je prawidłowo
utylizować.
Informacje dotyczące recyclingu
Urządzenia nie można wyrzucać razem z niesortowanymi
odpadami domowymi. Właściciele starych urządzeń
są prawnie zobowiązani do zutylizowania urządzenia w
odpowiedni sposób. Informacje na ten temat można uzyskać we
właściwym urzędzie miasta lub gminy.
Właściwe postępowanie na wypadek pożaru
Należy zachować spokój!
!
Powiadomić straż pożarną.
Istotne informacje dla straży pożarnej:
• Jak się nazywasz? (imię i nazwisko, numer telefonu)
• Gdzie się pali? (adres)
• Co się stało? (zakres)
• Ile osób jest rannych?
• Czekać na pytania rozmówcy.
• Należy ostrzec wszystkich współmieszkańców.
• Pomóc osobom starszym, chorym i niepełnosprawnym.
• Zamknąć wszystkie okna i drzwi.
• Nie korzystać z windy. W razie wątpliwości odnośnie tego, czy
alarm jest prawdziwy, czy fałszywy, należy zachować się tak,
jakby faktycznie wystąpił pożar.
Dane techniczne
Oznaczenie typu: Q10 Detektor dymu FMR 4467
Zasilanie bateryjne: Bateria litowa 3 V CR 123A,
wbudowana na stałe
Trwałość baterii: 10 lat przy użytkowaniu
zgodnym z przeznaczeniem
Siła głośności sygnału: 85 dB przy odl. 3 m
Względna wilgotność powietrza: 95%, bez kondensacji
Zakres temperatury roboczej: Od -10 do +40°C
Dopuszczenie: EN 14604:2005/AC:2008
Numer CPR: 0832-CPR-F2162
Numer VdS: G217093
Wymiary: Ø 102 mm, wysokość 32 mm
Zastrzega się możliwość zmian w zakresie danych technicznych i
wyglądu bez wcześniejszego powiadomienia.
22 23

Tabela funkcji
Czerwona
dioda LED
Miga co ok. 5 min - - Gotowość do pracy/tryb
Miga ok. 2 razy na
sekundę
Miga co ok. 10 s - Brak dźwięku Wyciszenie sygnału alarmu
Miga co ok. 10 s - 3 krótkie sygnały
Miga co ok. 5 min - Sygnał dźwiękowy co
- Miga trzykrotnie
Zielona dioda
LED
- Pulsujący dźwięk
Dźwięk Objaśnienie Środek zaradczy
alarmowy
dźwiękowe co
43 sekundy
43 sekundy
co 43 sekundy
przez 24
godziny
Brak dźwięku Przypomnienie o alarmie przez
normalny/
Detektor działa prawidłowo
i jest gotowy do wykrywania
dymu.
Wyzwolenie alarmu przez
detektor w przypadku
wykrycia dymu.
na 10 min ±1 min jest
uaktywnione.
Nieprawidłowe działanie/awaria
czujników/koniec żywotności
baterii.
Sygnał zakłóceń czujnika
oznaczający rozładowaną
baterię.
następne 24 godziny.
23
Zapobiegawcze wyciszenie
sygnału alarmu na 10 min ±1
min przez krótkie naciśnięcie
przycisku.
Wyciszenie sygnału alarmu na
10 min ±1 min przez krótkie
naciśnięcie przycisku.
Wyciszenie może zostać
anulowane przez funkcję testu:
długie naciśnięcie przycisku (min.
3 s) do momentu, aż rozlegnie
się głośny, pulsujący sygnał
alarmowy.
Wymiana urządzenia
Wymiana urządzenia
Naciskając na przycisk wyciszenia,
można wyłączyć przypomnienie o
alarmie.
DEGBFRITPL

G217093
Q10 Rauchwarnmelder FMR 4467
EN 14604:2005/AC:2008
0832-CPR-F2162
G217093
DoP-Nr.: DK01422300
http://www.gev.de/dop/a4009004467.pdf
GEV GmbH
Heidehofweg 16
25499 Tangstedt
Germany
www.gev.de
service@gev.de
Hotline: +49 (0)180/59 58 555
0832
Max. 14 Ct./Min aus dem deutschen Festnetz.
17
Mobil max. 42 Ct./Min.
International calls may vary.
BA01401001
 Loading...