

Page 1

Operation Guide Bedienungsanleitung
Guía de funcionamiento
Manuel de fonctionnement Guida d’Uso
Инструкция по эксплуатации
Rugged Mobile Computing Solutions
T800
操作指南
Page 2

English ......................................... 1
Deutsch ....................................... 6
Español ...................................... 11
Français ..................................... 16
Italiano ...................................... 21
Pусский ...................................... 26
繁體中文 .................................... 31
简体中文 .................................... 36
TRADEMARKS
All brand and product names are trademarks or registered trademarks of their respective
owners.
NOTE
The information in this manual is subject to change without notice.
Depending on the model you purchased, the appearance of your computer may not be
exactly the same as those shown in this guide.
Page 3
Before You Begin
For complete information of the product,
refer to the User Manual (in PDF format) on
your Windows desktop or Driver disc.
You can download the latest manual and
drivers by accessing the Getac web link at
http://www.getac.com Support
Download.
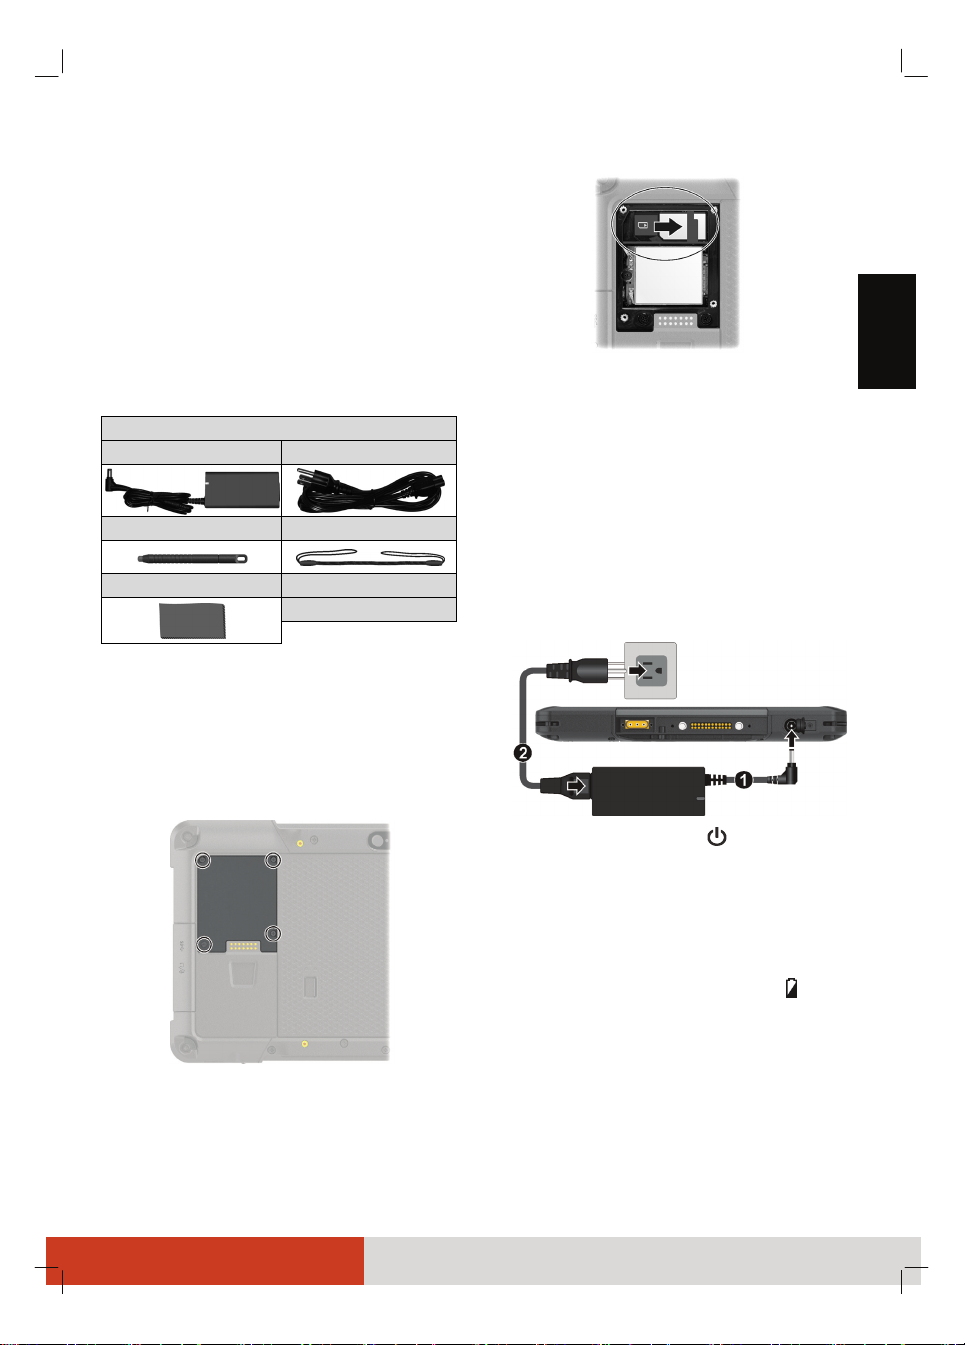
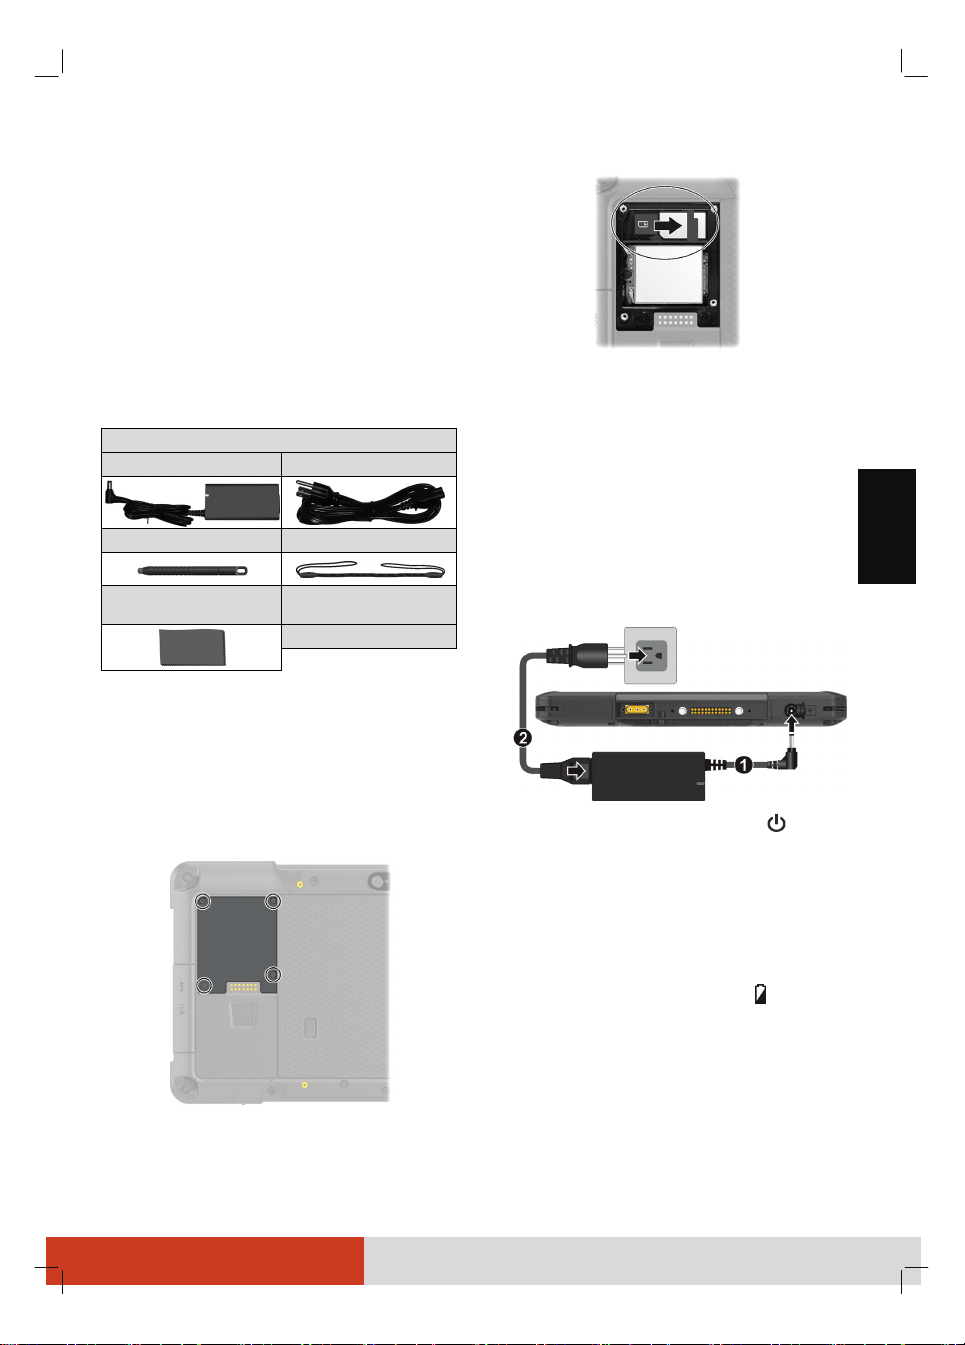
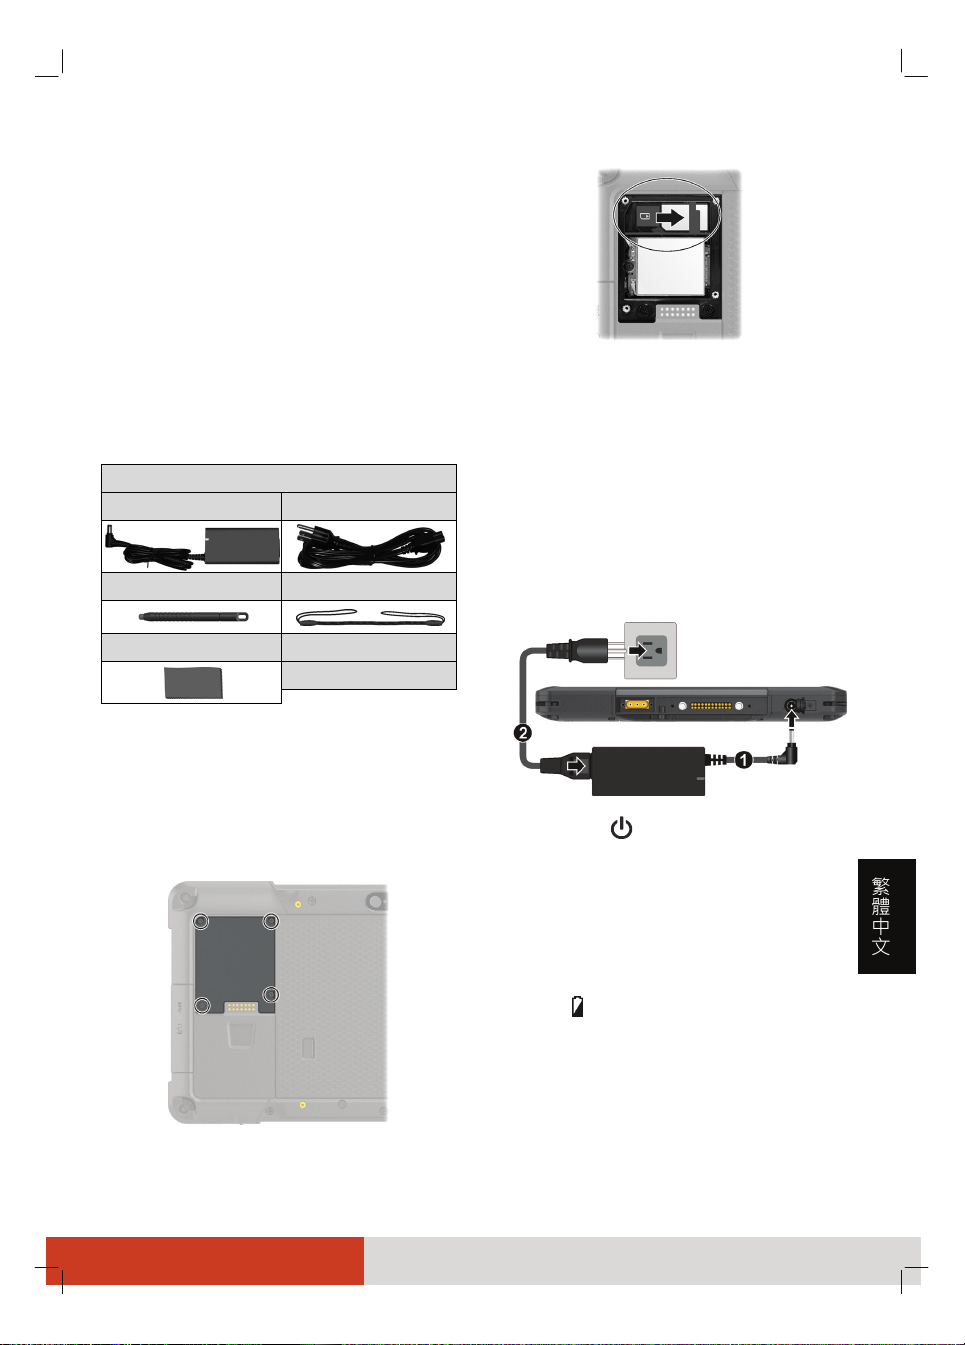
2. Noting the orientation, slide the SIM card
into place.
English
Getting the Tablet PC Running
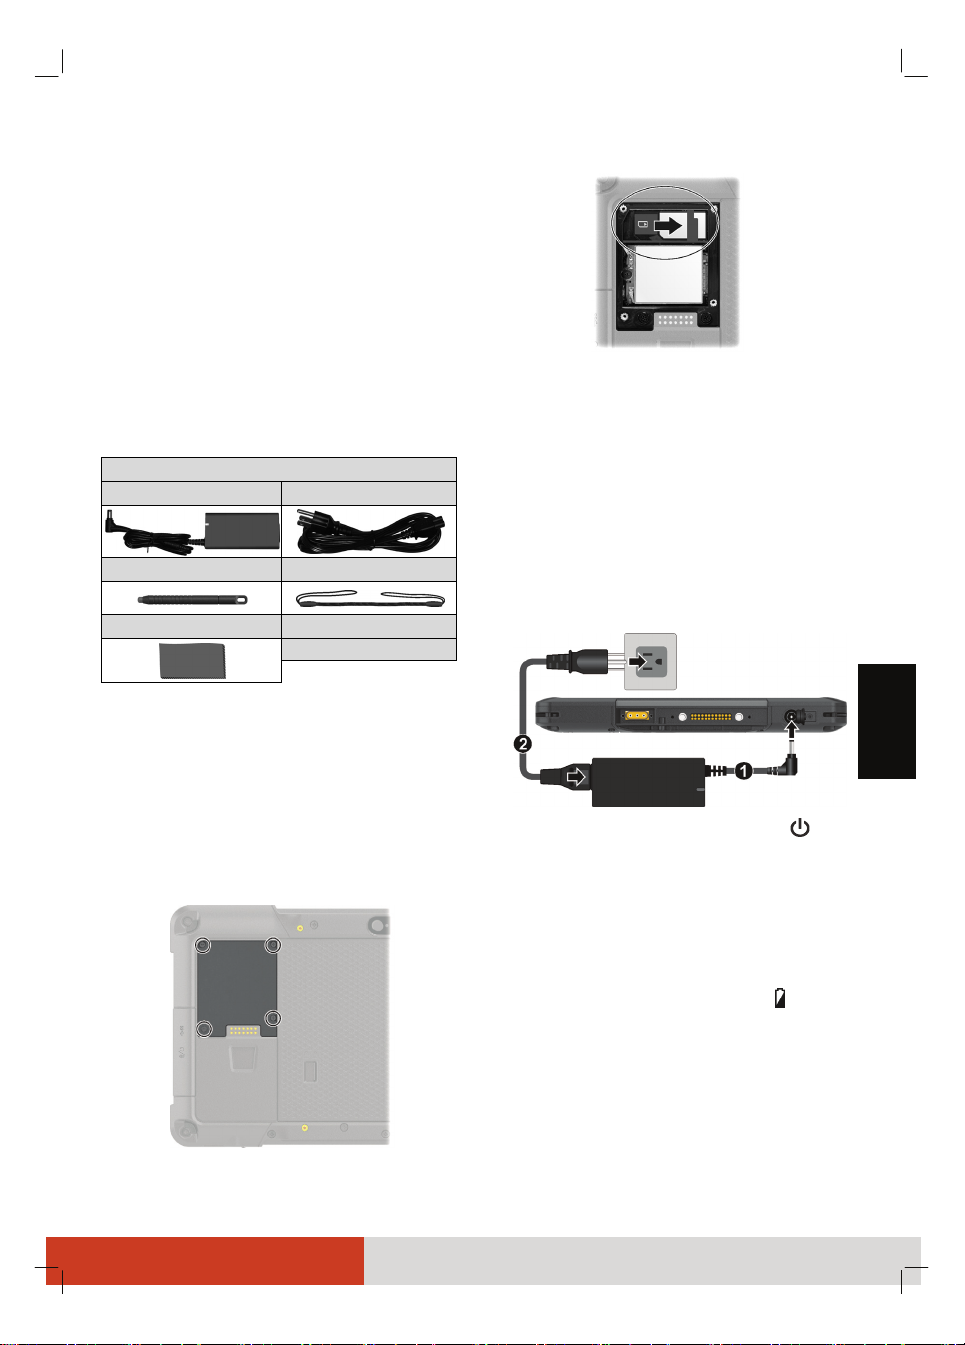
Unpacking
T800 Tablet PC
AC adapter AC power cord
Stylus Tether
Screen cleaning cloth Driver disc
NOTE: This packing list applies to standard
models. Select models may have different
items.
Installing the SIM Card (Optional)
1. Locate the SIM card cover. Remove the
cover by unfastening 4 screws.
Document(s)
3. Replace the cover and secure with 4
screws.
Connecting to AC Power and
Starting Up
The first time you use your Tablet PC, use the
AC adapter.
1. Plug the DC cord of the AC adapter to the
power connector of the Tablet PC (
2. Plug the female end of the AC power cord
to the AC adapter and the male end to an
electrical outlet (
3. Press the power button ( ) to start up.
The Windows operating system should
start.
).
).
Charging the Battery
To charge the battery, connect the AC
adapter to the computer and an electrical
outlet. The Battery Charge Indicator ( ) on
the Tablet PC glows amber to indicate that
charging is in progress. When the battery is
fully charged, the Battery Charge Indicator
glows green.
It takes approximately 3 hours to fully charge
the battery pack when the power is off and
approximately 3.5 hours when the power is
on.
1
Page 4
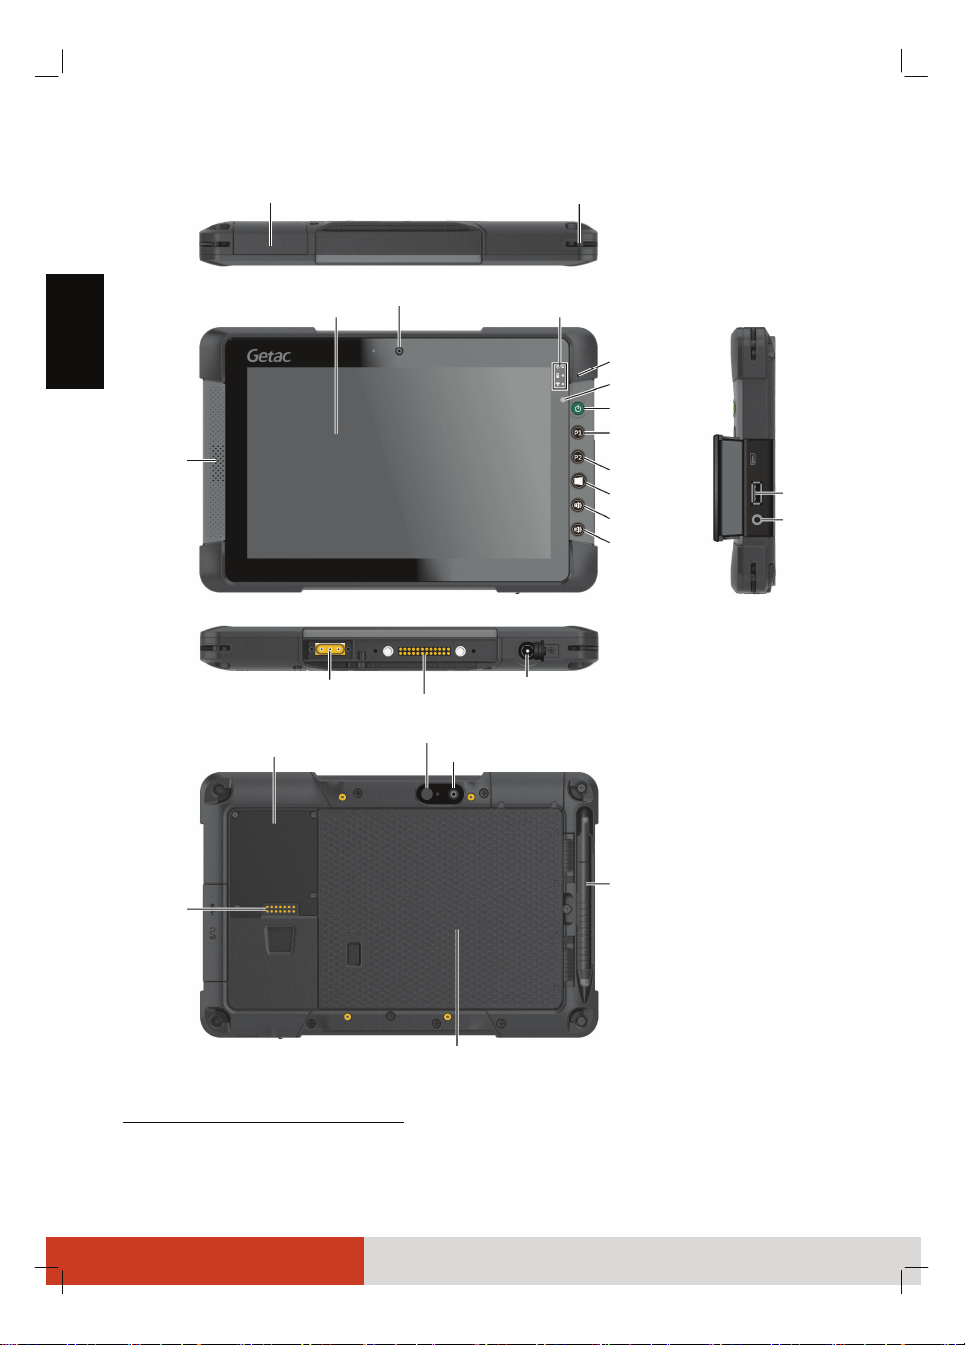
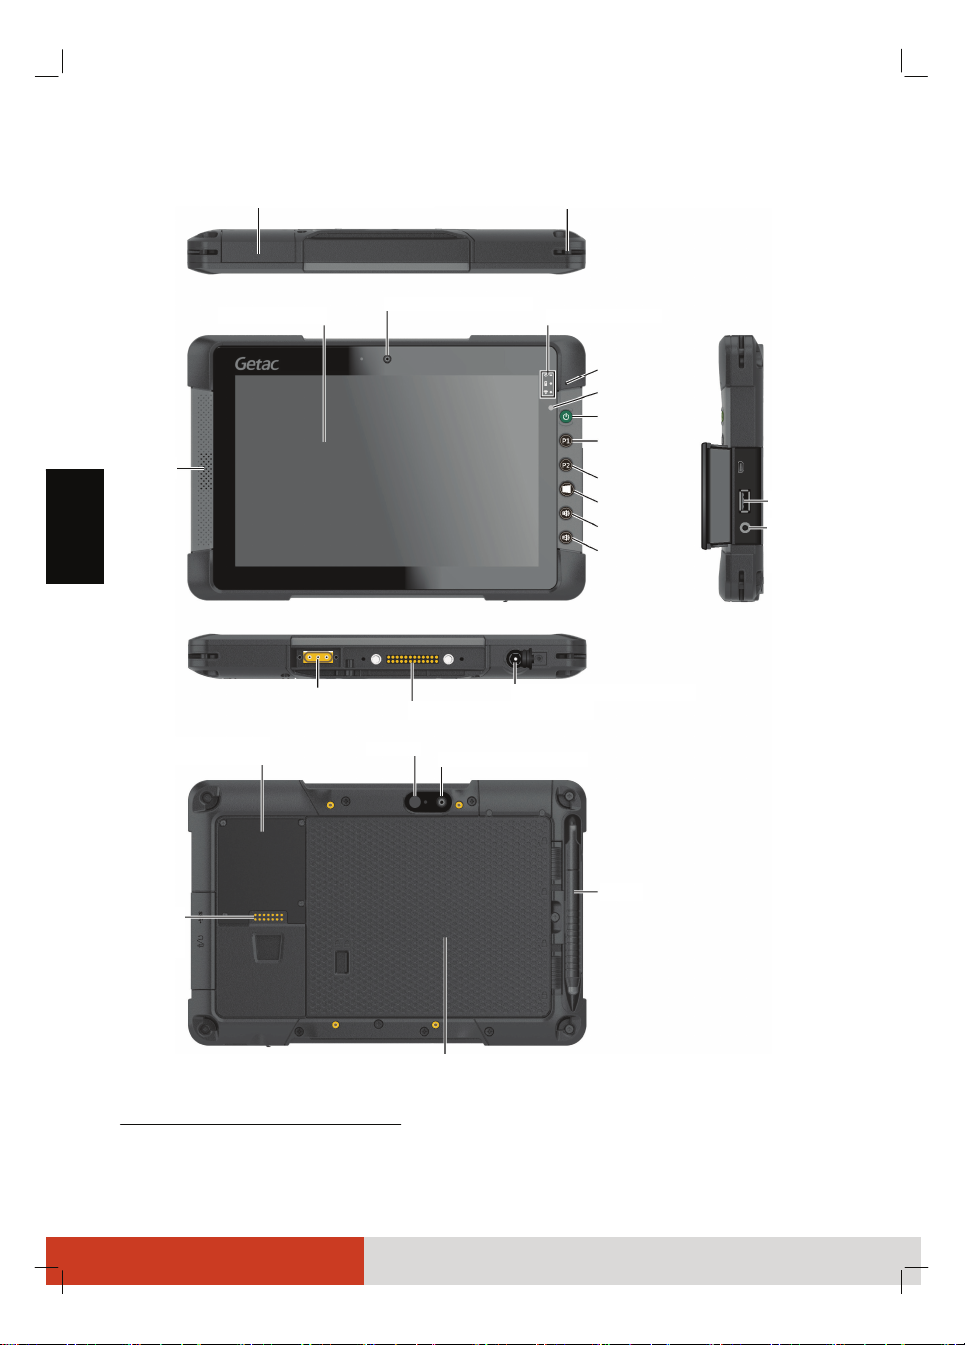
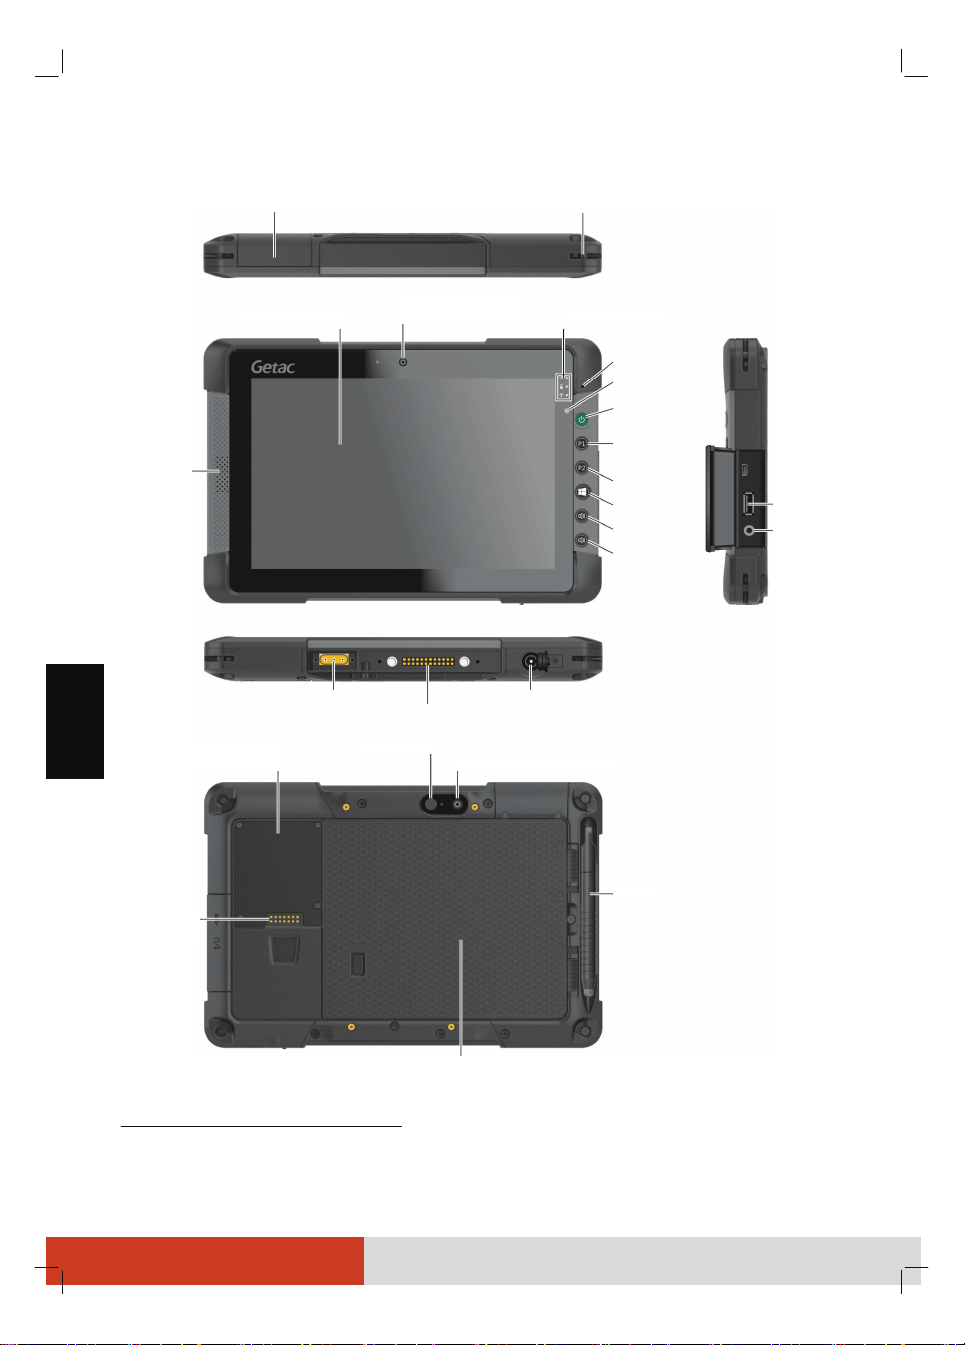
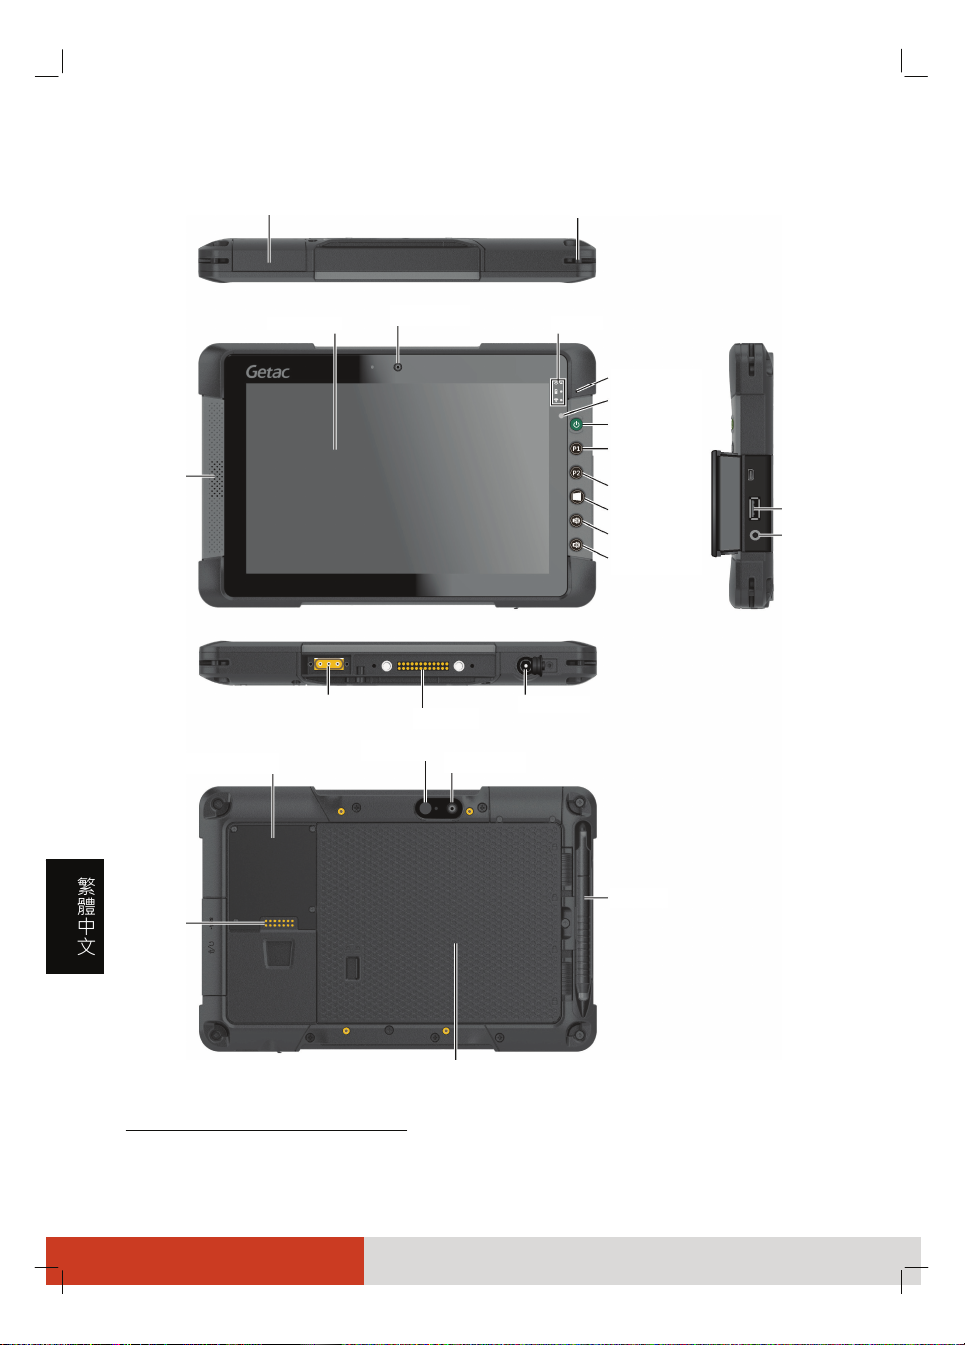
Taking a Look at the Tablet PC
See footnote1.
Tether holder x 4
English
Speaker
Touchscreen
Antenna pass-through
(GPS-WLAN-WWAN)
SIM card2cover
Camera lens
2
2
Docking connector
2
Flash
Camera lens
Power connector
2
Indicators
Microphone
Light sensor
Power button
Camera /
Trigger
OSDC
Start
Volume up
Volume down
USB 3.0 port
Combo audio
connector
Stylus
Expansion
connector
Battery pack
1
Select models have a component at this location. The component can be a serial port, microSD card slot, RJ-45
connector, or barcode reader lens.
2
Select models only.
2
Page 5

System Recovery
Taking Care of the Tablet PC
Windows 8 Models
If you're having problems with your Windows
8 computer, you can try one of the below
actions.
Restore your computer to an earlier point
in time.
Refresh your computer without affecting
your files.
Remove everything and reinstall Windows.
For more information, see the User Manual.
Windows 7 Models
A “System Recovery” tool allows you to
restore the Windows 7 system to the factory
state.
To run System Recovery:
1. Connect the AC adapter.
2. Turn on the Tablet PC. During system
startup when the logo screen appears, tap
and hold the screen or press the Windows
Logo button on your Tablet PC. This
invokes a menu. Select HDI Recovery in
the menu.
Or, if a keyboard is connected, you can
press Ctrl + Alt + F2 keys for four seconds
instead of tapping the screen.
3. In the screen that appears, select Recovery
to start the recovery process.
4. The progress bar shows the percentage
completed. When it reaches 100%, the
system turns off.
5. Turn on the computer. The Windows
setup wizard starts. Follow the onscreen
prompts to continue.
6. When the system restarts, the installer
screen appears. The installer will perform
system hardware detection and driver
installation.
7. When completed, the system restarts and
displays Windows desktop.
Location Guidelines
For optimal performance, use the Tablet
PC where the recommended temperature
is between 0 C (32 F) and 50 C (122 F).
(Aactual operating temperature depends
on product specifications.)
Avoid placing the Tablet PC in a location
subject to high humidity, extreme temperatures, mechanical vibration, direct sunlight, or heavy dust. Using in extreme
environments for long periods can result
in product deterioration and a shortened
product life.
Operating in an environment with metallic
dust is not allowed.
Place the Tablet PC on a flat and steady
surface. Do not stand the Tablet PC on its
side or store it in an upside-down position.
A strong impact by dropping or hitting
may damage the Tablet PC.
Do not cover or block any ventilation
openings on the Tablet PC. For example,
do not place the Tablet PC on a bed, sofa,
rug, or other similar surface. Otherwise,
overheating may occur that results in
damage to the Tablet PC.
As the Tablet PC can become very hot
during operation, keep it away from
objects that are vulnerable to heat.
Keep the Tablet PC at least 13 cm (5 inches)
away from electrical appliances that can
generate a strong magnetic field such as a
TV, refrigerator, motor, or a large audio
speaker.
Avoid moving the Tablet PC abruptly from
a cold to a warm place. A temperature
difference of more than 10 C (18 F) may
cause condensation inside the unit, which
may damage the storage media.
General Guidelines
Do not expose your skin to the Tablet PC
when operating it in a very hot or cold
environment.
Do not place heavy objects on top of the
Tablet PC as this may damage the display.
English
3
Page 6

The screen surface is easily scratched.
Avoid touching it with a sharp object such
as a pen or pencil.
LCD image sticking occurs when a fixed
pattern is displayed on the screen for a
prolonged period of time. You can avoid
the problem by limiting the amount of
static content on the display. It is recommended that you use a screen saver or
turn off the display when it is not in use.
To maximize the life of the backlight in
English
the display, allow the backlight to automatically turn off as a result of power
management.
Cleaning Guidelines
Never clean the Tablet PC with its power on.
Use a soft cloth moistened with water or
a non-alkaline detergent to wipe the
exterior of the Tablet PC.
Gently wipe the display with a soft, lint-
free cloth.
If water or liquid is split onto the Tablet PC,
wipe it dry and clean when possible.
Though your Tablet PC is water-proof, do
not leave the Tablet PC wet when you can
dry it.
If the Tablet PC gets wet where the tem-
perature is 0 C (32 F) or below, freeze
damage may occur. Make sure to dry the
wet Tablet PC.
Battery Pack Guidelines
Recharge the battery pack when it is nearly
discharged. When recharging, make sure
that the battery pack is fully charged.
Doing so may avoid harm to the battery
pack.
The battery pack is a consumable product
and the following conditions will shorten
its life:
– when frequently charging the battery
pack
– when using, charging, or storing the
battery in high temperature condition
To avoid hastening the deterioration of
the battery pack thereby prolonging its
useful life, minimize the number of times
you charge it so as not to frequently
increase its internal temperature.
Charge the battery pack between 10 C ~
30 C (50 F ~ 86 F) temperature range.
A higher environment temperature will
cause the battery pack’s temperature to
rise. Avoid charging the battery pack inside
a closed vehicle and in hot weather condition. Also, charging will not start if the
battery pack is not within the allowed
temperature range.
It is recommended that you do not charge
the battery pack more than once a day.
It is recommended that you charge the
battery pack with the Tablet PC’s power
off.
To maintain the battery pack’s operating
efficiency when removed from the Tablet
PC, store it in a cool dark place and with
30% ~ 40% charge remaining.
Important guidelines when using the bat-
tery pack.
When installing or removing the battery
pack take note of the following:
– avoid installing or removing the battery
pack when the Tablet PC is in Sleep
mode. Abruptly removing the battery
pack may cause loss of data or the
Tablet PC may become unstable.
– avoid touching the battery pack termi nals or damage may occur, thereby
causing improper operation to it or the
Tablet PC.
The Tablet PC’s input voltage and surrounding temperature will directly affect
the battery pack’s charge and discharge
time:
– charging time will be prolonged when
the Tablet PC is turned on.
To shorten the charging time, it is recom mended that you place the Tablet PC in
Sleep or hibernation mode.
– a low temperature will prolong the
charging time as well as hasten the dis charge time.
When using battery power in an extremely
low temperature environment, you may
experience shortened operating time and
incorrect battery level reading. This phenomenon comes from the chemical characteristics of batteries. The appropriate
operating temperature for the battery is
-10 C ~ 50 C (14 F ~ 122 F).
4
Page 7

Do not leave the battery pack in storage
for more than six months without
recharging it.
Touchscreen Guidelines
Use the finger or the included stylus on the
display. Using a sharp or metallic object
other than your finger or stylus may cause
scratches and damage the display, thereby
causing errors.
Use a soft cloth to remove dirt on the dis-
play. The touchscreen surface has a special
protective coating that prevents dirt from
sticking to it. Not using a soft cloth may
cause damage to the special protective
coating on the touchscreen surface.
Turn off the Tablet PC power when clean-
ing the display. Cleaning the display with
the power on may cause improper operation.
Do not use excessive force on the display.
Avoid placing objects on top of the display
as this may cause the glass to break
thereby damaging the display.
Using the touchscreen during low tempe-
rature (less than 5
response time. This is normal. A normal
response time may be restored upon returning to room temperature.
When there is a noticeable discrepancy in
the placement of the stylus on the screen
and the indicated position of the onscreen
pointer, use the calibration utility to recalibrate the touchscreen display.
o
C) may cause a slower
English
5
Page 8
Bevor Sie beginnen
Für vollständige Informationen über das
Produkt, lesen Sie das Handbuch (im PDF
Format) auf Ihrem Windows Desktop oder
der Treiber-CD.
Sie können das aktuelle Handbuch und
Treiber durch Aufruf des Getac Weblinks
http://www.getac.com Support
unter
Download.
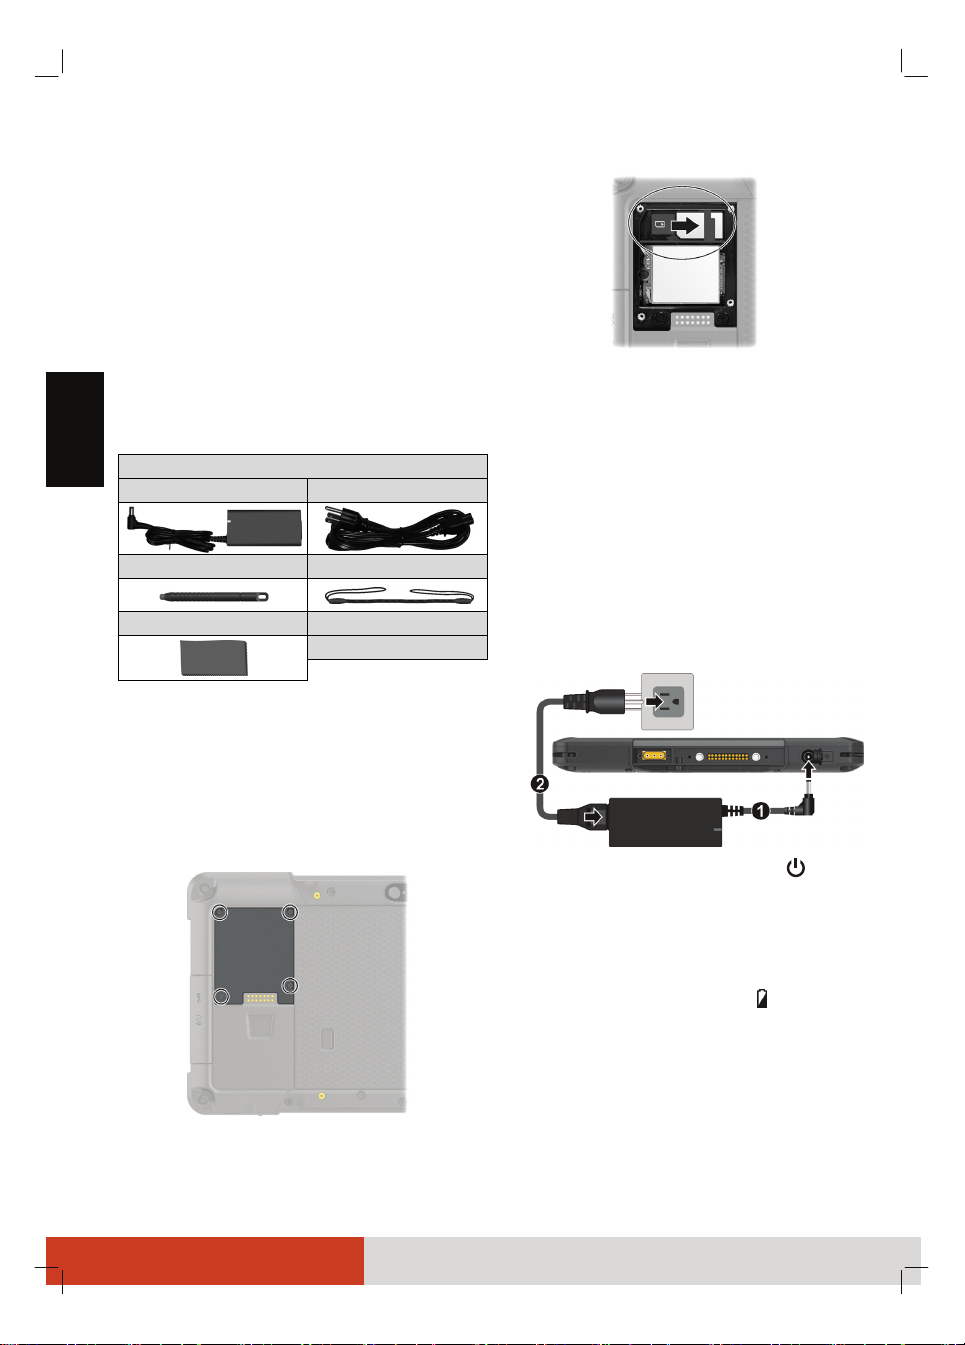
Den Computer betriebsfähig
machen
2. Stecken Sie die SIM-Karte ein, beachten
Sie die Ausrichtung.
3. Schließen Sie die Abdeckung und
befestigen Sie sie mit 4 Schrauben.
Auspacken des Lieferkartons
Deutsch
T800 Tablet PC
Netzteil Anschlussleitung
Stylus Befestigungsbandes
Bildschirmreinigungstuch Treibermedium
Dokument(e)
HINWEIS: Der Lieferumfang gilt für Standardmodelle, kann bei bestimmten Modellen
abweichen.
Einlegen der SIM Karte (Optional)
1. Suchen Sie nach der SIM-Kartenfachabdeckung. Entfernen Sie die Abdeckung
durch Lösen der 4 Schrauben.
6
Netzkabel anschließen und
Computer einschalten
Wir empfehlen, dass Sie den Computer beim
erstmaligen Einschalten mit Netzstrom
versorgen.
1. Verbinden die Gleichstromleitung des
Netzteils mit dem Netzanschluss an der
Rückseite des Computers (
2. Verbinden Sie die Anschlussbuchse der
Anschlussleitung mit dem Netzteil und
den Netzstecker mit einer Steckdose (
3. Betätigen Sie den Netzschalter ( ). Das
Windows-Betriebssystem sollte starten.
).
).
Aufladen des Akkus
Um den Akku aufzuladen, schließen Sie das
Netzteil an den Computer und eine Netzsteckdose an. Die Akkuladeanzeige ( ) am Computer leuchtet gelb, um den Ladevorgang anzuzeigen. Wenn der Akku voll aufgeladen ist,
die Akkuladeanzeige leuchtet grün.
Bei ausgeschaltetem Computer dauert es etwa
3 Stunden, bis der Akku vollständig aufgeladen ist. Bei eingeschaltetem Computer dauert
es etwa 3,5 Stunden, bis der Akku vollständig
aufgeladen ist.
Page 9
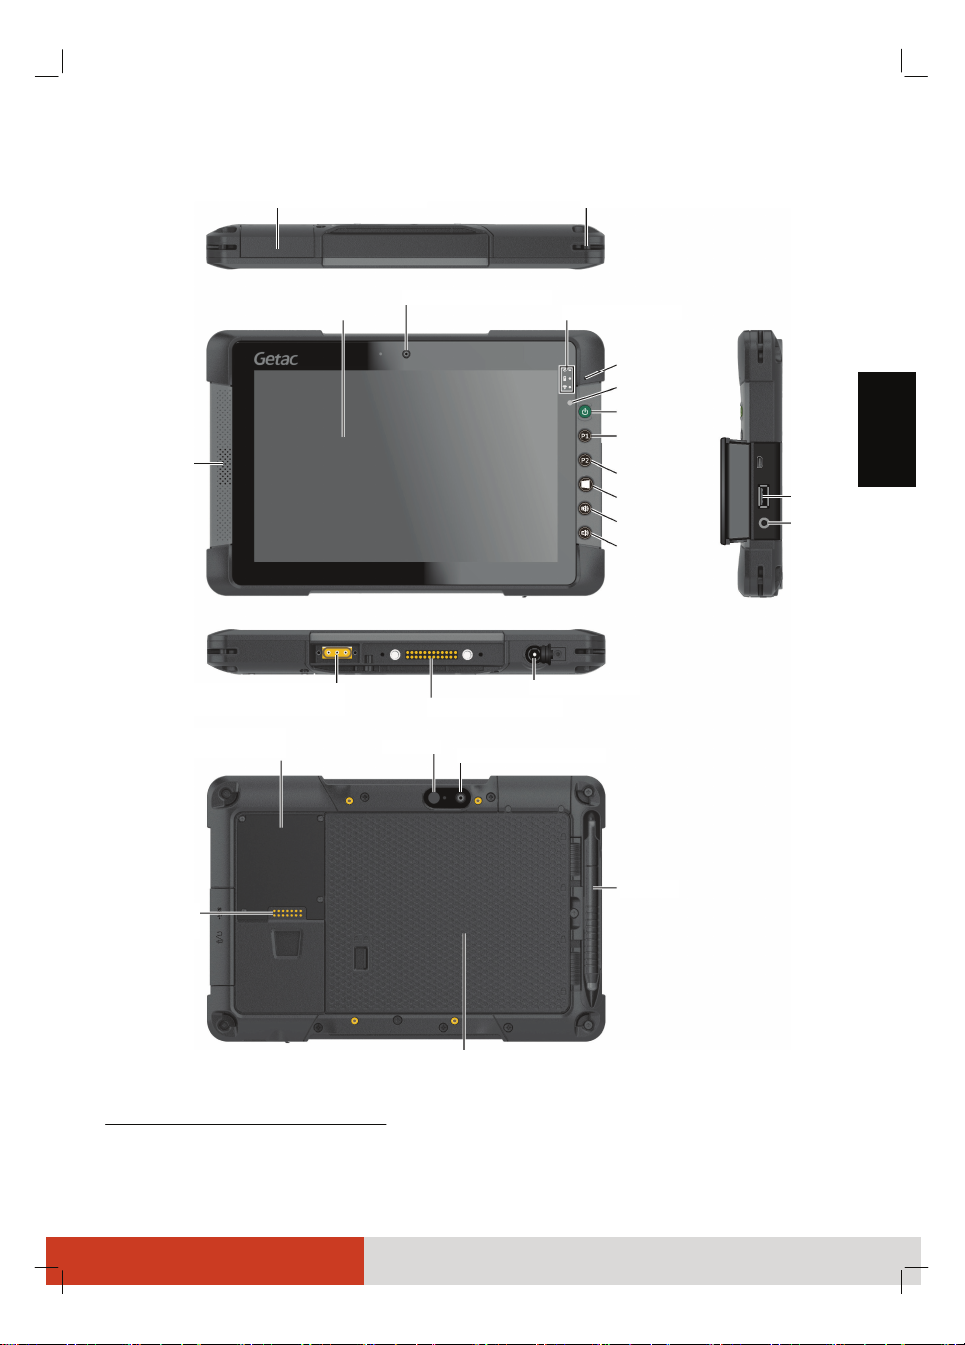
Der Computer von außen
Siehe Fußnote1.
Touchscreen
Lautsprecher
Kameraobjektiv
2
Halterung für Befestigungsband x 4
Geräteanzeigen
Mikrofon
Lightsensor
Netzschalter
Kamera-/
Auslöser
OSDC
Start
Lauter
Leiser
USB 3.0Anschluss
KombiAudioanschluss
Deutsch
Antennenanschluss
(GPS-WLAN-WWAN) Dockinganschluss
SIM-Karten2-
fachabdeckung
Erweiterungs-
anschluss
1
Bestimmte Modelle verfügen über eine Komponente an dieser Stelle. Dies kann ein serieller Port, ein microSD-
Kartensteckplatz, ein RJ-45 Netzwerkanschluss oder ein Barcodeleser sein.
2
Nur ausgewählte Modelle.
2
2
Blitz
Kameraobjektiv
Akku
Netzanschluss
2
Stylus
7
Page 10

System-Wiederherstellung
Umgang mit dem Computer
Windows-8-Modelle
Falls Schwierigkeiten mit Ihrem Windows-8Computer auftreten sollten, können Sie eine
der folgenden Aktionen probieren.
Führen Sie eine Wiederherstellung Ihres
Computers auf einen früheren Zeitpunkt
aus.
PC ohne Auswirkungen auf die Dateien
auffrischen.
Alles entfernen und Windows neu
installieren.
Für vollständige Informationen, lesen Sie das
Handbuch.
Deutsch
Windows-7-Modelle
Mit einem “Systemwiederherstellung”Werkzeug können Sie das Windows-7-System
auf den Auslieferungszustand rücksetzen.
Um das System-Wiederherstellung-Programm
aufzurufen:
1. Schließen Sie das Netzteil an.
2. Schalten Sie den Computer ein. Tippen und
halten Sie während des Systemstarts bei
angezeigtem Logo-Bildschirm eine beliebige
Stelle am Bildschirm oder drücken Sie die
Windows-Logo-Taste an Ihrem Gerät.
Dadurch wird ein Menü eingeblendet.
Wählen Sie HDI Recovery (HDI-Wiederher-
stellung) im Menü.
3. Wählen Sie im eingeblendeten Bildschirm
zum Start der Wiederherstellung
Recovery.
4. Die Fortschrittsleiste zeigt die abgeschlossene Prozentzahl. Sobald sie 100% erreicht,
schaltet sich das System aus.
5. Schalten Sie den Computer ein. Der Windows Einstellungsassistent startet. Folgen
Sie den Angaben auf dem Bildschirm.
6. Wenn das System neu startet, erscheint der
Installationsbildschirm. Das Installationsprogramm wird die System HardwareErkennung und die Treiberinstallation
durchführen.
7. Nach Abschluss wird das System neu gestartet und der Windows Desktop angezeigt.
8
Richtlinien zum Aufstellungsort
Arbeiten Sie mit dem Computer bei Tem-
peraturen zwischen 0 C (32 F) und 50 C
(122 F) – tatsächliche Betriebstemperatur
je nach Produktspezifikationen.
Stellen Sie den Compu ter nicht dort auf,
wo er hoher Luftfeuchte, extremen Temperaturen, mechanischen Erschütterungen,
direktem Sonnenlicht oder massivem Staub
ausgesetzt ist. Wenn Sie den Computer
längere Zeit in extremen Umgebungen
einsetzen, können sich das Produkt verziehen und die Lebensdauer verkürzen.
Der Einsatz in einer Umgebung mit Metall-
staub ist nicht erlaubt.
Platzieren Sie den Computer auf einem
flachen, stabilen Untergrund. Stellen Sie
den Computer nicht seitlich auf; lagern Sie
ihn nicht in umgedrehter Position. Starke
Erschütterungen durch Herunterfallen
oder Stöße können den Computer beschädigen.
Entlüftungsöffnungen im Computer dürfen
nicht abgedeckt oder zugestellt werden.
Stellen Sie den Computer z.B. nicht auf ein
Bett, ein Sofa, einen Teppich oder auf
ähnliche Flächen. Andernfalls könnte sich
der Computer überhitzen und Schaden
nehmen.
Halten Sie den Computer von wärmeemp-
findlichen Gegenständen fern, da er während des Betriebs sehr heiß werden kann.
Stellen Sie den Computer mindestens 13 cm
(5 Zoll) entfernt von Elektrogeräten auf,
die starke Magnetfelder erzeugen können,
z.B. Fernsehapparat, Kühlschrank, Motor
oder große Lautsprecher.
Transportieren Sie den Computer nicht
plötzlich von einem kalten zu einem warmen Ort. Bei einem Temperaturunterschied
von über 10 C (18 F) bildet sich Kondenswasser im Innern des Computer, was die
Speichermedien beschädigen könnte.
Page 11

Allgemeine Richtlinien
Richtlinien für den Akku
Vermeiden Sie direkten Kontakt zwischen
dem Computer und Ihrer Haut, wenn Sie
das Gerät in einer sehr warmen oder kalten
Umgebung einsetzen.
Stellen Sie keine schweren Gegenstände
auf den geschlossenen Computer, da
hierdurch der LCD-Bildschirm beschädigt
werden könnte.
Die Bildschirmoberfläche kann leicht
verkratzen. Berühren Sie sie nicht mit
einem scharfen Gegenstand wie bzw.
einem Bleistift oder Kugelschreiber.
Eingebrannte LCD-Bilder erscheinen,
wenn ein festes Muster längere Zeit am
Bildschirm angezeigt wird. Sie können das
Problem vermeiden, indem Sie die Menge
statischer Inhalte am Display reduzieren.
Wir empfehlen, bei Nichtbenutzung einen
Bildschirmschoner einzusetzen und das
Display aufzuschalten.
Um die Lebenszeit des Hintergrundlichts
der Anzeige zu verlängern, nehmen Sie
Einstellungen vor, die das Hintergrundlicht auf Grund von Energieverwaltung
automatisch abschaltet.
Richtlinien zum Reinigen
Reinigen Sie den Computer nie, wenn er
eingeschaltet ist.
Wischen Sie den Computer von außen mit
einem weichen Tuch ab, das mit Wasser
oder einem alkalifreien Reinigungsmittel
befeuchtet ist.
Wischen Sie den Bildschirm mit einem
weichen, fusselfreien Tuch ab.
Falls Wasser oder andere Flüssigkeiten
über dem Computer verschüttet werden,
wischen Sie ihn nach Möglichkeit trocken
und sauber. Obwohl Ihr Computer wasserdicht ist, sollten Sie ihn nach Möglichkeit
trocknen.
Wenn der Computer in Umgebungen mit
einer Temperatur von 0 °C (32 F) oder
weniger feucht wird, können durch Gefrierung Schäden entstehen. Achten Sie darauf,
den Computer zu trocknen, falls er feucht
ist.
Laden Sie den Akku auf, wenn er fast leer
ist. Achten Sie beim Aufladen darauf, dass
der Akku ganz aufgeladen wird. Auf diese
Weise vermeiden Sie eine Beschädigung
des Akkus.
Der Akku ist ein Verbrauchsartikel und
folgende Umstände verkürzen seine
Lebenszeit:
– bei häufigem Aufladen des Akkus.
– Verwenden, Laden oder Lagern des
Akkus bei hohen Temperaturen.
Um eine Verschlechterung des Akkus zu
vermeiden und dadurch seine Nutzungszeit
zu verlängern, halten Sie die Anzahl der
Aufladungen auf ein Minimum, damit sich
seine interne Temperatur nicht zu oft
erhöht.
Laden Sie den Akku bei Temperaturen
zwischen 10 C ~ 30 C (50 F ~ 86 F). Eine
höhere Umgebungstemperatur führt zu
einem Anstieg der Akkutemperatur.
Vermeiden Sie das Aufladen des Akkus in
einem geschlossenen Fahrzeug und bei
heißem Wetter. Zudem startet der Ladevorgang nicht, wenn der Akku nicht innerhalb des zugelassenen Temperaturbereichs
ist.
Es wird empfohlen, den Akku nicht mehr
als einmal pro Tag aufzuladen.
Es wird empfohlen, den Akku bei ausge-
schaltetem Computer zu laden.
Um die Betriebsleistung des Akkus beizu-
behalten, lagern Sie ihn außerhalb des
Computers an einem kühlen Ort und bei
einer Restladung von 30% ~ 40%.
Wichtige Richtlinien für den Umgang mit
dem Akku.
Beim Installieren oder Entnehmen des
Akkus müssen Sie Folgendes beachten:
– Vermeiden Sie die Installation oder
Entnahme des Akkus, wenn sich der
Computer im Schlafmodus befindet.
Plötzliches Herausnehmen des Akkus
kann einen Datenverlust verursachen
oder der Computer könnte instabil
werden.
– Vermeiden Sie den Kontakt mit den
Akkuanschlüssen, denn der Akku könnte
beschädigt werden, was triebsstörungen
des Akkus oder des Computers verur sachen könnte.
Deutsch
9
Page 12

Die Eingangsspannung und die Umgebungstemperatur des Computers haben
einen direkten Einfluss auf die Lade- und
Entladezeit des Akkus:
– Die Ladezeit verlängert sich bei einge schaltetem Computer.
Zur Verkürzung der Ladezeit ist es emp fehlenswert, den Computer in den Schlaf oder Ruhemodus zu versetzen.
– Eine niedrige Temperatur verlängert auch
die Ladezeit und beschleunigt das Entla den.
Wenn Sie das Gerät an extrem kalten
Orten im Akkubtrieb nutzen, verkürzt sich
möglicherweise die Laufzeit und die Akkukapazität wird falsch angezeigt. Dieses
Phänomen wird durch die chemischen
Deutsch
Eigenschaften von Akkus verursacht. Die
geeignete Betriebstemperatur des Akkus
beträgt -10 °C~50 °C (14 F~122 F).
Lagern Sie den Akku nicht länger als 6
Monate, ohne ihn aufzuladen.
Touchscreen-Richtlinien
Verwenden Sie den Finger oder den bei-
gefügten Eingabestift auf dem Display.
Wird anstelle Ihres Fingers oder Eingabestifte ein scharfkantiger oder metallener
Gegenstand verwendet, kann dieser das
Display verkratzen und beschädigen, wodurch Fehler entstehen.
Wischen Sie Schmutz auf dem Display mit
einem weichen Tuch weg. Die TouchscreenOberfläche besitzt eine spezielle Beschichtung, die verhindert, dass Schmutz auf ihr
haften bleibt. Wenn Sie kein weiches Tuch
verwenden, könnte die spezielle Beschichtung der Touchscreen-Oberfläche beschädigt werden.
Schalten Sie den Computer aus, wenn Sie
das Display reinigen. Reinigen Sie das
Display bei eingeschaltetem Computer,
könnten Betriebsstörungen entstehen.
Bringen Sie nicht übermäßig viel Kraft auf
dem Display auf. Vermeiden Sie es, Gegenstände auf das Display zu stellen, denn
dabei könnte das Glas zerbrechen und das
Display beschädigt werden.
Die Verwendung des Touchscreens bei
niedriger Temperatur (unter 5 °C) könnte
eine langsamere Reaktionszeit verursachen,
dies ist normal. Eine normale Reaktions-
zeit wird eventuell dann wiederhergestellt,
wenn man wieder auf Zimmertemperatur
zurückkehrt.
Wenn zwischen der Druckposition des
Eingabestift auf dem Display und der
angezeigten Position des Displaycursors
eine nennenswerte Abweichung besteht,
verwenden Sie zur erneuten Kalibrierung
des Touchscreen-Bildschirms das Kalibrierungsprogramm.
10
Page 13
Antes de empezar
Para obtener información completa del
producto, consulte el manual del usuario del
escritorio de Windows (en formato PDF) o el
disco con los controladores.
Puede descargar el manual y los controladores más recientes accediendo al vínculo
Web de Getac en
Support Download.
http://www.getac.com
Hacer funcionar el equipo
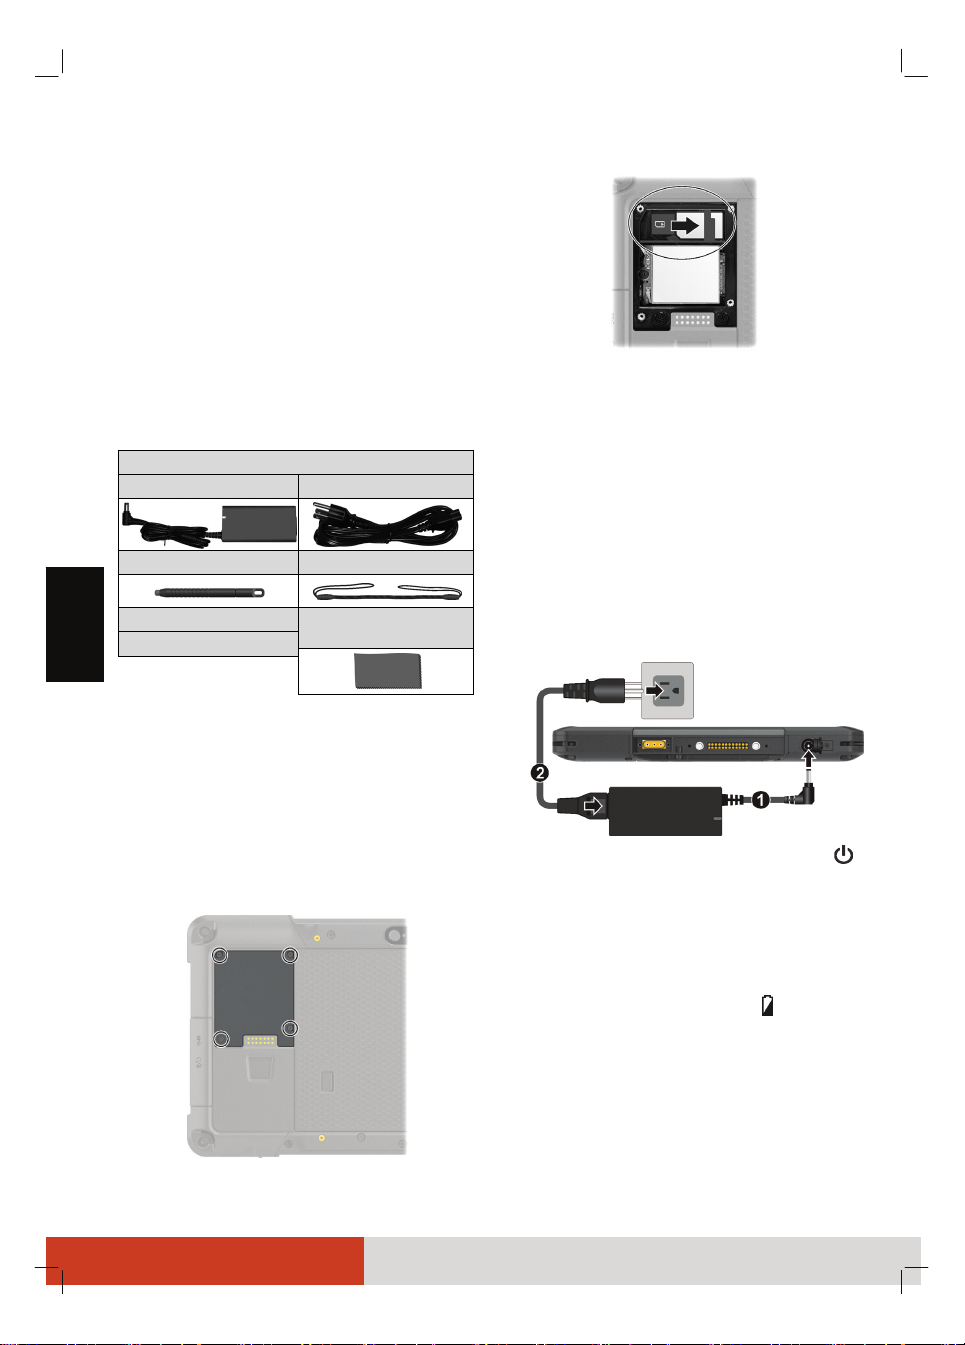
2. Observando la orientación, deslice la
tarjeta SIM insertándola en su lugar.
3. Cierre la tapa y fíjela con 4 tornillos.
Desembalaje
T800 tableta
Adaptador CA Cable de alimentación
Lápiz Correa flexible
Paño para limpiar la
pantalla
NOTA: Esta lista de contenido del paquete se
aplica los modelos estándar. En modelos
concretos el paquete puede contener
elementos diferentes.
Disco con los controladores
Documentos
Instalar la tarjeta SIM (opción)
1. Localice la tapa de la tarjeta SIM. Quite la
tapa aflojando los 4 tornillos.
Conectar a la alimentación de CA y
encender el equipo
Sugerimos que use la corriente CA cuando
inicie el equipo por primera vez.
1. Enchufe el cable de alimentación CC del
daptador CA al conector de alimentación
del equipo (
2. Enchufe el extremo hembra del cable de
alimentación CA al adaptador CA y el
extremo macho a la toma de corriente (
3. Presione el botón de encendido ( ) para
iniciar el equipo. El sistema operativo,
como por ejemplo Microsoft Windows, se
debe iniciar.
).
Cargar la batería
Para cargar la batería, conecte el adaptador
CA al equipo y a una toma eléctrica. El
Indicador de Carga de la Batería ( ) del
equipo se ilumina en ámbar para indicar que
la carga está en progreso. Cuando la batería
esté completamente cargada, el indicador de
carga de la batería se ilumina en verde.
La carga completa de la batería tarda aproximadamente 3 horas cuando el equipo está
apagado y unas 3,5 horas cuando dicho equipo
está encendido.
Español
).
11
Page 14
2
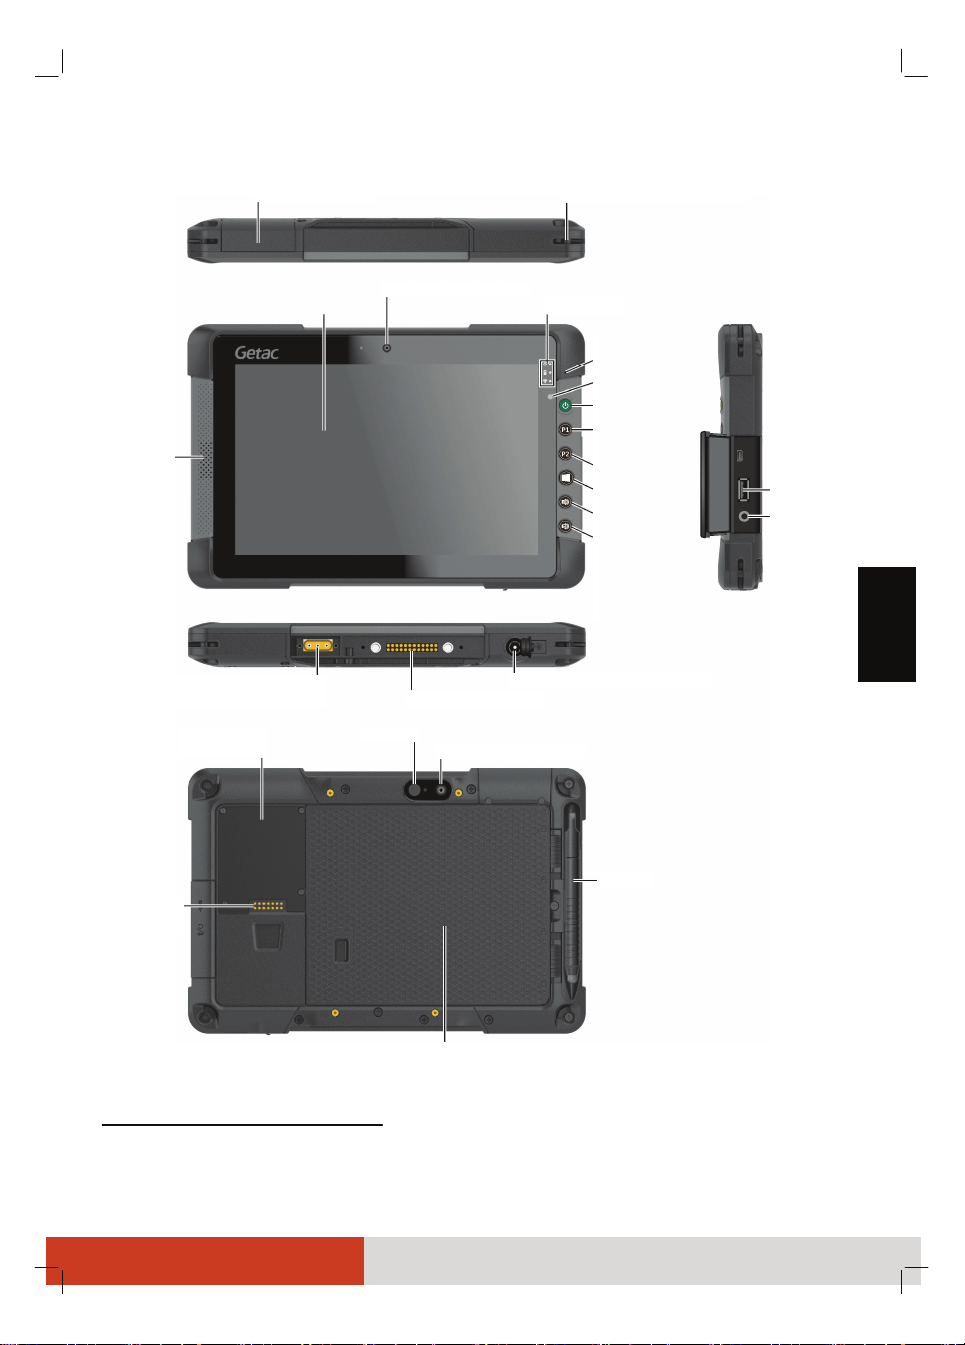
Echando un vistazo al equipo
Consulte la nota al pie1.
Soporte de correa flexible x 4
Altavoz
Español
Pantalla táctil
Antena paso a través
(GPS-WLAN-WWAN)
Ranura para
tarjetas SIM
2
Lentes de la cámara
Conector de acoplamiento
2
Flash
Lentes de la cámara
2
Conector de alimentación
Indicadores
Micrófono
Sensor de luz
Botón de
encendido
Cámara /
Activador
OSDC
Inicio
Subir volumen
Bajar volumen
2
Puerto USB 3.0
Conector de
audio
combinado
Lápiz
Conector
de
expansión
Batería
1
Ciertos modelos tienen un componente en esta ubicación. Puede ser un puerto serie, una ranura para tarjetas
microSD, un conector RJ-45 o una lente de lector de códigos de barras.
2
Solo para modelos seleccionados.
12
Page 15

Recuperación del sistema
Cuidar el equipo
Modelos con Windows 8
Si tiene problemas con su equipo con
Windows 8, puede llevar a cabo una de las
acciones siguientes.
Restaure el equipo a un punto anterior.
Actualice el equipo sin que ello afecte a
sus archives.
Quite todo y reinstale Windows.
Consulte el manual del usuario para obtener
más información.
Modelos con Windows 7
Una herramienta “Recuperación del sistema”
permite restaurar el estado de fábrica en el
sistema con Windows 7.
Para ejecutar la recuperación del sistema:
1. Conecte el adaptador de CA.
2. Encienda el equipo. Durante el arranque
del sistema, cuando aparece la pantalla
del logotipo, pulse sin soltar la pantalla o
presione el botón logotipo de Windows
del equipo. Esta acción abrirá un menú.
Seleccione HDI Recovery (Recuperación
HDI) en el menú.
3. En la pantalla que aparece, seleccione
Recovery para iniciar el proceso de
recuperación.
4. La barra de progreso muestra el porcentaje
completado. Cuando alcanza el 100%, el
sistema se apaga.
5. Encienda el equipo. El asistente para la
instalación de Windows se iniciará. Siga
las indicaciones de la pantalla para
continuar.
6. Cuando el sistema se reinicie, aparecerá la
pantalla del instalador. El instalador realizará la detección de hardware del sistema
y la instalación del controlador.
7. Cuando la operación se complete, el sistema
se reiniciará y mostrará el escritorio de
Windows.
Directrices de ubicación
Para un óptimo rendimiento, use el equipo
en un lugar en el que la temperatura sea la
recomendada, entre 0 C (32 F) y 50 C (122
F) – la temperatura de funcionamiento
real depende de las especificaciones del
producto.
Evite situar el equipo en un lugar que esté
sujeto a alta humedad, temperaturas
extremas, vibraciones mecánicas, luz solar
directa o mucho polvo. El uso del equipo en
ambientes extremos durante largos
períodos puede resultar en un deterioro
del producto y una reducción de su vida
útil.
No se permite utilizar el producto en un
entorno con polvo metálico.
Sitúe el equipo sobre una superficie lisa y
segura. No coloque el equipo sobre un
lado ni lo almacene boca-abajo. Un
impacto fuerte resultado de una caída o
golpe puede dañar el equipo.
No cubra ni bloquee ninguno de los orificios
de ventilación del equipo. Por ejemplo, no
coloque el equipo sobre una cama, sofá,
alfombra o superficie similar. Si no lo hace
así, puede producirse un sobrecalentamiento que resulte en daños al equipo.
Ya que el equipo puede calentarse mucho
durante su funcionamiento, manténgalo
alejado de cualquier objeto sensible al
calor.
Mantenga el equipo a una distancia de al
menos 13 cm (5 pulgadas) de cualquier
aparato eléctrico que pueda generar un
campo magnético fuerte, como un TV,
frigorífico, motor o un altavoz de audio
de gran tamaño.
Evite mover el equipo de forma brusca
desde un lugar frío a uno cálido. Una
diferencia de temperatura de más de 10 ºC
(18 ºF) puede causar condensación en el
interior de la unidad, la cual puede dañar
el medio de almacenamiento.
Español
13
Page 16

Indicaciones generales
No exponga la piel al equipo cuando lo
maneje en un ambiente muy cálido o frío.
No ponga objetos pesados sobre el equipo,
ya que esto podría dañar la pantalla.
La superficie de la pantalla se puede rayar
con facilidad. Evite tocarla con un objeto
afilado, como por ejemplo un bolígrafo o
lápiz.
El efecto de imagen remanente en la pan-
talla LCD se produce cuando se muestra
un patrón fijo en la pantalla durante un
prolongado período de tiempo. Puede
evitar el problema limitando la cantidad
de contenido estático en la pantalla. Es
recomendable utilizar un protector de
pantalla para desactivar la pantalla cuando
no esté en uso.
Para maximizar la vida útil de la retroilu-
minación de la pantalla, deje que la retroi-
Español
luminación se apague automáticamente
como resultado de la administración de
energía.
Directrices de limpieza
Nunca limpie el equipo mientras está
encendido.
Use un paño suave humedecido con agua
o un detergente no alcalino para limpiar
el exterior del equipo.
Limpie el producto con cuidado usando un
paño suave y sin pelusas.
Si se derrama agua o líquido en el equipo,
pásele un paño para secarlo y limpiarlo
cuando sea posible. Aunque el equipo es
impermeable, no deje que permanezca
mojado si puede secarlo.
Si el equipo se moja a una temperatura de
0 ºC (32 ºF) o inferior, puede producirse
daños por congelamiento. Asegúrese de
mantener el equipo seco.
Directrices de la batería
batería esté completamente cargada, el
indicador de carga de la batería se ilumina
en verde.
Recargue la batería cuando esté casi des-
cargada. Al recargar, asegúrese de que la
14
batería quede completamente cargada.
Hacerlo podría evitar daños a la batería.
La batería es un producto consumible. Las
siguientes condiciones acortarán su vida
útil:
– cargar frecuentemente la batería.
– al usar, cargar o almacenar la batería en
condiciones de altas temperaturas.
Para evitar acelerar el deterioro de la ba-
tería, y así prolongar su vida útil, reduzca
el número de veces que la carga para no
aumentar frecuentemente su temperatura
interna.
Cague la batería dentro de un rango de
temperaturas de 0 C ~ 30 C (50 F ~ 86 F).
Una temperatura ambiental más alta hará
que la temperatura de la batería se eleve.
Evite cargar la batería dentro de un vehículo cerrado y en condiciones de mucho
calor. Además, la carga no comenzará si la
batería no se encuentra dentro del rango
de temperaturas permitido.
Se recomienda que no cargue la batería
más de una vez al día.
Se recomienda que cargue la batería
cuando el equipo esté apagado.
Para mantener eficacia de funcionamiento
de la batería, guárdela en un lugar oscuro
y fresco después de sacarla del equipo y
con un 30% ~ 40% de carga restante.
Directrices importantes al usar la batería.
Al instalar o extraer la batería, tenga en
cuenta lo siguiente:
– evite instalar o extraer la batería mien tras el equipo esté en modo Suspensión.
La extracción brusca de la batería podría
causar pérdida de datos o hacer que el
equipo se vuelva inestable.
– evite tocar los terminales de la batería, ya
que podrían producirse daños, causando
así un funcionamiento inadecuado de
ésta o del equipo.
El voltaje de entrada y la temperatura ambiental del equipo afectarán directamente
al tiempo de carga y descarga de la batería.
– el tiempo de carga aumentará cuando
el equipo esté encendido.
Para reducir el tiempo de carga, se reco mienda que ponga el equipo en modo
standby o hibernación.
– una baja temperatura hará aumentar el
tiempo de carga, y también hará más
rápido el tiempo de descarga.
Page 17

Cuando utilice alimentación a batería en
un ambiente sometido a una temperatura
extremadamente baja, puede que el
tiempo de funcionamiento se reduzca y la
lectura del nivel de batería sea incorrecta.
Este fenómeno se debe a las características
químicas de las baterías. La temperatura
adecuada para el funcionamiento de la
batería es de -10 °C ~ 50 ºC (14 ºF ~ 122 ºF).
No deje la batería almacenada durante
más de seis meses sin recargarla.
Directrices de la pantalla táctil
Use le dedo o el lápiz incluido en la pan-
talla. El uso de un objeto metálico o afilado
en lugar de su dedo o lápiz de la pantalla
táctil podría causar rozaduras y daños a la
pantalla, provocando así errores.
Use un paño suave para eliminar el polvo
de la pantalla. La superficie de la pantalla
táctil tiene un recubrimiento protector
especial que evita que el polvo se adhiera
a ésta. Si no se usa un paño suave se podría
dañar el recubrimiento protector especial
de la superficie de la pantalla.
Apague el equipo al limpiar la pantalla.
Limpiar la pantalla mientras está encendida podría provocar un funcionamiento
inadecuado.
No aplique demasiada fuerza al usar la
pantalla. Evite poner objetos sobre la
pantalla, ya que esto podría hacer que se
rompa el crista, dañando por tanto la
pantalla.
Usar la pantalla táctil a bajas temperaturas
(menos de 5 ºC) podría hacer que le tiempo
de respuesta sea más lento. Esto es normal.
Se puede restablecer el tiempo normal de
respuesta volviendo a una temperatura de
interior.
Si hay una discrepancia clara en la ubica-
ción del lápiz que se muestra en la pantalla
y la posición indicada del puntero en pantalla, utilice la herramienta de calibración
para volver a calibrar la pantalla táctil.
Español
15
Page 18
Avant de commencer
Pour des informations complètes sur ce produit, veuillez consulter le manuel de l'utilisateur (en format PDF) sur votre bureau
Windows ou votre disque de pilotes.
Vous pouvez télécharger les dernières
éditions du manuel de l'utilisateur et des
pilotes à partir du site Web de Getac au lien
suivant: http://www.getac.com Support
Download.
Mise en route de l’ordinateur
2. En respectant le sens, faites coulisser la
carte SIM dans son emplacement.
3. Fermez le couvercle et fixez-le avec les 4
vis.
Déballage
T800 ordinateur tablette
Adaptateur CA Cordon électrique CA
Stylet Attache
Disque de pilotes
Document(s)
Français
REMARQUE : Cette liste d’emballage s’applique aux modèles standard. Les modèles
spécifiques peuvent contenir d’autres éléments.
Chiffon de nettoyage
d'écran
Installation de la carte SIM
(optionnel)
1. Localisez le couvercle de la carte SIM.
Retirez le couvercle en dévissant les 4 vis.
Branchement de l’alimentation CA
et mise en marche de l’ordinateur
Il est conseillé d'utiliser l'alimentation CA
lorsque vous mettez en marche l’ordinateur
pour la toute première fois.
1. Branchez le cordon CC de l'adaptateur CA
sur le connecteur d'alimentation de
l’ordinateur (
2. Brancher l'extrémité femelle du cordon
électrique CA sur l'adaptateur CA et l'extrémité mâle sur une prise électrique (
3. Appuyez sur le bouton d'alimentation ( ).
Le système d'exploitation Windows doit
démarrer.
).
).
Recharger le bloc batterie
Pour charger le bloc batterie, reliez l'adaptateur CA à l'ordinateur et à une prise secteur.
L'indicateur de charge batterie ( ) sur l’ordinateur s'illumine en ambre pour indiquer
que la charge est en cours. Quand la batterie
est entièrement chargée, l'indicateur de
charge de batterie s'illumine en vert.
Il faut approximativement 3 heures pour
charger complètement le bloc batterie quand
l’ordinateur est éteint, et approximativement
3,5 heures pour charger complètement le
bloc batterie quand l’ordinateur est allumé.
16
Page 19
É
Coup d'oil sur l'ordinateur
Voir la note1.
cran tactile
Objectif de la caméra
Haut-
parleur
Antenne Pass-through
(GPS-WLAN-WWAN)
Couvercle de
la carte SIM
2
2
Connecteur d'accueil
2
Flash
2
Indicateurs
Connecteur d'alimentation
Objectif de la caméra
Support pour attache x 4
Mikro
Capteur de lumière
Bouton
d'alimentation
Caméra /
Déclenchement
OSDC
Démarrer
Volume plus
Volume moins
2
Port USB 3.0
Connecteur
audio combo
Français
Styet
Connecteur
d'extension
Bloc batterie
1
Certains modèles ont un composant dans cet endroit. Il peut être un port série, une carte microSD, un connecteur
RJ-45, ou l'objectif d'un lecteur de code à barres.
2
Modèles sélectionnés uniquement.
17
Page 20

Récupération système
Prendre soin de l’ordinateur
Modèles Windows 8
Si vous avez des problèmes avec votre
ordinateur et Windows 8, vous pouvez
essayer l'une des solutions suivantes.
Restaurer votre ordinateur à un point
antérieur.
Actualiser votre PC sans affecter vos
fichiers.
Tout supprimer et réinstaller Windows.
Consultez le manuel de l'utilisateur pour plus
d'informations.
Modèles Windows 7
Un outil « Récupération du système » vous
permet de restaurer le système Windows 7 à
l'état d'usine.
Pour effectuer la récupération du système :
1. Branchez l'adaptateur CA.
2. Mettez l'ordinateur en marche. Lors du
démarrage système, quand l'écran avec le
Français
logo apparaît, appuyez longuement sur
l'écran ou appuyez sur le bouton Logo
Windows de votre appareil. Ceci fait
apparaître un menu. Sélectionnez HDI
Recovery (Restauration HDI) dans le menu.
3. Dans l'écran qui apparaît, sélectionnez
Recovery pour démarrer le processus de
restauration.
4. La barre des progrès affiche les pourcentages terminés. Lorsqu'elle atteint 100%,
le système s'éteint.
5. Mettez l'ordinateur en marche. L'assistant
de réglage Windows démarre. Suivez les
instructions à l'écran pour continuer.
6. Lorsque le système redémarre, l'écran
installateur s'affiche. L'installateur effectuera une détection matérielle du système
et une installation du pilote.
7. Une fois terminé, le système redémarrera
et affichera le bureau de Windows.
Consignes concernant l'emplacement
Pour des performances optimales, utilisez
l’ordinateur là où la température recommandée est entre 0 C (32 F) et 50 C (122
F) – la température de functionnement
réelle dépend des caractéristiques du
produit.
Évitez de placer l’ordinateur dans un
endroit sujet à une humidité élevée, à des
températures extrêmes, à des vibrations
mécaniques, à la lumière directe du soleil
ou à la poussière intense. L'utilisation de
l’ordinateur dans des environnements
extrêmes pendant de longues périodes
peut entraîner la détérioration du produit
et raccourcir sa durée de vie.
L'utilisation dans un environnement avec
de la poussière métallique est interdit.
Placez l’ordinateur sur une surface plane
et stable. Ne posez pas l’ordinateur sur sa
tranche et ne le rangez pas renversé. Un
impact fort lors d'une chute ou d'un coup
peut endommager l’ordinateur.
Ne couvrez pas et ne bloquez pas les ou-
vertures de ventilation sur l’ordinateur.
Par exemple, ne placez pas l’ordinateur
sur un lit, un sofa, une couverture ou toute
autre surface semblable. Autrement, une
surchauffe peut se produire provoquant
des dégâts.
Comme l’ordinateur peut devenir très
chaud pendant le fonctionnement, gardezle loin des objets qui sont vulnérables à la
chaleur.
Conservez l’ordinateur à au moins 13 cm
(5 pouces) des appareils électriques qui
peuvent produire un champ magnétique
fort tel qu'un téléviseur, un réfrigérateur,
un moteur ou un grand haut-parleur
audio.
Évitez de déplacer l’ordinateur abrup-
tement d'un endroit froid à un endroit
chaud. Une différence de température de
plus de 10 C (18 F) peut causer de la
condensation à l'intérieur de l'unité, qui à
sont tour peut endommager les supports
de stockage.
18
Page 21

Consignes générales
Ne pas exposer votre peau à l'ordinateur
quand il fonctionne dans un environnement très chaud ou très froid.
Ne placez pas d'objets lourds sur l’ordi-
nateur car ceci peut endommager
l'affichage.
La surface de l’écran peut facilement être
rayée. Ne pas la toucher avec des objets
pointus comme des stylos ou des crayons.
La rémanence d’image sur l’écran LCD se
produit si un motif reste affiché à l’écran
pendant une durée prolongée. Vous
pouvez éviter ce problème en limitant
l’affichage de contenus statiques sur le
moniteur. Il est conseillé d’utiliser un
économiseur d’écran ou d’éteindre le
moniteur lorsque vous ne l’utilisez pas.
Pour maximiser la vie du rétroéclairage de
l'affichage, réglez le rétroéclairage pour
qu'il s'éteigne automatiquement via la
gestion de l'alimentation.
Consignes de nettoyage
Ne nettoyez jamais l’ordinateur en marche.
Utilisez un linge doux humidifié avec de
l'eau ou un détergent non alcalin pour
essuyer l'extérieur de l’ordinateur.
Essuyez doucement l'affichage avec un
chiffon doux et non pelucheux.
Si de l'eau ou du liquide a été renversé sur
l’ordinateur, essuyez jusqu'au séchage.
Bien que votre ordinateur soit étanche
contre l'eau, ne laissez pas l’ordinateur
mouillé et séchez-le.
Si l’ordinateur est mouillé là où la tempé-
rature est de 0 ºC (32 ºF) ou moins, des
dégâts dus au gel peuvent survenir. Assurezvous de sécher l’ordinateur s'il est humide.
Consignes relatives au bloc batterie
Rechargez le bloc batterie quand il est
presque déchargé. Lors de la recharge,
assurez-vous que le bloc batterie est
entièrement chargé. Ce faisant, vous
pouvez éviter de faire du tort au bloc
batterie.
Le bloc batterie est un produit consom-
mable et les conditions suivantes raccourcissent sa vie :
- une charge fréquente du bloc batterie
- lors de l'utilisation, de la charge ou du
stockage à des temperatures trop élevées
Pour éviter d'accélérer la détérioration du
bloc batterie, prolongeant de ce fait sa vie
utile, réduisez au minimum le nombre de
fois où vous le chargez pour ne pas augmenter fréquemment sa température
interne.
Chargez le bloc batterie dans une page de
températures de 10 C ~ 30 C (50 F ~ 86 F).
Une température environnante plus élevée
provoque une augmentation de la température du bloc batterie. Évitez de charger
le bloc batterie à l'intérieur d'un véhicule
fermé et par temps chaud. En outre, la
charge ne commence pas si le bloc batterie
n'est pas dans la plage de température
ambiante permise.
Il est conseillé de ne pas charger le bloc
batterie plus d'une fois par jour.
Il est conseillé de charger le bloc batterie
avec l’ordinateur éteint.
Pour maintenir l'efficacité de fonctionne-
ment du bloc batterie, stockez-le dans un
endroit sombre et frais hors de l’ordinateur
et avec une charge résiduelle de 30% ~
40%.
Consignes importantes lors de l'utilisation
du bloc batterie.
Quand vous installez ou enlevez le bloc
batterie, prenez note de ce qui suit :
- évitez d'installer ou d'enlever le bloc
batterie quand l’ordinateur est en mode
Veille. Le fait d'enlever brusquement le
bloc batterie peut causer la perte de don nées ou une instabilité de l’ordinateur.
- évitez de toucher les bornes du bloc bat terie sinon des dégâts pourraient se
produire, entraînant de ce fait un fonc tionnement incorrect, ainsi que pour
l’ordinateur.
La tension d'entrée de l’ordinateur et la
température environnante affectent
directement le temps de charge et de
décharge du bloc batterie :
- le temps de charge est prolongé quand
l’ordinateur est mis en marche.
Français
19
Page 22

Pour raccourcir le temps de charge, il est
recommandé de placer l’ordinateur en
mode de veille ou de veille prolongée.
- une basse température prolonge le
temps de charge et raccourcit aussi le
temps de décharge.
Lorsque vous utilisez la batterie dans un
environnement de très basse température,
vous pouvez rencontrer une autonomie
raccourcie et une mauvaise indication de
niveau batterie. Ce phénomène provient
des caractéristiques chimiques des batteries. La température de functionnement
approprié pour la batterie est de -10 °C ~
50 ºC (14 ºF ~ 122 ºF).
Ne jamais laissez le bloc batterie dans
l'entreposage plus de 6 mois sans le
recharger.
Consignes relatives à l'écran tactile
Utilisez le doigt ou stylet pour écran
tactile fourni sur l'affichage. L'utilisation
d'un objet pointu ou métallique autre que
votre doigt ou le stylet pour écran tactile
peut causer des éraflures et endommager
l'affichage, causant de ce fait des erreurs.
Français
Utilisez un linge doux pour enlever la
saleté sur l'affichage. La surface de l'écran
tactile a un revêtement de protection
spécial qui empêche la saleté de s'y coller.
En n'utilisant pas un linge doux, vous
pouvez endommager le revêtement de
protection spécial à la surface de l'écran
tactile.
Coupez le courant de l’ordinateur pour
nettoyer l'affichage. Le nettoyage de
l'affichage avec l'alimentation en marche
peut causer un mauvais fonctionnement.
Ne pas employer de force excessive sur
l'affichage. Évitez de placer des objets
au-dessus de l'affichage car ceci peut
casser le verre et endommager de ce fait
l'affichage.
L'utilisation de l'écran tactile sous de
basses températures (moins de 5 ºC) peut
causer un temps de réponse plus lent, ceci
est normal. Vous récupérez un temps de
réponse normal lors du retour à la
température ambiante.
Lorsqu'il existe une incompatibilité entre
le positionnement du stylet sur l'écran et
le positionnement indiqué du pointeur à
l'écran, utilisez l'utilitaire de calibrage
pour recalibrer l'écran tactile.
20
Page 23
Prima di cominciare
Per le informazioni complete sul prodotto,
consultare il Manuale utente (nel formato
PDF) sul desktop di Window o nel disco con i
driver.
È possibile scaricare il manuale e i driver più
aggiornati accedendo al sito web Getac su
http://www.getac.com Support
Download.
Mettere in funzione il
computer
Disimballaggio
T800 Tablet PC
Adattatore CA Cavo elettrico
Stilo Laccio
Panno per schermo
NOTA: Questa lista di imballaggio si applica
ai modelli standard. Alcuni modelli possono
avere elementi diversi.
Disco con i driver
Documenti
2. Prestando attenzione all’orientamento, far
scorrere in sito la scheda SIM.
3. Chiudere il coperchio e fissarlo con 4 viti.
Collegamento dell’alimentazione
CA e accensione del computer
Si consiglia di usare il cavo elettrico quando si
avvia il computer per la prima volta.
1. Collegare il cavo CC dell'adattatore CA al
connettore del computer (
2. Inserire l'estremità femmina del cavo
elettrico CA nell’apposita presa di ingresso
dell'adattatore CA e l'altra estremità
maschio all'uscita elettrica (
).
).
Italiano
Installazione della scheda SIM
(opzionale)
1. Individuare il coperchio dell'alloggio
scheda SIM. Togliere il coperchio
allentando le 4 viti.
3. Premere il pulsante di accensione ( )
per avviare il vostro computer. Il sistema
operativo, come Windows, si dovrebbe
accendere.
Carica della batteria
Per caricare la batteria, connettere il trasformatore al computer e a una presa elettrica.
L'indicatore di carica della batteria ( ) sul
computer si illumina di giallo ad indicare che
la carica è in corso. Quando la batteria è
completamente carica, il relativo indicatore
luminosi di colore verde.
Ci vogliono circa 3 ore per ricaricare completamente la batteria quando il computer è
spento, e circa 3,5 ore quando è acceso.
21
Page 24
Un'occhiata al computer
Fare riferimento alla
nota a piè pagina
1
.
Touchscreen
Obiettivo
fotocamera
Altopar-
lante
Passante laccio x 4
2
Indicatori
Microfono
Sensore della
luminosità
Pulsante di
accensione
Fotocamera /
Trigger
OSDC
Start
Volume su
Volume giù
Porta USB 3.0
Connettore
audio combo
Passthrough antenna
(GPS-WLAN-WWAN)
Italiano
22
Coperchio alloggio
scheda SIM
Connettore
d’espansione
1
Alcuni modelli in questa posizione hanno un componente. Può trattarsi di una porta seriale, di un alloggio per
schede microSD, di un connettore RJ-45 o della lente del lettore di codici a barre. Qui è mostrata una sola scelta.
2
Solo modelli selezionati.
2
2
Presa docking
2
Flash
Obiettivo fotocamera
Batteria
Connettore alimentazione
2
Stilo
Page 25

Ripristino del sistema
Cura del computer
Modelli Windows 8
Se si riscontrano problemi con il computer
Windows 8, è possibile provare una delle
azioni che seguono.
Ripristinare il computer ad un punto
precedente.
Aggiornare il computer senza modificare i
file.
Rimuovi tutto e reinstalla Windows.
Vedere Manuale utente per ulteriori
informazioni.
Modelli Windows 7
Lo strumento “Ripristino di sistema”
permette di rirpistinare il sistema Windows 7
allo stato iniziale.
Per eseguire il Ripristino del sistema:
1. Connettere l’adattatore CA CA al computer.
2. Accendere il computer. Durante l’avvio del
sistema, quando appare la schermata del
loro, toccare e tenere premuto lo schermo
oppure premere il tasto logo di Windows
sul dispositivo. Questa operazione invoca
un menu. Selezionare HDI Recovery
(Ripristino HDI) nel menu.
3. Nella schermata che è visualizzata, selezionare Recovery per avviare il processo di
ripristino.
4. La barra di avanzamento mostra la percentuale completata. Quando raggiunge il
100% il sistema si spegne.
5. Accendere il computer. Si avvia il wizard di
setup di Windows. Seguire le prompt sullo
schermo per continuare.
6. Quando il sistema si riavvia, è visualizzata
la schermata di installazione. L’installer
eseguirà la rilevazione dell’hardware del
sistema e installerà il driver.
7. Quando è completato, il sistema si riavvia
e mostra il desktop di Windows.
Linee guida sul collocamento
Per avere una prestazione ottimale, usare
il computer dove la temperatura consigliata è tra 0 C (32 F) e 50 C (122 F) – la
temperatura d'esercizio reale dipende
dalle specifiche del prodotto.
Evitare di posizionare il computer in un
luogo soggetto a umidità elevata, temperature estreme, vibrazioni meccaniche, luce
solare diretta o molta polvere. L'utilizzo
del computer in ambienti estremi per
periodi prolungati può comportare il
deterioramento e una vita più breve del
prodotto.
Non è consentito l'utilizzo in ambienti
dove è presente po lvere metallica.
Collocare il computer su una superficie
piatta e stabile. Non poggiare il computer
su di un lato o riporlo sottosopra. Un forte
impatto se fatto cadere o un urto possono
danneggiare il computer.
Non coprire né bloccare i fori di ventila-
zione esterni del computer. Ad esempio,
non porre il computer su letti, divani,
tappetini o superfici simili. Diversamente,
può verificarsi surriscaldamento che può
provocare danni al computer.
Dato che il computer può diventare molto
caldo durante l'uso, tenerlo lontano dagli
oggetti vulnerabili al calore.
Tenere il computer ad almeno 13 cm (5 pol-
lici) dagli apparecchi elettrici che possono
generare un forte campo magnetico, come
TV, frigoriferi, motori o un grande speaker
audio.
Evitare di spostare troppo velocemente il
computer da un luogo freddo a uno caldo
Una differenza di temperatura di oltre 10 C
(18 F) può causare condensa all'interno
dell'unità, provocando danni ai supporti di
archiviazione.
Italiano
23
Page 26

Linee guida generali
Non esporre la pelle al computer mentre
lo si usa in un ambiente molto caldo o
molto freddo.
Non posizionare oggetti pesanti sulla
parte superiore del computer quando
viene chiuso in quanto il display potrebbe
rovinarsi.
La superficie dello schermo si graffia facil-
mente. Evitare di toccarla con oggetti
appuntiti come penne o matite.
Il fenomeno di “burn-in” o gohsting delle
immagini sul display LCD si verifica quando
sullo schermo è visualizzata la stessa immagina per periodi prolungati. Il problema
può essere evitato limitando la quantità di
immagini statiche sullo schermo. Si raccomanda di usare uno screen saver o di spegnere il display quando non è in uso.
Per massimizzare la vita utile della
retroilluminazione del monitor, lasciare
che si spenga in automatico in base alle
impostazioni di risparmio energetico.
Linee guida sulla pulizia
Non pulire mai il computer mentre è
acceso.
Usare un panno morbido inumidito d'acqua
o un detergente non alcalino per pulirne
Italiano
l'esterno.
Pulire delicatamente il monitor con un
panno soffice e senza pelucchi.
Se sul computer è versata dell'acqua o del
liquido, asciugare e pulire non appena
possibile. Anche se il computer è impermeabile, non lasciarlo bagnato quando è
possibile asciugarlo.
Se il computer diventa umido quando la
temperatura raggiunge gli 0 °C (32 °F) o
meno, possono verificarsi danni da congelamento. Accertarsi di aver asciugato il
computer bagnato.
Linee guida sulla batteria
Ricaricare la batteria quando è quasi
scarica. Accertarsi che l'operazione di
ricarica arrivi a completamento. In questo
modo si può evitare di danneggiare la
batteria.
La batteria è un prodotto consumabile e
le seguenti condizioni accorceranno la sua
vita utile:
- ricarica frequente della batteria
- utilizzo, caricamento o conservazione
della batteria alle alte temperature
Per evitare di accelerare il deterioramento
della batteria e prolungare così la sua vita
utile, ridurre al minimo il numero di
ricariche per non aumentare troppo di
frequente la sua temperatura interna.
Caricare la batteria in un intervallo di tem-
perature tra i 10 C ~ 30 C (50 F ~ 86 F).
Un ambiente con alte temperature farà
riscaldare la batteria. Evitare di caricare la
batteria all'interno di un veicolo chiuso e
quando ci sono alte temperature. Inoltre,
la ricarica non inizierà se la batteria non si
trova nella gamma di temperature
consentita.
Si consiglia di non ricaricare la batteria più
di una volta al giorno.
Si consiglia di caricare la batteria quando
il computer è spento.
Per mantenere l'efficienza operativa della
batteria, conservarla al riparo dalla luce,
una volta estratta dal computer e con una
carica rimanente del 30 ~ 40%.
Importanti linee guida durante l'utilizzo
della batteria.
Quando la batteria viene installata o tolta,
rispettare quanto segue:
- evitare di installare o rimuovere la bat teria quando il computer è in modalità
Sospensione. Una rimozione improvvisa
della batteria può causare la perdita di
dati, oppure il computer potrebbe diven tare instabile.
- evitare di toccare i terminali della bat teria per non causare danni, e di conse guenza un funzionamento scorretto
della stessa o del computer.
La tensione d'ingresso del computer e la
temperatura circostante influenzeranno
direttamente il tempo di carica e scarica
della batteria:
- il tempo di carica verrà prolungato quan do il computer è acceso. Per accorciare il
tempo di carica, si consiglia di mettere il
computer in modalità sospensione o iber nazione.
24
Page 27

- una bassa temperatura prolungherà il
tempo di carica e accelererà il tempo in
cui essa si scarica.
Usando l'alimentazione della batteria in
un ambiente con temperature estremamente basse, è possibile riscontrare tempi
operativi accorciati e una lettura del livello della batteria non corretta. Questo
fenomeno è dovuto alle caratteristiche
chimiche delle batterie. La temperatura
adeguata d'esercizio per la batteria è
-10 °C ~ 50 ºC (14 ºF ~ 122 ºF).
on lasciare il pacco batteria immagaz-
zinato per più di sei mesi senza ricaricarlo.
Linee guida del touchscreen
Usare il dito, oppure lo stilo o la penna
digitalizzatrice in dotazione. L'utilizzo di
un oggetto metallico diverso dal dito o
dallo stilo può provocare graffi e danneggiare il display, e di conseguenza causare
errori.
Per togliere un panno dal monitor usare
un panno umido. La superficie del touchscreen ha un rivestimento protettivo speciale che evita che lo sporco si attacchi ad
esso. Il mancato uso di un panno morbido
può danneggiare lo speciale rivestimento
protettivo sulla superficie del touchscreen.
Spegnere l'alimentazione durante la pu-
lizia del display. La pulizia del monitor
quando il computer è alimentato può
causare un funzionamento non corretto.
Non applicare forza eccessiva sul monitor.
Evitare di posizionare oggetti sulla parte
superiore del monitor in quanto questo
può causare la rottura del vetro e quindi
danni al display.
Usare il touchscreen mentre ci sono basse
temperature (inferiori ai 5 ºC) può provocare un rallentamento del tempo di risposta, il che è normale. Un tempo di risposta
normale può essere ripristinato tornando
alla temperatura ambiente.
Quando vi è un’evidente discrepanza tra il
posizionamento dello stilo sullo schermo e
la posizione dell’indicatore, utilizzare
l'utilità di calibratura per ricalibrare il
touchscreen.
Italiano
25
Page 28
Перед началом работы
Для получения подробной информации об
изделии обратитесь к руководству пользователя (в формате PDF), приведенному на
рабочем столе Windows, а также на диске с
драйверами.
Последние версии руководства и драйверов
можно загрузить с вебсайта Getac:
http://www.getac.com Support
Download.
Подготовка компьютера к
работе
Распаковка
T800 Планшетный компьютер
Адаптер переменного Шнур сетевого питания
тока
Стилус
Фала крепления
ПРИМЕЧАНИЕ: Этот упаковочный лист
применяется к стандартным моделям. В
некоторых выбранных моделях могут быть
различные предметы.
Установка SIM-карты (опция)
Pусский
1. Найдите крышку SIM-карты. Отверните 4
винта и снимите крышку.
Ткань для очистки
экрана
Диск с драйверами
Документация
2. Соблюдая направление, установите
SIM-карту на место.
3. Закройте крышку и закрепите 4 винтами.
Подключение к сети переменного
тока
При самом первом включении компьютера
рекомендуется использовать питание от
сети переменного тока.
1. Подсоедините кабель постоянного тока от
адаптера сетевого питания к разъему
питания компьютера (
2. Подключите розеточную часть шнура
питания переменного тока к адаптеру
сетевого питания, а вилочную часть к
электророзетке (
3. Нажмите кнопку питания ( ). Операци-
онная система Windows должна быть
запущена.
).
).
26
Зарядка аккумулятора
Для зарядки аккумулятора подключите
адаптер сетевого питания к компьютеру и
электророзетке. В процессе зарядки индикатор заряда батареи ( ) на компьютере
горит желтым светом. Во время зарядки
компьютер рекомендуется выключать. После
полной зарядки аккумулятора индикатор
заряда батареи гаснет.
Для полной зарядки аккумулятора требуется
около 3 часов при выключенном компьютере и
около 3,5 часов при
включенном компьютере.
Page 29
к
А
Обзор компьютера
См. примечание1.
Сенсорный
Динами
Объектив камеры
2
Фиксатор фала крепления x 4
Индикаторы
Микрофон
Датчик освещения
Кнопка питания
Камера / Trigger
OSDC
Пуск
Увеличение
громкости
Уменьшение
громкости
Порт USB 3.0
Комбинированный разъем
аудио
Проходная антенна
(GPS-WLAN-WWAN)
Крышка SIM-карты
Разъем
расширения
1
У избранных моделей в этом месте есть какой-либо компонент. Это может быть последовательный порт,
разъем для карты microSD, разъем RJ-45 или объектив считывателя штрих-кодов.
2
Опция.
2
2
Вспышка
Разъем
док-станции
2
Объектив камеры
ккумулятор
Разъем питания
2
Стилус
27
Pусский
Page 30

Восстановление системы
Обслуживание компьютера
Моделей с ОС Windows 8
Если возникли проблемы с компьютером с
ОС Windows 8, попробуйте выполнить
описанные ниже действия.
Восстановите предыдущее состояние
компьютера.
Обновите компьютер без использования
влияющих на его работу файлов.
Удалите все и переустановите ОС
Windows.
Дополнительные сведения приведены в
руководству пользователя.
Моделей с ОС Windows 7
Сервис Восстановление системы позволяет
восстановить заводское состояние системы
Windows 7.
Для выполнения восстановления системы:
1. Подсоедините адаптер сетевого питания.
2. Включите компьютер. В процессе запуска
системы при отображении экрана с логотипом приложите и удерживайте палец
на экране или нажмите кнопку Логотип
Windows на своем устройстве. При этом
отображается меню. Выберите в
пункт HDI Recovery (Восстановление
HDI).
3. На открывшемся экране выберите пункт
Recovery (Восстановление) для запуска
процедуры восстановления.
Pусский
4. Индикатор процесса отображает процент
выполнения процедуры. По достижении
100% компьютер выключится.
5. Включите компьютер. Запустится мастер
настройки Windows. Для продолжения
выполнения процедуры следуйте указаниям на экране.
6. После перезапуска системы появится
экран программы установки
установки выполнит распознавание
оборудования и установку драйверов.
7. По завершении система перезапустится,
и откроется рабочий стол Windows.
. Программа
меню
Указания по размещению
Для поддержания оптимальной произво-
дительности используйте компьютер в
помещениях с рекомендуемой температурой от 0 °C (32 °F) до 50 C (122 F);
реальная температура эксплуатации
зависит от характеристик изделия.
Не подвергайте компьютер воздействию
высокой влажности, крайних температур,
механических вибраций, прямых солнечных лучей и пыли. Использование компьютера в экстремальных условиях в течение
длительного времени может привести к
ухудшению характеристик и сокращению
срока службы изделия.
Применять в условиях присутствия в воз-
духе металлической пыли категорически
запрещается.
Размещайте компьютер на ровной устой-
чивой поверхности. Не ставьте компьютер
на бок и не храните его в перевернутом
положении. Удары и сильные воздействия
при падении могут привести к повреждению компьютера.
Не перекрывайте щели и вентиляционные
отверстия в корпусе компьютера. Например, не ставьте компьютер на кровать,
диван, коврик и другие мягкие поверхности. Это может привести к перегреву и
повреждению компьютера.
Так как компьютер во время работы может
сильно нагреваться, не используйте его
вблизи предметов, чувствительных к
высокой температуре.
Держите компьютер на расстоянии, по
меньшей мере, 13 см (5 дюймов) от электрооборудования, способного генерировать
сильное магнитное поле, например, телевизоров, холодильников, двигателей или
больших акустических динамиков.
Не допускайте быстрого перемещения
компьютера из холодного места в теплое.
При разности температур более 10 °C
(18 °F) это может привести к конденсации
влаги внутри изделия и повреждению
устройств хранения данных.
28
Page 31

Общие указания
Не допускайте соприкосновения кожи с
компьютером, если он работает в очень
жарких или холодных условиях.
Не помещайте на сложенный компьютер
тяжелые предметы — это может привести
к повреждению дисплея.
Поверхность экрана очень легко поца-
рапать. Не прикасайтесь к нему острыми
предметами, например, авторучкой или
карандашом.
Остаточное изображение на ЖК-экране
возникает при длительном отображении
на экране статичного изображения. Этой
проблемы можно избежать, ограничивая
объем выводимого на экран статичного
содержимого. С этой целью рекомендуется
пользоваться хранителем экрана или
отключать дисплей, когда он не используется.
Чтобы обеспечить максимальный срок
службы подсветки дисплея, включите
автовыключение экрана в настройках
управления питанием.
Указания по чистке
Не выполняйте чистку при включенном
компьютере.
Для чистки внешних частей компьютера
протрите их мягкой тканью, смоченной в
воде или в не щелочном моющем
средстве.
Осторожно протрите дисплей мягкой, не
содержащей пуха тканью.
При попадании на компьютер воды или
жидкостей, протрите его, чтобы осушить и
очистить, если это возможно. Хотя компьютер водонепроницаем, не оставляйте его
мокрым, если вы можете его осушить.
Если компьютер окажется мокрым при
температуре 0 °C (32 °F) или ниже, то замерзшая вода может повредить компьютер. Обязательно протирайте намокший
компьютер.
Указания по обращению с
аккумулятором
Если аккумулятор разряжен, его требу-
ется перезарядить. Перезаряжать аккумулятор требуется до его полной зарядки.
Это помогает не допустить нарушения
функционирования аккумулятора.
Аккумулятор является расходуемым изде-
лием, срок службы которого сокращают
следующие факторы:
– частая зарядка аккумулятора
– эксплуатация, зарядка или хранение при
высокой окружающей температуре
Чтобы не допустить быстрого ухудшения
характеристик аккумулятора и, таким
образом, продлить срок его службы,
постарайтесь минимизировать количество процедур перезарядки, и не допустить
слишком частого повышения его внутренней температуры.
Заряжайте аккумулятор при температуре
10 °C ~ 30 °C (50 °F ~ 86 °F). Более
высокая окружающая температура может
привести к чрезмерному повышению
температуры аккумулятора. Не заряжайте
аккумулятор в закрытом автомобиле или в
жарких условиях. Кроме того, зарядку
аккумулятора невозможно запустить вне
допустимого температурного диапазона.
Не рекомендуется заряжать аккумулятор
чаще одного раза в день.
Рекомендуется заряжать аккумулятор
только при выключенном компьютере.
Для сохранения эффективности работы
аккумулятора, храните его при уровне
заряда 30%~40% в темном прохладном
месте, предварительно вынув его из
компьютера.
Важные указания по использованию
аккумулятора.
При установке или извлечении аккумулятора соблюдайте следующие указания:
– не устанавливайте и не извлекайте
аккумулятор, когда компьютер нахо-
дится в спящем режиме. Неожиданное
извлечение аккумулятора может при-
вести к потере данных или к неста бильной работе компьютера.
29
Pусский
Page 32

– не касайтесь контактов аккумулятора;
это может привести к его повреждению
и ненадлежащему функционированию
аккумулятора и компьютера.
Входное напряжение компьютера и окружающая температура непосредственно
влияют на время зарядки и разрядки
аккумулятора:
– время зарядки увеличивается, когда
компьютер включен. Для сокращения
времени зарядки рекомендуется к пере-
вести компьютер в
режим пониженного энергопотребления;
– низкая температура увеличивает время
зарядки, а также сокращает время раз
рядки.
спящий режим или в
При использовании аккумуляторного пи-
тания при чрезмерно низкой окружающей
температуре могут наблюдаться снижение
времени работы, а также неверные показания уровня заряда батареи. Это явление
связано с химическими характеристиками
аккумулятора. Допустимый диапазон температуры эксплуатации аккумулятора:
-10 °C ~ 50 °C (14 °F ~ 122 °F).
Не оставляйте батарею в накопителе
свыше шести месяце без ее перезарядки.
Указания по работе с сенсорным
экраном
Не прилагайте к дисплею чрезмерных
усилий. Не помещайте на дисплей какиелибо предметы — это может привести к
разрушению стекла и повреждению
дисплея.
Использование сенсорного экрана при
низких температурах (ниже 5 °C) может
привести к снижению его времени отклика, это нормальное явление. При
комнатной температуре нормальное
время отклика восстановится.
При значительном несоответствии между
положением стилуса на экране и указываемой позицией экранного курсора запустите утилиту калибровки и откалибруйте
сенсорный дисплей.
При работе с дисплеем пользуйтесь паль-
цем или стилусом для сенсорного экрана.
Использование острых или металлических
предметов вместо пальца или стилуса
может привести к царапинам или повреждению дисплея и, таким образом, к ошиб-
Pусский
кам в работе.
Для удаления загрязнений с дисплея
используйте мягкую ткань. Поверхность
сенсорного экрана имеет защитное покрытие, не допускающее прилипания
грязи. Использование не мягкой ткани, а
других материалов, может привести к
повреждению защитного покрытия сенсорного экрана.
Перед чисткой дисплея следует выклю-
чать компьютер. Чистка дисплея при
включенном питании может привести к
нарушению функционирования дисплея.
30
Page 33
開始之前
要獲取本產品的完整資訊,請參閱放置於電腦
Windows 桌面或驅動程式光碟裡的使用手冊
(PDF 格式)。
您可以造訪 Getac 網站下載最新手冊和驅動程
式。網頁位於
Download
http://www.getac.com Support
。
2. 以正確方向將 SIM 卡插入到就定位。
開始使用
裝箱清單
T800 平板電腦
電源整流器 電源線
觸控筆 筆繩
拭鏡布 驅動程式光碟
註:本裝箱清單適用於標準型號;部分特定型號
可能擁有不同品項。
操作指南等文件
安裝 SIM 卡(選配)
1. 找到 SIM 卡插槽蓋,鬆開四顆螺絲打開蓋子。
3. 合上蓋子,鎖回四顆螺絲。
連接電源與開機
首次開機時,建議您連接 AC 交流電源。
1. 將電源整流器的 DC 端插入電腦的電源接頭
)。
內 (
2. 將電源線的母接頭端插入電源整流器,公接頭
端插入牆壁的電源插座 (
3. 按下電源鈕 ( ) 開機。作業系統 Microsoft
Windows 將啟動。
)。
為電池充電
繁體中文
將電腦接上電源整流器,並將整流器的電源線插
入電源插座,即會開始對電池充電。電腦上的電
池指示燈 ( ) 顯示為橙色時,表示充電進行中。
建議您在電腦關機狀態下充電。電池充飽電時,
指示燈改亮綠色。
充電所需時間為電腦關機下約 3 小時;電腦開機
狀態下約 3.5 小時。
31
Page 34
電腦外觀介紹
參見註記1
喇叭
觸控螢幕
相機鏡頭2
繩索孔 x 4
指示燈
麥克風
光線感應器
電源鈕
相機/觸發
OSDC
開始
提高音量
降低音量
USB 3.0 接頭
複合式音訊
接頭
天線直通接頭
(GPS-WLAN-WWAN)
2
SIM 卡插槽
蓋
2
閃光燈
底座接頭
2
相機鏡頭
電源接頭
2
繁體中文
觸控筆
擴充接頭
電池
1
部份型號於此處有一元件。可能是序列埠、microSD 卡插槽、RJ-45 接頭、或條碼掃描鏡頭的其中之一。
2
僅限特定型號。
32
Page 35

系統還原功能
平時維護
Windows 8 機型
使用 Windows 8 電腦時發生問題,您可以嘗試
以下方式之一解決問題。
將電腦還原至較早的時間點。
在不影響檔案的情況下重新整理您的電腦。
移除所有項目並重新安裝 Windows。
更多資訊請參閱使用手冊。
Windows 7 機型
「系統還原」工具讓您將 Windows 7 系統回復
成出廠狀態。
要執行系統還原:
1. 接上電源整流器。
2. 打開電腦電源。電腦開機期間螢幕出現 Getac
標誌畫面時,點選並按住螢幕或按機身的
Windows 商標鍵,這將開啟一個選單,在選
單裡選擇 HDI Recovery。
3. 在出現的畫面選擇 Recovery 即可開始。
4. 畫面下方的進度條會顯示已完成的百分比,到
達 100% 時,系統電源自動關閉。
5. 請打開電腦電源。Windows 設定精靈開始,
請遵照螢幕提示進行設定。
地點守則
為確保最佳之效能,請在建議的 0 C (32 F)
50 C (122 F) 環境溫度範圍內使用電腦。(實
際操作溫度取決於產品規格。)
使用電腦時應避免潮濕、過熱或過冷、震動、
陽光直射及落塵過多的場所。長期在極端環境
下使用電腦可能導致產品退化以及產品壽命
縮短。
禁止在含有金屬粉塵的環境下操作。
電腦應放置於平穩堅固的表面。勿讓電腦側立
或者將電腦翻轉過來存放。掉落或打擊所產生
的強力撞擊可能會損壞電腦。
不要蓋住或堵塞電腦上的任何通風口。例如,
不要將電腦放在床鋪、沙發、地毯或其它類似
物品表面上;這類環境可能會讓電腦過熱而導
致損壞。
電腦操作時會產生高溫,請讓電腦遠離受熱易
壞的物品。
電腦和會產生強烈磁場的電器應保持至少 13
公分(5 吋)的距離,例如電視、冰箱、馬達、
或大型音箱。
請勿驟將電腦由寒冷處移至溫暖處。兩處溫差
若高於 10 C (18 F),會導致機體內部出現凝
結,進而損壞存儲媒介。
繁體中文
6. 電腦會再重新啟動並顯示安裝畫面。此階段包
括硬體偵測與驅動程式安裝。
7. 完成時,電腦會再重新啟動。看到 Windows
桌面時即是還原完成。
一般守則
在極高或極低溫的環境下操作電腦時,請勿讓
肌膚直接碰觸電腦。
請勿放置重物於電腦上,以免損及螢幕。
液晶螢幕很容意被刮傷。請不要以鉛筆或原子
筆之類的尖銳物品碰觸螢幕。
33
Page 36

長時間讓液晶螢幕顯示固定影像有可能發生
影像殘留的現象。限制螢幕長時間顯示靜態內
容有助於避免此問題。建議您使用螢幕保護程
式或者在不用時關閉螢幕。
為了延長螢幕背光的壽命,請設定電源管理自
動關閉背光。
清潔守則
請勿在電腦開機狀態下進行清潔。
清潔機身外部時,請以軟質布料沾清水或無酒
精成份的清潔劑擦拭。
清潔螢幕時,請以不會掉綿絮的軟質布料擦
拭。
如果電腦遭水或其他液體濺溼,請在可以清理
的時候予以擦乾。雖然您的電腦為防水型,但
仍不適合讓電腦在可以擦乾的情況下持續潮
濕著。
電腦在 0 C (32 F) 環境下遇濕可能會導致凍
傷。請務必將打濕的電腦抹乾。
電池守則
使用電池時,儘量將電力全部用完後再充電,
並且一次就將電量充飽。這樣做可避免損壞電
池。
電池為消耗品,以下情況均可能縮短其壽命:
繁體中文
– 太過頻繁地充電
– 在高溫環境下使用、充電或存放電池
為避免電池快速退化,並延長其可用時間,請
盡量減少充電次數,以免經常提高其內部溫
度。
請在 10 C ~ 30 C (50 F ~ 86 F) 的溫度範
圍內對電池充電。偏高的環境溫度會導致電池
溫度升高。應避免在密閉的車內和炎熱天氣條
件下對電池充電。若電池不在允許的溫度範圍
內時,充電不會開始。
34
建議您一天之內不要充電超過一次。
建議您在電腦關機的狀態下對電池充電。
若要取出電池存放,為了維持電池的操作性
能,請在電池仍保有 30% 至 40% 的剩餘電
量時取出,然後存放在黑暗陰涼的地方。
使用電池的重要守則
安裝或取下電池時,請注意以下各點:
避免在電腦處於睡眠模式時,安裝或取下
電池。突然取下電池可能會造成資料遺失
或使電腦不穩定。
避免觸碰電池的電極端,否則可能會造成
損壞,使得電池或電腦運作不正常。
電腦的輸入電壓和環境溫度會直接影響電池
的充電和放電時間:
在電腦開機狀態下,充電時間會延長。若
要減短充電時間,建議您讓電腦進入睡眠
/休眠模式或關機。
低溫環境會使充電的時間延長,也會使放
電的時間加速。
在極低溫環境下使用電池電力時,可能會有操
作時間縮短以及電力顯示值不正確的情形產
生。此現象起因於電池的化學特性。建議適當
的電池操作溫度應維持在 -10 C ~ 50 C (14
F ~ 122 F) 。
請勿貯放電池超過六個月而不充電。
觸控螢幕守則
請用手指或隨附的專用筆操作螢幕。使用手指
或專用筆以外的尖銳或金屬物品碰觸螢幕,可
能會刮傷與損壞螢幕,因而造成故障。
請使用軟布擦拭螢幕上的灰塵。觸控螢幕的表
面有一層保護塗層,可預防灰塵黏著。使用軟
布之外的物品可能會傷害觸控螢幕表面上的
特殊保護塗層。
清潔螢幕時請務必關機。清潔時若未關閉電
源,可能會使螢幕故障。
Page 37

請勿在螢幕上施力過重。避免將物品放置在螢
幕上,以免螢幕破裂而損壞。
在低溫(低於 5
可能會變慢。此為正常現象。返回室溫環境後
反應時間即可恢復正常。
o
C) 下使用觸控螢幕時反應
如果實際碰觸螢幕的位置與電腦認知有明顯
差距時,請執行螢幕校準。
35
繁體中文
Page 38
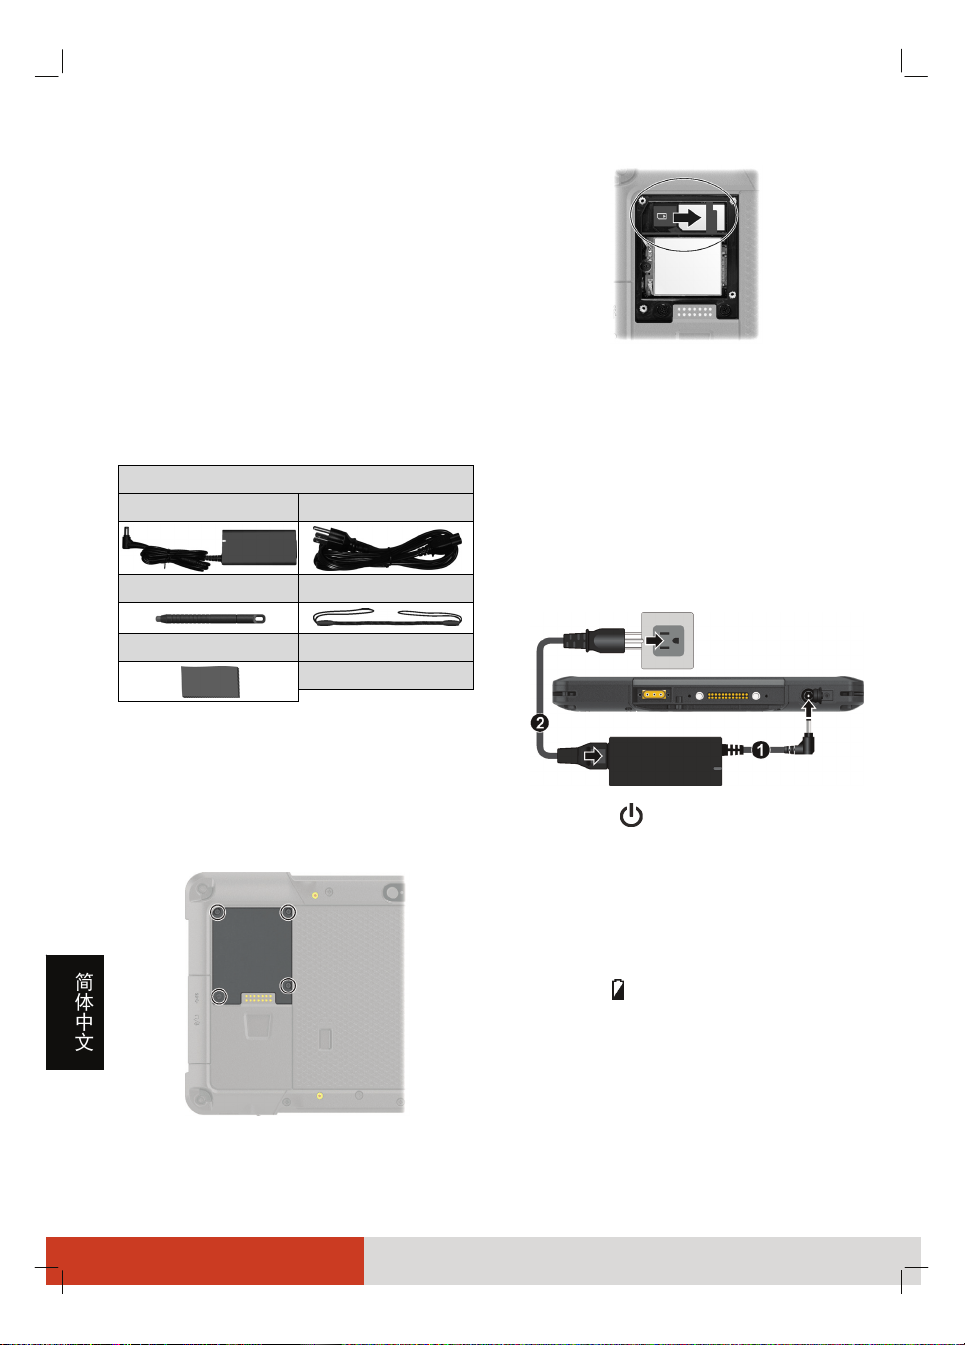
开始之前
要获得本产品的完整信息,请参阅放置于电脑
Windows 桌面或驱动程序光盘的用户手册(PDF
格式)。
您可以访问 Getac 网站 http://www.getac.com
Support Download 下载最新手册和驱动
程序。
准备开始
装箱清单
T800 平板电脑
电源适配器 电源线
2. 以正确方向将 SIM 卡插入到就定位。
3. 关闭盖子,拧上四颗螺丝。
连接电源和开机
当您首次开机时,建议您使用外部电源。
1. 将交流适配器的 DC 电源线插入电脑的电源
接口内 (
)。
触摸屏笔 笔绳
屏幕清洁布 驱动程序光盘
操作指南等文件
注:本装箱清单适用于标准型号;部分特定型号
可能拥有不同品项。
安装 SIM 卡(可选)
1. 找到 SIM 卡插槽盖,拧下四颗螺丝打开盖子。
2. 将 AC 电源线的母接头端插入交流适配器,公
接头端插入墙壁的电源插座 (
3. 按电源钮 ( ) 开机。操作系统 Microsoft
Windows 将启动。
)。
电池充电
简体中文
36
将电脑接上电源适配器,并且适配器的电源线插
入电源插座,即对电池进行充电。此时电脑上的
电池指示灯 ( ) 会亮褐色,表示充电正在进行
中。建议您在电脑关机状态下充电。电池充满电
时,指示灯改亮绿色。
充电所需时间为电脑关机下约 3 小时;电脑开机
状态下约 3.5 小时。
Page 39
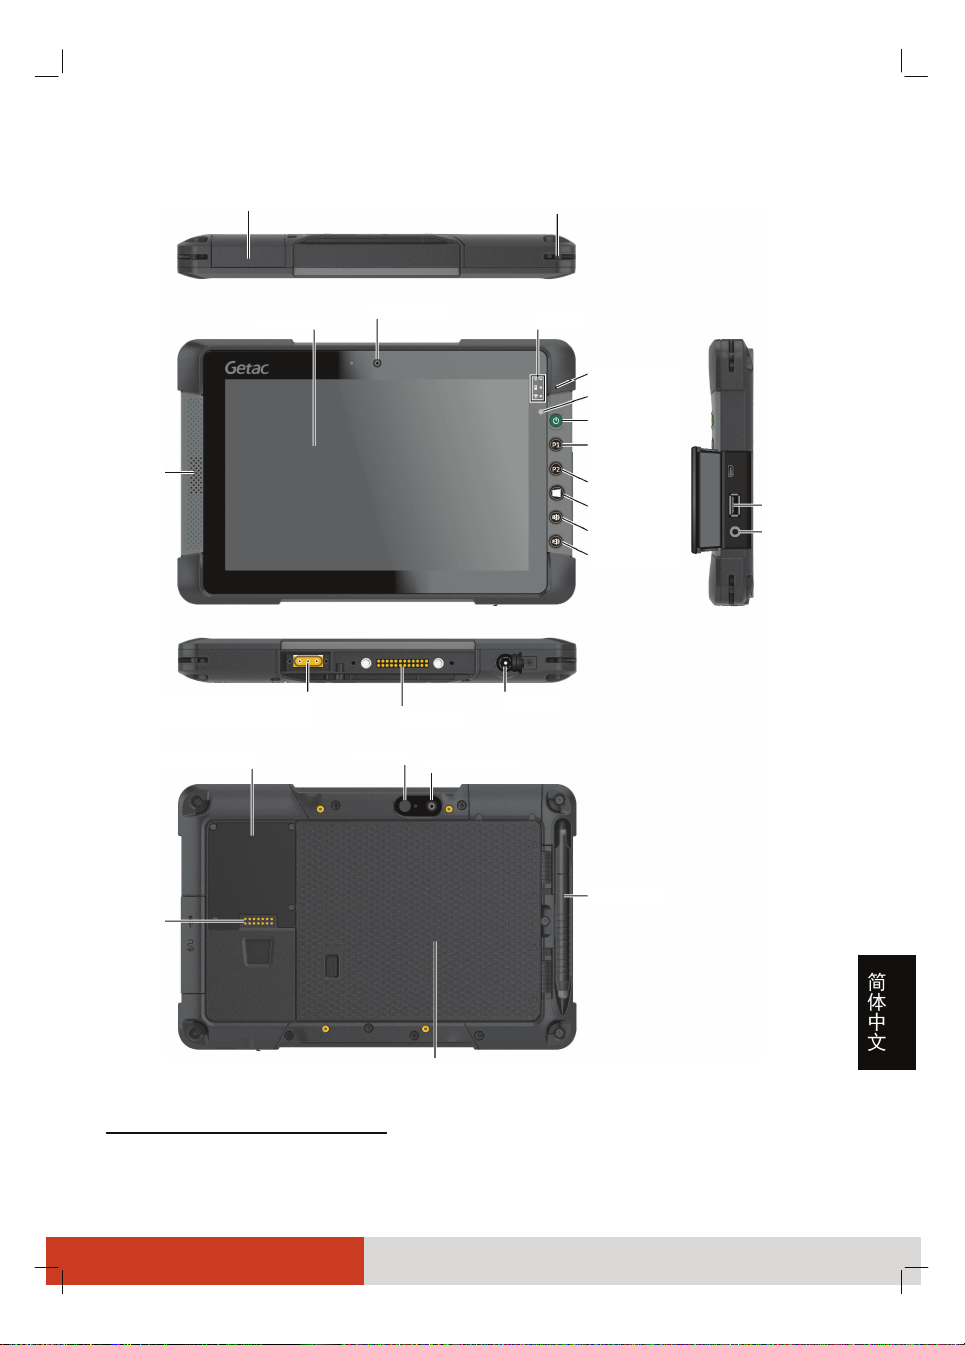
电脑外观介绍
参见脚注1
扬声器
触摸屏
摄像镜头
绳索孔 x 4
2
指示灯
麦克风
光传感器
电源钮
相机/触发
OSDC
开始
调高音量
调低音量
USB 3.0端口
复合式音频
端口
天线直通接口
(GPS-WLAN-WWAN)
SIM卡插槽2 盖
扩充端口
1
部份型号于此处有一组件。可能是序列端口、microSD 卡插槽、RJ-45 端口、或条形码扫描镜头的其中之一。
2
仅限特定型号。
2
闪光灯
基座接口
2
摄像镜头
电池
电源接口
2
触摸屏笔
37
简体中文
Page 40

系统恢复功能
平时维护
Windows 8 机型
如果你的 Windows 8 电脑遇到了问题,你可以
尝试以下方法之一解决问题。
将电脑还原到以前的时间点。
恢复电脑而不影响你的文件。
删除所有内容并重新安装 Windows。
更多信息请参阅用户手册。
Windows 7 机型
「系统恢复」工具让您将 Windows 7 系统恢复
成出厂状态。
运行系统恢复:
1. 接上电源适配器。
2. 打开电脑电源。在系统启动期间屏幕出现
Getac 商标画面时,点击并按住屏幕或按机身
的 Windows 商标键,这将打开一个菜单,在
菜单选择 HDI Recovery。
3. 在出现的画面选择 Recovery 即可开始。
地点准则
为达到最佳性能,请在 0 C (32 F) 到 50 C
(122 F) 的温度范围内使用电脑 – 实际运行
温度取决于产品规格。
使用电脑时应避免潮湿、极端的温度、震动、
阳光直射及落尘量多的场所。长期在极端环境
下使用可能导致产品退化以及产品寿命缩短。
禁止在含有金属粉尘的环境下操作。
电脑应放置于平稳坚固的表面。勿让电脑侧立
或者将电脑翻转过来存放。掉落或打击所产生
的强力撞击可能会损坏电脑。
不要盖住或堵塞电脑上的任何通风口。例如,
不要将电脑放在床、沙发、地毯或其它类似物
品表面上。否则,会因为过热而导致电脑损坏。
电脑和会产生强烈磁场的电器应保持至少 13
公分(5 吋)的距离,例如电视、冰箱、马达、
或大型扬声器。
请勿骤将电脑由寒冷处移至温暖处。两处温差
若高于 10 C (18 F),会导致机体内部出现
凝结,进而损坏存储介质。
4. 画面下方的进度条会显示已完成的百分比,到
达 100% 时,系统电源自行关闭。
5. 请打开电脑电源。Windows 设置向导开始,
请遵照屏幕提示进行设置。
6. 电脑会再重新启动并显示安装画面。此阶段包
括硬件检测和驱动程序安装。
简体中文
7. 完成时,电脑会再重新启动。看到 Windows
桌面时即是恢复完成。
一般准则
在极高或极低温的环境下操作电脑时,请勿让
肌肤直接碰触电脑。
当电脑上盖合着时,请勿放置重物于其上,以
免损及屏幕。
液晶屏幕很容意被刮伤。请不要用铅笔或原子
笔之类的尖锐物品碰触屏幕。
长时间让液晶屏幕显示固定影像有可能发生
影像残留的现象。限制屏幕长时间显示静态内
容有助于避免此问题。建议您使用屏幕保护程
序或者在不用时关闭屏幕。
为了延长屏幕背光的寿命,请让电源管理自动
关闭背光。
38
Page 41

清理准则
切勿在电脑开机中清理电脑。
清洁机身外部时,请以软质布料沾湿清水或无
酒精成份的清洁剂擦拭。
清洁屏幕时,请以不掉绵屑的软质布料擦拭。
如果电脑遭水或其他液体溅湿,请在可以清理
的时候予以擦干。虽然您的电脑为防水型,但
仍不适合让电脑在可以擦干的情况下持续潮
湿着。
电脑在 0 C (32 F) 环境下遇湿可能会导致冻
伤。请务必将打湿的电脑抹干。
电池准则
使用电池时,尽量将电力全部用完后再充电,
并且一次就将电量充满。这样做可避免损坏电
池。
使用电池时的重要准则。
在安装或卸下电池时注意下列事项:
避免当电脑处于睡眠模式时安装或卸下电
池。突然卸下电池可能导致数据丢失或电
脑可能变得不稳定。
避免触摸电池端子,否则可能导致损坏,
进而导致电池或电脑工作不正常。
电脑的输入电压和周围环境温度直接影响电
池的充电和放电时间:
当电脑处于工作状态时充电时间会延长。
为缩短充电时间,建议将电脑置于睡眠或
休眠模式。
低温会延长充电时间和缩短放电时间。
在极低温环境下使用电池电力时,可能会有操
作时间缩短以及电力显示值不正确的情形产
生。此现象起因于电池的化学特性。建议适当
的电池操作温度应维持在 -10 C ~ 50 C (14
F ~ 122 F) 。
请勿存放电池超过六个月而不充电。
电池属于消耗品,下列情形会缩短其寿命:
– 频繁对电池充电
– 在高温环境中使用、充电或存放电池
为避免加速电池老化,延长其使用寿命,应尽
量减少充电次数,避免其内部温度经常升高。
在 10
o
C ~ 30 oC (50 oF ~ 86 oF) 的温度范围
内对电池充电。更高的环境温度会导致电池温
度升高。避免在封闭的车内和炎热天气条件下
充电。此外,当电池不在允许的温度范围内时,
不会开始充电。
建议您不要在一天内对电池多次充电。
建议您在电脑关机的状态下对电池充电。
为保持电池的运行效率,当剩余电量为 30%
~ 40% 时将其从电脑上卸下,然后存放在阴
凉黑暗的地方。
如果要取出电池存放,为保持电池的运行效
率,请在剩余电量为 30% ~ 40% 时将其从
电脑上卸下,然后存放在阴凉黑暗的地方。
触摸屏准则
使用手指或附带的触摸屏笔在显示屏上操作。
若使用尖利或金属物品(而不使用手指或触摸
屏笔),可能导致显示屏刮伤和损坏,进而导
致错误。
使用软布擦去显示屏上的灰尘。触摸屏表面有
特殊保护层,可防止灰尘吸附在上面。若不使
用软布,可能导致触摸屏表面的特殊保护层损
坏。
清洁显示屏时应先关闭电脑电源。开机时清洁
显示屏可能导致工作不正常。
不要在显示屏上过分用力。避免在显示屏上方
放置物品,否则可能导致玻璃破碎并损坏显示
屏。
在低温条件(低于 5
导致响应速度变慢,这是正常现象。达到室温
条件后,即可恢复正常响应速度。
如果实际碰触屏幕的位置和电脑认知有明显
差距时,请重新校正触摸屏。
o
C)下使用触摸屏可能
39
简体中文
Page 42

简体中文
40
Page 43

Page 44

561512210004 R00
 Loading...