

Page 1

PS236
USER MANUAL
Rugged Mobile Computing Solutions
Page 2

Aug. 2009
Trademarks
Microsoft, Windows, the Windows logo, Windows Media, Outlook and
ActiveSync are registered trademarks or trademarks of Microsoft
Corporation in the United States and/or other countries. Microsoft products
are licensed to OEMs by Microsoft Licensing, Inc., a wholly owned subsidiary
of Microsoft Corporation.
The Bluetooth word mark and logos are owned by the Bluetooth SIG, Inc.
All other brand and product names are trademarks or registered trademarks
of their respective companies.
Disclaimer
Specifications and manuals are subject to change without notice. Getac
assumes no liability for damage incurred directly or indirectly from errors,
omissions, or discrepancies between the device and the manuals.
Notes
Depending upon the specific model purchased, the color and look of your
device and accessories may not exactly match the graphics shown in this
document.
The screenshots and other presentations shown in this document are for
reference only. They may differ from the actual screens and presentations
generated by the actual product.
Page 3

ENERGY STAR® is a government program that offers businesses and
consumers energy-efficient solutions, making it easy to save money while
protecting the environment for future generations.
Please reference ENERGY STAR® related information from
www.energystar.gov.
As an ENERGY STAR® Partner, MiTAC Technology Corporation has
determined that this product meets the ENERGY STAR® guidelines for
energy efficiency.
An ENERGY STAR® qualified computer uses 70 % less electricity than
computers without enabled power management features.
Earning the ENERGY STAR®
When every home office is powered by equipment that has earned the
ENERGY STAR®, the change will keep over 289 billion pounds of
greenhouse gases out of the air.
If left inactive, ENERGY STAR
mode and may use 15 watts or less. New chip technologies make power
management features more reliable, dependable, and user-friendly than
even just a few years ago.
Spending a large portion of time in low-power mode not only saves
energy, but helps equipment run cooler and last longer.
Businesses that use ENERGY STAR
realize additional savings on air conditioning and maintenance.
®
qualified computers enter a low-power
®
enabled office equipment may
Page 4

Over its lifetime, ENERGY STAR
®
qualified equipment in a single home
office (e.g., computer, monitor, printer, and fax) can save enough
electricity to light an entire home for more than 4 years.
Power management (‚sleep settings‛) on computers and monitors can
result in much savings annually.
Remember, saving energy prevents pollution
Because most computer equipment is left on 24 hours a day, power
management features are important for saving energy and are an easy way
to reduce air pollution. By using less energy, these products help lower
consumers’ utility bills, and prevent greenhouse gas emissions.
Page 5

Table of Contents
Chapter 1 Getting Started ............................................................. 1-1
Identifying Hardware Components ....................................... 1-1
Front Components .............................................................. 1-1
Back Components ............................................................... 1-5
Top Components ................................................................ 1-6
Bottom Components .......................................................... 1-6
Getting Your Device Ready for Use ....................................... 1-7
Installing the SIM Card and Battery .................................. 1-7
Connecting to AC Power and Charging the Battery ........ 1-9
Performing the Initial Startup ......................................... 1-10
Synchronizing with Your Computer .................................... 1-11
Installing ActiveSync or WMDC ....................................... 1-11
Using Options ........................................................................ 1-12
Using an SD Card .............................................................. 1-12
Using the Hand Strap ....................................................... 1-13
Chapter 2 Basic Skills ..................................................................... 2-1
Power Saving and Turning Off .............................................. 2-1
Backlight Off ....................................................................... 2-1
Entering the Suspend Mode .............................................. 2-1
Turning Off ......................................................................... 2-2
Navigating on the Screen ....................................................... 2-2
Using the Stylus .................................................................. 2-2
Using the Keypad ............................................................... 2-2
Today Screen ........................................................................... 2-3
Page 6

Landscape View .................................................................. 2-3
Navigation Bar and Toolbar ................................................... 2-4
Running Programs .................................................................. 2-5
Shortcut Menus ....................................................................... 2-5
Notifications ............................................................................ 2-6
Entering Information .............................................................. 2-6
Entering Text Using the Input Panel ................................. 2-6
Writing on the Screen ........................................................ 2-8
Drawing on the Screen ....................................................... 2-9
Recording a Message ........................................................ 2-10
Using My Text ................................................................... 2-11
Securing Your Device ............................................................ 2-12
Locking the Keypad .......................................................... 2-12
Locking Your Device ......................................................... 2-12
Chapter 3 Using the Phone (Select Models Only) ........................ 3-1
About Your Phone .................................................................. 3-1
Switching On or Off the Phone ......................................... 3-2
Starting Microsoft Phone ................................................... 3-3
Phone Status Icons .............................................................. 3-3
Making a Call .......................................................................... 3-4
Dialing a Call ....................................................................... 3-4
Making a Call from the Onscreen List ............................... 3-5
Making a Call from Contacts ............................................. 3-5
Making a Call from the Call History List ........................... 3-6
Making a Call from Speed Dial .......................................... 3-7
Responding to a Call ............................................................... 3-8
Answering a Call ................................................................. 3-8
Rejecting a Call ................................................................... 3-8
Ending a Call ....................................................................... 3-8
Operations during a Call ........................................................ 3-9
Adjusting the Phone Volume ............................................. 3-9
Using the Mute Function ................................................... 3-9
Using the Speakerphone .................................................... 3-9
Page 7

Managing More Than One Call ....................................... 3-10
Taking a Note during a Call ............................................. 3-11
Using Call History .................................................................. 3-12
Viewing Call History ......................................................... 3-12
Adding an Entry to Contacts Using Call History ............. 3-13
Using Speed Dial ................................................................... 3-13
Creating a Speed Dial Entry ............................................. 3-13
Editing or Deleting a Speed Dial Entry ........................... 3-14
Customizing Your Phone ...................................................... 3-15
Changing Phone Settings ................................................. 3-15
Changing Security Settings .............................................. 3-16
Changing Services Settings .............................................. 3-16
Changing Network Settings ............................................. 3-17
Additional Phone Operations .............................................. 3-17
Using Text Messages ......................................................... 3-17
Setting up an Internet Connection ................................. 3-18
Checking Your Voice Mail ................................................ 3-18
Making an Emergency Call .............................................. 3-18
Dialing an International Call ............................................ 3-18
Chapter 4 Managing Your Device ................................................. 4-1
Managing Power ..................................................................... 4-1
Low Battery Signals and Actions ....................................... 4-1
Power-Saving Tips ............................................................... 4-2
Customizing Your Device ....................................................... 4-3
Settings – Personal .............................................................. 4-3
Settings – System ................................................................ 4-4
Settings – Connections ....................................................... 4-5
Searching and Organizing Information ................................ 4-6
Chapter 5 Microsoft Pocket Outlook ............................................. 5-1
Calendar: Scheduling Appointments and Meetings ............. 5-1
Creating an Appointment .................................................. 5-2
Using the Calendar Summary Screen ................................ 5-3
Contacts: Tracking Friends and Colleagues ........................... 5-4
Page 8

Creating a Contact .............................................................. 5-4
Using the Contacts Summary Screen ................................. 5-5
Tasks: Keeping a To Do List .................................................... 5-6
Creating a Task ................................................................... 5-6
Using the Tasks Summary Screen ...................................... 5-7
Notes: Capturing Thoughts and Ideas ................................... 5-8
Creating a Note .................................................................. 5-8
Messaging: Sending and Receiving Messages ...................... 5-9
About Accounts .................................................................. 5-9
Reading E-mail Messages ................................................. 5-10
Composing and Sending an E-mail ................................. 5-10
Reading Text Messages (Select Models Only) ................. 5-11
Composing and Sending a Text Message (Select
Models Only) ................................................................. 5-12
Chapter 6 More Programs .............................................................. 6-1
ActiveSync ................................................................................ 6-1
Synchronizing Data ............................................................ 6-2
Synchronizing Directly with Exchange Server .................. 6-2
Office Mobile .......................................................................... 6-4
Creating a Document/Workbook/Note ............................. 6-4
Opening a Document/Workbook/Note/Presentation ...... 6-5
Internet Explorer ..................................................................... 6-6
Windows Live and Messenger ................................................ 6-7
Setting up Windows Live ................................................... 6-7
Signing in to Messenger ..................................................... 6-7
Windows Media ...................................................................... 6-8
Pictures & Videos ..................................................................... 6-9
Viewing Pictures and Videos .............................................. 6-9
Camera ................................................................................... 6-10
Taking Pictures .................................................................. 6-10
Recording Video Clips ...................................................... 6-12
Internet Sharing (Select Models Only) ................................ 6-15
Remote Desktop Mobile ....................................................... 6-16
Other Programs ..................................................................... 6-17
Page 9

E-Compass ......................................................................... 6-17
TacLink ............................................................................... 6-19
Chapter 7 Getting Connected ........................................................ 7-1
Types of Connections .............................................................. 7-1
Using Cellular Connection (Select Models Only) .................. 7-2
Setting up a Cellular (GPRS) Connection .......................... 7-2
Setting up a Dial-up Connection ....................................... 7-3
Using Wireless Network ......................................................... 7-4
Switching On or Off the Wi-Fi Radio ................................ 7-4
Connecting to a Wireless Network .................................... 7-5
Using the Bluetooth Function ................................................ 7-6
Switching On or Off the Bluetooth Radio ........................ 7-6
Sending Files via the Bluetooth Function ......................... 7-7
Creating a Bluetooth Partnership ..................................... 7-8
Chapter 8 Troubleshooting and Maintenance ............................. 8-1
Resetting Your Device ............................................................ 8-1
Restoring Factory Default State ............................................. 8-2
Troubleshooting ...................................................................... 8-3
Caring for Your Device ........................................................... 8-4
Chapter 9 Regulatory Information ................................................ 9-1
Regulations Statements .......................................................... 9-1
European Notice ................................................................. 9-1
FCC Regulations .................................................................. 9-2
Safety Precautions ................................................................... 9-3
About Charging .................................................................. 9-3
About the Charger ............................................................. 9-3
About the Battery ............................................................... 9-4
About the Radio Frequency Exposure ............................... 9-4
Page 10

Page 11
Chapter 1
Getting Started
This chapter introduces you to the external components of your device and
guides you through the process of setting up your device for use.
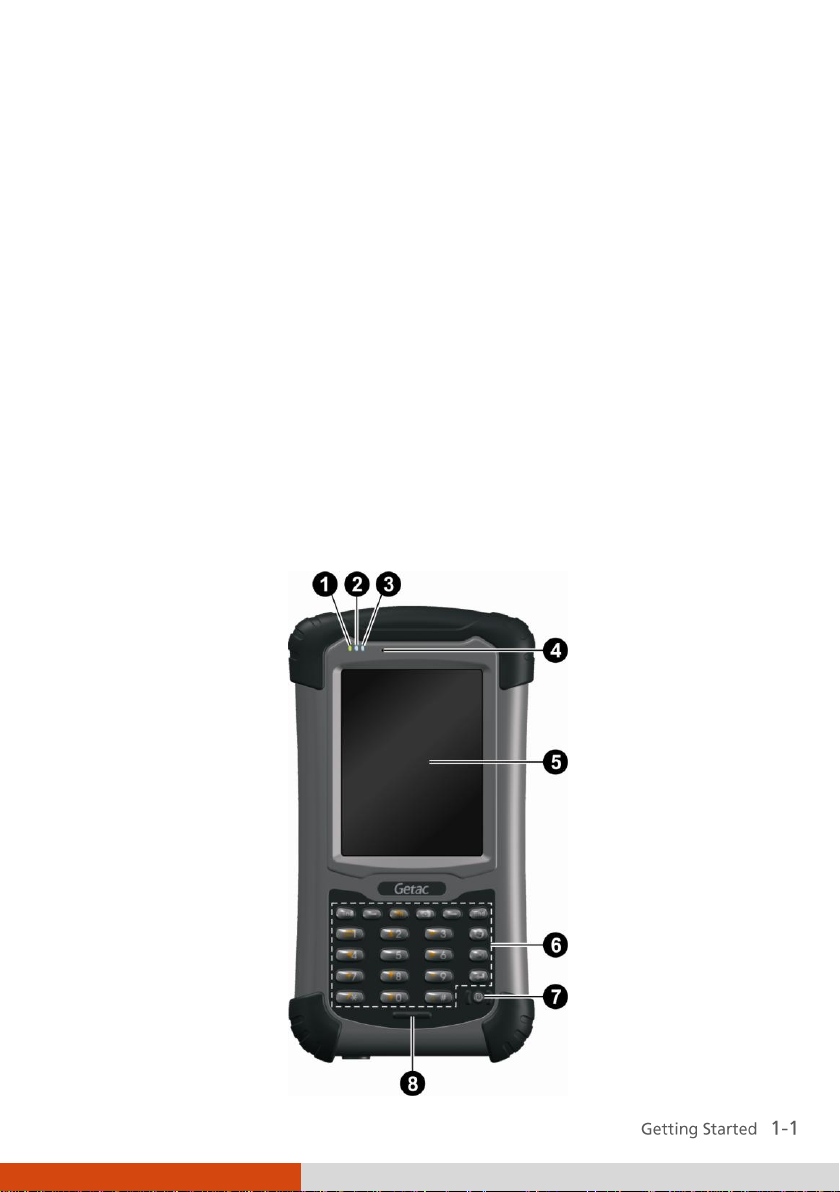
Identifying Hardware Components
Front Components
Page 12
Ref
Component
Description
Mobile Phone
Indicator
Flashes in blue to indicate that the phone function is
switched on (select models only).
RF (Radio
Frequency)
Indicator
Flashes in blue to indicate that the Bluetooth radio is
on.
Flashes in amber to indicate that the Wi-Fi (wireless
network) radio is on.
Flashes in purple to indicate that the GPS receiver is
on.
If more than one module is switched on, the indicator
changes color in a cyclic way.
Charge/
Notification
Indicator
Glows in amber to indicate that battery charging is in
progress.
Glows in green to indicate that the battery is fully
charged.
Glows in red to indicate that the battery power is
critically low (less than 10%).
Flashes in red to inform you of scheduled
appointments, alarms and reminders.
Earpiece
Serves as the phone earpiece during a call (select
models only).
Touch Screen
Displays the output of your device and responds to
your tapping.
Keypad
Includes keys for numbers and specific functions. It
lights up when a key is pressed. (See the next section
for details.)
Power Button
Turns on or off your device.
Microphone
Records voices.
Serves as the mouthpiece during a call (select models
only).
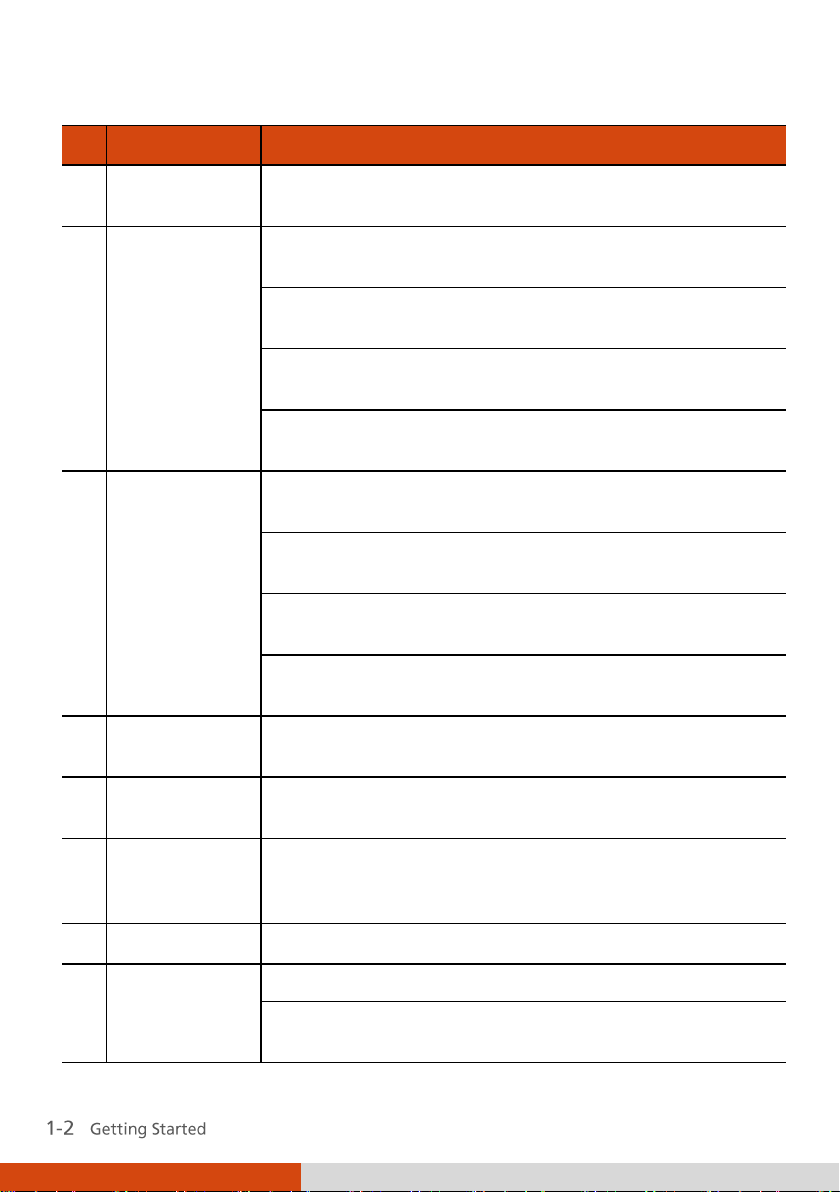
Page 13
Ref
Component
Description
Numeric Keys
Enter numbers (majorly for models with the phone
function).
Alternative
Function Keys
Provide functions as indicated by the orange icons
when Fn lock is on. (See also item later in this
table.)
Moves up, down, left and right within the
screen or menu.
Goes to the next input field.
Backspaces over one character when in a text
input field.
Enters the symbols when in an input field.
Increases the brightness level of the screen. It
cycles to the lowest level after reaching the
highest level.
Send Key
Dials or answers a call (select models only).
Keypad
Page 14
Ref
Component
Description
Left/Right Soft
Key
Performs the command shown on the bottom left or
right corner of the screen.
Function Key
Switches on or off the ‚alternative functions‛ of the
numeric keys. Fn lock is off by default. When it is
switched on, the icon shows in the navigation bar.
Camera Key
Starts the Camera program.
Serves as the shutter release button if the Camera
program is currently in use.
End Key
Ends or rejects a call (select models only).
Returns to the Today screen from another program.
Start Key
Opens the Start menu.
OK Key
Closes the current displayed menu or program.
Action Key
Confirms your selection by pressing, similar to the
Enter key on a keyboard.
Page 15
Ref
Component
Description
Stylus
Serves as the input device by tapping on the touch
screen to make selections and enter information.
Camera Lens
Takes still pictures or records video clips.
Flash
Provides extra light when taking pictures.
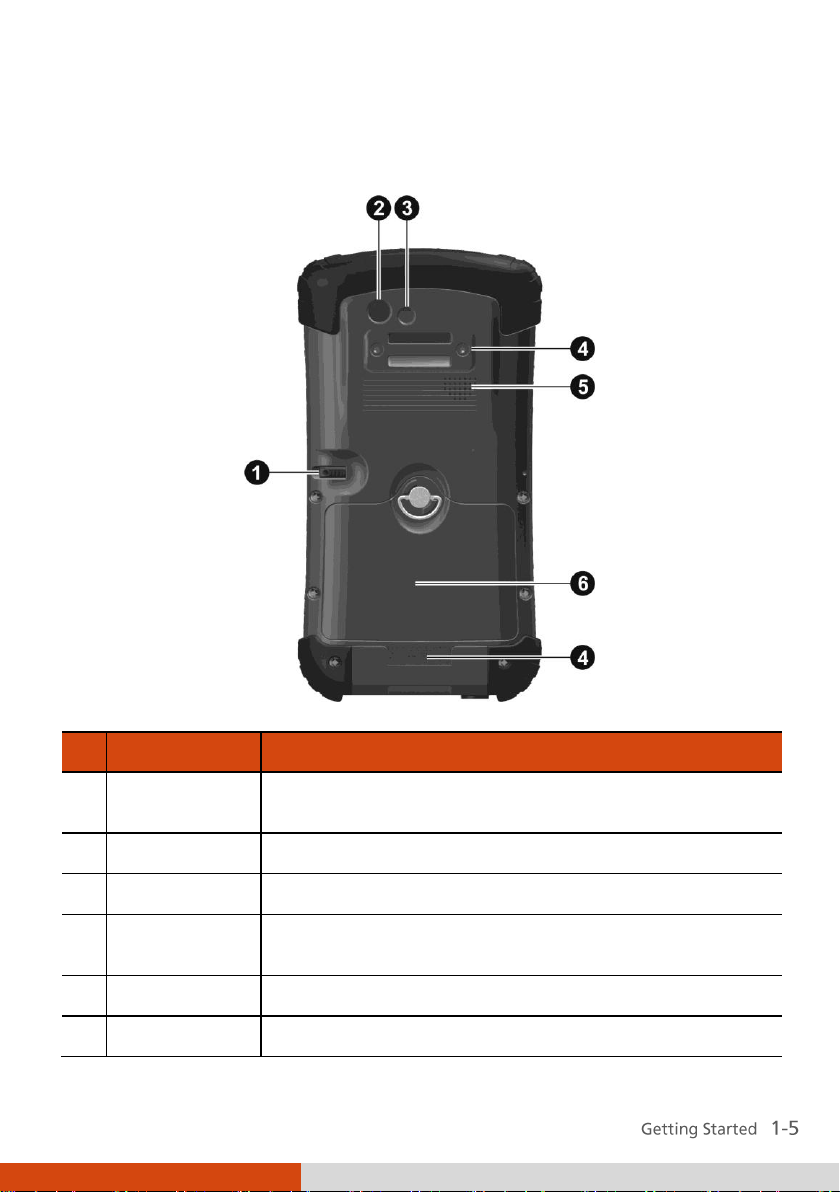
Hand Strap
Holders
The hand strap attaches here.
Speaker
Plays music, sounds and voices.
Battery Cover
Inside is the battery.
Back Components
Page 16
Ref
Component
Description
SD Card Slot
Cover
Inside is the SD card slot.
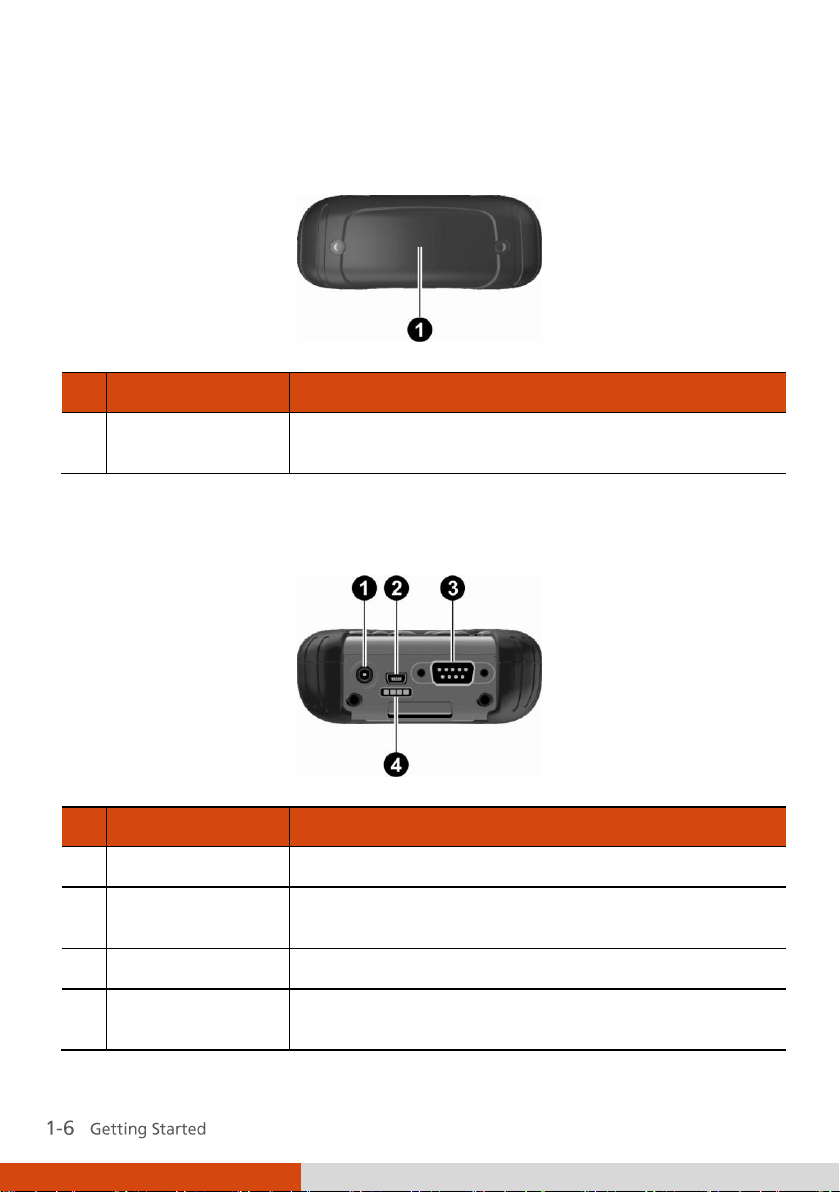
Ref
Component
Description
Power Connector
Connects to the AC adapter.
USB OTG (Host &
Client) Connector
Connects to the USB cable.
Serial Connector
Provides D-sub 9 pins RS232 function.
Docking
Connector
Connects to the office dock (an option).
Top Components
Bottom Components
Page 17
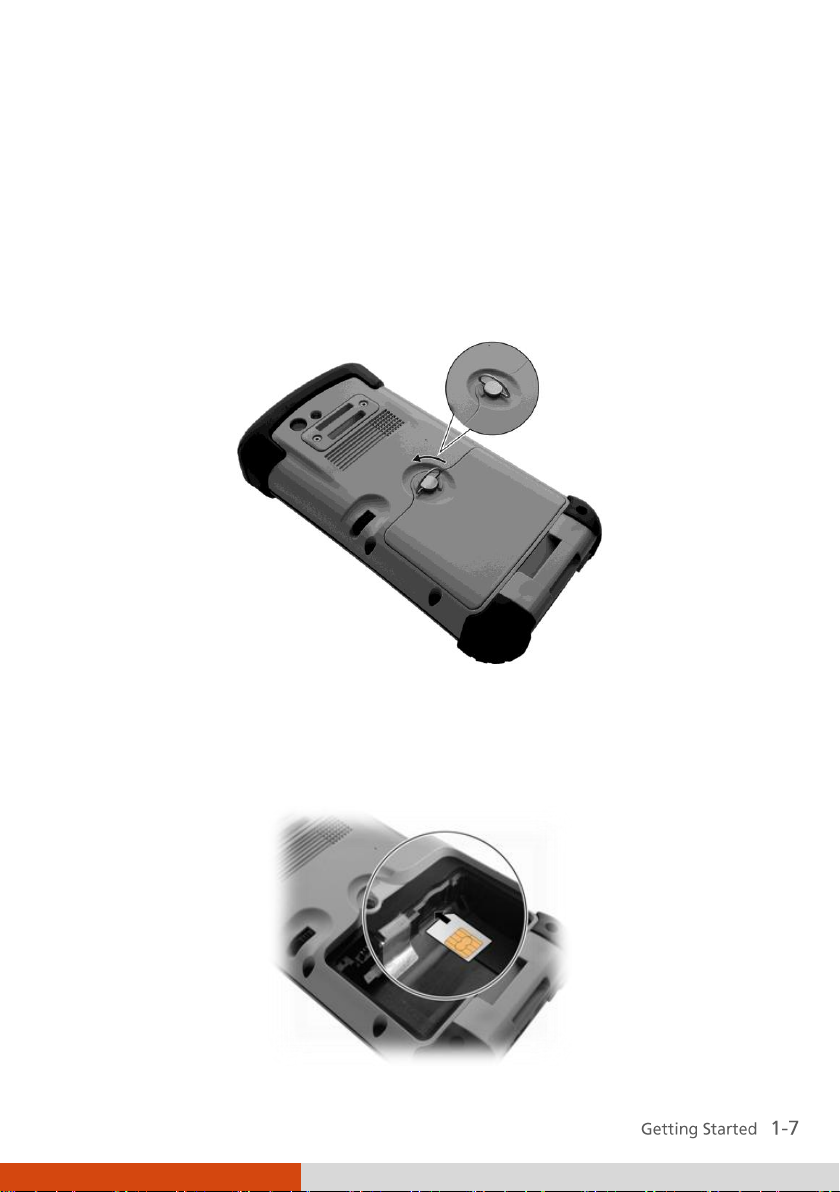
Unlock
position
Getting Your Device Ready for Use
Installing the SIM Card and Battery
1. Lift the latch handle of the battery cover and turn it counterclockwise to
the unlock (vertical) position. Then, detach the cover from the device.
2. If you model has the phone function, you need to install the SIM card
provided by your mobile operator. With the SIM card’s chip side facing
up and the beveled corner pointing to the slot, insert the card all the
way into the slot.
Page 18
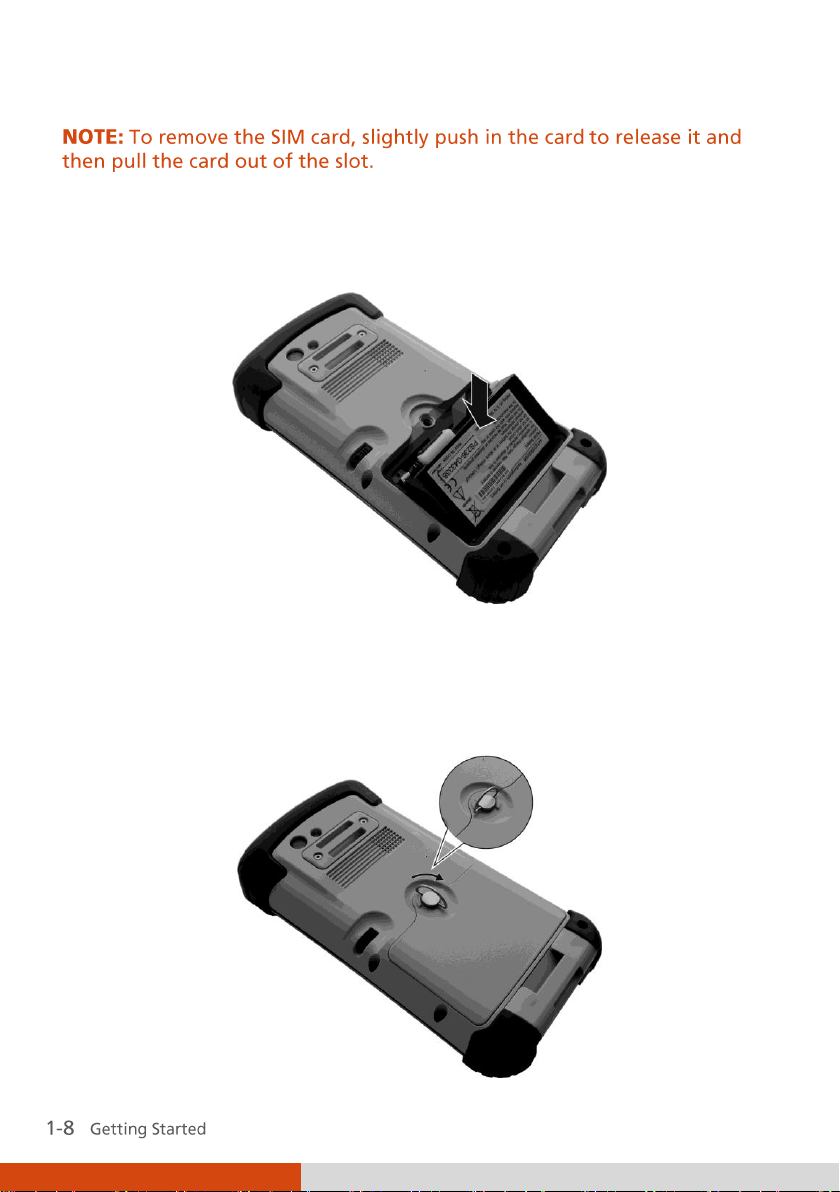
Lock
position
3. To install the battery, attach the bottom side of the battery to the
compartment at an angle and then lower the upper side to engage the
connector.
4. Attach the bottom side of the battery cover to the device at an angle
and then, with the handle still in the unlock (vertical) position, fit the
latch handle into place. Secure the latch by turning it clockwise to the
lock (horizontal) position.
Page 19
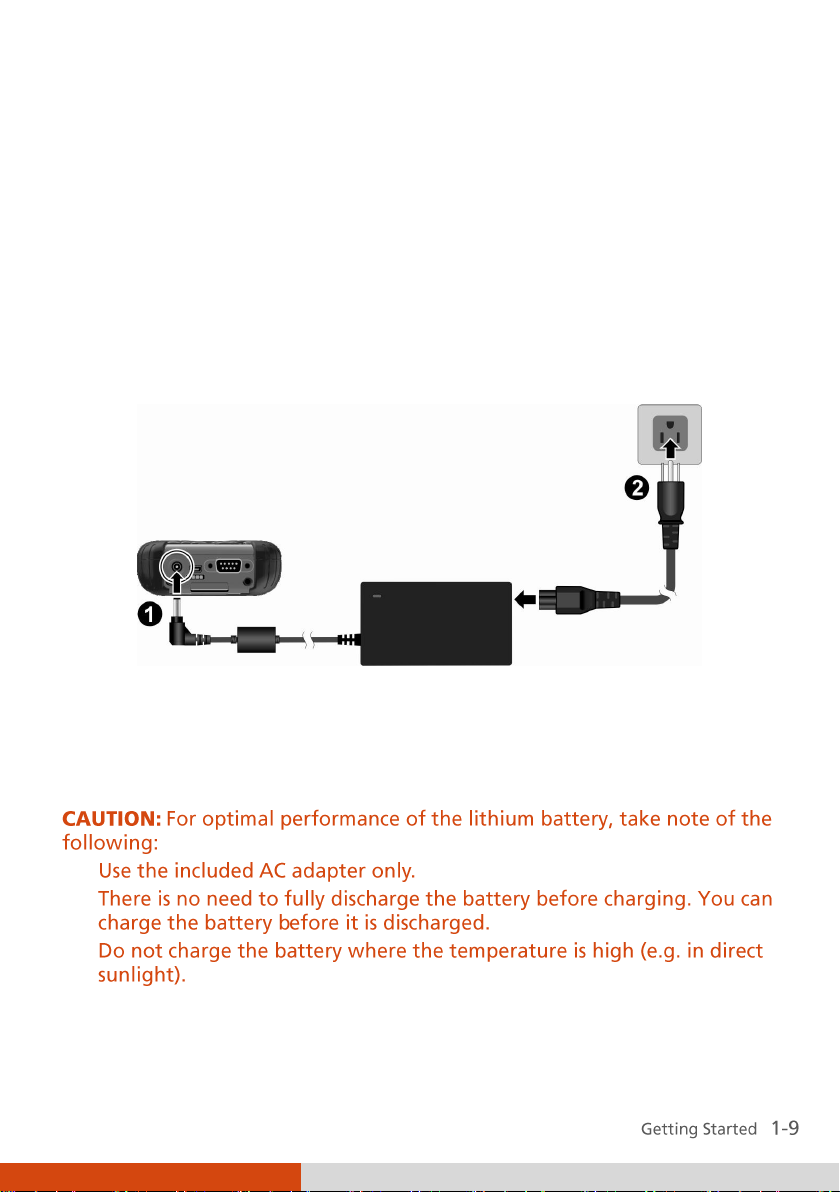
Connecting to AC Power and Charging the
Battery
Be sure to fully charge the battery before using your device for the first time.
1. Plug the DC cord of the AC adapter into the power connector of the
device ().
2. Plug the female end of the AC power cord into the AC adapter and the
male end into an electrical outlet ().
3. The charge indicator glows in amber when charging is in progress. Do
not disconnect your device from AC power until the battery is fully
charged, as indicated by the amber indicator turning into green. This will
take a couple of hours.
Page 20
Performing the Initial Startup
When turning on your device for the very first time, you will be guided
through a setup process.
1. Make sure that your device is either connected to AC power or the
battery has power.
2. Press the power button to turn on your device.
The backlight of the keypad will light up and, after a few seconds, the
setup screen appears.
3. Follow the on-screen instructions to complete the setup wizard.
4. For models with the phone function only:
If a SIM card has been inserted and the mobile phone network operator
(or you) has set the PIN, you will be prompted to enter the PIN. Enter the
PIN and tap Enter.
If a SIM card has not been inserted yet, a message of an invalid or
missing SIM card will appear on the screen. You can tap Cancel to
continue the startup procedure.
5. After the setup is completed, the Today screen appears. You can now use
your device.
Page 21
Synchronizing with Your
Computer
ActiveSync and Windows Mobile Device Center (WMDC) provide an easy way
to synchronize data on a Windows-based computer with your device.
ActiveSync works on computers that have the Windows XP operating
systems. WMDC works only on computers that have Windows Vista.
ActiveSync and WMDC act as gateways between your device and your
computer for transferring Outlook e-mail, appointments, contacts, and
tasks, and media such as pictures, music, and videos. You can also use the
Explore feature in either program to move files or programs from your
computer to your device.
Installing ActiveSync or WMDC
If you’re using Windows XP or earlier versions of Windows, install ActiveSync
with the supplied Getting Started Disc.
If you’re using Windows Vista, download and install Windows Mobile Device
Center 6.1. (Visit the Microsoft website to download the program and to
obtain operating instructions.)
NOTE:
Page 22
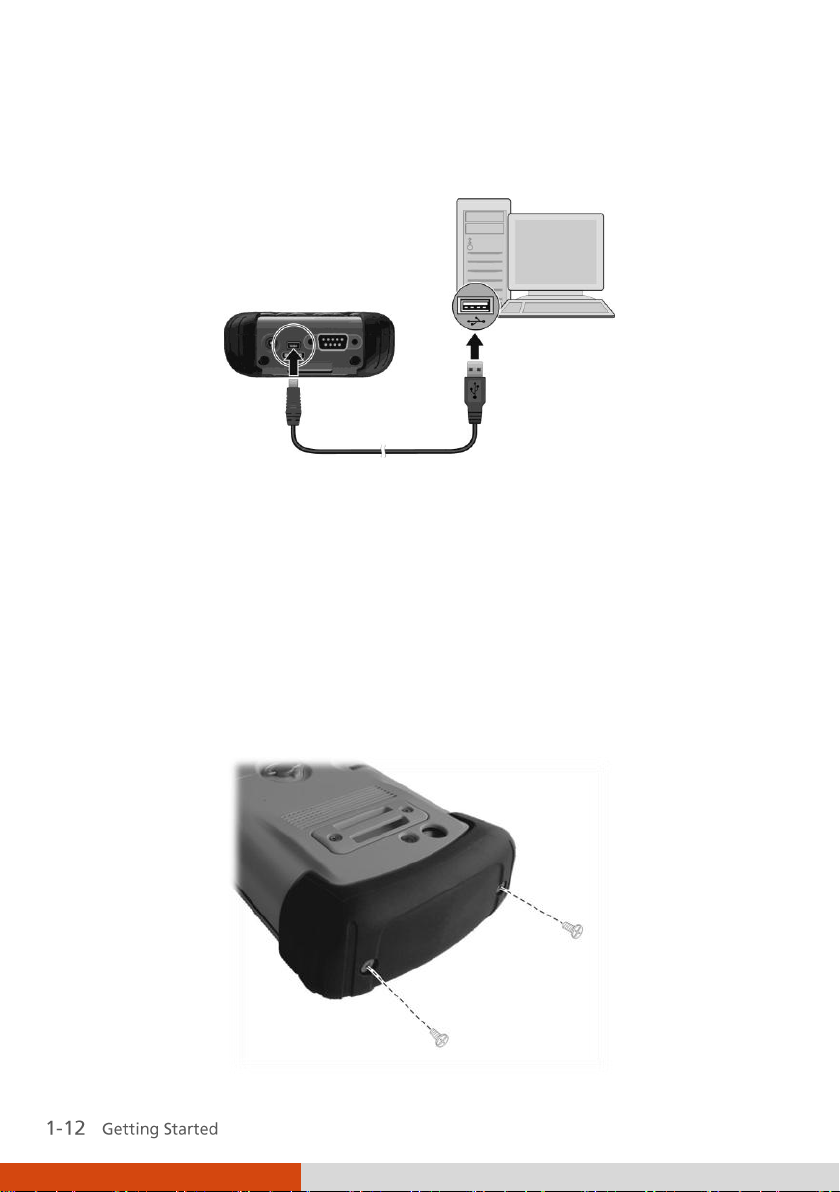
After the software installation, connect your device to your computer with
the USB cable and you are ready to synchronize.
Using Options
Using an SD Card
Your device has a SD (Secure Digital) card slot where you can insert an
SD/SDHC memory card or SDIO card. To insert an SD card:
1. Remove the rubber protection cap by unfastening two screws.
Page 23
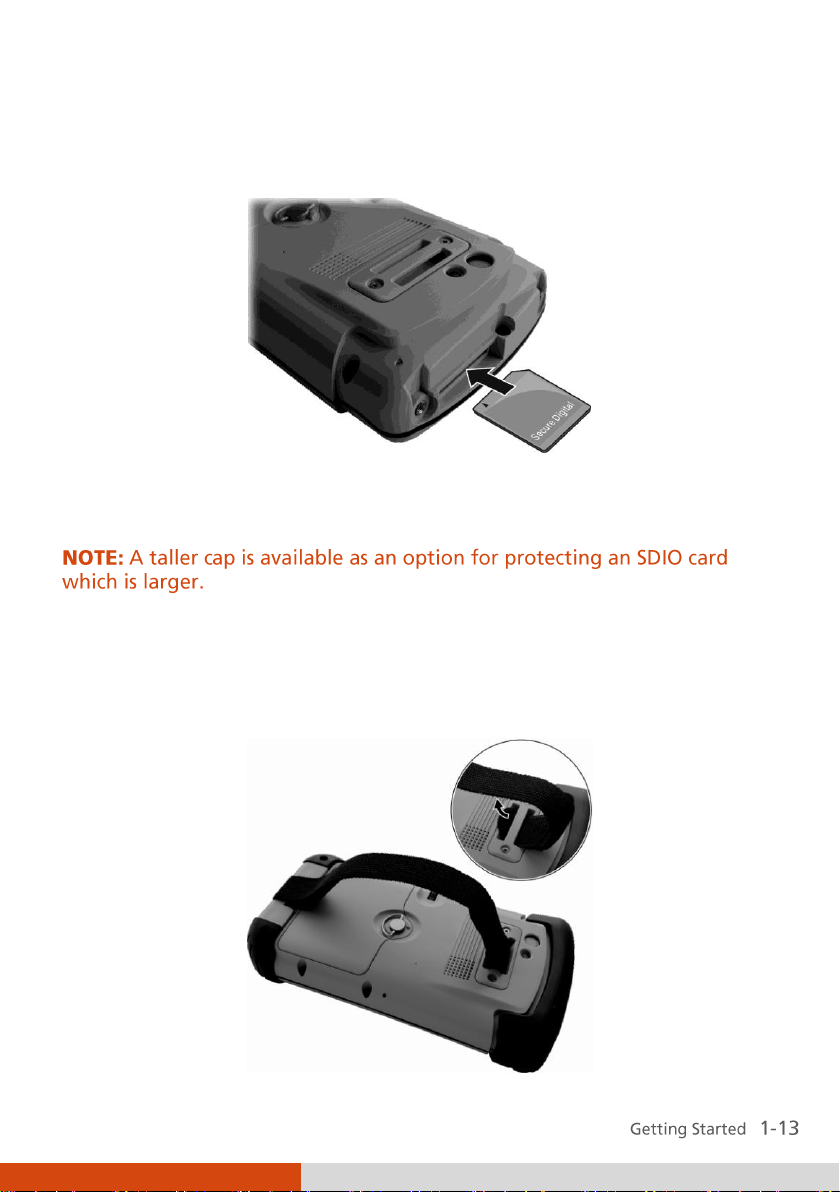
2. Insert the card into the slot, with the connector pointing to the slot and
its label facing the back of the device.
3. Replace the cap and secure with the two screws. The cap is required for
the waterproof capability of your device.
Using the Hand Strap
You can attach the hand strap to your device.
Page 24

Page 25

Chapter 2
Basic Skills
This chapter familiarizes you with the basic operations of your device.
Power Saving and Turning Off
Backlight Off
The backlight of the screen dims out after a period of inactivity (default 30
seconds while on battery power and 1 minute while on external power).
To restore the backlight, tap the screen or press a button. Note that where
you tap or what you press also causes the related task to be performed.
Entering the Suspend Mode
Your device automatically suspends after a period of inactivity (default 3
minutes while on battery power and 5 minutes while on external power).
To manually suspend the device, briefly press the power button.
To resume operation, press the power button. You will be back to where
you left off.
Page 26
Pull the stylus out of the slot and extend it
for ease of use. Store it in the slot when not
in use.
Tap
Touch the screen once with the stylus to
open items and select options.
Drag
Hold the stylus on the screen and drag
across the screen to select text and
images. Drag in a list to select multiple
items.
Tap and hold
Tap and hold the stylus on an item to see
a list of actions available for that item.
On the shortcut menu that appears, tap
the action you want to perform.
Turning Off
If you are not using your device, press and hold the power button for at least
3 seconds until the device plays a notification sound and turns off.
Navigating on the Screen
Using the Stylus
Use the stylus to navigate and select objects on the screen.
Using the Keypad
You can also use the keypad to navigate on the screen. (See ‚Keypad‛ in
Chapter 1 for information.)
Page 27

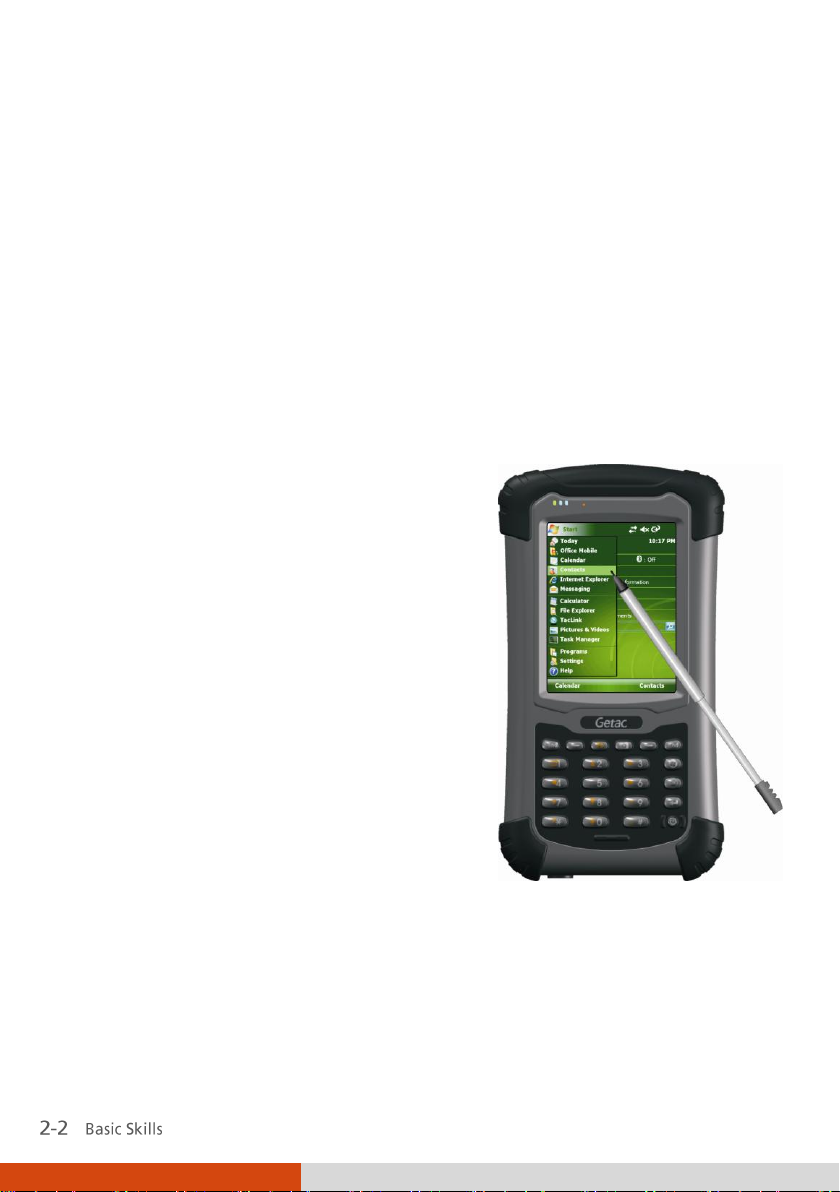
When you switch on your device for the first
time each day, you will see the Today screen.
The Today screen can be easily accessed from
any screen by tapping and then Today.
The Today screen shows your upcoming
appointments, active tasks, information
about e-mail messages, and more. You can
tap a section on the Today screen to open
the program that is associated with that
section.
Today Screen
Landscape View
You can use your device in a landscape manner. To change the screen view,
tap Settings System Screen General Landscape or Portrait.
Page 28

Tap to quickly select a program
you have recently used.
Tap to select a program.
Tap to see additional programs.
Tap to customize your device.
Input panel button
Right Soft Key
Left Soft Key
Navigation Bar and Toolbar
The navigation bar is located at the top of the screen. It displays the active
programs and allows you to switch programs and close screens.
The navigation bar and Start menu:
The navigation bar also contains the volume indicator, battery indicator, and
connectivity indicators. You can tap an indicator for related controls.
Use the toolbar at the bottom of the screen to perform tasks in programs.
The toolbar includes a left soft key, a right soft key, and the Input panel
button in between. The right soft key is usually Menu while the left soft key
varies with programs.
An example of the toolbar:
Page 29
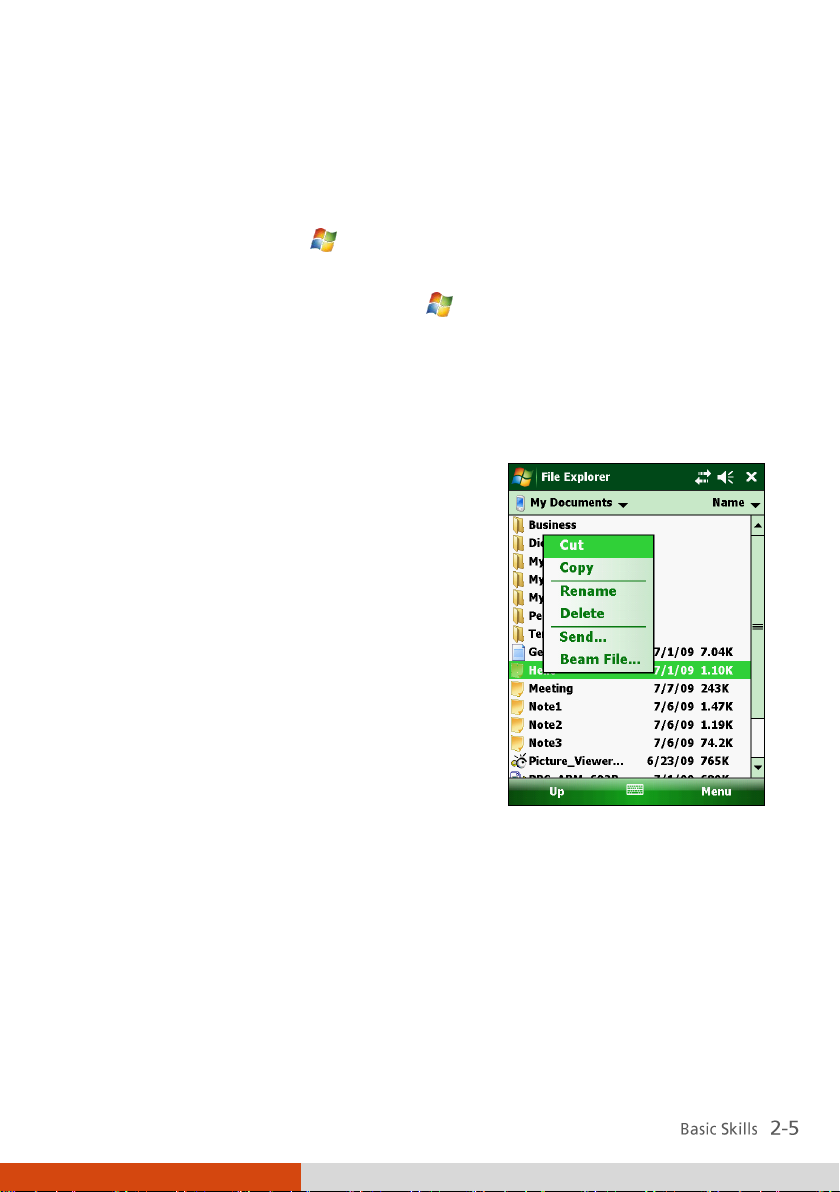
With shortcut menus, you can quickly
choose an action for an item. The actions in
the shortcut menus vary from program to
program. To access a shortcut menu, tap
and hold the stylus on the name of the item
that you want to perform the action on.
When the menu appears, lift the stylus and
tap the action you want to perform. Or tap
anywhere outside the menu to close the
menu without performing an action.
Running Programs
You can switch from one program to another without closing any program.
To run a program, tap
from the Start menu.
To access additional programs, tap
icon.
on the left-top corner of the screen and select
Shortcut Menus
Programs and tap the program
Page 30

Notifications
Your device reminds you in a variety of ways when you have something to
do. For example, if you have set up an appointment in Calendar, a task with
a due date in Tasks or an alarm in Clock, you will be notified in any of the
following ways:
A message appears on the screen.
A sound, which you can specify, is played.
The notification indicator flashes in red.
To choose reminder types and sounds for your device, tap Settings
Personal Sounds & Notifications.
Entering Information
You have several options for entering new information:
Use the Input panel to enter typed text, either by using the on-screen
keyboard or other input methods.
Write directly on the screen.
Draw pictures on the screen.
Speak into the microphone to record a message.
Entering Text Using the Input Panel
Use the Input panel to enter information in any program on your device.
You can either type using the on-screen keyboard or write using a
recognizer. In any case, the characters appear as typed text on the screen.
Page 31

Select an input
method.
Input panel button.
Tap to see your choices.
Tap here if this is the
right word.
To show or hide the Input panel, tap the Input panel button. Tap the arrow
next to the Input panel button to see your choices.
When you use the Input panel, your device anticipates the word you are
typing or writing and displays it above the Input panel. When you tap the
displayed word, it is inserted into your text at the insertion point. The more
you use your device, the more words it learns to anticipate.
Page 32

Recognizer
With a recognizer, you can write letters using the stylus just as you would
use a pen on paper.
When you write a letter, it is converted to typed text that appears on the
screen. For specific instructions on using a recognizer, open a recognizer and
then tap the question mark next to the writing area.
Writing on the Screen
In any program that accepts writing, such as the Notes program, you can use
your stylus to write directly on the screen. Write the way you do on paper.
You can edit and format what you have written and convert the information
to text later.
To write on the screen, tap Menu Draw to switch to drawing mode. A
check () appears before the command.
Page 33

The drawing box indicates
the boundaries of the
drawing.
Drawing on the Screen
You can draw on the screen in the same way that you write on the screen.
1. Tap Menu Draw to enable drawing mode. A check () appears before
the command.
2. To create a drawing, cross three ruled lines on your first stroke. A
drawing box appears.
3. Subsequent strokes in or touching the drawing box become part of the
drawing. Drawings that do not cross three ruled lines will be treated as
writing.
Page 34

Indicates an
embedded recording.
Recording toolbar
Recording a Message
You can quickly capture thoughts, reminders and phone numbers by
recording a message. In the Notes program, you can either create a
stand-alone recording or include a recording in a written note. If you want
to include the recording in a note, open the note first. In the Messaging
program, you can add a recording to an email message.
To create a recording:
1. Tap
2. Tap Menu View Recording Toolbar to show the Recording toolbar.
3. Hold the device’s microphone near your mouth or other source of sound.
4. Tap the Record button on the Recording toolbar to start recording.
5. To stop recording, tap the Stop button on the Recording toolbar. The
new recording appears in the note list or as an embedded icon.
To play a recording, tap it in the list or tap its icon in the note.
Programs Notes to switch to the program.
Page 35

Tap to select a
prewritten message.
Recording Formats
Your device supports several formats for voice notes. The formats vary in
both the quality of the recording and the size of the sound file. When
selecting a recording format, you should consider the quality you need as
well as how much storage memory the recording will use on your device.
Not all recording formats are compatible with other software or computers.
If you will share your recordings with others or transfer a recording to your
desktop computer, be sure to choose a recording format that is supported by
the software used to play recordings on the other computer.
To select a recording format:
1. Tap
2. On the Options tab in the Input control panel, select a voice recording
format from the drop-down list.
Settings Personal Input.
Using My Text
When using Messaging, use My Text to quickly insert preset or frequently
used messages into the text entry area. To insert a message, tap Menu My
Text and then tap a message.
Page 36

Securing Your Device
Locking Your Device
When not using your device, you can lock the device so that accidental
touching of the keypad or touchpad does not cause it to operate.
To lock the device: tap Device unlocked on the Today screen.
To unlock the device: tap Unlock (or press the left soft key on the device)
Unlock (or press the * key on the device).
Securing Your Device with a Password
You can help keep your data more secure by requiring a password every
time your device is switched on.
1. Tap
2. Tap to select Prompt if device unused for, and in the box to the right
select a desired period of time.
3. Select the password type.
4. Enter the password you want to use to access your device when it is
locked, and then confirm the password.
5. Tap ok to save the setting.
The next time your device is switched on, you will be prompted to enter your
password. You also need to enter this password on the computer for the
ActiveSync connection.
Settings Personal Lock.
Page 37

Chapter 3
Using the Phone
(Select Models Only)
This chapter tells you how to use the mobile phone function of your device.
About Your Phone
Select models are equipped with the HSDPA (High-Speed Downlink Packet
Access) module. HSDPA is an enhanced 3G (third generation) mobile
telephony communications protocol. It can operate on 850/900/1800/1900/
2100MHz.
To use the phone, you need to first set up an account with a mobile phone
network service. The functions available to you depend on the services
offered by your mobile phone network service provider and your type of
subscription.
Your service provider will provide you with a SIM card. This card contains
your mobile phone account details and rights, contacts that can be stored
and any additional services to which you have subscribed. You must install a
SIM card before you can make or receive phone calls or use wireless data
services. (See ‚Installing the SIM Card and Battery‛ in Chapter 1 for
installation instructions.)
Page 38

1. Tap the Wireless Manager section on
the Today screen.
- or -
Tap the connectivity indicator on the
navigation bar and tap Wireless Manager.
2. The Wireless Manager screen appears.
Tap Phone to switch it from on to off or
the other way around. Tap Done.
3. When the phone is switched on, you may
be requested to enter the PIN (Personal
Identification Number) code if it has been
set.
Then, your device will search for the
mobile phone network service and show
the name in the Wireless Manager section
on the Today screen.
When the phone is switched off, the
Wireless Manager section on the Today
screen displays Phone off.
Switching On or Off the Phone
When the device is turned on, the phone is switched on by default. When
needed (for example, on an airplane), you can switch off the phone without
turning off your device.
Page 39

Start the Phone program by any of the three
methods:
Press the Send key on the device.
Tap Phone (left soft key) on the Today
screen.
Tap
Phone.
Whenever you start Phone, the Phone screen
displays the soft keypad. You can tap Hide
Keypad (left soft key).
Icon
Meaning
Icon
Meaning
Phone off (airplane mode)
EDGE in use
Signal strength
WCDMA/UMTS available
Call in progress
WCDMA/UMTS in use
Missed call
HSPA available
Call on hold
HSPA in use
GPRS available
New message
GPRS in use
Missing SIM card
EDGE available
Starting the Phone Program
You can use other programs during a call. To quickly switch back to Phone,
press the Send key on your device.
Phone Status Icons
Icons will be displayed on the navigation bar to indicate the status of the
phone functions. They are listed below.
Page 40

1. When on the Today screen: Press the
numeric keys on your device to start
entering the phone number. Your device
will automatically switch to the Phone
program.
While in the Phone program: Enter the
phone number using the physical or
onscreen keypad.
2. As you enter the phone number, the
program searches Contacts, Call History,
and Speed Dial to find a matching name
and/or number. When you see the name
of the person to call listed, select it and
the desired phone number.
Making a Call
There are several ways you can make a call.
Dialing a Call
Or, you can continue entering the complete phone number.
3. Press the Send key on your device to make the call.
Page 41

Whenever you start the Phone program, the
screen lists all recent calls, speed dials, and
contacts.
If the list contains the number you want to
call, you can conveniently select from the list
and press the Send key on your device.
1. Start the Contacts program.
2. Do one of the followings to call a person
in the contact list:
Tap the contact to call. Then tap the
number to call; or move to the number
to call and then tap Call or press the
Send key.
Making a Call from the Onscreen List
Making a Call from Contacts
Microsoft Contacts displays your contact information stored both in your
device’s memory and on your SIM card. (See ‚Contacts: Tracking Friends and
Colleagues‛ in Chapter 5 for detailed information on the Contacts program.)
Page 42

Tap and hold on the contact to call,
and then tap the number to call in the
shortcut menu.
1. While in the Phone program, tap Call
History.
If have hidden the keypad, tap Keypad to
see the Call History key.
Making a Call from the Call History List
The Call History list displays the calls you made, received or missed.
Page 43

2. Do one of the followings to call a person
in the Call History list:
Select the number to call and then tap
Call or press the Send key on your
device.
Tap and hold on the number to call
and then tap Call in the shortcut menu.
If you have created speed dial entries, you can
call a person quickly. (See ‚Using Speed Dial‛
in this chapter for information.)
When on the Today screen or in the Phone
program, press and hold the numeric key of
the assigned speed dial number to make the
call.
Making a Call from Speed Dial
Page 44

When an incoming call is received, your
device rings or vibrates according to the
options you have set for the phone. The name
and number of the caller are displayed on the
pop-up window. If the name of the caller is
not in your contact list, only the caller’s phone
number is displayed.
Answering a Call
To answer an incoming call, press the Send
key on your device or tap Answer (left soft
key).
Responding to a Call
Rejecting a Call
To reject an incoming call, press the End key on your device or tap Ignore
(right soft key).
Ending a Call
To end a call, press the End key on your device or tap End on the screen.
Page 45

To adjust the volume during a call, tap the
icon on the navigation bar and select a
volume level.
CAUTION:
Operations during a Call
Adjusting the Phone Volume
Using the Mute Function
During a call, you can mute your microphone so that the person with whom
you are speaking cannot hear you, but you can still hear him or her.
On the Phone keypad, tap Mute to switch on the mute function. The icon
will appear on the upper-right corner.
To switch off the mute function, tap Unmute.
Using the Speakerphone
You can switch on the speakerphone to use your device as a hands-free
solution.
On the Phone keypad, tap Speaker On to switch on the speakerphone
function. The icon will appear on the navigation bar.
To switch off the speakerphone function, tap Speaker Off.
Page 46

Managing More Than One Call
NOTE:
During a call, you can make or take a second call while putting the current
call on hold. Then, you can choose to swap between the two callers or set up
a conference call between all three parties.
Holding a Call to Take a Second Call
1. If there is another incoming call when you are talking on your device, a
pop-up window appears to notify you.
2. Tap Answer to place the first call on hold, and answer the second call.
3. To end the second call and go back to the first, tap End.
Rejecting the Second Call
To reject the second call and keep your current call in progress, tap Ignore.
Be careful not to tap End; doing so will end the current call.
Placing a Call on Hold to Make a Second Call
1. During a call, tap Hold to place the first call on hold.
2. Dial a second number or the first few letters of the second contact’s
name by using the numeric keypad on your device. Then press the Send
key to connect. Wait for it to be picked up.
3. To end the second call and go back to the first, tap End.
Swapping between Calls
When you have put a call on hold and made or taken another call as
described earlier, you can swap between the two calls by tapping Swap.
Page 47

Setting up a Conference Call
NOTE:
1. When you have put a call on hold and made or taken another call as
described earlier, you can set up conference calling by tapping Menu
Conference.
2. To add additional people to your conference, tap Hold. Dial a second
number and press the Send key to connect. Wait for it to be picked up.
Then tap Menu Conference.
3. If you want to talk to one of the parties privately during the call, tap
Menu Private. Select a number, and tap Private.
To include everyone in the call again, tap Menu Conference.
Taking a Note during a Call
You can take a note during a call.
1. Tap Note.
2. Enter your note and tap ok.
To access a note you created during a call:
1. While in the Phone program, tap Call History.
2. The icon indicates that the phone call entry contains a note. Tap and
hold the name or number for that entry, and tap View Note in the
shortcut menu.
NOTE: Programs Notes
Page 48

All Calls: Displays all calls made to and
from your device in a chronological order.
Missed ( ): Displays only calls that were
not answered.
Outgoing ( ): Displays only calls made
from your device.
Incoming ( ): Displays only calls made
to your device.
To see the time, date and duration of a call,
tap the item on the list to view details.
To clear all items on the list, tap Menu
Delete All Calls.
Using Call History
Call History provides the time and duration of all incoming, outgoing, and
missed calls, and a summary of total calls. Call History also provides easy
access to any notes taken during a call.
To access Call History while in the Phone program, tap Call History.
Viewing Call History
You can tap Menu Filter to change the Call History view (All Calls by
default).
Page 49

Speed dials can only be created for numbers
stored in Contacts.
1. While in the Phone program, tap Speed
Dial.
2. Tap Menu New.
3. Tap the desired contact.
4. In Name, accept the current name or
change it if you want to.
5. In Number, select the phone number if
there is more than one number for the
contact.
Adding an Entry to Contacts Using Call
History
You can add a phone number in the Call History to Outlook Contacts or SIM
Contact.
1. Tap and hold the entry you wish to transfer, and tap Save to Contacts in
the shortcut menu.
2. Tap <New Contact> and select a contact type.
3. Enter the contact’s name, and select the proper number type.
4. Tap Save to save the entry.
Using Speed Dial
You can create Speed Dials for frequently-called phone numbers so you can
dial a number with a single key press.
Creating a Speed Dial Entry
Page 50

6. If Location, accept the current speed dial number or change the number
if you want to.
7. Tap ok to save the setting.
The new Speed Dial entry is now on the Speed Dial list. The letter on the
lower-right corner of the entry indicates the assigned phone number.
For example, ‚m‛ indicates the mobile phone number.
NOTE:
Editing or Deleting a Speed Dial Entry
1. While in the Phone program, tap Speed Dial.
2. Tap the desired entry and tap Delete.
– or –
Tap and hold on the desired entry, and tap Delete in the shortcut menu.
3. Tap Yes.
Page 51

Tap the Phone tab.
You can customize phone settings, such as the
ring type and ring tone to be used for
incoming calls, and the keypad tone to be
used when entering phone numbers.
NOTE:
Customizing Your Phone
To access the Phone Settings, start the Phone program and tap Menu
Options.
Changing Phone Settings
Page 52

Tap the Security tab.
You can protect your phone from
unauthorized use.
You might be prompted to enter the PIN2
code for specific functions (such as the
pre-paid card’s charging counters). Consult
your mobile phone network service to check
if your SIM card supports PIN2-related
functions and services.
NOTE:
Tap the Services tab.
You can access and configure settings for the
phone services you subscribed to through
your mobile phone network service. For
example, you may want to block certain types
of incoming and/or outgoing calls, forward
incoming calls to a different phone number
based on your situation, be notified of
incoming calls when you are already in a call,
or let others know your identity when making
calls. Services available to you depend on your
mobile phone network service and the type
of your subscription.
To view your services settings, tap a service
and then tap Get Settings.
Changing Security Settings
Changing Services Settings
Page 53

Tap the Network tab.
You can view available wireless networks,
determine the order in which your phone
accesses another network if the current one is
unavailable, and specify whether you want to
change networks manually or automatically.
The current network will remain active until
you change it, lose your signal, or change
your SIM card.
Changing Network Settings
Additional Phone Operations
Using Text Messages
Text messages are automatically received when your phone is switched on.
The Today screen shows if there are new text messages. You can tap the
section to open the message list.
To send a text message, you can do one of the followings:
First select a phone number from a program such as Phone or Contacts.
Then select Send Text Message from the shortcut menu or soft key.
First start the Messaging program. Then select the phone number.
See ‚Reading Text Messages‛ and ‚Composing and Sending a Text
Message‛ in Chapter 5 for more information.
Page 54

Setting up an Internet Connection
You can set up an Internet connection using the mobile network. See ‚Using
Cellular Connection (Select Models Only)‛ in Chapter 7 for information.
Checking Your Voice Mail
The first position in your speed dial list defaults as your voice mailbox. When
you insert your SIM card, your device automatically detects your voice
mailbox number and sets it to the first position in your speed dial list.
Making an Emergency Call
You can use your device to dial the international emergency number 112.
This number can normally be used to make an emergency call in any country
with or without a SIM card inserted, as long as you are within a mobile
phone network.
Some mobile phone network services may require that a SIM card be
inserted, and in some cases that the PIN be entered.
There may be other emergency numbers available. Your mobile phone
network service may save additional local emergency numbers in the SIM
card.
Dialing an International Call
When you are manually dialing a number, tap and hold on the number key 0
until the + sign appears. The + sign replaces the international prefix of the
country from where you are calling.
Enter the full phone number you want to dial including country code, area
code (without the leading area code zero) and local phone number.
Page 55

Chapter 4
Managing Your
Device
This chapter tells you how to effectively manage power, settings, data and
programs of your device.
Managing Power
A fully charged battery should provide power for up to 8 hours of use. The
operating time of a fully charged battery depends on how you are using the
device. Some functions, such as using multimedia or operating a SD/MMC
card, may consume the battery power considerably.
Low Battery Signals and Actions
You can monitor the battery power by tapping Settings System
Power. The remaining power is displayed on a status bar in the Power
control panel.
When the battery is low, your device will pop up a warning message and a
beep will sound. You should save your data and recharge the battery
immediately upon a warning of low power; otherwise your device will turn
Page 56

off automatically. You need to connect the device to external AC power for
charging before you can use it again.
Power-Saving Tips
Follow these suggestions to maximize the battery’s operating time,
particularly when you are relying solely on the battery power for extended
time periods.
Suspend frequently.
By default, the screen backlight will automatically dim out and the
device will also suspend when it has been idle for a period of time. You
can shorten the length of the idle time using
Power Advanced to set up.
Press the power button to suspend your device when it is not in use,
even for a short time.
Turn off functions not needed or adjust settings.
Settings Personal Sounds
& Notifications
Settings System
Avoid power-consuming situations such as:
Page 57

Item
Description
Buttons
To assign programs to hardware buttons (not supported
by your device) and set the repeat rate of the up/down
control.
Input
To set up items related to the input methods and voice
recording format.
Lock
To set a password for security. (See ‚Securing Your
Device‛ in Chapter 2 for more information.)
Menus
To customize what appears on the Start menu.
Owner
Information
To enter your personal information.
Phone
To customize the phone function. (See ‚Customizing
Your Phone‛ in Chapter 3 for more information.)
Sounds &
Notifications
To set the conditions and types of the sounds, system
volume and ways of notifications.
Today
To select the information you want displayed on the
Today screen and to select a desired theme for the
background.
Customizing Your Device
You can customize the settings of the device to your own preferences. Tap
Settings. Then tap the Personal, System or Connections tab.
Settings – Personal
Page 58

Item
Description
About
To show the hardware information of your device and to
define the name that your device uses for identifying
itself to other computers.
Backlight
To adjust the brightness level of the display and to set the
automatic turnoff for power saving purposes.
Certificates
To establish your identity or the identity of other
computers. This helps prevent unauthorized users from
accessing your device and information.
Clock & Alarms
To change the time and date and to set alarms.
Customer
Feedback
To set if you want to send your feedback on using the
Windows Mobile software.
Encryption
To set if you want to encrypt files placed on storage
cards. The encrypted files will be readable only on this
device.
Error Reporting
To enable or disable error reporting. Error Reporting
sends information needed by technical support groups to
diagnose a program error for a device running Windows
Mobile software.
GPS
To configure the GPS hardware settings and manage GPS.
Managed
Programs
To manage the programs you installed.
Memory
To display the allocation between storage and program
memory, to view the memory on the storage card (if
installed) and to manually stop a program if it becomes
unstable or program memory is low.
Power
To show the remaining battery power and to set the time
for the device to turn off automatically.
Regional
Settings
To specify the region of your location and the formats of
the number, currency, time and date.
Settings – System
Page 59

Item
Description
Remove
Programs
To remove programs you added to the memory of your
device.
Screen
To set the orientation of the screen to portrait or
landscape.
To adjust the touch screen for accurate screen taps.
To enable the ClearType feature for easier reading of text
in programs that support ClearType.
To adjust the text size to see more content or increase the
readability in many programs.
System
Information
To display the system information.
Task Manager
To display the information about the system
performances and the detailed information of the
running programs on your device. You can also end or
manage the running programs in Task Manager.
Windows
Update
To set how you want your device to check for important
updates.
Item
Description
Beam
To receive information and files via Bluetooth
technology.
Bluetooth
To set up or change the Bluetooth connection.
Connections
To set up or change connection information.
Domain Enroll
To connect your device with company resources. You will
need the enrollment password provided by your system
administrator.
Settings – Connections
Page 60

Item
Description
USB to PC
To change the type of USB connection your device is
using and to enable advanced network functionality.
Wi-Fi
To search for wireless networks and configure the
wireless network module.
Wireless
Manager
To change the Wi-Fi, Bluetooth, and Phone radio status.
Searching and Organizing
Information
The Search feature on your device helps you quickly locate information.
To search a file, tap
find, select a data type and then tap Search to start the search.
You can also use the File Explorer to find files on your device and to
organize these files into folders. Tap
Programs
Search. Enter the text you want to
Programs File Explorer.
Page 61

Chapter 5
Microsoft Pocket
Outlook
Microsoft Pocket Outlook includes Calendar, Contacts, Tasks, Notes, and
Messaging. You can use these programs individually or together. For
example, e-mail addresses stored in Contacts can be used to address e-mail
messages in Messaging.
Help
Calendar: Scheduling
Appointments and Meetings
Use Calendar to schedule appointments, including meetings and other events.
You can check your appointments in one of several views (Agenda, Day, Week,
Month and Year), and set Calendar to remind you of appointments with a
sound or other methods. Appointments for the day can be displayed on the
Today screen.
Tap
Calendar.
Page 62

1. In Day or Week view, tap the desired date
and time for the appointment.
2. Tap Menu New Appointment.
3. Using the Input panel, tap first to select
the field, and then enter a description and
a location.
4. Enter other desired information. You will
need to hide the Input panel to see all
available fields.
5. Tap ok to save and return to Calendar.
Tap to go to today.
Tap to display or edit the
appointment details.
Tap to switch to
another view.
NOTE:
Menu Tools Options
Creating an Appointment
Page 63

When you tap an appointment in Calendar,
a summary screen is displayed. To change the
appointment, tap Menu Edit.
NOTE:
Reply
Using the Calendar Summary Screen
Page 64

Contacts maintains a list of your friends and
colleagues so that you can easily find the
information you are looking for, whether
you are at home or on the road.
Tap
Contacts. The Contacts list appears.
For models with the phone function,
contacts stored in the SIM card also appear
in the list (indicated by the icon ).
1. In Contacts, tap New.
2. For models with the phone function, you
will be asked to select Outlook contact or
SIM contact if the phone function is
switched on.
3. Using the Input panel, enter a name and
other contact information. You will need
to scroll down to see all available fields.
NOTE:
4. Tap ok to save and return to the contact
list.
Contacts: Tracking Friends and
Colleagues
Creating a Contact
Page 65

When you tap a contact on the contact list, a
summary screen is displayed. To change the
contact information, tap Menu Edit.
Using the Contacts Summary Screen
Page 66

Use Tasks to keep track of what you have to
do.
Tap
Programs Tasks.
1. In Tasks, tap Menu New Task.
2. Using the Input panel, enter a
description.
3. You can enter a start date and due date
or enter other information by first
tapping the field. If the Input panel is
open, you will need to hide it to see all
available fields.
4. Tap ok to save and return to the task list.
Tasks: Keeping a To Do List
Creating a Task
Page 67

When you tap a task on the task list, a
summary screen is displayed. To change the
task, tap Edit.
Using the Tasks Summary Screen
Page 68

Quickly capture thoughts, reminders, ideas,
drawings and phone numbers with Notes.
You can create a written note or an audio
recording. You can also include a recording
in a note.
Tap
Programs Notes.
1. In Notes, tap New.
2. Create your note by writing, drawing,
typing, or recording.
3. Tap ok to save and return to the note
list.
Notes: Capturing Thoughts and
Ideas
Creating a Note
Page 69

Text Messages (select models only): This
item appears if your model comes with
the phone function.
Outlook E-mail: This item appears if you
have synchronized directly with a
Microsoft Exchange Server account or
with Microsoft Outlook on your
computer.
An Internet account: You have to
manually set up such an account. This
type of account depends on a service
provider or a mobile operator (select
models only) to provide the messaging
services that enable you to send and
receive e-mail over the Internet.
Messaging: Sending and Receiving
Messages
You can work with e-mail and text messages (select models only) from
Messaging.
Tap
Messaging. The account selection screen appears.
About Accounts
You can use multiple services to send and receive messages. For different
ways of accessing messages, there are different types of account:
Setting up an Internet E-mail Account
You can set up only one Outlook account on your device. However, you can
set up multiple Internet e-mail accounts.
1. Tap
Messaging.
Page 70

To read E-mail messages:
1. Tap
Messaging.
2. Tap the account you want to use on the
account selection screen.
3. Messages you receive are displayed in the
message list. Tap an item to open it.
2. Tap Setup E-mail on the account selection screen.
3. Follow the on-screen instructions to complete the setup.
During setup, you can enable Auto Setup to search for and enter the
settings of the e-mail account with which you want your device to
synchronize. If Auto Setup does not find the settings, you may have to
ask your ISP, mobile operator, or system administrator for the correct
settings, and then enter them yourself.
Reading E-mail Messages
When you connect to your email server or synchronize with your desktop
computer or server, by default, you will receive messages from the last three
days only and the first 2 KB of each new message, and not to sync file
attachments. The original messages remain on the server or your desktop
computer.
Composing and Sending an E-mail
1. Tap
2. Tap the account you want to use on the account selection screen.
Messaging.
Page 71

4. Enter the e-mail address of one or more
recipients, separating them with a
semicolon. To access addresses from
Contacts, tap To.
5. Enter your message and subject. To quickly
add common messages, tap Menu My
Text, and tap a desired message.
6. To add an attachment to the E-mail
message, tap Menu Insert, and tap the
item you want to attach: Picture, Voice
Note, or File. Then select the file you want
to attach or record a voice note.
Embedded objects cannot be attached to
messages.
7. Tap Send.
3. Tap Menu New.
NOTE:
Reading Text Messages (Select Models Only)
Text messages are automatically received when your phone is switched on.
The Today screen shows if there are new text messages. You can tap the
section to open the message list.
To manually open the message list:
1. Tap
2. Select Text Messages on the account selection screen.
3. The message list appears. Select the item you want to read.
Messaging.
Page 72

4. Enter the phone number of one or more
recipients, separating them with a
semicolon.
To select phone numbers from Contacts,
tap To.
5. Enter your message.
To quickly add common messages, tap
Menu My Text, and tap a desired
message.
6. Tap Send.
Composing and Sending a Text Message
(Select Models Only)
1. Tap
2. Select Text Messages on the account selection screen.
3. Tap Menu New.
Messaging.
Page 73

Chapter 6
More Programs
In addition to Microsoft Pocket Outlook, there are other programs built into
your device. This chapter tells you how to use these programs.
Help
ActiveSync
ActiveSync on your device works with ActiveSync on a Windows XP
computer and with Windows Mobile Device Center on a Windows Vista
computer.
When you have established the connection between your device and your
computer, you can synchronize the information between the two with
ActiveSync. Synchronization compares the data on the two sides and
updates both computers with the most recent information. For example, you
can:
Keep your Pocket Outlook Contacts, Calendar and Tasks databases
up-to-date by synchronizing your device with Microsoft Outlook data on
your computer.
Synchronize e-mail messages in your device Outlook Inbox with e-mail
messages in Microsoft Outlook on your computer.
Synchronize Microsoft Word, Excel and PowerPoint files between your
device and computer. Your files are automatically converted to the
correct format.
Page 74

You can select which information types are synchronized and control how
much data is synchronized. (See the ActiveSync or Windows Mobile Device
Center help on your computer.)
With ActiveSync, you can also:
Copy (rather than synchronize) files between your device and computer.
Add and remove programs on your device.
Pass through your computer to a network or the Internet.
Synchronizing Data
Once you have created a synchronization relationship and completed the
first synchronization, you can initiate synchronization from your device.
1. Connect your device to your computer.
2. On your device, tap
3. Tap Sync to begin synchronization.
Programs ActiveSync.
Synchronizing Directly with Exchange Server
You can increase your productivity when you are away from the office by
setting up an account to access e-mail, voice mail, calendar, and contact
information from a Microsoft Exchange Server.
Exchange Server, the Microsoft messaging and collaboration server, lets you
send and receive your work e-mail, calendar updates, voice mail, and contact
information while traveling.
To set up the account, you must obtain the name of the Exchange Server and
the server domain from the wireless service provider or system
administrator. You must also know your Exchange user name and password.
Page 75

1. Make sure your device is not connected to your computer.
2. On your device, tap
Programs ActiveSync.
3. Tap Menu Add Server Source.
4. Follow the on-screen instructions to complete the setup.
5. Connect your device to the Internet for synchronization with Exchange
Server.
NOTE:
OK
Programs ActiveSync
Menu Options E-mail ok
Page 76

Office Mobile
Microsoft Office Mobile works with Microsoft Office on your computer to give
you easy access to copies of your documents.
Tap
Excel Mobile
OneNote Mobile
PowerPoint Mobile
Word Mobile
Creating a Document/Workbook/Note
NOTE:
1. Tap
Office Mobile and select the program to use.
Office Mobile and select the program to use.
2. Enter the information.
Excel Mobile Word Mobile
Page 77

OneNote Mobile
3. When finished, tap ok and the document/workbook/note is
automatically saved and named according to the first characters of text
entered in the document.
Opening a
Document/Workbook/Note/Presentation
Whenever you switch to an Office Mobile program, you will see the file list.
Tap the desired file to open it. You can open only one document at a time;
when you open a second document, the first will be saved and closed
automatically.
Page 78

Tap
Internet Explorer. The Internet
Explorer Mobile home page appears.
Tap Favorites to display the Favorites list. Tap
the page that you want to view.
To visit web pages not included in Favorites,
in the address bar that appears at the top of
the screen, enter the web address you want
to visit and then tap . Or, tap the arrow to
choose from previously entered addresses.
Internet Explorer
Settings Connections Connections My ISP
Page 79

Before you sign in to Messenger, you need to sign in to Windows Live
first.
1. Tap
Programs Messenger.
Windows Live and Messenger
Windows Live lets you wirelessly access many of the features of the Windows
Live Web site.
You can access your Windows Live Hotmail.
You can access your Windows Live Messenger and contacts.
You can merge your Messenger contacts with the contacts on your
device. From the device contact list, you can access the contacts’
Windows Live Spaces and you can initiate an e-mail or an instant
message to any contact.
The Windows Live Search bar can help you find local services, images,
and information on the Internet.
You can send a photo to your Windows Live Space.
NOTE:
Setting up Windows Live
1. Tap
2. Tap Sign in to Windows Live.
3. Tap Accept to proceed.
4. Follow the on-screen instructions to complete the setup.
Programs Windows Live.
Signing in to Messenger
Page 80

2. Tap Sign in.
NOTE: Menu Sign out
Windows Media
Use Microsoft Windows Media Player Mobile to play digital audio and video
files that are stored on your device or on a network, such as on a web site.
You can play files in either Windows Media or MP3 format (including files
with the extensions .asf, .wma, .wmv and .mp3).
Tap
Use Microsoft Windows Media Player on your computer to synchronize (if
using Windows Media Player 10) or copy (if using Windows Media Player 9)
digital audio and video files from your computer to your device.
For more information, tap
the computer.
Programs Windows Media.
Library Screen Playback Screen
Help, or see Windows Media Player Help on
Page 81

1. To view pictures or video stored on a
storage card, insert the card.
2. Tap
Programs Pictures & Videos.
By default, the program displays
thumbnails of the pictures and videos in
the My Pictures folder, within the My
Documents folder on your device.
3. Thumbnails of pictures and videos appear
on the screen. You can tap one of them to
view in full screen.
Pictures & Videos
With Pictures & Videos, you can:
View pictures and video clips.
Send pictures and videos to others.
Set a picture as the background on the Today screen.
Play slide show.
Edit your pictures.
Viewing Pictures and Videos
Page 82

Display area
Current status
Camera
The Camera program allows you to take pictures and record video clips.
Taking Pictures
1. To start the program, press the
Programs Pictures & Videos Camera.
The Camera screen appears. Below the display area are indicators of the
current status.
key on your device or tap
Page 83

Menu Items
Descriptions
Mode
Three choices:
1. Normal
2. Burst – Continuous shooting of 5 pictures
3. Timer – 5 second countdown before shooting
Brightness
Seven brightness levels
Resolution
Six choices from 160x120 to 2048x1536 (640x480 by
default)
Zoom
Available choices depend on the resolution.
White
Balance
Five choices from which you can select one that matches
the current light source.
Flash
Flash on or off.
Full Screen
Full screen on or off.
Options
Overall settings to the Camera program.
Flicker
Set to the frequency of the local electrical system (60Hz
or 50Hz) for flicker free shooting where electrical lights
exist.
Night Mode
On or off. Set to On for shooting in low light situations.
2. For camera controls such as brightness and zooming, tap Menu.
Page 84

3. Aim the camera lens at the subject. Press the
automatic focusing. A white frame appears. Wait until the color of the
frame turns green indicating the subject is in focus.
key halfway down for
4. Press the
5. The result shows on the screen if the picture was taken in Normal or
Timer mode. At this time, you can tap Menu to perform a desired task to
the current picture. Tap Camera or ok to go back to the Camera screen.
6. The picture is saved to the predefined storage location (as long as you
didn’t delete it in the previous step).
key fully to take the picture.
Recording Video Clips
1. To start the program, press the
Programs Pictures & Videos Camera.
2. Tap Menu Video to switch to the video mode. Below the display area
are indicators of the current status.
3. For recording controls such as brightness and white balancing, tap
Menu.
key on your device or tap
Page 85

Menu Items
Descriptions
Brightness
Seven brightness levels
Quality
352 x 288
White Balance
Five choices from which you can select one that
matches the current light source.
Full Screen
Full screen on and off.
Options
Overall settings to the Camera program.
4. Press the
key to start recording.
If needed, you can tap Pause to temporarily pause the recording and
then tap Resume to continue.
5. To stop, press the
key or tap Stop.
Page 86

Or, the recording will automatically stop when the length reaches the
pre-defined maximum value (30 seconds by default).
6. The video clip is saved to the predefined storage location. To view the
video clip, tap Thumbnails.
Page 87

4. In PC Connection, select USB if using USB
connection.
Select Bluetooth PAN if using Bluetooth
connection. When prompted to make
your device as visible in the Bluetooth
settings, tap Yes.
5. In Network Connection, select your
GPRS setting (select models only).
6. Tap Connect for your device to connect
to the Internet.
Now your computer connects to the
Internet via your device.
Internet Sharing (Select Models
Only)
Using Internet Sharing, you can use your device as an external modem for
the computer via the USB or Bluetooth connection.
NOTE:
1. Make sure that your device is not connected to another device, and that
you have installed proper GPRS settings.
2. To use USB connection, connect your device to the computer with the
USB cable.
To use the Bluetooth connection, you must first initiate and complete
the Bluetooth Personal Area Network (PAN) partnership on the
computer. (For more information, refer to Windows Help and Support.)
3. Tap
7. To end the connection, tap Disconnect on your device.
Programs Internet Sharing.
Page 88

Remote Desktop Mobile
Using Remote Desktop Connection, you can log on to a Windows Terminal
Server and use all programs installed on this server.
To connect to a remote computer:
1. Tap
2. Select the computer. Enter the user name, password, and domain.
3. Tap Connect.
Programs Remote Desktop Mobile.
Page 89

Needle on the
compass dial
Other Programs
Other programs refer to programs installed by Getac.
E-Compass
The E-Compass program shows directions of movement including heading,
pitch angle, roll angle, and altitude.
Reading and Calibrating the Compass
To run the program, tap Programs E-Compass.
Each time you start the program, you’ll be requested to calibrate the
compass. Hold the device in your palm and swing it in the way as shown in
the small popup window on the screen. Do this several times until the popup
window disappears.
To exit the program, tap Exit at the bottom left of the screen.
Page 90

The value of altitude is adjusted according
to the change in the ambient pressure. It is
important that you regularly set the
reference altitude because the compass
needs an appropriate starting point
(altitude versus ambient pressure) for future
adjustments.
To configure the compass, tap Setting
Setting. When finished, tap OK to save the
changes and go back to the Compass screen.
Setting Items
Descriptions
Altimeter
Set the reference altitude for the compass. You can
either set a specific height (zero by default) or use GPS
positioning as the reference (GPS positioning will be
initiated after you tap OK).
Rotation Type
Set to Needle for a pivoting needle on a fixed dial or
Wheel for a fixed needle on a rotating dial.
Compass Settings
Page 91

Shows the overhead
satellite positions.
Shows the signal strength
of the satellites.
Shows the result of GPS
positioning. A minimum of
4 GPS satellite signals is
needed to calculate your
GPS position.
A red X indicates logging is not
activated. No X indicates logging is
activated.
This icon appears only if SBAS
is enabled. (See the next
section for information.)
TacLink
The TacLink program receives GPS satellite signals to calculate the location
of your device. You can also record a NMEA log file for the use of other
applications.
Settings
System GPS Mode for the need of third party programs.
Running TacLink
To run the program, tap Programs TacLink.
A message appears if positioning is not completed in 10 minutes.
To exit the program, tap Exit at the bottom left of the screen.
Page 92
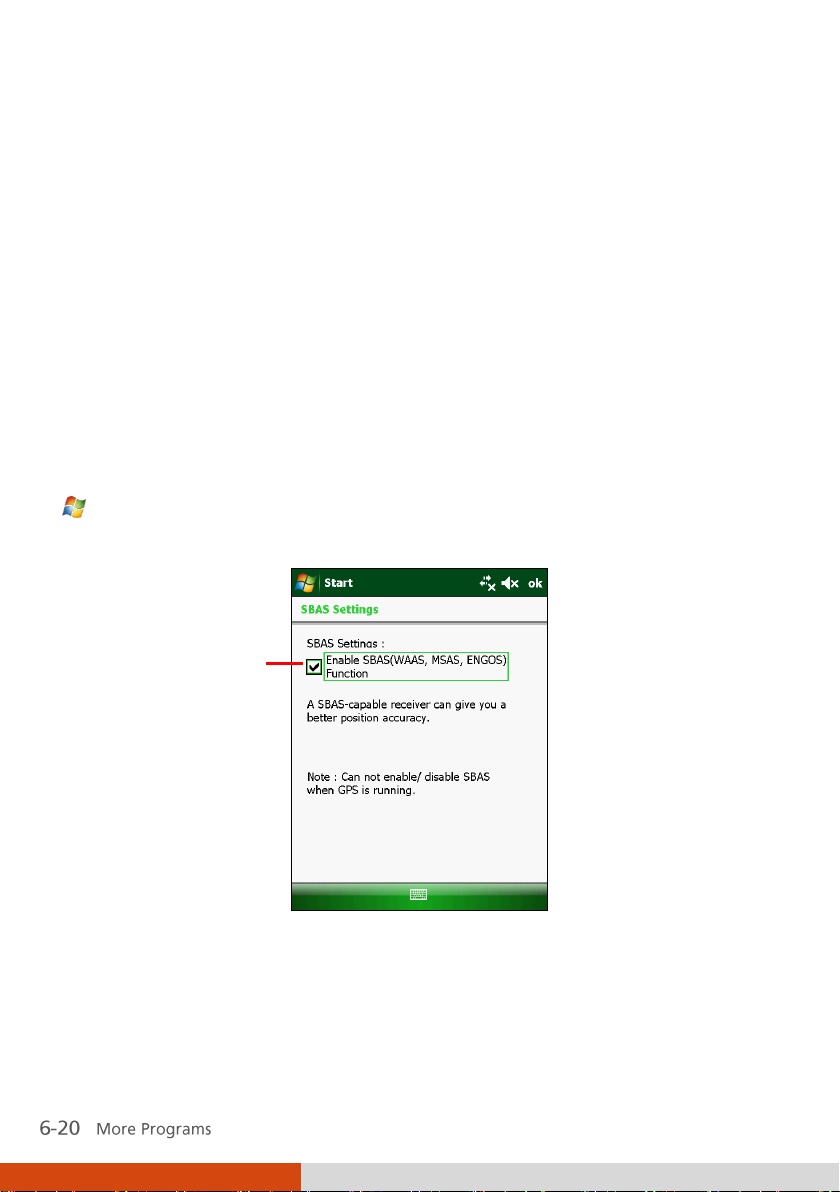
Tap the checkbox to
enable or disable the
function. A check ()
indicates enabled.
NMEA Log
To start logging, tap Setting Log Start. To stop, tap Setting Log
Stop.
For each logging section, new data is added to the end of the existing data
in the same file. By default, the log file is named ‚GeTACGPSLog‛ and saved
to ‚My Documents‛ folder on your device. To specify a different name and
location for file, tap Setting Log File.
SBAS Settings
SBAS (WAAS, MSAS, ENGOS) provides additional accuracy and reliability for
the GPS devices. Ground stations are necessary to achieve the purpose.
The SBAS feature works where such stations exist. To enable the feature, tap
Settings System GPS Advanced. Tap the checkbox to enable or
disable the SBAS function. A check () indicates enabled.
Tap ok when finished. If you change the setting while a GPS program (such
as TacLink) is running, the change takes effect only after you exit the GPS
program and then start it again.
Page 93

Chapter 7
Getting Connected
This chapter tells you how you can get your device connected through a
variety of ways.
Types of Connections
Your device can connect to the Internet, to your computer, and to other
devices and services.
Your device has two groups of connection settings: My ISP and My Work
Network. My ISP settings connect your device to the Internet, and My Work
Network settings connect to any private network, such as an intranet that
you use at work.
The following types of connections are available on your device:
Cellular (GPRS) is a long-distance wireless data connection that is
available through some mobile service operators. (Select models only)
Dial-up lets you access the Internet or a corporate network by dialing a
phone number. (Select models only)
Wi-Fi lets you wirelessly connect your device to the Internet through
access points that can be up to 30 meters (about 100 feet) away.
Bluetooth lets you create a temporary wireless network that can link up
to eight devices that are within 10 meters (about 33 feet) of one
another.
Page 94

USB is a wired connection between your device and a computer for
synchronizing data or surfing the Internet. (See ‚ActiveSync‛ in Chapter
6 for information.)
Using Cellular Connection (Select
Models Only)
Models supporting mobile phone functions allow you to access the Internet
using the mobile network.
Setting up a Cellular (GPRS) Connection
In most cases, your cellular (GPRS) connection will be preconfigured by your
cellular service provider. You will not have to set up a GPRS connection or
change your GPRS settings.
If you do have to set up a GPRS connection, you must obtain the settings
from your mobile operator before you start this procedure.
1. Tap Settings Connections Connections.
2. In either group, tap Add a new modem connection.
3. In the Enter a name for the connection field, enter a name for the
connection.
4. In the Select a modem field, select Cellular Line (GPRS), and then tap
Next.
5. Enter the access point name provided by your mobile operator, and then
tap Next.
6. Enter your user name and password, and then tap Finish.
Page 95

Setting up a Dial-up Connection
With dial-up, your service provider gives you a phone number that you dial
in order to connect your device to the Internet.
1. Tap Settings Connections Connections.
2. In either group, tap Add a new modem connection.
3. In the Enter a name for the connection field, enter a name for the
connection.
4. In the Select a modem field, select Cellular Line, and then tap Next.
5. Enter the phone number provided by your service provider, and then tap
Next.
6. Enter your user name and password, and then tap Finish.
Page 96

- or -
Tap the connectivity indicator on the
navigation bar and tap Wireless Manager.
2. In the Wireless Manager screen, tap Wi-Fi
to change the Wi-Fi radio status.
When switched on, your device will display
the word Available if wireless networks
are detected.
If you have previously connected to a
wireless network, your device will try to
connect to the same network and display
the name of the network after the
connection.
Using Wireless Network
Your device has a built-in wireless network module. As long as you are in a
wireless LAN (WLAN) environment, you can connect to the network without
physical cables.
Switching On or Off the Wi-Fi Radio
By default, the Wi-Fi radio is switched off. To switch on or off the Wi-Fi
radio:
1. Tap the Wireless Manager section on the Today screen.
Page 97

1. Switch on the Wi-Fi radio. (See ‚Switching
On or Off the Wi-Fi Radio‛ previously.)
2. Your device will detect available Wi-Fi
networks.
If more than one network is detected, the
screen will display a network list. Select
the network you want to connect to, and
tap OK.
3. Select to connect to the Internet or the
private network, and then tap Connect.
4. If the selected network requires a network
key, enter the key and tap Connect.
The icon appears on the navigation bar
and the RF indicator on your device flashes
in amber.
NOTE:
Settings
Connections Wi-Fi Search for
Networks.
Settings Connections Wi-Fi
5. When you have finished using the wireless
network, end the Wi-Fi connection by
switching off its radio.
Connecting to a Wireless Network
NOTE:
Page 98

1. Tap the Wireless Manager section on
the Today screen.
- or -
Tap the connectivity indicator on the
navigation bar and tap Wireless Manager.
2. In the Wireless Manager screen, tap
Bluetooth to switch on or off the radio.
The RF indicator flashes in blue to indicate
that the Bluetooth radio is on.
Using the Bluetooth Function
NOTE:
Your device incorporates the Bluetooth capability. Bluetooth technology is a
short-range wireless communications technology. Devices with Bluetooth
capabilities can exchange information over a distance of about 10 meters (30
feet) without requiring a physical connection.
Switching On or Off the Bluetooth Radio
By default, the Bluetooth radio is switched off. To switch on or off the
Bluetooth radio:
Page 99

3. For other devices to detect your device,
tap Menu Bluetooth Settings Mode
Make this device visible to other
devices.
4. When not using the Bluetooth function,
switch off the Bluetooth radio.
NOTE:
1. Switch on the Bluetooth radio. (See
‚Switching On or Off the Bluetooth
Radio‛ previously.)
2. From the program, tap and hold the
item you want to beam, such as an
appointment in Calendar, a task in
Tasks, a contact card in Contacts, or a
file in File Explorer.
3. Tap Beam [type of item] in the shortcut
menu.
4. Your device searches for other devices
with Bluetooth capabilities within close
range, and displays them in the list. Tap
the device to which you want to send
the item.
Sending Files via the Bluetooth Function
CAUTION:
Page 100

Your device searches for other devices
with Bluetooth capabilities, and displays
them in the list.
3. Tap the name of the other device, and tap
Next.
4. In Passcode, enter an alphanumeric
passcode between 1 and 16 characters,
and tap Next.
5. Enter the same passcode on the other
device.
6. Tap Done.
Creating a Bluetooth Partnership
A partnership is a relationship that you create between your device and
another device with Bluetooth capabilities to help exchange information in
a secure manner. Creating a partnership involves entering the same
Bluetooth passcode on both devices. Once a partnership is created, your
devices need only have the Bluetooth function switched on to exchange
information; they do not need to be visible.
1. Make sure that the two devices are switched on, visible, and within close
range.
2. Tap
device.
Settings Connections Bluetooth Devices Add new
 Loading...