

Page 1

Model name:
Wireless Desktop
Drahtloser Schreibtisch
Wireless Desktop
Desktop Senza Fili
Escritorio Inalámbrico
Draadloze Desktop
English Version
1-2
Deutsche Version
KB-E8188
3-4
Version française
5-6
Italiano
7-8
Versión Española
1
9-10
Page 2

Federal Communication
Commission Interference
Statement
This equipment has been tested and found
to comply with the limits for a Class B digital
device, pursuant to Part 15 of the FCC Rules.
These limits are designed to provide
reasonable protection against harmful
interference in a residential installation.
This equipment generates, uses and can
radiate radio frequency energy and, if not
installed and used in accordance with the
instructions, may cause harmful interference
to radio communications. However, there is
no guarantee that interference will not occur
in a particular installation. If this equipment
does cause harmful interference to radio or
television reception, which can be
determined by turning the equipment off and
on, the user is encouraged to try to correct
the interference by one of the following
measures:
- Reorient or relocate the receiving
antenna.
- Increase the separation between the
equipment and receiver.
- Connect the equipment into an outlet on a
circuit different from that
to which the receiver is connected.
- Consult the dealer or an experienced
radio/TV technician for help.
FCC Caution: Any changes or modifications
not expressly approved by the party
responsible for compliance could void the
user's authority to operate this equipment.
This device complies with Part 15 of the
FCC Rules. Operation is subject to the
following two conditions: (1) This device may
not cause harmful interference, and (2) this
device must accept any interference
received, including interference that may
cause undesired operation.
2
Page 3
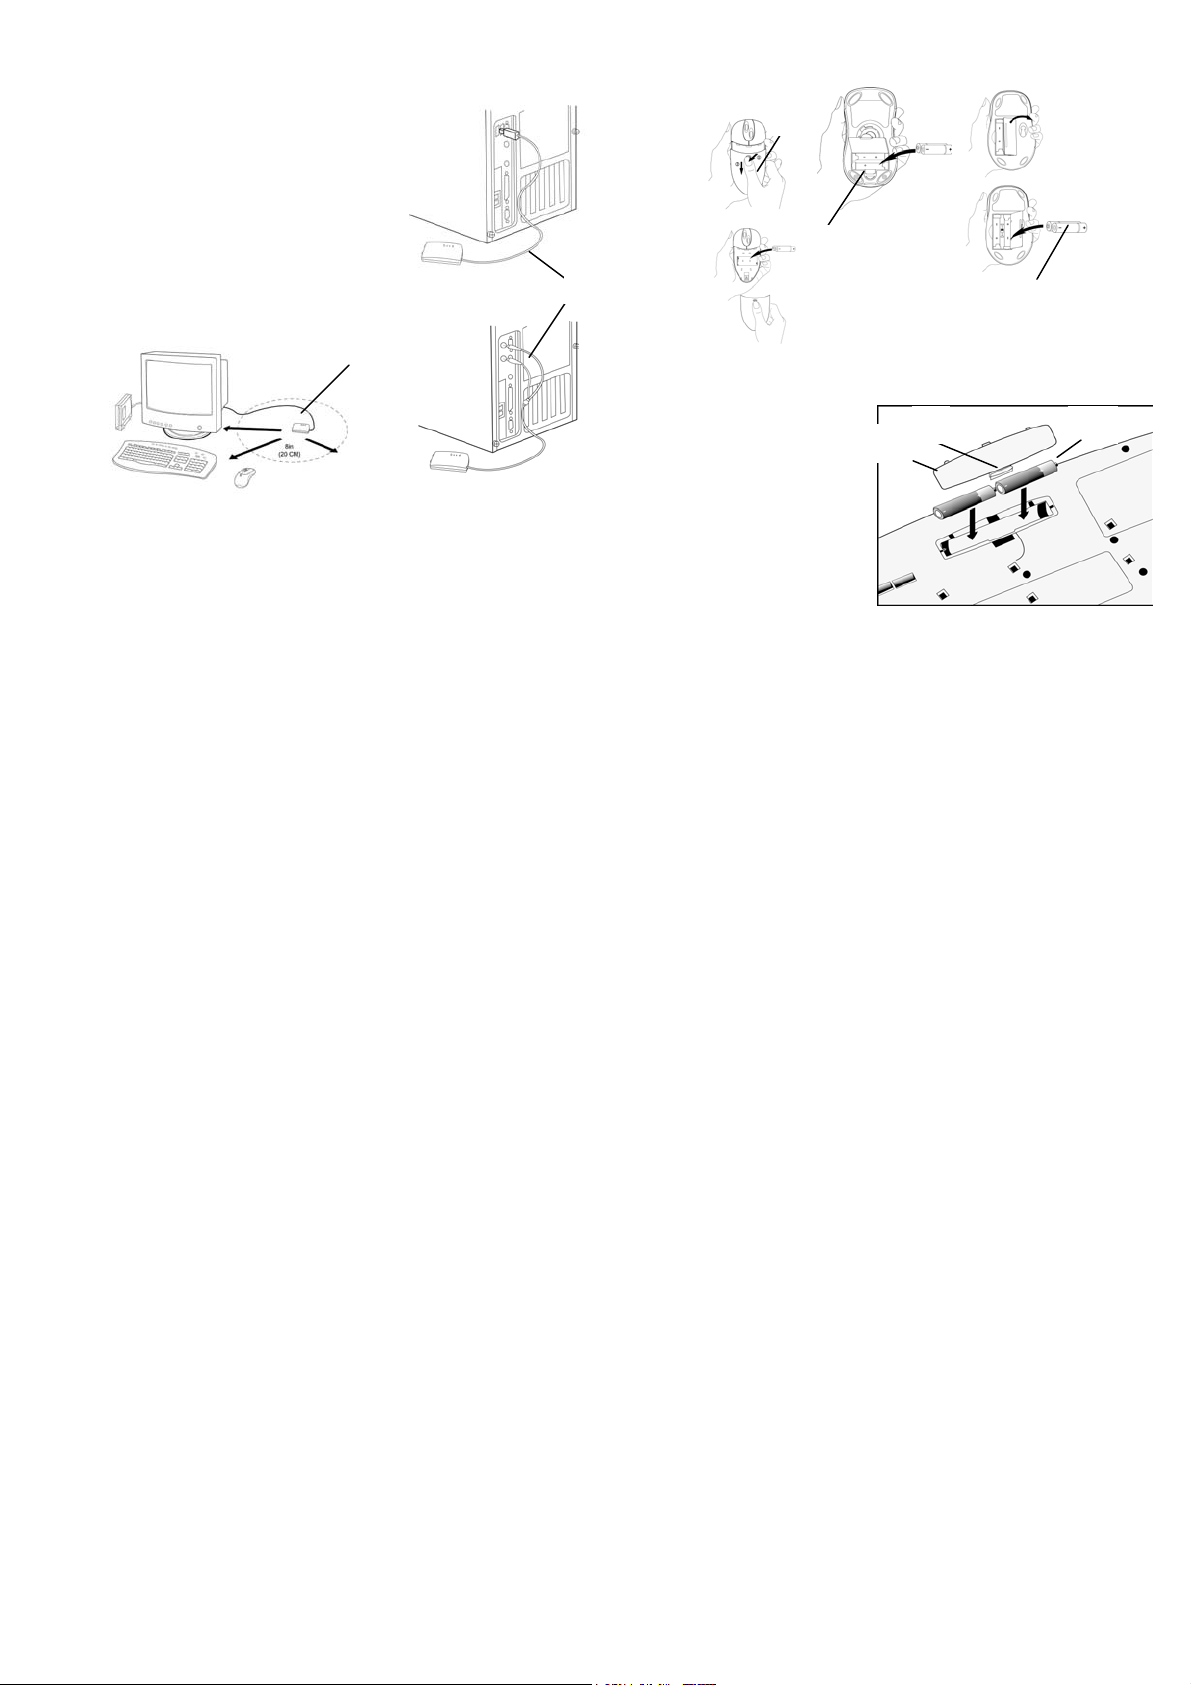
Getting the receiver ready
1. Turn off the power of your computer
2. Remove the existing keyboard and
mouse
3. Connect the receiver cable (A) to the
computer.
4. Place the receiver (C) eight inches (20
centimeters) from any
electromechanical device.
Getting the mouse ready
1. Remove the battery compartment cover (D) on the bottom of
the mouse by pressing down on the tab (E).
2. Insert the batteries (F) as shown inside the battery
compartment. Replace the cover (D).
D
Getting the keyboard ready
1. Install the AA alkaline
batteries (G) in the
Wireless keyboard.
2. Remove the battery
compartment cover (H)
on the bottom of the
keyboard by squeezing
the cover in from the
tab (I) to release it.
3
E
F
I G
H
Page 4

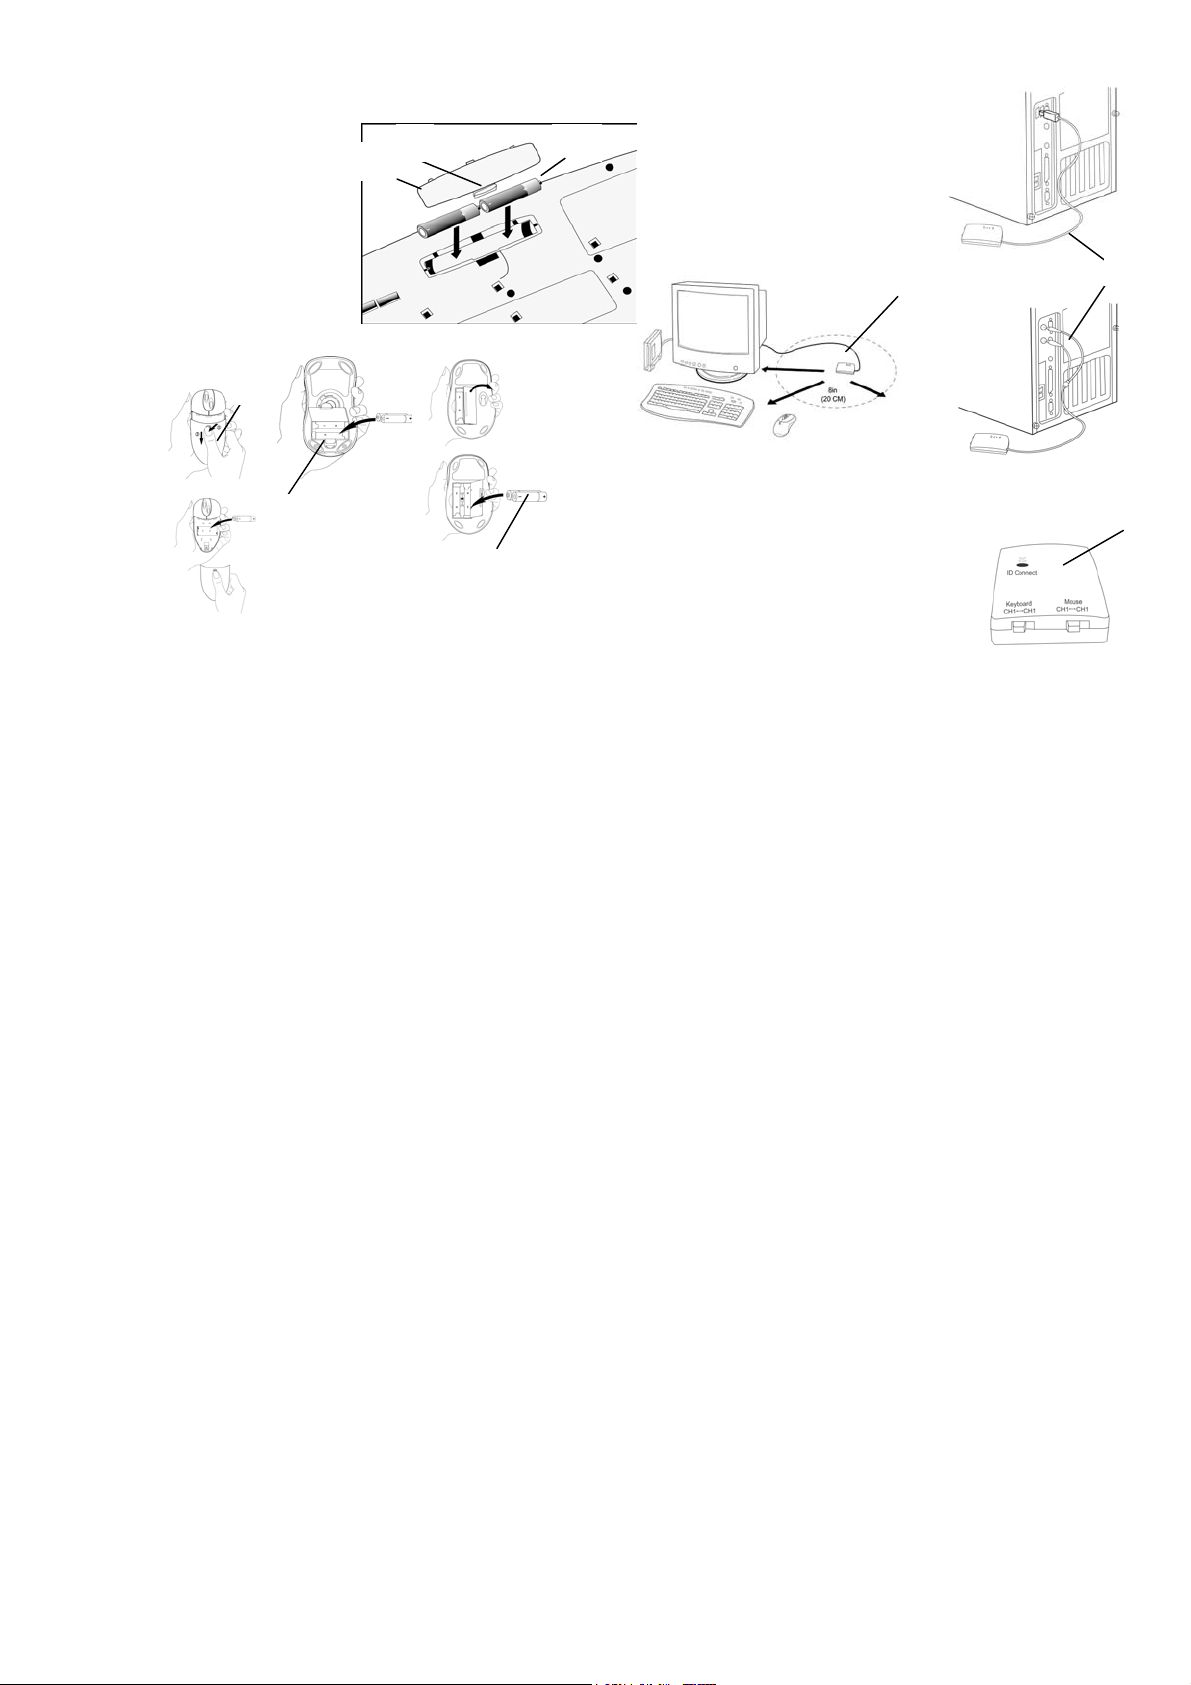
Selecting the Frequency Channel
The Wireless keyboard and Mouse operates
on two frequency channels. To prevent
interference when using two RF devices in
close proximity, a different frequency
channel should be used for each device.
Refer to the following to change the
frequency channel for your keyboard and
mouse: Set the frequency channel on the
receiver (J) to 1 or 2. Set the frequency channel on the keyboard (K)
and mouse (L) to 1 or 2.
L L
K
Installing the Mouse Software and Keyboard
software
Windows 98/Me/2000/XP installation
1. Insert the installation diskette into your floppy disk drive.
2. Click the Start button and then click Run.
3. In the Run dialog window, type A:\setup, where “A” is the
letter of your floppy disk drive.
J
4. Click OK and follow the instructions on your screen to
complete the installation.
The Wireless keyboard and mouse ID codes
Each keyboard and mouse is assigned a unique ID code when produced,
so the receiver only picks up the signal from your devices and prevents
other Wireless keyboard or mouse radio signals from operating on your
computer.
Connecting the wireless keyboard and mouse ID
codes
L
Manually establish a communication between the receiver for the
keyboard and mouse.
(a) Press any key on the keyboard and move the mouse
(b) Press the ID Connect button (L) on the receiver (J): the green
LED (K) light shows you that the keyboard and mouse IDs are
connected. If the green LED light is off then the keyboard and mouse
IDs are disconnected.
K
J
4
Page 5
Erste Schritte
1. Schalten Sie den Computer aus.
2. Entfernen Sie die vorhandene
Tas ta tur.
3. Legen Sie die Alkalibatterien Typ
AA (G) in die schnurlose Tastatur
ein. Entfernen Sie die Abdeckung
des Batteriefachs auf der
Unterseite der Tastatur, indem Sie
sie durch Hineindrücken von der
Zunge lösen.
4. Legen Sie die Alkalibatterien Typ
AAA (F) in die schnurlose Maus
ein.
D
I G
H
E
Die Tastatur oder das Wireless Desktop einrichten
1. Der Computer muss ausgeschaltet sein.
2. Schließen Sie das Tastaturkabel des Empfängers an.
3. Verbinden Sie das violette Tastaturkabel (A) des
F
Empfängers mit dem
Tastaturanschluss des
Computers.
4. Stellen Sie den Empfänger in
einem Abstand von 20
Zentimetern von allen
elektromechanischen Geräten
entfernt auf.
C
Den Frequenzkanal wählen
Die schnurlose Tastatur und Maus funktionieren auf zwei
Frequenzkanälen. Damit sich zwei
nebeneinander befindliche RF-Mäuse nicht
stören können, sollte für jede Maus ein
jeweils anderer Frequenzkanal gewählt
werden. Ändern Sie den Frequenzkanal für
die Tastatur und die Maus auf folgende
Weise: Setzen Sie den Frequenzkanal am
Empfänger auf 1 oder 2 (J). Setzen Sie den
Frequenzkanal an der Tastatur und der Maus
auf 1 oder 2 (L),(K).
5
J
Page 6

K
Die Maussoftware-iWheelWorks und die
Tastatursoftware-iKeyWorksOffice installieren
Installation unter Windows 95/98/Me/2000/NT4.0
ID-Codes der drahtlosen Tastatur und Maus
Jeder Tastatur und jeder Maus wird bei der Produktion ein eindeutiger
ID-Code zugewiesen, so dass der Empfänger nur das Signal von Ihren
L L
1. Legen Sie die Installationsdiskette in Ihr
Diskettenlaufwerk.
2. Klicken Sie die Schaltfläche Start und dann Ausführen
an.
3. Geben Sie A:\setup im Dialogfenster Ausführen ein,
wobei »A« der Buchstabe Ihres Diskettenlaufwerks ist
4. Klicken Sie auf OK und schließen Sie die Installation
anhand der Anweisungen auf dem Bildschirm ab
Geräten aufnimmt; so wird verhindert, dass Radiosignale einer anderen
drahtlosen Tastatur oder Maus auf Ihrem Computer tätig werden.
L
Verbinden von ID-Codes der drahtlosen Tastatur
und Maus
Stellen Sie manuell eine Kommunikation zwischen dem Empfänger
für die Tastatur und die Maus her.
(a) Drücken Sie eine beliebige Taste auf der Tastatur und verschieben
Sie die Maus.
(b) Drücken Sie die Taste ID Connect (L) auf dem Empfänger (J):
Die grüne LED (K) leuchtet, um anzuzeigen, dass die Tastatur- und
Maus-IDs verbunden sind. Wenn die grüne LED nicht leuchtet, sind
die Tastatur- und Maus-IDs nicht verbunden.
K
L
J
6
Page 7

Démarrer
1. Eteignez votre ordinateur.
2. Retirez le clavier existant .
3. Installez les piles alcalines
AA (G) dans le clavier sans
fil. Retirez le couvercle du
compartiment des piles sous
le clavier en pressant
l'onglet pour le relâcher.
4. Installez les piles alcalines
AAA (F) dans la souris sans
fil
I G
H
D
E
F
Installer le clavier ou le système Wireless Desktop
1. Assurez-vous que l'ordinateur est éteint.
2. Connectez le câble clavier (A) violet du récepteur au port
clavier de l’ordinateur.
3. Connectez le câble souris (B)
vert du récepteur au port
souris PS/2 de l’ordinateur.
4. Placez le récepteur (C) à 20
centimètres de n’importe
quel périphérique
électromécanique.
C
Installer le logiciel de la souris - iWheelWorks et le
logiciel du clavier - iKeyWorksOffice
Installation sous Windows 95/98/Me/2000/NT4.0
1. Insérez la disquette d’installation dans votre lecteur de
disquettes.
2. Cliquez sur le bouton Démarrer, puis sur Exécuter.
3. Dans la boîte de dialogue Exécuter, tapez A:\setup, « A » étant
la lettre du lecteur de disquettes.
4. Cliquez sur OK et suivez les instructions sur l’écran pour
compléter l’installation.
Sélectionner le canal de fréquence
Le clavier et la souris sans fil opèrent sur deux canaux de fréquence.
7
Page 8

Pour empêcher des interférences en utilisant deux souris RF, un canal
de fréquence différent devrait être utilisé pour chaque souris. Suivez
ces instructions pour changer le canal de fréquence de votre clavier et
souris : Réglez le canal de fréquence sur le récepteur à 1 ou 2 (J).
Réglez le canal de fréquence sur le clavier et la souris à 1 ou 2
(K)&(L).
K
L L
Codes d’identification du clavier et de la souris
Un code d’identification (ID) unique est assigné à chaque clavier /
souris lors de la fabrication, pour que le récepteur ne reçoive que les
signaux de vos périphériques et non pas des signaux radio d’autres
claviers/souris sans fils installés sur votre ordinateur.
Connecter les codes ID du clavier et de la souris sans
fil
Etablissez manuellement la communication entre le récepteur et le
clavier/souris.
J
(a) Appuyez sur une touche du clavier et déplacez la souris
(b) Appuyez sur le bouton Connexion ID (L) sur le récepteur (J) : Le
voyant vert (K) indique que les codes ID du clavier et de la souris
sont connectés. Si le voyant vert est éteint, les codes ID du clavier et
de la souris sont déconnectés.
L
K
J
8
Page 9

Per iniziare
1. Spegnere il computer.
2. Rimuovere la tastiera esistente.
3. Installare le batterie alcaline AA
(G) nella tastiera wireless.
Rimuovere lo sportello del vano
batterie, sul lato inferiore della
tastiera, premendo verso
l’interno la linguetta dello
sportello, per sbloccarlo.
4. Installare le batterie alcaline
AAA (F) nel mouse wireless.
D
I G
H
E
F
Impostazione della tastiera o di Wireless Desktop
1. Assicurarsi che il computer sia spento.
2. Collegare il cavo del ricevitore della tastiera: collegare
il cavo viola del ricevitore della tastiera (A) alla porta
per tastiera del computer.
3. Collegare il cavo del
ricevitore del mouse:
collegare il cavo verde del
ricevitore del mouse alla
porta mouse PS/2 del
computer.
4. Posizionare il ricevitore (C) a
20 cm da qualsiasi dispositivo
elettromeccanico.
Selezionare il canale di frequenza
La tastiera e il mouse wireless operano su due canali di frequenza. Per
evitare interferenze quando si utilizzano due mouse wireless molto
vicini fra loro, occorre selezionare un diverso canale di frequenza per
ciascuno. Fare riferimento a quanto segue per modificare il canale di
frequenza di tastiera e mouse: impostare il canale di frequenza del
ricevitore su 1 o 2 (J). Impostare il canale di frequenza di tastiera e
mouse su 1 o 2 (L)&(K).
9
Page 10

J
K
Installazione del software del mouse – iWheelWorks
- e della tastiera - iKeyWorksOffice
Installazione in Windows 95/98/Me/2000/NT4.0
1. Inserire il disco floppy di installazione nell’unità dischi floppy
del computer.
2. Fare clic sul pulsante Start (Avvio), quindi fare clic su Esegui.
3. Nella finestra di dialogo Esegui, digitare A:\setup, dove “A” è
la lettera dell’unità dischi floppy.
4. Fare clic su OK e seguire le istruzioni sullo schermo per
completare l’installazione.
Codici ID della tastiera e del mouse wireless
In fase di produzione a ogni mouse e tastiera viene assegnato un codice
ID univoco, di modo che il ricevitore possa individuare solo il segnale
L L
proveniente da una specifica periferica ed evitare quindi che i segnali
radio di altre tastiere o mouse interferiscano con il computer.
Connessione dei codici ID della tastiera e del mouse
wireless
L
Per stabilire a mano una comunicazione tra il ricevitore e la tastiera e
il mouse, eseguire le operazioni seguenti.
(a) Premere un tasto qualsiasi della tastiera e spostare il mouse.
(b) Premere il pulsante Connessione ID (L) sul ricevitore (J): se il
LED verde (K) si illumina, gli ID della tastiera e del mouse sono
collegati. Viceversa, se il LED verde rimane spento, la tastiera e il
mouse sono disconnessi.
K
J
10
Page 11

Primeros pasos
1. Apague su computadora.
2. Retire el teclado existente.
3. Instale las pilas alcalinas AA (G)
en el teclado inalámbrico. Para
retirar la cubierta del
compartimiento para las pilas
ubicado en la parte inferior del
teclado, deslice la cubierta
hacia adentro, con respecto a la
pestaña, para liberarlo.
4. Instale las pilas alcalinas AAA
(F) en el mouse inalámbrico.
D
I G
H
E
Configuración física del teclado o del Wireless
Desktop
1. Asegúrese de que su computadora esté apagada.
2. Conecte el cable para el teclado (A)
de color púrpura del receptor al
puerto de teclado de la
computadora.
3. Conexión del cable para el mouse
del receptor: conecte el cable para
el mouse de color verde del
receptor al puerto de mouse PS/2 de la
computadora
4. Ubique el receptor (C) a una
distancia de 20 centímetros de
cualquier otro dispositivo
electromecánico.
F
Selección de los canales de frecuencia
El Wireless Desktop y el mouse operan en dos canales de frecuencia.
Para evitar interferencias cuando se utilizan dos mouses inalámbricos
cercanos entre sí, debe utilizarse un canal de frecuencia diferente para
cada mouse. Para cambiar el canal de frecuencia del escritorio y del
11
Page 12

mouse: Establezca el canal de frecuencia del receptor en 1 ó 2 (J).
Establezca el canal de frecuencia del teclado y
mouse en 1 ó 2 (K) & (L).
K
L L
Installazione del software del mouse – iWheelWorks
- e della tastiera - iKeyWorksOffice
Installazione in Windows 95/98/Me/2000/NT4.0
1. Inserire il disco floppy di installazione nell’unità dischi floppy
del computer.
2. Fare clic sul pulsante Start (Avvio), quindi fare clic su Esegui.
3. Nella finestra di dialogo Esegui, digitare A:\setup, dove “A” è
la lettera dell’unità dischi floppy.
4. Fare clic su OK e seguire le istruzioni sullo schermo per
completare l’installazione.
J
L
Códigos de identificación del teclado y mouse
inalámbrico
En el momento de su fabricación, a cada teclado y cada mouse se le
asigna un código de identificación exclusivo, de forma que el receptor
sólo recoge la señal procedente de sus dispositivos, impidiendo
además que cualquier señal de radio procedente de otros teclados o
mouse inalámbricos funcione en su computadora.
Conexión de los códigos de identificación del teclado
y mouse inalámbrico
Establezca manualmente una comunicación entre el receptor y el
teclado y el mouse. Para ello:
(a) Presione cualquier tecla del teclado y
mueva el mouse
(b) Presione el botón de conexión
del identificador (L) ubicado en el
receptor (J): el indicador luminoso
LED de color verde (K) le indica
que se han conectado los códigos de
identificación del teclado y del
mouse. Si la luz del LED verde no
está iluminada, es que los códigos de
identificación del teclado y del
mouse están desconectados.
K
J
12
Page 13

Voorbereiding
1. Zet de computer uit.
2. Verwijder het huidige
toetsenbord.
3. Plaats de
AA-alkalinebatterijen (G) in het
draadloze toetsenbord.
Verwijder het dekseltje aan de
onderkant van het toetsenbord
door op het knopje op het
dekseltje te drukken.
4. Plaats de
AAA-alkalinebatterijen (F) in
de draadloze muis
D
E
I G
H
F
Het toetsenbord of de Wireless Desktop installeren
1. Controleer of de computer nog
steeds uit is.
2. Sluit de paarse toetsenbordkabel (A)
van de ontvanger aan op de
toetsenbordpoort van de computer.
3. Sluit de groene kabel van de
muisadapter aan op de
PS/2-muispoort van de computer.
4. Plaats de ontvangers op een afstand
van minimaal 20 centimeter van andere
elektromagnetische apparatuur.
C
Het frequentiekanaal instellen
Het draadloze toetsenbord en de draadloze muis gebruiken elk een
eigen frequentiekanaal. Om te voorkomen dat twee draadloze
apparaten die dicht bij elkaar worden gebruikt, elkaar beïnvloeden,
kan elk apparaat op een ander frequentiekanaal worden ingesteld. U
13
Page 14

wijzigt het frequentiekanaal van het toetsenbord of de muis als
volgt: Stel het frequentiekanaal van de
ontvanger in op kanaal 1 of 2 (J). en stel
het frequentiekanaal op het toetsenbord op
de muis vervolgens in op het
overeenkomstige kanaal 1 of 2 (K)&(L).
K
L L
De ID-code van het draadloze toetsenbord en de
muis
Tijdens de fabricage is aan elk toetsenbord en elke muis een unieke
ID-code toegewezen om ervoor te zorgen dat de ontvanger alleen
signalen van het gekoppelde apparaat verwerkt en andere draadloze
apparaten niet op uw computer zullen functioneren. U kunt deze
functie echter ook uitschakelen, zodat u met andere draadloze
apparaten uw computer kunt bedienen.
De muissoftware iWheelWorks en de
toetsenbordsoftware iKeyWorksOffice installeren
Installatie onder Windows 95/98/Me/2000/NT4.0
J
1. Plaats de installatiediskette in het diskettestation.
2. Klik op Start en kies Uitvoeren.
3. Typ in het dialoogvenster Uitvoeren de opdracht A:\setup,
waarbij “A” de stationsletter van het diskettestation is.
4. Kies OK en volg de aanwijzingen op het scherm om de
installatie te voltooien.
Id-codes van draadloze toetsenborden en muizen
Aan ieder toetsenbord en aan iedere muis zijn bij de productie een
L
unieke id-code toegewezen. Op deze manier vangt de ontvanger
alleen het signaal van uw apparaten op en wordt voorkomen dat
signalen van andere draadloze toetsenborden of muizen op uw
computer worden ontvangen.
Id-codes van draadloos toetsenbord en muis
aansluiten
Maak handmatig een verbinding tussen de
ontvanger voor het toetsenbord en de
muis.
(a) Druk op een willekeurige toets
op het toetsenbord en beweeg de
muis.
(b) Druk op de knop ID Connect (L)
op de ontvanger (J): het groene
lampje (K) geeft aan dat de id's van
het toetsenbord en de muis zijn
aangesloten. Als het groene lampje
niet brandt, zijn de id's van het
toetsenbord en de muis niet
aangesloten.
K
J
14
 Loading...