

Getac Technology 7260NGW, T800RFID, EM7355T, T800 Users manual

Rugged Mobile Computing
Solutions
T800
USER MANUAL

June 2014
TRADEMARKS
TRADEMARKS
TRADEMARKSTRADEMARKS
All brand and product names are trademarks or registered trademarks of their
respective companies.

NOTE
NOTE
NOTENOTE
The information in this manual is subject to change without notice.
For the latest version of the manual, please visit the Getac website at www.getac.com.


Table of Contents
Table of Contents
Table of ContentsTable of Contents
Chapter 1
Chapter 1
Chapter 1Chapter 1
Getting Started
Getting Started................................
Getting StartedGetting Started
Getting the Tablet PC Running .......................................... 2
Unpacking .................................................................. 2
Installing the SIM Card (Optional) ................................. 3
Connecting to AC Power ............................................... 4
Using the Tether ......................................................... 5
Turning On and Off the Tablet PC ................................. 6
Taking a Look at the Tablet PC ........................................ 8
Front Components ........................................................ 8
Rear Components ....................................................... 11
Top Components ......................................................... 12
Bottom Components ..................................................... 13
Right-Side Components ................................................ 13
................................................................
................................................................
................................................................
................................................................
..................................................
................................................................
.................. 1111
....................................
Chapter 2
Chapter 2
Chapter 2Chapter 2
Operating Your Tablet PC
Operating Your Tablet PC ................................
Operating Your Tablet PCOperating Your Tablet PC
Navigating on the Screen................................................. 16
Using the Touchscreen ................................................. 16
Using the Dual Mode Display (Optional) ........................ 19
Using the Network Features ............................................ 20
Using the LAN (Optional) .......................................... 20
Using the WLAN ....................................................... 20
Using the BT Feature .................................................... 23
Turning On/Off the BT Radio ...................................... 23
Connecting to another BT Device .................................. 24
Using the WWAN Feature (Optional) ............................... 25
Turning On/Off the WWAN Radio ................................. 25
Setting up a WWAN Connection ................................... 26
................................................................
................................................................
i
...........................................................
................................................................
........................... 15
......................................................
15
1515

Chapter 3
Chapter 3
Chapter 3Chapter 3
Chapter 4
Chapter 4
Chapter 4Chapter 4
Ch
Chapter 5
apter 5
ChCh
apter 5apter 5
Managing Power
Managing Power ................................
Managing PowerManaging Power
AC Adapter .................................................................. 28
Battery Pack ................................................................ 30
Charging the Battery Pack ........................................... 30
Initializing the Battery Pack ........................................... 31
Checking the Battery Level ........................................... 31
Battery Low Signals and Actions ................................... 32
Replacing the Battery Pack .......................................... 33
Power-Saving Tips ........................................................ 35
Expanding Your Tablet PC
Expanding Your Tablet PC ................................
Expanding Your Tablet PCExpanding Your Tablet PC
Connecting a USB Device ............................................... 37
Connecting an Audio Device ............................................ 38
Connecting an HDMI Display Monitor ................................ 39
Connecting a Serial Device (Optional) ............................. 40
Using MicroSD Cards (Optional) ...................................... 41
Using BIOS Setup
Using BIOS Setup ................................
Using BIOS SetupUsing BIOS Setup
When and How to Use .................................................. 43
Menu Descriptions ......................................................... 44
Information Menu ....................................................... 44
Main Menu ............................................................... 44
Advanced Menu ......................................................... 45
Security Menu ........................................................... 46
Boot Menu ............................................................... 47
Exit Menu ................................................................ 47
................................................................
................................................................
................................................................
................................................................
................................................................
................................................................
................................................................
................................................................
................................................................
................................................................
.........................................................
................................................................
............................................
................................................................
......................... 36
..................................................
..........................................
................................................................
............ 27
27
........................
2727
36
3636
.......... 42
42
....................
4242
Chapter 6
Chapter 6
Chapter 6Chapter 6
Chapter 7
Chapter 7
Chapter 7Chapter 7
Using Getac
Using Getac Software
Using Getac Using Getac
OSD Control Panel ........................................................ 49
G-Manager .................................................................. 50
Getac Camera (Optional) .............................................. 52
Using the Barcode Reader (Optional) .............................. 54
Care and Maintenance
Care and Maintenance ................................
Care and MaintenanceCare and Maintenance
Taking Care of the Tablet PC ......................................... 57
Location Guidelines ..................................................... 57
Software ................................
SoftwareSoftware
................................................................
................................................................
................................................................
................................................................
ii
................................................................
................................................................
...............................................................
................................................................
.................................... 48
................................................................
............................... 56
..............................................................
48
4848
56
5656

Chapter 8
Chapter 8
Chapter 8Chapter 8
General Guidelines ..................................................... 58
Cleaning Guidelines .................................................... 58
Battery Pack Guidelines .............................................. 59
Touchscreen Guidelines ............................................... 60
When Traveling ............................................................. 62
Troubles
Troubleshooting
TroublesTroubles
Preliminary Checklist ....................................................... 64
Solving Common Problems .............................................. 65
Resetting the Tablet PC ................................................. 72
System Recovery ........................................................... 73
hooting ................................
hootinghooting
Battery Problems ........................................................ 65
BT Wireless Transmission Problems ............................... 65
Display Problems ....................................................... 66
Hardware Device Problems .......................................... 66
Power Management Problems ....................................... 67
Sensor Problems (for Windows 8 Models Only) ............. 68
Software Problems ..................................................... 69
Sound Problems ........................................................ 69
Startup Problems ....................................................... 69
WAN Problems .......................................................... 70
Other Problems .......................................................... 71
System Restore, Refresh, or Reset (for Windows 8
Models) .................................................................. 73
System Recovery (a Tool for Windows 7 Models) ......... 74
................................................................
................................................................
................................................................
................................................................
...........................................
................................................................
........... 63
63
......................
6363
Appendix A
Appendix A Specifications
Appendix AAppendix A
Append
Appendix B
AppendAppend
ix B Regulatory Information
ix Bix B
Specifications ................................
SpecificationsSpecifications
Regulatory Information ................................
Regulatory InformationRegulatory Information
On the Use of the System ............................................. 80
Class B Regulations ................................................... 80
ANSI Warning ............................................................ 81
Safety Notices ........................................................... 82
On the Use of the RF Device ........................................ 85
USA and Canada Safety Requirements and Notices.......... 85
................................................................
................................................................
................................................................
................................................................
................................................................
................................................................
iii
..............................................................
................................................................
.................................................
................................................................
................. 77
..................................
..............................79
............................................................
77
7777
79
7979

European Union CE Marking and Compliance Notices ....... 87
User Notification of Take-back Service .............................. 89
ENERGY STAR ............................................................. 91
iv

Chapter 1
Chapter 1
Chapter 1Chapter 1
Getting Started
Getting Started
Getting StartedGetting Started
Congratulations on purchasing this rugged Tablet PC.
This chapter first tells you step by step how to get the Tablet PC up and running.
Then, you will find a section briefly introducing the external components of the Tablet
PC.
1

Getting the
Getting the Tablet PC
Getting the Getting the
Unpacking
Unpacking
UnpackingUnpacking
NOTE: This packing list applies to standard models. Select
models may have different items.
After unpacking the shipping carton, you should find these standard items:
T800 Tablet PC
Tablet PC Running
Tablet PCTablet PC
Running
RunningRunning
AC adapter
Stylus
Screen cleaning cloth
Inspect all the items. If any item is damaged or missing, notify your dealer
immediately.
AC power cord
Tether
Driver disc
Document(s)
2
Ins
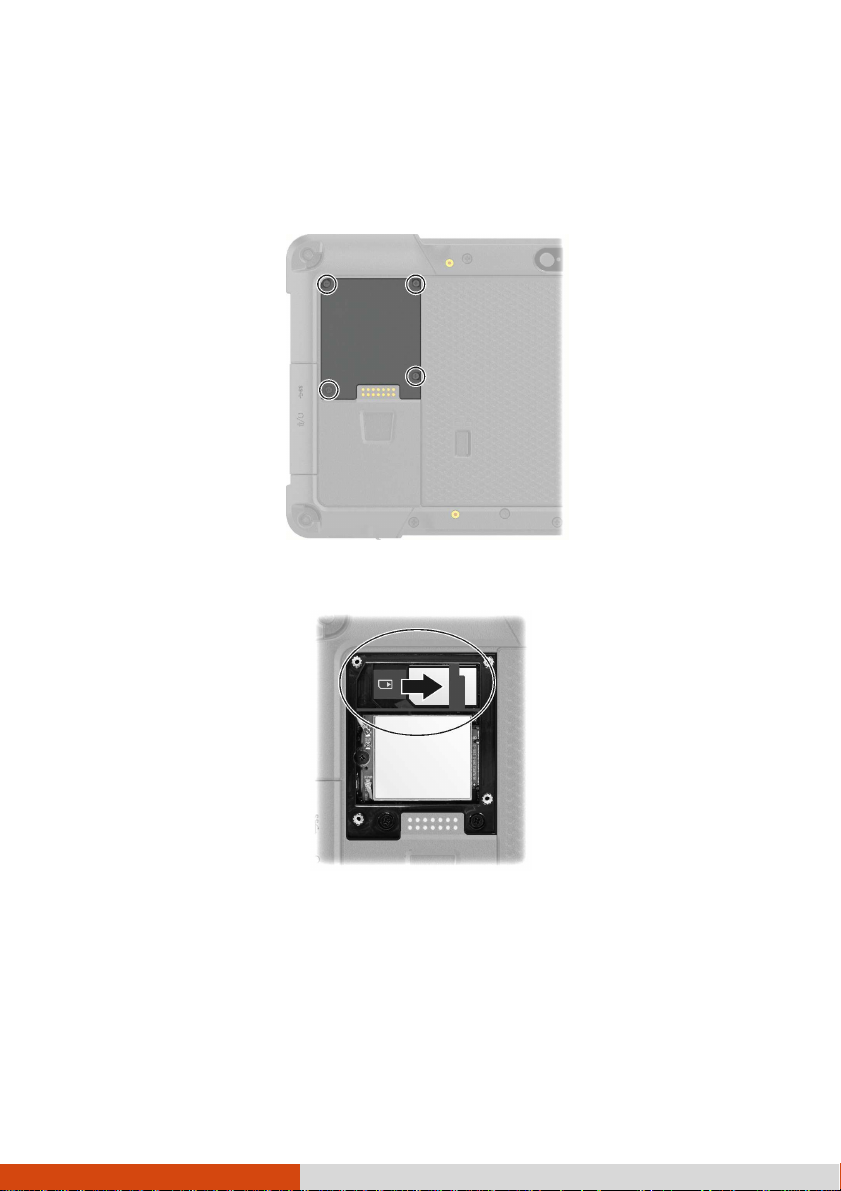
Installing the
talling the SIM Card (Optional)
InsIns
talling the talling the
1. Locate the SIM card cover. Remove the cover by unfastening 4 screws.
2. Noting the orientation, slide the SIM card into place.
SIM Card (Optional)
SIM Card (Optional)SIM Card (Optional)
3. Replace the cover and secure with 4 screws.
3
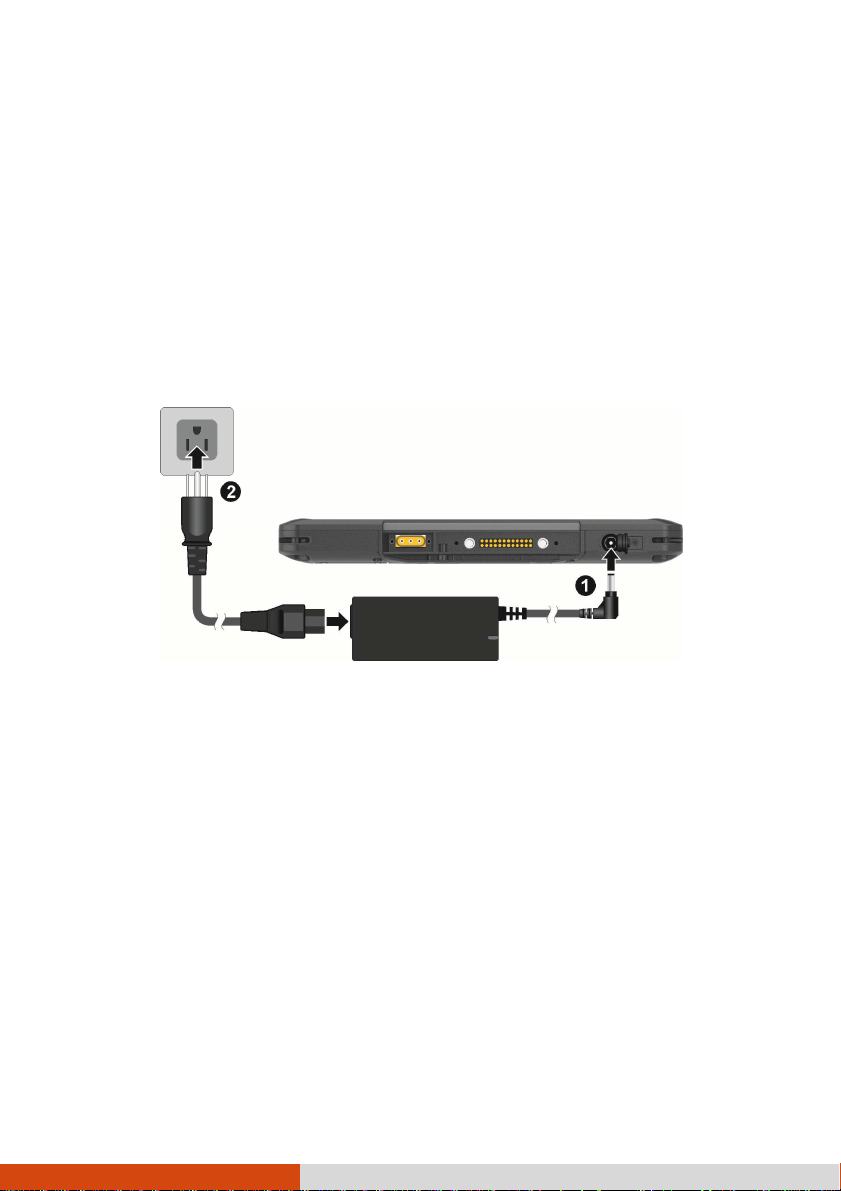
Connecting
Connecting to AC Power
Connecting Connecting
It is suggested that you use AC power when starting up the Tablet PC for the
very first time.
1. Plug the DC cord of the AC adapter to the power connector of the Tablet PC
().
2. Plug the female end of the AC power cord to the AC adapter and the male
end to an electrical outlet ().
to AC Power
to AC Powerto AC Power
3. Power is being supplied from the electrical outlet to the AC adapter and onto
your Tablet PC. Now, you are ready to turn on the Tablet PC.
CAUTION: Use only the AC adapter included with your Tablet PC.
Using other AC adapters may damage the Tablet PC.
NOTE: When the AC adapter is connected, it also charges the
battery pack. For information on using battery power, see
Chapter 3.
4
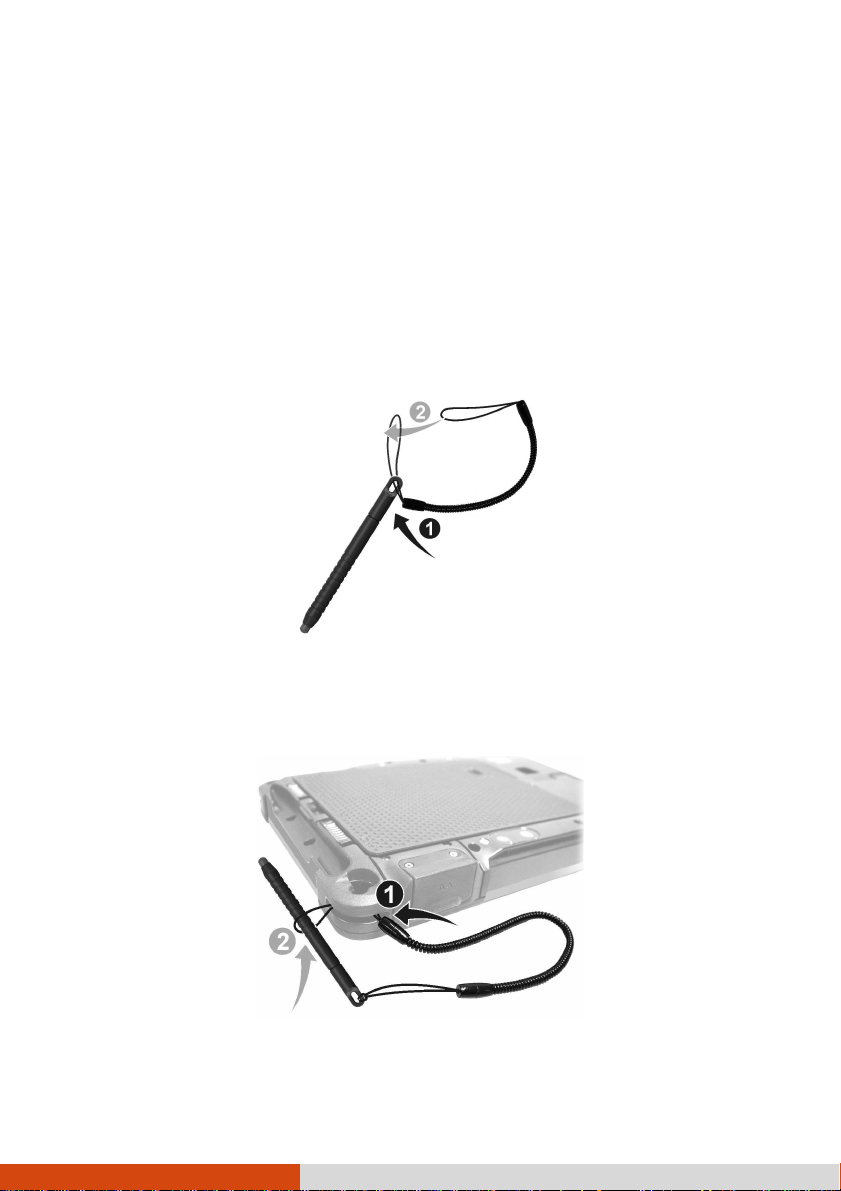
Using the Tether
Using the Tether
Using the TetherUsing the Tether
A tether is provided for attaching the stylus to your Tablet PC.
1. Insert one of the tether’s loop ends through the hole of the stylus (as indicated
by below). Then, insert the other end through the first loop (as indicated
by below) and pull it tight.
2. Insert the other loop end to the tether holder on the Tablet PC (as indicated
by below). Then, insert the stylus end through the loop (as indicated by
below) and pull it tight.
5
swiping in from
enu
in the lower left and follow the
or use the
enu
Sleep
in the Power menu. If you want to
enu
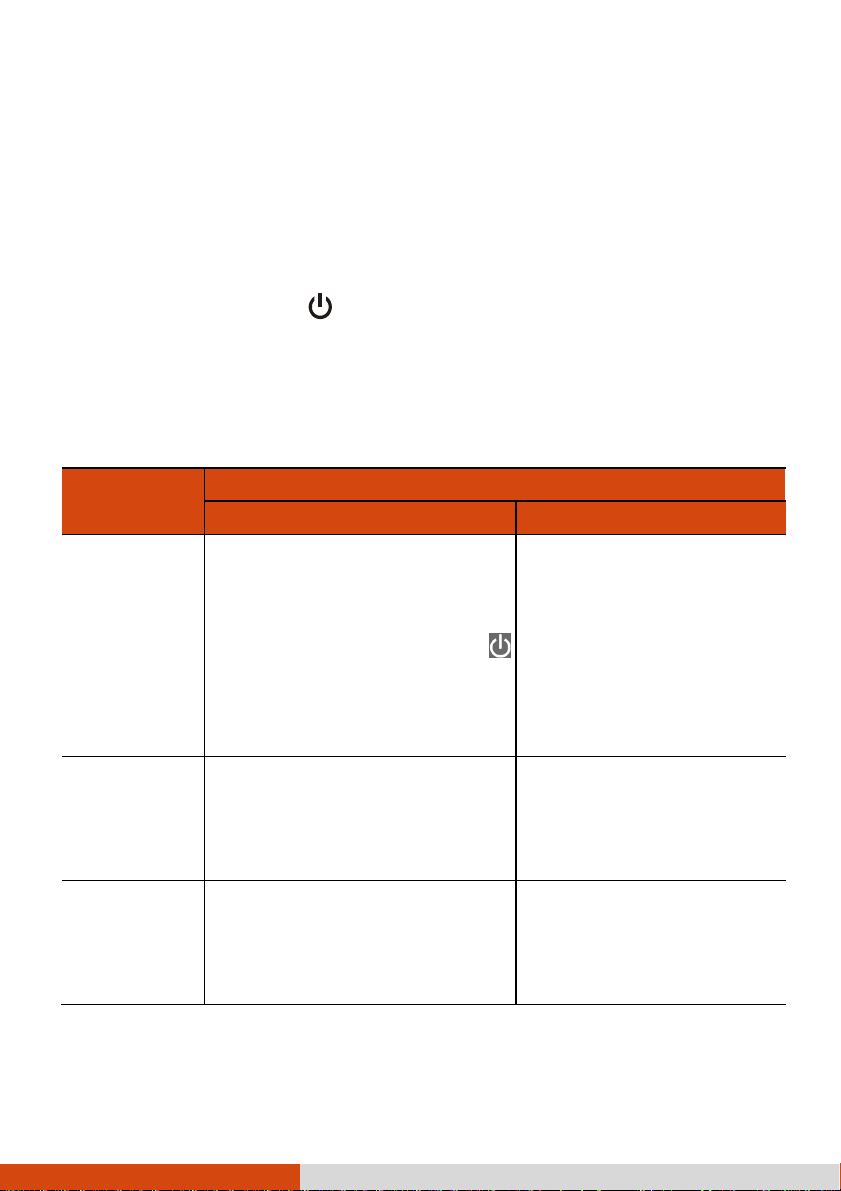
Turning On and Off the
Turning On and Off the Tablet PC
Turning On and Off the Turning On and Off the
Turning On
Turning On
Turning OnTurning On
Tablet PC
Tablet PCTablet PC
Press the power button (
Turning Off
Turning Off
Turning OffTurning Off
When you finish a working session, you can stop the system by turning off the
power or leaving it in Sleep or Hibernation mode:
To...
To...
To...To...
Power off
(Shutdown)
Sleep Press the power button*
1. Open the Charms Bar of
Windows 8 by
the right side of the screen.
2. Tap Settings and then tap
(Power).
3. Tap Shut down in the Power
menu that pops up.
Power menu to put the Tablet PC
in Sleep mode.
). The Windows operating system should start.
Do this...
Do this...
Do this...Do this...
Windows 8
Windows 8 Windows 7
Windows 8Windows 8
Use the Windows Start m
shutdown procedure.
Press the power button* or
use the Windows Start m
to put the Tablet PC in
mode.
Windows 7
Windows 7Windows 7
Hibernate By default, this option is not shown
use the feature, set up accordingly
in Windows Control Panel.
* “Sleep” is the default setting of the power button. You may change what the
power button does in Windows Control Panel.
Use the Windows Start m
to put the Tablet PC in
Hibernation mode.
6

7
Tablet
Allows you to use the camera function. When the
Taking a Look at the
Taking a Look at the Tablet PC
Taking a Look at the Taking a Look at the
NOTE: Depending on the model you purchased, the appearance of
your Tablet PC may not be exactly the same as those shown in
this manual.
CAUTION: You need to open the protective covers to access the
connectors or devices inside. When not accessing a connector
or device, make sure to close the cover completely for water-,
dust-, and fire-proof integrity of your computer. (Engage the
locking mechanism if existing.)
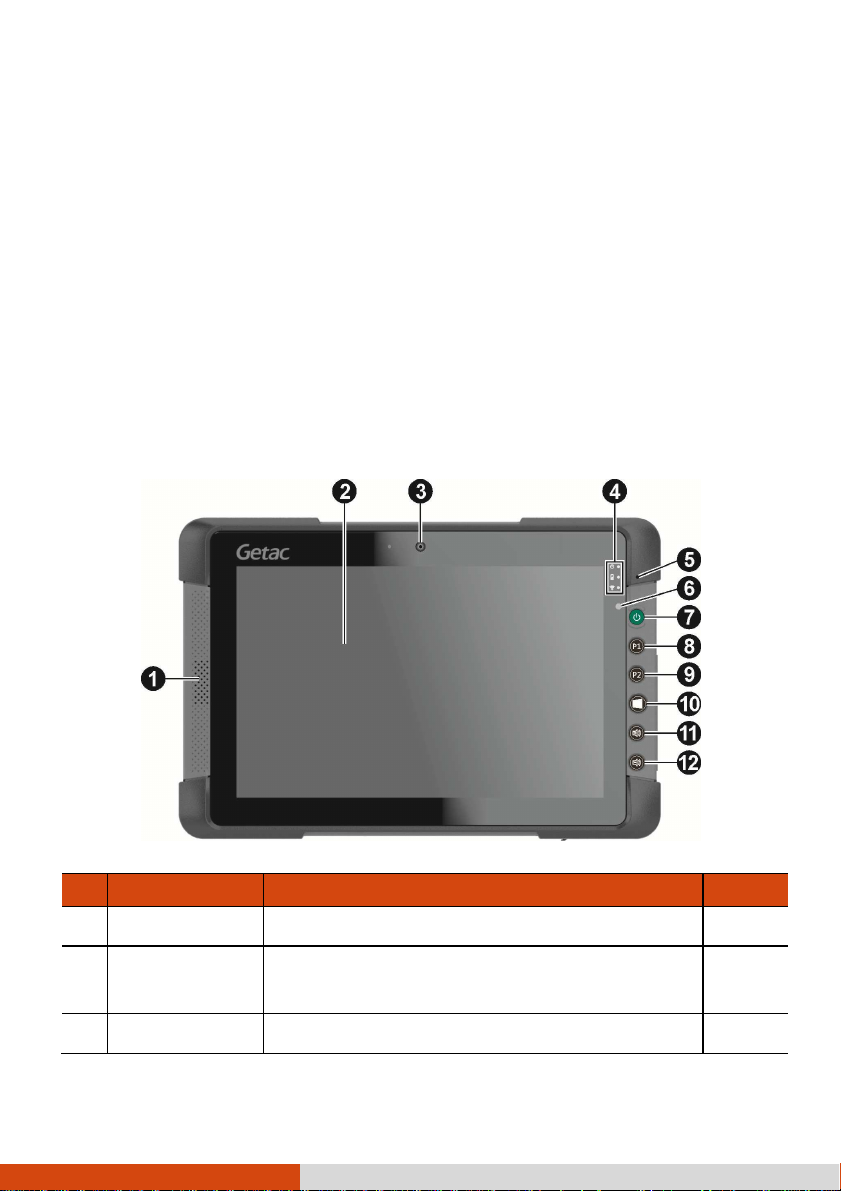
Front Components
Front Components
Front ComponentsFront Components
Tablet PC
Tablet PCTablet PC
Ref
Ref
RefRef
Component
Component Description
ComponentComponent
Speaker
Speaker
SpeakerSpeaker
Touchscreen
Touchscreen
TouchscreenTouchscreen
Camera Lens
Camera Lens
Camera Lens Camera Lens
Sends out sound and voice from your Tablet PC.
Displays and receives information for the
PC.
8
Description See Also
DescriptionDescription
See Also
See AlsoSee Also
P. 16
P. 52
beside it lights
s
Blinks red rapidly (once per 0.5 second) when
Ask for repair
Blinks amber when the battery charging is in an
abnormal state. Replace the battery in case this
Lights blue when the RF radio of any RF feature
for automatic adjustments
state
Camera program and serves as
Serves as the trigger button for the barcode reader
Ref
Ref
RefRef
Component
Component Description
ComponentComponent
(optional)
Indicators
Indicators
IndicatorsIndicators
Power
camera lens is in use, the indicator
up.
Lights blue when the power is on.
Blinks blue when the system is in Sleep mode.
Description See Also
DescriptionDescription
See Also
See AlsoSee Also
Frequency)
Frequency)
Frequency)Frequency)
Microphone
Microphone
MicrophoneMicrophone
Light Sensor
Light Sensor
Light SensorLight Sensor
Power Button
Power Button
Power ButtonPower Button
Battery
Battery
BatteryBattery
RF (Radio
RF (Radio
RF (Radio RF (Radio
Lights green when the battery is fully charged. P. 30
Lights amber when the battery is being charged.
Blinks red (once per second) when the battery’
capacity is below 10%.
there is a thermal protection problem.
service in case this happens.
happens.
(WLAN/BT/WWAN) is on.
Receives sound and voice to record voice.
Senses the ambient light
of the display backlight.
Turns the power on or off. (The default “off”
is “Sleep mode.”)
P. 32
P. 6
P1 Button
Starts the Getac
the shutter release button.
– or –
if your model has the barcode reader module.
9
P. 52
– or –
P. 54
button, you have to
Start screen. Or if you're already on
to the last
Ref
Ref
RefRef
Component
Component Description
ComponentComponent
Description See Also
DescriptionDescription
See Also
See AlsoSee Also
P2 Button
Windows Logo
Windows Logo
Windows Logo Windows Logo
Button
Button
ButtonButton
Can be changed to another set of predefined
functions using G-Manager.
Provides a keyboard key function for specific
occasions.
Opens or closes the OSD Control Panel.
NOTE (for Windows 8): To see the
result of the P2
go to Windows desktop.
When pressed longer:
Serves as the Ctrl
Can be changed to another set of predefined
functions using G-Manager.
Provides a keyboard key function for specific
occasions.
For Windows 8:
Goes to the
Start, pressing this button brings you
application you were in.
For Windows 7:
Opens or closes the Start menu.
Ctrl+Alt
Alt+Del
CtrlCtrl
AltAlt
Del keyboard keys.
DelDel
P. 50
P. 78
P. 49
P. 72
P. 50
P. 78
Provides a keyboard key function for specific
occasions.
Volume Up
Volume Up
Volume Up Volume Up
Button
Button
ButtonButton
Volume Down
Volume Down
Volume Down Volume Down
Button
Button
ButtonButton
Increases the sound volume.
Provides a keyboard key function for specific
occasions.
Decreases the sound volume.
Provides a keyboard key function for specific
occasions.
10
P. 78
P. 78
P. 78
on module such
Allows you to use the camera function. When the
the indicator beside it lights
on the
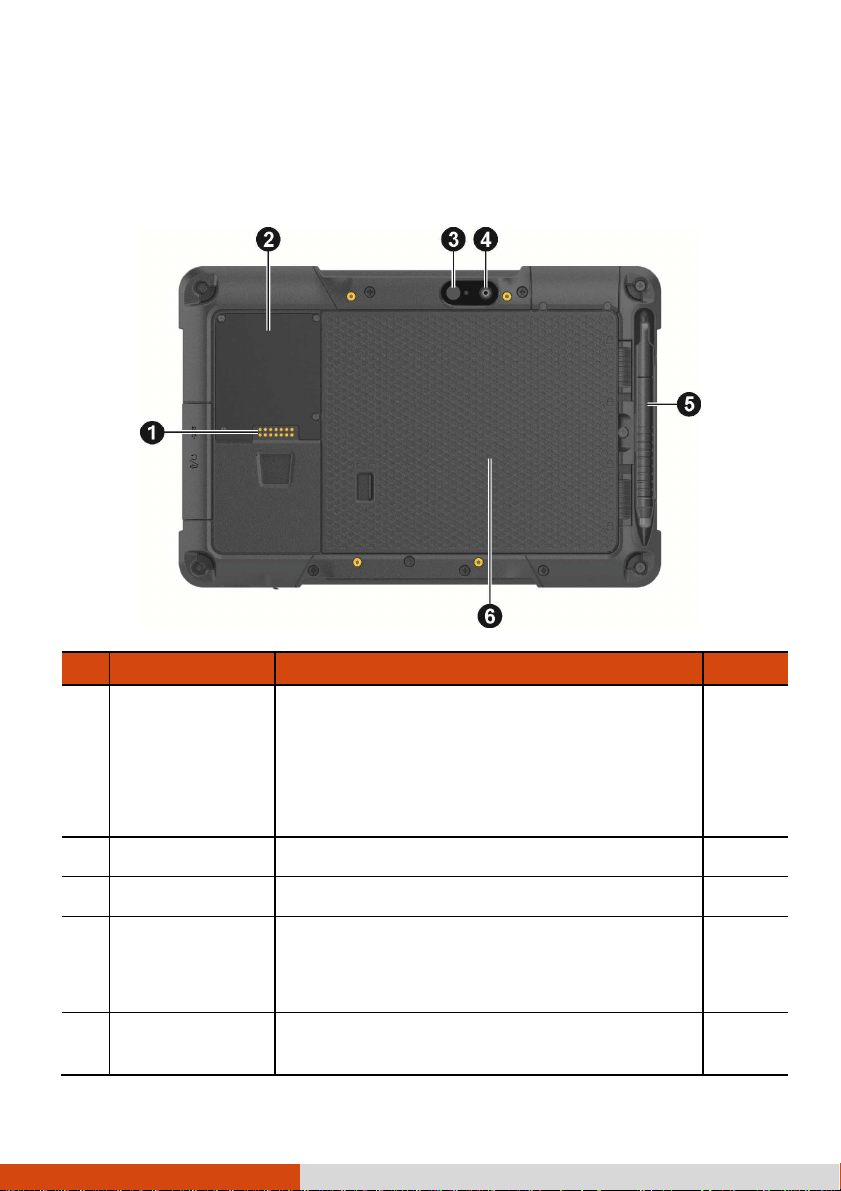
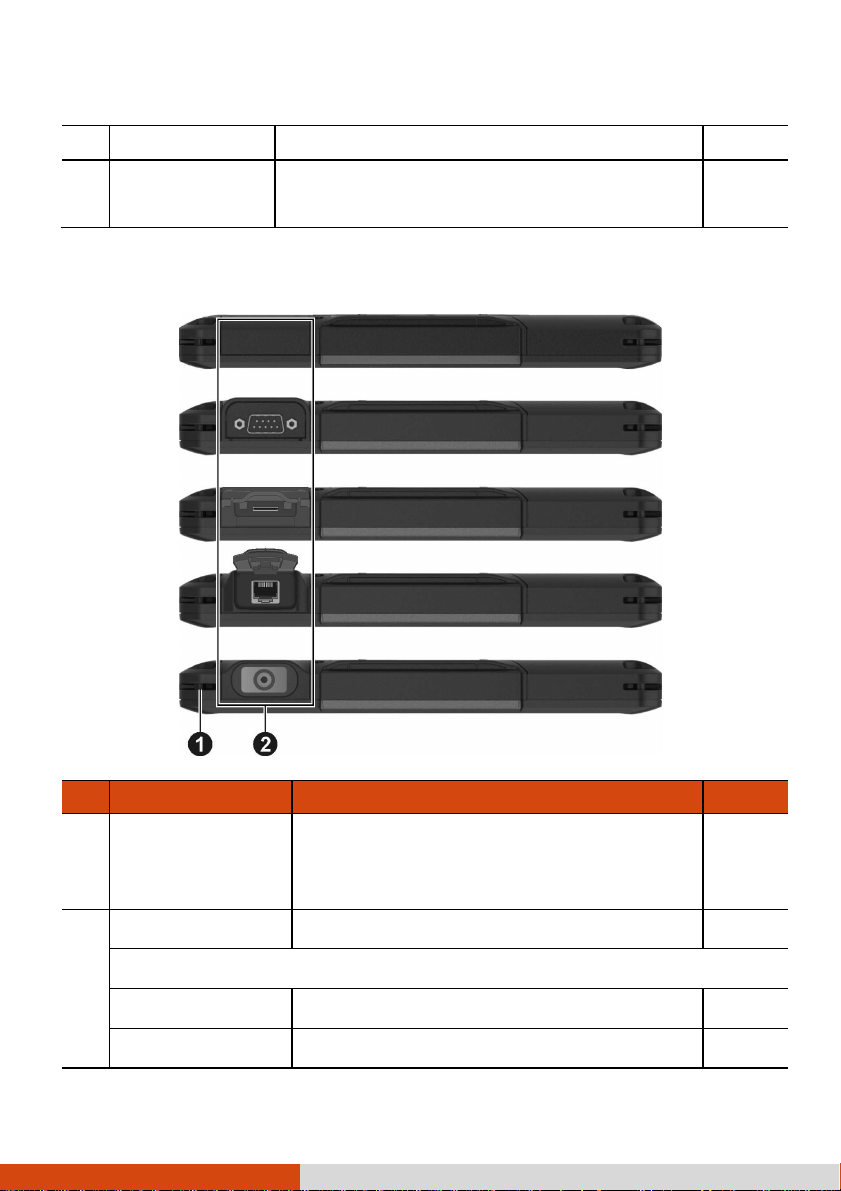
Rear Components
Rear Components
Rear ComponentsRear Components
Ref
Ref
RefRef
Component
Component Description
ComponentComponent
Ex
Expansion
pansion
ExEx
pansion pansion
Connector
Connector
ConnectorConnector
SIM Card Cover
SIM Card Cover
SIM Card CoverSIM Card Cover
Flash
Flash (optional) Provides extra light when taking pictures.
Flash Flash
Camera Lens
Camera Lens
Camera LensCamera Lens
(optional)
Stylus/
Stylus/
Stylus/Stylus/
Digitizer pen
Digitizer pen
Digitizer penDigitizer pen
Connect to a proprietary snapas:
- Second battery pack
- RFID and smart card reader
- Magnetic stripe card and smart card reader
Inside is the SIM card slot (optional).
camera lens is in use,
up.
Serves as the input device by tapping
touchscreen to make selections and enter
11
Description See Also
DescriptionDescription
See Also
See AlsoSee Also
P. 52
P. 16
upplies power to your computer when external
tether). There is one holder at each corner of
card for removable storage
Battery Pack
Battery Pack
Battery PackBattery Pack
Top
Top Components
Components
TopTop
ComponentsComponents
information.
S
power is not connected.
P. 30
Ref
Ref
RefRef
Component
Component Description
ComponentComponent
Tether Holder
Tether Holder
Tether HolderTether Holder
None
None
NoneNone
Or can be one of the below components depending on your model:
Serial Port
Serial Port
Serial PortSerial Port
MicroSD Card Slot
MicroSD Card Slot
MicroSD Card SlotMicroSD Card Slot
For holding a tether (such as the stylus
the Tablet PC.
Connects a serial device. P. 40
Accepts a microSD
Description See Also
DescriptionDescription
12
See Also
See AlsoSee Also
P. 5
P. 41
tation (available as
WWAN
WLAN
GPS
media.
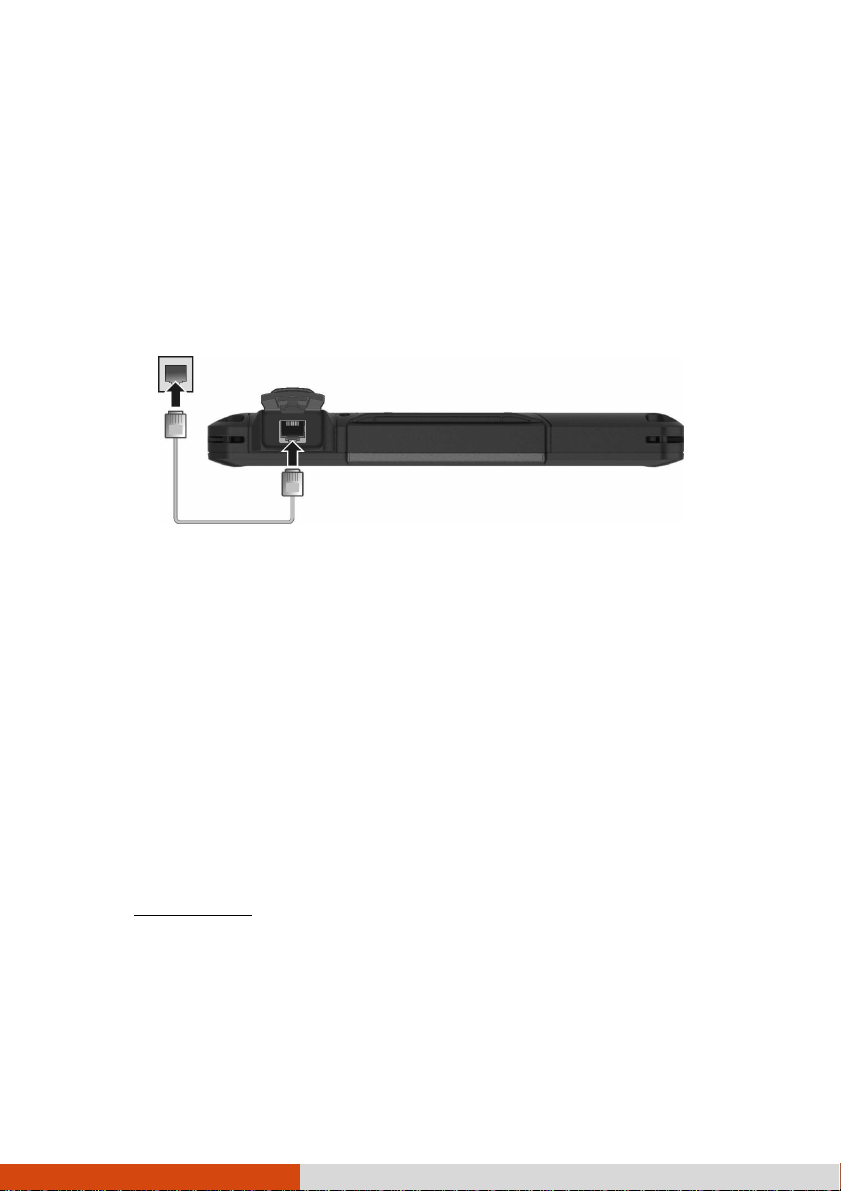
RJ
RJ----45
45 Connector
Connector
RJRJ
4545
ConnectorConnector
Connects the LAN cable. P. 20
Barcode Reader
Lens
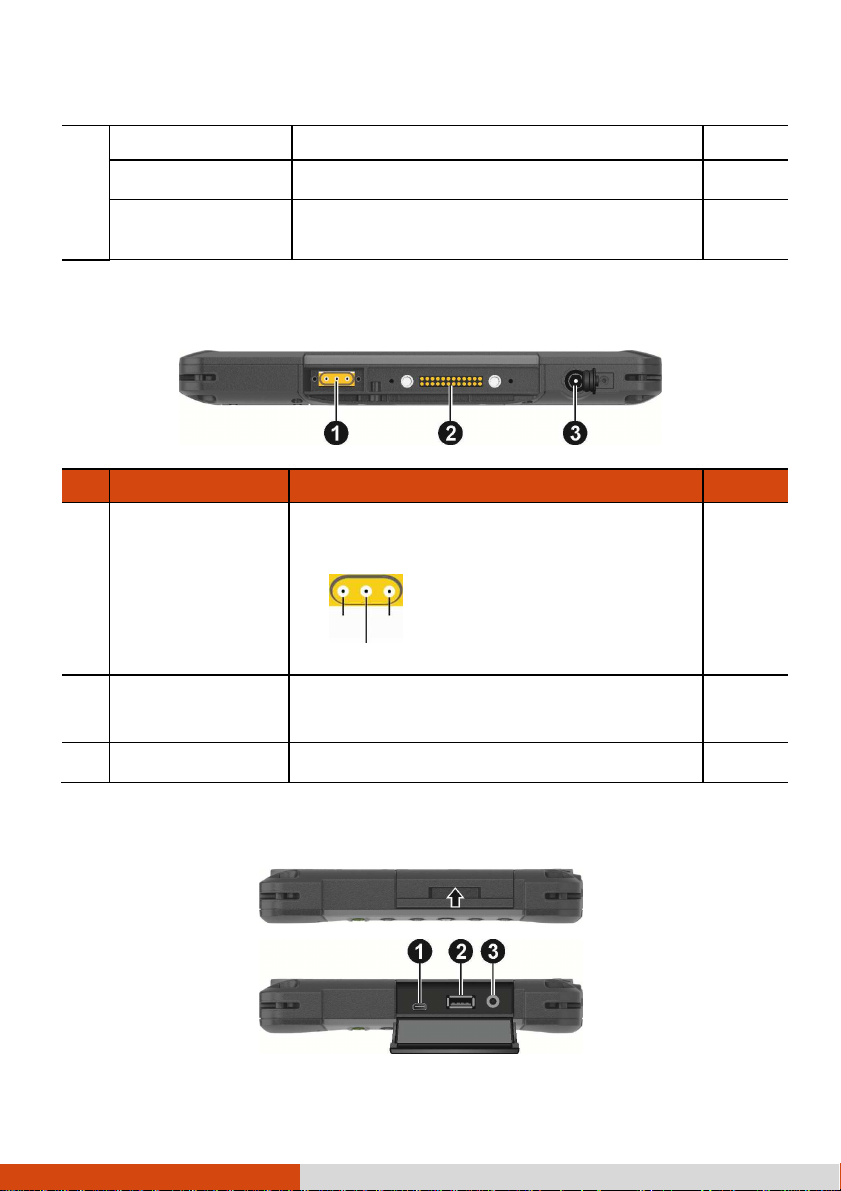
Bottom
Bottom Components
BottomBottom
Ref
Ref
RefRef
Components
ComponentsComponents
Component
Component Description
ComponentComponent
Antenna
Antenna PPPPass
AntennaAntenna
through
through (optional)
throughthrough
Docking Connector
Docking Connector
Docking ConnectorDocking Connector
Power Connector
Power Connector
Power ConnectorPower Connector
ass----
assass
Scans and reads barcodes. P. 54
Connects to the docking station for using
external GPS/WLAN/WWAN antenna.
Connects to the docking s
an option).
Connects the AC adapter. P. 4
Description See Also
DescriptionDescription
See Also
See AlsoSee Also
Righ
Rightttt----Side Components
RighRigh
Side Components
Side ComponentsSide Components
13

Connects a set of headphones or external speakers
pole TRRS
Ref
Ref
RefRef
Component
Component Description
ComponentComponent
Micro HDMI
Micro HDMI
Micro HDMI Micro HDMI
Connector
Connector
ConnectorConnector
USB
USB 3.0
3.0 Port
3.0 3.0
Port
PortPort
USB USB
Combo Audio
Combo Audio
Combo AudioCombo Audio
Connector
Connector
ConnectorConnector
Connects a HDMI monitor or TV set. P. 39
Connects a USB device. P. 37
with amplifier
Supports a headset microphone with 4-
3.5mm jack.
Description See Also
DescriptionDescription
See Also
See AlsoSee Also
P. 38
14

Chapter 2
Chapter 2
Chapter 2Chapter 2
Operating Your
Operating Your Tablet PC
Operating Your Operating Your
This chapter provides information about the use of the Tablet PC.
If you are new to Tablet PCs, reading this chapter will help you learn the operating
basics. If you are already a computer user, you may choose to read only the parts
containing information unique to your Tablet PC.
CAUTION:
Do not expose your skin to the Tablet PC when operating it
in a very hot or cold environment.
The Tablet PC can get uncomfortably warm when you use it in
high temperatures. As a safety precaution in such a
circumstance, do not place the Tablet PC on your lap or touch
it with your bare hands for extended periods of time.
Prolonged body contact can cause discomfort and potentially
a burn.
Tablet PC
Tablet PCTablet PC
15
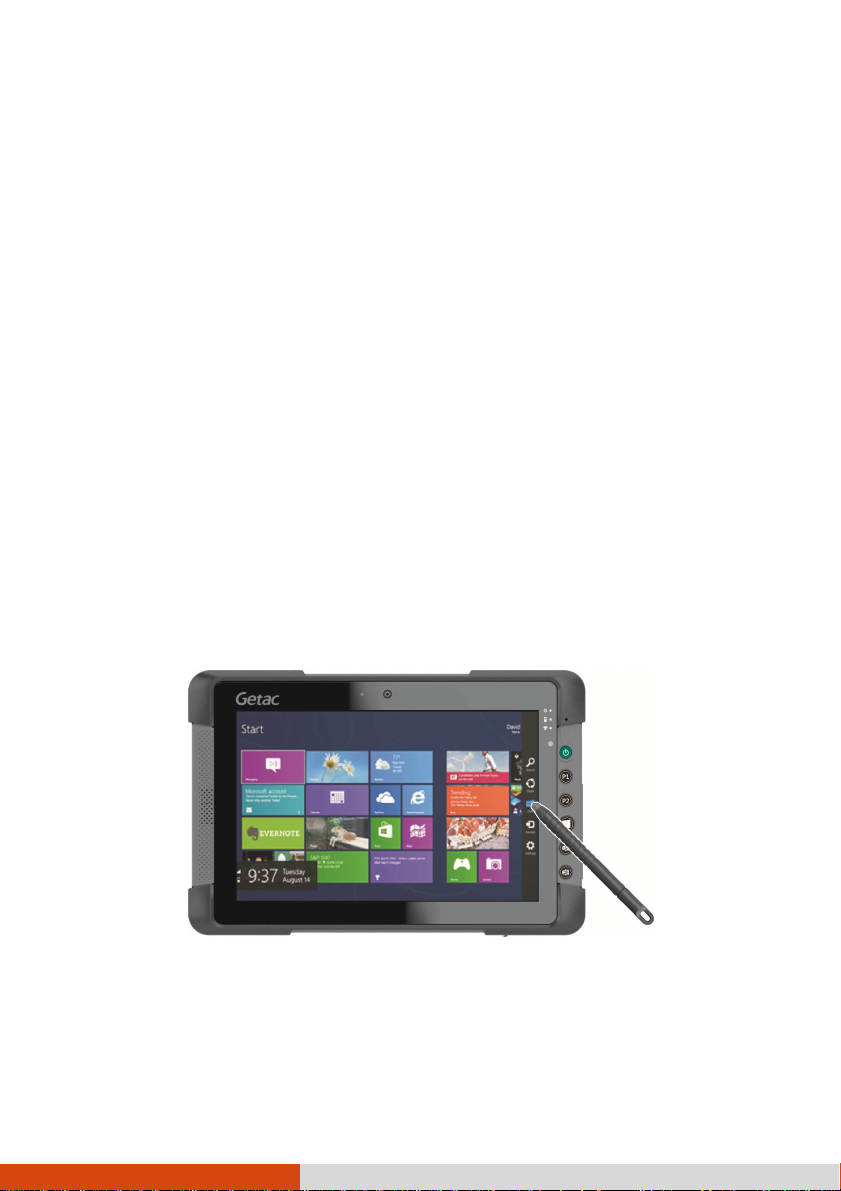
Nav
Navigating on the Screen
NavNav
The screen of your Tablet PC is touch-sensitive. You can control the location of
the cursor/pointer on the screen using the included stylus or your finger to
communicate with the Tablet PC.
CAUTION: Do not use a sharp object such as a ballpoint pen or
pencil on the touchscreen. Doing so may damage the touchscreen
surface. Use the included stylus or your finger.
NOTE: An AG/AR film has been attached to the screen before
shipment. The film is a consumable, which will be worn out by
possible scratches. You can purchase a new one when replacement
is required.
Using the Touchscreen
Using the Touchscreen
Using the TouchscreenUsing the Touchscreen
NOTE: Instead of a hard tip, your stylus has a soft tip so that
it does not scratch the AG/AR film. It is normal for the soft
tip to wear out after a long period of use. You can purchase
a new one when needed.
igating on the Screen
igating on the Screenigating on the Screen
The following table shows how you use the touchscreen to obtain equivalent mouse
functions.
16

on the screen and drag across
another part of a page that
Use zooming to make an
EEEEquivalent
quivalent Mouse
Term/
Term/Action
Action
Term/Term/
ActionAction
Tap: Touch the screen once. Click/Point
Double-tap: Touch the screen twice rapidly. Double-click
Tap and hold: Tap and hold until a popup menu appears. Right-click
quivalentquivalent
Function
Function
FunctionFunction
Mouse
Mouse Mouse
Drag: Hold the stylus (or finger)
the screen until reaching your destination.
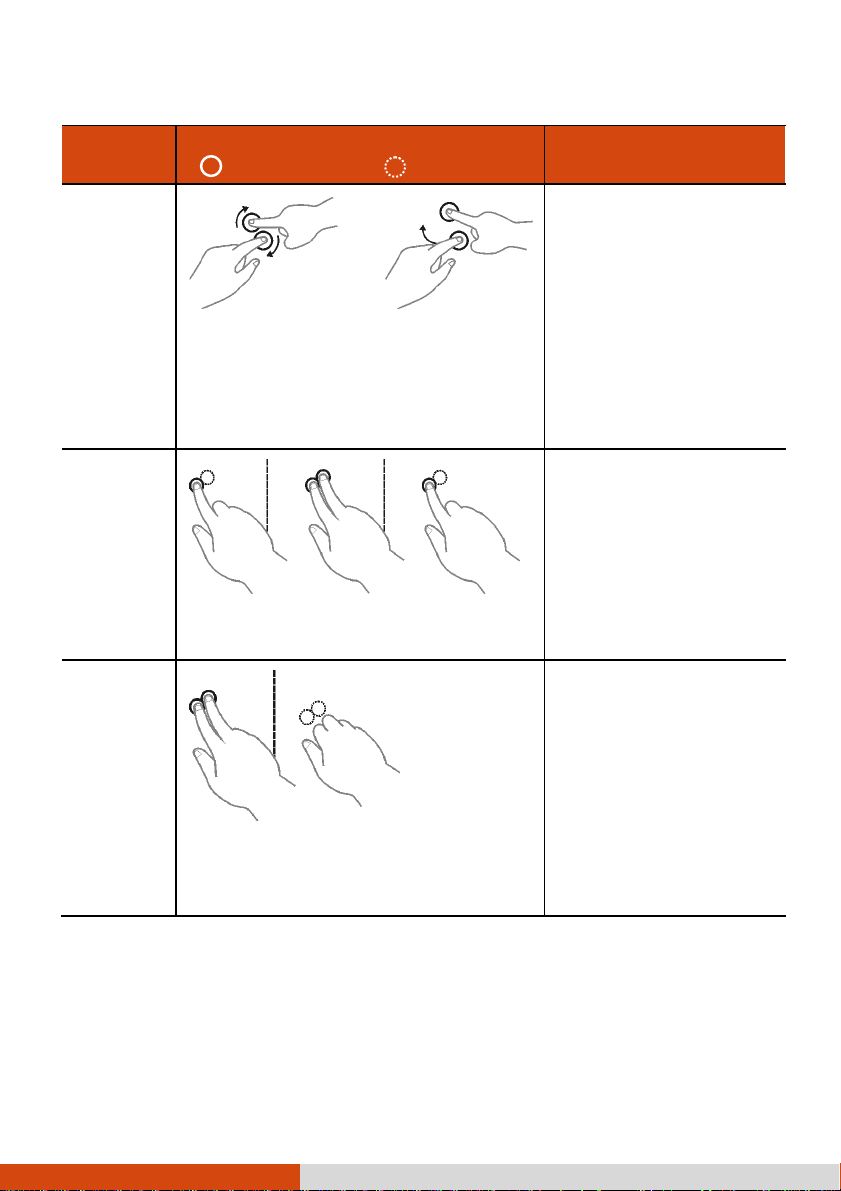
Using
Using Multi
Using Using
You can interact with your Tablet PC by placing two fingers on the screen. The
movement of the fingers across the screen creates “gestures,” which send commands
to the Tablet PC.
Here are the multi-touch gestures that you can use:
Pan
(Scroll)
Zoom
(Pinch)
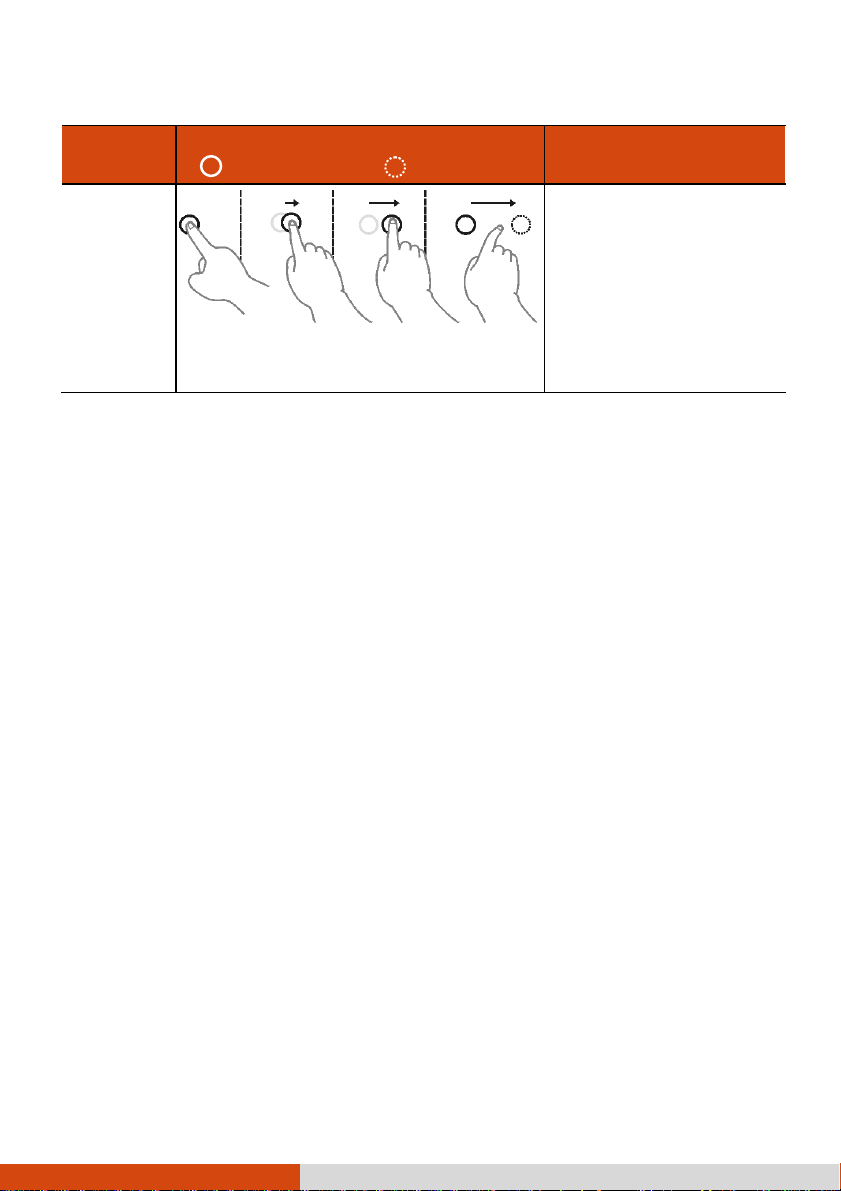
Multi----touch Gestures
MultiMulti
Gestures
Gestures
GesturesGestures
touch Gestures
touch Gesturestouch Gestures
( = finger down; = finger up)
( = finger down; = finger up)
( = finger down; = finger up)( = finger down; = finger up)
Drag 1 or 2 fingers up or down.
Move two fingers apart/toward each
other.
Action
Actionssss
ActionAction
or
Drag
Descriptions
Descriptions
DescriptionsDescriptions
Use panning to see
has scroll bars.
item (a photo for
example) on the screen
larger or smaller. The
gesture works in
applications that support
mouse wheel zooming.
17
works in applications that
Press on target and tap using a second
Gestures
Gestures
GesturesGestures
Action
Actionssss
ActionAction
( = finger down; = finger up)
( = finger down; = finger up)
( = finger down; = finger up)( = finger down; = finger up)
Descriptions
Descriptions
DescriptionsDescriptions
Rotate
Press and
Tap
Twofinger Tap
or
Move two fingers in opposing directions.
-orUse one finger to pivot around another.
finger.
Use rotating to move a
picture or other item on
the screen in a circular
direction (clockwise or
counterclockwise). The gesture
support the specific
gesture.
Use press and tap to
access the shortcut
menu.
The function is defined by
applications that support
the specific gesture.
Tap two fingers at the same time (where
the target is in the midpoint between the
fingers).
18
Gestures
Gestures
GesturesGestures
Action
Actionssss
ActionAction
( = finger down; = finger up)
( = finger down; = finger up)
( = finger down; = finger up)( = finger down; = finger up)
Descriptions
Descriptions
DescriptionsDescriptions
Flicks
Make quick drag gestures in the desired
direction.
Using the
Using the Dual Mode Display (Optional)
Using the Using the
Dual mode display (if your model has the feature) incorporates both touchscreen
and digitizer functions.
The display is set to Touchscreen mode by default. Touchscreen mode provides
all the functionalities that an ordinary touchscreen has. When the Tablet PC receives
signals from the digitizer pen, the display automatically switches to Digitizer mode.
You can move the cursor by bringing the digitizer pen close to the screen, without
actually touching the screen’s surface.
Dual Mode Display (Optional)
Dual Mode Display (Optional)Dual Mode Display (Optional)
Flick left or right to
navigate back and forward
in a browser and other
applications. The gesture
works in most applications
that support back and
forward.
19
Using the
Using the Network
Using the Using the
Using the LA
Using the LANNNN (Optional)
Using the LAUsing the LA
To connect the network cable to the LAN module (if your model has the feature),
connect one end of the LAN cable to the RJ-45 connector on the Tablet PC and
the other end to the network hub.
Using the WLAN
Using the WLAN
Using the WLANUsing the WLAN
Network Features
NetworkNetwork
(Optional)
(Optional)(Optional)
Features
FeaturesFeatures
The WLAN (Wireless Local Area Network) module supports IEEE 802.11ac,
compatible with 802.11a/b/g/n.
Turning O
Turning Onnnn/O
Turning OTurning O
To turn on the WLAN radio:
1. Make sure that the Airplane mode is switched off. You can control the Airplane
mode using one of the below methods.
• Use the Airplane Mode button in the OSD Control Panel.
• For Windows 8: Open the Charms Bar, tap Settings Change PC Settings
2. If you have previously turned off the WLAN radio, use one of the below methods
to turn it on.
/Off
ff the WLAN
the WLAN Radio
/O/O
ffff
the WLANthe WLAN
Network Airplane mode. Slide the Airplane mode switch to the Off
position.
Radio
RadioRadio
20
• For Windows 8: Open the Charms Bar of Windows. Tap Settings Change
PC Settings Network Airplane mode. Slide the Wi-Fi switch to the On
position.
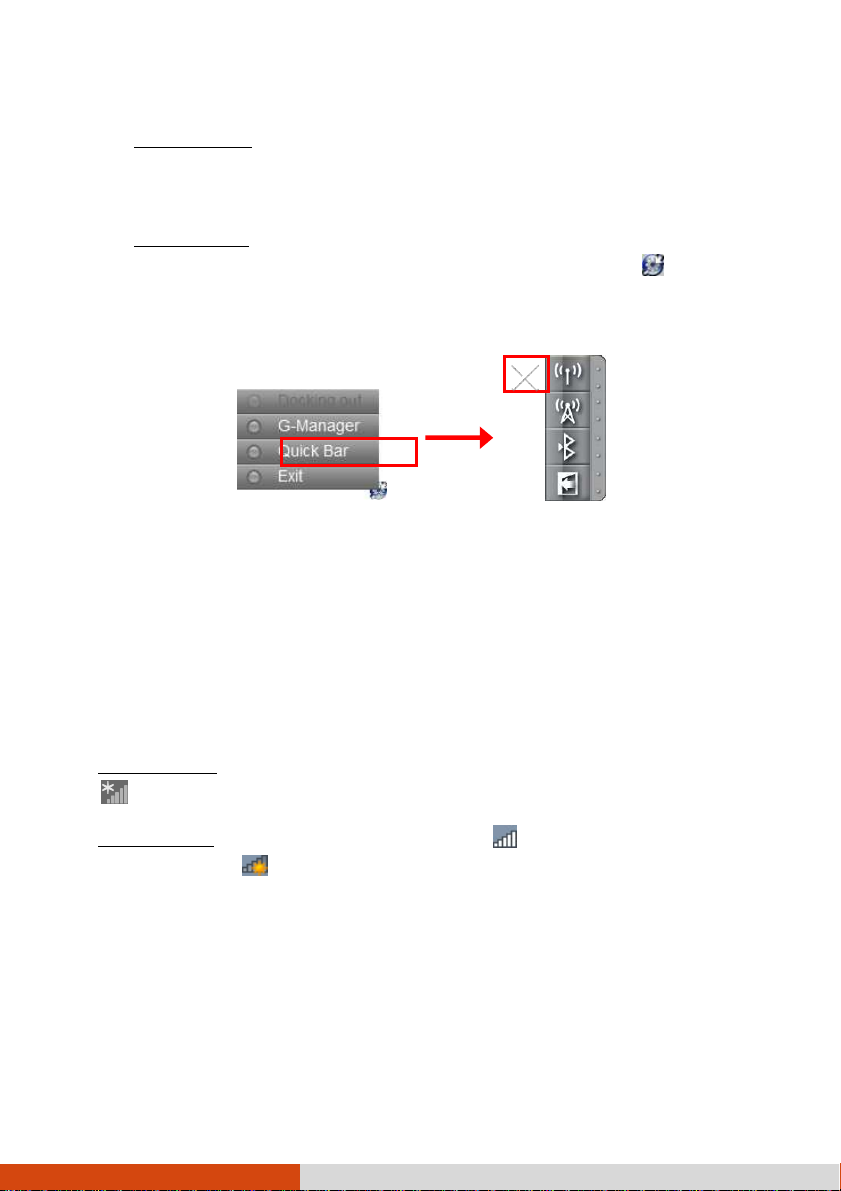
• For Windows 7: Use either Windows Mobility Center or Getac Quick Bar. To
open Getac Quick Bar, tap and hold the Getac Utility icon on Windows
taskbar and select Quick Ba
X over the button means the radio is currently off).
Quick Barrrr. Tap the WLAN button in the Quick Bar (an
Quick BaQuick Ba
To turn off the WLAN radio:
You can turn off the WLAN radio the same way you turn it on.
If you want to quickly turn off all wireless radio, simply switch on Airplane mode.
Connecting to a W
Connecting to a WLAN
Connecting to a WConnecting to a W
1. Make sure that the WLAN function is enabled (as described above).
2. For Windows 8
For Windows 8:
For Windows 8For Windows 8
.
For Windows 7
For Windows 7:::: Tap the Wireless Network icon on the taskbar. (An orange
For Windows 7For Windows 7
light in the icon indicates connections are available.)
3. In the list of available wireless networks, tap a network, and then tap Connect
4. Some networks require a network security key or passphrase. To connect to
one of those networks, ask your network administrator or Internet service provider
(ISP) for the security key or passphrase.
LAN Network
Network
LANLAN
NetworkNetwork
: Open the Charms Bar of Windows. Tap Settings and then tap
: :
Connect.
ConnectConnect
21

For more information on setting a wireless network connection, refer to Windows
online help.
NOTE: You can use Intel® PROSet Wireless to take full advantage
of the Wi-Fi capabilities of your Tablet PC. See the Help of
the utility for instructions.
22
 Loading...