

Page 1

X500
USER’S MANUAL
Page 2

Rugged Mobile Computing Solutions
2011
TRADEMARKS
All other brand and product names are trademarks or registered
trademarks of their respective owners.
NOTE
The information in this manual is subject to change without notice.
Most screens and operating instructions in this manual are based on
Windows 7. If you’re using a different version of Windows, the screens and
related operations may not be the same.
For the latest version of the manual, please visit the Getac website at
www.getac.com
.
Page 3

®
ENERGY STAR
is a government program that offers businesses and
consumers energy-efficient solutions, making it easy to save money while
protecting the environment for future generations.
Please reference ENERGY STAR
®
related information from
www.energystar.gov.
®
As an ENERGY STAR
determined that this product meets the ENERGY STAR
Partner, Getac Technology Corporation has
®
guidelines for
energy efficiency.
An ENERGY STAR
®
qualified computer uses 70 % less electricity than
computers without enabled power management features.
Earning the ENERGY STAR®
When every home office is powered by equipment that has earned
the ENERGY STAR
greenhouse gases out of the air.
If left inactive, ENERGY STAR
mode and may use 15 watts or less. New chip technologies make
power management features more reliable, dependable, and
user-friendly than even just a few years ago.
Spending a large portion of time in low-power mode not only saves
energy, but helps equipment run cooler and last longer.
Businesses that use ENERGY STAR
realize additional savings on air conditioning and maintenance.
®
, the change will keep over 289 billion pounds of
®
qualified computers enter a low-power
®
enabled office equipment may
Page 4

Over its lifetime, ENERGY STAR
®
qualified equipment in a single home
office (e.g., computer, monitor, printer, and fax) can save enough
electricity to light an entire home for more than 4 years.
Power management (“sleep settings”) on computers and monitors
can result in much savings annually.
Remember, saving energy prevents pollution
Because most computer equipment is left on 24 hours a day, power
management features are important for saving energy and are an easy
way to reduce air pollution. By using less energy, these products help
lower consumers’ utility bills, and prevent greenhouse gas emissions.
Page 5

Table of Contents
Getting Started.........................................................................................................................................1-1
Getting the Computer Running............................................1-2
Unpacking............................................................................1-2
Connecting to AC Power ..................................................1-3
Turning On and Off the Computer...................................1-4
Taking a Look at the Computer............................................1-6
Front Components..............................................................1-6
Rear Components...............................................................1-7
Right-Side Components.....................................................1-8
Left-Side Components........................................................1-9
Top-open Components ...................................................1-10
Bottom Components........................................................1-13
Operating Your Computer.................................................................................................................2-1
Using the Keyboard.................................................................2-2
Typewriter Keys....................................................................2-2
Cursor-Control Keys ............................................................2-2
Numeric Keypad.................................................................2-3
Function Keys.......................................................................2-4
Fn Key....................................................................................2-4
Hot Keys ................................................................................2-4
Using the Touchpad................................................................2-7
Configuring the Touchpad................................................2-9
Using the Touchscreen (Optional)......................................2-10
Using Multi-touch Gestures (Optional)...........................2-11
Using the Input Panel............................................................2-13
Using the Quick Buttons........................................................2-14
i
Page 6

Using the DVD Drive ..............................................................2-16
Inserting and Removing a Disc.......................................2-16
Using the Network Features .................................................2-18
Using the LAN.....................................................................2-18
Using the Wireless LAN......................................................2-18
Using the Fingerprint Sensor .................................................2-22
Managing Power....................................................................................................................................3-1
AC Adapter..............................................................................3-2
Battery Pack.............................................................................3-3
Charging the Battery Pack................................................3-3
Initializing the Battery Pack................................................3-4
Checking the Battery Level...............................................3-4
Replacing the Battery Pack ..............................................3-5
Battery Low Signals and Actions.......................................3-7
Power Management ..............................................................3-8
Hibernation...........................................................................3-9
Power-Saving Tips ..................................................................3-10
Expanding Your Computer................................................................................................................4-1
Connecting a VGA or HDMI Display Monitor......................4-2
Connecting a Serial Device ..................................................4-4
Connecting a USB Device .....................................................4-5
Connecting an eSATA Device ..............................................4-6
Connecting Audio Devices ...................................................4-7
Using Smart Cards....................................................................4-8
Using PC Cards.........................................................................4-9
Using ExpressCards................................................................4-11
System Memory Upgrade.....................................................4-13
Caring for the Computer....................................................................................................................5-1
Protecting the Computer.......................................................5-2
Using an Anti-Virus Strategy...............................................5-2
Using Windows Action Center...........................................5-2
Using the Cable Lock .........................................................5-3
Taking Care of the Computer ...............................................5-4
ii
Page 7

Location Guidelines............................................................5-4
General Guidelines.............................................................5-4
Cleaning Guidelines ...........................................................5-5
Battery Pack Guidelines.....................................................5-5
Touchscreen Guidelines.....................................................5-6
When Traveling ........................................................................5-8
Troubleshooting....................................................................................................................................6-1
Preliminary Checklist ...............................................................6-2
Solving Common Problems....................................................6-3
Battery Problems .................................................................6-3
Wireless Transmission Problems..........................................6-3
Display Problems .................................................................6-4
DVD Drive Problems............................................................6-5
ExpressCard Problems ........................................................6-5
Hardware Device Problems ..............................................6-6
Hard Disk Drive Problems ...................................................6-6
Keyboard, Mouse, and Touchpad Problems .................6-6
LAN Problems.......................................................................6-7
PC Card Problems...............................................................6-7
Power Management Problems.........................................6-8
Software Problems ..............................................................6-9
Sound Problems...................................................................6-9
Startup Problems ...............................................................6-10
WLAN Problems .................................................................6-10
Other Problems..................................................................6-12
Resetting the Computer.......................................................6-13
Specifications.........................................................................................................................................A-1
Regulatory Information..................................................................................................................... B-1
On the Use of the System.......................................................B-2
Class B Regulations .............................................................B-2
Safety Notices......................................................................B-3
On the Use of the RF Device..................................................B-6
USA and Canada Safety Requirements and Notices...B-6
iii
Page 8

European Union CE Marking and Compliance NoticesB-9
iv
Page 9

Chapter 1
Getting Started
Congratulations on purchasing this rugged computer.
This chapter first tells you step by step how to get the computer up and
running. Then, you will find a section briefly introducing the external
components of the computer.
Operating Your Computer 1-1
Page 10

Getting the Computer Running
This section guides you through the procedures for getting the computer
ready for operation.
Unpacking
After unpacking the shipping carton, you should find these standard
items:
Rugged computer
Accessories:
AC adapter
AC power cord
Driver disc
Document(s)
Stylus and tether (depending on your model)
Inspect all the items. If any item is damaged or missing, notify your dealer
immediately.
Keep the shipping carton and packing materials in case you need to ship
or store the computer in the future.
1-2
Operating Your Computer
Page 11
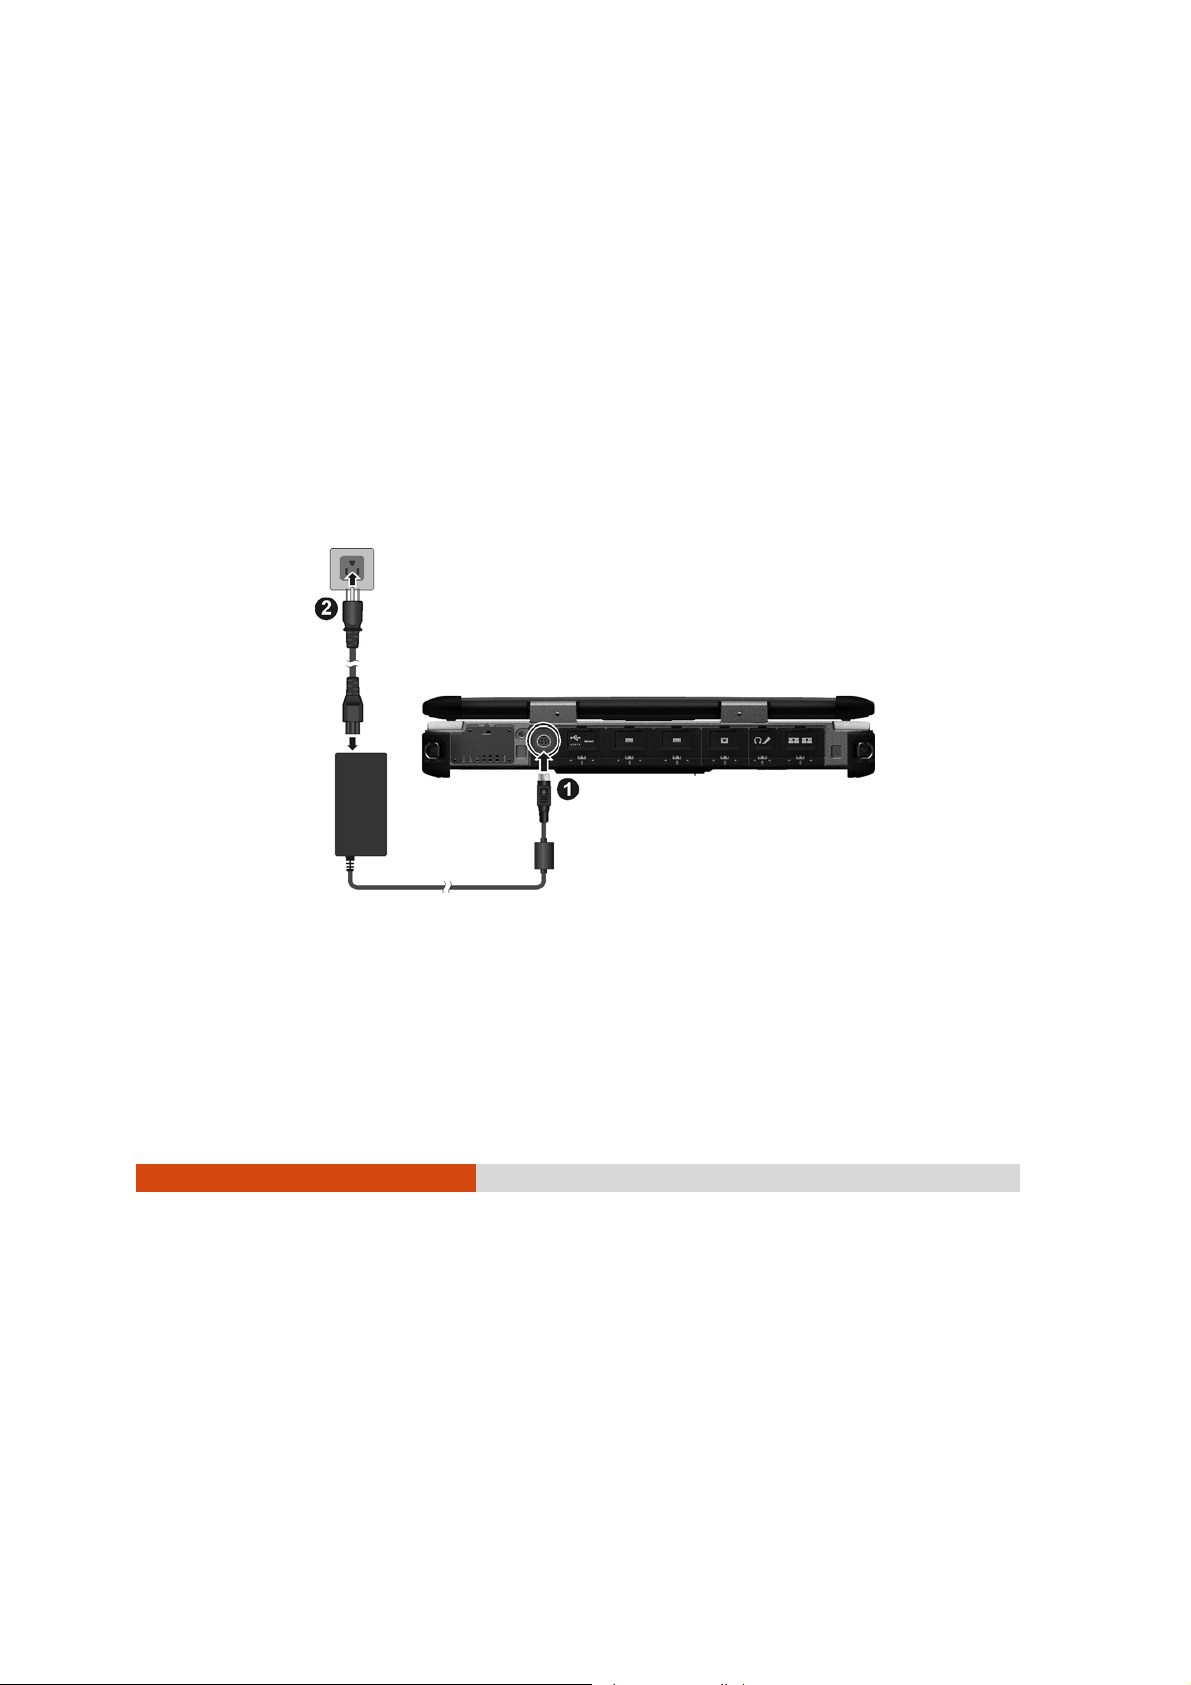
Connecting to AC Power
The computer operates either on the external AC power or internal
battery power. It is suggested that you use AC power when you start up
the computer for the very first time.
CAUTION: Use only the AC adapter included with your computer. Using other AC
adapters may damage the computer.
1. Plug the DC cord of the AC adapter to the power connector of the
computer (
2. Plug the female end o f the A C pow er cor d to the A C adap ter and the
male end to an electrical outlet (
).
).
3. When the AC adapter is connected, power is being supplied from the
electrical outlet to the AC adapter and o nto your computer. Now,
you are ready to turn on the computer.
CAUTION:
Operating Your Computer 1-3
Page 12
When you disconnect the AC adapter, disconnect from the electrical outlet
first and then from the computer. A reverse procedure may damage the AC
adapter or the computer.
When unplugging the connector, always hold the plug head. Never pull on the
cord.
NOTE: When the AC adapter is connected, it also charges the battery pack. For
information on using battery power, see Chapter 3.
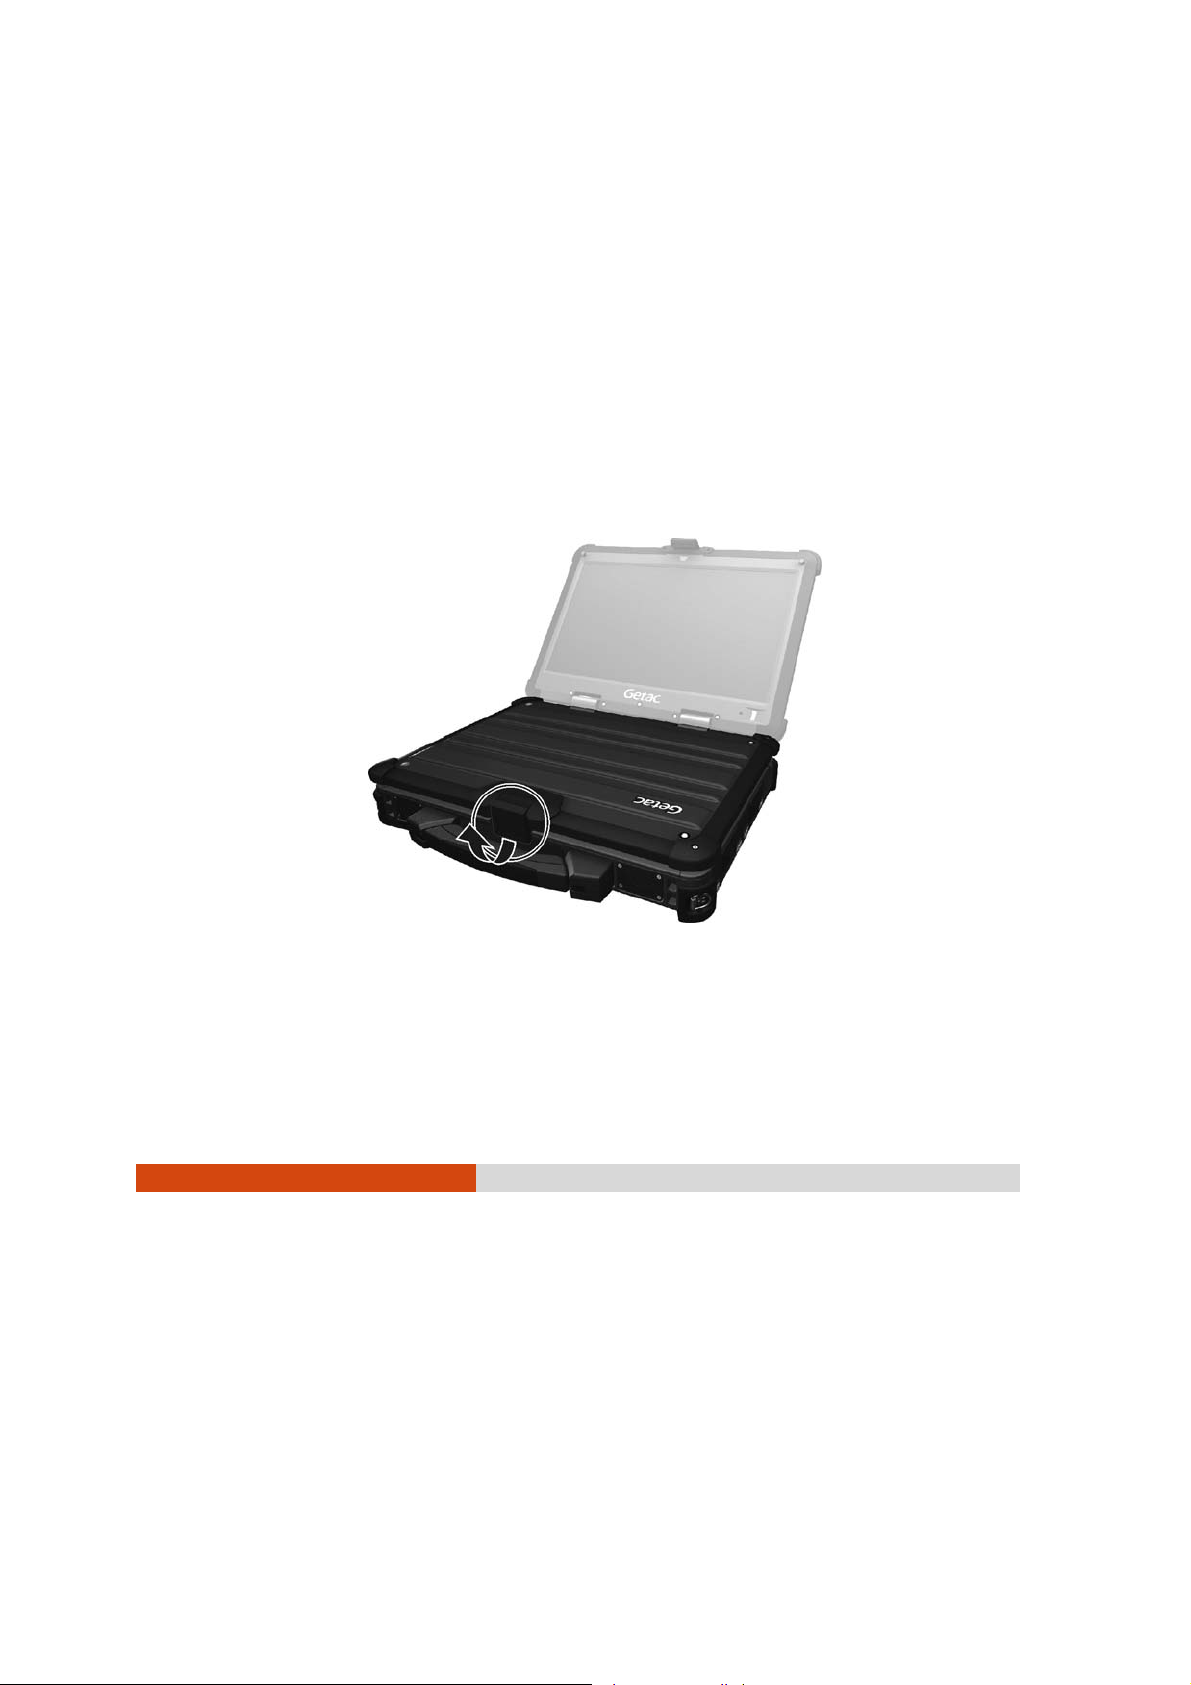
Turning On and Off the Computer
Turning On
1. Open the top co ver by p ulling the cover la tch and lifting up the cove r.
You can tilt the cover forward or backward for optimal viewing clarity.
1-4
Operating Your Computer
Page 13
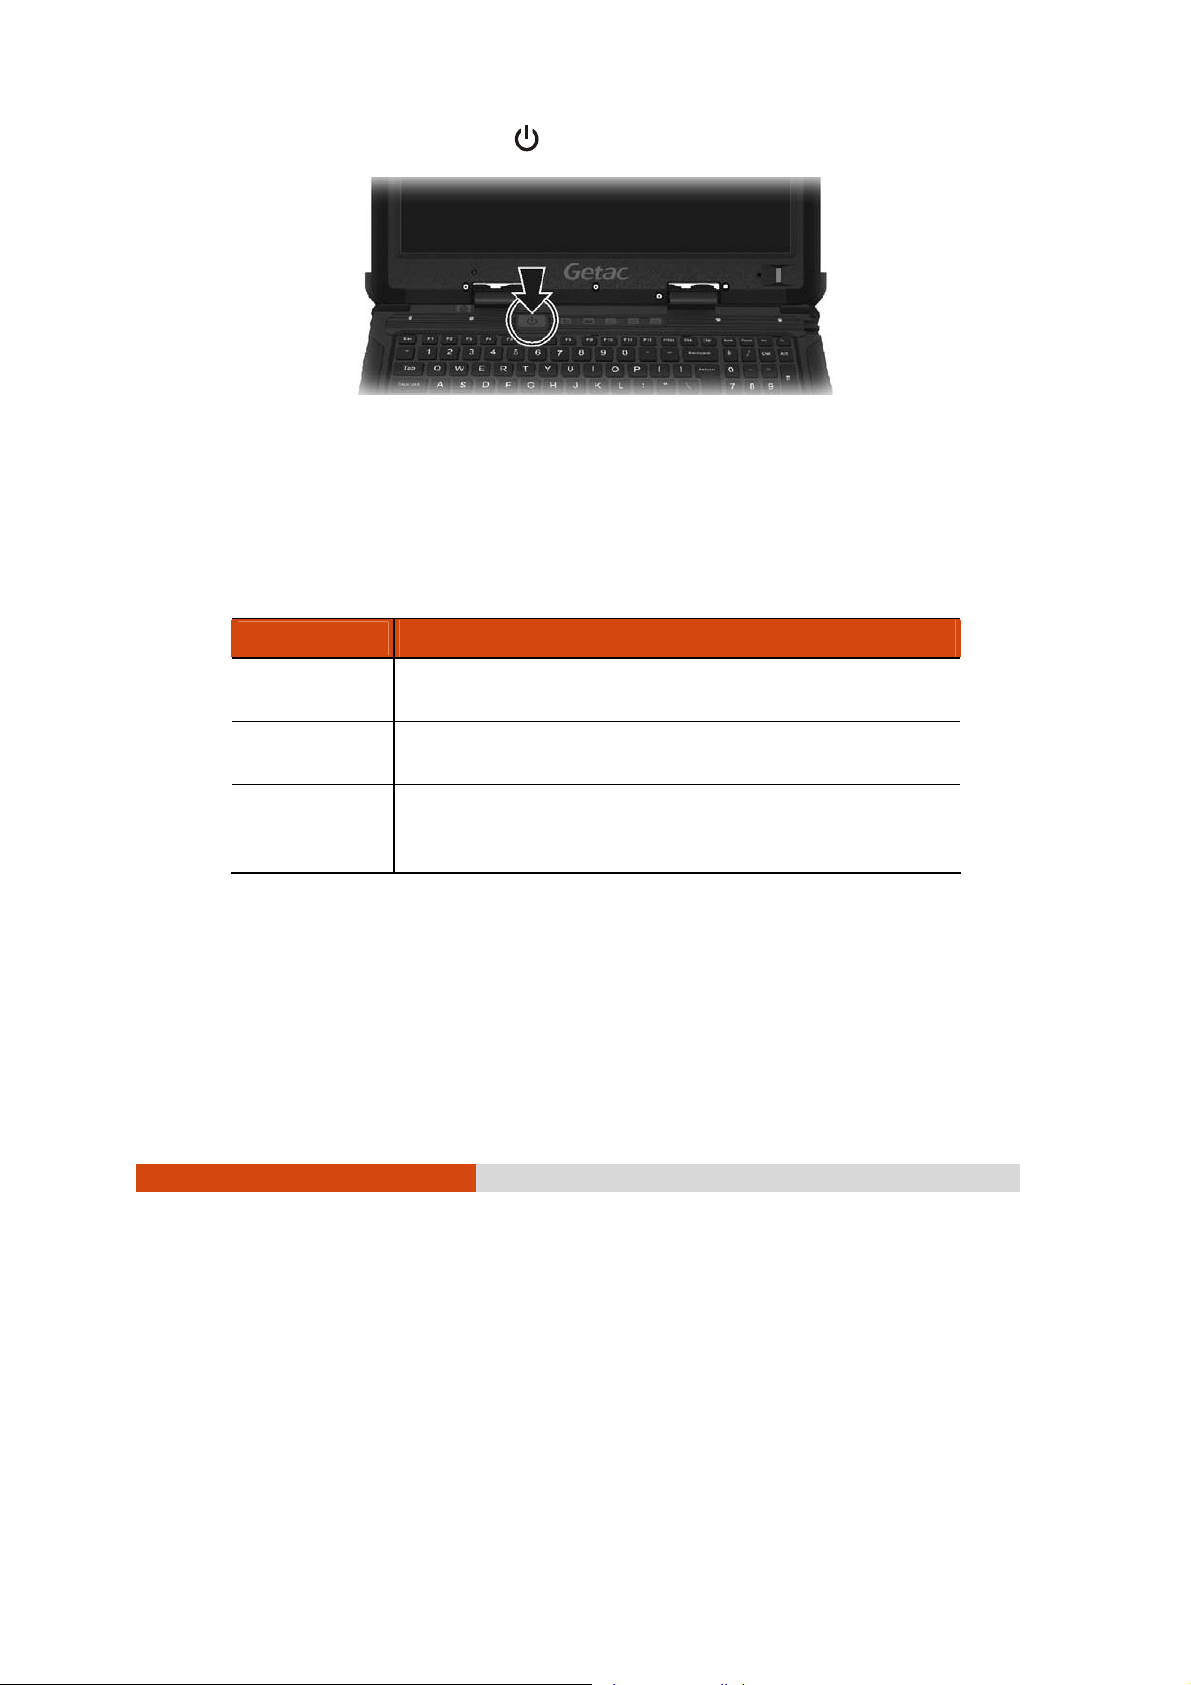
2. Press the power button (
3. Each time the computer is turned on, it performs a Power-On Self Test
(POST), and the operating system such as Windows should start.
).
Turning Off
When you finish a working session, you can stop the system by turning off
the power or leaving it in Sleep or Hibernation mode:
To... Do this...
Power off
(Shutdown)
Use the Windows Start menu in the lower left and follow
the shutdown procedure.
Sleep Press the power button* or use the Windows Start menu
to put the computer in Sleep mode.
Hibernate Use the Windows Start menu to put the computer in
Hibernation mode. (See “Hibernation” in Chapter 3 for
more information.)
* “Sleep” is the default se tting of the power button. You may change
what the power button does in Windows Control Panel.
Operating Your Computer 1-5
Page 14

Taking a Look at the Computer
NOTE: Depending on the model you purchased, the appearance of your
computer may not be exactly the same as those shown in this manual.
CAUTION: You need to open the protective covers to access the connectors.
When not using a connector, make sure to close the cover completely for waterand dust-proof integrity. (Engage the locking mechanism if existing.)
Front Components
Ref Component Description See Also
Top Cover Latch
Strap Holder
Stereo Speaker
Handle
1-6
Operating Your Computer
Locks the top cover. P. 1-4
Two buckles hold the shoulder strap.
Sends out sound and voice from the
computer.
Provides a convenient way to carry the
computer.
Page 15
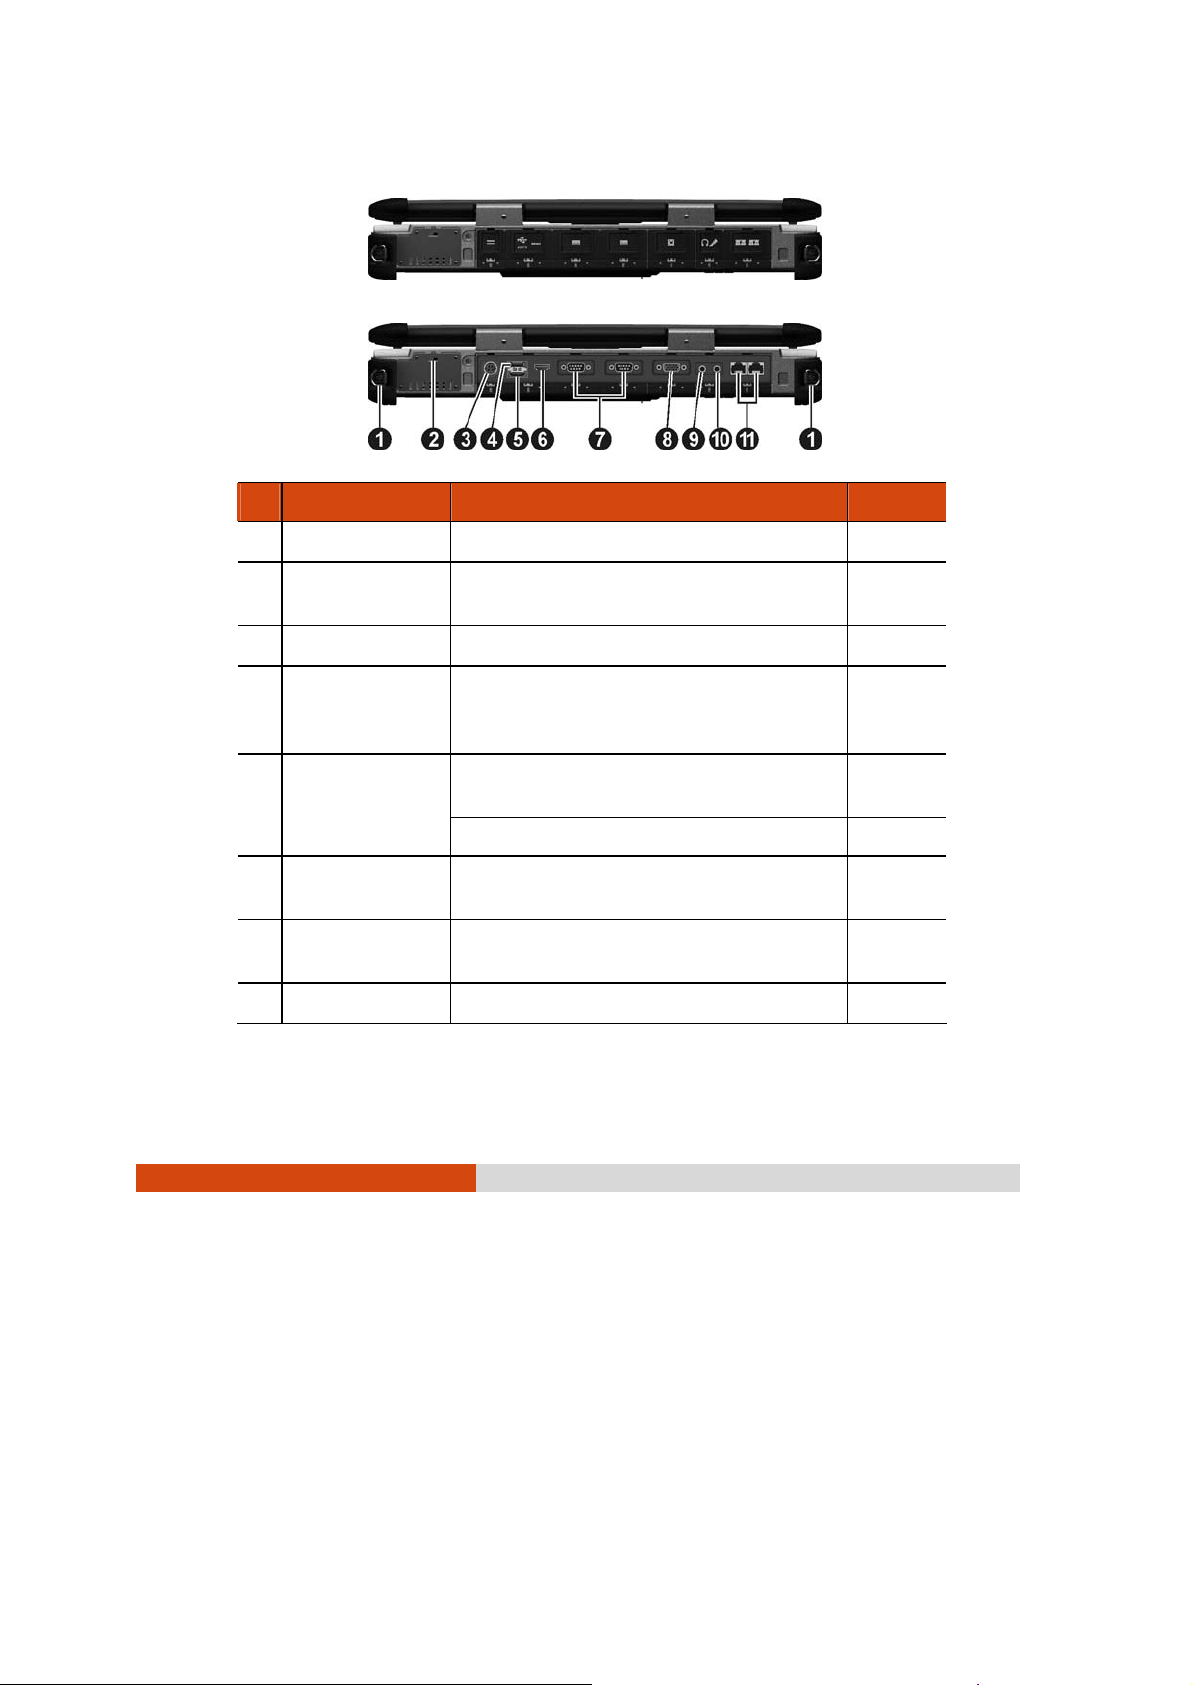
Rear Components
Ref Component Description See Also
Strap Holder
Kensington Lock
Power Connector
USB Port
eSATA/USB Combo
Port
HDMI Connector
Serial Connector
VGA Connector
Two buckles hold the shoulder strap.
Locks the computer to a stationary
object for security.
Connects the AC adapter. P. 1-3
Connects a USB device, such as a USB
flash disk, printer, digital camera,
joystick, and more.
Connects an eSATA device such as an
external hard drive or optical drive.
Can also function as a USB port.
Connects a HDMI (High-Definition
Multimedia Interface) monitor or TV set.
Connects a serial mouse or serial
communication device.
Connects an external display monitor. P. 4-2
P. 5-2
P. 4-5
P. 4-2
P. 4-4
Operating Your Computer 1-7
Page 16
Ref Component Description See Also
Audio Output
Connector
Microphone
Connector
RJ-45 Connector
Connects a set of headphones or
external speakers with amplifier.
Connects an external microphone. P. 4-7
Connects the LAN cable. P. 2-18
P. 4-7
Right-Side Components
Ref Component Description See Also
Battery Pack
Hard Disk Drive
Stylus (optional) Serves as the input device by tapping
Tether Hole
1-8
Operating Your Computer
Supplies power to your computer when
external power is not connected.
Inside is the hard disk drive.
on the touchsc reen to make selections
and enter information.
Stylus tethered to this hole.
P. 3-3
P. 2-10
Page 17

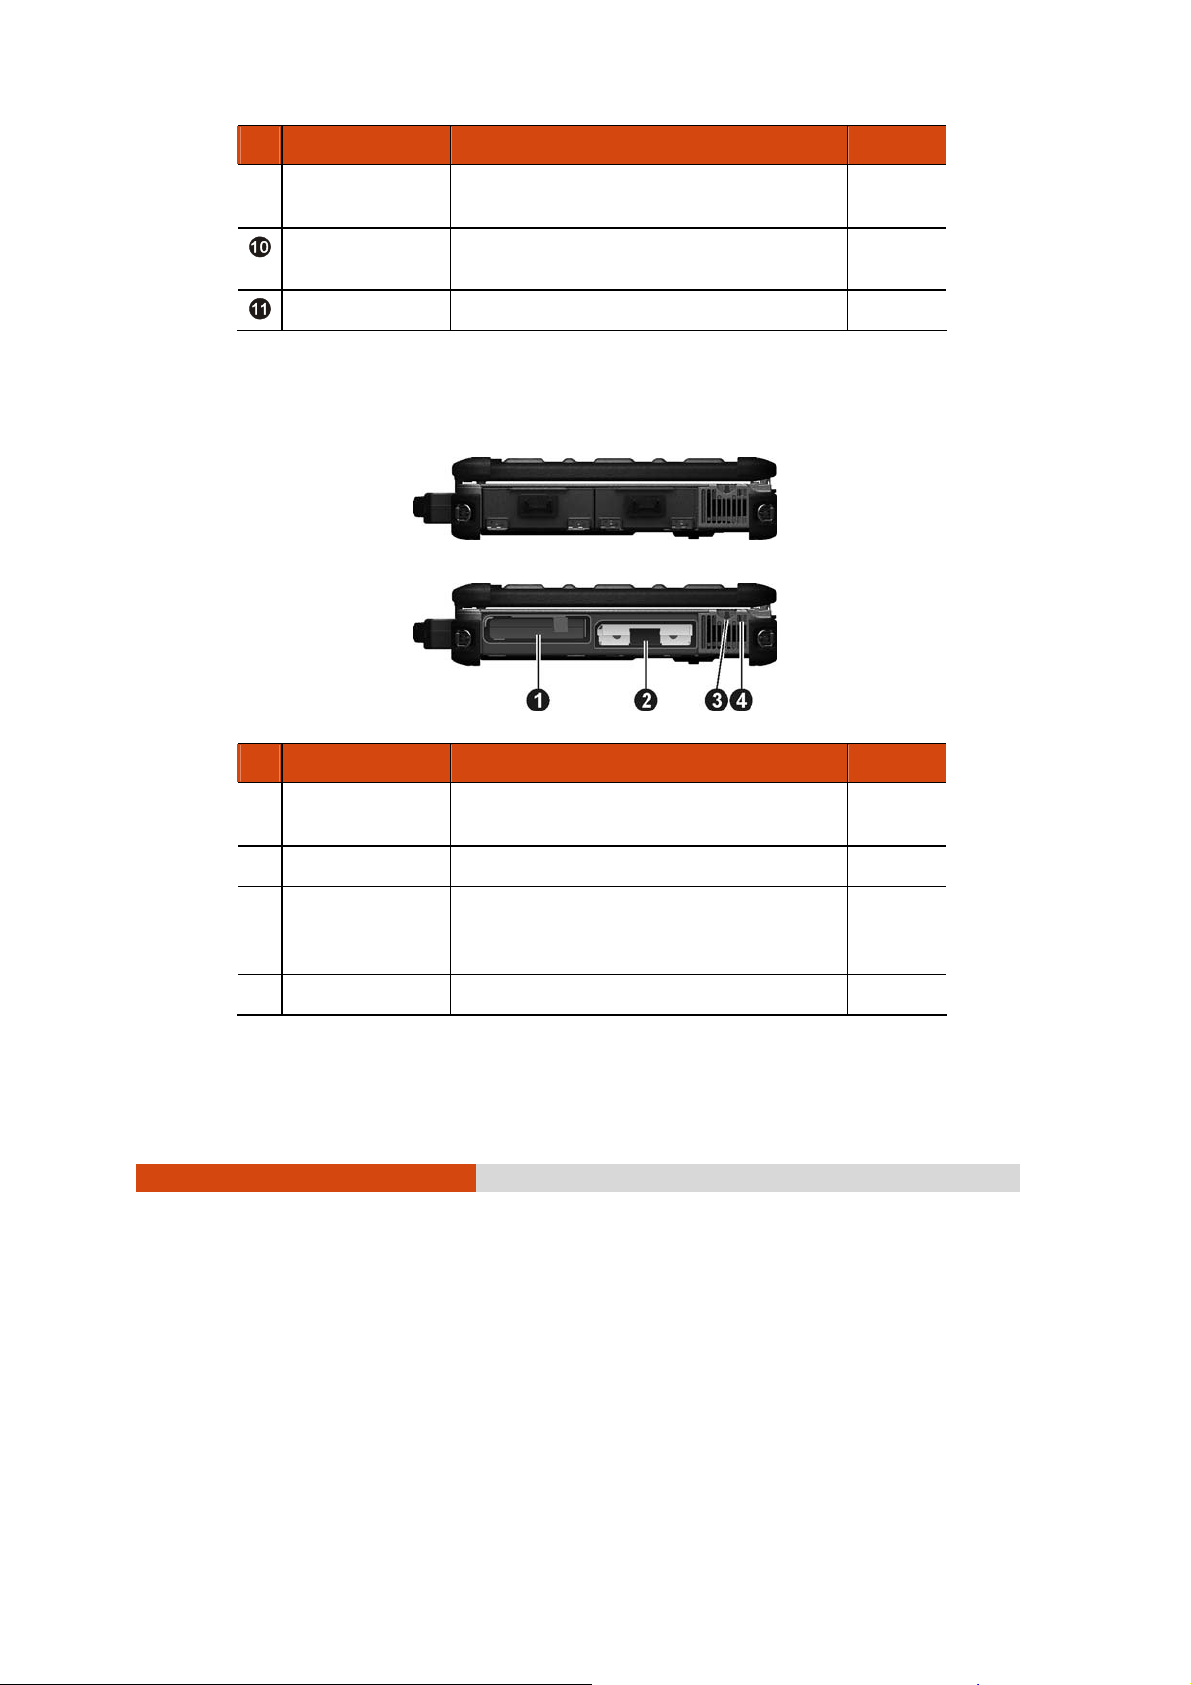
Left-Side Components
Ref
USB Port
PCMCIA Slot
ExpressCard
Slot
Super Multi
Drive
Smart Card
Reader
Connects a USB device, such as a USB
flash disk, printer, digital camera,
joystick, and more. There are two ports.
Accepts a PC card for additional
functions. There are two slots.
Accepts an ExpressCard/34 or
ExpressCard/54 for additional functions.
Accepts a compact disc for installing or
loading software, accessing data, and
playing music/video.
Can be replaced by a secondary hard
disk drive or battery pack (purchased
separately).
Accepts a smart card for additional
security feature.
P. 4-5
P. 4-8
P. 4-11
P. 2-16
P. 4-8
Operating Your Computer 1-9
Page 18
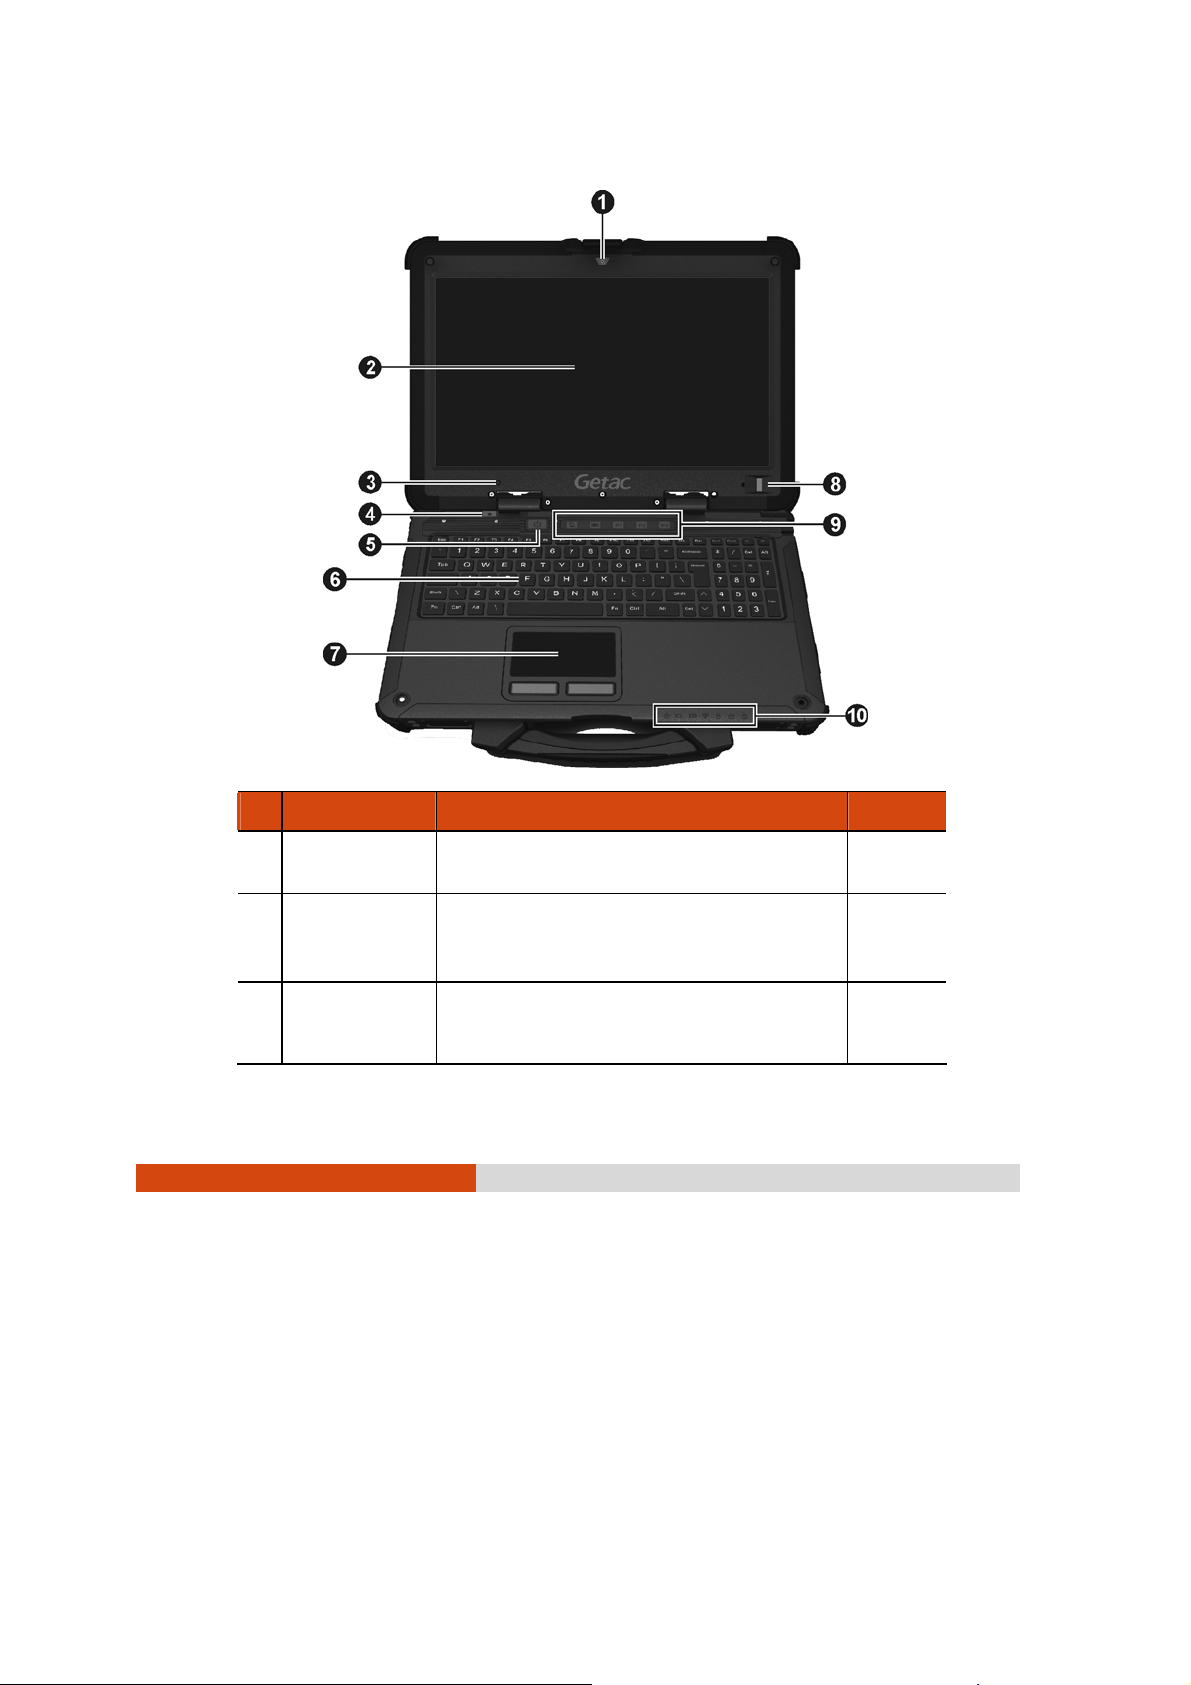
Top-open Components
Ref Component Description See Also
Camera Lens
(optional)
LCD Screen
Light Sensor
1-10
Operating Your Computer
Allows you to use the camera function.
Displays the output of the computer.
May include the optional touchscreen
feature.
Detects the surrounding lighting
condition for automatic adjustment of
the LCD brightness and optional
P. 2-10
Page 19
Ref Component Description See Also
keyboard backlight.
Microphone
Power Button
Keyboard
Touchpad
Fingerprint
Sensor
Quick Buttons
P1
Receives sound and voice for the
computer.
Turns the power on or off (Sleep mode by
default).
Serves as the data input d evice of the
computer.
Serves as the pointing device of the
computer.
Serves as the fingerprint verification,
preventing unauthorized access to your
computer.
Toggles the sunlight-readable mode on
or off.
Brings up the ECO menu for selecting a
power profile when using battery power.
Serves as the master ON/OFF control of
the RF radio. The function can be
redefined.
P. 錯誤!
尚未定義
書籤。
P. 2-14
P. 1-4
P.2-2
P. 2-7
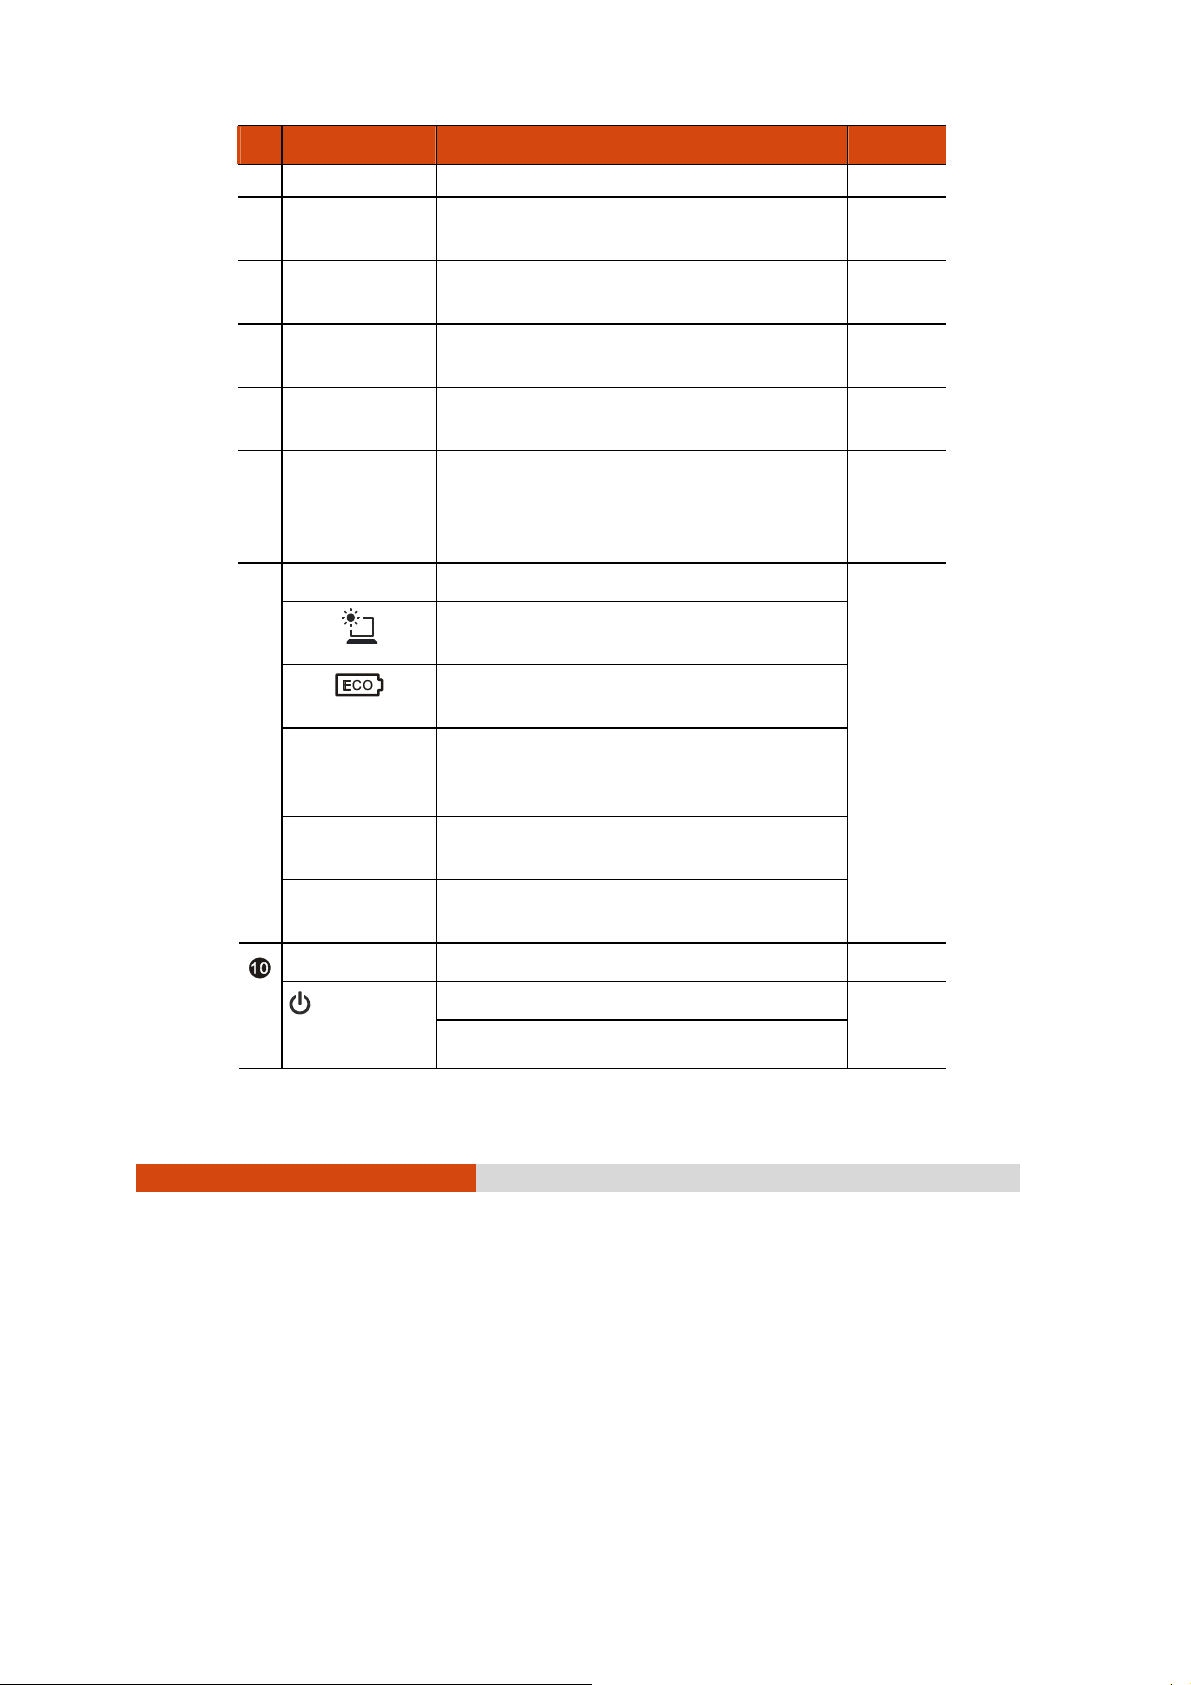
Indicators
Power
P2
P3
Serves as the Ctrl+Alt+Del keyboard keys.
The function can be redefined.
The function can be redefined.
Lights green when the computer is on.
Lights amber when the computer is in
Operating Your Computer 1-11
P. 1-4
Page 20

Ref Component Description See Also
Sleep mode.
Lights red when the optional hard disk
drive heater is on.
Battery
Charge
Wireless
LAN
Hard Disk
Drive
Num Lock
Caps Lock
Lights green when the battery is fully
charged.
Lights amber when the battery is being
charged.
Blinks amber when the battery’s
capacity is below 10 %.
Lights green when the wireless LAN.
Blinks green when computer is reading /
writing d ata to the hard disk.
Lights green when Num Lock is on. P. 2-3
Lights green when Caps Lock is on. P. 2-3
P. 3-3
1-12
Operating Your Computer
Page 21
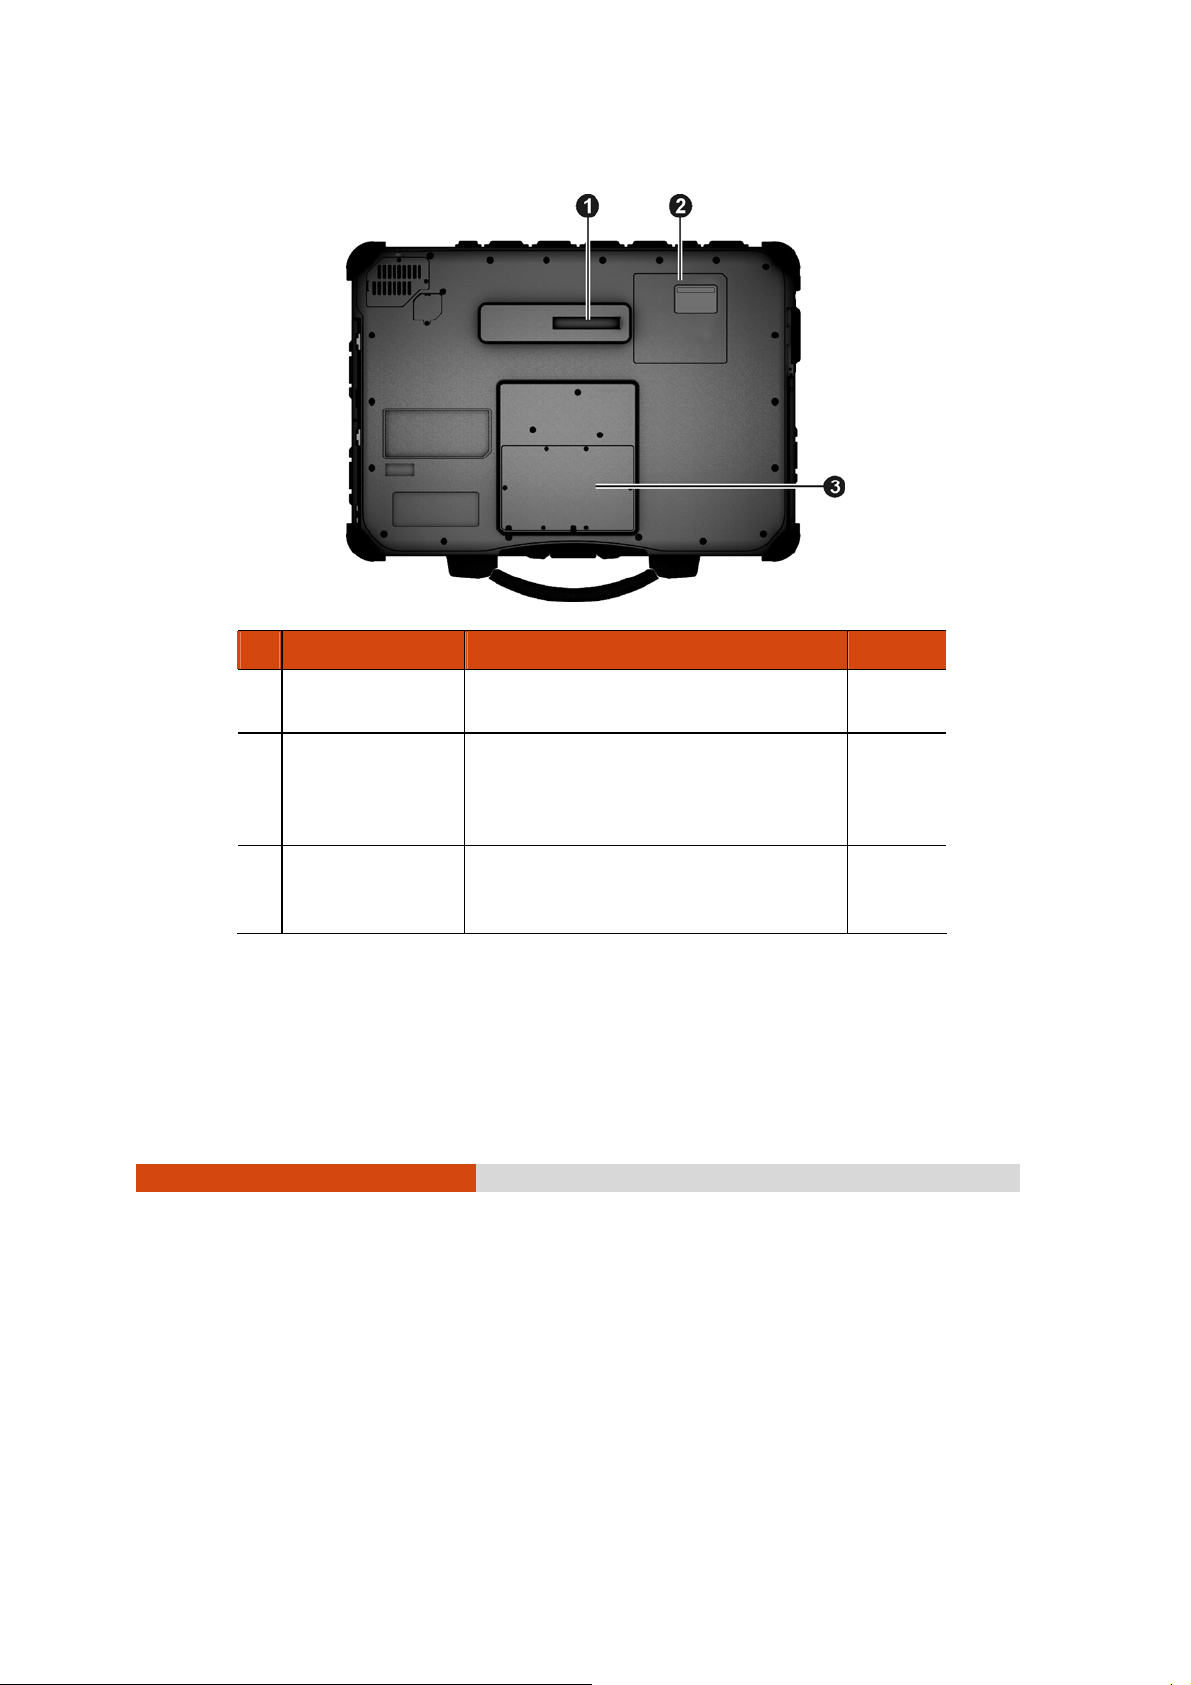
Bottom Components
Ref Component Description See Also
Docking Connector
SIM Card Slot
(optional)
Memory Slots
Connects to the Office Dock
(purchased separately).
Inside is the modem card
Inside are the memory slots for
expanding the memory size of your
computer.
Operating Your Computer 1-13
P. 錯誤!
尚未定義
書籤。
P. 4-13
Page 22

Page 23

Chapter 2
Operating Your Computer
This chapter provides information about the use of the computer.
If you are new to computers, reading this chapter will help you learn the
operating basics. If you are already a computer user, you may choose to
read only the parts containing information unique to your computer.
CAUTION: The computer can get uncomfortably warm when you use it in high
temperatures. As a safety precaution in such a circumstance, do not place the
computer on your lap or touch it with your bare hands for extended periods of
time. Prolonged body contact can cause discomfort and potentially a burn.
Operating Your Computer 2-1
Page 24

Using the Keyboard
Your keyboard has all the standard functions of a full-sized computer
keyboard plus an Fn key added for specific functions.
The standard functions of the keyboard can be further divided into four
major categories:
Typewriter keys
Cursor-control keys
Numeric keys
Function keys
Typewriter Keys
Typewriter keys are similar to the keys on a typewriter. Several keys are
added such as the Ctrl, Alt, Esc, and lock keys for special purposes. When
the lock keys (Caps Lock and Num Lk) are pressed, their corresponding
indicators light up.
The Control (Ctrl) / Alternate (Alt) key is normally used in combination with
other keys for program-specific functions. The Escape (Esc) key is usually
used for stopping a process. Examples are exiting a program and
canceling a command. The function depends on the program you are
using.
Cursor-Control Keys
Cursor-control keys are generally used for moving and editing purposes.
NOTE: The word “cursor” refers to the indicator on the screen that lets you know
exactly where on your screen anything you type will appear. It can take the form of
a vertical or horizontal line, a block, or one of many other shapes.
2-2
Operating Your Computer
Page 25
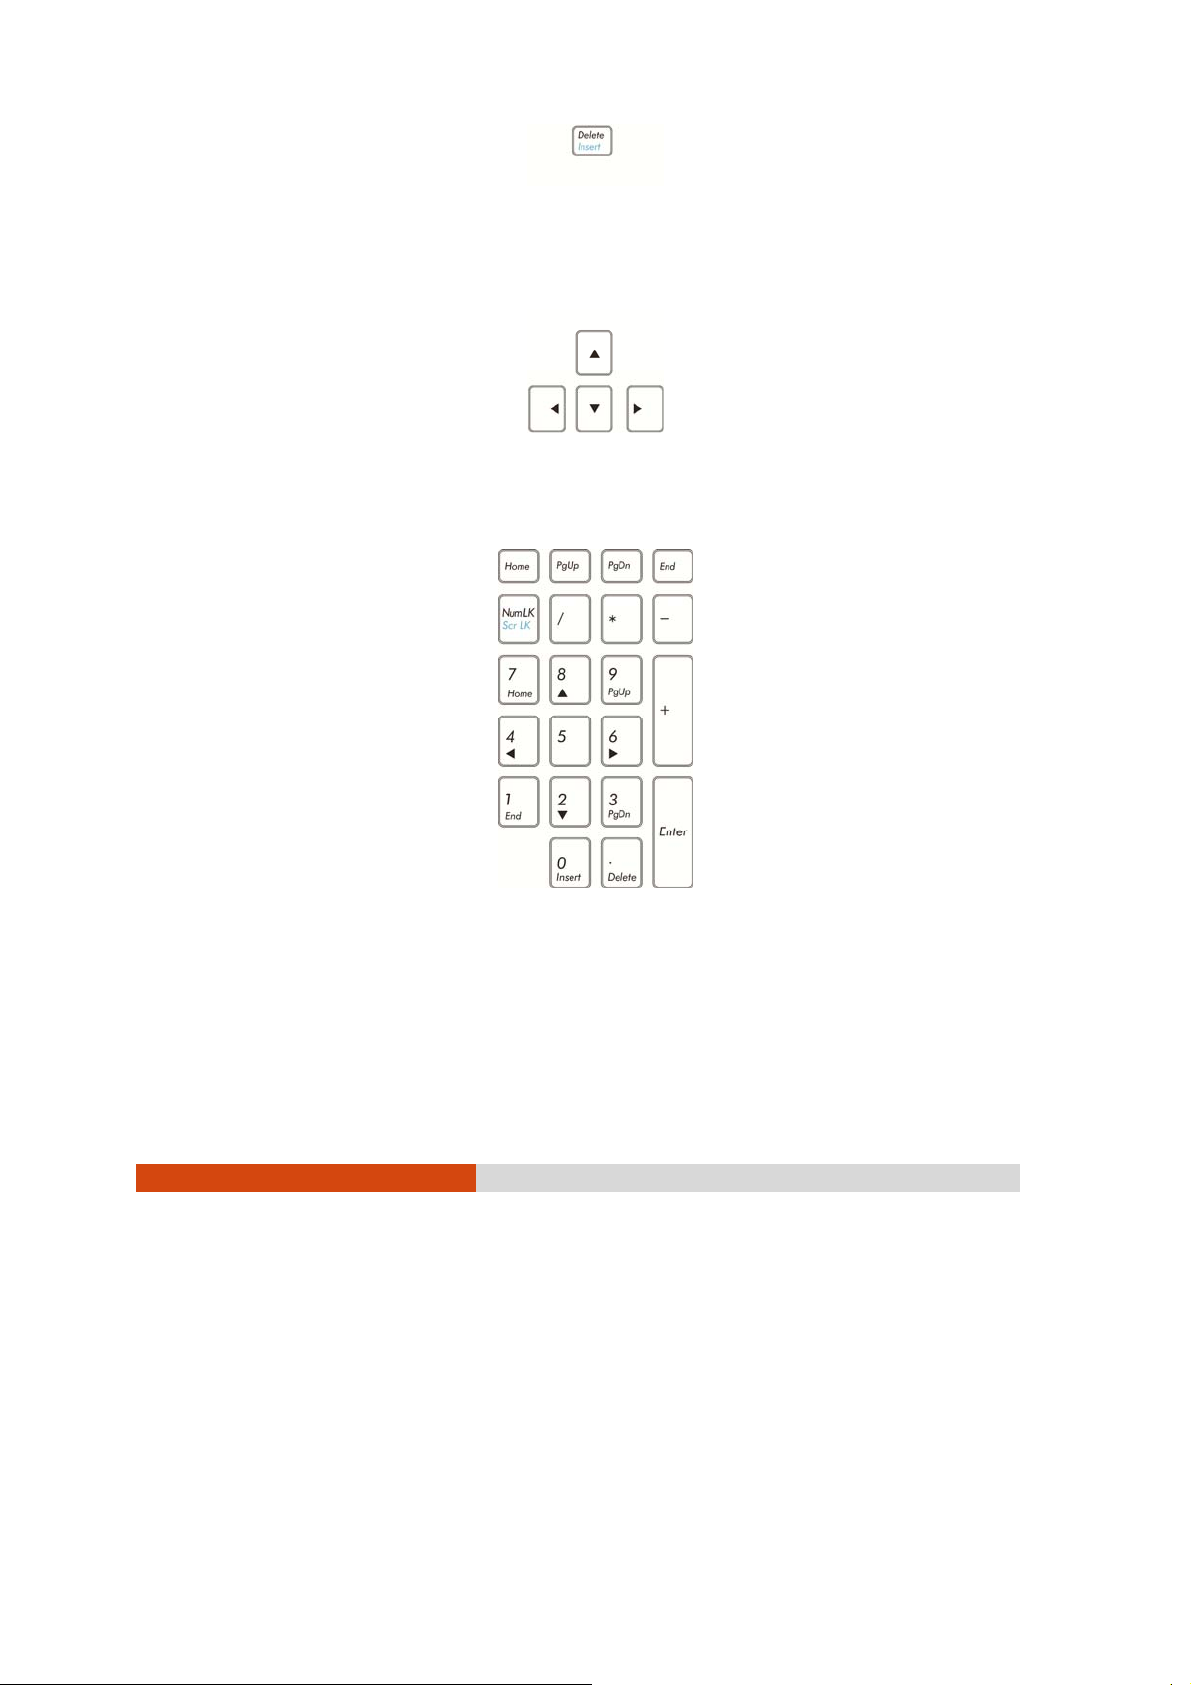
Numeric Keypad
Numeric keys facilitate entering of numbers and calculations. When Num
Lock is on, the numeric keys are activated; meaning you can use these
keys to enter numerals.
When Num Lock is off, the keys serve as cursor-control keys.
Operating Your Computer 2-3
Page 26
Function Keys
On the top row of the keys are the function keys: F1 to F12. Function keys
are multi-purpose keys that perform functions defined by individual
programs.
Fn Key
The Fn key, at the lower left corner of the keyboard, is used with another
key to perform the alternative function of a key. The letter “Fn” a nd the
alternative functions are identified by the color of blue on the keytop. To
perform a desired function, first press and hold Fn, then press the other key.
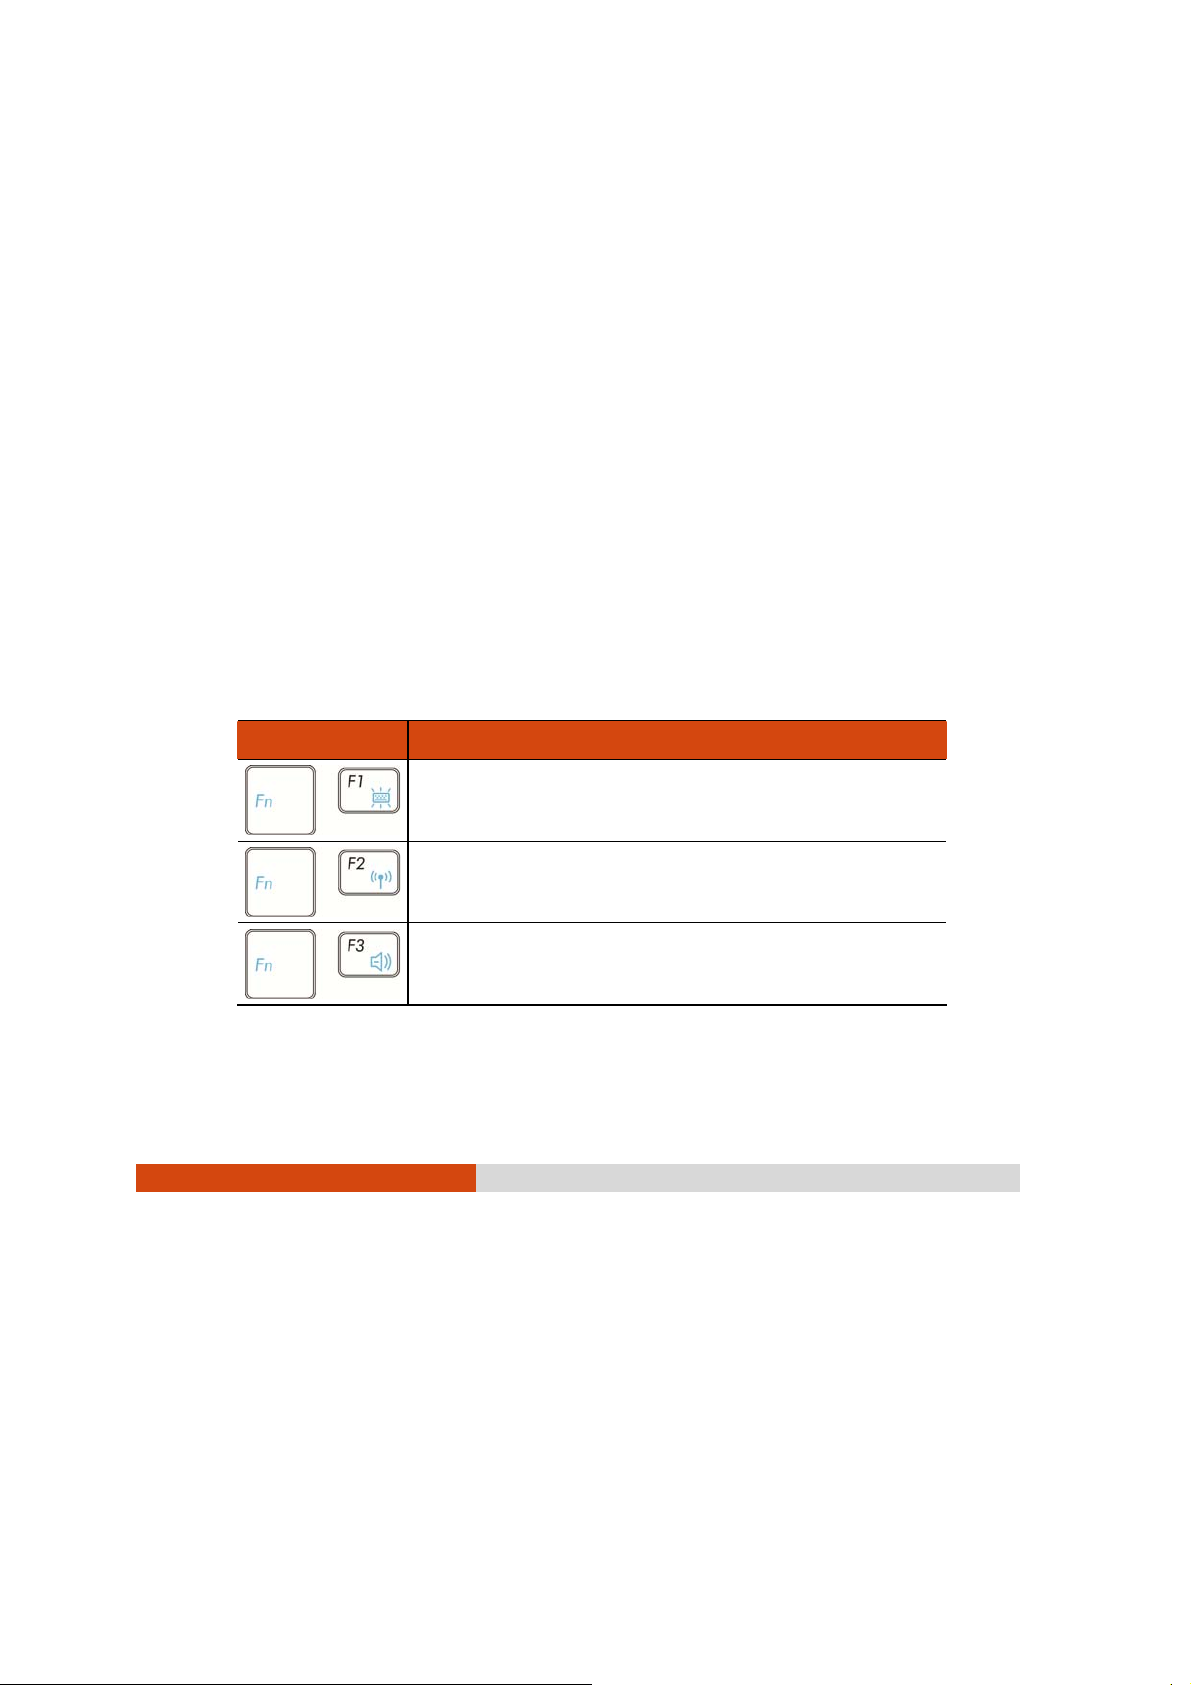
Hot Keys
Hot keys refer to a combination of keys that can be pressed any time to
activate special functions of the computer. Most hot keys operate in a
cyclic way. Each time a hot key combination is pressed, it shifts the
corresponding function to the other or next choice.
You can easi ly iden tify th e hot ke ys with the ico ns imp rinted on the key top.
The hot keys are described next.
Key Description
Switches the keyboard backlight off or on (with
4-level brightness) for keyboards with backlight.
Switches the wireless LAN radio off or on.
Decreases the sound volume.
2-4
Operating Your Computer
Page 27
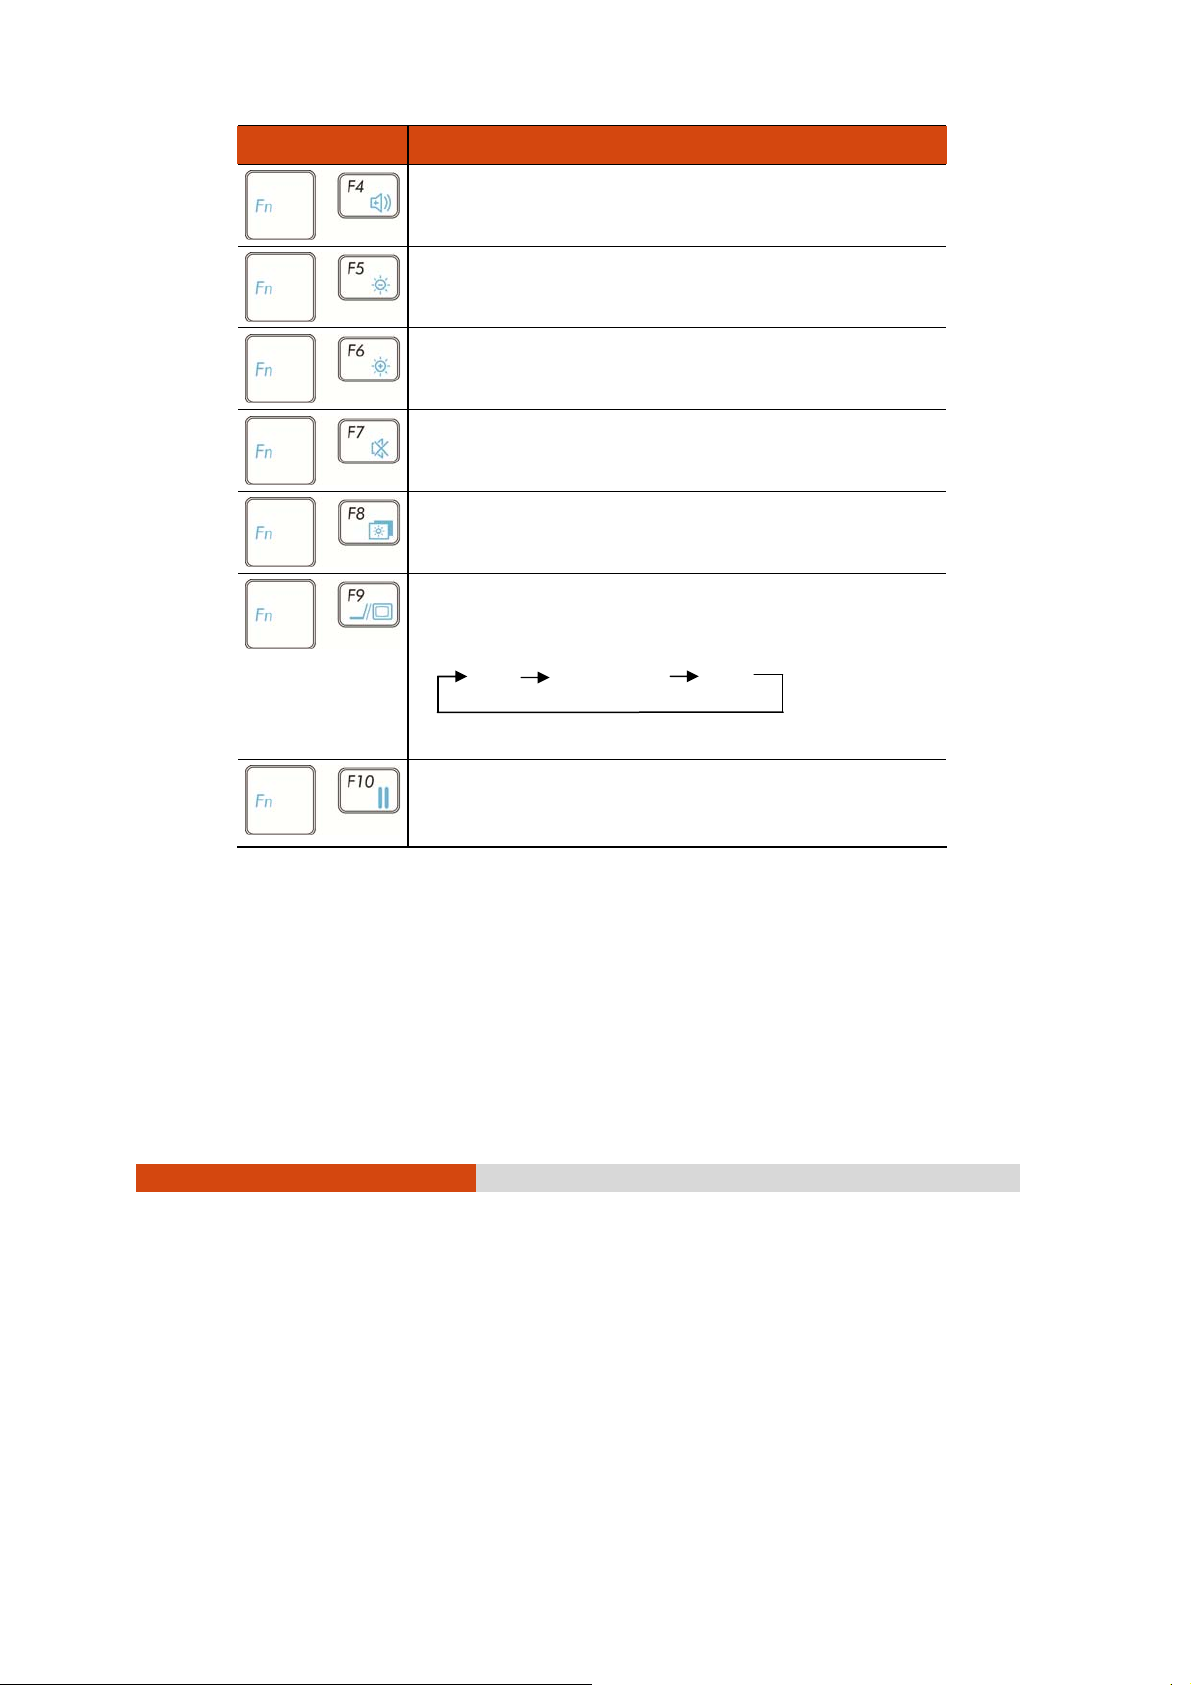
Key Description
Increases the sound volume.
Decreases the LCD brightness.
Increases the LCD brightness.
Switches the system sound output off (mute) or on.
Switches LCD backlight off or on.
Switches the display output to one of the following
when an external monitor is connected through the
VGA port.
LCD LCD & VGA VGA
Serves as the sleep button that you can define with
Windows’ Power Options. (See the “Power
Management” in Chapter 3.)
NOTE:
If you have changed your system from the default ACPI mode to APM mode,
the hot keys Fn+F3, Fn+F4, and Fn+F10 will not be supported.
The operating system might ignore the hot keys when busy with tasks. Do not
keep on pressing the hot keys under such circumstance. Wait for a while
before you try again.
Operating Your Computer 2-5
Page 28

Windows Keys
The keyboard has two keys that perform Windows-specific functions:
Windows Logo key and
The Windows Logo key opens the Start menu and performs
software-specific functions when used in combination with other keys. The
Application key usually has the same effect as a right mouse click. (See
your Windows manual for more information.)
Application key.
2-6
Operating Your Computer
Page 29
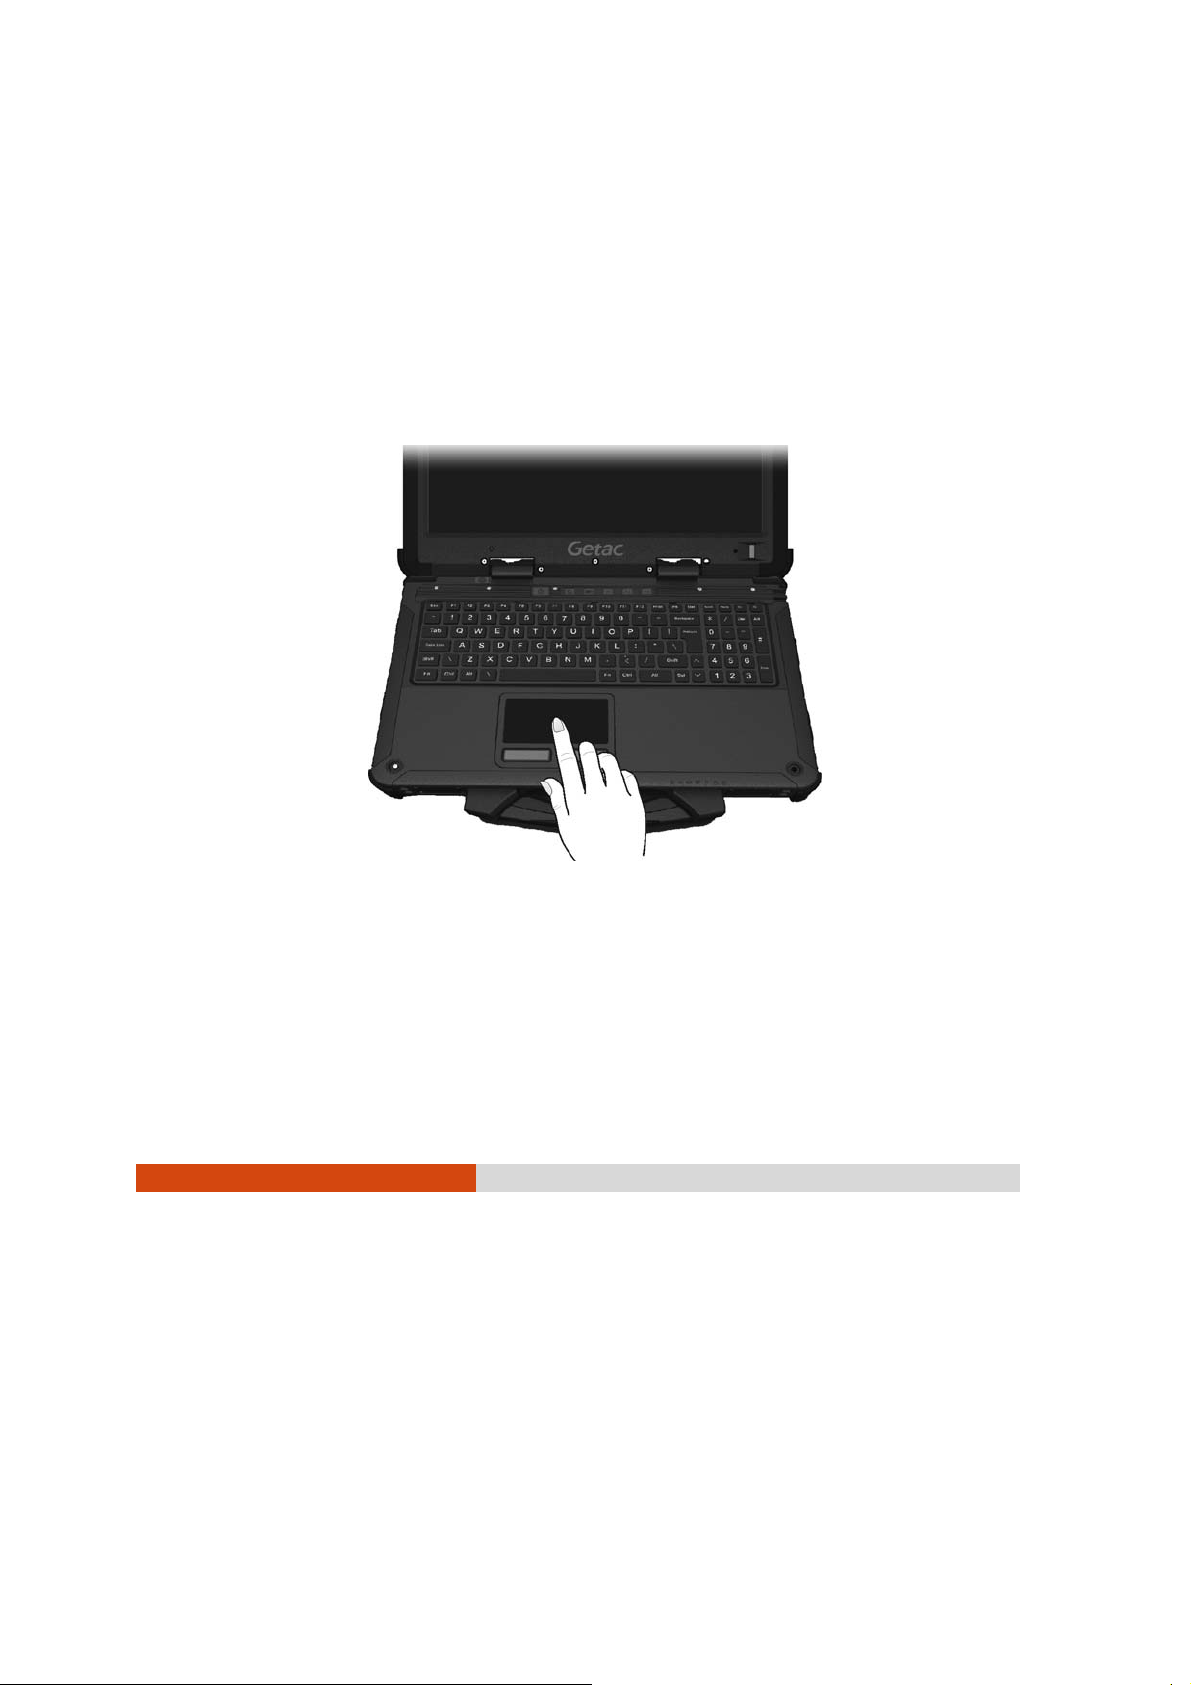
Using the Touchpad
CAUTION: Do not use a sharp object such as a pen on the touchpad. Doing so
may damage the touchpad surface.
NOTE: For optimal performance of the touchpad, keep your fingers and the pads
clean and dry. When tapping on the pad, tap lightly. Do not use excessive force.
The touchpad is a pointing device that allows you to communicate with
the computer by controlling the location of the pointer on the screen and
making selection with the buttons.
The touchpad consists of a rectangular pad (work surface) and a left and
right buttons. To use th e touchpad, place your forefinger or thu mb on the
pad. The rectangular pad acts like a miniature duplicate of your display.
As you slide your fingertip across the pad, the pointer (also called cursor)
on the screen moves accordingly. When your finger reaches the edge of
the pad, simply relocate yourself by lifting the finger and placing it on the
other side of the pad.
Operating Your Computer 2-7
Page 30

Here are some common terms that you should know when using the
touchpad:
Term Action
Point Move your finger on the pad until the cursor points to
the selection on the screen.
Click Press and release the left button.
–or–
Tap gently anywhere on the pad.
Double-click Press and release the left button twice in quick
succession.
–or–
Tap twice on the pad rapidly.
Drag and
drop
Press and hold the left button, then move your finger
until you reach your destination (d rag) . Finally, release
the button (drop) when you finish dragging your
selection to the destination. The object will drop into
the new location.
–or–
Gently tap twice on the pad an d on the second tap,
keep your finger in contact with the pad. Then, move
your finger across the pad to drag the selected
object to your destination. When you lift your finger
from the pad, the selected object will drop into place.
2-8
Operating Your Computer
Page 31

Term Action
Scroll To scroll is to move up and down or left and right in the
working area on the screen.
To move vertically, place your finger on the right or left
edge of the pad and slide your finger up and down
along the edge. To move horizontally, place your
finger on the to p or bo ttom ed ge o f the pa d an d sli de
your finger left and right.
This function works only a fter you install the touchpad
driver supplied with the computer and configure the
touchpad to enable the function. It may not work for
all applications.
TABLE NOTE: If you swap the left and right buttons, “tapping” on the
touchpad as an alternative method of press ing the left button will no
longer be valid.
Configuring the Touchpad
You may wan t to c on fi gur e th e tou chp ad to suit your needs. For example,
if you are a left-handed user, you can swap the two buttons so that you
can use the right button as the left button and vice versa. You can also
change the size of the on-screen pointer, the speed of the pointer, and so
on.
To configure the touchpad, go to Control Panel Mouse Properties.
Operating Your Computer 2-9
Page 32

Using the Touchscreen (Optional)
CAUTION: Do not use a sharp object such as a ballpoint pen or pencil on the
touchscreen. Doing so may damage the touchscreen surface. Use your finger or
the included stylus.
The touchscreen is a touch-sensitive d evice that allows you to navigate
on the screen without using a keyboard, touchpad, or mouse.
Use the included stylus to select objects on the screen. The stylus can be
stretched for better grip and handling.
Here are some common terms that you should know when using the
touchscreen:
Term Action
Click/Point Tap gently on the touchscreen.
Double-click Tap twice on the touchscreen rapidly.
Drag and
drop
2-10
Operating Your Computer
Press lightly on the touchscreen and move your finger
until you reach your destination (d rag) . Finally, release
your finger (drop) when you finish dragging your
selection to the destination. The object will drop into
the new location.
Page 33

Using Multi-touch Gestures (Optional)
If your computer model comes with multi-touch-capable screen and
Windows 7, you can interact with your computer by placing two fingers on
the screen. The movement of the fingers across the screen creates
“gestures,” which send commands to the computer.
Here are the multi-touch gestures that you can use:
Gestures Actions
( = finger down; = finger up)
Pan
(Scroll)
or
Drag 1 or 2 fingers up or down.
Zoom
(Pinch)
Move two fi ngers apart/toward
each other.
Descriptions
Use panning to see
another part of a
page that has scroll
bars.
Use zooming to make
an item (a photo for
example) on the
screen larger or
smalle r . The gesture
works in applications
that support mouse
wheel zooming.
Operating Your Computer 2-11
Page 34

Gestures Actions
( = finger down; = finger up)
Rotate
or
Move two fingers in opposing
directions.
-orUse one finger to pivot around
another.
Press
and Tap
Press on target and tap using a
second finger.
Twofinger
Tap
Descriptions
Use rotating to move
a picture or other
item on the screen in
a circular direction
(clockwise or counterclockwise). The
gesture works in
applications that
support the specific
gesture.
Use press and tap to
access the shortcut
menu.
The function is
defined by
applications that
support the specific
gesture.
2-12
Operating Your Computer
Tap two fingers at the same time
(where the target is in the midpoint
between the fingers).
Page 35

Gestures Actions
( = finger down; = finger up)
Flicks
Make quick drag gestures in the
desired direction.
Descriptions
Flick left or right to
navigate back and
forward in a browser
and other
applications. The
gesture works in most
applications that
support back and
forward.
Operating Your Computer 2-13
Page 36

Using the Input Panel
Use the Input Panel to enter text and perform various keyboard functions.
There are two types of Input Panels for you to use in Windows 7:
Touch Keyboard allows you to enter text by tapping the keys with your
stylus, like pressing the keys on a standard keyboard.
Writing Pad allows you to write on the writing pad, like writing on a piece
of paper. Your handwriting will be converted into typed text.
To open the Input Panel, tap the Input Panel tab, which appears by
default on the left edge of the screen. To switch between the two types,
tap
NOTE: For more information on using the Input Panel, see Windows’ online help.
2-14
or at the upper left corner of the Input Panel.
Operating Your Computer
Page 37

Using the Quick Buttons
The Quick Buttons allow you to quickly start a program or activate a
function.
The quick buttons are:
Button Description
Toggles the sunlight-readable mode on or off. An OSD (On
Screen Display) pops up on the screen indicating the result.
In sunlight-readable mode, the LCD brightness is increased to
the highest level. The mode automatically ends when the
brightness setting is changed, the computer resumes from
Sleep/Hibernation mode, or the computer is restarted.
Switches the ECO mode to the next choice (QUICK MODE, MAX
POWER SAVING, WORK MODE, or OFF). An OSD (On Screen Display)
pops up on the screen indicating the result.
The ECO mode will return to the d efault OFF setting when AC
power is connected, any power related setting is changed,
the computer resumes from Sleep/Hibernation mode, or the
computer is restarted.
Each ECO mode is a combination of power settings that results
in different power consumptions.
NOTE: The button works only when using battery power.
Operating Your Computer 2-15
Page 38

P1
Serves as the master ON/OFF control of the RF radio. An OSD
(On Screen Display) pops up on the screen indicating the
result.
When set to OFF, all wireless modules ( W LA N) cannot be used.
When set to ON, individual settings of the mo dule work.
The on/off status will persist through Sleep/Hibernation mode
but it will always be on upon restarting.
NOTE: The button works only when the hardware RF switch is on.
You can re-define the f unction of the button.
P2
Serves as the Ctrl+Alt+Del keyboard keys.
You can re-define the f unction of the button.
You can re-define the f unction of the button.
2-16
Operating Your Computer
Page 39

Using the DVD Drive
Your computer comes with a Super Multi drive. The drive can read from
and write to CD, DVD+, DVD- and DVD-RAM media.
CAUTION:
When inserting a disc, do not use force.
Make sure that the disc is correctly inserted into the tray, and then close the
tray.
Do not leave the drive tray open. Also, avoid touching the lens in the tray with
your hand. If the lens becomes dirty, the drive may malfunction.
Do not wipe the lens using materials with rough surface (such as paper
towel). Instead, use a cotton swab to gently wipe the lens.
FDA regulations require the following statement for all laser-based devices:
“Caution, Use of controls or adjustments or performance of procedures other than
those specified herein may result in hazardous radiation exposure.”
NOTE: The DVD drive is classified as a Class 1 laser product. This label is
located on the DVD drive.
NOTE: This product incorporates copyright protection technology that is
protected by method claims of certain U.S. patents and other intellectual property
rights owned by Macrovision Corporation and other rights owners. Use of this
copyright protection technology must be authorized by Macrovision Corporation,
and is intended for home and other limited viewing uses only unless otherwise
authorized by Macrovision Corporation. Reverse engineering or disassembly is
prohibited.
Inserting and Removing a Disc
Follow this procedure to insert or remove a disc:
Operating Your Computer 2-17
Page 40

1. Turn on the computer.
2. Open the cover.
3. Press the eject bu tton and the DVD tray will sli de out partially. Gently
pull on it until it is fully extended.
4. To insert a d i sc , p la ce d o wn the d i sc in the tr a y w ith i ts lab el f ac i ng up.
Slightly press the center of the disc until it clicks into place.
To remove a disc, hold the disc by its outer edge and lift it up from the
tray.
5. Gently push the tray back into the drive.
6. Close the cover.
NOTE: In the unlikely event that you are unable to release the drive tray by
pressing the eject button, you can manually release the disc. (See “Optical Drive
Problems” in Chapter 8.)
2-18
Operating Your Computer
Page 41

Using the Network Features
Using the LAN
The internal 10/100/1000Base-T LAN (Local Area Network) module allows
you to connect your computer to a network. It supports data transfer rate
up to 1000 Mbps.
To connect the network cable to the LAN module, connect one end of
the LAN cable to the RJ-45 connector on the computer and the other end
to the network hub.
Your computer supports two LAN modules (LAN 1 and LAN 2) so you can
connect to two networks at the same time.
NOTE: LAN 2 module implements DSM to save battery power.
Using the Wireless LAN
The WLAN features include:
WEP (Wired Equivalent Privacy) 64/128-bit data encryption
IEEE 802.11a/b/g/n standard compliance
Operating Your Computer 2-19
Page 42

Technology
Stated
Maximum
Data Rates
(Mbps)
Band (GHz)
Modulation Technology
Throughput
(Mbps)
802.11a 54 54, 48, 36,
24, 18, 12, 9,
6
802.11b 11 11, 5.5, 2, 1 2.412 ~
802.11g 54 54, 36, 18, 9 2.4 OFDM (Orthogonal
802.11n 100 Mbps
or more
NOTE: 802.11g mode is backward compatible with 802.11b mode.
100 ~ 210 2.4 / 5 Spatial multiplexing,
5.15 ~
5.35
2.462
OFDM (Orthogonal
Frequency Division
Multiplexing)
DSSS (Direct
Sequence Spread
Spectrum)
Frequency Division
Multiplexing)
uses MIMO
(multiple-input
multiple-output)
Turning On/Off the WLAN Radio
NOTE: The FAA (Federal Aviation Agency) has deemed it unsafe to operate
wireless devices in aircraft as this may interfere with flight safety. Remember to
turn off wireless LAN when using your computer in the airplane.
To turn on the WLAN radio:
1. Make sure that the RF switch is at the ON position. (Open the cover to
access the switch.)
2-20
Operating Your Computer
Page 43

2. To turn on the WLAN radio, press Fn+F1 or click the WLAN button in th e
Quick Bar as shown below (an X over the button means th e radio is
currently off.)
3. Windows Mobility Center has wireless network turned on by default.
The Wireless Network icon
red X. (In case you have previously turned it off in Windows Mobility
Center, be sure to turn it on when using the function the next time.)
on the taskbar should appear without a
To turn off the WLAN radio:
You can turn off the WLAN radio by pressing Fn+F1 or using the Quick Bar.
If you want to turn off all wireless radio, slide the RF switch to the OFF
position.
Connecting to a Wireless Network
1. Make sure that the WLAN function is enabled (as described above).
2. Tap the Wireless Network icon
the icon
3. In the list of available wireless networks, tap a network, and then tap
Connect.
indicates connections are available.)
on the taskbar. (An o range light in
Operating Your Computer 2-21
Page 44

4. Some networks require a network security key or passphrase. To
connect to one of those networks, ask your network administrator or
Internet service provider (ISP) for the security key or passphrase.
For more information on setting a wireless network connection, refer to
Windows online help.
NOTE: You can use Intel® PROSet Wireless to take full advantage of the WiFi
capabilities of your computer. See the Help of the utility for instructions.
2-22
Operating Your Computer
Page 45

Using the Fingerprint Sensor
The fingerprint sensor provides a strong authentication mechanism based
on fingerprint recognition. You can log on to your computer or sign in to a
web site with your fingerprint instead of a password.
NOTE: You can register a fingerprint only after creating a password for the
Windows user account.
To register your fingerprint, click Start All Programs Fingerprint Software
Fingerprint Registration. Click the finger you want to register and follow the
onscreen instructions to complete.
Operating Your Computer 2-23
Page 46

You can then use the Fingerprint Software to set up h ow the fingerprint
authentication works.
For detailed information, click Start All Programs Fingerprint Software
Help.
2-24
Operating Your Computer
Page 47

Chapter 3
Managing Power
Your computer operates either on external AC power or on internal
battery power.
This chapter tells you how you can effectively manage power. To
maintain optimal battery performance, it is important that you use the
battery in the proper way.
Managing Power 3-1
Page 48

AC Adapter
CAUTION:
The AC adapter is designed for use with your computer only. Connecting the
AC adapter to another device can damage the adapter.
The AC power cord supplied with your computer is for use in the country
where you purchased your computer. If you plan to go overseas with the
computer, consult your dealer for the appropriate power cord.
When you disconnect the AC adapter, disconnect from the electrical outlet
first and then from the computer. A reverse procedure may damage the AC
adapter or computer.
When unplugging the connector, always hold the plug head. Never pull on the
cord.
The AC adapter serves as a converter from AC (Alternating Current) to DC
(Direct Current) power because your computer runs on DC power, but an
electrical outlet usually provides AC power. It also charges the battery
pack when connected to AC power.
The adapter operates on any voltage in the range of 100~240 V AC.
3-2
Managing Power
Page 49

Battery Pack
The battery pack is the internal power source for the computer. It is
rechargeable using the AC adapter.
The operating time of a fully charged battery pack depends on how you
are using the computer. When your applications often access peripherals,
you will experience a shorter operating time.
NOTE: Care and maintenance information for the battery is provided in the
“Battery Pack Guidelines” section in Chapter 7.
Charging the Battery Pack
NOTE:
Charging will not start if the battery’s temperature is below 2 C (28 F) or
above 45 C (113F); the charging process will stop if the battery’s
temperature gets above 60 C (140 F). To avoid damaging the battery under
this situation, disconnect the AC adapter and wait for the battery to return to
room temperature before charging again.
During charging, do not disconnect the AC adapter before the battery has
been fully charged; otherwise you will get a prematurely charged battery.
To charge the battery pack, connect the AC ad apter to the computer
and an electrical outlet. The Battery Charge Indicator (
computer glows amber to indicate that charging is in progress. You are
advised to keep the computer power off while the battery is being
charged. When the battery is fully charged, the Battery Charge Indicator
lights green.
) on the
CAUTION: After the computer has been fully recharged, do not immediately
disconnect and reconnect the AC adapter to charge it again. Doing so may
damage the battery.
NOTE: The battery level may automatically lessen due to the self-discharge
process (0.21 % per day), even when the battery pack is fully charged (100 %).
This happens no matter if the battery pack is installed in the computer.
Managing Power 3-3
Page 50

Initializing the Battery Pack
You need to initialize a new battery pack before using it for the first time or
when the actual operating time of a battery pack is much less than
expected.
Initializing is the process of fully charging, discharging, and then charging.
It can take several hours.
A tool called “Gauge Reset” is provided for the purpose.
Checking the Battery Level
NOTE: Any battery level indication is an estimated result. The actual operating
time can be different from the estimated time, depending on how you are using
the computer.
By Operating System
You can check the approximate battery level using the battery meter
function of the operating system. To read the battery level in Windows,
click the battery icon (
running on external power) on the taskbar.
when running on battery power or when
By Gas Gauge
On the exterior side of the battery pack is a gas gauge for displaying the
estimated battery charge. When the battery pack is not installed in the
computer and you want to know the battery charge, you can press the
switch with a pointed device to see the corresponding value of indicator
segment that lig ht green.
3-4
Managing Power
Page 51

Switch
The value of the corresponding green segment indicates the relative
percentage of the battery charge. The battery pack is fully discharged
when you see no segment glowing green.
Replacing the Battery Pack
CAUTION:
There is danger of explosion if the battery is incorrectly replaced. Replace the
battery only with the computer manufacturer’s optional battery packs. Discard
used batteries according to the dealer’s instructions.
Do not attempt to disassemble the battery pack.
If you often rely on battery power for a long period of time while traveling,
you may consider the purchase of an additional battery pack from your
dealer and keep it with you in a fully charged state as a backup.
To replace the battery pack, follow these steps:
1. Turn off the computer and disconnect the AC adapter.
2. Open the cover.
Managing Power 3-5
Page 52

3. Pull the strip and slide the battery pack out of the slot.
4. With the strip facing outward, insert the new battery pack all the way
into the slot.
5. Close the cover.
3-6
Managing Power
Page 53

Battery Low Signals and Actions
The battery icon
the battery.
Battery
Icon
When the battery is low, the computer’s Battery Charge Indicator (
also blinks red to alert you to take actions.
Always respond to low-battery by connecting the AC adapter, placing
your computer in Hibernation mode, or turning off the computer.
Battery Level Description
Discharging The icon shows the charge remaining in
Low The battery charge has reached the
Critically low The battery charge has reached the critical
changes appearance to display the current state of
10-percent increments until the charge
reaches the low-battery level.
low-battery level (10% by default).
battery level (5% by default). By default,
Windows will display a notification and put
your computer into Hibernation.
)
Managing Power 3-7
Page 54

Power Management
Your computer supports ACPI (Advanced Configuration and Power
Interface) for power management. The power management feature
allows you to reduce the power consumption for energy saving.
With an ACPI-compliant operating system such as Windows, power supply
to different computer components is controlled on an as-needed basis.
This allows maximum power conservation and performance at the same
time.
In general, Windows’ power management works in this way:
What... When...
Power to the hard disk is turned
off
Power to the display is turned off When the display has been idle for a
The computer enters the Sleep
mode. The hard disk and display
are turned off and the entire
system consumes less power.
The computer enters the
Hibernation mode. (See the next
subsection for more information.)
For detailed information on power management, see Windows’ Help.
When the hard disk has been idle fo r a
set period.
set period.
When the entire system has been idle
for a set period.
When you manually activate the
mode.
When the entire system has been idle
for a set period.
When you manually activate the
mode.
3-8
Managing Power
Page 55

Hibernation
Hibernation is a very useful feature. People frequently open many
applications when they use computers. It takes some tim e to get all these
applications open and running, and normally they all have to be closed
before the computer can be turned off.
When you use the hibernation feature, you do not have to close the
applications. The computer stores the state of your computer to a file on
the hard disk and then shuts down. The next time you turn on your
computer, you return to exactly where you left off.
Managing Power 3-9
Page 56

Power-Saving Tips
Aside from enabling your computer’s power saving mode (see previous
section), you can do your part to maximize the battery’s ope rating time
by following these suggestions.
Enter power saving mode when using battery power.
Do not dis able automatic power ma nagement features.
Decrease the LCD brightness to the lowest comfortable level.
Shorten the length of time before Wi ndows turn off the display.
Many USB devices use power just by being connected. If you use a
USB mouse, you can save power by disconnecting the mouse and
using the touchpad. If you use a USB flash drive, unplug it when you
are not using it.
Remove the card (such as PC card and ExpressCard if not using it.
Turn off the wireless radio if you are not using the wireless module (such
as WLAN,).
Turn off the computer when you are not using it.
3-10
Managing Power
Page 57

Chapter 4
Expanding Your
Computer
You can expand the capabilities of your computer by connecting other
peripheral devices. When using a device, be sure to read the instructions
accompanying the device together with the relevant section in thi s
chapter.
Expanding Your Computer 4-1
Page 58

Connecting a VGA or HDMI Display
Monitor
If you want the benefits of a larger display screen with higher resolution,
you can connect an external display monitor to your computer
Your computer supports a VGA connector and a HDMI connector. HDMI
(High-Definition Multimedia Interface) is an audio/video interface that
transmits uncompressed digital data and therefore delivers true HD
quality. As a home theater system most likely includes a widescreen HDTV
and surround-sound system, you can use the home theater system to
view/play media stored on your computer by connecting via the HDMI
interface.
Follow this procedure to connect an external monitor:
1. Turn off the computer.
2. Depending on the type of your monitor, pl ug the monitor’s signa l
connector to the computer’s VGA or HDMI connector.
4-2
Expanding Your Computer
VGA
HDMI
Page 59

3. Plug one end of the monitor’s power cord into the power socket on
the monitor and the other end to an electrical outlet.
4. To use the monitor, turn on the monitor before turning on the
computer.
5. The connected device should respond by default. If not, you can
switch the display output by pressing the Fn+F5 hot keys. (You can also
change the di splay through Windows Control Panel Display Settings
Properties.)
CAUTION: Do not disconnect the external monitor while the computer is in the
Sleep mode or Hibernation mode. If no external monitor is connected when the
computer resumes, the LCD might not display properly.
Expanding Your Computer 4-3
Page 60

Connecting a Serial Device
Your computer has two serial ports for connecting a serial device such as
a serial mouse or serial communication device (modem).
Follow this procedure to connect a serial device:
1. The serial port is configured as RS232 by default. If you want to use it as
RS422, run BIOS Setup to change the setting.
2. Turn off the computer.
3. Plug the device cable to the serial port on the rear of the computer.
4. Turn on the computer.
NOTE: Portable modems that derive power through the serial port cannot be
used with the computer. Instead, use a modem that is powered by its own internal
battery or external AC power.
4-4
Expanding Your Computer
Page 61

Connecting a USB Device
Your computer has three USB ports for connecting USB devices, such as a
digital camera, scanner, printer, modem, and mouse.
NOTE: The eSATA/USB Combo port can also function as a USB port.
The USB ports support transfer rates up to 12 MB/s for USB 1.1 devices and
480 MB/s for USB 2.0 devices.
To connect a U S B d evic e, sli d e the r elea se la tch to war ds the r ig ht to op en
the port cover and then simply plug the device cable to one of the USB
ports.
Expanding Your Computer 4-5
Page 62

Connecting an eSATA Device
Your computer has an eSATA/USB combo port for connecting eSATA
devices (such as an external hard drive and external optical drive) / USB
devices (see previous section).
The port supports SATA II with transfer rate up o 3.0Gbit/s. It can provide 5V
power if a certified USB-eSata combo cable is used.
To connect an external eSATA device, simply plug the d evice c able to th e
eSATA port.
4-6
Expanding Your Computer
Page 63

Connecting Audio Devices
For higher audio quality, you can send or receive sound through external
audio devices.
Audio Output Connector (green) can be connected to speakers,
headphones, or earphone set.
Microphone Connector (pink) can be connected to an external
microphone for recording voice or sound.
NOTE:
After connecting an external audio device, make sure that you specify the use
of the correct audio device in Windows.
When using the external speakers/headphones or microphone, you cannot
use the internal one.
Expanding Your Computer 4-7
Page 64

Using Smart Cards
Your computer has a smart card slot.
With an embedded microcontroller, smart cards have the unique ability
to store large amounts of data, carry out their own on-card functions (e.g.,
encryption and mutual authentication), and inter act intelligently with a
smart card reader.
To insert a smart card:
1. Locate the smart card sl ot on the rig ht of the computer and open the
cover.
2. Slide the smart card, with its label and embedded chip facing up into
the slot.
Chip
3. When a new card is seated, use the third-party smart card software to
allow your computer to read it.
4. Close the cover.
To remove a smart card:
1. Make sure th at the th ird -par ty sm art ca rd s oftw are i s not a cces sing the
smart card.
2. Pull the card out of the slot.
4-8
Expanding Your Computer
Page 65

Using PC Cards
NOTE:
Some PC cards require additional system resources. Before using such PC
card, you may have to free other system resources for the PC card.
Although some PC cards can be inserted and removed without turning off the
computer, you cannot remove or install PC cards during Sleep mode.
Your computer has one PC card slot which supports type II card and
CardBus specifications.
To insert a PC card:
1. Locate the PC card slot on the right side of the computer and open
the cover.
2. Slide the PC card, with i ts label facing up, into the slot until the eject
button pops out.
Eject button
3. When a new card is seated, the computer will detect it and try to
install the appropriate driver. Follow the on-screen instructions to
complete the pro cess.
4. Close the cover.
To remove a PC card:
1. Double-click on the Safely Remove Hardware
Windows taskbar and the Safely Remove Hardware window appears on
screen.
icon found on the
Expanding Your Computer 4-9
Page 66

2. Select (highlight) the PC card from the list to disable the card.
3. Push the eject button and the card will slide out sl ightly.
4. Pull the card out of the slot.
4-10
Expanding Your Computer
Page 67

Using ExpressCards
Your computer has an ExpressCard slot.
ExpressCard supports the PCI Express and USB 2.0 serial data interfaces
(supporting speeds of up to 2.5 Gbps and 480 Mbps respectively),
improving speed in data transfer while conserving power usage.
The ExpressCard slot can accommodate a 54 mm (ExpressCard/54) or 34
mm (ExpressCard/34) wide ExpressCard. Typical ExpressCards support a
very extensive range of applications including memory, wired and wireless
communication cards, and security devices.
Shown next are the appearances of ExpressCards for your reference.
ExpressCard/54 ExpressCard/34
Expanding Your Computer 4-11
Page 68

To insert an ExpressCard:
1. Locate the ExpressCard slot on the right side of the computer.
2. Slide the ExpressCard, with its label facing up, all the way into the slot
until the rear connectors click into place.
3. When a new card is seated, the computer will detect it and try to
install the appropriate driver. Follow the on-screen instructions to
complete the pro cess.
4. Close the cover.
To remove an ExpressCard:
1. Double-click on the Safely Remove Hardware
icon found on the
Windows taskbar and the Safely Remove Hardware window appears on
screen.
2. Select (highlight) the ExpressCard from the list to disable the card.
3. Slightly push the card to release and then pull it out of the slot.
4-12
Expanding Your Computer
Page 69

System Memory Upgrade
You can upgrade your computer by changing system memory to a
maximum of 8 GB on the two 1066/1333 MHz DDR3 SO-DIMM slots.
CAUTION: RAM modules are extremely sensitive to static electricity. There are
cases where static electricity generated by the human body has adversely
affected such modules. When inserting or removing a RAM module, do not touch
the terminals or internal components, insert objects other than the module, or
allow foreign particles to enter. Doing so has been known to cause damage, fire,
or electrical shock.
To install the RAM module:
1. Remove the battery pack (see chapter 3).
2. Carefully place the computer upside down.
3. Remove the 6 screws to open the compartment cover.
4. To install the RAM module, match the module's n otched part with the
socket's projected part and firmly insert the module into the socket at
Expanding Your Computer 4-13
Page 70

a 20-degree angle (). Then push down until the retaining clips lock
the module into position ().
CAUTION: If the RAM module is difficult to insert or difficult to push down, do not
force it. Check once more to ensure that the module is positioned correctly.
5. Replace the compartmen t cover and secure with 6 s crews.
6. Replace the battery pack.
4-14
Expanding Your Computer
Page 71

Chapter 5
Caring for the Computer
Taking good care of your computer will ensure a trouble-free operation
and reduce the risk of damage to your computer.
This chapter gives you guidelines covering areas such as protecting,
storing, cleaning, and traveling.
Caring for the Computer 5-1
Page 72

Protecting the Computer
To safeguard the integrity of your computer data as well as the computer
itself, you can protect the computer in several ways as described in this
section.
Using an Anti-Virus Strategy
You can install a virus-detecting program to monitor potential viruses that
could damage your files.
Using Windows Action Center
Windows Action C enter alerts you to take action on the follow ing security
essentials:
Windows Firewall
Windows Update
Malware Protection (anti-virus, anti-spyware)
Others (Internet security, user account control)
For detailed information on Windows Security Center, see Windows’ Help.
5-2
Caring for the Computer
Page 73

Using the Cable Lock
You can use a Kensington-type cable lock to protect your computer
against theft. The cable lock is available in most computer stores.
To use the lock, loop the lock cable around a stationary object such as a
table. Insert the lock to the Kensington lock hole and turn the key to
secure the lock. Store the key in a safe place.
Caring for the Computer 5-3
Page 74

Taking Care of the Computer
Location Guidelines
For optimal performance, use the computer where the
recommended temperature is between 0 C (32 F) and 45 C (113 F).
Select models support -15 C (5 F) low temperature.
Avoid placing the computer in a location subject to high humidity,
extreme temperatures, mechanical vibration, direct sunlight, or heavy
dust. Operating in an envir onment with metallic dust is not allowed.
Do not cover or block any ventilation openings on the computer. For
example, do not place the computer on a bed, sofa, rug, or other
similar surface. Otherwise, overheating may occur that results in
damage to the computer.
Keep the computer at least 13 cm (5 inches) away from electrical
appliances that can generate a strong magnetic field such as a TV,
refrigerator, motor, or a large audio speaker.
Avoid moving the computer abruptly from a cold to a warm place. A
temperature difference of more than 10 C (18 F) may cause
condensation inside the unit, which may damage the storage media.
Do not place the computer on an unsteady surface.
General Guidelines
Do not place heavy objects on top of the computer when it is closed
as this may damage the display.
The screen surface is easily scratched. Do not use paper towels to
clean the display but use the included soft cloth. Avoid touching it
with your fingers, pen, or pencil.
To maximize the life of the backlight in the display, allow the backlight
to automatica lly turn off as a result of power management. Avoid
5-4
Caring for the Computer
Page 75

using a screen saver or other software that prevents the power
management from working.
Cleaning Guidelines
Never clean the computer with its power on.
Use a soft cloth moistene d with water o r a non-alkaline deterge nt to
wipe the exterior of the computer.
Gently wipe the display with a soft, lint-free cloth. Do not use alcohol
or detergent on the display.
Dust or grease on the touchpad can affect its sensitivity. Clean the
pad by using adhesive tape to remove the dust and grease on its
surface.
Battery Pack Guidelines
Recharge the battery pack when it is nearly discharged. When
rechargi n g, make su r e th a t th e b a tte r y pack is fully charged. Doing so
may avoid harm to the ba ttery pack.
The battery pack is a consumable product and the following
conditions will shorten its life:
– when frequently charging the battery pack
– when using, charging, or storing the battery in high temperature
condition
To avoid h astening the deterioration of the battery pack thereby
prolonging its useful life, minimize the number of times you charge it so
as not to frequently increase its internal temperature.
Charge the battery pack between 10 C ~ 30 C (50 F ~ 86 F)
temperature range.
A higher environment temperature will cause the battery pack’s
temperature to rise. Avoid charging the battery pack inside a closed
vehicle and in hot weather condition.
Caring for the Computer 5-5
Page 76

Also, ch ar g in g w i ll no t sta rt i f the b atte ry p ac k i s n ot w i thi n th e a llow ed
temperature range.
It is recommended that you do not charge the battery pack more
than once a day.
It is recommended that you charge the battery pack with the
computer’s power off.
To maintain the battery pack’s operating efficiency, store it in a cool
dark place removed from the computer and with 30 % ~ 40 % charge
remaining.
Important guidelines when using the battery pack.
When installing or removing the battery pack take note of the
following:
– avoid installing or removing the battery pack when the computer is
in Sleep mode. Abruptly removing the battery pack may cause loss
of data or the computer may become unstable.
– avoid touching the battery pack terminals or damage may occur,
thereby causing improper operation to it or the computer.
The computer’s input voltage and surrounding temperature will
directly affect the battery pack’s charge and discharge time:
– charging time will be prolonged when the computer is turned on.
To shorte n th e c h a rging time , it is reco m m e n d e d that you pla c e th e
computer in sleep or hibernation mode.
– a low temperature will prolong the charging time as well as hasten
the discharge time.
Touchscreen Guidelines
Use the finger or the included stylus on the display. Using a sharp or
metallic object other than your finger or stylus may cause scratches
and damage the display, thereby causing errors.
Avoid using excessive force that may cause damage to the display.
5-6
Caring for the Computer
Page 77

Use a soft cloth to remove dirt on the display. The touchscreen surface
has a special protective coating that prevents dirt from sticking to it.
Not using a soft cloth may cause damage to the special protective
coating on the touchscreen surface.
To remove hard to remove dirt, blow some steam on the particular
area and gently wipe away using a soft cloth.
Turn off the computer power when cleaning the display. Cleaning the
display with the power on may cause improper operation.
Use the touchscreen within the intended area only. The display area
and touchscreen operating area is the same. Using it beyond the
allowed area may cause damage to the display and result in
improper operation.
Do not use excessive force on the display. Avoid moving the
computer while holding the display or twisting the display. Avoid
placing objects on top o f the display as this may cause the glass to
break thereby damaging the display.
Using the touchscreen during low temperature (less than 5
o
C) may
cause a slower response time, this is normal. A normal response time
may be restored upon returning to room temperature.
When there is noticeable discrepancy in the operation of the
touchscreen function (wrong location on intended operation or
improper display resolution), refer to the Windows online Help for
instructions on recalibrating the touchscreen display.
Caring for the Computer 5-7
Page 78

When Traveling
Before traveling with your computer, make a backup of your hard disk
data into flash disks or other storage devices. As an added
precaution, bring along an extra copy of your important data.
Make sure that the battery pack is fully charged.
Make sure that the computer is turned off and the top cover is
securely closed.
Make sure that all the connector covers are closed completely to
ensure the waterproof integrity.
Do not leave objects in between the keyboard and closed display.
Disconnect the AC adapter from the computer an d take it with you.
Use the AC adapter as the power source and as a battery-charger.
Hand-carry the computer. Do not check it in as luggage.
If you need to leave the computer in the car, put it in the trunk of the
car to avoid exposing the computer to excessive heat.
When going through airport security, it is recommended that you send
the computer and flash disks through the X-ray machine (the device
you set your bags on). Avoid the magnetic detector (the device you
walk through) or the magnetic wand (the handheld device used by
security personnel).
If you plan to travel abroad with your computer, consult your dealer
for the appropriate AC power cord for use in your country of
destination.
5-8
Caring for the Computer
Page 79

Chapter 6
Troubleshooting
Computer problems can be caused by hardware, software, or both.
When you encounter any problem, it might be a typical problem that can
easily be solved.
This chapter tells you what actions to take when solving common
computer problems.
Troubleshooting 6-1
Page 80

Preliminary Checklist
Here are helpful hints to follow before you take further actions when you
encounter any problem:
Try to isolate which part of the computer is causing the problem.
Make sure that you turn on all peripheral devices before turning on the
computer.
If an external device has a problem, make sure that the cable
connections are correct and secure.
Make sure that the configuration information is properly set in the BIOS
Setup program.
Make sure that all the device drivers are correctly installed.
Make notes of your observations. Are there any messages on the
screen? Do any indicators light? Do you hear any beeps? Detailed
descriptions are useful to the service personnel when you need to
consult one for assistance.
If any problem persists after you follow the instructions in this chapter,
contact an authorized dealer for help.
6-2
Troubleshooting
Page 81

Solving Common Problems
Battery Problems
The battery does not charge (Battery Charge indicator does not light amber).
Make sure that the AC adapter is properly connected.
Make sure that the battery is not too hot or cold. Allow time for the
battery pack to return to room temperature.
Make sure that the battery pack is installed correctly.
Make sure that the battery terminals are clean.
The operating time of a fully charged battery becomes shorter.
If you often p artia lly rech arge a nd di schar ge, the battery might no t be
charged to its full potential. In itialize the battery to solve the problem.
(See “Initializing the Battery Pack” in Chapter 3 for instructions.)
The battery operating time indicated by the battery meter does not match the
actual operating time.
The actual operating time can be different from the estimated time,
depending on how you are using the computer. If the actual
operating time is much less than the estimated time, initialize the
battery. (See “Initializing the Battery Pa ck” in Chapter 3 for
instructions.)
Wireless Transmission Problems
I cannot connect to another device with wireless technology.
Make sure that the wireless card is correctly installed.
Make sure th at th e d i sta n ce be twe en the two d evi c es ar e n o t o ver 10
meters or that there are no walls or other obstructions between the
devices.
Troubleshooting 6-3
Page 82

Make sure that the other device is not in “Hidden” mode.
Make sure that devices are compatible.
Display Problems
Nothing appears on the screen.
During operation, the screen may automatically turn off as a result of
power management. Press any key to see if the screen comes back.
The brightness level might be too low. Increase brightness.
The display output might be set to an external device. To switch the
display bac k to th e L C D , press the Fn+F5 hot ke y or change the display
through the Display Settings Properties.
The characters on the screen are dim.
Adjust the brightness and/or contrast.
Bad dots appear on the display at all times.
A small number of missing, discolored, or bright dots on the screen are
an intrinsic characteristic of TFT LCD technology. It is not regarded as a
LCD defect.
The external monitor displays nothing.
Make sure that the monitor is turned on.
Make sure that the monitor’s signal cable is properly connected.
Switch the display to the monitor by pressing the Fn+F5 hot key or
change the display through the Display Settings Properties.
Simultaneous display/multi-display does not work.
Make sure that you turn on the external monitor before turning on the
computer.
Press the Fn+F5 hot key to togg le thr ough the di splay opti ons o r cha nge
the Display Settings Properties in Windows.
6-4
Troubleshooting
Page 83

DVD Drive Problems
The DVD drive cannot read a disc.
Make sure that the disc is correctly seated in the tray, with the label
facing up.
Make sure th at the disc is n ot dirty. C l e a n th e disc with a d isc cleanin g
kit, available in most computer stores.
Make sure that the computer supports the disc or the files contained.
You cannot eject a disc.
The disc is not properly seated in the drive. Manually release the disc
by inserting a small rod, such as a straightened paperclip, into the
drive’s manual eject hole and pushing firmly to release the tray
ExpressCard Problems
The ExpressCard does not work.
Make sure that the ExpressCard is correctly seated.
If the card requires an IRQ (Interrupt ReQuest), make sure that there is
one available.
The ExpressCard stops communicating properly.
The application may have been reset when the computer is turned off
or in Sleep mode. Exit and restart the application.
Troubleshooting 6-5
Page 84

Hardware Device Problems
The computer does not recognize a newly installed device.
The device may not be correctly configured in the BIOS Setup
program. Run the BIOS Setup program to iden tify the new type.
Make sure if any device driver needs to be installed. (Refer to the
documentation that came with the device.)
Make sure if the device needs any jumper or switch settings. (Refer to
the documentation that came with the de vice.)
Check the cables or power cords for correct connections.
For an external device that has its own power switch, make sure that
the power is turned on.
Hard Disk Drive Problems
The hard disk drive error message appears on the screen.
The hard disk drive has defects. Ask your dealer for help.
The hard disk drive operations seem slow.
The data files stored on the hard disk drive may be fragmented. Use a
tool such as Window’s Disk Defragmenter to defragment the files.
The hard disk drive in-use indicator glows without blinking.
The data files stored on the hard disk drive may be fragmented. Use a
tool such as Window’s Disk Defragmenter to defragment the files.
Keyboard, Mouse, and Touchpad Problems
The keyboard does not respond.
Try connecting an external keyboard. If it works, contact an
authorized dealer, as the internal keyboard cable might be loose.
6-6
Troubleshooting
Page 85

Water or liquid is spilt into the keyboard.
Immediately turn off the computer and unplug the AC adapter. Then
turn the keybo ard u pside down to drai n the liq uid ou t of the key board .
Make sure to clean up any part of the spill you can get to. Though the
keyboard of your computer is spill-proof, liquid will remain in the
keyboard enclosure if you don’t remove it.
The numeric keypad is disabled.
Make sure that the Num Lock is switched on. (Check if the Num Lock
Indicator glows or not.)
The external keyboard does not work.
Make sure that the keyboard cable is properly connected.
The USB mouse does not work.
Make sure that the mouse cable is properly connected.
The touchpad does not work, or the pointer is difficult to control with the
touchpad.
Make sure that the touchpad is clean.
LAN Problems
I cannot access the network.
Make sure that the LAN cable is properly connected to the RJ-45
connector and the network hub.
Make sure that the network configuration is appropriate.
Make sure that the user name or password is correct.
PC Card Problems
The PC card does not work.
Make sure that the PC card is correctly seated.
Troubleshooting 6-7
Page 86

If the card requires an IRQ (Interrupt ReQuest), make sure that there is
one available.
The PC card stops communicating properly.
The application may have been reset when the computer is turned off
or in Sleep mode. Exit and restart the application.
Power Management Problems
The computer does not enter Sleep or Hibernation mode automatically.
If you have a connection to another computer, the computer does
not enter Sleep or Hibernation mode if the connection is actively in
use.
Make sure that the Sleep or Hibernation time-out is enabled.
The computer does not enter Sleep or Hibernation mode immediately.
If the computer is performing an operation, it normally waits for the
operation to finish.
The computer does not resume from Sleep or Hibernation mode.
The computer automatically enters Sleep or Hibernation mode when
the battery pack is empty. Do any one of the following:
Connect the AC adapter to the computer.
Replace the empty battery pack with a fully charged one.
The computer does not enter Hibernation mode with the Fn+F12 hot keys.
Make sure that the Hibernation function is specified for the sleep
button.
You might be using a PC or other card that prevents the computer
from entering Hibernation mode. To enter the mode, stop the
communication program and then remove the card or stop the card.
6-8
Troubleshooting
Page 87

Software Problems
An application program does not work correctly.
Make sure that the software is correctly installed.
If an error message appears on the screen, consult the software
program’s documentation for further information.
If you are sure the operation has stop, reset the computer. (See
“Resetting the Computer” later in this chapter.)
Sound Problems
No sound is produced.
Make sure that the volume control is not set too low.
Make sure that the computer is not in Sleep mode.
If using an external speaker, make sure that the speaker is properly
connected.
Distorted sound is produced.
Make sure that the volume control is not set too high or too low. In
most cases, a high setting can cause the audio electronics to distort
the sound.
The sound system does not record.
Adjust the playback or recording sound levels.
The external microphone or audio device does not work.
Make sure that the microphone is connected to the proper connector
on the computer.
Click the speaker symbol on the taskbar and check the Windows
volume control.
Check the volume control of your computer.
Troubleshooting 6-9
Page 88

Startup Problems
When you turn on the computer, it does not respond and the Power Indicator
does not light green.
If you are using an external AC power, make sure that the AC adapter
is correctly and securely connected. If so, make sure that the
electrical outlet works properly.
If you are using the battery power, make sure that the battery is not
discharged.
When you turn on the computer, it stops after POST.
Restart your computer.
WLAN Problems
I cannot use the WLAN feature.
Make sure that the mini PCI-E WLAN card is correctly installed.
Make sure that the WLAN feature is turned on.
Transmission quality is poor.
Your computer may be in an out-of-range situation. Move your
computer closer to the Access Point or another WLAN device it is
associated with.
Check if there is high interference around the environment and solve
the problem as described next.
Radio interference exists.
Move your computer away from the device causing the radio
interference such as microwave oven and large metal objects.
Plug your computer into an outlet on a different branch circuit from
that used by the affecting device.
Consult your dealer or an experienced radio technician for help.
6-10
Troubleshooting
Page 89

I cannot connect to another WLAN device.
Make sure that the WLAN feature is turned on.
Make sure that the SSID setting is the same for every W L AN device in
the network.
Your computer is not recognizing changes. Restart the computer.
Make sure that the IP address or subnet mask setting is correct.
I cannot communicate with the computer in the network when Infrastructure
mode is configured.
Make sure that the Access Point your computer is associated with is
powered on and all the LEDs are working properly.
If the operating radio channel is in poor quality, change the Access
Point and all the wireless statio n(s) within the BSSID to another radio
channel.
Your computer may be in an out-of-range situation. Move your
computer closer to the Access Point it is associated with.
Make sure that your computer is configured w ith the same se curity
option (encryption) to the Access Point.
Use the Web Manager/Telnet of the Access Point to check whether it
is connec ted to the network.
Reconfigure and reset the Access Point.
I cannot access the network.
Make sure that the network configuration is appropriate.
Make sure that the user name or password is correct.
You have moved out of range of the network.
Turn off power management.
Troubleshooting 6-11
Page 90

Other Problems
The date/time is incorrect.
Correct the date and time via the operating system or BIOS Setup
program.
After you have performed everything as described above and still
have the incorrect date and time every time you turn on the
computer, the RTC (Real-Time Clock) battery is at the end of its life.
Call an authorized dealer to replace the RTC battery.
6-12
Troubleshooting
Page 91

Resetting the Computer
You may have to reset (reboot) your computer on some occasions when
an error occurs and the program you are using hangs up.
If the computer operation seems to hang up, first wait. It is possible that
the computer is processing data. Periodically check the hard disk drive
in-use indicator, if it flashes irregularly, the program may be accessing
data and preventing you from using the keyboard. If you are sure the
operation has stopped and you cannot use the “restart” function of the
operating system, reset the computer.
Reset the computer by any one of these methods:
Press Ctrl+Alt+Del on the keyboard.
If the above action does not work, press and hold the power button
for more than 5 seconds to force the system to turn off. Then turn on
the power again.
CAUTION: Resetting will cause any unsaved data to be lost.
Troubleshooting 6-13
Page 92

Page 93

Appendix A
Specifications
NOTE: Specifications are subject to change without any prior notice.
Parts Specifications
CPU Intel® Arrandale i5-520M 2.4GHz 3MB L3, 35W
Chipset Mobile Intel® QM57 Express Chipset, vPro support
BIOS 8MB SPI Flash
RAM Up to 8GB DDR3 SDRAM, 2 slots, 1066/1333MHz
Display
Audio
Keyboard Standard keys w ith numeric pad keys, 12 funct ion keys, special
Pointing device Glide touchpad with 2 buttons
Storage
device
Panel 15.6-inch (16:9) wide TFT LCD, 1366x768 resolution with 1200nits
Controller Arrandale integrated, BIOS adjustable share memory
Video port VGA and HDMI
Controller Azalia 32 bit, 192KHz chipset, HD audio support, MS-Sound
Microphone Integrated
Speaker Speaker × 2
Ports Two audio ports for Line-out (green color) / Mic-in (pink color)
Hard disk drive SATA interface, 2.5-inch diameter, shock-mounted,
DVD drive SATA interface, Super-Multi DVD drive
or optional 1920x1080 resolution with 600nits after T/S, ultra low
brightness support, sunlight readable, resistive multi-touch with
stylus (option)
Optional: MXM 3.0 Interface, N11P-LP1
compatible
Fn (Function) key and Windows keys, water-proof membrane,
with backlight (option )
user-removable, solid-state disk (option), HDD heater (option),
secondary hard disk drive and RAID support (option)
512MB GDDR3
Specifications A-1
Page 94

Parts Specifications
Card slots PCMCIA CardBus Type II x 2
I/O ports USB port × 3, serial port x 2(RS232/RS422), eSATA/ USB port, RJ-45
LAN LAN1: Intel® 82577LM Gigabit Network Connection
Wireless LAN Intel® Centrino® Ultimate N 6200 AGN Half Mini Card, IEEE
CMOS Web CAM 1.3M pixel
Security Kensington lock
AC adapter Universal AC adapter 90 W; input: 100240 V, output: 19 V Power
Battery Pack 8700mAH, 9 cells, 10.8V
Dimension (W×D×H) 410×290×65 mm (16.14×11.42×2.56 inch)
Weight 4.6 kg (10.14 lb)
Environment
Regulation EMC FCC part 15, subpart B, class B, CE, CCC, BSMI
Temperature Operating: 0 C (32 F) to 40 C (104 F)
Humidity 5 % to 95 % relative, non-condensing
Altitude Operating: 15,000 ft
Shock Operating: 15 g, 11 ms half-sine wave
Vibration Random vibration:
Drop 100 cm drop 26 times onto plywood plate surface
Enclosure IP65 (with input/output doors closed)
ESD Air discharge: 0~8 KV (included) no error; 9~15 KV allow soft
ExpressCard/34/54
Smart Card
port x 2, docking connector
LAN2: Realtek RTL8111DL, DSM mode support
802.11a/b/g/n
TPM 1.2
Fingerprint sensor, slide type
Smart Card Reader
–20 C (–4 F) to 71 C (160 F) – low temperature option
Non-operating: –40 C (–40 F) to 70 C (158 F)
Non-operating: 40,000 ft
Non-operating: 50 g, 11 ms half-sine wave
Operating: MIL-STD-810F, 514.5C-1 – highway truck exposure
Non-operating: MIL-STD-810F, 514.5C-17
error
Contact discharge: 0~6 KV (included) no error; 7~8 KV allow
soft error
A-2
Specifications
Page 95

Product
Coverage
Parts Specifications
Safety UL, UL1604, TUV, TUV/CB, E-mark
RoHS 6 European union banned materials, EPEAT silver Green
Other 12 universal GP product banned materials, ENERGY STAR,
WEEE
Specifications A-3
Page 96

Page 97

Appendix B
Regulatory Information
This appendix provides regulatory statements and safety notices on your
computer.
NOTE: Marking labels located on the exterior of your computer indicate the
regulations that your model complies with. Please check the marking labels and
refer to the corresponding statements in this appendix. Some notices apply to
specific models only.
Regulatory Information B-1
Page 98

On the Use of the System
Class B Regulations
USA
Federal Communications Commission Radio Frequency Interference Statement
NOTE:
This equipm ent has been tested and found to comply with th e limits for a
Class B digital device pursuant to Part 15 of the FCC Rules. These limits are
designed to provide reasonable protection against harmful interference
in a residential installation. This equipment generates, uses, and can
radiate radio frequency energy and, if not installed and used in
accordance with the instructions, may cause harmful interference to
radio communications. However, there is no guarantee that interference
will not occur in a particular installation. If this equipment does cause
harmful interference to radio or television reception, which can be
determined by turning the equipment off and on, the user is encouraged
to try to correct the interference by one or more of the following
measures:
Reorient or relocate the receiving antenna.
Increase the separation between the equipment and receiver.
Connect the equipment into an outlet on a circuit different from that
to which the receiver is connected.
Consult the dealer or an experienced radio/TV technician for help.
Any changes or modifications not expressly approved by the
manufacturer could void the user’s authority to operate the equipment.
Please note:
The use of a non-shielded interface cable with this equipment is
prohibited.
B-2
Regulatory Information
Page 99

Canada
Canadian Department of Communications
Radio Interference Regulations Class B Compliance Notice
This Class B digital apparatus meets all requirements of the Canada
Interference-Causing equipment regulations.
Cet appareil numérique de Classe B respecte toutes les exigences du
Règlement Canadien sur le matériel brouileur.
This digital apparatus does not exceed the Class B limits for radio noise
emissions from digital apparatus set out in the Ra dio Interference
Regulations of the Canadian Department of Communications.
Le présent appareil numérique n’émet pas de bruits radioélectriques
dépassant les limites applicables aux appareils numériques de la classe B
prescrites dans le Règlement sur le brouillage radioélectrique édicté par
le ministère des Communications du Canada.
Safety Notices
About the Battery
Caution Texts Concerning Lithium Batteries
DANISH
ADVARSEL! Lithiumba tteri – Eksplosionsfare ved fejlagtig håndtering.
Udskiftning må kun ske med batteri af samme fabrikat og type. Levér det
brugte batteri tilbage til leveran døren.
NORWEGIAN
ADVARSEL: Eksplosjonsfare ved feilaktig skifte av batteri. Benytt samme
batteritype eller en tilsvarende type anbefalt av apparatfabrikanten.
Brukte batterier kasseres i henhold til fabrikantens instruksjoner.
SWEDISH
VARNING: Explosionsfara vid felaktigt batteribyte. Använd samma
batterityp eller en ekvivalent typ som rekommenderas av
apparattillverkaren. Kassera använt batteri enligt fabrikantens instruktion.
Regulatory Information B-3
Page 100

FINNISH
VAROITUS: Paristo voi räjähtää, jos se on virheellisesti asennettu. Vaihda
paristo ainoastaan valmistajan suosittelemaan tyyppiin. Hävitä käytetty
paristo valmistajan ohjeiden mukaisesti.
ENGLISH
CAUTION: Danger of explosion if battery is incorrectly replaced. Replace
only with the same or equivalent type recommended by the equipment
manufacturer. Discard used batteries according to manufacturer's
instructions.
DEUTSCH
VORSICHT: Explosionsgefahr bei unsachgemäßem Austausch der
Batterie. Ersatz nur durch denselben oder einen vom Hersteller
empfohlenen gleich-wertigen Typ. Entsorgung gebrauchter Batterien
nach Angaben des Herstellers.
FRENCH
ATTENTION: II y a danger d’explosion s’il y a remplacement incorrect de
la batterie. Remplacer uniquement avec une batterie du même type ou
d’un type équivalent recommandé par le constructeur. Mettre au rebut
les batteries usagées conformément aux instructions du fabricant.
Attention (for USA Users)
The product that you have purchased contains a rechargeable battery.
The battery is recyclable. At the end of its useful life, under various state
and local laws, it may be illegal to dispose of this battery into the
municipal waste stream. Check with your local solid waste officials for
details in your area for recycling options or proper disposal.
About the AC Adapter
Use only the AC adapter supplied with your computer. Use of another
type of AC adapter will result in malfunction and/or danger.
Do not use the adapter in a high moisture environment. Never touch
the adapter when your hands or feet are wet.
Allow adequate ventilation around the adapter when using it to
operate the device or charge the battery. Do not cover the AC
B-4
Regulatory Information
 Loading...