

Page 1
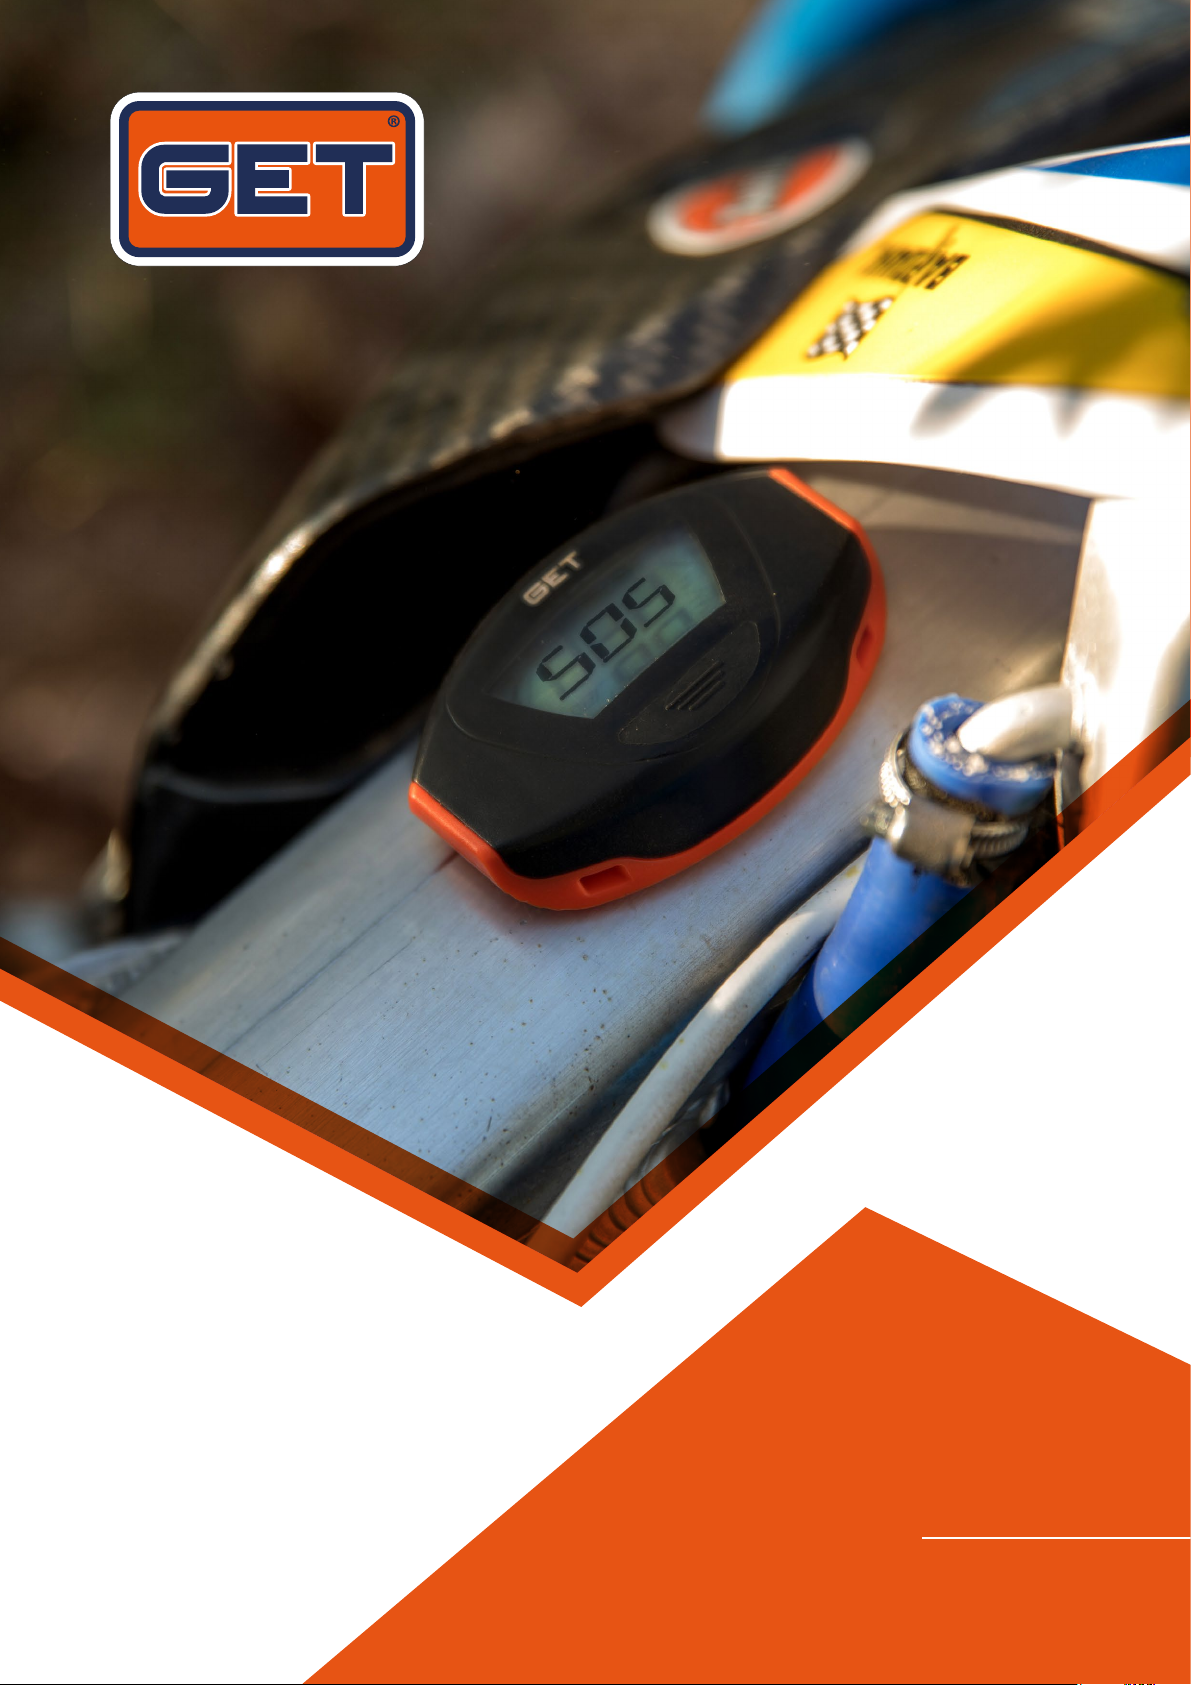
SMART SOS
SETTABLE SOS ALARM
AND WIRELESS HOUR METER
USER MANUAL
Page 2
SMART SOS
USER MANUAL
GD-MUP-0011-AB
2018
Used electrical or electronic devices should not be recycled as normal household waste.
IMPORTANT INFORMATION ON BATTERIES
The device contains a 3V non-rechargeable button lithium battery.
General precautions:
• Keep batteries out of the reach of children.
• If the battery compartment does not close firmly, stop using the product and keep it out of
reach of children.
• Do not swallow the battery – it can cause serious internal burns and result in death.
• If you suspect that a battery has been swallowed or inserted into any body orifice, consult a
doctor immediately.
• Do not open, puncture or damage batteries.
• ATTENTION: In case of oxidation do not touch liquid seeping from the battery! This liquid is
toxic and dangerous.
• Do not place the device near sources of heat – the batteries can explode if exposed to high
temperatures or thrown into a fire!
Used batteries must be disposed of at the appropriate recycling centres or in compliance with
local regulations.
SMART SOS USER MANUAL
The crossed-out bin symbol on the device indicates that the product, at the end of its useful life,
must be treated separately from household waste, and must be taken to a recycling centre for
electrical and electronic equipment or returned to the retailer if purchasing another similar
device.
Taking the device to a separate waste collection so that it can be recycled, treated and disposed
of helps to avoid possible negative effects on the environment and on health and promotes the
recovery of the materials of which the device is made.
The user is responsible for taking the device, once no longer in use, to the appropriate recycling
centre. For more detailed information regarding collection systems available, contact the local
waste disposal service or the store where the purchase was made.
Anyone who abandons or throws away this device and does not return it to a centre for recycling
electrical and electronic waste will be subject to the penalties laid down in the regulations in
force concerning the illegal disposal of waste.
Please also recycle the internal and external packaging in which the product is supplied.
This device complies with the European Union EMC (Electromagnetic Compatibility) directive,
the LVD (Low Voltage Directive), the ROHS (Restriction of Hazardous Substances) directive and
relative modifications.
IT
2
Page 3

CONTENTS
WARNINGS REGARDING PROPER USE OF THE SMART SOS DEVICE
1.
INDICATORS ON THE SMART SOS DISPLAY
2.
INSTALLING AND SETTING UP THE DEVICE
3.
WHY USE GET’S SMART SOS APP?
4.
INSTALLING, CONFIGURING THE APP AND CONNECTING TO SMART SOS DEVICES
5.
RESETTING THE PARTIAL HOUR METER
6.
THE ALARMS (CAN BE USED FOR MAINTENANCE INTERVALS)
7.
RESETTING AN ALARM
7.1
CREATING AN ALARM AND/OR MODIFYING THE WARNING INTERVAL
7.2
CANCELLING OR DISABLING A PERSONAL ALARM (CUSTOM ALARM)
7.3
CANCELLING A VEHICLE
7.4
10
13
14
14
15
17
18
4
5
8
9
SMART SOS USER MANUAL
THE SOS FUNCTION
8.
ADDING RECIPIENTS FOR THE SOS FUNCTION
8.1
DEACTIVATION/CANCELLING RECIPIENTS FOR THE SOS FUNCTION
8.2
20
21
22
3
Page 4
1. WARNINGS REGARDING PROPER
USE OF THE SMART SOS DEVICE
READ MORE
Before using the product, read the instructions and warnings carefully. Failure to read and/
or comply with the instructions and warnings may result in improper use of the device or its
malfunction, resulting in damage to the product and personal injury.
1. This product is not a toy. Keep out of reach of children and/or animals, as it contains very
small components that might be swallowed. Do not use the product for purposes other than
those specified in this manual.
2. Before use, always make sure that the product has been properly installed and is functioning.
3. Fix the device to the vehicle in the place suggested and in any case in a protected position,
to avoid damaging it in the event of falls or crashes.
4. Do not expose the device to temperatures over 70°C /158°F.
5. The SOS function can only be activated using an app, downloadable from Google or Apple
stores, using the QR code below or from the website http://hourmeter.athena.eu.
6. For the SOS ALARM function to be active, the app must always be running in the background
while the vehicle is in use.
7. The SOS ALARM function can send texts and emails using the GSM network. In the absence
of a signal, it cannot be guaranteed that rescue requests are always successfully sent and
read by the recipient.
8. GPS coordinates may not be available, accurate or complete. They can only be sent if the
Smartphone connected with the device has sufficient network coverage to activate the data
transmission.
9. Activation of the SOS service provides a limited number of texts and emails; add-on packs
can be purchased using the GET SMART SOS app.
10. Using this product when driving could create distraction and danger. Do not check the
product or Smartphone displays while driving or in situations where distraction might cause
danger to your own or others’ safety.
11. Do not use the product in places where the use of Bluetooth devices is not permitted.
12. Always use the vehicle on which the device is fixed with care and with respect for the
Highway Code.
13. In order to use the device with the GET SMART SOS app, the Bluetooth connection must
be stable. Do not leave a distance of over 5 metres between the Smartphone and the device.
SMART SOS USER MANUAL
4
Page 5
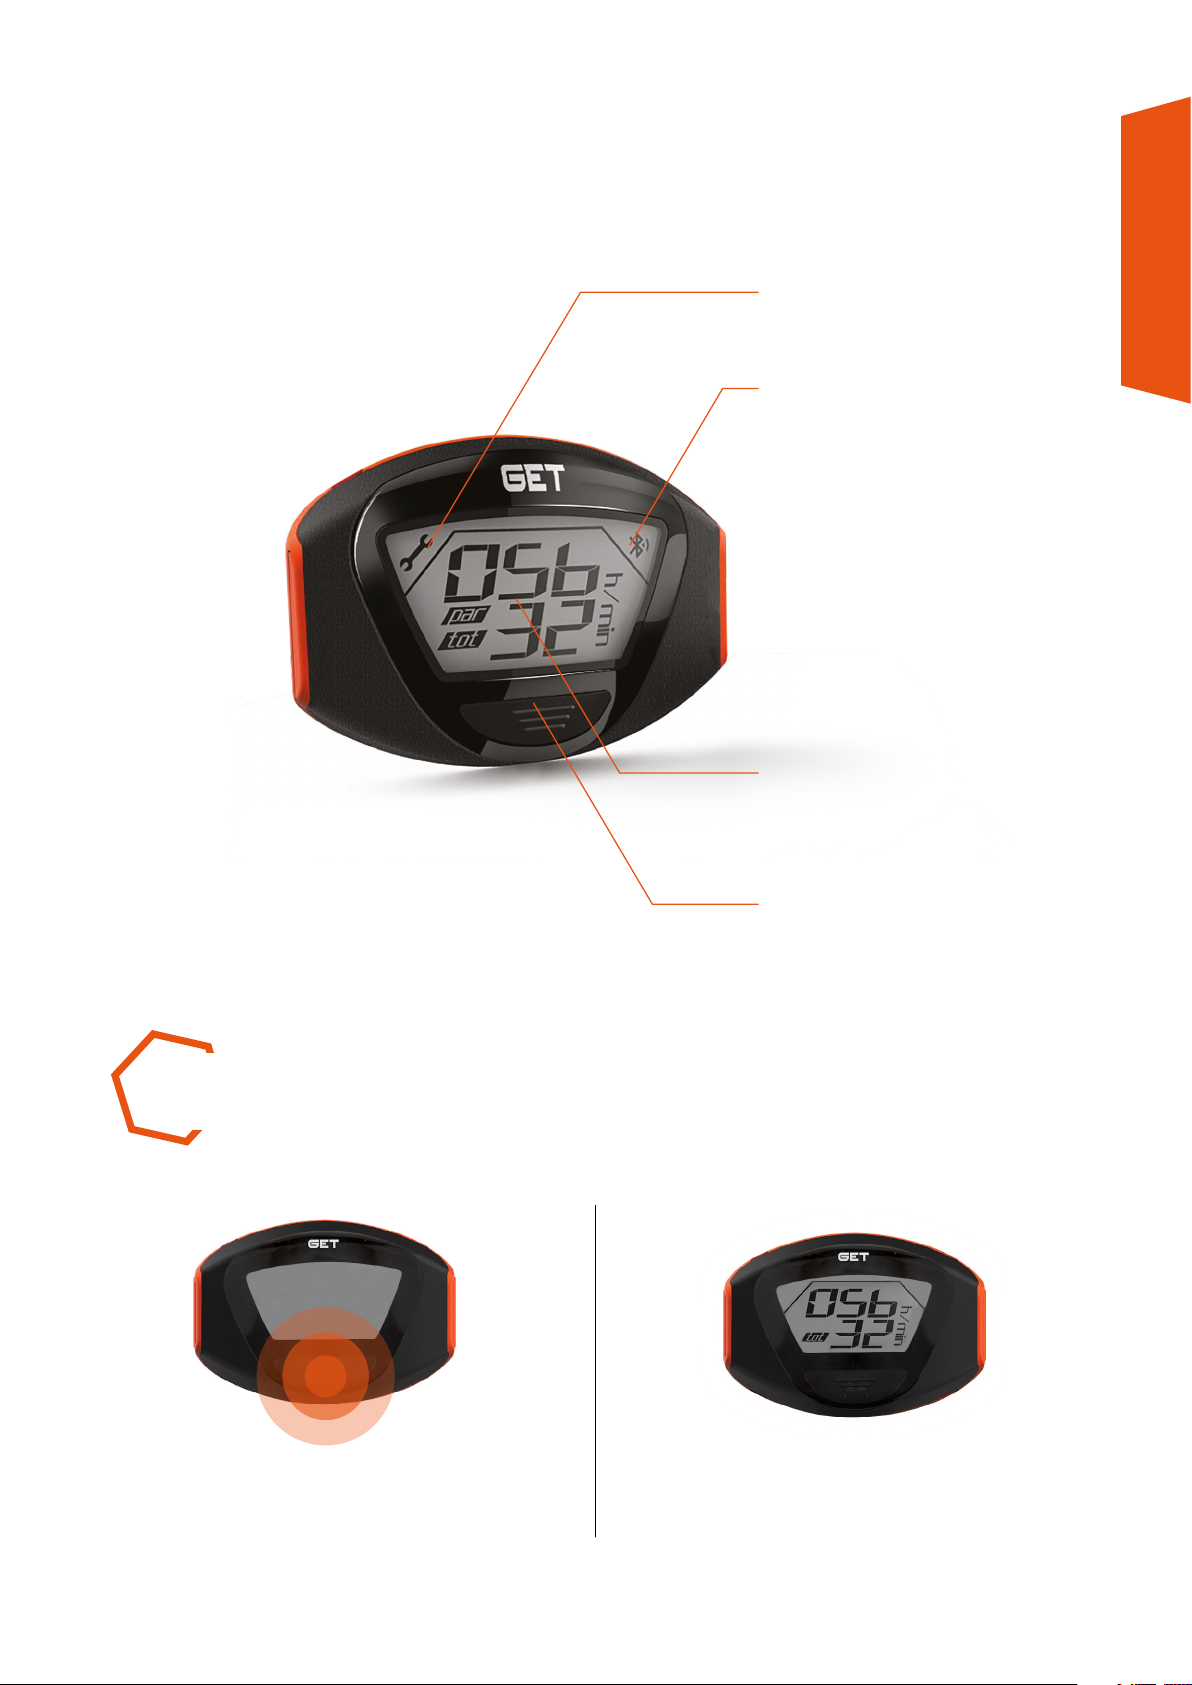
2. INDICATORS ON THE
SMART SOS DISPLAY
Service status icon
SMART SOS USER MANUAL
Bluetooth BLE status icon
TURNING ON THE DEVICE
WITH ENGINE OFF
Hour meter/alarm display
Multi-function button
Press the Multi-function button
to activate the display.
On releasing the button the total
hour meter is visualised.
5
Page 6
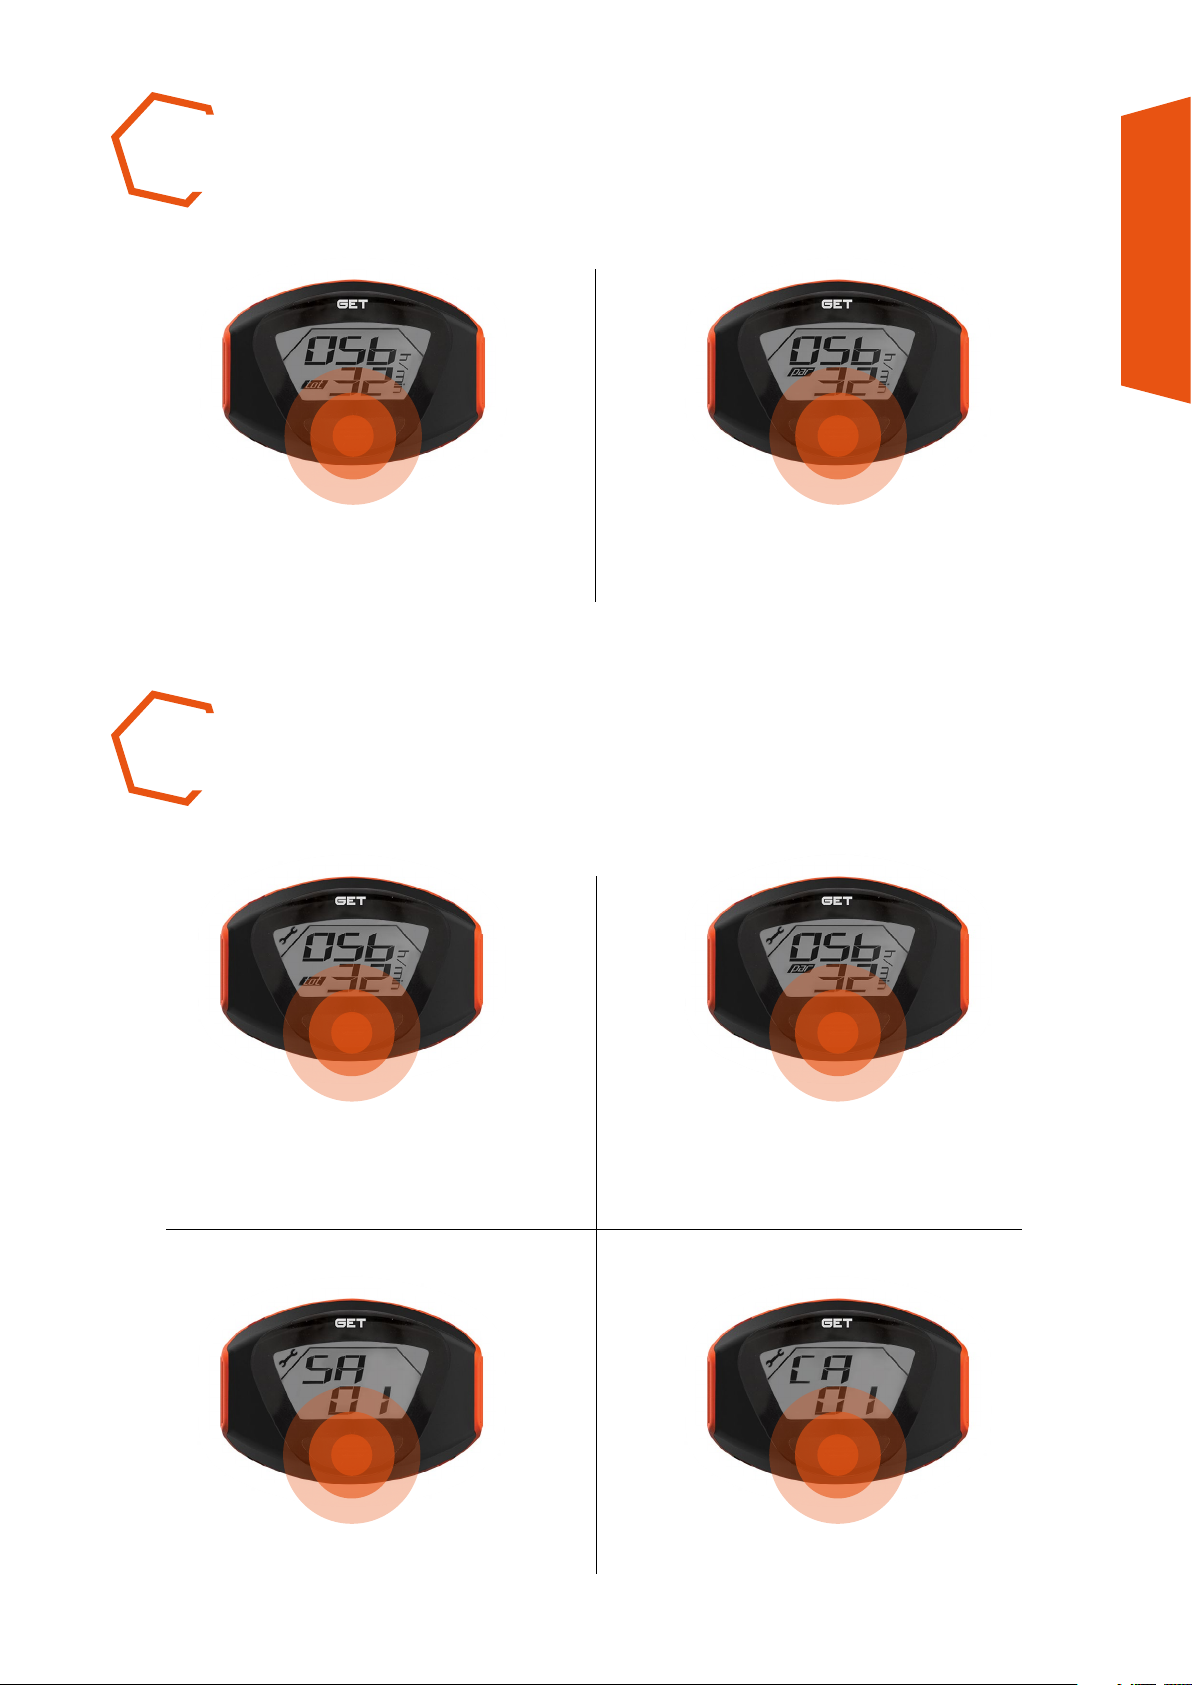
VISUALISING TIMES
TOTAL AND PARTIAL
button to visualise total time
(TOT icon active).
SMART SOS USER MANUAL
Or partial time (PAR icon active).Press the Multi-function
NOTIFICATION OF ALARMS
STANDARD AND CUSTOM (SERVICE ICON ACTIVE)
Press the Multi-function button.
Scroll through the screens to visualise
the number of the active alarm.
SA = Standard Alarms.
CA = Custom Alarms.
6
Page 7
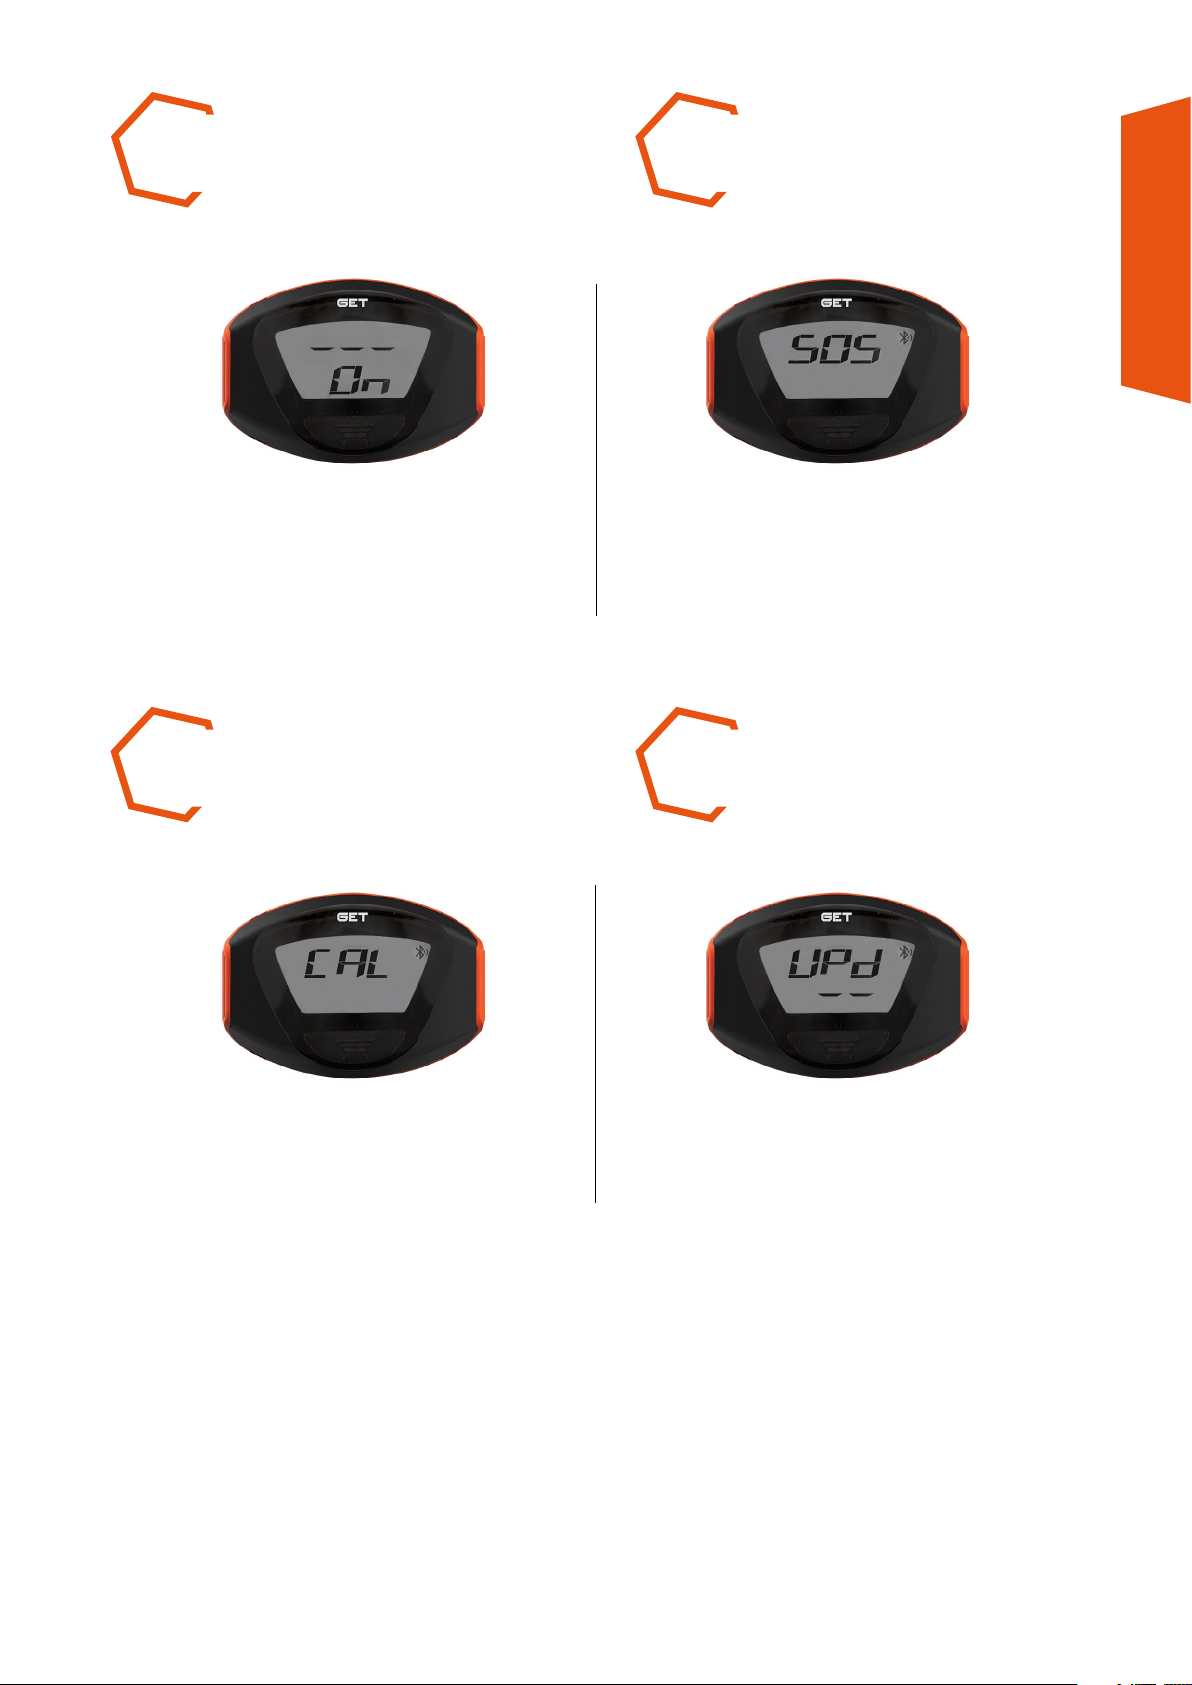
ENGINE RUNNING
SOS STATUS ACTIVE
REQUIRES GET SMART SOS APP
SMART SOS USER MANUAL
For the first 5 seconds,
---ON appears on the display. This
indicates that the device is picking up the
engine’s vibrations correctly.
CALIBRATION STATUS
REQUIRES GET SMART SOS APP
If the device detects an SOS
condition (vehicle overturned),
SOS will flash on the display.
SYSTEM UPDATE
REQUIRES GET SMART SOS APP
If the device is in SOS calibration mode,
CAL will flash on the display.
If the device is in update mode,
UPD will flash on the display.
7
Page 8
3. INSTALLING AND SETTING UP
THE DEVICE
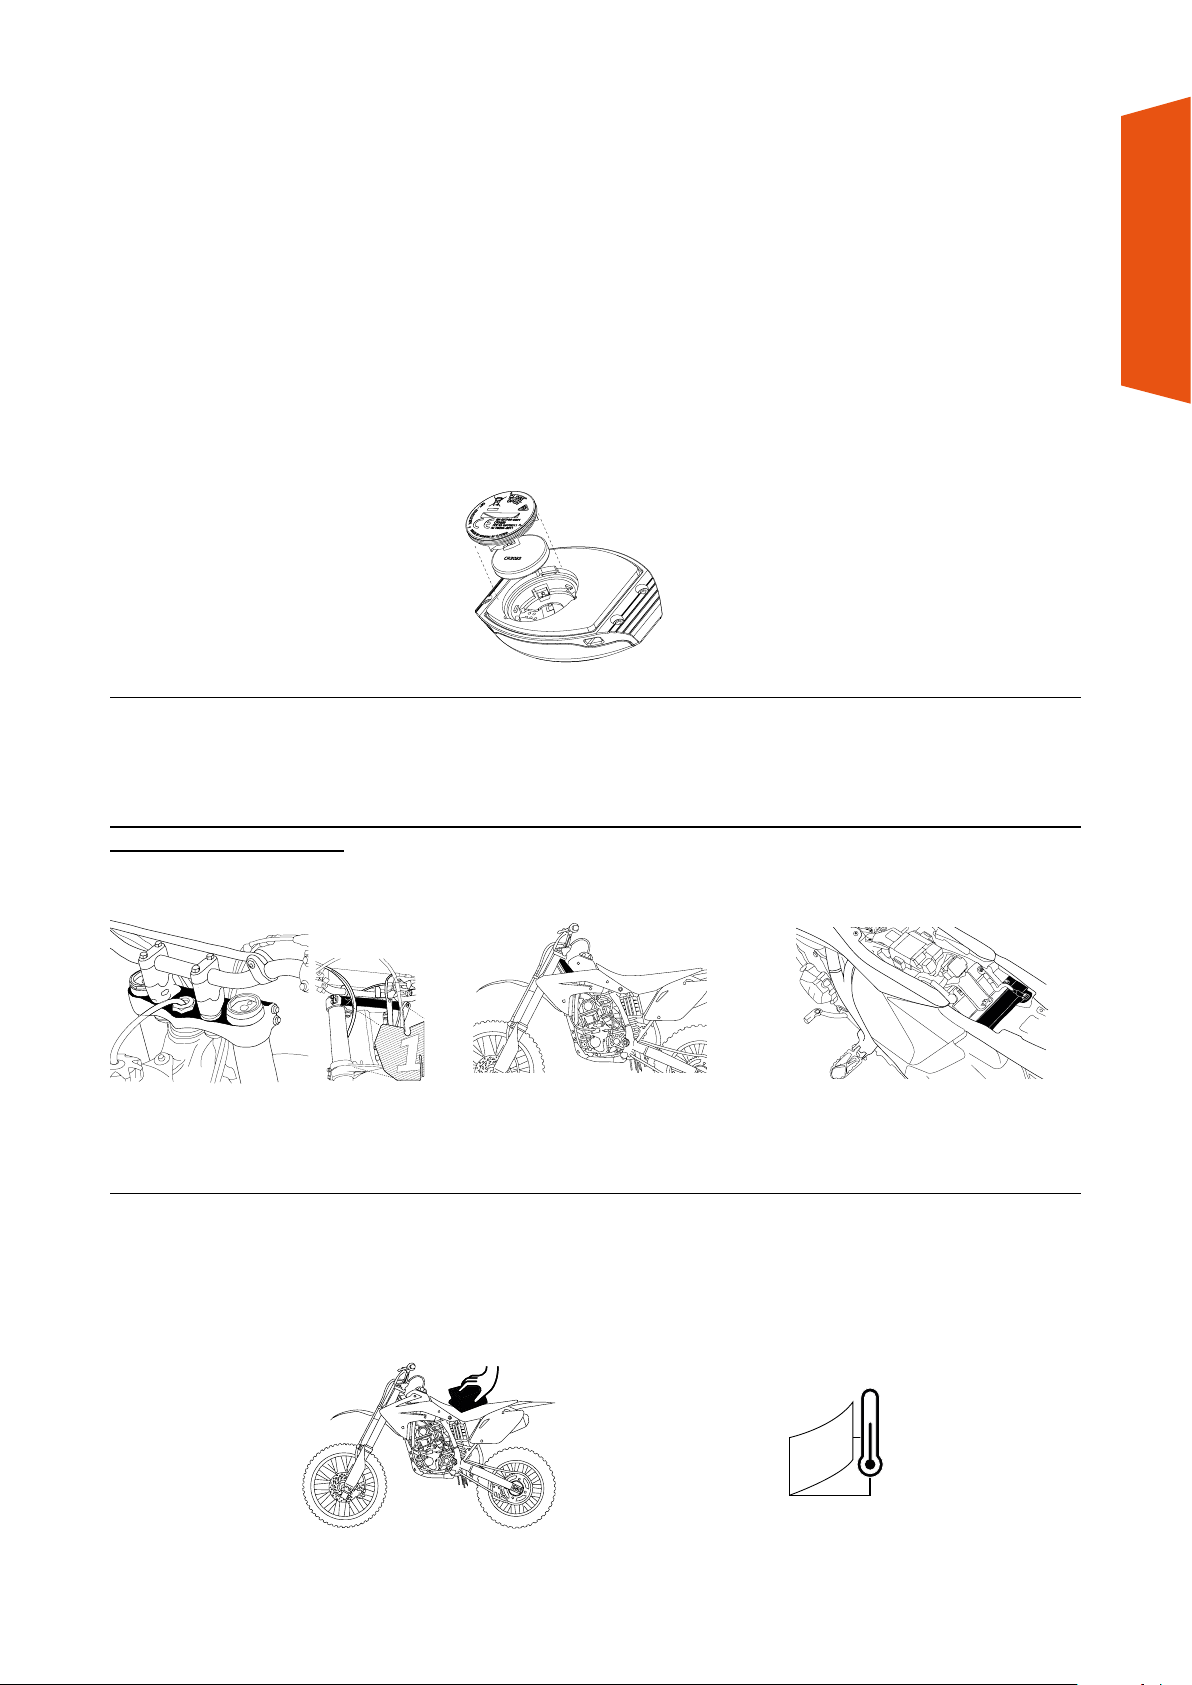
1. INSERT THE BATTERY taking care not to damage the rubber washer protecting the cap and the holder at the
back of the SMART SOS device.
SMART SOS USER MANUAL
2. DECIDE WHERE THE DEVICE IS TO BE FIXED and turn on the engine. Place the device on the spot where it is
to be fixed, pressing with two fingers at the sides of the display. Without pressing the button and with the engine
idling, the device should switch on automatically and begin to count the engine-hours.
N.B.: IF THE DEVICE DOES NOT SWITCH ON WITH ENGINE IDLING, TRY CARRYING OUT A CALIBRATION USING
THE GET SMART SOS APP.
TRIPLE CLAMP CHASSIS (AWAY FROM SOURCES
OF HEAT OVER 70°C /158°F)
3. FIX THE DEVICE, after first cleaning the bike surface before installation and gluing with double-sided tape
only at a temperature of over 10°C / 50°F. We recommend completing fixing of the device with two straps.
UNDER-SEAT COMPARTMENT / CHASSIS
IN POSITION PROTECTED FROM
MUD AND KNOCKS
>10°
8
Page 9
4. WHY USE THE
GET SMART SOS APP?
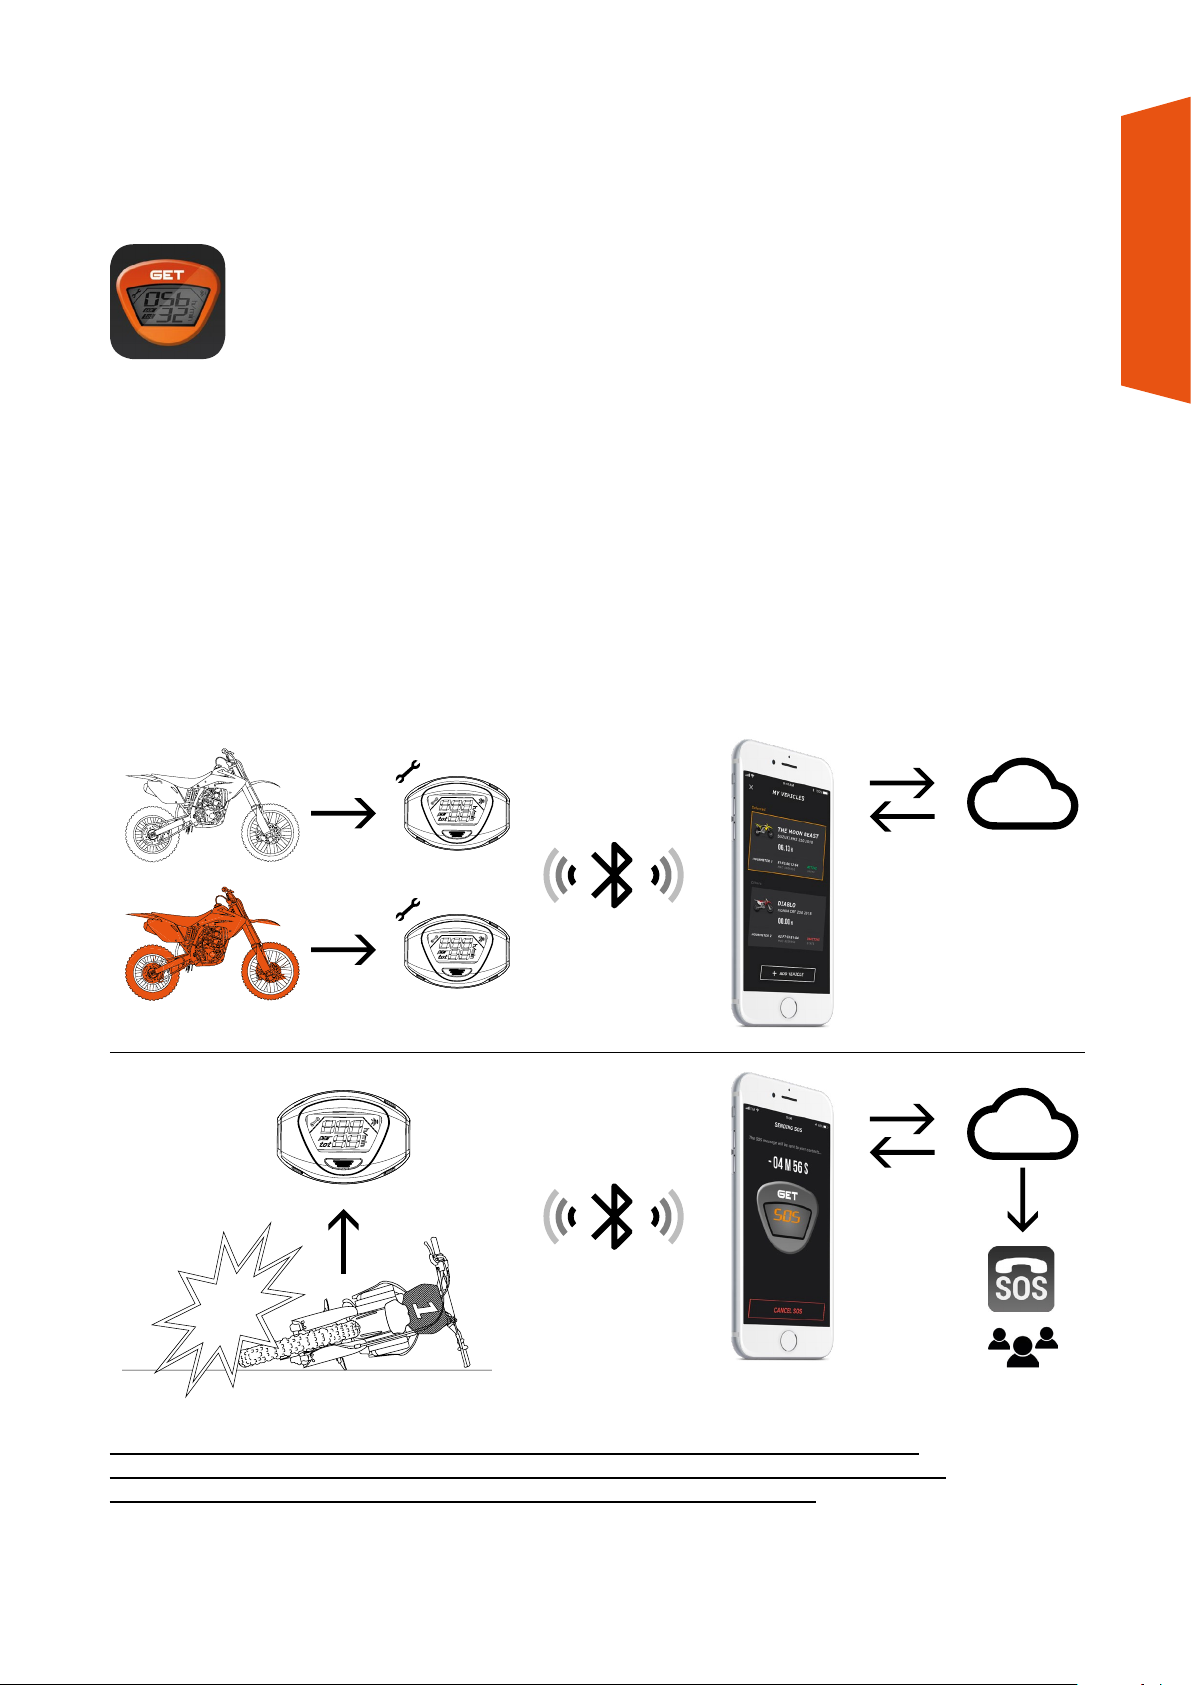
To fully use all functions of the SMART SOS device, you need the GET SMART SOS app.
The app enables you to:
• reset the partial hour meter
• verify installation and set your SMART SOS so that it picks up your vehicle-hours properly
• set the maintenance intervals (alarms) of your SMART SOS just as you want them
• activate the SOS function
• run one or more SMART SOS devices (useful for fleets)
• check your vehicle-hours any time, anywhere, thanks to data saved on free Cloud storage *
SMART SOS USER MANUAL
N.B.: THE APP REQUIRES BLUETOOTH ACTIVATION TO CONNECT TO SMART SOS DEVICES.
WE RECOMMEND ALWAYS ALLOWING THE GET SMART SOS APP ACCESS TO YOUR POSITION.
N.B.: THE APP MAY NEED A DATA CONNECTION TO ACTIVATE ALL FUNCTIONS.
* data are updated on the Cloud after each connection to your SMART SOS.
9
Page 10
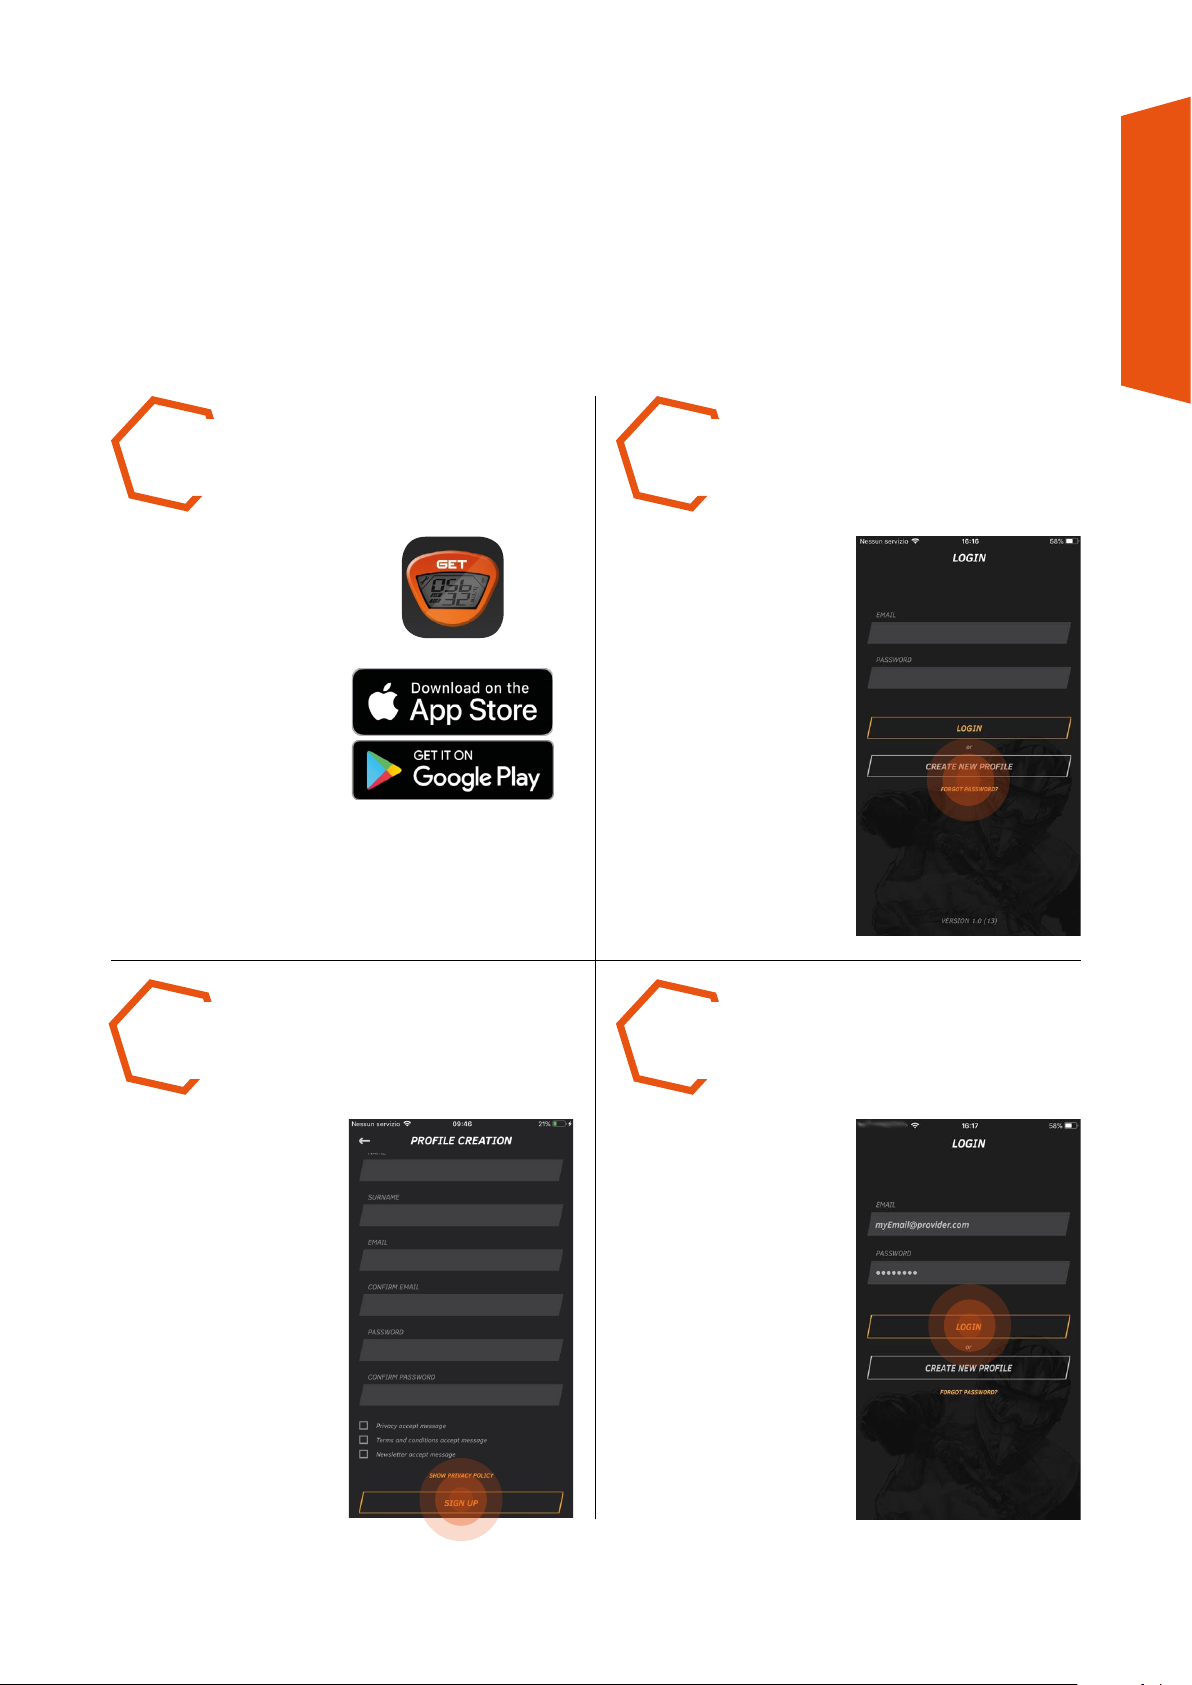
5. INSTALLING, CONFIGURING THE APP
AND CONNECTING TO SMART SOS DEVICES
STEP 1 STEP 2
SMART SOS USER MANUAL
DOWNLOAD and install
the GET SMART SOS app
from the store used by your
Smartphone or tablet. *
CREATE a new profile.
STEP 4STEP 3
COMPLETE all mandatory
fields, inserting an email
address (required to
confirm your profile) and
a password. Agree to
handling of your personal
data. Press SIGN UP to
confirm.
* the GET SMART SOS app requires the use of Bluetooth® and a GPS position.
AFTER RECEIVING email
confirmation that your
account is active, LOG IN
using your EMAIL and
PASSWORD.
10
Page 11
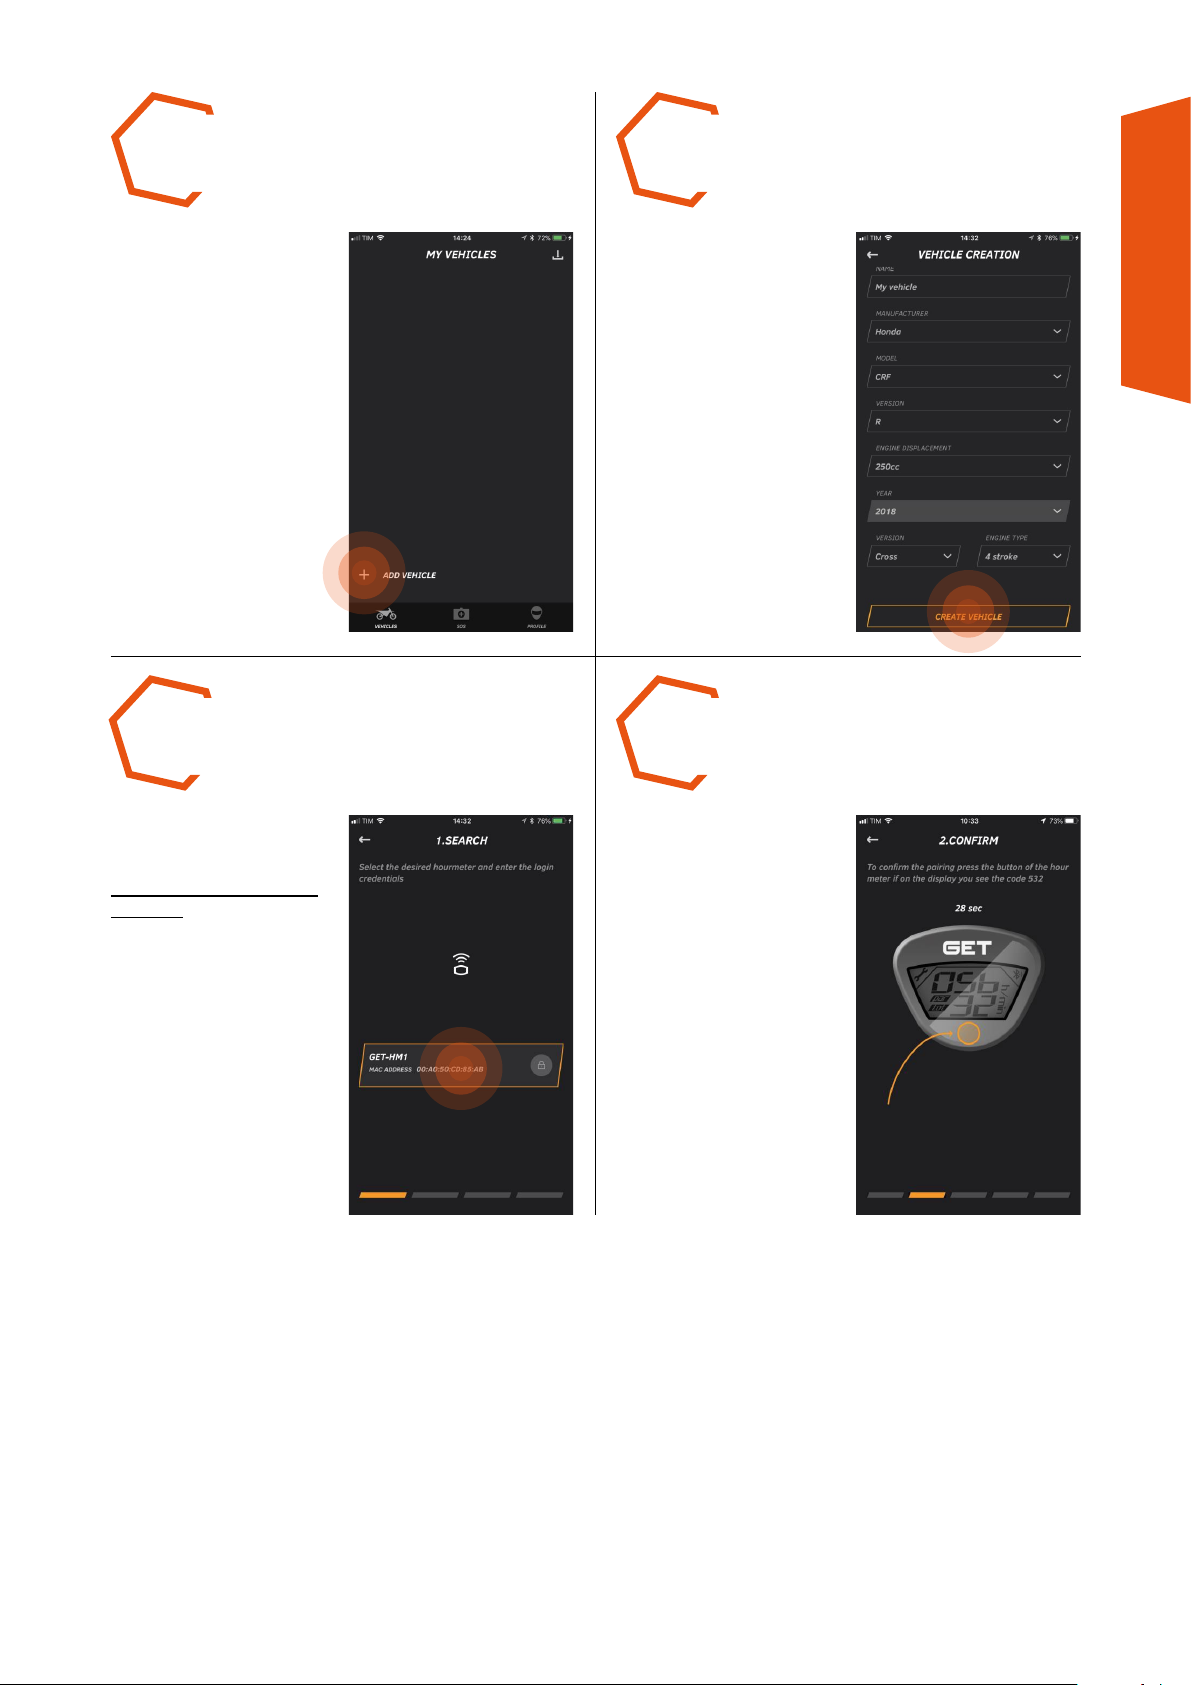
STEP 5 STEP 6
CHECK the SMART SOS
device is installed on the
vehicle and connect it to the
app using the function
+ ADD VEHICLE.
CHOOSE A NAME for your
vehicle and insert the data
required. If some data is not
available, select OTHER.
Lastly, press CREATE
VEHICLE.
STEP 8STEP 7
SMART SOS USER MANUAL
PRESS THE MULTIFUNCTION BUTTON of
the SMART SOS device
WITHOUT STARTING THE
VEHICLE.
Once visible in the page
1. SEARCH, select it and
continue.
IF REQUESTED, press again
the Multi-function button of
SMART SOS to link it to the
Smartphone.
11
Page 12
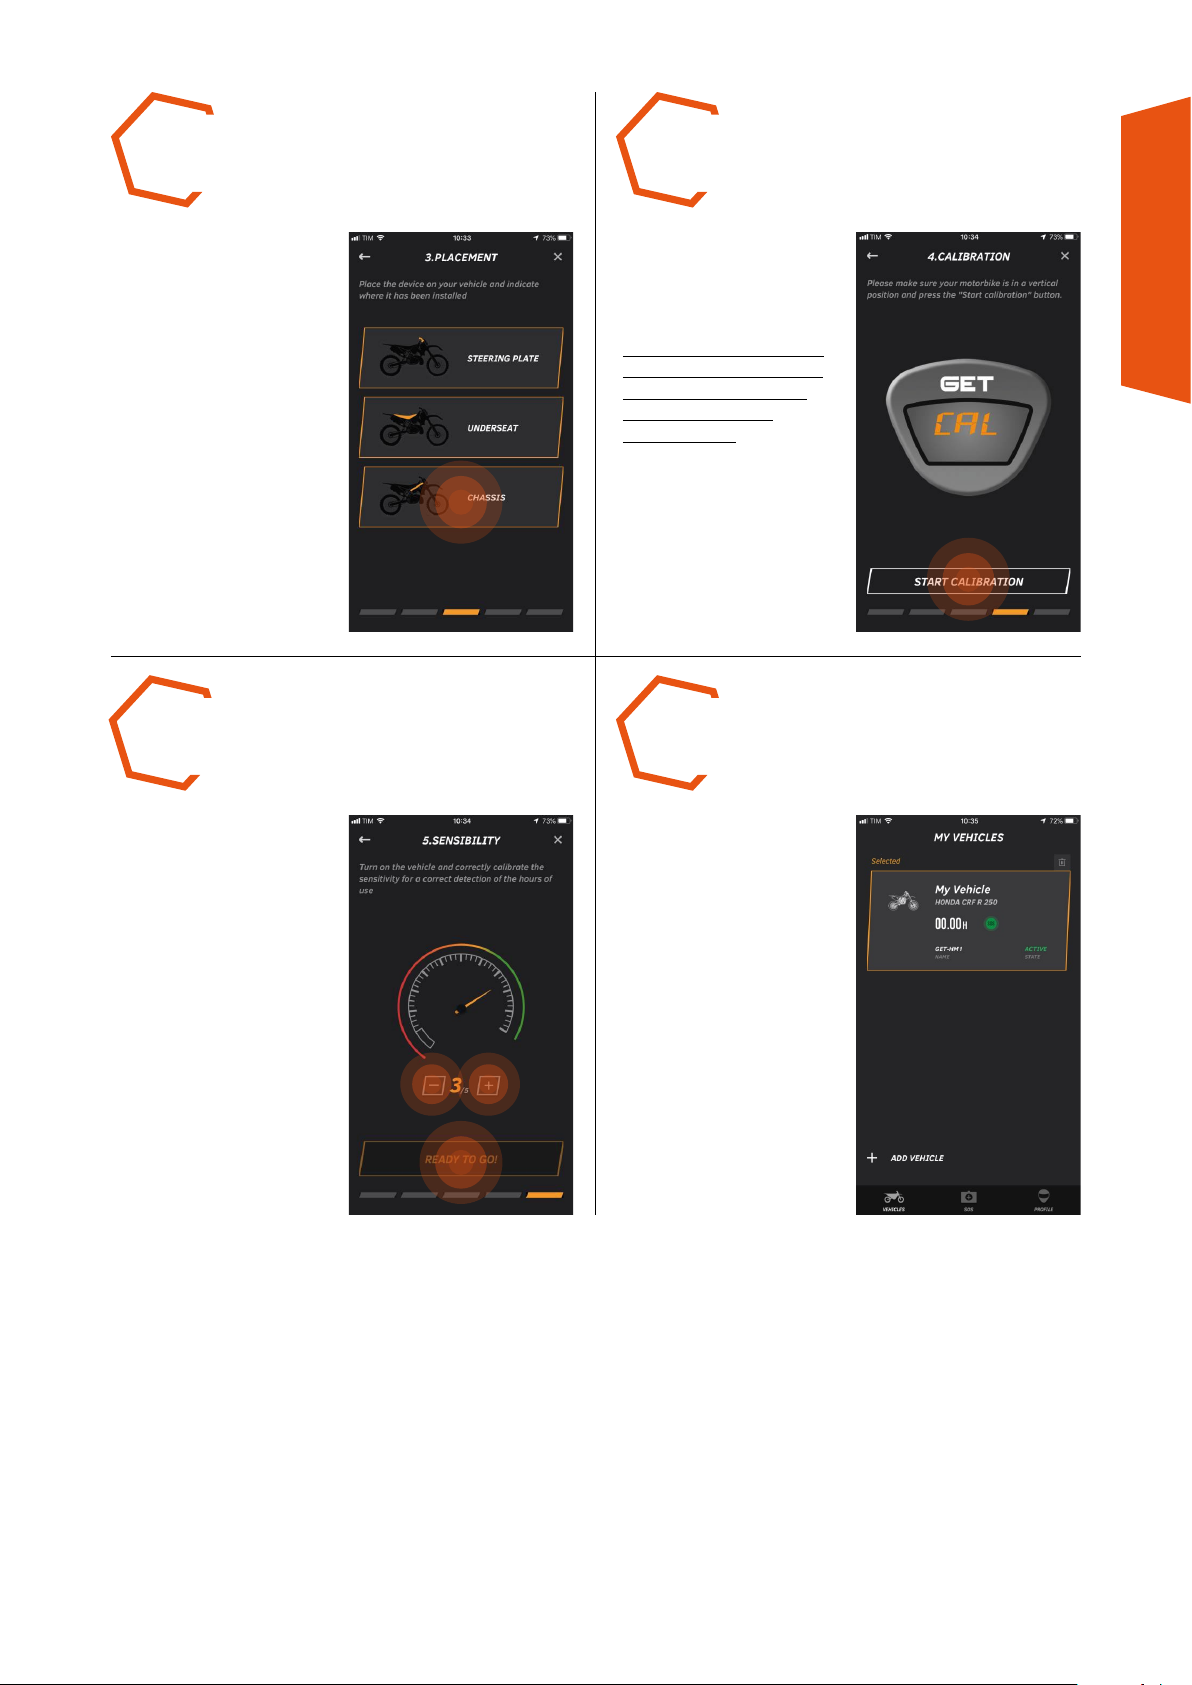
STEP 9 STEP 10
INDICATE THE POSITION
where the device has been
installed.
CALIBRATE the device
by pressing START
CALIBRATION to enable the
SOS function.
BE SURE TO CARRY OUT
CALIBRATION WITH THE
ENGINE OFF AND THE
VEHICLE UPRIGHT
AND PARKED.
STEP 12STEP 11
SMART SOS USER MANUAL
START THE ENGINE
and if necessary regulate
the tuning, using the +
and – buttons, so that the
indicator is in the green
zone. Press READY TO GO
to end this procedure.
In the MY VEHICLES
section, VEHICLE CREATED
will appear and will be
exclusively linked to the
SMART SOS used during
the creation process.
12
Page 13
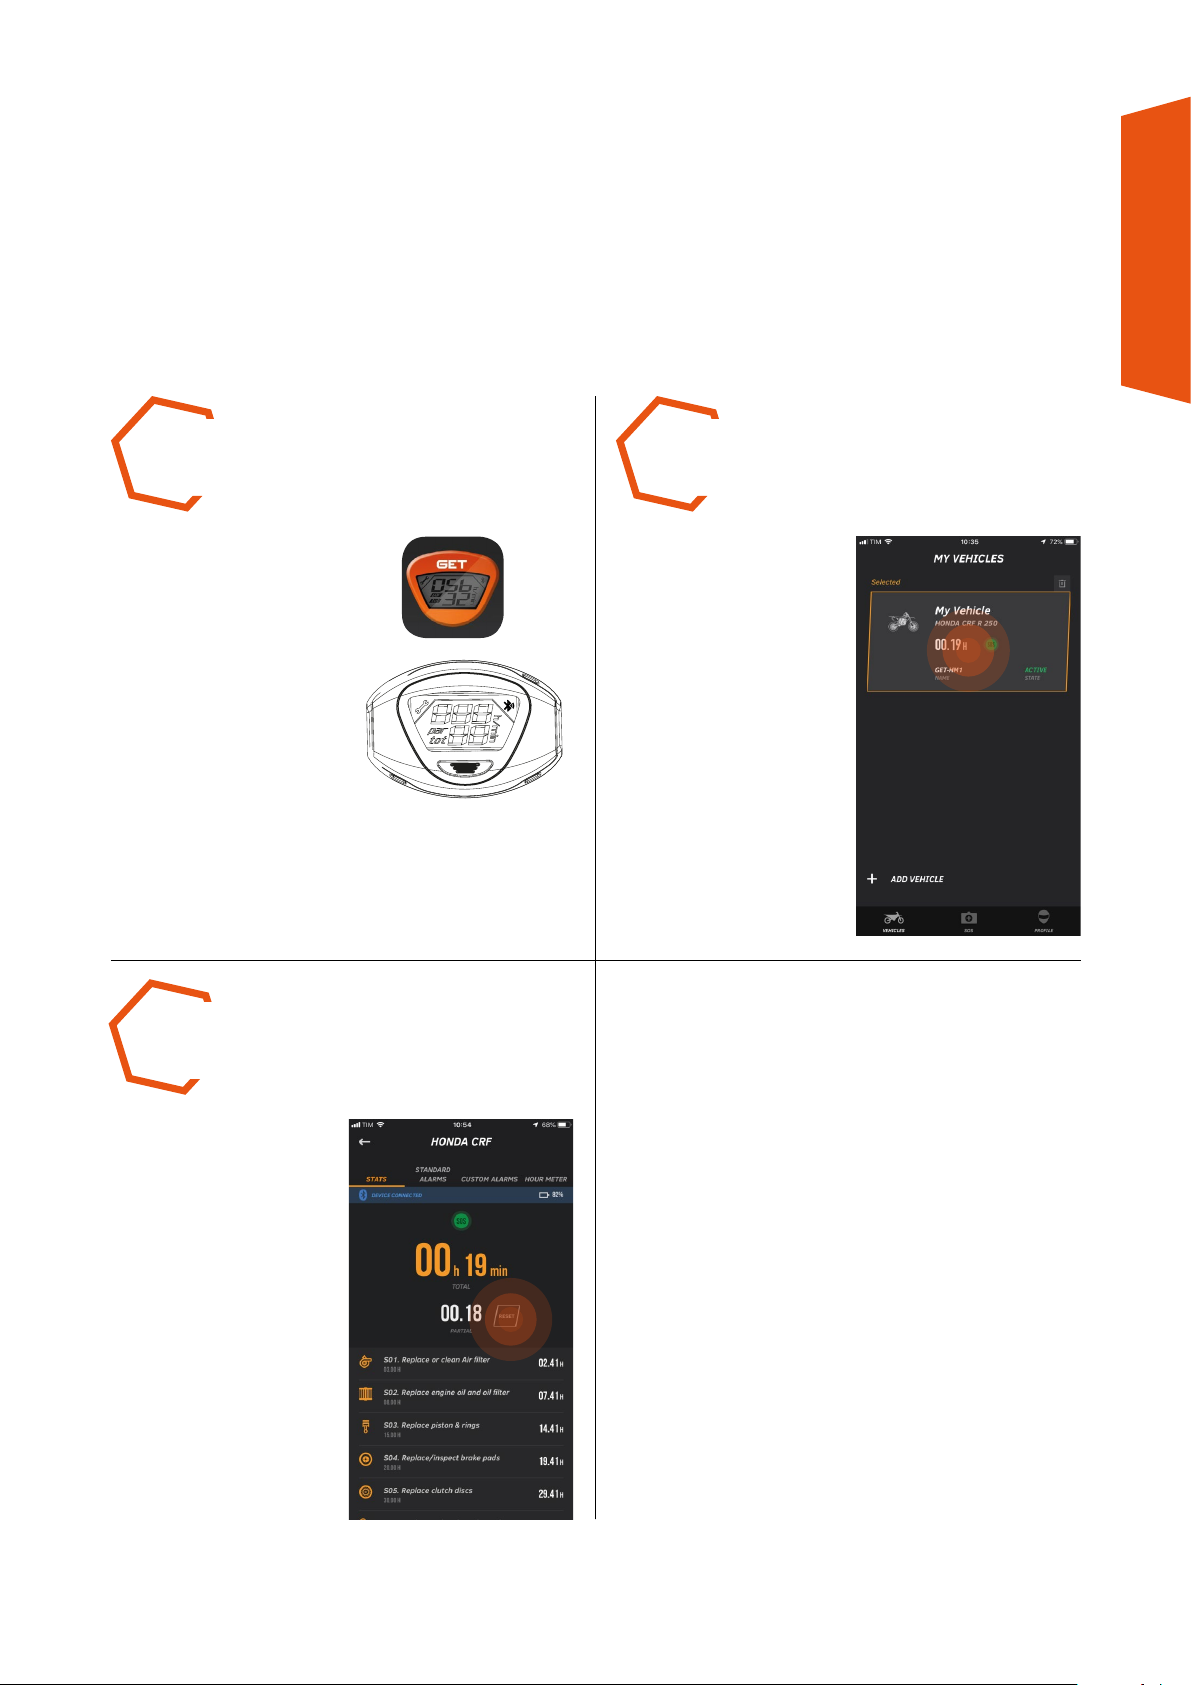
6. RESETTING THE PARTIAL
HOUR METER
STEP 1 STEP 2
SMART SOS USER MANUAL
RUN the GET SMART SOS
app and check the display is
on (turn the engine on and
press the Multi-function
button).
As soon as the GET SMART
SOS app identifies the
device, the Bluetooth icon
on the display will come on.
STEP 3
From the MY VEHICLES
page, SELECT the vehicle
to which the device just
connected is linked (ACTIVE
status).
RESET the partial hour
meter by pressing
the RESET key on the
STAT S page.
13
Page 14
7. THE ALARMS (CAN BE USED
FOR MAINTENANCE INTERVALS)
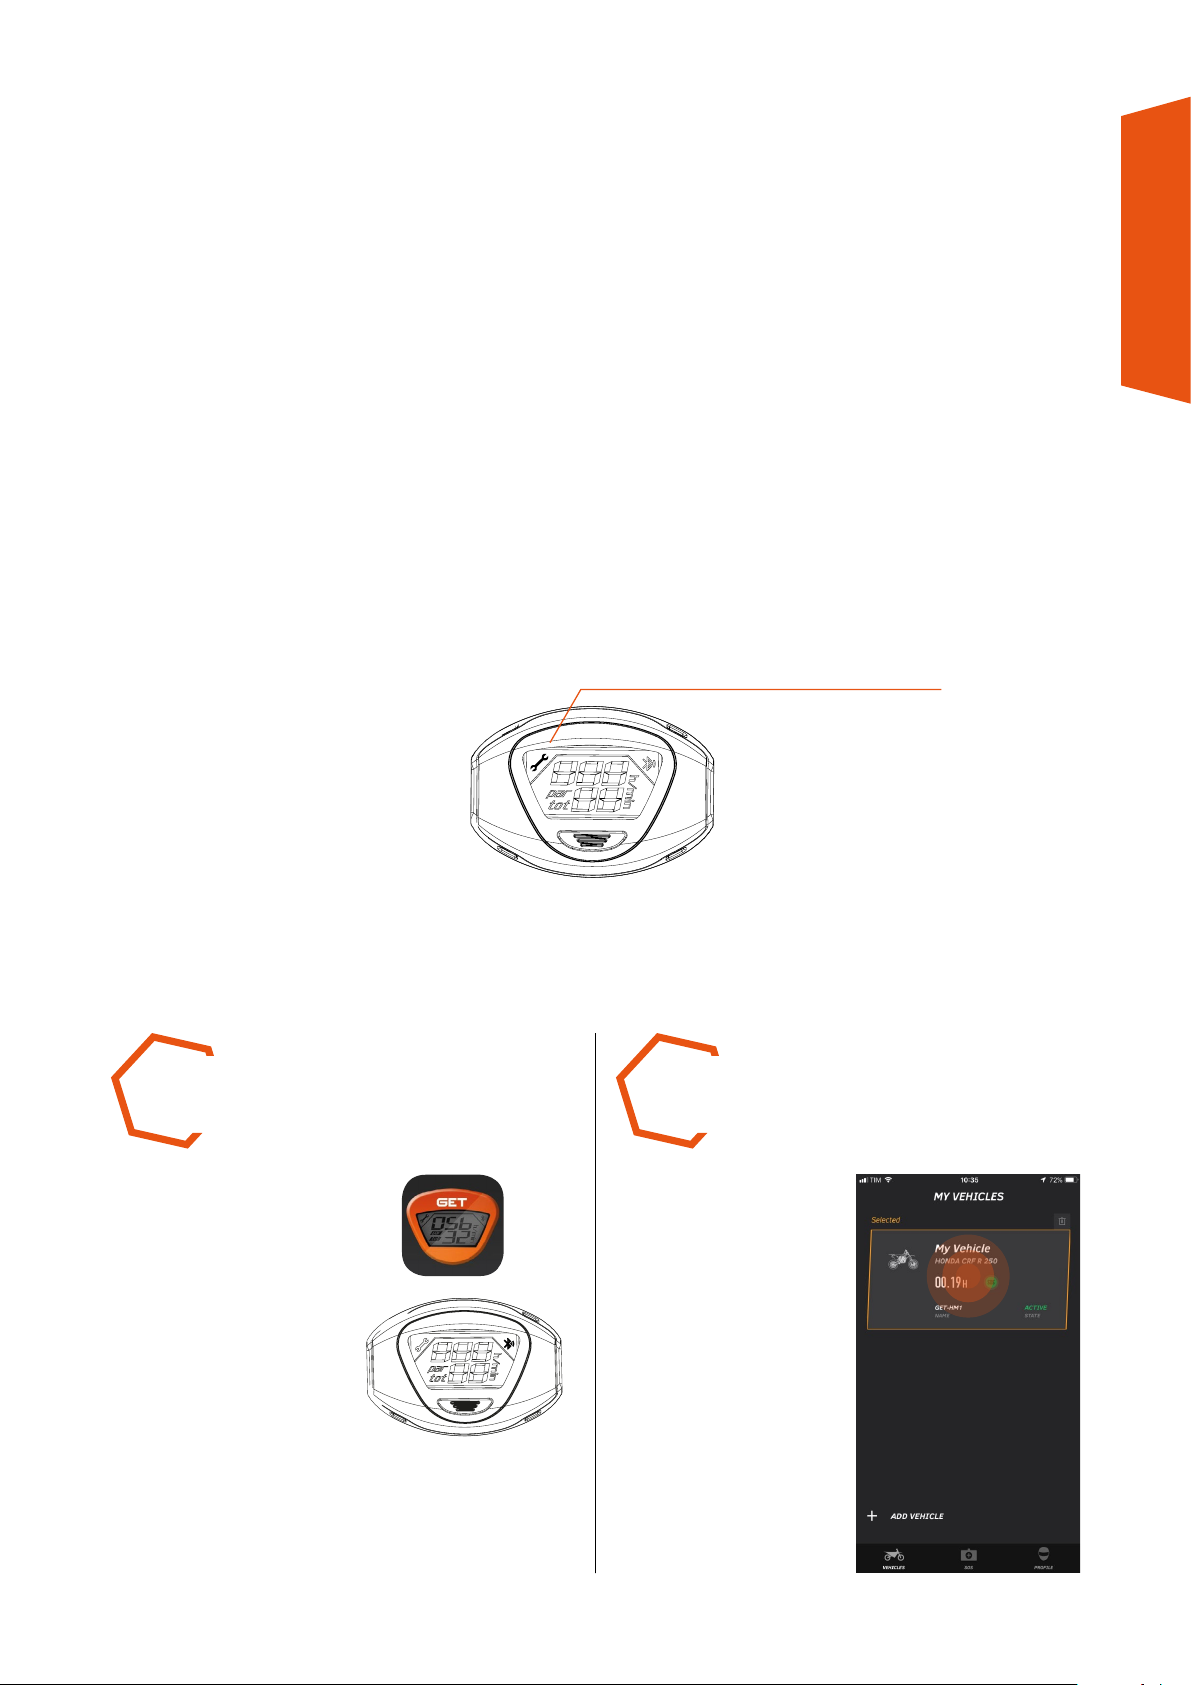
The GET SMART SOS app allows you to run 9 pre-installed standard alarms (SA) and to insert another 10
custom alarms (CA). The alarms can be used to warn of maintenance required (e.g. change of oil, filters and
other parts).
Standard alarms (SA) are fixed and modifiable only within the time interval, while custom alarms (CA) can be
completely managed, modified and removed by the user.
When the alarm time limit is exceeded, the display will activate the Service icon. By scrolling through the pages
using the Multi-function button you can display the number corresponding to the active alarm.
Use the GET SMART SOS app to get details of the active alarm and/or reset it.
Alarms are set on the GET SMART SOS app and updated on the device when it is connected to Bluetooth®.
Service icon
SMART SOS USER MANUAL
7.1 RESETTING AN ALARM
STEP 1 STEP 2
Run the GET SMART SOS
app and check the display is
on (turn the engine on and
press the Multi-function
button). As soon as the GET
SMART SOS app identifies
the device, the Bluetooth
icon on the display will
come on.
From the MY VEHICLES
page, SELECT the vehicle
that is connected (ACTIVE
status in the vehicle list).
14
Page 15
STEP 3 STEP 4
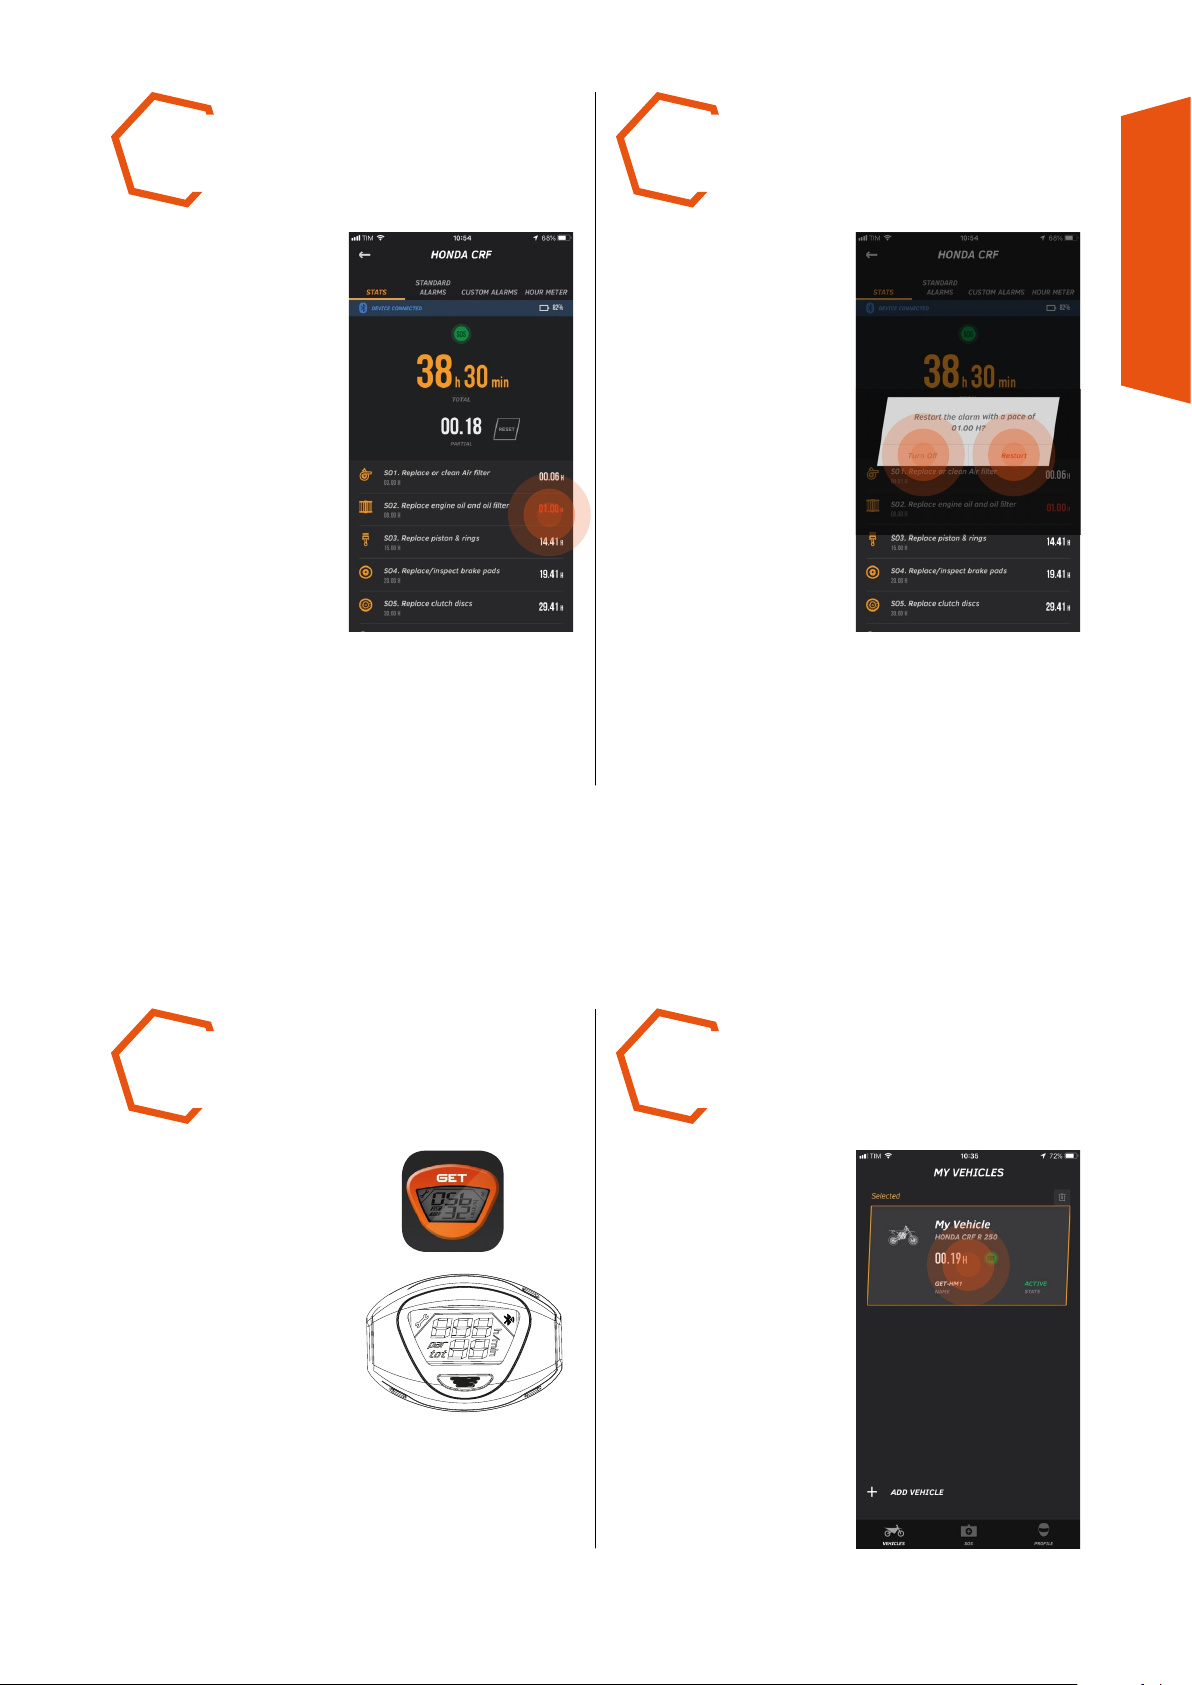
RESET/DISABLE the active
alarm, touching with your
finger the number of hours
and minutes on the right
(in red).
CHOOSE whether to
completely disable the
alarm (Turn Off function)
or reset the count only
(Restart function).
The Turn Off function will
make the alarm disappear
from the STATS page - to
restore it refer to the next
chapter.
Use the Restart function
when you have to reset
the count (normally after
performing a maintenance
operation) in order to be
alerted again when the time
limit set runs out.
N.B.: IN BOTH CASES
THE SERVICE ICON WILL
DISAPPEAR FROM THE
SMART SOS DISPLAY.
SMART SOS USER MANUAL
7.2 CREATING AN ALARM AND/OR MODIFYING THE WARNING INTERVAL
STEP 1 STEP 2
START the GET SMART
SOS app and verify that the
display is on (turn on the
engine or press the Multifunction button). As soon
as the GET SMART SOS
app identifies the device,
the Bluetooth icon on the
display will come on.
N.B.: ADDING OR
MODIFYING AN ALARM
DOES NOT REQUIRE THE
HOUR METER DEVICE,
BUT IT IS PREFERABLE
TO HAVE IT CONNECTED
TO UPDATE ITS
CONFIGURATION.
From the MY VEHICLES
page, SELECT the vehicle
that is connected (ACTIVE
status in the vehicle list).
15
Page 16
STEP 3 STEP 4
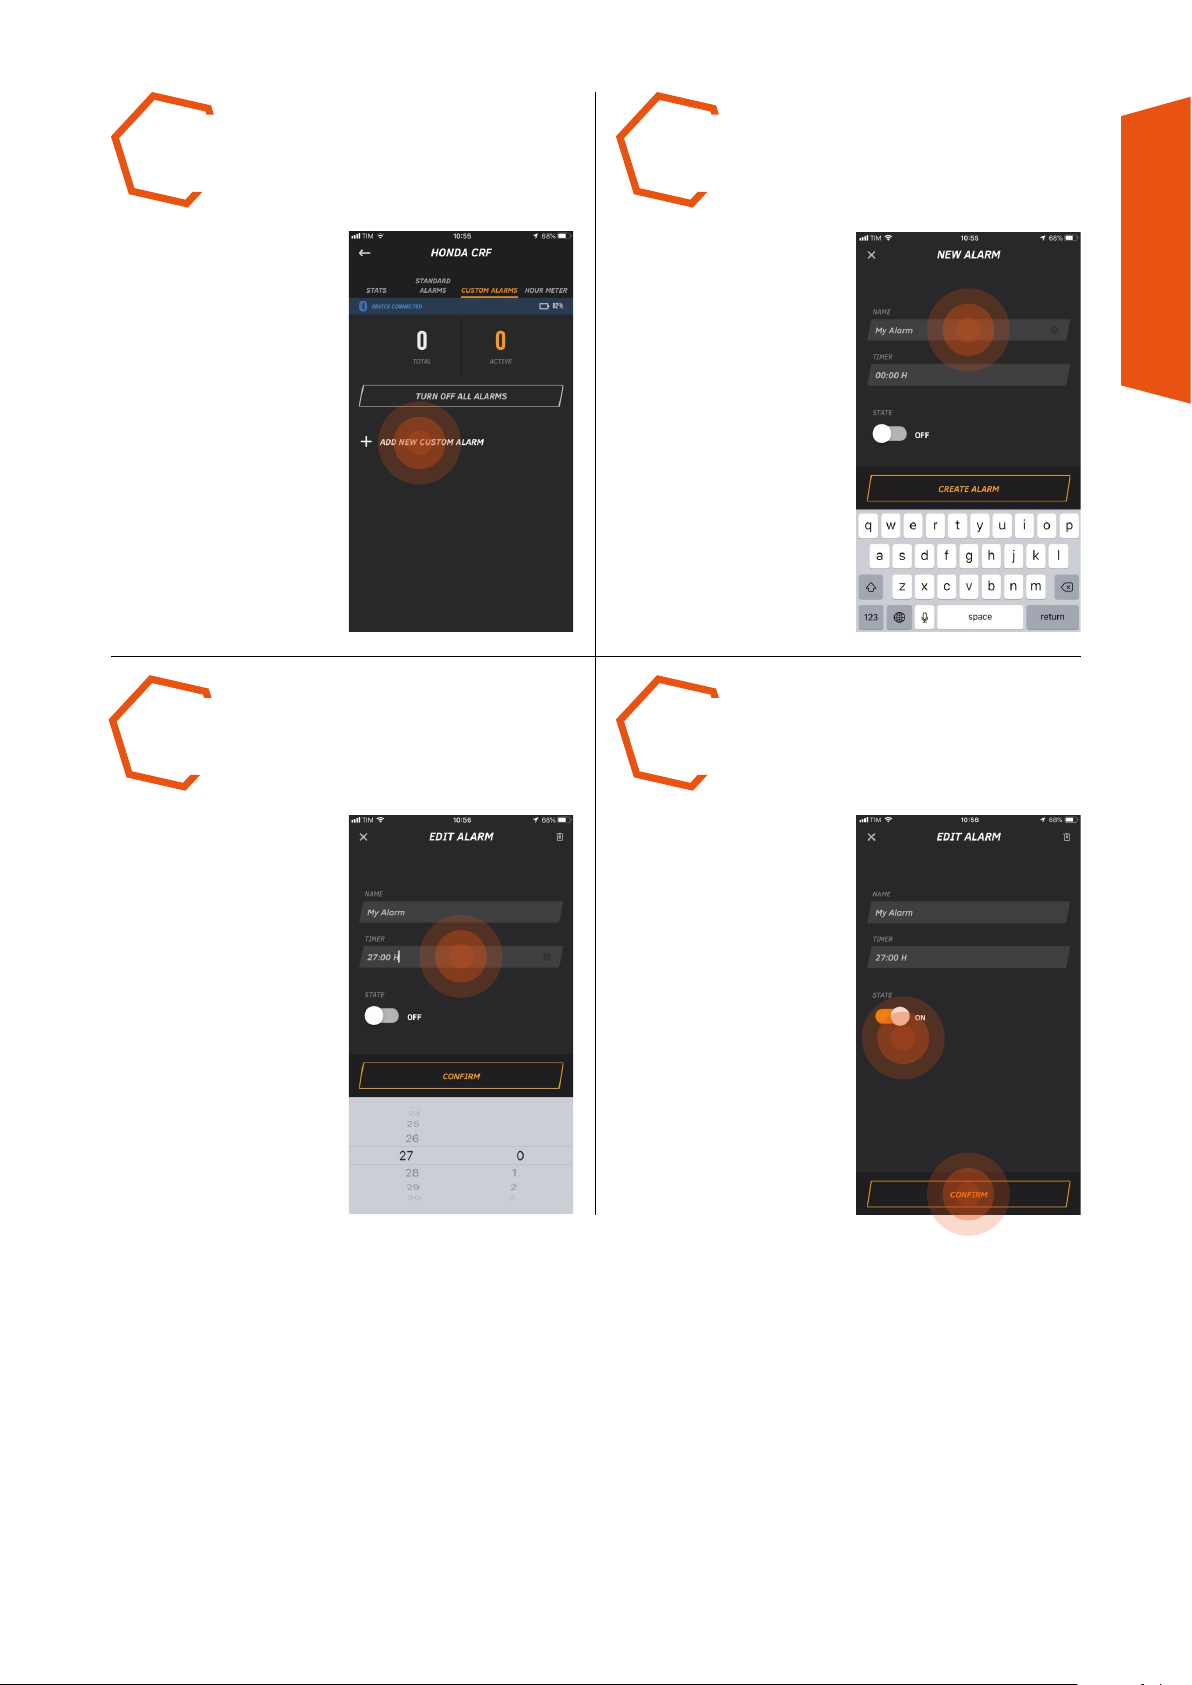
GO to the CUSTOM ALARMS
page and activate + ADD
NEW CUSTOM ALARM.
INSERT A NAME for the
alarm in the NAME field.
SMART SOS USER MANUAL
STEP 6STEP 5
SET UP the alarm interval
in the TIMER field.
ACTIVATE the alarm by
selecting ON in the STATUS
field. Then press CONFIRM.
16
Page 17
7.3 ELIMINARE O DISABILITARE UN ALLARME PERSONALIZZATO
(ALLARME CUSTOM)
STEP 1 STEP 2
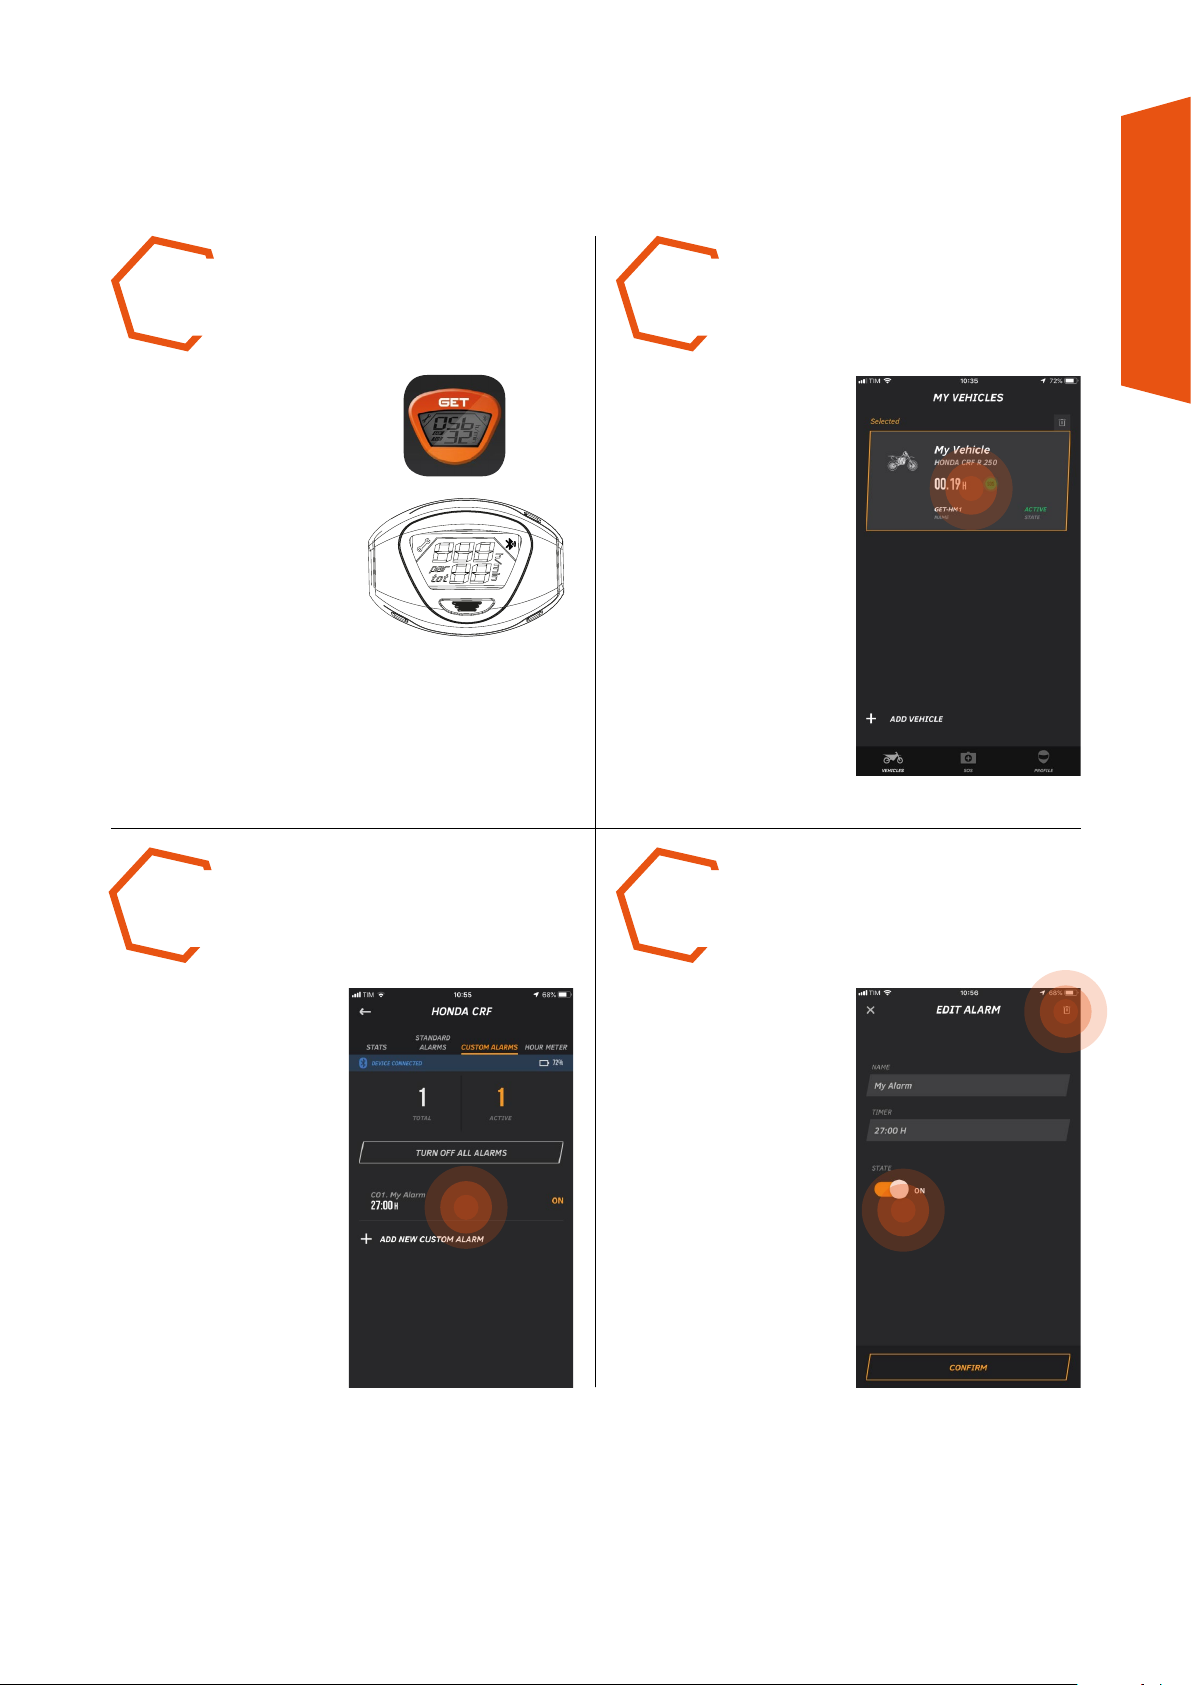
Run the GET SMART SOS
app and check the display is
on (turn the engine on and
press the Multi-function
button). As soon as the
app identifies the device,
the Bluetooth icon on the
display will come on.
N.B.: ADDING OR
MODIFYING AN ALARM
DOES NOT REQUIRE THE
HOUR METER DEVICE,
BUT IT IS PREFERABLE
TO HAVE IT CONNECTED
TO UPDATE ITS
CONFIGURATION.
From the MY VEHICLES
page, SELECT the vehicle
that is connected (ACTIVE
status in the vehicle list).
SMART SOS USER MANUAL
GO TO the CUSTOM
ALARMS page and touch
the alarm to be modified.
STEP 4STEP 3
DEACTIVATE the alarm
by choosing OFF in the
STATUS field, or press
the trash bin top right to
eliminate it completely.
17
Page 18
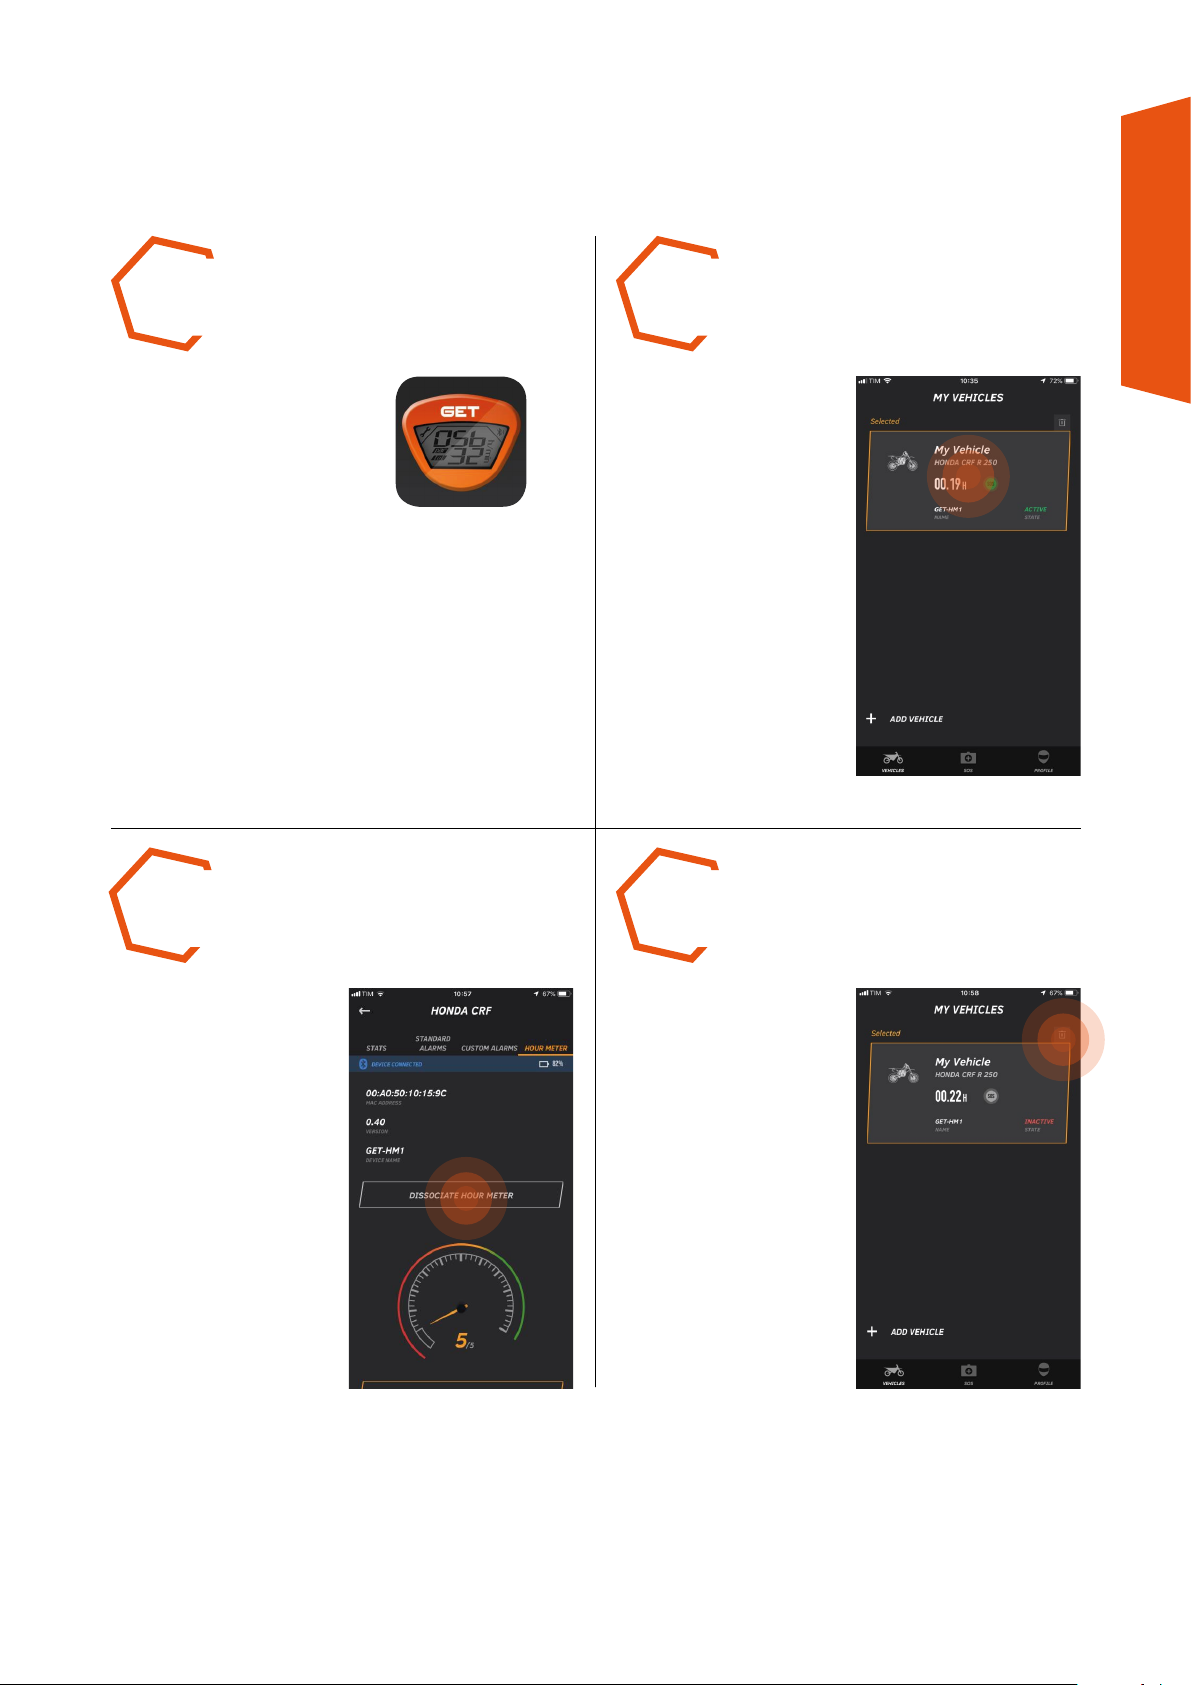
7.4 CANCELLING A VEHICLE
STEP 1 STEP 2
RUN the
GET SMART SOS app.
From the MY VEHICLES
page, SELECT the vehicle to
be eliminated.
SMART SOS USER MANUAL
DISSOCIATE the device
connected to the vehicle
using the DISSOCIATE
HOUR METER button on the
HOUR METER page.
STEP 4STEP 3
GO BACK to the MY
VEHICLES page and
touch the trash bin on the
right of the vehicle to be
eliminated.
18
Page 19
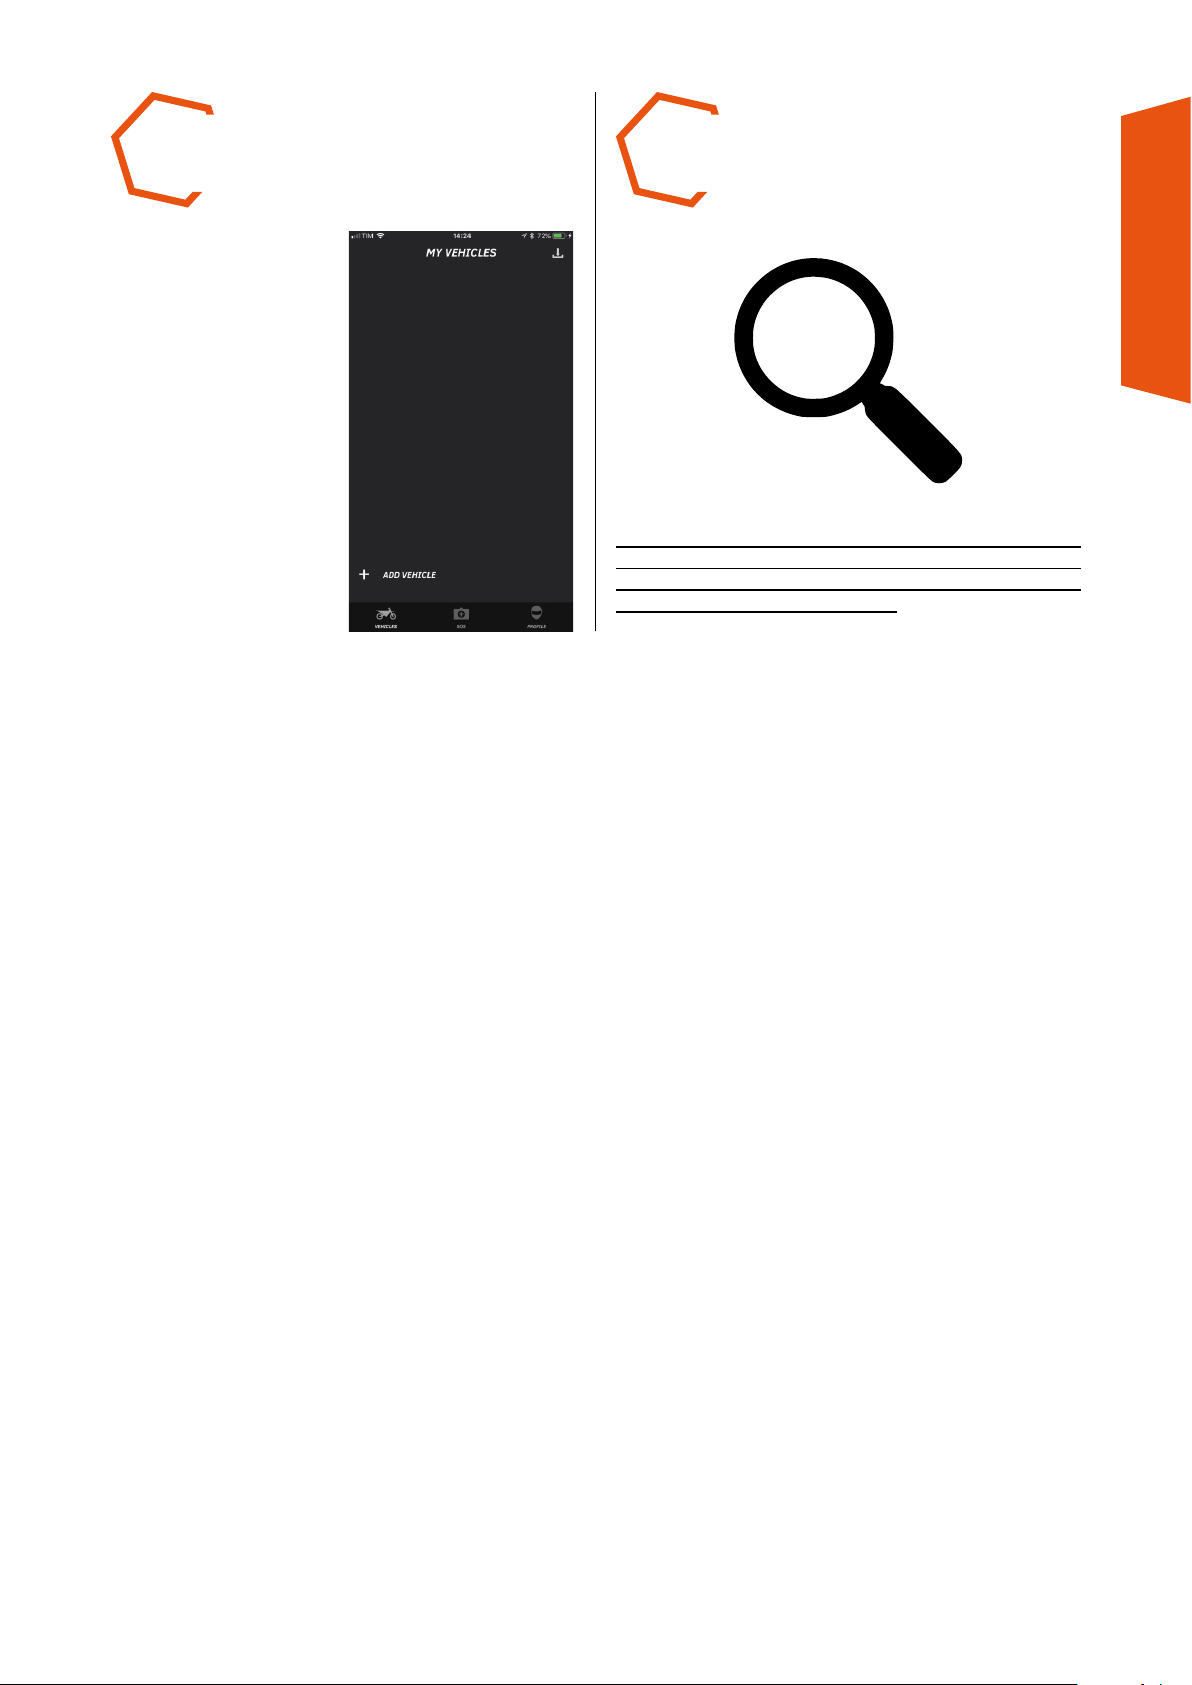
STEP 5
THE VEHICLE will be
removed from the MY
VEHICLES page and the
device can be linked to
a new vehicle.
ATTENTION
SMART SOS USER MANUAL
N.B.: THE SMART SOS DEVICE CAN ONLY BE LINKED TO
ONE VEHICLE. THIS MEANS THAT IT CAN NO LONGER
BE USED IN ANY WAY BY ANYONE ELSE, UNLESS IT IS
DISSOCIATED FROM THE VEHICLE.
19
Page 20
8. THE SOS FUNCTION
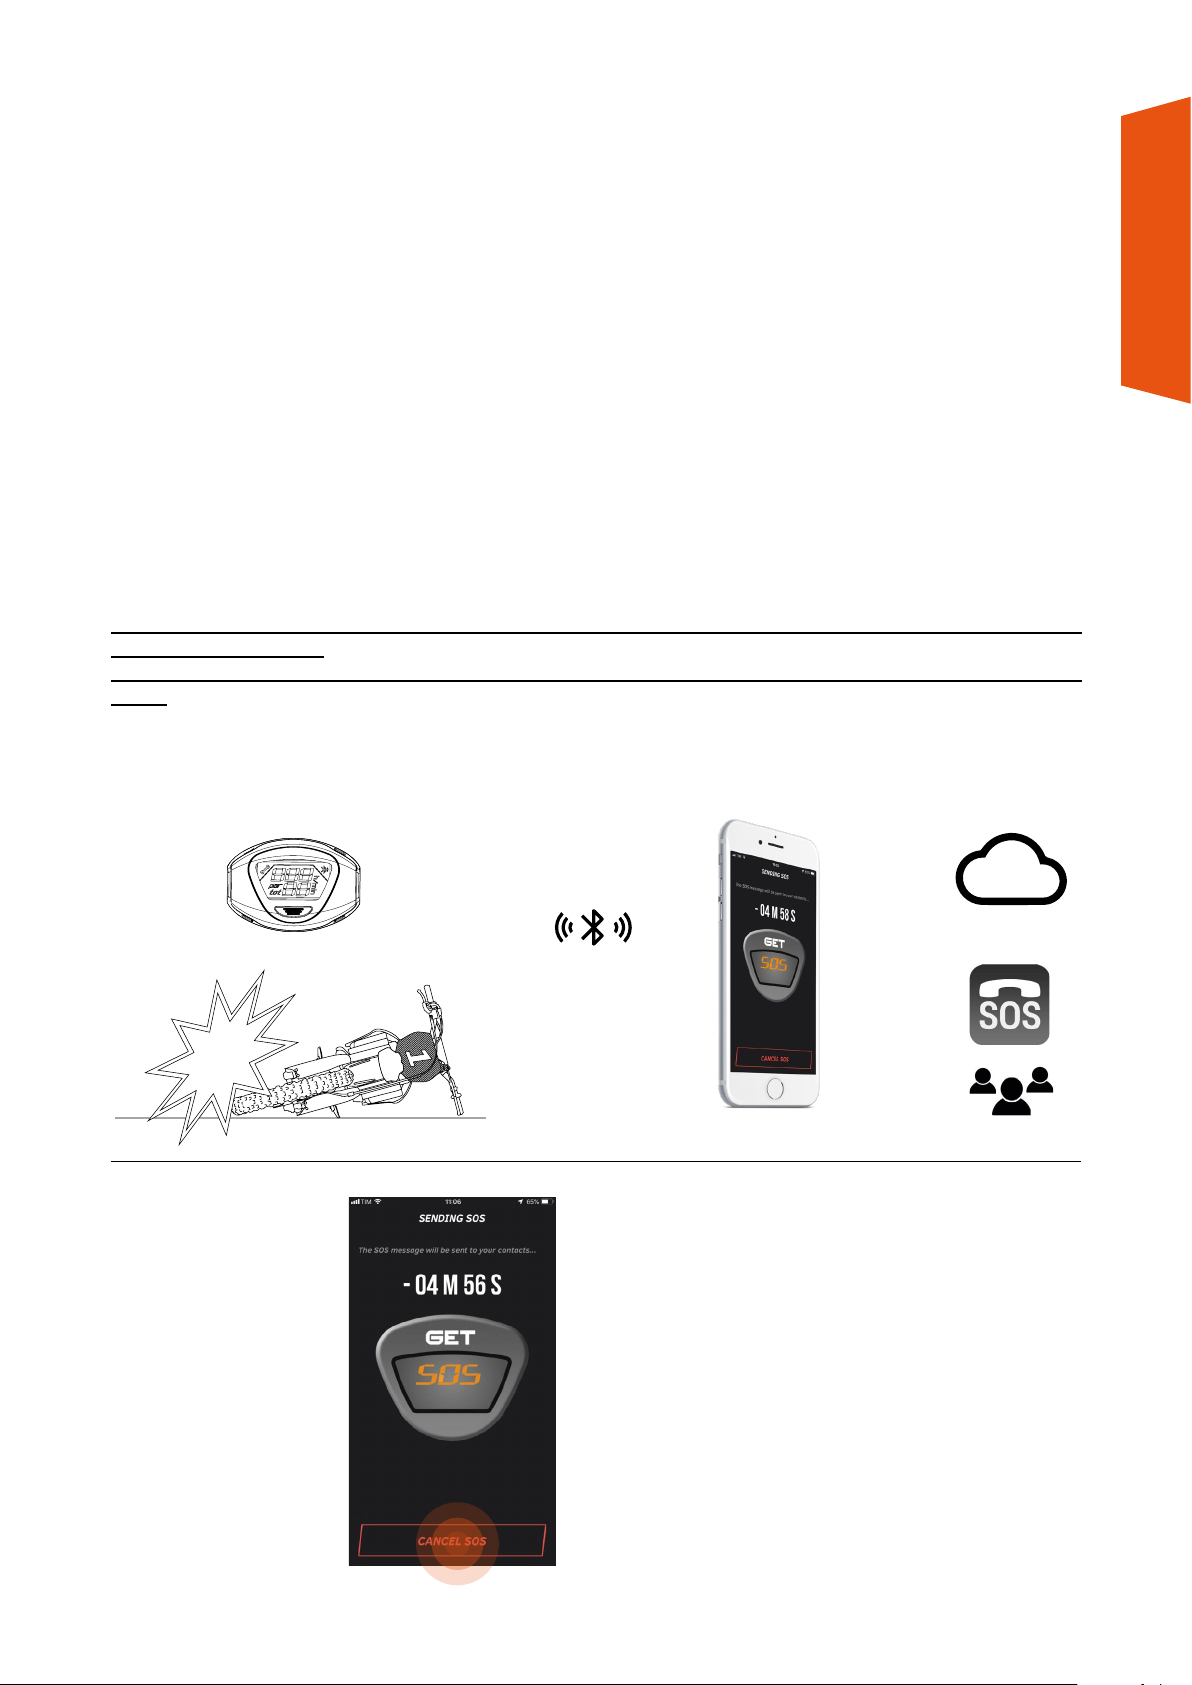
The GET SMART SOS app allows you to set up the sending of texts and/or emails to certain phone numbers/
email addresses in the event of a fall.
The message sent contains the GPS coordinates of where the event occurred: enable the GET SMART SOS app
when accessing the GPS position to use the service properly.
Messages and e-mails will be sent in the event of a fall, provided that the device connected to the app has been
correctly calibrated (see chapter 5 point 11). To use the SOS function, you must configure the recipients of the
texts and/or emails via the GET SMART SOS app.
THE SOS FUNCTION REQUIRES THE DEVICE ON THE BIKE TO BE CONNECTED TO THE GET SMART SOS APP
(see chapter 6, point 1).
THE GET SMART SOS APP MUST BE OPEN (OR RUNNING IN BACKGROUND) FOR THE SOS FUNCTION TO BE
USED.
SMART SOS USER MANUAL
In the event of a fall, the GET SMART SOS app, after one minute, will send you a series of notifications that the
SOS alarm has been activated and, after 5 minutes, all recipients will receive SOS alerts.
→
→
→
In the event of a false
alarm, you can stop sending
within 5 minutes
by pressing the CANCEL
SOS button on the GET
SMART SOS app.
20
Page 21
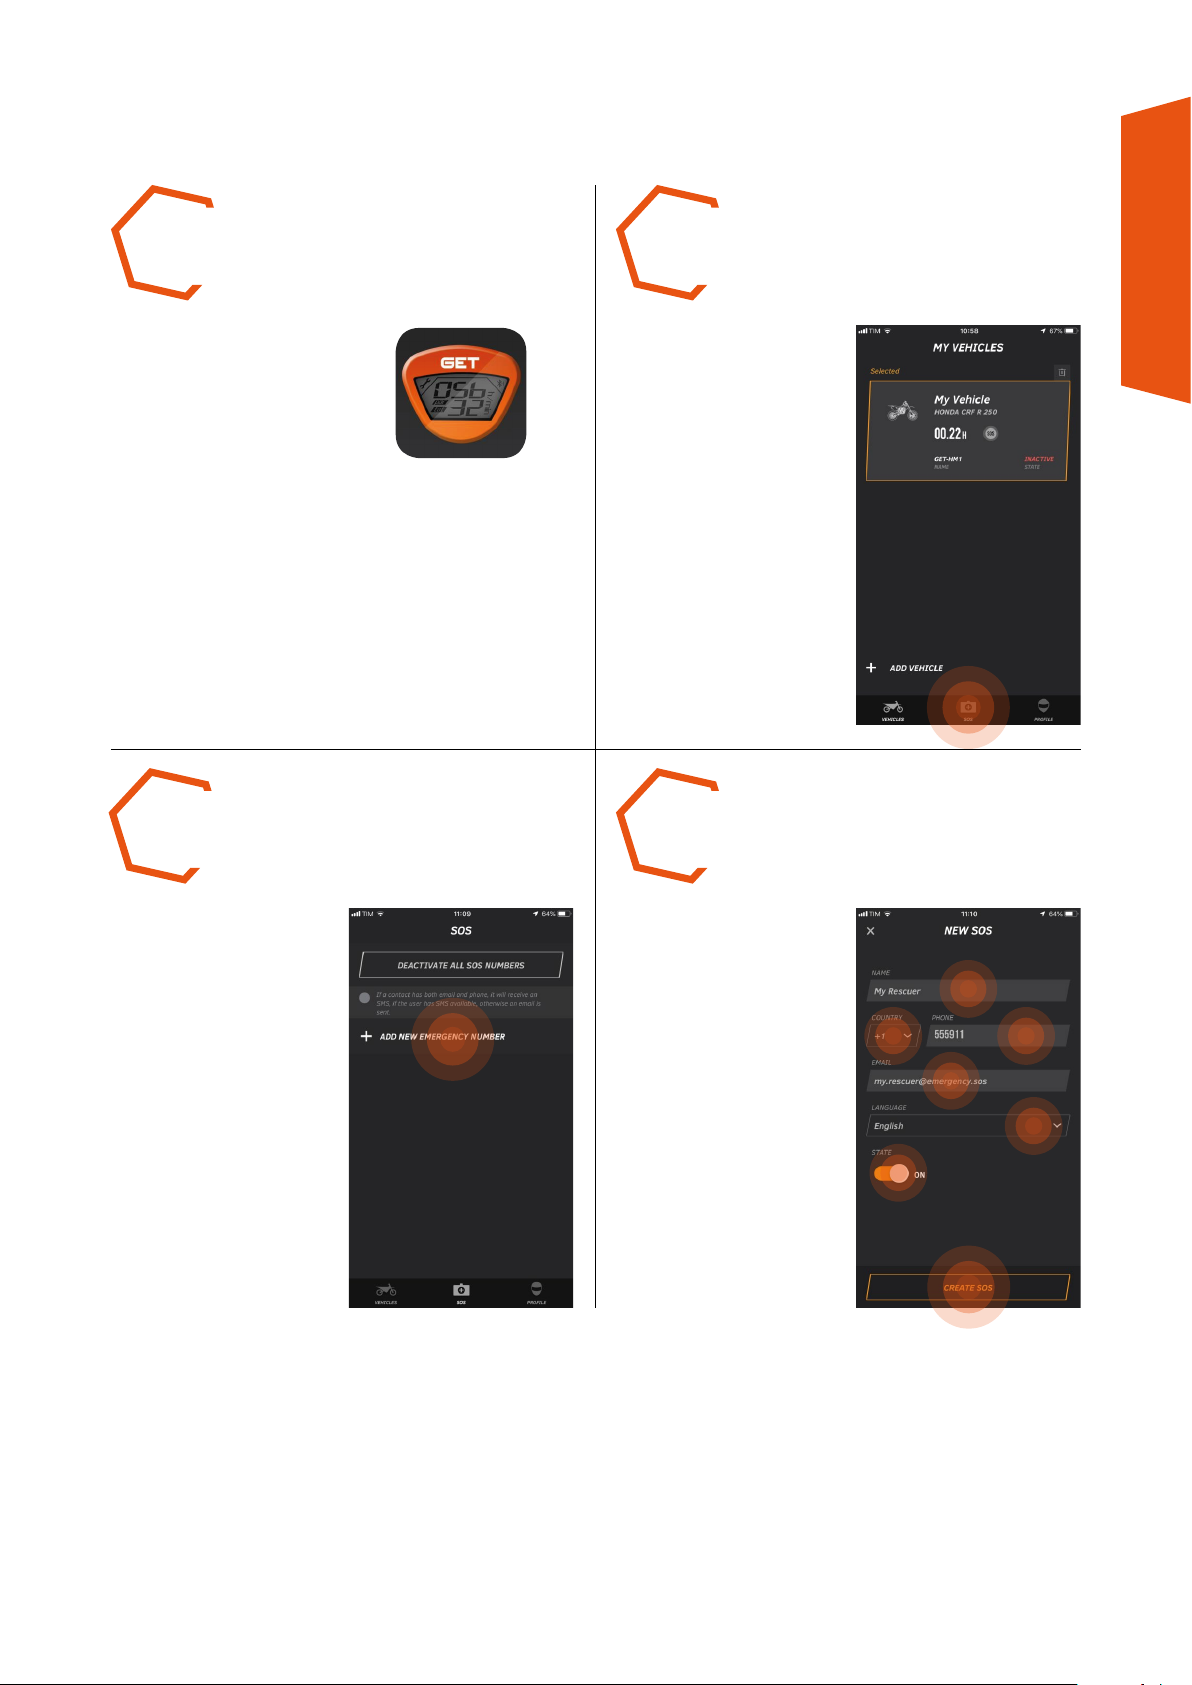
8.1 ADDING RECIPIENTS TO THE SOS FUNCTION
STEP 1 STEP 2
RUN the GET SMART SOS app.
N.B.: CONNECTION TO
THE SMART SOS APP IS
NOT REQUIRED TO INSERT
RECIPIENTS OF THE SOS
MESSAGE.
PRESS the SOS icon in the
Toolbar.
STEP 4STEP 3
SMART SOS USER MANUAL
PRESS the ADD NEW
EMERGENCY NUMBER
button, to open the page for
creating recipients (EDIT
SOS page).
COMPLETE the fields
for NAME (mandatory),
COUNTRY, PHONE,
EMAIL (not mandatory),
LANGUAGE and set STATUS
to ON. Press CREATE SOS
to end.
21
Page 22
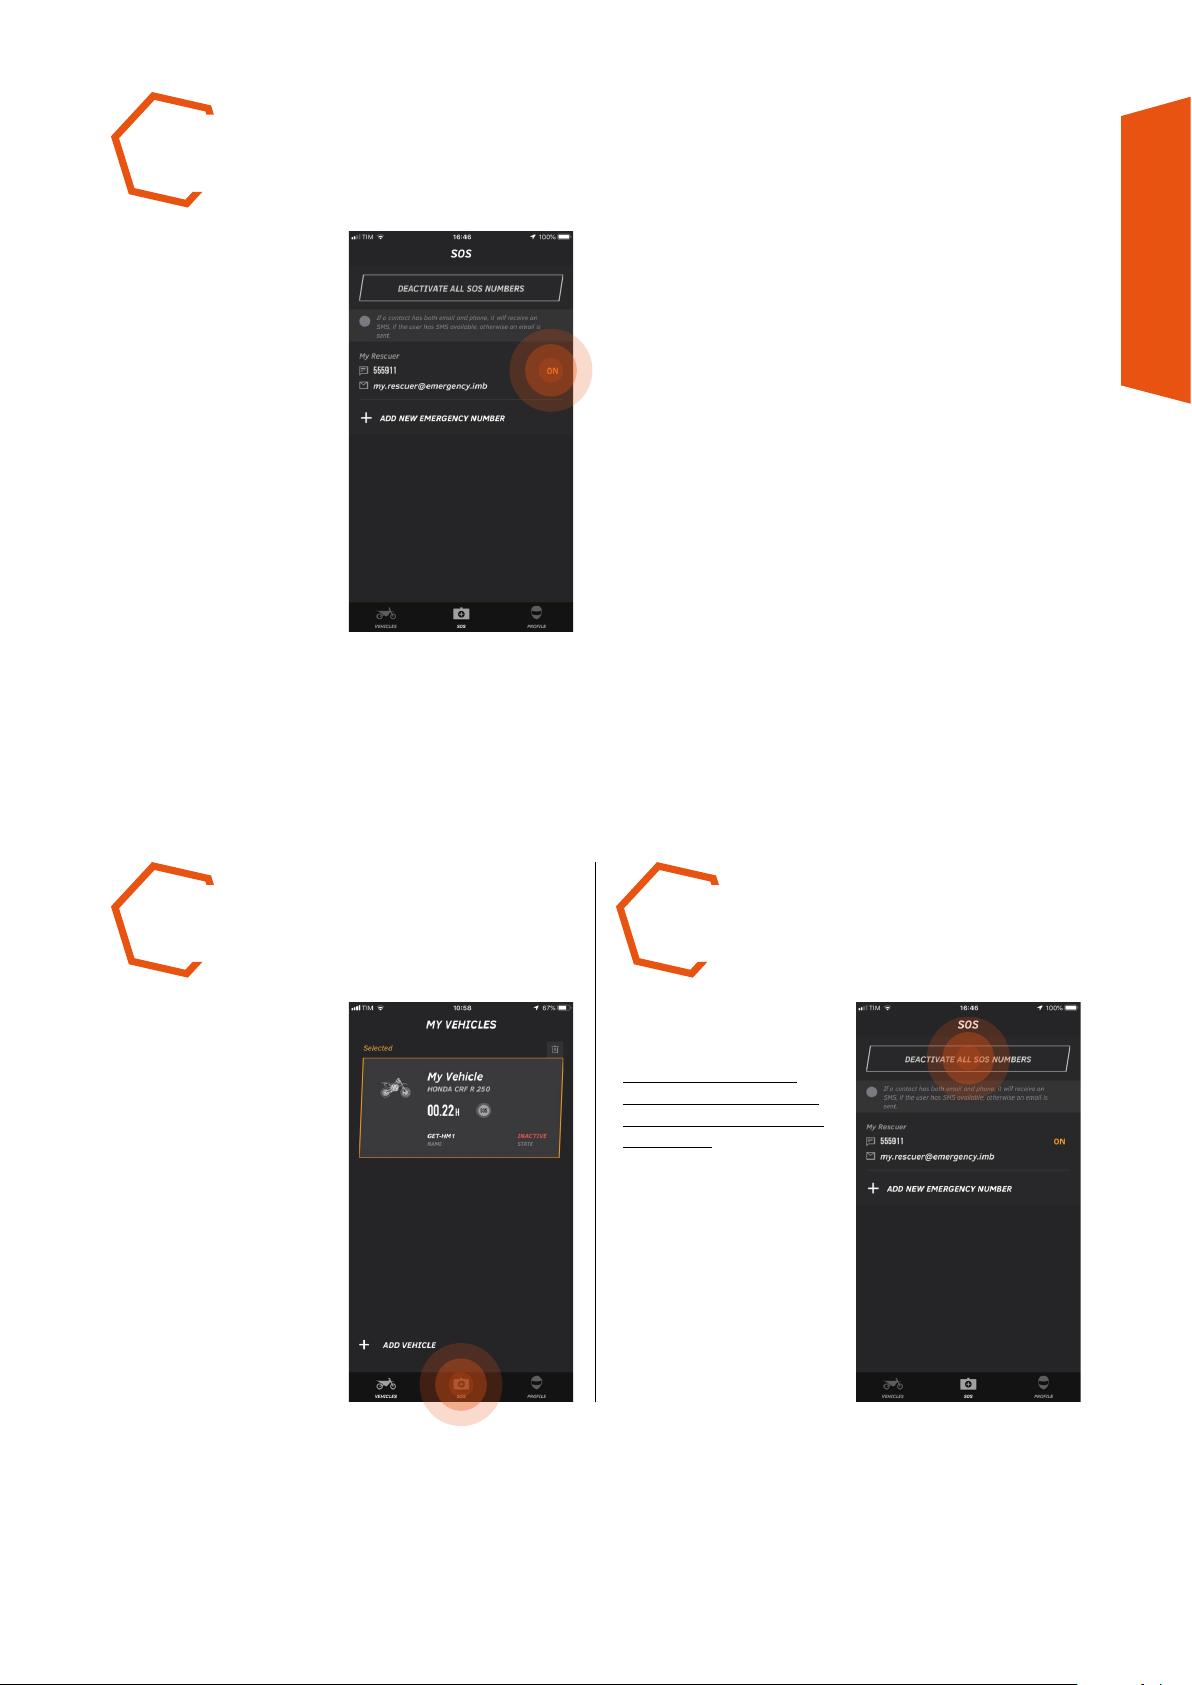
STEP 5
THE RECIPIENT just
inserted can be visualised
on the list on the SOS page.
Check that recipient status
is ON (enabled).
SMART SOS USER MANUAL
8.2 DEACTIVATION/CANCELLING RECIPIENTS FOR THE SOS FUNCTION
STEP 1 STEP 2
PRESS the SOS icon on the
Toolbar to visualise the list
of recipients.
Press the DEACTIVATE ALL
SOS NUMBERS button.
N.B.: IF THERE IS NO
ACTIVE RECIPIENT, THE
SOS FUNCTION WILL BE
DISABLED.
22
Page 23
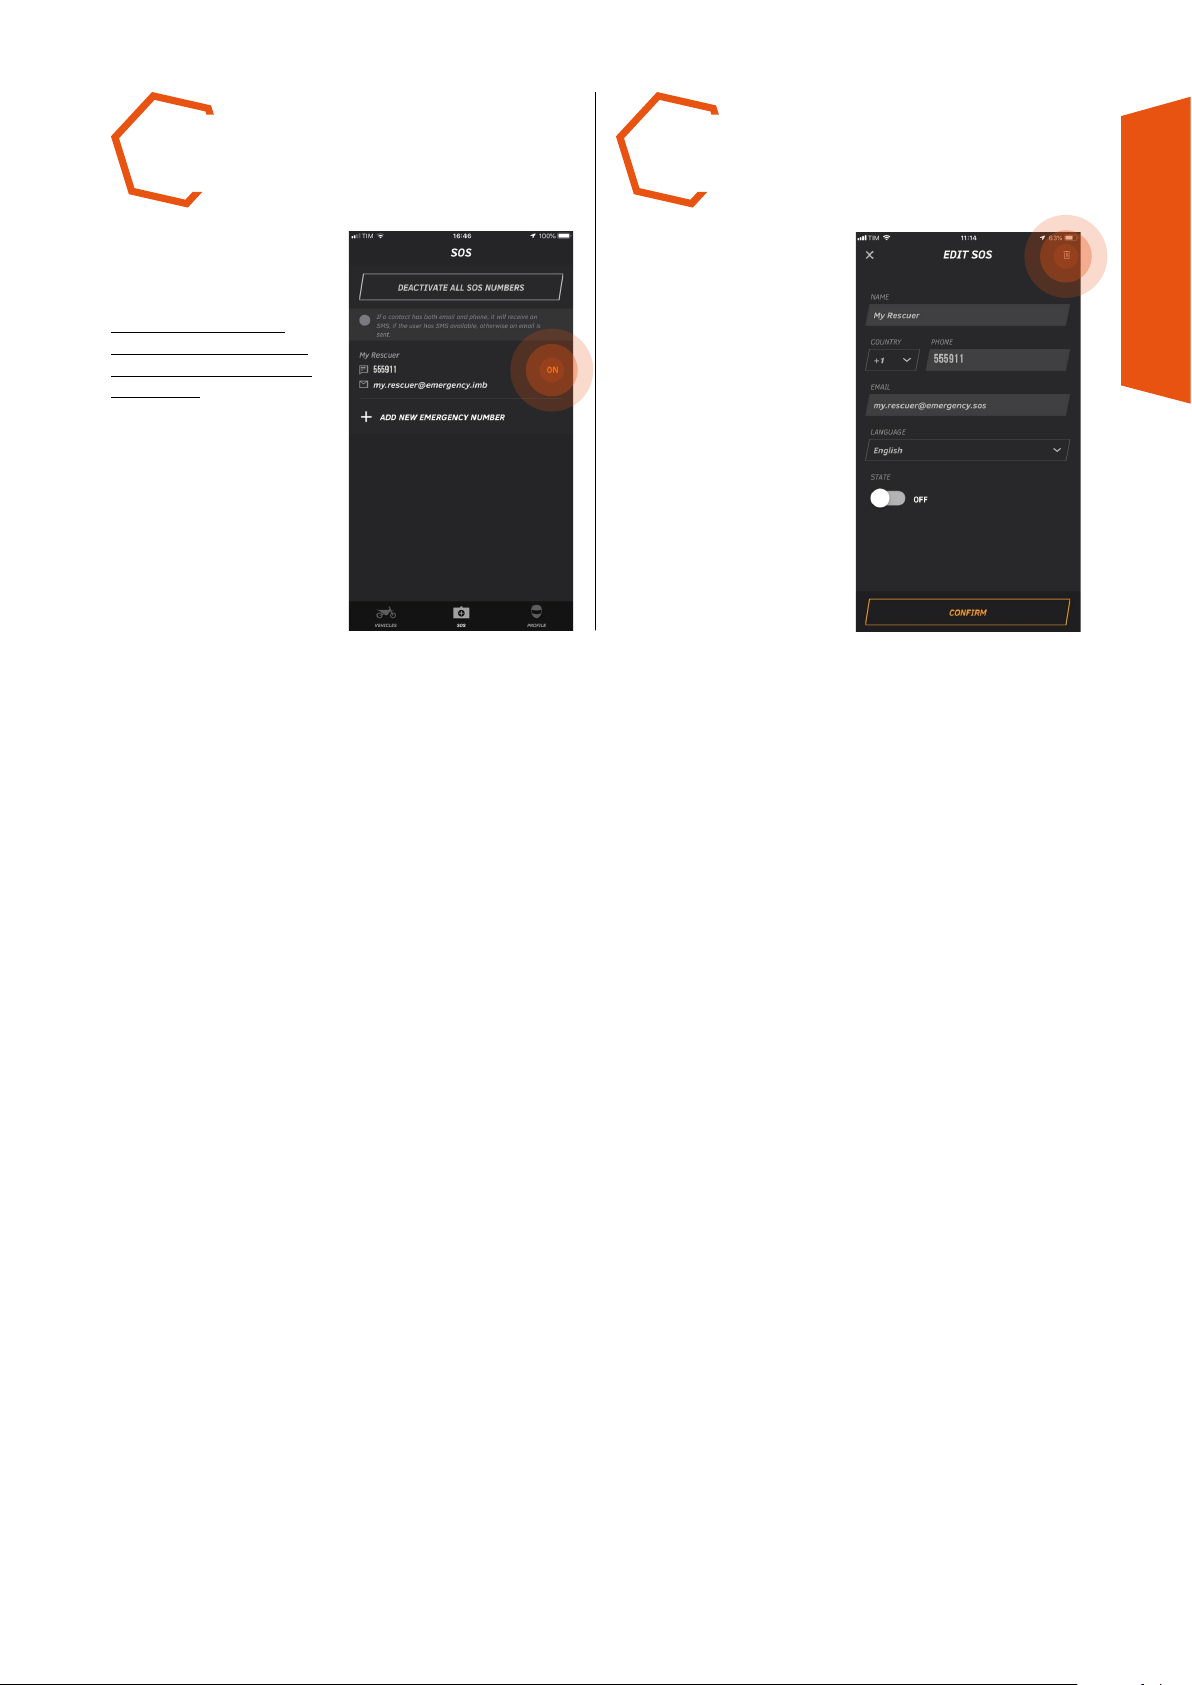
STEP 3 STEP 4
TO DEACTIVATE JUST ONE
RECIPIENT, touch ON next
to the recipient in question.
N.B.: IF THERE IS NO
ACTIVE RECIPIENT, THE
SOS FUNCTION WILL BE
DISABLED.
TO ELIMINATE
A RECIPIENT go to
the EDIT SOS page
and press the trash bin
button top right.
SMART SOS USER MANUAL
23
Page 24

BUSINESS UNIT GET
Via delle Albere 12,
36045 Alonte - Vicenza (Italy)
Phone: +39 0444 727272
Fax: +39 0444 727292
Email: [email protected]
Website: getdata.it
AthenaMotorsport
A BRAND OF
 Loading...