

Page 1
Note to Administrator
This manual is intended to provide administrators with additional information
about the security functions of this printer. Read this manual as well as “Hardware Guide” and “Software Guide”.
This manual and its contents should be kept by, and restricted to, administrators.
Network Configuration
Network Connection
The following explains the procedure for connecting the printer to the computer
through the network. Prepare the hub and other network devices before connecting the 10 BASE-T or 100 BASE-TX cable to the printer's Ethernet port. Alternatively, the optional gigabit ethernet board, which supports 1000BASE-T, is
available.
Important
❒ Use shielded Ethernet cable. Unshielded cables create electromagnetic inter-
ference that could cause malfunctions.
❒ The Ethernet cable is not supplied with this printer. Select your cable accord-
ing to the network environment.
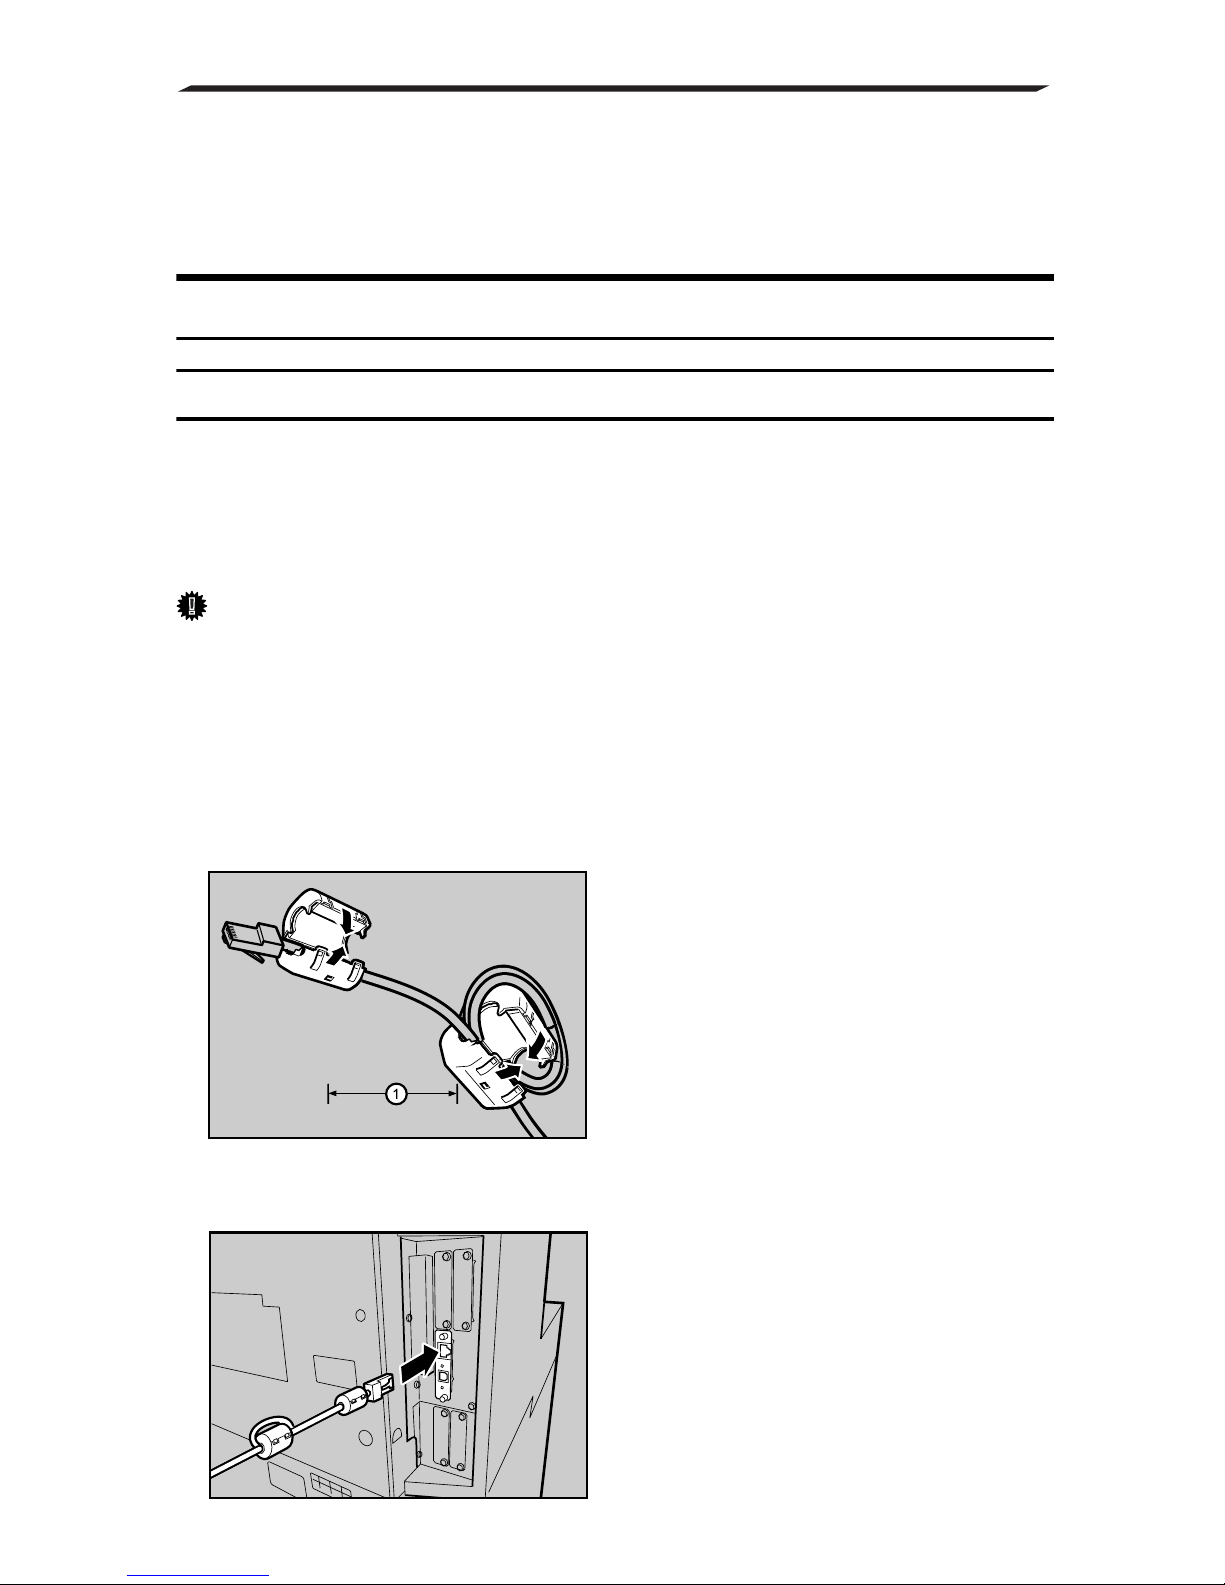
A Attach one ferrite core at the printer end of the Ethernet cable, and then at-
tach the other ferrite core about 10 cm (4 inches) (1) from this core making
two loops as shown.
AQU130S
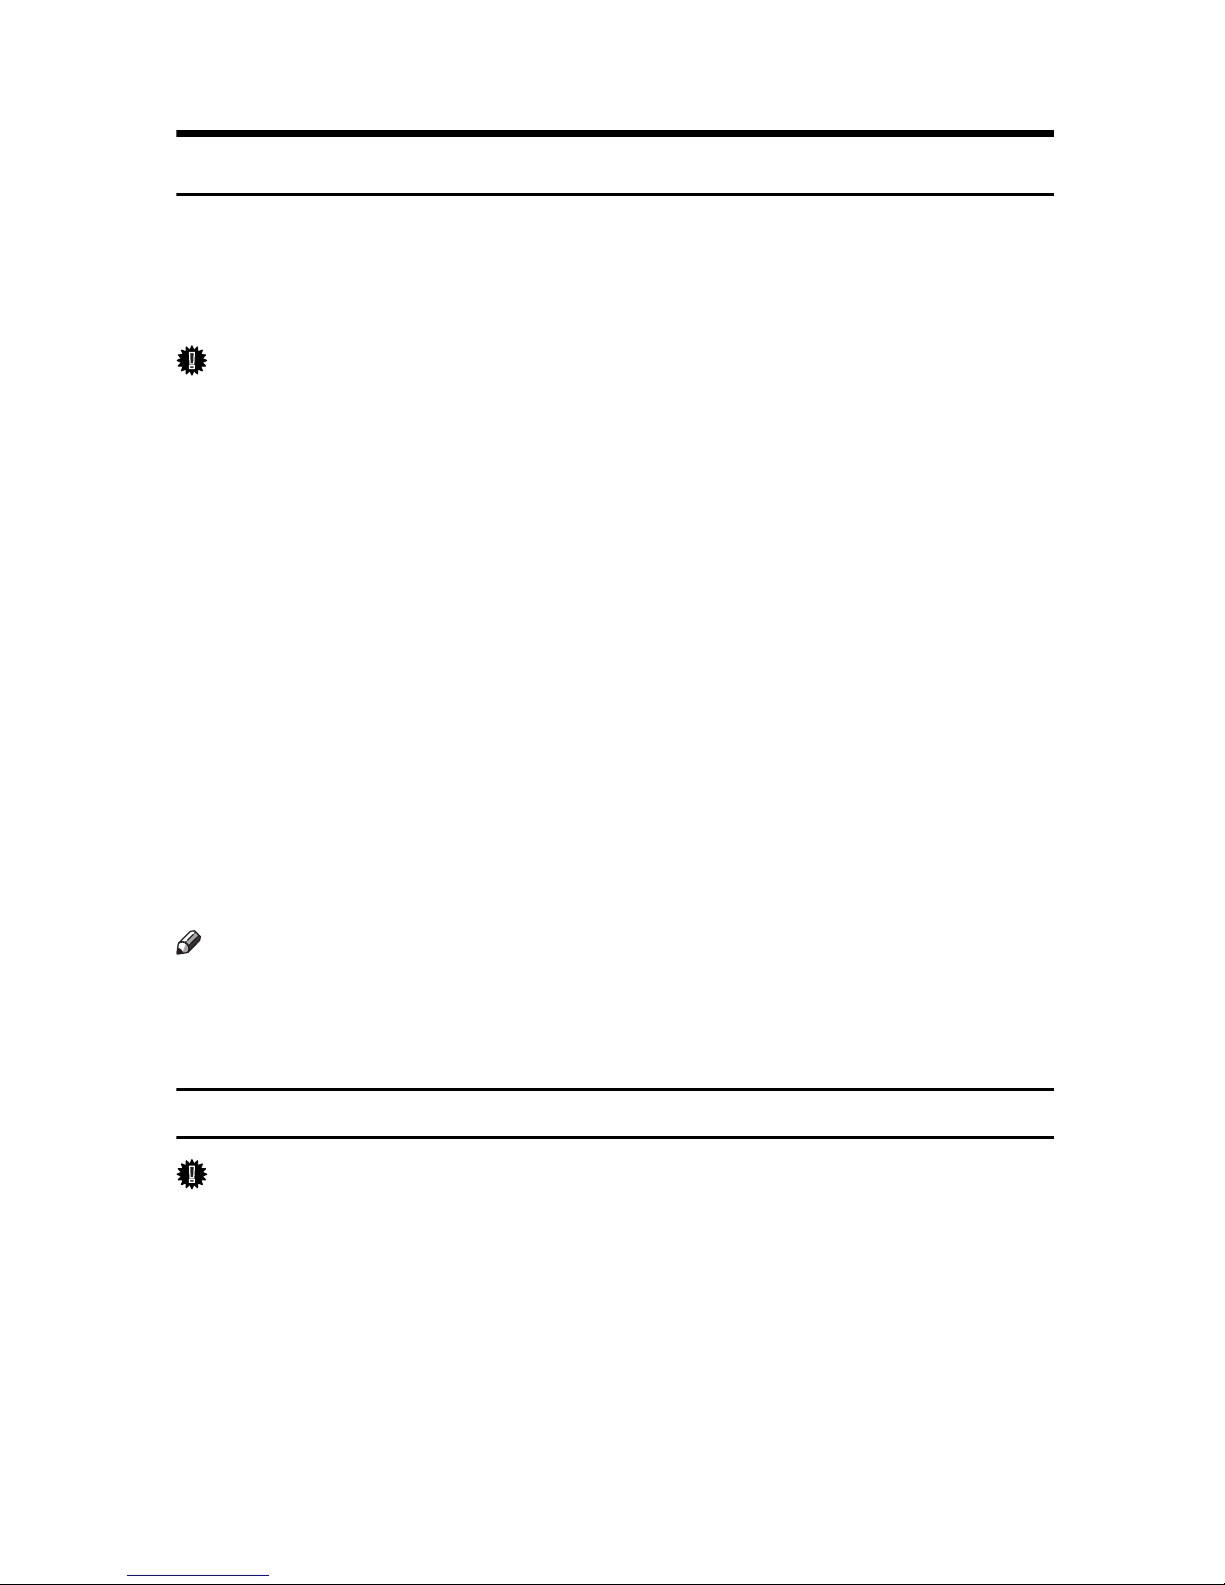
B Connect the Ethernet cable to the Ethernet port.
AST012S
1
Page 2

C Connect the other end of the cable to the printer's network, such as a hub.
Note
❒ The printer's ethernet and USB ports are not available when the gigabit
ethernet board is attached to the printer.
❒ Follow the same procedure when using the gigabit ethernet cable.
Reference
For details about network environment settings, see “Software Guide”.
Reading the LED Lamps
❖ For standard ethernet port
AQV563S
1. Green: comes on when the printer
is properly connected to the network.
❖ For gigabit ethernet board
AQU060S
1. Yellow: comes on 100BASE-TX is
in use.
2. Yellow: comes on when 100BASE-
TX is in used. It comes off when
10BASE-T is in used.
3. Green and yellow lamps are lit
when 1000BASE-T is in use.
2. Green: comes on when 10BASE-T
is in use.
2
Page 3
Ethernet Configuration
Make the following network settings according to the network interface you are
using.
You can use SmartDeviceMonitor for Admin or a Web browser to make IP address-related settings in a TCP/IP-capable environment.
Important
❒ Configure the printer for the network using the control panel.
❒ The following table shows the control panel settings and their default values.
These items appear in the [Host Interface] menu.
•DHCP: On
• IPv4 Address: 011.022.033.044
• Subnet Mask: 000.000.000.000
• Gateway Address: 000.000.000.000
• Frame Type (NW): Auto Select
• Active Protocol:
IPv4: Active
IPv6: Not Active
NetWare: Active
SMB: Active
Apple Talk: Active
• Ethernet Speed: Auto Select
• LAN Type: Ethernet
Note
❒ If TCP/IP is in use, the IP address, subnet mask, and gateway address are all
set automatically.
❒ Make this setting only when it is necessary. See “Software Guide”.
Using DHCP
Important
❒ When you use this printer in DHCP environment, select [DHCP] following this
procedure.
❒ When [DHCP] is selected, you cannot make settings for the IP address gateway
address.
❒ Consult your network administrator for information about making network
settings.
3
Page 4
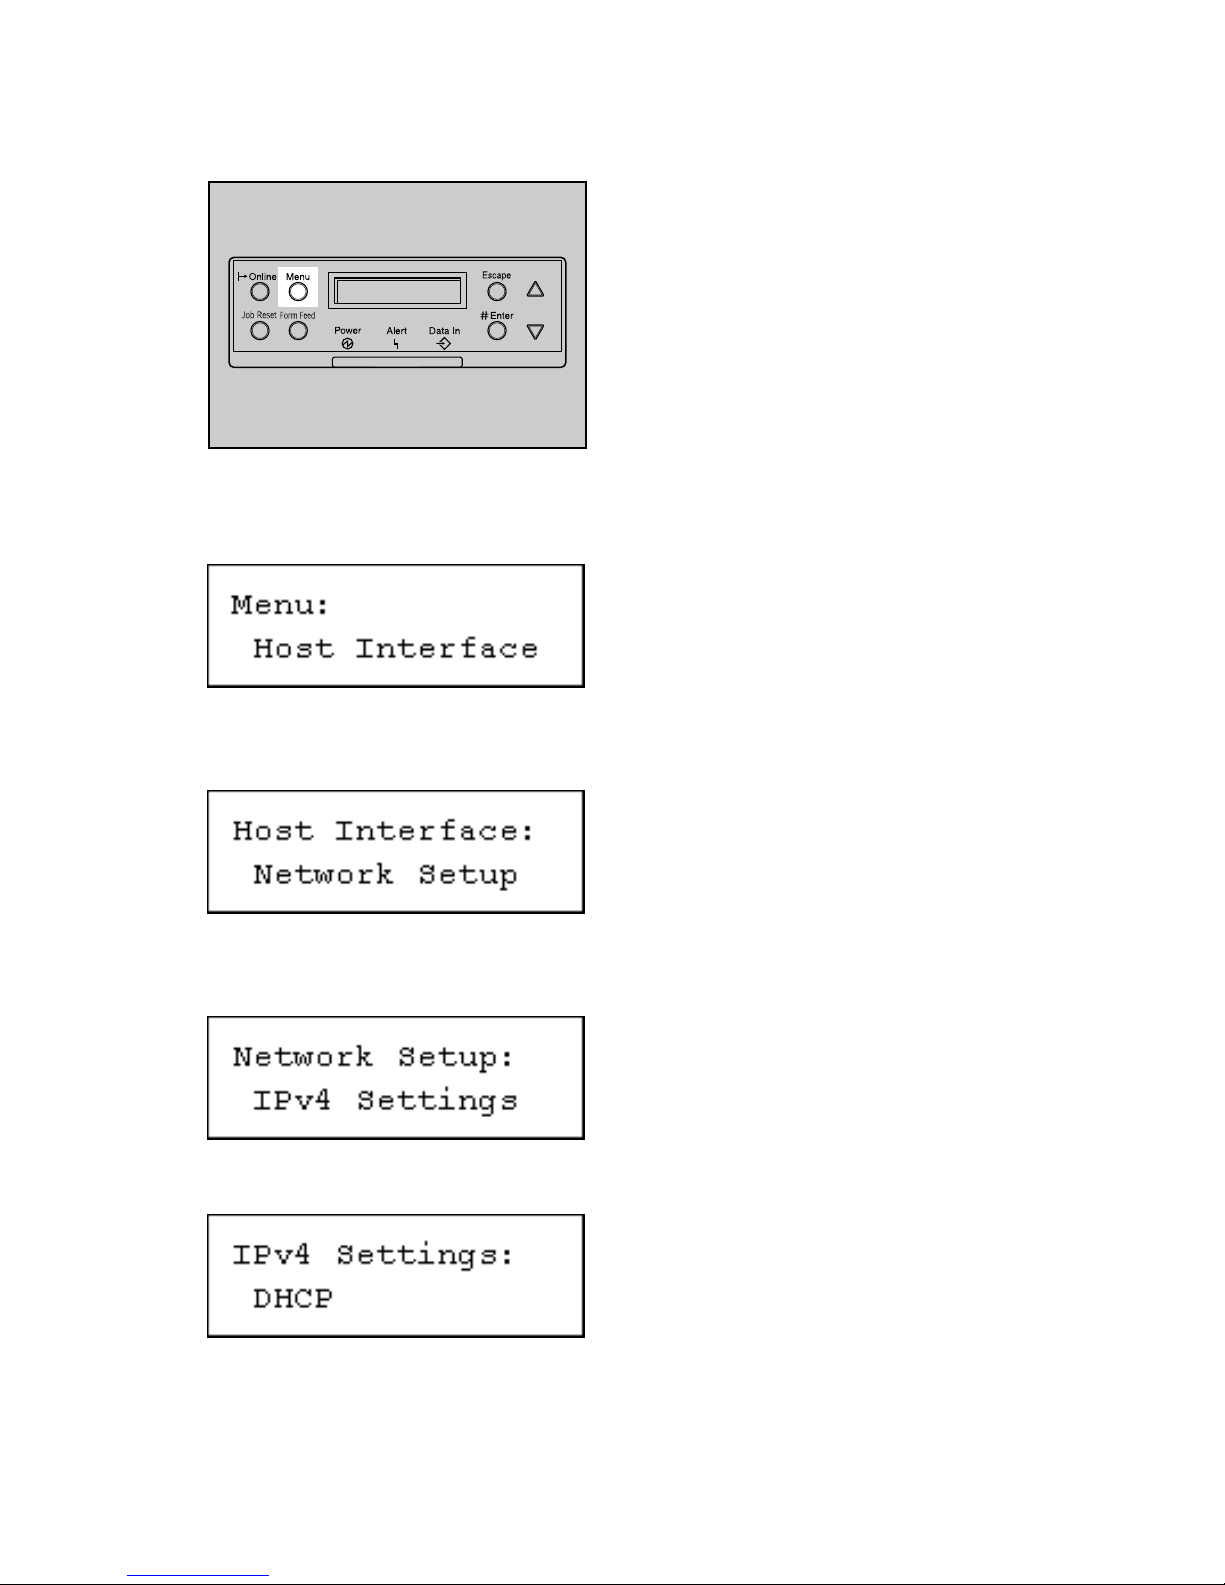
A Press the {Menu} key.
AST008S
B Press the {T} or {U} key to select [Host Interface], and then press the {q Enter}
key.
C Press the {T} or {U} key to select [Network Setup], and then press the {q Enter}
key.
D Press the {T} or {U} key to select [IPv4 Settings], and then press the {q Enter}
key.
E Press the {T} or {U} key to select [DHCP], and then press the {q Enter} key.
4
Page 5
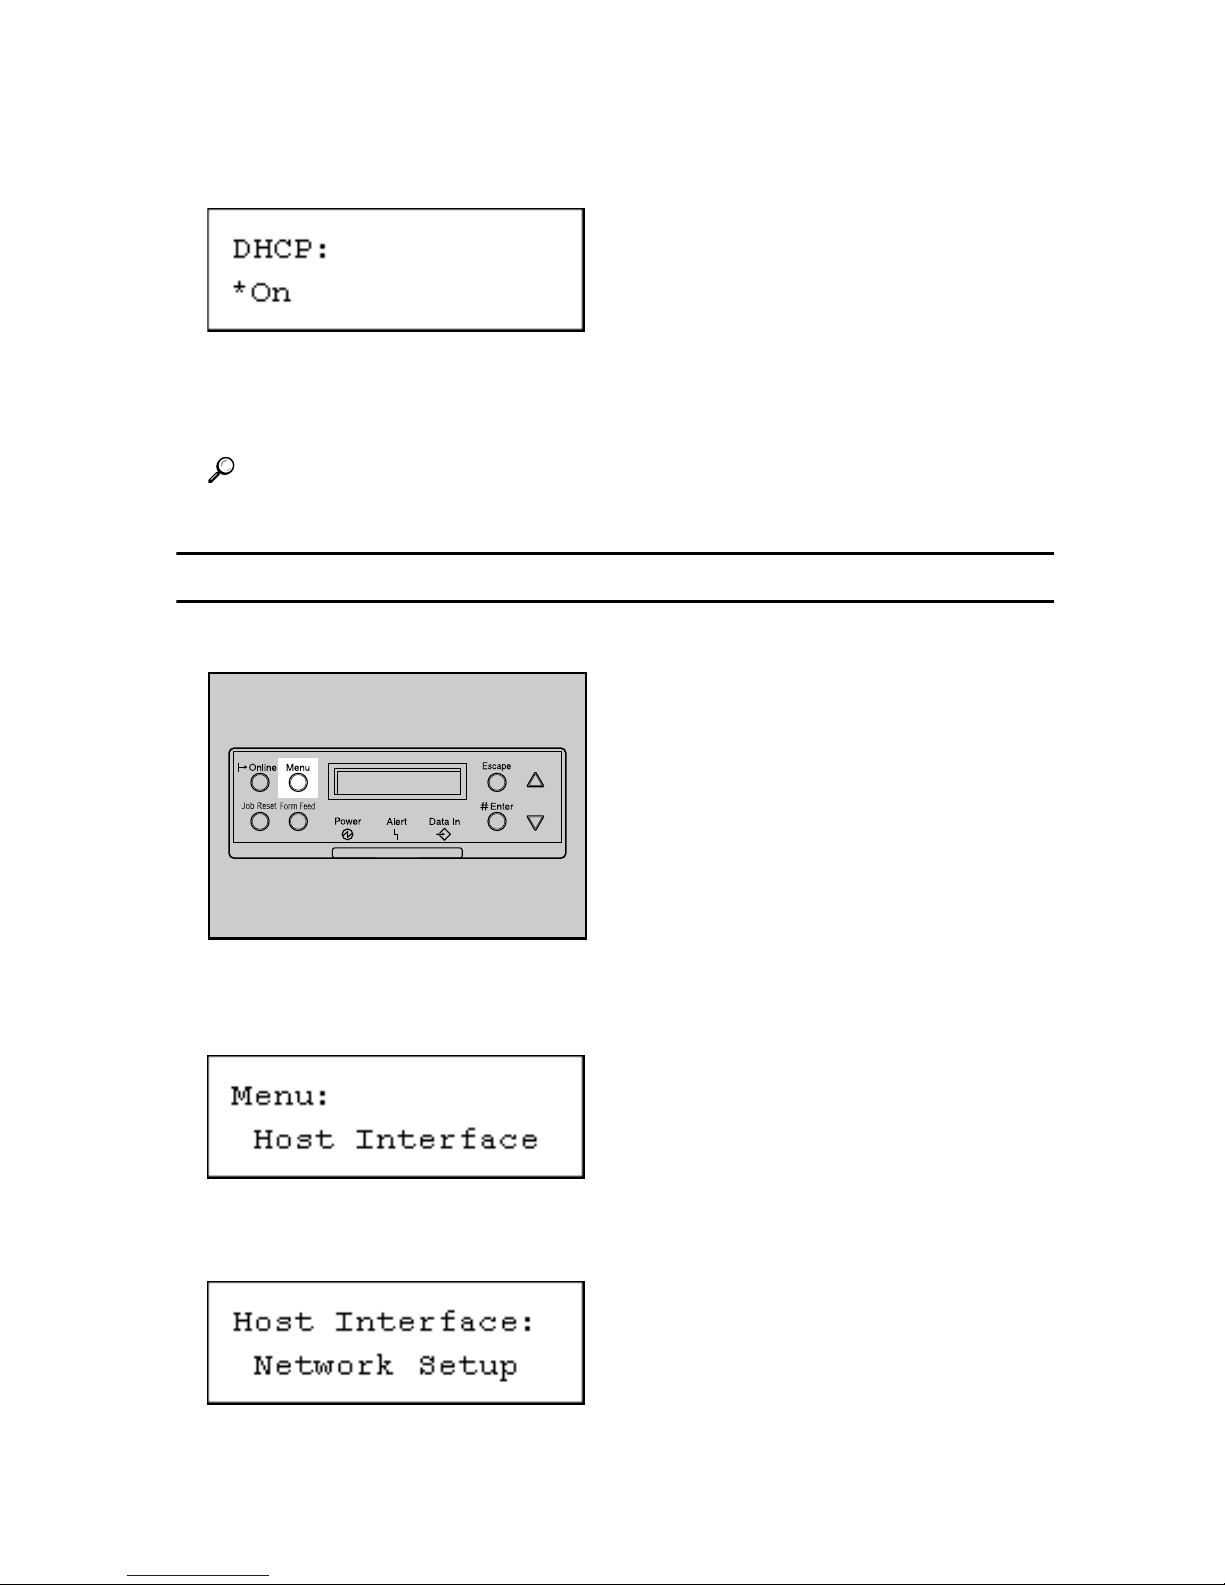
F Press the {T} or {U} key to select [On] or [Off], and then press the {q Enter}
key.
G Press the {Menu} key to return to the initial screen.
H Print a configuration page to confirm the settings made.
Reference
For details about printing the configuration page, see “Software Guide”.
Specifying a Network Address
A Press the {Menu} key.
AST008S
B Press the {T} or {U} key to select [Host Interface], and then press the {q Enter}
key.
C Press the {T} or {U} key to select [Network Setup], and then press the {q Enter}
key.
5
Page 6

D Press the {T} or {U} key to select [Active Protocol], and then press the {q Enter}
key.
E Press the {T} or {U} key to select the network protocol, and then press the
{q Enter} key.
F Press the {T} or {U} key to select [Active] or [Not Active], and then press the
{q Enter} key.
Set other protocols you need to set in the same way.
•Select [Not Active] for unused protocols.
• Enable IPv4 to use the Pure IPv4 environment of NetWare 5/5.1, NetWare
6/6.5.
G Press the {Escape} key until the screen returns to the [Network Setup] menu.
H If you use IPv4, assign the IPv4 address to the printer. Press the {T} or {U}
key to select [IPv4 Settings], and then press the {q Enter} key.
To get the IPv4 address for the printer, contact your network administrator.
I To specify the IPv4 Address, press the {T} or {U} key to select [IPv4 Ad-
dress], and then press the {q Enter} key.
6
Page 7

J Enter the address using {T} or {U}, and then press the {q Enter} key. Set-
tings made.
Press the {T} or {U} key to enter the left most entry field of the address. After
entering the left field, press the {q Enter} key, and then you can enter the next
field. After completing to enter in the all fields, press the {q Enter} key. Use
this method to assign the subnet mask and gateway address.
• Do not set “011.022.033.044” as the IPv4 address.
• The value moves by 10 if the {T} or {U} key is kept pressed.
• Set Subnet Mask and the Gateway address in the same way.
K Press the {Menu} key to return to the initial screen.
L Print a configuration page to confirm the settings made.
Reference
For details about printing the configuration page, see “Software Guide”.
7
Page 8

Password
When you log into this printer, you will be prompted to enter the user name and
password for your account. We strongly recommend you change the factory default user name and create a password immediately to prevent information leakage and unauthorized operations by others.
You will be prompted to enter your login password when performing the following operations:
• Logging in to Administrator mode in Web Image Monitor
• Starting User Management Tool of SmartDeviceMonitor for Admin
• Connecting to the printer via telnet
• Connecting to the printer via ftp
To use the default account, enter “admin” as the user name, and leave the password blank.
You can set the password in Web Image Monitor or telnet.
The password set here can be used to log in for any operation.
Reference
For details about setting a password, see Web Image Monitor Help.
Addendum for {Menu} function
Administrator menu
The control panel allows you to perform various basic configurations and adjustments that are required to use the printer. However, in order to protect the
printer from threats such as unauthorized access, data manipulation, and tampering, “administrator menus”, which are not normally displayed, are provided
for administrators.
This printer comes with the following administrator menus:
❖ Administrator menus under [Maintenance]:
• Netwrk Security
•Key Repeat
• Menu Protect
• List Print Lock
• File Locking
•Unlock Files
•Memory Erase
• Erase All Mem.
•Log Transfer
8
Page 9

Note
❒ The ”File Locking” and “Unlock Files” menus are displayed when the hard
disk is installed.
❒ The ”Memory Erase” and “Erase All Mem.” menus are displayed when the
optional overwrite security unit is installed.
❖ Administrator menus under [Host Interface]:
• USB Setting
Displaying administrator menus
You can display the administrator menus by using specific key combinations on
the control panel of the printer.
This section describes how to display the administrator menus.
A Check the printer is online.
B Press the {q Enter} key, press the {Escape} key, and then press the {Menu}
key.
AST008S
The menu screen appears.
C Press the {U} or {T} key to display [Maintenance], and then press the {q Enter}
key.
D Press the {U} or {T} key to check the administrator menus including [Net-
wrk Security], [Menu Protect], and [List Print Lock] are displayed.
You can now display the administrator menus and make any necessary
changes to the settings.
9
Page 10

E Press the {Online} key after completing all the required settings.
The initial screen appears, preventing you from displaying the administrator
menus. To display the administrator menus again, repeat the procedures
from the start.
Maintenance menu parameters (administrator menu)
❖ Netwrk Security
You can disable the network security settings enabled in Web Image Monitor.
You can use this menu item when you change the settings or when you cannot access the printer because the password or other account information is
unavailable.
❖ Key Repeat
You can specify whether or not to scroll the display panel when the {U} or
{T}key is held down. You can also specify the scroll speed.
•On
•Off
Note
❒ Default: On
❖ Menu Protect
You can protect menu settings from accidental changes.
• Level 1
You can preserve settings for the [Maintenance], [System](except for [Page Size]),
[Host Interface], [PCL Menu], [PS Menu], [PDF Menu], and [Language] menus.
• Level 2
You can preserve settings for the [Paper Input], [Maintenance], [Multiple Lists],
[Error Log], [System], [Host Interface], [PCL Menu], [PS Menu], [PDF Menu], and
[Language] menus.
•Off
Operation of menu items is unrestricted.
Note
❒ Default: Off
❖ List Print Lock
You can restrict the list and test printing
•On
Specifying [On] normally hides the [List/Test Print] menu, preventing users
from performing any test print operations using the control panel.
•Off
No menu item operations are restricted.
Note
10
❒ Default: Off
Page 11

❖ File Locking
If the user tries to access a file and enters the wrong password 10 times, the
file is automatically locked.
•On
•Off
Note
❒ Default: Off
❖ Unlock Files
You can unlock a file that was locked due to a user entering a wrong password 10 times.
❖ Memory Erase
This function is available when the Optional Overwrite Security Unit is installed. Selects whether or not to automatically delete memory, and select deletion method and time when you do.
•Auto Erase
•On
•Off
•Erase Method
NSA
DoD
Random
❖ Erase All Mem.
Deletes all data inside the memory. Select the deletion method, and then set
the overwrite times.
•Erase Method
•NSA
•DoD
•Random
•Start Erase
❖ Log Transfer
You can turn off the log transfer function. The default is off.
Note
❒ Optional software is required for this function.
Host Interface menu parameters (administrator menu)
❖ USB Setting
You can specify the USB communication speed.
• Full Speed
You can set the communication speed of USB to USB1.1.
•Auto
11
Page 12

Note
❒ Default: Auto
❒ The settings you apply here do not affect the functions of an optional USB
host interface unit.
❒ The settings you apply here take effect on the USB interface that comes
with an optional Gigabit Ethernet unit.
Deleting Data on the hard disk
❖ Hard disk
The printer’s hard disk lets you store data under the printer, as well as the address book and counters stored under each user code.
Overwriting the Data on the hard disk
To use this function, the DataOverwriteSecurity unit must be installed.
To prevent data on the hard disk being leaked before disposing of the printer,
you can overwrite all data stored on the hard disk. You can also automatically
overwrite temporarily-stored data.
Note
❒
Depending on the hard disk capacity and the method of erasing the data, this action
may take a few hours. Once you start the “Erase All Memory” function, no other
printer operation is possible until the function completes or you quit the function.
❖ Auto Erase Setting
To erase selected data on the hard disk.
❖ Erase All Memory
To erase all the data on the hard disk.
❖ Methods of Erasing the Data
You can select the method of erasing the data from the following:
The default is [NSA].
NSA
*1
DoD
*2
Random Overwrites the data with random numbers the specified number of times.
Overwrites the data on the hard disk twice with random numbers and
once with zeros.
Overwrites the data with a number, its complement, and random numbers, and then checks the result.
You can specify between 1 and 9 as the number of times the data is overwritten with random numbers. The default is 3 times.
*1
National Security Agency
*2
Department of Defense
Reference
12
For details, see the manual supplied with the DataOverwriteSecurity unit.
Page 13

[Auto Erase] Setting
This can be specified by the machine administrator.
A print data sent from a printer driver is temporarily stored on the hard disk.
Even after the job is completed, it remains in the hard disk as temporary data.
[Auto Erase] erases the temporary data on the hard disk by writing over it.
Overwriting starts automatically once the job is completed.
The Printer functions take priority over the [Auto Erase] function. If a print job is
in progress, overwriting will only be done after the job is completed.
A Check the printer is online.
B Press the {q Enter} key, press the {Escape} key, and then press the {Menu} key.
C Press the {U} or {T} key to display [Maintenance], and then press the {q Enter}
key.
D Press the {U} or {T} key to display [Memory Erase], and then press the {q Enter}
key.
E
Select [Erase Method] using the
{U}
or
{T}
key, and then press the {q
Enter} key.
Select the method of erasing the data from [NSA], [DoD], or [Random].
If you select [NSA], proceed to step
If you select [DoD] proceed to step
If you select [Random], proceed to step
I
H
.
.
.
F
F Select [Random] using the {U} or {T} key, and then press the {q Enter} key.
G Enter the number of times that you want to overwrite using the {U} or {T}
keys, and then press the {q Enter} key.
[Auto Erase] is set.
H Select [NSA] using the {U} or {T} key, and then press the {q Enter} key.
[Auto Erase] is set.
I Select [DoD] using the {U} or {T} key, and then press the {q Enter} key.
[Auto Erase] is set.
Important
❒ When [Auto Erase] is set to [On], temporary data that remained on the hard
disk when [Auto Erase] was [Off] might not be overwritten.
Note
❒ Should the main power switch of the printer be turned off before overwrit-
ing is completed, the temporary data will remain on the hard disk until the
main power switch is next turned on and overwriting is resumed.
❒
If the overwriting method is changed while overwriting is in progress, the remainder of the temporary data will be overwritten using the method set originally.
13
Page 14

Canceling [Auto Erase]
A Follow steps
to C in ”Auto Erase Setting".
A
B Select [Off] using the {U} or {T} key, and then press the {q Enter} key.
[Auto Erase] is disabled.
Note
❒ To set [Auto Erase] to [On] again, repeat the procedure in “[Auto Erase] Set-
ting”.
Types of Data that Can or Cannot Be Overwritten
The following table shows the types of data that can or cannot be overwritten by
[Auto Erase].
Data overwritten by [Auto
Erase]
Data not overwritten by [Auto
Erase]
Printer • Print Jobs
• Sample Print/Locked
Print/Stored Print Jobs
• Spool Printing jobs
• PDF Direct Print data
Information registered in the Address Book
Counters stored under each user code
*1
Image overlay data
*1
A Sample Print, Locked Print, or Stored Print job can only be overwritten after it has
been executed. Stored print jobs can be overwritten by [Auto Erase] only if they have
been deleted in advance.
*2
Image overlay data can be overwritten by [Auto Erase] only if it is deleted in advance.
*2
“Erase All Memory([Erase All Mem.])
This can be specified by the machine administrator.
You can erase all the data on the hard disk by writing over it. This is useful if you
relocate or dispose of your printer.
Important
❒ If you select “Erase All Memory”, the following are also deleted: user codes,
counters under each user code, user stamps, data stored in the Address Book,
printer fonts downloaded by users, applications using Embedded Software
Architecture, SSL server certificates, and the printer’s network settings.
❒ Should the power switch of the printer be turned off before “Erase All Mem-
ory” is completed, overwriting is canceled.
❒ Make sure the power switch is not turned off during overwriting.
A Disconnect communication cables connected to the printer.
14
Page 15

B Press the {q Enter} key, press the {Escape} key, and then press the {Menu}
key.
C Press the {U} or {T} key to display [Maintenance], and then press the {q Enter}
key.
D Press the {U} or {T} key to display [Erase All Mem.], and then press the {q Enter}
key.
E
Select [Erase Method] using the
Select the method of erasing the data from [NSA], [DoD], or [Random].
{U}
or
{T}
key, and then press the {q
Enter} key.
I
.
F
.
.
If you select [Random], proceed to step
If you select [NSA] proceed to step
If you select [DoD], proceed to step
H
F Select [Random] using the {U} or {T} key, and then press the {q Enter} key.
G Enter the number of times that you want to overwrite using the {U} or {T}
key, and then press the {q Enter} key.
H Select [NSA] using the {U} or {T} key, and then press the {q Enter} key.
I Select [DoD] using the {U} or {T} key, and then press the {q Enter} key.
J When overwriting is completed, press the {q Enter} key, and then turn off
the power.
Note
❒ Before erasing the hard disk, you can back up user codes, counters for each
user code, and Address Book data using SmartDeviceMonitor for Admin.
For details, see SmartDeviceMonitor for Admin Help.
❒ If the power is turned off when Erase All Memory is in progress, overwrit-
ing will start again when you next turn on the power.
❒ If an error occurs before overwriting is completed, turn off the main pow-
er. Turn it on again, and then repeat from step
Canceling “Erase All Memory”
A Press the {Job Reset} key while Erase All Memory is in progress.
Erase All Memory is canceled.
If you stop this before completion, the data is not fully erased. Execute [Erase
All Mem.] again to erase the data.
B Turn off the main power.
Note
❒ To resume overwriting after power off, turn on the power of the printer,
and then repeat the procedure in “Erase All Memory”.
B
.
15
Page 16

Changing Password
Changes or deletes the print job’s password already set.
The password can be cleared using [Change] only for the Stored Print jobs stored
in the printer.
A Log on to Web Image Monitor in the administrator mode.
B In the menu area, click [Printer: Print Jobs].
C Click Property icon of the print job you want to change the password in the
“Print Job List” area.
D Click [Printer: Print Jobs].
E Enter the “New Password” and “Confirm Password”, and then click [OK].
F Quit Web Image Monitor.
16
Copyright © 2006
GB GB G148-7214
 Loading...