

Page 1

COLOR NIC FAX UNIT
TYPE410
Operating Instructions
Introduction
1
Getting Started
2
Using Scan to E-mail Functions
3
Using Internet Fax Functions
4
Using IP-Fax Functions
5
Using LAN-Fax Functions
6
Using Network Delivery Scanner Functions
7
Registering Addresses
8
Making Settings through a Web Browser
9
Troubleshooting
10
Appendix
11
For safe and correct use of this machine, please be sure to read the Safety Information in the
Basic Features manual before you use it.
Page 2

Introduction
Thank you for purchasing NIC FAX. This manual contains important information you need to know in
order to get the most out of the powerful features and functions of this product. Be sure to read it carefully, and keep it on hand for future reference. Note that you are authorized to use this manual and NIC
FAX Driver and Utilities only after you agree to the terms and conditions of the User License Agreement.
• This manual covers NIC FAX operation on a Local Area Network (LAN).
• COLOR NIC FAX UNIT TYPE410 is required in order to use the Internet Fax Features. (For Type 1.)
• Installation of COLOR NIC FAX UNIT TYPE410 should be performed by an authorized service provider. Do not attempt installation on your own. (For Type 1.)
For simplicity, fax machines equipped with COLOR NIC FAX UNIT TYPE410 are referred to throughout
this manual as NIC FAX.
The contents of this manual assume that you are already familiar with Windows functions and procedures. If you are not, see the documentation that comes with Windows for details on use.
Notes:
Some illustrations in this manual might be slightly different from the machine.
Certain options might not be available in some countries. For details, please contact your local dealer.
Two kinds of size notation are employed in this manual. With this machine refer to the inch version.
Machine Types:
The model names of the machine do not appear in the following pages. Check the type of your machine
before reading this manual. (For details, see Chapter 1 "Machine Types", Basic Features.)
• Type 1: NIC FAX Unit optional
• Type 2: NIC FAX Unit standard
Important
Contents of this manual are subject to change without prior notice. In no event will the company be liable for direct, indirect, special, incidental, or consequential damages as a result of handling or operating the machine.
Trademarks
®
Microsoft
, Windows®, Windows NT®, Outlook® are registered trademarks of Microsoft Corporation in
the United States and/or other countries.
®
Netscape
is a registered trademark of Netscape Communications Corporation.
Netscape Communicator and Netscape Messaging Server are trademarks of Netscape Communications Corporation.
®
Ethernet
is a registered trademark of Xerox Corporation.
Other product names used herein are for identification purposes only and might be trademarks of their
respective companies. We disclaim any and all rights to those marks.
Note
❒ The proper names of the Windows operation systems are as follows:
•Microsoft® Windows® 95 operating system
®
•Microsoft
•Microsoft® Windows® Millennium Edition (Windows Me)
•Microsoft® Windows NT® Server network operating system version 4.0 network operating sys-
tem version 4.0
•Microsoft
•Microsoft® Windows® 2000 Professional
•Microsoft
•Microsoft® Windows® XP Professional
•Microsoft® Windows® XP Home Edition
Windows® 98 operating system
®
Windows NT® Workstation operating system version 4.0
®
Windows® 2000 Server
Page 3

TABLE OF CONTENTS
What Do You Want to Do with This Machine? ....................................................1
How to Read This Manual .....................................................................................2
Manuals for This Machine.....................................................................................3
NIC FAX Unit Manual (on CD-ROM) (this manual).................................................... 3
NIC FAX Unit CD-ROM Manual ................................................................................. 3
Basic Features ........................................................................................................... 3
Advanced Features .................................................................................................... 3
Before You Use This Machine ................................................................................... 3
1. Introduction
Scan to E-mail Functions......................................................................................5
Functions Not Supported by Scan to E-mail .............................................................. 6
Internet Fax Functions ..........................................................................................7
Internet Fax Precautions ............................................................................................8
Functions Not Supported by E-mail Transmission ..................................................... 8
Functions Not Supported by E-mail Reception .......................................................... 9
IP-Fax Functions..................................................................................................10
IP-Fax Precautions................................................................................................... 11
Functions Not Supported by IP-Fax Transmission................................................... 11
Functions Not Supported by IP-Fax Reception........................................................ 11
LAN-Fax Functions..............................................................................................12
LAN-Fax Precautions ............................................................................................... 12
Network Delivery Scanner Functions ................................................................13
Using ScanRouter V2 Lite Server ............................................................................ 13
Using ScanRouter V2 Professional Server .............................................................. 15
Functions Not Supported by Network Delivery Scanner ..........................................16
How to Read This Manual ........................................................................................17
Necessary Operation Manuals................................................................................. 18
Overview of Setting Up and Delivering Data ............................................................19
Using ScanRouter V2 Lite ..................................................................................... 19
Using ScanRouter V2 Professional .......................................................................20
Precautions for Reading Instructions and Online Help ............................................21
Making Settings through a Web Browser..........................................................22
i
Page 4

2. Getting Started
Control Panel........................................................................................................23
Before Using Network Functions .......................................................................25
Connecting to a LAN ................................................................................................ 25
Assigning User Function Keys ................................................................................. 26
NIC FAX Initial Settings ....................................................................................... 28
Network Settings ......................................................................................................33
TCP/IP Settings ..................................................................................................... 33
Mail Server Settings .............................................................................................. 37
Auto Mail RX (Auto Mail Reception) ...................................................................... 42
Returning to the Initial Display...............................................................................42
IP-Fax Parameter Settings .......................................................................................43
Installing the Software......................................................................................... 45
Auto-run Program..................................................................................................... 45
Quick Install..............................................................................................................45
Installing the Driver and Utilities Individually ............................................................ 47
LAN-Fax Driver ......................................................................................................47
SmartNetMonitor for Client .................................................................................... 50
SmartNetMonitor for Admin ................................................................................... 51
DeskTopBinder V2 Lite..........................................................................................52
ScanRouter V2 Lite ............................................................................................... 53
Software Included on the CD-ROM ....................................................................54
List of Files ............................................................................................................... 54
LAN-Fax Driver ........................................................................................................ 55
Address Book ........................................................................................................ 55
LAN-Fax Cover Sheet Editor .................................................................................56
SmartNetMonitor for Client....................................................................................... 56
SmartNetMonitor for Admin...................................................................................... 57
DeskTopBinder V2 Lite ............................................................................................58
ScanRouter V2 Lite .................................................................................................. 59
Online Help ..............................................................................................................60
3. Using Scan to E-mail Functions
Scanning a Color Original...................................................................................61
Scanner RGB ...........................................................................................................67
Scanning a Monochrome Original......................................................................68
ii
Page 5

4. Using Internet Fax Functions
E-mail Server Settings (by Network Administrator) .........................................73
Mail Server Settings ................................................................................................. 73
E-mail Servers That Have Been Confirmed to Work................................................ 73
Transmitting Internet Fax....................................................................................74
Confirming Reception............................................................................................... 80
Transmitting Journal by E-mail................................................................................. 81
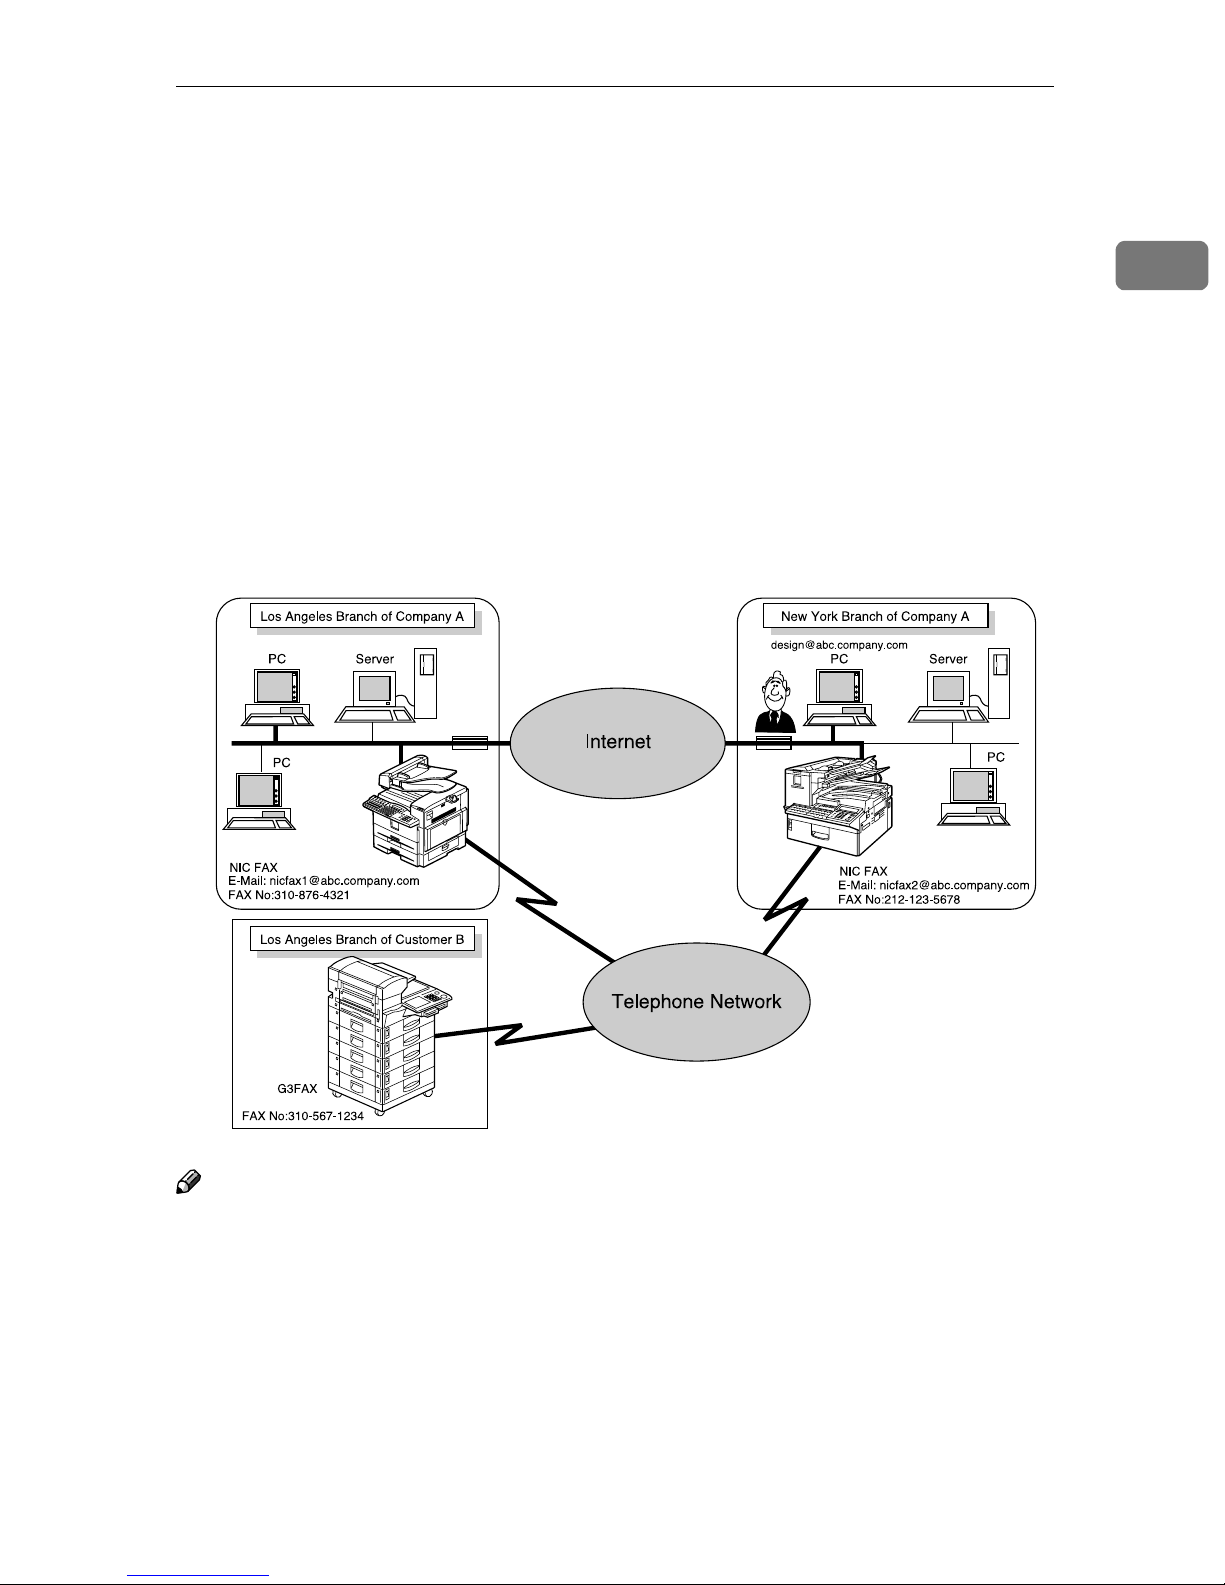
Transfer Request .................................................................................................82
Transfer Request by E-mail ..................................................................................... 84
Specifying End Receivers......................................................................................87
Receiving Internet Fax.........................................................................................88
Auto Mail Reception ................................................................................................. 88
Manual Mail Reception.............................................................................................88
Receiving Transfer Request E-mail ......................................................................... 90
Routing Received Documents..................................................................................91
Transferring Received Documents...........................................................................91
Forwarding Received Documents ............................................................................92
SMTP Reception ......................................................................................................93
Routing Mail Received via SMTP .......................................................................... 94
Canceling Transmission of an Internet Fax ......................................................96
While the Original is Being Scanned In .................................................................... 96
After the Original Has Been Scanned In .................................................................. 96
5. Using IP-Fax Functions
Transmitting IP-Fax .............................................................................................98
Transmitting by Specifying an IP Address or Host Name ........................................98
Transmitting by Specifying a VoIP Gateway .......................................................... 100
Transmitting by Specifying an Alias Fax Number ..................................................101
Canceling Transmission of an IP-Fax..............................................................104
While the Original Is Being Scanned In.................................................................. 104
After the Original Has Been Scanned In ................................................................ 104
6. Using LAN-Fax Functions
Basic Transmission...........................................................................................107
Address Book.....................................................................................................110
Printing and Saving ........................................................................................... 112
Setting LAN-Fax Properties ..............................................................................114
iii
Page 6

7. Using Network Delivery Scanner Functions
Delivering Scanned Data...................................................................................117
Color Original ......................................................................................................... 118
Monochrome Original ............................................................................................. 119
Specifying Destinations Without Using Quick Dial Keys or Speed Dials.....120
Specifying by Groups (Group Code) ...................................................................... 120
Specifying by Groups (Quick Dial) ......................................................................... 120
Specifying by Redial............................................................................................... 121
Specifying Using the Number Keys........................................................................ 121
Routing Received Fax Documents...................................................................122
Setting up ScanRouter V2 Professional .................................................................122
Fax Document Delivery Settings............................................................................ 122
Transmission End Operation.................................................................................. 126
Transmission Using the Backup File Transmission Feature ..................................129
Temporarily Terminating Fax Document Delivery ..................................................131
8. Registering Addresses
Registering Addresses for Scanner.................................................................133
Registering/Editing a Destination ...........................................................................133
Checking the Short ID of a Destination ............................................................... 136
Registering Addresses for Internet Faxing .....................................................137
Registering/Editing a Destination ...........................................................................137
Registering Addresses for IP-Faxing...............................................................141
Registering/Editing a Destination ...........................................................................141
Registering Template Addresses.....................................................................147
Deleting Template Addresses ................................................................................ 148
Registering Template Subjects and Messages...............................................149
Deleting Template Subjects and Messages...........................................................151
9. Making Settings through a Web Browser
Connecting from your Computer .....................................................................153
System Requirements............................................................................................153
Initial Display ..........................................................................................................153
Functions You Can Check or Set Up ...............................................................156
Using Online Help .............................................................................................. 157
10.Troubleshooting
Error Messages..................................................................................................159
NIC FAX Display Messages ...................................................................................159
Web Browser Initial Display Messages .................................................................. 163
LAN-Fax Operation Messages............................................................................... 164
User Parameters ................................................................................................ 166
iv
Page 7

11.Appendix
Reports and Lists...............................................................................................171
Transfer Result Report...........................................................................................171
Error Mail Notification ............................................................................................. 172
Error Report (Mail) ................................................................................................. 173
Server-Generated Error E-mail .............................................................................. 173
Journal ...................................................................................................................174
Box List .................................................................................................................. 176
Communication Result Report ............................................................................... 177
LAN-Fax Error Report ............................................................................................ 178
Journal by E-mail ...................................................................................................180
Specifications.....................................................................................................182
Received Images................................................................................................184
INDEX....................................................................................................... 185
v
Page 8

vi
Page 9

What Do You Want to Do with This
Machine?
This is the summary of this machine's features showing which page you have to
read for detailed information.
I Want... Reference
to change the interval time for automatic email reception
to block out unwanted e-mail p.41 “Auth. E-Mail RX (Authorized E-mail
to scan a colored document and send it to computers
to adjust the color balance for color scanning p.67 “Scanner RGB”
to send scanned documents as e-mail p.68 “Scanning a Monochrome Original”
to send fax via the Internet p.73 “Using Internet Fax Functions”
to keep the history of incoming and outgoing
faxes and e-mail automatically
to check incoming e-mail immediately p.88 “Receiving Internet Fax”
to route documents sent with a SUB code to my
computer through NIC FAX using an e-mail
address
to route all documents sent without a SUB code
to the specified e-mail address
to transfer specified senders' fax to my computer using an e-mail address
p.39 “Mail RX Interval (Mail Reception Interval)”
Reception)”
p.61 “Scanning a Color Original”
p.81 “Transmitting Journal by E-mail”
p.91 “Routing Received Documents”
p.91 “Routing Received Documents”
p.91 “Transferring Received Documents”
to receive faxes on computer and not to print
out them on fax machine
to receive e-mail with SMTP reception p.93 “SMTP Reception”
to receive faxes immediately via a network p.97 “Using IP-Fax Functions”
to fax documents created with computer applications
to edit Address Book of LAN-Fax p.110 “Address Book”
to print documents created with computer applications for proof checking
to route scanned documents via network p.117 “Delivering Scanned Data”
to register frequently-used addresses, subjects
and messages
p.92 “Forwarding Received Documents”
p.107 “Using LAN-Fax Functions”
p.112 “Printing and Saving”
p.147 “Registering Template Addresses”
p.149 “Registering Template Subjects and
Messages”
1
Page 10

How to Read This Manual
R
R
Symbols
The following set of symbols is used in this manual.
WARNING:
This symbol indicates a potentially hazardous situation that might result in
death or serious injury when you misuse the machine without following the instructions under this symbol. Be sure to read the instructions, all of which are described in the Safety Information section in the Basic Features manual.
CAUTION:
This symbol indicates a potentially hazardous situation that might result in minor or moderate injury or property damage that does not involve personal injury
when you misuse the machine without following the instructions under this
symbol. Be sure to read the instructions, all of which are described in the Safety
Information section in the Basic Features manual.
* The statements above are notes for your safety.
Important
If this instruction is not followed, paper might be misfed, originals might be
damaged, or data might be lost. Be sure to read this.
Preparation
This symbol indicates information or preparations required prior to operating.
Note
This symbol indicates precautions for operation, or actions to take after abnormal operation.
Limitation
This symbol indicates numerical limits, functions that cannot be used together,
or conditions in which a particular function cannot be used.
Reference
This symbol indicates a reference.
{}
Keys built into the control panel of the machine.
[]
Keys and buttons that appear on the computer's display.
2
Page 11

Manuals for This Machine
Three Facsimile Reference manuals are provided, the Basic Features manual, the
Advanced Features manual, and Before You Use This Machine manual . For
Type 2 machines and Type 1 machines with option, the NIC FAX Unit manual,
NIC FAX Unit CD-ROM manual are also provided. Please refer to the manual
that suits your needs.
NIC FAX Unit Manual (on CD-ROM) (this manual)
Explains about the Scanner function, Internet Fax function, IP-Fax function, and
LAN-Fax function.
Note
❒ NIC FAX Unit is an option for Type 1.
NIC FAX Unit CD-ROM Manual
Introduces the contents of the NIC FAX CD-ROM and the necessary operating
environment for the CD-ROM.
How to access the NIC FAX Unit manual in PDF file on the CD-ROM is also explained.
Note
❒ NIC FAX Unit is an option for Type 1.
Basic Features
Explains the most frequently used fax functions and operations.
Advanced Features
Describes more advanced functions, and also explains settings for key operators.
Before You Use This Machine
Explains how to set up your machine.
3
Page 12

4
Page 13
1. Introduction
Scan to E-mail Functions
There are two types of scanner related functions Scan to E-mail and Network Delivery Scanner. This section describes about the Scan to E-mail function. For details about the Network Delivery Scanner function, see p.13 “Network Delivery
Scanner Functions”.
Scanned documents are sent as e-mail messages with an attached image. Black
and white documents are converted into PDF or TIFF-F, and color documents
into PDF or JPEG images. You can specify a document format with user parameters. Also you can turn the JPEG function on and off with a user function key
for Color Scanning.
GFSCAN0E
Note
❒ When you send e-mail with PDF or JPEG images to NIC FAX using the Scan
to E-mail function, NIC FAX cannot receive the e-mail.
5
Page 14

1
Introduction
Functions Not Supported by Scan to E-mail
The following functions are supported with standard fax transmission and reception, but not with Scan to E-mail transmission.
• Immediate Transmission for monochrome originals, Memory Transmission
for color originals
• Confidential Transmission
• SUB Code Transmission
• SEP Code Polling Reception
• Polling Transmission
• Polling Reception
• Transfer Request Transmission
• Fax Header
• Label Insertion
• Dialing with the Dial Option Key
• Chain Dial
• On Hook Dial
• Manual Dial
• JBIG Transmission
• Batch Transmission
• ECM (Error Correction Mode)
• Memory File Transfer
6
Page 15
Internet Fax Functions
Internet Fax Functions
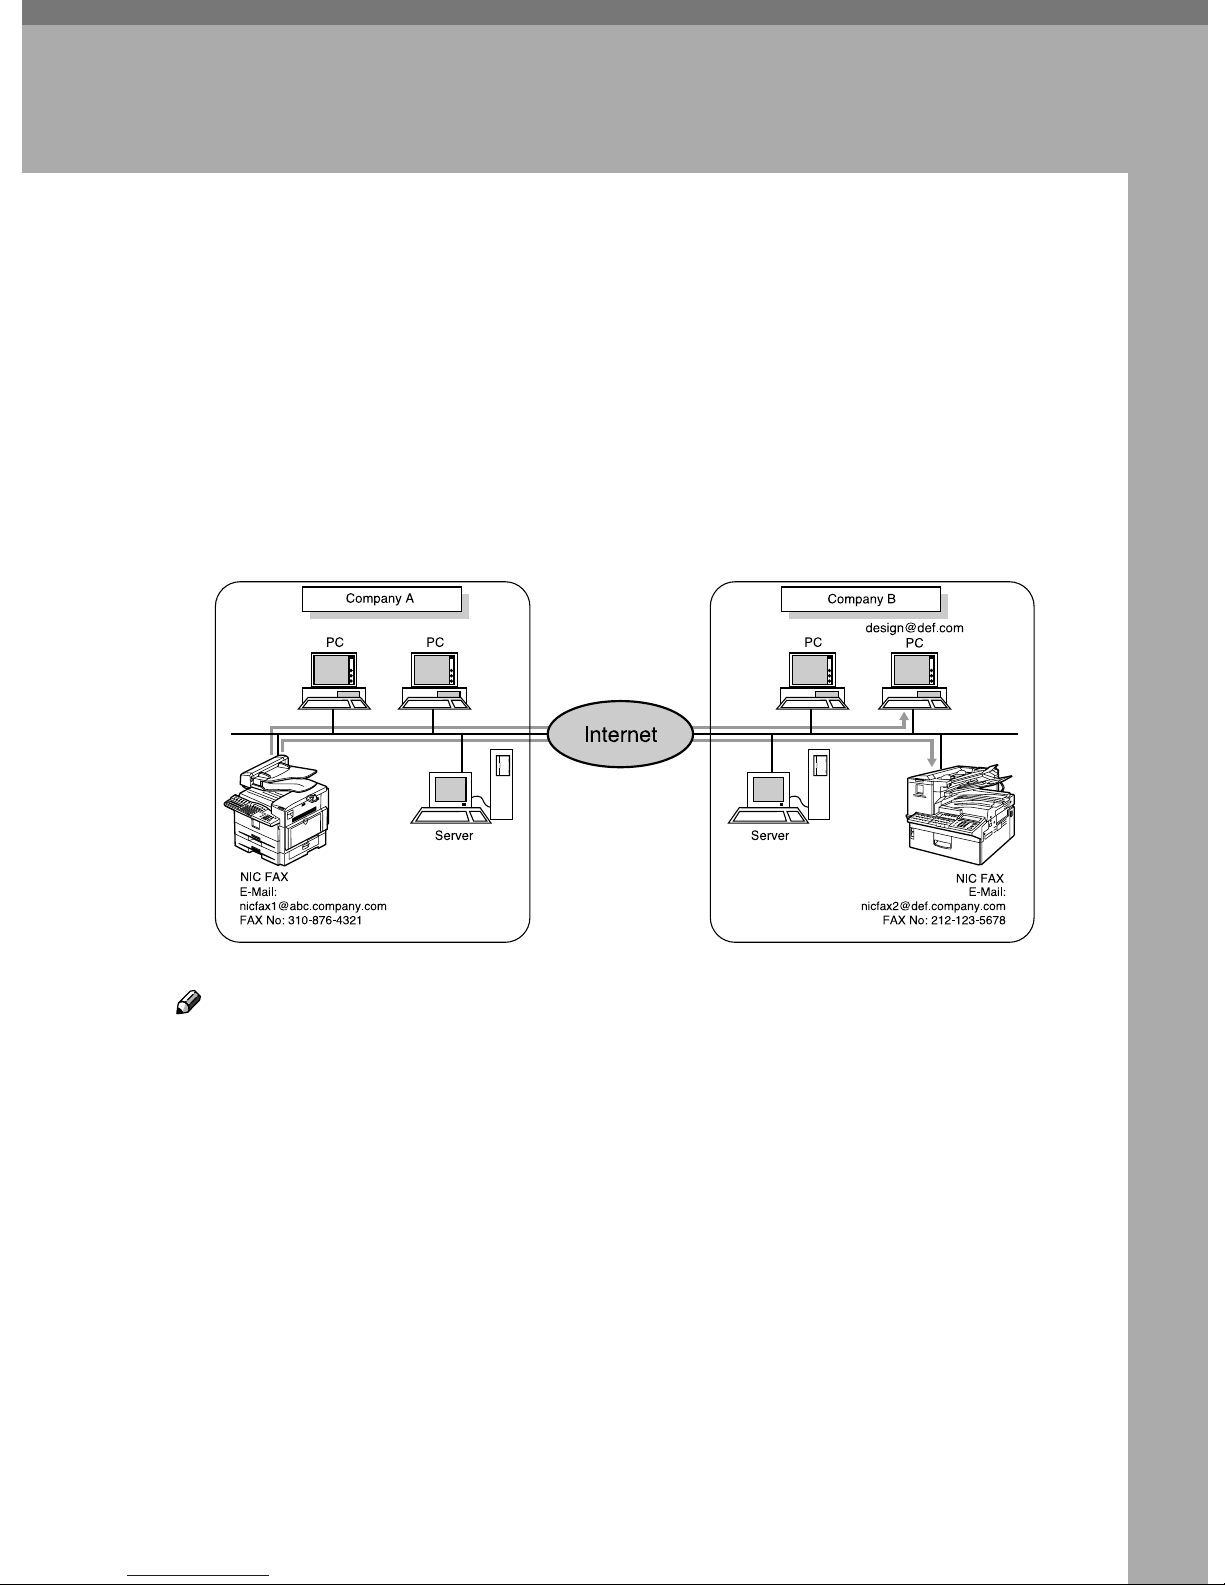
NIC FAX converts scanned document images to e-mail format and transmits the
data over the Internet.
The e-mail sent by NIC FAX can be received by another NIC FAX or a computer.
Instead of dialing the telephone number of the destination you want to send to,
you enter the relevant e-mail address.
Documents are sent as e-mail messages with an attached TIFF-F image. Because
of this, a MIME-compatible e-mail reader is required in order to view documents
received on a computer. To view an attached image, software capable of displaying TIFF-F formatted images is required. NIC FAX includes DeskTopBinder V2
Lite, which can be used to view, edit, and store image data.
You can also receive e-mail messages from computers or other Internet fax machines, and print or forward these.
1
Note
❒ NIC FAX must be connected to a LAN and set up correctly in order to use its
Internet fax functions. See p.23 “Getting Started”.
❒ The Internet Fax function supported by NIC FAX is compliant with ITU-T
Rec. T.37.
GFINFX0E
7
Page 16

1
Introduction
Internet Fax Precautions
• Internet Fax communicates with a server over a LAN. It cannot communicate
directly with other parties.
• If a transmission is not successful, NIC FAX usually receives an e-mail error
notification. However, e-mail error notifications may not be transmitted for
various reasons. We recommend you confirm receipt of important e-mail by
calling the other party.
• The level of security for Internet communications is low. We recommend you
use the telephone network for confidential communications.
• Voice communication is not supported over a LAN.
• Internet fax delivery might be delayed due to network congestion. Use a stan-
dard fax whenever communication is time sensitive.
Functions Not Supported by E-mail Transmission
The following functions are supported with standard fax transmission, but not
with Internet faxing.
• Immediate Transmission
• Confidential Transmission
• SUB Code Transmission
• ID Transmission
• Polling Transmission
• Chain Dial
• Dialing with the Dial Option Key
• On Hook Dial
• Manual Dial
• JBIG Transmission
• Batch Transmission
• ECM (Error Correction Mode)
• Memory File Transfer
8
Page 17

Internet Fax Functions
Functions Not Supported by E-mail Reception
The following functions are supported with standard fax reception, but not with
Internet faxing.
• ID Reception
• Confidential Reception
• Memory Lock Reception
• Polling Reception
• SEP Code Polling Reception
• Authorized Reception
• Multi-copy Reception
• Specified Tray (optional paper tray required)
1
9
Page 18
1
Introduction
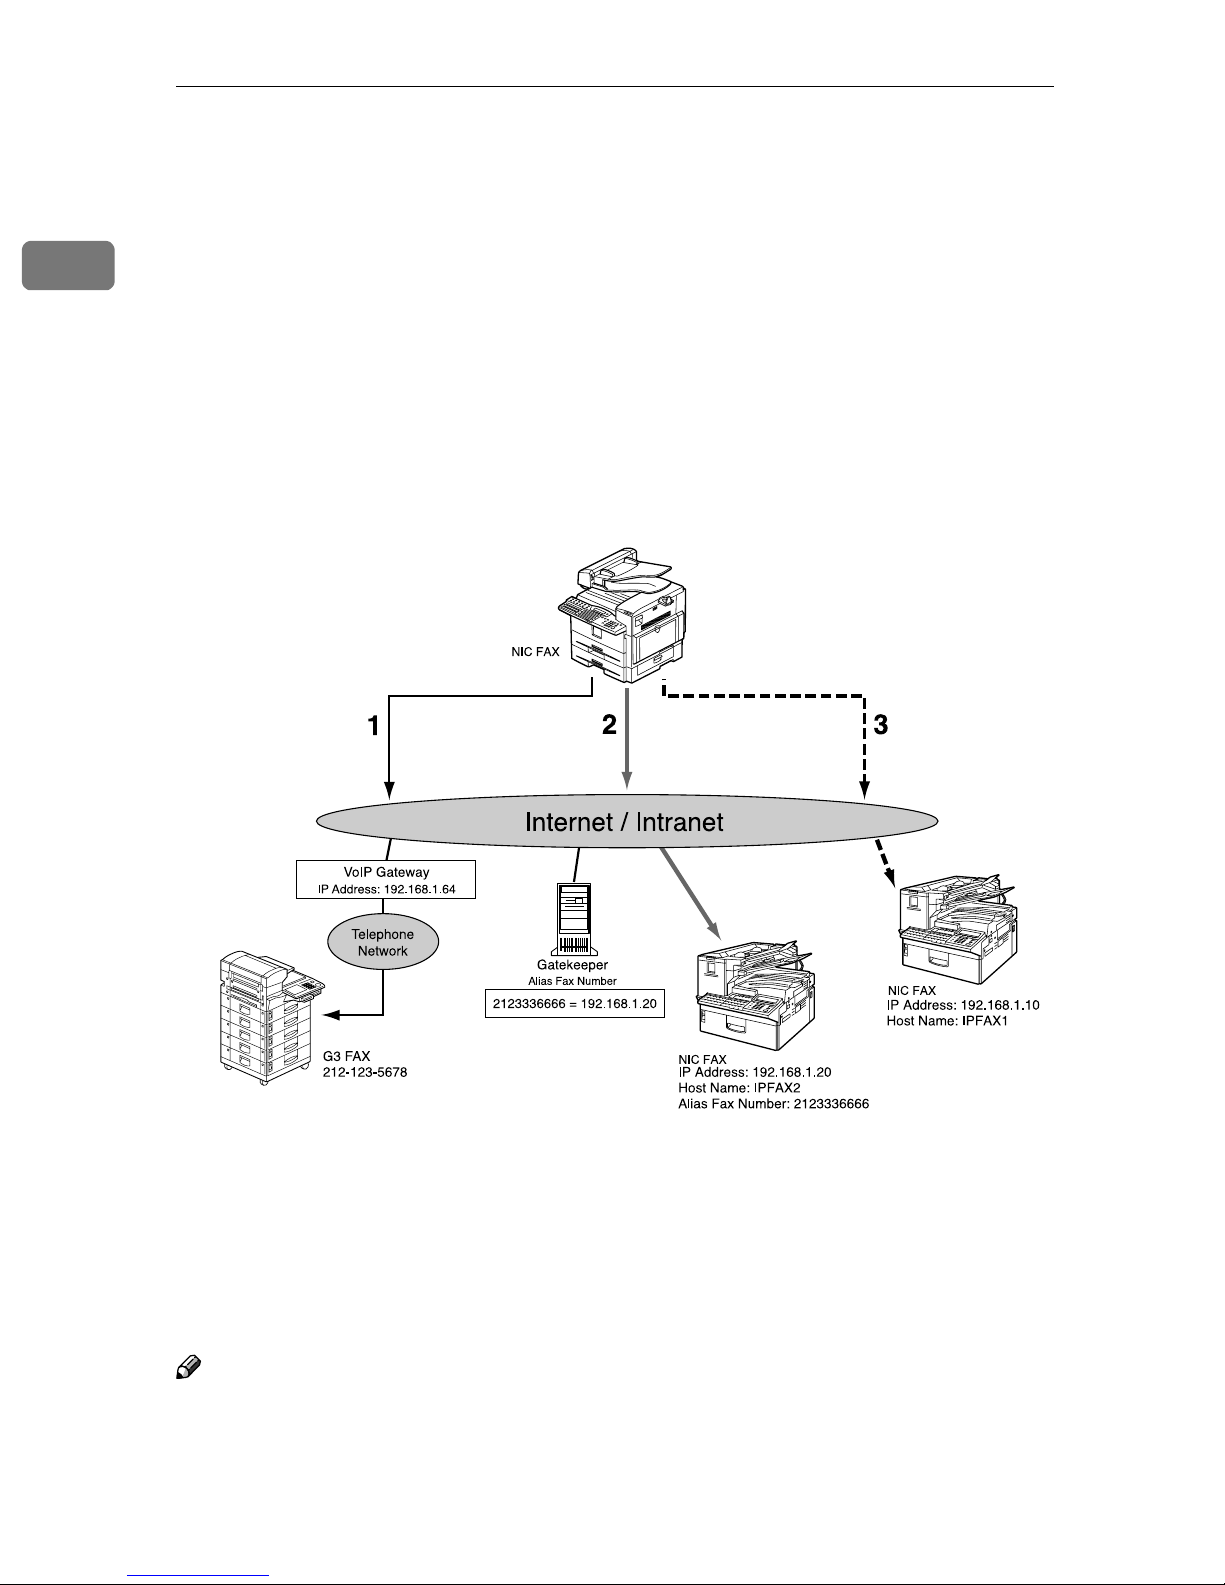
IP-Fax Functions
With the IP-Fax feature, you can send or receive faxes through fax machines directly connected to the same network using TCP/IP protocol.
Use the IP address or host name instead of the fax number to specify the destination machine, or use the alias number when using the gatekeeper.
You can also send faxes to G3 fax machines connected to PSTN via the VoIP gateways (with T.38 Function).
No e-mail server is required since NIC FAX communicates with destination fax
machines connected to the same network directly. The transmission speed is
higher than when using G3.
1. Transmission by specifying the destination with the IP address of VoIP gate-
way (192.168.1.64) and fax number of the receiver (212–123–5678)
2. Transmission by specifying the destination with the alias fax number of the re-
ceiver (2123336666)
3. Transmission by specifying the destination with the IP address or host name
of the receiver (192.168.1.10 or IPFAX1)
Note
❒ NIC FAX must be connected to a LAN and set up correctly in order to use its
IP-Fax functions. See p.23 “Getting Started”.
❒ The IP-Fax function supported by NIC FAX is compliant to ITU-T Rec. T.38.
10
GFIPFX0E
Page 19

IP-Fax Functions
----Glossary
❖❖❖❖ Gatekeeper
This is a device that manages equipment connected to an IP network by converting and authenticating addresses.
❖❖❖❖ VoIP (Voice over Internet Protocol)
This is a technology that enables voice communications over the Internet by
linking telephone network and IP network. VoIP gateway converts protocols
to connect these different types of networks.
IP-Fax Precautions
• You cannot transmit any data to other networks where a firewall is installed.
• The level of security for Internet communications is low. We recommend use
of the telephone network for confidential communications.
1
• Voice communications are not supported over a LAN.
Functions Not Supported by IP-Fax Transmission
The following functions are supported with standard fax transmission, but not
with IP-Fax transmission.
• Batch Transmission
• Memory File Transfer
• Manual Dial
Functions Not Supported by IP-Fax Reception
The following functions are supported with standard fax reception, but not with
IP-Fax reception.
• RDS
11
Page 20
1
Introduction
LAN-Fax Functions
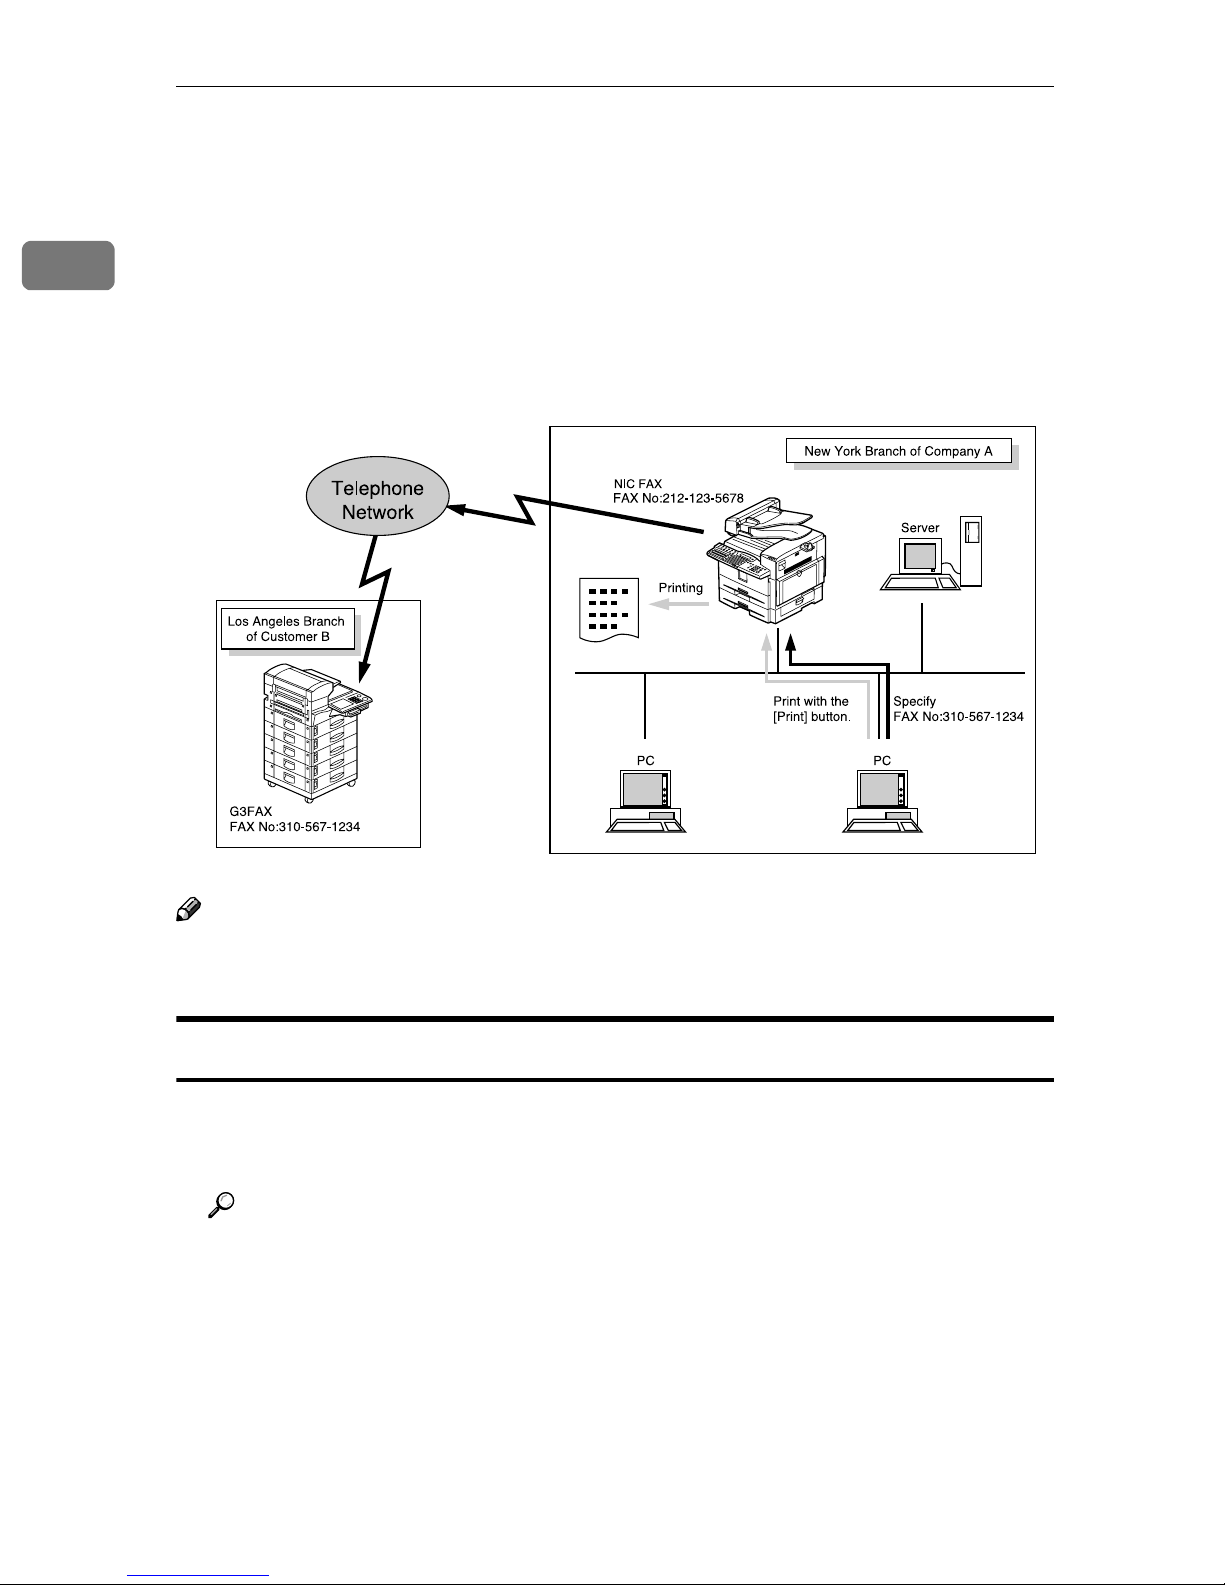
With a NIC FAX connected to a LAN, you can use a telephone line to send a fax
created using a computer application to another fax machine.
To send a fax, simply select [Print] from the Windows application, and then select
LAN-Fax as the printer and specify a destination.
In addition to sending faxes, LAN-Fax allows NIC FAX to be used for printing
out and saving documents in TIFF-F file for proof checking.
GFLNFX0E
Note
❒ NIC FAX must be connected to a LAN and set up correctly in order to use
LAN-Fax functions. See p.23 “Getting Started”.
LAN-Fax Precautions
• When you transmit faxes, or print documents using the LAN-Fax functions,
you cannot abort data transmission by pressing the {{{{Clear/Stop}}}} key while the
data is being transmitted from your computer to the fax machine.
Reference
p.107 “Basic Transmission”
p.112 “Printing and Saving”
12
Page 21

Network Delivery Scanner Functions
Network Delivery Scanner Functions
You can use NIC FAX as a network scanner for ScanRouter V2 Lite/Professional. The documents scanned in by NIC FAX can be saved in the network server
or in designated folders on network computers.
Note
❒ ScanRouter V2 Lite and DeskTopBinder V2 Lite are on the CD-ROM which
comes with your NIC FAX.
❒ ScanRouter V2 Professional is optional.
❒ Please contact your service representative if you want to use ScanRouter V2
Professional.
❒ For brevity, ScanRouter V2 Lite and ScanRouter V2 Professional are referred
to throughout this manual as ScanRouter V2 Lite/Professional.
❒ There is no compatibility between the machine and ScanRouter/ScanRouter
Professional. Thus, you cannot transmit documents to ScanRouter or ScanRouter Professional delivery servers.
1
❒ This function is available without using e-mail.
Using ScanRouter V2 Lite Server
Documents scanned in by NIC FAX are sent to the ScanRouter V2 Lite server.
Sent documents are delivered to or saved in the following locations depending
on the setting of ScanRouter V2 Lite server:
ScanRouter V2 Lite server Fax In-Tray
A
13
Page 22
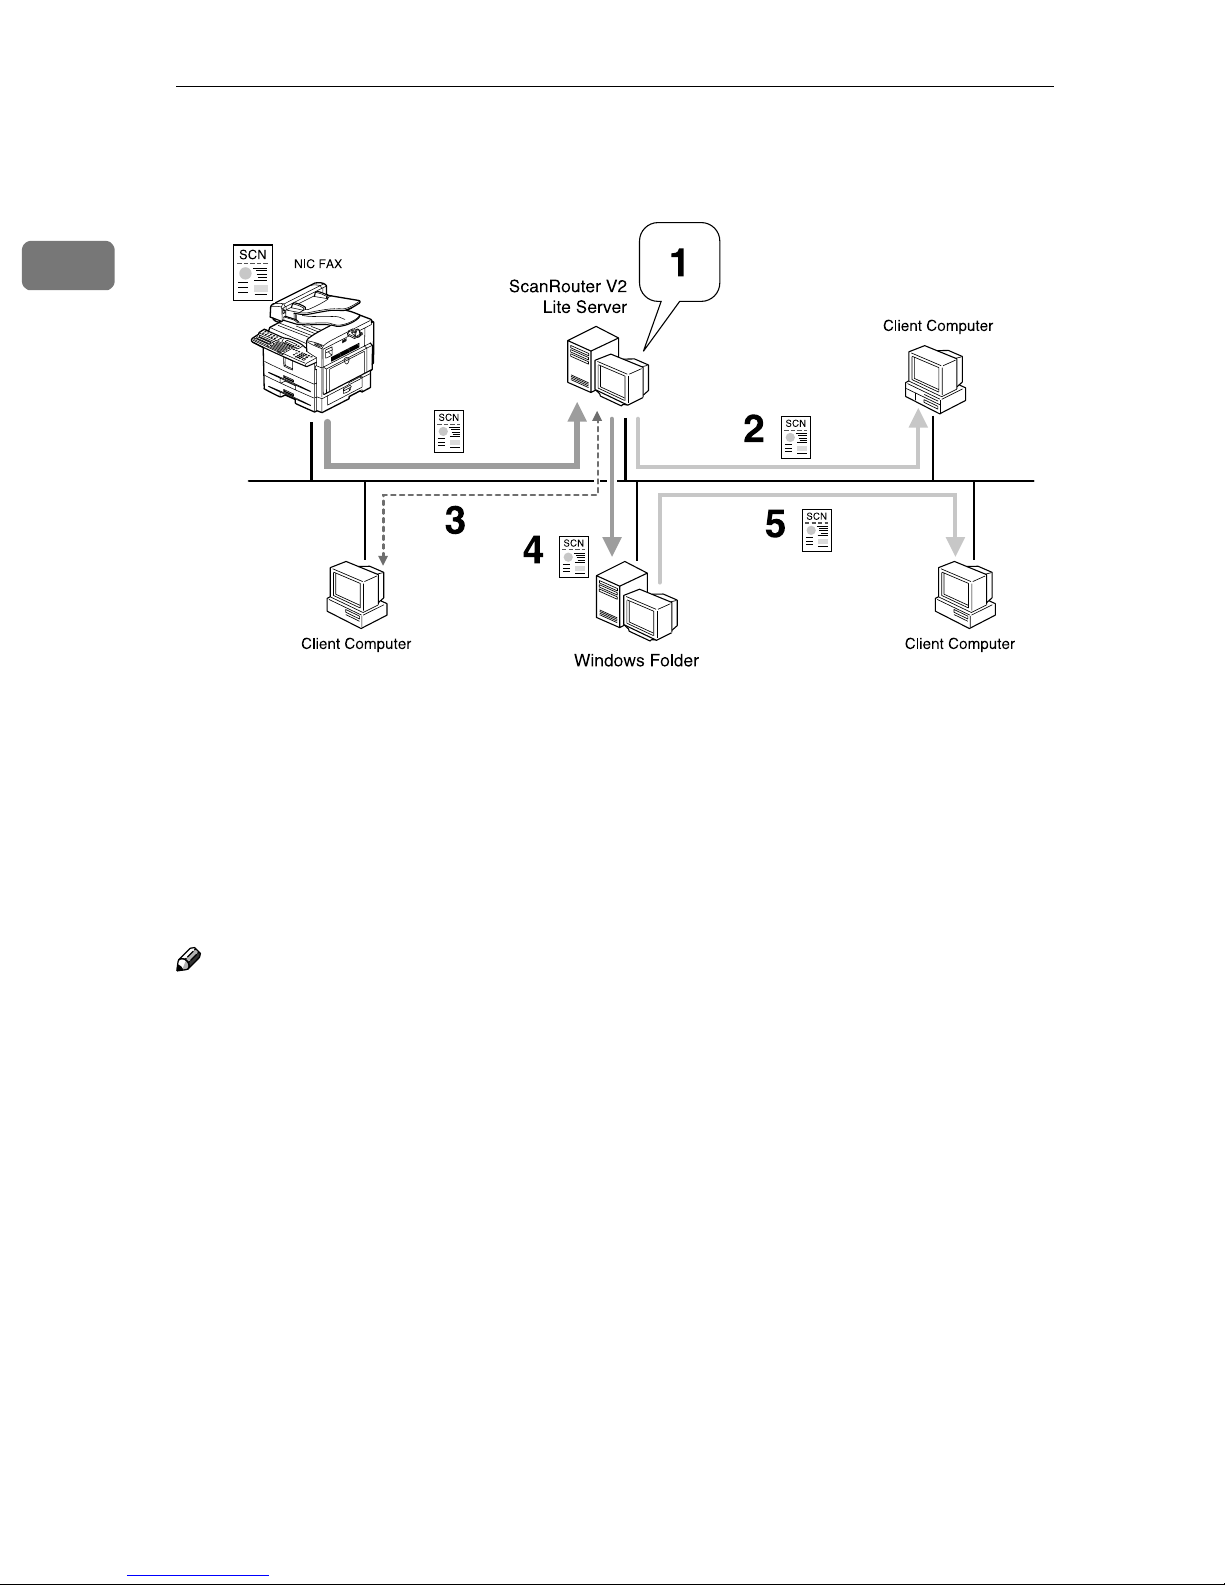
1
Introduction
The designated folder on the same network as the ScanRouter V2 Lite server
B
GFLNFX1E
Scanned documents are:
1. saved in Fax In-Tray.
2. received with ScanRouter V2 Link.
3. viewed or picked up by DeskTopBinder V2 Lite.
4. delivered.
5. shared on network.
Note
❒ Folders in the other computers as well as in the computer where the Scan-
Router V2 Lite Server is installed can be specified as the destination as long
as they are connected to the same network as the ScanRouter V2 Lite Server.
14
Page 23
Network Delivery Scanner Functions
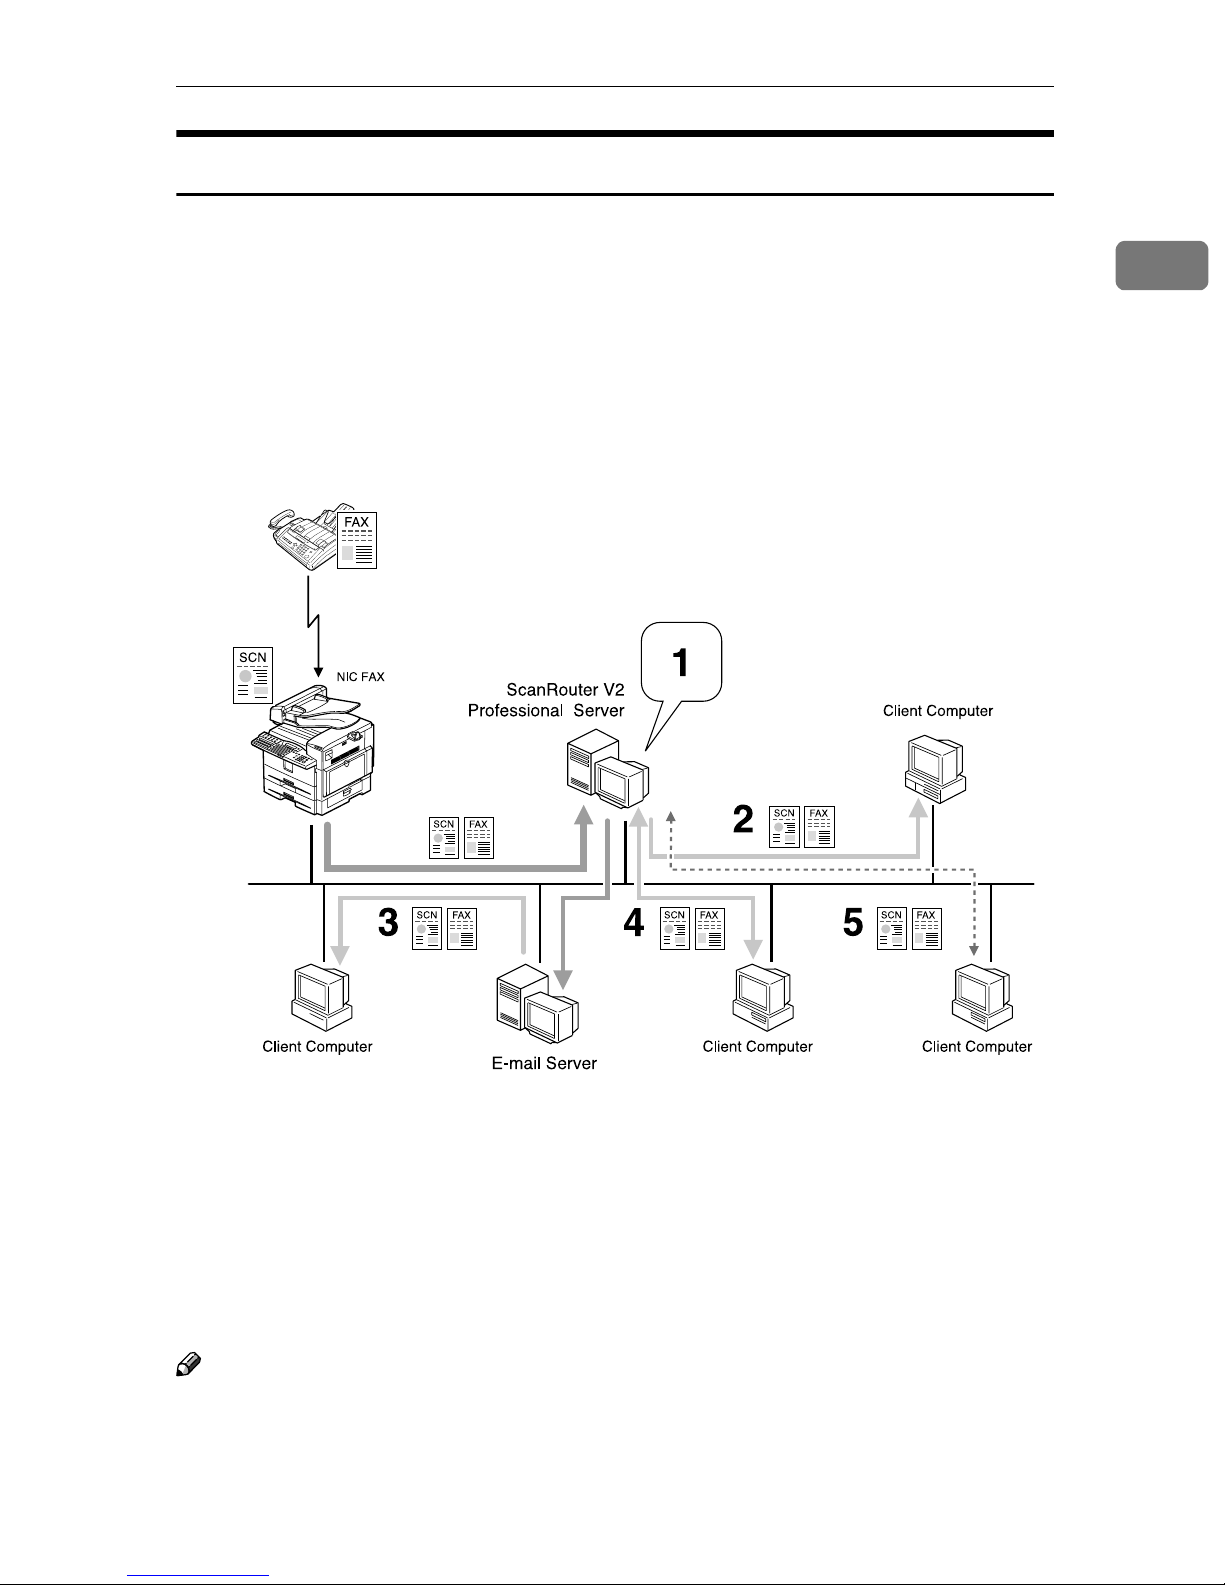
Using ScanRouter V2 Professional Server
Documents received from other fax machines or scanned by NIC FAX itself are
sent to the ScanRouter V2 Professional server.
Sent documents are delivered to or saved in the following locations depending
on the setting of ScanRouter V2 Professional server:
Fax In-Tray in the ScanRouter V2 Professional server
A
The designated folder on the same network as the ScanRouter V2 Professional
B
server
The specified e-mail address(es) set on the Fax In-Tray
C
1
Faxed or scanned documents are:
1. saved as files in Fax In-Tray.
2. received with ScanRouter V2 Link.
3. delivered with e-mail.
4. viewed or downloaded with a Web browser.
5. viewed or picked up with DeskTopBinder V2 Lite.
Note
❒ You need an e-mail server in order to transmit the scanned documents in e-
mail format.
❒ Folders in the other computers as well as in the computer where ScanRouter V2
Professional Server is installed can be specified as the destination as long as they
are connected to the same network as the ScanRouter V2 Professional Server.
GFLNFX2E
15
Page 24

1
Introduction
Functions Not Supported by Network Delivery Scanner
The following functions are supported with standard fax transmission and reception, but not with Network Delivery Scanner.
• Immediate Transmission for monochrome originals, Memory Transmission
for color originals
• Confidential Transmission
• SUB Code Transmission
• SEP Code Polling Reception
• Polling Transmission
• Polling Reception
• Transfer Request Transmission
• Fax Header
• Label Insertion
• Dialing with the Dial Option Key
• Chain Dial
• On Hook Dial
• Manual Dial
• JBIG Transmission
• Batch Transmission
• ECM (Error Correction Mode)
• Memory File Transfer
16
Page 25

Network Delivery Scanner Functions
How to Read This Manual
This manual describes the Network Delivery Scanner function that uses ScanRouter V2 Lite/Professional. Note that descriptions in some of the sections are
applicable to both applications, and descriptions in other sections are applicable
only to particular applications.
Refer to the table below to find the sections that contain the information about
the applications you want to use.
1
Page Numb er in T his
Manual
p.117 “Delivering
Scanned Data”
p.120 “Specifying
Destinations Without
Using Quick Dial
Keys or Speed Dials”
p.133 “Registering
Addresses for Scanner”
p.122 “Routing Received Fax Documents”
p.159 “NIC FAX Display Messages” (Messages regarding the
Network Scanner
function only)
p.162 “While Using
the Network Delivery
Scanner Function”
ScanRouter V2
Lite
Applicable Applicable Describes the procedure for de-
Not Applicable Applicable Provides additional information
Applicable Applicable Provides information that is com-
ScanRouter V2
Professional
Contents
livering scanned documents or
registering a destination. These
procedures are the same for both
(ScanRouter V2 Lite/Professional).
about ScanRouter V2 Professional not included in the instructions
that come with the application.
Read this section before you use
ScanRouter V2 Professional.
mon to all (ScanRouter V2
Lite/Professional). Read this section as required.
17
Page 26

1
Introduction
Necessary Operation Manuals
Several other operation manuals are provided other than this that are necessary
for using ScanRouter V2 Lite/Professional. Refer to the table below to find additional instructions that are necessary to you.
❖❖❖❖ When Using ScanRouter V2 Lite
Basic Features manual/Advanced Features
manual
COLOR NIC FAX UNIT TYPE410 Operating
Instructions
ScanRouter V2 Lite Setup Guide
ScanRouter V2 Lite Management Guide
*1
An operation manual in PDF file that is displayed when you install ScanRouter
*1
*2
V2 Lite
*2
An operation manual in PDF file that is registered to the Start Menu when you install ScanRouter V2 Lite
❖❖❖❖ When Using ScanRouter V2 Professional
Basic Features manual/Advanced Features
manual
The Basic Features manual explains the most
frequently used fax functions and operations. The Advanced Features manual describes more advanced functions as well as
settings for key operators.
This manual
ScanRouter V2 Lite Setup Guide describes
the setup procedure for ScanRouter V2 Lite.
ScanRouter V2 Lite Management Guide describes operations the Administrator needs
to perform for managing and maintaining
ScanRouter V2 Lite.
The Basic Features manual explains the most
frequently used fax functions and operations. The Advanced Features manual describes more advanced functions as well as
settings for key operators.
COLOR NIC FAX UNIT TYPE410 Operating
Instructions
ScanRouter V2 Professional Setup Guide
ScanRouter V2 Professional Management
Guide
ScanRouter V2 Professional Web Document
Viewer Setup Guide
*1
*2
*2
An operation manual in PDF file that is displayed when you install ScanRouter
V2 Professional
*2
An operation manual in PDF file that is registered to the Start Menu when you install ScanRouter V2 Professional
18
This manual
*1
ScanRouter V2 Professional Setup Guide describes the setup procedure for ScanRouter
V2 Professional.
ScanRouter V2 Professional Management
Guide describes the operation the Administrator needs to perform for managing and
maintaining ScanRouter V2 Professional.
ScanRouter V2 Professional Web Document
Viewer Setup Guide describes the setup procedure for the server.
Page 27
Network Delivery Scanner Functions
Overview of Setting Up and Delivering Data
In order to deliver data to designated server or fax machines, you need to set up
NIC FAX and the server correctly. First, follow the steps described below before
delivering data. Note that you need to register NIC FAX by I/O device settings
for ScanRouter V2 Lite/Professional.
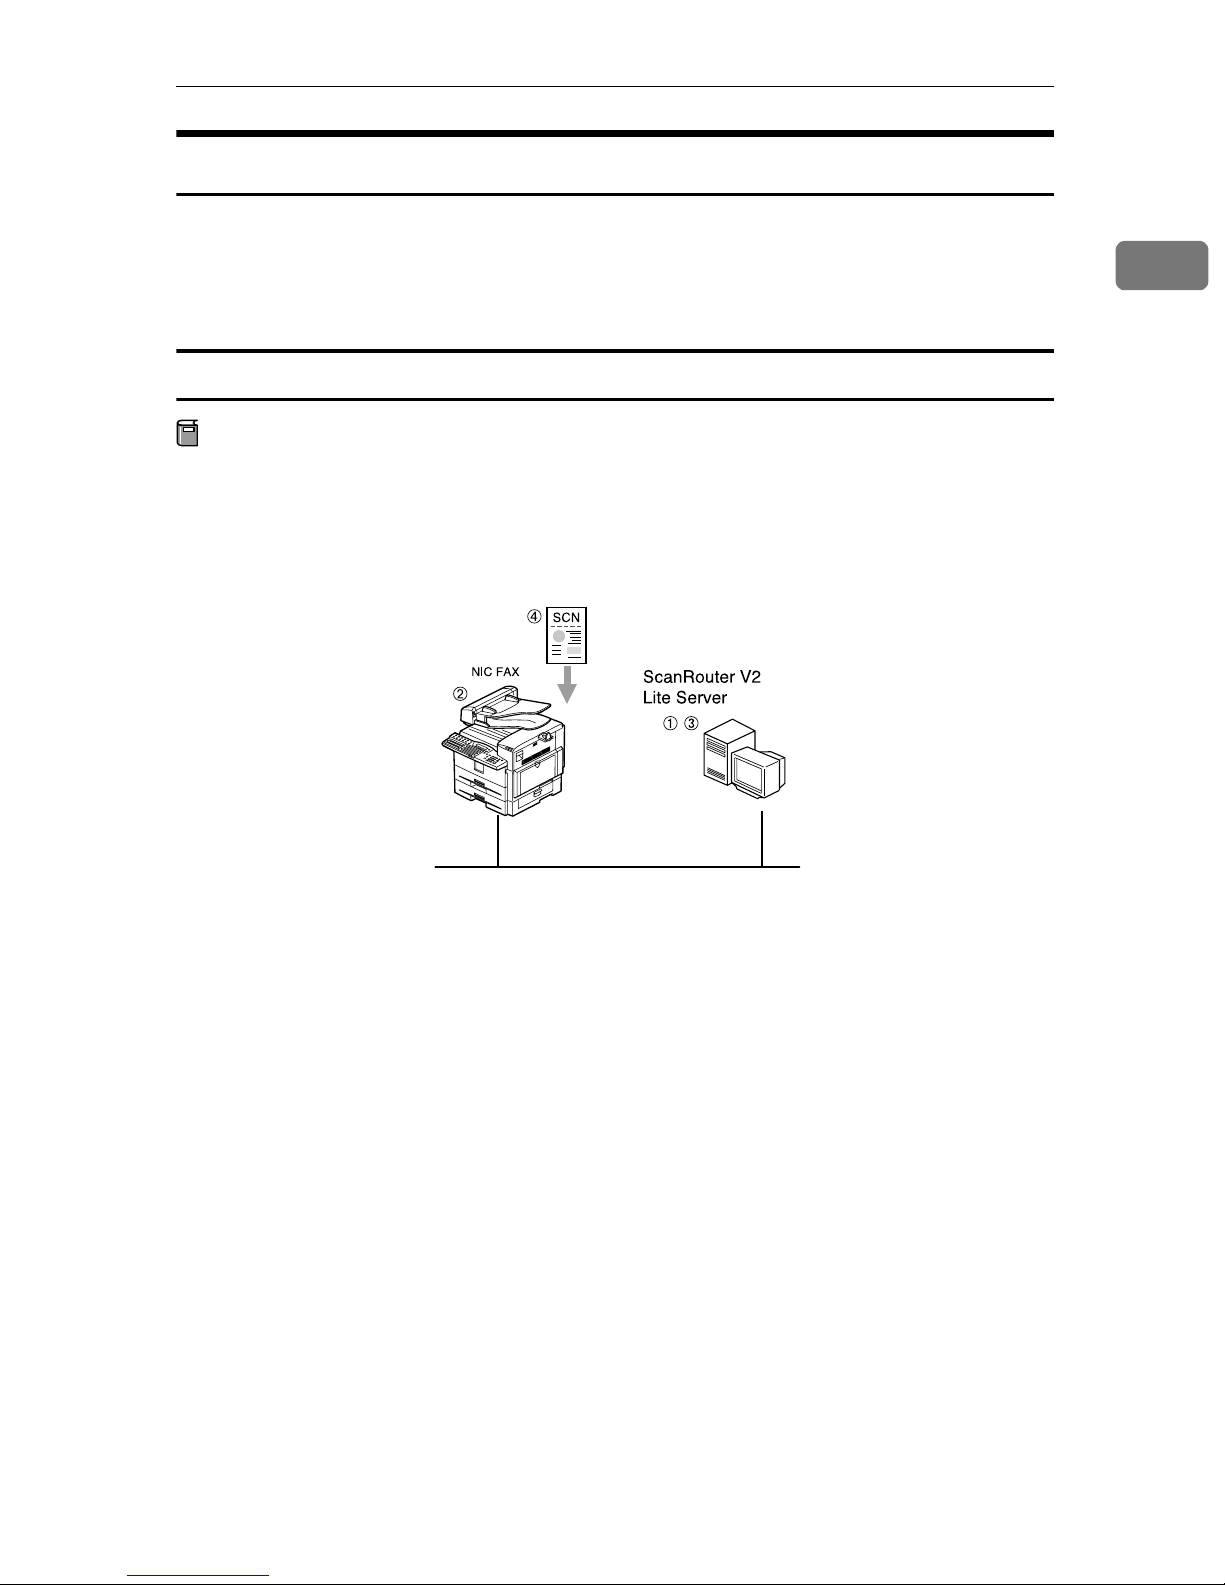
Using ScanRouter V2 Lite
Preparation
You need to complete "Network" settings beforehand. Also, set NIC FAX to
use ScanRouter V2 Lite with user parameters. See p.166 “User Parameters”
(switch 16, bit 2).
1
GFLNFX3E
Install ScanRouter V2 Lite from the CD-ROM that comes with NIC FAX. See
A
ScanRouter V2 Lite Setup Guide.
Register the IP address or the host name of the ScanRouter V2 Lite server with
B
NIC FAX, and then assign the Scanner (Scan to E-mail) function to a user
function key. If your machine is Type 2, the Scanner (Scan to E-mail) function
is pre-assigned to the {{{{F10}}}} key. See p.41 “Scanner Server” , p.26 “Assigning
User Function Keys”, and Chapter 6 "User Function Keys", Advanced Features.
Adjust necessary settings in the computer where ScanRouter V2 Lite is in-
C
stalled, and then set up destinations. See ScanRouter V2 Lite Management
Guide.
Transmit the data from NIC FAX. See p.117 “Delivering Scanned Data”.
D
19
Page 28
1
Introduction
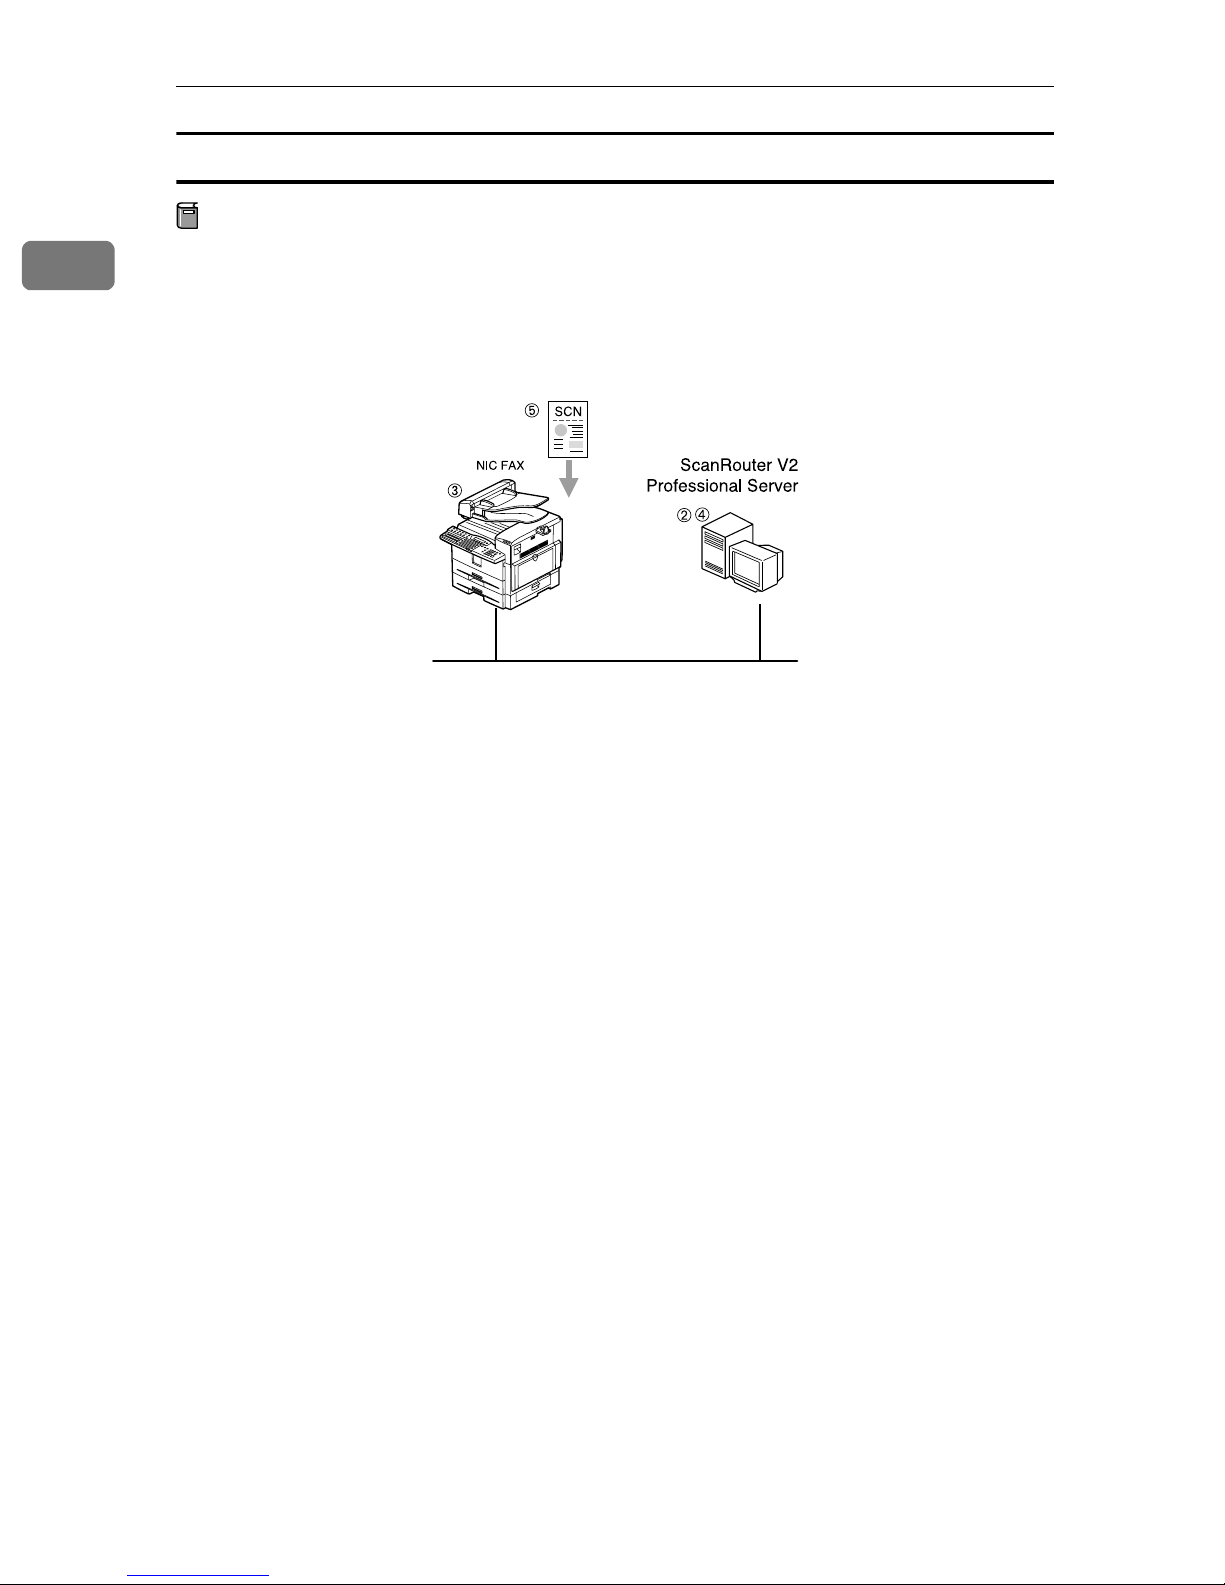
Using ScanRouter V2 Professional
Preparation
You need to adjust "Network" settings beforehand. Also, you need to contact
your service representative for the setup.
Read precautions to use ScanRouter V2 Professional with NIC FAX. See p.122
A
“Setting up ScanRouter V2 Professional”.
GFLNFX4E
Install ScanRouter V2 Professional on the computer server. See ScanRouter V2
B
Professional Setup Guide.
Register the IP address or the host name of the ScanRouter V2 Professional
C
server with NIC FAX, and then assign the Scanner (Scan to E-mail) function
to a user function key. If your machine is Type 2, the Scanner (Scan to E-mail)
function is pre-assigned to the {{{{F10}}}} key. See p.41 “Scanner Server”, p.26 “As-
signing User Function Keys”, and Chapter 6 "User Function Keys", Advanced
Features.
Adjust necessary settings in the computer where ScanRouter V2 Professional
D
is installed, and then set up destinations. See ScanRouter V2 Professional Management Guide.
Transmit the data from NIC FAX. See p.117 “Delivering Scanned Data”.
E
20
Page 29
Network Delivery Scanner Functions
Precautions for Reading Instructions and Online Help
When using ScanRouter V2 Lite/Professional with NIC FAX, some specifications differ from those described in the ScanRouter V2 Lite Management Guide
stored in NIC FAX Unit CD-ROM and the Operating Instructions and Help are
provided with ScanRouter V2 Professional.
Specification differences are described below.
Function Specification difference
1
Fax document
delivery setup
Fax document
delivery
Sender's information
Display order of
the users/groups
NIC FAX forwards incoming faxes to ScanRouter V2
Professional via the network, thus omit the procedure
described under "For a Device for Fax Delivery using
RS232" in the ScanRouter V2 Professional Setup Guide.
• You need to adjust the necessary settings of NIC
FAX in order to use the Fax Delivery function, in addition to the settings of ScanRouter V2 Professional.
• To specify the destination of the Fax Document Delivery using Fax Delivering ID, SUB codes are used.
Limitation
❒ Confidential Transmission (ID Override) is not
available.
See p.122 “Fax Document Delivery Settings” for details.
Since NIC FAX cannot specify the sender when transmitting the data using the Network Deliver Scanner
function, the sender's information is not included in the
mail header.
Since user/group information is not shown on NIC FAX
display when specifying the destination, even if you attempt to change the order of the users/groups in the
server, the change will not be reflected.
ScanRouter V2 Lite
Applied
Applied
ScanRouter V2 Professional
Applied
Applied
Applied
Applied
Fax port settings You cannot assign different actions to each fax port.
Applied
Applied
21
Page 30
1
Introduction
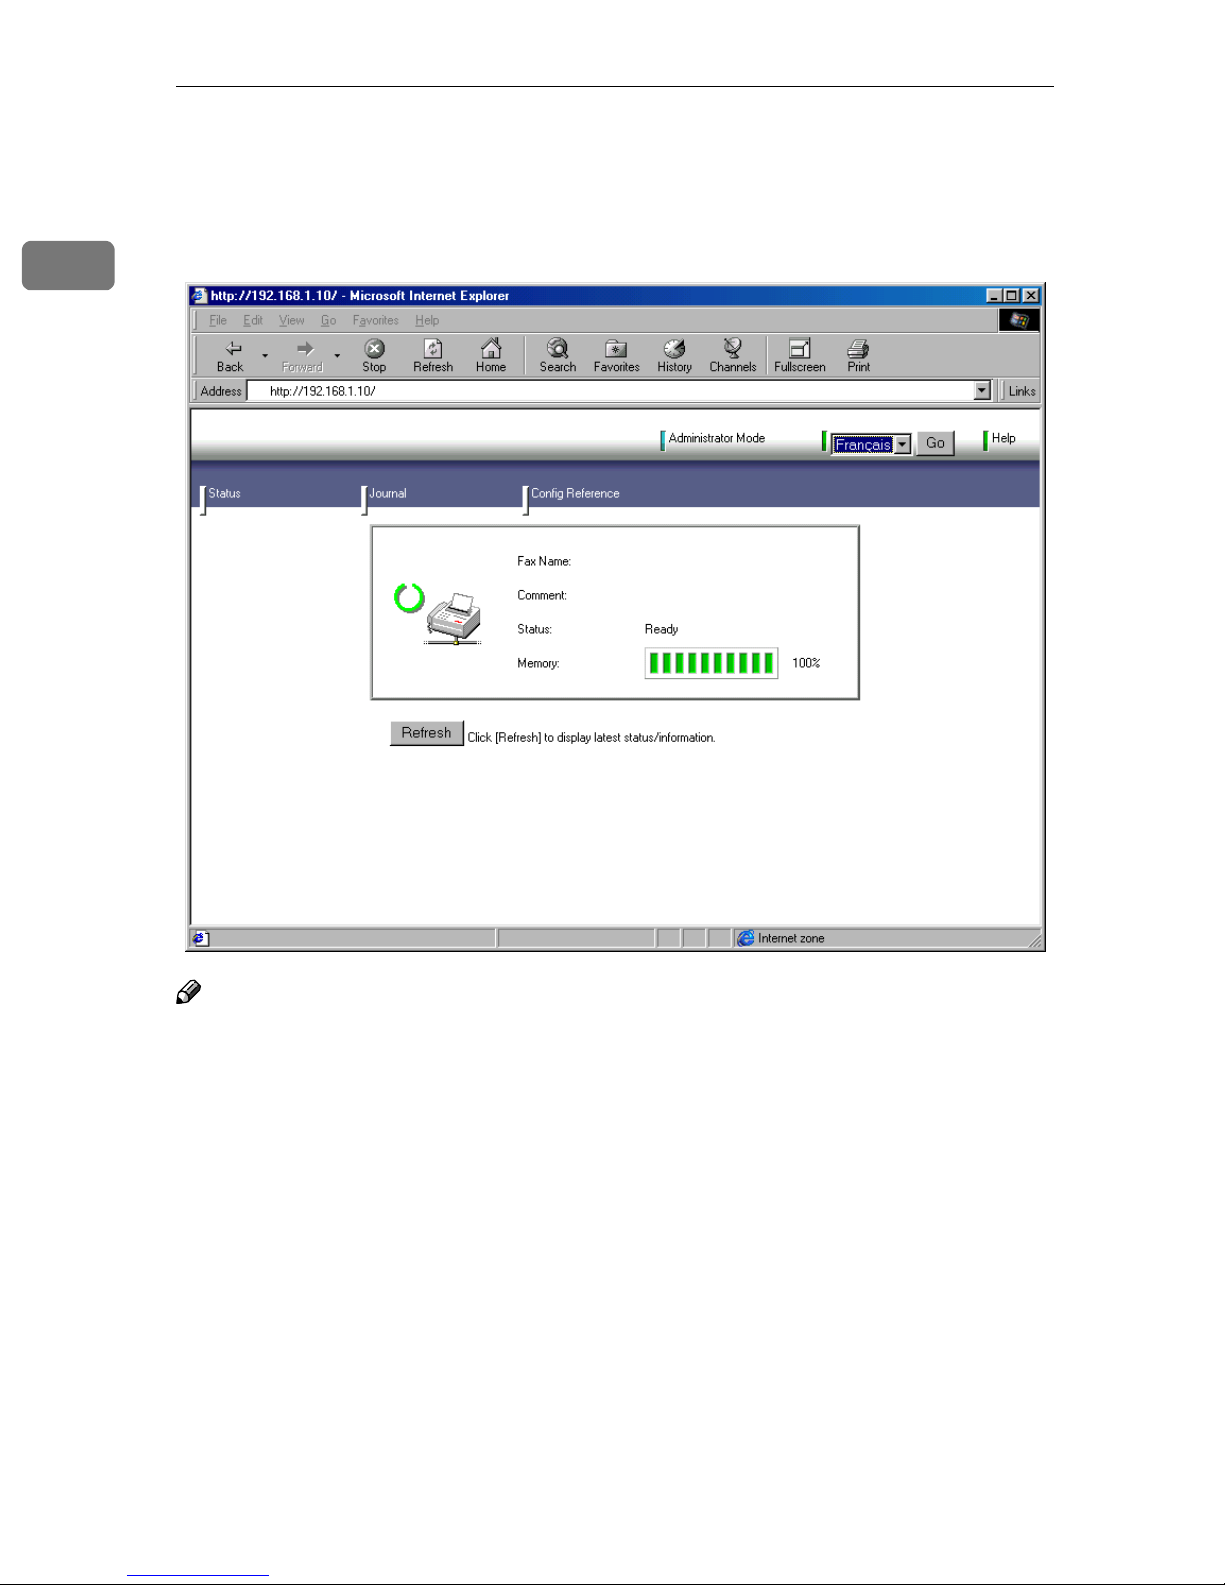
Making Settings through a Web Browser
Using a Web browser on your computer connected to a network, you can check
the condition of fax communications as well as make changes to settings.
Note
❒ You need to connect NIC FAX to a LAN and make "Network" settings in or-
der to make fax settings through a Web browser. See p.23 “Getting Started”.
❒ See p.153 “Making Settings through a Web Browser” for information about
basic procedures and settings you can make.
❒ Use online Help to learn the procedures for making various settings. You
need to make settings before using online Help. See p.157 “Using Online
Help”.
22
Page 31

2. Getting Started
Control Panel
This section describes the control panel buttons and indicators that are unique
to Scanner, Internet Fax, IP-Fax and functions. See Chapter 1 "Control Panel", Ba-
sic Features for details on other control panel buttons and indicators.
The following illustration is for Type 2.
1. User Function keys
You can assign the following functions to
user function keys according your needs.
• Auto Mail Reception
• Mail Reception
• Mail Options
• E-mail Message
• Internet FAX
• JPEG
• Scanner (Scan to E-mail)
Note
❒ On Type 2 machines, the E-mail Mes-
sage function is pre-assigned to the
{{{{F4}}}} key, Internet FAX function to the
{{{{F5}}}} key, JPEG function key to the
{{{{F9}}}} key, and the Scanner (Scan to E-
mail) function to the {{{{F10}}}} key.
❒ If your machine is Type 1 and assign
the E-mail Message, Internet FAX,
JPEG, or Scanner (Scan to E-mail)
function to a user function key, put
the label come with NIC FAX.
ZHMS010N
Reference
p.26 “Assigning User Function
Keys”
2. Resolution key
Press the Resolution key to toggle the resolutions (Standard, Detail, 300dpi, Super
Fine, and Extra Super Fine) depending on
how finely you want to transmit documents. See Chapter 2 "Resolution”, Basic
Features.
Note
❒ When selecting 300dpi, both the De-
tail and Super Fine indicators are lit.
❒ To select Extra Super Fine, you need
to change the setting with user parameters. See p.166 “User Parameters”
(switch 20, bit 2).
23
Page 32

2
Getting Started
{{{{@}}}} {{{{.}}}} Space key (when selecting
3.
the QWERTY layout)
You can use "@", ".", and Space to enter email address, IP address, host name or
alias fax number. Depending on the key
layout, the characters you can enter with
Quick Dial keys differ. See Chapter 7
"Key Layout", Advanced Features.
Note
❒ Characters you can enter using Quick
Dial keys differ depending on layout.
To set a layout, see Chapter 7 "Key
Layout", Advanced Features.
4. {
{★}}}} key
{{
You can register letter strings under this
key and extract them entering e-mail addresses, subjects, and messages.
You can register the following letter
strings:
• To enter e-mail addresses
By registering strings like ".com" or
".net", you can enter e-mail addresses
easily.
Reference
p.147 “Registering Template
Addresses”
• To enter subjects and messages of email
By registering subjects and messages
you often use beforehand, you can enter them easily.
Reference
p.149 “Registering Template
Subjects and Messages”
24
Page 33

Before Using Network Functions
Before Using Network Functions
Before using network functions, you
need to connect the machine to a
LAN, and assign necessary functions
to the user function keys.
Connecting to a LAN
NIC FAX uses TCP/IP protocol to
communicate over a LAN, and must
be connected to the LAN with
10BASE-T or 100BASE-TX LAN cable.
❖❖❖❖ 10BASE-T
10BASE-T refers to a twisted pair
IEEE802.3 (Ethernet) cable that
supports LAN communication at
10 Mbps. Use cables of category 3,
4 or 5 to connect to the machine.
❖❖❖❖ 100BASE-TX
100BASE-TX refers to a twisted
pair IEEE802.3u (Ethernet) cable
that supports LAN communication at 100 Mbps. Use cables of category 5 to connect to the machine.
Note
❒ The LAN cable loop should be
about 5.1 cm (2 inches) (L) from
the end.
Connect the cable to the LAN port
BBBB
on the rear of NIC FAX.
Plug the other end of the cable
CCCC
into a hub.
2
ZHMH360E
Note
❒ A LAN cable is not supplied with
NIC FAX.
Attach the ferrite core.
AAAA
Loop the cable and attach the ferrite core as shown.
L
ZHMP120
25
Page 34

Getting Started
2
Assigning User Function Keys
Assign necessary functions to the
user function keys in advance.
❖❖❖❖ Auto Mail Reception
Press the user function key assigned to the Auto Mail Reception
function to turn this feature on or
off. When the Auto Mail Reception
indicator is lit, the server is
checked periodically for e-mail,
and downloading takes place as
necessary. When not lit, e-mail is
not received automatically. It is
recommended to assign the Auto
Mail Reception function to a user
function key if you frequently
switch the function. See p.88 “Auto
Mail Reception”.
You also can turn on or off in "Auto
Mail RX (Auto Mail Reception)" of
the "Network" settings. See p.42
“Auto Mail RX (Auto Mail Reception)”.
Reference
p.61 “Using Scan to E-mail
Functions”
p.74 “Transmitting Internet
Fax”
❖❖❖❖ E-mail Message
You can enter a message by pressing the user function key assigned
to the E-mail Message function after entering a subject.
This key also enables you to register subjects/messages on the Template: Subject display.
Note
❒ On Type 2 machines, the E-mail
Message function is pre-as-
signed to the {{{{F4}}}} key.
Reference
p.61 “Using Scan to E-mail
Functions”
p.74 “Transmitting Internet
Fax”
26
❖❖❖❖ Mail Reception
Press the user function key assigned to the Mail Reception function to check the e-mail server and
receive any new e-mail. Use this
key if you do not want to wait for
the machine to check the server automatically. This is the same function as "Mail Reception" under
{{{{Job Information}}}}. It is recommend-
ed to assign the Mail Reception
function to a user function key if
you frequently check e-mail, in addition to Auto Mail Reception. See
p.88 “Manual Mail Reception”.
❖❖❖❖ Mail Options
You can enter a subject and/or
message, and set the Heading, Reception Confirmation and Viewer
URL Information function. These
are the same functions as "Mail
Options" under {{{{Trans. Option}}}}.
p.149 “Registering Template
Subjects and Messages”
❖❖❖❖ Internet FAX
You need to assign this function
when you enter an e-mail address,
IP address, host name, or alias fax
number.
Pressing the user function key preassigned to the Internet FAX function changes the Quick Dial key's
function and you can enter alphabets, ". (period)", "@ (at mark )", "(hyphen)", "_ (under bar)" and other symbols.
Note
❒ On Type 2 machines, the Inter-
net FAX function is pre-as-
signed to the {{{{F5}}}} key.
Page 35

Before Using Network Functions
❖❖❖❖ JPEG
You can assign this function when
you send color documents using
the Scanner function. You can select whether you send color documents in JPEG format or not (PDF
file) by pressing the user function
key assigned to the function. You
can also select "JPEG" or "PDF"
with user parameters. If you frequently change format, it is recommended you assign the JPEG
function to a user function key.
Note
❒ On Type 2 machines, the JPEG
function is pre-assigned to the
{{{{F9}}}} key.
Reference
p.166 “ User Parameters”
(switch 17, bit 5)
Note
❒ On Type 2 machines, the Scan-
ner (Scan to E-mail) function is
pre-assigned to the {{{{F10}}}} key.
❒ When a user function key as-
signed to the Scanner (Scan to Email) function is pressed, the
"Scanner" display appears.
Reference
See Chapter 6 "User Function
Keys", Advanced Features for details
about how to assign these functions to user function keys.
2
❖❖❖❖ Scanner (Scan to E-mail)
This function must be assigned in
order to use Scan to E-mail or Network Delivery Scanner.
To send scanned documents to
computers using Scan to E-mail,
press the assigned user function
key to specify the mail address. To
send documents scanned with the
Network Delivery Scanner to a
ScanRouter V2 Lite server or a
ScanRouter V2 Professional server,
press the user function key to specify the server-registered destinations.
27
Page 36

2
Getting Started
NIC FAX Initial Settings
NIC FAX settings of the machine include the following items.
❖❖❖❖ How to Read This Table
Required: Setting required
Optional: Setting required in order to use function, or as necessary
: Setting not required
*1
Items you can acquire from the DHCP server when the Network Boot function is
active
*2
Items you cannot set using the Web browser
Other items you can set using the Web browser
❖❖❖❖ TCP/IP settings
Used function
Scanner function Internet Fax function
Item
IP Address
Subnet Mask
Gateway Address
Host Name
Domain Name
DNS Address 1
DNS Address 2
Access Control Optional
Access Mask Optional
Network Boot Optional
*1
*1
*1
Optional Optional
*1
*1
*1
Optional
Optional Optional
POP reception
Scan to E-mail
of error mail
SMTP reception
Required
Required
Required
Optional
of error mail
POP reception
E-mail transmission
Network Delivery Scanner
Required Required Required Required Required
Required Required Required Required Required
Required Required Required Required Required
Required
Required
Optional Optional Optional Optional Optional
Optional Optional Optional Optional Optional
Optional Optional Optional Optional Optional
Optional Optional Optional Optional Optional
Optional Optional Optional Optional Optional
Optional
Optional
SMTP reception
Required
Required
Optional Optional
Optional
IP-Fax function
LAN-Fax function
WINS Server Addr.
(WINS server address)
*1
28
Optional Optional Optional
Page 37

❖❖❖❖ Mail Server settings
NIC FAX Initial Settings
Used function
Scanner function Internet Fax function
Item
SMTP Server
POP Server
Mail Address
Account Name
Password
Mail RX Interval
(Mail reception interval)
Time Zone
Mail to Admin.
(Mail to administrator)
*1
*1
Scan to E-mail
of error mail
POP reception
Required Required
Required
Required Required
Required
Required
Optional
Required Required
Optional Optional
of error mail
SMTP reception
POP reception
E-mail transmission
Network Delivery Scanner
Required Required Required
Required
Required Required Required
Optional Required
Optional Required
Optional
Required Required Required
Optional Optional Optional
2
SMTP reception
Backup Mail TX
(Backup mail transmission)
Max. Mail Size
(Maximum mail size)
*2
Auth. E-Mail RX
(Authorized e-mail reception)
*2
Scanner Address
Template: Subject
*2
Optional Optional
Optional
Optional Optional
Optional
Required
Optional Optional Optional
Optional
Optional
❖❖❖❖ IP-Fax Parameter settings
Item
GateKeeper Address Optional
Own Fax Number (Alias fax number) Optional
Used function
IP-Fax function
Optional
29
Page 38

2
Getting Started
Note
❒ After making the settings, print out the list of parameter settings and save it
for future reference. See Chapter 7 "How to Set the User Parameters - Printing
the User Parameter List", Advanced Features.
❒ To acquire the set values from the DHCP server using the Network Boot func-
tion, you need to register the set values on the DHCP server beforehand.
❒ You can set the reception protocol to IMAP4 with user parameters. IMAP (In-
ternet Message Access Protocol) receives e-mail from the e-mail server. If you
receive e-mail from an IMAP4 server, set IMAP4. See p.166 “User Parameters” (switch 17, bit 6).
❒ Set "Yes" with user parameters beforehand to use the gatekeeper for IP-Fax
transmission. See p.166 “User Parameters” (switch 32, bit 0).
Reference
p.93 “SMTP Reception”
p.153 “Making Settings through a Web Browser”
❖❖❖❖ Safer E-mail Transmission and Reception
To transmit and receive e-mail via the Internet with more security, you can
use APOP, SMTP authentication, and POP before SMTP for NIC FAX.
Function Descriptions Setting
APOP When you use APOP, passwords are encrypt-
ed when e-mail is received. It is safer than
POP3 authentication (clear text) which does
not encrypt.
To use APOP, you need to use a POP server
that supports APOP.
SMTP authentication
SMTP authentication (SMTP-AUTH) is an
SMTP function that authenticates users to prevent e-mail transmission via unauthorized access to your server.
To use the SMTP authentication function, you
need to use an SMTP server that supports any
of three systems of SMTP authentication
(CRAM-MD5, PLAIN, LOGIN).
The account name and password specified in
the "Mail Server" settings are used for SMTP
authentication. Other account names and
passwords cannot be specified.
Set "Use APOP" to "Yes"
with user parameters.
See p.166 “User Parameters” (switch 18, bit 1).
Set "Execute SMTP authentication" to "Yes"
with user parameters.
See p.166 “User Parameters” (switch 18, bit 2).
POP before
SMTP
This function prevents unauthorized access to
the SMTP server, and requires users to access
and log on the POP server before e-mail transmission.
If the IMAP server supports AUTHENTICATE command (CRAM-MD5,
30
PLAIN, LOGIN), the user authentication enables logon with more security.
Set "Access the POP server
before accessing the SMTP
server at the time of e-mail
transmission" to "Yes"
with user parameters. See
p.166 “User Parameters”
(switch 18, bit 6).
Page 39

NIC FAX Initial Settings
❖❖❖❖ Network Boot
Network boot automatically acquires information related to network settings
from the network's DHCP server. Setting Network Boot to "DHCP" activates
the Network Boot function. See p.37 “Network Boot”.
You do not need to set that information on the machine. You can acquire the
following information from the DHCP server:
Acquired information Descriptions Note
• IP Address
• Subnet Mask
• Gateway Address
• Domain Name
• DNS Address 1
• DNS Address 2
• WINS Addr.
• SMTP Server
• POP Server
Even if you specify these on
the machine, information acquired from the DHCP server
is valid.
If you specify these on the
machine, they are valid. If
you do not, information acquired from the DHCP server
is valid.
• On the Network setting
display, the values you
specify on the machine always appear.
• The User Parameter List
shows both the values you
specify on the machine
and those the DHCP server acquires. See Chapter 7
"How to Set the User Parameters - Printing User
Parameter List", Advanced
Features.
• You can check currentlyvalid ones only among
values the DHCP server
acquires using the Web
browser. See p.153 “Mak-
ing Settings through a
Web Browser”.
Note
❒ Servers that have been confirmed to work as DHCP server are Windows
NT Server 4.0, and Windows 2000 Server.
2
❒ DHCP (Dynamic Host Configuration Protocol) automatically assigns IP
addresses and other necessary settings to devices on the network.
❒ To use a DHCP server, the DHCP server (or DHCP relay agent) has to be
installed on the same subnet.
❒ If the DHCP server cannot assign an IP address, an IP address that is not
used on network and begins with "169.254", is automatically selected and
used. Then, the fax machine periodically accesses the DHCP server to acquire an IP address, and when successful, the IP address is changed to the
new one. This is called AutoNet function. While the AutoNet function
runs, neither of the Scanner function, Internet Fax function, IP-Fax function and LAN-Fax function can be used.
❒ When Network Boot is set to "DHCP" and the fax machine runs, the IP ad-
dress of the fax machine may be changed. To maintain the DHCP serverassigned IP address, do one of the following:
• Reserve the NIC FAX IP address (MAC address) you want to use on the
DHCP server, so the fixed address is allocated to NIC FAX.
• Lease the IP address for an indefinite time.
31
Page 40

Getting Started
❖❖❖❖ WINS Server
If a WINS server is running, the fax machine registers the host name and IP
address to the WINS server, and renews them periodically. Computers with
the WINS client function allow you to communicate with the fax machine using the host name instead of the IP address. To use a WINS server, you need
to specify the WINS server address. See p.37 “WINS Server Addr. (WINS
Server Address)”.
2
Note
❒ Servers that have been confirmed to work as WINS server are Windows
NT Server 4.0 Service Pack 4 and higher, and Windows 2000 Server.
❒ WINS (Windows Internet Name Service) associates the IP address allocat-
ed to the device on network with the computer name (host name).
❒ This function searches for NIC FAX using the name from your computer.
You cannot inquire the computer name from NIC FAX with the WINS
server.
❒ Only the scope ID allocated by the DHCP server is available.
❖❖❖❖ Other Settings
• To back up incoming and outgoing faxes, see Chapter 3, "Backup File
Transmission" and Chapter 7 "Memory File Transfer", Advanced Features.
• To specify the SUB code and route documents from NIC FAX to destinations with set user codes, see p.91 “Routing Received Documents”.
• To forward received documents to registered destinations based on Own
Name, Own Fax Number or sender's e-mail address, see p.92 “Forwarding
Received Documents”.
• When you send a fax or e-mail specifying the user code, a Communication
Result Report is sent to the routing destination's e-mail address. For details, see p.177 “Communication Result Report”.
32
Page 41

Network Settings
Press the {{{{User Tools}}}} key.
AAAA
The User Tools main menu appears.
Note
❒ Make sure the machine shows
the standby display. If it does
not, see Chapter 1 "Standby Display", Basic Features to return to
the standby display.
Press the 0000 or 1111 key to display
BBBB
"2. Fax Features".
ZHMS130E
NIC FAX Initial Settings
Press the 0000 or 1111 key to display
GGGG
"15. Network".
Note
❒ The number of the function dif-
fers depending on the options
installed.
Press the {{{{OK}}}} key.
HHHH
Press the 0000 or 1111 key to display
IIII
the item you want to set.
Note
❒ For further steps, see p.33
“TCP/IP Settings”, p.37 “Mail
Server Settings”, and p.42 “Au-
to Mail RX (Auto Mail Reception)”.
TCP/IP Settings
2
Press the {{{{OK}}}} key.
CCCC
Press the 0000 or 1111 key to display
DDDD
"4. Key Op. Tools" .
Press the {{{{OK}}}} key.
EEEE
Press {{{{2}}}} {{{{2}}}} {{{{2}}}} {{{{2}}}}, and then
FFFF
press the {{{{OK}}}} key.
Press the 0000 or 1111 key to display
AAAA
"1. TCP/IP".
Press the {{{{OK}}}} key.
BBBB
Press the 0000 or 1111 key to display
CCCC
the item you want to set, and then
press the {{{{OK}}}} key.
Note
❒ If you make a mistake, press the
{{{{Cancel}}}} key to try again.
33
Page 42

Getting Started
2
IP Address
Enter the IP address.
The IP (Internet Protocol) address
is used by TCP/IP protocol to
identify a particular computer.
Consult your systems administrator if you are unsure about this setting.
A Enter the IP address using the
number keys.
Note
❒ Press the 0 or 1 key to
move the display cursor.
❒ If you make a mistake, press
the {{{{Clear/Stop}}}} key to try
again.
B Press the {{{{OK}}}} key.
Note
❒ Press the 0 or 1 key to
move the display cursor.
❒ If you make a mistake, press
the {{{{Clear/Stop}}}} key to try
again.
B Press the {{{{OK}}}} key.
The display returns to the
TCP/IP settings menu.
Gateway Address
Enter the default gateway address.
This is the IP address of the router
through which connection is made
to other networks.
Consult your systems administrator if you are unsure about this setting.
A Enter the gateway address us-
ing the number keys.
The display returns to the
TCP/IP settings menu.
Subnet Mask
Enter the subnet mask.
The subnet mask is a group of bits
whose value operates on the IP address to separate the network ID
portion from the host ID to identify
a subnetwork.
Consult your systems administrator if you are unsure about this setting.
A Enter the subnet mask using
the number keys.
Note
❒ Press the 0 or 1 key to
move the display cursor.
❒ If you make a mistake, press
the {{{{Clear/Stop}}}} key to try
again.
B Press the {{{{OK}}}} key.
The display returns to the
TCP/IP settings menu.
34
Page 43

NIC FAX Initial Settings
Host Name
Enter the host name of NIC FAX.
Consult your systems administrator if you are unsure about this setting.
A Enter the host name.
Note
❒ You can enter up to 63 char-
acters for a host name.
❒ To use the WINS server, en-
ter 13 or fewer characters. If
you enter 14 or more characters, they are not registered
in the WINS server.
❒ If you make a mistake, press
the {{{{Clear/Stop}}}} key to try
again.
Note
❒ You can enter up to 63 char-
acters for a domain name.
❒ If you make a mistake, press
the {{{{Clear/Stop}}}} key to try
again.
B Press the {{{{OK}}}} key.
The display returns to the
TCP/IP settings menu.
DNS Address 1
Enter the primary DNS server IP
address of the network to which
NIC FAX is connected.
The DNS server uses DNS (Domain Name System) to manage the
computer names (host names) and
IP addresses of the computers on
the network. When the DNS server
is operative, you can find the IP address within the host name.
2
B Press the {{{{OK}}}} key.
The display returns to the
TCP/IP settings menu.
Domain Name
Enter the domain name of NIC
FAX.
Domain name represents the organization you belong to on the Internet.
Consult your systems administrator if you are unsure about this setting.
A Enter the domain name.
Consult your systems administrator if you are unsure about this setting.
A Enter the primary DNS server
address using the number
keys.
Note
❒ Press the 0 or 1 key to
move the display cursor.
❒ If you make a mistake, press
the {{{{Clear/Stop}}}} key to try
again.
B Press the {{{{OK}}}} key.
The display returns to the
TCP/IP settings menu.
35
Page 44

Getting Started
2
DNS Address 2
Enter the secondary DNS server IP
address of the network to which
NIC FAX is connected.
You may set the DNS Address 2
when two domain name systems
are connected to your machine. A
connection is made to DNS 2 only
if DNS 1 does not respond.
Consult your systems administrator if you are unsure about this setting.
A Enter the secondary DNS serv-
er address using the number
keys.
A Enter the Access Control set-
ting using the number keys.
Note
❒ Press the 0 or 1 key to
move the display cursor.
❒ If you make a mistake, press
the {{{{Clear/Stop}}}} key to try
again.
B Press the {{{{OK}}}} key.
The display returns to the
TCP/IP settings menu.
Access Mask
Enter the access mask.
Note
❒ Press the 0 or 1 key to
move the display cursor.
❒ If you make a mistake, press
the {{{{Clear/Stop}}}} key to try
again.
B Press the {{{{OK}}}} key.
The display returns to the
TCP/IP settings menu.
Access Control
Enter the access control setting.
When using the Web browser
monitoring function or LAN-Fax
function, access control determines the IP address(es) that can
connect to NIC FAX.
Enter a mask that specifies the
range of IP addresses that can be
connected based upon the access
control setting.
• Example:
Access control: 192.168.15.16
Access mask: 255.255.0.0
In this case, addresses in the
range 192.168.XXX.XXX can
connect.
Consult your systems administrator if you are unsure about this setting. If you set this value to
"0.0.0.0", Access Control is not
available.
A Enter the access mask using the
number keys.
Consult your systems administrator if you are unsure about this setting. If you do not want to use this
feature, leave the setting as
"0.0.0.0".
36
Note
❒ Press the 0 or 1 key to
move the display cursor.
❒ If you make a mistake, press the
{{{{
Clear/Stop
}}}}
key to try again.
Page 45

NIC FAX Initial Settings
B Press the {{{{OK}}}} key.
The display returns to the
TCP/IP settings menu.
Network Boot
Set the Network Boot setting to
"DHCP" if you use the Network
Boot function with the DHCP server.
Consult your systems administrator if you are unsure about this setting.
Reference
p.31 “Network Boot”
A Press the 0000 or 1111 key to select
"Off" or "DHCP".
Mail Server Settings
Press the 0000 or 1111 key to display
AAAA
"2. Mail Server".
Press the {{{{OK}}}} key.
BBBB
Press the 0000 or 1111 key to display
CCCC
the item you want to set, and then
press the {{{{OK}}}} key.
Note
❒ If you make a mistake, press the
{{{{Cancel}}}} key to try again.
2
B Press the {{{{OK}}}} key.
The display returns to the
TCP/IP settings menu.
WINS Server Addr. (WINS
Server Address)
Enter the IP address of the WINS
server.
Consult your systems administrator if you are unsure about this setting.
Reference
p.32 “WINS Server”
A Enter the IP address of the
WINS server using the number
keys.
❒ You can enter "." and "@" with
the Quick Dial key in each ad-
dress setting. Pressing the {{{{Sym-
bols}}}} key enables entering
symbols. Pressing the
{{{{ABC/abc}}}} key switches be-
tween upper cases and lower
cases.
SMTP Server
Enter the IP address of the SMTP
server.
The SMTP server is the server that
delivers e-mail over the Internet.
Consult your systems administrator if you are unsure about this setting.
A Enter the SMTP server address
using the number keys.
B Press the {{{{OK}}}} key.
The display returns to the
TCP/IP settings menu.
37
Page 46

Getting Started
2
Note
❒ If you make a mistake, press the
{{{{
Clear/Stop
❒ The SMTP server can also be
specified as a domain. In this
case, you must specify the DNS
server address beforehand.
❒ You can enter up to 127 char-
acters for a domain.
B Press the {{{{OK}}}} key.
The display returns to the Mail
Server settings menu.
}}}}
key to try again.
POP Server
Enter the IP address of the POP
server.
The POP server is the server that
receives e-mail over the Internet.
If you use IMAP4 server, specify
the IMAP4 address in the following
procedure. Also, you need to set
IMAP4 with user parameters. See
p.166 “User Parameters”(switch
17, bit 6).
Consult your systems administrator
if you are unsure about this setting.
A Enter the POP server address
using the number keys.
Mail Address
Enter the mail address of NIC
FAX.
Consult your systems administrator if you are unsure about this setting.
A Enter the mail address.
Note
❒ You can enter up to 127 char-
acters for a mail address.
❒ If you make a mistake, press
the {{{{Clear/Stop}}}} key to try
again.
B Press the {{{{OK}}}} key.
The display returns to the Mail
Server settings menu.
Account Name
Enter the account name to be used
for connection to the POP server.
Consult your systems administrator if you are unsure about this setting.
A Enter the account name.
Note
❒ If you make a mistake, press the
{{{{
Clear/Stop
❒ The POP server can also be
specified as a domain. In this
case, you must specify the DNS
server address beforehand.
❒ You can enter up to 127 char-
acters for a domain.
B Press the {{{{OK}}}} key.
The display returns to the Mail
38
Server settings menu.
}}}}
key to try again.
Note
❒ You can enter up to 31 char-
acters for an account name.
❒ If you make a mistake, press
the {{{{Clear/Stop}}}} key to try
again.
B Press the {{{{OK}}}} key.
The display returns to the Mail
Server settings menu.
Page 47

NIC FAX Initial Settings
Password
Enter the login password to be
used for connection to the POP
server.
Consult your systems administrator if you are unsure about this setting.
A Enter the password.
Note
❒ You can enter up to 31 char-
acters for a password.
❒ If you make a mistake, press
the {{{{Clear/Stop}}}} key to try
again.
B Press the {{{{OK}}}} key.
The display returns to the Mail
Server settings menu.
Time Zone
Enter the time difference between
your time zone and Greenwich
Mean Time.
A Press the 0000 or 1111 key to adjust
the time difference.
2
Note
❒ The time zone set up in this
step appears on the mail
header information, thus if
the setting is not done correctly, the receivers will not
get the correct reception time
either.
B Press the {{{{OK}}}} key.
The display returns to the Mail
Server settings menu.
Mail RX Interval (Mail Reception
Interval)
When using the Auto Mail Reception function, enter the interval in
minutes at which NIC FAX is to
automatically check for mail.
A Enter the interval for automatic
reception using the number
keys.
Note
❒ You can enter a value be-
tween 1 and 60 minutes in
one-minute increments.
B Press the {{{{OK}}}} key.
Mail to Admin. (Mail to
Administrator)
Make this setting when you want
Error Mail Notifications to be sent
to another address, in addition to
the originator.
NIC FAX sends an Error Mail Notification and a Transfer Request
Notification to the sender and a
copy (CC) to the address specified
with this setting.
You can also have the Journal sent
to address specified with this setting. For more details about the
setting, see p.81 “Transmitting
Journal by E-mail”.
The display returns to the Mail
Server settings menu.
39
Page 48

Getting Started
2
A Enter the address to which no-
tification will be sent if an error occurs.
Note
❒ You can enter up to 127 char-
acters.
❒ If you make a mistake, press
the 0 or 1 key to move the
display cursor, and then
press the {{{{Clear/Stop}}}} key to
try again.
B Press the {{{{OK}}}} key.
The display returns to the Mail
Server settings menu.
Backup Mail TX (Backup Mail
Transmission)
Make this setting when you want
all outgoing e-mail sent by the Internet Fax function and monochrome Scan to E-mail function to
be routed to another address in addition to the destination. A blind
carbon copy (BCC) of all sent e-mail
messages is sent to this address. If
you want to back up outgoing faxes, see Chapter 3 "Backup File
Transmission",
A Enter the e-mail backup ad-
dress.
Advanced Features
.
B Press the {{{{OK}}}} key.
The display returns to the Mail
Server settings menu.
Max. Mail Size (Maximum Mail
Size)
Make this setting when you want
to limit the size of e-mail messages
that are transmitted, if receivers
limit e-mail size, or you cannot
send large size e-mail for some reason. When this function is set to on,
transmission of e-mail that exceeds
the set size is aborted.
Limitation
❒ This function does not work
with Backup File Transmission
destinations specified on NIC
FAX.
Note
❒ When e-mail exceeds the maxi-
mum file size, an Error Report is
output, and the e-mail is deleted.
❒ Even when e-mail does not ex-
ceed the size limit, it may be rejected if it does not meet the
requirements of the server settings.
A Press 0000 or 1111 key to display "1.
On/Off".
Note
❒ You can enter up to 127 char-
acters.
❒ If you make a mistake, press
the 0 or 1 key to move the
display cursor, and then
press the {{{{Clear/Stop}}}} key to
40
try again.
B Press the {{{{OK}}}} key.
C Press 0000 or 1111 key to select
"On".
Page 49

NIC FAX Initial Settings
Note
❒ If you do not want to set a
maximum e-mail size, press
the 0 or 1 key to select
"Off".
D Press the {{{{OK}}}} key.
E Press the 0000 or 1111 key to dis-
play "2. Available Size".
F Press the {{{{OK}}}} key.
G Enter the file size limit using
the number keys.
Note
❒ You can set a file size from 1
to 9999 KB.
H Press the {{{{OK}}}} key.
I Press the {{{{Cancel}}}} key.
The display returns to the Mail
Server settings menu.
When the limit address is set to
"@nic.fax.com":
abc@nic.fax.com - accepted
nic@fax.com - not accepted
abc@fax.com - not accepted
Note
❒ No Error Report is output even
when e-mail is discarded.
A Enter the e-mail address for
limiting routing.
Note
❒ You can enter up to 127 char-
acters.
❒ If you make a mistake, press
the 0 or 1 key to move the
display cursor, and then
press {{{{Clear/Stop}}}} key to try
again.
B Press the {{{{OK}}}} key.
The display returns to the Mail
Server settings menu.
2
Auth. E-Mail RX (Authorized Email Reception)
This function is available on systems that allow routing of mail received via SMTP. See p.94
“Routing Mail Received via
SMTP”.
When a limit address is set, mail
received from addresses that do
not match the limit address is discarded, and an error message is returned to the SMTP server.
The limit address is compared
with the addresses of mail originators, as illustrated by the following
examples.
Scanner Server
Enter the IP address of the delivery
server to transmit the scanned documents.
Note
❒ "Scanner Server" only appears
on the display when ScanRouter V2 Lite is selected with user
parameters or ScanRouter V2
Professional is set up by the service representative. See p.166
“User Parameters”(switch 16,
bit 2).
41
Page 50

Getting Started
2
A Enter the IP address or domain
name of the server.
Note
❒ If you want to enter the serv-
er address with a domain
name, make sure that the
DNS server address is specified in advance.
❒ You can enter up to 127 char-
acters for a domain name.
B Press the {{{{OK}}}} key.
The display returns to the Mail
Server settings menu.
Template: Subject
Note
❒ Set the Auto Mail Reception func-
tion to "On" or "Off" by following
the procedure below, or assign a
user function key to "Auto Mail
RX". If you assign a user function
key to "Auto Mail RX" beforehand,
you can easily switch between
"On" and "Off" anytime. See p.23
“Control Panel”.
Press the 0000 or 1111 key to display
AAAA
"3. Auto Mail RX".
Press the {{{{OK}}}} key.
BBBB
Press the 0000 or 1111 key to select
CCCC
"On" or "Off".
Register template subjects and/or
messages to use them in "Subject/Message" under "Mail Options".
In "Subject/Message" under "Mail
Options", you can easily extract and
enter registered subjects/messages
by pressing the {{{{★}}}} key.
For details about the setting of "Template: Subject", see p.149 “Registering
Template Subjects and Messages”
Auto Mail RX (Auto Mail Reception)
If Auto Mail Reception function is set
to "On", the machine automatically
receives e-mail according to the Mail
Reception Interval setting. See p.39
“Mail RX Interval (Mail Reception Interval)”.
Press the {{{{OK}}}} key.
DDDD
The display returns to the Network settings menu.
Returning to the Initial Display
Press the {{{{User Tools}}}} key.
AAAA
42
ZHMS130E
The standby display reappears.
Page 51

IP-Fax Parameter Settings
Preparation
Select "Yes" with user parameters
to use the gatekeeper for IP-Fax
transmission. See p.166 “User Parameters” (switch 32, bit 0).
Press the {{{{User Tools}}}} key.
AAAA
NIC FAX Initial Settings
Press {{{{2}}}} {{{{2}}}} {{{{2}}}} {{{{2}}}}, and then
FFFF
press the {{{{OK}}}} key.
Press the 0000 or 1111 key to display
GGGG
"16. IP-Fax Parameter".
Note
❒ The number of the function dif-
fers depending on the options
installed.
Press the {{{{OK}}}} key.
HHHH
2
The User Tools main menu appears.
Note
❒ Make sure that the machine
shows the standby display. If it
does not, see Chapter 1 "Standby Display", Basic Features to return to the standby display.
Press the 0000 or 1111 key to display
BBBB
"2. Fax Features".
Press the {{{{OK}}}} key.
CCCC
Press the 0000 or 1111 key to display
DDDD
"4. Key Op. Tools" .
ZHMS130E
Press 0000 or 1111 to display the item
IIII
you want to set, and then press
the {{{{OK}}}} key.
Gatekeeper Address
Gatekeeper is a server which connects the telephone number and
the IP address.
You need to set up the gatekeeper
address to use this function.
A Enter the IP address or host
name of the gatekeeper.
Note
❒ If you want to enter the gate-
keeper address using the
host name, make sure that
the DNS server address is
specified in advance.
Press the {{{{OK}}}} key.
EEEE
❒ You can enter up to 127 char-
acters for a host name.
43
Page 52

2
Getting Started
❒ If you make a mistake, press
the 0 or 1 key to move the
display cursor, and then
press the {{{{Clear/Stop}}}} key to
try again.
B Press the {{{{OK}}}} key.
The display returns to the IPFax Parameter settings menu.
Own Fax Number (Alias Fax
Number)
Own Fax Number is an alias fax
number that represents the IP address in a shortened form; that is a
telephone number.
When using gatekeeper, Own Fax
Number needs to be specified on
NIC FAX.
A Enter Own Fax Number.
Note
❒ You can enter up to 127 dig-
its.
❒ You can enter digits 0 to 9,
"#", and "*".
❒ If you make a mistake, press
the 0 or 1 key to move the
display cursor, and then
press the {{{{Clear/Stop}}}} key to
try again.
B Press the {{{{OK}}}} key.
The display returns to the IPFax Parameter settings menu.
Press the {{{{User Tools}}}} key.
JJJJ
The standby display reappears.
44
Page 53

Installing the Software
NIC FAX comes with a CD-ROM containing the driver and utilities for
LAN-Fax and Network Delivery
Scanner functions.
Note
❒ This manual assumes users al-
ready have a working knowledge
of Windows operating systems.
Refer to the relevant Windows
manual for specific details of Windows functions and operations.
Installing the Software
Quick Install
You can install software easily, using
the CD-ROM provided. By simply
pressing Quick Install, the following
are installed:
• LAN-Fax Driver
(Settings for the TCP/IP port are
also made.)
• Address Book
• LAN-Fax Cover Sheet Editor
2
Auto-run Program
When the CD-ROM is loaded, the installer starts automatically (auto-run),
allowing easy installation.
Note
❒ To install NIC FAX Driver and
Utilities on a Windows NT 4.0,
Windows 2000, or Windows XP
system, you have to be in an Administrators group.
❒ Depending on Windows settings,
the auto-run program may not
start. In such cases, double-click
"SETUP.EXE" (located in the CDROM's root directory).
❒ If you do not want to start the auto-
run program, hold down the shift
key until your computer loads the
CD-ROM and access is complete.
• SmartNetMonitor for Client
Note
❒ If you have already installed
SmartNetMonitor for Client, the
LAN-Fax function will be ready after installing LAN-Fax Driver. See
p.47 “LAN-Fax Driver”.
Before beginning installation,
AAAA
exit all other applications.
Insert the CD-ROM that contains
BBBB
NIC FAX Driver and Utilities into
the CD drive on your computer.
The Select Language dialog box
appears.
Select the language you want, and
CCCC
then click [OK].
❒ If you click [Cancel] before installa-
tion is complete, the process stops.
Restart the installer to complete installation.
❒ Screen displays shown in the pro-
cedure below may differ depending on versions of Windows, and
environment settings.
The install program starts.
45
Page 54

Getting Started
2
Click [Quick Install].
DDDD
Software License Agreement appears.
Make sure you read it carefully,
EEEE
click [I accept the agreement.], and
then click [Next].
The Installation Completion dialog
box appears.
Note
❒ The following display may ap-
pear during installation. Click
[Yes] for Windows 2000, and
[Continue Anyway] for Windows
XP to continue the installation.
• Windows 2000
Click [NIC FAX UNIT].
FFFF
Click [Install].
GGGG
The following display appears and
installation starts.
• Windows XP
To restart the computer, click [Yes.
HHHH
Restart right now.]
46
Page 55

Installing the Software
Note
❒ If you do not want to restart the
computer, click [No. Restart later.]
❒ If the [Confirm restart] area does
not appear, proceed to step
Click [Finish].
IIII
If you click [Yes. Restart right now.]
in the step
completes and the computer restarts.
Note
❒ If you click [No. Restart later.] in
the step
completes without restarting
the computer. Installed driver
and utilities are available only
after you restart the computer.
❒ To edit the printer name, on the
[Start] menu, point to [Settings],
and then click [Printers]. Next,
right-click the printer icon you
want to edit the name of, and
then click [Rename].
display, installation
H
display, installation
H
I
Insert the CD-ROM that contains
BBBB
NIC FAX Driver and Utilities into
the CD drive on your computer.
The Select Language dialog box
.
appears.
Select the language you want, and
CCCC
then click [OK].
The install program starts.
Click [LAN-Fax Driver].
DDDD
2
Installing the Driver and
Utilities Individually
LAN-Fax Driver
Note
❒ You need to install SmartNetMon-
itor for Client before LAN-Fax
Drivers. If SmartNetMonitor for
Client is not installed, follow the
steps described in SmartNetMonitor for Client. See p.50 “SmartNet-
Monitor for Client”.
Before beginning installation,
AAAA
exit all other applications.
[Add Printer and Utility Wizard] starts,
and Software License Agreement
appears.
Make sure you read it carefully,
EEEE
click [I accept the agreement.], and
then click [Next].
47
Page 56

Getting Started
2
Click [LAN-Fax Driver].
FFFF
Click [Next].
GGGG
Double-click [Printer Name: <LAN-
HHHH
Fax F3>].
Note
❒ With Windows 2000 or Win-
dows XP, do not select "Standard TCP/IP Port" as the port
for LAN-Fax Driver. If "Standard TCP/IP Port" is specified,
error notification will not be
sent, even if an error occurs during data transmission from the
computer to NIC FAX for LANFax faxing or printing. See p.165
“When Using Standard TCP/IP
Port”.
Click [Specify Address].
KKKK
Click [Port], and then [Add].
IIII
Select [SmartNetMonitor], and then
JJJJ
click [OK].
Enter the IP address or host name
LLLL
assigned to NIC FAX, and then
click [OK].
When entering a host name, first
click [Host Name] and then enter the
host name in the box to the right.
48
Page 57

Installing the Software
Note
❒ If you use the Network Boot
function, specify the host name,
as the NIC FAX IP address may
change. In this case, you need to
make the following settings to
search for NIC FAX by host
name:
• When you use the DNS server:
The DNS server settings
must be made on the computer on which LAN-Fax
Driver is being installed.
• When you use the WINS
server:
The settings of the WINS
server must be made the
same as those on the computer on which LAN-Fax Driver
is being installed, and NIC
FAX.
Reference
p.31 “Network Boot”
Click [Continue].
NNNN
Install starts.
Click [Finish].
OOOO
To restart the computer, click [Yes.
PPPP
Restart right now.]
2
p.32 “WINS Server”
Check to see if [TCP/IP] is selected
MMMM
and the machine's port name is
displayed correctly, and then
click [OK].
Note
❒ If you do not want to restart the
computer, click [No. Restart later.]
❒ If the [Confirm restart] area does
not appear, proceed to step
Click [Finish].
QQQQ
If you click [Yes. Restart right now.]
in the step
completes and the computer restarts.
display, installation
P
Q
.
49
Page 58

Getting Started
2
Note
❒ If you click [No. Restart later.] in
the step
completes without restarting
the computer. Installed driver
and utilities are available only
after you restart the computer.
❒ To edit the printer name, on the
[Start] menu, point to [Settings],
and then click [Printers]. Next,
right-click the printer icon you
want to edit the name of, and
then click [Rename].
SmartNetMonitor for Client
Before beginning installation,
AAAA
exit all other applications.
Insert the CD-ROM that contains
BBBB
NIC FAX Driver and Utilities into
the CD drive on your computer.
display, installation
P
Click [SmartNetMonitor for Client / Ad-
DDDD
min].
[Add Printer and Utility Wizard] starts,
and Software License Agreement
appears.
Make sure you read it carefully,
EEEE
click [I accept the agreement.], and
then click [Next].
The Select Language dialog box
appears.
Select the language you want, and
CCCC
then click [OK].
The install program starts.
Select the [SmartNetMonitor for Cli-
FFFF
ent] check box, and then click
[Next].
The [Welcome] dialog box appears.
50
Page 59

Installing the Software
Click [Next].
GGGG
Software License Agreement appears.
Make sure you read it carefully,
HHHH
and then click [Yes].
Select the language you want, and
CCCC
then click [OK].
The install program starts.
Click [SmartNetMonitor for Client / Ad-
DDDD
min].
2
Follow the steps displayed on the
IIII
screen to complete the installation of SmartNetMonitor for Client.
SmartNetMonitor for Admin
Before beginning installation,
AAAA
exit all other applications.
Insert the CD-ROM that contains
BBBB
NIC FAX Driver and Utilities into
the CD drive on your computer.
The Select Language dialog box
appears.
[Add Printer and Utility Wizard] starts,
and Software License Agreement
appears.
Make sure you read it carefully,
EEEE
click [I accept the agreement.], and
then click [Next].
51
Page 60

2
Getting Started
Select the [SmartNetMonitor for Ad-
FFFF
min] check box, and then click
[Next].
The [Welcome] dialog box appears.
Click [Next].
GGGG
DeskTopBinder V2 Lite
Before beginning installation,
AAAA
exit all other applications.
Insert the CD-ROM that contains
BBBB
the NIC FAX Driver and Utilities
into the CD drive on your computer.
The Select Language display appears.
Select the language you want, and
CCCC
then click [OK].
52
Software License Agreement appears.
Make sure you read it carefully,
HHHH
and then click [Yes].
Follow the steps displayed on the
IIII
screen to complete installation of
SmartNetMonitor for Admin.
The install program starts.
Click [DeskTopBinder V2 Lite].
DDDD
The DeskTopBinder V2 Lite Setup
display appears.
Click [Setup Guide] and follow the
EEEE
steps described in the PDF manual to complete installation.
Note
❒ To view the PDF manual, you
need Adobe Acrobat Reader installed on your computer. If you
need to install it, click [Acrobat
Reader].
Page 61

ScanRouter V2 Lite
Before beginning installation,
AAAA
exit all other applications.
Insert the CD-ROM that contains
BBBB
NIC FAX Driver and Utilities into
the CD drive on the server computer.
The Select Language display appears.
Select the language you want, and
CCCC
then click [OK].
Installing the Software
Click [Setup Guide] and follow the
EEEE
steps described in the PDF manual to complete installation.
Note
❒ To view the PDF manual, you
need Acrobat Reader installed
on your computer. If you need
to install it, click [Acrobat Read-
er].
2
The install program starts.
Click [ScanRouter V2 Lite].
DDDD
The ScanRouter V2 Lite Setup display appears.
53
Page 62

2
Getting Started
Software Included on the CD-ROM
List of Files
The software for LAN-Fax features or Network Delivery Scanner function is
stored in the following directories on the CD-ROM.
CD-
ROM
SETUP.EXE
Software installer
DRIVERS
HELP WSMHLP en Help file for using a Web browser
NETWORK
UTILITY ROUTERV2 ScanRouter V2 Lite
LAN-Fax WIN9X_ME LAN-Fax Driver, Address Book, LAN-Fax
Cover Sheet Editor
(for Windows 95/98/Me)
NT4 LAN-Fax Driver, Address Book, LAN-Fax
Cover Sheet Editor
(for Windows NT4.0)
WIN2000 LAN-Fax Driver, Address Book, LAN-Fax
Cover Sheet Editor
(for Windows 2000/XP)
(English)
es Help file for using a Web browser
(Español)
fr Help file for using a Web browser
(Français)
NETMON ADMIN SmartNetMonitor for Admin
CLIENT SmartNetMonitor for Client
DESKV2 DeskTopBinder V2 Lite
54
Page 63

Software Included on the CD-ROM
LAN-Fax Driver
LAN-Fax Driver enables you to send and print documents created using a computer.
Note
❒ See LAN-Fax Help for detailed instructions.
Reference
p.107 “Using LAN-Fax Functions”
❖❖❖❖ File Location
LAN-Fax Driver is stored in the following directories:
• LAN-Fax Driver for Windows 95/98/Me
\DRIVERS\LAN-FAX\WIN9X_ME
• LAN-Fax Driver for Windows NT 4.0
\DRIVERS\LAN-FAX\NT4
• LAN-Fax Driver for Windows 2000/XP
\DRIVERS\LAN-FAX\WIN2000
❖❖❖❖ System Requirements
• Computer
IBM PC/AT or compatible running Windows 95, Windows 98, Windows
Me, Windows NT4.0, Windows 2000, Windows XP
Limitation
❒ LAN-Fax Driver does not work with Windows NT on RISC processors
(MIPS R series, Alpha AXP or PowerPC).
• Operating System
Microsoft Windows 95/98/Me
Microsoft Windows NT4.0
Microsoft Windows 2000/XP
• Display
VGA 640×480 or higher resolution
2
Address Book
Address Book allows you to program destinations for fax transmissions using
LAN-Fax functions.
Note
❒ Address Book is saved as a CSV file. You can register 2000 addresses in a CSV
file, and specify destinations using multiple CSV files.
❒ See Address Book Help for detailed instructions.
Reference
p.110 “Address Book”
55
Page 64

Getting Started
❖❖❖❖ Operating System
• Microsoft Windows 95/98/Me
• Microsoft Windows NT4.0
• Microsoft Windows 2000/XP
LAN-Fax Cover Sheet Editor
2
LAN-Fax Cover Sheet Editor helps you edit LAN-Fax cover sheets.
❖❖❖❖ Operating System
• Microsoft Windows 95/98/Me
• Microsoft Windows NT4.0
• Microsoft Windows 2000/XP
SmartNetMonitor for Client
SmartNetMonitor for Client allows you to use NIC FAX as a network printer.
Note
❒ See SmartNetMonitor for Client Help for the detailed instructions.
❖❖❖❖ File Location
SmartNetMonitor for Client is stored in the following directory on the CDROM:
NETWORK\NETMON\CLIENT
❖❖❖❖ Operating System
• Microsoft Windows 95/98/Me
• Microsoft Windows NT4.0
• Microsoft Windows 2000/XP
56
Page 65

Software Included on the CD-ROM
SmartNetMonitor for Admin
SmartNetMonitor for Admin is a network utility for administrator with it, you
can confirm NIC FAX settings and conditions from a computer.
Note
❒ See SmartNetMonitor for Admin Help for the detailed instructions.
2
❖❖❖❖ File Location
SmartNetMonitor for Admin is stored in the following directory on the CDROM:
NETWORK\NETMON\ADMIN
❖❖❖❖ Operating System
• Microsoft Windows 95/98/Me
• Microsoft Windows NT4.0
• Microsoft Windows 2000/XP
57
Page 66

2
Getting Started
DeskTopBinder V2 Lite
DeskTopBinder V2 Lite enables you to handle various data including scanned
images, documents or files created with various software, or image files you already have. This software is installed on client computers. With it, you can use
NIC FAX as a network delivery scanner, or view the documents in the Fax InTray saved using ScanRouter V2 Lite/Professional.
Note
❒ See DeskTopBinder V2 Lite Help for the detailed instructions.
❖❖❖❖ File Location
DeskTopBinder V2 Lite is stored in the following directory on the CD-ROM:
UTILITY\DESKV2
❖❖❖❖ System Requirements
• Computer
IBM PC/AT or compatible running Windows 95, Windows 98, Windows
Me, Windows NT4.0, Windows 2000, Windows XP
Limitation
❒ DeskTopBinder V2 Lite does not work with Windows NT on RISC pro-
cessors (MIPS R series, Alpha AXP or PowerPC).
• Operating System
Microsoft Windows 95 operating system OSR2 or later
Microsoft Windows 98/98SE operating system
Microsoft Windows Millennium Edition (Windows Me)
Microsoft Windows NT Workstation operating system version 4.0 (Service
Pack 5 or later)
Microsoft Windows NT Server network operating system version 4.0 (Service Pack 5 or later)
Microsoft Windows 2000 Professional
Microsoft Windows 2000 Server (Service Pack 1 or later)
Microsoft Windows XP Professional
Microsoft Windows XP Home Edition
58
Page 67

Software Included on the CD-ROM
❖❖❖❖ Software Installed with DeskTopBinder V2 Lite
• Auto Document Link
Monitors the delivery server regularly, picks up newly arrived documents
in the Fax In-Tray, and sends notification to users when new documents
are delivered to the server.
Also, automatically registers the saved file under the specified directory to
DeskTopBinder V2 Lite.
ScanRouter V2 Lite
With ScanRouter V2 Lite installed, the delivery server enables you to sort
scanned documents and images, save them in specified inboxes, and send them
to designated client folders.
Note
❒ See ScanRouter V2 Lite Help for detailed instructions.
❖❖❖❖ File Location
ScanRouter V2 Lite is stored in the following directory on the CD-ROM.
UTILITY\ROUTERV2
2
❖❖❖❖ System Requirements
• Computer
IBM PC/AT or compatible running Windows 95, Windows 98, Windows
Me, Windows NT4.0, Windows 2000, Windows XP
• Operating System
Microsoft Windows 95 operating system OSR2 or later
Microsoft Windows 98/98SE operating system
Microsoft Windows Millennium Edition (Windows Me)
Microsoft Windows NT Workstation operating system version 4.0 (Service
Pack 5 or later)
Microsoft Windows NT Server network operating system version 4.0 (Service Pack 5 or later)
Microsoft Windows 2000 Professional
Microsoft Windows 2000 Server (Service Pack 1 or later)
Microsoft Windows XP Professional
Microsoft Windows XP Home Edition
❖❖❖❖ Software Installed with ScanRouter V2 Lite
• Administration Utility
This application helps you run the delivery network system using ScanRouter V2 Lite.
With this utility, the destination(s) of scanned documents and sender(s) information can be programmed into the delivery server. It also performs
maintenance operations such as monitoring free disk space on the delivery
server, and recording error logs.
59
Page 68

Getting Started
Note
❒ Administration Utility can be installed on client computers as well as the
delivery server. To install it, click [Administration Utility] on the ScanRouter
V2 Lite display of the installer.
Online Help
2
You can refer to this when you confirm or edit NIC FAX settings using a Web
browser.
Note
❒ To use online Help, see p.157 “Using Online Help”.
❒ The online Help file is common for Windows 95/98/Me, Windows NT4.0,
and Windows 2000/XP.
❖❖❖❖ File Location
The online Help files are stored in the following directories on the CD-ROM:
English \HELP\WSMHLP\en
Español \HELP\WSMHLP\es
Français \HELP\WSMHLP\fr
60
Page 69

3. Using Scan to E-mail
Functions
There are two types of scanner related functions Scan to E-mail and Network Delivery Scanner. This section describes the Scan to E-mail function. If you want to
deliver the scanned data to destinations registered to a networked ScanRouter
V2 Lite server or ScanRouter V2 Professional server, see p.117 “Using Network
Delivery Scanner Functions”.
Scanning a Color Original
You can scan and transmit originals
in color using NIC FAX. The scanned
image is attached to an e-mail as a
PDF or JPEG file.
Preparation
You need to make Network settings beforehand. See p.28 “NIC
FAX Initial Settings”.
Limitation
❒ You cannot use this feature with
Memory Transmission. Use it with
Immediate Transmission.
❒ If the fax machines at both ends are
NIC FAX, the file exchange by using the Color Scanning function is
not possible. If you attempt such
transmissions, documents will not
be received and a Mail Information
/ Error Mail Notification / Error
Report will be printed on the transmitting or receiving end NIC FAX.
Note
❒ You can store the {{{{Color Scan}}}} key
into a Keystroke Program. If you
regularly send color documents to
particular destinations in the same
size and format (PDF or JPEG),
you can store the program and
send quickly by just pressing the
Quick Dial key you store the program in. For details about storing a
program, see Chapter 6 "Programs", Advance Features.
When sending documents, you can
set e-mail options using the {{{{Trans.
Option}}}} key.
If the Mail Options function is already
assigned to a user function key ({{{{F1}}}}
to {{{{F10}}}}), you can set the same op-
tions using that key.
You can set the following options:
❒ You cannot specify an Internet fax
machine as destination.
61
Page 70

Using Scan to E-mail Functions
3
❖❖❖❖ Subject and Message
You can enter a subject and message for the document you want to
send. You can also enter either
subject or message only.
Note
❒ To enter a message, you need to
assign the E-mail Message function to a user function key beforehand. See p.26 “Assigning
User Function Keys”. On Type 2
machines, the E-mail Message
function is pre-assigned to the
{{{{F4}}}} key.
❒ If you send e-mail without set-
ting a subject/message in "Subject/Message" under "Mail
Options" when a subject/message is already registered as
No.1 in "Template: Subject", the
registered subject/message is
automatically used. For more
details about registering subjects/messages, see p.149 “Reg-
istering Template Subjects and
Messages”. If you send e-mail
without setting a subject/message in "Subject/Message" under "Mail Options" when a
subject/message is not registered, the subject is automatically inserted. For more details
about how a subject is automatically inserted, see p.79 “About
the E-mail Subject”.
❖❖❖❖ Confirmation of Reception
You can confirm sent documents
were properly received using email or the Journal.
Note
❒ You cannot specify multiple desti-
nations, because this feature is
available only with Immediate
Transmission.
❒ You cannot send color originals to
destinations already registered for
Internet FAX or IP-FAX in Quick
Dial or Speed Dial keys. Specify
destinations for the scanner when
you send originals in color. See
p.133 “Registering Addresses for
Scanner”.
❒ The Color Scanning feature is not
available with Backup Transmission.
❒ The Fax Header (TTI) is not added
to the transmitted data.
❒ You need to select a format of
transmitted files with user parameters or the user function key. If
you frequently switch the format,
it is recommended that you assign
the JPEG function to a user function key so that you can switch the
format easily. On Type 2 machines,
the JPEG function is pre-assigned
to the {{{{F9}}}} key. See p.27 “JPEG”
and p.166 “User Parameters”
(switch 17, bit 5).
❒ You cannot send only a sub-
ject/message as an e-mail without an original.
❖❖❖❖ Heading
You can add "Urgent" in front of
the document subject.
62
Page 71

Scanning a Color Original
❒ You can adjust the quality of imag-
es transmitted using the Color
Scanning feature with user parameters. If you make a setting that reduces the difference between
values for Brightness and Color
Difference (for example, "Brightness: 1, Color Difference: 1, Color
Difference: 1"), the quality of images increases, but the data size also
increases. You do not need to make
changes to default settings. For
more information, see p.166 “User
Parameters” (switch 33: bit 1,0).
However, this setting is not valid
when PDF is selected as the file format for Color Scanning with user
parameters (switch 17, bit 5).
❒ You can adjust the color balance.
See p.67 “Scanner RGB”.
Press the {{{{Color Scan}}}} key.
BBBB
Make sure the Color Scan indicator is lit.
Press the 0000 or 1111 key to select the
CCCC
original size, and then press the
{{{{OK}}}} key.
ZHMS290E
3
❒ Adobe Acrobat Reader is neces-
sary for viewing PDF files.
❒ The following functions are in-
valid even if you specify them:
• Fax Header Print
• Label Insertion
• Maximum Mail Size
• Viewer URL Information
Make sure the Memory Trans. in-
AAAA
dicator is not lit.
Make any settings for "Mail Op-
DDDD
tions", if necessary.
Note
❒ Proceed to step
want to make any Mail Options
settings.
if you do not
F
Using {{{{Trans. Option}}}} Key
A Press the {{{{Trans. Option}}}} key.
Note
❒ If the Memory Trans. indicator
is lit, press the {{{{Memory Trans.}}}}
key.
ZHMS300E
ZHMS280E
63
Page 72

Using Scan to E-mail Functions
3
B Press the 0000 or 1111 key to dis-
play "10. Mail Options".
C Press the {{{{OK}}}} key.
Using the User Function Key
A Press the user function key
({{{{F1}}}} to {{{{F10}}}}) assigned to the
Mail Options function.
Note
❒ If you do not want to enter a
subject, proceed to step B.
❒ If a subject/message is regis-
tered as No.1, it automatically appears on the display
above. If you want to enter
another subject/message,
press the {{{{Clear/Stop}}}} key to
delete it, and then enter the
subject/message.
❒ To enter a subject/message
registered in "Template: Sub-
ject", press the {{{{★}}}} key, press
the 0 or 1 key to display the
desired subject/message,
and then press the {{{{OK}}}} key.
❒ If you enter only a subject,
you can enter up to 150 characters.
Press 0000 or 1111 key to display the
EEEE
item you want to set, and then
press the {{{{OK}}}} key.
Subject/Message
A Enter the subject.
ZHMS170E
❒ If you enter only a message
or both subject and message,
you can enter up to 148 characters for message, since
space for two characters is
used by pressing the E-mail
Message function.
Reference
Chapter 3 "Entering Characters", Basic Features
p.149 “Registering Template
Subjects and Messages”
64
Page 73

Scanning a Color Original
B If you want to enter a message,
press the user function key
({{{{F1}}}} to {{{{F10}}}}) assigned to the
E-mail Message function.
ZHMS170E
Note
❒ If you do not want to enter a
message, proceed to step D.
C Enter a message.
D Press the {{{{OK}}}} key.
Reference
p.80 “Confirming Reception”
B Press the {{{{OK}}}} key.
Set the original.
FFFF
Press the {{{{Resolution}}}} key to select
GGGG
data resolution.
Note
❒ In order to set resolution to Ex-
tra Super Fine, you need to
make necessary settings with
user parameters. For information about making this setting,
see p.166 “User Parameters”
(switch 20, bit 2).
3
ZHMS190E
Heading
A Press the 0000 or 1111 key to select
"No" or "Urgent".
B Press the {{{{OK}}}} key.
Confirmation of Reception
A Press the 0000 or 1111 key to select
"Yes" or "No".
Specify the destination.
HHHH
Specifying by the E-mail Address
A Press the user function key
({{{{F1}}}} to {{{{F10}}}}) assigned to the
Scanner (Scan to E-mail) function.
ZHMS170E
65
Page 74

Using Scan to E-mail Functions
3
Note
❒ On Type 2 machines, the
Scanner (Scan to E-mail)
function is pre-assigned to
the {{{{F10}}}} key.
❒ You do not need to press the
user function key in the following cases:
• When the e-mail address
is stored in either Quick
Dial key, Speed Dial, or
Group Dial.
• When specifying the address using the Redial
function.
Reference
Chapter 2 "Dialing", Basic
Features
Chapter 3 "Redial", Advanced
Features
B Enter the e-mail address of the
destination.
❒ If you incorrectly enter char-
acters, press the {{{{Clear/Stop}}}}
key, and then enter the correct characters.
C Press the {{{{OK}}}} key.
Specifying a Destination in the
Server
A Specify the destination using a
Quick Dial key or Speed Dial.
Note
❒ You can specify the destina-
tion using methods other
than Quick Dial or Speed Dial. See p.120 “Specifying Destinations Without Using
Quick Dial Keys or Speed Dials”.
Press the {{{{Start}}}} key.
IIII
Note
❒ You can enter up to 127 char-
acters for an e-mail address.
❒ You can enter "." and "@" us-
ing a Quick Dial key. Press
the {{{{Symbols}}}} key to enter
symbols. You can shift between upper and lower case
by pressing the {{{{ABC/abc}}}}
key.
❒ To enter texts registered in
"Template: Address", press
the {{{{★}}}} key, press the 0 or
1 key to display the desired
text, and then press the {{{{OK}}}}
key. See p.147 “Registering
Template Addresses”.
The transmission begins.
Note
❒ To cancel transmission of a Scan
to E-mail, follow the same procedure as for canceling an Internet fax. See p.96 “Canceling
Transmission of an Internet
Fax”.
66
Page 75

Scanner RGB
You can adjust the color balance for
Color Scanning by using the Scanner
RGB feature.
Press the {{{{User Tools}}}} key.
AAAA
ZHMS130E
Note
❒ Start this procedure when the
standby display is shown on the
display. If the standby display is
not shown, make it reappear.
See Chapter 1 "Standby Display", Basic Features.
Press the 0000 or 1111 key to display
BBBB
"2. Fax Features".
Scanning a Color Original
Press the 0000 or 1111 key to display
FFFF
"7. Scanner RGB".
Press the {{{{OK}}}} key.
GGGG
The Scanner RGB display appears.
Press the 0000 or 1111 key to display
HHHH
the color you want to adjust.
Press the {{{{OK}}}} key.
IIII
Press the 0000 or 1111 key to make ad-
JJJJ
justments, and then press the
{{{{OK}}}} key.
The display in step
Repeat steps
KKKK
as necessary.
Press the {{{{User Tools}}}} key.
LLLL
HHHH
to
appears.
H
as many times
JJJJ
3
Press the {{{{OK}}}} key.
CCCC
The Fax Features main menu appears.
Press the 0000 or 1111 key to display
DDDD
"3. Setup".
Press the {{{{OK}}}} key.
EEEE
The Setup main menu appears.
The standby display reappears.
67
Page 76

Using Scan to E-mail Functions
Scanning a Monochrome Original
3
You can scan originals and transmit
them as image files with e-mail. The
originals are converted into PDF or
TIFF-F image files.
Preparation
You need to make Network settings beforehand. See p.28 “NIC
FAX Initial Settings”.
The content of originals is transmitted
as an attachment to the e-mail in PDF
or TIFF-F files. You can specify a format with user parameters. See p.166
“User Parameters” (switch 17, bit 5).
Limitation
❒ If you specify the format of an at-
tached image file to PDF, Viewer
URL Information function is invalid even if you set it with "Mail
Options".
When sending documents, you can
set e-mail options using the {{{{Trans.
Option}}}} key.
If the Mail Options function is already
assigned to a user function key ({{{{F1}}}}
to {{{{F10}}}}), you can set the same op-
tions using that key.
You can set the following options:
❖❖❖❖ Subject and Message
You can enter a subject and message for the document you want to
send. You can also enter either
subject or message only.
Note
❒ To enter a message, you need to
assign the E-mail Message function to a user function key beforehand. See p.26 “Assigning
User Function Keys”. On Type 2
machines, the E-mail Message
function is pre-assigned to the
{{{{F4}}}} key.
❒ If you send e-mail without set-
ting a subject/message in "Subject/Message" under "Mail
Options" when a subject/message is already registered as
No.1 in "Template: Subject", the
registered subject/message is
automatically used. For more
details about registering subjects/messages, see p.149 “Reg-
istering Template Subjects and
Messages”. If you send e-mail
without setting a subject/message in "Subject/Message" under "Mail Options" when a
subject/message is not registered, the subject is automatically inserted. For more details
about how a subject is automatically inserted, see p.79 “About
the E-mail Subject”.
68
❒ You cannot send a subject/mes-
sage only as e-mail without an
original.
❖❖❖❖ Heading
You can add "Urgent" in front of
the document subject.
Page 77

Scanning a Monochrome Original
❖❖❖❖ Confirmation of Reception
You can confirm sent documents
were properly received using email or the Journal.
❖❖❖❖ Viewer URL Information
You can record URL sites for
downloading viewer applications
on e-mail you are about to send.
Note
❒ You need Acrobat Reader for
viewing PDF files.
❒ The following functions are in-
valid even if you specify them:
• Fax Header Print
• Label Insertion
❒ When you transmit e-mail by the
Scanner function specifying a user
code, and the e-mail address is set
as the routing destination of the
specified user code, a Communication Result Report is sent after the
transmission is completed. This
makes it possible to verify the result of a transmission. See p.177
“Communication Result Report”.
Make any settings for "Mail Op-
BBBB
tions", if necessary.
Note
❒ Proceed to step
if you do not
D
want to make any Mail Options
settings.
Using {{{{Trans. Option}}}} Key
A Press the {{{{Trans. Option}}}} key.
B Press the 0000 or 1111 key to dis-
play "10. Mail Options".
3
ZHMS280E
Make sure the Memory Trans. in-
AAAA
dicator is lit.
Note
❒ If the Memory Trans. indicator
is not lit, press the {{{{Memory
Trans.}}}} key.
C Press the {{{{OK}}}} key.
Using the User Function Key
A Press the user function key
({{{{F1}}}} to {{{{F10}}}}) assigned to the
Mail Options function.
ZHMS300E
ZHMS170E
69
Page 78

Using Scan to E-mail Functions
3
Press 0000 or 1111 key to display the
CCCC
item you want to set, and then
press the {{{{OK}}}} key.
Subject/Message
A Enter the subject.
Note
❒ If you do not want to enter a
subject, proceed to step B.
❒ If a subject/message is regis-
tered as No.1, it automatically appears on the display
above. If you want to enter
another subject/message,
press the {{{{Clear/Stop}}}} key to
delete it, and then enter the
subject/message.
B If you want to enter a message,
press the user function key
({{{{F1}}}} to {{{{F10}}}}) assigned to the
E-mail Message function.
ZHMS170E
Note
❒ If you do not want to enter a
message, proceed to step D.
C Enter a message.
❒ To enter a subject/message
registered in "Template: Sub-
ject", press the {{{{★}}}} key, press
the 0 or 1 key to display the
desired subject/message,
and then press the {{{{OK}}}} key.
❒ If you enter only a subject,
you can enter up to 150 characters.
❒ If you enter only a message
or both subject and message,
you can enter up to 148 characters for message, since
space for two characters is
used by pressing the E-mail
Message function.
Reference
Chapter 3 "Entering Characters", Basic Features
D Press the {{{{OK}}}} key.
Heading
A Press the 0000 or 1111 key to select
"No" or "Urgent".
B Press the {{{{OK}}}} key.
Confirmation of Reception
A Press the 0000 or 1111 key to select
"Yes" or "No".
p.149 “Registering Template
70
Subjects and Messages”
Reference
p.80 “Confirming Reception”
Page 79

Scanning a Monochrome Original
B Press the {{{{OK}}}} key.
Viewer URL Information
A Press the 0000 or 1111 key to select
"Yes" or "No".
B Press the {{{{OK}}}} key.
Set the original.
DDDD
Press the {{{{Resolution}}}} key to select
EEEE
data resolution.
Press the user function key ({{{{F1}}}}
FFFF
to {{{{F10}}}}) assigned to the Scanner
(Scan to E-mail) function.
The display for entering the scanner destination appears.
Note
❒ On Type 2 machines, the Scan-
ner (Scan to E-mail) function is
pre-assigned to the {{{{F10}}}} key.
3
ZHMS170E
ZHMS190E
Note
❒ When you are specifying the
Broadcasting function with a
fax message, the resolution of
the fax message is automatically
set to 200 × 200 dpi, even if you
specify 300dpi.
❒ In order to set resolution to Ex-
tra Super Fine, you need to
make necessary settings with
user parameters. For information about making this setting,
see p.166 “User Parameters”
(switch 20, bit 2).
❒ You do not need to press the
user function key in the following cases:
• When the e-mail address is
stored in either Quick Dial
key, Speed Dial, or Group Dial.
• When specifying the address
using the Redial function.
Reference
Chapter 2 "Dialing", Basic Features
Chapter 3 "Redial", Advanced
Features
Specify the e-mail address using
GGGG
the Quick Dial key or number
keys.
71
Page 80

Using Scan to E-mail Functions
3
Note
❒ You can enter up to 127 charac-
ters for an e-mail address.
❒ You can enter the "." and "@"
with the Quick Dial keys. Press
the {{{{Symbols}}}} key when you
want to enter other symbols.
Use the {{{{ABC/abc}}}} key to shift
between uppercase and lowercase characters.
❒ To enter texts registered in
"Template: Address", press the
{{{{★}}}} key, press the 0 or 1 key
to display the desired text, and
then press the {{{{OK}}}} key. See
p.147 “Registering Template
Addresses”.
Press the {{{{OK}}}} key.
HHHH
The destination is set.
Note
❒ With a large volume of docu-
ments, it may take some time
before transmission starts. This
is due to the time the machine
requires to convert data in
memory.
❒ To cancel transmission of a Scan
to E-mail, follow the same procedure as for canceling an Internet fax. See p.96 “Canceling
Transmission of an Internet
Fax”.
To add one or more addresses,
IIII
press the {{{{OK}}}} key, and then re-
peat steps
Note
❒ If you do not want to add any
other addresses, proceed to step
.
J
❒ You can also specify destina-
tions of faxes using public telephone line. In this case, omit
step
Press the {{{{Start}}}} key.
JJJJ
This starts reading the document
into memory. The e-mail send operation starts after the read operation
is complete. The Communicating
indicator is lit when a send operation is in progress.
F
to
HHHH
.
FFFF
.
72
Page 81

4. Using Internet Fax Functions
E-mail Server Settings (by Network
Administrator)
The information in this section is for your network administrator.
Mail Server Settings
NIC FAX uses an Internet e-mail system to send Internet faxes. Since it automatically connects to the e-mail server to get e-mail, a NIC FAX account and password must be set up on the e-mail server. In order to use SMTP reception, an
entry indicating that NIC FAX is capable of SMTP reception must be made in the
DNS server's MX record. See the documentation for the e-mail server for details
on the procedure required for setting up accounts and passwords.
Be sure to provide the NIC FAX's IP address or host name to NIC FAX users who
need to input this information when establishing a connection through a Web
browser.
E-mail Servers That Have Been Confirmed to Work
❖❖❖❖ Sendmail/QUALCOM Pop server
Program: SMTP sendmail Ver.8 or higher POP QUALCOM Pop server
OS: Solaris 1 Ver.2.1.4-R3
❖❖❖❖ Post.Office
Version: Ver.3.1 Release PO203a
Agency: Software.com
❖❖❖❖ Seattle Lab Mail Server
Version: Ver.4.1
Agency : Seattle Lab Inc.
❖❖❖❖ Netscape Messaging Server
Version: Ver.3.0
Agency: Netscape Communications
❖❖❖❖ IMail Server for Windows NT
Version: Ver.4.0
Agency: Ipswitch, Inc.
Limitation
❒ Supported operations and services differ according to the e-mail server used.
73
Page 82

Using Internet Fax Functions
Transmitting Internet Fax
4
Preparation
You need to make Network settings beforehand. See p.28 “NIC
FAX Initial Settings”.
This section describes how to scan a
document into NIC FAX memory and
send it as e-mail. You can enter the email address directly, or use a Quick
Dial key, Speed Dial or Group with an
address already stored in it. You can
also use the {{{{Redial}}}} key to recall the
previous address sent to.
When sending documents, you can
set e-mail options using the {{{{Trans.
Option}}}} key.
If the Mail Options function is already
assigned to a user function key ({{{{F1}}}}
to {{{{F10}}}}), you can set the same op-
tions using that key.
❒ If you send e-mail without set-
ting a subject/message in "Subject/Message" under "Mail
Options", the subject is automatically inserted. For more details about how a subject is
automatically inserted, see p.79
“About the E-mail Subject”.
However, if a subject/message
is already registered as No.1 in
"Template: Subject", the registered subject/message is automatically used. For more details
about registering subjects/messages, see p.149 “Registering
Template Subjects and Messages”.
❒ You cannot send a subject/mes-
sage only as e-mail without an
original.
You can set the following options:
❖❖❖❖ Subject and Message
You can enter a subject and message for the document you want to
send. You can also enter either
subject or message only.
Note
❒ To enter a message, you need to
assign the E-mail Message function to a user function key beforehand. See p.26 “Assigning
User Function Keys”. On Type 2
machines, the E-mail Message
function is pre-assigned to the
{{{{F4}}}} key.
❖❖❖❖ Heading
You can add "Urgent" in front of
the document subject.
❖❖❖❖ Confirmation of Reception
You can confirm sent documents
were properly received using email or Journal.
❖❖❖❖ Viewer URL Information
You can record URL sites for
downloading viewer applications
on e-mail you are about to send.
Important
❒ You may not be able to send large
files as e-mail, depending on email environment conditions.
❒ The level of security for Internet
communications is low. Use of the
telephone network is recommended for confidential communications.
74
Page 83

Transmitting Internet Fax
Note
❒ Because NIC FAX sends docu-
ments as e-mail messages with an
attached TIFF-F image, viewer applications are required in order to
view documents when they are received on a computer. You can inform the receiver of sites for
downloading viewer applications
using the Viewer URL Information
mail option.
❒ When you send viewer URL infor-
mation, depending on the receiver's fax machine, Journal may
show a page count that is one or
two pages greater than the number
of pages actually sent.
❒ See p.184 “Received Images” for
how e-mail is actually received by
the computer when it is sent with
mail options selected.
Make sure that the Memory
AAAA
Trans. indicator is lit.
Limitation
❒ When using NIC FAX to send e-
mail over the Internet, documents are stored in memory,
and then sent using Memory
Transmission. Internet faxing
does not allow immediate transmission.
ZHMS300E
4
❒ With the Scanner function, you can
transmit color documents. However, the Internet Faxing function
does not support color transmission. For information about Color
Scanning, see p.61 “Scanning a
Color Original”.
❒ When you transmit an Internet Fax
specifying a user code, and the email address is set as the routing
destination of the specified user
code, a Communication Result Report is sent after the transmission
is completed. This makes it possible to verify the result of a transmission. See p.177
“Communication Result Report”.
Note
❒ If the Memory Trans. indicator
is not lit, press the {{{{Memory
Trans.}}}} key to change back to
Memory Transmission.
Make any settings for "Mail Op-
BBBB
tions", if necessary.
Note
❒ Proceed to step
want to make any Mail Options
settings.
if you do not
D
75
Page 84

Using Internet Fax Functions
4
Using {{{{Trans. Option}}}} Key
A Press the {{{{Trans. Option}}}} key.
ZHMS280E
B Press the 0000 or 1111 key to dis-
play "10. Mail Options".
C Press the {{{{OK}}}} key.
Using the User Function Key
A Press the user function key
({{{{F1}}}} to {{{{F10}}}}) assigned to the
Mail Options function.
Subject/Message
A Enter the subject.
Note
❒ If you do not want to enter a
subject, proceed to step B.
❒ If a subject/message is regis-
tered as No.1, it automatically appears on the display
above. If you want to enter
another subject/message,
press the {{{{Clear/Stop}}}} key to
delete it, and then enter the
subject/message.
❒ To enter a subject/message
registered in "Template: Sub-
ject", press the {{{{★}}}} key, press
the 0 or 1 key to display the
desired subject/message,
and then press the {{{{OK}}}} key.
❒ If you enter only a subject,
you can enter up to 150 characters.
76
Press the 0000 or 1111 key to display
CCCC
the item you want to set, and then
press the {{{{OK}}}} key.
ZHMS170E
❒ If you enter only message or
both subject and message,
you can enter up to 148 characters since space for two
characters is used by pressing a user function key assigned to the E-mail Message
function.
Reference
Chapter 3 "Entering Characters", Basic Features
p.149 “Registering Template
Subjects and Messages”
Page 85

Transmitting Internet Fax
B If you want to enter a message,
press the user function key
({{{{F1}}}} to {{{{F10}}}}) assigned to the
E-mail Message function.
ZHMS170E
Note
❒ If you do not want to enter a
message, proceed to step D.
C Enter the message.
Reference
p.80 “Confirming Reception”
B Press the {{{{OK}}}} key.
Viewer URL Information
A Press 0000 or 1111 key to select
"Yes" or "No".
B Press the {{{{OK}}}} key.
Set the original and adjust any
DDDD
scan settings as necessary.
Note
❒ Original images are sent at De-
tail resolution even if 300dpi,
Super Fine, or Extra Super Fine
is selected.
Press the user function key ({{{{F1}}}}
EEEE
to {{{{F10}}}}) assigned to the Internet
FAX function.
4
D Press the {{{{OK}}}} key.
Heading
A Press the 0000 or 1111 key to select
"No" or "Urgent".
B Press the {{{{OK}}}} key.
Confirmation of Reception
A Press the 0000 or 1111 key to select
"Yes" or "No".
ZHMS170E
The display for entering an address appears.
77
Page 86

Using Internet Fax Functions
4
Note
❒ On Type 2 machines, the Inter-
net FAX function is pre-as-
signed to the {{{{F5}}}} key.
❒ You do not need to press the
user function key in the following cases:
• When the e-mail address is
stored in a Quick Dial key,
Speed Dial, or Group Dial.
• When specifying the address
using the Redial function.
Reference
Chapter 2 "Dialing", Basic Features
Chapter 3 "Redial", Advanced
Features
If the Network Transmission Auto
Check Function Is Turned Off
If the Network Transmission Auto
Check function is set to "Off" with
user parameters, select E-mail
Transmission in the display that appears. For information about changing this setting, see
Parameters” (switch 32, bit 1).
p.166 “User
When the Network Transmission
Auto Check function is set to Off:
Note
❒ You can enter up to 127 charac-
ters for an e-mail address.
❒ You can enter the "." and "@"
with the Quick Dial keys. Press
the {{{{Symbols}}}} key when you
want to enter other symbols.
Use the {{{{ABC/abc}}}} key to shift
between uppercase and lowercase characters.
❒ To enter texts registered in
"Template: Address", press the
{{{{★}}}} key, press the 0 or 1 key
to display the desired text, and
then press the {{{{OK}}}} key. See
p.147 “Registering Template
Addresses”.
Press the {{{{OK}}}} key.
GGGG
The destination is set.
To add one or more addresses,
HHHH
press the {{{{OK}}}} key, and then re-
peat steps
EEEE
to
GGGG
.
A Confirm "1. Mail Address" ap-
pears, and then press the {{{{OK}}}}
key.
Specify the e-mail address using
FFFF
the Quick Dial key or number
keys.
When the Network Transmission
Auto Check function is set to On:
78
Note
❒ If you do not want to add more
addresses, proceed to step
❒ You can also specify destina-
tions of faxes using a public
telephone line. In this case, omit
step
Press the {{{{Start}}}} key.
IIII
This starts reading the document
into memory. The e-mail send operation starts after the read operation
is complete. The Communicating
indicator is lit when a send operation is in progress.
E
.
I
.
Page 87

Transmitting Internet Fax
Note
❒ With a large volume of docu-
ment, it may take some time before transmission starts. This is
due to the time NIC FAX requires to convert the data in
memory.
❒ To cancel transmission of an In-
ternet fax, see p.96 “Canceling
Transmission of an Internet
Fax”.
----About the E-mail Subject
If no subject is specified for "Subject/Message" in "Mail Options", the
following subject is automatically inserted:
❖❖❖❖ When a User Code Is Set
• If the mail address of the Routing Address is registered:
From "mail address of the Routing Address" Fax Message
NO.xxxx.
• If the mail address of the Routing Address is not registered:
From "User Code name" Fax
Message NO.xxxx.
❖❖❖❖ When a User Code Is Not Set
• If Own Fax Number and Own
Name are registered:
From "Own Fax Number"
("Own Name") (Fax Message
NO.xxxx)
• If only Own Fax Number is registered:
From "Own Fax Number" (Fax
Message NO.xxxx)
Note
❒ User codes refer to the names as-
signed to Confidential Boxes.
❒ "xxxx" is the document number
that appears in the Journal.
Reference
Chapter 3 "Own Name/Fax Header/Own Fax Number", Basic Fea-
tures
Chapter 1 "User Code Transmission", Advanced Features
4
----When using NIC FAX with
Broadcasting and Sequential
Broadcasting
Broadcasting is used to send e-mail
when multiple addresses are specified for transmission. With broadcasting, the same e-mail can be sent to
multiple addresses at once, just as
when ordinary e-mail is sent to multiple addresses.
However, if "Yes" is selected for "Confirm Receipt" or "On" is selected for
"Label Insertion", sequential broadcasting is used for transmission. With
sequential broadcasting, the e-mail is
sent to one address at a time.
Note
❒ When using Quick Dial keys or
Speed Dials to specify a destination, documents with Fax Header 1
and Fax Header 2 selected (according to Fax Header settings under
Fax Information) are transmitted
separately.
❒ The Auto Document function
transmits specified destination
and non-specified destination documents separately.
79
Page 88

4
Using Internet Fax Functions
Confirming Reception
When Reception Confirmation is selected, the receiver sends back a reception confirmation message. Once
the reception confirmation message
has been received, "OK" appears in
the Result column of Journal, allowing the originator to verify that the
transmission has been received.
Limitation
❒ The Reception Confirmation fea-
ture is only available if the receiver
supports MDN (Message Disposition Notification).
Note
❒ If your fax is not received normal-
ly, "E" appears in the Result column.
❒ Reception confirmation results are
only shown in Journal. The Result
column in all other files, lists, and
transmission reports show "- -".
❒ Reception confirmation messages
themselves are not recorded in
Journal.
❒ To enable Reception Confirmation
under "Mail Options", select "Yes"
for "Confirm Receipt". Set this to
"Yes" with user parameters if you
use this function frequently. You
can have confirmation of receipt,
without having to specify "Confirm Receipt" each time. Once you
set this to "Yes" with user parameters, this function can be turned off
by selecting "No" for "Confirm Receipt" under "Mail Options". See
p.166 “User Parameters” (switch
17, bit 4).
❒ Information regarding the last 250
messages is recorded, but only the
last 50 communications appear in
Journal. If you do not receive a reception confirmation message for
one of the last 50 communications
from the receiver's machine, you
may not be able to confirm that the
e-mail has been received by the
Journal's Result column.
❒ If you specify mailing list address-
es, do not select "Yes" for "Confirm
Receipt". Otherwise, you will receive multiple reception confirmation messages from e-mail
recipients, and the Result column
will be overwritten each time a
new confirmation message is received. However, if you receive a
reception confirmation message
indicating an error, "E" appears in
the Result column and will not be
overwritten, even if you subsequently receive a reception confirmation message as "OK" following
the error message.
❒ The reception confirmation notifi-
cation can be printed out. This can
be set with user parameters. See
p.166 “User Parameters” (switch
18, bit 7).
80
Page 89

Transmitting Journal by E-mail
Preparation
To transmit the Journal by e-mail, it
is necessary to make settings with
user parameters. See
Parameters” (switch 18, bit 5).
The Journal is automatically transmitted to an e-mail address of the administrator by 50 communications. A
CSV format Journal is attached to the
e-mail. See p.39 “Mail to Admin.
(Mail to Administrator)” and p.180
“Journal by E-mail”.
Important
❒ It is recommended that you dou-
ble-check the e-mail address of an
administrator before the Journal is
transmitted. If the e-mail address
of the administrator is not correct,
your important Journal may be lost
and sent CSV file is not left on NIC
FAX.
p.166 “User
Transmitting Internet Fax
❒ The name of an attached CSV
file is "JOURNAL+year, month,
hours, minutes". For example,
the file name transmitted in
10:40:12 on 15th, April, 2003 is
"JOURNAL20030415104012.csv".
❒ The subject of Journal by e-mail be-
gins with "Journal".
4
Note
❒ Even if the administrator address
is wrong, you can acquire Journal
from Error Mail Notification by
setting that the error e-mail is left
on the server. To leave the error email on the server, set "Leave message on POP server after receiving
them" to "Save only errors" with
user parameters beforehand. See
p.166 “User Parameters” (switch
16; bit 1, 0).
❒ If you specify the destination of
Backup Mail Transmission, the
Journal is also transmitted to the
destination.
❒ If the Journal in e-mail format fails
to be transmitted, the Communication Failure Report and Journal are
printed out.
81
Page 90

4
Using Internet Fax Functions
Transfer Request
You can request transfer specifying Quick Dial, Speed Dial, and Group destinations registered in Transfer Station. Transfer requests allow you to make use of
the Internet to reduce costs, particularly with long distance and international
communications.
There are two types of transfer request transmissions: transfer request by e-mail
and transfer request by fax (standard transfer request transmission).
The following are some terms you must be familiar with in order to perform the
following procedure.
❖❖❖❖ Transfer Requester
This is the fax machine performing the transfer request transmission (this machine).
❖❖❖❖ Transfer Station
This is the fax machine that performs the transfer. This machine needs to be
capable of performing transfers.
❖❖❖❖ End Receiver
This is the fax machine or computer that receives the e-mail or fax from the
Transfer Station.
82
Page 91

Transfer Request
Limitation
❒ Fax machines that are equipped with NIC FAX KIT TYPE 140, TYPE 500,
COLOR NIC FAX UNIT TYPE410, or NIC FAX UNIT TYPE 510 can be specified as the Transfer Station for a transfer request by e-mail.
4
GFTRRQ0E
Note
❒ You can specify one Transfer Station and up to 30 End Receivers in a single
Transfer Request.
❒ Each group is considered one item when specifying Transfer Stations pro-
grammed in Group Dials.
❒ If you make a Transfer Request by e-mail, a Transfer Result Report is trans-
mitted to the Transfer Requester by e-mail when Transfer Station completes
all transmissions to the End Receivers.
❒ You can specify IP-Fax destinations as Transfer Station making a Transfer Re-
quest.
❒ If you use the Network Boot function, the IP address of the fax machine may
be changed after making the Transfer Request by specifying IP-Fax destinations as Transfer Station and the Transfer Result Report cannot be received. If
you want to specify an IP-Fax destination as Transfer Station, consult your
network administrator in order to keep the same IP address. See p.31 “Net-
work Boot”.
❒ See Chapter 1 "Transfer Request", Advanced Features to send Transfer Re-
quests by fax.
83
Page 92

4
Using Internet Fax Functions
Transfer Request by E-mail
Preparation
In order to use this function, you
must make polling ID and Transfer
Report settings. The same polling
ID must be set for both Transfer
Requester and Transfer Stations.
See Chapter 7 "ID Codes" and
"Transfer Report", Advanced Fea-
tures.
Make sure that the Memory
AAAA
Trans. indicator is lit.
Press the {{{{Trans. Option}}}} key.
CCCC
Press the 0000 or 1111 key to display
DDDD
"9. Transfer Request", and then
press the {{{{OK}}}} key.
ZHMS280E
Note
❒ If the Memory Trans. indicator
is not lit, press the {{{{Memory
Trans.}}}} key to change back to
Memory Transmission.
Set the original and adjust the
BBBB
scan settings as necessary.
Note
❒ Originals are sent at Detail reso-
lution even if 300dpi, Super
Fine, or Extra Super Fine is selected.
ZHMS300E
Note
❒ If you want to make Mail Op-
tions settings, follow steps
of p.74 “Transmitting Internet
C
Fax”.
Press the 0000 or 1111 key to select
EEEE
"On".
Press the {{{{OK}}}} key.
FFFF
B
to
84
Page 93

Enter a Transfer Station.
GGGG
Limitation
❒ When an originator requests
transfer by e-mail to a station
that is not capable of performing transfers, the station addressed receives the request as
ordinary e-mail and does not
transfer it or return an Error Report to the originator of the request. Before sending e-mail,
confirm that the Transfer Station is equipped with the Transfer function.
Transfer Request
Entering an E-mail Address
Stored in a Speed Dial
A Press the {{{{Speed Dial}}}} key.
ZHMS330E
4
Note
❒ You can also specify the IP-Fax
destination. See p.98 “Transmit-
ting IP-Fax”.
Entering an E-mail Address
Stored in a Quick Dial Key
A Press the Quick Dial key in
which the recipient's mail address is stored.
ZHMS320E
B Enter the speed dial code in
which the recipient's mail address is stored using the number keys.
Entering an E-mail Address
Manually
A Press the user function key
({{{{F1}}}} to {{{{F10}}}}) assigned to the
Internet FAX function.
ZHMS170E
85
Page 94

Using Internet Fax Functions
4
Note
❒ On Type 2 machines, the In-
ternet FAX function is pre-as-
signed to the {{{{F5}}}} key.
❒ If the Network Transmission
Auto Check function is set to
"Off" with user parameters,
press the 0 or 1 key to select "1. Mail Address", and
then press the {{{{OK}}}} key. For
information about changing
this setting, see p.166 “User
Parameters” (switch 32, bit
1).
B Enter the mail address of the
Transfer Station.
Enter the End Receiver.
IIII
Specify the End Receiver by using
the Quick Dial key, Speed Dial and
Group registered in Transfer Station.
Reference
p.87 “Specifying End Receivers”
Press the {{{{OK}}}} key.
JJJJ
Press the 0000 or 1111 key to select
KKKK
"No", and then press the {{{{OK}}}}
key.
Note
❒ If you make a mistake, press
the {{{{Clear/Stop}}}} key, and then
try again.
❒ You can enter the "." and "@"
with the Quick Dial keys.
Press the {{{{Symbols}}}} key
when you want to enter other
symbols. Use the {{{{ABC/abc}}}}
key to shift between uppercase and lowercase characters.
C Press the {{{{OK}}}} key.
Press the {{{{OK}}}} key.
HHHH
Note
❒ If you want to add End Receiv-
ers, select "Yes", press the {{{{OK}}}}
key, and then repeat steps
.
J
Press the {{{{Start}}}} key.
LLLL
This starts reading the document
into memory. The e-mail is sent to
the Transfer Station after the read
operation is complete. The Communicating indicator is lit while a
send operation is in progress.
I
to
86
Page 95

Specifying End Receivers
You can only specify End Receivers
already programmed in a Quick Dial
key, Speed Dial, or Group Dial of the
designated Transfer Station.
❖❖❖❖ Quick Dial
Enter the number (two or three
digits) of the Quick Dial where the
End Receiver is stored. For example, to choose the number stored in
Quick Dial 001 in the Transfer Sta-
tion, enter: {{{{0}}}} {{{{0}}}} {{{{1}}}}.
Note
❒ If the Transfer Station only sup-
ports two digits for the Quick
Dials, enter the number with
two digits like {{{{0}}}} {{{{1}}}}.
Transfer Request
4
❖❖❖❖ Speed Dial
Enter {{{{pppp}}}} followed by the Speed
Dial code (two or three digits).
For example, to select the number
stored in Speed Dial 012 in the
Transfer Station, enter: {{{{pppp}}}} {{{{0}}}}
{{{{1}}}} {{{{2}}}}.
Note
❒ If the Transfer Station only sup-
ports 2 digits for the Speed Dials, enter the number with two
digits like, {{{{pppp}}}} {{{{1}}}} {{{{2}}}}.
❖❖❖❖ Group Dial
Enter {{{{pppp}}}}, {{{{pppp}}}} followed by the
Group number (2 digits).
For example, to select the number
stored in Group 04 in the Transfer
Station, enter: {{{{pppp}}}} {{{{pppp}}}} {{{{0}}}} {{{{4}}}}.
87
Page 96

Using Internet Fax Functions
Receiving Internet Fax
4
There are two methods of receiving email: Auto Mail Reception and Manual Mail Reception.
Limitation
❒ Documents sent from computers
as e-mail attachments cannot be received. Senders receive an Error
Mail Notification if their e-mail
contains attachments. You can select whether or not the machine
sends this message with user parameters. See p.166 “User Parameters” (switch 16, bit 3). However,
TIFF-F documents created by the
Saving function of LAN-Fax Driver can be received.
Note
❒ With user parameters, you can
have the machine retain incoming
mail or delete it from the POP server. See p.166 “User Parameters”
(switch 16; bit 1, 0).
❒ With user parameters, you can
have the machine return the acknowledgment of mail to the sender. See p.166 “User Parameters”
(switch 17, bit 2).
Auto Mail Reception
The interval between checks is referred to as Mail RX Interval (Mail Reception Interval). You can specify the
interval to any value between 1 and
60 minutes, and can also force NIC
FAX to check for incoming e-mail by
pressing the user function key assigned to the Mail Reception function
or the {{{{Job Information}}}} key. See p.88
“Manual Mail Reception”.
You can also configure this feature to
work in conjunction with the Night
Timer so that Auto Mail Reception
does not occur at times when NIC
FAX is saving energy. See p.166 “User
Parameters”(switch 16, bit 4), and
Chapter 7 "Energy Save Timer", Ad-
vanced Features.
Note
❒ If the indicator of the user function
key assigned to the Auto Mail Reception function is not lit, automatic e-mail reception will not take
place. See Chapter 6 "User Function Keys", Advanced Features.
❒ If memory runs out, e-mail will not
be received at the specified intervals. Reception will resume when
sufficient memory becomes available.
When this function is turned on, NIC
FAX periodically checks the e-mail
server for incoming e-mail and downloads it as necessary. You can set this
function to "On" or "Off" by following
p.42 “Auto Mail RX (Auto Mail Reception)” of the "Network" settings,
or by assigning the Auto Mail Reception function to a user function key
and specifying "On" or "Off".
88
Manual Mail Reception
Follow these steps at any time to
check for incoming e-mail immediately.
Preparation
To receive e-mail by the Manual
Mail Reception key, you need to
assign the Manual Mail Reception
function (Mail Reception) to a user
function key beforehand. See p.26
“Assigning User Function Keys”.
Page 97

Receiving Internet Fax
Receiving E-mail with the Mail
Reception Function
Press the user function key ({{{{F1}}}}
AAAA
to {{{{F10}}}}) assigned to the Mail Re-
ception function.
ZHMS170E
Receiving E-mail with the Job
Information Function
Press the {{{{Job Information}}}} key.
AAAA
Press the 0000 or 1111 key to display
BBBB
"12. Mail Reception".
ZHMS080E
4
Press the {{{{Start}}}} key to check for
BBBB
e-mail.
After checking the server, the machine receives e-mail, if there is
any.
If there is no e-mail, the following
display appears. Press the {{{{OK}}}}
key.
Note
❒ If there is e-mail, the Communi-
cating indicator will light and
the e-mail will be printed.
Press the {{{{Job Information}}}} key.
CCCC
The standby display reappears.
Press the {{{{OK}}}} key.
CCCC
Press the {{{{Start}}}} key.
DDDD
The machine accesses the server to
check whether there is e-mail. If
there is, it is received.
If there is no e-mail, the following
display appears. Press the {{{{OK}}}}
key.
Note
❒ If there is e-mail, the Communi-
cating indicator will light and
the e-mail will be printed.
Press the {{{{Job Information}}}} key.
EEEE
The standby display reappears.
89
Page 98

4
Using Internet Fax Functions
Receiving Transfer Request E-mail
When the machine receives Transfer Request e-mail, it transfer faxes to all the
End Receivers specified in the e-mail.
Note
❒ You must register Polling ID and End Receivers.
❒ End Receivers must be programmed into Quick Dial keys, Speed Dials, or
Groups in the Transfer Station (this machine). You can specify e-mail addresses as End Receivers.
❒ The transferred originals are printed in the Transfer Station.
❒ NIC FAX can receive the transfer request when the Internet Fax or IP-fax des-
tination is specified as Transfer Station.
When NIC FAX (nicfax2@abc.company.com) receives Transfer Request e-mail
from another NIC FAX (nicfax1@abc.company.com), it transfers the faxes to the
specified End Receivers.
90
GFRECP0E
Page 99

Receiving Internet Fax
Routing Received Documents
When a document is received, its SUB code is compared to user codes registered
in Personal Boxes and, if a match is found, the document is routed to the destination whose user code is specified. If the destination specified is an e-mail address, the received document is routed to that destination as e-mail.
At the same time, you can make the settings that all documents which do not
have the SUB code are routed to the specified e-mail address by the Forwarding
function. For details, see p.92 “Forwarding Received Documents”.
4
GFRECP1E
Note
❒ You can route documents received from any fax machine, regardless of man-
ufacturer.
❒ Before routing received documents, you must set up a Personal Box and rout-
ing address. See Chapter 7 "Programming / changing Personal Boxes", Ad-
vanced Features.
Transferring Received Documents
Originals sent with a SUB code that matches the SUB code registered as a Transfer Box are received then relayed to the registered receiver.
When e-mail addresses are registered in the Transfer Station as receivers, received messages are sent in an e-mail format to the receivers.
Preparation
Transfer Boxes and End Receivers must be set up in order to transfer received
documents. See Chapter 7 "Programming / changing Transfer Boxes", Ad-
vanced Features.
Note
❒ Transfer Results are not sent back to Transfer Requesters.
❒ You can transfer data received from any fax machine, regardless of manufac-
turer.
91
Page 100

4
Using Internet Fax Functions
Forwarding Received Documents
NIC FAX can automatically forward received documents to other destinations
registered in memory based on Own Name, Own Fax Number or sender's e-mail
address. If an e-mail address is registered as the destination, documents received are forwarded as e-mail.
GFRECP2E
Note
❒ You need to specify the Forwarding destination in advance. See Chapter 7
"Forwarding", Advanced Features.
❒ You can select whether the machine prints out the messages it forwards with
user parameters (switch 11, bit 6). For details, see Chapter 7 "User Parameters", Advanced Features.
❒ If you do not specify Own Name, Own Fax Number or sender's e-mail ad-
dress, all documents are forwarded to the registered destination. For details,
see Chapter 7 "Forwarding", Advanced Features.
92
 Loading...