

Page 1

6. LAN-Fax Features
Sending Fax Documents from Computers
The optional printer/scanner unit is required.
Using computers connected to the machine through parallel ports, IEEE 1394 (IP
Over 1394) ports, LANs, or wireless LANs, you can fax documents, created using Windows applications, to other fax machines over a telephone line.
• To send a fax, simply select [Print] from the Windows application, then select
LAN-Fax as the printer, and then specify a destination.
• In addition to sending faxes, LAN-Fax Driver allows this machine to be used
for printing out documents prepared on a computer for proof checking.
• To use LAN-Fax Driver, connect this machine to a LAN and make the necessary network settings, and then install LAN-Fax Driver and related utilities
on your computer.
Important
r Errors occurring when the machine is used as a LAN-Fax will not be dis-
played on the computer. Check the help menus using a Web browser.
GFIFAX5E
107
Page 2

LAN-Fax Features
6
Before Use
To use these features, a LAN-Fax
Driver must be installed on your computer. Use the LAN-Fax driver included on the printer CD-ROM. You
must also make the required computer to fax network settings on the machine, according to the type of
connection.
Reference
When a personal computer and the
machine are connected in parallel:
See "System Settings (Parallel Connection)", Printer Reference 2.
When using Ethernet, IEEE 1394
(IP over 1394), or IEEE 802.11b
(wireless LAN):
See "User Tools (System Settings)",
Network Guide.
Installing the Software
You need to install LAN-Fax Driver
on your computer before using the
LAN-Fax functions. LAN-Fax Driver
is on the CD-ROM included with the
printer.
Address Book and LAN-Fax Cover
Sheet Editor are installed with LANFax Driver. Address Book helps you
edit LAN-Fax transmission destinations. LAN-Fax Cover Sheet Editor
helps you edit LAN-Fax cover sheets.
Note
r The following explanation as-
sumes that you are familiar with
general Windows procedures and
practices. If you are not, see the
documentation that comes with
Windows for details.
Auto run program
With Windows 95/98/Me, Windows
2000/XP, and Windows NT 4.0, the installers for various drivers and utilities
launch automatically as Auto Run programs when you insert the CD-ROM.
If your operating system is Windows
2000/XP or Windows NT 4.0, installing a printer driver using Auto Run requires Administrator permissions.
When you install LAN-Fax Driver using Auto Run, log on using an account
that has Administrator permissions.
Note
r If the plug and play function starts,
click [Cancel] in the [New Hardware
Found], [Device Driver Wizard], or
[Found New Hardware Wizard] dialog
box, and then insert the CD-ROM.
The [New Hardware Found] or [Found
New Hardware Wizard] dialog box ap-
pears depending on the system
version of Windows 95/98/Me,
Windows 2000, or Windows XP.
r Auto Run might not work auto-
matically with certain OS settings.
If this is the case, double-click “Setup.exe”, located on the CD-ROM
root directory.
r If you want to cancel Auto Run,
hold down the {SHIFT} key (when
your system is Windows
2000/Windows XP, hold down the
left {SHIFT} key) while inserting
the CD-ROM. Keep the {SHIFT}
key hold down until the computer
stops reading the CD-ROM.
r Clicking [Cancel] during installa-
tion aborts the installation. If you
cancel the installation, restart your
computer and install the rest of the
software or printer driver.
108
LAN-Fax Driver, Address Book, and
LAN-Fax Cover Sheet Editor can be
installed by Auto Run.
Page 3

Sending Fax Documents from Computers
Installing individual applications
Preparation
Before installing the above applications, install SmartNetMonitor
for Client. See “Installing SmartNetMonitor for Client/Admin”,
Printer Reference 1.
Use the following procedure to install
LAN-Fax Driver, Address Book, and
LAN-Fax Cover Sheet Editor at one
time.
A Quit all applications currently
running.
B Insert the CD-ROM included
with this machine into the CDROM drive of your computer.
The installer launches automatically, and the language selection window appears.
E Read all of the terms and, if you
agree, select [I accept the agreement],
and then click [Next].
Note
r If you select [I don't accept the
agreement], you cannot complete
the installation.
F Click the [LAN-Fax Driver] check
box, and then click [Next].
G Confirm that the [Printer
Name:<LAN-Fax M3>] check box has
been selected, and then click [Con-
tinue].
Note
r Select the desired port.
H Click [Finish].
The installation completion dialog
box appears.
6
Note
r Depending on your operating
system settings, the installer
may not launch automatically.
If it does not, double-click “SETUP.EXE” in the CD-ROM root
directory to launch the installer.
C Select the interface language of
the software, and then click [OK].
D Click [LAN-Fax Driver].
The software license agreement
window appears.
I Click [Finish].
J Click [Exit].
109
Page 4

LAN-Fax Features
6
Applications Stored on the
CD-ROM
This section provides information
about LAN-Fax Driver, Address
Book, and LAN-Fax Cover Sheet Editor.
LAN-Fax Driver
This driver allows you to use LANFax functions.
v Location of the File
The following folders are on the
CD-ROM:
• LAN-Fax Driver for Windows
95/98/Me
DRIVERSLANFAXWIN9X_Me
• LAN-Fax Driver for Windows
2000/XP
DRIVERSLAN-FAXWIN2K_XP
Limitation
r All operations cannot be guaran-
teed depending on the system environment.
r When you use Windows NT,
LAN-Fax Driver will not work in
an RISC base processor (MIPS R
series, Alpha AXP, PowerPC) environment.
Note
r Before beginning installation, exit
all other applications.
Address Book
Address Book helps you edit LANFax transmission destinations.
v Operating Systems
Microsoft Windows 95/98/Me
Microsoft Windows 2000/XP
Microsoft Windows NT 4.0
• LAN-Fax Driver for Windows
NT 4.0
DRIVERSLAN-FAX T4
v Operating Environment
•Computer
PC/AT Compatible
• Operating Systems
Microsoft Windows 95/98/Me
Microsoft Windows 2000/XP
Microsoft Windows NT 4.0
•Display
VGA 640×480 dots or more
LAN-Fax Cover Sheet Editor
LAN-Fax Cover Sheet Editor helps
you edit LAN-Fax cover sheets.
v Operating Systems
Microsoft Windows 95/98/Me
Microsoft Windows 2000/XP
Microsoft Windows NT 4.0
110
Page 5

Sending Fax Documents from Computers
Setting LAN-Fax Properties
This section describes how to make
settings such as paper size, resolution, and options.
• Paper size
•Orientation
•Tray
•Resolution
•Gray scale
• Printing images of True Type fonts
When this machine is connected to a
network, selections for the option
configuration are automatically performed.
For details, see Help.
Note
r If the options on this machine are
not configured as instructed, LANFax functions may fail to work as
intended.
r If your operating system is Win-
dows 2000/XP or Windows NT
4.0, log on using an account that
has Administrator permissions.
A On the [Start] menu, point to [Set-
tings], and then click [Printers].
B Double-click [LAN-Fax M3], and
then click [Properties] on the [File]
menu.
Note
r With Windows NT, click [Docu-
ment Default] on the [File] menu.
C Make settings for the option con-
figuration.
When using Windows 95/98/Me
A Click the [Paper] tab.
B Click [Accessories…].
When using Windows 2000,
Windows XP, or Windows NT
A Click the [Advanced] tab.
B Click [Printing Defaults…].
C Click [Accessories…].
D Confirm the settings for the op-
tion configuration.
When using a network
A If the settings do not match the
installed optional units, click
[Reload from Device].
6
Note
r With Windows XP Professional,
select [Printers and Faxes] on the
[Start] menu.
r With Windows XP Home Edi-
tion, select [Control Panel] on the
[Start] menu. Next select [Printers and Other Hardware], and then
[Printers and Faxes].
When not using a network
A Select the check box besides
the installed optional units.
E Click [OK].
The settings for the option configuration are completed.
F Click [OK].
111
Page 6

LAN-Fax Features
6
Basic Transmission
This section describes how to send fax
documents created using Windows
applications.
To send a fax, simply select [Print]
from the Windows application, then
select [LAN-Fax] as the printer, and
then specify a destination in the [LAN-
Fax] dialog box.
Open the application document you
want to send or create a new document, and then perform the following
procedure.
For details, see Help.
Limitation
r When using SmartNetMonitor for
Client, you cannot send documents to this machine using more
than one LAN-Fax at the same
time.
Note
r To send to an Internet Fax destina-
tion, the destination must be set in
the destination list of this machine
beforehand. Use this machine's
destination list to specify Internet
Fax destinations. E-mail addresses
cannot be entered in the LAN-Fax
dialog box.
A On the [File] menu, click [Print].
B Select [LAN-Fax M3] in [Printer
Name].
C Click [OK].
The LAN-Fax dialog box appears.
D Specify the destination.
Use one of the following procedures to specify a destination. For
details, see Help.
Note
r You can select the appropriate
line in the [Line:] list.
r You can specify up to 500 desti-
nations.
r The machine can hold up to 64
documents sent using LANFax, as those to be transmitted.
Specifying a destination using a
destination list
A Enter a destination in the [Fax
Number:] box.
When using a destination list:
Enter [#] and the registration
number.
B Click [Next Number].
The entered destination is add-
ed and displayed in the [List of
Destinations:] box.
Note
r If you do not want the en-
tered destination to be added
to the list, skip this step. Also
when this step is skipped, the
document will be sent to the
number entered in the [Fax
Number:] box.
C To specify more destinations,
repeat steps A and B.
Note
r The setting method may differ
depending on the application
you are using. In all cases, select
[LAN-Fax M3] for the printer.
112
Specifying a destination by
directly entering a fax number
A Enter a fax number in the [Fax
Number:] box.
Note
r
To enter a pause, click [Pause].
Page 7

Sending Fax Documents from Computers
B Click [Next Number].
The entered destination is add-
ed and displayed in the [List of
Destinations:] box.
Note
r If you do not want the en-
tered destination to be added
to the list, skip this step. Also
when this step is skipped, the
document will be sent to the
number entered in the [Fax
Number:] box.
C To specify more destinations,
repeat steps A and B.
Specifying a destination using
Address Book
In order to use this method, you
need to register destinations in the
address list using Address Book.
See p.110 “Address Book”.
A Select a CSV file containing
the desired address list, from
the drop-down menu.
D To specify more destinations,
repeat steps B and C.
E Specify options.
Reference
See p.113 “Attaching a cover
sheet”.
See p.116 “Specifying Two-Sided Printing”.
See p.114 “Previewing fax images”.
See p.115 “Printing and Saving”.
See p.114 “Specifying options”.
If you do not want to specify options, proceed to step
F
.
F Click [Send].
Note
r When you click [Print & Send], a
fax will be transmitted to the
destination and a copy of the
document you send will be
printed from your machine.
6
Note
r Up to three files used most
lately appear in the dropdown menu. To use an address list that did not appear,
click [Browse...], and then se-
lect the file.
B In the [Name:] list select [Con-
tact], [Company], or [Group], and
then select [ALL] or an initial
letter.
The destinations matching the
selected parameters appear.
C Click the destination to high-
light it, and then click [Set as
Destination].
The entered destination is add-
ed and displayed in the [List of
Destinations:] box.
Attaching a cover sheet
Selecting the [Attach a Cover Sheet]
check box causes a cover sheet to be
attached to the top of the fax document.
The cover sheet includes the following items:
• Company name as destination info.
• Department name as destination
info.
• Person name as destination info.
• Title of address as destination info.
• Company name as sender info.
• Department name as sender info.
• Person name as sender info.
113
Page 8

LAN-Fax Features
6
• Telephone number as sender info.
• Fax number as sender info.
•Date
• Message
Note
r To edit the cover sheet, click [Cover
Sheet...]. See p.118 “Editing Fax
Cover Sheets”.
Previewing fax images
Selecting the [Preview] check box al-
lows you to check how the fax document will be output at the
destination.
A Select the [Preview] check box, and
then click [Print] or [Send].
The [Preview] window appears.
B Check the image, and then click
[OK].
Note
r To cancel printing or sending,
click [Cancel].
Images on the Preview window
are not exactly the same as images
to be output.
A Click [Option...].
B Specify options you want to use.
v To send the fax document at a spe-
cific time:
Select the [Sending at Specific
Time] check box, and then speci-
fy a transmission time.
v To send with a user code:
Enter a user code into the [User
Code] field.
v To distinguish fax documents for
each user:
Enter a user ID into the [User ID:]
field. Use this option when
checking the job history using
SmartNetMonitor for Client.
v To have the header printed on the
fax document:
Select the [Print Fax Header]
check box.
v To store the fax document on the
Document Server:
Select the [Send to Document Serv-
er] check box, and then enter a
user name, file name, and password.
Specifying options
You can specify the following options:
For details, see Help.
• Sending at a Specific Time
•User Code
•User ID
•Print Fax Header
• Document Server
114
Note
r The user code you specified for
this machine must be the same
as the one entered in this machine. See General Settings Guide.
r If [Hard Disk Unit] has not been
selected in the [Accessories]
window, you cannot perform
selection for "Document Server". See p.111 “Setting LAN-Fax
Properties”.
C Click [OK].
Page 9

-Transmission result notification
After you have sent faxes, this function informs you whether the fax was
successfully transmitted to its destination or not.
Sending Fax Documents from Computers
Printing and Saving
You can print documents created using Windows applications.
You can also save documents in TIF
format.
When you store documents in the
Document Server or use this machine
just as a printer, this function also informs you whether data was successfully transmitted to this machine or
not.
Note
r You cannot receive notification
when using SmartNetMonitor for
Client version 5.0 or earlier.
r Transmission results are informed
only when connected with a network using SmartNetMonitor for
Client.
-Managing transmission using
LAN-Fax Driver
From “SmartNetMonitor for Admin”,
“SmartNetMonitor for Client”, or a
Web browser, you can manage transmissions using LAN-Fax Driver. You
can view the following information
on transmitted files using LAN-Fax
Driver.
•User ID
•Status
•Number of pages
•Start time
Open the application document you
want to print or create a new document, and then perform the following
procedure.
For details, see Help.
Note
r You can select whether to cause
the machine to automatically restart printing when problems such
as paper running-out or paper
jams are resolved. The machine
may not allow LAN-Fax Driver to
send documents until it finishes reprinting. See p.159 “User Parameters” (switch 20, bit 1).
r You can select the time delay after
problems are resolved until the
machine restarts printing. See
p.159 “User Parameters” (switch
20 , bit 2/3/4/5).
A On the [File] menu, click [Print...].
B Select [LAN-Fax M3] in [Printer
Name], and then click [OK].
The [LAN-Fax] dialog box appears.
Note
r The setting method may differ
depending on the application
you are using. In all cases, select
[LAN-Fax M3] for the printer.
6
• File No.
Reference
For details, see Help.
Printing
A Click [Print].
115
Page 10

LAN-Fax Features
6
Specifying Two-Sided Printing
A Selecting the [Duplex printing]
check box.
B Click [Print].
Saving as Files
You can save the fax document in
TIF format.
A Select the [Save as file] check
box.
B Click [Save to...].
C Select a folder on the folder
tree.
D Select a file naming method.
Note
r To manually enter a file
name, select the [Specify file
name when saving] check box.
To have the program itself
name the file, select the [Auto-
matically create a new file]
check box.
E Click [OK].
F Click [Save].
If you have selected [Automati-
cally create a new file], the image
file is assigned a name and
saved under the specified folder. The file name will be RicHHMMSS.tif (HH: hours, MM:
minutes, SS: seconds).
G Enter a file name.
Note
r You can also change the fold-
er in this step.
H Click [Save].
The image file is saved in the
specified folder.
Editing Address Book
You can program and edit destinations in the address list using the Address Book.
For details, see Help.
A On the [Start] menu, point to [Pro-
grams], [LAN-Fax Utilities], and then
click [Address Book].
The Address Book display appears.
Note
r If LAN-Fax Driver has already
started up, click [Address
Book...].
B Click [New/Browse], and then se-
lect the CSV file containing the
address list to be edited.
C Edit an existing destination or
program a new one.
Note
r
You can use files created in CSV
format, as Address Book data.
For this purpose, create CSV files
that conform to a certain format.
For more information, see Help.
r You can register the Address
Book data of this machine in the
LAN-Fax's Address Book.
Programming new destinations
A Enter the destination.
Note
r For [Line:], select the appro-
priate line type; G3, G3-2, or
G3-3, G3 Dir. Auto, G3 PABX
Auto. Do not select G4 and IG3, which is unavailable on
this machine.
116
B Click [Add].
Page 11

Editing programmed destinations
A Select the destination you
want to edit in the list.
The company name should appear in gray.
B Edit the data.
C Click [Update].
Deleting programmed
destinations
A Select the destination you
want to edit in the list.
The company name should appear in gray.
B Click [Delete].
C Click [Yes].
D Click [Close].
E If you made changes to a destina-
tion, a confirmation message appears. To save the changes, click
[Yes].
If you do not want to save the
changes and want to quit editing,
click [No].
To return to the editing display,
click [Cancel].
Sending Fax Documents from Computers
-Using the machine's Address
Book data as the LAN-Fax's
Address Book data
You can retrieve the Address Book
data of this machine using SmartNetMonitor for Admin and edit it to register in the LAN-Fax's Address Book.
Reference
For more information, see Help on
SmartNetMonitor for Admin.
-Managing the facsimile
functions using
SmartNetMonitor for Admin
Using SmartNetMonitor for Admin,
you can check information about the
machine's facsimile functions and
save the information on the computer.
SmartNetMonitor for Admin provides
the following management functions:
Using [Address Management Tool], you
can check the information about destinations programmed on the machine and change the fax numbers
and names of these destinations. You
can also register a new destination.
6
Note
r The confirmation dialog box
does not appear when you have
not made any changes after
starting Address Book.
Using [Address Management Tool], you
can retrieve destinations programmed
on the machine and save them on the
computer as CSV files. You can then
export the saved CSV files to the Address Book of LAN-Fax Driver using
the Address Book application.
Note
r For the method of installing Smart-
NetMonitor for Admin, see the
Printer Reference 1.
r For detailed operations, see Net-
work Guide and Help on SmartNet-
Monitor for Admin.
117
Page 12

LAN-Fax Features
6
Editing Fax Cover Sheets
LAN-Fax Cover Sheet Editor allows
you to edit the format for fax cover
sheets. It is necessary to create a cover
sheet file before attaching a cover
sheet to fax messages using LAN-Fax
Driver.
Creating a cover sheet
Use the following procedure to create
a fax cover sheet.
You can edit the items below using
LAN-Fax Cover Sheet Editor.
• Company name as destination info.
• Department name as destination
info.
• Person name as destination info.
B Edit the cover sheet.
Note
r For details about operations, see
Help.
C Click [Save as...] on the [File] menu.
D Select a folder, and then enter a
file name.
E Click [Save].
Attaching a created cover sheet
Use the following procedure to attach
a created cover sheet file to a fax message.
A On the [File] menu, click [Print...].
B Select “LAN-Fax M3” in “Printer
Name”, and then click [OK].
118
• Title of address as destination info.
• Company name as sender info.
• Department name as sender info.
• Person name as sender info.
• Telephone number as sender info.
• Fax number as sender info.
•Date
• Message
Note
r Cover sheet data is stored in its
own format (using "fcp" as its extension)
A On the [Start] menu, point to [Pro-
grams], [LAN-Fax Utilities], and then
click [Cover Sheet Editor].
The dialog box of LAN-Fax Cover
Sheet Editor appears.
The [LAN-Fax] dialog box appears.
C Click [Cover Sheet...].
The [Cover Sheet...] dialog box ap-
pears.
D Select a cover sheet file from the
drop-down list or after clicking
[Browse...] in [Select Cover Sheet].
Note
r The selection made in [Select
Cover Sheet] is not canceled un-
less you select another file. If
you want to change only destination information, skip this
step and proceed to step
E
Enter the destination information.
Note
r You can select [(Import from) Ad-
dress Book], [To Whom It May Concern], [Edit Names], or [None].
Selecting [Edit Names] allows
you to enter company, department, and person names.
E
.
Page 13
Sending Fax Documents from Computers
F To print the date, select the [With a
Date] check box.
H Click [OK].
I Specify a destination.
G Enter the sender information.
J Select the [Attach a Cover Sheet]
Note
r You can enter company, depart-
ment, and person names, and
telephone and fax numbers.
r To add a message, select the
[With a Message] check box, and
then enter a message.
LAN-Fax Operation Messages
Note
r You can have the LAN-Fax Error Report printed when options are not prop-
erly selected, or there is a communication error with a computer. See p.159
“User Parameters” (switch 20, bit 0).
check box.
K Click [Send].
Message Causes and Solutions
Cannot access the printer. Click [retry] to send
the data again.
The number of entries in
Destinations exceed the
limits. Up to 500 entries
can be entered.
“LAN-Fax” has already
been launched. Cannot
launch it again.
Failed to allocate memory.
6
Check the network connection.
Check that the power is turned on.
The number of destinations specified exceeds the maximum possible. The maximum number of destinations
that can be specified at one time is 500.
The [LAN-Fax] dialog box is already open. Quit LAN-Fax
once, and then start it up again.
Available memory on the computer is insufficient. Quit
applications currently not in use.
119
Page 14

LAN-Fax Features
LAN-Fax Error Report
This report is printed when options are not properly selected, or a communication error with a computer occurs. Check the error message of the report.
If you entered a user code in the [Options] dialog box, this report can be sent to
you by e-mail, provided your e-mail address is programmed in the machine.
However, if User Code Management is on for fax, the report is not sent.
Note
r You can select whether or not a LAN-Fax Error Report is printed. See p.159
“User Parameters” (switch 20, bit 0).
LAN-Fax Result by E-mail
If you entered a user code in the [Options] dialog box, the result can be sent to you
by e-mail, provided your e-mail address is programmed in the machine.
6
Note
r You can select whether or not a LAN-Fax Result is sent to the specified e-mail
address. See p.159 “User Parameters” (switch 20, bit 7). If the message failed
to be sent to one or more of the specified destinations, the result is sent regardless of this setting.
120
Page 15

Viewing Fax Information Using a Web Browser
Viewing Fax Information Using a Web
Browser
The optional printer/scanner unit is required.
You can view received fax messages
and their lists or print these messages
using a Web browser on a network
computer.
Note
r You need to select "Store" as the
"Reception File Setting" in the Facsimile Features menu. See p.184
“Storing or Printing Received Documents”.
r You can also check and manage
the documents using DeskTopBinder V2 Lite. See p.135 “Managing Documents Saved in the
Document Server from a Computer”.
Viewing, Printing, and Deleting
Received Fax Messages Using
a Web Browser
Use the following procedure to view
and/or print received fax messages
using a Web browser.
Viewing received fax messages using a
Web browser
A Start a Web browser.
B Enter the machine's IP address in
the [Address] field.
6
Reference
“Configuring the Network Interface Board using a Web Browser”,
Network Guide
C Click [Fax Received File].
With a user code programmed
A If you have programmed a user
code, enter the code, and then
press [OK].
A list of the received fax messages appears.
Note
r If the programmed user code
has been deleted using the
Address Book Management
function under System Settings, a message indicating
incorrect user code entry appears. If this is the case, reprogram a user code. See
p.186 “Setting a User Code
for Viewing Received and
Stored Documents”.
121
Page 16

LAN-Fax Features
6
D Click the Property icon of the de-
sired fax message.
Information such as reception
dates, senders, line types, number
of pages, and file numbers appear
in addition to preview images.
Note
r You can select the thumbnail
display, details display, or icon
display. Click [Thumbnails], [De-
tails], or [Icons].
E View the content of the fax mes-
sage.
Note
r To enlarge the preview image,
click [Enlarge Image]. Enlarge-
ment cannot be performed
without Acrobat Reader installed. For more information,
see Help on the Web browser.
Printing fax information using a Web
browser
A Start a Web browser.
B Enter the machine's IP address in
the [Address] field.
C Click [Fax Received File].
The list of received fax messages
appears.
D Click and select the check box be-
side the fax message to be printed.
Note
r You can select the thumbnail
display, details display, or icon
display. Click [Thumbnails], [De-
tails], or [Icons].
E Click [Print].
F To download the received fax
message, click [PDF] or [Multi-page
TIFF].
Clicking [PDF] causes Acrobat
Reader to be started and the message to be displayed.
Clicking [Multi-page TIFF] causes a
downloading confirmation window to appear.
Note
r The method for downloading
differs depending on the selected format. For more information, see Help on the Web
browser.
F Click [Start Print].
Note
r To cancel printing, press [Can-
cel] before clicking [Start Print].
r You can change the printing or-
der of selected multiple messages. You can also have messages
printed on both sides of paper.
For more information, see Help
on the Web browser.
G Click [OK].
The display returns to that of step
.
D
122
Page 17

Deleting fax information using a Web
browser
A Start a Web browser.
B Enter the machine's IP address in
the [Address] field.
C Click [Fax Received File].
The list of received fax messages
appears.
D Click and check the check box be-
side the fax message to be deleted.
Note
r You can select the thumbnail
display, details display, or icon
display. Click [Thumbnails], [De-
tails], or [Icons].
Viewing Fax Information Using a Web Browser
6
E Click [Delete].
F Click [Delete File].
Note
r To cancel deletion, press [Can-
cel] before clicking [Delete File].
r After selecting multiple mes-
sages, you can also cancel deletion of some of the selected
messages. For more information, see Help on the Web
browser.
G Click [OK].
The display returns to that of step
.
D
123
Page 18

6
124
LAN-Fax Features
Viewing Received Messages on a
Computer
ScanRouter V2 Professional (sold separately) is also required as a delivery server. DesktopBinder V2 Professional Lite or DesktopBinder V2 Professional software (both sold
separately) must be installed on your computer.
• You can check or download
Delivering Received Messages
Messages received by the machine
can be viewed on or downloaded to a
computer with the network delivery
server, ScanRouter V2 Professional.
This is a useful function, enabling you
to view and store messages on your
computer without printing them.
Using the delivery server, you can
eliminate the task of retrieving and
delivering messages.
v Functions
Delivery server provides the following functions:
•
Use the delivery server to associate incoming messages (Confidential ID, SUB Code, Own Name,
and Own Fax Number) with receivers, so messages are delivered
to the intended receivers.
• You can select the delivery
method for incoming messages:
"Save in the delivery server inbox," "Send as an e-mail attachment," or "Save in the
designated PC folder." Incoming messages with no Confidential ID, SUB Code, Own Name,
or Own Fax Number are saved
in the delivery server inbox.
You can also set so that the received messages are stored in
the specified delivery server inbox according to the used line
for reception.
received messages stored in the
delivery server inbox using DesktopBinder V2 Professional Lite or
DesktopBinder V2 Professional.
Limitation
r
Confidential messages are also
forwarded to the delivery server.
Note
r
To view or download messages stored in the delivery server inbox, you need to install
the separately sold DesktopBinder V2 Professional Lite or
DesktopBinder V2 Professional on your computer.
r
To send received messages to
your computer as e-mail attachments, you need to have a
ScanRouter V2 Professionalcompatible e-mail program on
your computer.
r
To create a network using the
delivery server, settings must be
specified in the User Tools of the
machine. Settings must also be
specified on the delivery server.
See “Settings You Can Change
with User Tools - File Transfer”,
Network Guide
r
See ScanRouter V2 Professional
Help or instructions for more information on the delivery server
(ScanRouter V2 Professional).
r
For information about DesktopBinder V2 Lite/Professional, see
DesktopBinder V2 Lite/Professional Help or instructions.
.
Page 19

7. Simplifying the Operation
Programs
If you regularly send messages to a
particular destination or transmit using the same functions, you can save
repetitive keypad operations by registering this information in a Keystroke Program.
Registering and Changing
Keystroke Programs
Keystroke Programs can be recalled
by just pressing a Quick Dial key. The
following procedure can be used to
program a new Keystroke Program or
overwrite an old one.
You can register the following items
in Keystroke Programs:
• Memory Transmission, Internet
Fax transmission, Difference size
originals, Immediate Transmission, destinations (up to 500 numbers), resolution, original type, G3
communication mode, Stamp,
Send Later, Default ID, Auto Image Density, Manual Image Density, Scan Area, Auto Document,
Book Fax, Polling Transmission,
Polling Reception, Transfer Request, two-sided transmission, entering text, reception confirmation
settings, and BCC transmission
settings, optional functions
• Program name (up to 20 characters)
Note
r The maximum number of pro-
grams you can register is 100 (200
with the optional fax function upgrade unit).
r Use the same procedure to register
and change programs. Follow the
procedure for the items you want
to change.
r The method of registering or
changing programs for the copy
function is different from that of
the fax function.
r You cannot register the following
using program No.1:
•Any destination
• Polling Transmission
• User Transmission
•Store File
• Specifying a stored file
• Enter Subject of Mail Options
A Make sure that the machine is in
facsimile mode and the standby
display is shown.
Note
r If the standby display is not
shown, press the {Facsimile}
key.
B Prepare for registering the pro-
gram.
Note
r The procedure for program-
ming differs depending on the
items you want to register.
r Press the {Clear Modes} key to
cancel programming.
125
Page 20
Simplifying the Operation
Example of registering a program
using Send Later with the fax
number “0123456789”
A Press {0}, {1}, {2}, {3}, {4}, {5},
{6}, {7}, {8}, {9} using the
number keys.
B Perform the Send Later setting
till the procedure of pressing
[OK] key to return to the stand-
by mode.
Reference
p.3 “Sending at a Specific
Time (Send Later)”
C Press the {Program} key.
r When you change a Keystroke
Program, press [Register] after
pressing the program number
you want to change. If you
make a mistake, press [Do not
Register] and return to step
E
.
F Enter the program name, and then
press [OK].
The standby display appears.
Note
r If you make a mistake, press
[Backspace] or [Delete All], and
then try again.
r You should register the pro-
gram name.
r To cancel a programmed pro-
gram, press [Cancel]. The dis-
play returns to that of step
E
.
7
D
Make sure that [Register] is selected.
E
Select a program number in which
“*Not Programed” is shown
Note
r If you make a mistake, press
[Cancel] and select a program
number again.
Reference
"Entering Text", General Settings
Guide
Registering a priority function using a
program
You can select whether or not the
function registered in program No. 1
will be set after the power is turned
on or the {Clear Modes} key is pressed.
After registering a function in pro-
.
gram No. 1, select [Program No.1] for
[Change Initial Mode] on the Facsimile
Features menu. See p.142 “General
Settings/Adjustment”.
Note
r For this purpose, program No.1
does not allow you to program
destinations, Polling Transmission, User Transmission, Store File,
Scan Area, resolution, Image Density and Send Stored-file functions.
126
Page 21
Programs
Changing a program name
A Make sure that the machine is in
facsimile mode and the standby
display is shown.
Note
r
If the standby display is not
shown, press the
{
Facsimile} key.
B Press the {Program} key.
C Press [Change Name].
Deleting a Program
A Make sure that the machine is in
facsimile mode and the standby
display is shown.
Note
r
If the standby display is not
shown, press the
{
Facsimile} key.
B Press the {Program} key.
C Press [Delete].
D Select the program number of the
name you want to change.
E Enter a new program name, and
then press [OK].
Note
r
Press [Cancel] to cancel the change,
and proceed to step
F
.
D Select the program number you
want to delete.
E Press [Yes].
Note
r Press [No] not to delete the pro-
gram. The display returns to
that of step
C
.
7
F Press [Exit].
The standby display appears.
F Press [Exit].
The standby display appears.
127
Page 22
Simplifying the Operation
Using a Program
Then, the programmed fax number is shown. Transmission Mode
is selected.
7
Note
r Using the program causes the pre-
vious settings to be cleared.
Example of executing a program
using Send Later with the fax
number “0123456789”
A Make sure that the machine is in
facsimile mode and the standby
display is shown.
Note
r If the standby display is not
shown, press the {Facsimile}
key.
B Place the original.
Note
r If you have no programmed
destinations or scan settings as
programs, enter the fax number
of the destination and select the
scan settings you require.
E Press the {Start} key.
The fax number and specified time
are shown on the display, and the
machine starts to scan the original.
Transmission will start at the specified time.
128
C Press the {Program} key.
D Select the program number you
registered.
The standby display appears.
Page 23

Using the Document Server
Using the Document Server
Use this function to store documents
in the Document Server on this machine.
The Document Server can store documents from various applications.
The documents that are stored using
the facsimile function are available to
transmit by facsimile.
Storing in the Document Server enables the following:
• Once stored, a document can be
sent out as many times as you
want, just by selecting it.
• Storing a document does not use
facsimile memory.
You can send and print multiple
stored documents as a single document, and also send them with
scanned originals at the same time.
Follow the instructions under [Select
Stored File] in [Sub TX Mode] when
sending or printing stored documents. See p.67 “Sending a Stored
File”.
Reference
"What You Can Do with This Machine", General Settings Guide
Important
r Data stored in the machine might
be lost if some kind of failure occurs. The manufacturer shall not
be responsible for any damage that
might result from the loss of data.
r You can specify whether or not the
machine automatically deletes
documents from the Document
Server after a certain number of
days. The delete function is preconfigured with the software and
automatically deletes any stored
document that is more than three
days (72 hours) old. You can
change the setting with “Auto Delete File”under “Key Operator
Tools” . See “Key Operator Tools
— Auto Delete File”, General Set-
tings Guide.
r You can store approximately 9,000
pages (ITU-T No.4 chart) in the
Document Server, using the copy,
facsimile, printer, and scanner
functions.
r The fax feature has a memory ca-
pacity of approximately 3,000 documents.
r You can store up to 1,000 pages per
document.
r You cannot check received and
stored documents through the
Document Server. See p.34 “Printing Received and Stored Documents” .
7
Note
r Stored documents are not deleted
even when there is a power failure,
or the main power switch is turned
off.
129
Page 24
Simplifying the Operation
Storing a Document
You can store and send a document at
the same time. You can also just store
a document.
v File names
Scanned documents are automatically assigned names like
“FAX0001” or “FAX0002”. See
p.131 “Setting a file name”.
v User Names
You can set this function if necessary to know who and what departments stored documents in the
machine. See p.131 “Programming
a user name”.
v Password
You can set this function so as not
to send to unspecified people. See
p.131 “Setting a password”.
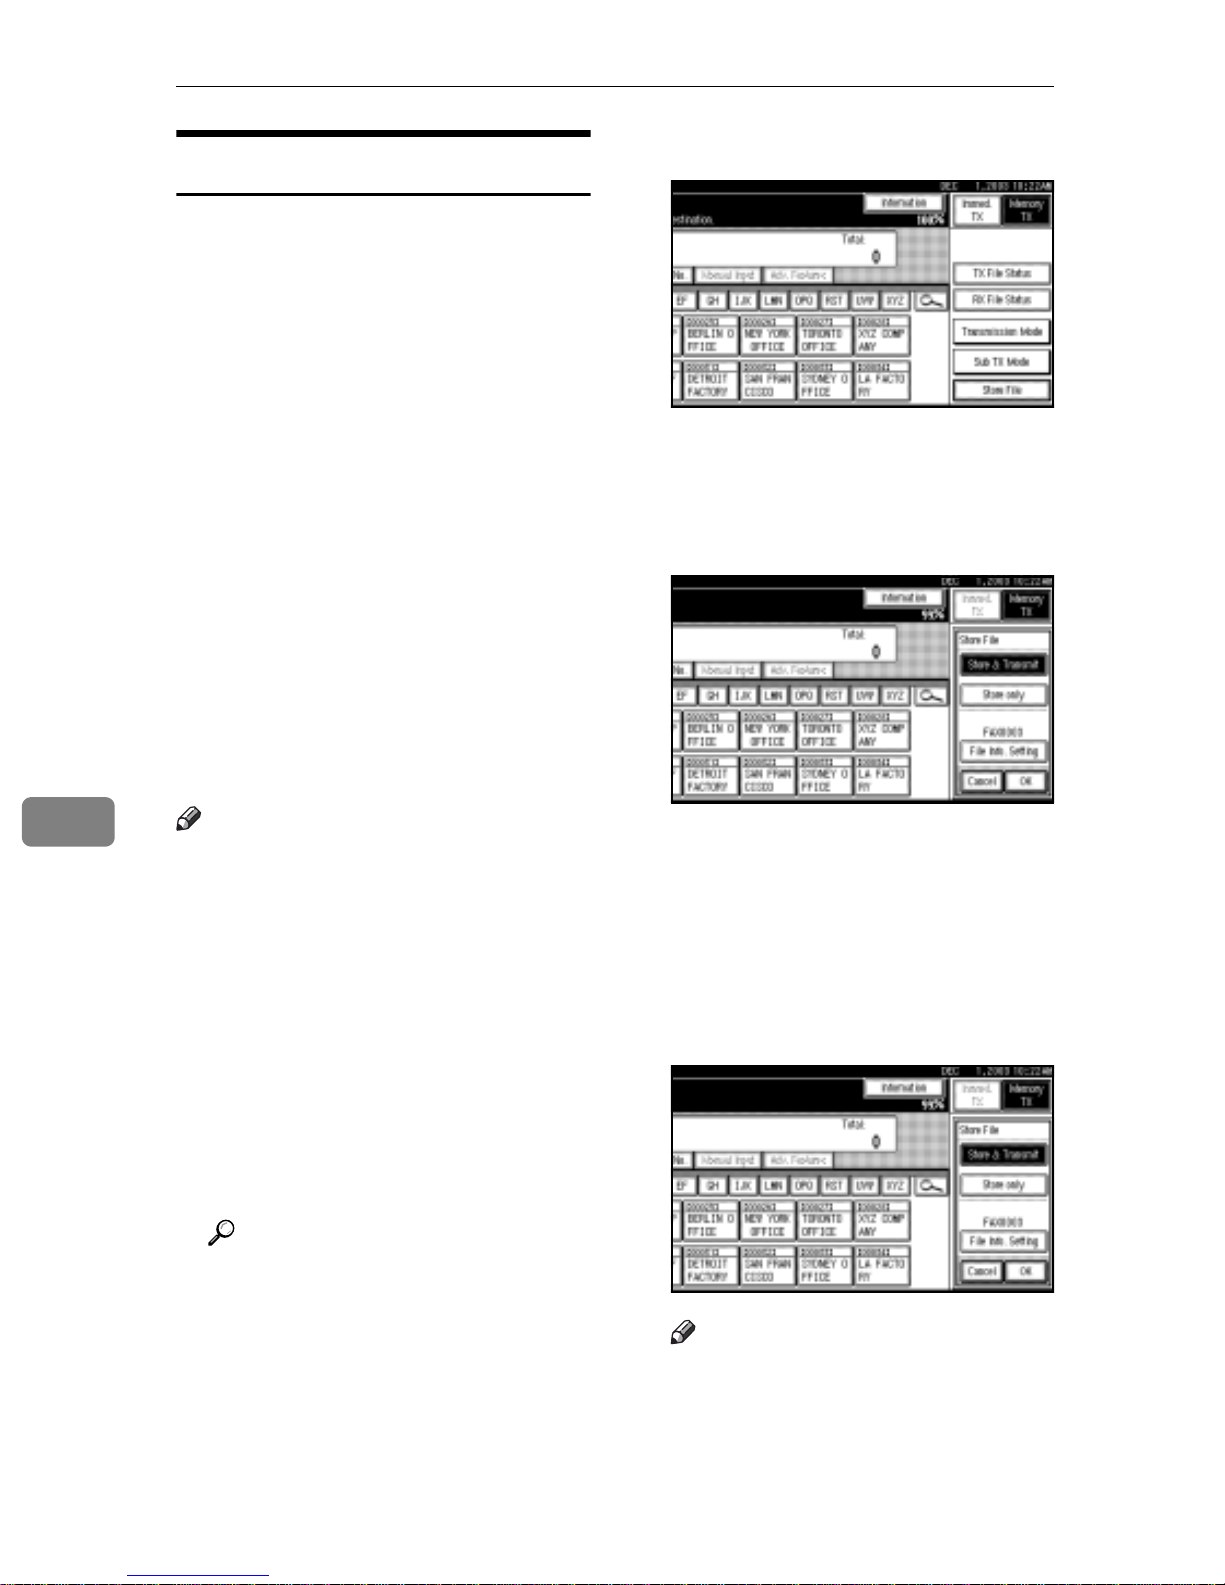
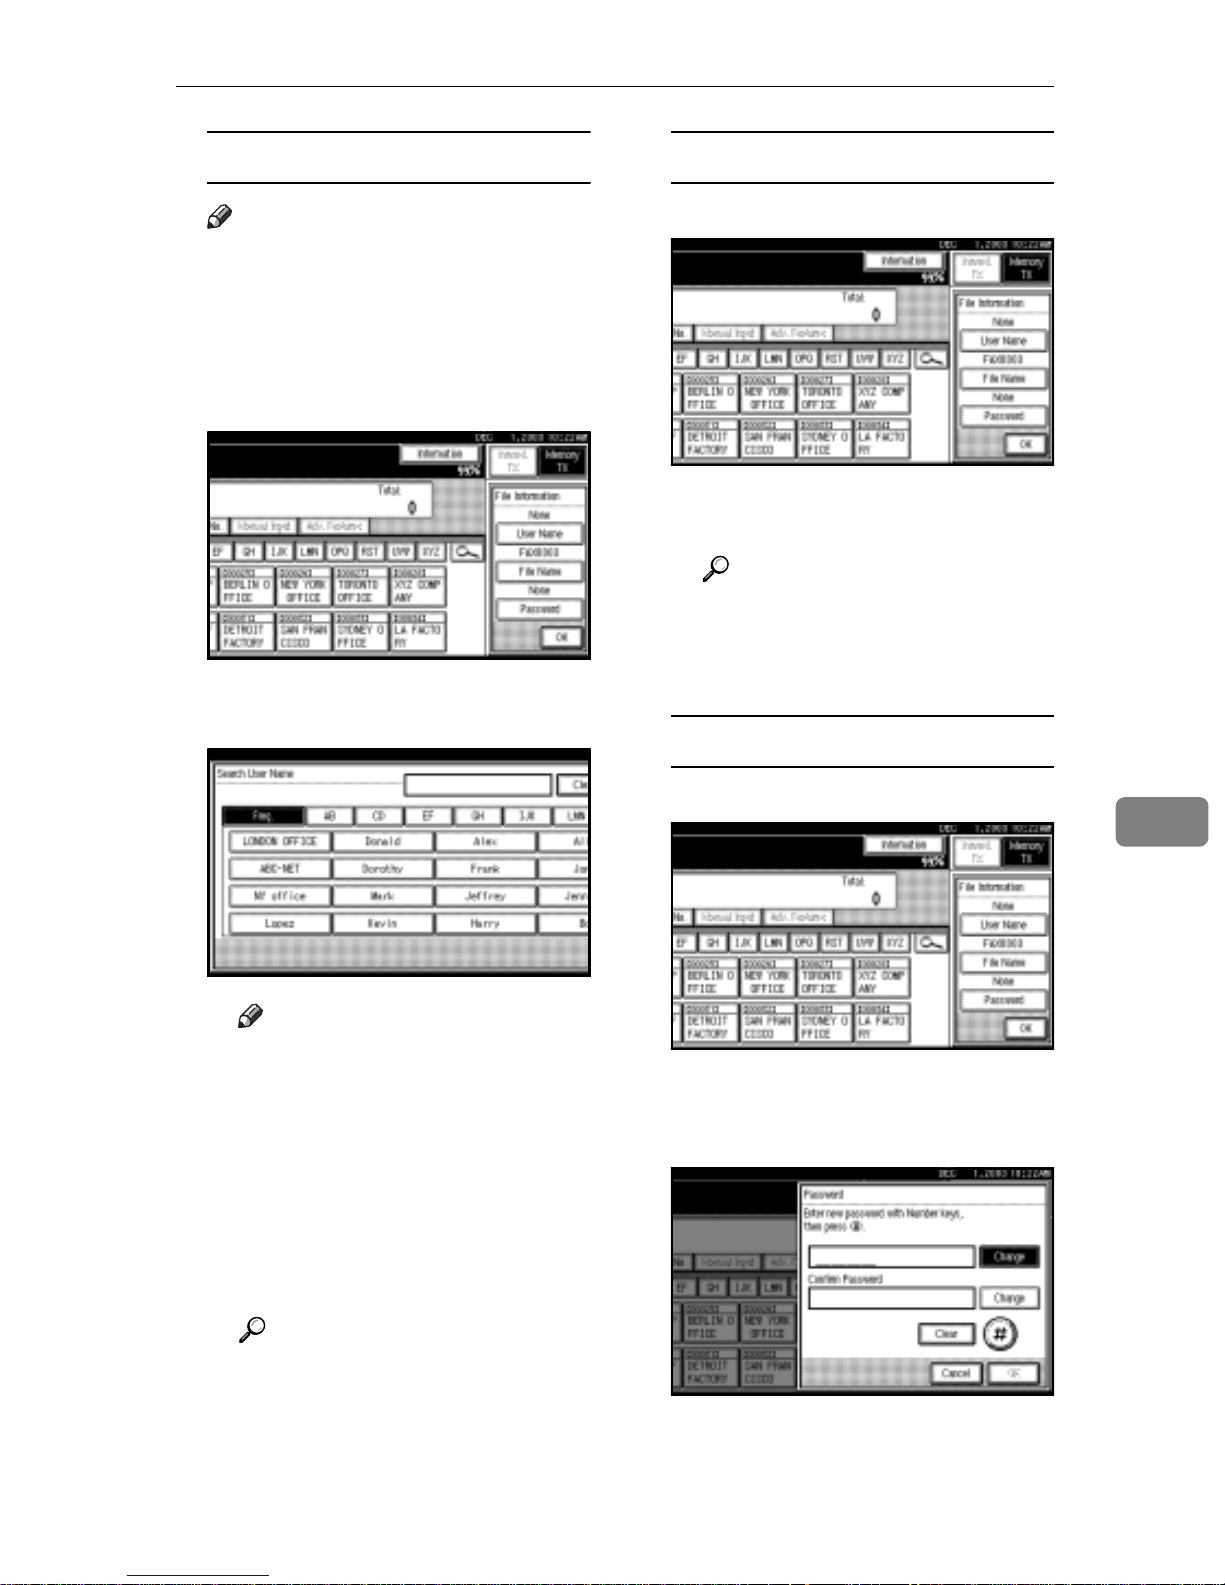
C Press [Store File].
D Select [Store & Transmit] or [Store
only].
Select [Store & Transmit] to send
documents after they are stored.
7
Note
r You can change file names and
user names. See p.132 “Changing
Information of Stored Documents”.
A Make sure that the machine is in
facsimile mode and the standby
display is shown.
If the standby display is not
shown, press the {Facsimile} key.
B Place the original, and then select
the scan settings you require.
Reference
p.15 “Placing Originals”, Facsimile Reference <Basic Features>
p.33 “Scan Settings”, Facsimile
Reference <Basic Features>
Select [Store only] to store docu-
ments.
When [Store only] is selected,
“
pppppppppp” is shown.
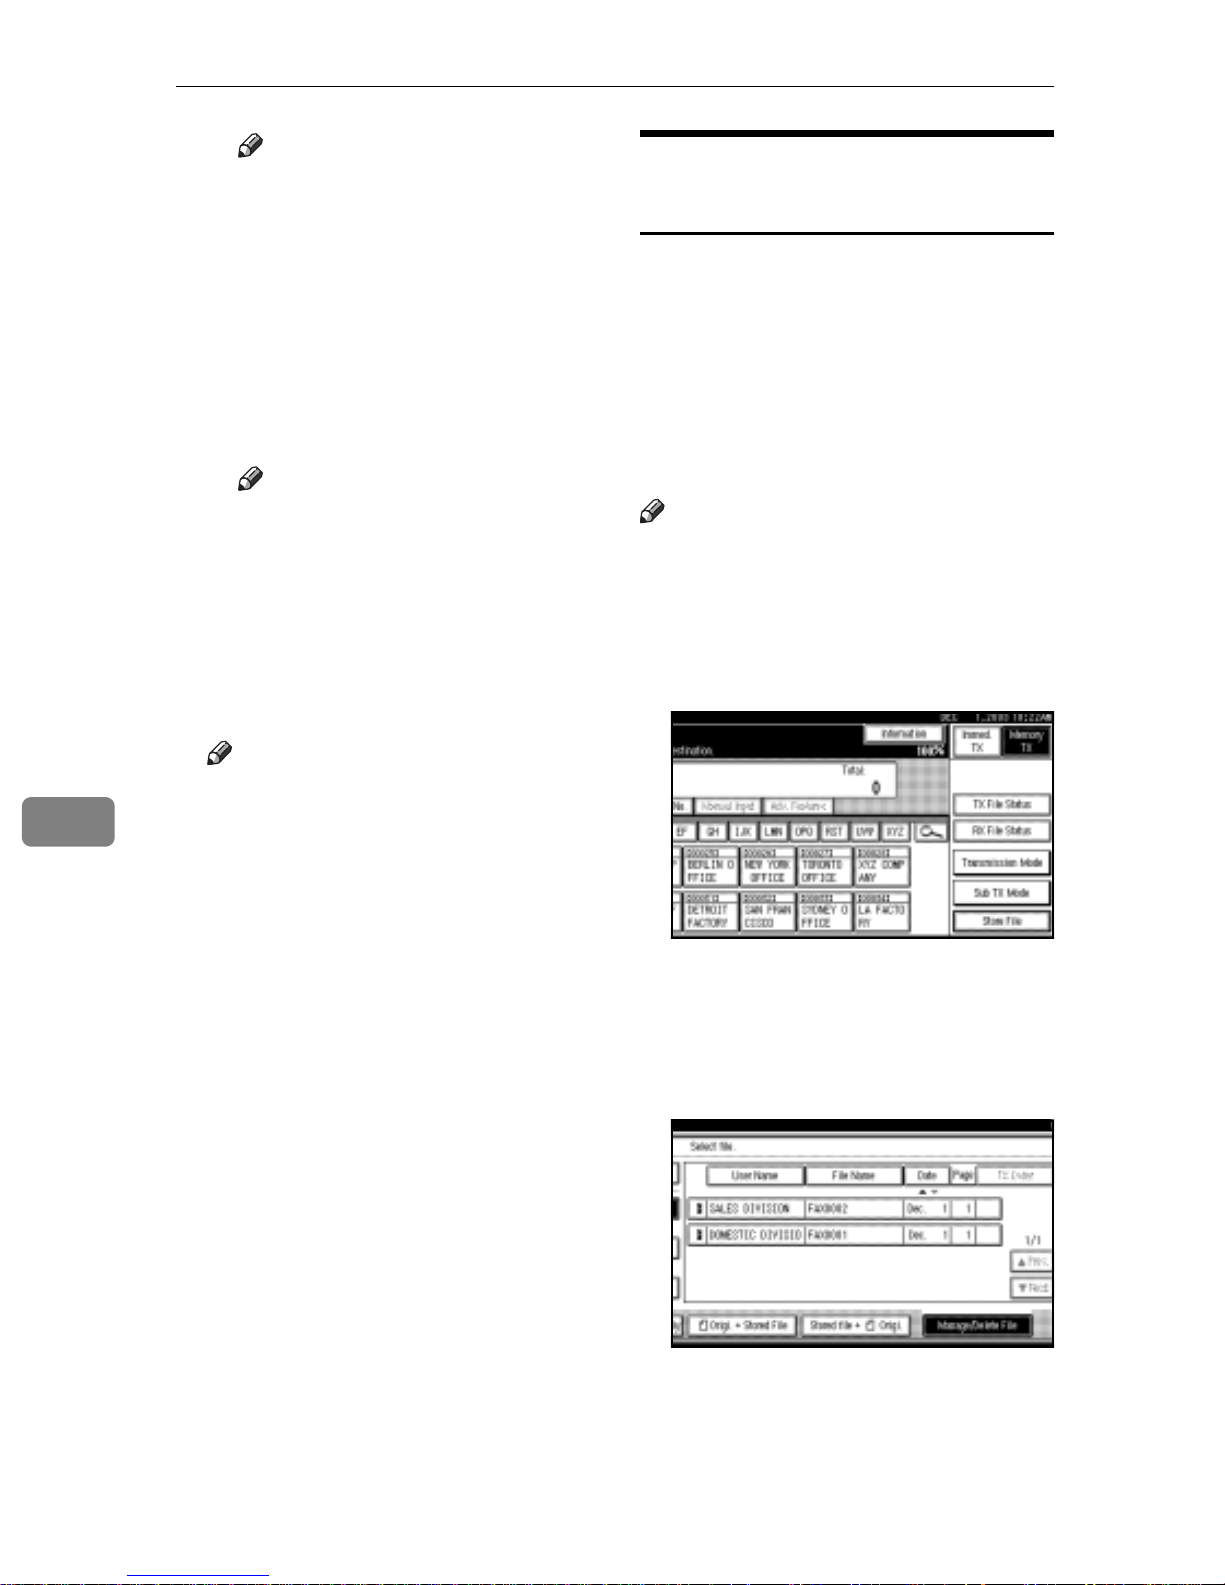
E Press [File Info. Setting], and then
set the user name, file name, and
password as necessary.
Note
r If you are not setting a user
name, file name, or password,
proceed to step
r You cannot change multiple
documents at once.
F
.
130
Page 25
Using the Document Server
Programming a user name
Note
r Set a user name from those pro-
grammed in the user code. User
code is programmed in System
Settings. See General Settings
Guide.
A Press [User Name].
B Press the user name to be pro-
grammed, and then press [OK].
Setting a file name
A Press [File Name].
B Enter the file name, and then
press [OK].
Reference
“Entering Text”, General Settings Guide
C Press [OK].
Setting a password
Note
r Press the title key to switch
between titles.
r To set an non-programmed
user name, press [Non-pro-
grammed Name], and then en-
ter the name. User names
entered by pressing [Non-pro-
grammed Name] are not pro-
grammed into the user code.
Reference
“Entering Text”, General Settings Guide
A Press [Password].
7
B Enter a password using the
number keys, and then press
[#].
C Press [OK].
131
Page 26
Simplifying the Operation
Note
r If you make a mistake, press
[Clear] or the {Clear/Stop} key
before pressing [OK], and
then reenter your password.
r You can enter up to four dig-
its.
C Enter the password again, and
then press [#].
D Press [OK].
Note
r Press [Change] to enter a dif-
ferent password.
E Press [OK].
F Press [OK].
G If you have selected [Store & Trans-
mit], specify the receiver.
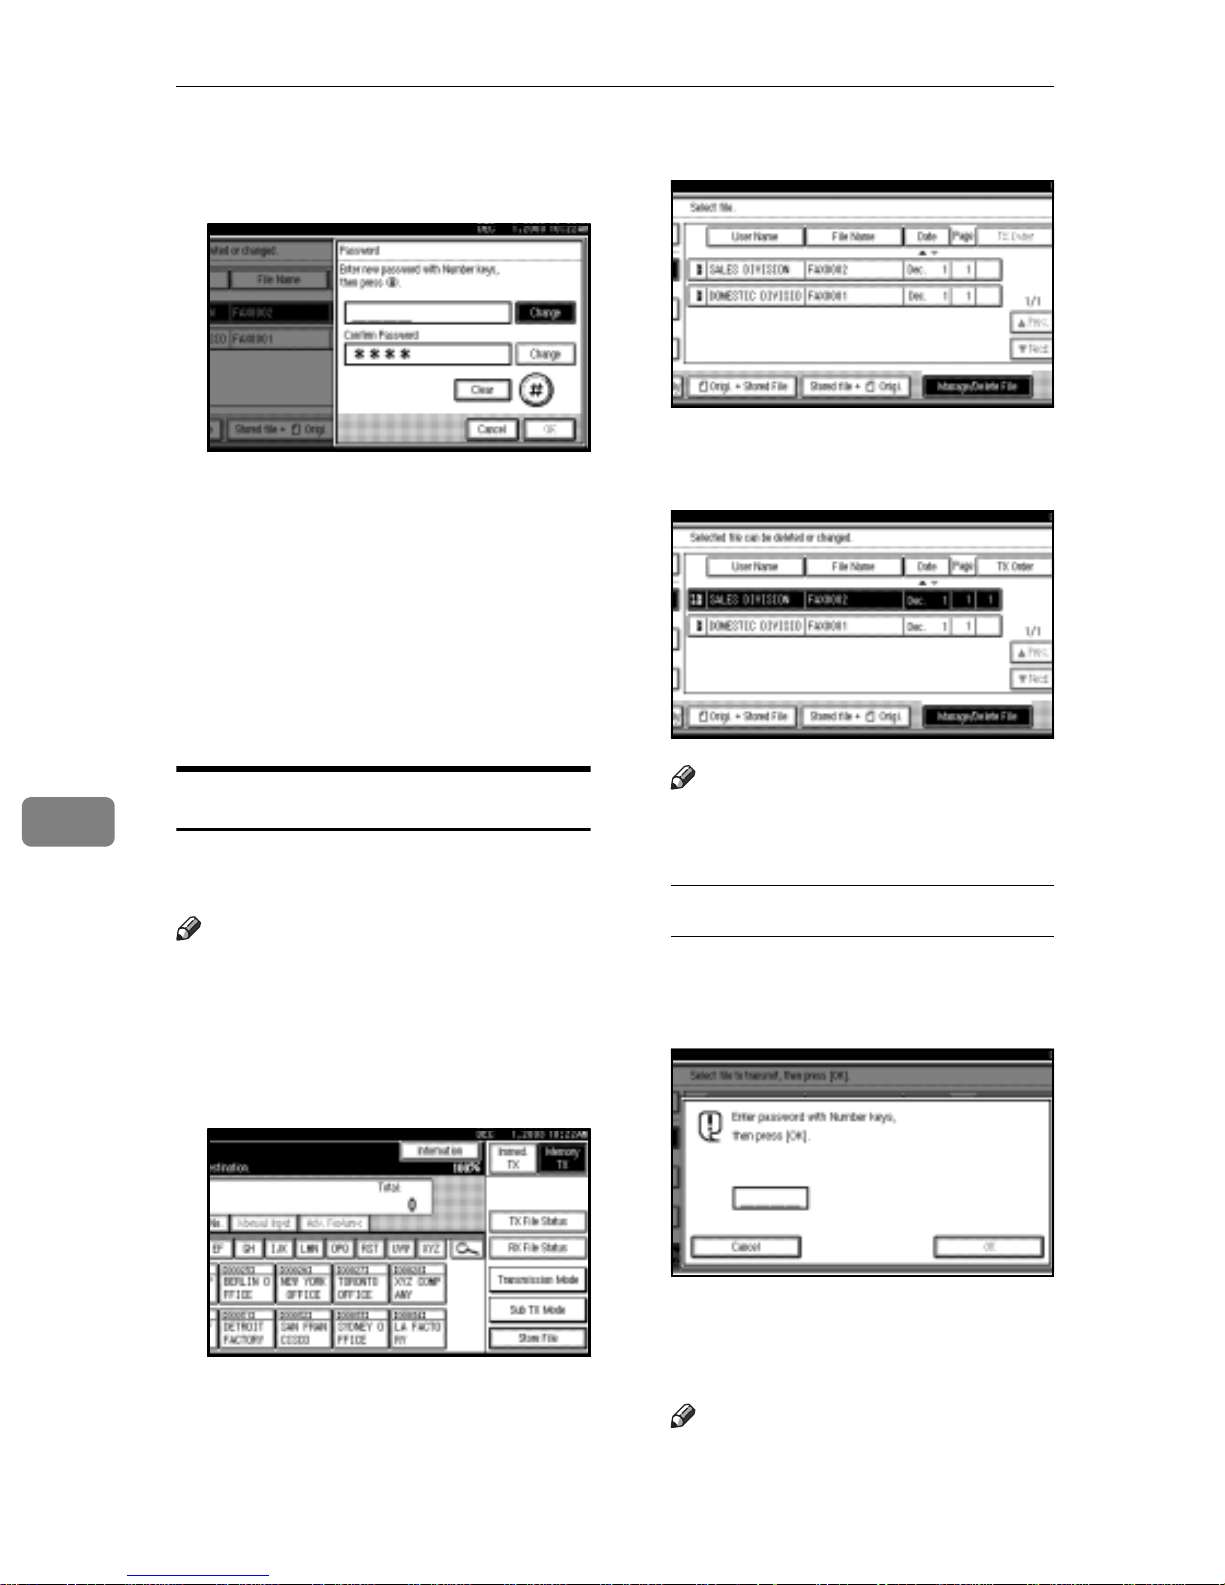
Changing Information of
Stored Documents
You can change the file name, user
name, and password of stored documents.
To change a stored document, delete
the document you no longer need,
and then reprogram the new document. See p.134 “Deleting a Stored
Document”.
Note
r You can program one of the Quick
Operation keys with operations for
this function. Using the key allows
you to omit steps A and B.
A Press [Sub TX Mode].
7
Note
r If you have selected [Store only],
proceed to step
H
.
H Press the {Start} key.
B Select [Select Stored File].
C Select [Manage/Delete File], and
then press the document to be
changed.
132
Page 27
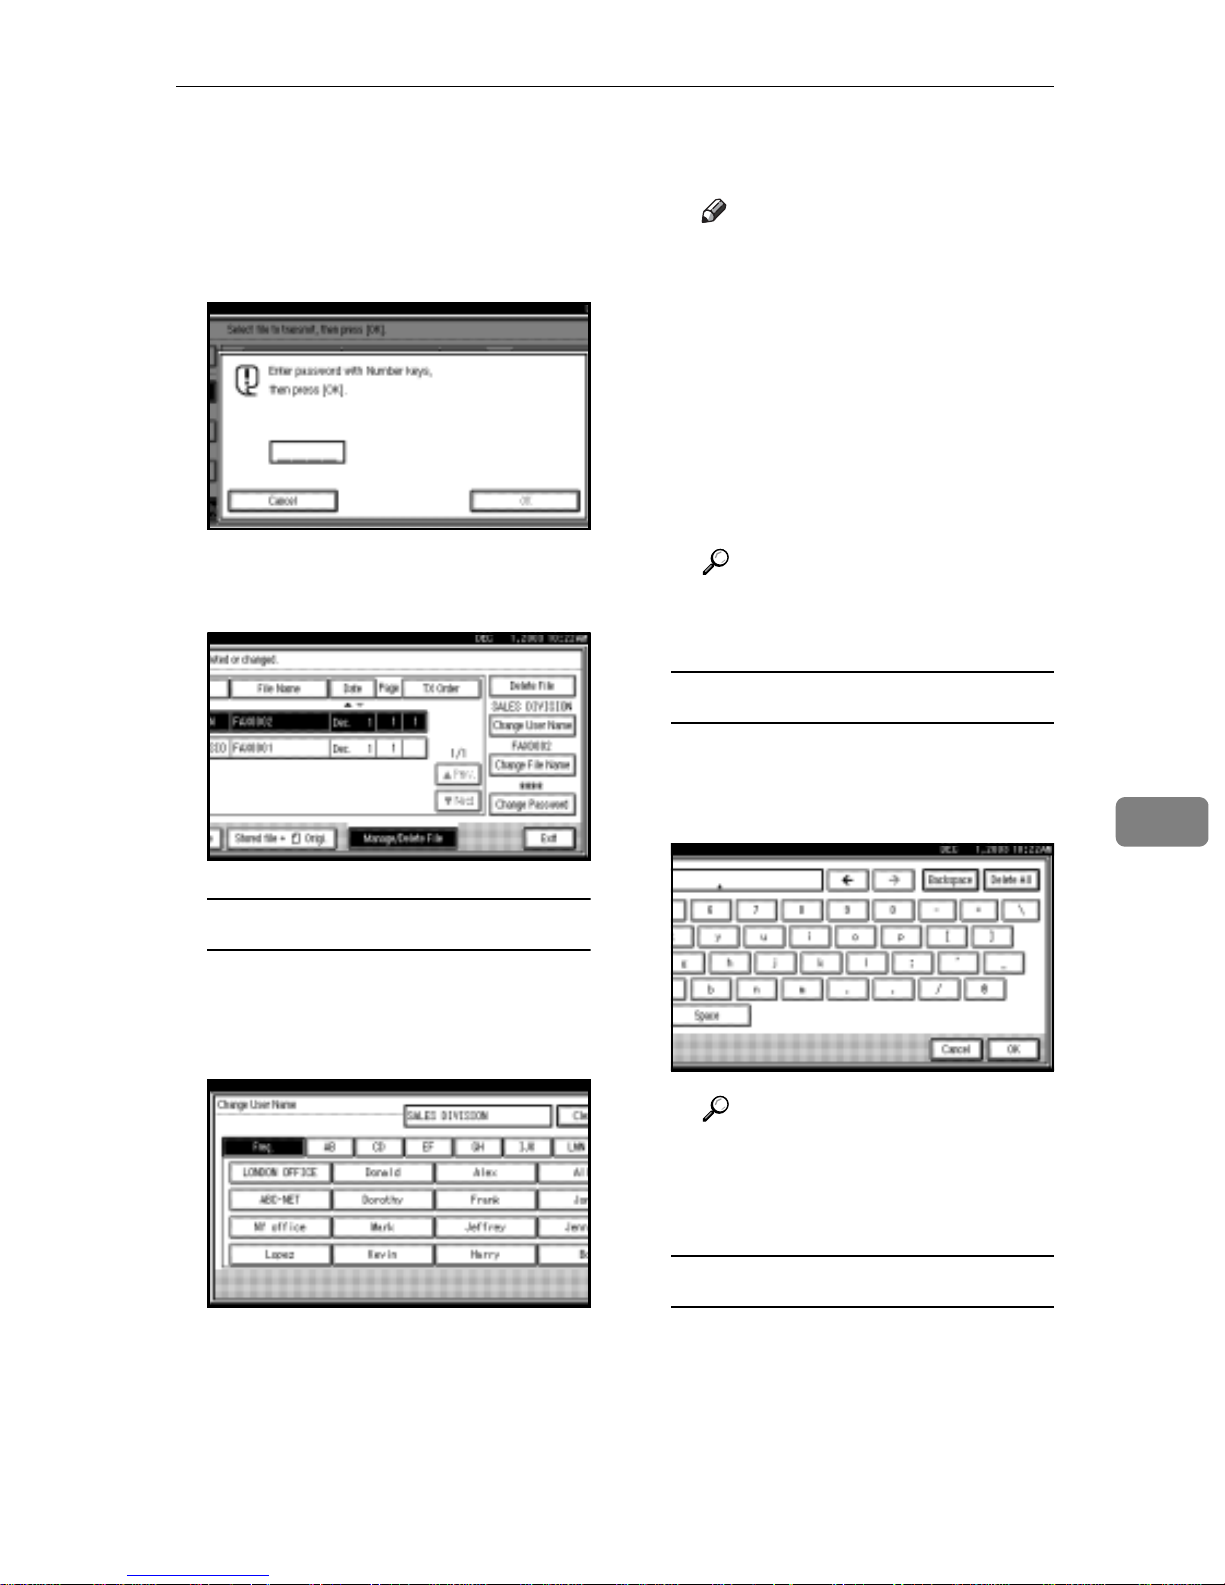
Using the Document Server
D
If you select a document for which
a password is set, enter the password, and then press
When a selected file does not have
a password, proceed to step
[OK]
.
.
E
E Change the desired information
of the stored document.
C Enter the new user name, and
then press [OK].
Note
r Press the title keys to switch
between titles.
r To set a non-programmed
user name, press [Non-pro-
grammed Name], and then en-
ter the name.
r User names entered by press-
ing [Non-programmed Name]
are not programmed into the
user code.
Reference
“Entering Text”, General Settings Guide
Changing the file name
Changing a user name
A Press [Change User Name].
B Press [Clear].
The user name is deleted.
A Press [Change File Name].
B Press [Backspace] or [Delete All],
and then re-enter the file name.
Reference
“Entering Text” General Settings Guide
C Press [OK].
Changing the password
7
A Press [Change Password].
B Press upper [Change].
133
Page 28
Simplifying the Operation
C Enter a new password using
the number keys, and then
press [#].
D Press lower [Change].
E Enter the password again, and
then press [#].
F Press [OK].
F Press [Exit].
G Press [OK].
C Press [Manage/Delete File].
D Select the document you want to
delete.
7
The standby display appears.
Deleting a Stored Document
Use this function to delete stored documents.
Note
r You can program one of the Quick
Operation keys with operations for
this function. Using the key allows
you to omit steps A and B.
A Press [Sub TX Mode].
Note
r You can also delete multiple
documents at once.
With a programmed password
A Enter a password using the
number keys, and then press
[OK].
B Press [Select Stored File].
134
E Press [Delete File].
F Press [Delete].
Note
r If you do not want to delete the
document, press [Do not Delete].
Page 29

Using the Document Server
G Press [Exit].
H Press [OK].
The standby display appears.
Managing Documents Saved
in the Document Server from a
Computer
Using DesktopBinder
Fax documents saved in the Document Server can be viewed and controlled from a network computer
with DesktopBinder V2 Lite or DesktopBinder V2 Professional installed.
The following operations are available using the computer:
Using a Web browser
Fax documents saved in the Document Server can be viewed using a
Web browser on a network computer.
These fax documents can also be
downloaded to the computer's hard
disk. See p.121 “Viewing Fax Information Using a Web Browser”.
•
Displaying documents (Easy Viewer)
• Displaying document properties
(Properties)
• Deleting documents (Delete)
• Copying documents to a computer
(Copy)
• Printing documents (Print from
Document Server)
• Exporting documents as files (Export Document)
For more information, see DesktopBinder V2 operating instructions and
Help.
Note
r Settings made in System Settings
enable you to send documents to
the delivery server. See “Setting up
the Machine on a Network”, Net-
work Guide.
7
135
Page 30

Simplifying the Operation
7
136
Page 31

8. Facsimile Features
Function List
The User Tools allow you to program your identification, store frequently used
numbers and settings, and customize default settings to meet your needs.
The User Tools are grouped by functions so that you can quickly and easily find
the desired User Tool.
v General Settings /Adjustment
Description Reference
Default Transmission Mode and scan settings. When the power is turned on, settings
specified here are selected:
• Memory/Immediate Transmission
Switch
•Text Size Priority
• Original Type Priority
• Auto Image Density
• Adjust Scan Density
• Select Title
• Change Initial Mode
• Adjust Sound Volume
• Program Fax Information
• Scan End Reset
• Transmission Stamp Priority
• Line Priority Setting
• Program Economy Time
• On Hook Mode Release Time
• Quick Operation key
p.142 “General Settings/Adjustment”
137
Page 32

Facsimile Features
v Reception Settings
Description Reference
Allows you to switch the following reception
functions on or off:
• Switch Reception Mode
• Authorized Reception
See p.167 “Authorized RX (Authorized
Reception)”.
•Forwarding
See p.167 “Forwarding”.
• Reception File Print Quantity
See p.167 “Reception File Print Qty”.
• Two-Sided Print
See p.97 “Two-Sided Printing”.
• Reception Reverse Printing
See p.100 “Reverse Order Printing”.
• Paper Tray
See p.168 “Paper Tray”.
• Specify Tray for Lines
See p.105 “Specifying Tray for Lines”.
• Checkered Mark
See p.96 “Checkered Mark”.
•Center Mark
See p.96 “Center Mark”.
• Print Reception Time
See p.97 “Reception Time”.
p.144 “Reception Settings”
8
v E-mail Settings
Description Reference
• Internet Fax Settings
• Maximum E-mail Size
• SMTP Reception File Settings
p.145 “E-mail Settings”
138
Page 33

v Key Operator Tools
Description Reference
Function List
• Program/Change/Delete Standard Message
• Store/Change/Delete Auto Document
• Program/Change/Delete Scan Size
• Print Journal
• Transmission Page Count
•Forwarding
• Memory Lock Reception
•ECM
• Parameter Setting
• Program Special Sender
•Box Setting
• Transfer Report
• Program Confidential ID
• Program Polling ID
• Program Memory Lock ID
• Select Dial/Push Phone
• Reception File Setting
• Stored Reception File User Code Setting
p.147 “Key Operator Setting”
-Displays
• Each menu appears in each tab.
• You can switch the display by pressing [U Prev.] or [T Next].
• The selected item is highlighted.
• When you have made all required settings, press [OK]. If [OK] is not pressed,
the new settings might be canceled.
• Press [Cancel] to cancel the new settings. The previous display appears.
8
139
Page 34

Facsimile Features
-Key Operator Code
When Key Operator Code is programmed and turned on, users have to enter a
programmed Key Operator Code (eight digits maximum) to operate the User
Tools. This prevents unauthorized people from changing settings.
Note
r You can turn the Key Operator Code on or off in “User Tools Menu (System
Settings)”, General Settings Guide.
r When you set the Key Operator Code to active, enter a code (eight digits max-
imum) using the number keys and select [Partial] or [All Initial Settings] to limit
access.
• When [Partial] is selected:
Only Key Operator Tools are protected with a Key Operator Code.
• When [All Initial Settings] is selected:
Key Operator Tools and User Tools are protected with a Key Operator
Code.
8
A Press the {User Tools/Counter} key.
B Press [Facsimile Features].
If you have selected [All Initial Settings], proceed to step D.
C Press [Key Operator Tools].
D Enter a Key Operator Code (eight digits maximum) using the number keys.
E Press [OK].
Note
r If you enter a Key Operator Code not programmed, the display will return
to that of step D.
140
Page 35

Accessing User Tools (Facsimile Features)
Accessing User Tools (Facsimile Features)
Customize the facsimile settings according to the operations to be frequently performed.
Note
r The machine allows you to change
the facsimile defaults in a mode
that is not the facsimile mode. After changing the defaults, select
facsimile mode again. This section
describes the facsimile defaults
that the machine allows you to customize.
r Customized facsimile defaults are
kept until the defaults are changed
again. The new settings are not
cancelled by turning off the main
power switch or the Operation
switch or pressing the {Clear
Modes} key.
B Press [Facsimile Features].
The menu display for facsimile default settings appears.
C Select the item that you want to
change.
The corresponding setting display
appears.
Reference
p.137 “Function List”
D Follow the displayed instructions
to change the default, and then
press [OK].
Note
r If you make a mistake, press
[Cancel].
Reference
For the items that can be changed
using System Settings, see "User
Tools (System Settings)", General
Settings Guide.
A Press the {User Tools/Counter} key.
The main menu display for default
settings appears.
Note
r With a Key Operator Code pro-
grammed, changing the default
causes the Key Operator Code
entry display to appear. If this
happens, enter the programmed code first. For the Key
Operator Code, see the General
Settings Guide.
Quitting Default Settings
A After changing the defaults, press
[Exit] on the main menu display
for default settings.
The standby display appears.
Note
r You can also press the {User
Tools/Counter} key to quit the
main menu display for default
settings.
8
141
Page 36

Facsimile Features
General Settings/Adjustment
v Memory/Immed. Transmission Switch
Use this function to specify the
Transmission Mode for document
transmission.
• Memory Transmission
• Immediate Transmission
v Change Initial Mode
Use this function to select whether
contents registered in program
No.1 are to be used as the initial
settings after the power is turned
on or the {Clear Modes} key is
pressed:
•Standard
• Program No.1
8
v Text Size Priority
Use this function to specify the
character size of your originals for
scanning.
•Standard
•Detail
• Super Fine (expansion memory
required)
v Original Type Priority
Use this function to specify the
type of originals for scanning.
•Text
•Text/Photo
•Photo
v Auto Image Density
Use this function to prioritize automatic Image Density for scanning
your originals.
•ON
•OFF
Note
r You cannot select Program
No.1 if program No.1 has not
been programmed with priority functions.
v Adjust Sound Volume
See p.75 “Adjusting the Volume”,
Facsimile Reference <Basic Features>.
• On Hook Mode
•At Transmission
• At Reception
•At Dialing
•At Printing
v Program Fax Information
See p.67 “Initial Settings and Adjustments”, Facsimile Reference <Ba-
sic Features>.
•Fax Header
•Own Name
•Own Fax Number
v Adjust Scan Density
Use this function to specify the
scan density of your originals.
v Select Title
Use this function for selecting the
title to be shown on the destination
list.
• Title 1
• Title 2
• Title 3
142
v Scan End Reset
Use this function to return to the
initial settings each time an original is scanned.
•ON
•OFF
v TX Stamp Priority
Use this function to press a TX
stamp.
•ON
•OFF
Page 37

Accessing User Tools (Facsimile Features)
v Line Priority Setting
Use this function to specify the line
of usage.
Note
r The display may differ depend-
ing on the line type you have.
v Program Economy Time
Use this function for specifying a
time for transmission when call
charges are low. See p.3 “Sending
at a Specific Time (Send Later)”.
Limitation
r You can program only one
Economy Time.
Note
r If you make a mistake, press
[Clear] or the {Clear/Stop} key be-
fore pressing [OK], and then try
again.
v On Hook Mode Release Time
Use this function to specify a time
to cancel On Hook mode after you
transmit using On Hook dialing.
•1 minute
•3 minutes
•5 minutes
•Stored File
• Send Later
•Auto Document
• 2 Sided Original
•Closed Network
• Polling TX (Polling Transmission)
• Polling RX (Polling Reception)
•Fax Header Print
•Label Insertion
• RX File Status (Reception File
Status)
• Forwarding
•Transfer Request
• Switch RX Mode (Reception
Mode Switch)
• Manual E-mail RX (Manual Email Reception)
• TX Status Report (Transmission
Status Report)
• User TX (User Transmission)
• E-mail TX Results (E-mail
Transmission Results)
Up to three functions can be programmed into a Quick Operation
keys.
8
• 10 minutes
v Quick Operation Key
Frequently used functions programmed as Quick Operation keys
are shown on the menu immediately after the power is turned on.
The Quick Operation keys can be
programmed with the following
functions:
•Journal
•
TX File Status (Transmission File
Status)
• Print Conf. RX (Print Confidential Reception)
• Print Memory Lock
A Select Quick Operation key
you want to program.
B Select the function you want to
program in the Quick Operation key
Note
r
Functions that appear dimmed
have already been set.
143
Page 38

Facsimile Features
Reception Settings
v Switch Reception Mode
Specify the method for receiving
fax messages.
• Manual Reception
• Auto Reception
v Paper Tray
Use this function to print fax messages received from programmed
senders and fax messages from
other senders, using different paper trays.
Display of tray names may differ
depending on the options installed.
8
v Authorized RX (Authorized Recep-
tion)
Specify whether or not unwanted
fax messages are to be screened
out.
•ON
•OFF
v Forwarding
Specify whether or not received
fax messages are to be forwarded
to a programmed receiver.
•ON
•OFF
v RX File Print Qty (Reception File Print
Quantity)
Specify the number of copies to be
printed for each fax message received.
•Tray 1
•Tray 2
•Tray 3 (option)
•Tray 4 (option)
•Auto Select
•LCT (option)
v Specify Tray for Lines
Specify a paper tray for each line
(telephone/LAN).
•OFF
•ON
A Select [ON] to select a paper tray.
• 1 to 10 set(s)
v 2 Sided Print (Available only with the
optional duplex unit)
Specify whether or not received
fax messages are to be printed on
both sides of paper.
•ON
•OFF
v RX Reverse Printing (Reception Re-
verse Printing)
Specify whether or not received
fax messages are to be printed
from the last page received.
•ON
•OFF
144
Note
r If you select [OFF], the re-
ceived fax is delivered to a
default tray.
B Select the line type.
Page 39

C Select a tray to deliver the re-
ceived paper onto, and then
press [OK].
Note
r If you want to specify anoth-
er line type, repeat from step
B.
v Checkered Mark
Specify whether or not a checkered
mark is to be printed on the first
page of received fax messages.
•ON
•OFF
v Center Mark
Specify whether or not a center
mark is to be printed halfway
down the left side and at the top
center of each page received.
•ON
•OFF
v Print Reception Time
Specify whether or not received
date and time are to be printed at
the bottom of received fax messages.
Accessing User Tools (Facsimile Features)
E-mail Settings
v Internet Fax Setting
You can select to display or
not. When you want to send an Internet Fax, set ON to display the
icon.
•ON
•OFF
v Max. E-mail Size
Make this setting when you want
to limit the size of e-mail messages
that are transmitted, if receivers
limit e-mail size, or you cannot
send large size e-mail for some reason. When this function is set to on,
transmission of e-mail that exceeds
the set size is aborted.
•ON
•OFF
Note
r When e-mail exceeds the maxi-
mum file size, an Error Report is
output, and the e-mail is deleted.
r Even when e-mail does not ex-
ceed the size limit, it may be rejected if it does not meet the
requirements of the server settings.
A Press [ON]
8
•ON
•OFF
145
Page 40

Facsimile Features
8
B Enter the maximum e-mail size
using the number keys.
Note
r Maximum e-mail size can be
between 64 and 102400 KB.
C Press [OK]
v SMTP RX File Delivery Settings
(SMTP Reception File Delivery Settings)
This function is available on systems that allow routing of e-mail
received via SMTP. See p.94 “Routing E-mail Received via SMTP”.
•On
•Off
When an authorized e-mail address is set, e-mail received from
addresses that do not match the
authorized address is discarded,
and an error message is returned
to the SMTP server.
The authorized e-mail address is
compared with the addresses of email originators, as illustrated by
the following examples.
When the authorized e-mail address is set to "@aaa.abcd.com":
abc@aaa.abcd.com - accepted
def@aaa.xyz.com - not accepted
abc@abcd.com - not accepted
A Press [On].
B Press [Change], and then enter
the sending e-mail address with
transmission permission.
Note
r If you make a mistake, press
[Backspace] or [Delete All], and
then enter again.
C Press [OK] twice.
Note
r No Error Report is output even
when e-mail is discarded.
146
Page 41

9. Key Operator Setting
Key Operator Tools List
You can program, change, or delete standard messages and auto documents.
You can also set the line type for the machine connection, program various IDs
(including a Polling ID), fax destinations, and many other items. In addition, you
can check the number of documents transmitted and received.
Function name Description Reference
Program/Change/Delete
Standard Message
Store/Change/Delete Auto
Document
Program/Change/Delete
Scan Size
Print Journal Prints a Journal. p.154 “Printing the Journal”
Transmission Page Count Checks the transmission and
Forwarding Transfers received messages
Memory Lock RX Switches the Memory Lock to
You can program, change, or
delete standard messages
printed at the top of the first
page of each incoming message.
You can program, change, or
delete pages stored as auto
documents.
You can program, change, or
cancel frequently used scan
sizes.
reception, and totals on the
display.
to a programmed receiver
(forwarding destination).
on or off. To use it, program
an ID for printing a message
received in Memory Lock
mode.
p.149 “Programming, Changing, and Deleting Standard
Messages”
p.149 “Programming, Changing, and Deleting Standard
Messages”
p.152 “Programming, Changing and Deleting a Scan Size”
p.154 “Counters”
p.155 “Forwarding”
p.157 “Memory Lock”
ECM If part of the transmission fails
Parameter Setting Allows you to change and
Program Special Sender By programming particular
due to a telephone line fault,
this function resends the
failed part automatically.
print the function settings to
meet your needs.
receivers as Special Sender in
advance, you can have Special
Senders treated differently.
p.158 “ECM”
p.159 “User Parameters”
p.166 “Programming/ Changing Special Senders”
147
Page 42

Key Operator Setting
Function name Description Reference
Box Setting By using SUB and SEP Codes
with these functions, you can
send messages to another party's box, and retrieve messages stored in boxes.
Transfer Report Before using Transfer Re-
quest, you need this Transfer
Report setting.
Program Confidential ID Registers an ID required for
Confidential communication.
Program Polling ID Registers an ID required for
Polling communication.
Program Memory Lock ID Registers an ID required for
Memory Lock reception.
Select Dial/Push Phone Selects a line type when you
connect the machine to a G3
analog line.
Note
r This function is not avail-
able in some areas.
p.172 “Box Settings”
p.181 “Transfer Report”
p.182 “Programming a Confidential ID”
p.183 “Programming a Polling
ID”
p.183 “Programming a Memory Lock ID”
p.184 “Selecting Dial/Push
Phone”
9
Reception File Setting Selects whether received doc-
uments are saved on the hard
disk to be printed later or
printed immediately without
being saved.
Stored RX File User Code Setting
Set the password to view received and stored documents
using a Web browser or DeskTopBinder V2 Lite.
p.184 “Storing or Printing Received Documents”
p.186 “Setting a User Code for
Viewing Received and Stored
Documents”
148
Page 43

Using Key Operator Settings
Using Key Operator Settings
Programming, Changing, and
Deleting Standard Messages
Use this function to program standard messages to be printed at the top
of the first page of the original. It is
useful for personalizing messages
such as sending greetings.
Note
r You can program three standard
messages. You cannot change the
“Confidential”, “Urgent”, “Please
phone”, or “Copy to corres. section” messages.
r Use the same procedure to pro-
gram and change your messages.
A Press the {User Tools/Counter} key.
Programming or changing
standard messages
A
Select the message number key
you want to program or change.
B Enter a new message.
Reference
“Entering Text”, General Settings Guide
C Press [OK].
B Press [Facsimile Features].
C Press [Key Operator Tools].
D Press [Program/Change/Delete Stan-
dard Message].
Note
r To program another mes-
sage, repeat the procedure
from step A.
r
To cancel a registration, press
[
Cancel].
Deleting Standard Messages
A Press [Delete], and then select
the message you want to delete.
9
149
Page 44

Key Operator Setting
B Press [Delete].
Note
r To delete another message,
repeat from step A.
r To cancel a deletion, press
[Do not Delete]. The display returns to that of step A.
E Press [Exit].
F Press the {User Tools/Counter} key.
The standby display appears.
Storing, Changing, and
Deleting an Auto Document
If you often have to send a particular
page to people (for example, a map, a
standard attachment, or a set of instructions), you can store that page in
memory as an Auto Document. This
saves rescanning the original every
time you want to send it.
Use the following procedure to program a new Auto Document or overwrite an existing one.
Important
r When about one hour passes after
power of the machine is turned off,
all fax messages stored in memory
are lost. If any messages have been
lost for this reason, a Power Failure
Report is automatically printed
when the operation switch is
turned on. Use this report to identify lost messages.
A
Press the {User Tools/Counter} key.
B
Press [Facsimile Features].
C
Press [Key Operator Tools].
D
Press [Store/Change/Delete Auto Doc-
ument].
E
Select and follow the appropriate
procedure depending on what
you want to perform.
9
150
You can store the following items in
an Auto Document:
• Originals (6 documents maximum;
when the optional fax function upgrade unit is installed, 18 documents maximum, only one page
per file).
• Scan settings (resolution, original
type, and image density)
• Irregular scan area
• Document name (16 characters
maximum)
Note
r If there are stored files, the file
names are shown.
Page 45

Using Key Operator Settings
Storing a file
A Select [*Not Programed].
B Enter a file name, and then
press [OK].
Reference
“Entering Text”,General Settings Guide
Changing a file
A Select the file you want to
change.
The “
stored.
stored, previous one will
be deleted. Is it OK?” mes-
sage is shown.
B Press [Store].
A file is already
If another file is
F Place the original, and then select
any scan settings you require.
Note
r You can also specify a scan size.
See p.18 “Setting a Scan Area”,
Facsimile Reference <Basic Features>.
G Press the {Start} key.
The machine starts to scan and
completes scanning.
If you want to cancel storing,
press [Do not Store].
Changing only a file name
A Press [Change Name].
B Select the file whose name you
want to change.
C Enter a file name, and then
press [OK].
Reference
“Entering Text”, General Settings Guide
Proceed to step
H
.
Note
r To cancel scanning, press [Stop
Scanning].
H Press [Exit].
I Press the {User Tools/Counter} key.
The standby display appears.
Deleting an Auto Document
Note
r You cannot delete an Auto Docu-
ment waiting to be transmitted.
Delete it after the transmission or
cancel the transmission, and then
delete the Auto Document.
A Press the {User Tools/Counter} key.
9
151
Page 46

Key Operator Setting
B Press [Facsimile Features].
C Press [Key Operator Tools].
D Press [Store/Change/Delete Auto Doc-
ument].
E Press [Delete], and then select the
file you want to delete.
F Press [Delete].
Note
r To cancel deleting, press [Do not
Delete]. The display returns to
that of step
E
.
G Press [Exit].
Programming, Changing and
Deleting a Scan Size
When you select a scan size to scan a
non-standard size original, two custom sizes are available (Program Size
1 and Program Size 2). Use these functions to program a custom size in advance.
To change an existing scan size, just
use the same procedure.
Important
r When programming or changing a
scan size, we recommend you
make a record of the new size.
Note
r You can program up to two sizes.
r You can specify a horizontal length
from 128 to 1,200 mm, or from 5.5
to 47 inches.
A
Press the {User Tools/Counter} key.
9
H Press the {User Tools/Counter} key.
The standby display appears.
B
Press [Facsimile Features].
C
Press [Key Operator Tools].
D
Press [Program/Change/Delete Scan
Size].
152
Page 47

Using Key Operator Settings
E Select [Program Size 1] or [Program
Size 2].
F Enter a horizontal size using the
number keys.
Note
r Each time you press [mm] or
[inch], the units switch between
“mm” and “inch”. If you enter a
length and change the units by
pressing [mm] or [inch], the
length is converted automatically according to the unit (fractions are rounded off). For
example, when you enter {2},
{2}, and {0} in millimeters and
change to “inch”, the length “8.7
inch” is shown on the display. If
you press [mm] or [inch] again,
“221 mm” is displayed.
G Select a vertical size, and then
press [OK].
Note
r A displayed vertical size differs
depending on the selected unit.
When [mm] is selected, [Auto De-
tect], [210mm (A4)], [257mm (B4
JIS)], [297mm (A3)], [216mm (8
1/2)], and [279mm (11)] are
shown. When [inch] is selected,
[Auto Detect], [8.3inch (A4)],
[10.1inch (B4 JIS)], [11.7inch (A3)],
[8.5inch], and [11.0inch] are
shown.
r To cancel a scan size, press [Can-
cel].
H Press [Exit].
I Press the {User Tools/Counter} key.
The standby display appears.
Deleting a scan size
A Press the {User Tools/Counter} key.
9
r If you make a mistake, press
[Clear] or the {Clear/Stop} key,
and then try again.
r To cancel a scan size, press [Can-
cel].
B Press [Facsimile Features].
C Press [Key Operator Tools].
D Press [Program/Change/Delete Scan
Size].
153
Page 48

Key Operator Setting
E Press [Delete], and then select [Pro-
gram Size 1] or [Program Size 2].
F Press [Yes].
Note
r To cancel deleting, press [No].
The display returns to that of
step
E
.
G Press [Exit].
H Press the {User Tools/Counter} key.
Counters
This function allows you to check the
total number of pages transmitted
and received on the display.
• Transmissions:
Total number of transmitted pages
• Receptions:
Total number of received pages
A Press the {User Tools/Counter} key.
B Press [Facsimile Features].
C Press [Key Operator Tools].
9
The standby display appears.
Printing the Journal
The Journal allows you to check a
maximum of the last 50 communications (receptions & transmissions)
performed by the machine. You can
print the Journal using the Information menu. See p.27 “Printing the
Journal”.
D Press [Transmission Page Count].
E After checking the display, press
[Exit].
F Press the {User Tools/Counter} key.
The standby display appears.
154
Page 49

Forwarding
This function allows you to have messages printed on the machine, and
sent to a specified End Receiver.
This is useful if, for example, you are
visiting another office and would like
a copy of your messages to be sent to
that office.
Preparation
To use this function, set Forwarding under Reception Settings to
ON (enable). See p.144 “Reception
Settings”
Limitation
r The Forwarding function does not
forward messages received with
Confidential Reception, Memory
Lock, Polling Reception mode, or
messages received by Transfer Request.
r You can select end receivers only
from among destinations programmed in the Address Book.
You cannot specify programmed
transfer stations as end receivers.
Note
r An e-mail address can be set as the
forwarding destination.
Using Key Operator Settings
r If you want to change End Receiv-
ers separately according to senders, specify End Receivers for each
special sender in “Special Senders
to Treat Differently”. You can program one receiver per Special
Sender. Received messages from
unspecified senders will be forwarded to the End Receiver specified here. See p.163 “Special
Senders to Treat Differently”.
r One receiver only can be specified
using this function. For multiple
receivers, use Group Dial.
r You can specify whether or not to
print forwarded messages. See
p.159 “User Parameters” (switch
11, bit 6).
r Deleting a destination specified as
an end receiver from the Address
Book causes the settings for the
end receiver to be deleted. If this is
the case, reprogram the end receiver. If the destination has been
changed, a message is transmitted
to the new destination.
r You can program one of the Quick
Operation keys with operations for
this function.
9
Programming an End Receiver
r If you do not program an End Re-
ceiver, the machine performs
printing but not forwarding even
with the Forwarding function On.
r You can program one of the Quick
Operation keys with operations for
this function. You can then switch
the function on or off merely by
pressing the Quick Operation key.
The function is on when the Quick
Operation key has been highlighted.
A Press the {User Tools/Counter} key.
B Press [Facsimile Features].
C Press [Key Operator Tools].
D Press [Forwarding].
155
Page 50

Key Operator Setting
E Press [ON].
Note
r If there is an End Receiver al-
ready programmed, a receiver
name is shown. If you want to
change the receiver, press [Re-
ceiver] and proceed to step
r To cancel Forwarding, press
[Cancel] and proceed to step
F
.
H
.
F Specify an End Receiver using the
destination list, and then press
[OK].
Quitting the forwarding function
A Press the {User Tools/Counter} key.
B Press [Facsimile Features].
C Press [Key Operator Tools].
D Press [Forwarding].
E Press [OFF], and then press [OK].
9
F Press the {User Tools/Counter} key.
The standby display appears.
The receiver name is shown to the
right of [Receiver].
Note
r Pressing to switch the des-
tination between fax number
and e-mail address.
G Press [OK].
H Press the {User Tools/Counter} key.
The standby display appears.
156
Page 51

Using Key Operator Settings
180
Forwarding Mark
You can print a Forwarding Mark on
the receiver's messages that have
been forwarded.
The receiver can distinguish between
forwarded messages and usual receptions.
Note
r You can specify whether or not to
print a Forwarding Mark in the
User Parameters. See p.159 “User
Parameters” (switch 02, bit 0).
Gfmten0e.eps
Note
r To store incoming documents
from Special Senders only in Memory Lock, program each sender
with “Special Senders to Treat Differently”. See p.163 “Special Senders to Treat Differently”.
A Press the {User Tools/Counter} key.
ZHPS
E.eps
B Press [Facsimile Features].
C Press [Key Operator Tools].
D Press [Memory Lock RX].
E Select [ON] or [OFF], and then
press [OK].
Memory Lock
When you switch Memory Lock on,
received messages are stored in memory and not printed automatically.
When a message is received in the
Memory Lock mode, the Confidential
File (i) indicator blinks. To print this
message, enter the Memory Lock ID.
A user without the ID cannot print
the message. This prevents unauthorized users from seeing the message.
Preparation
To use Memory Lock, program the
Memory Lock ID, and then switch
Memory Lock on. See p.183 “Programming a Memory Lock ID”.
Note
r To cancel this setting, press
[Cancel]. The display returns to
that of step
D
.
F Press the {User Tools/Counter} key.
The standby display appears.
9
157
Page 52

Key Operator Setting
ECM
If part of a transmission fails because
of a line problem, the lost data is automatically resent. For this function to
work, the other machine must have
ECM. You can turn this function on or
off through the following procedure.
Note
r If you turn ECM off, you cannot
use the following functions:
• JBIG Transmission
• Super G3 Communication
A Press the {User Tools/Counter} key.
9
B Press [Facsimile Features].
C Press [Key Operator Tools].
D Press [ECM].
E Select [ON] or [OFF], and then
press [OK].
Note
r To cancel this setting, press
[Cancel]. The display returns to
that of step
D
.
F Press the {User Tools/Counter} key.
The standby display appears.
158
Page 53

Using Key Operator Settings
User Parameters
User Parameters allow you to customize various settings to suit your needs.
To change function settings, set the User Parameter Switches.
Preparation
Access to some User Parameter Settings requires installation of optional
equipment, or that other settings be made beforehand.
v Switches and Bits
Each User Parameter has a set of switches, and each of the switches consist of
eight bits, whose values are “0”or “1”. The right most bit is bit 0 and the left
most is bit 7. You can adjust the settings to match your needs by switching the
value of bits between “0”and“1”.
Switch 02
00111011
↓↓↓↓↓↓↓↓
76543210
v User Parameter List
User Parameter Switches are outlined below.
Switch Bit Item 0 1
02 0 Forwarding Mark Off On
3TSI Print Off On
03 0 Automatic printing of the
Memory Transmission Result
Report
2 Automatic printing of the
Memory Storage Report
Automatic printing of the Poll-
3
ing Reception Reserve Report
Automatic printing of the Poll-
4
ing Reception Result Report
Off On
Off On
Off On
Off On
9
5 Automatic printing of the Im-
mediate Transmission Result
Report
Automatic printing of the Poll-
6
ing Transmission Clear Report
7 Automatic printing of the
Journal
04 0 Automatic printing of the
Confidential File Report
7 Include a portion of the image
on reports
Off On
Off On
Off On
Off On
Off On
159
Page 54

Key Operator Setting
Switch Bit Item 0 1
05 0 Receive Service Call (SC)
Condition (Substitute Reception during service call)
2, 1 Substitute the reception when the machine cannot print (because all pa-
per trays have run out of paper, toner is empty, or all paper trays are out
of order)
00: Enabled unconditionally (Free)
01: Enabled when Own Name/Own Fax Number is received
10: Enabled for Polling ID match
11: Disabled (Reception off)
5 Just Size Printing Off On
7 Empty tray alert (Paper Emp-
ty Warning) even when one
paper tray is empty
06 6 First page scanned for book
originals
07 2
08 2 Authorized Reception Type Receiving from
Parallel Memory Transmission
Possible
(Substitute RX)
Off On
From the left page From the right
Off On
only specified
senders
Not possible
(Reception off)
page
Receiving all mes-
sages except those
from specified
senders
9
10 1 Combine two originals Off On
3 Page reduction when printing Off On
11 6 Local print when forwarding Off On
7 Polling file after sending
(Polling transmission standby
time)
14 0 Print documents received
with Auto Power-On Reception (Night Printing mode)
Long Document Transmission
1
(Well Log)
2 Batch Transmission Off On
3 Reset when function changed Off On
7 System Parameter List Trans-
mission
17 2 Whether you need to press
[Add] after entering a Quick
Dial/Group Dial when
broadcasting
Delete (Use Once) Standby (Save)
Immediate printing (On)
Off On
Off On
Not necessary Necessary
When turning on
the operation
switch (Off)
7 Receive messages by pressing
the {Start} key when originals
are not set.
160
Off (The machine
does not receive
messages by press-
{
ing the
Start} key.)
On (The machine
receives messages
by pressing the
{Start} key .)
Page 55

Using Key Operator Settings
Switch Bit Item 0 1
18 0 Print date with Fax Header Off On
1 Print transmitter origin with
Fax Header
2 Print file number with Fax
Header
3 Print page number with Fax
Header
19 0 Use paper delivery shift func-
tion (Offset Print)
1 Sort Journal by line type Off On
20 0 Automatic printing of the
LAN-Fax Error Report
1 Reprint documents that could
not be printed using LAN-Fax
Driver
5, 4, 3,2Reprinting time of stored documents in memory that could not be print-
ed using LAN-Fax Driver
0000: 0 minute / 0001: 1 minute / 0010: 2 minutes / 0011: 3 minutes /
0100: 4 minutes / 0101: 5 minutes / 0110: 6 minutes / 0111: 7 minutes /
1000: 8 minutes / 1001: 9 minutes / 1010: 10 minutes / 1011: 11 minutes
/ 1100: 12 minutes / 1101: 13 minutes / 1110: 14 minutes / 1111: 15 minutes
Off On
Off On
Off On
Off On
Off On
Off On
7 Notify LAN-Fax Result by E-
mail
21 0 Print results of sending Re-
ception Notice Request message
1 Respond to e-mail reception
acknowledgment request
4 Transmit Journal by E-mail Off On
6 Not display Network error Display (Off) Not display (On)
7 Transmit Error Mail Notifica-
tion
24 1, 0 Store a message in memory that could not be transmitted
00: Off, 01: Store for 24 hours, 11: Store for 72 hours
25 4 RDS Off On
32 0 Priority destination for For-
warding
when an error oc-
Off On
Off (print only
curs)
Off On
On Off
Fax Destination E-mail Address
On
9
161
Page 56

Key Operator Setting
Changing the User Parameters
Important
r We recommend you print and
keep a User Parameter list when
you program or change a User Parameter. See p.162 “Printing the
User Parameter List”.
r Do not change any bit switches
other than those shown on the previous pages.
A
Press the {User Tools/Counter} key.
B
Press [Facsimile Features].
When the bit number is pressed,
the current value switches between 1 and 0.
Note
r Repeat from step
another bit number for the same
switch.
G
Press [OK].
Note
r To cancel these settings, press
[Cancel]. The display returns to
that of step
H
Repeat steps E and F to change
the switch settings.
I
After all the settings are finished,
press [Exit].
J
Press the {User Tools/Counter} key.
E
.
to change
F
9
C
Press [Key Operator Tools].
D
Press [Parameter Setting].
E
Select the switch number you
want to change.
F
Select the bit number you want to
change.
The standby display appears.
Printing the User Parameter List
Print this list to see the current User
Parameter settings. However, only
items of importance or often-used
items are included in the list.
A
Press the {User Tools/Counter} key.
B
Press [Facsimile Features].
C
Press [Key Operator Tools].
D
Press [Print List] next to [Parameter
Setting].
162
Note
r To cancel printing a list, press
[Cancel]. The display returns to
that of step
D
.
Page 57

Using Key Operator Settings
E Press the {Start} key.
Note
r To cancel printing a list after
pressing the {Start} key, press
[Stop Printing]. The display re-
turns to that of step
D
.
F Press the {User Tools/Counter} key.
The standby display appears.
Special Senders to Treat
Differently
By programming particular receivers
in advance, you can set the following
function for each receiver:
•Authorized Reception
•Forwarding
• Reception File Print Quantity
•Print 2 Sided
•Memory Lock
• Reception Reverse Printing
The following items can be programmed.
• Special Senders (Up to 30. A maximum of 50 when the optional fax
function upgrade unit is installed.
A maximum of 20 characters for
each name when using G3.)
• Full/ Partial agreement
When you program own names
and facsimile names for multiple
destinations, you can program a
common sequence of characters to
identify destinations using Partial
agreement.
v Using a Full agreement
Destination to be
programmed
(Own Name)
NEW YORK
BRANCH
HONG KONG
BRANCH
SYDNEY
BRANCH
Number of
programmed
identifications
3
• Paper Tray
Use the Own Name or Own Fax
Number to program your receivers. If
the receiver has a machine of the
same manufacturer, program an Own
Name that has already been programmed as a receiver. If the machine
is not of the same manufacturer, use
Own Fax Number. You can apply the
same settings to all programmed
numbers. You can then customize the
settings for individual numbers as
necessary using the Special Sender
Registration function.
v Using a Partial agreement
Destination to be
programmed
(Own Name)
BRANCH 1
Note
Number of
programmed
identifications
r You can program up to 30 wild
cards (50 with the optional fax
function upgrade unit).
r Spaces are ignored when identi-
fications are compared.
r You can use wild cards for the
following functions:
• See p.166 “Programming/
Changing Special Senders”.
• See p.167 “Authorized RX
(Authorized Reception)”.
9
• See p.167 “Forwarding”.
163
Page 58

Key Operator Setting
r You cannot use the following
functions with Internet Fax receptions.
• Authorized Reception
• Reception File Print Quantity
•Memory Lock
• Reception Reverse Printing
r To use the Forwarding, Print 2
Sided, or Paper Tray with Internet Fax receptions, program the
e-mail address of the sender.
Limitation
r You cannot program senders as
Special Senders if they do not have
Own Name or Own Fax Number
programmed.
r The machine cannot differentiate
between Polling Reception and
Free Polling documents from Special Senders.
Authorized Reception
Use this function to limit incoming
senders. The machine only receives
faxes from programmed Special
Senders, and therefore, it helps you
screen out unwanted messages, such
as junk mail, and saves wasting fax
paper.
Note
r To use this function, program the
Special Senders function, and then
select “ON” in “Authorized RX”
with “Reception Settings”. See
p.144 “Reception Settings”. See
p.159 “User Parameters” (switch
08, bit 2).
r Without programming Special
Senders, the Authorized RX function will not work, even if you select “ON”.
9
Note
r You can program up to 24 charac-
ters for the sender.
r You can check Own Name and
Own Fax Number using the Journal. You can check programmed
Special Senders using the specified
sender list. See p.27 “Printing the
Journal”. See p.171 “Printing the
Special Sender List”.
r If you select “OFF” for the Special
Sender function in “Initial Set Up”,
the settings will be the same as the
Reception Settings. See p.144 “Reception Settings”.
r You can select to receive only from
programmed senders or receive
only from senders other than those
programmed in User Parameters.
See p.159 “User Parameters”
(switch 08, bit 2).
r If you select “OFF” for “Autho-
rized RX” in “Initial Set Up”, the
settings will be the same as the Reception Mode settings. See p.144
“Reception Settings”.
r You can change Special Senders in
the same way as you program
them.
164
Page 59

Using Key Operator Settings
Forwarding
Use this function to print received
messages, and then transfer them to
those receivers programmed beforehand.
It is also possible to forward faxes
sent only by senders programmed as
Special Senders.
Note
r To use this function, program your
Special Senders, and then select
“ON” for “Forwarding” in “Reception Settings”. See p.144 “Reception Settings”.
r If you specify “ON” in “Forward-
ing” and select [Same as basic set-
tings], the fax message will be
forwarded to the other ends programmed in “Specify End Receiver”. See p.155 “Forwarding”.
r If you do not program any Special
Senders, the machine transfers all
incoming documents to the other
end specified in “Specify End Receiver”.
r You can program e-mail address
as the receiver.
Reception File Print Quantity
Use this function to print the specified number of copies of documents
received from programmed senders
(Special Senders). If you do not program any Special Senders, the machine prints the specified number of
copies for all received documents.
Limitation
r You cannot use multi-copy print-
ing with Polling Reception, Free
Polling, Confidential Reception, or
Memory Lock.
Note
r You can specify up to 10 copies.
Print 2 Sided
Use this function to print on both
sides of paper.
Limitation
r If you select the bypass tray for
“Paper Tray”, duplex printing is
disabled.
Memory Lock
Use this function to store incoming
documents from programmed senders (Special Senders) in memory without printing them. People without the
Memory Lock ID cannot print the
documents, and therefore this function is useful for receiving confidential documents. If you do not
program any senders, the machine receives fax message from all senders
using Memory Lock reception.
Reference
p.183 “Programming a Memory
Lock ID”
9
Limitation
r If you program the same sender in
Memory Lock and Forwarding,
Forwarding is disabled.
Reception Reverse Printing
Use this function to print the pages in
reverse order. See p.100 “Reverse Order Printing”.
165
Page 60

Key Operator Setting
Paper Tray
Use this function to print documents
received from programmed senders
(Special Senders) and the documents
from other senders on different types
of paper.
For example, if blue paper is in Tray 1
and white paper is in Tray 2, the machine prints the documents from Special Senders on the blue paper and
prints the documents from other
senders on the white paper, making it
easy for you to separate the two.
If you do not program any Special
Senders, the machine outputs documents received from all senders using
the default paper tray.
Limitation
r For Polling Reception and Free
Polling, you cannot select the paper tray.
Programming/ Changing Special Senders
A Press the {User Tools/Counter} key.
B Press [Facsimile Features].
C Press [Key Operator Tools].
D Press [Program Special Sender].
E Select the destination to program
or change.
9
Note
r If the machine receives a message
that has a different size from the
paper in the specified tray, the machine prints it after splitting it or
minimizing its size. See p.100
“Page Separation and Length Reduction”.
r Selection of the bypass tray en-
ables you to specify the paper size
in “Scan Area”.
When programming a new Special
Sender, press [*Not Programed].
F Enter a destination name, and
then press [OK].
Enter a destination name using
Own Name or Own Fax Number.
Reference
“Entering Text”, General Settings Guide
G Press [Full agreement] or [Partial
agreement].
166
Page 61

Using Key Operator Settings
H Select the item you want to pro-
gram.
Note
r You must select only the item
you want to program.
r To cancel these settings, press
[Cancel]. The display returns to
that of step
Authorized RX (Authorized
Reception)
A Select [Authorized RX].
B Press [ON] or [OFF], and then
press [OK].
E
.
If you select [OFF], proceed to
step D.
Note
r Selecting [Same as basic set-
tings] will result in the same
setting made for “Forwarding” under “Key Operator
Tools”. See p.155 “Forwarding”.
C Specify an End Receiver.
D Press [OK].
If you select [ON], the name of
the End Receiver appears to the
right of “Receiver“.
E Press [OK].
Note
r After you perform step
"Authorized RX" of “Reception Settings” to "ON". See
p.144 “Reception Settings”.
Forwarding
A Select [Forwarding].
B Select [ON] or [OFF].
I
, set
Note
r After you perform step
"Forwarding" of “Reception
Settings” to "ON". See p.144
“Reception Settings”.
I
, set
Reception File Print Qty
A Select [Reception File Print Qty].
B Press [Number of Sets].
9
167
Page 62

Key Operator Setting
Note
r Selecting [Same as basic set-
tings] will result in the same
setting made for “RX File
Print Qty” of “Reception Settings”. See p.144 “Reception
Settings”.
C Enter the print quantity using
the number keys, and then
press [OK].
Note
r If you make a mistake, press
[Clear] or the {Clear/Stop} key
before pressing [OK], and
then try again.
Print 2 Sided
A Select [Print 2 Sided].
Memory Lock
A Select [Memory Lock].
B Select [ON] or [OFF], and then
press [OK].
Note
r Selecting [Same as basic set-
tings] will result in the same
setting made for "Program
Memory Lock ID" under
"Key Operator Tools". See
p.157 “Memory Lock”.
RX Reverse Printing (Reception
Reverse Printing)
A Select [RX Reverse Printing].
B Select [ON] or [OFF], and then
press [OK].
Note
r Selecting [Same as basic set-
tings] will result in the same
setting made for “RX Reverse
Printing” of “Reception Settings”. See p.144 “Reception
Settings”.
B Select [ON] or [OFF], and then
9
press [OK].
Note
r Selecting [Same as basic set-
tings] will result in the same
setting made for “2 Sided
Print” of “Reception Settings”. See p.144 “Reception
Settings”.
168
Paper Tray
A Select [Paper Tray].
B Select the tray you want to use,
and then press [OK].
Note
r Selecting [Same as basic set-
tings] will result in the same
setting made for “Paper
Tray” of ”Reception Settings”. See p.144 “Reception
Settings”.
Page 63

Using Key Operator Settings
I Press [OK].
A Special Sender has been programmed.
Note
r To program another sender, re-
peat the procedure from step
E
J Press [Exit].
K Press the {User Tools/Counter} key.
The standby display appears.
Programming Initial Set Up of a Special
Sender
Use this function to program “Initial
Set Up” of a Special Sender. You can
also specify the Bypass Tray Paper
Size.
F Select the function you want to
program.
.
Note
r In this feature, “Authorized
RX” has the same settings as
“Reception Settings”. See p.144
“Reception Settings”.
Programming Authorized RX and
Special RX Function
A Press the {User Tools/Counter} key.
B Press [Facsimile Features].
C Press [Key Operator Tools].
D Press [Program Special Sender].
E Press [Initial Set Up].
A Select [Authorized RX] or [Special
RX Function].
B Select [ON] or [OFF], and then
press [OK].
9
The illustration shows the “Authorized RX” display as an example.
169
Page 64

Key Operator Setting
Programming Bypass Tray Paper
Size
A Press [Bypass Tray Paper Size].
You can select a size from [Auto
Detect], [Standard Size], or [Custom Size].
If you select [Auto Detect], proceed to steps B and G.
If you select [Standard Size], proceed to steps B, C, and G.
If you select [Custom Size], proceed to steps B , and D to G.
B Select the size you want to pro-
gram.
D Make sure that [Vertical] is se-
lected.
Note
r If [Vertical] has not been se-
lected, press [Vertical].
E Enter the vertical size of the pa-
per using the number keys,
and then press [#].
Note
r You can specify a vertical
size from 210 mm (8.3 inch)
to 305 mm (12.0 inch). You
cannot enter a size smaller
than 210 mm or larger than
305 mm.
9
Note
r If you select [Auto Detect], the
machine recognizes the paper size automatically.
• The machine will detect
the paper size for the bypass tray as the short edge
of the paper is inserted
into the machine. Even if
you placed an A4 size
sheet in theK orientation,
the machine will detect it
as A3L.
r If you select [Standard Size],
select a paper size displayed,
and then proceed to step G.
r If you select [Custom Size],
proceed to step D.
C Select the size you want to pro-
gram from the sizes shown.
r Each time you press [mm] or
[inch], the units switch be-
tween “mm” and “inch”. If
you enter a length and
change the units by pressing
[mm] or [inch], it is converted
automatically (fractions are
rounded off).
F Enter the horizontal size of the
paper using the number keys,
and then press [#].
170
Page 65

Using Key Operator Settings
Note
r You can specify a horizontal
size from 148 mm (5.9 inch)
to 600 mm (23.7 inch). You
cannot enter a size smaller
than 148 mm or larger than
600 mm.
r Each time you press [mm] or
[inch], the units switch be-
tween “mm” and “inch”. If
you enter a length and
change the units by pressing
[mm] or [inch], it is converted
automatically (fractions are
rounded off).
G Press [OK].
G Press [Exit].
H Press the {User Tools/Counter} key.
F Press [Delete].
Note
r To cancel deleting a special
sender, press [Do not Delete]. The
display returns to that of step
E
G Press [Exit].
H Press the {User Tools/Counter} key.
The standby display appears.
Printing the Special Sender List
A Press the {User Tools/Counter} key.
.
The standby display appears.
Deleting a Special Sender
Use this function to program “Initial
Set Up” of a Special Sender. The Bypass Tray Paper Size can also be specified.
A Press the {User Tools/Counter} key.
B Press [Facsimile Features].
C Press [Key Operator Tools].
D Press [Program Special Sender].
B Press [Facsimile Features].
C Press [Key Operator Tools].
D Press [Print List] next to “Program
Special Sender”.
Note
r To cancel printing, press [Can-
cel]. The display returns to that
of step
D
.
E Press the {Start} key.
Note
r To cancel printing after press-
ing the {Start} key, press [Stop
Printing]. The display returns to
that of step
D
.
F Press the {User Tools/Counter} key.
9
E Press [Delete], and then select the
Special Sender you want to delete.
The standby display appears.
171
Page 66

Key Operator Setting
Box Settings
The following functions are for delivery and transfer of messages:
•Personal Box
• Information Box
•Transfer Box
Reference
For details about how to set up
these functions:
• p.172 “Programming/changing Personal Boxes”
• p.175 “Programming/changing Information Boxes”
• p.178 “Programming/changing Transfer Boxes”
For details about how to print out
and delete messages stored in boxes:
• p.40 “Personal Boxes”
• p.42 “Information Boxes”
Limitation
r You cannot set the same Box code
on two different boxes.
Programming/changing Personal Boxes
This section describes how to program Personal Boxes.
You can store the following items:
• Box name (required)
Up to 20 characters long
• SUB Code (required)
Up to 20 characters long and can be
composed of digits 0-9, “#”, “*”,
and spaces (the first character cannot be a space).
• Password (optional)
Up to 20 characters long and can be
composed of digits 0-9, “#”, “*”,
and spaces (the first character cannot be a space).
Note
r When programming a pass-
word, a mark is displayed before the Box name.
• Receiver (optional)
You can program one delivery destination for each Personal Box.
Specify a delivery destination programmed in Quick Dial.
9
172
r Transmission or programming
may not be allowed if there is not
enough free memory left. The
amount of free memory left differs
depending on the optional equipment installed.
Note
r The combined total of items that
can be stored using the Personal
Box, Information Box, and Transfer Box functions is 150. Installing
the optional fax function upgrade
unit increases this capacity to 400.
Note
r An e-mail address can be set as the
transmission destination.
r The contents of the Personal Box
will be saved until printing is completed.
r The Fax Header is not printed on
delivered messages.
r If a message cannot be delivered, a
Communication Failure Report is
printed and the message is saved
as a Confidential Reception document.
r You can edit boxes in the same
way you program them. However,
to change the SUB Code itself, you
must delete the box, and then program a new SUB Code.
Page 67

r
If the fax number or e-mail address
of a programmed receiver is deleted using System Settings, the setting for the receiver is cancelled
and a message is not delivered. If
the fax number or e-mail address of
a programmed receiver is changed,
a message is delivered to the new
fax number.
Reference
p.40 “Personal Boxes”
A Press the {User Tools/Counter} key.
B Press [Facsimile Features].
C Press [Key Operator Tools].
D Press [Box Setting].
Using Key Operator Settings
G Enter a box name, and then press
[OK].
Reference
“Entering Text”, General Settings Guide
H Enter a SUB Code.
Note
r
To change the SUB Code, press
[
Clear] or the {Clear/Stop} key, and
then try again. To change a Box
name, press
repeat the procedure from step
[
Box Name], and then
G
.
E Select a box to program.
When programming a new box,
press [*Not Programed].
Note
r To change a box already pro-
grammed, press it and proceed
to step
H
.
F Press [Personal Box].
I
Specify the settings you require.
If you do not want to program a password or receiver, proceed to step
Programming a password
A Press [Password].
B Enter a password, and then
press [OK].
Note
r If you make a mistake, press
[Clear] or the {Clear/Stop} key
before pressing [OK], and
then try again.
J
.
9
173
Page 68

Key Operator Setting
C Re-enter the password, and
then press [OK].
Note
r If you make a mistake, press
[Clear] or the {Clear/Stop} key
before pressing [OK], and
then try again.
r If you want to change the
password after pressing [OK],
press [Change], and then perform from step B.
D Press [OK].
Programming an End Receiver
Deleting Personal Boxes
This section describes how to delete
Personal Boxes.
Limitation
r
If messages have been programmed
in the box, you cannot delete the
box.
A Press the {User Tools/Counter} key.
B Press [Facsimile Features].
C Press [Key Operator Tools].
D Press [Box Setting].
E Press [Delete], and then select the
box you want to delete.
9
A Press [Receiver].
B Select a destination using the
Quick Dial Table, and then
press [OK].
J Press [OK] twice.
K Press [Exit].
L Press the {User Tools/Counter} key.
The standby display appears.
174
Page 69

Using Key Operator Settings
With a programmed password
A Enter a password using the
number keys, and then press
[OK].
Note
r If you make a mistake, press
[Clear] or the {Clear/Stop} key.
F Press [Delete].
Note
r To cancel deleting a box, press
[Do not Delete]. The display re-
turns to that of step
E
.
• Password (optional)
Up to 20 characters long and can be
composed of digits 0-9, “#”, “*”,
and spaces (the first character cannot be a space).
Note
r When programming a pass-
word, a mark is displayed before the Box name.
Note
r You can edit boxes in the same
way you program them. However,
to change the SEP Code itself, you
must delete the box, and then program a new SEP Code.
Reference
p.42 “Information Boxes”
A Press the {User Tools/Counter} key.
G Press [Exit].
H Press the {User Tools/Counter} key.
The standby display appears.
Programming/changing Information
Boxes
This section describes how to set up
an Information Box.
You can store the following items:
•Box name (required)
Up to 20 characters long
• SEP Code (required)
Up to 20 characters long and can be
composed of digits 0-9, “#”, “*”,
and spaces (the first character cannot be a space).
B Press [Facsimile Features].
C Press [Key Operator Tools].
D Press [Box Setting].
E Select the box to program.
When programming a new box,
press [*Not Programed].
9
175
Page 70

Key Operator Setting
Note
r To change a box already pro-
grammed, press it, and then
proceed to step
has been programmed, enter
the password, press [OK], and
then proceed to step
. If a password
H
.
H
F Press [Information Box].
G Enter a box name, and then press
[OK].
Reference
“Entering Text”, General Settings Guide
H Enter the SEP Code.
J Enter a password, and then press
[OK].
Note
r If you make a mistake, press
[Clear] or the {Clear/Stop} key be-
fore pressing [OK], and then try
again.
K Re-enter the password, and then
press [OK].
9
Note
r To change the SEP Code, press
[Clear] or the {Clear/Stop} key,
and then try again. To change
the box name, press [Box Name],
and then repeat the procedure
from step
G
.
I Press [Password].
Note
r If you do not want to program a
password, proceed to step
M
Note
r If you make a mistake, press
[Clear] or the {Clear/Stop} key be-
fore pressing [OK], and then try
again.
r If you want to change the pass-
word after pressing [OK], press
[Change], and then perform
from step
.
J
.
L Press [OK].
M Press [OK].
N Press [Exit].
O Press the {User Tools/Counter} key.
The standby display appears.
176
Page 71

Using Key Operator Settings
Deleting Information Boxes
This section describes how to delete
Information Boxes.
Limitation
r If messages have been pro-
grammed in the box, you cannot
delete the box.
A Press the {User Tools/Counter} key.
B Press [Facsimile Features].
C Press [Key Operator Tools].
D Press [Box Setting].
E Press [Delete], and then select the
box you want to delete.
With a programmed password
A Enter a password using the
number keys, and then press
[OK].
Note
r If you make a mistake, press
[Clear] or the {Clear/Stop} key.
F Press [Delete].
Note
r To cancel deleting a box, press
[Do not Delete]. The display re-
turns to that of step
E
.
G Press [Exit].
H Press the {User Tools/Counter} key.
The standby display appears.
9
177
Page 72

Key Operator Setting
Programming/changing Transfer Boxes
This function turns your machine into
a fax relay station. Documents sent
with a SUB Code that matches the
SUB Code programmed as a Transfer
Box are received, and then relayed to
a programmed receiver.
Since documents can be sent to multiple destinations in a single transfer request, you can economize on call
charges when sending to remote destinations.
• Password (optional)
Up to 20 characters long and can be
composed of digits 0-9, “#”, “*”,
and spaces (the first character cannot be a space).
Note
r When programming a pass-
word, a mark is displayed in
front of the Box name.
• End Receiver (required)
You can store five End Receivers
(destinations to which messages
will be forwarded) for each box.
Specify End Receivers with Quick
Dials or Groups assigned to Quick
Dials that have been programmed
beforehand.
Limitation
r After messages are transferred,
Transfer Result Reports are not
sent back to the sender.
9
Note
r Inform the Requesting Party of the
SUB Code assigned to the Transfer
Box. When they want to have a
message transferred by your machine, ask them to send the message using SUB Code
Transmission and specifying this
SUB Code. If a password has also
been programmed, inform them of
this too, and ask them to enter it as
the SID code.
You can store the following items:
•Box name (required)
Up to 20 characters
• SUB (required)
Up to 20 characters long and can be
composed of digits 0-9, “#”, “*”,
and spaces (the first character cannot be a space).
Note
r An e-mail address can be set as the
End Receiver.
r After messages are transferred,
they are deleted.
r When this function is turned on,
the machine prints out the received messages it transfers and a
Transfer Result Report after the
transfer has finished. If you want
to turn this function off, please
contact your service representative.
r When the programmed receiver is
a Multi-step Transfer Group Dial,
Multi-step Transfer takes place.
For more information, contact
your service representative.
r You can edit boxes in the same
way you program them.
178
Page 73

Using Key Operator Settings
r Deleting a destination specified as
an end receiver from the Address
Book causes the settings for the
end receiver to be deleted. If this is
the case, reprogram the end receiver. If the destination has been
changed, a message is transmitted
to the new destination.
A Press the {User Tools/Counter} key.
B Press [Facsimile Features].
C Press [Key Operator Tools].
D Press [Box Setting].
H Enter a SUB Code.
Note
r To change the SUB Code, press
[Clear] or the {Clear/Stop} key,
and then try again. To change
Box name, press [Box Name], and
then repeat from step .
I Specify the condition of registra-
tion.
E Select a box to program.
When programming a new box,
press [*Not Programed].
Note
r To change a box already pro-
grammed, press it, and then
proceed to step .
F Press [Transfer Box].
G Enter a Box name, and then press
[OK].
Reference
“Entering Text”, General Settings Guide
Programming End Receivers
A Select an End Receiver.
Note
r You can store five End Re-
ceivers.
B Specify End Receivers with
Quick Dials, and then press
[OK].
Note
r You can also specify End Re-
ceivers with Group Dials.
Note
r Repeat from step A to speci-
fy another End Receiver.
9
179
Page 74

Key Operator Setting
Programming a password
If you do not want to program a
password, proceed to step
A Press [Password].
B Enter a password, and then
press [OK].
Note
r If you make a mistake, press
[Clear] or the {Clear/Stop} key
before pressing [OK], and
then try again.
J
.
K Press [Exit].
L Press the {User Tools/Counter} key.
The standby display appears.
Deleting Transfer Boxes
A Press the {User Tools/Counter} key.
B Press [Facsimile Features].
C Press [Key Operator Tools].
D Press [Box Setting].
E Press [Delete], and then select the
box you want to delete.
9
C Re-enter the password, and
then press [OK].
Note
r If you make a mistake, press
[Clear] or the {Clear/Stop} key
before pressing [OK], and
then try again.
r If you want to change the
password after pressing [OK],
press [Change], and then perform from step B.
With a programmed password
A Enter a password using the
number keys, and then press
[OK].
D Press [OK].
J Press [OK].
180
Page 75

Using Key Operator Settings
Note
r If you make a mistake, press
[Clear] or the {Clear/Stop} key.
F Press [Delete].
Note
r To cancel deleting a special
sender, press [Do not Delete]. The
display returns to that of step
E
G Press [Exit].
H Press the {User Tools/Counter} key.
The standby display appears.
Printing the Box List
Follow the procedure below to print a
list showing the currently programmed Personal Boxes, Information Boxes, and Transfer Boxes.
A Press the {User Tools/Counter} key.
r To cancel printing a list after
pressing the {Start} key, press
[Stop Printing]. The display re-
turns to that of step
D
F Press the {User Tools/Counter} key.
The standby display appears.
Transfer Report
.
For the Requesting Party to be able to
receive Transfer Result Reports from
the Transfer Station, the Requesting
Party must program the number of
the telephone line in connection on
their own machine. See p.52 “Transfer Request”.
Be sure to insert a pause after the area
code.
For example, if you are in the United
States and your fax number is 2121234567, program the following:
• 1212-1234567
.
B Press [Facsimile Features].
C Press [Key Operator Tools].
D Press [Print List] next to “Box Set-
ting”.
E Press the {Start} key.
After printing the list, you can then
start from step
Note
r To cancel printing a list before
pressing the {Start} key, press
[Cancel] or the {Clear/Stop} key.
The display returns to that of
step
D
.
D
.
You can program the fax number for
the G3 line.
Limitation
r You cannot program or edit a
Transfer Report when using a line
(during communication). Program
or edit after communication.
Note
r You cannot use Transfer Request if
the telephone number of their machine is not programmed into that
machine.
r Up to 16 digits are available for G3.
A Press the {User Tools/Counter} key.
9
181
Page 76

Key Operator Setting
B Press [Facsimile Features].
C Press [Key Operator Tools].
D Press [Transfer Report].
E Specify the fax number.
Programming a G3 Fax Number
A Press [G3 Fax No.(Dir.)].
B Enter your facsimile number
using the number keys, and
then press [OK].
Programming a Confidential ID
Program a Confidential ID to print a
Confidential Reception. See p.36
“Printing a Confidential Message”.
Note
r If you do not program a Confiden-
tial ID, you cannot receive a Confidential Transmission.
A Press the {User Tools/Counter} key.
B Press [Facsimile Features].
C Press [Key Operator Tools].
D Press [Program Confidential ID].
9
Note
r If you make a mistake, press
[Clear] or the {Clear/Stop} key.
F Press [Exit].
G Press the {User Tools/Counter} key.
The standby display appears.
E Enter an ID using the number
keys, and then press [OK].
Note
r A Confidential ID can be any
four-digit number, except 0000.
r If you make a mistake, press
[Clear] or the {Clear/Stop} key be-
fore pressing [OK], and then try
again.
To cancel programming an ID,
press [Cancel]. The display returns
to that of step
D
.
182
F Press the {User Tools/Counter} key.
The standby display appears.
Page 77

Programming a Polling ID
Program a Polling ID to use the
Transfer Request, Transfer Station,
Default ID Polling Transmission, and
Default ID Polling Reception functions. When you use ID Transmission,
program the same ID as the one programmed on the sender's machine.
Reference
p.10 “Polling Transmission”
p.13 “Polling Reception”
p.52 “Transfer Request”
p.75 “Selecting transmission options for a single transmission”
A Press the {User Tools/Counter} key.
Using Key Operator Settings
r If you make a mistake, press
[Clear] or the {Clear/Stop} key be-
fore pressing [OK], and then try
again.
To cancel programming an ID,
press [Cancel]. The display returns
to that of step
D
.
F Press the {User Tools/Counter} key.
The standby display appears.
Programming a Memory Lock
ID
Program a Memory Lock ID to be entered before printing documents
when the Memory Lock function is
activated.
B Press [Facsimile Features].
C Press [Key Operator Tools].
D Press [Program Polling ID].
E Enter an ID using the number
keys and [A] to [F], and then press
[OK].
Note
r A Memory Lock ID can be any
four-digit number, except 0000.
A Press the {User Tools/Counter} key.
B Press [Facsimile Features].
C Press [Key Operator Tools].
D Press [Program Memory Lock ID].
E Enter an ID using the number
keys, and then press [OK].
9
Note
r A Polling ID can be any combi-
nation of digits (0-9) and letters
(A-F), except 0000 and FFFF.
183
Page 78

Key Operator Setting
Note
r If you make a mistake, press
[Clear] or the {Clear/Stop} key be-
fore pressing [OK], and then try
again.
To cancel programming an ID,
press [Cancel]. The display returns
to that of step
D
.
F Press the {User Tools/Counter} key.
The standby display appears.
Selecting Dial/Push Phone
Use this function to select a line type
when the machine is connected to a
G3 analog line.
Dial and Push lines are available for
selection.
E Press [Push Button Phone] or [Dial
Phone (10PPS)] to select the line,
and then press [OK].
Reference
p.193 “Selecting the Line Type”
F Press the {User Tools/Counter} key.
The standby display appears.
Storing or Printing Received
9
Note
r When the optional G3 expansion
unit is installed, “G3-2” and “G33” appear.
r This function is not available in
some areas.
A Press the {User Tools/Counter} key.
B Press [Facsimile Features].
C Press [Key Operator Tools].
D Press [Select Dial/Push Phone].
Documents
The optional printer/scanner unit is required.
Specify whether received documents
are to be saved on the hard disk or
printed immediately without being
saved. You can print stored documents repeatedly or download them
as images to a computer using a Web
browser or DeskTopBinder V2 Lite. If
you select printing without saving,
documents are printed each time they
are received.
Limitation
r If using System Settings you have
set the machine to distribute received faxes to the delivery server,
the documents cannot be saved on
the hard disk.
184
Page 79

Using Key Operator Settings
Note
r If the facsimile is set to store re-
ceived documents, document reception can be notified to a
specified e-mail address.
r Documents saved on the hard disk
are categorized as received and
stored documents. For details
about printing saved documents,
see p.34 “Printing/Deleting Received and Stored Documents
(Print Stored RX File)”.
r You cannot switch the setting if re-
ceived documents have been
stored on the hard disk. To switch
the setting, print documents stored
on the hard disk if necessary, and
delete them.
r Received confidential messages
are stored in memory. Use the
Print Confidential RX File function
to print them.
A Press the {User Tools/Counter} key.
B Press [Facsimile Features].
C Press [Key Operator Tools].
D Press [Reception File Setting].
E Select [Print] or [Store], and then
press [OK].
r With [Store] selected, more memo-
ry space will be used as the number of saved documents increase.
After memory space becomes insufficient, no more documents are
saved on the hard disk. If this happens, the machine will start printing and deleting saved documents
with the oldest one.
r You can store received documents
up to a total of approximately 320
pages or 2,240 (when the optional
expansion memory is installed) of
A4 size Standard <ITU-T#4Chart>.
r You cannot send received docu-
ments.
r You cannot manage documents
stored on the Document Server
display.
Note
r To cancel your selection, press
[Cancel]. The display returns to
that of step
r When "Store" is selected, you
can select whether or not to notify a specific e-mail address of
reception. If you want to notify
the reception, press [Notify Dest.]
and select an e-mail address
from the Internet Fax destinations programmed in the address book.
D
.
F Press the {User Tools/Counter} key.
The standby display appears.
Reception Report e-mail
9
When a received document is stored,
this report is sent to the e-mail address set as the destination for notification.
185
Page 80

Key Operator Setting
Setting a User Code for
Viewing Received and Stored
Documents
You can view and print documents
received and saved on the hard disk
using a Web browser or DeskTopBinder V2 Lite. Specify whether or
not a user code is entered to view
saved documents. If you want to use
a user code, set one using a maximum
of eight digits.
Note
r This function is only available
when received documents are
saved on the hard disk. See p.184
“Storing or Printing Received Documents”.
r You can set a user code with the
System Settings. See the General
Settings Guide.
E If you want to use a user code,
press [ON].
Note
r If you do not want to use a user
code, press [OFF] and proceed to
step
r To cancel the selection, press
[Cancel]. The display returns to
that of step
G
.
.
D
F Enter a user code (eight digits
maximum) using the number
keys, and then press [ #].
9
r If the programmed user code has
been deleted using the Address
Book Management function under
System Settings, you cannot view
received and saved documents us-
ing a Web browser. Select [OFF] in
step E or reprogram a user code.
A Press the {User Tools/Counter} key.
B Press [Facsimile Features].
C Press [Key Operator Tools].
D Press [Stored RX File User Code Set-
ting].
Note
r If you enter a wrong user code,
press [Clear] or the {Clear/Stop}
key, and then try again.
G Press [OK].
H Press the {User Tools/Counter} key.
The standby display appears.
186
Page 81

10. Solving Operation
R
Reading Reports
Problems
Error Report
An Error Report is printed if a message cannot be successfully sent or received.
Possible causes include a problem
with your machine or noise on the
telephone line. If an error occurs during transmission, resend the original.
If an error occurs during reception,
ask the sender to resend the message.
Note
r If an error happens frequently,
contact your service representative.
r The “Page” column gives the total
number of pages. The “Page Not
Sent” column gives the number of
pages not sent or received successfully.
Power Failure Report
CAUTION:
• When you disconnect the power
plug from the wall outlet, always
pull the plug (not the cable).
Even if the main power switch is
turned off, the contents of the machine memory (for example, programmed numbers) will not be lost.
However, if power is lost for about
one hour because the main power
switch is turned off, there is a power
cut, or the power cable is removed,
contents of the Fax memory will be
lost. Lost items will include any fax
messages stored in memory using
Memory Transmission/Reception,
Auto Document, Confidential Reception, Memory Lock, or Substitute Reception.
If a file has been deleted from memory, a Power Failure Report is automatically printed as soon as the
power is restored. This report can be
used to identify lost files. If a memory
stored for Memory Transmission was
lost, resend it. If a message received
by Memory Reception or Substitute
Reception was lost, ask the sender to
resend it.
187
Page 82

Solving Operation Problems
Important
r Do not turn off the main power
switch while the power indicator is
lit or blinking. If you do, the hard
disk and memory may be damaged and failure could result.
r Turn off the main power switch be-
fore pulling out the plug. If you
pull out the plug with the switch
on, the hard disk and memory may
be damaged and failure could result.
r Make sure that 100% is shown on
the display before you unplug the
machine. If a lower value is shown,
some data is currently present in
memory.
10
r Right after a power failure, the in-
ternal battery needs to be sufficiently recharged to guard against
future data loss. Keep the machine
plugged in and the main power
switch on for about one week after
the power loss.
-RDS (Remote Diagnostic
System)
If your machine has a problem, a service representative can perform various settings over the telephone line
from the service station.
If you want to use this function,
change the User Parameter. See p.159
“User Parameters” (switch 25, bit 4).
188
Page 83

When an Error Occurs Using Internet Fax
When an Error Occurs Using Internet Fax
Error Mail Notification
The machine sends the Error Mail Notification to the sender when it is unable to
successfully receive a particular e-mail message. A "cc" of this notification is also
sent to the administrator's e-mail address when one is specified.
Note
r You can select to send Error Mail Notification with User Parameters. See
p.159 “User Parameters” (switch 21, bit 7).
r If Error Mail Notification cannot be sent, the Error Report (Mail) is printed by
the machine.
r If an error occurs when an e-mail is received via SMTP, the SMTP server
sends an error e-mail to the originator of the message.
Reference
p.189 “Error Report (Mail)”
p.159 “User Parameters”
Error Report (Mail)
The Error Report (Mail) is printed by the machine when it is unable to send an
Error Mail Notification.
Server-Generated Error E-mail
The transmitting server sends this error e-mail to the originator of e-mail that
cannot be transmitted successfully (due to reasons such as specifying an incorrect e-mail address).
Note
r After a server-generated error e-mail is printed, the first page of the sent doc-
ument is printed.
10
189
Page 84

Solving Operation Problems
10
190
Page 85

11. Appendix
Replacing the Stamp Cartridge
The optional ADF is required.
When the stamp becomes lighter, replace the cartridge.
Note
r Use the cartridge specified for this
machine.
r Do not add ink to the cartridge by
yourself. Neglecting this can cause
ink leakage.
r Be sure not to dirty your fingers
with ink from the cartridge.
A Lift the ADF, and then open the
stamp cover.
C Set a new cartridge.
Insert the cartridge until the metal
parts are no longer visible.
1. New cartridge
D Replace the stamp cover until it
clicks.
B Pull out the cartridge.
1. Cartridge Lock Lever
E Lower the ADF.
191
Page 86

Appendix
R
R
Connecting the Machine to a Telephone
Line and Telephone
Connecting the Telephone Line
To connect the machine to a telephone line, use a snap-in modular type connector.
CAUTION:
• To reduce the risk of fire, use only No. 26 AWG or large r telecommunication line cord.
ATTENTION:
• Pour réduire le risque d'incendie, utiliser uniquement des conducteurs de
télécommunications 26 AWG ou de section supérieure.
11
Important
r By law in the United States, you must program your phone number identifi-
cation (your fax number) into your machine before you can connect the public
phone system. See p.67 “Initial Settings and Adjustments”, Facsimile Reference
<Basic Features>.
r Make sure the connector is the correct type before you start.
v Where to connect the machine
1. G3 interface unit connector
2. External telephone connector
Note
192
r A maximum of two optional G3 lines can be connected.
3. Extra G3 interface unit connector
4. Extra G3 interface unit connector
Page 87

Connecting the Machine to a Telephone Line and Telephone
Selecting the Line Type
Select the line type to which the machine is connected. There are two types: tone
and pulse dial.
Note
r This function is not available in some areas.
Select the line type using “Key Operator Settings”. See p.184 “Selecting Dial/Push Phone”.
Connecting the Optional Handset or an External Telephone
You can connect the optional handset or an external telephone to the machine.
You can use it for telephone calls.
Note
r Some external telephones may not be connected or may suffer reduced func-
tionality.
Limitation
r When you use the optional handset or an external telephone with the {On
Hook Dial} key for telephone calls, you can not talk with the other party with-
out pressing the {On Hook Dial} key after taking off the receiver.
v Specifying the handset line type
DPTT
ND1X00E0
The switch on the handset should be in the appropriate position-TT (Tone Dialing) or DP (Pulse Dialing).
11
193
Page 88

Appendix
v Adjusting the handset bell volume
Ringer
3
6
9
2
5
8
1
0
4
7
ND1X00E1
Adjust the handset ringer volume using the volume switch.
11
194
Page 89

Optional Equipment
Optional Equipment
Fax Function Upgrade Unit
JBIG compression for transmission/reception becomes possible.
You can increase the maximum programmable numbers of the following functions. See p.201 “Maximum Values”.
•Quick Dial
• Memory Transmission file
•Auto Document
• Specific Sender
•Program
• Transmission Result
•Box
Expansion Memory (32MB: DIMM)
This allows you to send fax messages at high resolution (Super Fine). This also
allows you to receive fax messages at high resolution (Fine or Super Fine). See
p.201 “Maximum Values”.
Handset
You can make or receive calls by installing the optional handset and dialing
manually.
Reference
p.58 “Manual Dial”
Extra G3 Interface Unit
This option provides one extra G3 line connection.
A maximum of two G3 interface units can be installed.
11
195
Page 90

Appendix
Specifications
v Fax Transmission and Reception
Standard G3
Resolution G3:
8×3.85/mm•200×100 dpi (Standard),
8×7.7/mm•200×200 dpi (Detail),
8×15.4/mm•200×400 dpi (Fine),
16×15.4/mm•400×400 dpi (Super Fine: optional
expansion memory required)
Transmission time G3: 3 seconds at 28,800 bps, Standard resolution
Data compression method MH, MR, MMR, JBIG (optional fax function up-
grade unit required)
Maximum original size Standard size: A3, 11"×17"
Irregular size: 304×432 mm/12"×17"
11
Maximum scanning size 297×1,200 mm/11"×47"
Print process Printing on standard paper using a laser
Transmission speed G3:
33,600/31,200/28,800/26,400/24,000/21,600/19,2
00/16,800/14,400/12,000/9,600/7,200/4,800/2,40
0bps (auto shift down system)
v Power Consumption
Standby mode 230 W
Transmission 230 W
Reception 230 W
Maximum power consumption 1,440 W
Low power mode/sleep mode 20 W or less
v Internet Fax Transmission and Reception
Network LAN : Local Area Network
Ethernet/10Base-T, 100Base-TX, IEEE1394 (IP over 1394),
IEEE802.11b (wireless LAN)
Transmit function E-mail
Scan line density Standard (200 × 100 dpi), Detail (200 × 200 dpi)
Original size : Scanning width A4 : 210 mm (8.3 in.) (Originals larger than A4 size is reduced
196
in size when transmitted.)
Page 91

Specifications
Communication Protocols • Transmission
SMTP, TCP/IP
• Reception
POP3, SMTP, IMAP4, TCP/IP
E-mail format Single/Multi-part, MIME Conversion
Attached file forms: TIFF-F (MH compression)
Authentication method SMTP-AUTH, POP before SMTP, A-POP
Internet communication Send and receive e-mail with a computer that has an e-mail
address
E-mail send functions Automatic conversion of sent documents to e-mail format
and e-mail transmission. Memory transmission only.
E-mail receive functions Automatic detection and printing of appended TIFF-F (MH)
files and ASCII text. Memory reception only.
Compatible Machines
This machine is compatible to machines having the following specifications.
Communication protocols • Transmission
SMTP
• Reception
POP3, SMTP
E-mail format • Format
MINE, Base64
•Content-Type
Image/tiff
Multipart/mixed [text/plain, Image/tiff] (attached file
forms)
Data format • Profile
TIFF Profile S
•Coding
MH
• Original size
A4
• Resolution (dpi)
200×100/200×200 or 204×98/204×196
11
197
Page 92

Appendix
Acceptable Types of Originals
Make sure your originals are completely dry before setting them in the machine.
Wet ink or correcting fluid from originals will mark the exposure glass and affect
the resulting image.
Acceptable original sizes
Where original is set Acceptable original size Maximum
number of
sheets
Exposure glass Up to A3 (297×420 mm),
11"×17" (279×432 mm)
ADF, one-sided document
ADF, two-sided document
Fax transmission: A5 L to A3
L (up to 1,200 mm long)
1
/
8"×5
Fax transmission: A5 L to A3
L (up to 432 mm long) 8"×5
L to 11"×17"L
" L to 11"×17"L
2
1
/2"
80 sheets
(80 g/m
80 sheets
(80 g/m
1 ----
Paper size and scanned area
v Exposure Glass
2
, 20 lb)
2
, 20 lb)
Paper thickness
40-128 g/m
(11-34 lb)
52-105 g/m
(14-28 lb)
2
2
11
v ADF
198
Page 93

Specifications
Limitation
r There may be a difference in the size of the image when it is printed at the des-
tination.
r If you place an original larger than A3, 11"×17" on the exposure glass, only an
A3, 11"×17" area is scanned.
Note
r Even if an original is correctly placed on the exposure glass or in the ADF, a
margin of 3 mm (0.1") around each edge of the original may not be sent.
r If the receiver uses paper of a smaller width than the original, the image will
be reduced to fit that paper. See p.74 “Auto Reduce”.
r The machine detects paper sizes in the following ways:
• When you place an original in the ADF, an original wider than about 264
mm (10.4") is scanned as A3, 11"×17" size.
An original narrower than about 230 mm (9.1") will be sent as 8
1
/
"×14" size, and an original narrower than about 264 mm (10.4”) is
8
2
1
/
"×11" or
2
scanned as B4 JIS.
Originals up to 1,200 mm (47.2") in length can be scanned.
• Refer to the table below for sizes the machine can detect when you place
an original on the exposure glass. Because the machine scans non-standard
size documents in a standard size, part of the image may be truncated depending on the length of the document. For details about how to set nonstandard size documents, see p.18 “Setting a Scan Area”, Facsimile Refer-
ence <Basic Features>.
v Metric Version
Length
-249 mm 249 mm-274 mm 274 mm-316 mm 316 mm-
-243 mm × B5 JISL A4L FL
243 mm-
268 mm
Width
268 mm- A4K A3L A3L A3L
B5 JISK B4 JISL B4 JISL B4 JISL
*1
v Inch Version
*1
1
/
"×11"L FL
2
-9.8" 9.8"-10.8" 10.8"-12.4" 12.4"-
-9.6" × × 8
9.6"-10.6" 11"×8
Width
10.6"- 11"×8
1
/
"K 11"×17"L 11"×17"L 11"×17"L
2
1
/
"K 11"×17"L 11"×17"L 11"×17"L
2
Length
11
× - Unable to auto detect
*1
Normally a length of about 420 mm (16.5") can be scanned; however, it is only possible to specify a scanning size up to 432 mm (17").
199
Page 94

Appendix
-Maximum scan area
The maximum scan area is shown below:
• Memory Transmission: 297×1,200 mm/11"×47" (W×L) from the ADF
• Immediate Transmission: 297×1,200mm/11"×47" (W×L) from the ADF
Note
r During Immediate Transmission, the length of the scanning range can be-
come narrower than 1,200 mm (47"), depending on the character size as
well as the settings on the destination machine.
•297×432 mm/11"×17" (W×L) (from the exposure glass)
11
200
Page 95

Maximum Values
Maximum Values
The following list contains the maximum value for each item.
Note
r The maximum number of pages that can be stored or transmitted may de-
crease depending on the contents of documents.
Item
Memory 4 MB 4 MB 28 MB 28 MB
The number of pages
that you can store in
memory (Using A4 size
Standard <ITU-T
#4Chart> )
Total number of all
documents
The number of pages
per file
The number of pages
for all files
The number of destinations you can specify
for one file
Standard
Fax function
upgrade unit
Approx.
320
400 800 400 800
1,000 1,000 1,000 1,000
1,000 1,000 3,000 3,000
500 500 500 500
Approx. 320 Approx. 2,240 Approx. 2,240
With optional unit
Expansion
memory
Expansion memory + fax function upgrade unit
The number of destinations you can specify
for all files
The number of Quick
Dials you can program
*1
The number of Group
Dials you can program
The number of destinations you can program
in a group
The number of digits
for Dials
The number of Programs you can register
The number of Auto
Documents you can
program
500 2,000 500 2,000
500 1,200 500 1,200
100 100 100 100
500 500 500 500
128 128 128 128
100 200 100 200
618 6 18
11
201
Page 96

Appendix
Item
The number of Standard Message Stamps
you can program
The number of transmission records the
machine can store
The number of stored
documents you can
specify at one time
The number of stored
documents you can
send at one time
The number of pages
that you can store in the
Document Server (Using ITU-T #4Chart )
Standard
Fax function
upgrade unit
3333
200 1,000
1,000 1,000 1,000 1,000
30 30 30 30
Approx.
9000
*2
Approx. 9,000 Approx. 9,000 Approx. 9,000
With optional unit
Expansion
memory
200 1,000
Expansion memory + fax function upgrade unit
*2
11
The number of pages
you can store in the
Document Server for
one document
*1
With the optional printer/scanner unit or network board, a maximum of 2000 desti-
1,000 1,000 1,000 1,000
nations can be programmed.
*2
This indicates the number of transmission records that you can check using SmartNetMonitor for Admin. From the machine you can check up to 400 communication
records (transmission plus reception).
202
Page 97

INDEX
180-Degree Rotation Printing, 98
2-Sided Printing
, 85
A
Address Book, 116
Authorized Reception
Auto Document
Changing
Deleting
Sending
Storing
Auto Fax Reception Power-up
Automatic Redial
Auto Reduce
, 150
, 151
, 65
, 150
, 74
, 164
, 65, 150
, 78
B
Basic Transmission, 112
Batch Transmission
Book Fax
Box Setting
, 61
, 148, 172
, 78
C
Canceling
Transmission
Center Mark
Chain Dial
Checkered Mark
Checking
Combine 2 originals
Combine Two originals
Communication Failure Report
Communication Information
Confidential File Report
Confidential ID
Confidential Message
Confidential Transmission
Counters
Cover sheet
, 47
Transmission Result (TX File Status)
, 147, 154
, 19
, 96
, 96
, 85
, 99
, 27
, 37
, 182
, 36
, 8
, 113
, 95
, 83
, 31
D
Default ID/Free Polling Reception, 13
Default ID Transmission
Deleting
Information Box Messages
programmed destinations
Destination
Adding
Checking
Deleting
Displaying the Memory Status
Document Server
Delete File
Manage File
Storing a Document
Dual Access
, 21
, 18
, 20
, 129
, 134
, 132
, 79
, 10, 11, 75
, 45
, 117
, 33
, 130
E
ECM (Error Correction Mode)
Economy Transmission Time
E-mail transfer
End Receiver
Error Mail Notification
Error Report
Error Report (Mail)
Expansion Memory
Extra G3 Interface Unit
, 95
, 155
, 187
, 189
, 195
, 78, 147, 158
, 3
, 189
, 195
F
Fax Function Upgrade Unit, 195
Fax Header Print
File
Printing
Printing a List of Files in Memory
(Print TX File List)
Re-sending
Forwarding
Free Polling Transmission
Full/Partial agreement
, 73
, 23
, 25
, 24
, 91, 147, 155, 165
, 10, 11
, 163
G
General Settings/Adjustment, 142
H
Handy Dialing Functions, 47
203
Page 98

I
O
ID Override Polling Reception, 13
ID Override Transmission
Image Rotation
Immediate Reception
Information Boxes
Changing
Deleting
Printing
Programming
Storing Messages
, 79, 99
, 42
, 175
, 177
, 181
, 175
, 10
, 85
, 42
J
JBIG, 80, 95
Reception
Transmission
Journal
Journal by E-mail
Journal by E-mail, Transmitting
Just size printing
, 27
, 95
, 80
, 81
, 103
K
Key Operator Code, 140
Key Operator Settings
Key Operator Tools List
Keystroke Program
, 147
, 147
, 125
L
Label Insertion, 74
LAN-Fax Features
LAN-Fax Operation Messages
LAN-Fax Properties, Setting
Line Type
Changing
Selecting
, 107
, 119
, 111
, 59
, 193
M
Manual Dial, 58
Maximum Value
Memory Lock
Memory Lock ID
Memory Reception
Memory Status
Memory Storage Report
More Transmission Functions
Multi-copy
Multi-copy Reception
Multi-port
Multistep Transfer
, 59
, 201
, 38, 157, 165
, 183
, 85
, 33
, 82
, 77
, 85
, 98
, 90
, 80
On Hook Dial, 56
Optional Equipment
Originals
Output Tray
, 198
, 105
, 195
P
Page Reduction, 101
Page Separation and Length Reduction
Paper Tray
Parallel Memory Transmission
Parameter Setting
Personal Boxes
Polling ID
Polling Reception
Polling Reserve Report
Polling Result Report
Polling Transmission
Polling Transmission Clear Report
Power Failure Report
Print 2 Sided
Print Completion Beep
Printed Report
Printing
Printing and Saving
Priority trays
Programs
PWD Code
, 144
, 77
, 147
, 40, 172, 174
Changing
Deleting
Printing
Programming
, 172
, 174
, 181
, 172
, 183
, 13
, 15
, 15
, 10
, 187
, 165
, 96
, 82
Box List
Confidential Message
File Received with Memory Lock
Information Box Messages
Journal
Options
Personal Box Messages
Special Sender List
, 181
, 36
, 44
, 27
, 96
, 41
, 171
, 115
, 103
, 125
Changing
Deleting
Registering
, 125
, 127
, 125
, 51
Q
Quick Operation key, 143
, 100
, 12
, 38
204
Page 99

R
RDS (Remote Diagnostic System), 188
Receiving Station
Reception
Reception Result (RX File Status)
Redial
Reduced Image Transmission
Report
Requesting Party
Reverse Order Printing
RX File Status
, 85
Reception Features
Reception File Print Quantity
Reception Functions
Reception Reverse Printing
Reception Settings
Reception Time
, 47
, 82, 187
Communication Failure Report
Error Report
Memory Storage Report
Power Failure Report
Transmission Result Report
(Immediate Transmission)
Transmission Result Report
(Memory Transmission)
, 52, 89
, 85
, 165
, 89
, 165
, 144
, 97
, 32
, 74
, 83
, 187
, 82
, 187
, 83
, 82
, 52, 89
, 85, 100
, 32
S
Scan Size, 152
Changing
Deleting
Programming
Selecting
Dial/Push Phone
Sender Stamp
Send Later
SEP Code
Server-Generated Error E-mail
SID Code
Simultaneous Broadcast
SMTP
, 94
SMTP reception
Special Senders
Special Senders to Treat Differently
Specifications
Stamp
Stamp Cartridge
Standard Messages
Standard Message Stamp
, 72
Deleting
Programming
, 152
, 152
, 152
, 184
, 74
, 3
, 50
, 189
, 50
, 79
, 93
, 163
, 196
, 191
, 149
, 149
, 149
, 64
, 163
SUB Code
Substitute Reception
Switches and Bits
, 49, 92
, 86
, 159
T
Telephone Line, 192
Transfer Boxes
Changing
Deleting
Printing
Programming
Transfer Report
Transfer Request
Transfer Result Report
Transfer Result Report
(transfer request by e-mail)
Transferring
Transfer Station
Transmission Features
Transmission Mode
Transmission Options
Transmission Result Report
(Immediate Transmission)
Transmission Result Report
(Memory Transmission)
Transmission Time
Changing
Transmission with Image Rotation
Tray for Lines
Tray Shift
TSI Print
Two-Sided Printing
Two-Sided Transmission
TX File
TX File Status
, 18
, 180
, 178
, 180
, 181
, 178
, 181
, 52
, 90
, 91
, 93
, 52, 89
, 47
, 3
, 73
, 83
, 82
, 22
, 105
, 105
, 101
, 97
, 62
, 31
U
User Parameter List, 159
User Parameters
, 159
, 79
205
Page 100

MEMO
206
 Loading...