

Page 1

Operating Instructions
Software Guide
Read This First
Manuals for This Printer........................................................................................8
Preparing for Printing
Quick Install............................................................................................................9
Confirming the Connection Method...................................................................11
Network Connection.................................................................................................11
Local Connection .....................................................................................................13
Using the SmartDeviceMonitor for Client Port..................................................15
Installing SmartDeviceMonitor for Client ..................................................................15
Installing the PCL or RPCS Printer Driver (TCP/IP).................................................16
Installing the PCL or RPCS Printer Driver (NetBEUI) ..............................................17
Installing the PCL or RPCS Printer Driver (IPP) ......................................................19
Installing the PostScript 3 Printer Driver (Windows 95/98/Me - TCP/IP)..................21
Installing the PostScript 3 Printer Driver (Windows 95/98/Me - NetBEUI) ...............22
Installing the PostScript 3 Printer Driver (Windows 95/98/Me - IPP) .......................24
Installing the PostScript 3 Printer Driver (Windows 2000 - TCP/IP).........................26
Installing the PostScript 3 Printer Driver (Windows 2000 - NetBEUI) ......................27
Installing the PostScript 3 Printer Driver (Windows 2000 - IPP) ..............................28
Installing the PostScript 3 Printer Driver (Windows XP, Windows Server 2003 - TCP/
IP) ..........................................................................................................................30
Installing the PostScript 3 Printer Driver (Windows XP, Windows Server 2003 - IPP)
31
Installing the PostScript 3 Printer Driver (Windows NT 4.0 - TCP/IP)......................33
Installing the PostScript 3 Printer Driver (Windows NT 4.0 - NetBEUI) ...................34
Installing the PostScript 3 Printer Driver (Windows NT 4.0 - IPP)............................35
Changing the Port Settings for SmartDeviceMonitor for Client ................................37
G1058614_1.00 GB GB EN USA G105-8614 Copyright © 2004 1
Page 2

Using the Standard TCP/IP Port .........................................................................39
Installing the PCL or RPCS Printer Driver................................................................39
Installing the PostScript 3 Printer Driver (Windows 2000) .......................................40
Installing the PostScript 3 Printer Driver (Windows XP, Windows Server 2003) .....41
Using the LPR Port ..............................................................................................44
Installing the PCL or RPCS Printer Driver................................................................44
Installing the PostScript 3 Printer Driver (Windows 2000) .......................................45
Installing the PostScript 3 Printer Driver (Windows XP, Windows Server 2003) .....46
Installing the PostScript 3 Printer Driver (Windows NT 4.0).....................................47
Using as the Windows Network Printer .............................................................49
Installing the PCL or RPCS Printer Driver................................................................49
Installing the PostScript 3 Printer Driver (Windows 95/98/Me) ................................50
Installing the PostScript 3 Printer Driver (Windows 2000) .......................................51
Installing the PostScript 3 Printer Driver (Windows XP, Windows Server 2003) .....52
Installing the PostScript 3 Printer Driver (Windows NT 4.0).....................................54
Using as the NetWare Print Server/Remote Printer..........................................56
When using the PostScript 3 Printer Driver..............................................................57
Form Feed................................................................................................................58
Banner Page ............................................................................................................58
Printing after Resetting the Printer ...........................................................................58
Installing the Printer Driver Using USB .............................................................59
Windows 98 SE/Me - USB .......................................................................................59
Windows 2000 - USB ...............................................................................................61
Windows XP, Windows Server 2003 - USB .............................................................62
Troubleshooting USB ...............................................................................................63
Printing with Parallel Connection.......................................................................64
Installing the PCL or RPCS Printer Driver................................................................64
Installing the PostScript 3 Printer Driver (Windows 95/98/Me) ................................65
Installing the PostScript 3 Printer Driver (Windows 2000) .......................................66
Installing the PostScript 3 Printer Driver (Windows XP, Windows Server 2003) .....67
Installing the PostScript 3 Printer Driver (Windows NT 4.0).....................................68
Installing the Printer Driver Using IEEE 1394 (SCSI print)...............................69
Windows 2000..........................................................................................................69
Windows XP, Windows Server 2003........................................................................71
Printing with Bluetooth™ Connection ...............................................................73
Supported Profiles....................................................................................................73
Printing with Bluetooth™ Connection.......................................................................73
If a Message Appears during Installation ..........................................................76
Making Option Settings for the Printer..............................................................77
Conditions for Bidirectional Communication ............................................................77
If Bidirectional Communication is Disabled ..............................................................78
Setting Up the Printer Driver
PCL - Accessing the Printer Properties.............................................................80
Windows 95/98/Me - Accessing the Printer Properties ............................................80
Windows 2000 - Accessing the Printer Properties ...................................................81
Windows XP, Windows Server 2003 - Accessing the Printer Properties .................83
2
Page 3

Windows NT 4.0 - Accessing the Printer Properties ................................................84
RPCS - Accessing the Printer Properties ..........................................................87
Windows 95/98/Me - Accessing the Printer Properties ............................................87
Windows 2000 - Accessing the Printer Properties ...................................................88
Windows XP, Windows Server 2003 - Accessing the Printer Properties .................90
Windows NT 4.0 - Accessing the Printer Properties ................................................92
PostScript 3 - Setting Up for Printing ................................................................95
Windows 95/98/Me - Accessing the Printer Properties ............................................95
Windows 2000 - Accessing the Printer Properties ...................................................96
Windows XP, Windows Server 2003 - Accessing the Printer Properties .................98
Windows NT 4.0 - Accessing the Printer Properties ................................................99
Mac OS - Setting Up for Printing............................................................................101
Other Print Operations
Printing a PDF File Directly...............................................................................103
Using DeskTopBinder Lite .....................................................................................103
Installing DeskTopBinder Lite ................................................................................103
Using Commands...................................................................................................104
Sample Print .......................................................................................................105
Printing the First Set...............................................................................................105
Printing the Remaining Sets...................................................................................106
Deleting a Sample Print File...................................................................................107
Checking the Error Log ..........................................................................................107
Locked Print .......................................................................................................109
Sending Print Job to the Printer .............................................................................109
Entering a Password ..............................................................................................110
Deleting a Locked Print File ...................................................................................111
Checking the Error Log ..........................................................................................112
Form Feed...........................................................................................................113
Canceling a Print Job ........................................................................................114
Windows - Canceling a Print Job ...........................................................................114
Mac OS - Canceling a Print Job.............................................................................115
Caution During Printing ....................................................................................117
Collate ....................................................................................................................117
Spool Printing.........................................................................................................117
Cover......................................................................................................................119
Memory Capacity and Paper Size.......................................................................... 119
Making Printer Settings Using the Control Panel
Menu Chart .........................................................................................................122
Paper Input Menu...............................................................................................126
Changing the paper input menu.............................................................................126
Paper input menu parameters................................................................................127
List/Test Print Menu...........................................................................................130
Printing a Configuration Page ................................................................................130
Interpreting the configuration page ........................................................................130
3
Page 4

List/Test menu parameters ....................................................................................132
Maintenance Menu.............................................................................................134
Changing the maintenance menu ..........................................................................134
Maintenance menu parameters .............................................................................136
System Menu......................................................................................................140
Changing the system menu ...................................................................................140
System menu parameters ......................................................................................140
Host Interface Menu...........................................................................................147
Changing the Host Interface menu ........................................................................147
Host Interface menu parameters............................................................................147
PCL Menu ...........................................................................................................154
Changing the PCL menu........................................................................................154
PCL menu parameters ...........................................................................................154
PS Menu..............................................................................................................157
Changing the PS menu ..........................................................................................157
PS menu parameters .............................................................................................157
PDF Menu ...........................................................................................................159
Changing the PDF menu........................................................................................159
PDF menu parameters...........................................................................................159
Language Menu..................................................................................................162
Changing the language menu ................................................................................162
Language menu parameters ..................................................................................162
Monitoring and Configuring the Printer
Using Web Image Monitor.................................................................................163
Displaying Top Page ..............................................................................................164
About Menu and Mode...........................................................................................165
Access in the Administrator Mode..........................................................................166
Displaying Web Image Monitor Help......................................................................166
Using SmartDeviceMonitor for Admin .............................................................168
Installing SmartDeviceMonitor for Admin ...............................................................169
Changing the Network Interface Board Configuration............................................170
Locking the Menus on the Printer's Control Panel .................................................170
Changing the Paper Type ......................................................................................171
Managing User Information....................................................................................172
Configuring the Energy Saver Mode ......................................................................175
Setting a Password ................................................................................................175
Checking the Printer Status ...................................................................................176
Changing Names and Comments ..........................................................................176
Using SmartDeviceMonitor for Client ..............................................................178
Monitoring Printers .................................................................................................178
Checking the Printer Status ...................................................................................178
When Using IPP with SmartDeviceMonitor for Client ............................................179
Printer Status Notification by E-Mail................................................................180
Auto E-mail Notification..........................................................................................181
On-demand E-mail Notification ..............................................................................181
Remote Maintenance by telnet .........................................................................182
4
Page 5

Using telnet ............................................................................................................182
access ....................................................................................................................183
appletalk.................................................................................................................183
autonet ...................................................................................................................184
btconfig...................................................................................................................184
devicename............................................................................................................185
dhcp .......................................................................................................................185
diprint .....................................................................................................................186
dns .........................................................................................................................187
domainname ..........................................................................................................188
help ........................................................................................................................189
hostname ...............................................................................................................189
ifconfig....................................................................................................................190
info .........................................................................................................................191
ipp ..........................................................................................................................191
netware ..................................................................................................................192
passwd ...................................................................................................................193
prnlog .....................................................................................................................194
rendezvous.............................................................................................................194
route .......................................................................................................................196
set ..........................................................................................................................197
show.......................................................................................................................198
slp...........................................................................................................................199
smb ........................................................................................................................199
snmp ......................................................................................................................200
sntp ........................................................................................................................203
spoolsw ..................................................................................................................203
sprint ......................................................................................................................204
status......................................................................................................................204
syslog .....................................................................................................................205
upnp ......................................................................................................................205
web.........................................................................................................................205
wiconfig ..................................................................................................................206
wins ........................................................................................................................208
SNMP...................................................................................................................210
Getting Printer Information over the Network.................................................211
Current Printer Status ............................................................................................211
Printer configuration ...............................................................................................217
Understanding the Displayed Information ......................................................219
Print Job Information..............................................................................................219
Print Log Information..............................................................................................219
Configuring the Network Interface Board ...............................................................220
Message List ......................................................................................................226
System Log Information .........................................................................................226
Using a Printer Server
Preparing Printer Server ...................................................................................232
Printing notification via SmartDeviceMonitor for Client ..........................................232
5
Page 6

Using NetWare ...................................................................................................234
Setting Up as a Print Server (NetWare 3.x) ...........................................................235
Setting Up as a Print Server (NetWare 4.x, 5/5.1, 6/6.5) .......................................236
Using Pure IP in the NetWare 5/5.1 or 6/6.5 Environment.....................................237
Setting Up as a Remote Printer (NetWare 3.x) ......................................................240
Setting Up as a Remote Printer (NetWare 4.x, 5/5.1, 6/6.5) ..................................242
Special Operations under Windows
Printing Files Directly from Windows ..............................................................246
Setup......................................................................................................................246
Using a Host Name Instead of an IP Address........................................................246
Printing Commands................................................................................................ 248
Mac OS Configuration
Mac OS................................................................................................................251
Installing the PostScript 3 Printer Driver and PPD File ..........................................251
Setting Up PPD Files .............................................................................................252
Creating a Desktop Printer Icon .............................................................................252
Setting Up Options.................................................................................................253
Installing the ColorSync Profiles ............................................................................253
Installing Adobe Type Manager .............................................................................254
Installing Screen fonts............................................................................................255
Using USB Interface...............................................................................................255
Changing to EtherTalk ...........................................................................................256
Mac OS X ............................................................................................................258
Installing the PPD Files ..........................................................................................258
Setting Up the PPD File .........................................................................................258
Setting Up Options.................................................................................................259
Using USB Interface...............................................................................................259
Using Rendezvous .................................................................................................259
Changing to EtherTalk ...........................................................................................260
Configuring the Printer......................................................................................261
Using PostScript 3 .............................................................................................262
Job Type ................................................................................................................262
Duplex Printing.......................................................................................................264
Color Mode.............................................................................................................265
Gradation ...............................................................................................................265
Color Profile ...........................................................................................................265
Color Setting ..........................................................................................................266
CMYK Simulation Profile........................................................................................267
Dithering.................................................................................................................267
Gray Reproduction .................................................................................................267
Color Matching .......................................................................................................267
Printer Utility for Mac.........................................................................................268
Installing Printer Utility for Mac...............................................................................268
Starting Printer Utility for Mac ................................................................................269
Printer Utility for Mac Functions .............................................................................269
6
Page 7

Appendix
Software and Utilities Included on the CD-ROM............................................. 276
Printer Drivers for This Printer................................................................................276
SmartDeviceMonitor for Admin ..............................................................................277
SmartDeviceMonitor for Client ...............................................................................278
Additional Information on the Printer Driver...................................................281
Enable Large Papers .............................................................................................281
Cautions to Take When Using in a network ....................................................282
Connecting a Dial-up Router to a Network.............................................................282
Using DHCP...........................................................................................................282
Configuring the WINS Server.................................................................................284
Using the Dynamic DNS Function..........................................................................286
Configuring SSL Encryption.............................................................................288
SSL (Secure Sockets Layer) Encryption................................................................288
User Settings for SSL (Secure Sockets Layer) ......................................................291
Installing Font Manager 2000............................................................................293
Using Adobe PageMaker Version 6.0, 6.5, or 7.0............................................ 294
When Using Windows Terminal Service/MetaFrame......................................295
Operating Environment ..........................................................................................295
Supported Printer Drivers.......................................................................................295
Limitations ..............................................................................................................295
Cautions When Using Bluetooth Interface Unit ..............................................297
Information about Installed Applications ........................................................298
expat ......................................................................................................................298
JPEG LIBRARY .....................................................................................................298
NetBSD ..................................................................................................................298
Samba(Ver 2.2.2–1.1)............................................................................................300
®
RSA
BSAFE™ .....................................................................................................301
7
Page 8

Read This First
Manuals for This Printer
For particular functions, see the relevant parts of the manual.
❖ Setup Guide
Provides information about printer setup and options.
❖ Maintenance Guide
Provides information about paper, replacing supplies, and dealing with paper
jams and error messages.
❖ Software Guide (HTML) (this manual)
Provides basic information about installing the printer driver and software, using the printer in a network environment, and configuration and setup.
Also, provides information about configuring and monitoring printer status using software and a Web browser.
❒ Some functions cannot be used depending on your printer.
G1058614_1.00 Copyright © 2004 8
Page 9

Preparing for Printing
Quick Install
Windows 95/98/Me/2000/XP, Windows Server 2003, and Windows NT 4.0 users
can easily install this software using the CD-ROM provided.
Using Quick Install, the PCL printer driver and/or RPCS printer driver and SmartDeviceMonitor for Client is installed under network environment, and TCP/IP
port will be set.
❒ To install printer driver under Windows 2000/XP Professional, Windows Serv-
er 2003, and Windows NT 4.0, you must have an account that has Manage
Printers permission. Log on as an Administrator.
❒ The Quick Install is not available when using this printer under USB connec-
tion. If you connect using USB, see p.59 “
USB”.
A Quit all applications currently running.
Installing the Printer Driver Using
B Insert the CD-ROM into the CD-ROM drive.
The installer starts.
Auto Run may not work with certain operating system settings. If this happens, launch “Setup.exe” on the CD-ROM root directory.
C Select an interface language, and then click [OK].
The default interface language is English.
D Click [Quick Install].
The software license agreement appears in the [License Agreement] dialog box.
E After reading the agreement, click [I accept the agreement], and then click
[Next].
F Select the printer model you want to use in the [Select Printer] dialog box.
For network connection via TCP/IP, select the printer whose IP address is displayed in [Connect To].
For parallel connection, select the printer whose printer port is displayed in
[Connect To].
G Click [Install].
The printer driver installation starts.
H Click [Finish]
A message about restarting the computer may appear. Restart the computer
to complete installation.
G1058614_1.00 Copyright © 2004 9
Page 10

Preparing for Printing
I Click [Exit] in the first dialog box of the installer, and then take out the
CD-ROM.
❒ To stop installation of the selected software, click [Cancel] before installa-
tion is complete.
❒ Auto Run may not work with certain operating system settings. If this hap-
pens, launch “Setup.exe” on the CD-ROM root directory.
❒ Select a printer to whose IP address is displayed in [Connect To] to install
SmartDeviceMonitor for Client when using TCP/IP.
Quick Install is not available unless bidirectional communication between
the printer and computer is enabled via parallel connection. See p.78 “
directional Communication is Disabled” for details about bidirectional com-
munication between printer and computer.
If Bi-
10
Page 11
Preparing for Printing
Confirming the Connection Method
This printer supports network and local connection.
Before installing the printer driver, check how the printer is connected. Follow the
driver installation procedure that is appropriate to the connection method.
Network Connection
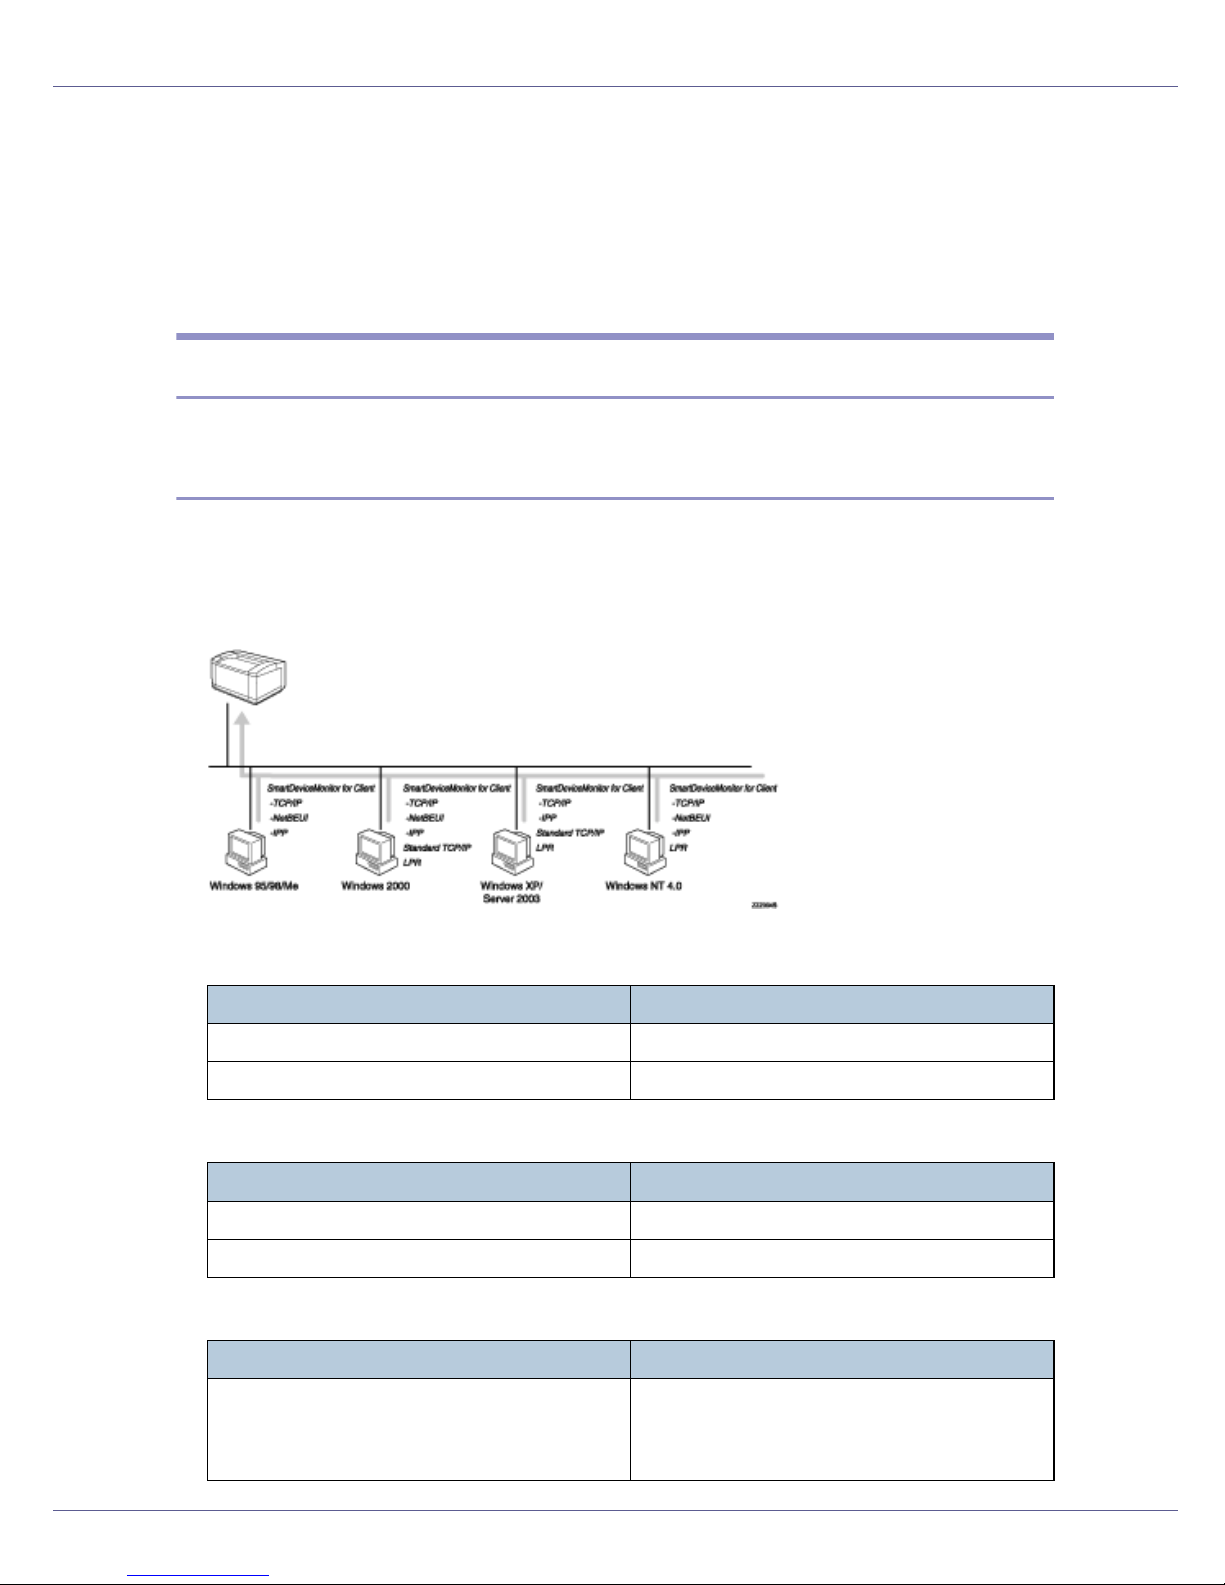
This printer can be used as a Windows printing port or network printer.
Using this printer as the Windows printing port
Network connections can be established through Ethernet, IEEE 802.11b, and
IEEE 1394 (IP over 1394).
Available ports are determined based on the combination of Windows operating
system version and connection method used.
❖ Windows 95/98
Connection Method Available Ports
Ethernet/ IEEE 802.11b SmartDeviceMonitor for Client port
IEEE 1394 (IP over 1394) None
❖ Windows Me
Connection Method Available Ports
Ethernet/ IEEE 802.11b SmartDeviceMonitor for Client port
IEEE 1394 (IP over 1394) SmartDeviceMonitor for Client port
❖ Windows 2000
Connection Method Available Ports
Ethernet/ IEEE 802.11b SmartDeviceMonitor for Client port
Standard TCP/IP
LPR port
11
Page 12
Preparing for Printing
Connection Method Available Ports
IEEE 1394 (IP over 1394) None
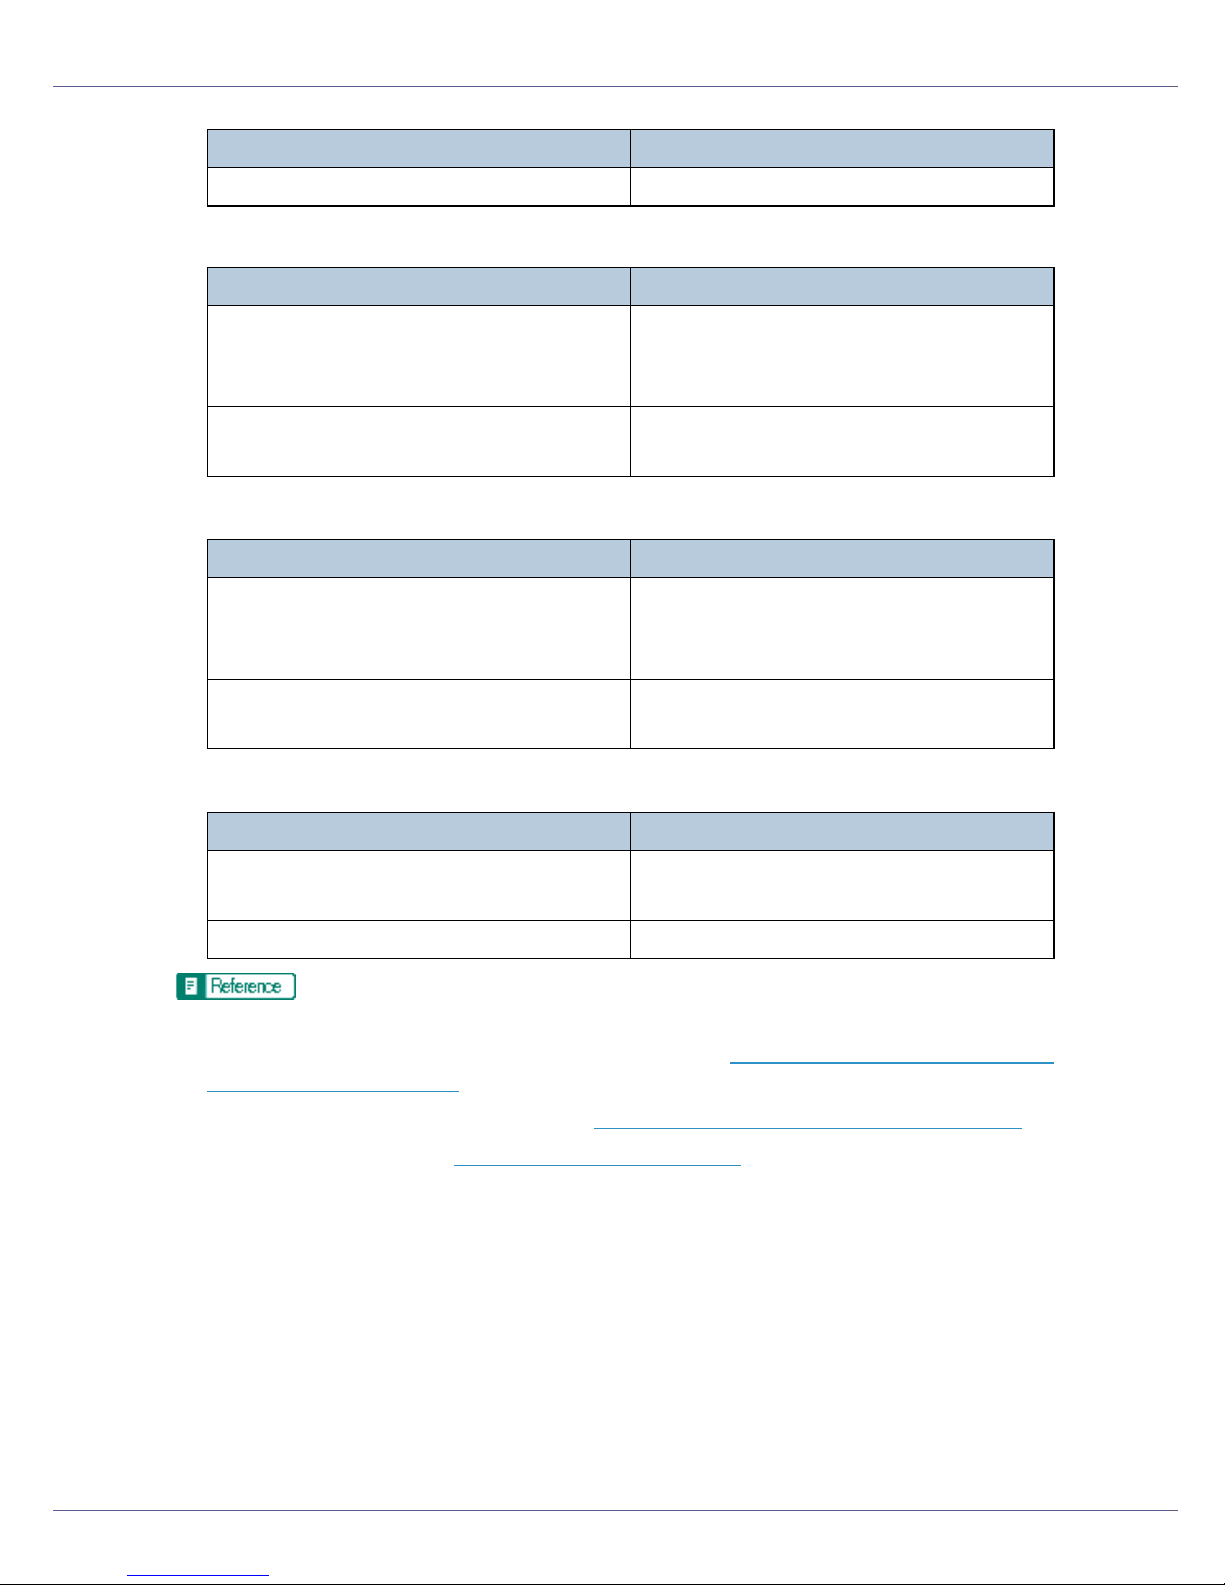
❖ Windows XP
Connection Method Available Ports
Ethernet/ IEEE 802.11b SmartDeviceMonitor for Client port
Standard TCP/IP
LPR port
IEEE 1394 (IP over 1394) SmartDeviceMonitor for Client port
Standard TCP/IP
❖ Windows Server 2003
Connection Method Available Ports
Ethernet/ IEEE 802.11b SmartDeviceMonitor for Client port
Standard TCP/IP
LPR port
IEEE 1394 (IP over 1394) SmartDeviceMonitor for Client port
Standard TCP/IP
❖ Windows NT 4.0
Connection Method Available Ports
Ethernet/ IEEE 802.11b SmartDeviceMonitor for Client port
LPR port
IEEE 1394 (IP over 1394) None
See the explanation of how to install the printer driver for each type of port.
For the SmartDeviceMonitor for Client port, see p.15 “
Using the SmartDevice-
Monitor for Client Port”.
For the Standard TCP/IP port, see p.39 “
For the LPR port, see p.44 “
Using the LPR Port”.
Using the Standard TCP/IP Port”.
12
Page 13
Preparing for Printing
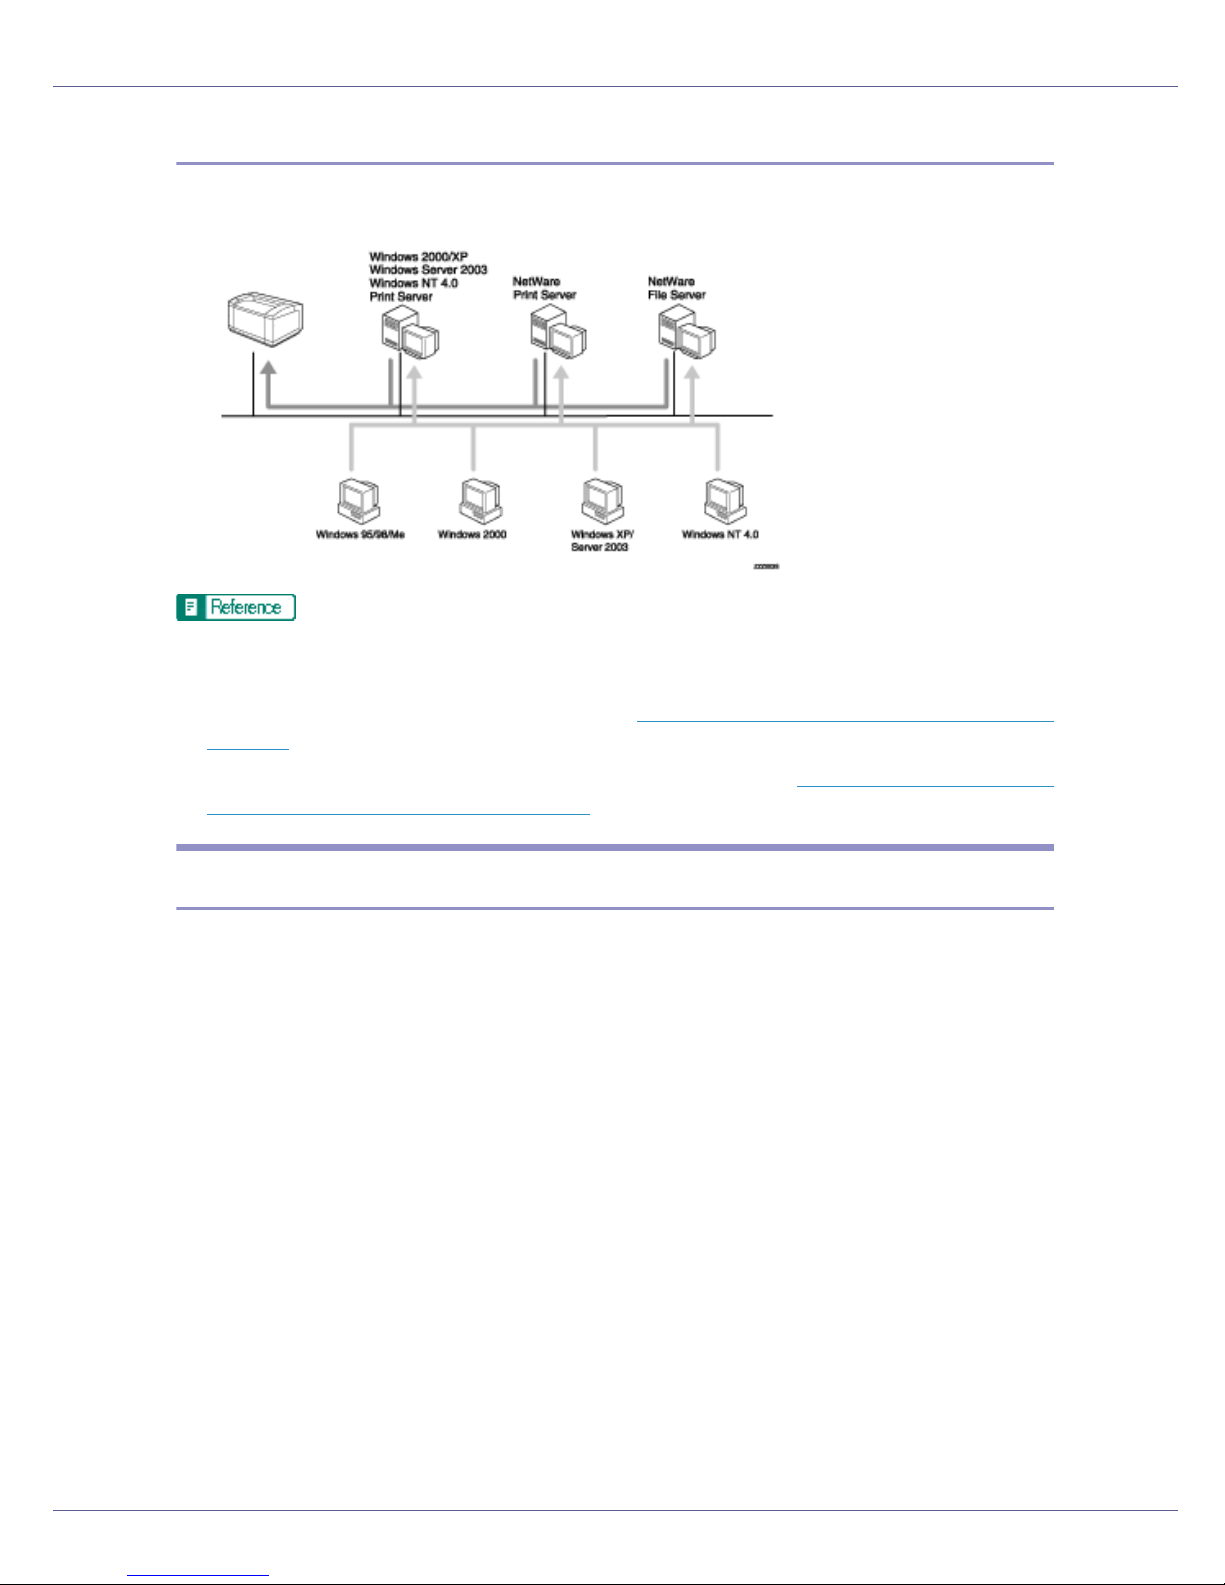
Using as a network printer
This printer can be used as the Windows network printer, the NetWare print server, or the NetWare remote printer.
See the explanation of how to install the printer driver for each type of network
printer.
For the Windows network printer, see p.49 “
Using as the Windows Network
Printer”.
For the NetWare print server and remote printer, see p.56 “
Using as the Net-
Ware Print Server/Remote Printer”.
Local Connection
Local connections can be established via parallel, USB, IEEE 1394 (SCSI print),
and Bluetooth connections.
Windows operating system version determines the available connection methods.
• Windows 95:
• Parallel connections
• Windows 98:
• Parallel and Bluetooth connections
• Windows 98 SE/Me:
• USB, Parallel, and Bluetooth connections
• Windows 2000:
• USB, Parallel, IEEE 1394 (SCSI print), and Bluetooth connections
•Windows XP:
• USB, Parallel, IEEE 1394 (SCSI print), and Bluetooth connections
• Windows Server 2003:
13
Page 14

Preparing for Printing
• USB, Parallel, IEEE 1394 (SCSI print), and Bluetooth connections
• Windows NT 4.0:
• Parallel and Bluetooth connections
See the explanation of how to install the printer driver for each method of
connection.
For the USB connection, see p.59 “
For the parallel connection, see p.64 “
Installing the Printer Driver Using USB”.
Printing with Parallel Connection”.
For the IEEE 1394 (SCSI print) connection, see p.69 “
Driver Using IEEE 1394 (SCSI print)”.
For the Bluetooth connection, see p.73 “
Printing with Bluetooth™ Connec-
tion”.
Installing the Printer
14
Page 15

Preparing for Printing
Using the SmartDeviceMonitor for Client
Port
Installing SmartDeviceMonitor for Client
❒ To install SmartDeviceMonitor for Client under Windows 2000/XP Profession-
al, Windows Server 2003, and Windows NT 4.0, you must have an account
that has Manage Printers permission. Log on as an Administrator.
❒ Install SmartDeviceMonitor for Client before installing the printer driver when
using the SmartDeviceMonitor for Client port.
A Quit all applications currently running.
B Insert the CD-ROM into the CD-ROM drive.
The installer starts.
Auto Run may not work with certain operating system settings. If this happens, launch “Setup.exe” on the CD-ROM root directory.
C Select an interface language, and then click [OK].
The default interface language is English.
D Click [SmartDeviceMonitor for Client / Admin].
E The SmartDeviceMonitor for Client installer starts.
F Click [SmartDeviceMonitor for Client], and then click [Next >].
The SmartDeviceMonitor for Client installer starts.
G The software license agreement appears in the [License Agreement] dialog
box. After reading through its contents, click [Yes] to accept it.
H Follow the instructions on the display to install SmartDeviceMonitor for
Client.
I Click [OK].
If you are required to restart the computer after installing SmartDeviceMonitor
for Client, restart the computer.
❒ To stop installation of the selected software, click [Cancel] before installa-
tion is complete.
15
Page 16

Preparing for Printing
❒ SmartDeviceMonitor for Client supports following languages: Czech, Dan-
ish, German, English, Spanish, French, Italian, Hungarian, Dutch, Norwegian, Polish, Portuguese, Finnish, Swedish, Chinese Simple and Chinese
Traditional.
Installing the PCL or RPCS Printer Driver (TCP/IP)
❒ To install this printer driver under Windows 2000/XP Professional, Windows
Server 2003, and Windows NT 4.0, you must have an account that has Manage Printers permission. Log on as an Administrators or Power Users group
member.
A Quit all applications currently running.
B Insert the CD-ROM into the CD-ROM drive.
The installer starts.
Auto Run may not work with certain operating system settings. If this happens, launch “Setup.exe” on the CD-ROM root directory.
C Select an interface language, and then click [OK].
The default interface language is English.
D Click [PCL/RPCS Printer Drivers].
E The software license agreement appears in the [License Agreement] dialog
box.
After reading the agreement, click [I accept the agreement], and then click [Next].
F Select the printer driver you want to use in the [Printer Program] dialog
box.
You can select several printer drivers.
G Select the printer model you want to use.
The printer name can be changed in the [Change settings for 'Printer Name'] box.
H Double-click the printer name to display the printer settings.
❒ The details shown in [Comment:], [Driver:], and [Port:] vary depending on the
operating system, printer model, and port.
I Click [Port:], and then click [Add].
J Click [SmartDeviceMonitor], and then click [New Port...].
K Click [TCP/IP], and then click [Search].
16
Page 17

Preparing for Printing
A list of printers using TCP/IP appears.
L Select the printer you want to use, and then click [OK].
Only printers that respond to a broadcast from the computer appear. To use
a printer not listed here, click [Specify Address], and then enter the IP address
or host name of the printer.
Under Windows 95/98/Me, you cannot add an IP address partially similar to
the one already used. For example, if “192.168.0.2” is in use, “192.168.0.2xx”
cannot be used. Similarly, if “192.168.0.20” is in use, “192.168.0.2” cannot be
used.
M Check that the port of the selected printer is displayed in [Port:].
N Set a User Code, if necessary.
This allows a SmartDeviceMonitor for Admin user to display and check statistics about the number of sheets which each user prints. For details, see
SmartDeviceMonitor for Admin Help.
Up to 8 numeric characters can be entered. Neither alphabetic characters nor
symbols are available.
O Select the [Default Printer] check box to configure the printer as default.
P Click [Finish].
Installation starts.
Q Click [Finish] in the installation completion dialog box.
A message about restarting the computer may appear. Restart the computer
to complete installation.
A message appears if there is a newer version of the printer driver already
installed. If there is, you cannot install the printer driver using Auto Run. If
you still want to install the printer driver, install use [Add Printer]. See p.76
“If a Message Appears during Installation”.
Installing the PCL or RPCS Printer Driver (NetBEUI)
❒ To install this printer driver under Windows 2000, and Windows NT 4.0, you
must have an account that has Manage Printers permission. Log on as an Administrators or Power Users group member.
❒ Windows XP and Windows Server 2003 do not support NetBEUI.
❒ You cannot print using printers beyond routers.
A Quit all applications currently running.
17
Page 18

Preparing for Printing
B Insert the CD-ROM into the CD-ROM drive.
The installer starts.
Auto Run may not work with certain operating system settings. If this happens, launch “Setup.exe”on the CD-ROM root directory.
C Select an interface language, and then click [OK].
The default interface language is English.
D Click [PCL/RPCS Printer Drivers].
E The software license agreement appears in the [License Agreement] dialog
box.
After reading the agreement, click [I accept the agreement] , and then click
[Next].
F Select the printer driver you want to use in the [Printer Program] dialog
box.
You can select several printer drivers.
G Select the printer model you want to use.
The printer name can be changed in the [Change settings for 'Printer Name'] box.
H Double-click the printer name to display the printer settings.
❒ The details shown in [Comment:], [Driver:], and [Port:] vary depending on the
operating system, printer model, and port.
I Click [Port:], and then click [Add].
J Click [SmartDeviceMonitor], and then click [New Port...].
K Click [NetBEUI], and then click [Search].
A list of printers using NetBEUI appears.
L Select the printer you want to use, and then click [OK].
Only printers that respond to a broadcast from the computer appear. To use
a printer not listed here, click [Specify Address], and then enter the NetBEUI address. The NetBEUI address can be checked with the configuration page. For
information about printing a configuration page, see p.130 “
uration Page”. The NetBEUI address appears in the format of
“\\RNPxxxx\xxx” on the configuration page. Enter the printer's network path in
the format of “%%Computer name\Share name”. Use “\\” instead of “%%” at
the beginning.
Printing a Config-
M Check that the port of the selected printer is displayed in [Port:].
N Set a User Code, if necessary.
18
Page 19
Preparing for Printing
This allows a SmartDeviceMonitor for Admin user to display and check statistics about the number of sheets which each user prints. For details, see
SmartDeviceMonitor for Admin Help.
Up to 8 numeric characters can be entered. Neither alphabetic characters nor
symbols are available.
O Select the [Default Printer] check box to configure the printer as default.
P Click [Finish].
The printer driver installation starts.
Q Click [Finish] in the installation completion dialog box.
A message about restarting the computer may appear. Restart the computer
to complete installation.
❒ The protocol is set to inactive as default. Enable it using Web Image Mon-
itor or Telnet.
❒ To stop installation of the selected software, click [Cancel] before installa-
tion is complete.
A message appears if there is a newer version of the printer driver already
installed. If there is, you cannot install the printer driver using Auto Run. If
you still want to install the printer driver, use [Add Printer]. See p.76 “
Message Appears during Installation”.
If a
Installing the PCL or RPCS Printer Driver (IPP)
❒ To install printer driver under Windows 2000/XP Professional, Windows Serv-
er 2003, and Windows NT 4.0, you must have an account that has Manage
Printers permission. For this, log on as an Administrators or Power Users
group member.
A Quit all applications currently running.
B Insert the CD-ROM into the CD-ROM drive.
The installer starts.
Auto Run may not work with certain operating system settings. If this happens, launch “Setup.exe” on the CD-ROM root directory.
C Select an interface language, and then click [OK].
The default interface language is English.
D Click [PCL/RPCS Printer Drivers].
19
Page 20

Preparing for Printing
E The software license agreement appears in the [License Agreement] dialog
box.
After reading the agreement, click [I accept the agreement], and then click [Next].
F Select a printer driver you want to use in the [Printer Program] dialog box.
You can select several printer drivers.
G Select the printer model you want to use.
The printer name can be changed in the [Change settings for 'Printer Name'] box.
H Double-click the printer name to display the printer settings.
❒ The details shown in [Comment:], [Driver:], and [Port:] vary depending on the
operating system, printer model, and port.
I Click [Port:], and then click [Add].
J Click [SmartDeviceMonitor], and then click [New Port...].
K Click [IPP].
L In the [Printer URL] box, enter “http://printer's address/printer” as the
printer's address.
If the server authentification is issued, to enable SSL( a protocol for encrypted
communication), enter “https://printer's address/printer” (Internet Explorer
5.01, or a higher version must be installed).
(example IP address: 192.168.15.16)
http://192.168.15.16/printer
https://192.168.15.16/printer
You can enter “http://printer's address/ipp” as the printer's address.
M Enter a name for identifying the printer in [IPP Port Name]. Use a name dif-
ferent from the one of any existing port.
If a name is not specified here, the address entered in the [Printer URL] box
becomes the IPP port name.
N Click [Detailed Settings] to make necessary settings.
For information about the settings, see SmartDeviceMonitor for Client Help.
O Check that the port of the selected printer is displayed in [Port:].
P Set a User Code, if necessary.
This allows a SmartDeviceMonitor for Admin user to display and check the
number of sheets each user prints. For details, see SmartDeviceMonitor for
Admin Help.
20
Page 21

Preparing for Printing
Up to 8 numeric characters can be entered. No alphabetic characters or symbols can be entered.
Q Select the [Default Printer] check box to configure the printer as default.
R Click [Finish].
Installation starts.
S Click [Finish] in the installation completion dialog box.
A message about restarting the computer may appear. Restart the computer
to complete installation.
❒ To stop installation of the selected software, click [Cancel] before installa-
tion is complete.
A message appears if there is a newer version of the printer driver already
installed. If there is, you cannot install the printer driver using Auto Run. If
you still want to install the printer driver, use [Add Printer]. See p.76 “
Message Appears during Installation”.
If a
Installing the PostScript 3 Printer Driver (Windows 95/98/Me TCP/IP)
A Quit all applications currently running.
B Insert the CD-ROM into the CD-ROM drive.
The installer starts.
Auto Run may not work with certain operating system settings. If this happens, launch “Setup.exe” on the CD-ROM root directory.
C Select an interface language, and then click [OK].
The default interface language is English.
❒ The printer driver with the selected language will be installed. The English
printer driver is installed when the following language is selected: Cestina,
Magyar, Polski, Portugues, Suomi.
D Click [PostScript 3 Printer Driver].
Add Printer Wizard starts.
E Click [Next].
F Click [Local Printer], and then click [Next].
A dialog box for selecting the printer manufacturer and model name appears.
21
Page 22

Preparing for Printing
G Select the name of the printer whose driver you want to install, and then
click [Next].
H In the [Available ports:] box, click [Printer Port], and then click [Next].
I Change the printer name if you want, and then click [Next].
Select the [Yes] check box to configure the printer as default.
J Specify whether or not to print a test page, and then click [Finish].
K On the [Start] menu, point to [Settings], and then click [Printers].
The [Printers] window appears.
L Click the icon of the printer you want to use. On the [File] menu, click
[Properties].
M On the [Details] tab, click [Add Port…].
N Click [SmartDeviceMonitor] in the [Other] list, and then click [OK].
O Click [TCP/IP], and then click [Search].
A list of printers using TCP/IP appears.
P Select the printer you want to use, and then click [OK].
Only printers that respond to a broadcast from the computer appear. To use
a printer not listed here, click [Specify Address], and then enter the IP address
or host name of the printer.
You cannot add an IP address partially similar to the one already used. For
example, if “192.168.0.2” is in use, “192.168.0.2xx” cannot be used. Similarly,
if “192.168.0.20” is in use, “192.168.0.2” cannot be used.
Q Click [OK].
R Check that the selected port is highlighted in [Printer to the following port],
and then click [OK].
S Restart the computer to complete installation.
❒ A User Code can be set after the printer driver installation. For information
about User Code, see the printer driver Help.
Installing the PostScript 3 Printer Driver (Windows 95/98/Me NetBEUI)
A Quit all applications currently running.
22
Page 23

Preparing for Printing
B Insert the CD-ROM into the CD-ROM drive.
The installer starts.
Auto Run may not work with certain operating system settings. If this happens, launch “Setup.exe”on the CD-ROM root directory.
C Select an interface language, and then click [OK].
The default interface language is English.
❒ The printer driver with the selected language will be installed. The English
printer driver is installed when the following language is selected: Cestina,
Magyar, Polski, Portugues, Suomi.
D Click [PostScript 3 Printer Driver].
Add Printer Wizard starts.
E Click [Next].
F Click [Local Printer], and then click [Next].
A dialog box for selecting the printer manufacturer and model name appears.
G Select the name of the printer whose driver you want to install, and then
click [Next].
H In the [Available ports:] box, click [Printer Port], and then click [Next].
I Change the printer name if you want, and then click [Next].
Select the [Yes] check box to configure the printer as default.
J Specify whether or not to print a test page, and then click [Finish].
K On the [Start] menu, point to [Settings], and then click [Printers].
The [Printers] window appears.
L Click the icon of the printer you want to use. On the [File] menu, click
[Properties].
M On the [Details] tab, click [Add Port…].
N Click [Other] in the [SmartDeviceMonitor] list, and then click [OK].
O Click [NetBEUI], and then click [Search].
A list of printers using [NetBEUI] appears.
P Click the printer you want to use, and then click [OK].
23
Page 24

Preparing for Printing
Only printers that respond to a broadcast from the computer appear. To use
a printer not listed here, click [Specify Address], and then enter the NetBEUI address. The NetBEUI address can be checked with the configuration page. For
information about printing a configuration page, see p.130 “
uration Page”. The NetBEUI address appears in the format of
“\\RNPxxxx\xxx” on the configuration page. Enter the printer's network path in
the format of"%%Computer name\Share name". Use “\\” instead of “%%” at
the beginning.
You cannot print using printers beyond routers.
Printing a Config-
Q Click [OK].
R Check that the selected port is highlighted in [Printer to the following port],
and then click [OK].
S Restart the computer to complete installation.
❒ A User Code can be set after the printer driver installation. For information
about User Code, see the printer driver Help.
Installing the PostScript 3 Printer Driver (Windows 95/98/Me - IPP)
A Quit all applications currently running.
B Insert the CD-ROM into the CD-ROM drive.
The installer starts.
Auto Run may not work with certain operating system settings. If this happens, launch “Setup.exe” on the CD-ROM root directory.
C Select an interface language, and then click [OK].
The default interface language is English.
❒ The printer driver with the selected language will be installed. The English
printer driver is installed when the following language is selected: Cestina,
Magyar, Polski, Portugues, Suomi.
D Click [PostScript 3 Printer Driver].
Add Printer Wizard starts.
E Click [Next].
F Click [Local Printer], and then click [Next].
A dialog box for selecting the printer manufacturer and model name appears.
24
Page 25

Preparing for Printing
G Select the name of the printer whose driver you want to install, and then
click [Next].
H In the [Available ports:] box, click [Printer Port], and then click [Next].
I Change the printer name if you want, and then click [Next].
Select the [Yes] check box to configure the printer as default.
J Specify whether or not to print a test page, and then click [Finish].
K On the [Start] menu, point to [Settings], and then click [Printers].
The [Printers] window appears.
L Click the icon of the printer you want to use. On the [File] menu, click
[Properties].
M On the [Details] tab, click [Add Port…].
N Click [SmartDeviceMonitor] in the [Other] list, and then click [OK].
O Click [IPP].
P In the [Printer URL] box, enter “http://(printer's address)/printer” as the
printer's address.
If the server authentification is issued, to enable SSL (a protocol for encrypted
communication), enter “https://(printer's address)/printer” (Internet Explorer
5.01, or a higher version must be installed).
(example IP address: 192.168.15.16)
http://192.168.15.16/printer
https://192.168.15.16/printer
You can enter “http://(printer's address)/ipp” as the printer's address.
Q Enter a name for identifying the printer in [IPP Port Name]. Use a name dif-
ferent from the one of any existing port.
If a name is not specified here, the address entered in the [Printer URL] box
becomes the IPP port name.
R Click [Detailed Settings] to configure proxy server, IPP user name, and oth-
er settings. Make these settings, and then click [OK]. For details, see
Help on the CD-ROM.
❒ For information about the settings, see SmartDeviceMonitor for Client
Help.
S Click [OK].
25
Page 26
Preparing for Printing
T Check that the selected port is highlighted in [Printer to the following port],
and then click [OK] .
U Restart the computer to complete installation.
❒ A User Code can be set after the printer driver installation. For information
about User Code, see the printer driver Help.
Installing the PostScript 3 Printer Driver (Windows 2000 - TCP/IP)
❒ Installing this printer driver requires Administrators permission. Log on using
an account that has Administrators permission.
A Quit all applications currently running.
B Insert the CD-ROM into the CD-ROM drive.
The installer starts.
Auto Run may not work with certain operating system settings. If this happens, launch “Setup.exe” on the CD-ROM root directory.
C Select an interface language, and then click [OK].
The default interface language is English.
❒ The printer driver with the selected language will be installed. The English
printer driver is installed when the following language is selected: Cestina,
Magyar, Polski, Portugues, Suomi.
D Click [PostScript 3 Printer Driver].
Add Printer Wizard starts.
E Click [Next >].
F Click [Local printer], and then click [Next>].
G Click [Add Port...].
H Click [SmartDeviceMonitor], and then click [Next >].
I Click [TCP/IP], and then click [Search].
A list of printers using TCP/IP appears.
J Select the printer you want to use, and then click [OK].
26
Page 27
Preparing for Printing
Only printers that respond to a broadcast from the computer appear. To use
a printer not listed here, click [Specify Address], and then enter the IP address
or host name of the printer.
K Check that the name of the printer whose driver you want to install is se-
lected, and then click [Next >].
L Change the printer name if you want, and then click [Next >].
Select the [Yes] check box to configure the printer as default.
M Click [Next >].
N Specify whether or not to print a test page, and then click [Next>].
O Click [Finish].
The printer driver installation starts.
❒ A User Code can be set after the printer driver installation. For information
about User Code, see the printer driver Help.
Installing the PostScript 3 Printer Driver (Windows 2000 NetBEUI)
❒ Installing this printer driver requires Administrators permission. Log on using
an account that has Administrators permission.
A Quit all applications currently running.
B Insert the CD-ROM into the CD-ROM drive.
The installer starts.
Auto Run may not work with certain operating system settings. If this happens, launch “Setup.exe” on the CD-ROM root directory.
C Select an interface language, and then click [OK].
The default interface language is English.
❒ The printer driver with the selected language will be installed. The English
printer driver is installed when the following language is selected: Cestina,
Magyar, Polski, Portugues, Suomi.
D Click [PostScript 3 Printer Driver].
Add Printer Wizard starts.
E Click [Next >].
27
Page 28

Preparing for Printing
F Click [Local printer], and then click [Next>].
G Click [Add Port...].
H Click [SmartDeviceMonitor], and then click [Next >].
I Click [NetBEUI], and then click [Search].
A list of printers using NetBEUI appears.
J Select the printer you want to use, and then click [OK].
Only printers that respond to a broadcast from the computer appear. To use
a printer not listed here, click [Specify Address], and then enter the NetBEUI address. The NetBEUI address can be checked with the configuration page. For
information about printing a configuration page, see p.130 “
uration Page”. The NetBEUI address appears in the format of
“\\RNPxxxx\xxx” on the configuration page. Enter the printer's network path in
the format of "%%Computer name\Share name". Use“%%” instead of “\\” at
the beginning.
Printing a Config-
You cannot print using printers beyond routers.
K Check that the name of the printer whose driver you want to install is se-
lected, and then click [Next >].
L Change the printer name if you want, and then click [Next >].
Select the [Yes] check box to configure the printer as default.
M Click [Next >].
N Specify whether or not to print a test page, and then click [Next>].
O Click [Finish].
The printer driver installation starts.
❒ A User Code can be set after the printer driver installation. For information
about User Code, see the printer driver Help.
Installing the PostScript 3 Printer Driver (Windows 2000 - IPP)
❒ Installing this printer driver requires Administrators permission. Log on using
an account that has Administrators permission.
A Quit all applications currently running.
B Insert the CD-ROM into the CD-ROM drive.
The installer starts.
28
Page 29

Preparing for Printing
Auto Run may not work with certain operating system settings. If this happens, launch “Setup.exe” on the CD-ROM root directory.
C Select an interface language, and then click [OK].
The default interface language is English.
❒ The printer driver with the selected language will be installed. The English
printer driver is installed when the following language is selected: Cestina,
Magyar, Polski, Portugues, Suomi.
D Click [PostScript 3 Printer Driver].
Add Printer Wizard starts.
E Click [Next >].
F Click [Local printer], and then click [Next>].
G Click [Add Port...].
H Click [SmartDeviceMonitor], and then click [Next >].
I Click [IPP].
J In the [Printer URL] box, enter “http://(printer's address)/printer” as the
printer's address.
If the server authentification is issued, to enable SSL (a protocol for encrypted
communication), enter “https://(printer's address)/printer” (Internet Explorer
5.01, or a higher version must be installed).
(example IP address: 192.168.15.16)
http://192.168.15.16/printer
https://192.168.15.16/printer
You can enter “http://(printer's address)/ipp” as the printer's address.
K Enter a name for identifying the printer in [IPP Port Name]. Use a name dif-
ferent from the name of any existing port.
If a name is not specified here, the address entered in the [Printer URL] box
becomes the IPP port name.
L Click [Detailed Settings] to configure proxy server, the IPP user name and
other settings. Specify the necessary settings, and then click [OK].
For information about the settings, see SmartDeviceMonitor for Client Help.
M Click [OK].
N Check that the name of the printer whose driver you want to install is se-
lected, and then click [Next >].
29
Page 30
Preparing for Printing
O Change the printer name if you want, and then click [Next >].
P Click [Next >].
Q Specify whether or not to print a test page, and then click [Next>].
R Click [Finish].
The printer driver installation starts.
❒ A User Code can be set after the printer driver installation. For information
about User Code, see the printer driver Help.
Installing the PostScript 3 Printer Driver (Windows XP, Windows
Server 2003 - TCP/IP)
❒ Installing this printer driver requires Administrators permission. Log on using
an account that has Administrators permission.
A Quit all applications currently running.
B Insert the CD-ROM into the CD-ROM drive.
The installer starts.
Auto Run may not work with certain operating system settings. If this happens, launch “Setup.exe”on the CD-ROM root directory.
C Select an interface language, and then click [OK].
The default interface language is English.
❒ The printer driver with the selected language will be installed. The English
printer driver is installed when the following language is selected: Cestina,
Magyar, Polski, Portugues, Suomi.
D Click [PostScript 3 Printer Driver].
Add Printer Wizard starts.
E Click [Next >].
F Click [Local printer], and then click [Next>].
G Click [Create a new port:].
H Click [SmartDeviceMonitor], and then click [Next >].
I Click [TCP/IP], and then click [Search].
30
Page 31

Preparing for Printing
A list of printers using [TCP/IP] appears.
J Select the printer you want to use, and then click [OK].
Only printers that respond to a broadcast from the computer appear. To use
a printer not listed here, click [Specify Address], and then enter the IP address
or host name of the printer.
K Check that the name of the printer whose driver you want to install is se-
lected, and then click [Next >].
L Change the printer name if you want, and then click [Next >].
Select the [Yes] check box to configure the printer as default.
M Click [Next >].
N Specify whether or not to print a test page, and then click [Next>].
O Click [Finish].
The printer driver installation starts.
❒ A User Code can be set after the printer driver installation. For information
about User Code, see the printer driver Help.
Installing the PostScript 3 Printer Driver (Windows XP, Windows
Server 2003 - IPP)
❒ Installing this printer driver requires Administrators permission. Log on using
an account that has Administrators permission.
A Quit all applications currently running.
B Insert the CD-ROM into the CD-ROM drive.
The installer starts.
Auto Run may not work with certain operating system settings. If this happens, launch “Setup.exe” on the CD-ROM root directory.
C Select an interface language, and then click [OK].
The default interface language is English.
❒ The printer driver with the selected language will be installed. The English
printer driver is installed when the following language is selected: Cestina,
Magyar, Polski, Portugues, Suomi.
D Click [PostScript 3 Printer Driver].
31
Page 32

Preparing for Printing
Add Printer Wizard starts.
E Click [Next >].
F Click [Local printer], and then click [Next>].
G Click [Create a new port:].
H Click [SmartDeviceMonitor], and then click [Next >].
I Click [IPP].
J In the [Printer URL] box, enter “http://(printer's address)/printer” as the
printer's address.
If the server authentification is issued, to enable SSL (a protocol for encrypted
communication), enter “https://(printer's address)/printer” (Internet Explorer
5.01, or a higher version must be installed).
(example IP address: 192.168.15.16)
http://192.168.15.16/printer
https://192.168.15.16/printer
You can enter “http://(printer's address)/ipp” as the printer's address.
K Enter a name for identifying the printer in [IPP Port Name]. Use a name dif-
ferent from the one of any existing port.
If a name is not specified here, the address entered in the [Printer URL] box
becomes the IPP port name.
L Click [Detailed Settings] to make necessary settings.
For information about the settings, see SmartDeviceMonitor for Client Help.
M Click [OK].
N Check that the name of the printer driver you want to install is selected,
and then click [Next >].
O Change the name of the printer if you want, and then click [Next >].
Select the [Yes] check box to configure the printer as default.
P Click [Next >].
Q Specify whether or not to print a test page, and then click [Next>].
R Click [Finish].
The printer driver installation starts.
❒ A User Code can be set after the printer driver installation. For information
about User Code, see the printer driver Help.
32
Page 33

Preparing for Printing
Installing the PostScript 3 Printer Driver (Windows NT 4.0 TCP/IP)
❒ Installing this printer driver requires Administrators permission. Log on using
an account that has Administrators permission.
A Quit all applications currently running.
B Insert the CD-ROM into the CD-ROM drive.
The installer starts.
Auto Run may not work with certain operating system settings. If this happens, launch “Setup.exe” on the CD-ROM root directory.
C Select an interface language, and then click [OK].
The default interface language is English.
❒ The printer driver with the selected language will be installed. The English
printer driver is installed when the following language is selected: Cestina,
Magyar, Polski, Portugues, Suomi.
D Click [PostScript 3 Printer Driver].
Add Printer Wizard starts.
E Click [Next].
F Click [Add Port:].
G Click [SmartDeviceMonitor], and then click [New Port...].
H Click [TCP/IP], and then click [Search].
A list of printers using [TCP/IP] appears.
I Select the printer you want to use, and then click [OK].
Only printers that respond to a broadcast from the computer appear. To use
a printer not listed here, click [Specify Address], and then enter the IP address
or host name of the printer.
J Check that the name of the printer whose driver you want to install is se-
lected, and then click [Next >].
K Change the printer name if you want, and then click [Next >].
Select the [Yes] check box to configure the printer as default.
L Specify whether or not to print a test page, and then click [Finish].
33
Page 34

Preparing for Printing
The printer driver installation starts.
M Restart the computer to complete installation.
❒ A User Code can be set after the printer driver installation . For information
about User Code, see the printer driver Help.
Installing the PostScript 3 Printer Driver (Windows NT 4.0 NetBEUI)
❒ Installing this printer driver requires Administrators permission. Log on using
an account that has Administrators permission.
A Quit all applications currently running.
B Insert the CD-ROM into the CD-ROM drive.
The installer starts.
Auto Run may not work with certain operating system settings. If this happens, launch “Setup.exe” on the CD-ROM root directory.
C Select an interface language, and then click [OK].
The default interface language is English.
❒ The printer driver with the selected language will be installed. The English
printer driver is installed when the following language is selected: Cestina,
Magyar, Polski, Portugues, Suomi.
D Click [PostScript 3 Printer Driver].
Add Printer Wizard starts.
E Click [Next].
F Click [Add Port:].
G Click [SmartDeviceMonitor], and then click [New Port...].
H Click [NetBEUI], and then click [Search].
A list of printers using NetBEUI appears.
I Select the printer you want to use, and then click [OK].
34
Page 35

Preparing for Printing
Only printers that respond to a broadcast from the computer are displayed. To
use a printer not listed here, click [Specify Address], and then enter the Net-
BEUI address. The NetBEUI address can be checked with the configuration
page. For information about printing a configuration page, see p.130 “
a Configuration Page”. The NetBEUI address appears in the format of
“\\RNPxxxx\xxx” on the configuration page. Enter the printer's network path in
the format of "%%Computer name\Share name". Use "%%" instead of "\\" at
the beginning.
You cannot print using printers beyond routers.
Printing
J Check that the name of the printer whose driver you want to install is se-
lected, and then click [Next >].
K Change the printer name if you want, and then click [Next >].
Select the [Yes] check box to configure the printer as default.
L Specify whether or not to print a test page, and then click [Finish].
The printer driver installation starts.
M Restart the computer to complete installation.
❒ A User Code can be set after the printer driver installation. For information
about User Code, see the printer driver Help.
Installing the PostScript 3 Printer Driver (Windows NT 4.0 - IPP)
❒ Installing this printer driver requires Administrators permission. Log on using
an account that has Administrators permission.
A Quit all applications currently running.
B Insert the CD-ROM into the CD-ROM drive.
The installer starts.
Auto Run may not work with certain operating system settings. If this happens, launch “Setup.exe” on the CD-ROM root directory.
C Select an interface language, and then click [OK].
The default interface language is English.
❒ The printer driver with the selected language is installed. The English print-
er driver is installed when either of the following languages is selected: Portuguese, Finnish.
D Click [PostScript 3 Printer Driver].
35
Page 36

Preparing for Printing
Add Printer Wizard starts.
E Click [Next].
F Click [Add Port:].
G Click [SmartDeviceMonitor], and then click [New Port...].
H Click [IPP].
I In the [Printer URL] box, enter “http://(printer's address)/printer”as the
printer's address.
If the server authentification is issued, to enable SSL (a protocol for encrypted
communication), enter “https://(printer's address)/printer” (Internet Explorer
5.01, or a higher version must be installed).
(example IP address: 192.168.15.16)
http://192.168.15.16/printer
https://192.168.15.16/printer
You can enter “http://(printer's address)/ipp” as the printer's address.
J Enter a name for identifying the printer in [IPP Port Name]. Use a name dif-
ferent from the one of any existing port.
If a name is not specified here, the address entered in the [Printer URL] box
becomes the IPP port name.
K Click [Detailed Settings] to make necessary settings.
For information about the settings, see SmartDeviceMonitor for Client Help.
L Click [OK].
M Check that the name of the printer whose driver you want to install is se-
lected, and then click [Next >].
N Change the printer name if you want, and then click [Next >].
Select the [Yes] check box to configure the printer as default.
O Specify whether or not to print a test page, and then click [Finish].
The printer driver installation starts.
P Restart the computer to complete installation.
❒ A User Code can be set after the printer driver installation. For information
about User Code, see the printer driver Help.
36
Page 37

Preparing for Printing
Changing the Port Settings for SmartDeviceMonitor for Client
Follow the procedure below to change the SmartDeviceMonitor for Client settings, such as TCP/IP timeout, recovery/parallel printing, and printer groups.
❒ There are no settings for NetBEUI protocol.
Windows 95/98:
A Open [Printers] window from [Start] menu.
B In the [Printers] window, click the icon of the printer you want to use. On
the [File] menu, click [Properties].
C Click the [Details] tab, and then click [Configure Port].
The [Port Settings] dialog box appears.
Windows 2000 / Windows NT 4.0:
A Open [Printers] window from [Start] menu.
B In the [Printers] window, click the icon of the printer you want to use. On
the [File] menu, click [Properties].
C On the [Ports] tab, click [Configure Port].
The [Port Settings] dialog box appears.
Windows XP, Windows Server 2003:
A On the [Start] menu, point to [Settings], and then click [Printers].
B In the [Printers] window, click the icon of the printer you want to use. On
the [File] menu, click [Properties].
C Click the [Details] tab, and then click [Configure Port].
The [Port Settings] dialog box appears.
• For TCP/IP, timeout setting can be configured.
❒ If no settings on the [Recovery/Parallel Printing] tab are available, follow
the procedure below.
A Click [Cancel] to close the [Port Configuration:] dialog box.
B Start SmartDeviceMonitor for Client, and then right-click the Smart-
DeviceMonitor for Client icon on the taskbar.
37
Page 38

Preparing for Printing
C Click [Extended Features Settings], and then select the [Set Recovery/Par-
allel Printing for each port] check box.
D Click [OK] to close the [Extended Features Settings] dialog box.
• User, proxy, and timeout settings can be configured for IPP.
For information about these settings, see SmartDeviceMonitor for Client
Help.
38
Page 39

Preparing for Printing
Using the Standard TCP/IP Port
Installing the PCL or RPCS Printer Driver
❒ To install printer driver under Windows 2000/XP Professional, and Windows
Server 2003, you must have an account that has Manage Printers permission.
Log on as an Administrators or Power Users group member.
A Quit all applications currently running.
B Insert the CD-ROM into the CD-ROM drive.
The installer starts.
Auto Run may not work with certain operating system settings. If this happens, launch “Setup.exe” on the CD-ROM root directory.
C Select an interface language, and then click [OK].
The default interface language is English.
D Click [PCL/RPCS Printer Drivers].
E The software license agreement appears in the [License Agreement] dialog
box.
After reading the agreement, click [I accept the agreement], and then click [Next].
F Select a printer driver you want to use in the [Printer Program] dialog box.
You can select several printer drivers.
G Select the printer model you want to use.
The printer name can be changed in the [Change settings for 'Printer Name'] box.
H Double-click the printer name to display the printer settings.
❒ The details shown in [Comment:], [Driver:], and [Port:] vary depending on the
operating system, printer model, and port.
I Click [Port:], and then click [Add].
J Click [Standard TCP/IP], and then click [New Port...].
Configure the Standard TCP/IP port settings, and then see Windows Help if
[Standard TCP/IP Port] does not appear.
K Click [Next] in the [Add Standard TCP/IP Printer Port Wizard] dialog box.
L Enter the printer name or IP address in the [Printer Name or IP Address] box.
39
Page 40

Preparing for Printing
The [Port Name] text box automatically obtains a port name. Change this name
if necessary.
When screen for Device selection appears, select "RICOH NetworkPrinter
Driver C Model".
M Click [Finish] in the [Add Standard TCP/IP Printer Port Wizard] dialog box.
The installation start dialog box reappears.
N Check that the port of the selected printer is displayed in [Port:].
O Configure the default printer as necessary.
P Click [Finish].
The printer driver installation starts.
Q Click [Finish] in the installation completion dialog box.
A message about restarting the computer may appear. Restart the computer
to complete installation.
❒ To stop installation of the selected software, click [Cancel] before installa-
tion is complete.
A message appears if there is a newer version of the printer driver already
installed. If there is, you cannot install the printer driver using Auto Run. If
you still want to install the printer driver, use [Add Printer]. See p.76 “
Message Appears during Installation”.
If a
Installing the PostScript 3 Printer Driver (Windows 2000)
❒ Installing this printer driver requires Administrators permission. Log on using
an account that has Administrators permission.
A Quit all applications currently running.
B Insert the CD-ROM into the CD-ROM drive.
The installer starts.
Auto Run may not work with certain operating system settings. If this happens, launch “Setup.exe” on the CD-ROM root directory.
C Select an interface language, and then click [OK].
The default interface language is English.
40
Page 41

Preparing for Printing
❒ The printer driver with the selected language will be installed. The English
printer driver is installed when the following language is selected: Cestina,
Magyar, Polski, Portugues, Suomi.
D Click [PostScript 3 Printer Driver].
Add Printer Wizard starts.
E Click [Next >].
F Click [Local printer], and then click [Next>].
G Click [Add Port...].
H Click [Standard TCP/IP], and then click [New Port...].
I Click [Next] in the [Add Standard TCP/IP Printer Port Wizard] dialog box.
J Enter the printer name or IP address in the [Printer Name or IP Address] box,
and then click [Next>].
When screen for Device selection appears, select "RICOH NetworkPrinter
Driver C Model".
K Click [Finish] in the [Add Standard TCP/IP Printer Port Wizard] dialog box.
L Check that the name of the printer whose driver you want to install is se-
lected, and then click [Next >].
M Change the printer name if you want, and then click [Next >].
Select the [Yes] check box to configure the printer as default.
N Click [Next >].
O Specify whether or not to print a test page, and then click [Next>].
P Click [Finish].
The printer driver installation starts.
❒ A User Code can be set after the printer driver installation . For information
about User Code, see the printer driver Help.
Installing the PostScript 3 Printer Driver (Windows XP, Windows
Server 2003)
❒ Installing this printer driver requires Administrators permission. Log on using
an account that has Administrators permission.
41
Page 42

Preparing for Printing
A Quit all applications currently running.
B Insert the CD-ROM into the CD-ROM drive.
The installer starts.
Auto Run may not work with certain operating system settings. If this happens, launch “Setup.exe” on the CD-ROM root directory.
C Select an interface language, and then click [OK].
The default interface language is English.
❒ The printer driver with the selected language will be installed. The English
printer driver is installed when the following language is selected: Cestina,
Magyar, Polski, Portugues, Suomi.
D Click [PostScript 3 Printer Driver].
Add Printer Wizard starts.
E Click [Next >].
F Click [Local printer], and then click [Next>].
G Click [Create a new port:].
H Click [Standard TCP/IP] in [Create a new Port], and then click [Next].
I Click [Standard TCP/IP], and then click [OK].
J Click [Next] in the [Add Standard TCP/IP Printer Port Wizard] dialog box.
K Enter the printer name or IP address in the [Printer Name or IP Address] box,
and then click [Next>].
When screen for Device selection appears, select "RICOH NetworkPrinter
Driver C Model".
L Click [Finish] in the [Add Standard TCP/IP Printer Port Wizard] dialog box.
M Check that the name of the printer whose driver you want to install is se-
lected, and then click [Next >].
N Change the printer name if you want, and then click [Next >].
Select the [Yes] check box to configure the printer as default.
O Click [Next >].
P Specify whether or not to print a test page, and then click [Next >].
Q Click [Finish].
The printer driver installation starts.
42
Page 43

Preparing for Printing
❒ A User Code can be set after the printer driver installation. For information
about User Code, see the printer driver Help.
43
Page 44

Preparing for Printing
Using the LPR Port
Installing the PCL or RPCS Printer Driver
❒ To install this printer driver under Windows 2000/XP Professional, Windows
Server 2003, and Windows NT 4.0, you must have an account that has Manage Printers permission. Log on as an Administrators or Power Users group
member.
A Quit all applications currently running.
B Insert the CD-ROM into the CD-ROM drive.
The installer starts.
Auto Run may not work with certain operating system settings. If this happens, launch “Setup.exe” on the CD-ROM root directory.
C Select an interface language, and then click [OK].
The default interface language is English.
D Click [PCL/RPCS Printer Drivers].
E The software license agreement appears in the [License Agreement] dialog
box.
After reading the agreement, click [I accept the agreement], and then click [Next].
F Select a printer driver you want to use in the [Printer Program] dialog box.
You can select several printer drivers.
G Select the printer model you want to use.
The printer name can be changed in the [Change settings for 'Printer Name'] box.
H Double-click the printer name to display the printer settings.
❒ The details shown in [Comment:], [Driver:], and [Port:] vary depending on the
operating system, printer model, and port.
I Click [Port:], and then click [Add].
J Click [LPR Port], and then click [New Port...].
If [LPR Port] does not appear, see Windows Help and install it.
K Enter the printer's IP address in the [Name or address of server providing lpd]
box.
44
Page 45

Preparing for Printing
L Enter “lp” in the [Name of printer or print queue on that server] box, and then
click [OK].
The port is added.
M Check that the port of the selected printer is displayed in [Port:].
N Configure the default printer as necessary.
O Click [Finish].
The printer driver installation starts
P Click [Finish] in the installation completion dialog box.
A message about restarting the computer may appear. Restart the computer
to complete installation.
A message appears if there is a newer version of the printer driver already
installed. If there is, you cannot install the printer driver using Auto Run. If
you still want to install the printer driver, use [Add Printer]. See p.76 “
Message Appears during Installation”.
If a
Installing the PostScript 3 Printer Driver (Windows 2000)
❒ Installing this printer driver requires Administrators permission. Log on using
an account that has Administrators permission.
A Quit all applications currently running.
B Insert the CD-ROM into the CD-ROM drive.
The installer starts.
Auto Run may not work with certain operating system settings. If this happens, launch “Setup.exe” on the CD-ROM root directory.
C Select an interface language, and then click [OK].
The default interface language is English.
❒ The printer driver with the selected language will be installed. The English
printer driver is installed when the following language is selected: Cestina,
Magyar, Polski, Portugues, Suomi.
D Click [PostScript 3 Printer Driver].
Add Printer Wizard starts.
E Click [Next >].
45
Page 46

Preparing for Printing
F Click [Local printer], and then click [Next>].
G Click [Add Port...].
H Click [LPR Port], and then click [New Port...].
I Enter the printer's IP address in the [Name or address of server providing lpd]
box.
J Enter “lp” in the [Name of printer or print queue on that server] box, and then
click [OK].
K Check that the name of the printer whose driver you want to install is se-
lected, and then click [Next >].
L Change the printer name if you want, and then click [Next >].
Select the [Yes] check box to configure the printer as default.
M Click [Next >].
N Specify whether or not to print a test page, and then click [Next>].
O Click [Finish].
The printer driver installation starts.
❒ A User Code can be set after the printer driver installation. For information
about User Code, see the printer driver Help.
Installing the PostScript 3 Printer Driver (Windows XP, Windows
Server 2003)
❒ Installing this printer driver requires Administrators permission. Log on using
an account that has Administrators permission.
A Quit all applications currently running.
B Insert the CD-ROM into the CD-ROM drive.
The installer starts.
Auto Run may not work with certain operating system settings. "If this happens, launch “Setup.exe” on the CD-ROM root directory."
C Select an interface language, and then click [OK].
The default interface language is English.
46
Page 47

Preparing for Printing
❒ The printer driver with the selected language will be installed. The English
printer driver is installed when the following language is selected: Cestina,
Magyar, Polski, Portugues, Suomi.
D Click [PostScript 3 Printer Driver].
Add Printer Wizard starts.
E Click [Next >].
F Click [Local Printer], and then click [Next>].
G Click [Create a new port:].
H Click [LPR Port] in [Create a new Port], and then click [Next>].
I Enter the printer's IP address in the [Name or address of server providing lpd]
box.
J Enter “lp” in the [Name of printer or print queue on that server box], and then
click [OK].
K Check that the name of the printer whose driver you want to install is se-
lected, and then click [Next >].
L Change the printer name if you want, and then click [Next >].
Select the [Yes] check box to configure the printer as default.
M Click [Next >].
N Specify whether or not to print a test page, and then click [Next>].
O Click [Finish].
The printer driver installation starts.
❒ A User Code can be set after the printer driver installation. For information
about User Code, see the printer driver Help.
Installing the PostScript 3 Printer Driver (Windows NT 4.0)
❒ Installing this printer driver requires Administrators permission. Log on using
an account that has Administrators permission.
A Quit all applications currently running.
B Insert the CD-ROM into the CD-ROM drive.
47
Page 48

Preparing for Printing
The installer starts.
Auto Run may not work with certain operating system settings. If this happens, launch “Setup.exe” on the CD-ROM root directory.
C Select an interface language, and then click [OK].
The default interface language is English.
❒ The printer driver with the selected language will be installed. The English
printer driver is installed when the following language is selected: Cestina,
Magyar, Polski, Portugues, Suomi.
D Click [PostScript 3 Printer Driver].
Add Printer Wizard starts.
E Click [Next].
F Click [Add Port:].
G Select [LPR Port], and then click [OK].
H Enter the printer's IP address in the [Name or address of server providing lpd
box] box.
I Enter “lp” in the [Name of printer or print queue on that server ] box, and then
click [OK].
J Check that the name of the printer whose driver you want to install is se-
lected, and then click [Next >].
K Change the printer name if you want, and then click [Next >].
Select the [Yes] check box to configure the printer as default.
L Specify whether or not to print a test page, and then click [Finish].
The printer driver installation starts.
M Restart the computer to complete installation.
❒ A User Code can be set after the printer driver installation. For information
about User Code, see the printer driver Help.
48
Page 49

Preparing for Printing
Using as the Windows Network Printer
Installing the PCL or RPCS Printer Driver
To use the print server, install the printer driver by selecting "Network printer
server", and then select the Windows 2000/XP, Windows Server 2003, or Windows NT 4.0 shared printer.
This section assumes that the client has already been configured to communicate with a Windows 2000/XP, Windows Server 2003, or Windows NT 4.0 print
server. Do not begin the following procedure before the client is set up and configured correctly.
❒ To install printer driver under Windows 2000/XP Professional, Windows Serv-
er 2003, and Windows NT 4.0, you must have an account that has Manage
Printers permission. For this, log on as an Administrators or Power Users
group member.
❒ If you print with a print server connected to the printer using the SmartDevice-
Monitor port, Recovery Printing and Parallel Printing cannot be used from the
client.
❒ If you print with a Windows XP or Windows Server 2003 print server, notifica-
tion functions of SmartDeviceMonitor may not be used with the client.
❒ If you print with a Windows NT 4.0 print server, install the printer driver before
you connect the print server to the printer.
A Quit all applications currently running.
B Insert the CD-ROM into the CD-ROM drive.
The installer starts.
Auto Run may not work with certain operating system settings. If this happens, launch “Setup.exe” on the CD-ROM root directory.
C Select an interface language, and then click [OK].
The default interface language is English.
D Click [PCL/RPCS Printer Drivers].
E The software license agreement appears in the [License Agreement] dialog
box.
After reading the agreement, click [I accept the agreement], and then click [Next].
F Select a printer driver you want to use in the [Printer Program] dialog box.
You can select several printer drivers.
49
Page 50

Preparing for Printing
G Select the [Printer Name] check box to select the printer models you want
to use.
The printer name can be changed in the [Change settings for 'Printer Name'] box.
H Double-click the printer name to display the printer settings.
The details shown in [Comment:], [Driver:], and [Port:] vary depending on the
operating system, printer model, and port.
I Click [Port:], and then click [Add].
J Click [Network Printer], and then click [OK].
K Double-click the computer name you want to use as a print server in the
[Browse for Printer] window.
L Select the printer you want to use, and then click [OK].
M Check that the port of the selected printer is displayed in [Port:].
N Configure the User Code as necessary.
For an RPCS printer driver, a User Code can be set after the printer driver installation. For information about User Code, see the printer driver Help.
O Select the [Default Printer] check box to configure the printer as default.
P Click [Finish].
The printer driver installation starts.
Q Click [Finish] in the installation completion dialog box.
A message about restarting the computer may appear. Restart the computer
to complete installation.
A message appears if there is a newer version of the printer driver already
installed. If there is, you cannot install the printer driver using Auto Run. If
you still want to install the printer driver, use [Add Printer]. See p.76 “
Message Appears during Installation”.
Installing the PostScript 3 Printer Driver (Windows 95/98/Me)
If a
❒ If you print from a print server connected to the printer using the SmartDevice-
Monitor port, the client cannot use Recovery Printing and Parallel Printing.
A Quit all applications currently running.
B Insert the CD-ROM into the CD-ROM drive.
50
Page 51

Preparing for Printing
The installer starts.
Auto Run may not work with certain operating system settings. If this happens, launch “Setup.exe” on the CD-ROM root directory.
C Select an interface language, and then click [OK].
The default interface language is English.
❒ The printer driver with the selected language will be installed. The English
printer driver is installed when the following language is selected: Cestina,
Magyar, Polski, Portugues, Suomi.
D Click [PostScript 3 Printer Driver].
Add Printer Wizard starts.
E Click [Next].
F Click [Network Printer], and then click [Next].
G Click [Browse].
H Double-click the computer name you want to use as a print server in the
[Browse for Printer] window.
I Select the printer you want to use, and then click [OK].
J Check the location of the selected printer is shown, and then click [Next].
K Change the printer name if you want, and then click [Next].
Select the [Yes] check box to configure the printer as default.
L Specify whether or not to print a test page, and then click [Finish].
M Restart the computer.
❒ A User Code can be set after the printer driver installation. For information
about User Code, see the printer driver Help.
Installing the PostScript 3 Printer Driver (Windows 2000)
❒ Installing a printer driver requires Administrators permission. Log on using an
account that has Administrators permission.
❒ If you print from a print server connected to the printer using the SmartDevice-
Monitor port, the client cannot use Recovery Printing and Parallel Printing.
A Quit all applications currently running.
51
Page 52

Preparing for Printing
B Insert the CD-ROM into the CD-ROM drive.
The installer starts.
Auto Run may not work with certain operating system settings. If this happens, launch “Setup.exe” on the CD-ROM root directory.
C Select an interface language, and then click [OK].
The default interface language is English.
❒ The printer driver with the selected language will be installed. The English
printer driver is installed when the following language is selected: Cestina,
Magyar, Polski, Portugues, Suomi.
D Click [PostScript 3 Printer Driver].
Add Printer Wizard starts.
E Click [Next].
F Click [Network printer], and then click [Next].
G Click [Next].
H Double-click the computer name you want to use as a print server in the
[Shared printers] window.
I Select the printer you want to use, and then click [Next].
J The printer driver installation starts.
K Click [Next>].
Select the [Yes] check box to configure the printer as default.
L Click [Finish].
Restart the computer to complete installation.
❒ A User Code can be set after the printer driver installation. For information
about User Code, see the printer driver Help.
Installing the PostScript 3 Printer Driver (Windows XP, Windows
Server 2003)
❒ Installing this printer driver requires Administrators permission. Log on using
an account that has Administrators permission.
52
Page 53

Preparing for Printing
❒ If you print from a print server connected to the printer using the SmartDevice-
Monitor port, the client cannot use Recovery Printing and Parallel Printing.
❒ If you print with a Windows XP or Windows Server 2003 print server, Smart-
DeviceMonitor notification functions may not be possible for the client.
A Quit all applications currently running.
B Insert the CD-ROM into the CD-ROM drive.
The installer starts.
Auto Run may not work with certain operating system settings. If this happens, launch “Setup.exe” on the CD-ROM root directory.
C Select an interface language, and then click [OK].
The default interface language is English.
❒ The printer driver with the selected language will be installed. The English
printer driver is installed when the following language is selected: Cestina,
Magyar, Polski, Portugues, Suomi.
D Click [PostScript 3 Printer Driver].
Add Printer Wizard starts.
E Click [Next].
F Click [Network printer] and then click [Next].
G Click [Next].
H Double-click the computer name you want to use as a print server in the
[Shared printers] window.
I Select the printer you want to use, and then click [Next].
J The printer driver installation starts.
K Click [Next>].
Select the [Yes] check box to configure the printer as default.
L Click [Finish].
Restart the computer to complete installation.
❒ A User Code can be set after the printer driver installation. For information
about User Code, see the printer driver Help.
53
Page 54

Preparing for Printing
Installing the PostScript 3 Printer Driver (Windows NT 4.0)
❒ Installing this printer driver requires Administrators permission. Log on using
an account that has Administrators permission.
❒ If you print from a print server connected to the printer using the SmartDevice-
Monitor port, the client cannot use Recovery Printing and Parallel Printing.
❒ To print from a Windows NT 4.0 print server, install the printer driver before
you connect the print server to the printer.
A Quit all applications currently running.
B Insert the CD-ROM into the CD-ROM drive.
The installer starts.
Auto Run may not work with certain operating system settings. If this happens, launch “Setup.exe” on the CD-ROM root directory.
C Select an interface language, and then click [OK].
The default interface language is English.
❒ The printer driver with the selected language will be installed. The English
printer driver is installed when the following language is selected: Cestina,
Magyar, Polski, Portugues, Suomi.
D Click [PostScript 3 Printer Driver].
Add Printer Wizard starts.
E Click [Next].
F Click [Network printer], and then click [Next].
G Click [Next].
H Double-click the computer name you want to use as a print server in the
[Shared printers] window.
I Select the printer you want to use, and then click [Next].
J Check the location of the selected printer is shown, and then click [Next].
K Change the printer name if you want, and then click [Next].
L Specify whether or not to print a test page, and then click [Finish].
Restart the computer to complete installation.
54
Page 55

Preparing for Printing
❒ A User Code can be set after the printer driver installation. For information
about User Code, see the printer driver Help.
55
Page 56

Preparing for Printing
Using as the NetWare Print Server/Remote
Printer
This explains how to set up the Windows computer used as the NetWare client.
❒ To install this printer driver under Windows 2000/XP Professional, Windows
Server 2003, and Windows NT 4.0, you must have an account that has Manage Printers permission. Log on as an Administrators or Power Users group
member.
The following explanation assumes NetWare Client is installed on the client computer and the NetWare server environment is correctly set up. Install all necessary client applications before following this procedure.
Set up the printer driver while logging on to the NetWare file server.
The following values are used in the example:
• Operating system: Windows 98
• NetWare version: 4.1
• File server name: CAREE
• Queue name: R-QUEUE
A Insert the CD-ROM into the CD-ROM drive.
The installer starts.
Auto Run may not work with certain operating system settings. If this happens, launch “Setup.exe” on the CD-ROM root directory.
B Select an interface language, and then click [OK].
The default interface language is English.
C Click [PCL/RPCS Printer Drivers].
D The software license agreement appears in the [License Agreement] dialog
box.
After reading the agreement, click [I accept the agreement], and then click [Next].
E Select the printer driver you want to use in the [Printer Program] dialog
box.
You can select several printer drivers.
F Select the [Printer Name] check box to select the printer models you want
to use.
The printer name can be changed in the [Change settings for 'Printer Name'] box.
G Double-click the printer name to display the printer settings.
56
Page 57

Preparing for Printing
The details shown in [Comment:], [Driver:], and [Port:] vary depending on the
operating system, printer model, and port.
H Click [Port:], and then click [Add].
I Click [Network Printer], and then click [OK].
J Double-click the name of the NetWare file server on the network tree.
The created queue is displayed.
K Select the print queue, and then click [OK].
L Check that the port of the selected printer is displayed in [Port:].
M Click [Finish].
The printer driver installation starts.
N Click [Finish] in the [Component selection] dialog box.
O Click [Finish] in the [Introduction complete] dialog box.
P In the [Printers] window, open the printer properties.
Under Windows XP or Windows Server 2003, open the printer properties from
the [Printers and Faxes] window.
Q On the [Printer Settings] tab, clear the [Form Feed] and [Enable Banner] check
boxes.
Under Windows 2000/XP, Windows Server 2003, or Windows NT 4.0, click
the [NetWare setting] tab.
Do not select these check boxes since they are automatically selected by the
printer driver. If you select the check boxes, the printer may not print correctly.
R Click [OK] to close the printer properties dialog box.
❒ The protocol is set to inactive as default. Enable it using Web Image Mon-
itor or Telnet
When using the PostScript 3 Printer Driver
Follow the procedure below to set up the PostScript 3 printer driver.
A In the [Printers] or [Printers and Faxes] window, open the printer properties.
B Click the [PostScript] tab.
❒ When using Windows 2000/XP or Windows NT 4.0, click the [Device Set-
tings] tab, and then proceed to step to clear the check box.
57
Page 58

Preparing for Printing
C Click [Advanced].
D Clear the [Send CTRL+D before job] and [Send CTRL+D after job] check boxes,
and then click [OK].
E Click [OK] to close the printer properties dialog box.
Form Feed
Do not use NetWare to configure form feed. Form feed is controlled by the printer
driver on Windows. If NetWare form feed is configured, the printer may not print
properly.
Follow the procedure below to disable form feed according to the operating system used:
• Under Windows 95/98/Me, clear the [Form feed] check box on the [Printer Set-
tings] tab in the printer properties dialog box.
• Under Windows 2000/XP, Windows Server 2003, or Windows NT 4.0, clear
the [Form feed] check box on the [NetWare Settings] tab in the printer properties
dialog box.
Banner Page
Do not use NetWare to configure a banner page.
Follow the procedure below to disable banner pages according to the operating
system used:
• Under Windows 95/98/Me, clear the [Enable banner] check box on the [Printer
Settings] tab in the printer properties dialog box.
• Under Windows 2000/XP, Windows Server 2003, or Windows NT 4.0, clear
the [Enable banner] check box on the [NetWare Settings] tab in the printer properties dialog box.
Printing after Resetting the Printer
Printer to print server connection requires 30 - 40 seconds to resume after the
printer is reset. During this period, jobs may be accepted (depending on NetWare specifications) but not printed.
To print after resetting the printer as the remote printer, check on the print server
that the remote printer is disconnected, or wait for two minutes before trying to
print.
58
Page 59

Preparing for Printing
Installing the Printer Driver Using USB
This section explains how to install printer drivers using USB.
❒ Make sure that printer is connected to the computer's USB ports using the
USB interface cable.
Before installing, check that only the operating system is running on the computer and no print jobs are in progress.
The printer drivers can be installed from the CD-ROM provided with this printer.
Windows 98 SE/Me - USB
❒ Installation via USB is not possible under Windows 95/98. Upgrade to Win-
dows 98 SE/Me.
If the printer driver has already been installed, plug and play is enabled, and the
icon of the printer connected to the "USB" port is added to the [Printers] window.
A Check that the power of the printer is off.
B Connect the printer and computer using the USB cable.
C Turn on the power of the printer.
The plug and play function starts and the [New Hardware Found], [Device Driver
Wizard], or [Add New Hardware Wizard] dialog box appears, depending on the op-
erating system.
D Click [Next>].
E Click [Search for the best driver for your device. {Recommended}.], and then click
[Next>].
F Select the [Specify a location:] check box, and then click [Browse...].
The [Browse for Folder] dialog box appears.
G Insert the CD-ROM into the CD-ROM drive.
❒ When Auto Run starts, click [Exit].
❒ To disable Auto Run, press the {Shift} key when inserting the CD-ROM into
the drive and keep it pressed until the computer finishes reading from the
CD-ROM.
H Specify the location where USB Printing Support is located, and then
click [Next>].
59
Page 60

Preparing for Printing
If the CD-ROM drive is D, the source files of USB Printing Support are stored
in the following location:
D:DRIVESRPCSWIN98_ME
I Check the location, and then click [Next].
USB Printing Support is installed.
J Click [Finish].
If the printer driver has already been installed, plug and play is enabled, and
the icon of the printer connected to the "USB001" port is added to the [Printers]
window.
K Click [Next>].
L Click [Search for the best driver for your device. {Recommended}.], and then click
[Next>].
M Select the [Specify a location:], check box, and then click [Browse...].
The [Browse for Folder] dialog box appears.
N Insert the CD-ROM into the CD-ROM drive.
❒ When Auto Run starts, click [Exit].
❒ To disable Auto Run, press the {Shift} key when inserting the CD-ROM into
the drive and keep it pressed until the computer finishes reading from the
CD-ROM.
O Specify the location where the source files of the printer driver is stored,
and then click [Next>].
If the CD-ROM drive is D, the source files of the printer driver are stored in the
following location:
•RPCS
D:DRIVESRPCSWIN98_ME(Language)DISK1
•PCL 5c
D:DRIVESPCL5cWIN98_ME(Language)DISK1
• PostScript 3
D:DRIVESPS3WIN98_ME(Language)DISK1
P Check the location, and then click [Next].
Add Printer Wizard starts.
Q Click [Finish].
Installation is complete. If installation is successful, the icon of the printer connected to the "USB001" port is added to the [Printers] window.
60
Page 61

Preparing for Printing
❒ The number after "USB" varies depending on the number of printers con-
nected.
❒ It is not necessary to reinstall USB Printing Support when connecting a dif-
ferent printer via USB interface when USB Printing Support is installed.
❒ After installing USB Printing Support, if the printer driver is not installed, fol-
low the plug-and-play instructions of the printer.
❒ Install the printer driver from the CD-ROM provided with the printer.
Windows 2000 - USB
❒ Installing a printer driver requires Administrators permission. Log on using an
account that has Administrators permission.
If the printer driver has already been installed, plug and play is enabled, and the
icon of the printer connected to the "USB" port is added to the [Printers] window.
If the printer driver is not installed, follow the plug-and-play instructions of the
printer to install it from the CD-ROM provided.
A Check that the power of the printer is off.
B Connect the printer and computer using the USB cable.
C Turn on the power of the printer.
Found New Hardware Wizard starts, and USB Printing Support is installed automatically.
D Click [Next] in the [Found New Hardware Wizard] dialog box.
E Select the [Search for a suitable driver for my device (recommended)] check box,
and then click [Next]."
F Select the [Specify location] check box, and then click [Next].
G Insert the CD-ROM into the CD-ROM drive.
❒ When Auto Run starts, click [Exit].
❒ To disable Auto Run, press the left {Shift} key when inserting the CD-ROM
into the drive and keep it pressed until the computer finishes reading from
the CD-ROM.
H Specify the location where the source files of the printer driver is stored.
If the CD-ROM drive is D, the source files of the printer driver are stored in the
following location:
61
Page 62

Preparing for Printing
•RPCS
D:DRIVESRPCSWIN2K_XP(Language)DISK1
•PCL 5c
D:DRIVESPCL5cWIN2K_XP(Language)DISK1
• PostScript 3
D:DRIVESPS3WIN2K_XP(Language)DISK1
I Check the printer driver location, and then click [OK].
J Click [Next].
K Click [Finish].
If the printer driver has already been installed, plug and play is enabled, and
the icon of the printer connected to the "USB001" port is added to the [Printers]
window.
❒ The number after “USB” varies depending on the number of printers con-
nected.
Windows XP, Windows Server 2003 - USB
❒ Installing a printer driver requires Administrators permission. Log on using an
account that has Administrators permission.
If the printer driver has already been installed, plug and play is enabled, and the
icon of the printer connected to the "USB" port is added to the [Printers] window.
The printer drivers can be installed from the CD-ROM provided with this printer.
If the printer driver is not installed, follow the plug-and-play instructions of the
printer to install it from the CD-ROM provided.
A Check that the power of the printer is off.
B Connect the printer and computer using the USB cable.
C Turn on the power of the printer.
Found New Hardware Wizard starts, and USB Printing Support is installed automatically.
D In the Found New Hardware Wizard display, click [Search for a suitable driver
for my device [recommended] ], and then click [Next>].
E To disable Auto Run, press the left {SHIFT} key when inserting the CD-
ROM into the drive and keep it pressed until the computer finishes reading from the CD-ROM.
62
Page 63

Preparing for Printing
❒ If Auto Run starts, click [Cancel], and then [Exit].
F Select the [Include this location in the search] check box under [Search for the
best driver in these location], and then click [Browse] to select the printer driv-
er location.
If the CD-ROM drive is D, the source files of the printer driver are stored in the
following location:
•RPCS
D:DRIVESRPCSWIN2K_XP(Language)DISK1
•PCL 5c
D:DRIVESPCL5cWIN2K_XP(Language)DISK1
• PostScript 3
D:DRIVESPS3WIN2K_XP(Language)DISK1
G Check the printer driver location, and then click [Next].
H Click [Continue].
I Click [Finish].
If installation is successful, the icon of the printer connected to the "USB001"
port is added to the [Printers] window.
❒ The number after “USB” varies depending on the number of printers con-
nected.
Troubleshooting USB
Problem Solutions
The printer is not recognized automatically.
Windows has already configured
the USB settings.
Turn off the power of the printer, reconnect the USB cable,
and then turn it on again.
Open Windows' Device Manager, and then, under [Univer-
sal Serial Bus controllers], remove any conflicting devices.
Conflicting devices have a yellow [!] or [?] icon by them.
Take care not to accidentally remove required devices.
For details, see Windows Help.
❒ When using Windows 2000/XP or Windows Server
2003, an erroneous device is displayed under [USB
Controller]in the [Device Manager] dialog box.
63
Page 64

Preparing for Printing
Printing with Parallel Connection
To use a printer connected using a parallel interface, click [LPT1] when installing
the printer driver.
Installing the PCL or RPCS Printer Driver
❒ To install this printer driver under Windows 2000/XP Professional, Windows
Server 2003, and Windows NT 4.0, you must have an account that has Manage Printers permission. Log on as an Administrators or Power Users group
member.
A Quit all applications currently running.
B Insert the CD-ROM into the CD-ROM drive.
The installer starts.
Auto Run may not work with certain operating system settings. If this happens, launch “Setup.exe” on the CD-ROM root directory.
C Select an interface language, and then click [OK].
The default interface language is English.
D Click [PCL/RPCS Printer Drivers].
E The software license agreement appears in the [License Agreement] dialog
box.
After reading the agreement, click [I accept the agreement], and then click [Next].
F Select a printer driver you want to use in the [Printer Program] dialog box.
You can select several printer drivers.
G Select the [Printer Name] check box to select the printer models you want
to use.
The printer name can be changed in the [Change settings for 'Printer Name'] box.
H Double-click the printer name to display the printer settings.
The details shown in [Comment:], [Driver:], and [Port:] vary depending on the
operating system, printer model, and port.
I Check that [LPT1:] is shown in [Port:].
J Select the [Default Printer] check box to configure the printer as default.
K Click [Finish].
64
Page 65

Preparing for Printing
The printer driver installation starts.
L Click [Finish] in the installation completion dialog box.
❒ To stop installation of the selected software, click [Cancel] before installa-
tion is complete. Restart the computer and reinstall other software programs or printer drivers.
A message appears if there is a newer version of the printer driver already
installed. If there is, you cannot install the printer driver using Auto Run. If
you still want to install the printer driver, use [Add Printer]. See p.76 “
Message Appears during Installation”.
Installing the PostScript 3 Printer Driver (Windows 95/98/Me)
A Quit all applications currently running.
If a
B Insert the CD-ROM into the CD-ROM drive.
The installer starts.
Auto Run may not work with certain operating system settings. If this happens, launch “Setup.exe” on the CD-ROM root directory.
C Select an interface language, and then click [OK].
The default interface language is English.
❒ The printer driver with the selected language will be installed. The English
printer driver is installed when the following language is selected: Cestina,
Magyar, Polski, Portugues, Suomi.
D Click [PostScript 3 Printer Driver].
Add Printer Wizard starts.
E Click [Next].
F Click [Local Printer], and then click [Next].
A dialog box for selecting the printer manufacturer and model name appears.
G Select the name of the printer whose driver you want to install, and then
click [Next].
H In the [Available ports:] box, click [Printer Port], and then click [Next].
I Change the printer name if you want, and then click [Next].
Select the [Yes] check box to configure the printer as default.
65
Page 66

Preparing for Printing
J Specify whether or not to print a test page, and then click [Finish].
K Restart the computer to complete installation.
❒ A User Code can be set after the printer driver installation. For information
about User Code, see the printer driver Help.
Installing the PostScript 3 Printer Driver (Windows 2000)
❒ Installing this printer driver requires Administrators permission. Log on using
an account that has Administrators permission.
A Quit all applications currently running.
B Insert the CD-ROM into the CD-ROM drive.
The installer starts.
Auto Run may not work with certain operating system settings. If this happens, launch “Setup.exe” on the CD-ROM root directory.
C Select an interface language, and then click [OK].
The default interface language is English.
❒ The printer driver with the selected language is installed. The English print-
er driver is installed when either of the following languages is selected: Portuguese, Finnish.
D Click [PostScript 3 Printer Driver].
Add Printer Wizard starts.
E Click [Next].
F Click [Local Printer], and then click [Next].
A dialog box for selecting the printer manufacturer and model name appears.
G Select the name of the printer whose driver you want to install, and then
click [Next].
H Specify whether or not to print a test page, and then click [Finish].
I Select whether or not you want to print a test page, and then click [Fin-
ish].
The printer driver installation starts.
J Restart the computer to complete installation.
66
Page 67

Preparing for Printing
❒ A User Code can be set after the printer driver installation. For information
about User Code, see the printer driver Help.
Installing the PostScript 3 Printer Driver (Windows XP, Windows
Server 2003)
❒ Installing this printer driver requires Administrators permission. Log on using
an account that has Administrators permission.
A Quit all applications currently running.
B Insert the CD-ROM into the CD-ROM drive.
The installer starts.
Auto Run may not work with certain operating system settings. If this happens, launch “Setup.exe” on the CD-ROM root directory.
C Select an interface language, and then click [OK].
The default interface language is English.
❒ The printer driver with the selected language will be installed. The English
printer driver is installed when the following language is selected: Cestina,
Magyar, Polski, Portugues, Suomi.
D Click [PostScript 3 Printer Driver].
Add Printer Wizard starts.
E Click [Next].
F Click [Local Printer], and then click [Next].
G Select the port you want to use, and then click [Next].
A dialog box for selecting the printer manufacturer and model name appears.
H Select the name of the printer whose driver you want to install, and then
click [Next].
I Change the printer name if you want, and then click [Next].
J Specify whether or not to print a test page, and then click [Finish].
K Restart the computer to complete installation.
67
Page 68

Preparing for Printing
❒ A User Code can be set after the printer driver installation. For information
about User Code, see the printer driver Help.
Installing the PostScript 3 Printer Driver (Windows NT 4.0)
❒ Installing this printer driver requires Administrators permission. Log on using
an account that has Administrators permission.
A Quit all applications currently running.
B Insert the CD-ROM into the CD-ROM drive.
The installer starts.
Auto Run may not work with certain operating system settings. If this happens, launch “Setup.exe” on the CD-ROM root directory.
C Select an interface language, and then click [OK].
The default interface language is English.
❒ The printer driver with the selected language will be installed. The English
printer driver is installed when the following language is selected: Cestina,
Magyar, Polski, Portugues, Suomi.
D Click [PostScript 3 Printer Driver].
Add Printer Wizard starts.
E Click [Next].
F Select the port you want to use, and then click [Next].
A dialog box for selecting the printer manufacturer and model name appears.
G Select the name of the printer whose driver you want to install, and then
click [Next].
H Change the printer name if you want, and then click [Next].
I Click [Next].
J Specify whether or not to print a test page, and then click [Finish].
K Restart the computer to complete installation.
❒ A User Code can be set after the printer driver installation. For information
about User Code, see the printer driver Help.
68
Page 69

Preparing for Printing
Installing the Printer Driver Using IEEE 1394
(SCSI print)
The printer drivers can be installed from the CD-ROM provided with this printer.
❒ Quit all applications currently running, and do not print during installation.
❒ Do not connect IEEE 1394 or USB devices to the computer or turn on another
printers during installation.
❒ Before uninstalling the printer driver, check that the IEEE 1394 interface cable
is disconnected from the computer.
❒ SCSI print must be set to "active" from the control panel. For details, see
p.147 “
❒ This printer can receive print data from one computer at a time only. An mes-
sage may appear if jobs from different computers collide.
❒ If jobs collide, the first received is printed first.
Host Interface Menu”.
❒ When the printer driver is properly installed, connecting or disconnecting the
optional IEEE 1394 cable causes the printer icon to change.
Windows 2000
❒ If [Found New Hardware Wizard] appears every time the computer is started or
the cable is connected, disable the device. To install another printer driver after setting the "1394_00n" port, click [1394_00] as a port during the printer
driver installation.
❒ Installing this printer driver requires Administrators permission. Log on using
an account that has Administrators permission.
❒ The optional 1394 interface unit can be used only with Service Pack 1 (SP1)
or higher.
A Connect the printer and computer using the IEEE 1394 interface cable.
B Click [Next] in the [Found New Hardware Wizard] dialog box.
C When the message "This wizard will complete the installation for this
Device: Unknown" appears, click [Specify a location], and then click [Next>].
D When the message "Locate Driver Files" appears, select the [Optional
search locations] check box, and then click [Specify a location], and then click
[Next>].
69
Page 70

Preparing for Printing
E To disable Auto Run, press the left {SHIFT} key when inserting the CD-
ROM into the drive and keep it pressed until the computer finishes reading from the CD-ROM.
If Auto Run starts, click [Cancel], and then [Exit].
F Click [Browse].
G Select the printer driver you want to use.
If the CD-ROM drive is D, the source files of the printer driver are stored in the
following location:
•RPCS
D:DRIVESRPCSWIN2K_XP(Language)DISK1
•PCL 5c
D:DRIVESPCL5cWIN2K_XP(Language)DISK1
• PostScript 3
D:DRIVESPS3WIN2K_XP(Language)DISK1
H Click [Open].
I Click [OK].
J Follow the instructions.
When installation is complete, the printer connected to "1394_00n" appears
in the [Printers] window. ("n" shows the number of printers connected.)
❒ If the printer driver has already been installed, the printer icon is added to
the [Printers] window. In this case, printer driver installation is not necessary.
❒ If printing does not work properly after the installation, delete the port and
reinstall the printer driver. For details, see "Printer Does Not Print", Main-
tenance Guide.
❒ If you do not want to install the printer when Found New Hardware Wizard
starts under an operating system that supports SCSI print, disable the device by following the procedure below.
A When the [Found New Hardware Wizard] dialog box appears, click [Next>].
B When the message "This wizard will complete the installation for this
Device: Unknown" appears, select the [Search for a suitable driver for my
device [recommended]] check box, and then click [Next>].
C When the message "Please choose your search and installation option."
appears, clear all check boxes from [Search for the best driver in these loca-
tions.], and then click [Next>].
70
Page 71

Preparing for Printing
D When the message "Driver Files Search Results" appears, select the
[Disable the device. The Add/Remove Hardware Wizard in the control Panel can
be able to complete the driver installations.] check box, and then click [Fin-
ish].
Windows XP, Windows Server 2003
❒ SCSI print must be set to "active" from the control panel. For details, see
p.147 “
❒ Installing this printer driver requires Administrators permission. Log on using
an account that has Administrators permission.
❒ This printer can receive print data from one computer at a time only. If a job
from a computer collides with other data, a message may appear on the computer.
Host Interface Menu”.
❒ To install another printer driver after setting the "1394_00n" port, click
[1394_00] as a port during the printer driver installation.
❒ When the printer driver is properly installed, connecting or disconnecting the
optional IEEE 1394 cable causes the printer icon to change.
A Connect the printer and computer using the IEEE 1394 interface cable.
When the [Found New Hardware Wizard] dialog box appears, check that [This wiz-
ard helps you install software for: (Unknown)] is displayed.
B Select the [Install from a list on specific location (Advanced)] check box, and
then click [Next>].
C When the message "Please choose your search and installation option."
appears, select the [Search for the best driver in these locations.] check box, select the [Include this location in the search:] check box, and then select the [In-
clude this location in the search:] check box.
D To disable Auto Run, press the left {SHIFT} key when inserting the CD-
ROM into the drive and keep it pressed until the computer finishes reading from the CD-ROM.
❒ If Auto Run starts, click [Cancel], and then [Exit].
E Specify the location where the source files of the printer driver is stored,
and then click [Next].
If the CD-ROM drive is D, the source files of the printer driver are stored in
the following location:
•RPCS
71
Page 72

Preparing for Printing
D:DRIVESRPCSWIN2K_XP(Language)DISK1
•PCL 5c
D:DRIVESPCL5cWIN2K_XP(Language)DISK1
• PostScript 3
D:DRIVESPS3WIN2K_XP(Language)DISK1
When installation is complete, the printer connected to "1394_00n" appears
in the [Printers and Faxes] window. ("n" shows the number of printers connected.)
F Follow the instructions.
❒ If the printer driver has already been installed, the printer icon is added to
the [Printers and Faxes] window. In this case, printer driver installation is not
necessary.
❒ Even if the printer driver is already installed, the message " Found New
Hardware Wizard" may appear when the printer and the computer are connected using the IEEE 1394 interface cable for the first time. If it does, install the printer driver.
❒ If printing does not work properly after the installation, delete the port and
reinstall the printer driver. For details, see "Printer Does Not Print", Main-
tenance Guide.
❒ If you do not want to install the printer when Found New Hardware Wizard
starts under an operating system that supports SCSI print, disable the device by following the procedure below
A When the [Found New Hardware Wizard] dialog box appears, check that
[This wizard helps you install software for: Unknown] displayed, select [Install
from a list on specific location (Advanced)] check box, and then click [Next>].
B When the message "Please choose your search and installation option."
appears, clear all check boxes from [Search for the best driver in these loca-
tions.], and then click [Next>].
C When the message "The wizard could not find the software on your
computer for." appears, click [OK].
D When the message "Cannot Install this Hardware" appears, select the
[Don't prompt again to install the software] check box, and then click [Finish].
72
Page 73

Preparing for Printing
Printing with Bluetooth™ Connection
Supported Profiles
❖ SPP, HCRP
• A maximum of two Bluetooth adaptor or Bluetooth-equipped computers
can be connected at the same time using the Bluetooth interface: one by
SPP, one by HCRP.
• When connecting more than one Bluetooth adaptor or Bluetooth-equipped
computer at the same time, the first device that establishes connection is
selected. When selecting the connection between the other devices, cancel the first established connection.
• Conditions for bidirectional communications
• SPP connection does not support bidirectional communications.
• HCRP connection supports bidirectional communications.
❖ BIP
• For BIP connection, a module including PostScript 3 must be installed in
the printer.
• Only one Bluetooth adaptor or Bluetooth-equipped computer can be con-
nected via BIP.
• Only JPEG images that can be printed using BIP.
• User Code are disabled for BIP.
You cannot print if print functions are restricted.
• Some printers do not support BIP.
Printing with Bluetooth™ Connection
To install the printer driver, follow the procedure used to install parallel interface.
❒ To install the printer driver under Windows 2000/XP Professional, Windows
Server 2003, and Windows NT 4.0, you must have an account that has Manage Printers permission. Log on as an Administrators or Power Users group
member.
❒ System requirements vary depending on the Bluetooth standard and specifi-
cations. For details, see the manuals provided with each product.
❒ For information about setting up Bluetooth under other operating systems or
using it with different utilities, see the manuals provided with those operating
systems or utilities.
73
Page 74

Preparing for Printing
A Start 3Com Bluetooth Connection Manager.
B Check that the printer you want to use appears in 3Com Bluetooth Con-
nection Manager.
C On the [Tool] menu, click [COM port].
D Check that the message "Bluetooth Serial Client (COMx) " appears un-
der Client Ports. (X indicates the COM port number used by Bluetooth™.)
E Click [Close].
F On the [Start] menu, point to [Settings], and then click [Printers].
The [Printers] window appears.
G Click the icon of the printer you want to use.
H On the [File] menu, click [Properties].
I Click the [Ports] tab.
J Under [Port], select the [COMx:] check box. X indicates the COM port
number used by Bluetooth™.
K Click [OK].
Close the [Printers] window.
❖ If a dialog box appears while transmitting a print job, reestablish network connec-
tion as follows:
A Select the printer you want to use in the [Printers and Faxes] box.
B Click [Connect].
❒ To always use the same printer, select the [Always use for this connection]
check box.
For details, see the manuals provided with the Bluetooth adaptor or
computer equipped with Bluetooth.
Configuring Security Mode Settings
A Start 3Com Bluetooth Connection Manager.
B On the [Tools] menu, click [Security Mode].
The [Security Mode] dialog box appears.
C Select the security mode in the [Security Mode:] list.
74
Page 75

Preparing for Printing
If you click [High], or [Custom], and specify [Link] in the [Custom Settings] dialog
box, enter the Bluetooth password. For information about entering the password, see p.75 “
For all other security modes and custom settings, no password is required.
❒ For information about each mode, see the manuals provided with the utility.
Send the print job to the printer in use.”
D Click [OK].
Close the [Security Mode] dialog box.
For details about the security mode, see 3Com Bluetooth Connection Manager Help. For details about the password entry which is required to transmit print jobs, see p.75 “
Printing in the Security Mode
Printing in the Security Mode”.
A Send the print job to the printer in use.
Depending on the computer configuration, the [Connect] dialog box may appear. If it does, use it to establish the network connection.
B The [Authentication] dialog box appears.
C Enter the Bluetooth password, and then click [OK].
As the Bluetooth password, enter the last four digits of the printer's serial
number. You can find the serial number on the label on the back of the printer.
For example, if the serial number is 00A0-001234, the Bluetooth password is
1234.
D The print job is sent.
❒ The Bluetooth password differs for each printer and cannot be changed.
75
Page 76

Preparing for Printing
If a Message Appears during Installation
Message number 58 or 34 indicates the printer driver cannot be installed using
Auto Run. Install the printer driver using [Add Printer] or [>Install Printer].
For Windows 95/98/Me, Windows 2000 and Windows NT 4.0:
A On the [Start] menu, point to [Settings], and then click [Printers].
B Double-click the Add Printer icon.
C Follow the instructions in Add Printer Wizard.
❒ If the printer driver is on a CD-ROM, the location of the RPCS printer driver
is either DRIVERSRPCSWIN9X_ME, DRIVERSRPCSWIN2K_XP, or
DRIVERSRPCS T4. If the installer starts, click [Cancel] to quit.
For Windows XP Professional and Windows Server 2003:
A On the [Start] menu, click [Printers and Faxes].
B Click [Add a printer].
C Follow the instructions in Add Printer Wizard.
❒ If the printer driver is on a CD-ROM, the location of the RPCS printer driver
is DRIVERSRPCSWIN2K_XP. If the installer starts, click [Cancel] to quit.
For Windows XP Home Editions:
A On the [Start] menu, click [Control Panel].
B Click [Printers and Other Hardware].
C Click [Printers and Faxes].
D Click [Install Printer].
E Follow the instructions in Add Printer Wizard.
❒ If the printer driver is on a CD-ROM, the location of the RPCS printer driver
is \DRIVERS\RPCS\WIN2K_XP. If the installer starts, click [Cancel] to quit.
76
Page 77

Preparing for Printing
Making Option Settings for the Printer
Make option settings for the printer using the printer driver when bidirectional
communication is disabled.
For details about making option settings for the printer, see p.78 “If Bidirec-
tional Communication is Disabled”.
Conditions for Bidirectional Communication
Bidirectional communication allows information about paper size and feed direction settings to be automatically sent to the printer. You can check printer status
from your computer.
• Bidirectional communication is supported by Windows 95/98/Me/2000/XP,
Windows Server 2003, and Windows NT 4.0.
• If you use the RPCS printer driver and bidirectional communication is enabled
under Windows 2000, the [Change Accessories] tab is unavailable.
❒ The RPCS printer driver supports bidirectional communications and updates
the printer status automatically.
❒ The PCL printer driver supports bidirectional communications. You can up-
date printer status manually.
❒ The PostScript 3 printer driver does not support bidirectional communications.
To support bidirectional communication, the following conditions must be met:
❖ When connected with parallel cables
• The computer must support bidirectional communication.
• The printer must support bidirectional communication.
• The interface cable must support bidirectional communication.
• The printer must be connected to the computer using the standard parallel
cables and parallel connectors.
• Under Windows 2000, [Enable bidirectional support] must be selected, and
[Enable printer pooling] must not be selected on the [port] tab with the RPCS
printer driver.
❖ When connected with the network
• The printer must support bidirectional communication.
• SmartDeviceMonitor for Client included on the CD-ROM must be installed,
and TCP/IP must be used.
77
Page 78

Preparing for Printing
• Under Windows 2000, [Enable bidirectional support] must be selected, and
[Enable printer pooling] must not be selected on the [port] tab with the RPCS
printer driver.
• In addition to the above, one of the following conditions must also be met:
• The SmartDeviceMonitor for Client port and the TCP/IP protocol must
be used.
• The standard TCP/IP port must be used without changing the default
port name (for Windows 2000/XP and Windows Server 2003).
• Microsoft TCP/IP print IP address must be specified for use (for Windows NT 4.0).
• IPP port name must include the IP address when using the IPP protocol.
❖ When connected with IEEE 1394
• The computer must support bidirectional communication.
• The printer must be connected to the IEEE 1394 connector of a computer
using the IEEE 1394 interface cable.
• [Activate] must be selected in the SCSI print of IEEE 1394 and [Activate]
must be selected in the Bidi-SCSI print.
• Under Windows 2000/XP or Windows Server 2003, [Enable bidirectional sup-
port] must be selected, and [Enable printer pooling] must not be selected on
the [port] tab with RPCS printer driver.
❖ When connected with USB
The printer must be connected to the computer's USB port using the USB interface cable.
The computer must support bidirectional communication.
❒ Install SmartDeviceMonitor for Client from the CD-ROM provided.
If Bidirectional Communication is Disabled
Set up option settings when bidirectional communications are disabled.
❒ Under Windows 2000/XP and Windows Server 2003, Manage Printers per-
mission is required to change the printer properties in the [Printers] folder. Log
on as an Administrators or Power Users group member.
❒ Under Windows NT 4.0, Full Control permission is required to change the
printer properties in the [Printers] folder. Log on as an Administrators or Power
Users group member.
A On the [Start] menu, point to [Settings], and then click [Printers].
The [Printers] window appears.
78
Page 79

Preparing for Printing
B Click the icon of the printer you want to use.
C On the [File] menu, click [Properties].
D Click the [Accessories] tab.
If options in the [Change Accessories] tab are disabled, bidirectional connection
is enabled. In this case, no change is necessary for option settings.
❒ If you are using the RPCS printer driver, click the [Change Accessories] tab.
❒ If you are using the PS printer driver, click the [Device Settings] tab.
E Select options installed from the [Option] area, and then make the neces-
sary settings.
F Select the total amount of the memory in [Total memory:], when the option-
al SDRAM module is added.
G Under [Paper source tray settings], click and highlight the tray to be used,
and then select the appropriate size, position, and type for the tray. Select the [Tray locking] check box to exclude the tray from the targets of automatic tray selection.
H Click [OK] to close the printer properties dialog box. Click the [Defaults]
tab, and then click [Change Accessories] to display the option selection.
Click [OK] to close the printer properties dialog box. Click the [Defaults] tab,
and then click [Change Accessories] to display the option selection.
79
Page 80

Setting Up the Printer Driver
PCL - Accessing the Printer Properties
Windows 95/98/Me - Accessing the Printer Properties
There are two methods to open the printer properties dialog box.
Making printer default settings
To make the printer default settings, open the printer properties dialog box from
the [Printers] window.
❒ You cannot change the printer default settings for each user. Settings made
in the printer properties dialog box are applied to all users.
A On the [Start] menu, point to [Settings], and then click [Printers].
The [Printers] window appears.
B Click the icon of the printer you want to use.
C On the [File] menu, click [Properties].
D Make the necessary settings, and then click [OK].
❒ With some applications, the printer driver settings are not used, and the ap-
plication's own default settings are applied.
For details, see Printer Driver Help.
Making printer settings from an application
You can make printer settings for a specific application.
To make printer settings for a specific application, open the printer properties dialog box from that application. The following explains how to make settings for
the WordPad application provided with Windows 95/98/Me.
A On the [File] menu, click [Print].
The [Print] dialog box appears.
B Select the printer you want to use in the [Name] list, and then click [Prop-
erties].
The printer properties dialog box appears.
C Make the necessary settings, and then click [OK].
D Click [OK] to start printing.
G1058614_1.00 Copyright © 2004 80
Page 81

Setting Up the Printer Driver
❒ The procedure to open the printer properties dialog box may vary depend-
ing on the application. For details, see the manuals provided with the application you use.
❒ With some applications, the printer driver settings are not used, and the ap-
plication's own default settings are applied.
❒ Any settings you make in the following procedure are valid for the current
application only.
❒ General users can change the properties displayed in the [Print] dialog box
of an application. Settings made here are used as defaults when printing
from this application.
For details, see Printer Driver Help.
Windows 2000 - Accessing the Printer Properties
Making printer default settings - the printer properties
❒ To change the printer default settings including option configuration settings,
log on using an account that has Manage Printers permission. Members of the
Administrators and Power Users groups have Manage Printers permission by
default.
❒ You cannot change the printer default settings for each user. Settings made
in the printer properties dialog box are applied to all users.
A On the [Start] menu, point to [Settings], and then click [Printers].
The [Printers] window appears.
B Click the icon of the printer you want to use.
C On the [File] menu, click [Properties].
The printer properties dialog box appears.
D Make the necessary settings, and then click [OK].
❒ Settings you make here are used as the default settings for all applications.
❒ Do not make a setting for [Form to Tray Assignment].
For details, see Printer Driver Help.
81
Page 82

Setting Up the Printer Driver
Making printer default settings - Printing Preferences
❒ You cannot change the printer default settings for each user. Settings made
in the printer properties dialog box are applied to all users.
A On the [Start] menu, point to [Settings], and then click [Printers].
The [Printers] window appears.
B Click the icon of the printer you want to use.
C On the [File] menu, click [Printing Preferences...].
The [Printing Preferences] dialog box appears.
D Make the necessary settings, and then click [OK].
❒ Settings you make here are used as the default settings for all applications.
For details, see Printer Driver Help.
Making printer settings from an application
You can make printer settings for a specific application.
To make printer settings for a specific application, open the [Printing Preferences]
dialog box from that application. The following explains how to make settings for
the WordPad application provided with Windows 2000.
❒ The procedure to open the [Printing Preferences] dialog box may vary depend-
ing on the application. For details, see the manuals provided with the application you use.
❒ Any settings you make in the following procedure are valid for the current ap-
plication only.
❒ General users can change the properties displayed in the [Print] dialog box of
an application. Settings made here are used as defaults when printing from
this application.
A On the [File] menu, click [Print...].
The [Print] dialog box appears.
B Select the printer you want to use in the [Select Printer] list.
C Make the necessary settings, and then click [Apply] to start printing.
For details, see Printer Driver Help.
82
Page 83

Setting Up the Printer Driver
Windows XP, Windows Server 2003 - Accessing the Printer
Properties
Making printer default settings - the printer properties
❒ To change the printer default settings including option configuration settings,
log on using an account that has Manage Printers permission. Members of the
Administrators and Power Users groups have Manage Printers permission by
default.
❒ You cannot change the printer default settings for each user. Settings made
in the printer properties dialog box are applied to all users.
A On the [Start] menu, click [Printers and Faxes].
The [Printers and Faxes] window appears.
B Click the icon of the printer you want to use.
C On the [File] menu, click [Properties].
The printer properties dialog box appears.
D Make the necessary settings, and then click [OK].
❒ Settings you make here are used as the default settings for all applications.
❒ Do not make a setting for [Form to Tray Assignment].
For details, see Printer Driver Help.
Making printer default settings - Printing Preferences
❒ You cannot change the printer default settings for each user. Settings made
in the printer properties dialog box are applied to all users.
A On the [Start] menu, click [Printers and Faxes].
The [Printers and Faxes] window appears.
B Click the icon of the printer you want to use.
C On the [File] menu, click [Printing Preferences...].
The [Printing Preferences] dialog box appears.
D Make the necessary settings, and then click [OK].
83
Page 84

Setting Up the Printer Driver
❒ Settings you make here are used as the default settings for all applications.
For details, see Printer Driver Help.
Making printer settings from an application
You can make printer settings for a specific application.
To make printer settings for a specific application, open the [Printing Preferences]
dialog box from that application. The following explains how to make settings for
the WordPad application provided with Windows XP.
❒ The procedure to open the [Printing Preferences] dialog box may vary depend-
ing on the application. For details, see the manuals provided with the application you use.
❒ Any settings you make in the following procedure are valid for the current ap-
plication only.
❒ General users can change the properties displayed in the [Print] dialog box of
an application. Settings made here are used as defaults when printing from
this application.
A On the [File] menu, click [Print...].
The [Print] dialog box appears.
B Select the printer you want to use in the [Select Printer] list.
C Make the necessary settings, and then click [Apply] to start printing.
For details, see Printer Driver Help.
Windows NT 4.0 - Accessing the Printer Properties
Making printer default settings - the printer properties
❒ To change the printer default settings including option configuration settings,
log on using an account that has Full Control permission. Members of the Administrators, Server Operators, Print Operators, and Power Users groups
have Full Control permission by default.
❒ You cannot change the printer default settings for each user. Settings made
in the printer properties dialog box are applied to all users.
A On the [Start] menu, point to [Settings], and then click [Printers].
84
Page 85

Setting Up the Printer Driver
The [Printers] window appears.
B Click the icon of the printer you want to use.
C On the [File] menu, click [Properties].
The printer properties dialog box appears.
D Make the necessary settings, and then click [OK].
❒ Settings you make here are used as the default settings for all applications.
❒ Do not make a setting for [Form to Tray Assignment].
For details, see Printer Driver Help.
Making printer default settings - Default
❒ To change the printer default settings including option configuration settings,
log on using an account that has Full Control permission. Members of the Administrators, Server Operators, Print Operators, and Power Users groups
have Full Control permission by default.
❒ You cannot change the printer default settings for each user. Settings made
in the printer properties dialog box are applied to all users.
A On the [Start] menu, point to [Settings], and then click [Printers].
The [Printers] window appears.
B Click the icon of the printer you want to use.
C On the [File] menu, click [Document Defaults].
The [Default] dialog box appears.
D Make the necessary settings, and then click [OK].
❒ Settings you make here are used as the default settings for all applications.
For details, see Printer Driver Help.
Making printer settings from an application
You can make printer settings for a specific application.
To make printer settings for a specific application, open the printer properties dialog box from that application. The following explains how to make settings for
the WordPad application provided with Windows NT 4.0.
85
Page 86

Setting Up the Printer Driver
❒ The procedure to open the printer properties dialog box may vary depending
on the application. For details, see the manuals provided with the application
you use.
❒ With some applications, the printer driver settings are not used, and the appli-
cation's own default settings are applied.
❒ Any settings you make in the following procedure are valid for the current ap-
plication only.
❒ General users can change the properties displayed in the [Print] dialog box of
an application. Settings made here are used as defaults when printing from
this application.
A On the [File] menu, click [Print].
The [Print] dialog box appears.
B Select the printer you want to use in the [Name] list, and then click [Prop-
erties].
The printer properties dialog box appears.
C Make the necessary settings, and then click [OK].
D Click [OK] to start printing.
For details, see Printer Driver Help.
86
Page 87

Setting Up the Printer Driver
RPCS - Accessing the Printer Properties
Windows 95/98/Me - Accessing the Printer Properties
There are two dialog box types of the printer properties dialog box.
"Multi-tab" is used as an example in this manual. For details about changing the
dialog box types, see the printer driver Help.
❖ Multi-tab
This dialog box type is designed for users who often change print settings to
perform various printing operations.
❖ Custom Setting
This dialog box type is designed for users who rarely change print settings.
This type of dialog box may vary depending on the installed options.
Making printer default settings
To make the printer default settings, open the printer properties dialog box from
the [Printers] window.
❒ You cannot change the printer default settings for each user. Settings made
in the printer properties dialog box are applied to all users.
❒ With some applications, the printer driver settings are not used, and the appli-
cation's own default settings are applied.
A On the [Start] menu, point to [Settings], and then click [Printers].
The [Printers] window appears.
B Click the icon of the printer you want to use.
C On the [File] menu, click [Properties].
❒ When you open the printer properties dialog box initially after installing the
RPCS printer driver, a confirmation message appears. After clicking [OK],
the printer properties dialog box appears.
D Make the necessary settings, and then click [OK].
For details, see Printer Driver Help.
87
Page 88

Setting Up the Printer Driver
Making printer settings from an application
You can make printer settings for a specific application.
To make printer settings for a specific application, open the printer properties dialog box from that application. The following explains how to make settings for
the WordPad application provided with Windows 95/98/Me.
❒ The procedure to open the printer properties dialog box may vary depending
on the application. For details, see the manuals provided with the application
you use.
❒ With some applications, the printer driver settings are not used, and the appli-
cation's own default settings are applied.
❒ Any settings you make in the following procedure are valid for the current ap-
plication only.
❒ General users can change the properties displayed in the [Print] dialog box of
an application. Settings made here are used as defaults when printing from
this application.
A On the [File] menu, click [Print].
The [Print] dialog box appears.
B Select the printer you want to use in the [Name] list, and then click [Prop-
erties].
The printer properties dialog box appears.
C Make the necessary settings, and then click [OK].
D Click [OK] to start printing.
For details, see Printer Driver Help.
Windows 2000 - Accessing the Printer Properties
Making printer default settings - the printer properties
❒ To change the printer default settings including option configuration settings,
log on using an account that has Manage Printers permission. Members of the
Administrators and Power Users groups have Manage Printers permission by
default.
❒ You cannot change the printer default settings for each user. Settings made
in the printer properties dialog box are applied to all users.
A On the [Start] menu, point to [Settings], and then click [Printers].
88
Page 89

Setting Up the Printer Driver
The [Printers] window appears.
B Click the icon of the printer you want to use.
C On the [File] menu, click [Properties].
The printer properties dialog box appears.
❒ When you open the printer properties dialog box initially after installing the
RPCS printer driver, a confirmation message appears. After clicking [OK],
the printer properties dialog box appears.
D Make the necessary settings, and then click [OK].
❒ Settings you make here are used as the default settings for all applications.
❒ Do not make a setting for [Form to Tray Assignment].
For details, see Printer Driver Help.
Making printer default settings - Printing Preferences
❒ You cannot change the printer default settings for each user. Settings made
in the printer properties dialog box are applied to all users.
A On the [Start] menu, point to [Settings], and then click [Printers].
The [Printers] window appears.
B Click the icon of the printer you want to use.
C On the [File] menu, click [Printing Preferences...].
The [Printing Preferences] dialog box appears.
D Make the necessary settings, and then click [OK].
❒ Settings you make here are used as the default settings for all applications.
For details, see Printer Driver Help.
Making printer settings from an application
You can make printer settings for a specific application.
To make printer settings for a specific application, open the [Printing Preferences]
dialog box from that application. The following explains how to make settings for
the WordPad application provided with Windows 2000.
89
Page 90

Setting Up the Printer Driver
❒ The procedure to open the [Printing Preferences] dialog box may vary depend-
ing on the application. For details, see the manuals provided with the application you use.
❒ Any settings you make in the following procedure are valid for the current ap-
plication only.
❒ General users can change the properties displayed in the [Print] dialog box of
an application. Settings made here are used as defaults when printing from
this application.
A On the [File] menu, click [Print...].
The [Print] dialog box appears.
B Select the printer you want to use in the [Select Printer] list.
C Make the necessary settings, and then click [Apply] to start printing.
For details, see Printer Driver Help.
Windows XP, Windows Server 2003 - Accessing the Printer
Properties
Making printer default settings - the printer properties
❒ To change the printer default settings including option configuration settings,
log on using an account that has Manage Printers permission. Members of the
Administrators and Power Users groups have Manage Printers permission by
default.
❒ You cannot change the printer default settings for each user. Settings made
in the printer properties dialog box are applied to all users.
A On the [Start] menu, click [Printers and Faxes].
The [Printers and Faxes] window appears.
B Click the icon of the printer you want to use.
C On the [File] menu, click [Properties].
The printer properties dialog box appears.
❒ When you open the printer properties dialog box initially after installing the
RPCS printer driver, a confirmation message appears. After clicking [OK],
the printer properties dialog box appears.
90
Page 91

Setting Up the Printer Driver
D Make the necessary settings, and then click [OK].
❒ Settings you make here are used as the default settings for all applications.
❒ Do not make a setting for [Form to Tray Assignment].
For details, see Printer Driver Help.
Making printer default settings - Printing Preferences
❒ You cannot change the printer default settings for each user. Settings made
in the printer properties dialog box are applied to all users.
A On the [Start] menu, click [Printers and Faxes].
The [Printers and Faxes] window appears.
B Click the icon of the printer you want to use.
C On the [File] menu, click [Printing Preferences...].
The [Printing Preferences] dialog box appears.
D Make the necessary settings, and then click [OK].
❒ Settings you make here are used as the default settings for all applications.
For details, see Printer Driver Help.
Making printer settings from an application
You can make printer settings for a specific application.
To make printer settings for a specific application, open the [Printing Preferences]
dialog box from that application. The following explains how to make settings for
the WordPad application provided with Windows XP.
❒ The procedure to open the [Printing Preferences] dialog box may vary depend-
ing on the application. For details, see the manuals provided with the application you use.
❒ Any settings you make in the following procedure are valid for the current ap-
plication only.
❒ General users can change the properties displayed in the [Print] dialog box of
an application. Settings made here are used as defaults when printing from
this application.
91
Page 92

Setting Up the Printer Driver
A On the [File] menu, click [Print...].
The [Print] dialog box appears.
B Select the printer you want to use in the [Select Printer] list.
C Make the necessary settings, and then click [Apply] to start printing.
For details, see Printer Driver Help.
Windows NT 4.0 - Accessing the Printer Properties
Making printer default settings - the printer properties
❒ To change the printer default settings including option configuration settings,
log on using an account that has Full Control permission. Members of the Administrators, Server Operators, Print Operators, and Power Users groups
have Full Control permission by default.
❒ You cannot change the printer default settings for each user. Settings made
in the printer properties dialog box are applied to all users.
A On the [Start] menu, point to [Settings], and then click [Printers].
The [Printers] window appears.
B Click the icon of the printer you want to use.
C On the [File] menu, click [Properties].
The printer properties dialog box appears.
❒ When you open the printer properties dialog box initially after installing the
RPCS printer driver, a confirmation message appears. After clicking [OK],
the printer properties dialog box appears.
D Make the necessary settings, and then click [OK].
❒ Settings you make here are used as the default settings for all applications.
❒ Do not make a setting for [Form to Tray Assignment].
For details, see Printer Driver Help.
92
Page 93
Setting Up the Printer Driver
Making printer default settings - Default
❒ To change the printer default settings including option configuration settings,
log on using an account that has Full Control permission. Members of the Administrators, Server Operators, Print Operators, and Power Users groups
have Full Control permission by default.
❒ You cannot change the printer default settings for each user. Settings made
in the printer properties dialog box are applied to all users.
A On the [Start] menu, point to [Settings], and then click [Printers].
The [Printers] window appears.
B Click the icon of the printer you want to use.
C On the [File] menu, click [Document Defaults...].
The [Default] dialog box appears.
D Make the necessary settings, and then click [OK].
❒ Settings you make here are used as the default settings for all applications.
For details, see Printer Driver Help.
Making printer settings from an application
You can make printer settings for a specific application.
To make printer settings for a specific application, open the printer properties dialog box from that application. The following explains how to make settings for
the WordPad application provided with Windows NT 4.0.
❒ The procedure to open the printer properties dialog box may vary depending
on the application. For details, see the manuals provided with the application
you use.
❒ With some applications, the printer driver settings are not used, and the appli-
cation's own default settings are applied.
❒ Any settings you make in the following procedure are valid for the current ap-
plication only.
❒ General users can change the properties displayed in the [Print] dialog box of
an application. Settings made here are used as defaults when printing from
this application.
A On the [File] menu, click [Print].
The [Print] dialog box appears.
93
Page 94

Setting Up the Printer Driver
B Select the printer you want to use in the [Name] list, and then click [Prop-
erties].
The printer properties dialog box appears.
C Make the necessary settings, and then click [Apply].
D Click [OK] to start printing.
For details, see Printer Driver Help.
94
Page 95
Setting Up the Printer Driver
PostScript 3 - Setting Up for Printing
Windows 95/98/Me - Accessing the Printer Properties
There are two methods to open the printer properties dialog box.
Making printer default settings
To make the printer default settings, open the printer properties dialog box from
the [Printers] window.
❒ You cannot change the printer default settings for each user. Settings made
in the printer properties dialog box are applied to all users.
❒ With some applications, the printer driver settings are not used, and the appli-
cation's own default settings are applied.
A On the [Start] menu, point to [Settings], and then click [Printers].
The [Printers] window appears.
B Click the icon of the printer you want to use.
C On the [File] menu, click [Properties].
The printer properties dialog box appears.
D Make the necessary settings, and then click [OK].
E Click [OK].
For details, see Printer Driver Help.
Making printer settings from an application
You can make printer settings for a specific application.
To make printer settings for a specific application, open the printer properties dialog box from that application. The following explains how to make settings for
the WordPad application provided with Windows 95/98/Me.
❒ The procedure to open the printer properties dialog box may vary depending
on the application. For details, see the manuals provided with the application
you use.
❒ With some applications, the printer driver settings are not used, and the appli-
cation's own default settings are applied.
95
Page 96

Setting Up the Printer Driver
❒ Any settings you make in the following procedure are valid for the current ap-
plication only.
❒ General users can change the properties displayed in the [Print] dialog box of
an application. Settings made here are used as defaults when printing from
this application.
A On the [File] menu, click [Print].
The [Print] dialog box appears.
B Select the printer you want to use in the [Name] list, and then click [Prop-
erties].
The printer properties dialog box appears.
C Make the necessary settings, and then click [OK].
D Click [OK] to start printing.
For details, see Printer Driver Help.
Windows 2000 - Accessing the Printer Properties
Making printer default settings - the printer properties
❒ To change the printer default settings including option configuration settings,
log on using an account that has Manage Printers permission. Members of the
Administrators and Power Users groups have Manage Printers permission by
default.
❒ You cannot change the printer default settings for each user. Settings made
in the printer properties dialog box are applied to all users.
A On the [Start] menu, point to [Settings], and then click [Printers].
The [Printers] window appears.
B Click the icon of the printer you want to use.
C On the [File] menu, click [Properties].
The printer properties dialog box appears.
D Make the necessary settings, and then click [OK].
❒ Settings you make here are used as the default settings for all applications.
❒ Do not make a setting for [Form to Tray Assignment].
96
Page 97

Setting Up the Printer Driver
For details, see Printer Driver Help.
Making printer default settings - Printing Preferences
❒ You cannot change the printer default settings for each user. Settings made
in the printer properties dialog box are applied to all users.
A On the [Start] menu, point to [Settings], and then click [Printers].
The [Printers] window appears.
B Click the icon of the printer you want to use.
C On the [File] menu, click [Printing Preferences...].
The [Printing Preferences] dialog box appears.
D Make the necessary settings, and then click [OK].
❒ Settings you make here are used as the default settings for all applications.
For details, see Printer Driver Help.
Making printer settings from an application
You can make printer settings for a specific application.
To make printer settings for a specific application, open the [Printing Preferences]
dialog box from that application. The following explains how to make settings for
the WordPad application provided with Windows 2000.
❒ The procedure to open the [Printing Preferences] dialog box may vary depend-
ing on the application. For details, see the manuals provided with the application you use.
❒ Any settings you make in the following procedure are valid for the current ap-
plication only.
❒ General users can change the properties displayed in the [Print] dialog box of
an application. Settings made here are used as defaults when printing from
this application.
A On the [File] menu, click [Print...].
The [Print] dialog box appears.
B Select the printer you want to use in the [Select Printer] list.
C Make the necessary settings, and then click [Print] to start printing.
97
Page 98

Setting Up the Printer Driver
For details, see Printer Driver Help.
Windows XP, Windows Server 2003 - Accessing the Printer
Properties
Making printer default settings - the printer properties
❒ To change the printer default settings including option configuration settings,
log on using an account that has Manage Printers permission. Members of the
Administrators and Power Users groups have Manage Printers permission by
default.
❒ You cannot change the printer default settings for each user. Settings made
in the printer properties dialog box are applied to all users.
A On the [Start] menu, click [Printers and Faxes].
The [Printers and Faxes] window appears.
B Click the icon of the printer you want to use.
C On the [File] menu, click [Properties].
The printer properties dialog box appears.
D Make the necessary settings, and then click [OK].
❒ Settings you make here are used as the default settings for all applications.
❒ Do not make a setting for [Form to Tray Assignment].
For details, see Printer Driver Help.
Making printer default settings - Printing Preferences
❒ You cannot change the printer default settings for each user. Settings made
in the printer properties dialog box are applied to all users.
A On the [Start] menu, click [Printers and Faxes].
The [Printers and Faxes] window appears.
B Click the icon of the printer you want to use.
C On the [File] menu, click [Printing Preferences...].
The [Printing Preferences] dialog box appears.
98
Page 99

Setting Up the Printer Driver
D Make the necessary settings, and then click [OK].
❒ Settings you make here are used as the default settings for all applications.
For details, see Printer Driver Help.
Making printer settings from an application
You can make printer settings for a specific application.
To make printer settings for a specific application, open the [Printing Preferences]
dialog box from that application. The following explains how to make settings for
the WordPad application provided with Windows XP.
❒ The procedure to open the [Printing Preferences] dialog box may vary depend-
ing on the application. For details, see the manuals provided with the application you use.
❒ Any settings you make in the following procedure are valid for the current ap-
plication only.
❒ General users can change the properties displayed in the [Print] dialog box of
an application. Settings made here are used as defaults when printing from
this application.
A On the [File] menu, click [Print...].
The [Print] dialog box appears.
B Select the printer you want to use in the [Select Printer] list.
C Make the necessary settings, and then click [Print] to start printing.
For details, see Printer Driver Help.
Windows NT 4.0 - Accessing the Printer Properties
Making printer default settings - the printer properties
❒ To change the printer default settings including option configuration settings,
log on using an account that has Full Control permission. Members of the Administrators, Server Operators, Print Operators, and Power Users groups
have Full Control permission by default.
❒ You cannot change the printer default settings for each user. Settings made
in the printer properties dialog box are applied to all users.
99
Page 100

Setting Up the Printer Driver
A On the [Start] menu, point to [Settings], and then click [Printers].
The [Printers] window appears .
B Click the icon of the printer you want to use.
C On the [File] menu, click [Properties].
The printer properties dialog box appears.
D Make the necessary settings, and then click [OK].
❒ Settings you make here are used as the default settings for all applications.
❒ Do not make a setting for [Form to Tray Assignment].
For details, see Printer Driver Help.
Making printer default settings - Default
❒ To change the printer default settings including option configuration settings,
log on using an account that has Full Control permission. Members of the Administrators, Server Operators, Print Operators, and Power Users groups
have Full Control permission by default.
❒ You cannot change the printer default settings for each user. Settings made
in the printer properties dialog box are applied to all users.
A On the [Start] menu, point to [Settings], and then click [Printers].
The [Printers] window appears.
B Click the icon of the printer you want to use.
C On the [File] menu, click [Document Defaults].
The [Default] dialog box appears.
D Make the necessary settings, and then click [OK].
❒ Settings you make here are used as the default settings for all applications.
For details, see Printer Driver Help.
Making printer settings from an application
You can make printer settings for a specific application.
100
 Loading...