

Page 1
i
Manuals for This Machine
The following manuals describe the operational procedures of this machine. For
particular functions, see the relevant parts of the manual.
Note
❒ Manuals provided are specific to machine type.
❒ Adobe Acrobat Reader / Adobe Reader is necessary to view the manuals as
a PDF file.
❒ Two CD-ROMs are provided:
• CD-ROM 1 “Operating Instructions”
• CD-ROM 2 “Scanner Driver and Utilities”
❖❖❖❖ General Settings Guide
Provides an overview of the machine and describes System Settings (such as
Tray Paper Settings), Document Server functions, and troubleshooting.
Refer to this manual for Address Book procedures such as registering e-mail
address, and user codes.
❖❖❖❖ Security Reference
This manual is for administrators of this machine. It describes security functions that the administrators can use to protect data from being tampered, or
prevent the machine from unauthorized use.
Also refer to this manual for the procedures for registering administrators, as
well as setting user and administrator authentication.
❖❖❖❖ Network Guide (PDF file - CD-ROM1)
Provides information about configuring and operating the scanner (Type 480)
in a network environment.
For details about network settings of the scanner (RW480) and printer
(RW480), see the manual that comes with the related option.
❖❖❖❖ Copy Reference (this manual)
Describes operations, functions, and troubleshooting for the machine's copier
function.
❖❖❖❖ Scanner Reference(Scanner Unit Type 480) (PDF file - CD-ROM1)
Describes operations, functions, and troubleshooting for the machine's scanner function.
DolphinC2_ENcopy_F_FM.book Page i Friday, February 25, 2005 10:46 AM
Page 2
ii
❖❖❖❖ Manuals for DeskTopBinder Lite
DeskTopBinder Lite is a utility included on the CD-ROM labeled “Scanner
Driver and Utilities”.
• DeskTopBinder Lite Setup Guide (PDF file - CD-ROM2)
Describes installation of, and the operating environment for DeskTopBinder Lite in detail. This guide can be displayed from the [Setup] display
when DeskTopBinder Lite is installed.
• DeskTopBinder Introduction Guide (PDF file - CD-ROM2)
Describes operations of DeskTopBinder Lite and provides an overview of
its functions. This guide is added to the [Start] menu when DeskTopBinder
Lite is installed.
• Auto Document Link Guide (PDF file - CD-ROM2)
Describes operations and functions of Auto Document Link installed with
DeskTopBinder Lite. This guide is added to the [Start] menu when Desk-
TopBinder Lite is installed.
❖❖❖❖ Other manuals
• Manuals for Printer (RW480) function.
• Manuals for Scanner (RW480) function.
DolphinC2_ENcopy_F_FM.book Page ii Friday, February 25, 2005 10:46 AM
Page 3
iii
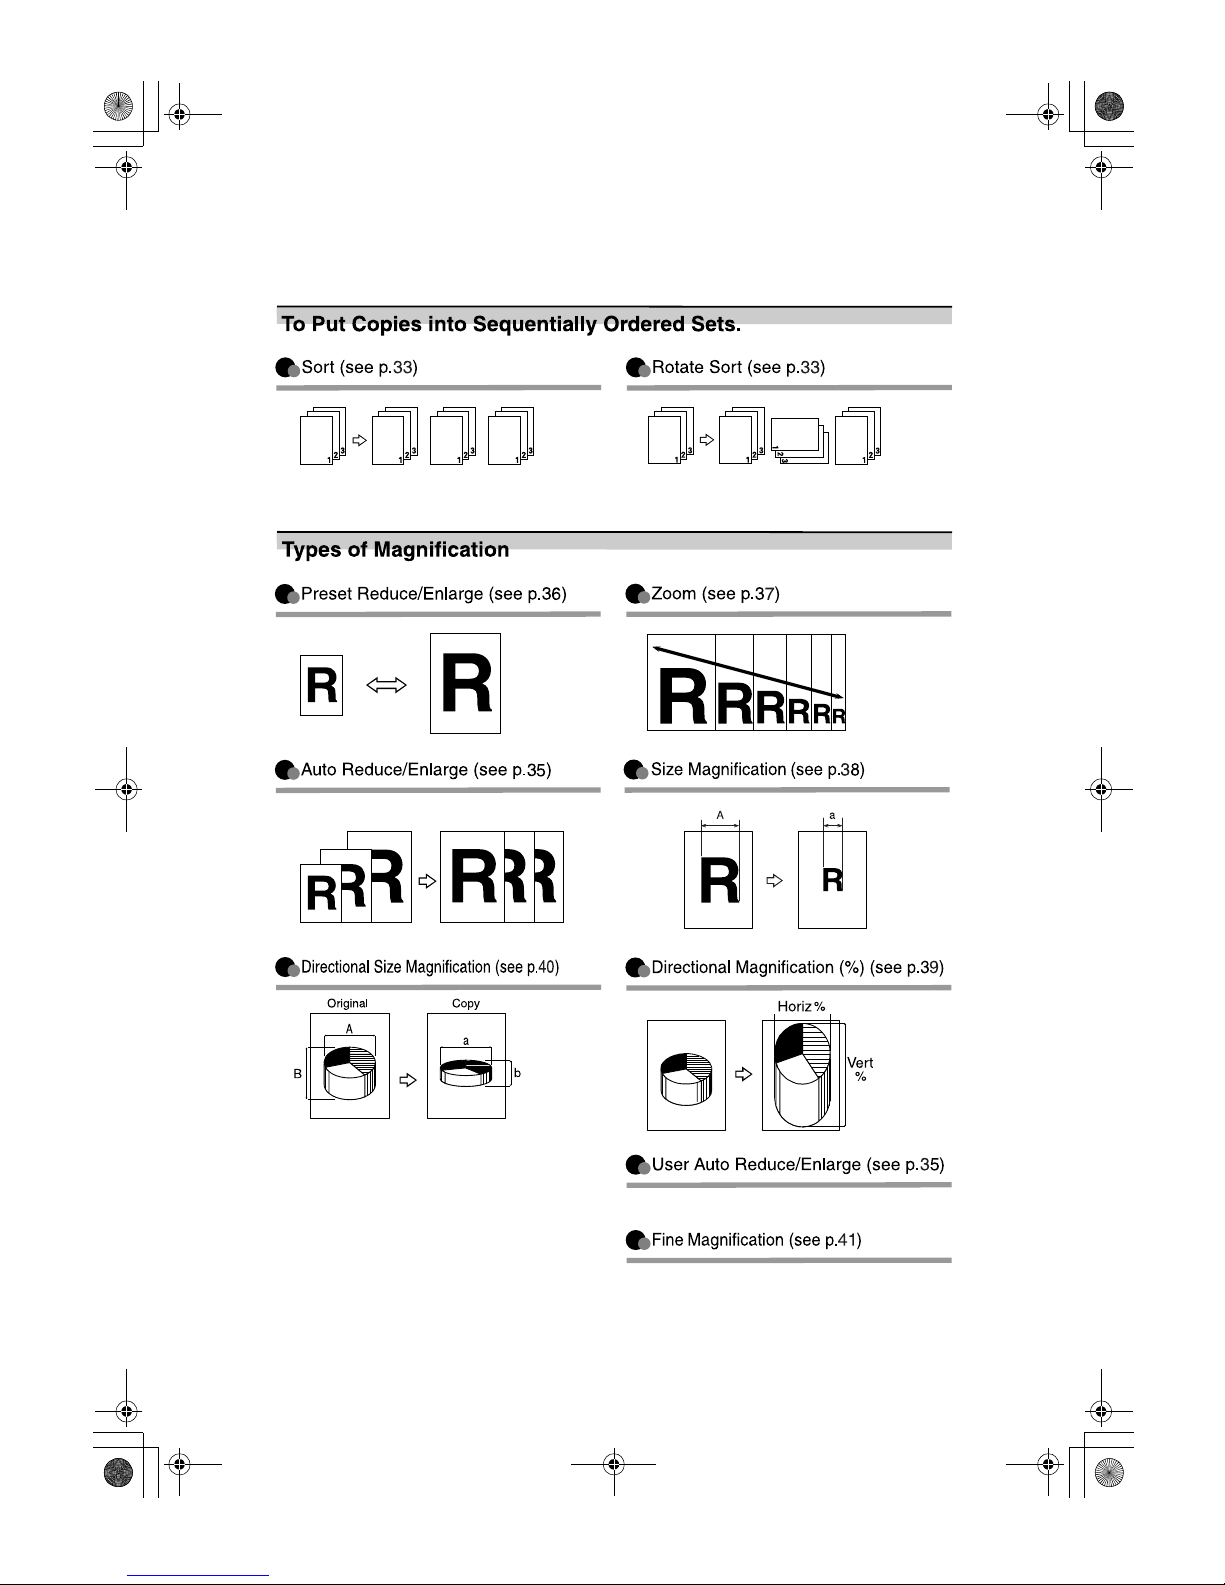
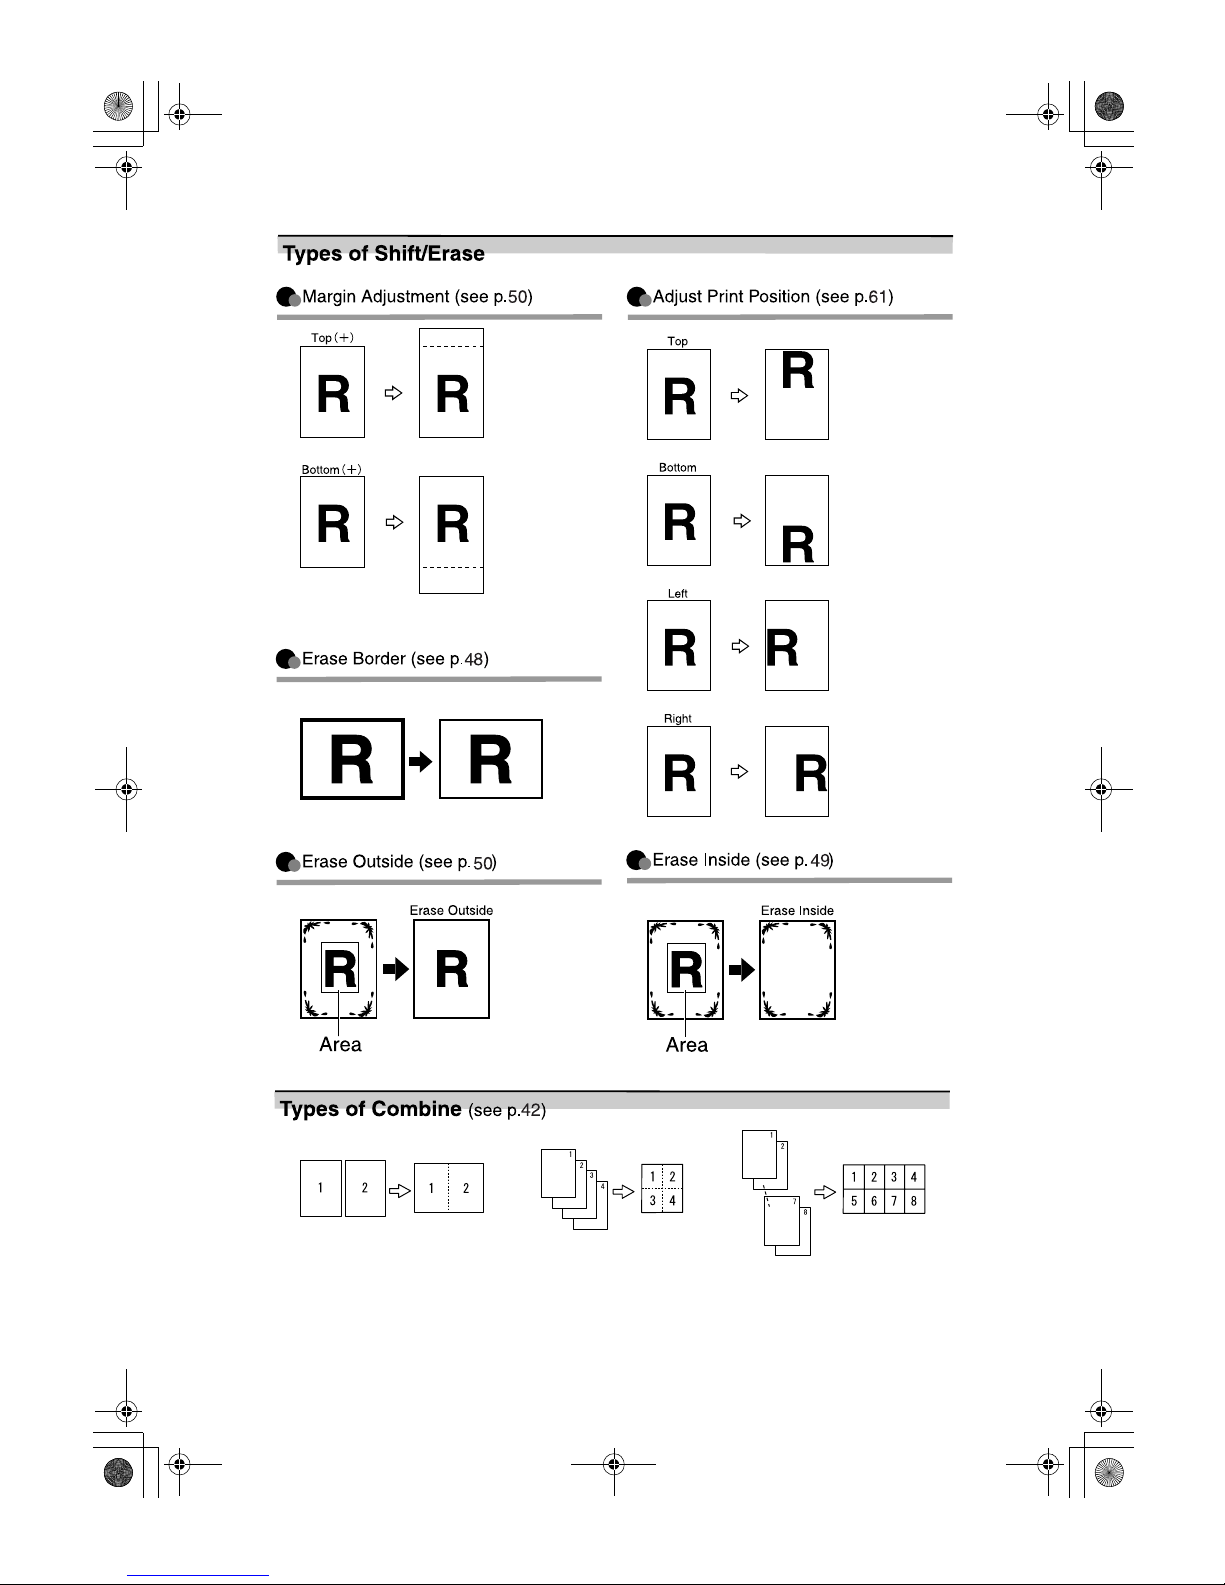
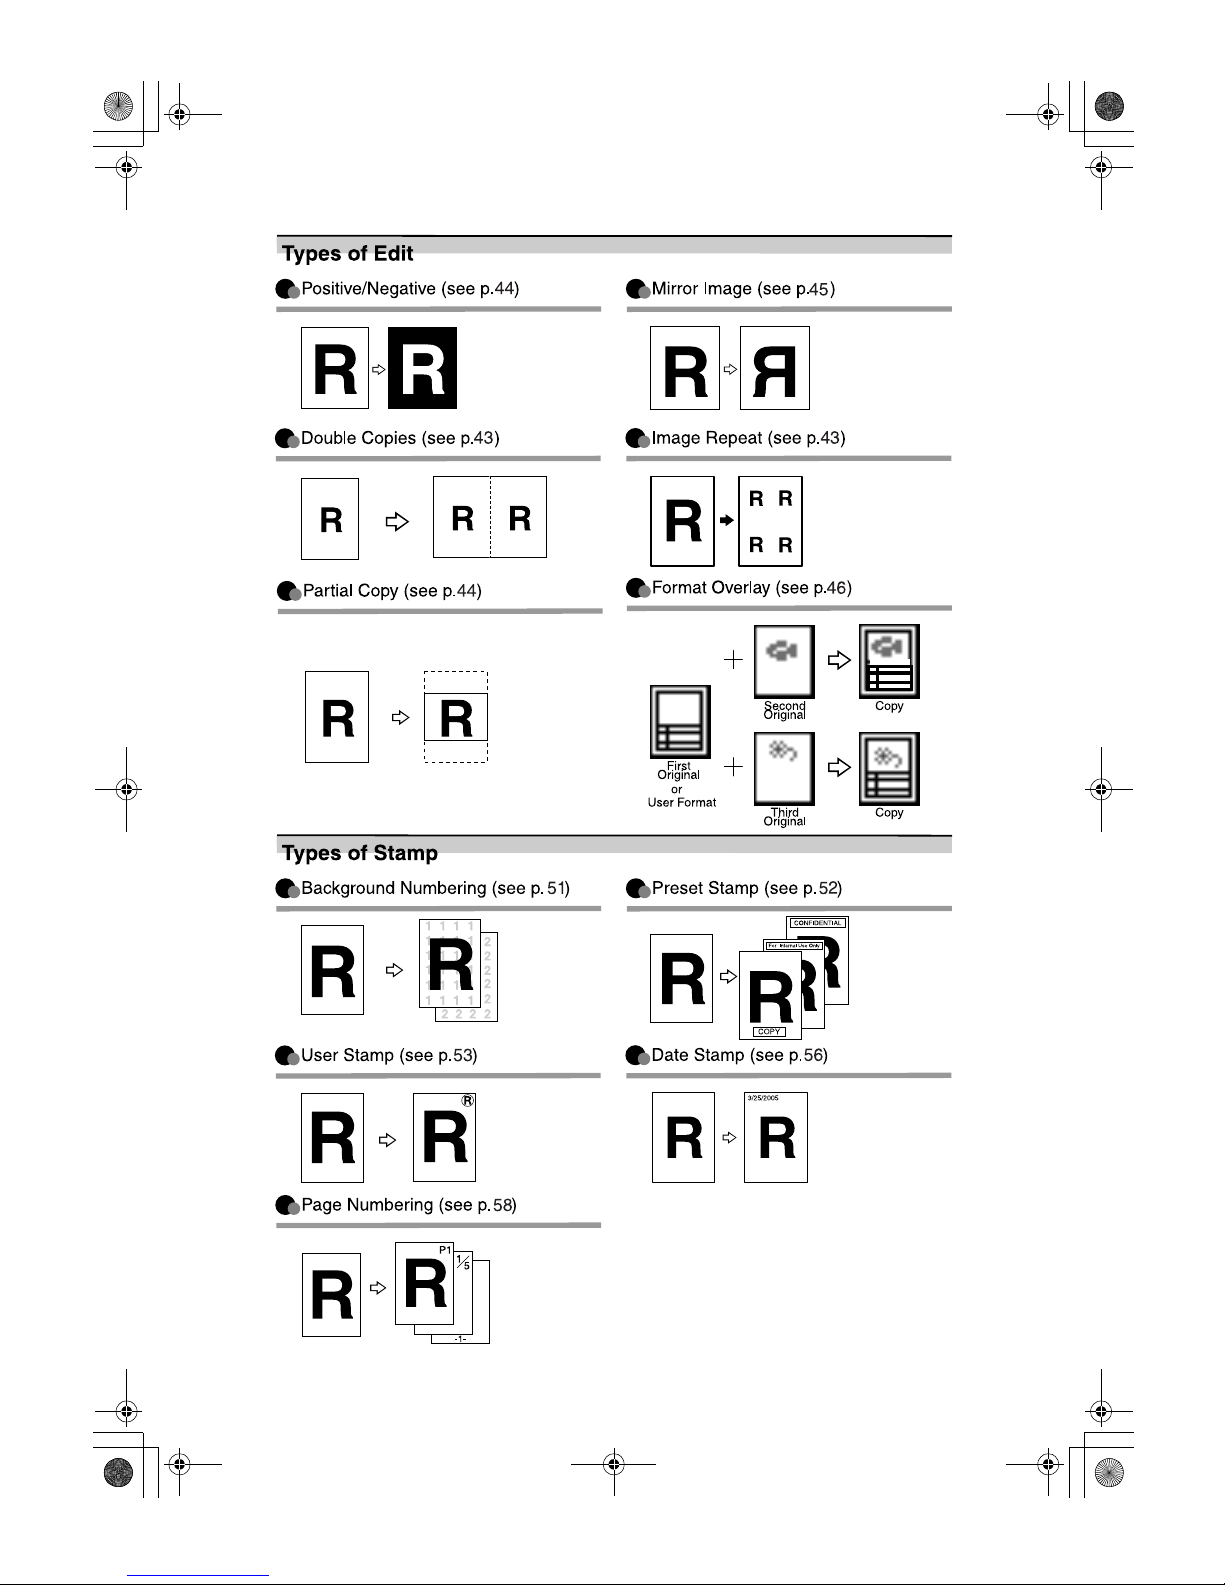
What You Can Do with This Machine
AHD001S
DolphinC2_ENcopy_F_FM.book Page iii Friday, February 25, 2005 10:46 AM
Page 4
iv
AHD002S
DolphinC2_ENcopy_F_FM.book Page iv Friday, February 25, 2005 10:46 AM
Page 5
v
AHD051S
DolphinC2_ENcopy_F_FM.book Page v Friday, February 25, 2005 10:46 AM
Page 6
vi
TABLE OF CONTENTS
Manuals for This Machine......................................................................................i
What You Can Do with This Machine..................................................................iii
How to Read this Manual ......................................................................................1
Names of Major Options ............................................................................................2
Terms .........................................................................................................................2
Control Panel..........................................................................................................3
Display Panel..........................................................................................................5
1. Basics
Before Copying ......................................................................................................7
Original Output Locations...........................................................................................8
Adjusting the Original Tray.......................................................................................10
Copy Output Locations.............................................................................................10
Originals ...............................................................................................................12
Sizes and Weights of Recommended Originals.......................................................12
Placing Originals..................................................................................................15
Original Orientation ..................................................................................................16
Placing Custom Size Originals.................................................................................17
Wide Scan................................................................................................................17
Setting the Carrier Sheet..........................................................................................18
2. Copying
Basic Procedure...................................................................................................21
Original Counter/Reset.............................................................................................22
Auto Start .................................................................................................................23
Job Preset................................................................................................................23
Interrupt Copy ..........................................................................................................24
Copying from the Paper Bypass ..............................................................................25
Copier Functions .................................................................................................27
Selecting Original Type Setting................................................................................27
Adjusting Copy Image Density.................................................................................28
Selecting Copy Paper ..............................................................................................29
Setting the Length of Copy Paper Cut .....................................................................30
Sort/Rotate Sort .......................................................................................................33
Auto Reduce/Enlarge ...............................................................................................35
User Auto Reduce/Enlarge ......................................................................................35
Preset Reduce/Enlarge............................................................................................36
Zoom ........................................................................................................................37
Size Magnification....................................................................................................38
Directional Magnification (%) ...................................................................................39
Directional Size Magnification (inch) ........................................................................40
Fine Magnification....................................................................................................41
Combine...................................................................................................................42
Image Repeat...........................................................................................................43
Double Copies..........................................................................................................43
Positive/Negative .....................................................................................................44
Partial Copy..............................................................................................................44
Mirror Image.............................................................................................................45
DolphinC2_ENcopy_F_FM.book Page vi Friday, February 25, 2005 10:46 AM
Page 7
vii
Format Overlay ........................................................................................................46
Erase Border............................................................................................................48
Erase Inside .............................................................................................................49
Erase Outside ..........................................................................................................50
Margin Adjustment ...................................................................................................50
Background Numbering ...........................................................................................51
Preset Stamp ...........................................................................................................52
User Stamp ..............................................................................................................53
Date Stamp ..............................................................................................................56
Page Numbering ......................................................................................................58
Adjust Print Position.................................................................................................61
Storing Data in the Document Server ................................................................63
Programs ..............................................................................................................65
Storing a Program ....................................................................................................65
Changing a Stored Program ....................................................................................66
Changing a Stored Program Name..........................................................................66
Deleting a Program ..................................................................................................66
Recalling a Program.................................................................................................66
3. Troubleshooting
If Your Machine Does Not Operate As You Want..............................................67
When a Message Appears.......................................................................................67
Screen......................................................................................................................69
If You Cannot Make Clear Copies.......................................................................70
If You Cannot Make Copies As You Want .........................................................73
4. User Tools (Copier / Document Server Features)
User Tools Menu (Copier / Document Server Features) ..................................75
Accessing User Tools (Copier Features)...........................................................81
Changing Default Settings .......................................................................................81
Exiting User Tools ....................................................................................................82
Settings You Can Change with User Tools .......................................................83
General Features .....................................................................................................83
Reproduction Ratio ..................................................................................................85
Edit ...........................................................................................................................87
Stamp.......................................................................................................................90
Input / Output ...........................................................................................................96
Administrator Tools ..................................................................................................96
5. Specifications
Combination Chart...............................................................................................97
Supplementary Information ................................................................................98
Scan Size Limitations, by Function..................................................................104
Settings Record Sheet.......................................................................................105
Magnification Ratio Chart.......................................................................................108
Measure Chart .......................................................................................................109
INDEX....................................................................................................... 110
DolphinC2_ ENcopy_F_ FM.book Pa ge vii Frid ay, February 25, 2005 10 :46 AM
Page 8
viii
DolphinC2_ENcopy_F_FM.book Page viii Friday, February 25, 2005 10:46 AM
Page 9
1
How to Read this Manual
Symbols
The following set of symbols is used in this manual.
R
WARNING:
This symbol indicates a potentially hazardous situation that might result in
death or serious injury when you misuse the machine without following the instructions under this symbol. Be sure to read the instructions, all of which are described in the Safety Information section in the General Settings Guide.
R
CAUTION:
This symbol indicates a potentially hazardous situation that might result in minor or moderate injury or property damage that does not involve personal injury
when you misuse the machine without following the instructions under this
symbol. Be sure to read the instructions, all of which are described in the Safety
Information section in the General Settings Guide.
* The statements above are notes for your safety.
Important
If this instruction is not followed, paper might be misfed, originals might be
damaged, or data might be lost. Be sure to read this.
Preparation
This symbol indicates information or preparations required prior to operating.
Note
This symbol indicates precautions for operation, or actions to take after abnormal operation.
Limitation
This symbol indicates numerical limits, functions that cannot be used together,
or conditions in which a particular function cannot be used.
Reference
This symbol indicates where further relevant information can be found.
[]
Keys that appear on the machine's display.
{}
Keys built into the machine's control panel.
DolphinC2_ENcopy_F_FM.book Page 1 Friday, February 25, 2005 10:46 AM
Page 10
2
Names of Major Options
Major options for this machine are referred to as follows:
• Roll Holder Unit Type A→ Roll holder
• Roll Feeder Type 480→ Lower tray
• Paper Cassette Type 480 → Cut paper tray
• Original Tray Type G → Original tray
Terms
• Long length original/paper
Original/paper length longer than 1189 mm, 46.8".
DolphinC2_ENcopy_F_FM.book Page 2 Friday, February 25, 2005 10:46 AM
Page 11
3
Control Panel
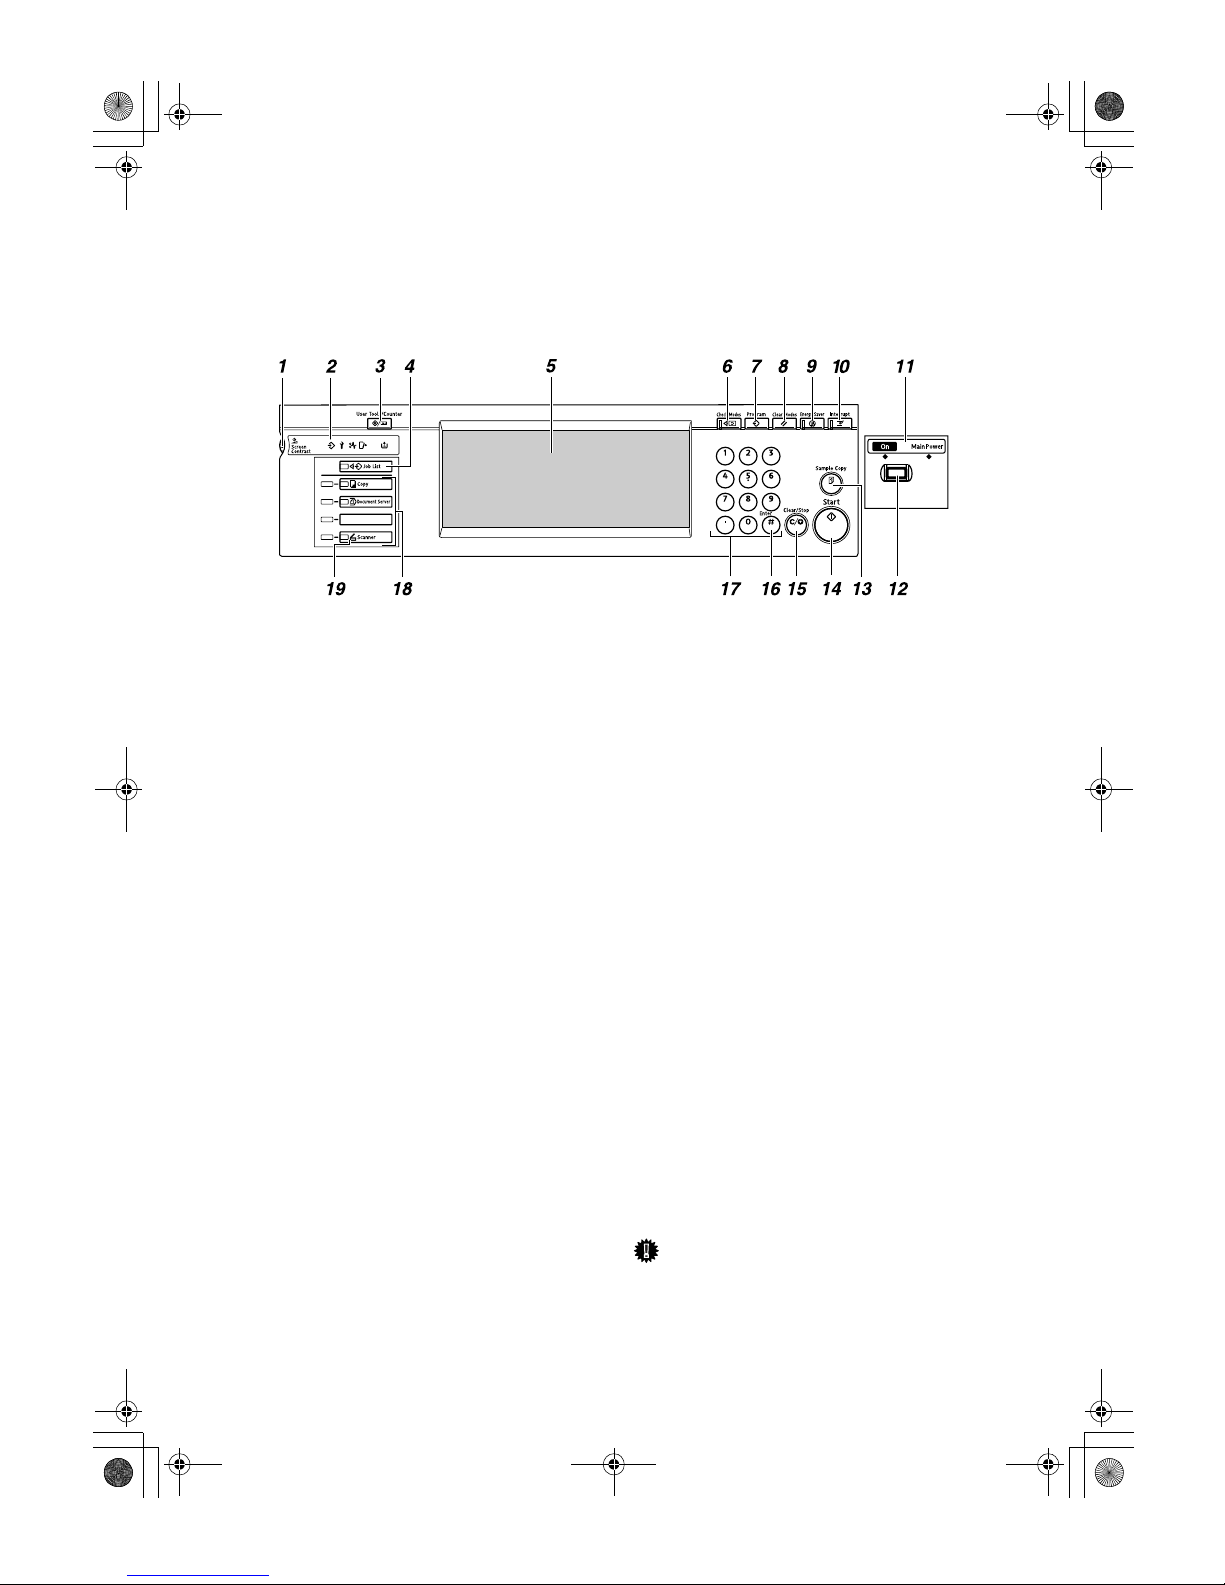
This illustration shows the control panel of a machine that has all options fully
installed.
1.
Screen contrast knob
Adjusts the brightness of the screen.
2.
Indicators
Show errors or machine status. For details, see “Control Panel”, General Settings
Guide.
m: Data In indicator
L: Service Call indicator
x: Misfeed indicator
M: Open Cover indicator
D: Add Toner indicator
3.
{{{{User Tools/Counter}}}} key
• User Tools
Press to change the default settings
and operation conditions to match
your requirements. See p.75 “User
Tools (Copier / Document Server Features)”.
• Counter
Press to check or print the counter value. For details, see “Counter”, General
Settings Guide.
4.
{{{{Job List}}}} key
Shows the job list. See “Job List”, General
Settings Guide.
5.
Display panel
Shows operation status, error messages,
and function menus.
6.
{{{{Check Modes}}}} key
Press to check the entered copying settings.
7.
{{{{Program}}}} key
Press to store or select the program
mode. See p.65 “Programs”.
8. {
{{
{Clear Modes}}}} key
Press to clear a setting's contents. The
number of copies is cleared when you
press and hold down this key for three
seconds.
9.
{{{{Energy Saver}}}} key
Press to switch to and from the Energy
Saver mode. For details, see “Saving Energy”, General Settings Guide.
10. {
{{
{Interrupt}}}} key
Press to make interrupt copies during a
copy run. See p.24 “Interrupt Copy”.
11.
Main power indicator/On indicator
When the main power switch is turned
on, the main power indicator lights.
The On indicator lights when the operation switch is on.
Important
❒ Do not turn the main power off
while the On indicator is flashing.
The hard disk may malfunction.
AHD100S
DolphinC2_ENcopy_F_FM.book Page 3 Friday, February 25, 2005 10:46 AM
Page 12
4
12.
Operation switch
Press this switch to turn the power on
(the On indicator goes on). To turn the
power off, press this switch again (the On
indicator goes off). See ”Turning On the
Power”, General Settings Guide.
13.
{{{{Sample Copy}}}} key
Press to make a single sample copy before starting a long copy run. By checking
the sample copy and making any necessary changes to the image quality settings
before you make multiple copies, you can
save time and paper. See p.34 “Sample
Copy”.
14.
{{{{Start}}}} key
Press to start scanning originals or copying. Press to start scanning and printing
in Document Server mode.
15.
{{{{Clear/Stop}}}} key
• Clear
Press to clear numbers entered.
• Stop
Press to stop a copy job in progress.
Press to stop scanning and printing in
Document Server mode.
16.
{{{{#}}}} key
Press to confirm values entered.
17.
Number keys
Press to enter a value, such as the number
of copies.
18.
Function keys
Press to select the following functions:
• Copy:
• Document Server:
• Scanner:
19.
Function Status indicator
These show the status of the above functions:
• Yellow: selected
• Green: active
• Red: interrupted
DolphinC2_ENcopy_F_FM.book Page 4 Friday, February 25, 2005 10:46 AM
Page 13
5
Display Panel
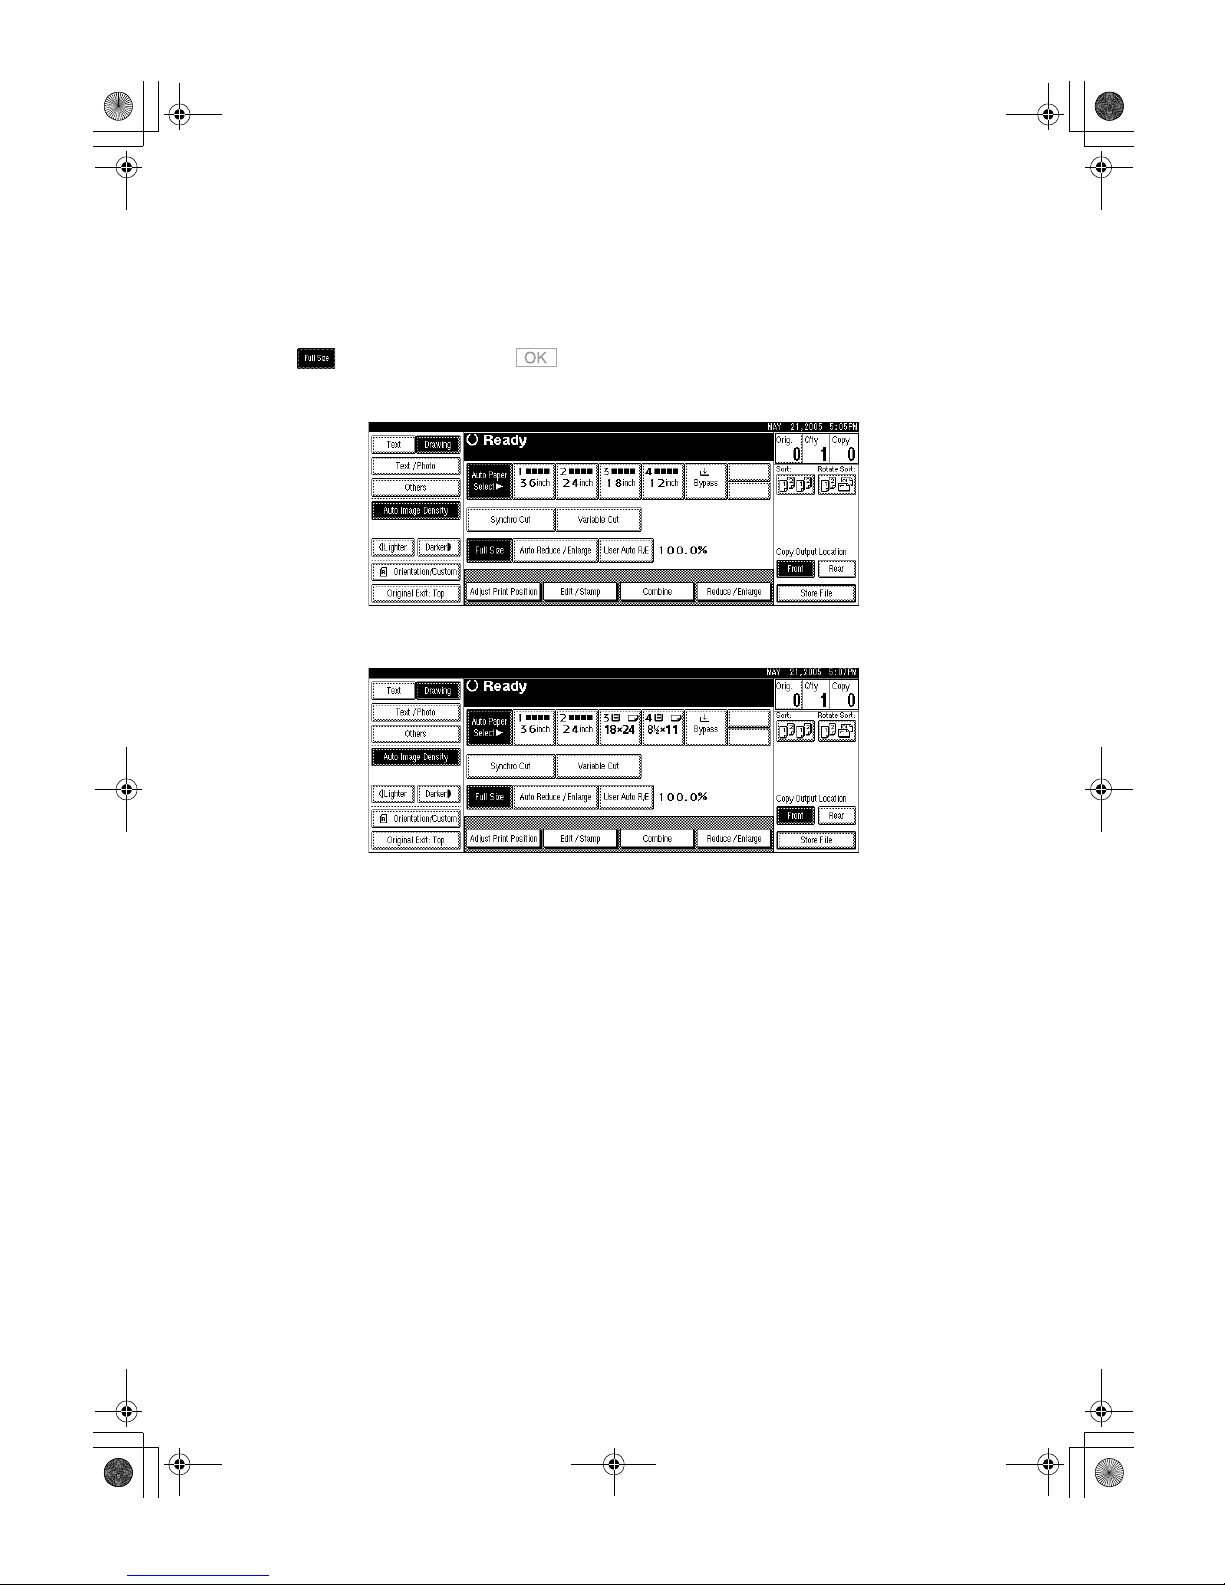
The function items displayed serve as selector keys. You can select or specify an
item by lightly pressing them.
When you select or specify an item on the display panel, it is highlighted like
this: . Keys appearing as cannot be used.
❖❖❖❖ When the lower tray (paper roll tray) is installed
❖❖❖❖ When the cut paper trays are installed
DolphinC2_ENcopy_F_FM.book Page 5 Friday, February 25, 2005 10:46 AM
Page 14
6
DolphinC2_ENcopy_F_FM.book Page 6 Friday, February 25, 2005 10:46 AM
Page 15
7
1. Basics
Before Copying
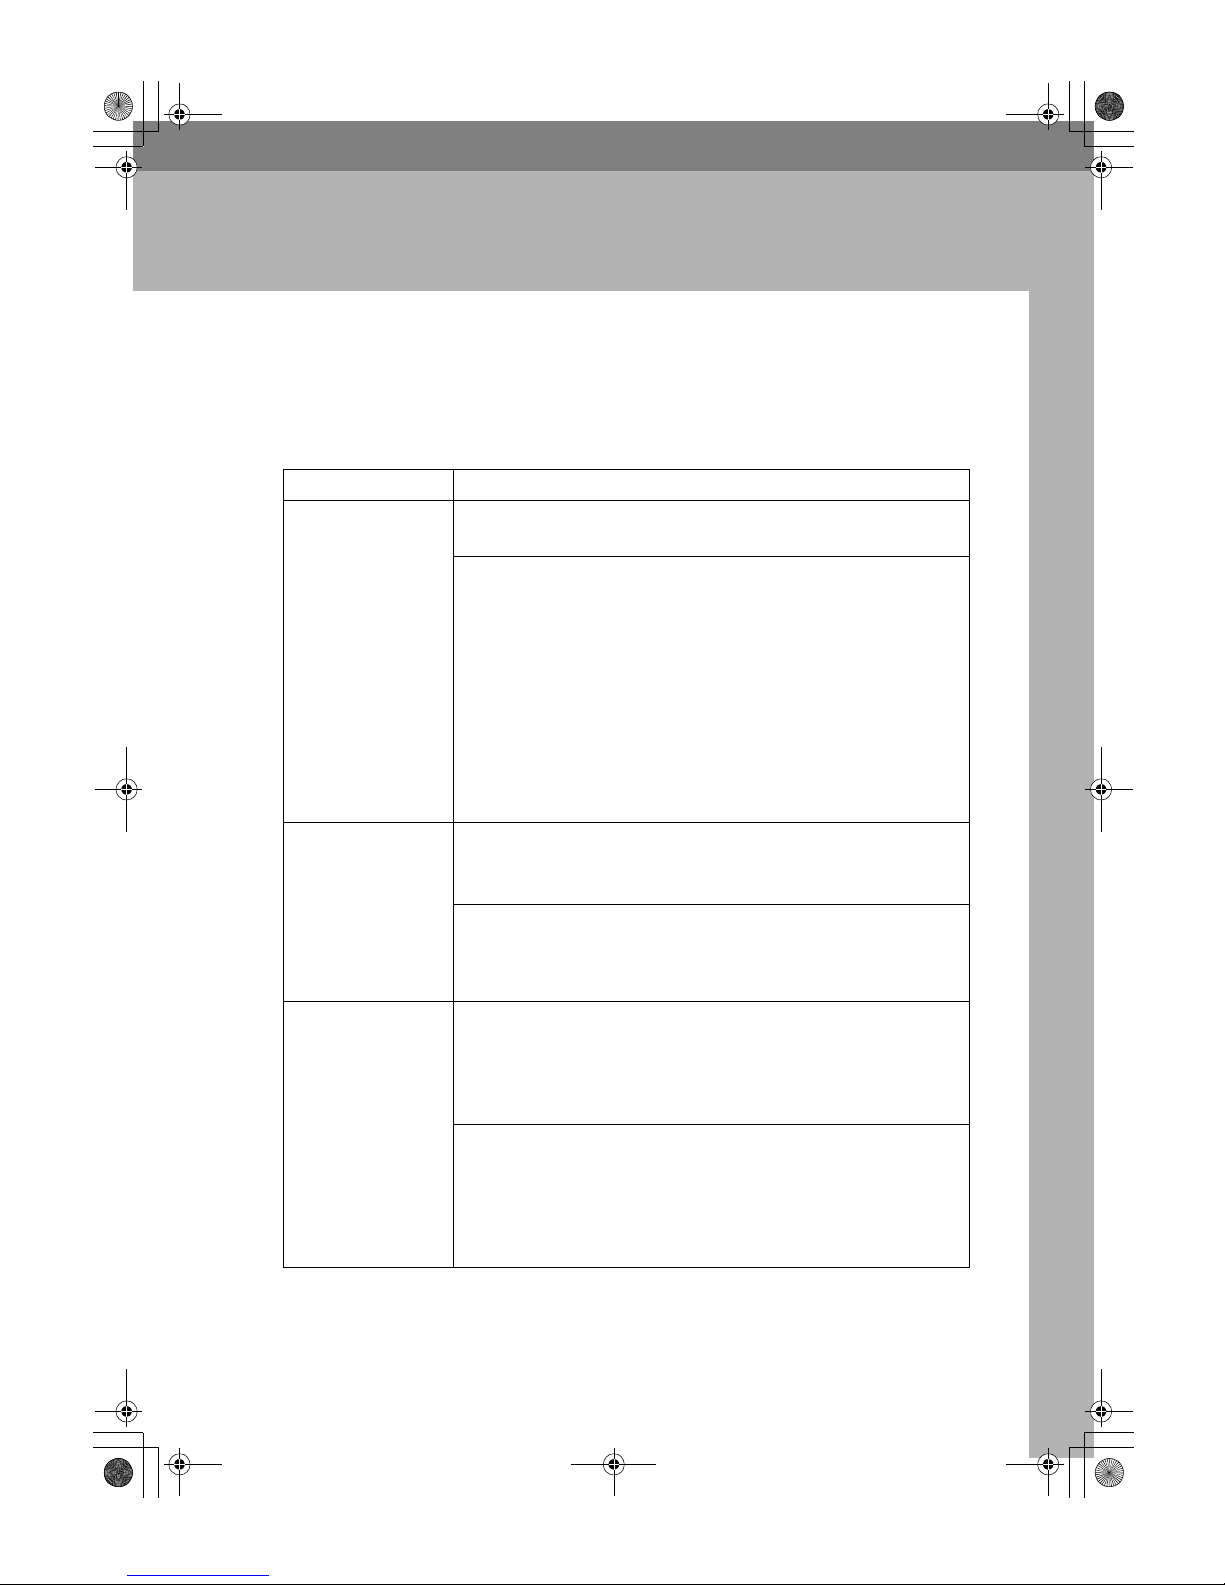
Before you start copying, specify the original and copy paper locations.
❖❖❖❖ Paper Capacities For Each Original/Paper Output
Original output Capacities
Original Exit : Top A1 (D)L or smaller: 50 sheets (plain paper)
20 sheets (translucent paper)
• Use originals that are the same size, and of medium or high quality paper.
• Do not use paper that is long length paper, thick, curled, film,
folded, or translucent paper that is less than 80 g/m
2
(21.3 lb) in
weight.
• Do not load more than 10 sheets during very hot or humid conditions.
•
Output thick paper (104.7 g/m2 (27.9 lb) or more) to Rear (Straight).
• Translucent paper: 80 g/m2 (21.3 lb) or less, plain paper: 52.3
g/m
2
(13.9 lb) or less, and originals that are not stiff should be
output to Rear (Straight).
Original Exit : Rear
(Straight)
A0 (E) K or smaller: 1 sheet (plain paper)
1 sheet (translucent paper)
1 sheet (film)
• When output originals of A1 (E)K or larger, the ejected originals
may interfere with the copy paper and impede its progress. If this
happens, use the copy output (rear) auxiliary guide.
• When copying A0 (E) Ksize originals, remove them one by one.
Original Exit : Rear
(document roller)
A1 (D)Lor larger: 1 sheet (up to 6 m (236")) (plain
paper)
1 sheet (up to 3.6 m (141")) (translucent paper)
1 sheet (up to 3.6 m (141")) (film)
• Use face-curl originals.
• For roll originals, use originals with a diameter of roll Φ40 mm –
Φ
110 mm (Φ1.6" – Φ4.3").
• Do not use the document roller when copying on originals of size
longer than the maximum length for each paper type. Use both
hands to roll the original.
DolphinC2_ENcopy_F_FM.book Page 7 Friday, February 25, 2005 10:46 AM
Page 16
Basics
8
1
Important
❒ The paper capacity indicated assumes the use of standard copier paper, and
should only be used as a guide. If the paper exceeds the upper limit, the copies may become folded or cause paper jams.
Original Output Locations
The following original output locations are available:
❖❖❖❖ Top Original Exit
This is the basic original output location. Originals are ejected onto
the upper output stacker.
❖❖❖❖ Rear Original Exit (straight)
Originals are ejected onto the original output supports. When copying thick or hard originals, select
this output location.
❖❖❖❖ Rear Original Exit (document roller)
When copying rolled originals
such as long length originals, select
this output location so that originals can be rolled and stacked by
the document roller. See p.9 “Rear
Original Exit (Document Roller)”.
Note
❒ Originals of 52.3 g/m
2
– 104.7
g/m
2
(13.9 lb – 27.9 lb) can be
used with the document roller.
❒ Do not use the document roller
when copying originals that are
longer than the maximum
length for each paper type. Use
both hands to roll the original.
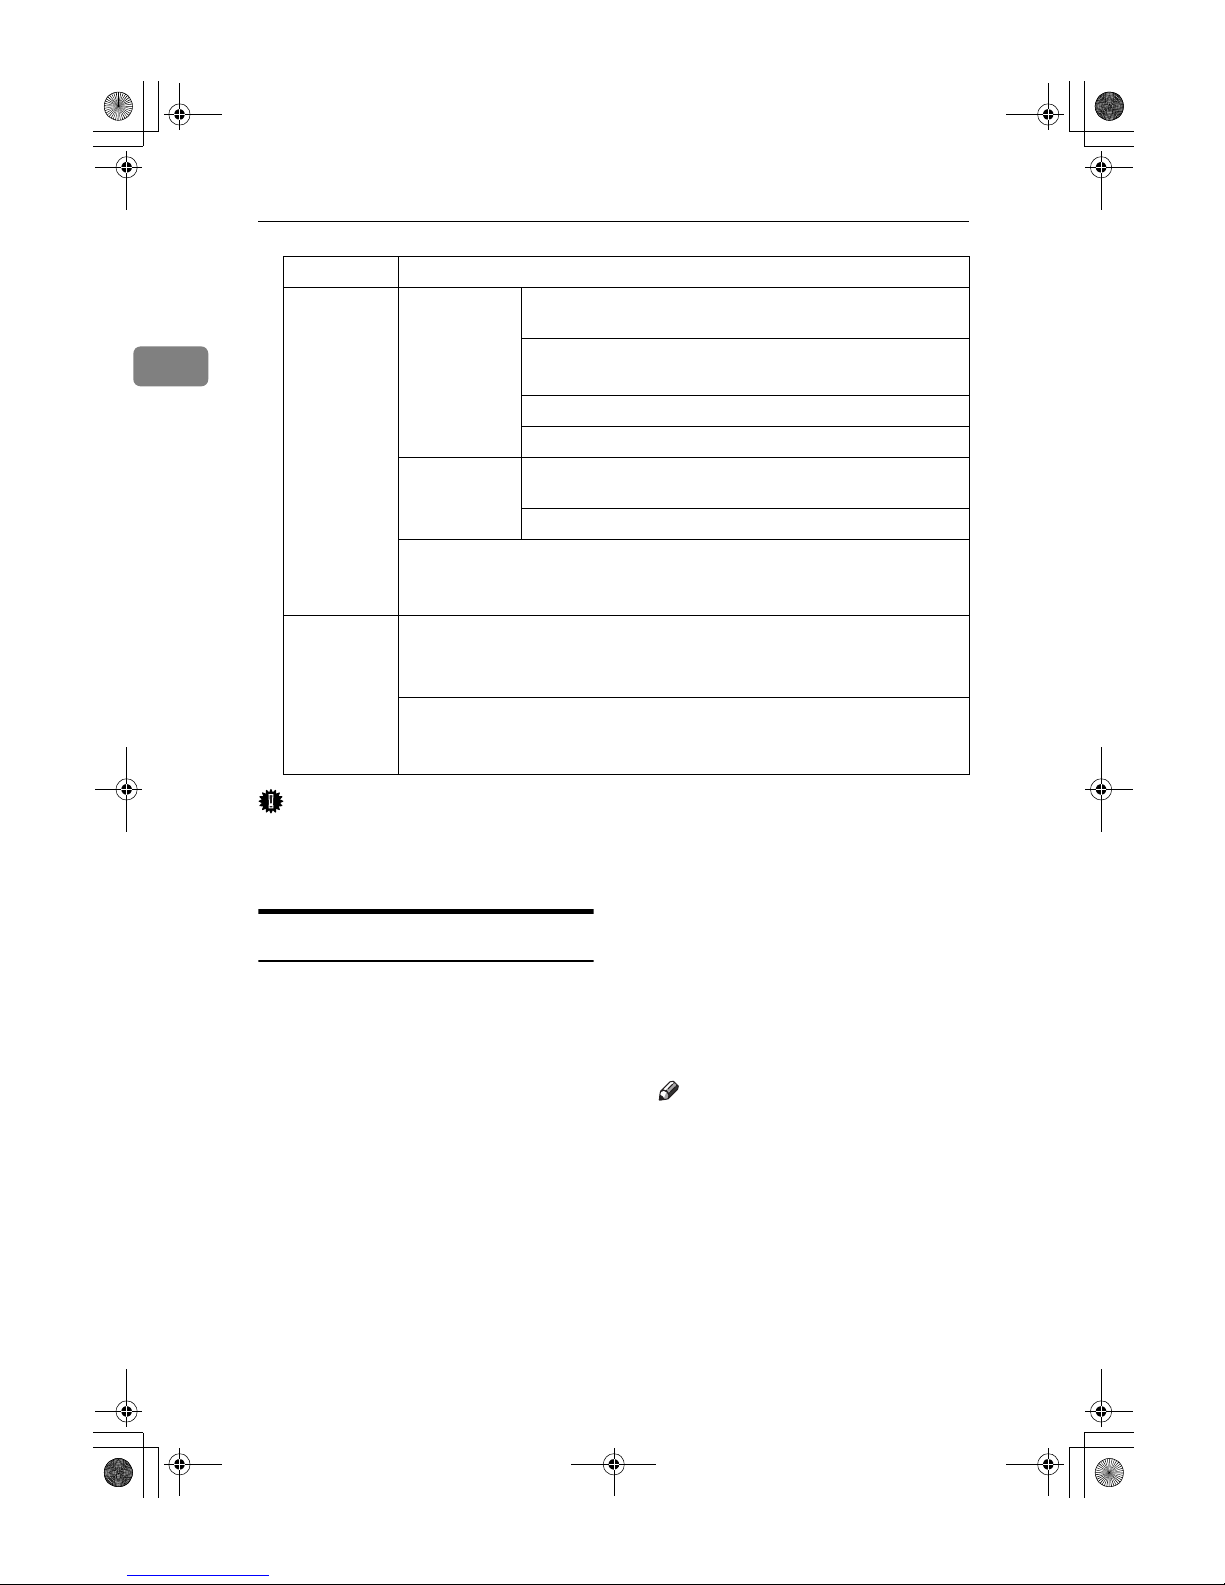
Copy output Capacities
Copy Output:
Front
Roll paper Plain paper (at normal tem-
perature and humidity):
99 sheets
Plain paper (at high or low
temperature and humidity):
10 sheets (A1L to A2)
99 sheets (smaller than A2)
Translucent paper(vellum): 10 sheets
Film: 1 sheet
Cut sheet paper
Plain paper, and translucent
paper (vellum):
10 sheets
Film: 1 sheet
• Same size copy paper
• Normal temperature = 23°C
Normal humidity = 65%
Copy Output:
Rear
A1 (D)K, A0 (E): 10 sheets (plain paper)
1 sheet (translucent paper)
1 sheet (film)
• Same size copy paper
• When using A0 size copy paper, attach the copy output (rear) auxiliary
guide. See p.11 “Using the rear output to eject A0 (E) KPaper”.
DolphinC2_ENcopy_F_FM.book Page 8 Friday, February 25, 2005 10:46 AM
Page 17
Before Copying
9
1
Important
❒ When using the optional carrier
sheet, set the original output location to rear original exit. If the original output location is set to top
original exit, the original may be
damaged.
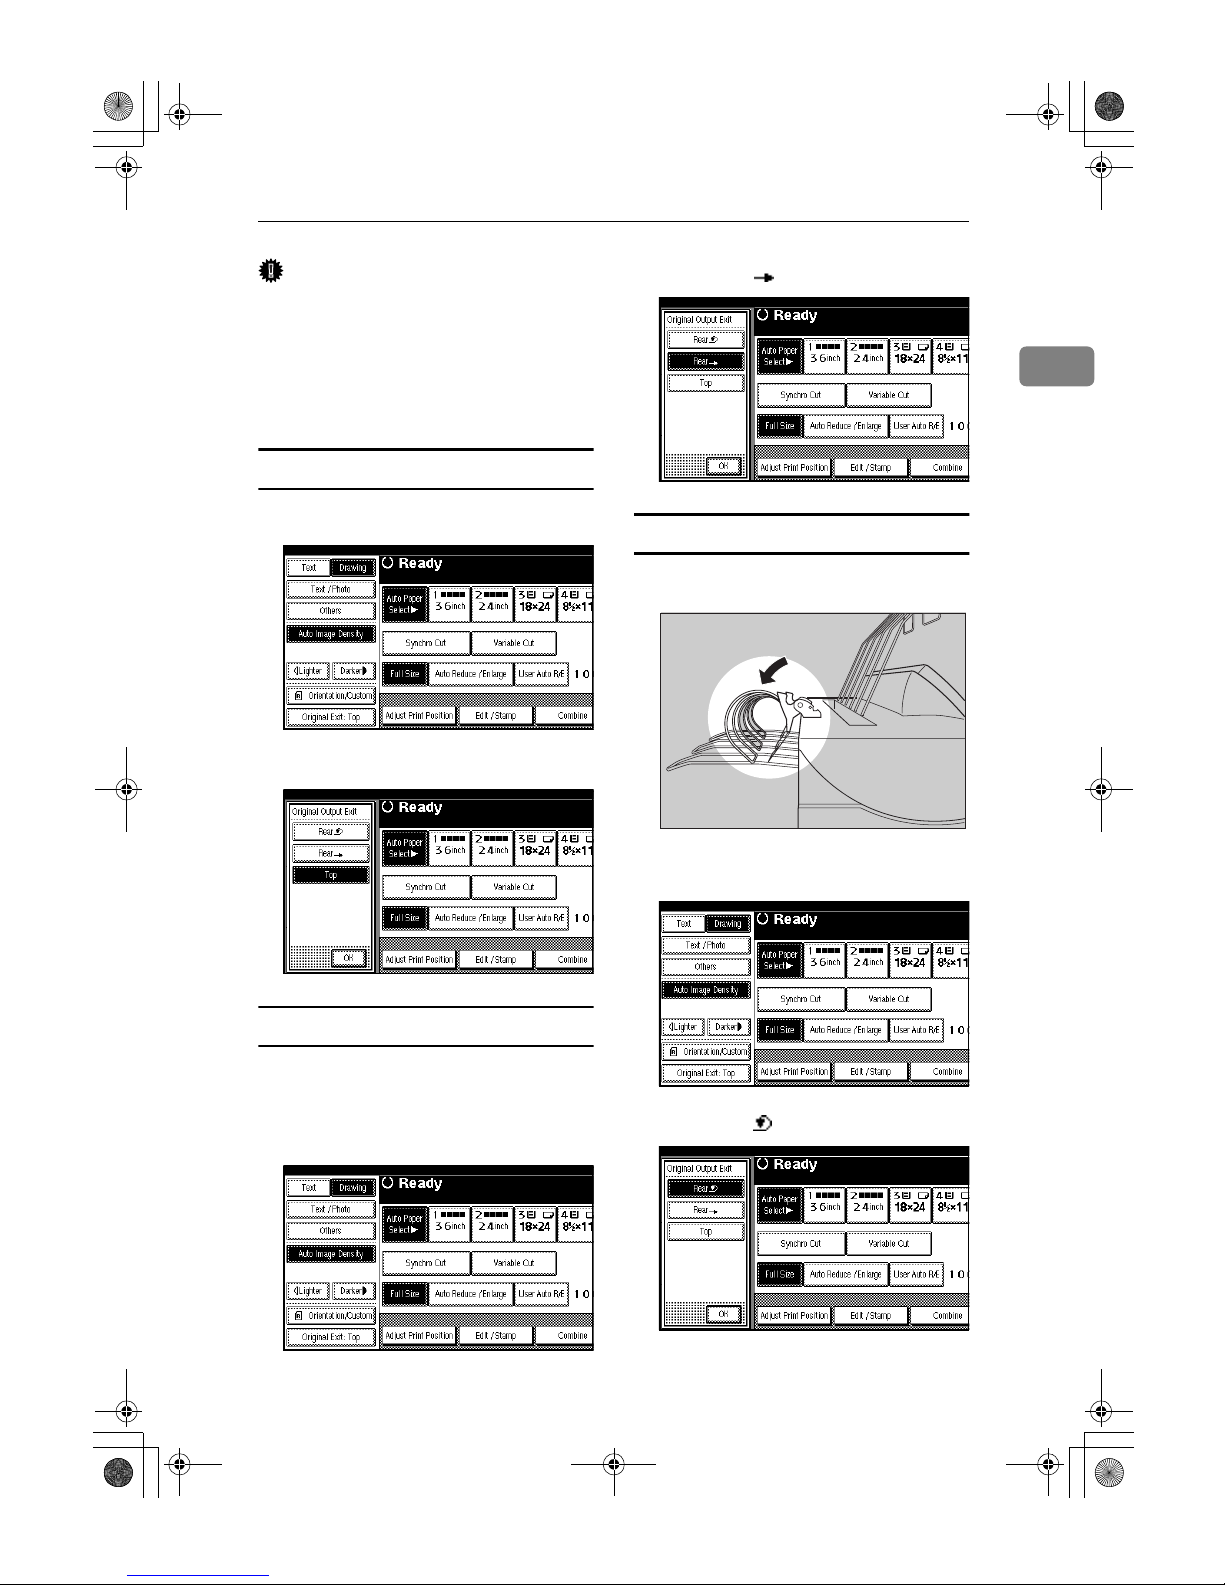
Top Original Exit
AAAA
Press [Original Exit].
BBBB
Press [Top], and then press [OK].
Rear Original Exit (Straight)
AAAA
Check that the document roller is
raised.
BBBB
Press [Original Exit].
CCCC
Press [Rear ], and then press [OK].
Rear Original Exit (Document Roller)
AAAA
Lower the document roller.
BBBB
Press [Original Exit].
CCCC
Press
[Rear ]
, and then press
[OK]
.
ZEDH140E
DolphinC2_ENcopy_F_FM.book Page 9 Friday, February 25, 2005 10:46 AM
Page 18

Basics
10
1
DDDD
After the original has been ejected, pull the document roller forward and remove the original.
Adjusting the Original Tray
When using the optional original
tray, adjust the hook position to the
size of the original.
Copy Output Locations
The following copy output locations
are available.
❖❖❖❖ Front Output
When [Front] is selected, copies are
sent to the copy output tray at the
front of the machine. When copying sizes up to A1 (D)L, select
front output.
If the output copies are badly
curled, turn the paper loaded in
the cut paper trays upside down,
or remove the copies during the
copy run.
❖❖❖❖ Rear Output
When [
Rear
] is selected, copies are
sent to the copy output tray at the
back of the machine.
When copying A1 (D)K or A0
(E)K, select rear output.
Front output
AAAA
Press [Front] under Copy Output
Location.
Rear output
AAAA
Press [
Rear
] under Copy Output
Location.
Note
❒ When copying onto thick paper,
the last sheet to be ejected may
remain in the exit area. If this
happens, remove it.
ZEDP071E
DolphinC2_ENcopy_F_FM.book Page 10 Friday, February 25, 2005 10:46 AM
Page 19
Before Copying
11
1
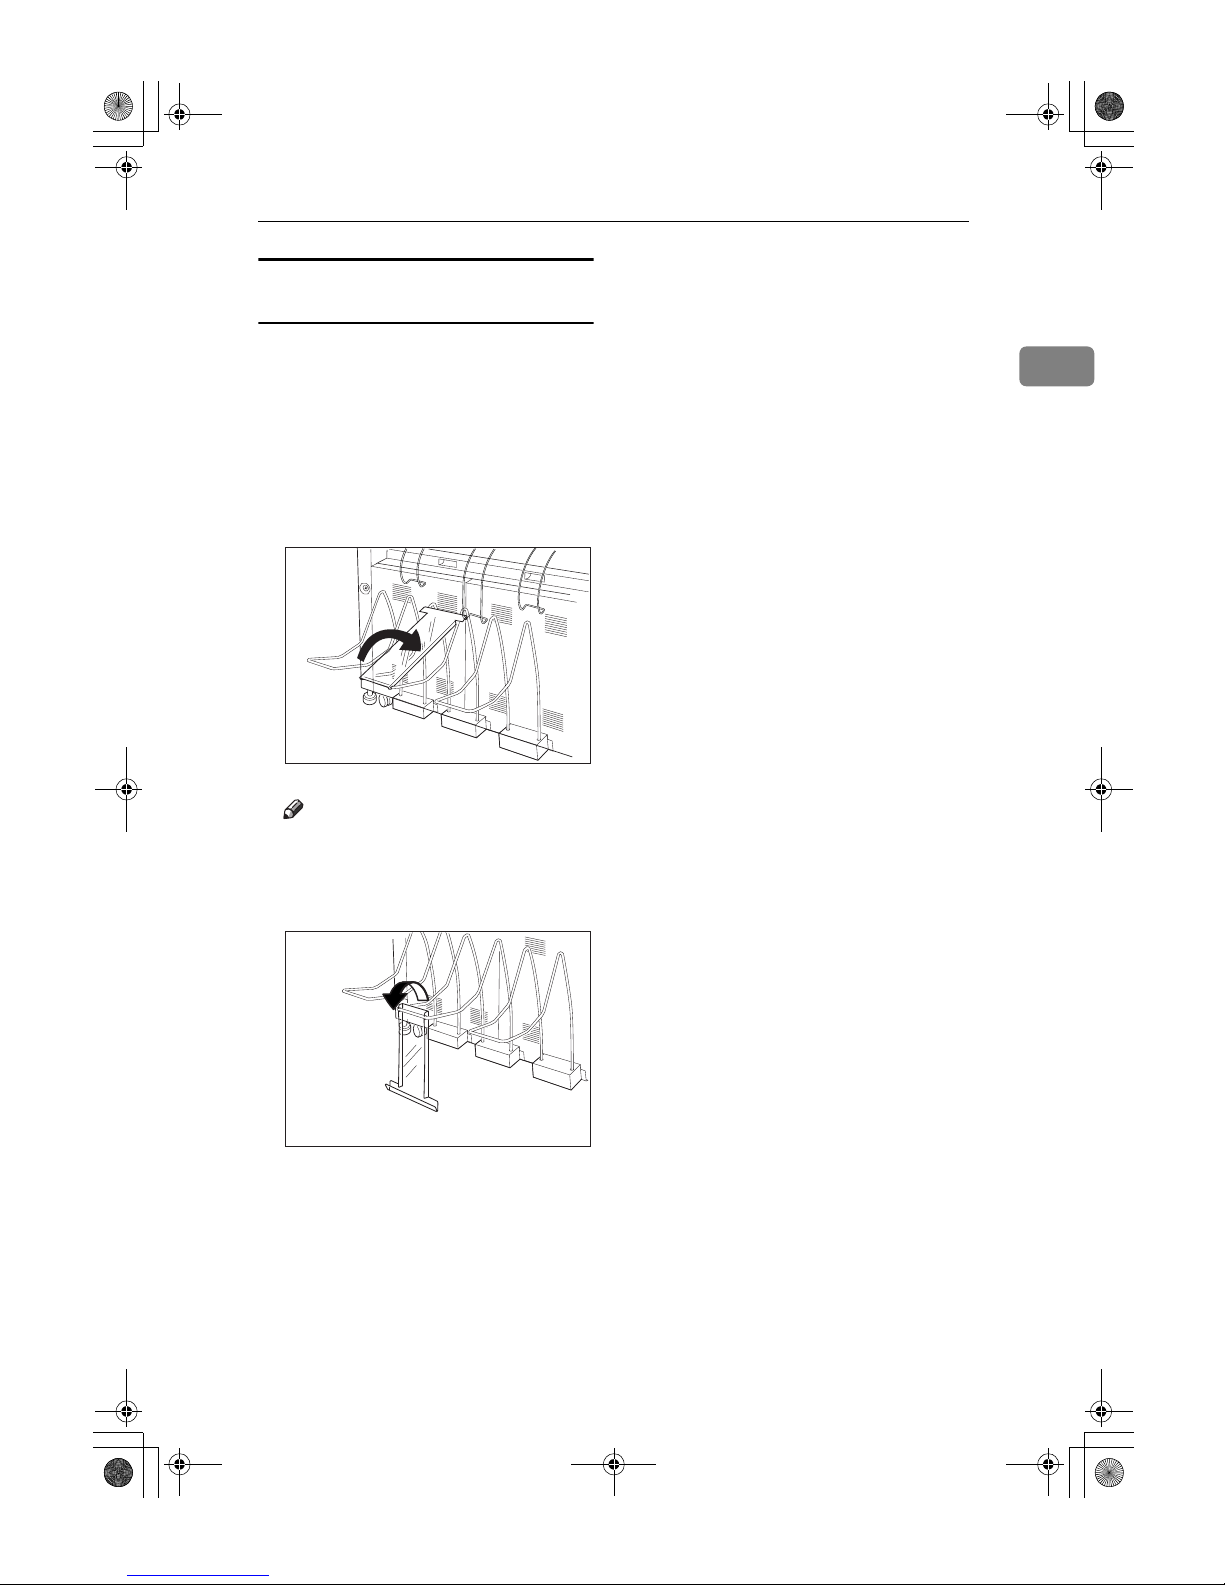
Using the rear output to eject A0 (E)
KKKKPaper
When ejecting A0 (E) Ksize paper to
the rear output, the leading edge of
the paper may become caught in the
back of the copy output tray. You can
prevent this by attaching the copy
output auxiliary guide.
AAAA
Lower the copy output auxiliary
guide and adjust the position.
Note
❒ You do not need to use the copy
output auxiliary guide when
copying on to A1 (D), or shorter
paper.
ZEDH410E
ZEDH420E
DolphinC2_ENcopy_F_FM.book Page 11 Friday, February 25, 2005 10:46 AM
Page 20

Basics
12
1
Originals
Sizes and Weights of Recommended Originals
❖❖❖❖ Metric version
❖❖❖❖ Inch version
Where original
is placed
Original size Original weight
Original table Standard sizes: A0K, A1KL, A2KL, A3KL,
A4KL, B1K, B2KL, B3KL, B4KL
20.9 – 157 g/m
2
and
0.03 – 1 mm thick originals
Custom sizes:
Length 210 – 15000 mm
Width 210 – 950 mm
Where original
is placed
Original size Original weight
Original table Standard sizes
• Engineering
E(34"×44")K, D(22"×34")K L, C(17"×22")K L
B(11"×17")K L, A(8
1
/2"×11")K L
• Architecture
E(36"×48")K, D(24"×36")KL, C(18"×24")K L
B(12"×18")K L, A(9"×12")K L
• 30"×42"K
5.6 - 41.8 lb. and 1.1
Mil - 40 Mil thick originals
Custom sizes
Length: 8.3" - 590.5"
Width: 8.3" - 37.5"
DolphinC2_ENcopy_F_FM.book Page 12 Friday, February 25, 2005 10:46 AM
Page 21
Originals
13
1
Originals that should be scanned using the carrier sheet
The following type of originals should be mounted on the carrier sheet. You
should also use the carrier sheet for important originals and for originals you
will copy repeatedly.
• Cut and pasted originals
• Originals with fold lines
• Wrinkled or torn originals
• Waved originals
• Punched originals
• Originals with sticky tape or adhesive
• Pasted originals
• Originals with a damaged leading edge
• Originals with surfaces that attach to glass easily such as photographs
• Originals drawn in pencil
Reference
p.18 “Setting the Carrier Sheet”
Non-recommended original
The following original types can cause jams, or may itself be damaged.
• Originals other than those specified in p.12 “Sizes and Weights of Recom-
mended Originals”
• Stapled or clipped originals
• Perforated or torn originals
• Bent, folded, or creased originals
• Pasted originals
• Originals with any kind of coating, such as thermal fax paper, art paper, alu-
minum foil, carbon paper, or conductive paper
• Originals with indexes, tags, or other projecting parts
• Sticky originals such as translucent paper
• Bound originals such as books
• Damp originals
• Badly curled originals
• Originals that vary in thickness
• Originals with sticky tape or adhesive
• Originals with thick leading edges
• Originals with wet ink or correction fluid
• Carbon-backed originals
DolphinC2_ENcopy_F_FM.book Page 13 Friday, February 25, 2005 10:46 AM
Page 22

Basics
14
1
• Originals not made of paper (such as glass, metal)
• Originals with a roll diameter smaller than φ35 mm (φ1.4")
• Originals with a roll diameter larger than φ110 mm (φ4.3")
Flatten curled originals so they fit within the range shown below:
• Front and back curl; R 60 mm (2.4") or more, height 10 mm (0.4") or less
Originals that use more than 20% of the image area, may be faint.
Missing Image Area
As shown above, part of the original may not be copied when using paper roll
or full-size copying.
*
1: Left and right, less than 5 mm (0.2")
60mm (2.4") 60mm (2.4")
10mm (0.4")
10mm (0.4")
AHD046S
DolphinC2_ENcopy_F_FM.book Page 14 Friday, February 25, 2005 10:46 AM
Page 23
Placing Originals
15
1
Placing Originals
Note
❒ Place the original after any correc-
tion fluid or ink has completely
dried. Not taking this precaution
will result in a dirtied exposure
glass and blemished copies.
❒
Dust and residue from pencil-drawn
originals can result in a dirtied exposure glass and blemished copies. We recommend using the
carrier sheet for this type of original. See p.18 “Setting the Carrier
Sheet”.
❒ If the original's rear edge is badly
curled, smooth it out with both
hands before scanning. If the original is inserted as is, it may be damaged.
❒
When copying curled originals, use
the front copy output auxiliary
tray.
Reference
For details about precautions for
originals, see p.12 “Originals”.
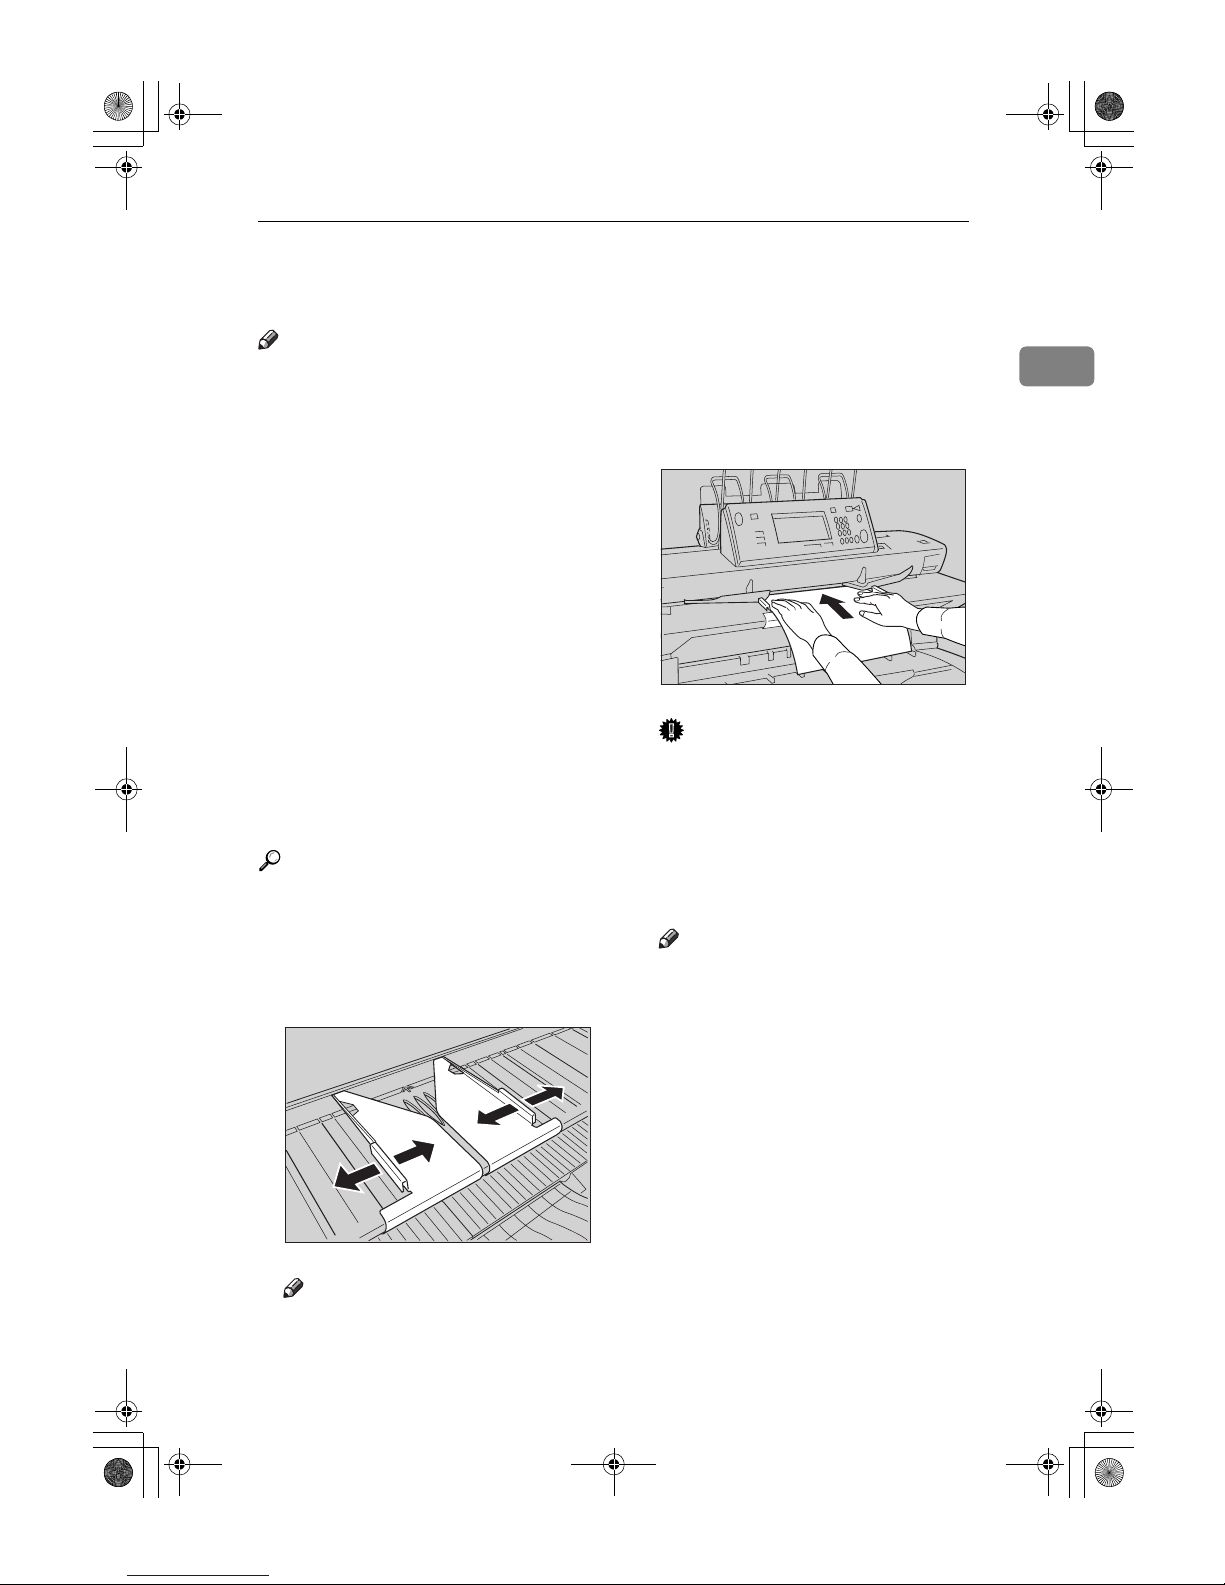
AAAA
Adjust the original guides to the
size and orientation of the original width.
Note
❒ Make sure the original guides
are flush against the original.
❒ Do not push the original guide
side fence with force.
BBBB
Using both hands, carefully insert
the original between the original
guides, copy side up.
Important
❒ Once originals start to feed in,
do not push or pull them. This
may damage them.
❒ Do not operate the document
roller while originals are being
fed through the machine. Originals may be damaged.
Note
❒ Do not release your hands until
the original is pulled in. Release
when it has gone slightly in.
❒ You can change the original
feed delay setting if originals
are repeatedly feeding in slanted, or if you need to adjust the
delay for the type of originals
you are using. See “Original
Feed Delay 1”, General Settings
Guide.
❒ If the leading edge of the origi-
nal is badly curled, smooth out
the curl, and then place the original in the insertion area.
ZEDH190E
ZEDH180E
DolphinC2_ENcopy_F_FM.book Page 15 Friday, February 25, 2005 10:46 AM
Page 24
Basics
16
1
❒
When inserting long length originals,
there may be some movement to either side. If this
happens, correct the movement
manually while feeding the
originals into the machine.
CCCC
Press the {{{{#}}}} key after all originals have been scanned.
----To stop originals feeding in
If the originals are feeding in slanted,
or jamming, etc., press the {{{{Scanner
Stop}}}} key to stop them feeding in.
Note
❒ When you press the {{{{Scanner Stop}}}}
key, the original stops immediately, which can cause it to jam. If this
happens, see “xClearing Misfeeds”, General Settings Guide.
❒ When you have set rear original
exit as the original output location,
the rear edge of the originals are
held at the output exit. To cancel
this, press the {{{{Scanner Stop}}}} key.
See p.8 “Original Output Locations”.
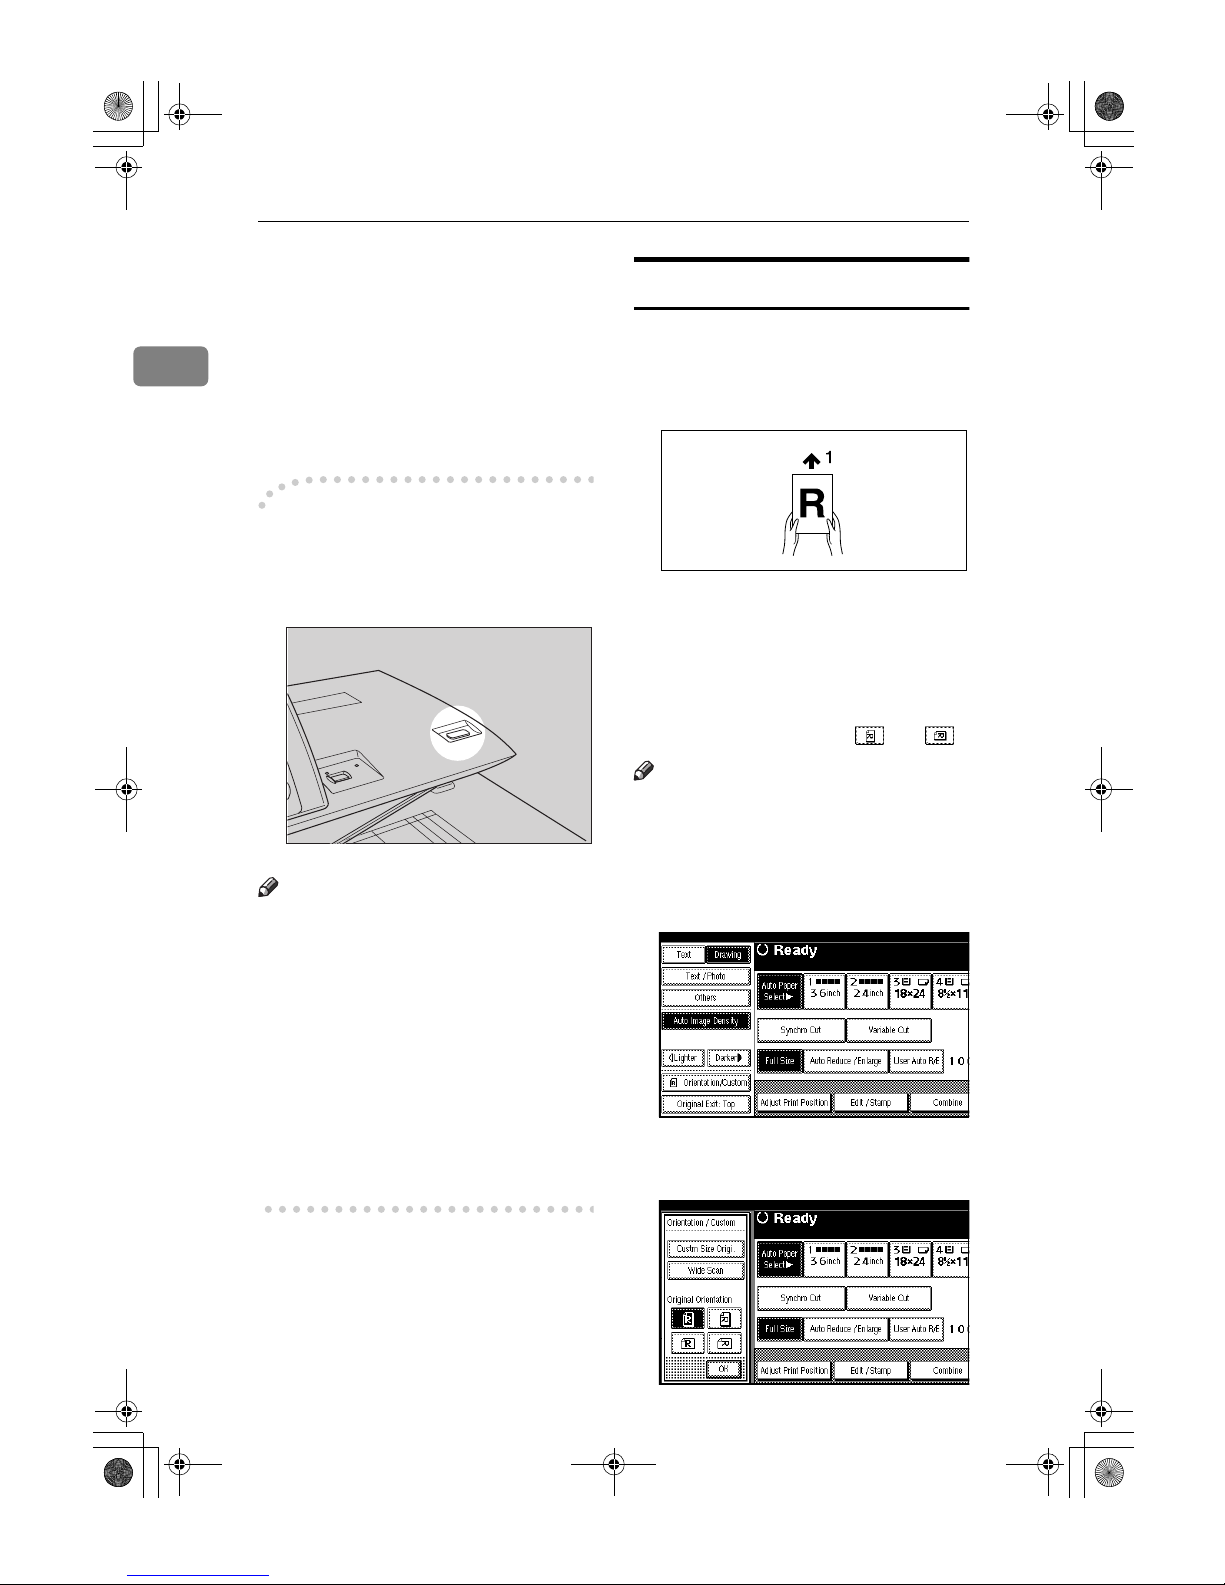
Original Orientation
Place the original of the same orientation as the copy paper on the original
table.
1.
Feeding direction
When you cannot place the original
as the above, you may not make copies as you want with particular functions. If this happens, change the
orientation by selecting [] or [].
Note
❒ It is recommended that you use
this function together with the
Auto Paper Select or Preset Reduce/Enlarge function.
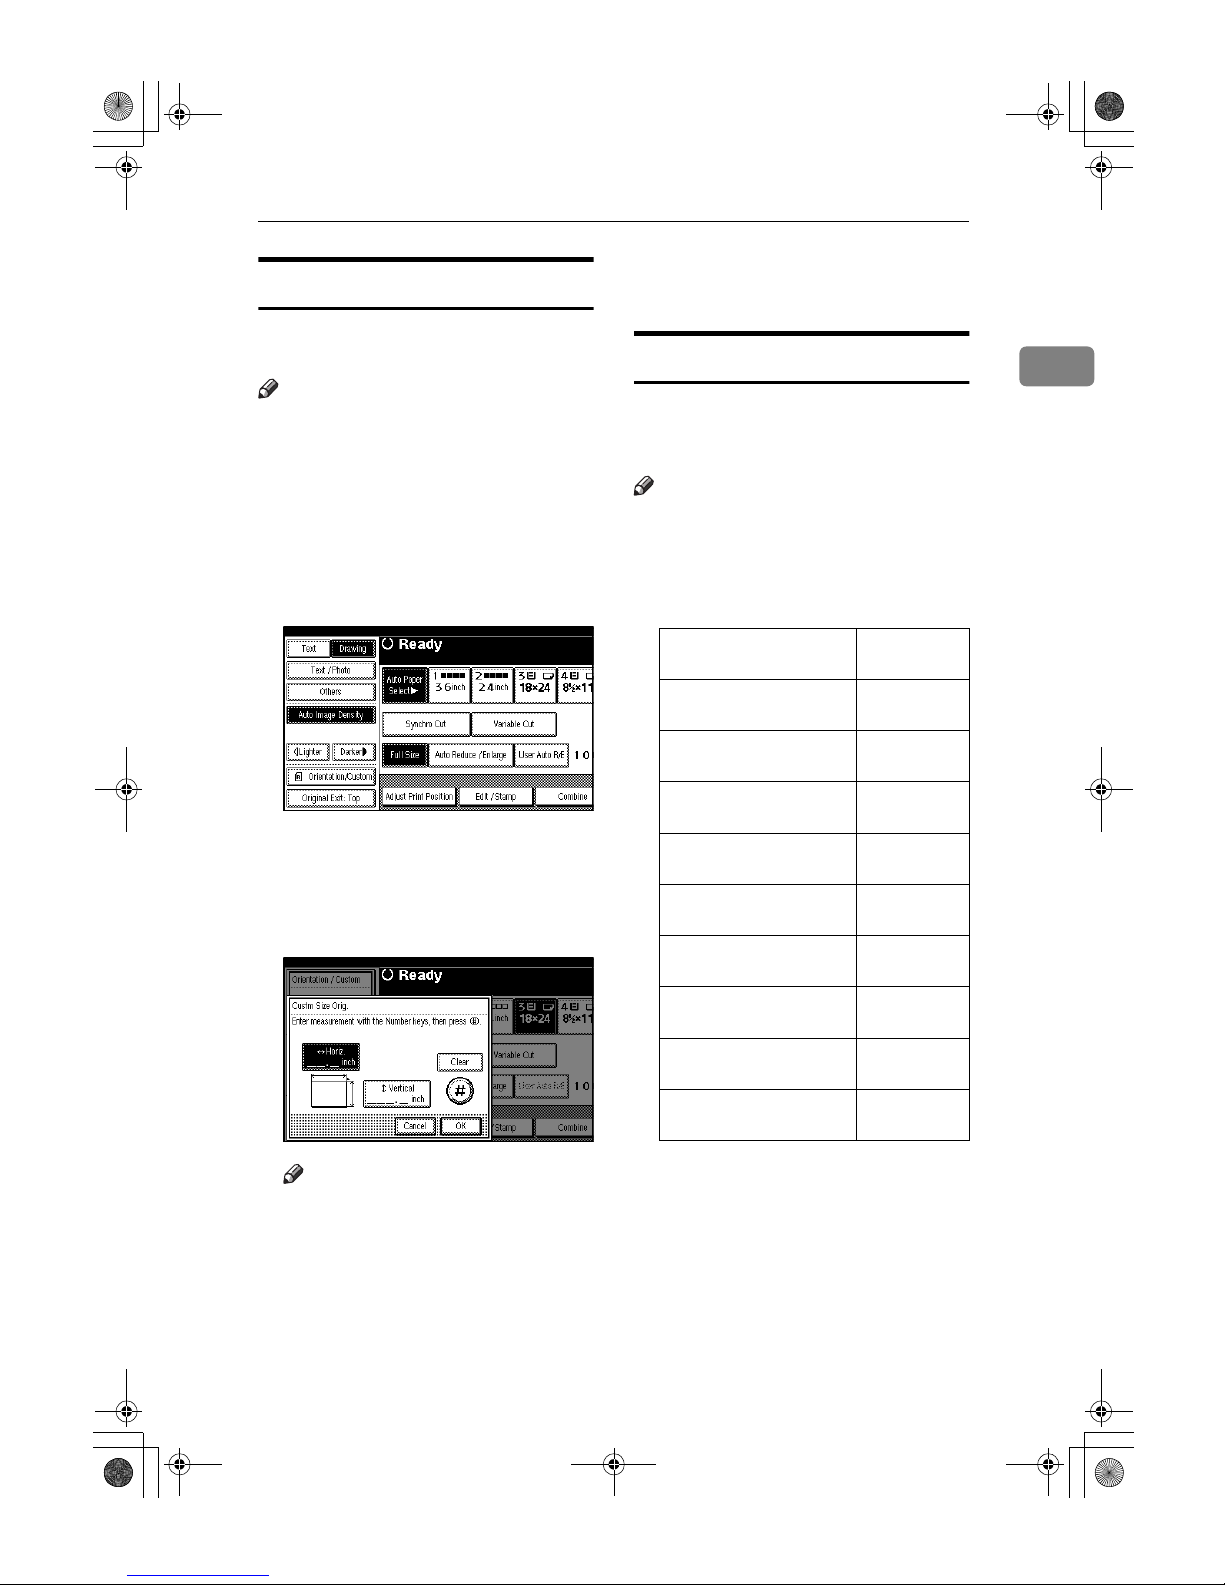
AAAA
Press [Orientation/Custom].
BBBB
Select the original orientation,
and then press [OK].
ZEDH150E
AHD005S
DolphinC2_ENcopy_F_FM.book Page 16 Friday, February 25, 2005 10:46 AM
Page 25
Placing Originals
17
1
Placing Custom Size Originals
When placing custom size originals,
specify the size of the originals.
Note
❒ Paper with a vertical size of 210–
15000 mm (8.3"–590.5") and a horizontal size of 210–914 mm (8.3"–
35.9") can be specified with this
function.
❒ If you do not specify the size, parts
of the image may not be copied.
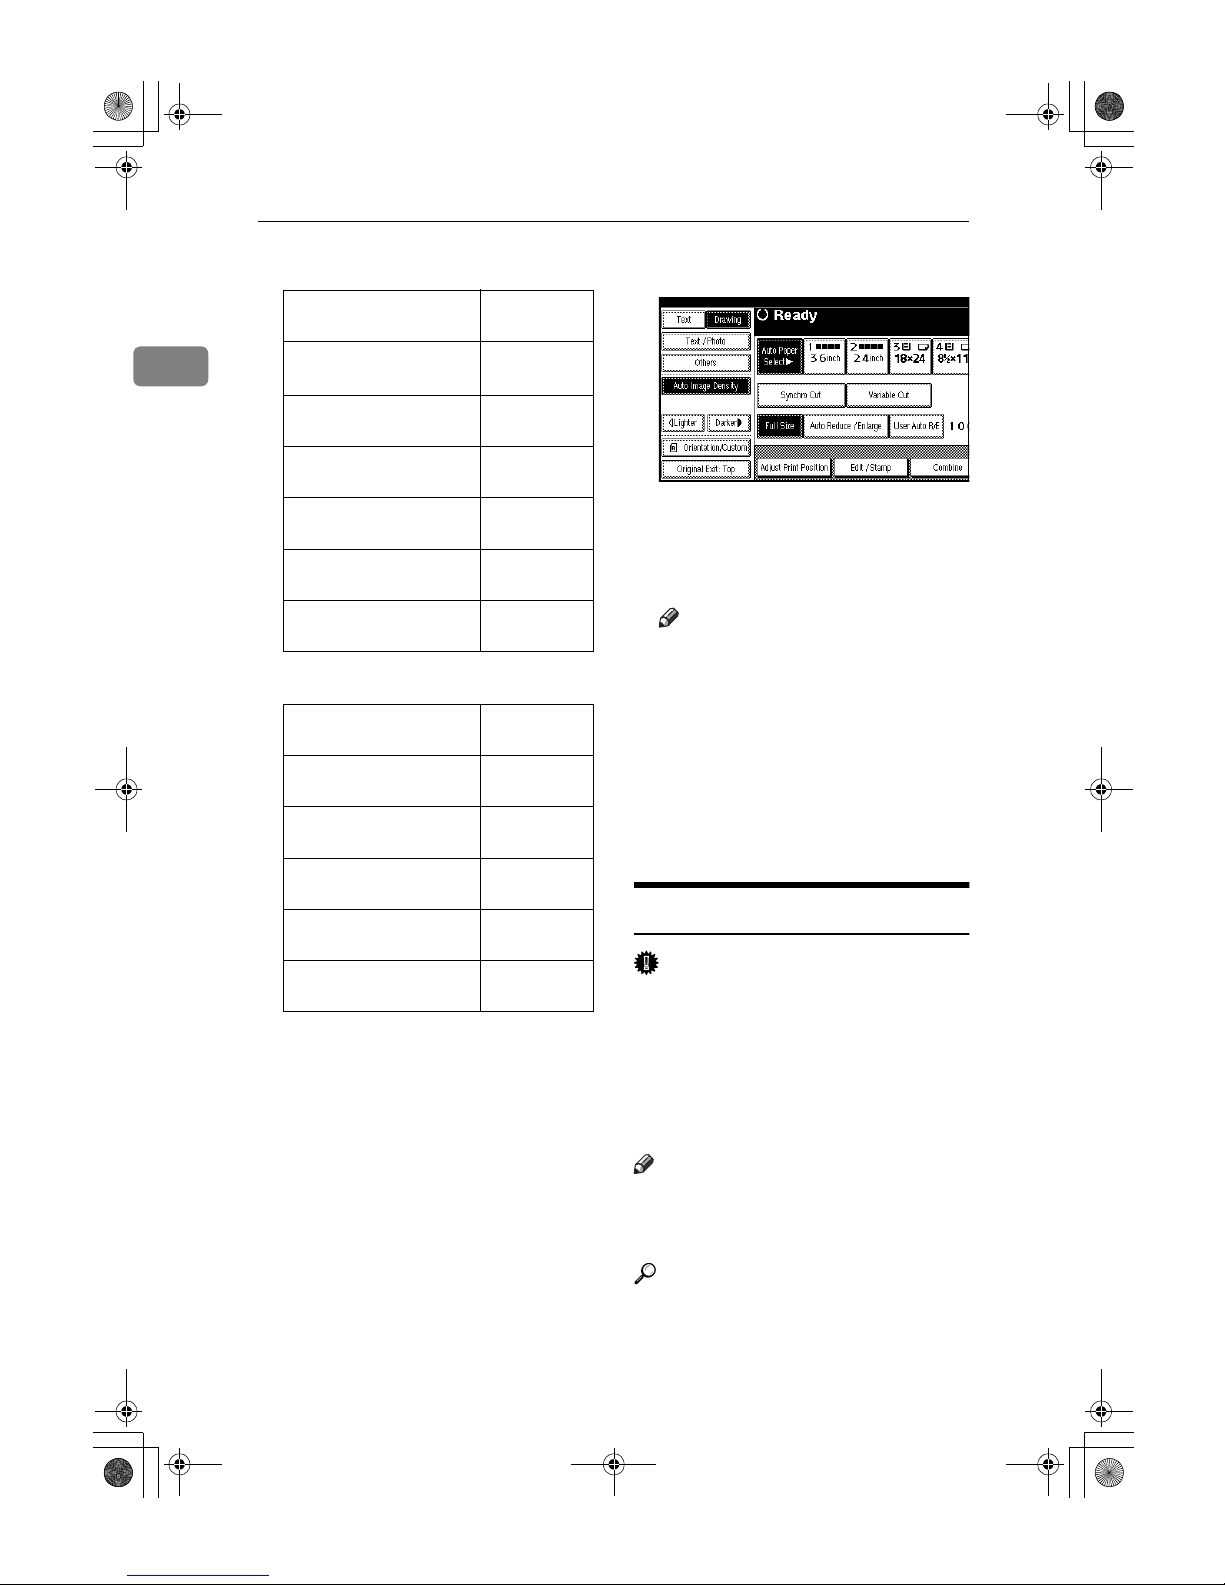
AAAA
Press [Orientation/Custom].
BBBB
Press [Custm Size Orig.].
CCCC
Enter the horizontal size of the
original using the number keys,
and then press [#].
Note
❒ If you make a mistake, press
[Clear] or the {{{{Clear/Stop}}}} key,
and then enter the value again.
DDDD
Enter the vertical size of the original using the number keys, and
then press [#].
EEEE
Press [OK].
FFFF
Place the originals, and then press
the {{{{Start}}}} key.
Wide Scan
The machine checks the original
width and then increases the scan size
to a slightly larger standard size.
Note
❒ Scan size differs depending on the
size of the original. See the following table for available scan sizes:
❖❖❖❖ Metric version
❒ The machine adjusts to a scan size
of the same paper series as the
original. If you want to mix the sizes of A and B series when scanning, contact your service
representative.
Original width Scanning
width
Over than A4K(210 mm)
and less than 257 mm
A3K(297 mm)
Over than A3K(297 mm)
and less than 364 mm
A2K(420 mm)
Over than A2 K(420 mm)
and less than 515 mm
A1K(594 mm)
Over than A1K(594 mm)
and less than 728 mm
A0K(841 mm)
Over than A0K(841 mm)
and less than 914 mm
914 mm
Over than B4K(257 mm)
and less than 297 mm
B3K(364 mm)
Over than B3K(364 mm)
and less than 420 mm
B2K(515 mm)
Over than B2K(515 mm)
and less than 594 mm
B1K(728 mm)
Over than B1K(728 mm)
and less than 841 mm
914 mm
DolphinC2_ENcopy_F_FM.book Page 17 Friday, February 25, 2005 10:46 AM
Page 26
Basics
18
1
❖❖❖❖ Inch version (Engineering)
❖❖❖❖ Inch version (Architecture)
❒ The machine adjusts to a scan size
of the same paper series as the
original. If you want to mix the sizes of Engineering and Architecture
series when scanning, contact your
service representative.
❒ When copying custom size origi-
nals, you can use this function with
Synchro Cut to specify the copy
paper to be cut to the size of the
original.
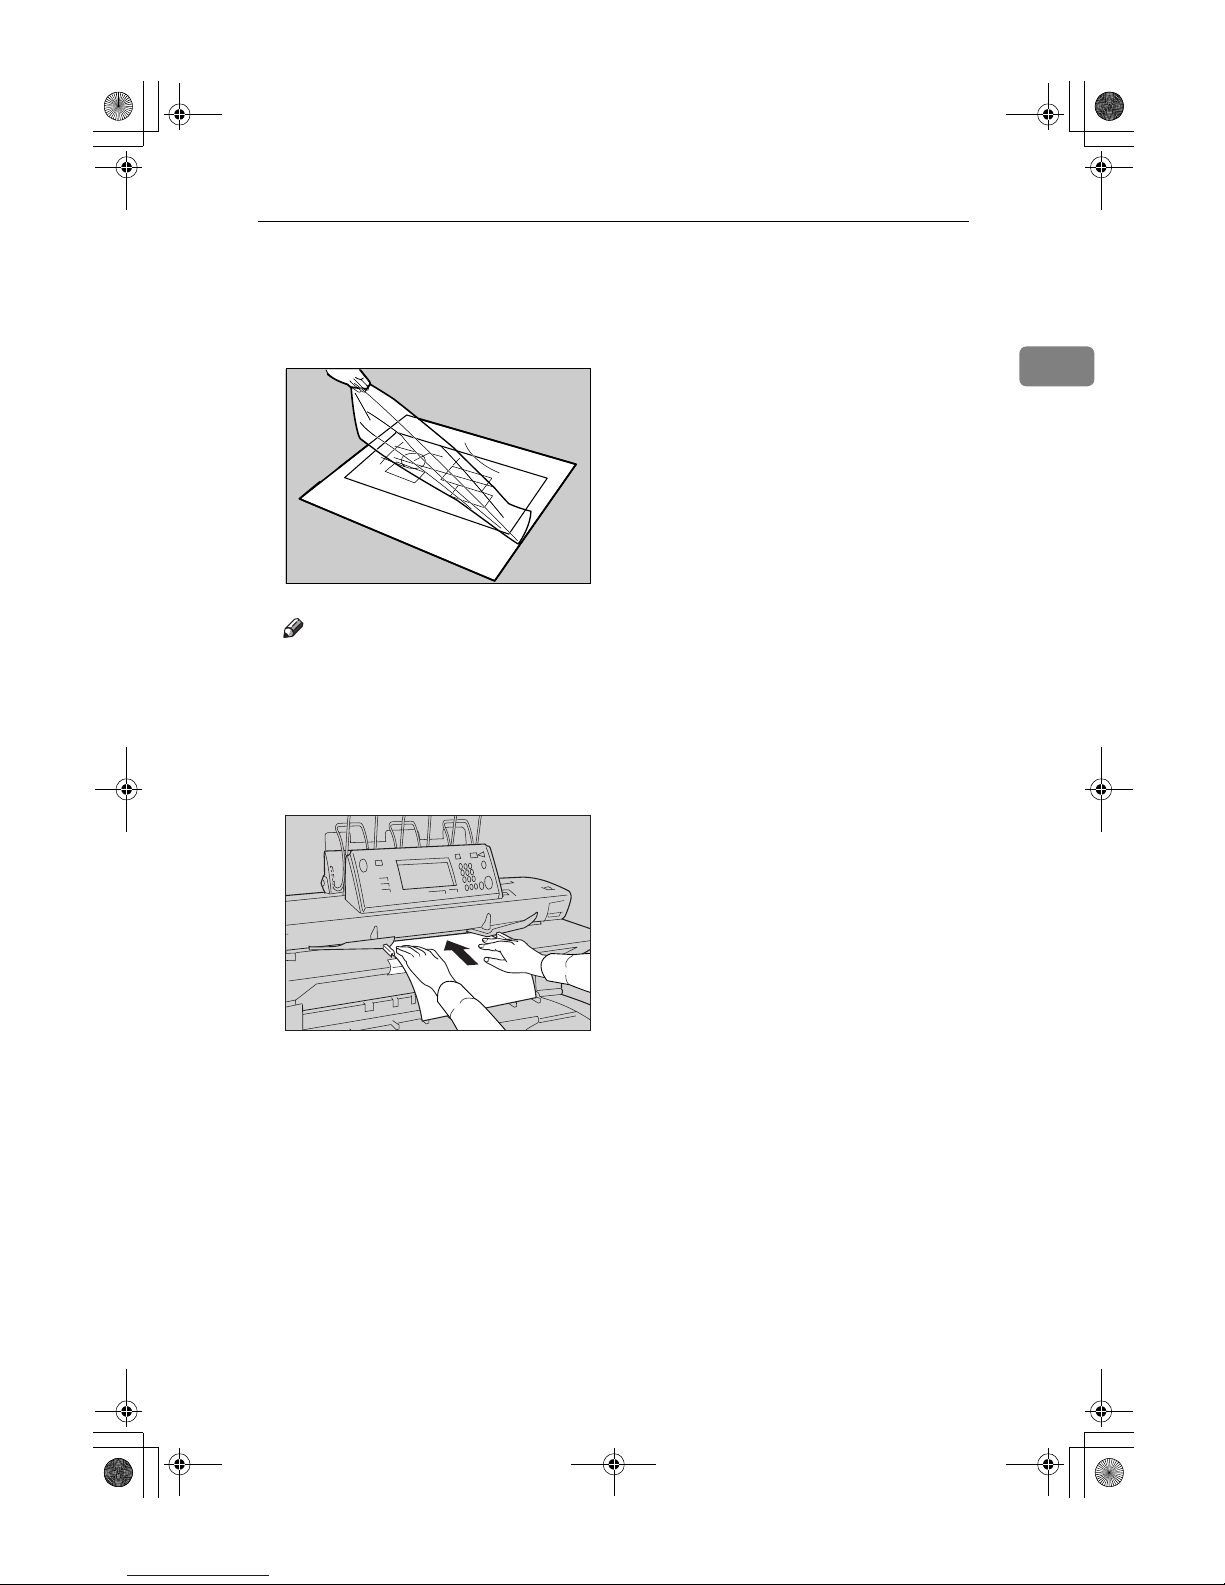
AAAA
Press [Orientation/Custom].
BBBB
Press [Wide Scan], and then press
[OK].
CCCC
Select the paper tray.
Note
❒ When using this function, the
Auto Paper Select function does
not work. If the paper size you
select is as the same as that of
the original, part of the image
may not be copied. Select a
slightly larger standard size.
DDDD
Place the originals, and then press
the {{{{Start}}}} key.
Setting the Carrier Sheet
Important
❒ When using the optional carrier
sheet, set the original output location to rear original exit (straight).
If the original output location is set
to top original exit, or rear original
exit (document roller), the original
may be damaged.
Note
❒ When using the carrier sheet with
Synchro Cut selected, the paper is
cut to the size of the carrier sheet.
Reference
For details about using the carrier
sheet to make copies, see p.13
“Originals that should be scanned
using the carrier sheet”.
Original width Scanning
width
Over than AK(8
1
/2")
and less than 9"
BK(11")
Over than BK(11") and
less than 12"
CK(17")
Over than CK(17") and
less than 18"
DK(22")
Over than DK(22") and
less than 24"
EK(34")
Over than 30" and less
than 36"
36"
Over than EK(34") and
less than 36"
36"
Original width Scanning
width
Over than AK(9") and
less than 11"
BK(12")
Over than BK(12") and
less than 17"
CK(18")
Over than CK(18") and
less than 22"
DK(24")
Over than DK(24") and
less than 34"
EK(36")
Over than 30" and less
than 36"
36"
DolphinC2_ENcopy_F_FM.book Page 18 Friday, February 25, 2005 10:46 AM
Page 27
Placing Originals
19
1
AAAA
Open the carrier sheet with the
transparent sheet face up, and
then insert the original also face
up.
Note
❒ Align the original with the fold
of the carrier sheet.
BBBB
Using both hands, hold the original copy side up, and carefully insert the folded edge of the carrier
sheet into the insertion area.
ZEDP020E
ZEDH180E
DolphinC2_ENcopy_F_FM.book Page 19 Friday, February 25, 2005 10:46 AM
Page 28
Basics
20
1
DolphinC2_ENcopy_F_FM.book Page 20 Friday, February 25, 2005 10:46 AM
Page 29
21
2. Copying
Basic Procedure
Preparation
When User Code Authentication is
set, the screen for entering a user
code will be displayed. Enter your
user code (up to eight digits) using
the number keys, and then press
the {{{{#}}}} key.
Reference
For user codes, see "Registering
User Codes", General Settings
Guide.
When Basic Authentication, Windows Authentication, or LDAP
Authentication is set, the authentication screen will be displayed.
Enter your login user name and
user password, and then press [Lo-
gin]. See "When the Authentication
Screen is Displayed", General Set-
tings Guide.
Note
❒ Consult the User Administrator
about your login user name and login password.
AAAA
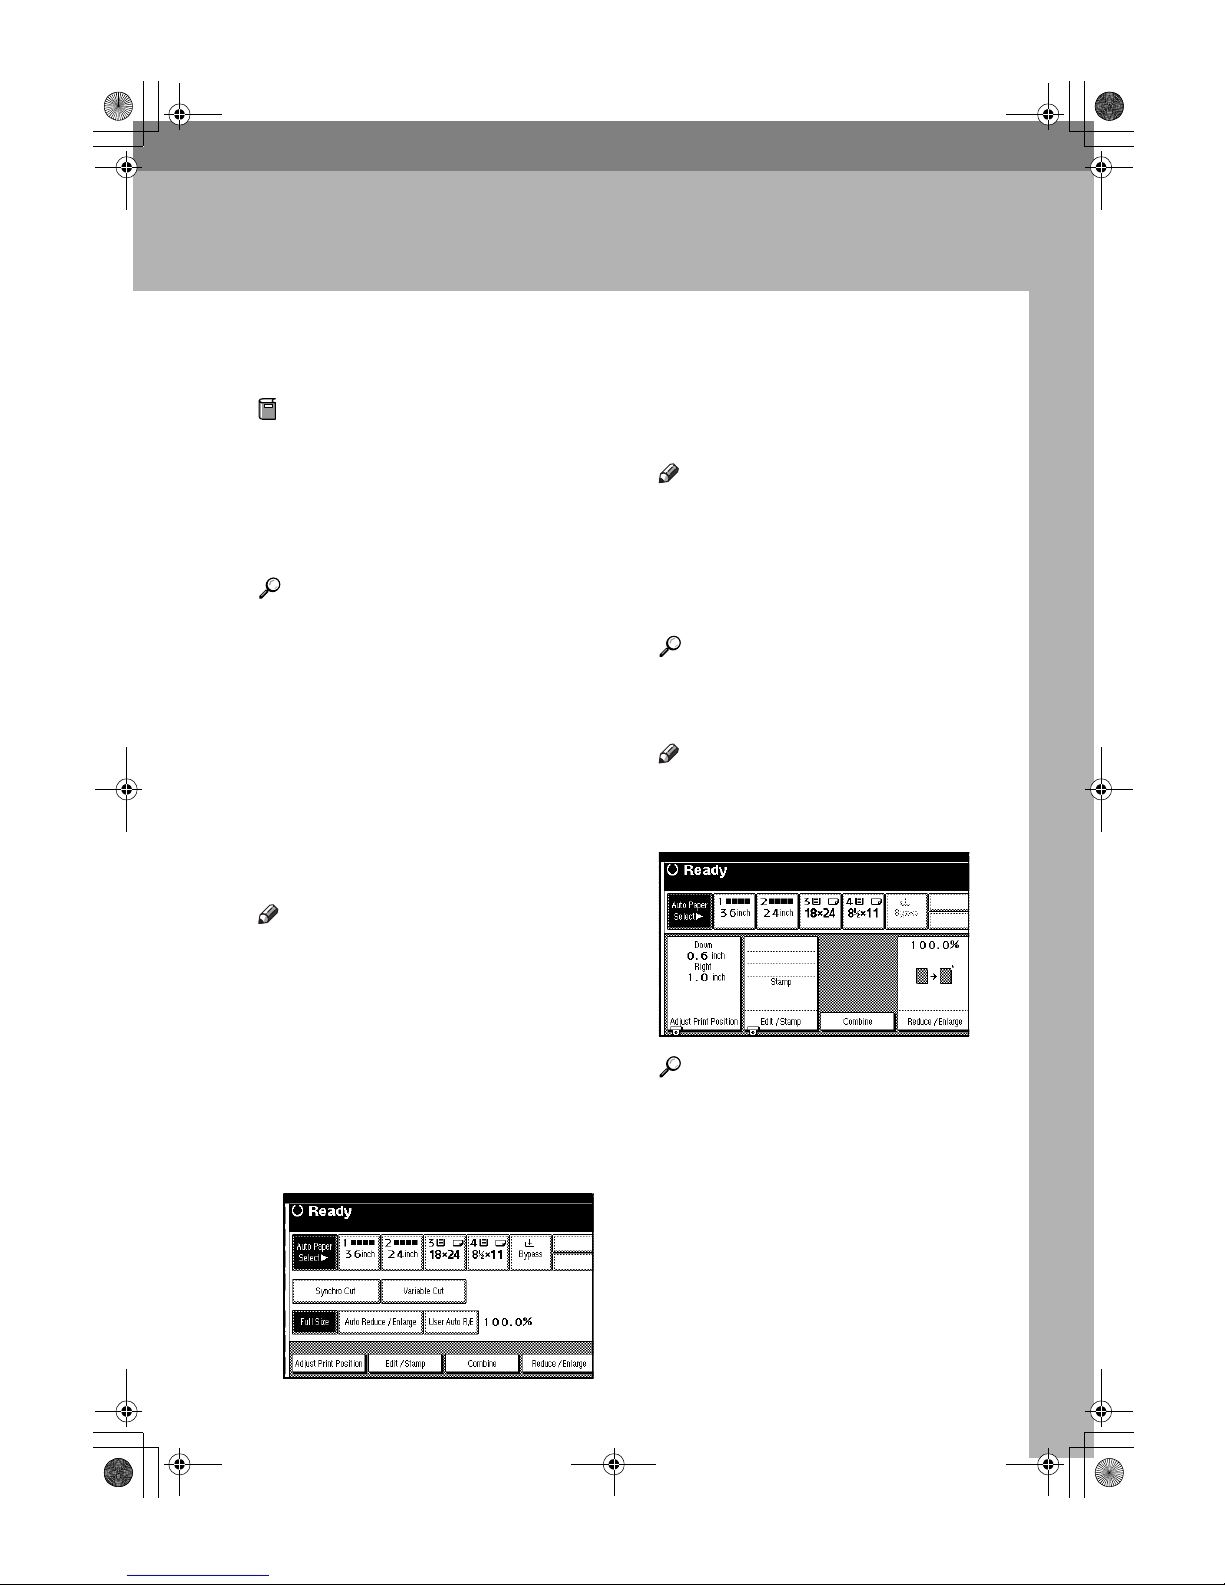
Make sure "dddd Ready" is shown
on the display.
If any other function is displayed,
press the {{{{Copy}}}} key on the left of
the control panel.
❖❖❖❖ Initial copy display
BBBB
Make sure no previous settings
remain.
Note
❒ To clear settings, press the
{{{{Clear Modes}}}} key.
CCCC
Select the output locations for
originals and copies, and then
prepare to use them.
Reference
p.7 “Before Copying”
DDDD
Make the necessary settings.
Note
❒ You can press the {{{{Check Modes}}}}
key to view the settings you
have made.
Reference
For details, see explanations of
each function.
If you use the {{{{Program}}}} key to
access the program function,
you can store and easily recall
the settings. See p.65 “Pro-
grams”.
DolphinC2_ENcopy_F_FM.book Page 21 Friday, February 25, 2005 10:46 AM
Page 30
Copying
22
2
EEEE
Enter the number of copies using
the number keys.
Note
❒ The copy quantity is from 1 to
99.
FFFF
Place the originals.
Originals feed into the machine,
which then starts copying.
Reference
p.15 “Placing Originals”
Note
❒ When [Press Start Key] is select-
ed in the Feed Start Method,
copying starts when you press
the {{{{Start}}}} key. See “Feed Start
Method”, General Settings
Guide”.
❒ To stop originals feeding in,
press the {{{{Scanner Stop}}}} key. See
p.16 “To stop originals feeding
in”.
❒ Insert the original so that the
right edge is aligned with the
original guide.
❒ The continuous copy speed may
be slow down to ensure the toner fuses to paper in the following cases:
• When the machine is just
turned on
• When the temperature is low
• When making a lot of contin-
ues copies (more than 30
sheets/A0, E)
Important
❒
When Basic Authentication, Windows
Authentication, or LDAP
Authentication is set, always
log off when you have finished
using the machine to prevent
unauthorized users from using
the machine.
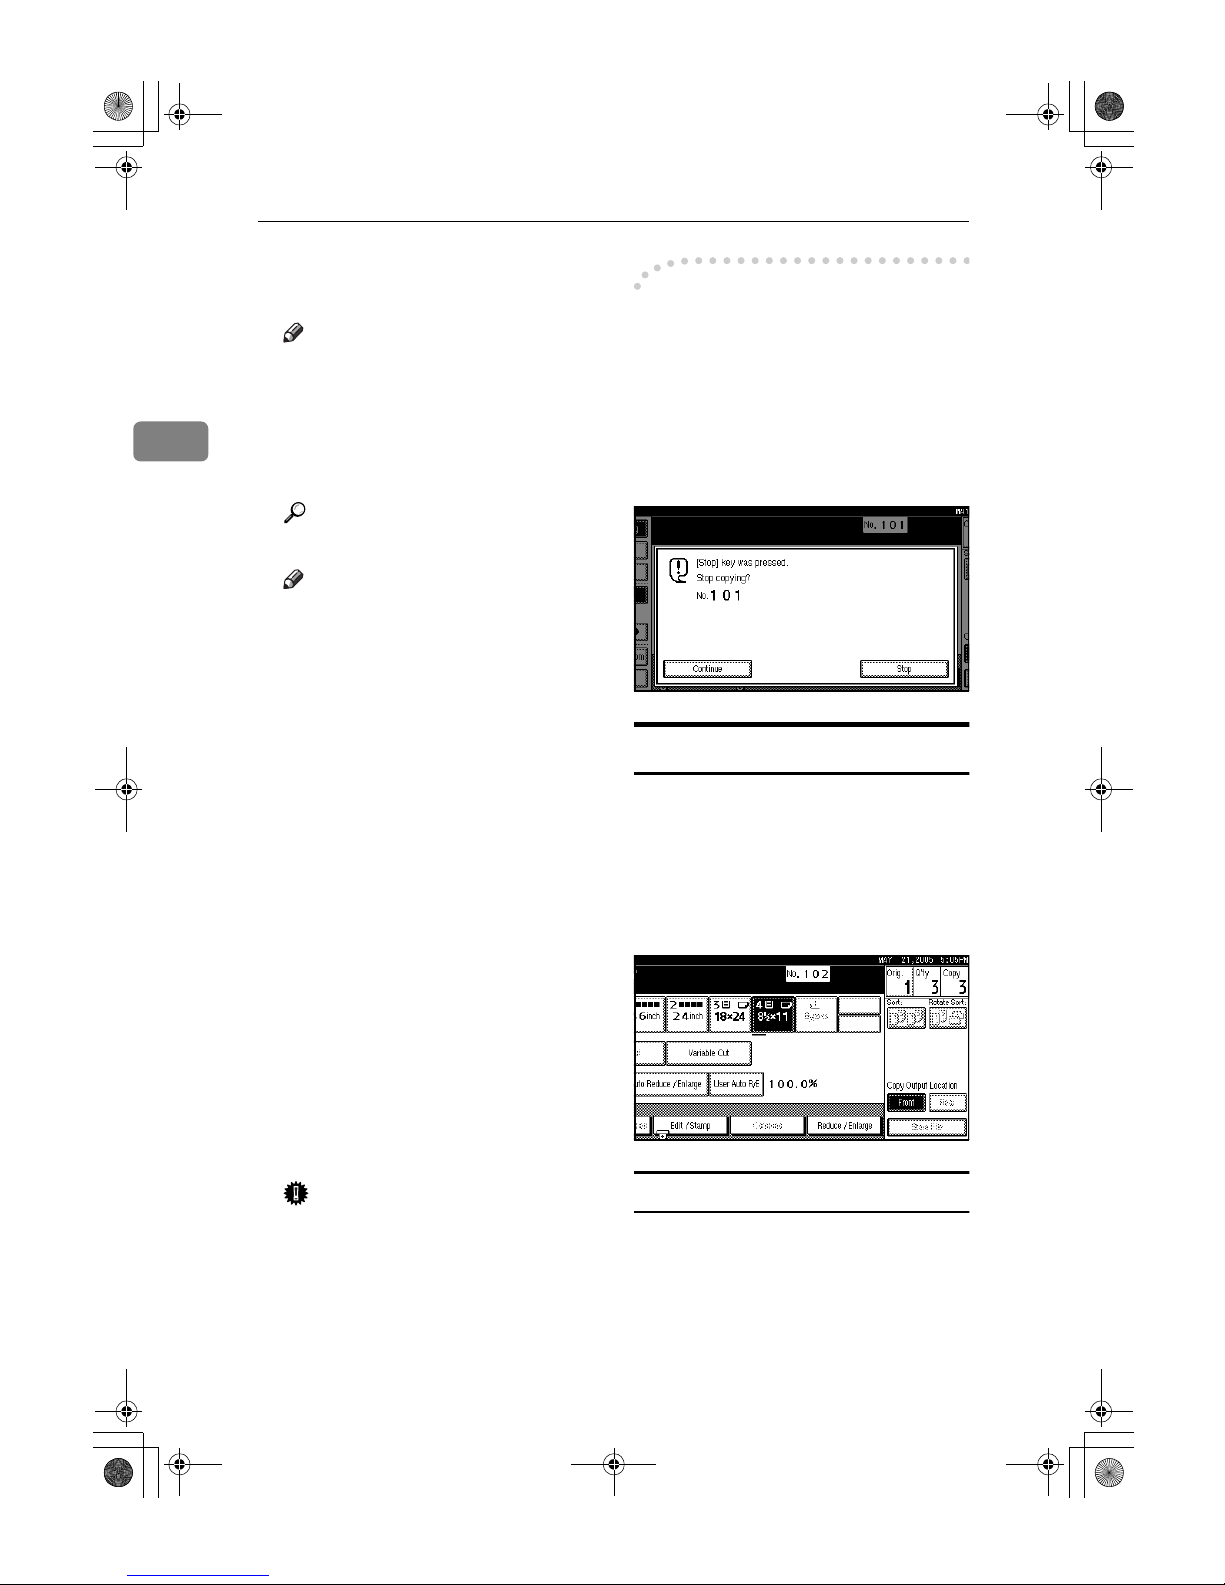
----To stop the machine during a
multi-copy run
Press the {{{{Clear/Stop}}}} key after the
originals have fed in. The machine
stops when the current copy finishes.
Press [Stop] to cancel the copy job;
press [Continue] to resume the interrupted copy job.
Original Counter/Reset
The number of scanned originals is
displayed in the screen's top right corner. This allows you to check the
number of originals in a job, or if any
sheets have been fed together, and the
number of copies that will be stored
in the copy output tray.
Resetting the original counter
AAAA
Press [Orig.] and the counter num-
ber in the screen's top right corner.
The number is reset to 0.
DolphinC2_ENcopy_F_FM.book Page 22 Friday, February 25, 2005 10:46 AM
Page 31
Basic Procedure
23
2
Auto Start
If you make settings and scan the
originals while the message “
Scan-
ning originals can be started.
”
and “
Select copy mode and press
[Start].
” are displayed alternately,
your copies will be made once the
machine is ready.
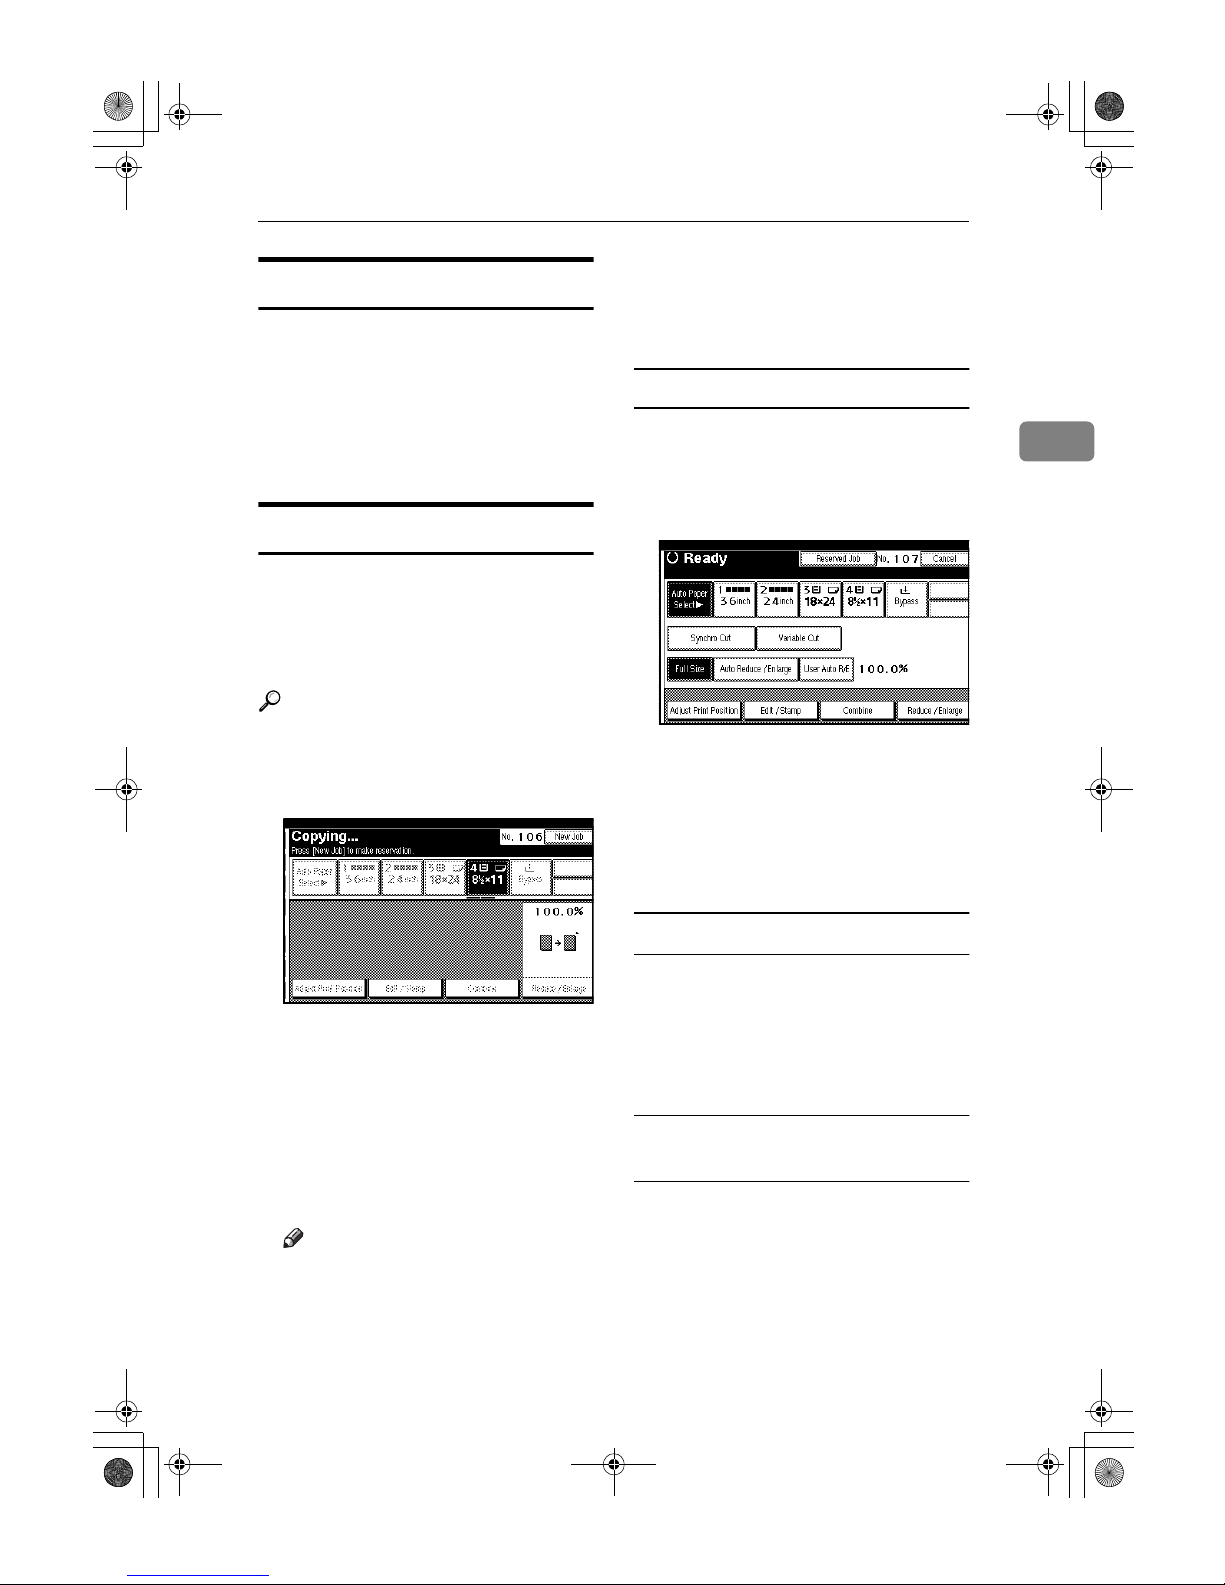
Job Preset
Use this function to set up the next
copy job and scan an original when a
copy job is in progress. When the current copy job is finished, your copy
job will start automatically.
Reference
“Job List”, General Settings Guide
AAAA
Press [
New Job
] while ”
Copying...
"
is displayed.
BBBB
Make settings for the next copy
job.
CCCC
Place the originals. The machine
scans them.
When the current copy job finishes, the preset job starts automatically.
Note
❒ Each job stored is allocated a job
number that is displayed on the
Reserved Job screen.
❒ To switch the display to the cur-
rent copy job press [Reserved
Job], followed by [Printing], and
then [Exit].
Editing Job Preset
You can check and change the contents of preset jobs. You also can delete preset jobs.
AAAA
Press [Reserved Job].
BBBB
Select the number of the job you
want to check or change.
CCCC
Press [Check / Change Job].
The contents of the job are displayed.
To check the job contents
AAAA
Check the contents of the job.
BBBB
Press [Confirmed].
The display returns to the Reserved Job screen.
To change the job contents after
checking
AAAA
Check the contents of the job.
BBBB
Change its contents, and then press
[Confirmed].
CCCC
Press [Change].
The display returns to the Reserved Job screen.
DolphinC2_ENcopy_F_FM.book Page 23 Friday, February 25, 2005 10:46 AM
Page 32
Copying
24
2
To delete a job after checking its
contents
AAAA
Check the contents of the job.
BBBB
Press [Delete Job].
CCCC
Press [Delete].
The display returns to the Reserved Job screen.
Deleting a Preset Job
AAAA
Press [Reserved Job].
BBBB
Select the number of the job you
want to delete.
CCCC
Press [
Delete Job
].
DDDD
Press [
Delete
].
The display returns to the Reserved Job screen.
Interrupt Copy
Use this function to interrupt a long
copy job to make urgently needed
copies.
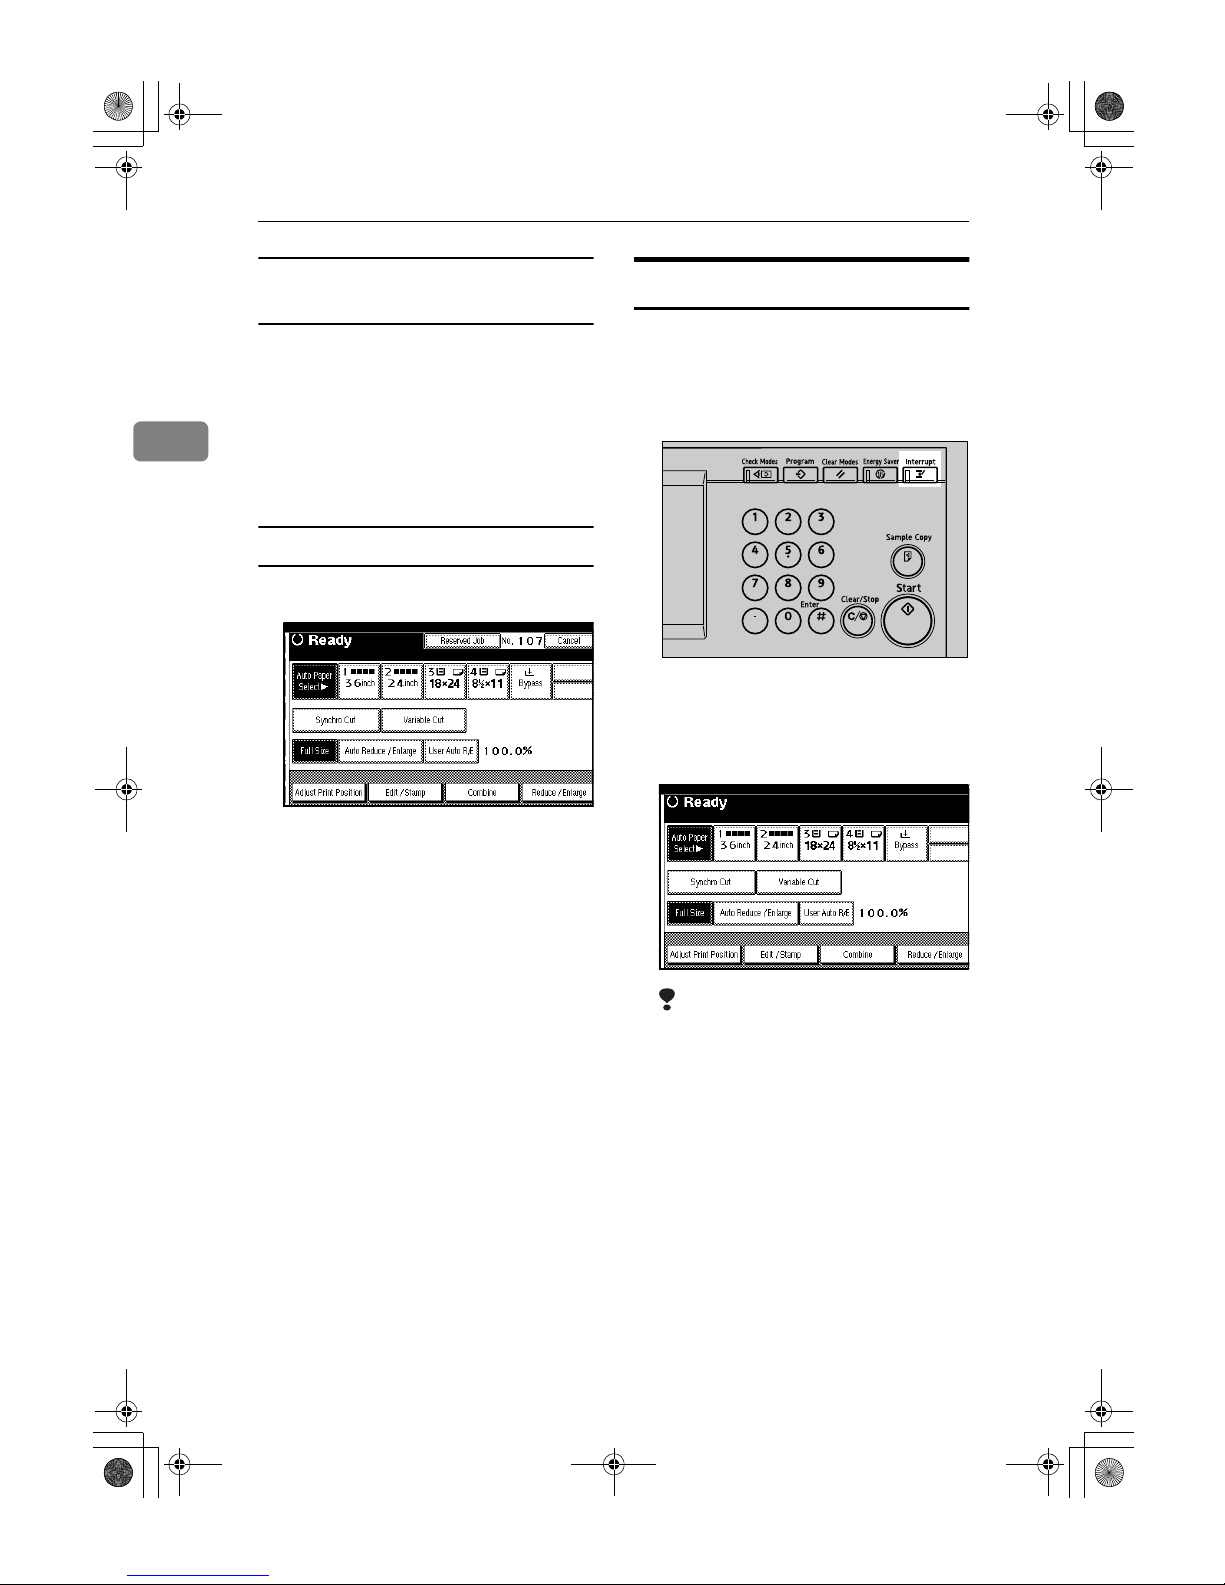
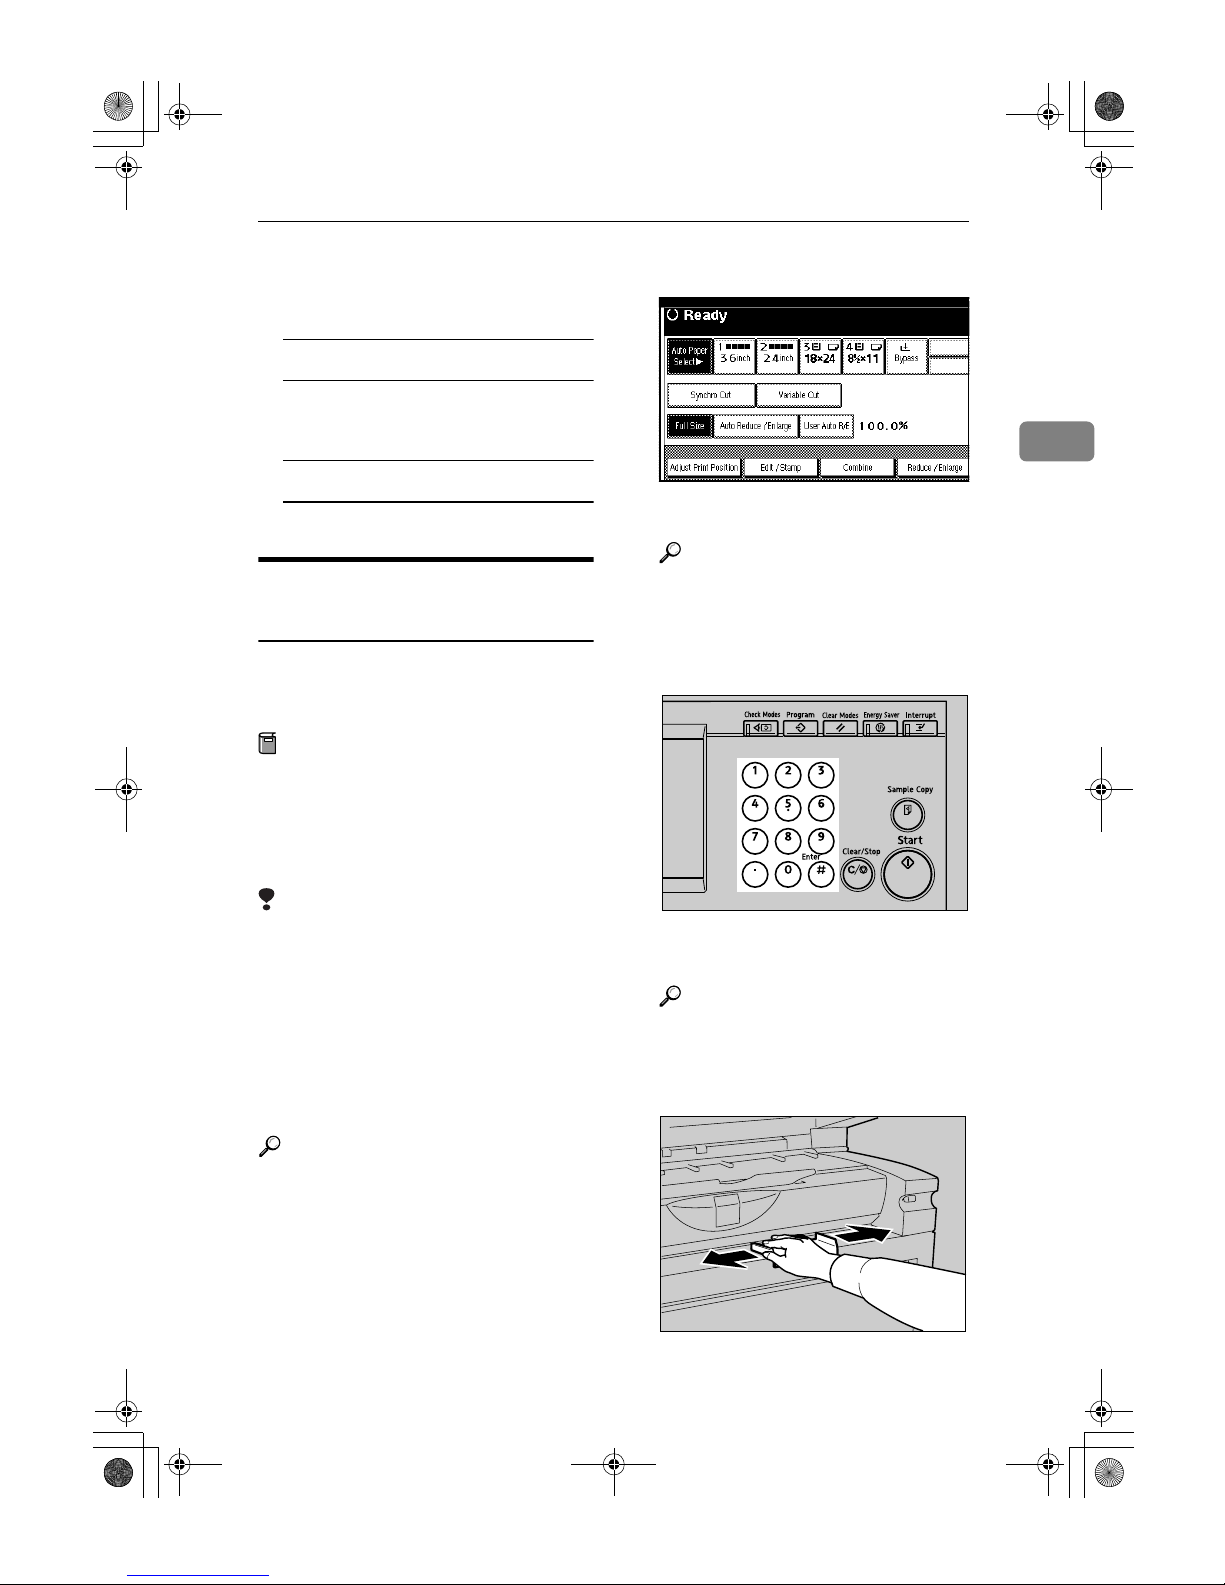
AAAA
Press the {{{{Interrupt}}}} key.
The Interrupt key indicator lights.
BBBB
Make the settings for the Interrupt Copy job.
Limitation
❒ You cannot make settings of the
Job Preset function.
CCCC
Place your originals.
DDDD
When copying has finished, remove the copies output for the Interrupt Copy job.
AHD053S
DolphinC2_ENcopy_F_FM.book Page 24 Friday, February 25, 2005 10:46 AM
Page 33
Basic Procedure
25
2
EEEE
Press the {{{{Interrupt}}}} key again.
The Interrupt key indicator goes off.
Resuming the previous copy job
A Place your originals, and then
press the {{{{Start}}}} key.
Exiting interrupt copy
A Press the {{{{Clear Modes}}}} key.
Copying from the Paper
Bypass
Use the paper bypass to copy onto paper sizes that cannot be loaded on the
paper rolls, or cut sheet paper.
Preparation
When copying from the paper bypass, you can make multiple copies for a single original. Specify the
number of copies using the number keys.
Limitation
❒ The maximum length is 2000 mm
(78").
❒ The width for paper in the paper
bypass is 210 – 914 mm (81/2" – 36").
❒ Do not copy on both sides of the
paper.
❒ Do not use paper already copied or
printed on.
Reference
For details about paper type, orientation, and number of sheets
that can be placed in the paper bypass, see “Copy Paper”, General
Settings Guide.
You can specify the paper type for
the paper bypass in advance. See
“Paper Type: Bypass Tray”, Gener-
al Settings Guide.
AAAA
Press [Bypass].
BBBB
Make the necessary settings.
Reference
See explanations of each function.
CCCC
Enter the number of copies using
the number keys.
DDDD
Place your original and scan it.
Reference
p.15 “Placing Originals”
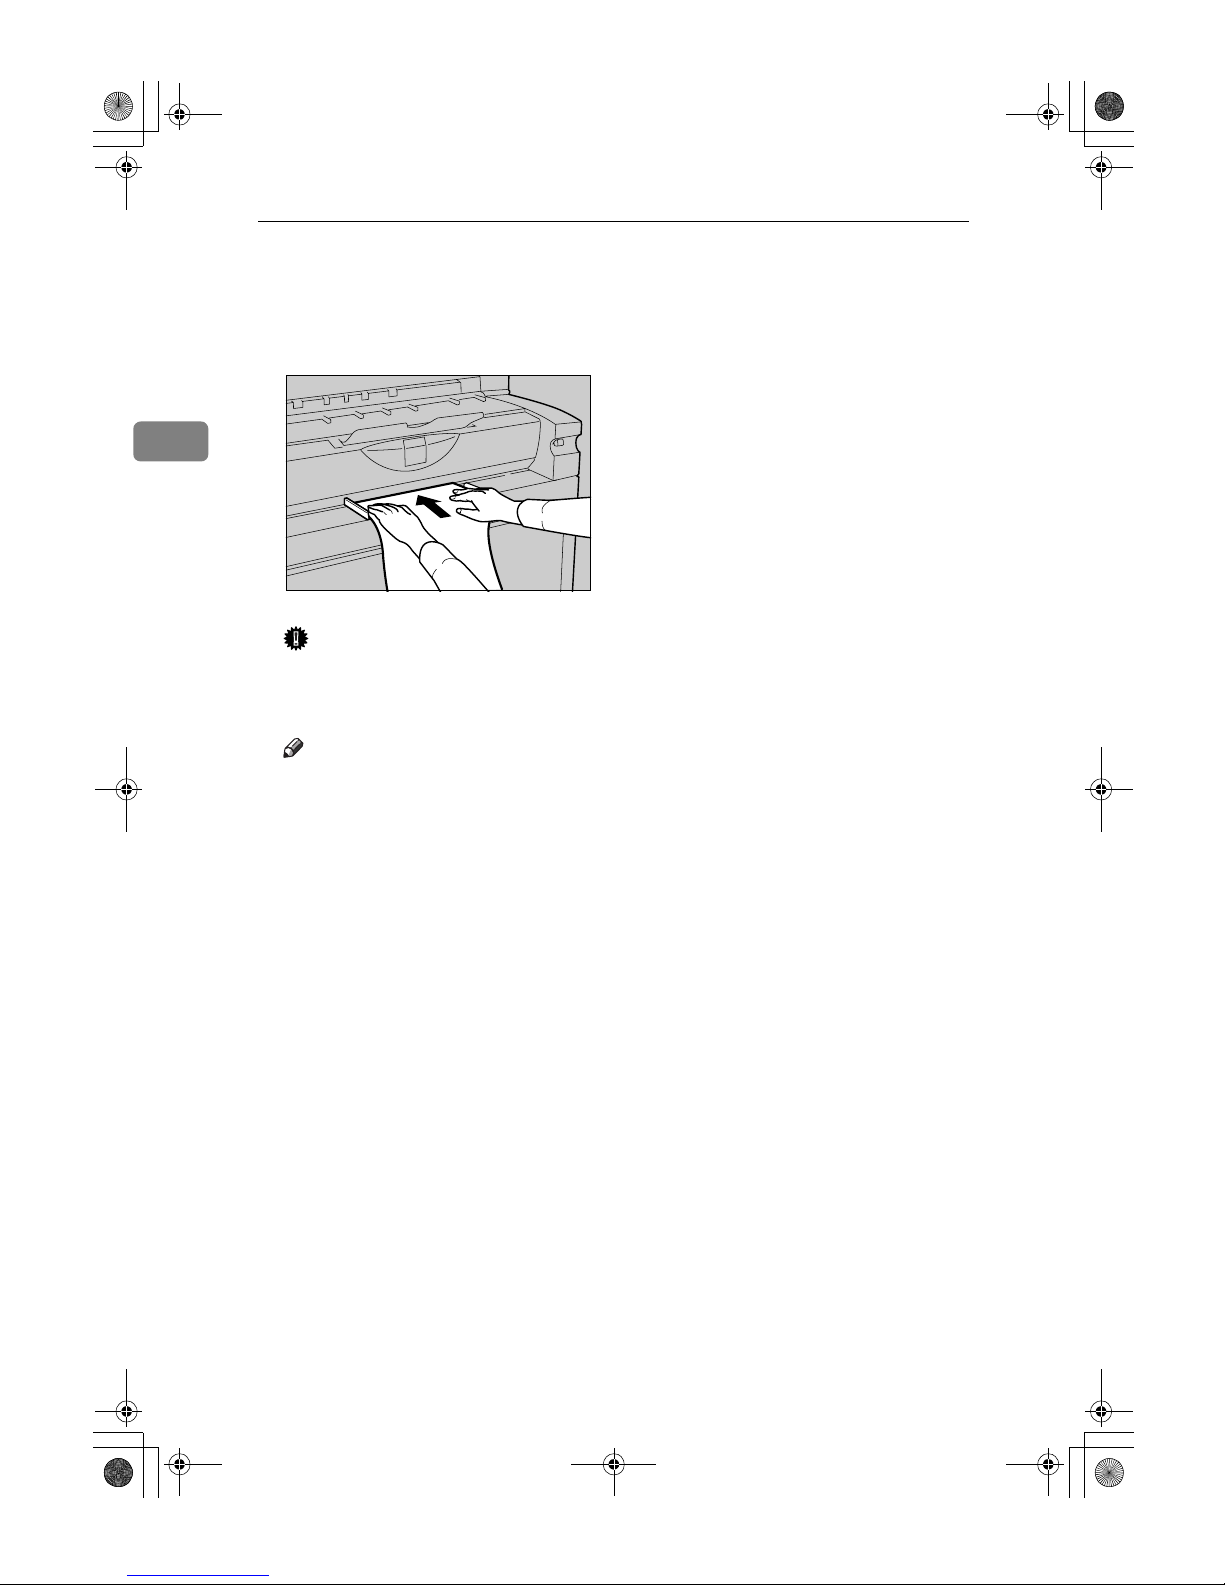
EEEE
Adjust the paper bypass's paper
guides to the size of the paper.
AHD054S
AGL058S
DolphinC2_ENcopy_F_FM.book Page 25 Friday, February 25, 2005 10:46 AM
Page 34
Copying
26
2
FFFF
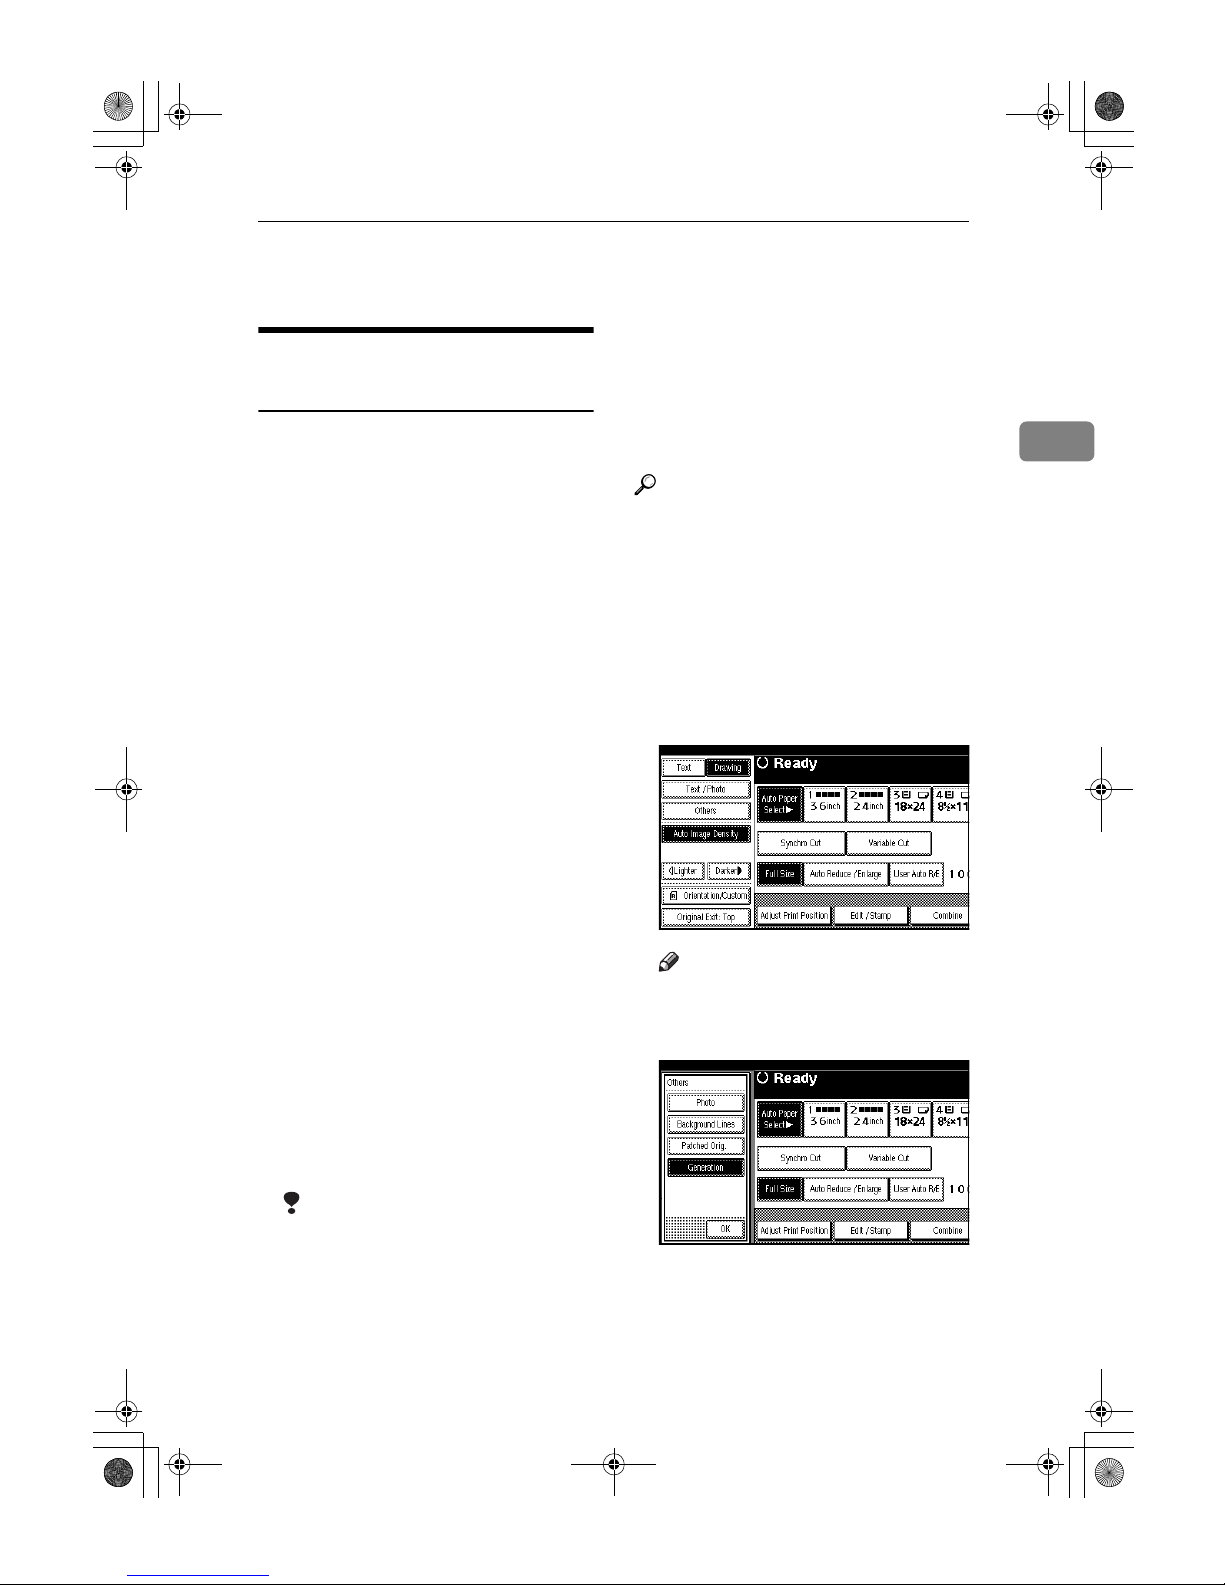
Insert the paper in the paper bypass, copy side up.
The paper feeds in automatically
and copying starts.
Important
❒ Insert the paper evenly on both
sides and support it with your
hands until it feeds in.
Note
❒ Insert the paper until you hear
the beep.
❒ To make multiple copies, insert
an additional sheet after each
feeds in.
AGL059S
DolphinC2_ENcopy_F_FM.book Page 26 Friday, February 25, 2005 10:46 AM
Page 35
Copier Functions
27
2
Copier Functions
Selecting Original Type
Setting
The following image quality modes
are available, select one to match your
originals:
❖❖❖❖ Drawing
For drawings that contain fine
lines. Faint lines are clearly reproduced.
❖❖❖❖ Text
For originals that contain mainly
text, or printed characters.
❖❖❖❖ Text/Photo
For originals that contain both text
and photographs or pictures.
❖❖❖❖ Others – Photo
For photographs or pictures.
❖❖❖❖ Others – Background Lines
For images drawn on section paper
(blue or green sectioned graph paper) without copying the lines on
the paper.
Sepia lines on originals cannot be
eliminated.
❖❖❖❖ Others – Patched Original
For originals made up of several
pieces of smaller originals which
differ in background density. Selecting this mode tones down the
dark background of originals.
Limitation
❒ Thick lines, text, or solid images
in the patched originals are recognized as dark background
that may not be copied.
❖❖❖❖ Others – Generation
For originals that are copied. This
will copy the image while stopping
the width of the characters expanding. It also eliminates any
specks on the image.
Reference
Related default settings:
p.84 “Original Type Priority”
p.84 “Auto Image Density Priority”
p.84 “Copy Quality”
p.85 “Image Density”
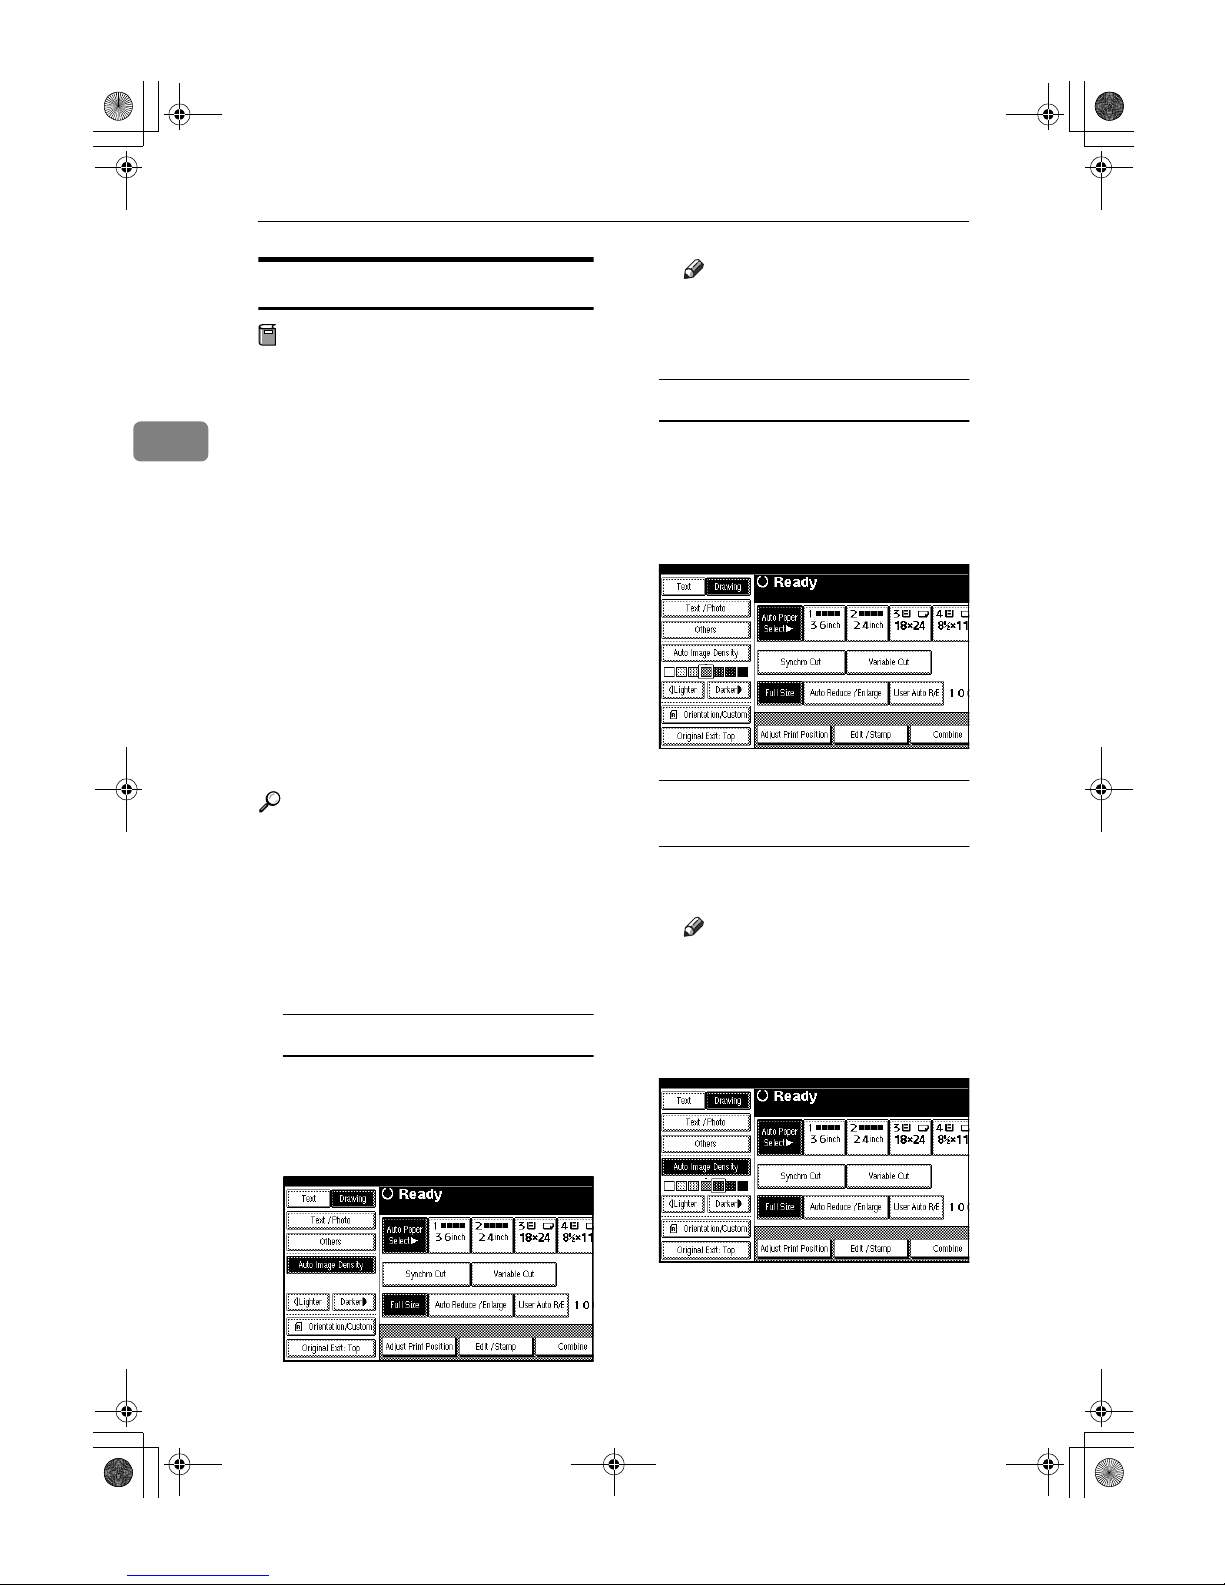
AAAA
Press the appropriate key to select
the original type.
Note
❒ Press [Others] first if you want to
select other special original
types.
❒ When you select [Photo], Auto
Image Density is automatically
canceled.
DolphinC2_ENcopy_F_FM.book Page 27 Friday, February 25, 2005 10:46 AM
Page 36
Copying
28
2
Adjusting Copy Image Density
Preparation
You can adjust the copy density to
match your originals. There are
three types of density function:
❖❖❖❖ Auto Image Density
To automatically adjust the image density.
❖❖❖❖ Manual Image Density
You can adjust the density of
the overall original in seven increments.
❖❖❖❖
Combined Auto and Manual Density
To copy originals with a dirty
background (such as newspapers). You can adjust the foreground density while leaving
the background unchanged.
Reference
Related default settings:
p.84 “Auto Image Density Priority”
p.85 “Image Density”
AAAA
Select the method of image density adjustment.
Auto image density
A Make sure that [Auto Image Den-
sity] is selected.
Auto Image Density is highlighted when selected.
Note
❒ If Auto Image Density is not
selected, press [Auto Image
Density].
Manual image density
A If Auto Image Density is se-
lected, press [Auto Image Density]
to cancel it.
B Press [Lighter] or [Darker] to ad-
just the image density.
Combined auto and manual
density
A Make sure that [Auto Image Den-
sity] is selected.
Note
❒ If Auto Image Density is not
selected, press [Auto Image
Density].
B Press [Lighter] or [Darker] to ad-
just the image density.
DolphinC2_ENcopy_F_FM.book Page 28 Friday, February 25, 2005 10:46 AM
Page 37
Copier Functions
29
2
Selecting Copy Paper
Preparation
There are two ways to select copy
paper:
❖❖❖❖ Auto Paper Select
The machine detects the original's size, and then automatically selects a suitable copy paper
size based on the magnification.
❖❖❖❖ Manual Paper Select
Select the paper roll tray, cut paper tray, or paper bypass containing the paper you want to
copy onto.
Note
❒ In Auto Paper Select mode, insert
the proper size paper in the paper
bypass or select the magnification
ratio for the paper currently loaded in the paper tray, and then set
your original again.
Reference
p.25 “Copying from the Paper Bypass”
Related default settings:
p.83 “Auto Paper Select Priority”
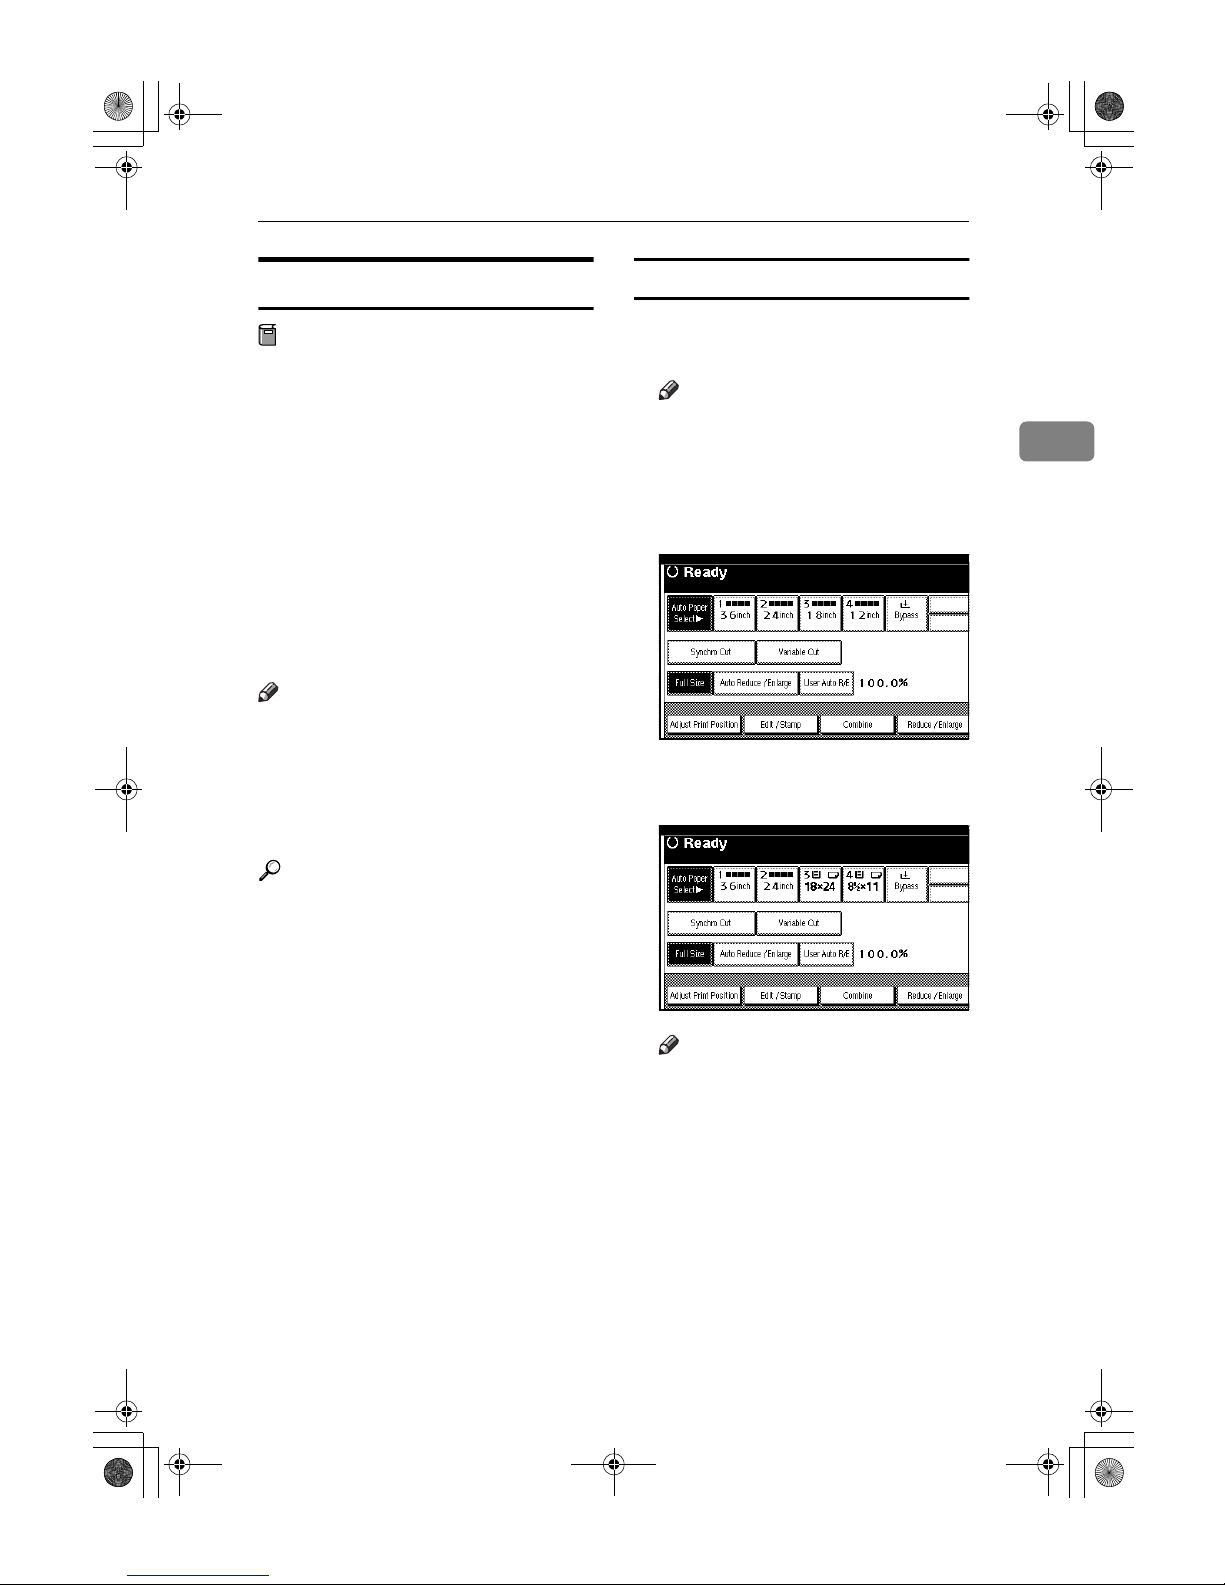
Auto paper select
AAAA
Make sure [Auto Paper Select] is se-
lected.
Note
❒ When Auto Paper Select is not
selected, press [Auto Paper Se-
lect].
❖❖❖❖ When the lower tray (paper roll
tray) is installed
❖❖❖❖ When the cut paper trays are
installed
Note
❒ Only the paper trays set to [No
Display] or [Recycled Paper] in Pa-
per Type and also set to [Yes] in
Apply Auto Paper Select can be
selected for the Auto Paper Select function. See “Paper Type”
in “Tray Paper Settings”, Gener-
al Settings Guide.
DolphinC2_ENcopy_F_FM.book Page 29 Friday, February 25, 2005 10:46 AM
Page 38

Copying
30
2
Manual paper select
AAAA
Select the paper tray or paper bypass.
The selected tray key is highlighted.
❖❖❖❖ When the lower tray (paper roll
tray) is installed
❖❖❖❖ When the cut paper trays are
installed
----Rotate Copy
If the original's width is different to
that of the paper set in the paper roll
tray, or the original's orientation ( K
or L ) is different to that of the paper
loaded in the cut paper trays, this
function rotates the original image by
90 degrees, to fit it onto the copy paper.
Note
❒ This function works when Auto
Paper Select is selected. See p.29
“Selecting Copy Paper”.
❒ The default for Auto Tray Switch-
ing is With image rotation. You
cannot use Rotate Copy if this setting is changed to Without image
rotation or Off. See p.83 “Auto
Tray Switching”.
Setting the Length of Copy
Paper Cut
Preparation
The following paper cut methods
are available.
❖❖❖❖ Synchro Cut
Cuts the paper at the same
length as the original.
If the copy is enlarged or reduced, the machine calculates
the appropriate length for the
magnification ratio and cuts the
paper.
GCROTA0E
DolphinC2_ENcopy_F_FM.book Page 30 Friday, February 25, 2005 10:46 AM
Page 39
Copier Functions
31
2
❖❖❖❖ Preset Cut
Cuts the paper at a preset size,
regardless of the size of the original. You can use this to copy
different sized originals to the
same size.
❖❖❖❖ Variable Cut
Cuts the paper to the size entered.
Important
❒ Except for Synchro Cut, the paper
is cut regardless of the size of the
original.
Note
❒ When copying onto long paper,
the maximum length for which image quality can be guaranteed differs according to paper type and
width.
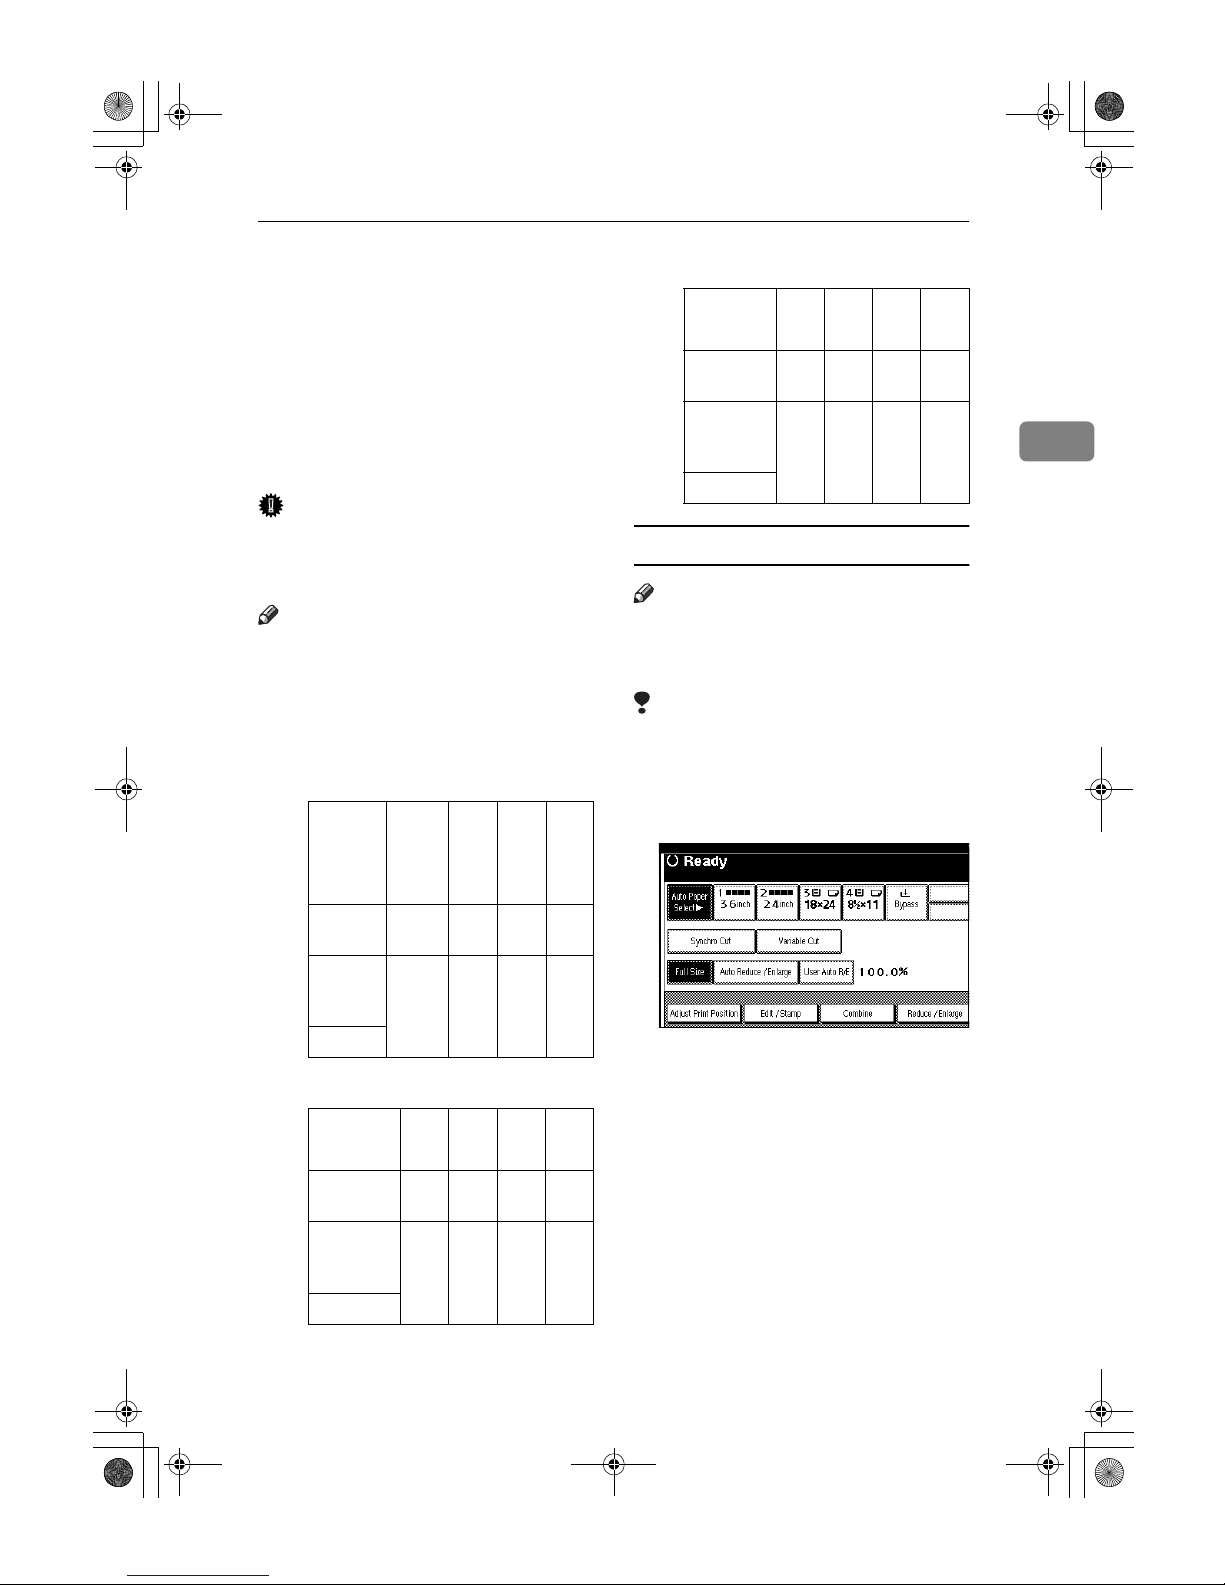
❖❖❖❖ Metric version
❖❖❖❖ Inch version (Engineering)
❖❖❖❖ Inch version (Architecture)
Synchro cut
Note
❒ When using Synchro Cut, the pa-
per can be cut from 210 to 15000
mm (8.3" to 590.5").
Limitation
❒ Depending on the original length
and paper, copy paper length may
be different from the original.
AAAA
Press [Synchro Cut].
BBBB
Select a paper tray.
Paper
width
728
mm
or
above
727
–
515
mm
514
–
364
mm
363
–
210
mm
Paper
type
Plain 15000 mm3600 mm2000 mm2000
mm
Translucent paper
3600 mm3600 mm2000
mm
2000
mm
Film
Paper width
34" 22" 17" 11"
Paper type
Plain 590.5"142" 80" 80"
Translucent paper
(vellum)
142" 142" 80" 80"
Film
Paper width
36" 24" 18" 12"
Paper type
Plain 590.5"142" 80" 80"
Translucent paper
(vellum)
142" 142" 80" 80"
Film
DolphinC2_ENcopy_F_FM.book Page 31 Friday, February 25, 2005 10:46 AM
Page 40
Copying
32
2
Preset cut
AAAA
Select a paper tray.
BBBB
Select a preset cut size.
Note
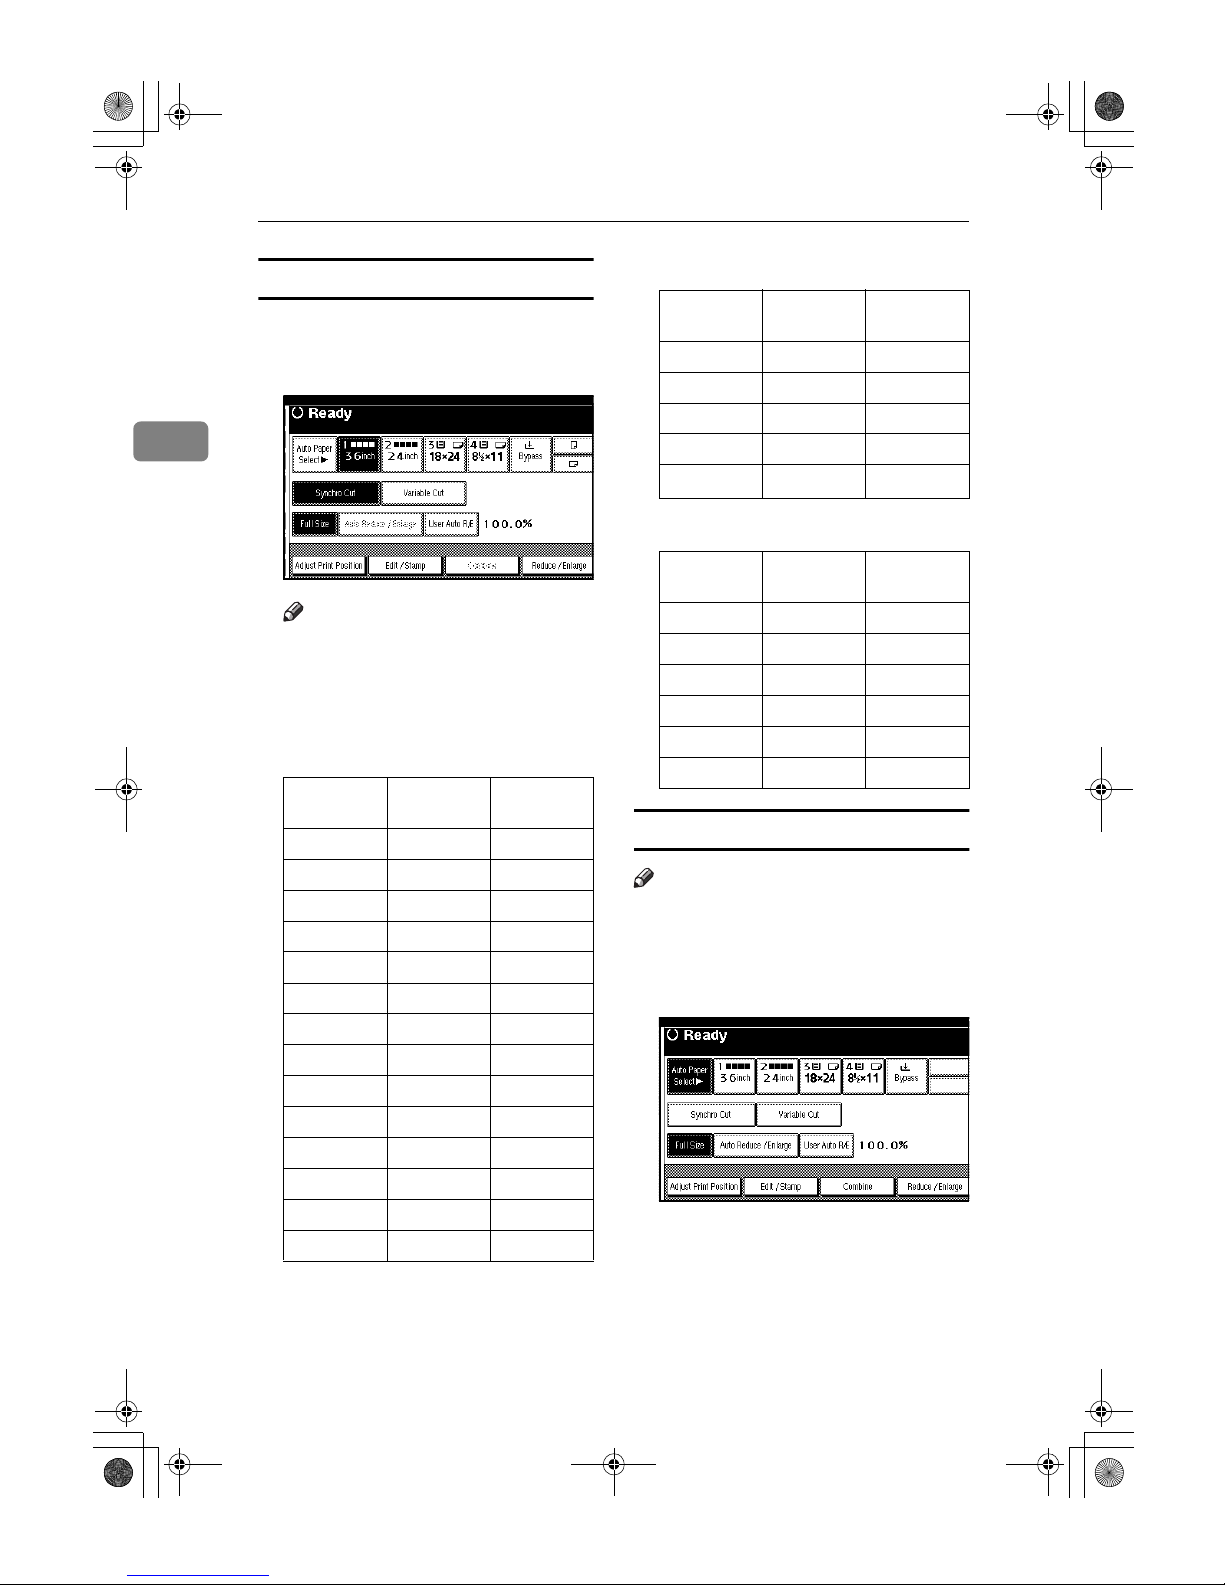
❒ The preset cut size differs de-
pending on the roll paper
width. It is cut in the following
sizes or standard lengths:
❖❖❖❖ Metric version
❖❖❖❖ Inch version (Engineering)
❖❖❖❖ Inch version (Architecture)
Variable cut
Note
❒ When using Variable Cut, the pa-
per can be cut from 210 to 15000
mm (from 8.3" to 590.5").
AAAA
Press [Variable Cut].
Roll paper
width
Preset
KKKK
Preset
LLLL
841 mm A0
K
A1
L
594 mm A1
K
A2
L
420 mm A2
K
A3
L
297 mm A3
K
—
210 mm A4
K
—
728 mm B1
K
B2
L
515 mm B2
K
B3
L
364 mm B3
K
—
257 mm B4
K
—
914 mm 1219 mm 610 mm
880 mm 1219 mm 610 mm
800 mm 1189 mm 594 mm
660 mm 1189 mm 594 mm
440 mm 594 mm 297 mm
Roll paper
width
Preset
KKKK
Preset
LLLL
34" 44" 22"
22" 34" 17"
17" 22" 11"
11" 17" —
8
1
/2"
11" —
Roll paper
width
Preset
K
Preset
L
36" 48" 24"
30" 42" 21"
24" 36" 18"
18" 24" 12"
12" 18" —
9" 12" —
DolphinC2_ENcopy_F_FM.book Page 32 Friday, February 25, 2005 10:46 AM
Page 41
Copier Functions
33
2
BBBB
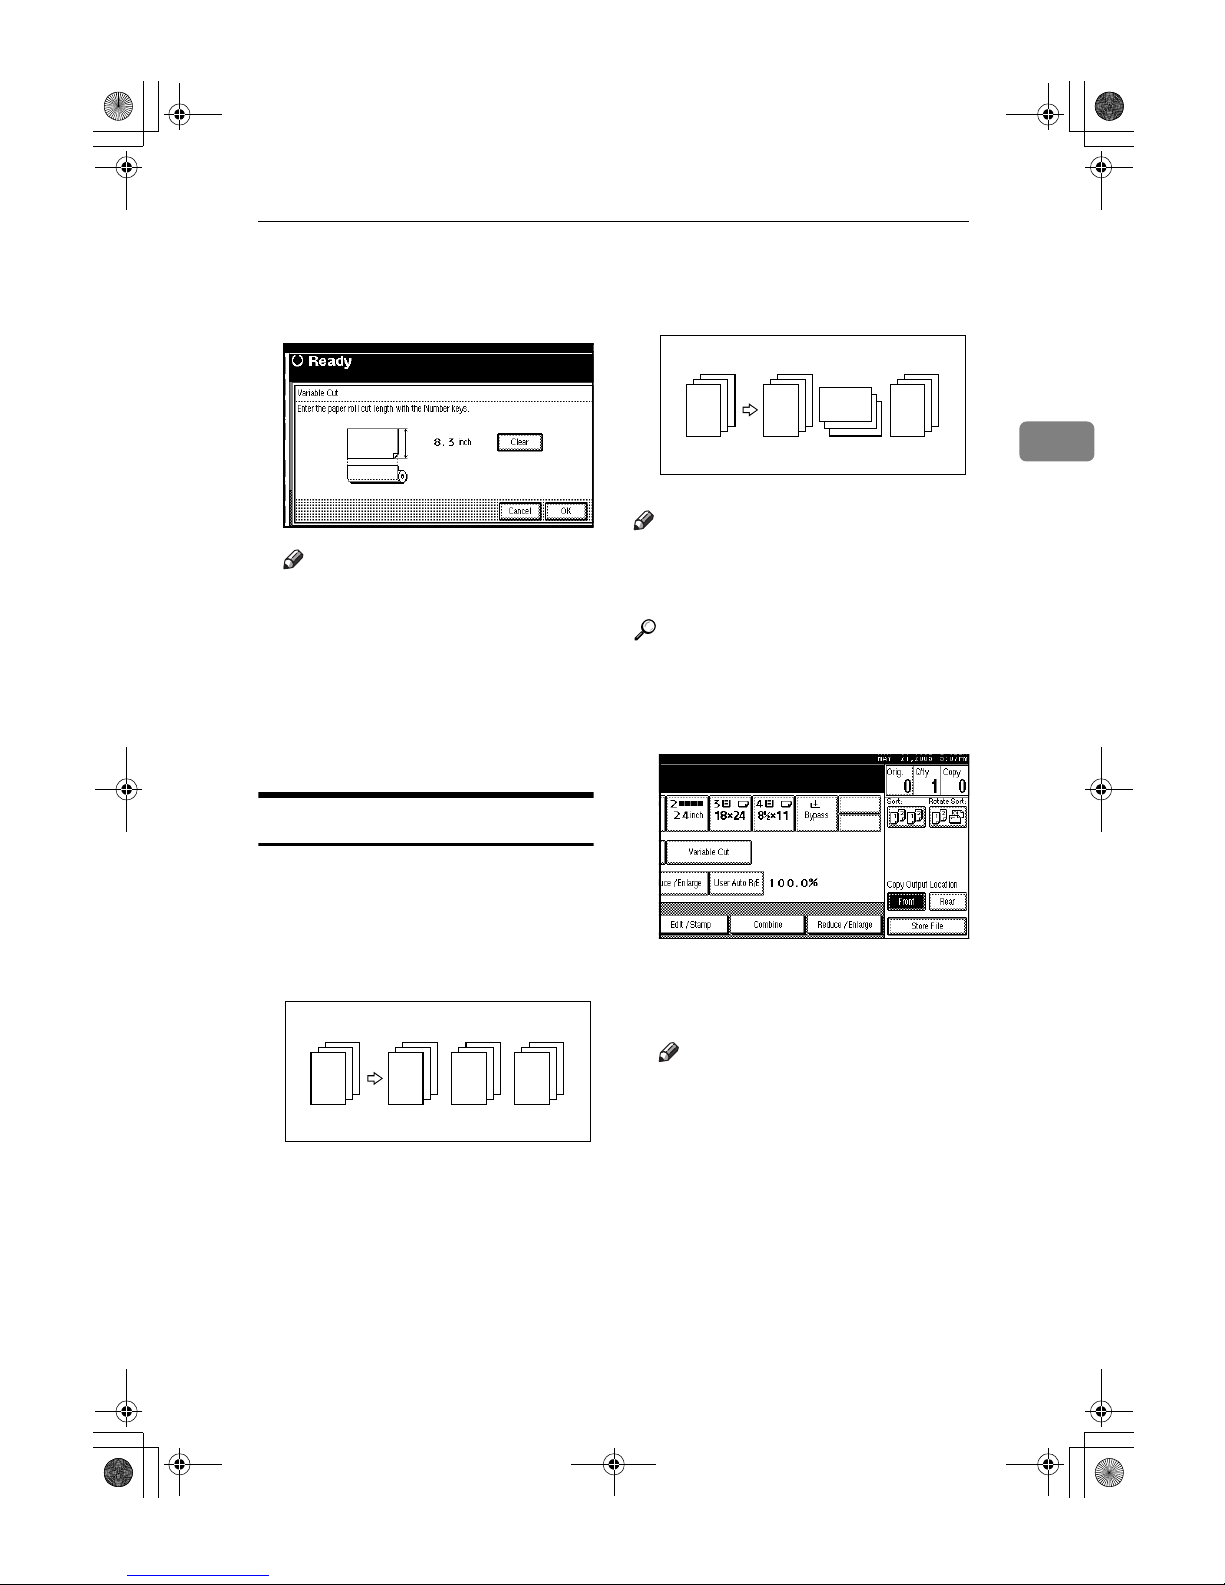
Enter the length using the number keys, and then press [OK] or
the {{{{#}}}} key.
Note
❒
To change the value, press
[
Clear
],
and then enter the new one.
❒ If you do not want to use Vari-
able Cut, press [Cancel].
The entered length size is displayed on the screen.
CCCC
Select a paper tray.
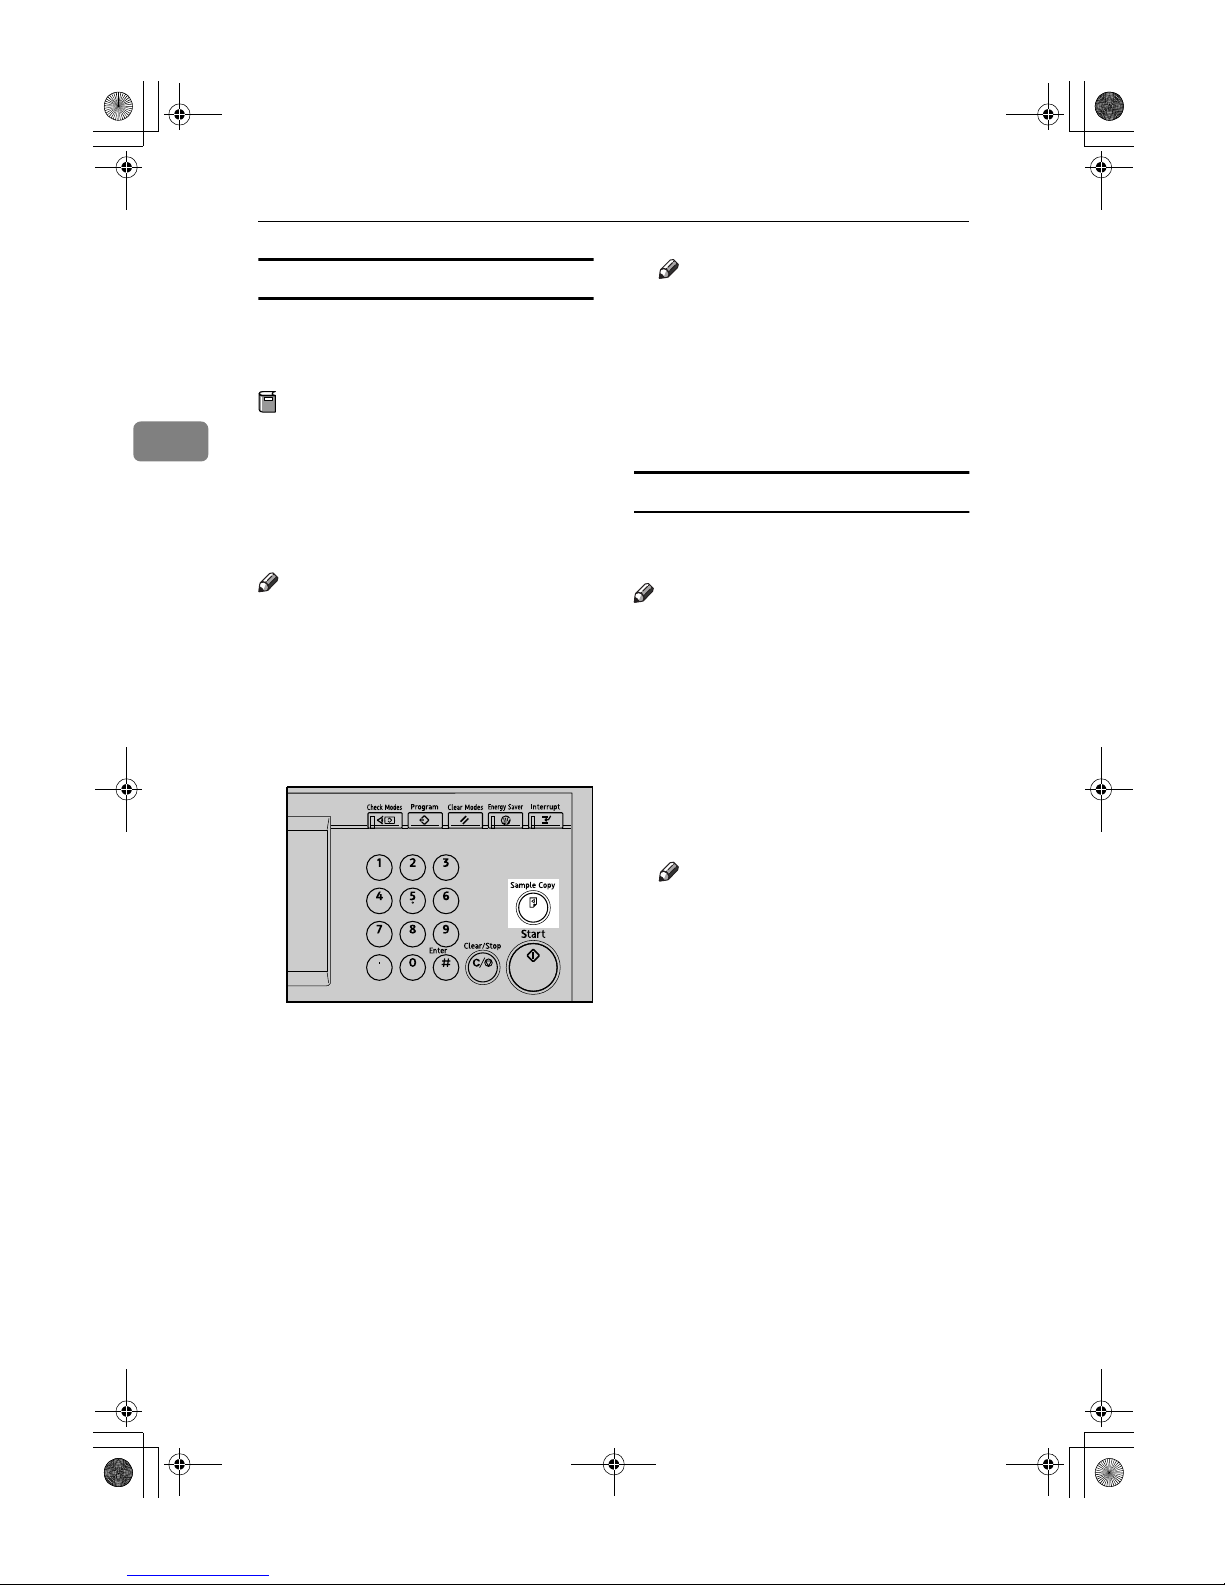
Sort/Rotate Sort
You can put copies into sequentially
ordered sets.
❖❖❖❖ Sort
Put copies into sequentially ordered sets.
❖❖❖❖ Rotate sort
Alternate sets are rotated (KL)
and delivered to the output tray.
Note
❒ When using Rotate Sort, make sure
original and paper image sizes are
the same.
Reference
Related default settings:
p.83 “Auto Tray Switching”
AAAA
Press [Sort] or [Rotate Sort].
BBBB
Make the necessary settings.
CCCC
Place your originals.
Note
❒ Repeat the scanning procedure
until all your originals are
scanned.
❒ To cancel Sort or Rotate Sort,
press the {{{{Clear/Stop}}}} key.
DDDD
After the last original is scanned,
press the {{{{#}}}} key.
Copying starts.
2
1
3
2
1
3
2
1
3
2
1
3
ZEDG030E
2
1
3
2
1
3
2
1
3
2
1
3
ZEDG040E
DolphinC2_ENcopy_F_FM.book Page 33 Friday, February 25, 2005 10:46 AM
Page 42
Copying
34
2
Sample Copy
Use this function to check the copy
settings before making a long copy
run.
Preparation
Select [Press Start Key] under Feed
Start Method in System Settings.
You cannot make sample copy
when [Auto] is selected. See “Feed
Start Method”, General Settings
Guide.
Note
❒ This function can be used only
when the Sort function is selected.
AAAA
Select [Sort] and make any other
necessary settings, and then place
the originals.
BBBB
Press the {{{{Sample Copy}}}} key.
One copy set is delivered as a sample.
CCCC
If the sample is acceptable, press
[Print].
The specified number of copies is
made, minus one for the sample
copy.
Note
❒ If you press [Suspend] after
checking the results, return to
step
A
to adjust the copy settings as necessary. Depending
on the combination of functions, you may not be able to
change certain settings.
Changing the number of sets
You can change the number of copy
sets during copying.
Note
❒ This function can only be used
when the Sort function is selected.
AAAA
While "
Copying...
" is displayed,
press the {{{{Clear/Stop}}}} key.
BBBB
Press [Change Quantity].
CCCC
Enter the number of copy sets using the number keys, and then
press the {{{{#}}}} key.
Note
❒ The number of sets you can en-
ter differs depending on when
the {{{{Clear/Stop}}}} key is pressed.
DDDD
Press [Continue].
Copying starts again.
AHD104S
DolphinC2_ENcopy_F_FM.book Page 34 Friday, February 25, 2005 10:46 AM
Page 43
Copier Functions
35
2
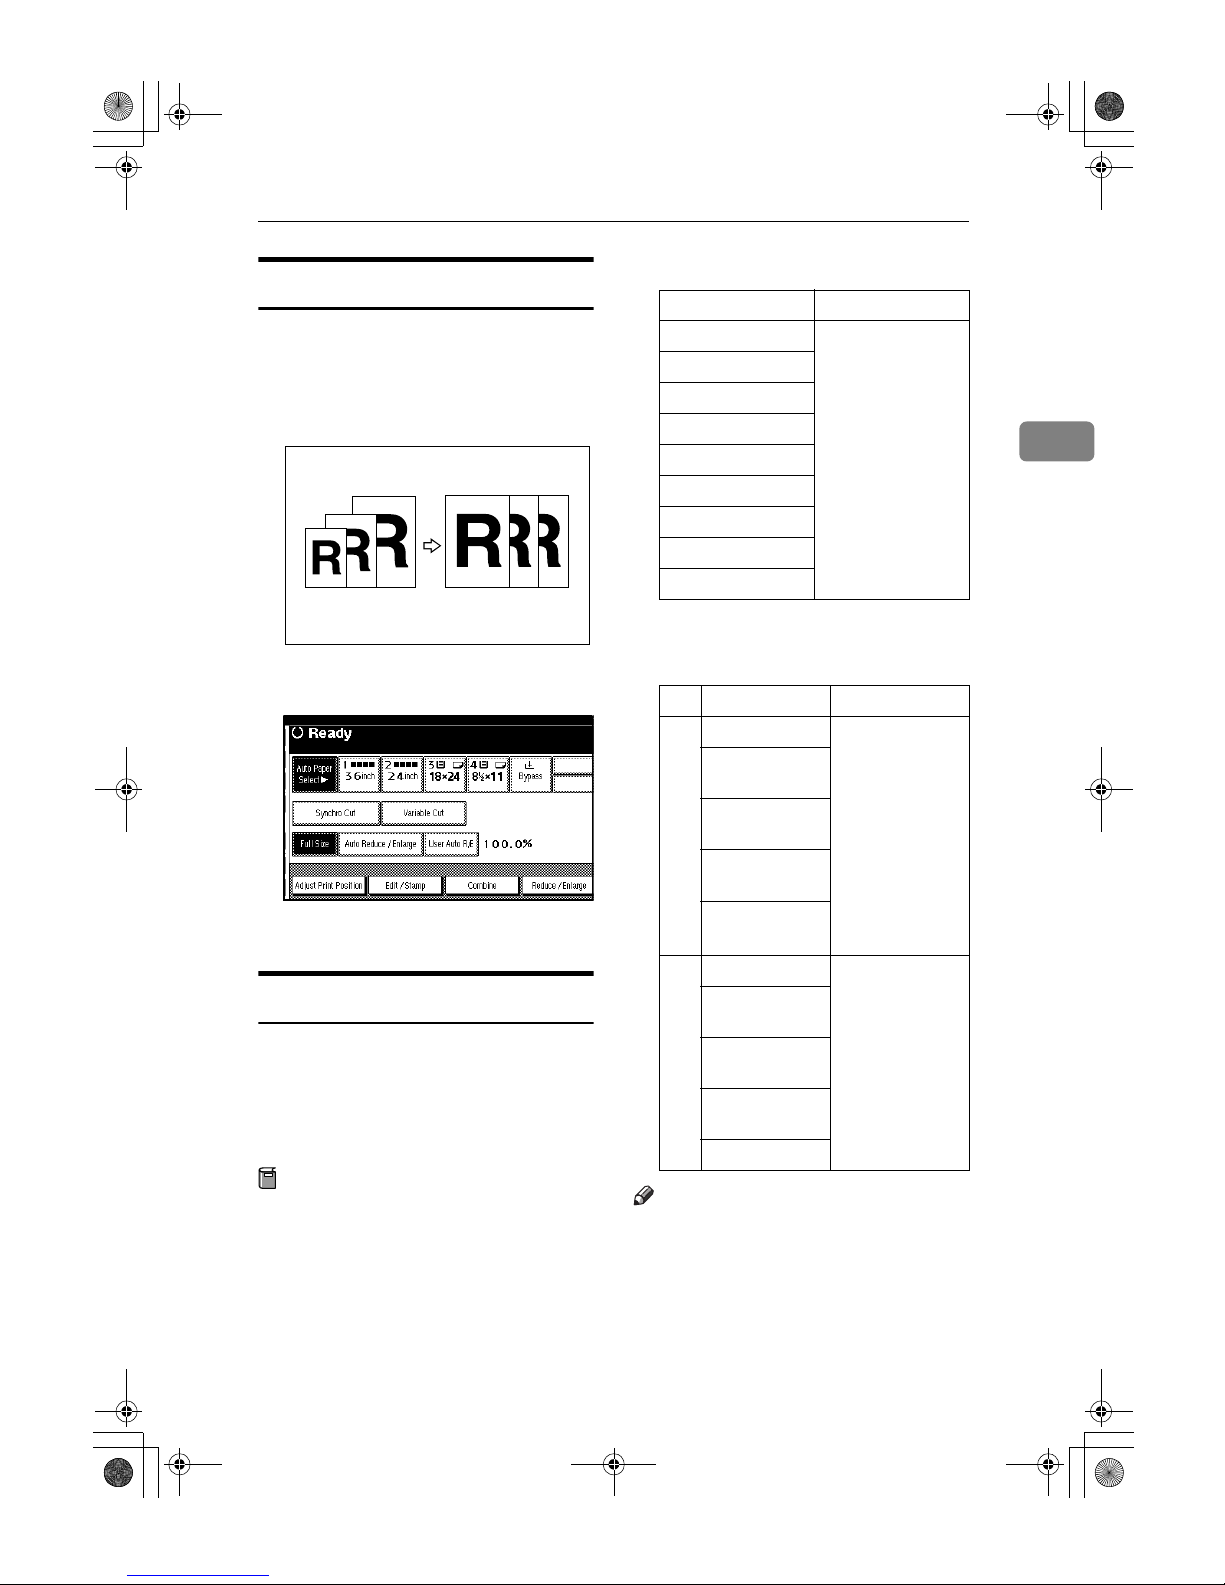
Auto Reduce/Enlarge
The machine chooses an appropriate
magnification based on the paper and
original sizes you select. This is useful
to copy different size originals to
same size paper.
AAAA
Press [Auto Reduce / Enlarge].
BBBB
Select the paper tray.
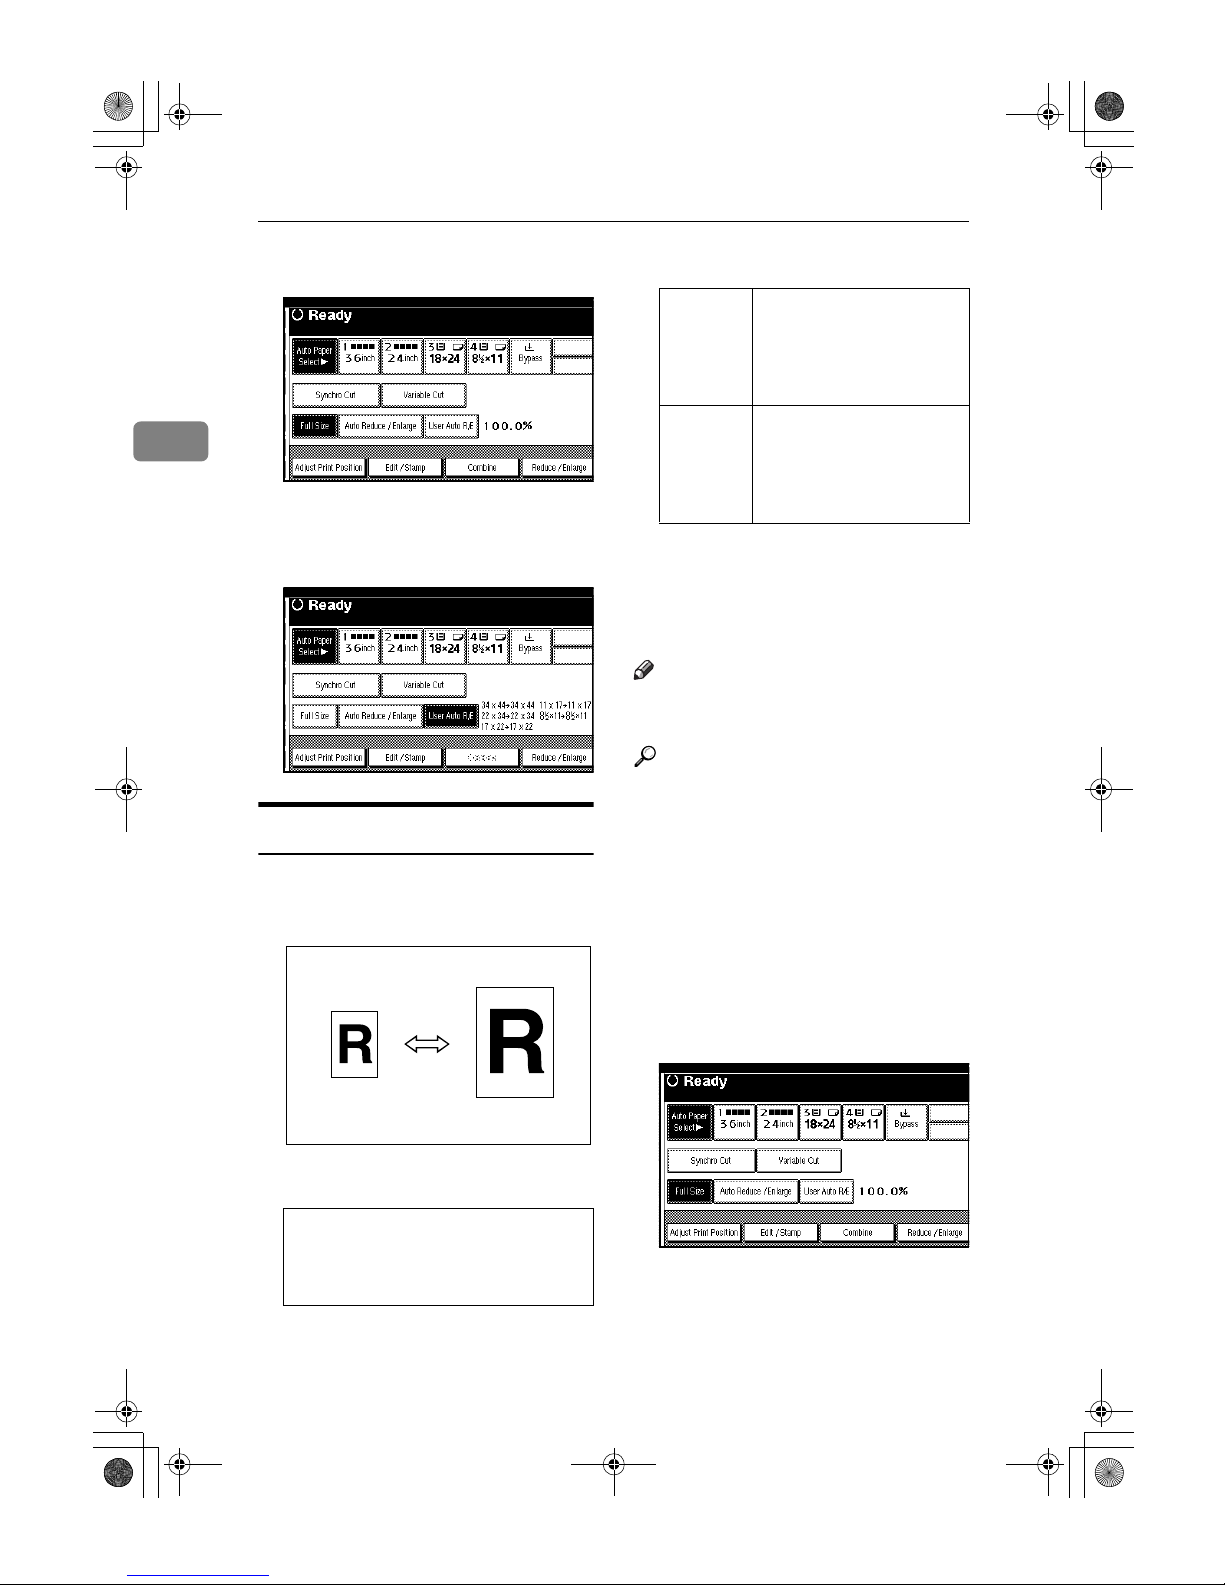
User Auto Reduce/Enlarge
Use this function to copy to a selected
size for each original size.
When the original is set, the machine
automatically enlarges or reduces the
image to fit the size of the copy paper.
Preparation
You can select the following combinations:
❖❖❖❖ Metric version
JIS: Japanese Industrial Standard
❖❖❖❖ Inch version
Note
❒ The default setting is to copy at
same size (full size). To change the
combination, use User Auto R/E.
See p.86 “User Auto R/E”.
CP2F0100
Original size Copy size
A0
K
A0, A1, A2, A3, A4,
B1 JIS, B2 JIS, B3
JIS, B4 JIS
A1
KL
A2
KL
A3
KL
A4
KL
B1
KL
B2
KL
B3
KL
B4
KL
Original size Copy size
Engineering
E(34"×44")
K
E(34"×44"),
D(22"×34"),
C(17"×22"),
B(11"×17"),
A(81/2"×11")
D(22"×34")
KL
C(17"×22")
KL
B(11"×17")
KL
A(8
1
/2"×11")
KL
Architecture
E(36"×48")
K
E(36"×48"),
D(26"×36"),
C(18"×24"),
B(12"×18"),
A(9"×12")
D(26"×36")
KL
C(18"×24")
KL
B(12"×18")
KL
A(9"×12")
KL
DolphinC2_ENcopy_F_FM.book Page 35 Friday, February 25, 2005 10:46 AM
Page 44
Copying
36
2
AAAA
Press [User Auto R/E].
BBBB
Check that the combination selected for User Auto Reduce/Enlarge is the one you want.
Preset Reduce/Enlarge
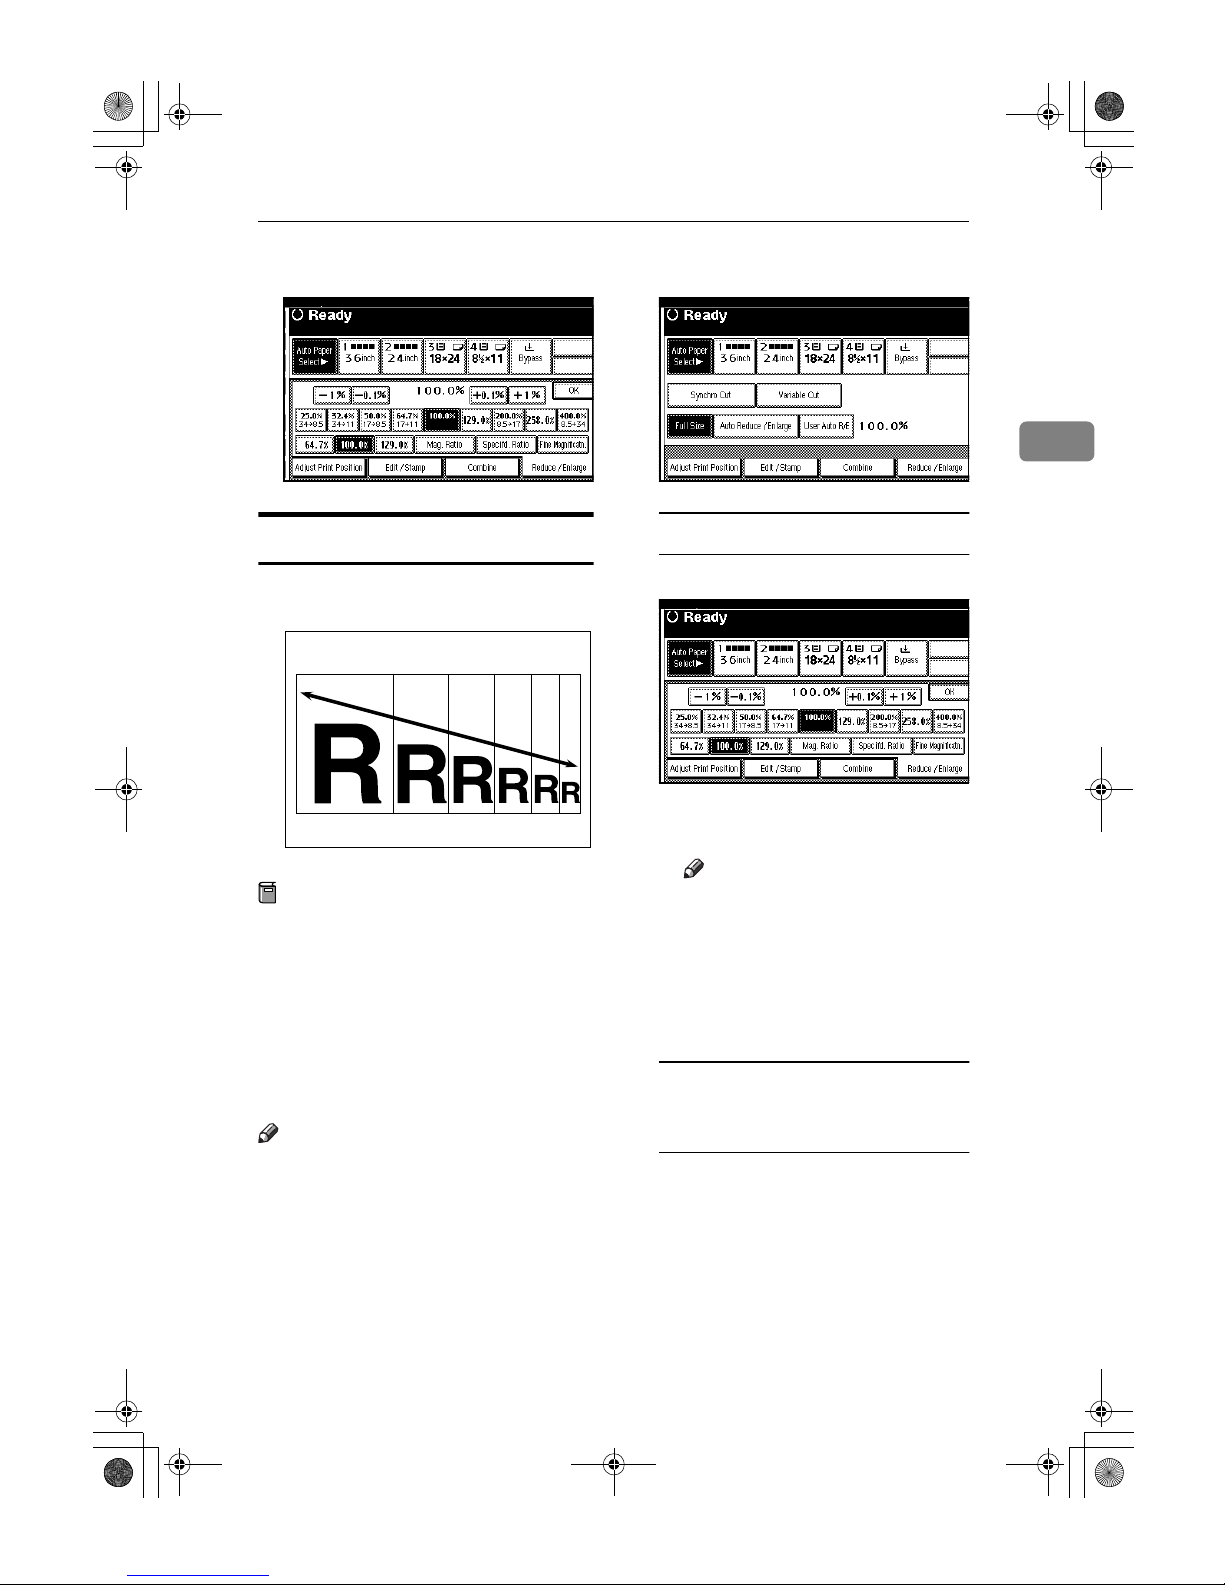
You can select a preset copy ratio.
You can store up to three enlargement
or reduction ratios of your own.
❖❖❖❖ Metric version
❖❖❖❖ Inch version
You can store up to three ratios of
your own for frequently used ratio,
but are not preset. The ratios can be
set in 0.1% increments. See p.85 “Cus-
tom Magnification Settings 1–3”.
Note
❒ Preset ratios are set by combining
original size and paper size.
Reference
For details about the relationship
between the original and paper
sizes for preset ratios, see p.108
“Magnification Ratio Chart”.
Related default settings:
p.86 “Enlarge 1–4”
p.86 “Reduce 1–4”
p.86 “Priority Setting : Reduce /
Enlarge”
AAAA
Press [Reduce / Enlarge]
Enlargement ratios: 141.4%, 200.0%,
282.8%, 400.0%
Reduction ratios: 25.0%, 35.4%, 50.0%,
70.7%
Engineering
Enlargement ratios:
129.4%, 200.0%, 258.8%,
400.0%
Reduction ratios: 25.0%,
32.4%, 50.0%, 64.7%
Architecture
Enlargement ratios:
133.3%, 200.0%, 266.7%,
400.0%
Reduction ratios: 25.0%,
33.3%, 50.0%, 66.7%
DolphinC2_ENcopy_F_FM.book Page 36 Friday, February 25, 2005 10:46 AM
Page 45
Copier Functions
37
2
BBBB
Select a ratio, and then press [OK].
Zoom
You can change the magnification in
0.1% (or 1%) increments.
Preparation
You can set the ratio in the following ways.
• Using the number keys
• Selecting a ratio close to the one
you want to set from Preset Reduce/Enlarge, and then using
[
–1%
], [
–0.1%
], [
+0.1%
] or [
+1%
] to
adjust it.
Note
❒ To set the magnification ratio on
the screen, use [–1%], [+1%]. To
specify a decimal value, use [
–0.1%
]
or [
+0.1%
].
AAAA
Press [Reduce / Enlarge].
Using the number keys
A Press [Mag. Ratio].
B Enter the ratio using the num-
ber keys.
Note
❒ Use the {{{{·}}}} key to enter a dec-
imal point.
❒ To change the value, press
[Clear], and then enter the
new one.
C Press the {{{{#}}}} key.
Selecting a ratio from the preset
ratios, and then using
[
–1%
], [
–0.1%
]
,
[+0.1%
] or [
+1%
] to adjust it
A Select a ratio.
B Press [
–1%
], [
–0.1%
], [
+0.1%
] or
[
+1%
] to adjust the ratio.
ZEDG060E
DolphinC2_ENcopy_F_FM.book Page 37 Friday, February 25, 2005 10:46 AM
Page 46
Copying
38
2
Note
❒ Press [–0.1%] or [+0.1%] to ad-
just the ratio in 0.1% increments.
❒ If you make a mistake, press
[– 1%], [– 0.1%], [+0.1%] or
[+1%] to readjust the ratio.
BBBB
Press [OK].
CCCC
Select the paper tray.
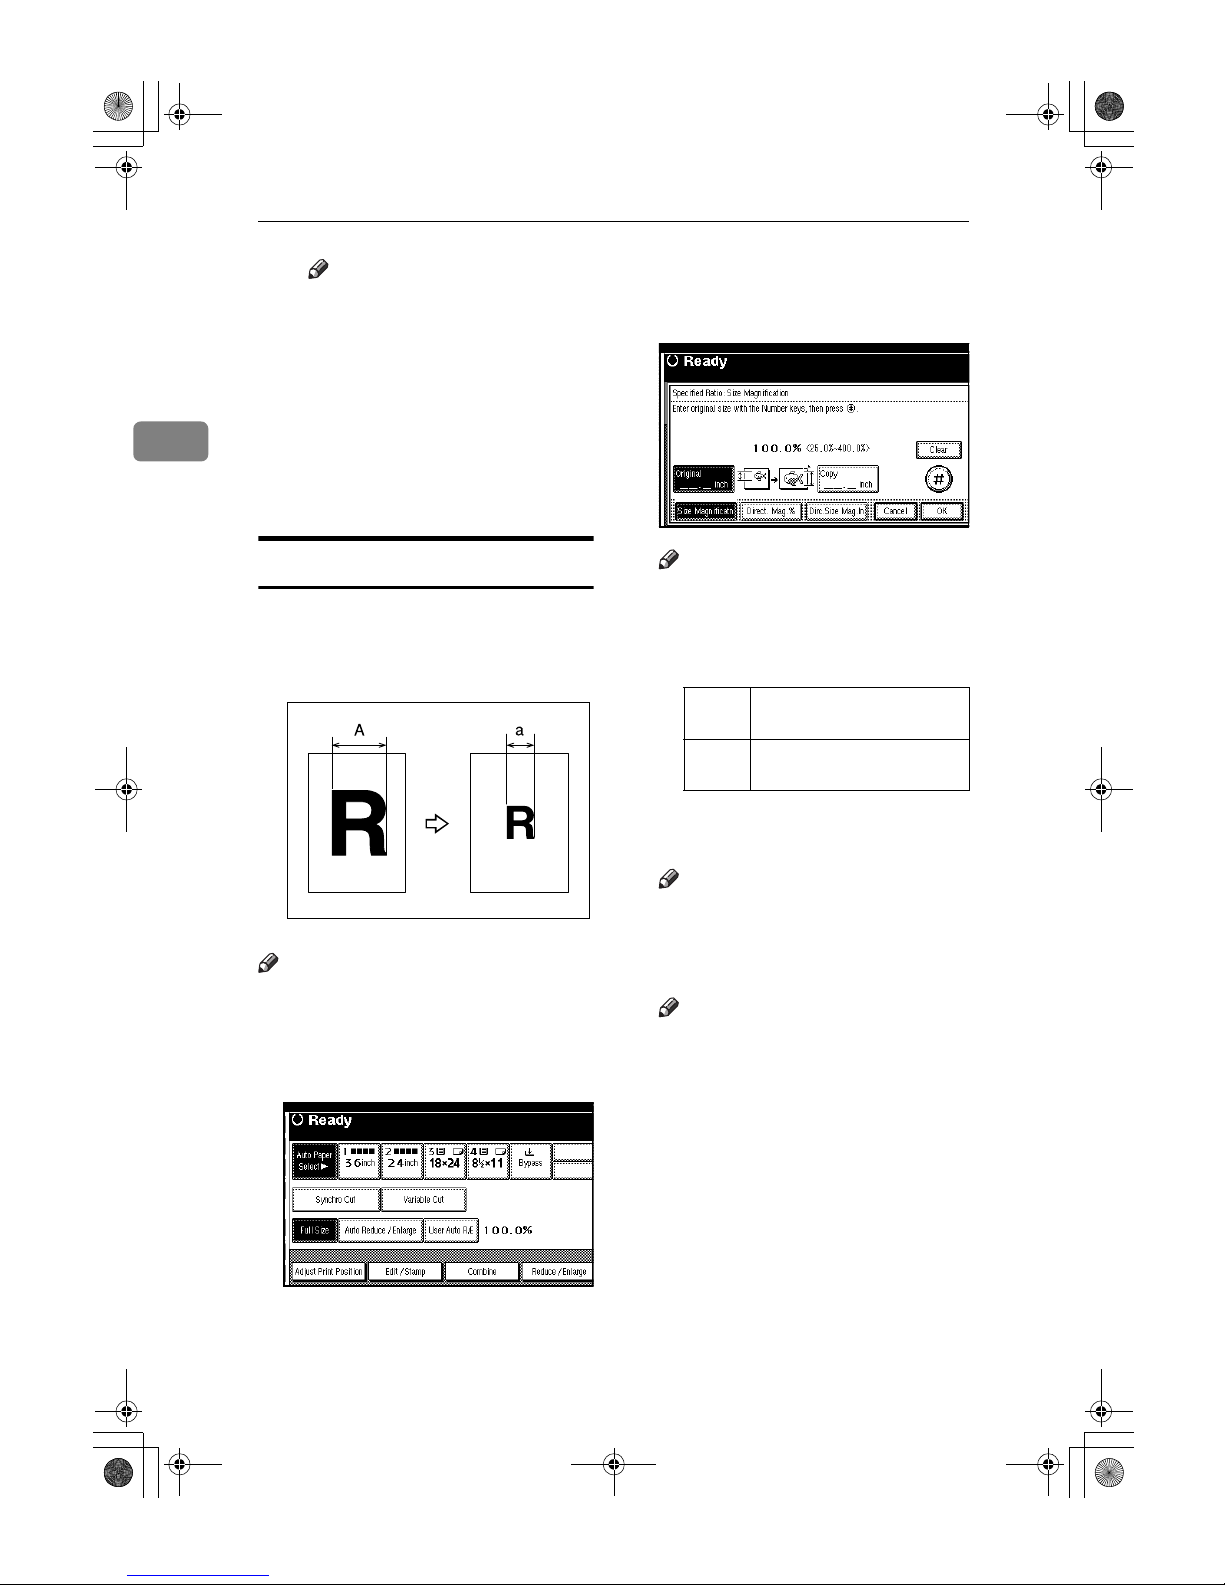
Size Magnification
This function calculates an enlargement or reduction ratio based on the
specified lengths of the original and
copy.
Note
❒ Measure and specify the lengths of
the original and copy by comparing "A" with "a".
AAAA
Press [Reduce / Enlarge].
BBBB
Press [Specifd. Ratio].
Make sure [Size Magnificatn] is highlighted.
CCCC
Enter the length of the original
using the number keys, and then
press [#].
Note
❒ To change the size, press [Clear],
and then enter the new one.
❒ You can enter sizes within the
following ranges:
DDDD
Enter the length of the copy using
the number keys.
Note
❒ To change the size, press [Clear],
and then enter the new one.
EEEE
Press [#].
Note
❒
To change the length after pressing
[#], select [Original] or [Copy],
and then enter the length again.
FFFF
Press [OK].
GGGG
Select the paper tray.
ZEDG070E
Metric
version
1–9999 mm
(increments of 1 mm)
Inch
version
0.1"–99.9"
(increments of 0.1")
DolphinC2_ENcopy_F_FM.book Page 38 Friday, February 25, 2005 10:46 AM
Page 47
Copier Functions
39
2
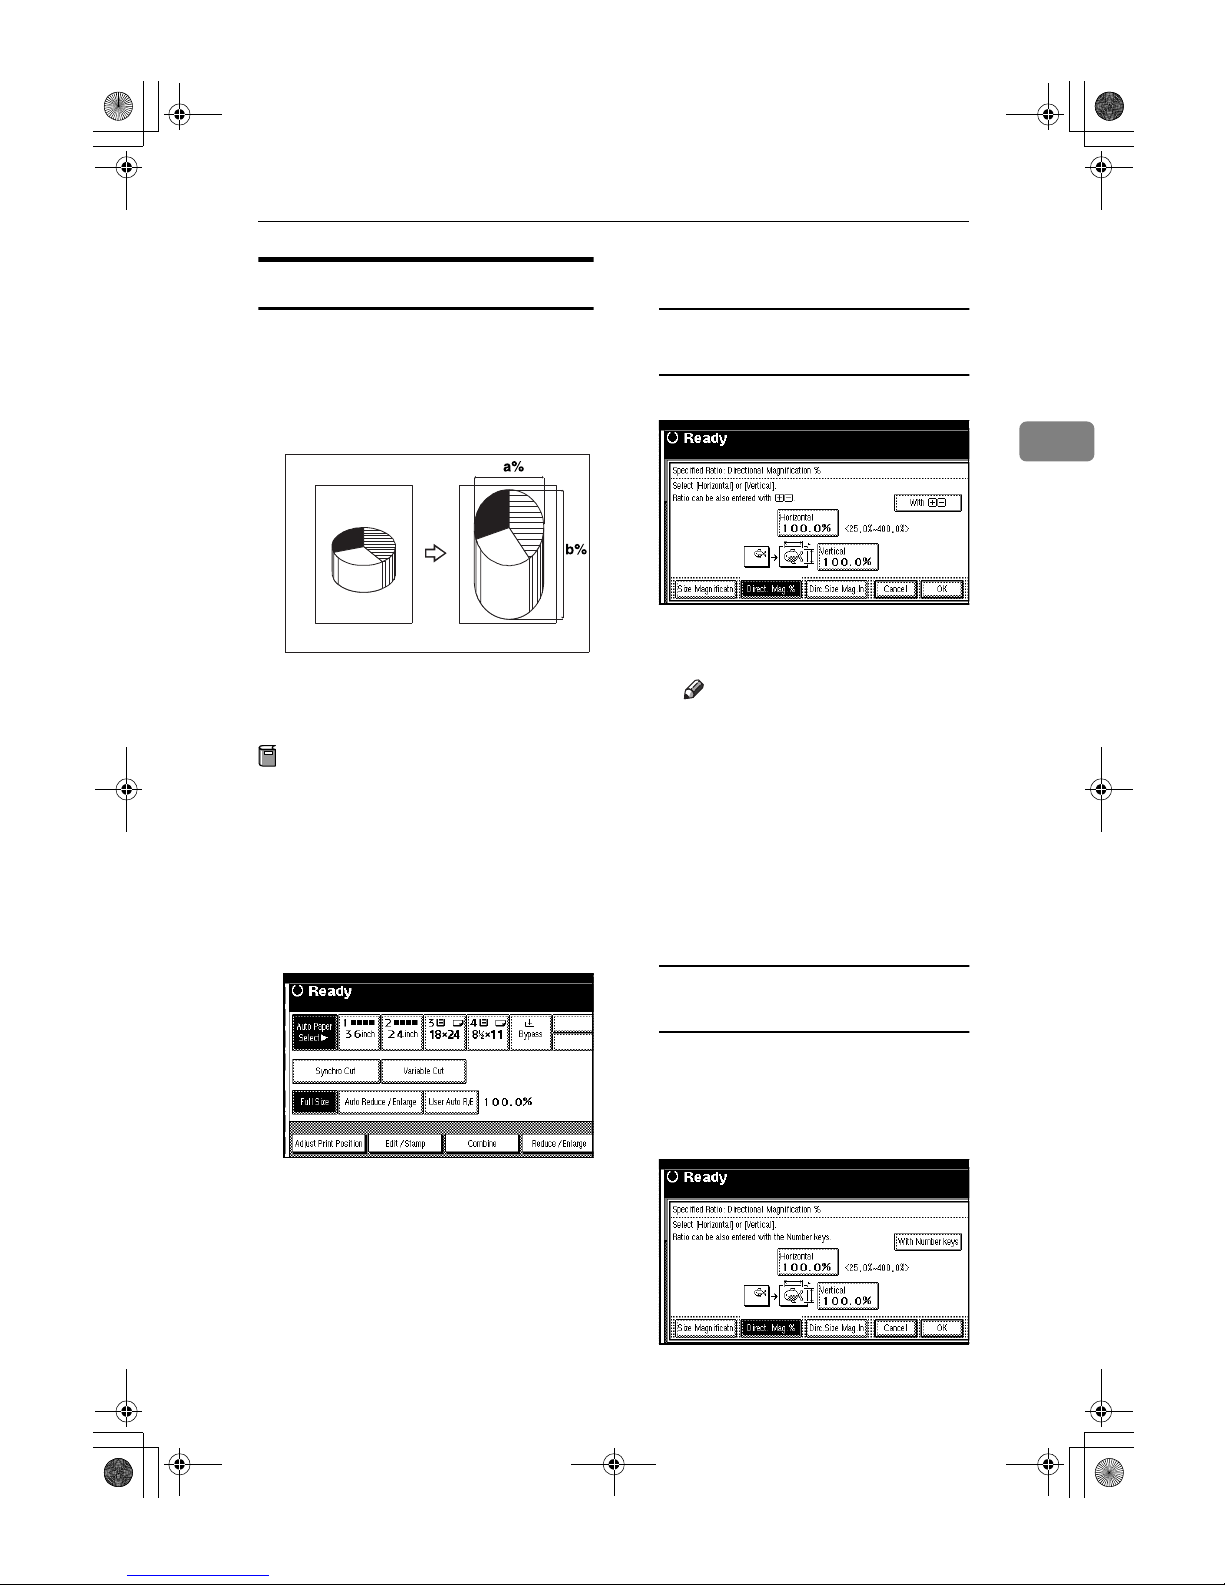
Directional Magnification (%)
Copies can be reduced or enlarged at
different magnifications, horizontally
and vertically. Use this function to alter the image.
a: Horizontal ratio
b: Vertical ratio
Preparation
You can set the ratio in the following ways.
• Using the number keys
• Using [nnnn] or [oooo]
AAAA
Select the paper tray.
BBBB
Press [Reduce / Enlarge].
CCCC
Press [Specifd. Ratio].
DDDD
Press [Direct. Mag.%]
To enter the ratio using the
number keys
A Press [Horizontal].
B Enter the ratio using the num-
ber keys, and then press [#].
Note
❒ Use the {{{{.}}}} key to enter a dec-
imal point.
❒ To change the size, press
[Clear], and then enter the
new one.
C Press [Vertical].
D Enter the ratio using the num-
ber keys, and then press [#].
E Press [OK].
To specify a ratio with [nnnn] and
[oooo]
A Press [Withnnnnoooo].
B Press [Horizontal].
C Adjust the ratio using [nnnn] or
[oooo].
CP2P01EE
DolphinC2_ENcopy_F_FM.book Page 39 Friday, February 25, 2005 10:46 AM
Page 48
Copying
40
2
Note
❒ Pressing [nnnn] or [oooo] changes
the ratio in increments of
0.1%. Pressing and holding
down [nnnn] or [oooo] changes it
in increments of 1%.
❒ If you have incorrectly en-
tered the ratio, readjust it
with [nnnn] or [oooo].
D Press [Vertical].
E Adjust the ratio using [nnnn] or
[oooo].
F Press [OK].
EEEE
Press [OK].
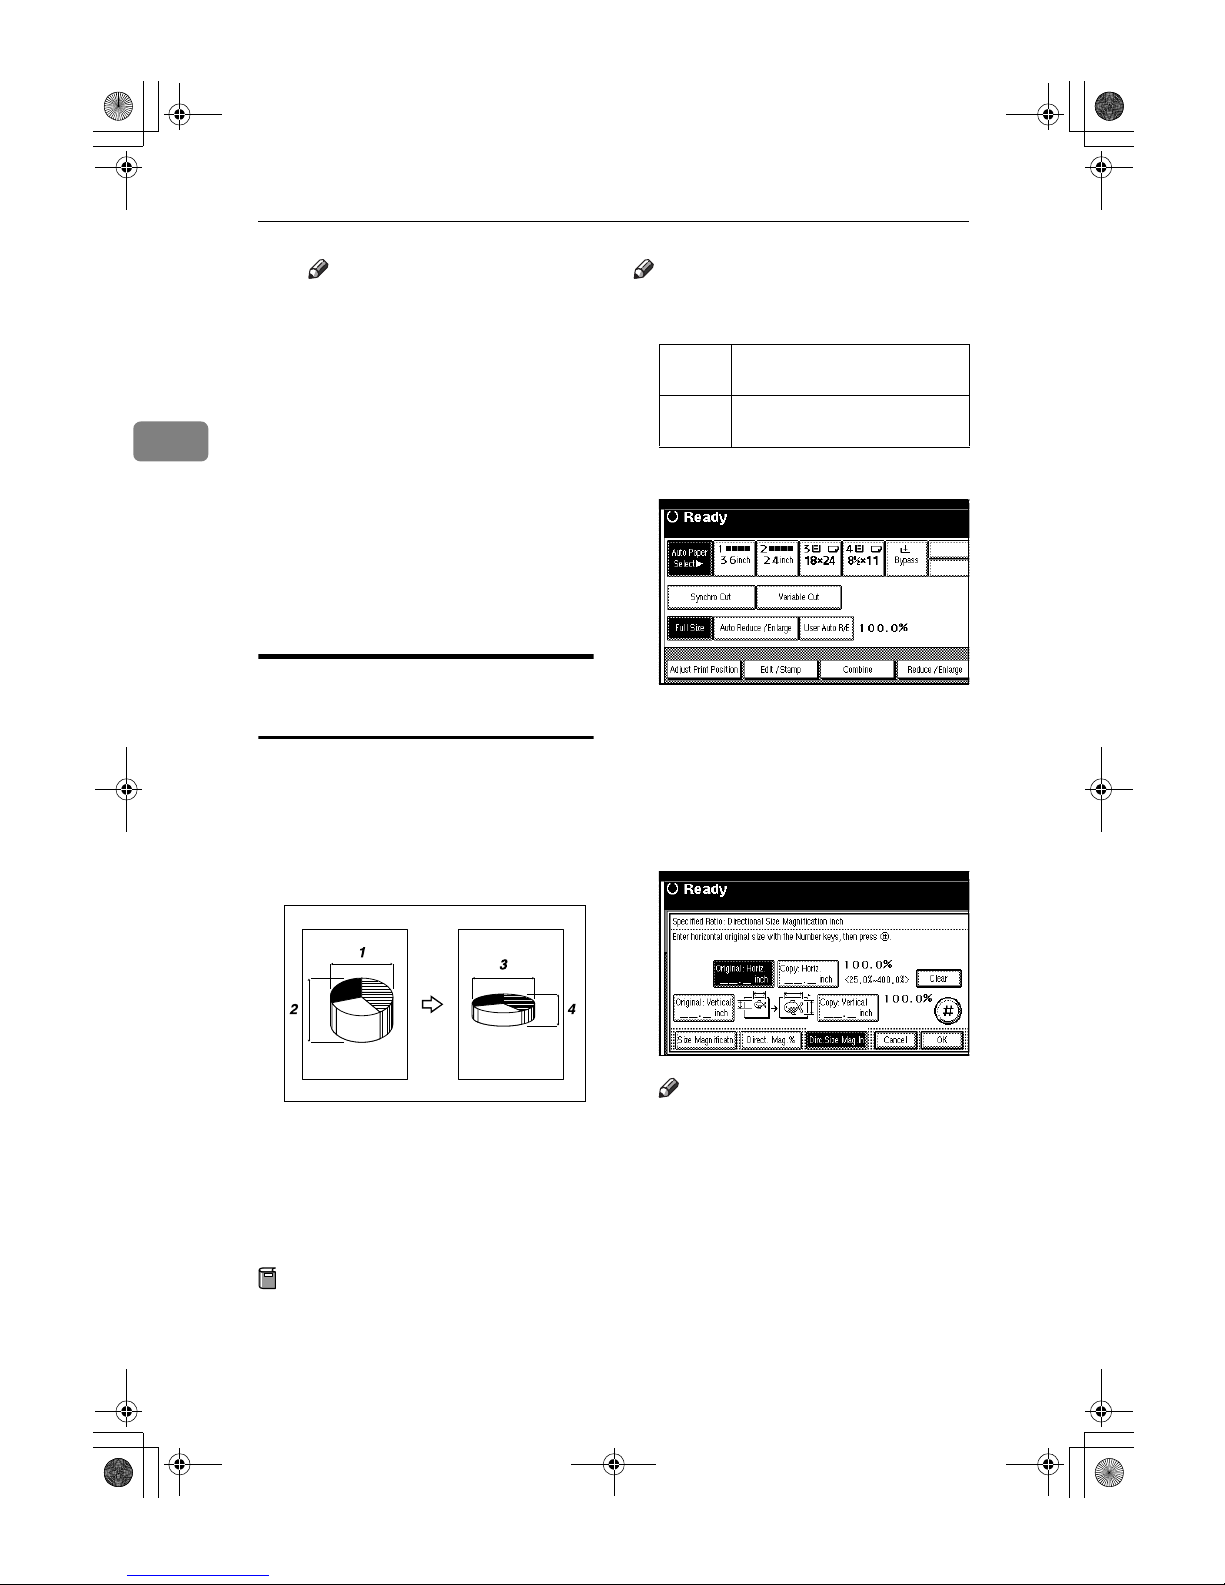
Directional Size Magnification
(inch)
A suitable reproduction ratio is automatically selected when you enter the
horizontal and vertical lengths of the
original and copy image you require.
Use this function to alter the image.
1.
Horizontal original size
2.
Vertical original size
3.
Horizontal copy size
4.
Vertical copy size
Preparation
Measure and specify the lengths of
the original and copy by comparing “A” with “a”.
Note
❒ You can enter sizes within the fol-
lowing ranges:
AAAA
Press [Reduce / Enlarge].
BBBB
Press [Specifd. Ratio].
CCCC
Press [Dirc. Size Mag. In].
DDDD
Enter the length for “Original:
Horiz.” using the number keys,
and then press [#].
Note
❒ To change the size, press [Clear],
and then enter the new one.
EEEE
Enter the length for “Copy: Horiz.”
using the number keys, and then
press [#].
FFFF
Enter the length for “Original:
Vertical” using the number keys,
and then press [#].
CP2M01EE
Metric
version
1–9999 mm (increments of 1 mm)
Inch
version
0.1"–99.9" (increments of 0.1")
DolphinC2_ENcopy_F_FM.book Page 40 Friday, February 25, 2005 10:46 AM
Page 49
Copier Functions
41
2
GGGG
Enter the length for “Copy: Vertical” using the number keys, and
then press [#].
Note
❒ To change a length, press the
key you want to change, and
then enter the new value.
HHHH
Press [OK].
IIII
Select paper tray.
Fine Magnification
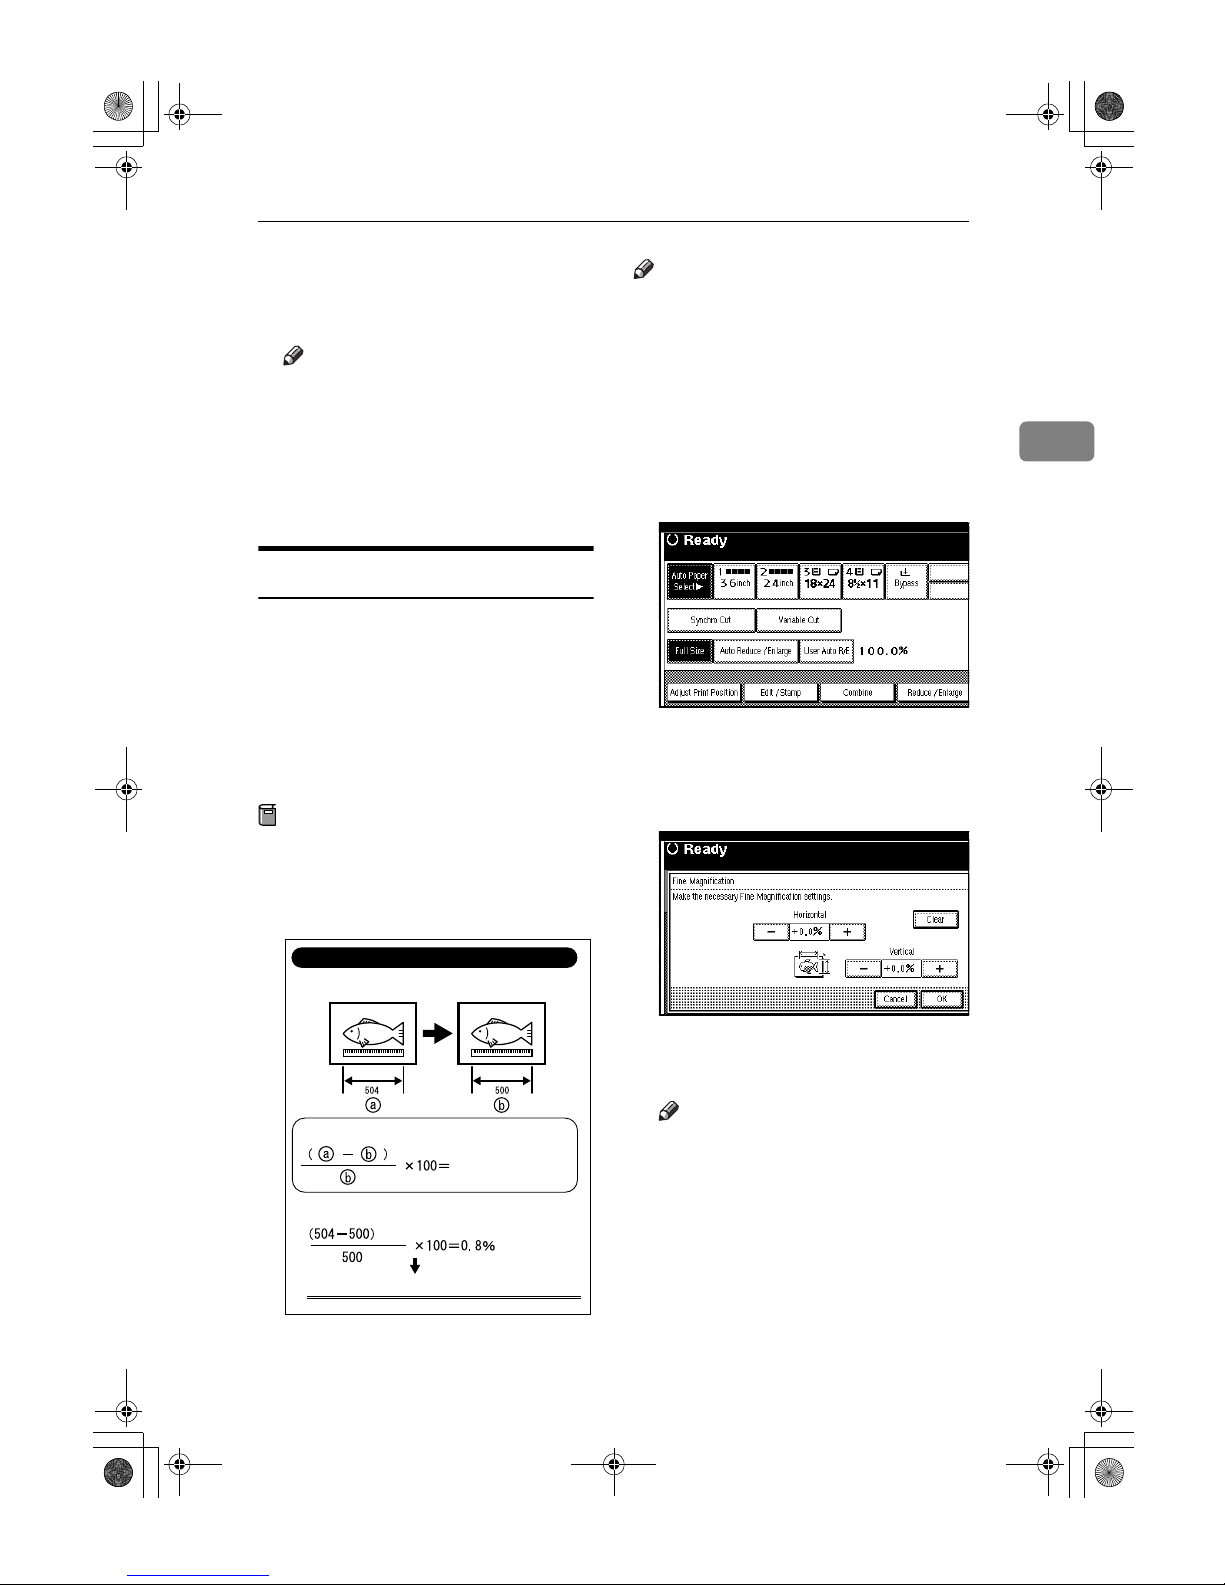
For environment reasons such as humid conditions, paper may expand or
shrink. This can result in a mismatch
between the size of the original and
copy. This function uses the measurements of the original and the copy to
calculate a ratio to produce copies
that are close to the actual size.
Preparation
Measure the length and width of
the original and the copy, and then
calculate the correction ratio as follows:
Note
❒ Fine Magnification is used for orig-
inals that have already been
scanned. If you want to apply fine
magnification corrections to paper
that has stretched due to the paper
type or exposure to humid conditions, see "Fine Ratio Adjustment:
Copier", General Settings Guide.
AAAA
Press [
Reduce / Enlarge
].
BBBB
Press [
Fine Magnificatn.
].
CCCC
Adjust the horizontal ratio using
[oooo] and [nnnn].
DDDD
Adjust the vertical ratio using
[oooo] and [nnnn].
Note
❒
To change the value, press
[
Clear
],
and then enter the new one.
EEEE
Press [OK].
ZEDG010E
Calculating the Correction Value (%)
To copy at the same size as the original
Example)
CopyOriginal
Horiz. Horiz.
... For the example above:
correction value(%)
Set the correction value (horizontal) to 0.8%.
DolphinC2_ENcopy_F_FM.book Page 41 Friday, February 25, 2005 10:46 AM
Page 50
Copying
42
2
Note
❒ You can also make these set-
tings in "Fine Ratio Adjustment:
Copier" under System Settings.
If you specified the ratio in both
System Settings and this function menu, the resulting settings
will be the sum of the set value.
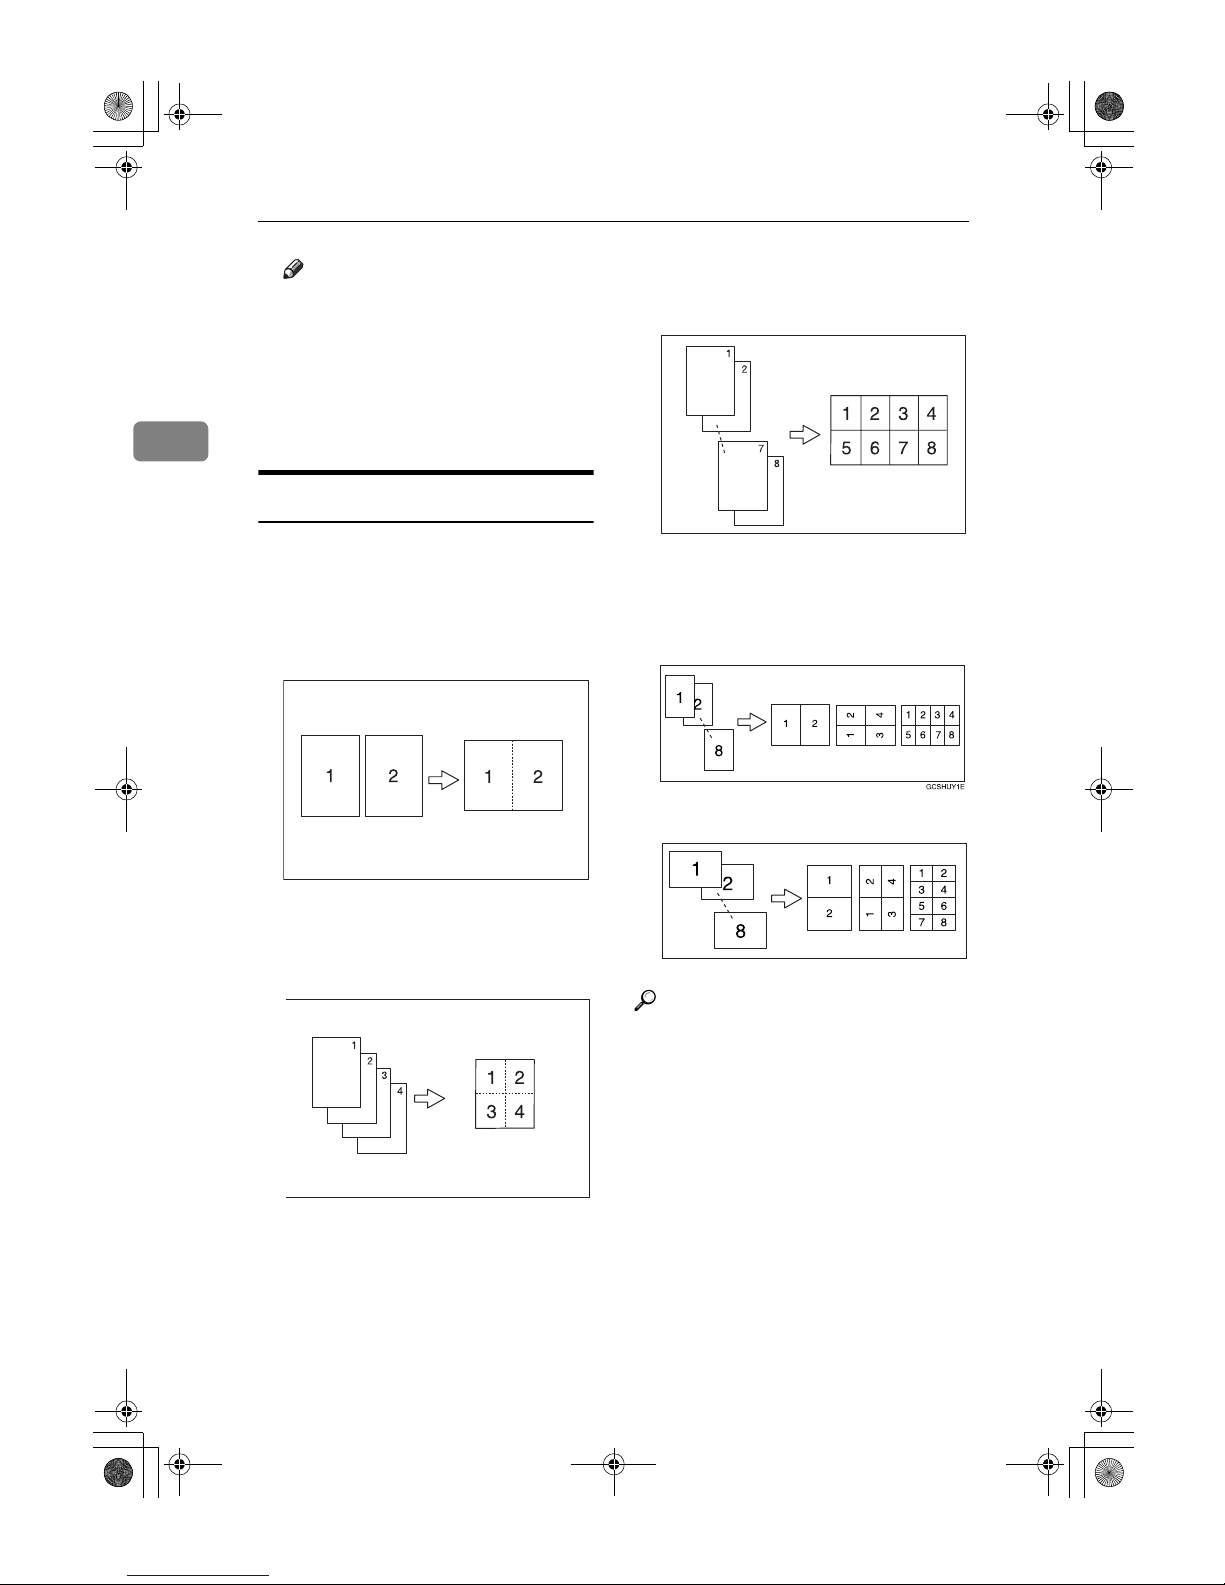
Combine
Combine several pages onto one side
of a sheet.
❖❖❖❖ Combine 2 Pages
Copies 2 one-sided originals onto
one side of a sheet.
❖❖❖❖ Combine 4 Pages
Copies 4 one-sided originals onto
one side of a sheet.
❖❖❖❖ Combine 8 Pages
Copies 8 one-sided originals onto
one side of a sheet.
❖❖❖❖ Orientation of the original and com-
bine image position
• Open to leftK originals
• Open to top L originals
Reference
Related default settings:
p.87 “Erase Original Shadow in
Combine”
p.88 “Separation Line in Combine”
p.88 “Copy Order in Combine”
AAAA
Select the paper tray.
GCSHVY7E
GCSHVY8E
GCSHVY3E
GCSHUY2E
DolphinC2_ENcopy_F_FM.book Page 42 Friday, February 25, 2005 10:46 AM
Page 51
Copier Functions
43
2
BBBB
Press [Combine].
CCCC
Select the number of originals to
combine.
DDDD
Press [OK].
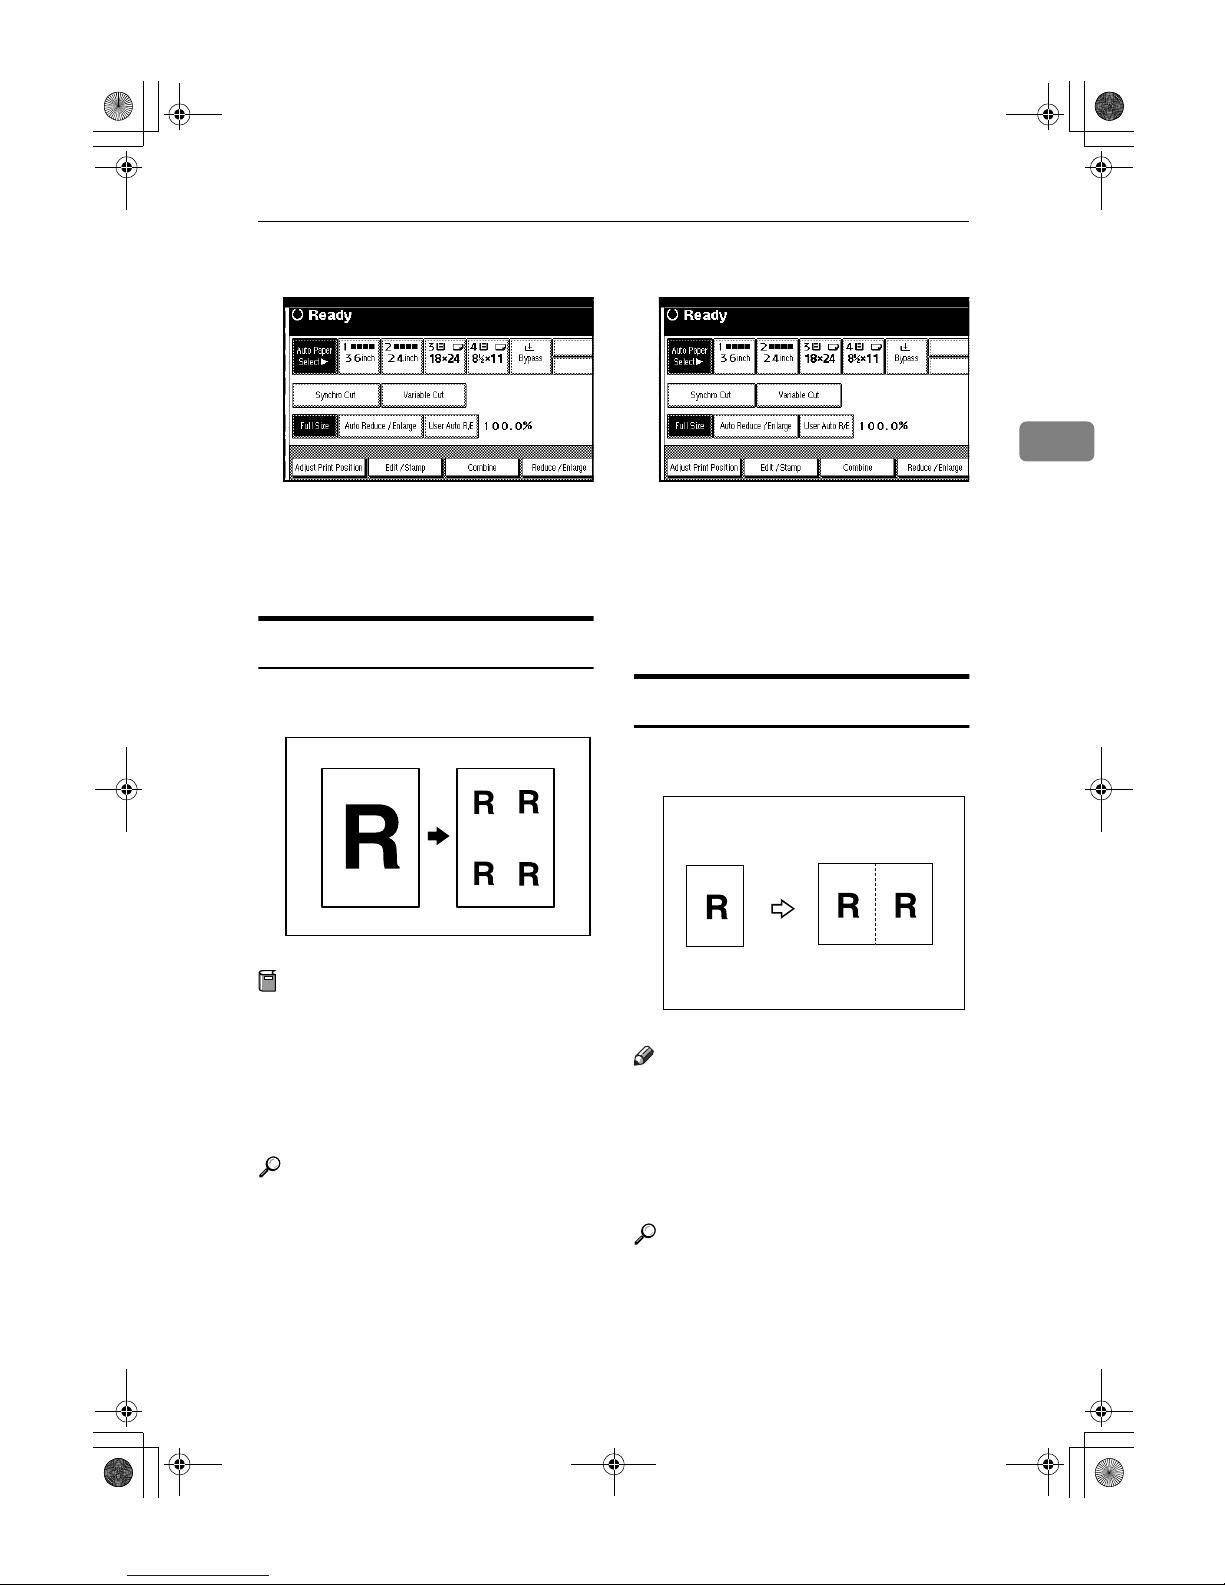
Image Repeat
The original image is copied repeatedly.
Preparation
The number of repeated images
depends on original size, copy paper size, and reproduction ratio.
• For example, you can copy eight
A4 (A) images onto one sheet of
A1 (D) size paper.
Reference
Related default settings:
p.87 “Image Repeat Separation
Line”
AAAA
Press [Edit / Stamp].
BBBB
Press [Edit Image].
CCCC
Press [
Image Repeat
].
DDDD
Press [OK] twice.
EEEE
Select the paper tray.
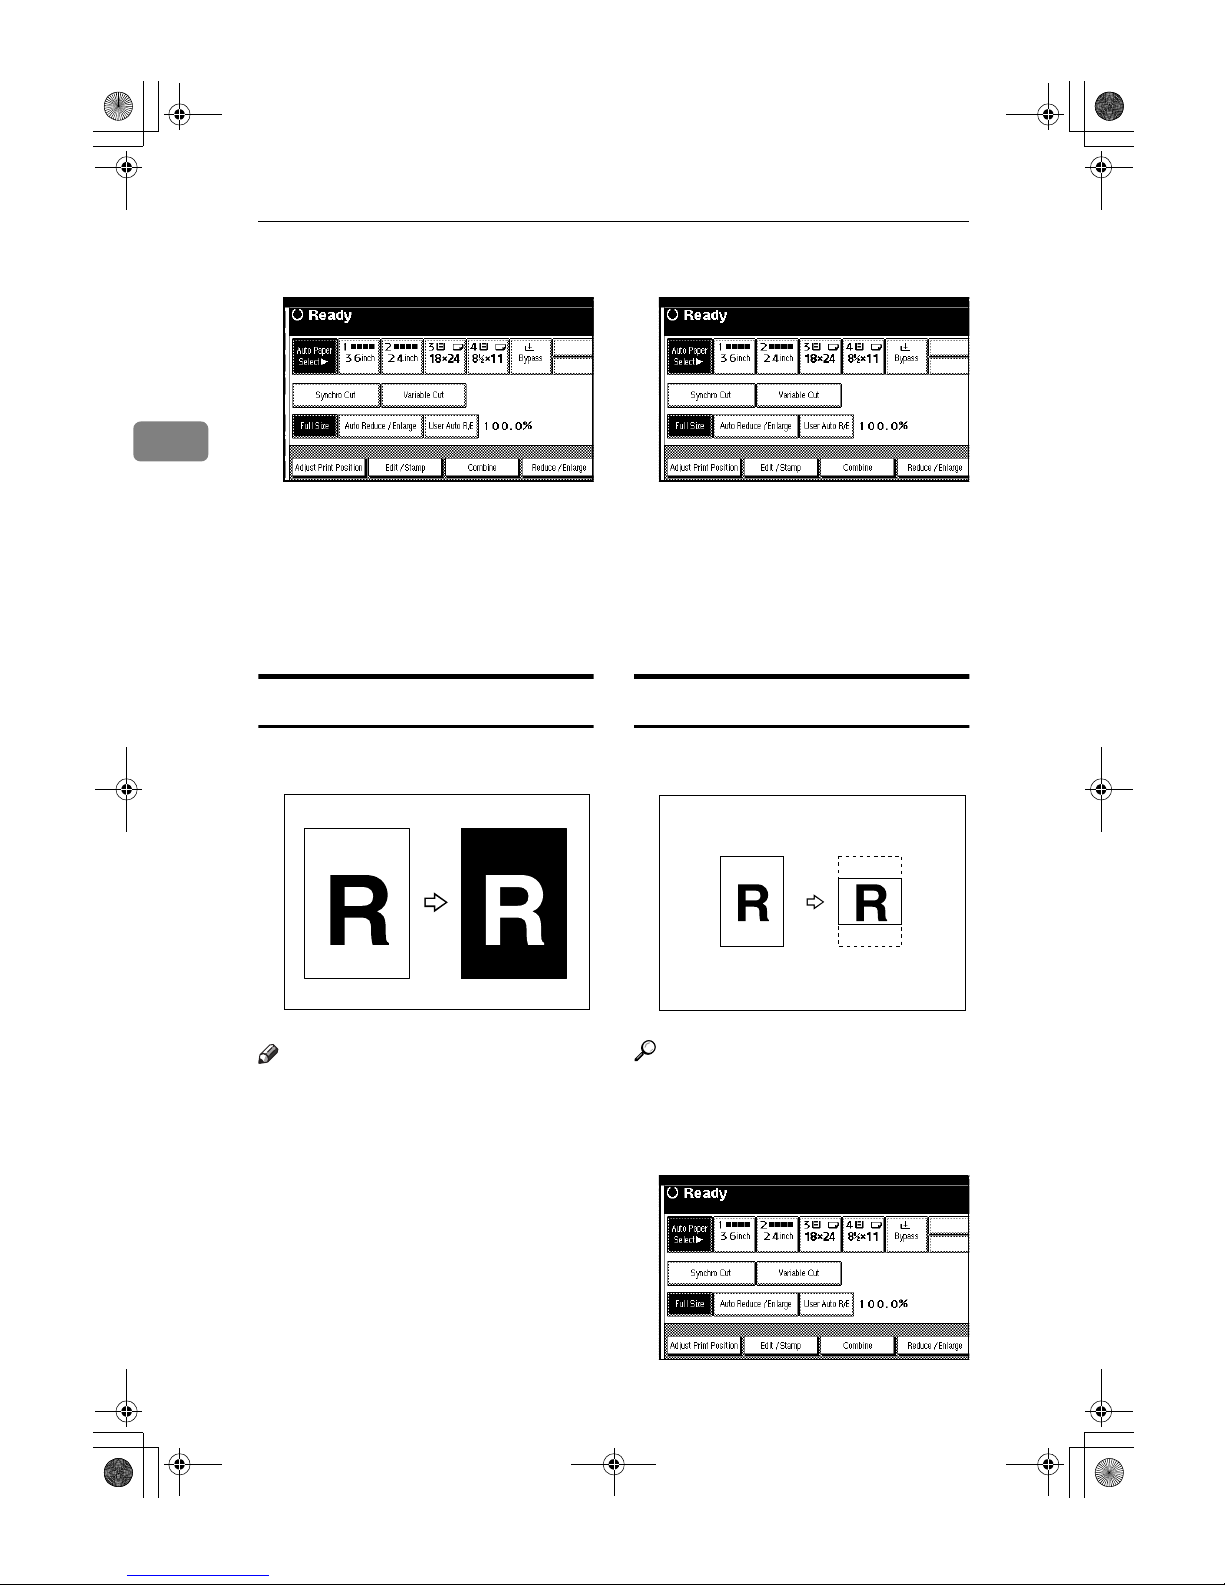
Double Copies
Use this function to copy an original
image twice onto one copy, as shown.
Note
❒ When using Double Copies, the
copy paper must be twice as large
as the original. When using Reduce/Enlarge, consider the magnification ratio when selecting the
paper size.
Reference
Related default settings:
p.87 “Double Copies Separation
Line”
HE2R0100
ZEDG170E
DolphinC2_ENcopy_F_FM.book Page 43 Friday, February 25, 2005 10:46 AM
Page 52
Copying
44
2
AAAA
Press [Edit / Stamp].
BBBB
Press [Edit Image].
CCCC
Press [
Double Copies
].
DDDD
Press [OK] twice.
EEEE
Select the paper tray.
Positive/Negative
Use this function to reverse black and
white areas of the original.
Note
❒ When making continuous copies,
image density may deteriorate. See
p.70 “If You Cannot Make Clear
Copies”.
AAAA
Press [Edit / Stamp].
BBBB
Press [Edit Image].
CCCC
Press [
Positive/Negative
].
DDDD
Press [OK] twice.
EEEE
Select the paper tray.
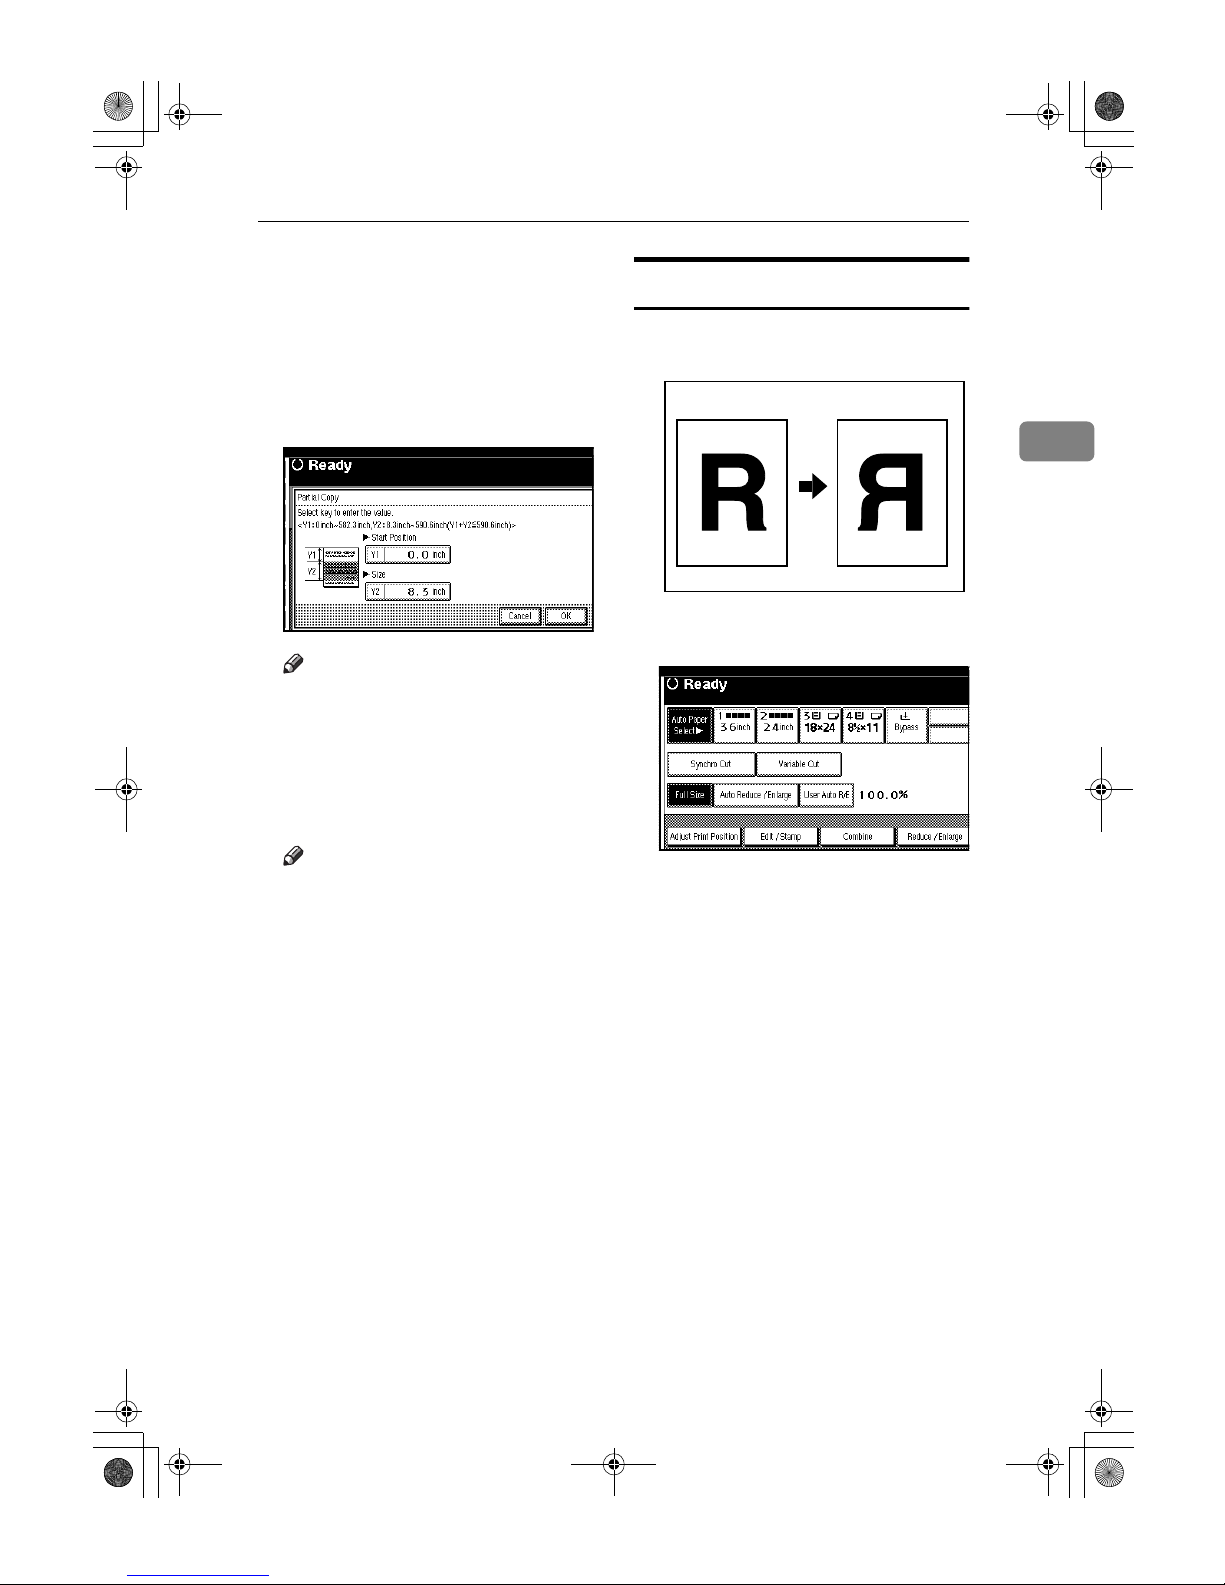
Partial Copy
Use this function to copy only a specified portion of the original.
Reference
Related default settings:
p.89 “Partial Copy Priority”
AAAA
Press [
Edit / Stamp
].
ZEDG150E
AGL040S
DolphinC2_ENcopy_F_FM.book Page 44 Friday, February 25, 2005 10:46 AM
Page 53
Copier Functions
45
2
BBBB
Press [Edit Image].
CCCC
Press [Partial Copy].
DDDD
Press [Y1], and then enter the scan
start position (the length from the
leading edge of the original) using the number keys.
Note
❒
To change the value, press
[
Clear
],
and then enter the new one.
EEEE
Press [#].
FFFF
Press [Y2], and then enter the copy
size using the number keys.
Note
❒ The copy size (Y2) should be at
least 210 mm (8.3").
❒ The maximum length of copy
sizes is Y1 + Y2 ≤ 15000 mm
(590.6").
❒ If the length specified by “Y1”
and “Y2” is larger than the maximum, the machine shortens it.
The value entered second is adjusted based on the value entered first.
GGGG
Press [OK] three times.
Mirror Image
Copies by reversing the image from
left to right, as reflected in a mirror.
AAAA
Press [Edit / Stamp].
BBBB
Press [
Edit Image
].
CCCC
Press [
Mirror Image
].
DDDD
Press [OK] twice.
ZEDG160E
DolphinC2_ENcopy_F_FM.book Page 45 Friday, February 25, 2005 10:46 AM
Page 54
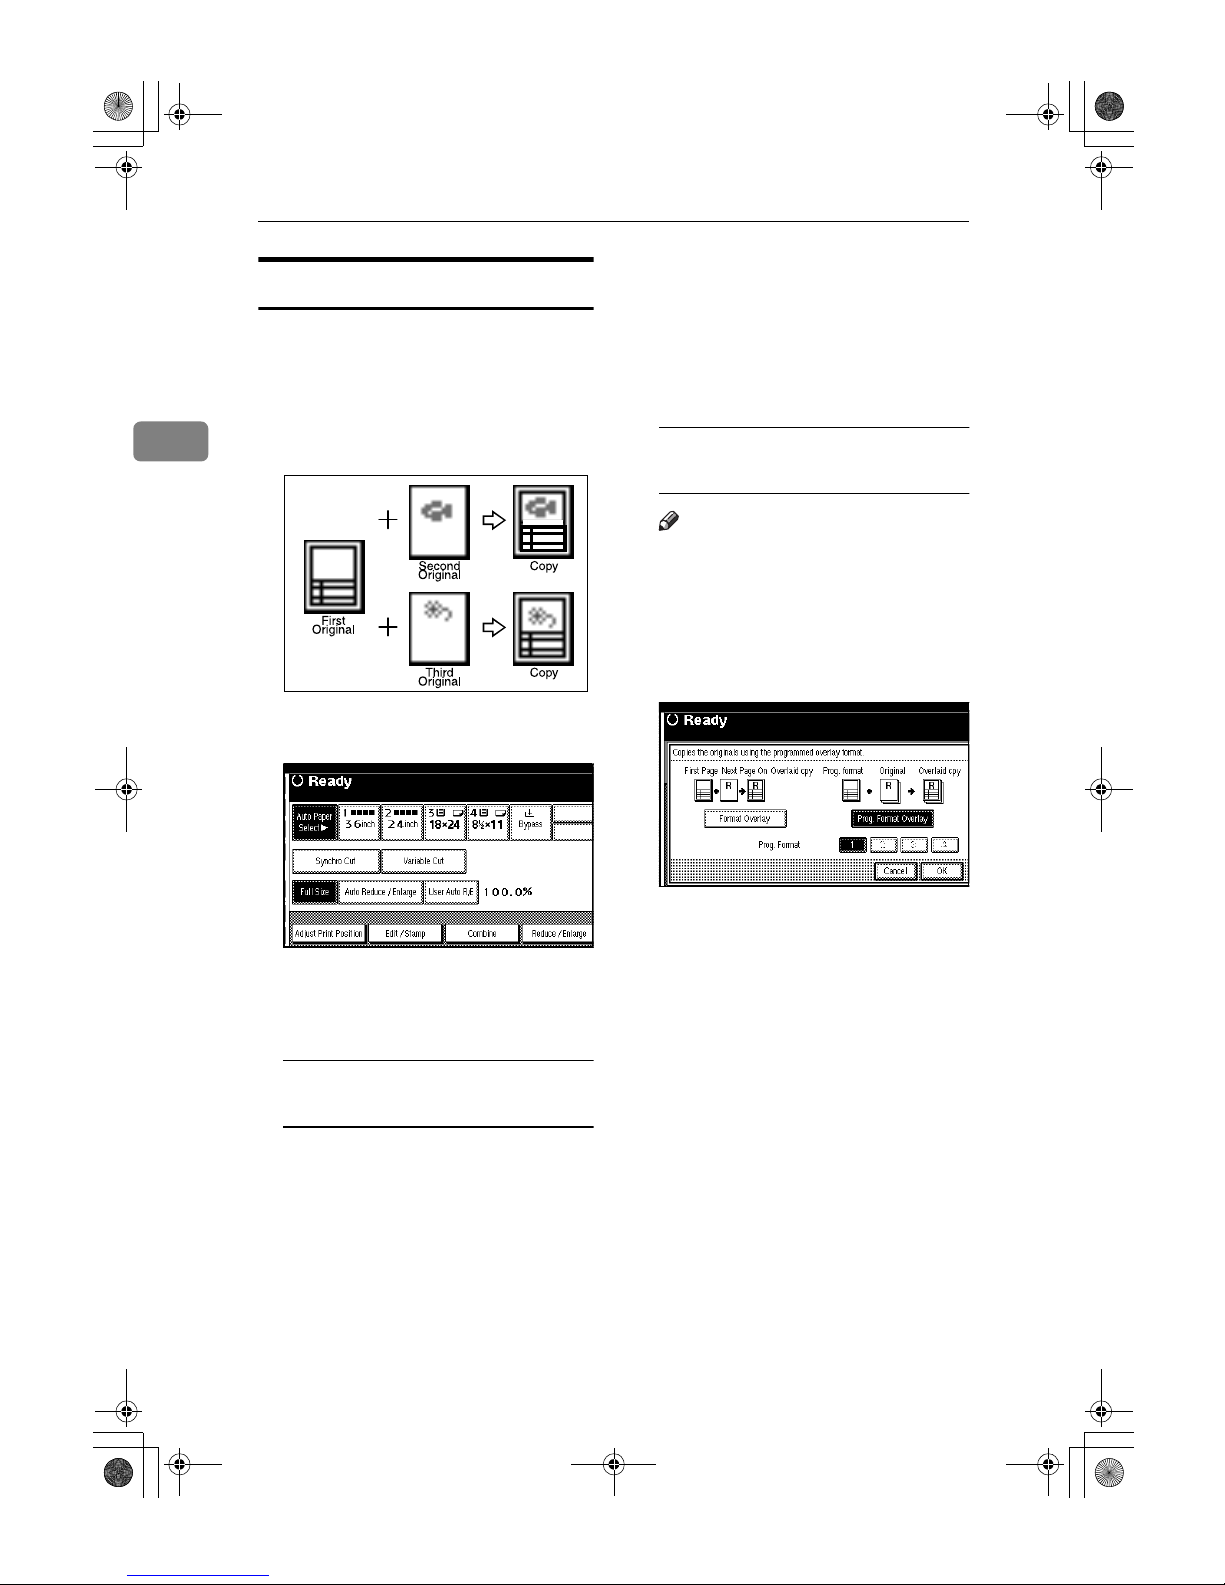
Copying
46
2
Format Overlay
Use this function to combine two images (original + format) onto one
copy using the first original.
You can store frequently used format
original in the machine memory and
recall them for future use.
AAAA
Press [Edit / Stamp].
BBBB
Press [Edit Image].
CCCC
Press [Format Overlay].
Using the first original as the
background original
A Press [
Format Overlay
].
B Make the necessary settings,
and then place the first original.
C Place the second original.
The machine makes a composite copy of the first and second
originals.
D Place the third original.
The machine makes a composite copy of the first and third
originals.
E Place any further originals, as
required.
Using the stored image as the
background original
Note
❒ To use this function, you need
to program the overlay format
in advance. See p.47 “Pro-
gram/Delete Overlay Format”.
A Press [
Prog. Format Overlay
].
B Select a stored format number.
C Make the necessary settings,
and then place the original to
be overlaid on the format original.
The machine makes a copy
overlaying the first original
onto the stored format original.
D Place any further originals, as
required.
The machine makes a copy
overlaying the new original
onto the stored format original.
AHD006S
DolphinC2_ENcopy_F_FM.book Page 46 Friday, February 25, 2005 10:46 AM
Page 55
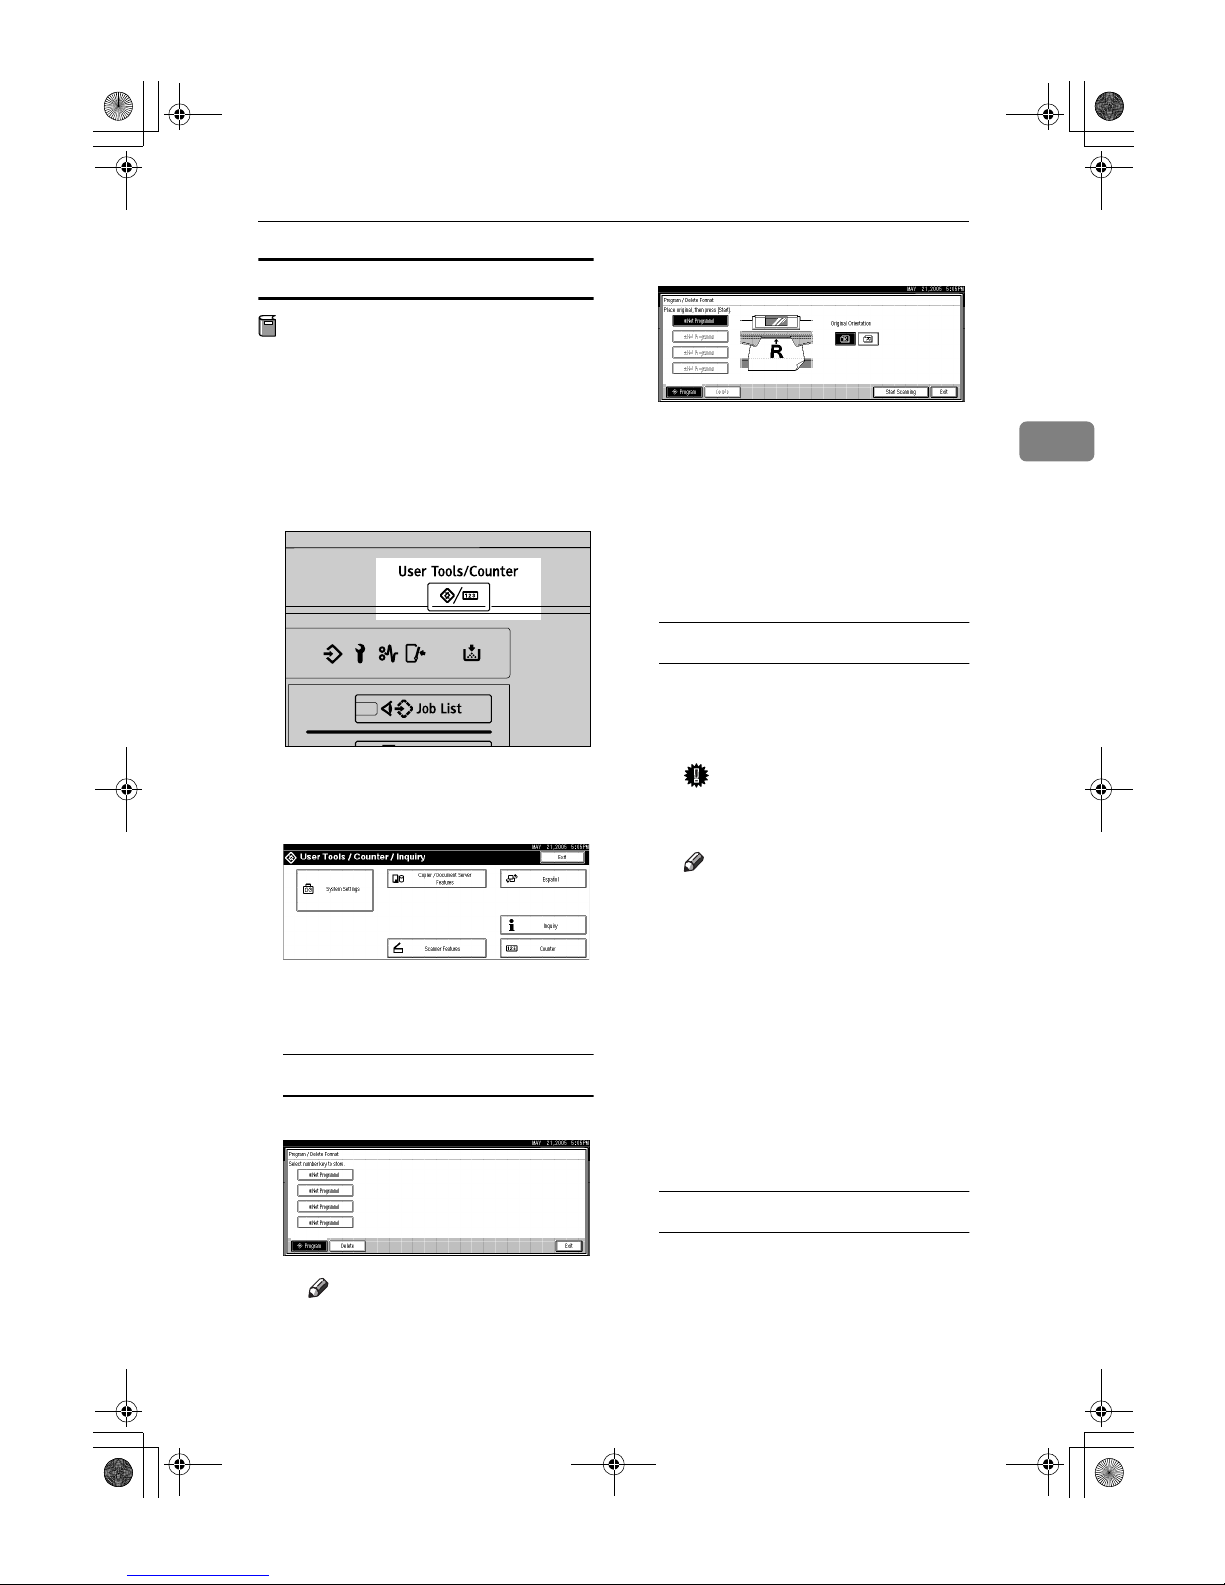
Copier Functions
47
2
Program/Delete Overlay Format
Preparation
The maximum size of original size
to be stored is A0(E). You cannot
store long length originals.
AAAA
Make sure the machine is ready to
copy.
BBBB
Press the {{{{User Tools/Counter}}}} key.
CCCC
Press [Copier / Document Server Fea-
tures].
DDDD
Press [Edit], and then press [Pro-
gram / Delete Format].
Storing
A Select a format number (1 to 4).
Note
❒ Format numbers with m
against them have already
been stored.
B Select the original orientation.
C Place the original, and then
press [Start Scanning].
The original is scanned and
stored.
D Press [Exit] twice.
Returns to the initial User Tools
/ Counter display.
Overwriting a stored format
A Select a format number you
want to overwrite.
B Press [Yes].
Important
❒ You cannot restore a format
that has been overwritten.
Note
❒ Press [Stop] if you do not
want to overwrite the existing format.
C Select the original orientation.
D Place the original, and then
press [Start Scanning].
The original is scanned and
stored.
E Press [Exit] twice.
Returns to the initial User Tools
/ Counter display.
Deleting
A Press [Delete], and then select
the format number you want to
delete.
B Press [Delete].
AHD101S
DolphinC2_ENcopy_F_FM.book Page 47 Friday, February 25, 2005 10:46 AM
Page 56
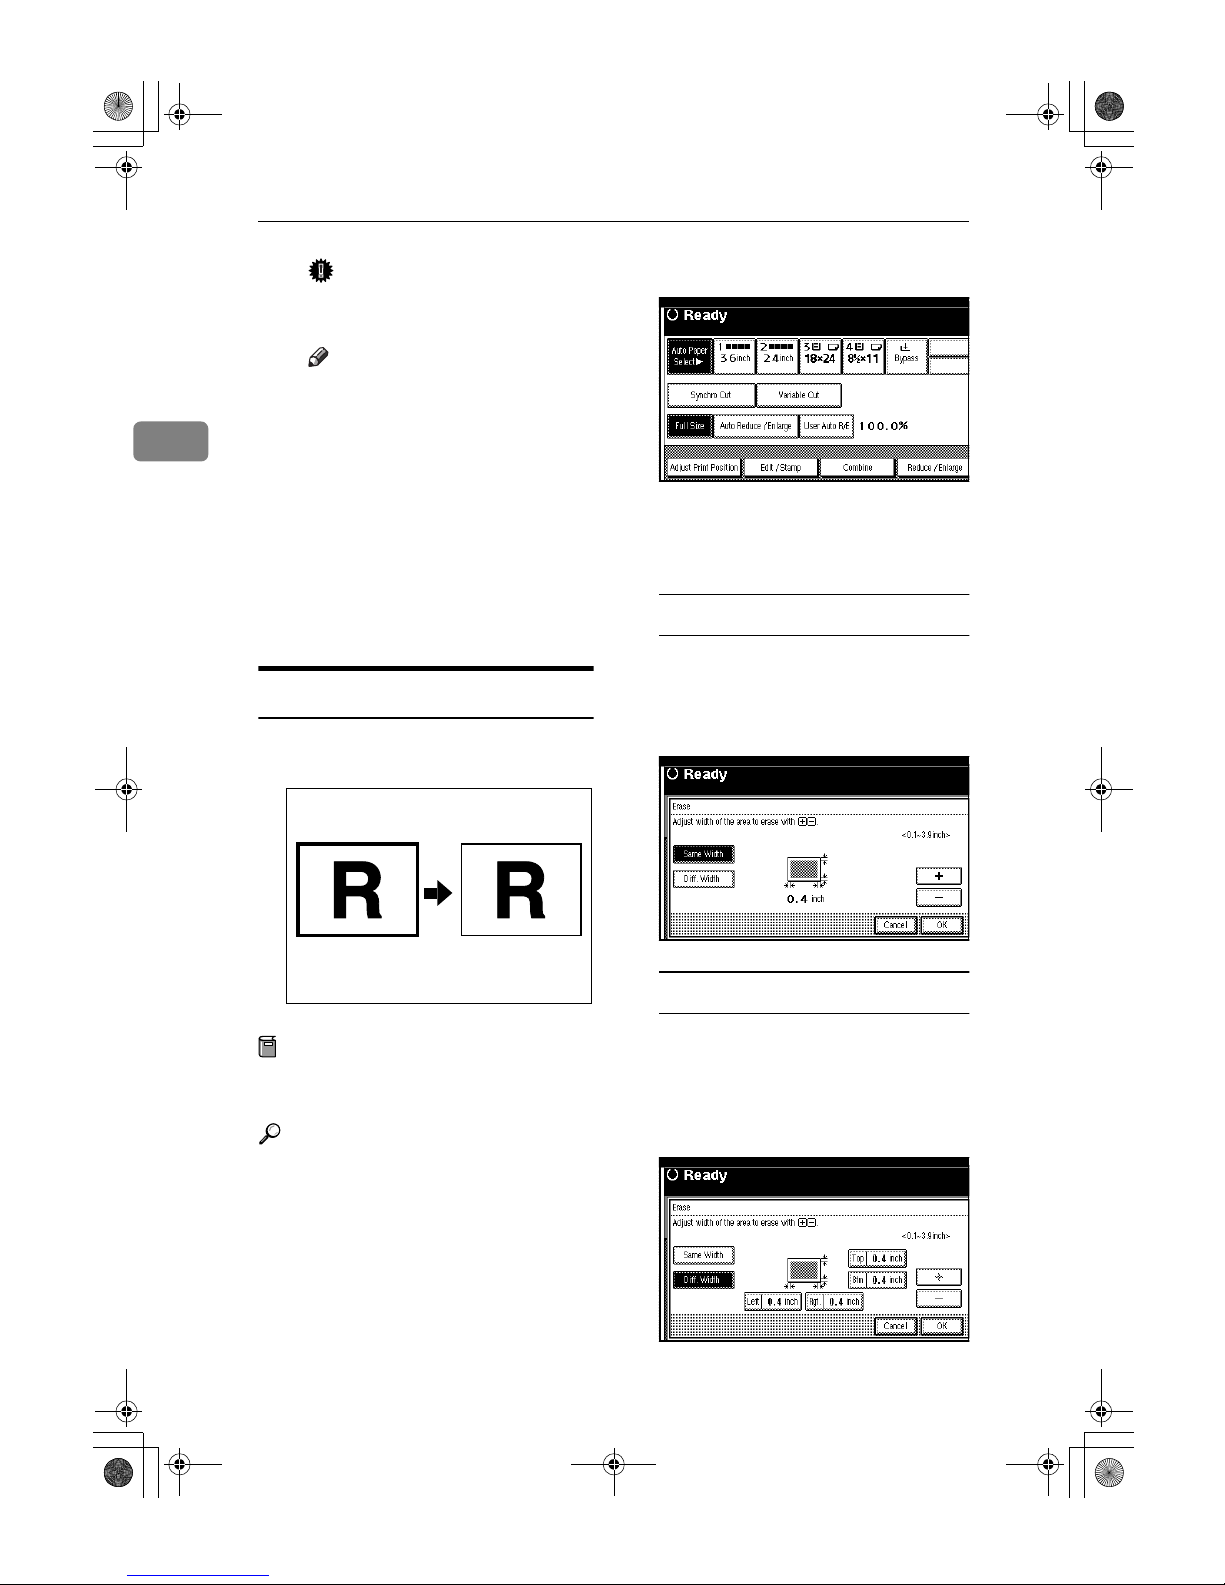
Copying
48
2
Important
❒ You cannot restore a format
that has been deleted.
Note
❒ Press [Stop] if you do not
want to delete the existing
format.
C Press [Exit] twice.
Returns to the initial User Tools
/ Counter display.
EEEE
Press the {{{{User Tools/Counter}}}} key.
The overlay format is stored or deleted, and the display returns to
the initial copy display.
Erase Border
Use this function to erase the border
area around the original image.
Preparation
The default erase border setting is
10 mm (0.4").
Reference
Related default settings:
p.87 “Erase Border Width”
AAAA
Press [Edit / Stamp].
BBBB
Press [Erase].
CCCC
Press [Erase Border].
Selecting [Same Width]
A Press [Same Width].
B Set the erase border width us-
ing [nnnn] and [oooo], and then
press [OK].
Selecting [Diff. Width]
A Press [Diff. Width].
B Press the key for the border
you want to change, and then
set the erase border width using [nnnn] and [oooo].
C Press [OK].
ZEDX080E
DolphinC2_ENcopy_F_FM.book Page 48 Friday, February 25, 2005 10:46 AM
Page 57
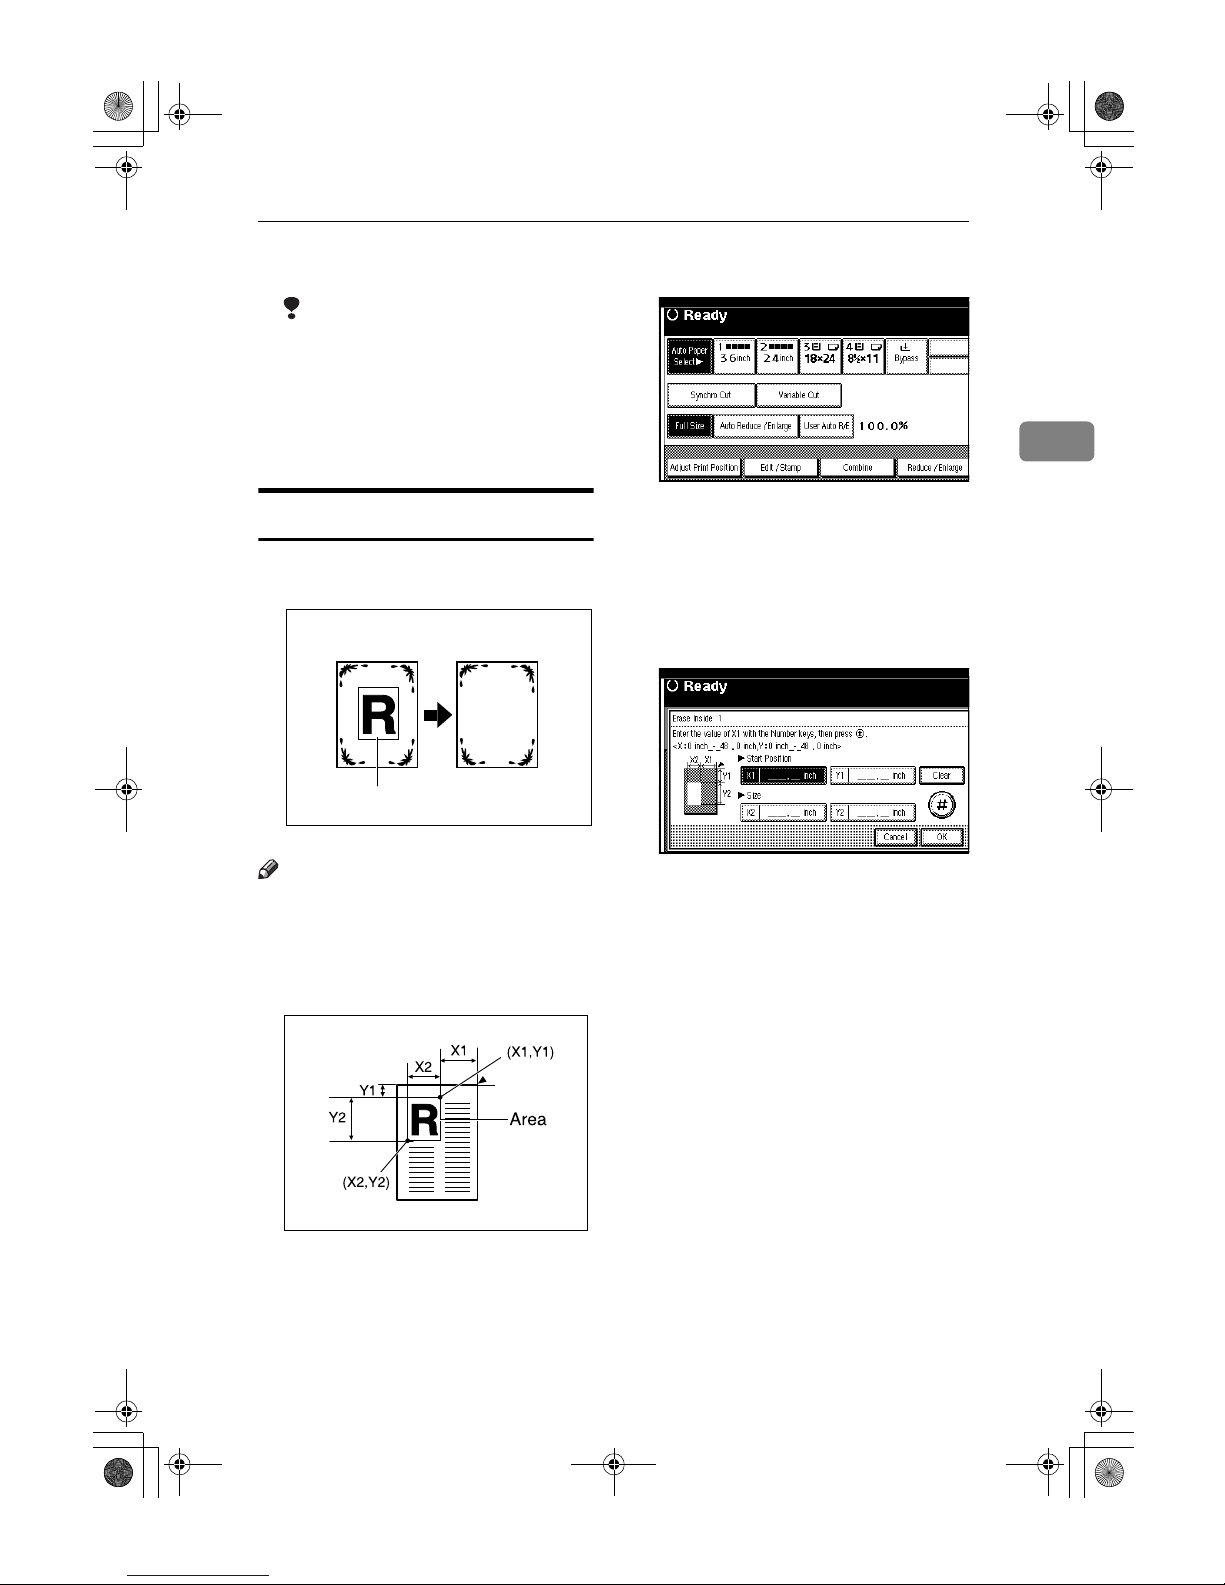
Copier Functions
49
2
DDDD
Press [OK] twice.
Limitation
❒ For details about the scan size
limitations when using the
Erase Border function together
with the other functions, see
p.104 “Scan Size Limitations, by
Function”.
Erase Inside
Use this function to copy the original
while erasing a specified area.
Note
❒ To specify the area you want to
erase, you have to define the value
of X1, Y1, X2, and Y2. Measure the
area you want to specify before entering the area settings.
❒ When using this function with
magnification, the actual setting
will be the specified setting multiplied by the reproduction ratio.
❒ You can specify up to five areas.
AAAA
Press [Edit / Stamp].
BBBB
Press [Erase].
CCCC
Select one of the areas from [
Erase
Inside 1
] to [
Erase Inside 5
].
DDDD
Enter the length of “X1” using the
number keys, and then press [#].
EEEE
Enter the length of “X2”, “Y1”,
and “Y2” in the same way, and
then press [OK].
FFFF
To specify multiple areas, specify
areas 1 to 5, and then repeat steps
DDDD
to
EEEE
.
GGGG
Press [OK] twice.
Erase Inside
ABB524S
Area
AHD047S
DolphinC2_ENcopy_F_FM.book Page 49 Friday, February 25, 2005 10:46 AM
Page 58
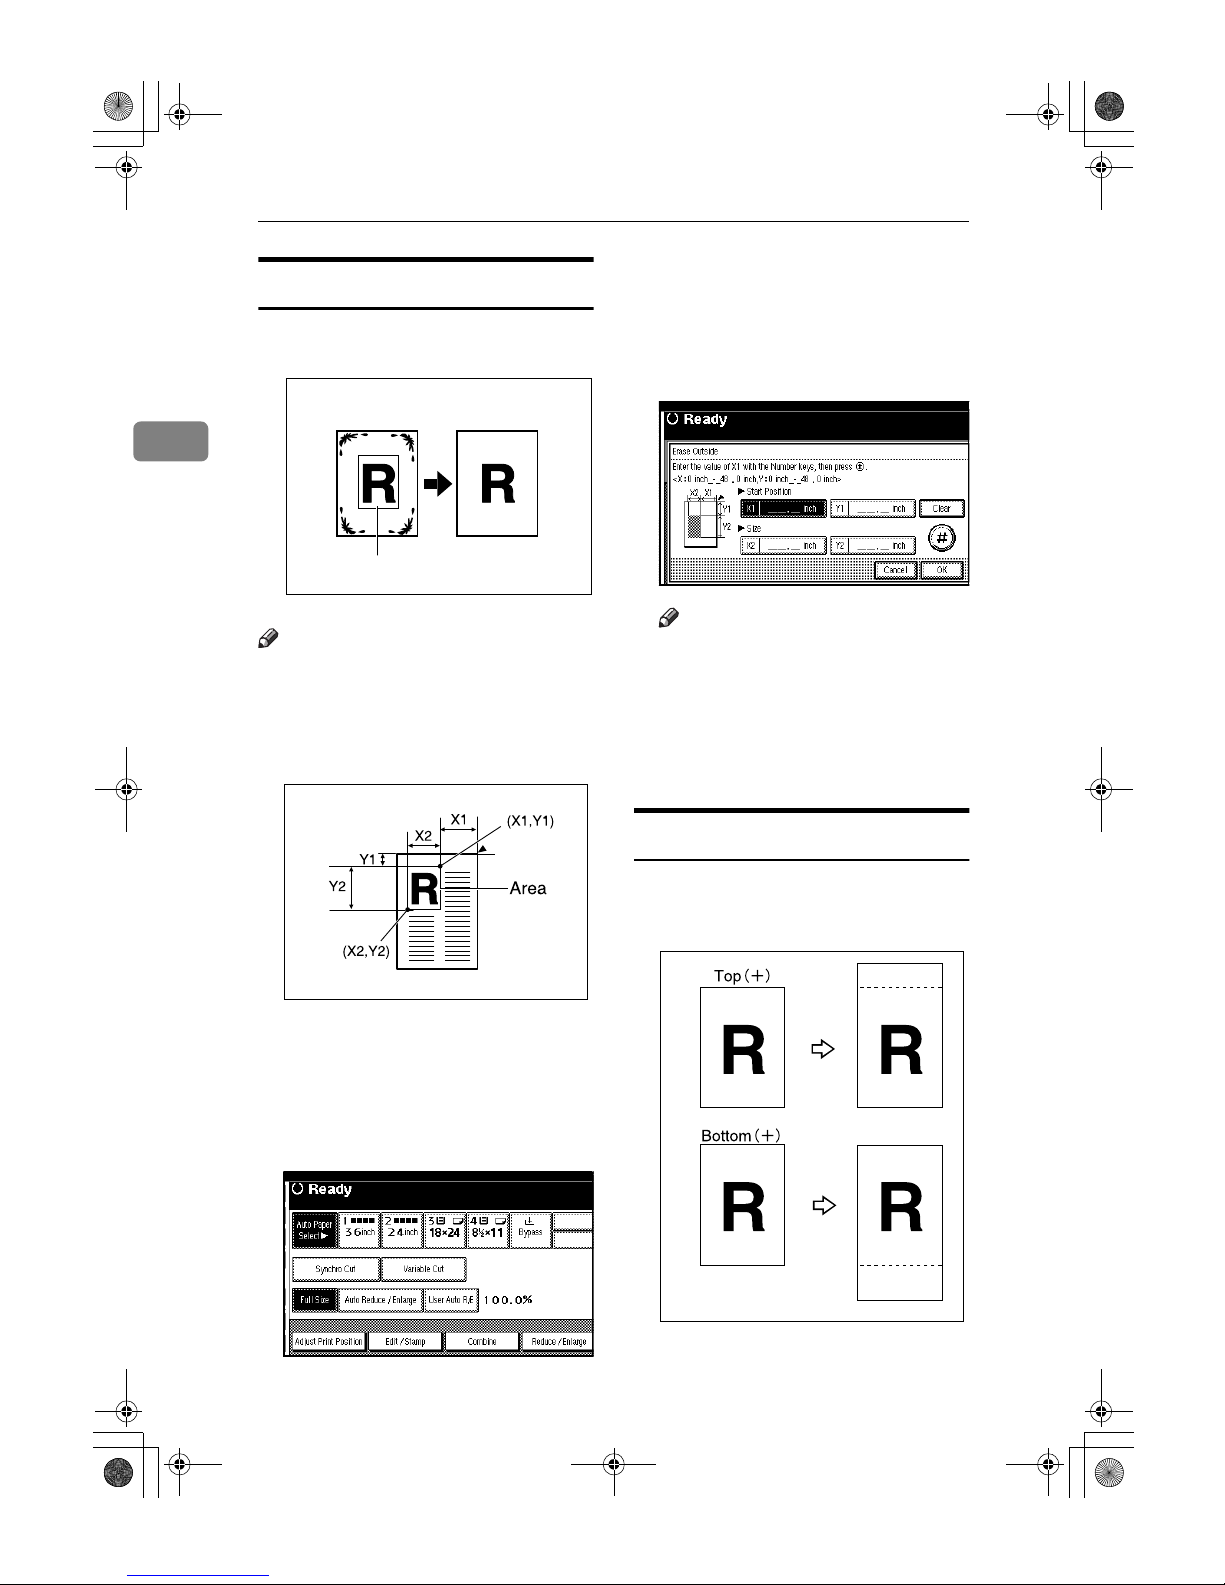
Copying
50
2
Erase Outside
Use this function to copy the original
while erasing outside a specified area.
Note
❒ To specify the area you want to
erase, you have to define the value
of X1, Y1, X2, and Y2. Measure the
area you want to specify before entering the area settings.
❒ When using this function with
magnification, the actual setting
will be the specified setting multiplied by the reproduction ratio.
AAAA
Press [Edit / Stamp].
BBBB
Press [Erase].
CCCC
Press [Erase Outside].
DDDD
Enter the length of “X1” using the
number keys, and then press [#].
Note
❒
To change the value, press
[Clear],
and then enter the new one.
EEEE
Enter the length of “X2”, “Y1”,
and “Y2” in the same way.
FFFF
Press [OK] three times.
Margin Adjustment
When Synchro Cut is selected, you
can create a margin on the copy's
leading and trailing edge.
Erase Outside
ABB526S
Area
AHD047S
AHD007S
DolphinC2_ENcopy_F_FM.book Page 50 Friday, February 25, 2005 10:46 AM
Page 59
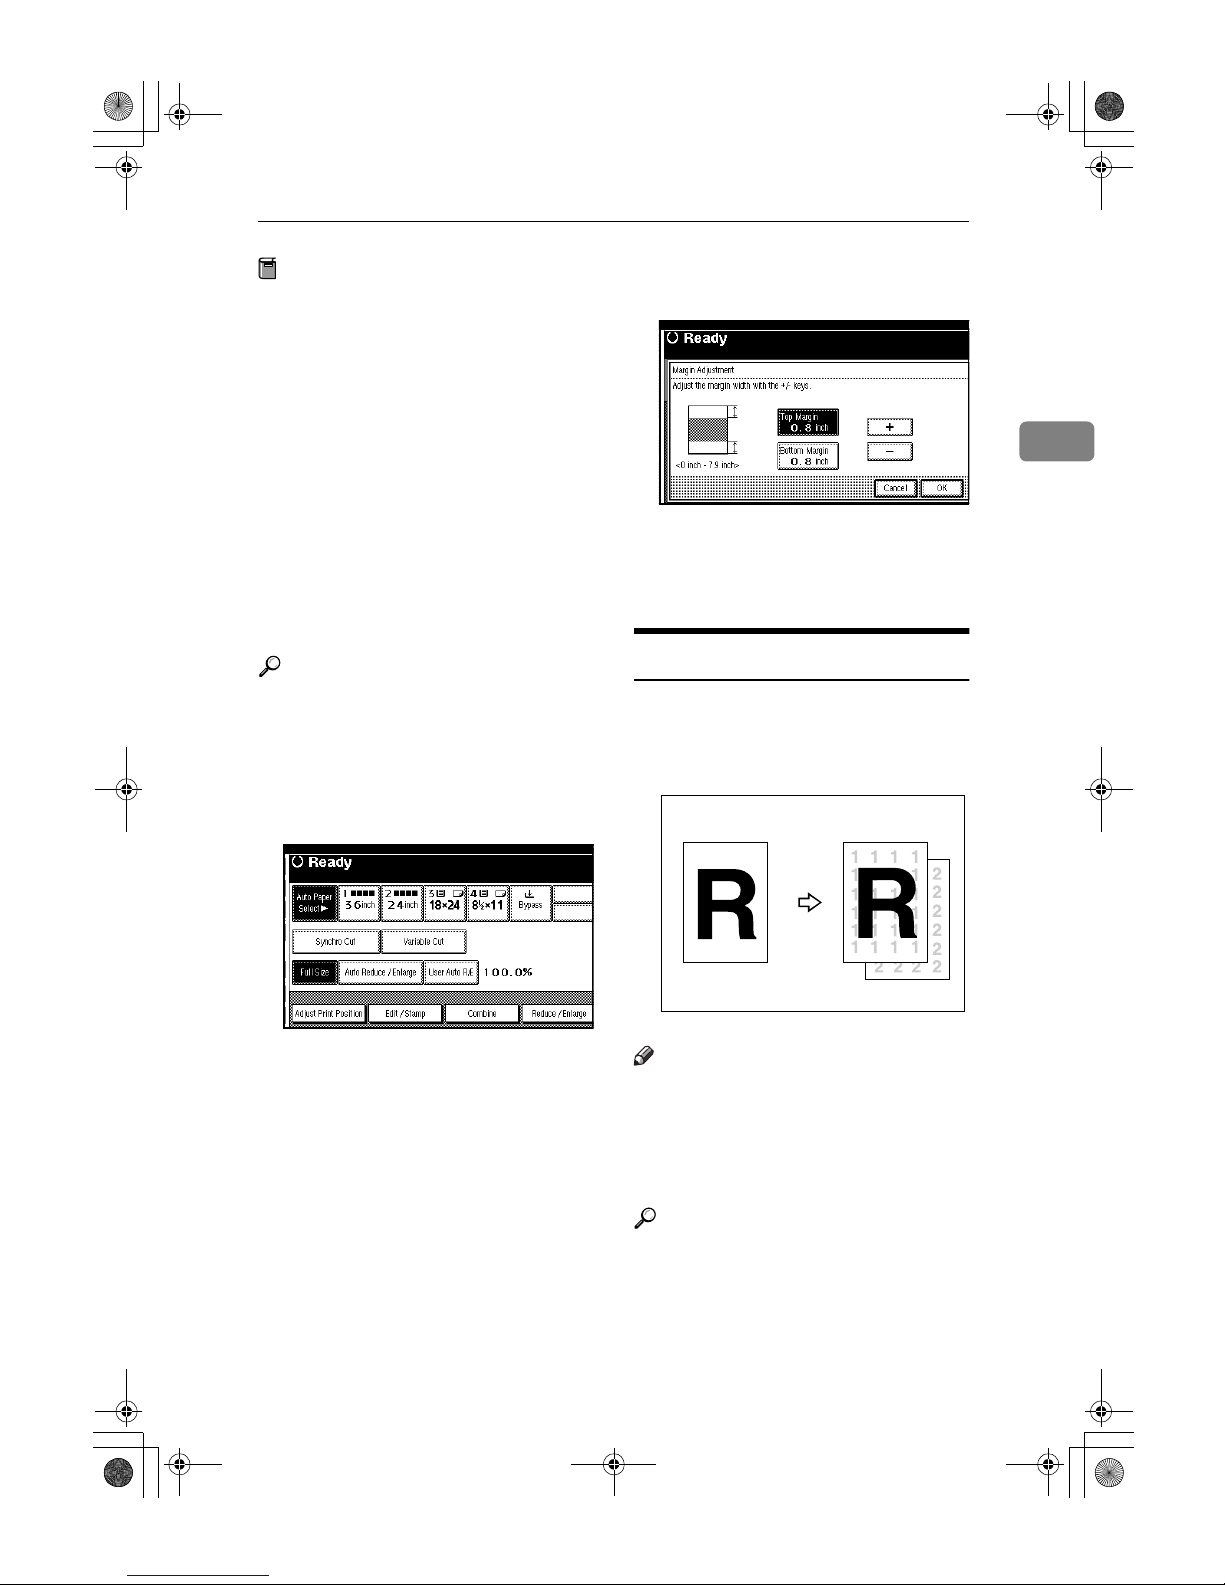
Copier Functions
51
2
Preparation
You can select the following types
of margin for this function:
• Top (+): margin at the leading
edge of the original (top of
copy).
• Bottom (+): margin at the trailing edge of the original (bottom
of copy).
The default margin setting is 20
mm (0.8").
You can specified both the top and
the bottom margins at a time.
The copy length is the specified
length plus or minus the margin.
Reference
p.31 “Synchro cut”
Related default settings:
p.88 “Margin Adjustment Priority”
AAAA
Press [Edit / Stamp].
BBBB
Press [Margin Adjustment].
CCCC
Press [Top Margin] or [Bottom Mar-
gin].
DDDD
Use [-] or [+] to specify the margin,
and then press [OK].
[Synchro Cut] is automatically selected.
EEEE
Press [OK].
Background Numbering
Use this function to have numbers
printed on the background of copies.
It can help you to keep track of confidential documents.
Note
❒ You can set the number from 1 to
999.
❒ You can combine this function
with up to four other stamping
functions.
Reference
Related default settings:
p.90 “Size”
p.90 “Density”
ZEDG190E
DolphinC2_ENcopy_F_FM.book Page 51 Friday, February 25, 2005 10:46 AM
Page 60
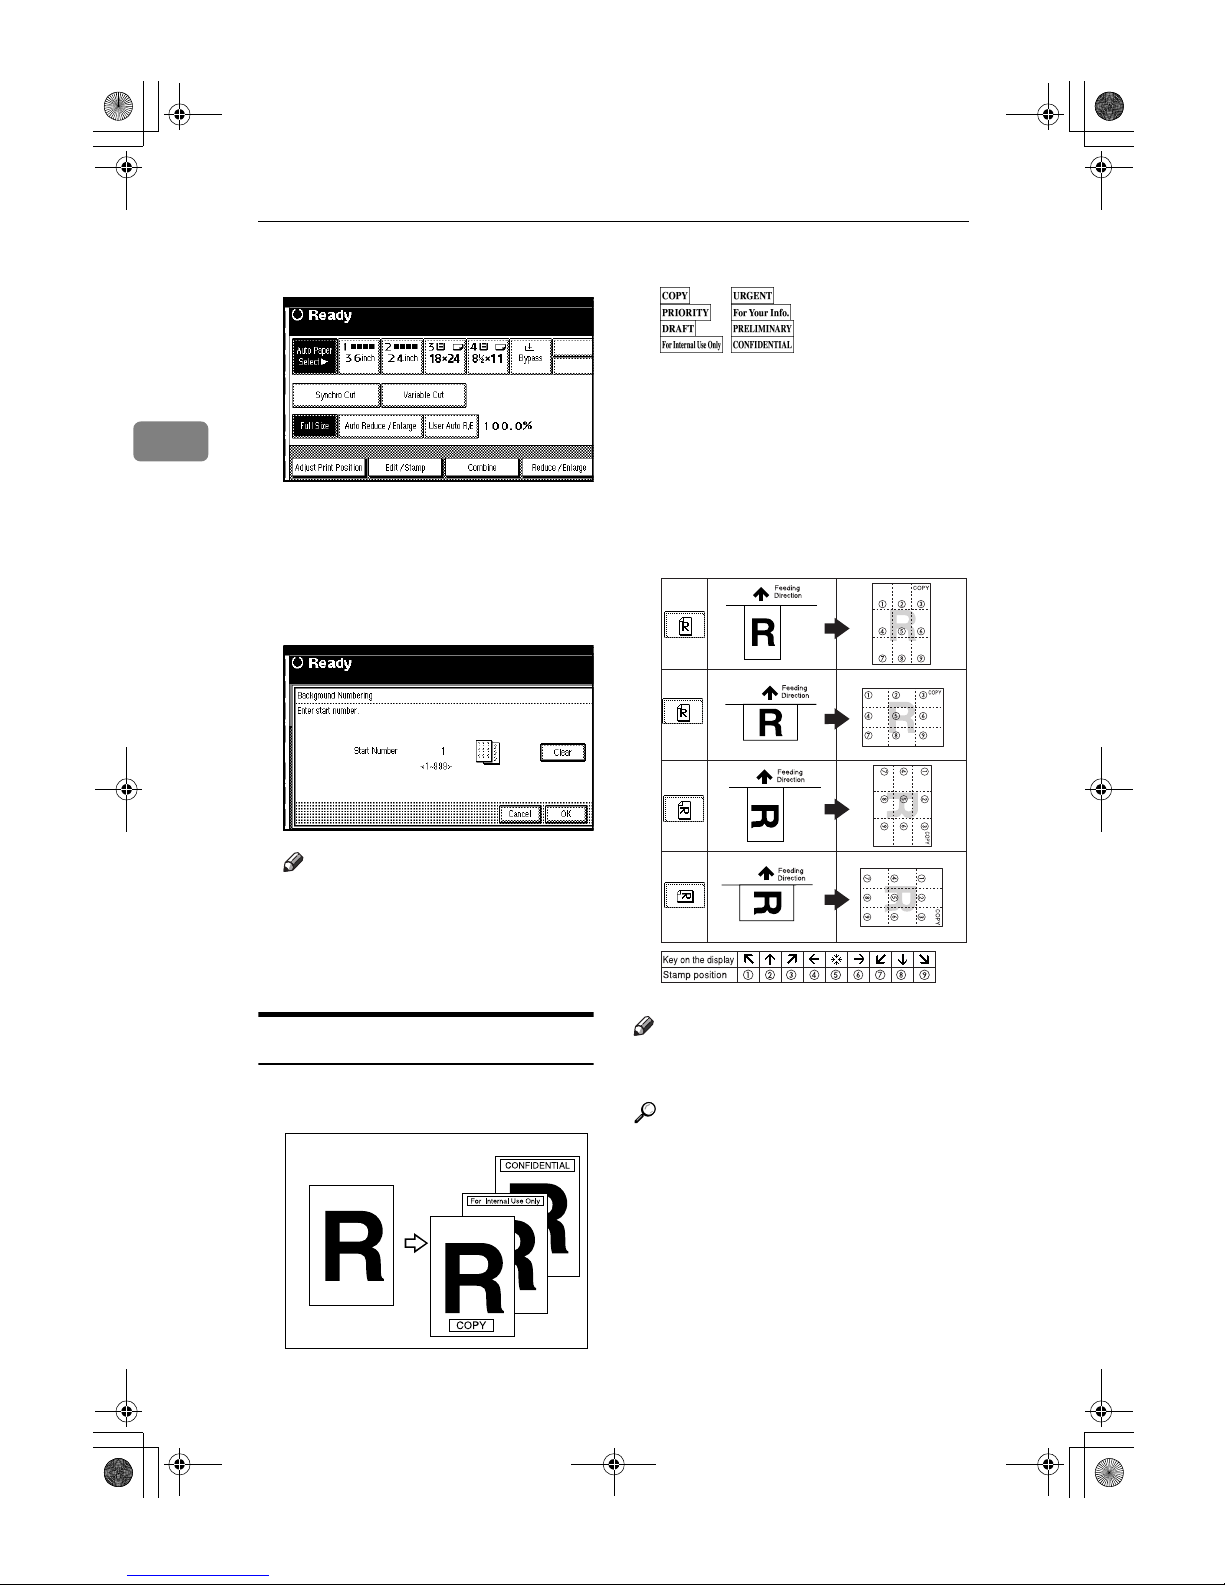
Copying
52
2
AAAA
Press [Edit / Stamp].
BBBB
Press [Stamp].
CCCC
Press [
Background Numbering
].
DDDD
Enter the start number using the
number keys, and then press [OK].
Note
❒ To change the number, press
[Clear] or the {{{{Clear/Stop}}}} key,
and then enter the new one.
EEEE
Press [OK] twice.
Preset Stamp
Use this function to print a stamp that
already stored in the machine.
• Stamp types are as follows:
• You can change the position and
orientation of the stamp.
• You can use this function with up
to four other stamping functions.
❖❖❖❖ Setting Originals and Stamp Posi-
tion/Orientation
Note
❒ You can use only one type of
stamp at a time.
Reference
Related default settings:
p.90 “Stamp Priority”
p.90 “Stamp Language”
p.90 “Stamp Position”
p.91 “Stamp Format”
ABB527S
AHD008S
DolphinC2_ENcopy_F_FM.book Page 52 Friday, February 25, 2005 10:46 AM
Page 61
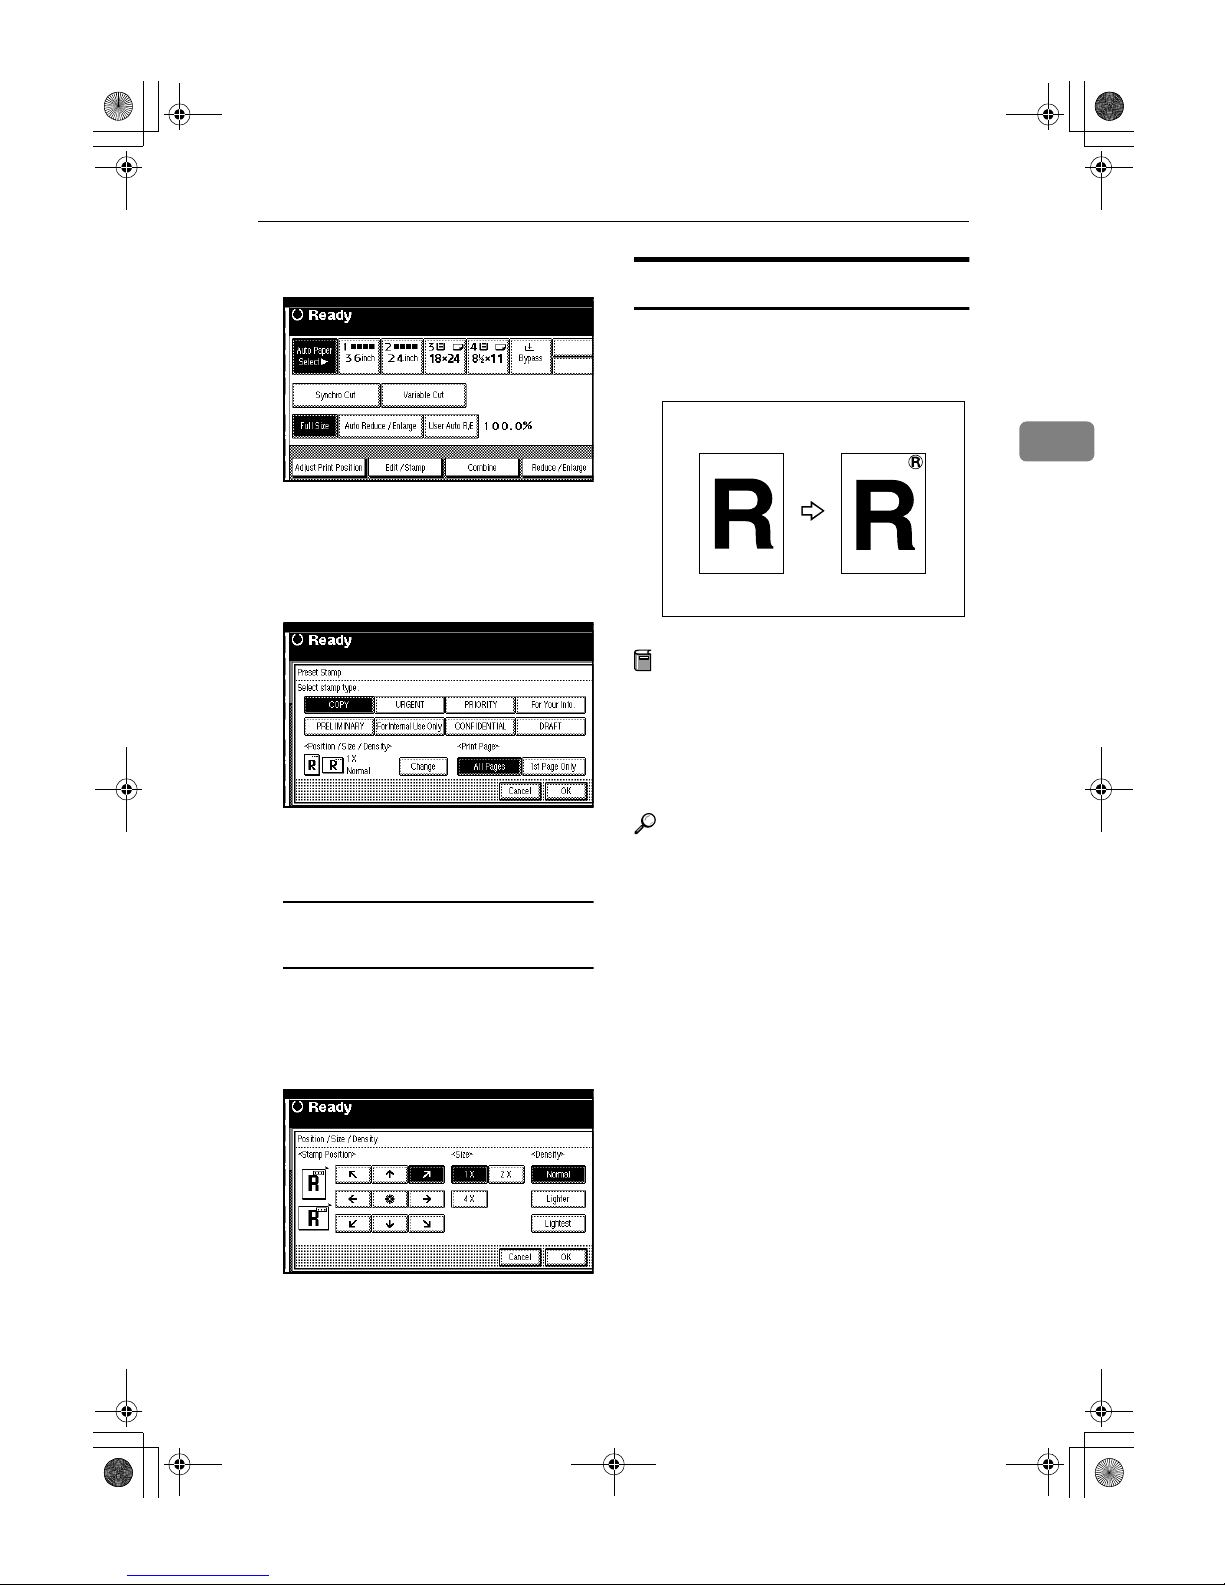
Copier Functions
53
2
AAAA
Press [Edit / Stamp].
BBBB
Press [Stamp].
CCCC
Press [
Preset Stamp
].
DDDD
Select the stamp type.
EEEE
Press [All Pages] or [1st Page Only] to
select the print page.
Changing the stamp position,
size and density
A Press [Change].
B Select the stamp position, size
and density, and then press
[OK].
FFFF
When all settings are made, press
[OK].
GGGG
Press [OK] twice.
User Stamp
You can store frequently used characters or symbols, and then use them as
a stamp.
Preparation
You must have a user stamp already stored. See p.55 “ Pro-
gram/Delete User Stamp”.
You can store up to four types of
user stamp.
Reference
To delete a stored user stamp, see
p.56 “Deleting a user stamp”.
ZEDG220E
DolphinC2_ENcopy_F_FM.book Page 53 Friday, February 25, 2005 10:46 AM
Page 62
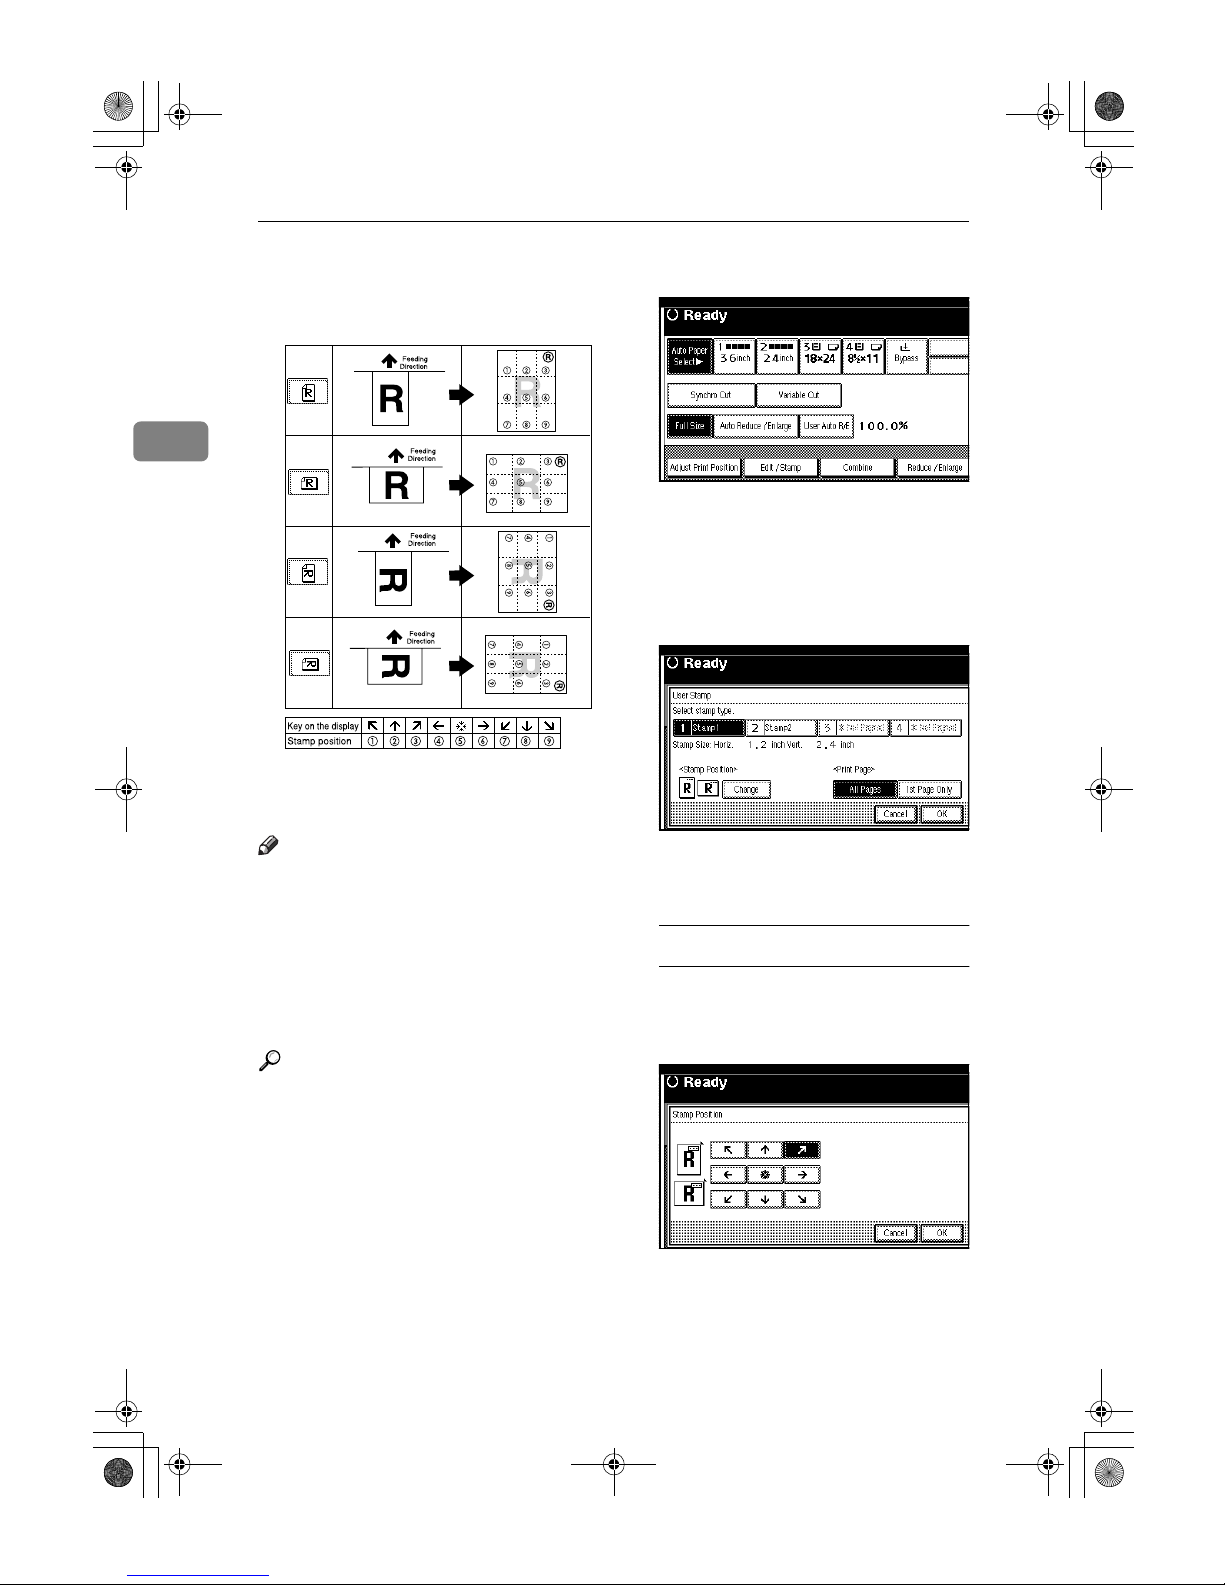
Copying
54
2
❖❖❖❖ Setting Originals and Stamp Posi-
tion/Orientation
• You can change the stamp position
and orientation.
Note
❒ You can use only one type of
stamp at a time.
❒ You can use this function with up
to four other stamping functions.
❒ When User Stamp is selected, it
may take longer to print the first
copy.
Reference
Related default settings:
p.92 “Stamp Position 1 - 4”
p.92 “Stamp Format 1 - 4”
AAAA
Press [Edit / Stamp].
BBBB
Press [Stamp].
CCCC
Press [User Stamp].
DDDD
Select the number for the user
stamp.
EEEE
Press [All Pages] or [1st Page Only] to
select the print page.
Changing the stamp position
A Press [Change].
B Select the stamp position, and
then press [OK].
FFFF
When all settings are made, press
[OK].
GGGG
Press [OK] twice.
AHD043S
DolphinC2_ENcopy_F_FM.book Page 54 Friday, February 25, 2005 10:46 AM
Page 63
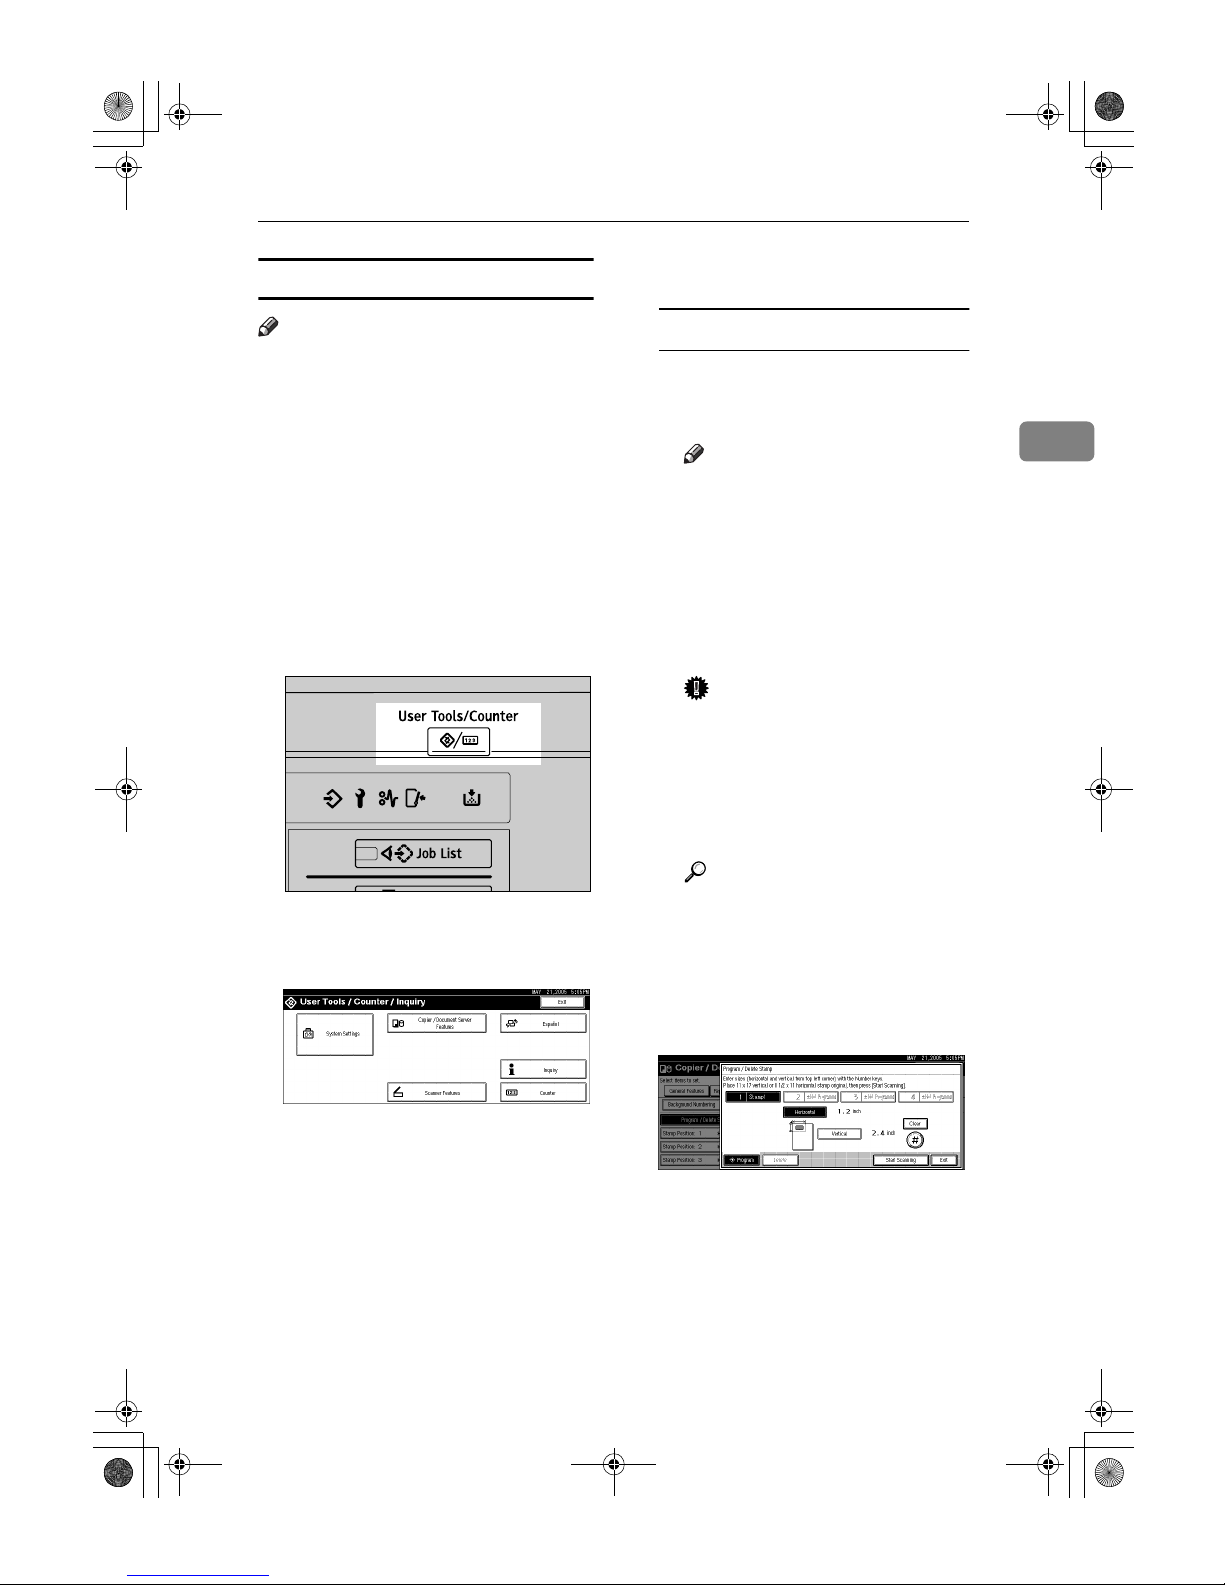
Copier Functions
55
2
Program/Delete User Stamp
Note
❒ The range of stamp images for
readability is 10–432 mm high
(0.4"–17") and 10–297 mm wide
(0.4"–11"). However, if the value
exceeds the maximum area (5,000
mm
2
, 7.75 inch2), it is automatically
adjusted to range.
❒ Up to four frequently used images
can be stored in memory.
AAAA
Make sure the machine is ready to
copy.
BBBB
Press the {{{{User Tools/Counter}}}} key.
CCCC
Press [Copier/Document Server Fea-
tures].
DDDD
Press [Stamp].
EEEE
Press [User Stamp].
FFFF
[Program / Delete Stamp].
Storing/Overwriting a user stamp
A Press [Program], and then press
the stamp number (1–4) you
want to program.
Note
❒
Stamp numbers displayed with
m next to them already have
settings.
❒ If the stamp number is al-
ready in use, the machine
will ask you if you want to
overwrite it. Press [Yes] or
[No].
Important
❒ You cannot restore the stamp
after it has been overwritten.
B Enter the user stamp name us-
ing the letter keys on the display panel. You can register up
to 10 characters.
Reference
“Entering Text”, General Set-
tings Guide
C Press [OK].
D Enter the horizontal size of the
stamp using the number keys,
and then press [#].
E Press [Vertical], and then enter
the vertical size of the stamp
using the number keys, and
then press [#].
AHD101S
DolphinC2_ENcopy_F_FM.book Page 55 Friday, February 25, 2005 10:46 AM
Page 64
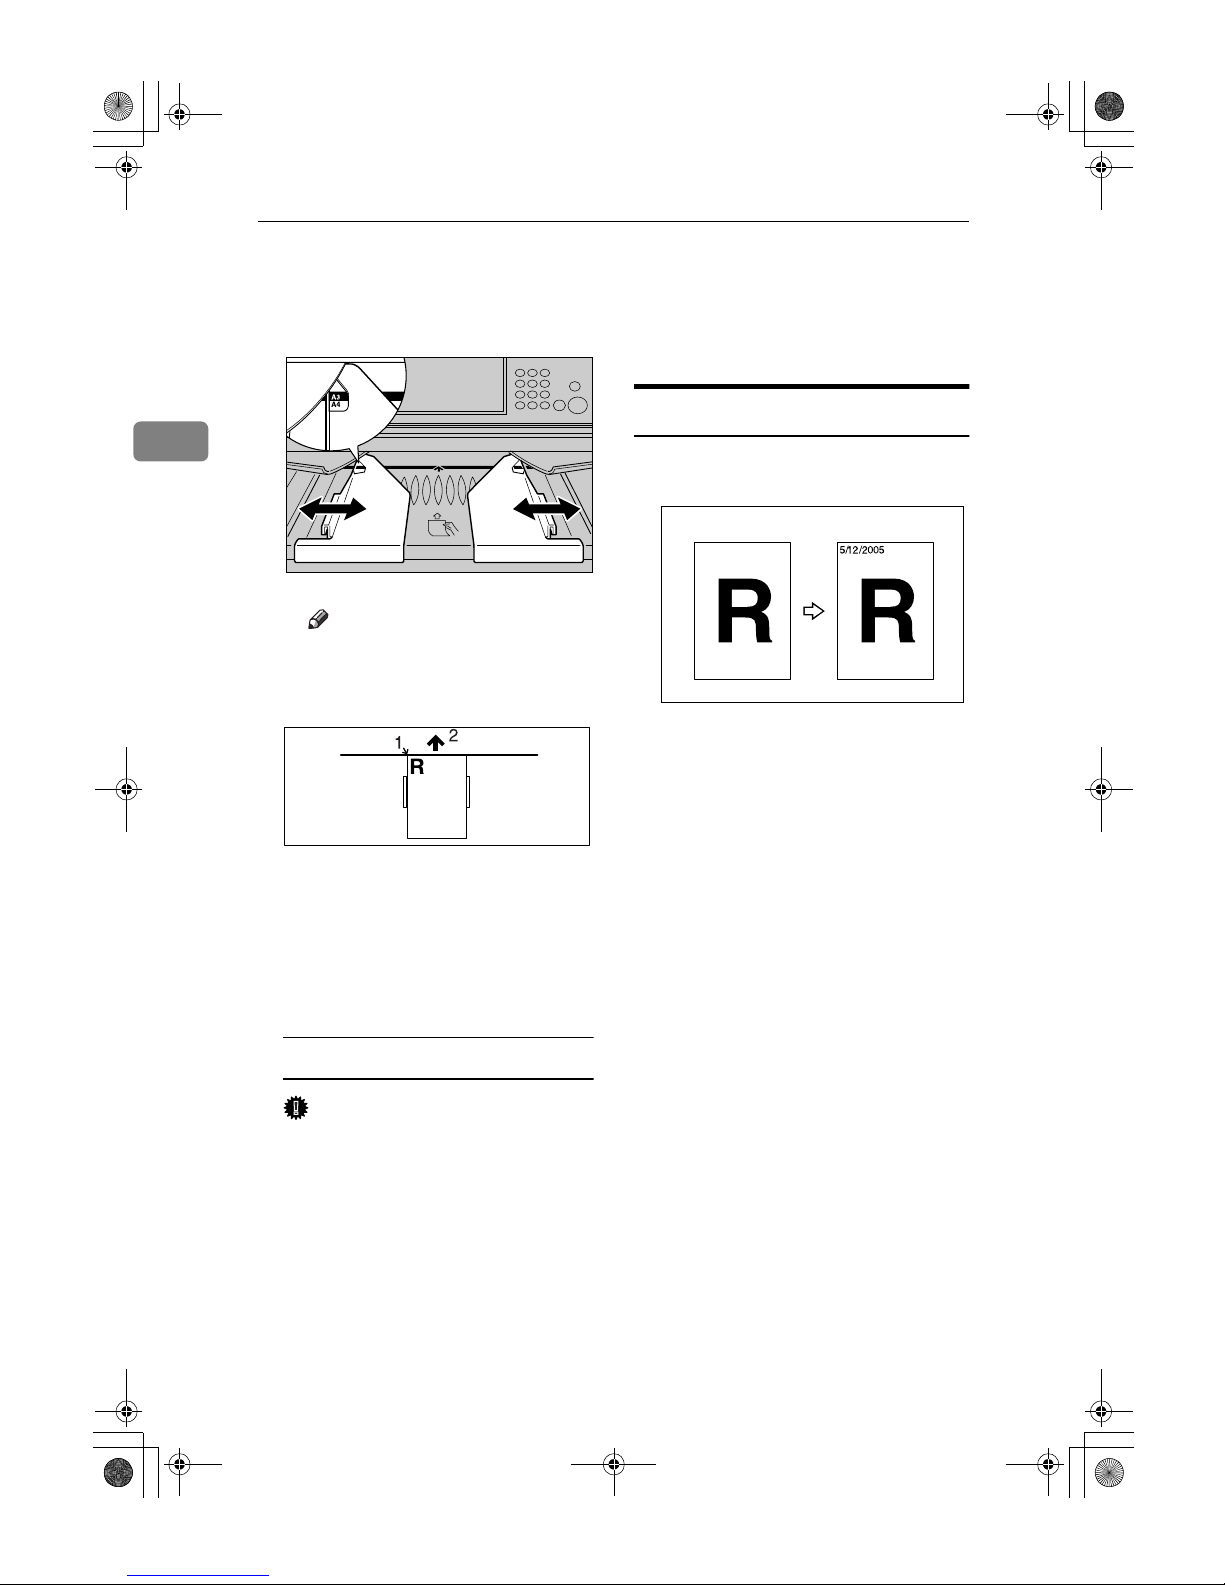
Copying
56
2
F Adjust the original guides to
A3 (B)KKKK or A4 (A)LLLL, and then
place the original for user
stamp on the original table.
Note
❒ The upper left corner is the
base point for scanning.
1.
Base point
2.
Feeding direction
G Press [Start Scanning].
The original is scanned, and the
stamp is registered.
Deleting a user stamp
Important
❒ You cannot restore a deleted
user stamp.
A Press [Delete], and then press
the stamp number you want to
delete.
B Select [Delete], and then press
[Exit].
C Press [Exit].
GGGG
Press the {{{{User Tools/Counter}}}} key.
The default settings are changed,
and the machine is ready to make
copies.
Date Stamp
Use this function to print a date
stamp on copies.
• There are five formats of Date
Stamp:
• MM/DD/YYYY
• MM.DD.YYYY
• DD/MM/YYYY
• DD.MM.YYYY
• YYYY.MM.DD
AGL060S
AHD009S
AHD052S
DolphinC2_ENcopy_F_FM.book Page 56 Friday, February 25, 2005 10:46 AM
Page 65
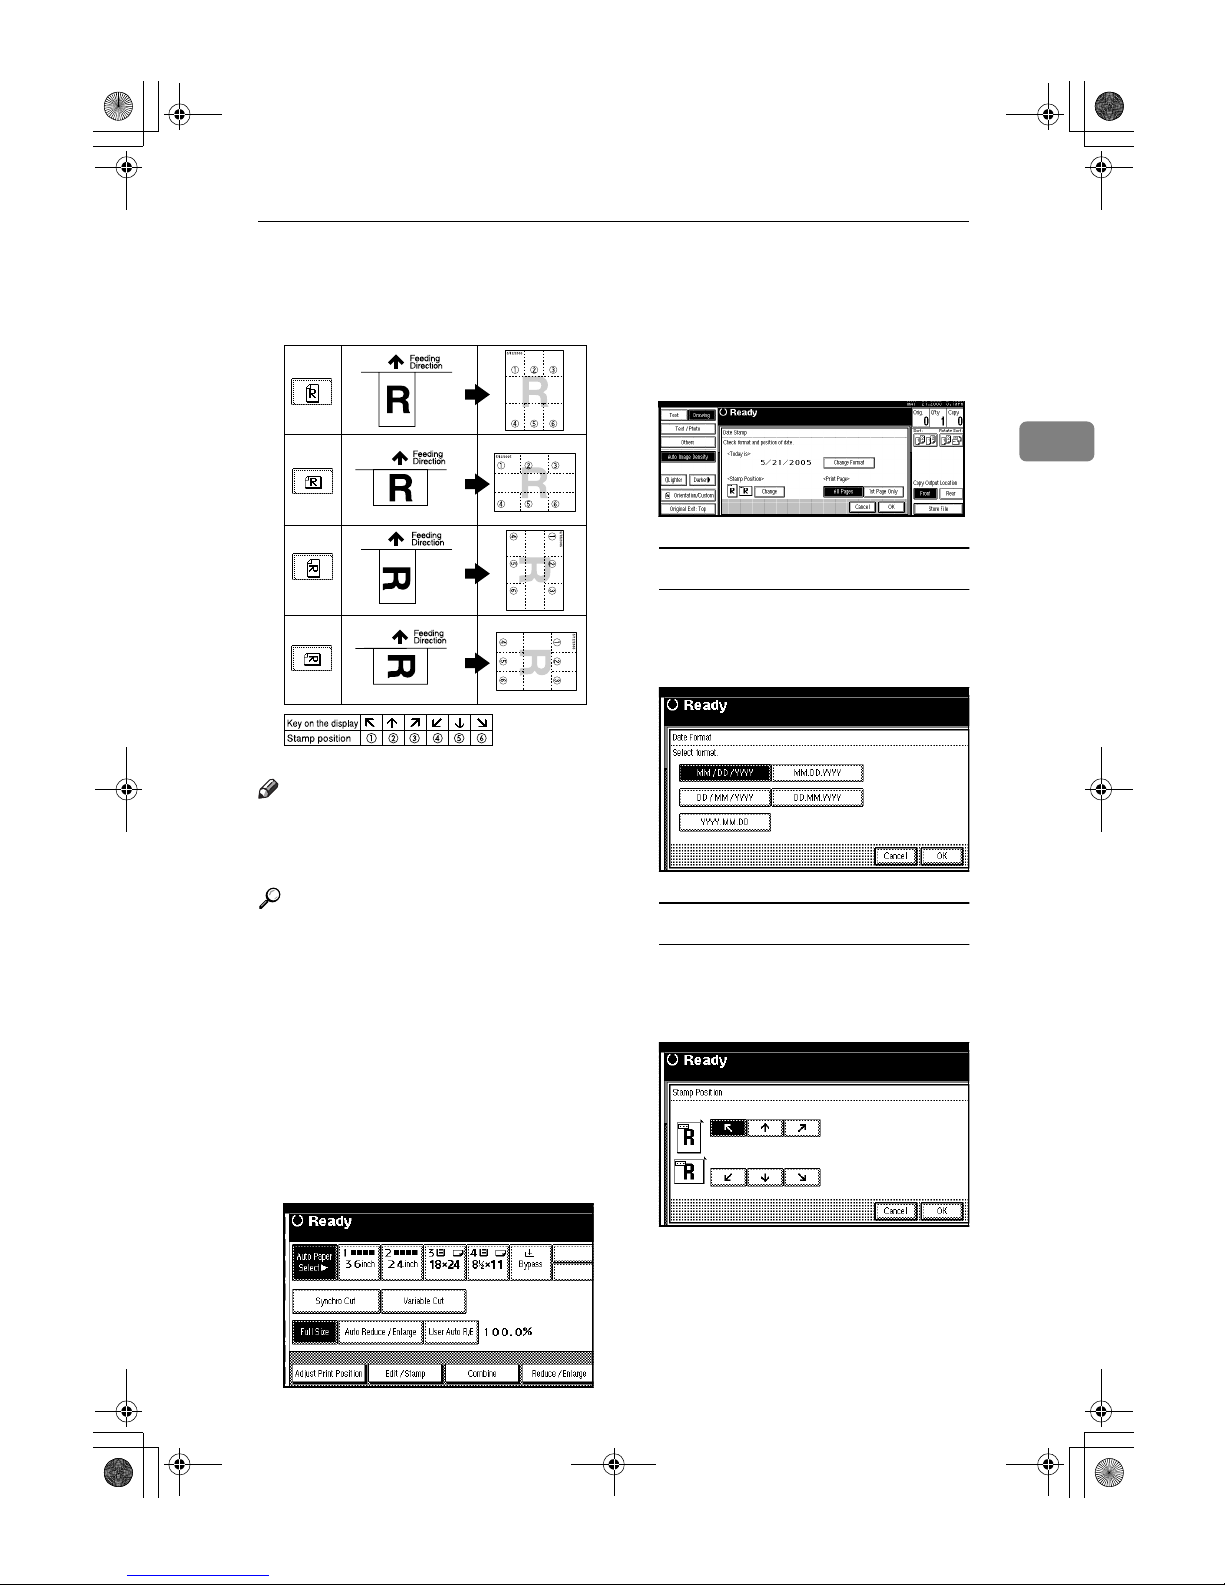
Copier Functions
57
2
❖❖❖❖ Setting Originals and Date Stamp Po-
sition/Orientation
Note
❒ You can use the date stamp with
up to four other stamping functions.
Reference
Related default settings:
p.93 “Format”
p.93 “Font”
p.93 “Stamp Position”
p.94 “Stamp Setting”
p.94 “Size”
p.94 “Superimpose”
“Set Date”, General Settings Guide
AAAA
Press [Edit / Stamp].
BBBB
Press [Stamp].
CCCC
Press [Date Stamp].
DDDD
Press [All Pages] or [1st Page Only] to
select the print page.
Changing the date format
A Press [Change Format].
B Select the date format, and
then press [OK].
Changing the stamp position
A Press [Change].
B Select the date stamp position,
and then press [OK].
EEEE
When all settings are made, press
[OK].
FFFF
Press [OK] twice.
AHD056S
DolphinC2_ENcopy_F_FM.book Page 57 Friday, February 25, 2005 10:46 AM
Page 66
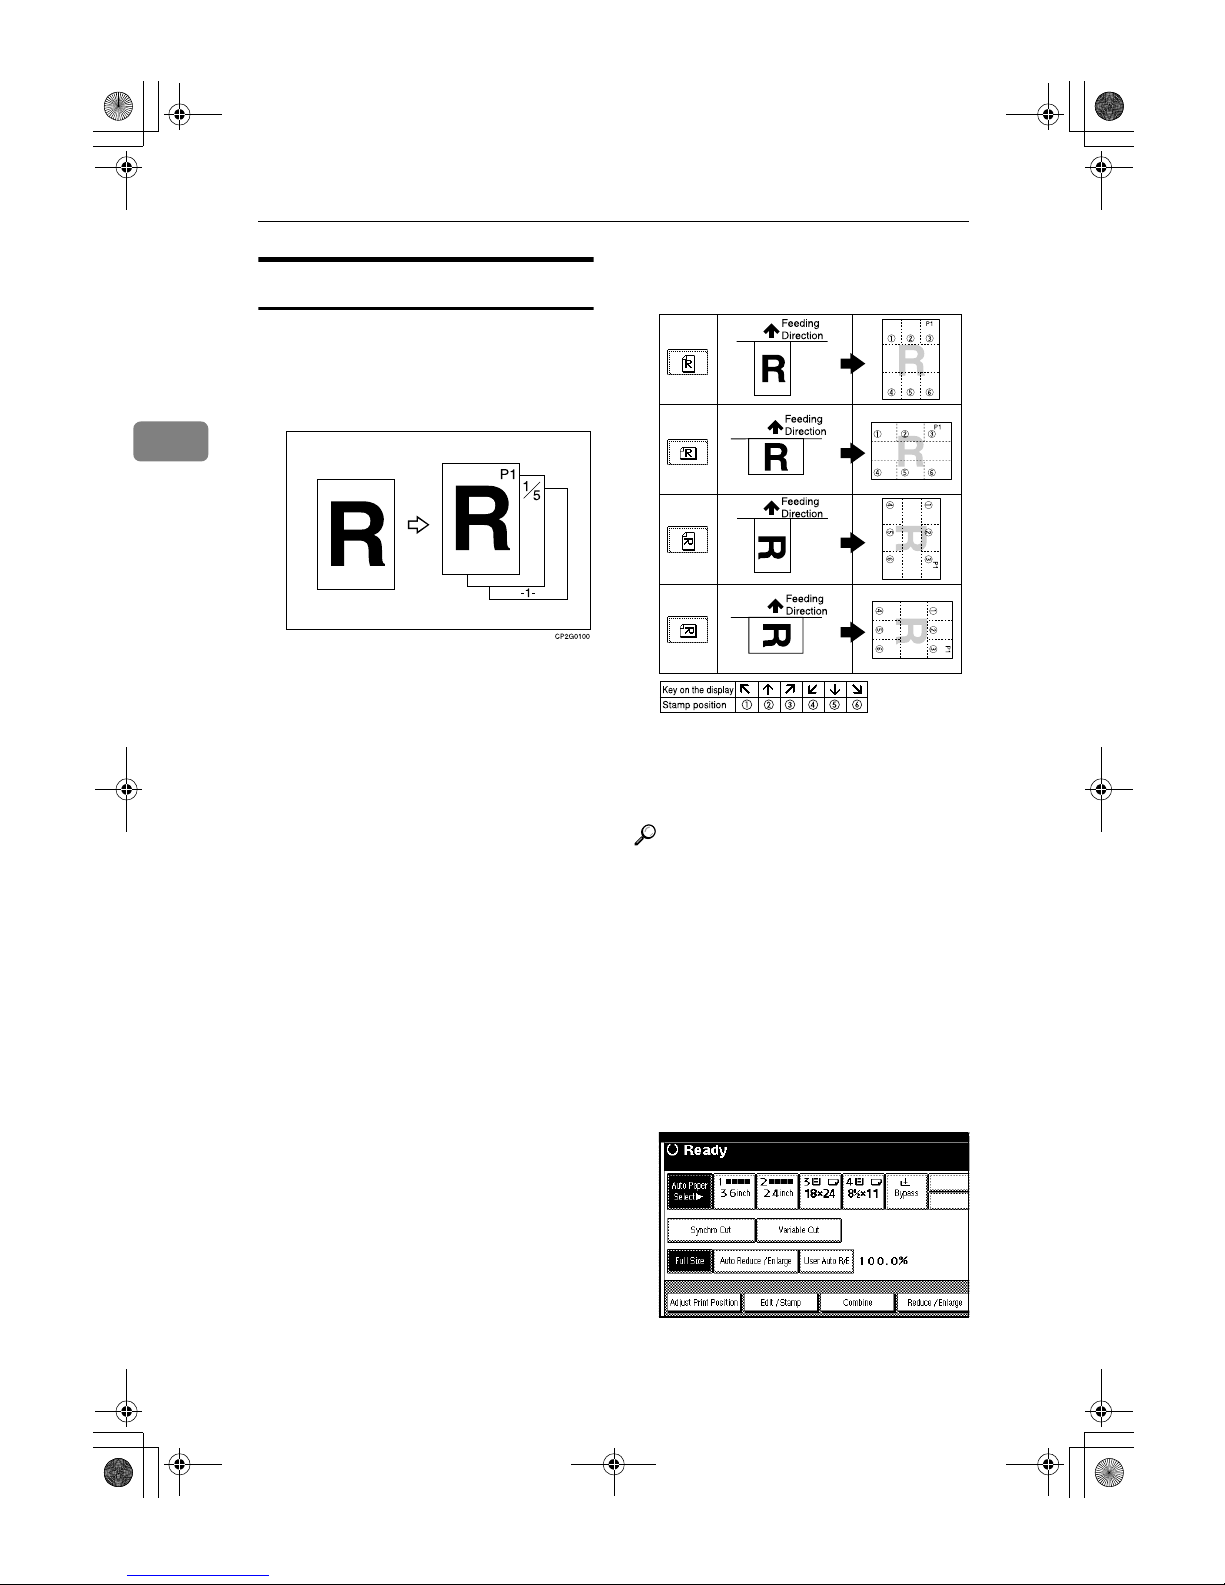
Copying
58
2
Page Numbering
Use this function to print page numbers on your copies.
This function is effective when the
Sort function is selected.
• There are six types of Page Numbering (“n” is the total number of
pages in your original):
• P1, P2,…Pn
• 1/n, 2/n,...n/n
• -1-, -2-,...-n-
• P.1, P.2,...P.n
• 1, 2…n
• 1-1, 1-2,..1-n
❖❖❖❖ Stamp position and orientation of
originals
You can use the page numbering
stamp with up to four other stamping
functions.
Reference
Related default settings:
p.94 “Stamp Format”
p.94 “Font”
p.94 “Size”
p.94 “Page Numbering in Combine”
p.95 “Stamp Position”
p.95 “Superimpose”
AAAA
Press [Edit / Stamp].
BBBB
Press [Stamp].
AHD012S
DolphinC2_ENcopy_F_FM.book Page 58 Friday, February 25, 2005 10:46 AM
Page 67
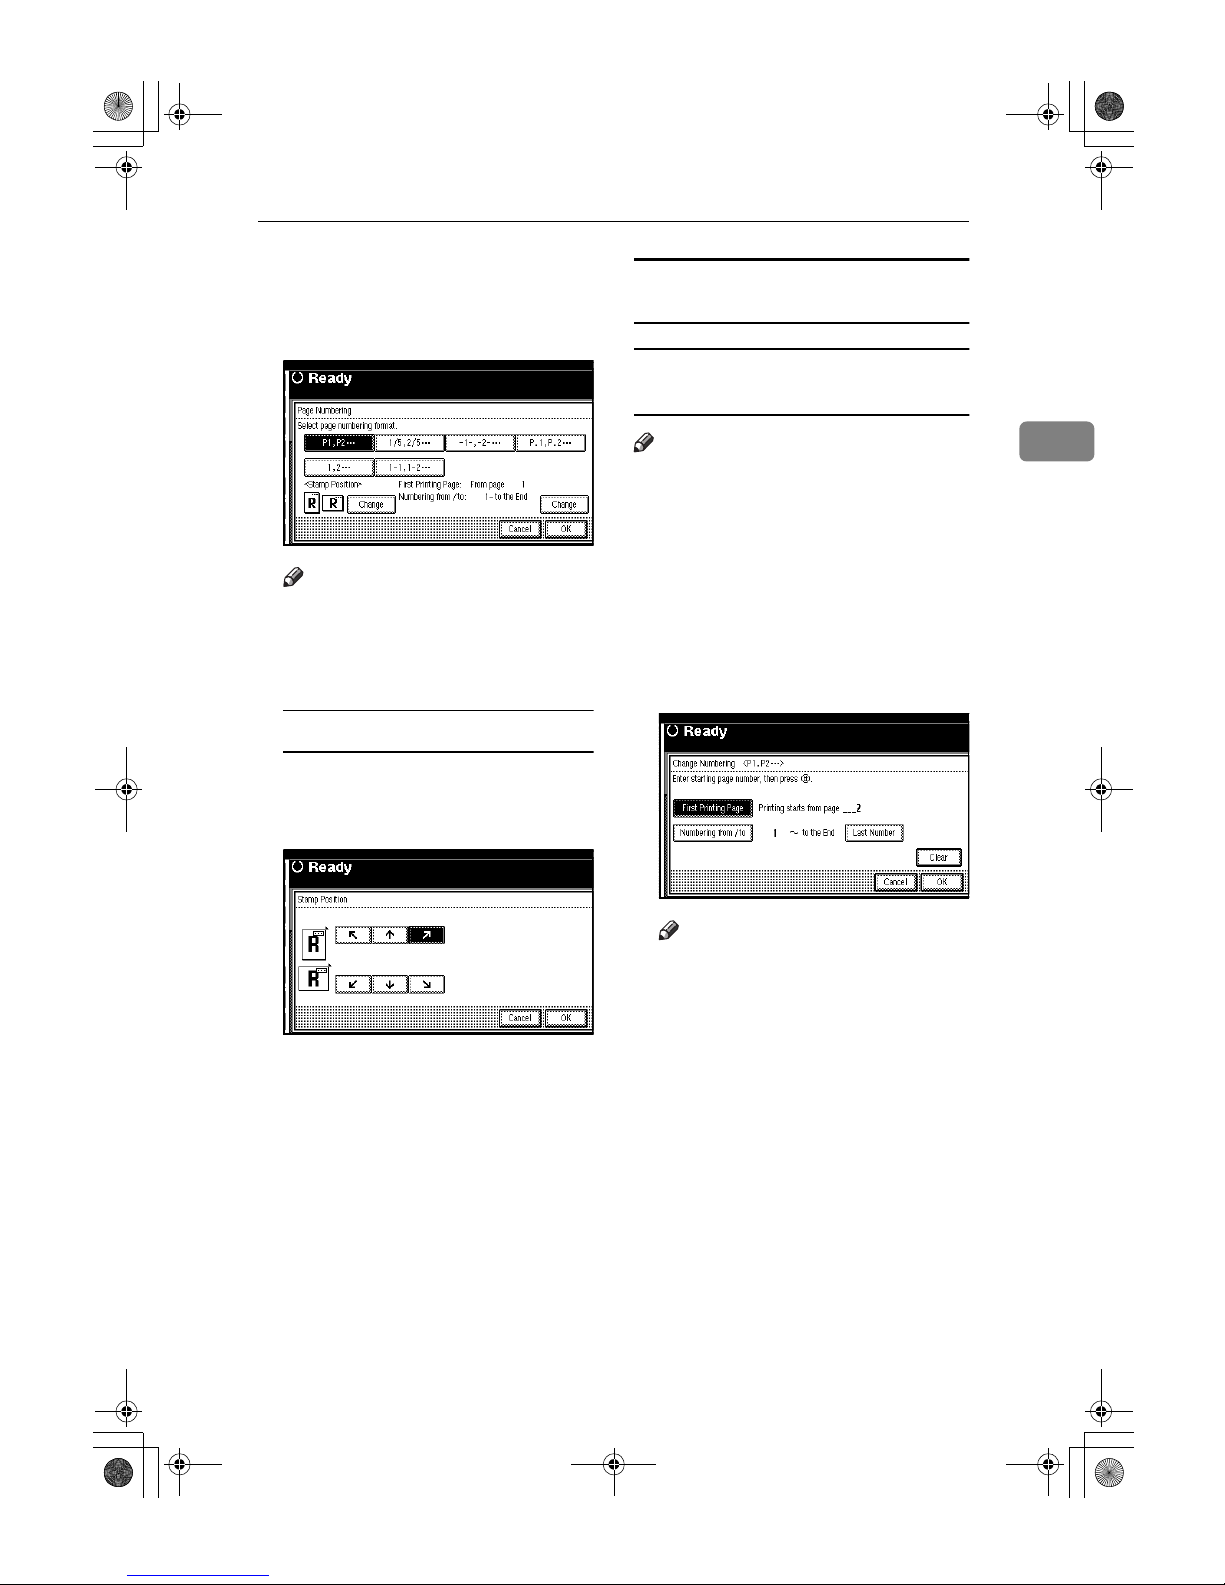
Copier Functions
59
2
CCCC
Press [Page Numbering].
DDDD
Select the page numbering format.
Note
❒ You can specify the pages to be
stamped, and numbering. See
p.59 “Specifying the first printing page and start number”.
Setting the stamp position
A Press [
Change
] on the left side.
B Select the stamp position, and
then press [OK].
EEEE
After all settings are complete,
press [OK].
FFFF
Press [OK] twice.
Specifying the first printing page and
start number
If you selected (P1, P2…, -1-,-2-…,
P.1, P.2…, 1, 2…, )
Note
❒ The following explanation uses P1,
P2... as an example. The steps are
the same for other selections.
AAAA
Press [Change] on the right side.
BBBB
Press [First Printing Page], then enter the original page number from
which to start printing using the
number keys, and then press the
{{{{#}}}} key.
Note
❒ To change the number entered,
press [
Clear
] or the {{{{Clear/Stop}}}}
key, and then enter a new number.
CCCC
Press [Numbering from/to], enter the
number of the page from which to
start numbering using the number keys, and then press the {{{{#}}}}
key.
DolphinC2_ENcopy_F_FM.book Page 59 Friday, February 25, 2005 10:46 AM
Page 68
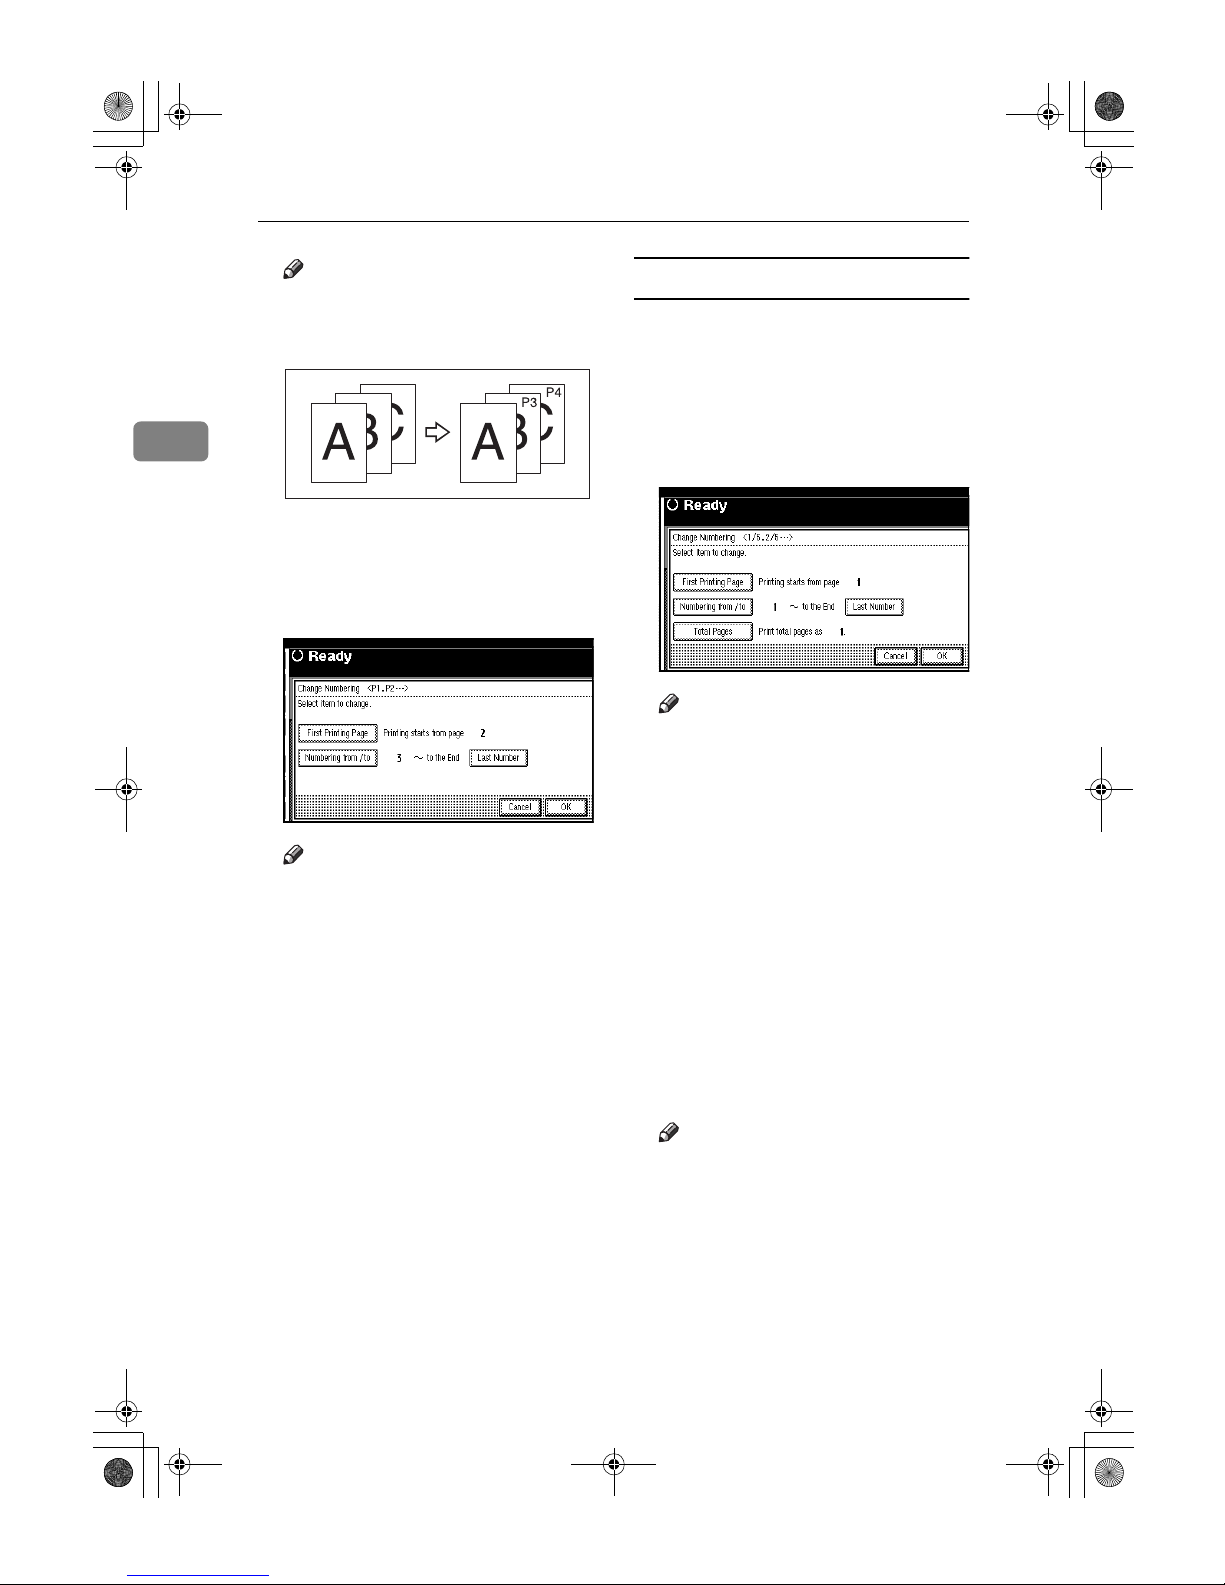
Copying
60
2
Note
❒ The example below shows the
first printing page as “2”and the
start number as “3”.
DDDD
Press [Last Number], enter the num-
ber of the page to stop numbering
using the number keys, and then
press the {{{{#}}}} key.
Note
❒ If you want to number all pages
to the end, press [to the End].
EEEE
When page designation is complete, press [OK].
FFFF
Press [OK] three times.
If you selected (1/5, 2/5…)
AAAA
Press [Change] on the right side.
BBBB
Press [First Printing Page], then enter the original page number from
which to start printing using the
number keys, and then press the
{{{{#}}}} key.
Note
❒ To change the number entered,
press [Clear] or the {{{{Clear/Stop}}}}
key, and then enter a new number.
CCCC
Press [Numbering from / to], then en-
ter the number of page from
which to start numbering using
the number keys, and then press
the {{{{#}}}} key.
DDDD
Press [Last Number], then enter the
number of page at which to stop
numbering using the number
keys, and then press the {{{{#}}}} key.
Proceed to step
E
when not chang-
ing.
Note
❒ To print on the last page, press
[to the End].
❒ The last number is the last page
number printed. For example, if
[Total Page] is ten, and you want
to print seven pages up to page
7, enter [7] as the [Last Number].
❒ Normally, you do not need to
enter this number.
GCANPE2-2E
DolphinC2_ENcopy_F_FM.book Page 60 Friday, February 25, 2005 10:46 AM
Page 69
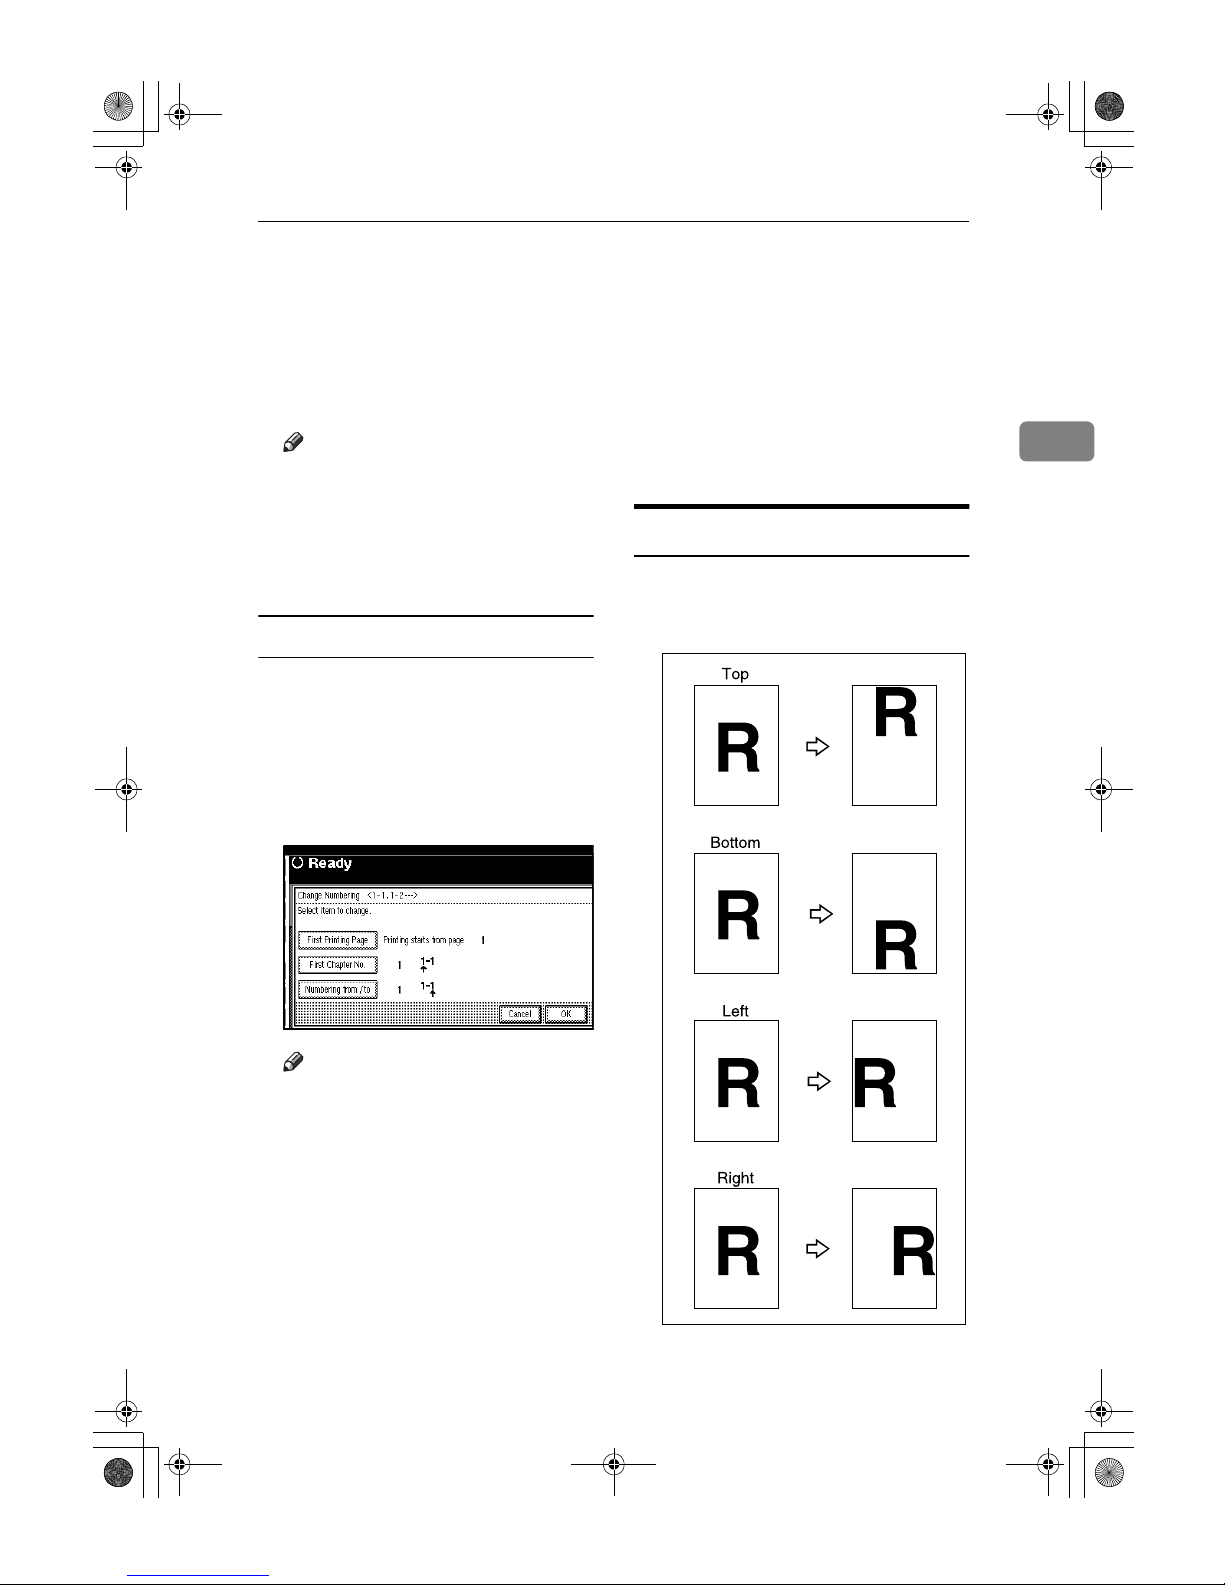
Copier Functions
61
2
EEEE
Press [Total Pages], enter the total
number of original pages using
the number keys, and then press
the {{{{#}}}} key.
FFFF
When page designation is complete, press [OK].
Note
❒ To change the settings after
pressing [OK], press [Change],
and then enter the numbers
again.
GGGG
Press [OK] three times.
If you selected (1-1, 1-2,…)
AAAA
Press [Change] on the right side.
BBBB
Press [First Printing Page], and then
enter the original page number
from which to start printing using
number keys, and then press the
{{{{#}}}} key.
Note
❒ To change the number entered,
press [
Clear
] or the {{{{Clear/Stop}}}}
key, and then enter a new number.
CCCC
Press [First Chapter No.], enter the
chapter number from which to
start numbering using the number keys, and then press the {{{{#}}}}
key.
DDDD
Press
[Numbering from / to]
, and then
enter the page number from
which to start numbering using
the number keys, and then press
the {{{{#}}}} key.
EEEE
When page designation is complete, press [OK].
FFFF
Press [OK] three times.
Adjust Print Position
Use this function to move (shift) the
copy image up, down, left, or right to
create a margin.
ZEDG110E
DolphinC2_ENcopy_F_FM.book Page 61 Friday, February 25, 2005 10:46 AM
Page 70
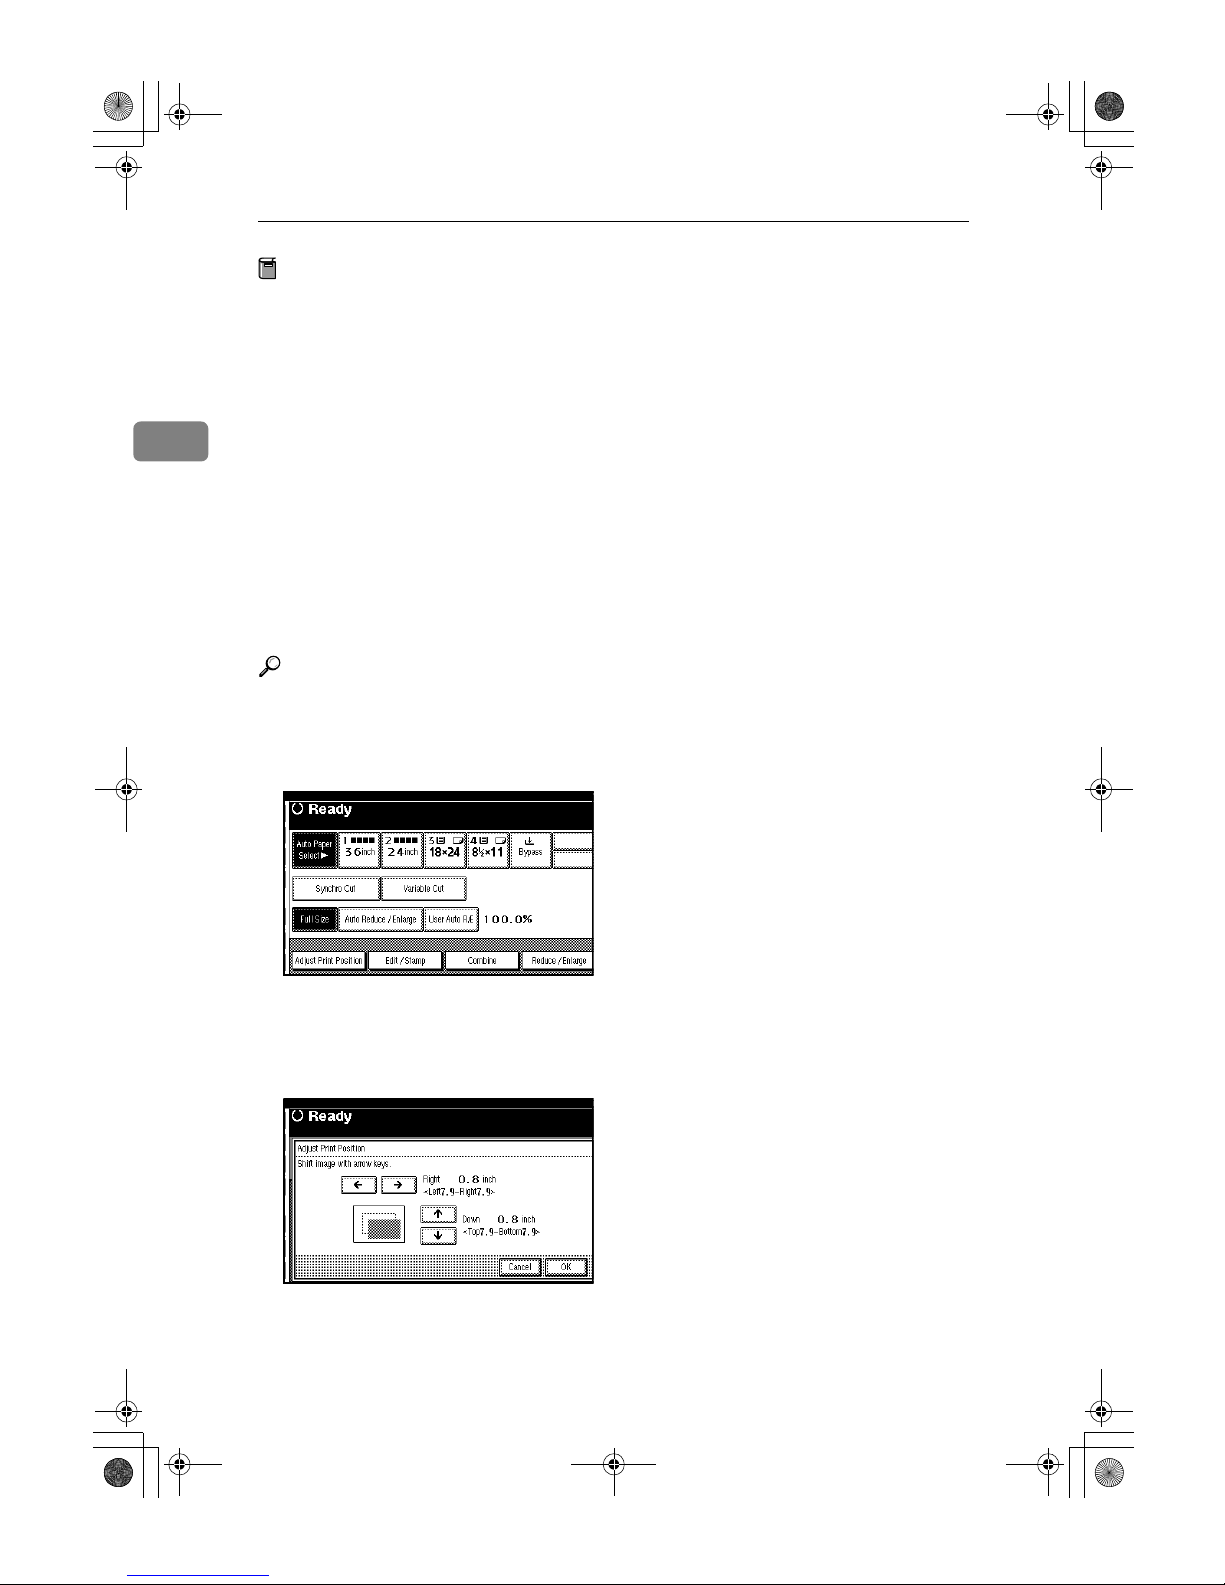
Copying
62
2
Preparation
You can select the following types
of margin for this function:
• [↑↑↑↑] (Top): shift towards the
leading edge of the original (top
of copy).
• [↓↓↓↓] (Bottom): shift towards the
trailing edge of the original
(bottom of copy).
• [←←←←] (Left): shift towards the left
of the original.
• [→→→→] (Right): shift towards the
right of the original.
You can also shift in a combination
of up/down and left/right.
Reference
Related default settings:
p.87 “Adjust Position”
AAAA
Press [Adjust Print Position].
BBBB
Press [Adjust Print Position].
CCCC
Use [←←←←] or [→→→→] to specify the
length of shift.
DDDD
Use [↑↑↑↑] or [↓↓↓↓] to specify the length
of shift.
EEEE
Press [OK] twice.
DolphinC2_ENcopy_F_FM.book Page 62 Friday, February 25, 2005 10:46 AM
Page 71
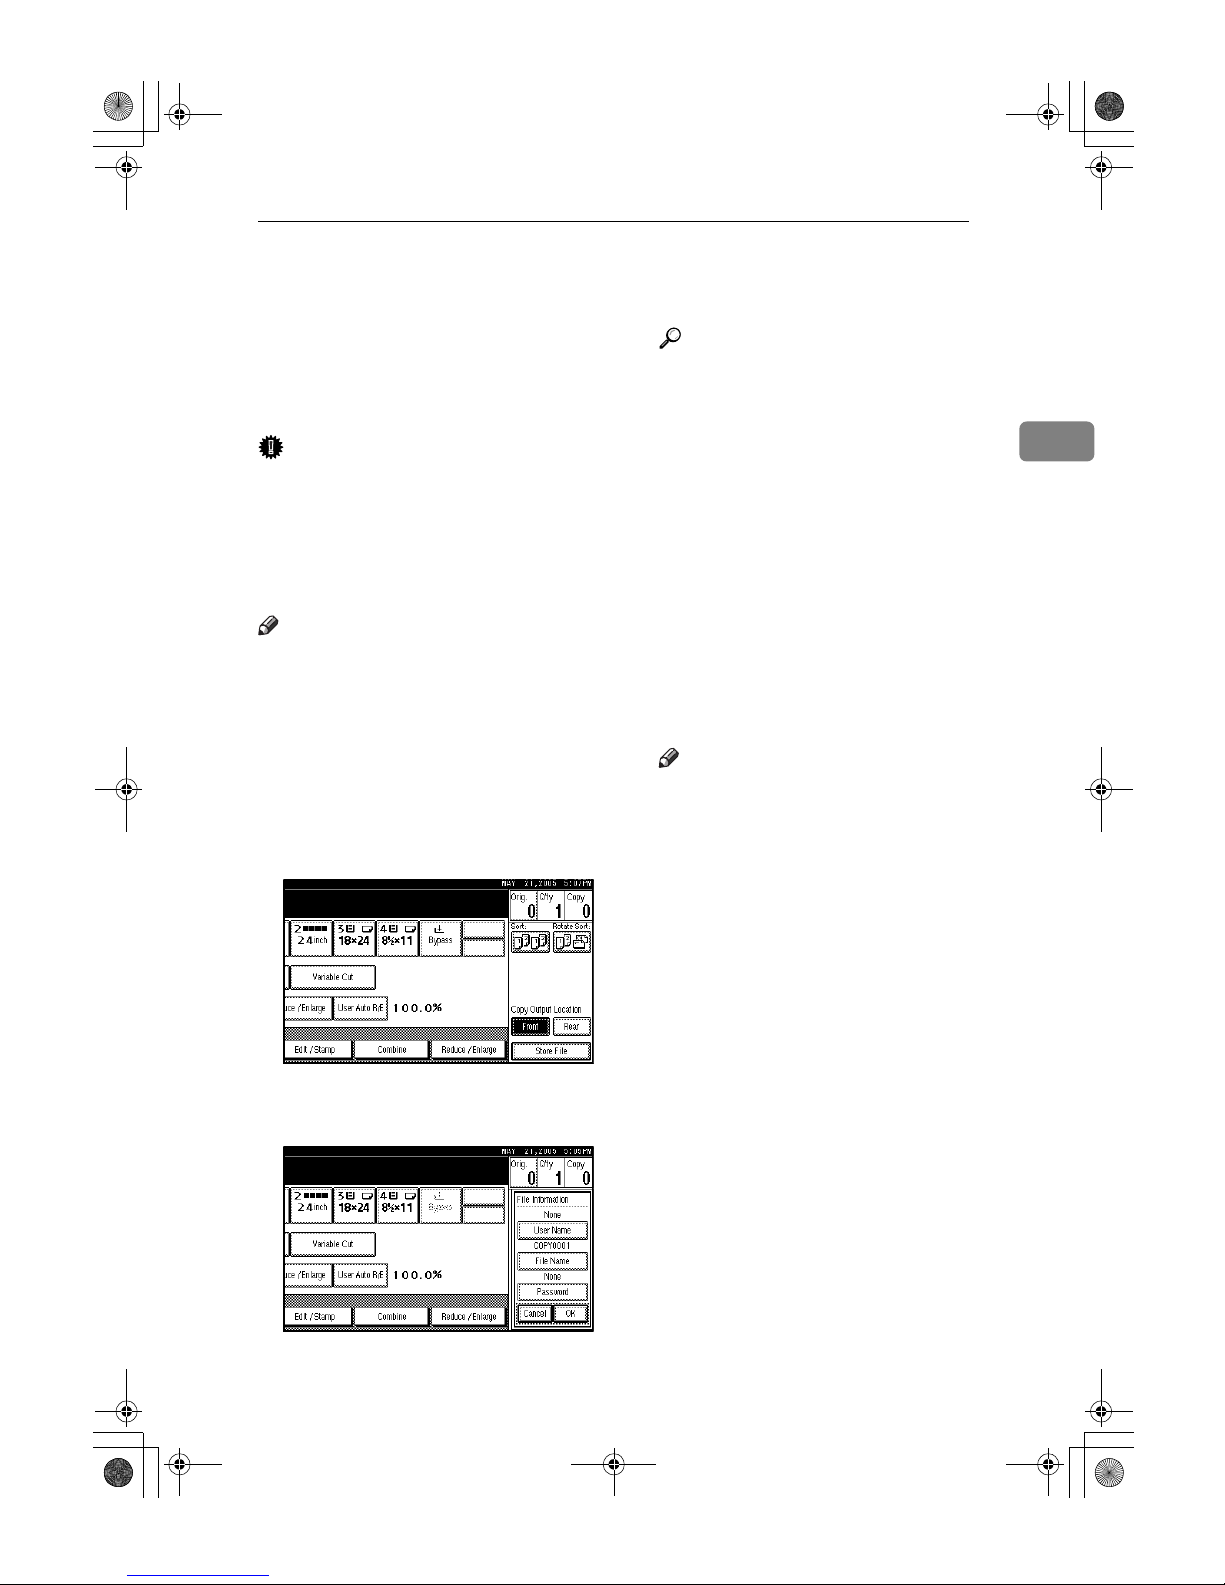
Storing Data in the Document Server
63
2
Storing Data in the Document Server
The Document Server enables you to
store documents in memory and print
them as you want.
For details, see General Settings Guide.
Important
❒ Machine failure can result in data
loss. Important data stored on the
hard disk should be backed up.
The manufacturer shall not be responsible for any damage that
might result from loss of data.
Note
❒ Data stored in the Document Serv-
er is deleted after three days by setting default. You can specify a
period after which stored data is
automatically deleted. For more
information about settings, see
“Auto Delete File” in “Administrator Tools”, General Settings Guide.
AAAA
Press [Store File].
BBBB
Enter a user name, file name, or
password if necessary.
Reference
For details about how to register the user name, file name, or
password, see “To register or
change a user name”, and “To
set or change a password”, Gen-
eral Settings Guide.
CCCC
Press [OK].
DDDD
Make the scanning settings for
the originals.
EEEE
Place the originals.
FFFF
Press the {{{{Start}}}} key.
Copies are delivered, and originals
scanned and stored in memory.
Note
❒ To stop scanning, press the
{{{{Clear/Stop}}}} key. To resume a
paused scanning job, press [Con-
tinue] in the confirmation dis-
play. To delete saved images
and cancel the job, press [Stop].
❒ Press the {{{{#}}}} key after all the
originals have been scanned.
❒ To check that the document has
been stored, press the {{{{Docu-
ment Server}}}} key to display the
document selection screen.
❒ When the machine is printing a
document stored using the
copier function, wait until printing has finished before you
store another copy document.
DolphinC2_ENcopy_F_FM.book Page 63 Friday, February 25, 2005 10:46 AM
Page 72
Copying
64
2
----Use the Reduce/Enlarge
function to print the stored
documents
A
Press the {{{{Document Server}}}} key.
B Select the document to be printed.
C Press [Print Settings].
D Press [Reduce / Enlarge].
E Select a ratio, and then press [OK].
F Enter the number of copies using
the number keys.
G
Press the {{{{Start}}}} key.
Reference
For details about how to print
stored documents, see "Printing
Stored Documents", General Set-
tings Guide.
DolphinC2_ENcopy_F_FM.book Page 64 Friday, February 25, 2005 10:46 AM
Page 73
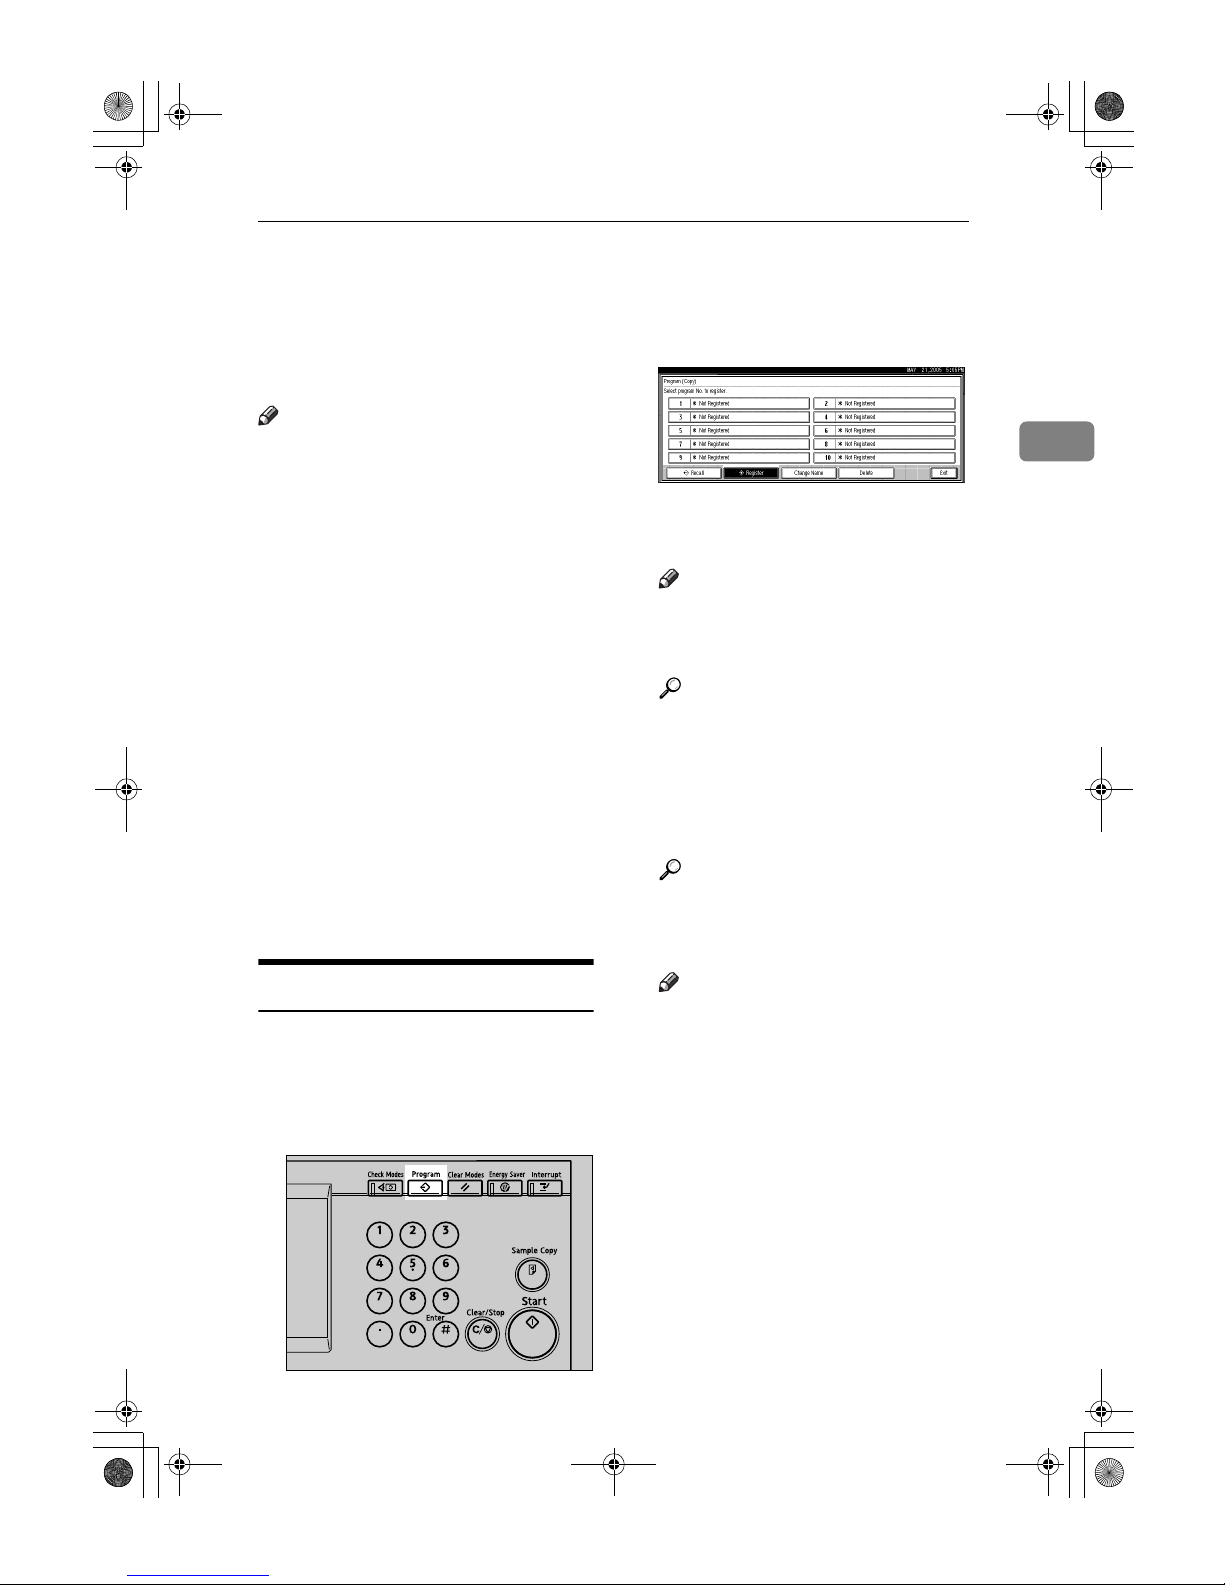
Programs
65
2
Programs
You can store frequently used copy
job settings in machine memory and
recall them for future use.
Note
❒ You can store up to 10 programs.
❒
You can select the standard mode or
Program No.10 as the default mode
to be set when modes are cleared or
reset, or immediately after the operation switch is turned on. See
p.85
“Change Initial Mode”.
❒ Paper settings are stored based on
paper size. However, if you have
more than one paper tray containing the same size paper, the tray
prioritized with User Tools (System Settings) is selected first. See
“Paper Tray Priority” in “Tray Paper Settings”, General Settings
Guide.
❒
Programs are not deleted by turning the power off or pressing the
{{{{
Clear Modes
}}}}
key. They are canceled only when you delete or overwrite them with another program.
Storing a Program
AAAA
Edit the copy settings so all functions you want to store in this program are selected.
BBBB
Press the {{{{Program}}}} key.
CCCC
Press [Register].
DDDD
Press the program number you
want to store.
Note
❒
Program numbers displayed with
m next to them already have
settings.
Reference
p.66 “Changing a Stored Program”
EEEE
Enter the program name using the
letter keys on the display panel.
You can enter up to 40 characters.
Reference
For details about entering characters, see “Entering Text”, Gen-
eral Settings Guide.
Note
❒ If you do not want to enter a
program name, proceed to step
F
.
FFFF
Press [OK].
When the settings are successfully
stored, the m indicator followed
by the program number and program name will be displayed. After a while, the screen reverts back
to the initial copy display.
AHD055S
DolphinC2_ENcopy_F_FM.book Page 65 Friday, February 25, 2005 10:46 AM
Page 74
Copying
66
2
Changing a Stored Program
AAAA
Check the program settings.
Note
❒ To check the contents of a pro-
gram, recall it. See p.66 “Recall-
ing a Program”.
BBBB
Repeat steps
AAAA
to
DDDD
of “Storing a
Program”.
CCCC
Press [Register].
Repeat steps
E
and F of “Storing a
Program”.
Note
❒ When overwritten, the previous
program is deleted.
Changing a Stored Program
Name
AAAA
Press the {{{{Program}}}} key.
BBBB
Press [Change Name].
CCCC
Press the program number whose
program name you want to
change.
DDDD
Press [Backspace] or [Delete All],
and then enter the new program
name.
EEEE
Press [OK].
Deleting a Program
AAAA
Press the {{{{Program}}}} key.
BBBB
Press [Delete].
CCCC
Press the number of the program
you want to delete.
DDDD
Press [Yes].
The program is deleted, and the
screen returns to the initial copy
display.
Recalling a Program
AAAA
Press the {{{{Program}}}} key.
BBBB
Press [Recall].
CCCC
Press the number of the program
you want to recall.
The stored settings are displayed.
Note
❒
Program numbers displayed with
m next to them already have
settings.
DDDD
Place the originals, and then press
the {{{{Start}}}} key.
DolphinC2_ENcopy_F_FM.book Page 66 Friday, February 25, 2005 10:46 AM
Page 75
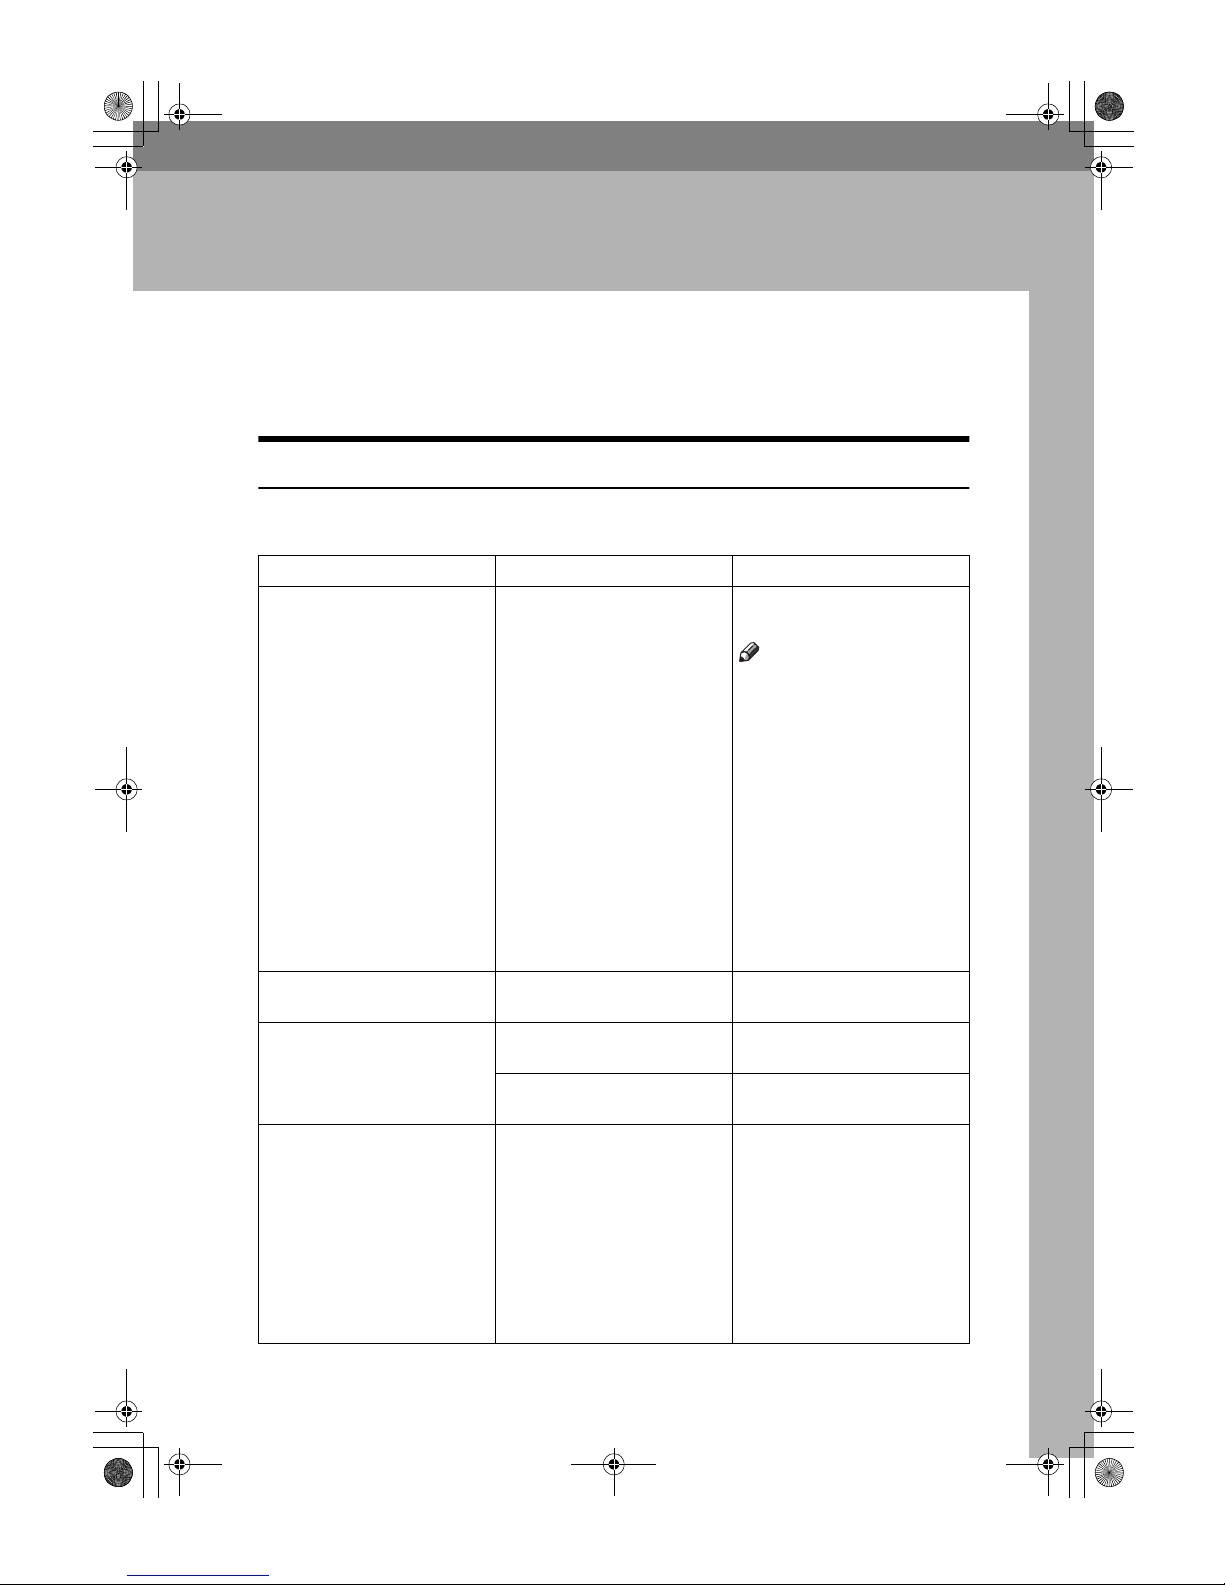
67
3. Troubleshooting
If Your Machine Does Not Operate As You
Want
When a Message Appears
The following chart contains explanations of common messages. If other messages appear, follow the instructions displayed.
Message Problem/Causes Solutions
Please wait.
The main power has just been
turned on, paper type (plain
paper/translucent paper/film) was changed, or the
machine is otherwise getting
ready.
Wait for the machine to fully
warm-up.
Note
❒
When “
Scanning
originals can be
started.
” and “
Select copy mode and
Place original
” are
displayed alternately, you
can make the settings for
your copies and scan your
originals. After the originals have been scanned,
the machine will automatically start copying after it
has warmed-up. See p.23
“Auto Start”.
Check paper size
An improper paper size is set. Select paper manually, do not
use Auto Paper Select.
Check original orientation.
In User Auto Reduce/Enlarge, the original is set to L.
For User Auto Reduce/Enlarge, set the original to K.
In User Auto Reduce/Enlarge, the original is set to K.
For User Auto Reduce/Enlarge, set the original to L.
Memory is full.
The machine's memory is full
due to scanning originals or
performing a function. The
number of originals that can
be stored in memory depends
on the size of originals and
function settings.
• When Sort is selected,
press
[Exit]
to copy
scanned originals, and
then copy remaining originals.
• When the Job Preset function is selected, check the
number of preset jobs, and
then try scanning the originals again.
DolphinC2_ENcopy_F_FM.book Page 67 Friday, February 25, 2005 10:46 AM
Page 76
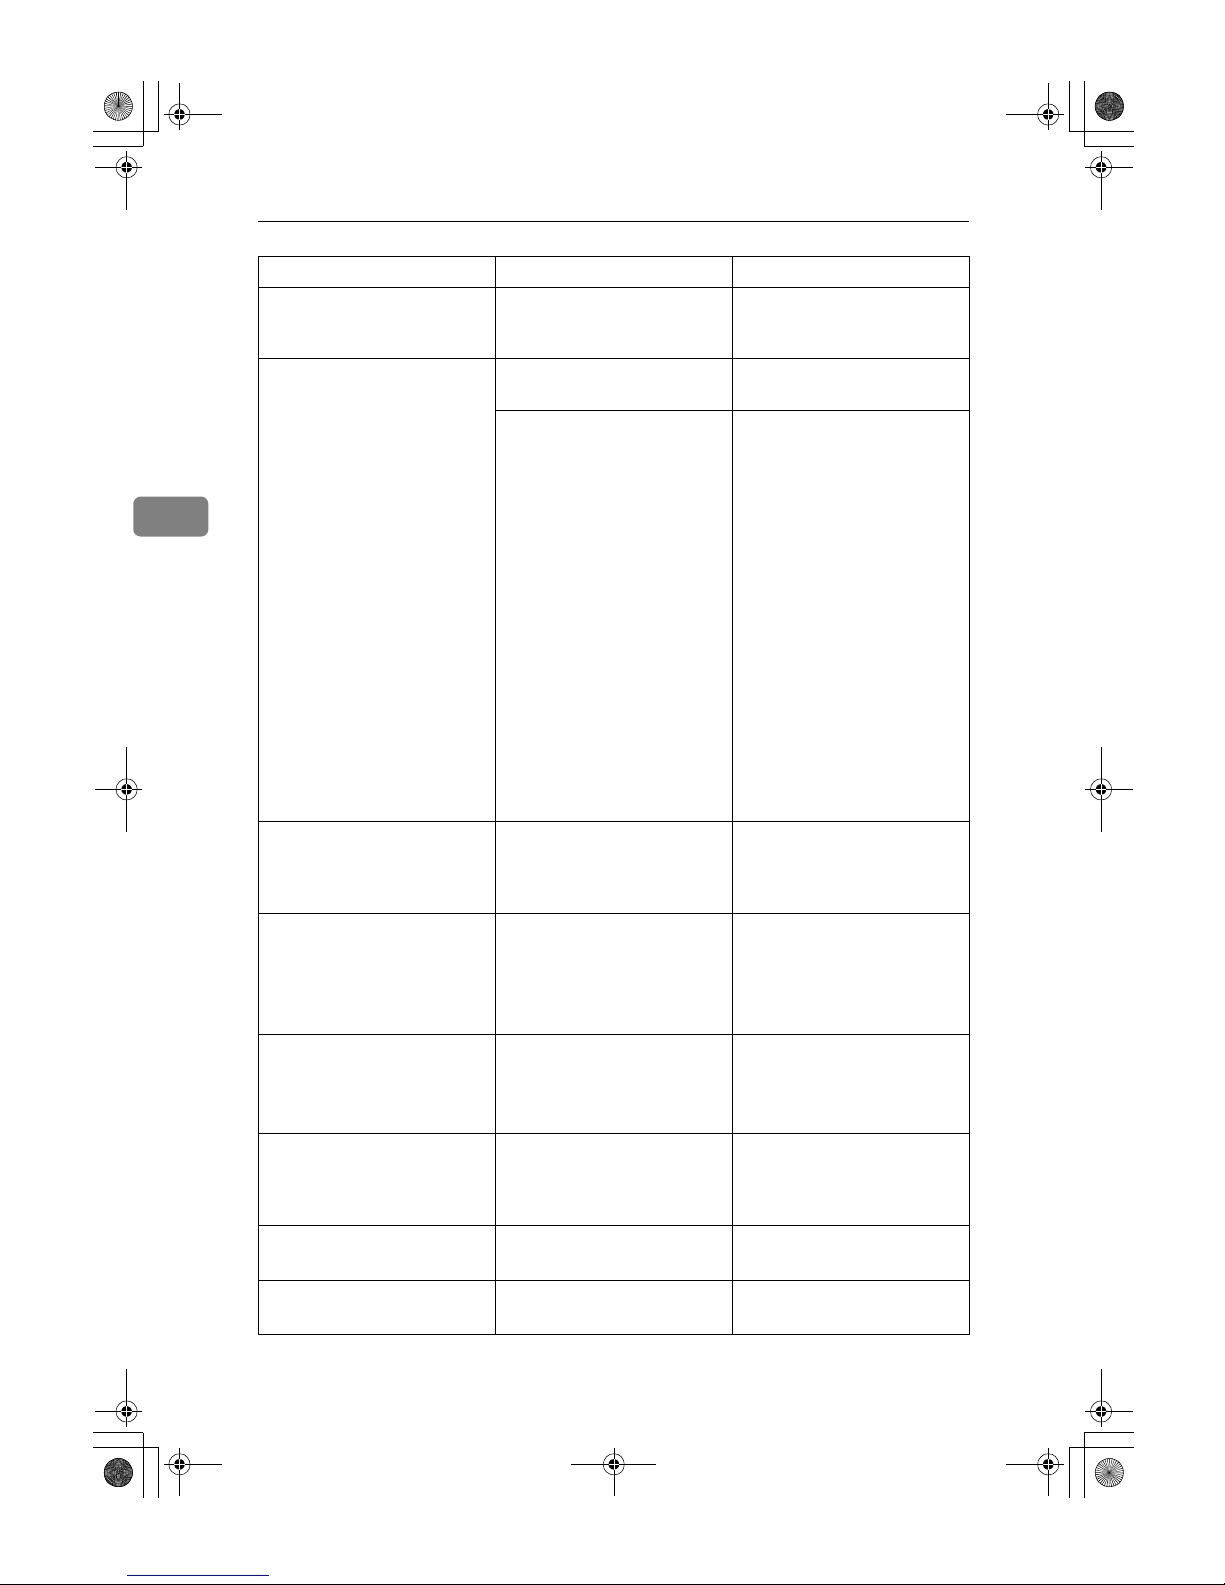
Troubleshooting
68
3
Check paper size.
The size of the paper loaded is
different to the size of the
copy paper size.
Check the settings for Reduce/Enlarge, etc., and then
try again.
Rotate Sort is not
available with this
image size.
Select another paper
size or cancel Rotate Sort mode.
The scanned original is too big
to rotate.
You cannot use rotate sort
with A0 (E), A1(D) originals.
An unsuitable paper size for
rotate sort has been set.
Set paper of the following paper width:
❖❖❖❖ Metric version:
•
594 mm and 420 mm (A2)
•
420 mm and 297 mm (A3)
•
297 mm and 210 mm (A4)
❖❖❖❖
Inch version (Engineering)
• 81/2" and 11" (A)
• 11" and 17" (B)
• 17" and 22" (C)
❖❖❖❖
Inch version (Architecture)
• 9" and 12" (A)
• 12" and 18" (B)
• 18" and 24" (C)
Maximum number of
sets is NN
The number of copies exceeds
maximum.
Change the maximum copy
quantity you can make at a
time. See p.85 “Max. Copy
Quantity”.
Original was misfed
at following point.
Open the part as
shown, then remove
it.
The original has jammed
(original misfeed).
Follow the on-screen instructions to remove the jammed
original. See “xClearing Misfeeds”, General Settings Guide.
Paper was misfed at
following point.
Open the part as
shown and remove it.
The copy paper has jammed. Follow the on-screen instruc-
tions to remove the jammed
paper. See “xClearing Misfeeds”, General Settings Guide.
Add Toner
The machine is running out of
toner.
Follow the on-screen instructions to change the toner cartridge. See “DAdding
Toner”, General Settings Guide.
Cover is open as
shown.Close it.
The cover shown on the display is open.
Close the cover as shown.
Used Toner Bottle is
full.
Used Toner Bottle is full. Call your service representa-
tive.
Message Problem/Causes Solutions
DolphinC2_ENcopy_F_FM.book Page 68 Friday, February 25, 2005 10:46 AM
Page 77
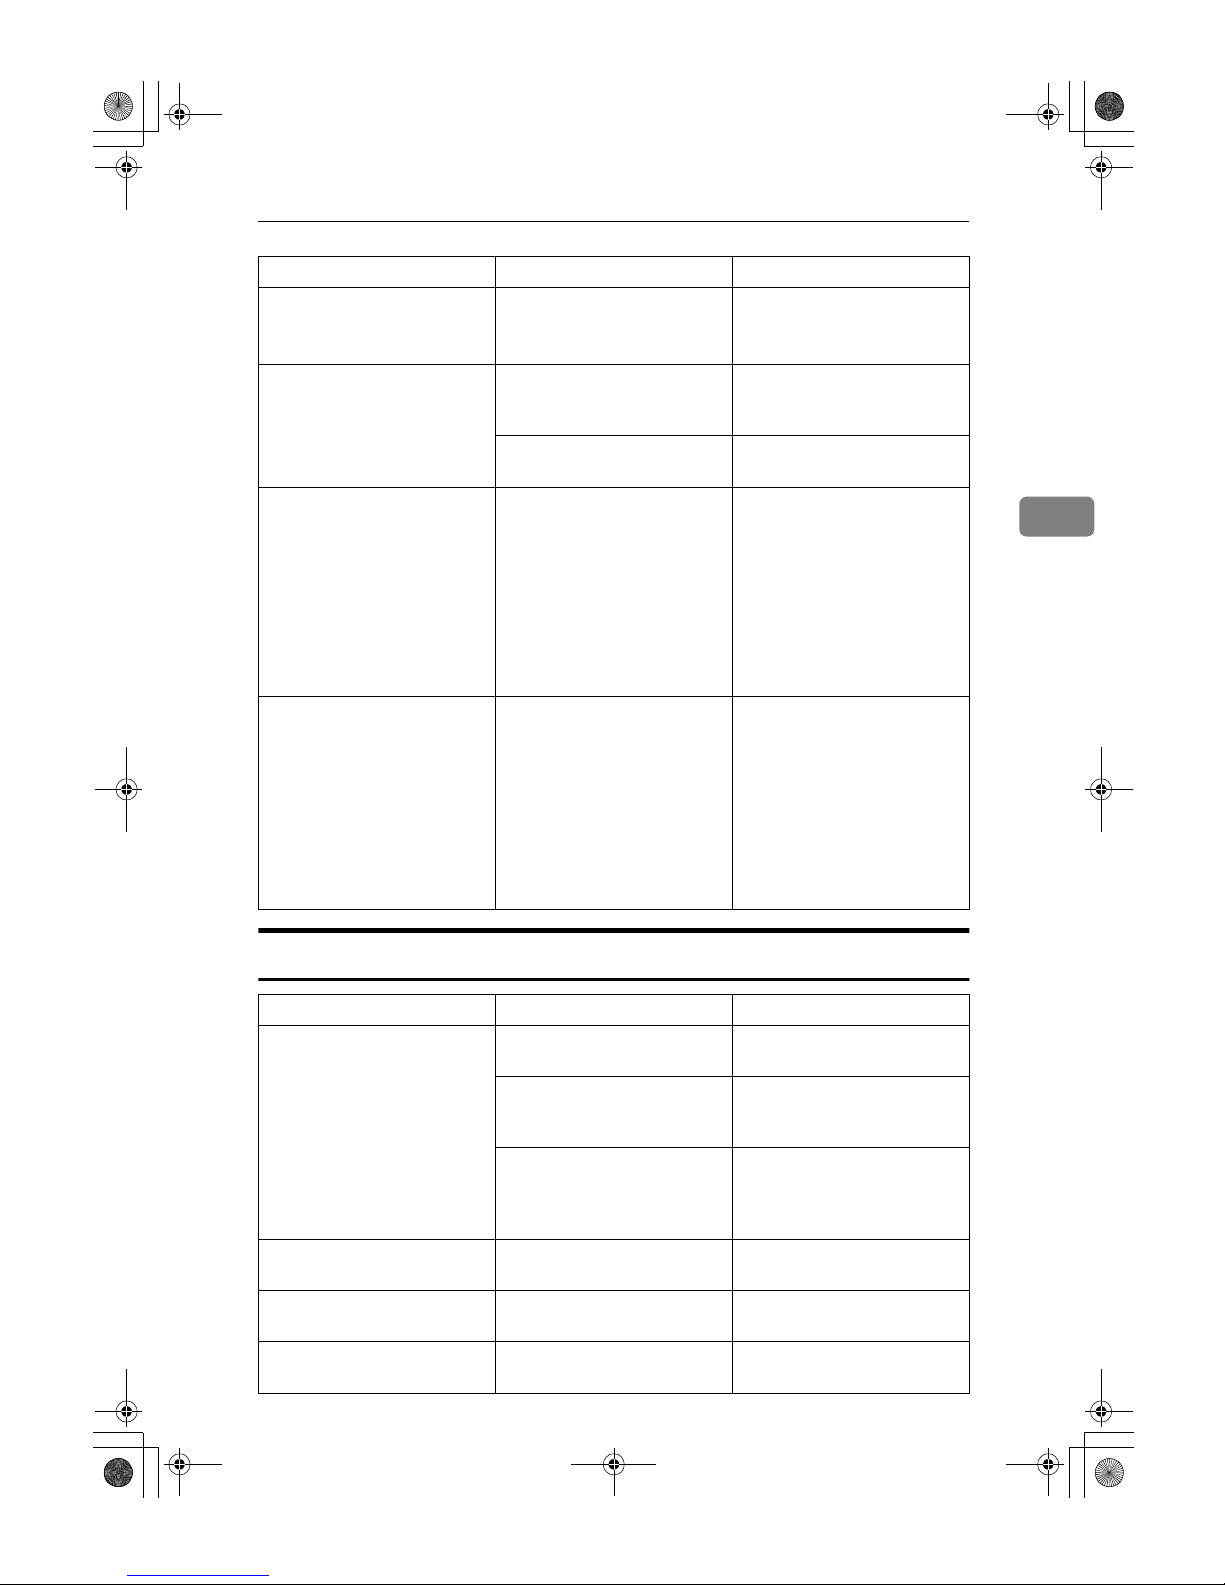
If Your Machine Does Not Operate As You Want
69
3
Screen
You do not have the
privileges to use
this function.
The use of this function is restricted to authenticated users
only.
Contact the administrator.
Authentication has
failed.
The entered login user name
or login password is not correct.
Inquire the user administrator
for the correct login user name
and login password.
The machine cannot perform
authentication.
Contact the administrator.
Selected files contain file(s) that
the user does not
have access privileges to. Please
note that only the
files with access
privileges will be
deleted.
You have tried to delete files
without the authority to do so.
Files can be deleted by the file
creator or file administrator.
To delete a file which you are
not authorized to delete, contact the file creator.
“
Updating the destination list...Please
wait.Specified destination(s) or sender's name has been
cleared.
” appears, and
operations are not possible.
The destination list is being
updated from the network using SmartDeviceMonitor for
Admin. Depending on the
number of destinations to be
updated, there may be some
delay before you can resume
operation. Operations are not
possible while this message is
displayed.
Wait until the message disappears. Do not switch off the
power while this message is
displayed.
Problem Cause Action
The screen is off. The screen contrast knob is
turned to the dark position.
Turn the screen contrast knob
until you can see the screen.
The machine is in Energy Saver mode.
Press the {{{{Clear Modes/Energy
Saver}}}} key to cancel Energy
Saver mode.
The operation switch is turned
off. (The Auto Off function
has turned the machine off.)
Turn on the operation switch.
You can change the Auto Off
time. See “Auto Off Timer”,
General Settings Guide.
Cannot select the functions on
the screen.
Selected functions cannot be
used together.
See p.97 “Combination
Chart”.
There is no paper roll displayed in the paper roll tray.
The paper volume setting is
not properly set.
Load paper into the tray properly. See
General Settings Guide
.
The power does not come on. The main power switch is
turned off.
Turn on the Main power switch.
See General Settings Guide.
Message Problem/Causes Solutions
DolphinC2_ENcopy_F_FM.book Page 69 Friday, February 25, 2005 10:46 AM
Page 78
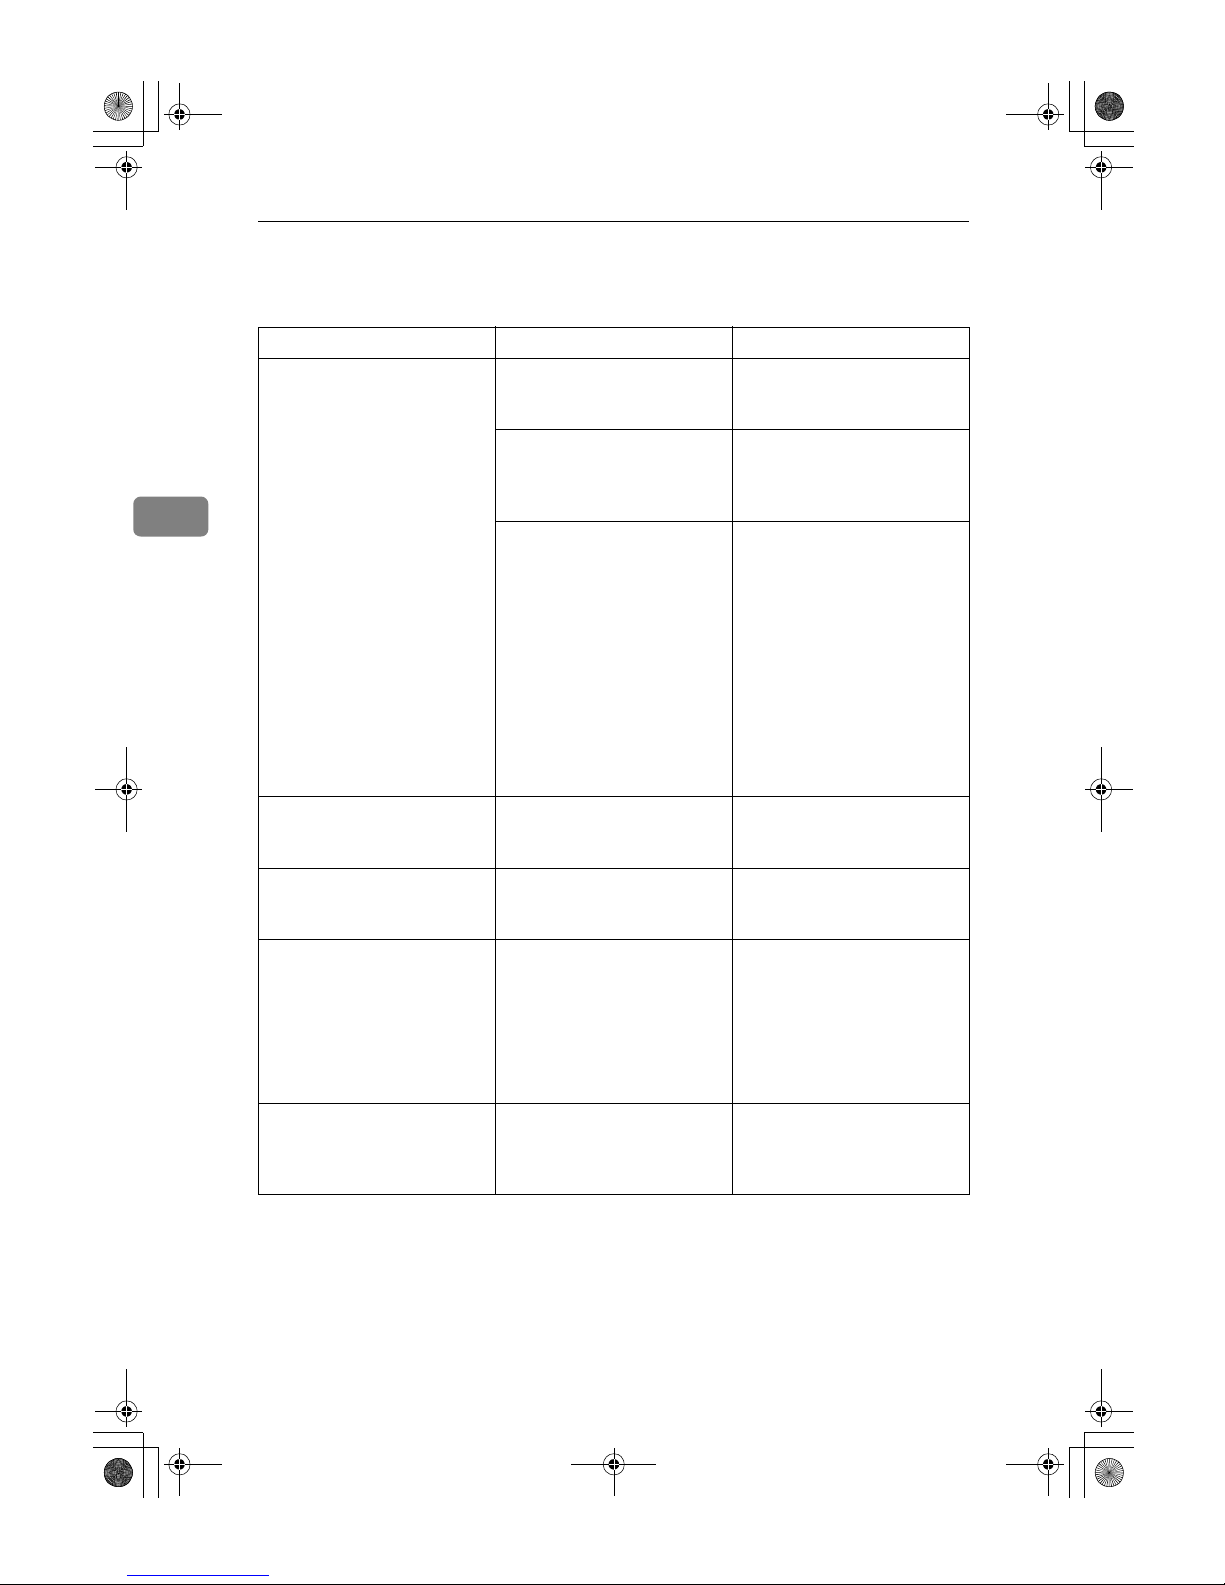
Troubleshooting
70
3
If You Cannot Make Clear Copies
Problem Causes Solutions
Black or white streaks appear
on copies.
Image density is too dark. Adjust image density. See p.28
“Adjusting Copy Image Density”.
The exposure glass or feed
roller is dirty.
Clean the exposure glass or
feed roller. See “Maintaining
Your Machine”, General Set-
tings Guide.
The original is dusty. Clean the original and try
copying again.
Be particularly careful when
using the following types of
original:
• Hand drawn or drawn on
with other forms of pencil
or pen, such as a plotter.
• Film, translucent paper, or
other originals that attract
static electricity.
• Very long originals.
A shadow of the reverse side
of an original image appears
on copies.
Image density is too dark. Adjust the image density set-
ting. See p.28 “Adjusting
Copy Image Density”.
The background is dirty. Image density is too dark. Adjust the image density set-
ting. See p.28 “Adjusting
Copy Image Density”.
The edges of pasted sections
are shown.
Image density is too dark. Adjust the image density set-
ting. See p.28 “Adjusting
Copy Image Density”.
Change the orientation of the
original.
Put mending tape on the pasted part.
The same copy area is dirty
whenever making copies.
The exposure glass or feed
roller is dirty.
Clean the exposure glass or
feed roller. See “Maintaining
Your Machine”, General Set-
tings Guide.
DolphinC2_ENcopy_F_FM.book Page 70 Friday, February 25, 2005 10:46 AM
Page 79
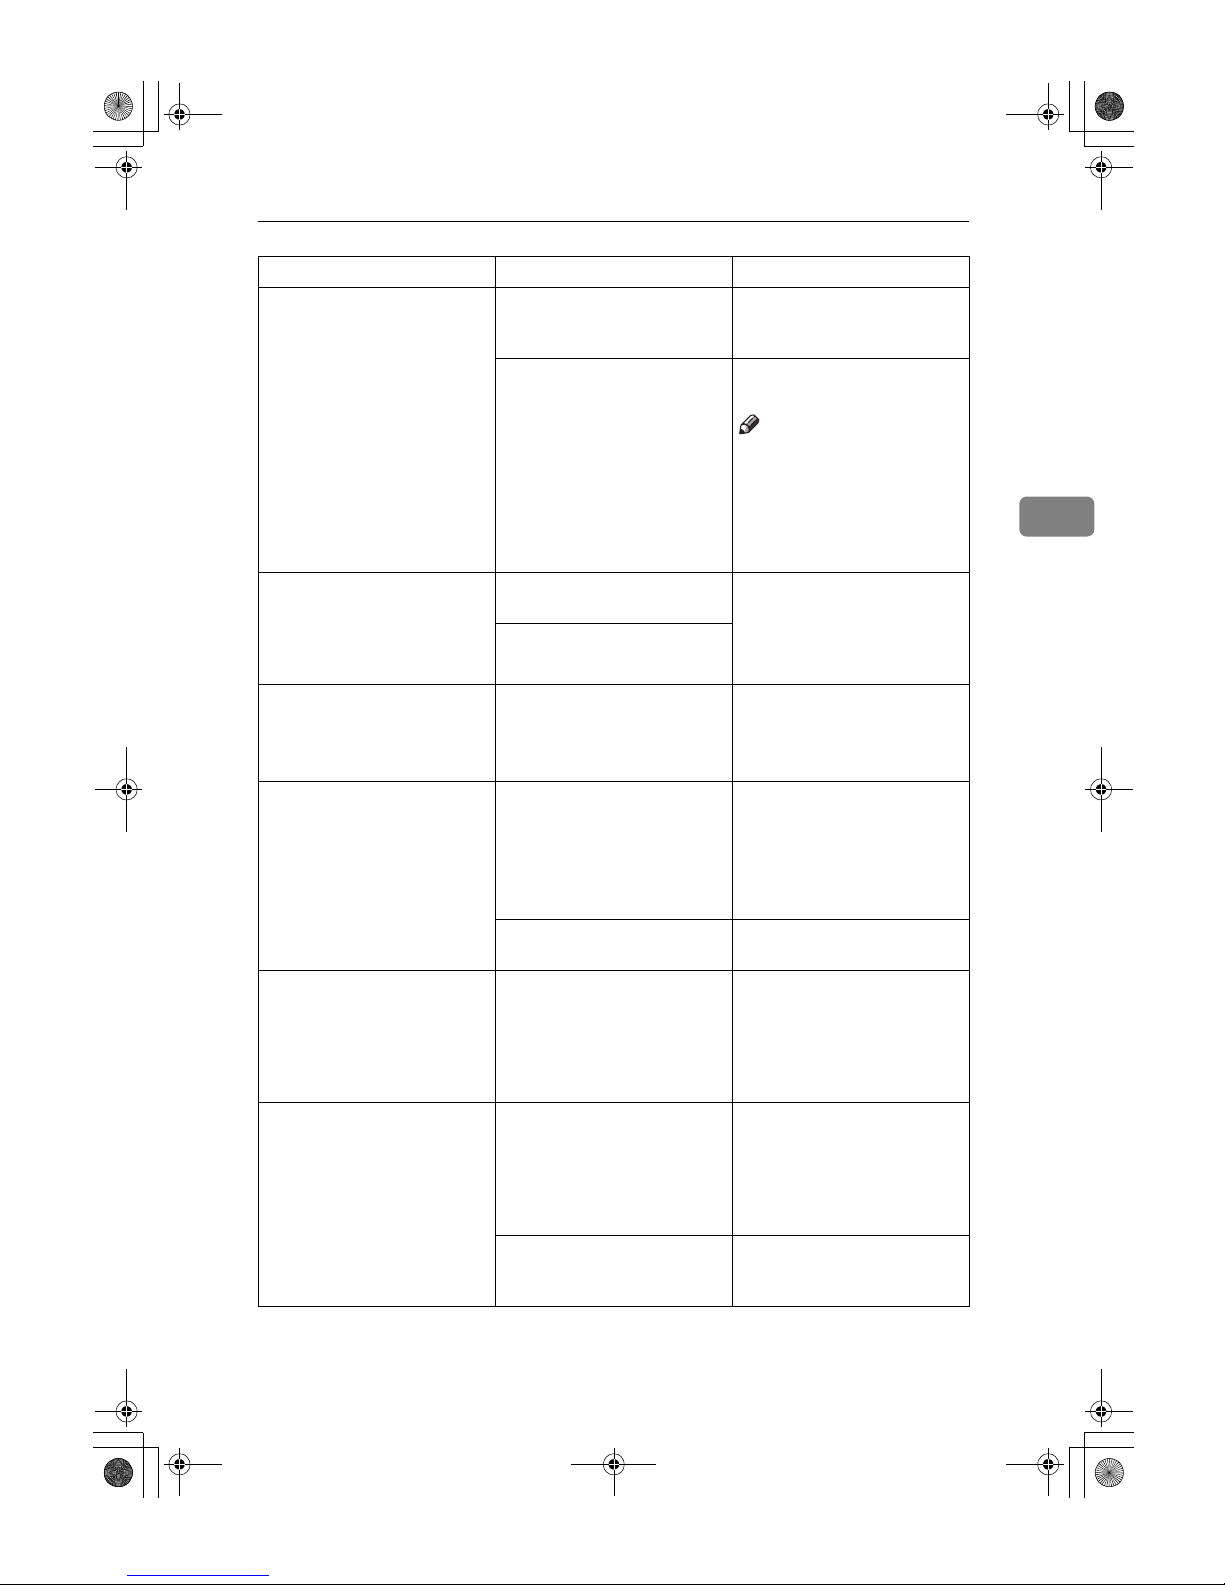
If You Cannot Make Clear Copies
71
3
Copies are too light. Image density is too light. Adjust the image density set-
ting. See p.28 “Adjusting
Copy Image Density”.
Damp or rough grain paper is
used.
For good copy quality, use
recommended paper.
Note
❒ If you use coated paper
(such as thermal fax paper,
art paper, carbon paper),
damp paper, or rough
grain paper, copy image
might be too light.
Toner fusing is poor. The paper thickness is not
properly set.
Set the paper thickness again.
See “Paper Thickness: Paper
Tray” and “Paper Thickness:
Paper Bypass”, General Set-
tings Guide.
The copy paper is too thick.
A moire pattern appears on
copies.
Your original has a dot pattern image or many lines.
Change the orientation of the
original. This may prevent the
moire pattern.
Copy using “Photo” mode.
Image density is uneven. The original has areas of solid
color, or Positive/Negative is
selected when copying multiple sheets.
When using Repeat Copy
with originals that have areas
of solid color, set the number
of originals as follows:
A0 – A2 (E – C): 1 sheet, A3 (B)
or smaller: 3 sheets
Halftone originals can cause
this problem.
Try using “Text/Photo” or
“Photo”.
Images are blurred when using translucent paper.
Translucent paper is being
used when copying multiple
sheets.
Select a proper paper thickness for the copy paper. See
“Paper Thickness: Paper
Tray” and “Paper Thickness:
Paper Bypass”, General Set-
tings Guide.
Wrinkles appear when using
translucent paper.
An improper paper thickness
is selected.
Select a proper paper thickness for the copy paper. See
“Paper Thickness: Paper
Tray” and “Paper Thickness:
Paper Bypass”, General Set-
tings Guide.
The paper type has recently
been changed from plain paper to translucent paper.
Wait about one minute.
Problem Causes Solutions
DolphinC2_ENcopy_F_FM.book Page 71 Friday, February 25, 2005 10:46 AM
Page 80

Troubleshooting
72
3
The background on translucent paper is dirty.
More than 50 copies are being
made of originals longer than
1189 mm (46.9") with solid
blocks of color (2 mm × 900
mm (0.08" × 35.4") or larger).
Select a proper paper thickness for the copy paper. See
“Paper Thickness: Paper
Tray” and “Paper Thickness:
Paper Bypass”, General Set-
tings Guide.
Streaks, scratches, or wrinkles
appear in areas of solid black.
Copy paper has been changed
from plain to translucent paper, or from translucent to
plain paper.
After switching from plain to
translucent paper, wait one
minute. After switching from
translucent to plain paper,
wait two minutes before making copies.
Shadows appear on the copies.
The original is two-sided, or
the image density setting is
too dark.
Adjust the image density setting. See p.28 “Adjusting
Copy Image Density”.
Copies are blurred. Continuous copies have been
made on small sized paper.
Wait about two minutes, and
then try copying again.
When copying on patched
originals, parts of the image
are blurred.
This may happen when the
originals are curled, folded or
creased.
Straighten curls in the originals.
When making copies with
50% reduction ratio, the image
density becomes dark and images are blurred.
When making copies with
50% reduction ratio, the image
density may become dark.
Select “Sharp” in “Drawing”
under “Copy Quality” with
User Tools, and select “Draw-
ing”as the original type. See
p.84 “Copy Quality” and p.27
“Selecting Original Type Setting”.
When the temperature and
humidity is low (below 10°C
and 15%) , image density is
uneven in dot patterns.
Originals with wrinkles are
used and the image density is
set too dark.
Select “Sharp” in “Drawing”
under “Copy Quality” with
User Tools, and select “Draw-
ing”as the original type. See
p.84 “Copy Quality” and p.27
“Selecting Original Type Setting”.
Problem Causes Solutions
DolphinC2_ENcopy_F_FM.book Page 72 Friday, February 25, 2005 10:46 AM
Page 81
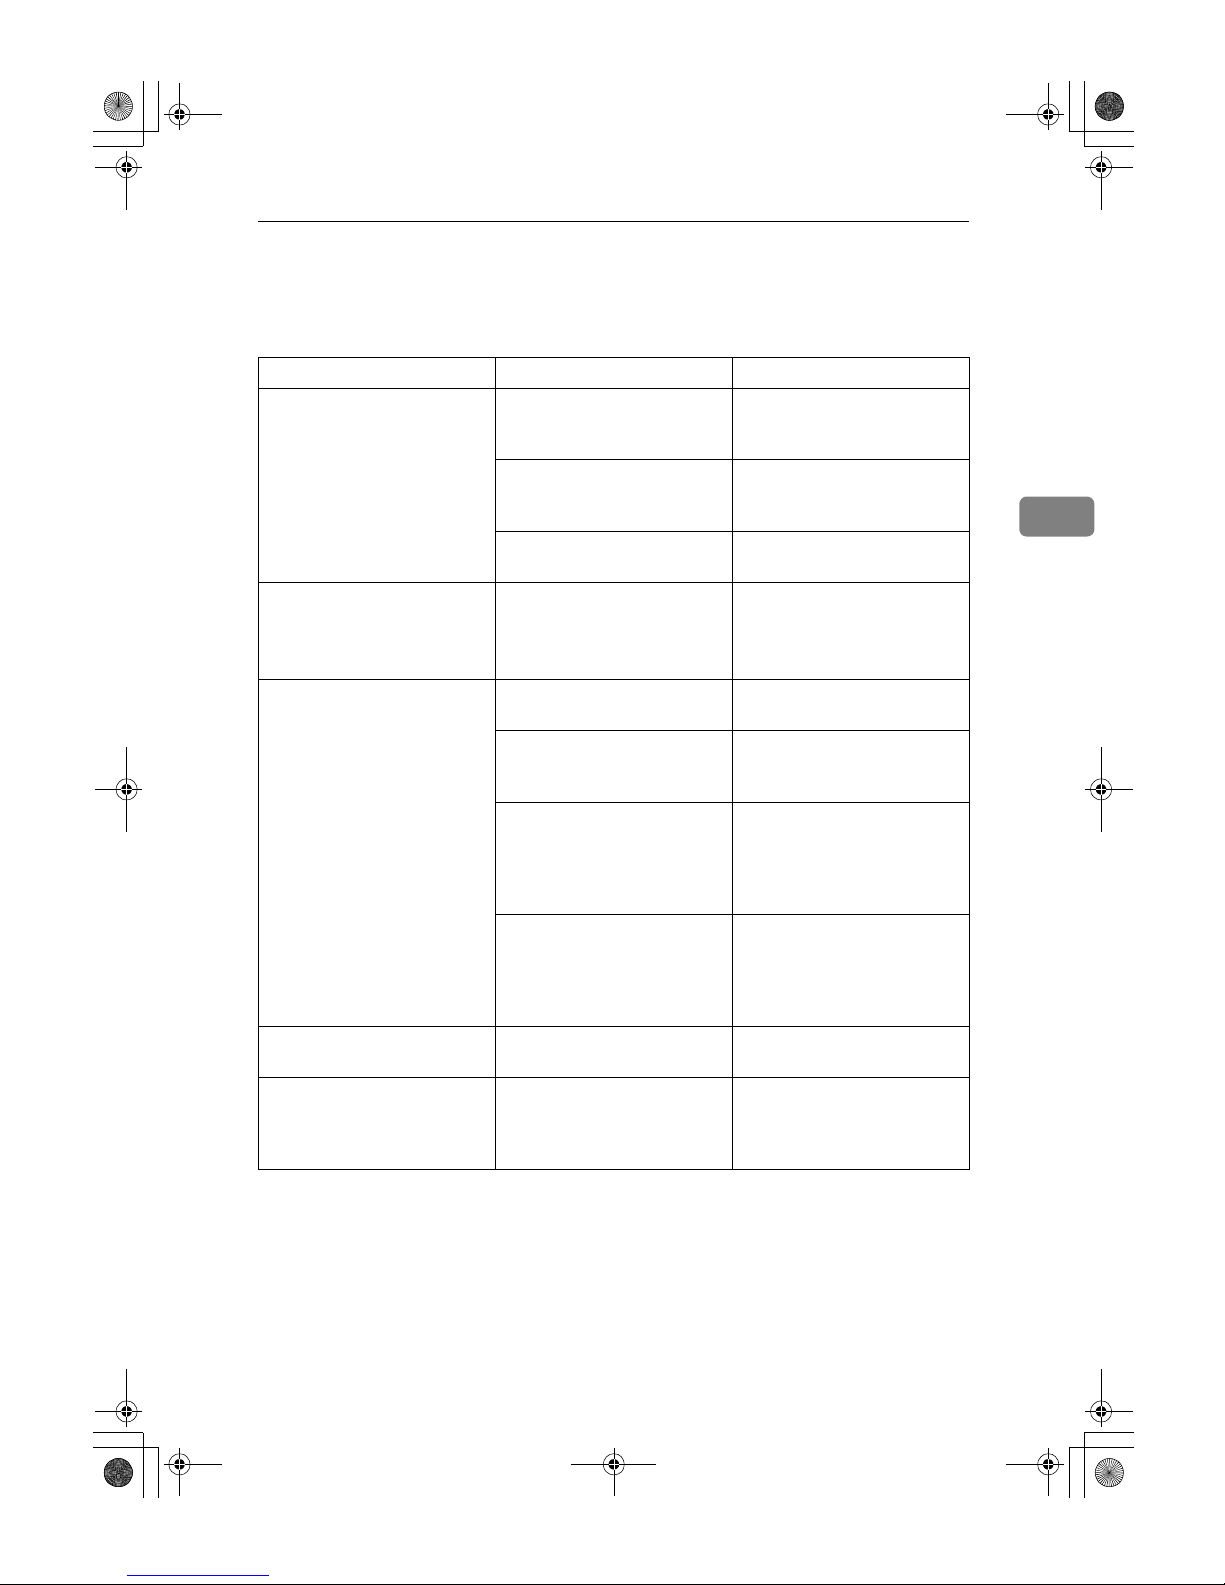
If You Cannot Make Copies As You Want
73
3
If You Cannot Make Copies As You Want
This section explains causes of, and solutions for, unexpected copy results.
Problem Causes Solutions
Misfeeds occur frequently. The paper is folded or
creased.
Cut away the folded or
creased part from the roll paper.
Jammed or torn paper is inside the machine.
Remove the paper properly.
See “xClearing Misfeeds”,
General Settings Guide
.
The paper is curled. Smooth out the curl and try
again.
Images are cropped when using Erase Border.
The Erase Border setting is too
wide.
The margin of the original is
too narrow.
Set the Erase Border setting
narrower. See p.48 “Erase Border”.
Parts of the image are not copied.
The original is not placed correctly.
Place the original correctly.
See p.15 “Placing Originals”.
An improper size of paper is
selected.
Select the proper paper. See
“Copy Paper”,
General Set-
tings Guide
.
Print Position Adjustment or
Margin Adjustment mode is
selected.
Cancel Print Position Adjustment or Margin Adjustment
mode. See p.50 “Margin Adjustment” and p.61 “Adjust
Print Position”.
You placed a custom size original.
Enter the size of the original,
or set the scanning area wider.
See p.17 “Placing Custom Size
Originals” and p.17 “Wide
Scan”.
Copies are blank. The original is not set correct-
ly.
Place the original with the surface to be copied on face up.
The machine does not start
copying even though you
have inserted paper into the
paper bypass.
The number of copies has not
been entered.
Enter the number of copies using the number keys. See ⇒
p.25 “Copying from the Paper
Bypass”.
DolphinC2_ENcopy_F_FM.book Page 73 Friday, February 25, 2005 10:46 AM
Page 82
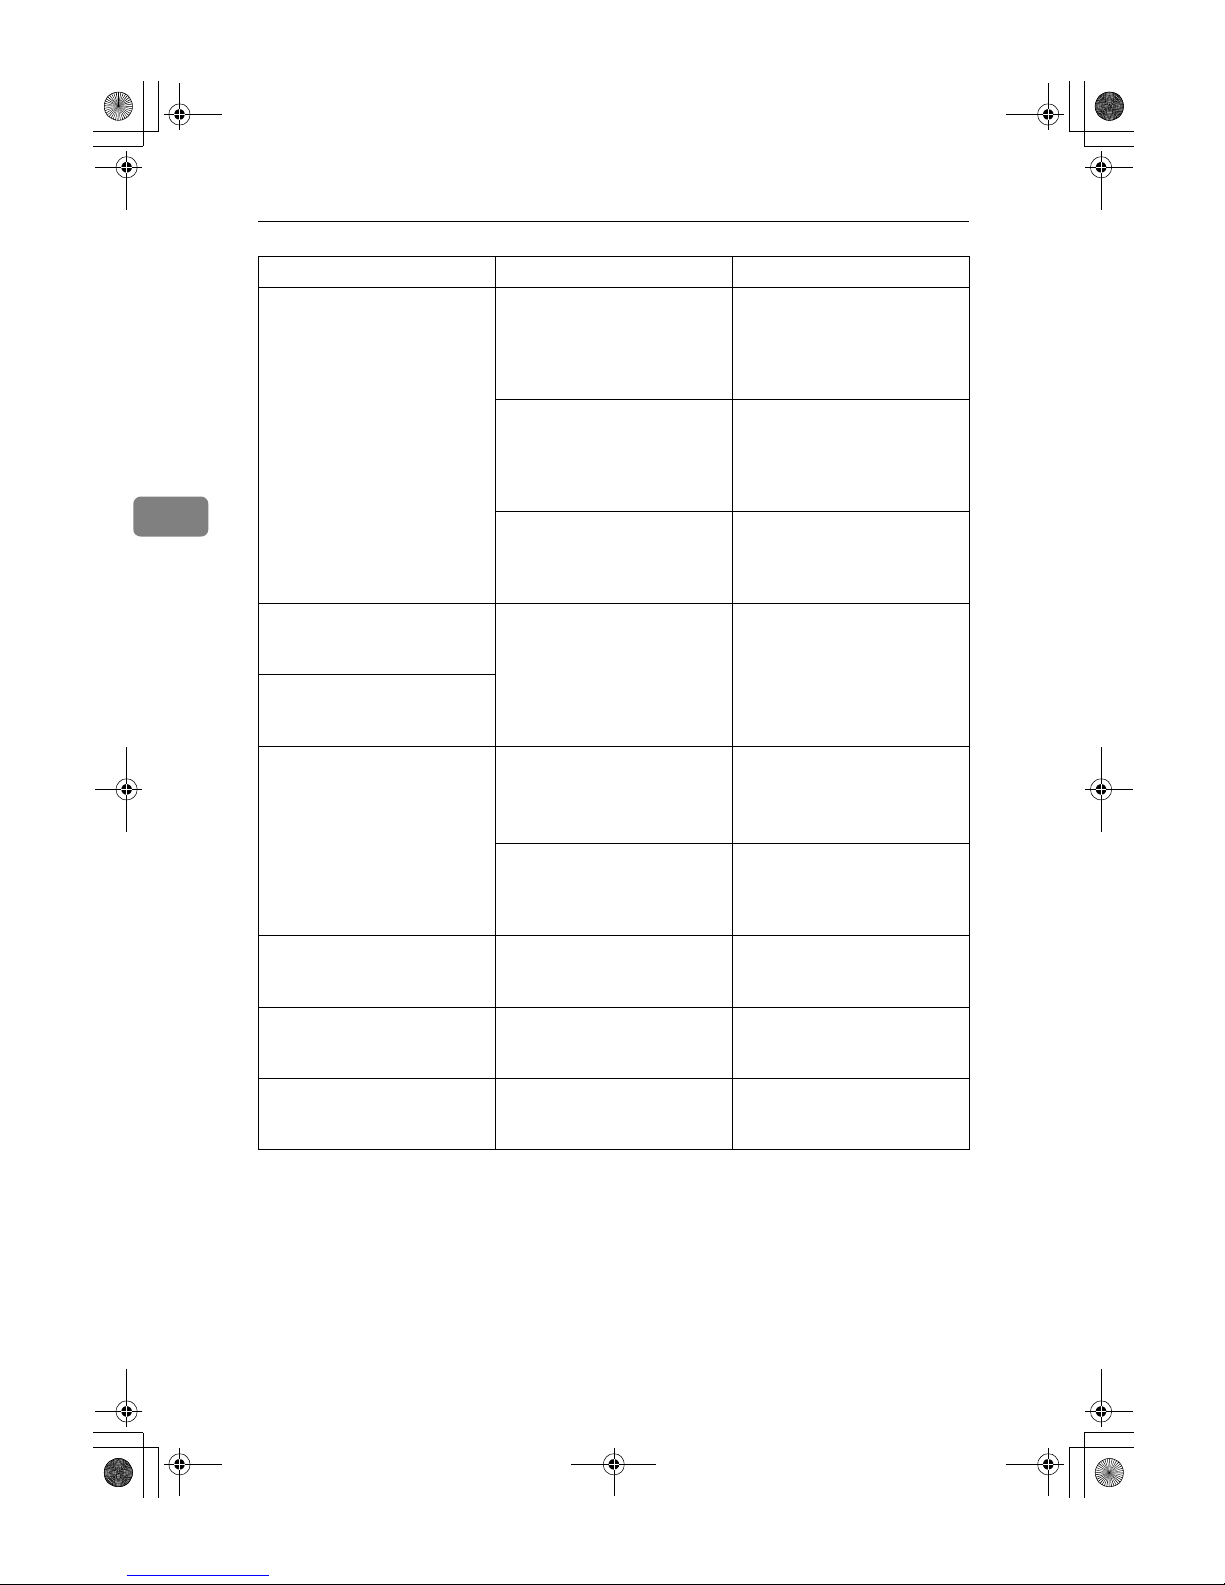
Troubleshooting
74
3
Copies shift sideways. The paper roll is not set cor-
rectly.
Set the paper roll correctly,
making sure it is straight and
not loose. See “CLoading Paper Roll”, General Settings
Guide.
The original does not match
the size in the original table
setting.
Adjust the original guides to
the specified size, and then insert the original along the
guides. See p.15 “Placing
Originals”.
The paper is not set correctly
in the paper bypass.
Make sure the paper size
matches the paper bypass's
paper guides. See p.25 “Copy-
ing from the Paper Bypass”.
Copies shift in the direction of
the original feed (or opposite)
direction.
Print Position Adjustment or
Margin Adjustment mode is
selected.
Cancel Print Position Adjustment or Margin Adjustment
mode. See p.50 “Margin Adjustment” and p.61 “Adjust
Print Position”.
Copies are shorter than the selected size, or cut off before
the end.
Wrinkles appear on the copy. The paper is damp. Replace the paper with new
paper.
Cut the paper to 1000 mm
(40") just before copying.
The paper is damp. See “Anti-
humidity Heater Switch”,
General Settings Guide.
Turn on the anti-humidity
heater. See “Anti-humidity
Heater Switch”, General Set-
tings Guide.
Copies are slanted. The original is not straight. Insert the original along the
original guides, so it is
straight.
Original and copy size does
not match.
Dampness can cause paper to
stretch.
Adjust the Fine Magnification
setting for Additional Copy.
See p.41 “Fine Magnification”.
You cannot combine several
functions.
The selected functions cannot
be used together.
Check the combination of settings, and set again. See p.97
“Combination Chart”.
Problem Causes Solutions
DolphinC2_ENcopy_F_FM.book Page 74 Friday, February 25, 2005 10:46 AM
Page 83
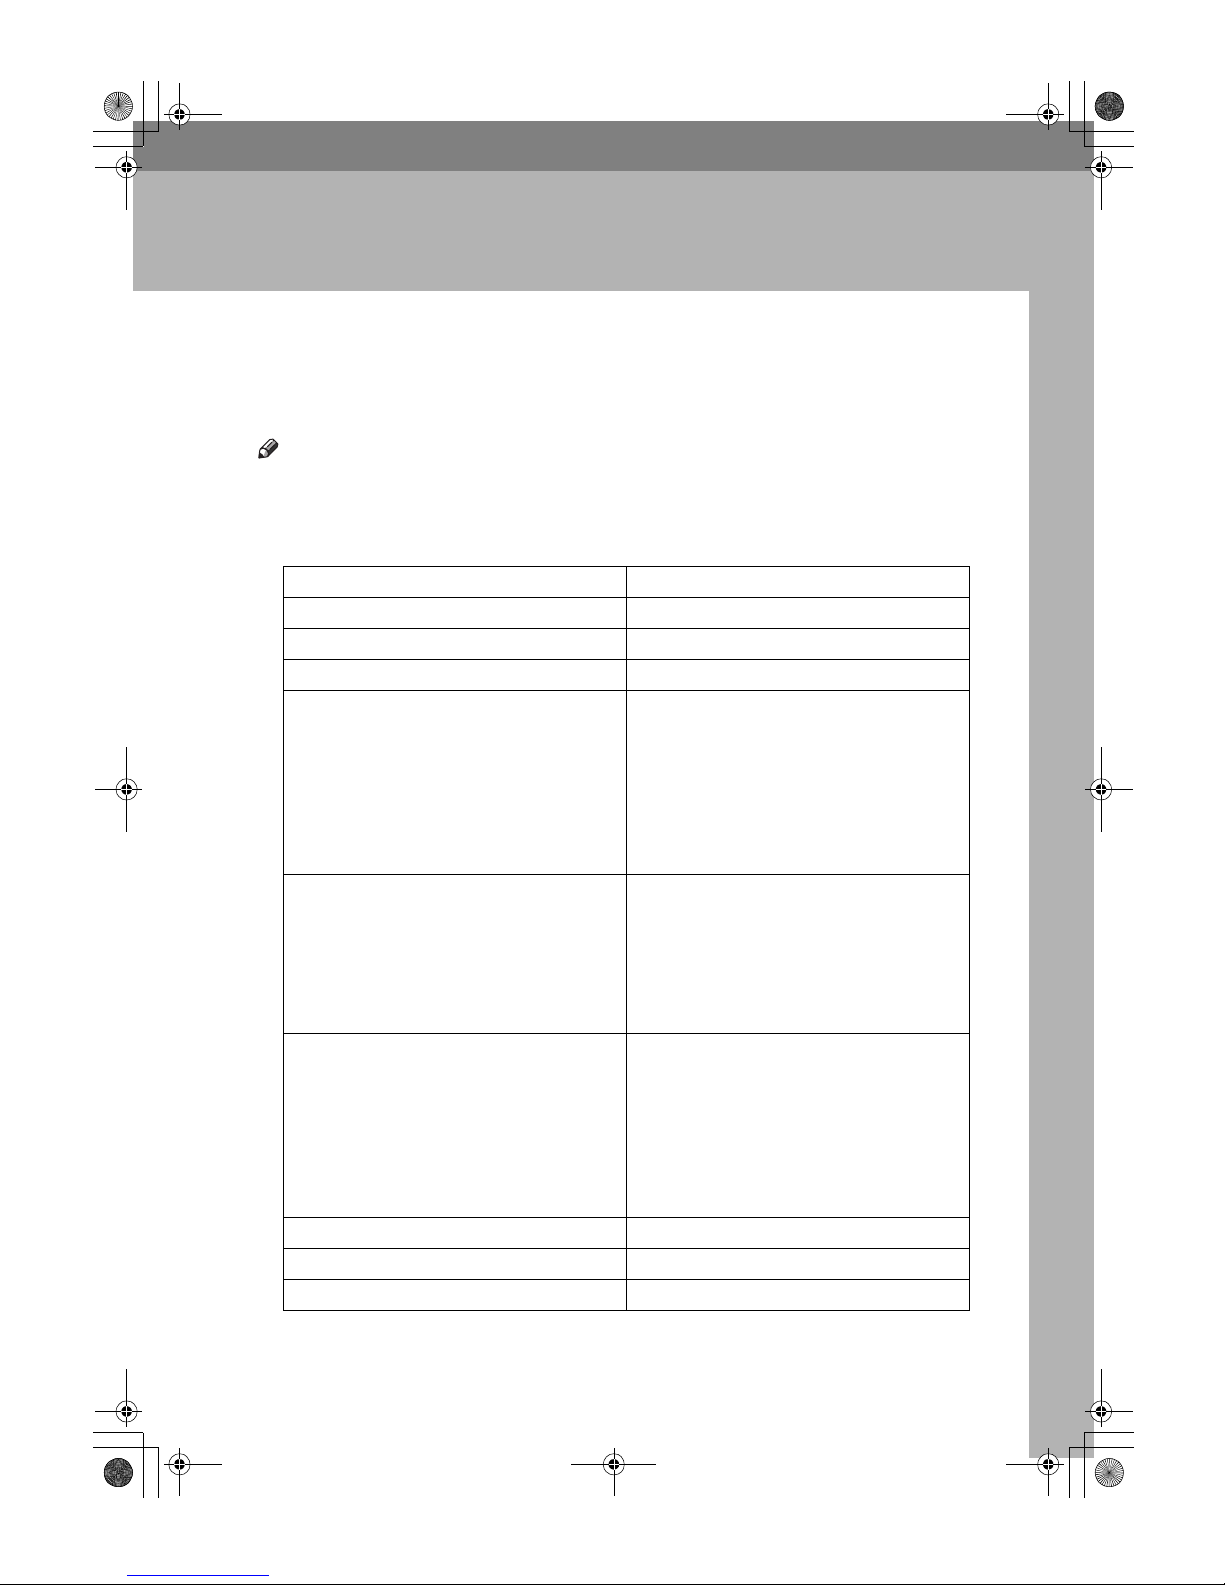
75
4. User Tools (Copier /
Document Server Features)
User Tools Menu (Copier / Document
Server Features)
Note
❒ Depending on the options installed, not all items listed below may be dis-
played.
❖❖❖❖ General Features (see p.83 “General Features”)
User Tools item menu Default
Auto Paper Select Priority
On
Auto Tray Switching
With Image Rotation
Original Type Priority
Drawing
Auto Image Density Priority Text:
On
Drawing:
On
Text/Photo:
On
Photo:
Off
Background Lines:
On
Patched Original:
On
Generation Copy:
On
Copy Quality Text:
Normal
Drawing:
Normal
Text/Photo:
Normal
Photo:
Print Photo
Background Lines:
Normal
Patched Original:
Pale
Image Density Text:
Normal
Drawing:
Normal
Text/Photo:
Normal
Photo:
Normal
Background Lines:
Normal
Patched Original:
Normal
Generation Copy:
Normal
Change Initial Mode
Standard
Max. Copy Quantity
99 sheets
Job End Call
On
DolphinC2_ENcopy_F_FM.book Page 75 Friday, February 25, 2005 10:46 AM
Page 84
User Tools (Copier / Document Server Features)
76
4
❖❖❖❖ Reproduction Ratio (see p.85 “Reproduction Ratio”)
User Tools item menu Default
Custom Magnification Settings 1–3Metric version:
• Setting 1: 70.7%
• Setting 2: 100.0%
• Setting 3: 141.4%
Inch version (Engineering):
• Setting 1: 64.7%
• Setting 2: 100.0%
• Setting 3: 129.4%
Inch version (Architecture):
• Setting 1: 66.7%
• Setting 2: 100.0%
• Setting 3: 133.3%
Enlarge 1–4Metric version:
• Enlarge 1: 141.4%
• Enlarge 2: 200.0%
• Enlarge 3: 282.8%
• Enlarge 4: 400.0%
Inch version (Engineering):
• Enlarge 1: 129.4%
• Enlarge 2: 200.0%
• Enlarge 3: 258.8%
• Enlarge 4: 400.0%
Inch version (Architecture):
• Enlarge 1: 133.3%
• Enlarge 2: 200.0%
• Enlarge 3: 266.7%
• Enlarge 4: 400.0%
DolphinC2_ENcopy_F_FM.book Page 76 Friday, February 25, 2005 10:46 AM
Page 85
User Tools Menu (Copier / Document Server Features)
77
4
Reduce 1–4Metric version:
• Reduce 1: 25.0%
• Reduce 2: 35.4%
• Reduce 3: 50.0%
• Reduce 4: 70.7%
Inch version (Engineering):
• Reduce 1: 25.0%
• Reduce 2: 32.4%
• Reduce 3: 50.0%
• Reduce 4: 64.7%
Inch version (Architecture):
• Reduce 1: 25.0%
• Reduce 2: 33.3%
• Reduce 3: 50.0%
• Reduce 4: 66.7%
Priority Setting: Reduce/Enlarge 100.0%
User Auto R/E Metric version
A0 : A0/ A1 : A1/ A2 : A2/ A3 : A3/A4 : A4/B1
JIS : B1 JIS / B2 JIS : B2 JIS / B3 JIS : B3 JIS / B4
JIS : B4 JIS
Inch version (Engineering)
34
×
44 : 34×44/22×34 : 22×34/17×22 :
17
×
22/11×17 : 11×17/81/
2
×
11 : 81/
2
×
11
Inch version (Architecture)
36
×
48 : 36×48/24×36 : 24×36/18×24 :
18
×
24/12×18 : 12×18/9×12 : 9×12
Manification Key Display Engineering
User Tools item menu Default
DolphinC2_ENcopy_F_FM.book Page 77 Friday, February 25, 2005 10:46 AM
Page 86
User Tools (Copier / Document Server Features)
78
4
❖❖❖❖ Edit (see p.87 “Edit”)
❖❖❖❖ Stamp (see p.90 “Stamp”)
User Tools item menu Default
Adjust Position —
Erase Border Width Metric version
10 mm
Inch version
0.4"
Erase Original Shadow in Combine Yes
Image Repeat Separation Line None
Double Copies Separation Line None
Separation Line in Combine None
Copy Order in Combine From Left to Right
Program / Delete Format —
Margin Adjustment Priority —
Partial Copy Priority —
User Tools item menu Default
Background
Numbering
Size Normal
Density Normal
Preset Stamp
Stamp Priority COPY
Stamp Language English
Stamp Position Metric version
• Position: Top Right
• Top Margin: 24 mm
• Right Margin: 24 mm
Inch version
• Position: Top Right
• Top Margin: 1.0"
• Right Margin: 1.0"
Stamp Format Size: 1X
Density: Normal
Page to Stamp: All Pages
DolphinC2_ENcopy_F_FM.book Page 78 Friday, February 25, 2005 10:46 AM
Page 87
User Tools Menu (Copier / Document Server Features)
79
4
User Stamp
Program / Delete Stamp —
Stamp Position: 1–4 Metric version
• Position: Top Right
• Top Margin: 24 mm
• Right Margin: 24 mm
Inch version
• Position: Top Right
• Top Margin: 1.0"
• Right Margin: 1.0"
Stamp Format: 1–4 All Pages
Date Stamp
Format Metric version:
DD/MM/YYYY
Inch version:MM/DD/YYYY
Font Font 1
Stamp Position Metric version
• Position: Top Left
• Top Margin: 8 mm
• Right Margin: 32 mm
Inch version
• Position: Top Left
• Top Margin: 0.3"
• Right Margin: 0.8"
Stamp Setting All Pages
Size Auto
Superimpose No
Page Numbering
Stamp Format P1, P2...
Font Font 1
Size Auto
Page Numbering in Combine Per Original
Stamp Position Metric version
• Position
P1, 1/5, P.1, 1: Top Right
-1-, 1-1: Bottom Center
Inch version
• Position
P1, 1/5, P.1, 1: Top Right
-1-, 1-1: Bottom Center
Superimpose No
Page Numbering Initial Letter P1, P2.../P.1, P.2...
User Tools item menu Default
DolphinC2_ENcopy_F_FM.book Page 79 Friday, February 25, 2005 10:46 AM
Page 88
User Tools (Copier / Document Server Features)
80
4
❖❖❖❖ Input / Output (see p.96 “Input / Output”)
❖❖❖❖ Administrator Tools (see “Menu Protect”, Security Reference)
User Tools item menu Default
Rotate Sort: Auto Paper Continue No
User Tools item menu Default
Menu Protect Level 2
DolphinC2_ENcopy_F_FM.book Page 80 Friday, February 25, 2005 10:46 AM
Page 89
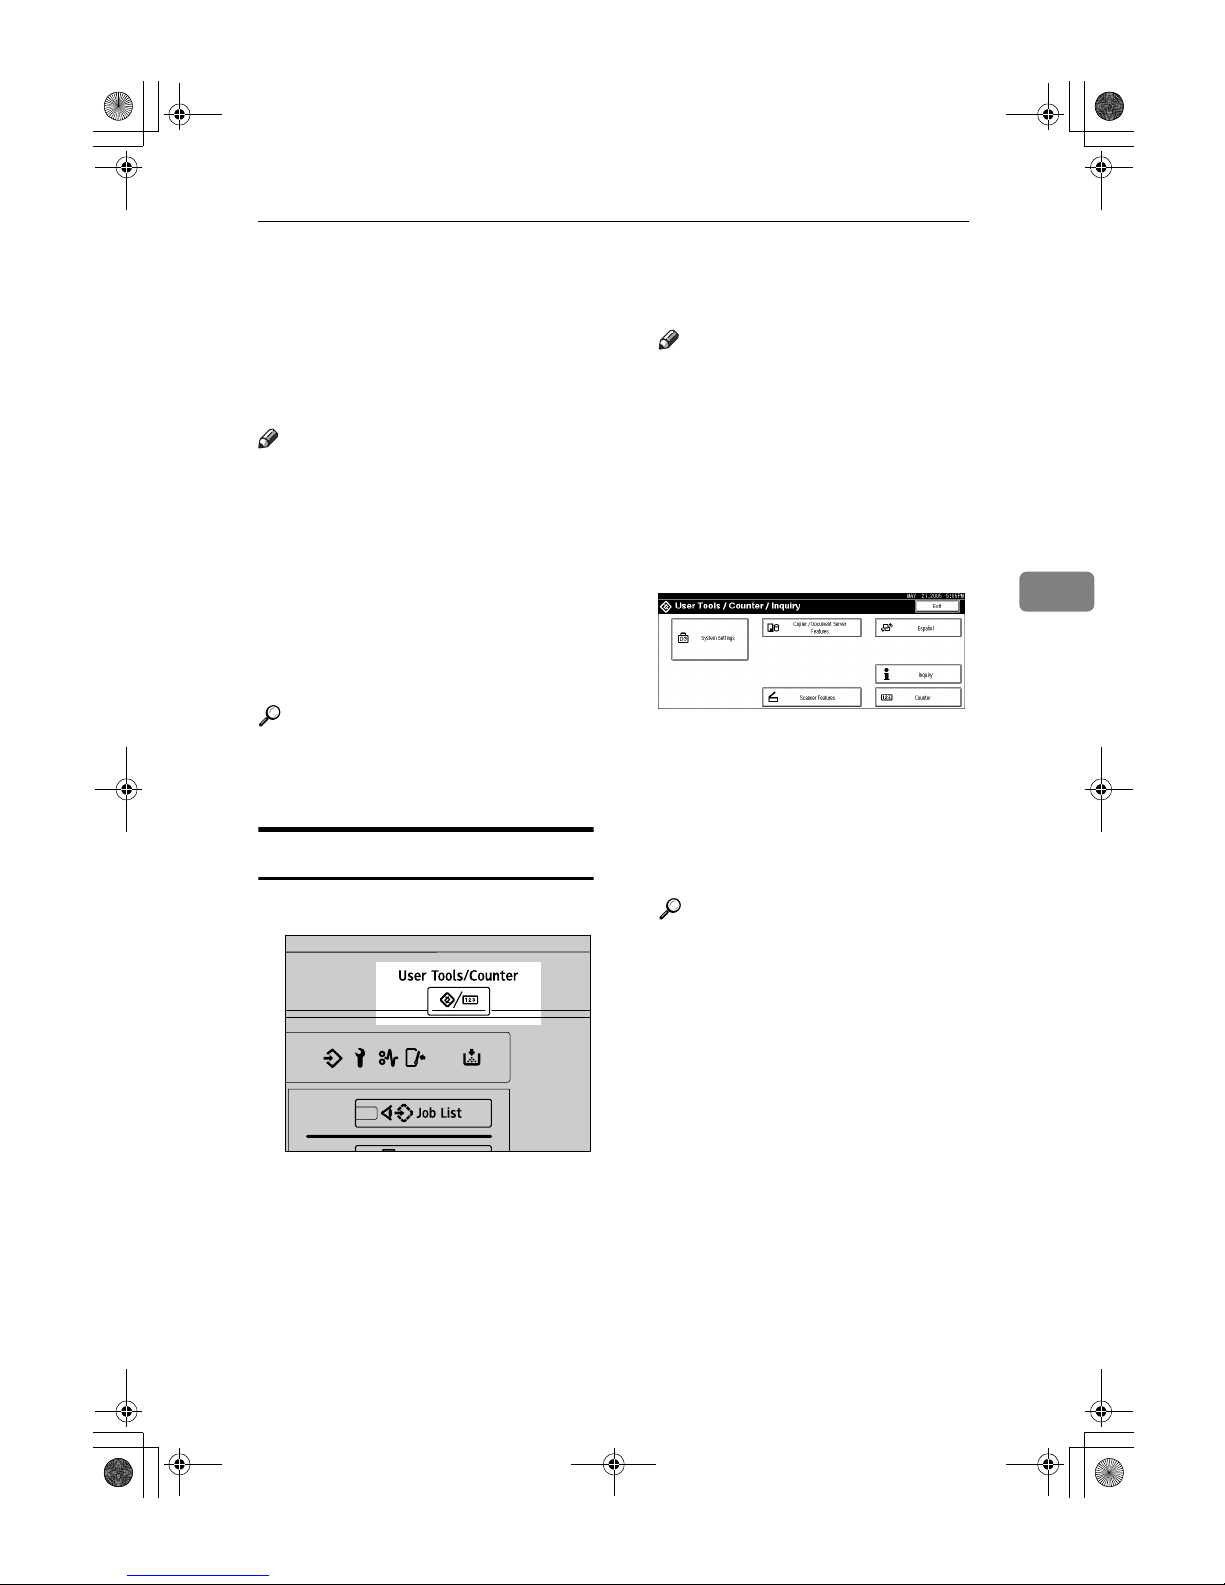
Accessing User Tools (Copier Features)
81
4
Accessing User Tools (Copier Features)
This section is for key operators in
charge of this machine. You can
change or set the machine's default
settings.
Note
❒ Be sure to exit User Tools and re-
turn to the initial copy display after all settings are made. This
section describes system settings
you can set for the copier function.
❒ Any changes you make with User
Tools remain in effect even if the
main power switch or operation
switch is turned off, or the {{{{Clear
Modes}}}} key is pressed.
Reference
For details about System Settings,
see “User Tools Menu (System Settings)”, General Settings Guide.
Changing Default Settings
AAAA
Press the {{{{User Tools/Counter}}}} key.
The User Tools main menu appears.
Note
❒
When Basic Authentication, Windows
Authentication, or LDAP
Authentication is set, the authentication screen will be displayed. Enter your login name
and login password, and then
press [Login].
BBBB
Press [Copier / Document Server Fea-
tures].
The Copier / Document Server
Features menu is displayed.
CCCC
Select the menu you want to make
settings.
The setting display for each menu
is displayed.
Reference
p.75 “User Tools Menu (Copier
/ Document Server Features)”
DDDD
Change settings by following the
instructions on the display panel,
and then press [OK].
AHD101S
DolphinC2_ENcopy_F_FM.book Page 81 Friday, February 25, 2005 10:46 AM
Page 90
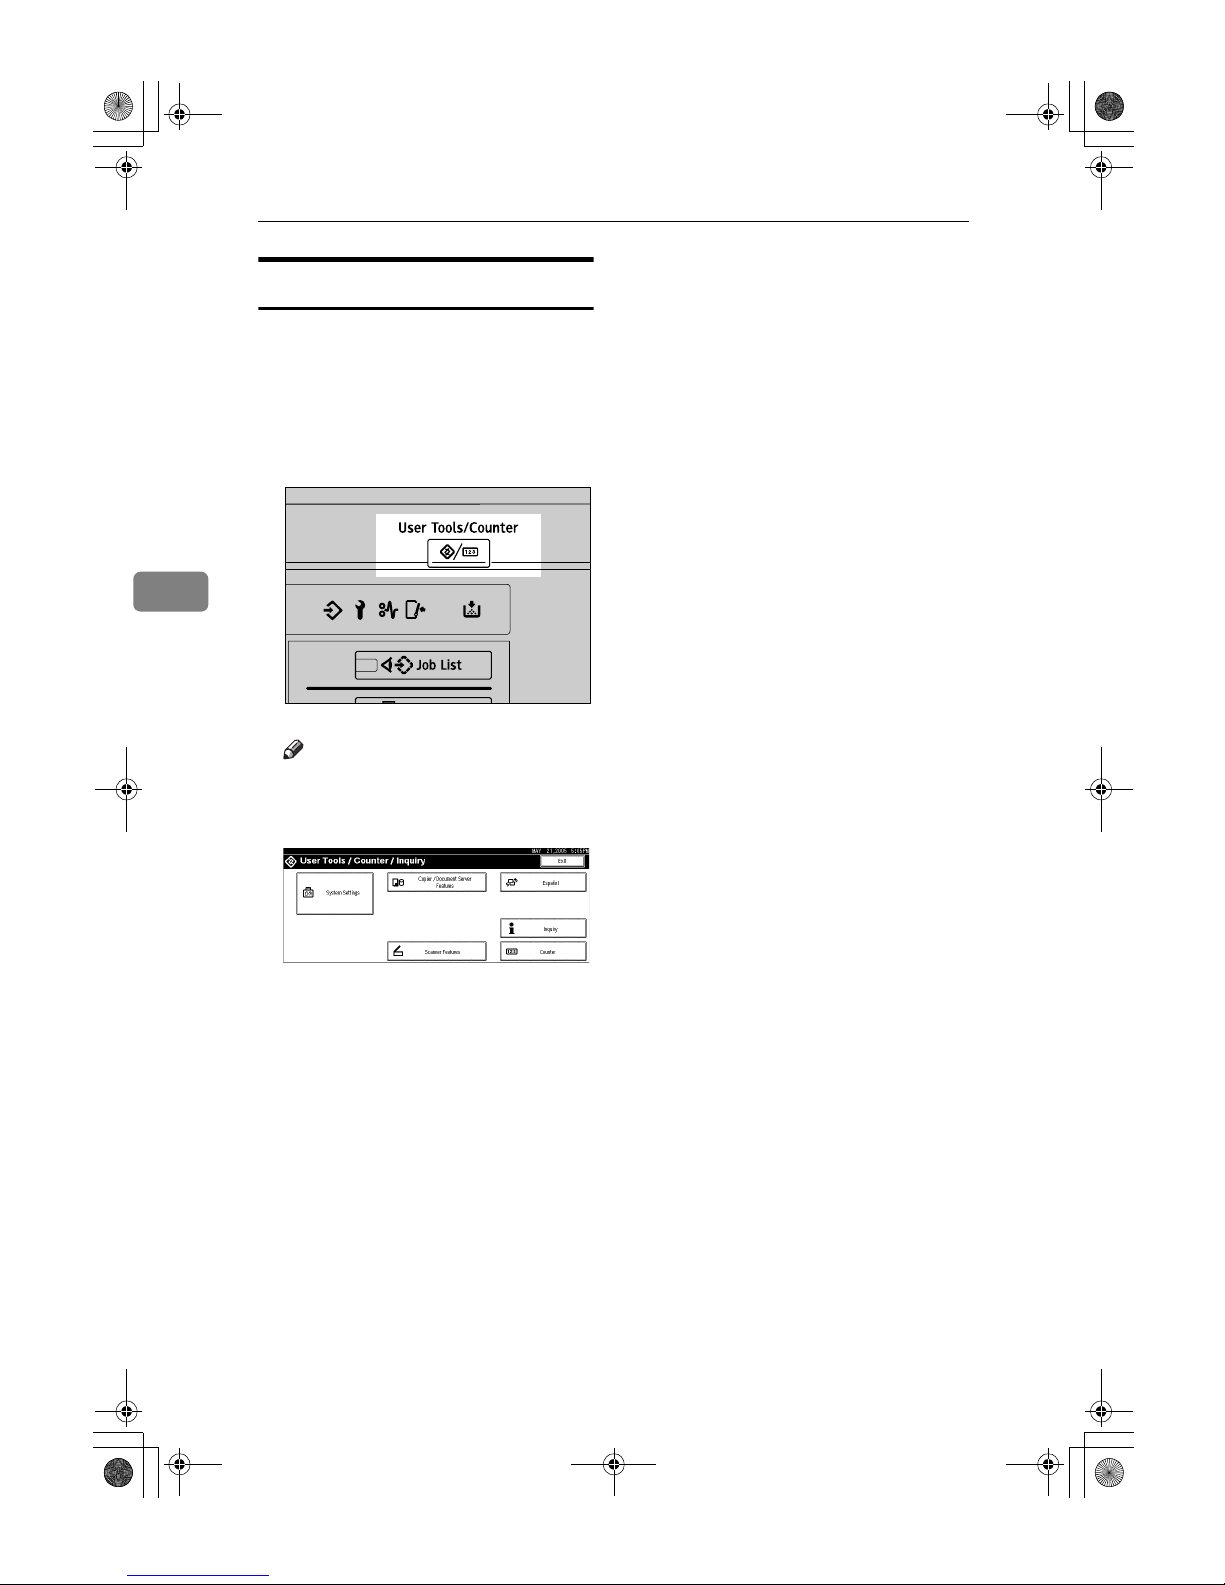
User Tools (Copier / Document Server Features)
82
4
Exiting User Tools
AAAA
After changing default settings,
press [
Exit
] on the User Tools main
menu.
Changes to User Tools are complete, and the machine is ready to
copy.
Note
❒
You can also exit User Tools by
pressing the
{{{{User Tools/Counter}}}}
key.
AHD101S
DolphinC2_ENcopy_F_FM.book Page 82 Friday, February 25, 2005 10:46 AM
Page 91

Settings You Can Change with User Tools
83
4
Settings You Can Change with User Tools
For details about displaying settings, see p.81 “Accessing User Tools (Copier
Features)”.
General Features
❖❖❖❖ Auto Paper Select Priority
Auto Paper Select is the default
setting. You can cancel this setting.
See p.29 “Selecting Copy Paper”.
Note
❒ Default: On
❖❖❖❖ Auto Tray Switching
If you load paper of the same size
in two or more trays, the machine
automatically shifts to the other
when the first tray runs out of paper (when Auto Paper Select is selected.) This function is called
“Auto Tray Switching”. This setting specifies whether to use Auto
Tray Switching or not.
Note
❒ Default: With Image Rotation
• [With Image Rotation] Use to copy
when using the Auto Tray
Switching function.
1.
Original
2.
Paper (Tray 1)
3.
Paper (Other paper tray)
4.
Paper (Other paper tray)
Limitation
❒ Paper may not rotate for
some functions.
• [Without Image Rotation] Only
copies with Auto Tray Switching if you load paper of the
same size and in the same orientation in two or more trays. If
the paper is not the same size or
in the same orientation, copying
is interrupted and the message
“
Load paper
” is displayed.
ZGVX020E
DolphinC2_ENcopy_F_FM.book Page 83 Friday, February 25, 2005 10:46 AM
Page 92
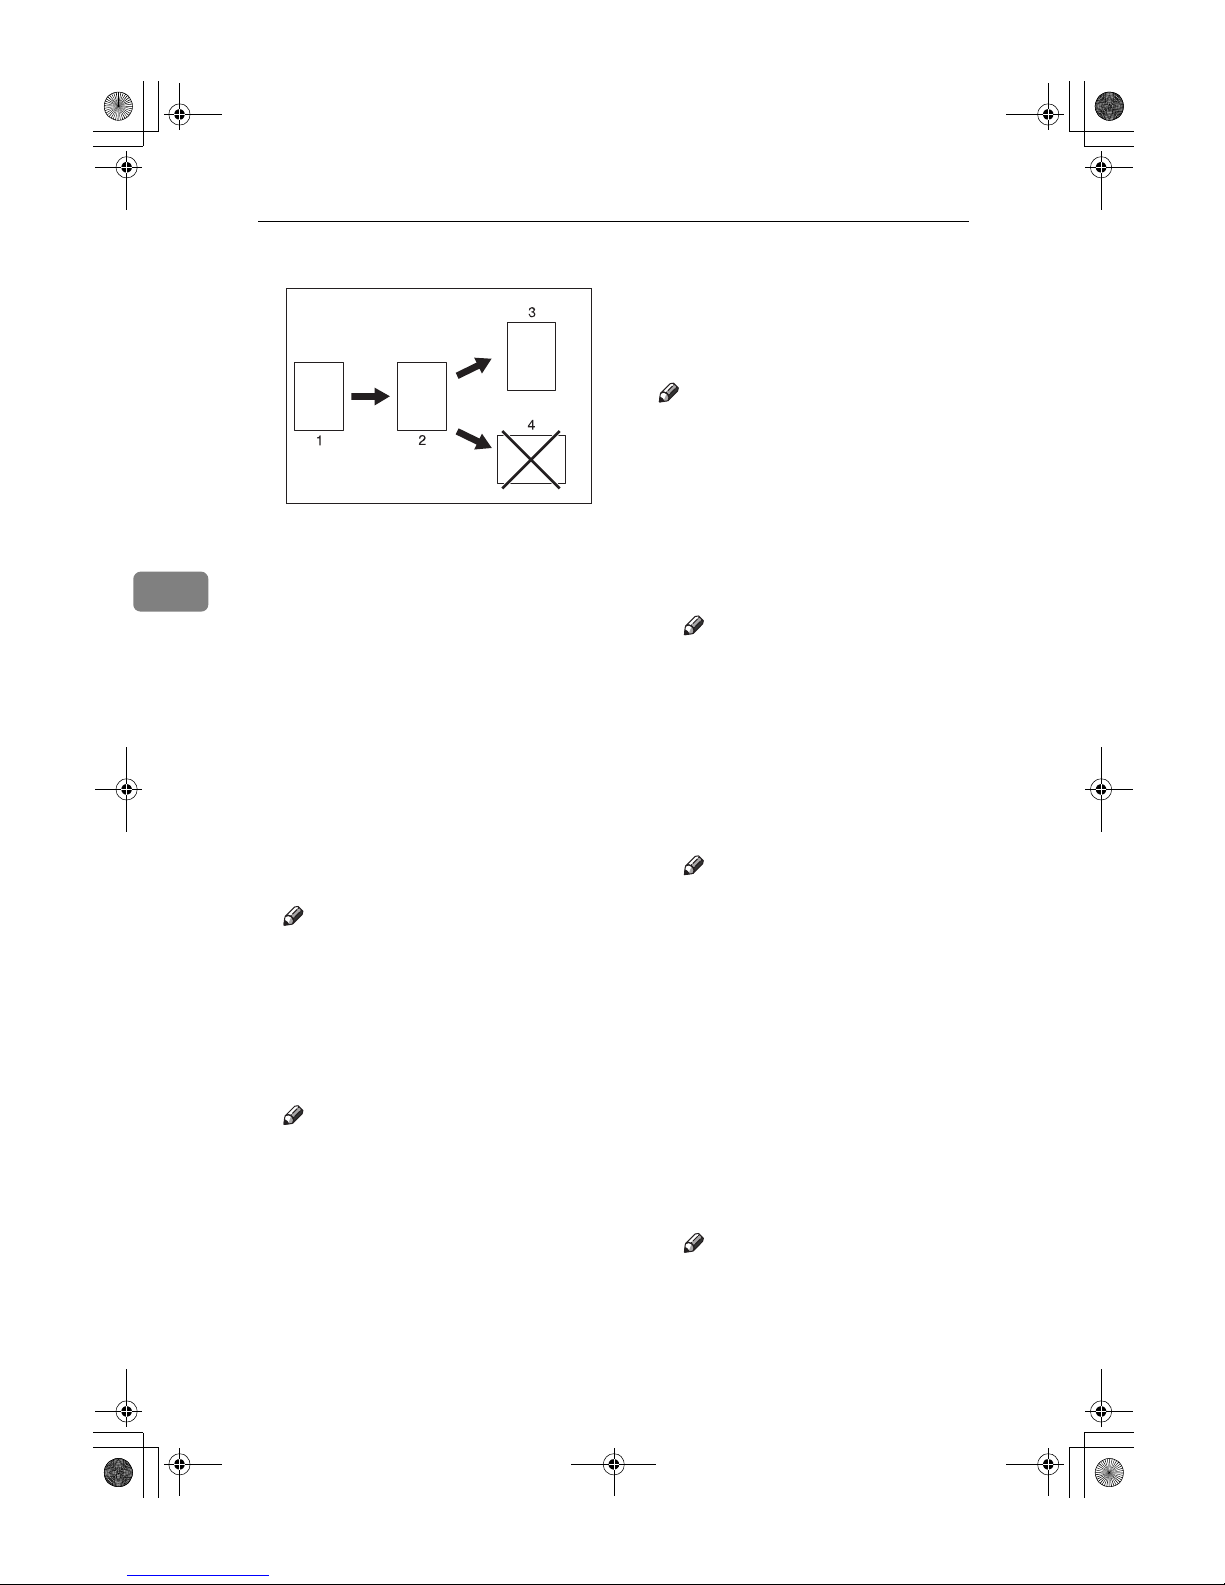
User Tools (Copier / Document Server Features)
84
4
1.
Original
2.
Paper (Tray 1)
3.
Paper (Other paper tray)
4.
Paper (Other paper tray)
• [Off] When a paper tray runs out
of paper, copying is interrupted
and the message “
Load paper
”
is displayed.
❖❖❖❖ Original Type Priority
You can select the type of originals
effective when the machine is
turned on or reset, or when modes
are cleared.
Note
❒ Default: Drawing
❖❖❖❖ Auto Image Density Priority
You can set whether Auto Image
Density is “On” or “Off” when the
machine is turned on, reset, or
modes are cleared.
Note
❒ Default:
• Text: On
• Drawing: On
• Text/Photo: On
• Photo: Off
• Background Lines: On
• Patched Original: On
• Generation Copy: On
❖❖❖❖ Copy Quality
Adjusts the finish for each original
type (Text, Drawing, Text/Photo,
Photo, Background Lines, Patched
Original, Generation Copy).
Note
❒ [
Custom Setting
]: Your service
representative will set this to
meet your requirements. For
details, consult your service
representative.
• Text
Adjusts line and character outline quality in the copy image.
Note
❒ Default: Normal
❒ Character outline is less de-
fined when [Soft] is selected;
more defined when [
Sharp
] is
selected.
• Drawing
Adjusts the line density and
lighter sections of image.
Note
❒ Default: Normal
❒ Originals that have light pen-
cil lines can be reproduced
with greater clarity when
[
Soft
] is selected. When
[Sharp] is selected, pencil
lines can be reproduced
clearly with improved clarity.
• Text / Photo
You can select to prioritize the
copy image of “Text” or “Pho-
to” when copying originals contain photographs and the text.
Note
❒ Default: Normal
❒ When [
Normal
] is selected, an
original containing a mixture
of text and photographs can
be reproduced.
ZGVX030E
DolphinC2_ENcopy_F_FM.book Page 84 Friday, February 25, 2005 10:46 AM
Page 93
Settings You Can Change with User Tools
85
4
• Photo
You can configure the machine
to copy originals with photographs.
Note
❒ Default: Print Photo
❒
Select
[Print Photo]
when copy-
ing
originals with photographs such as magazines or
catalogues. A smooth finish
image can be reproduced.
❒ Select [Glossy Photo] when
copying developed photographs. The text contained
within the photographs can
be reproduced appropriately.
• Background Lines
Note
❒ Default: Normal
• Patched Original
Note
❒ Default: Pale
❖❖❖❖ Image Density
Specifies the copy image density
for each original type (Text, Drawing, Text/Photo, Photo, Background Lines, Patched Original,
Generation Copy).
Note
❒ Default: Normal
❖❖❖❖ Change Initial Mode
You can select standard mode or
Program No.10 as the mode effective when power is turned on, or
modes are cleared.
Note
❒ Default: Standard
❖❖❖❖ Max. Copy Quantity
Specifies the maximum number of
copies that can be set.
Note
❒ Default: 99 sheets
❒ The number can be set from 1 to
99 sheets using the number
keys.
❖❖❖❖ Job End Call
You can choose to have the beeper
sound when copying is complete.
Note
❒ Default: On
❒ If Panel Tone of User Tools (Sys-
tem Settings) settings is [On], the
machine beeps to notify you
that it did not complete a job for
reasons such as: the paper tray
ran out of paper, or a paper misfeed occurred. See “Panel
Tone”, General Settings Guide.
Reproduction Ratio
❖❖❖❖ Custom Magnification Settings 1–3
You can store up to three reproduction ratios, and have them
shown on the initial display. You
can also change registered Reduce
/ Enlarge ratios.
Enter the reproduction ratio using
the number keys.
The value can be set from 25.0% to
400.0%.
Use the {{{{·}}}} key to enter a decimal
point.
Note
❒ Default:
• Metric version:
• Settings 1: 70.7%
• Settings 2: 100%
• Settings 3: 141.4%
DolphinC2_ENcopy_F_FM.book Page 85 Friday, February 25, 2005 10:46 AM
Page 94
User Tools (Copier / Document Server Features)
86
4
• Inch version: (Engineering)
• Settings 1: 64.7%
• Settings 2: 100%
• Settings 3: 129.4%
• Inch version: (Architecture)
• Settings 1: 66.7%
• Settings 2: 100%
• Settings 3: 133.3%
❖❖❖❖ Enlarge 1–4
You can customize available enlargement ratios by pressing [Re-
duce / Enlarge].
Note
❒ Default:
• Metric version:
• Enlarge 1: 141.4%
• Enlarge 2: 200%
• Enlarge 3: 282.8%
• Enlarge 4: 400%
• Inch version: (Engineering)
• Enlarge 1: 129.4%
• Enlarge 2: 200%
• Enlarge 3: 258.8%
• Enlarge 4: 400%
• Inch version: (Architecture)
• Enlarge 1: 133.3%
• Enlarge 2: 200%
• Enlarge 3: 266.7%
• Enlarge 4: 400%
❒ When selecting [
User Enlrg. Ra-
tio
], enter a ratio using the num-
ber keys (in the range of 101.0 to
400.0%).
❖❖❖❖ Reduce 1–4
You can customize available reduction ratios by pressing [
Reduce /
Enlarge].
Note
❒ Default:
• Metric version:
• Reduce 1: 25.0%
• Reduce 2: 35.4%
• Reduce 3: 50.0%
• Reduce 4: 70.7%
• Inch version: (Engineering)
• Reduce 1: 25.0%
• Reduce 2: 32.4%
• Reduce 3: 50.0%
• Reduce 4: 64.7%
• Inch version: (Architecture)
• Reduce 1: 25.0%
• Reduce 2: 33.3%
• Reduce 3: 50.0%
• Reduce 4: 66.7%
❒ When selecting [User Redc.Ra-
tio], enter a ratio using the num-
ber keys (in the range of 25.0 to
99.9%).
❖❖❖❖ Priority Setting : Reduce / Enlarge
You can set the ratio with priority
when [
Reduce / Enlarge
] is pressed.
Note
❒ Default: 100%
❒ The values you set in Enlarge 1–
4 and Reduce 1–4 can be selected here.
❖❖❖❖ User Auto R/E
Specifies original and copy sizes
displayed when [
User Auto R/E
] is
pressed. See p.35 “User Auto Reduce/Enlarge”.
Select the copy size to use with the
original size.
DolphinC2_ENcopy_F_FM.book Page 86 Friday, February 25, 2005 10:46 AM
Page 95
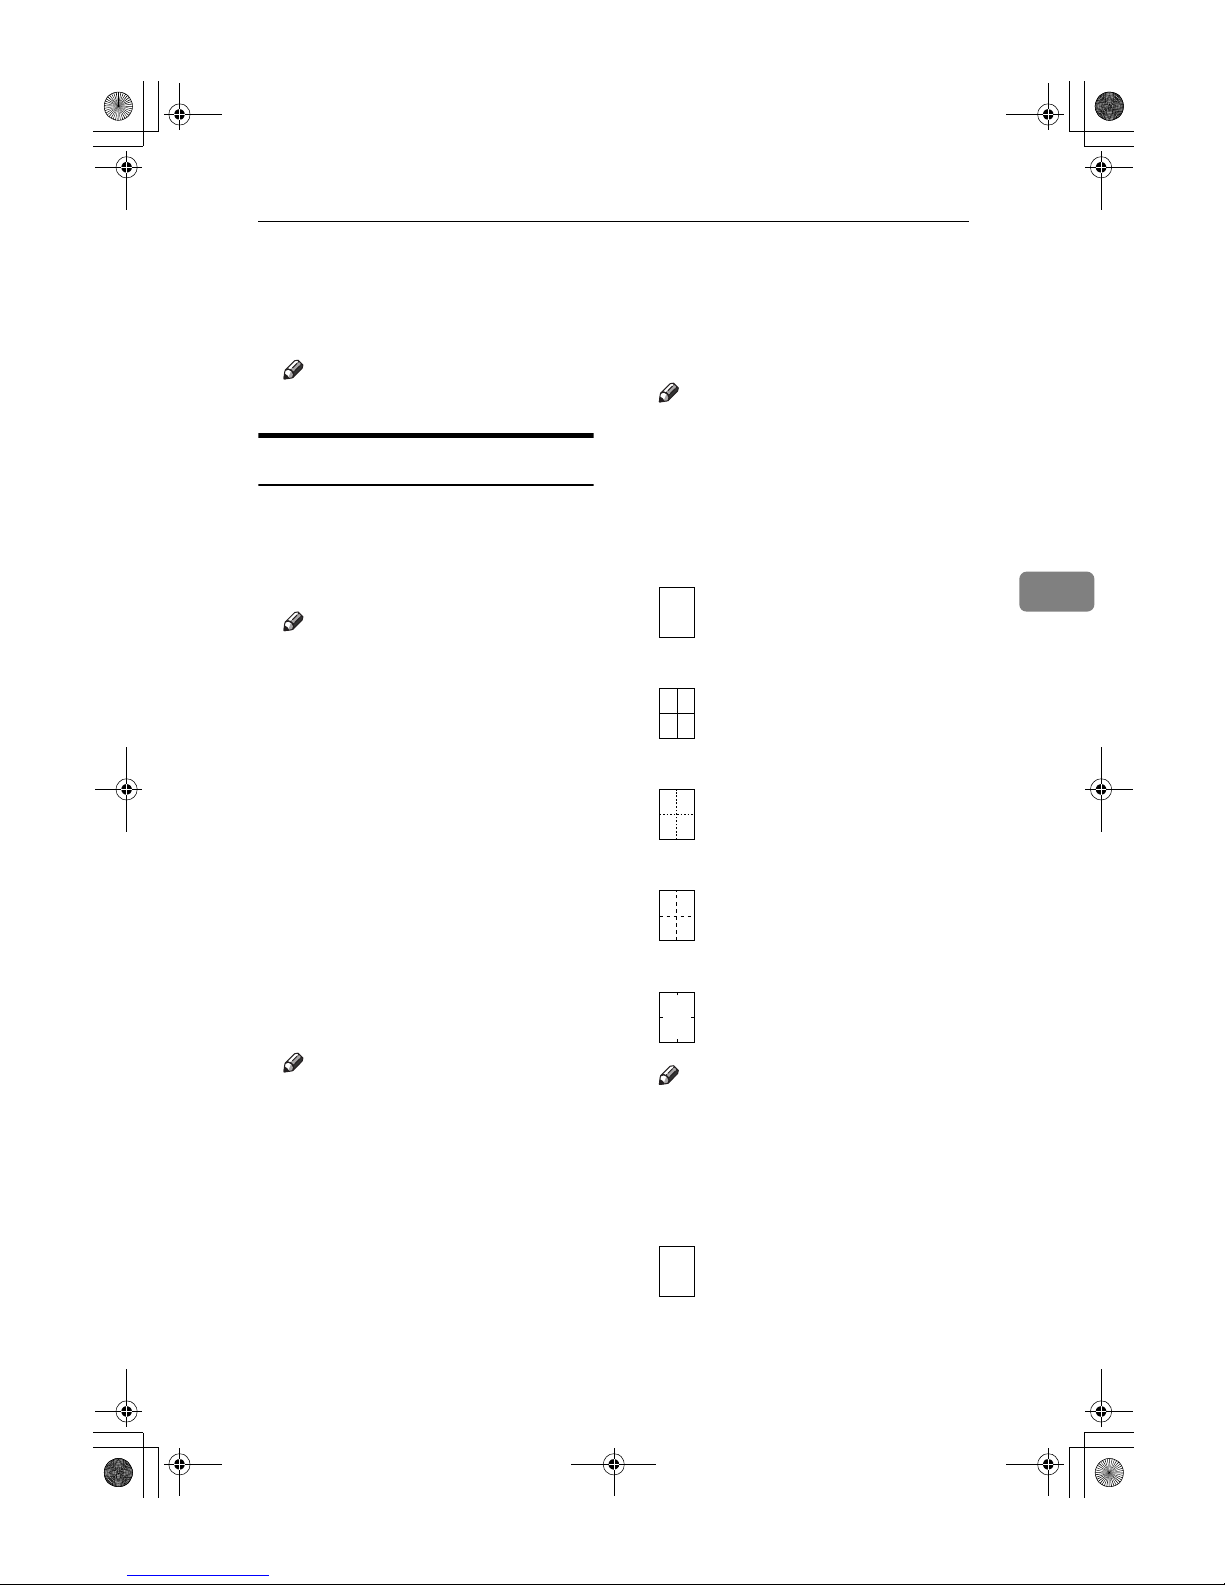
Settings You Can Change with User Tools
87
4
❖❖❖❖ Magnification Key Display
Specifies which scale's reproduction ratios shown on the initial display.
Note
❒ Default: Engineering
Edit
❖❖❖❖ Adjust Position
Specifies the default setting for
Print Position Adjustment. See
p.61 “Adjust Print Position”.
Note
❒ Default:
•
Metric version: Bottom: 20 mm/
Right: 20 mm
• Inch version: Bottom: 0.8"/
Right: 0.8"
❒
You can adjust the position within
the following range:
• Metric version: 0– 200 mm (1
mm increments)
• Inch version: 0– 7.8" (0.1" increments)
❖❖❖❖ Erase Border Width
Specifies the default setting for
Erase Border. See p.48 “Erase Border”.
Note
❒ Default:
• Metric version: 10 mm
• Inch version: 0.4"
❒ The width can be set as follows:
•
Metric version: 2 mm - 99 mm
(1 mm increments)
• Inch version: 0.1" - 2.0" (0.1"
increments)
❖❖❖❖ Erase Original Shadow in Combine
In Combine Copy mode, you can
specify whether to erase a 3 mm,
0.1" bounding margin around all
four edges of each original.
Note
❒ Default: Yes
❖❖❖❖ Image Repeat Separation Line
Specifies a separation line type
when using the Image Repeat
function.
• None
• Solid
• Broken A
• Broken B
• Crop Marks
Note
❒ Default: None
❖❖❖❖ Double Copies Separation Line
Specifies a separation line when
using the Double Copies function.
• None
DolphinC2_ENcopy_F_FM.book Page 87 Friday, February 25, 2005 10:46 AM
Page 96
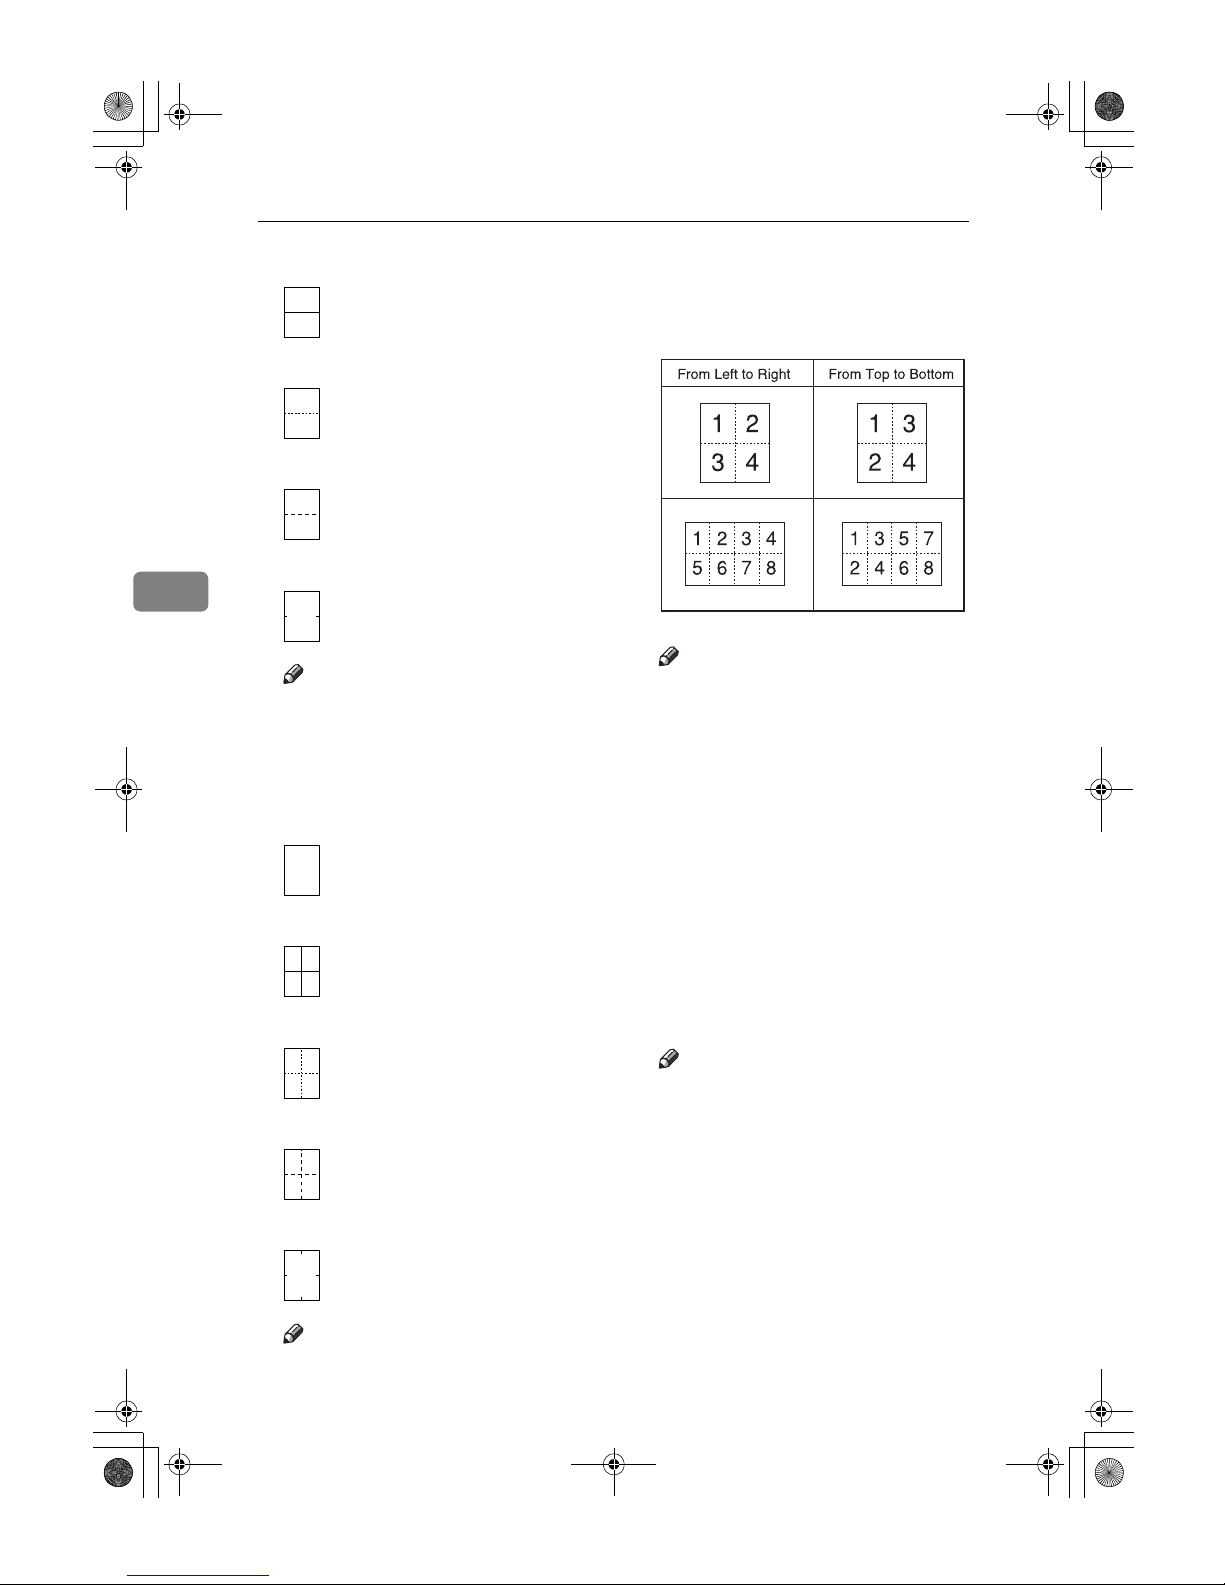
User Tools (Copier / Document Server Features)
88
4
• Solid
• Broken A
• Broken B
• Crop Marks
Note
❒ Default: None
❖❖❖❖ Separation Line in Combine
Specifies a separation line when
using the Combine function.
• None
• Solid
• Broken A
• Broken B
• Crop Marks
Note
❒ Default: None
❖❖❖❖ Copy Order in Combine
You can set the copy order to Left
to Right or Top to Bottom when using the Combine function .
Note
❒ Default: From Left to Right
❖❖❖❖ Program / Delete Format
Stores a format (background) image for use with Format Overlay.
You can store up to four formats.
See p.46 “Format Overlay” and
p.47 “Program/Delete Overlay
Format”.
❖❖❖❖ Margin Adjustment Priority
Specifies the default setting for the
margin size.
You can set the top and bottom
margin sizes. See p.50 “Margin
Adjustment”.
Note
❒ Default:
•
Metric version:
Up 20 mm Down
20 mm
•
Inch version:
Up 0.8" Down 0.8"
❒ The size can be set as follows:
• Metric version: 0 to 200 mm
(1 mm increments)
• Inch version: 0 to 7.9" (0.1" increments)
GCAH090E
DolphinC2_ENcopy_F_FM.book Page 88 Friday, February 25, 2005 10:46 AM
Page 97
Settings You Can Change with User Tools
89
4
❖❖❖❖ Partial Copy Priority
Specifies the default settings of the
start position (Y1) and the copy
size (Y2).
Note
❒ Default:
• Metric version: Y1: 0 mm, Y2:
210 mm
Inch version: Y1: 0", Y2: 8.3"
❒ The size can be set as follows:
• Metric version: Y1: 0 to 14790
mm (1 mm increments), Y2:
210 mm to 15000 mm (1 mm
increments)
• Inch version: Y1: 0 to 582.3"
(0.1" increments), Y2: 8.3" to
590.6"
DolphinC2_ENcopy_F_FM.book Page 89 Friday, February 25, 2005 10:46 AM
Page 98
User Tools (Copier / Document Server Features)
90
4
Stamp
Background Numbering
❖❖❖❖ Size
Make settings for the size of background numbers. See p.51 “Background
Numbering”.
Note
❒ Default: Normal
❖❖❖❖ Density
Make settings for the density of background numbers. See p.51 “Background
Numbering”.
Note
❒ Default: Normal
Preset Stamp
❖❖❖❖ Stamp Priority
You can select the stamp type given priority when [Preset Stamp] is pressed.
See p.52 “Preset Stamp”.
Note
❒ Default: COPY
❖❖❖❖ Stamp Language
You can select the language of the stamp.
Note
❒ Default: English
❖❖❖❖ Stamp Position
You can set the position where the stamp is printed.
Press the arrow keys to adjust the position.
Note
❒ Default:
• Metric version:
• Position: Top Right
• Top Margin: 24 mm
• Right Margin: 24 mm
DolphinC2_ENcopy_F_FM.book Page 90 Friday, February 25, 2005 10:46 AM
Page 99
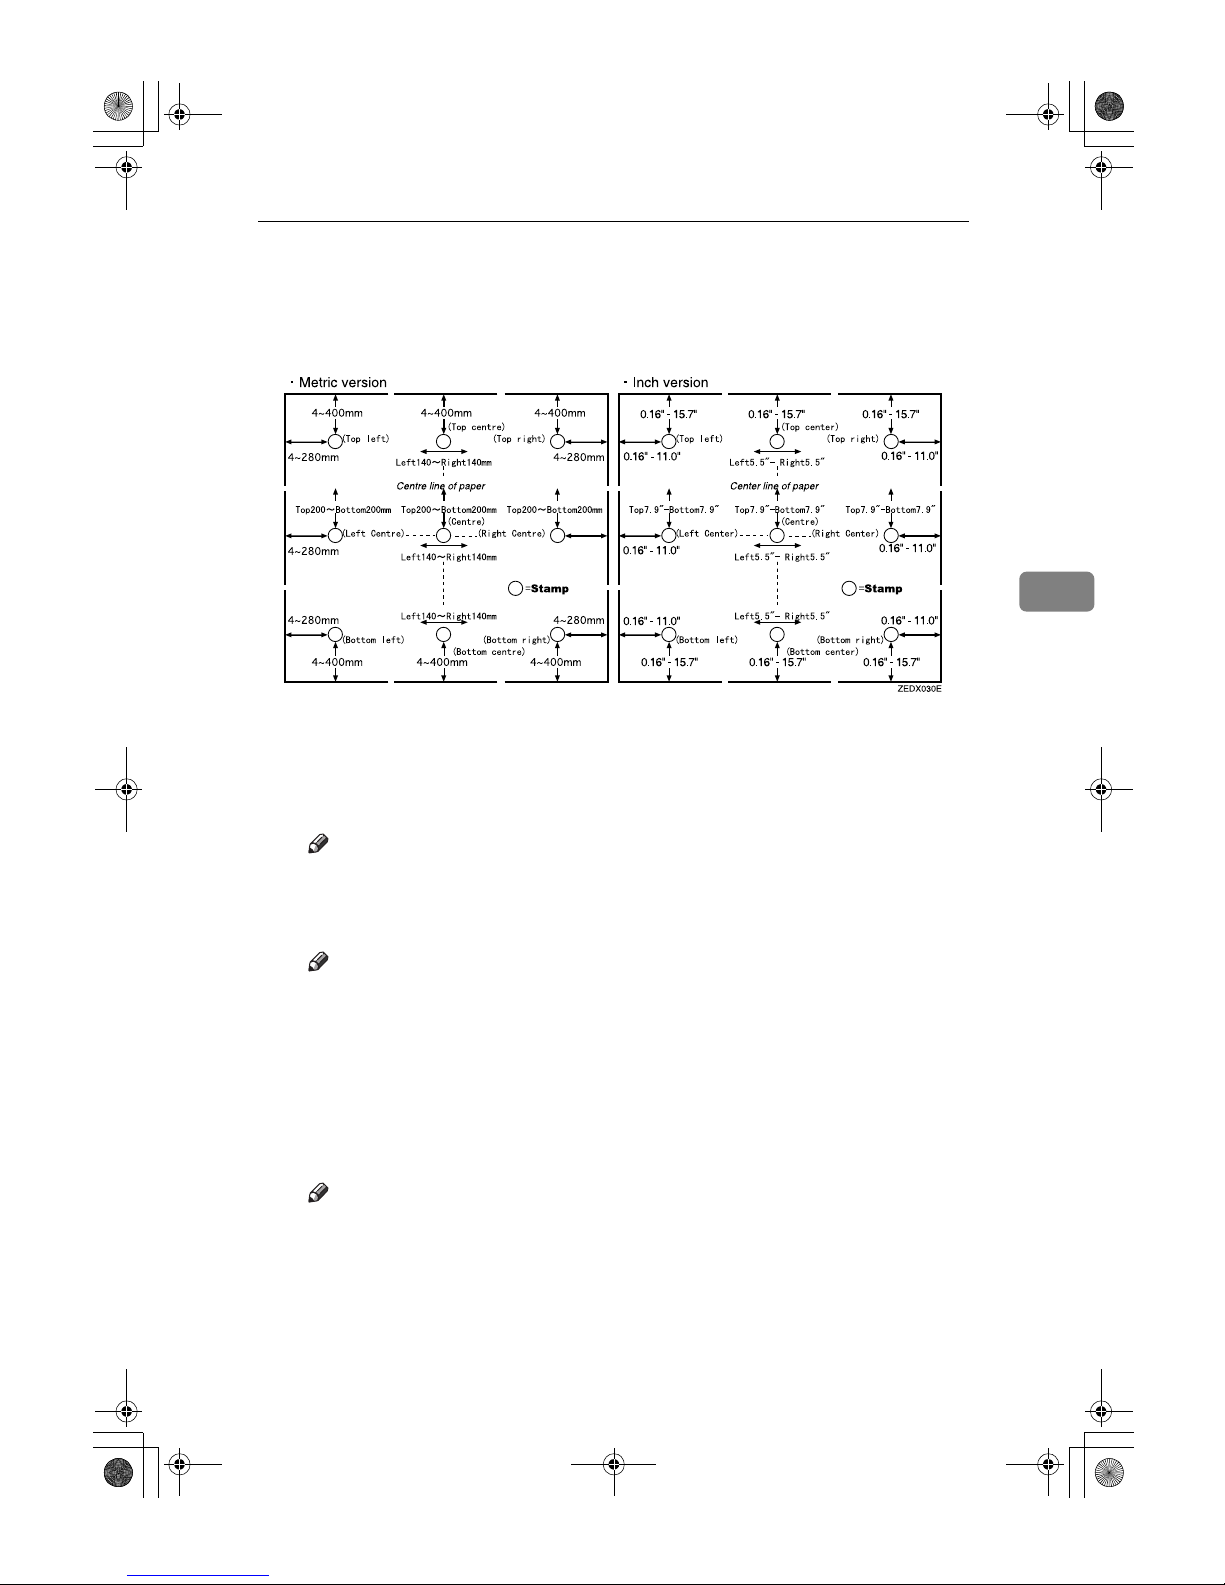
Settings You Can Change with User Tools
91
4
• Inch version:
• Position: Top Right
• Top Margin: 1.0"
• Right Margin: 1.0"
❖❖❖❖ Stamp Format
You can adjust the stamp's size, density, and print page.
• Size
You can set the size of the stamp.
Note
❒ Default: 1 X
• Density
You can set the pattern used to print the stamp.
Note
❒ Default: Normal
❒ Normal: The stamp is printed on the image. You cannot check which
parts will overlap.
❒ Lighter: The image can be seen through the stamp.
❒ Lightest: The image appears even clearer than in the Lighter setting.
• Print Page
You can have the stamp printed on the first page or all pages.
Note
❒ Default: All Pages
DolphinC2_ENcopy_F_FM.book Page 91 Friday, February 25, 2005 10:46 AM
Page 100
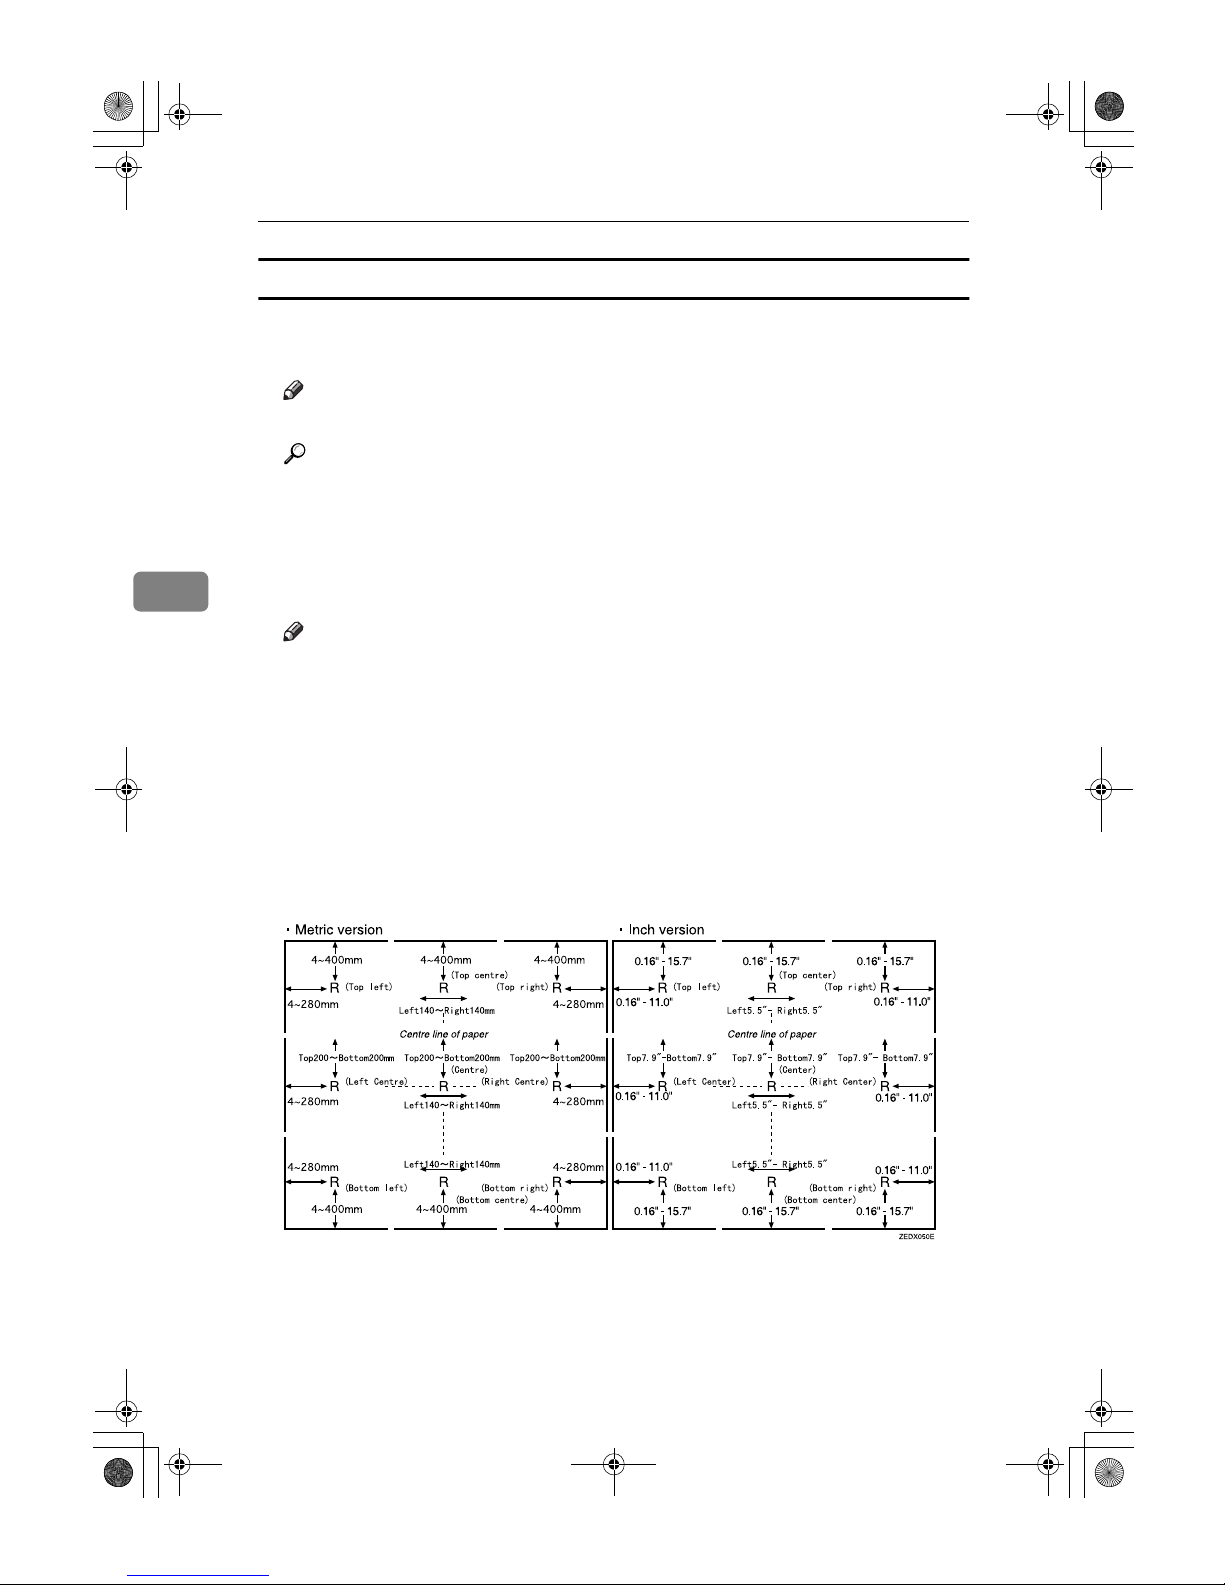
User Tools (Copier / Document Server Features)
92
4
User Stamp
❖❖❖❖ Program / Delete Stamp
You can store, change, or delete a design of your choice as a user stamp.
Note
❒ You can store up to four user stamps. See p.53 “User Stamp”.
Reference
For details about deleting user stamps, see p.55 “Program/Delete User
Stamp”.
❖❖❖❖ Stamp Position 1 - 4
You can set the position where the stamp is printed.
Press the arrow keys to adjust the position.
Note
❒ Default:
• Metric version:
• Position: Top Right
• Top Margin: 24 mm
• Right Margin: 24 mm
• Inch version:
• Position: Top Right
• Top Margin: 1.0"
• Right Margin: 1.0"
❖❖❖❖ Stamp Format 1 - 4
You can adjust the print page for User Stamps 1 to 4 already registered.
• Page to Stamp
Sets whether to print the stamp on all pages or only the first page.
DolphinC2_ENcopy_F_FM.book Page 92 Friday, February 25, 2005 10:46 AM
 Loading...