

Page 1
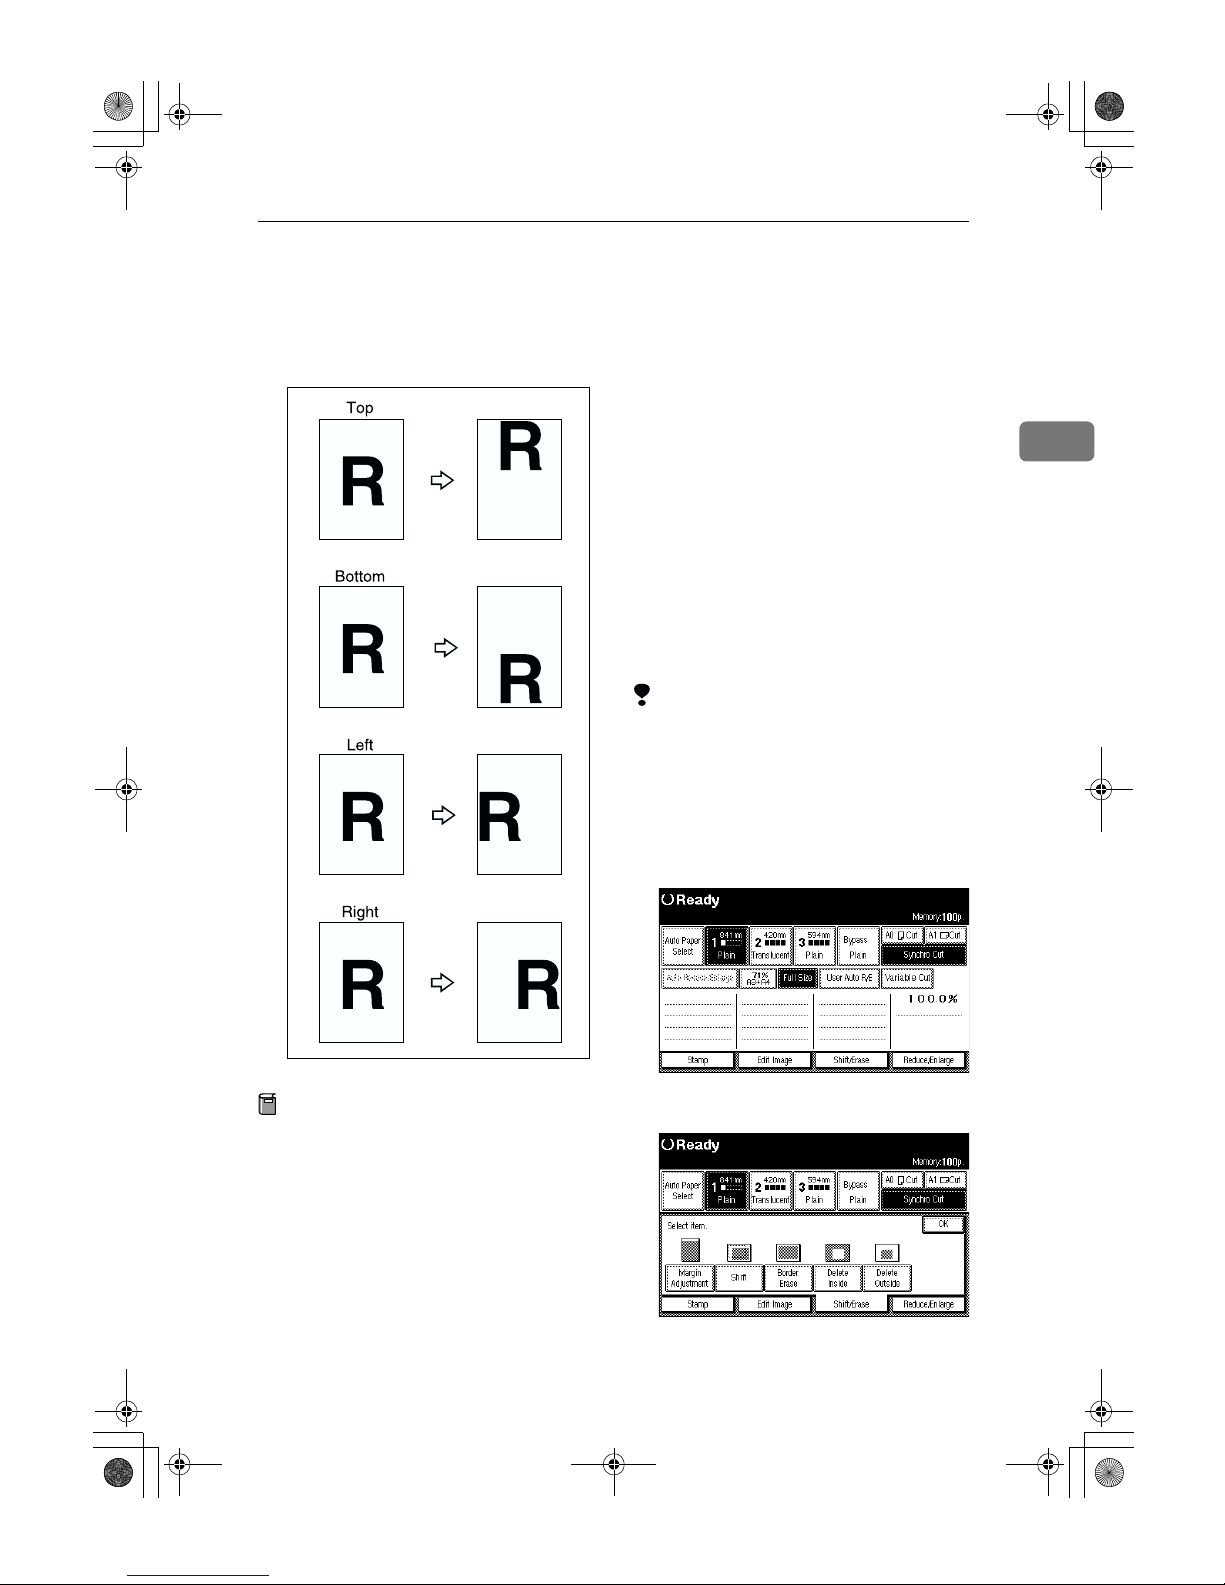
Shift
71
2
Shift
Moves (shifts) the copy image up,
down, left, or right to create a margin.
Preparation
You can select the following types
of margin for this function.
• [↑↑↑↑] key (Top): Shifts the image
towards the leading edge of the
original (top of the copy.)
• [↓↓↓↓] key (Bottom): Shifts the im-
age towards the trailing edge of
the original (bottom of the
copy.)
• [←←←←] key (Left): Shifts the image
towards the left of the original.
• [→→→→] key (Right): Shifts the im-
age towards the right of the
original.
You can shift the image from 0 to
200mm in 1mm steps (0 to 7.8" in
0.1" steps).
The default setting is 20mm, 2.0".
You can change this setting. See
p.133 “Shift Image Area Priority”
You can also shift the image in a
combination of up/down and left/
right.
Limitation
❒ When using the print and shift set-
tings, the print position is moved
in the direction of the shift setting.
❒ You can use the Shift function for
copy sizes up to A0 (E).
A
Press the [Shift/Erase] key.
B
Press the [Shift] key.
ZEDG110E
DolphinGB- Copy-F_V4_ FM.book Page 71 Monday, June 11, 2001 5:02 PM
Page 2
Copying
72
2
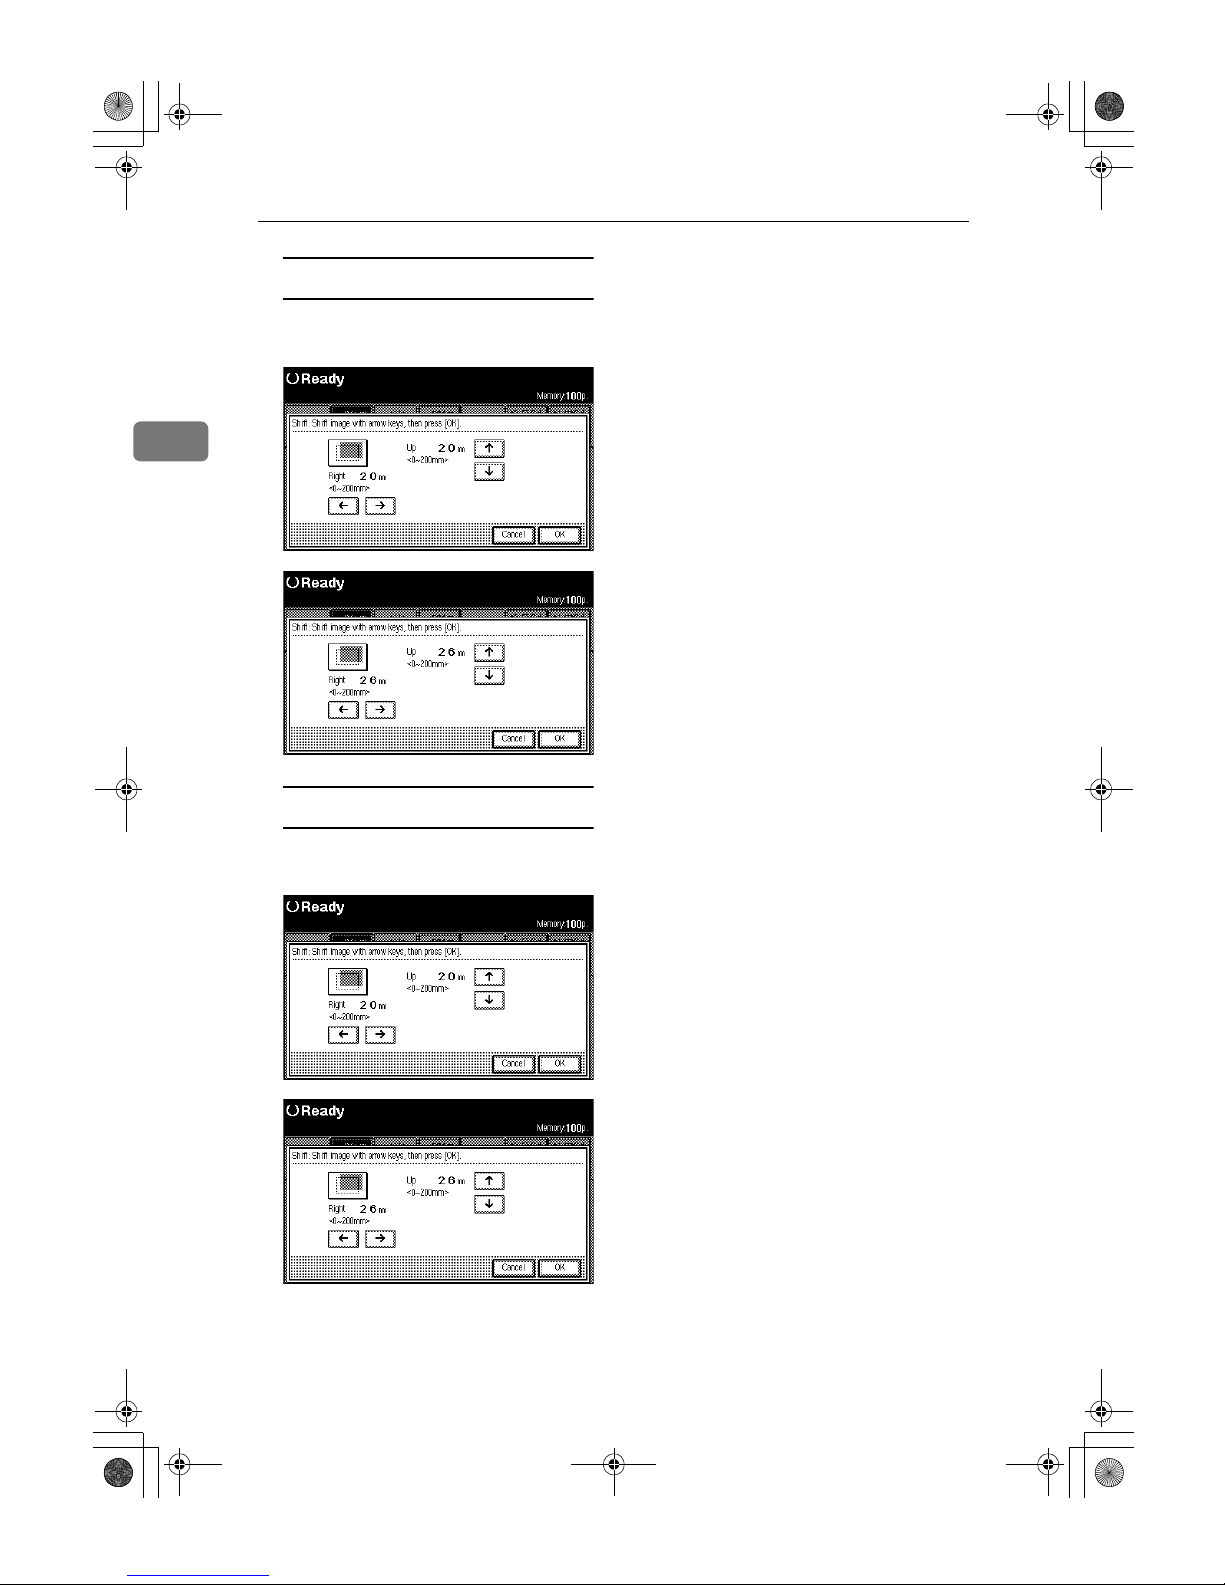
Creating a top or bottom margin
A Press the [↑↑↑↑] or [↓↓↓↓] keys to set
the length of the shift amount.
Creating a left or right margin
A Press the [←←←←] or [→→→→] keys to set
the length of the shift amount.
C
Press the [OK] key.
DolphinGB- Copy-F_V4_ FM.book Page 72 Monday, June 11, 2001 5:02 PM
Page 3
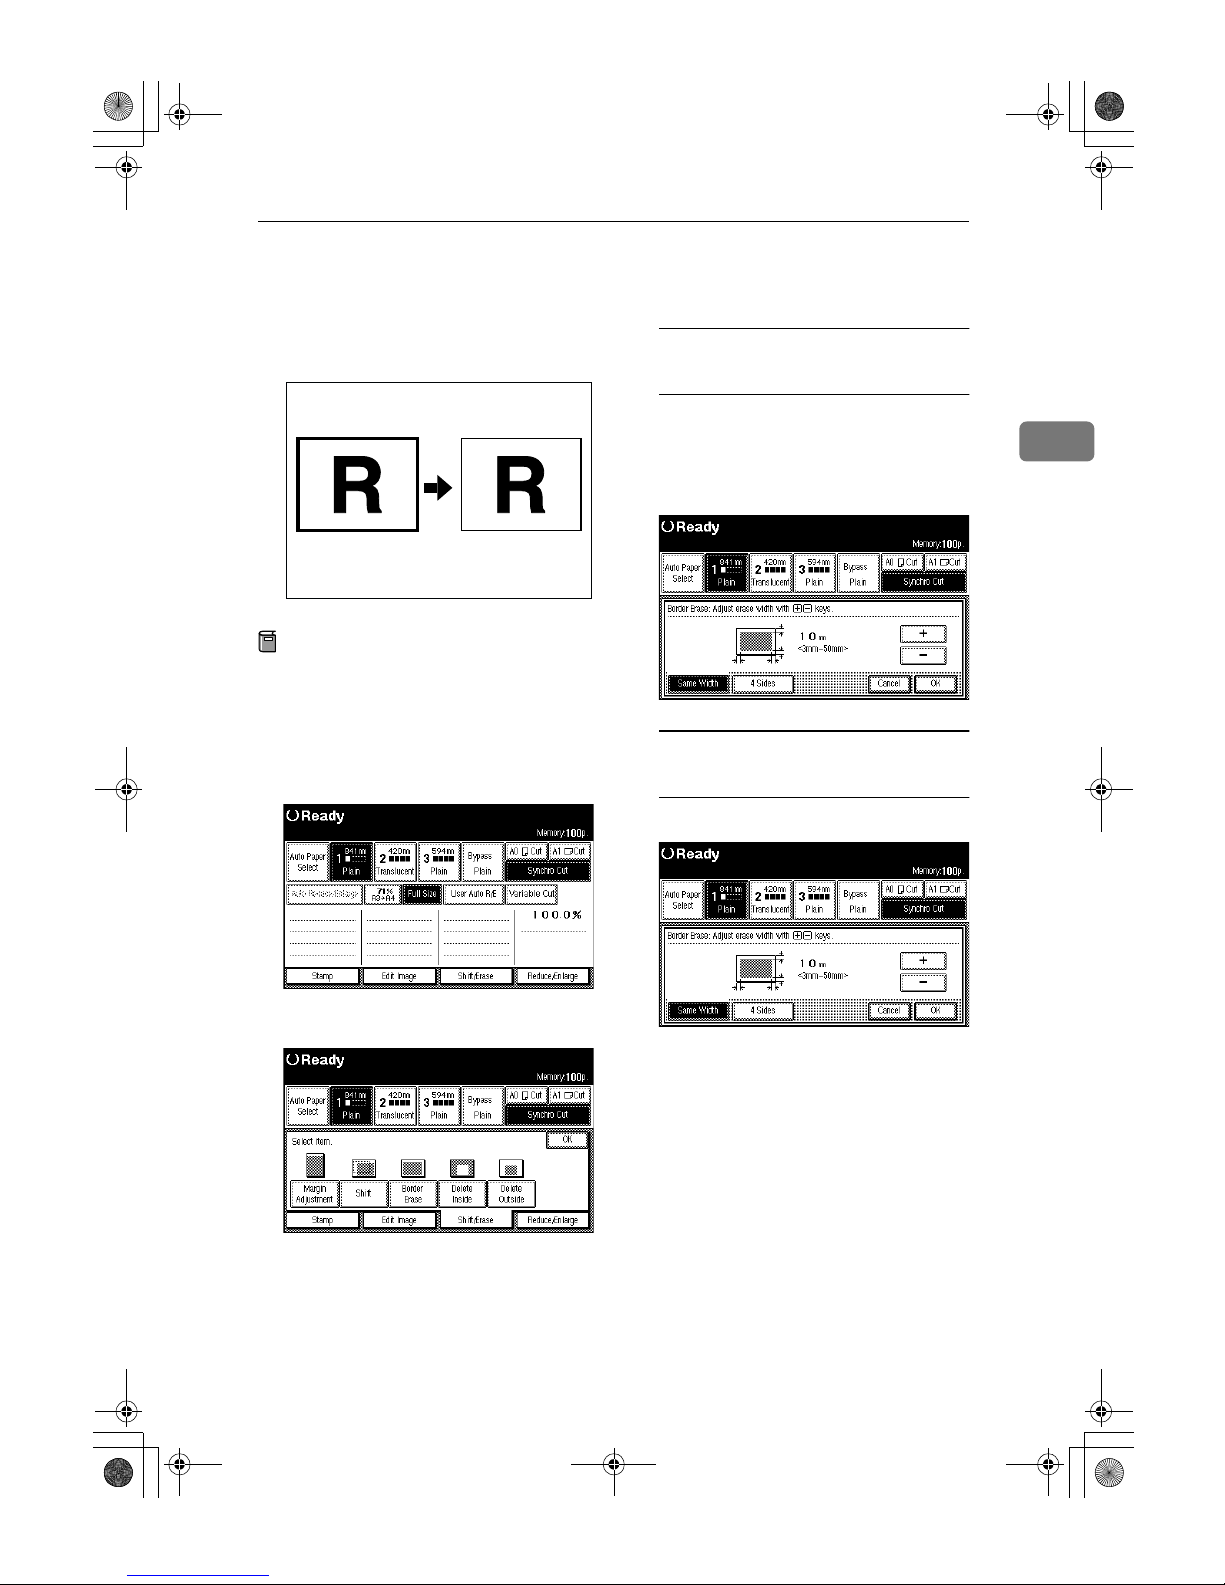
Border Erase
73
2
Border Erase
Erases the rim area of the original image.
Preparation
The default border erase setting is
10mm, 0.4". You can change this
setting. See p.133 “Border Erase
Width Priority”
A
Press the [Shift/Erase] key.
B
Press the [Border Erase] key.
Setting border erase to same
width
A Press the [Same Width] key.
B Press the [-] or [+] keys to set
the Border Erase width, and
then press the [OK] key.
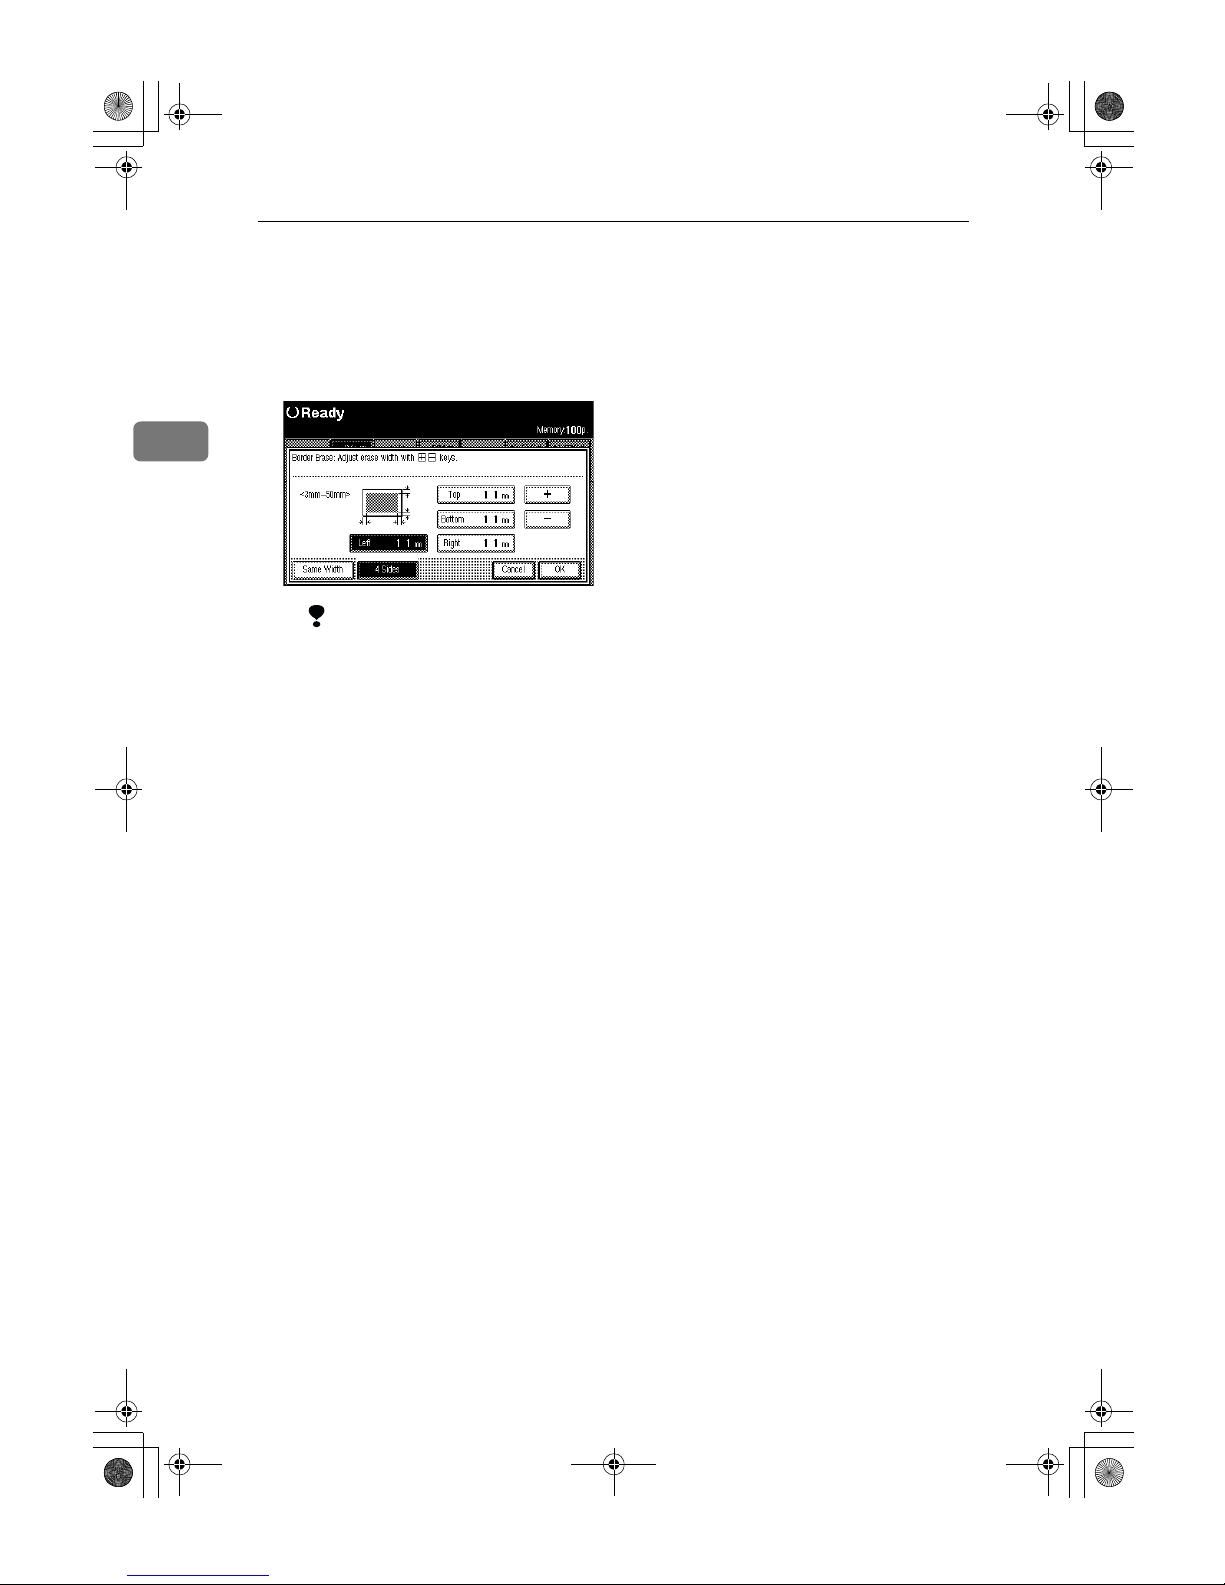
Setting border erase to separate
widths
A Press the [4 Sides] key.
ZEDX080E
DolphinGB- Copy-F_V4_ FM.book Page 73 Monday, June 11, 2001 5:02 PM
Page 4
Copying
74
2
B Press the [Top], [Bottom], [Left]
and [Right] keys to select the
erase rim area, and set the Border Erase width using the [-] or
[+] keys. Then press the [OK]
key.
Limitation
❒ When using the Border Erase
function with other functions, see p.102 “Chart of
Scan Sizes for Each Function”.
DolphinGB- Copy-F_V4_ FM.book Page 74 Monday, June 11, 2001 5:02 PM
Page 5
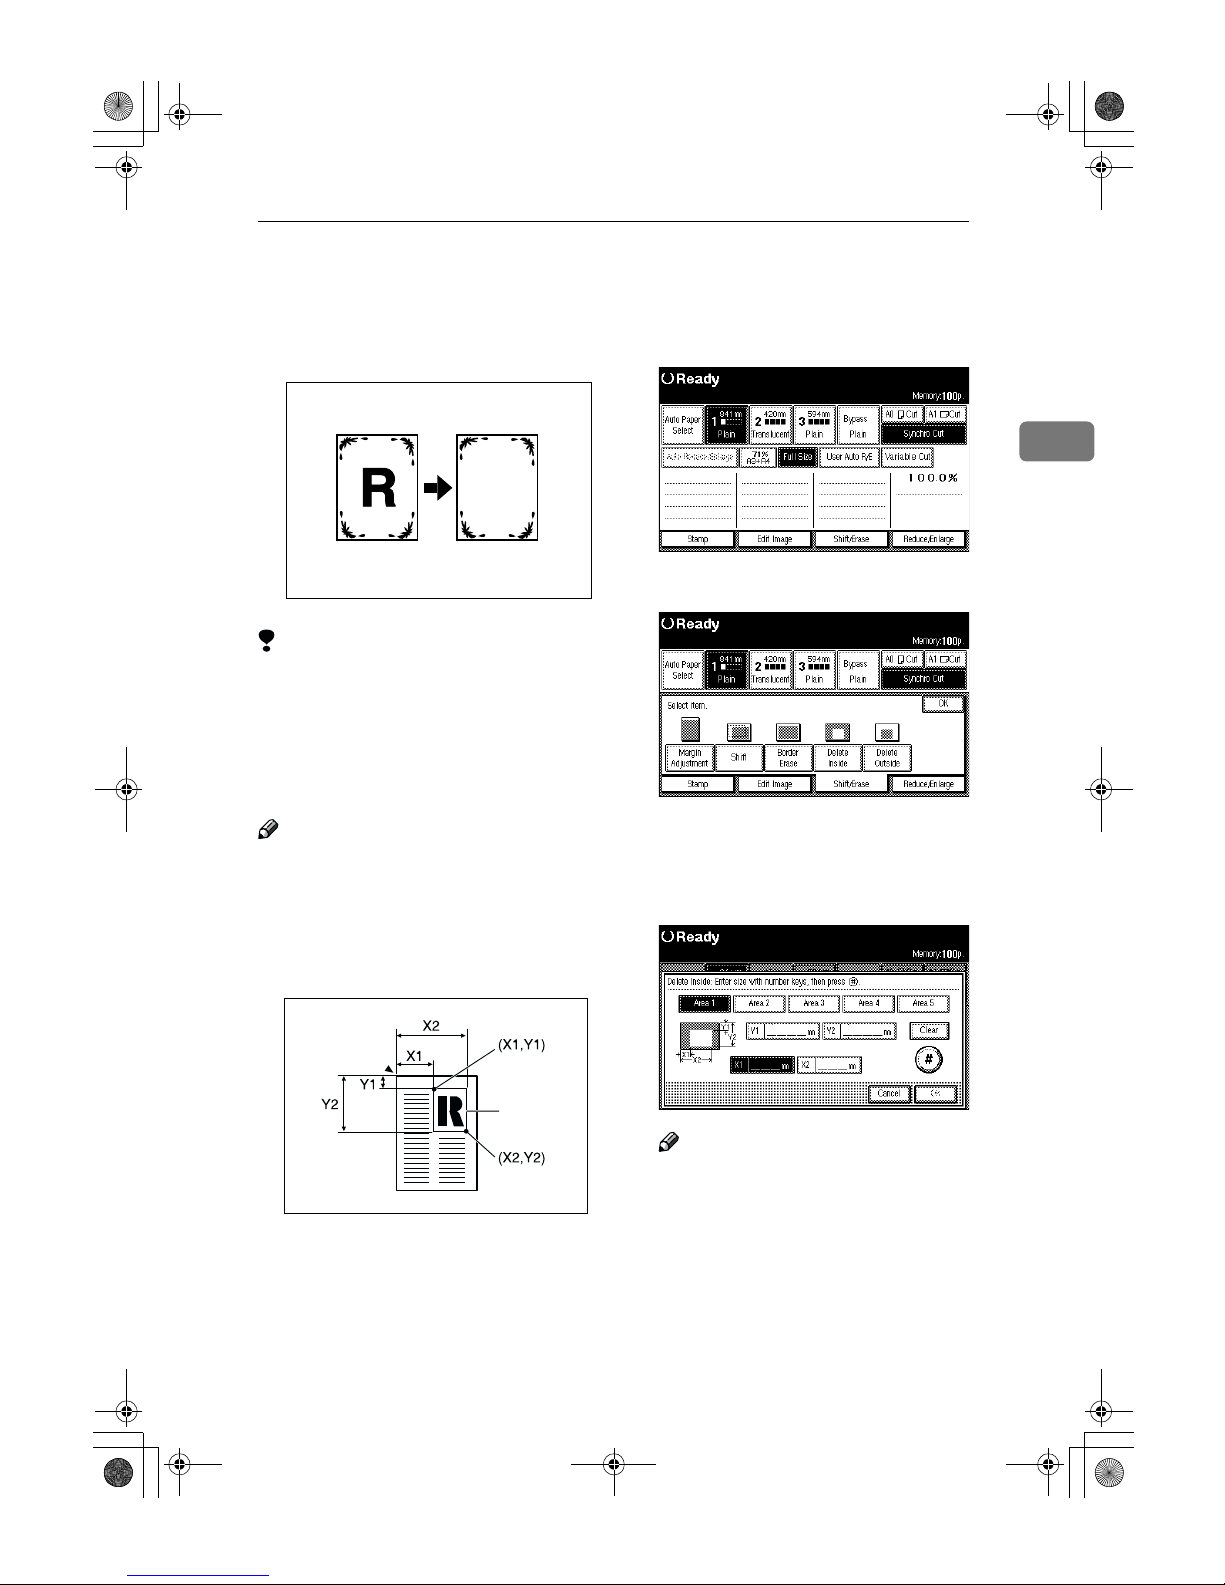
Delete Inside
75
2
Delete Inside
Copies the original while erasing
parts inside a specified area.
Limitation
❒ If the original is larger than A1,
you can only erase one area (Metric version only).
❒ If the original is larger than C, you
can only erase one area (Inch version only).
Note
❒ The area is specified by defining to
two points for the top left of the
original (X1, Y1) and two points for
the size of the area (X2, Y2). Measure the area you want to specify
before entering the area settings.
❒
When using this function with the
magnification function, the actual
setting will be the specified setting
multiplied by the reproduction ratio.
❒ You can specify up to 5 areas.
A
Press the [Shift/Erase] key.
B
Press the [Delete Inside] key.
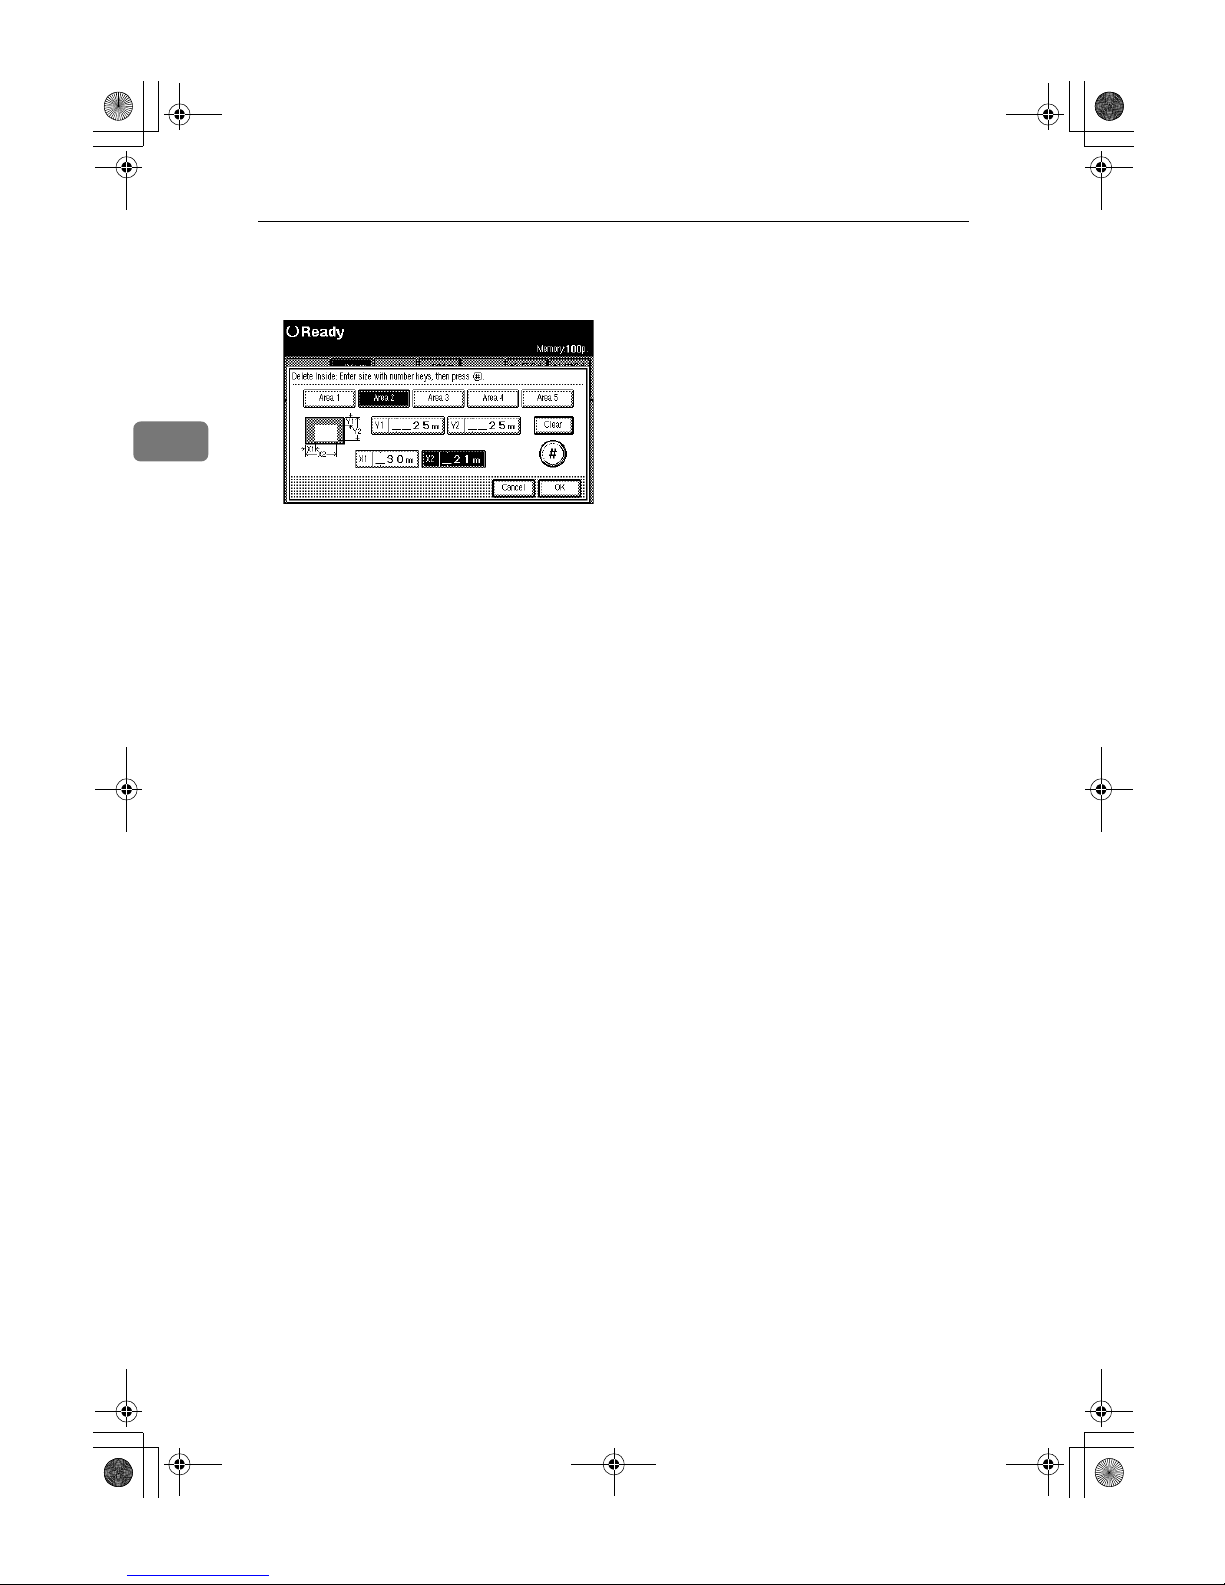
C
Press the [Y1], [Y2], [X1] and [X2]
keys to select the delete position,
and enter the values to specify the
area, and then press the [#] key.
Note
❒ To change the value, press the
[Clear] key, and then enter the
new value.
Delete Inside
ZEDX010E
ZEDG140E
Area
DolphinGB- Copy-F_V4_ FM.book Page 75 Monday, June 11, 2001 5:02 PM
Page 6
Copying
76
2
D
To specify several areas, specify
areas 1 – 5 in the same way.
E
Press the [OK] key.
DolphinGB- Copy-F_V4_ FM.book Page 76 Monday, June 11, 2001 5:02 PM
Page 7
Delete Outside
77
2
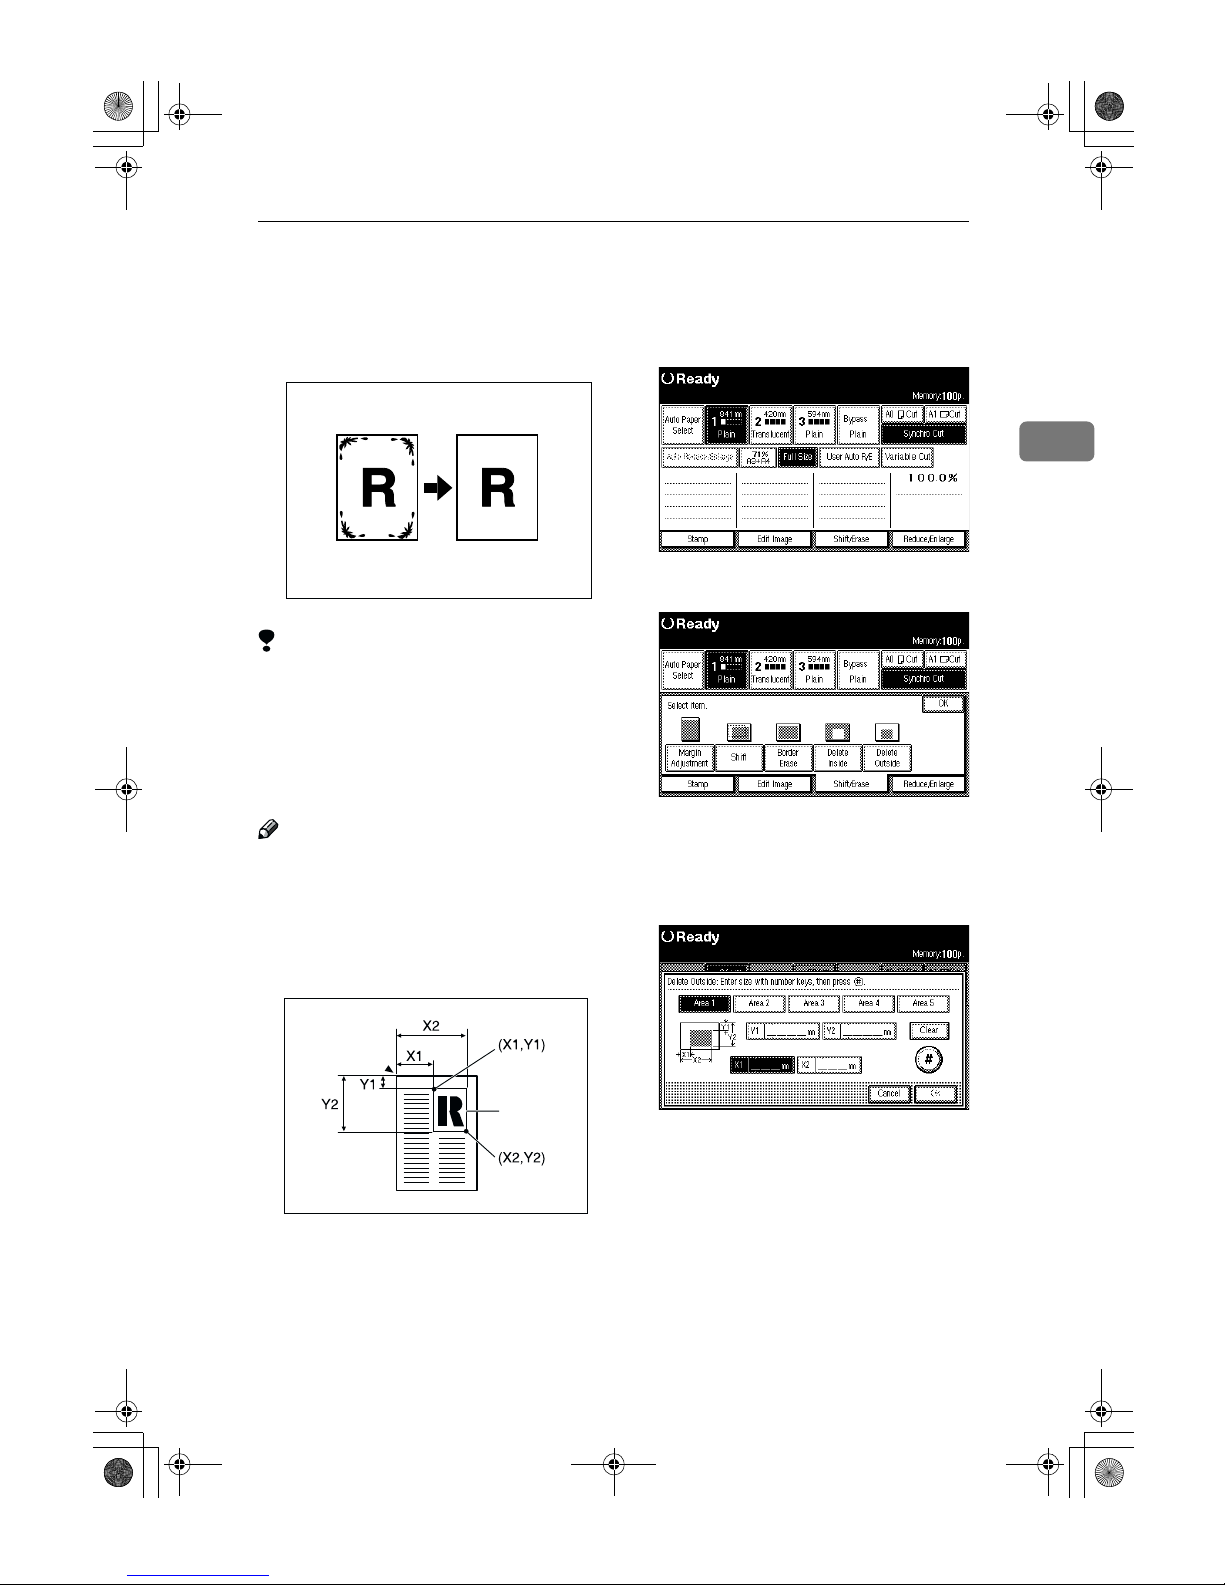
Delete Outside
Copies the original while erasing
parts outside a specified area.
Limitation
❒ If the original is larger than A1,
you can only specify one area
(Metric version only).
❒ If the original is larger than C, you
can only erase one area (Inch version only).
Note
❒ The area is specified by defining
two points for the top left of the
original (X1, Y1) and two points for
the size of the area (X2, Y2). Measure the area you want to specify
before entering the area settings.
❒
When using this function with the
magnification function, the actual
setting will be the specified setting
multiplied by the reproduction ratio.
❒ You can specify up to 5 areas.
A
Press the [Shift/Erase] key.
B
Press the [Delete Outside] key.
C
Press the [Y1], [Y2], [X1] and [X2]
keys to select the delete position,
and enter the values to specify the
area, and then press the [#] key.
D
To specify several areas, specify
areas 1 – 5 in the same way.
E
Press the [OK] key.
Delete Outside
ZEDX020E
ZEDG140E
Area
DolphinGB- Copy-F_V4_ FM.book Page 77 Monday, June 11, 2001 5:02 PM
Page 8
Copying
78
2
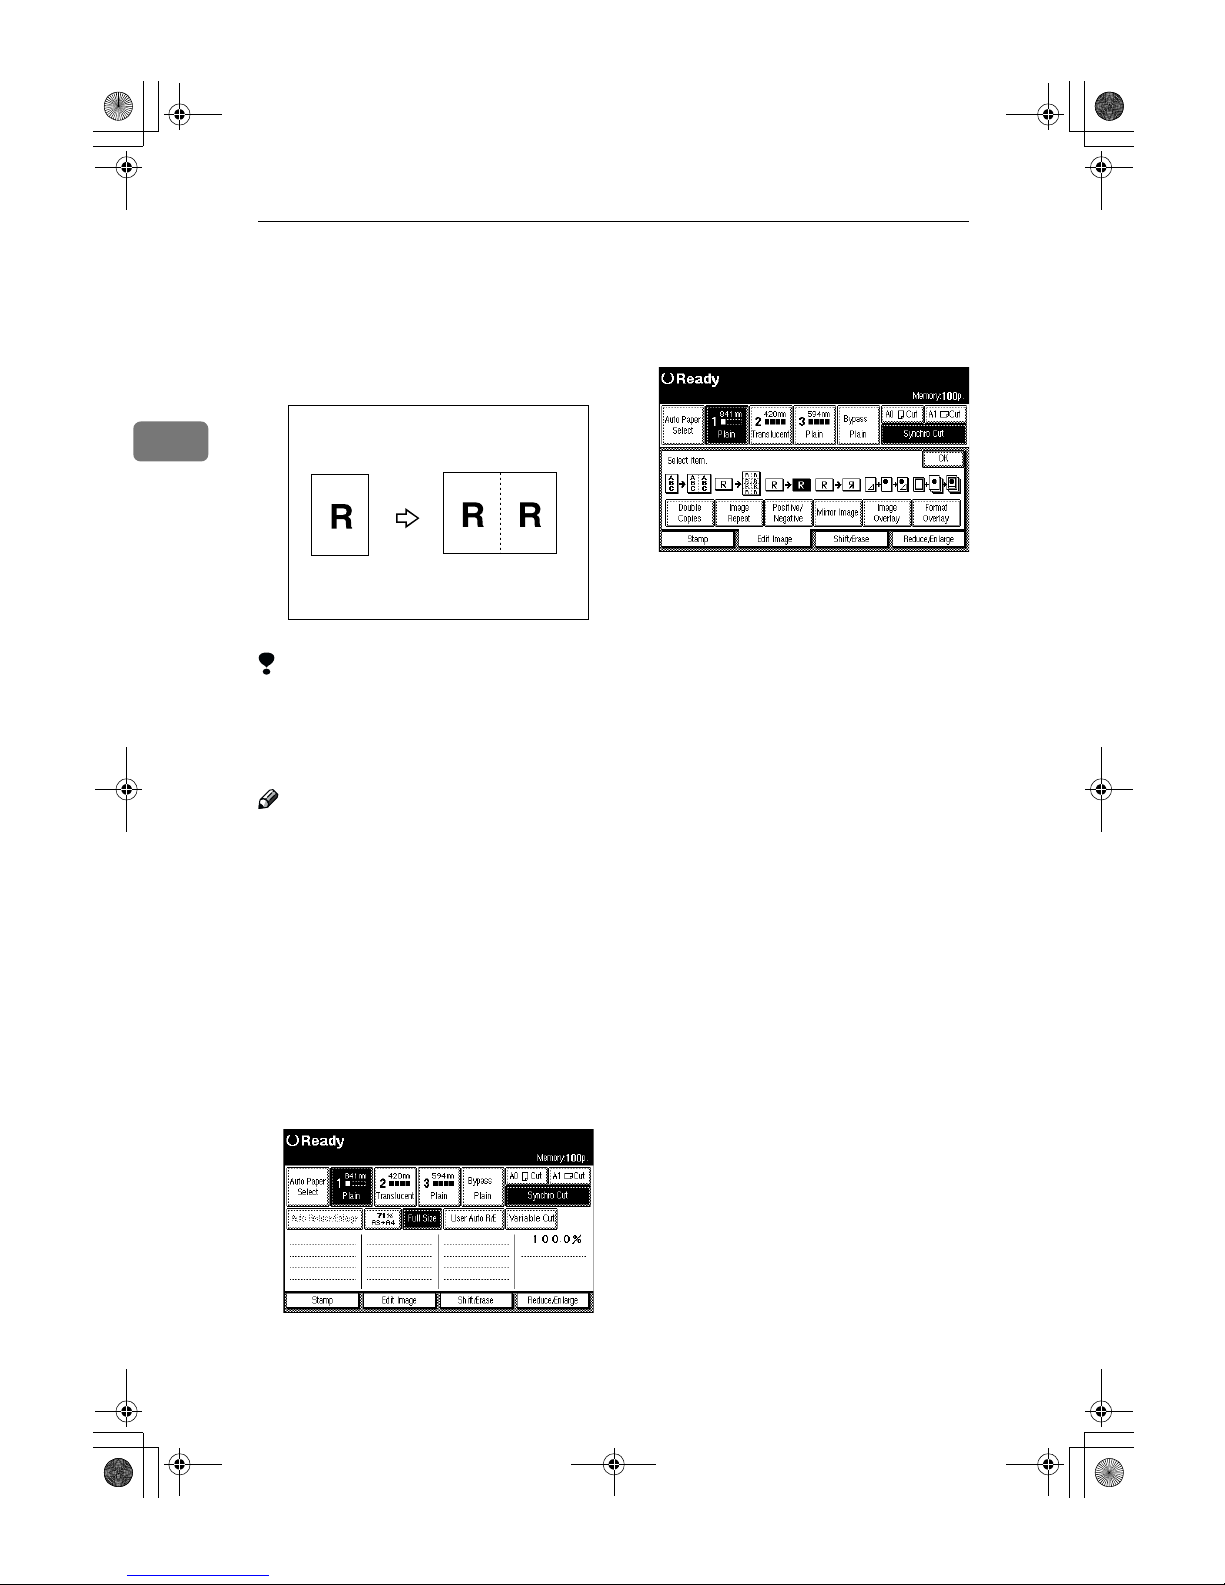
Double Copies
One original image is copied twice on
to one copy as shown in the illustration.
Limitation
❒ You can copy an image up to A2
(C) in size with the Double Copies
function K. You can use a paper
size up to A1 (D) L.
Note
❒ You can erase the separation line
between the two images. The default setting is Separation Line. See
p.134 “Double Copies Separation
Line”
❒ When using Double Copies, the
paper size must be twice as large as
the original (when [Full Size] is se-
lected). When using Reduce/Enlarge, consider the magnification
ratio when selecting the paper size.
A
Press the [Edit Image] key.
B
Press the [Double Copies ] key.
C
Press the [OK] key.
ZEDG170E
DolphinGB- Copy-F_V4_ FM.book Page 78 Monday, June 11, 2001 5:02 PM
Page 9
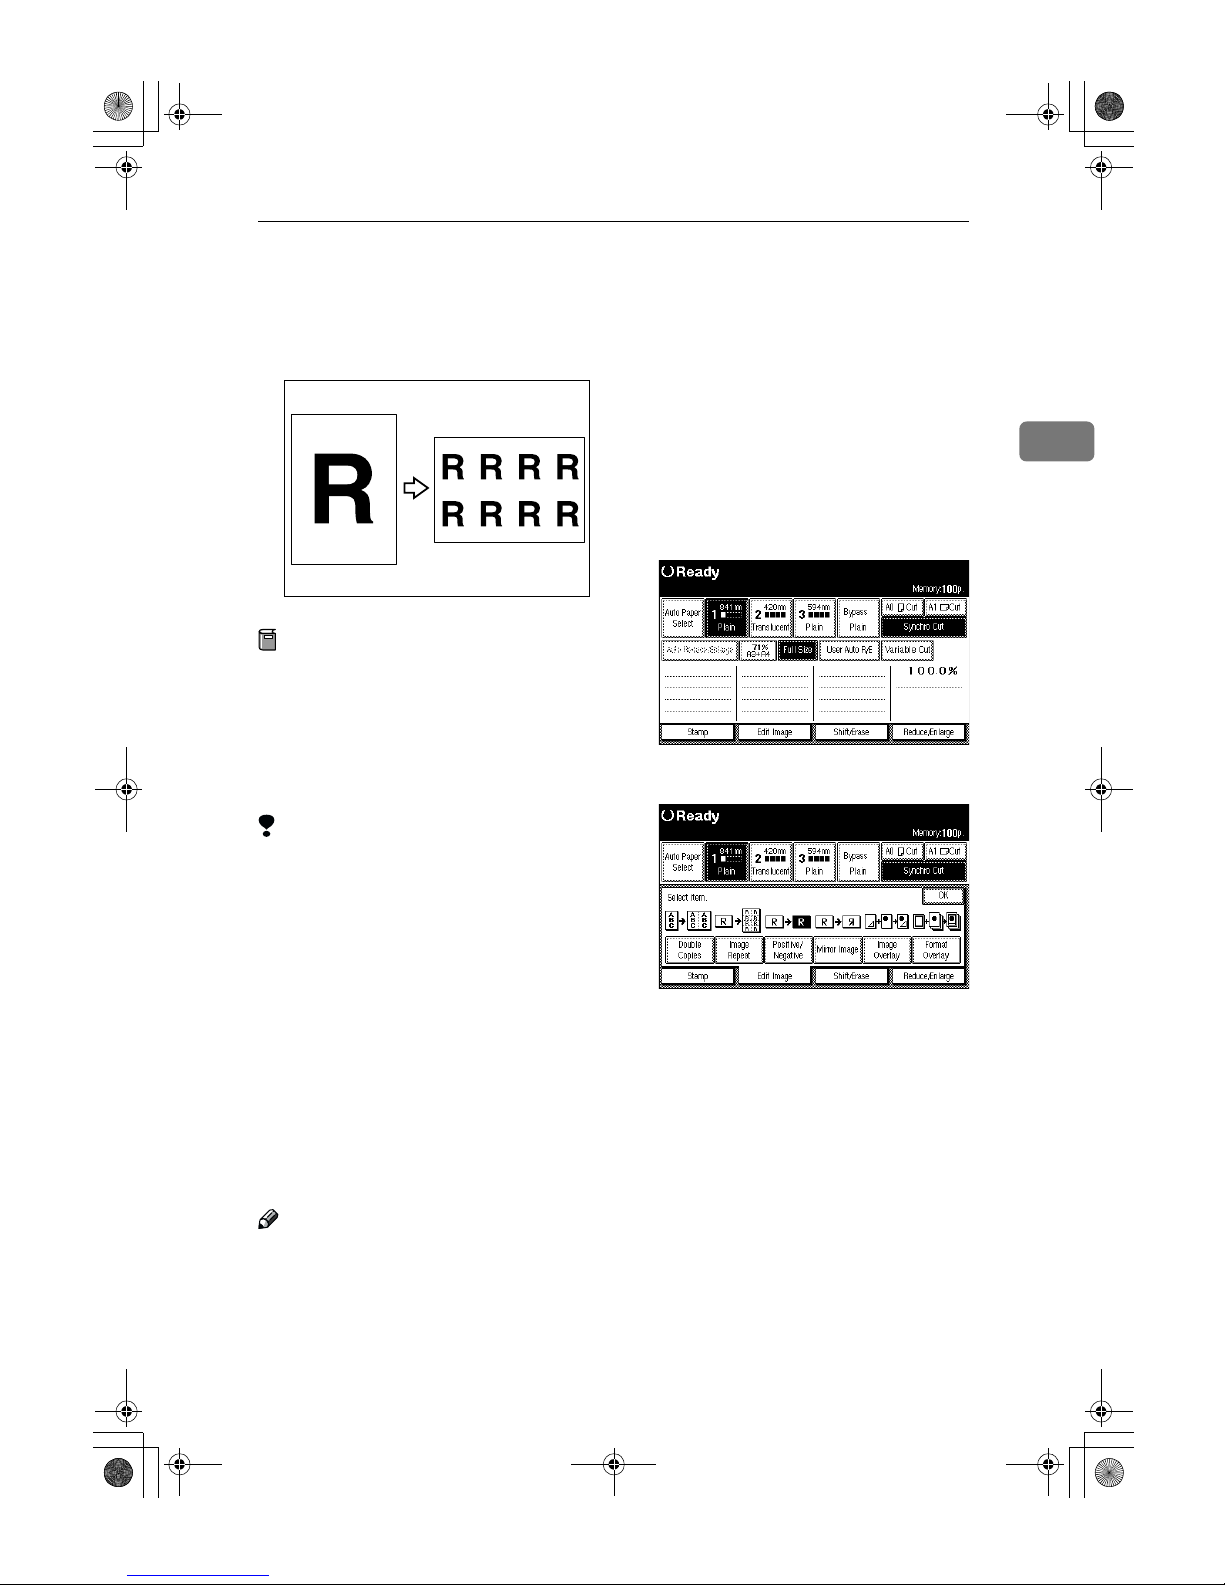
Image Repeat
79
2
Image Repeat
The original image is copied repeatedly.
Preparation
The number of repeated images
depends on the original size, copy
paper size, and reproduction ratio.
• For example you can copy eight
images of a A4 (A) original to
A1 (D) size copy paper.
Limitation
❒ You cannot use the bypass tray.
❒ Depending on the paper size and
the reproduction ratio, the repeated image may be cropped.
❒ You can use Image Repeat for cop-
ies with sizes up to A0(E).
❒ When Image repeat is selected, the
maximum length for Variable Cut
is 1,248mm, 48".
❒ When you have used Image Re-
peat with the stamp function, you
cannot delete only the repeated
image when using Additional
Copy.
Note
❒ You can insert separation lines
(Solid, Broken, Crop Marks) between repeated images. The default setting is None. See p.133
“Image Repeat Separation Line”
❒ When using Image Repeat with the
Shift function, the composite image is repeated.
❒ When using Image Repeat with the
Image Overlay function, the composite image is repeated.
A
Select the paper.
B
Press the [Edit Image] key.
C
Press the [Image Repeat] key.
D
Press the [OK] key.
ZEDG180E
DolphinGB- Copy-F_V4_ FM.book Page 79 Monday, June 11, 2001 5:02 PM
Page 10
Copying
80
2
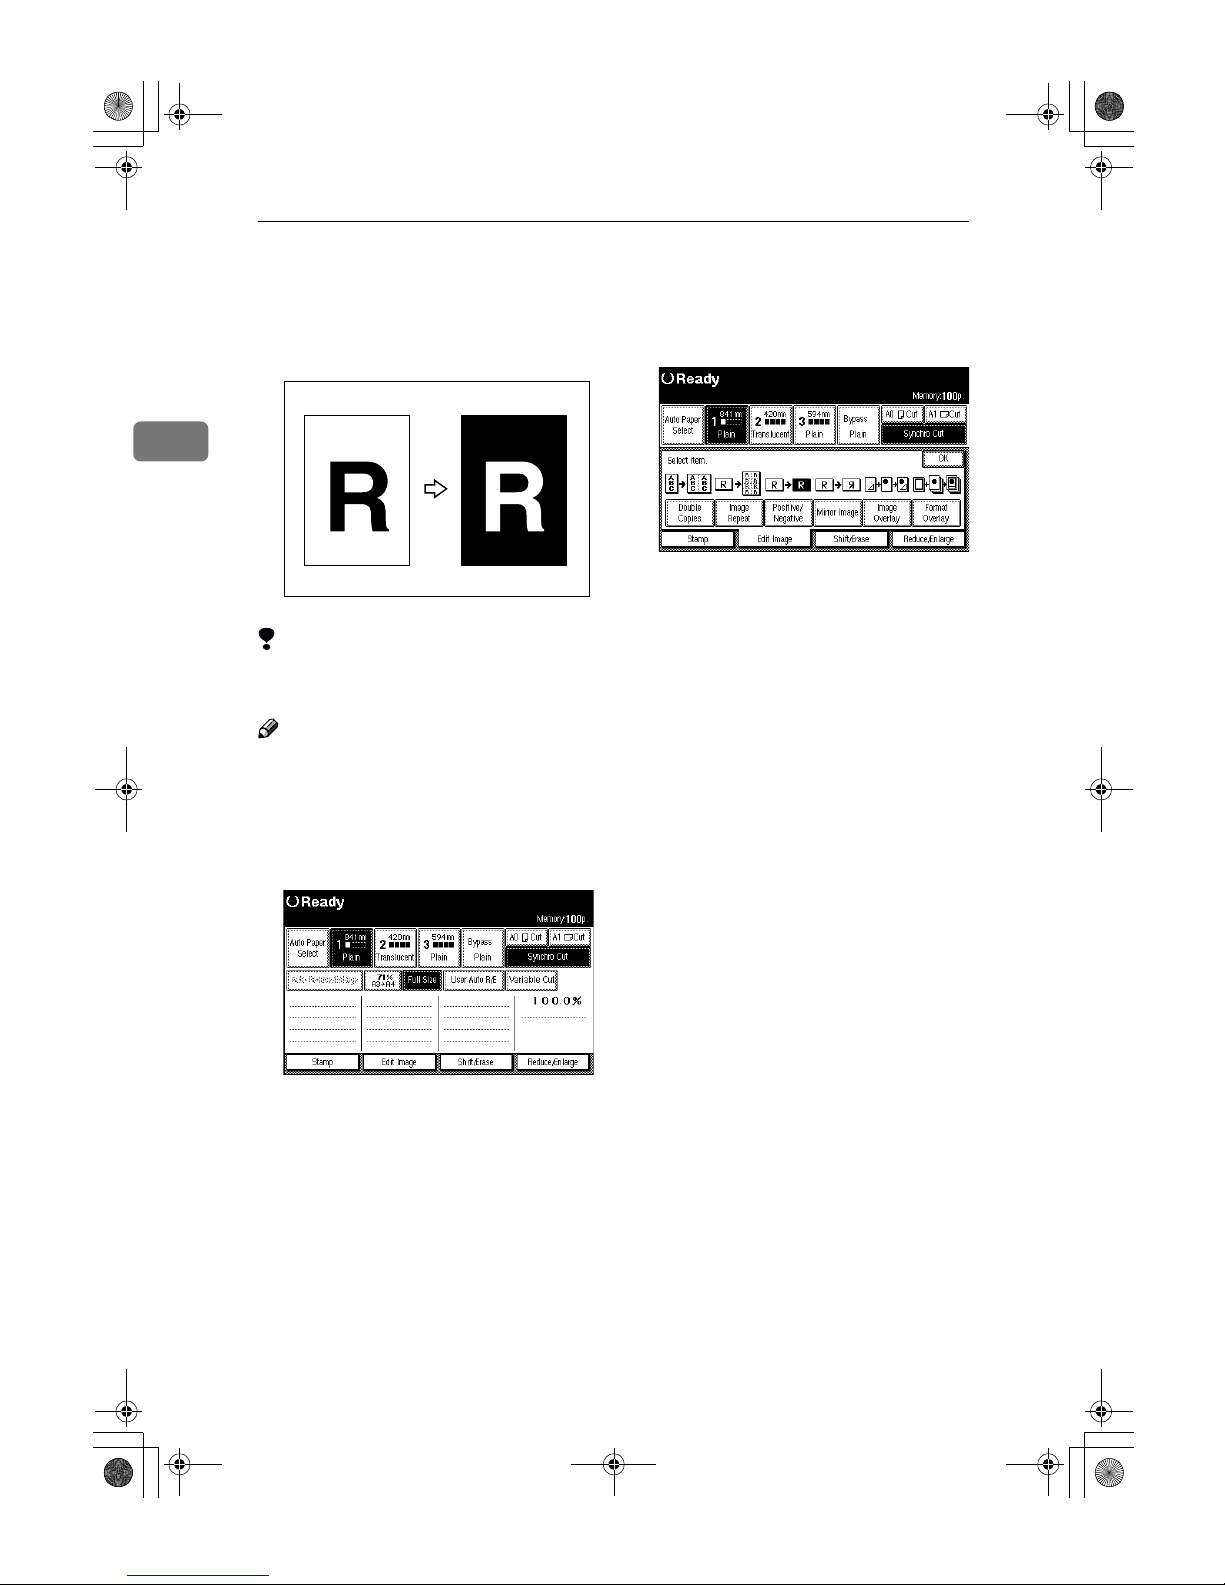
Positive/Negative
Black and white areas of the original
are reversed.
Limitation
❒ You can use Positive/Negative for
copies with sizes up to A0(E).
Note
❒ When making continuous copies,
the image density may deteriorate.
See p.106 “If You Cannot Make
Clear Copies”
A
Press the [Edit Image] key.
B
Press the [Positive/Negative] key.
C
Press the [OK] key.
ZEDG150E
DolphinGB- Copy-F_V4_ FM.book Page 80 Monday, June 11, 2001 5:02 PM
Page 11
Mirror Image
81
2
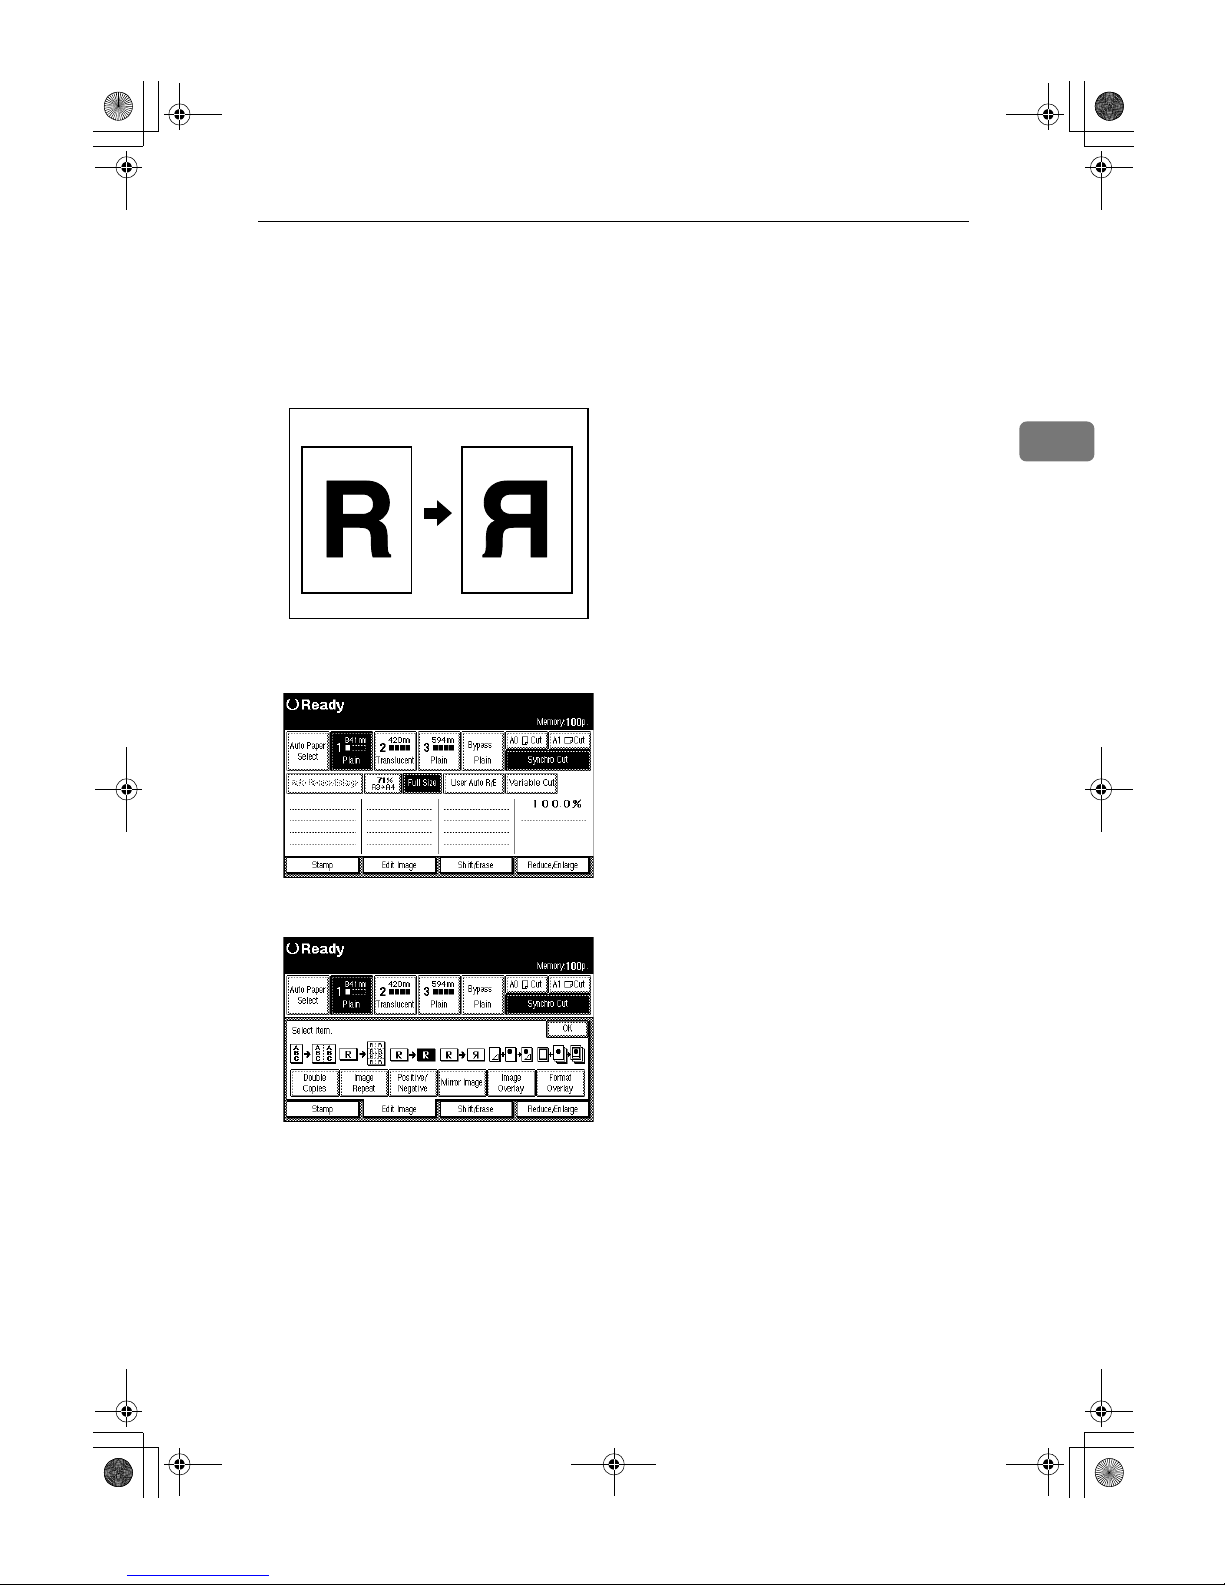
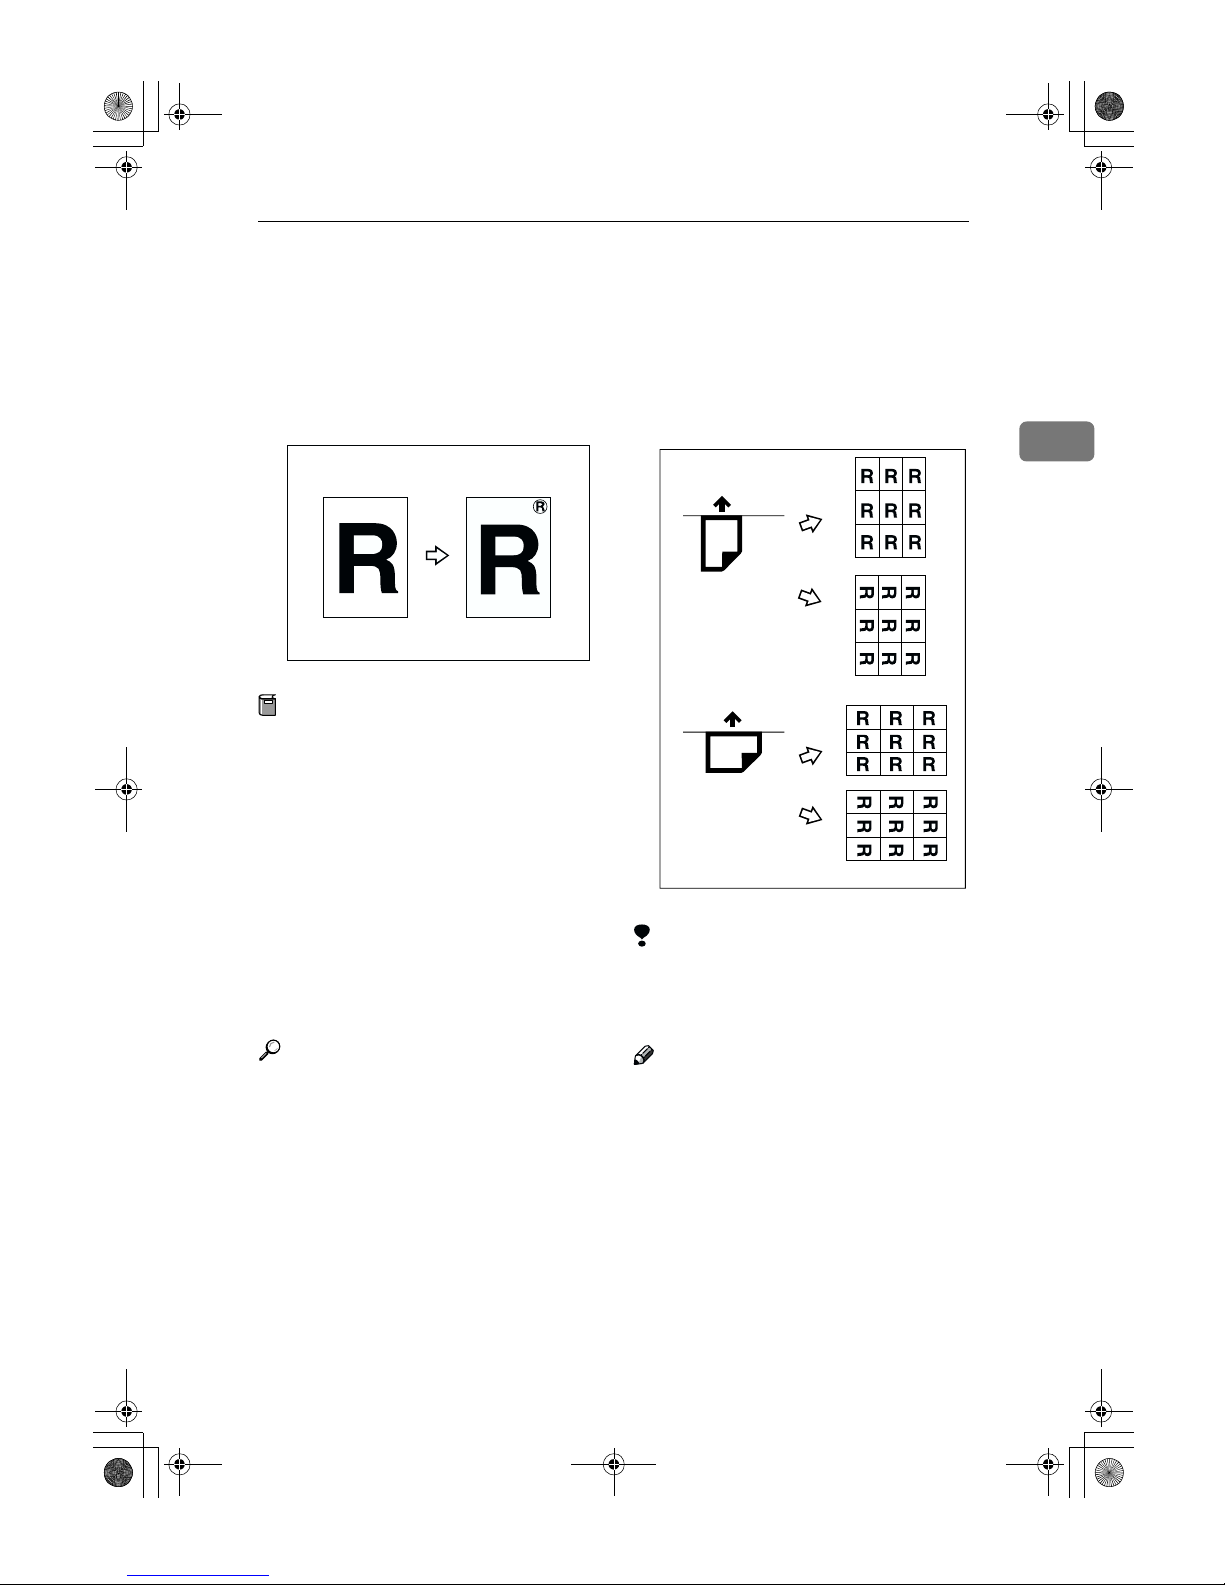
Mirror Image
The image is mirrored along the left/
right axis, so that it appears as it
would when viewed in a mirror.
A
Press the [Edit Image] key.
B
Press the [Mirror Image] key.
C
Press the [OK] key.
ZEDG160E
DolphinGB- Copy-F_V4_ FM.book Page 81 Monday, June 11, 2001 5:02 PM
Page 12
Copying
82
2
Image Overlay
Two originals are combined on one
copy.
Limitation
❒ For details on the combinations for
background original and original
for the composite image, see p.83
“Image Overlay Limitations”.
❒ You cannot shift the position of the
first or second original after the
composite image has been created.
If you want to change the position,
move one of the originals. Use the
composite copy itself as an original, or insert the originals in the
carrier sheet.
Note
❒ You cannot use the following func-
tions after the originals have been
scanned.
• Copying From The Bypass Tray
• Interrupt Copy
A
Press the [Edit Image] key.
B
Press the [Image Overlay] key.
C
Press the [OK] key.
D
Make your desired settings.
Reference
For details, see explanations of
each function.
E
Place the first original for the
composite image.
F
Place the next original (to be overlaid on top of the first original)
for the composite image.
The composite copy is output to
the copy output tray.
You can also add a third, fourth,
fifth and sixth image.
ZEDG280E
First
Original
Second
Original
Third
Original
Fourth
Original
Copy
Copy
DolphinGB- Copy-F_V4_ FM.book Page 82 Monday, June 11, 2001 5:02 PM
Page 13
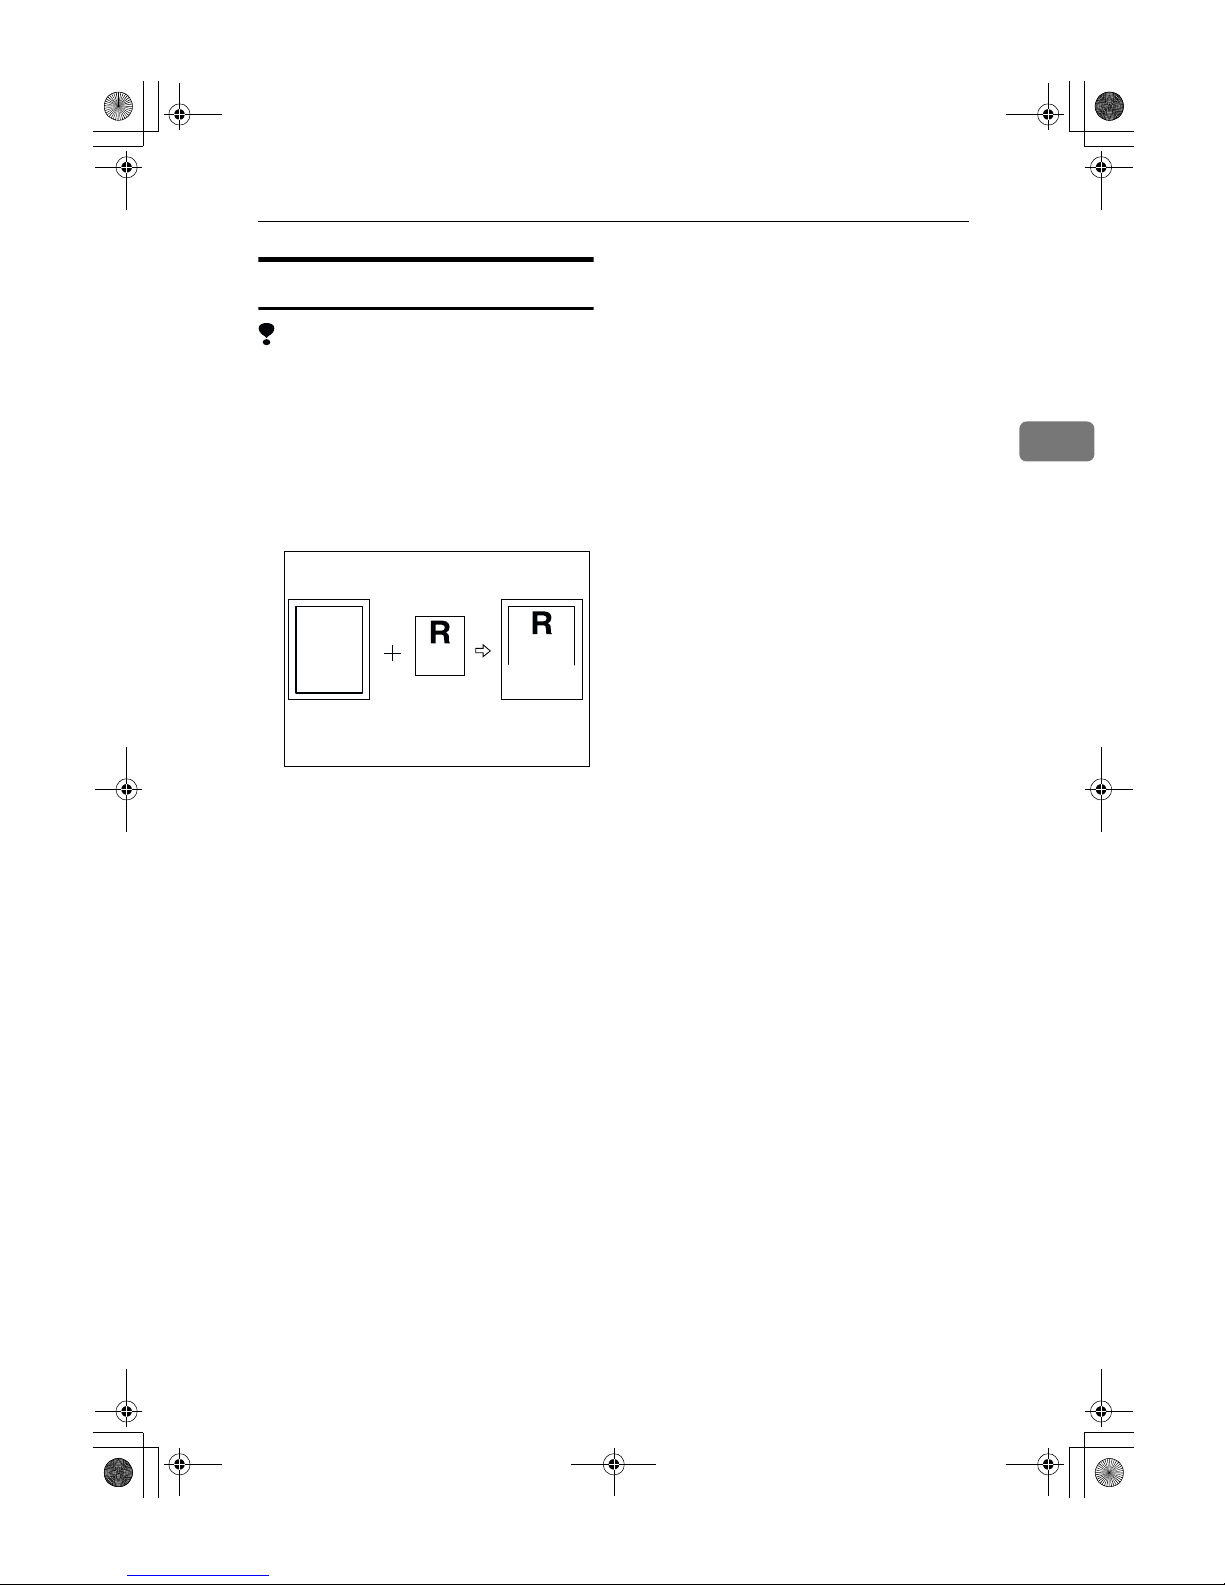
Image Overlay
83
2
Image Overlay Limitations
Limitation
❒ When using Image Overlay, you
should use a second original that is
larger than the first original. Because the background image (image of the first original) will be cut
if Preset Cut is selected, and if the
second original is smaller than the
first original.
❒ You cannot use Image Overlay
with the following functions.
• Sort
• Rotate Sort
• Format Overlay
❒ If you use the Shift function with
the Additional Copy function after
creating an Image Overlay copy,
the composite image is moved.
You cannot move the individual
original images.
❒ When using the following func-
tions, the effects are applied to the
composite image created with Image Overlay.
• Shift
• Margin Adjustment
• Border Erase
• Area Selection
• Mirror Image
• Double Copies
• Image Repeat
❒ The maximum size for the original
and the image is A1(D).
ZEDG130E
Second
original
First
original
Copy
DolphinGB- Copy-F_V4_ FM.book Page 83 Monday, June 11, 2001 5:02 PM
Page 14
Copying
84
2
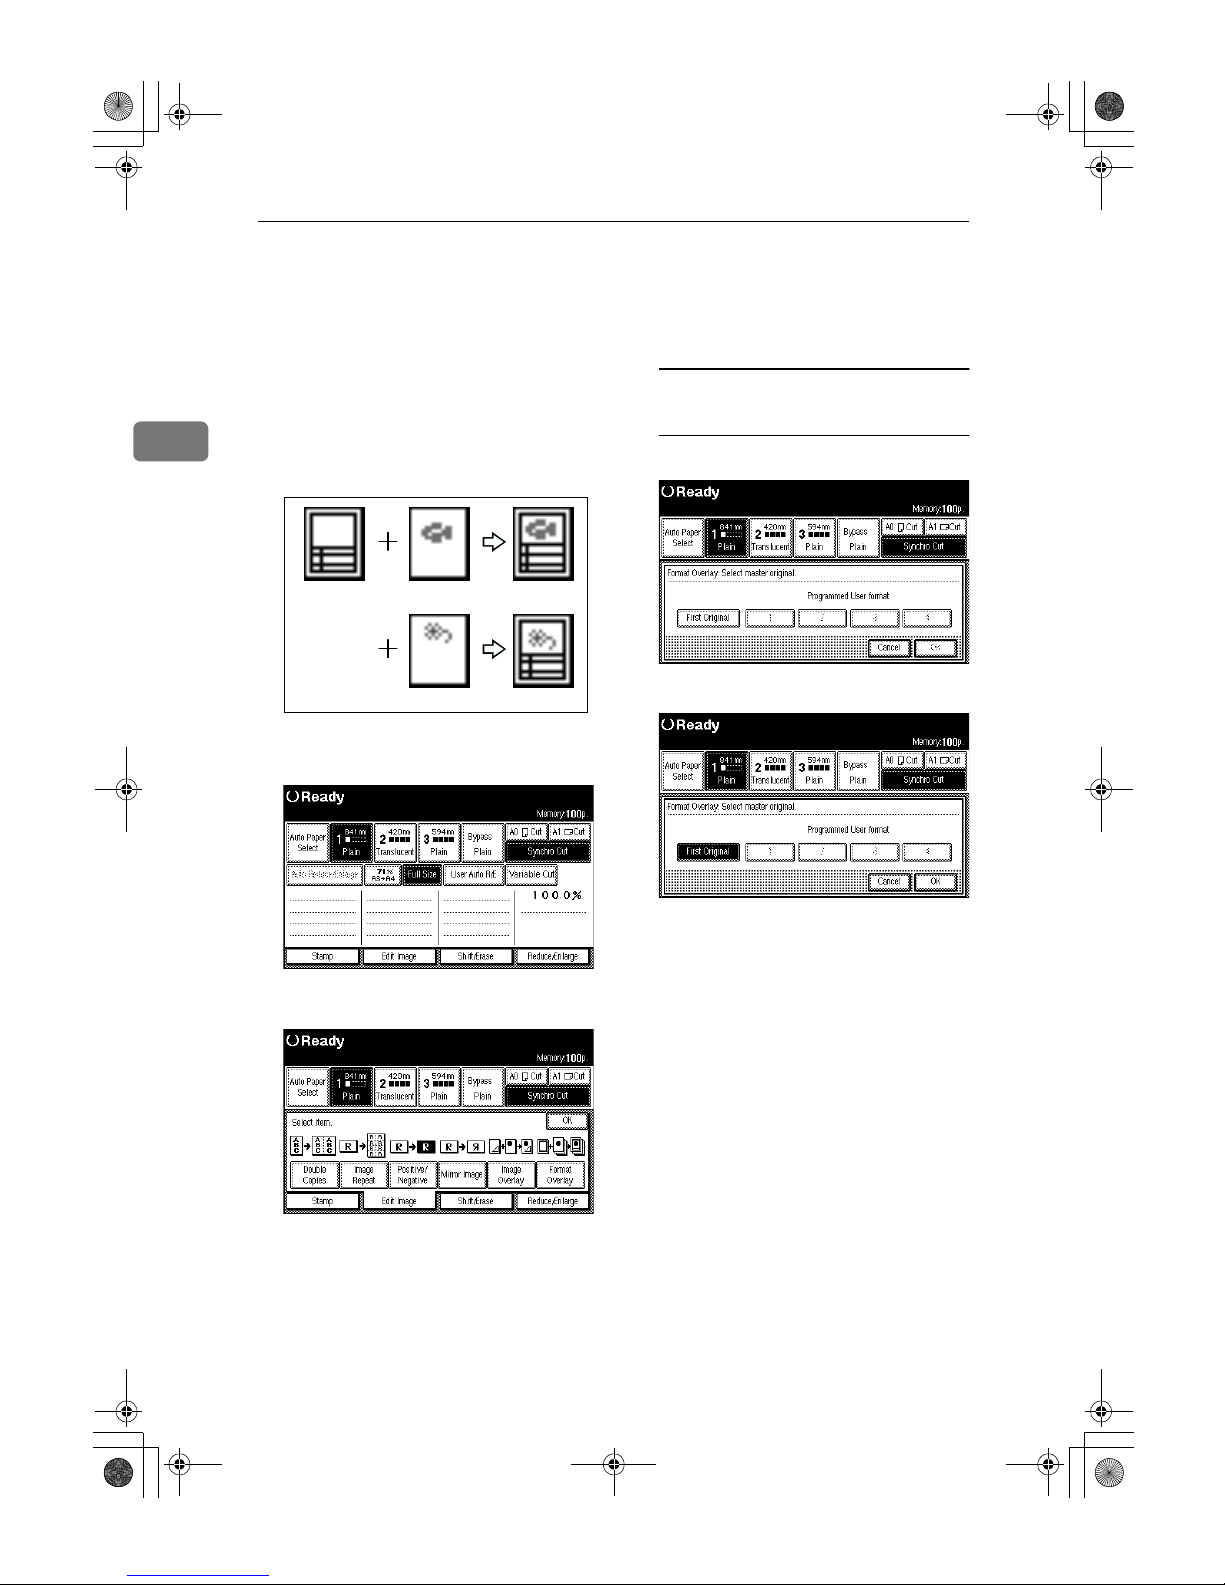
Format Overlay
The optional HDD are required to use this function.
Two images (original + format) are
combined on one copy using stored
image (user format) or first original.
You can store the format original and
recall it for next use.
A
Press the [Edit Image] key.
B
Press the [Format Overlay] key.
Scanning the format original
(background original)
A Press the [First Original] key.
B Press the [OK] key.
C Make the desired settings, and
then place the first original.
D Place the second original.
The machine makes a composite copy of the first and second
originals.
E Place the third original.
The machine makes a composite copy of the first and third
originals.
F Place any other originals, as re-
quired.
First
Original
Second
Original
Third
Original
Copy
Copy
ZEDG290E
or
User Format
DolphinGB- Copy-F_V4_ FM.book Page 84 Monday, June 11, 2001 5:02 PM
Page 15

Format Overlay
85
2
Storing a format overlay
beforehand
Note
❒ To use User Format Overlay,
you need to use Program /Delete, Overlay Format. See p.85
“Program/Delete, Overlay Format”
A Select a stored format original.
B Press the [OK] key.
C Select the desired settings, and
place the original to be overlaid on the format original.
The machine makes a copy
overlaying the first original on
the user format original.
D Place any other originals, as re-
quired.
The machine makes a copy
overlaying the new original on
the user format original.
Limitation
❒ When selecting the [First Orig-
inal], if the sizes of the first
original and the original to be
overlaid on the first original
are different, the image is
created at the size of the
overlaid original.
❒ When selecting the programmed
user format, if the sizes of the
programmed user format and the
original to be overlaid on the programmed user format are different, the image is created at the
size of the overlaid original.
❒
You cannot use Format Overlay
with the following functions.
• Image Overlay
• Sort
• Rotate Sort
❒ The maximum size for the
paper size is A1 (D).
Program/Delete, Overlay Format
Preparation
The maximum size for the original
size to be stored is A0 (E). You cannot store long length originals.
A
Make sure that the machine is
ready to copy.
B
Press the {User Tools/Counter} key.
C
Press the [Copier Features] key.
D
Press the [Adjust Image] key, and
then press the [Program/Delete,
Overlay Format] key.
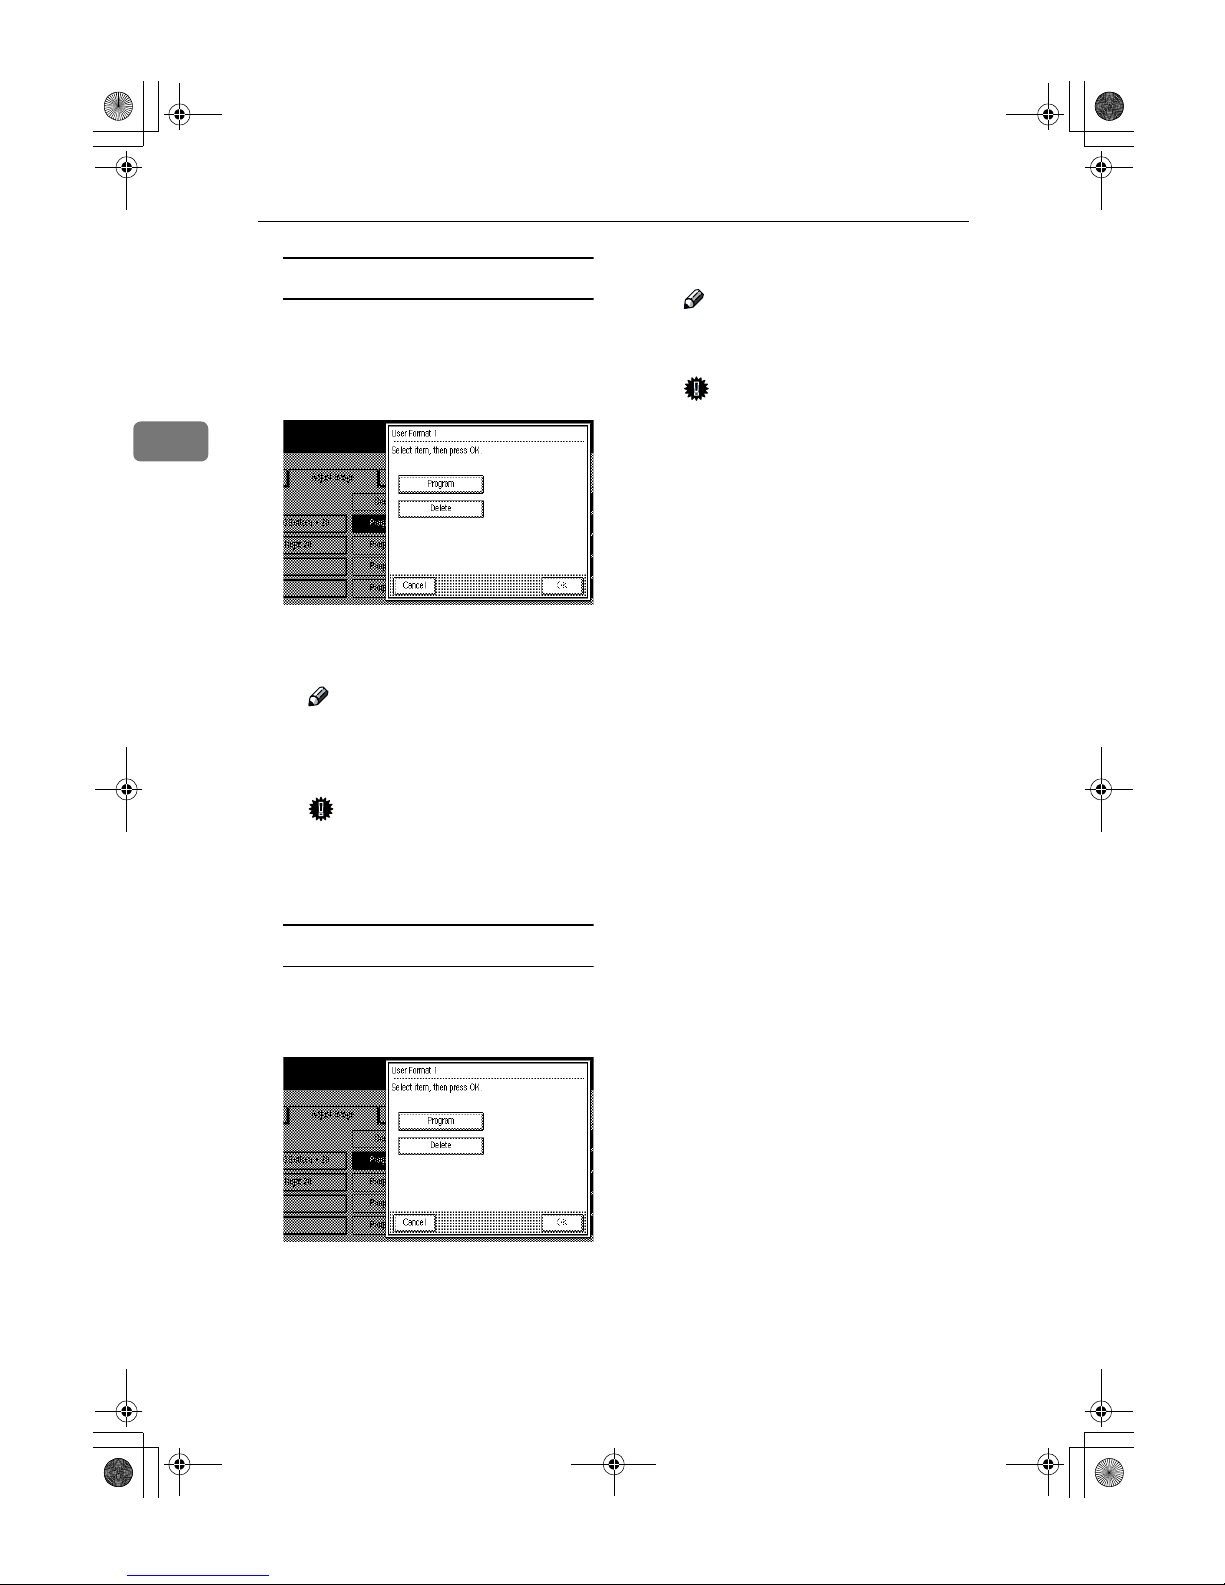
Storing
A Select a format number (1 – 4).
B Place your originals.
C To store another original, re-
peat steps A – B.
DolphinGB- Copy-F_V4_ FM.book Page 85 Monday, June 11, 2001 5:02 PM
Page 16
Copying
86
2
Overwriting a stored format
A Select the format number for
the format you want to overwrite.
B Press the [Program] key.
C Press the [OK] key.
D Press the [OK] key.
Note
❒ If you do not want to over-
write the existing format,
press the [No] key.
Important
❒ You cannot restore a format
that has been overwritten.
E Place your originals.
Deleting
A Select the format number for
the format you want to delete,
and then press the [Delete] key.
B Press the [OK] key.
C Press the [OK] key.
Note
❒ To cancel the deletion, press
the [No] key.
Important
❒ You cannot restore a format
that has been deleted.
E
Press the {User Tools/Counter} key.
The machine exits Program/Delete and is ready to copy.
DolphinGB- Copy-F_V4_ FM.book Page 86 Monday, June 11, 2001 5:02 PM
Page 17
Background Numbering
87
2
Background Numbering
The optional stamp board and HDD are required to use this function.
This function produces copies which
have been stamped by the numbering
user stamp.
Preparation
You can set the start number from
1 to 999.
Note
❒ You can change the density of the
background numbers. See p.137
“Background Numbering Format”
❒ You can change the size of the
background numbers. See p.137
“Background Numbering Format”
❒ You can combine this function
with other (up to two) print functions.
A
Press the [Stamp] key.
B
Press the [Background Numbering]
key.
C
Enter the start number with the
number keys, and then press the
[OK] key.
Note
❒ To change the value, press the
{Clear/Stop} key, and then enter
the new value.
D
Press the [OK] key.
ZEDG190E
DolphinGB- Copy-F_V4_ FM.book Page 87 Monday, June 11, 2001 5:02 PM
Page 18

Copying
88
2
User Stamp Repeat
The optional stamp board and HDD are required to use this function.
Prints a stored user stamp of letters or
symbols on the whole area of the paper.
Preparation
You must store a User Stamp before using this function. See p.92
“Program/Delete, User Stamp”
You can store up to four User
Stamps.
You can choose to print the User
Stamp vertically or horizontally.
You can use this function with the
Background Numbering and Date
Stamp (up to two types) functions.
The Size, Density, Positive/Negative settings, in "User Stamp Conditions" are also applied to the
User Stamp. See p.138 “User
Stamp Format”
Limitation
❒ You can use paper sizes up to A0.
Note
❒ When the User Stamp Repeat func-
tion is selected, it may take longer
for the first copy to be printed.
Reference
For details on deleting a User
Stamp, see "Program/Delete, User
Stamp". See p.92 “Program/De-
lete, User Stamp”
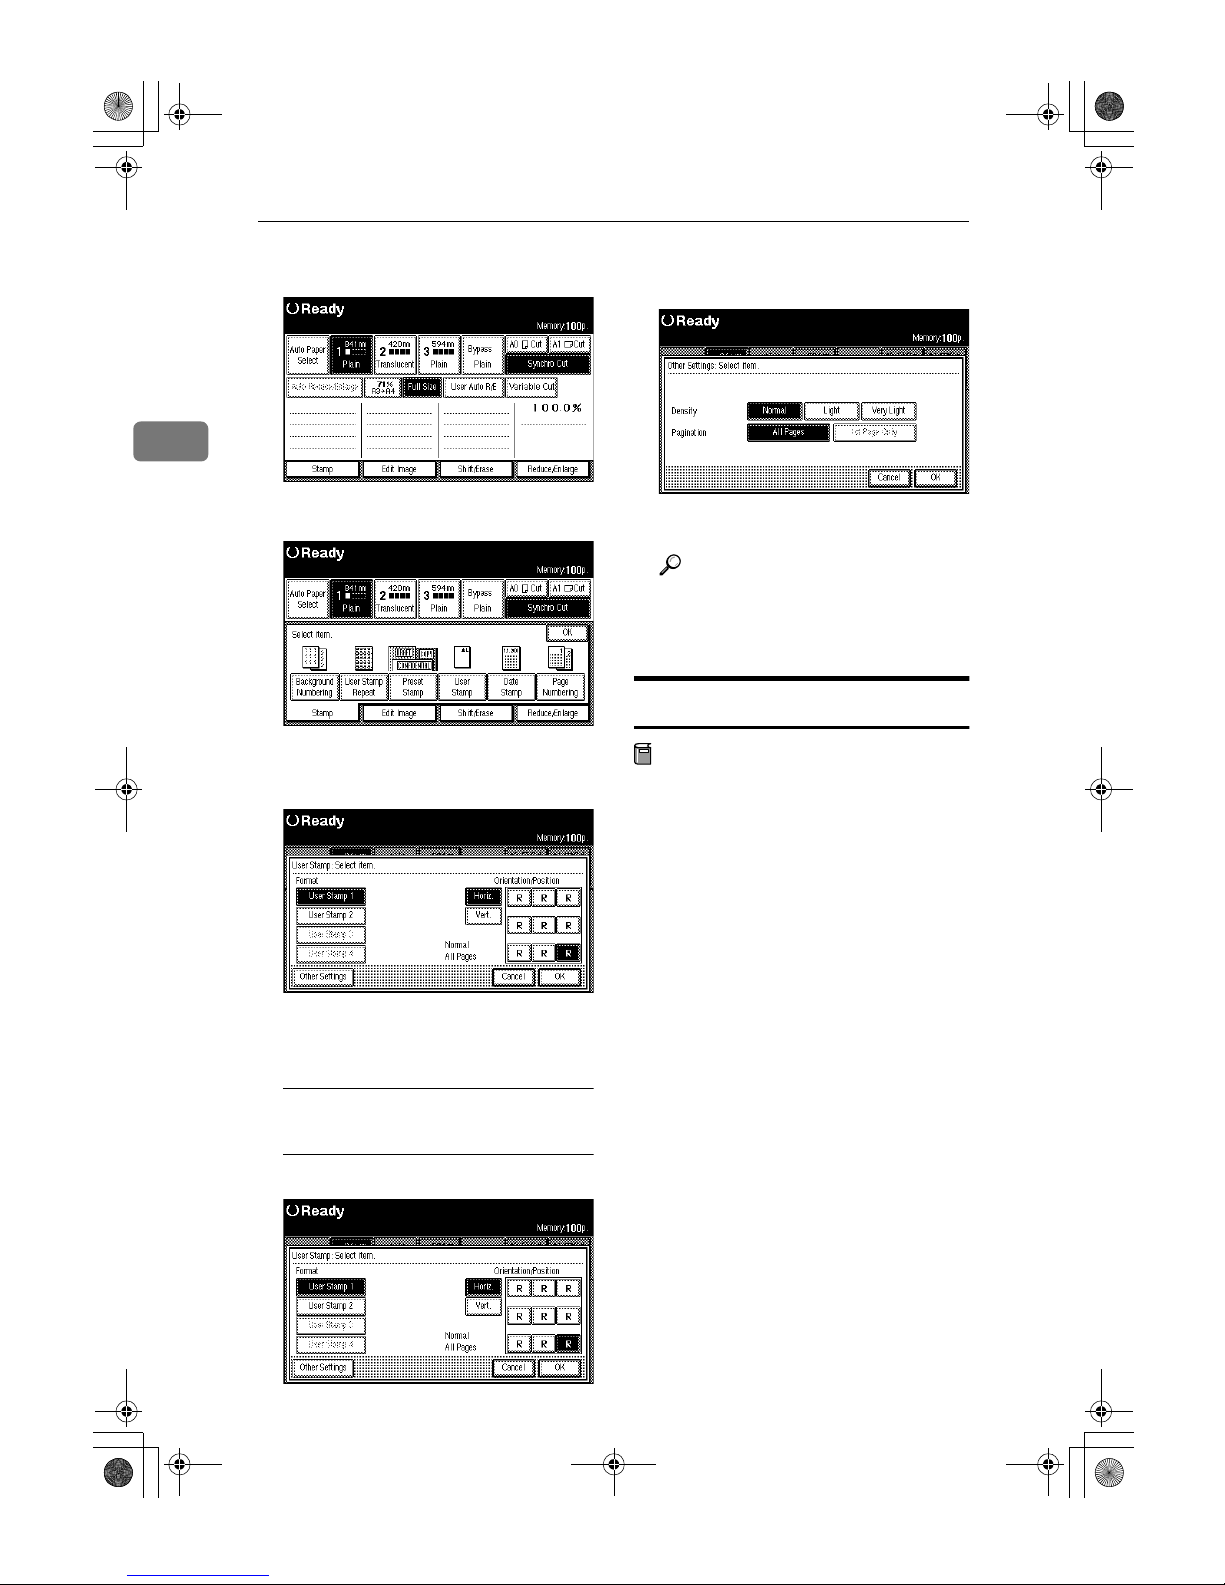
A
Press the [Stamp] key.
B
Press the [User Stamp Repeat] key.
C
Select the user stamp item (stamp
number).
D
Select the stamp direction ([Horiz.]
or [Vert.] keys.)
E
Press the [OK] key.
ZEDG270E
DolphinGB- Copy-F_V4_ FM.book Page 88 Monday, June 11, 2001 5:02 PM
Page 19
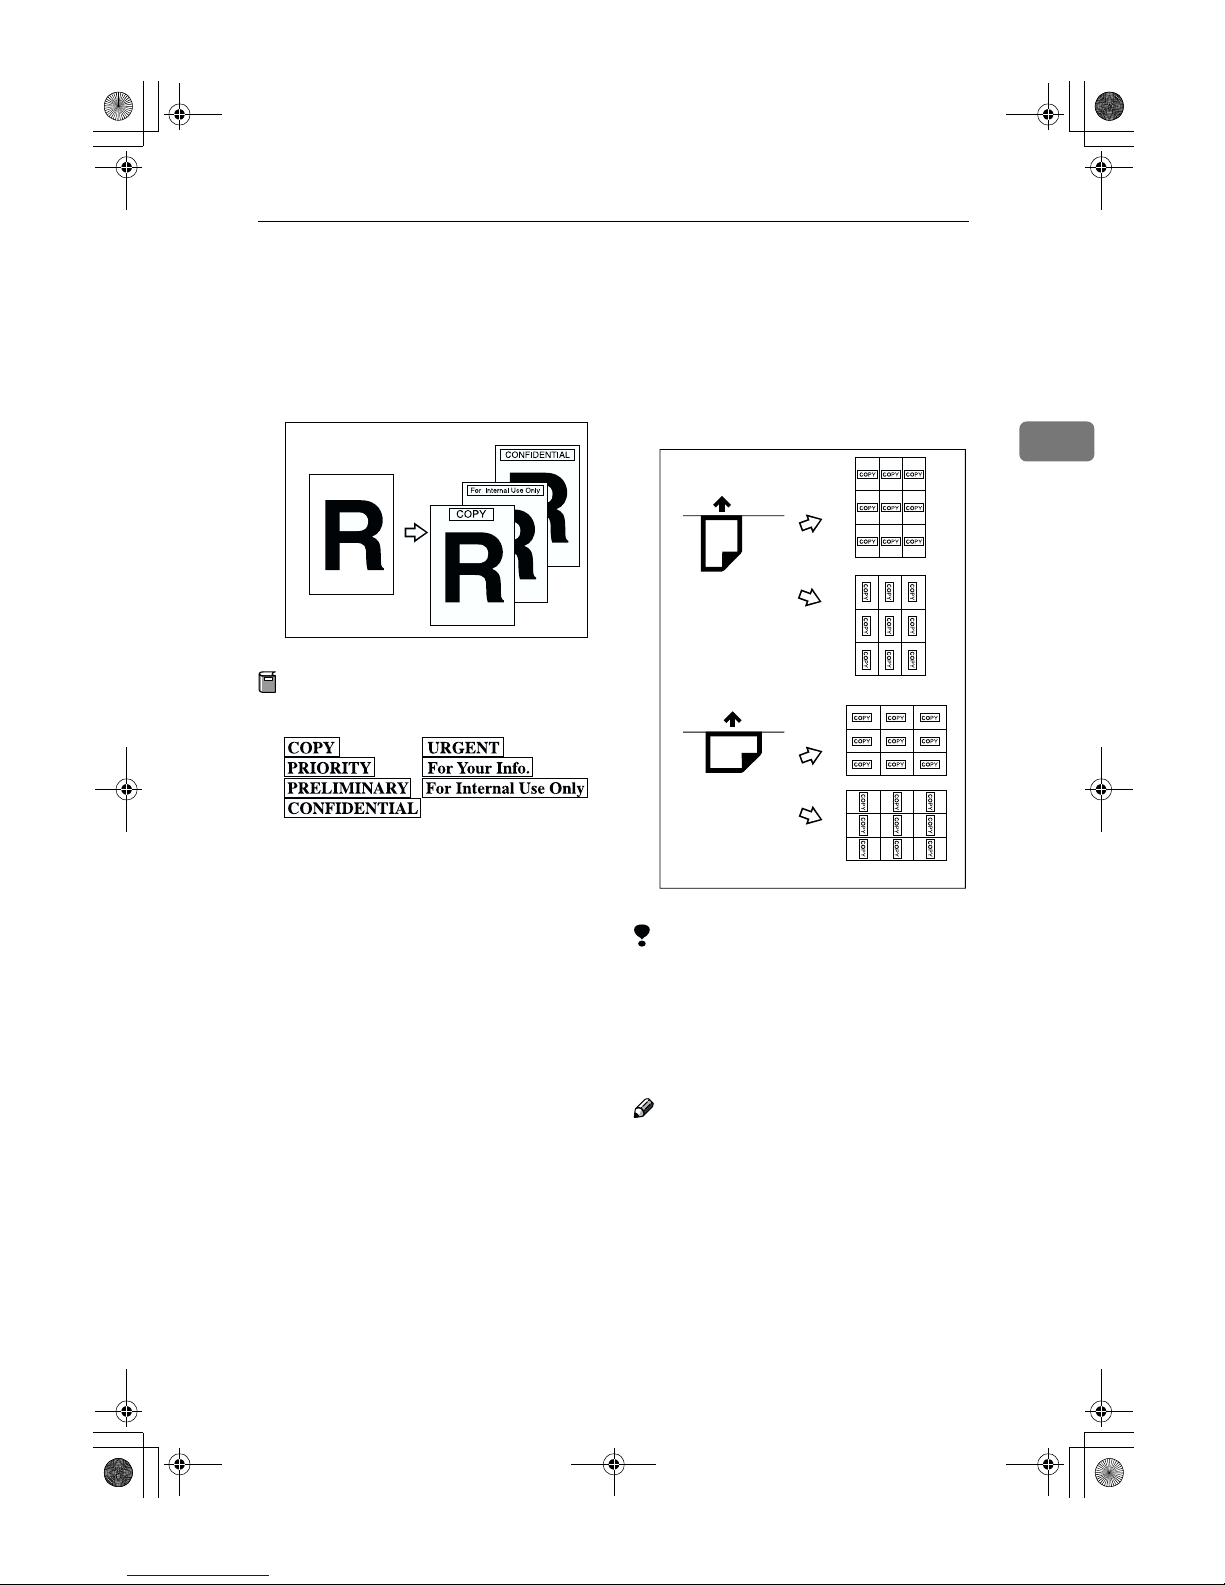
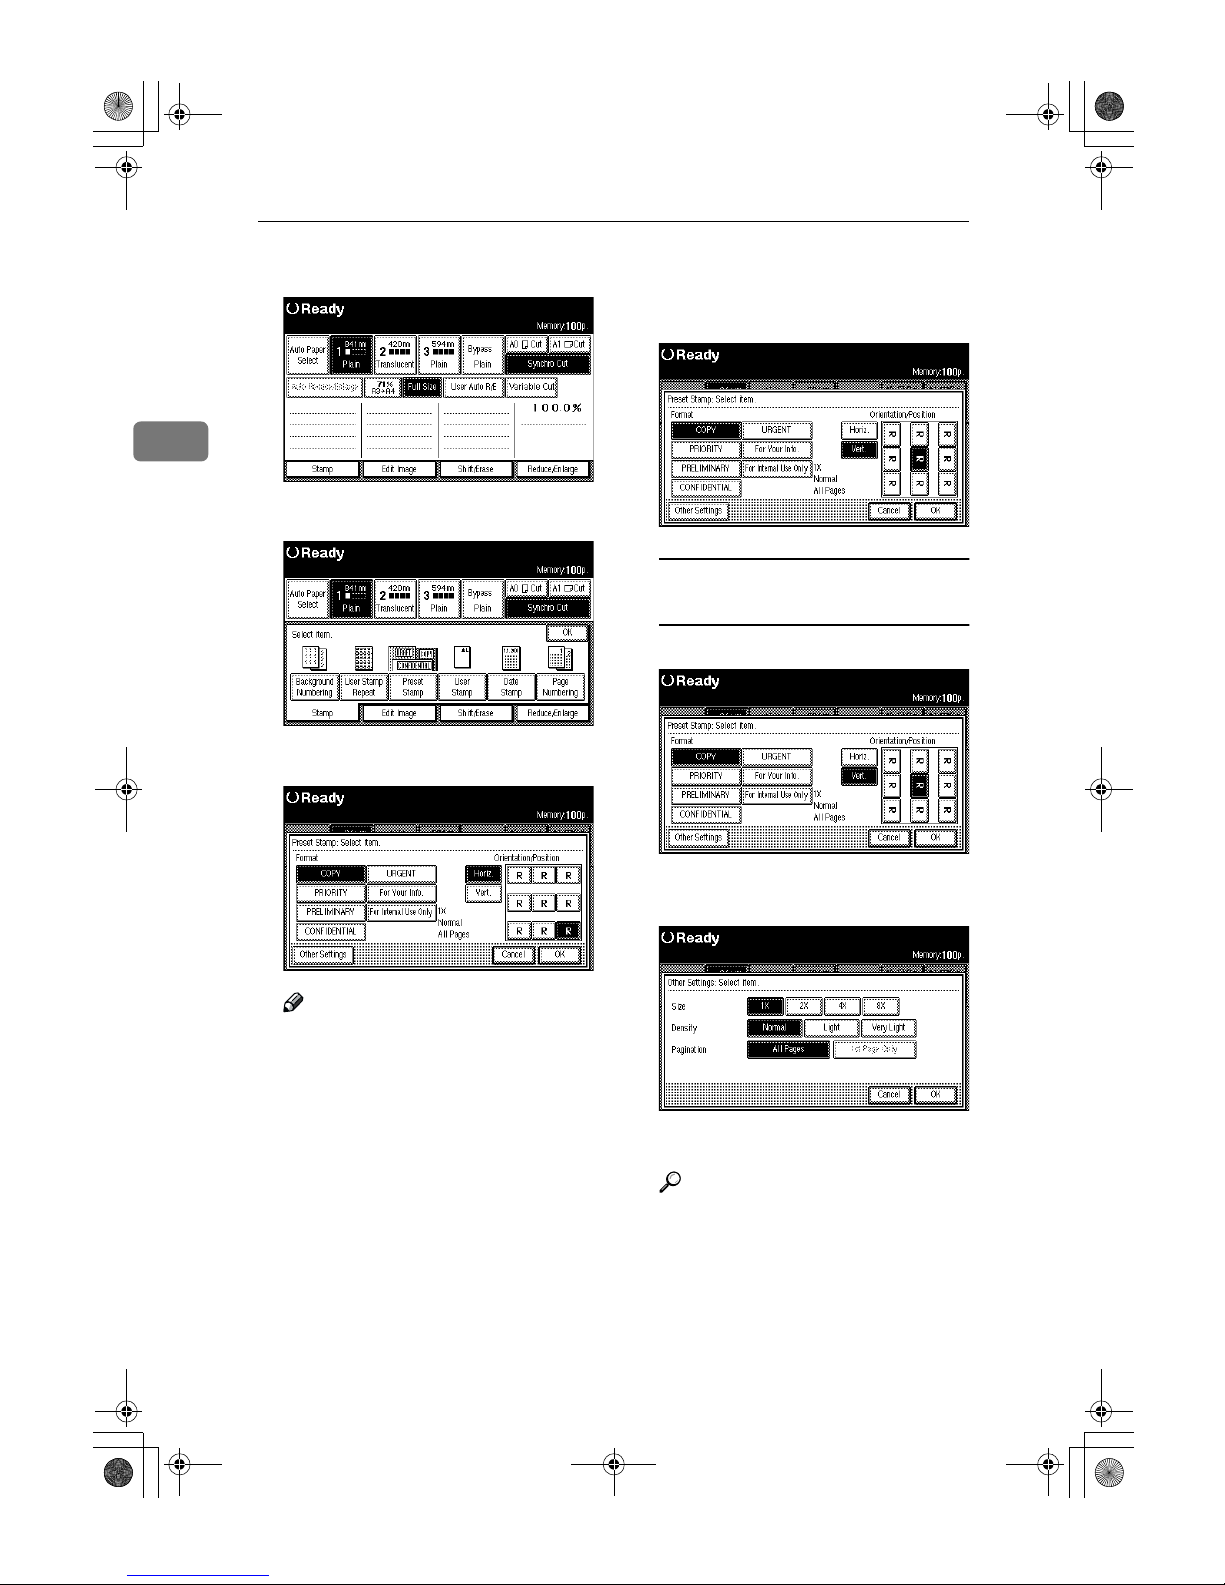
Preset Stamp
89
2
Preset Stamp
The optional stamp board and HDD are required to use this function.
Prints a user stamp that has already
been stored.
Preparation
The stamp types are as follows.
You can change the position and
direction of the stamp.
You can use this function with
Background Numbering and Date
Stamp.
❖❖❖❖ Place your originals, and then
specify the user stamp position
and direction.
Limitation
❒ You cannot use the bypass tray.
❒ You can only use one type of
stamp at a time.
❒ You can print on paper sizes up to
A0 (E).
Note
❒ You can change the size, density
and print position of the stamp.
❒ You can change the default print
position for the stamp. See p.135
“Preset Stamp Format Priority”
ZEDG200E
ZEDG201E
Feed
Direction
Feed
Direction
Horizon
Horizon
Vertical
Vertical
DolphinGB- Copy-F_V4_ FM.book Page 89 Monday, June 11, 2001 5:02 PM
Page 20
Copying
90
2
A
Press the [Stamp] key.
B
Press the [Preset Stamp] key.
C
Select the stamp type.
Note
❒ You can change the priority of
the selected stamp. See p.134
“Preset Stamp Priority”
D
Select the print direction ([Horiz.]
or [
Vert.
] keys), and print position
for the stamp.
Changing the size and density/
setting print page
A Press the [Other Settings] key.
B Sets the Size, Density and Pag-
ination.
E
Press the [OK] key.
Reference
For details on how to set the
originals, see "Setting Originals
and Print Position/Direction".
See p.91 “Place the originals and
then specify the stamp position
and direction.”
DolphinGB- Copy-F_V4_ FM.book Page 90 Monday, June 11, 2001 5:02 PM
Page 21
User Stamp
91
2
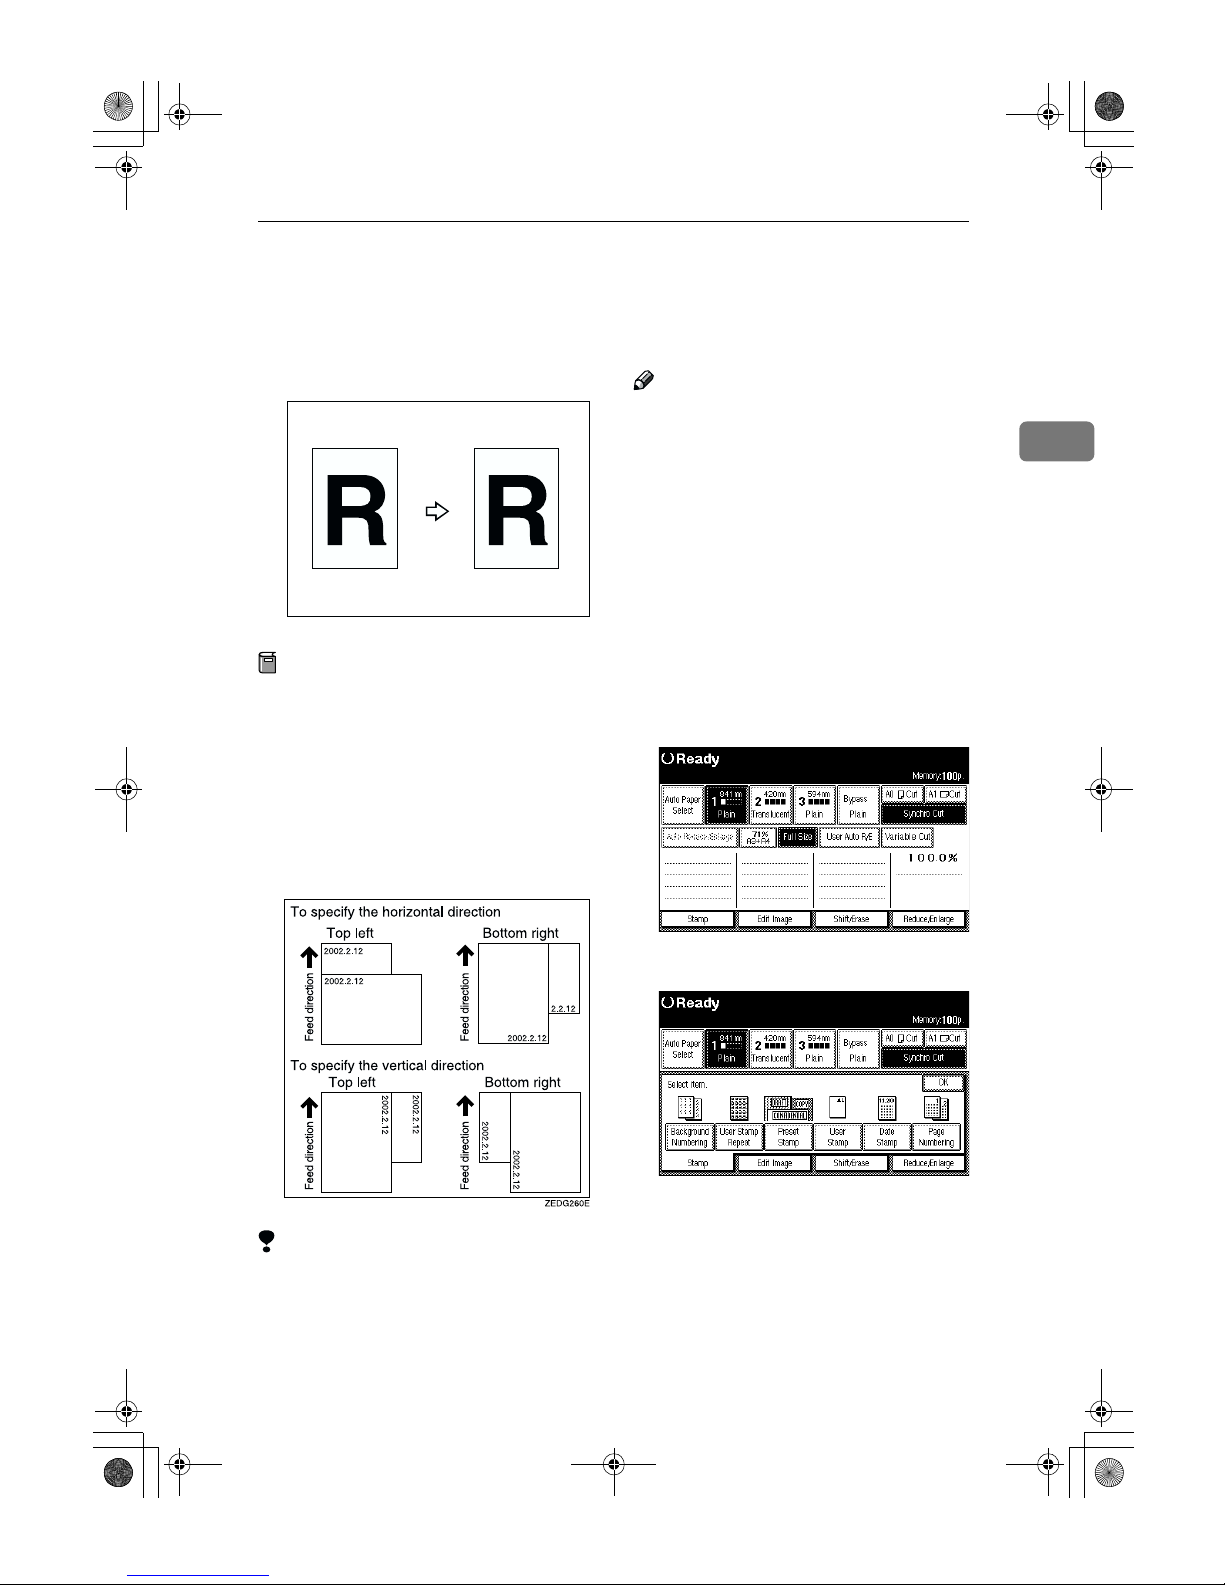
User Stamp
The optional stamp board and HDD are required to use this function.
You can store frequently used characters or symbols, and then use them as
a stamp.
Preparation
You must store a user stamp. See
p.92 “ Program/Delete, User
Stamp”
You can store up to four types of
user stamps.
You can use a stored user stamp
for User Stamp Repeat.
You can use this function with the
Background Numbering and Date
Stamp (up to two types) functions.
You can change the stamp position
and direction.
Reference
For details on how to delete a
stored user stamp, see p.92 “Pro-
gram/Delete, User Stamp”.
❖❖❖❖ Place the originals and then
specify the stamp position and
direction.
Limitation
❒ You cannot use the bypass tray.
❒ You can print on paper sizes up to
A0.
Note
❒ You can change the default size,
density and print position of the
stamp. See p.138 “User Stamp Format”
❒ When User Stamp is selected, it
may take longer for the first copy
to be printed.
ZEDG220E
ZEDG230E
Feed
Direction
Feed
Direction
Horizon
Horizon
Vertical
Vertical
DolphinGB- Copy-F_V4_ FM.book Page 91 Monday, June 11, 2001 5:02 PM
Page 22
Copying
92
2
A
Press the [Stamp] key.
B
Press the [User Stamp] key.
C
Select the number for the user
stamp.
D
Select the print direction ([Horiz.]
or [Vert.] keys) and print position.
Changing the density/setting print
page
A Press the [Other Settings] key.
B Set the Density and Pagina-
tion.
E
Press the [OK] key.
Reference
For details on how to set the
originals, see p.31 “Setting Originals”.
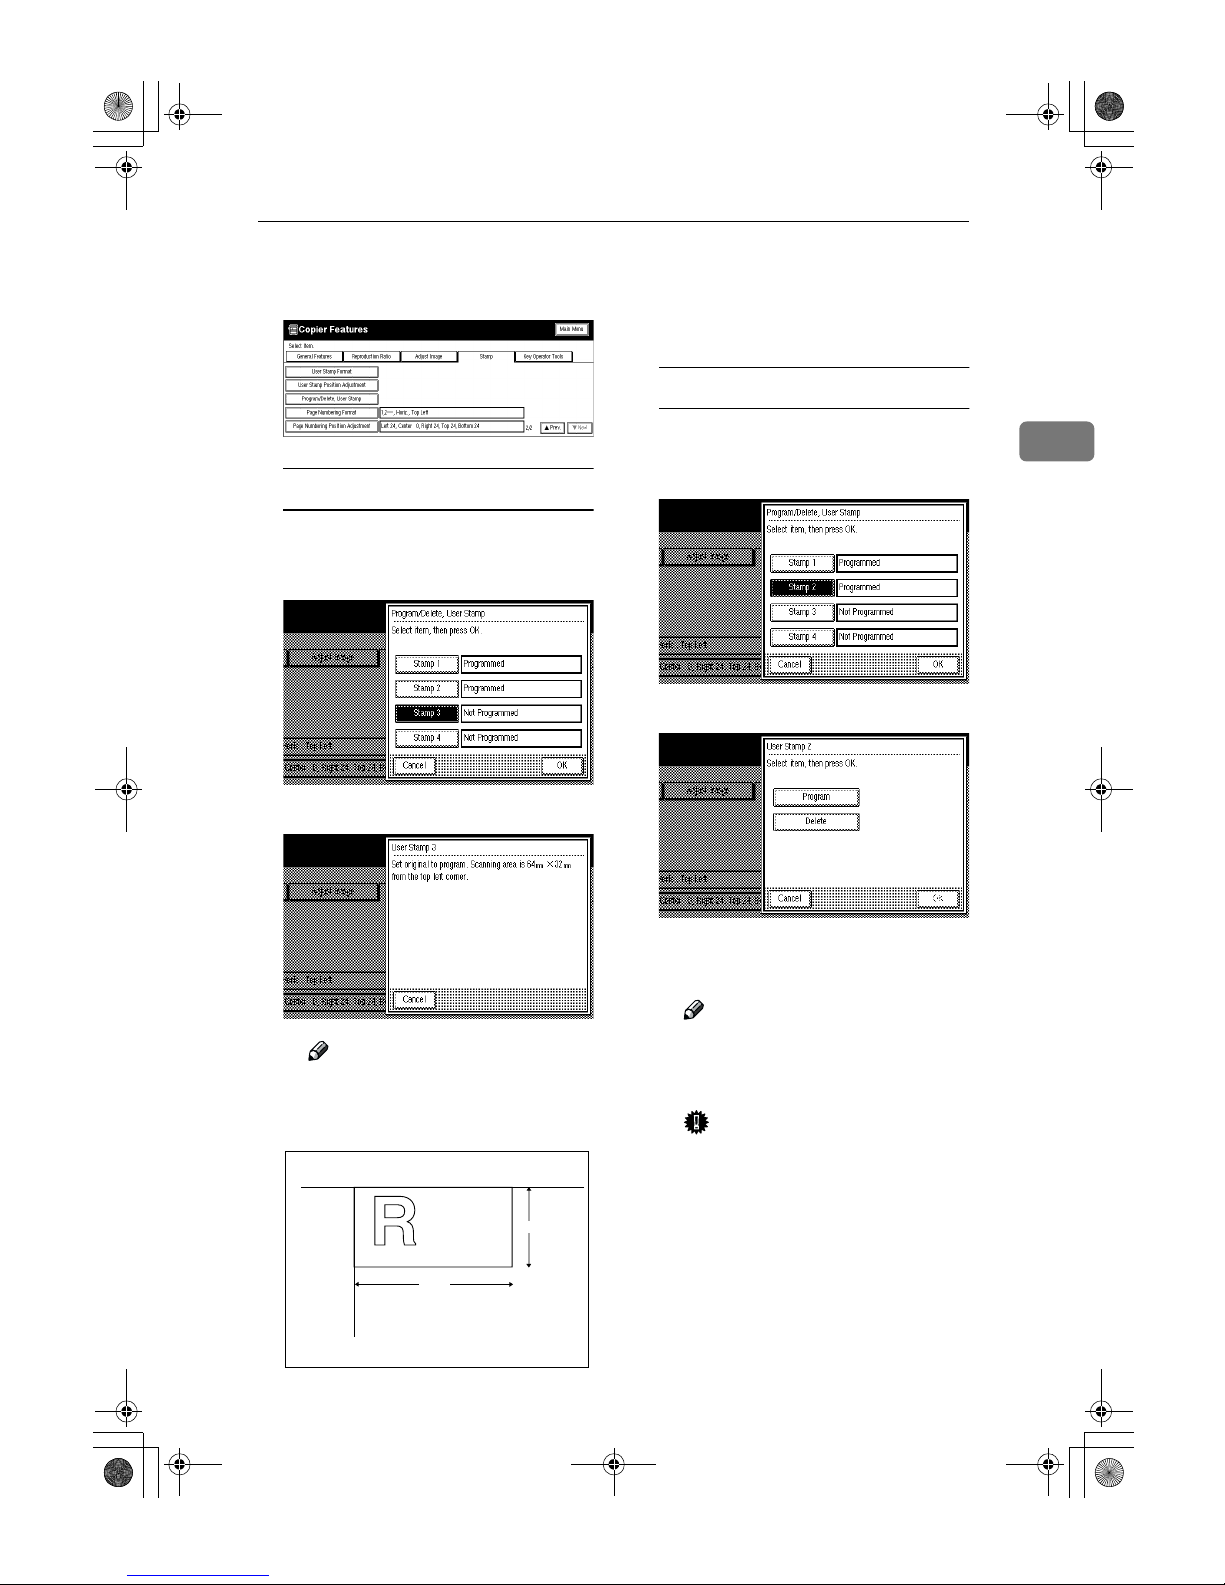
Program/Delete, User Stamp
Preparation
If the stamp printed on the original
is bright red or red, it may not be
scanned clearly. To store a stamp,
use either a stamp printed with
black ink, or make a copy and use
the copy as the original.
A
Check that the machine is ready
to copy.
B
Press the {User Tools/Counter} key.
C
Press the [Copier Features] key.
D
Press [Print Settings] key, and then
press the [
Next
] key.
"Print Settings 2/2" is displayed.
DolphinGB- Copy-F_V4_ FM.book Page 92 Monday, June 11, 2001 5:02 PM
Page 23
User Stamp
93
2
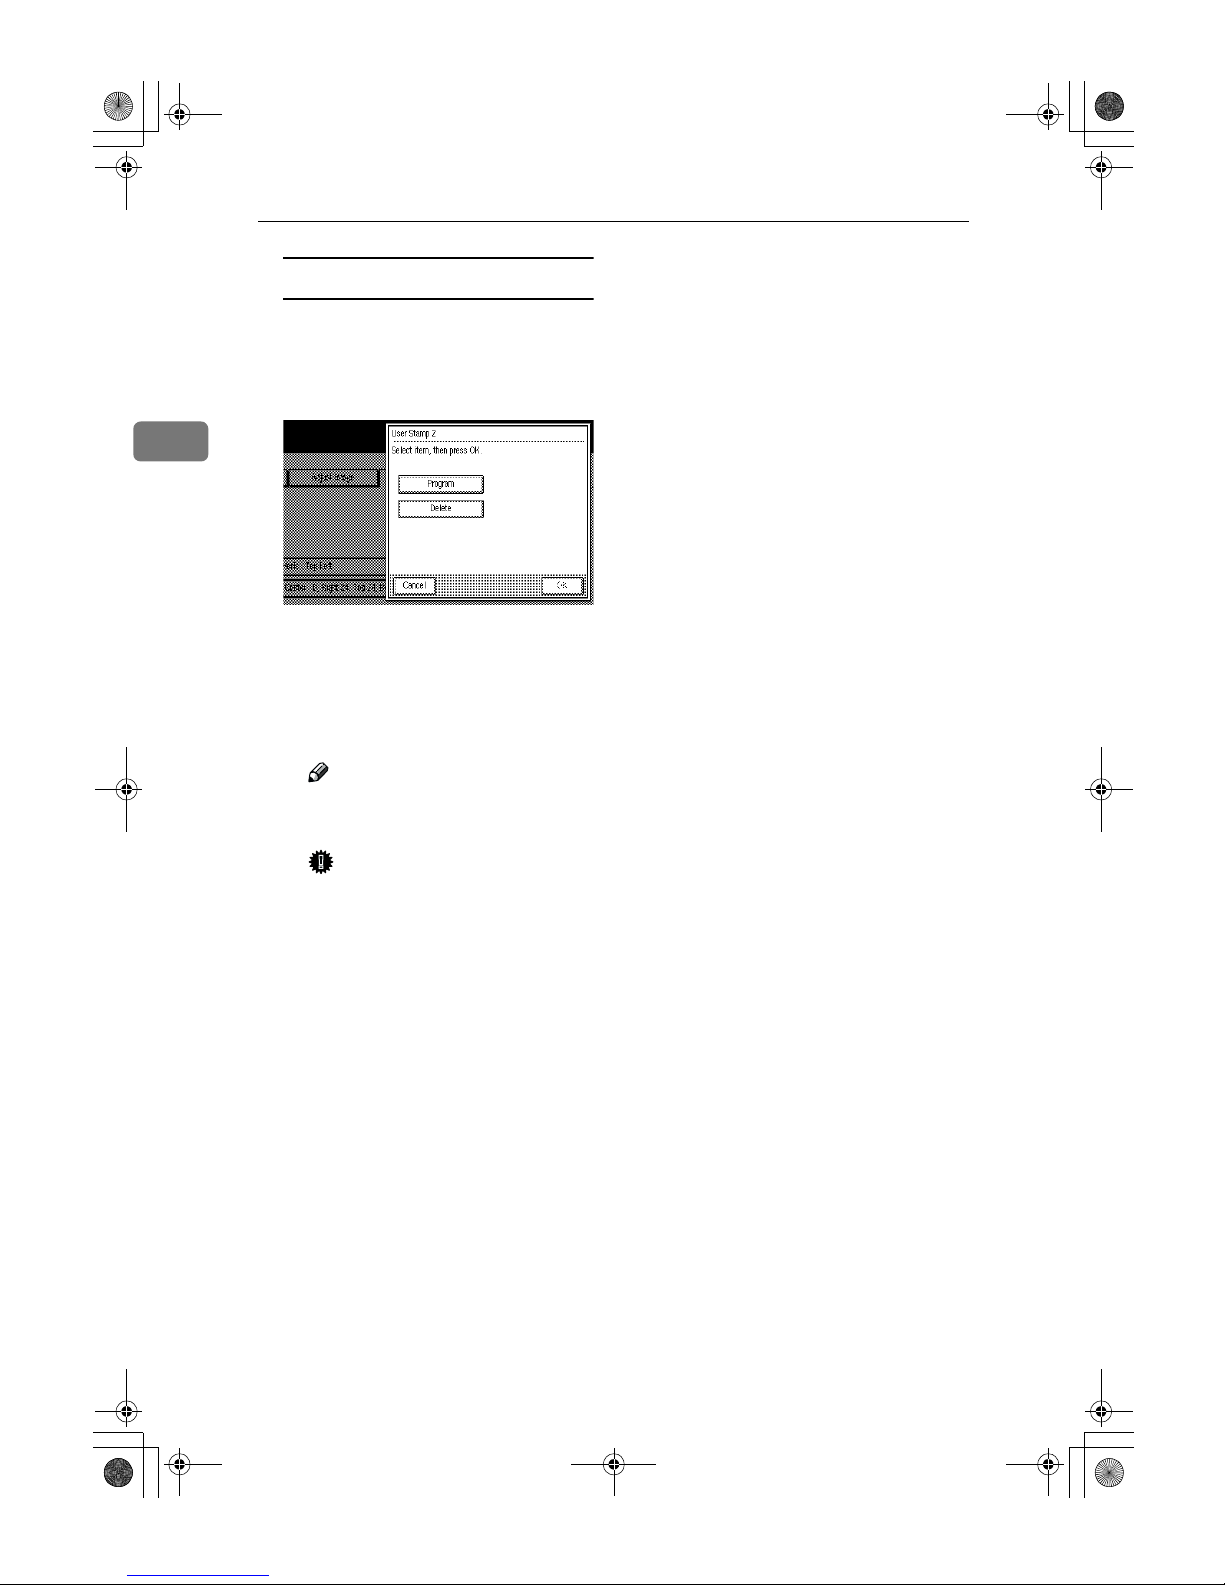
E
Press the [Program/Delete, User Stamp]
key.
Storing
A Select the number you want to
use to store the stamp, and then
press the [OK] key.
B Place your originals.
Note
❒ The area in the top right of the
original of 64×32mm, 2.6"×1.3"
is stored as a user stamp.
❒ You can specify the print
conditions for stored stamps.
See p.138 “User Stamp Format”
Overwriting a stored user stamp
A Select the number for the
stamp you want to overwrite,
and then press the [OK] key.
B Press the [Program] key.
C Press the [OK] key.
D Press the [OK] key.
Note
❒ If you do not want to over-
write the existing stamp,
press the [No] key.
Important
❒ You cannot use as original
stamp before overwritling.
E Place your originals.
32mm
64mm
ZEDG240E
(2.6")
(1.3")
DolphinGB- Copy-F_V4_ FM.book Page 93 Monday, June 11, 2001 5:02 PM
Page 24
Copying
94
2
Deleting
A Select the number of the stamp
you want to delete, and then
press the [OK] key.
B Press the [Delete] key.
C Press the [OK] key.
"Are you sure you want to delete this programmed stamp?" is
displayed on the screen.
D Press the [OK] key.
Note
❒ To cancel the deletion, press
the [No] key.
Important
❒ You cannot use a user stamp
which has been deleted.
F
Press the {User Tools/Counter} key.
After the default settings have
been changed, the machine is
ready to make copies.
DolphinGB- Copy-F_V4_ FM.book Page 94 Monday, June 11, 2001 5:02 PM
Page 25
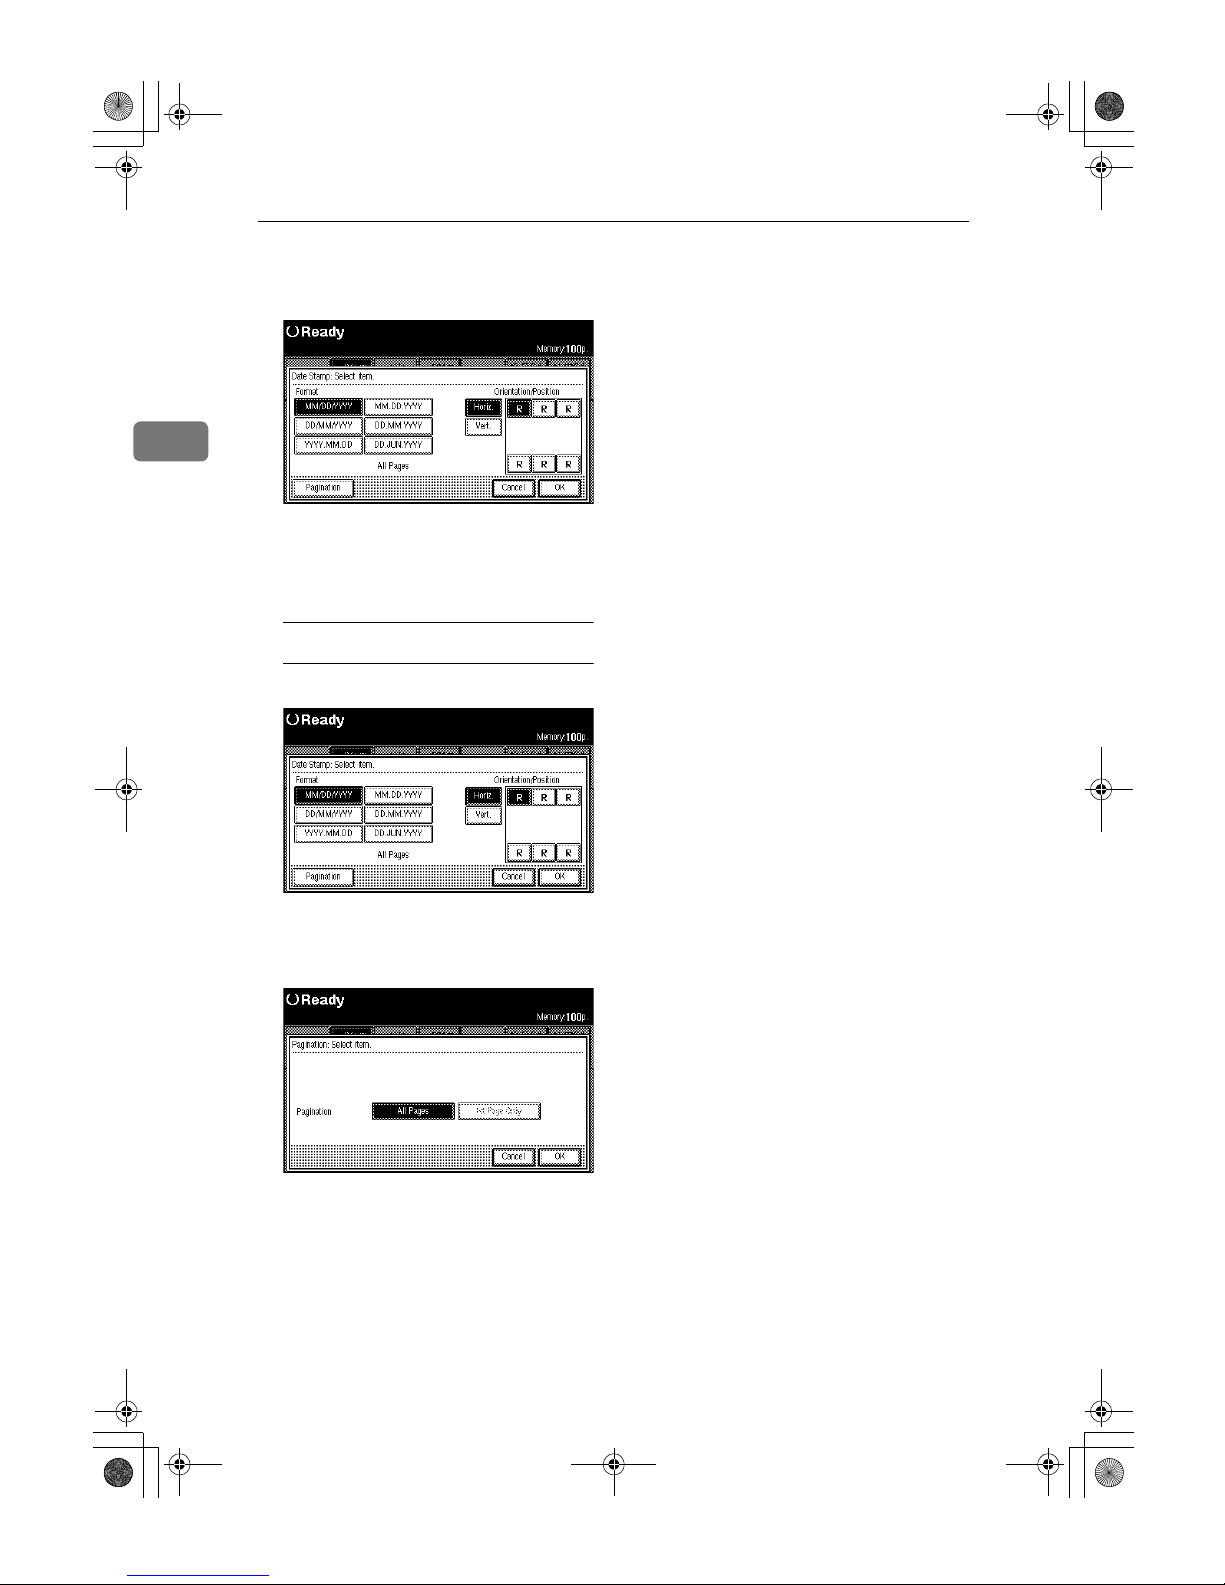
Date Stamp
95
2
Date Stamp
The optional stamp board and HDD are required to use this function.
Preparation
Specify the print position (Top
left/Top centre/Top right/Bottom
left/Bottom centre/Bottom right)
and print direction (Horizontal/
Vertical).
❖❖❖❖ Place your originals, and then
specify the date stamp position
and direction.
Limitation
❒ You cannot use the bypass tray.
❒ You can print on paper sizes up to
A0.
Note
❒ You can change the date format of
the date stamp. See p.136 “Date
Stamp Format Priority”
❒ You can also set and change the
other date stamp conditions. See
p.136 “Date Stamp Format Priority”
❒ You can use the date stamp with
(up to two) other user stamps.
❒ The date set in "Time Settings" is
used for the date stamp. See the
System Settings manual.
A
Press the [Stamp] key.
B
Press the [Date Stamp ] key.
ZEDG250E
2002.2.12
DolphinGB- Copy-F_V4_ FM.book Page 95 Monday, June 11, 2001 5:02 PM
Page 26
Copying
96
2
C
Select the date format for the date
stamp.
D
Select the print direction ([Horiz.]
or [Vert.] keys) and the print position.
Selecting pagination
A Press the [Pagination] key.
B Select the [All Pages] or [First
Page Only] key, and then press
the [OK] key.
E
Press the [OK] key.
DolphinGB- Copy-F_V4_ FM.book Page 96 Monday, June 11, 2001 5:02 PM
Page 27

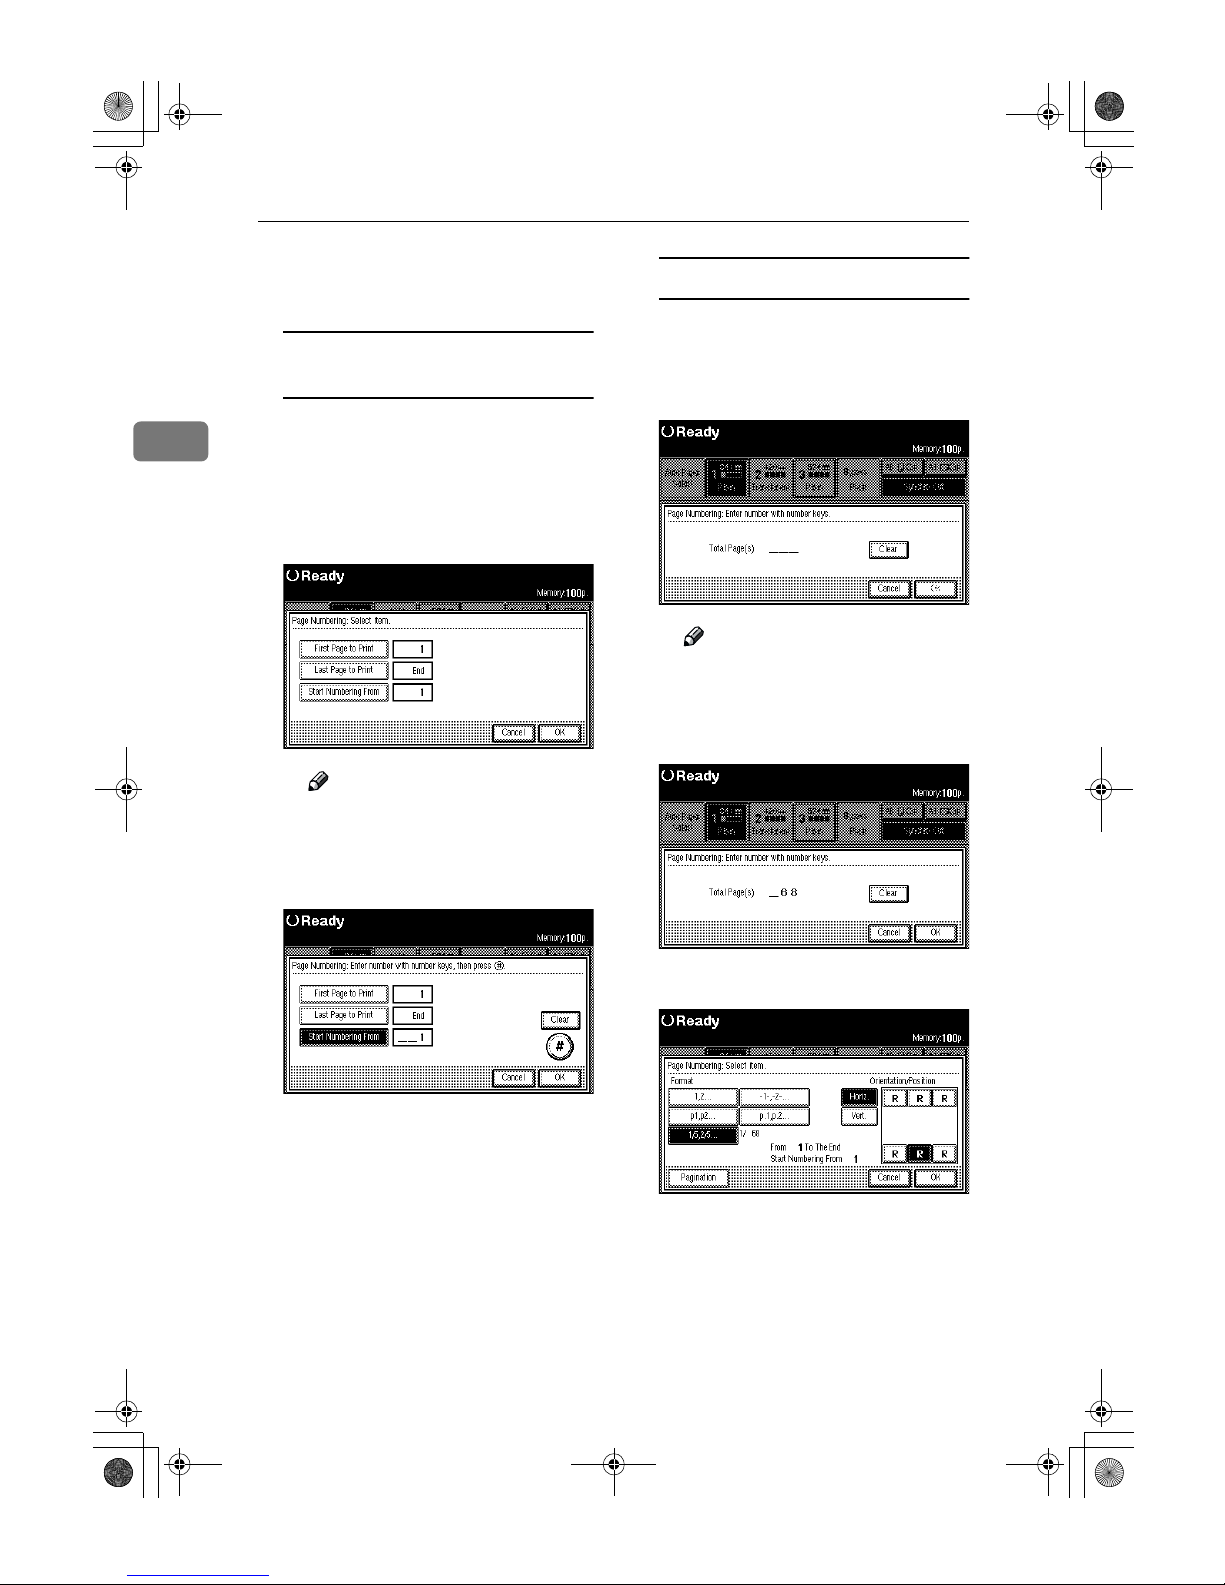
Page Numbering
97
2
Page Numbering
The optional stamp board and HDD are required to use this function.
Use this function to print page numbers on your copies. There are five
types of Page Numbering.
There are five types of Page Numbering.
• 1, 2,…
• -1-, -2-,…
• P1, P2,…
• P.1, P.2,…
• 1/5, 2/5,…
Limitation
❒ When using the function with the
bypass tray selected, the print position will be based on the original
size multiplied by the magnification ratio.
Note
❒ You can finely adjust the default
setting for the page print position.
See p.140 “Page Numbering Position Adjustment”
❒ You can change the default set-
tings for the format, print direction, and print position. See p.139
“Page Numbering Format”
A
Press the [Stamp] key.
B
Press the [Page Numbering] key.
C
Select the page print format.
ZEDG300E
R
B
A
R
B
A
-1-
-2-
-3-
DolphinGB- Copy-F_V4_ FM.book Page 97 Monday, June 11, 2001 5:02 PM
Page 28
Copying
98
2
D
Select the print direction ([Horiz.]
or [
Vert.
] keys) and print position.
Selecting first page to Print/Last Page
to print and start numbering from
A Press the [Pagination] key.
B To change the first/last page,
and starting page, press the corresponding key, and then enter
the value with the number
keys. Then press the [#] key.
Note
❒ To change the value, press
the [
Clear
] key, and then enter
the new value.
C Press the [OK] key.
If [
1/5,2/5…
] are selected
If you select [1/5,2/5…] the screen
for setting fractions is displayed.
A Enter the denominator with
the number keys.
Note
❒ To change the value, press
the [Clear] key, and then enter
the new value.
B Press the [OK] key.
E
Press the [OK] key.
DolphinGB- Copy-F_V4_ FM.book Page 98 Monday, June 11, 2001 5:02 PM
Page 29
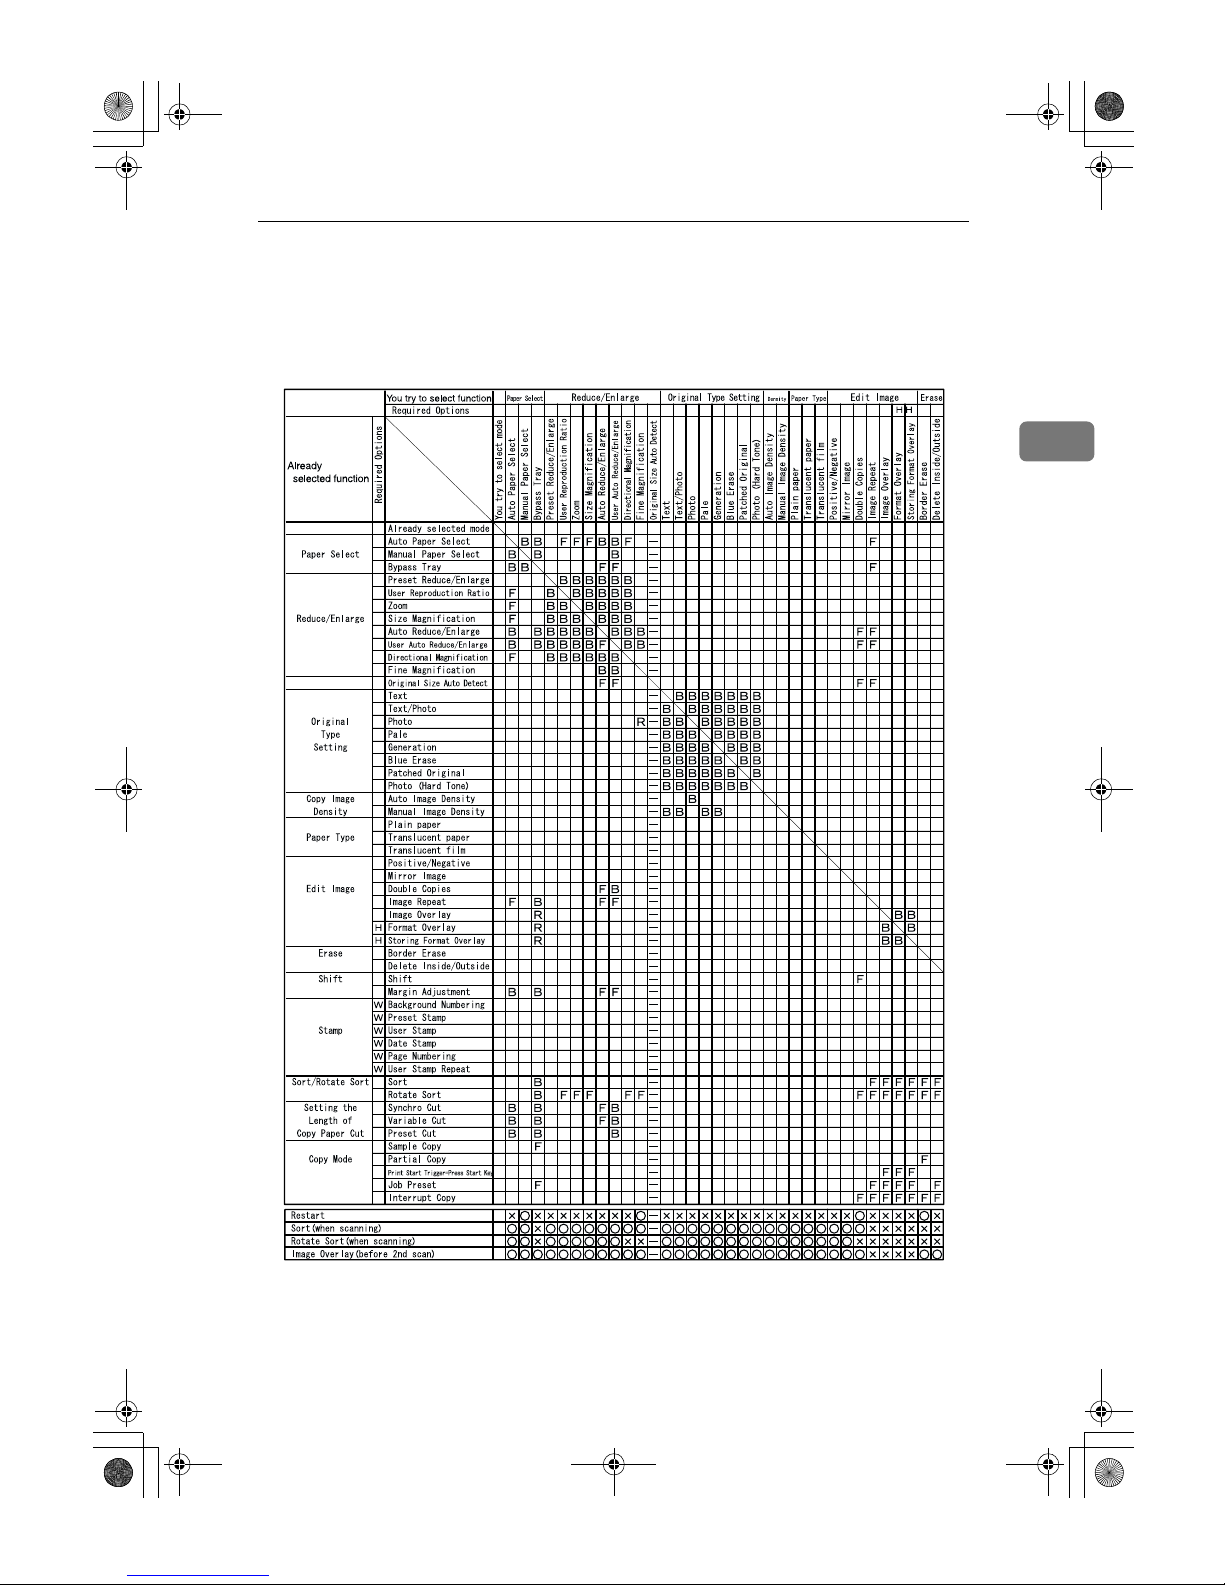
Combination Chart
99
2
Combination Chart
The combination chart given below shows which modes can be used together.
DolphinGB- Copy-F_V4_ FM.book Page 99 Monday, June 11, 2001 5:02 PM
Page 30

Copying
100
2
DolphinGB-Copy-F_V4_FM.book Page 100 Monday, June 11, 2001 5:02 PM
Page 31

Combination Chart
101
2
❖❖❖❖ Symbols used in the chart
Blank means that these modes can be used together.
F means that these modes cannot be used together. The mode you select
will be the mode you're working in.
B means that these modes cannot be used together. The mode you select
will be the mode you're working in.
S means that these modes cannot be used together. A message is displayed
telling you that the mode cannot be selected and the machine stops.
R means you cannot set modes after the original has been scanned.
Numerical value
means the number of the modes that can used together.
1 means full size copying, B for preset ratio
2 only shown if the margin setting is a + setting. A - setting is impossible.
3 means that when additional copy is selected, you cannot set new settings
means that the previous settings can be reset, changed, or deleted.
❍ means that these modes cannot be used together. The mode you select
will be the mode you're working in.
× means that these modes cannot be used together. The mode you select
will be the mode you're working in.
Required option
W stamp board and optional HDD
H optional HDD
DolphinGB-Copy-F_V4_FM.book Page 101 Monday, June 11, 2001 5:02 PM
Page 32

Copying
102
2
Chart of Scan Sizes for Each Function
The following chart shows the scan size limitations for Shift, Margin Adjustment, Edit Image, and Print functions.
Functions Standard Optional HDD installed
Shift A0(E) less than 6m (236")
Margin Adjustment A0(E) less than 6m
Image
Overlay
Image Overlay A1(D) A0 (E)
Format Overlay — A0 (E)
Erase Delete Inside A1 or smaller, 5 location.
A0/D or smaller 1, location.
A1 or smaller, 5 location.
A0/D or smaller 1, location.
Delete Outside A1 or smaller, 5 location.
A0/D or smaller 1, location.
A1 or smaller, 5 location.
A0/D or smaller 1, location.
Border Erase A0 (E) less than 5.5m (216")
with Delete Inside,
Border Erase, and Image
Overlay
A1 (D) A0 (E)
Delete Outside and Image
Overlay Combinations
A1 (D) A0 (E)
with Delete Inside,
Border Erase, and Format
Overlay
A1 (D) A0 (E)
with Delete Outside and
Format Overlay
A1 (D) A0 (E)
Positive/Negative A0 (E) less than 6m (236")
Mirror Image less than 6m (236") less than 6m
Double Copies Output: A0 (E) less than 6m (236")
Image
Repeat
with no other modes A0 (E) A0 (E)
with Border Erase A0 (E) A0 (E)
with Image Overlay A1 (D) A0 (E)
with Format Overlay — A0 (E)
Stamp — A0
DolphinGB-Copy-F_V4_FM.book Page 102 Monday, June 11, 2001 5:02 PM
Page 33

103
3. Troubleshooting
If Your Machine Does Not Operate As You
Want
Error Messages
Machine's Condition Problem/Cause Action
Please Wait. Displayed when the main
power is turned on, when the
paper type (plain paper/
translucent paper/film) is
changed, the toner is replaced,
or other situations when the
machine is getting ready.
Wait for the machine to warmup.
Note
❒ When the message
"Ready" is displayed, you
can make the settings for
your copies and scan your
originals. After the originals have been scanned,
the machine will automatically start copying after it
has warmed-up. See p.130
“Feed Start Trigger”
Cannot detect original size. Improper original is set. Select paper roll manually,
not in Auto Paper Select.
Change the orientation of the
originals and try scanning it
again.
In User Auto Reduce/Enlarge, the original is set to L
For User Auto Reduce/Enlarge, set the original to K
In User Auto Reduce/Enlarge
the original is set to K
For User Auto Reduce/Enlarge set the original toL
Memory is full. The machine's memory is full
because the number of originals scanned or for performing a function. The number of
originals that can be stored in
memory depends on the size
of the originals and the function settings.
• When the Sort function is
selected, press the [Exit]
key to copy the scanned
originals, and then copy
the remaining originals.
• When the Job Preset function is selected, check the
number of preset jobs, and
then try scanning the originals again.
When using the Repeat Copy
with the scanning A0(E) size
original.
Clear the Repeat Copy function.
Original orientation: K The machine is set for K orig-
inals.
Change the orientation (direction) of the original.
You can specify whether K or
L originals have priority. See
"Basic Setting 1/3" in the System Settings manual.
Original orientation: L The machine is set for L orig-
inals.
Dol_Chapter-3 Page 103 Thursday, July 19, 2001 3:16 PM
Page 34

Troubleshooting
104
3
Check paper size. The paper size is different to
the size of the original.
• Set the suitable paper, or
change paper roll selecting.
• Reset the function settings,
and then try again.
Rotate Sort mode is not available with the current settings.
The scanned original is too big
to rotate.
You cannot use rotate sort
with A0 (E) originals.
A paper size suitable for rotate sort has not been selected.
Set paper with the following
dimensions; A2 594 × 420mm,
A3 420 × 297mm, A4 297 ×
210mm.
❖❖❖❖ Inch version
(Engineering)
• 11" × 81/2"
• 17" × 11"
• 22" × 17"
❖❖❖❖ Inch version
(Architecture)
• 12" × 9"
• 18" × 12"
• 24" × 18"
Maximum copy quantity: The number of copies exceeds
the maximum copy quantity.
You can change the maximum
copy quantity that you can
make at a time. See p.128
“Maximum Copy Quantity”
Misfed original is located in
this area. Open the indicated
cover and remove misfed
original.
The original has jammed
(original misfeed).
When you press the {Scanner
Stop} key while original is be-
ing fed through the machine.
Follow the on-screen instructions to remove the jammed
original. See p.116 “xClear-
ing Misfeeds”
Misfed paper is located in
these areas. Open the indicated areas and remove misfed
paper.
The copy paper has jammed. Follow the on-screen instruc-
tions to remove the jammed
paper. See p.116 “xClearing
Misfeeds”
Add Toner The machine has run out of
toner.
Open the toner supply cover
and change the toner cartridge. See p.114 “DAdding
Toner”
Close the indicated covers. The indicated cover(s) is open. Follow the on-screen instruc-
tions to close the cover.
Used toner bottle full. Used toner bottle full. Call your service representa-
tive.
Machine's Condition Problem/Cause Action
DolphinGB-Copy-F_V4_FM.book Page 104 Monday, June 11, 2001 5:02 PM
Page 35

If Your Machine Does Not Operate As You Want
105
3
Screen
Problem Cause Action
The screen is off. The screen contrast knob is
turned to the dark position.
Turn the screen contrast knob
until you can see the screen.
The machine is in Energy Saver mode.
Press the {Clear Modes/Energy
Saver} key to cancel Energy
Saver mode.
The operation switch is
turned off. (The Auto Off
function has turned the machine off.)
Turn on the operation switch.
You can change the Auto Off
time. See "Auto Off Timer" of
the "System Settings" manual.
Cannot select the functions on
the screen.
Selected functions cannot be
used together.
See p.99 “Combination
Chart”.
Function requires the stamp
board or other option.
Some functions require an option.
The power does not come on. The main power switch is
turned off.
Turn on the Main power
switch. See p.11 “Turning On
the Main Power”
DolphinGB-Copy-F_V4_FM.book Page 105 Monday, June 11, 2001 5:02 PM
Page 36

Troubleshooting
106
3
If You Cannot Make Clear Copies
Problem Cause Action
Black or white streaks appear
on the copy.
The image density is too dark. Adjust the image density. See
p.41 “Adjusting Copy Image
Density”
The exposure glass or feed
roller is dirty.
Clean the exposure glass or
feed roller. See p.147 “Main-
taining Your Machine”
The original is dusty. Clean the original and try cop-
ying again.
Be particularly careful when
using the following types of
original.
• Hand drawn or other originals drawn with a pencil
or pen, such as fr om a plotter.
• Film, translucent paper or
other originals that easily
attract static electricity.
• Very long originals.
A shadow of the reverse side
of an original image is also
copied.
The image density is too dark. Adjust the image density set-
ting. See p.41 “Adjusting
Copy Image Density”
The background is dirty. The image density is too dark. Adjust the image density set-
ting. See p.41 “Adjusting
Copy Image Density”
The edges of pasted sections
are shown.
The image density is too dark. Adjust the image density set-
ting. See p.41 “Adjusting
Copy Image Density”
Change the direction of the
original.
Put mending tape on the pasted part.
The same copy area is dirty
whenever making copies.
The exposure glass or feed
roller is dirty.
Clean the exposure glass or
feed roller. See p.147 “Main-
taining Your Machine”
Copies are too light. The image density is too light. Adjust the image density set-
ting. See p.41 “Adjusting
Copy Image Density”
Damp or rough grain paper is
used.
For good copy quality, use the
recommended paper.
Note
❒ If you use coating paper
(such as thermal fax paper,
art paper, carbon paper),
dry paper, or rough grain
paper, the copy image
might be too light.
DolphinGB-Copy-F_V4_FM.book Page 106 Monday, June 11, 2001 5:02 PM
Page 37

If You Cannot Make Clear Copies
107
3
The toner fusing is poor. The toner fusing temperature
is too low.
Adjust the fusing setting for
the paper. See "Fusing Adjustment: Paper Tray" in the System Settings manual.
The copy paper is too thick.
A moire pattern is produced
on copies.
Your original has dot pattern
image or many lines.
Change the direction of the
original. This may prevent the
moire pattern.
Using [Photo] or [Photo(Hard
Tone)].
The image density is uneven. The original has areas of solid
color, or the Positive/Negative function is selected for
Repeat Copy.
When using Repeat Copy
with originals that have areas
of solid color, set the number
of originals as follows:
A0 – A2 (E – C): 1 sheet, A3 (B)
or smaller: 3 sheets
Halftone originals can cause
this problem.
Try using [Text/Photo] or [Pho-
to].
Images are blurred when using translucent paper.
Translucent paper is being
used with Repeat Copy.
Adjust the fuser setting to
match the paper type. See
"Fusing Adjustment: Paper
Tray" in the System Settings
manual.
Wrinkles appear when using
translucent paper.
The fusing temperature is too
low.
Adjust the fuser setting to
match the paper type. See
"Fusing Adjustment: Paper
Tray" in the System Settings
manual.
The paper type has just been
changed from plain paper to
translucent paper.
Wait about one minute.
The background for translucent paper is dirty.
More than 50 copies are being
made of originals longer than
1189mm (46.9") with solid
block of color (2mm × 900mm
(0.08" × 35.4") or larger.)
Adjust the fuser setting to
match the paper type. See
"Fusing Adjustment: Paper
Tray" in the System Settings
manual.
Streaks, scratches, or wrinkles
appear in areas of solid black
color.
The paper has been changed
from plain paper to translucent paper, or from translucent paper to plain paper.
After switching from plain paper→ to translucent paper
wait one minute. After switching from translucent paper →
to plain paper wait two minutes before making copies.
Shadows appear on the copies.
The original is a two sided
original, or image density setting is too dark.
Adjust the image density setting. See p.41 “Adjusting
Copy Image Density”
The copies are blurred. Continuous copies have been
made on small sized paper.
Wait about two minutes, and
then try copying again.
Problem Cause Action
DolphinGB-Copy-F_V4_FM.book Page 107 Monday, June 11, 2001 5:02 PM
Page 38

Troubleshooting
108
3
If You Cannot Make Copies As You Want
Problem Cause Action
Misfeeds occur frequently. There are folds or wrinkles in
the paper.
Remove the folds or wrinkles
from the roll paper.
Jammed pap er or torn paper is
inside the machine.
Remove the paper, as appropriate. See p.116 “xClearing
Misfeeds”
The paper is curled. Smooth out the curl and try
again.
Images are cropped when using the Border Erase function.
The Border Erase setting is to
too big.
The margin of the original is
small.
Reduce the size of the Border
Erase setting. See p.73 “Border
Erase”
Parts of the image are not copied.
The original is not placed correctly.
Placing original correctly. See
p.31 “Setting Originals”
An improper paper roll is selected.
Select the proper paper roll.
See p.16 “Copy Paper”
Shift/Erase or Margin Adjustment mode is selected.
Cancel Shift/Erase or Margin
Adjustment mode. See p.69
“Margin Adjustment”, p.71
“Shift”
Copies are blank. The original is not set correct-
ly.
Placing the original with the
surface to copied on to face
up.
The copy paper shifts sideways.
The paper roll is not set correctly.
Set the paper roll correctly,
making sure that it is straight
and not loose. See p.112
“CLoading Roll Paper”
The original does not match
size in the original table setting.
Adjust the original guides to
the specified size, and then insert the original along the
guides. See p.31 “Setting Originals”
The paper is not set correctly
in the bypass tray.
Make sure that the paper
matches the size for the bypass tray guides. See p.46
“Copying from the Bypass
Tray”
The copy has shifted in the direction of the original feed (or
opposite) direction.
Shift/Erase or Margin Adjustment mode is selected.
Cancel Shift/Erase or Margin
Adjustment mode. See p.69
“Margin Adjustment”, p.71
“Shift”
The copy is shorter than the
selected size. Or the copy is
cut off before the end.
DolphinGB-Copy-F_V4_FM.book Page 108 Monday, June 11, 2001 5:02 PM
Page 39

If You Cannot Make Copies As You Want
109
3
Wrinkles appear in the copy. The paper is damp. Replace the paper with new
paper.
Cut the paper to 1000mm (40")
just before copying.
The paper is damp. See p.12
“Anti-humidity Heater
Switch”
Turn on the anti-humidity
heater. See p.12 “Anti-humid-
ity Heater Switch”
The copies are slanted. The original is not straight. Insert the original along the
original guides, so that it is
straight.
The original and the copy size
does not match.
The paper may have stretched
because it is damp.
Adjust the Fine Magnification
setting for the Additional
Copy function. See p.62 “Fine
Magnification”
Adjust the Fine Magnification
setting. See p.62 “Fine Magnification”
You cannot combine several
functions.
Selected functions cannot be
used together.
See p.99 “Combination
Chart”.
Problem Cause Action
DolphinGB-Copy-F_V4_FM.book Page 109 Monday, June 11, 2001 5:02 PM
Page 40

Troubleshooting
110
3
Changing The Roll Paper Size
Change the size guides on the left and right of the roll paper holder when you
load different sized paper rolls.
Important
❒ Always follow the instructions below when adjusting the roll paper holder.
Do not force the roll paper holder by pulling or sliding it strongly. This could
damage the holder.
Removing the Roll Paper Holder
DolphinGB-Copy-F_V4_FM.book Page 110 Monday, June 11, 2001 5:02 PM
Page 41

Changing The Roll Paper Size
111
3
Setting the Roll Paper Holder
Reference
Refer to the procedure for loading paper. See p.112 “CLoading Roll Paper”.
DolphinGB-Copy-F_V4_FM.book Page 111 Monday, June 11, 2001 5:02 PM
Page 42

Troubleshooting
112
3
CLoading Roll Paper
R
CAUTION:
Important
❒ When removing paper rolls, lift the roll holders on either side of paper roll be-
fore removing it. Do not lift one side only. This could damage the machine.
Reference
For details on the paper sizes and types that can be loaded, see p.16 “Copy
Paper”.
• Be careful when replacing the roll paper or removing misfed paper by following the operating instructions properly. Otherwise, an injury may result from
the paper cutter inside.
ZEDH390E
DolphinGB-Copy-F_V4_FM.book Page 112 Monday, June 11, 2001 5:02 PM
Page 43

CLoading Roll Paper
113
3
DolphinGB-Copy-F_V4_FM.book Page 113 Monday, June 11, 2001 5:02 PM
Page 44

Troubleshooting
114
3
DAdding Toner
R
WARNING:
R
CAUTION:
R
CAUTION:
Important
❒ If you use toner other than the recommended type, a problem might occur.
❒ Replace the toner while the machine is turned on. If you turn the machine off,
your settings will be lost and you will not be able to resume copying.
❒ Always replace toner when the message is displayed.
Note
❒ When the indicators blink, replace the toner as soon as possible.
❒ If toner runs out, the message “DOut of toner.” is displayed and you cannot
make copies.
❒ The machine will be ready to make copies again, about two minutes after the
toner is replaced.
Reference
For details on how to store toner, see p.20 “Storage”.
• Do not incinerate used toner or toner containers. Toner dust might ignite when exposed to an open flame. Dispose of used toner containers
in accordance with local regulations for plastics.
• Keep toner (used or unused) and toner containers out of reach of children.
• Our products are engineered to meet high standards of quality and function-
ality, and we recommend that you only use the expendable supplies available at an authorized dealer.
DolphinGB-Copy-F_V4_FM.book Page 114 Monday, June 11, 2001 5:02 PM
Page 45

DAdding Toner
115
3
DolphinGB-Copy-F_V4_FM.book Page 115 Monday, June 11, 2001 5:02 PM
Page 46

Troubleshooting
116
3
xClearing Misfeeds
Original Misfeeds
R
CAUTION:
Important
❒ If the originals are fed at a slant or become jammed, press the {Scanner Stop}
key.
❒ Do not turn off the operation switch when removing jammed originals. If you
turn the power off, your settings will be lost.
❒ Completely remove the jammed original, taking care not to tear it. If scraps of
paper are left in the machine, the originals will jam again or the machine may
be damaged.
❒ If the original misfeeds again, immediately call your service representative.
Reference
For details of the paper sizes and types that can be loaded, see p.16 “Recom-
mended Size and Type”.
• The fusing section of this equipment might be very hot. You should be very
careful that you don't touch this section when removing the misfed paper.
DolphinGB-Copy-F_V4_FM.book Page 116 Monday, June 11, 2001 5:02 PM
Page 47

xClearing Misfeeds
117
3
Paper Misfeeds
R
CAUTION:
R
CAUTION:
Important
❒ xDo not open the covers, paper path section or paper roll tray immediately
after the paper misfeed display blinks or comes on. Wait 10 seconds before
opening them. If you open them immediately, it will be difficult to remove
paper trapped in the fusing unit.
❒ Completely remove the jammed paper, taking care not to tear it. If scraps of
paper are left in the machine, the originals will jam again or the machine may
be damaged.
❒ If the paper misfeeds again, immediately call your service representative.
Note
❒ Paper jam locations may be displayed in more than one place. In these cases,
check all the locations indicated.
❒ Instructions for clearing paper jams in the copy output area and paper roll
tray are contained in the stickers on the machine.
• The fusing section of this equipment might be very hot. You should be very
careful that you don't touch this section when removing the misfed paper.
• Be careful when replacing the roll paper or removing misfed paper by following the operating instructions properly. Otherwise, an injury may result from
the paper cutter inside.
DolphinGB-Copy-F_V4_FM.book Page 117 Monday, June 11, 2001 5:02 PM
Page 48

Troubleshooting
118
3
Paper roll tray (A1,A2)
When you can see the edge of the paper
DolphinGB-Copy-F_V4_FM.book Page 118 Monday, June 11, 2001 5:02 PM
Page 49

xClearing Misfeeds
119
3
When you cannot see the edge of the paper
DolphinGB-Copy-F_V4_FM.book Page 119 Monday, June 11, 2001 5:02 PM
Page 50

Troubleshooting
120
3
Bypass tray (A3,B)
DolphinGB-Copy-F_V4_FM.book Page 120 Monday, June 11, 2001 5:02 PM
Page 51

xClearing Misfeeds
121
3
Copy output (rear) (C)
Even if C is displayed, check the front area first and clear any paper jams there.
If you still cannot clear the paper jam, use the following procedure.
Important
❒ When clearing the paper, be careful of the auxiliary guide and other protru-
sions.
R
CAUTION:
• The fusing section of this equipment might be very hot. You should be very
careful that you don't touch this section when removing the misfed paper.
DolphinGB-Copy-F_V4_FM.book Page 121 Monday, June 11, 2001 5:02 PM
Page 52

Troubleshooting
122
3
DolphinGB-Copy-F_V4_FM.book Page 122 Monday, June 11, 2001 5:02 PM
Page 53

123
4. User Tools (Copier Features)
Accessing The User Tools (Copier Features)
This section is for the key operation in
charge of this machine. You can
change or set the machine's default
settings.
Preparation
Any changes you make with the
user tools remain in effect even if
the main power switch or operation switch is turned off, or the
{Clear Modes/Energy Saver} key is
pressed.
Reference
For details about the System settings, see the System Settings manual.
A
Press the {User Tools/Counter} key.
The User Tools menu is displayed.
B
Press the [
Copier Features
] key.
C
Select the desired User Tools menu.
The relevant settings screen is displayed for the item selected.
Reference
⇒ p.125 “User Tools Menu
(Copier Features)”
D
Change the settings as described
in the on-screen instructions, and
then press the [OK] key.
Note
❒ Use the {·} key to enter a deci-
mal point.
❒ If you press the [Cancel] key, the
changes to the settings are cancelled and the previous screen is
displayed.
Reference
For details about how to set or
change settings, see the System
Settings manual. See p.126 “Set-
tings You Can Change with the
User Tools”
ZEDS100E
ZEDS090E
DolphinGB-Copy-F_V4_FM.book Page 123 Monday, June 11, 2001 5:02 PM
Page 54

User Tools (Copier Features)
124
4
Exiting from User Tools
A
Press the {User Tools/Counter} key.
The machine exits User Tools
mode and is ready for copying.
Note
❒ You can exit from the User
Tools by pressing the [Exit] or
the {Clear Modes/Energy Saver}
key.
DolphinGB-Copy-F_V4_FM.book Page 124 Monday, June 11, 2001 5:02 PM
Page 55

User Tools Menu (Copier Features)
125
4
User Tools Menu (Copier Features)
ZEDX100E
General Features 1/2
General Features 2/2
Reproduction Ratio
Adjust Image
Stamp 1/2
Stamp 2/2
Key Operator Tools
DolphinGB-Copy-F_V4_FM.book Page 125 Monday, June 11, 2001 5:02 PM
Page 56

User Tools (Copier Features)
126
4
Settings You Can Change with the User
Tools
For details about how to display the settings, see p.123 “Accessing The User
Tools (Copier Features)”
General Features 1/2
❖❖❖❖ Initial Mode Set
Specifies the settings to appear in the Copy Initial Display screen after the machine is turned on, after Auto Reset, or after the {Clear Modes/Energy Saver} key
has been pressed. Or whether to use the settings stored in Program No. 20.
• Standard
• Program No.20
Note
❒ Default: Standard
❖❖❖❖ Copier Reset Timer
Specifies the time period for Auto Reset. See p.30 “Auto Reset”
Note
❒ Default: 60 sec.
❒ The time can be set to 0, and from 10 to 999 seconds.
❒ If you select 0 sec., the setting is set to No Auto Reset.
❖❖❖❖ Original Mode Priority
Specifies the default original type to be used after the machine is turned on,
after Auto Reset, or after the {Clear Modes/Energy Saver} key has been pressed.
See p.40 “Selecting Original Type Setting”
• Text
• Text/Photo
• Photo
• Pale
• Generation
• Blue Line
• Petched Original
• Photo (Hand Toner)
Note
❒ Default: Text
DolphinGB-Copy-F_V4_FM.book Page 126 Monday, June 11, 2001 5:02 PM
Page 57

Settings You Can Change with the User Tools
127
4
❖❖❖❖ Auto Image Density Priority
Specifies whether Auto Image Density should be used after the machine is
turned on, after Auto Reset, or after the {Clear Modes/Energy Saver} key has
been pressed, or not. See p.41 “Adjusting Copy Image Density”
• On
• Off
Note
❒ Default: On
❖❖❖❖ Density Priority
Specified one of seven density levels as the image density.
Note
❒ Default: Center
❖❖❖❖ Auto Paper Select Priority
Specifies whether Auto Paper Select should be used after the machine is
turned on, after Auto Reset, or after the {Clear Modes/Energy Saver} key has
been pressed, or not. See p.42 “Selecting Copy Paper”
• On
• Off
Note
❒ Default: On
❖❖❖❖ Paper Roll Priority
Specifies the default paper roll to be used after the machine is turned on, after
Auto Reset, or after the {Clear Modes/Energy Saver} key has been pressed.
• Paper Roll 1
• Paper Roll 2
• Paper Roll 3 (option)
Note
❒ Default: Paper Roll 1
DolphinGB-Copy-F_V4_FM.book Page 127 Monday, June 11, 2001 5:02 PM
Page 58

User Tools (Copier Features)
128
4
❖❖❖❖ Print Start Trigger
Specifies whether all the originals should be scanned first, or not.
To scan the originals first and then copy when the {Start} key is pressed, press
the [Press Start Key] key, To start copying automatically after the originals
have been scanned, press the [
Set Original
] key.
• Press Start Key
• Set Original
Note
❒ Default: Set Original
❖❖❖❖ Original Size Auto Detect
Specifies whether to detect the size of the original or not.
If On is selected, the machine automatically detects the size of the original. If
Off is selected, the machine ignores the original size and assumes it is the largest size original. For example, to copy a an original 841mm wide, or JIS B series size or other custom size original, set this setting to Off to scan the
original at the maximum width of 914mm. (In this case, be sure to select a paper size larger than the original when making the copy. (When enlarging, be
sure to select a size larger than the original size × reproduction ratio.))
• Off
• On
Note
❒ Default: On
❒ When using 30" width original, set this setting to Off.
General Features 2/2
❖❖❖❖ Memory Status Display
Specifies how the amount of remaining memory should be displayed. If you
select [Page], it is displayed as a number of A1(D) pages.
• Percentage
• Page
Note
❒ Default: Page
❖❖❖❖ Maximum Copy Quantity
Specifies the maximum number of copies that can be made with the Repeat
Copy function. See p.34 “Repeat Copy”
Note
❒ Default: 99 copies
❒ The value can be set from 0 to 99 copies.
DolphinGB-Copy-F_V4_FM.book Page 128 Monday, June 11, 2001 5:02 PM
Page 59

Settings You Can Change with the User Tools
129
4
❖❖❖❖ Noise Reduction
Specifies the noise (small specks of dirt or dust on the image) reduction level
for each of the original types (Text, Text/Photo, Pale, Special Original.)
If you select [Off], small scratches and specks on the original will not be removed.
• Off
• Low
• Medium
• High
Note
❒ Default: Off
❖❖❖❖ Original Mode Quality Level
Adjusts the finish for each original type.
• Normal
• Special
Note
❒ Default: Normal
❒ When select [Special]: Your service representative will set this to a value
that matches your requirements. For details consult your service representative.
❖❖❖❖ Original Mode Density Level
Specifies the copy image density for each original type.
• Lighter
• Normal
• Darker
Note
❒ Default: Normal
❖❖❖❖ Sort Copy Setting
Specifies whether all the originals should be scanned before starting copying,
when using the Sort function. Or whether copying should start while originals are still being scanned. See p.51 “Sort/Rotate Sort”
If "Rear" is selected for the copy output when using the Sort function, even if
[Copy after Each Scan] is selected, copying starts after all the originals have
been scanned.
• Copy after All Scans
• Copy after Each Scan
Note
❒ Default: Copy after All Scans
DolphinGB-Copy-F_V4_FM.book Page 129 Monday, June 11, 2001 5:02 PM
Page 60

User Tools (Copier Features)
130
4
❖❖❖❖ Sample Copy Priority
Specifies the default dimensions to be used for the Sample Copy function. See
p.57 “Sample Copy”
Note
❒ Default: 0
❒ The value can be set from 0 to 250 mm (9").
❖❖❖❖ Partial Copy Priority
Specifies the default dimensions to be used for the start point (Y1) and end
point (Y2) in the Partial Copy function. See p.58 “Partial Copy”
Note
❒ Default:
• Y1: 0 (0.0")
• Y2: 210 mm (8.3")
❒ Y1 can be set from 0 to 5000 mm (0" to 197.0").
❒ Y2 can be set from 210 to 6000 mm (8.3" to 236.0").
❖❖❖❖ Feed Start Trigger
Specifies how copying starts.
If you select [Set Original], copy starts automatically, if you select [Press Start
Key] then copying starts after you press the {Start} key.
• Set Original
• Press Start Key
Note
❒ Default: Set Original
DolphinGB-Copy-F_V4_FM.book Page 130 Monday, June 11, 2001 5:02 PM
Page 61

Settings You Can Change with the User Tools
131
4
Reproduction Ratio
❖❖❖❖ User Reproduction Ratio
You can store up to three reproduction ratios, in addition to those in the Preset Ratio function.
Enter the desired reproduction ratio with the number keys.
Note
❒ Default: 100 %
❒ Use the {·} key to enter a decimal point.
• 25.0% – 400.0%
❖❖❖❖ Preset Reduce/Enlarge Priority
When [Reduce/Enlarge] key is pressed, the selected reproduction ratio is used
as the priority ratio.
The selected user reproduction ratio will also have priority when the [Reduce/
Enlarge] key is pressed.
Note
❒ Default:
• Metric version: 71%
• Inch version (Engineering): 65%
• Inch version (Architecture): 67%
DolphinGB-Copy-F_V4_FM.book Page 131 Monday, June 11, 2001 5:02 PM
Page 62

User Tools (Copier Features)
132
4
❖❖❖❖ Shortcut Reduce/Enlarge
You can specify a frequently used reproduction ratio to appear on the basic
screen.
Note
❒ Default:
• Metric version: 71%
• Inch version (Engineering): 65%
• Inch version (Architecture): 67%
❖❖❖❖ User Auto Reduce/Enlarge
Specifies the original and copy sizes to be displayed when the [User Auto R/E]
key is pressed. See p.45 “User Auto Reduce/Enlarge”
Select the copy size to use with the original size.
Note
❒ If you have selected a setting for A0(E) size paper in Auto Reduce/Enlarge,
you cannot select "Original orientationL". When you cannot select "Original orientationL" (grayed out), select the original size and copy size for
Horizontal in this setting.
❖❖❖❖ User Auto R/E Original Size Detect
Specifies whether an original should be processed as a vertical or horizontal
original when [User Auto R/E] is selected. See p.45 “User Auto Reduce/En-
large”
• Original Orientation: K
• Original Orientation: L
Note
❒ Default: Original OrientationK
DolphinGB-Copy-F_V4_FM.book Page 132 Monday, June 11, 2001 5:02 PM
Page 63

Settings You Can Change with the User Tools
133
4
Adjust Image
❖❖❖❖ Margin Adjustment Priority
Specifies the default setting for the size of the margin.
You can set the size for the top and bottom margin. See p.69 “Margin Adjustment”
Note
❒ Default:
• Metric version: 20 mm
• Inch version: 0.8"
❖❖❖❖ Shift Image Area Priority
Specifies the default setting for the Shift function. Use the arrow keys to set
the shift direction and distance. See p.71 “Shift”
Note
❒ Default:
• Metric version: 20 mm
• Inch version: 0.8"
❖❖❖❖ Border Erase Width Priority
Specifies the default setting for the Border Erase function. See p.73 “Border
Erase”
Use the [+] or [-] keys to make the setting.
Note
❒ Default:
• Metric version: 10 mm
• Inch version: 0.4"
❖❖❖❖ Image Repeat Separation Line
Specifies the type of line to use for the separation line. See p.79 “Image Repeat”
• None
• Solid
• Broken A
• Broken B
• Crop Marks
Note
❒ Default: None
DolphinGB-Copy-F_V4_FM.book Page 133 Monday, June 11, 2001 5:02 PM
Page 64

User Tools (Copier Features)
134
4
❖❖❖❖ Double Copies Separation Line
Specifies whether to use a separation line, or not, for the Double Copies function. See p.78 “Double Copies”
The separation line will be a dotted line.
• None
• Separation Line
Note
❒ Default: Separation Line
❖❖❖❖ Program/Delete, Overlay Format
Stores a format image (background image) for use with the Format Overlay
function.
You can store up to four formats.
See p.84 “Format Overlay”, p.85 “Program/Delete, Overlay Format”
Stamp 1/2
❖❖❖❖ Preset Stamp Priority
Specifies the default user stamp to be selected for the Preset Stamp function.
See p.89 “Preset Stamp”
• COPY
• URGENT
• PRIORITY
• For Your Info
• PRELIMINARY
• For Internal Use Only
• CONFIDENTIAL
Note
❒ Default: COPY
DolphinGB-Copy-F_V4_FM.book Page 134 Monday, June 11, 2001 5:02 PM
Page 65

Settings You Can Change with the User Tools
135
4
❖❖❖❖ Preset Stamp Format Priority
Specifies the size, density, print direction and print position for each of the
preset stamps (COPY, URGENT, PRIORITY, For Your Info., PRELIMINARY,
For Internal Use Only, CONFIDENTIAL). You can make separate settings for
both horizontal and vertical. See p.89 “Preset Stamp”
• Size (1X, 2X, 4X, 8X)
• Density (Normal, Light, Very Light)
• Orientation (Horiz., Vert.)
• Position
Note
❒ Default:
• Size: 1X
• Density: Normal
• Orientation: Horiz.
• Position: Bottom Right
❖❖❖❖ Preset Stamp Position Adjustment
Specifies the print position on the copies for each of the preset stamps.
Enter the settings for stamp position with the [+][-] keys or the number keys.
Note
❒ Default:
• [From Left][From Right][From Top][From Bottom]:
• Metric version: 24 mm
• Inch version: 0.9"
• [From Horiz. Center]:
• Metric version: 0 mm
• Inch version: 0.0"
DolphinGB-Copy-F_V4_FM.book Page 135 Monday, June 11, 2001 5:02 PM
Page 66

User Tools (Copier Features)
136
4
❖❖❖❖ Date Stamp Format Priority
Specifies the format and other conditions to be used for the Date Stamp function. See p.95 “Date Stamp”
You can specify the format to be used for the date stamp and its orientation
and position.
• Date format
• MM/DD/YYYY
• DD/MM/YYYY
• YYYY.MM.DD
• MM.DD.YYYY
• DD.MM.YYYY
• DD.JUN.YYYY
• Orientation
• Position
Note
❒ Default:
• Date Format: MM/DD/YYYY
• Orientation: Horiz.
• Position: Top Left
DolphinGB-Copy-F_V4_FM.book Page 136 Monday, June 11, 2001 5:02 PM
Page 67

Settings You Can Change with the User Tools
137
4
❖❖❖❖ Date Stamp Position Adjustment
Specifies the print position on the copies for the date stamp.
Enter the settings for stamp position with the [+][-] keys or the number keys.
Note
❒ Default:
• [From Left][From Right][From Top][From Bottom]:
• Metric version: 24 mm
• Inch version: 0.9"
• [From Horiz. Center]:
• Metric version: 0 mm
• Inch version: 0.0"
❖❖❖❖ Background Numbering Format
Specifies the format and other conditions to be used for the Background
Numbering function. See p.87 “Background Numbering”
You can specify the print size and density.
• Size (1X, 2X, 4X, 8X)
• Density (Light, Normal, Dark, Very Dark)
Note
❒ Default:
• Size: 1X
• Density: Normal
DolphinGB-Copy-F_V4_FM.book Page 137 Monday, June 11, 2001 5:02 PM
Page 68

User Tools (Copier Features)
138
4
Stamp 2/2
❖❖❖❖ User Stamp Format
Specifies the density, print direction and print size to be used for user stamps.
You can set separate settings for horizontal and vertical. See p.91 “User
Stamp”
• Density (Normal, Light, Very Light)
• Orientation (Horiz, Vert)
• Position
Note
❒ Default:
• Density: Normal
• Position: Horiz
• Position: Bottom Right
❖❖❖❖ User Stamp Position Adjustment
Specifies the print position on the copies for user stamps.
Enter the settings for stamp position with the [+][-] keys or the number keys.
Note
❒ Default:
• [From Left][From Right][From Top][From Bottom]:
• Metric version: 24 mm
• Inch version: 0.9"
• [From Horiz. Center]:
• Metric version: 0 mm
• Inch version: 0.0"
DolphinGB-Copy-F_V4_FM.book Page 138 Monday, June 11, 2001 5:02 PM
Page 69

Settings You Can Change with the User Tools
139
4
❖❖❖❖ Program/Delete, User Stamp
You can store, change, or delete a design of your choice as a user stamp.
You can store up to four user stamps.
See p.91 “User Stamp”, p.92 “Program/Delete, User Stamp”
❖❖❖❖ Page Numbering Format
Specifies the conditions to be used for the Page Numbering function. See p.97
“Page Numbering”
You can specify the format to be used for the page number and its orientation
and position.
• Format
• 1, 2...
• p1, p2...
• 1/5, 2/5...
• -1-, -2-...
• p.1, p.2...
• Orientation (Horiz, Vert)
• Position
Note
❒ Default:
• Format: 1,2,3……
• Orientation: Horiz
• Position: Top Left
DolphinGB-Copy-F_V4_FM.book Page 139 Monday, June 11, 2001 5:02 PM
Page 70

User Tools (Copier Features)
140
4
❖❖❖❖ Page Numbering Position Adjustment
Specifies the print position on the copies for the page number.
Enter the settings for numbering position with the [+][-] keys or the number
keys.
Note
❒ Default:
• [From Left][From Right][From Top][From Bottom]:
• Metric version: 24 mm
• Inch version: 0.9"
• [From Horiz. Center]
• Metric version: 0 mm
• Inch version: 0.0"
Key Operator Tools
When a key operator code has already been entered, you cannot begin manager
setting unless you enter the key operator code(up to 8 digit).
❖❖❖❖ Check/Reset/Print, Copy Counter
You can check or print the number of copies made under each user code. You
can also reset each user code's counter to 0.
Note
❒ Print Counter List
• Press the [
Print Counter List
] key.
❒ Reset Counter.
• Press the [Reset Counter] key.
❒ Reset All Counters
• Press the [
Reset All Counters
] key.
DolphinGB-Copy-F_V4_FM.book Page 140 Monday, June 11, 2001 5:02 PM
Page 71

Settings You Can Change with the User Tools
141
4
❖❖❖❖ Program/Change/Delete, User Code
You can register, change, or delete user codes (8 digits or less).
You can store up to 100 user codes.
Note
❒ Program
• You can register user codes.
Press the [Program] key, and then enter the user code with the number
keys.
❒ Change
• You can change user codes.
Press the [Change] key after selecting the user code.
❒ Delete User Code
• You can delete user codes.
Press the [Delete User Code] key after selecting the user code you want to
delete.
❒ Delete All User Codes
• You can delete all user codes.
Press the [Delete All User Codes] key.
DolphinGB-Copy-F_V4_FM.book Page 141 Monday, June 11, 2001 5:02 PM
Page 72

User Tools (Copier Features)
142
4
DolphinGB-Copy-F_V4_FM.book Page 142 Monday, June 11, 2001 5:02 PM
Page 73

143
5. Remarks
Do's and Don'ts
R
CAUTION:
Important
❒ Only disconnect the power cord after checking that all copies are finished.
• Do not touch areas on or around the fusing unit. These areas get hot.
• After making copies continuously, the exposure glass may feel warm to
the touch. This is not a malfunction.
• Make sure the machine is well ventilated when in use. If the machine is operated for a long time in a poorly ventilated location, it may begin to smell.
We recommend that you use the machine in a well ventilated room to ensure you maintain the operating conditions.
• You might feel warm around the ventilation hole. This is caused by exhaust air, and not a malfunction.
• Do not turn off the operation switch while copying or printing. When turning
off the operation switch, make sure that copying or printing is completed.
• Do not open the covers of machine while copying or printing. If you do,
misfeeds might occur.
• Do not drop staples, paper clips, or other object in to the machine.
• Do not stand or sit on the machine.
• Do not leave the paper path section open for more than 10 minutes.
• Do not touch the photosensitive conductor. If you touch it by accident,
wipe it gently with a soft cloth.
• If you will not be using the machine for a long time, remove the paper from
the paper roll tray and place it in its storage bag.
• The machine might fail to produce good copy images if there should occur
condensation inside caused by temperature change. To prevent such trouble, this machine has an anti-condensation function. Even after the main
power switch is in the stand-by position, the anti-condensation heater is
active, thus keeping the machine body slightly warm.
• The machine has a Anti-humidity function. Even when the main power switch
is in the Off position, the Anti-humidity heater is active if it is turned on.
• Do not move the machine while copying or printing.
• Be sure to take a note of your machine settings. If you operate the machine im-
properly or a failure occurs in the machine, your machine settings might be lost.
• Supplier shall not be liable for any loss or damages resulting form a failure
on the machine, loss of machine settings, and use of the machine.
• Unplug the power cord from the wall outlet before you move the equipment.
While moving the equipment, you should take care that the power cord will
not be damaged under the equipment.
DolphinGB-Copy-F_V4_FM.book Page 143 Monday, June 11, 2001 5:02 PM
Page 74

Remarks
144
5
Where To Put Your Machine
Machine Environment
Your machine's location should be carefully chosen because environmental conditions greatly affect its performance.
Optimum environmental conditions
R
CAUTION:
R
CAUTION:
• Temperature: 10 – 32°C (50 – 89.6°F)(humidity to be 54% at 32°C, 89.6°F)
• Humidity: 15 – 80% (temperature to be 27°C, 80.6°F at 80%)
• A strong and level base.
• The machine must be level within 5mm, 0.2" both front to rear and left to
right.
• To avoid possible buildup of ozone, be sure to locate this machine in a large
well ventilated room that has an air turnover of more than 30 m
3
/hr/person.
Environments to avoid
• Locations exposed to direct sunlight or strong light (more than 1,500 lux).
• Locations directly exposed to cool air from an air conditioner or heated air
from a heater. (Sudden temperature changes might cause condensation within the machine.)
• Locations close to such machines generating ammonia such as diazo copy
machines.
• Places where the machine might be subjected to frequent strong vibration.
• Dusty areas.
• Areas with corrosive gases.
• Keep the equipment away from humidity and dust. Otherwise a fire or an
electric shock might occur.
• Do not place the equipment on an unstable or tilted surface. If it topples
over, it could cause injury.
• If you use the equipment in a confined space, make sure there is a continuous air turnover.
DolphinGB-Copy-F_V4_FM.book Page 144 Monday, June 11, 2001 5:02 PM
Page 75

Where To Put Your Machine
145
5
Access To Machine
Place the machine near the power source, providing clearance as shown.
Note
❒ For the required space when options are installed, please contact your service
representative.
Standard setting
Front more than 100cm (40")
Rear more than 70cm (28")
Left more than 40cm (16")
Right more than 45cm (18")
Upper more than 45cm (18")
ZEDH400E
Front
Right
Left
Rear
DolphinGB-Copy-F_V4_FM.book Page 145 Monday, June 11, 2001 5:02 PM
Page 76

Remarks
146
5
Power Connection
R
WARNING:
R
CAUTION:
R
CAUTION:
• When the main switch is in the Stand-by positions, the optional anti-condensation heaters are on. In case of emergency, unplug the machine's power cord.
• When you unplug the power cord, the anti-condensation heaters turn off.
• Make sure that the plug is firmly inserted in the outlet.
• Voltage must not fluctuate more than 10%.
• The socket-outlet shall be installed near the equipment and shall be easily ac-
cessible.
Disposal
Contact your service representative if you want to dispose of the machine.
• Only connect the machine to the power source described on the inside
front cover of this manual. Connect the power cord directly into a wall
outlet and do not use an extension cord.
• Do not damage, break or make any modifications to the power cord.
Do not place heavy objects on it. Do not pull it hard nor bend it more
than necessary. These actions could cause an electric shock or fire.
• Unplug the power cord from the wall outlet before you move the equipment.
While moving the equipment, you should take care that the power cord will
not be damaged under the equipment.
• When you disconnect the power plug from the wall outlet, always pull the
plug (not the cable).
DolphinGB-Copy-F_V4_FM.book Page 146 Monday, June 11, 2001 5:02 PM
Page 77

Maintaining Your Machine
147
5
Maintaining Your Machine
If the exposure glass or feed rollers
are dirty, you will not be able to make
clear copies. Clean them when they
become dirty.
❖❖❖❖ Cleaning the machine
Wipe the machine with a soft dry
cloth. If this does not remove the
dirt, wipe the machine with a damp,
tightly wrung, cloth. If a damp cloth
still does not remove the dirt, try using a mild detergent. Wipe the machine with a dry cloth to remove the
moisture, after using a damp cloth.
Important
❒
Do not use chemical cleaner or organic solvent, such as thinner or benzene.
If they get into the machine or melt
plastic parts, a failure might occur.
❒ Do not clean parts other than those
specified in this manual. Such
parts should be cleaned by your
service representative.
Cleaning inside the Original
Cover
If you open the original cover, you
can access the exposure glass and
original feed mechanism.
A
Lift the release lever on the original cover and open the cover
while holding it on both sides.
Cleaning the exposure glass
A Wipe the exposure glass with a
soft, damp cloth.
Cleaning the feed roller
A Wipe the feed roller with a
soft, dry cloth while turning
the roller.
ZEDH210E
ZEDH220E
ZEDH230E
DolphinGB-Copy-F_V4_FM.book Page 147 Monday, June 11, 2001 5:02 PM
Page 78

Remarks
148
5
Cleaning the original feed guide
A Wipe the original feed guides
at the top and bottom with a
soft, dry cloth.
Note
❒ If there is paper dust or
threads inside, remove them.
B
Close the original cover gently.
Cleaning The Paper Path
Section
Cleans toner powder that may have
collected on the imaging area.
A
Lift the release levers on either
side and open the paper path section.
Important
❒ Do not leave the paper path sec-
tion open for more than 10 minutes.
B
Wipe it with a soft, dry cloth.
C
Close the paper path section cover
gently.
ZEDH240E
ZEDH250E
ZEDH260E
ZEDH270E
DolphinGB-Copy-F_V4_FM.book Page 148 Monday, June 11, 2001 5:02 PM
Page 79

149
6. Specification
Mainframe
❖❖❖❖ Configuration:
Console
❖❖❖❖ Fusing:
Digital dry electrostatic transfer system
❖❖❖❖ Originals:
Sheet
❖❖❖❖ Original size (W ×××× L):
• Metric version: 210 × 182mm-914 × 6000mm
• Inch version: 8
1
/2" × 9"-36" × 236"
❖❖❖❖ Copy size (W ×××× L):
• Metric version:
A0K-A4 K
Roll paper: 210 × 210mm-914 × 6000mm
Bypass tray: 210 × 182mm-914 × 2000mm
• Inch version:
EK-A K
Roll paper: 8
1
/2" × 81/2" -36" × 236"
Bypass tray: 8
1
/2" × 9"-36" × 78"
❖❖❖❖ Reproduction ratio:
• Metric version:
Full-size: 100%
Reduce: 25.0%, 35.4%, 50.0%, 70.7%
Enlarge: 141.4%, 200.0%, 282.8%, 400.0%
Zoom: 25.0-200.0% (0.1% step)
Zoom: 200.0-400.0% (0.2% step)
• Inch version (Engineering):
Full-size: 100%
Reduce: 25.0%, 32.0%, 50.0%, 65.0%
Enlarge: 129.0%, 200.0%, 259.0%, 400.0%
Zoom: 25.0-200.0% (0.1% step)
Zoom: 200.0-400.0% (0.2% step)
• Inch version (Architecture):
Full-size: 100%
Reduce: 25.0%, 33.0%, 50.0%, 67.0%
Enlarge: 133.0%, 200.0%, 267.0%, 400.0%
Zoom: 25.0-200.0% (0.1% step)
Zoom: 200.0-400.0% (0.2% step)
DolphinGB-Copy-F_V4_FM.book Page 149 Monday, June 11, 2001 5:02 PM
Page 80

Specification
150
6
❖❖❖❖ Copying speed (full-size copying):
7 copies/minute (A1(D)L) (3.54 inch per second)
❖❖❖❖ Warm-up time:
Less than 2 minutes (20°C)
❖❖❖❖ First copy time:
• Metric version:
When selected upper tray: 18 seconds (A1L), 25 seconds(A0K)
• Inch version:
When selected upper tray: 18.5 seconds (DL), 25.4 seconds(EK)
❖❖❖❖ Repeat copy:
• Metric version:
• Mainframe only
• Optional HDD installed
6 m (any width)
• Inch version (Engineering):
• Mainframe only
• Optional HDD installed
236" (any width)
Width Length
914/880mm Up to 1,219mm
841mm Up to 1,325mm
594mm Up to 1,875mm
420mm Up to 2,652mm (Transportation dis-
tance:2,000mm)
297mm Up to 2,751mm (Transportation dis-
tance:2,000mm)
When deleting a copy size: Up to 1,219mm
Width Length
34" Up to 50.8"
22" Up to 78.5"
17" Up to 101.6"
11" Up to 157"
8
1
/2"
Up to 203.2"
When deleting a copy size: Up to 50.8"
DolphinGB-Copy-F_V4_FM.book Page 150 Monday, June 11, 2001 5:02 PM
Page 81

Mainframe
151
6
• Inch version (Architecture):
• Mainframe only
• Optional HDD installed
236" (any width)
❖❖❖❖ Non-reproduction area:
• Metric version:
• Top: 8mm
• Bottom: 10mm
• Left and Right 2 ± 2mm (less than 6mm on either side)
• Inch version:
• Top: 0.32"
• Bottom: 0.39"
• Left and Right 0.08" ± 0.08" (less than 0.24" on either side)
❖❖❖❖ Continuous copying count:
99 copies
❖❖❖❖ Copy paper capacity:
2 roll unit/bypass tray
❖❖❖❖ Power source:
• Metric version
220-240V, 50Hz/60Hz, 10A
• Inch version
120V, 60Hz, 20A
❖❖❖❖ Dimensions (W ×××× D ×××× H):
1,250 × 748 × 1,200mm, 49.2" × 29.4" × 47.2"
❖❖❖❖ Weight:
Approx. 225kg, 496lb
❖❖❖❖ Original scanning:
Original feed image scanning over a fixed contact image sensor
Width Length
36" (30") Up to 48"
24" Up to 72"
18" Up to 96"
12" Up to 144"
9" Up to 192"
When deleting a copy size: Up to 48"
DolphinGB-Copy-F_V4_FM.book Page 151 Monday, June 11, 2001 5:02 PM
Page 82

Specification
152
6
❖❖❖❖ Original scanning pivot:
Center
❖❖❖❖ Light source:
LED
❖❖❖❖ Scanning resolution:
600dpi
❖❖❖❖ Scanning gradation:
256 values
❖❖❖❖ Printing gradation:
4 values
❖❖❖❖ Printing resolution:
600dpi
❖❖❖❖ Photo conductor type:
OPC
❖❖❖❖ Development:
Dry two-component magnetic brush development system
❖❖❖❖ Fusing:
Hot roller
❖❖❖❖ Power consumption:
❖❖❖❖ Noise Emission
*1
:
Sound Power Level:
Sound Pressure Level
*2
:
*1
The above measurements are made in accordance with ISO 7779 which are the actual value.
*2
It is measured at the position of the operator.
Metric version Inch version
Warm-up 1.6 kw 1.7 kw
Ready (Anti-humidity heater
= OFF)
0.2 kw 0.2 kw
During printing 1.5 kwh 1.4 kwh
Maximum 1.8 kw 1.7 kw
Stand-by Less than 50.6 dB (A)
Copying Less than 65.7 dB (A)
Stand-by Less than 38.0 dB (A)
Copying Less than 54.7 dB (A)
DolphinGB-Copy-F_V4_FM.book Page 152 Monday, June 11, 2001 5:02 PM
Page 83

Options
153
6
Options
❖❖❖❖ 2nd Roll Tray TypeA
Adds the lower tray (paper roll 3).
❖❖❖❖ Roll Holder Unit TypeA
When using different sizes of roll paper, use the roll holder to quickly change
the paper rolls.
❖❖❖❖ Original Tray TypeG
Attach this to the rear of the machine to store large quantities of originals.
❖❖❖❖ Stamp Board TypeA
Adds the print capability required for the Background Numbering, Preset
Stamp, User Stamp, Date Stamp, User Stamp Repeat, and Page Numbering
functions.
❖❖❖❖ Hard Disk Drive Option Type 470
Allows you to incrase the copy functions, like the following:
• Repoat Copy (longer than A0(E)K)
• Stamp function (required stamp board)
• Sort/Rotate Sort (50 sheets or more)
• Restart Copy (longer than A0(E))
• Format Overlay
• Sample Copy (longer than A0(E))
DolphinGB-Copy-F_V4_FM.book Page 153 Monday, June 11, 2001 5:02 PM
Page 84

Specification
154
6
Settings Record Sheet
❖❖❖❖ Program Record Sheet
Please make a copy of this sheet and use it to keep a record of your program
settings.
DolphinGB-Copy-F_V4_FM.book Page 154 Monday, June 11, 2001 5:02 PM
Page 85

Settings Record Sheet
155
6
❖❖❖❖ Stored Format Record Sheet
Please make a copy of this sheet and use it to keep a record of your format settings.
DolphinGB-Copy-F_V4_FM.book Page 155 Monday, June 11, 2001 5:02 PM
Page 86

Specification
156
6
❖❖❖❖ User Stamp Record Sheet
Please make a copy of this sheet and use it to keep a record of your user
stamps.
DolphinGB-Copy-F_V4_FM.book Page 156 Monday, June 11, 2001 5:02 PM
Page 87

Settings Record Sheet
157
6
Magnification Ratio Chart
❖❖❖❖ Metric version (A series)
❖❖❖❖ Inch version (Engineering)
❖❖❖❖ Inch version (Architecture)
Copy size
%A0A1A2A3A4
Original size
A0 100.0 70.7 50.0 35.4 25.0
A1 141.4 100.0 70.7 50.0 35.4
A2 200.0 141.4 100.0 70.7 50.0
A3 282.8 200.0 141.4 100.0 70.7
A4 400.0 282.8 200.0 141.4 100.0
Copy size
%E D C B A
Original size
E 100.0 65.7 50.0 32.0 25.0
D 129.0 100.0 65.0 50.0 32.0
C 200.0 129.0 100.0 65.0 50.0
B 259.0 200.0 129.0 100.0 65.0
A 400.0 259.0 200.0 129.0 100.0
Copy size
%E D C B A
Original size
E 100.0 67.0 50.0 33.0 25.0
D 133.0 100.0 67.0 50.0 33.0
C 200.0 133.0 100.0 67.0 50.0
B 267.0 200.0 133.0 100.0 67.0
A 400.0 267.0 200.0 133.0 100.0
DolphinGB-Copy-F_V4_FM.book Page 157 Monday, June 11, 2001 5:02 PM
Page 88

Specification
158
6
Measure Chart
❖❖❖❖ Metric version (A series)
❖❖❖❖ Inch version (Engineering)
❖❖❖❖ Inch version (Architecture)
Width × Length
A0 841 × 1,189 mm
A1 594 × 841 mm
A2 420 × 594 mm
A3 297 × 420 mm
A4 210 × 297 mm
Width × Length
E 34" × 44"
D 22" × 34"
C 17" × 22"
B 11" × 17"
A
8
1
/2" × 11"
Width × Length
E 36" × 48"
D 24" × 36"
C 18" × 24"
B 12" × 18"
A9" × 12"
DolphinGB-Copy-F_V4_FM.book Page 158 Monday, June 11, 2001 5:02 PM
Page 89

159
INDEX
A
Accessing The User Tools
(Copier Features)
, 123
Adding Toner (D)
, 114
Additional Copy
, 36
Adjust Image
,
133
Adjusting Copy Image Density
, 41
Anti-humidity Heater Switch
, 12
Auto Image Density Priority
, 127
Auto Off
,
30
Auto Paper Select Priority
, 127
Auto Reduce/Enlarge
, 44
Auto Reset
, 30
Auto Start
,
56
B
Background Numbering, 87
Background Numbering Format
,
137
Basic Functions
, 40
Basic Procedure
,
28
BASICS
, 11
Before Copying
, 21
Border Erase
, 73
Border Erase Width Priority
, 133
C
Changing The Roll Paper Size, 110
Chart of Scan Sizes for Each Function
, 102
Check/Reset/Print, Copy Counter
, 140
Cleaning inside the Original Cover
, 147
Cleaning The Paper Path Section
,
148
Clearing Misfeeds (x)
, 116
Combination Chart
, 99
Copier Reset Timer
, 126
Copying
, 21
Copying from the Bypass Tray
, 46
Copy Paper
, 16
D
Date Stamp, 95
Date Stamp Format Priority
, 136
Date Stamp Position Adjustment
, 137
Delete Inside
, 75
Delete Outside
, 77
Deleting a Program
, 54
Density Priority
, 127
Directional Magnification (%)
, 65
Directional Size Magnification (mm)
,
67
Displays And Key Operations
, 8
Disposal
, 146
Do's and Don'ts
, 143
Double Copies
, 78
Double Copies Separation Line
, 134
E
Energy Saver Mode, 56
F
Feed Start Trigger, 130
Fine Magnification
,
62
Format Overlay
, 84
G
General Features 1/2
,
126
General Features 2/2
, 128
Guide to Components
,
1
Guide To Option Components
, vi
H
Handling
,
20
I
If You Cannot Make Clear Copies
,
106
If You Cannot Make Copies As You Want
, 108
If Your Machine Does Not Operate As
You Want
,
103
Image Overlay
, 82
Image Overlay Limitations
, 83
Image Repeat
, 79
Image Repeat Separation Line
, 133
Initial Mode Set
, 126
Interrupt Copy
, 39
J
Job Preset, 37
K
Key Names, vi
Key Operator Tools
, 140
DolphinGB-Copy-F_V4_FM.book Page 159 Monday, June 11, 2001 5:02 PM
Page 90

160
L
Loading Roll Paper (C)
,
112
M
Machine Environment, 144
Magnification Ratio Chart
, 157
Mainframe
, 149
Maintaining Your Machine
, 147
Margin Adjustment
, 69
Margin Adjustment Priority
, 133
Maximum Copy Quantity
, 128
Measure Chart
, 158
Memory Status Display
, 128
Message
,
103
Mirror Image
, 81
Missing Image Area
,
15
N
Noise Reduction, 129
O
Operation Panel, 6
Options
, 5, 153
Original Counter/Reset
, 29
Original Misfeeds
, 116
Original Mode Density Level
, 129
Original Mode Priority
, 126
Original Mode Quality Level
, 129
Originals
, 13
Other Functions
, 56
P
Page Numbering Format
,
139
Page Numbering Position Adjustment
, 140
Panel Screen
,
8
Paper Misfeeds
, 117
Paper Roll Priority
, 127
Partial Copy Priority
, 130
Positive/Negative
, 80
Power Connection
, 146
Preset Cut
, 49
Preset Reduce/Enlarge
, 59
Preset Reduce/Enlarge Priority
, 131
Preset Stamp
, 89
Preset Stamp Format Priority
, 135
Preset Stamp Position Adjustment
, 135
Preset Stamp Priority
, 134
Print Start Trigger
, 128
Program
, 53
Program/Change/Delete, User Code,
141
Program/Delete, Overlay Format
, 85
Program/Delete, User Stamp
, 92, 139
R
Recalling a Program, 55
Recommended Size and Type
, 16
Remarks
, 143
Repeat Copy
,
34
Reproduction Ratio
, 131
Restart Copy
, 35
S
Safety Information, i
Sample Copy
, 57
Sample Copy Priority
, 130
Screen
, 105
Selecting Copy Paper
, 42
Selecting Original Type Setting
, 40
Setting Carrier Sheet
, 32
Setting Originals
,
31
Settings Record Sheet
, 154
Settings You Can Change with
the User Tools
,
126
Setting the Length of Copy Paper Cut
, 48
SGML_ERROR
SGML_ERROR
, 134
Shift
, 71
Shift Image Area Priority
, 133
Shortcut Reduce/Enlarge
, 132
Size Magnification
,
64
Sizes and Weights
, 13
Sort
, 51
Sort Copy Setting
, 129
Specification
,
149
Stamp 1/2
, 134
Stamp 2/2
, 138
Starting The Machine
, 11
Storage
, 20
Storing Your Settings
, 53
Synchro Cut
, 49
T
Terms, vi
Toner
, 20
Troubleshooting
, 103
Turning Off the Main Power
, 12
Turning Off the Power
, 12
Turning On the Main Power
, 11
Turning On the Power
, 11
DolphinGB-Copy-F_V4_FM.book Page 160 Monday, June 11, 2001 5:02 PM
Page 91

161
U
User Auto Reduce/Enlarge
, 45,
132
User Auto R/E Original Size Detect
, 132
User Codes
, 56
User Reproduction Ratio
, 131
User Stamp
, 91
User Stamp Format
, 138
User Stamp Position Adjustment
, 138
User Stamp Repeat
, 88
User Tools (Copier Features)
,
123
User Tools Menu (Copier Features)
, 125
V
Variable Cut
,
50
W
Warnings and Precautions, iii
What You Can Do With This Machine
(Copy Mode),
viii
Where To Put Your Machine
, 144
Z
Zoom
,
60
DolphinGB-Copy-F_V4_FM.book Page 161 Monday, June 11, 2001 5:02 PM
Page 92

162
MEMO
DolphinGB-Copy-F_V4_FM.book Page 162 Monday, June 11, 2001 5:02 PM
Page 93

163
MEMO
DolphinGB-Copy-F_V4_FM.book Page 163 Monday, June 11, 2001 5:02 PM
Page 94

164 EE GB B010
MEMO
DolphinGB-Copy-F_V4_FM.book Page 164 Monday, June 11, 2001 5:02 PM
 Loading...