


6. Troubleshooting
If An Indicator Lights Up On The Operation
Panel
❖ PRESS STOP KEY
Press the
❖
The Receive File indicator is lit:
You've received a fax message which is now stored in the machine. See P.20
“Printing Received Messages That Have Been Stored (Substitute Reception)”
❖
The Check Display indicator is lit:
Read the message on the display and check the descriptions listed on P.112
“Displayed Error Messages”
{
Stop
appears in the display:
key.
}
95

Troubleshooting
Other Possible Problems
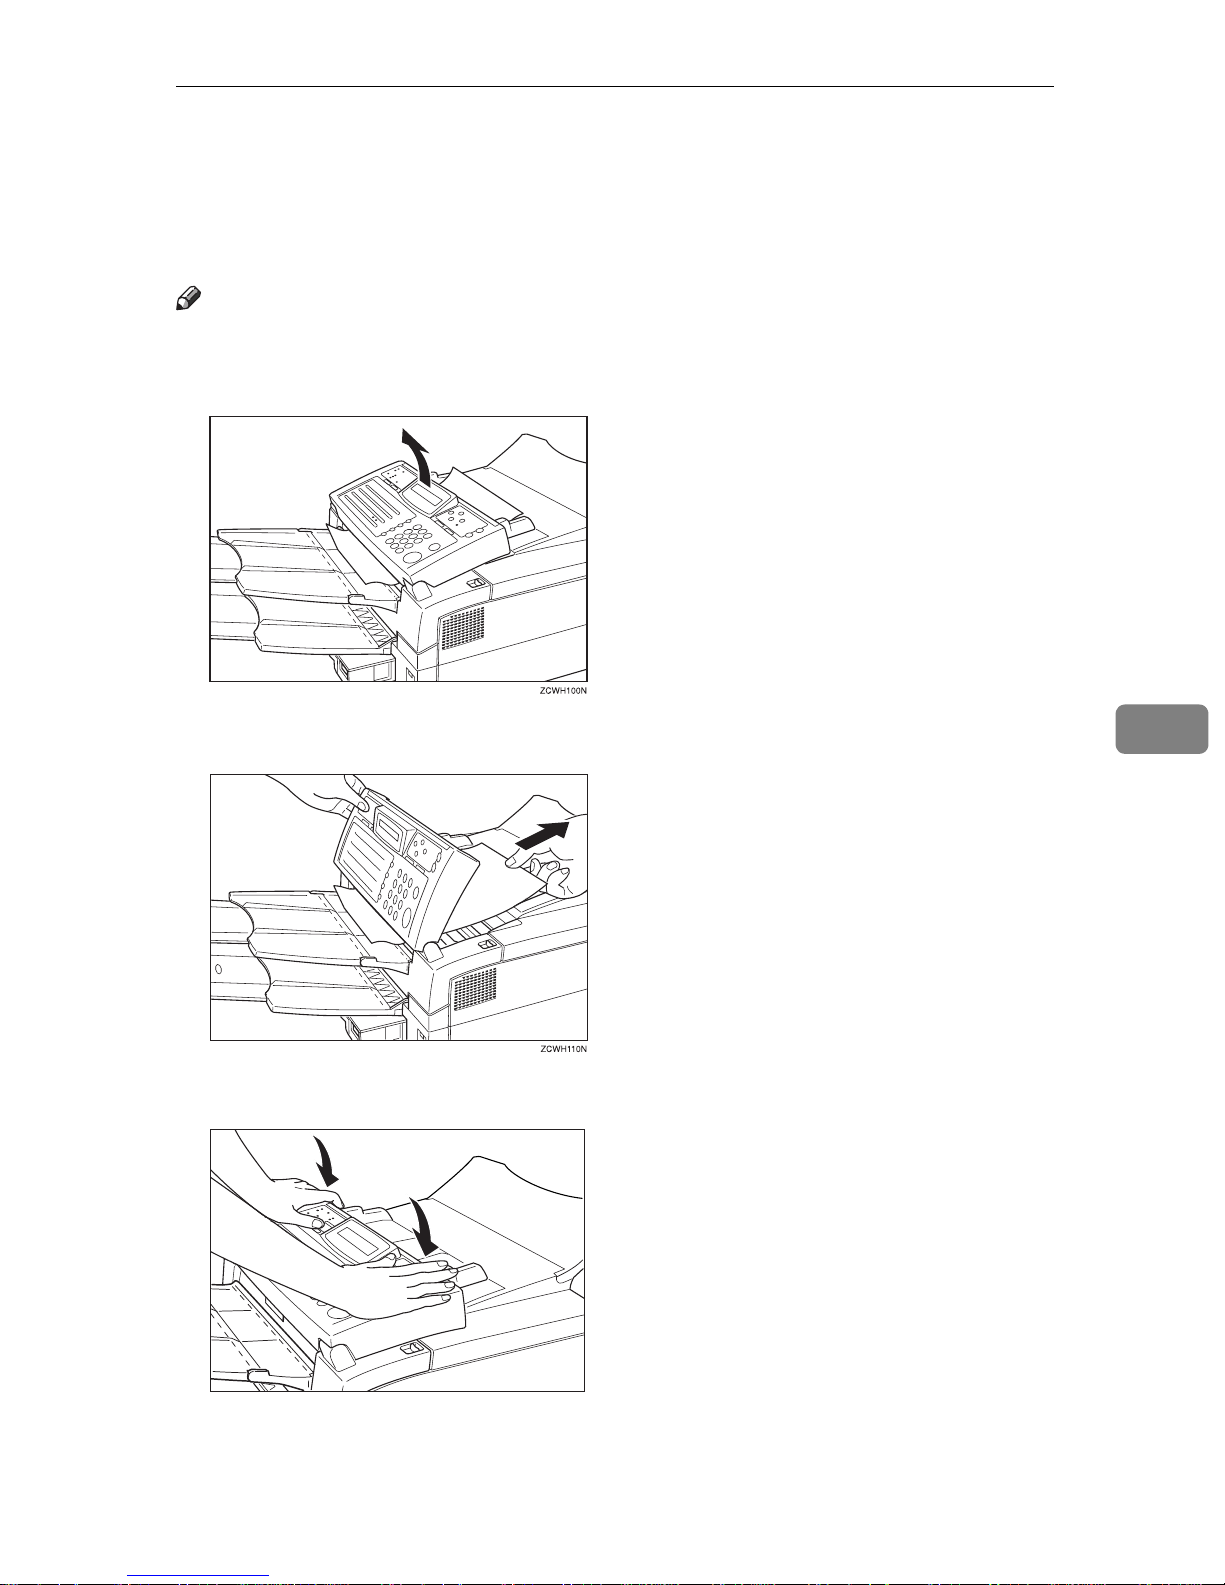
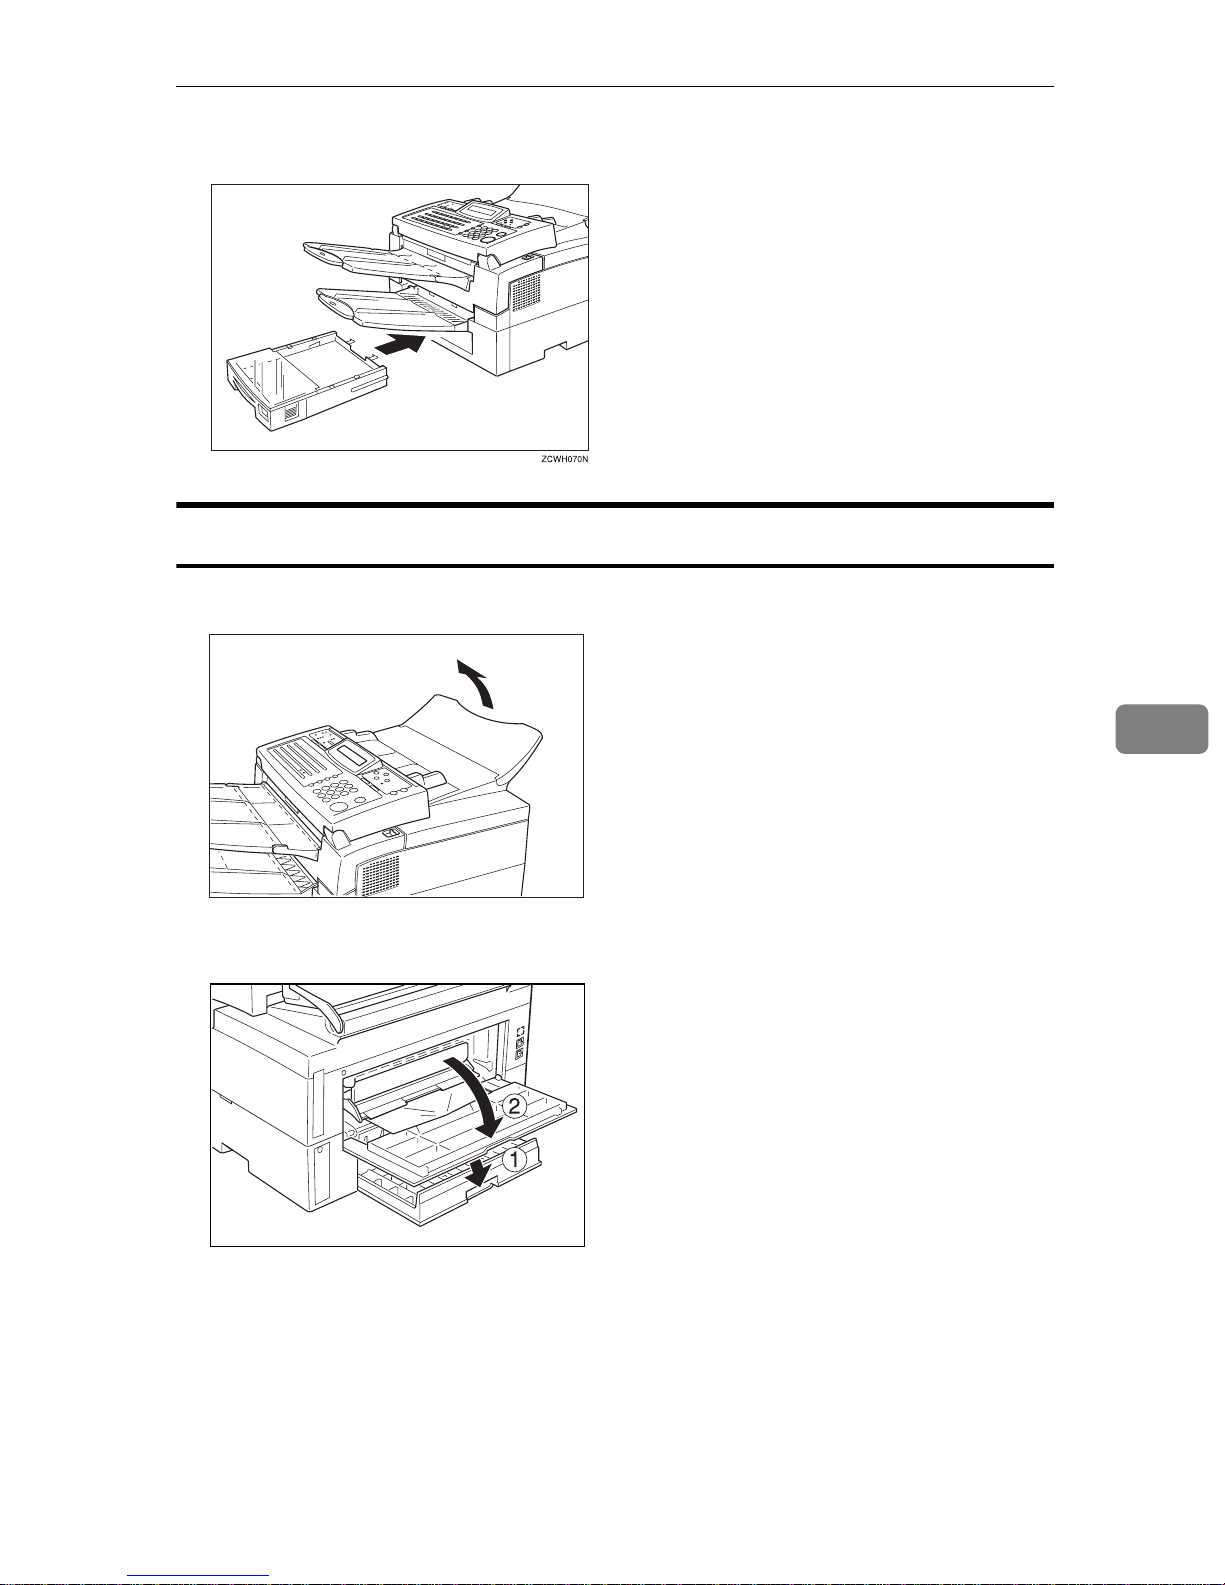
You Want To Remove The Document In The Feeder
6
Open the document feeder (see P.97
the document.
Important
❒
Do not pull out the document without opening the auto document feeder, or
you will damage the scanning mechanism.
“Clearing a Document Jam”
), then remove
96
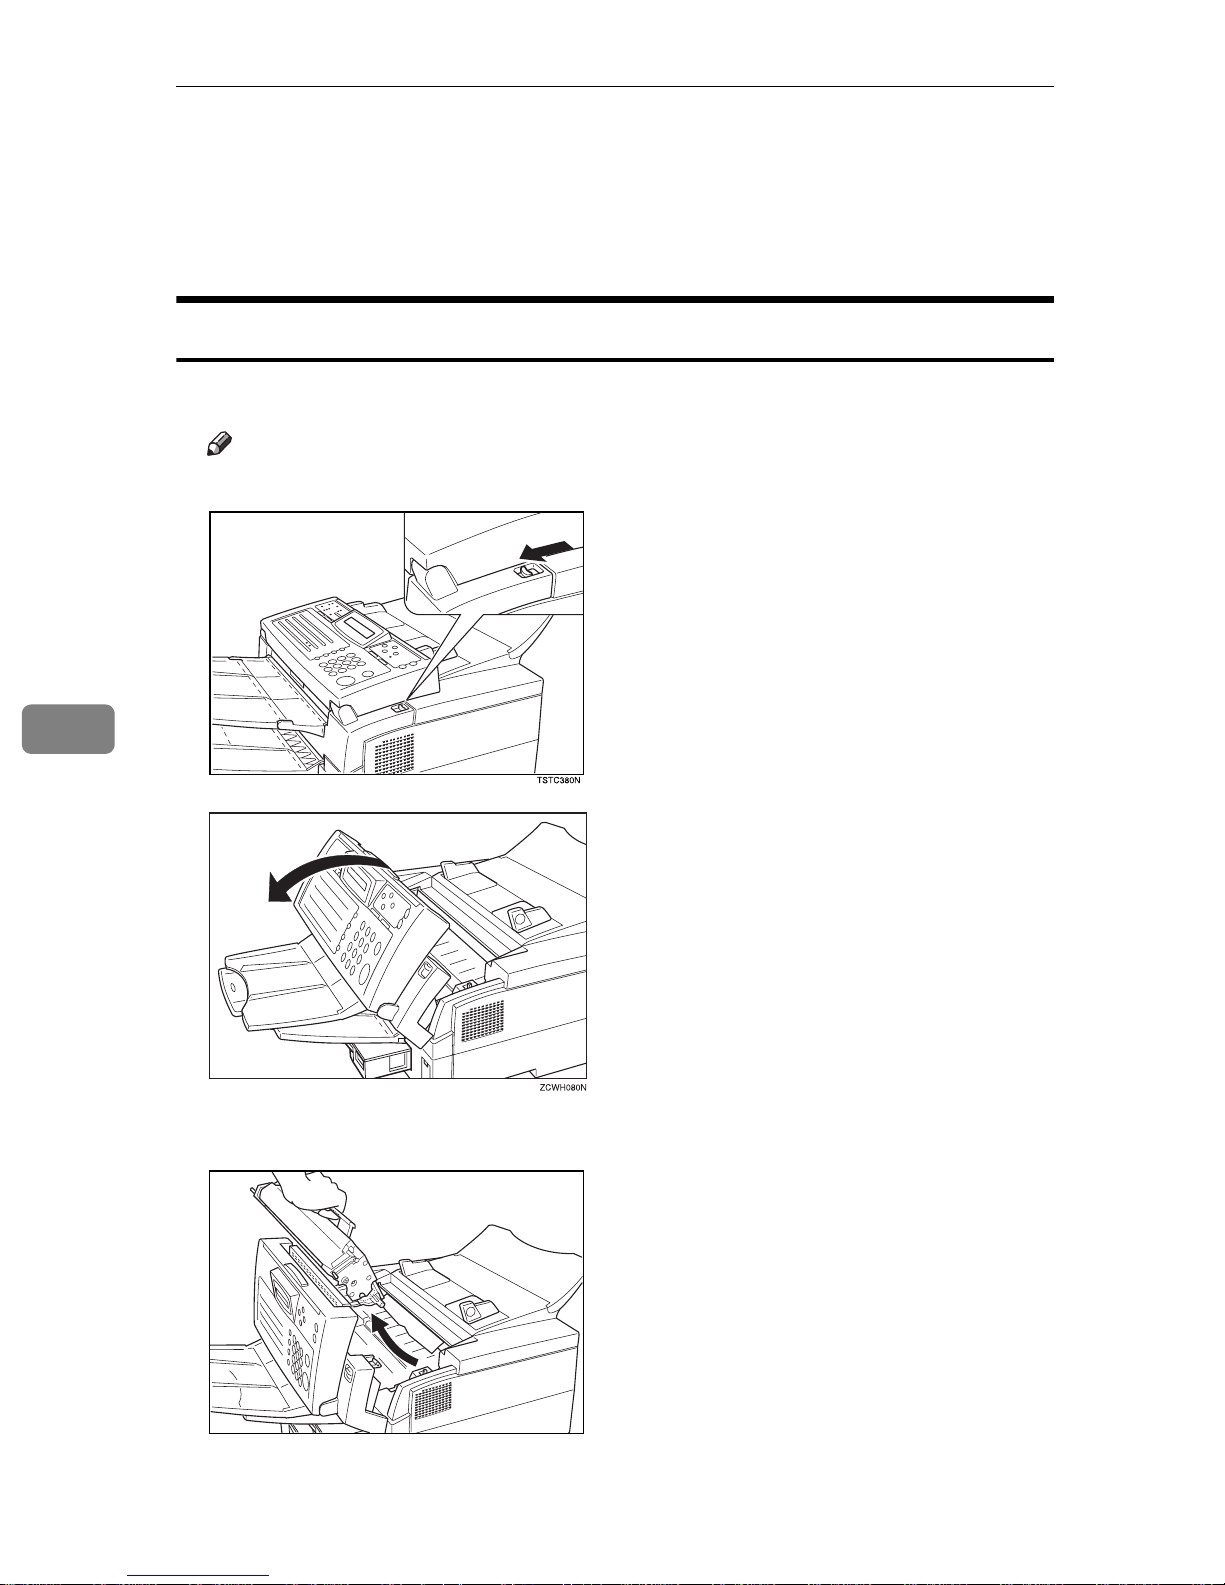
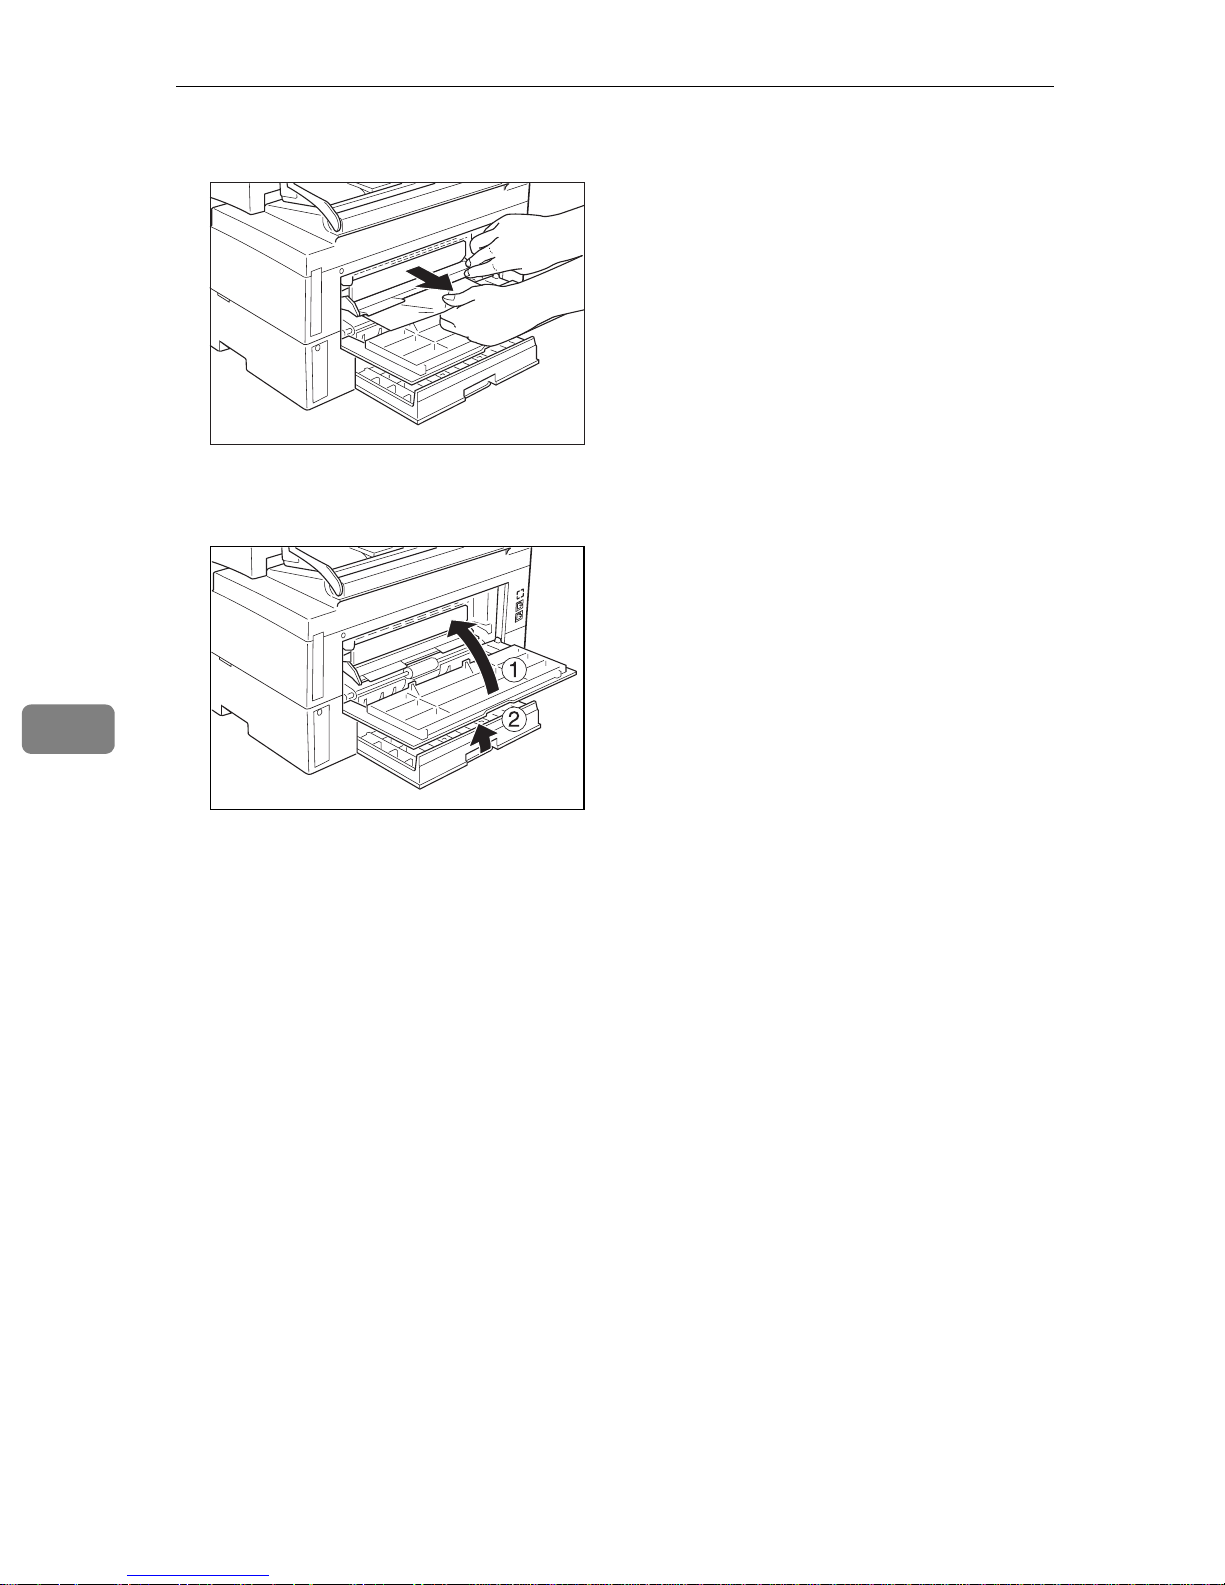
Clearing a Document Jam
Clearing a Document Jam
When an original is jammed, CLEAR ORIGINAL is displayed — follow this procedure to solve the problem.
Note
❒
If copies, fax message or prints are jammed, follow the next procedure.
A Open the top cover to an angle of about 45°.
B Remove the original.
C Close the top cover.
6
ZAXJ030E
97
Troubleshooting
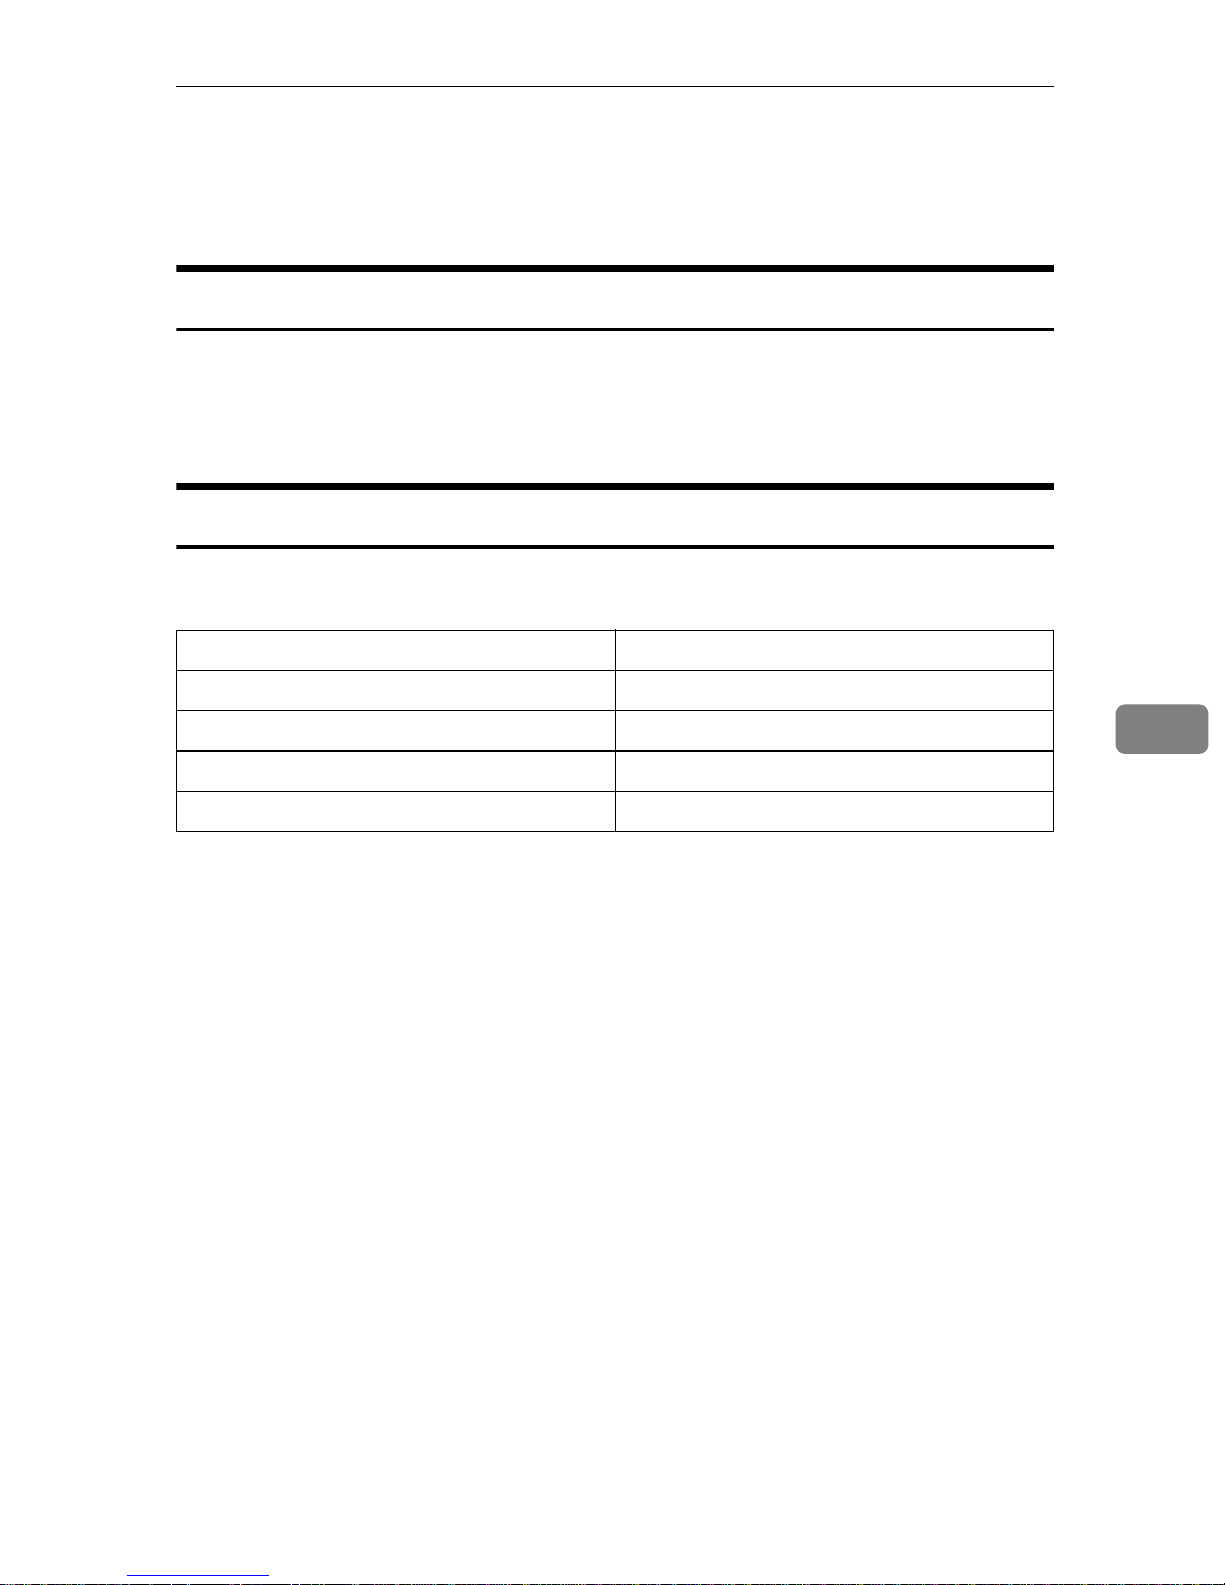
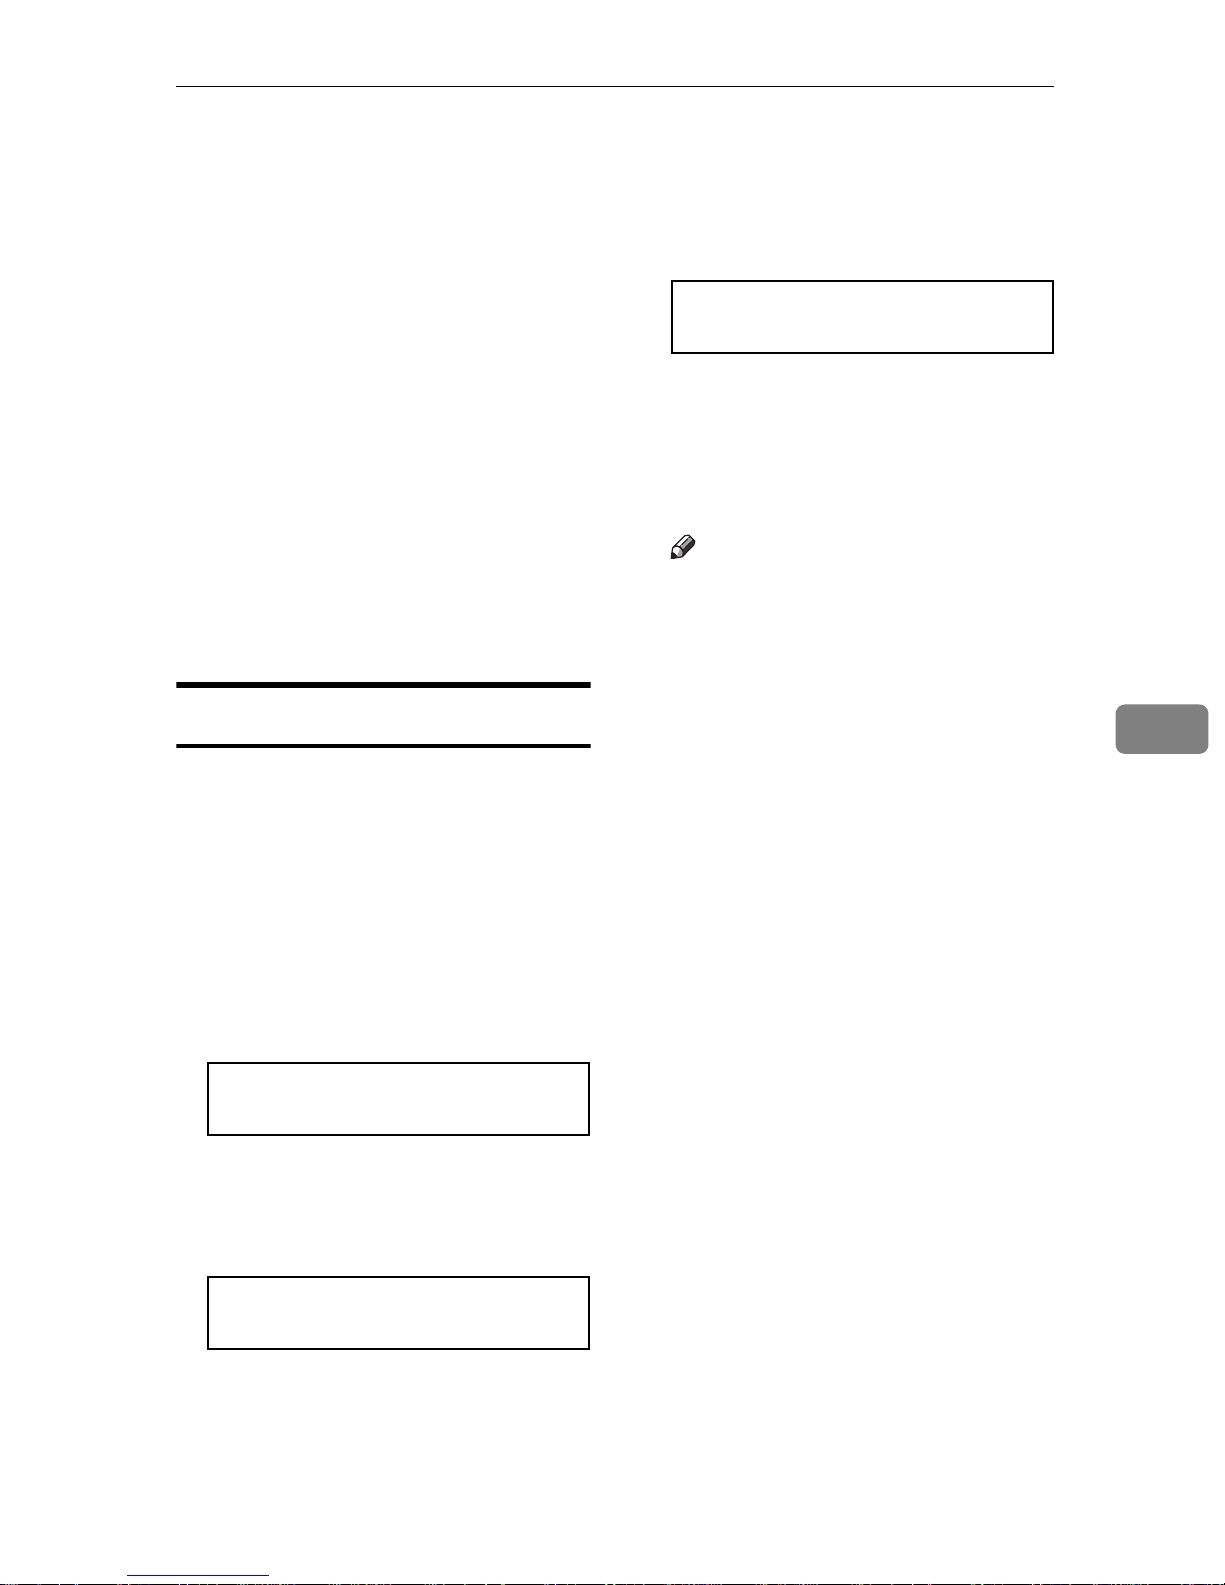
Clearing a Copy, Fax, or Print Jam
When CLEAR COPY is displayed, follow this procedure to solve the problem.
For how to clear original jams, see the previous procedure.
Clear a Jam inside the machine
A Pull the lower unit release lever towards you and open the top cover.
Note
❒
If you do not pull the lever, only the upper unit will open.
6
B Remove the toner cassette.
98
ZAXJ040
C Remove any jammed paper underneath.
D Replace the toner cassette.
Clearing a Copy, Fax, or Print Jam
E Close the top cover.
6
ZAXT010E
ZAXC040E
99
Troubleshooting
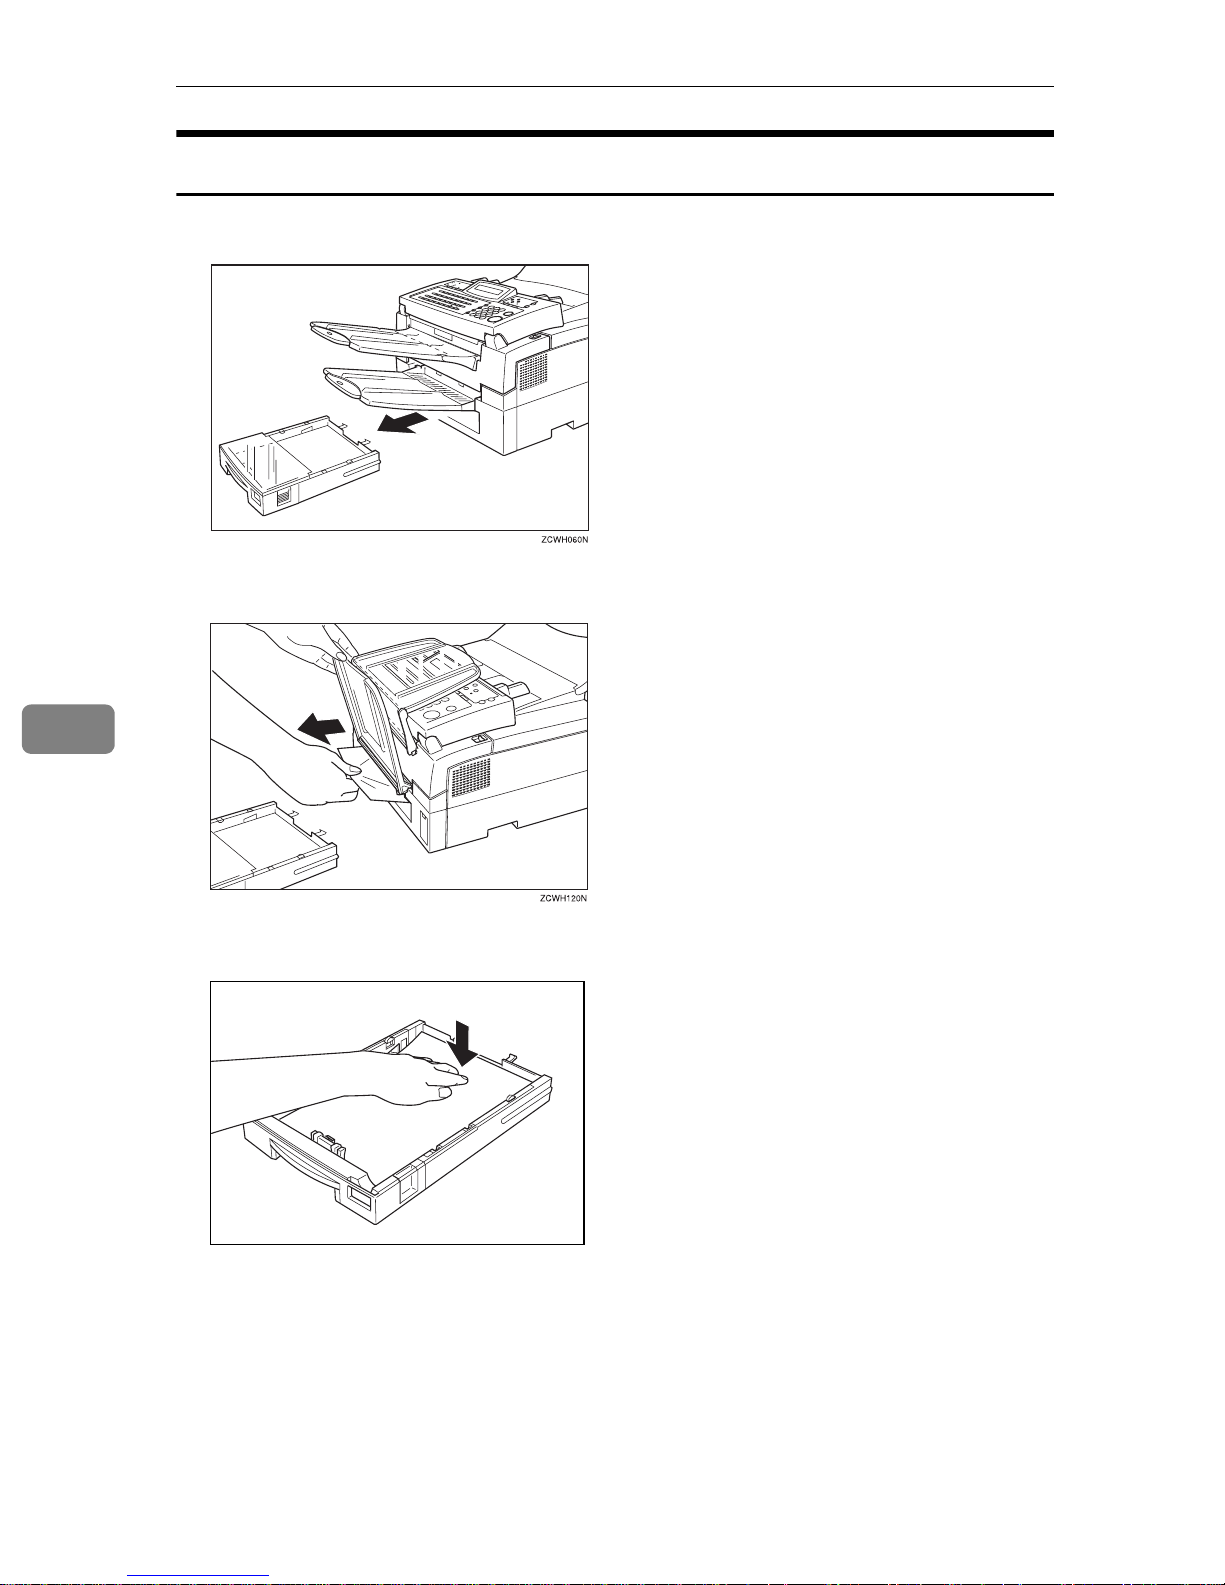
Clear a Jam in the Cassette Entr ance
A Remove the main cassette and place it on a flat surface.
B Remove any paper from inside the machine.
6
C Push down the paper so that the base plate locks into place.
TSTJ090N
100
D Replace the main cassette.
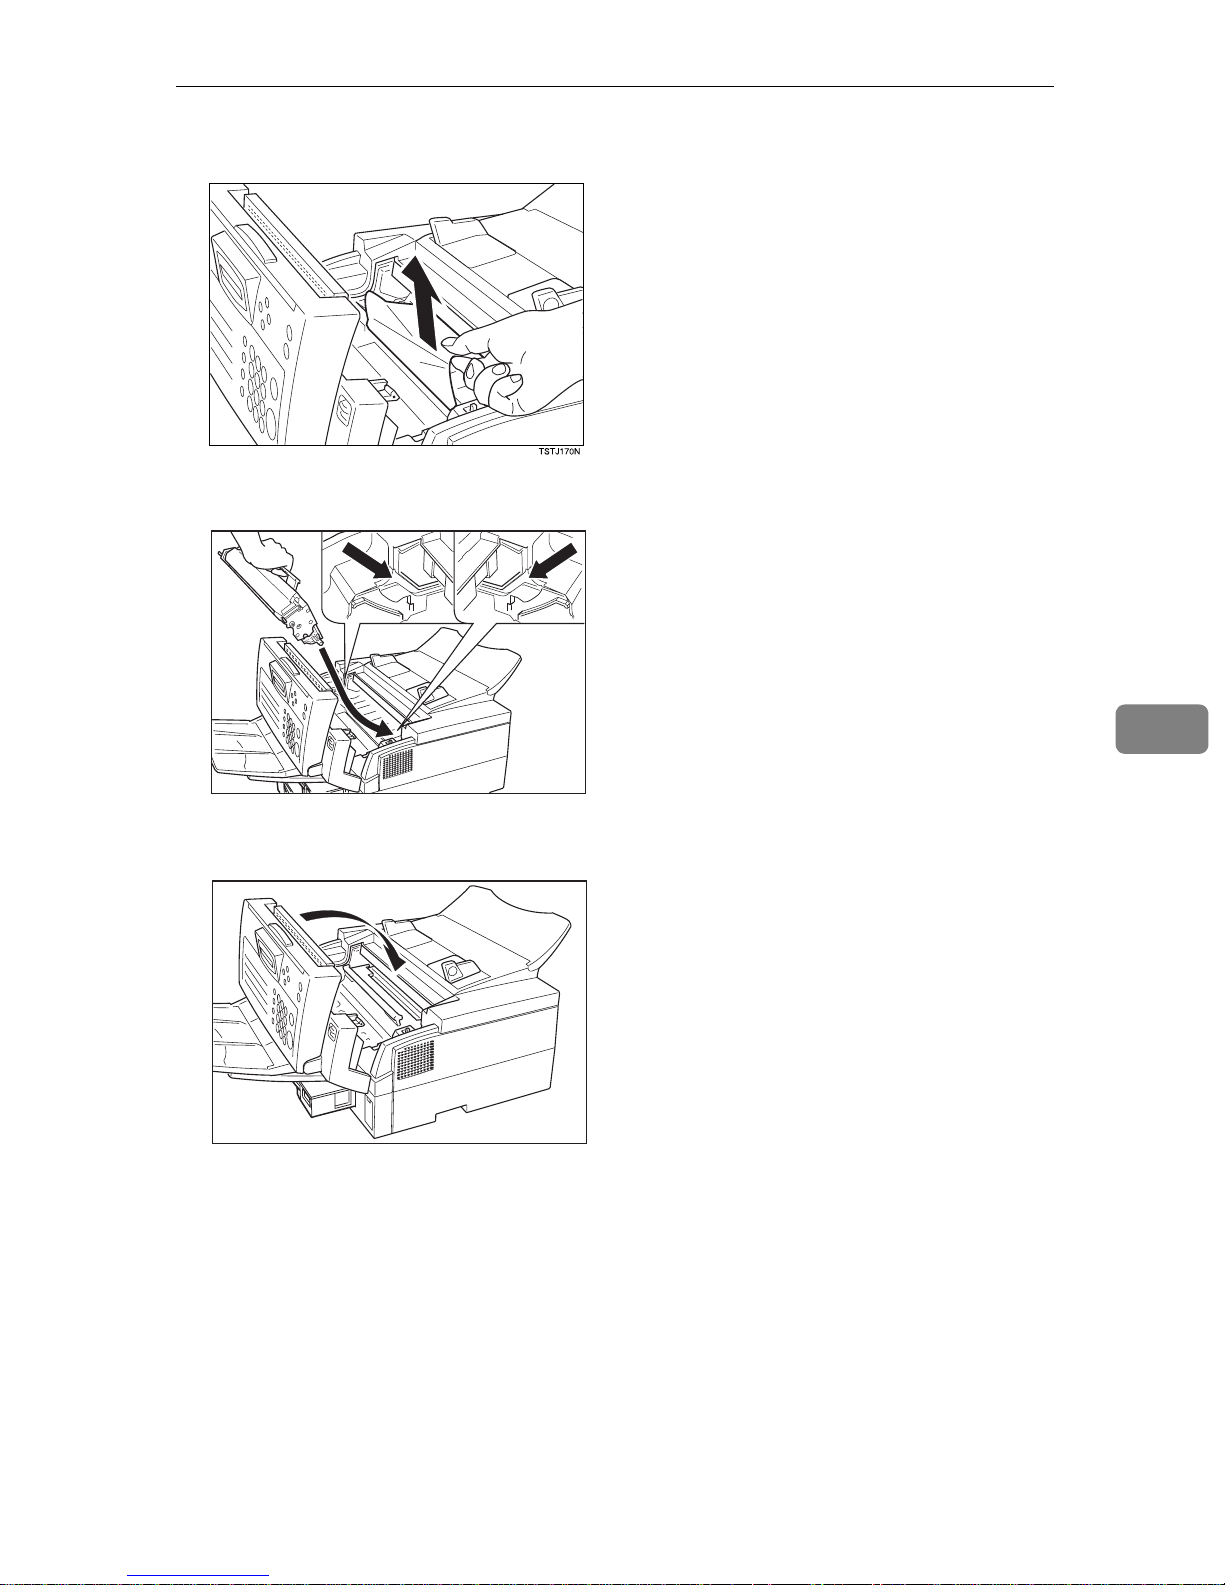
Clear a Jam in the Upper Rear Unit
A Lift back the document table.
Clearing a Copy, Fax, or Print Jam
B Open the upper rear cover.
6
ZAXF010
ZAXJ060
101
Troubleshooting
C Pull out any jammed paper.
D Close the upper rear cover.
ZAXJ070
6
ZAXJ080
102
If Messages You Receive Don't Fit On Your Paper
If Messages You Receive Don't Fit On Your
Paper
Breaking Down Large Format Messages
If the incoming document is longer than the paper in your fax machine, the machine will split it into multiple sheets. The tail end of the message will be reproduced at the head of the next page. The images overlap each other by 10mm.
(You can ask a service technician to turn off the overlap.)
Length Reduction
If the incoming document is larger than the paper in the cassette, but still within
the limits below, the machine can reduce it so that it will fit on one page.
Paper size in the cassette Maximum reducible length
Letter (11") 14.4"
Legal (14") 18.3"
A4 15.3"
F4 17.0"
6
103

Troubleshooting
Communication Problems
If ERROR PRE SS STOP appears in the
display: Press the
Causes:
• A poor line caused the communication to fail.
• The line is busy or noisy. Try to retransmit.
• The other machine is out of order.
Ask the other party to check their
machine.
{
Stop
key.
}
6
104
RDS (Remote Diagnostic System)
RDS (Remote Diagnostic System)
If your machine has a problem, a
service technician can perform various diagnostic tasks over the telephone line from the service station to
try to find out what is wrong with
your machine. The service technician
can also use RDS to change some of
your machine's settings if you request
it.
For RDS to work, you must switch it
on before the service technician starts
the RDS operation on your machine.
For some RDS operations, it may be
necessary for you to stay near the machine.
Switching RDS On/Off
Before your machine can accept incoming calls from an RDS, you have
to switch RDS on using Function 62. If
it is switched off, the machine will not
accept treatment from an RDS.
C Press the
{
Yes
key.
}
RDS Y/hi
ON iOFF
D Change the on/off setting by
pressing W key or V key.
E Press the
keys to finish.
Note
❒
RDS is automatically switched
off 24 hours after you switch it
on.
{
Yes
and
}
{
Function
}
6
A Press the
the access number
Then press
{
}
Yes
key.
{
Function
{
6
} {2}
then enter
} {6}
{
} {2} {2} {2}
2
and press the
Y/NEXTi
SELECT LINE
B Scroll through the list of features
with W key and V key until the
screen is as shown.
Y/NEXTi
RDS ON/OFF
.
105
Troubleshooting
Adjusting the Printing Margins (Function
95)
6
Follow these steps if you wish to adjust the top and left margins on printed messages.
You can chose the site of margins in
steps of about 0.5 mm.
Note
❒
Do not change the margins too
much, or no margin will be used
and print quality might deteriorate.
A Press the
the access code
Then press
key.
{
Function
{
2
} {5}
{
9
then enter
} {6}
} {2} {2} {2}
and the
{
Yes
Y/NEXTi
MAIN CASSETTE
B If the cassette whose paper mar-
gins you wish to adjust is not displayed, press the V key until it
appears.
E Press the
margin is OK, go to step I.
{
key. If the left
}
Yes
TOP MARGIN Y/N/hi
PROGRAMMED
F Press the
the size of the margin. The position of the asterisk indicates the
current size.
and V key to adjust
W
LEFT MARGIN Y/N/hi
.
}
- * +
G Press the
{
Yes
key.
}
LEFT MARGIN Y/N/hi
PROGRAMMED
H If you wish to make a test print,
press the
just press the
{
key. To skip this,
}
Start
key.
{
}
No
C Press the
margin is OK, go to step F.
{
key. If the top
}
Yes
TOP MARGIN Y/N/hi
- * +
D Press the
the size of the margin. The position of the asterisk indicates the
current size.
and V key to adjust
W
TOP MARGIN Y/N/hi
- * +
106
START
TEST PRINT
I Press the
to standby mode.
{
Function
key to return
}
Operating Difficulties
Problem Required Action
STANDBY MODE
Operating Difficulties
Nothing happens when the
switch is turned on.
SET DOC. OR DIAL NO.
not displayed.
The display does not show
the Ready condition, or the
machine stops during an operation.
is
Check the power cord. Is it properly plugged into the
outlet?
Plug it in firmly.
Switch the power on.
If the Power indicator does not light, check that the
power cord is plugged in.
Does
CLEAR ORIGINAL
display?
Clear the misfed paper.
or
CLEAR COPY
appear in the
Reference
See P.97
ing a Copy, Fax, or Print Jam”
Does ADD PAPERappear in the display?
Load paper into the paper tray. See P.79
In The Main Cassette”
Does CLOSE COVERappear in the display?
Close all cover.
“Clearing a Document Jam”
.
.
and P.98
“Loading Paper
“Clear-
6
Is theAdd Tonerindicator on?
Load a new toner cassette. See P.82
er Cassette And Cleaning Pad”
“Replacing The Ton-
107
Troubleshooting
Problem Required Action
TRANSMISSION
6
The original is not pulled into
the auto document feeder.
You did not feed the document far enough into the
feeder.
Insert the document into the feeder until it stops.
Retransmit.
Do user maintenance, especially rollers (1,8).
The telephone line is disconnected.
Check that the line is connected properly.
The telephone line type setting is incorrect.
Check the telephone line type setting (see P.142
ting The Phone Line (Function 62)”
The dialed number does not contain an PSTN access
code or a pause.
Include the PSTN access number and a pause before
the telephone number.
The dialed number did not have enough pauses between the access PSTN number and the telephone
number.
).
“Set-
Try adding more pauses after the access PSTN code.
108
Problem Required Action
Frequent original misfeeds Multifeeds
Incorrect positioning of originals
Put the document in the feeder correctly. See P.13
“Memory Transmission (Memory Indicator Lit)”
Incorrect alignment of originals
Operating Difficulties
.
Align the edges of the document. See P.12
dition”
Curled pages
Flatten the document. See P.12
Incorrect document type
Use a proper document type. See P.11
Types Of Document”
Mixed document types
The pages must all be of the same type.
Static electricity on the originals
Shuffle the document. See P.13
(Memory Indicator Lit)”
User maintenance is needed.
Do user maintenance, especially roller (1). See P.87
“Cleaning The Rollers And Scanner”
Non-feeds
Copier silicone oil on the originals
.
“Page Condition”
.
“Memory Transmission
.
.
“Page Con-
.
“Recommended
6
Wait a few minutes, then try again.
Incorrect alignment of originals
Align the edges of the document. See P.13
Transmission (Memory Indicator Lit)”
Curled pages
Flatten the document. See P.12
Incorrect document type
Use a proper document type. See P.12
.
tion”
More than 30 pages in the feeder
Do not place more than 30 pages in the automatic doc-
ument feeder at once.
User maintenance is needed.
Do user maintenance, especially rollers (1,8). See P.87
“Cleaning The Rollers And Scanner”
.
“Page Condition”
.
“Memory
.
“Page Condi-
109
Troubleshooting
Problem Required Action
6
Transmission cannot take
place;
pears.
Transmission cannot take
place.
Before taking action, wait until the
cator goes out, then press the
{
Consistent difficulty in communicating with a particular
terminal
Consistent poor image quality when communicating with
a particular terminal
CLEAR ORIGINAL
Communicating
key.
}
Stop
ap-
indi-
The document is jammed in the feeder.
Remove the jammed document (see P.97
Document Jam”
dure.
The document may be longer than the maximum limit
(see P.6
Make sure that none of your originals exceed this limit.
Do user maintenance, especially rollers (1,8) (see P.87
“Cleaning The Rollers And Scanner”
The other machine is out of order.
Check the error report.
Ask the other party to check their machine and correct
the fault.
The line is busy or noisy.
Check that the dial tone is sent out.
Try to retransmit.
There are some bad lines between you and that other
terminal.
Store that terminal's number as a Quick Dial Key or
Speed Dial Code.
Then call a service technician. Inform the nature of the
problem and give the Quick Dial Key or Speed Dial
Code that you stored the number in.
“Copy Paper”
) and repeat the transmission proce-
).
).
“Clearing a
110
RECEPTION
The telephone keeps ringing
and no fax is printed.
RECEPTION/COPYING
No printout; the Add Paper
indicator is lit.
No printout;
appears.
CLEAR COPY
You are in TELmode.
Change to AUTO or TEL mode (see P.18
Telephone Calls & Fax Messages (Faxes/Phone Calls)”
Power is switched off.
Switch the power on.
The cassette is empty.
Add Paper (see P.79
).
sette”
The printer has jammed.
Clear the jam (see P.98
).
Jam”
“Loading Paper In The Main Cas-
“Clearing a Copy, Fax, or Print
“Receiving
).
Operating Difficulties
Problem Required Action
Copies are blank. The original must be placed face down in the docu-
ment feeder.
Copy paper misfeeds occur
frequently.
Position the original correctly. See P.13
Transmission (Memory Indicator Lit)”
Is the proper paper in the paper cassette?
Paper size and weight must be within the standards
set for this machine.
Is folded, wrinkled, damp, or curled paper in the pa-
per cassette?
Always use dry, undamaged paper.
Is the paper set properly in the paper cassette?
Always load paper correctly. See P.79
In The Main Cassette”
Make sure that there is not too much paper in the trays;
do not fill them up over the load limit mark.
Are there any pieces of misfed paper or other foreign
objects in the machine?
Make sure that the paper path is completely clear of
paper and other material after a misfeed.
Are you copying onto recycled paper?
“Memory
.
“Loading Paper
6
Fan the stack of recycled paper and load it in the paper
tray.
Stripes on copies. The exposure glass is dirty.
Clean the exposure glass (6). (see P.87
).
).
TELEPHONING
You can't receive phone calls;
the unit only rings once then
goes into receive mode.
You can't receive phone calls;
the unit does not ring.
Rollers And Scanner”
You are in FAXmode.
Change to TEL or AUTO mode (see P.18
Telephone Calls & Fax Messages (Faxes/Phone Calls)”
The telephone line is not connected.
Connect the modular cord (see P.138
To The Telephone Line”
“Cleaning The
“Receiving
).
“Connecting Up
111
Troubleshooting
Displayed Error Messages
The following messages may appear while you are operating or programming
the machine.
6
CHECK AUTO-DIALING
NO FILE EXISTS
TOO MANY DEST.
USED AS GROUP
USED AS PROGRAM
You cannot use the auto-dialer at the moment. Use the ten key pad or the handset.
No polling reception operations have
been programmed.
There are no messages in memory waiting
for transmission.
Incorrect file number. Check the file
number and try again.
The memory cannot hold any more telephone numbers. Either:
• Delete some numbers then try again.
• Wait until some of the Send Later or
other delayed transmissions waiting in
memory have been carried out, then
try again.
This Quick Dial Key has a Group stored in
it.
This Quick Dial Key has a Keystroke Program stored in it.
USED AS DIAL
USED AS GROUP KEY
NOT PROGRAMMED
ALREADY PROGRAMMED
PLEASE SET PAUSE
This Quick Dial Key has a telephone
number stored in it.
This Quick Dial Key is programmed as
Group Key.
Either:
• This Quick Dial Key or Speed Dial
Code does not contain a number.
• This Quick Dial Key does not contain a
Keystroke Program.
Either:
• This number is already included in this
Group.
• This RTI/CSI has already been stored
for use with this feature.
You must add a pause after your area
code when you input your fax terminal's
own telephone number.
112
 Loading...