

Getting Started
1
Entering Text
2
Appendix
3
Operating Instructions
About This Machine
Read this manual carefully before you use this machine and keep it handy for future reference. For safe and correct use, be sure to read the
Safety Information in this manual before using the machine.

Introduction
This manual contains detailed instructions and notes on the operation and use of this machine. For your
safety and benefit, read this manual carefully before using the machine. Keep this manual in a handy
place for quick reference.
Important
Contents of this manual are subject to change without prior notice. In no event will the company be liable for direct, indirect, special, incidental, or consequential damages as a result of handling or operating the machine.
Notes:
Some illustrations in this manual might be slightly different from the machine.
Certain options might not be available in some countries. For details, please contact your local dealer.
Depending on which country you are in, certain units may be optional. For details, please contact your
local dealer.
Laser Safety:
CDRH Regulations
This equipment complies with requirements of 21 CFR Subchapter J for class 1 laser products. This
equipment contains two GaAlAs laser diodes, 5-milliwatt, 760-800 nanometer wavelength for each
emitter. This equipment does not emit hazardous light, since the beam is totally enclosed during all customer modes of operation and maintenance.
Caution:
Use of controls or adjustments or performance of procedures other than those specified in this manual
might result in hazardous radiation exposure.
Notes:
The model names of the machines do not appear in the following pages. Check the type of your machine before reading this manual. (For details, see p.10 “Machine Types”.)
• Type 1: 8025e/DSm725e/LD325/Aficio MP 2510
• Type 2: 8030e/DSm730e/LD330/Aficio MP 3010
Certain types might not be available in some countries. For details, please contact your local dealer.
Two kinds of size notation are employed in this manual. With this machine refer to the inch version.
For good copy quality, the supplier recommends that you use genuine toner from the supplier.
The supplier shall not be responsible for any damage or expense that might result from the use of parts
other than genuine parts from the supplier with your office products.
Power Source
120V, 60Hz, 12A or more
Please be sure to connect the power cord to a power source as above. For details about power source,
see Troubleshooting.

Manuals for This Machine
Refer to the manuals that are relevant to what you want to do with the machine.
Important
❒ Media differ according to manual.
❒ The printed and electronic versions of a manual have the same contents.
❒ Adobe Acrobat Reader/Adobe Reader must be installed in order to view the
manuals as PDF files.
❒ Depending on which country you are in, there may also be html manuals. To
view these manuals, a Web browser must be installed.
❖ About This Machine
Be sure to read the Safety Information in this manual before using the machine.
This manual provides an introduction to the functions of the machine. It also
explains the control panel, preparation procedures for using the machine,
how to enter text, and how to install the CD-ROMs provided.
❖ General Settings Guide
Explains User Tools settings, and Address Book procedures such as registering fax numbers, e-mail addresses, and user codes. Also refer to this manual
for explanations on how to connect the machine.
❖ Troubleshooting
Provides a guide to solving common problems, and explains how to replace
paper, toner, and other consumables.
❖ Security Reference
This manual is for administrators of the machine. It explains security functions that the administrators can use to protect data from being tampered
with, or prevent the machine from unauthorized use.
Also refer to this manual for the procedures for registering administrators, as
well as setting user and administrator authentication.
❖ Copy/ Document Server Reference
Explains Copier and Document Server functions and operations. Also refer to
this manual for explanations on how to place originals.
❖ Facsimile Reference
Explains Facsimile functions and operations.
❖ Printer Reference
Explains Printer functions and operations.
❖ Scanner Reference
Explains Scanner functions and operations.
i

❖ Network Guide
Explains how to configure and operate the machine in a network environment, and use the software provided.
This manual covers all models, and includes descriptions of functions and
settings that might not be available on this machine. Images, illustrations, and
information about operating systems that are supported might also differ
slightly from those of this machine.
❖ Other manuals
• PostScript3 Supplement
•UNIX Supplement
• Manuals for DeskTopBinder Lite
• DeskTopBinder Lite Setup Guide
• DeskTopBinder Introduction Guide
•Auto Document Link Guide
Note
❒ Manuals provided are specific to machine types.
❒ For “UNIX Supplement”, please visit our Web site or consult an authorized
dealer.
❒ “PostScript3 Supplement” and “UNIX Supplement” include descriptions of
functions and settings that might not be available on this machine.
❒ The following software products are referred to using general names:
Product name General name
DeskTopBinder Lite and DeskTopBinder Professional
ScanRouter EX Professional
er EX Enterprise
*1
Optional
*1
*1
*1
and ScanRout-
DeskTopBinder
the ScanRouter delivery software
ii
What You Can Do with This Machine
This section introduces the features of this machine.
Note
❒ For details about options, see “Options”.
Reference
p.13 “Options”
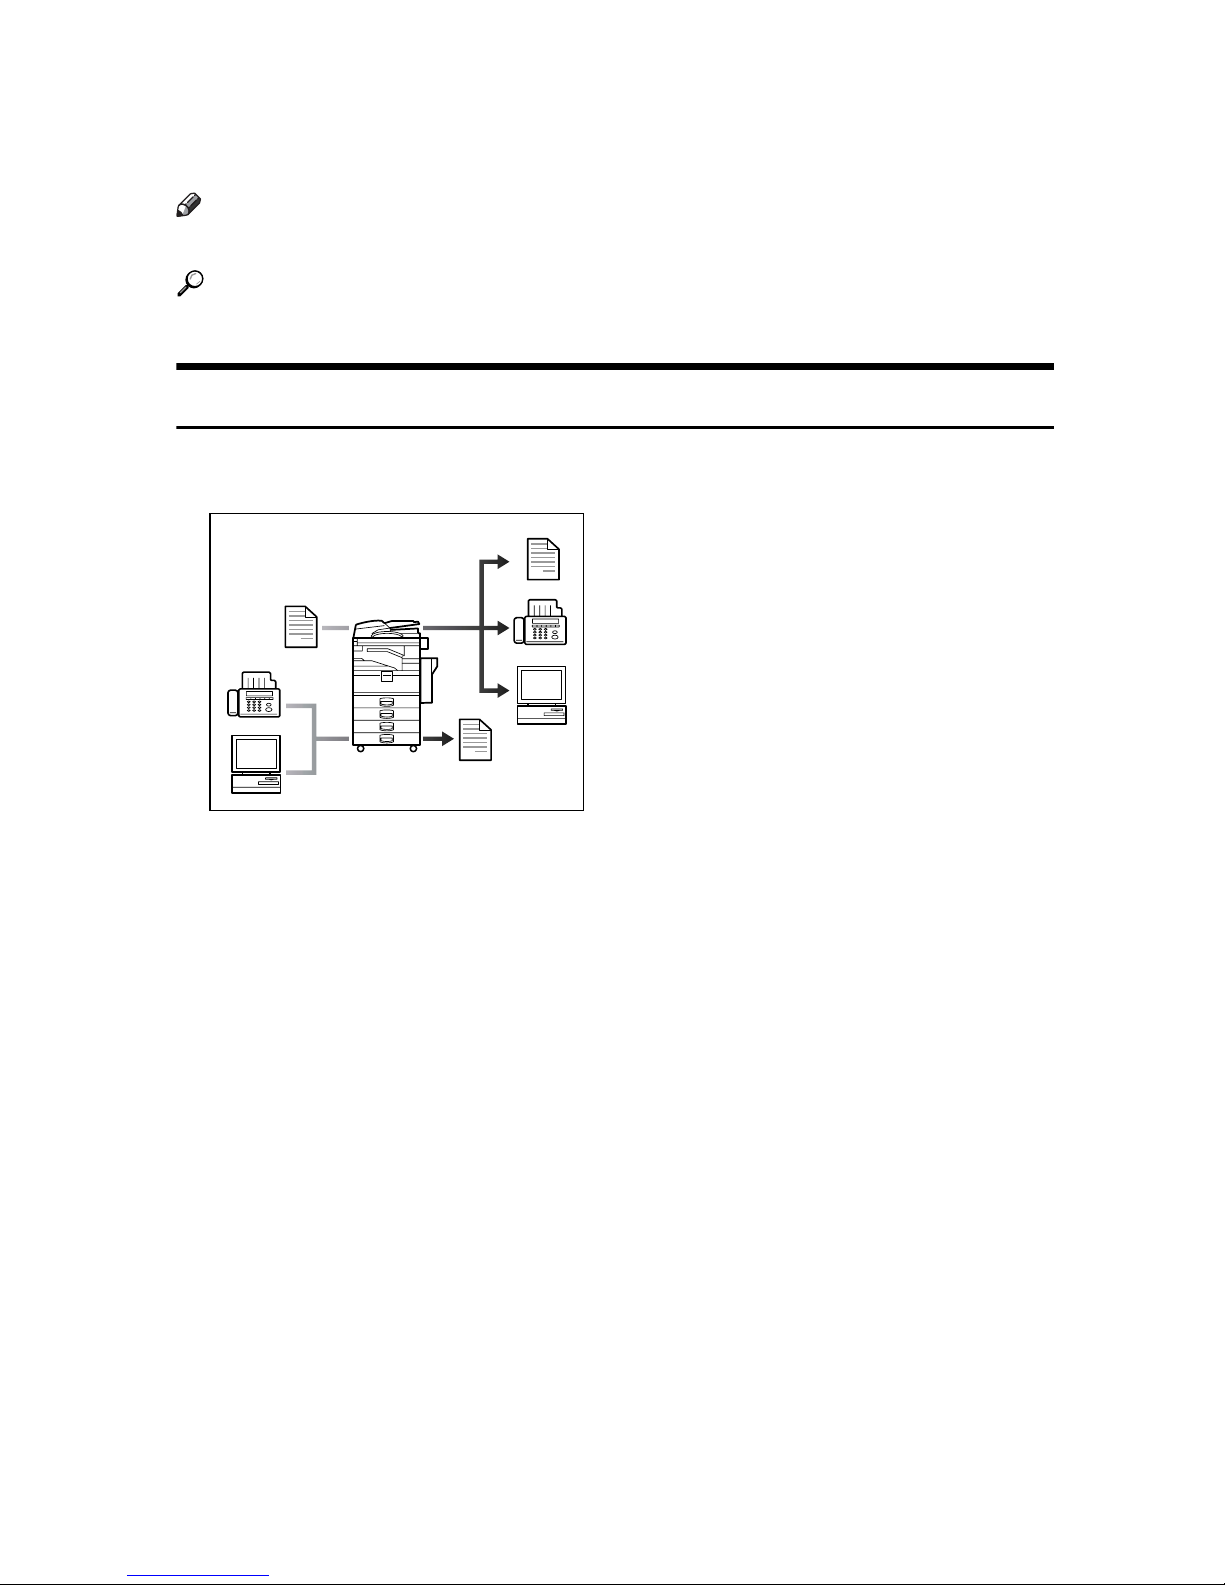
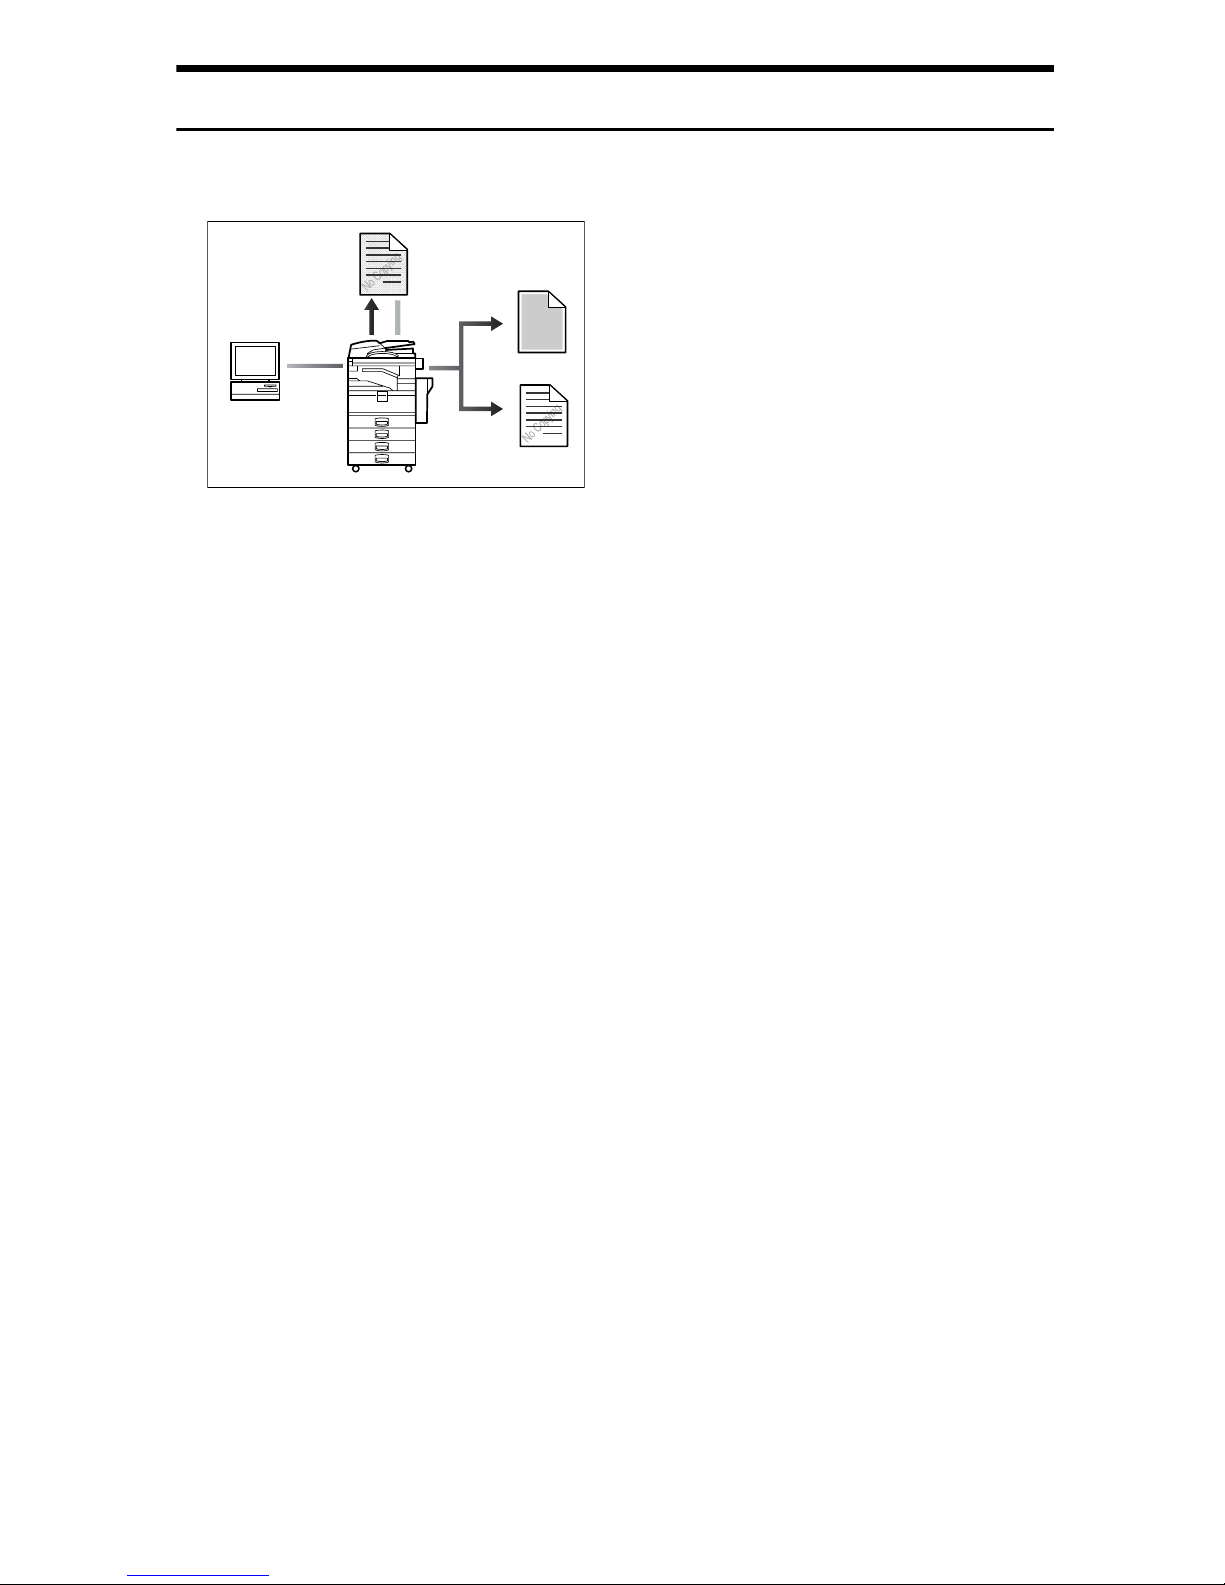
Copier, Facsimile, Printer, and Scanner Functions
This machine provides copier, facsimile (optional), printer (optional), and scanner (optional) functions.
AHR002S
• You can make copies of originals. With a finisher (optional), you can sort and
staple copies. See Copy/ Document Server Reference.
• You can send originals by fax or e-mail, and receive faxes from other parties.
See Facsimile Reference.
• You can print documents created in applications. See Printer Reference.
You can print documents from Windows 95/98/Me (TCP/IP, IPP), Windows
2000 (TCP/IP, IPP), Windows XP/Server 2003 (TCP/IP, IPP), Windows NT
4.0 (TCP/IP, IPP), NetWare, UNIX (TCP/IP), and Macintosh (AppleTalk) environments because the machine supports all these (multi-protocol).
• You can scan originals and send scan files to a computer. See Scanner Reference.
iii
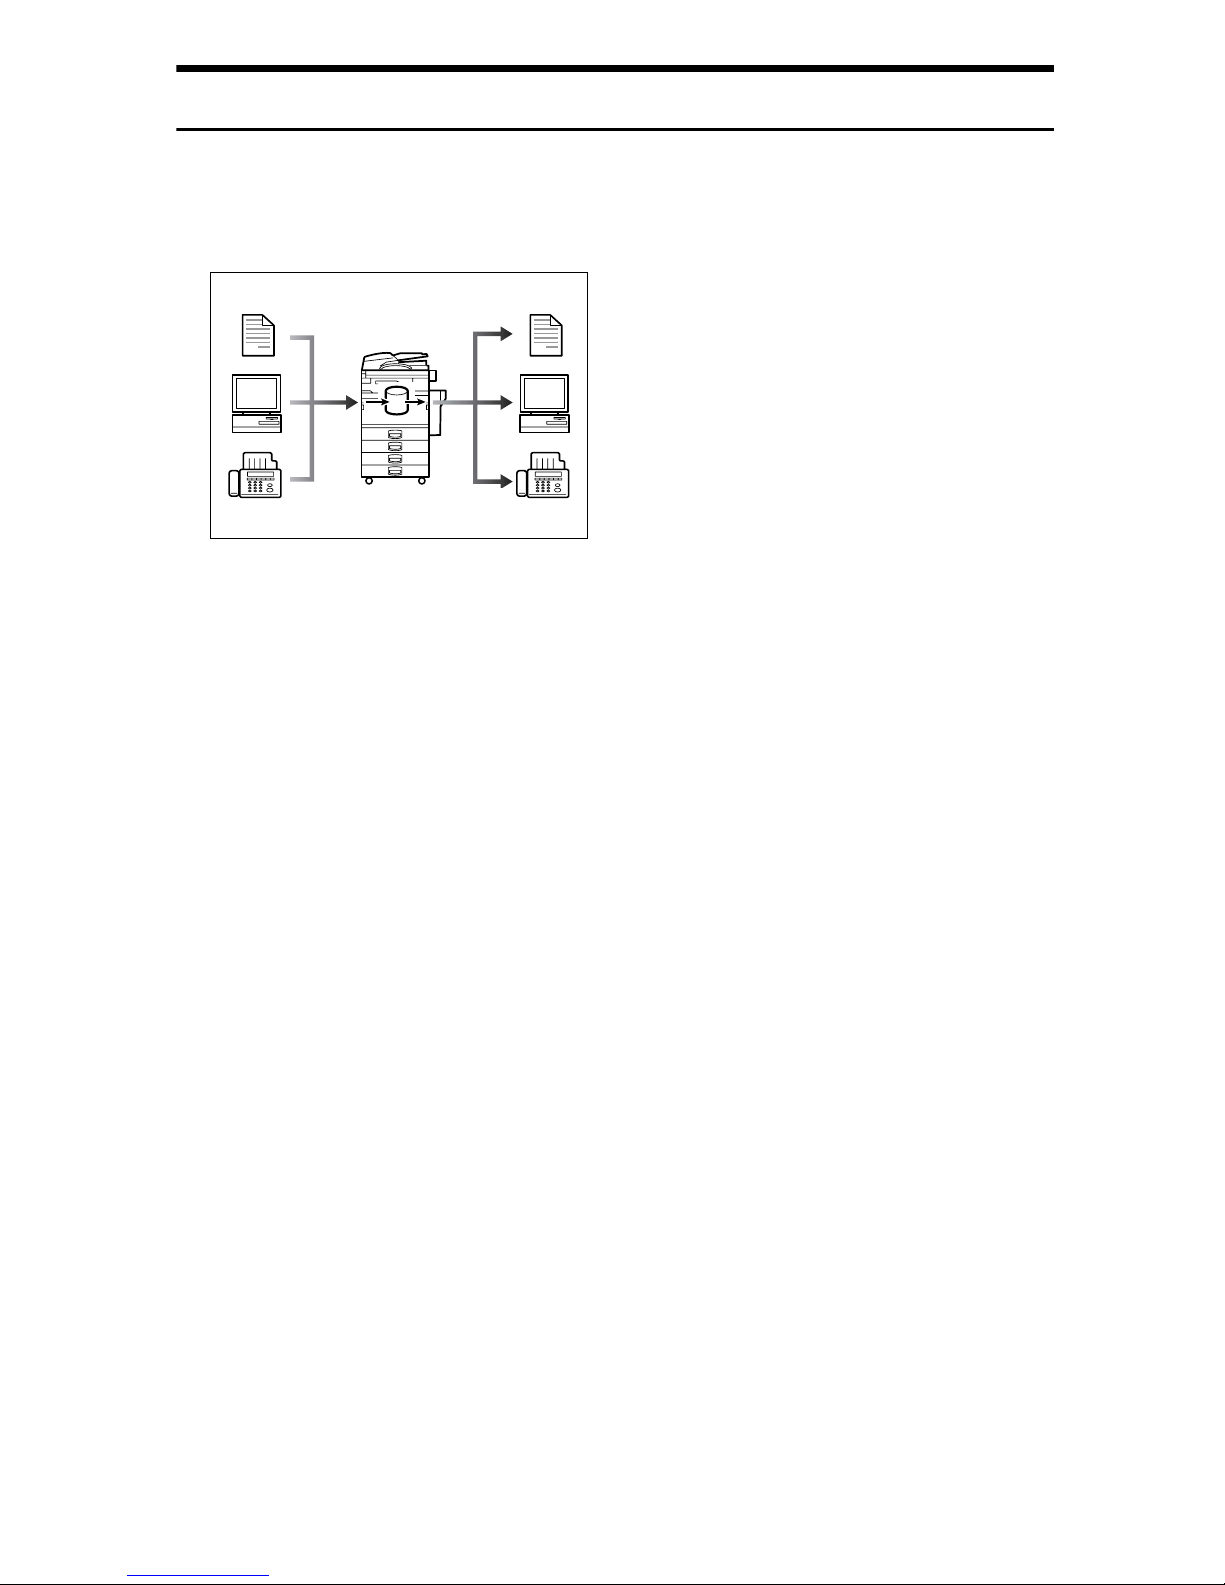
Utilizing Stored Documents
You can store files of originals scanned by this machine, or files sent from other
computers, onto the hard disk of the machine. You can print the stored documents, as well as change print settings and print multiple documents (Document
Server).
GCKONN2J
• With DeskTopBinder, you can search, check, print and delete stored documents from your computer.
• You can also retrieve stored documents scanned in scanner mode.
• You can retrieve documents scanned in copier mode, if the Printer/Scanner
Unit or the Scanner Enhance Option is installed.
For details, see Scanner Reference.
• With File Format Converter (optional), you can even download documents
stored in copy and printer functions to your computer. See Network Guide.
• For more information about the machine's settings, see “Network Settings”,
General Settings Guide.
• For more information about Document Server in printer mode, see “Saving
and Printing Using the Document Server”, Printer Reference.
• For more information about Document Server in scanner mode, see “Storing
Files Using the Scanner Function”, Scanner Reference.
• For more information about Document Server, see “Storing Originals in the
Document Server”, Copy/Document Server Reference.
• For more information about DeskTopBinder, see DeskTopBinder manuals.
iv
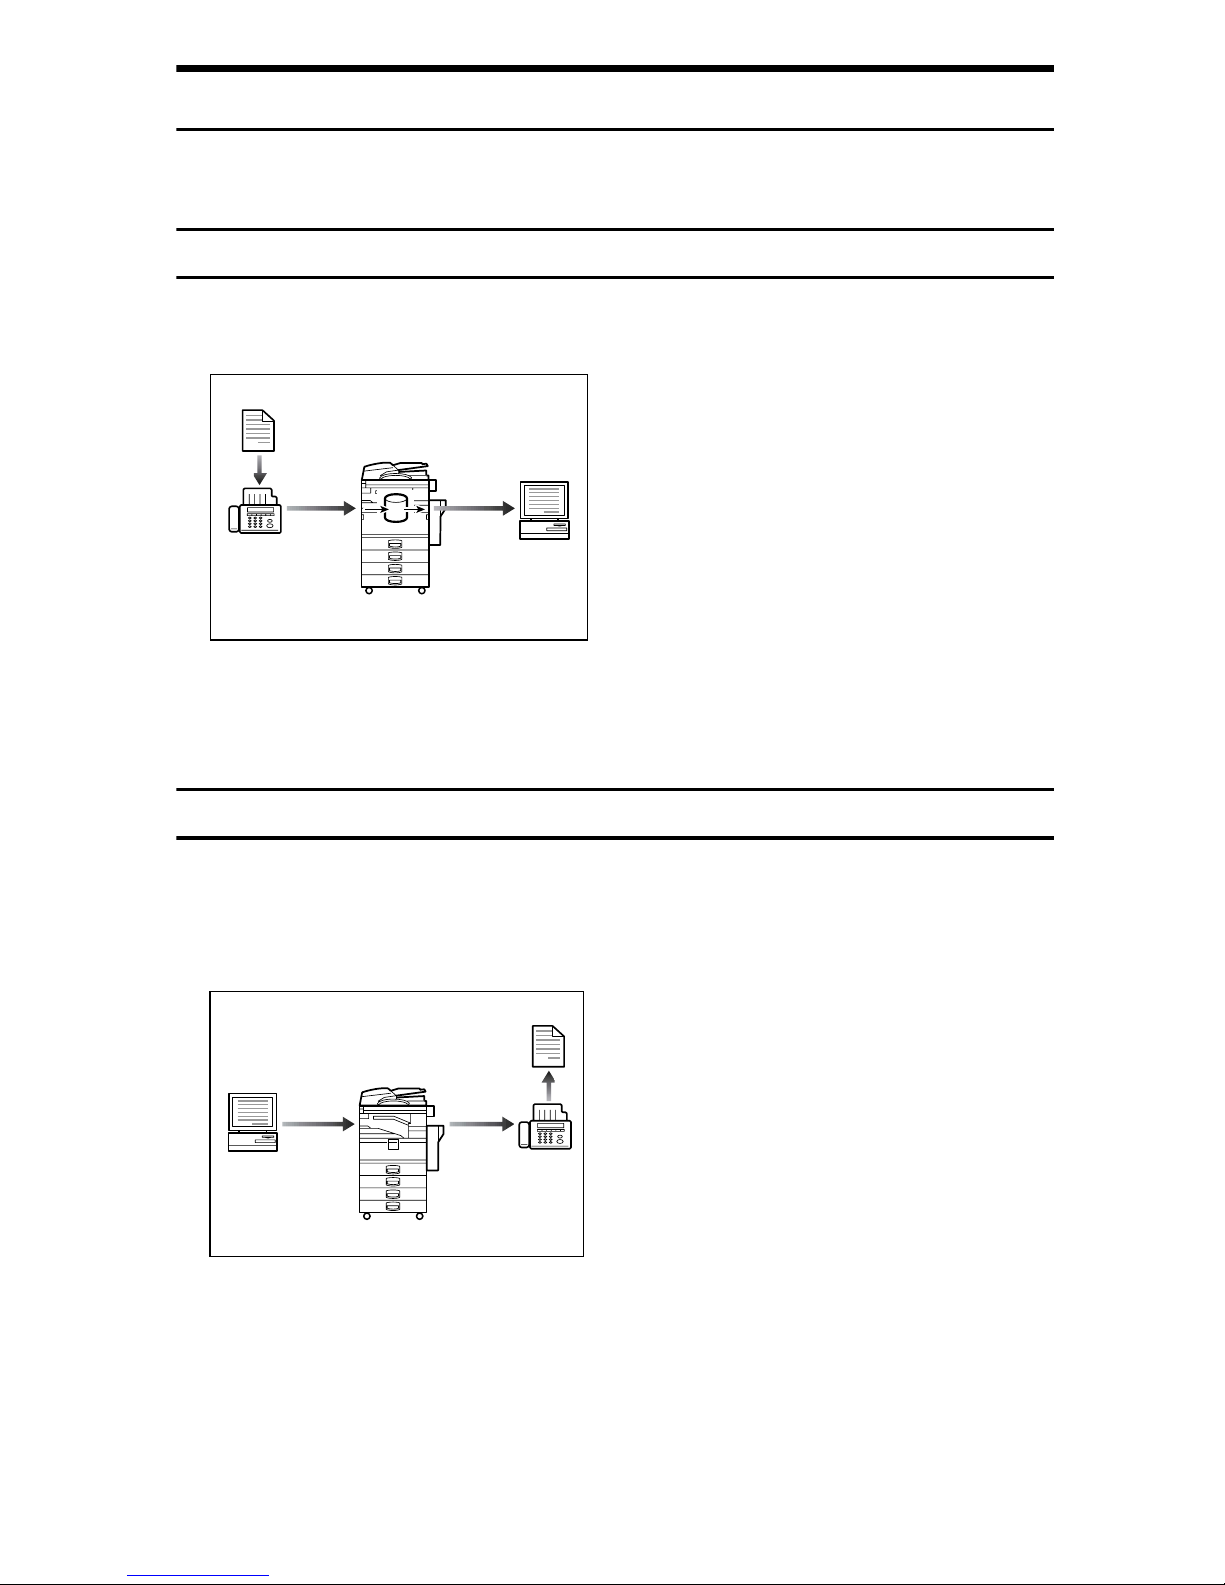
Paperless Fax Transmission and Reception
You can store received fax messages on the machine's hard disk, instead of printing them onto paper.
Reception
You can store received fax documents in electrical format without printing it onto paper.
GCKONN3J
• You can use DeskTopBinder or a Web Image Monitor to check, print, delete,
retrieve, or download documents using your computer (Storing received documents). See Facsimile Reference.
Transmission
You can send a fax from your computer over the network (Ethernet, or wireless
LAN) to this machine, which then forwards the fax via its telephone connection
(LAN-Fax).
AHR003S
• Print from a Windows application, select the LAN-Fax printer, and then select the fax destination.
• The sender can check the images s/he has sent.
• For more information about the machine's settings, see “Network Settings”,
General Settings Guide.
• For more information about how to use the function, see “Fax via Computer”,
Facsimile Reference.
v
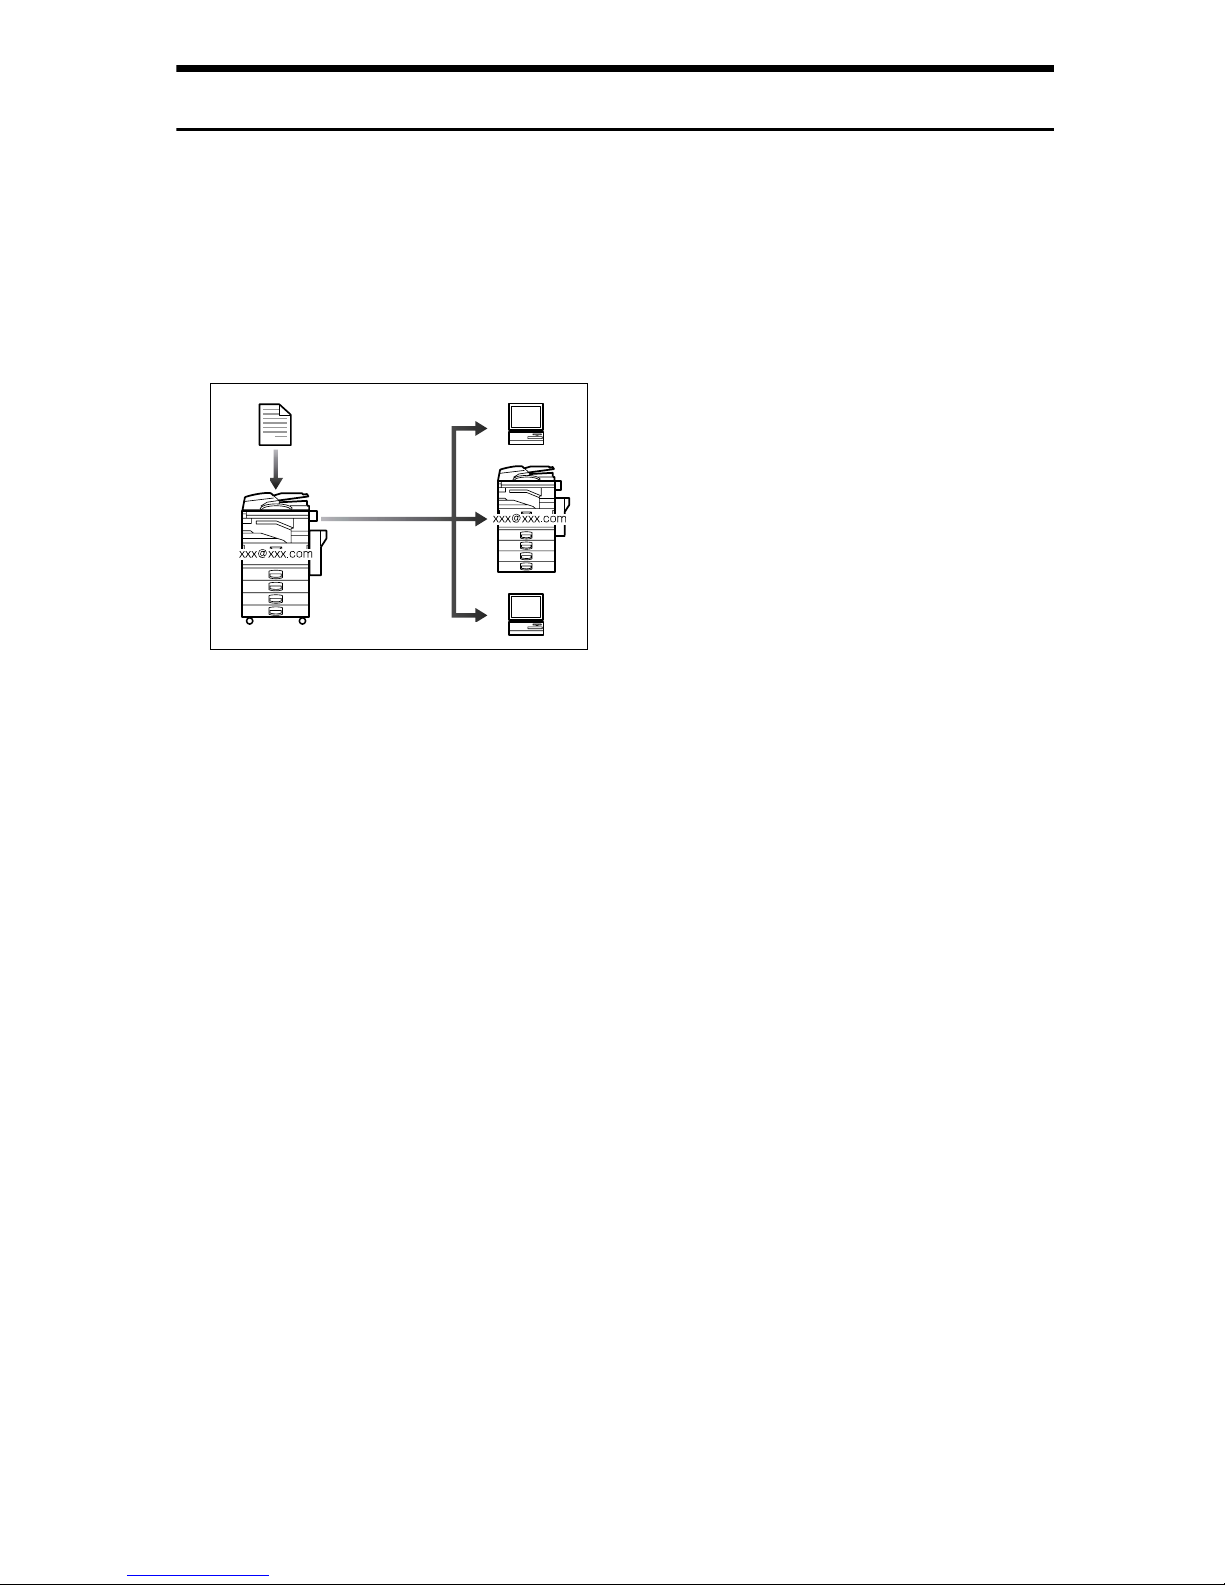
Fax Transmission and Reception Through the Internet
You can send fax documents via e-mail by specifying the recipient's e-mail address (Internet Fax Transmission).
You can receive sent documents via Internet Fax, or from computers (Internet
Fax Reception).
You can send fax documents by specifying IP-fax destination using IPv4 addresses (IP-Fax Transmission).
You can receive sent documents via Internet Fax (IP-Fax Reception).
GCKONN9J
❖ Internet Fax
• You can send fax documents through e-mail by specifying the recipient’s
e-mail address.
• You can receive sent documents via Internet Fax, or from computers.
• You can receive data such as e-mail from computers and faxes from Inter-
net fax machines, and then print or forward that data.
• For more information about machine's settings, see “Network Settings”,
General Settings Guide.
• For more information about how to use the function, see “Transmission”
and “Reception”, Facsimile Reference.
❖ IP-Fax
• You can exchange documents between fax machines directly connected to
the TCP/IP network.
• You can send documents by specifying an IPv4 address or host name in-
stead of a fax number.
• For details about the machine's settings, see “Network Settings”, General
Settings Guide.
• For details about how to use this function, see “Transmission” and “Recep-
tion”, Facsimile Reference.
vi
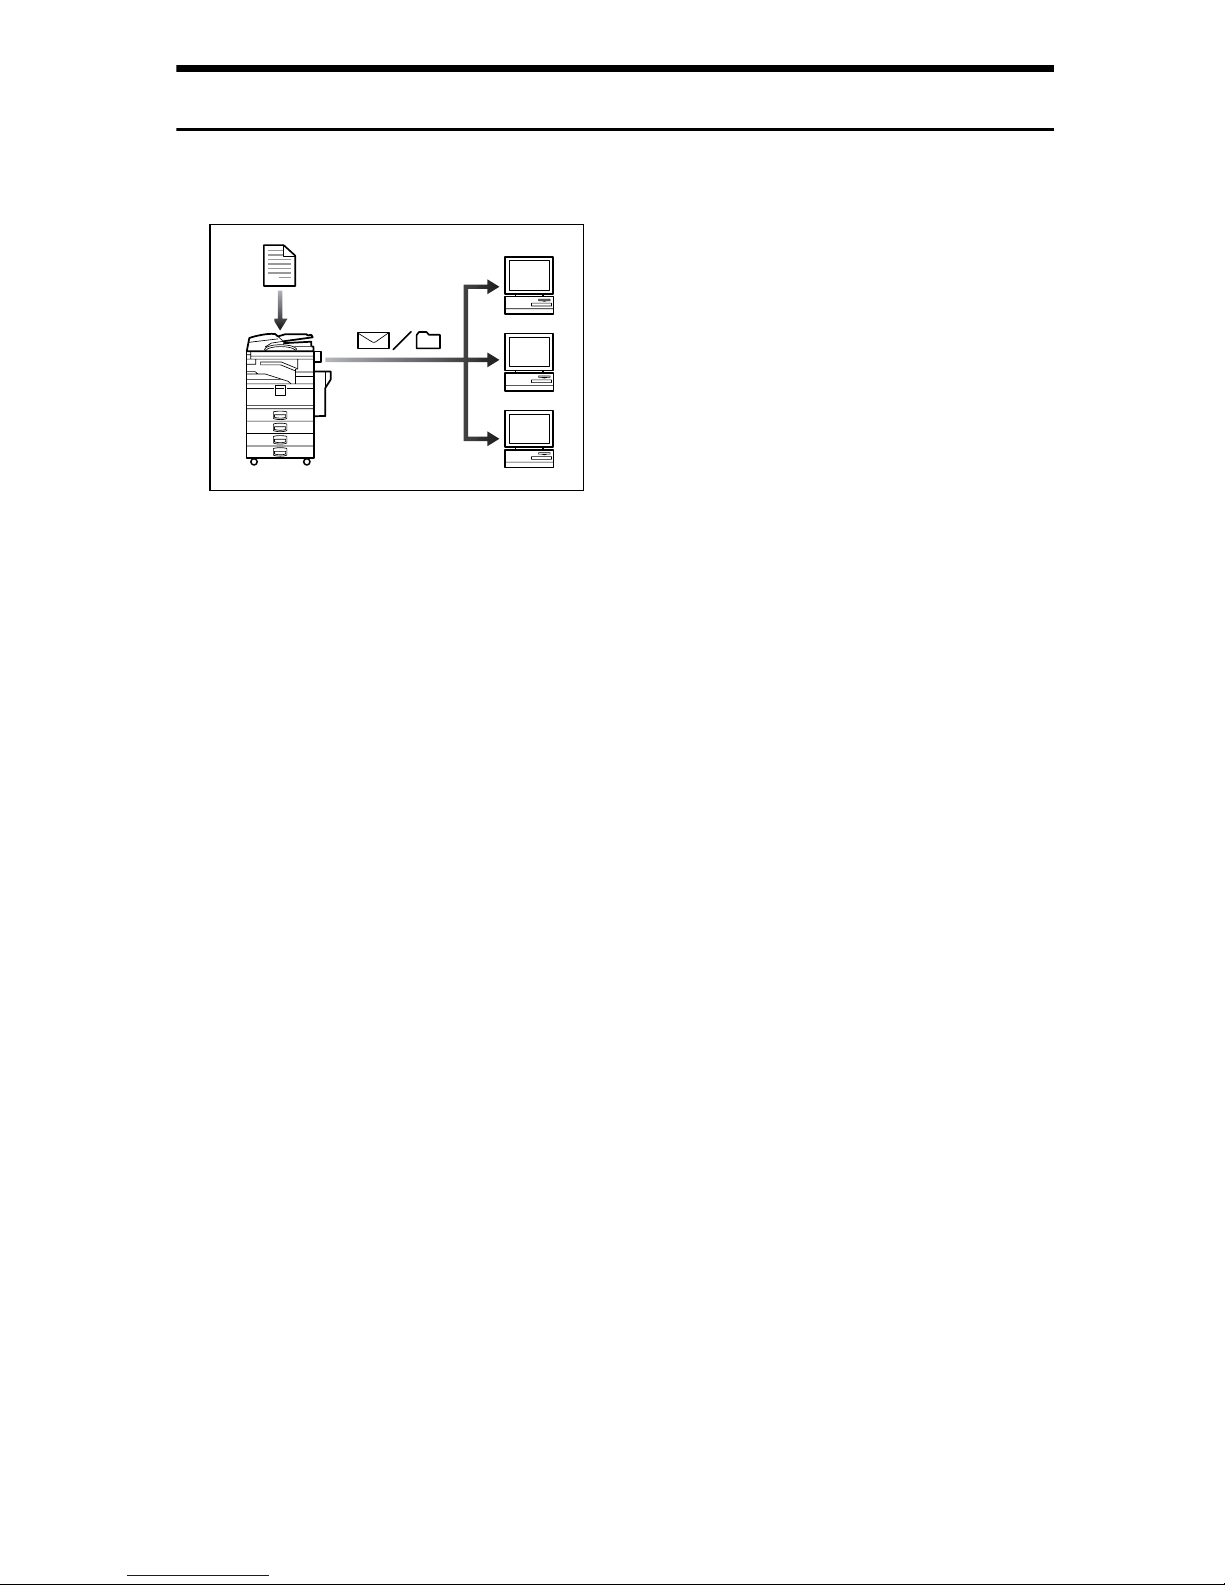
Using the Scanner in a Network Environment
You can use a scanner over the network.
AHR004S
• You can send scanned documents to other network computers using e-mail
(Sending stored scan file by e-mail). See “Sending Scan Files by E-mail”, Scanner Reference.
• With the ScanRouter delivery software, you can store scanned documents in
specified destinations on network computers (File storage). See Scanner Reference.
• You can send scanned documents to other network folders (Scan to Folder).
See “Sending Scan Files by Scan to Folder”, Scanner Reference.
• You can use this machine as a delivery scanner for the ScanRouter delivery
application (Network delivery scanner). You can save scan files in the delivery server or send them to a folder in a computer on the same network. For
details about the machine's settings, see “Network Settings”, General Settings
Guide. For details about how to use the function, see “Delivering Scan Files”,
Scanner Reference.
vii
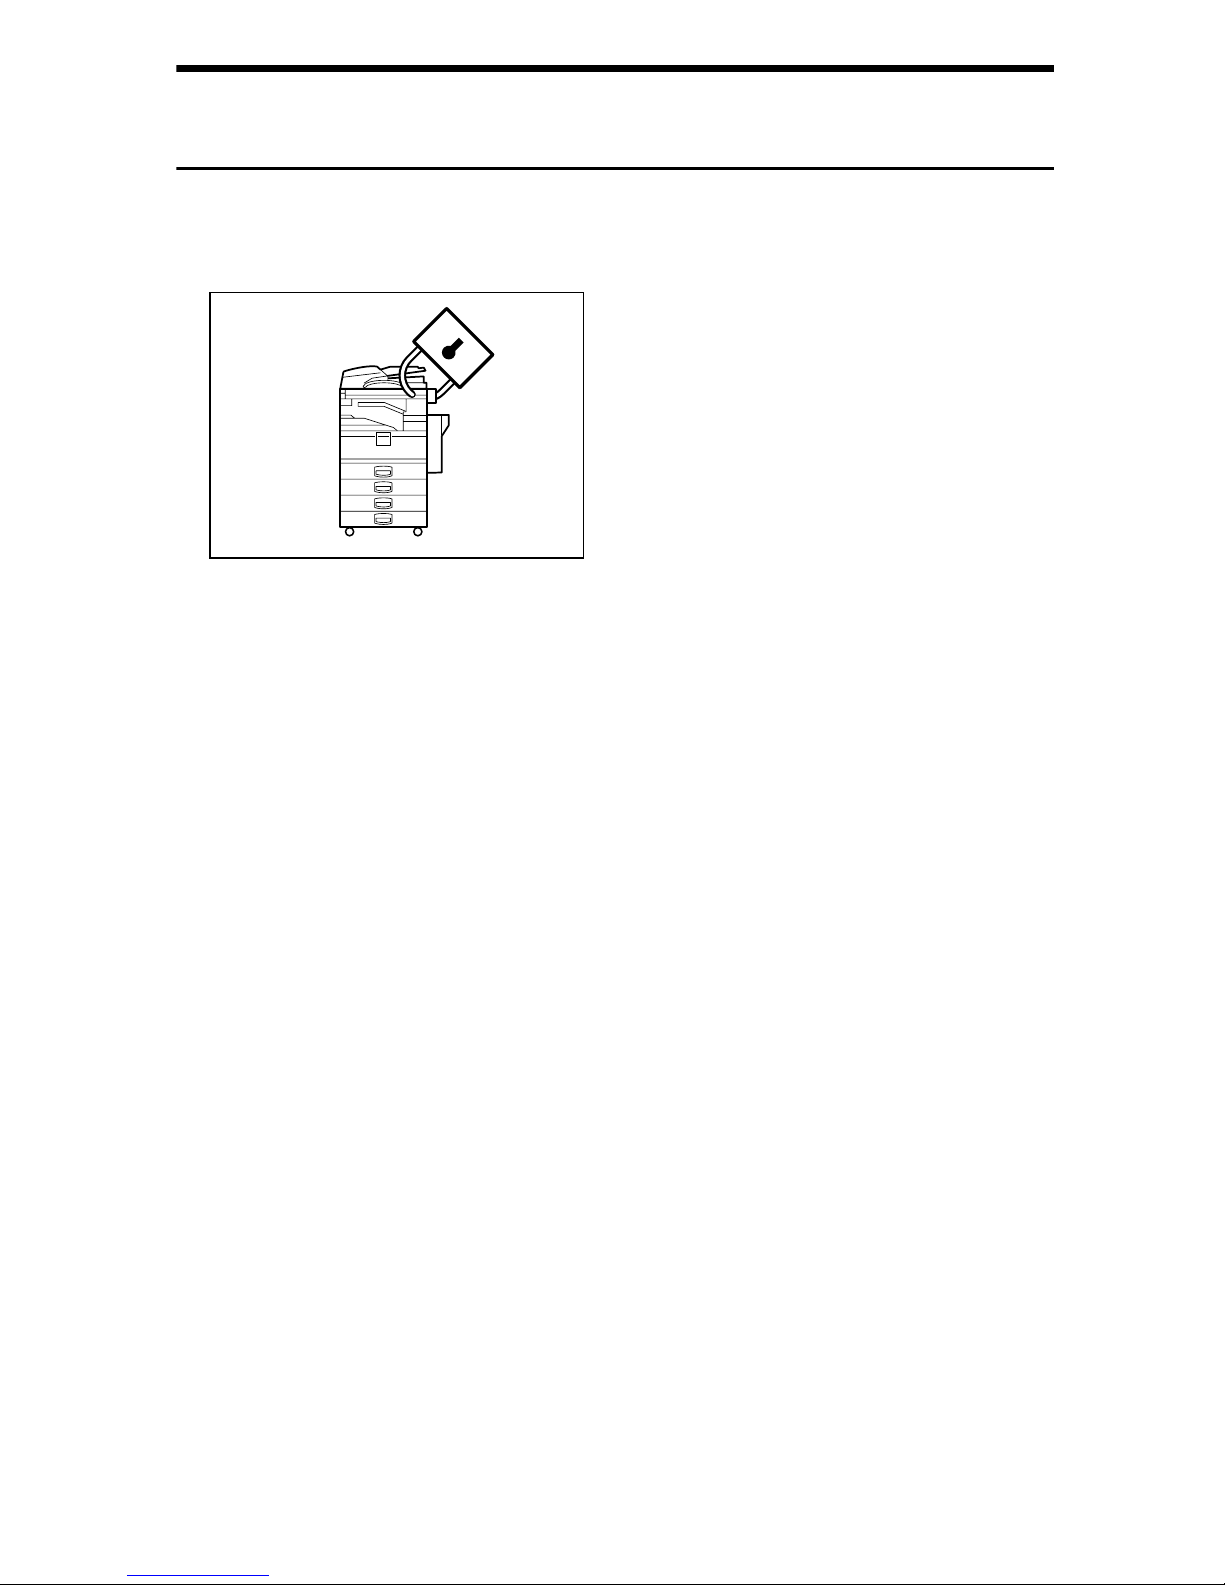
Administrating the Machine/Protecting Documents (Security
Functions)
You can prevent information leakage by managing the machine and protecting
documents.
AHR005S
• You can protect documents from unauthorized access and stop them from being copied without permission. See Security Reference.
• You can control the use of the machine, as well as prevent machine settings
from being changed without authorization. See Security Reference.
• By setting passwords, you can prevent unauthorized access via the network.
See Security Reference.
• You can erase the data on the hard disk to prevent the information from leaking out. See the manual for the DataOverWriteSecurity Unit (optional) and
Security Reference.
viii
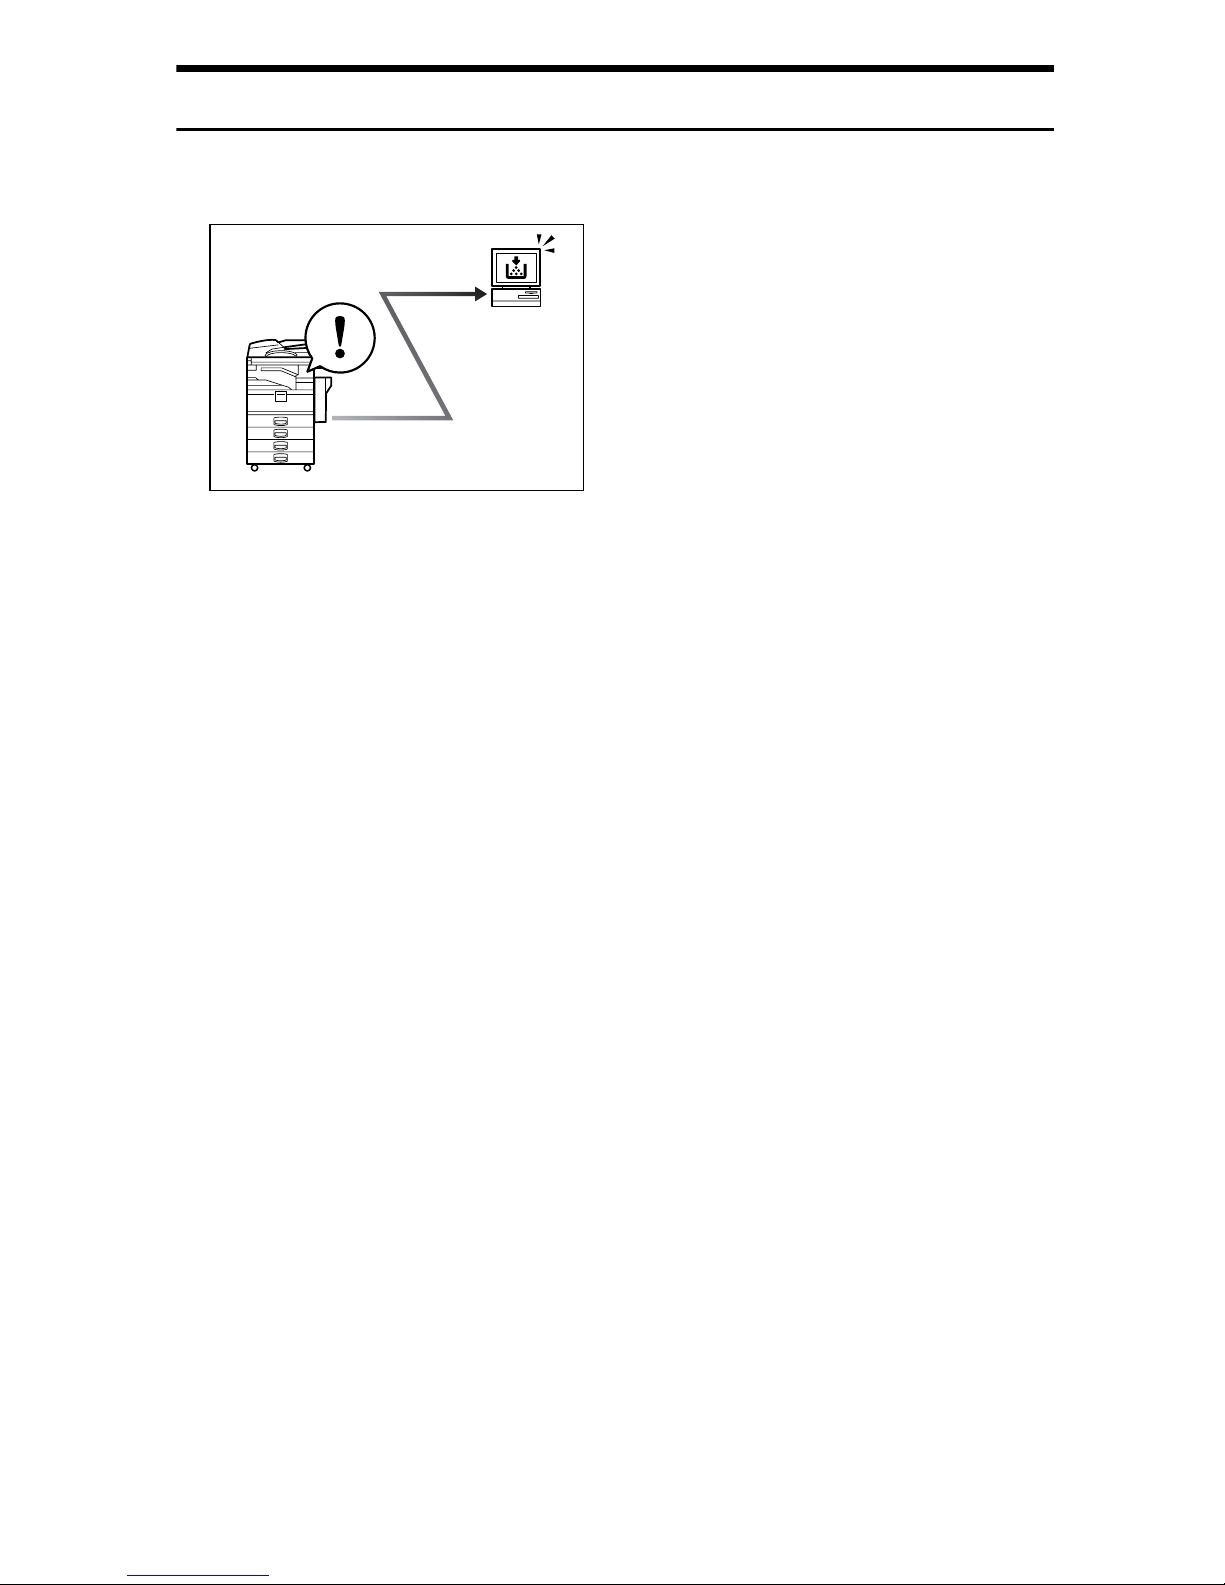
Monitoring the Machine Via Computer
You can monitor machine status and change settings using a computer.
AHR006S
• Using SmartDeviceMonitor for Admin, SmartDeviceMonitor for Client, or a
Web browser, you can use a computer to view the machine's status, such as
checking on paper quantities, or misfeeds. See General Settings Guide.
• You can use a Web browser to make network settings. See General Settings
Guide.
• You can also use a Web browser to register and manage items such as user
codes, fax numbers, e-mail addresses, and folders in the Address Book.
See the Web Image Monitor's Help.
• Using Web Image Monitor, you can receive e-mails notifying you when toner
runs out or a paper misfeed occurs. See the Web Image Monitor Help.
• Using Web Image Monitor, you can receive information on the machine status via e-mail. See the Web Image Monitor Help.
ix
Preventing an Unauthorized Copy
You can embed a pattern in the printed document to prevent it from being copied.
AHR023S
• Using the printer driver, you can embed a pattern in the printed document. If
the document is copied on a machine with the Copy Data Security Unit (optional), protected pages are grayed out in the copy, preventing confidential
information from being copied. In addition, the machine beeps to notify that
unauthorized copying is being attempted.
If the document is copied on a machine without the Copy Data Security Unit,
the hidden text becomes conspicuous in the copy, showing that the copy is
unauthorized.
See the printer driver Help and Printer Reference.
•Using the printer driver, you can embed text in the printed document for unauthorized copy prevention. If the document is copied, scanned, or stored in
a Document Server by a copier or multifunction printer, the embedded text
appears conspicuous in the copy, discouraging such unauthorized copying.
See the printer driver Help.
See Printer Reference.
• If a document protected by unauthorized copy guard is copied on a machine
that is equipped with the Copy Data Security Unit (optional), the machine
beeps to notify users that unauthorized copying is being attempted.
See Security Reference.
x

TABLE OF CONTENTS
Manuals for This Machine ......................................................................................i
What You Can Do with This Machine..................................................................iii
Copier, Facsimile, Printer, and Scanner Functions ................................................... iii
Utilizing Stored Documents....................................................................................... iv
Paperless Fax Transmission and Reception..............................................................v
Fax Transmission and Reception Through the Internet ............................................ vi
Using the Scanner in a Network Environment ......................................................... vii
Administrating the Machine/Protecting Documents (Security Functions) ................viii
Monitoring the Machine Via Computer...................................................................... ix
Preventing an Unauthorized Copy ............................................................................. x
Notice ......................................................................................................................1
Important ....................................................................................................................1
Notes To Wireless LAN Interface (optional) Users ....................................................1
How to Read This Manual .....................................................................................4
Symbols .....................................................................................................................4
Safety Information .................................................................................................5
Safety During Operation.............................................................................................5
Positions of RWARNING and RCAUTION labels ..............................................8
ENERGY STAR Program .......................................................................................9
Recycled Paper........................................................................................................10
Machine Types.........................................................................................................10
1. Getting Started
Guide to Components .........................................................................................11
Options.....................................................................................................................13
Control Panel........................................................................................................16
Display Panel........................................................................................................19
When the Authentication Screen is Displayed..................................................20
User Code Authentication (Using the Control Panel)...............................................20
User Code Authentication (Using a Printer Driver) ..................................................21
Login (Using the Control Panel) ...............................................................................21
Log Off (Using the Control Panel) ............................................................................ 22
Login (Using a Printer Driver)...................................................................................22
Login (Using Web Image Monitor) ...........................................................................22
Log Off (Using Web Image Monitor) ........................................................................22
Changing Modes ..................................................................................................23
System Reset...........................................................................................................24
Turning On the Power .........................................................................................25
Turning On the Main Power .....................................................................................25
Turning On the Power ..............................................................................................26
Turning Off the Power ..............................................................................................26
Turning Off the Main Power .....................................................................................27
Saving Energy..........................................................................................................28
xi

2. Entering Text
Entering Text ........................................................................................................29
Available Characters ................................................................................................29
Keys .........................................................................................................................29
How to Enter Text ....................................................................................................30
3. Appendix
Dos and Don'ts.....................................................................................................31
Software and Utilities Included on the CD-ROM...............................................32
Viewing the contents of the CD-ROM ......................................................................32
Printer Drivers for This Machine...............................................................................33
TWAIN Driver ...........................................................................................................34
LAN-Fax Driver ........................................................................................................35
DeskTopBinder Lite..................................................................................................36
SmartDeviceMonitor for Admin ................................................................................37
DeskTopBinder-SmartDeviceMonitor for Client .......................................................38
Installing the Operating Instructions .................................................................39
PDF Manuals ...........................................................................................................40
Opening the Installed Operating Instructions...................................................41
Opening from the Icon..............................................................................................41
Opening from the [Start] Menu .................................................................................41
Opening from the CD-ROM......................................................................................42
Specifications for the Main Unit .........................................................................43
Specifications for Options ..................................................................................48
Copy Paper ...........................................................................................................53
Recommended Paper Sizes and Types................................................................... 53
Unusable Paper .......................................................................................................56
Paper Storage ..........................................................................................................57
INDEX......................................................................................................... 58
xii

Notice
Important
Do not copy or print any item for which reproduction is prohibited by law.
Copying or printing the following items is generally prohibited by local law:
bank notes, revenue stamps, bonds, stock certificates, bank drafts, checks, passports, driver's licenses.
The preceding list is meant as a guide only and is not inclusive. We assume no
responsibility for its completeness or accuracy. If you have any questions concerning the legality of copying or printing certain items, consult with your legal
advisor.
Notes To Wireless LAN Interface (optional) Users
Notes to users
It is strictly forbidden to use antenna(s) except designated.
The antenna used for this transmitter must be installed to provide a separation
distance of at least 2.5 cm from all persons and must not be co-located or operating in conjunction with any other antenna or transmitter.
Notes to users in the United States of America
This equipment complies with FCC RF radiation exposure limits set forth for an
uncontrolled environment.
Notice:
This equipment has been tested and found to comply with the limits for a Class
B digital device, pursuant to Part 15 of the FCC Rules. These limits are designed
to provide reasonable protection against harmful interference in a residential installation. This equipment generates, uses and can radiate radio frequency energy and, if not installed and used in accordance with the instructions, may cause
harmful interference to radio communications. However, there is no guarantee
that interference will not occur in a particular installation. If this equipment does
cause harmful interference to radio or television reception, which can be determined by turning the equipment off and on, the user is encouraged to try to correct the interference by one more of the following measures:
• Reorient or relocate the receiving antenna.
• Increase the separation between the equipment and receiver.
• Connect the equipment into an outlet on a circuit different from that to which
the receiver is connected.
• Consult the dealer or an experienced radio/TV technician for help.
1

This device complies with part 15 of the FCC Rules.
Operation is subject to the following two conditions:
(1) This device may not cause harmful interference, and (2) this device must accept any interference received, including interference that may cause undesired
operation.
Warning
Changes or modifications not expressly approved by the party responsible for
compliance could void the user's authority to operate the equipment.
Note to users in Canada
Note:
This Class B digital apparatus complies with Canadian ICES-003.
Operation is subject to the following two conditions:
(1) This device may not cause interference, and (2) this device must accept any
interference, including interference that may cause undesired operation of the
device.
IEEE 802.11b Interface Unit Type H:
This device complies with RSS-210 of Industry Canada.
The term “IC:” before the certification/registration number only signifies that
the Industry Canada technical specifications were met.
To prevent radio interference to the licensed service, this device is intended to
be operated indoors and away from windows to provide maximum shielding.
Equipment (or its transmit antenna) that is installed outdoors is subject to licensing.
To reduce potential radio interference to other users, the antenna type and its
gain should be so chosen that the equivalent isotropically radiated power (EIRP)
is not more than that required for successful communication.
This device has been designed to operate with an antenna having a maximum
gain of [0.00] dBi. Antenna having a higher gain is strictly prohibited per regulations of Industry Canada. The required antenna impedance is [50] ohms.
2

Remarque concernant les utilisateurs au Canada
Avertissement:
Cet appareil numérique de la classe B est conforme à la norme NMB-003 du Canada.
L'utilisation de ce dispositif est autorisée seulement aux conditions suivantes: (1)
il ne doit pas produire de brouillage et (2) l'utilisateur du dispositif doit être prêt
à accepter tout brouillage radioélectrique reçu, même si ce brouillage est susceptible de compromettre le fonctionnement du dispositif.
IEEE 802.11b Interface Unit Type H:
Ce dispositif est conforme à la norme CNR-210 d'Industrie Canada.
L'expression <<IC:>> avant le numéro d'homologation/enregistrement signifie
seulement que les spécifications techniques d'Industrie Canada ont été respectées.
Pour empêcher que cet appareil cause du brouillage au service faisant l'objet
d'une licence, il doit être utilisé à l'intérieur et devrait être placé loin des fenêtres
afin de fournir un écran de blindage maximal.
Si le matériel (ou son antenne d'émission) est installe à l'extérieur, il doit faire
l'objet d'une licence.
Afin de réduire le risque d'interférence aux autres utilisateurs, le type d'antenne
et son gain doivent être choisis de façon à ce que la puissance isotrope rayonnée
équivalente (p.i.r.e.) ne soit pas supérieure au niveau requis pour obtenir une
communication satisfaisante.
Ce dispositif a été conçu pour fonctionner avec une antenne ayant un gain maximal de [0.00] dBi. Une antenne ayant un gain plus élevé est strictement interdite
par les réglements d'Industrie Canada. L'impédance d'antenne requise est [50]
ohms.
3
How to Read This Manual
Symbols
This manual uses the following symbols:
Indicates important safety notes.
Ignoring these notes could result in serious injury or death. Be sure to read these
notes. They can be found in the “Safety Information” section of this manual.
Indicates important safety notes.
Ignoring these notes could result in moderate or minor injury, or damage to the
machine or to property. Be sure to read these notes. They can be found in the
“Safety Information” section of this manual.
Indicates points to pay attention to when using the machine, and explanations
of likely causes of paper misfeeds, damage to originals, or loss of data. Be sure
to read these explanations.
Indicates supplementary explanations of the machine's functions, and instructions on resolving user errors.
This symbol is located at the end of sections. It indicates where you can find further relevant information.
[ ]
Indicates the names of keys that appear on the machine’s display panel.
{ }
Indicates the names of keys on the machine’s control panel.
4

Safety Information
When using this machine, the following safety precautions should always be followed.
Safety During Operation
In this manual, the following important symbols are used:
Indicates a potentially hazardous situation which, if instructions are not followed, could result
in death or serious injury.
Indicates a potentially hazardous situation which, if instructions are not followed, may result
in minor or moderate injury or damage to property.
5

R WARNING:
• Connect the power cord directly into a wall outlet and do not use an
extension cord.
• Disconnect the power plug (by pulling the plug, not the cable) if the
power cable or plug becomes frayed or otherwise damaged.
• To avoid hazardous electric shock or laser radiation exposure, do not
remove any covers or screws other than those specified in this manual.
• Turn off the power and disconnect the power plug (by pulling the plug,
not the cable) if any of the following occurs:
• You spill something into the machine.
• You suspect that your machine needs service or repair.
• The external housing of your machine has been damaged.
• Do not incinerate used toner or toner containers. Toner dust might ig-
nite when exposed to an open flame.
• Disposal can take place at our authorized dealer.
• Dispose of used toner containers in accordance with local regulations.
• Keep the machine away from flammable liquids, gases, and aerosols.
A fire or an electric shock might occur.
• Connect the machine only to the power source described on the inside front cover of this manual.
• Do not damage, break or make any modifications to the power cord.
Do not place heavy objects on it. Do not pull it hard nor bend it more
than necessary. These actions could cause an electric shock or fire.
• If the power cord is damaged (exposure of the core, disconnection,
etc.), contact your service representative to change a new one. Operating the machine with a damaged power cord may cause an electric
shock or fire.
• Do not incinerate the photoconductor unit. Toner dust might ignite
when exposed to an open flame. Dispose of the used photoconductor
unit in accordance with local regulations.
6

R CAUTION:
• Protect the machine from dampness or wet weather, such as rain and snow.
• Unplug the power cord from the wall outlet before you move the machine.
While moving the machine, you should take care that the power cord will not
be damaged under the machine.
• When you disconnect the power plug from the wall outlet, always pull the
plug (not the cable).
• To disconnect the power cord, pull it out by plug. Do not drag the cord itself.
Doing so may result in damage to the cord, leading to fire or electric shock.
• Do not allow paper clips, staples, or other small metallic objects to fall inside
the machine.
• Keep toner (used or unused) and toner containers out of reach of children.
• For environmental reasons, do not dispose of the machine or expended
supply waste at household waste collection points. Disposal can take place
at an authorized dealer.
• The inside of the machine could be very hot. Do not touch the parts with a
label indicating the “hot surface”. Otherwise, an injury might occur.
• If toner or used toner is inhaled, gargle with plenty of water and move into a
fresh air environment. Consult a doctor if necessary.
• If toner or used toner gets into your eyes, flush immediately with large
amounts of water. Consult a doctor if necessary.
• If toner or used toner is swallowed, dilute by drinking a large amount of water. Consult a doctor if necessary.
• Avoid getting toner on your clothes or skin when removing a paper jam or
replacing toner. If your skin comes into contact with toner, wash the affected
area thoroughly with soap and water.
• If toner gets on your clothing, wash with cold water. Hot water will set the
toner into the fabric and may make removing the stain impossible.
• Keep the machine away from humidity and dust. Otherwise a fire or an electric shock might occur.
• Do not place the machine on an unstable or tilted surface. If it topples over,
an injury might occur.
• Make sure the room where you are using the machine is well ventilated and
spacious. Good ventilation is especially important when the machine is used
heavily.
• The fusing section of this machine might be very hot. Caution should be taken when removing misfed paper.
• Do not use aluminum foil, carbon paper, or similar conductive paper to avoid
a fire or machine failure.
7
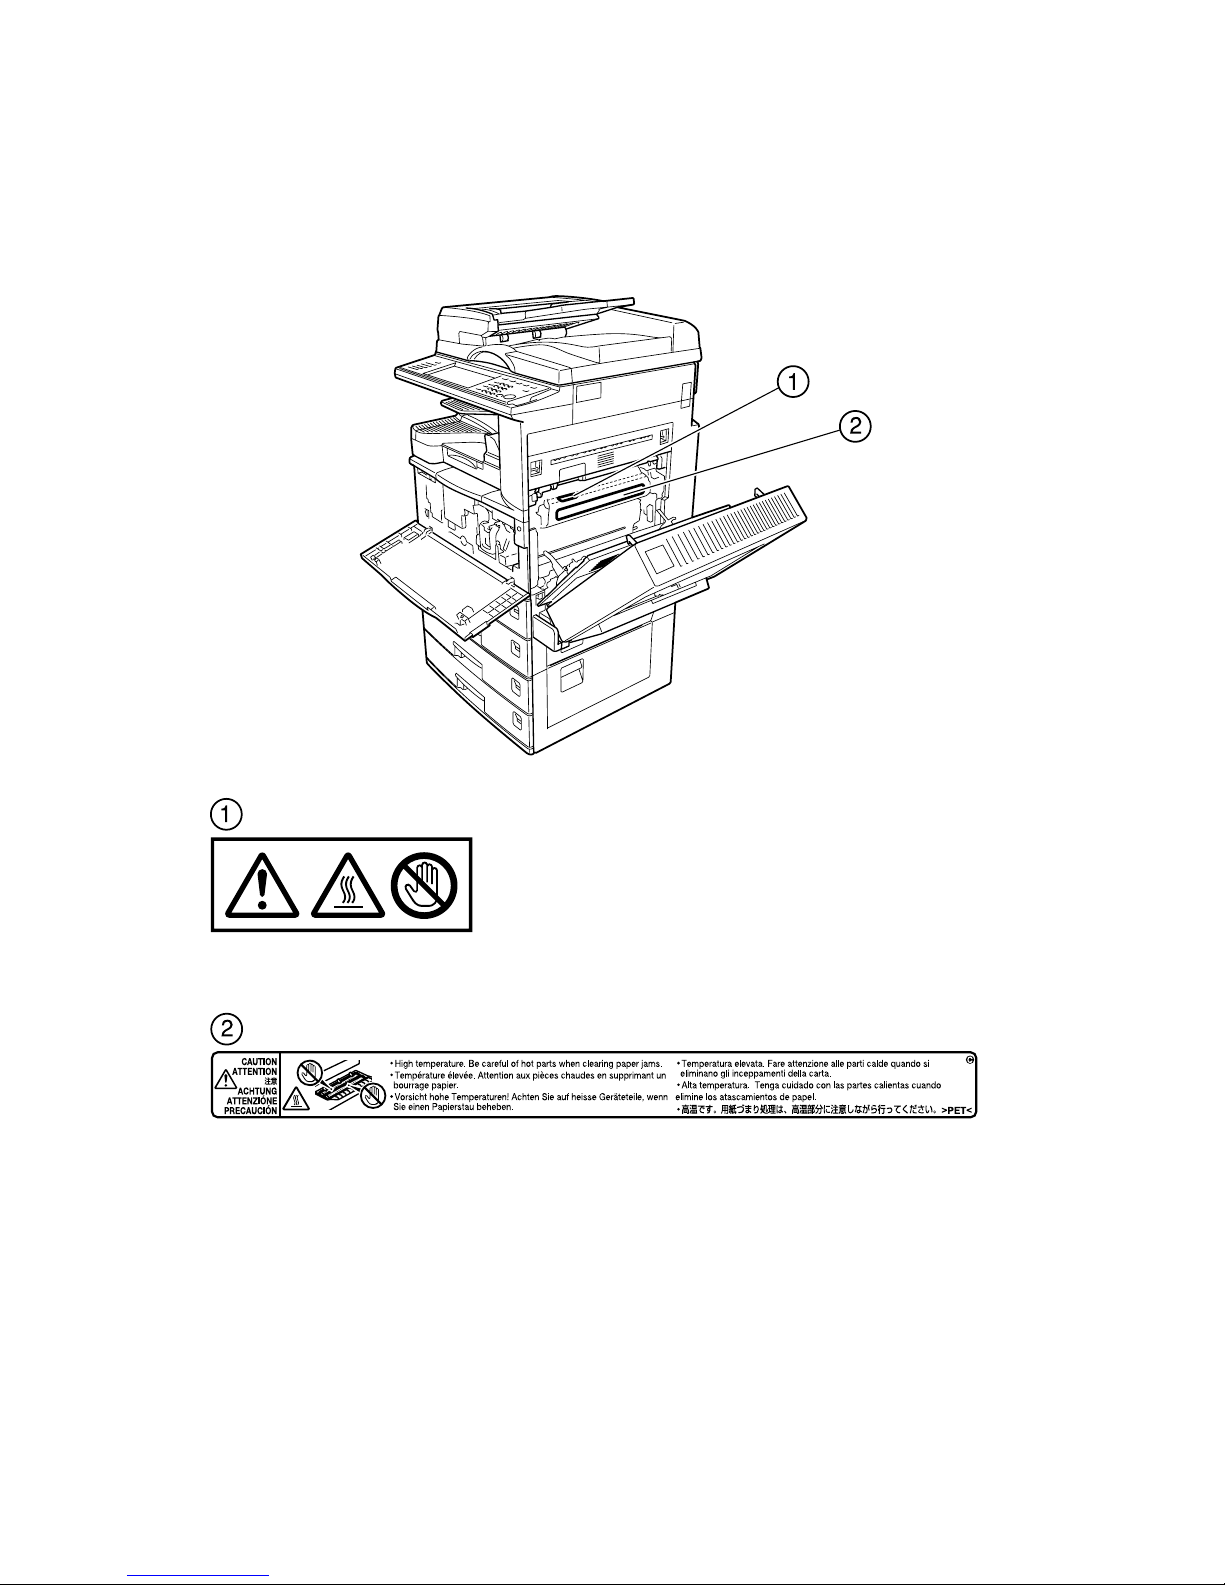
Positions of RWARNING and RCAUTION
labels
This machine has labels for RWARNING and RCAUTION at the positions
shown below. For safety, please follow the instructions and handle the machine
as indicated.
ARS016S
ARS017S
Do not touch! Surface may be very hot.
High temperature. Be careful of hot parts when clearing paper jams.
ARS018S
8

ENERGY STAR Program
As an ENERGY STAR Partner, we have determined
that this machine model meets the ENERGY STAR
Guidelines for energy efficiency.
The ENERGY STAR Guidelines intend to establish an international energy-saving system for
developing and introducing energy-efficient office equipment to deal with environmental issues, such as global warming.
When a product meets the ENERGY STAR Guidelines for energy efficiency, the Partner shall
place the ENERGY STAR logo onto the machine model.
This product was designed to reduce the environmental impact associated with office equipment by means of energy-saving features, such as Low-power mode.
❖ Low-Power mode and Off mode or Sleep mode
This product automatically lowers its power consumption when it is not operated for a fixed time (standard setting time: 1 minute). This is called “Off
mode” on a single function copying machine, and “Sleep mode” on a multiple
function machine equipped with optional facsimile and printing functions.
• Off mode: Same as the condition when the operation switch is turned off.
• Sleep mode: Same as the condition when the operation switch is turned off.
Receiving fax messages and printing from a computer are possible.
If you want to operate this product while it is in either of these modes, do one
of the following:
• Turn on the operation switch.
• Place an original in the Auto Document Feeder (ADF).
• Lift and lower the exposure glass cover or the ADF.
The default interval before entering Off mode or Sleep mode can be adjusted.
To change it, see “Timer Settings”, General Settings Guide.
The ENERGY STAR Program establishes two modes which lower the power
consumption of the product when it is not operated for a fixed time. These
modes are the Low-power mode and the Off mode or Sleep mode. This product has only one mode, the Off mode or Sleep mode. This mode meets the requirements of both the Low-power mode and Off mode or Sleep mode. In this
manual, the Off mode is called the Auto Off mode.
9

❖ Duplex Priority
The ENERGY STAR Program recommends the duplex function. By conserving paper resources this function reduces a burden to the environment. For
applicable machines, duplex function (one-sided originals→two-sided copies) is selected preferentially when the operation switch or the main power
switch is turned on, the {Energy Saver} key is pressed, or the machine resets
automatically.
Low- Power mode, Off Mode Power consumption 1.0W
Default interval 1 minute
Recovery time 10 seconds or less
Duplex priority One-sided→Two-sided
Reference
For details about how to change the default interval, see “Timer Settings”,
General Settings Guide.
To change the settings of the Duplex Priority mode, see “Copier and Document Server Features”, General Settings Guide.
Recycled Paper
In accordance with the ENERGY STAR Program, we recommend you use environmentally friendly recycled paper. Please contact your sales representative for
recommended paper.
Machine Types
This machine comes in two models which vary in copy speed. To ascertain
which model you have, see the inside front cover.
Type 1 Type 2
Copy speed 25 copies/minute
1
(A4K, 8
/2" × 11"K)
30 copies/minute
(A4K, 81/2" × 11"K)
10

1. Getting Started
This section describes how to start using this machine.
Guide to Components
This section introduces the names and functions of the components.
1. Exposure glass cover (optional) or
Auto Document Feeder (ADF) (optional)
Lower the exposure glass cover over
originals placed on the exposure glass. If
you have the ADF, load a stack of originals here. They will be fed automatically,
one by one.
(The illustration shows the ADF.)
2. Exposure glass
Place originals face down.
3. Internal tray
Copied, printed paper or fax messages
are delivered here.
AHR034S
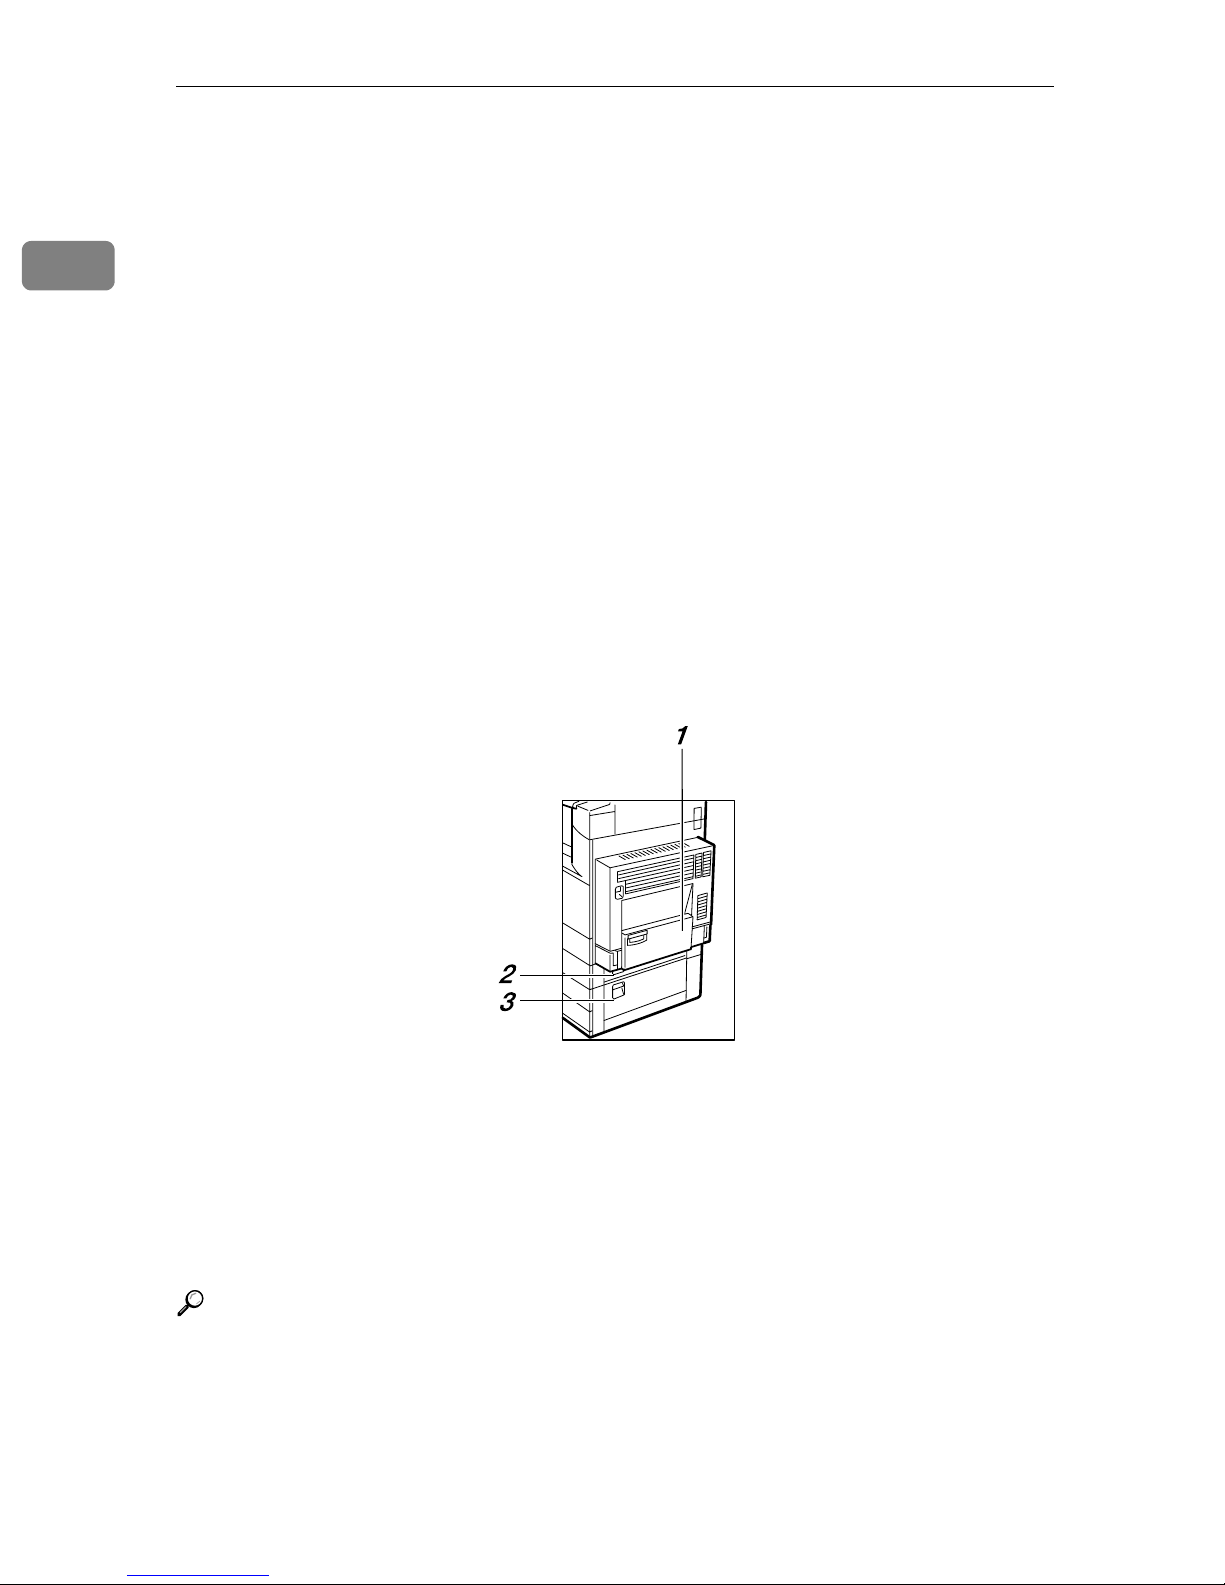
4. Ventilation holes
Prevents overheating. Do not obstruct
the ventilation holes by placing anything
near it or leaning objects against it. If the
machine overheats, a fault might occur.
5. Main power switch
If the machine does not operate after
turning on the operation switch, check
the main power switch is turned on. If it
is off, turn it on.
6. Main power indicator
This indicator lights when the main power switch is turned on, and goes off when
the switch is turned off.
11
Getting Started
1
7. On indicator
This indicator lights when the operation
switch is turned on, and goes off when
the switch is turned off.
8. Operation switch
Press this switch to turn the power on
(the On indicator lights up). To turn the
power off, press this switch again (the On
indicator goes off).
9. Control panel
See “Control panel”.
10. Remove Paper Indicator
The indicator lights when paper is delivered to the optional internal tray 2 (1 bin
tray). When paper is removed from the
internal tray 2, the indicator goes off.
11. Duplex unit (Unit for two-sided
copies)
Makes two-sided copies.
12. Front cover
Open to access the inside of the machine.
13. Paper tray
Load paper. See “Loading Paper”, Troubleshooting.
14. Paper tray 2
Use when copying onto OHP transparencies, label paper (adhesive labels), translucent paper, postcards, envelopes and
custom size paper. See “Loading Paper”,
Troubleshooting.
15. Paper tray unit (optional)
Load paper. See “External Options” and
“Loading Paper”, Troubleshooting.
1. Bypass tray
Use when copying onto OHP transparencies, label paper (adhesive labels), translucent paper, postcards, envelopes and
custom size paper. See “Copying from
the Bypass Tray”, Copy/Document Server Reference.
Reference
p.13 “External Options”
p.16 “Control Panel”
“Loading Paper”, Troubleshooting
12
ZEWH020E
2. Paper tray cover
Open this cover to remove jammed paper.
3. Lower right cover
Open this cover to remove jammed paper.
Guide to Components
Options
This section introduces the names and functions of main optional parts.
External Options
This section provides explanations about external options.
1
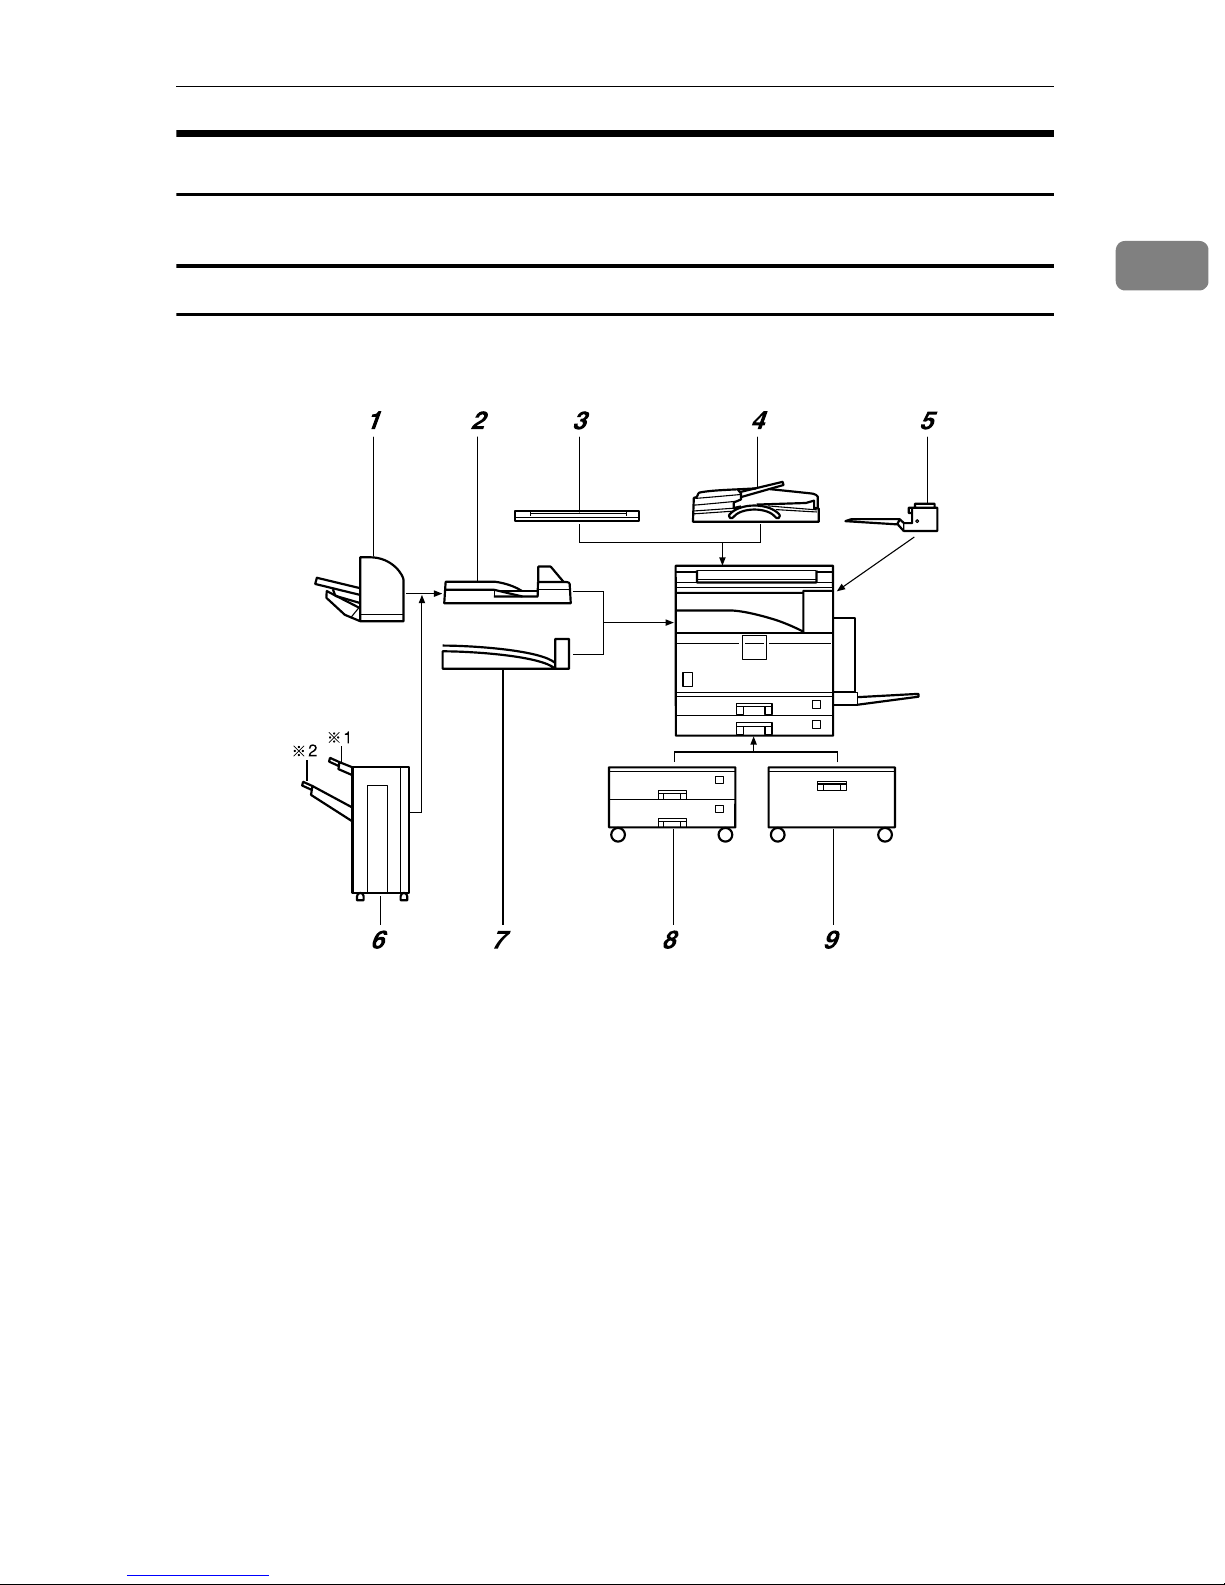
1. 500-sheet finisher
Sorts, stacks and staples copies.
2. Bridge unit
Relays copies to the finisher.
3. Exposure glass cover
Lower this cover over originals.
4. ADF
Load a stack of originals. They will feed
in automatically.
5. Internal tray 2 (1 bin tray)
If you select this as the output tray, copies
are delivered face down.
AHR038S
6. 1000-sheet finisher
Sorts, stacks and staples copies.
*1 : Finisher upper tray
*2 : Finisher shift tray
7. Shift sort tray
Sorts and stacks copies.
8. Paper tray unit
Consists of two paper trays.
9. Large Capacity Tray (LCT)
Holds up to 2000 sheets of paper.
13

1
Getting Started
Internal Options
This section provides explanations about internal options.
•HDD
Allows you to use the Document Server function.
•Fax Unit
Allows you to use the facsimile function.
• RPCS Printer Unit
Allows you to print by RPCS printer driver. Does not include the HDD.
•Printer Unit
Allows you to print by RPCS or PCL printer driver. Does not include the
HDD.
• Printer/Scanner Unit
Allows you to print by RPCS or PCL printer driver, and use the scanner function. The HDD is included.
• Printer Enhance Option
Allows you to print by PCL printer driver. The HDD is included.
• Scanner Enhance Option
Allows you to use the scanner function. Does not include the HDD.
• PostScript3 Unit
Allows you to print by Adobe Postscript printer driver and send PDF files directly to the machine. Does not include the HDD.
•Bluetooth
Allows you to expand the interface.
• File Format Converter
Allows you to download documents from the Document Server stored by
copier and printer functions. See “Downloading Stored Documents”,
Copy/Document Server Reference.
• IEEE 802.11b Wireless LAN Board
You can install a wireless LAN interface.
• IEEE 1284 Interface Board
Connects to an IEEE 1284 cable.
• User Account Enhance Unit
Allows you to increase the number of user codes.
• Copy Data Security Unit
If a document containing embedded text for unauthorized copy guard is copied, protected pages are grayed out in the copy.
• DataOverWriteSecurity Unit
Allows you to erase data on the hard disk.
14

Guide to Components
Note
❒ You cannot install two or more of the following options at the same time:
IEEE 802.11b wireless LAN board, IEEE 1284 Interface Board, Bluetooth, file
format converter.
❒ If the Copy Data Security Unit is installed in the machine, you can not use the
scanner and fax functions.
Reference
“Downloading Stored Documents”, Copy/Document Server Reference
1
15
1
Getting Started
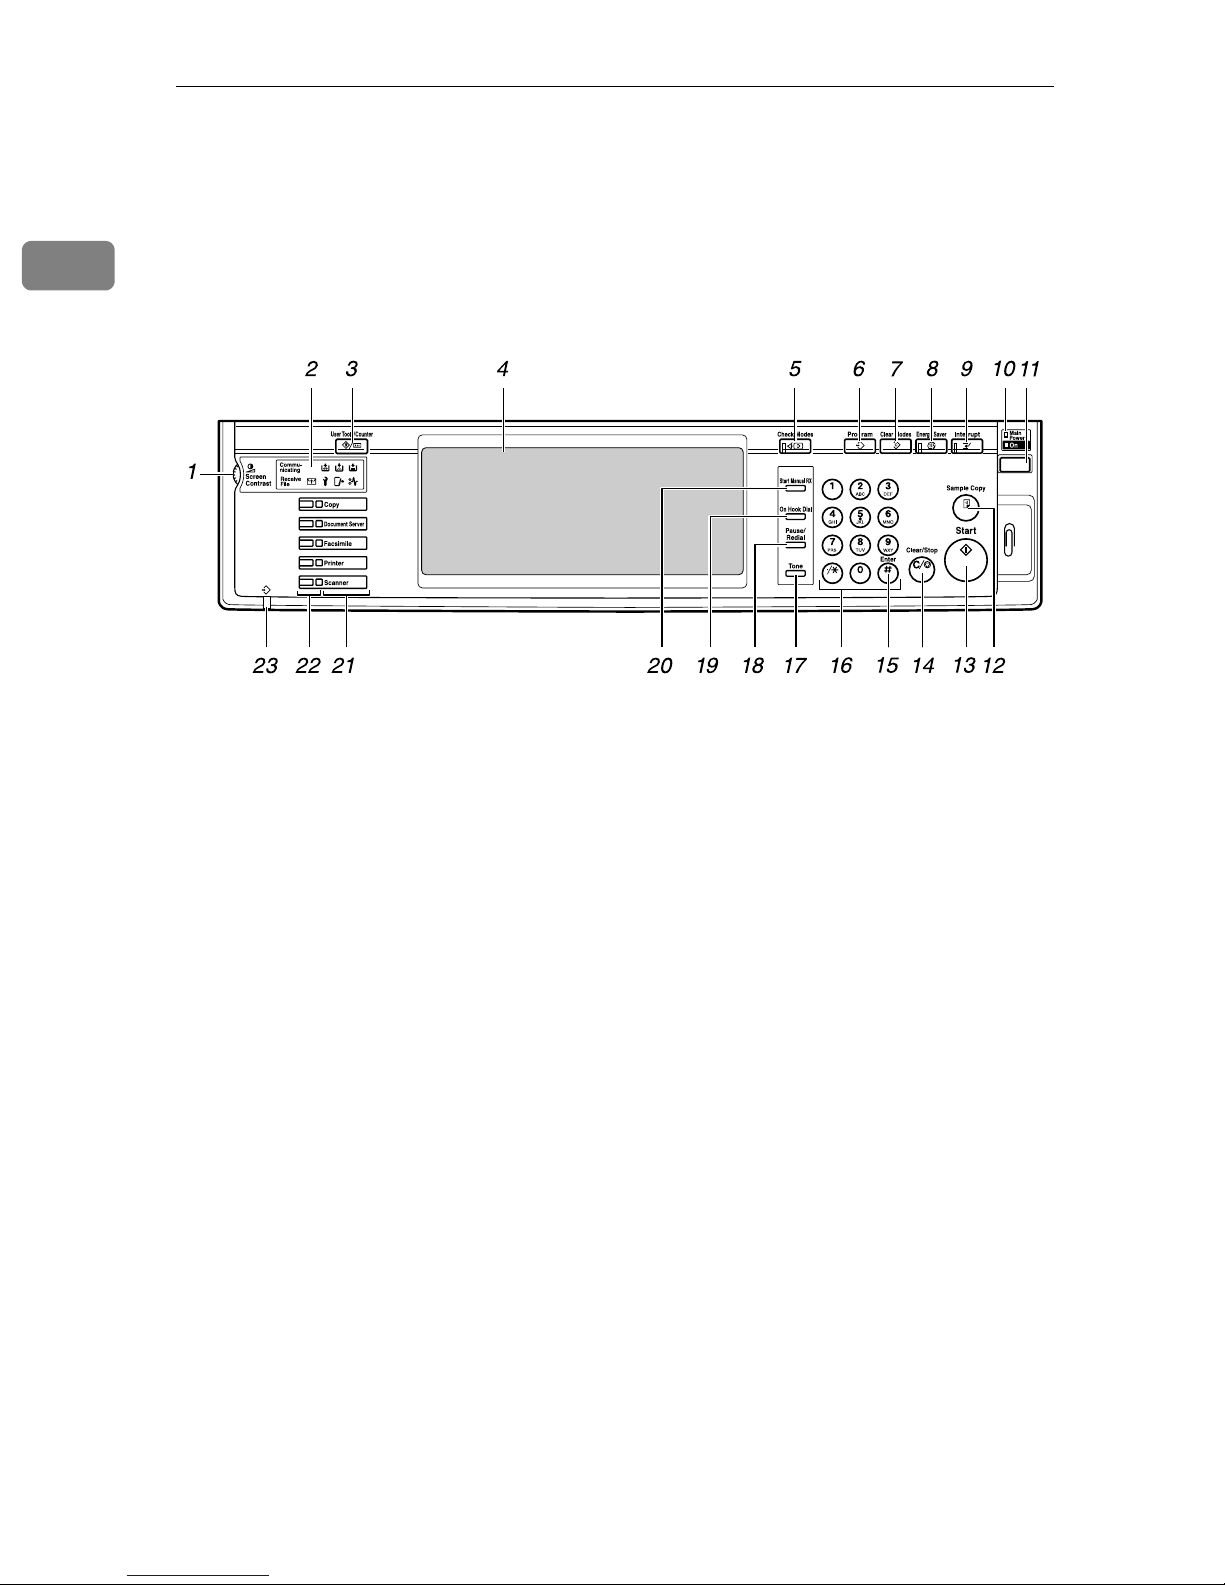
Control Panel
This section introduces the names and functions of the components on the control panel.
This illustration shows the control panel of a machine that has options fully installed.
1. Screen contrast knob
Adjusts the brightness of the display panel.
2. Indicators
Show errors and machine status.
• d : Add Staple indicator. See “Adding
Staples”, Troubleshooting.
• D : Add Toner indicator. See “Adding
Toner”, Troubleshooting.
• B : Load Paper indicator. See “Loading Paper”, Troubleshooting.
• L: Service Call indicator
• M : Open Cover indicator
• x : Misfeed indicator. See “Clearing
Misfeeds”, Troubleshooting.
•
Communicating: Communicating indicator.
Lights during transmission or reception.
• i: Confidential File indicator.
Lights when a document is received
into memory with Confidential Reception or Personal Box. See “Printing
a Confidential Document” and “Personal Boxes”, Facsimile Reference.
Blinks when a Memory Lock file is received into memory. See “Printing a
File Received with Memory Lock”,
Facsimile Reference.
ARS021S
• Receiving File: Receiving File indicator.
Lights when a document other than a
Confidential Reception or Memory
Lock file is received. See “Substitute
Reception”, Facsimile Reference.
Also lights when a document is received if the Reception Setting is set to
Store. See “Storing or Printing Received Documents”, General Settings
Guide.
3. {User Tools/Counter} key
•User Tools
Press to change the default settings
and conditions to meet your requirements. See “Accessing User Tools”,
General Settings Guide.
•Counter
Press to check or print the total number of copies made. See “Counter”,
General Settings Guide.
•Inquiry
Press to check where to contact for
machine repairs and ordering toner.
See “Inquiry”, General Settings
Guide.
4. Display panel
Shows the operation status, error messages, and function menus.
16

Control Panel
5. {Check Modes} key
Press to check settings.
6. {Program} key (copier/facsimi-
le/scanner mode)
Press to register frequently used settings,
or recall registered settings.
7. {Clear Modes} key
Press to clear previous copy job settings.
8. {Energy Saver} key
Press to shift to and from Low Power
mode. See “Saving Energy”.
9. {Interrupt} key (copier/scanner
mode)
Press to make interrupt copies during
copying or scanning. See “Interrupt
Copy”, Copy/Document Server Reference.
10. Main power indicator and On
indicator
The main power indicator goes on when
you turn on the main power switch.
The On indicator lights when the power
is on. Do not turn off the main power
switch while the power indicator is lit or
blinking. Doing so may damage the hard
disk.
11. Operation switch
Press this switch to turn the power on
(the On indicator lights up). To turn the
power off, press this switch again (the On
indicator goes off). See “Turning On the
Power”.
12. {Sample Copy} key
Press to make a single set of copies or
prints to check for print quality before
making multiple sets. See “Sample copy”,
Copy/Document Server Reference.
13. {Start} key
Press to start copying, or to scan or print
documents stored on the Document Server.
14. {Clear/Stop} key
•Clear
Press to delete a number entered.
•Stop
Press to stop a job in progress.
15. {q} key (Enter key)
Press to enter a numerical value.
16. Number keys
Use to enter the desired number of copies, fax numbers, or data for a selected
function.
17. {Tone} key (facsimile mode)
Press to send tonal signals down a pulse
dialing line. See “Entering a tone”, Facsimile Reference.
18. {Pause/Redial} key (facsimile
mode)
•Pause
Inserts a pause when you are dialing
or storing a fax number. A pause cannot be inserted as the first digit. See “Entering a pause”, Facsimile Reference.
• Redial
Press to redial one of the last ten numbers.
See “Redial”, Facsimile Reference.
19. {On Hook Dial} key (facsimile
mode)
Press to dial while listening to the speaker tone. See “On Hook Dial”, Facsimile
Reference.
20. {Start Manual RX} key (facsimile
mode)
Press when Manual Reception is set. See
“Manual Reception”, Facsimile Reference.
21. Function keys
Press to display the operation screen of
one of the following functions:
•Copy
• Document Server
• Facsimile
•Printer
• Scanner
The indicator of the selected function
goes on. See “Changing Modes”.
22. Function status indicators
These show the status of the above functions:
• Yellow: selected.
• Green: active.
• Red: interrupted.
1
17

Getting Started
1
23. m: Data In indicator (printer mode)
The Data In indicator shows the status of
data reception from a computer.
Reference
• This indicator blinks when data is being received.
• This indicator lights when there is data
remaining to be printed.
p.19 “Display Panel”
p.23 “Changing Modes”
p.25 “Turning On the Power”
p.28 “Saving Energy”
“Accessing User Tools”, General Settings Guide
“Counter”, General Settings Guide
“Inquiry”, General Settings Guide
“Storing or Printing Received Documents”, General Settings Guide
“Adding Staples”, Troubleshooting
“Adding Toner”, Troubleshooting
“Loading Paper”, Troubleshooting
“Clearing Misfeeds”, Troubleshooting
“Interrupt Copy”, Copy/Document Server Reference
“Sample copy”, Copy/Document Server Reference
“Printing a Confidential Document”, Facsimile Reference
“Personal Boxes”, Facsimile Reference
“Printing a File Received with Memory Lock”, Facsimile Reference
“Substitute Reception”, Facsimile Reference
“Entering a tone”, Facsimile Reference
“Entering a pause”, Facsimile Reference
“Redial”, Facsimile Reference
“On Hook Dial”, Facsimile Reference
“Manual Reception”, Facsimile Reference
18

Display Panel
Display Panel
The display panel shows machine status, error messages and function menus.
The function items displayed serve as selector keys. You can select or specify an
item by lightly pressing them.
When you select or specify an item on the display panel, it is highlighted like
. Keys appearing as cannot be used.
Important
❒ A force or impact of more than 30 N (about 3 kgf) will damage the display
panel.
By default the copying screen is displayed when you turn the power on.
The following display is of a machine with the options fully installed.
1
19

Getting Started
When the Authentication Screen is
Displayed
1
When Basic Authentication, Windows Authentication, LDAP Authentication, or
Integration Server Authentication is set, the Authentication Screen appears on
the screen. Unless a valid user name and password are entered, operations are
not possible with the machine.
Important
❒ Consult the User Administrator about your login user name and login pass-
word. For details of the various types of user authentication, consult the respective administrators.
❒ When User Code Authentication is set, the screen for entering a user code is
displayed instead.
Note
❒ “Authentication has failed.” appears if the authentication failed. Check the lo-
gin user name and login password.
User Code Authentication (Using the Control Panel)
When user authentication is set, the following screen appears:
Enter a user code (up to eight digits), and then press [q].
Note
❒ To log off, do one of the following:
• Press the Operation switch.
•Press the {User Tools/Counter} key.
•Press the {Energy Saver} key after jobs are completed.
20

When the Authentication Screen is Displayed
User Code Authentication (Using a Printer Driver)
When user authentication is set, specify the user code in the printer properties
of the printer driver. For details, see the printer driver Help.
Login (Using the Control Panel)
Follow the procedure below to log on when Basic Authentication, Windows Authentication, LDAP Authentication, or Integration Server Authentication is set.
A Press [Enter] for [Login User Name].
1
B Enter a login user name, and then press [OK].
C Press [Enter] for [Login Password].
D Enter a login password, and then press [OK].
E Press [Login].
When the user is authenticated, the screen for the function you are using appears.
Note
❒ “Authentication has failed.”appears if the authentication failed. Check the
login user name and login password.
❒ If user code authentication is enabled, a different screen appears. See “Au-
thentication Information”, General Settings Guide.
21

1
Getting Started
Log Off (Using the Control Panel)
Follow the procedure below to log off when Basic Authentication, Windows Authentication, LDAP Authentication, or Integration Server Authentication is set.
A Press the {User Tools/Counter} key.
B Press [Logout].
C Press [Yes].
D Press the {User Tools/Counter} key.
Login (Using a Printer Driver)
When Basic Authentication, Windows Authentication, LDAP Authentication, or
Integration Server Authentication is set, make encryption settings in the printer
properties of the printer driver, and then specify a login user name and password. For details, see the printer driver Help.
Note
❒ When logged on using a printer driver, you do not have to log off.
Login (Using Web Image Monitor)
This section explains how to log onto the machine via Web Image Monitor.
A Click [Login].
B Enter a login user name and password, and then click [OK].
Note
❒ For user code authentication, enter a user code in [User Name], and then
click [OK].
Log Off (Using Web Image Monitor)
A Click [Logout] to log off.
Note
❒ Delete the cache memory in the Web Image Monitor after logging off.
22

Changing Modes
Changing Modes
Note
❒ You cannot switch modes in any of the following situations:
• When scanning in a fax message for transmission
• During immediate transmission
• When accessing User Tools
• During interrupt copying
• During On hook dialing for fax transmission
• While scanning an original
❒ The copying screen is displayed as default after power on. You can change
this default setting. For the setting procedure, see “General Features”, General Settings Guide.
1
AHR037S
23

1
Getting Started
System Reset
The screen specified in “Function Priority” appears automatically or interrupt
copying is cancelled, after a certain period of time has elapsed. This function is
called “System Reset”. See “General Features”, General Settings Guide. You can
change the System Reset time. See “Timer Settings”, General Settings Guide.
24

Turning On the Power
This section discusses how to turn on/off the power.
Turning On the Power
❖ Power supply
This machine has two power switches: Operation switch and main power
switch.
• Operation switch (right side of the control panel)
Press to activate the machine. When the machine has finished warming up,
you can make copies.
• Main power switch (left side of the machine)
Turning off this switch makes the main power indicator on the right side
of the control panel go off. When this is done, machine power is completely
off.
When the fax unit (optional) is installed, fax files in memory may be lost if
you turn this switch off. Use this switch only when necessary.
Note
❒ This machine automatically enters Energy Saver mode or turns itself off if you
do not use it for a certain period. See “Timer Settings”, General Settings Guide.
Turning On the Main Power
Turn on the main power as follows:
1
A Make sure that the power cord is firmly plugged into the wall outlet.
B Open the switch cover, and then turn on the main power switch.
The main power indicator goes on.
ZFFH250E
Note
❒ Do not turn off the main power immediately after it has been turned on.
Otherwise it may result in damage to the hard disk or memory, leading to
the malfunctioning of the machine.
25

Getting Started
Turning On the Power
Turn on the power as follows:
1
A Press the operation switch.
The On indicator goes on.
Note
❒ If the power is not turned on when the operation switch is pressed, check
if the main power switch is on. If not, turn it on.
❒ When the message “
[Restart] after the current process. Make the settings again
after the machine has restarted.
tions and press [Restart] at the bottom right-hand corner of the screen after
the process is completed.
Functional problem within the machine. Press
” is displayed, follow the instruc-
Turning Off the Power
Turn off the power as follows:
A Make sure the exposure glass cover or the ADF is in the right position.
B Press the operation switch.
The On indicator goes off.
26

Turning On the Power
Note
❒ In the following cases, the indicator will not go off but will instead blink
when you press the operation switch:
• When the exposure glass cover or ADF is open.
• During communication with external equipment.
• When the hard disk is active.
• If a file is waiting to be transmitted within the next minute using the
“Send Later” facsimile function.
Turning Off the Main Power
Turn off the main power as follows:
Important
❒ Do not turn off the main power switch when the On indicator is lit or blink-
ing. Failure to observe this may result in damage to the hard disk or memory,
leading to malfunction.
1
❒ Be sure to pull out the power cord only after you have turned off the main
power switch. Not doing this may result in damage to the hard disk or memory.
A Make sure the On indicator is not lit.
B Open the switch cover, and then turn off the main power switch.
The main power indicator goes off.
Note
❒ When the main power switch is turned off while using the fax function,
waiting fax and print jobs may be canceled, and incoming fax documents
not received. If you have to turn off this switch for some reason, make sure
100% is shown as available memory on the screen before turning off the
main power switch or unplugging the power cord. Fax files in memory are
deleted an hour after you turn off the main power switch or unplug the
power cord.
Reference
“Turning Off the Main Power / In the Event of Power Failure”, Troubleshooting
27

Getting Started
Saving Energy
This machine has the following two energy saving functions.
1
❖ Energy Saver
If you do not use the machine for a certain period after an operation, or when
you press the {Energy Saver} key, the display disappears and the machine
goes into Energy Saver mode. When you press the {Energy Saver} key again,
the machine returns to the ready condition. The machine uses less electricity
in Energy Saver mode.
You can change the amount of time the machine waits before switching to Energy Saver mode after copying has finished or the last operation is performed.
See “Timer Settings”, General Settings Guide.
❖ Auto Off
The machine automatically turns itself off when the job is finished, after a certain period of time has elapsed without any operation. This function is called
“Auto Off”.
You can change the Auto Off time. See “Timer Settings”, General Settings Guide.
Note
❒ The Auto Off Timer function will not operate in the following cases:
• When a warning message appears
• When the service call message appears
• When paper is jammed
• When the cover is open
• When the “Add Toner” message appears
• When toner is being replenished
• When the User Tools/Counter screen is displayed
• When fixed warm-up is in progress
• When the facsimile, printer, or other functions are active
• When operations were suspended during printing
• When the handset is in use
• When the On-hook dialing function is in use
• When a recipient is being registered in the address list or group dial list
• When the Data In indicator is on or blinking
• When the screen of stored document under the printer function is displayed
Reference
“Timer Settings”, General Settings Guide
28
2. Entering Text
This section describes how to enter characters.
Entering Text
When you enter a character, it is shown at the position of the cursor. If there is a
character already at the cursor position, the entered character is shown before
that character.
Available Characters
You can enter the following characters:
• Alphabetic characters
ABCDEFGHIJKLMNOPQRSTUVWXYZabcdefghijklmnopqrstuvwxyz
•Symbols
•Numerals
0123456789
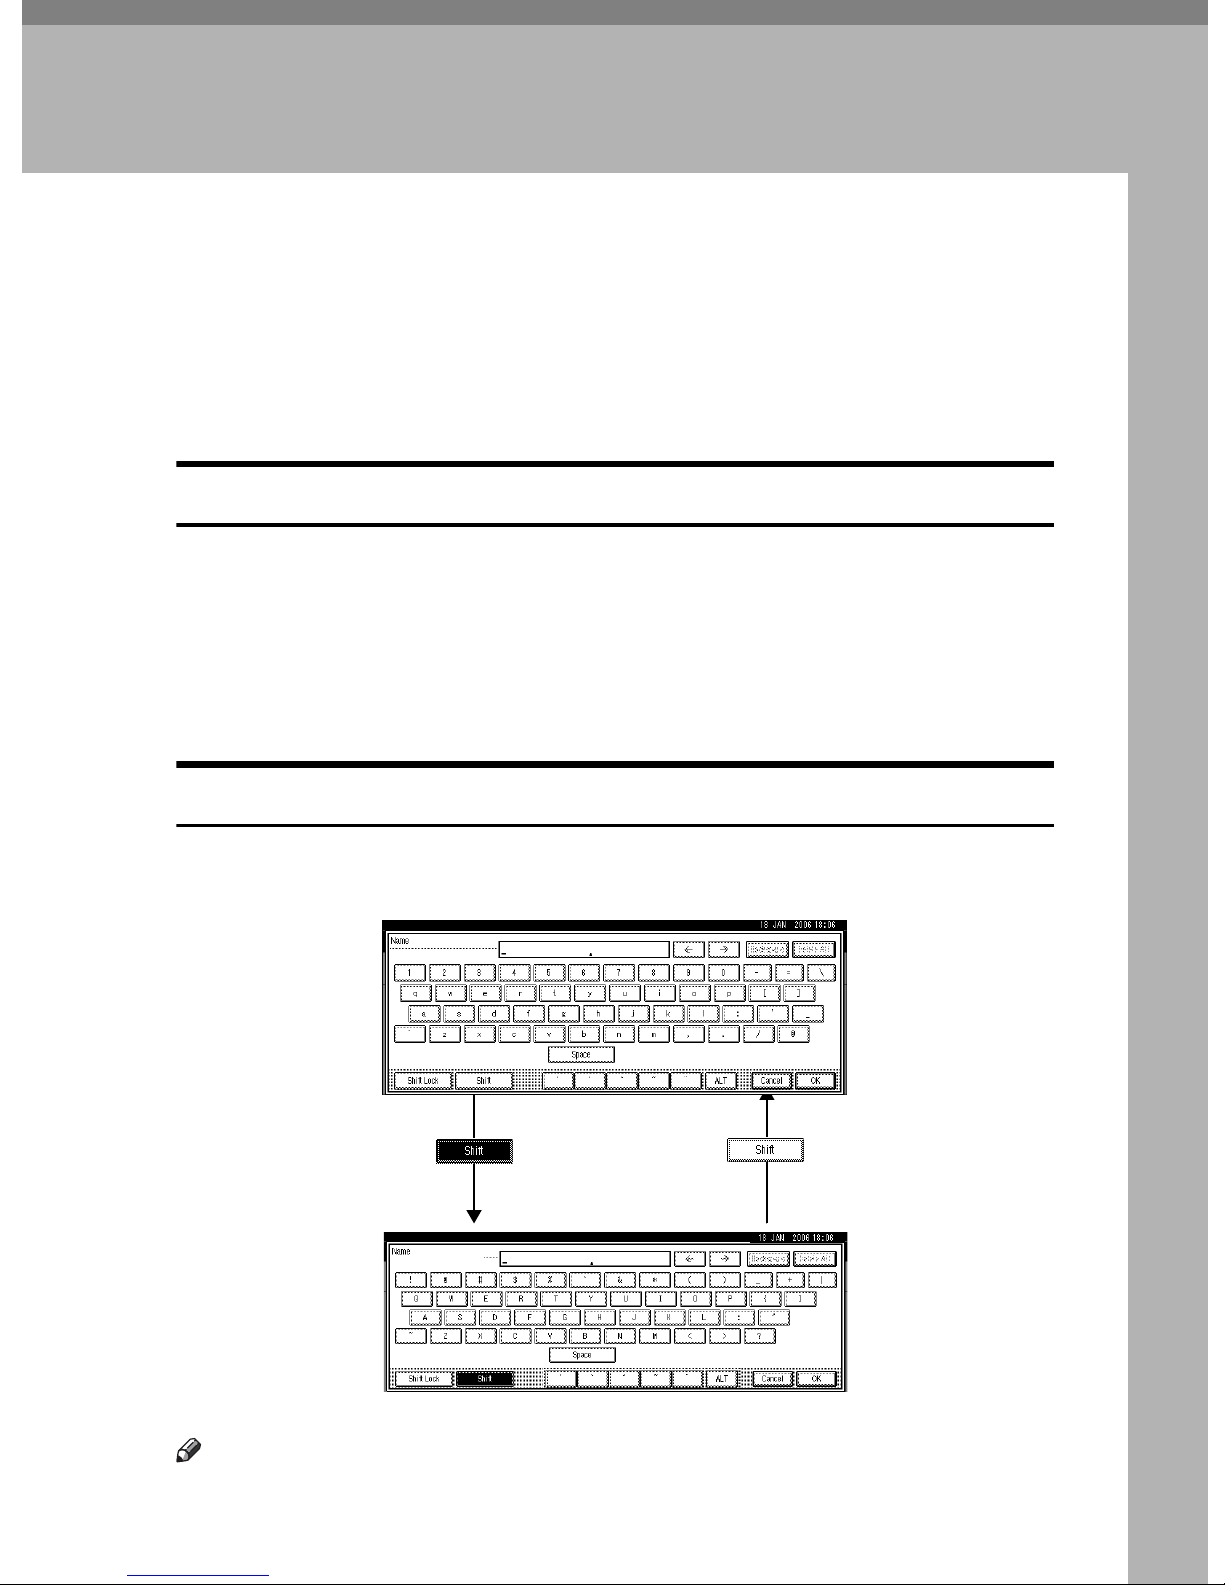
Keys
You can change the entry screen using the keys below.
Note
❒ When entering uppercase or lowercase letters continuously, use [Shift Lock] to
lock the case.
AHR039S
29

Entering Text
How to Enter Text
You can enter text as described below.
Entering characters
2
A Press [Shift] to switch between uppercase and lowercase.
B Press the letters you want to enter.
Deleting characters
A Press [Backspace] or [Delete All] to delete characters.
30

3. Appendix
R
R
This section describes Dos and Don'ts, and copy paper.
Dos and Don'ts
The following information should be kept in mind during use of this machine.
WARNING:
• Keep the machine away from flammable liquids, gases, and aerosols.
A fire or an electric shock might occur.
CAUTION:
• Unplug the power cord from the wall outlet before you move the machine.
While moving the machine, you should take care that the power cord will not
be damaged under the machine.
• Do not turn off the main power switch while the On indicator is lit or blinking. This may cause damage to the hard disk or memory.
• Do not touch areas on or around the fusing unit. These areas get hot.
• After scanning originals continuously, the exposure glass may become
warm—this is not a malfunction.
• When you use this machine for a long time in a confined space without good
ventilation, you may detect an odd smell. To keep the workplace comfortable,
we recommend that you keep it well ventilated.
• The area around the ventilation hole may become warm. This is caused by exhaust air and is not a malfunction.
• When the machine is not in use and in stand-by mode, you may hear a small
noise inside. This is caused by the image stabilization process and is not a
malfunction.
• Do not turn off the power when the machine is in operation.
• The machine might fail to produce good copy images if condensation forms
inside due to rapid temperature change.
• Do not open the covers of the machine when it is in operation. If you do, misfeeds might occur.
• Do not move the machine when the power is on.
• If you operate the machine improperly or a failure occurs, settings might be
lost. Be sure to make a note of your machine settings.
• The supplier shall not be liable for any loss or damage resulting from a failure
of the machine, loss of settings, or use of the machine.
Reference
p.26 “Turning Off the Power”
p.27 “Turning Off the Main Power”
31

3
Appendix
Software and Utilities Included on the CDROM
The CD-ROMs provided are specific to machine types. One or more of the following CD-ROMs are provided with this machine: “Printer Drivers and Utilities”, “Scanner Driver/Font Manager and Utilities”, “Scanner Driver and
Utilities”, “Font Manager 2000”, and “Manuals”. In “Manuals”, manuals are
stored in PDF format and HTML-format.
The following are included on the separate CD-ROMs:
❖ Font Manager 2000
For installing new screen fonts, or organizing and managing fonts already in
the system. For details about Font Manager 2000, see the manual on the CDROM labeled “Scanner Driver/Font Manager and Utilities” or “Font Manager 2000”.
❖ SmartDeviceMonitor for Admin
For the system administrator to manage network printers.
❖ DeskTopBinder-SmartDeviceMonitor for Client
For users to manage their network print status.
❖ Printer Utility for Mac
This utility allows users to download and manage a variety of fonts as well as
manage printers. For details about this utility, see PostScript3 Supplement.
Note
❒ Documentation about using the machine is included on the CD-ROM in PDF
format. For details about using Acrobat Reader, see Acrobat Reader online
Help.
Reference
SmartDeviceMonitor for Admin Help
DeskTopBinder-SmartDeviceMonitor for Client Help
Acrobat Reader online Help
Viewing the contents of the CD-ROM
Follow the procedure below to view the contents of the CD-ROMs.
A Insert the CD-ROM into the CD-ROM drive.
The installer starts.
B Click [Browse This CD-ROM].
Explorer starts and displays the contents of the CD-ROM.
32

Software and Utilities Included on the CD-ROM
Printer Drivers for This Machine
Printing requires installation of a printer driver for your operating system. The
following drivers are included on the CD-ROM labeled “Printer Drivers and
Utilities”.
Printer Language PCL 6 PCL 5e RPCS PostScript 3
Windows 95
Windows 98
Windows Me
Windows 2000
Windows XP
Windows Server 2003
Mac OS
Mac OS X
*1
Microsoft Windows 95 operating system
*2
Microsoft Windows 98 operating system
*3
Microsoft Windows Millennium Edition
*4
Microsoft Windows 2000 Advanced Server
*1
*2
*3
*4
*5
*7
*8
OK OK OK OK
OK OK OK OK
OK OK OK OK
OK OK OK OK
OK OK OK OK
*6
OK OK OK OK
––– OK
––– OK
Microsoft Windows 2000 Server
Microsoft Windows 2000 Professional
*5
Microsoft Windows XP Professional
Microsoft Windows XP Home Edition
*6
Microsoft Windows Server 2003 Standard Edition
Microsoft Windows Server 2003 Enterprise Edition
*7
Versions 8.6 to 9.2 of the Mac OS (Mac OS X Classic mode is supported.)
*8
Mac OS X 10.1 or later (Native mode)
3
❖ PCL printer drivers
Two kinds of PCL printer driver (PCL 5e and PCL 6) are included on the CDROM that comes with this machine. These drivers allow your computer to
communicate with this machine via a printer language. To use these drivers,
the Printer Unit, the Printer/Scanner Unit, or the Printer Enhance Option is
required.
❖ RPCS printer driver
This printer driver allows the computer to communicate with the printer using a printer language. In addition to the conventional user interface, another
preset user interface is provided.
❖ Adobe PostScript Printer Drivers and PPD files
Adobe PostScript printer drivers and the PPD files are included on the CDROM provided with this machine. Adobe PostScript printer drivers allow the
computer to communicate with the printer using a printer language. PPD
files allow the printer driver to enable specific printer functions. These drivers
require the PostScript3 Unit.
33

3
Appendix
❖ PPD files
PPD files are included on the CD-ROM provided with this machine. PPD files
allow the printer driver to enable specific printer functions.
Note
❒ Some applications may require installation of the PCL 5e printer driver. In
this case, you can install PCL 5e without having to install PCL6.
Reference
“Preparing the Machine”, Printer Reference
PostScript 3 Supplement
TWAIN Driver
This section describes the file path to and system requirements of the TWAIN
driver.
This driver is required to scan an original using a scanner. To use the machine
as a network TWAIN scanner, this driver must be installed.
❖ File path
The TWAIN driver is stored in the following folder on the CD-ROM labeled
“Scanner Driver/Font Manager and Utilities” or “Scanner Driver and Utilities”:
\DRIVERS\TWAIN
❖ System requirements
•Hardware
PC/AT-compatible machines that support the following operating system
properly
Under Windows NT with RISC-based processors (MIPS R series, Alpha
AXP, or PowerPC), this driver is not supported.
• Operating system
Microsoft Windows 95/98/Me
Microsoft Windows 2000/XP
Microsoft Windows NT 4.0
Microsoft Windows Server 2003
• Display resolution
800 × 600 pixels, 256 colors or higher
34

Software and Utilities Included on the CD-ROM
LAN-Fax Driver
This driver allows you to use LAN-Fax functions.
❖ File path
LAN-Fax Driver is stored in the following folder on the CD-ROM labeled
“Printer Drivers and Utilities”:
• LAN-Fax Driver for Windows 98/Me
\DRIVERS\LAN-FAX\WIN9X_ME
• LAN-Fax Driver for Windows
2000/XP and Windows Server 2003
\DRIVERS\LAN-FAX\WIN2K_XP
❖ System requirements
•Hardware
PC/AT-compatible
• Operating systems
Microsoft Windows 98/Me
Microsoft Windows 2000/XP
Microsoft Windows Server 2003
3
•Display
VGA 640×480 pixels or more
Note
❒ Before beginning installation, exit all other applications.
35

3
Appendix
DeskTopBinder Lite
This section explains the file path and system requirements of DeskTopBinder
Lite.
DeskTopBinder is to be installed on the client computers for integration and
management of various kinds of files such as scan files, files created with applications, and existing scan files. This software allows you to use various functions
for stored scan files such as viewing stored files. Also, with the ScanRouter delivery software, you can view the files stored in in-trays of the delivery server or
use other functions for stored files.
For details about the software installed with DeskTopBinder Lite, see “DeskTopBinder Lite”, Scanner Reference.
❖ File path
DeskTopBinder Lite is stored in the following folder on the CD-ROM labeled
“Scanner Driver/Font Manager and Utilities” or “Scanner Driver and Utilities”:
\UTILITY\DESKV2
❖ System requirements
•Hardware
PC/AT-compatible machines that support the operating system properly
• Operating system
When installing all functions of DeskTopBinder.
Microsoft Windows 98SE/Me/2000 Professional SP1 or later/2000 Server SP1
or later/2000 Advanced Server SP1 or later/XP Professional/XP Home Edition
When installing only SmartDeviceMonitor for Client
Microsoft Windows 95 SP1/98/98SE/Me/2000 Professional SP1 or later/
2000 Server SP1 or later/XP Professional/XP Home Edition
Microsoft Windows Server 2003 Standard Edition/Enterprise Edition
Microsoft Windows NT 4.0 SP5 or later
Reference
Scanner Reference
36

Software and Utilities Included on the CD-ROM
SmartDeviceMonitor for Admin
SmartDeviceMonitor for Admin is an application that uses TCP/IP and
IPX/SPX to monitor network printers. It can monitor multiple network printers
using their IPv4 addresses. We recommend that network administrators use this
application.
❖ File path
SmartDeviceMonitor for Admin is stored in the following folder on the CDROM labeled “Printer Drivers and Utilities”:
NETWORK\DEVMON\ADMIN\DISK1
Operating system Protocol stack
Windows 95 / 98 / Me TCP/IP provided with Windows 95 / 98 / Me
IPX/SPX provided with Windows 95 / 98 / Me
NetWare Client provided with Windows 95 / 98
Novell Client provided with Windows 95 / 98
Windows 2000 TCP/IP provided with Windows 2000
IPX/SPX provided with Windows 2000
NetWare Client provided with Windows 2000
Novell Client provided with Windows 2000 or Windows NT
Windows XP TCP/IP provided with Windows XP
IPX/SPX provided with Windows XP
NetWare Client provided with Windows XP
Novell Client provided with Windows XP
Windows Server 2003 TCP/IP provided with Windows Server 2003
IPX/SPX provided with Windows Server 2003
NetWare Client provided with Windows Server 2003
Novell Client provided with Windows Server 2003
3
Windows NT 4.0 TCP/IP provided with Windows NT
❖ Available functions
SmartDeviceMonitor for Admin has the functions to check the followings:
• printer supplies such as paper or toner;
• results of print jobs executed from the computer.
Reference
Network Guide
SmartDeviceMonitor for Admin Help
IPX/SPX provided with Windows NT
Client Service for NetWare provided with Windows NT
Novell Client provided with Windows 2000 or Windows NT
37

Appendix
DeskTopBinder-SmartDeviceMonitor for Client
DeskTopBinder-SmartDeviceMonitor for Client allows you to manage and print
various data such as files created with an application, images scanned with a
scanner, and existing images as one document.
❖ File path
DeskTopBinder-SmartDeviceMonitor for Client is stored in the following
folder on the CD-ROM labeled “Printer Drivers and Utilities”:
NETWORK\DEVMON\CLIENT\DISK1
3
❖ System requirements
•Hardware
PC/AT-compatible
• Operating systems
Microsoft Windows 98SE/Me
Microsoft Windows 2000/XP
Microsoft Windows Server 2003
Microsoft Windows NT 4.0
Note
❒ See “DeskTopBinder Lite”, Scanner Reference or Help of DeskTopBinder-
SmartDeviceMonitor for Client.
❒ DeskTopBinder includes SmartDeviceMonitor for Client. See Help of Desk-
TopBinder-SmartDeviceMonitor for Client.
38

Installing the Operating Instructions
Installing the Operating Instructions
The supplied “Manuals” CD-ROM contains HTML-format manuals. Install the
manuals you want to read.
Important
❒ The system requirements for installing the manuals are as follows:
• Operating System: Windows 95/98/Me, Windows 2000/XP, Windows
Server 2003, or Windows NT4.0
• Minimum Display Resolution: 800×600 pixels
❒ Recommended Browser:
• Microsoft Internet Explorer 4.01 SP2 or later
• Netscape 6.2 or later
❒ A simplified manual is displayed if you are using Internet Explorer 3.02 or
Netscape Navigator 4.05 or later versions.
❒ HTML manuals can also be viewed on a Macintosh.
3
A Click [Install manuals].
B Install the manual you require according to the displayed instructions.
C When installation is complete, click [Finish].
D Click [Finish].
Note
❒ If you cannot install a manual, copy the “Manual” folder to your comput-
er’s hard drive, and then run “Setup.exe”.
❒ To delete an installed manual, on the [Start] menu, click [Programs], then
[Product Name], and then uninstall the data.
39

3
Appendix
PDF Manuals
The supplied CD-ROM contains PDF versions of the HTML user manuals.
❖ File path
The PDF manuals are in the following folders on the CD-ROM:
• About This Machine
PDF MANUAL\US_ENG\INTRO
• General Settings Guide
PDF MANUAL\US_ENG\USERTOOL
•Troubleshooting
PDF MANUAL\US_ENG\TROUBLE
•Copy/Document Server Reference
PDF MANUAL\US_ENG\COPY
• Facsimile Reference
PDF MANUAL\US_ENG\FAX
•Printer Reference
PDF MANUAL\US_ENG\PRINTER
• Scanner Reference
PDF MANUAL\US_ENG\SCANNER
• Network Guide
PDF MANUAL\US_ENG\NETWORK
• PostScript3 Supplement
PDF MANUAL\US_ENG\PS3
Note
❒ To view the PDF manuals, you need to have Adobe Acrobat or Adobe Reader
installed on your computer.
40

Opening the Installed Operating Instructions
Opening the Installed Operating
Instructions
This section explains how to open installed manuals.
3
Opening from the Icon
This section explains how to open a manual using its desktop icon.
A Double-click the icon on your desktop.
The browser opens, and then the manual appears.
Opening from the [Start] Menu
This section explains how to open a manual from the [Start] menu.
A On the [Start] menu, point to [Programs] (Windows XP: [All Programs]), then
[Product Name], and then click the manual you want to view.
The browser opens, and then the manual appears.
Note
❒ Depending on the settings made during installation, folder names may differ.
41

3
Appendix
Opening from the CD-ROM
This section explains how to open a manual from a supplied CD-ROM.
A Click [Read manuals].
B Click the title of the manual you want to view.
The browser opens, and then the manual appears.
42

Specifications for the Main Unit
This section describes specifications for the main unit.
❖ Configuration:
Desktop
❖ Photosensitivity type:
OPC drum ( 30)
Specifications for the Main Unit
❖ Original scanning:
One-dimensional solid scanning system through CCD
❖ Copy process:
Dry electrostatic transfer system
❖ Development:
Dry two-component magnetic brush development system
❖ Fusing:
Heating roll pressure system
❖ Resolution:
600 dpi
❖ Exposure glass:
Stationary original exposure type
❖ Original reference position:
Rear left corner
❖ Warm-up time:
3
• Main power switch: 15 seconds or less (20 °C, 68 °F)
• Operation switch: 10 seconds or less (20 °C, 68 °F)
❖ Originals:
Sheet/book/objects
❖ Maximum original size:
A3L, 11"×17"L
43

3
Appendix
❖ Copy paper size:
•Tray 1: A3L-A5L, 11" × 17"L-51/2" × 81/2"L
1
•Tray 2: A3L-A6L, 11" × 17"L-5
•Bypass:A3L-A6L, 11" × 17"L-5
/2" × 81/2"L
1
/2" × 81/2"L
• Tray 2 (custom size):
Vertical: 100 – 297 mm, 4.0" – 11.7"
Horizontal: 148 – 432 mm, 5.9" – 17.0"
• Bypass (custom size):
Vertical: 90 – 297 mm, 3.6" – 11.7"
Horizontal: 148 – 600 mm, 5.9" – 23.6"
•Duplex: A3L – A5L, 11" × 17"L – 5
1
5
/2" × 81/2" K)
1
•LCT: A4K, 8
/2"×11"K
1
/2" × 81/2"L (impossible on A5K,
❖ Paper weight:
• Paper Tray 1: 60-90g/m2, 16-24lb.
• Paper Tray 2: 52-157g/m
• Bypass: 52-157g/m
2
2
, 14-42lb.
, 14-42lb.
❖ Non-reproduction area:
• Leading edge: 3 ± 2 mm or less, 0.12" ± 0.08" or less
• Trailing edge: 0.5 mm or more, 0.02" or more
• Left edge: 2 ± 1.5 mm or less, 0.08" ± 0.06" or less
• Right edge: 2 + 2.5/-1.5 mm or less, 0.08" + 0.1"/-0.06" or less
❖ First copy time:
Type 1, 2: 4.5 seconds or less
(A4K, 8
1
/2" × 11"K, 100%, feeding from the tray 1, on the exposure glass,
Text mode, Auto Image Density)
❖ Copying speed: (Type 1)
• 15 copies/minute (A3L, 11"×17"L)
• 17 copies/minute (B4JISL)
1
• 25 copies/minute (A4K, 8
/2"×11"K)
❖ Copying speed: (Type 2)
• 17 copies/minute (A3L, 11"×17"L)
• 20 copies/minute (B4JISL)
1
• 30 copies/minute (A4K, 8
/2"×11"K)
44
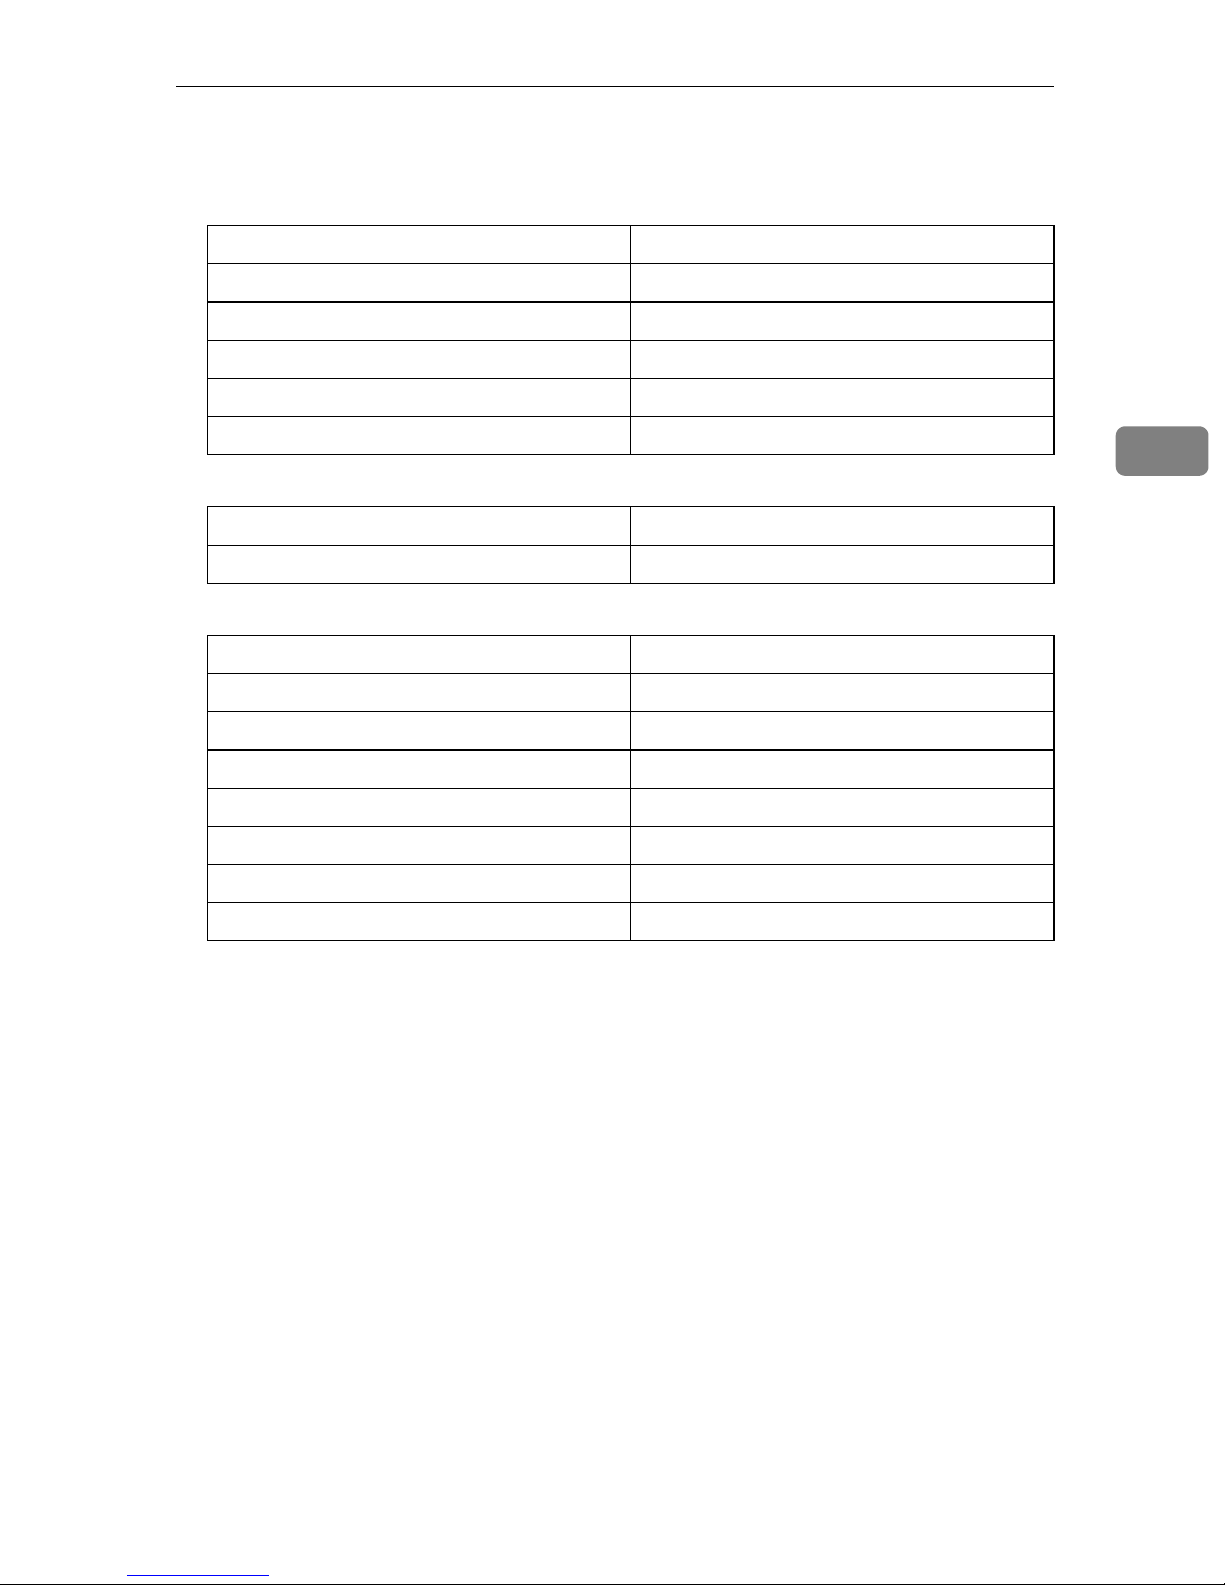
❖ Reproduction ratio:
Preset reproduction ratios:
Enlargement:
Metric version Inch version
400% 400%
200% 200%
141% 155%
122% 129%
115% 121%
Full size:
Metric version Inch version
100% 100%
Reduction:
Metric version Inch version
Specifications for the Main Unit
3
93% 93%
82% 85%
75% 78%
71% 73%
65% 65%
50% 50%
25% 25%
Zoom: From 25 to 400% in 1% steps (from 25 to 200% in 1% step, when setting
originals in the ADF).
❖ Maximum continuous copy run:
999 sheets
❖ Paper capacity:
• Tray1, 2: 500 sheets (80g/m2, 20lb.)
• Bypass tray: 100 sheets (80g/m
2
, 20lb.)
45

Appendix
❖ Power consumption:
Main unit only:
Type 1 Type 2
Warm-up 1.27 KW 1.27 KW
Stand-by about 150 W about 160 W
During printing about 690 W about 790 W
Maximum 1.17 KW 1.17 KW
Complete system:
3
Type 1 Type 2
Warm-up 1.34 KW 1.34 KW
Stand-by about 160 W about 170 W
During printing about 750 W about 840 W
Maximum 1.28 KW 1.28 KW
The main unit does not include the bypass tray, duplex unit, and interchange
unit.
The Complete system consists of the main unit, 1000-sheet finisher, duplex
unit, ADF, bypass tray, interchange unit, internal tray 2, paper tray unit, fax
unit, expansion memory, printer unit, File Format Converter, IEEE 1284 Interface Board, HDD and memory unit.
The measurements are actual values.
❖ Dimensions (W × D × H up to exposure glass):
Type 1, 2: 550 × 604 × 980 mm, 21.7" × 23.8" ×38.6 "
(Bypass tray, duplex unit, and interchange unit are not included.)
❖ Space for main unit (W × D):
Type 1, 2: 550 × 604 mm, 21.7" × 23.8"
46

❖ Noise emission:
• Sound power level
Main unit only:
Type 1 Type 2
Stand-by 40 dB (A) 40 dB (A)
Copying 63 dB (A) 63 dB (A)
Complete system:
Type 1 Type 2
Specifications for the Main Unit
Stand-by 44 dB (A) 44 dB (A)
Copying 68.5 dB (A) 69 dB (A)
• Sound pressure level
Main unit only:
Type 1 Type 2
Stand-by 34 dB (A) 34 dB (A)
Copying 57 dB (A) 57 dB (A)
Complete system:
Type 1 Type 2
Stand-by 38 dB (A) 38 dB (A)
Copying 61 dB (A) 61 dB (A)
• Sound power level and sound pressure level are actual values measured in
accordance with ISO 7779.
Sound power level and sound pressure level are measured from the position of the bystander.
The main unit does not include the bypass tray, duplex unit, and interchange unit.
The Complete System consists of the main unit, ADF, 1000-sheet finisher,
duplex unit, internal tray 2 and paper tray unit.
3
❖ Weight:
Type 1, 2: Approx. 62 kg, 136.7 lb.
(Bypass tray, duplex unit, and interchange unit are not included.)
❖ HDD:
20 GB or more
• Capacity for Document Server
3.6 GB
• Capacity for memory sorting
3.2 GB
• Capacity for others
1.32 GB or more
47

3
Appendix
Specifications for Options
This section describes specifications for options.
Specifications are subject to change without notice.
❖ Exposure Glass Cover
Lower this over originals for copying.
❖ Auto Document Feeder
Lower this over originals for copying.
•Mode:
ADF mode, Batch mode, SADF mode, Mixed Size mode, Custom Size originals mode
•Original size:
A3L - A5KL
11" × 17"L – 5
1
/2" × 81/2"KL
• Original weight:
One-sided originals: 40 – 128 g/m
Two-sided originals: 52 – 105 g/m
• Maximum number of originals:
50 sheets (80 g/m
2
, 20 lb.) or less than 11 mm, 0.43"
• Maximum power consumption:
Less than 50 W (power is supplied from the main unit)
• Dimensions (W×D×H):
550 × 470 × 130 mm, 21.7" × 18.6" × 5.2"
•Weight:
Approx. 10 kg, 22.1 lb.
❖ 500-Sheet Finisher
• Paper size:
A3L, B4 JISL, A4KL, B5 JISK, 11" × 17"L, 11" × 14"L, 8
1
8
/2" × 11"KL, 81/2" × 13"L, 8" × 101/2"K
•Paper weight:
60 – 128 g/m
2
, 16 – 34 lb.
• Stack capacity:
500 sheets (A4K, 8
250 sheets (B4 JISL, 8
1
/2" × 11"K or smaller) (80 g/m2, 20 lb.)
1
/2" × 14"L or larger) (80 g/m2, 20 lb.)
2
(11 – 34 lb.)
2
(14 – 28 lb.) (Duplex)
1
/2" × 14"L,
• Staple capacity:
30 sheets (A4K, 8
20 sheets (B4 JISL, 8
• Staple paper size:
A3L, B4 JISL, A4KL, B5 JISK, 11" × 17"L, 11" × 15"L, 11" × 14"L,
10" × 14"L, 10" × 15"L, 8
8" × 10
1
/2"K, 8" × 10"K, 101/2" × 71/4"K
48
1
/2" × 11"K or smaller) (80 g/m2, 20 lb.)
1
/2" × 14"L or larger) (80 g/m2, 20 lb.)
1
/2" × 14"L, 81/2" × 13"L, 81/2" × 11"KL,

Specifications for Options
• Staple paper weight:
2
64 – 90 g/m
, 17 – 24 lb.
• Staple position
1 position (upper left)
• Power consumption:
48 W (power is supplied from the main unit)
• Dimensions (W×D×H)
350 × 490 × 230 mm, 13.8" × 19.3" × 9.1"
•Weight:
Approx. 10 kg, 22.1 lb.
❖ 1000-Sheet Finisher
Finisher Upper Tray:
• Paper size:
A3L, B4 JISL, A4KL, B5 JISKL, A5KL, B6 JISL, A6L, PostcardL,
11" × 17"L, 11" × 15"L, 11" × 14"L, 10" × 14"L, 10" × 15"L, 8
1
/2" × 11"KL, 101/2" × 71/4"KL, 8" × 13"L, 81/2" × 13"L, 81/4" × 13"L,
8
8" × 10
1
/2"KL, 8" × 10"KL, 81/4" × 14"L, 51/2" × 81/2"KL
•Paper weight:
60 – 157 g/m
2
, 16 – 42 lb.
1
/2" × 14"L,
3
• Stack capacity:
250 sheets (A4K, 8
50 sheets (B4 JISL, 8
1
/2" × 11"K or smaller) (80 g/m2, 20 lb.)
1
/2" × 14"L or larger) (80 g/m2, 20 lb.)
Finisher Shift Tray:
• Paper size:
1
A3L, B4 JISL, A4KL, B5 JISKL, 11" × 17"L, 11" × 14"L, 8
1
8
/2" × 11"KL, 101/2" × 71/4"L, 8" × 101/2"KL, 8" × 13L, 81/2" × 13"L,
1
8
/4" × 13"L, 81/4" × 14"L, 51/2" × 81/2" KL
/2" × 14"L,
•Paper weight:
60 – 157 g/m
2
, 16 – 42 lb.
• Stack capacity:
1,000 sheets (A4K, 8
500 sheets (B4 JISL, 8
1
/2" × 11"K or smaller) (80 g/m2, 20 lb.)
1
/2" × 14"L or larger) (80 g/m2, 20 lb.)
• Staple capacity:
50 sheets (A4K, 8
30 sheets (B4 JISL, 8
1
/2" × 11"K or smaller) (80 g/m2, 20 lb.)
1
/2" × 14"L or larger) (80 g/m2, 20 lb.)
• Staple paper size:
A3L, B4 JISL, A4KL, B5 JISKL, 11" × 17"L, 11" × 15"L, 11" × 14"L,
10" × 14"L, 10" × 15"L, 8
8" × 13"L, 8
1
/4" × 14"L
8
1
/2" × 13"L, 81/4" × 13"L, 8" × 101/2"KL, 8" × 10"KL,
1
/2" × 14"L, 81/2" × 11"KL, 101/2" × 71/4"KL,
• Staple paper weight:
64 – 90 g/m
2
, 17 – 24 lb.
49

Appendix
• Staple position
1 staple – 2 positions
2 staples – 2 positions
• Power consumption:
Less than 50 W (power is supplied from the main unit)
• Dimensions (W×D×H)
527 × 520 × 790 mm, 20.8" × 20.5" × 31.1"
•Weight:
Approx. 25 kg, 55.2 lb.
3
❖ Shift Sort Tray
• Paper capacity:
250 sheets (A4K, 8
1
/2" × 11"K or smaller) (80 g/m2, 20 lb.)
125 sheets (B4 JISL, 8
• Power consumption:
3.6 W (power is supplied from the main unit)
• Dimensions (W × D × H)
430 × 372 × 148 mm, 17" × 15" × 6"
•Weight:
Approx. 1.6 kg, 3.5 lb.
❖ Duplex Unit
• Paper size:
A3L, B4 JISL, A4KL, B5 JISKL, A5L, 5
1
/4" × 10 1/2"KL, 8" × 10"KL, 8 1/2" × 11"KL, 8" × 13"L, 8 1/2" × 13"L,
7
1
8
/2" × 14"L, 8 1/4" × 13"L, 11" × 17"L
•Paper weight:
2
64 – 90 g/m
, 20 – 24 lb.
• Power consumption (Max):
35 W (power is supplied from the main unit)
1
/2" × 14" or larger) (80 g/m2, 20 lb.)
1
/2" × 8 1/2"L,
• Dimensions (W × D × H):
90 × 495 × 455 mm, 3.6" × 19.5" × 17.9"
•Weight:
Approx. 6 kg, 13.3 lb.
50

❖ Bypass Tray
Specifications for Options
• Paper size:
Standard size: A3L – A6L, 11" × 17"L – 5
Custom size: Vertical (90 – 297 mm, 3.6" – 11.7"), Horizontal (148 – 600 mm,
5.9" – 23.6")
•Paper weight:
52 – 157 g/m
2
, 14 – 42 lb.
• Paper capacity:
52 – 90 g/m
2
, 16 – 20 lb: 100 sheets
• Dimensions (W × D × H):
296 × 495 × 163 mm, 11.7" × 19.5" × 6.5"
•Weight:
Approx. 2.5 kg, 5.6 lb.
❖ Bridge Unit
• Dimensions:
413 × 435 × 126 mm, 16.3" × 17.1" × 5.0"
•Weight:
3.6 kg, 7.9 lb.
1
/2" × 81/2"L
3
❖ Internal Tray 2 (1 bin tray)
• Number of bins:
1
• Available paper size:
A3L, B4 JISL, A4KL, B5 JISKL, A5K, 11" × 17"L, 8
1
/2" × 14"L, 11" × 15"L, 11" × 14"L, 10" × 14"L, 10" × 15"L,
8
1
8
/2" × 11"KL, 101/2" × 71/4" KL, 8" × 13"L, 81/2" × 13"L, 81/4" × 13"L,
8" × 10
1
/2"KL, 8" × 10"KL, 51/2" × 81/2" L
• Paper capacity:
125 sheets (80 g/m
2
, 20 lb.)
•Paper weight:
60 – 90 g/m
2
(16 – 24 lb.)
• Maximum power consumption:
Less than 15 W (power is supplied from the main unit)
• Dimensions (W × D × H):
530 × 410 × 120 mm, 20.9" × 16.2" × 4.7"
•Weight:
Approx. 1.1 kg, 2.5 lb.
1
/4" × 14"L,
51

Appendix
❖ Large Capacity Tray
3
• Paper size:
1
A4K, 8
/2" × 11"K
•Paper weight:
60 – 90 g/m
2
, 16 – 24 lb.
• Paper capacity:
2,000 sheets (80 g/m
2
, 20 lb.)
•Power consumption
Maximum. 40 W (power is supplied from the main unit)
• Dimensions (W × D × H, option unit):
550 × 520 × 271 mm, 21.7" × 20.5" × 10.7"
•Weight:
Approx. 25 kg, 55.2 lb.
❖ Paper Tray Unit
•Paper weight:
2
60 – 90 g/m
(16 – 24 lb.)
• Paper size:
A3L, B4 JISL, A4KL, B5 JISKL, A5L, 11" × 17"L, 8
1
8
/2" × 11"KL, 51/2" × 81/2" L, 81/4" × 14"L, 11" × 14"L,
1
7
/4" × 101/2" K, 8" × 13"L, 8" × 101/2"KL, 81/2" × 13"L, 81/4" × 13"L
1
/2" × 14"L,
• Maximum power consumption:
Less than 30 W (power is supplied from the main unit)
• Paper capacity:
500 sheets (80 g/m
2
, 20 lb.) × 2 trays
• Dimensions (W × D × H):
550 × 520 × 271 mm, 21.7" × 20.5" × 10.7"
•Weight:
Approx. 25 kg, 55.2 lb.
52

Copy Paper
Copy Paper
This section describes recommended paper sizes and types, unusable paper, and
paper storage.
Recommended Paper Sizes and Types
The following table shows recommended types, sizes, and capacity of copy paper loadable in each tray.
Important
❒ If you use damp or curled paper, a staple clogging or paper jam may occur.
Tray
Type
Tray
1
Paper
Tray
Unit
*10
(optional)
Tray
2
*10
*10
Paper Type
and Weight
60-90 g/m2
(16-24 lb.)
60-90 g/m2
(16-24 lb.)
Thin paper
52-60 g/m
2
(14-16 lb.)
Metric Version Inch Version Paper
A3L, B4 JISL, A4KL, B5 JISKL, A5L 500
*1
11" ×17"L, 81/2" × 14"L, 81/2" × 11"KL, 8" × 13"L,
1
/2" × 13"L, 81/4" × 13"L, 81/4" × 14"L, 11" × 14"L,
8
1
7
/4" × 101/2"K, 8" × 101/2"KL, 51/2" × 81/2"L, 8KL,
16KKL
*2
Custom size
Vertical: 140-297 mm
Horizontal: 182-432 mm
*2
Custom size
Vertical: 5.6"-11.7"
Horizontal: 7.3"-17.0"
A3L, B4 JISL, A4KL, B5 JISKL, A5L 500
*1
B6 JISL, A6L, 11" × 17"L, 81/2" × 14"L,
1
8
/2" × 11"KL, 51/2" × 81/2"L, 71/4" × 101/2" KL,
8" × 13"L, 8
1
/4" × 14"L, 11" × 14"L, 8" × 101/2"KL, 11" × 15"L,
8
1
/2" × 13"L, 81/4" × 13"L, 8" × 10"KL,
10" × 14"L, 10" × 15"L, 8KL, 16KKL
Capacity
sheets
sheets
3
Thick paper
*11
105-157 g/m2
(28-42 lb.)
*2
Custom size
Vertical: 100-297 mm
Horizontal: 148-432 mm
*2
Custom size
Vertical: 4.0"-11.7"
Horizontal: 5.9"-17.0"
A3L, B4 JISL, A4KL, B5 JISKL, A5L
*1
B6 JISL, A6L, 11" × 17"L, 81/2" × 14"L,
1
/2" × 11"KL, 51/2" × 81/2"L, 71/4" × 101/2" KL,
8
8" × 13"L, 8
1
/4" × 14"L, 11" × 14"L, 8" × 101/2"KL, 11" × 15"L,
8
1
/2" × 13"L, 81/4" × 13"L, 8" × 10"KL,
10" × 14"L, 10" × 15"L, 8KL, 16KKL
*2
Custom size
Vertical: 100-297 mm
Horizontal: 148-432 mm
*2
Custom size
Vertical: 4.0"-11.7"
Horizontal: 5.9"-17.0"
*7
53

Appendix
3
Tray
Type
Tray
*10
2
Bypass
Tray
*10
(optional)
Paper Type
Metric Version Inch Version Paper
and Weight
Translucent
A3L, B4 JISL, A4KL, B5 JISKL
paper
OHP
A4KL
transparencies
Postcards 100 × 148 mm
Label paper
B4 JISL, A4L
(adhesive
labels)
Envelope
7
/8" × 71/2"L, 41/8" × 91/2"L, C5 EnvL, C6 EnvL,
3
DL EnvL
2
52-90 g/m
(14-24 lb.)
Thin paper
52-60 g/m
(14-16 lb.)
2
A3L, B4 JISL, 11" × 17"L, 8
1
/2" × 13"L, 81/4" × 13"L, 81/4" × 14"L, 11" × 14"L,
8
11" × 15"L, 10" × 14"L, 10" × 15"L, 8KL
A4KL, B5 JISKL, A5KL, B6 JISL 100
*3
A6L, 81/2" × 11"KL, 51/2" × 81/2"L,
1
/4" × 101/2"LK, 8" × 10"KL, 8" × 101/2"KL, 16KKL
7
1
/2" × 14"L, 8" × 13"L,
Capacity
*7
–
10 sheets
sheets
Thick paper
*11
105-157 g/m2
(28-42 lb.)
Translucent
paper
OHP
transparencies
*4
Custom size
Vertical: 90-297 mm
Horizontal: 148-600 mm
A3L, B4 JISL, 11" × 17"L, 8
1
/2" × 13"L, 81/4" × 13"L, 81/4" × 14"L, 11" × 14"L,
8
*4
Custom size
Vertical: 3.6"-11.7"
*12
Horizontal: 5.9"-23.6"
1
/2" × 14"L, 8" × 13"L,
*12
*8
10 sheets
11" × 15"L, 10" × 14"L, 10" × 15"L, 8KL
A4KL, B5 JISKL, A5KL, B6 JISL 40 sheets
*3
A6L, 81/2" × 11"KL, 51/2" × 81/2"L,
1
/4" × 101/2"KL, 8" × 10"KL, 8" × 101/2"KL, 16KKL
7
*4
Custom size
Vertical: 90-297 mm
Horizontal: 148-600 mm
*4
Custom size
Vertical: 3.6"-11.7"
*12
Horizontal: 5.9"-23.6"
*12
*9
A3L, B4 JISL 10 sheets
A4KL, B5 JISKL 40 sheets
*5
A4KL 10 sheets
*5
Postcards 100 × 148 mm 40 sheets
Label paper
(adhesive
labels)
Envelope
54
*5
B4 JISL, A4L 1 sheet
7
/8" × 71/2"L, 41/8" × 91/2"L, C5 EnvL, C6 EnvL,
3
–
DL EnvL

Copy Paper
Tray
Type
LCT
*10
(optional)
*1
Paper Type
and Weight
60-90 g/m
(16-24lb.)
2
Metric Version Inch Version Paper
A4K, 81/2" × 11"K
*6
Capacity
2000
(1000 +
1000)
sheets
Set the paper size selector to the p mark, and then select the paper size in System
Settings. See “Tray Paper Settings”, General Settings Guide.
*2
Set the paper size selector to the p mark, and then specify the paper size. See “Copying from Paper Tray 2”, Copy/Document Server Reference.
*3
Place the paper in the bypass tray, and select the paper size. See “When Copying onto
Regular Size Paper”, Copy/Document Server Reference.
*4
Place the paper in the bypass tray, and specify the paper size. See “When Copying
onto Custom Size Paper”, Copy/Document Server Reference.
When paper larger than 433 mm is used, it is likely to jam, crease or not feed in properly. Make sure the paper is placed correctly so that it feeds in straight.
*5
Placing one sheet at a time is recommended.
*6
The paper tray guide is fixed. If you want to change the size of paper placed in this
tray, contact your service representative.
*7
When loading paper, make sure the stack height does not exceed the lower limit
mark of the paper tray 2. See “Setting special paper in the paper tray 2”, Troubleshooting.
*8
When the paper size is larger than A4L, you can load 10 sheets.
When the paper size is smaller than A4L, you can load 100 sheets.
*9
When the thick paper size is larger than A4L, you can load 10 sheets. When the thick
paper size is smaller than A4L, you can load 40 sheets.
*10
When loading copy paper, make sure the stack height does not exceed the limit mark.
The maximum number of sheets you can load at a time depends on the paper thickness and condition.
*11
If you want to copy onto thick (105 g/m2, 28 lb or heavier) paper, select Thick Paper
mode. See “Copying from Paper Tray 2”, Copy/Document Server Reference.
*12
Paper size up to 600 mm (23.6") is available when the optional HDD is installed.
3
55

Appendix
R
Note
❒ When loading paper in the paper tray 1-4 and the LCT, place the copy side of
the paper face up.
❒ When loading paper in the bypass tray, place the copy side of the paper face
down.
❒ When using the bypass tray, it is recommended to set the paper orientation to
L.
❒ Do not use paper for inkjet printers.
❒ When you use OHP transparencies, fan them for each use.
3
❒ If multiple sheet feeding occurs, load sheets one by one.
❒ If you load paper of the same size in the same orientation in two or more
trays, the machine automatically shifts to the other tray when the first tray in
use runs out of paper. This function is called Auto Tray Switching. (However,
if the Paper Type of one tray is recycled or special paper, the settings of the
other trays must be the same for Auto Tray Switching to work.) This saves interrupting a copy run to replenish paper when making a large number of copies. See “Selecting Copy Paper”, Copy/Document Server Reference and
“Copier / Document Server Features”, General Settings Guide.
❒ The paper types you can select in System Settings are only general classifica-
tions. Copy quality for every kind of paper in a classification is not guaranteed. See “Unusable Paper” for more information.
Unusable Paper
This section describes which types of paper are unusable on this machine.
CAUTION:
• Do not use aluminum foil, carbon paper, or similar conductive paper to avoid
a fire or machine failure.
Important
❒ Do not use any of the following kinds of paper or a fault might occur:
• Paper for inkjet printers
• Thermal fax paper
• Art paper
• Aluminum foil
• Carbon paper
•Conductive paper
• OHP transparencies for color copying
• Paper with perforated lines
• Hemmed paper
56

Copy Paper
❒ Do not copy on the side of paper that has been already copied onto, or mis-
feed might occur or a fault might occur.
To prevent misfeeds, do not use the following kinds of paper:
• Bent, folded, or creased paper
• Perforated paper
• Slippery paper
• Torn paper
• Rough paper
• Thin paper with low stiffness
• Paper with a dusty surface
If you copy onto rough grain paper, the image might be blurred.
Paper Storage
This section describes how to store paper.
3
• When storing paper, the following precautions should always be followed:
• Do not store paper where it will be exposed to direct sunlight.
• Avoid storing paper in humid areas (humidity: 70% or less).
• Store on a flat surface.
• Do not store paper vertically.
• In high temperature/high humidity conditions or low temperature/ low humidity conditions, store paper in a vinyl bag.
57

INDEX
E
1000-sheet finisher, 13
500-sheet finisher
, 13
A
ADF, 11, 13
Administrating the Machine/
Protecting Documents
Authentication Screen
Auto Document Feeder (ADF)
Auto Off
, 28
, viii
, 20
B
Bluetooth, 14
Bridge unit
Bypass tray
, 13
, 11
C
CAUTION labels, 8
CD-ROM
Changing Modes
Character
Check Modes key
Clear Modes key
Clear/Stop key
Components
Control panel
Copier functions
Copy Data Security Unit
Copy paper
, 32
, 23
, 29, 30
, 16
, 16
, 16
, 11
, 11, 16
, iii
, 14
, 53, 56, 57
, 11, 13
e-mail, vi
Energy Saver
Energy Saver key
Energy saving
ENERGY STAR Program
Enter
, 29, 30
Entering text
Enter key (# key)
Entry screen
Exposure glass
Exposure glass cover
External option
, 28
, 16
, 9, 28
, 29, 30
, 16
, 29
, 11
, 13
, 13
F
Facsimile functions, iii
Fax
, v
Fax Unit
File Format Converter
Front cover
Function keys
Function status indicators
, 14
, 14
, 11
, 16
G
Guide to Components, 11
H
HDD, 14
How to Read This Manual
HTML manuals
, 39
, 9
, 16
, 4
D
DataOverWriteSecurity Unit, 14
Delete
DeskTopBinder Lite
DeskTopBinder-SmartDeviceMonitor for
Display
Display panel
Dos and Don'ts
Duplex Priority
Duplex unit
Client
, 30
, 36
, 38
, 19
, 16
, 31
, 9
, 11
58
I
IEEE 1284 Interface Board, 14
IEEE 802.11b Wireless LAN Board
Indicators
Installing the manuals
Internal option
Internal tray
Internal tray 2 (1 bin tray)
Internet Fax
Interrupt key
IP-Fax
, 16
, 39
, 14
, 11
, 13
, vi
, 16
, vi
K
Key arrangement, 29
, 14

L
R
LAN-Fax Driver, 35
Large Capacity Tray (LCT)
Login
, 20, 21, 22
Log Off
Lower right cover
Low-Power mode
, 22
, 11
, 9
, 13
M
Machine Types, 10
Main power
Main power indicator
Main power switch
Manuals for This Machine
Monitoring the Machine Via Computer
, 25, 27
, 11, 16
, 11
, i
N
Notice, 1
Number keys
, 16
O
Off Mode, 9
On Hook Dial key
On indicator
Opening the installed manuals
Operation switch
Option
, 13, 14
, 16
, 11, 16
, 41
, 11, 16
P
Paper, 53, 56, 57
Paperless
Paper size
Paper tray
Paper tray 2
Paper tray cover
Paper tray unit
Paper type
Pause/Redial key
PDF manuals
PostScript3 Unit
Power
Preventing an Unauthorized Copy
Printer Drivers for This Machine
Printer Enhance Unit
Printer functions
Printer/Scanner Unit
Printer Unit
Program key
, v
, 53
, 11
, 11
, 11
, 13
, 53
, 16
, 40
, 14
, 25, 26
, 33
, 14
, iii
, 14
, 14
, 16
, x
, ix
Reception, v
Recycled Paper
Remove Paper Indicator
RPCS Printer Unit
, 10
, 11
, 14
S
Safety During Operation, 5
Safety information
Sample Copy key
Scanner Enhance Option
Scanner functions
Screen contrast knob
Security Functions
Shift sort tray
Sleep mode
SmartDeviceMonitor for Admin
Software
Software on CD-ROM
Start key
Start Manual RX key
Storage
Symbols
System Reset
, 9
, 32
, 16
, 57
, 4
, 5
, 16
, 14
, iii
, 16
, viii
, 13
, 37
, 32
, 16
, 24
T
Tone key, 16
Transmission
Turn off
Turn on
TWAIN Driver
, v
, 25, 26, 27
, 25, 26
, 34
U
Unusable, 56
User Account Enhance Unit
User Code Authentication
User Tools/Counter key
Using the Scanner in a
Network Environment
Utilizing Stored Documents
, 14
, 20, 21
, 16
, vii
, iv
V
Ventilation holes, 11
Viewing the contents of the CD-ROM
W
WARNING labels, 8
What You Can Do with This Machine
, 32
, iii
59

60 EN USA D008-6502

In accordance with IEC 60417, this machine uses the following symbols for the main power switch:
a means POWER ON.
c means STAND BY.
Trademarks
Microsoft
®
, Windows® and Windows NT® are registered trademarks of Microsoft Corporation in the
United States and/or other countries.
Adobe®, PostScript®, Acrobat®, are registered trademarks of Adobe Systems Incorporated.
The Bluetooth
®
word mark and logos are owned by the Bluetooth SIG, Inc. and any use of such marks
by Ricoh Company, Ltd. is under license.
NetWare is a registered trademark of Novell, Inc.
®
PCL
is a registered trademark of Hewlett-Packard Company.
AppleTalk, Macintosh, and Mac OS are trademarks of Apple Computer, Inc., registered in the U.S. and
other countries.
PowerPC is a trademark of International Business Machines Corporation in the United States, other
countries, or both.
UNIX is a registered trademark in the United States and other countries, licensed exclusively through
X/Open Company Limited.
Other product names used herein are for identification purposes only and might be trademarks of their
respective companies. We disclaim any and all rights to those marks.
The proper names of the Windows operating systems are as follows:
• The product name of Windows
• The product name of Windows
• The product name of Windows
®
95 is Microsoft® Windows® 95
®
98 is Microsoft® Windows® 98
®
Me is Microsoft® Windows® Millennium Edition (Windows Me)
• The product names of Windows® 2000 are as follows:
Microsoft
Microsoft
®
Windows® 2000 Advanced Server
®
Windows® 2000 Server
Microsoft® Windows® 2000 Professional
• The product names of Windows
Microsoft
Microsoft
®
Windows® XP Professional
®
Windows® XP Home Edition
• The product names of Windows Server
Microsoft
®
Windows ServerTM 2003 Standard Edition
®
XP are as follows:
TM
2003 are as follows:
Microsoft® Windows ServerTM 2003 Enterprise Edition
Microsoft
• The product names of Windows NT
®
Windows ServerTM 2003 Web Edition
®
are as follows:
Microsoft® Windows NT® Server 4.0
Microsoft
®
Windows NT® Workstation 4.0
Copyright © 2006

Operating Instructions About This Machine
Type for 8025e/DSm725e/LD325/Aficio MP 2510
Type for 8030e/DSm730e/LD330/Aficio MP 3010
EN USA D008-6502
 Loading...