

Page 1
Programs
You can store frequently used copy
job settings in memory and recall
them for future use.
Note
❒ You can store up to 10 programs.
❒ You can select standard mode or
program No. 10 as the mode to be
set when modes are cleared or reset, or immediately after the operation switch is turned on. ⇒ p.99
“Change Initial Mode”
3. Program
Storing a Program
Edit the copy settings so that all
AAAA
functions you want to store in this
program are selected.
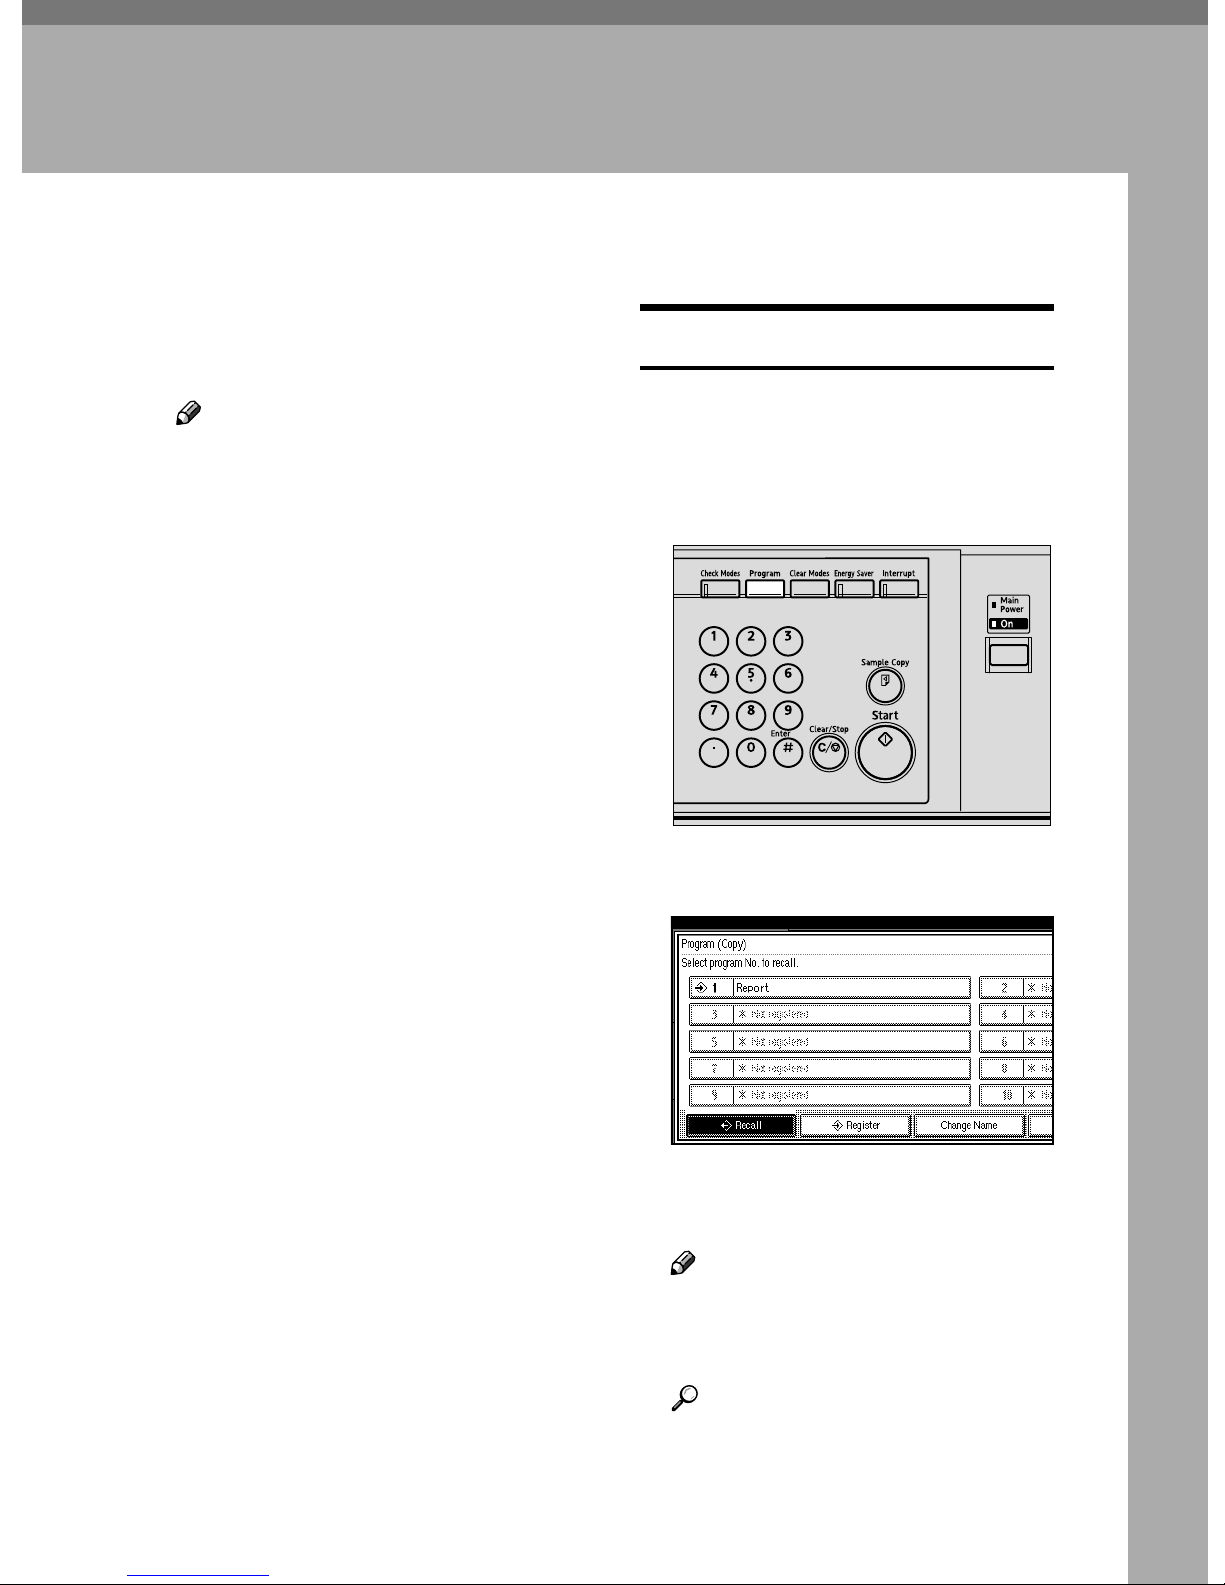
Press the {{{{Program}}}} key.
BBBB
❒ Paper settings are stored based on
size. So, if paper of the same size is
set for more than one tray, the paper tray prioritized with User
Tools (System Settings) will be selected first. ⇒“Paper Settings”
General Settings Guide
❒ Programs are not cleared by turn-
ing the power off or by pressing
the {{{{Clear Modes}}}} key. They are
canceled only when you delete or
overwrite them with another program.
Press the [Register] key.
CCCC
Press the program number you
DDDD
want to store.
ZGVS050E
Note
❒ Program numbers with m
against them already have settings in them.
Reference
⇒ p.80 “Changing a stored pro-
gram”
79
Page 2
Program
3
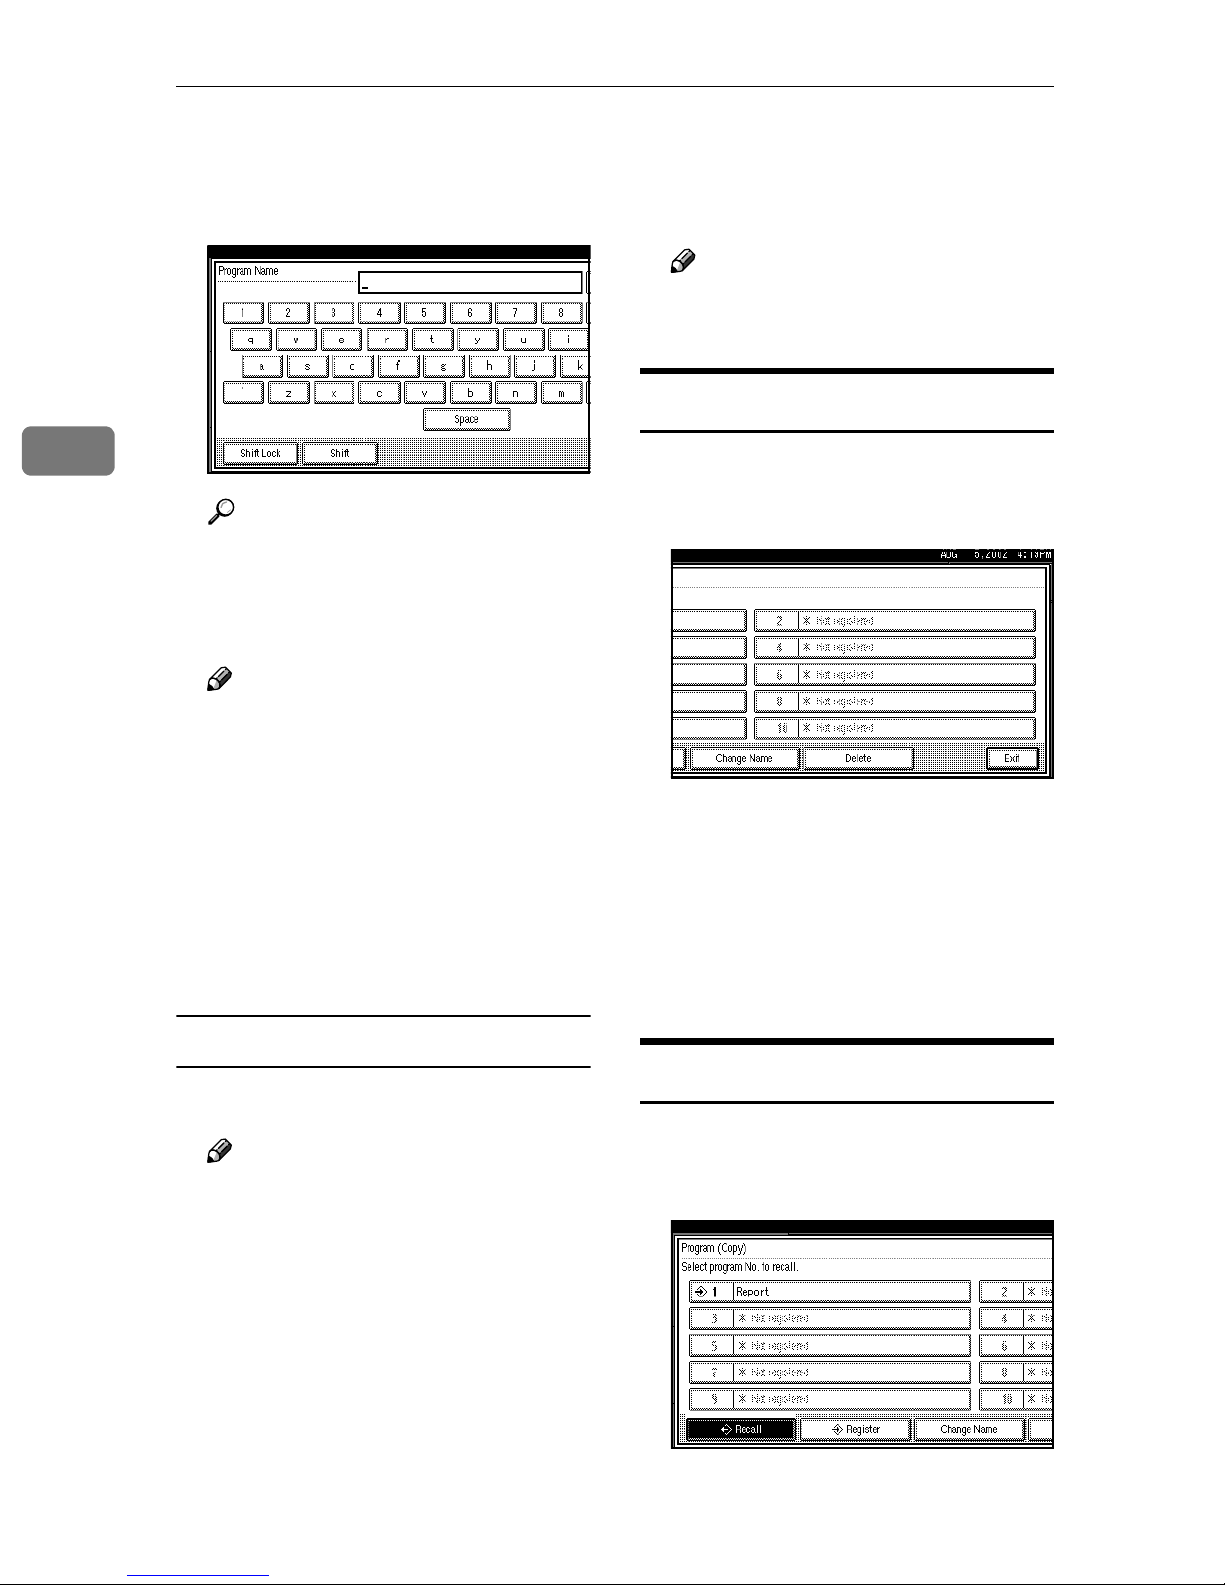
Enter the program name with the
EEEE
letter keys on the display panel.
You can enter up to 40 characters.
Reference
For details on entering characters, see “Entering Text Characters” in the General Settings
Guide.
Note
❒ If you do not wish to enter the
program name, go to step
F
Press the [Register] key.
CCCC
Repeat steps E, F of ”Storing a Pro-
gram”.
Note
❒ This overwrites the previous
program.
Deleting a Program
Press the {{{{Program}}}} key.
AAAA
Press the [Delete] key.
BBBB
.
Press the [OK] key.
FFFF
When the settings are successfully
stored, the mmmm indicator before the
program number goes on, followed by the program name. The
screen returns to the initial copy
display after a short time.
Changing a stored program
Check the program settings.
AAAA
Note
❒ When you want to check the
contents of a program, recall the
program. ⇒ p.80 “Recalling a
Program”
Repeat steps AAAA to DDDD of “Storing a
BBBB
Program”.
Press the program number you
CCCC
want to delete.
Press the [Yes] key.
DDDD
The program is deleted, and the
screen returns to the initial copy
display.
Recalling a Program
Press the {{{{Program}}}} key.
AAAA
Press the [Recall] key.
BBBB
80
Page 3

Press the program number you
CCCC
want to recall.
Stored settings are displayed.
Note
❒ Only programs with m against
them contain a program.
Place your originals, and then
DDDD
press the {{{{Start}}}} key.
Programs
3
81
Page 4

3
Program
82
Page 5
4. Troubleshooting
If Your Machine Does Not Operate as You
Want
When a Message is Displayed
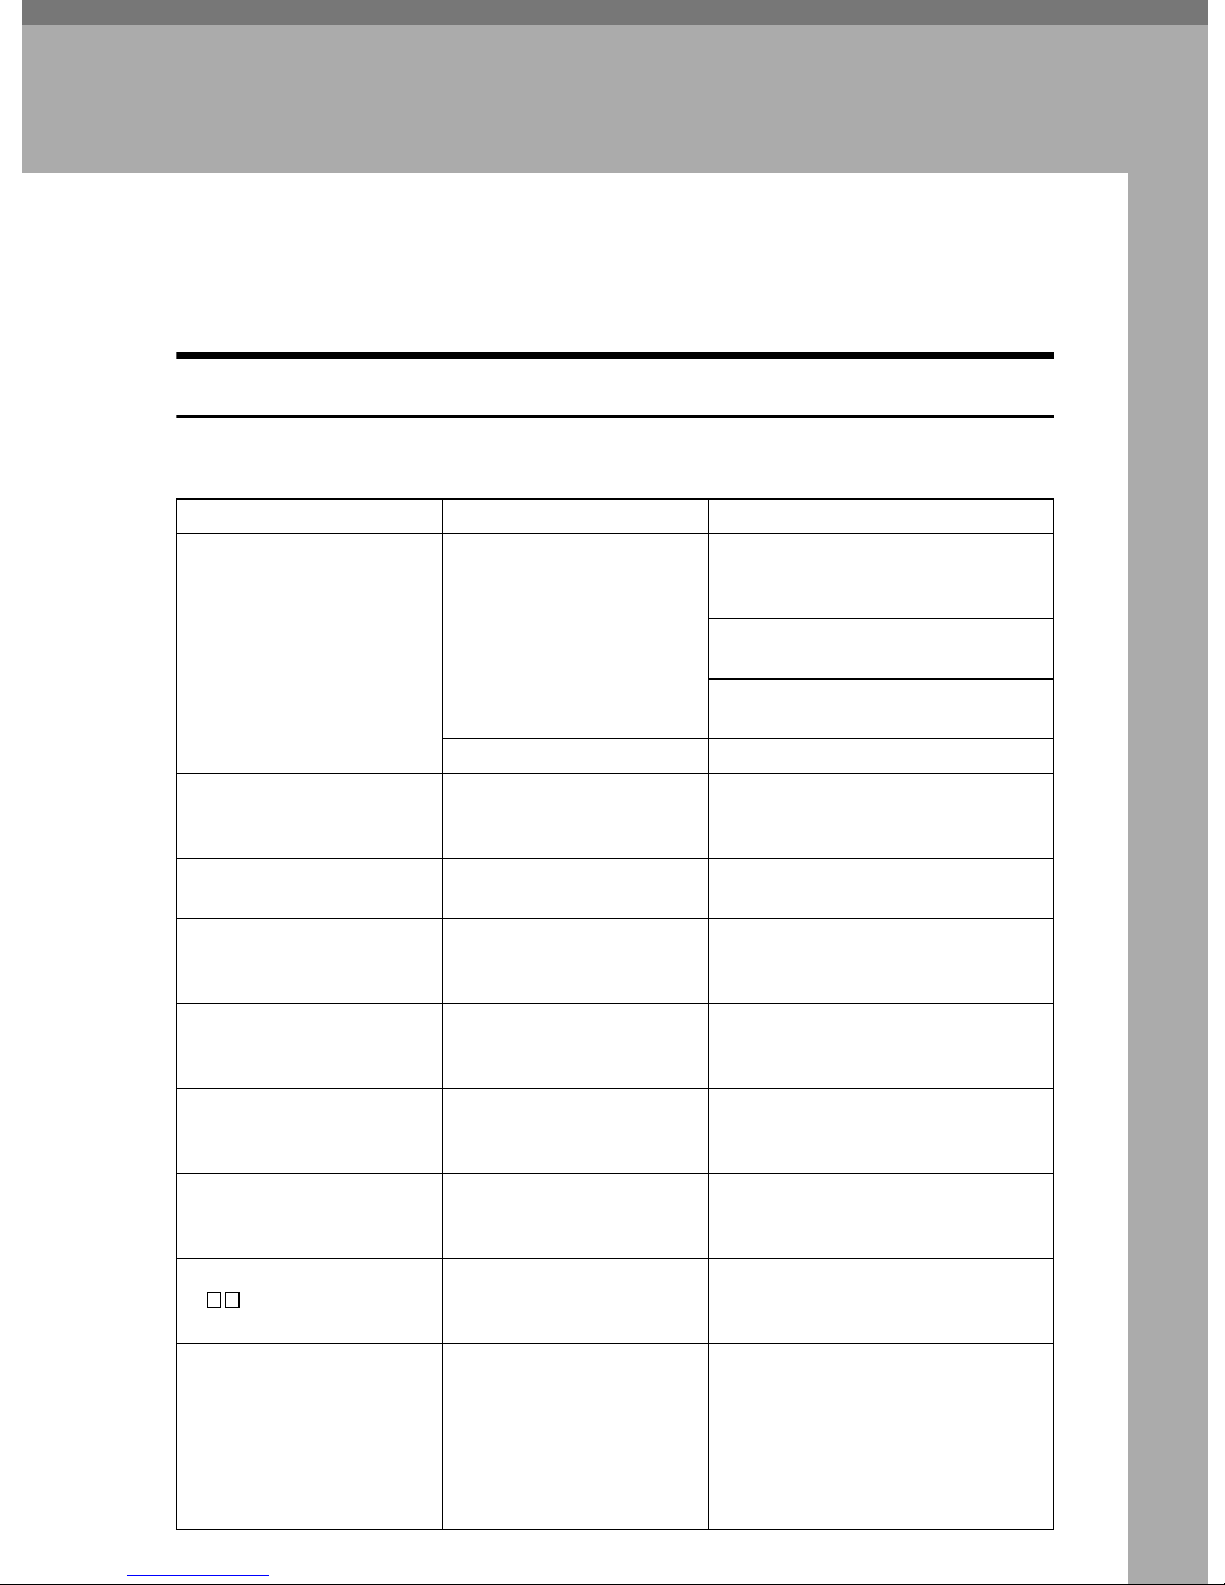
The following chart contains explanations of common messages. If other messages appear, follow the instructions as they are displayed.
Messege Cause Action
Cannot detect original size. The size of the originals
placed is difficult to detect.
⇒ p.9 “Sizes difficult to de-
tect”
Original is not placed. Place your originals.
Check original orientation. There is no copy paper in
the same direction as the
originals.
Check paper size. In correct paper size is set. If you press the {{{{
Rotate Sort is not available
with this paper size.
It is over stapling capacity. The number of sheets per
Cannot staple paper of this
size.
A size of paper for which
Rotate Sort is not available
is selected.
set is over the staple capacity.
The Staple function cannot
be used with the paper size
selected.
Place the original on the exposure
glass. ⇒ p.13 “Placing Originals on
the Exposure Glass”
If the original size is difficult to detect, select the size manually.
Do not use Auto Reduce/Enlarge
mode.
Place the original in the same direction as the copy paper.
will start onto the selected paper.
Select the correct paper size. ⇒ p.35
“Sort”
Check the stapler capacity. ⇒ p.37
“Staple”
Select a paper size that can be used
in Staple mode. ⇒ p.37 “Staple”
}}}} key, copy
Start
Duplex is not avilable with
this paper size.
Maximum number of sets
is .
Cannot copy. Original is
being scanned by other
functions.
A paper size not available
in Duplex mode has been
selected.
The number of copies exceeds the maximum copy
quantity.
The Document Server function is in use.
Select the proper paper size.
You can change the maximum copy
quantity. ⇒ p.99 “Max. Copy Quantity”
To cancel the job in process, press
the [
{{{{
Document Server
the {{{{
sage ” [
storing?” appears, press the [
key.
] key, and then press the
Exit
}}}} key. Next, press
Clear/Stop
Stop
}}}} key. When the mes-
] key was pressed. Stop
Stop
]
83
Page 6
Troubleshooting
;
;;;
y
yyy
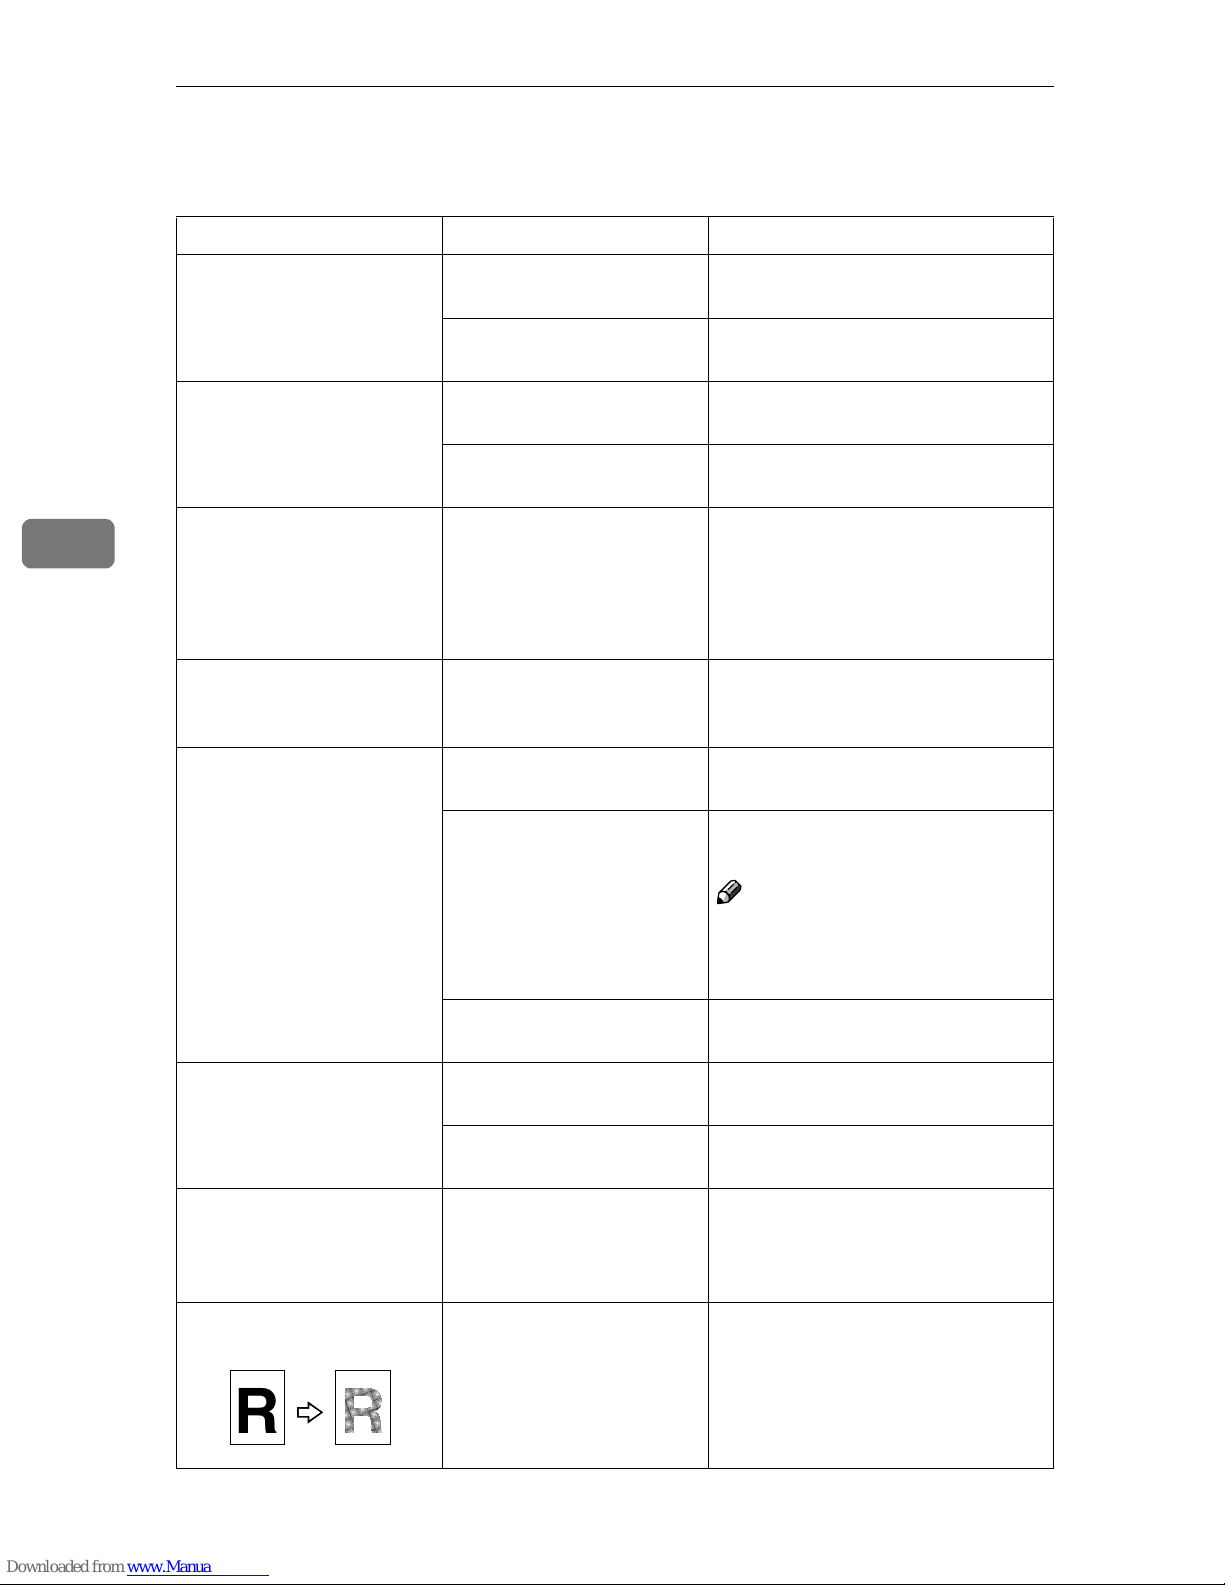
If You Cannot Make Clear Copies
Problem Cause Action
4
Copies appear dirty. The image density is too
dark.
Auto Image Density is not
selected.
The reverse side of an original image is copied.
A shadow appears on copies if you use pasted originals.
The same copy area is dirty
whenever making copies.
Copies are too light. The image density is too
The image density is too
dark.
Auto Image Density is not
selected.
The image density is too
dark.
The exposure glass or document feeder is dirty.
light.
The paper size is not appropriate.
Adjust the copy density. ⇒ p.25
“Adjusting Copy Image Density”
Adjust the auto density. ⇒ p.25
“Adjusting Copy Image Density”
Adjust the copy density. ⇒ p.25
“Adjusting Copy Image Density”
Adjust the auto density. ⇒ p.25
“Adjusting Copy Image Density”
Adjust the copy density. ⇒ p.25
“Adjusting Copy Image Density”
Change the direction of the original.
Put mending tape on the pasted
part.
Clean them. ⇒ “Maintainging Your
Machine” in the General Settings
Guide
Adjust the copy density. ⇒ p.25
“Adjusting Copy Image Density”
Use the recommended paper. ⇒
General Settings Guide
Toner cartridge is almost
empty.
Parts of the image are not
copied.
Copies are blank. The original is not set cor-
A moiré pattern is produced on copies.
The original is not set correctly.
An improper paper size is
selected.
rectly.
Your original has a dot pattern image or many lines.
R
Note
❒ A light copy may result when
you use damp or rough grain paper.
Add toner. ⇒ “D Adding Toner” in
the General Settings Guide
Set originals correctly. ⇒ p.12 “Plac-
ing Originals”
Select the proper paper size.
When using the exposure glass, face
the originals down. When using the
document feeder, face them up. ⇒
p.12 “Placing Originals”
Place the original on the exposure
glass at a slight angle.
84
Page 7
If You Cannot Make Copies As You Want
If You Cannot Make Copies As You Want
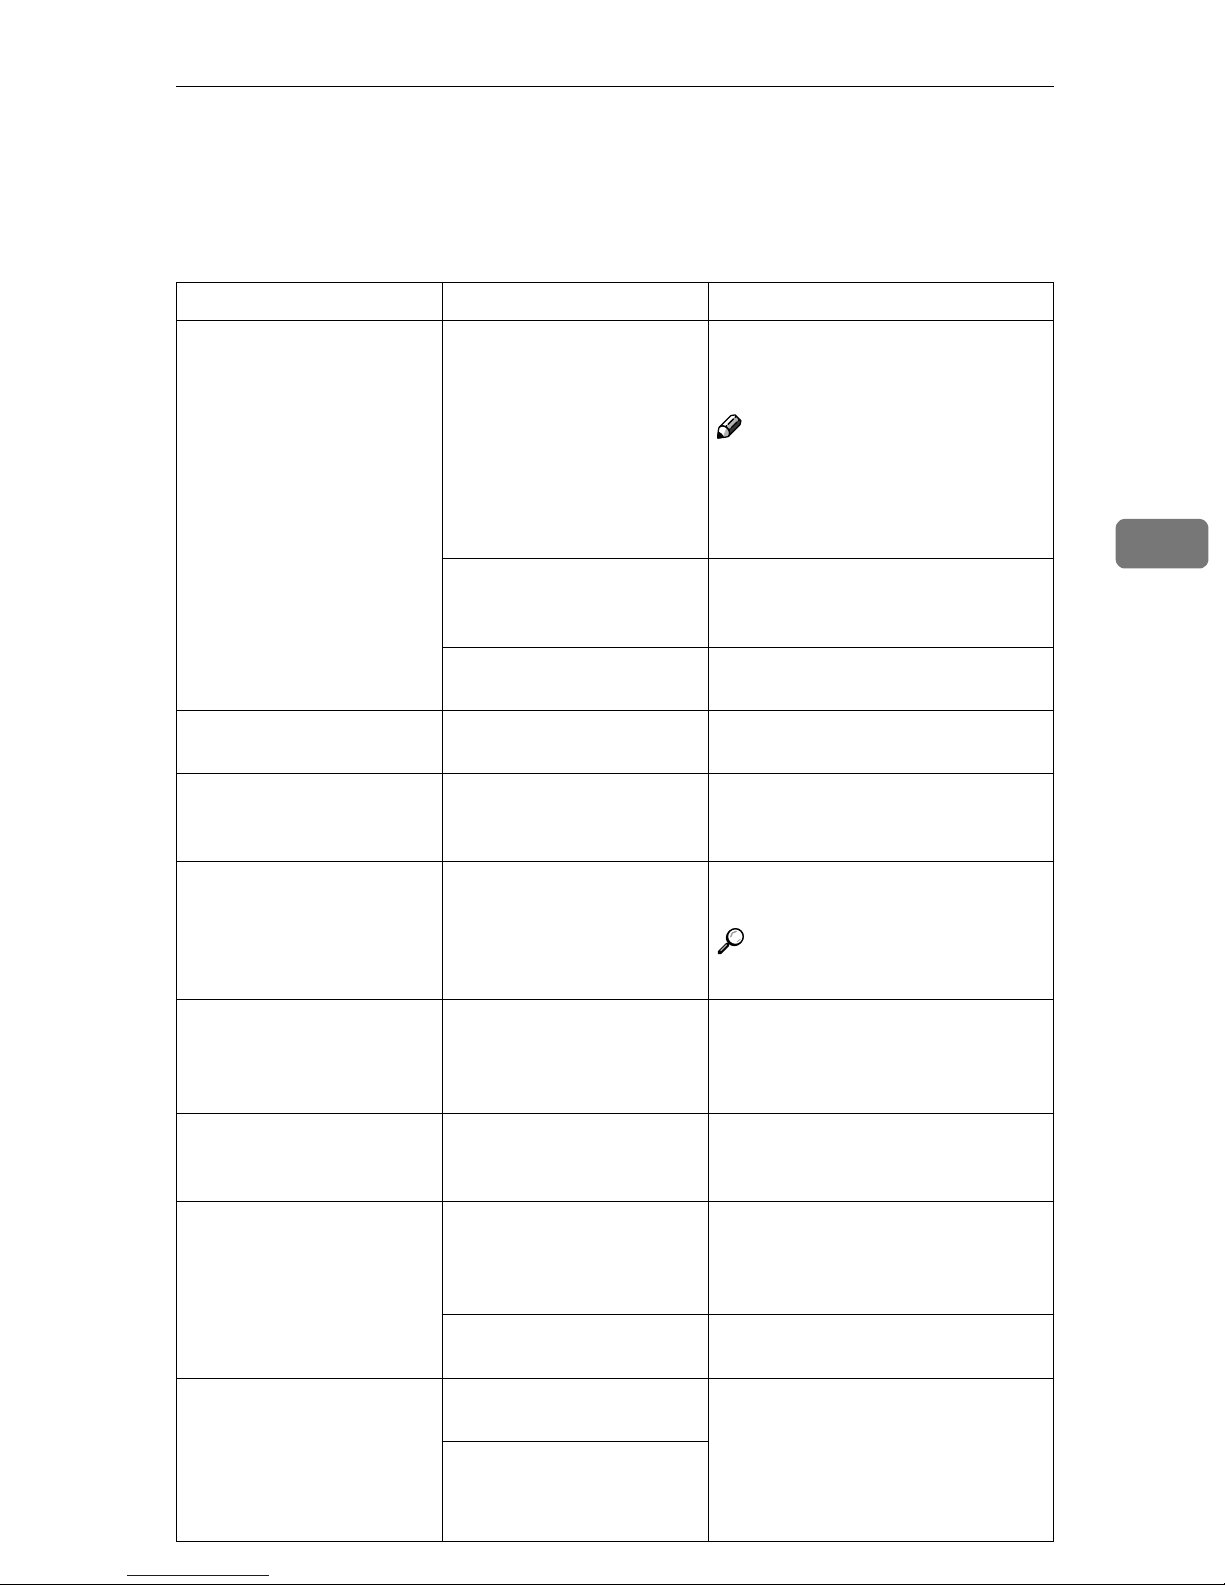
This section explains causes and remedies when copy results are not as expected.
Problem Cause Action
Copies are not stapled. There are jammed staples
in the stapler.
The number of copies exceeds the capacity of the
stapler.
Copy paper is curled. Turn the copy paper over in the
Staples are wrongly positioned.
Paper jams occur frequently.
You cannot combine several functions.
Originals are not set correctly.
The paper size is not correct.
Selected functions cannot
be used together.
Remove jammed staples. ⇒ ” e Re-
moving Jammed Staple” in the General Settings Guide
Note
❒ After removing jammed staples,
staples might not be ejected the
first few times you try to use the
stapler.
Check the stapler capacity. ⇒ p.37
“Staple”
tray.
Check the correct position to place
the originals. ⇒ p.37 “Staple”
Set the correct paper size. ⇒
“Changing the Paper Size”in the
General Settings Guide
Check the combination of functions
and make the settings again.
4
When sorting, the pages
are divided into two
blocks.
In Double Copies mode,
parts of the original image
are not copied.
In Border, Center, or Center/Border mode, parts of
the original image are not
copied.
In Margin Adjustment
mode, parts of the original
image are not copied.
The memory became full in
the middle of sorting and
the pages were delivered in
two blocks.
Combination of original
and copy paper is not correct.
You set a wide erased margin.
Originals are not scanned
correctly.
You set a wide erased margin.
There is a lack of margin
space on the opposite side
of the binding position.
Reference
⇒ p.109 “Combination Chart”
You can interrupt copying when the
memory becomes full. ⇒ p.106
“Memory Full Auto Scan Restart”
Select A3L for A4 K originals and
A4 for A5 originals (when using a
100% ratio).
Make the margin width narrower.
You can adjust it between 2–99mm.
⇒ p.101 “Erase Border Width” and
⇒ p.101 “Erase Center Width”
Set the originals correctly.
Set a narrower margin with the User
Tools. ⇒ p.101 “Front Margin :
Left/Right”, ⇒ p.101 “Front Margin
: Top/Bottom”, ⇒ p.101 “Back Margins : Left/Right”, ⇒ p.101 “Back
Margin : Top/Bottom”
85
Page 8

Troubleshooting
Problem Cause Action
4
In Image Repeat mode, the
original image is not copied repeatedly.
The stamp position is
wrong.
When using Combine,
parts of the image are not
copied.
Order of copies is not correct.
You selected copy paper
the same size as the originals, or you did not select
the proper reproduction
ratio.
The paper orientation is
wrong.
You specified a reproduction ratio that does not
match the sizes of your
originals and copy paper.
You placed originals in incorrect order.
Select copy paper larger than the
originals.
Select the proper reproduction ratio.
Check the paper orientation and
stamp position.
When you specify a reproduction
ratio using Manual Paper Select
mode, make sure the ratio matches
your originals and the copy paper.
Note
❒ Select the correct reproduction
ratio before using Combine
mode.
When placing a stack of originals in
the document feeder, the last page
should be on the bottom.
If you place an original on the exposure glass, start with the first page to
be copied.
When using Duplex, copy
is made Top/Bottom even
though Left/Right is selected, or copy is made
Left/Right even though
Top/Bottom is selected.
Paper does not output during printing with stapling.
You placed originals in the
wrong direction.
If you stop printing while
using the staple function,
papers not stapled during
printing may be left in the
staple unit.
Place originals in the correct orientation. ⇒ p.12 “Original Orientation”
Press the {{{{Reset}}}} key and cancel
copy settings, including stapling.
86
Page 9
If You Cannot Make Copies As You Want
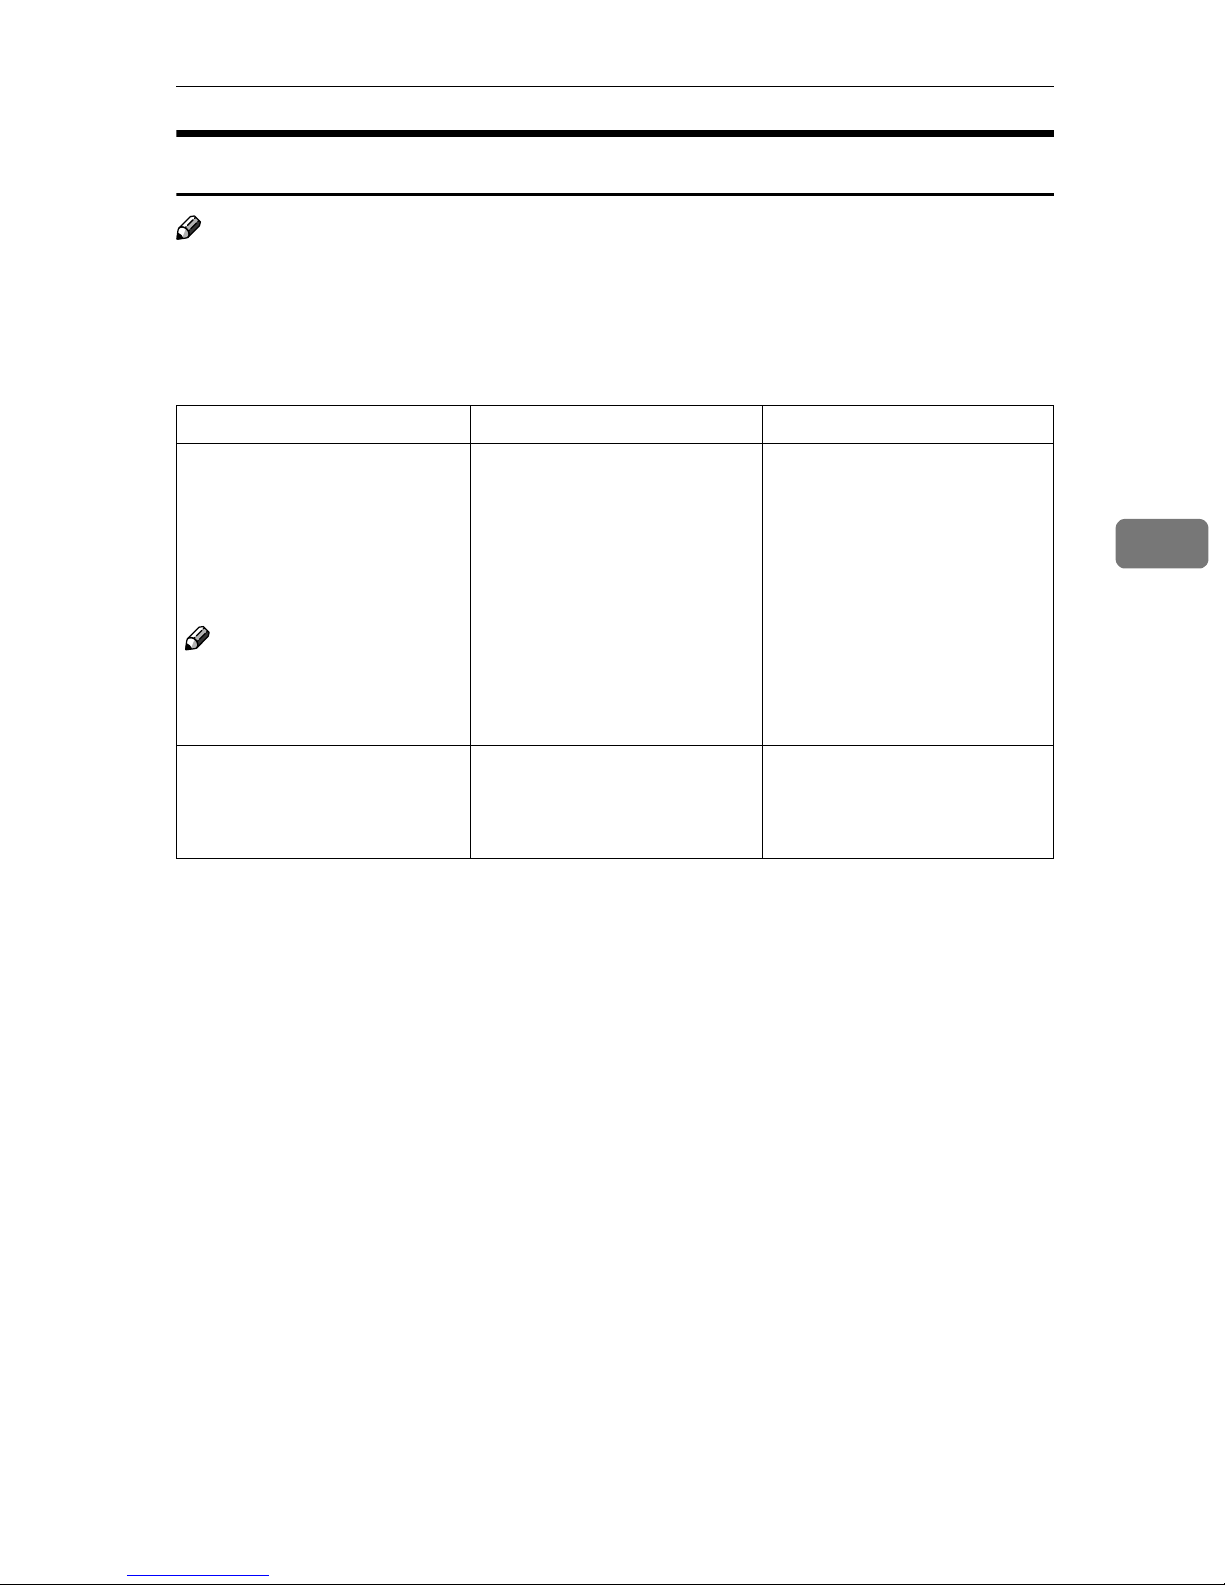
When Memory Is Full
Note
❒ If you set "Memory Full Auto Scan Restart" in User Tools (⇒ p.106) to "Yes",
the memory overflow message will not be displayed, but Connect Copy continues to scan originals automatically. Connect Copy continues scanning and
copying until the job is finished. Note that copy sets will be printed separately
at this time.
Message Cause Solution & Reference
Memory is full. ## originals
have been scanned.
Press [
originals.
Do not remove remaining
originals.
] to copy scanned
Print
Note
❒ Copying will stop and this
message will be displayed
when memory is full.
Press [
printing.
[
Stop
Continue
] [
Continue
] to continue
]
The scanned original exceeds
the number of pages that can
be stored in memory.
The machine checks if the remaining original should be
copied, after the scanned original has been printed.
Press the [
scanned originals and clear
the scanning data. Press the
[
Print Inquiry List
the scanning data and not
copy.
To continue copying, remove
all copies then press the [
] key. To stop copying,
tinue
press the [
] key to copy
Output
] key to clear
] key.
Stop
Con-
4
87
Page 10

4
Troubleshooting
88
Page 11
5. User Tools (Copy/Document
Server Features)
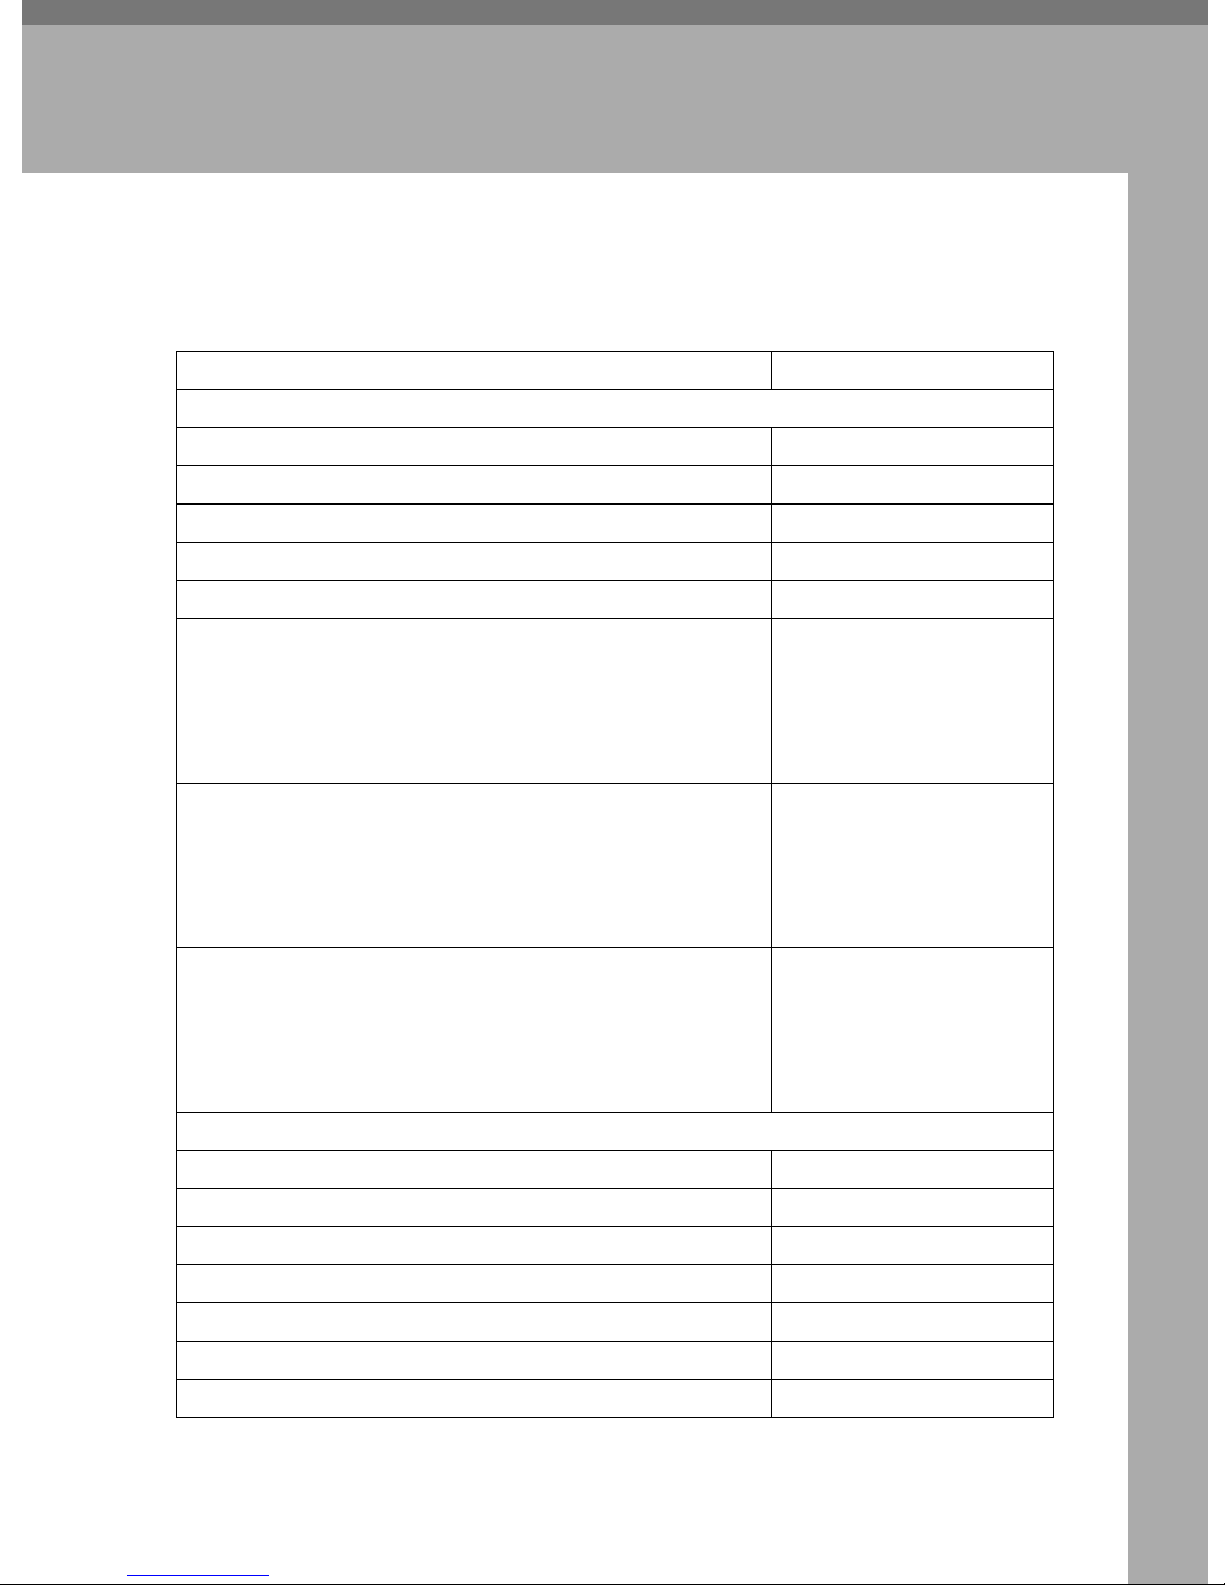
User Tools Menu (Copier/Document
Server Features)
User Tools Item Names Default Settings
1
General Features 1/5 ⇒ p.97 “General Features
Auto Paper Select Priority ON
Auto Tray Switching With image rotation
Paper Display Display
Original Type Priority Text
Original Type Display Display
Auto Image Density Priority Text: On
/5”
Text/Photo: On
Photo: Off
Pale: On
Generation Copy: On
Copy Quality Text: Normal
Text/Photo: Normal
Photo: Print Photo
Pale: Normal
Generation Copy: Normal
Image Density Text: Normal
Text/Photo: Normal
Photo: Normal
Pale: Normal
Generation Copy: Normal
General Features 2/5 ⇒ p.99 “General Features
Duplex Mode Priority 1 Sided → 1 Sided
Copy Orientation in Duplex Mode Top to Top
Original Orientation in Duplex Mode Top to Top
Change Initial Mode Standard
Max. Copy Quantity 999 Sheets
Tone: Original remains ON
2
/5”
Job End Call ON
89
Page 12
5
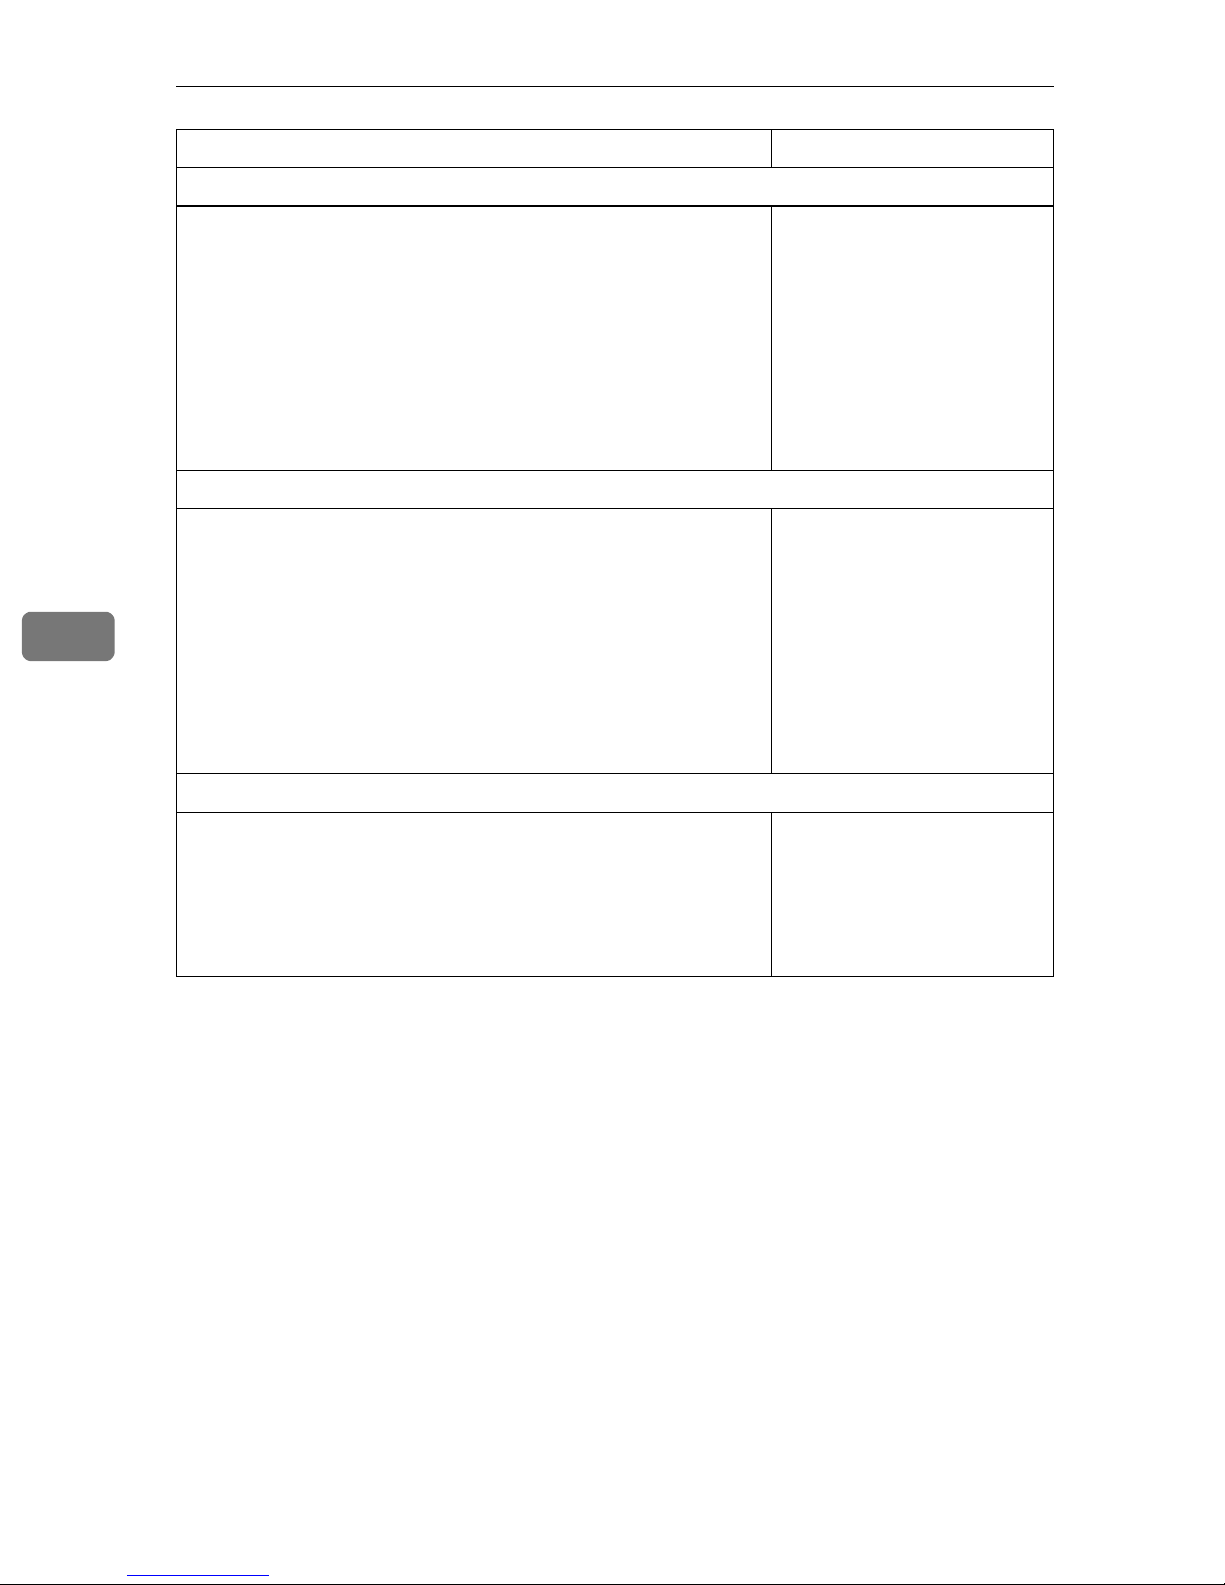
User Tools (Copy/Document Server Features)
User Tools Item Names Default Settings
General Features 3/5 ⇒ p.99 “General Features 3/5”
Copy Function Key: F1–F5 • F1: 1 Sided → 2 Sided: T to
T
• F2: 2 Sided: T to T → 2 Sid-
ed: T to T
• F3: 1 Sided → 1 Sided Com-
bine
• F4: 1 Sided → 1 Sided Com-
bine: 4 originals
• F5: Create Margin
General Features 4/5 ⇒ p.99 “General Features
Document Server Storage Key: F1–F5 • F1: 2 Sided Original Top to
General Features 5/5 ⇒ p.100 “General Features
4
/5”
5
Top
• F2: 1 Sided → 1 Sided Com-
bine
• F3: 1 Sided → 1 Sided Com-
bine: 4 originals
• F4: 1 Sided → 1 Sided Com-
bine: 8 originals
• F5: Create Margin
/5”
Document Server Print Key: F1–F5 • F1: 2 Sided Top to Top
• F2: 2 Sided Top to Bottom
• F3: Booklet
• F4: Magazine
• F5: Off
90
Page 13
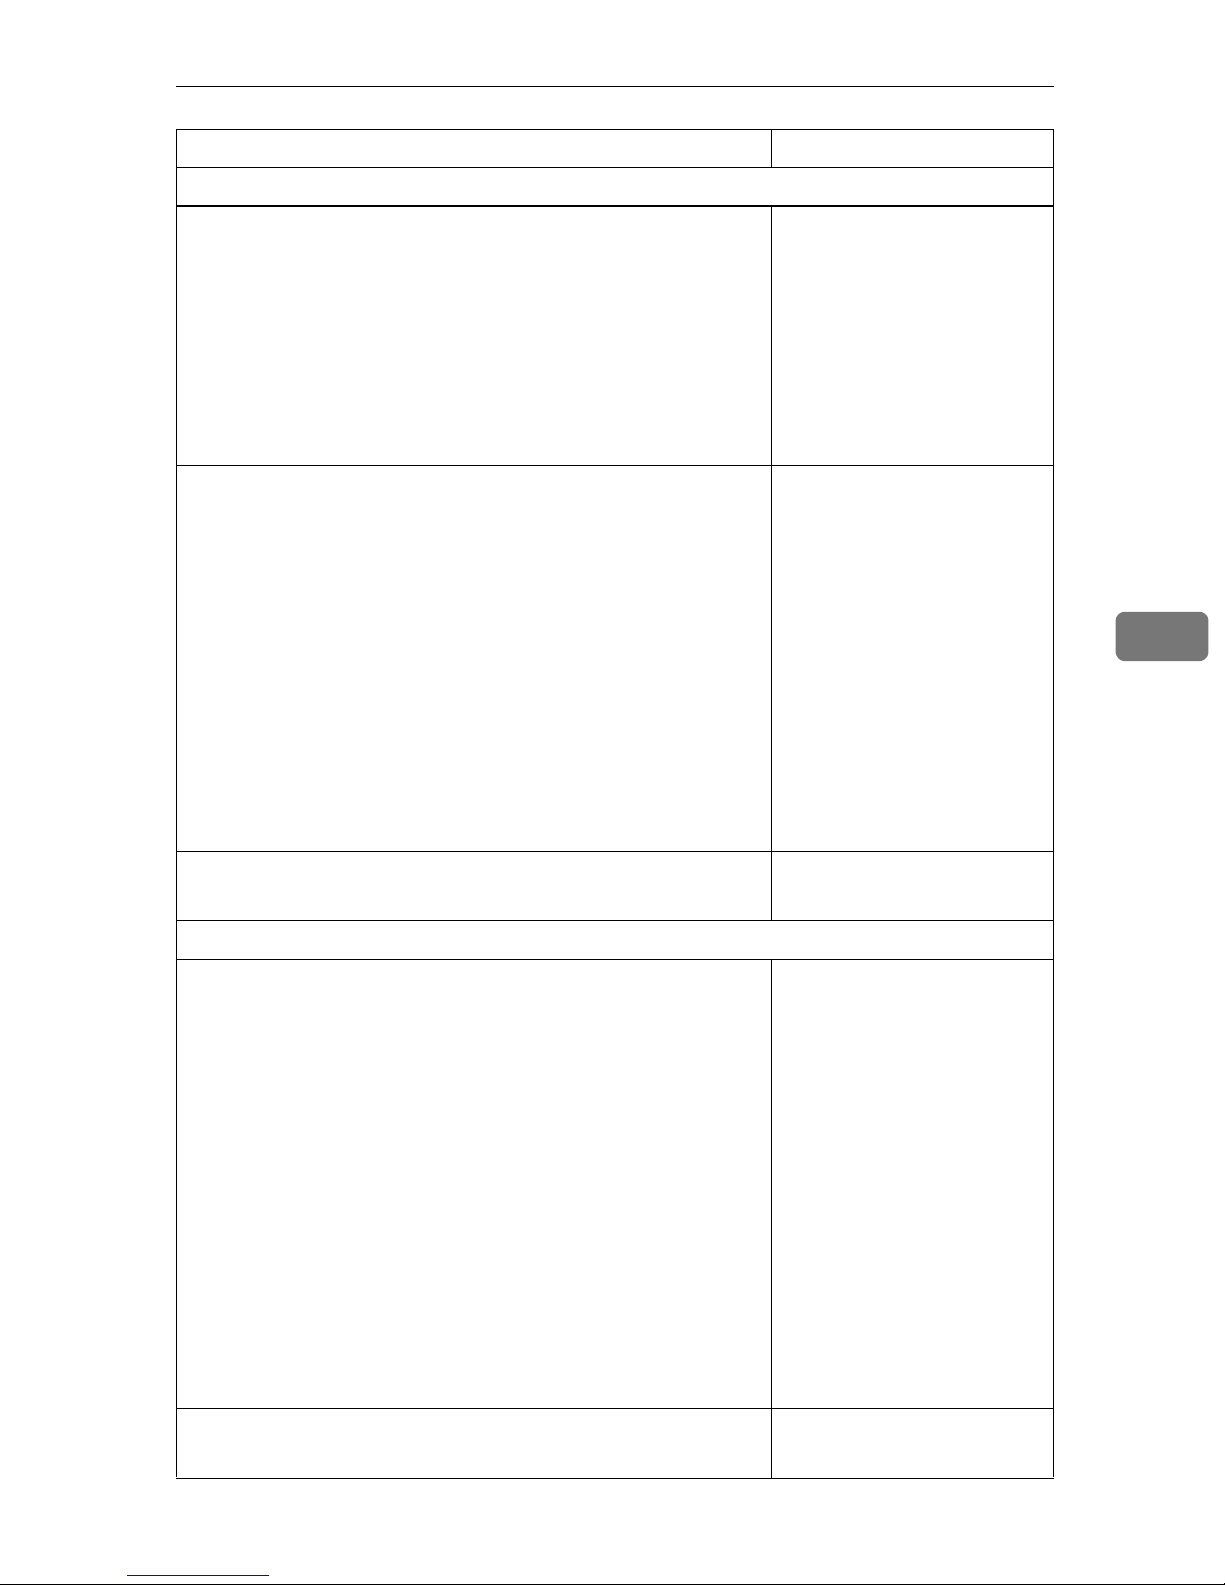
User Tools Menu (Copier/Document Server Features)
User Tools Item Names Default Settings
Reproduction Ratio 1/2 ⇒ p.100 “Reproduction Ratio 1/2”
Shortcut R/E 1–3 Metric version
• Shortcut R/E 1: 71%
• Shortcut R/E 2: 141%
• Shortcut R/E 3: 93%
Inch version
• Shortcut R/E 1: 73%
• Shortcut R/E 2: 155%
• Shortcut R/E 3: 93%
Enlarge 1–5 Metric version
• Enlarge 1: 115%
• Enlarge 2: 122%
• Enlarge 3: 141%
• Enlarge 4: 200%
• Enlarge 5: 400%
Inch version
• Enlarge 1: 121%
• Enlarge 2: 129%
• Enlarge 3: 155%
• Enlarge 4: 200%
• Enlarge 5: 400%
5
Priority Setting: Enlarge Metric version 141%
Inch version 155%
Reproduction Ratio 2/2 ⇒ p.100 “Reproduction Ratio
Reduce 1–6 Metric version
Priority Setting: Reduce Metric version: 71%
2
/2”
• Reduce 1: 25%
• Reduce 2: 50%
• Reduce 3: 65%
• Reduce 4: 71%
• Reduce 5: 75%
• Reduce 6: 82%
Inch version
• Reduce 1: 25%
• Reduce 2: 50%
• Reduce 3: 65%
• Reduce 4: 73%
• Reduce 5: 78%
• Reduce 6: 85%
Inch version: 73%
91
Page 14
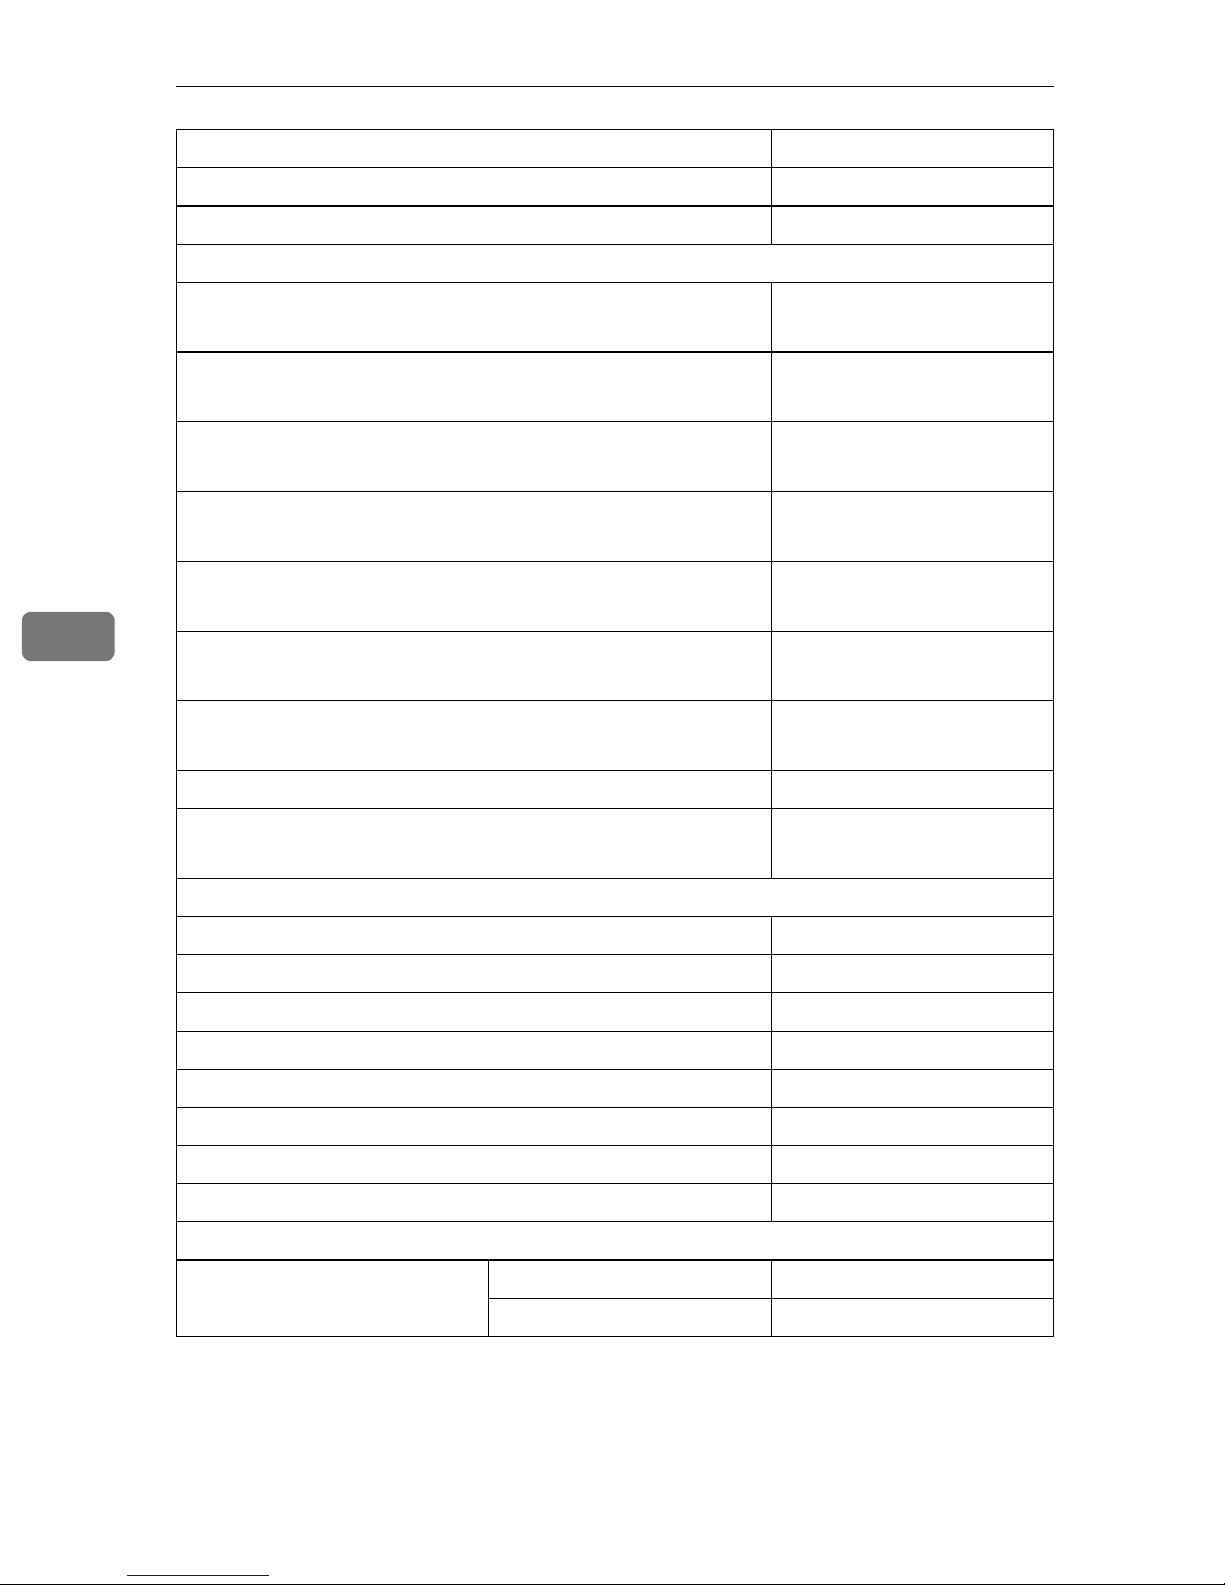
User Tools (Copy/Document Server Features)
User Tools Item Names Default Settings
Ratio for Create Margin 93%
R/E Priority Reduce
Edit 1/2 ⇒ p.101 “Edit
Front Margin: Left/Right Metric version: Left 5 mm
Back Margin: Left/Right Metric version: Right 5 mm
Front Margin: Top/Bottom Metric version: T/B 0 mm
Back Margin: Top/Bottom Metric version: T/B 0 mm
1 Sided → 2 Sided Auto Margin: T to T Metric version: Right 5 mm
1
/2”
Inch version: Left 0.2”
Inch version: Right 0.2”
Inch version: T/B 0”
Inch version: T/B 0”
Inch version: Right 0.2”
5
1 Sided → 2 Sided Auto Margin: T to B Metric version: T/B 0 mm
Inch version: T/B 0”
Erase Border Width Metric version: 10 mm
Inch version: 0.4”
Erase Original Shadow in Combine Yes
Erase Center Width Metric version: 10 mm
Inch version: 0.4”
Edit 2/2 ⇒ p.102 “Edit
Image Repeat Separation Line None
Double Copies Separation Line None
Separation Line in Combine None
Copy Back Cover Outside
Front Cover Copy in Combine Combine
Copy on Designating Page in Combine Combine
Orientation: Booklet, Magazine Open to left
Copy Order in Combine From left to right
2
/2”
Stamp ⇒ p.104 “Stamp”
Background Numbering Size Normal
92
Density Normal
Page 15
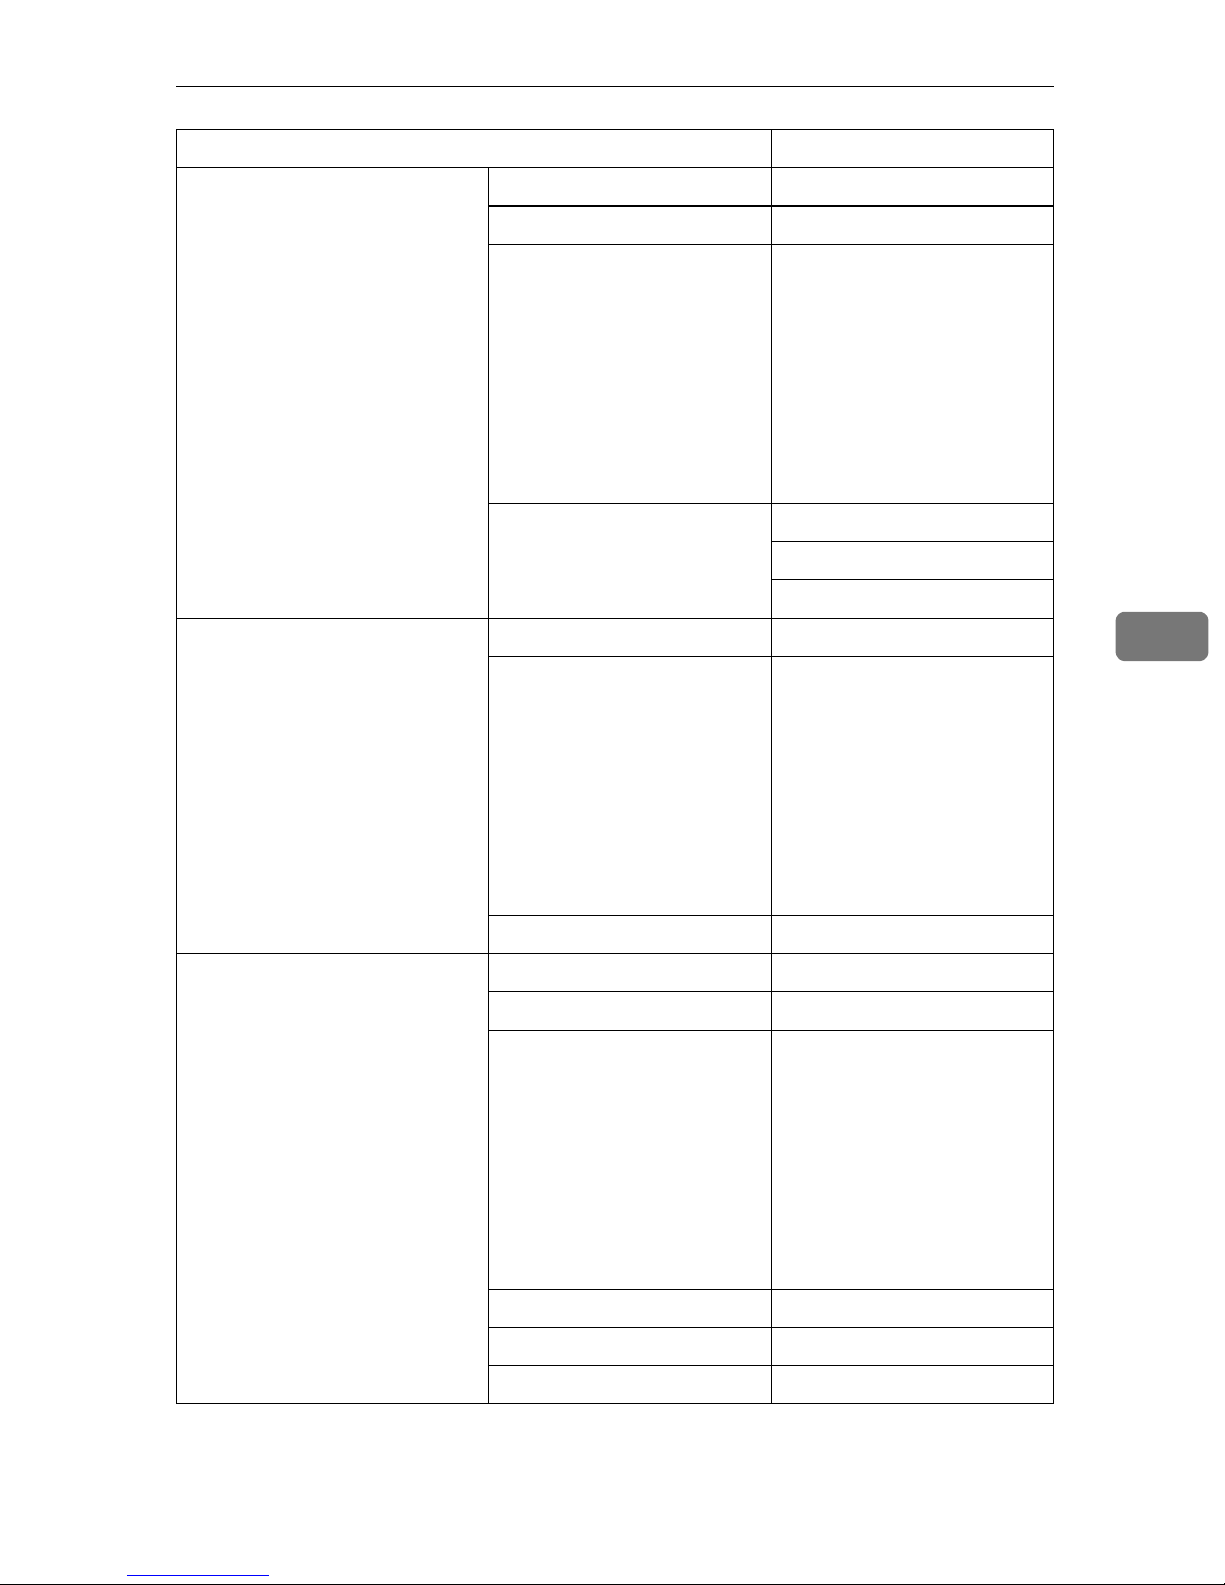
User Tools Menu (Copier/Document Server Features)
User Tools Item Names Default Settings
Preset Stamp Stamp Priority Copy
Stamp Language English
Stamp Position Metric version
• Position: Top right
• Top Margin: 24 mm
• Right Margin: 24 mm
Inch version
• Position: Top right
• Top Margin: 1.0"
• Right Margin: 1.0"
Stamp Format Size: 1×
Density: Normal
All pages
User Stamp Program/Delete Stamp
Stamp Position: 1~4 Metric version
• Position: Top right
• Top Margin: 24 mm
• Right Margin: 24 mm
Inch version
• Position: Top right
• Top Margin: 1.0"
• Right Margin: 1.0"
Stamp Format : 1~4 All pages
Date Stamp Format MM/DD/YYYY
Font Font 1
Stamp Position Metric version
• Position: Top left
• Top Margin: 8 mm
• Right Margin: 32 mm
Inch version
• Position: Top left
• Top Margin: 0.3"
• Right Margin: 0.8"
5
Stamp Setting All pages
Size Auto
Superimpose No
93
Page 16
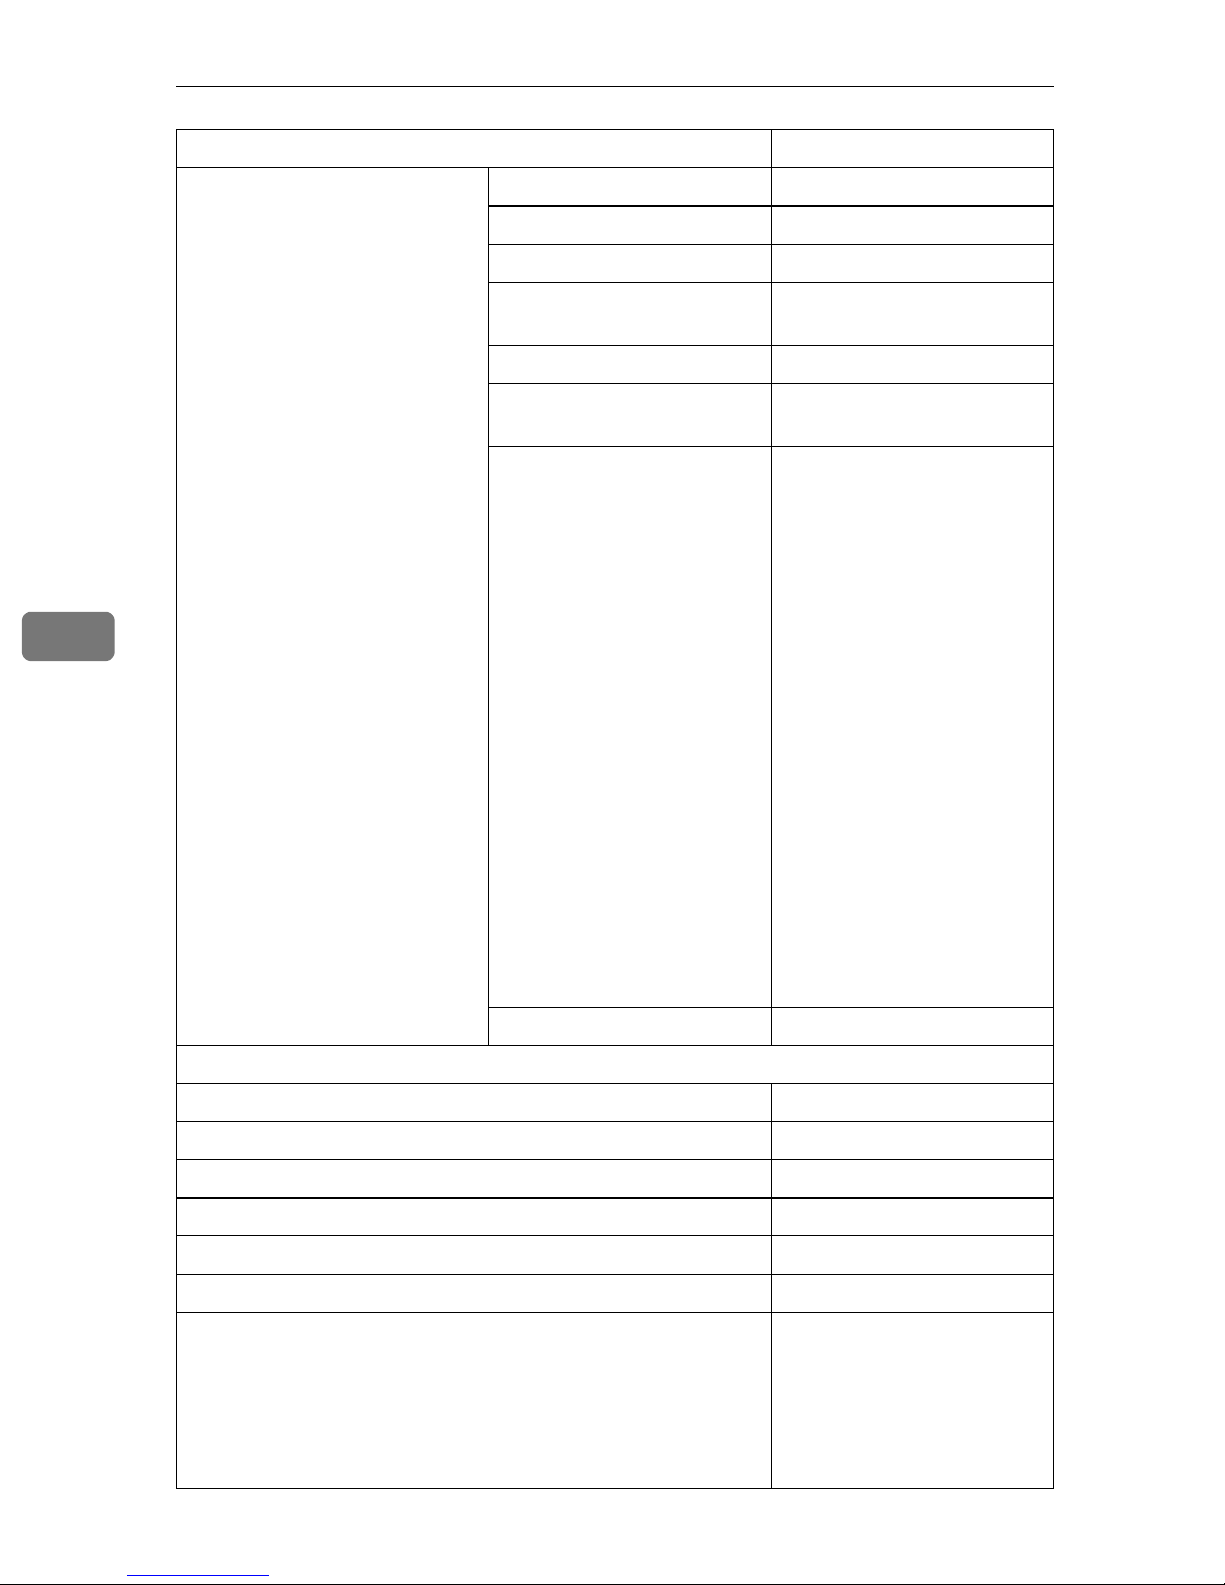
User Tools (Copy/Document Server Features)
User Tools Item Names Default Settings
Page Numbering Stamp Format P1, P2...
Font Font 1
Size Auto
5
Duplex Back Page Stamping
Position
Page Numbering in Combine Per original
Stamp on Designated Slip
Sheet
Stamp Position Metric version
Opposite position
No
• Position
P1, 1/5, P.1, 1: Top right
-1-, 1–1: Bottom center
• Top/Bottom Margin
P1, 1/5, P.1, 1: 12 mm
-1-, 1–1: 8 mm
• Left/Right Margin
P1, 1/5, P.1, 1: 12 mm
-1-, 1–1: 0 mm
Inch version
• Position
P1, 1/5, P.1, 1: Top right
-1-, 1–1: Bottom center
• Top/Bottom Margin
P1, 1/5, P.1, 1: 0.5"
-1-, 1–1: 0.3"
• Left/Right Margin
P1, 1/5, P.1, 1: 0.5"
-1-, 1–1: 0.0"
Input/Output
Switch to Batch Batch
SADF Auto Reset 5 seconds
Rotate Sort: Auto Paper Continue No
Auto Sort No
Memory Full Auto Scan Restart No
Select Stapling Position (Top Left) Top
Select Stapling Position (Bottom Left) Finisher 3000B(100-sheet sta-
1
/2 ⇒ p.106 “Input/Output 1/2”
94
Superimpose No
ples): Top Slant
Finisher 3000M(50-sheet staples): Top Slant
Booklet Finisher: Saddle
Stitch
Page 17
User Tools Menu (Copier/Document Server Features)
User Tools Item Names Default Settings
Select Stapling Position (Top Right) Top 2
Select Stapling Position (Bottom Right) Left 2
Input/Output
Select Stack Function Stack
Select Punch Type 3 holes
Letterhead Setting No
Eject Copy Face Up/Down in Glass Mode Face up
Eject Copy Face Up/Down in Bypass Mode Face up
*1
The 4–hole punch type is only capable of punching in the 4–hole format.
2
/2 ⇒ p.107 “Input/Output2/2”
*1
5
95
Page 18
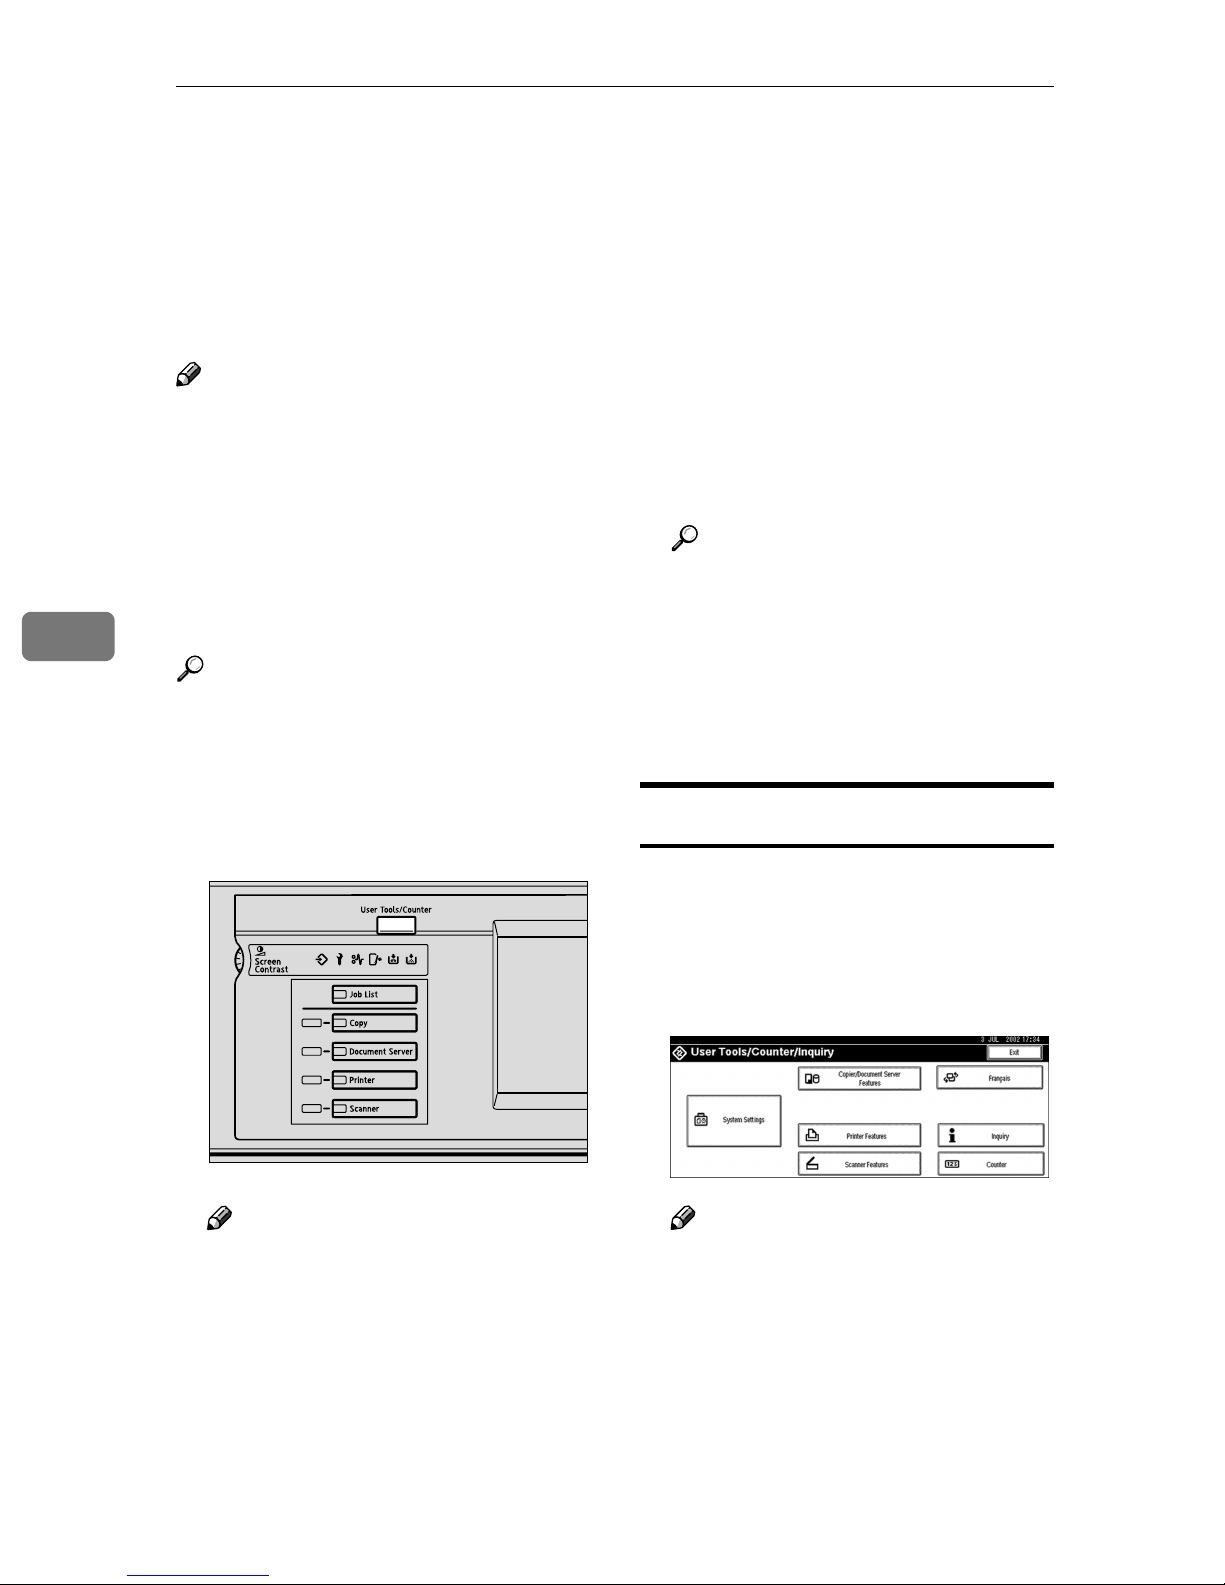
User Tools (Copy/Document Server Features)
Accessing User Tools (Copy/Document
Server Features)
5
This section is for key operators in
charge of this machine. You can
change default settings.
Note
❒ Be sure to exit from User Tools af-
ter all settings are finished.
❒ Selected keys are highlighted.
❒ Any changes you make with User
Tools remain in effect even if the
main power switch or operation
switch is turned off, or the {{{{Clear
Modes}}}} key is pressed.
Reference
For details, see "User Tools (System Settings)" in the General Settings Guide.
Press the {{{{User Tools/Counter}}}} key.
AAAA
User Tools Main Menu appears.
Press the [Copier/Document Server
BBBB
Features] key.
The Copier/Document Server Features menu appears.
Select the menu you want to set.
CCCC
Setting screens for each menu will
be displayed.
Reference
⇒ p.89 “ User Tools Menu
(Copier/Document Server Features)”
Change settings by following the
DDDD
instructions on the display panel,
and then press the [OK] key.
Exiting From User Tools
ZGVS060E
Note
❒ When the access code is set, the
access code input screen is displayed when changing the initial settings. Operate by
entering the registered access
code beforehand. For access
code, see “Key Operator Tools”
in the General Settings Guide.
After changing User Tools set-
AAAA
tings, press the [Exit] key on the
User Tools Main Menu.
User Tool changes are complete,
and the machine is ready to copy.
Note
❒ You can also exit from User
Tools by pressing the {{{{User
Tools/Counter}}}} key.
96
Page 19
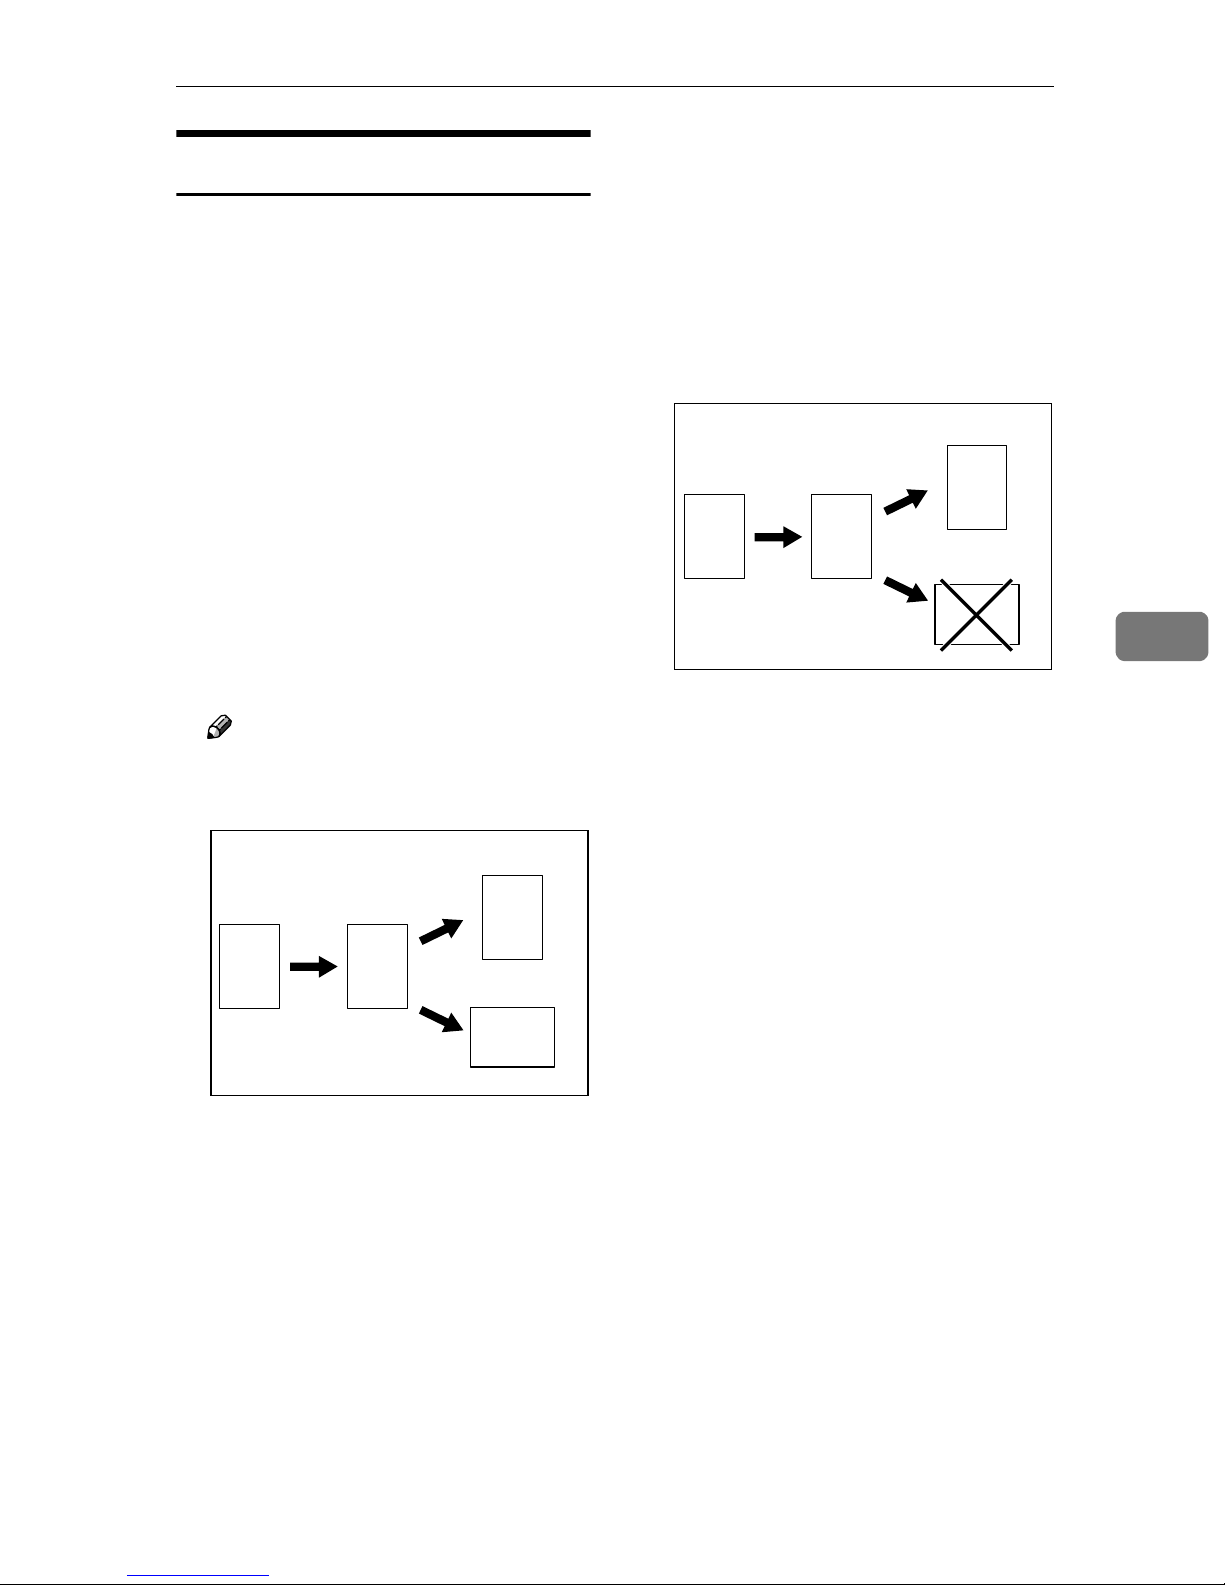
General Features 1/
5
❖❖❖❖ Auto Paper Select Priority
You can choose to have“Auto Paper Select” selected when the machine is turned on or reset, or
modes are cleared. ⇒ p.27 “Select-
ing Copy Paper”
Accessing User Tools (Copy/Document Server Features)
❒ [Without image rotation] Only cop-
ies with Auto Tray Switching if
you load paper of the same size
and in the same direction in two
or more trays. If the paper is not
the same size or in the same direction, copying is interrupted
and the message "Load paper."
is displayed.
❖❖❖❖ Auto Tray Switching
If you load paper of the same size
in two or more trays, the machine
automatically shifts to the other
tray when the tray in use runs out
(when Auto Paper Select is selected.) This function is called "Auto
Tray Switching". This setting specifies whether to use "Auto Tray
Switching" or not.
Note
❒ [With image rotation] Use this to
copy with Auto Tray Switching.
3
3
1
2
4
1. Original
2. Paper (Tray 1)
3. Paper (Tray 2)
4. Paper (Tray 3)
❒ [OFF] When a paper tray runs
out, copying is interrupted and
the message "Load paper." is
displayed.
5
ZGVX030E
1
2
1. Original
2. Paper (Tray 1)
3. Paper (Tray 2)
4. Paper (Tray 3)
❖❖❖❖ Paper Display
You can choose to have available
4
ZGVX020E
paper trays/sizes shown on the
initial display.
97
Page 20
User Tools (Copy/Document Server Features)
5
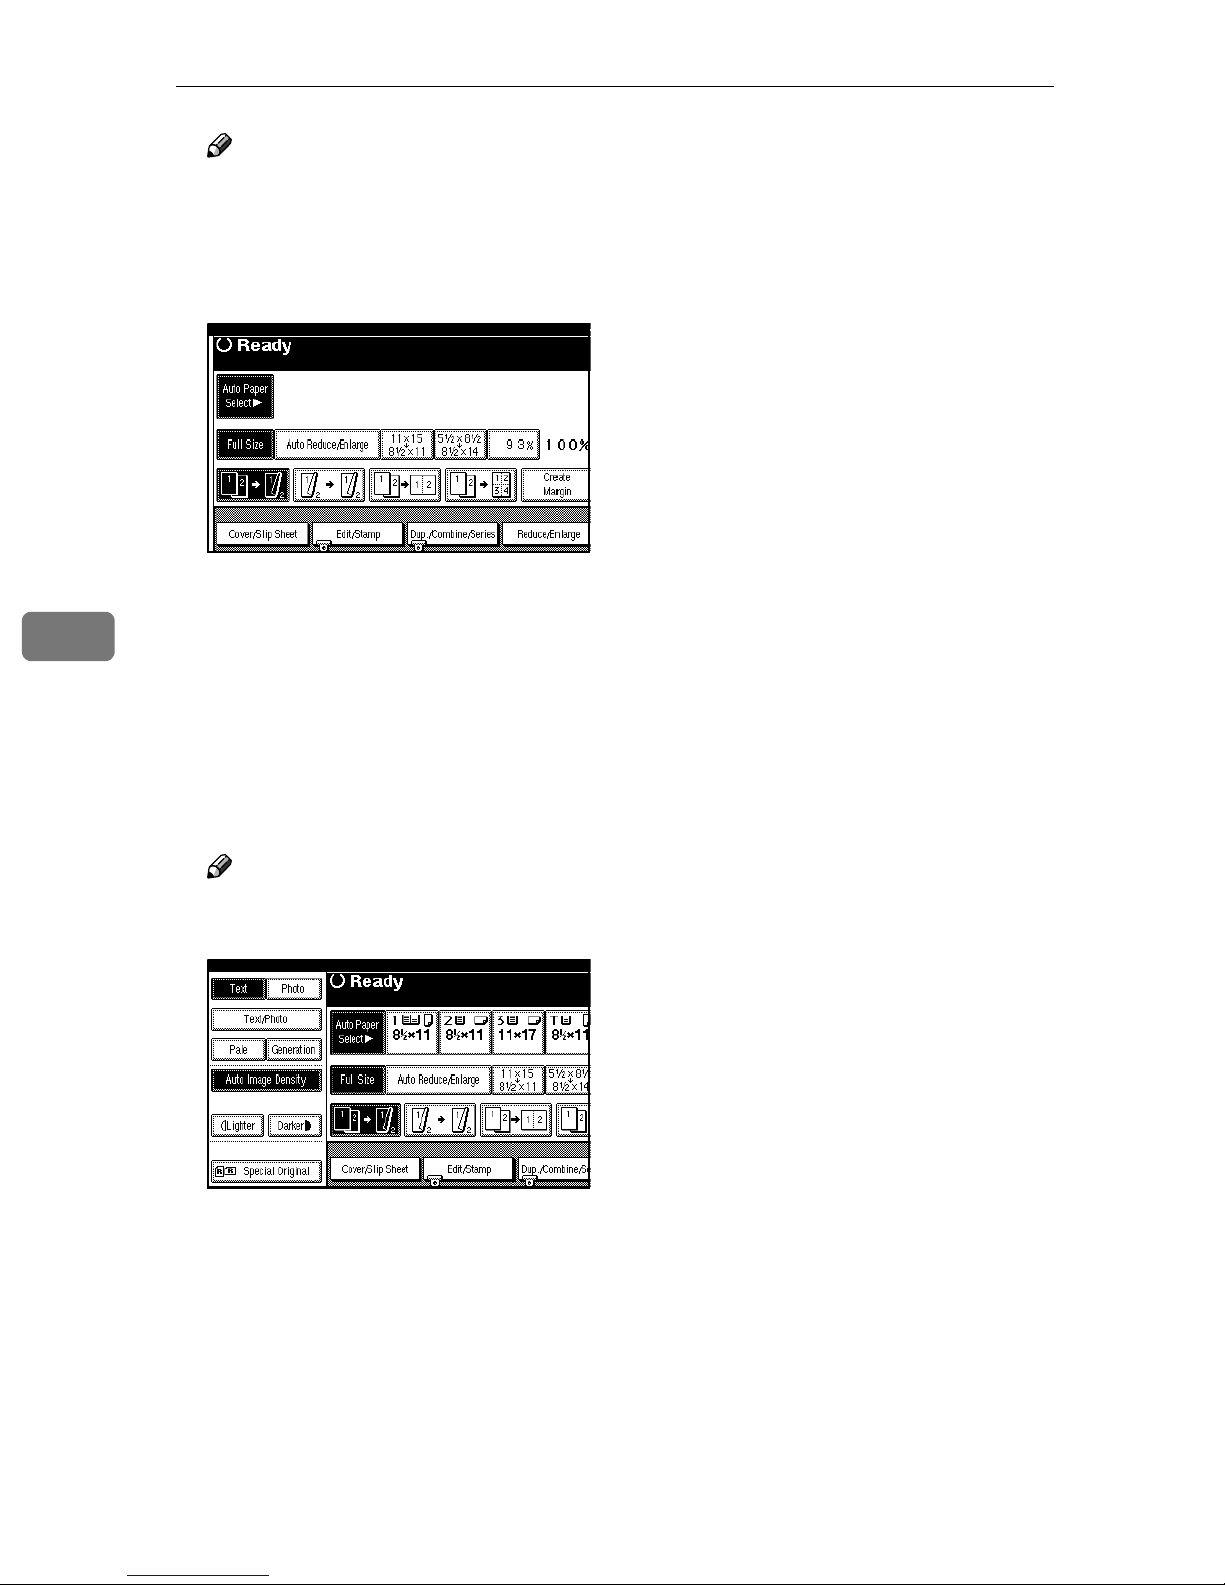
Note
❒ If you choose "Hide", the dis-
play is shown as below. When
the [Auto Paper Select] key is
pressed, paper sizes appear on
the display.
❖❖❖❖ Original Type Priority
You can select the type of originals
effective when the machine is
turned on or reset, or when modes
are cleared.
❖❖❖❖ Original Type Display
You can choose to have original
types shown on the initial display.
Note
❒ If you choose "Hide", the dis-
play is shown as below.
❖❖❖❖ Copy Quality
You can adjust the quality level for
each original type (Text, Text/Photo, Photo, Pale, Generation Copy).
• Text
Adjust sharpness.
• Text/Photo
When there are photo(s) and
text on the original, determine
which takes priority.
• Photo
For a photo original, adjust the
finish quality level to match the
photo original.
• Pale
Adjust the quality level for a
pale original with normal density.
• Generation Copy
Adjust the quality level so as
not to thicken the lines of the
finish image.
❖❖❖❖ Image Density
You can select one of seven original image density levels for each
original type (Text, Text/Photo,
Photo, Pale, Generation Copy).
❖❖❖❖ Auto Image Density Priority
You can turn the Auto Image Density on or off for each original type
(Text, Text/Photo, Photo, Pale,
and Generation Copy).
98
Page 21
General Features 2/
Accessing User Tools (Copy/Document Server Features)
❖❖❖❖ Job End Call
5
You can choose to have the beeper
sound when copying is complete.
❖❖❖❖ Duplex Mode Priority
You can select the type of Duplex
function effective when the machine is turned on or reset, or when
modes are cleared.
❖❖❖❖ Copy Orientation in Duplex Mode
You can set copy orientation when
making two-sided copies.
❖❖❖❖ Original Orientation in Duplex Mode
You can set original orientation
when making two-sided copies.
❖❖❖❖ Change Initial Mode
You can select the initial mode or
Program No. 10 as the mode effective when the machine is turned on
or reset, or when modes are
cleared.
❖❖❖❖ Max. Copy Quantity
The maximum copy quantity can
be between 1 and 999.
Note
❒ If the "Panel Tone" in the User
Tools (System Settings) is "On",
the machine beeps to notify you
if it did not complete a job, for
reasons such as: copying was interrupted, the paper tray ran
out of paper or a paper jam occurred.
General Features 3/
5
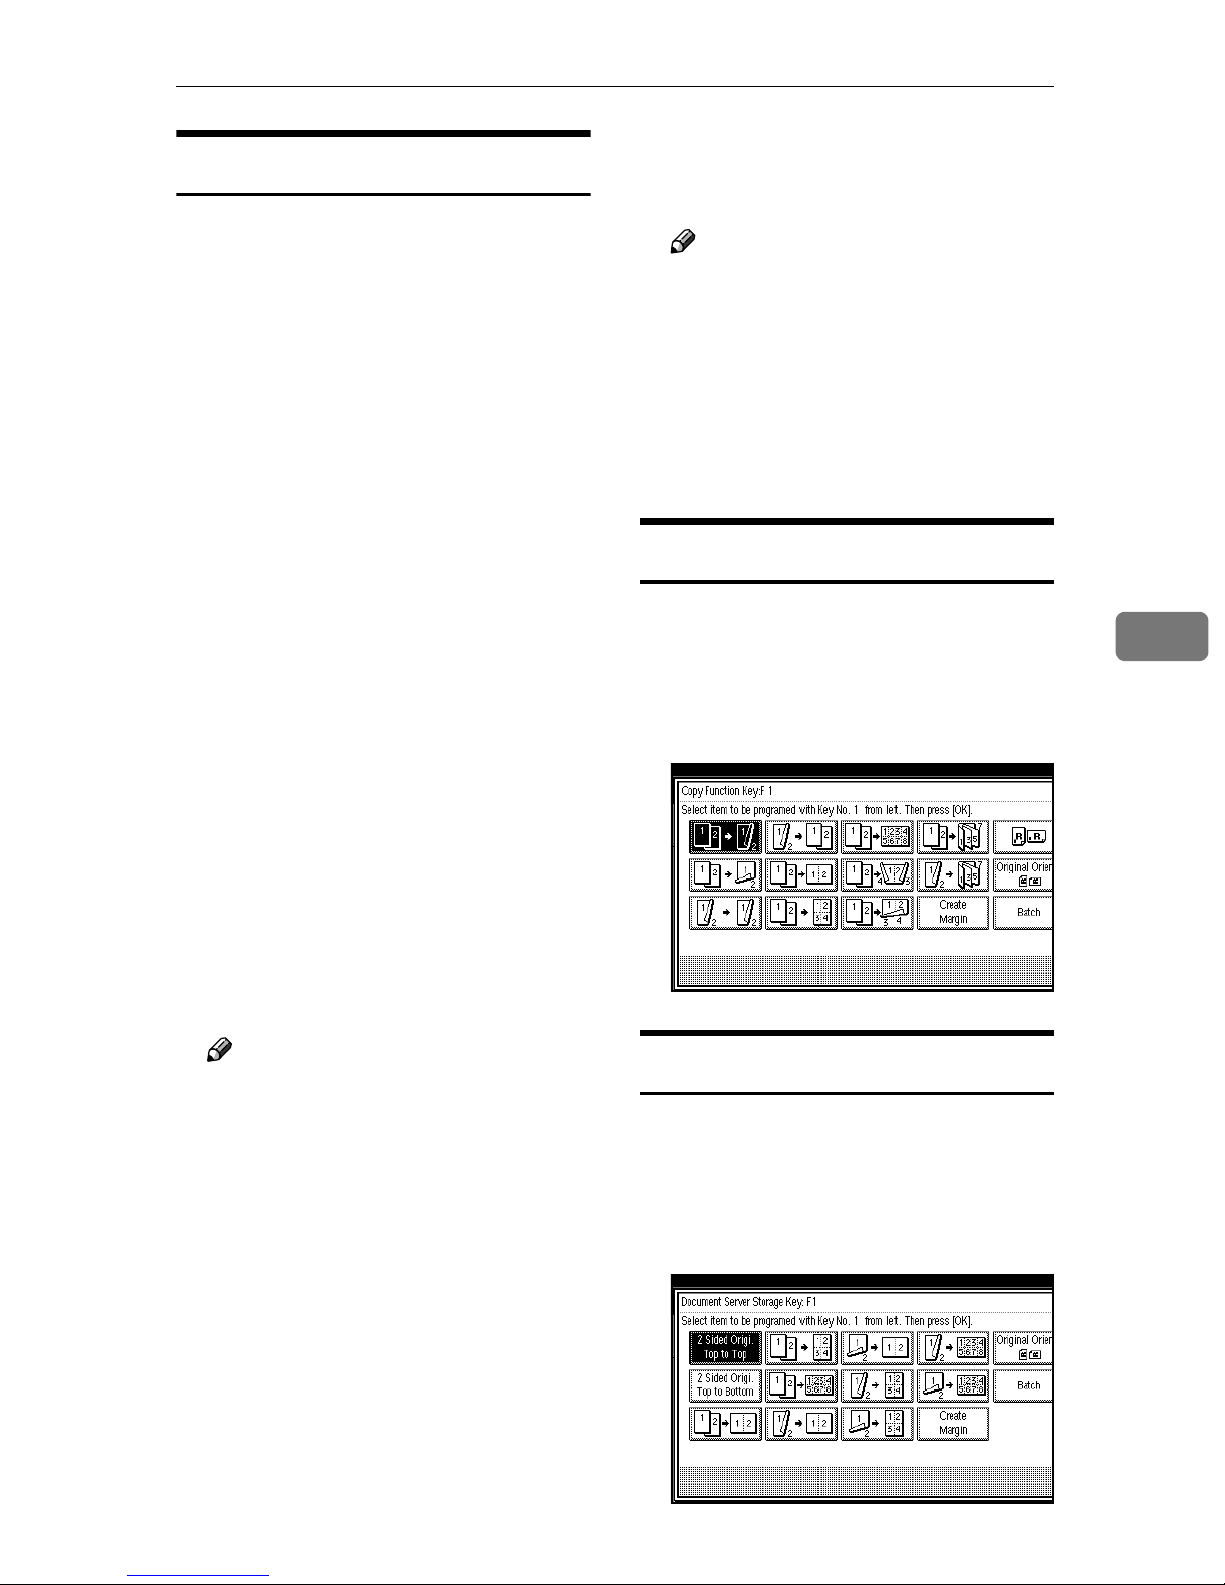
❖❖❖❖ Copy Function Key: F1–F5
You can register frequently used
functions in function keys F1 to F5.
You can also change registered
functions.
5
❖❖❖❖ Tone: Original remains
The beeper (key tone) sounds
when you forget to remove originals after copying.
Note
❒ If the "Panel Tone" in User Tools
(System Settings) is "Off", the
beeper does not sound irrespective of the "Tone: Original remains" setting. ⇒"Panel Tone"
in the General Settings Guide
General Features 4/
5
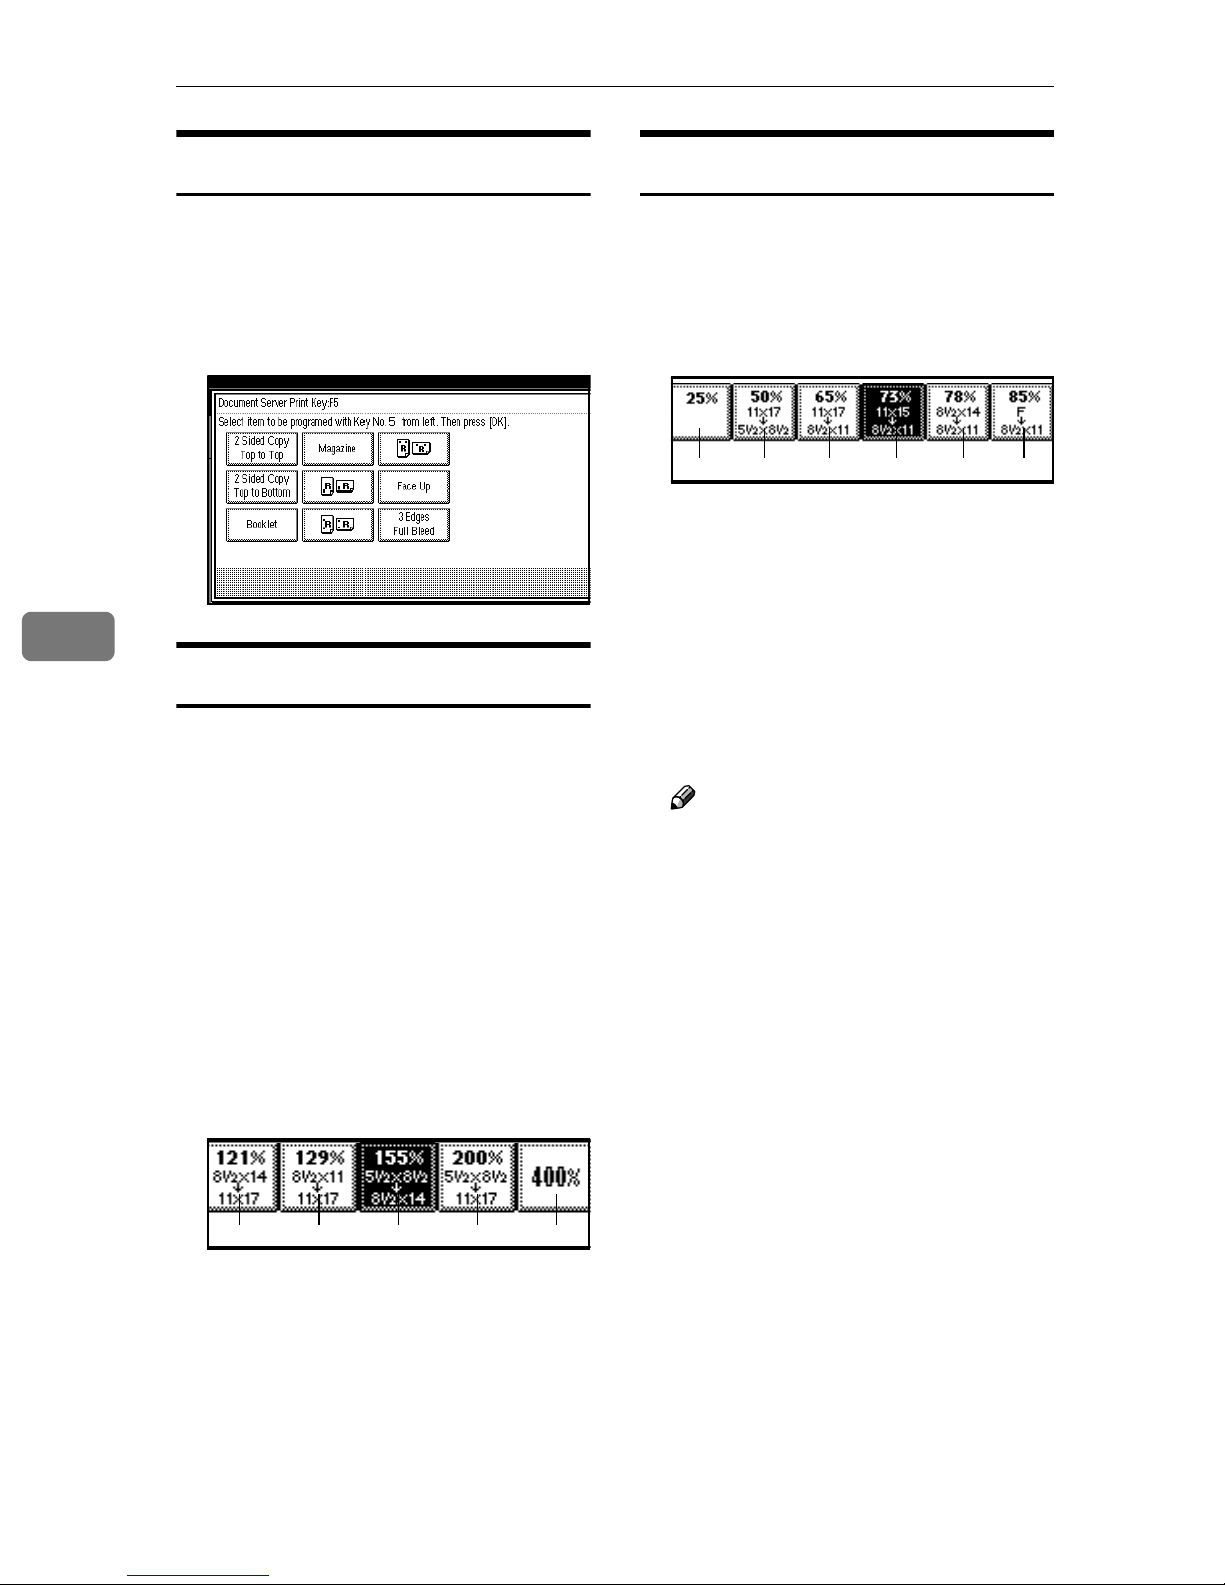
❖❖❖❖ Document Server Storage Key: F1–F5
You can register frequently used
functions in function keys F1 to F5.
You can also change registered
functions.
99
Page 22
User Tools (Copy/Document Server Features)
5
General Features 5/
5
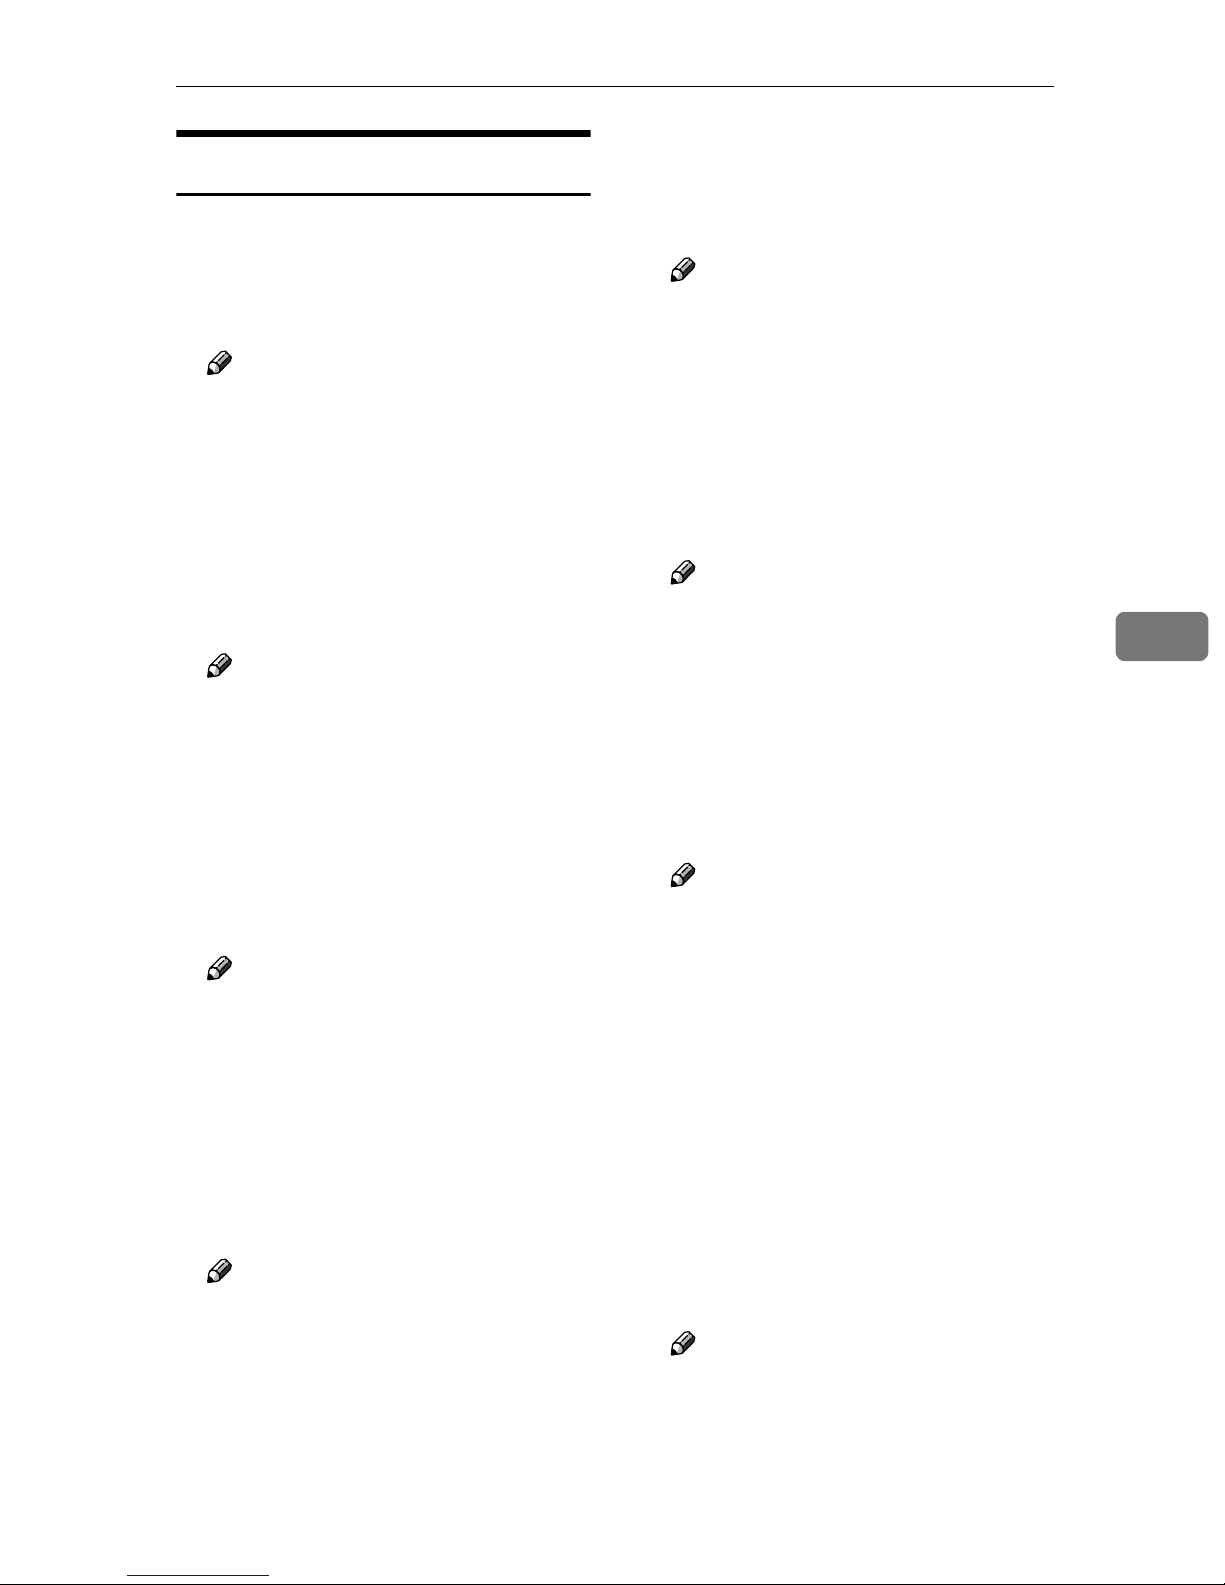
❖❖❖❖ Document Server Print Key: F1–F5
You can register frequently used
functions in function keys F1 to F5.
You can also change registered
functions.
Reproduction Ratio 1/
2
❖❖❖❖ Shortcut R/E 1–3
You can register up to three frequently used Reduce/Enlarge ratios other than the fixed
Reduce/Enlarge ratio and have
them shown on the initial display.
You can also change the registered
Reduce/Enlarge ratios.
❖❖❖❖ Enlarge 1–5
You can customize available enlargement ratios when you press
the [Reduce/Enlarge] key followed
by the [Enlarge] key.
Reproduction Ratio 2/
2
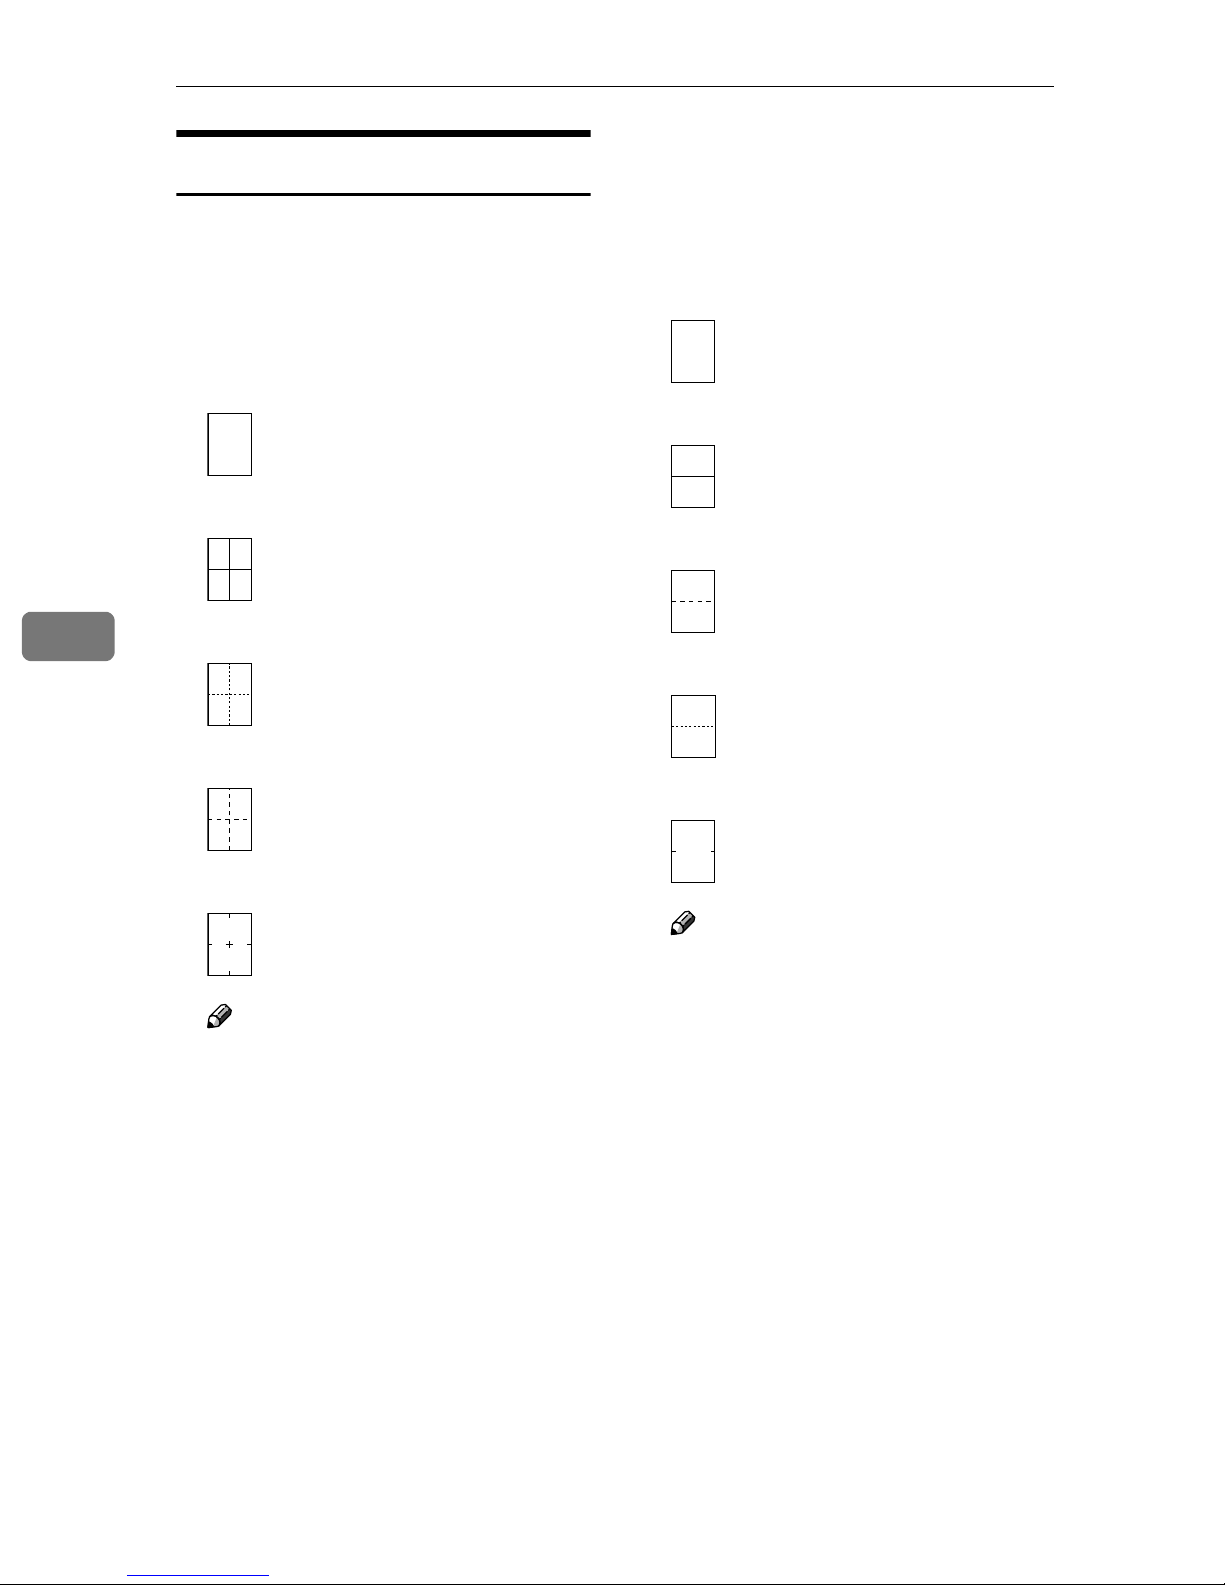
❖❖❖❖ Reduce 1–6
You can customize available reduction ratios when you press the
[Reduce/Enlarge] key followed by
the [Reduce] key.
Reduce1 Reduce2 Reduce3 Reduce4 Reduce5 Reduce6
❖❖❖❖ Priority Setting: Reduce
You can set the priority ratio when
the [Reduce/Enlarge] key is pressed,
followed by the [Reduce] key.
❖❖❖❖ Ratio for Create Margin
You can set a Reduce/Enlarge ratio when registering "Create Margin" in a Shortcut Key.
Note
❒ You can enter a ratio between 90
and 99 (in increments of 1%)
with the number keys.
❖❖❖❖ R/E Priority
Specifies the tab given priority on
the display panel when the [Re-
duce/Enlarge] key is pressed.
Enlarge1 Enlarge2 Enlarge3 Enlarge4 Enlarge5
❖❖❖❖ Priority Setting: Enlarge
You can set the priority ratio when
the [Reduce/Enlarge] key is pressed,
followed by the [Enlarge] key.
100
Page 23
Edit 1/
2
❖❖❖❖ Front Margin : Left/Right
You can specify left and right margins on the front side of copies in
Margin Adjust mode.
Note
❒ You can enter a margin width of
between 0 and 30 mm in 1 mm
increments (0” and 1.2” in 0.1”
steps) with the number keys.
❖❖❖❖ Back Margins : Left/Right
You can specify left and right margins on the back side of copies in
Margin Adjust mode.
Note
❒ You can enter a margin width of
between 0 and 30 mm in 1 mm
increments (0” and 1.2” in 0.1”
steps) with the number keys.
❖❖❖❖ Front Margin : Top/Bottom
You can specify top and bottom
margins on the front side of copies
in Margin Adjust mode.
Note
❒ You can enter a margin depth of
between 0 and 30 mm in 1 mm
increments (0” and 1.2” in 0.1”
steps) with the number keys.
❖❖❖❖ Back Margin : Top/Bottom
You can specify top and bottom
margins on the back side of copies
in Margin Adjust mode.
Note
❒ You can enter a margin depth of
between 0 and 30 mm in 1 mm
increments (0” and 1.2” in 0.1”
steps) with the number keys.
Accessing User Tools (Copy/Document Server Features)
❖❖❖❖ 1 sided→→→→2 sided Auto Margins:T to T
In 1 sided → 2 sided Duplex mode,
you can specify the margins on the
back side.
Note
❒ You can enter a margin width of
between 0 and 30 mm in 1 mm
increments (0” and 1.2” in 0.1”
steps) with the number keys.
❖❖❖❖ 1 sided→→→→2 sided Auto Margins :T to B
In 1 sided → 2 sided Duplex mode,
you can specify the margins on the
back side.
Note
❒ You can enter a margins depth
of between 0 and 30 mm in 1
mm increments (0” and 1.2” in
0.1” steps) with the number
keys.
❖❖❖❖ Erase Border Width
Specify the width of erased border
margins using this function.
Note
❒ You can enter a width of be-
tween 2 and 99 mm in 1 mm increments (0” and 1.2” in 0.1”
steps) with the number keys.
❖❖❖❖ Erase Original Shadow in Combine
In Combine Copy mode, you can
erase a 3 mm, 0.1" boundary margin around all four edges of originals.
❖❖❖❖ Erase Center Width
You can specify the width of the
erased center area using this function.
Note
❒ You can enter a width of be-
tween 2 and 99 mm in 1 mm increments (0” and 1.2” in 0.1”
steps) with the number keys.
5
101
Page 24
User Tools (Copy/Document Server Features)
Edit 2/
2
❖❖❖❖ Image Repeat Separation Line
You can select a separation line in
Image Repeat mode: None, Solid,
Broken A, Broken B or Crop
Marks.
• None
• Solid
❖❖❖❖ Double Copies Separation Line
You can select a separation line in
Double Copy mode: None, Solid,
Broken A, Broken B or Crop
Marks.
• None
• Solid
• Broken A
5
• Broken A
• Broken B
• Crop Marks
Note
❒ An image of approximately 1.5
mm (0.06”) will not be copied as
the width of the separation line,
when specifying solid or broken
lines.
• Broken B
• Crop Marks
Note
❒ An image of approximately 1.5
mm (0.06”) will not be copied as
the width of the separation line,
when specifying solid or broken
lines.
102
Page 25
Accessing User Tools (Copy/Document Server Features)
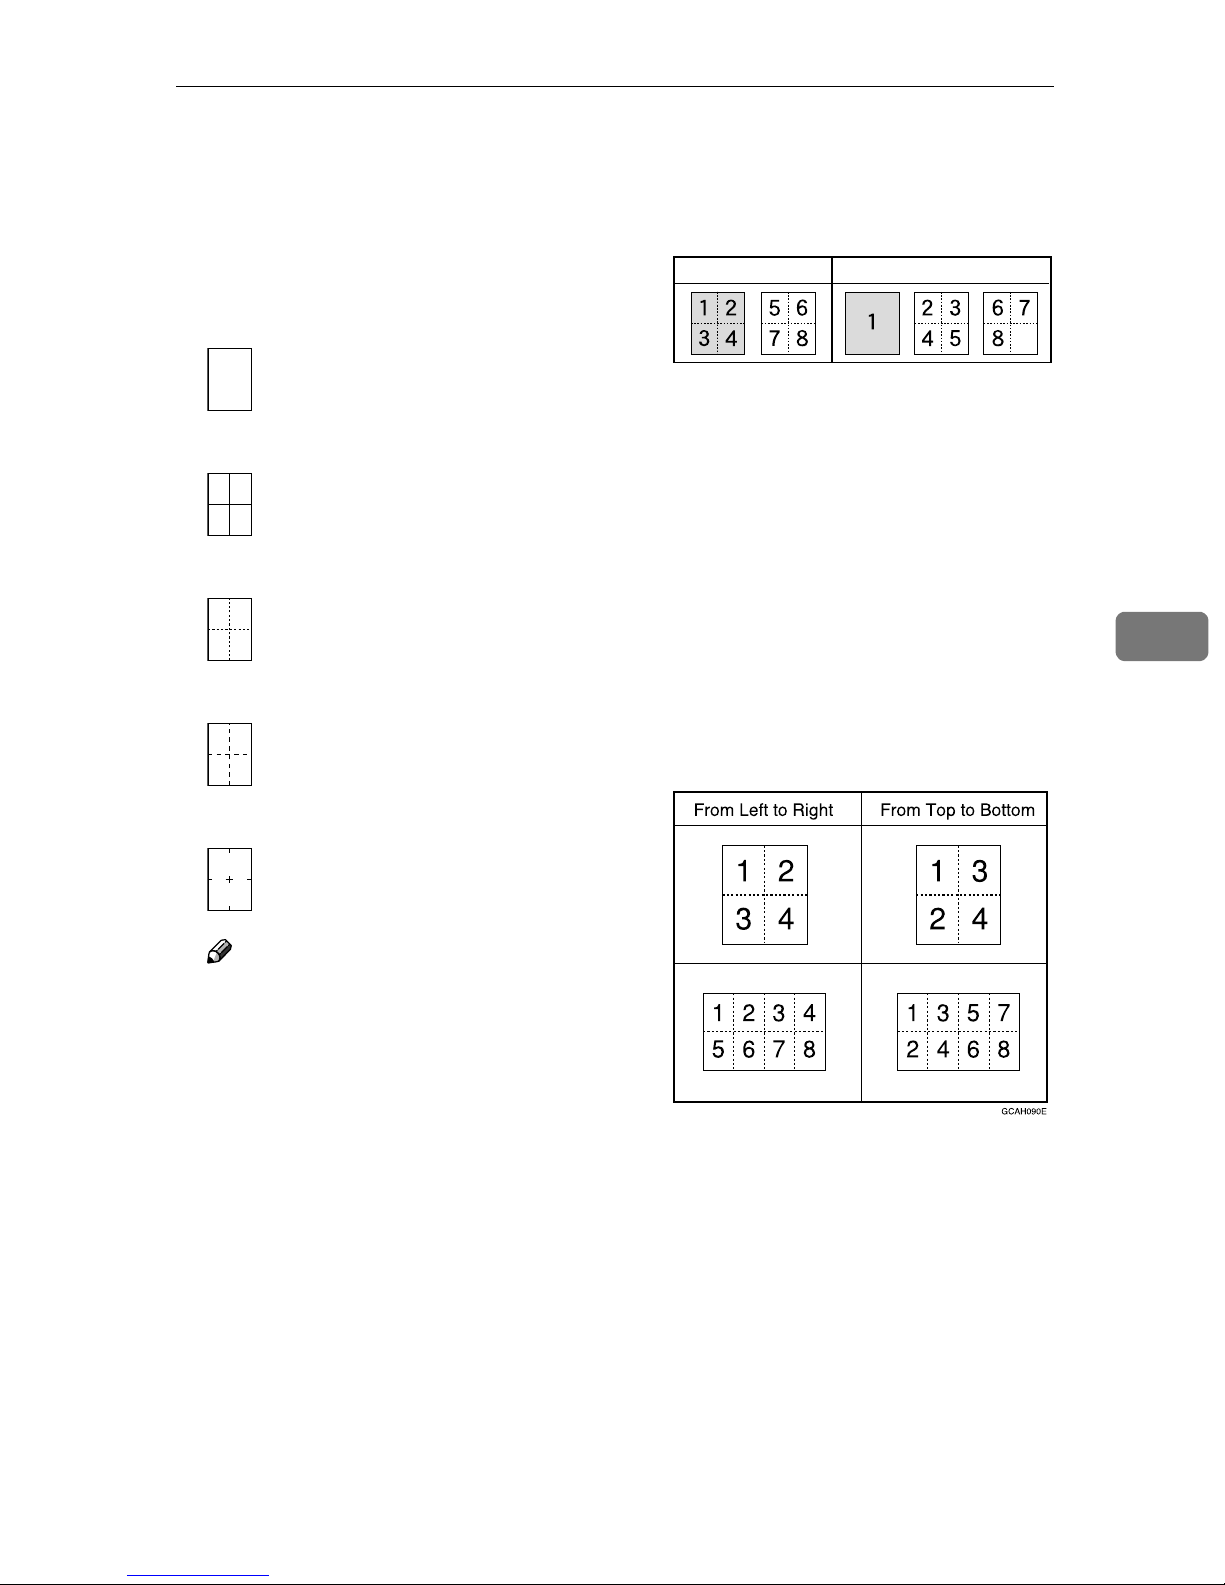
❖❖❖❖ Separation Line in Combine
You can select a separation line in
Combine mode: None, Solid, Broken A, Broken B or Crop Marks. ⇒
p.45 “1 Sided Combine”, ⇒ p.47 “2
Sided Combine”
• None
• Solid
• Broken A
• Broken B
❖❖❖❖ Front Cover Copy in Combine
You can make a combined copy on
the front cover sheet when you select Front Cover copy mode.
Combine Not Combined
GCST019E
❖❖❖❖ Copy on Designating Page in Com-
bine
You can make a combined copy on
a designated paper.
❖❖❖❖ Orientation: Booklet, Magazine
You can select the type of originals
for Booklet or Magazine mode.
5
❖❖❖❖ Copy Order in Combine
You can set the copy order in Combine mode to "Left to Right" or
"Top to Bottom".
• Crop Marks
Note
❒ An image of approximately 1.5
mm (0.06”) will not be copied as
the width of the separation line,
when specifying solid or broken
lines.
❖❖❖❖ Copy Back Cover
When copying the back cover, you
can specify whether to have the
back cover outside (outside page)
or inside (inside page).
103
Page 26
User Tools (Copy/Document Server Features)
5
Stamp
Background Numbering
❖❖❖❖ Size
You can set the size of the numbers.
❖❖❖❖ Density
You can set the density of the numbers.
Preset Stamp 1/4-4/
❖❖❖❖ Stamp Priority
You can select the priority stamp
type when the [Preset Stamp] key is
pressed. ⇒ p.63 “Preset Stamp”
❖❖❖❖ Stamp Language
You can select the language of the
message that is printed in Stamp
mode.
❖❖❖❖ Stamp Position
You can set the position at which
the stamp is printed.
Press the arrow keys to adjust the
position.
4
Note
❒ Normal: The stamp is print-
ed on the image. You cannot
confirm which parts overlap
the image.
❒ Lighter: The image can be
seen through the stamp.
❒ Light: You can see the image
even clearer than in the
"Lighter" setting.
• Print Page
You can select whether the
stamp is printed on the first
page or all pages.
User Stamp 1/2-2/
2
❖❖❖❖ Program/Delete Stamp
You can register/change/delete
designs you like as user stamps.
Note
❒ You can register up to 4 custom
stamps with your favorite designs. ⇒ p.66 “To program the
user stamp”
Reference
For how to delete stamps, see
p.67 “To delete the user stamp”
❖❖❖❖ Stamp Format
You can adjust the size, density
and print page for the stamp.
• Size
You can set the size of the
stamp.
• Density
You can set the pattern used to
print the stamp.
104
❖❖❖❖ Stamp Position
You can set the position at which
the stamp is printed.
Press the arrow keys to adjust the
position.
❖❖❖❖ Stamp Format
You can adjust the print page for
User Stamps 1 to 4 that you registered.
• Stamp Page
Sets whether to print the stamp
on all pages or only the first
page.
Page 27

Accessing User Tools (Copy/Document Server Features)
Date Stamp
❖❖❖❖ Format
You can select the date format for
Date Stamp mode.
❖❖❖❖ Font
You can select the Date Stamp font.
❖❖❖❖ Stamp Position
You can set the position at which
the stamp is printed.
Press the arrow keys to adjust the
position.
❖❖❖❖ Stamp Setting
You can select whether the date is
printed on the first page or all pages.
❖❖❖❖ Size
You can set the Date Stamp size.
❖❖❖❖ Superimpose
You can select whether the Date
Stamp is printed as a negative
when it overlaps black parts of the
image.
❖❖❖❖ Duplex Back Page Stamping Position
You can set the position of the duplex back page number printed in
Duplex mode.
❖❖❖❖ Page Numbering in Combine
You can set how pages are numbered when you use the Combine
function and Page Numbering
function together.
❖❖❖❖ Stamp on Designated Slip Sheet
You can print the page number on
slip sheets when you use the Designate function set to "Copy" and
Page Numbering function together.
❖❖❖❖ Stamp Position
P1, P2...Stamp Position: 1/5,
2/5...Stamp Position: —1–, —2–
...Stamp Position: P.1, P.2...Stamp
Position: 1, 2...Stamp Position: 1–1,
1–2...
You can set the position at which
the stamp is printed.
Press the arrow keys to adjust the
position.
5
Page Numbering 1/3-2/
3
❖❖❖❖ Stamp Format
You can select the priority page
number format when the [Page
Numbering] key is pressed.
❖❖❖❖ Font
You can select the font of the page
number printed in Page Numbering mode.
❖❖❖❖ Size
You can set the size of the stamp
printed in Page Numbering mode.
❖❖❖❖ Superimpose
You can select whether page numbers are printed as a negative
when they overlap black parts of
the image.
105
Page 28
5
User Tools (Copy/Document Server Features)
Input/Output 1/
2
❖❖❖❖ Switch to Batch (SADF)
You can have Batch mode or SADF
mode have displayed when you
press the Special Original key. ⇒
p.14 “Batch mode”
❖❖❖❖ SADF Auto Reset
When you set one original at a time
in the document feeder, the Auto
Feed indicator lights for a selected
time after an original is fed, to
show is ready for another original.
Note
❒ You can adjust this time from 3
seconds to 99, in 1 second increments.
❖❖❖❖ Rotate Sort: Auto Paper Continue
You can specify to continue copying when paper of the required orientation has run out during rotatesorting. ⇒ p.35 “Rotate Sort”
Note
❒ If you select [No]:
• When paper of the required
orientation runs out, the machine stops copying and
prompts you to supply copy
paper. When you load paper,
the machine will continue
copying.
❒ If you select [Yes]:
• Copying continues using paper of a different orientation.
The copy job will finish even
if you have left the machine.
❖❖❖❖ Memory Full Auto Scan Restart
If memory becomes full while
scanning originals, the machine
can make copies of those already
scanned, and then automatically
resume scanning the remaining
originals.
You can enable or disable this
function.
Note
❒ If you select [No]:
• When memory becomes full,
the machine stops operation
allowing you to remove copies delivered to the output
tray.
❒ If you select [Yes]:
• You can leave the machine
unattended to make all the
copies, but the resulting pages will not be sequentially ordered.
❖❖❖❖ Select Stapling Position (Top Left)
You can register a type of stapling
used frequently in the top left staple key on the initial display. You
can also change the registered
type.
Note
❒ The Finisher 3000B(100–sheet
staples), Finisher 3000M(50–
sheet staples) or Booklet Finisher is required to use this function.
❖❖❖❖ Auto Sort
You can have Sort mode selected
when the machine is turned on or
reset, or if the mode is cleared.
106
Page 29
Accessing User Tools (Copy/Document Server Features)
❖❖❖❖ Select Stapling Position (Bottom Left)
You can register a type of stapling
used frequently in the bottom left
staple key on the initial display.
You can also change the registered
type.
Note
❒ The Finisher 3000B(100–sheet
staples), Finisher 3000M(50–
sheet staples) or Booklet Finisher is required to use this function.
❖❖❖❖ Select Stapling Position (Top Right)
You can register a type of stapling
used frequently in the top right
staple key on the initial display.
You can also change the registered
type.
❖❖❖❖ Select Stapling Position (Bottom
Right)
You can register a type of stapling
used frequently in the bottom right
staple key on the initial display.
You can also change the registered
type.
Note
❒ The Finisher 3000B(100–sheet
staples), Finisher 3000M(50–
sheet staples) or Booklet Finisher is required to use this function.
Input/Output2/
2
❖❖❖❖ Select Stack Function
Specify whether Stack or Rotate
Sort has priority on the initial display.
5
Note
❒ The Finisher 3000B(100–sheet
staples), Finisher 3000M(50–
sheet staples) or Booklet Finisher is required to use this function.
Note
❒ An optional finisher is required
to use this function.
❖❖❖❖ Select Punch Type
You can select the type of the
punch.
Note
❒ The Finisher 3000B(100–sheet
staples), Finisher 3000M(50–
sheet staples) or Booklet Finisher is required to use this function.
❒ The 4–hole punch type is only
capable of punching in the 4–
hole format.
107
Page 30

User Tools (Copy/Document Server Features)
❖❖❖❖ Letterhead Setting
If you select "Yes" in this function,
the machine rotates the image correctly.
Note
❒ Direction-fixed (top to bottom)
or 2-sided paper might not be
printed correctly depending on
how the originals and paper are
placed.
Reference
When using letterhead paper,
pay attention to the paper orientation. ⇒ p.11 “Direction-fixed
paper or 2-sided paper”
5
❖❖❖❖ Eject Copy Face Up/Down in Glass
You can specify the way in which
copies are delivered when copying
an original placed on the exposure
glass.
❖❖❖❖ Eject Copy Face Up/Down in Bypass
Mode
You can specify the way in which
copies are delivered when copying
in Bypass mode.
Note
❒ If you have selected OHP trans-
parencies or thick paper in "Special paper", you cannot have
copies delivered face down.
108
Page 31
6. Specifications
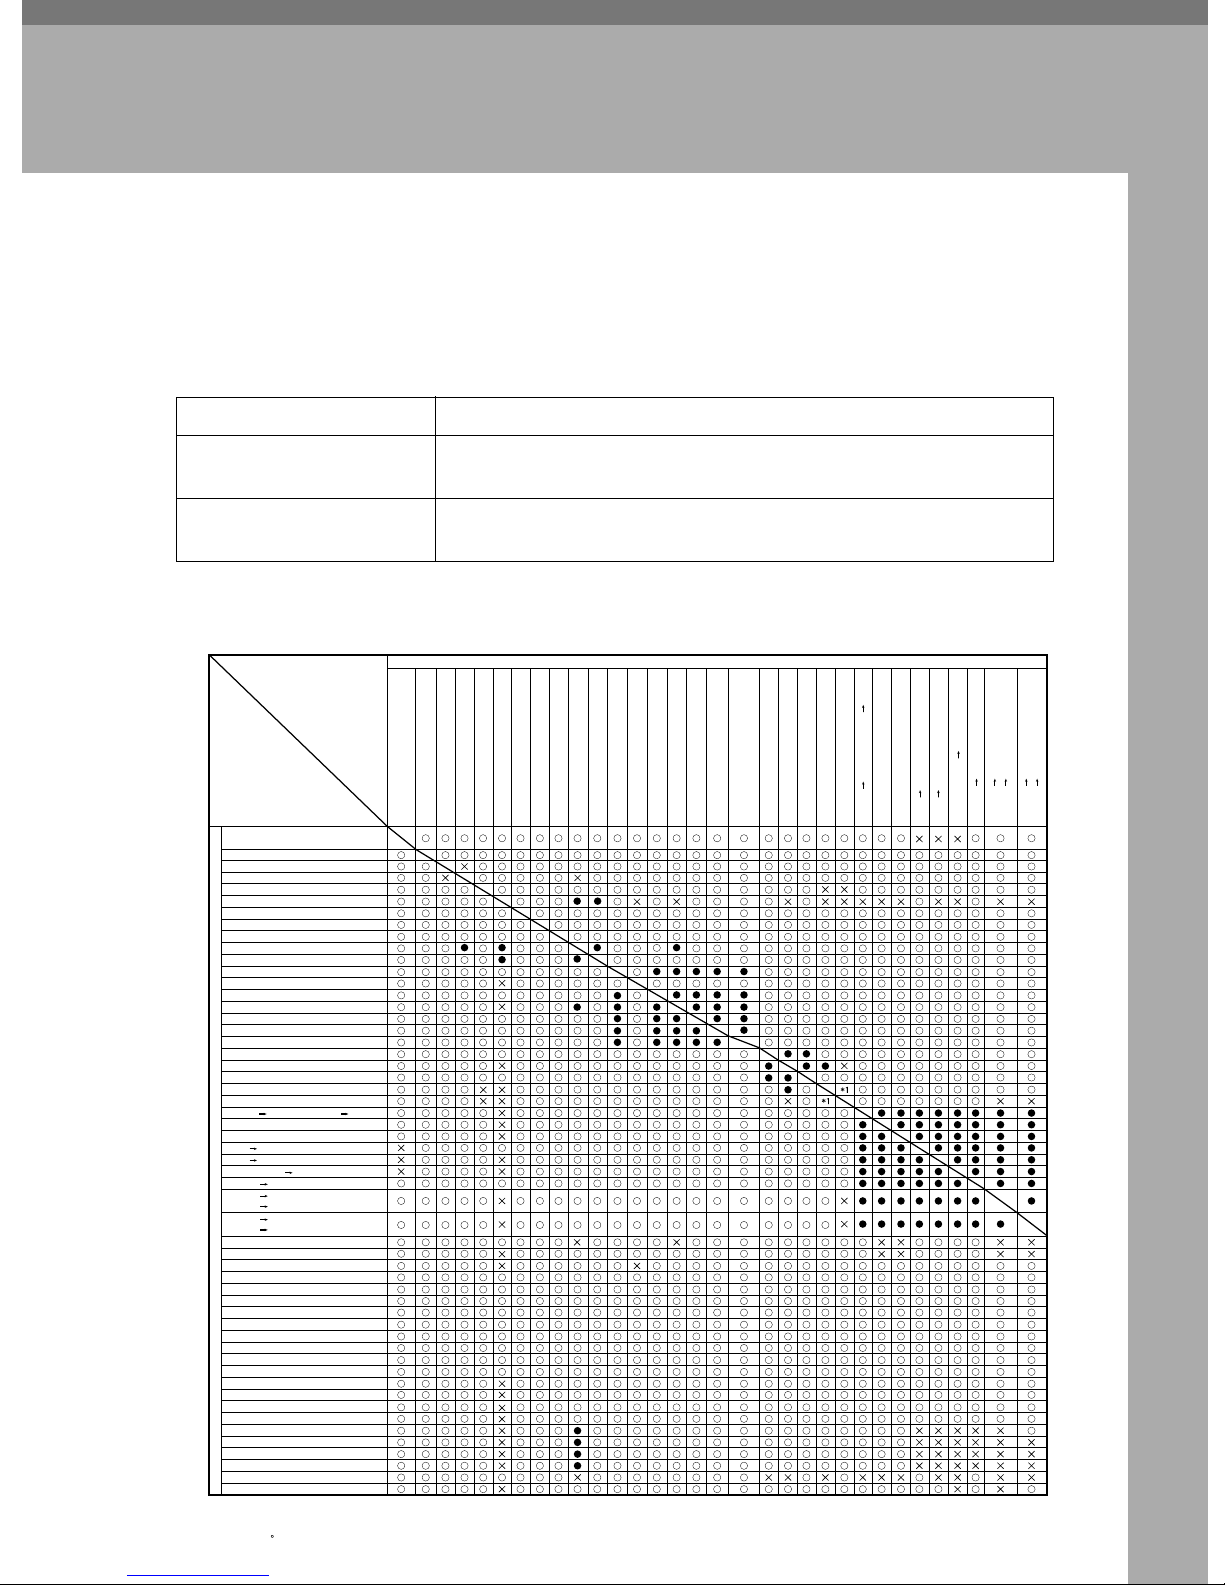
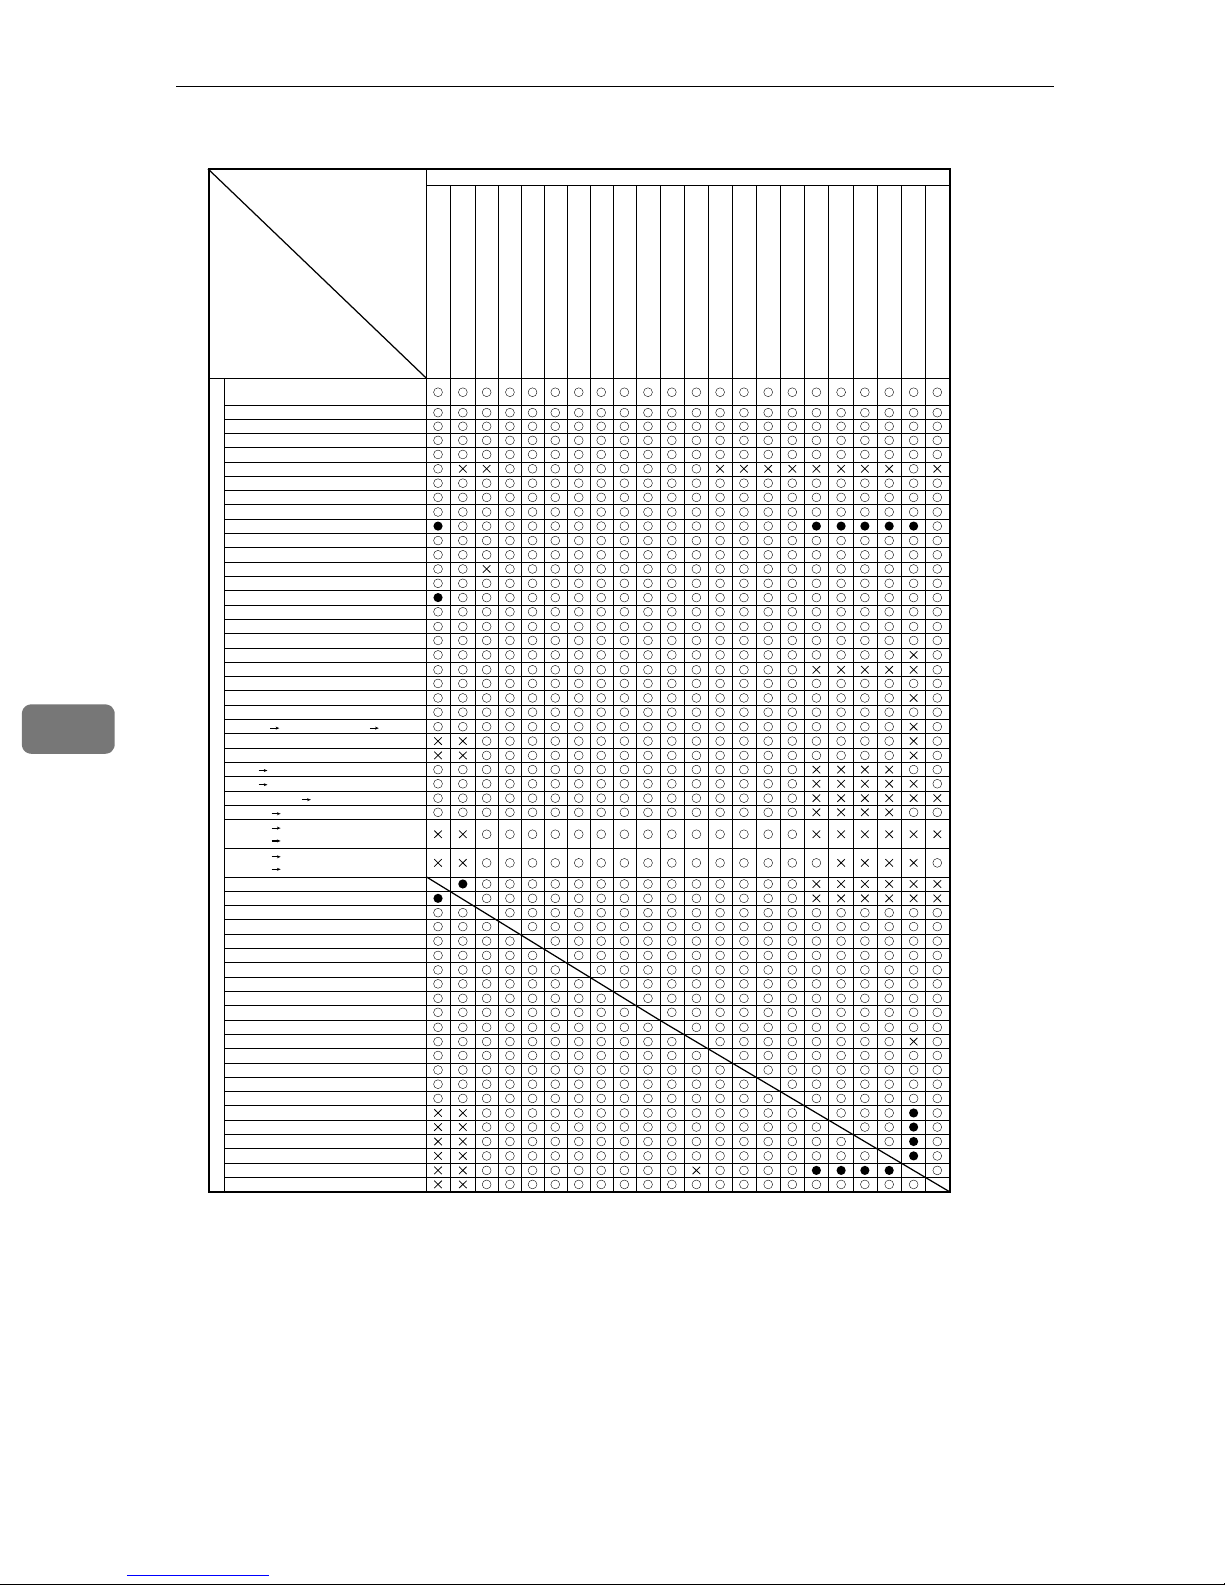
Combination Chart
The combination chart given below shows modes that can be used together.
When using the chart, note the explanations of the symbols, as given in the following table.
❍ These modes can be used together.
$ These modes cannot be used together. The second mode selected
will be the mode you're working in.
× These modes cannot be used together. The first mode selected will
be the mode you're working in.
The following shows the combinations of functions.
Function
Function
Original Orientation
(Standard Orientation)
Batch Mode
Mixed Sizes
Custom Size Originals
Face Up
Bypass Tray
Auto Image Density
Manual Image Density
Original Type Setting
Auto Paper Select
Manual Paper Select
Reduce/Enlarge
Create Margin
Zoom
Auto Reduce/Enlarge
Size Magnification
Directional Magnification(%)
Directional Size Magnification (mm)
Sort
Rotate Sort
Stack
Staple
Punch
1 Sided 2 Sided/2 Sided 2 Sided
1 Sided Combine
2 Sided Combine
Book 1 Sided
Book 2 Sided
Front & Back 2 Sided
2 Sided 1 Sided
1 Sided Booklet
2 Sided Booklet
Function selected first
1 Sided Magazine
2 Sided Magazine
Repeat
Double Copy
Centering
Scanning Position
Border Erase
Center Erase
Center/Border Erase
3 Edges Full Bleed
Inside Erase
Outside Erase
Margin Adjustment
Background Numbering
Preset Stamp
User Stamp
Date Stamp
Page Numbering
Covers
Designate
Chapter
Blank Slip Sheets
Slip Sheets
Document Server
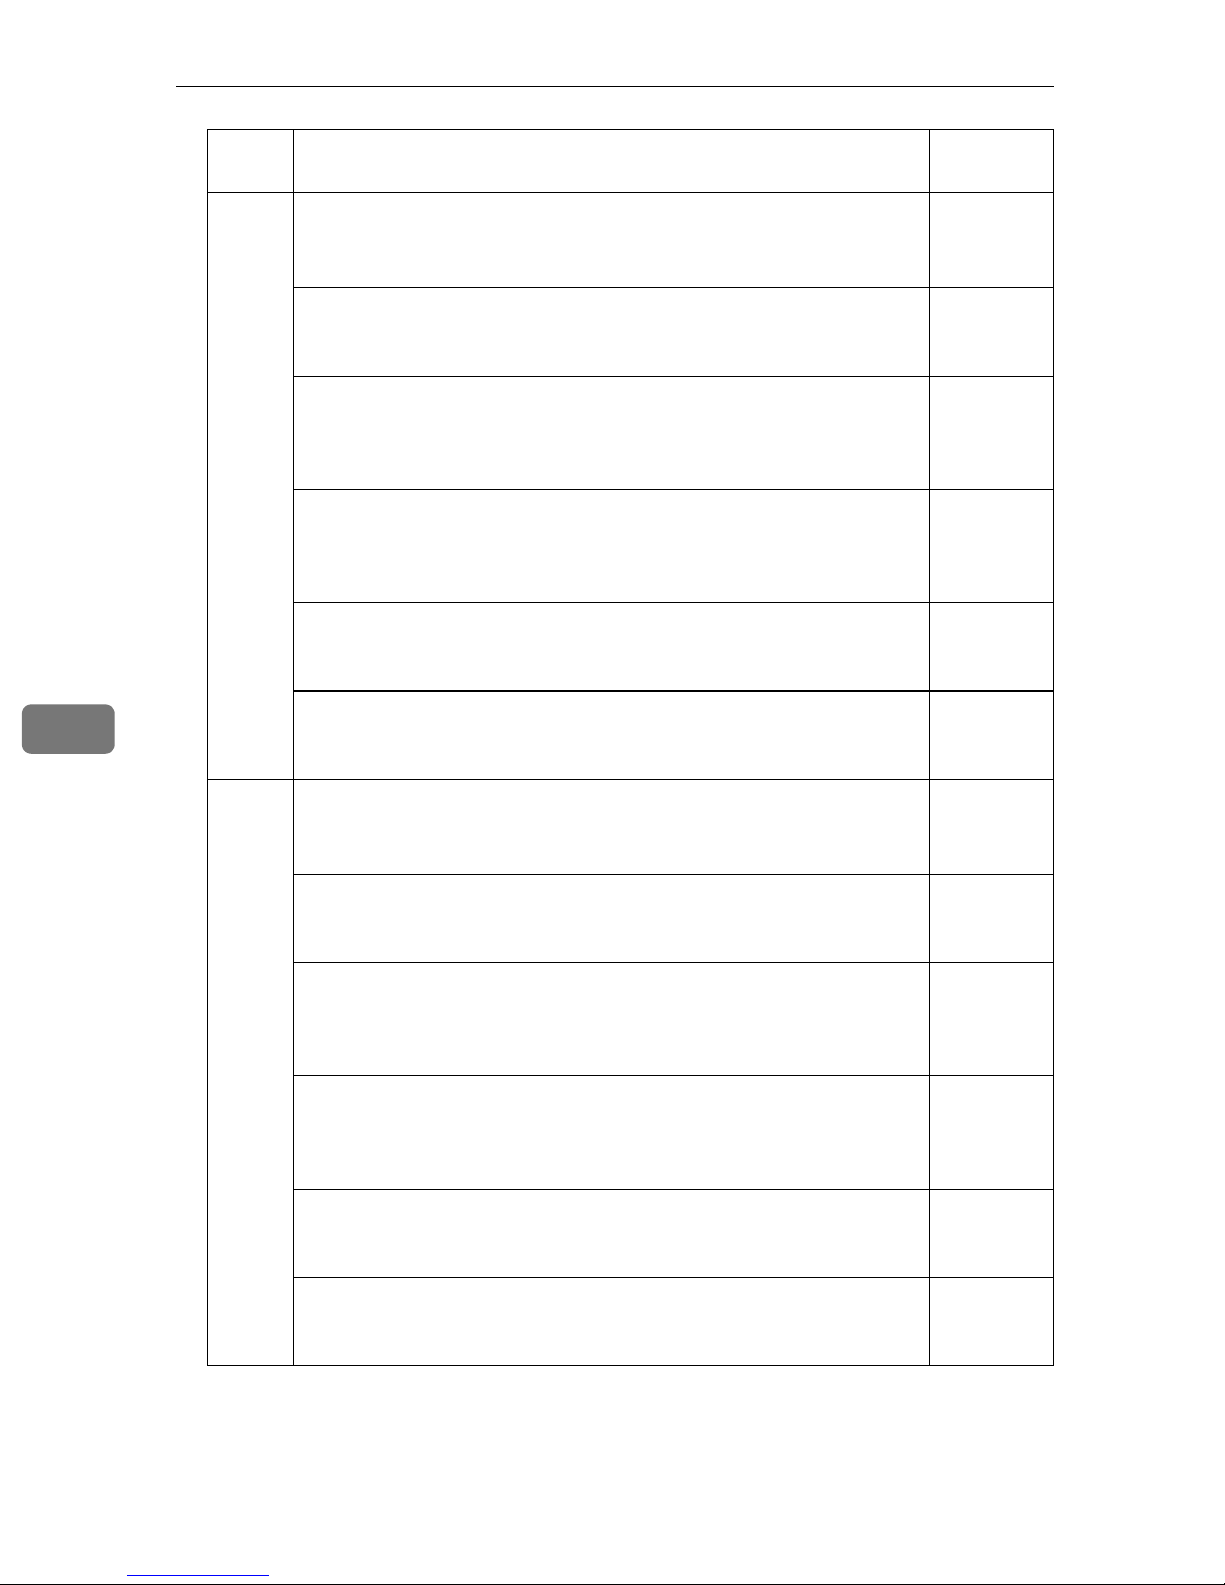
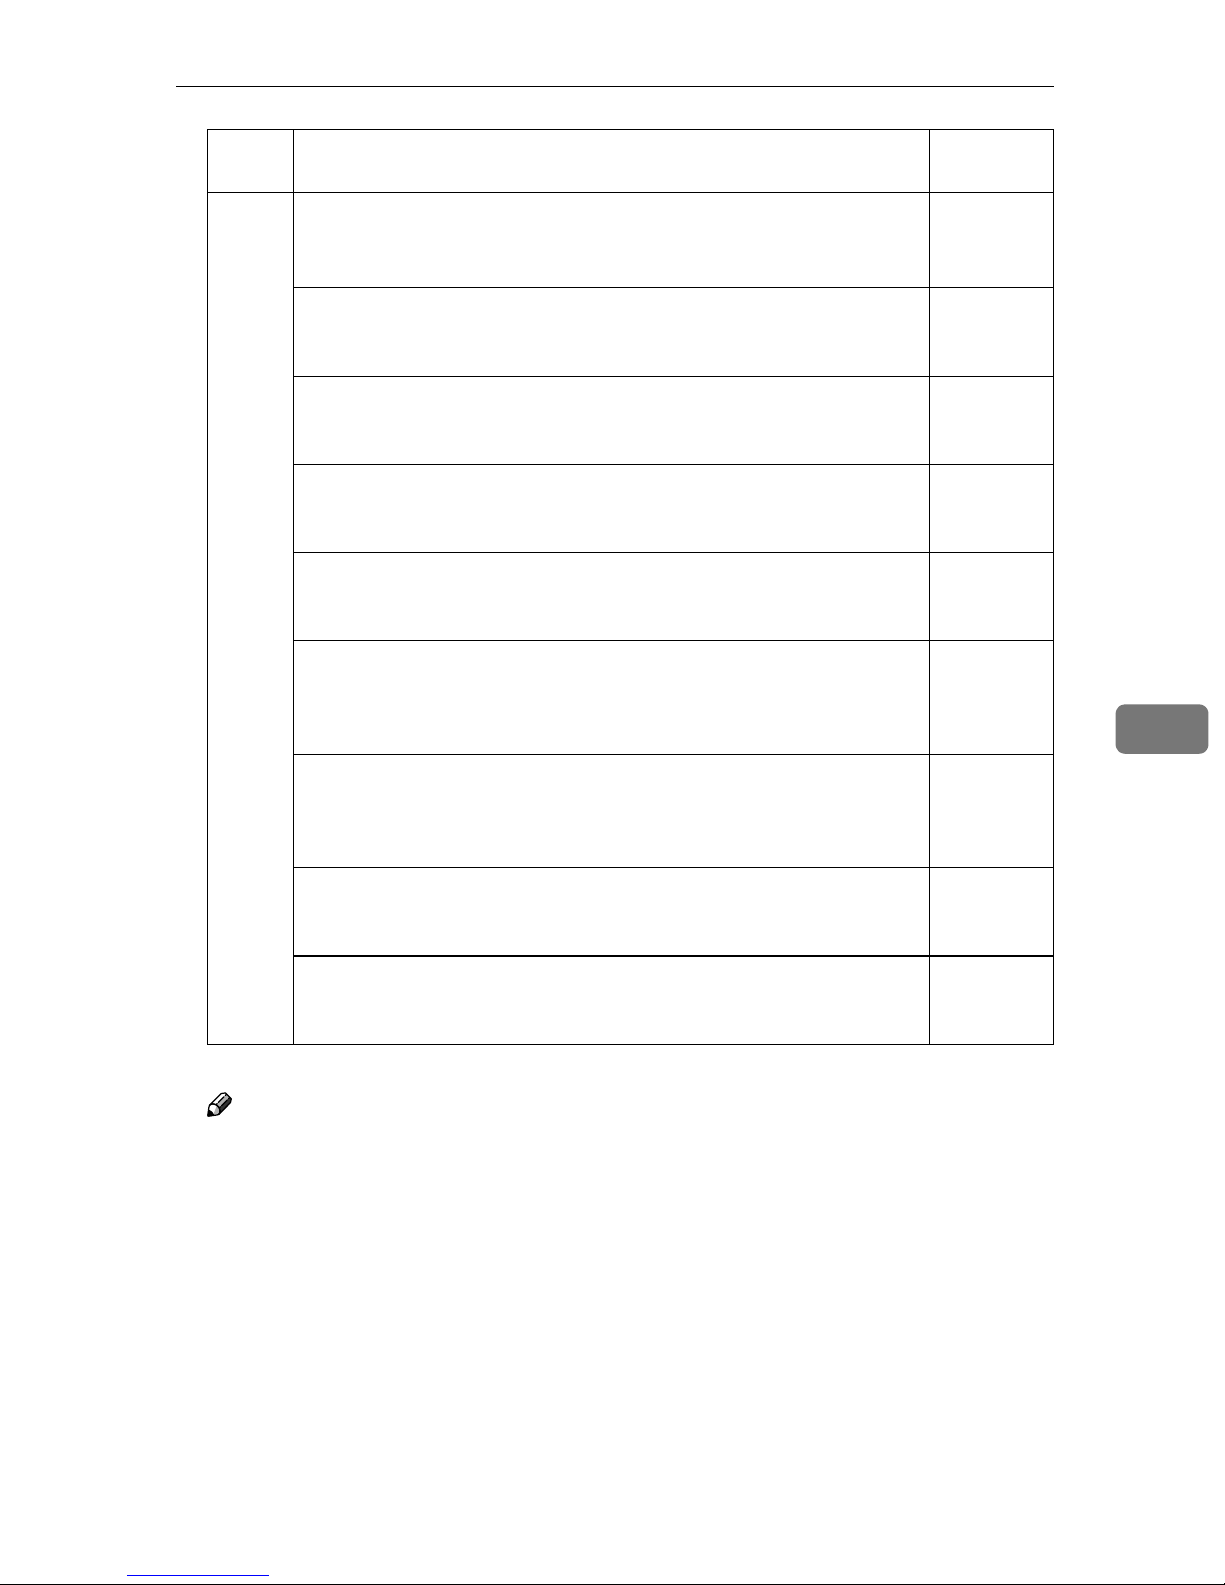
*1 You cannot use Top 2 of Staple position together with Standard
Punch position. You cannot use Top, Top Sland or Bottom together
with 90 turn Punch position.
Original Orientation
( Standard Orientation)
Batch Mode
Mixed Sizes
Custom Size Originals
Face Up
Bypass Tray
Original Type Setting
Auto Paper Select
Auto Image Density
Manual Image Density
Function selected after
Create Margin
Zoom
Reduce/Enlarge
Auto Reduce/Enlarge
Manual Paper Select
Directional Magnification(%)
Directional Size
Magnification(mm)
Sort
Size Magnification
Rotate Sort
Stack
Staple
Punch
1 Sided 2 Sided/2 Sided 2 Sided
1 Sided Combine
2 Sided Combine
Book 1 Sided
Book 2 Sided
Front & Back 2 Sided
2 Sided 1 Sided
1 Sided Booklet
2 Sided Booklet
ZGVX120E
1 Sided Magazine
2 Sided Magazine
109
Page 32
Specifications
Function selected after
Function
6
Function
Original Orientation
(Standard Orientation)
Batch Mode
Mixed Sizes
Custom Size Originals
Face Up
Bypass Tray
Auto Image Density
Manual Image Density
Original Type Setting
Auto Paper Select
Manual Paper Select
Reduce/Enlarge
Create Margin
Zoom
Auto Reduce/Enlarge
Size Magnification
Directional Magnification(%)
Directional Size Magnification (mm)
Sort
Rotate Sort
Stack
Staple
Punch
1 Sided 2 Sided/2 Sided 2 Sided
1 Sided Combine
2 Sided Combine
Book 1 Sided
Book 2 Sided
Front & Back 2 Sided
2 Sided 1 Sided
1 Sided Booklet
2 Sided Booklet
Function selected first
1 Sided Magazine
2 Sided Magazine
Repeat
Double Copy
Centering
Scanning Position
Border Erase
Center Erase
Center/Border Erase
3 Edges Full Bleed
Inside Erase
Outside Erase
Margin Adjustment
Background Numbering
Preset Stamp
User Stamp
Date Stamp
Page Numbering
Covers
Designate
Chapter
Blank Slip Sheets
Slip Sheets
Document Server
Repeat
Double Copy
Border Erase
Centering
Scanning Position
Center Erase
Inside Erase
Center/Border Erase
3 Edges Full Bleed
Outside Erase
Margin Adjustment
Background Numbering
Preset Stamp
User Stamp
Date Stamp
Covers
Designate
Page Numbering
Chapter
Slip Sheets
Document Server
Blank Slip Sheets
ZGVX110E
110
Page 33
Supplementary Specifications
Supplementary Specifications
❖❖❖❖ Batch Mode
In Batch mode, you cannot switch between 1–sided originals and 2–sided
originals in the middle of copying.
❖❖❖❖ Mixed Size mode
• Copy speed and scanning speed may be reduced.
❖❖❖❖ Bypass Tray Copy
• The following paper sizes can be selected:
A3L, A4KL, A5KL, A6L, B4L, B5KL, B6L, 11” × 17”L, Legal(8
× 14”)L, Letter(8
1
/2”)KL, 8” × 13”L, 81/2” × 13”L, 81/4” × 13”K, 11” × 14”L, 11” ×
10
15”L, 10” × 14”L, 10” × 15”L, 8
1
/2” × 11”)KL, 51/2” × 81/2”KL, Executive(71/4” ×
1
/4” × 14”L, 8” × 101/2”KL, 8 “× 10”KL,
12” × 18”L, Postcards(100 × 148 mm)L
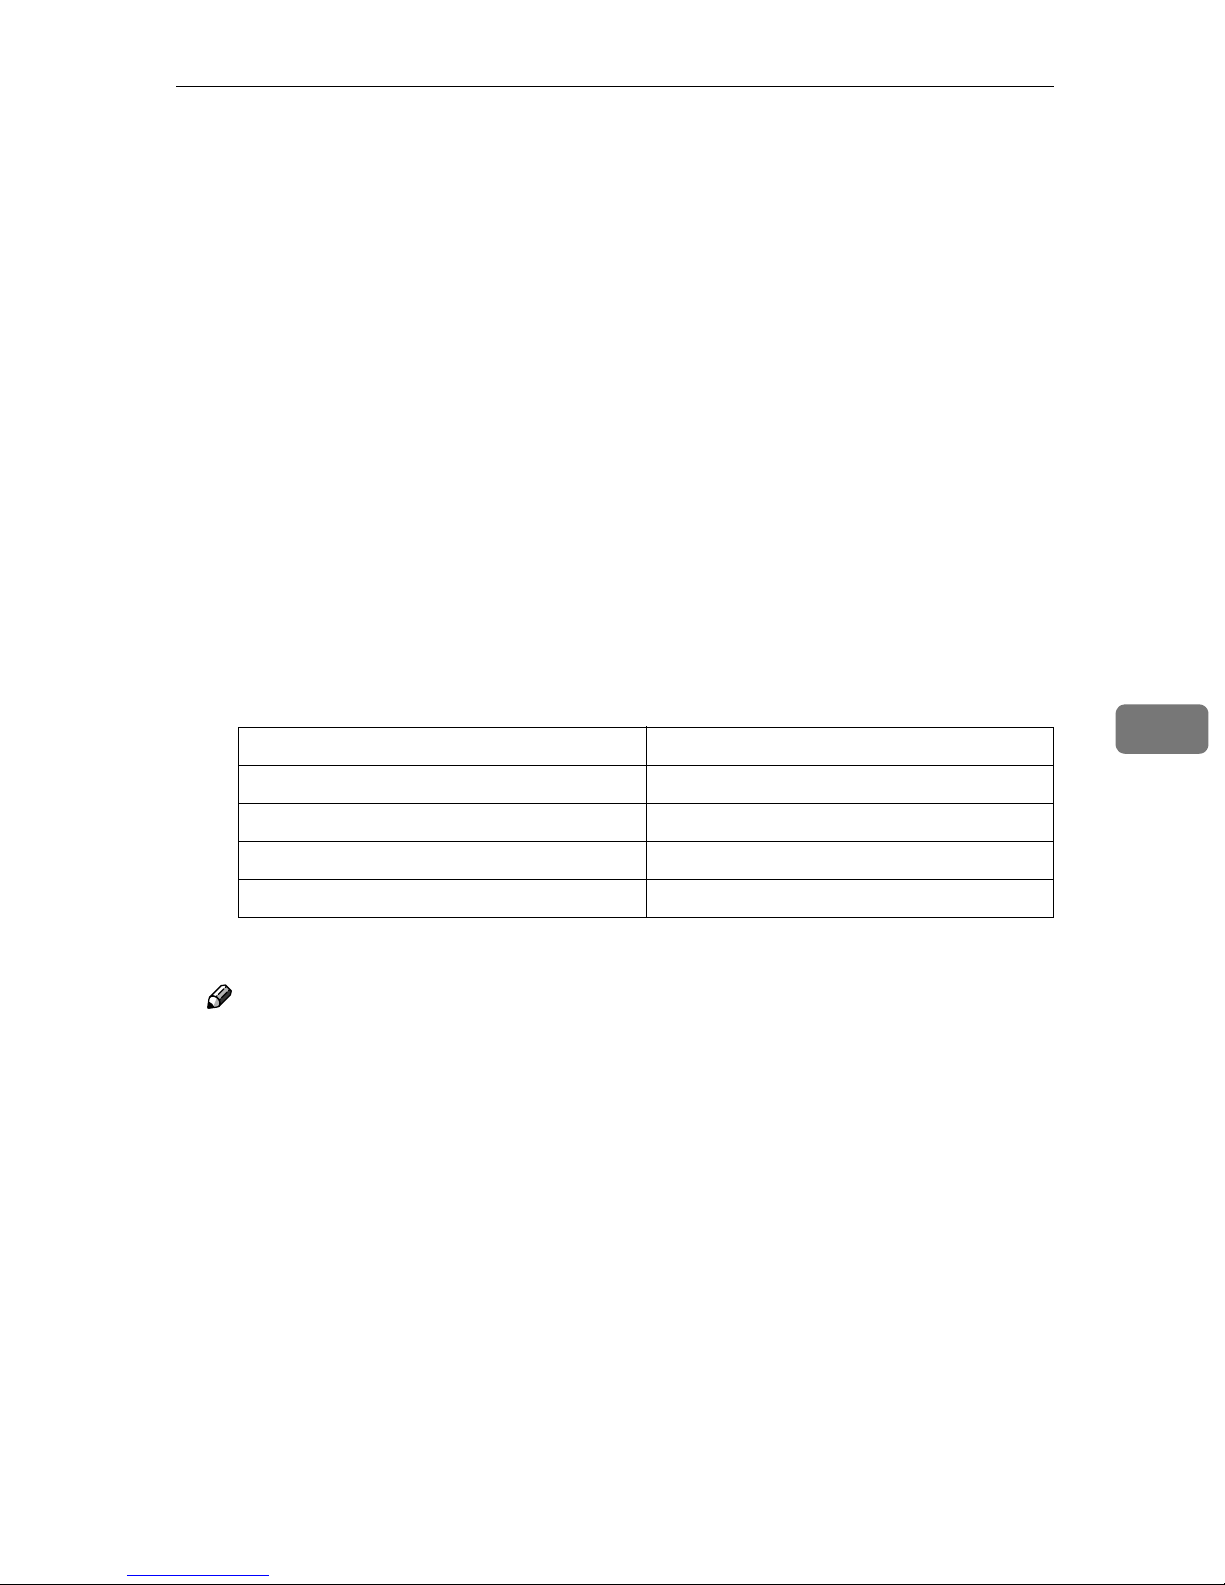
• The number of sheets you can set in the bypass tray depends on the paper
type. If the number set exceeds that in the table below, paper misfeeds may
occur or copies may be skewed.
Paper type Number
Thick paper (105/157g/m
Thick paper (157/216g/m
Translucent paper 50 sheets
OHP transparencies 50 sheets
2
) 30 sheets
2
) 20 sheets
❖❖❖❖ Preset Enlarge/Reduce
Note
❒ You can select one of 12 preset ratios (5 enlargement ratios, 7 reduction ra-
tios).
1
/2”
6
❒ You can select a ratio regardless of the size of an original or copy paper.
With some ratios, parts of the image might not be copied or margins will
appear.
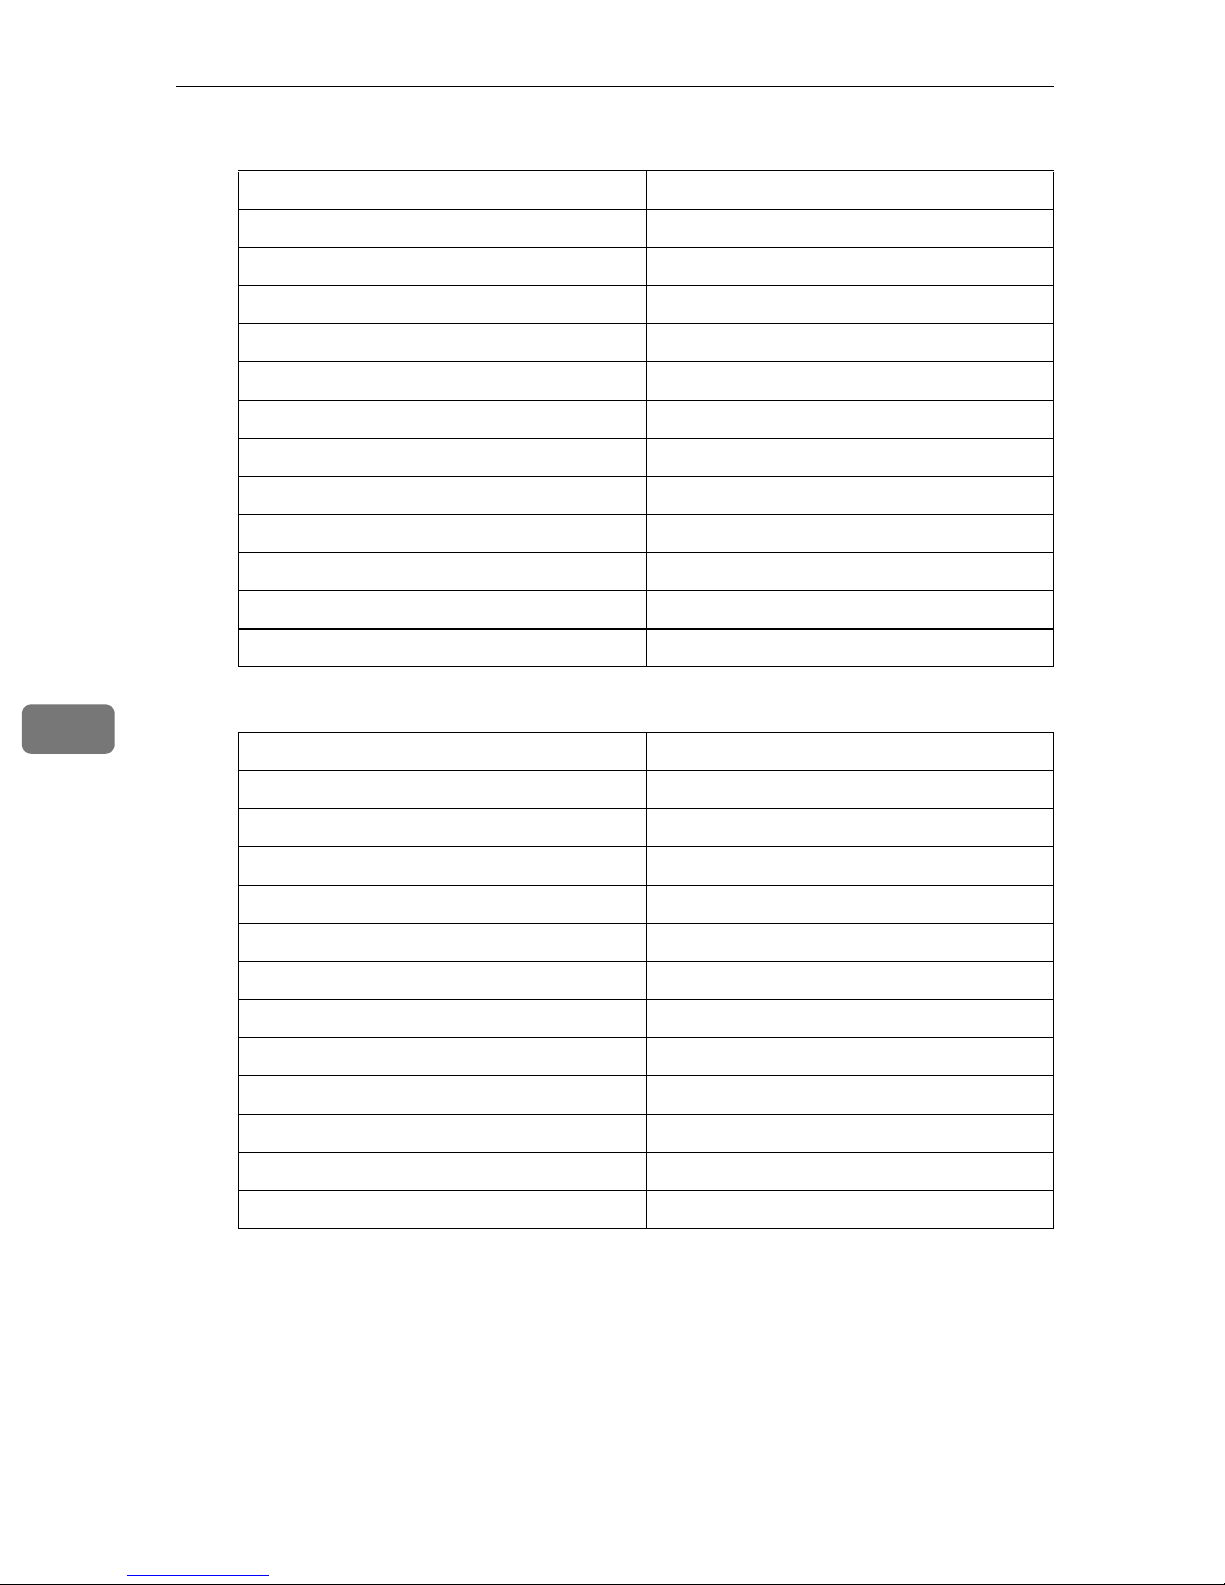
❒ Copies can be reduced or enlarged as follows.
111
Page 34
Specifications
❖❖❖❖ Metric version
Ratio (%) Original →→→→ Copy paper size
400 (enlarge area by 16) --
200 (enlarge area by 4) A5→A3, A6→A4, B6→B4
141 (enlarge area by 2) A4→A3, A5→A4, A6→A5, B5→B4, B6→B5
122 F→A3, A4→B4
115 B4→A3
93 --
82 F→A4, B4→A4
75 B4→F4, B4→F
71 (reduce area by 1/2)A3→A4, A4→A5
65 A3→F
50 (reduce area by
25 --
1
/4)A3→A5, F→A5
6
❖❖❖❖ Inch version
Ratio (%) Original →→→→ Copy paper size
400 (enlarge area by 16) --
200 (enlarge area by 4) 5
155 (enlarge area by 2) 5
129 8
121 8
93 --
85 F→8
78 8
73 11" × 15"→8
65 11" × 17"→8
50 (reduce area by
25 --
❖❖❖❖ Zoom
1
/2" × 81/2"→11" × 17"
1
/2" × 81/2"→81/2" × 14"
1
/2" × 11"→11" × 17"
1
/2" × 14"→11" × 17"
1
/2" × 11"
1
/2" × 14"→81/2" × 11"
1
/2" × 11"
1
/2" × 11"
1
/4)11" × 17"→51/2" × 81/2"
• The reproduction ratios you can specify are 25 – 400%.
• You can select a ratio regardless of the size of an original or copy paper.
With some ratios, parts of the image might not be copied or margins will
appear.
112
Page 35

Supplementary Specifications
❖❖❖❖ Auto Reduce/Enlarge
• The reproduction ratios you can specify are 25 – 400%.
❖❖❖❖ Size Magnification
• If the calculated ratio is over maximum or under the minimum ratio, it is
adjusted to within available range automatically. However, with some ratios, parts of the image might not be copied or margins will appear on.
• The reproduction ratio that you can specify are 25 – 400%.
❖❖❖❖ Directional Size Magnification
• The reproduction ratios you can specify are 25 – 400%.
• When entering a percentage ratio, you can specify any value in the permit-
ted range, regardless of the size of originals or copy paper. However, depending on settings and other conditions, part of the image may not be
copied, or margins will appear.
• When entering a size in mm, if the calculated ratio is over maximum or under minimum ratio, it is adjusted to within available range automatically.
However, with some ratios, parts of the image might not be copied or margins will appear.
❖❖❖❖ Sort
The number of copies that can be placed on the tray is as follows. When the
number exceeds capacity, remove copies from the tray.
Paper Size and Direction Number of
Copies
B4 or smaller, A4 or larger 500 sheets
(80 g/m
(20 lb.)
A3, B5 or smaller 250 sheets
(80 g/m
Copy tray
(20 lb.)
6
2
)
2
)
113
Page 36
Specifications
Paper Size and Direction Number of
Copies
6
Finisher Upper Tray
A4KL, B5KL, A5KL, B6L, A6L, 8
1
/2"KL
8
1
A3L, B4L, 11" × 17"L, 8
/2" × 14"L, 12" × 18"L 250 sheets
1
/2" × 11"KL, 51/2" ×
500 sheets
(80 g/m
2
(20 lb.)
(80 g/m
2
)
)
(20 lb.)
Finisher Shift Tray
A4K, B5K, 8
1
/2" × 11"K
3, 000
sheets
(80 g/m
2
)
(20 lb.)
A3L, B4L, A4L, B5L, 11" × 17"L, 8
12" × 18"L
1
/2" × 14"L, 81/2" × 11"L,
1, 500
sheets
(80 g/m
2
)
(20 lb.)
1
Finisher 3000B(100– sheet staples)
A5K, 5
/2" × 81/2"K 500 sheets
(80 g/m
2
)
(20 lb.)
A5L, 8
1
/2" × 11"L 100 sheets
(80 g/m
2
)
(20 lb.)
Finisher Upper Tray
A4KL, B5KL, A5KL, B6KL, 8
1
8
/2"KL
1
A3L, B4L, 11" × 17"L, 8
/2" × 14"L, 12" × 18"L 50 sheets
1
/2" × 11"KL, 51/2" ×
250 sheets
(80 g/m
2
(20 lb.)
(80 g/m
2
)
)
(20 lb.)
Finisher Shift Tray
A4K, 8
1
/2" × 11"K
3, 000
sheets
(80 g/m
2
)
(20 lb.)
A3L, B4L, A4L, B5KL, 11" × 17"L, 8
12" × 18"L
/2" × 14"L, 81/2" × 11"L,
1, 500
sheets
(80 g/m
2
)
1
(20 lb.)
Finisher 3000M(50– sheet staples)
A5K 500 sheets
(80 g/m
2
)
(20 lb.)
1
A5L, B6L, 5
/2" × 81/2"L 100 sheets
(80 g/m
2
)
(20 lb.)
114
Page 37
Supplementary Specifications
Paper Size and Direction Number of
Copies
Finisher Upper tray
A4KL, B5KL, A5KL, B6KL, 8
1
/2"KL
8
1
A3L, B4L, 11" × 17"L, 8
/2" × 14"L, 12" × 18"L 50 sheets
1
/2" × 11"KL, 51/2" ×
250 sheets
(80 g/m
2
(20 lb.)
(80 g/m
2
)
)
(20 lb.)
Finisher shift tray 1
A4KL, B5KL, A5K, 8
1
/2" × 11"KL
500 sheets
(80 g/m
2
)
(20 lb.)
A3L, B4L, 11" × 17"L, 8
1
/2" × 14"L, 12" × 18"L 250 sheets
(80 g/m
2
)
(20 lb.)
1
A5L, B6L, 5
/2" × 81/2"L 100 sheets
(80 g/m
2
)
(20 lb.)
Finisher Shift Tray 2
Booklet Finisher
A4K, 8
A3L, B4L, A4L, B5KL, 11" × 17"L, 8
1
/2" × 11"K
1
/2" × 14"L, 81/2" × 11"L,
12" × 18"L
2, 500
sheets
(80 g/m
(20 lb.)
1, 250
sheets
(80 g/m
2
)
6
2
)
(20 lb.)
A5K 500 sheets
(80 g/m
2
)
(20 lb.)
1
A5L, B6L or 5
/2" × 81/2"L 100 sheets
(80 g/m
2
)
(20 lb.)
*1
Place paper in the bypass tray.
Note
❒ When using Rotate Sort or Staple functions, tray capacity may be reduced.
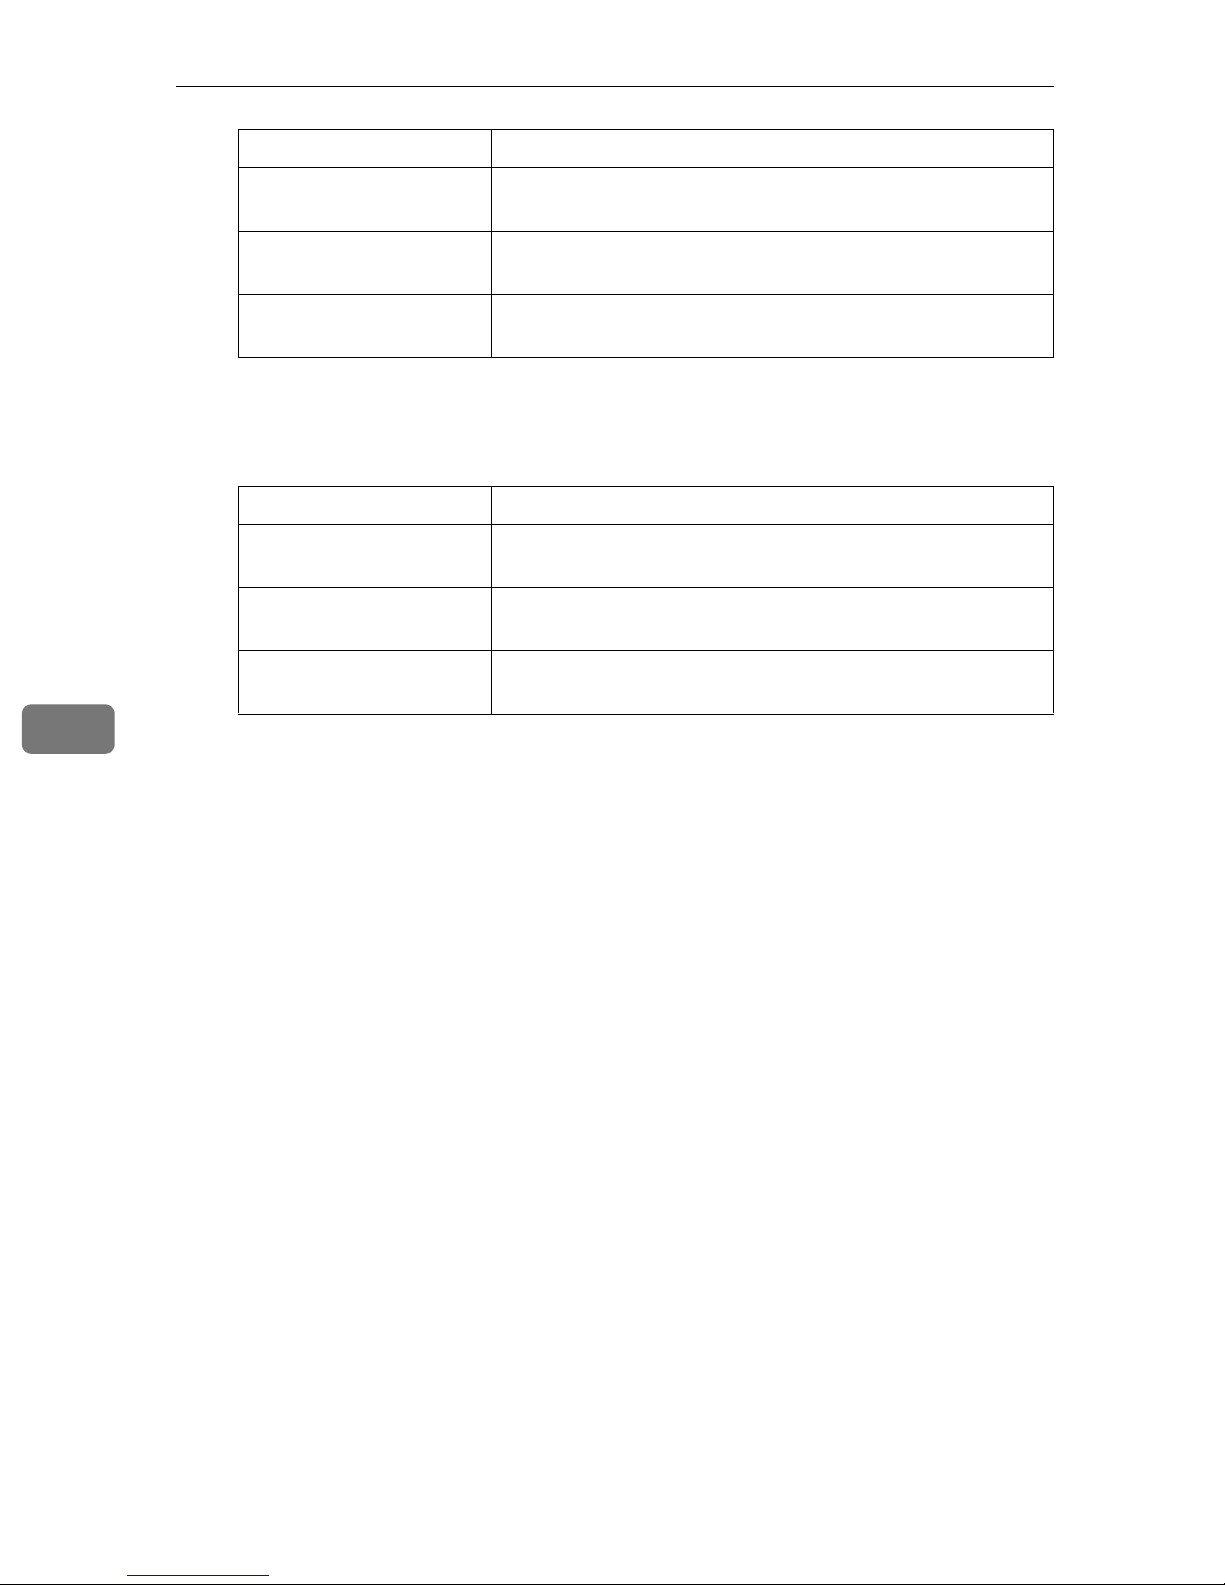
• Paper sizes and orientations that can be used with the Sort function are
A3L, B4L, A4KL, B5KL, A5KL , 11" × 17"L, 8
1
11"KL and 5
/2" × 81/2"KL.
1
/2" × 14"L, 81/2" ×
• Paper sizes and orientations that can be used with the Rotate Sort function
1
are A4KL, B5KL, A5KL, 8
/2" × 11"KL and 51/2" × 81/2"KL.
• Paper sizes and orientations that can be used with the Shift Sort function
are as follows:
115
Page 38
Specifications
Paper Size and Orientation
Finisher 3000B(100–sheet
staples)
Finisher 3000M(50–sheet
staples)
Booklet Finisher A3L, B4L, A4KL, B5KL, A5KL, 11" × 17"L, 8
A3L, B4L, A4KL, B5KL, A5KL, 11" × 17"L, 8
11"KL, 5
A3L, B4L, A4KL, B5KL, A5KL, 11" × 17"L, 8
11"KL, 5
11"KL, 5
1
/2" × 81/2"KL, 81/2" × 14"L, 12" × 18"L
1
/2" × 81/2"KL
1
/2" × 81/2"KL
❖❖❖❖ Stack
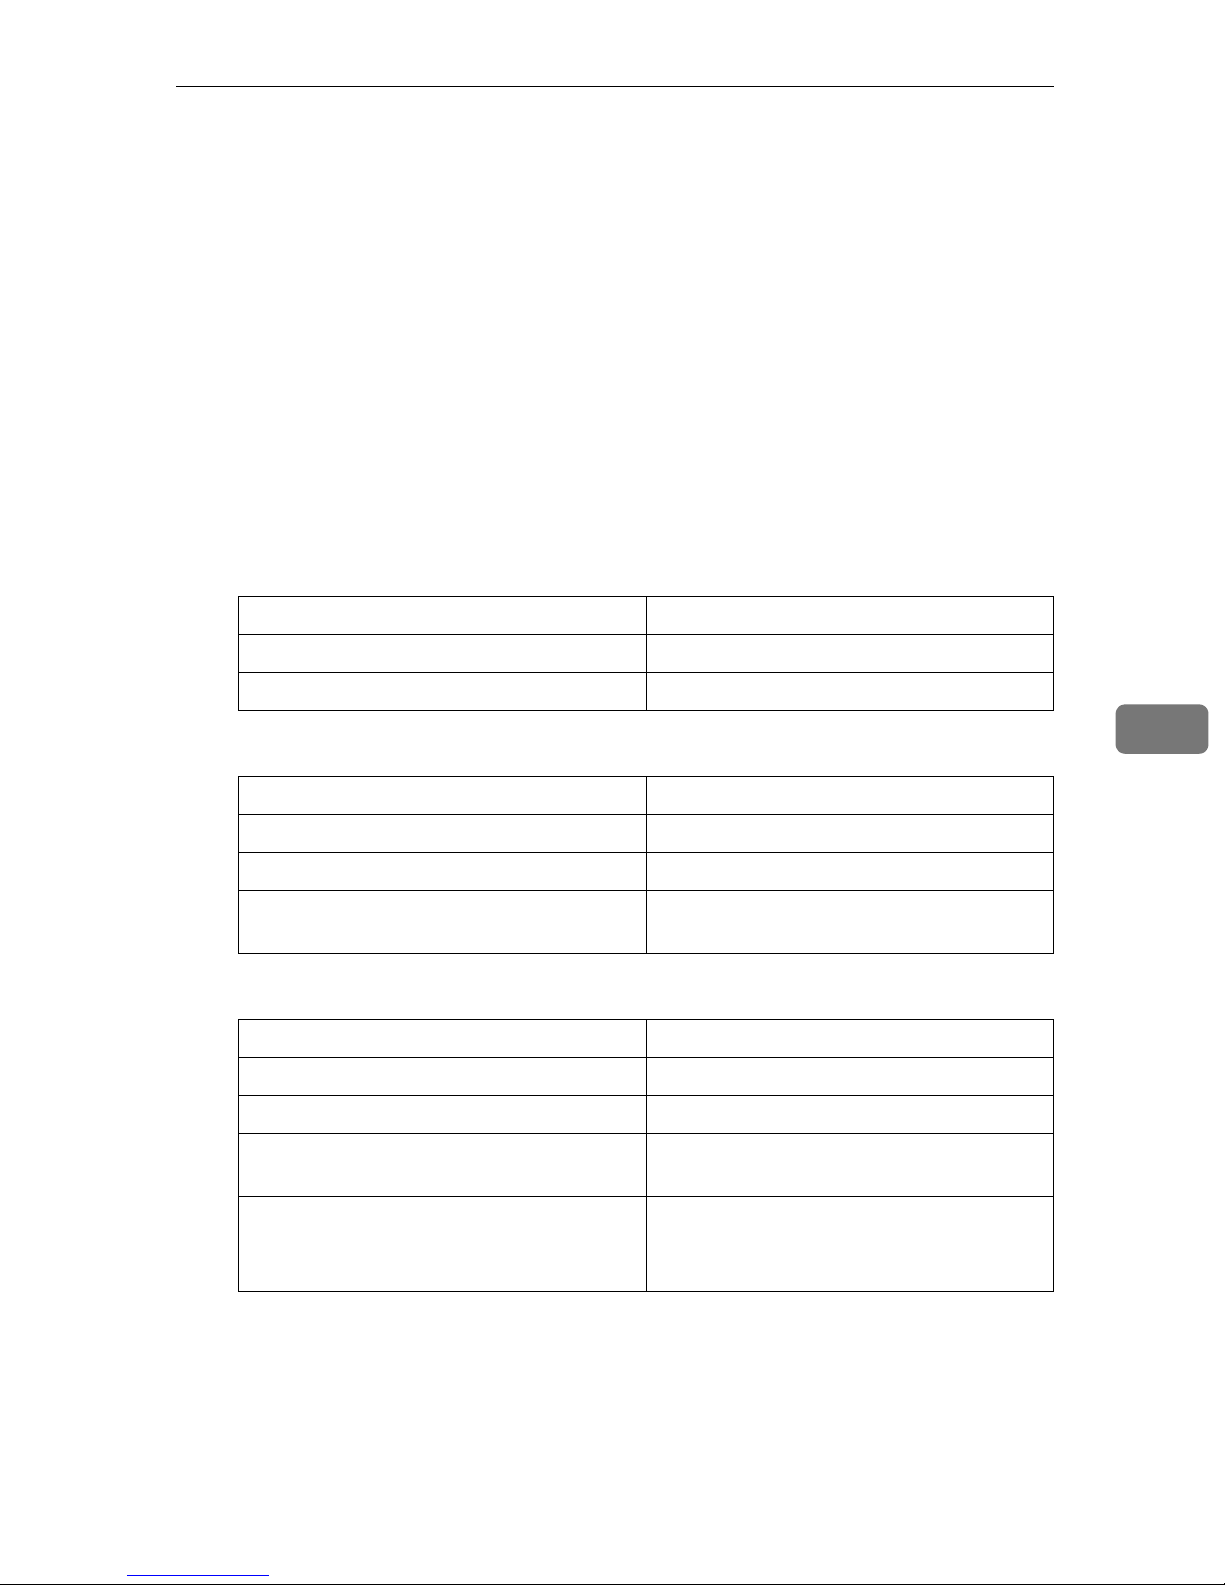
• Paper sizes and orientations that can be used with the Stack function are as
follows:
Paper Size and Orientation
Finisher 3000B(100–sheet
staples)
Finisher 3000M(50–sheet
staples)
Booklet Finisher A3L, B4L, A4KL, B5KL, A5KL, 11" × 17"L, 8
A3L, B4L, A4KL, B5KL, A5KL, 11" × 17"L, 8
11"KL, 5
A3L, B4L, A4KL, B5KL, A5KL, 11" × 17"L, 8
11"KL, 5
11"KL, 5
1
/2" × 81/2"KL, 81/2" × 14"L, 12" × 18"L
1
/2" × 81/2"KL
1
/2" × 81/2"KL
1
/2" ×
1
/2" ×
1
/2" ×
1
/2" ×
1
/2" ×
1
/2" ×
6
❖❖❖❖ Staple
The following types of paper cannot be stapled:
• Postcards
• Translucent paper
• OHP transparencies
• Label paper (adhesive labels)
• Thick paper
• Thin paper
• Curled paper
• Paper of low stiffness
• Paper of mixed sizes (Differing horizontal dimensions, such as A4 L and
A3 L)
In the following cases, the copies will be delivered to the shift tray without
stapling:
• When the number of sheets for one set is above stapler capacity.
• When memory reaches 0% during copying.
• When using Double copies, or "1 Sided → 1 Sided", "1 Sided → 2 Sided", "2
Sided → 1 Sided" or "2 Sided → 2 Sided" in Combine mode, select K original for L copy and L original for K copy.
• When using Double copies, or "1 Sided 2 Pages→ 1 Sided Combine" and "1
Sided 4 Pages→ 2 Sided Combine" in Combine mode, select K original for
L copy and L original for K copy.
116
Page 39
Supplementary Specifications
• When using "Left 2" or "Top 2" with Double copies, or "1 Sided → 1 Sided",
"1 Sided → 2 Sided", "2 Sided → 1 Sided", or "2 Sided → 2 Sided" in Combine mode, select K original for L copy and L originals for K copy.
• If you use the Auto Paper Select function in the Mixed Size mode, the machine selects the proper size of paper and staples it even if you place different sizes of originals. Set the size of paper you want to use in the paper
tray beforehand. The sizes of the paper you can staple in the Mixed Size
mode are as follows.
• A3L and A4 K
• B4 L and B5 K
• 11” × 17”L and Letter (8”
1
/2 × 11”)K
The sizes and orientations of the paper you can staple and the stapler capacity are as follows.
❖❖❖❖ Finisher 3000B(100–sheet staples)
Paper Sizes and Orientations Stapler Capacity
1
A4KL, B5KL, 8
A3L, B4L, 11" × 17"L, 8
/2" × 11"KL 100 sheets
1
/2" × 14"L 50 sheets
❖❖❖❖ Finisher 3000M(50–sheet staples)
Paper Sizes and Orientations Stapler Capacity
1
A4KL, B5KL, 8
A3L, B4L, 11" × 17"L, 8
A4K/A3L, B5K/B4L, 8
× 17"L
/2" × 11"KL 50 sheets
1
/2" × 14"L 30 sheets
1
/2" × 11"K, 11"
30 sheets
❖❖❖❖ Booklet Finisher
Paper Sizes and Orientation Stapler Capacity
A4KL, B5KL, 8
A3L, B4L, 11" × 17"L, 8
A4K/A3L, B5K/B4L, 8
× 17"L
Saddle stitch
A3L, B4L, A4L, 11" × 17"L, 8
11"L
1
/2" × 11"KL 50 sheets
1
/2" × 14"L 30 sheets
1
/2" × 11"K, 11"
1
/2" ×
30 sheets
15 sheets
6
• When the number of copies exceeds tray capacity, copying stops. In this
case, remove copies from the tray, and then resume copying.
The finisher capacities after stapling are as follows.
117
Page 40
Specifications
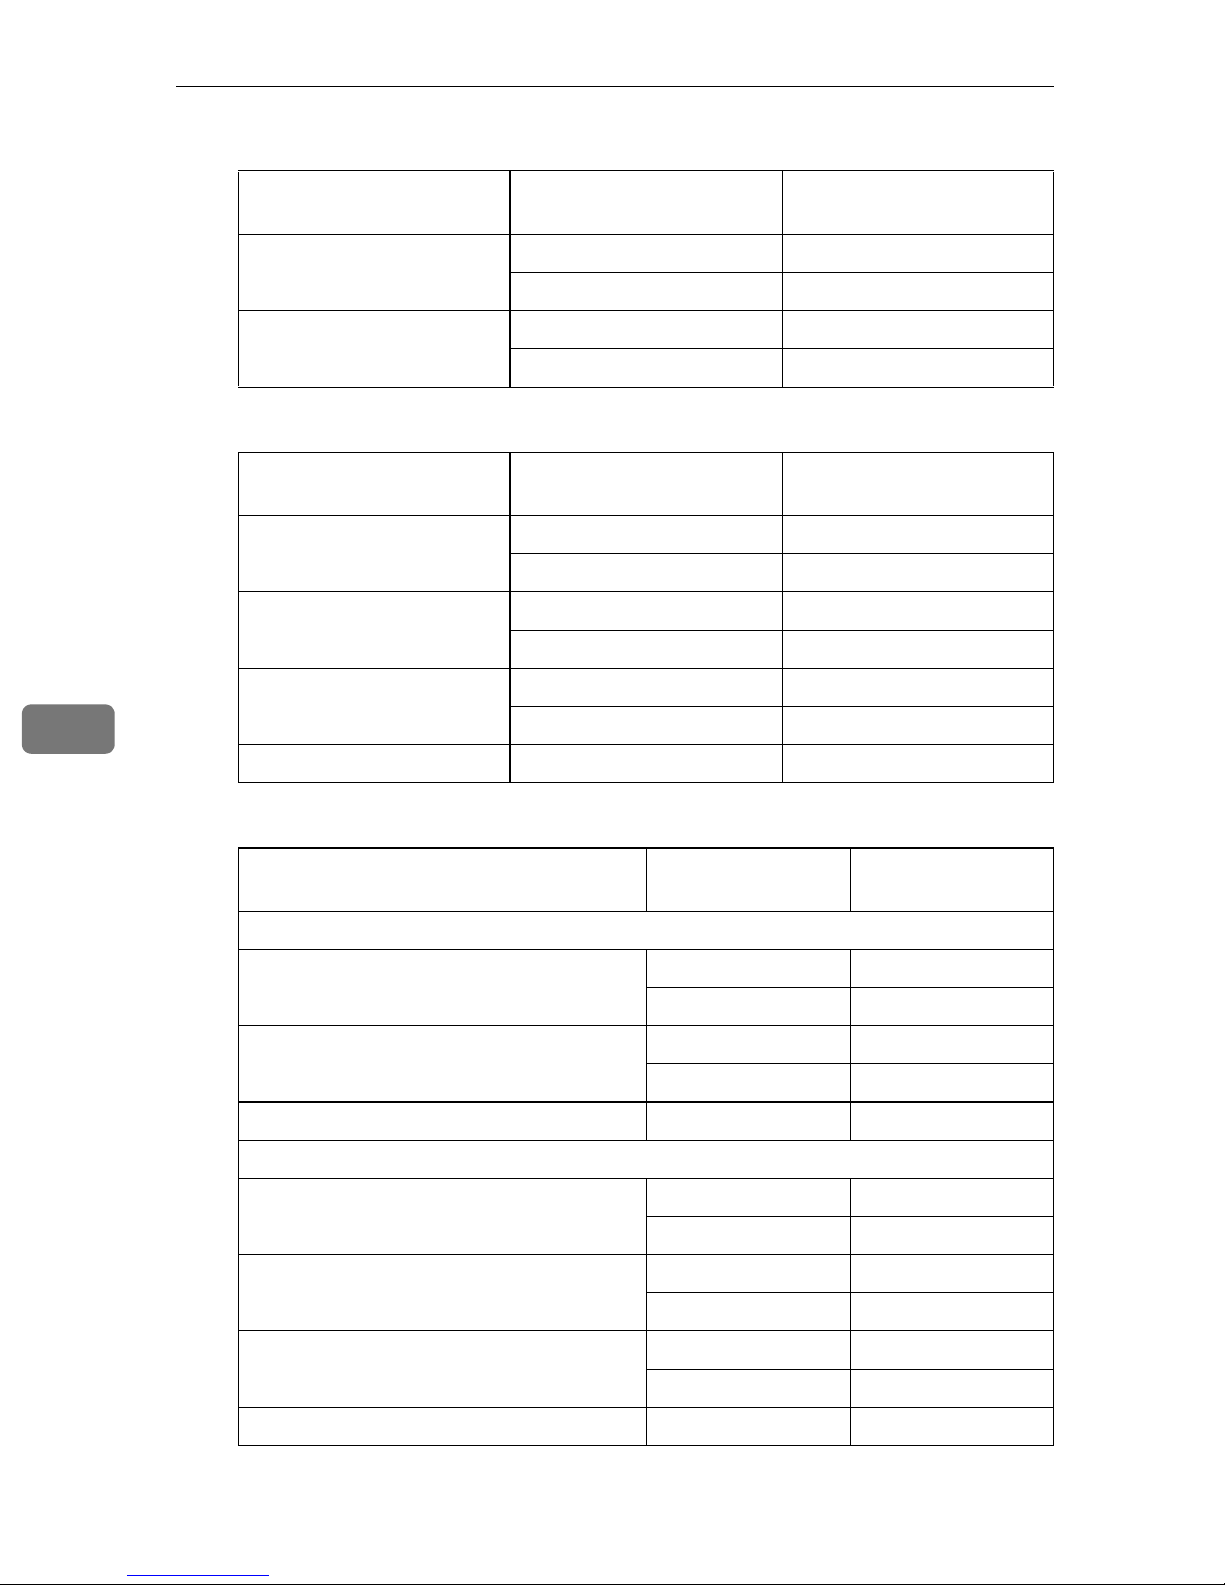
❖❖❖❖ Finisher 3000B(100–sheet staples)
6
Paper Sizes and
Orientation Number of the Sheets
A4KL, B5KL, 8
11"KL
A3L, B4L, 11" × 17"L,
1
/2" × 14"L
8
1
/2" ×
10∼100 sheets 200∼30 sets
2∼9 sheets 150 sets
10∼50 sheets 150∼30 sets
2∼9 sheets 150 sets
Number of the Stapled
Copies
❖❖❖❖ Finisher 3000M(50–sheet staples)
Paper Sizes and
Orientation
A4K, 8
A4K, B5KL, 8
1
/2" × 11"K 10∼50 sheets 300∼60 sets
1
/2" × 11"L 10∼50 sheets 150∼30 sets
Other size paper 10∼30 sheets 150∼50 sets
In the Mixed Size mode 2∼30 sheets 50 sets
Maximum Number of the
Sheets
Maximum Number of the
Stapled Copies
2∼9 sheets 300 sets
2∼9 sheets 150 sets
2∼9 sheets 150 sets
❖❖❖❖ Booklet Finisher
Maximum Number
Paper Sizes and Orientation
of the Sheets
Finisher Tray 1
A4K, 8
1
/2" × 11"K 10∼50 sheets 50∼10 sets
2∼9 sheets 50 sets
Other paper size 10∼30 sheets 25∼16 sets
2∼9 sheets 25 sets
In the Mixed Size Mode 2∼30 sheets 16 sets
Finisher Tray 2
A4K, 8
1
/2" × 11"K 10∼50 sheets 250∼50 sets
2∼9 sheets 250 sets
A4L, B5KL, 8
1
/2" × 11"L 10∼50 sheets 125∼25 sets
2∼9 sheets 125 sets
Other paper size 10∼30 sheets 125∼40 sets
2∼9 sheets 125 sets
Maximum Number
of the Stapled Copies
In the Mixed Size Mode 2∼30 sheets 50 sets
118
Page 41
Supplementary Specifications
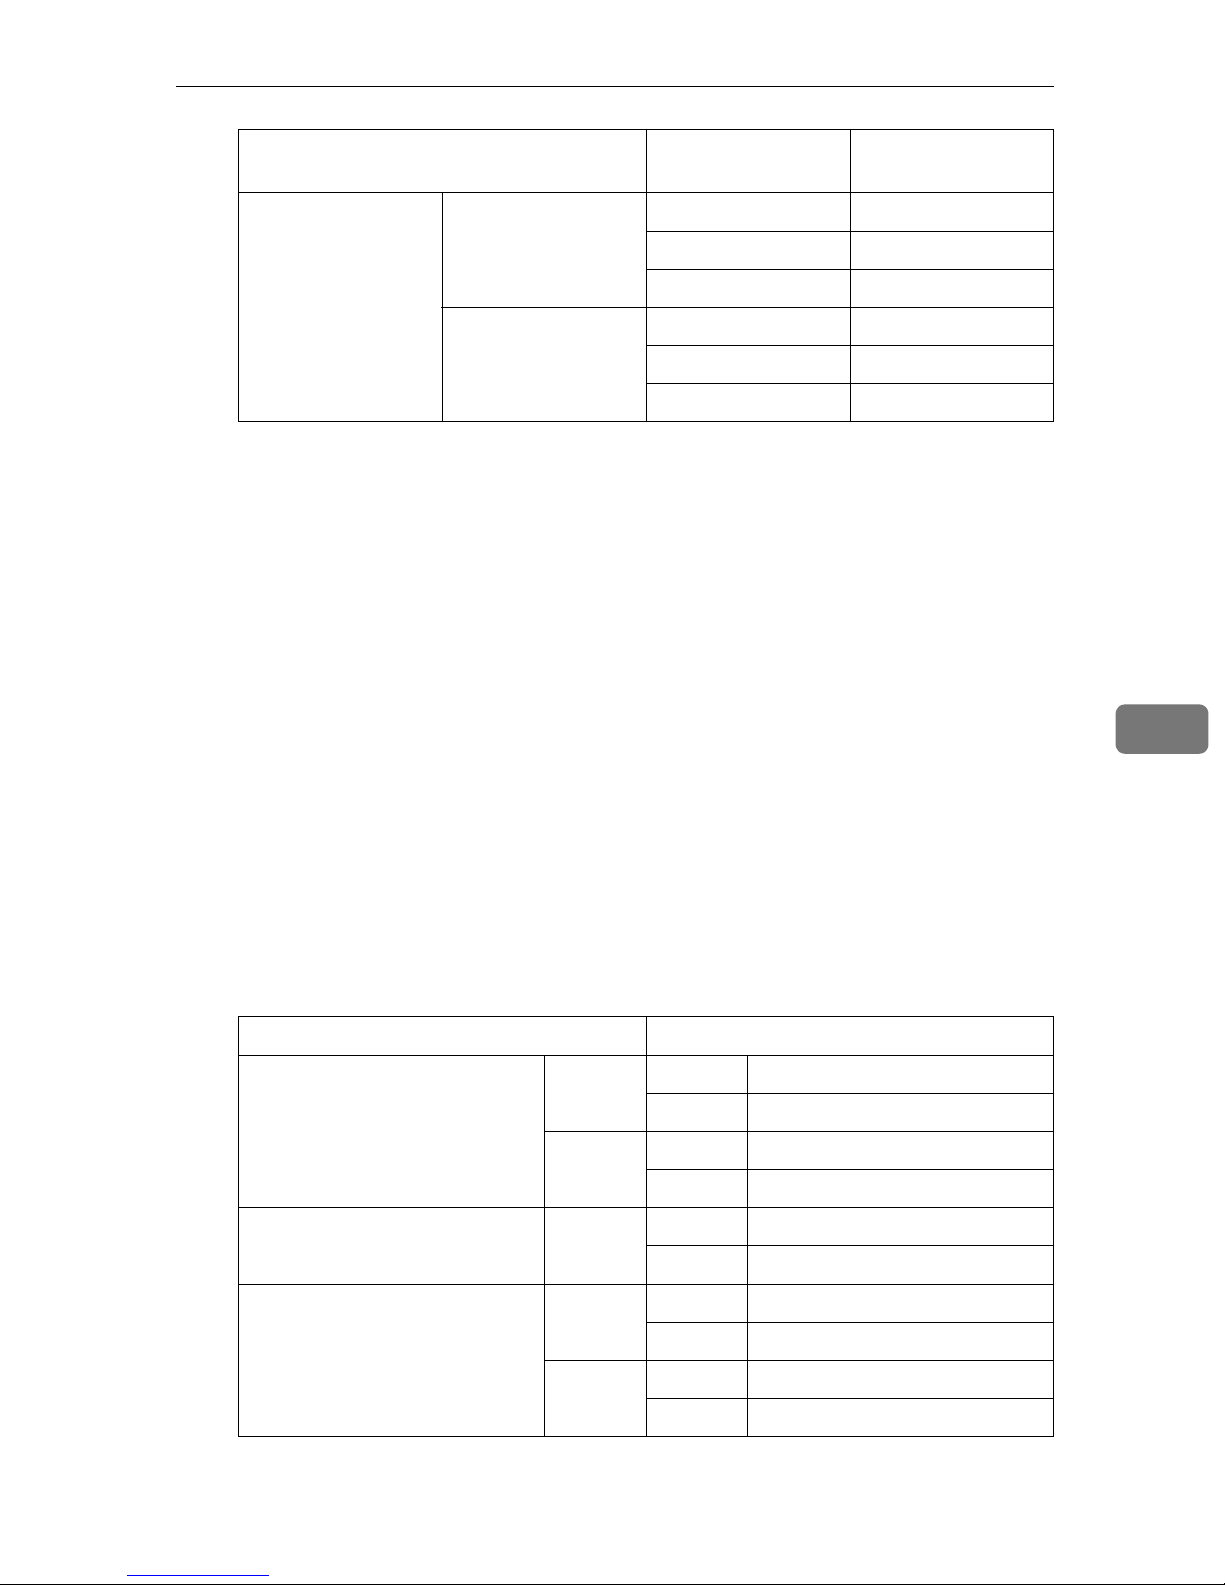
Maximum Number
of the Stapled Copies
Paper Sizes and Orientation
A4L, 81/2" × 11"L 2∼5 sheets 25 sets
Other paper size 2∼5 sheets 30 sets
Saddle Stitch
Maximum Number
of the Sheets
6∼10 sheets 15 sets
11∼15 sheets 10 sets
6∼10 sheets 20 sets
11∼15 sheets 10 sets
You cannot change the stapling positions during copying.
When the original image is rotated, the stapling direction turns by 90°.
When “Top” or “Bottom” is selected and the paper with the same orientation as the original is not loaded, the image is rotated and the paper with
the same size and the different orientation is selected.
With certain stapling settings, you cannot use the Rotate function.
When “Saddle Stitch” is selected, the copies are stapled with the saddle
stitch stapler, folded in half and then delivered.
When “Saddle Stitch” is selected with the “Magazine” function, the copies
are stapled with the saddle stitch stapler, folded like a magazine and then
delivered.
6
❖❖❖❖ Punch
• With certain Punch function settings, the Rotate function cannot be used.
• Since punch holes are made in each copy, positions vary slightly.
• Punchable paper sizes are as follows:
❖❖❖❖ Booklet Finisher, Finisher 3000M(50–sheet staples)
Punch unit type
2 & 4 holes type 2 holes L A3–A5, 11" × 17"–5
1
K A4–A5, 8
4 holes L A3, B4, 11" × 17"
K A4, B5, 8
4 holes type 4 holes L A3–A5, 11" × 17"–5
K A4–A5, 8
2 & 3 holes type 2 holes L A3–A5, 11" × 17"–5
K A4–A5, 8
3 holes L A3, B4, 11" × 17"
K A4, B5, 8
/2" × 11", 51/2" × 81/2"
1
/2" × 11"
1
/2" × 11", 51/2" × 81/2"
1
/2" × 11", 51/2" × 81/2"
1
/2" × 11"
1
/2" × 81/2"
1
/2" × 81/2"
1
/2" × 81/2"
119
Page 42
6
Specifications
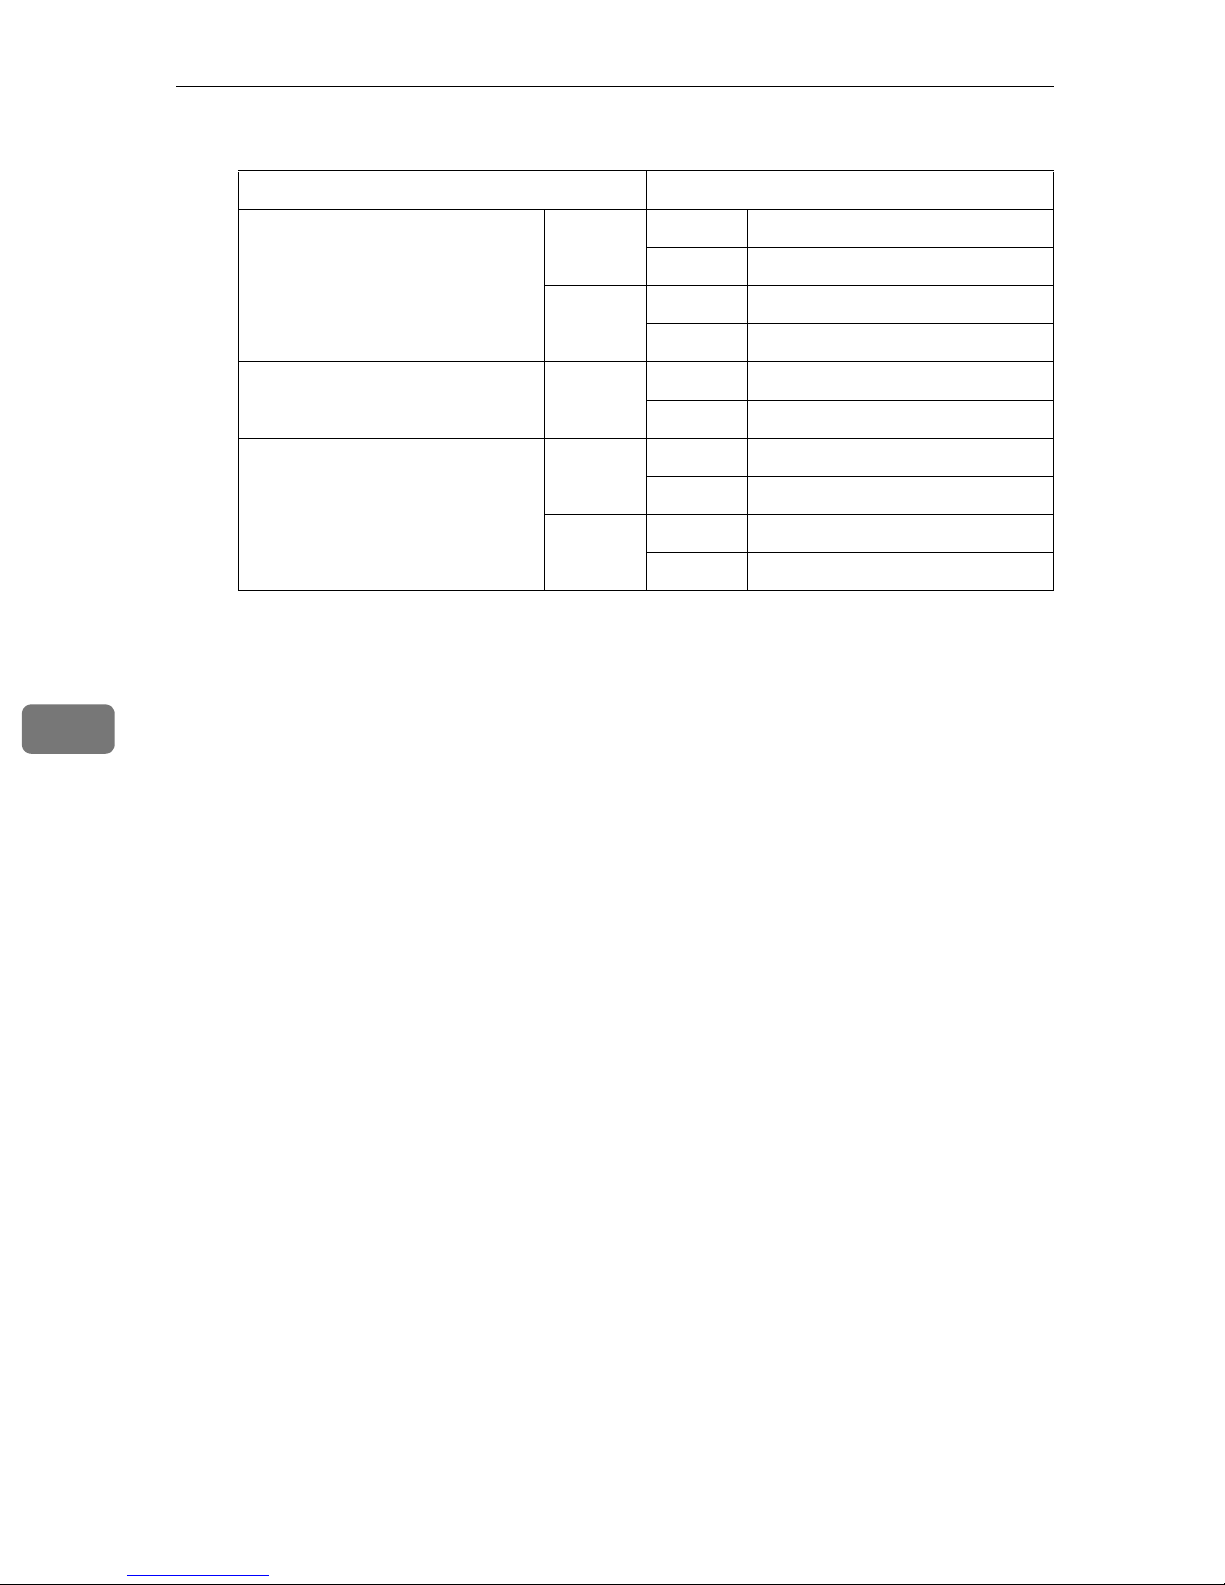
❖❖❖❖ Finisher 3000B(100–sheet staples)
Punch unit type
2 & 4 holes type 2 holes L A3–A5, 11" × 17"–5
K A4–A5, 8
4 holes L A3, 11" × 17"
K A4, 8
4 holes type 4 holes L A3–B5, 11" × 17"–8
K A4–A5, 8
2 & 3 holes type 2 holes L A3–A5, 11" × 17"–5
K A4–A5, 8
3 holes L A3, B4, 11" × 17"
K A4, B5, 8
❖❖❖❖ Duplex
You cannot use the following copy paper with this function:
• Paper smaller than A5, 5
• Paper thicker than 127.9 g/m
• Paper thinner than 64 g/m
1
/2" × 81/2"
2
, 34 lb.
2
, 20 lb.
1
/2" × 81/2"
1
/2" × 11", 51/2" × 81/2"
1
/2" × 11"
1
/2" × 11"
1
/2" × 11", 51/2" × 81/2"
1
/2" × 81/2"
1
/2" × 11", 51/2" × 81/2"
1
/2" × 11"
• Translucent paper
• Label paper (adhesive labels)
• OHP transparencies
• Postcards
When an odd number of originals is set in the optional document feeder, the
back of the last page is blank. During copying, the image is shifted to allow
for the binding margin.The image quality of the front and back of copies
might be different.
❖❖❖❖ Combine
• If the calculated ratio is under the minimum ratio, it is adjusted to within
available range automatically. However, with some ratios, parts of the image might not be copied.
• You cannot use custom size paper.
• In this mode, the machine selects the ratio automatically. This ratio de-
pends on copy paper size and the number of originals.
• The reproduction ratios you can specify are 25 – 400%.
• If the direction of originals is different from that of the copy paper, the ma-
chine will automatically rotate the image by 90° to make copies properly.
120
Page 43
Supplementary Specifications
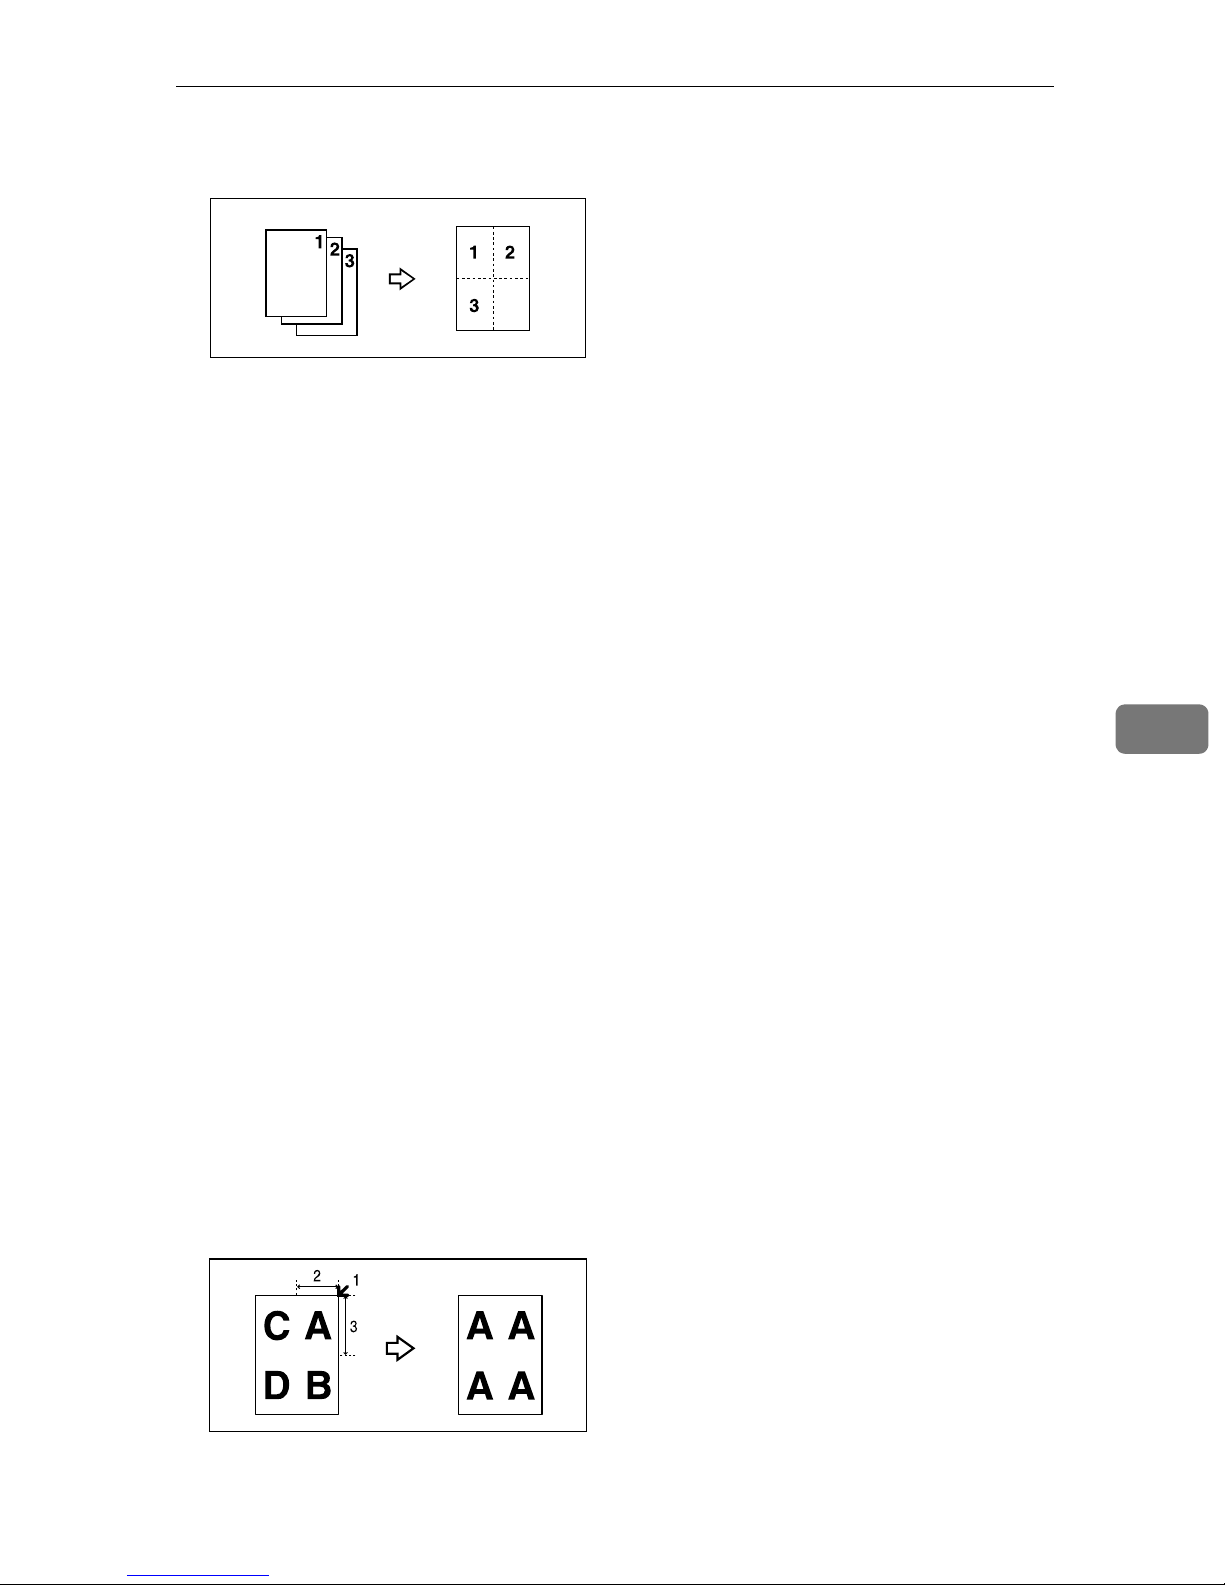
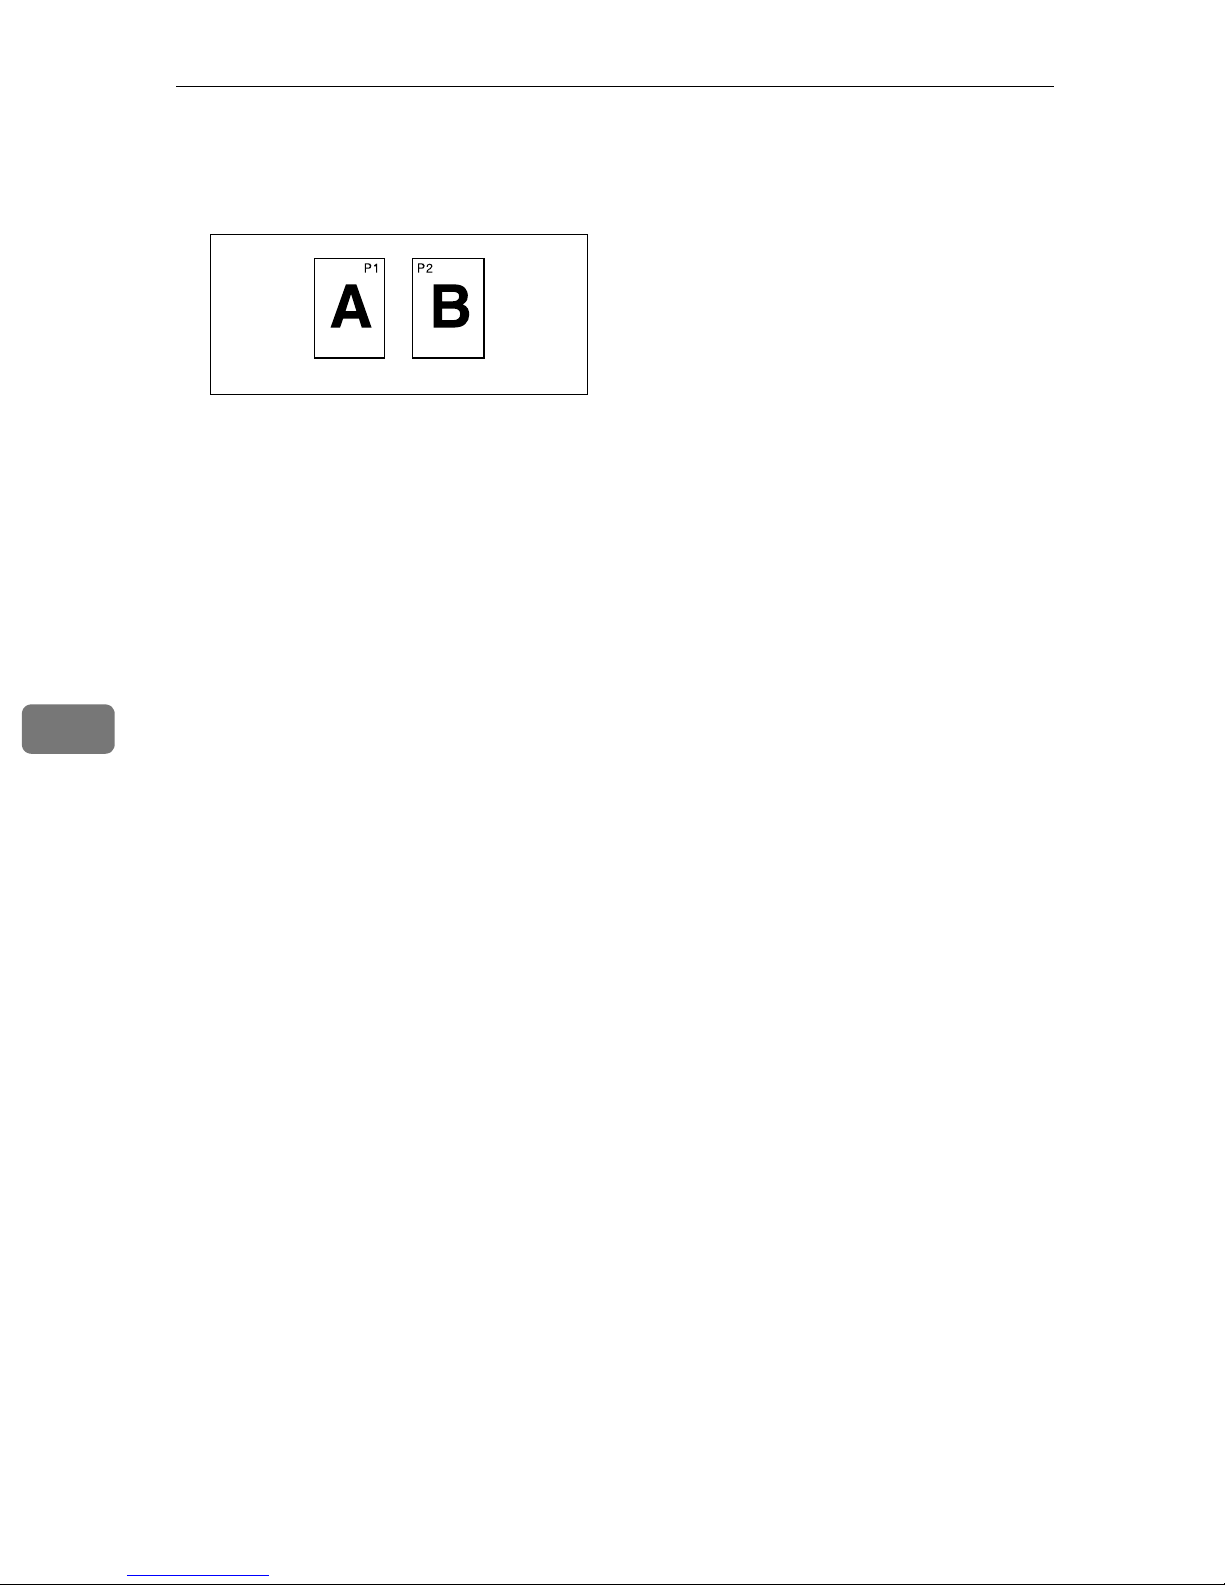
• If the number of originals placed is less than the number specified for combining, the last page is left blank, as shown in the illustration.
❖❖❖❖ Copying Book Originals
• The machine sets the reproduction ratio automatically to meet paper size
and copies originals together onto the paper.
• The machine uses ratios in the range of 25 to 400%
• If the calculated ratio is under the available minimum, it will be adjusted
to minimum ratio. However, with some ratios, parts of the image might
not be copied.
• Even if the direction of originals is different from that of the copy paper,
the machine will automatically rotate the image by 90°to make copies
properly.
• If you mix originals of different sizes or place originals in different orientations, you cannot use this function.
• Four originals are copied onto each sheet of copy paper with this function.
If the number of originals scanned is less than a multiple of 4, the last page
will be blank.
• Copying to make a magazine may take some time after scanning originals.
• If the Booklet Finisher is installed and you select "Magazine" and "Staple
(Saddle Stitch)", copies are stacked, stapled at the center, folded in half automatically, and then delivered.
❖❖❖❖ Repeat
Depending on paper size, ratio, and orientation, parts of repeated images
may not be copied.
• If you use this function with "Custom Size Original", you can copy repeatedly the image in the area you want by specifying the vertical and horizontal lengths from the base point. In this case, place your original on the
exposure glass. ⇒ p.16 “Placing Custom Size Originals”
6
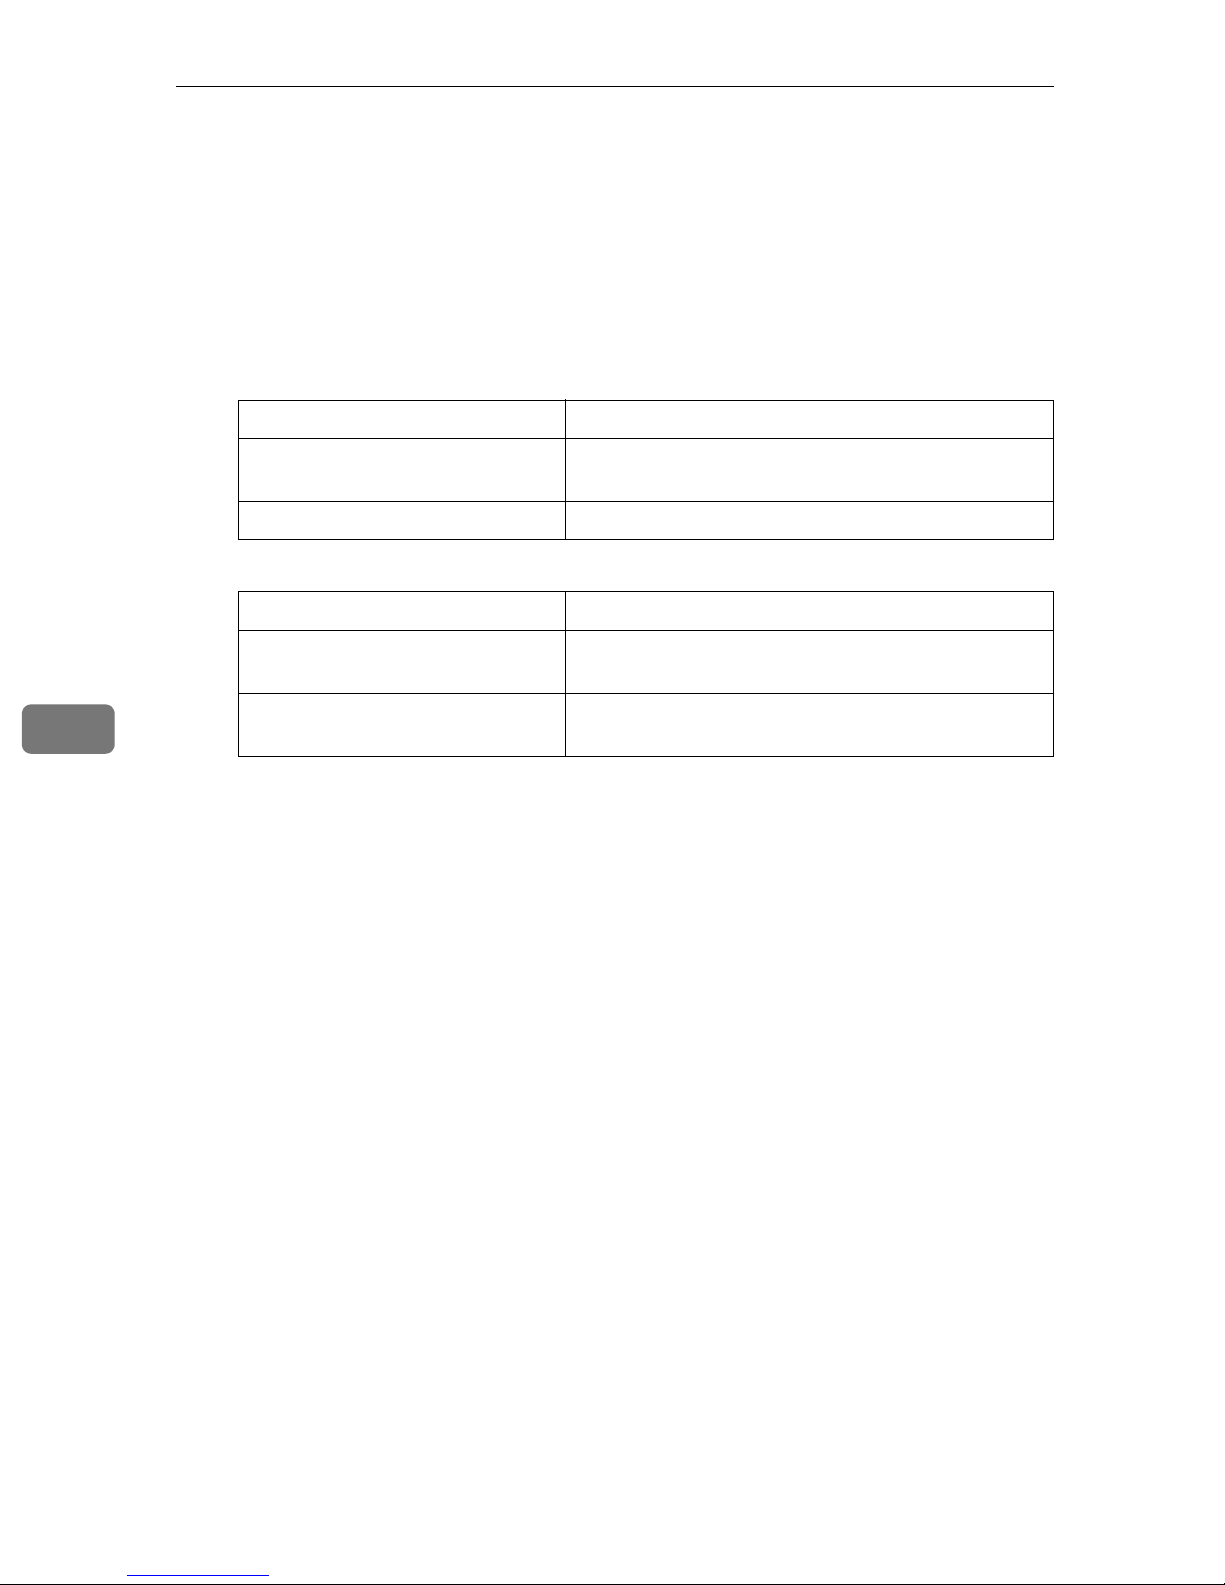
1.
Base point
2. Horizontal length
3.
Vertical length
121
Page 44
6
Specifications
❖❖❖❖ Centering
Although the original is set at a different orientation to the paper, the machine
will not rotate the image by 90° (Rotate copy).
❖❖❖❖ Erase
The width of the erased margin varies depending on the reproduction ratio.
If the size of the original is different to sizes listed in the following chart, the
erased margin might be shifted.
• Metric version
Where Original Is Set Paper Size and Orientation
Exposure glass A3L, B4L, A4KL, B5KL, A5L, 8
Document feeder A3L, B4L, A4KL, B5KL, A5KL, 8
1
/2" × 13"L
8
1
/2" × 14"L,
1
/2" × 13"L
• Inch version
Where Original Is Set Paper Size and Orientation
Exposure glass 11" × 17"L, 8
14"L, 8" × 10"L
Document feeder 11" × 17"L, 8
14"L, 5
1
/2" × 14"L, 81/2" × 11"KL, 10" ×
1
/2" × 14"L, 81/2" × 11"KL, 10" ×
1
/2" × 81/2"L
You can erase two parts using “Erase Inside 1” together with “Erase Inside
2”
❖❖❖❖ Margin Adjustment
If you set a binding margin too wide, part of the image may not be copied.
When making copies in Combine mode, the binding margin is added to copies after the combination is finished.
❖❖❖❖ Background Numbering
If the numbers overlap the copied image, the parts overlapped may look like
some pattern.
❖❖❖❖ Preset Stamp
You can change the size and density of the stamp with User Tools.
Depending on paper size, if you change the stamp size, parts of the stamp
might not be printed.
When you use this function with the Magazine or Booklet function, you can
print the stamp only on the first page.
122
Page 45
Supplementary Specifications
❖❖❖❖ Date Stamp
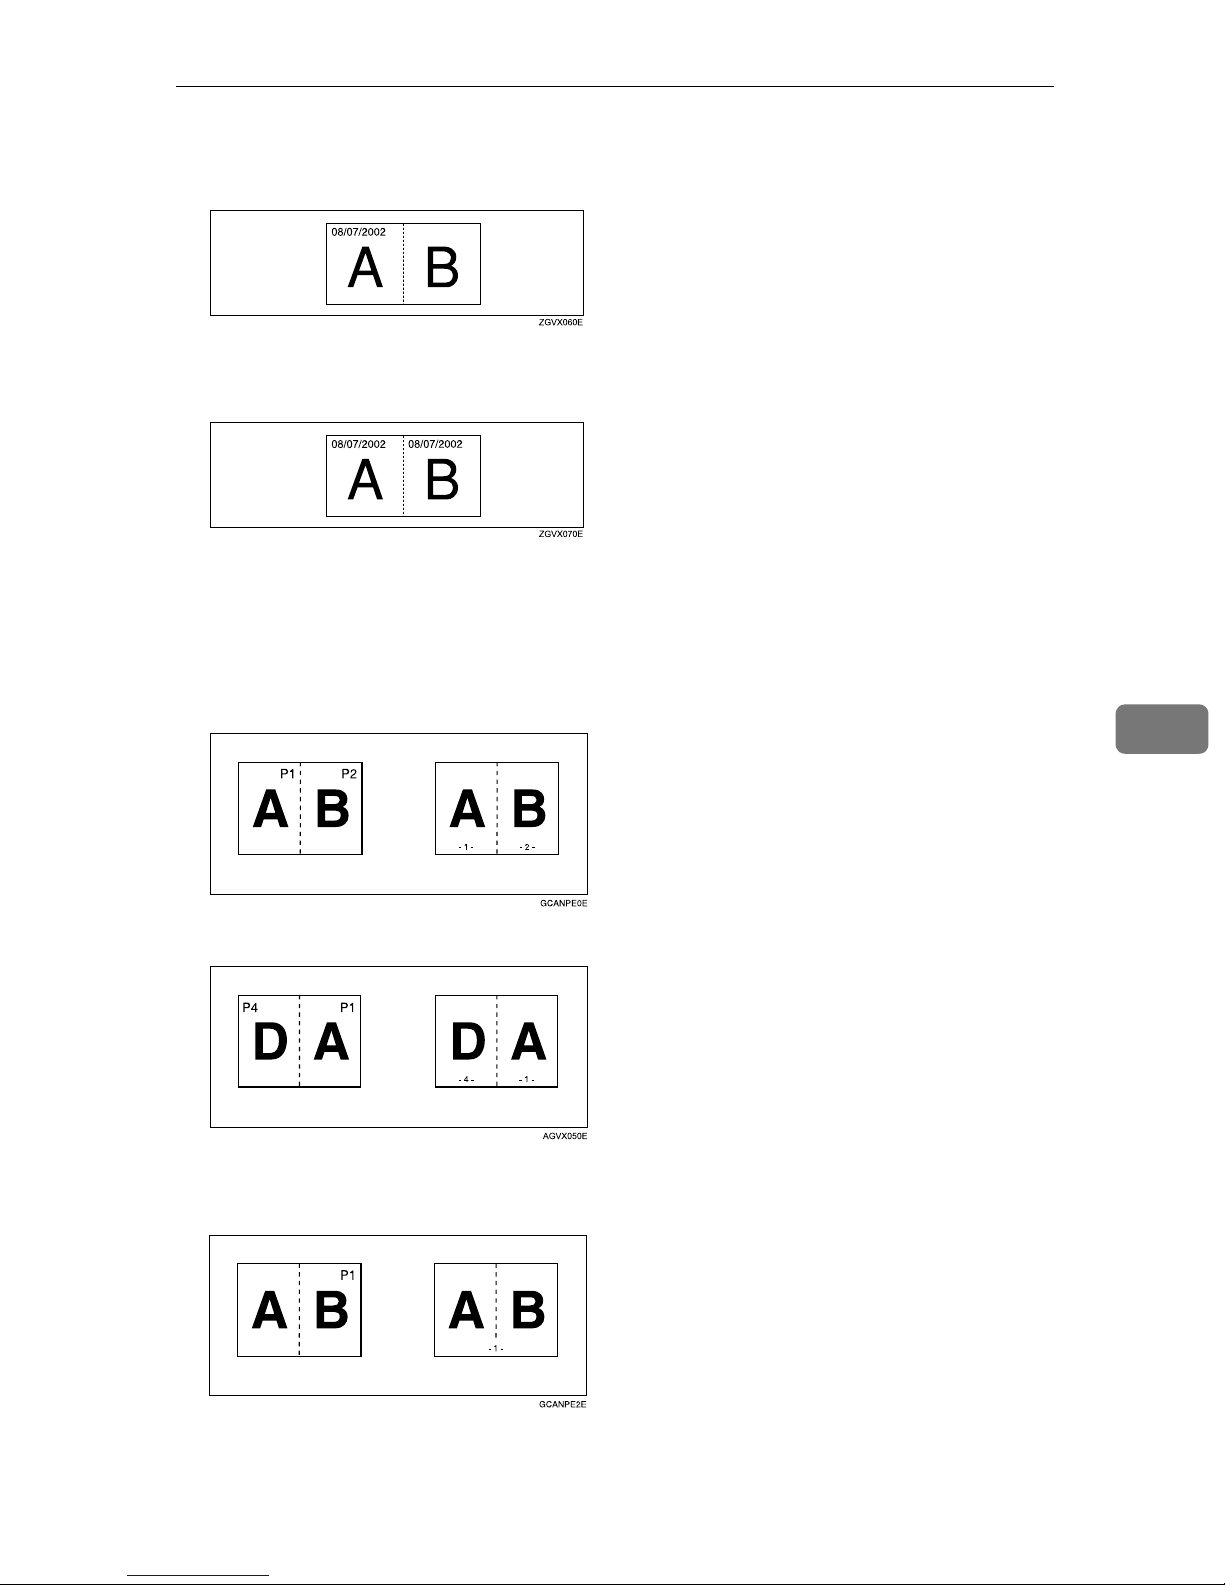
• When using Combine mode, the date stamp is printed as follows:
• When using Magazine or Booklet function, the date stamp is printed as fol-
lows:
❖❖❖❖ Page Numbering
When page numbering is used with Combine mode, page numbers are printed as follows:
• Page Numbering per original:
Combined with 1 Sided/2 Sided in the Combine function
6
Combined with Magazine or Booklet function
• Page Numbering per copy:
Combined with 1 Sided/2 Sided in the Combine function
123
Page 46
Specifications
If you combine this function with the Duplex (Top to Top) function and select
the "P1, P2" or "1/n, 2/n" format, the page numbers on the back of are printed
as follows:
6
1
2
GCSTMPBE
1. Front
2. Back
❖❖❖❖ Front Cover, Front/Back Cover
• In "Cover Sheet Tray" of User Tools (System Settings), if you selected "At
Mode Selected" for "Display Time", the machine refers to the settings in
"Cover Sheet Tray" to ascertain whether the front and back covers are copied 1-sided or 2-sided. If you selected "Full Time" for "Display Time", the
machine refers to the settings in "Paper Type" to ascertain whether the
front and back covers are copied 1-sided or 2-sided. ⇒ "Paper Type" and
"Cover Sheet Tray" in the General Settings Guide
• If Blank mode is selected, the cover is not counted as a copy.
❖❖❖❖ Designate
When "Combine (1 Sided→2 Sided)" has been selected, specified pages will
always be copied on the front of copies in the same way as in Chapters mode.
❖❖❖❖ Slip Sheets
When not copying onto slip sheets, the sheets are not counted as copies.
124
Page 47

INDEX
C
1 sided → 2 sided
1 sided combine
1 sided 2 pages
1 sided 4 pages
1 sided 8 pages
2 sided 1 page
2 sided 2 pages
2 sided 4 pages
2 sided → 2 sided
2 sided combine
1 sided 16 pages
1 sided 4 Pages
1 sided 8 pages
2 sided 16 pages
2 sided 4 pages
2 sided 8 pages
2-sided paper
,
A
Accessing user tools
copy/document server features
Adjusting
copy image density
Auto
image density
paper select
paper select priority
reduce/enlarge
,
start
tray switching
Auto paper select
,
18
B
,
,
,
,
14
57
22
Basic procedure
Batch mode
Border erase
Bypass tray
,
43
→
combine 1 side
→
combine 1 side
→
combine 1 side
→
combine 1 side
→
combine 1 side
→
combine 1 side
,
43
→
combine 2 side
→
combine 2 side
→
combine 2 side
→
combine 2 side
→
combine 2 side
→
combine 2 side
11
,
,
25
27
,
,
32
,
97
,
28
17
25
89
,
,
96
,
,
,
,
,
,
,
,
,
45
,
,
45
45
45
45
45
47
47
47
47
47
48
58
,
,
,
,
,
,
4
,
55
,
69
, 66,
,
,
,
64
,
,
5
25
68
,
,
,
48
77
65
,
4
,
53
63
64
4
,
,
54
,
,
40
71
80
109
45
47
,
59
,
,
69
,
,
33
69
62
,
79
,
,
32
,
,
30
27
,
Center/border erase
,
,
,
,
25
,
,
35
,
,
,
,
73
43
37
37
31
Center erase
Change
date format
stamp position
Changing
number of sets
stamp density
stamp position
stamp position, size and density
stamp size
stored program
Check Modes key
Clear Modes key
Clear/Stop key
Colour
adjustment/program
Combination chart
Combined auto and manual image
density
Control panel
Copy/document server features
Copy functions
1 sided combine
2 sided combine
adjusting copy image density
auto reduce/enlarge
centering
covers
date stamp
directional magnification (%)
directional magnification (mm)
double copies
duplex
image repeat
margin adjustment
page numbering
preset reduce/enlarge
preset stamp
selecting copy paper
selecting original type setting
series copies
size magnification
slip sheets
sort
stack
Staple
user stamp
zoom
,
25
33
26
64
89
34
125
Page 48

Copying
Copying from the bypass tray
Covers
Create margin mode
,
17
,
,
73
,
,
18
19
73
,
,
18
18
,
,
24
31
auto start
interrupt copy
job preset
original beeper
onto custom size paper
onto special paper
onto standard size paper
Front
front/back
D
, 22,
,
23
23
,
Erase
Exiting from user tools
56
,
,
56
57
,
,
,
101
57
101
border
border width
center
center/border
center width
original shadow in combine
F
,
Font
Format
Function keys
Function Status indicator
105
,
105
,
5
,
96
,
,
101
5
,
,
,
105
,
105
105
,
,
,
105
,
80
,
4
Date stamp
change position
change style
font
position
position and original orientation
size
stamp format
superimpose
Deleting
program
user stamp
Direction-fixed paper
Display panel
Document server
E
, 92,
Edit
Energy Saver key
101
1 sided→2 sided auto margins − T to B
1 sided→2 sided auto margins − T to T
back margin
back margin
copy order in combine
double copies separation line
erase border width
erase center width
erase original shadow in combine
front cover copy in combine
front margin
front margin
image repeat separation line
separation line in combine
−
−
,
69
69
,
105
105
67
,
11
,
78
left/right
top/bottom
,
,
101
,
101
−
left/right
−
top/bottom
,
4
,
,
101
,
103
,
,
101
,
,
101
,
103
101
102
103
,
102
,
,
,
68
101
101
101
G
General features
auto paper select priority
auto tray switching
change initial mode
copy function key
copy orientation in duplex mode
document server storage key
duplex mode priority
job end call
max. copy quantity
original orientation in duplex mode
original type display
original type priority
paper display
−
tone
original remains
Generation copy
I
Indicators
Input/Output
Input/Output 1/2
Interrupt key
,
4
,
auto sort
letterhead setting
memory full auto scan restart
rotate sort
SADF auto reset
select stack function
switch to batch (SADF)
,
,
, 89, 90, 97, 99,
,
97
,
97
,
99
,
99
,
,
99
,
99
,
99
,
98
,
98
,
97
,
99
,
26
94
106
,
108
−
auto paper continue
,
106
,
107
,
106
,
106
4
100
99
,
,
106
,
99
,
106
99
126
Page 49

K
P
Key
,
,
,
,
,
4
,
5
4
,
5
,
4
4
4
5
,
4
check modes
clear modes
clear/stop
energy saver
interrupt
program
sample copy
# (sharp)
,
start
user tools/counter
5
M
,
,
15
,
,
,
28
10
4
25
Main power indicator
Manual image density
Manual paper select
Messages
Missing image area
Mixed size mode
,
83
N
Non-recommended originals for
,
,
7
5
document feeder
Number keys
O
46
,
,
,
,
,
12
98
98
5
,
43
77
OHP transparencies
Operation switch
Original
,
,
18
,
7
beeper
combine
copy direction
direction and completed copies
orientation
orientation in duplex mode
type display
type priority
Originals
,
99
,
44
Page numbering
duplex back page stamping position
first printing page
,
105
font
page numbering in combine
,
,
105
, 7, 12, 13,
,
,
104
,
,
,
,
,
79
71
104
104
104
104
4
position
position and original orientation
size
stamp format
stamp on designated slip sheet
stamp position
start number
superimpose
,
Pale
Photo
Placing
Preset stamp
Program key
Programs
Punching copies
26
,
26
custom size originals
originals
originals in document feeder
originals on exposure glass
changing density
changing position
changing size
format
language
position
position and original direction
priority
R
Recalling a program
Reproduction ratio
,
,
100
100
,
29
enlarge
priority setting
priority setting
ratio for create margin
reduce
R/E priority
shortcut R/E
Rotated copy
,
,
,
,
,
,
,
,
105
,
105
,
105
71
105
,
,
64
41
,
, 91,
−
enlarge
−
reduce
100
100
80
64
64
71
,
16
100
,
16
,
,
100
,
,
,
100
100
105
,
13
,
13
,
,
105
64
105
65
127
Page 50

S
105
35
37
,
68
→
→
104
,
,
15
,
40
,
1 sided
2 sided
,
,
,
,
,
,
104, 105
,
,
104, 105
,
104
,
105
,
5
,
,
79
,
,
→
5
35
36
109
104
,
78
105
5
27
,
,
2 sided
,
68
,
63
65
,
48
49
69
4
9
,
26
,
49
,
,
7
SADF mode
Sample copy
Sample copy key
Screen contrast knob
Selecting
copy paper
original type setting
Series copies
book
book
front & back
Sharp (#) key
,
Size
Sizes
detectable by auto paper select
difficult to detect
of recommended originals
,
Sort
rotate sort
shift sort
Specifications
,
Stack
Stamp
date stamp
format
language
page numbering
position
position and orientation of originals
position and original orientation
preset stamp
priority
setting
user stamp
Stapling position and original setting
Start key
Storing
originals
program
Superimpose
8
,
, 65,
,
70
38
Supplementary specifications
123
124
122
,
,
,
,
111
124
,
123
,
122
,
113
auto reduce/enlarge
bypass tray copy
,
,
,
,
122
,
113
112
,
120
121
116
122
120
,
,
,
centering
combine
date stamp
duplex
eirectional size magnification
,
erase
front/back cover
front cover
margin adjustment
page numbering
preset enlarge/reduce
preset stamp
repeat
size magnification
,
sort
staple
zoom
T
,
Text
Tone − original remains
Troubleshooting
Types of duplex copies
26
,
,
83
,
memory is full
you cannot make clear copies
you cannot make copies as you want
your machine does not operate as you
,
want
83
87
,
U
User stamp
User tools
User Tools/Counter key
,
104
,
,
66
104
changing position
,
,
,
67
,
,
89
104
104
66
delete
format
position
position and original orientation
program
program/delete
,
113
111
99
i
4
,
111
,
,
113
84
,
,
65
85
128
W
Weights of recommended originals
What you can do with this machine
,
,
7
i
Page 51

MEMO
129
Page 52

MEMO
130
UE USA B064
 Loading...