

Page 1
Introduction
This manual describes detailed instructions on the operation and notes about the use of this machine.
To get maximum versatility from this machine all operators are requested to read this manual carefully
and follow the instructions. Please keep this manual in a handy place near the machine.
For safe and correct use of this machine, please be sure to read the Safety Information in the General
Settings Guide before you use it.
Notes:
Some illustrations in this manual might be slightly different from the machine.
Certain options might not be available in some countries. For details, please contact your local dealer.
Warning:
Use of controls or adjustment or performance of procedures other than those specified in this manual
might result in hazardous radiation exposure.
Notes:
The model names of the machines do not appear in the following pages. Check the type of your machine before reading this manual. (For details, see p.2 “Machine Types”.)
• Type 1: 3518
• Type 2: 4518
Certain types might not be available in some countries. For details, please contact your local dealer.
Two kinds of size notation are employed in this manual. With this machine refer to the metric version.
For good copy quality, Rex-Rotary recommends that you use genuine Rex-Rotary toner.
Rex-Rotary shall not be responsible for any damage or expense that might result from the use of parts
other than genuine Rex-Rotary parts in your Rex-Rotary office product.
Power Source
220 - 240V, 50/60Hz, 8A or more
Please be sure to connect the power cord to a power source as above. For details about power source,
see “Power Connection” in the General Settings Guide.
For safety, please read this manual carefully before you use this product and keep it handy for future
reference.
AdonisC3_GBcopyF_FM1.book Page 1 Thursday, November 28, 2002 1:53 PM
Page 2
Introduction
This manual describes detailed instructions on the operation and notes about the use of this machine.
To get maximum versatility from this machine all operators are requested to read this manual carefully
and follow the instructions. Please keep this manual in a handy place near the machine.
For safe and correct use of this machine, please be sure to read the Safety Information in the General
Settings Guide before you use it.
Notes
Some illustrations in this manual might be slightly different from the machine.
Certain options might not be available in some countries. For details, please contact your local dealer.
Warning:
Use of controls or adjustment or performance of procedures other than those specified in this manual
might result in hazardous radiation exposure.
Notes:
The model names of the machines do not appear in the following pages. Check the type of your machine before reading this manual. (For details, see p.2 “Machine Types”.)
• Type 1: 3532
• Type 2: 4532
Certain types might not be available in some countries. For details, please contact your local dealer.
Two kinds of size notation are employed in this manual. With this machine refer to the metric version.
For good copy quality, Gestetner recommends that you use genuine Gestetner toner.
Gestetner shall not be responsible for any damage or expense that might result from the use of parts
other than genuine Gestetner parts in your Gestetner office product.
Power Source
220 - 240V, 50/60Hz, 8A or more
Please be sure to connect the power cord to a power source as above. For details about power source,
see “Power Connection” in the General Settings Guide.
For safety, please read this manual carefully before you use this product and keep it handy for future
reference.
AdonisC3_GBcopyF_FM1.book Page 1 Thursday, November 28, 2002 1:53 PM
Page 3
Introduction
This manual describes detailed instructions on the operation and notes about the use of this machine.
To get maximum versatility from this machine all operators are requested to read this manual carefully
and follow the instructions. Please keep this manual in a handy place near the machine.
For safe and correct use of this machine, please be sure to read the Safety Information in the General
Settings Guide before you use it.
Notes
Some illustrations in this manual might be slightly different from the machine.
Certain options might not be available in some countries. For details, please contact your local dealer.
Warning:
Use of controls or adjustment or performance of procedures other than those specified in this manual
might result in hazardous radiation exposure.
Notes:
The model names of the machines do not appear in the following pages. Check the type of your machine before reading this manual. (For details, see p.2 “Machine Types”.)
• Type 1: 3545
• Type 2: 4545
Certain types might not be available in some countries. For details, please contact your local dealer.
Two kinds of size notation are employed in this manual. With this machine refer to the metric version.
For good copy quality, Nashuatec recommends that you use genuine Nashuatec toner.
Nashuatec shall not be responsible for any damage or expense that might result from the use of parts
other than genuine Nashuatec parts in your Nashuatec office product.
Power Source
220 - 240V, 50/60Hz, 8A or more
Please be sure to connect the power cord to a power source as above. For details about power source,
see “Power Connection” in the General Settings Guide.
For safety, please read this manual carefully before you use this product and keep it handy for future
reference.
AdonisC3_GBcopyF_FM1.book Page 1 Thursday, November 28, 2002 1:53 PM
Page 4
Declaration of Conformity
“The Product complies with the requirements of the EMC Directive 89/336/EEC and its amending directives and the Low Voltage Directive 73/23/EEC and its amending directives.”
In accordance with IEC 60417, this machine uses the following symbols for the main power switch:
aaaa means POWER ON.
cccc means STAND BY.
Trademark
Acrobat
®
is a registered trademark of Adobe Systems Incorporated.
Copyright © 2002
AdonisC3_GBcopyF_FM1.book Page 1 Thursday, November 28, 2002 1:53 PM
Page 5
Introduction
This manual describes detailed instructions on the operation and notes about the use of this machine.
To get maximum versatility from this machine all operators are requested to read this manual carefully
and follow the instructions. Please keep this manual in a handy place near the machine.
For safe and correct use of this machine, please be sure to read the Safety Information in the General
Settings Guide before you use it.
Notes
Some illustrations in this manual might be slightly different from the machine.
Certain options might not be available in some countries. For details, please contact your local dealer.
Warning:
Use of controls or adjustment or performance of procedures other than those specified in this manual
might result in hazardous radiation exposure.
Notes:
The model names of the machines do not appear in the following pages. Check the type of your machine before reading this manual. (For details, see p.2 “Machine Types”.)
• Type 1: IS2035
• Type 2: IS2045
Certain types might not be available in some countries. For details, please contact your local dealer.
Two kinds of size notation are employed in this manual. With this machine refer to the metric version.
For good copy quality,Infotec recommends that you use genuine Infotec toner.
Infotec shall not be responsible for any damage or expense that might result from the use of parts other
than genuine Infotec parts in your Infotec office product.
Power Source
220 - 240V, 50/60Hz, 8A or more
Please be sure to connect the power cord to a power source as above. For details about power source,
see “Power Connection” in the General Settings Guide.
This information is based on our present state of knowledge and is intended to provide general notes
on our products and their uses.
It should not therefore be construed as guaranteeing specific properties of the products described or
their suitability for particular applications.
Any existing industrial property rights must be observed. The quality of our products is guaranteed under our General Conditions of Sale.
For safety, please read this manual carefully before you use this product and keep it handy for future
reference.
AdonisC3copy_gb_Cover2-5 Page 1 Friday, January 24, 2003 1:26 PM
Page 6
Declaration of Conformity
“The Product complies with the requirements of the EMC Directive 89/336/EEC and its amending directives and the Low Voltage Directive 73/23/EEC and its amending directives.”
In accordance with IEC 60417, this machine uses the following symbols for the main power switch:
aaaa means POWER ON.
cccc means STAND BY.
Trademark
Acrobat
®
is a registered trademark of Adobe Systems Incorporated.
Copyright © 2002
AdonisC3_GBcopyF_FM1.book Page 1 Thursday, November 28, 2002 1:53 PM
Page 7
i
Manuals for This Machine
The following manuals describe the operational procedures of this machine. For
particular functions, see the relevant parts of the manual.
Note
❒ Manuals provided are specific to machine type.
❒ Adobe Acrobat Reader is necessary to view the manuals as a PDF file.
❒ Two CD-ROMs are provided:
• CD-ROM 1 "Operating Instructions for Printer/Scanner"
• CD-ROM 2 "Scanner Driver & Document Management Utilities"
❖❖❖❖ General Settings Guide
Provides an overview of the machine.
It also describes System Settings (such as paper trays and user codes settings),
Document Server functions, and troubleshooting.
❖❖❖❖ Network Guide (PDF file - CD-ROM1)
Describes procedures for configuring the machine and computers in a network environment.
❖❖❖❖ Copy Reference (this manual)
Describes operations, functions, and troubleshooting for the machine's copier
function.
❖❖❖❖ Facsimile Reference <Basic Features>
Describes operations, functions, and troubleshooting for the machine's facsimile function.
❖❖❖❖ Facsimile Reference <Advanced Features>
Describes advanced functions and settings for key operators.
❖❖❖❖ Printer Reference 1
Describes system settings and operations for the machine's printer function.
❖❖❖❖ Printer Reference 2 (PDF file - CD-ROM1)
Describes operations, functions, and troubleshooting for the machine's printer function.
❖❖❖❖ Scanner Reference (PDF file - CD-ROM1)
Describes operations, functions, and troubleshooting for the machine's scanner function.
AdonisC3_GBcopyF_FM1.book Page i Thursday, November 28, 2002 1:53 PM
Page 8
ii
❖❖❖❖ Manuals for DeskTopBinder V2 Lite
DeskTopBinder V2 Lite is a utility included on the CD-ROM labeled "Scanner
Driver & Document Management Utilities".
• DeskTopBinder V2 Lite Setup Guide (PDF file - CD-ROM2)
Describes installation of, and the operating environment for DeskTopBinder V2 Lite in detail. This guide can be displayed from the [Setup] dialog box when DeskTopBinder V2 Lite is installed.
• DeskTopBinder V2 Lite Introduction Guide (PDF file - CD-ROM2)
Describes operations of DeskTopBinder V2 Lite and provides an overview
of its functions. This guide is added to the [Start] menu when DeskTopBinder V2 Lite is installed.
• Auto Document Link Guide (PDF file - CD-ROM2)
Describes operations and functions of Auto Document Link installed with
DeskTopBinder V2 Lite. This guide is added to the [Start] menu when
DeskTopBinder V2 Lite is installed.
❖❖❖❖ Manuals for ScanRouter V2 Lite
ScanRouter V2 Lite is a utility included on the CD-ROM labeled "Scanner
Driver & Document Management Utilities".
• ScanRouter V2 Lite Setup Guide (PDF file - CD-ROM2)
Describes installation of, settings, and the operating environment for ScanRouter V2 Lite in detail. This guide can be displayed from the [
Setup
] dia-
log box when ScanRouter V2 Lite is installed.
• ScanRouter V2 Lite Management Guide (PDF file - CD-ROM2)
Describes delivery server management and operations, and provides an
overview of ScanRouter V2 Lite functions. This guide is added to the [Start]
menu when ScanRouter V2 Lite is installed.
❖❖❖❖ Other manuals
• PS3 Supplement (PDF file - CD-ROM1)
• Unix Supplement (Available from an authorized dealer, or as a PDF file on
our Web site.)
AdonisC3_GBcopyF_FM1.book Page ii Thursday, November 28, 2002 1:53 PM
Page 9
iii
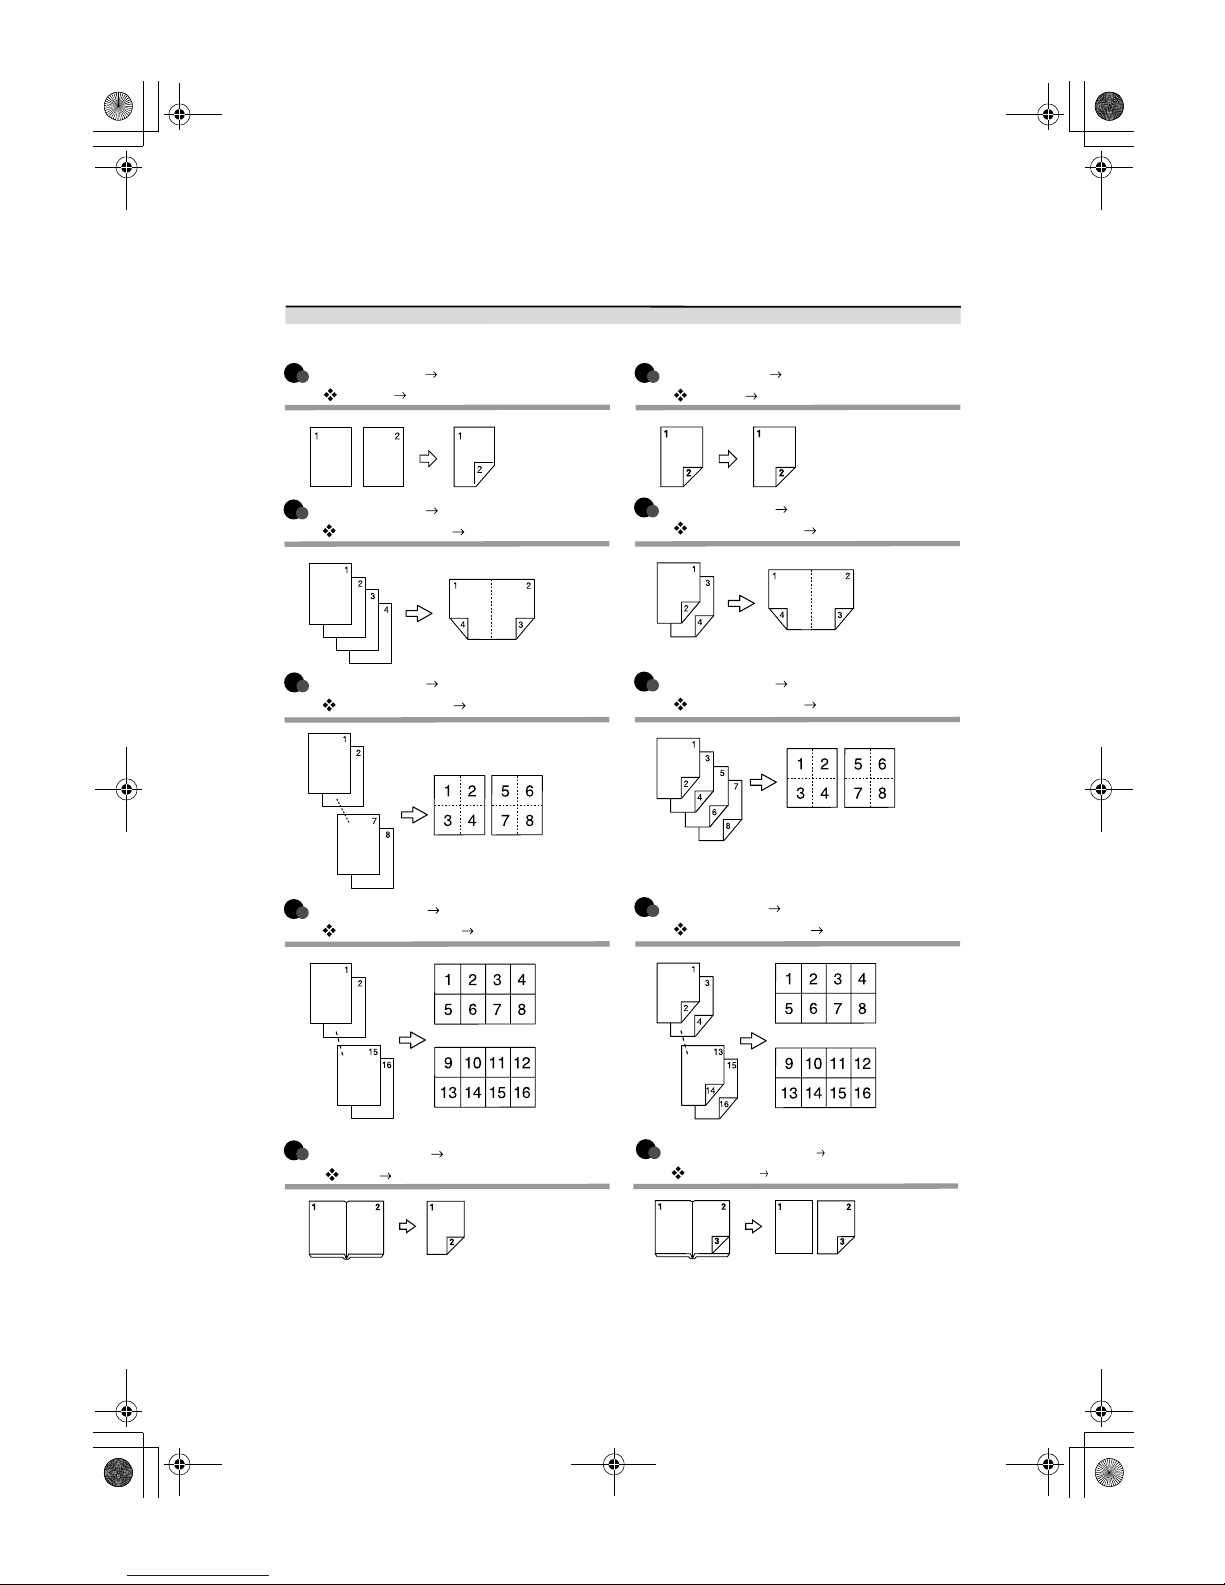
What You Can Do with This Machine
2-sided 2 Pages 2-sided 1 Page (see p.47
" 2 Sided 4 Pages Combine 2 Side")
Front
Front
Back
Back
Front
Back
Front
Back
Types of Duplex Copies
1-sided 4 Pages 2-sided 1 Page (see p.47
" 1 Sided 4 Pages Combine 2 Side")
2-sided 4 Pages 2-sided 1 Page (see p.47
" 2 Sided 8 Pages Combine 2 Side")
1-sided 8 Pages 2-sided 1 Page (see p.47
" 1 Sided 8 Pages Combine 2 Side")
1-sided 16 Pages
2-sided 1 Page
(see p.47
" 1 Sided 16 Pages Combine 2 Side")
1-sided 2 Pages 2-sided 1 Page (see p.43
" 1 Sided 2 Sided")
2-sided 1 Page 2-sided 1 Page (see p.43
" 2 Sided 2 Sided")
2-sided 8 Pages
2-sided 1 Page
(see p.48
" 2 Sided 16 Pages Combine 2 Side")
Front/Back Bound Originals
2-sided Pages (see p.49
" Front & Back 2 Sided")
Bound Originals 2-sided Pages (see p.49
" Book 2 Sided")
AdonisC3_GBcopyF_FM1.book Page iii Thursday, November 28, 2002 1:53 PM
Page 10
iv
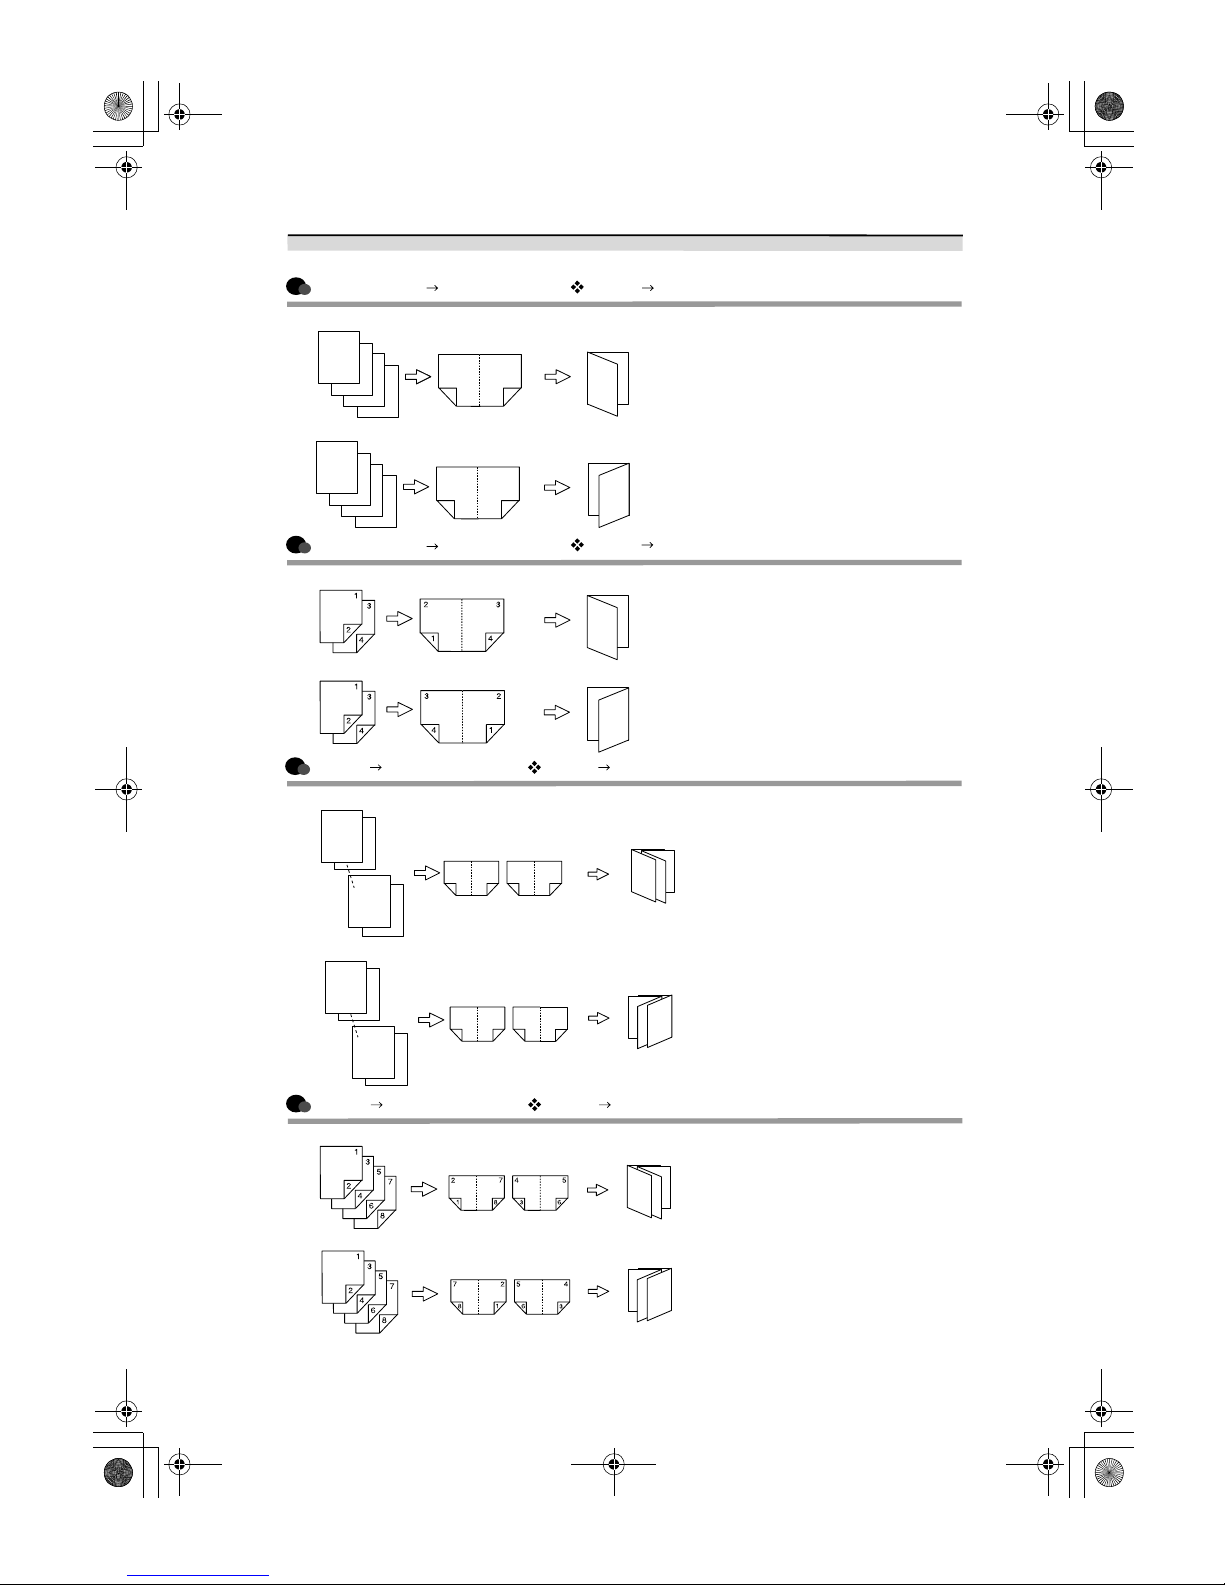
Copying Book Originals
1-sided 4 Pages Booklet (see p.50 " 1 Sided Booklet")
4
3
2
1
4
32
1
Open to Left
3
1
Open to Right
3
1
4
3
2
1
1
23
4
2-sided 2 Pages Booklet (see p.51 " 2 Sided Booklet")
Open to Left
Open to Right
Open to Left
Open to Right
1-sided Magazine (see p.51 " 1 Sided Magazine")
2
1
8
7
8
72
16
54
3
2
1
8
7
12783
45
6
1
3
5
3
1
5
Open to Left
Open to Right
2-sided Magazine (see p.51 " 2 Sided Magazine")
1
3
5
3
1
5
3
1
3
1
AdonisC3_GBcopyF_FM1.book Page iv Thursday, November 28, 2002 1:53 PM
Page 11
v
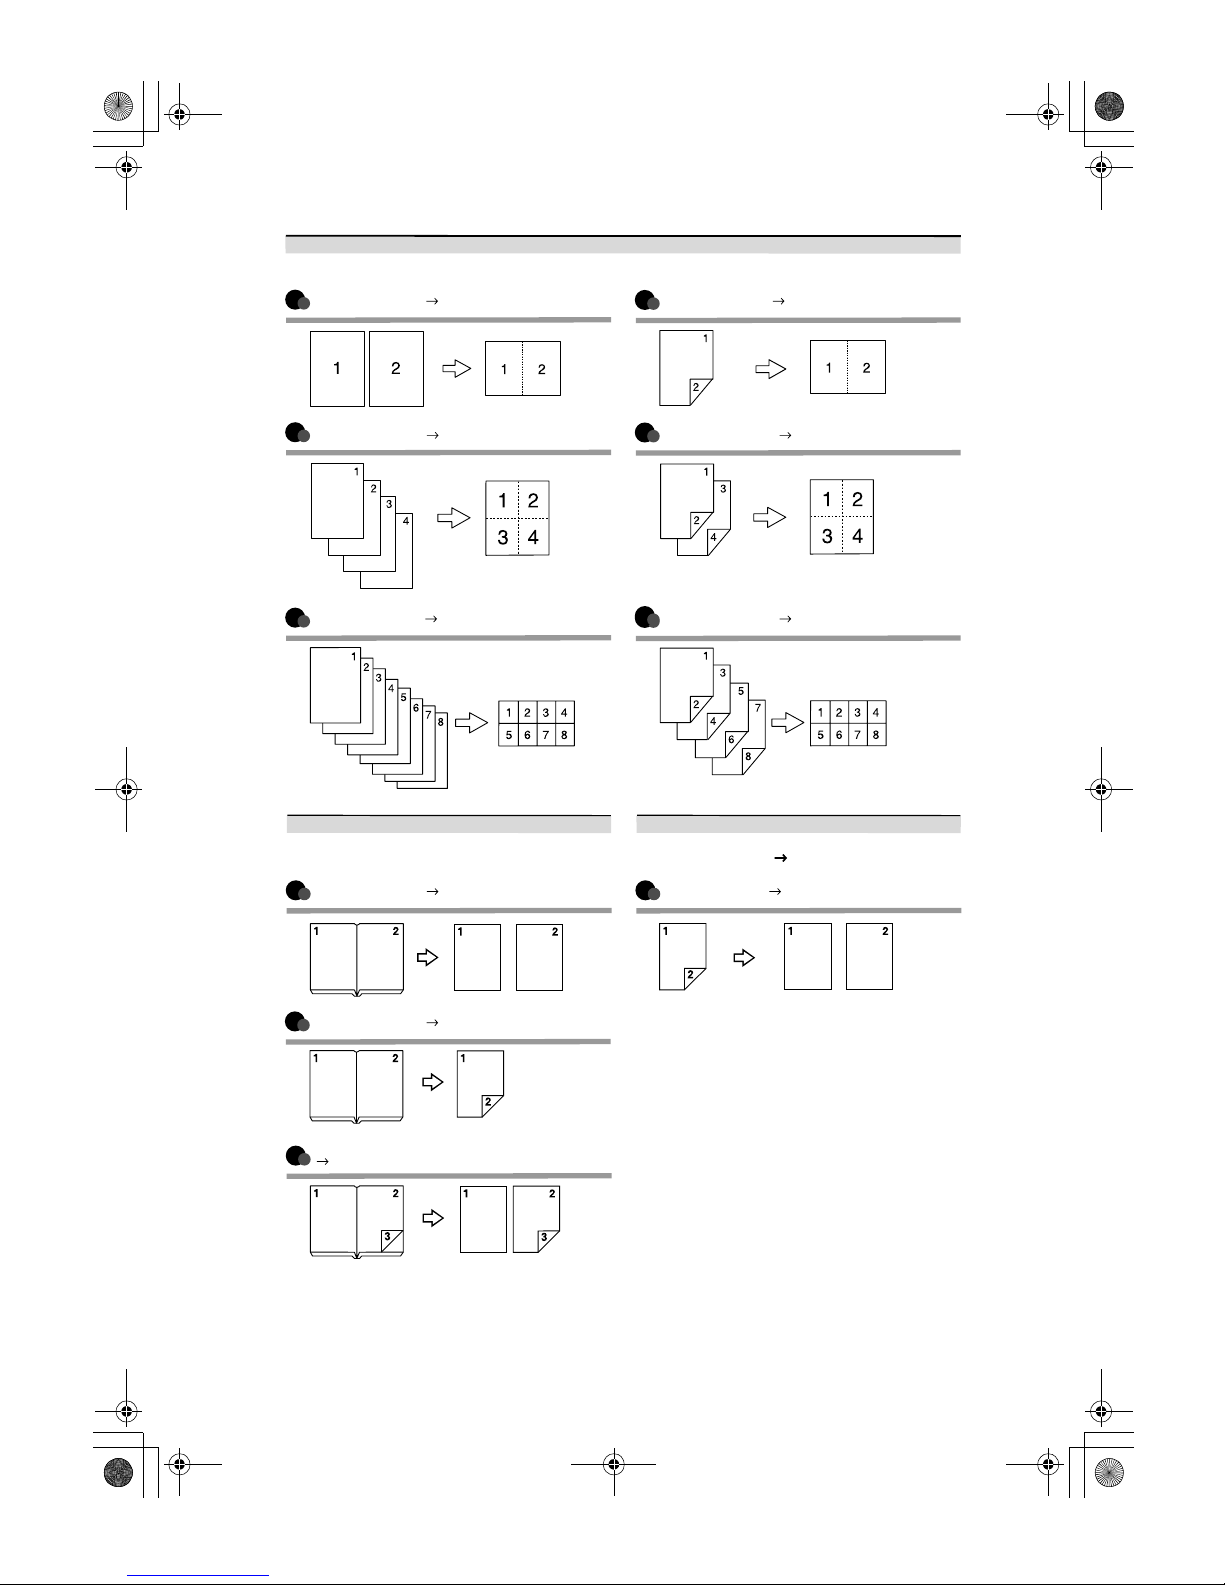
Combining Multiple Pages onto a Single Page (see p.45 " One-Sided Combine")
1-sided 2 Pages 1-sided 1 Page 2-sided 1 Page 1-sided 1 Page
1-sided 4 Pages 1-sided 1 Page 2-sided 2 Pages 1-sided 1 Page
1-sided 8 Pages 1-sided 1 Page
Bound Originals 1-sided Pages
Bound Originals 2-sided Pages
Front/Back Bound Originals
2-sided Pages
2-sided 4 Pages 1-sided 1 Page
Copying Originals Such as Books
(see p.49 "Series Copies")
2-sided 1 page 1-sided 2 pages
Copying 2-Sided Pages onto 1-Sided Pages
(see p.43 "2 Sided 1 Sided")
AdonisC3_GBcopyF_FM1.book Page v Thursday, November 28, 2002 1:53 PM
Page 12
vi
TABLE OF CONTENTS
Manuals for This Machine......................................................................................i
What You Can Do with This Machine..................................................................iii
How to Read This Manual .....................................................................................1
Machine Types .......................................................................................................2
Functions that Require Options ...........................................................................3
Control Panel..........................................................................................................4
Display Panel .............................................................................................................6
1. Placing Originals
Originals .................................................................................................................7
Sizes and Weights of Recommended Originals.........................................................7
Sizes Detectable by the Auto Paper Select ...............................................................8
Missing Image Area ...................................................................................................9
Placing Originals..................................................................................................10
Original Orientation ..................................................................................................10
Placing Originals on the Exposure Glass.................................................................11
Placing Originals in the Auto Document Feeder ......................................................12
2. Copying
Basic Procedure...................................................................................................15
Interrupt Copy ..........................................................................................................16
Original Beeper ........................................................................................................16
Job Preset................................................................................................................17
Copying from the Bypass Tray...........................................................................18
Copier Functions .................................................................................................21
Adjusting Image Density ..........................................................................................21
Selecting Original Type Setting................................................................................22
Selecting Copy Paper ..............................................................................................23
Preset Reduce/Enlarge............................................................................................26
Zoom ........................................................................................................................27
Auto Reduce/Enlarge ...............................................................................................28
Size Magnification....................................................................................................28
Directional Magnification (%) ...................................................................................29
Directional Size Magnification (mm).........................................................................30
Sort...........................................................................................................................31
Stack ........................................................................................................................34
Staple .......................................................................................................................35
Punch .......................................................................................................................41
Duplex ......................................................................................................................43
One-Sided Combine.................................................................................................45
Two-Sided Combine.................................................................................................47
Series Copies...........................................................................................................49
Booklet/Magazine.....................................................................................................50
Image Repeat...........................................................................................................53
Double Copies..........................................................................................................54
Centring....................................................................................................................55
AdonisC3_GBcopyF_FM1.book Page vi Thursday, November 28, 2002 1:53 PM
Page 13
vii
Positive/Negative .....................................................................................................55
Erase........................................................................................................................56
Margin Adjustment ...................................................................................................58
Background Numbering ...........................................................................................59
Preset Stamp ...........................................................................................................60
User Stamp ..............................................................................................................61
Date Stamp ..............................................................................................................64
Page Numbering ......................................................................................................65
Covers......................................................................................................................69
Designate .................................................................................................................70
Chapter ....................................................................................................................71
Slip Sheets ...............................................................................................................71
Storing Data in the Document Server ................................................................73
Programs ..............................................................................................................74
Storing a Program ....................................................................................................74
Deleting a Program ..................................................................................................75
Recalling a Program.................................................................................................75
3. Troubleshooting
If Your Machine Does Not Operate As You Want..............................................77
When a Message Is Displayed.................................................................................77
If You Cannot Make Clear Copies.......................................................................79
If You Cannot Make Copies As You Want .........................................................80
When Memory Is Full ...............................................................................................82
4. User Tools (Copier/Document Server Features)
User Tools Menu (Copier/Document Server Features) ....................................83
Accessing User Tools (Copier/Document Server Features)............................89
Exiting from User Tools............................................................................................89
General Features
1
/4................................................................................................90
General Features
2
/4................................................................................................92
General Features
3
/4................................................................................................93
General Features
4
/4................................................................................................93
Reproduction Ratio
1
/2.............................................................................................94
Reproduction Ratio
2
/2.............................................................................................94
Edit
1
/2......................................................................................................................95
Edit
2
/2......................................................................................................................96
Stamp ......................................................................................................................98
Input/Output ..........................................................................................................101
5. Specifications
Combination Chart.............................................................................................103
Supplementary Informations ............................................................................104
INDEX....................................................................................................... 116
AdonisC3_G BcopyF_FM1 .book Page vii Thursday, N ovember 28, 2002 1:53 PM
Page 14
viii
AdonisC3_GBcopyF_FM1.book Page viii Thursday, November 28, 2002 1:53 PM
Page 15
1
How to Read This Manual
Symbols
In this manual, the following symbols are used:
R
WARNING:
This symbol indicates a potentially hazardous situation that might result in
death or serious injury when you misuse the machine without following the instructions under this symbol. Be sure to read the instructions, all of which are included in the Safety Information section in the General Settings Guide.
R
CAUTION:
This symbol indicates a potentially hazardous situation that might result in minor or moderate injury or property damage that does not involve personal injury
when you misuse the machine without following the instructions under this
symbol. Be sure to read the instructions, all of which are included in the Safety
Information section in the General Settings Guide.
• WARNINGS and CAUTIONS are notes for your safety.
Important
If this instruction is not followed, paper might misfeed, originals might be damaged, or data might be lost. Be sure to read this.
Preparation
This symbol indicates prior knowledge or preparations are required before operation.
Note
This symbol indicates precautions for operation or actions to take after following
mal-operation.
Limitation
This symbol indicates numerical limits, functions that cannot be used together,
or conditions in which a particular function cannot be used.
Reference
This symbol indicates a reference.
[]
Keys that appear on the machine's display panel.
{}
Keys built into the machine's control panel.
AdonisC3_GBcopyF_FM1.book Page 1 Thursday, November 28, 2002 1:53 PM
Page 16
2
Machine Types
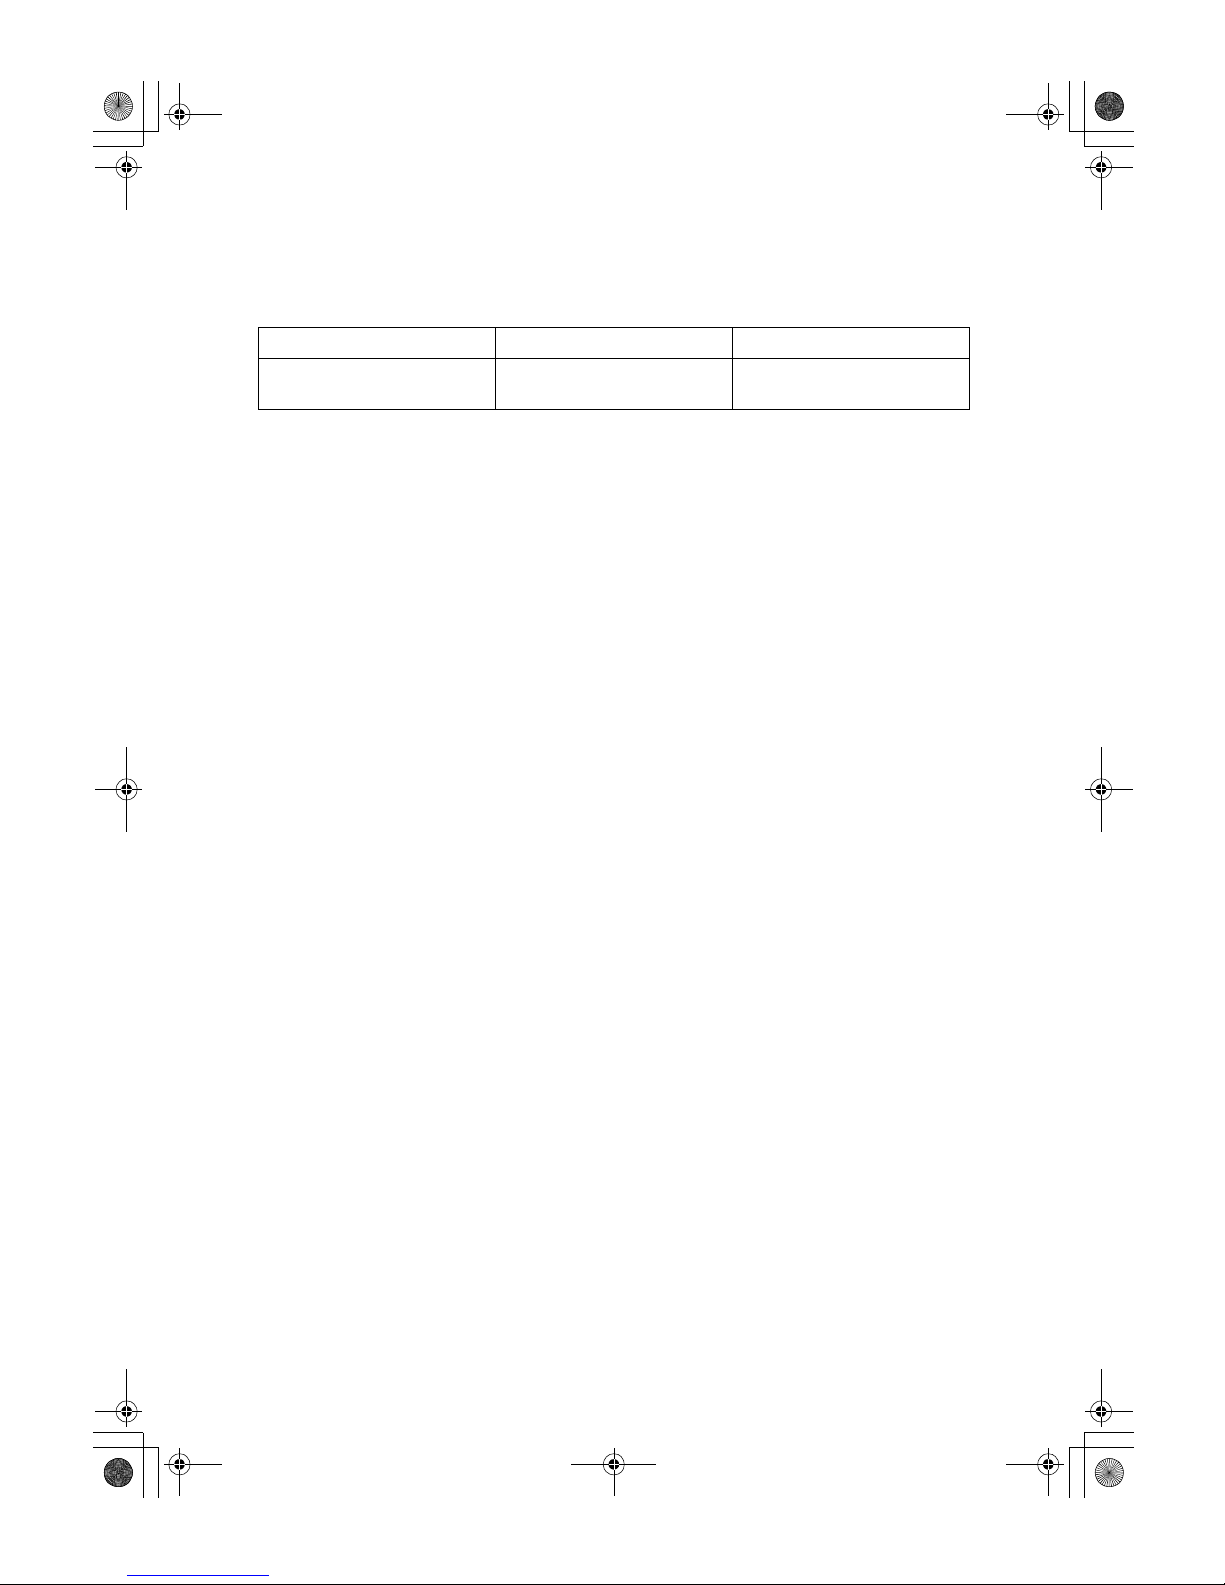
This machine comes in two models which vary by copy speed. To make sure
which model you have, see the inside front cover of this manual.
Type 1 Type 2
Copy speed 35 copies/minute
(A4K, 8
1
/2" × 11"K)
45 copies/minute
(A4K, 81/2" × 11"K)
AdonisC3_GBcopyF_FM1.book Page 2 Thursday, November 28, 2002 1:53 PM
Page 17
3
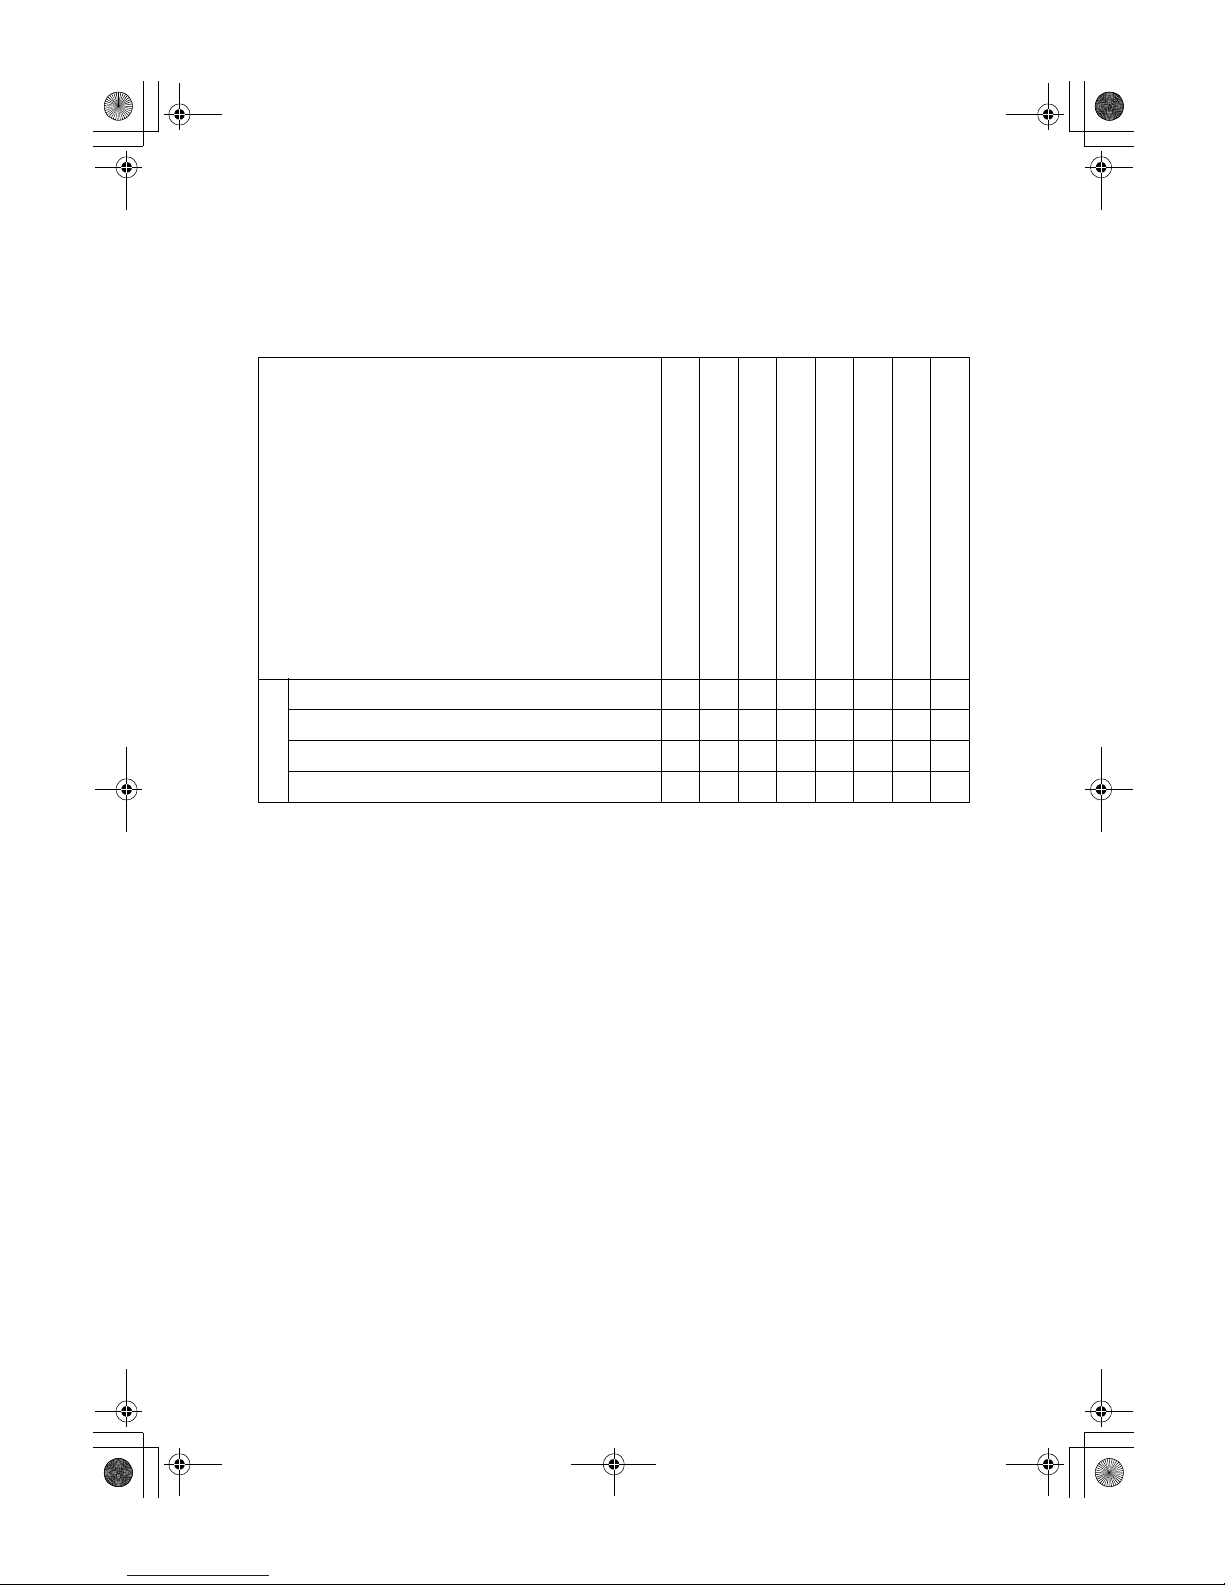
Functions that Require Options
The available functions depend on your machine configuration and which options you have. See the table below.
❍Required options
*1
The bridge unit and paper tray unit are required when you install the finisher.
Functions
Batch mode
SADF
Auto Document Feeder Mixed Size mode
Shift Sort
Shift Stack
Staple
Saddle Stitch
Punch
Options
Auto Document Feeder (ADF)
❍❍❍
1000-Sheet finisher
*1
❍❍❍
2 Tray finisher
*1
❍❍❍ ❍
Booklet finisher
*1
❍❍❍❍
AdonisC3_GBcopyF_FM1.book Page 3 Thursday, November 28, 2002 1:53 PM
Page 18
4
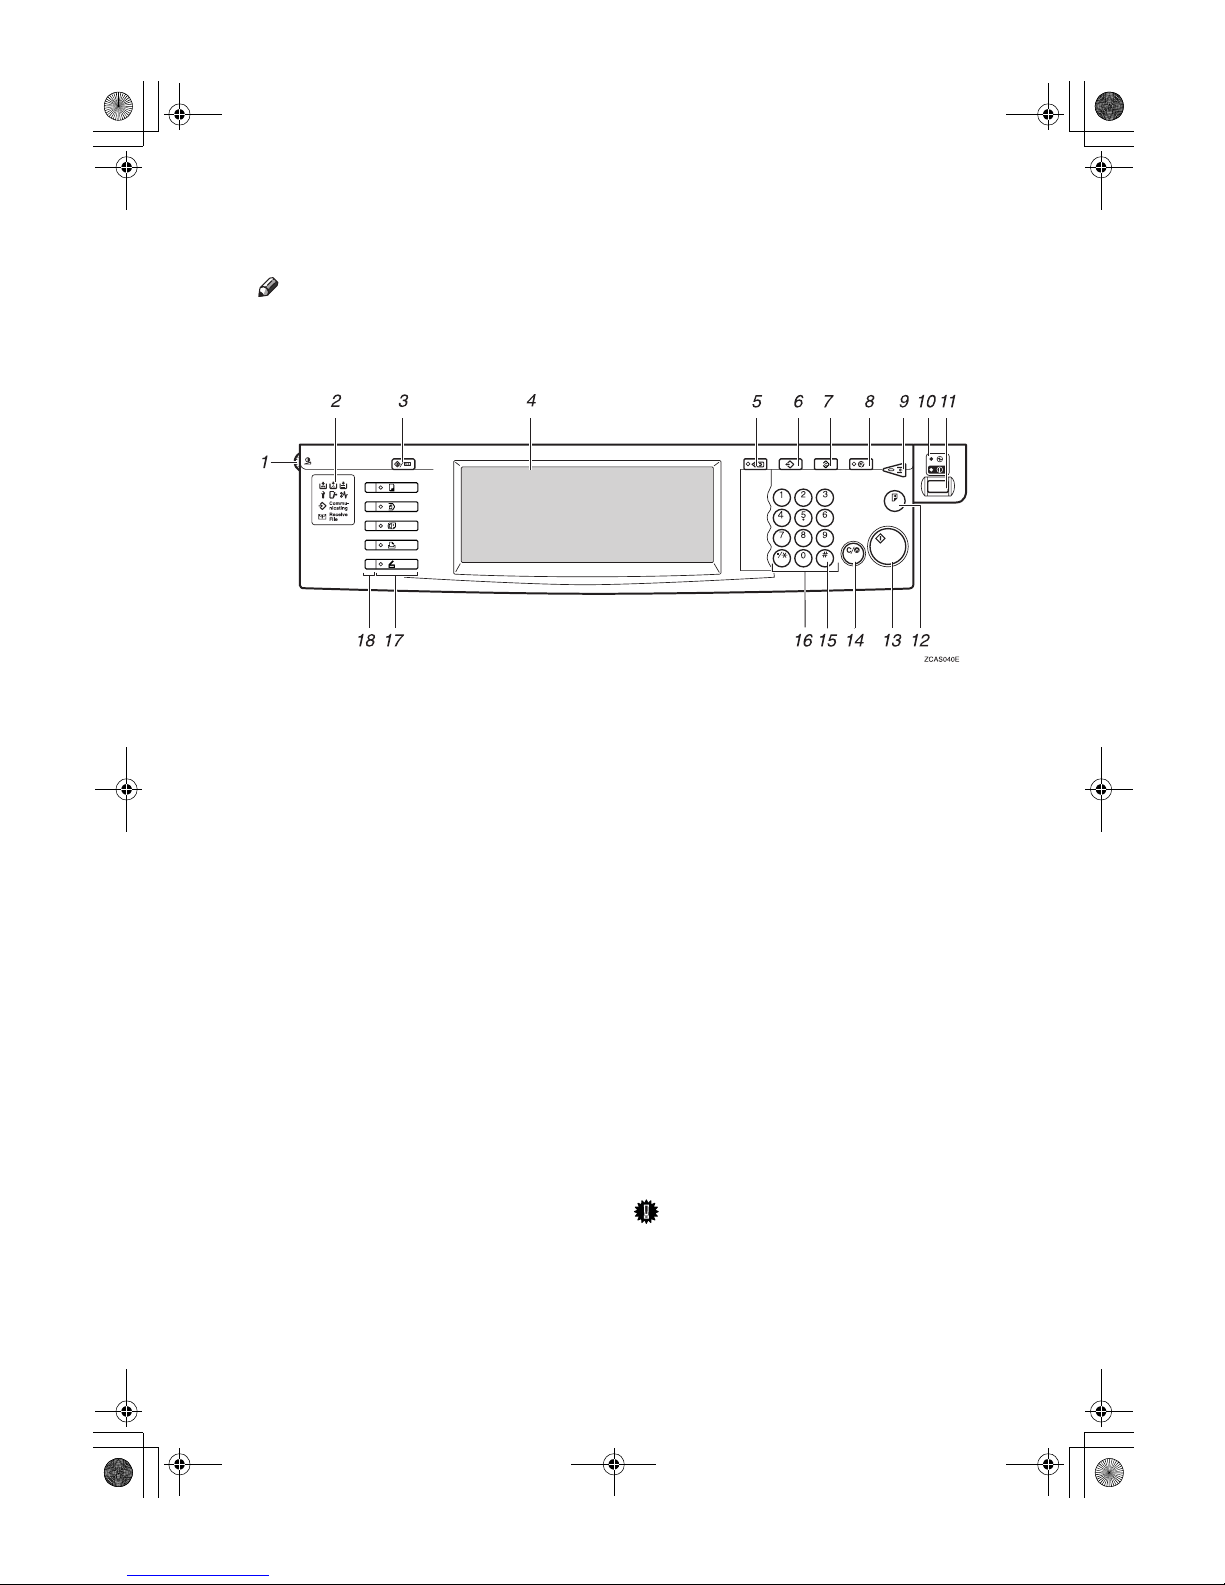
Control Panel
Note
❒ This illustration shows the control panel of the machine with options fully in-
stalled.
1.
Screen Contrast knob
Adjusts the brightness of the display panel.
2.
Indicators
These indicators show the status of the
machine or indicate errors.
• d: Add Staple indicator
• D: Add Toner indicator
• B: Load Paper indicator
• L: Service Call indicator
• M: Open Cover indicator
• x: Misfeed indicator
See “Control Panel”, General Settings
Guide.
3.
{{{{User Tools/Counter}}}} key
• User Tools
Press to change the default and conditions to meet your requirements.
• Counter
Press to check or print the counter value.
4.
Display panel
Shows operation status, error messages,
and function menus.
5. {
{{
{Check Modes}}}} key
Press to check the entered copy job settings.
6.
{{{{Program}}}} key
Press to select the program mode. See
p.74 “Programs”.
7.
{{{{Clear Modes}}}} key
Press to clear the previously entered copy
job settings.
8. {
{{
{Energy Saver}}}} key
Press to switch to and from the Energy
Saver mode. See General Settings Guide.
9.
{{{{Interrupt}}}} key
Press to interrupt a long copy job to make
copies. See p.16 “Interrupt Copy” .
10.
Main power indicator
The main power indicator goes on when
you turn on the main power. The power
indicator lights when the power is on.
Important
❒ Do not turn off the main power
switch while the power indicator
goes on or is flashing. The hard
disk may malfunction.
AdonisC3_GBcopyF_FM1.book Page 4 Thursday, November 28, 2002 1:53 PM
Page 19
5
11.
Operation switch
Press this switch to turn the power on
(the On indicator goes on). To turn the
power off, press this switch again (the On
indicator goes off).
12.
{{{{Sample Copy}}}} key
Use this key to make a single sample
copy before starting a long copy run. By
checking the sample copy and making
any necessary changes to the image quality settings before you make multiple
copies, you can save time and paper. See
p.33 “Sample copy”.
13.
{{{{Start}}}} key
Press to start copying. Press to start scanning and printing in Document Server
mode.
14.
{{{{Clear/Stop}}}} key
• Clear
Press to delete a number entered.
• Stop
Press to stop a copy job in progress.
15.
{{{{#}}}} key
Press to enter a value.
16.
Number keys
Use to enter the desired number of copies
and data for selected modes.
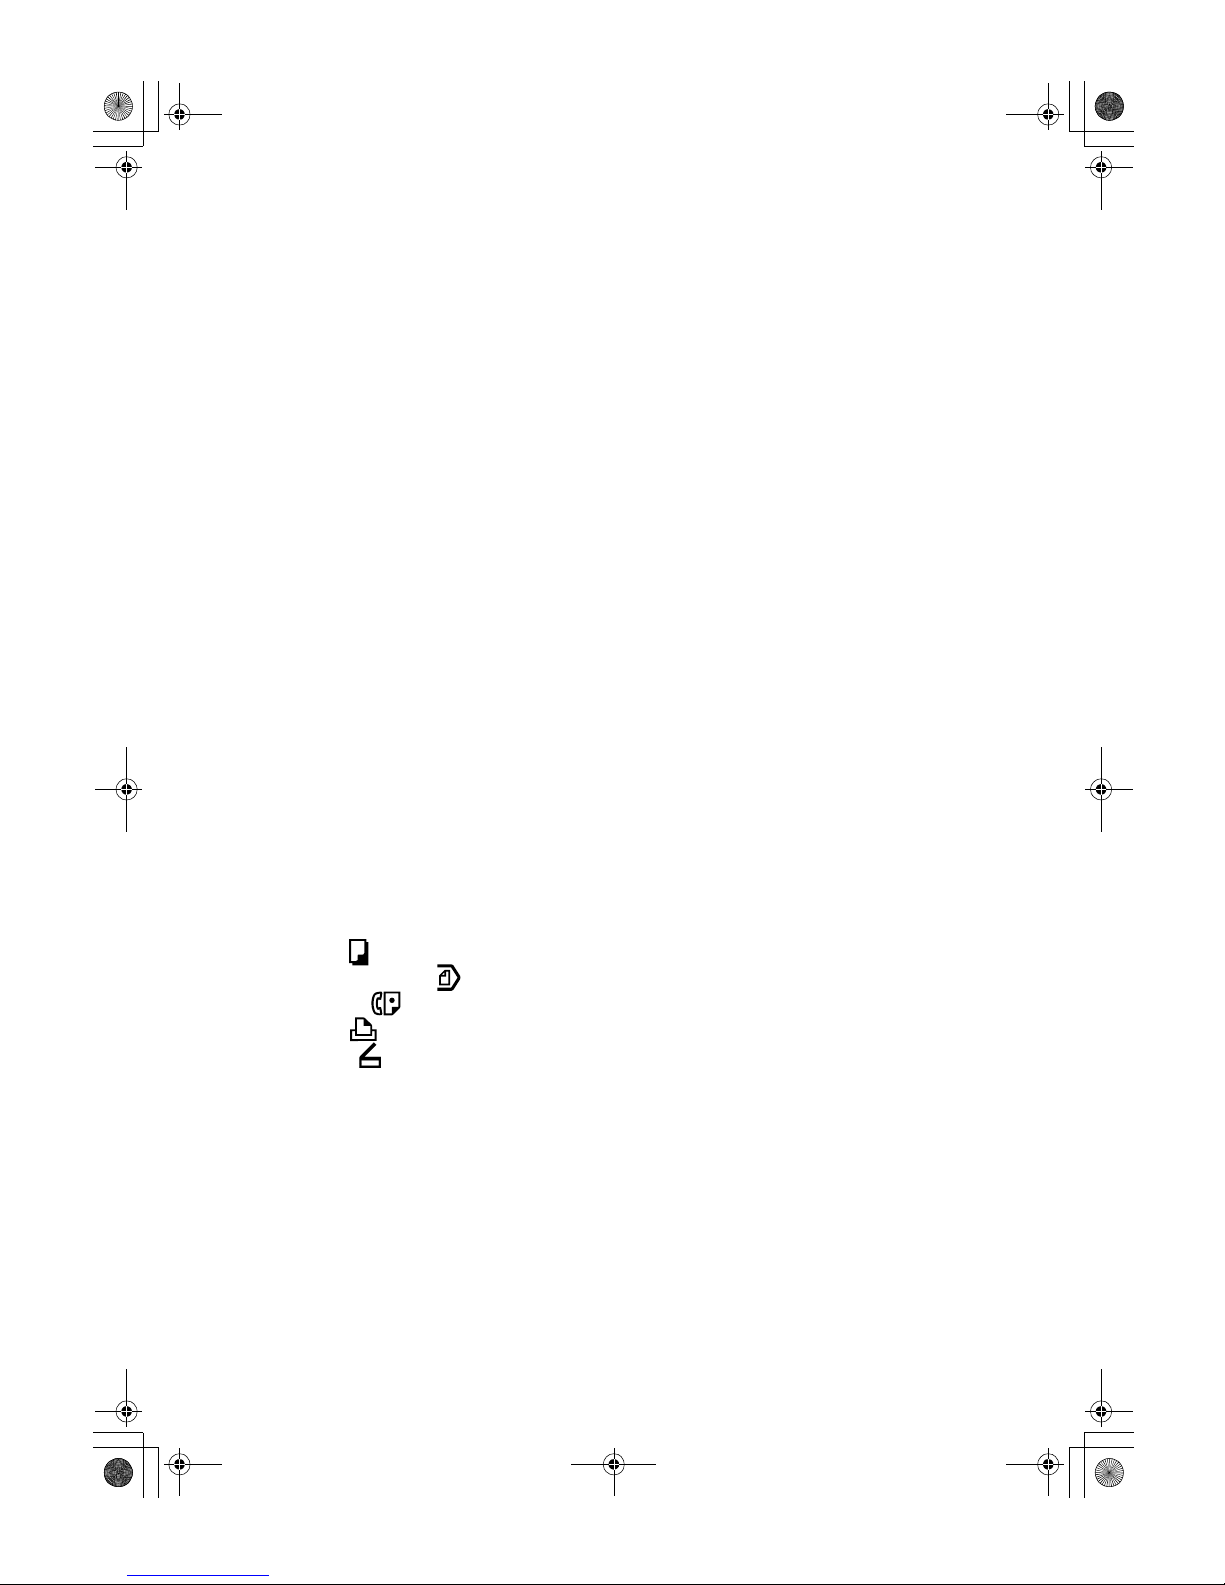
17.
Function keys
Press to select the following functions:
• Copier:
• Document Server:
• Facsimile:
• Printer:
• Scanner:
18.
Function status indicator
These show the status of the above functions:
• Yellow: the function is selected.
• Green: the function is active.
• Red: the function has been interrupt-
ed.
AdonisC3_GBcopyF_FM1.book Page 5 Thursday, November 28, 2002 1:53 PM
Page 20
6
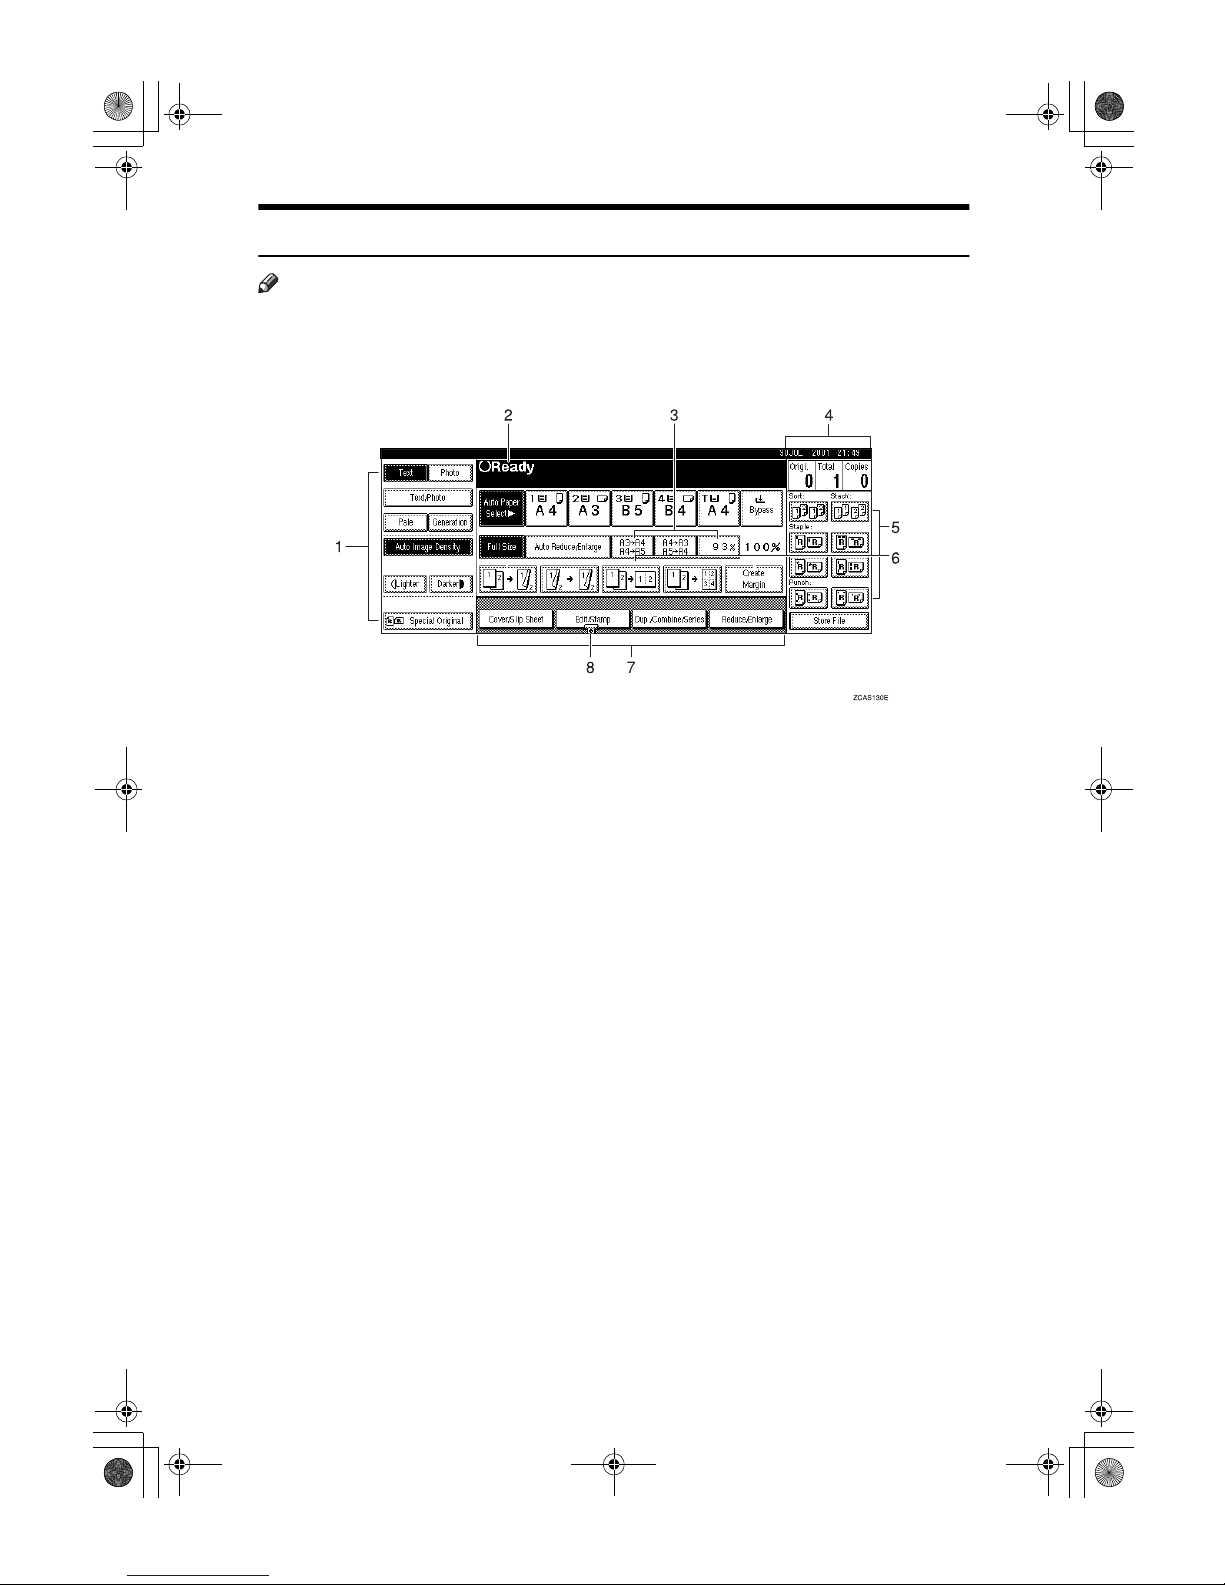
Display Panel
Note
❒ The following illustrations are examples for the machine with the optional 2
Tray finisher and large capacity tray (LCT) installed.
❖❖❖❖ Initial copy display
1.
Original mode, Image Density
and Special Original mode.
2.
Operational status or messages.
3.
You can register up to three fre-
quently used reduce/enlarge ratios
other than the fixed reduce/enlarge
ratios. See p.94 “Shortcut R/E”.
4.
The number of originals scanned
into memory, number of copies set,
and number of copies made.
5.
Sort, Stack, Staple or Punch
mode.
6.
Displays the contents of the
Shortcut keys. You can register frequently used functions in these
keys. See p.93 “Copy Function Key:
F1-F5”.
7.
Shows the available functions.
Press a function name to display its
menu. For example, press the [Re-
duce/Enlarge] key to bring up the Re-
duce/Enlarge menu.
8.
A clip mark appears for a current-
ly selected function.
AdonisC3_GBcopyF_FM1.book Page 6 Thursday, November 28, 2002 1:53 PM
Page 21
7
1. Placing Originals
Originals
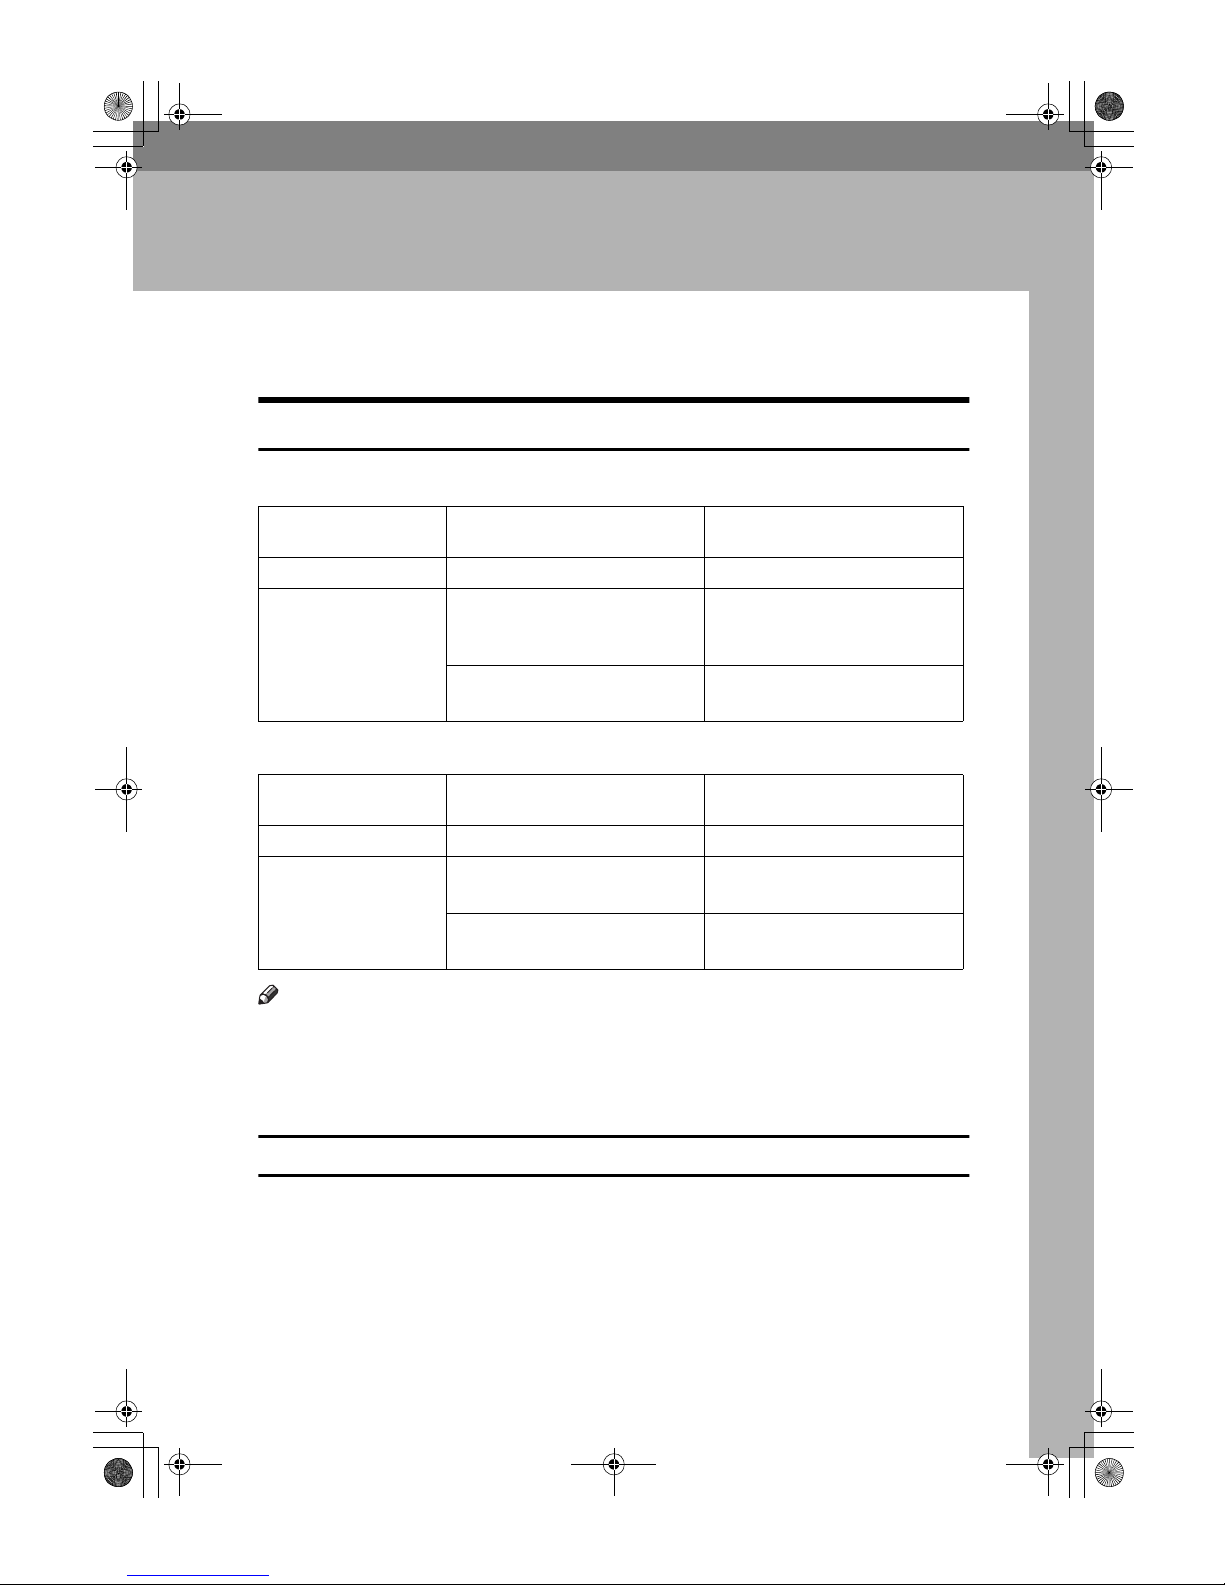
Sizes and Weights of Recommended Originals
❖❖❖❖ Metric version
❖❖❖❖ Inch version
Note
❒ The number of originals that can be placed in the Auto Document Feeder is
about 80.
❒ The weight range for originals in the Mixed Size mode is 52–81 g/m
2
, 13.8–
21.5 lb.
Non-recommended originals for the Auto Document Feeder
Placing the following types of originals in the ADF can cause paper misfeeds or
result in damage to the originals. Place these originals on the exposure glass instead.
• Originals other than those specified on p.7 “Sizes and Weights of Recommended Originals”.
• Stapled or clipped originals
Where original is
placed Original size Original weight
Exposure glass Up to A3 --
Auto Document Feeder One-sided originals:
A3L – B6 JIS (Japanese Industrial Standard)
KL
40–128 g/m
2
Two-sided originals:
A3L – A5
KL
52–105 g/m
2
Where original is
placed Original size Original weight
Exposure glass Up to 11" × 17" --
Auto Document Feeder One-sided originals:
11" × 17"L – 5
1
/2" × 81/2"
KL
11–34 lb.
Two-sided originals:
11" × 17"L – 5
1
/2" × 81/2"
KL
14–28 lb.
AdonisC3_GBcopyF_FM1.book Page 7 Thursday, November 28, 2002 1:53 PM
Page 22
Placing Originals
8
1
• Perforated or torn originals
• Curled, folded, or creased originals
• Pasted originals
• Originals with any kind of coating, such as thermal fax paper, art paper, alu-
minum foil, carbon paper, or conductive paper
• Originals with perforated lines
• Originals with indexes, tags, or other projecting parts
• Sticky originals such as translucent paper
• Thin originals that have low stiffness
• Thick originals such as postcards
• Bound originals such as books
• Transparent originals such as OHP transparencies or translucent paper
Note
❒ The original might become dirty if it is written with a pencil or a similar
tool.
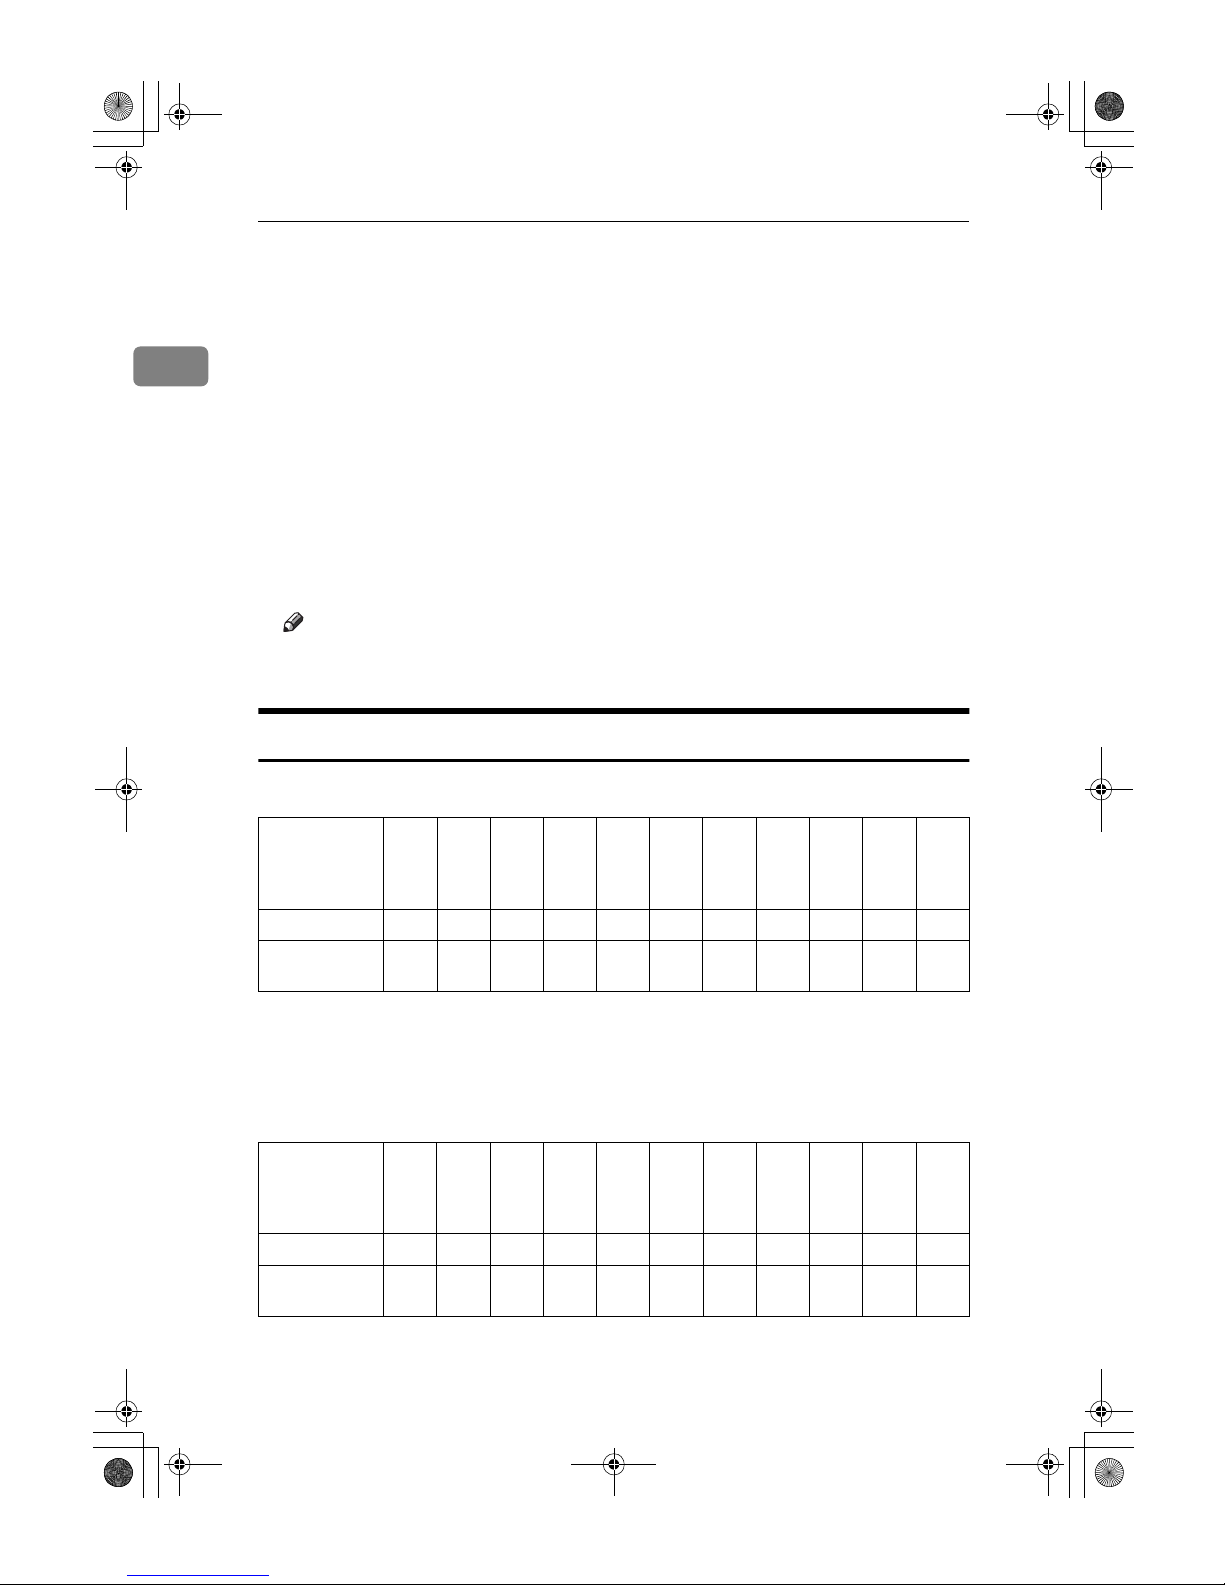
Sizes Detectable by the Auto Paper Select
❖❖❖❖ Metric version
*1
You can select from 81/2" × 13", 81/4" × 13", 8" × 13" with User Tools (System Settings).
See “<F/F4>Size Setting ”in “General Features”, General Settings Guide.
*2
The machine cannot detect two-sided originals of B6 JIS size.
❍ : Detectable size × : Undetectable size
❖❖❖❖ Inch version
❍ : Detectable size × : Undetectable size
Size A3LB4
JIS
LA4KL
B5
JIS
KL
A5KLB6
JIS
K
L
11" ×
17"
L
81/2"
×
14"
L
81/2"
×
11"
KL
51/2"
×
8
1
/2"
KL
8
1
/2"
×
13"
L
*1
Location of the
original
Exposure glass
❍❍❍❍ ××××❍ × ❍
Auto Document
Feeder
❍❍❍❍❍❍
*2
❍ × ❍ × ❍
Size A3LB4
JIS
LA4KL
B5
JIS
K
L
A5
KL
11" ×
17"
L
81/2"
×
14"
L
81/2"
×
11"
KL
51/2"
×
8
1
/2"
KL
8
1
/2"
×
13"
L
10" ×
14"
L
Location of the
original
Exposure glass
ЧЧЧЧЧ❍❍❍ ×××
Auto Document
Feeder
❍ × ❍ ××❍❍❍❍ × ❍
AdonisC3_GBcopyF_FM1.book Page 8 Thursday, November 28, 2002 1:53 PM
Page 23
Originals
9
1
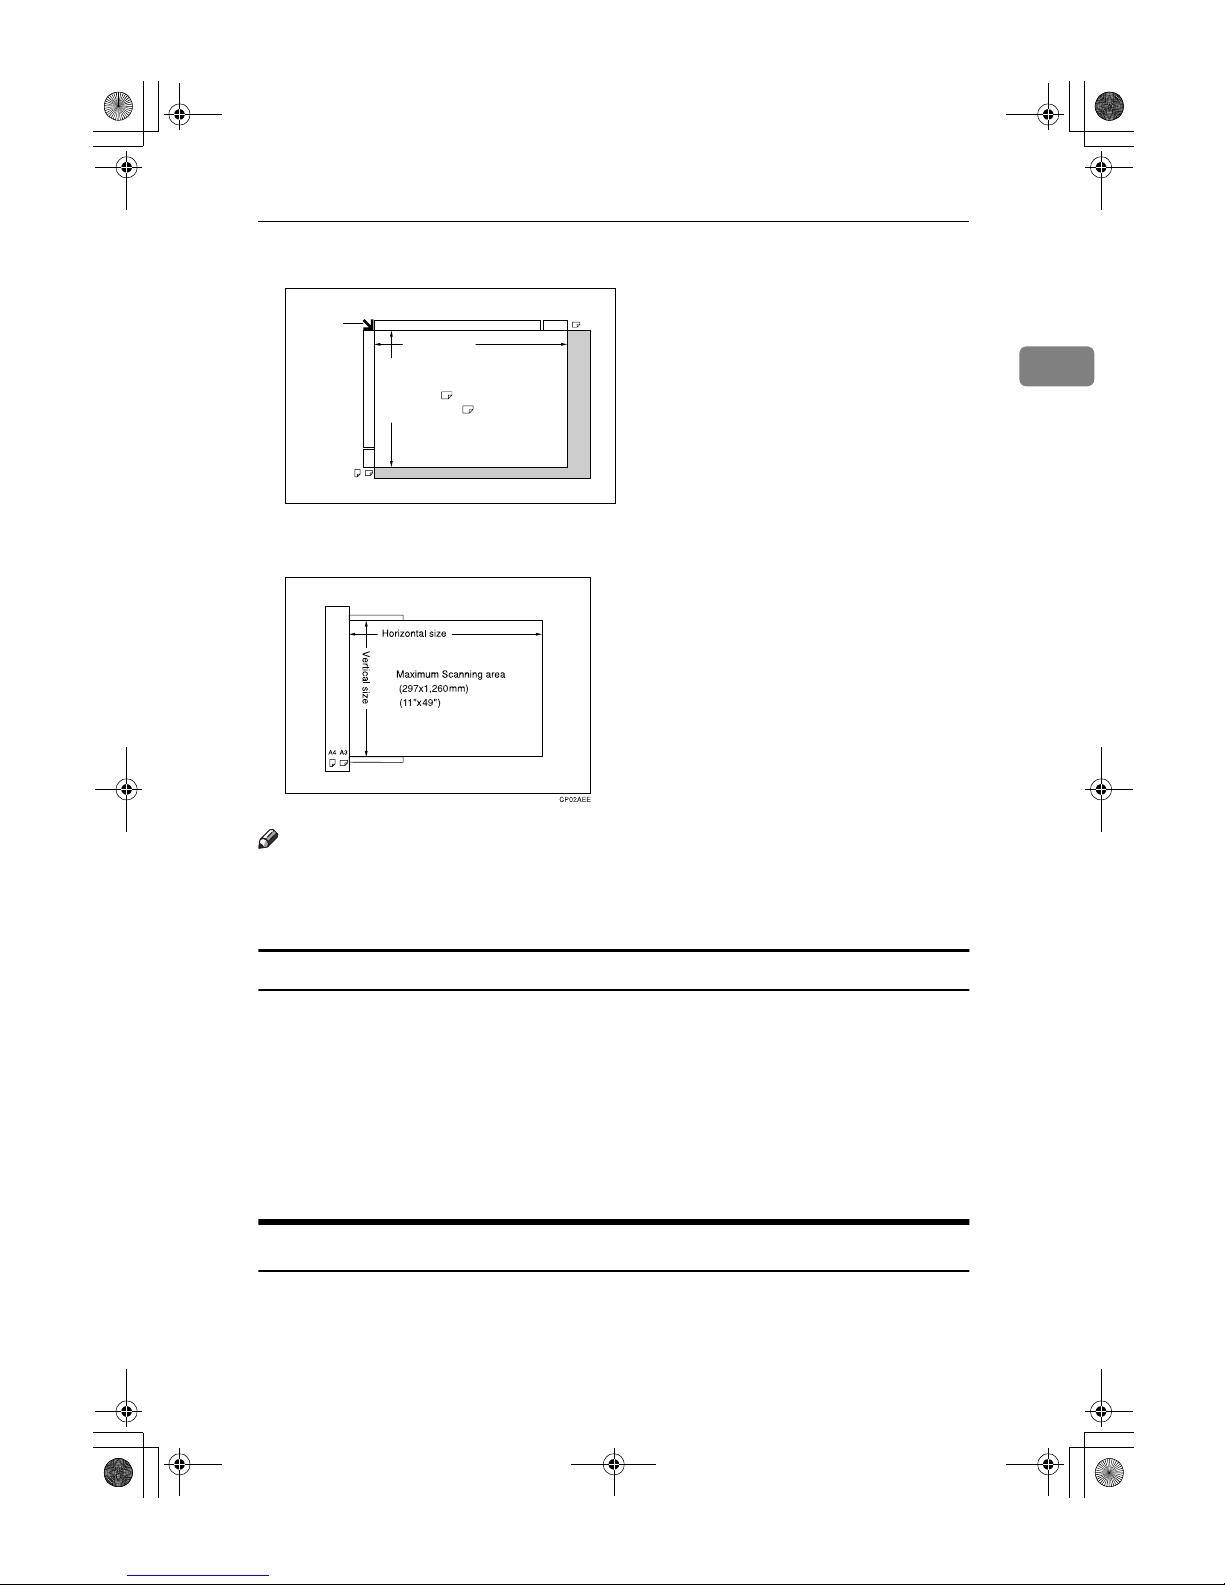
❖❖❖❖ Exposure glass
❖❖❖❖ Auto Document Feeder
Note
❒ When you copy custom size originals, make sure you specify the size of the
originals. If not, the image may not be copied properly. See p.14 “Placing custom size originals”.
Sizes difficult to detect
It is difficult for the machine to detect the sizes of the following originals, so select the paper size manually.
• Originals with indexes, tags, or other projecting parts
• Transparent originals such as OHP transparencies or translucent paper
• Dark originals with a lot of text and drawings
• Originals which partially contain a solid image
• Originals which have solid images at their edges
Missing Image Area
Even if you correctly place originals in the ADF or on the exposure glass, 3 mm
(0.1”) margins on all four sides might not be copied.
A3
A3A4
Horizontal size
Vertical size
Reference
position
Maximum Scanning area
A3 (297x420mm)
11"x17" (279x432mm)
CP01AEE
AdonisC3_GBcopyF_FM1.book Page 9 Thursday, November 28, 2002 1:53 PM
Page 24
Placing Originals
10
1
Placing Originals
Note
❒ Place originals after correction flu-
id and ink have completely dried.
Not taking this precaution could
dirty the exposure glass with
marks that will be copied.
Reference
For original sizes you can set, see
p.7 “Originals” .
Original Orientation
You can set the original orientation in
the following ways.
This function is useful for copying
torn originals or large originals.
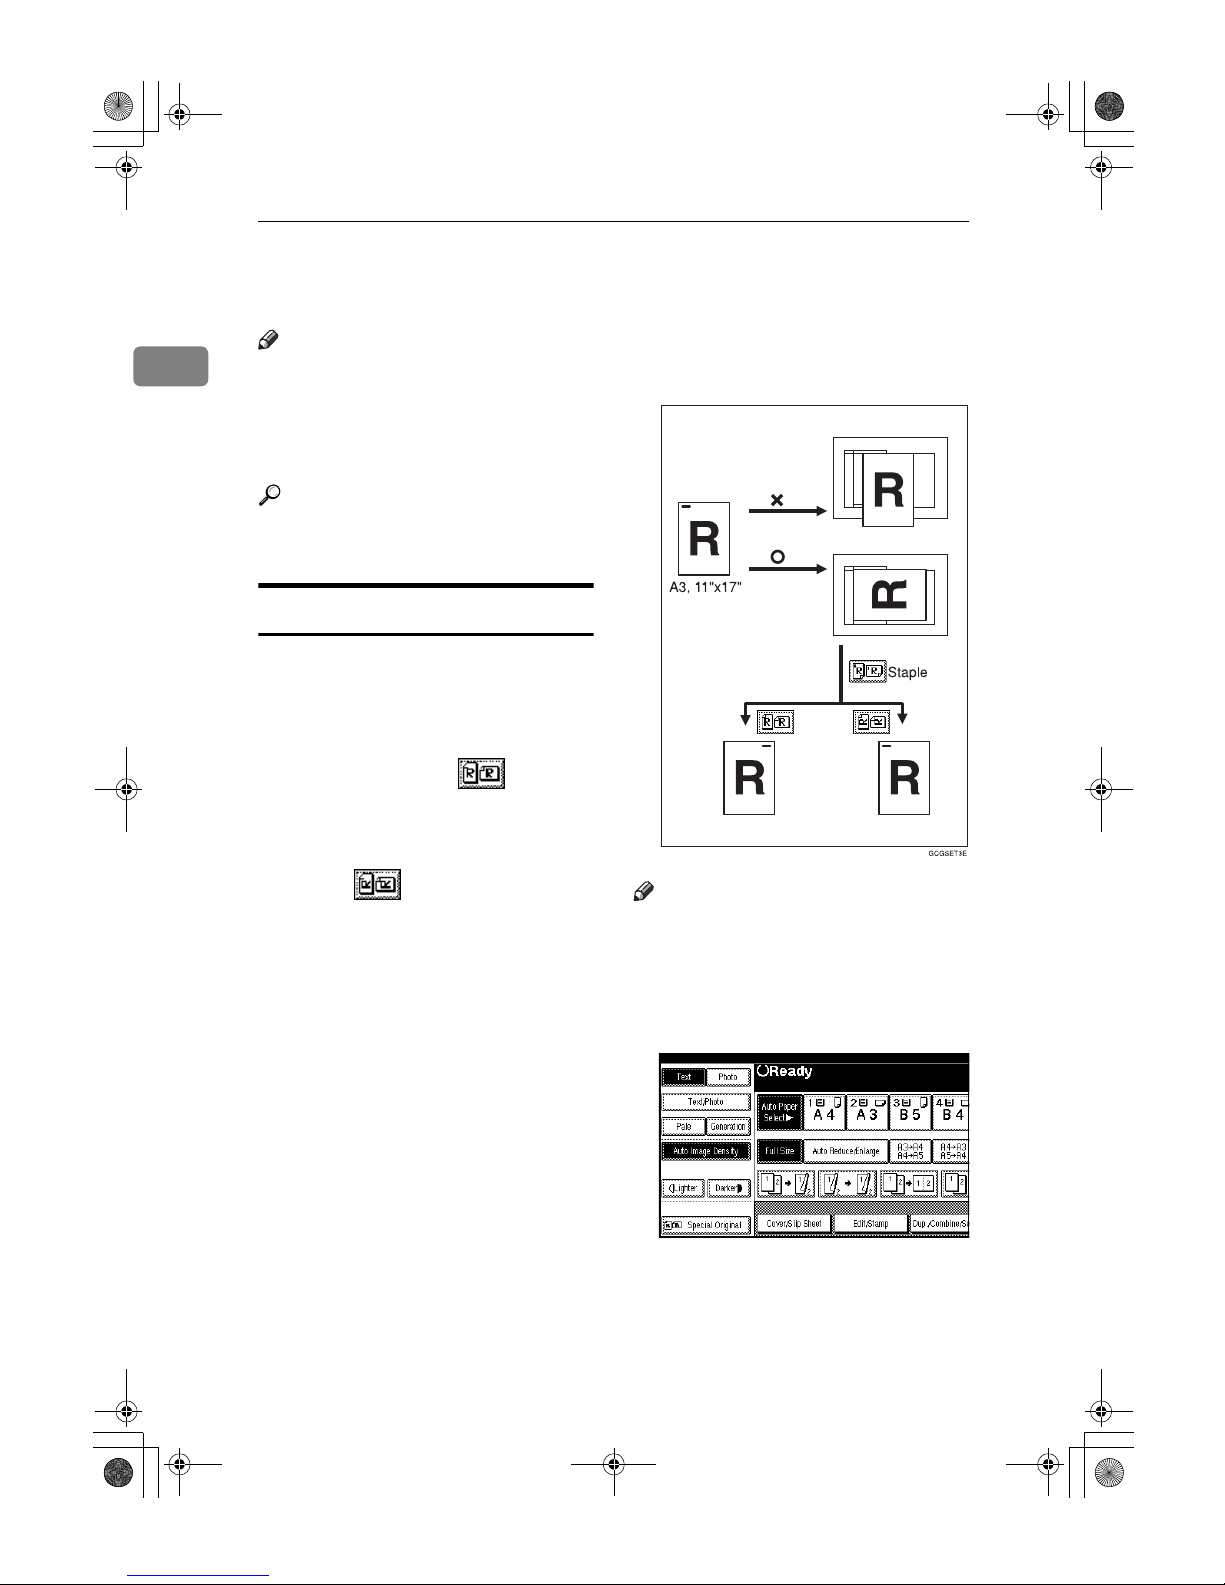
❖❖❖❖ Standard orientation
Select this function when the original orientation is the same as the
copy paper orientation.
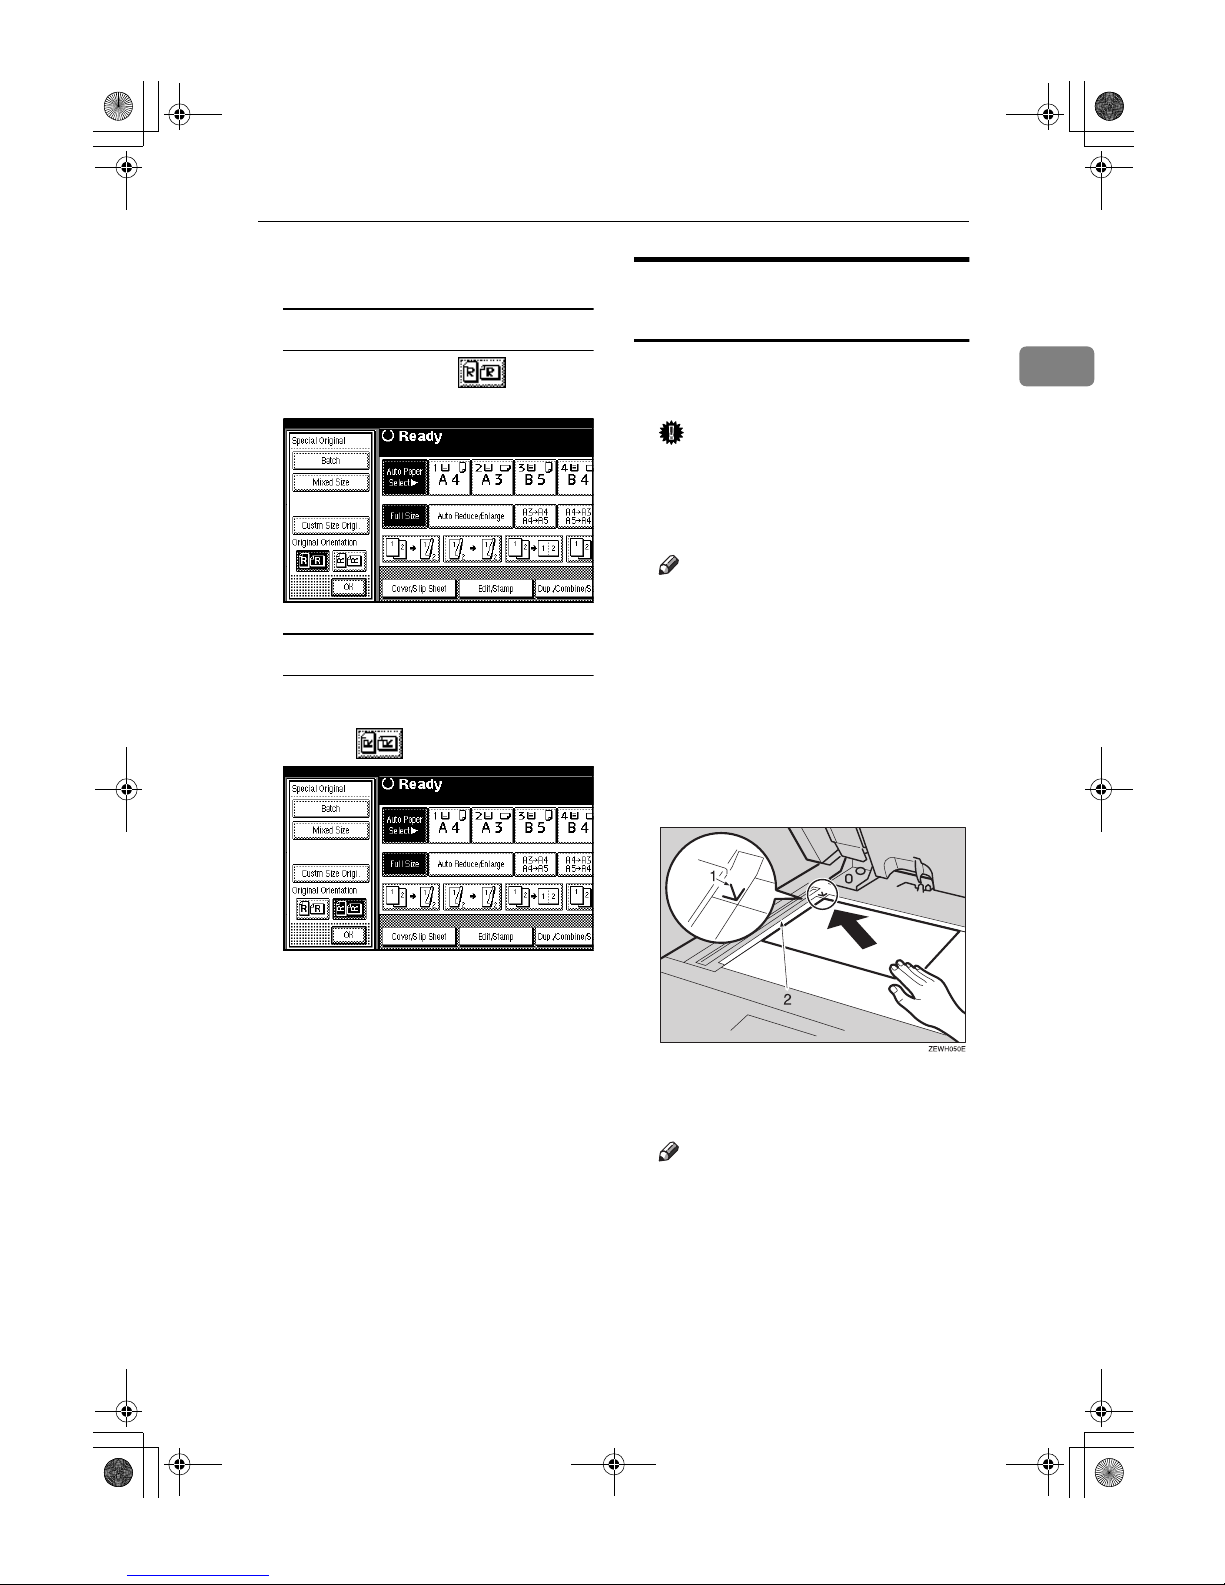
❖❖❖❖ 90°°°° turn
Use this function when you want
to copy A3K, B4 JISKor 11"
×
17"K size originals. The machine
rotates the copy image by 90° and
you can make copies as you want.
This is useful for copying large
originals with the Staple, Duplex,
Combine or Stamp functions.
For example, to copy A3Kor 11"
×
17"K originals with the Staple
function selected:
Note
❒ It is recommended to use this func-
tion together with the Auto Paper
Select or the Preset Reduce/Enlarge function.
AAAA
Press [Special Original].
AdonisC3_GBcopyF_FM1.book Page 10 Thursday, November 28, 2002 1:53 PM
Page 25
Placing Originals
11
1
BBBB
Select the original orientation.
Standard orientation
A Make sure that is select-
ed.
90° turn
A Place your original in the land-
scape orientation, and then
press .
CCCC
Press [OK].
Placing Originals on the
Exposure Glass
AAAA
Lift the exposure glass cover or
the ADF.
Important
❒ Do not lift the exposure glass
cover or the ADF forcefully.
Otherwise, the cover of the ADF
might open or be damaged.
Note
❒ Be sure to lift the exposure glass
cover or the ADF by more than
30°. Otherwise, the size of the
original might not be detected
correctly.
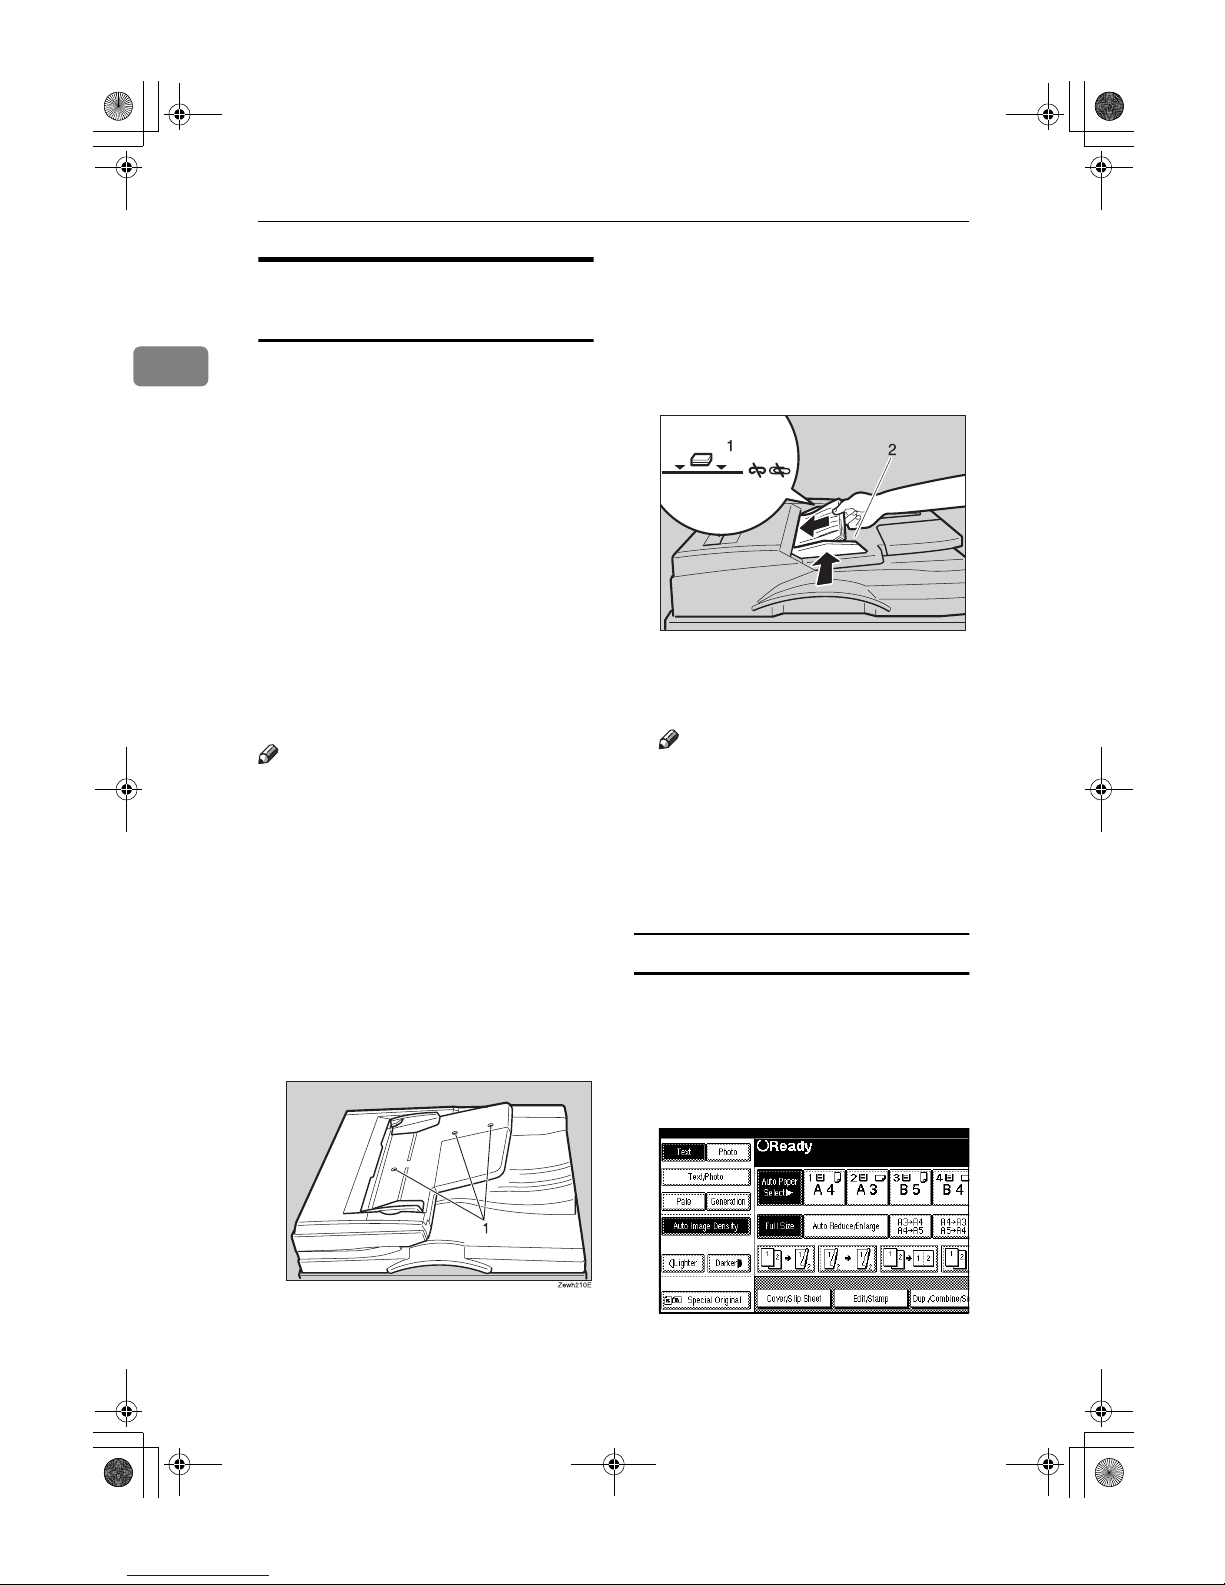
BBBB
Place the original face down on
the exposure glass. The original
should be aligned to the rear left
corner.
1.
Reference mark
2.
Left scale
Note
❒ Start with the first page to be
copied.
CCCC
Lower the exposure glass cover or
the ADF.
AdonisC3_GBcopyF_FM1.book Page 11 Thursday, November 28, 2002 1:53 PM
Page 26
Placing Originals
12
1
Placing Originals in the Auto
Document Feeder
Settings should be made in the following situations:
❖❖❖❖ When placing originals one by one:
p.13 “SADF mode”
❖❖❖❖ When placing originals consisting of
more than 80 pages:
p.12 “Batch mode”
❖❖❖❖ When copying originals of various
sizes:
p.13 “Mixed Size mode”
❖❖❖❖ When placing custom size originals:
p.14 “Placing custom size originals”
Note
❒ Do not stack originals beyond the
limit mark on the side fence of the
ADF.
❒ The last page should be on the bot-
tom.
❒ Do not place objects on the sensors
or cover them with your hands.
This could cause the size to be detected incorrectly. Also, do not
place anything on the exposure
glass cover as this could cause a
malfunction.
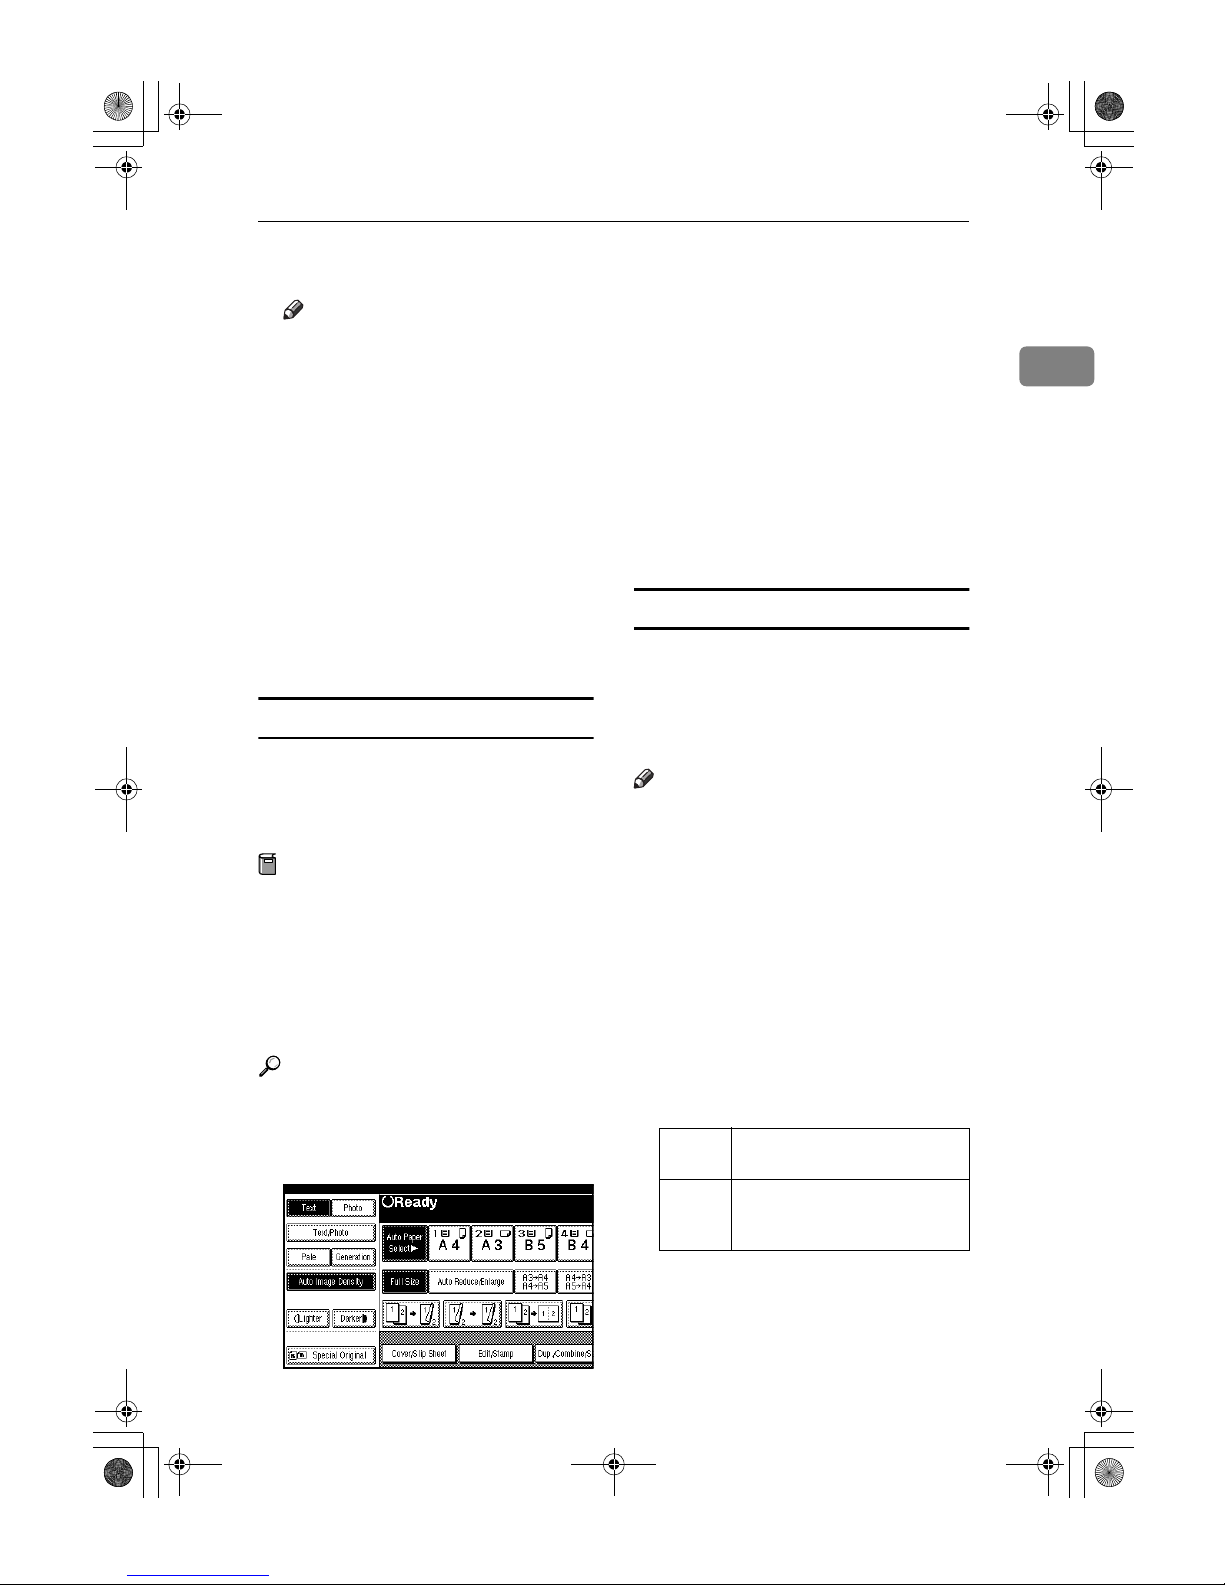
1.
Sensors
AAAA
Set the document guide to the
original size.
BBBB
Align the edges of the original
and place it on the ADF with the
side to be copied facing up.
1.
Limit mark
2.
Document guide
Note
❒ Straighten curls in the original
before placing it on the ADF.
❒ To prevent multiple sheets from
being fed at once, fan the original before placing it on the ADF.
❒ Set the original squarely.
Batch mode
In Batch mode, the machine copies an
original including more than 80 pages
as one document, even if it is placed
on the ADF in parts.
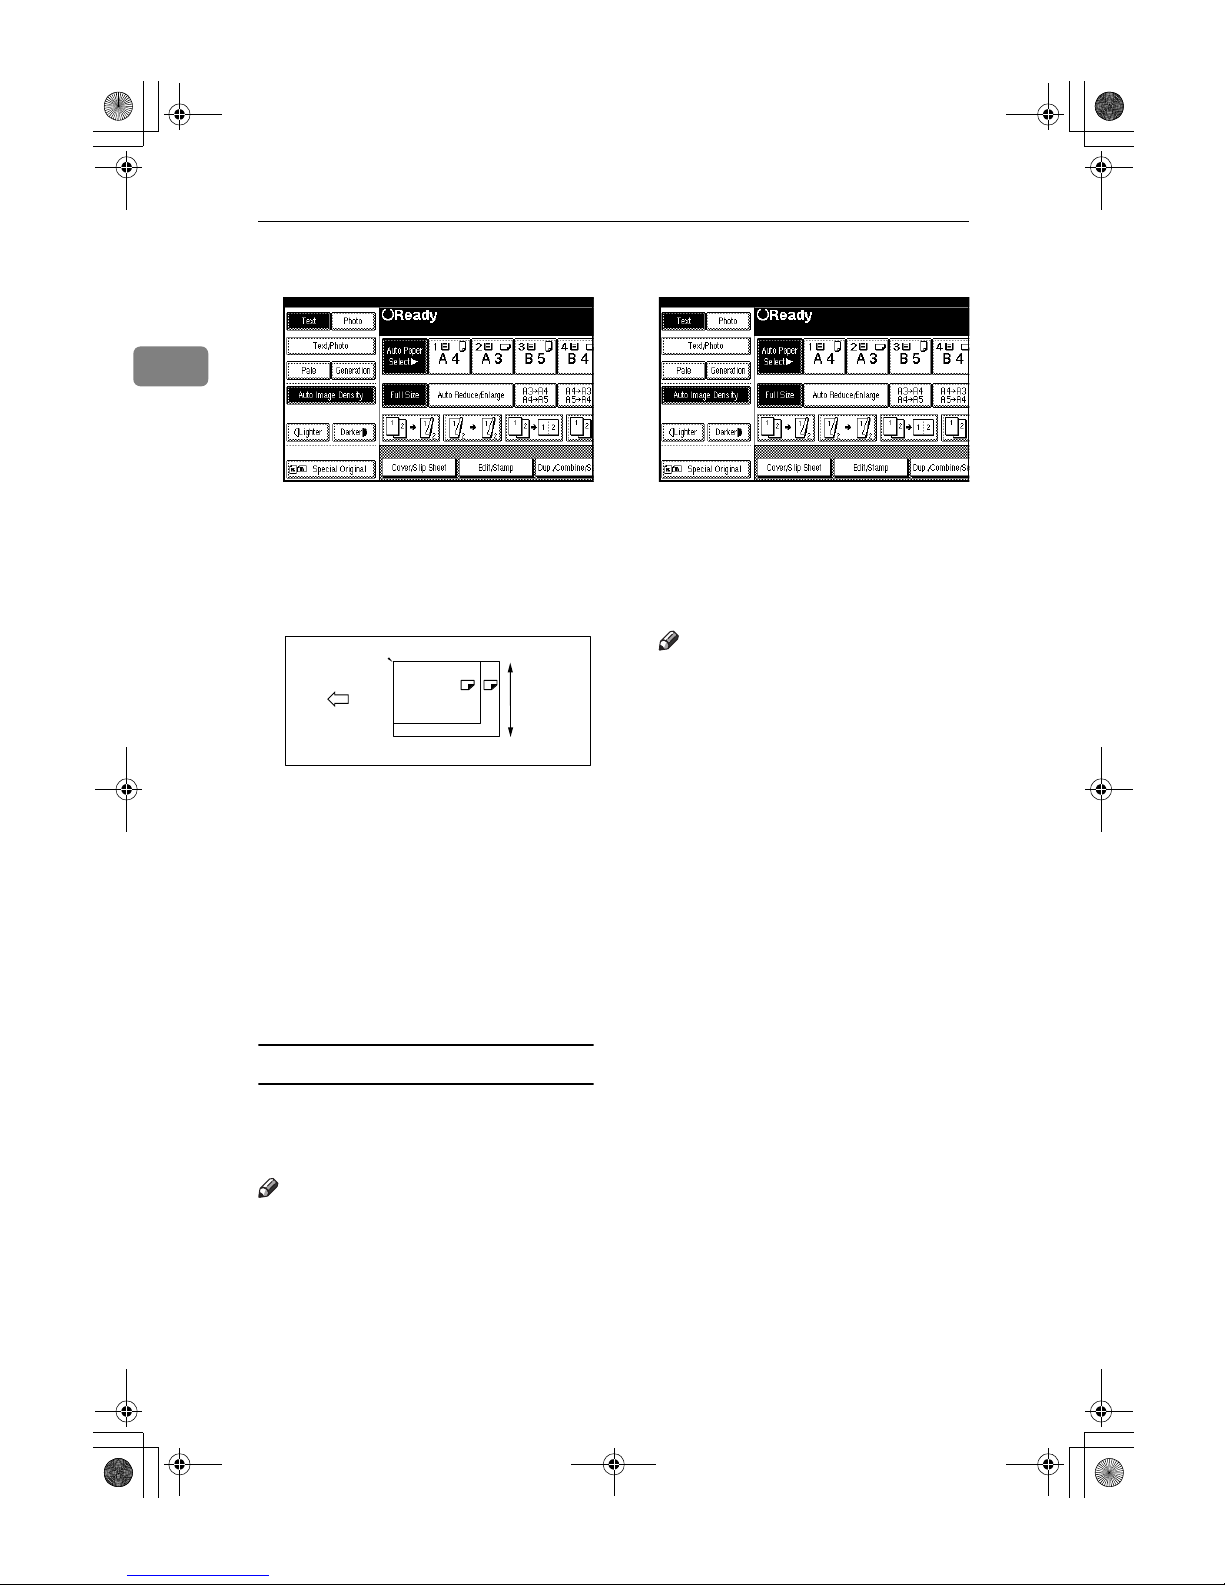
AAAA
Press [Special Original].
ZGHS060E
AdonisC3_GBcopyF_FM1.book Page 12 Thursday, November 28, 2002 1:53 PM
Page 27
Placing Originals
13
1
BBBB
Select [Batch], and then press [OK].
Note
❒ When [Batch] is not displayed,
change the settings. See p.101
“Switch to Batch (SADF)”.
CCCC
Place the first part of the original,
and then press the {{{{Start}}}} key.
DDDD
After the first part of the original
has been fed, place the next part.
EEEE
When the Sort, Combine or 1 Sided →→→→ 2 Sided mode has been set,
press the {{{{#}}}} key after all originals have been scanned.
FFFF
Press the {{{{Start}}}} key.
SADF mode
In SADF mode, even when an original is placed page by page in the ADF,
each page is automatically fed when
placed.
Preparation
To use the SADF function, you
should make a setting in User
Tools (Copier/Document Server
Features), so that [
SADF
] will be
displayed when you press [Special
Original]. See p.101 “Switch to Batch
(SADF)”.
Reference
Related default settings, see p.94
“Shortcut R/E”.
AAAA
Press [Special Original].
BBBB
Press [SADF], and then press [OK].
CCCC
Place one page of an original, and
then press the {{{{Start}}}} key.
The Auto Feed indicator is shown
on the display.
DDDD
When the machine instructs you
to place another original, place
the next page.
The second and subsequent pages
will be fed automatically without
pressing the {{{{Start}}}} key.
Mixed Size mode
When placing different size originals
of the same width in the ADF at the
same time, the machine automatically
checks the size of the originals and
makes copies.
Note
❒ When placing originals of different
sizes in the ADF and making copies without using the Mixed Size
mode, parts of the original image
might not be copied or paper
might become jammed.
❒ Copy speed and scanning speed
may be reduced.
❒ You can place originals of two dif-
ferent sizes at a time.
❒ The sizes of the originals that can
be placed together using this function are as follows:
Metric
version
A3L, B4 JIS L, A4KL, B5
JIS
KL
Inch
version
11" × 17"L, 8
1
/2" × 14"L,
8
1
/2" × 11"KL, 51/2" × 81/2"
KL
AdonisC3_GBcopyF_FM1.book Page 13 Thursday, November 28, 2002 1:53 PM
Page 28
Placing Originals
14
1
AAAA
Press [Special Original].
BBBB
Press [Mixed Size], and then press
[OK].
CCCC
Align the rear and left edges of
the originals as shown.
1.
Place into the ADF
2.
Vertical size
DDDD
Adjust the guide to the widest
original size.
EEEE
Place the aligned originals face
up into the ADF.
FFFF
Press the {{{{Start}}}} key.
Placing custom size originals
When placing custom size originals in
the ADF, specify the size of the originals.
Note
❒ Paper that has a vertical length of
128–297 mm (5"–11") and a horizontal length of 128–1,260 mm (5"–
49") can be placed with this function.
AAAA
Press [Special Original].
BBBB
Press [Custm Size Origi.].
CCCC
Enter the horizontal size of the
original with the number keys,
and then press [#].
Note
❒ If you make a mistake, press
[
Clear
] or the {{{{Clear/Stop}}}} key,
and then enter the value again.
DDDD
Enter the vertical size of the original with the number keys, and
then press [#].
EEEE
Press [OK].
B4
A3
1
2
CP19AE
AdonisC3_GBcopyF_FM1.book Page 14 Thursday, November 28, 2002 1:53 PM
Page 29
15
2. Copying
Basic Procedure
AAAA
When the machine is set for user
codes, enter a user code (up to 8
digits) with the number keys, and
then press the {{{{#}}}} key.
The machine is ready to copy.
Reference
For users codes, see “Key Operator Tools” , General Settings
Guide.
BBBB
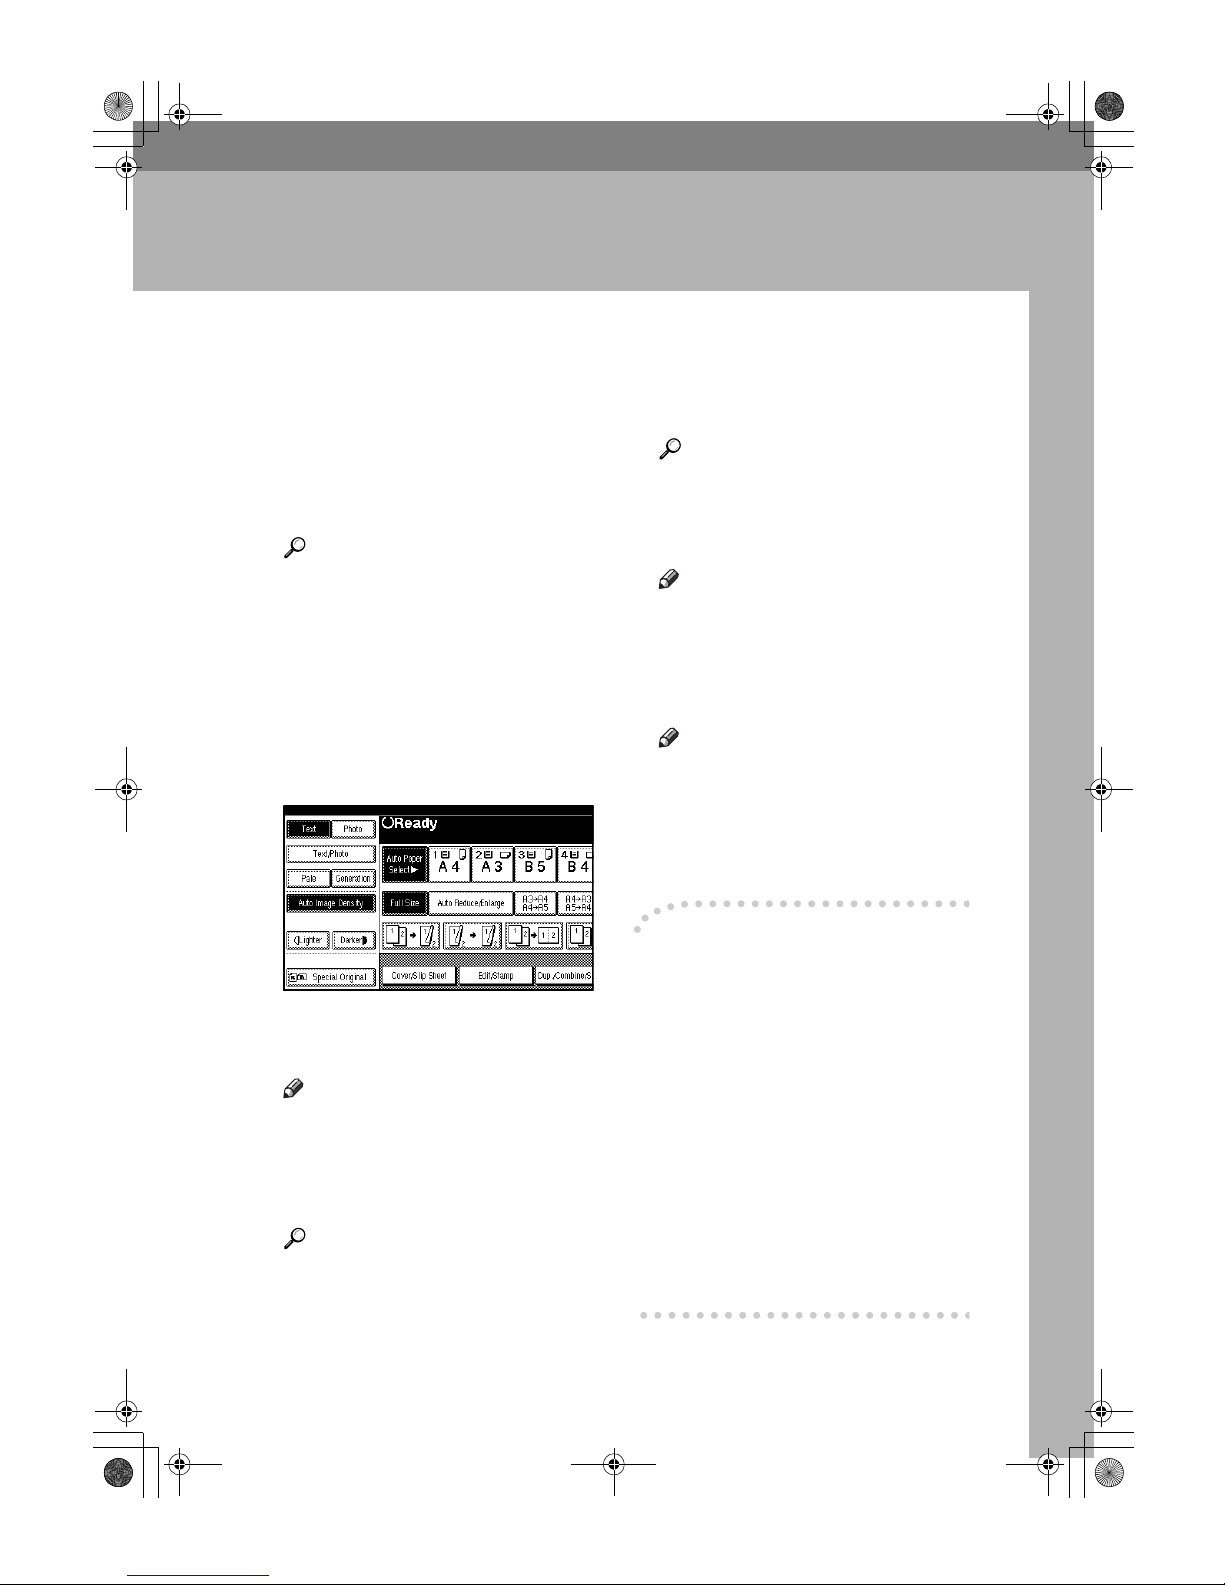
Make sure that "ddddReady" is
shown on the display.
If any other function is displayed,
press the {{{{Copy}}}} key.
❖❖❖❖
Initial copy display
CCCC
Make sure that there are no previous settings remaining.
Note
❒ When there are previous set-
tings remaining, press the {{{{Re-
set}}}} key and enter again.
DDDD
Place your originals.
Reference
p.10 “Placing Originals”
EEEE
Set your desired settings.
Reference
Please refer to each function.
FFFF
Enter the required number of copies with the number keys.
Note
❒ The maximum copy quantity
that can be set is 999.
GGGG
Press the {{{{Start}}}} key.
The machine starts copying.
Note
❒ When placing originals on the
exposure glass, press the {{{{# }}}}
key after all originals are
scanned.
❒ Copies are delivered face down.
----How to operate
❖❖❖❖
To stop the machine during a multicopy run.
Press the {{{{Clear/Stop}}}} key.
❖❖❖❖
To return the machine to the initial
condition after copying.
Press the {{{{Clear Modes}}}} key.
❖❖❖❖
When clearing entered values.
Press the {{{{Clear/Stop}}}} key or [Clear]
on the display.
❖❖❖❖
To check the settings.
Press the {{{{Check Modes}}}} key.
AdonisC3_GBcopyF_FM1.book Page 15 Thursday, November 28, 2002 1:53 PM
Page 30
Copying
16
2
Interrupt Copy
Use this function if you want to interrupt a long copy job to make urgently
needed copies.
Limitation
❒ You cannot use the Interrupt Copy
function when fax originals are being scanned or the scanner function is being used.
AAAA
Press the {{{{Interrupt}}}} key.
The Interrupt indicator goes on.
When the originals stop scanning
A Remove the originals that were
being copied and place the
originals you want to copy.
B Press the {{{{Start}}}} key.
The machine starts making the
copies.
C When copying is complete, re-
move the originals and copies.
D Press the {{{{Interrupt}}}} key again.
The Interrupt indicator goes off.
E When the display prompts
you, place the remaining originals again before interrupting.
F Press the {{{{Start}}}} key.
Note
❒ The interrupt copy job set-
tings will be restored and the
machine will continue copying from where it left off.
When the machine keeps copying
A Place the originals you want to
copy.
B Press the {{{{Start}}}} key.
The machine stops the previous
original job and starts copying
the original.
C When copying is complete, re-
move originals and copies.
D Press the {{{{Interrupt}}}} key again.
The Interrupt indicator goes off.
The interrupt copy job settings
will be restored and the machine will continue copying
from where it left off.
Original Beeper
The beeper sounds and an error message is displayed when you leave
your originals on the exposure glass
after copying.
Note
❒ See p.92 “Tone: Original remains”.
AdonisC3_GBcopyF_FM1.book Page 16 Thursday, November 28, 2002 1:53 PM
Page 31
Basic Procedure
17
2
Job Preset
You can set up the next copy content
during copying.
If a long copy job is in progress and
you do not want to wait for it to finish, you can use this function to set up
the next copy job in advance. When
the current copy job is finished, the
next job will start automatically.
AAAA
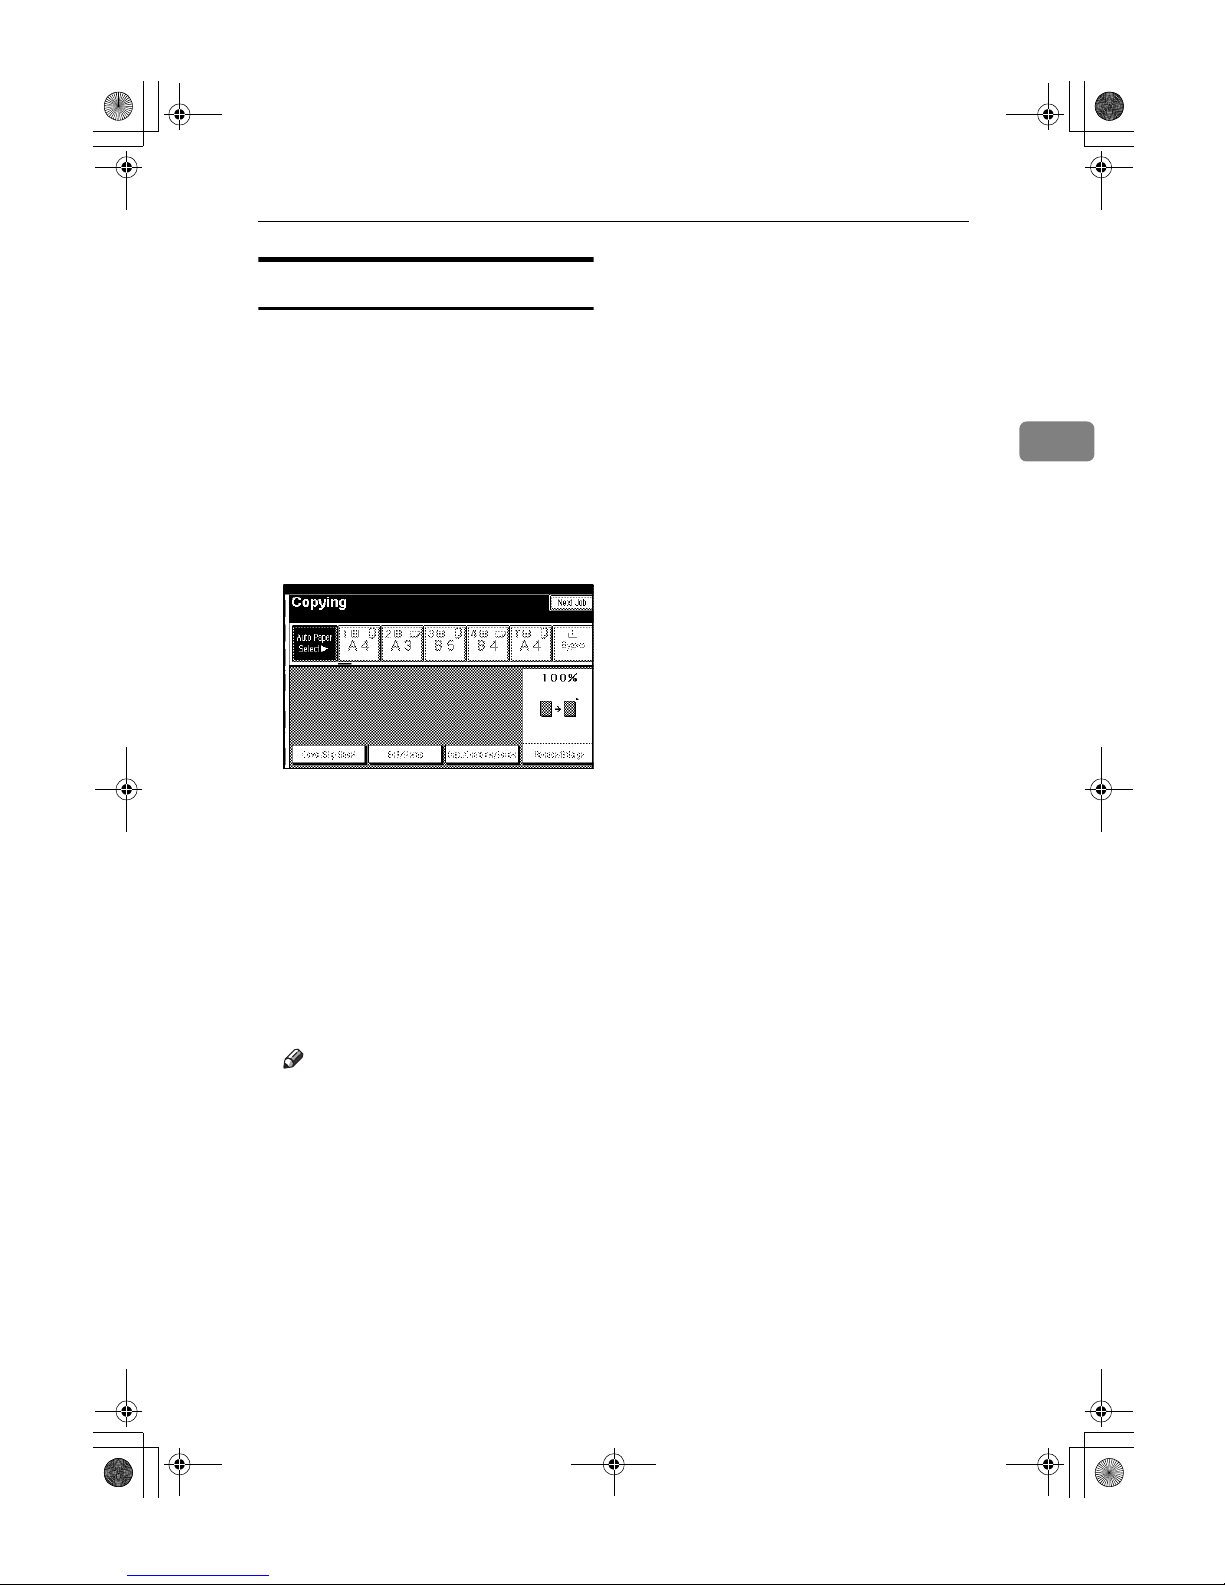
Press [
Next Job
] when "Copying" is
shown.
BBBB
Set up the next copy job.
CCCC
Place the originals in the ADF,
and then press the {{{{Start}}}} key.
All originals are scanned.
DDDD
Press [
To "Printing"
].
Returns to the initial copy display.
After the current copy job, the next
job starts automatically.
Note
❒ You can switch the display to
the current copy job by pressing
[To "Printing"]. You can switch
the display to the preset job by
pressing [
To "Reserving"
].
AdonisC3_GBcopyF_FM1.book Page 17 Thursday, November 28, 2002 1:53 PM
Page 32
Copying
18
2
Copying from the Bypass Tray
Use the bypass tray to copy onto OHP
transparencies, adhesive labels, translucent paper, postcards and copy paper that cannot be loaded in the paper
trays.
Preparation
When the duplex unit is attached,
the default is [1 Sided →→→→ 2 Sided].
When copying from the bypass
tray, select [1 Sided] for copying in
[Dup./Combine/Series] (for example
[1 Sided →→→→ 1 Sided] or [2 Sided →→→→ 1
Sided] ). You can change the initial
settings. See p.92 “Duplex Mode
Priority” .
Important
❒ When paper larger than 433 mm in
size is used, the paper may become
wrinkled, may not be fed into the
machine, or may cause paper jams.
Note
❒ If you do not use the standard size
copy paper or if you use special paper, you should input vertical and
horizontal dimensions. See p.14
“Placing custom size originals”.
The sizes that you can input are as
follows:
*1
The range is 148-432 mm (5.8"-17")
when the booklet finisher is installed.
❒ The machine can automatically de-
tect the following sizes as standard
size copy paper:
❒ When copying on OHP transpar-
encies or paper heavier than 128
g/m
2
(about 34 lb.), you need to
specify the paper type. See p.19
“When copying onto special paper” .
❒ The maximum number of sheets
you can load at the same time depends on paper type. The maximum number of sheets should not
exceed the upper limit.
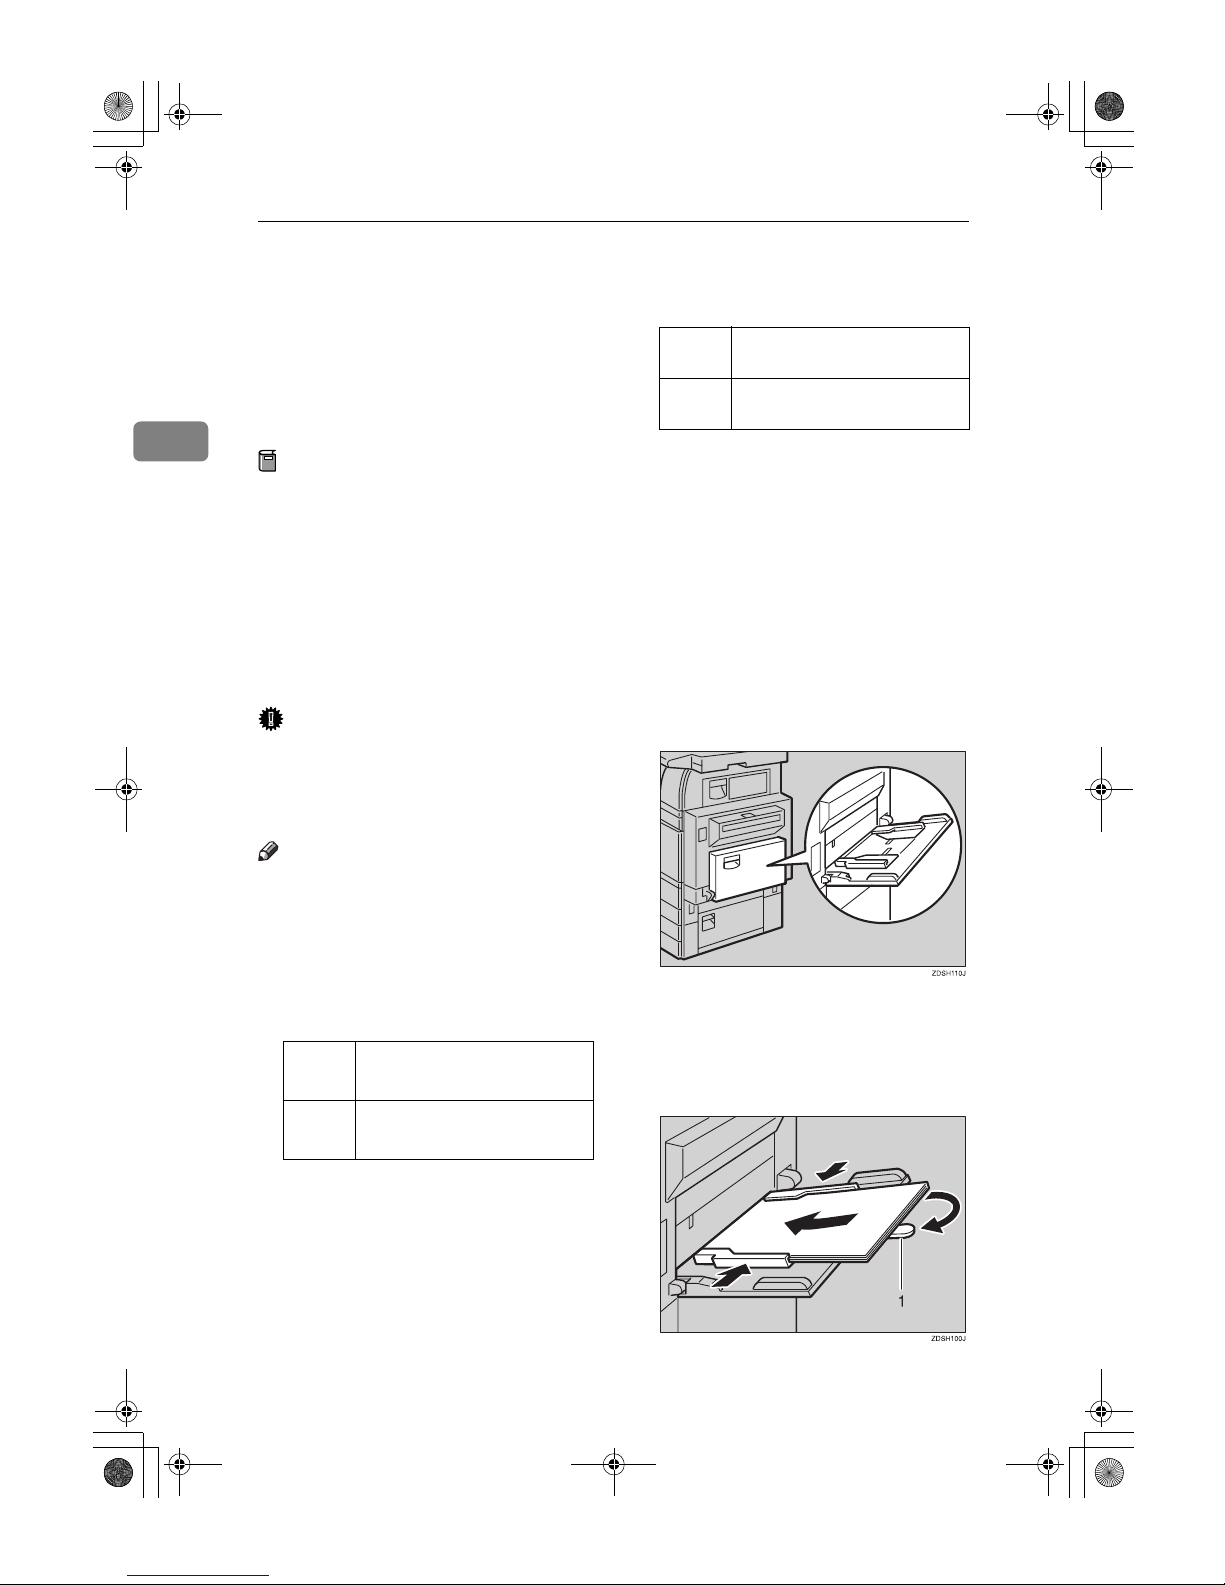
AAAA
Open the bypass tray.
BBBB
Insert the paper with the side you
want to copy facing down until
you hear the beep, and then align
the paper guide to the paper size.
1.
Extender
Metric
version
• Vertical: 100–297 mm
• Horizontal: 148–600 mm
*1
Inch
version
• Vertical: 3.9"–11.6"
• Horizontal: 5.8"–23.4"
*1
Metric
version
A3L, A4KL, A5KL, 81/2"
×
13"
L
Inch
version
A3L, 11" × 17"L, 81/2" ×
11"KL, 5
1
/2" × 81/2"
L
AdonisC3_GBcopyF_FM1.book Page 18 Thursday, November 28, 2002 1:53 PM
Page 33
Copying from the Bypass Tray
19
2
Note
❒ If the guides are not flush with
the copy paper, images might
be skewed or paper misfeeds
might occur.
❒ Do not stack paper over the lim-
it mark, otherwise images
might be skewed or paper misfeeds might occur.
❒ Swing out the extender to sup-
port paper sizes larger than
A4L, 8
1
/2" × 11"L.
❒ Fan paper to get air between the
sheets and avoid a multi-sheet
feed.
CCCC
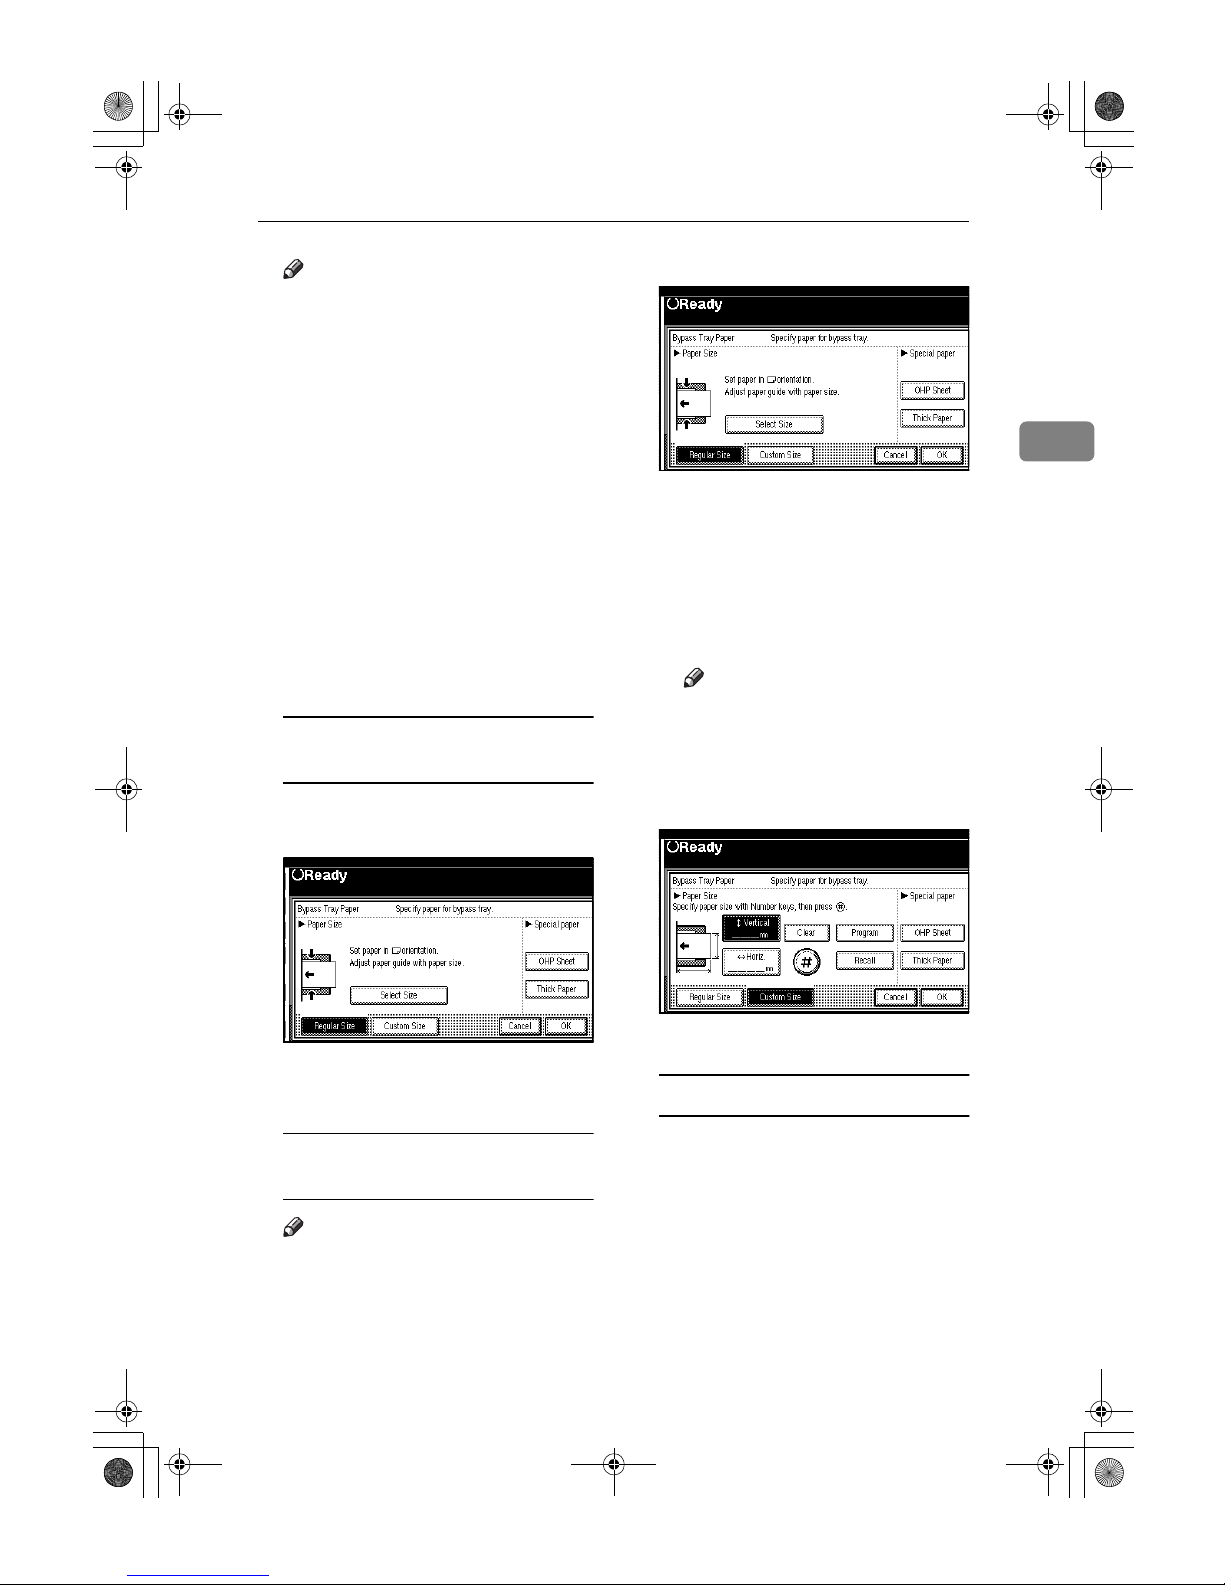
Select the type and size of the paper.
When copying onto standard size
paper
A Press the {{{{#}}}} key.
B Press [Select Size].
C Select the paper size.
D Press [OK].
When copying onto custom size
paper
Note
❒ Paper will be automatically de-
livered to the internal tray.
A Press the {{{{#}}}} key.
B Press [Custom Size].
C Press [Vertical mm], enter the
vertical size with the number
keys, and then press the [#]
key.
D Enter the horizontal size of the
paper with the number keys,
and then press the [#] key.
Note
❒ If [Horiz mm] is not highlight-
ed, press [Horiz mm].
❒ To register the custom size
entered, press [Program], and
then press [Exit].
E Press [OK].
When copying onto special paper
A Press the {{{{#}}}} key.
B Select paper type in Special pa-
per.
C Press [OK].
AdonisC3_GBcopyF_FM1.book Page 19 Thursday, November 28, 2002 1:53 PM
Page 34
Copying
20
2
DDDD
Place your originals, and then
press the {{{{Start}}}} key.
Note
❒ When copying onto OHP trans-
parencies, remove copied sheets
one by one.
EEEE
When your copy job is finished,
press the {{{{Clear Modes}}}} key to
clear the settings.
AdonisC3_GBcopyF_FM1.book Page 20 Thursday, November 28, 2002 1:53 PM
Page 35
Copier Functions
21
2
Copier Functions
Adjusting Image Density
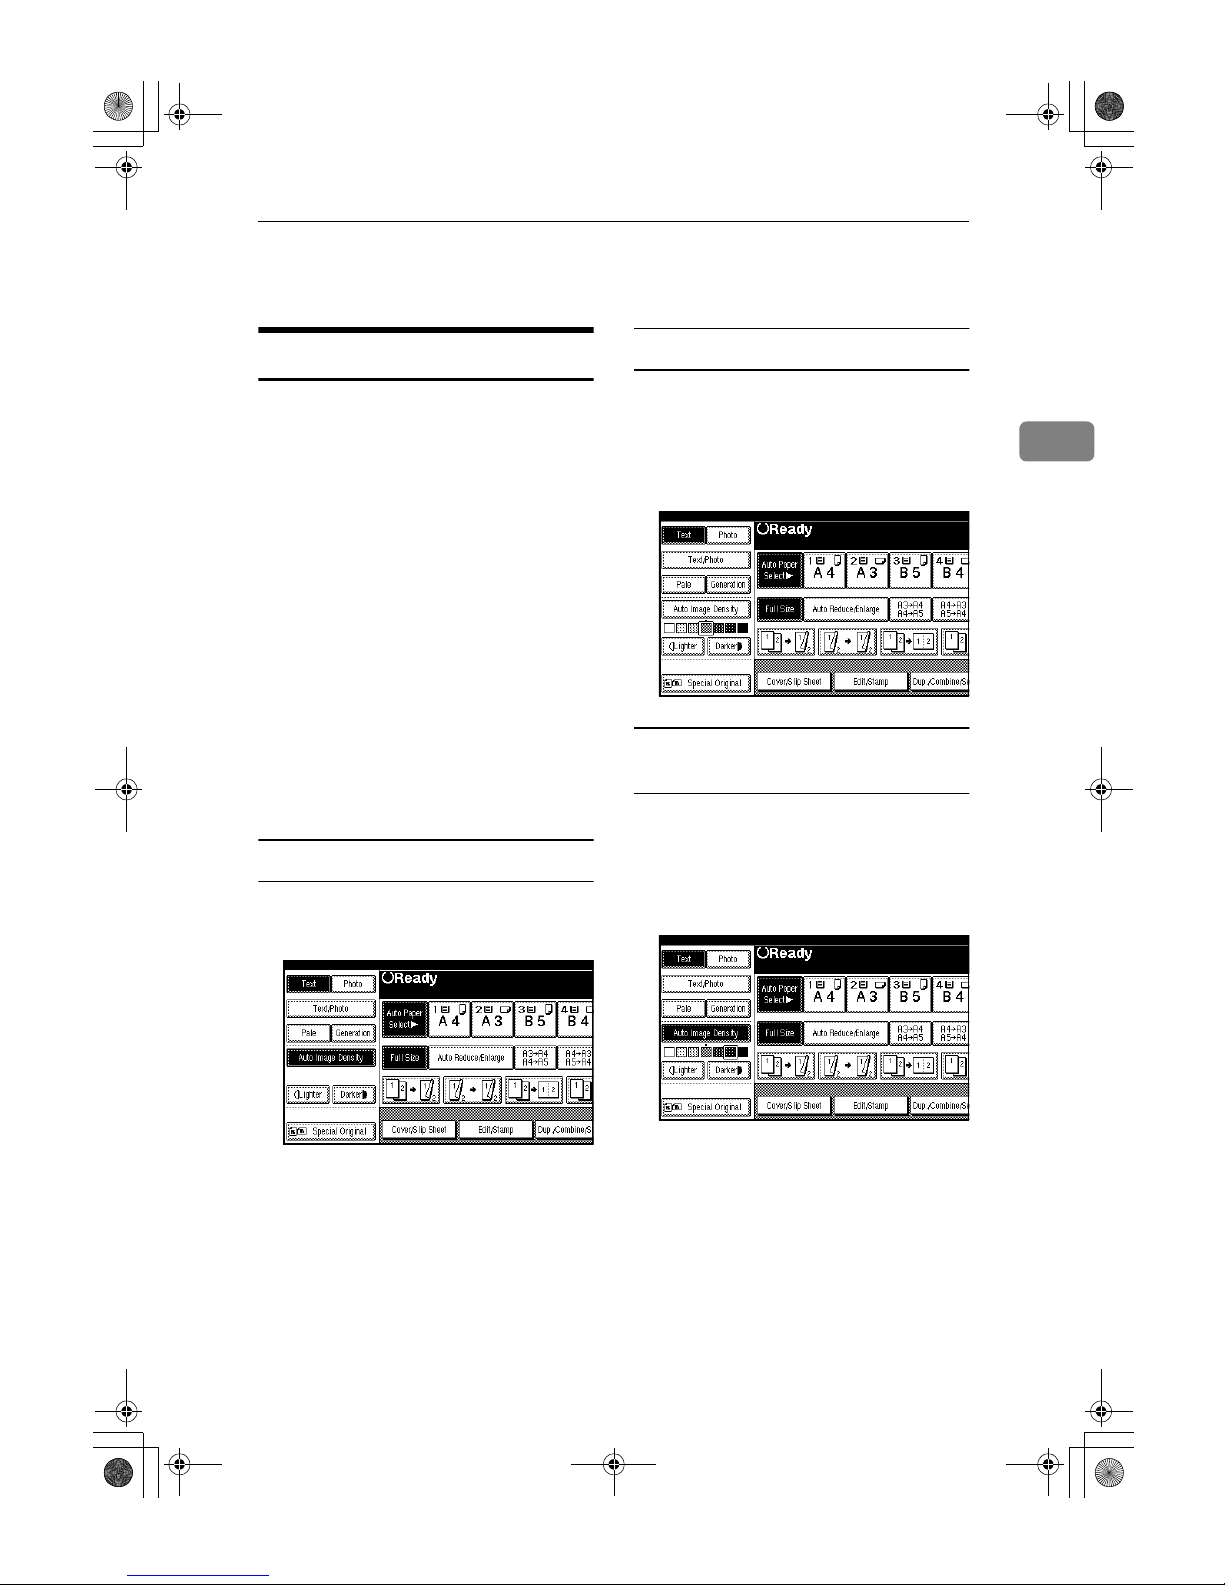
There are three types of adjustment
available:
❖❖❖❖ Auto Image Density
The machine automatically adjusts
image density.
❖❖❖❖ Manual image density
You can adjust the density of the
overall original in seven increments.
❖❖❖❖ Combined auto and manual image
density
Use when copying originals with a
dirty background (such as newspapers). You can adjust foreground density while leaving the
background unchanged.
Auto image density
AAAA
Make sure that [
Auto Image Density
]
is selected.
Manual image density
AAAA
Press [
Auto Image Density
] to cancel
it.
BBBB
Press [Lighter] or [Darker] to adjust
the image density.
Combined auto and manual image
density
AAAA
Make sure that [Auto Image Density]
is selected.
BBBB
Press [Lighter] or [Darker] to adjust
the density.
AdonisC3_GBcopyF_FM1.book Page 21 Thursday, November 28, 2002 1:53 PM
Page 36
Copying
22
2
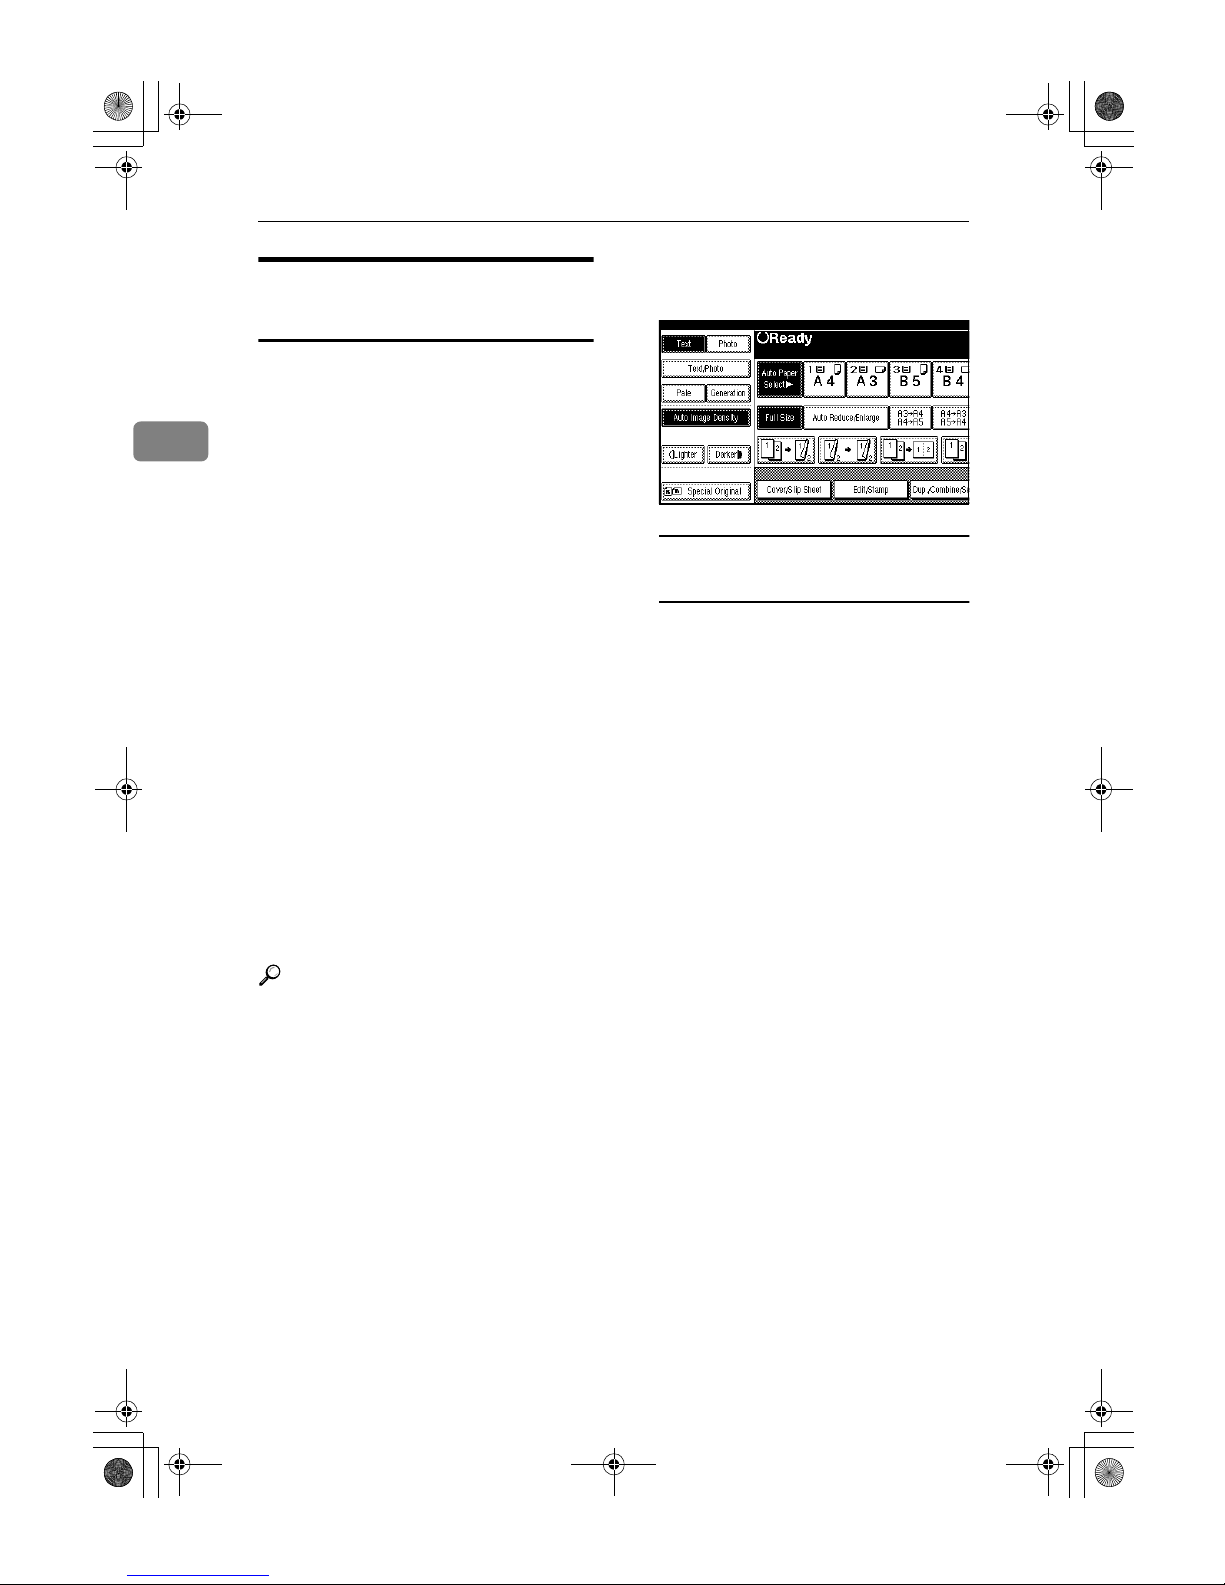
Selecting Original Type
Setting
Select one of the following six types to
match your originals:
❖❖❖❖ Text
Select this mode when your originals contain only text (no pictures).
❖❖❖❖ Text/Photo
Select [
Text/Photo
] when your origi-
nals contain photographs or pictures with text.
❖❖❖❖ Photo
Delicate tones of photographs and
pictures can be reproduced with
this mode.
❖❖❖❖ Pale
Select this mode for originals that
have lighter lines in pencil, or for
faint copied slips. The faint lines
will be clearly copied.
❖❖❖❖ Generation Copy
If your originals are copies (generation copies), the copy image can
be reproduced sharply and clearly.
Reference
p.90 “Original Type Display”
p.91 “Copy Quality”
AAAA
Press the appropriate key to select
the original type.
When the original type keys are
not displayed
A Press [Original Type].
B Select the original type, and
then press [OK].
AdonisC3_GBcopyF_FM1.book Page 22 Thursday, November 28, 2002 1:53 PM
Page 37
Copier Functions
23
2
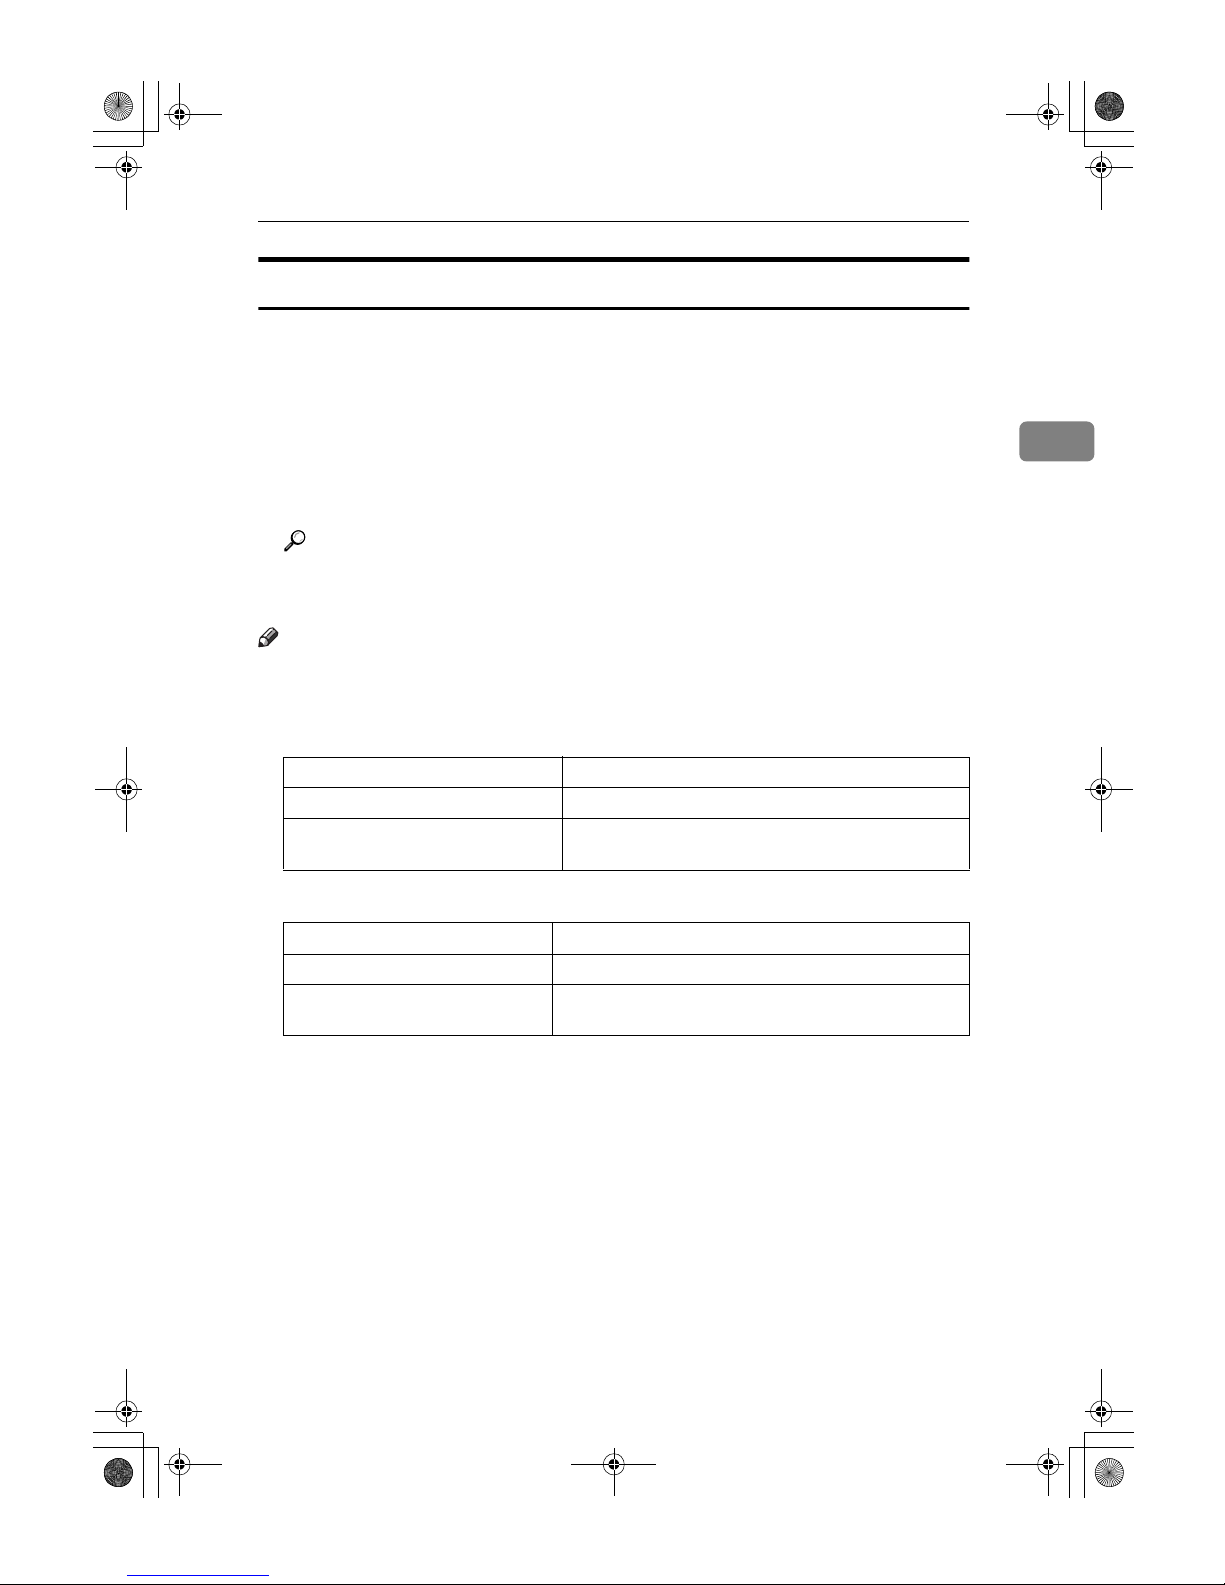
Selecting Copy Paper
There are two ways to select copy paper:
❖❖❖❖ Auto Paper Select
The machine selects a suitable size of copy paper automatically based on original size and reproduction ratio.
❖❖❖❖ Manual Paper Select
Choose the tray containing the paper you want to copy onto: a paper tray, bypass tray or Large Capacity Tray (LCT).
Reference
p.9 “Sizes difficult to detect”
p.90 “Paper Display”
Note
❒ See the following table for copy paper sizes and orientations that can be used
with Auto Paper Select (when copying at a ratio of 100%).
❖❖❖❖ Metric version
❖❖❖❖ Inch version
❒ Only the paper trays set to [No display] or [Recycled paper] in Paper Type and
also set to [Yes] in Apply Auto Paper Select can be selected in Auto Paper Se-
lect mode. See “Paper Type: Tray 1–4”in "Tray Paper Settings", General Set-
tings Guide.
Where original is placed Paper size and orientation
Exposure glass A3L, B4 JISL, A4KL, B5 JIS
KL
Auto Document Feeder A3L, B4 JISL, A4KL, B5 JISKL, A5KL, B6
JISKL, 11”× 17”L, 8
1
/2" × 11"
KL
Where original is placed Paper size and orientation
Exposure glass 11" × 17"L, 8
1
/2" × 14"L, 81/2" × 11"
KL
Auto Document Feeder A3L, A4KL, 11" × 17"L, 8
1
/2" × 14"L, 81/2" ×
11"KL, 5
1
/2" × 81/2"KL, 10" × 14"
L
AdonisC3_GBcopyF_FM1.book Page 23 Thursday, November 28, 2002 1:53 PM
Page 38
Copying
24
2
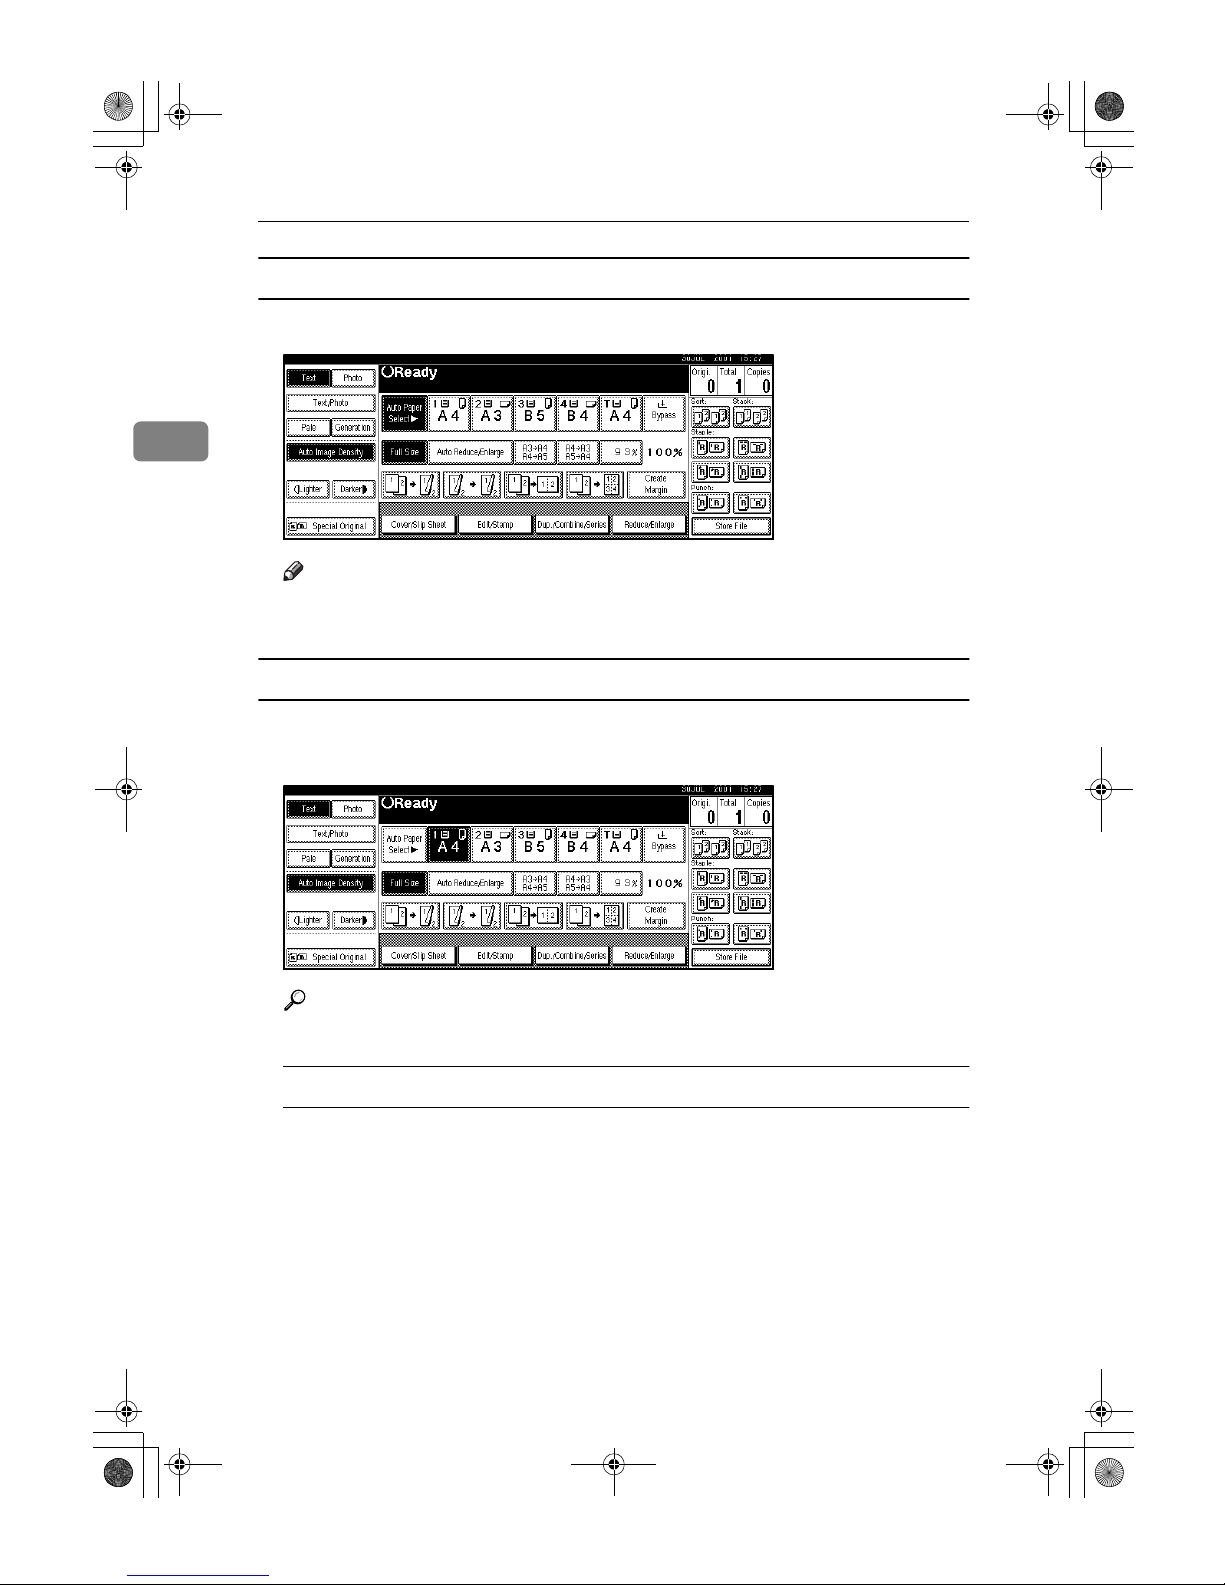
Auto Paper Select
AAAA
Make sure that [Auto Paper Select] is selected.
Note
❒ Trays with a key mark will not be automatically selected. See “Paper
Type”in “Tray Paper Settings", General Settings Guide.
Manual Paper Select
AAAA
Select the paper tray, bypass tray or the LCT.
The indicator corresponding to the selected paper tray is highlighted.
Reference
p.18 “Copying from the Bypass Tray”
When the paper type keys are not displayed
A Press [Auto Paper Select].
B Select the paper type.
AdonisC3_GBcopyF_FM1.book Page 24 Thursday, November 28, 2002 1:53 PM
Page 39
Copier Functions
25
2
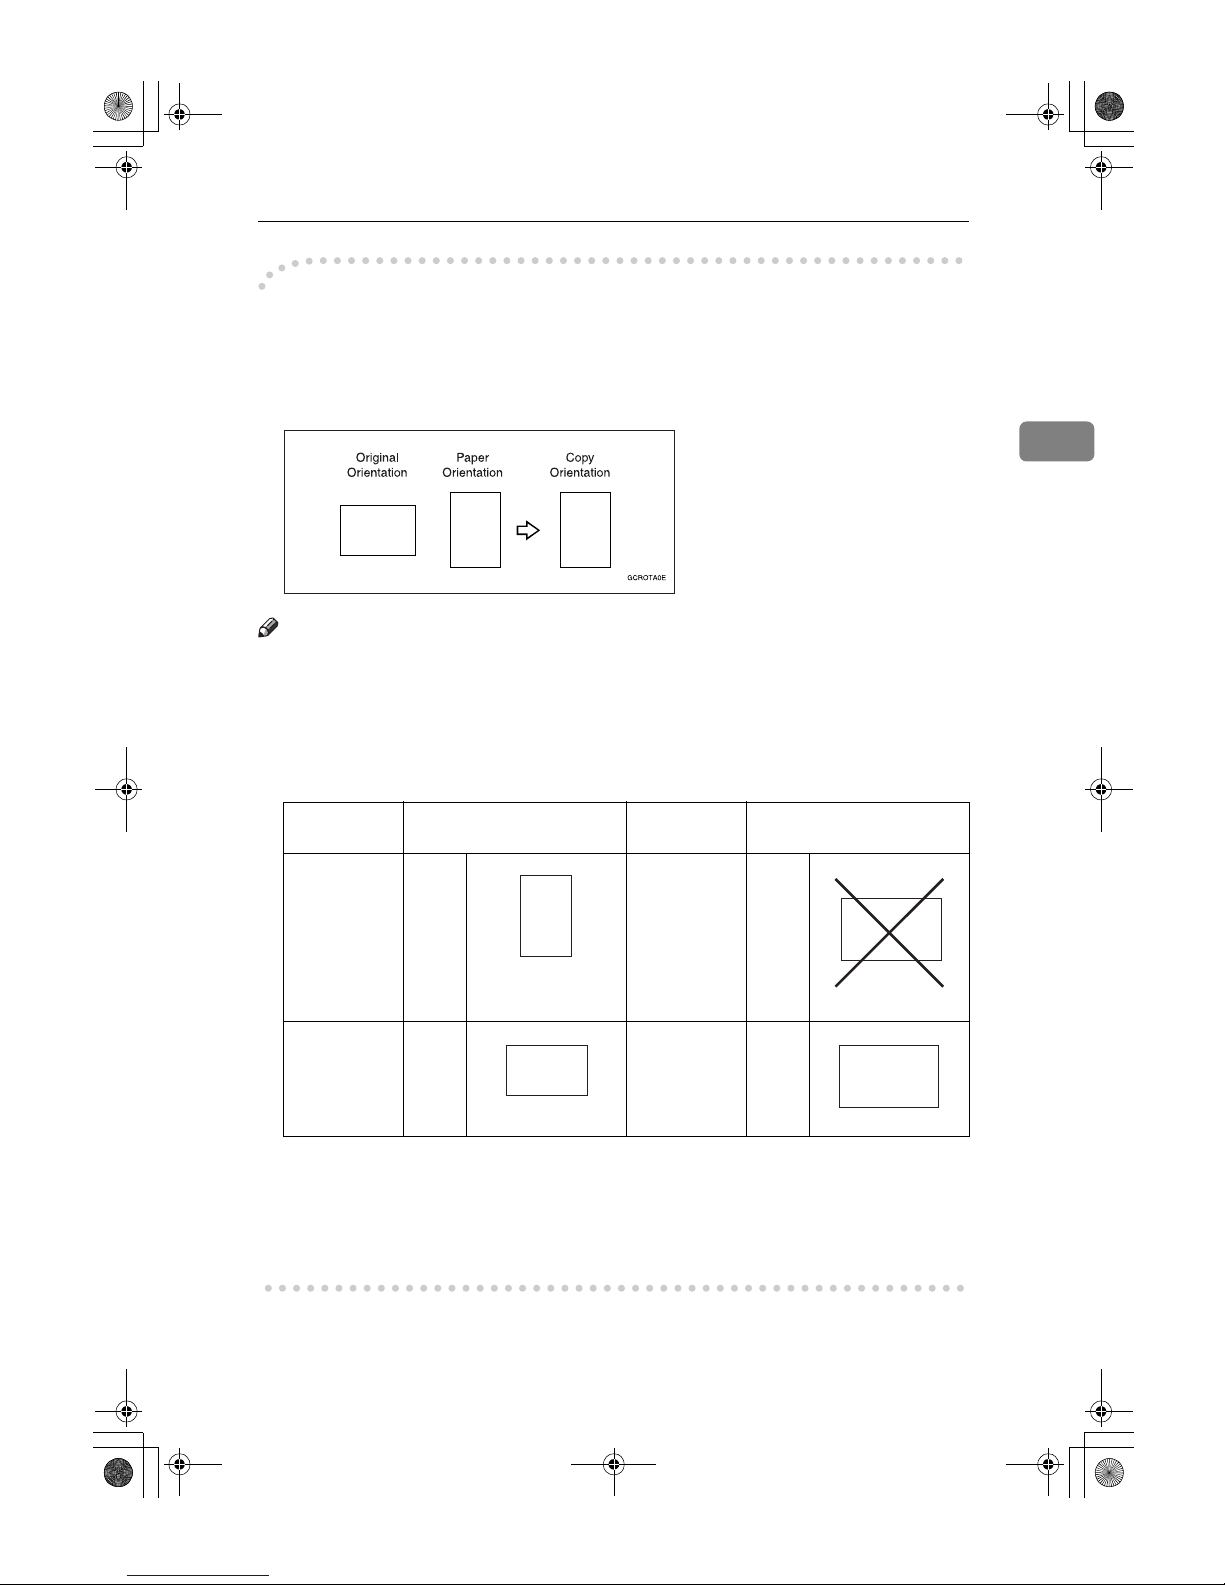
----Rotated copy
If the orientation in which your original is placed (L or K) is different from that
of the paper you are copying onto, this function rotates the original image by 90°
to fit it on the copy paper. This function works when Auto Paper Select or Auto
Reduce/Enlarge is selected. See p.23 “Auto Paper Select”.
Note
❒ The default for Auto Tray Switching is With image rotation, You cannot use
the Rotated Copy function if this setting is changed to Without image rotation
or Off. See p.90 “Auto Tray Switching”.
❒ You cannot use the Rotated Copy function when enlarging onto A3, B4 JIS or
11" × 17", 8
1
/2" × 14" size paper. In this case, place your original in the L ori-
entation.
❒ You cannot use the Rotated Copy function when” Left 2" or "Top 2” is select-
ed for stapling or if the Punch function is selected when using the 2 Tray finisher. See p.35 “Staple” and p.41 “Punch”.
❒ You cannot use the Rotate Copy function if ”Left 2”, “Top 2”or “Saddle
Stitch”is selected for the stapling when using the booklet finisher.
Original size and
orientation
Copy paper size and
orientation
You cannot
rotate:
A4, B5
JIS, or
A5
K
When enlarging to
→
B4 JIS,
A3
However,
you can use:
A4, B5
JIS, or
A5
L
When enlarging to
→
B4 JIS,
A3
R
R
GCROTA1E
R
GCROTA2E
R
GCROTA3E
R
GCROTA4E
R
AdonisC3_GBcopyF_FM1.book Page 25 Thursday, November 28, 2002 1:53 PM
Page 40
Copying
26
2
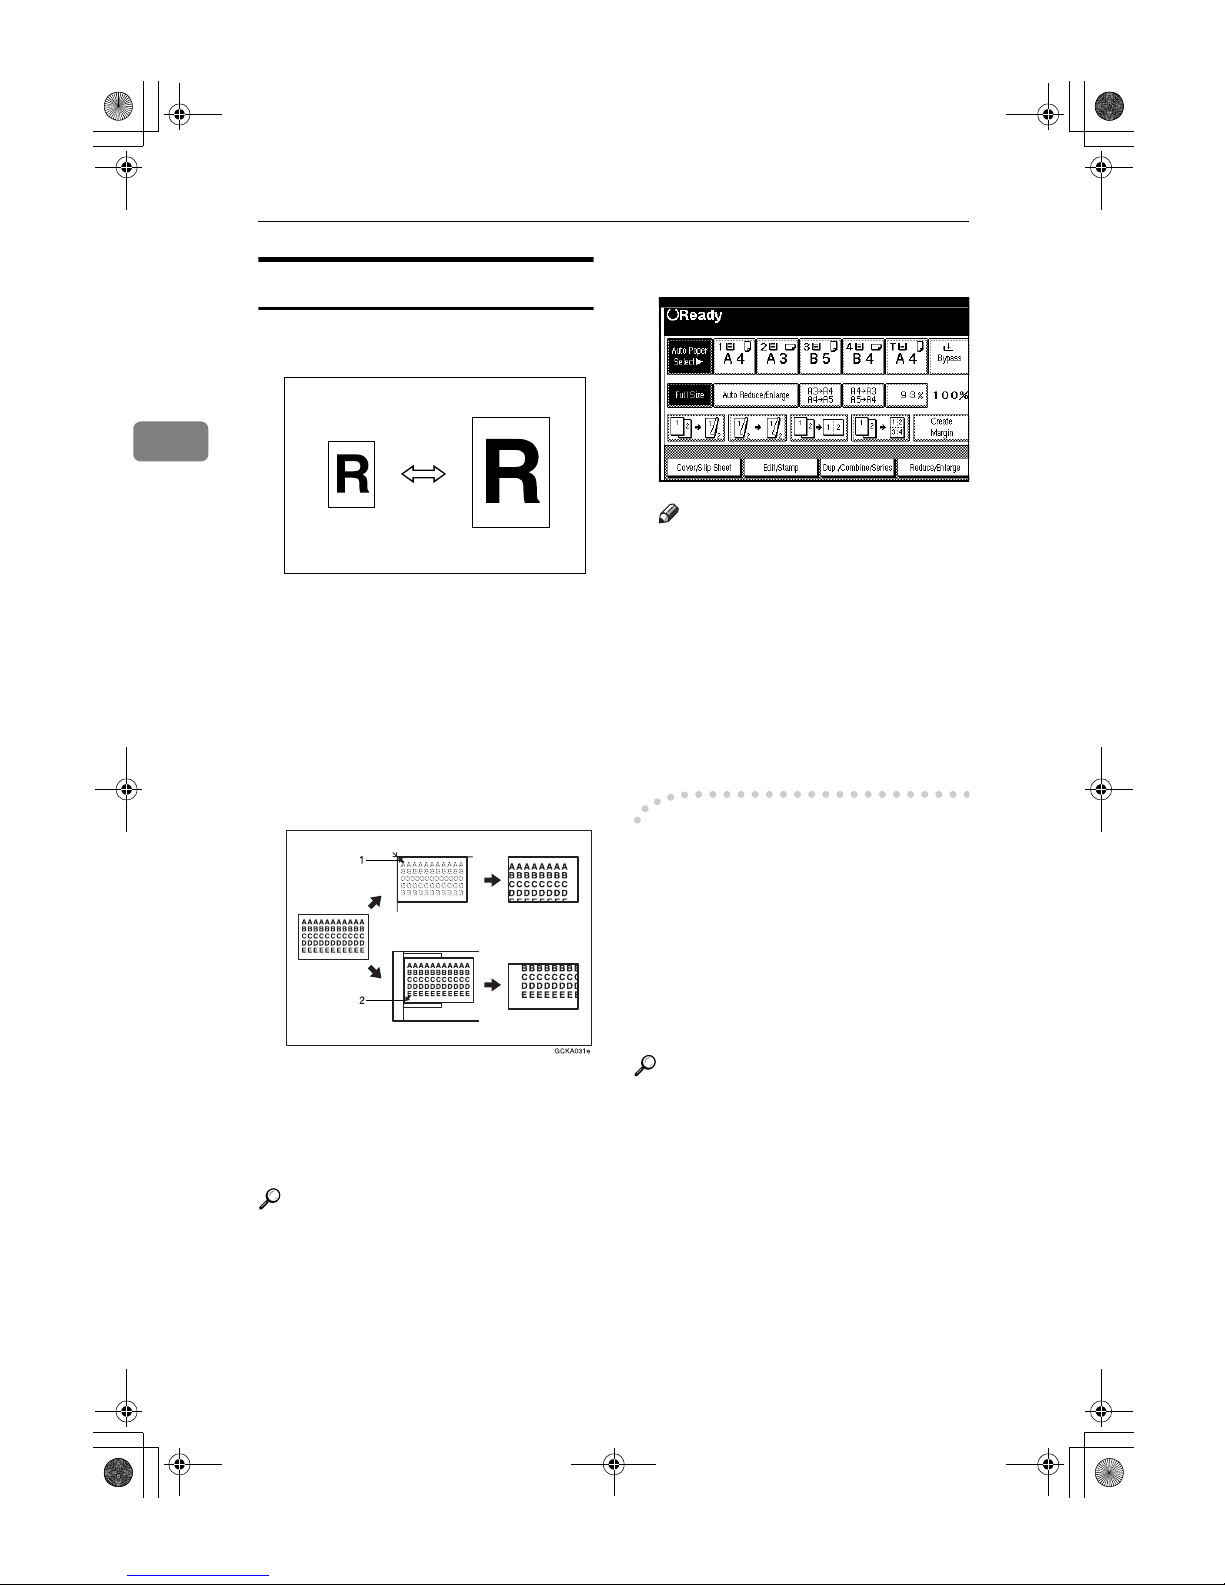
Preset Reduce/Enlarge
You can select a preset ratio for copying.
❖❖❖❖ Base Point
The base point of Reduce/Enlarge
differs depending on how the original is scanned. When the original
is placed on the exposure glass, the
upper left corner will be the base
point. When it is placed in the
ADF, the bottom left corner will be
the base point.
1.
Base point when placing on the
exposure glass.
2.
Base point when placing in the
ADF.
Reference
Related initial settings
p.94 “Shortcut R/E”
p.95 “R/E Priority”
AAAA
Press [Reduce/Enlarge].
Note
❒ To select a preset ratio on the in-
itial display, press the shortcut
reduce/enlarge key and proceed to step
D
.
BBBB
Press [Enlarge] or [Reduce].
CCCC
Select a ratio, and then press [OK].
DDDD
Place your originals, and then
press the {{{{Start}}}} key.
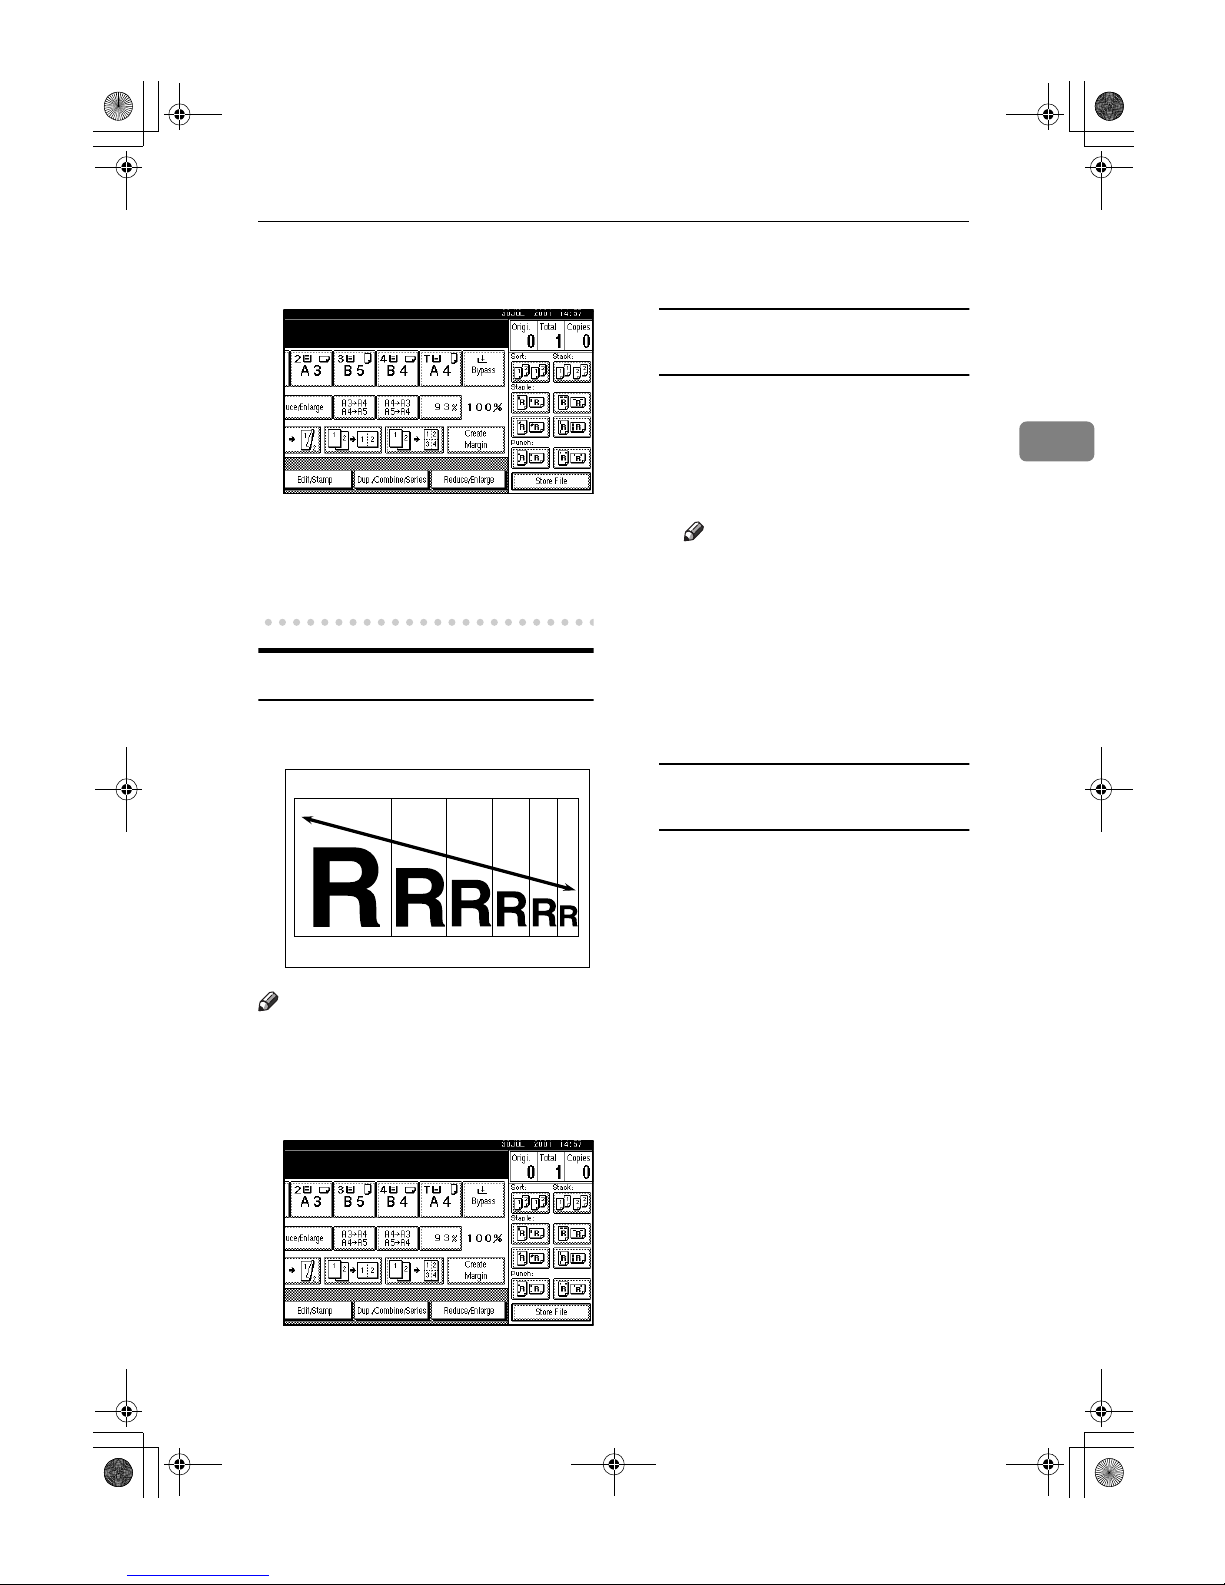
----Create margin mode
Use Create Margin to reduce the image to 93% of its original size with the
centre as reference. You can assign
this function to a shortcut key on the
initial display. By combining it with
the Reduce/Enlarge function, you
can also provide the Reduce/Enlarge
copy with a margin.
Reference
Related initial settings
p.93 “Copy Function Key: F1-F5”
p.95 “Ratio for Create Margin”
AdonisC3_GBcopyF_FM1.book Page 26 Thursday, November 28, 2002 1:53 PM
Page 41
Copier Functions
27
2
A Press [Create Margin] displayed on
the initial display.
B If you do not want to combine it
with the Reduce/Enlarge function,
place your originals, and then
press the {{{{Start}}}} key.
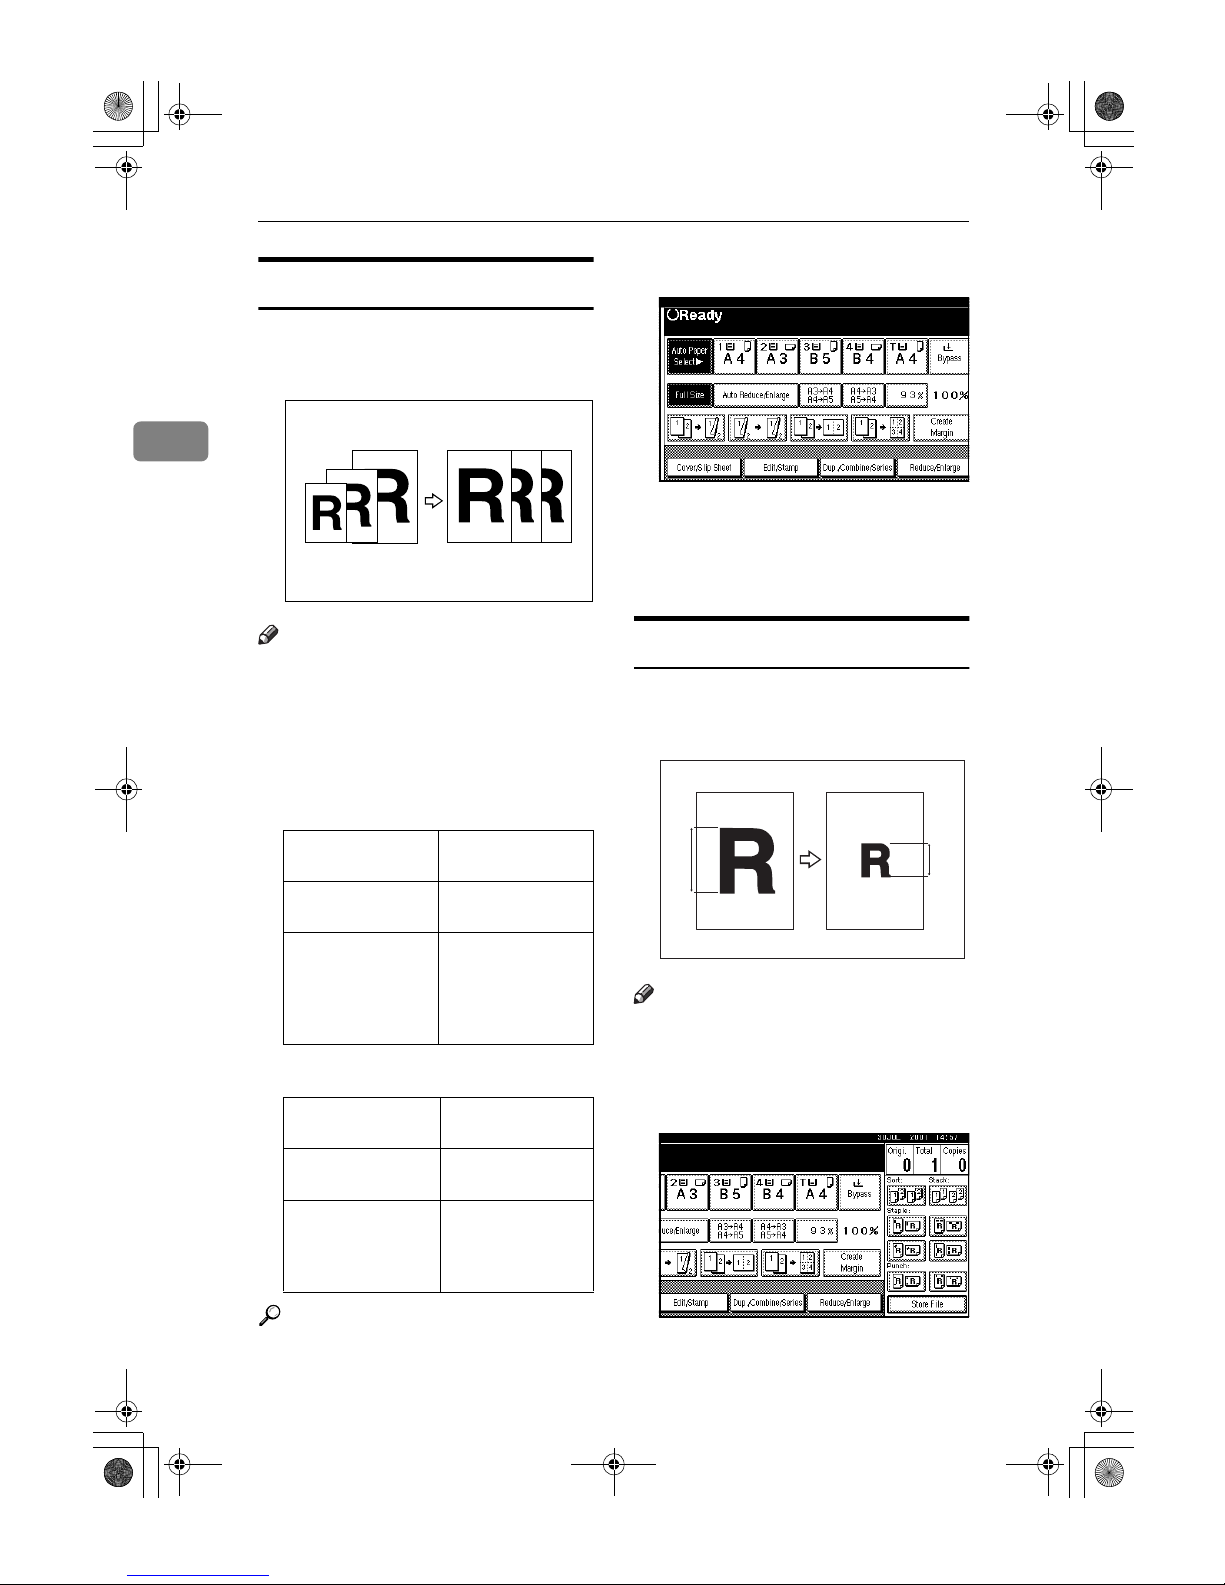
Zoom
You can change the reproduction ratio in 1% steps.
Note
❒ You can select a preset ratio near
the desired ratio, then adjust the
ratio with [nnnn] or [oooo].
AAAA
Press [Reduce/Enlarge].
BBBB
Enter the ratio.
To select the ratio with [nnnn] and
[oooo]
A Select a preset ratio close to the
desired ratio by using [Reduce]
or [Enlarge].
B Adjust the ratio with [nnnn] or
[oooo].
Note
❒ To change the ratio in incre-
ments of 1%, press [nnnn] or
[oooo]. To change the ratio in
10% steps, press and hold
down [nnnn] or [oooo].
❒ If you have incorrectly en-
tered the ratio, readjust with
[nnnn] or [oooo].
To enter the ratio with the number
keys
A Press [
Mag. Ratio
].
B Enter the desired ratio with the
number keys.
C Press [#].
D Press [OK].
CCCC
Place your originals, and then
press the {{{{Start}}}} key.
AdonisC3_GBcopyF_FM1.book Page 27 Thursday, November 28, 2002 1:53 PM
Page 42
Copying
28
2
Auto Reduce/Enlarge
The machine can choose an appropriate reproduction ratio based on the
paper and original sizes you select.
Note
❒ You cannot use the bypass tray
with this function.
❒
When using Auto Reduce/Enlarge,
see the following table for original
sizes and orientations you can use:
❖❖❖❖ Metric version
❖❖❖❖ Inch version
Reference
p.9 “Sizes difficult to detect”
AAAA
Press [Auto Reduce/Enlarge].
BBBB
Select the paper tray.
CCCC
Place the original, and then press
the {{{{Start}}}} key.
Size Magnification
This function calculates an enlargement or reduction ratio based on the
lengths of the original and copy.
Note
❒ Measure and specify the lengths of
the original and copy by comparing "A" with "a".
AAAA
Press [Reduce/Enlarge] .
Where original is
placed
Original size and
orientation
Exposure glass
A3L, B4 JISL,
A4KL, B5 JIS
KL
Auto Document
Feeder
A3L, B4 JISL,
A4KL, B5 JISKL,
A5KL, B6 JISKL,
11”
×
17”L, 81/2" ×
11"
KL
Where original is
placed
Original size and
orientation
Exposure glass
11" × 17"L, 81/2" ×
14"
L
, 81/2" × 11
KL
Auto Document
Feeder
A4LK, 11" ×
17"L, 8
1
/2" × 14"L,
8
1
/2" × 11"KL,
5
1
/2" × 81/2"
KL
Amm amm
AdonisC3_GBcopyF_FM1.book Page 28 Thursday, November 28, 2002 1:53 PM
Page 43
Copier Functions
29
2
BBBB
Press [Specifd. Ratio].
CCCC
Make sure that [Specifd. Ratio] is
highlighted.
DDDD
Enter the length of the original
with the number keys, and then
press the [#] key.
Note
❒ You can enter sizes within the
following ranges:
EEEE
Enter the length of the copy with
the number keys, and then press
[#].
Note
❒ To change the length after
pressing [#], select [Original] or
[Copy] and enter the desired
length.
FFFF
Press [OK].
GGGG
Press [OK].
HHHH
Place your original, and then
press the {{{{Start}}}} key.
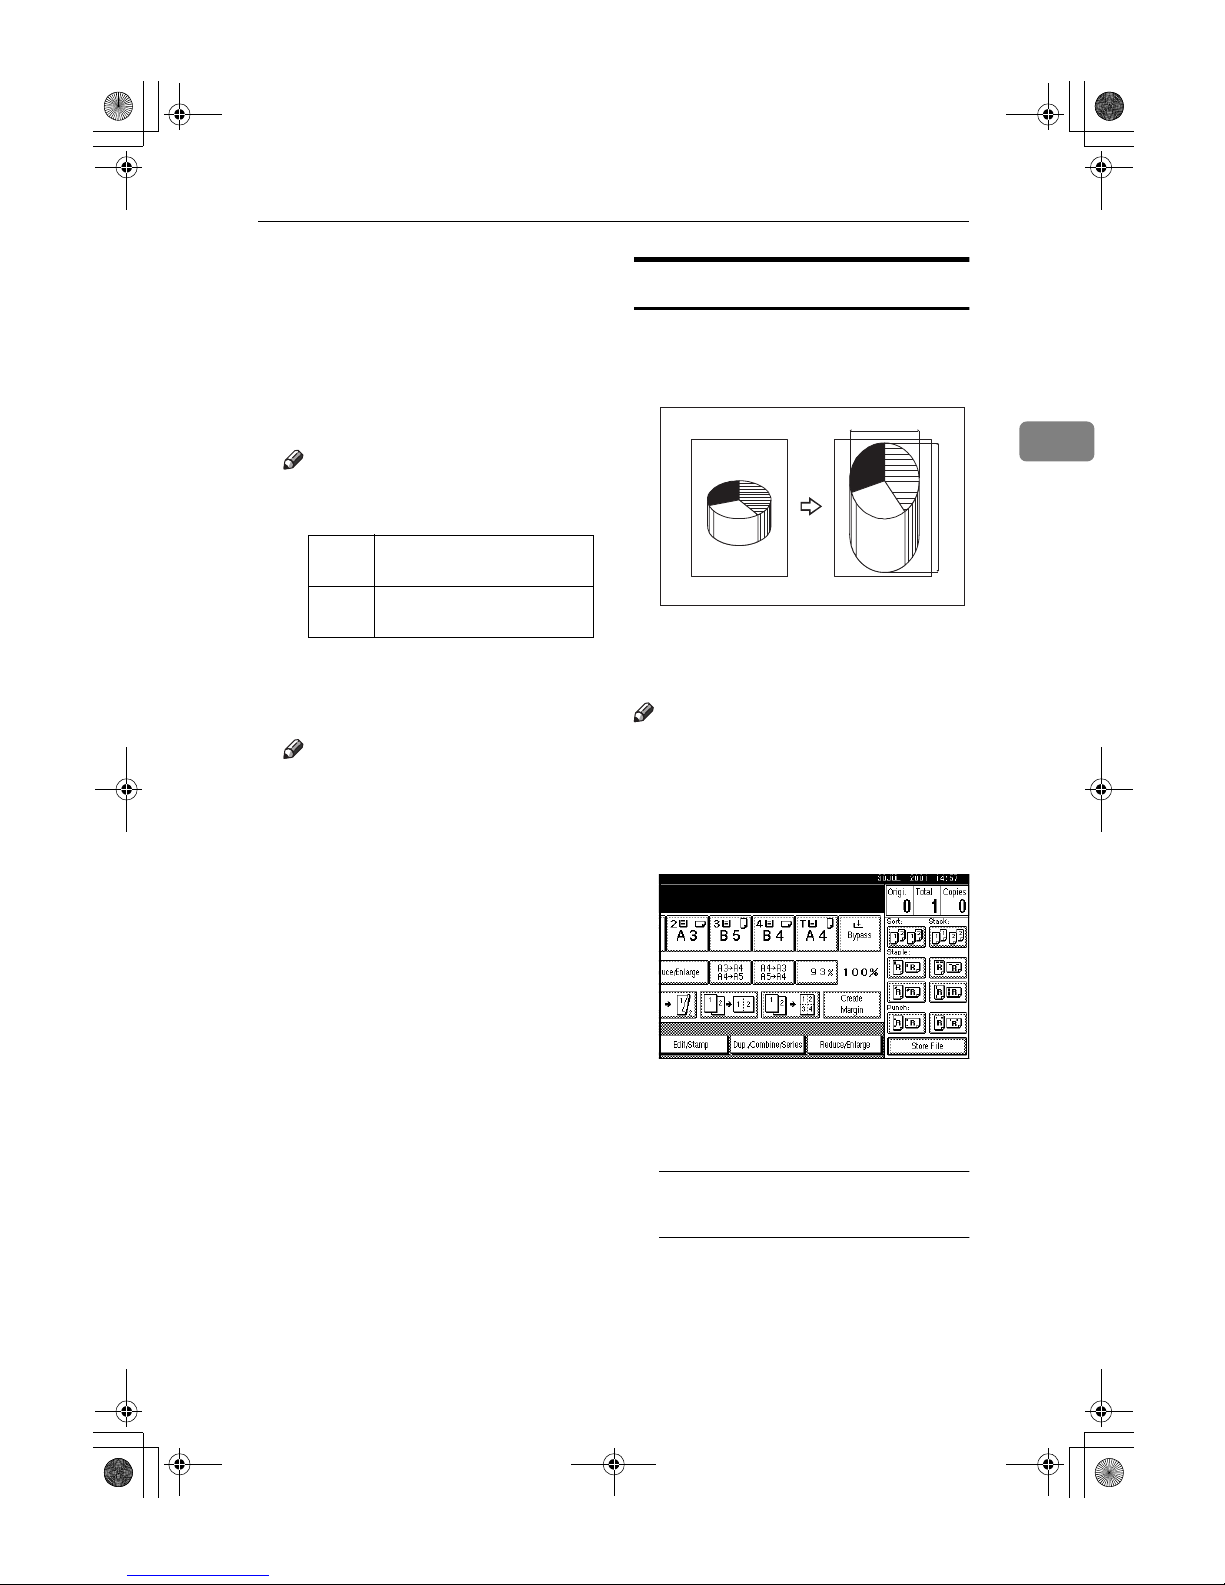
Directional Magnification (%)
Copies can be reduced or enlarged at
different reproduction ratios, horizontally and vertically.
1.
Horizontal ratio
2.
Vertical ratio
Note
❒ You can also select a preset ratio
close to the desired ratio using [Re-
duce] or [Enlarge], then adjust with
[nnnn] or [oooo].
AAAA
Press [Reduce/Enlarge].
BBBB
Press [Specifd. Ratio].
CCCC
Press [Direct. Mag.%].
To enter the ratio with the number
keys
A Press [
Horizontal
].
B Enter the desired ratio with the
number keys, followed by [#].
C Press [Vertical].
Metric
version
1–999 mm (in increments of
1 mm)
Inch
version
0.1"–99.9" (in increments of
0.1")
a%
b%
CP2P01EE
AdonisC3_GBcopyF_FM1.book Page 29 Thursday, November 28, 2002 1:53 PM
Page 44
Copying
30
2
D Enter the desired ratio with the
number keys, followed by [#].
E Press [OK].
To specify a ratio with [nnnn] and
[oooo]
A Press [With nnnnoooo].
B Press [Horizontal].
C Adjust the ratio using [nnnn] or
[oooo].
Note
❒ Pressing [nnnn] or [oooo] changes
the ratio in increments of 1%.
Pressing and holding down
[nnnn] or [oooo] changes it in in-
crements of 10%.
❒ If you have incorrectly en-
tered the ratio, readjust the
ratio with [nnnn] or [oooo].
D Press [Vertical].
E Adjust the ratio with [nnnn] or
[oooo].
F Press [OK].
DDDD
Press [OK].
EEEE
Place your originals, and then
press the {{{{Start}}}} key.
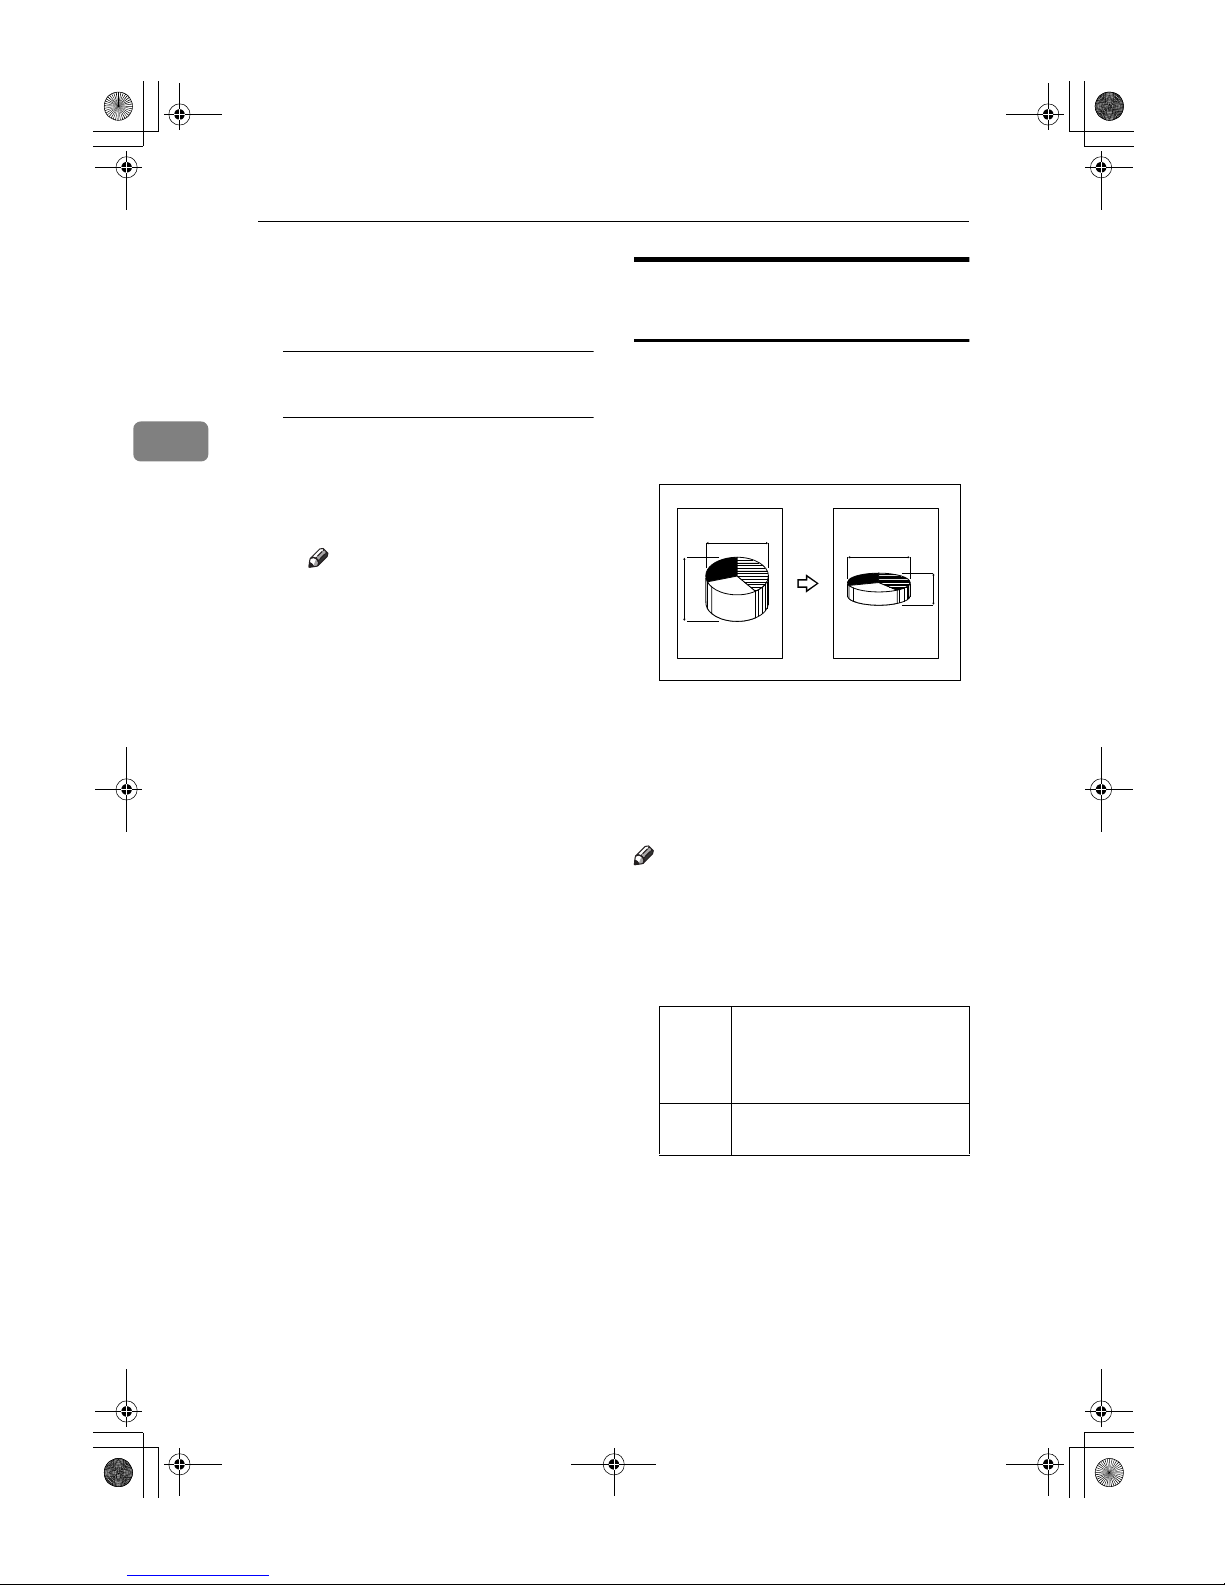
Directional Size Magnification
(mm)
The suitable reproduction ratios will
be automatically selected when you
enter the horizontal and vertical
lengths of the original and copy image you require.
1.
Horizontal original size
2.
Vertical original size
3.
Horizontal copy size
4.
Vertical copy size
Note
❒ Specify the vertical and horizontal
sizes of the original and those of
the copy, as shown.
❒ You can enter sizes within the fol-
lowing ranges:
Metric
version
Vertical: 1–999 mm (in incre-
ments of 1 mm)
Horizontal: 1–999 mm (in in-
crements of 1 mm)
Inch
version
0.1"–99.9" (in increments of
0.1")
1
3
24
CP2M01EE
AdonisC3_GBcopyF_FM1.book Page 30 Thursday, November 28, 2002 1:53 PM
Page 45
Copier Functions
31
2
AAAA
Press [Reduce/Enlarge].
BBBB
Press [Specifd. Ratio].
CCCC
Press [
Dir. Size Mag mm
].
DDDD
Enter the horizontal size of the
original with the number keys,
and then press [#].
EEEE
Enter the horizontal size of the
copy with the number keys, and
then press [#].
FFFF
Enter the vertical size of the original with the number keys, and
then press [#].
GGGG
Enter the vertical size of the copy
with the number keys, and then
press [#].
Note
❒ To change a length, press the
key you want to change and enter the new value.
HHHH
Press [OK].
IIII
Press [OK].
JJJJ
Place the originals, and then press
the {{{{Start}}}} key.
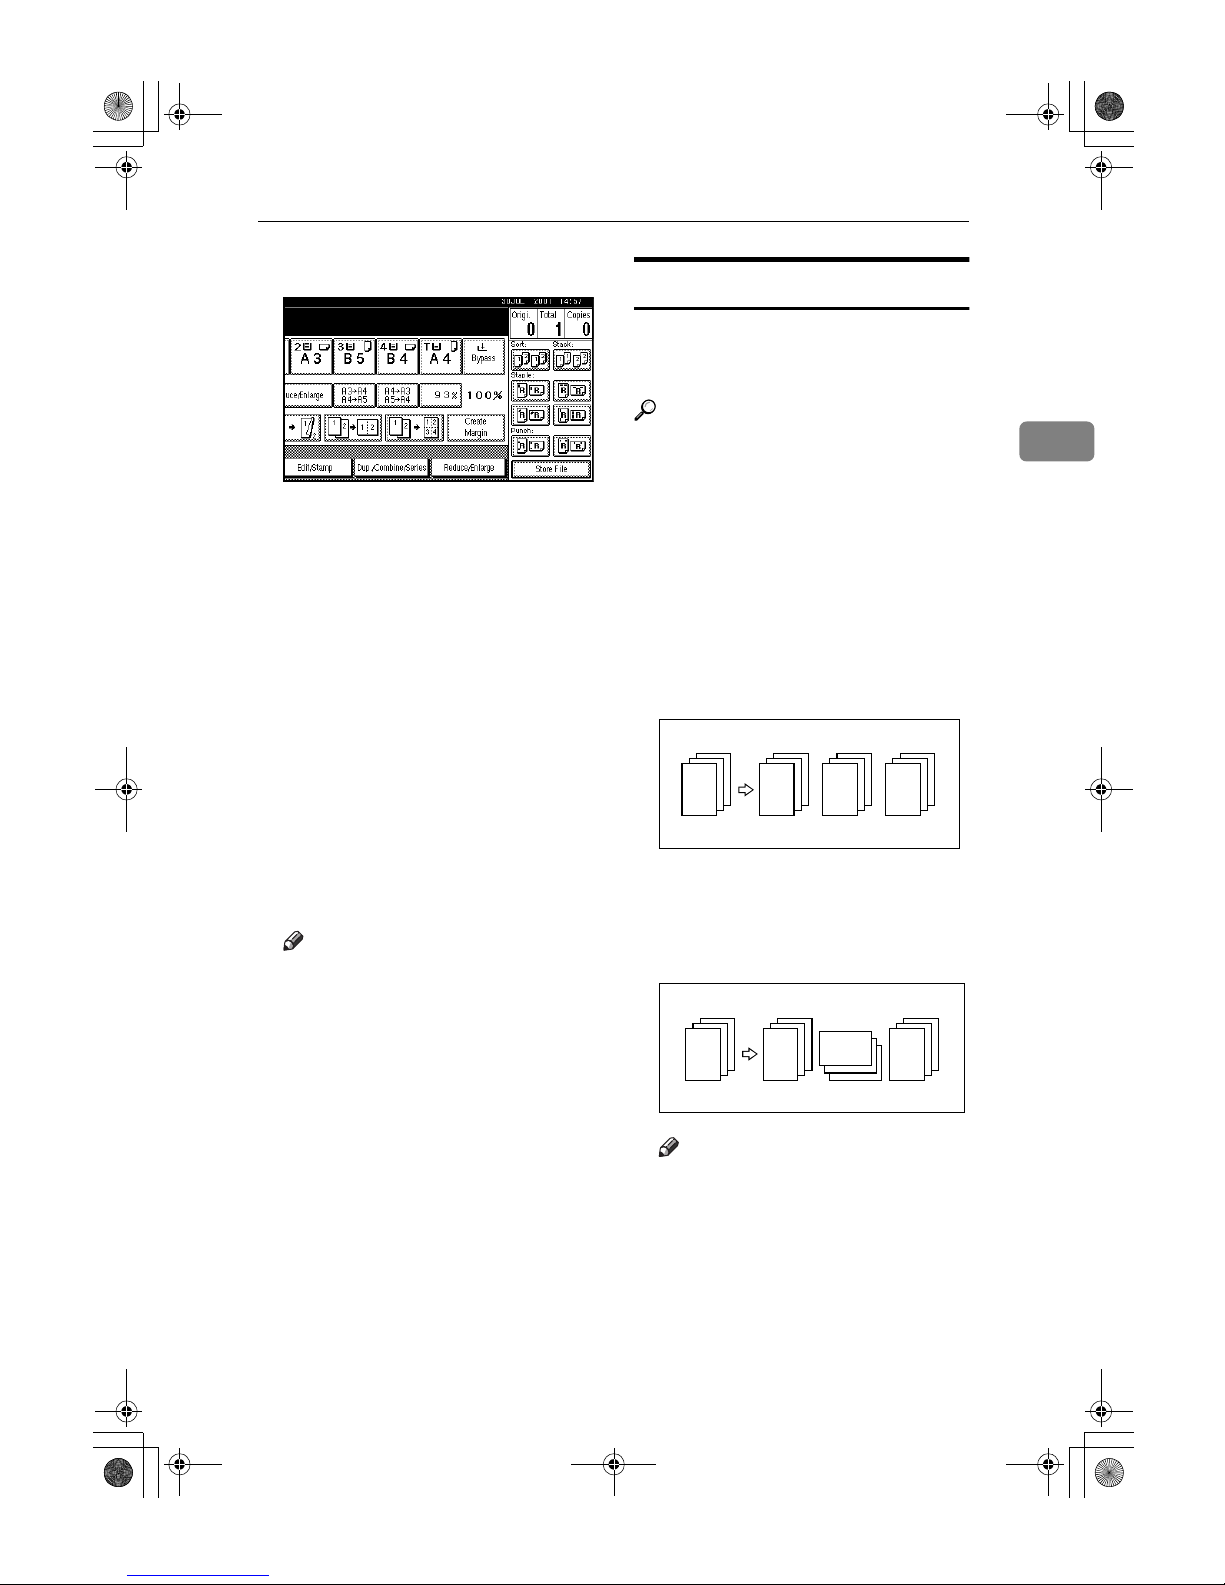
Sort
The machine can scan originals into
memory and automatically sort copies.
Reference
Related initial settings
p.102 “Select Stack Function”
p.102 “Memory Full Auto Scan Restart”
p.101 “Rotate Sort: Auto Paper
Continue”
p.90 “Auto Tray Switching”
❖❖❖❖ Sort
Copies are assembled as sets in sequential order.
❖❖❖❖ Rotate Sort
Every other copy set is rotated by
90°KL and delivered to the copy
tray.
Note
❒ To use the Rotate Sort function,
two paper trays with paper
identical in size and different in
orientation (KL) are required.
2
1
3
2
1
3
2
1
3
2
1
3
2
1
3
2
1
3
2
1
3
2
1
3
AdonisC3_GBcopyF_FM1.book Page 31 Thursday, November 28, 2002 1:53 PM
Page 46
Copying
32
2
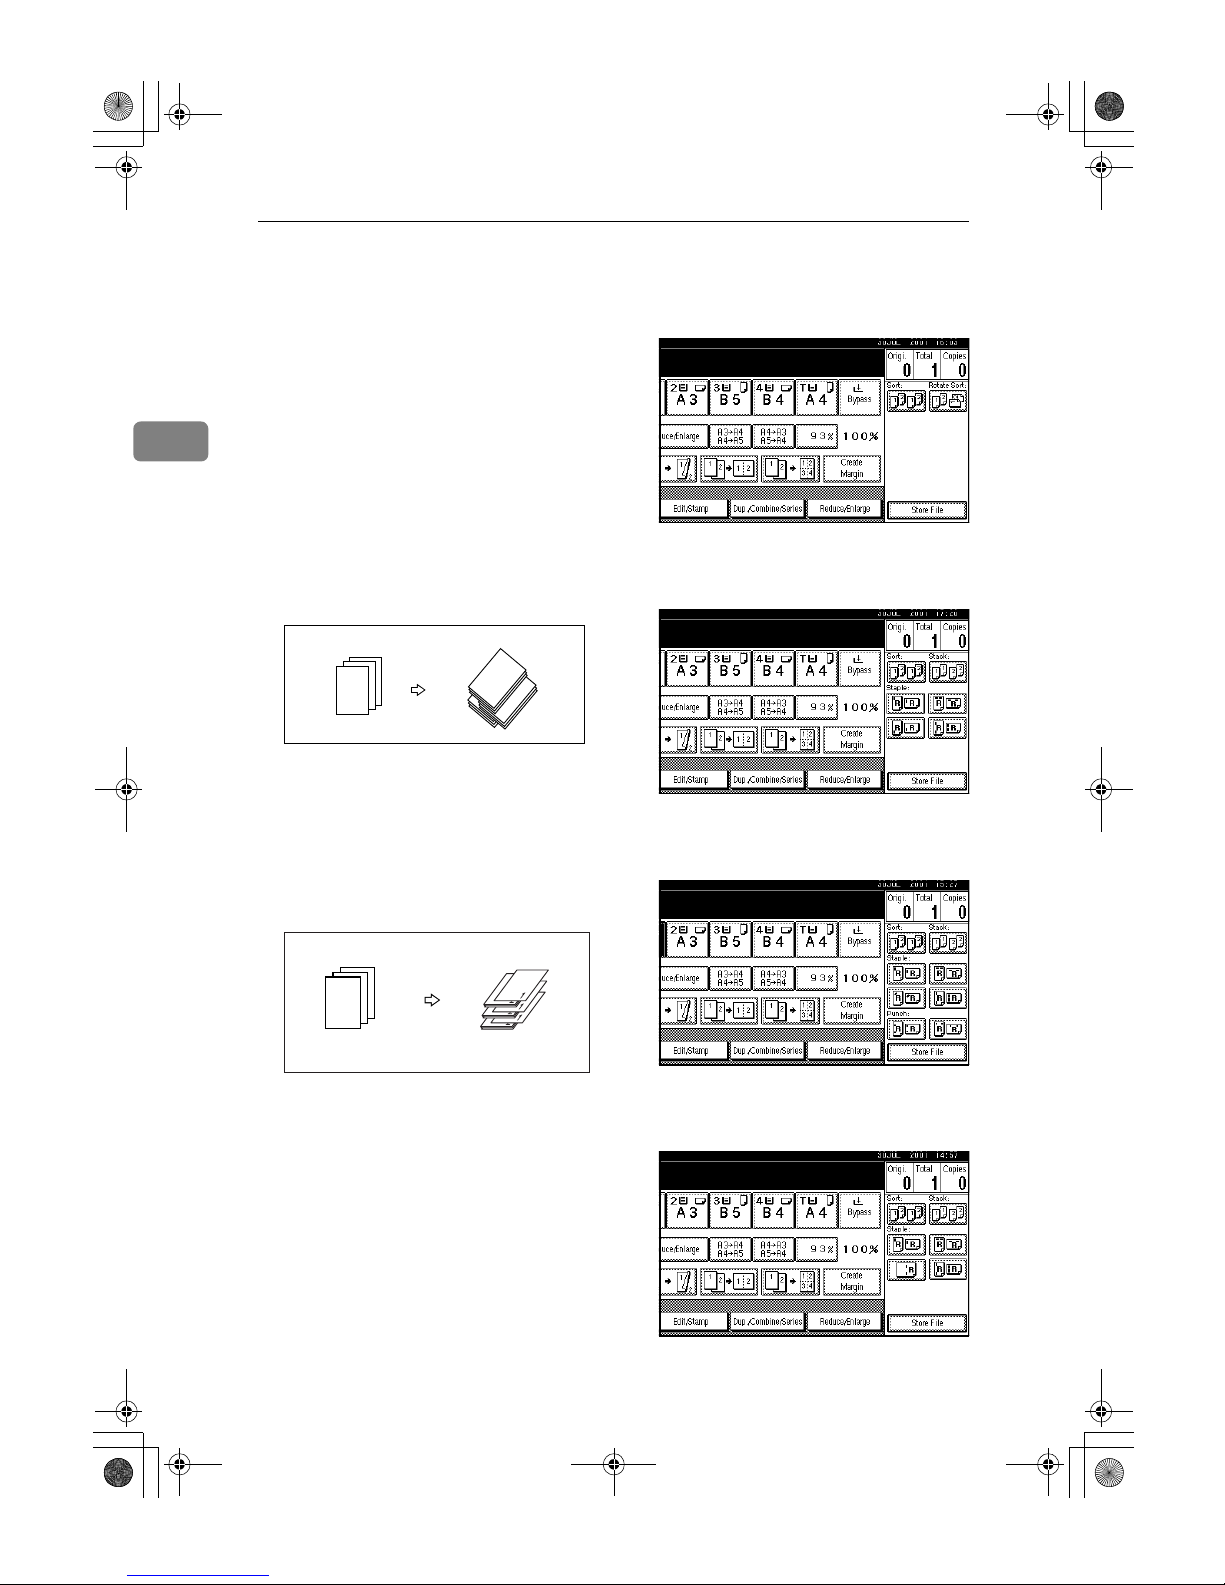
❖❖❖❖ Shift Sort
• 1000-Sheet finisher (optional)
Each time the copies of one set
or those of each job are delivered, the next copy is shifted
when delivered so you can separate each set or job.
• 2 Tray finisher (optional)
The shift tray moves backward
or forward each time the copies
of one set or those of each job
are delivered, causing the next
copy to shift when delivered so
that you can differentiate each
set or job.
• Booklet finisher (optional)
Each time a set of copies or a job
is delivered, the finisher shift
tray moves backward or forward , causing the top sheet of
each set to shift when delivered,
separating each set or job.
AAAA
Press [Sort] or [Rotate Sort].
❖❖❖❖ When a finisher is not installed
❖❖❖❖ When the 1000-Sheet finisher is
installed
❖❖❖❖ When the 2 Tray finisher is
installed
❖❖❖❖ When the booklet finisher is
installed
2
1
3
3
2
1
3
2
1
3
2
1
2
1
3
GCANSO1E
AdonisC3_GBcopyF_FM1.book Page 32 Thursday, November 28, 2002 1:53 PM
Page 47
Copier Functions
33
2
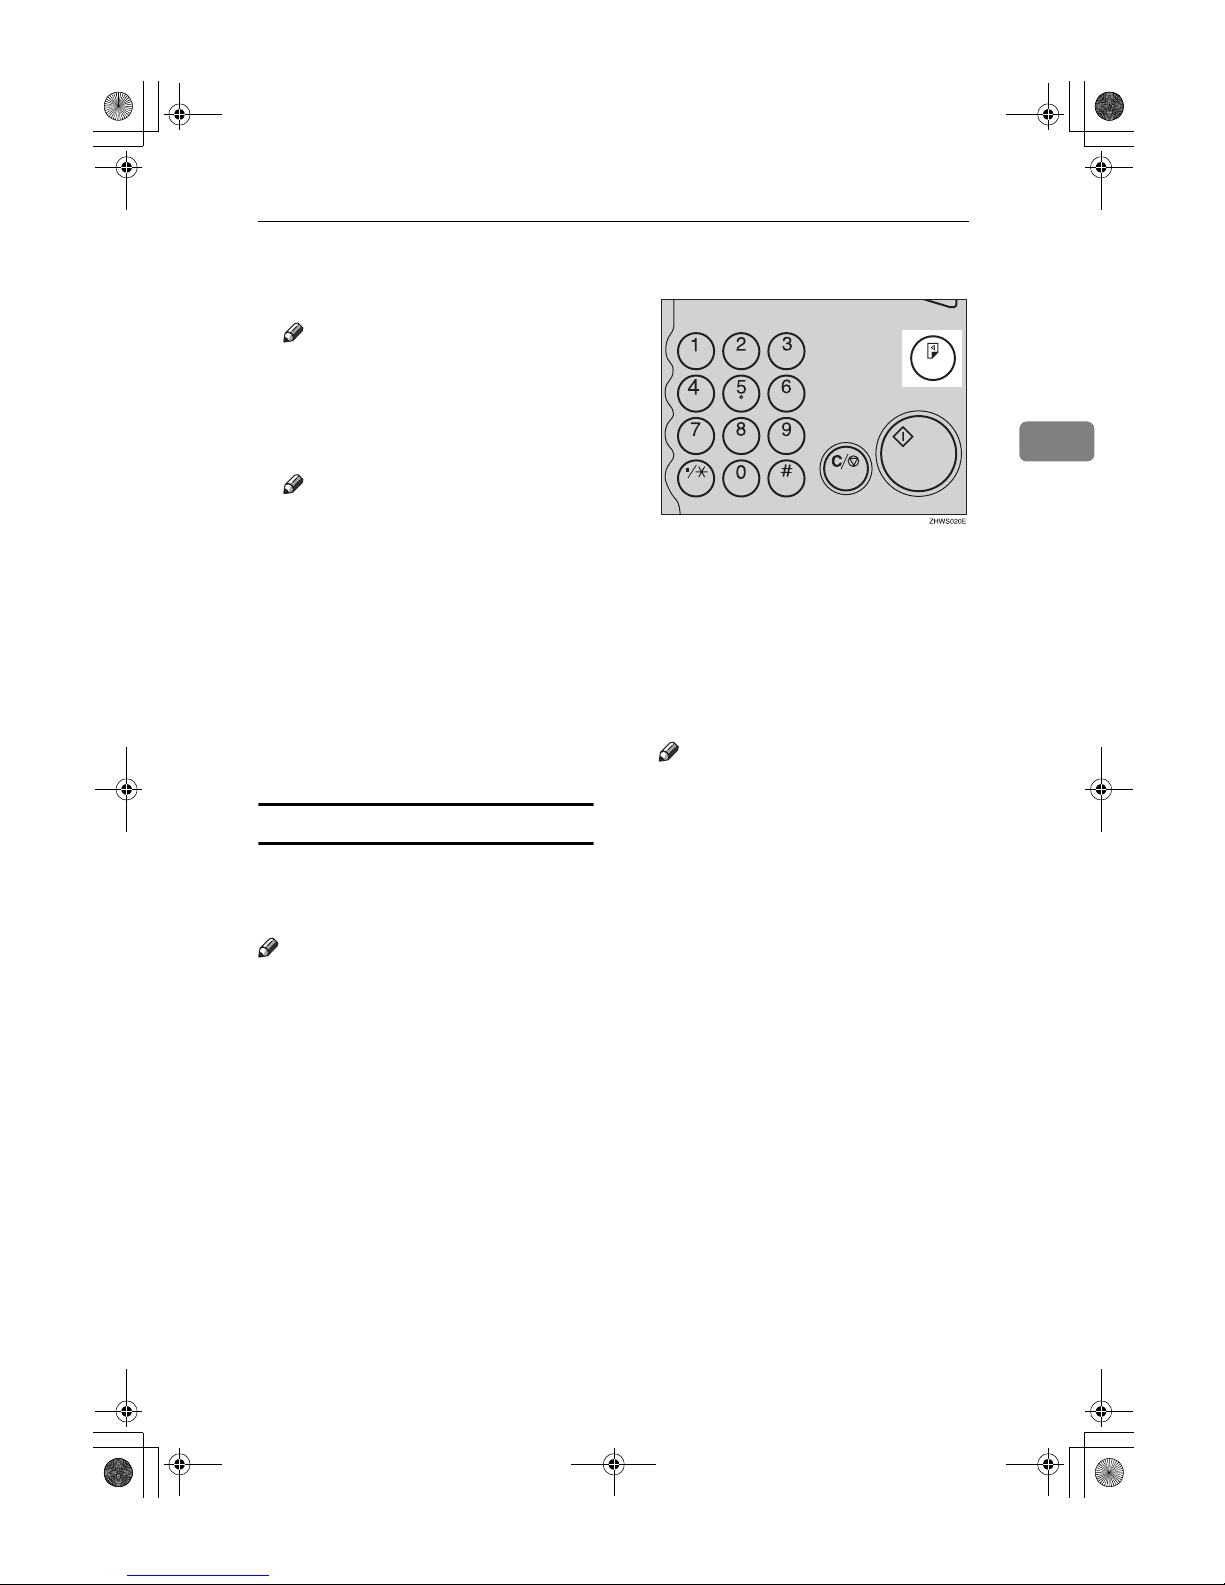
BBBB
Enter the number of copy sets
with the number keys.
Note
❒ To confirm the type of finishing,
press the {{{{Sample Copy}}}} key. See
p.33 “Sample copy”.
CCCC
Place your originals.
Note
❒ When placing an original on the
exposure glass, start with the
first page to be copied. When
placing an original in the ADF,
set so the first page is on the top.
❒ When placing an original on the
exposure glass or in the ADF using Batch mode, press the {{{{#}}}}
key after all the originals have
been scanned.
DDDD
Press the {{{{Start}}}} key.
Sample copy
Use this function to check the copy
settings before making a long copy
run.
Note
❒ This function can be used only
when the Sort function is turned
on.
AAAA
Select Sort and any other necessary functions, and then place the
originals.
BBBB
Press the {{{{Sample Copy}}}} key.
One copy set is delivered as a sample.
CCCC
If the sample is acceptable, press
[Print].
The number of copies made is the
number specified, minus one for
the proof copy.
Note
❒ If you press [Suspend] after
checking the results, return to
step A to adjust the copy settings as necessary. You can
change the settings for Staple,
Duplex (one-sided → one-sided, one-sided → two-sided),
Copy Orientation, Margin Adjust., and Cover/Slip Sheet.
However, depending on the
combination of functions, you
may not be able to change some
settings.
AdonisC3_GBcopyF_FM1.book Page 33 Thursday, November 28, 2002 1:53 PM
Page 48
Copying
34
2
Changing the number of sets
You can change the number of copy
sets during copying.
Note
❒ This function can only be used
when the Sort function is turned
on.
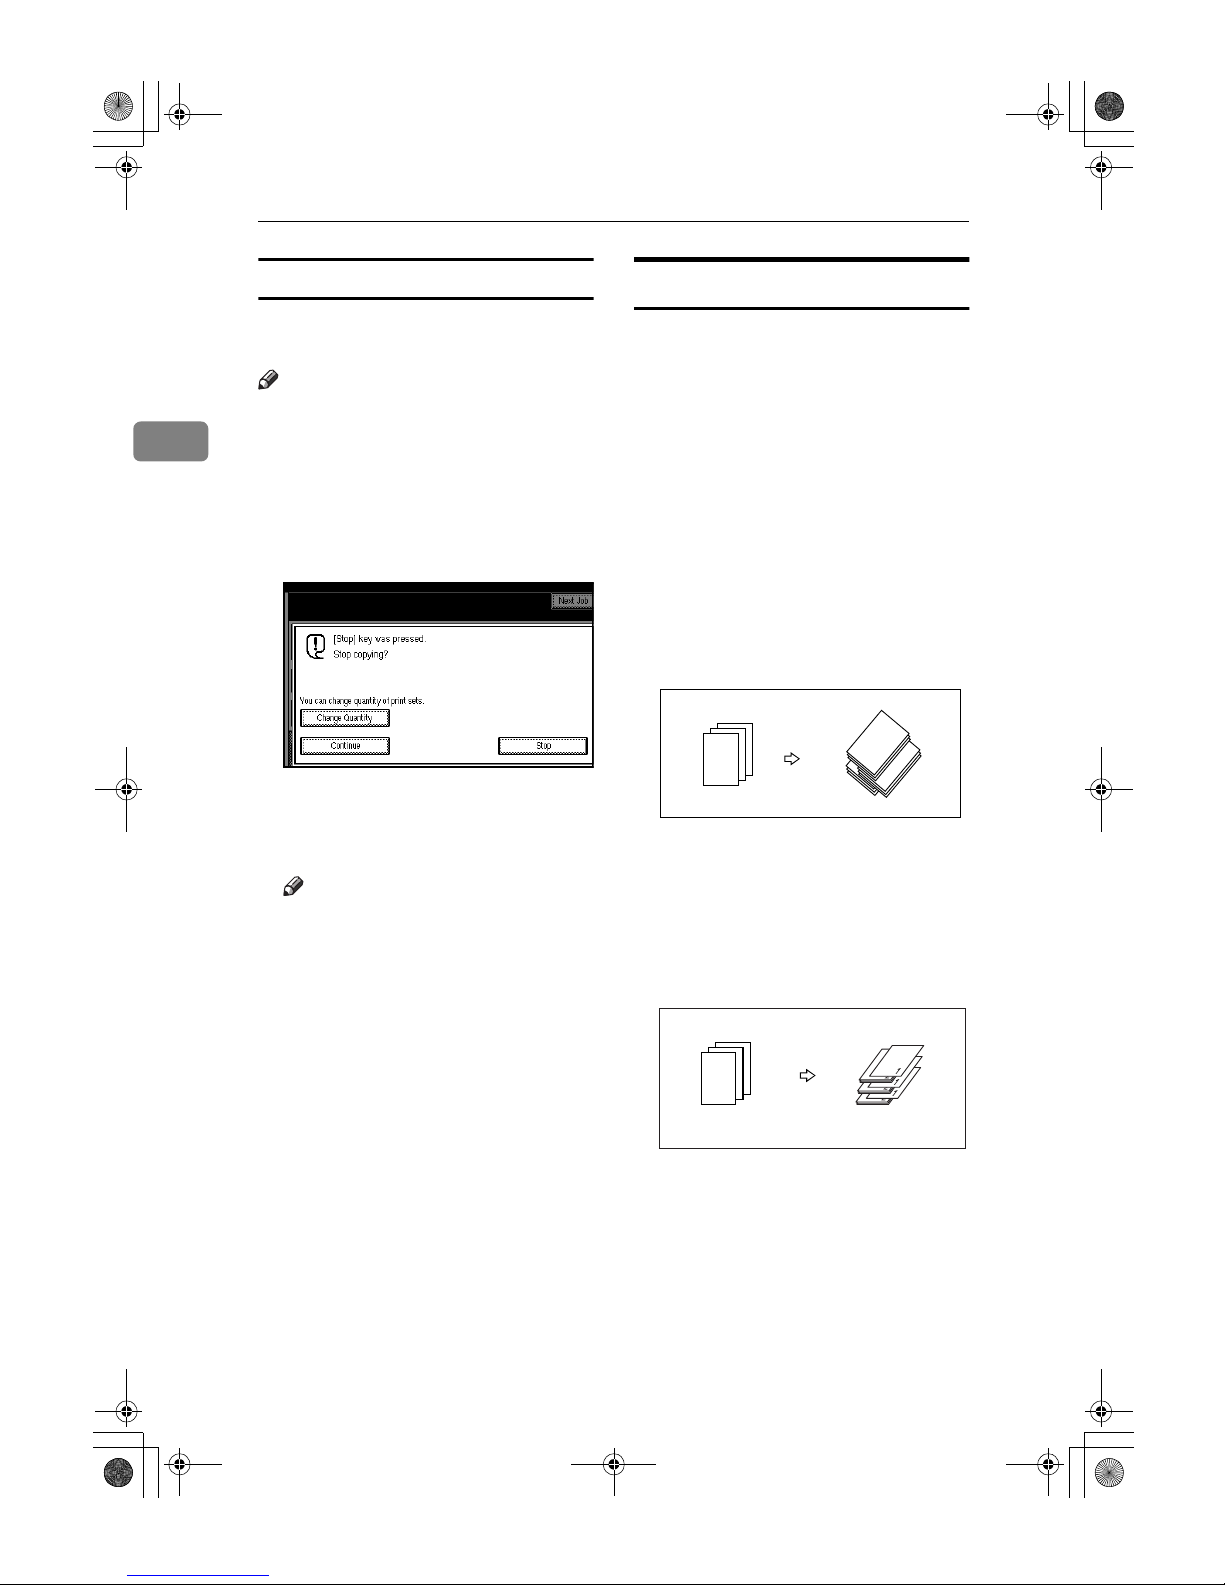
AAAA
While "Copying" is displayed,
press the {{{{Clear/Stop}}}} key.
BBBB
Press [Change Quantity].
CCCC
Enter the number of copy sets
with the number keys, and then
press the {{{{#}}}} key.
Note
❒ The number of sets you can en-
ter differs depending on when
the {{{{Clear/Stop}}}} key is pressed.
DDDD
Press [Continue].
Copying starts again.
Stack
Copies can be assembled with each
page placed.
• 1000-Sheet finisher (optional)
Each time the copies of one set or
those of each job are delivered, the
next copy is shifted when delivered so you can separate each set
or job.
• 2 Tray finisher (optional)
The shift tray moves backward or
forward each time the copies of
one set or those of each job are delivered, causing the next copy to
shift when delivered so that you
can differentiate each set or job.
• Booklet finisher (optional)
Each time a set of copies or a job is
delivered, the finisher shift tray
moves backward or forward ,
causing the top sheet of each set to
shift when delivered, separating
each set or job.
2
1
3
3
3
3
2
2
2
1
1
1
2
1
3
GCANSO1E
AdonisC3_GBcopyF_FM1.book Page 34 Thursday, November 28, 2002 1:53 PM
Page 49
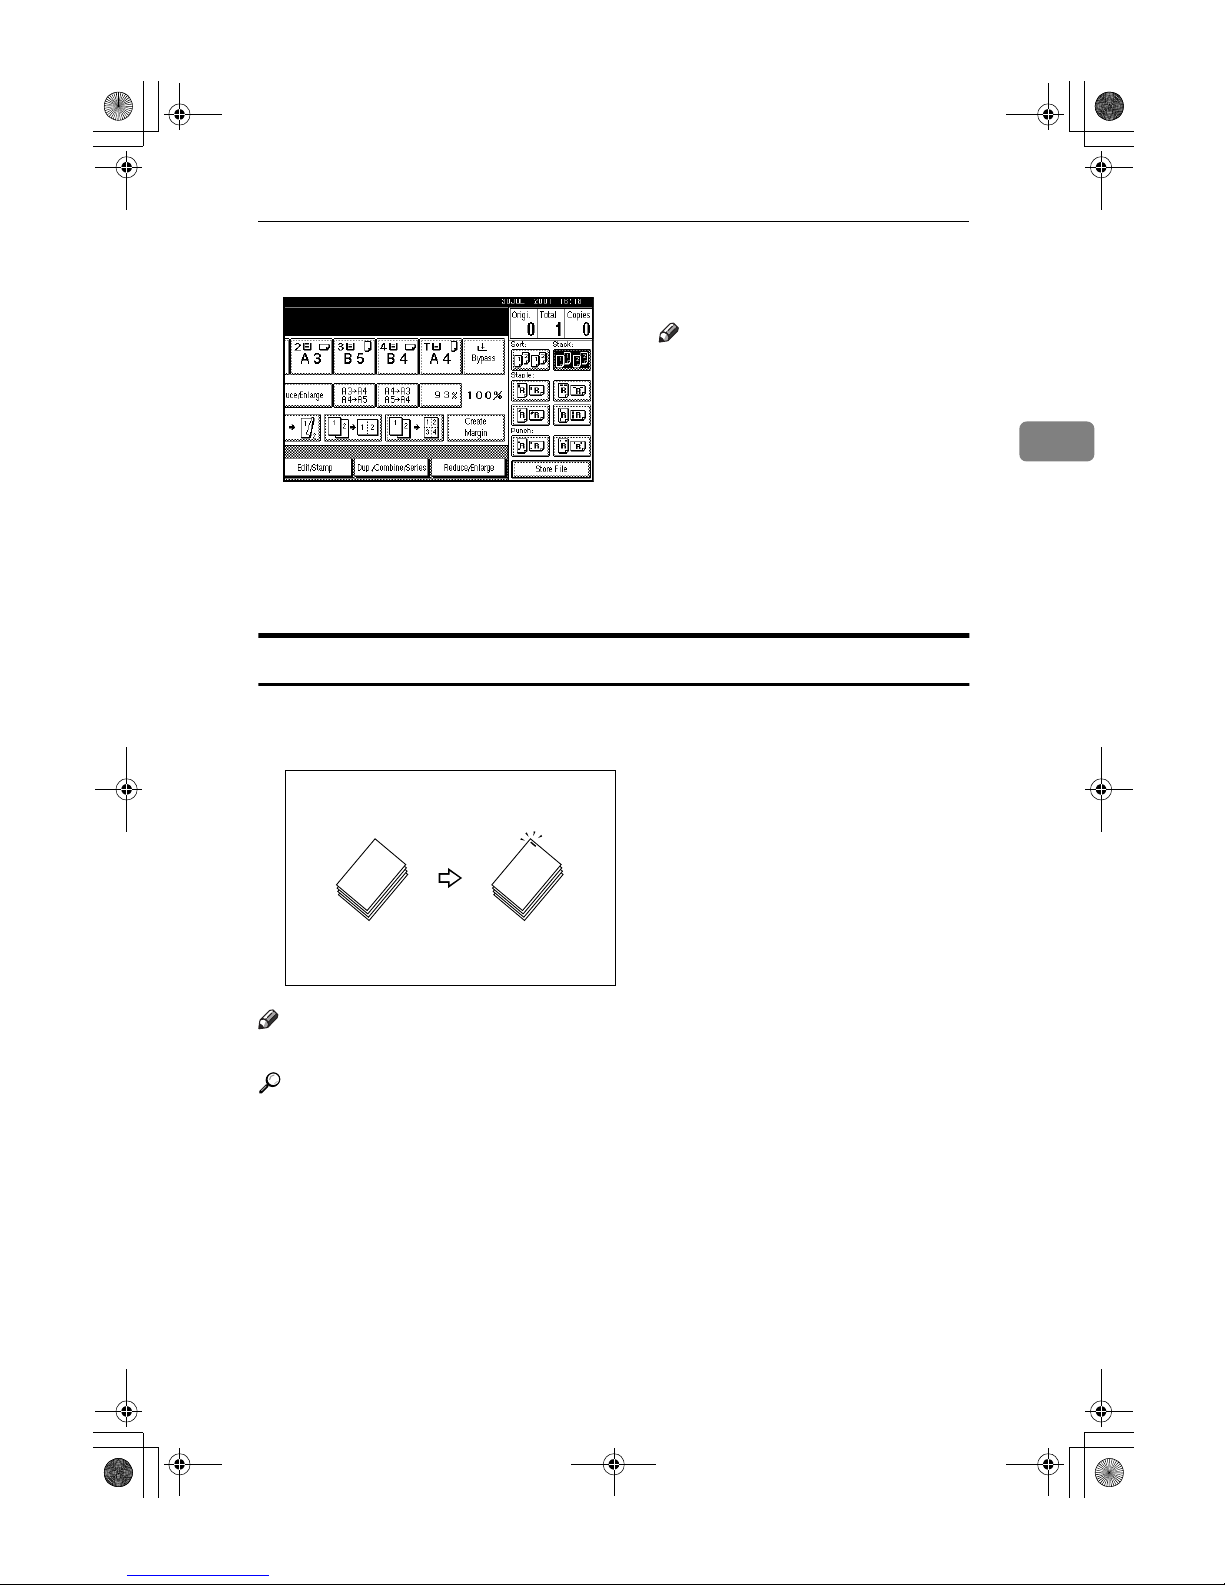
Copier Functions
35
2
AAAA
Press [Stack].
BBBB
Enter the number of copies with
the number keys.
CCCC
Place your originals, and then
press the {{{{Start}}}} key.
Note
❒ When placing an original on the
exposure glass, start with the
first page to be copied. When
placing an original in the ADF,
set so the last page is on the bottom.
❒ When placing an original on the
exposure glass or in the ADF using Batch mode, press the {{{{#}}}}
key after all the originals have
been scanned.
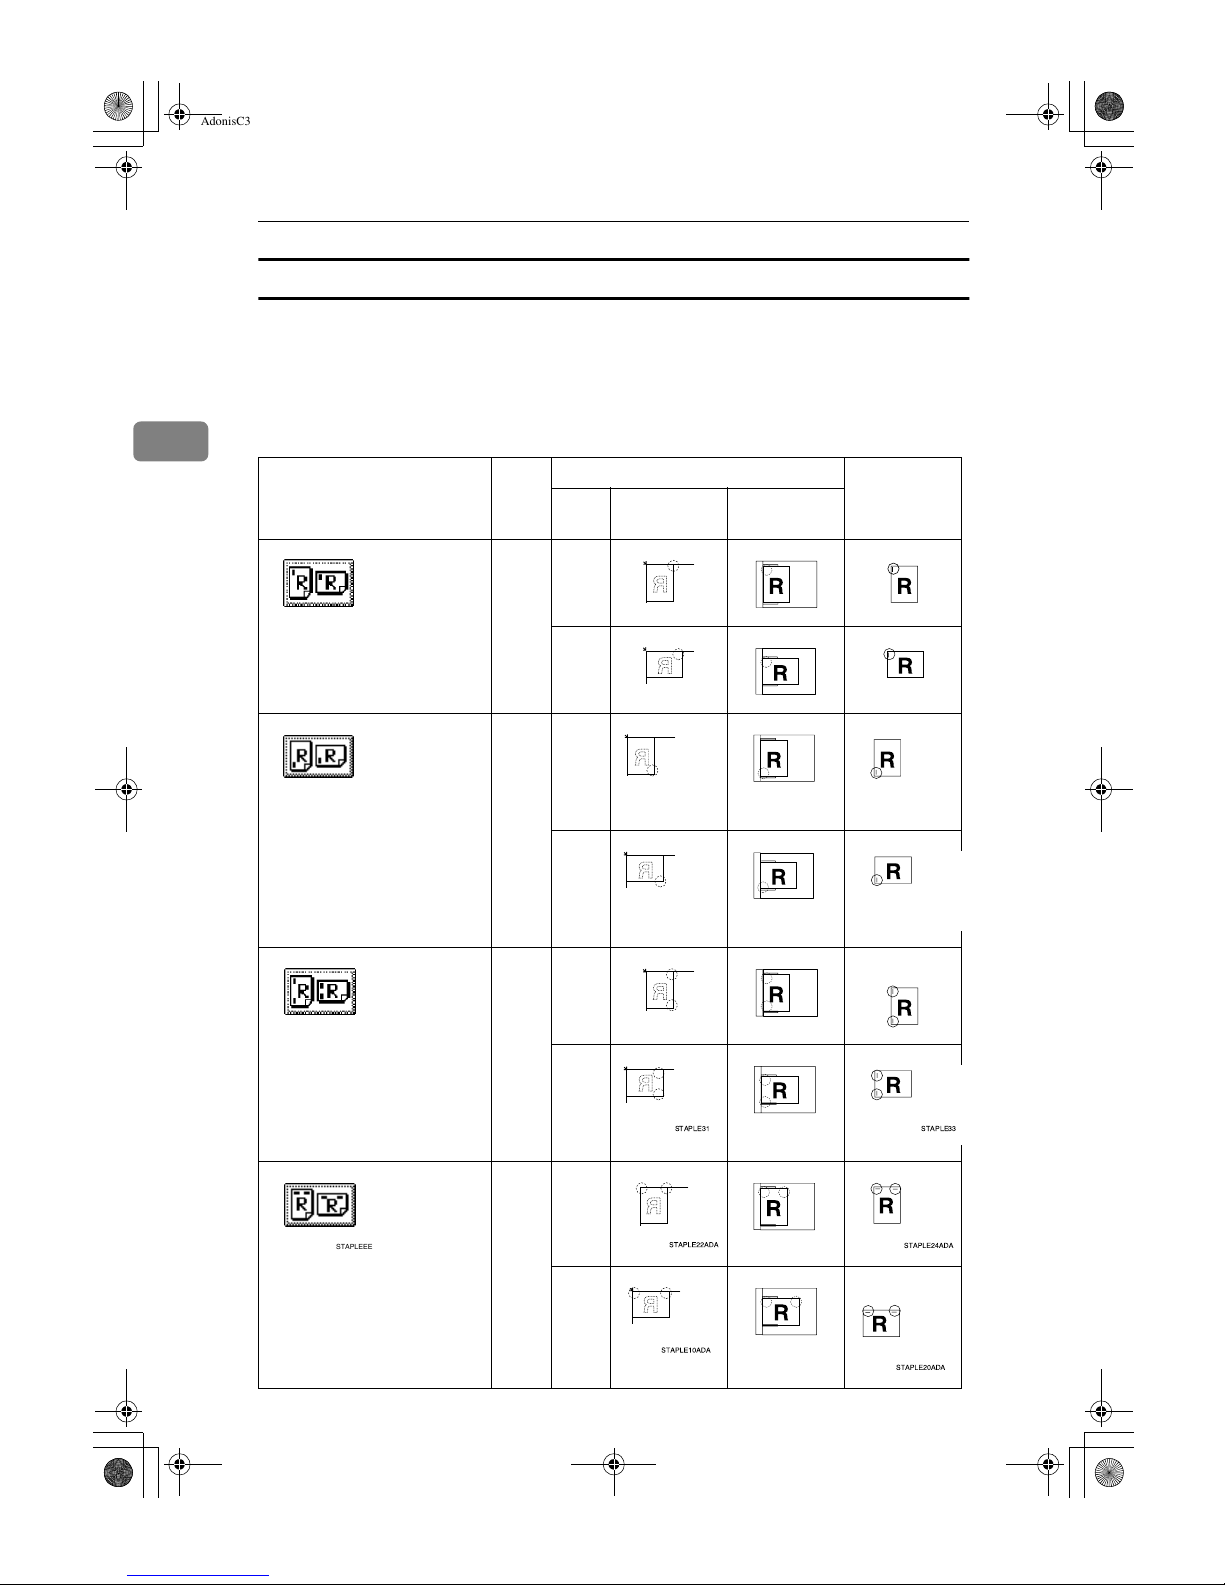
Staple
An optional finisher and the bridge unit are required to use this function.
Each copy set can be stapled together.
Note
❒ You cannot use the bypass tray with this function.
Reference
Related initial settings
p.102 “Select Stapling Position”
AdonisC3_GBcopyF_FM1.book Page 35 Thursday, November 28, 2002 1:53 PM
Page 50
Copying
36
2
Stapling position and original setting
Place all the originals in the ADF in the orientation in which they can be read normally. When placing the original on the exposure glass, keep the same orientation,
but set the original facing downwards. When there is copy paper that is identical
in size and orientation to your original, the staple positions are as follows:
❖❖❖❖ 1000-Sheet finisher
Original location Stapling
position
*1
Exposure
glass
Auto Document Feeder
Top
K
L
Bottom
K
L
Left 2
K
*2
L
Top 2
K
L
*2
STAPLEAE
STAPLECE
STAPLE25
STAPLE27
STAPLE28 STAPLE30
STAPLEDE
STAPLE31
STAPLE33
STAPLEEE
AdonisC3_GBcopyF_FM1.book Page 36 Thursday, November 28, 2002 1:53 PM
Page 51
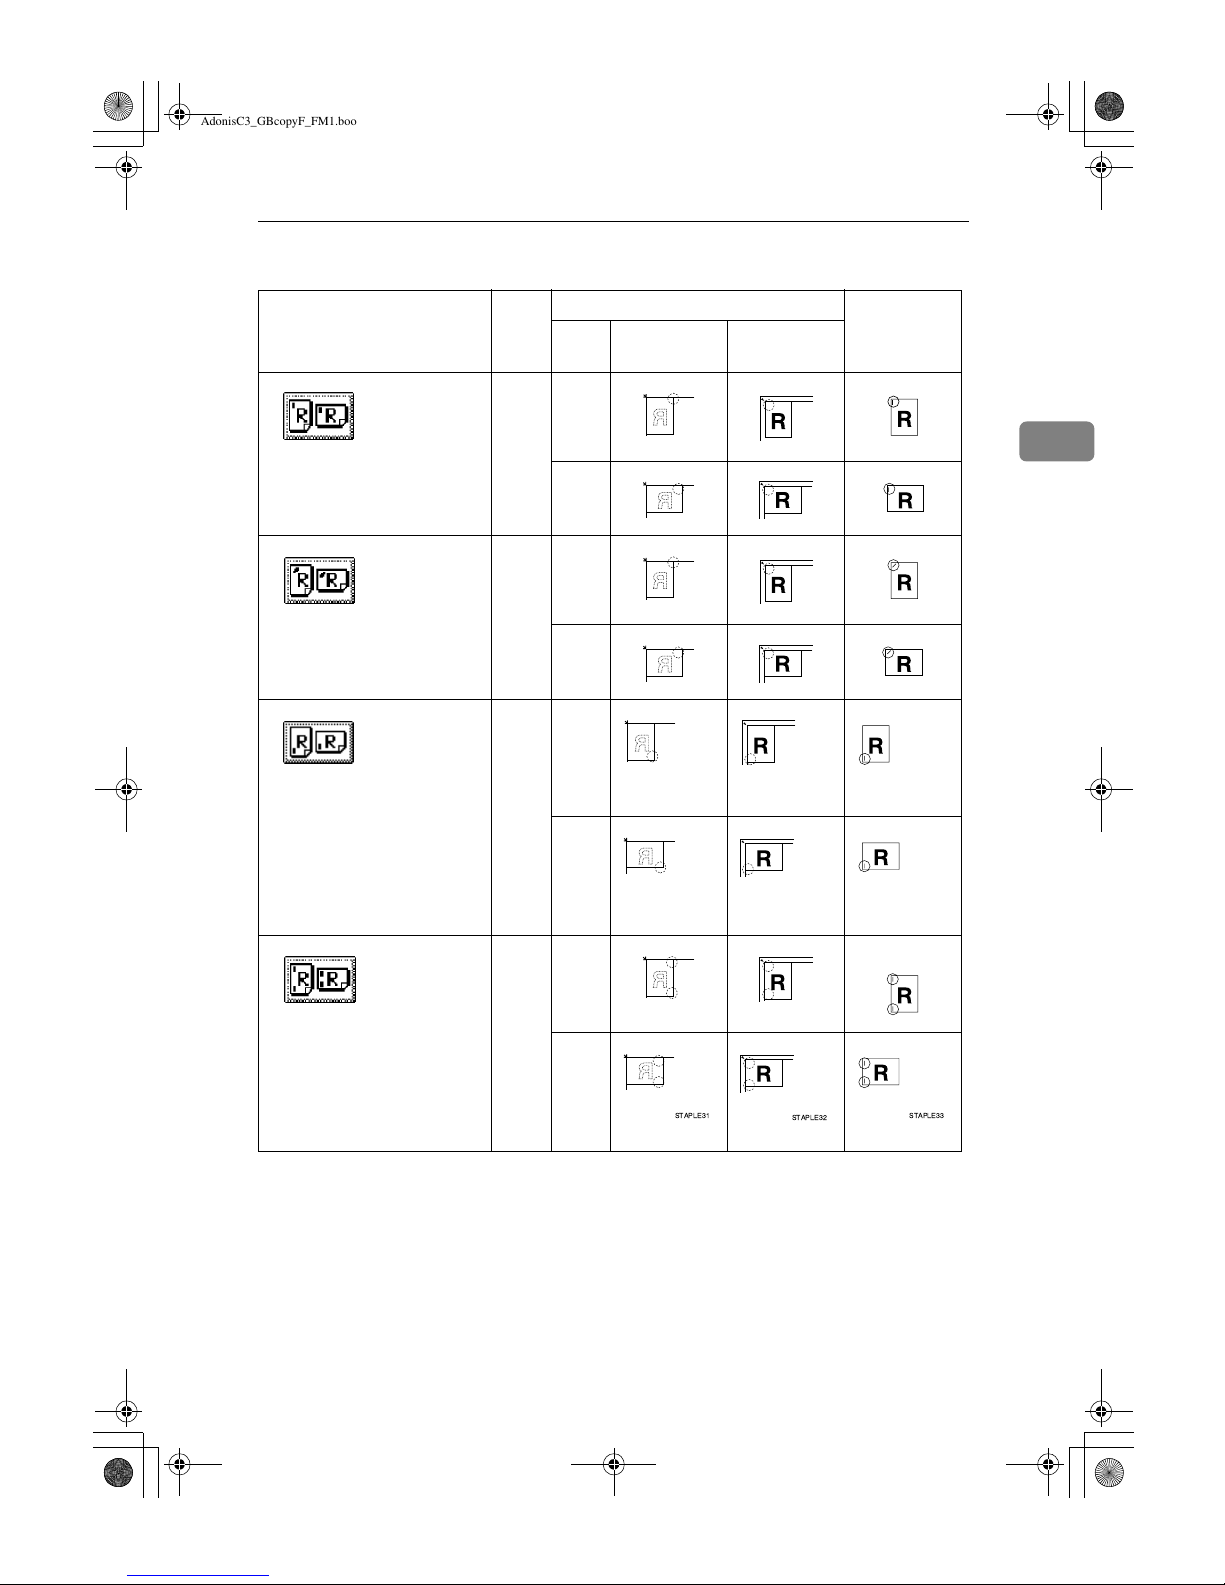
Copier Functions
37
2
❖❖❖❖ 2 Tray finisher
Original location Stapling
position
*1
Exposure
glass
Auto Document Feeder
Top
K
L
Top Slant
K
L
Bottom
K
L
Left 2
K
*2
L
STAPLEAE
STAPLEBE
STAPLECE
STAPLE25
STAPLE26
STAPLE27
STAPLE28
STAPLE29
STAPLE30
STAPLEDE
STAPLE31
STAPLE32
STAPLE33
AdonisC3_GBcopyF_FM1.book Page 37 Thursday, November 28, 2002 1:53 PM
Page 52
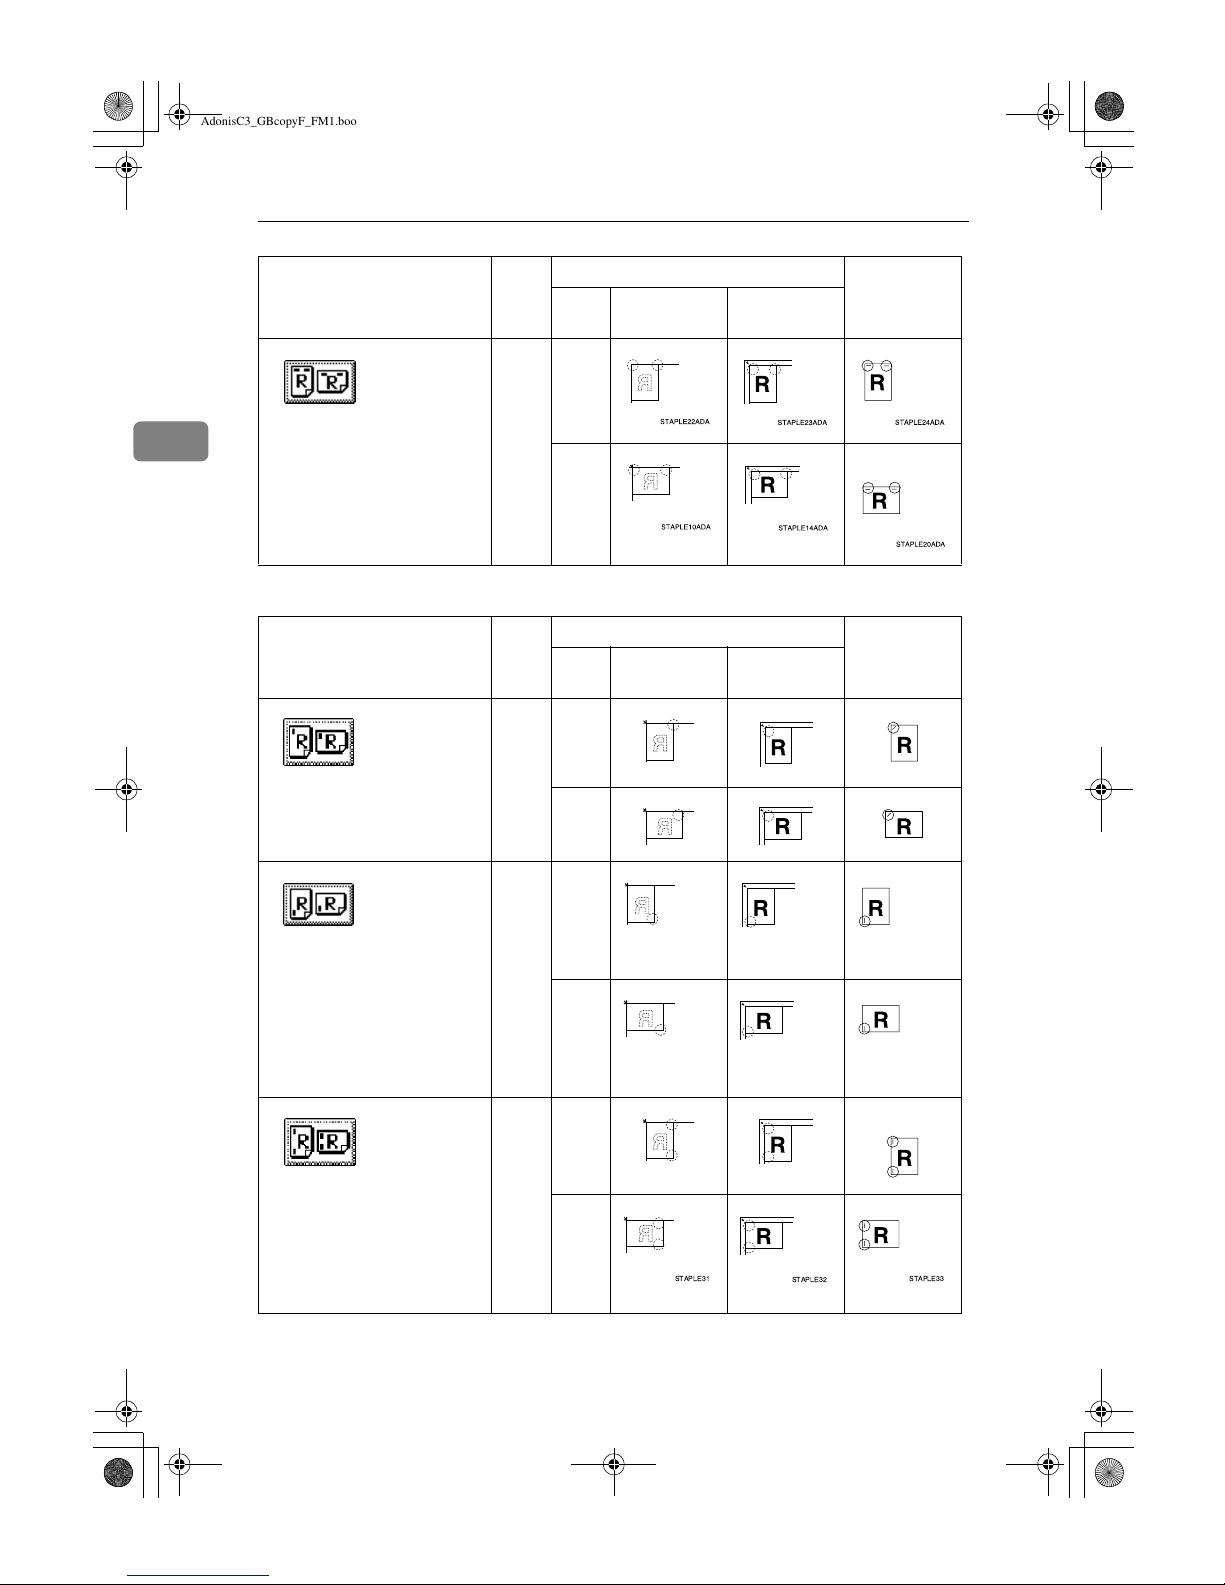
Copying
38
2
❖❖❖❖ Booklet finisher
Top 2
K
L
*2
Original location Stapling
position
*1
Exposure
glass
Auto Document Feeder
Top
K
L
Bottom
K
L
Left 2
K
*2
L
Original location Stapling
position
*1
Exposure
glass
Auto Document Feeder
STAPLEEE
STAPLEAE
STAPLECE
STAPLE25
STAPLE26
STAPLE27
STAPLE28
STAPLE29
STAPLE30
STAPLEDE
STAPLE31
STAPLE32
STAPLE33
AdonisC3_GBcopyF_FM1.book Page 38 Thursday, November 28, 2002 1:53 PM
Page 53
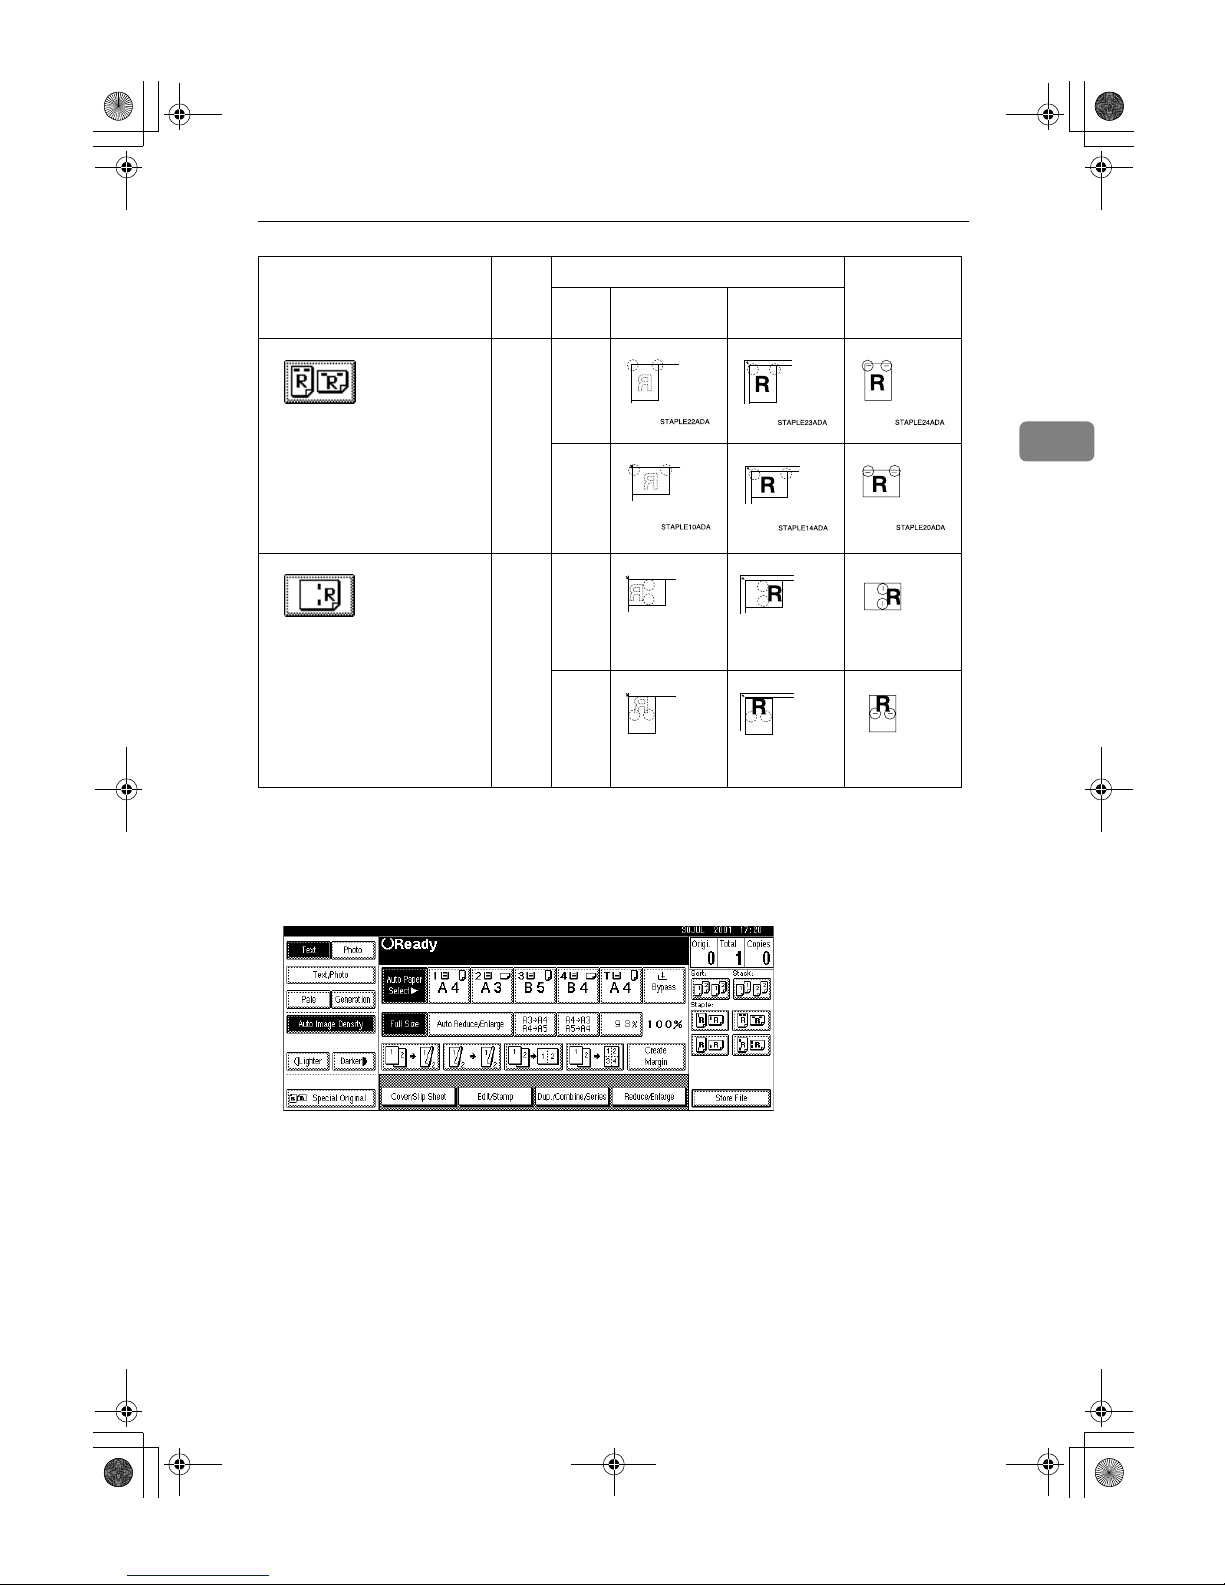
Copier Functions
39
2
*1
This table shows the stapling positions, not the orientation of delivery.
*2
Not available for A3 and B4 JIS size paper.
AAAA
Select one of the stapling positions.
❖❖❖❖ 1000-Sheet finisher
Top 2
K
L
*2
Saddle Stitch
L
K
Original location Stapling
position
*1
Exposure
glass
Auto Document Feeder
STAPLEEE
STAPLEFE
STAPLE34
STAPLE35
STAPLE36
STAPLE37
STAPLE38
STAPLE39
AdonisC3_GBcopyF_FM1.book Page 39 Thursday, November 28, 2002 1:53 PM
Page 54
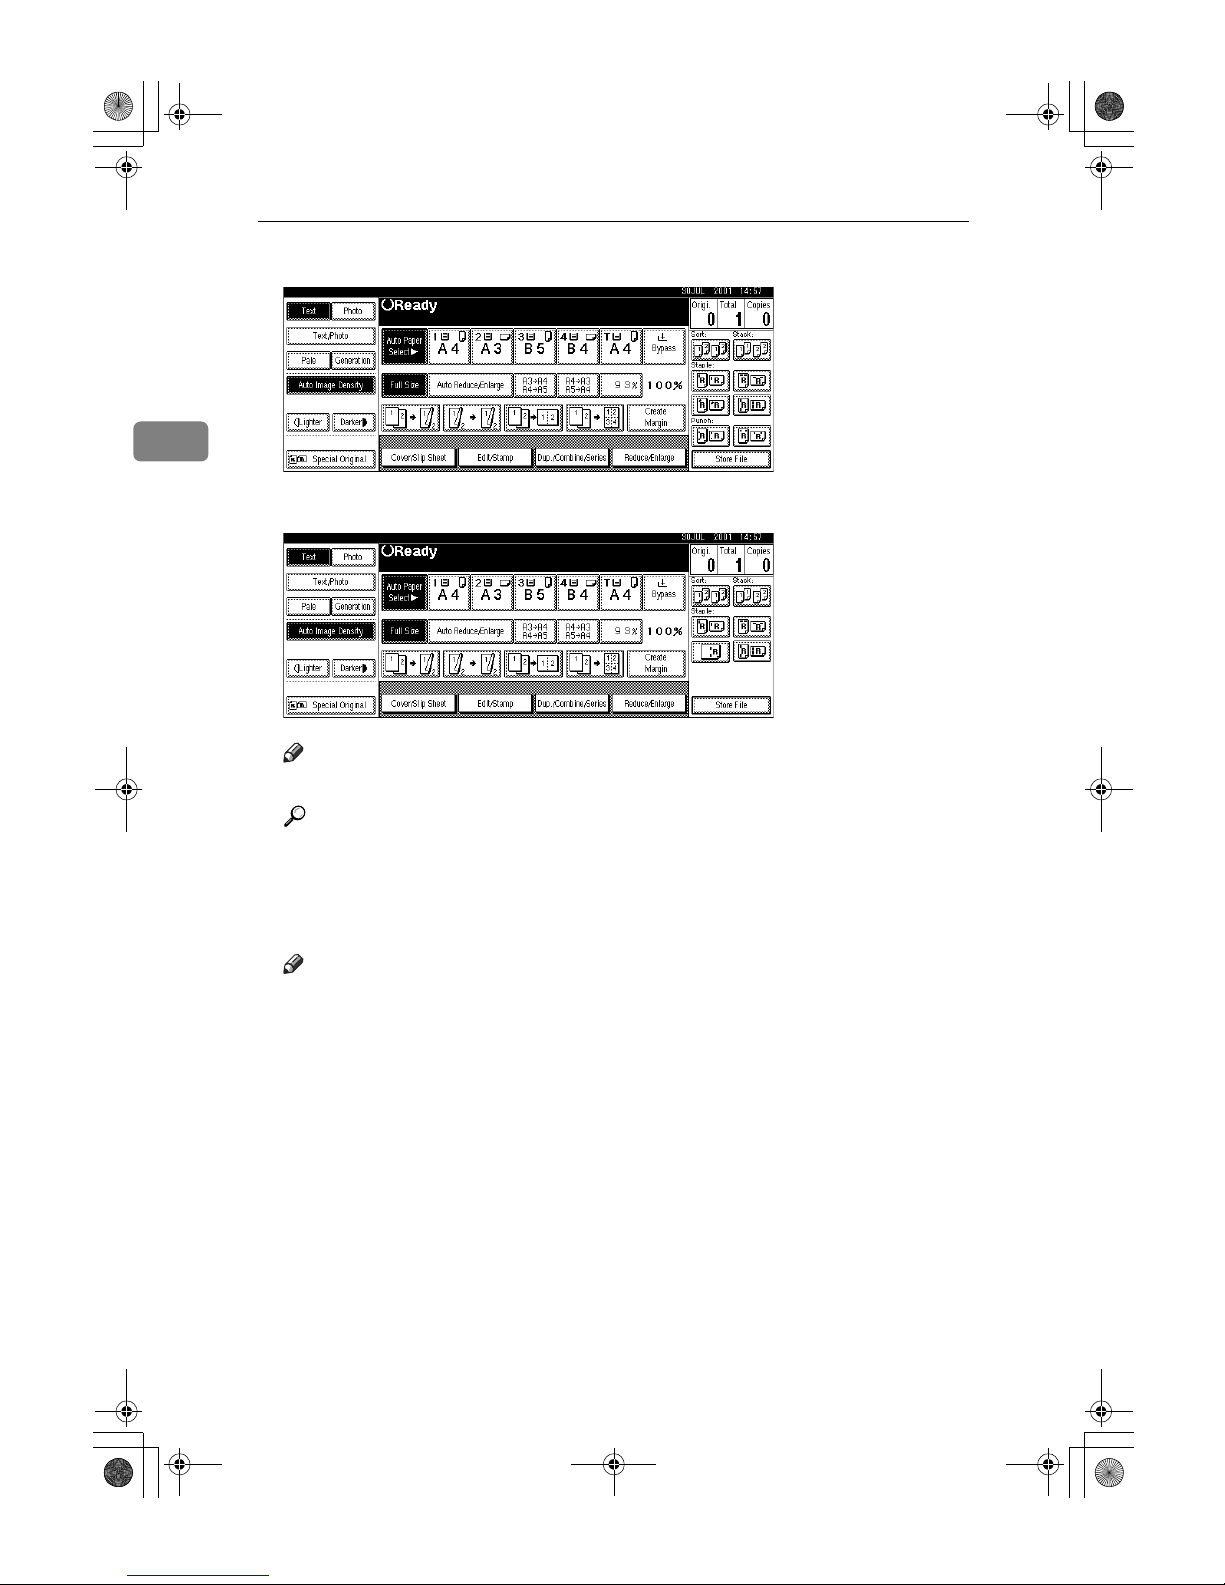
Copying
40
2
❖❖❖❖ 2 Tray finisher
❖❖❖❖ Booklet finisher
Note
❒ When you select the stapling position, Sort mode is automatically selected.
Reference
p.36 “Stapling position and original setting”
BBBB
Enter the number of copy sets with the number keys.
CCCC
Place your originals, and then press the {{{{Start}}}} key.
Note
❒ When placing an original on the exposure glass, start with the first page to
be copied. When placing an original in the ADF, set so the last page is on
the bottom.
❒ When placing an original on the exposure glass or in the ADF using Batch
mode, press the {{{{#}}}} key after all the originals have been scanned.
AdonisC3_GBcopyF_FM1.book Page 40 Thursday, November 28, 2002 1:53 PM
Page 55
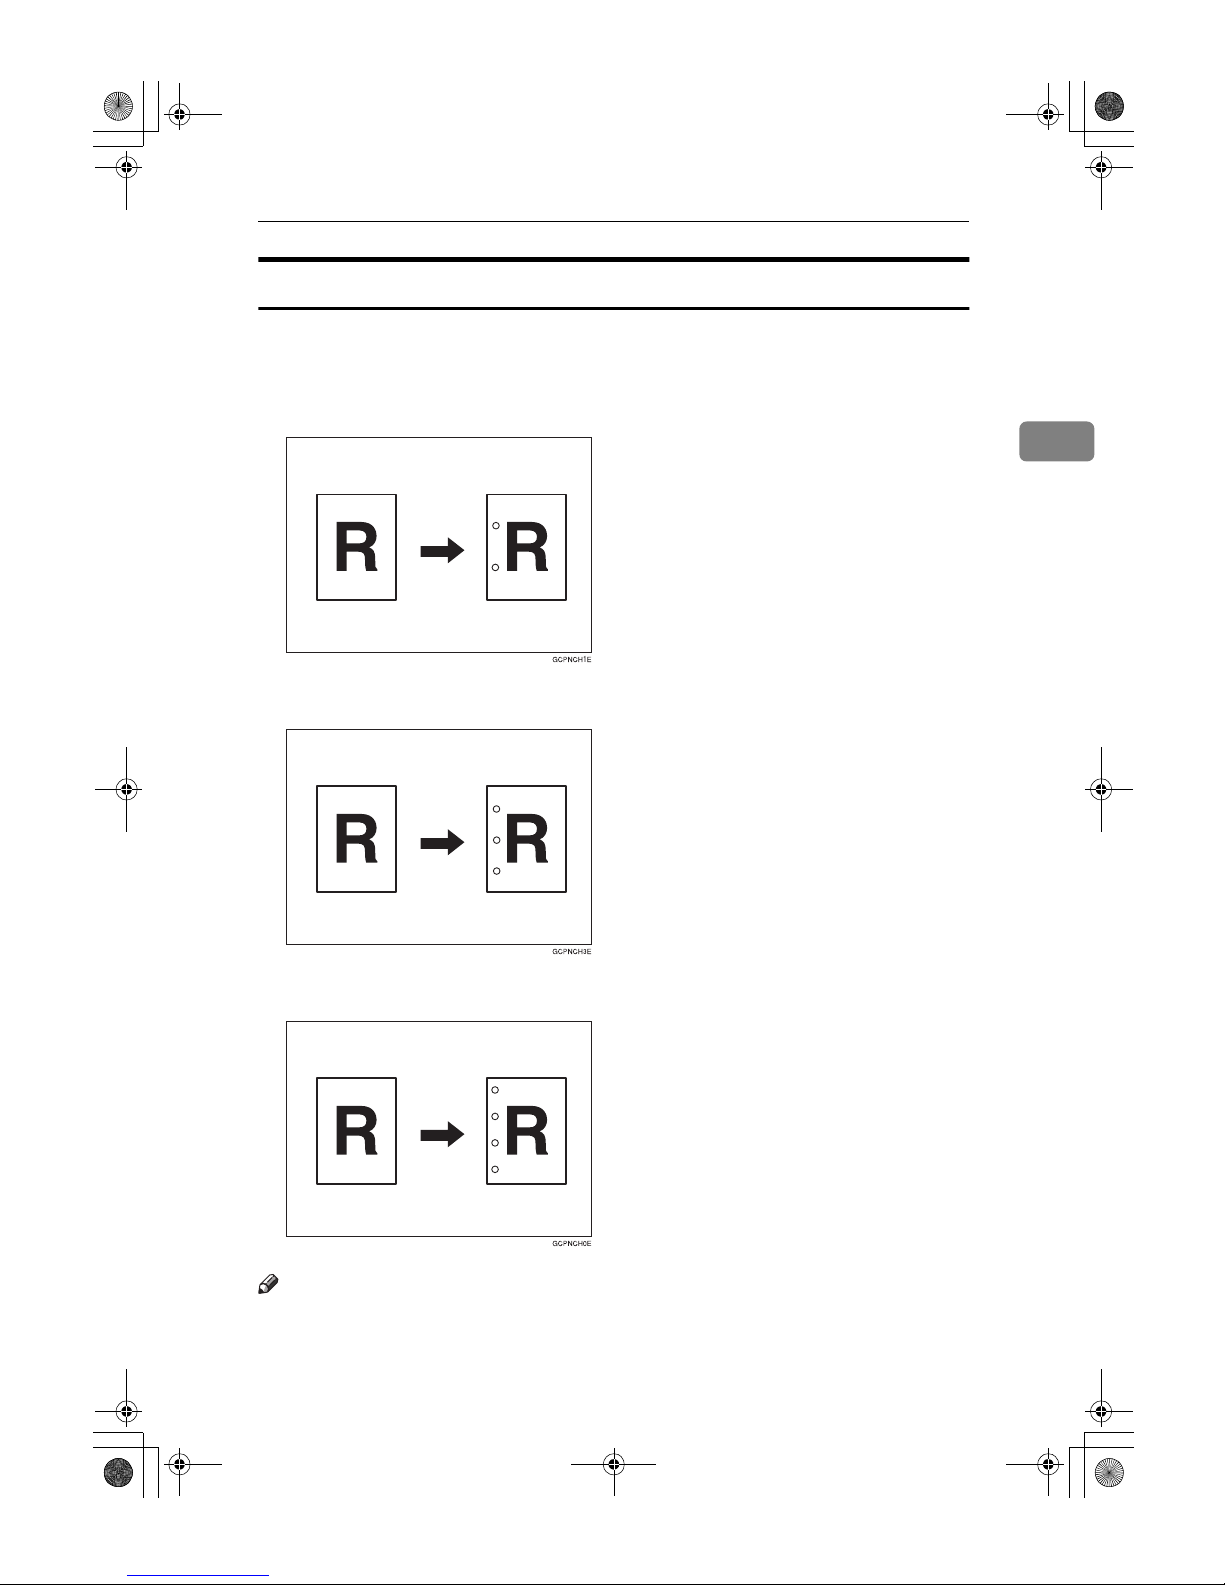
Copier Functions
41
2
Punch
The optional 2 Tray finisher and the bridge unit are required to use this function.
You can make punch holes in copies.
❖❖❖❖ 2 holes
❖❖❖❖ 3 holes
❖❖❖❖ 4 holes
Note
❒ You cannot use the bypass tray with this function.
AdonisC3_GBcopyF_FM1.book Page 41 Thursday, November 28, 2002 1:53 PM
Page 56
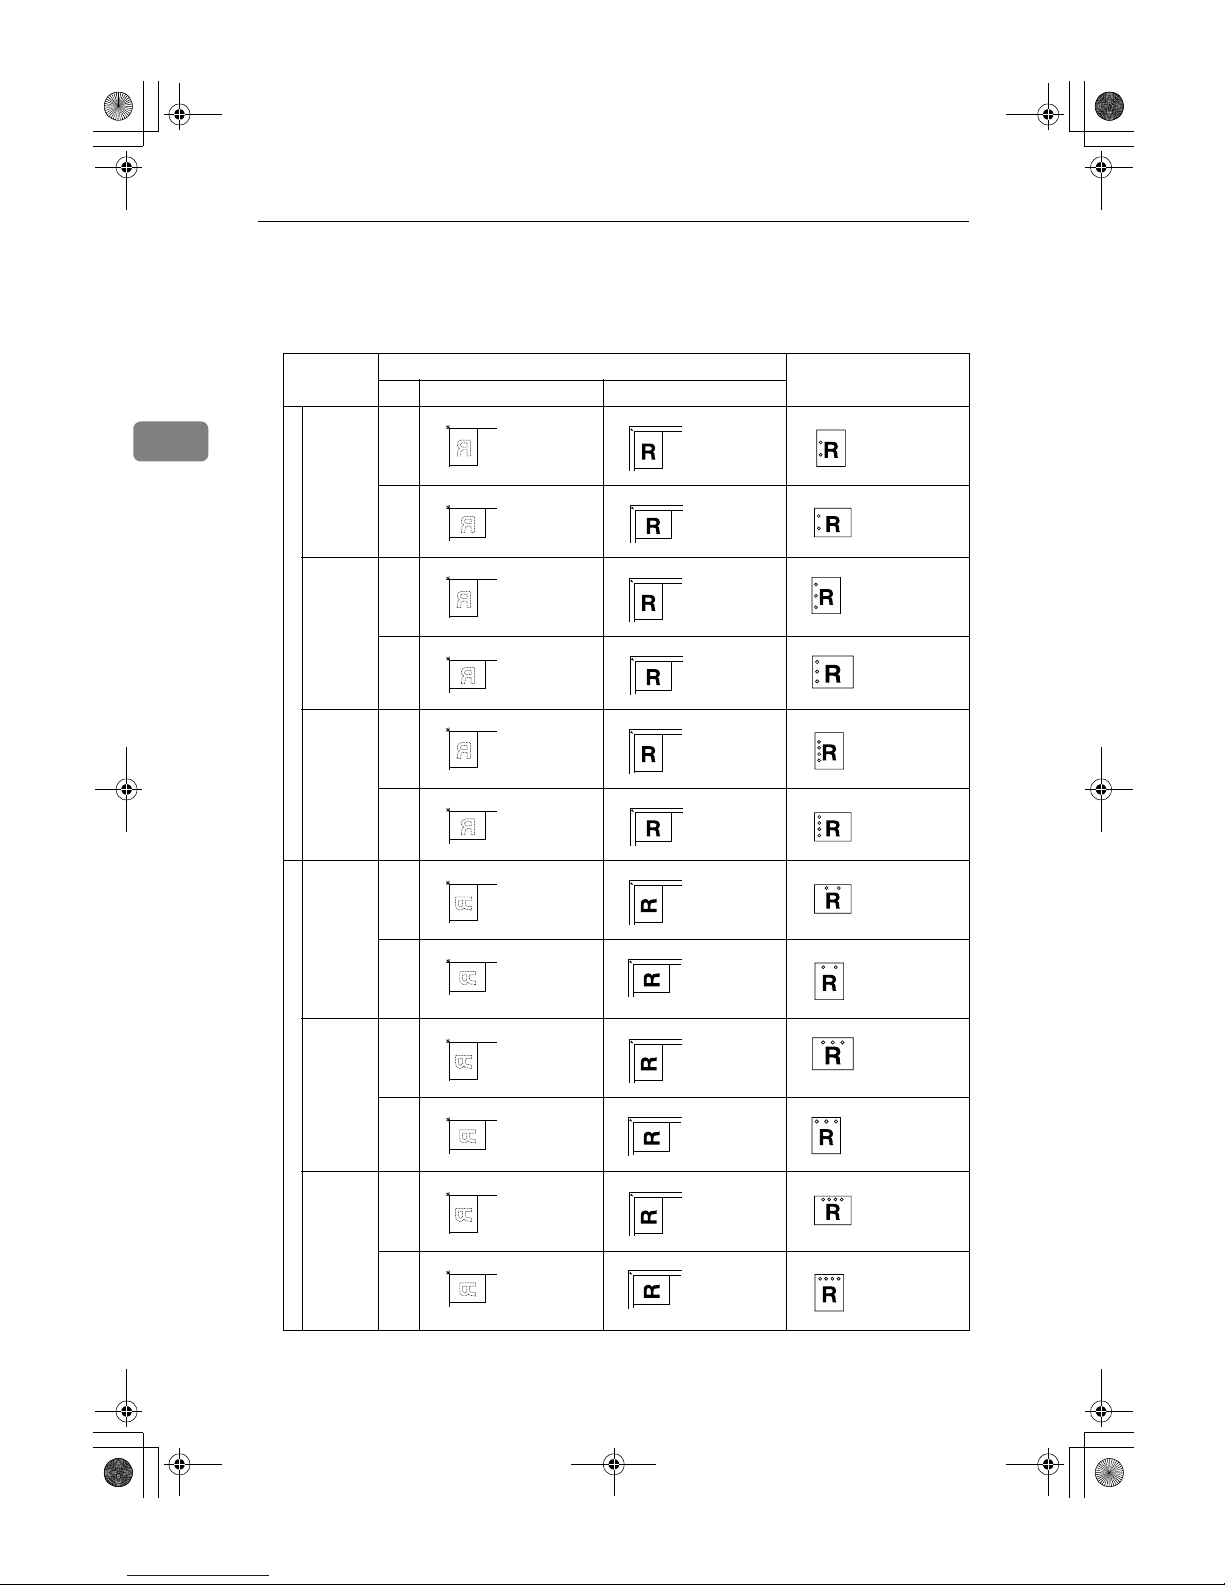
Copying
42
2
❒ The relationship between the orientation in which you place the original and
the punch hole positions is as follows:
❖❖❖❖ Punch hole positions
*1
This table shows the punch hole positions, not the orientation of delivery.
Original location Punch hole positions
*1
Exposure glass Auto Document Feeder
Standard
2 holes
K
L
3 holes
K
L
4 holes
K
L
90º Turn
2 holes
K
L
3 holes
K
L
4 holes
K
L
AdonisC3_GBcopyF_FM1.book Page 42 Thursday, November 28, 2002 1:53 PM
Page 57
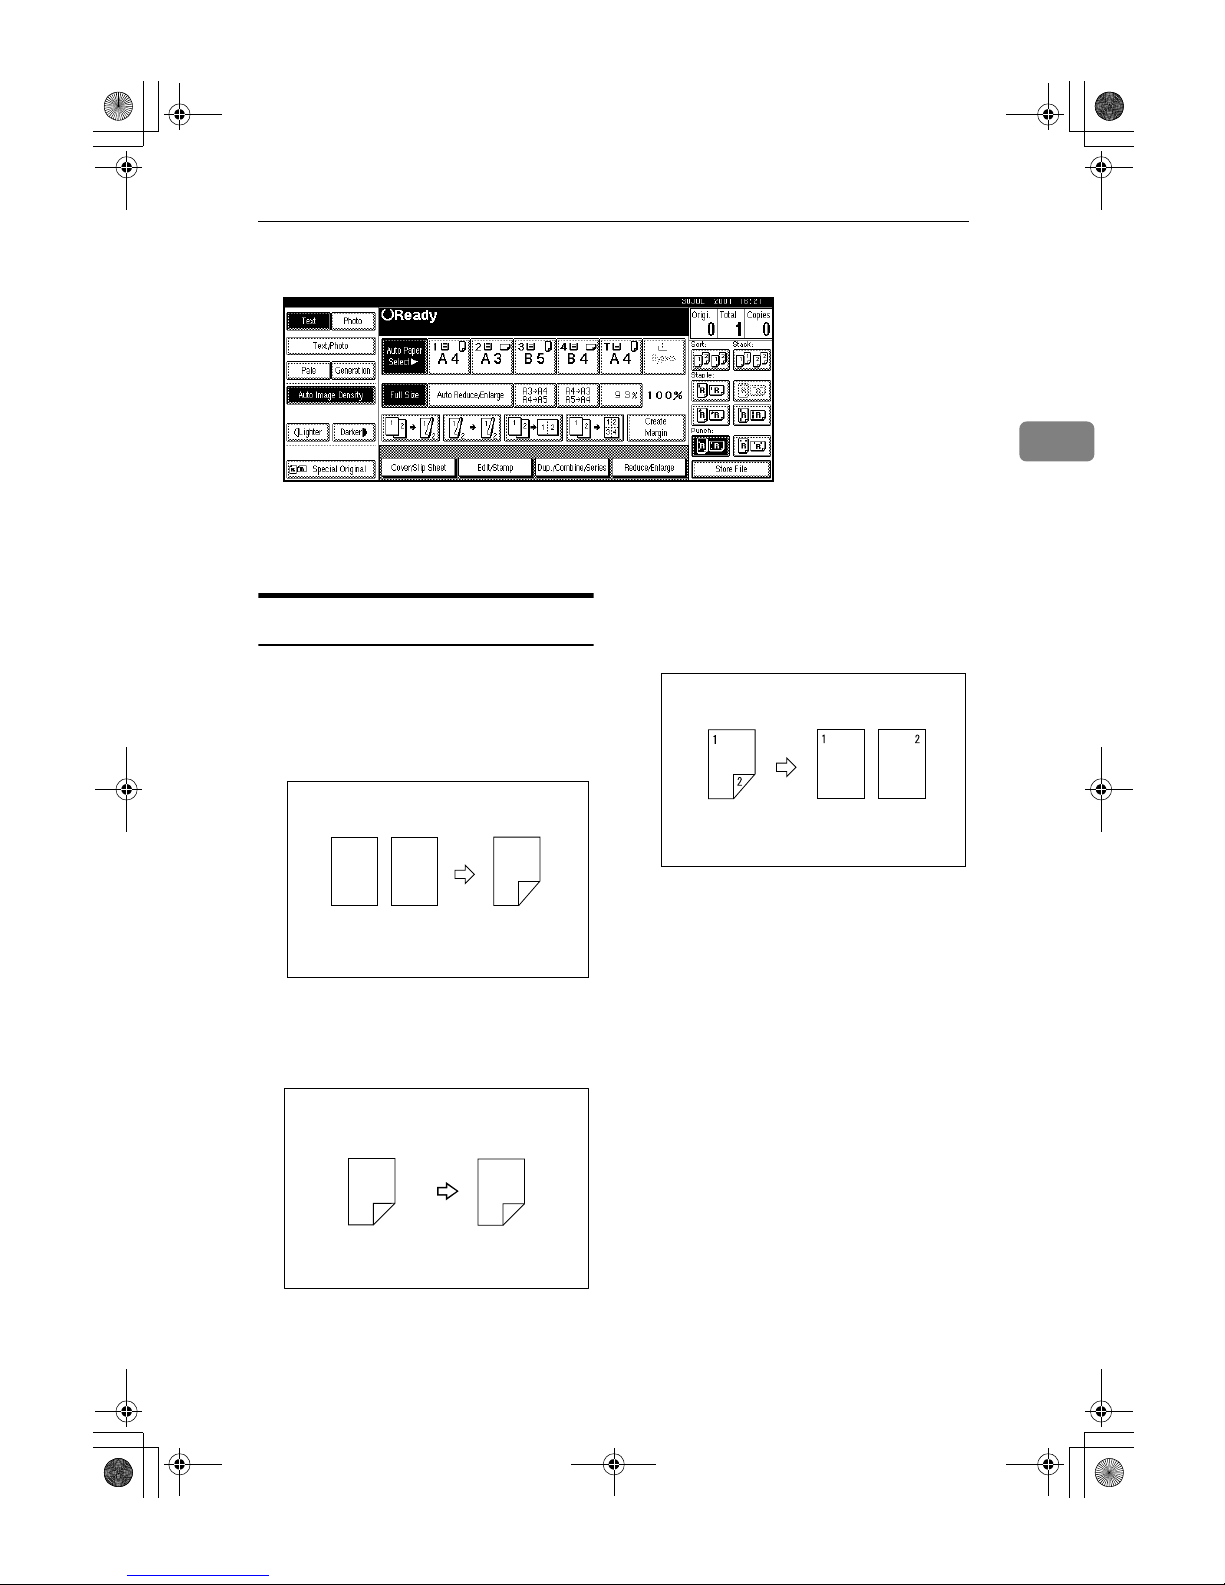
Copier Functions
43
2
AAAA
Select one of the punch hole positions.
BBBB
Enter the number of copy sets with the number keys.
CCCC
Place your originals, and then press the {{{{Start}}}} key.
Duplex
There are three types of duplex.
❖❖❖❖ 1 Sided →→→→ 2 Sided
Copies 2 one-sided pages on one
two-sided page.
❖❖❖❖ 2 Sided →→→→ 2 Sided
Copies 1 two-sided page on one
two-sided page.
❖❖❖❖ 2 Sided →→→→ 1 Sided
Copies each side of a two-sided
original onto two separate pages.
12
2
1
1
2
1
2
AdonisC3_GBcopyF_FM1.book Page 43 Thursday, November 28, 2002 1:53 PM
Page 58
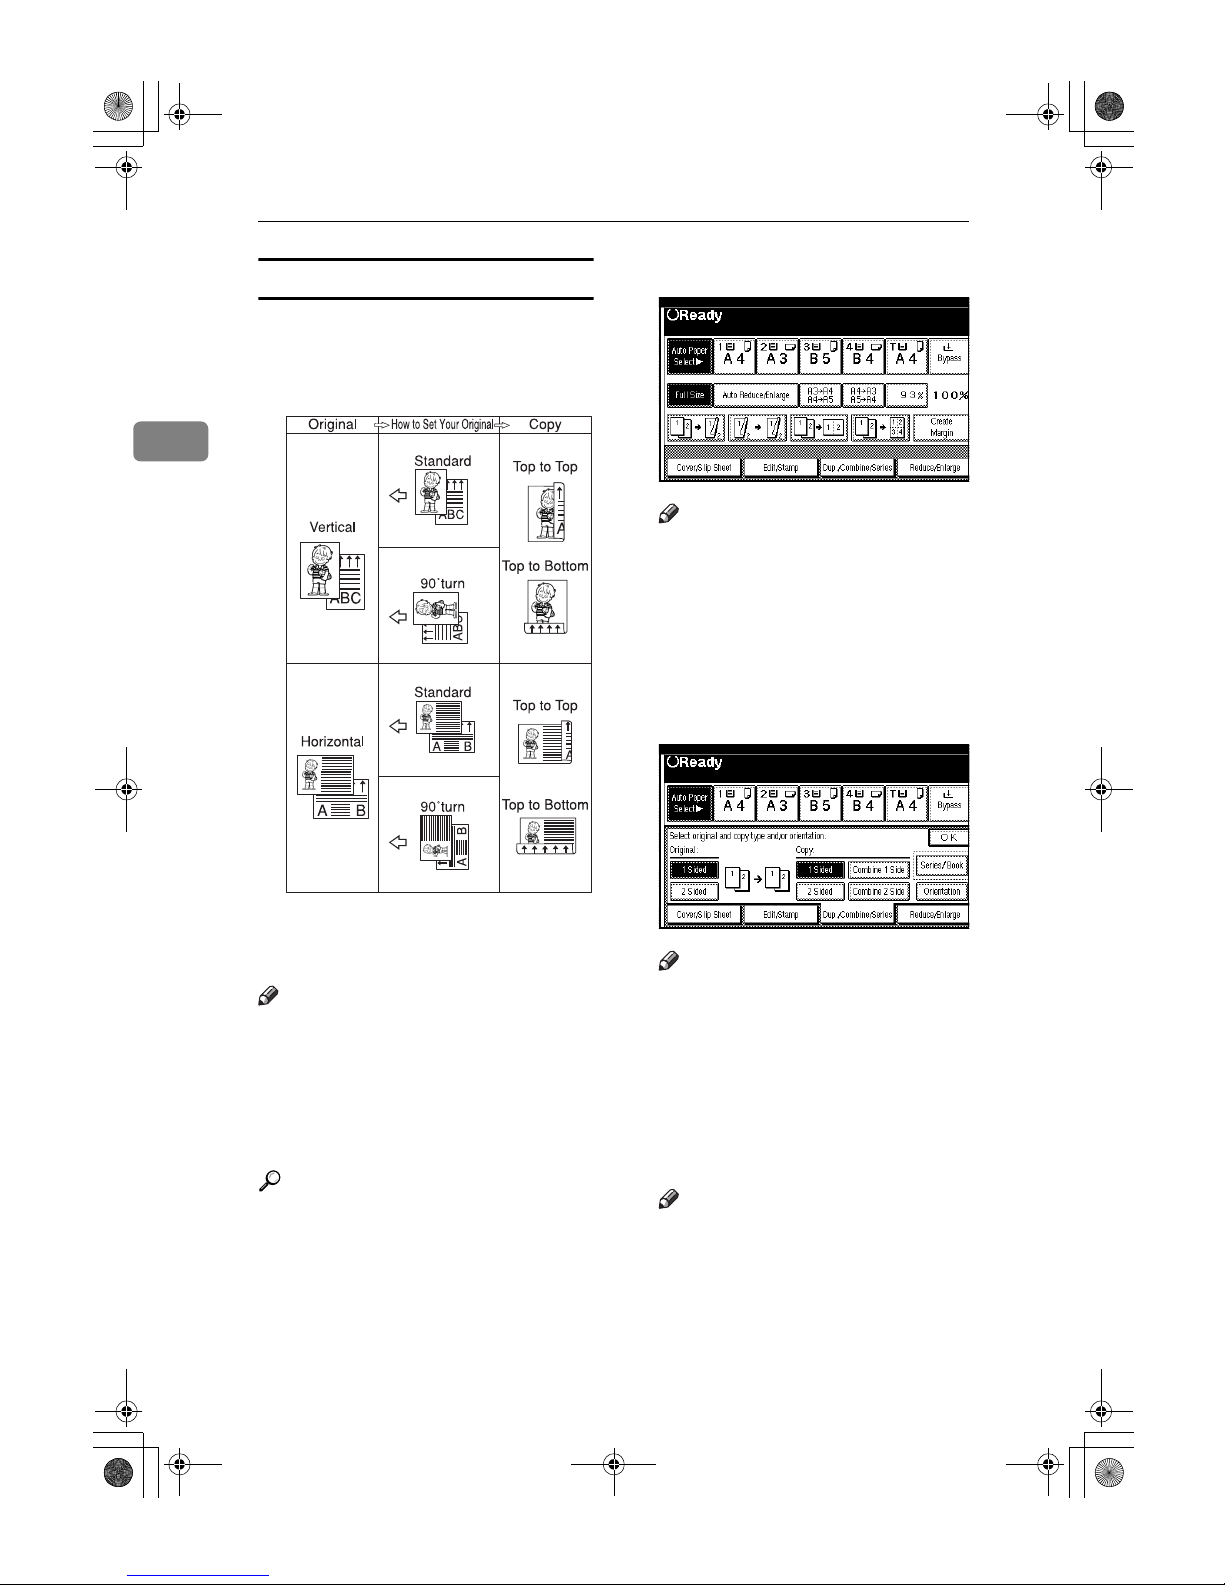
Copying
44
2
Original orientation and completed copies
The resulting copy image will differ
according to the orientation in which
you place your originals (vertical K
or horizontal L ).
*1
The table shows the orientation of images on the front and back of copies,
not the orientation of delivery.
Note
❒ You cannot use the bypass tray
with this function.
❒ The maximum paper weight that
can be used with duplex copying is
64–105 g/m
2
, 17–28 lb. (55–90 kg,
121.3–198.4 lb.).
Reference
p.58 “Margin Adjustment”
Related initial settings
p.95 “Front Margin: Left/Right”
p.95 “Back Margin: Left/Right”
p.95 “Front Margin: Top/Bottom”
p.95 “Back Margin: Top/Bottom”
AAAA
Press [Dup./Combine/Series].
Note
❒ You can also select “1 Sided to 2
Sided” or ”2 Sided to 2 Sided”directly by pressing the
Copy Function Key. In that case,
proceed to
D
.
BBBB
Select [1 Sided] or [2 Sided] for
Original, and then select [1 Sided]
or [2 Sided] for Copy.
Note
❒ To change the copy orientation,
press [Orientation] . See p.45
“Originals and copy orientation”.
CCCC
Press [OK].
DDDD
Place your originals, and then
press the {{{{Start}}}} key.
Note
❒ When placing an original on the
exposure glass, start with the
first page to be copied. When
placing an original in the ADF,
set so the last page is on the bottom.
GCRYOU1E
AdonisC3_GBcopyF_FM1.book Page 44 Thursday, November 28, 2002 1:53 PM
Page 59
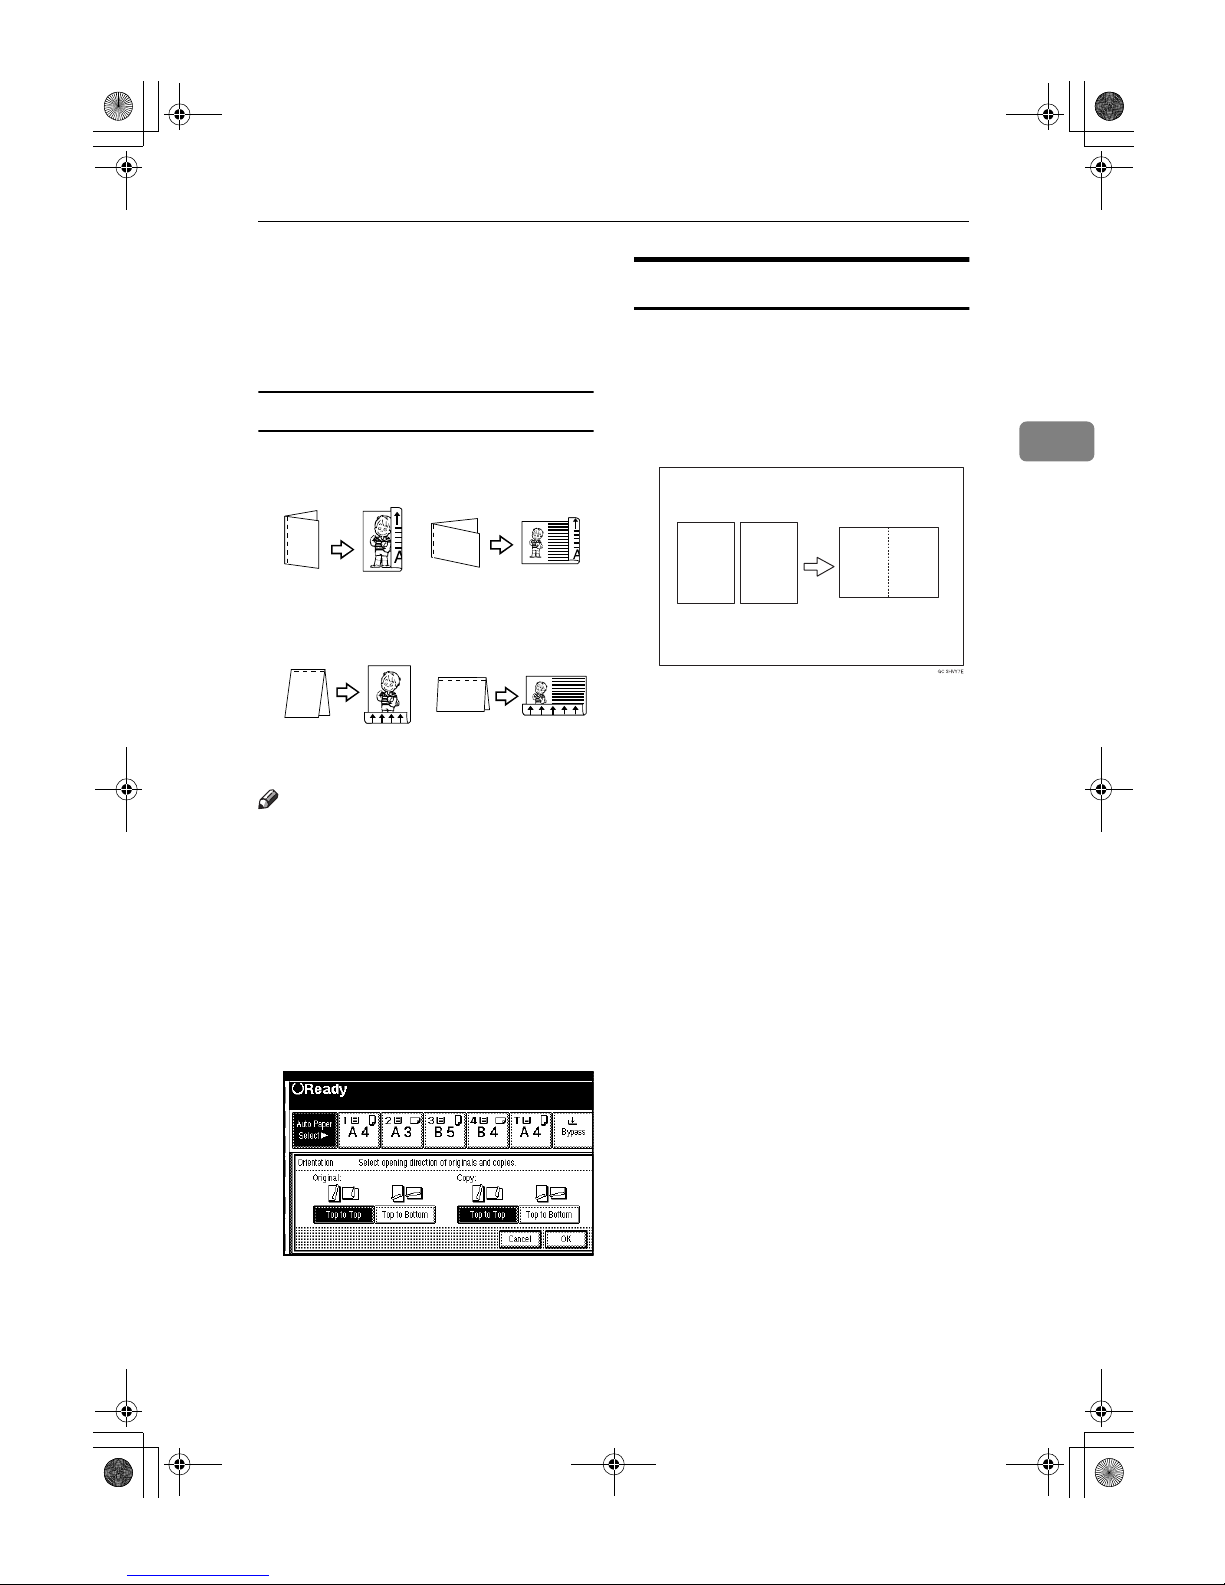
Copier Functions
45
2
❒ When placing an original on the
exposure glass or in the ADF using Batch mode, press the {{{{#}}}}
key after all the originals have
been scanned.
Originals and copy orientation
You can select the orientation.
• Top to Top
• Top to Bottom
Note
❒ You can change the default orien-
tation with User Tools. See p.92
“Copy Orientation in Duplex
Mode” and p.92 “Original Orientation in Duplex Mode” .
AAAA
Press [Dup./Combine/Series].
BBBB
Press [Orientation], select the orien-
tation (Original/Copy), and then
press [OK].
One-Sided Combine
Combine several pages onto one side
of a sheet.
❖❖❖❖ 1 Sided 2 Pages →→→→ Combine 1 Side
Copies two one-sided originals to
one side of a sheet.
❖❖❖❖ 1 Sided 4 Pages →→→→ Combine 1 Side
Copies 4 one-sided originals to one
side of a sheet.
❖❖❖❖ 1 Sided 8 Pages →→→→ Combine 1 Side
Copies 8 one-sided originals to one
side of a sheet.
❖❖❖❖ 2 Sided 1 Page →→→→ Combine 1 Side
Copies 1 two-sided original to one
side of a sheet.
❖❖❖❖ 2 Sided 2 Pages →→→→ Combine 1 Side
Copies 2 two-sided originals to
one side of a sheet.
❖❖❖❖ 2 Sided 4 Pages →→→→ Combine 1 Side
Copies 4 two-sided originals to
one side of a sheet.
Duplex1
Duplex2
1 2
1
2
AdonisC3_GBcopyF_FM1.book Page 45 Thursday, November 28, 2002 1:53 PM
Page 60
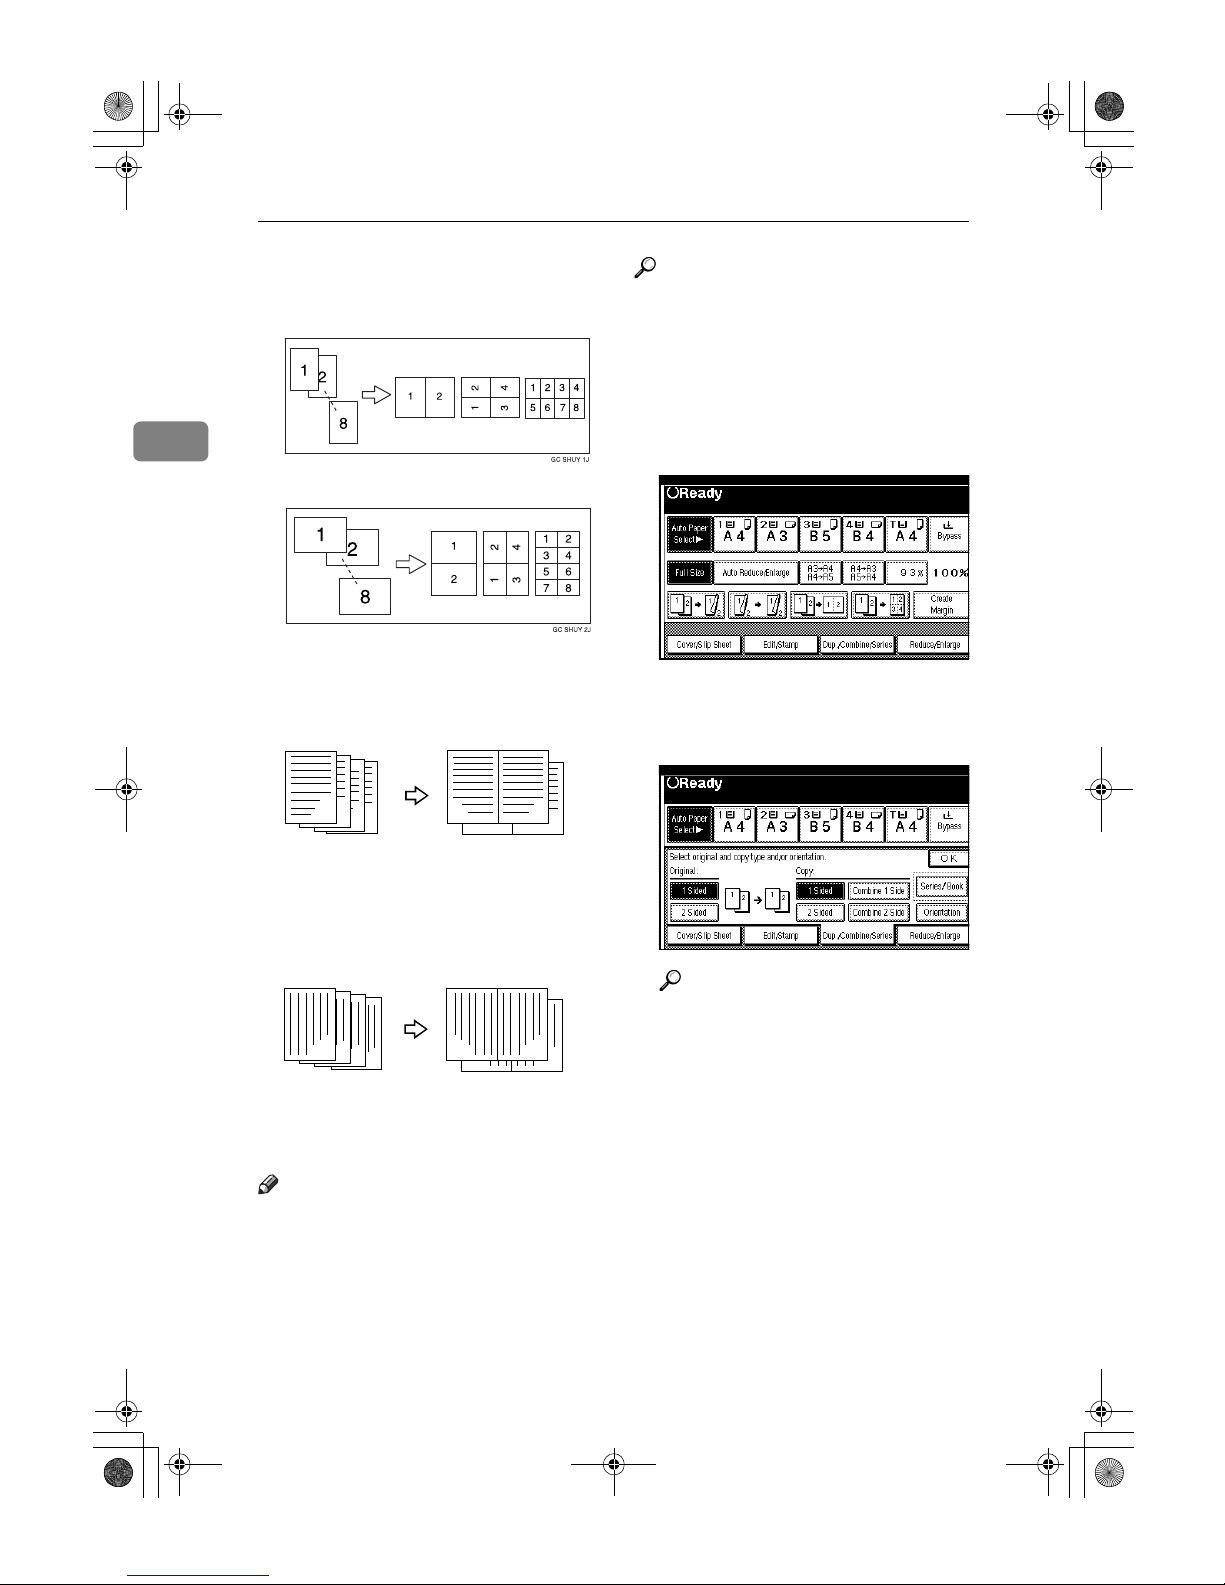
Copying
46
2
❖❖❖❖ Orientation of the original and image
position of combine
Open to left R originals
Open to top S originals
❖❖❖❖ Placing originals (originals placed in
the ADF)
• Originals read from left to right
• Originals read from top to bot-
tom
Note
❒ You cannot use the bypass tray
with this function.
Reference
Related initial settings
p.96 “Erase Original Shadow in
Combine”
p.98 “Copy Order in Combine”
p.97 “Separation Line in Combine”
AAAA
Press [Dup./Combine/Series].
BBBB
Press [1 Sided] or [2 Sided] for Orig-
inal, and then press [Combine 1
Side] for Copy.
Reference
p.45 “Originals and copy orientation”
CCCC
Select the number of originals to
combine, and then press [OK].
DDDD
Select the paper size.
EEEE
Press [OK].
FFFF
Place your originals, and then
press the {{{{Start}}}} key.
Combine5
3
4
1
2
4
3
2
1
Combine6
3
4
1
2
4
3
2
1
AdonisC3_GBcopyF_FM1.book Page 46 Thursday, November 28, 2002 1:53 PM
Page 61
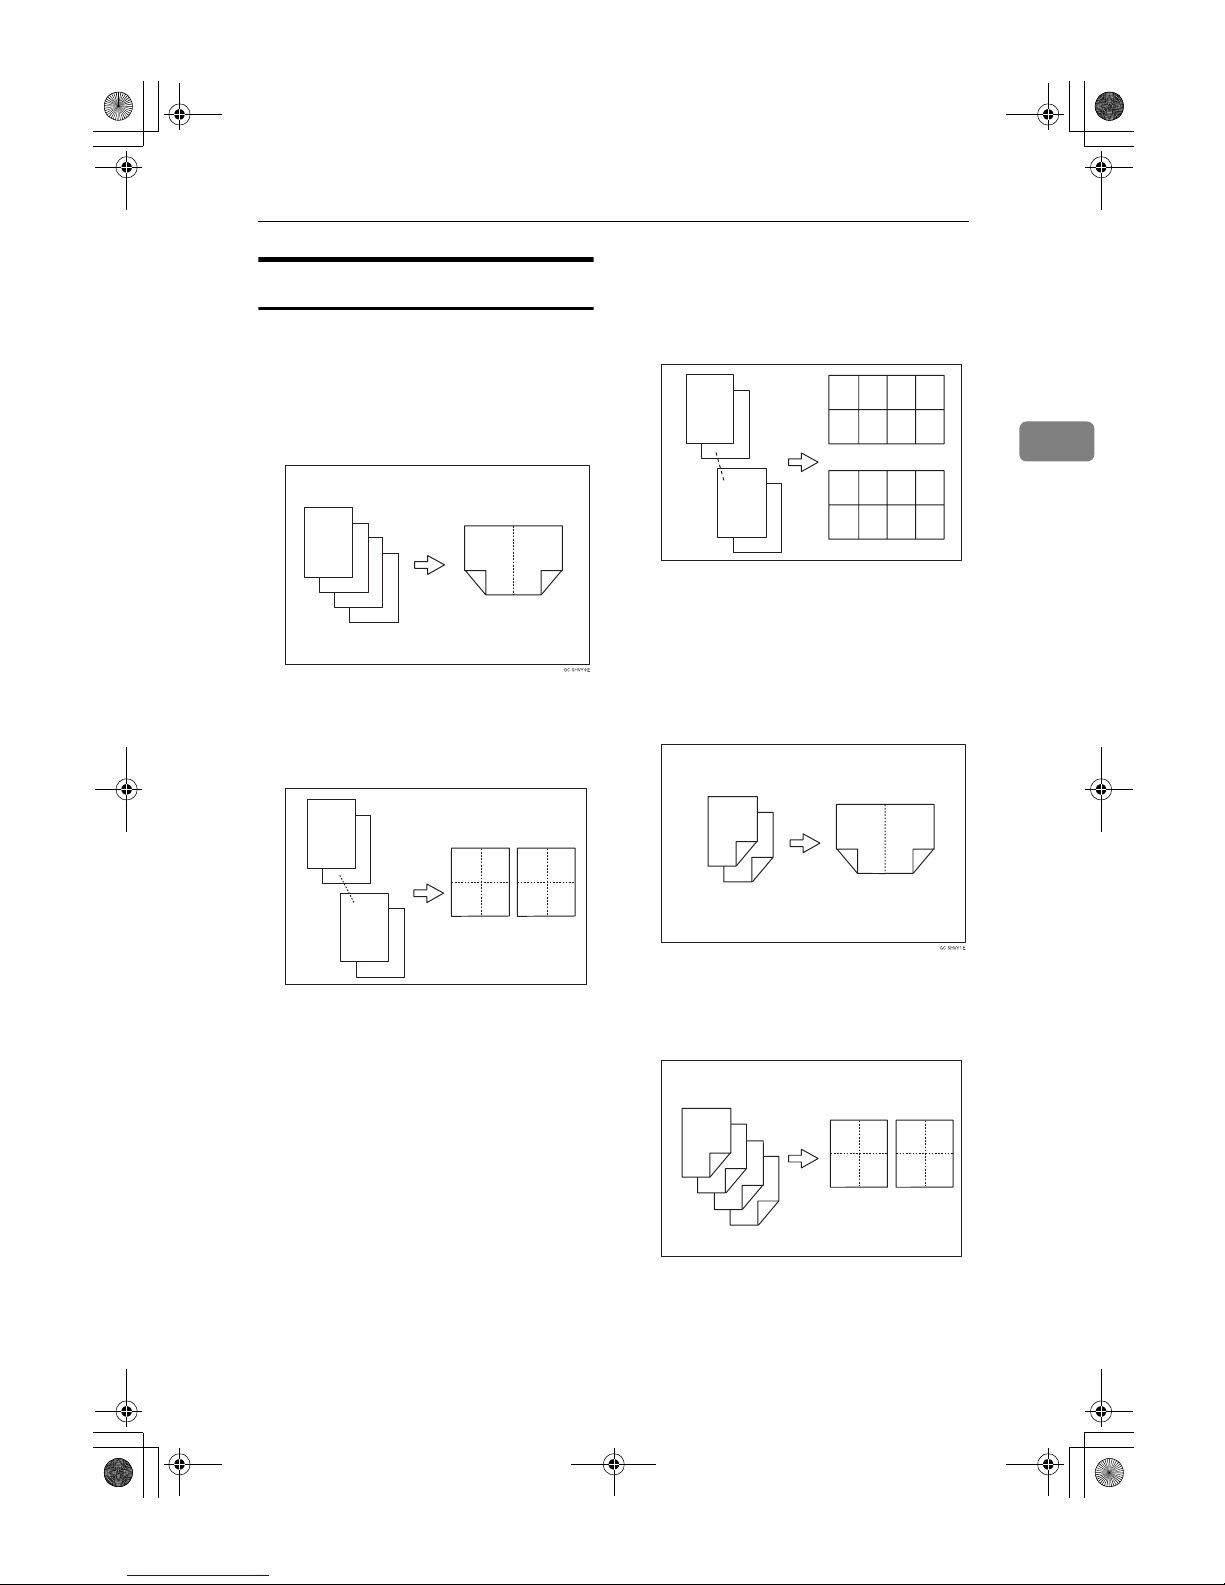
Copier Functions
47
2
Two-Sided Combine
Combines various pages of originals
into one sheet with two sides.
❖❖❖❖ 1 Sided 4 Pages →→→→ Combine 2 Side
Copies 4 one-sided originals to one
sheet with two pages per side.
❖❖❖❖ 1 Sided 8 Pages →→→→ Combine 2 Side
Copies 8 one-sided originals to one
sheet with four pages per side.
1.
Front
2.
Back
❖❖❖❖ 1 Sided 16 Pages →→→→ Combine 2 Side
Copies 16 one-sided originals to
one sheet with eight pages per
side.
1.
Front
2.
Back
❖❖❖❖ 2 Sided 4 Pages →→→→ Combine 2 Side
Copies 2 two-sided originals to
one sheet with two pages per side.
❖❖❖❖ 2 Sided 8 Pages →→→→ Combine 2 Side
Copies 4 two-sided originals to
one sheet with four pages per side.
4
3
2
1
3
21
4
1 2
34
GCSHVYAE
12
8
7
2
1
5 6
78
GCSHVY5E
1 234
5678
2
1
2
1
16
15
9 10 11 12
13 14 15 16
4
3
2
1
3
21
4
GCSHVY2E
12
8
7
6
5
4
3
2
1
5 6
78
1 2
34
AdonisC3_GBcopyF_FM1.book Page 47 Thursday, November 28, 2002 1:53 PM
Page 62
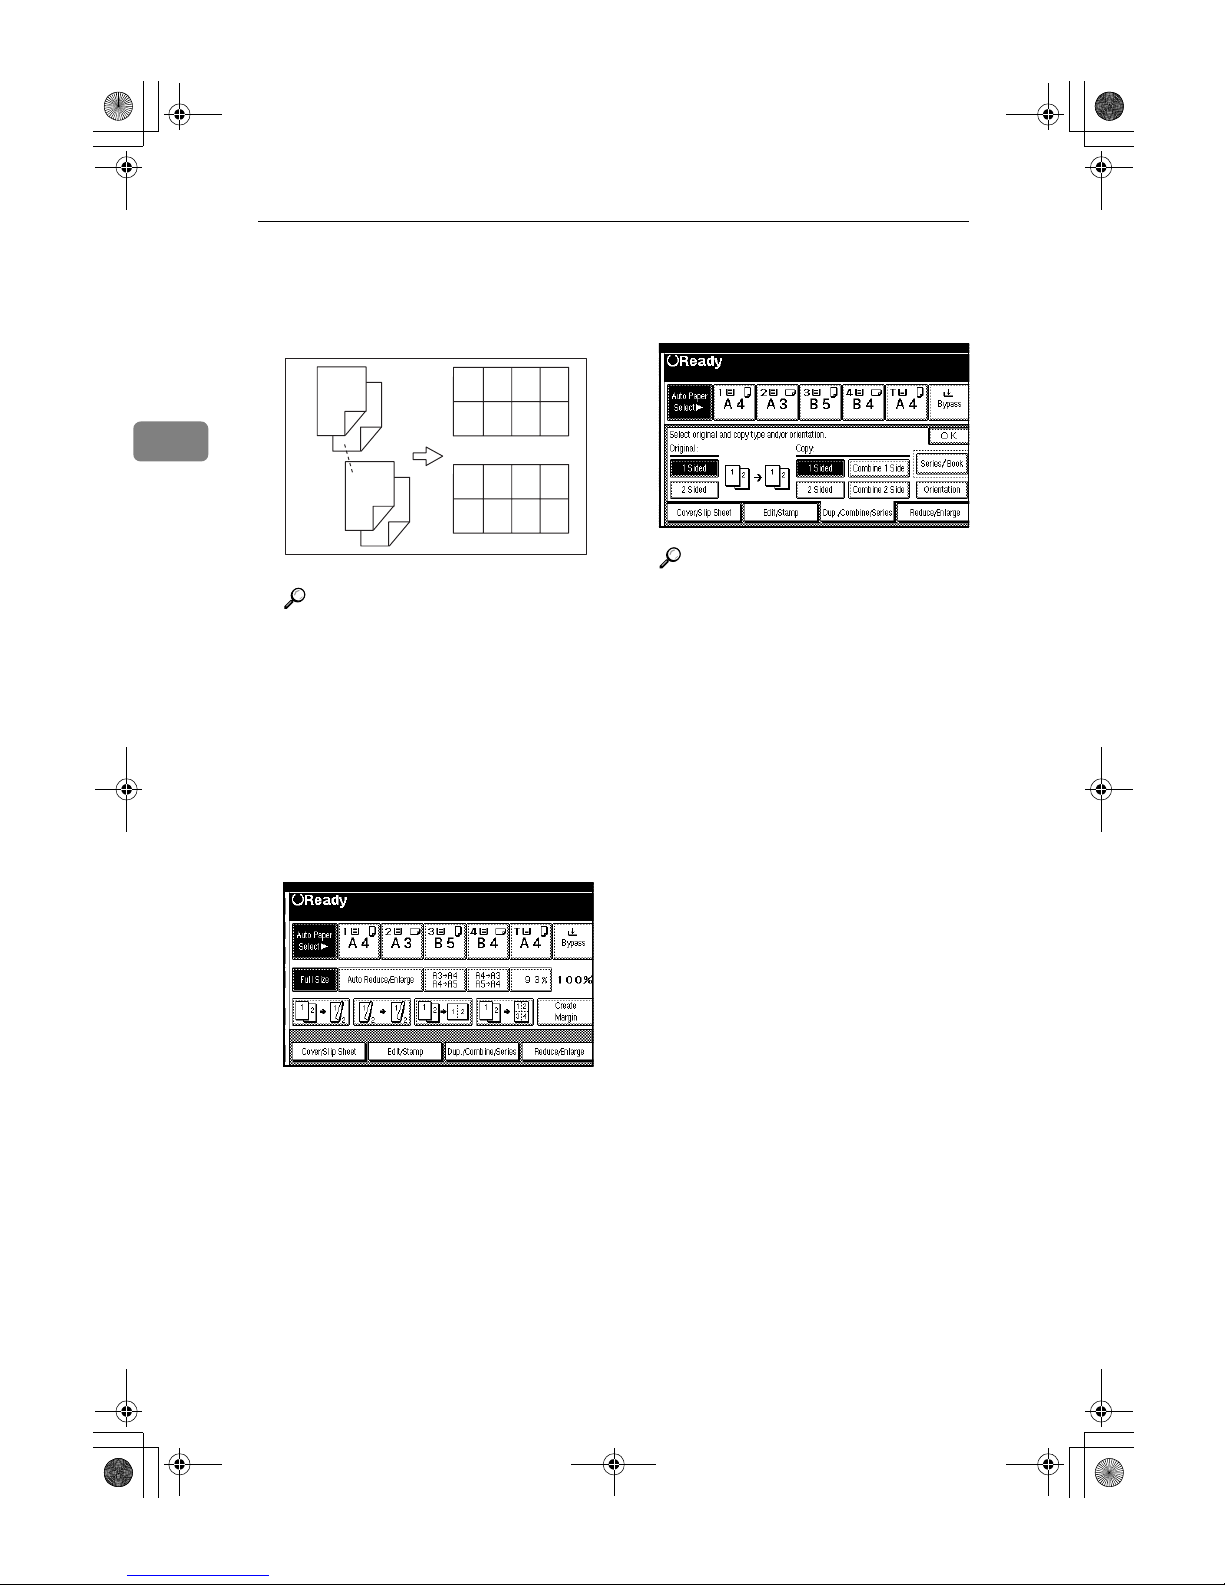
Copying
48
2
❖❖❖❖ 2 Sided 16 Pages →→→→ Combine 2 Side
Copies 8 two-sided originals to
one sheet with eight pages per
side.
Reference
Related initial settings
p.46 “Orientation of the original
and image position of combine”
p.96 “Erase Original Shadow in
Combine”
p.98 “Copy Order in Combine”
p.97 “Separation Line in Combine”
AAAA
Press [Dup./Combine/Series].
BBBB
Press [1 Sided] or [2 Sided] for Orig-
inal, and then press [Combine 2
Side] for Copy.
Reference
p.45 “Originals and copy orientation”
CCCC
Select the number of originals to
combine, and then press [OK].
DDDD
Select the paper size.
EEEE
Press [OK].
FFFF
Place your originals, and then
press the {{{{Start}}}} key.
GCSHVY6E
1 234
5678
2
1
9 10 11 12
13 14 15 16
4
3
2
1
16
15
14
13
AdonisC3_GBcopyF_FM1.book Page 48 Thursday, November 28, 2002 1:53 PM
Page 63
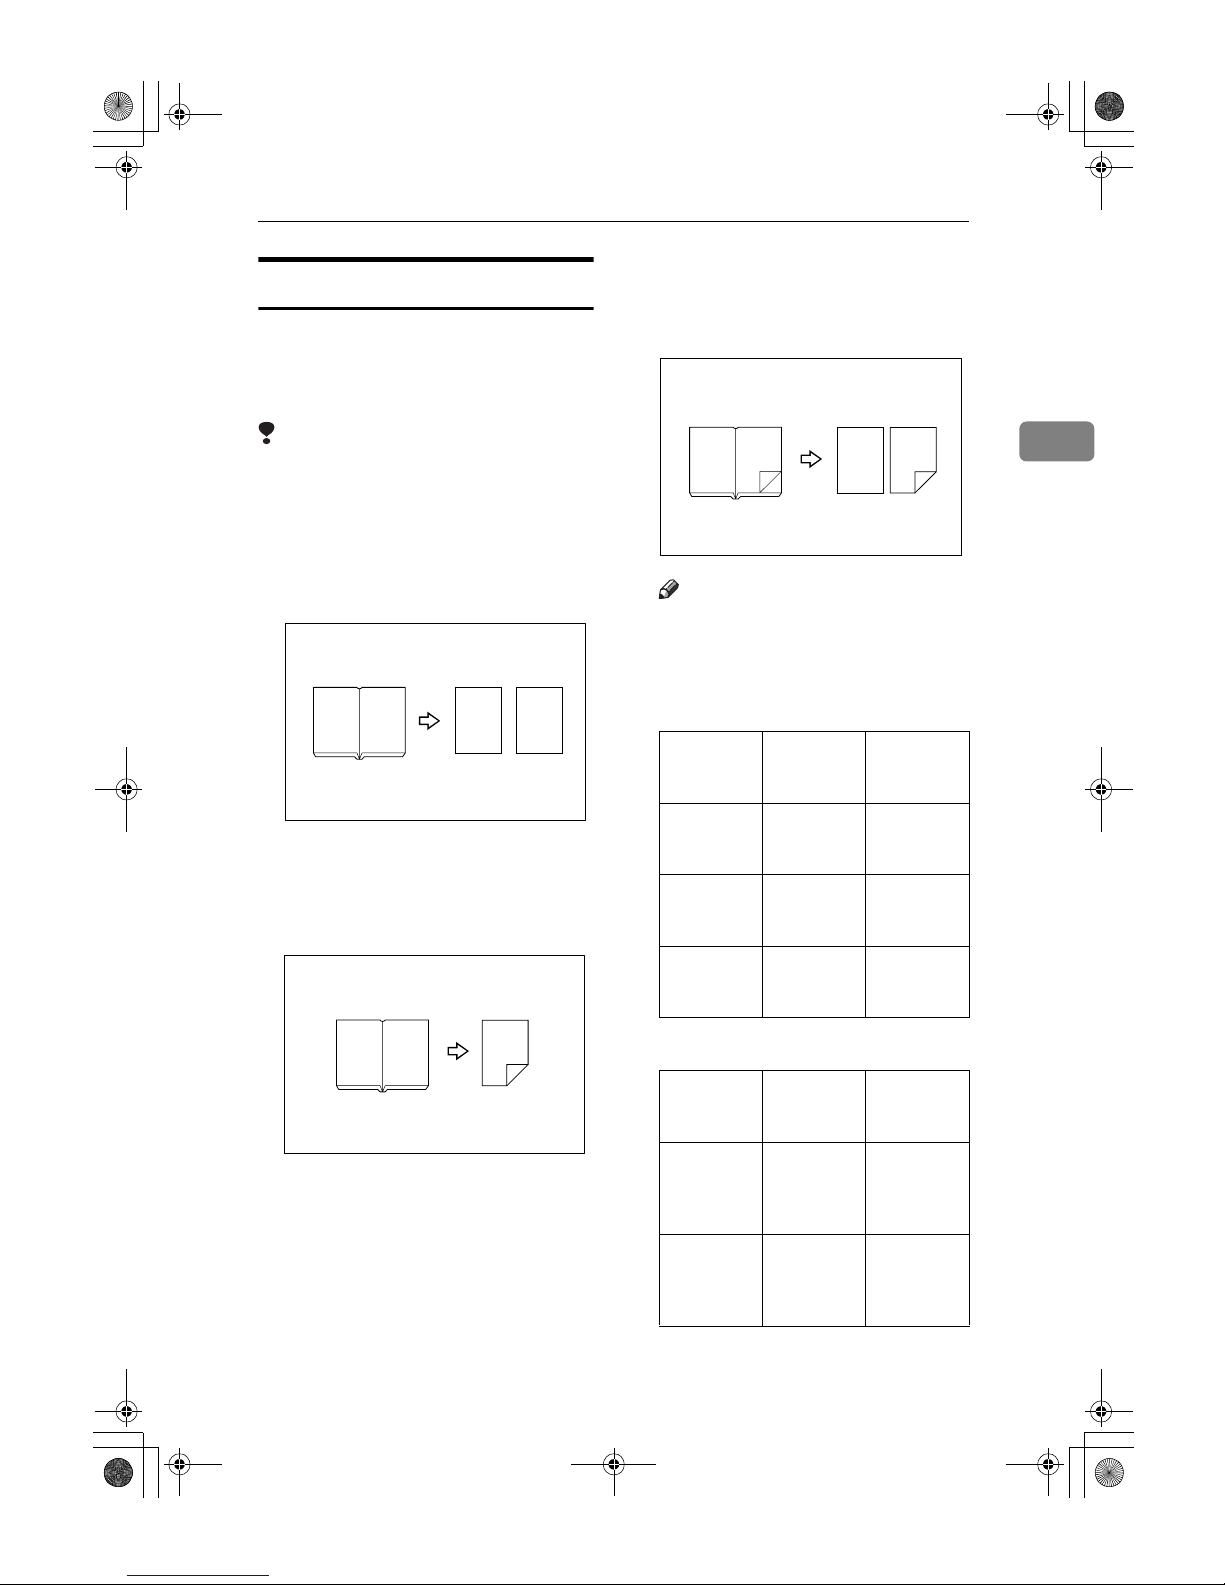
Copier Functions
49
2
Series Copies
Separately copies the front and back
of a two-sided original or the two facing pages of a bound original onto
two sheets.
Limitation
❒ You cannot use the Series Copies
function from the ADF.
❖❖❖❖ Book→→→→1 Sided
You can make one-sided copies
from two facing pages of a bound
original (book).
❖❖❖❖ Book→→→→2 Sided
Copies a two-page spread original
onto one sheet with one page per
side.
❖❖❖❖ Front&Back→→→→2 Sided
Copies each two-page spread original as it is onto both sides of a
sheet.
Note
❒ See the following table for orig-
inal and copy paper sizes when
using a 100% ratio.
❖❖❖❖ Metric version
❖❖❖❖ Inch version
12
12
12
1
2
Original
Paper for
one-sided
copy
Paper for
two-sided
copy
A3
L
A4K × 2
sheets
A4K × 1
sheet
(two-sided)
B4 JIS
L
B5 JISK × 2
sheets
B5 JISK × 1
sheet
(two-sided)
A4
L
A5K × 2
sheets
A5K × 1
sheet
(two-sided)
Original
Paper for
one-sided
copy
Paper for
two-side
copy
11" × 17"
L
8
1
/2" ×
11"K × 2
sheets
81/2" ×
11"K × 1
sheet
(two-sided)
8
1
/2" ×
11"
L
5
1
/2" ×
8
1
/2"K × 2
sheets
5
1
/2" ×
11"K × 1
sheet
(two-sided)
12
3
1
2
3
AdonisC3_GBcopyF_FM1.book Page 49 Thursday, November 28, 2002 1:53 PM
Page 64
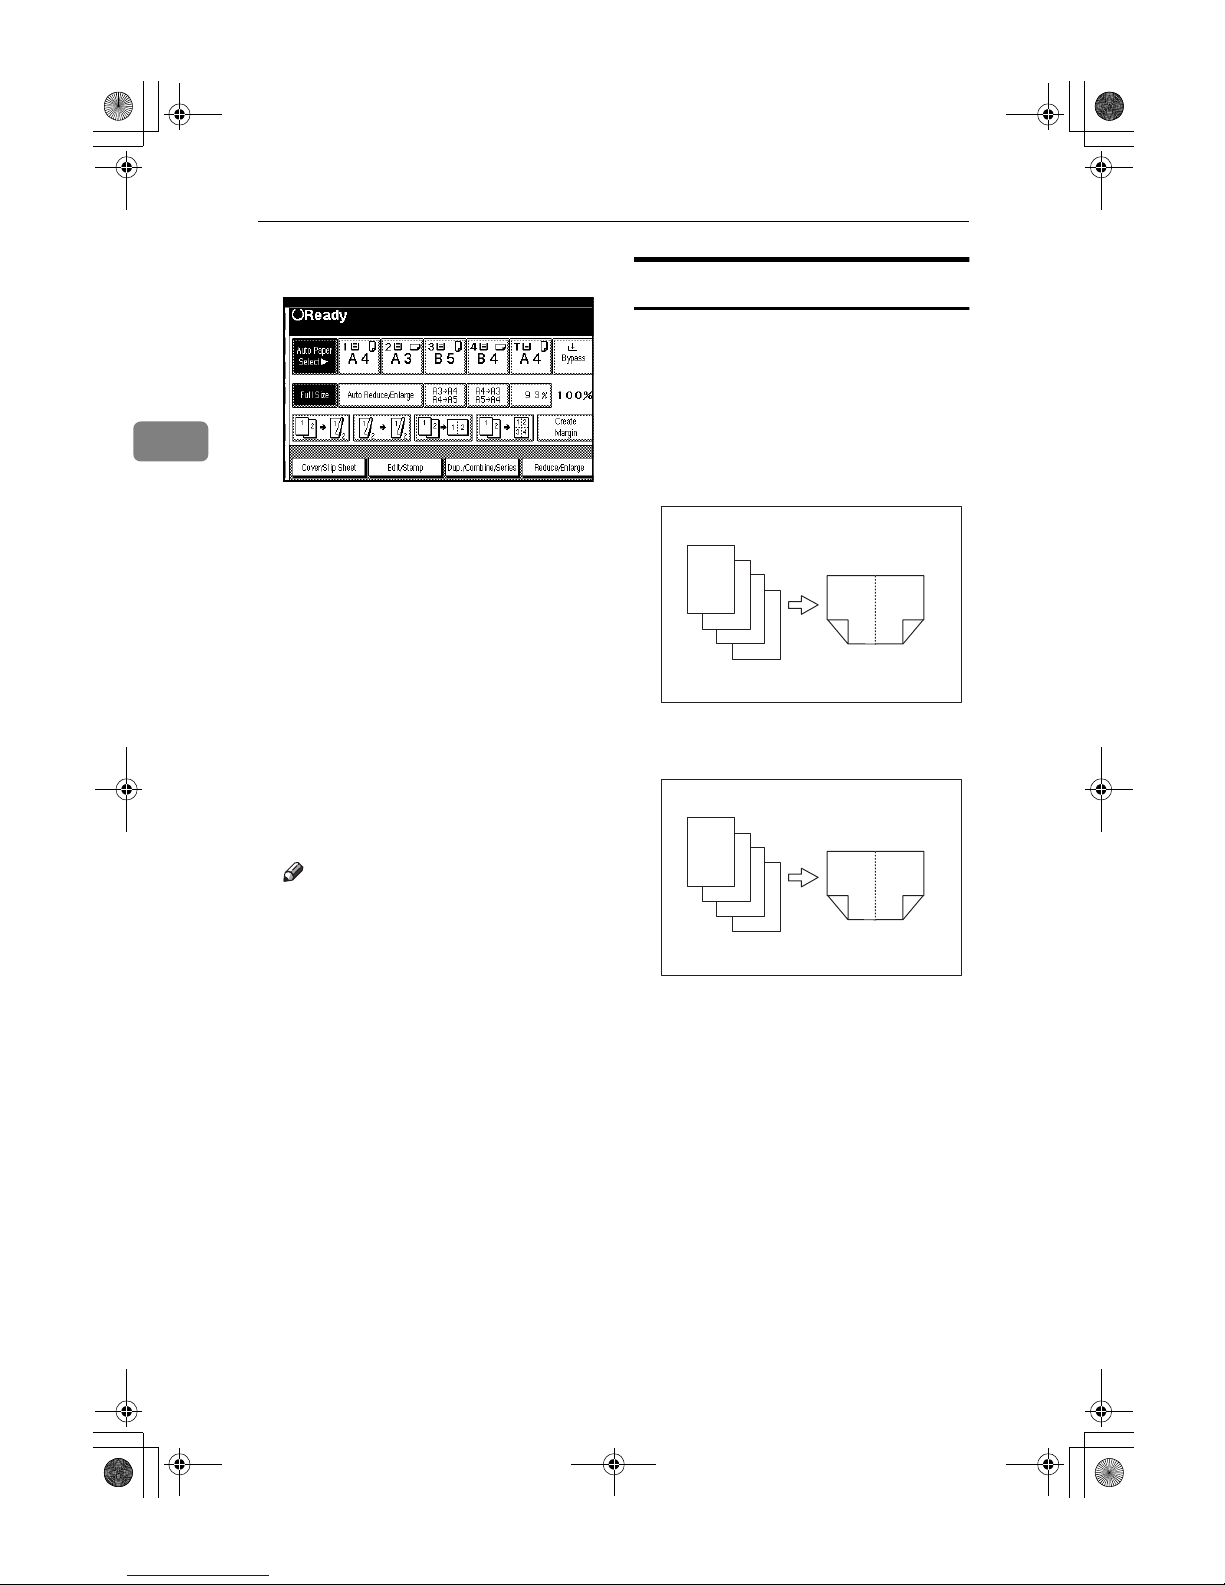
Copying
50
2
AAAA
Press [Dup./Combine/Series].
BBBB
Press [Series/Book].
CCCC
Press [
Series
].
DDDD
Select [Book→→→→1 Sided], [Book→→→→2
Sided], or [Front&Back→→→→2 Sided],
and then press [OK].
EEEE
Press [OK].
FFFF
Make sure that [Auto Paper Select]
is selected.
GGGG
Place your original on the exposure glass, and then press the
{{{{Start}}}} key.
Note
❒ Press the {{{{#}}}} key after all origi-
nals have been scanned.
Booklet/Magazine
Copies two or more originals in page
order.
❖❖❖❖ 1 Sided→→→→Booklet
Make copies in page order for a
folded booklet as shown.
❖❖❖❖ Open to left
❖❖❖❖ Open to right
❖❖❖❖ 2 Sided→→→→Booklet
Make two–sided originals to copies in page order for a folded booklet as shown.
GCBOOK0E
4
3
2
1
4
32
1
GCBOOK1E
4
3
2
1
1
23
4
AdonisC3_GBcopyF_FM1.book Page 50 Thursday, November 28, 2002 1:53 PM
Page 65
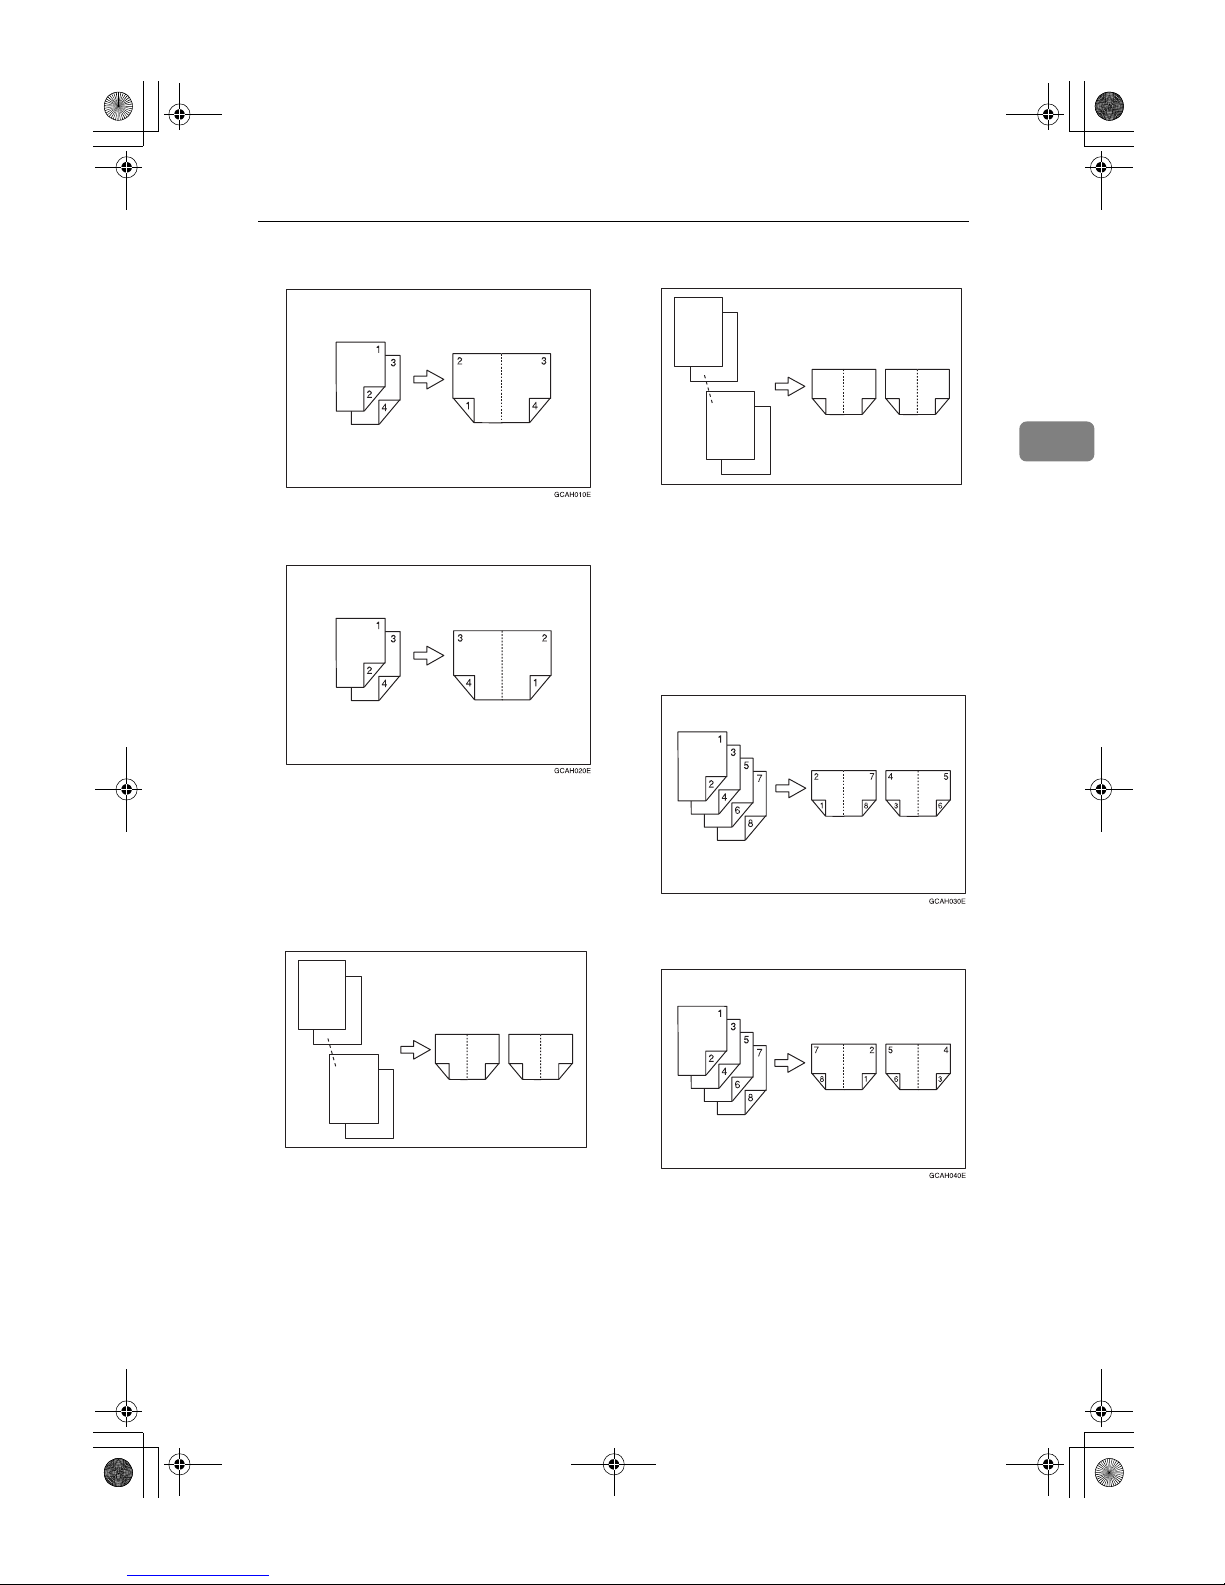
Copier Functions
51
2
❖❖❖❖ Open to left
❖❖❖❖ Open to right
❖❖❖❖ 1 Sided→→→→Magazine
Copies two or more originals to
make copies in page order when
they are folded and stacked.
❖❖❖❖ Open to left
❖❖❖❖ Open to right
❖❖❖❖ 2 Sided→→→→Magazine
Copies two or more originals of
two-sided to make copies in page
order when they are folded and
stacked.
❖❖❖❖ Open to left
❖❖❖❖ Open to right
GCBOOK3E
2
1
8
7
8
72
16
54
3
GCBOOK4E
2
1
8
7
1
27
83
45
6
AdonisC3_GBcopyF_FM1.book Page 51 Thursday, November 28, 2002 1:53 PM
Page 66
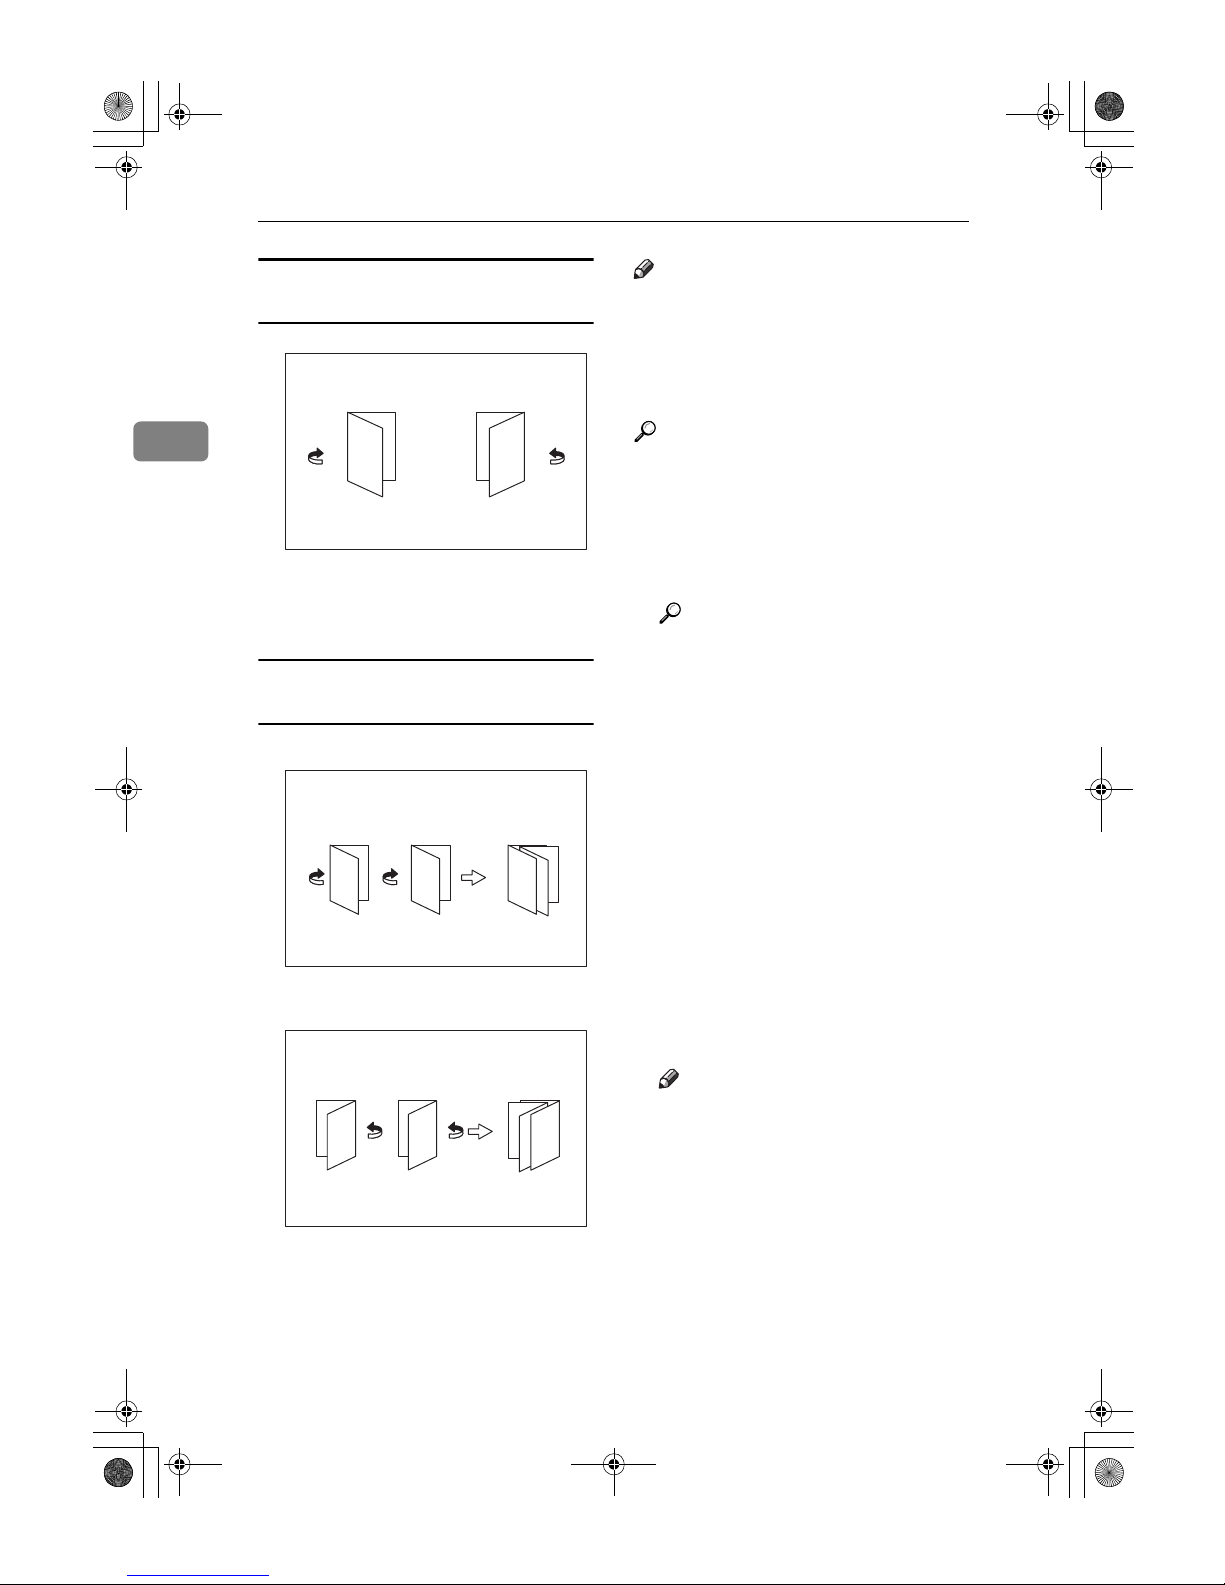
Copying
52
2
How to fold and unfold copies to make a
booklet
1.
Open to left
2.
Open to right
How to fold and unfold copies to make a
magazine
Note
❒ You cannot use the bypass tray
with this function.
❒ The machine sets the reproduction
ratio automatically to meet the paper size.
Reference
Related initial settings
p.96 “Erase Original Shadow in
Combine”
AAAA
Select “Open to left”or “Open to
right” with the User Tools.
Reference
p.98 “Orientation: Booklet,
Magazine”
BBBB
Press [Dup./Combine/Series].
CCCC
Press [Series/Book].
DDDD
Press [Book].
EEEE
Select
[1 Sided→→→→Booklet], [2 Sided→→→→-
Booklet]
,
[1 Sided→→→→Magazine]
or
[2
Sided→→→→Magazine]
, and then press
[OK]
.
FFFF
Press [OK].
GGGG
Select the paper.
HHHH
Place your original, and then
press the {{{{Start}}}} key.
Note
❒ When placing an original on the
exposure glass or in the ADF using Batch mode, press the {{{{#}}}}
key after all the originals have
been scanned.
GCBOOK2E
3
1
3
1
12
GCBOOK5E
7 5
1
3
1
3
5
GCBOOK6E
3
1
55
3
7
1
AdonisC3_GBcopyF_FM1.book Page 52 Thursday, November 28, 2002 1:53 PM
Page 67
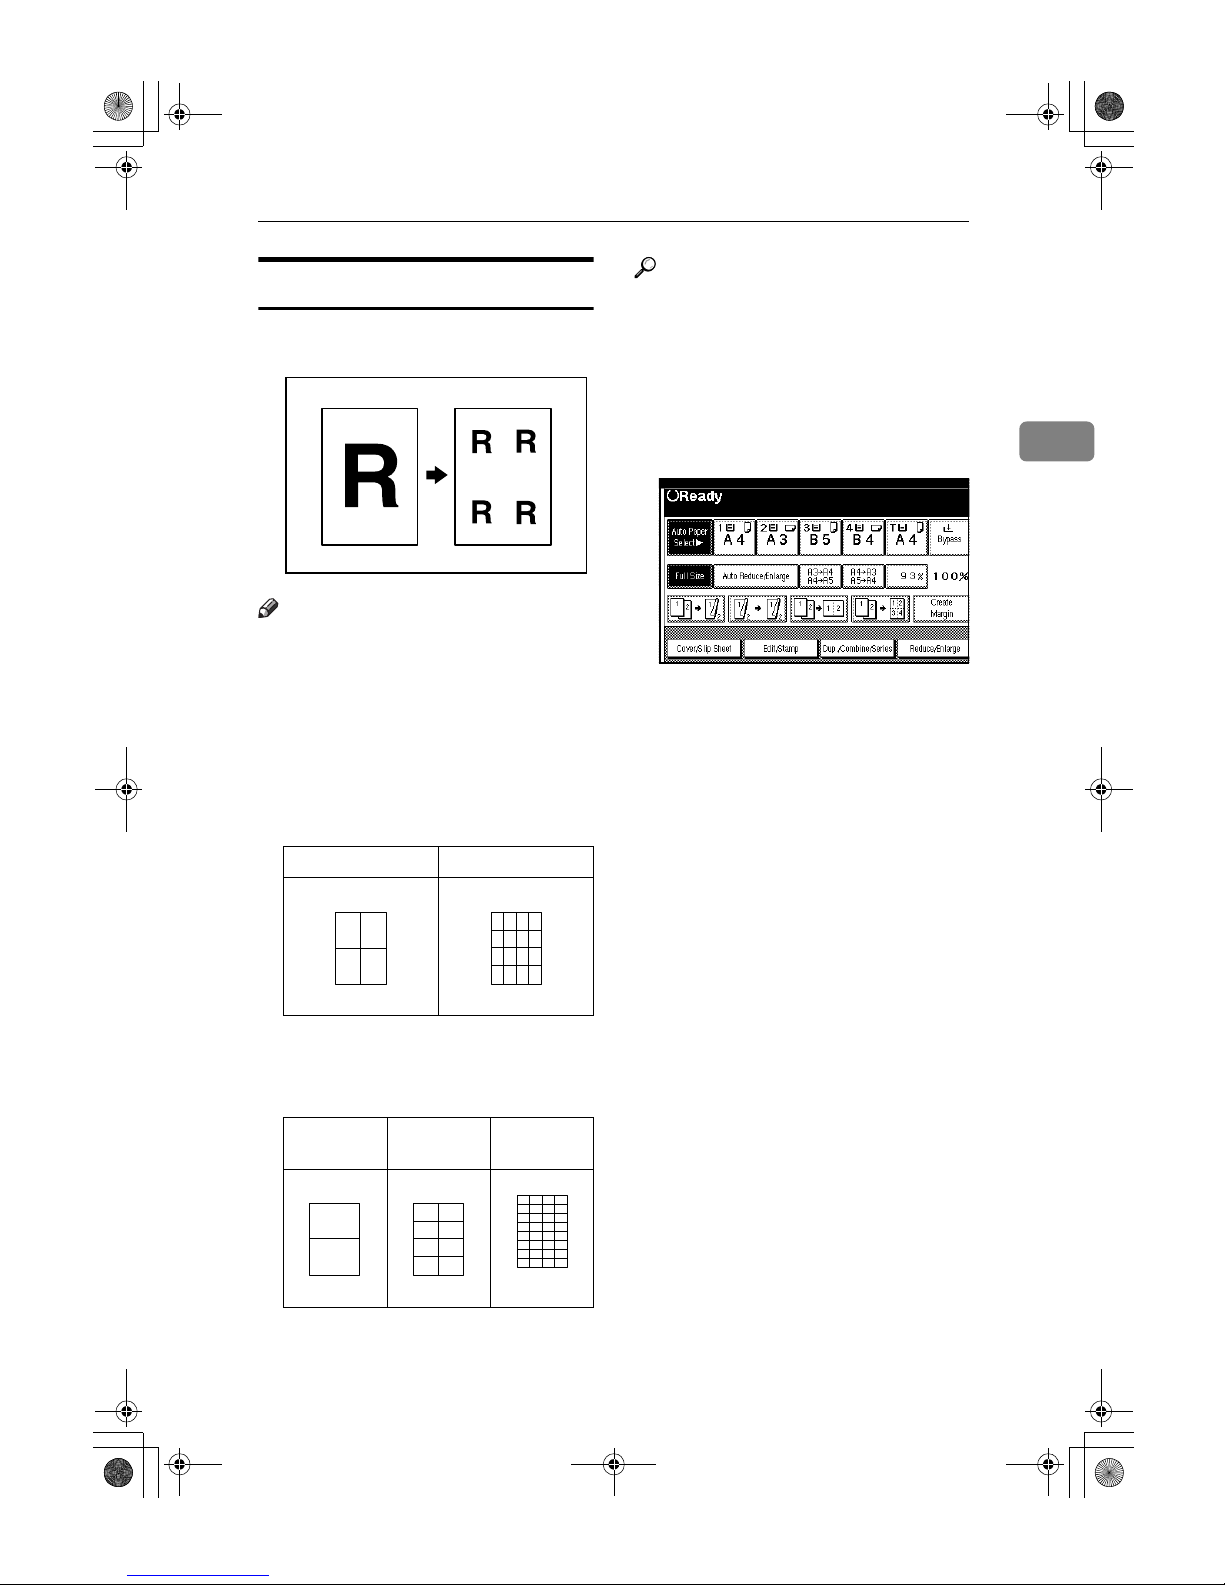
Copier Functions
53
2
Image Repeat
The original image is copied repeatedly.
Note
❒ The number of repeated images
depends on the original size, copy
paper size, and reproduction ratio.
For example, see the following table:
❖❖❖❖ Original: A5KKKK/Copy paper: A4KKKK
or Original: A5LLLL/Copy paper
A4LLLL
❖❖❖❖ Original: A5KKKK/Copy paper: A4LLLL
or Original: A5LLLL/Copy paper
A4KKKK
Reference
Related initial settings
p.96 “Image Repeat Separation
Line”
AAAA
Select the size of the copy paper
and the reproduction ratio.
BBBB
Press [Edit/Stamp].
CCCC
Press [Edit Image].
DDDD
Press [Image Repeat].
EEEE
Press [OK].
FFFF
Press [OK].
GGGG
Place your original, and then
press the {{{{Start}}}} key.
4 repeats (71%) 16 repeats (35%)
2 repeats
(100%)
8 repeats
(50%)
32 repeats
(25%)
Repeat1
Repeat2
Repeat3
Repeat4
Repeat5
AdonisC3_GBcopyF_FM1.book Page 53 Thursday, November 28, 2002 1:53 PM
Page 68
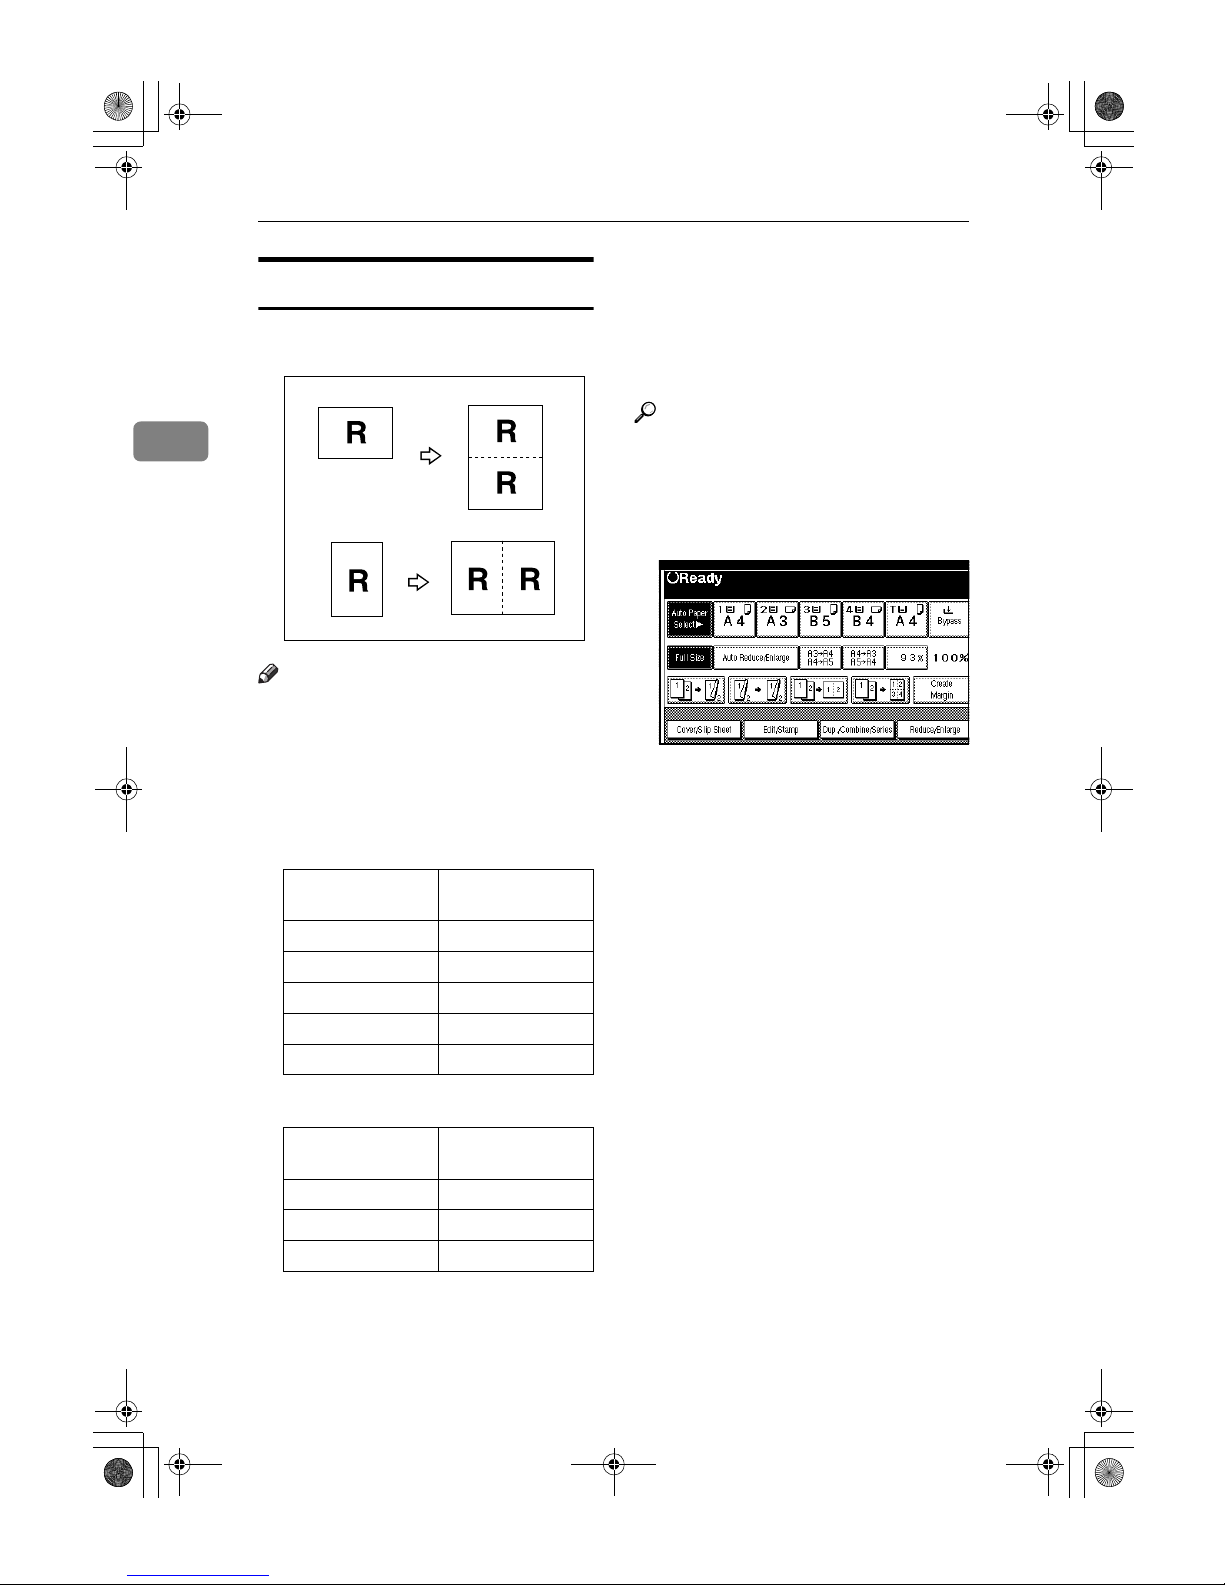
Copying
54
2
Double Copies
One original image is copied twice on
one copy as shown.
Note
❒ You cannot use the bypass tray
with this function.
❒ See the following table for original
and copy paper sizes when using a
100% ratio:
❖❖❖❖ Metric version
❖❖❖❖ Inch version
❒ The originals of size A5L, B6
JISKL, 5
1
/2" × 81/2"L cannot be
detected properly on the exposure
glass. Be sure to select the copy paper manually or place the originals
in the ADF.
Reference
Related initial settings
p.97 “Double Copies Separation
Line”
AAAA
Press [Edit/Stamp].
BBBB
Press [Edit Image].
CCCC
Press [Double Copies].
DDDD
Press [OK].
EEEE
Press [OK].
FFFF
Select the paper.
GGGG
Place your originals, and then
press the {{{{Start}}}} key.
Original size and
orientation
Copy paper size
and orientation
A5
L
A4
K
B6 JIS
L
B5 JIS
K
A4
K
A3
L
A5
K
A4
L
B6 JIS
K
B5 JIS
L
Original size and
orientation
Copy paper size
and orientation
5
1
/2" × 81/2"
L
81/2" × 11"
K
5
1
/2" × 81/2"
K
81/2" × 11"
L
8
1
/2" × 11"
K
11" × 17"
L
AdonisC3_GBcopyF_FM1.book Page 54 Thursday, November 28, 2002 1:53 PM
Page 69
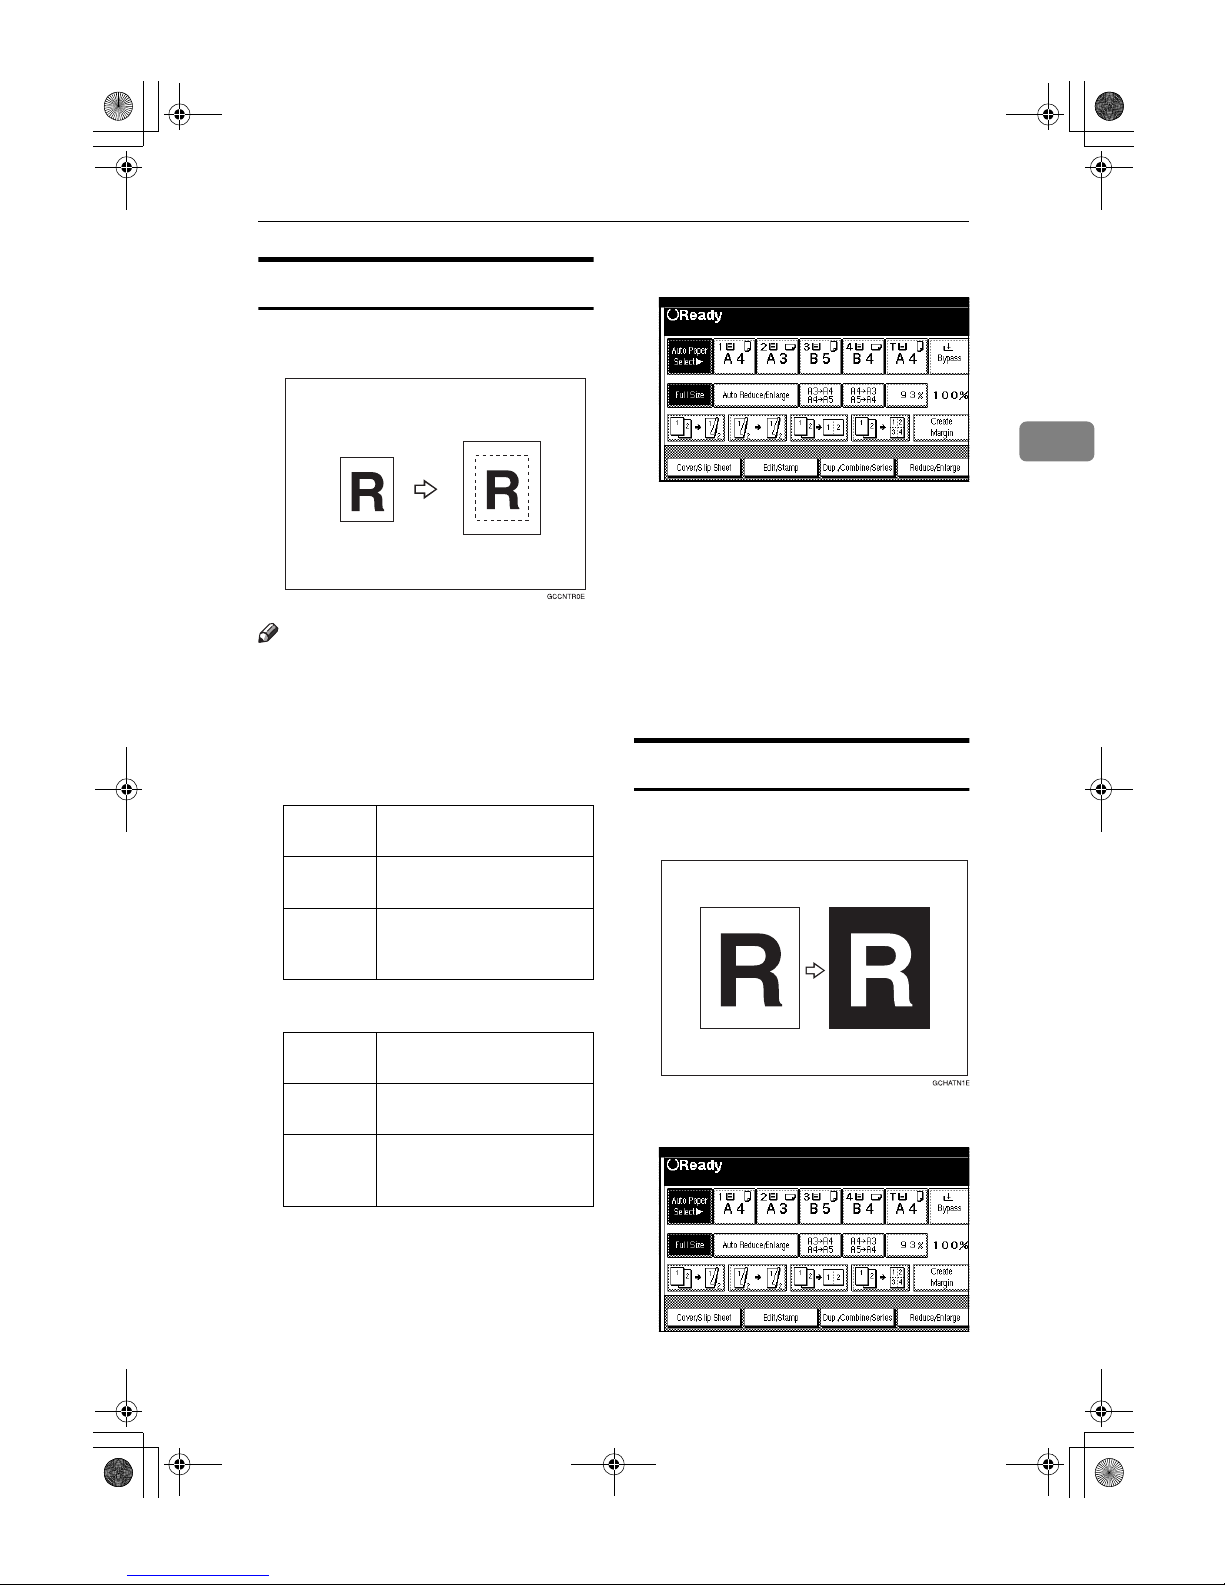
Copier Functions
55
2
Centring
You can make copies with the image
moved to the centre.
Note
❒ You cannot use the bypass tray
with this function.
❒ The original sizes and orientations
for centring are listed below.
❖❖❖❖ Metric version
❖❖❖❖ Inch version
AAAA
Select the paper.
BBBB
Press [Edit/Stamp].
CCCC
Press [Edit Image].
DDDD
Press [Centring].
EEEE
Press [OK].
FFFF
Press [OK].
GGGG
Place your originals, and then
press the {{{{Start}}}} key.
Positive/Negative
If your original is black and white,
copy images are inverted.
AAAA
Press [Edit/Stamp].
Original
placed on:
Original size and orientation
Exposure
glass
A3L, B4 JISL, A4KL, B5
JIS
KL
Auto Document
Feeder
A3L, B4 JISL, A4KL, B5
JISKL, A5KL, B6
JISKL, 11" × 17"
L
Original
placed on:
Original size and orientation
Exposure
glass
11" × 17"L, 81/2" × 14"L,
8
1
/2" × 11"
KL
Auto Document
Feeder
A3L, A4KL, 11" × 17"L,
8
1
/2" × 14"L, 81/2" × 11"K,
5
1
/2" × 81/2"
KL
AdonisC3_GBcopyF_FM1.book Page 55 Thursday, November 28, 2002 1:53 PM
Page 70
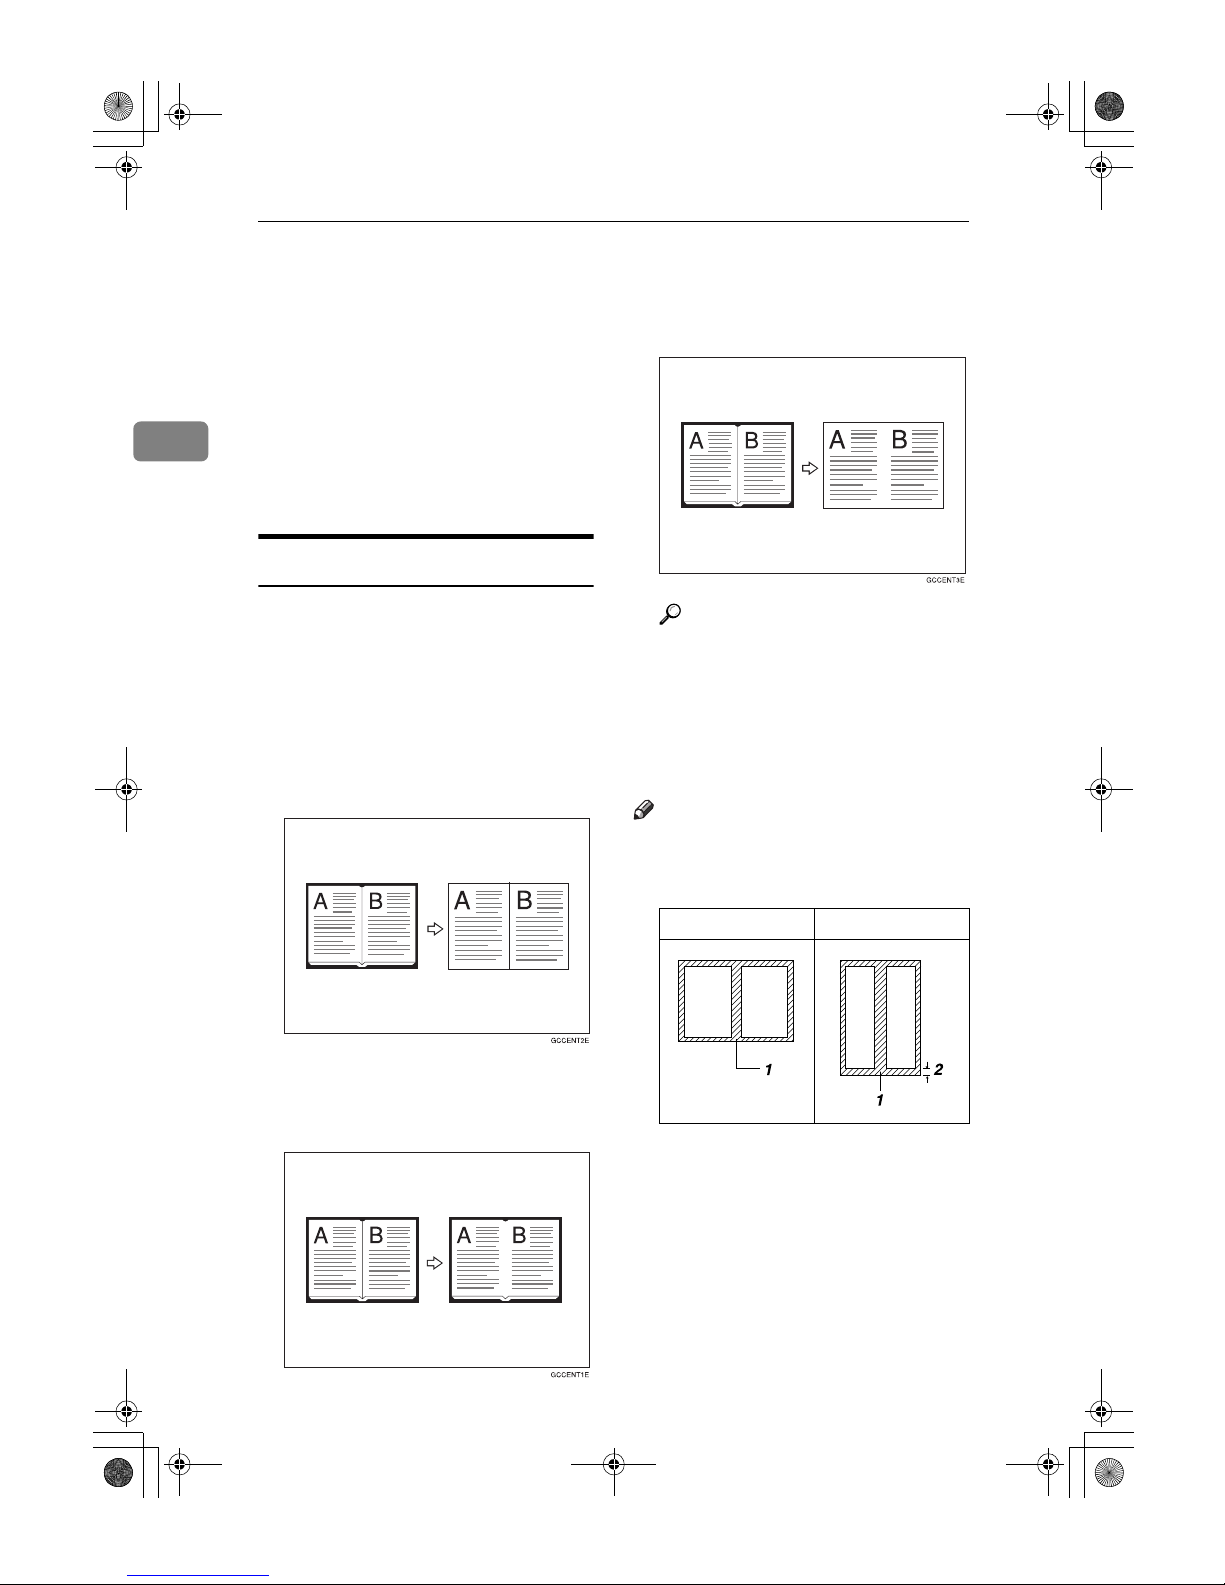
Copying
56
2
BBBB
Press [Edit Image].
CCCC
Press [Positive/Negative].
DDDD
Press [OK].
EEEE
Press [OK].
FFFF
Select the paper.
GGGG
Place your originals, and then
press the {{{{Start}}}} key.
Erase
This function erases the centre
and/or all four sides of the original
image.
This function has the following three
types:
❖❖❖❖ Border
This mode erases the edge margin
of the original image.
❖❖❖❖ Centre
This mode erases the centre margin of the original image.
❖❖❖❖ Centre/Border
This mode erases both the centre
and edge margins of the original
image.
Reference
The erase width is set to 10 mm
(0.4”) as a default. You can
change this setting with User
Tools.
p.96 “Erase Centre Width”
p.96 “Erase Border Width”
Note
❒ The relationship between the orig-
inal orientation and the erased part
is as follows:
❒ 1: Erased part
❒ 2: 2–99 mm (0.1”–3.9”)
L
original
K
original
AdonisC3_GBcopyF_FM1.book Page 56 Thursday, November 28, 2002 1:53 PM
Page 71
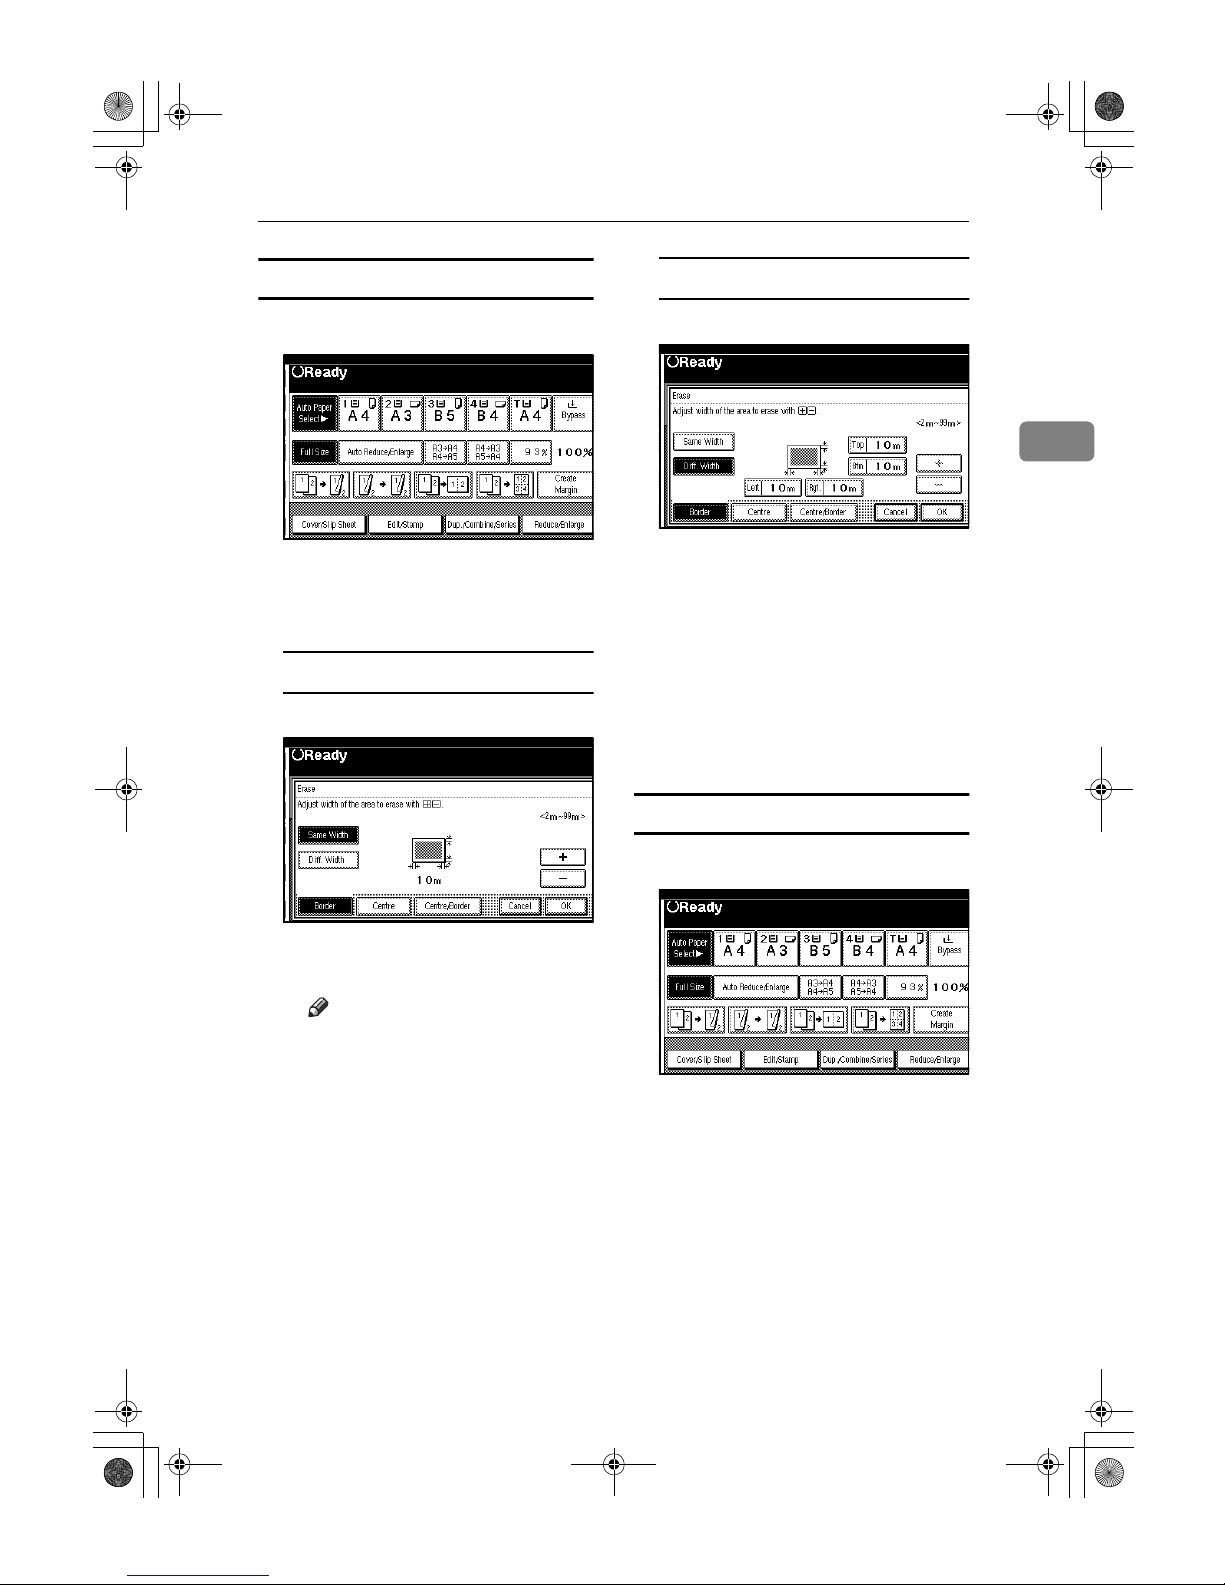
Copier Functions
57
2
Border erase
AAAA
Press [Edit/Stamp].
BBBB
Press [Erase].
CCCC
Set the erase border width.
Selecting [Same Width]
A Press [Same Width].
B Set an erase border width with
[nnnn] and [oooo].
Note
❒ To change the value entered,
press [nnnn] and [oooo] to set the
new value.
C Press [OK].
Selecting [
Diff. Width
]
A Press [Diff. Width].
B Press the key for the border
you want to change and set an
erase border width with [nnnn]
and [oooo].
C Press [OK].
DDDD
Press [OK].
EEEE
Place your originals, and then
press the {{{{Start}}}} key.
Centre erase
AAAA
Press [Edit/Stamp].
BBBB
Press [Erase].
CCCC
Press [Centre].
DDDD
Set the erase centre width with
[nnnn] and [oooo], and then press [OK].
EEEE
Press [OK].
FFFF
Place your originals, and then
press the {{{{Start}}}} key.
AdonisC3_GBcopyF_FM1.book Page 57 Thursday, November 28, 2002 1:53 PM
Page 72
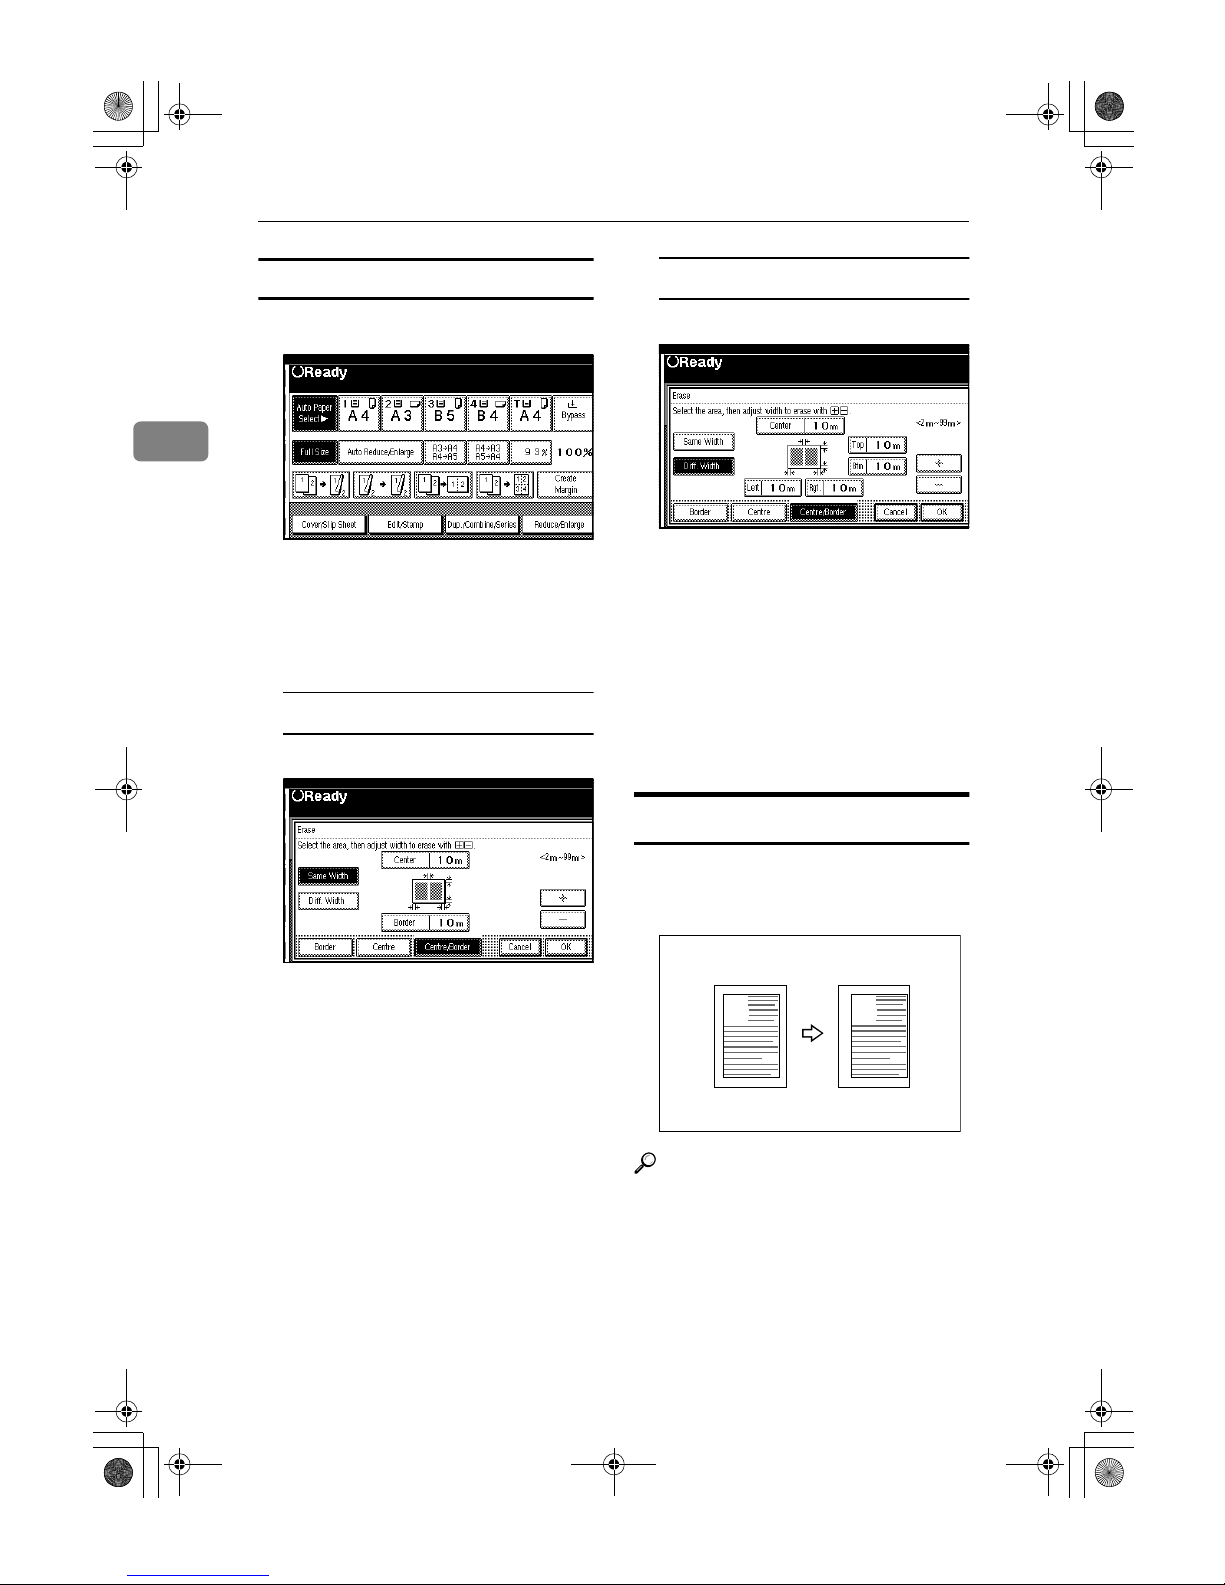
Copying
58
2
Centre/Border erase
AAAA
Press [Edit/Stamp].
BBBB
Press [Erase].
CCCC
Press [
Centre/Border
].
DDDD
Set the border to be erased.
Selecting [Same Width]
A Press [
Same Width
].
B Press [
Centre
], and then set the
erase centre width with [nnnn]
and [oooo].
C Press [Border], and then set the
erase border width with [nnnn]
and [oooo].
D Press [OK].
Selecting [
Diff. Width
]
A Press [Diff. Width].
B Press the key for the part you
want to change, and then set an
erase margin width with [nnnn]
and [oooo].
C Press [OK].
EEEE
Press [OK].
FFFF
Place your originals, and then
press the {{{{Start}}}} key.
Margin Adjustment
You can shift the image to the left,
right, top, or bottom to make a binding margin.
Reference
Related initial settings
p.95 “Front Margin: Left/Right”
p.95 “Back Margin: Left/Right”
p.95 “Front Margin: Top/Bottom”
p.95 “Back Margin: Top/Bottom”
p.95 “1 Sided→2 Sided Auto Mar-
gin: TtoT”
A
A
AdonisC3_GBcopyF_FM1.book Page 58 Thursday, November 28, 2002 1:53 PM
Page 73
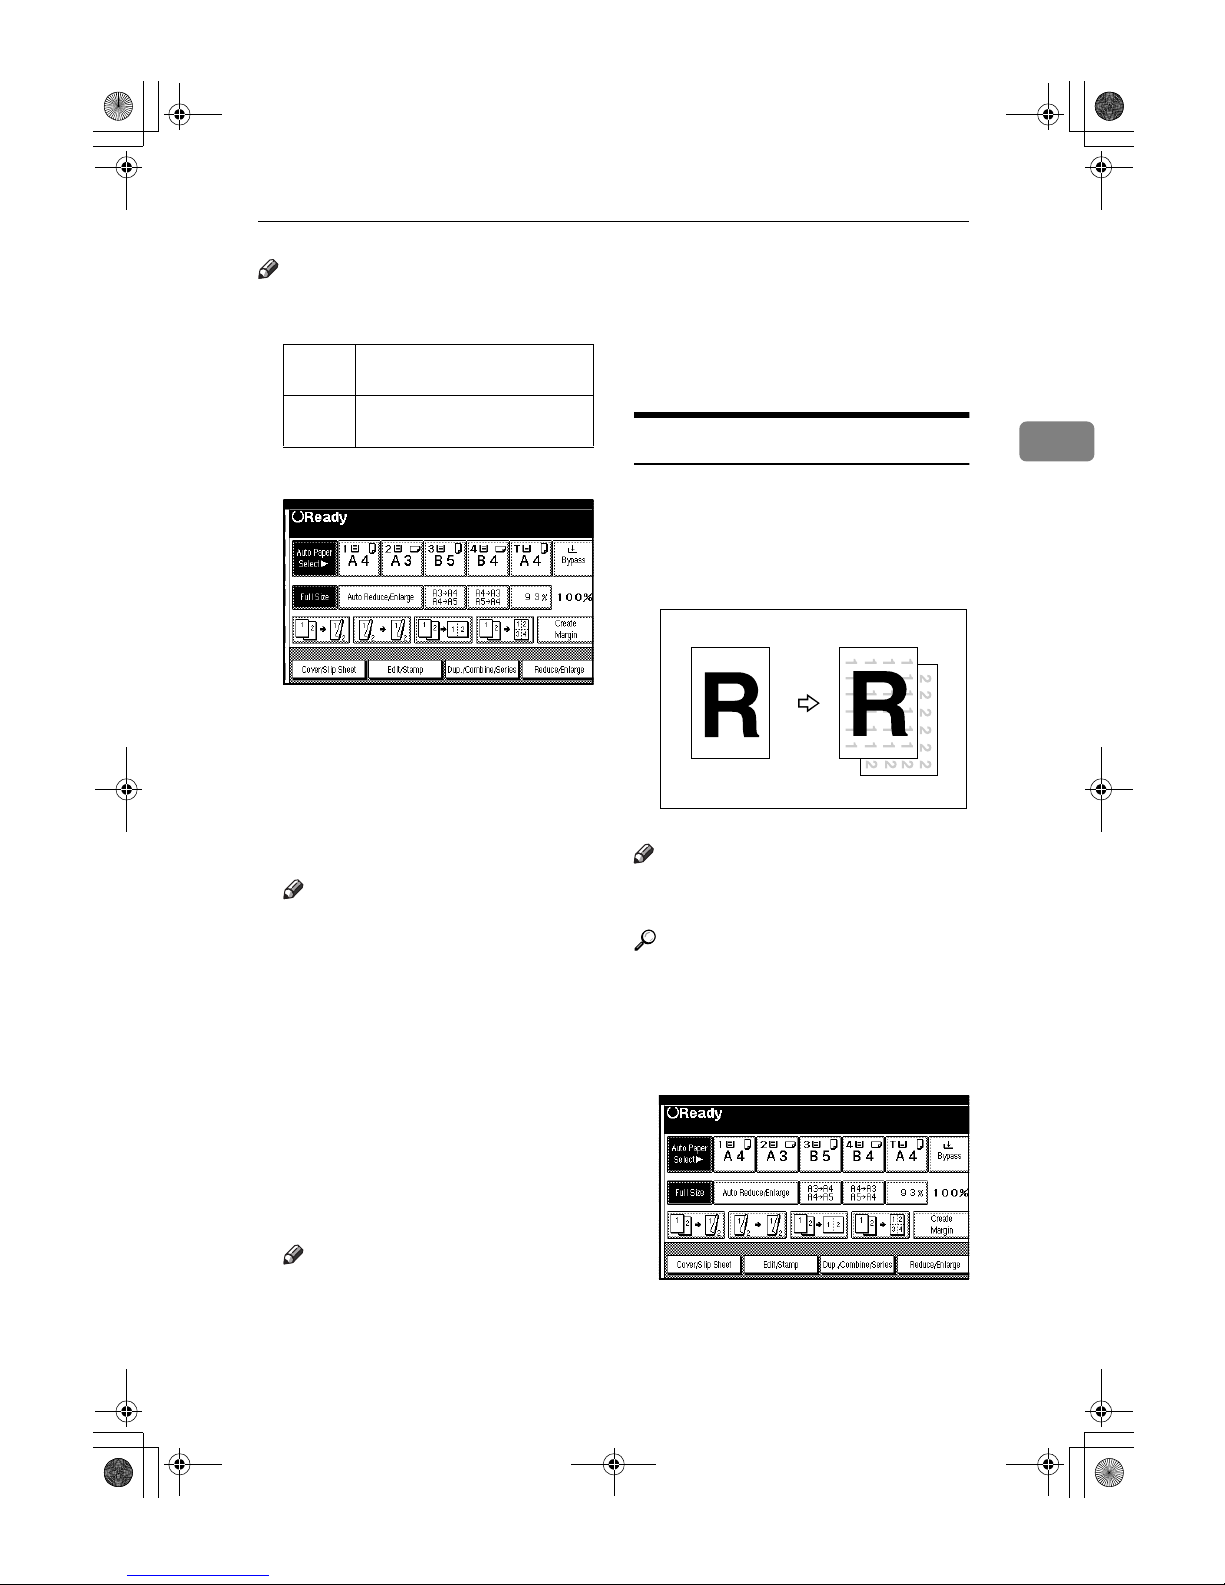
Copier Functions
59
2
Note
❒ You can change the width of the
binding margin as follows:
AAAA
Press [Edit/Stamp].
BBBB
Press [Margin Adjustment].
CCCC
Set a binding margin for a front
page. Press [←←←←] and [→→→→] when set-
ting the left and right margins,
and [↓↓↓↓] and [↑↑↑↑] when setting the
top and bottom margins.
Note
❒ To change the value entered,
press [←←←←], [→→→→], [↓↓↓↓], [↑↑↑↑] to set the
new value.
❒ If you do not need to specify the
margins for the back side pages,
press [OK] and proceed to step
E
.
DDDD
Set a binding margin for the back
side pages. Press [←←←←] and [→→→→]
when setting the left and right
margins, and [↓↓↓↓] and [↑↑↑↑] when set-
ting the top and bottom margins,
and then press [OK].
Note
❒ Margin on the back side of the
page is valid only when [2 Sided]
or [Combine 2 Side] is selected.
EEEE
Press [OK].
FFFF
Press [OK].
GGGG
Place your originals, and then
press the {{{{Start}}}} key.
Background Numbering
Use this function to have numbers
printed on the background of copies.
It can help you to keep track of confidential documents.
Note
❒ You can enter a number between 1
and 999.
Reference
Related initial settings
p.98 “Size”
p.98 “Density”
AAAA
Press [Edit/Stamp].
BBBB
Press [Stamp].
Metric
version
0–30 mm (in increments of 1
mm)
Inch
version
0"–1.2" (in increments of 0.1")
GCSTMP2E
AdonisC3_GBcopyF_FM1.book Page 59 Thursday, November 28, 2002 1:53 PM
Page 74
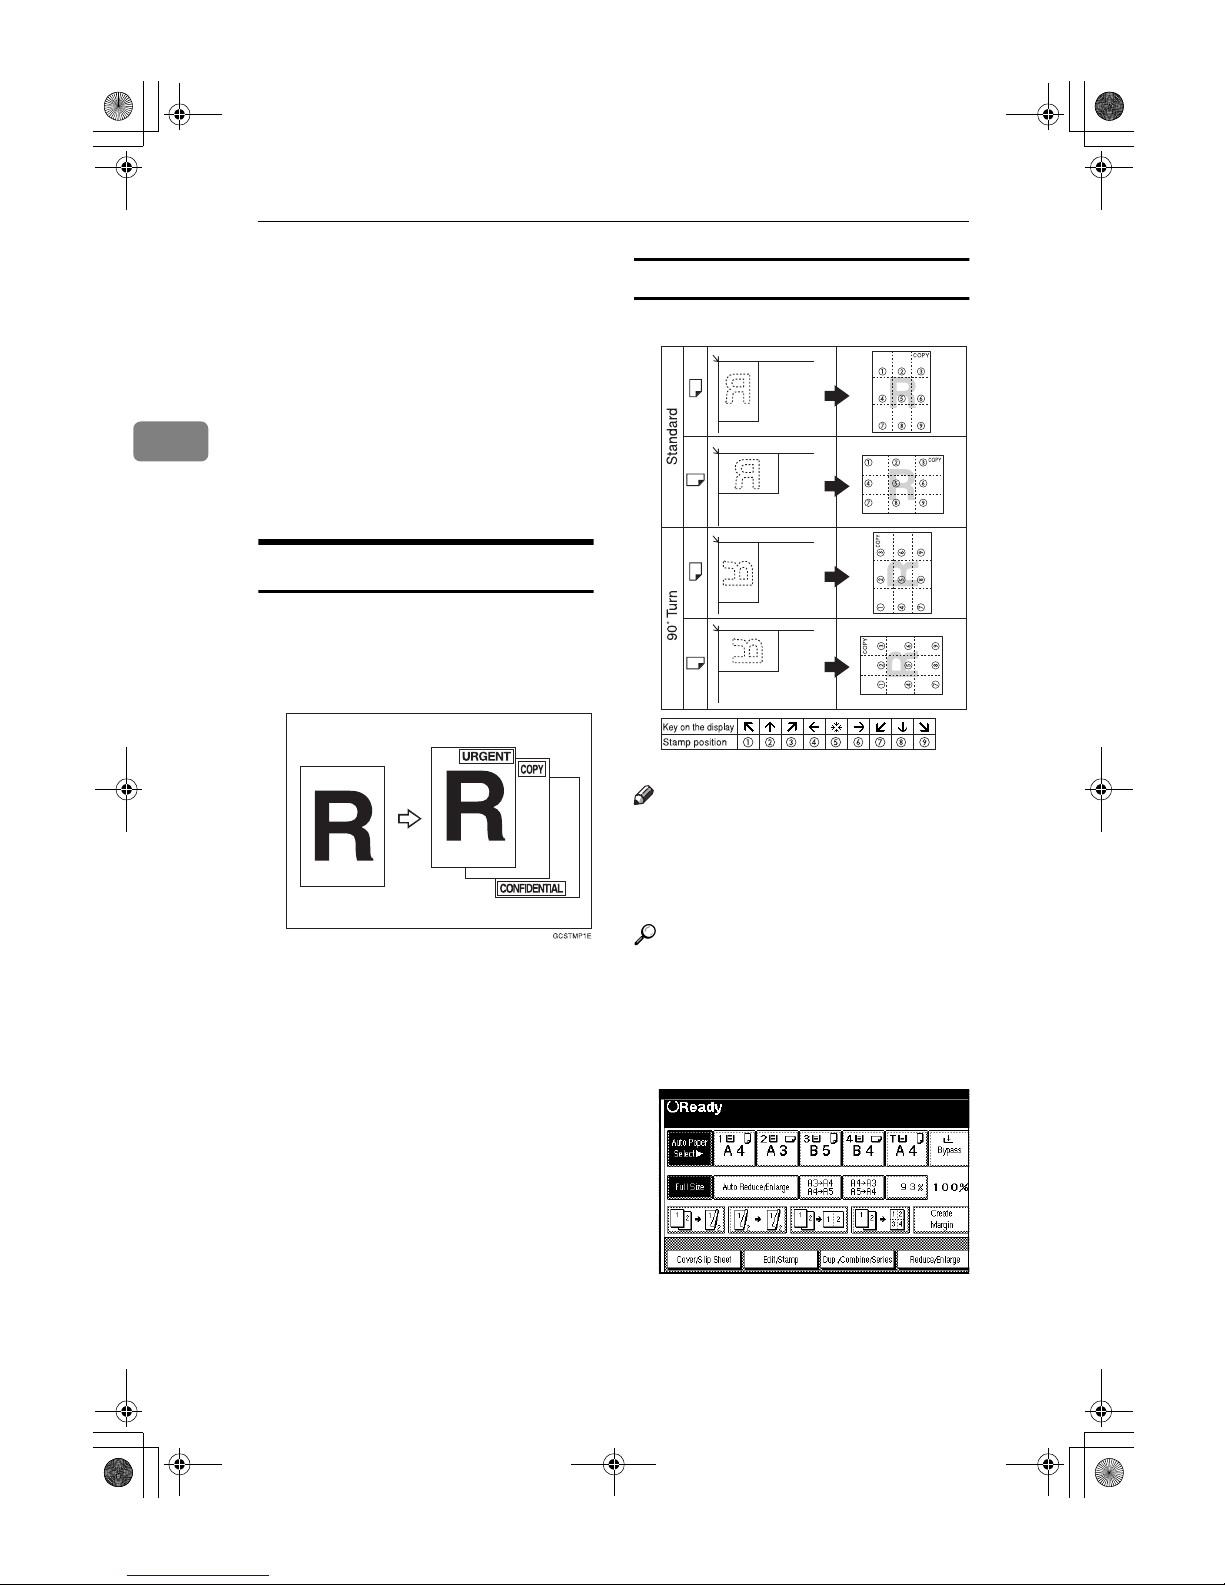
Copying
60
2
CCCC
Press [Background Numbering].
DDDD
Enter the number to start counting from with the number keys,
and then press [OK].
EEEE
Press [OK].
FFFF
Press [OK].
GGGG
Place your originals, and then
press the {{{{Start}}}} key.
Preset Stamp
Messages used frequently can be
stored in memory and stamped on
copies.
One of the following eight messages
can be stamped on copies with a
frame around it: "COPY", "URGENT",
"PRIORITY", "For Your Info.", "PRELIMINARY", "For Internal Use Only",
"CONFIDENTIAL", "DRAFT".
Stamp position and original orientation
Note
❒ You cannot use the bypass tray
with this function.
❒ Only one message can be stamped
at a time.
Reference
p.98 “Stamp Language”
p.98 “Stamp Position”
p.99 “Stamp Format”
AAAA
Press [Edit/Stamp].
BBBB
Press [
Stamp
].
GCSTMP5E
AdonisC3_GBcopyF_FM1.book Page 60 Thursday, November 28, 2002 1:53 PM
Page 75
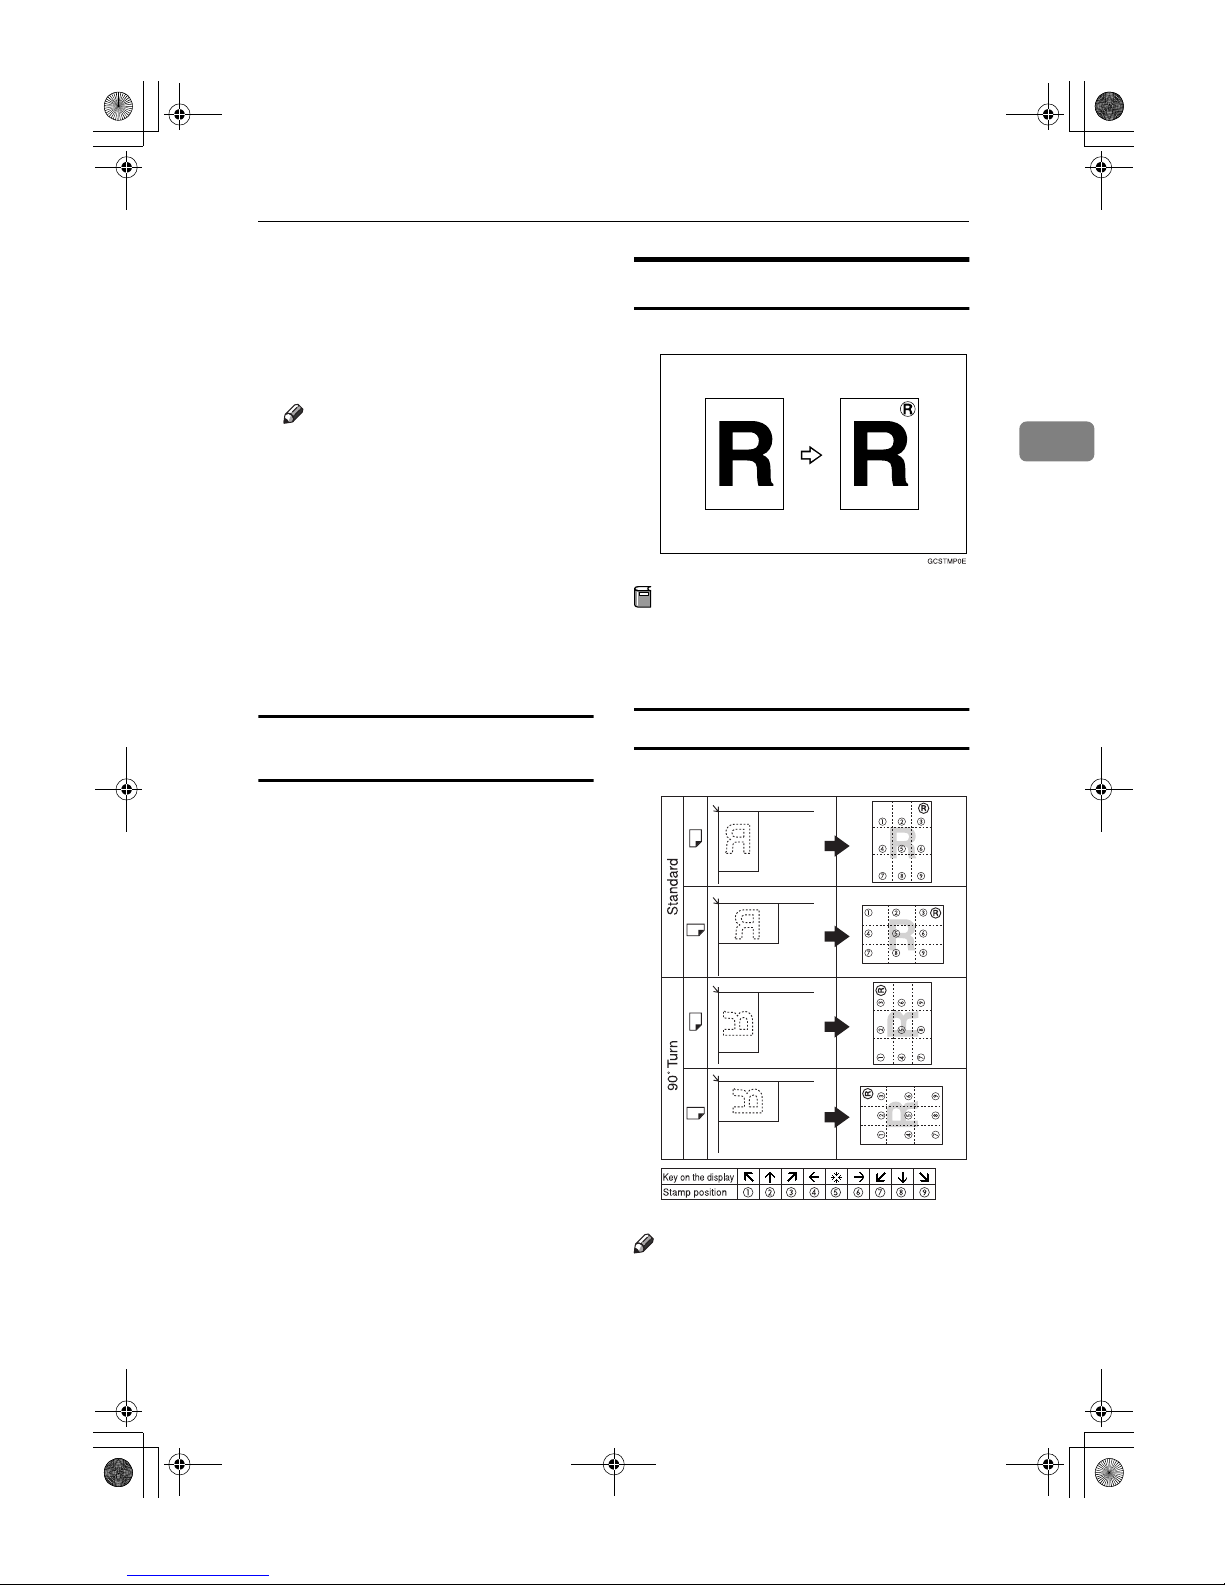
Copier Functions
61
2
CCCC
Press [Preset Stamp].
DDDD
Select the desired message.
EEEE
Press [All Pages] or [1st Page only] to
select the print page.
Note
❒ You can change the position,
size, and density of the stamp.
See p.61 “Changing the stamp
position, size and density”.
FFFF
After you specify all desired settings, press [OK].
GGGG
Press [OK].
HHHH
Place your originals, and then
press the {{{{Start}}}} key.
Changing the stamp position, size and
density
AAAA
Press [Change].
BBBB
Select the position for print, size,
and density, and then press [OK].
User Stamp
Copies with the registered stamp.
Preparation
You have to register a user stamp
before using this function. See p.62
“To program the user stamp”
Stamp position and original orientation
Note
❒ You cannot use the bypass tray
with this function.
❒ Only one message can be stamped
at a time.
GCSTMP6E
AdonisC3_GBcopyF_FM1.book Page 61 Thursday, November 28, 2002 1:53 PM
Page 76
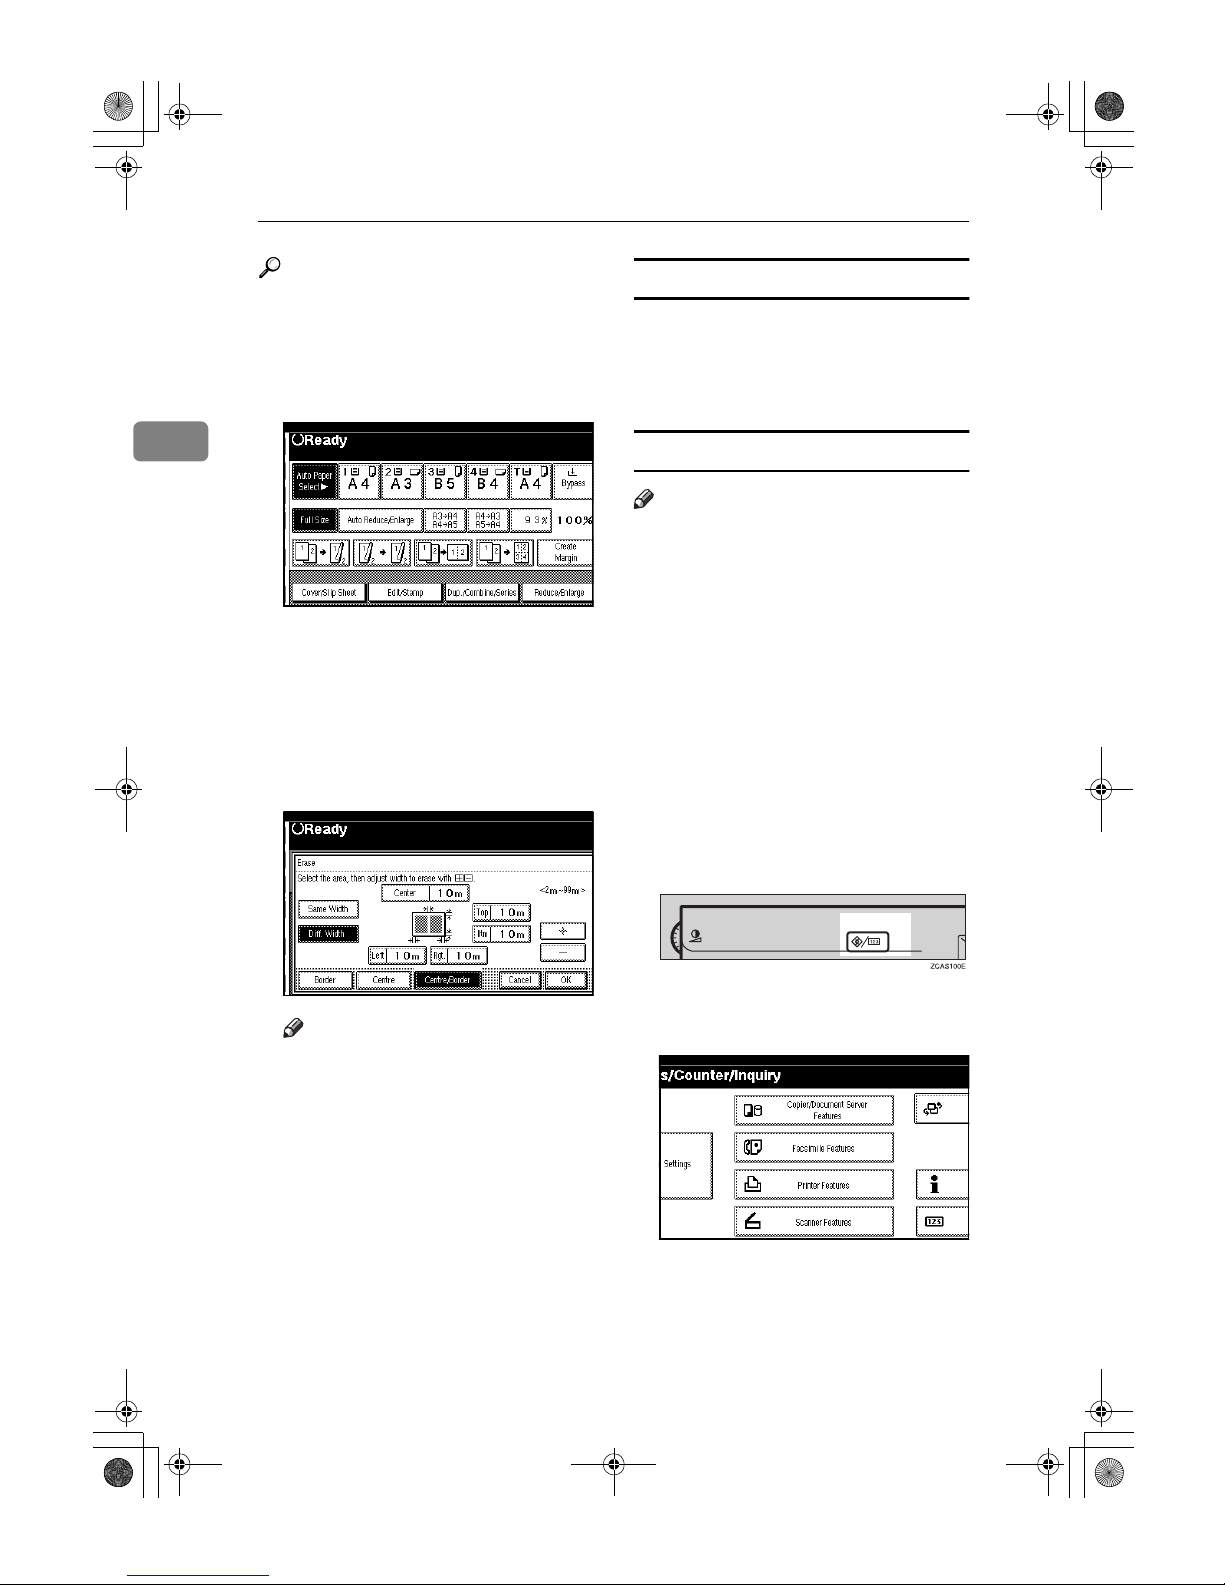
Copying
62
2
Reference
Related initial settings
p.99 “Stamp Position 1 - 4”
p.99 “Stamp Format 1 - 4”
AAAA
Press [Edit/Stamp].
BBBB
Press [Stamp].
CCCC
Press [User Stamp].
DDDD
Select the stamp you require.
EEEE
Press [All Pages] or [1st Page only] to
select the print page.
Note
❒ You can change the stamp posi-
tion. See p.62 “To change the
stamp position”.
FFFF
After making all settings, press
[OK].
GGGG
Press [OK].
HHHH
Place the original, and then press
the {{{{Start}}}} key.
To change the stamp position
AAAA
Press [Change].
BBBB
Select the desired position, and
then press [OK].
To program the user stamp
Note
❒ The range of stamp images for
readability is 10–297 mm high
(0.4"–11.7") and 10–432 mm (0.4"–
17") wide. However, if the value
exceeds the maximum value of the
area (5,000 mm
2
, 7.75 inch2), it is
corrected within the range of the
area automatically.
❒ Up to four images that you use fre-
quently can be stored in the machine's memory.
AAAA
Make sure that the machine is in
copier mode.
BBBB
Press the {{{{User Tools/Counter}}}} key.
CCCC
Press [Copier/Document Server Fea-
tures].
DDDD
Press [Stamp].
EEEE
Press [User Stamp].
AdonisC3_GBcopyF_FM1.book Page 62 Thursday, November 28, 2002 1:53 PM
Page 77
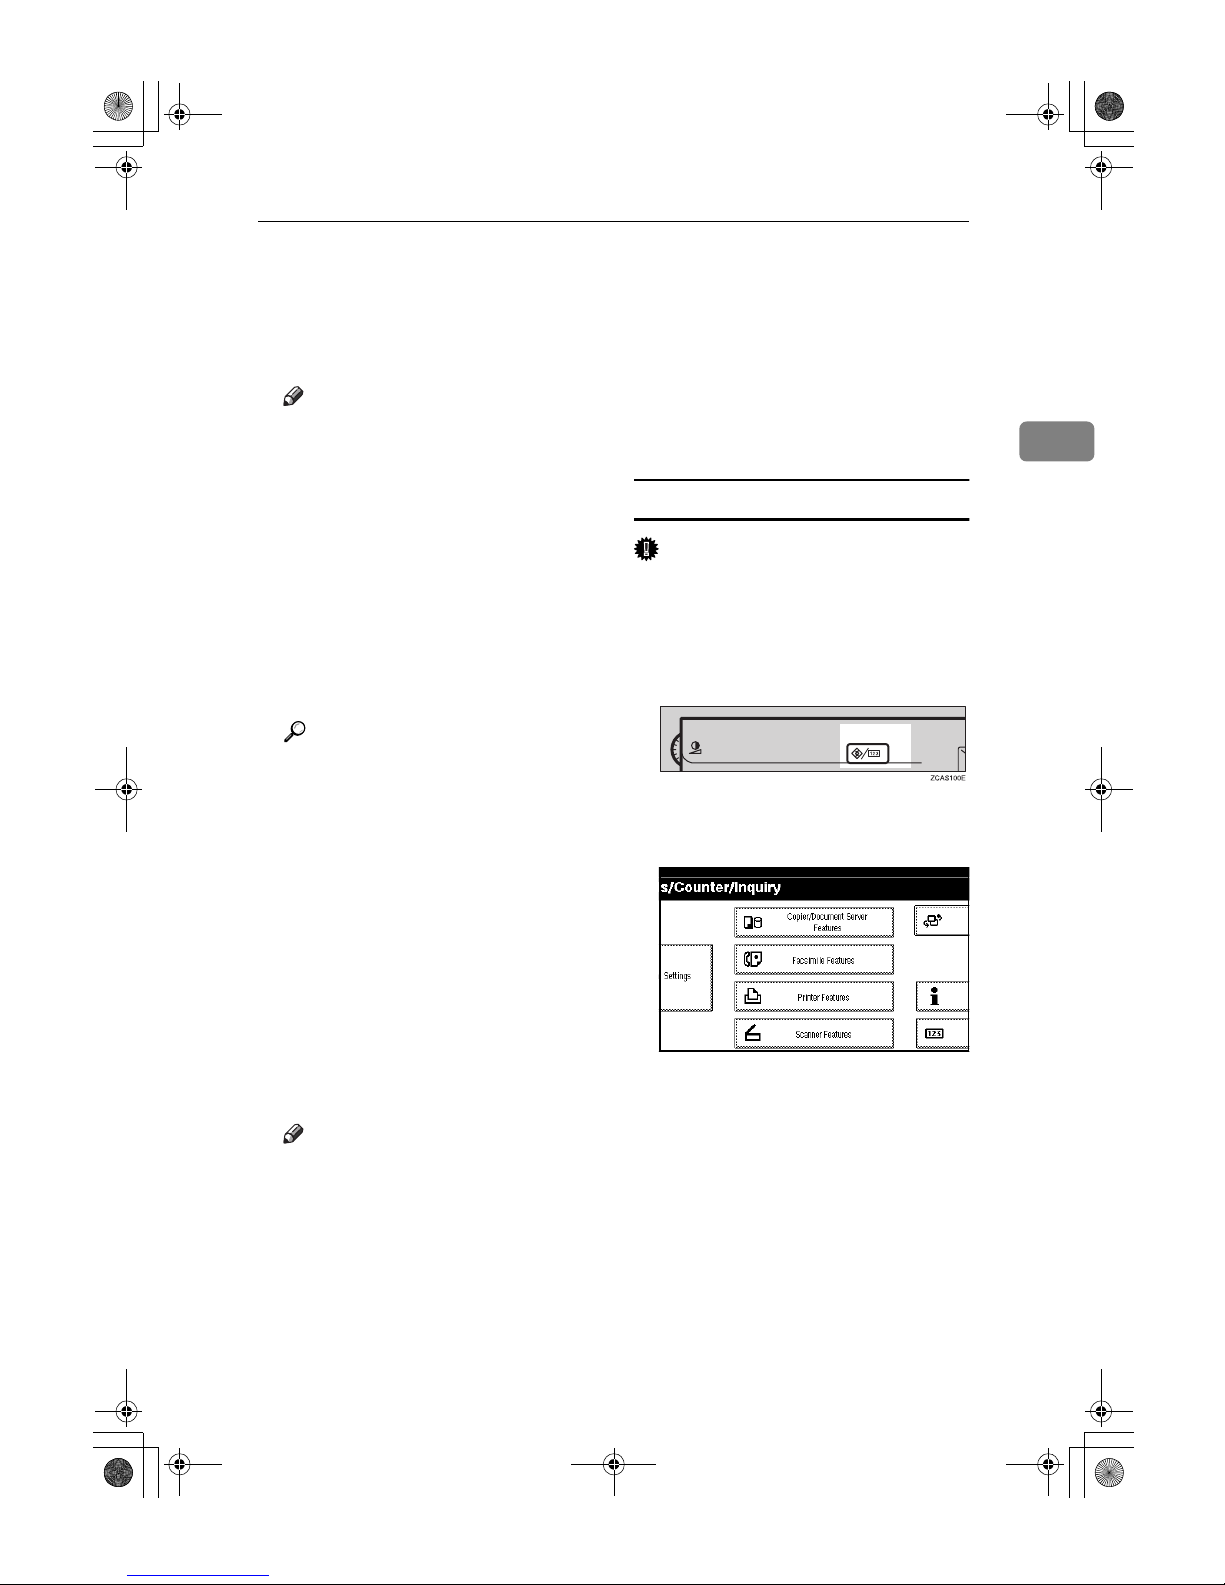
Copier Functions
63
2
FFFF
Press [Program/Delete Stamp].
GGGG
Press [Program], and then press the
stamp number (1–4) you want to
program.
Note
❒ Stamp numbers with m already
have settings in them.
❒ If the stamp number is already
being used, the machine will
ask you if you want to overwrite it . Press [Yes] or [No].
HHHH
Enter the user stamp name with
the letter keys on the display panel. You can register up to 10 characters.
IIII
Press [OK].
Reference
“Entering Text”, General Set-
tings Guide
JJJJ
Enter the horizontal size of the
stamp with the number keys, and
then press [#].
KKKK
Press [Vertical], and then enter the
vertical size in the same way as
step
JJJJ
.
LLLL
Place the original for user stamp
on the exposure glass, and then
press [Start Scanning].
The original will be scanned, and
the stamp will be registered.
Note
❒ Originals cannot be scanned
from the ADF when programming the user stamp.
MMMM
Press [Exit].
NNNN
Press [Exit].
The display returns to the Copier/Document Server Features
main menu.
OOOO
Press [Exit].
Exits settings and gets ready to
copy.
To delete the user stamp
Important
❒
You cannot restore a deleted stamp.
AAAA
Make sure that the machine is in
copier mode.
BBBB
Press the {{{{User Tools/Counter}}}} key.
CCCC
Press [Copier/Document Server Fea-
tures].
DDDD
Press [
Stamp
].
EEEE
Press [User Stamp].
FFFF
Press [Program/Delete Stamp].
GGGG
Press [
Delete
], and then press the
stamp number you want to delete.
HHHH
Select [
Delete
], and then press [
Ex-
it
].
AdonisC3_GBcopyF_FM1.book Page 63 Thursday, November 28, 2002 1:53 PM
Page 78
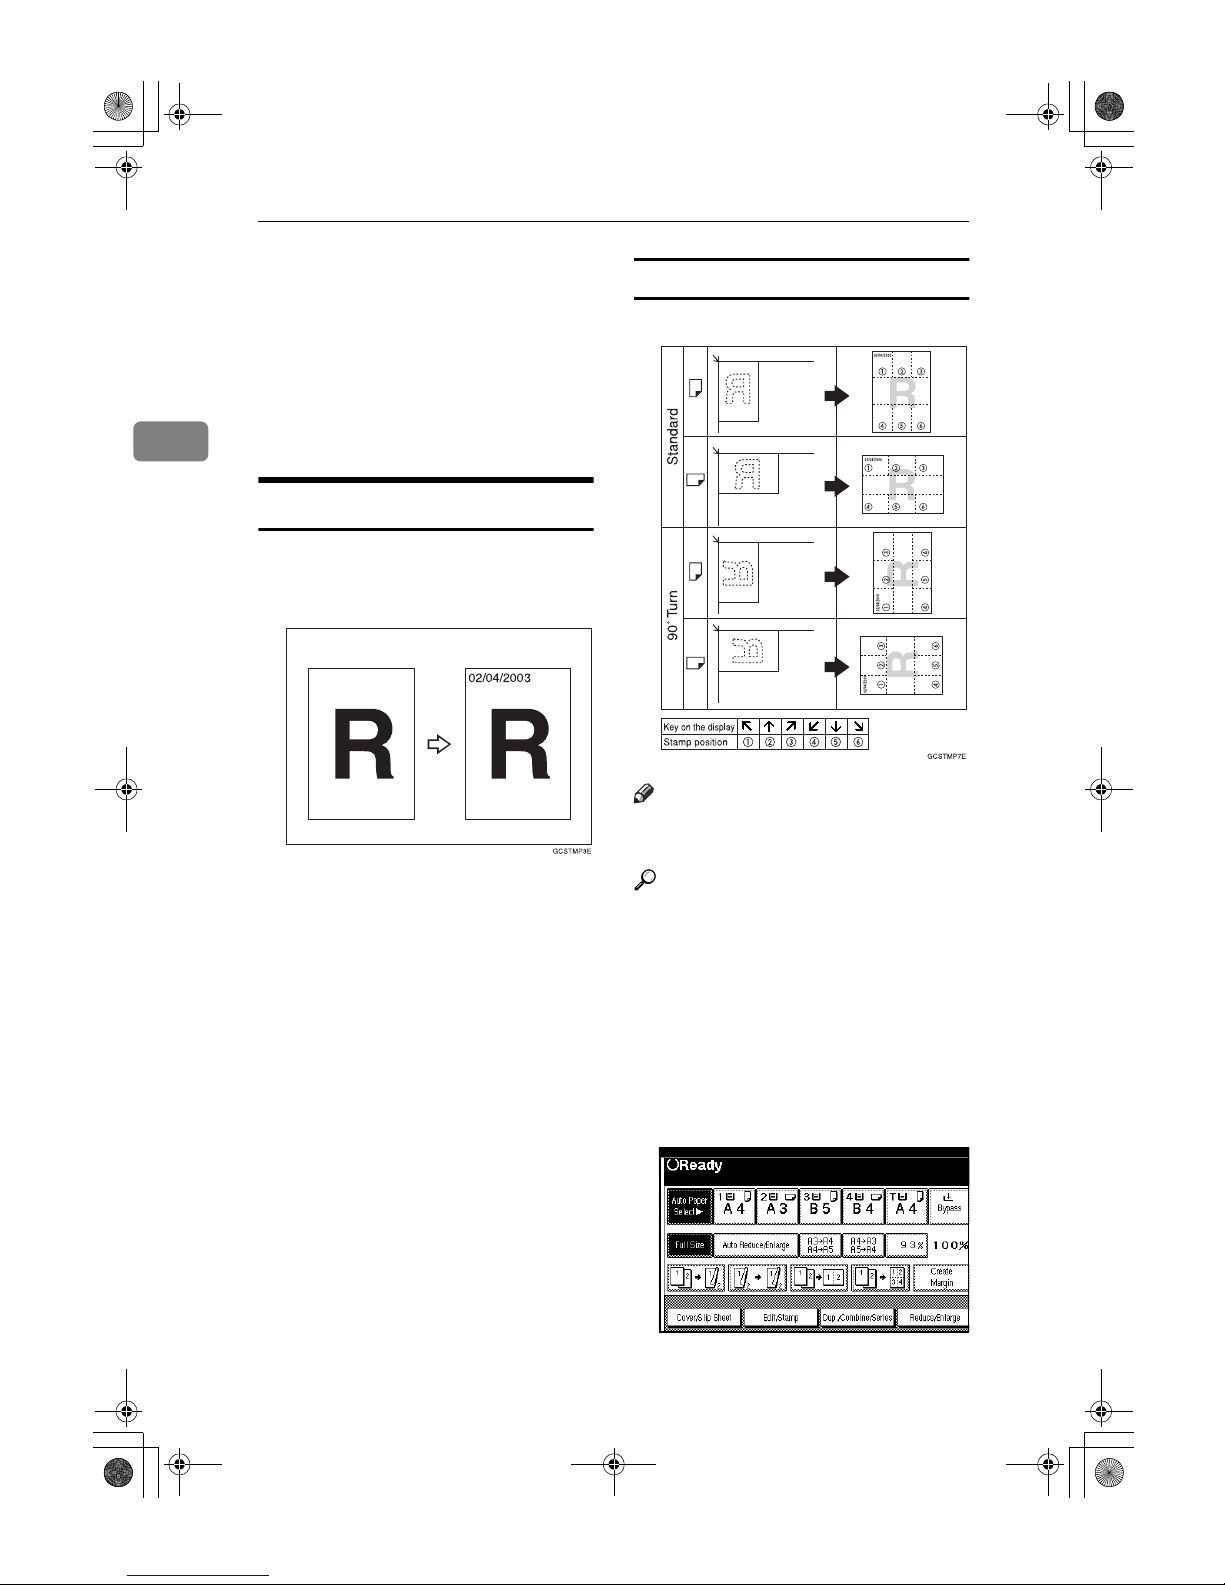
Copying
64
2
IIII
Press [Exit].
The display returns to the Copier/Document Server Features
main menu.
JJJJ
Press [Exit].
Exits settings and gets ready to
copy.
Date Stamp
Use this function to print dates on
your copies.
You can select from the following
styles:
• MM/DD/YYYY
• MM.DD.YYYY
• DD/MM/YYYY
• DD.MM.YYYY
• YYYY.MM.DD
Stamp position and original orientation
Note
❒ You cannot use the bypass tray
with this function.
Reference
Related initial settings
p.100 “Font”
p.100 “Size”
p.100 “Superimpose”
p.100 “Stamp Position”
“Timer Settings”, General Settings
Guide
AAAA
Press [
Edit/Stamp
].
AdonisC3_GBcopyF_FM1.book Page 64 Thursday, November 28, 2002 1:53 PM
Page 79
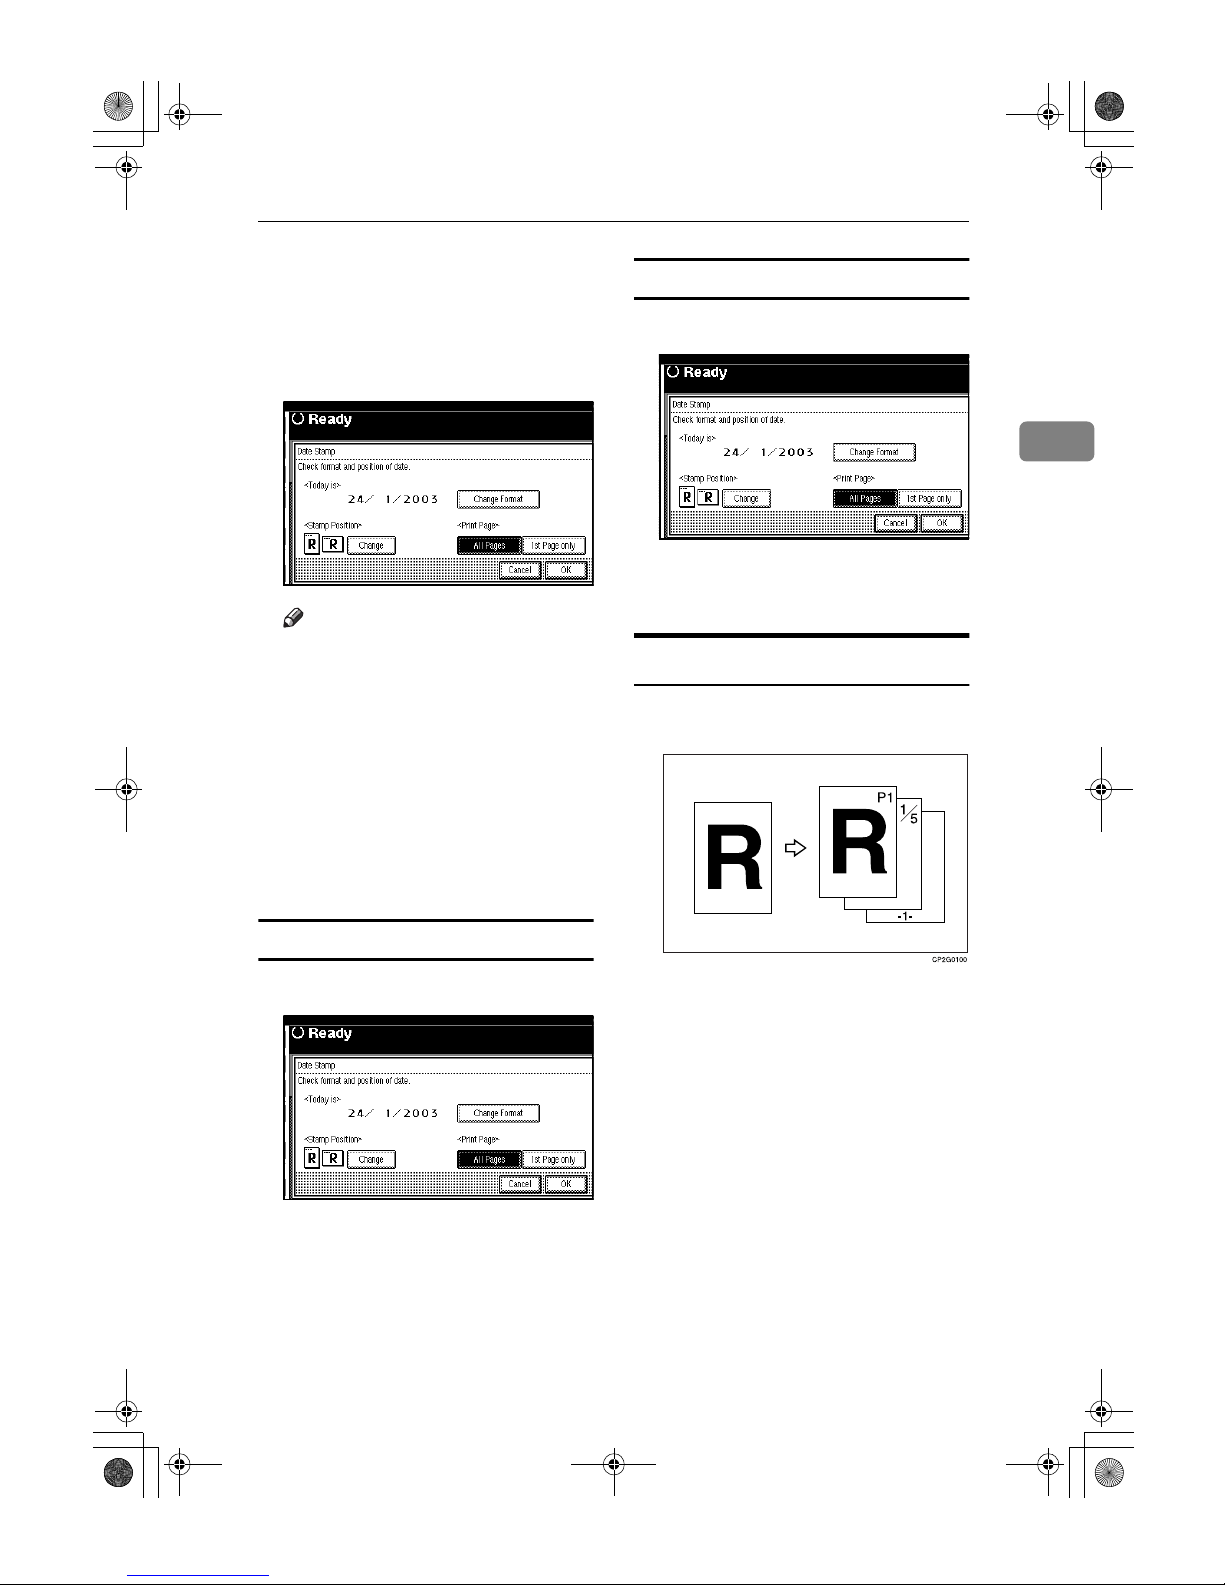
Copier Functions
65
2
BBBB
Press [Stamp].
CCCC
Press [Date Stamp].
DDDD
Press [All Pages] or [1st Page only] to
select the print page.
Note
❒ You can change the font and po-
sition of the date to be stamped.
See p.65 “To change the style of
date”.
EEEE
After all settings are complete,
press [OK].
FFFF
Press [OK].
GGGG
Place the original, and then press
the {{{{Start}}}} key.
To change the style of date
AAAA
Press [
Change Format
].
BBBB
Select the date format, and then
press [OK].
To change the stamp position
AAAA
Press [Change].
BBBB
Select the desired date stamp position, and then press [OK].
Page Numbering
Use this function to print page numbers on your copies.
There are six types of Page Numbering (n is the total number of pages in
your original):
• P1, P2,…Pn
• 1/n, 2/n,...n/n
• -1-, -2-,...-n-
• P.1, P.2 ...P.n
• 1, 2…n
• 1-1, 1-2,..1-n
AdonisC3_GBcopyF_FM1.book Page 65 Thursday, November 28, 2002 1:53 PM
Page 80
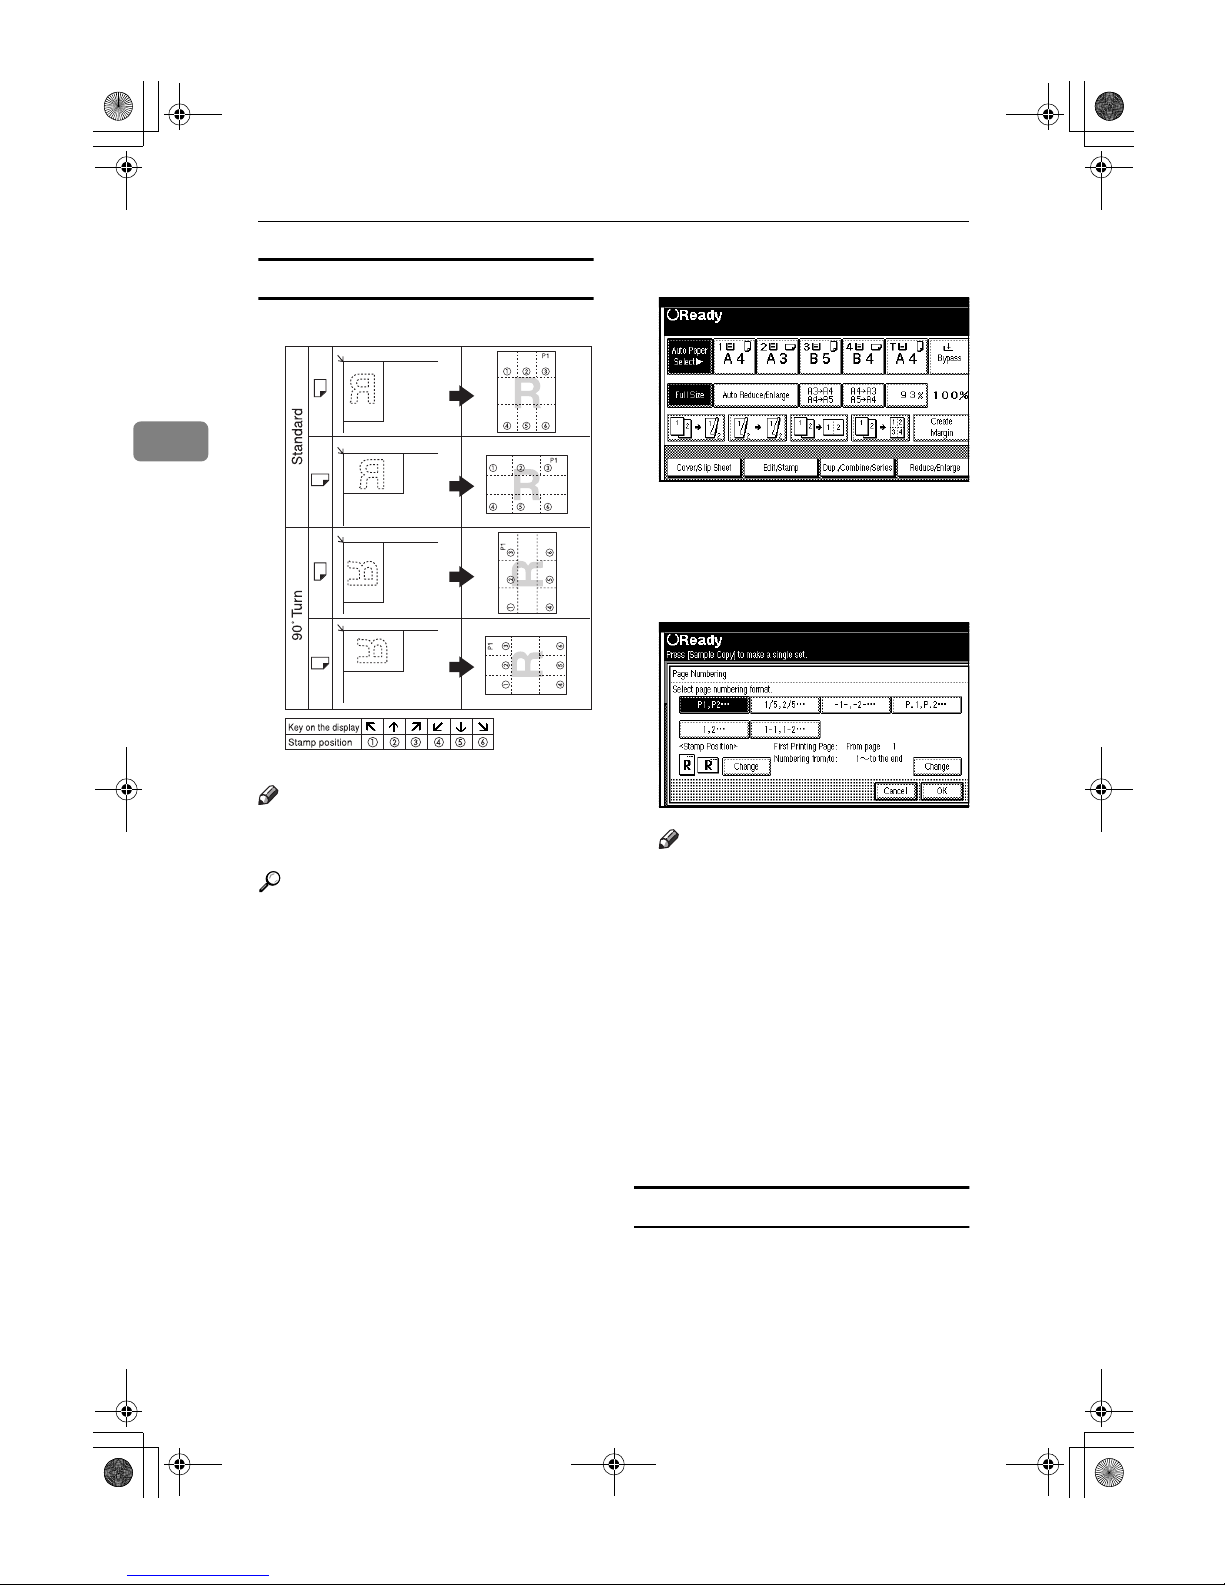
Copying
66
2
Stamp position and original orientation
Note
❒ You cannot use the bypass tray
with this function.
Reference
Related initial settings
p.100 “Font”
p.100 “Size”
p.101 “Superimpose”
p.100 “Stamp Format”
p.100 “Duplex Back Page Stamping Position”
p.101 “Stamp Position”
p.101 “Stamp on Designated Slip
Sheet”
AAAA
Press [Edit/Stamp].
BBBB
Press [Stamp].
CCCC
Press [Page Numbering].
DDDD
Select the format.
Note
❒ You can specify the stamp posi-
tion, pages to be stamped, and
numbering. See p.66 “Changing
the stamp position” and p.67
“Specify the first printing page
and what page to number”.
EEEE
After you specify all desired settings, press [OK].
FFFF
Press [OK].
GGGG
Place the originals, and then press
the {{{{Start}}}} key.
Changing the stamp position
AAAA
Press [Change].
BBBB
Select the desired position, and
then press [OK].
GCSTMP8E
AdonisC3_GBcopyF_FM1.book Page 66 Thursday, November 28, 2002 1:53 PM
Page 81
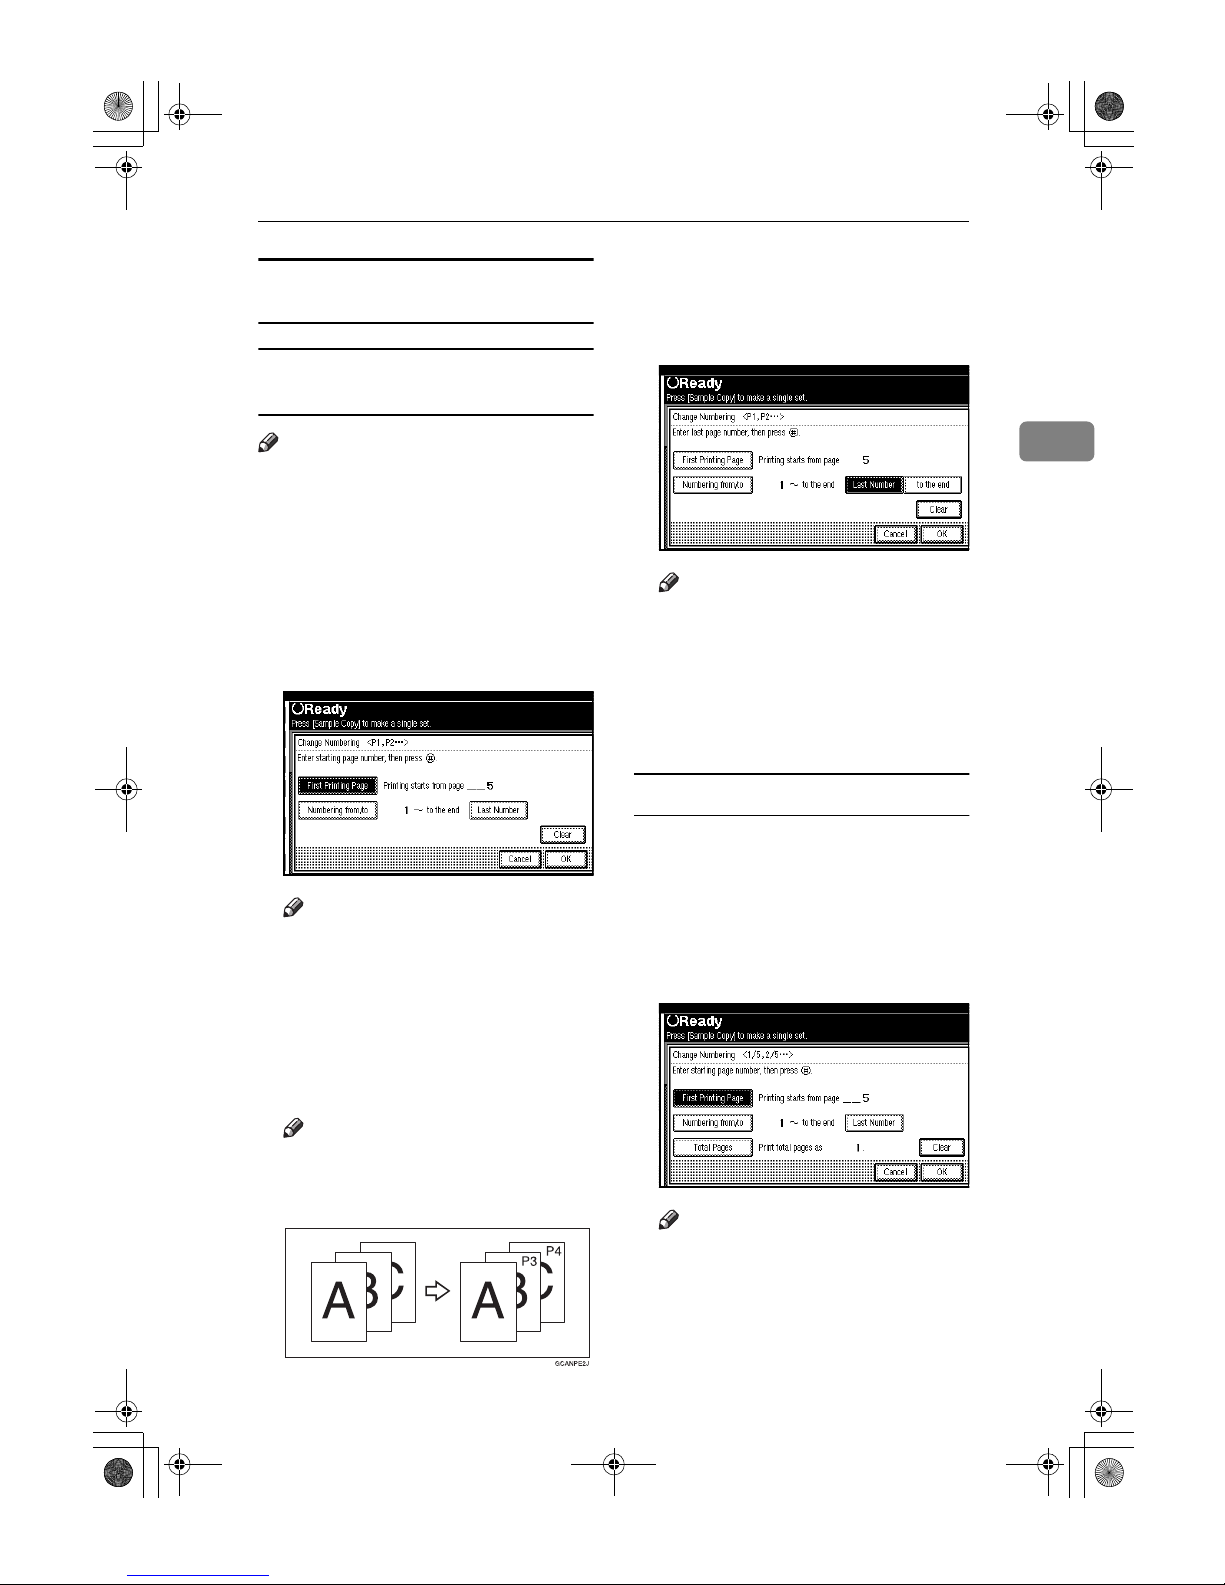
Copier Functions
67
2
Specify the first printing page and what
page to number
If you selected (P1, P2…, -1-,-2-…,
P.1, P.2…, 1, 2…, )
Note
❒ Below explains the example when
(P1, P2...) is selected. The steps are
the same for other cases.
AAAA
Press [Change] on the right side.
BBBB
Press [First Printing Page], and then
enter the original sheet number
from which to start printing, and
then press the {{{{#}}}} key.
Note
❒ To change the number entered,
press [
Clear
] or the
{{{{Clear/Stop}}}}
key, and then enter a new number.
CCCC
Press [Numbering from/to], enter the
number of the page from which to
start numbering with the number
keys, and then press the {{{{#}}}} key.
Note
❒ The example below shows when
the first printing page is “2”and
the start number is “3”.
DDDD
Press [Last Number], enter the
number of the page at which to
stop numbering with the number
keys, and then press the {{{{#}}}} key.
Note
❒ If you want to number all pages
to the end, press [to the end].
EEEE
When page designation is complete, press [OK].
FFFF
Press [OK].
If you selected (1/5, 2/5…)
AAAA
Press [Change] on the right hand
side.
BBBB
Press [First Printing Page], and then
enter the original sheet number
from which to start printing, and
then press the {{{{#}}}} key.
Note
❒ You can enter between 1 and
999 for the original sheet
number from which to start
printing.
AdonisC3_GBcopyF_FM1.book Page 67 Thursday, November 28, 2002 1:53 PM
Page 82
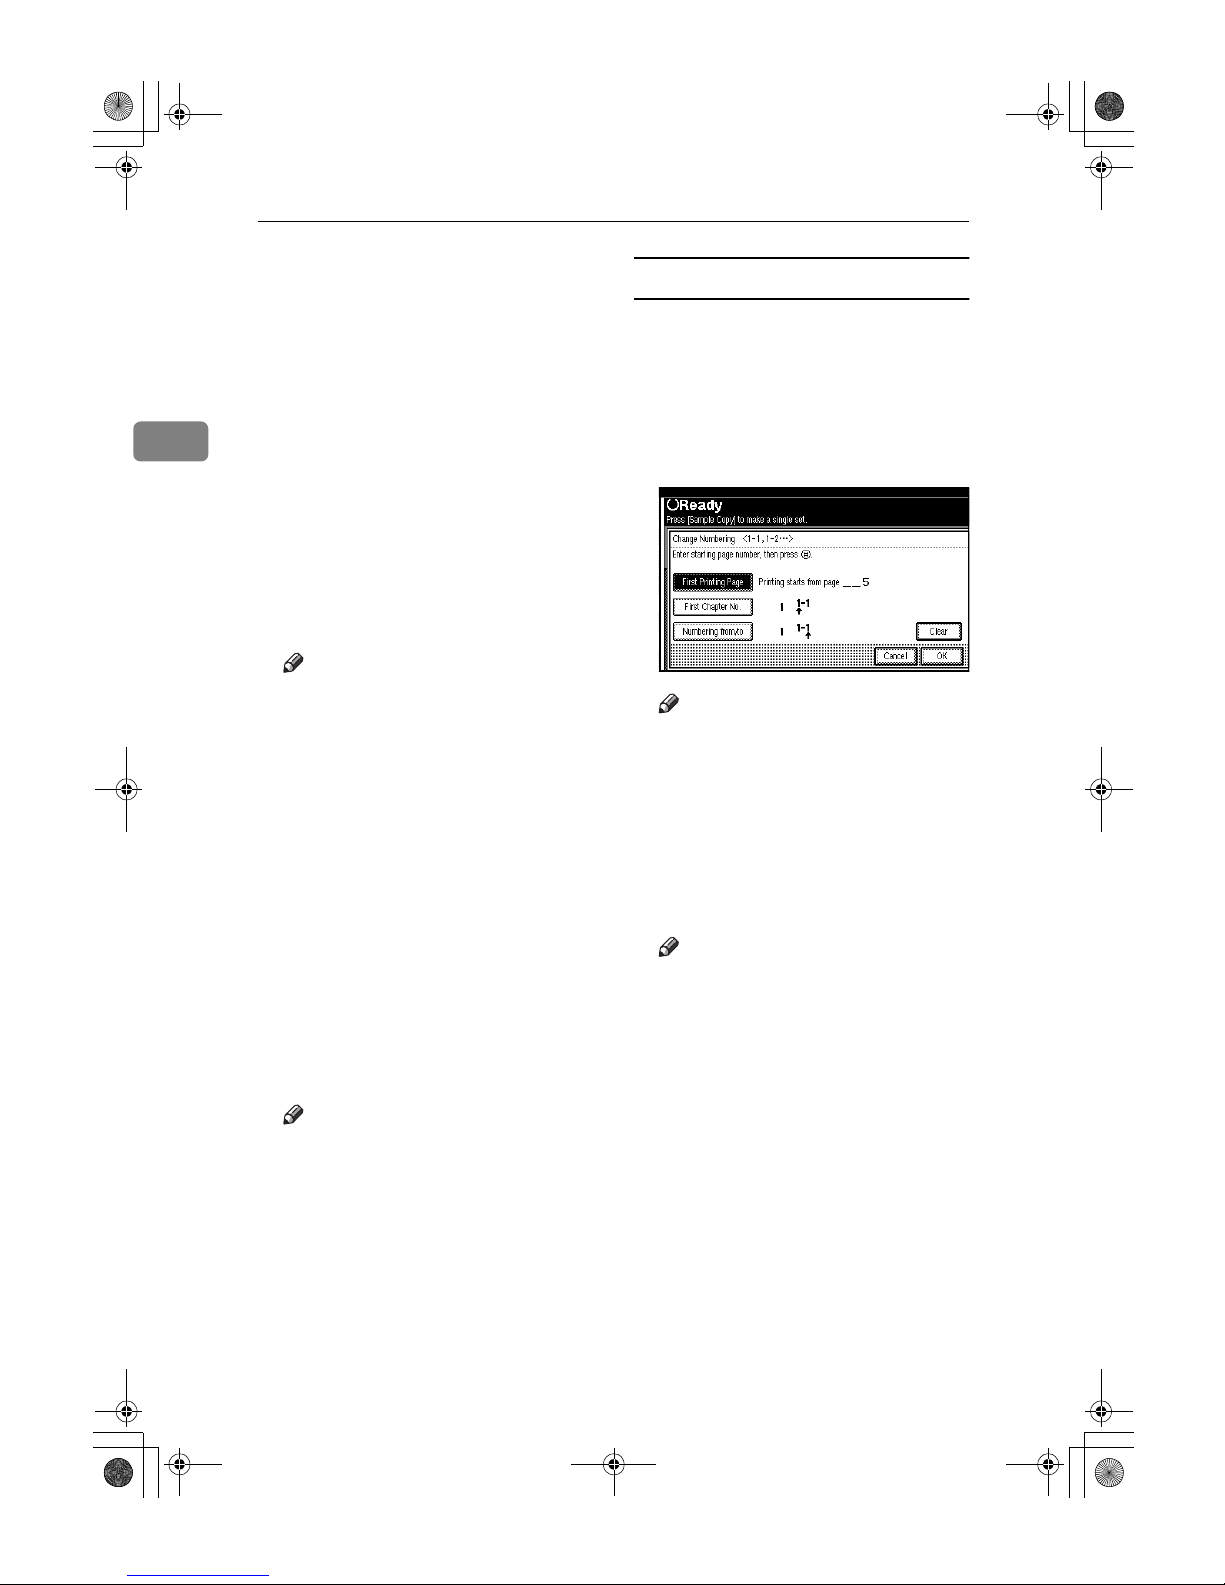
Copying
68
2
❒ To change the number entered,
press [Clear] or the {{{{Clear/Stop}}}}
key, and then enter a new
number.
CCCC
Press [Numbering from/to], and then
enter the number of page from
which to start numbering with
the number keys, and then press
the {{{{#}}}} key.
DDDD
Press [Last Number], and then enter
the number of page at which to
stop numbering with the number
keys, and then press the {{{{#}}}} key.
Proceed to step E when not changing .
Note
❒ If you want to print on the last
page, press [to the end].
❒ The last number is the last page
number to print. For example, if
[
Total Pages
] is ten, if you want
to print up to seven pages and
do not want to print from page
8 on, enter [7] for [Last Number].
Normally, you do not need to
enter the number.
EEEE
Press [
Total Pages
], enter the total
number of original pages with the
number keys, and then press the
{{{{#}}}} key.
FFFF
When page designation is complete, press [OK].
Note
❒ To change the settings after
pressing [OK], press [
Change
],
and then enter the numbers
again.
If you selected (1-1, 1-2,…)
AAAA
Press [Change ] on the right hand
side.
BBBB
Press [
First Printing Page
], and then
enter the original sheet number
from which to start printing, and
then press the {{{{#}}}} key.
Note
❒ To change the number entered,
press [Clear] or the {{{{Clear/Stop}}}}
key, and then enter a new
number.
CCCC
Press [First Chapter No.], enter the
chapter number from which to
start numbering with the number
keys, and then press the {{{{#}}}} key.
Note
❒ You can enter between 1 and
999 for the chapter number
from which to start numbering.
DDDD
Press [Numbering from/to], and then
enter the page number from
which to start printing with the
number keys, and then press the
{{{{#}}}} key.
EEEE
Press [OK].
FFFF
When page designation is complete, press [OK].
AdonisC3_GBcopyF_FM1.book Page 68 Thursday, November 28, 2002 1:53 PM
Page 83
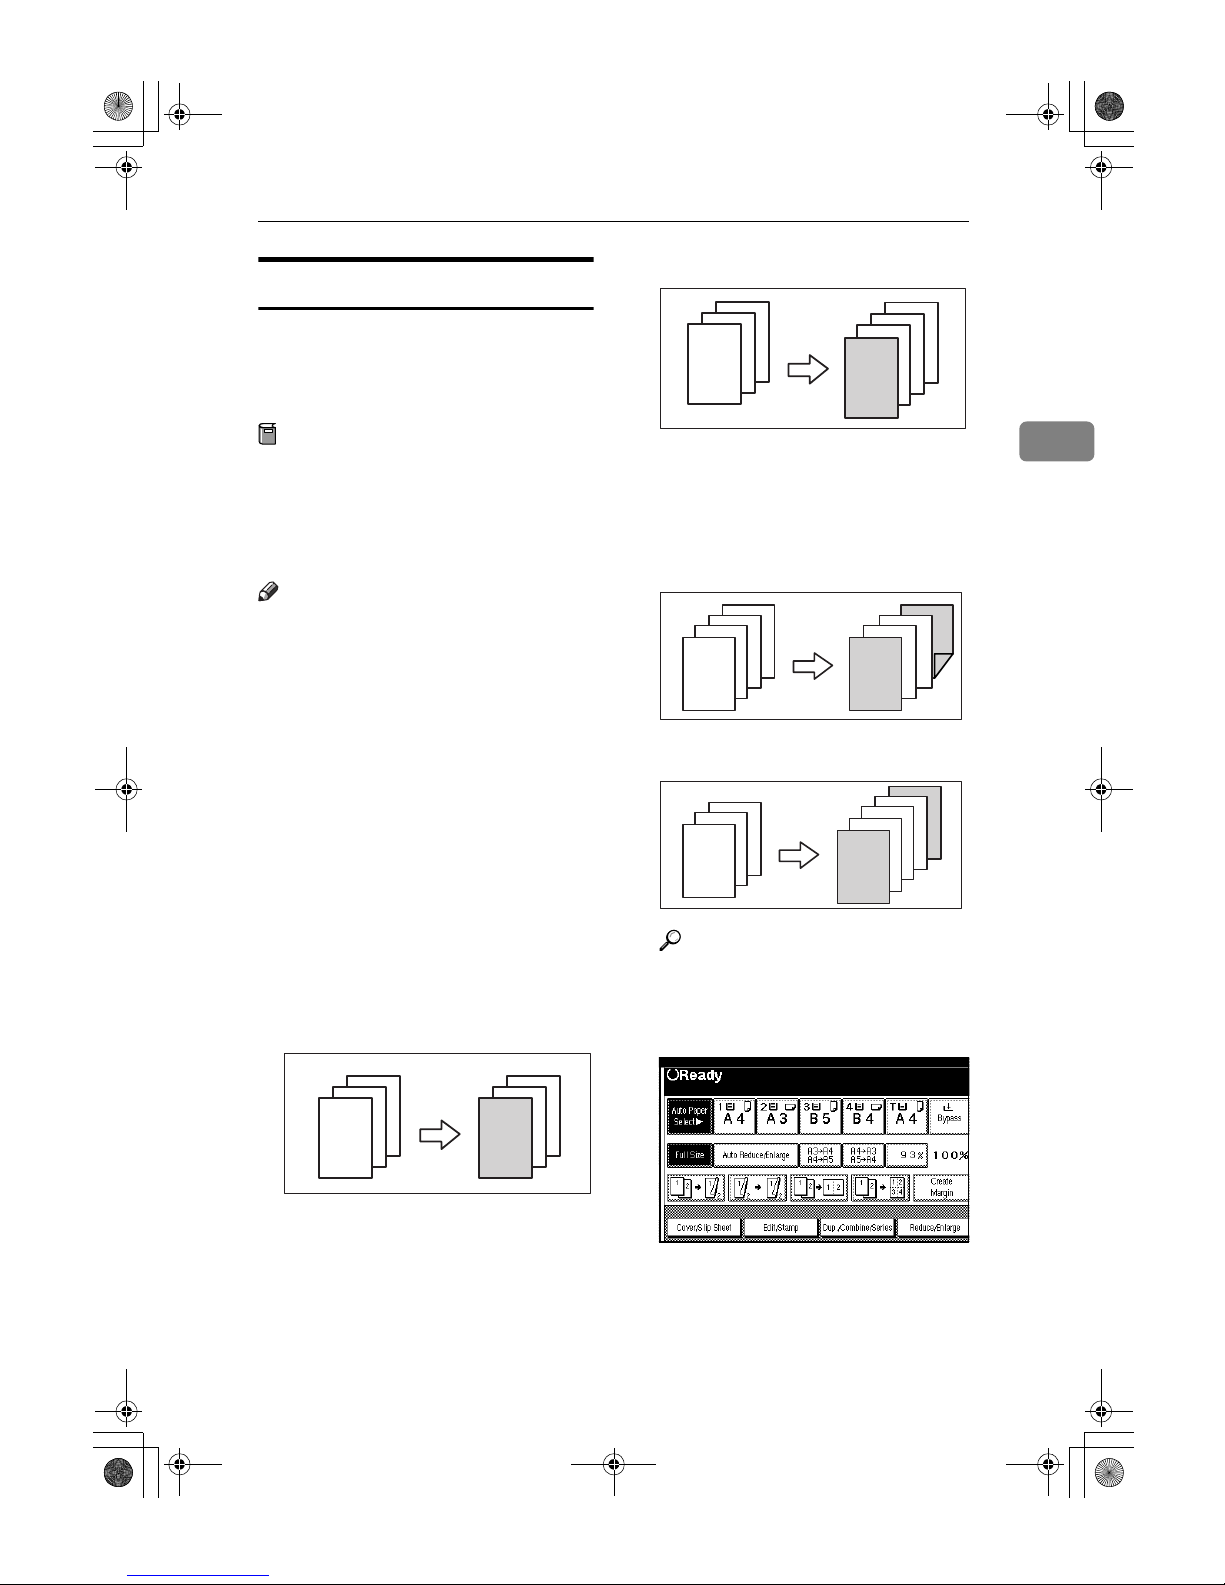
Copier Functions
69
2
Covers
Using this function, you can create
cover sheets by adding additional
pages of different paper or copying
existing pages on different paper.
Preparation
Before selecting this function, set
the tray for the front cover paper.
See “Cover Sheet Tray”in “Tray
Paper Settings”, General Settings
Guide.
Note
❒ The cover sheet should be the same
size and orientation as the copy paper.
❒ You cannot set the copy paper in
the bypass tray.
❒ When selecting [Copy], select
whether the front and back covers
are copied one-sided or two-sided.
See “Cover Sheet Tray”in “Tray
Paper Settings”, General Settings
Guide.
❖❖❖❖ Front cover
The first page of your originals is
copied on specific paper sheet for
covers, or a cover sheet is inserted
before the first copy.
• Copy
• Blank
❖❖❖❖ Front/Back covers
The first and last pages of your
original are copied on specific paper for use as covers.
• Copy
• Blank
Reference
p.97 “Front Cover Copy in
Combine”
AAAA
Press [Cover/Slip Sheet].
BBBB
Press [Front Cover] or [Front/Back
Cover].
3
2
1
3
2
1
3
2
1
3
2
1
3
2
1
4
3
2
1
4
GCCOVE0E
3
2
1
3
2
1
AdonisC3_GBcopyF_FM1.book Page 69 Thursday, November 28, 2002 1:53 PM
Page 84
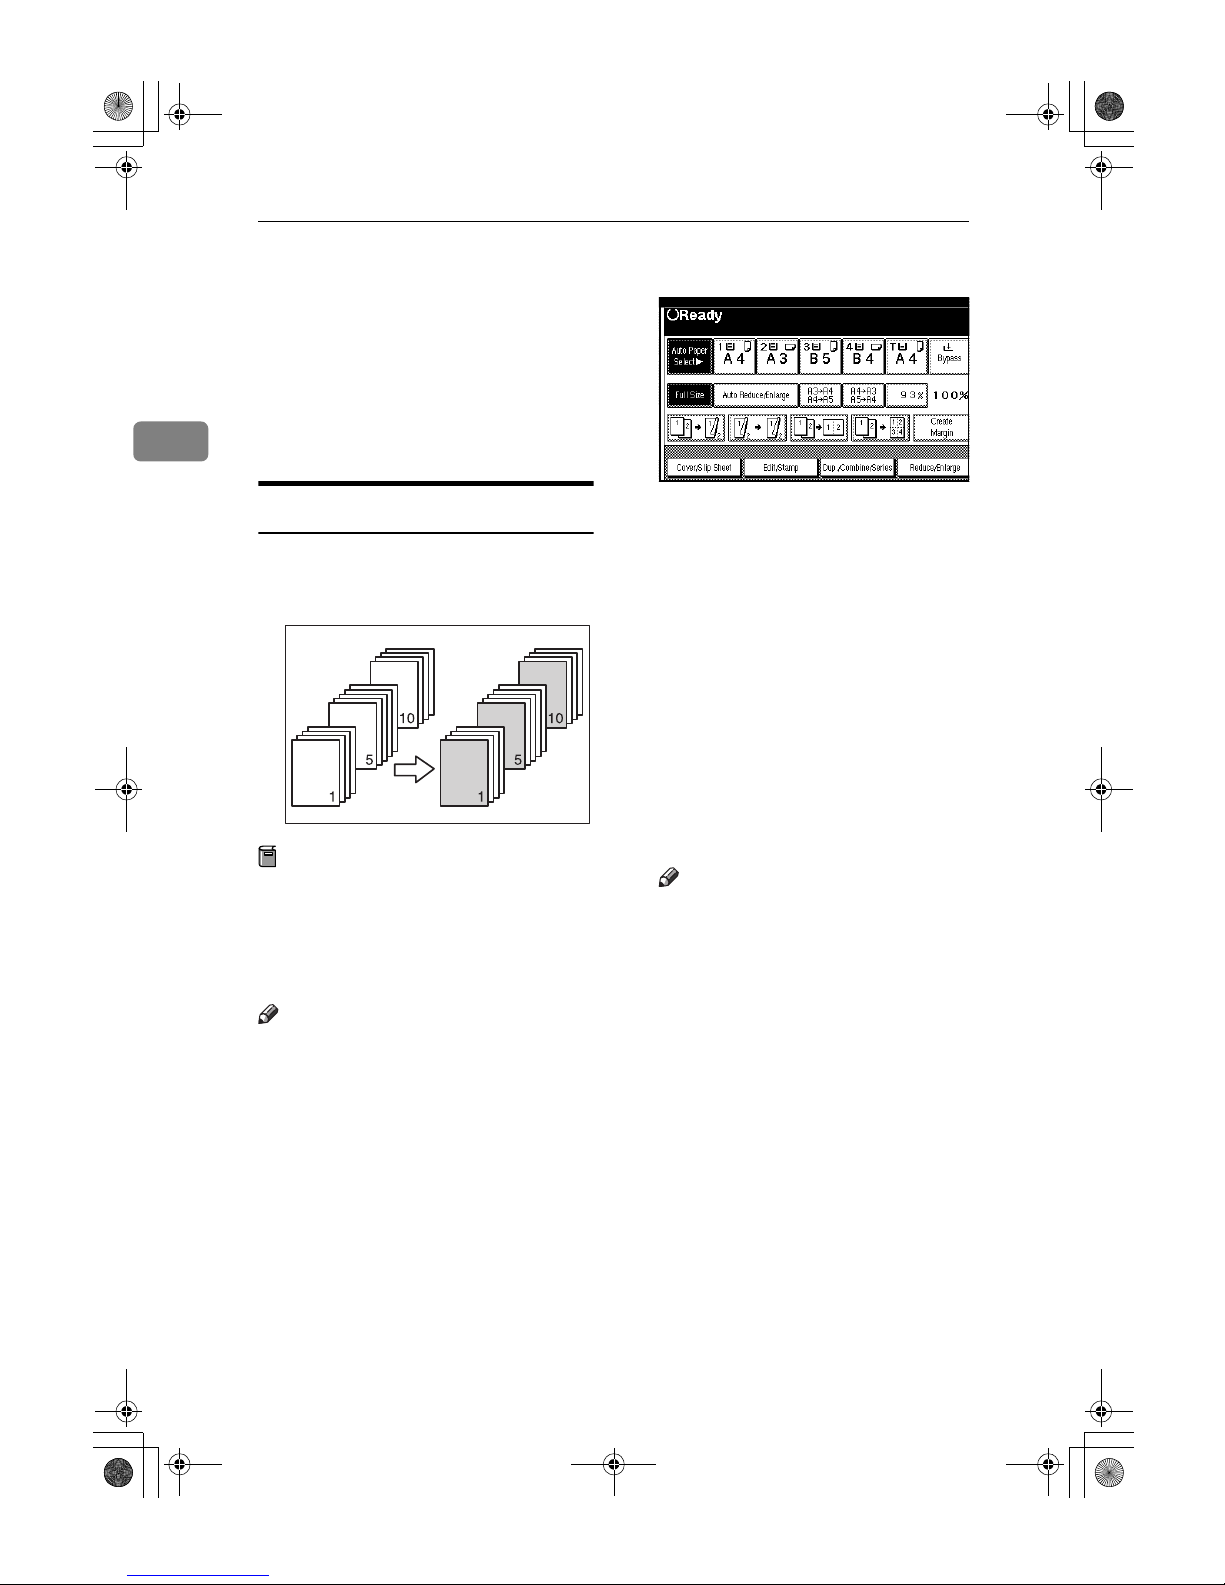
Copying
70
2
CCCC
Select [Copy] or [Blank] for the cov-
er sheet.
DDDD
Select the paper tray that contains
the sheet paper to copy the originals, and then press [OK].
EEEE
Place your originals in the ADF,
and then press the {{{{Start}}}} key.
Designate
Use this function to have certain pages of your original copied onto slip
sheets.
Preparation
Before using this function, set the
special paper tray for slip sheets.
See “Cover Sheet Tray”and “Slip
Sheet Tray”in “ Tray Paper Settings”, General Settings Guide.
Note
❒ The slip sheets should be the same
size and orientation as the copy paper.
❒ You cannot set the copy paper in
the bypass tray.
❒ You can specify the pages up to 20.
AAAA
Press [Cover/Slip Sheet].
BBBB
Press [Desig./Chapter].
CCCC
Press the key to select the chapter
number.
DDDD
Enter the page number of the
original's location you want to
copy onto a slip sheet with the
number keys, and then press the
{{{{#}}}} key.
EEEE
Select the paper tray for slip
sheets.
FFFF
To specify another page location,
repeat steps CCCC to EEEE.
Note
❒ To select chapters 11 to 20, press
the [TTTT11∼∼∼∼20] key.
GGGG
When page designation is complete, press [OK].
HHHH
Press [OK].
IIII
Select the paper tray that contains
the sheet paper to copy the originals.
JJJJ
Place your originals in the ADF,
and then press the {{{{START}}}} key.
AdonisC3_GBcopyF_FM1.book Page 70 Thursday, November 28, 2002 1:53 PM
Page 85
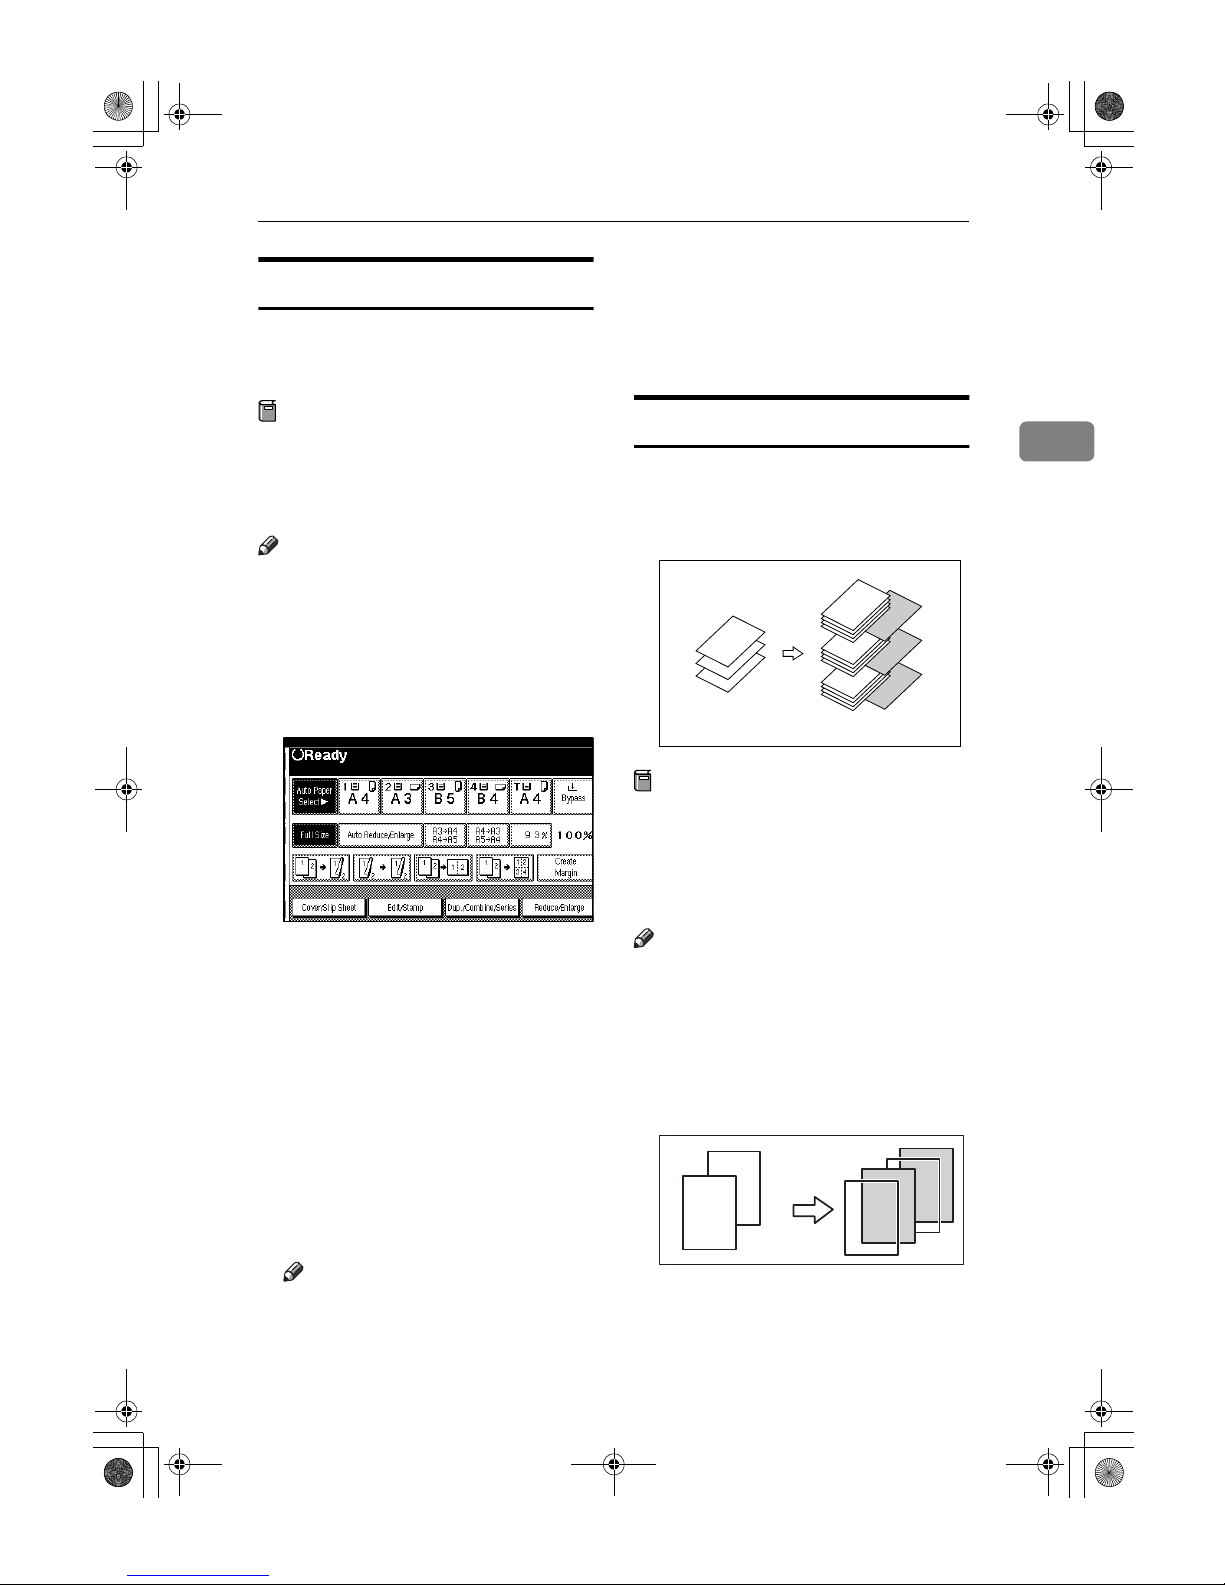
Copier Functions
71
2
Chapter
The page locations you specify with
this function will appear on the front
of copy sheets.
Preparation
Before selecting this function,
press [Dup./Combine/Series] and select Duplex (1 Sided → 2 Sided)
mode or Combine mode.
Note
❒ This function can be used only
when you use the Duplex (1
Sided→2 Sided) or Combine function.
❒ You can specify the pages up to 20.
AAAA
Press [Cover/Slip Sheet].
BBBB
Press [Desig./Chapter].
CCCC
Press [Chapter].
DDDD
Press the key to select the chapter
number.
EEEE
Enter the page location of the first
page of the first chapter with the
number keys, and then press the
{{{{#}}}} key.
FFFF
To specify another page location,
repeat steps DDDD to EEEE.
Note
❒ To select chapters 11 to 20, press
the [TTTT11-20] key.
GGGG
When page designation is complete, press [OK].
HHHH
Place your originals, and then
press the {{{{Start}}}} key.
Slip Sheets
Using this function, you can insert a
slip sheet between OHP transparencies or stacks. You can also print on
the inserted slip sheet.
Preparation
Before selecting this function,
specify the paper tray for slip
sheets. See "Slip Sheet Tray" in
“Tray Paper Settings”, General Set-
tings Guide.
Note
❒ Load the slip sheets in the same
size and orientation as the copy paper or the OHP transparency.
❖❖❖❖ When using OHP transparencies
placed in the bypass tray
• Copy
1
2
3
1
2
3
2
2
2
1
2
1
1
1
AdonisC3_GBcopyF_FM1.book Page 71 Thursday, November 28, 2002 1:53 PM
Page 86
Copying
72
2
• Blank
Note
❒ Press the {{{{#}}}} key and select [OHP
Sheet] in Special paper. See p.19
“When copying onto special paper”.
AAAA
Press [Cover/Slip Sheet].
BBBB
Press [Slip Sheet].
CCCC
Select [Copy] or [Blank], and then
press [OK].
DDDD
Select the paper tray containing
the sheet paper to copy the originals.
EEEE
Place the originals, and then press
the {{{{Start}}}} key.
2
2
2
1
1
1
AdonisC3_GBcopyF_FM1.book Page 72 Thursday, November 28, 2002 1:53 PM
Page 87
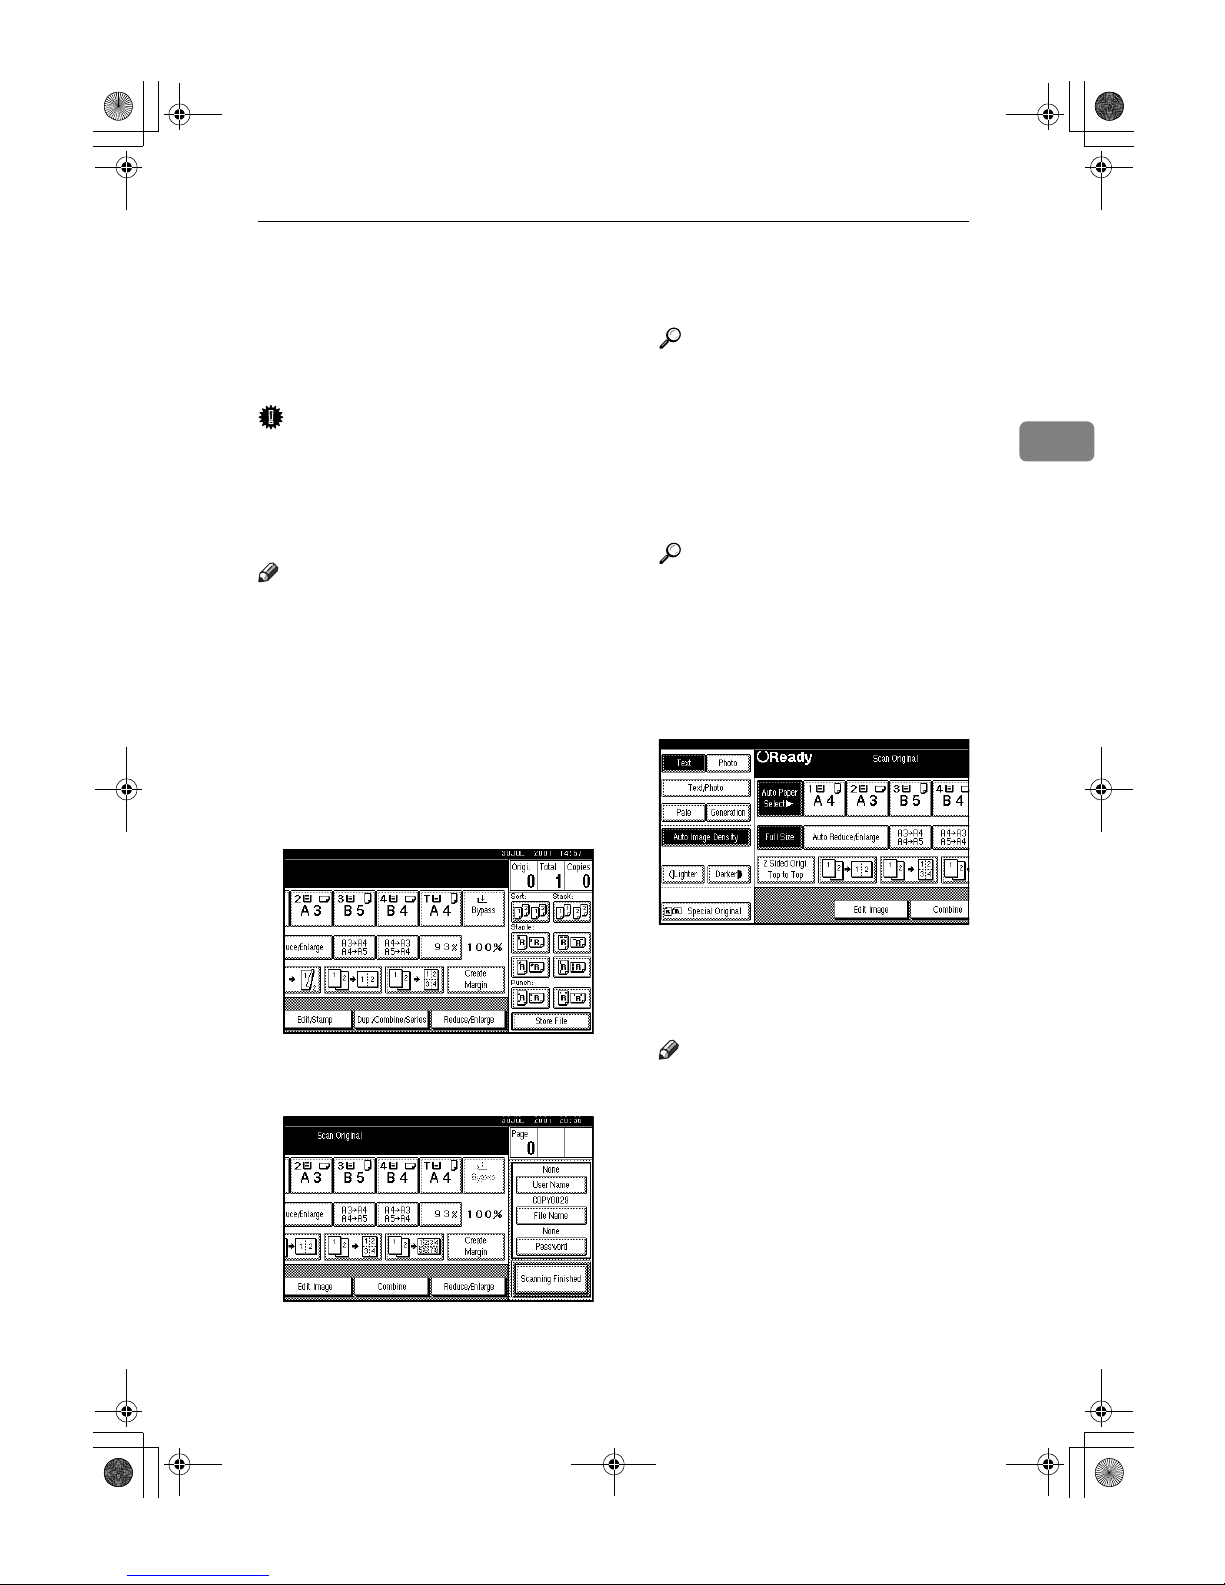
Storing Data in the Document Server
73
2
Storing Data in the Document Server
The Document Server enables you to
store documents in the memory and
print them as you want.
Important
❒ Data stored in the machine might
be lost if some kind of failure occurs. The supplier shall not be responsible for any damage that
might result from the loss of data.
Note
❒ Data stored in the Document Serv-
er is set to be deleted after three
days by the factory default. You
can specify the period after which
the stored data is deleted automatically. For more information about
settings, see “Auto Delete File “ in
“Key Operator Tools”, General Set-
tings Guide.
AAAA
Press [Store File].
BBBB
Enter a file name, user name, or
password if necessary.
Reference
For details about how to register the file name, user name or
password, see General Settings
Guide.
CCCC
Press [OK].
DDDD
Place the originals.
Reference
For more information about the
types of originals that can be
placed and how to place them,
see p.10 “Placing Originals”.
EEEE
Make the scanning settings for
the original.
FFFF
Press the {{{{Start}}}} key.
Originals are scanned and stored
in memory.
Note
❒ To stop scanning, press the
{{{{Clear/Stop}}}} key. To resume a
paused scanning job, press
[Resume] in the confirmation dialog box. To delete scanned images and cancel the job, press
[Cancel]. The originals placed in
the ADF are delivered.
❒ To check if the document has
been stored, press the {{{{Docu-
ment Server}}}} key.
AdonisC3_GBcopyF_FM1.book Page 73 Thursday, November 28, 2002 1:53 PM
Page 88
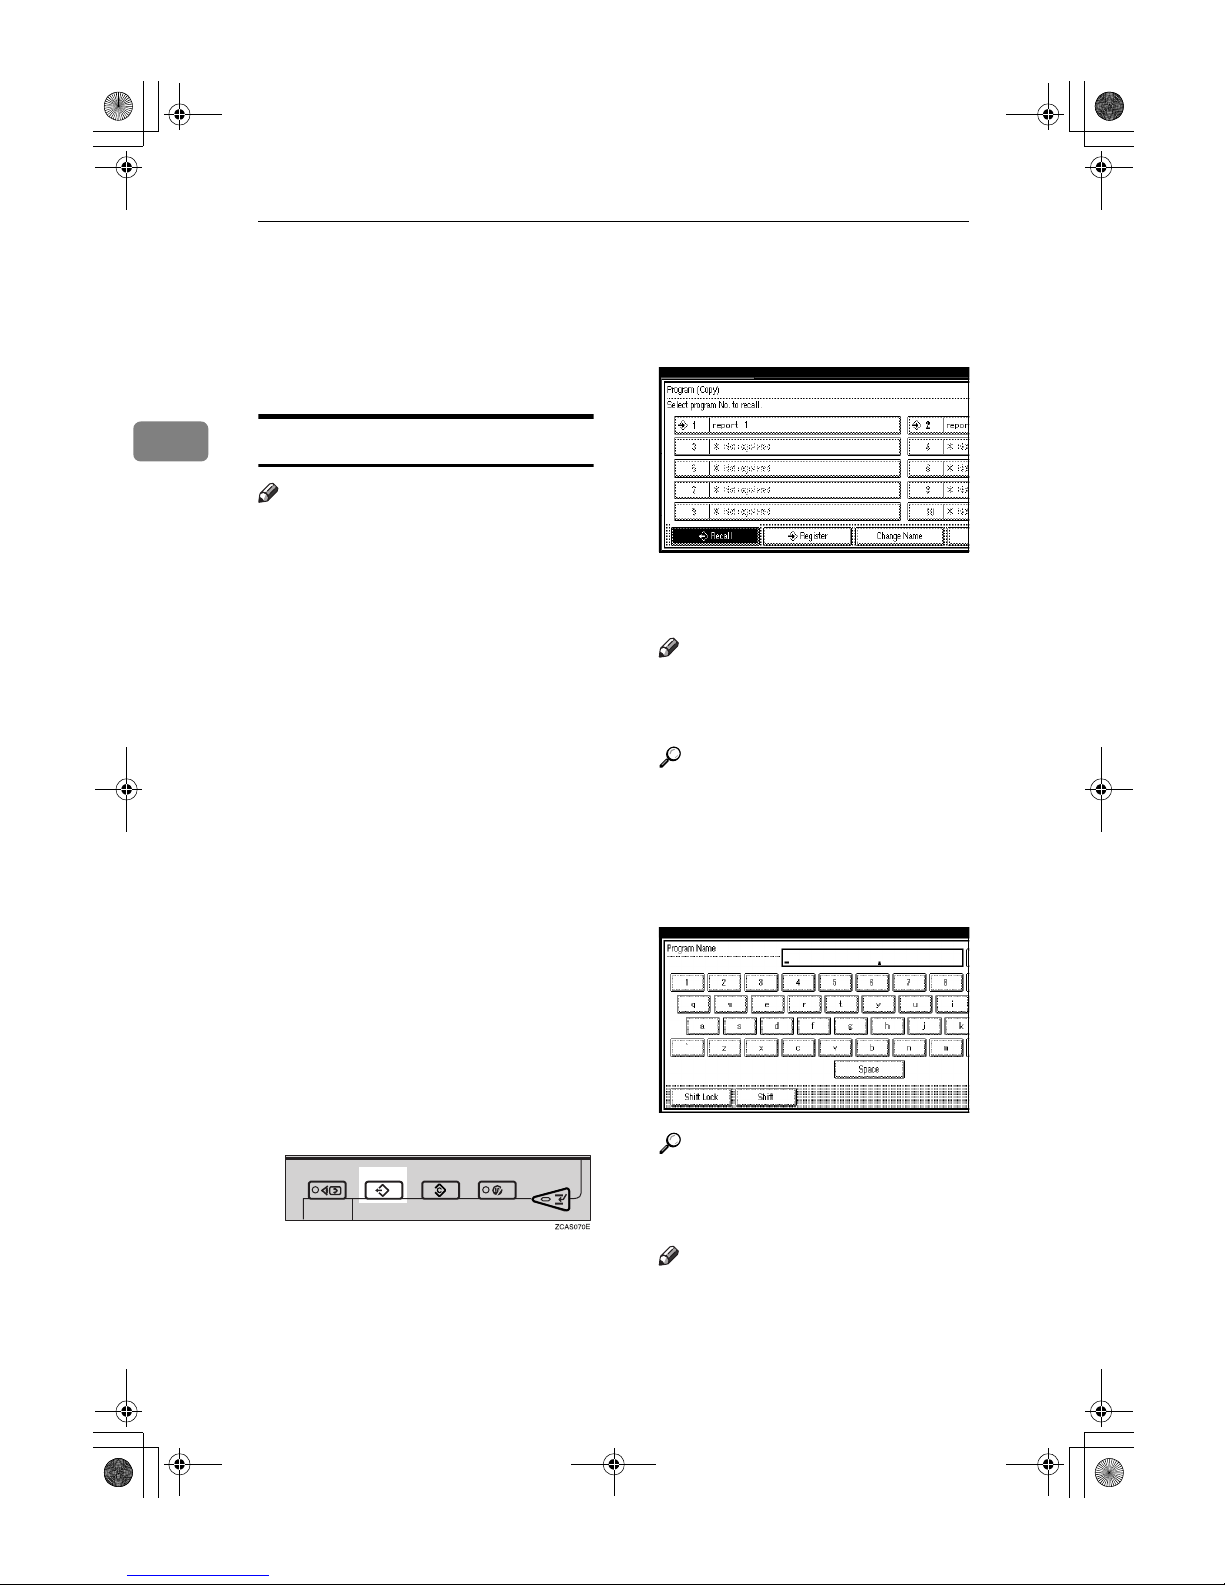
Copying
74
2
Programs
You can store frequently used copy
job settings in the machine memory
and recall them for future use.
Storing a Program
Note
❒ You can store up to 10 programs.
❒ You can select the standard mode
or program No. 10 as the mode to
be set when modes are cleared or
reset, or immediately after the operation switch is turned on. See
p.92 “Change Initial Mode” .
❒ Paper settings are stored based on
paper size. So if you place more
than one paper tray of the same
size, the paper tray prioritized
with User Tools (System Settings)
will be selected first. See “Paper
Tray Priority”in “Tray Paper Settings”, General Settings Guide.
❒ Programs are not deleted by turn-
ing the power off or by pressing
the {{{{Clear Modes}}}} key. They are
canceled only when you delete or
overwrite them with another program.
AAAA
Edit the copy settings so all functions you want to store in this program are selected.
BBBB
Press the {{{{Program}}}} key.
CCCC
Press [Register].
DDDD
Press the program number you
want to store.
Note
❒ Program numbers with m
against them already have settings in them.
Reference
p.75 “Changing a stored program”
EEEE
Enter the program name with the
letter keys on the display panel.
You can enter up to 40 characters.
Reference
For details about entering characters, see “Entering Text”, Gen-
eral Settings Guide.
Note
❒ If you do not want to enter the
program name, proceed to step
F
.
AdonisC3_GBcopyF_FM1.book Page 74 Thursday, November 28, 2002 1:53 PM
Page 89
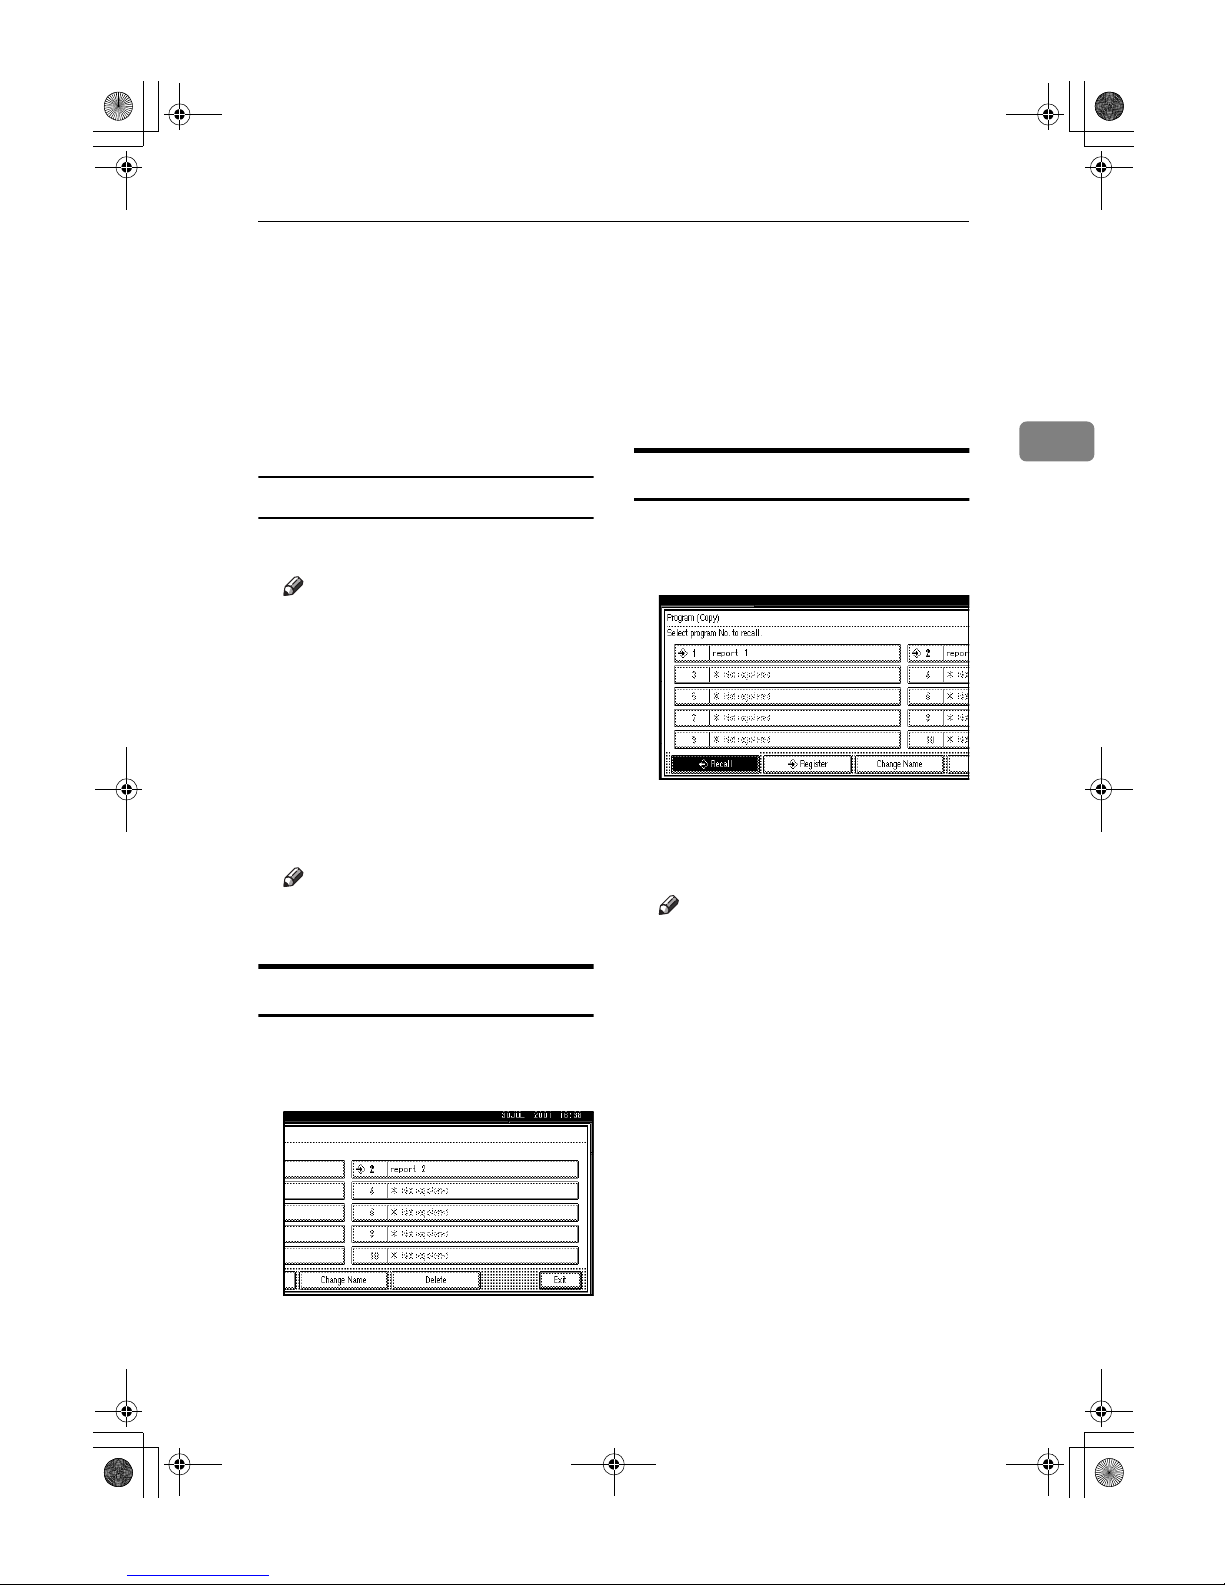
Programs
75
2
FFFF
Press [OK].
When the settings are successfully
stored, m appears on the left side
and the program name appears on
the right side of the registered program number. The display returns
to the initial copy display for a
while.
Changing a stored program
AAAA
Check the program settings.
Note
❒ When you want to check the
contents of a program, recall the
program. See p.75 “Recalling a
Program”.
BBBB
Repeat steps AAAA to DDDD of “Storing a
Program”.
CCCC
Press [Register].
Repeat steps E, F of ”Storing a Program”.
Note
❒ When it is overwritten, the pre-
vious program is deleted.
Deleting a Program
AAAA
Press the {{{{Program}}}} key.
BBBB
Press [Delete].
CCCC
Press the program number you
want to delete.
DDDD
Press [Yes].
The program is deleted, and the
display returns to the initial copy
display.
Recalling a Program
AAAA
Press the {{{{Program}}}} key.
BBBB
Press [Recall].
CCCC
Press the program number you
want to recall.
The stored settings are displayed.
Note
❒ Program numbers with m
against them already have settings in them.
DDDD
Place the originals, and then press
the {{{{Start}}}} key.
AdonisC3_GBcopyF_FM1.book Page 75 Thursday, November 28, 2002 1:53 PM
Page 90
Copying
76
2
AdonisC3_GBcopyF_FM1.book Page 76 Thursday, November 28, 2002 1:53 PM
Page 91
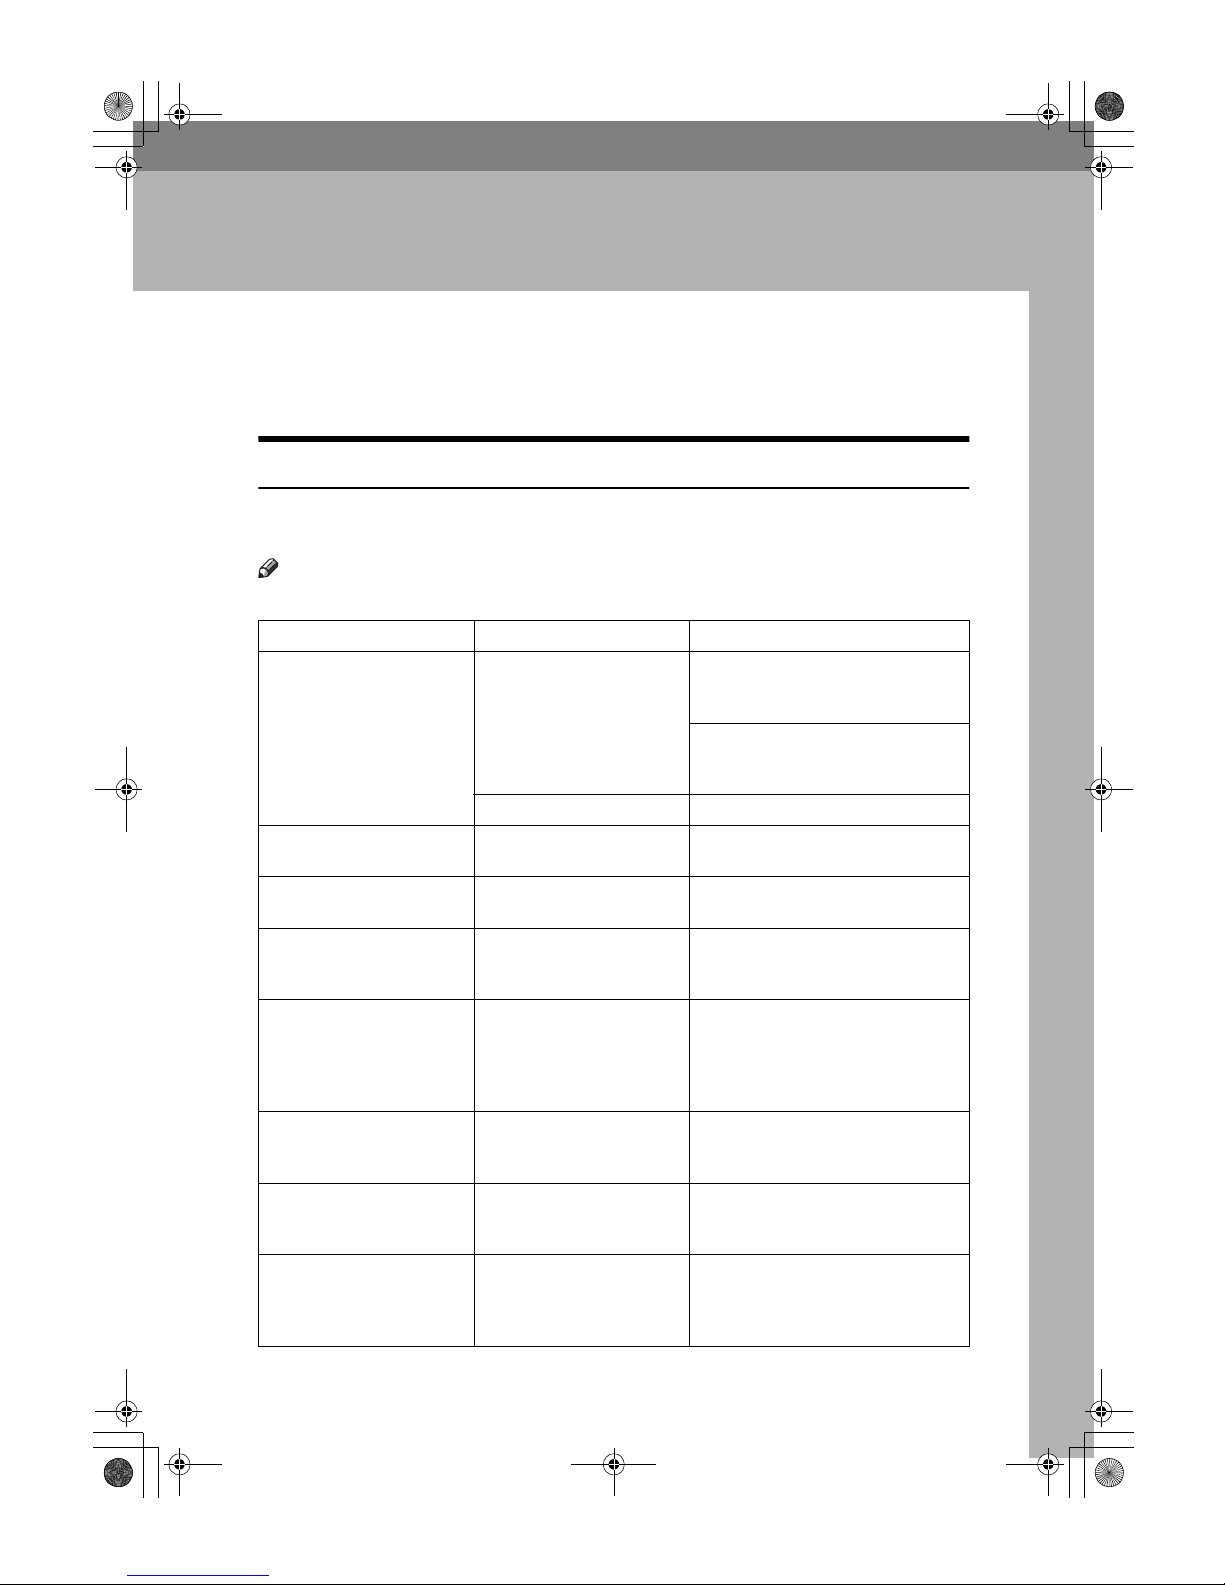
77
3. Troubleshooting
If Your Machine Does Not Operate As You
Want
When a Message Is Displayed
The following chart contains explanations for the common messages. If other
messages appear, follow the instructions as they are displayed.
Note
❒ For messages that are not listed here, see General Settings Guide.
Message Causes Solutions
Cannot detect original size. Improper original is
placed. See p.9 “Sizes difficult to detect”.
Select paper manually, not in Auto
Paper Select mode, and do not use
Auto Reduce/Enlarge function.
Place the original on the exposure
glass. See p.11 “Placing Originals on
the Exposure Glass” .
Original is not placed. Place your originals.
Check original orientation. Original is not placed in a
proper orientation.
Change the orientation of the original.
Check paper size. Improper paper size is set. If you press the
{{{{Start}}}}
key, copy
will start onto the selected paper.
Rotate Sort is not available
with this image size.
A size of paper for which
Rotate Sort is not available
is selected.
Select the proper paper size. See
p.31 “Sort”.
Cannot punch paper of this
size.
The Punch function cannot
be used with paper size selected.
The following paper sizes are available for Punch mode: A3L, B4
JISL, A4KL, B5 JISKL, A5KL,
11" × 17"L, 8
1
/2" × 14"L and 51/2" ×
8
1
/2"KL. Select one of these sizes.
It is over stapling capacity. The number of sheets per
set is over the staple capacity.
Check the stapler capacity. See p.108
“Staple”.
Cannot staple paper of this
size.
The Staple function cannot
be used with paper size selected.
Select a paper size that can be used
in Staple mode. See p.108 “Staple”.
Duplex is not avilable with
this paper size.
A paper size not available
in Duplex mode has been
selected.
The following paper sizes are available for Duplex mode: A3L, B4
JISL, A4KL, B5 JISKL, A5L.
Select one of these sizes.
AdonisC3_GBcopyF_FM1.book Page 77 Thursday, November 28, 2002 1:53 PM
Page 92
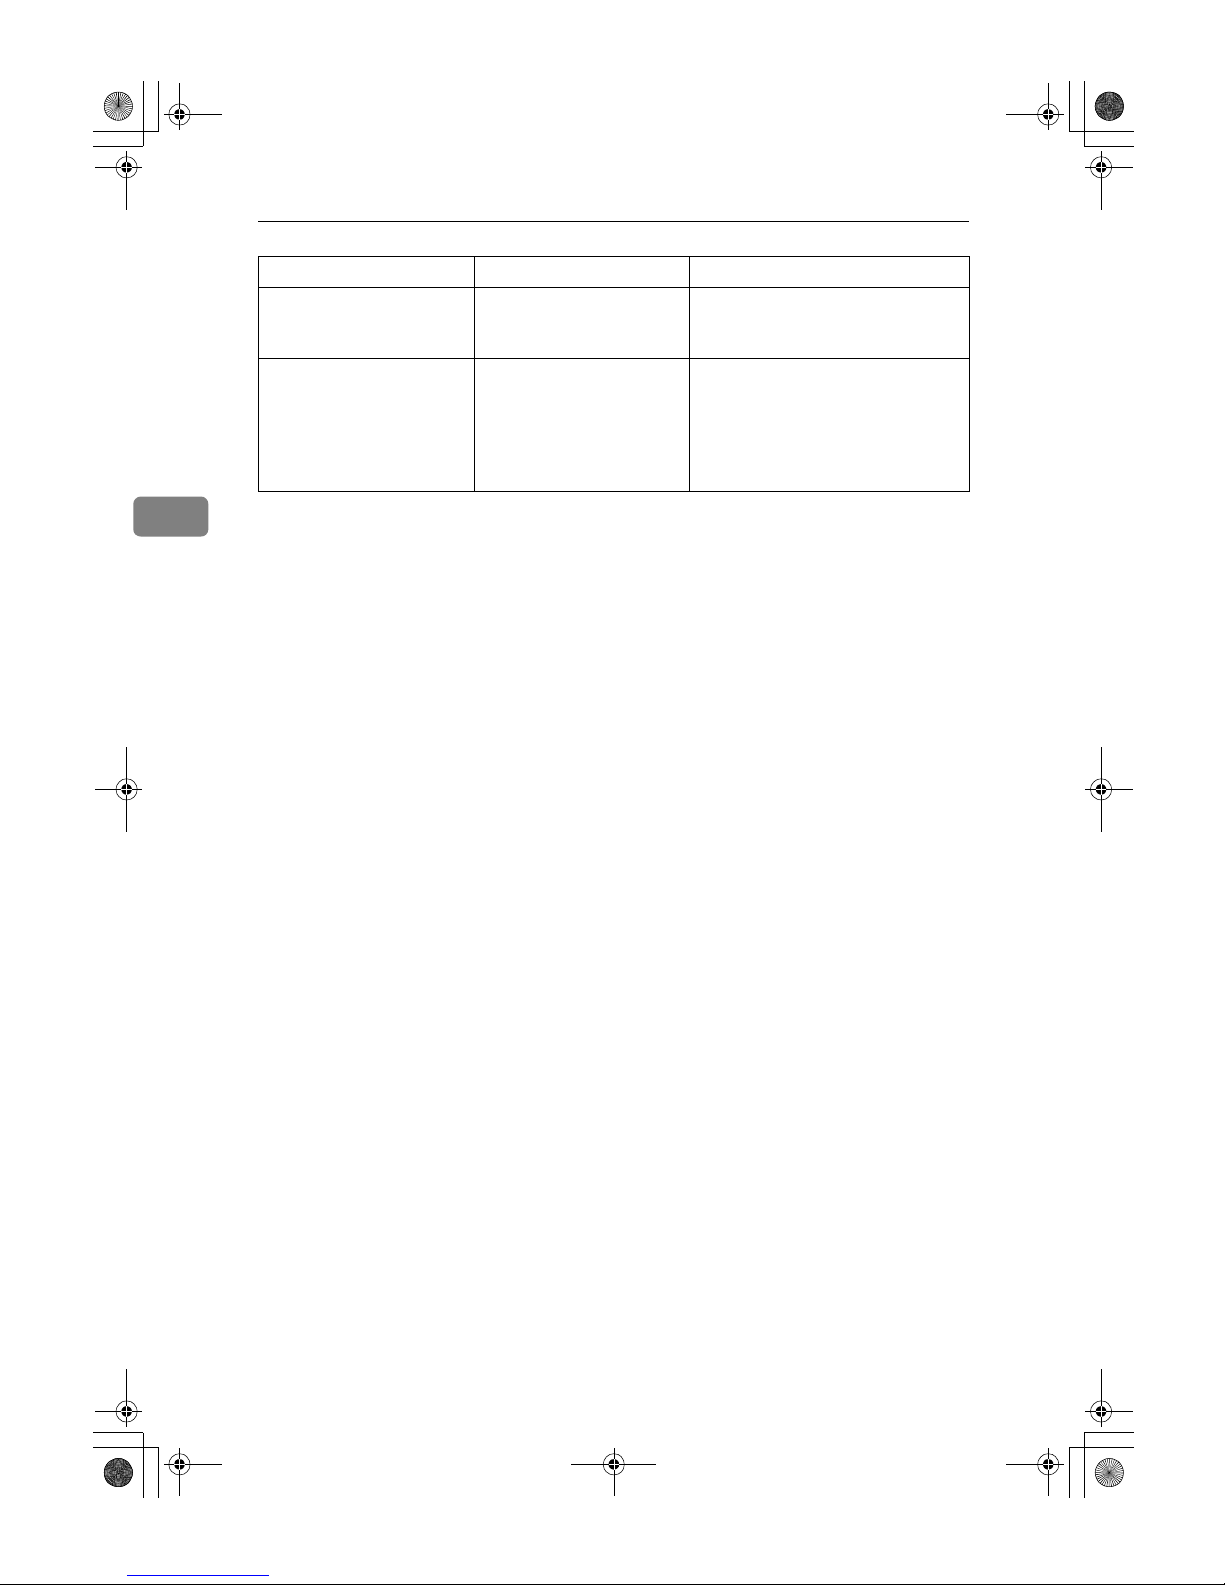
Troubleshooting
78
3
Maximum number of sets
is *.
The number of copies exceeds the maximum copy
quantity.
You can change the maximum copy
quantity. See p.92 “Max. Copy
Quantity”.
Cannot copy. Original is
being scanned by other
functions.
The Document Server function is in use.
To cancel the job in process, press
[Exit], and then press the {{{{Document
Server}}}} key. Next, press the
{{{{Clear/Stop}}}} key. When the message
” [Stop] key was pressed. Stop stor-
ing?” appears, press [Stop].
Message Causes Solutions
AdonisC3_GBcopyF_FM1.book Page 78 Thursday, November 28, 2002 1:53 PM
Page 93
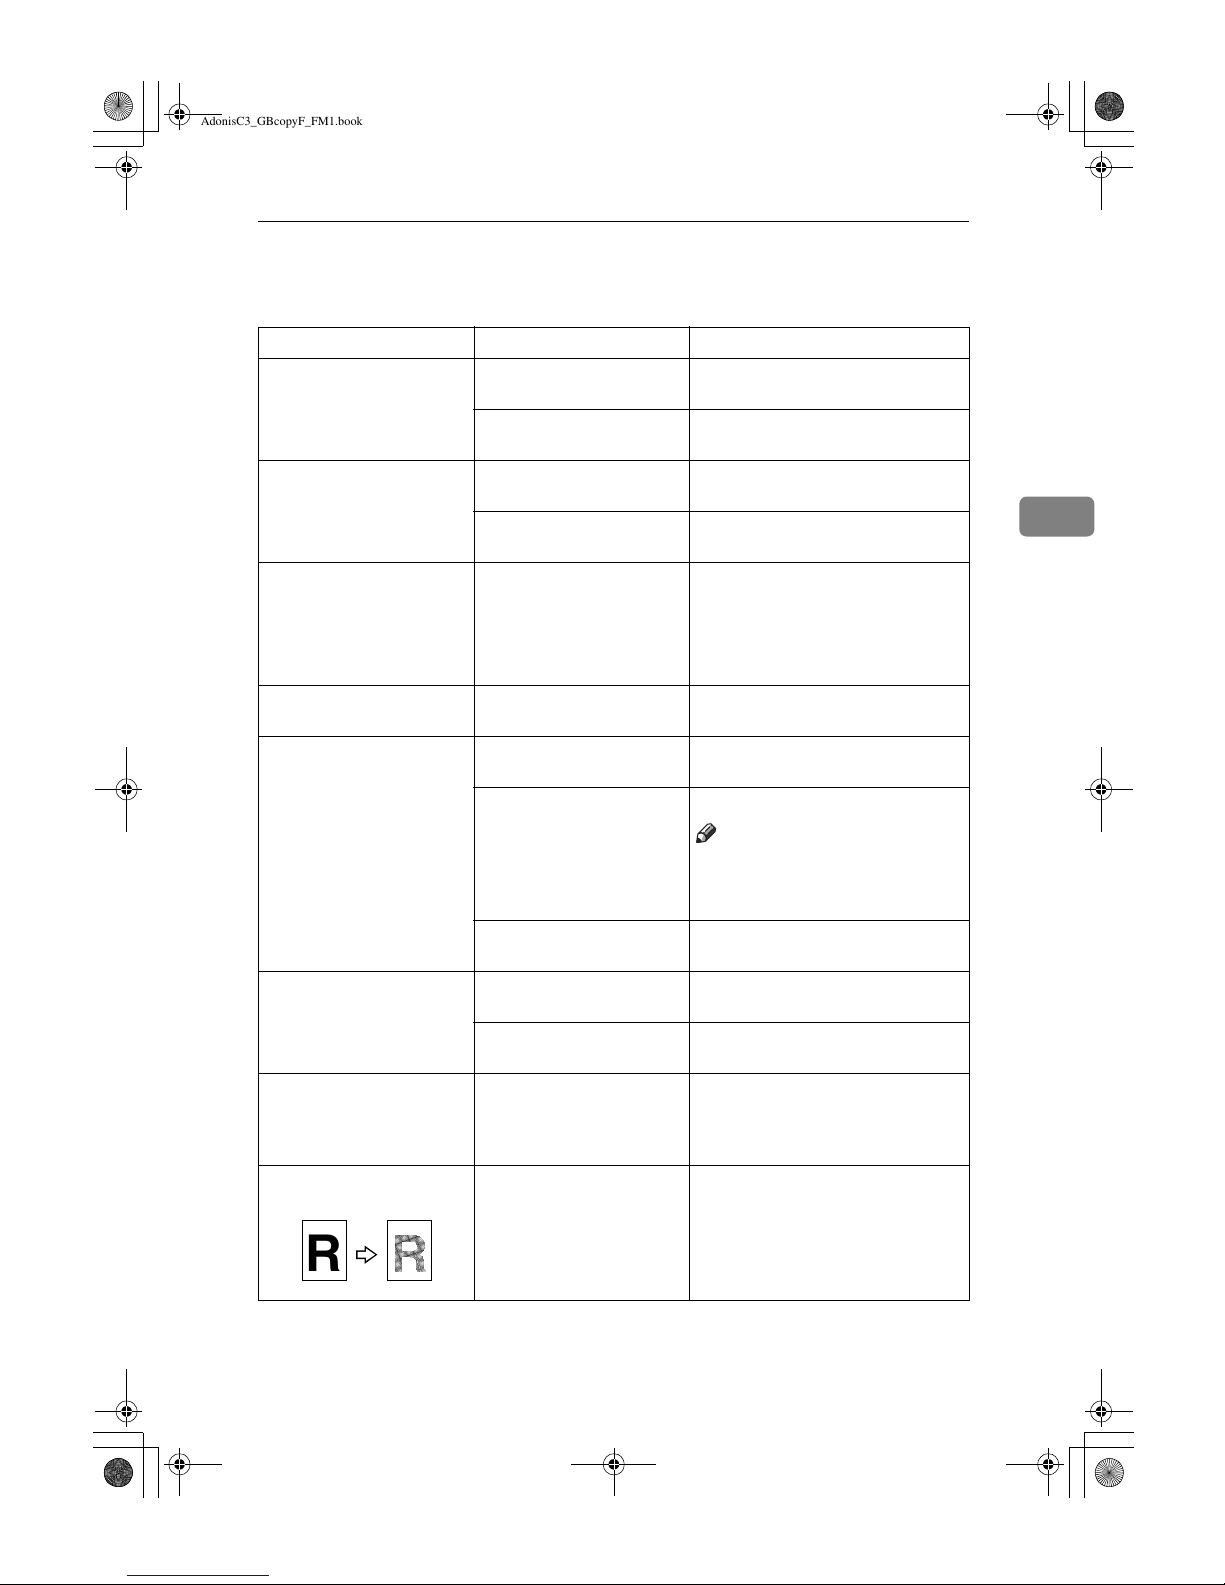
If You Cannot Make Clear Copies
79
3
If You Cannot Make Clear Copies
Problem Causes Solutions
Copies appear dirty. The image density is too
dark.
Adjust the image density. See p.21
“Adjusting Image Density”.
Auto Image Density is not
selected.
Adjust the auto density. See p.21
“Adjusting Image Density”.
The reverse side of an original image is copied.
The image density is too
dark.
Adjust the image density. See p.21
“Adjusting Image Density”.
Auto Image Density is not
selected.
Adjust the auto density. See p.21
“Adjusting Image Density”.
A shadow appears on copies if you use pasted originals.
The image density is too
dark.
Adjust the image density. See p.21
“Adjusting Image Density”.
Change the orientation of the original.
Put mending tape on the pasted part.
The same copy area is dirty
whenever making copies.
The exposure glass or the
ADF is dirty.
Clean them. See General Settings
Guide.
Copies are too light. The image density is too
light.
Adjust the image density. See p.21
“Adjusting Image Density”.
The paper size is not appropriate.
Use the recommended paper.
Note
❒ A light copy may result when
you use damp or rough grain paper.
Toner cartridge is almost
empty.
Add toner. See General Settings
Guide.
Parts of the image are not
copied.
The original is not set correctly.
Set originals correctly. See p.10
“Placing Originals”.
An improper paper size is
selected.
Select the proper paper size.
Copies are blank. The original is not set cor-
rectly.
When using the exposure glass, face
the originals down. When using the
ADF, face them up. See p.10 “Plac-
ing Originals”.
A moiré pattern is produced on copies.
Your original has a dot pattern image or many lines.
Place the original on the exposure
glass at a slight angle.
;;
;
;;;
yy
y
yyy
R
AdonisC3_GBcopyF_FM1.book Page 79 Thursday, November 28, 2002 1:53 PM
Page 94
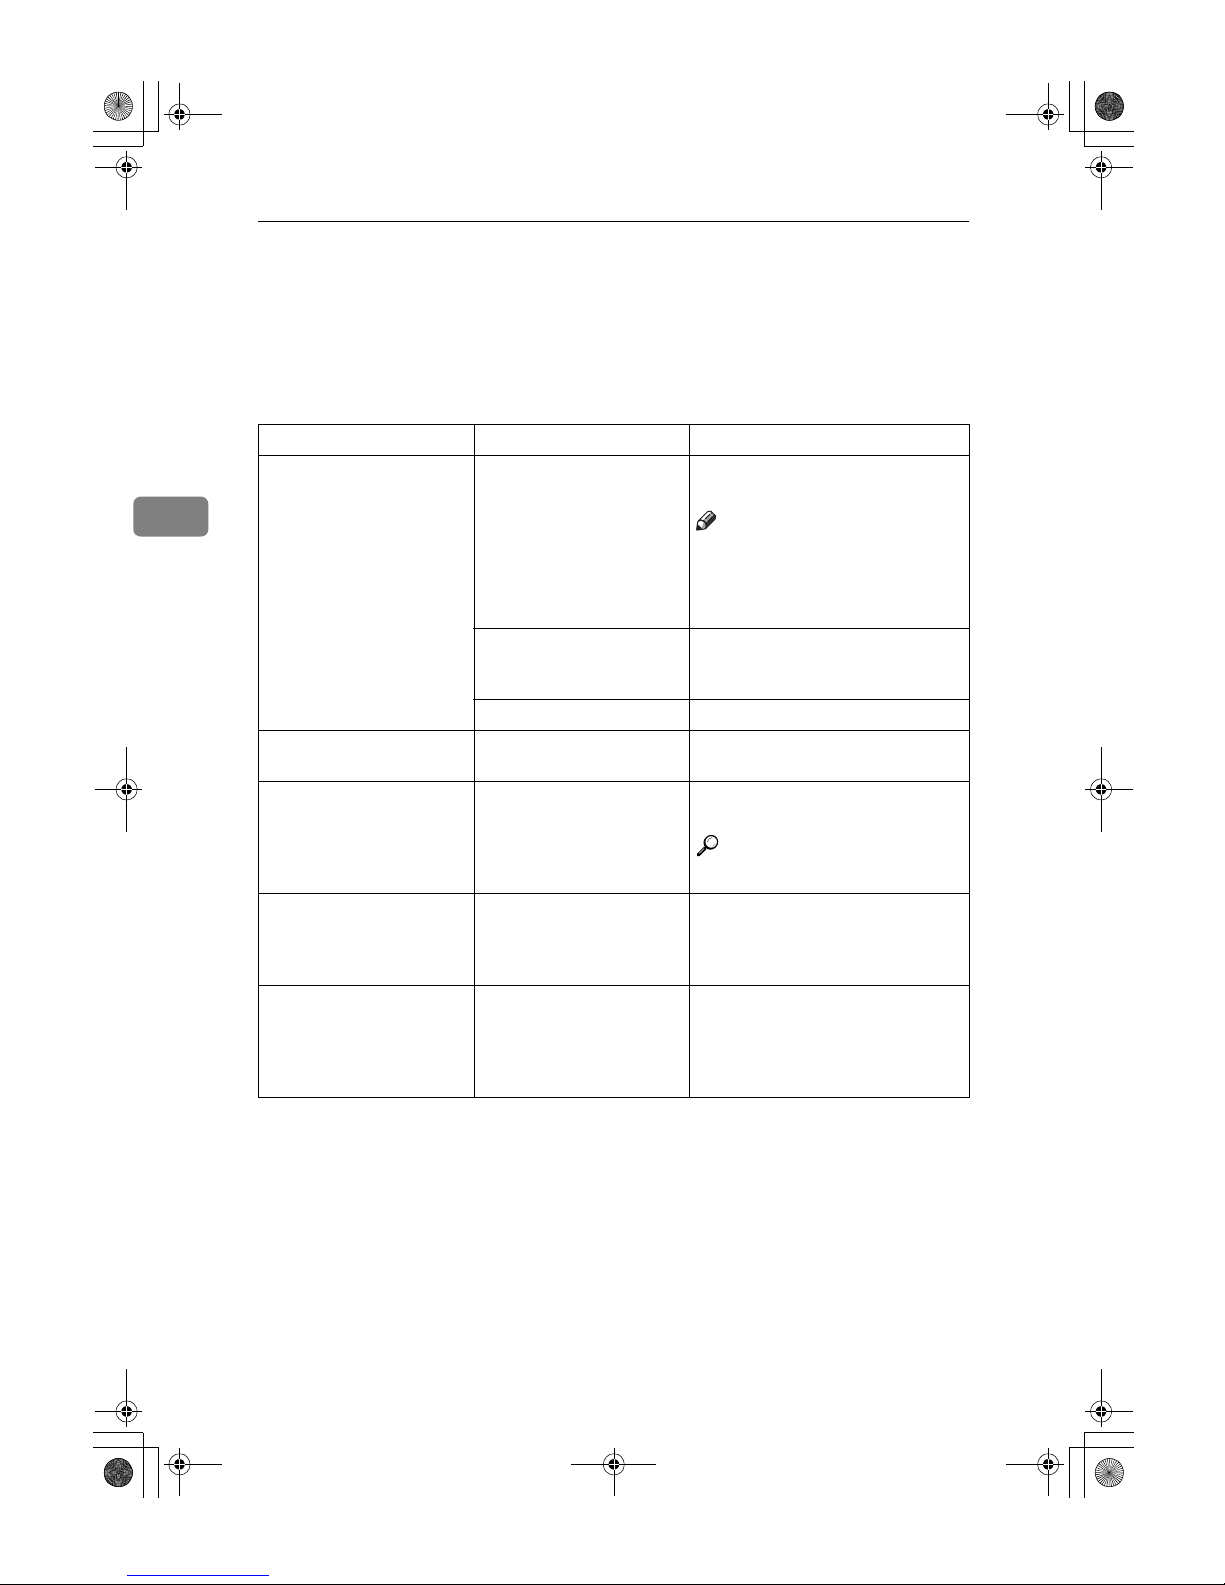
Troubleshooting
80
3
If You Cannot Make Copies As You Want
This section explains causes and remedies when copy results are not as expected.
❖❖❖❖ Basic
Problem Causes Solutions
Copies are not stapled. There are jammed staples
in the stapler.
Remove jammed staples. See
Gener-
al Settings Guide
.
Note
❒
After removing jammed staples,
staples might not be ejected the
first few times you try to use the
stapler.
The number of copies exceeds the capacity of the
stapler.
Check the stapler capacity. See p.108
“Staple”.
Copy paper is curled.
Turn the copy paper over in the tray.
Staples are wrongly positioned.
Originals are not set correctly.
Check the correct position to place
the originals. See p.35 “Staple”.
You cannot combine several functions.
Selected functions cannot
be used together.
Check the combination of functions
and make the settings again.
Reference
p.103 “Combination Chart”
When sorting, the pages
are divided into two
blocks.
The memory became full in
the middle of sorting and
the pages were delivered in
two blocks.
You can interrupt copying when the
memory becomes full. See p.102
“Memory Full Auto Scan Restart”.
Paper does not output during printing with stapling.
When you stop printing
while using the staple function, papers not stapled
during printing may be left
in the staple unit.
Press the
{{{{Reset}}}}
key and cancel
copy settings, including stapling.
AdonisC3_GBcopyF_FM1.book Page 80 Thursday, November 28, 2002 1:53 PM
Page 95
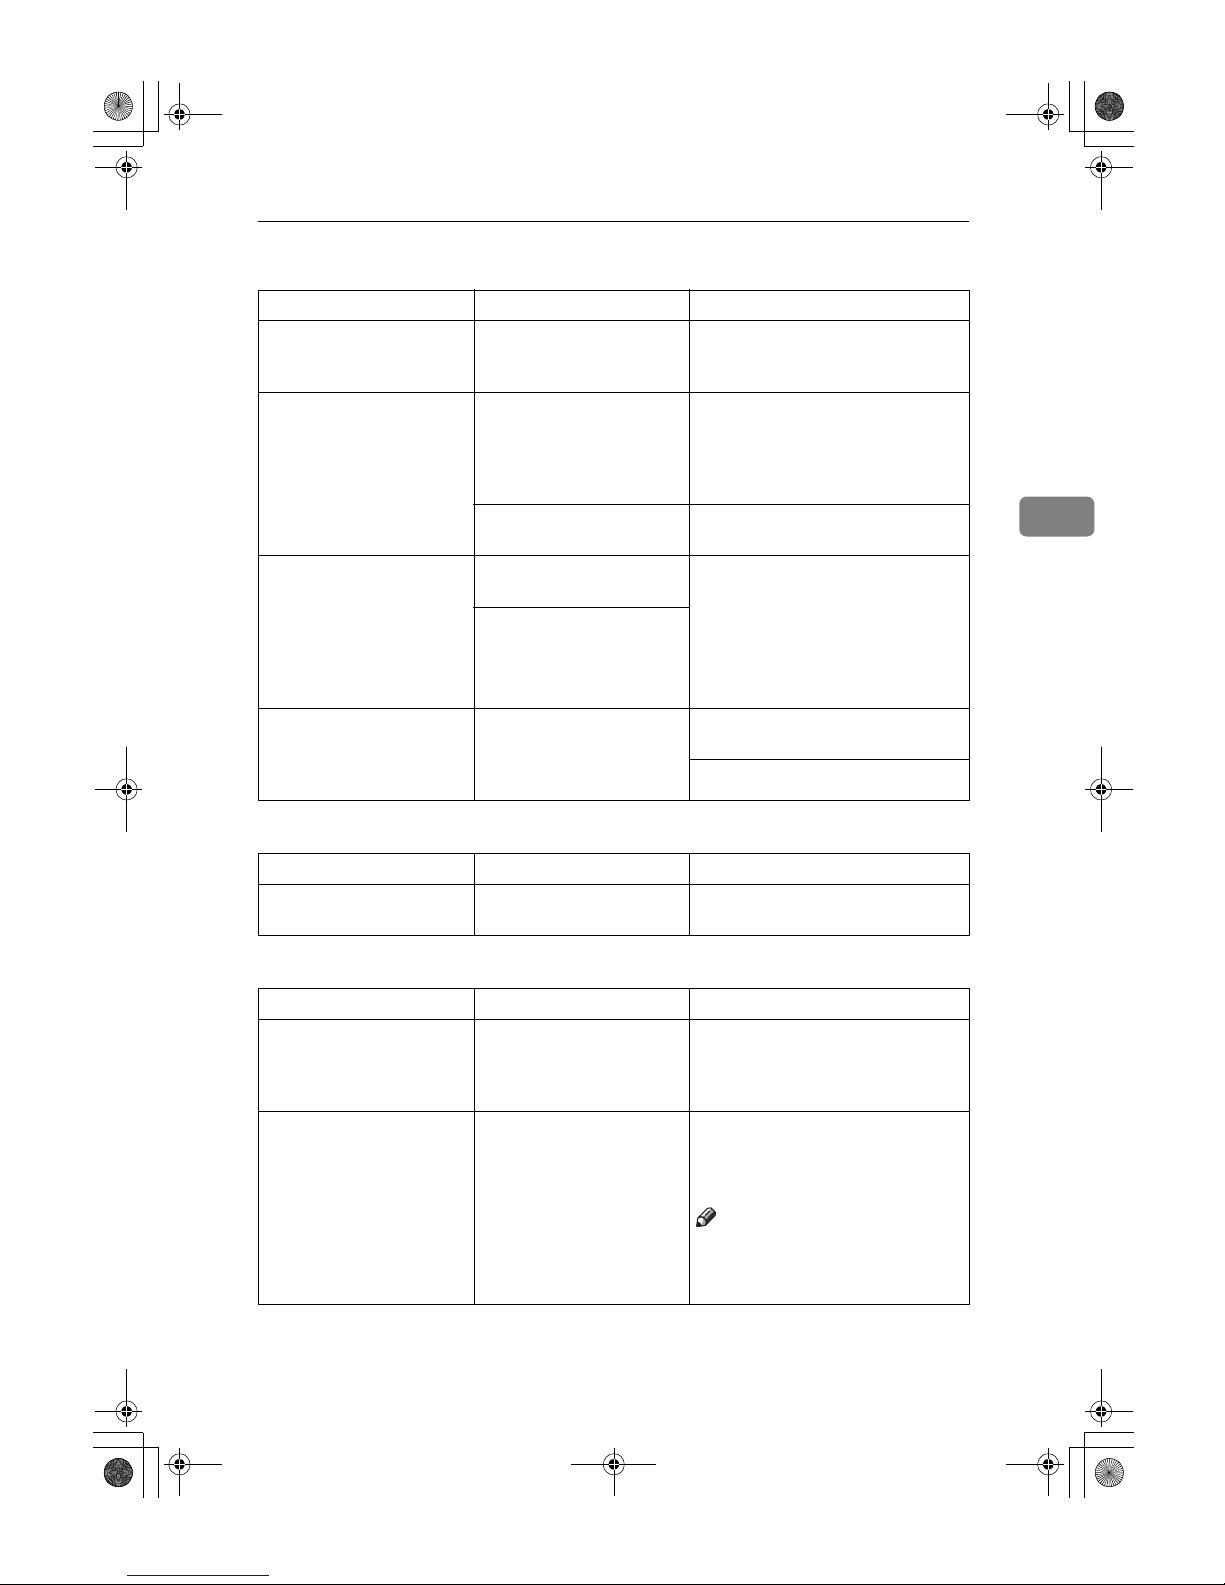
If You Cannot Make Copies As You Want
81
3
❖❖❖❖ Edit
❖❖❖❖ Stamp
❖❖❖❖ Combine
Problem Causes Solutions
In Double Copies mode,
parts of the original image
are not copied.
Combination of original
and copy paper is not correct.
Select A3L for A4 K originals and
A4 for A5 originals.
In Border, Centre, or Centre/Border mode, parts of
the original image are not
copied.
You set a wide erased margin.
Make the margin width narrower.
You can adjust it between 2–99 mm
(0.1"–3.9"). See p.96 “Erase Border
Width”and p.96 “Erase Centre
Width”.
Originals are not scanned
correctly.
Place the originals correctly.
In Margin Adjustment
mode, parts of the original
image are not copied.
You set a wide erased margin.
Set a narrower margin with User
Tools. You can set the width between 0–30 mm (0"–1.2"). See p.95
“Front Margin: Left/Right”, p.95
“Front Margin: Top/Bottom”, p.95
“Back Margin: Left/Right”, and
p.95 “Back Margin: Top/Bottom”.
There is a lack of margin
space on the opposite side
of the binding position.
In Image Repeat mode, the
original image is not copied repeatedly.
You selected copy paper the
same size as the originals,
or you did not select the
proper reproduction ratio.
Select copy paper larger than the
originals.
Select the proper reproduction ratio.
Problem Causes Solutions
The stamp position is
wrong.
The paper orientation is
wrong.
Check the paper orientation and
stamp position.
Problem Causes Solutions
You cannot make a book
from Booklet or Magazine
mode by folding copies.
You selected a setting
(“Open to left”or “Open to
right”) that does not match
the orientation of originals.
Change the setting.
When using Combine,
parts of the image are not
copied.
You specified a reproduction ratio that does not
match the sizes of your
originals and copy paper.
When you specify a reproduction ratio using Manual Paper Select mode,
make sure that the ratio matches
your originals and the copy paper.
Note
❒ Select the correct reproduction
ratio before using Combine
mode.
AdonisC3_GBcopyF_FM1.book Page 81 Thursday, November 28, 2002 1:53 PM
Page 96
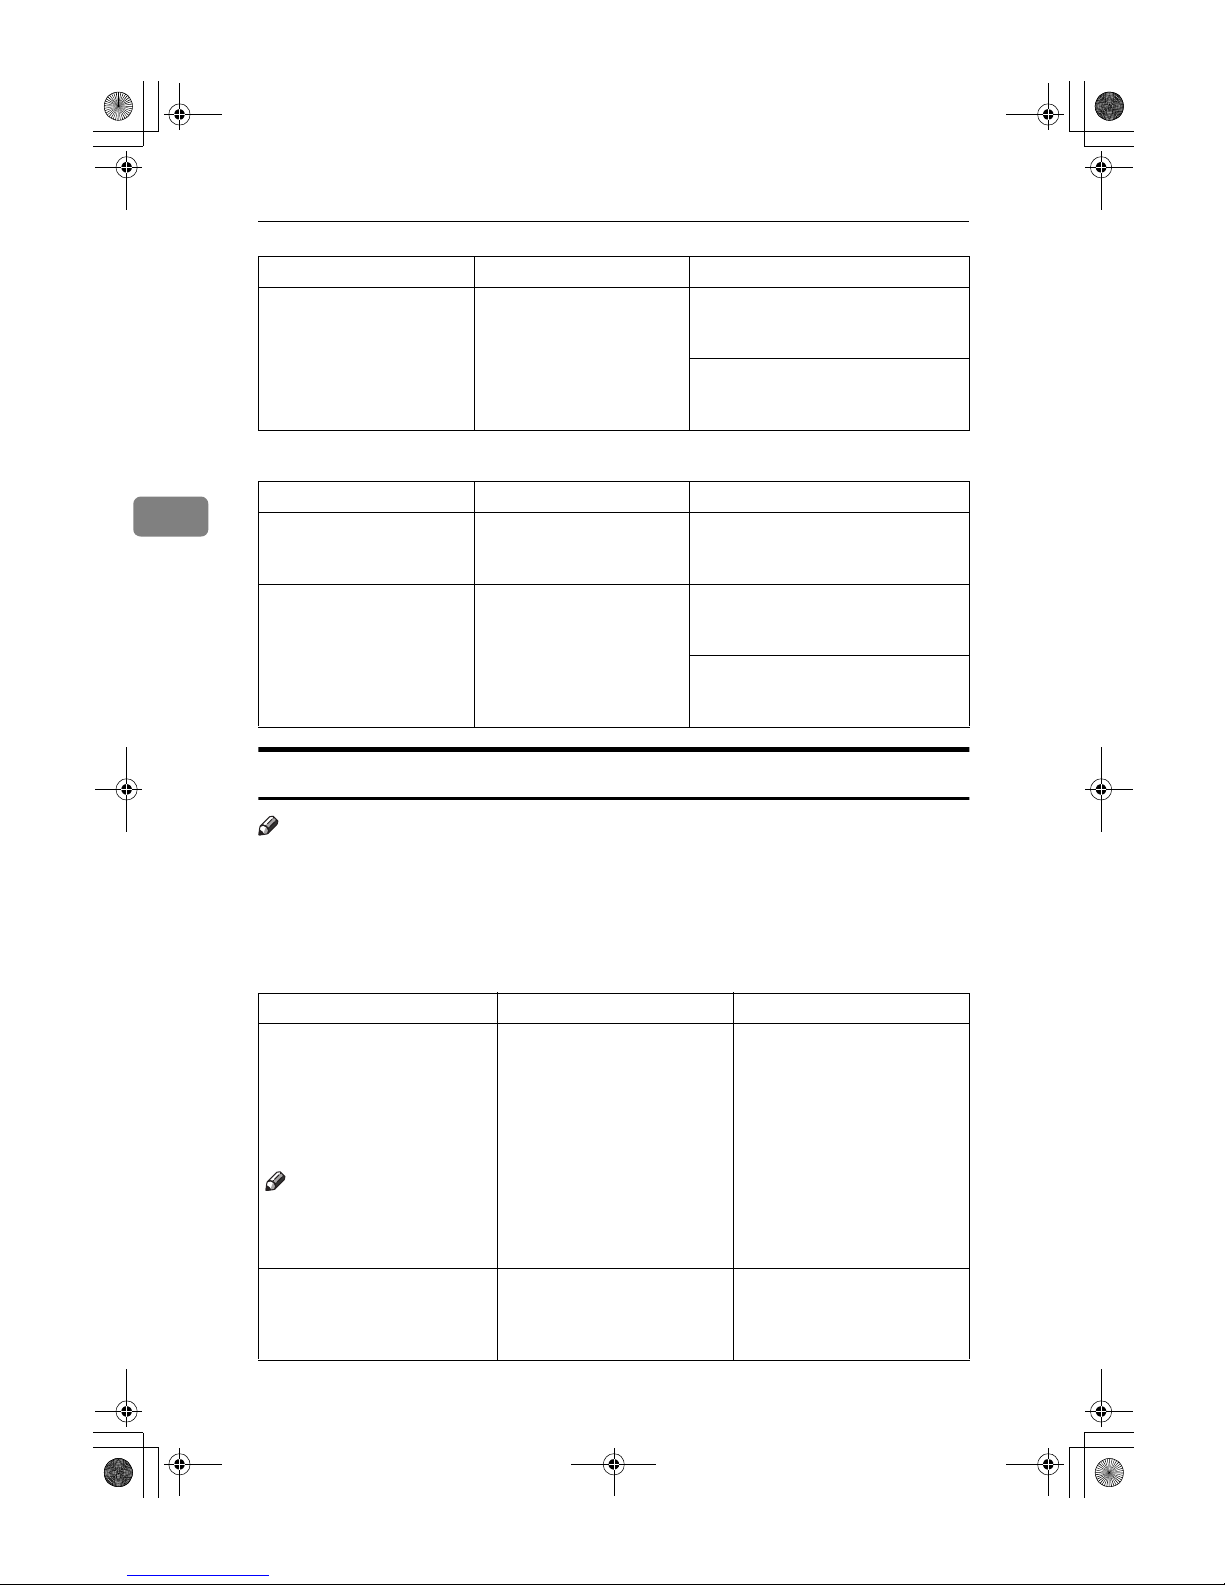
Troubleshooting
82
3
❖❖❖❖ Duplex
When Memory Is Full
Note
❒ If you set [Memory Full Auto Scan Restart] in User Tools (see p.102 “Memory
Full Auto Scan Restart” ) to [Yes], even if the memory becomes full, the memory overflow message will not be displayed. The machine will make copies of
the scanned originals first, then automatically proceed scanning and copying
the remaining originals. In this case, the resulting sorted pages will not be sequential.
Copies are not in correct order.
You placed the originals in
the incorrect order.
When placing a stack of originals in
the ADF, the last page should be on
the bottom.
If you place an original on the exposure glass, start with the first page to
be copied.
Problem Causes Solutions
When using Duplex, copy is
made Top/Bottom even
though Left/Right is selected.
You placed the originals in
the wrong orientation.
Place the originals in the correct orientation. See p.10 “Original Orientation” .
Copies are not in correct order.
You placed the originals in
the incorrect order.
When placing a stack of originals in
the ADF, the last page should be on
the bottom.
If you place an original on the exposure glass, start with the first page to
be copied.
Messages Causes Solutions
Memory is full. *originals
have been scanned.
Press
[Print]
to copy scanned
originals.
Do not remove remaining
originals.
Note
❒
Copying will stop and this
message will be displayed
when the memory is full.
The scanned original exceeds
the number of pages that can
be stored in memory.
Press
[Output]
to cop y sc ann ed
originals and cancel the scanning data. Press
[Clear]
to cancel the scanning data and not
copy.
Press
[Resume]
to scan and
copy remaining originals.
[Stop] [Resume]
The machine checks if the remaining originals should be
copied, after the scanned original has been printed.
To continue copying, remove
all copies, and then press
[Resume]
. To stop copying,
press
[Stop]
.
Problem Causes Solutions
AdonisC3_GBcopyF_FM1.book Page 82 Thursday, November 28, 2002 1:53 PM
Page 97
83
4.
User Tools (Copier/Document
Server Features)
User Tools Menu (Copier/Document
Server Features)
User Tools Item Names Default
General Features 1/4 See p.90 “General Features
1
/4”.
Auto Paper Select Priority ON
Auto Tray Switching With image rotation
Paper Display Display
Original Type Priority Text
Original Type Display Display
Auto Image Density Priority Text: On
Text/Photo: On
Photo: Off
Pale: On
Generation Copy: On
Copy Quality Text: Normal
Text/Photo: Normal
Photo: Print Photo
Pale: Normal
Generation Copy: Normal
Image Density Text: Normal
Text/Photo: Normal
Photo: Normal
Pale: Normal
Generation Copy: Normal
General Features 2/4 See p.92 “General Features
2
/4”.
Duplex Mode Priority 1 Sided → 1 Sided (metric)
1 Sided → 2 Sided (inch)
Copy Orientation in Duplex Mode Top to Top
Original Orientation in Duplex Mode Top to Top
Change Initial Mode Standard
Max. Copy Quantity 999 Sheets
Tone: Original remains ON
Job End Call ON
AdonisC3_GBcopyF_FM1.book Page 83 Thursday, November 28, 2002 1:53 PM
Page 98
User Tools (Copier/Document Server Features)
84
4
General Features 3/4 See p.93 “General Features 3/4”.
Copy Function Key: F 1–F5 • F1: 1 Sided → 2 Sided : T to
T
• F2: 2 Sided : T to T → 2 Sid-
ed : T to T
• F3: 1 Sided → 1 Sided Com-
bine
• F4: 1 Sided → 1 Sided Com-
bine: 4 originals
• F5: Create Margin
General Features 4/4 See p.93 “General Features
4
/4”
Document Server Storage Key: F1–F5 • F1: 2 Sided Original Top to
top
• F2: 1 Sided → 1 Sided Com-
bine
• F3: 1 Sided → 1 Sided Com-
bine: 4 originals
• F4: 1 Sided → 1 Sided Com-
bine: 8 originals
• F5: Create Margin
Reproduction Ratio 1/2 See p.94 “Reproduction Ratio
1
/2”.
Shortcut R/E Metric version
•Shortcut R/E 1: 71%
•Shortcut R/E 2: 141%
•Shortcut R/E 3: 93%
Inch version
•Shortcut R/E 1: 73%
•Shortcut R/E 2: 155%
•Shortcut R/E 3: 93%
Enlarge 1–5 Metric version
•Enlarge 1: 115%
•Enlarge 2: 122%
•Enlarge 3: 141%
•Enlarge 4: 200%
•Enlarge 5: 400%
Inch version
•Enlarge 1: 121%
•Enlarge 2: 129%
•Enlarge 3: 155%
•Enlarge 4: 200%
•Enlarge 5: 400%
Priority Setting: Enlarge Metric version 141%
Inch version 155%
User Tools Item Names Default
AdonisC3_GBcopyF_FM1.book Page 84 Thursday, November 28, 2002 1:53 PM
Page 99
User Tools Menu (Copier/Document Server Features)
85
4
Reproduction Ratio 2/2 See p.94 “Reproduction Ratio 2/2”.
Reduce 1–6 Metric version
•Reduce 1: 25%
•Reduce 2: 50%
•Reduce 3: 65%
•Reduce 4: 71%
•Reduce 5: 75%
•Reduce 6: 82%
Inch version
•Reduce 1: 25%
•Reduce 2: 50%
•Reduce 3: 65%
•Reduce 4: 73%
•Reduce 5: 78%
•Reduce 6: 85%
Priority Setting: Reduce Metric version: 71%
Inch version: 73%
Ratio for Create Margin 93%
R/E Priority Reduce
Edit 1/2 See p.95 “Edit
1
/2”.
Front Margin: Left/Right Metric version: Left 5 mm
Inch version: Left 0.2”
Back Margin: Left/Right Metric version: Right 5 mm
Inch version: Right 0.2”
Front Margin: Top/Bottom Metric version: T/B 0 mm
Inch version: T/B 0”
Back Margin: Top/Bottom Metric version: T/B 0 mm
Inch version: T/B 0”
1 Sided→2 Sided Auto Margin: TtoT Metric version: Right 5 mm
Inch version: Right 0.2”
1 Sided→2 Sided Auto Margin: TtoB Metric version: T/B 0 mm
Inch version: T/B 0”
Erase Border Width Metric version: 10 mm
Inch version: 0.4”
Erase Original Shadow in Combine Yes
Erase Centre Width Metric version: 10 mm
Inch version: 0.4”
User Tools Item Names Default
AdonisC3_GBcopyF_FM1.book Page 85 Thursday, November 28, 2002 1:53 PM
Page 100
User Tools (Copier/Document Server Features)
86
4
Edit 2/2 See p.96 “Edit 2/2”.
Image Repeat Separation Line None
Double Copies Separation Line None
Separation Line in Combine None
Copy on Designating Paper Yes
Front Cover Copy in Combine Combine
Copy on Designating Page in Combine Combine
Orientation: Booklet, Magazine Open to Left
Copy Order in Combine From left to right
Stamp See p.98 “Stamp”.
Background Numbering Size Normal
Density Normal
Preset Stamp Stamp Priority Copy
Stamp Language English
Stamp Position Metric version
• Position: Top right
• Top Margin: 24 mm
• Right Margin: 24 mm
Inch version
• Position: Top right
• Top Margin: 1.0"
• Right Margin: 1.0"
Stamp Format Size : 1×
Density: Normal
Page to Stamp: All Pages
User Stamp Program/Delete Stamp
Stamp Position: 1–4 Metric version
• Position: Top right
• Top Margin: 24 mm
• Right Margin: 24 mm
Inch version
• Position: Top right
• Top Margin: 1.0"
• Right Margin: 1.0"
Stamp Format : 1–4All Pages
User Tools Item Names Default
AdonisC3_GBcopyF_FM1.book Page 86 Thursday, November 28, 2002 1:53 PM
 Loading...