

3720/9920
Operator's Manual
TSTH120N
Read this manual carefully before you use this product and keep it handy for future
reference.
For safety, please follow the instructions in this manual.

Optional Equipment
HANDSET TYPE 100( Telephone Handset )
❖❖❖❖
This permits voi ce comm unication (over th e PSTN).
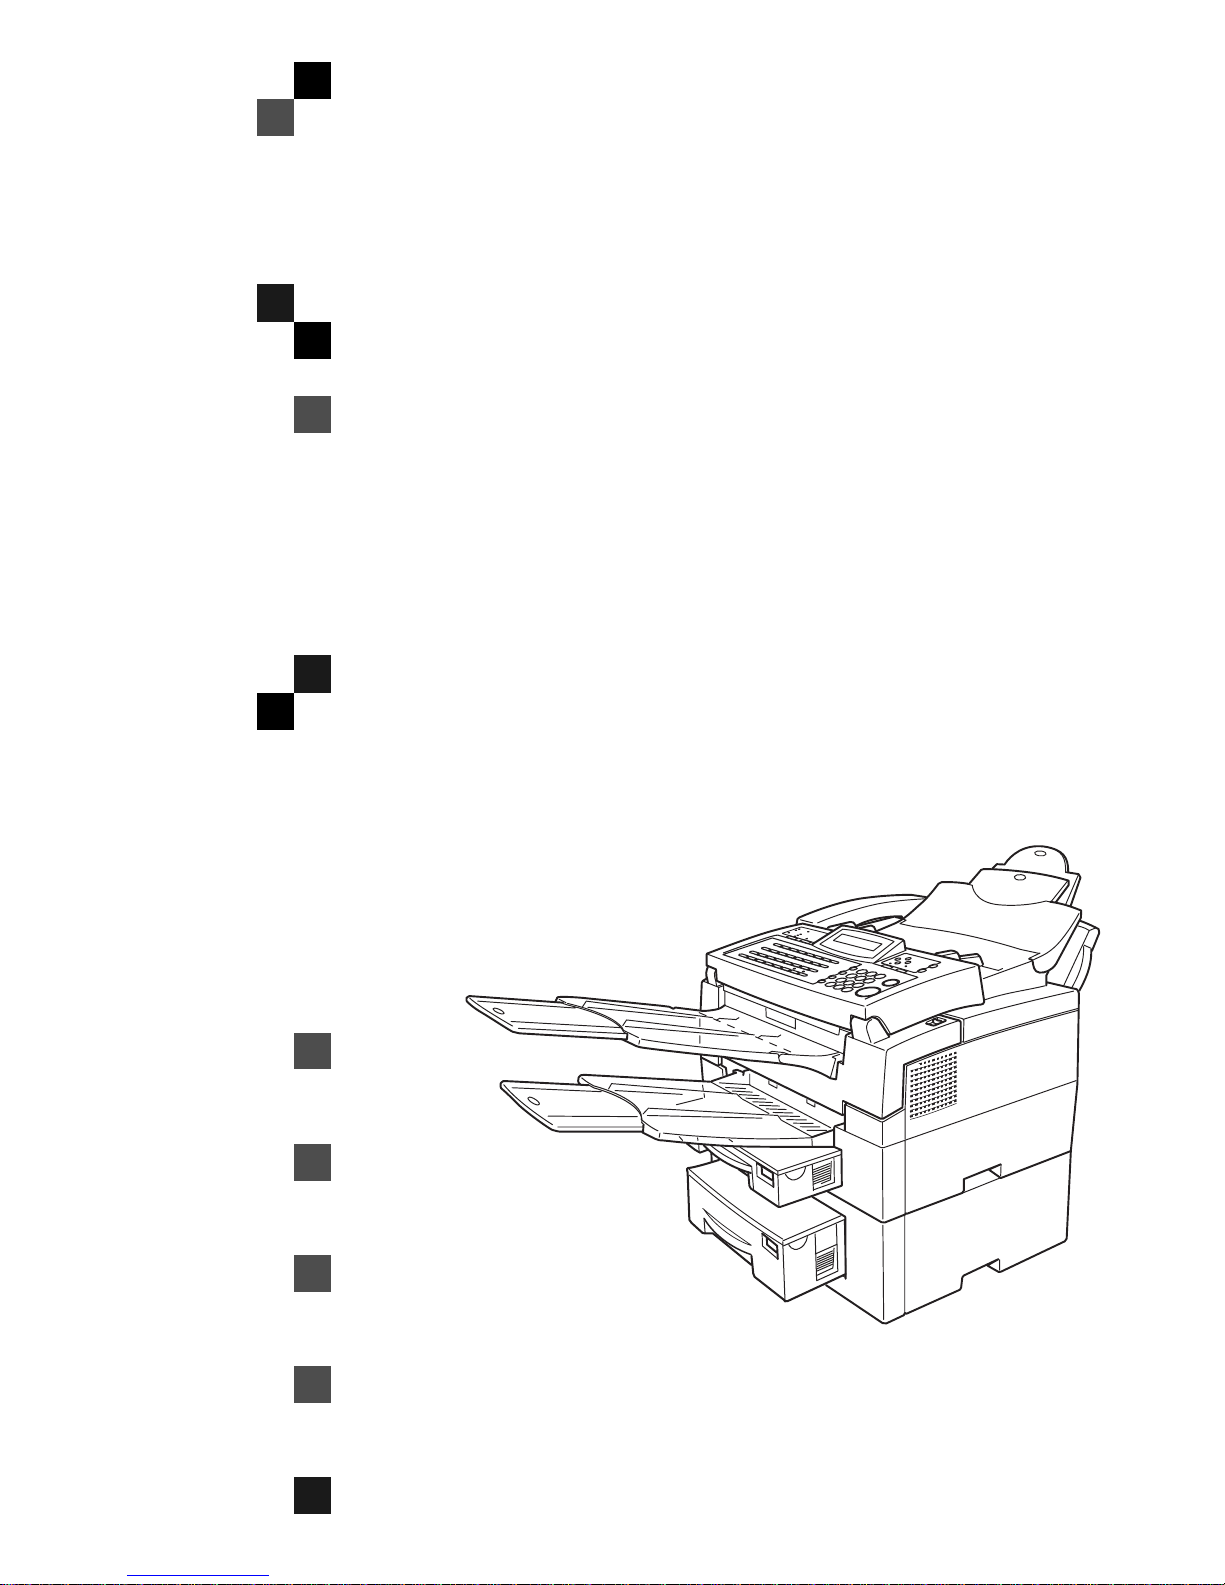
PAPER FEED UNIT TYPE 180( Second Cassette )
❖❖❖❖
A second paper feed unit can be added to the base machine.
BYPASS FEEDER TYPE 180( Multi-purpose Feeder )
❖❖❖❖
A third paper feed unit can be added to the base machine.
FAX EXP ANSION CARD TYPE 10
❖❖❖❖
A 1-Mbyte memory card can be added.
FAX EXP ANSION CARD TYPE 20
❖❖❖❖
A 1-Mbyte memory card can be added.
PC INTERFACE KIT TYPE 180
❖❖❖❖
This allows you to use the machine as a PC-Printer or PC-Scanner for an IBM or compatible personal computer. Viewing and editing various fax settings from your PC can be also available.

USA
FCC Requirements
❖❖❖❖
1. This equipment c omplies with Par t 68 of the FCC rul es. On the c over o f this equipmen t is a l abel
that contains, among other information, the FCC registration number and ringer equivalence
number (REN) for this equipment. If requested, this information must be provided to the telephone company.
2. This equipment uses t he fol lowing USOC jack: RJ11C
3. The REN is used t o de termin e t he quant ity o f d evices which may be connec ted t o the t elephon e
line. Excessi ve REN's on the telep hone line may resul t in the device s not ringing in resp onse to
an incoming call. In most, but not all areas, the sum of the REN's should not exceed five (5.0).
Contact the tele phone company to determine the maximum REN for the calling area.
4. If this equipm ent causes harm to the telephone network, the telephone company will notify you
in advance that temporary discontinuance of service may be required. If advance notice is not
practical, the telephone com pany will noti fy the customer as soon as possible. Also, you will be
advised your right to file a complaint with the FCC if you believe it is necessary.
5. The telephone company may make changes in its facilities, equipment, operations, or procedures that could affect the operation of the equipment. If this happens, the tel ephone company
will provide advance notice in order to make necess ary modificatio ns in order to maintain uninterrupted ser vice.
6. In the event of operation problems (document jam, copy jam, communication error indication),
refer to the solving problems section in this manual.
7. If you cannot correct the problem, please contact the SAVIN CORP. CUSTOMER SUPPORT
at 1-800-756 -879 8 for repai r and war ran ty i nformat ion. If it i s causin g ha rm to the t el ephone ne twork, the telephone company may request you to disconnect the equipment from the network
until the problem is resolved.
8. This equipment ca nnot be used tel ephone com pany- pro vided coi n servi ce. Conn ect ion to Part y
Line Service is subject to state tariffs.
WHEN PR OGRAMM ING EM ERGE NCY NUMB ERS AND/ OR MAKI NG TEST CALLS T O
❖❖❖❖
EMERGE NCY NUMBERS:
1. Remain on the line and briefly explain to the dispatcher the reason for the call before hanging
up.
2. Perform such activities in the off-peak hours, such as early morni ng hours or late evenings.
CANADA
The Industry Canada label identifies certified equipment. This certification means that the equipment
meets telecommunications network protective, operational, and safety requirements as prescribed in
the appropriate Terminal Equipment Technical Requirements document(s). The department does not
guarantee the equipment will operate to th e user's satisfaction.
Before installing this equipment, users should en sure that it is permissible to be connect ed to the facilities of the local telecommunications compa ny. The equipment m ust also be installed using an acceptable method of connection. The customer should be aware that compli ance with the above conditions
may not prevent degradation of service in some situations.
Repairs to certified equipment should be coordinated by a representative designated by the supplier.
Any repairs or alterat ion s made by the use r to t his e quipm ent, o r equi pment malfun ctions , ma y give th e
telecommunications company cause to request the user disconnect the equipment.
User should ensure for their own protection that the electrical ground connections of the power utility,
telephone lines, and internal metallic water pipe system, if present, are connected together. This precaution may be particularly important in rural areas.
Caution: Users should not attempt to make such connections themselves, but should contact the appropriate el ectric inspection authority, or electrician, as appropri ate.
The Ringer E quival ence Num ber (REN) assign ed t o each te rminal device pr ovides a n indi cat ion of the
maximum number of terminals allowed to be connected to a telephone interface. The termination on
an interface may consist of any combination of device subject only to the requirement that the sum of
the Ringer Equivalence Numbers of all the devi ces does not exceed 5.

Notice
R
CAUTION:
Use of controls, adjustments or performance of procedures other than those
specified herein may result in hazardou s radiation exposure.
Shielded interconnect cables must be employed with this equipment to ensure
compliance with the pertinent RF emission limits governing this device.
Although this equipment can use either loop disc onnect or DTMF signalling,
only the performance of the DTMF signalling is subject to regulatory requirements for correct operat ion. It is theref ore strongly recommended that the equipment is set to use DTMF signalling for access to public or private emergency
services. DTMF signalling also p rovides fast er call set up.
Direct (o r indirec t reflected eye con tact with th e laser beam may ca use serious eye
damage. Safety precautions and interlock mechanisms have been designed to prevent
any possible laser beam exposure to the operator.
Note
Some illustrations may be slightly different from you r mach in e .
❒
Certain options may not be available in some countries. For details, please
❒
contact your local dealer.
Notice about the Telephone Consumer Protection Act (Valid in USA
----
only).
The Telephone Consumer Protection Act of 1991 among other things makes it
unlawful for any person to send any message via a telephone fax machine unless
such message clearly contains in a margin at the top or bottom of each transmitted page or on the first page of the transmission, the date and time it is sent and
an identification of the business, other entity, or other individual sending the
message and the telephone number of the sending machine or such business,
other entity or individual. This information is transmitted with your docu ment
by the TTI (Transmit Terminal Identification) feature. In order for you to meet
the requirement, your machine must be programmed by following the instructions in the accompanying Operation Manual. In particular, please refer to the
chapter of Installation. A lso refer to the TTI (Tran smit Terminal Ident ification)
programming procedure to enter the business identification and telephone
number of the terminal or business. Do not forget to set the date and time.
Thank you.
i

ENERGY SAVING INFORMATION
----
As an Energy Star Partner, we have determined that this fax model meets Energy Star guidelines for energy efficiency. This product was designed to reduce the
environmental impact associated with fax equipment. This is accomplished by
means of energy saving features such as power saving mode. Please see applicable sections of operating instructions for details.
M001
Laser Safety:
The Center for Devices and Radiological H e alth (CD R H) prohibits the repa ir of
laser-based optical unit in the field. The optical housing unit can only be repaired in a factory or at a location with the requ isite equipment. The laser subsystem is replaceable in the field by a qu alified Customer Engineer. The laser
chassis is not repairable in the field. Customer engineers are therefore directed
to return all chassis and laser subsystems to the factory or service depot when
replacement or the optical subsystem is required.
Operator Safety :
This machine is considered a CDRH class I laser device, safe for office/ EDP use.
The machine contains two 5-milliwat, 765 - 805 nanometer wavelength, GaAIAs
laser diodes. Direct (or indirect reflected) eye contact with the laser beam might
cause serious eye damage. Safety precautions and interlock mechanisms have
been designed to prevent any possible laser beam exposure to the operator.
In accordance with ISO Standard 7001, this machine uses the following symbols
for the main power swit ch:
• a means POWER ON.
• c means STAND BY.
ii
Note to users in the United States of Am eri ca
Notice:
----
This equipment has been tested and found to comply with the limits for a Class
B digital device, purs uant to Part 15 o f the F CC Rules . These li mits are desig ned
to provide reasonable protection against harmful interference in a residential installation. T his equi pme nt ge nerat es, us es and can rad iat e radi o fr eq uency energy and, if not installed and used in accordance with the instructions, may cause
harmful interference to radio communicat ions. Howe ver, there is no guarantee
that interference will not occur in a particular installation. If this equipment does
cause harmful interference to radio or television reception, which can be determined by turning the equipment off and on, the user is encouraged to try to correct the interference by one more of the following measures:
• Reorient or relocate the receiving antenna.
• Increase the separation between the equipment and receiver.
• Connect the equipment into an outlet on a circuit different from that to which
the receiver is connected.
• Consult the dealer or an experienced radio /TV technician for help.
Warning
----
Changes or modifications not expressly approved by the party responsible for
compliance could void the user's authority to operate the equipment.
Examples Of Indications
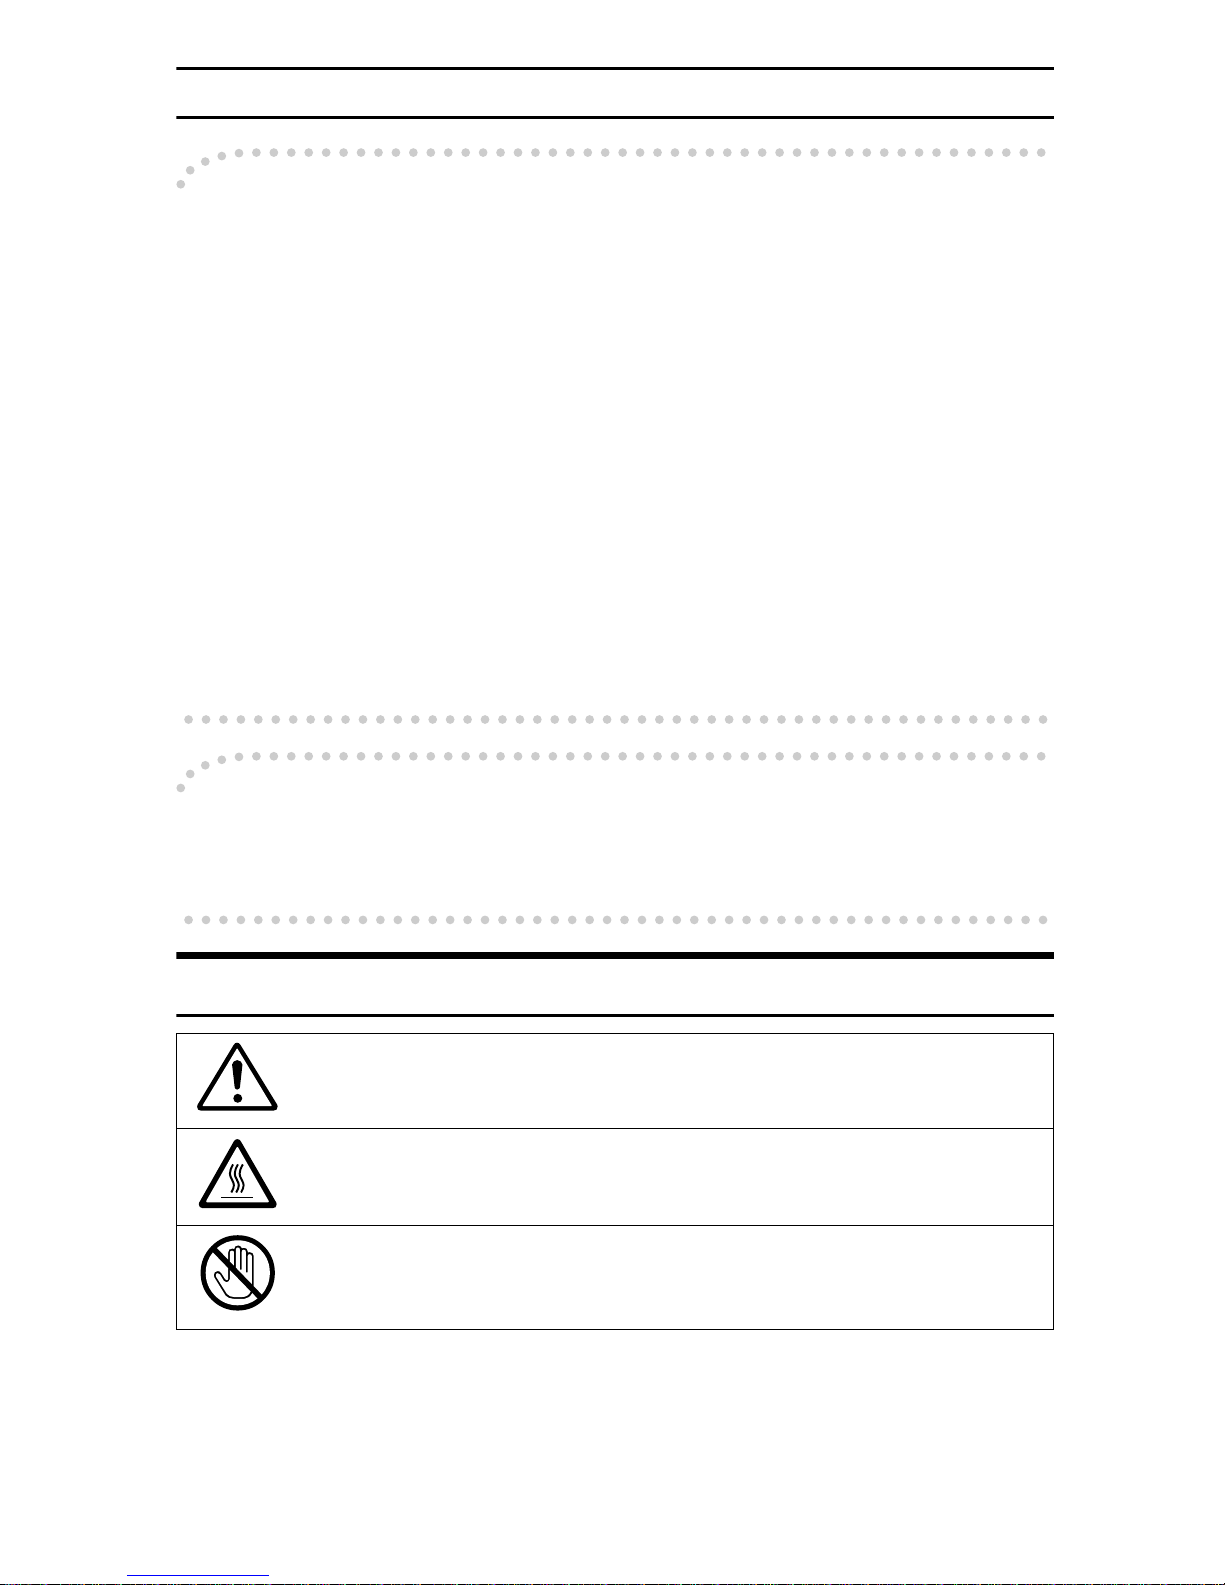
Symbols R mean a si tuation tha t requires you take care.
Symbols v mean “Hot surface”.
Symbols n mean “Do not touch”.
iii

TABLE OF CONTENTS
1.Safety
Important Safety Instructions................................................................... 1
When to Call Your Service Representative............................................. 3
Power And Grounding.............................................................................. 4
Power Supply................................................................................................ 4
Grou ndi ng ......... ... .... ... ... ... .... ... ... ... ... .... ......... .... ... ... ... ... .... ... ... ... .... ... ... ... ..... 4
Other Important Informations. .......... ......... ..................................... .......... 5
Genera l ... .... ... ... ... .......... ... .... ... ... ... ... .... ... ... ... .... ... ... .......... ... ... ... .... ... ... ... .... . 5
Cold Weather Power-up................................................................................ 5
Thund e rst orm s..... .... ... ... ... .... ... ... ... ... .... ... ... ... .... ... ... ... ... .......... ... .... ... ... ... .... . 5
Oper at ing P rec a ut ion s .......... ... ... ... ... .... ... ... ... .... ... ... ... ... .......... ... .... ... ... ... .... . 5
Copy Paper ................................................................................................... 6
Symb ol s & Co nv e ntio ns Use d In Thi s Man u al...... ... ... ... .... ... ... ... .... ... ... ... .... . 6
2.Machine Layout
Part Names................................................................................................. 7
Operation Panel......................................................................................... 9
3.Faxing
Recommended Types Of Document...................................................... 11
Correct Size For The Document Delivery Tray ........................................... 11
Page Condition............................................................................................ 12
Memory Transmission And Immediate Transmission......................... 13
Memory Transmiss ion (Memory Indicator Lit)............................................. 13
Immediate Transmission............................................................................. 15
Dialing with the Telephone Directory .......................................................... 16
Receiving Telephone Calls & Fax Messages (Faxes/Phone Calls)..... 17
Switching Between Auto, Fax, and Telephone Mode ................................. 17
Recei v ing th e F ax M ess a ge in the T e leph o ne Mo de..... .... ... ... ... .... ... ... ... ... 17
Setting the Auto Ring Time ......................................................................... 18
Printing Received Messages That Have Been Stored
(Substitute Reception)........................................................................... 19
Faxing A Page With Very Fine Detail..................................................... 20
Resolution & Shading.................................................................................. 20
Optional Features For Transmission..................................................... 21
Sending At A Specific Time (Send Later).................................................... 21
Printing The Page Number (Page Count) ................................................... 21
Sending Your Identification At The Top Of Your Message (TTI)................. 22
Personal Codes........................................................................................... 22
Redialing .................................................................................................. 24
iv

Automatic Redialing .................................................................................... 24
Using the AI Redial key............................................................................... 24
Storing & Editing Fax Numbers (Functions 31 & 32)........................... 25
Storing, Editing & Erasing Quick Dial Numbers (Function31)..................... 25
Storing, Editing & Erasing Speed Dial Numbers (Function32).................... 26
Storing & Editing A Group Of Fax Numbers (Function 33) ................. 28
Erasing Groups ........................................................................................... 29
Programming The Group Key..................................................................... 29
Dial Options............................................................................................. 31
Programming The Dial Option Key............................................................. 31
Using the Di a l Opt ion s .......... ... ... ... ... .... ... ... ... .... ... ... ... ... .... ... ... ... .......... ... ... 31
Chain Dialing............................................................................................ 33
Erasing A Stored Message Before It Is Sent (Functions 21 & 22)....... 34
Printing A Stored Message (Function 51)............................................. 35
Confidential Reception .......................................................................... 36
Storing & Editing the Confidential ID........................................................... 36
Printing messages Received into Memory (Function 52)............................ 37
Sending A Fax Using The Handset........................................................ 38
Answering The Telephone...................................................................... 39
If the telephone rings continuously............................................................. 39
Phoning And Faxing On The Same Call................................................ 40
To talk before sending a fax........................................................................ 40
4.Other Features
Verifying Communications, Errors, Counters, Etc............................... 41
Automatically printed reports....................................................................... 41
Report formats ............................................................................................ 42
Coun te rs (fu nction 94).... ... .... ... ... ... ... .... ... ... .......... ... ... ... .... ... ... ... .... ... ... ... ... 43
Programming Keystrokes....................................................................... 44
Storing a keystroke program....................................................................... 44
Labeling a program ..................................................................................... 45
Using a program.......................................................................................... 45
Erasing a program / Changing the program Label...................................... 46
Batch Transmission................................................................................ 47
Changing the batch transmission on/off...................................................... 47
Programming the personal codes ......................................................... 48
Storing a personal code.......................................................................... 49
Editing or erasing a personal code........................................................ 51
Tonal Signals........................................................................................... 52
Using the tone key ...................................................................................... 52
Rejecting messages from senders who don't identify themselves .... 53
v

Rejecting or accepting messages from specified senders
(Authorized Reception).......................................................................... 54
About A uth o riz e d Rec e pti o n . ... ... ... ... .... ... ... ... .... ... ... ... ... .... ... .......... ... ... ... ... 54
Entering A List Of Senders To Treat Differently (Function 81).................... 54
Switching authorized reception on / off (Function 62)................................. 54
Cassette Selection................................................................................... 55
About Cassette Selection............................................................................ 55
Entering A List Of Senders To Treat Differently (Function 81).................... 55
Selecting the messages to be printed from the main cassette.................... 55
Selecting the Cassette( Function 62 )......................................................... 55
Entering A List Of Senders To Treat Differently (Function 81)........... 57
Programming the list of senders (Special Senders).................................... 57
Editing the RTI/CSI for the special terminals .............................................. 58
Erasing the special terminal........................................................................ 59
Forwarding............................................................................................... 60
Programming the forwarding feature........................................................... 60
Editin g the for wa rdi n g fea tu re ........ ... .... ... .......... ... ... ... ... .... ... ... ... .... ... ... ... ... 61
Switching forwarding on / off (Function 62)................................................. 63
Selecting which messages to forward......................................................... 63
Switching local printing on / off.................................................................... 64
Enabling and disabling the forwarding mark ............................................... 64
Wild Cards................................................................................................ 65
Receiving Options................................................................................... 66
Reverse Order Printing ............................................................................... 66
Printing A Center Mark................................................................................ 66
Reports You Can Printout Yourself....................................................... 67
Journal (Function 41) .................................................................................. 67
File list (Function 42)................................................................................... 67
Telephone number list (Function 43) .......................................................... 67
Program List ( Function 44 )........................................................................ 68
Saving Energy.......................................................................................... 69
How to start the saving energy mode.......................................................... 69
How to exit the saving energy mode........................................................... 69
Whic h sav ing ene rg y mod e is best fo r you ? ......... ... ... ... .... ... ... ... .... ... ......... 69
Saving Energy With The Power Saving Timer...................................... 71
Setting the Power Saving time ( Function 71 )............................................ 71
Switching the Power Saving Timer on / off ( Function 62 ) ......................... 72
Copying.................................................................................................... 73
Calling To Request A Message (Polling)....................................... ........ 74
Picking up messages stored elsewhere (polling reception) ........................ 74
Oper at ing pr o ced u re ...... ... .... ... ... ... ... .... ... ... ... .... ... ... ... ... .... ... ... ... .......... ... ... 74
Entering a Personal Code........................................................................... 74
User Function Keys................................................................................. 76
Programming a User Function Code........................................................... 76
Using a Function Program .......................................................................... 76
vi

Editing a Function Program......................................................................... 77
Deleting a Function Program ...................................................................... 77
Dual Access............................................................................................. 78
5.Maintaining Your Mach ine
Loading Paper In The Main Cassette..................................................... 79
Loading Paper In The Lower Cassette.................................................. 82
Loading Paper In The Optional Multi-purpose Feeder......................... 85
Replacing The Toner Cassette And Cleaning Pad............................... 86
Toner Cassette......................................................................................... 90
Cleaning The Rollers And Scanner........................................................ 91
Changing The Paper Size In The Main Cassette................................... 92
Changing The Paper Size In The Lower Cassette................................ 97
Changing The Paper Size In The Optional Multi-purpose Feeder..... 101
Changing The Paper Size Settings...................................................... 103
6.Troubleshooting
If An Indicator Lights Up On The Operation Panel............................. 105
Other Possible Problems...................................................................... 106
You Want To Remove The Document In The Feeder............................... 106
Clearing a Document Jam .................................................................... 107
Clearing a Copy, Fax, or Print Jam...................................................... 108
Clear a Jam inside the machine................................................................ 108
Clear a Jam in the Cassette Entrance ...................................................... 110
Clear a Jam in the Optional Second Cassette .......................................... 111
Clear a Jam in the Upper Rear Unit.......................................................... 112
Clear a Jam in the Lower Rear Unit.......................................................... 113
If Messages You Receive Don't Fit On Your Paper............................ 115
Breaking Down Large Format Messages.................................................. 115
Length Reduction...................................................................................... 115
Communication Problems.................................. .......... ......... ......... ...... 116
RDS (Remote Diagnostic System)....................................................... 117
Switching RDS On/Off............................................................................... 117
Adjusting the Printing Margins (Function 95)..................................... 118
Operating Difficulties............................................................................ 119
Displayed Error Messages.................................................................... 124
Error Codes............................................................................................ 125
Calling The Service Station.................................................................. 129
Sending A Service Report......................................................................... 129
vii

7.Technical Reference
Access Code For Functions 61 To 95.................................................. 131
User Parameters.................................................................................... 132
User Parameter Hints................................................................................ 136
Adjusting The Volume Of Various Features (Function 92)................ 137
Selecting The Display's Language (Function 93)............................... 139
Entering Characters.............................................................................. 140
Entering Symbols...................................................................................... 140
Entering Numbers..................................................................................... 140
Document & Paper Specifications....................................................... 141
Documents (Using The Auto Document Feeder)...................................... 141
Docum en t F e eder Re qu ir em e nt s.......... ... ... ... .... ... ... .......... ... ... ... .... ... ... ... . 141
Paper Requirements ................................................................................. 141
Capabilities............................................................................................ 142
Store d Nu m ber s (L on g Te rm ) ........ ... .... ... ... ... .... ... ... ... .......... ... ... .... ... ... ... . 142
Store d De sti na tion s..... ... ... .... ... ... ... ... .... ... ... ... .... ... ... ... ... .... ... .......... ... ... ... . 142
File Sto rag e....... ... .... ... ... ... .... ... ... ... ... .......... ... .... ... ... ... ... .... ... ... ... .... ... ... .... 14 2
Specifications........................................................................................ 143
Base M ach in e .......... ... ... ... .... ... ... ... ... .... ... ... ... .... ... ......... .... ... ... ... .... ... ... ... . 143
Optio na l Low er Pap er Ca ss et te ........ .... ... ... ... .... ... ... ... ... .... ... .......... ... ... ... . 143
Multi-p ur p o se F eed er..... ... .... ... ... ... ... .... ... ... ... .... ... ... ... ... .... ... ... ... .......... ... . 143
8.Installation
Before Installation................................................................................. 145
Machine Environment........................................................................... 146
Location..................................................................................................... 146
Installing The Toner Cassette ............................................................. 147
Installing The Main Paper Cassette..................................................... 150
Installing The Optional Second Cassette............................................ 152
Attaching The Trays And Document Table......................................... 155
Ventilation Grill Direction........................................................................... 156
Installing The Optional Multi-purpose Feeder.................................... 157
Installing The Optional Memory Card.................................................. 159
Installing The Optional Handset........................................................... 160
Connecting The Machine...................................................................... 162
Connecting Up To The Telephone Line............................................... 163
Connecting The Power And Switching On.......................................... 164
Initial Settings & Adjustments................... ..................................... ...... 165
Initial Settings (Function 61)...................................................................... 165
Setting The Access Number ..................................................................... 167
viii

Setting The Phone Line (Function 62) ...................................................... 167
Settin g The Da te & Tim e (F u ncti o n 91 ) . ... ... ... .... ... ... .......... ... ... ... .... ... ... ... . 167
Summer Time / Daylight Saving Time (Function 62) ................................ 168
9.Function List
Function List.......................................................................................... 169
10.Certification Label
Certification Label................... .......... ......... ......... .......... ......... ......... ...... 173
INDEX...................................................................................................... 174
ix

This page is intentionally blank.
x

Important Safety Instructions
1. Safety
All Safety messages in the main text
of this manual are labeled WARNING or CAUTION. These mean the
following:
WARNING: Important information
to alert you to a situation that might
cause serious injury and damage to
your property if instructions are not
followed properly.
CAUTION: Important information
that tells how to prevent damage to
your equipment or h ow to avoid a si tuation that might cause minor injury.
In addition to the warnings and cautions included in the text of this manual, please read and observe the
following safety instructions.
A Read all of these instructions.
B Save these instructions for later
use.
C Follow all warnings and cautions
marked on the product.
D Unplug this product from the w all
outlet before cleaning. Do not use
liquid cleaners or aerosol cleaners.
Use a damp cloth for cleaning.
E Do not use this p roduct near water,
for example, near bath tub, wash
bowl, kitchen sink or laundry tub,
in a wet basement or near a swimming pool.
F Avoid using a telephone (other
than a cordless type) during an
electrical storm. There may be a remote risk of electric shock from
lightning.
G Do not use a telephone in the vicin-
ity of a gas leak to report the leak.
H Do not place this p roduct on an un-
stable cart, stand, or table. The
product may fall, causing serious
damage to the product or injuring
the user.
I Slots and opening in the cabinet
and the back or bottom are provided for ventilation; to ensure reliable operation of the product and
to protect it from overheating,
these openings must not be
blocked or covered. The openings
should never be blocked by placing the product on a bed, sofa, rug,
or other similar surface. This product should not be placed in a builtin installation unless proper ventilation is provided.
J This product should be operated
from the type of power source indicated on the marking label. Using a different power source may
result in injury or accident. If you
are no t sure of the type of power
available, consult an authorized
sales person or your local power
company.
K This product is equipped with a 3-
wire grounding type plug, a plug
having a third (grounding) pin.
This plug will only fit into a
groundi ng-type power out l et. T his
is a safety feature. If you are unable
to insert the plug into the outlet,
contact your electrician to replace
your obsolete outlet. Do not defeat
the purpose of the grounding type
plug. (This does no t apply in countries in which the 2-wire, nongrounded type of plug is used.)
1

Safety
1
L Do not allow anything to rest on
the power cord. Do not locate this
product where persons will walk
on the cord.
M If an extension cord is used with
this product, mak e sure that the total of the ampere ratings on the
products plugged into the extension cord does not exceed the extension cord ampere rating. Also,
make sure that the total of all products plugged into the wall outlet
does not exceed 15 amperes.
N Never push objects of any kind
into this product through cabinet
slots as they may touch dangerous
voltage points or short out parts
that could result in a risk of fire or
electric shock. Never spill liquid of
any kind on the product.
O Do not attempt to service this
product yourself, as opening or removing covers may expose you to
dangerous voltage points or other
risks.
Refer all servicing to qualified service personnel.
• If the product has been exposed
to rain or water.
• If the product does not operate
normally when the operating
instructions are followed. Adjust only those controls t hat are
covered by the operating instructions since improper adjustment of other controls may
result in damage and will often
required extensive work by a
qualified technician to restore
the product to normal operation.
• If the pro duct has be en dropped
or the cabinet has been damaged.
• If the product exhibits a distinct
change in performan ce, in dicating a need for service.
P Do not take apart or attempt any
modifications to this machine.
There is a risk of fire, electric
shock, explosion or loss of sight.
Q Do not incinerate used toner or
toner containers. Toner dust might
ignite when exposed to open
flame. Dispose of the used toner
containers according t o local regulations for plastics.
R Unplug this product from the w all
outlet and refer servicing to qualified service personnel under the
following conditions:
• When the power cord or plug is
damaged or frayed.
• If liquid has been spilled into
the product.
2

When to Call Your Service Representative
When to Call Your Service Representative
WARNING: Do not attempt any
maintenance or tr oubleshoot ing other
than that mentioned in this manual.
This machine contains a laser beam
generator and direct exposure to laser
beams can cause permanent eye damage.
Unplug this product from the wall
outlet and refer servicing to qualified
service personnel under the following conditions:
A When the power cord or plug is
damaged or frayed.
B If liquid has been spilled into the
product.
C If the product has been exposed to
rain or water.
D If the product does not operate
normally when the operator's
manual are followed. Adjust only
those controls that are covered by
the operator's manual since improper adjustment of other controls may result in damage and
will often require extensive work
by a qualified technician to restore
the product to normal operation.
I After you move the machine, fix it
with the caster fixture. Otherwise
the machine might move or come
down to cause a personal injury.
J When removing misfed paper, do
not touch the fusing section because could be very hot.
1
E If the pr oduct has b een dro ppe d or
the cabinet has been damaged.
F If the product exhibits a distinct
change in performance, indicating
a need for service.
G If smoke is coming out, there is a
strange smell or anything looks
unusual.
H Do not use reuse stapled pap er. Do
not use aluminum foil, carboncontaining paper or other conductive paper. Otherwise, a fire might
occur.
3

Safety
Power And Grounding
1
Power Supply
A Power requirements: 115 V, 60 Hz
B Insert the power plug securely into
the wall socket.
C Make sure that the wall outlet is
near the machine and readily accessible.
D Do not connect oth er equipment to
the same socket.
E Do not step on or set anything on
the power cord.
F Do not connect oth er equipment to
the same extension cord.
G Be sure that the power cord is not
in a position where it would trip
someone.
H The wall outlet must be easily ac-
cessible.
Grounding
Ground the machine and the lightning protection circuit in accordance
with regulations. Do not ground to
gas or water pipes, or to a telephone
ground plug. Proper g rounding is to
the ground terminal of the power outlet. Be sure that the ground terminal
of the power outlet is properly
grounded.
The lightning protection circuit for
the machine requires the machine to
be properly grounded. If proper
grounding is provided, about 90 % of
lightning damage can be prevented.
For safety, be sure to connect the machine to a three-prong grounded outlet.
I Do not damage, break or make any
modifications to the power cord.
Do not place heavy objects on it,
pull it hard or bend it more than
necessary. These actions could
cause and electric shock or fire.
J Do no t plug or unp lug the po wer
cord with wet hands or an electric
shock migh t occur.
K When you move the machine, un-
plug the power cord from the wall
outlet to avoid fire or electric
shock.
L When you pull out the plug from
the socket, grip the plug to avoid
damaging the cord and causing
fire or electric shock.
4

Other Important Informations
Other Important Informations
General
A Since some parts of the machine
are supplied with high voltage,
make sure that you do not attempt
any repairs or attempt to access
any part of the machine except
those described in this manual.
B Do not make modifications or re-
placements other than those mentioned in this manual.
C When not using the machine for a
long period, disco nnect the pow er
cord.
D Keep the machine away from hu-
midity and dust . A fire or an electric shock might occur.
E Do not reuse stapled paper. Do not
use aluminum foil, carbon-containing paper or other co nductive
paper. Otherwise, a fire might occur.
Cold Weather Power-up
Avoid raising the room temperature
abruptly when it is below 57°F, or
condensation may form inside the
machine.
A Raise the room temperature to
68°F at less than 18°F per hour.
B Wait for 30 to 60 minutes.
C Turn the power on.
D Do not use the machine near a hu-
midifier.
Thunders tor ms
With proper grounding, about 90 %
of lightning damage can be prevented. However, if possible, during severe electric storms turn the power
switch off and disconnect the power
cord and telephone line cord.
1
F This machine has been tested for
safety using this supplier's parts
and consumable. We recommend
you only use these specified supplies.
G Ventilate the room around every
half an hour during a long copy
run or while p rinting a long mes-
sage.
Ozone
The machine generates ozone du ring
operation. Normally, the ozone level
is safe for operators. However, during a long copy run or while printing
a long message, ozon e odor may appear; in such a case, ventilate the
room.
Operating Precautions
• While the machine is in operation,
do not turn off th e main switch or
unplug the power cord.
• Keep corrosive liquids, such as acid, off the machine.
• Do not allow paper clips, staples,
or other small metallic objects to
fall inside the machine.
• The fusing unit may be very hot.
Be careful when
handling it.
5

1
Safety
Copy Paper
• 16 to 24 lb. copy paper is recommended.
• Do not use damp paper, or copies
will be defective.
• Do not touch copy paper if your
fingers are wet or oily; fingerprints
may appear on the copy.
• Keep paper in a vinyl bag if it will
not be used for a long time.
• Store in a cool dry place.
• Store flat. Do not stand upright.
• The following materials cannot be
used in the paper cassettes: Post
cards, Tracing paper, OHP sheets,
Adhesive labels
step it accompanies. Other illustrations accompanying steps help
you find the ri ght key or handle, or
show you how to perfor m the ste p.
A This is a step in a procedure.
THIS CORRESPONDS TO
THE LCD DISPLAY.
• Do not overload the paper trays.
• If Multi-sheet Feeding occurs or
dog-eared copies are made when
using recycled paper in the paper
tray, fan the recycled paper and
load it in the paper tray again.
Symbols & Conventions Used
In This Manual
Documents:
❖❖❖❖
A document is anything you put
on the feed table of your machine
whether you are faxing it or copying it.
Prints:
❖❖❖❖
A print is anything that comes out
of the machine: a fax message you
received or a copy you made.
Procedures:
❖❖❖❖
Procedures are described step by
step. Perform them in order. When
you see a display, it alw ays show s
what comes after performing the
6

Part Names
2. Machine Layout
1.
Lower pape r cassette
The opti onal lower pa per cassette ho lds
more paper.
2. Main paper cassette
The main paper cassette holds copy paper.
TSTH060N
3.
Print delivery tray
Copies, inc oming fa xes, an d prints generated usin g the Optional PC Interface kit
are deliv e red here.
4.
Document delivery tray
Scanned documents are stacked on the
Document delivery Tray.
7

Machine Layout
5. Main switch
The main switch turns your machine on
and off.
6. Operation panel
Key panel for operating the machine.
7. Optional Handset
2
8. Document guide
Match the document guide to the size of
your original documents.
9. Document table
Document table holds up to 30 sheets
which are fed one at a time. Place your
original documents here.
10. Multi-purpose Feeder
Multi-purpose Feeder can be loaded with
various kind of printable med ia.
11. Cover release button
Pull this catch to release the top cover.
8
Operation Panel
Operation Panel
2
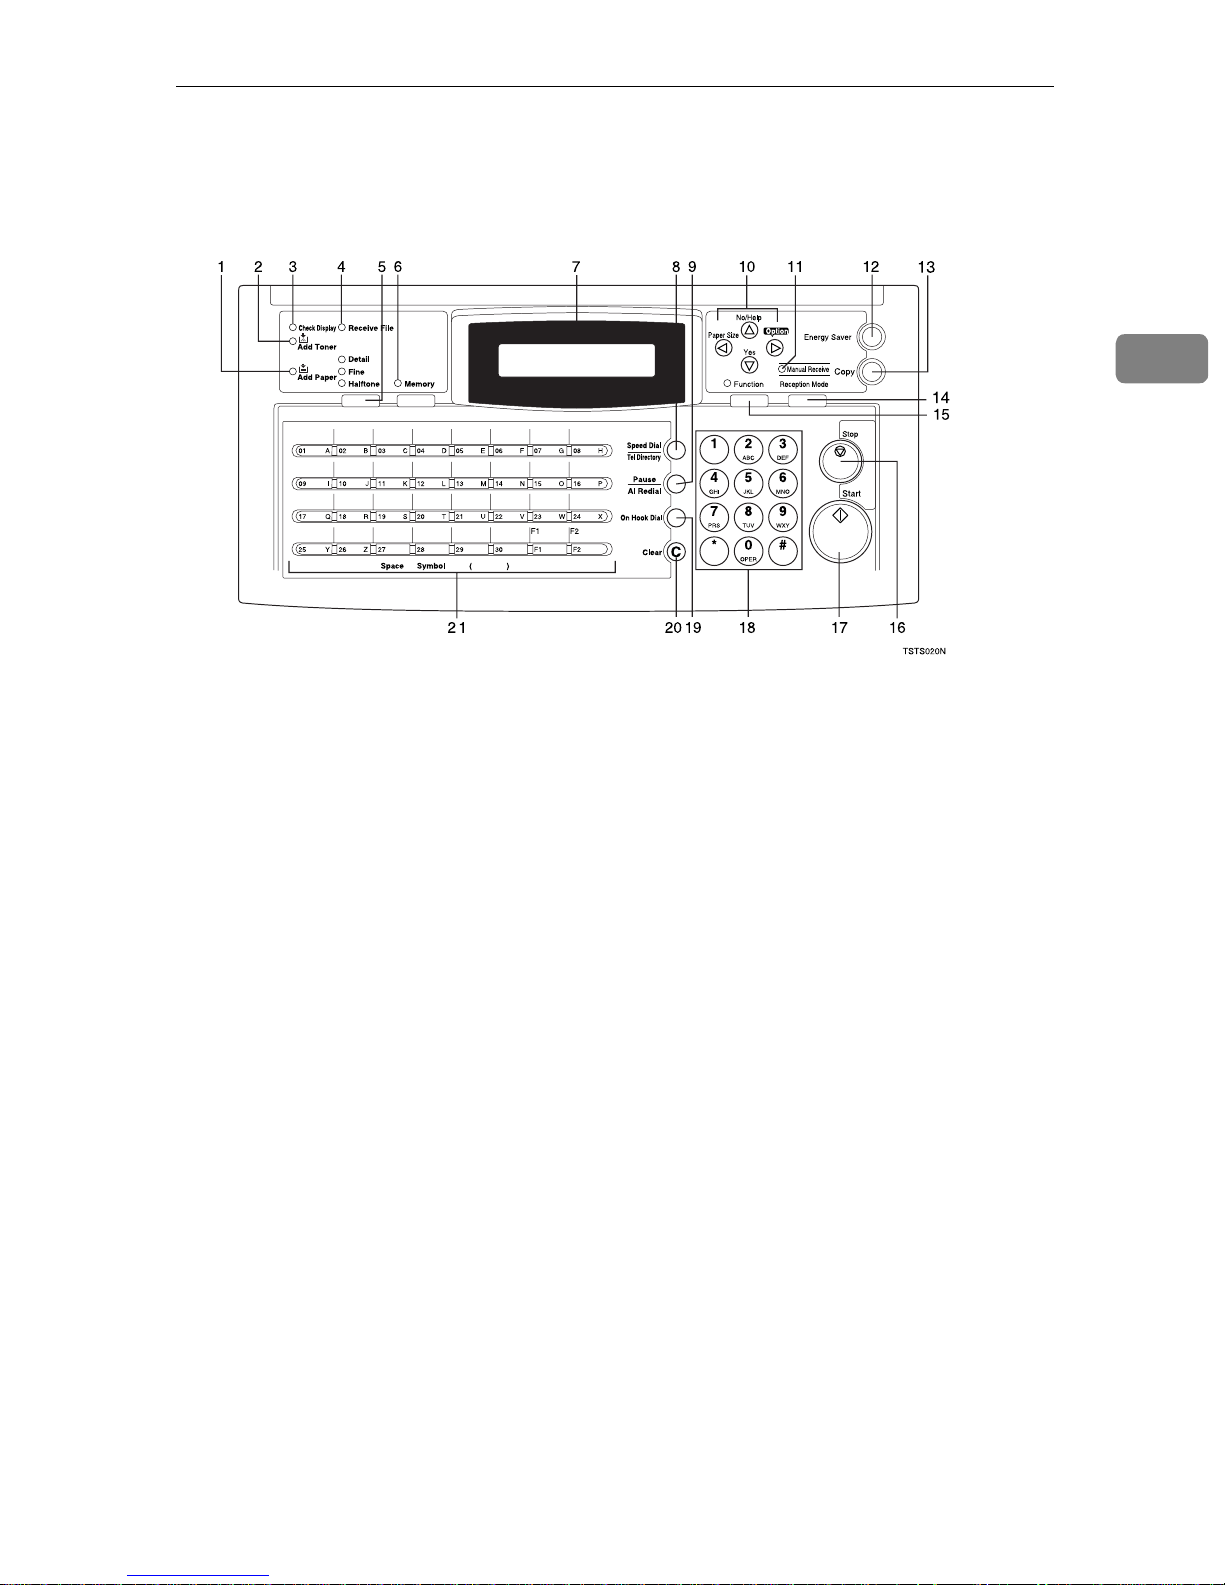
1. Add Paper indicator
Lights when a cassette is empty.
2. Add Toner indicator
Blinks when toner is about to run out and
lights continuously when toner has run
out.
3. Check Display indicator
Check Display
The
you to read the display.
Indicator lights to tell
4. Receive File indicator
Receive File
The
incoming message was received into
memory. Blinks when cinfidencial reception file is stored in the memory. ( see
P.105
Operation Panel”
5.
The reso lution / Halftone is indicated by
these three indicators and can be changed
by the resolution / Hal ftone.
“If An Indicator Lights Up On The
Resolution
{{{{
indicator lights when an
).
key.
}}}}
6. Memory indicator
When the
mem ory transmi ssion is in effect , if it is
off, immediate transmission is in effect.
Switch betw een th e tw o w it h the
ry
key.
}
Memory
indicato r is on, then
Memo-
{
7. Control panel Display
The Liquid Crystal Display guides you
through tasks and informs you of the
state of the machine. Messages appear
here. The display consis ts of t wo 20-c h aracter lines.
8.
Speed Dial/Tel Directory
{{{{
Press th e
ing Speed Dial or the Telephone Directory Feature.
9.
Pause/Al Redial
{{{{
The
{
when you are dialing or storing a fax
number. Or, press the key to redial the
last number dialed. (The redial feature
doesn't work once you've started dialing
a new number.)
10.
Arrow keys
Yes
T {
U {No}
scroll l eft
W
scroll right
V
Speed Dial/Tel Directory
{
key
}}}}
Pause/Al Redial
accept
}
reject / print help list
key inserts a pau se
}
key
}}}}
key us-
}
11. Manual Receive indicator.
Lights when the reception mode is Telephone.
9

Machine Layout
2
12.
Energy Saver
{{{{
Hold a few seconds this to start or end the
energy saver mode.
13.
Copy
{{{{
Press this to copy the document now in
the feeder.
14.
Reception Mode
{{{{
Press this to select the reception mode
(Tel, Auto, or Fax).
15.
Function
{{{{
Press the
digit code to access functions 11 to 52.
(For functions 61 to 95, enter 6, the acc ess
code on see P.131
tions 61 To 95”
16.
Stop
{{{{
Press the
sion or a document sc anning, to sto p a reception or to stop a long copy run. The
machine will finish printing out the sheet
being printed and then stop.
key
}}}}
Function
{
key
}}}}
Stop
{
key
}}}}
key
}}}}
key
}}}}
key and enter a two
}
“Access Co de For Func -
and the function number.)
key to stop a transmis-
}
31 & 32)”
Editing A Group Of Fax Numbers (Function
33)”
characters (see P.140
ters”
Dial 29 as the Dial Option key ( see P.31
“Programming The Dial Option Key”
can also use Quick Dial 30 as a Group key
(see P.29
You can store combinations of settings
that you use on a frequently basi s in the
two User Function key s ( F1,F2 ). Wh en
you press a Us e r function key, it lights to
show you that it is selected.
) or groups (see P.28
). Yo u c an a lso us e t hes e ke ys to ent er
“Entering Charac-
). In addition you can register Quick
“Programming The Group Key”
“Storing &
). You
).
Start
}}}}
Start
{
key
key to start all tasks.
}
17.
{{{{
Press the
18. Ten key pad
Use the ten key pad (sometimes called
the ten keys) to dial fax numbers, to enter
the numbers of copies, etc.
19.
On Hook Dial
{{{{
Press the
phone call from the keypad without having to lift the phone or handset off the
hook (phone or handset option needed).
20.
Clear
{{{{
Press the
character or digit entered, or use the left
and right a rro w keys to mo ve the cur sor
and then press Clear to erase whatever is
at the cursor.
21.
Quick Dial
{{{{
On Hook Dial
{
key
}}}}
Clear
{
keys.
There are 30 Quick Dial keys. Use them to
store individual fax numbers (see P.25
“Storing & Editing Fax Numbers (Functions
key
}}}}
key to dial a
}
key to erase the last
}
keys /
}}}}
User Function
{{{{
}}}}
10
3. Faxing
Recommended Types Of Document
Before you send y our document, mak e sure that it meets the following requirements.
Important
Documents that do not meet these requirements can cause your machine to
❒
jam or may cause some components of the machine to become damaged or
dirty.
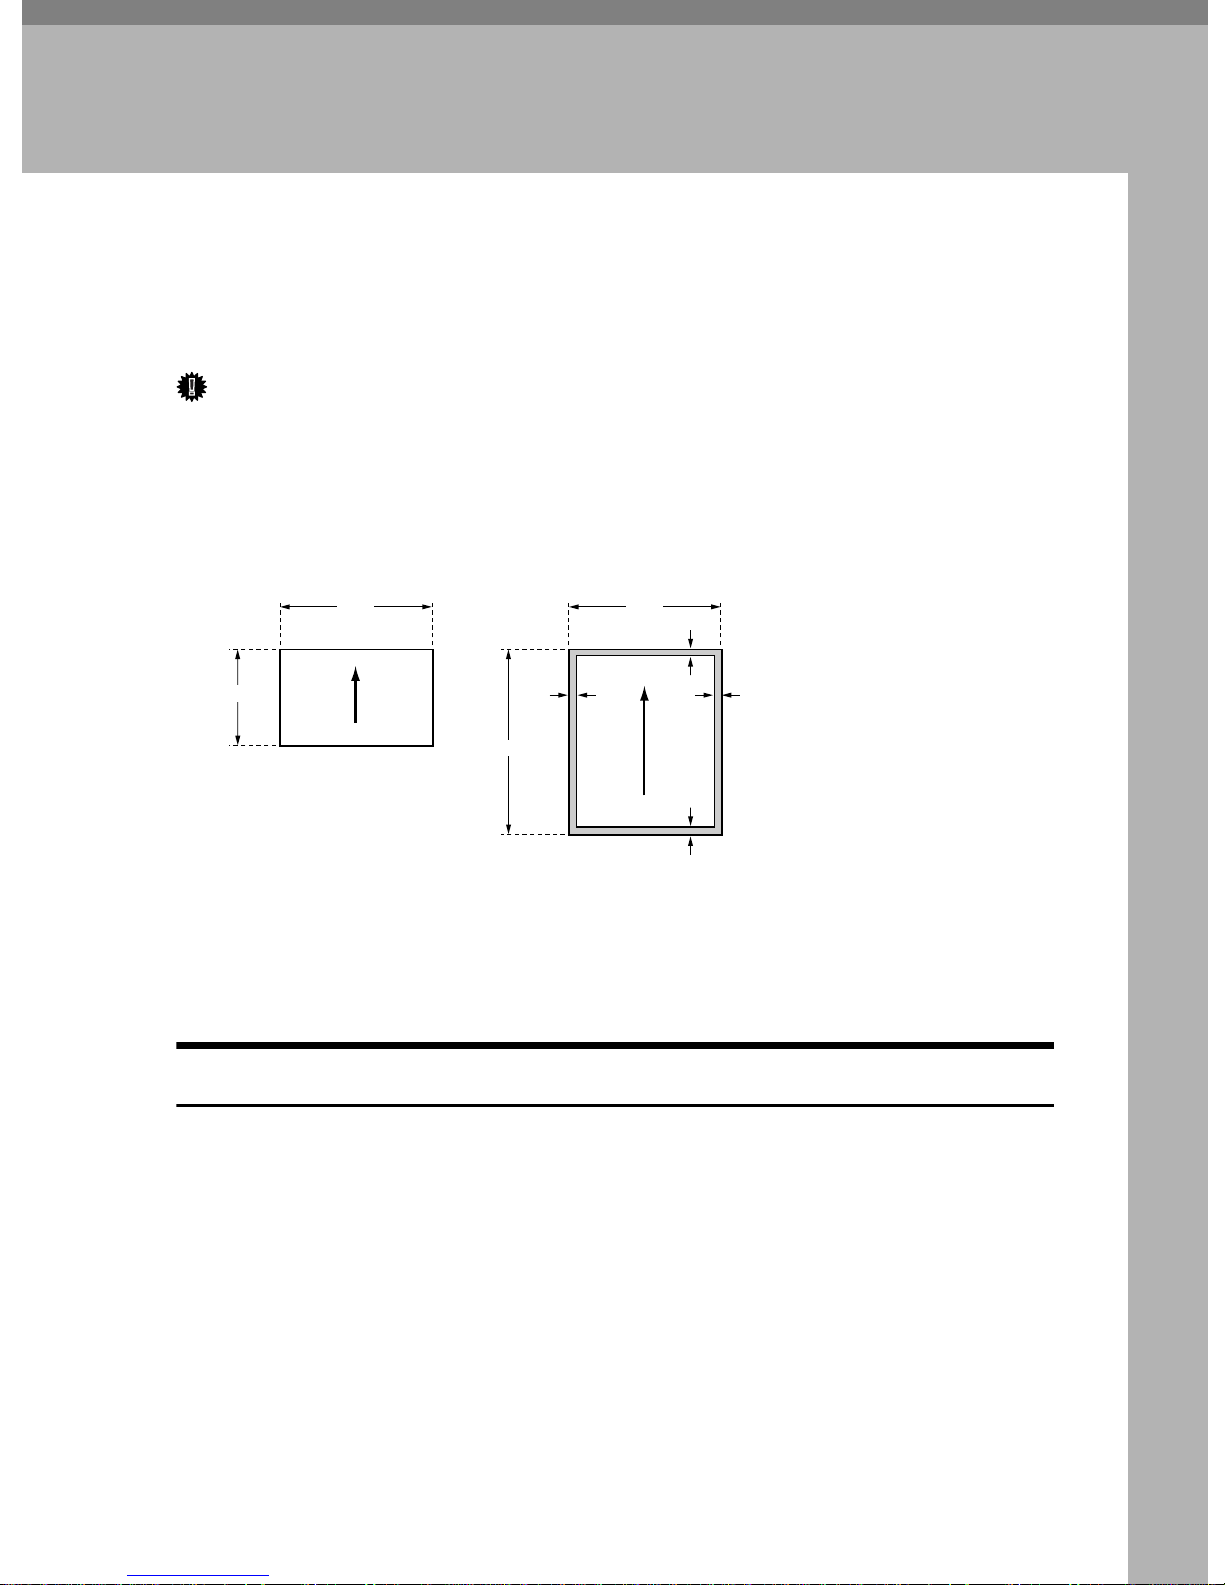
Scanning area
❖❖❖❖
Minimum size
5.8"
4.1"
23.6"
Scanning direction
Maximum size
0.15" 0.15"
8.5"
0.15"
0.19"
Scanning direction
GFSIZE0N
The part shaded will not be scanned, because it is outside the maximum scanning width range.
Correct Size For The Document Delivery Tray
• Thickness 0.05 to 0.2 mm ( 50 ∼ 90 g / m2, 20 lb paper)
• Length and Width: See the above diagram.
If the page is too short, pu t it inside a document c arrier or enlarge it with a
copier.
If the page is too long, divid e it into two or more sheets.
Clearly Written
• Small faint characters may not be transmitted clearly.
Uniform Page Size
• Do not use different sizes of document in the same transmission.
11

3
Faxing
Page Condition
Do not place damaged pages in the automatic document feeder.
• If your pages are curled or dog eared, flatten them.
• If your pages are stuck together, shuffle the stack.
• If your pages are folded, torn, or patched together, mak e copies.
• If your pages have binding files, trim the edges or make copies.
Important
Do not place originals that contain the following materials in the document
❒
feeder ;
• Crayon
• Paint
• Charcoal, soft pencil
• Glue
• Thermal paper
• Clips
• OHP Sheets, vinyl-coat paper
• Wa xed paper
• Carbon paper
• Silicone oil
Note
Copies made with a cop ier that uses silicone oil may cause a misfeed. To
❒
avoid this, do not scan such copies until five or ten minutes after copying.
12
Memory Transmission And Immediate Transmission
Memory Transmission And Immediate
Transmission
There are two ways to send a fax message.
• Immediate Transmission
• Memory Transmission
Memory Tra nsm is sio n
(Memory Indicator Lit)
Memory Transmission is convenient
because:
• Fax messages can be scanned
much more quickly (you can take
your document away from the fax
machine without waiting too
long).
• While your fax message is being
sent, another user can operate the
machine (people will not have to
wait by the fax machine too long ).
• You can send the same message to
more than one place with t he s ame
operation.
• After you press the
machine doesn't dial until all the
pages of your fax message have
been stores in the memory.
{
Start
key, the
}
READY 100% 10:00AM
SET DOC. OR DIAL NO.
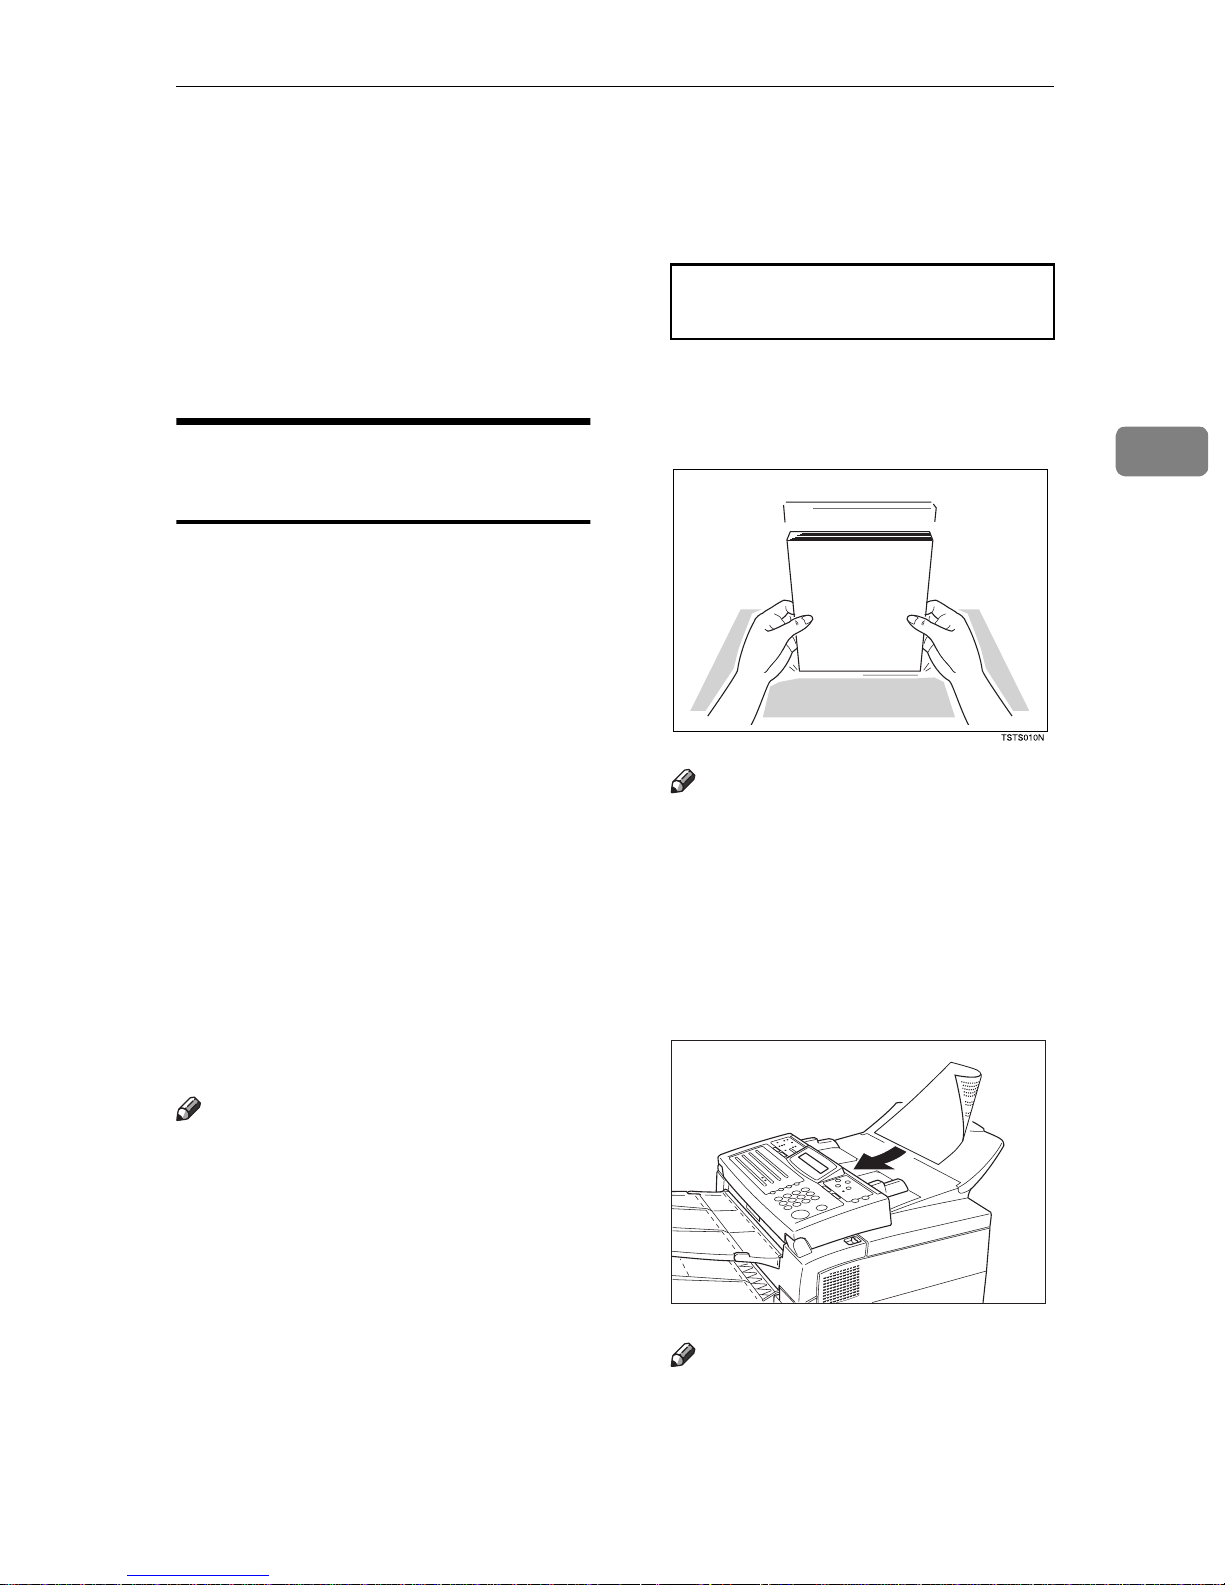
Fan your docum en t stack (at most
B
30 pages: 20 lb) to make sure all
pages are loose, then square it.
Note
All pages in your document
❒
must be one-sided and be of the
same size.
Insert the document face - down
C
into the feeder until the machine
beeps. Then adjust the guides to
match the width of the document.
3
Note
If your document gets stuck while
❒
it is being processed, press the
key, and turn to P.107
Stop
{
}
“Clearing a Document Jam”
structions on how to safely remove
the original.
Make sure that the m achine is in
A
standby mode for faxing.
The display should look like this:
for in-
Note
You can dial before you set the
❒
document. Place the document
TSTH110N
13
Faxing
3
after you dial the number and
go to step G.
The display will look like this:
D
TRANSMIT OPTIONi
DIAL FAX NUMBER
If the memory ind icator is not lit,
E
press the
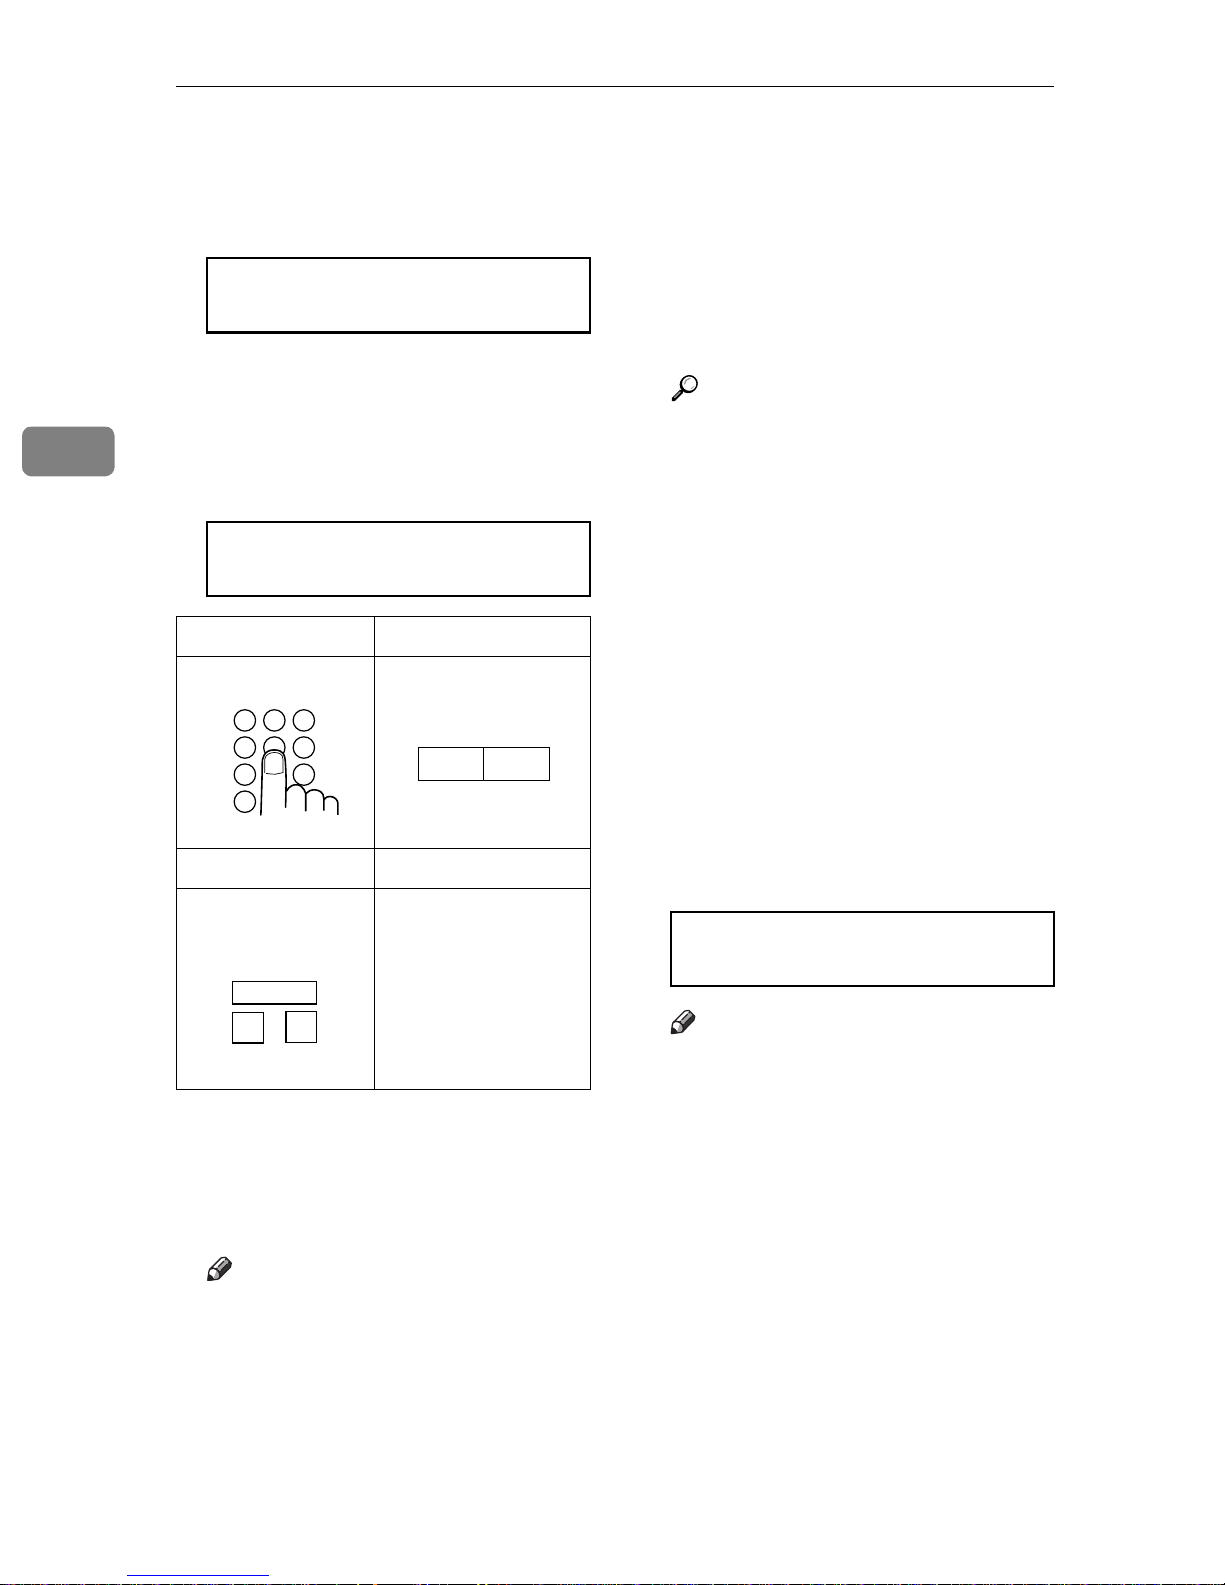
Dial the number in one of the fol-
F
Memory
{{{{
key.
}}}}
lowing ways.
TRANSMIT Y/START
5551234kkkkkkkkkkkkk
Ten Key Pad Quick Dial
1 2 3
4 5 6
7 9
*
Speed Dial Group
GFDIAL0N
06
07
GFDIAL1N
Clear
{
the entire number, press the
key.
{No}
The maximum destinations you
❒
can dial using the t en key pad is
49. However, this limitation is
also subject to memory capacity.
Reference
Programming Quick Dial: see
P.25
Numbers (Functi ons 31 & 32)”
Programming Speed Dial: see
P.25
Numbers (Functi ons 31 & 32)”
Programming Group Dial:
seeP.28
Group Of Fax Numbers (Function
33)”
.
Programming Group key: see
P.29
Key”
.
Press the
G
other number.
key. If you want to erase
}
“Storing & Editing Fax
.
“Storing & Editing Fax
.
“Storing & Editing A
“Programming The Group
key to enter an-
Yes
{{{{
}}}}
Example:
Method
Example: Speed Dial 10
Speed Dial
0
1
GFDIAL2N
*1
In this example Group Dial is programmed in Quick Dial 08.
*2
In this example Quick Dial key 30
is programmed as the Group key,
and Group dial number 1 is programmed.
Note
If you install the handset or an
❒
Dial key 08.
Method
Dial key 30 and 1
on the ten key pad.
*1
Quick
*2
Quick
external telephone, you can
send the message manually.
Pick up the handset and dial.
If you want to erase a digit of
❒
the phone number, press the
TRANSMIT DIAL/START
DIAL NEXT FAX NUMBER
Note
Repeat steps F and G until all
❒
destinations are entered.
If you have only one destina-
❒
tion, press the
The machine stores your mes-
❒
{
sage and dials the first number
(or, if you selected Send Later, it
will return to standby mode and
the fax message will be s ent at
the time that you selected).
Start
key.
}
14

Memory Transmission And Immediate Transmission
Reference
Send Later: see P.21
At A Specific Time (Send Later)”
.
Press the
H
The machine will dial the destination's number.
{{{{
key and wait.
Start
}}}}
“Sending
5551234
SET DOC. OR DIAL NO.
Note
If the other party's line is busy,
❒
your machine will dial
again.P.24
“Redialing”
READY 100% 10:04AM
SET DOC. OR DIAL NO.
Immediate Transmission
Immediate Transmission is convenient when:
• You wish to send a message immediately.
• You wish to quickly check whether
you have successful connected
with the other party' s f ax machi ne.
• Your machine's memory is getting
full.
The machine dials immediately after
you press the {Start} key (or at the
specified later time, if you used a
time-delay feature like Send Later).
The message is scanned and trans mitted page by page without being
stored in memory.
3
If the other party's fax machine
❒
answers, both machines will
connect and you r s will send the
message. A name or a label will
appear on the upper line.
If your line goes through a local
❒
switchboard (a PBX) remember
to dial the exit code. Press the
Pause
{
the code. If the number includ es
a country code, press the
Pause
{
code, then dial the rest of the
number.
key immediately after
}
key after the country
}
If you like to cancel the
transmission
A Press the {{{{Stop}}}} key during
communication.
A Make sure th at the machine is in
standby mode.
The display should look like this:
READY 100% 10:00AM
SET DOC. OR DIAL NO.
Note
❒ The memory indicator should
go out. If the memory indicator
is lit, press the {Memory} key.
B Place the entire document face
down into the feeder.
TRANSMIT OPTIONi
DIAL FAX NUMBER
Note
❒ No more than 30 pages.
5551234
STOP & CLR FILE? Y/N
B Then press the {{{{Yes }}}} key to
cancel the transmission.
❒ You can dial before you set the
document. Place the document
after you dial the number and
go to step D.
15

Faxing
3
Reference
How to set document, see P.13
“Memory Transmission (Memory
Indicator Lit)”.
C Dial.
TRANSMIT Y/START
5551234
Reference
How to dial, see P.13 “Mem ory
Transmission (Memory Indicator
Lit)”.
D Press the {
5551234
DIALING
The machine dials and connect to
the other party. The number that
you dialed and the other party's
RTI or CSI is displayed.
Reference
RTI, CSI: see P.165 “Initial Settings & Adjustmen t s”.
{Start}}}} key.
{{
B Carefully place your fax message
into the auto document feeder.
TRANSMIT OPTIONi
DIAL FAX NUMBER
C Press {
{Speed Dial/Tel Directory}}}}
{{
SPEED DIAL 0-9/hi
PUSH NUM OR ABC
D Press the first letter of the name.
TEL DIR. Y/hi
b01 XA COMPANY
E Press {
you want.
{Yes}}}} to dial the number
{{
TEL DIR. Y/hi
b12 XYZ CO. NEW YORK
F Either :
• Dial more numbers.
• Press {Start}
Dialing with the Telephone
Directory
This can be done for any number that
you have stored as a Speed Dial code
with a label programmed for it.
Example : you wish to dial “ XYZ CO.
NEWYORK “ .
A Make sure that the machine is in
standby mo de .
READY 100% 10:00AM
SET DOC. OR DIAL NO.
16

Receiving Telephone Calls & Fax Messages (Faxes/Phone Calls)
Receiving Telephone Calls & Fax
Messages (Faxes/Phone Calls)
The machine can treat incoming fax
messages and telephone calls in three
ways.
❖❖❖❖
Auto mode
Use this mode if your line is shared
by a fax machine and telephone.
When a call comes in, the machine
will ring a number of times to give
you the chance to pick up the
handset. If you do not pick up and
the call is a fax message, the machine will go into fax mode and
start receiving. You can choose the
number of times t he machi ne rin gs
before taking the call by altering
the Auto Ring time (see P.18 “Set-
ting the Auto Ring Time”).
❖❖❖❖
Fax mode
Use this mode if you have a dedicated fax line. The machine assumes all calls are fax messages. It
will ring once to alert you to an incoming call and then start receiving.
Switching Between Auto, Fax,
and Telephone Mode
The Manual Receive indicator is lit
when the machine is in Telephone
mode. To switch to a different mode,
follow the steps below.
A Press the {
RECEIVE MODE Y/hi
iFAX TEL AUTO
B Press the W
mode you require.
RECEIVE MODE Y/hi
FAX TEL iAUTO
C Press the {
READY 100% 10:00AM
SET DOC. OR DIAL NO.
{Reception Mode}}}} key.
{{
W and VVVV key to select the
WW
{Yes }}}} key.
{{
3
❖❖❖❖
Telephone mode
Use this mode if your line is shared
by a fax machine and a telephone
but you wish to answer all calls
yourself and decide whether they
are fax messages or telephone
calls. You must manually hit the
Start key to receive a fax.
The machine will ring continuously until yo u answer the call, so you
have to be near the machine at all
times.
The Manual Receive indicator is lit
when the machine is in this mode.
Receiving the Fax Message in
the Telephone Mode
This mode is active when the Manual
Receive indicator is lit. You have to
answer the call yourself and decide
whether it is a fax or a telephone call.
The procedure for answering a call is
as follows:
A Pick up the handset of the option-
al handset or the external telephone.
B Listen to the other end.
17
 Loading...