

Page 1

2
Copying
When Memory Reaches 0%
Scanning will be stopped if the size of scanned image data exceeds memory capacity.
Note
❒
There is enough memory to store approximate 200 to 1,000 originals of A4,
1
8
/2" × 11" size. The number of originals that can be stored in memory varies
depending on the memory setting and original type.
Reference
Scanning will stop when memory reaches 0% during sorted copying. However, you can change this setting so that all the scanned pages are copied and
delivered to the tray first, then the machine automatically continues scanning
the remaining originals. See “Memory Full Auto Scan Restart” in ⇒ P.329
put/Output”
.
“In-
A Press the
The scanned pages are delivered to the tray. Then, the image data in memory
is cleared.
{
Start
key.
}
B Remove the copies and continue copying by following the instructions on
the display.
To Remove the Paper from the Staple Unit
If you cancel the stapling copy job in the middle of the job, the paper might be
left in the staple unit. In this case, remove the paper from the staple unit.
A Press the
{
Clear Modes/Ene rgy Sa ver
B Set the next original, then press the
The paper left in the staple unit is automatically delivered, then the next job
starts.
Note
❒
When the paper is not delivered and the message is displayed, follow the
instructions on the display to remove the paper.
key to cancel the copy settings.
}
key.
Start
}
{
68
Page 2
Punch
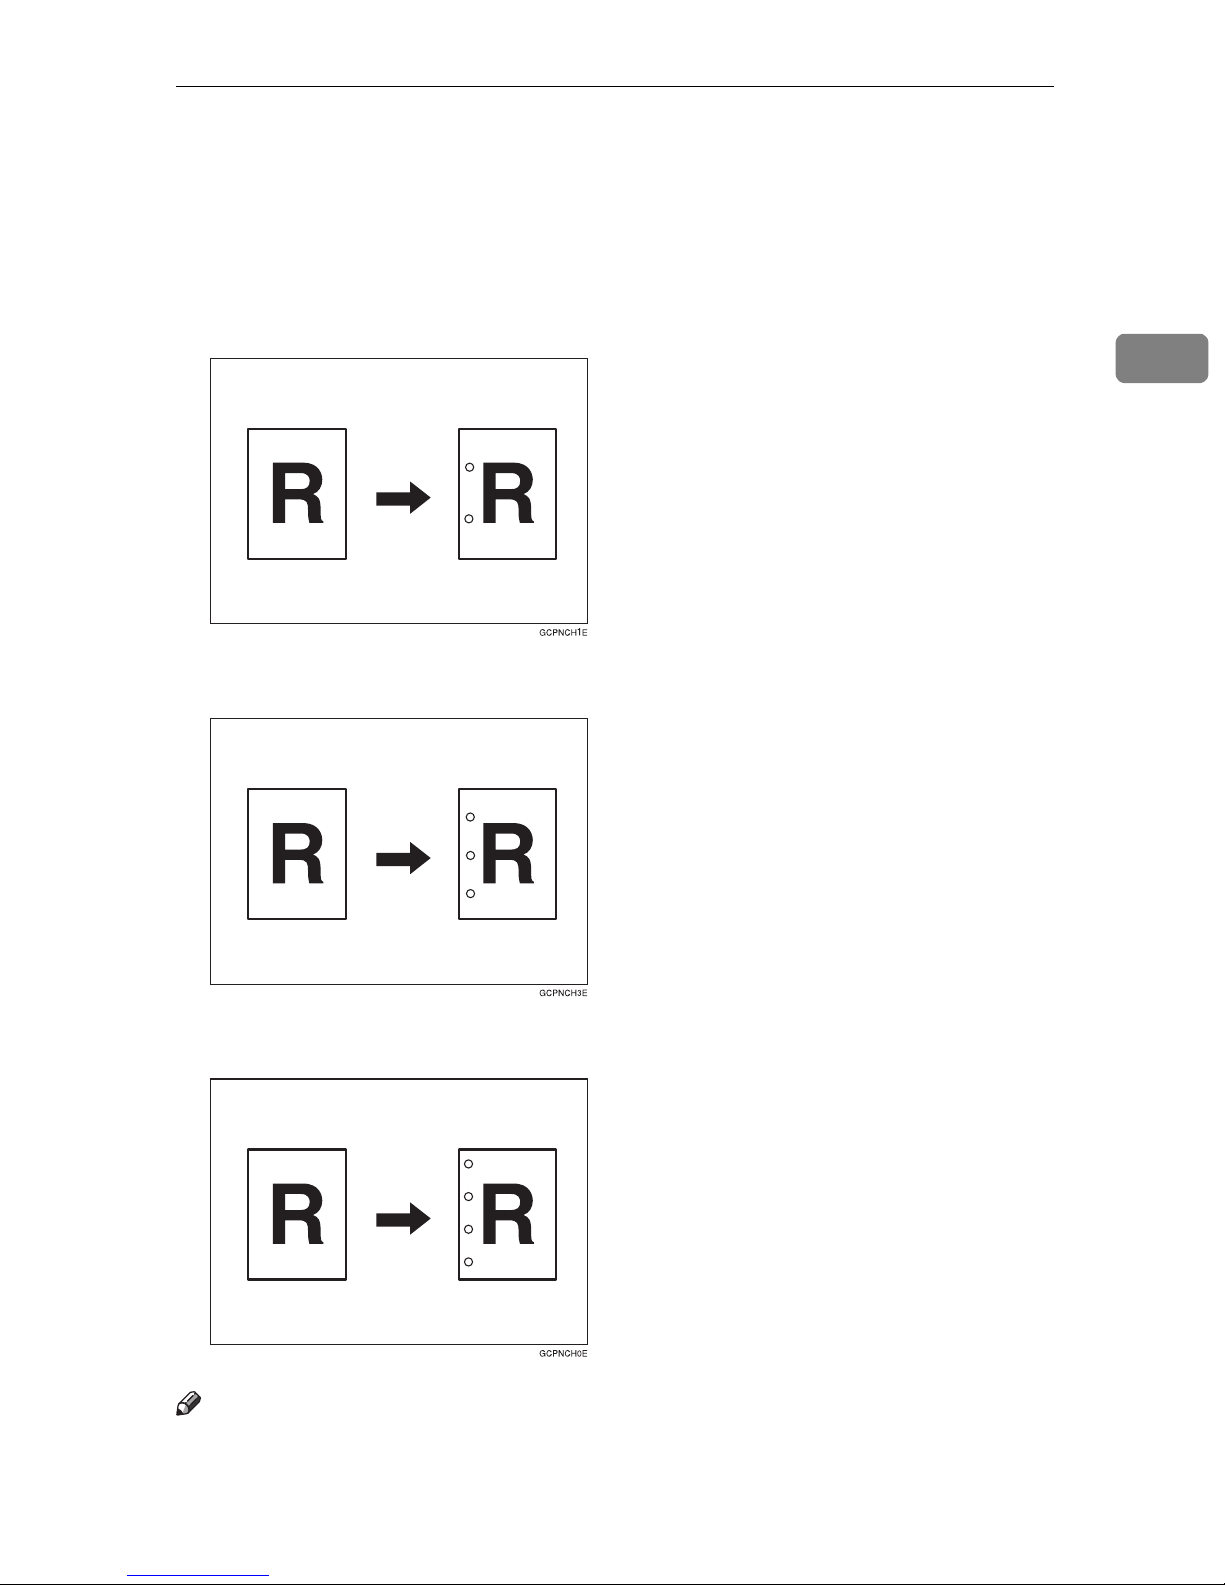
The optional finisher and punch kit are required to use this function.
This function is used to make punch holes in copies.
❖
2 holes
Punch
2
❖
❖
3 holes
4 holes
Note
❒
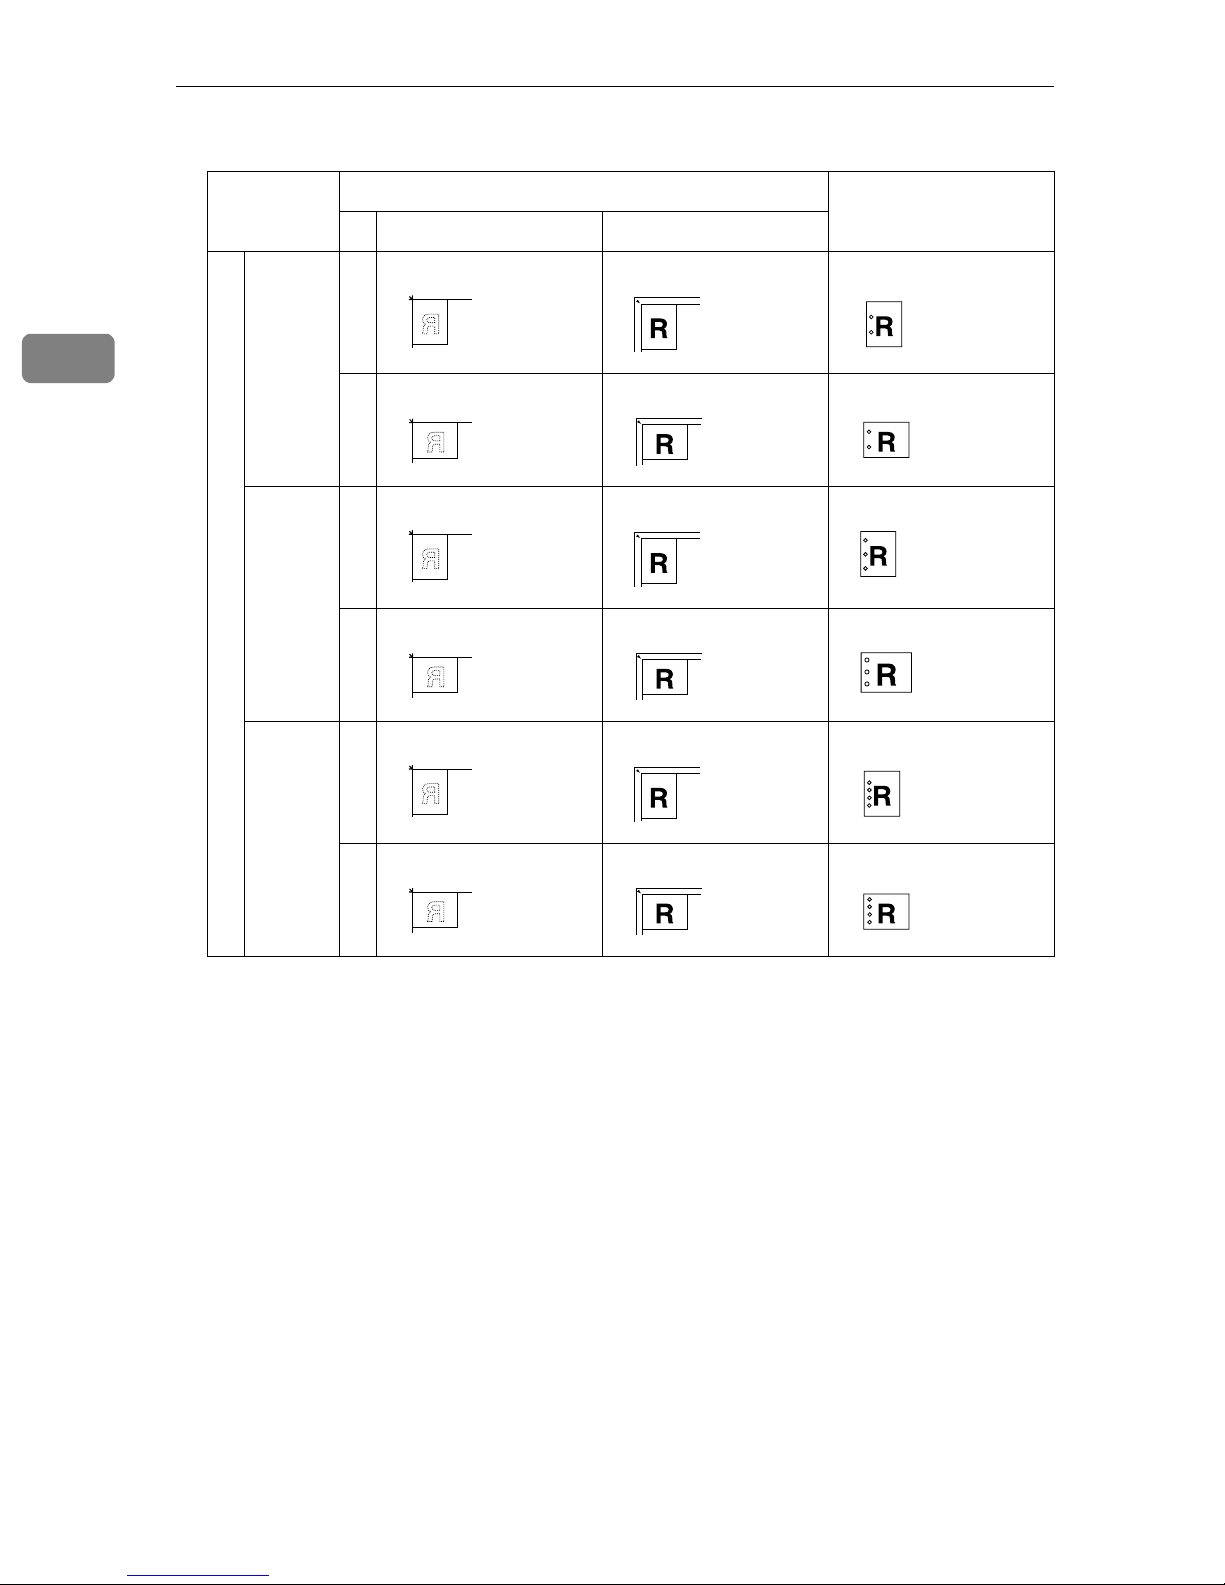
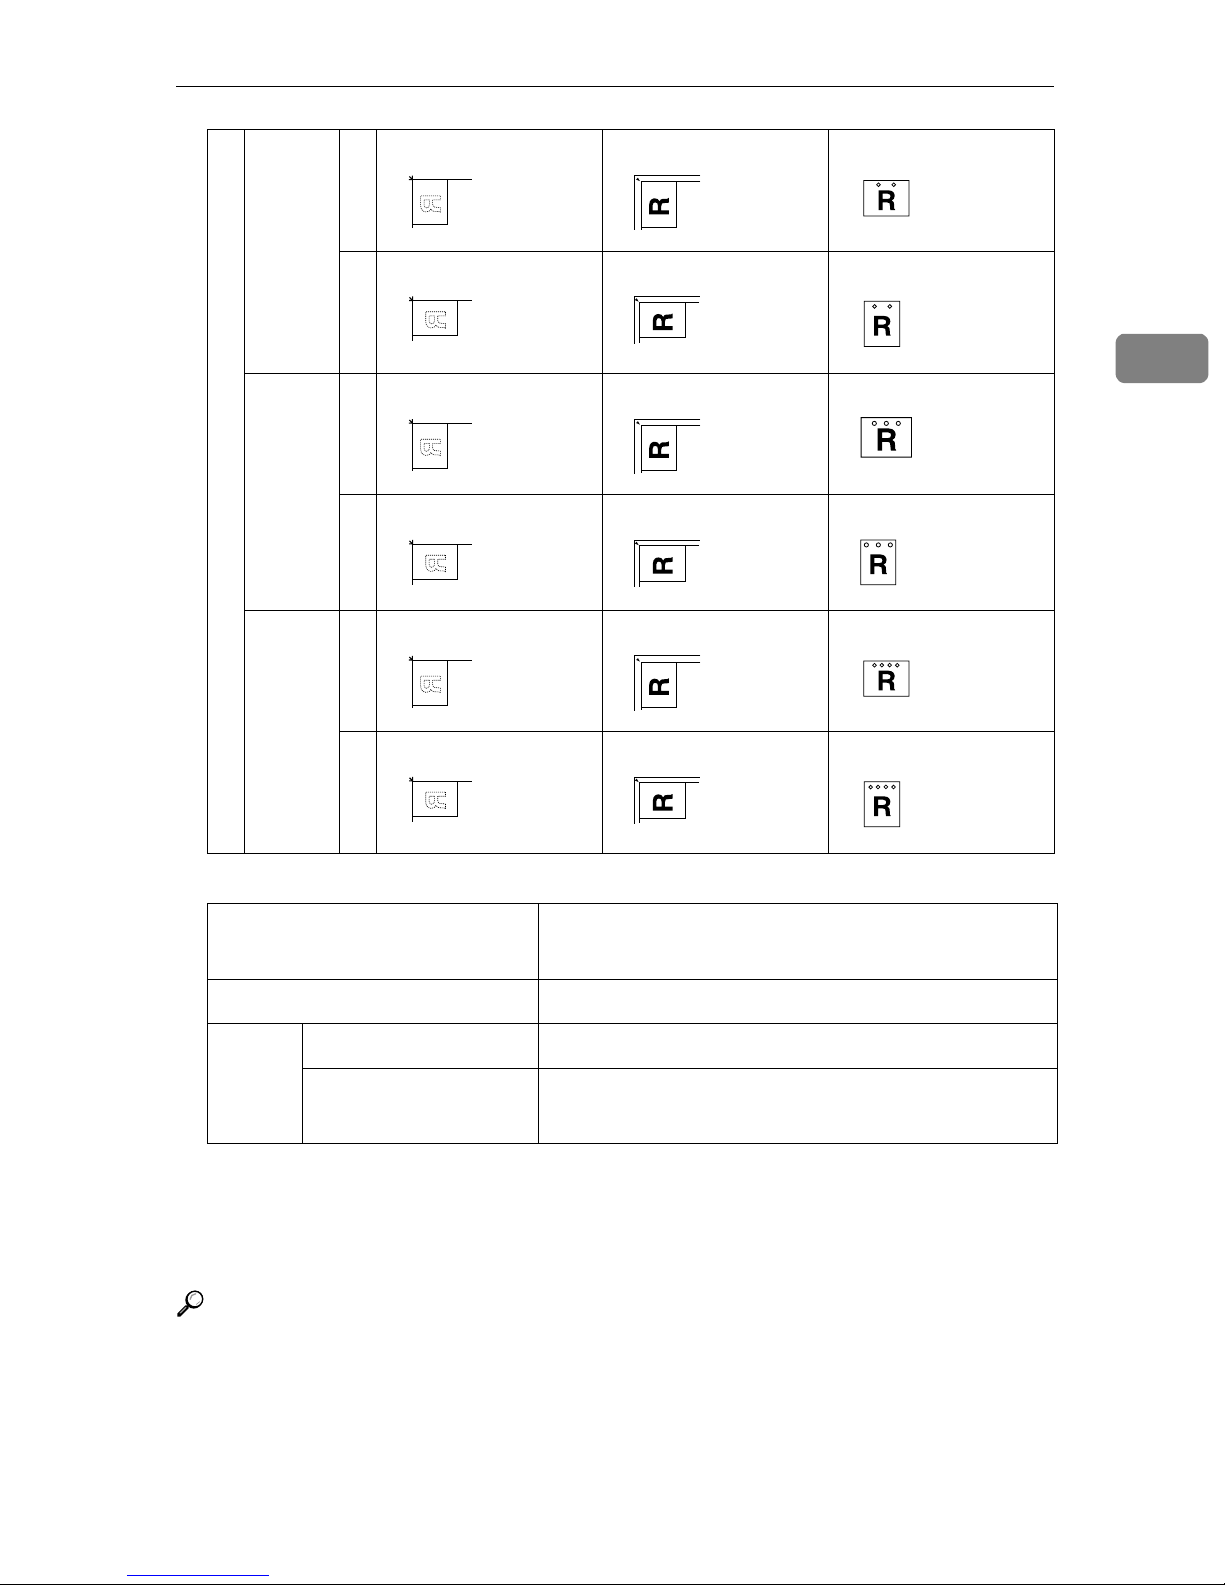
The relationship between the direction in which you set the original and the
punch hole positions is as follows:
69
Page 3
2
Copying
❖
Punch hole positions
Direction in which Original Is Set Punch Hole Posi-
Exposure glass Document feeder
2 holes K
L
3 holes K
tions
Standard
4 holes K
L
L
70
Page 4
2 holes K
L
3 holes K
Punch
2
90º Turn
4 holes K
❒
Punchable paper sizes are as follows:
2 holes
3 holes
4 holes Metric version
L
L
Scandinavian version
1
A3L – A5KL, 11" × 17"L, 8
1
/2"KL
8
×
A3L, B4L, A4K, B5K, 11" × 17"L, 8
A3L, A4K, 11" × 17"L, 8
A3L – A5K, 11" × 17"L, 8
1
8
/2"K
/2" × 14"L – 51/2"
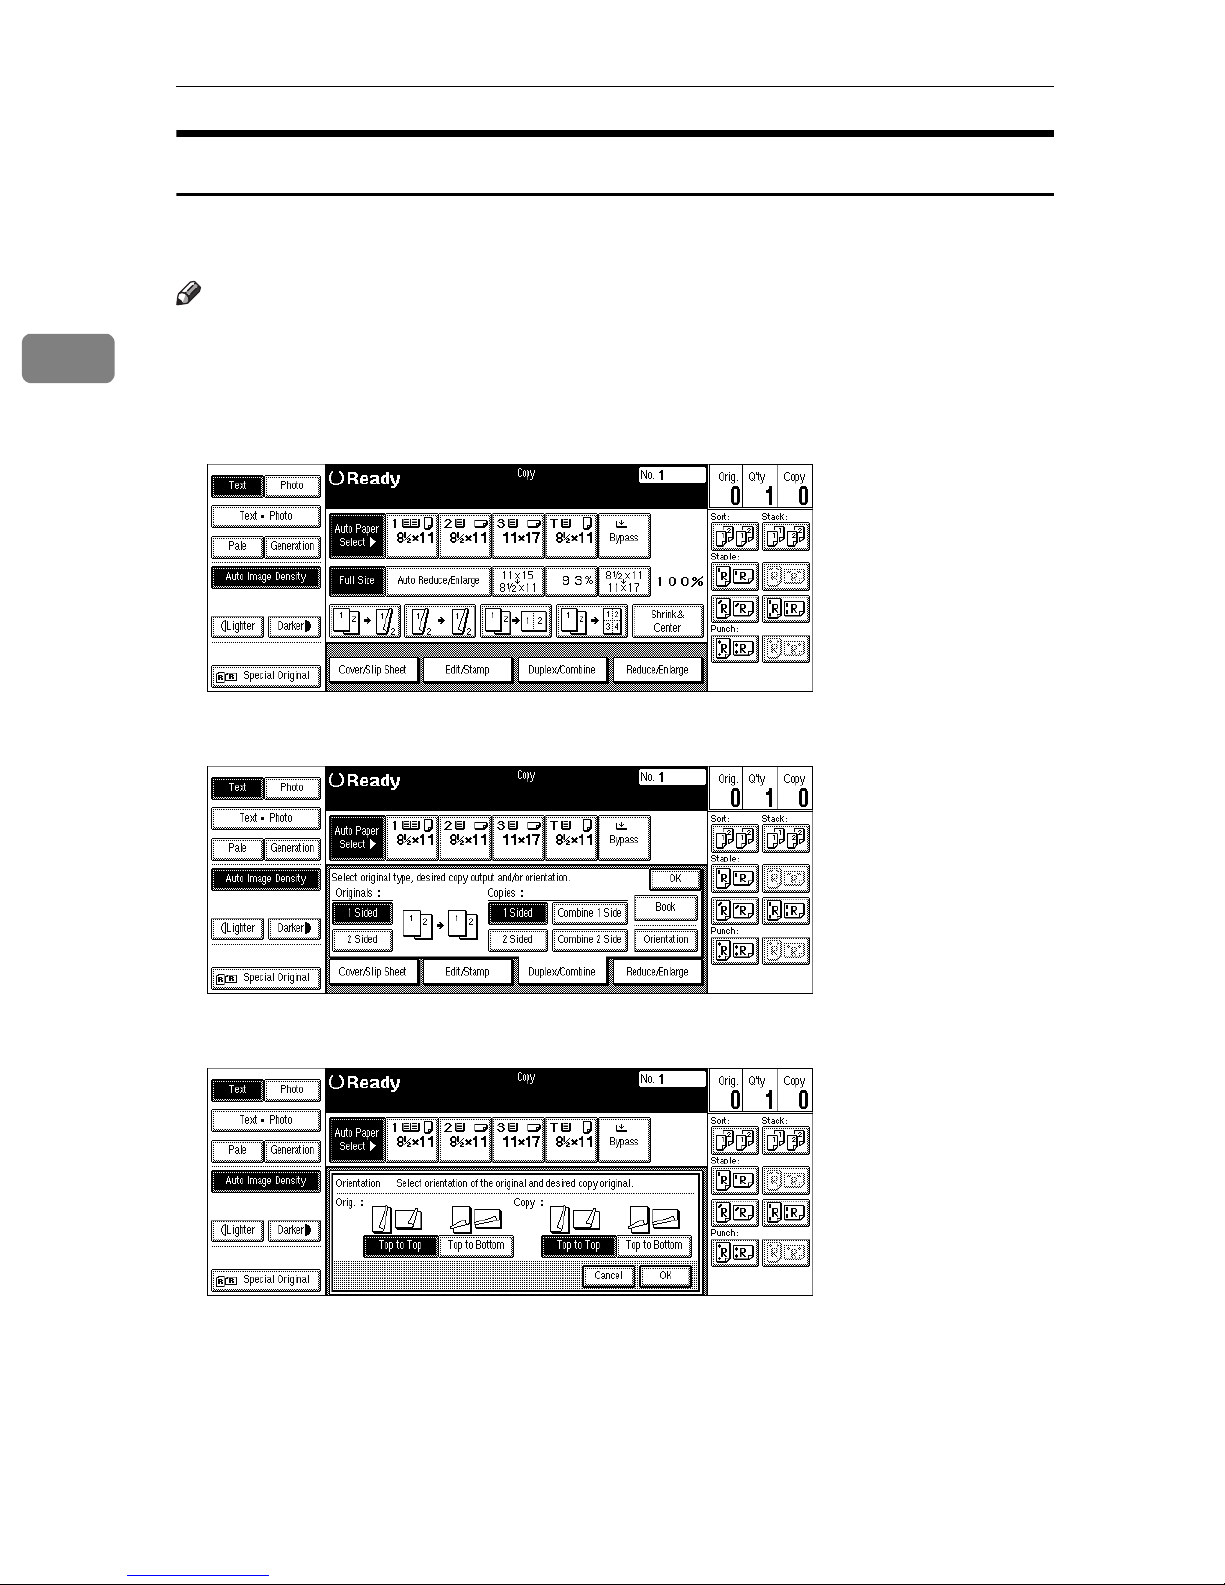
1
/2" × 11"K
1
/2" × 14"L – 51/2" ×
1
/2" × 11"K
❒
Since punch holes are made in each copy, the punch hole positions vary
slightly.
❒
The punch hole positions change according to the direction of the paper selected.
Reference
If the punch waste box fills up, see ⇒ P.301
y
Removing Punch Waste”
“
.
71
Page 5
2
Copying
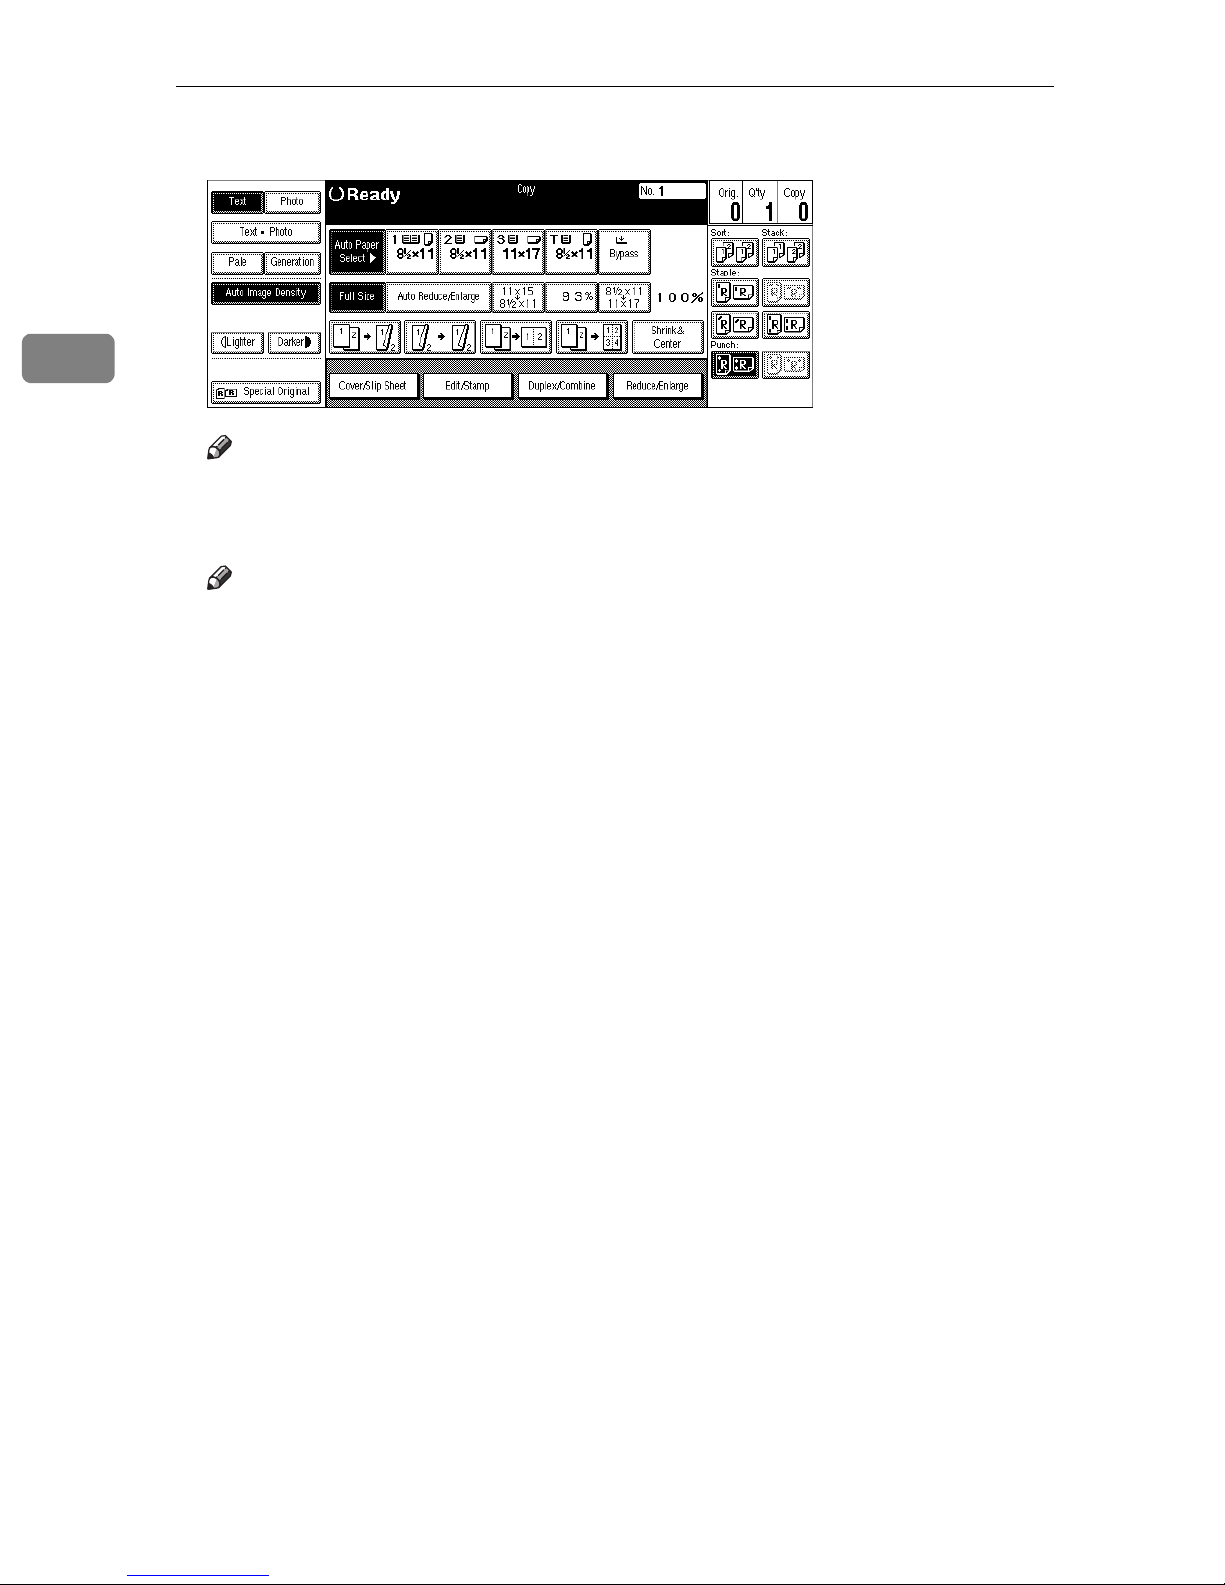
A Select the Punch position.
Note
❒
When stapling copies, also select a stapling position. See ⇒ P.60
B Enter the number of copy sets with the number keys.
Note
❒
To change the entered number, press the
❒
If you wish to use the Sort function, press the
{
Clear/Stop
[
Sort
]
key.
}
key.
“Staple”
.
C Set your originals, then press the
{
Start
key.
}
72
Page 6
Copying from the Bypass Tray
Copying from the Bypass Tray
Use the bypass tray to copy onto OHP transparencies, adhesive labels, translucent paper, postcards, and copy paper that cannot be set in the paper tray.
Limitation
❒
When copying several originals using the bypass tray, copies are delivered
face up (“Face Up Exit”) and in reverse order by default.
❒
You can change the setting to “Face Down Exit” only when you are using
high quality copy paper with a weight of 52 – 105g/m
“Face-Up/Down Selection in Bypass Mode” in ⇒ P.331
❒
If you have copies delivered face down when copying onto special paper,
such as adhesive labels, a paper misfeed may occur. Be sure to select “Face Up
Exit”.
Note
❒
If you wish to have copies delivered face down when only one original is set
on the exposure glass or in the document feeder, you must set the “Face-Up/
Down Selection in Bypass Mode” setting to “Face Down Exit” and the “FaceUp/Down Selection in Platen Mode” setting to “Face Down Exit” with the
User Tools. See “Face-Up/Down Selection in Bypass Mode” in ⇒ P.331
“Count Manager”
“Input/Output”
and “Face-Up/Down Selection in Platen Mode” in ⇒ P.329
.
2
(14 – 28 lb. Bond). See
“Count Manager”
.
2
❒
The machine can automatically detect the following sizes as standard size
copy paper:
Metric version A3L, A4L, A5L
Inch version
❒
If you do not use the standard size copy paper, you should input vertical and
A3L, 11" × 17"L, 8
1
10"K, 5
×
/2" × 81/2"L
1
/2" × 14"L, 81/2" × 11"L, 8" × 101/2"K, 8"
horizontal dimensions. The sizes that you can input are as follows:
Metric version • Vertical: 100 – 300mm
• Horizontal: 140 – 432mm
Inch version • Vertical: 4.0" – 11.7"
• Horizontal: 5.6" – 17.0"
❒
To make copies onto OHP transparencies or thick paper exceeding 105g/m
28 lb. Bond, specify the paper type in ⇒ P.76
parencies or Thick Paper”
❒
The maximum number of sheets you can set at a time depends on the paper
.
type. For details about paper capacity of the bypass tray, see ⇒ P.23
.
per”
“When Copying onto OHP Trans-
“Copy Pa-
2
,
73
Page 7
2
Copying
❒
In Connect Copy mode, you can set only cover sheet paper and slip sheet paper for the Cover/Slip Sheet function in the bypass tray.
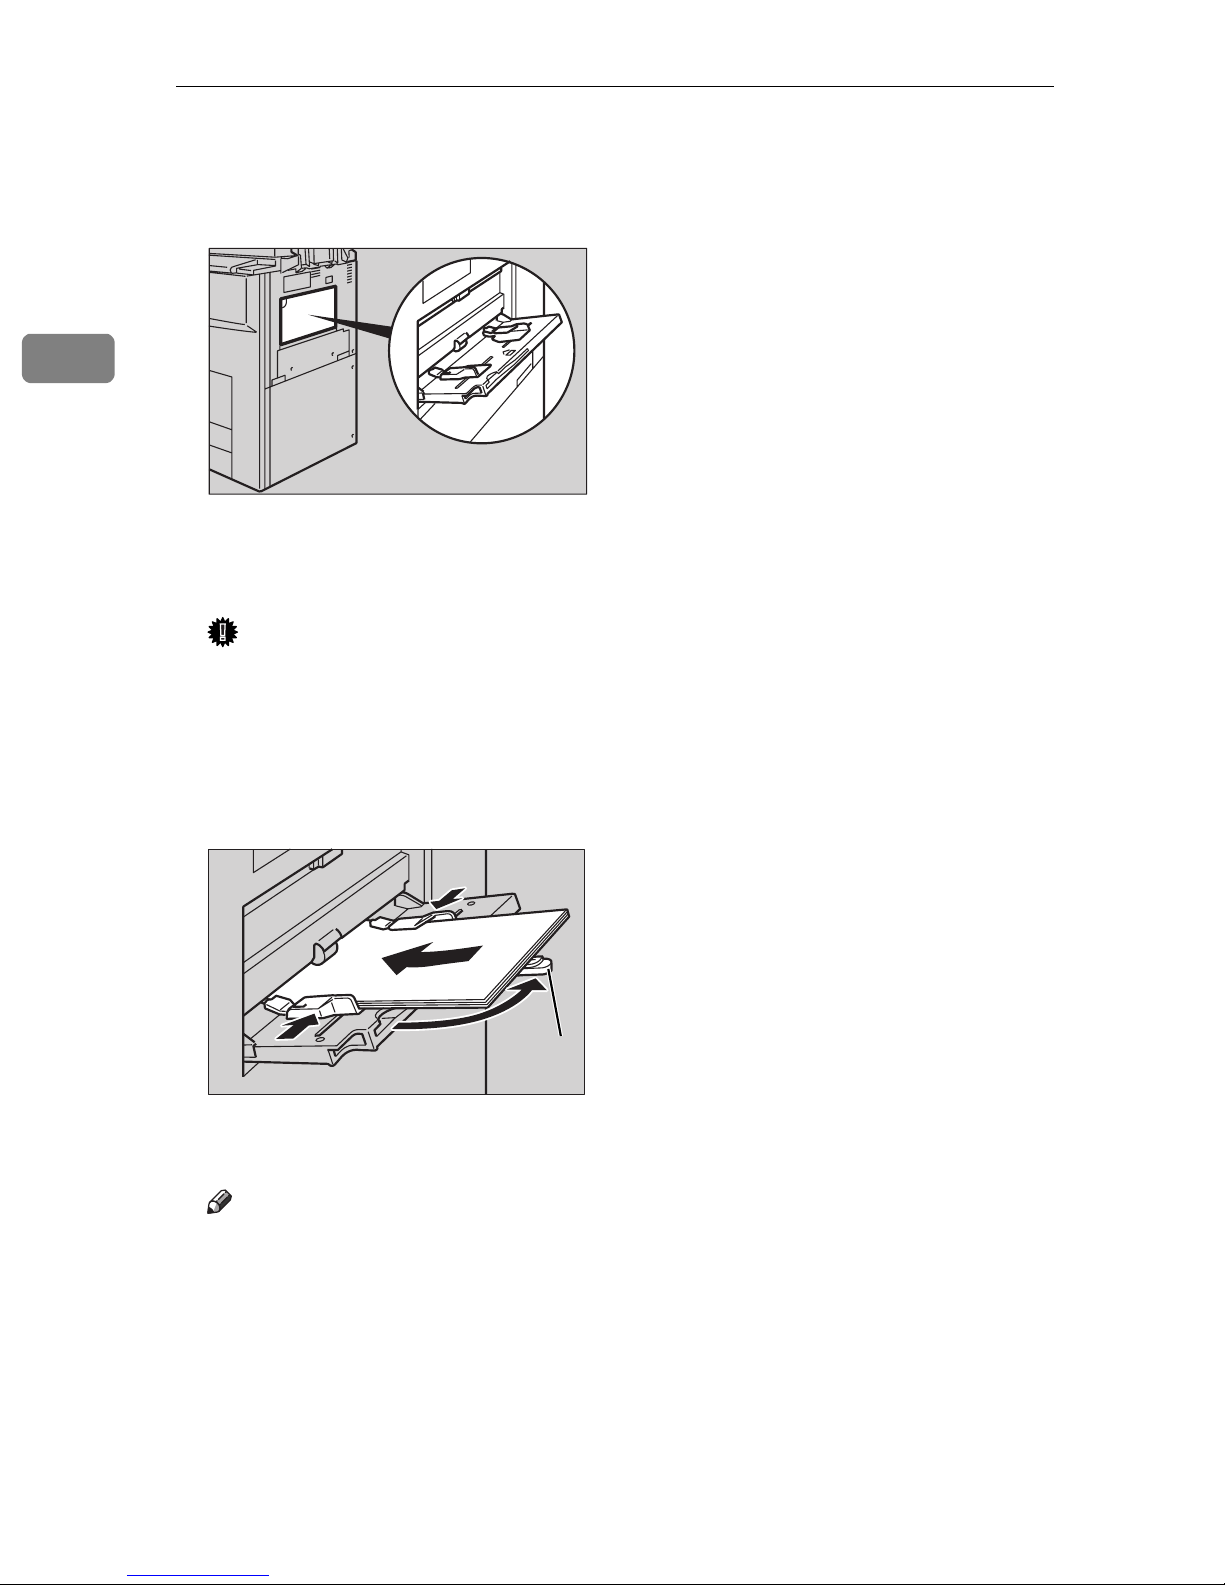
A Open the bypass tray.
ZBQH050E
B Adjust the guides to copy paper size.
Important
❒
If the guides are not flush with the copy paper, a skew image or paper misfeeds might occur.
C Lightly insert the copy paper face up until the beeper sounds.
The k indicator on the display automatically goes on.
1
ZBQH040E
1. Extender
Note
❒
The face side of the paper set is copied on.
❒
Do not stack paper over the limit mark, otherwise a skew image or paper
misfeeds might occur.
❒
If the beeper is turned off, lightly insert the copy paper until it stops. See
“Operation Panel Beeper” in the System Settings manual.
❒
When the document feeder is open, set the direction of the copy paper to
L
.
74
Page 8
Copying from the Bypass Tray
❒
Swing out the extender to support paper sizes larger than A4L, 8
11"L.
❒
Fan paper to get air between the sheets and avoid a multi-sheet feed.
❒
Before setting, adjust the paper if curled or warped.
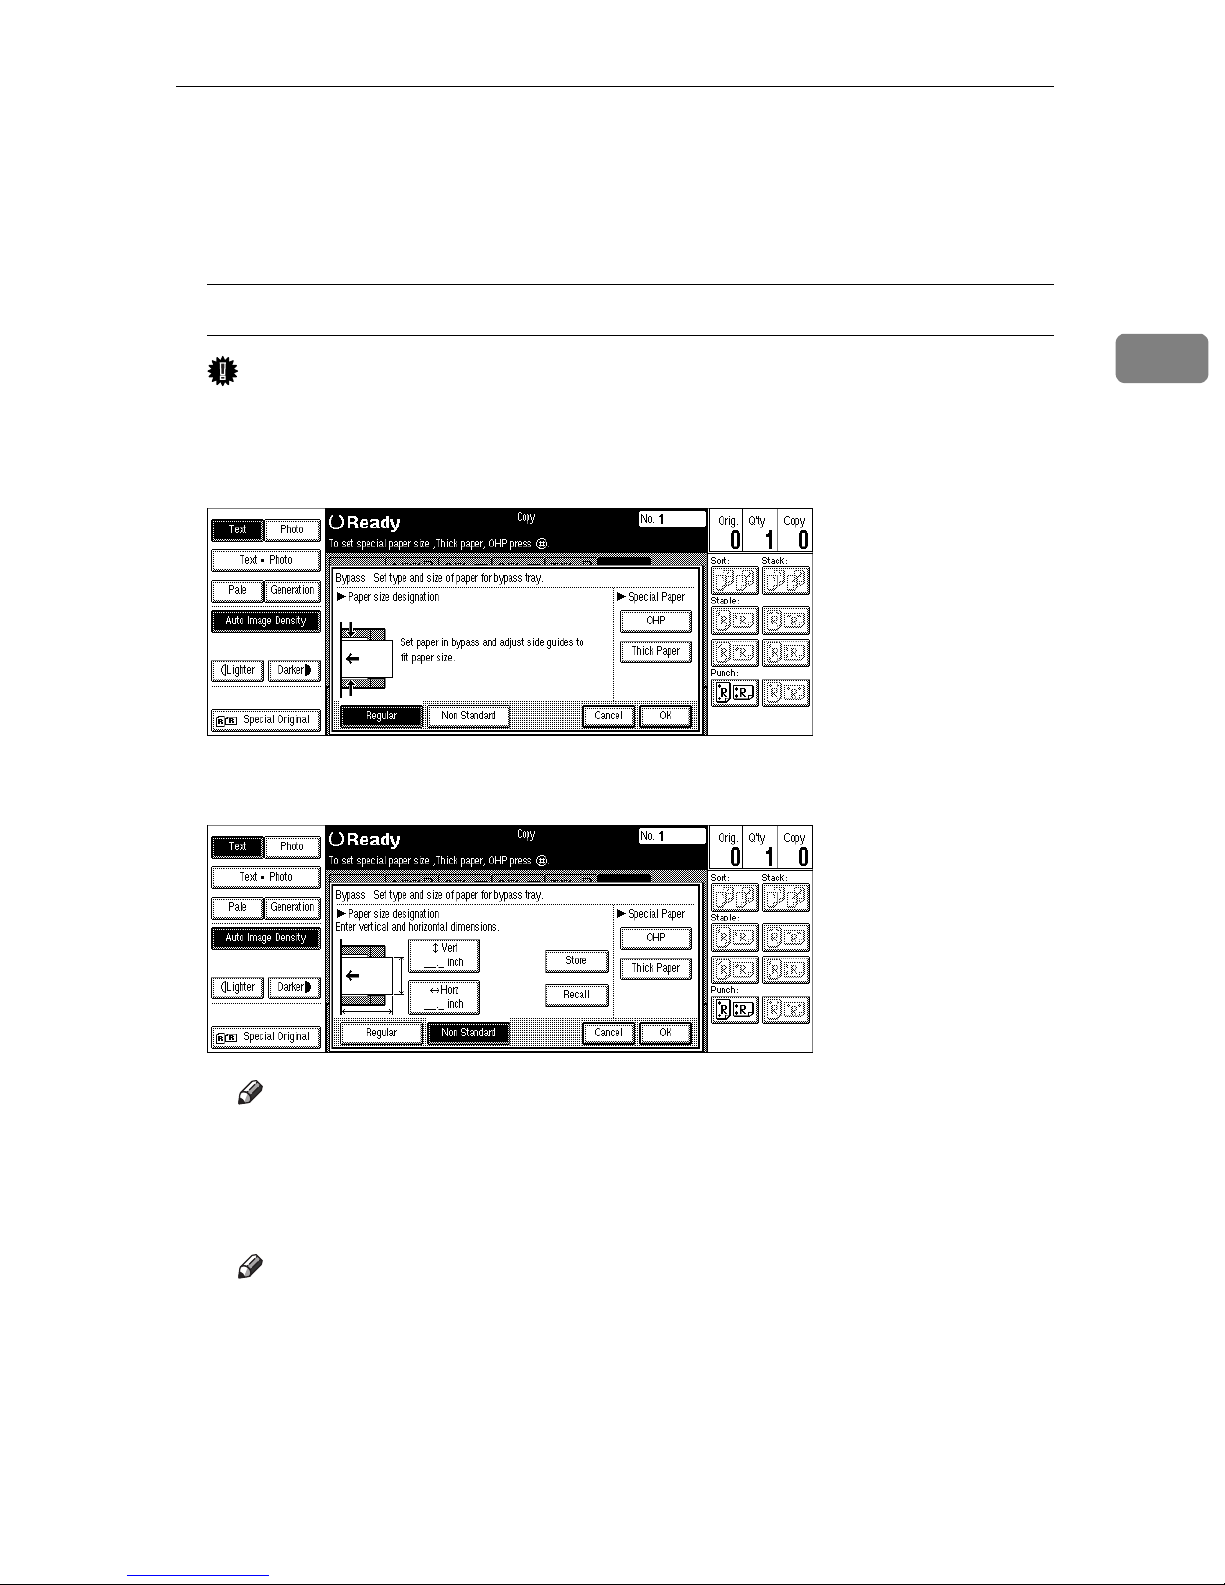
When copying onto non-standard size paper
Important
❒
You should specify the size of copy paper to avoid paper misfeeds.
A Press the
B Press the
key.
{
}
#
[
Non Standard
key.
]
1
/2"
×
2
C Press the
[
Vert inch
number keys, then press the
Note
❒
To change the number entered, press the
key and enter the vertical size of the paper with the
]
key.
]
[
#
[
Clear
or
]
{
Clear/Stop
key and
}
enter the new number.
D Enter the horizontal size of the paper with the number keys, then press
the
❒
❒
key.
[
]
#
Note
If the
[
Horz inch
key is not highlighted, press the
]
To change the number entered, press the
[
Clear
[
Horz inch
or
{
]
key.
]
Clear/Stop
key and
}
enter the new number.
E To register the non-standard size entered, press the
press the
[
Cancel
key.
]
[
Store
key and then
]
75
Page 9
Copying
Note
❒
If you do not register the non-standard size, go to step F.
❒
Only one non-standard size can be stored.
❒
To recall the non-standard size stored, press the
❒
If you do not register the non-standard size, the size you set is deleted
when modes are cleared.
[
Recall
key.
]
2
F Press the
D Set your originals, then press the
E When your copy job is finished, press the
clear the settings.
[
OK
key.
]
{
Start
key.
}
{
Clear Modes/Energy Saver
key to
}
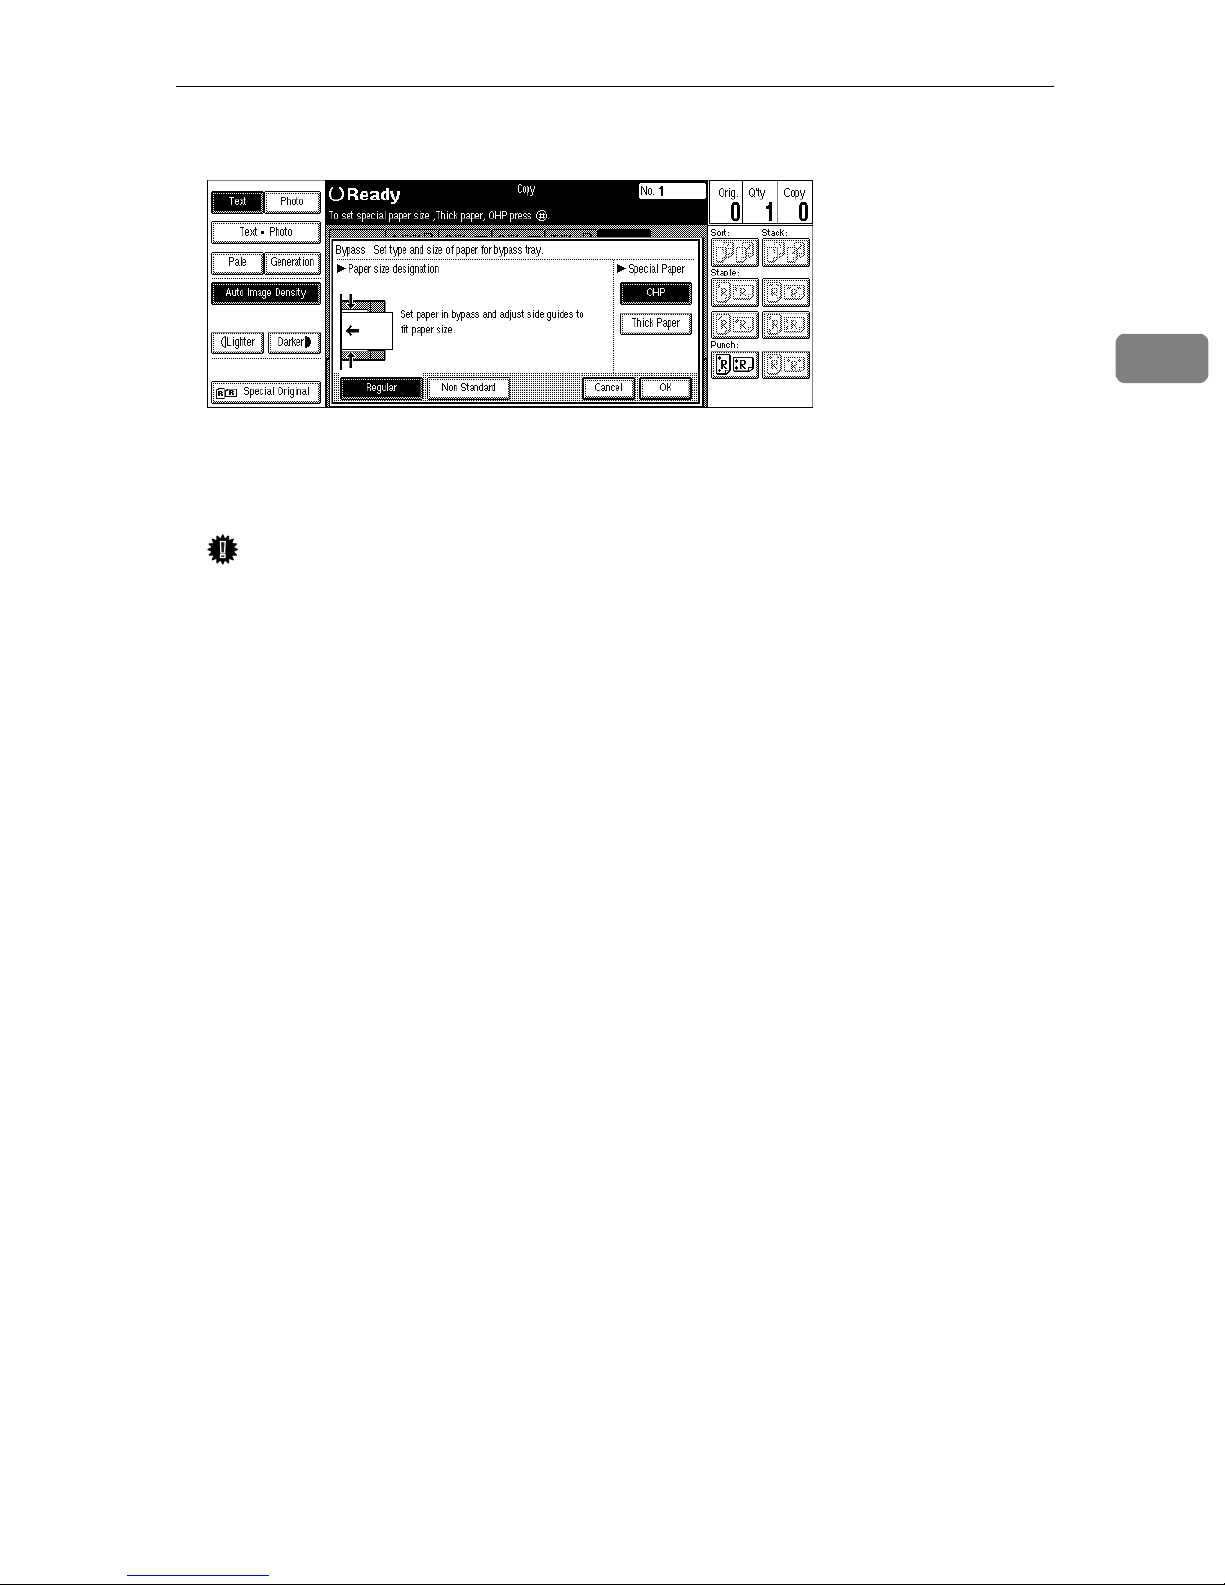
When Copying onto OHP Transparencies or Thick Paper
To make copies onto OHP transparencies or thick paper, you need to specify the
paper type.
Limitation
❒
When you select “OHP” or “Thick Paper”, copy paper is delivered face up
even if you have set the “Face-Up/Down Selection in Bypass Mode” setting
to “Face Down Exit”. See “Face-Up/Down Selection in Bypass Mode” in
❒
P.331
Note
Select
“Count Manager”
[
Thick Paper
.
if the paper weight is more than 105g/m
]
2
, 28 lb. Bond.
⇒
A Open the bypass tray, and adjust the guides to the paper size.
Important
❒
If the guides are not flush with the copy paper, a skew image or paper misfeeds might occur.
B Lightly insert the OHP transparencies or thick paper face up until the beep-
er sounds.
The k indicator on the display automatically goes on.
Note
❒
When you set an OHP transparency, make sure that its front and back faces
are properly positioned.
❒
To avoid paper misfeeds, fan the paper before setting it in the tray.
C Press the
key.
}
{
#
76
Page 10
Copying from the Bypass Tray
D Select
E Press the
[
OHP
[
OK
or
]
[
Thick Paper
key.
]
F Set your originals and press the
Important
❒
When copying onto OHP transparencies, remove copied sheets one by
one.
.
]
key.
}
{
Start
G When your copy job is finished, press the
clear the settings.
{
Clear Modes/Energy Saver
key to
}
2
77
Page 11

2
Copying
Programs
You can store frequently used copy job settings in machine memory, and recall
them for future use.
Limitation
❒
You cannot store the settings whether the Connect Copy function will be selected automatically in a program.
❖
Storing Your Settings
You can store your settings you frequently use.
❖
Deleting A Program
You can delete a stored program.
❖
Recalling A Program
You can recall a stored program.
Note
❒
You can store up to ten programs.
❒
You can select the standard mode or program No. 10 as the mode to be set
when modes are cleared or reset is made, or immediately after the operation
switch is turned on. See “Initial Mode” in ⇒ P.313
❒
Paper settings are stored based on paper size. So if you place more than one
paper tray of the same size, the paper tray prioritized with the User Tools
(System Settings) will be selected first. See “Paper Tray Priority” in the System Settings manual.
❒
Programs are not cleared by turning the power off or by pressing the
key. They are canceled only when you delete or overwrite
Modes/Energy Save r
them with another program.
❒
If your program contains settings that are not available in Connect Copy
mode, they are ignored in Connect Copy mode.
❒
If your program contains settings that are not available on the sub-unit, they
are ignored in Connect Copy mode.
}
“General Features
2
/3”
Storing a Program
.
{
Clear
A Edit the copy settings so that all functions you want to store in this program
are selected.
78
Page 12
Programs
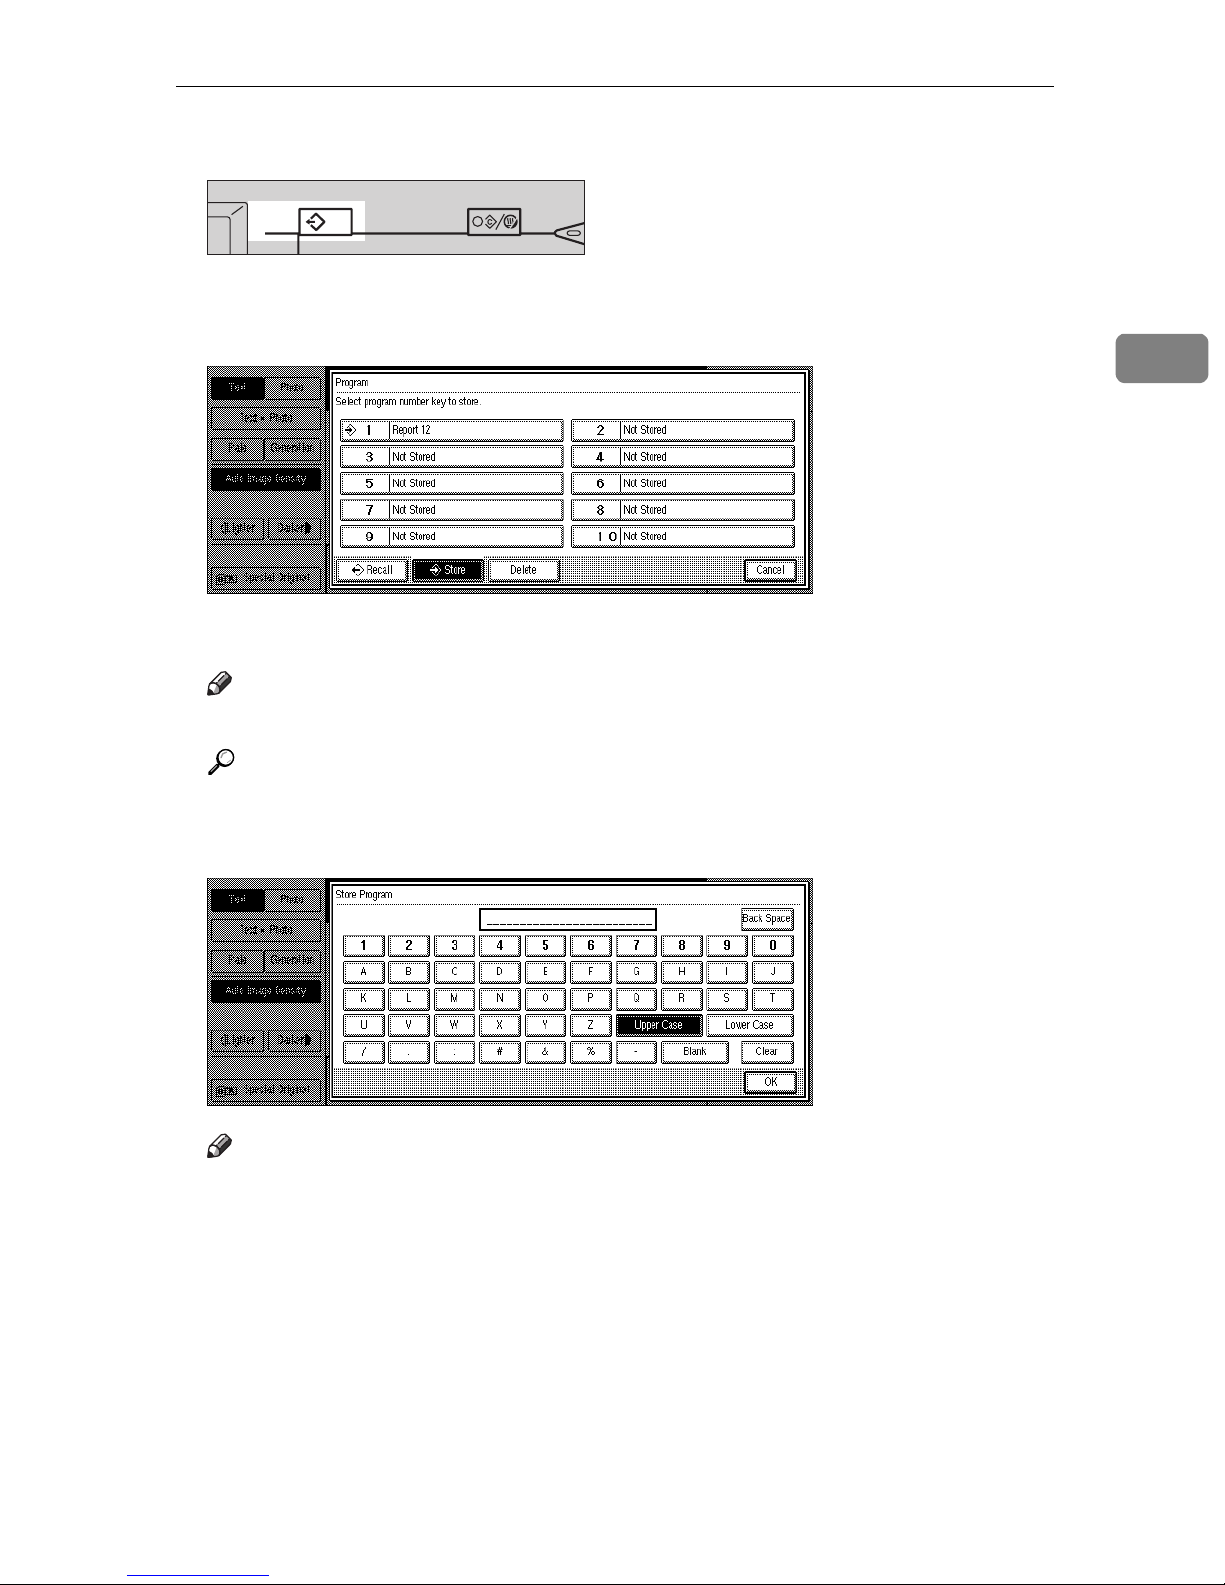
B Press the
Program
C Press the
{
Program
[
Store
}
Clear Modes/
Energy Saver
key.
]
key.
Interrupt
TSPS030N
D Press the program number you want to store.
Note
❒
Program numbers with m already have settings in them.
2
Reference
P.80
⇒
“Changing a Stored Program”
E Enter the program name with the letter keys on the display panel.
Note
❒
If you do not wish to enter the program name, go to step F.
❒
You can register up to 25 characters.
❒
To change the name entered, press the
key and enter new letters.
F Press the
[
OK
key.
]
[
Back S pace
], [
Clear
or
]
{
Clear/Stop
}
When the settings are successfully stored, the m indicator goes on.
79
Page 13
2
Copying
Changing a Stored Progra m
A Press the stored program number key and make sure the settings.
Note
❒
When you want to check the contents of the program, recall the program.
See ⇒ P.81
“Recalling a Program”
.
B Repeat steps A to D in Storing a Program.
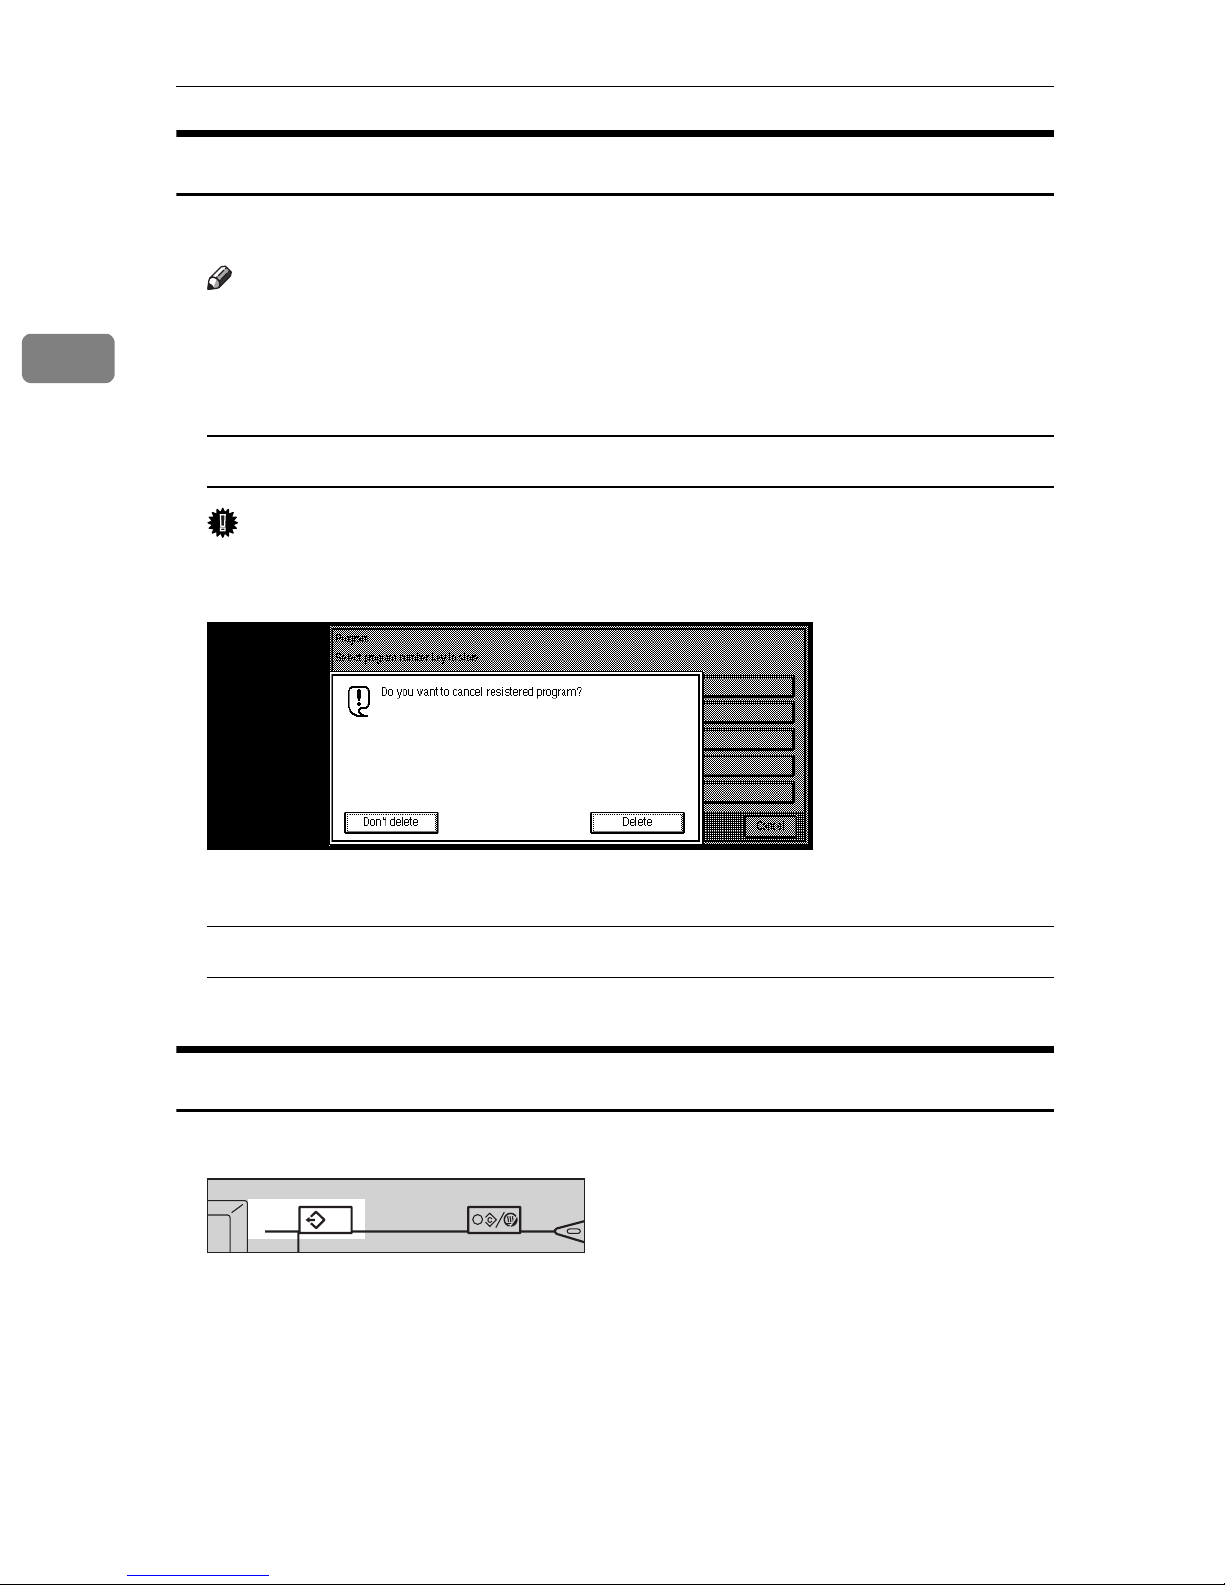
To overwrite the program
Important
❒
If you select
[
Delete
, the previous program is lost.
]
A Press the
B Repeat steps E and F in Storing a Program.
[
Delete
key.
]
Not to overwrite the program
A Press the
[
Don't delete
key.
]
Deleting a Program
A Press the
{
Program
key.
}
Program
Clear Modes/
Energy Saver
80
Interrupt
TSPS030N
Page 14
Programs
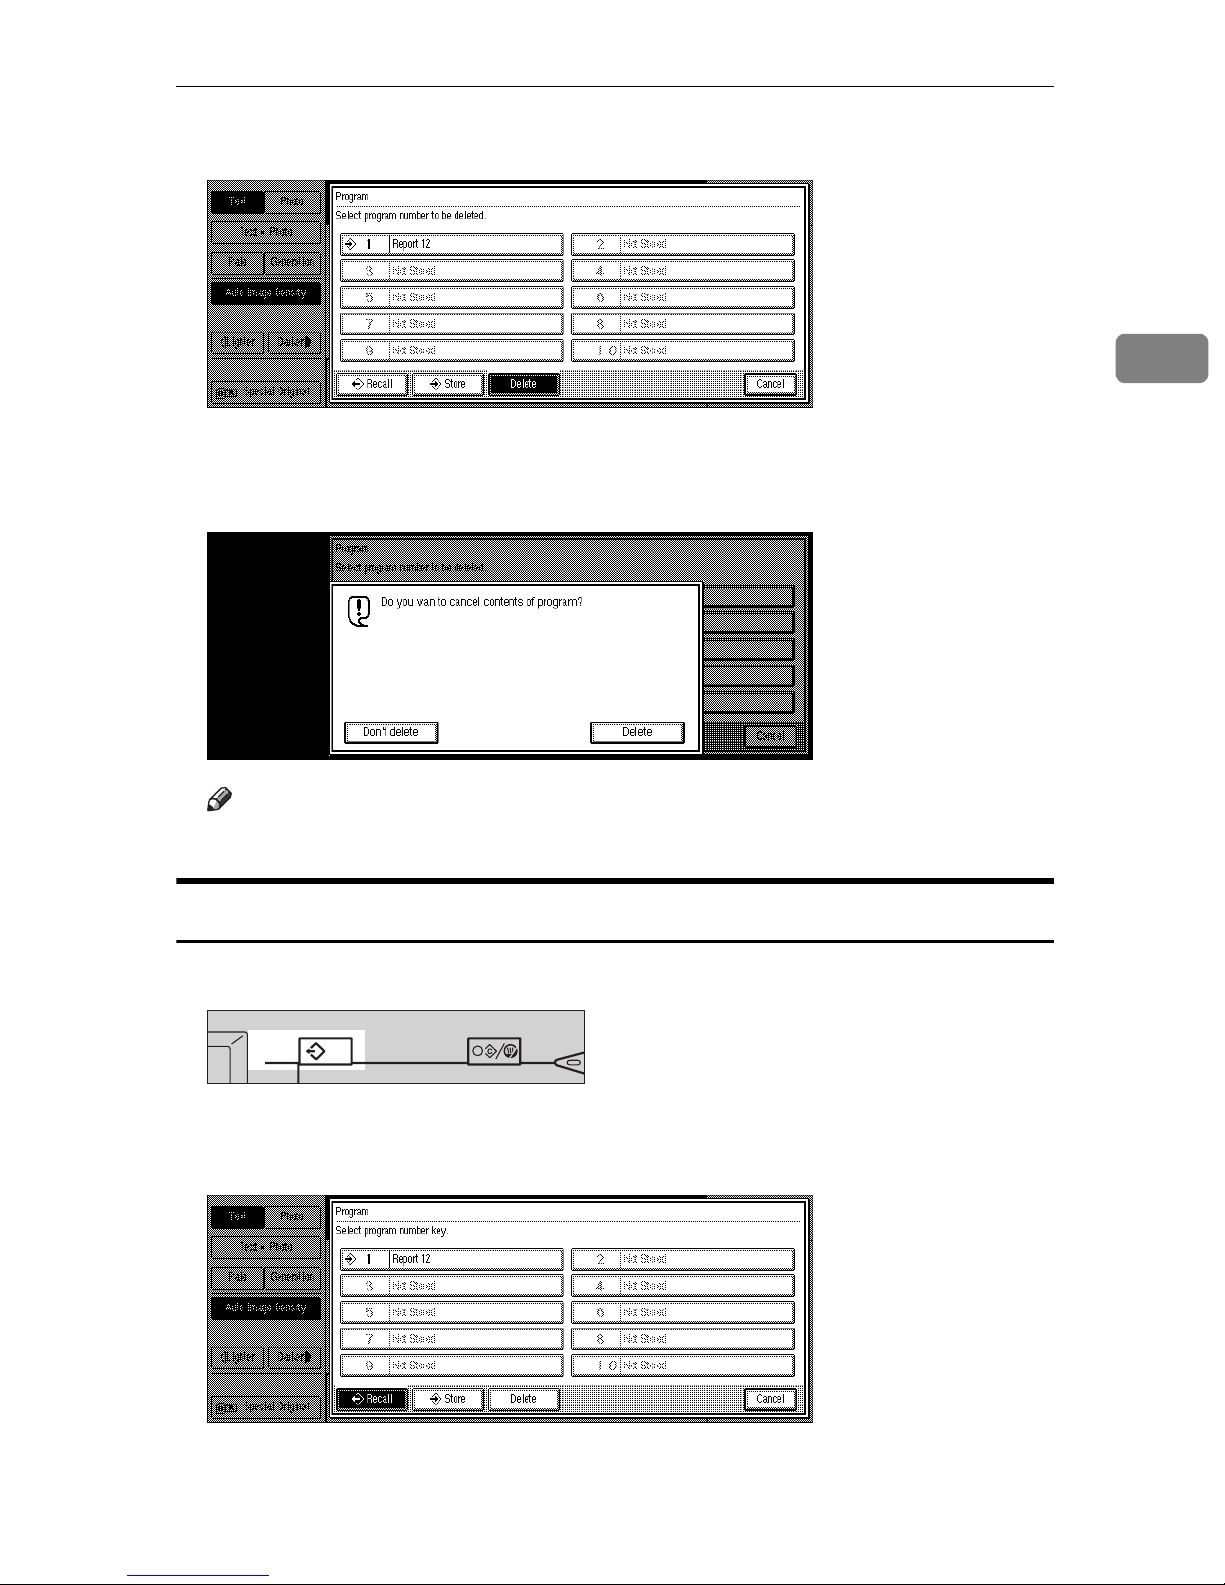
B Press the
[
Delete
key.
]
C Press the program number you want to delete.
D Press the
[
Delete
key.
]
2
Note
❒
To cancel the deletion, press the
Recalling a Program
A Press the
Program
B Press the
{
Program
[
Recall
key.
}
Clear Modes/
Energy Saver
key.
]
Interrupt
TSPS030N
[
Don't delete
key.
]
81
Page 15

Copying
C Press the program number you want to recall.
The stored settings are displayed.
Note
❒
Only programs with m contain a program.
2
D Set your originals, then press the
{
Start
key.
}
82
Page 16
Job Preset
Job Preset
If a long copy job is in progress and you do not wish to wait for it to finish, you
can use this function to set up the next copy job in advance. When the current
copy job is finished, your copy job will be started automatically.
Limitation
❒
You cannot combine the Job Preset function with the Connect Copy function
(option).
Note
❒
The maximum number of job sets that you can set with this function is 8.
❒
You can use this function for the documents stored in the Document Server.
2
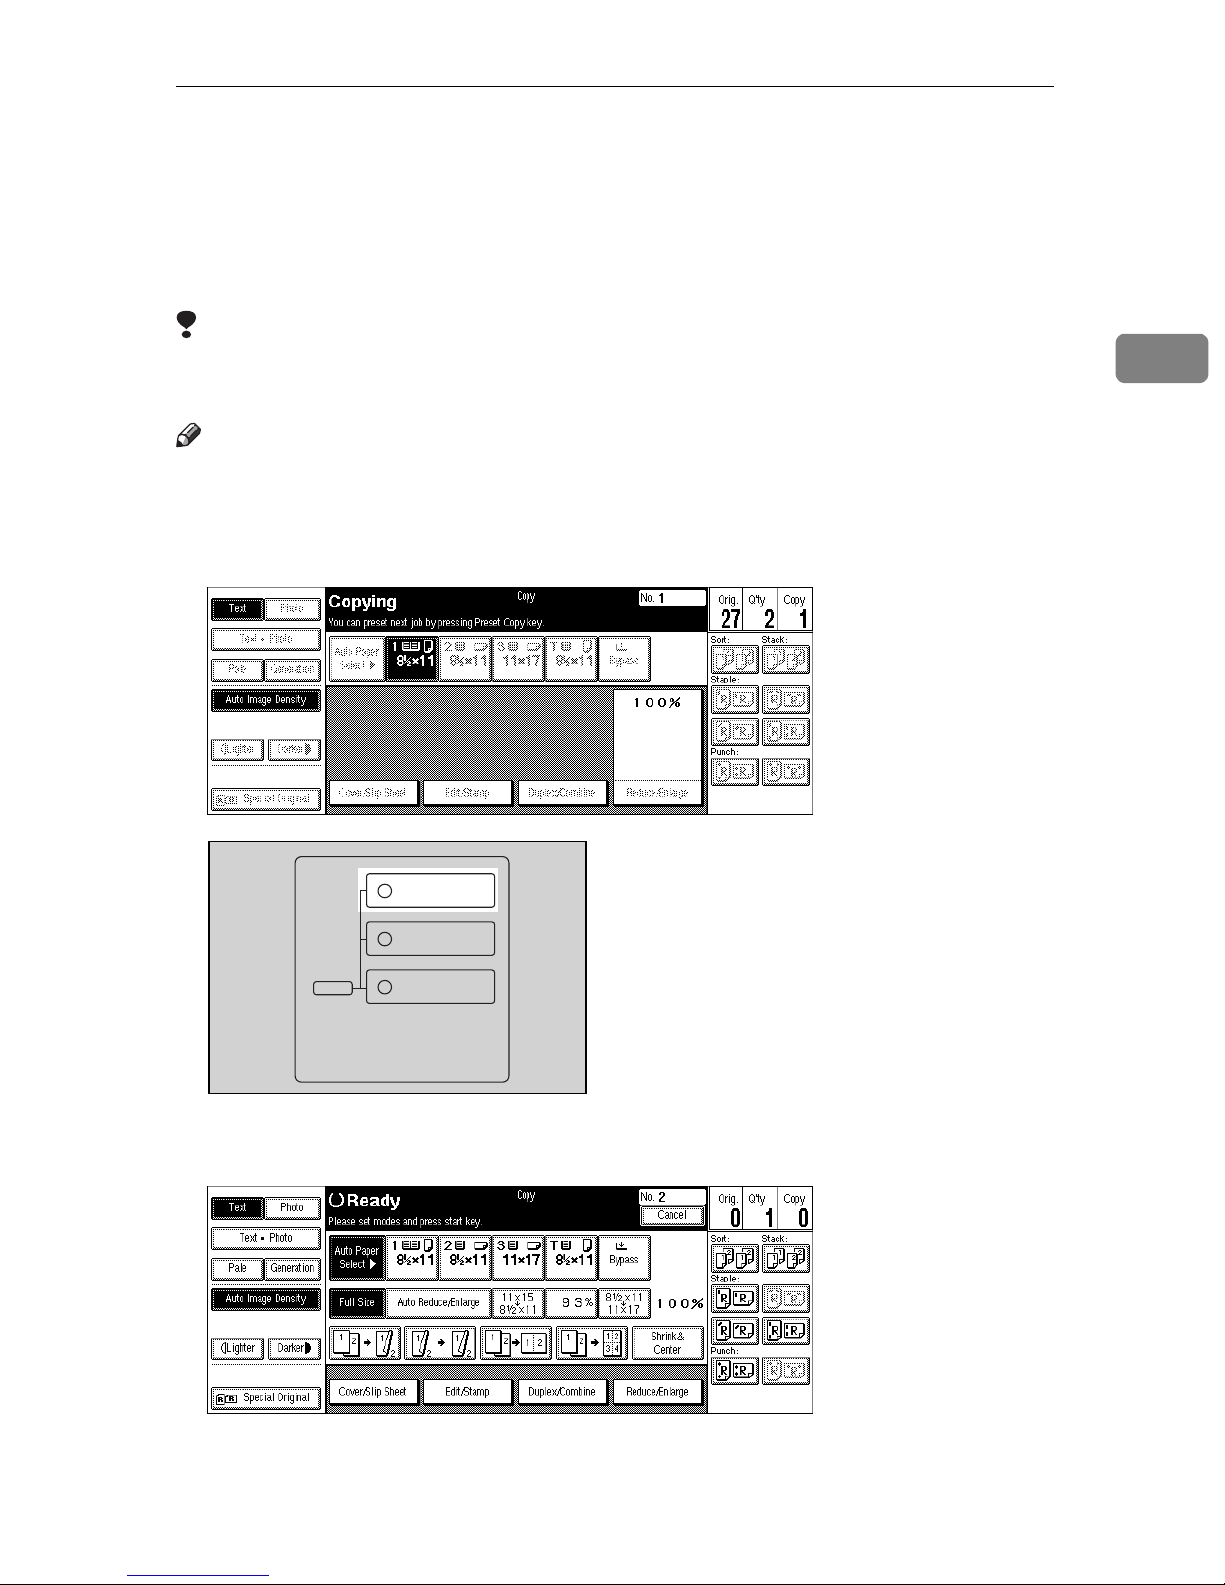
A Press the
{
Copy/New Job
Copy
New Job
Document Server
New Job
Job List
key.
}
ZBQS080N
B Set up the next copy job.
83
Page 17
Copying
❒
Note
The receipt number (preset number) of the preset job is displayed on the
upper right of the display panel.
2
❒
To cancel this job, press the
[
Cancel
key.
]
C Set the originals in the document feeder and press the
After all originals are scanned, the Job List is displayed.
D Press the
After the current copy job, the next job starts automatically.
Note
❒
You can switch the display to the current copy job by pressing the
to menu in printing
play to the preset job by pressing the
[
Return to menu in printing
or
]
[
Return to menu in scanning
key.
]
key. You can switch the dis-
]
[
Return to menu in setting new job
{
Start
key.
}
[
Return
key.
]
Editing Job Preset
A Press the
Note
❒
You can confirm the preset number, time to end, number of originals,
number of copy sets, and functions you use in the job status list.
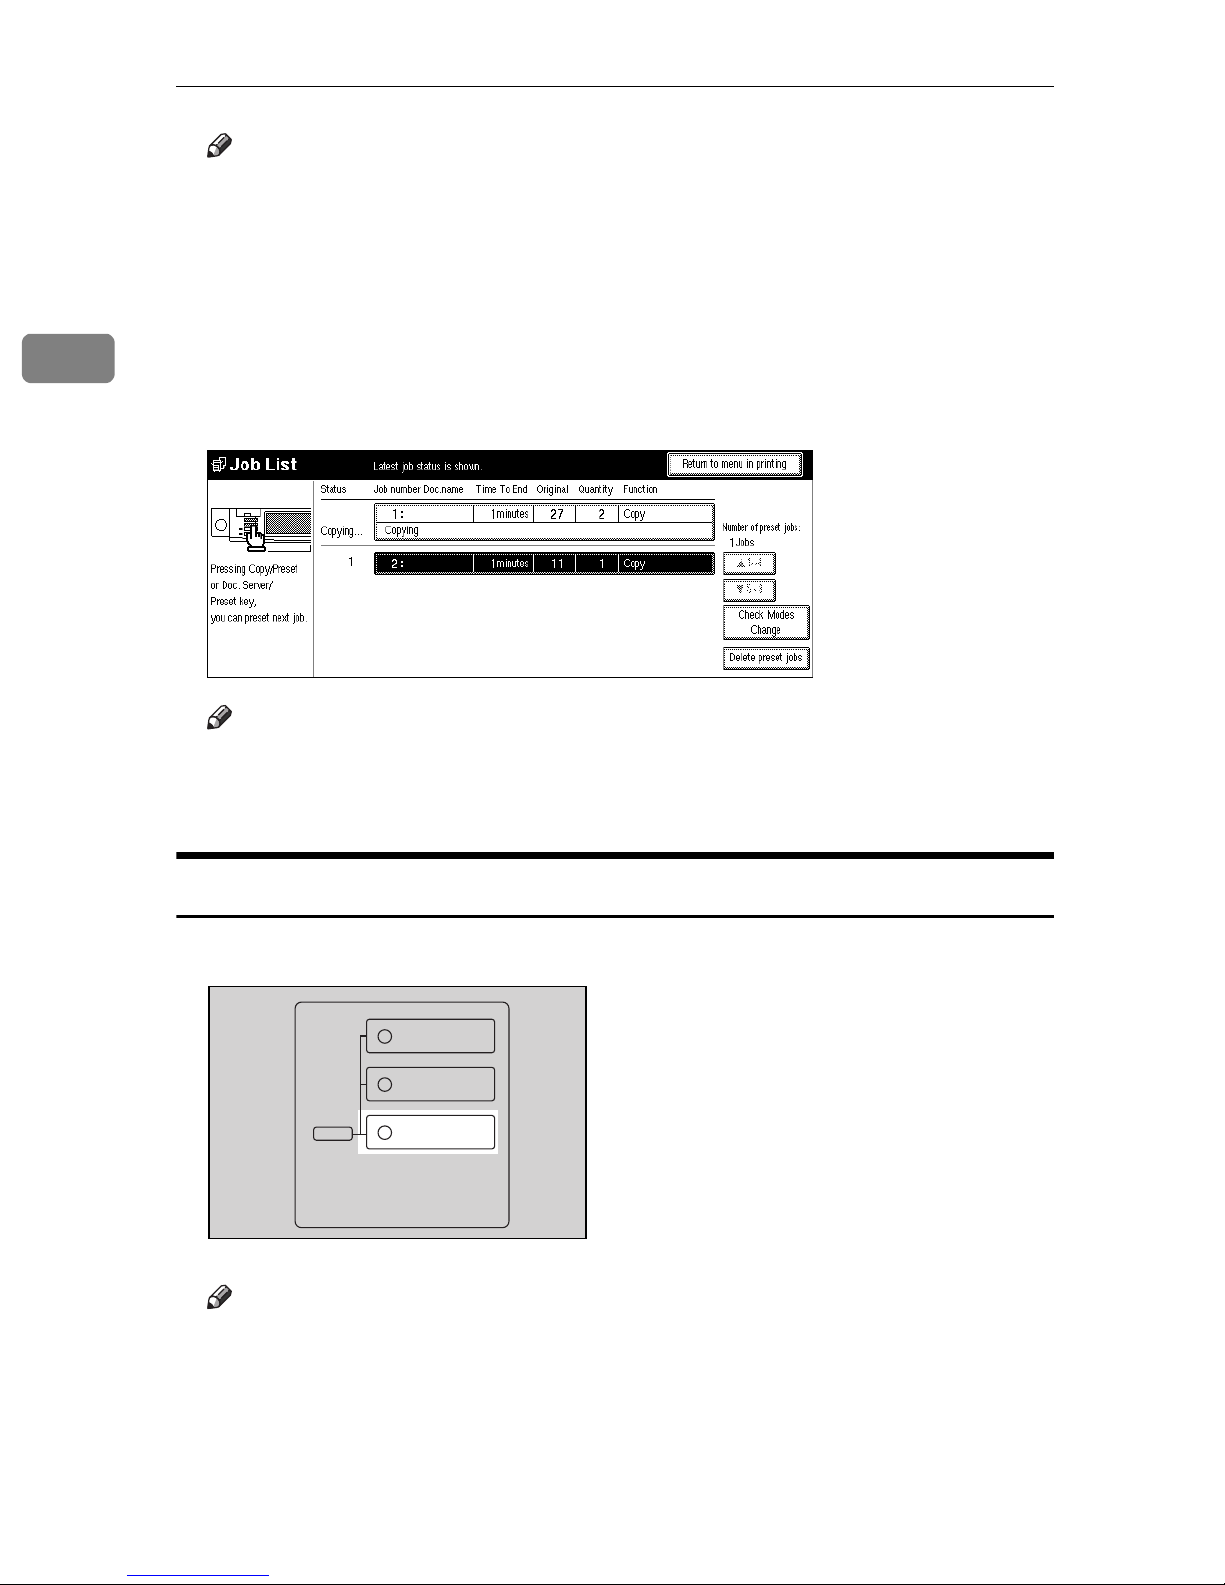
{
Job List
key.
}
Copy
New Job
Document Server
New Job
Job List
ZBQS090N
B Press the preset job you want to change.
84
Page 18
Job Preset
Note
❒
If the desired job is not shown and more than 5 jobs are preset, press the
T
[
key to display the desired job.
]
5∼8
2
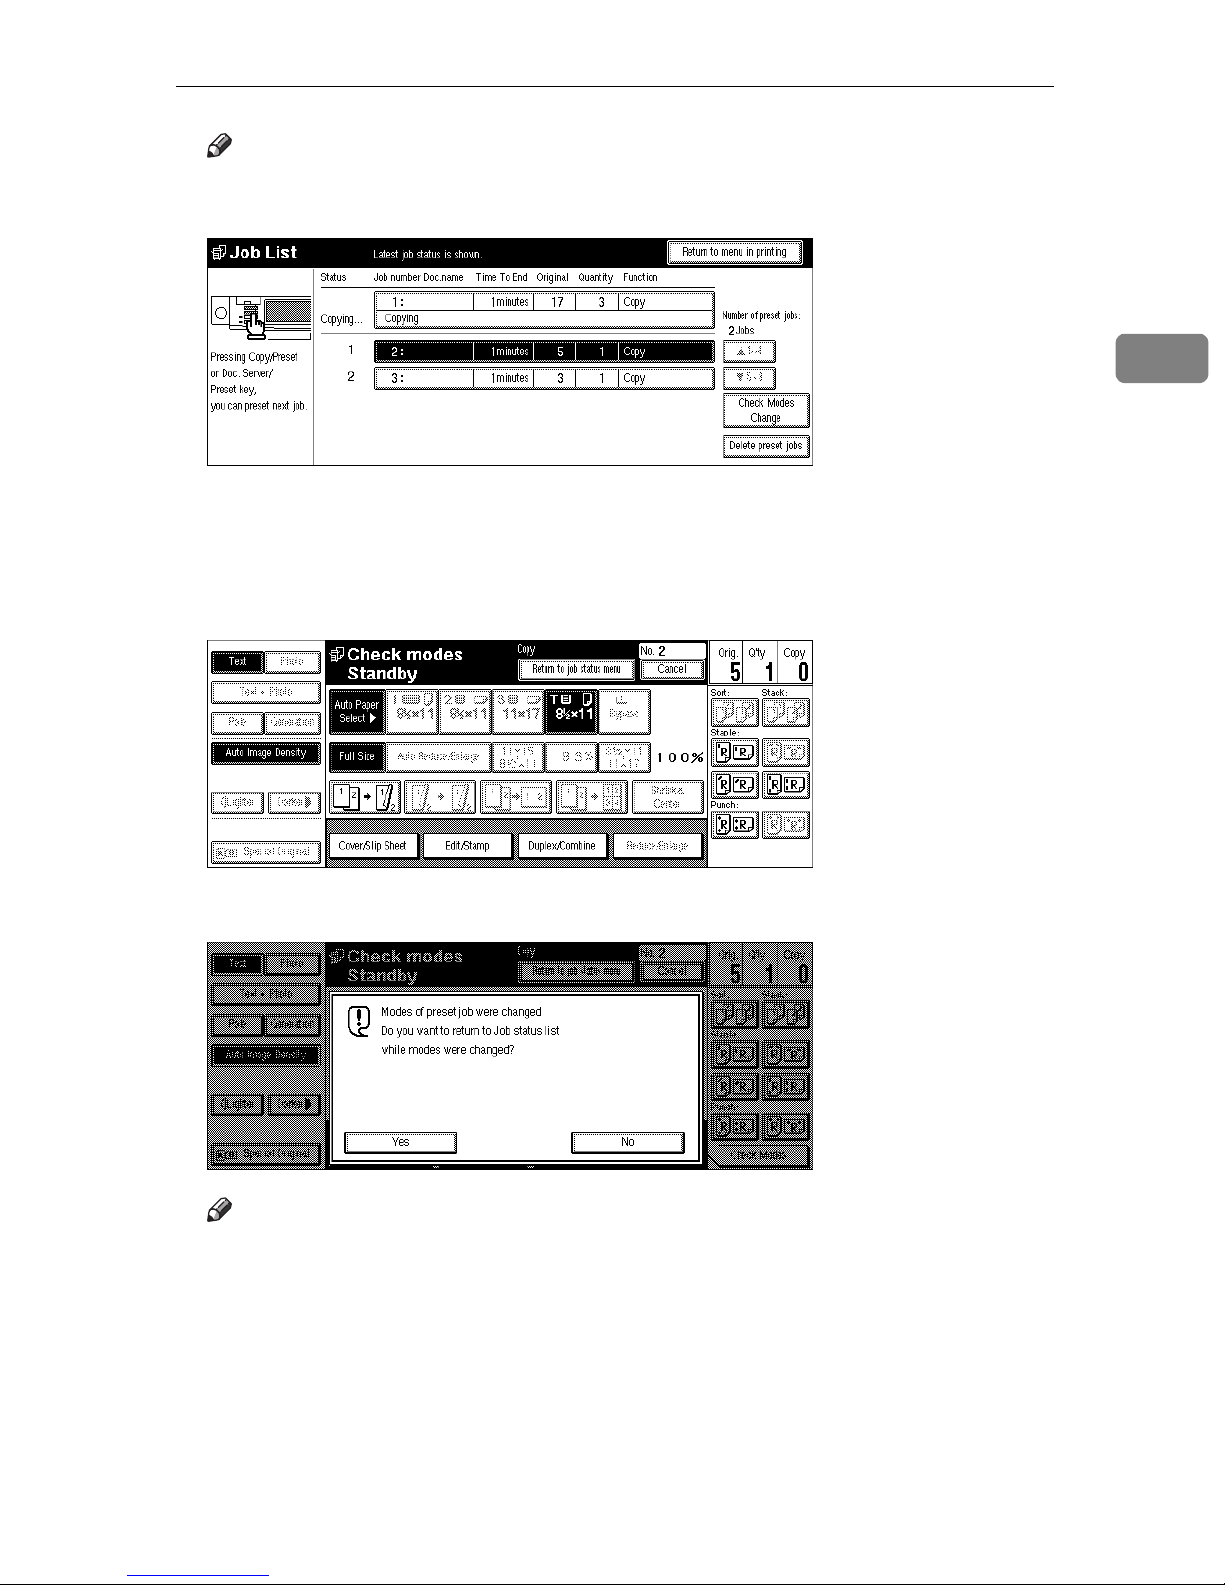
C Press the
[
Check Modes//Change
D Change the settings.
E Press the
F Press the
[
Return to job status menu
key.
]
[
Yes
key.
]
key.
]
Note
❒
To cancel the changes, press the
G If you want to change the settings for other preset jobs, repeat steps B to F.
H Press the
The initial display reappears.
[
Return to menu in printing
[
No
key.
]
key.
]
85
Page 19
Copying
❒
Note
Depending on the condition of the current copy job, the
setting new job
case, press the
or
]
[
Return to menu in scanning
[
Return to menu in setting new job
key might be displayed. In this
]
or
]
[
Return to menu in scanning
key.
[
Return to menu in
]
2
Deleting Job Preset
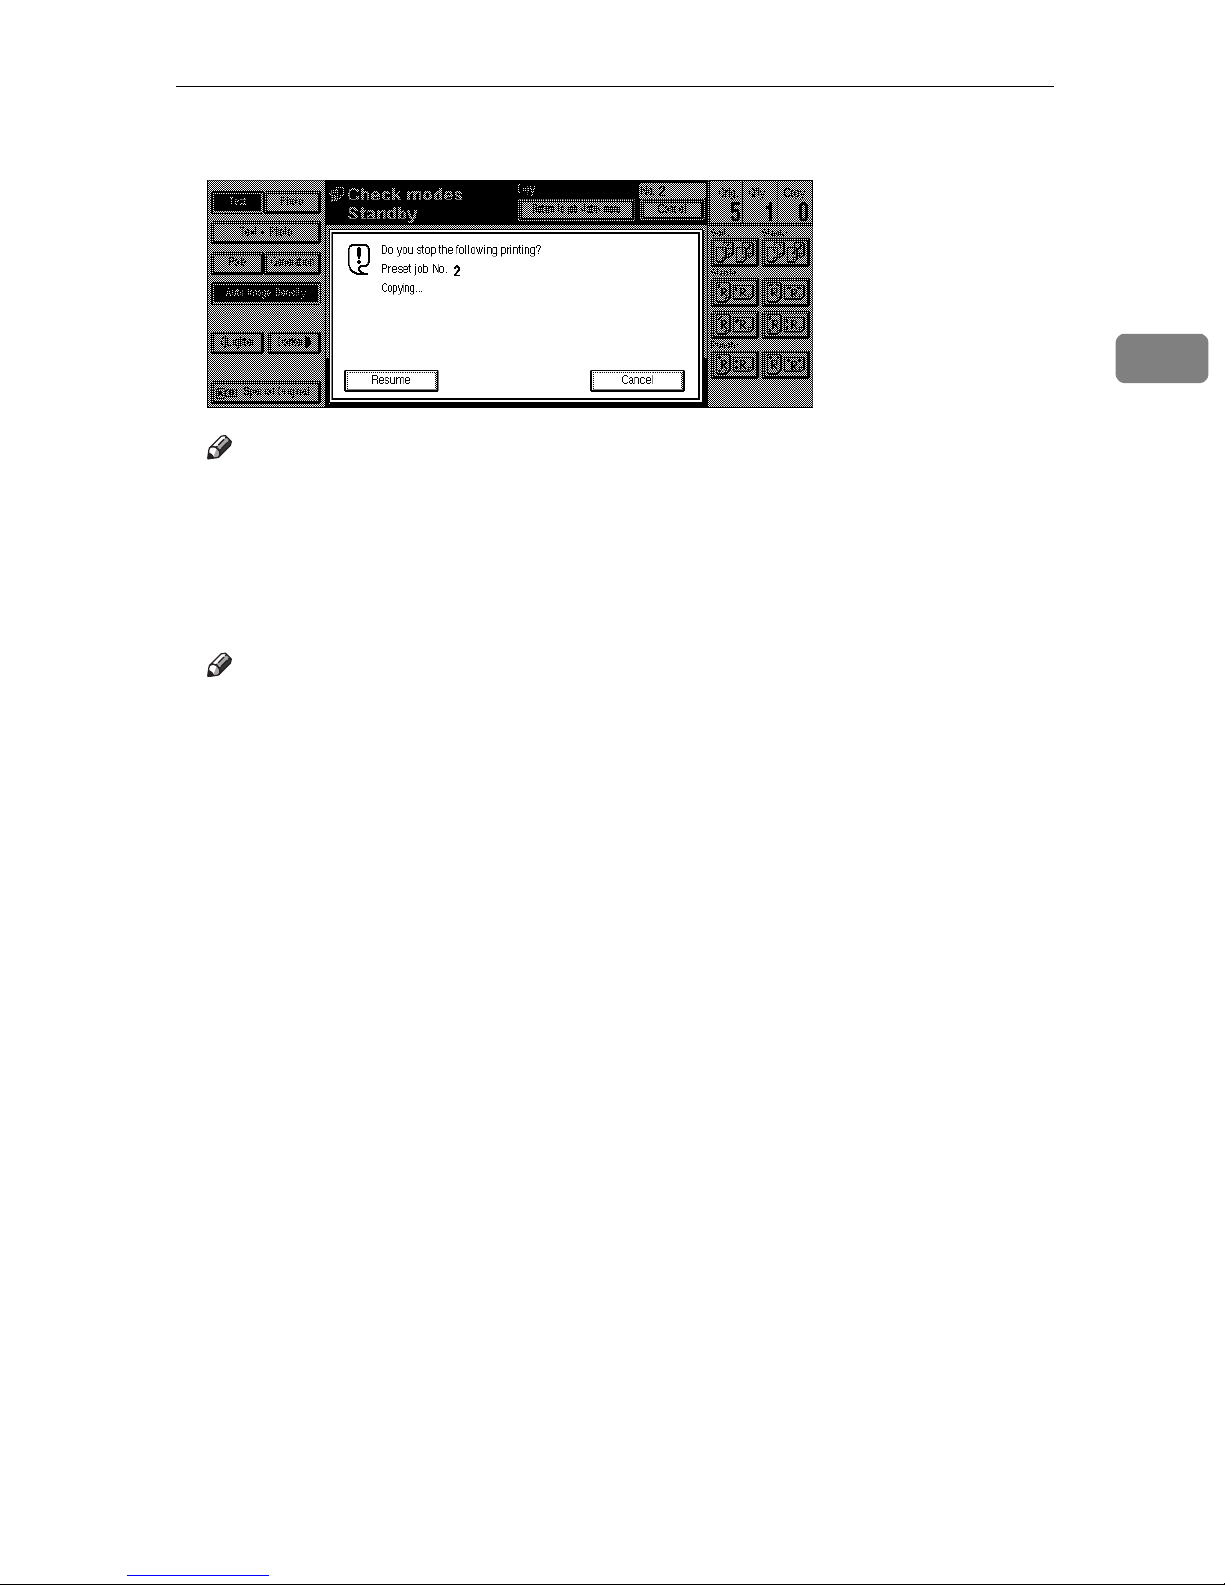
You can delete the preset job in the Job List or Check modes display. The following procedure describes how to delete the preset job in the Job List display.
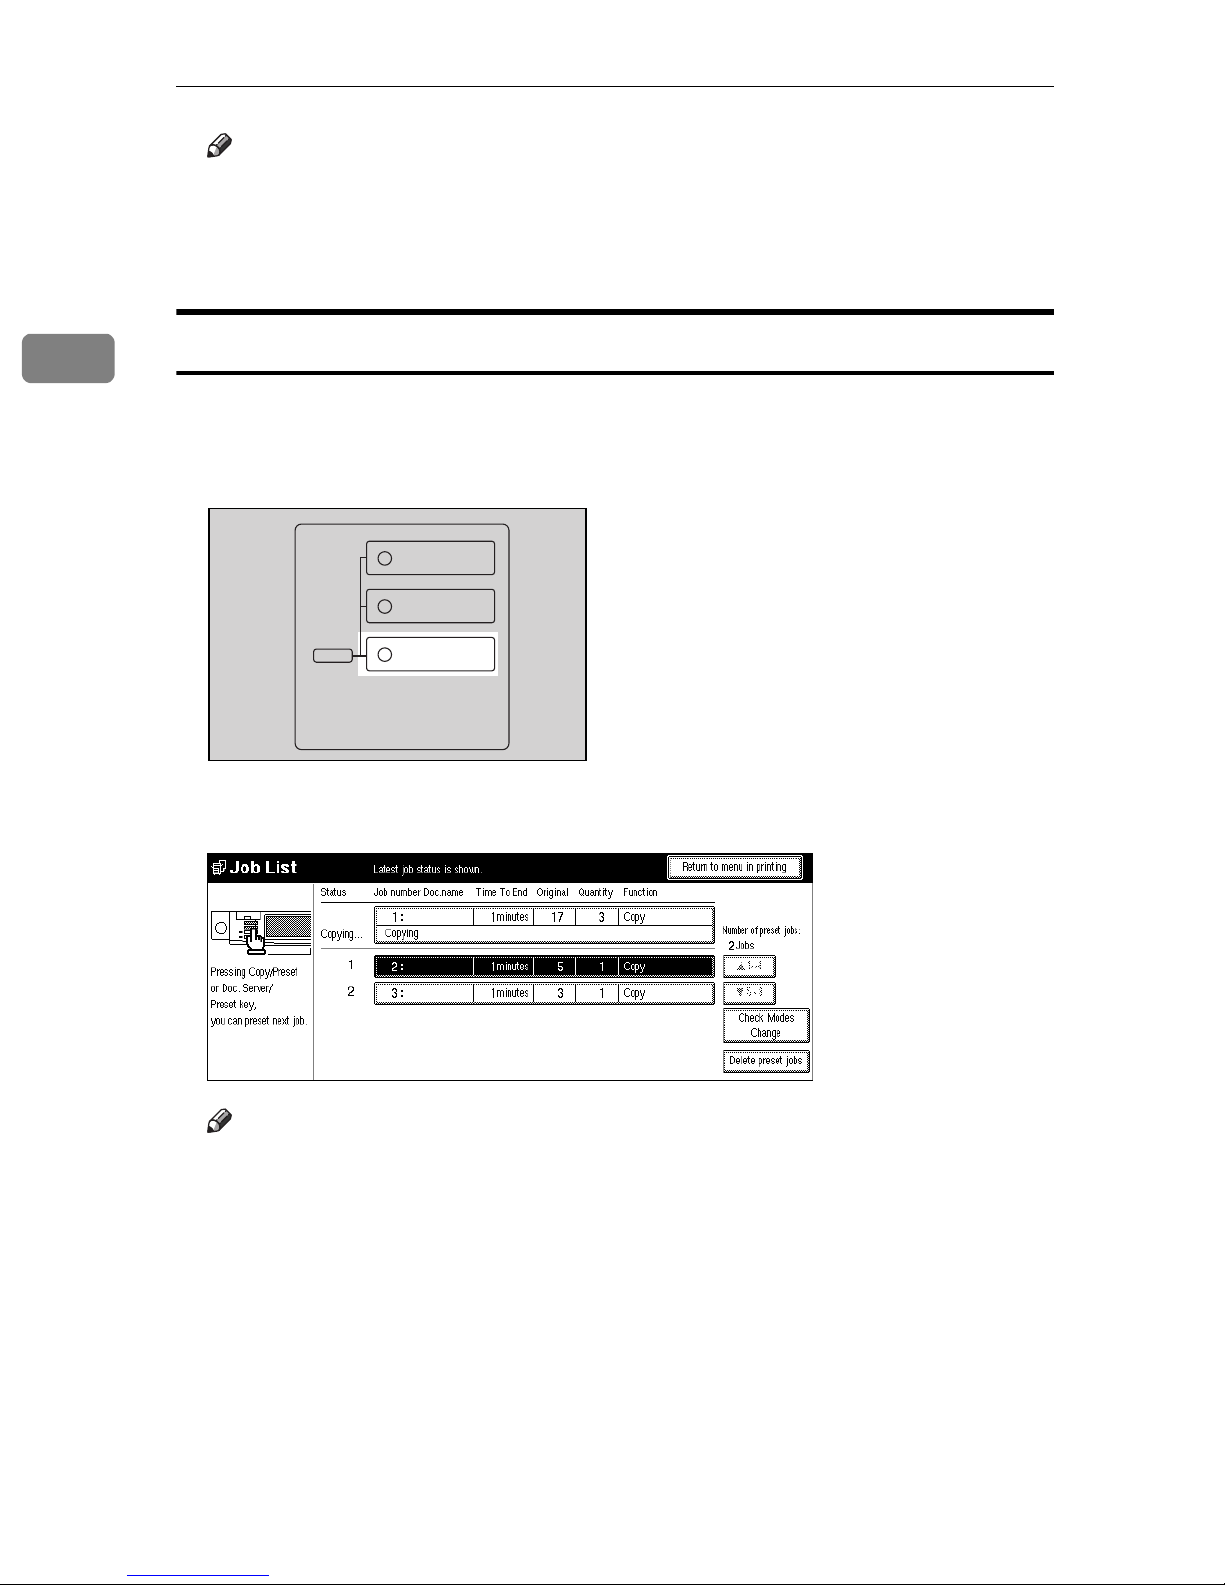
A Press the
{
Job List
B Press the preset job you want to delete, then press the
key.
}
Copy
New Job
Document Server
New Job
Job List
ZBQS090N
[
Delete preset jobs
key.
]
Note
❒
If you delete the preset job in the Check modes display, press the
key in the Check modes display.
❒
If the desired job is not shown and more than 5 jobs are preset, press the
T
[
key to display the desired job.
]
5∼8
86
[
Cancel
]
Page 20
Job Preset
C Press the
Note
❒
To cancel the deletion, press the
[
Cancel
key.
]
[
Resume
key.
]
D If you want to delete other preset jobs, repeat steps B and C.
E Press the
The initial display reappears.
Note
❒
Depending on the condition of the current copy job, the
preset mode
case, press the
key.
[
Return to menu in printing
or
]
[
Return to menu in scanning
[
Return to menu in preset mode
key.
]
[
key might be displayed. In this
]
or
]
[
Return to menu in scanning
2
Return to menu in
]
87
Page 21
2
Copying
Other Functions
Energy Saver Mode
If you do not operate the machine for a certain period after copying, or when you
press and hold the
display disappears and the machine enters Energy Saver mode. When you press
the
{
Clear Modes/Energy Saver
ment feeder, or when the document feeder is opened, the machine returns to the
ready condition. In Energy Saver mode, the machine uses less electricity.
Energy Saver mode makes a two-step reduction in electricity: one for the period
up to the time set for Low Power mode, the other for the period after that time.
Note
❒
If you press the
rent settings will be cleared.
{
Clear Modes/Energy Saver
key again, when the originals are set in the docu-
}
{
Clear Modes/Energy Saver
key for more than one second, the
}
key during the operation, the cur-
}
❒
It takes about 10 seconds to return to the ready condition from Energy Saver
mode.
❒
It takes about 30 seconds to return to the ready condition from Low Power
mode.
❒
If you press the
Connect Copy mode is canceled and the machine returns to the initial condition of Copy mode.
❒
If you press the
Saver mode and enters Connect Copy mode.
❒
In Connect Copy mode, the sub-unit will not enter Energy Saver mode.
Reference
See “Low Power Timer” in the System Settings manual.
{
Clear Modes/Energy Saver
[
Connect
key on the master unit, the sub-unit exits Energy
]
key while setting Connect Copy,
}
Interrupt Copy
Use this function if you wish to interrupt a long copy job to make urgently needed copies.
Note
❒
The procedure for making interrupt copies depends on which kind of operation the machine is currently carrying out.
❒
You can use Document Server mode in Interrupt Copy mode.
❒
In Connect Copy mode, you cannot use the Interrupt Copy function on the
master unit.
❒
In Connect Copy mode, you cannot use the Interrupt Copy function on the
sub-unit while the master unit is scanning an original.
88
Page 22

Other Functions
❒
In Connect Copy mode, you cannot use the Interrupt Copy function when
memory on the sub-unit is full.
❒
In Connect Copy mode, after finishing the interrupt copy job on the sub-unit,
be sure to exit Interrupt mode on the sub-unit. When you exit Interrupt mode,
the two machines automatically share the rest of the connect copy job.
❒
In Connect Copy mode, if the connect copy job is finished before finishing the
interrupt copy job on the sub-unit, be sure to exit Interrupt mode on the subunit. If you do not exit Interrupt mode, the next connect copy job cannot be
started.
To interrupt an original being fed
2
A Press the
The Interrupt indicator goes on and scanning stops.
{
Interrupt
key.
}
B Remove the originals that were being copied and set the originals you wish
to copy.
C Press the
The machine starts making your copies.
{
Start
key.
}
D When your copy job is finished, remove your originals and copies.
E Press the
The Interrupt indicator goes off.
{
Interrupt
key again.
}
F When the display prompts you to, replace the originals that were being
copied before.
G Press the
The previous copy job settings will be restored and the machine will continue
copying from where it left off.
{
Start
key.
}
To interrupt copying after all originals have been fed
A Press the
The Interrupt indicator goes on.
Note
❒
Copying will not stop yet.
{
Interrupt
B Set your original.
C Press the
The machine stops the original job and starts copying your original.
{
Start
key.
}
key.
}
89
Page 23

Copying
D When copying is complete, remove your originals and copies.
2
E Press the
The Interrupt indicator goes off.
The previous copy job settings will be restored and the machine will continue
copying from where it left off.
{
Interrupt
key again.
}
User Codes
If the machine is set to use the User Code function, operators must input their
user codes before the machine can be operated. The machine keeps count of the
number of copies made under each user code.
Note
❒
When the machine is set for the user codes, the machine will prompt you for
your user codes after the operation switch is turned on or Auto Reset comes
into effect.
❒
You can adjust how long the machine waits before switching to the user code
input display. See “Auto Reset Timer” in ⇒ P.310
❒
To prevent others from making copies using your user code, press the
Modes/Energy Saver
and
}
{
Clear/Stop
keys simultaneously after copying.
}
“General Features
1
/3”
.
{
Clear
❒
You can turn the User Codes on or off with the master unit User Tools (System Settings). See “Set User Codes” in the System Settings manual.
❒
You can monitor the total number of copies made by the master unit and subunit with the master unit User Codes function.
❒
If the User Codes are set to on in the sub-unit and a code has been entered before Connect Copy was selected, the master unit cannot monitor the number
of copies made.
❒
If the User Codes are set only in the sub-unit, you can enter Connect Copy
mode and make copies without entering a code. In this case the number of
copies made will not be monitored.
Reference
For how to set up the user codes, see “Set User Codes” in the System Settings
manual.
For how to register, change and delete the user codes, see “User Code Register/Change/Delete” in ⇒ P.331
“Count Manager”
.
Auto Start
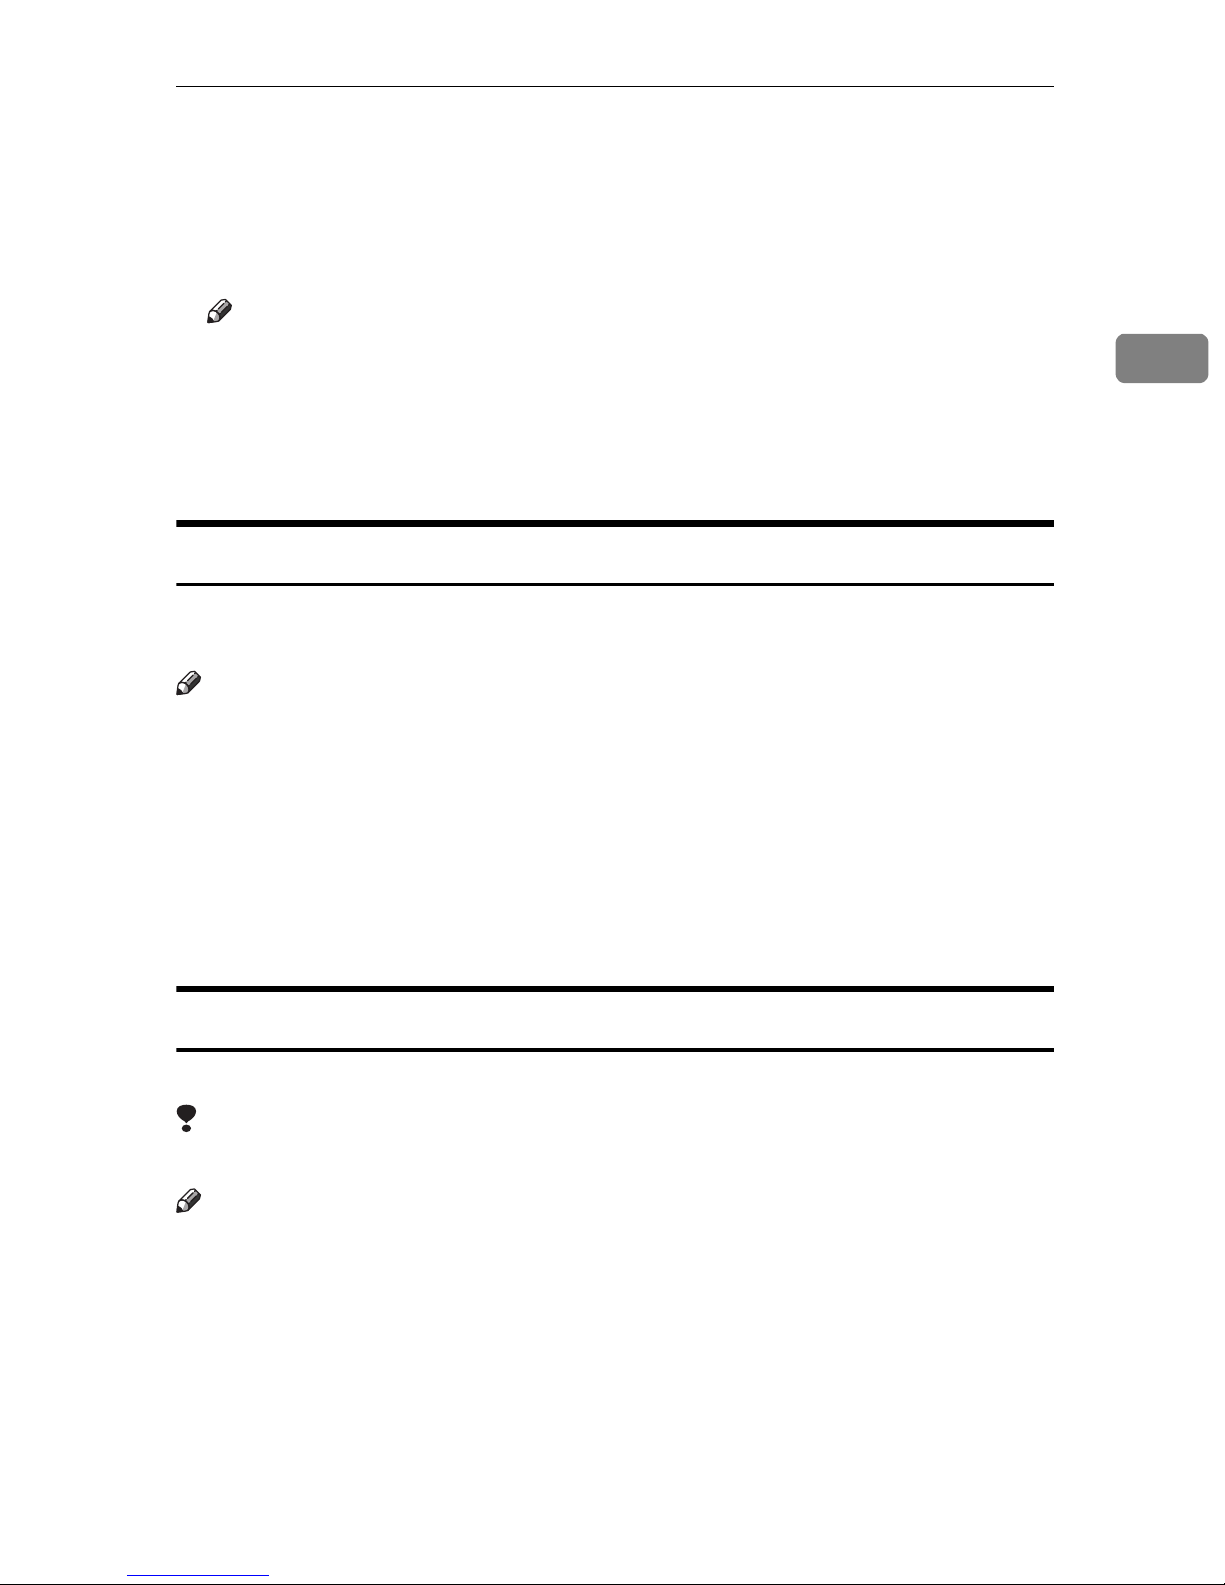
If you press the
blink, and your copies will be made as soon as warm-up finishes.
{
Start
A Make any adjustments to copy settings during the warm-up period.
90
key during the warm-up period, the
}
{
Start
key will
}
Page 24
B Set your originals.
Other Functions
C Press the
Copying automatically starts when the
green and the machine is ready for copying.
Note
❒
In Connect Copy mode, copying starts when the master unit is ready for
copying.
❒
To cancel Auto Start, press the
❒
In Connect Copy mode, press the
cancel Auto Start.
{
Start
key.
}
{
{
Clear/Stop
{
Clear/Stop
key indicator flashes red and
}
Start
key.
}
key on the master unit to
}
Original Beeper
The beeper sounds and an error message is displayed when you leave your originals on the exposure glass after copying.
Note
❒
You can adjust when the beeper sounds with the “Auto Response (Human)
Sensor” setting:
2
• If set to “Yes”, the beeper sounds as soon as you leave the machine after
copying.
• If set to “No”, the beeper sounds 2 seconds after copying. See “Auto Response (Human) Sensor” in the System Settings manual.
❒
To cancel this function, see “Original Beeper” in ⇒ P.313
.
”
3
“General Features
Sample Copy
Use this function to check a copy set before making a long copy run.
Limitation
❒
This function can be used only when the Sort function has been turned on.
Note
❒
This function is only available on the master unit in Connect Copy mode.
A Select Sort and any other functions, then enter the number of copy sets to
be made.
2
/
B Set the originals.
C Press the
One copy set is delivered for proof copying.
{
Sample Copy
key.
}
91
Page 25
Copying
2
D After checking the finish, press the
[
Resume
key if the sample is acceptable.
]
The number of copies made is the number you specified minus one for the
proof copy.
Note
❒
If you press the
[
Cancel
key after checking the finish, return to step A to ad-
]
just the copy settings as necessary. You can change the settings for Staple,
Punch, Duplex, Copy Orientation, Stamp, Margin Adjust, and Cover/Slip
Sheet. However, depending on the combinations of functions, some settings might not be changed.
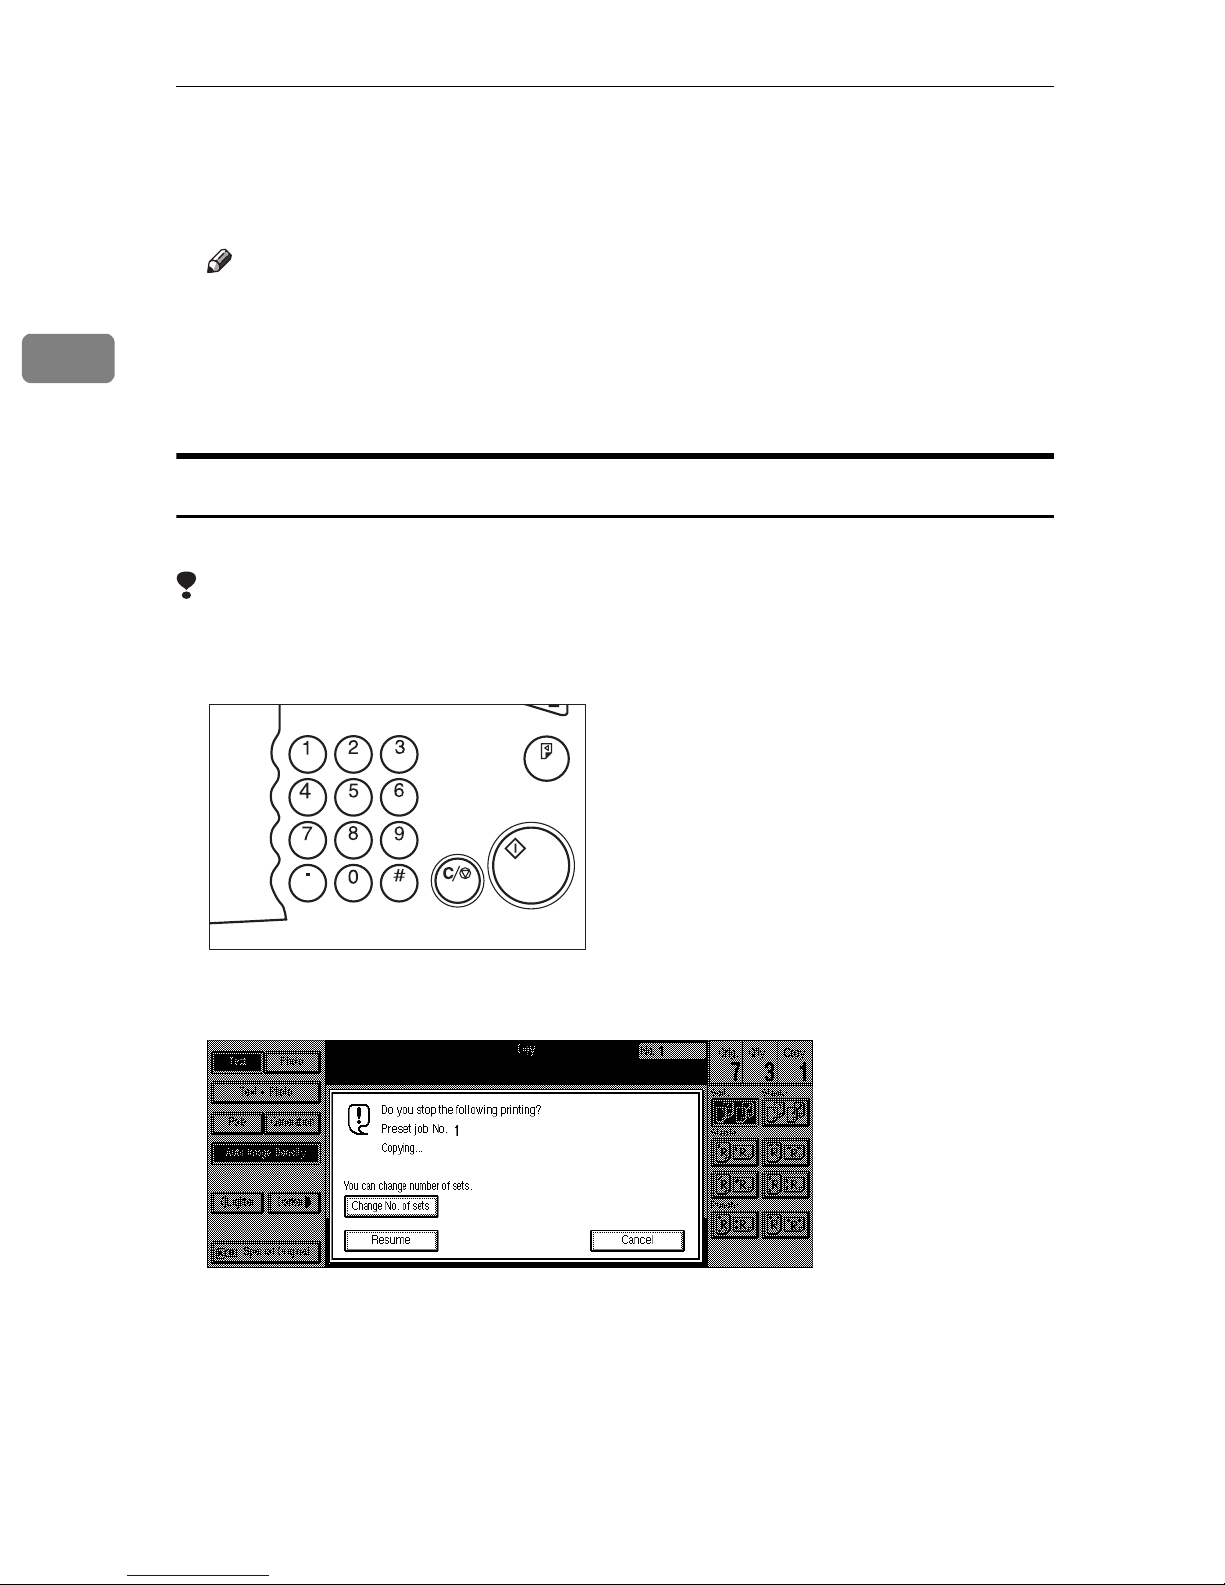
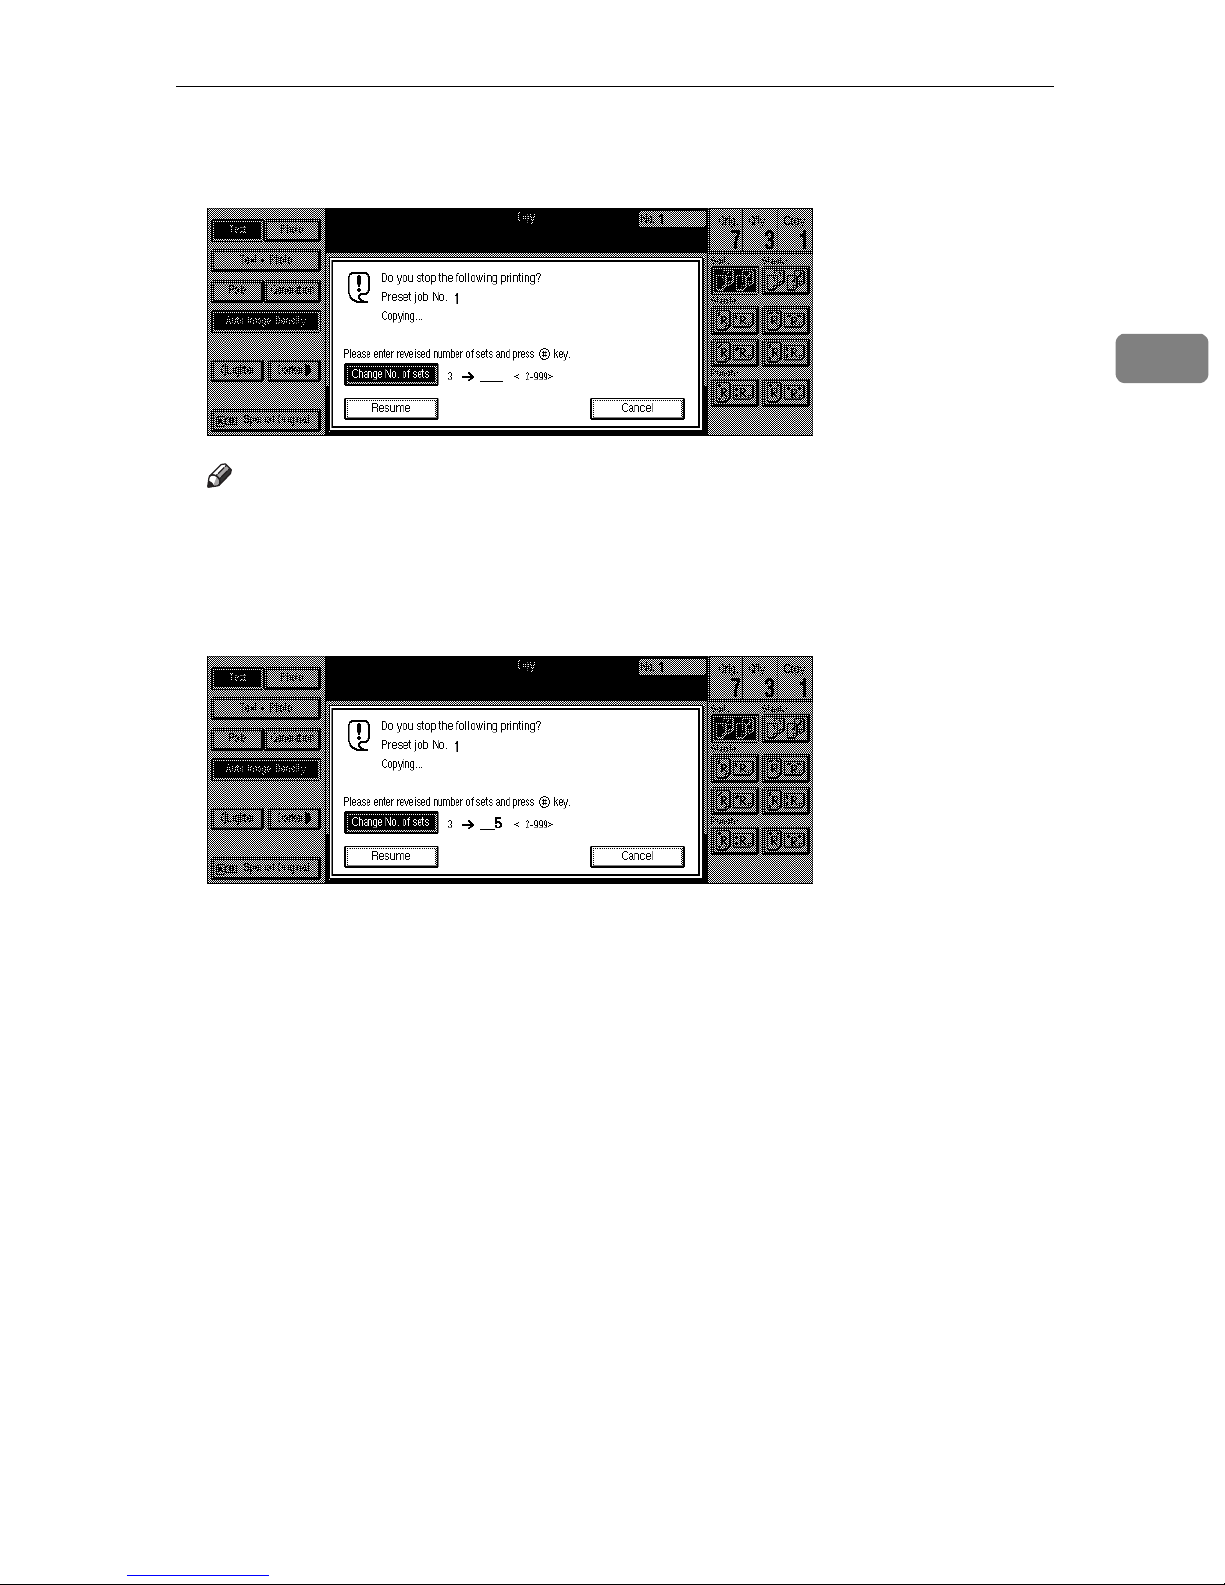
Changing the Number of Sets
You can change the number of copy sets during copying.
Limitation
❒
This function can be used only when the Sort function has been turned on.
A Press the
{
Clear/Stop
key when “Copying” is displayed.
}
Sample Copy
B Press the
Start
Enter
[
Change No. of sets
Clear/Stop
TSPS020N
key.
]
92
Page 26
Other Functions
C Enter the number of copy sets with the number keys, then press the
key.
Note
❒
The number of sets you can enter differs depending on the timing of press-
key.
]
key.
}
{
Clear/Stop
key.
}
ing the
❒
To change the entered number, press the
D Press the
{
Clear/Stop
[
Resume
}
{
#
2
93
Page 27
2
Copying
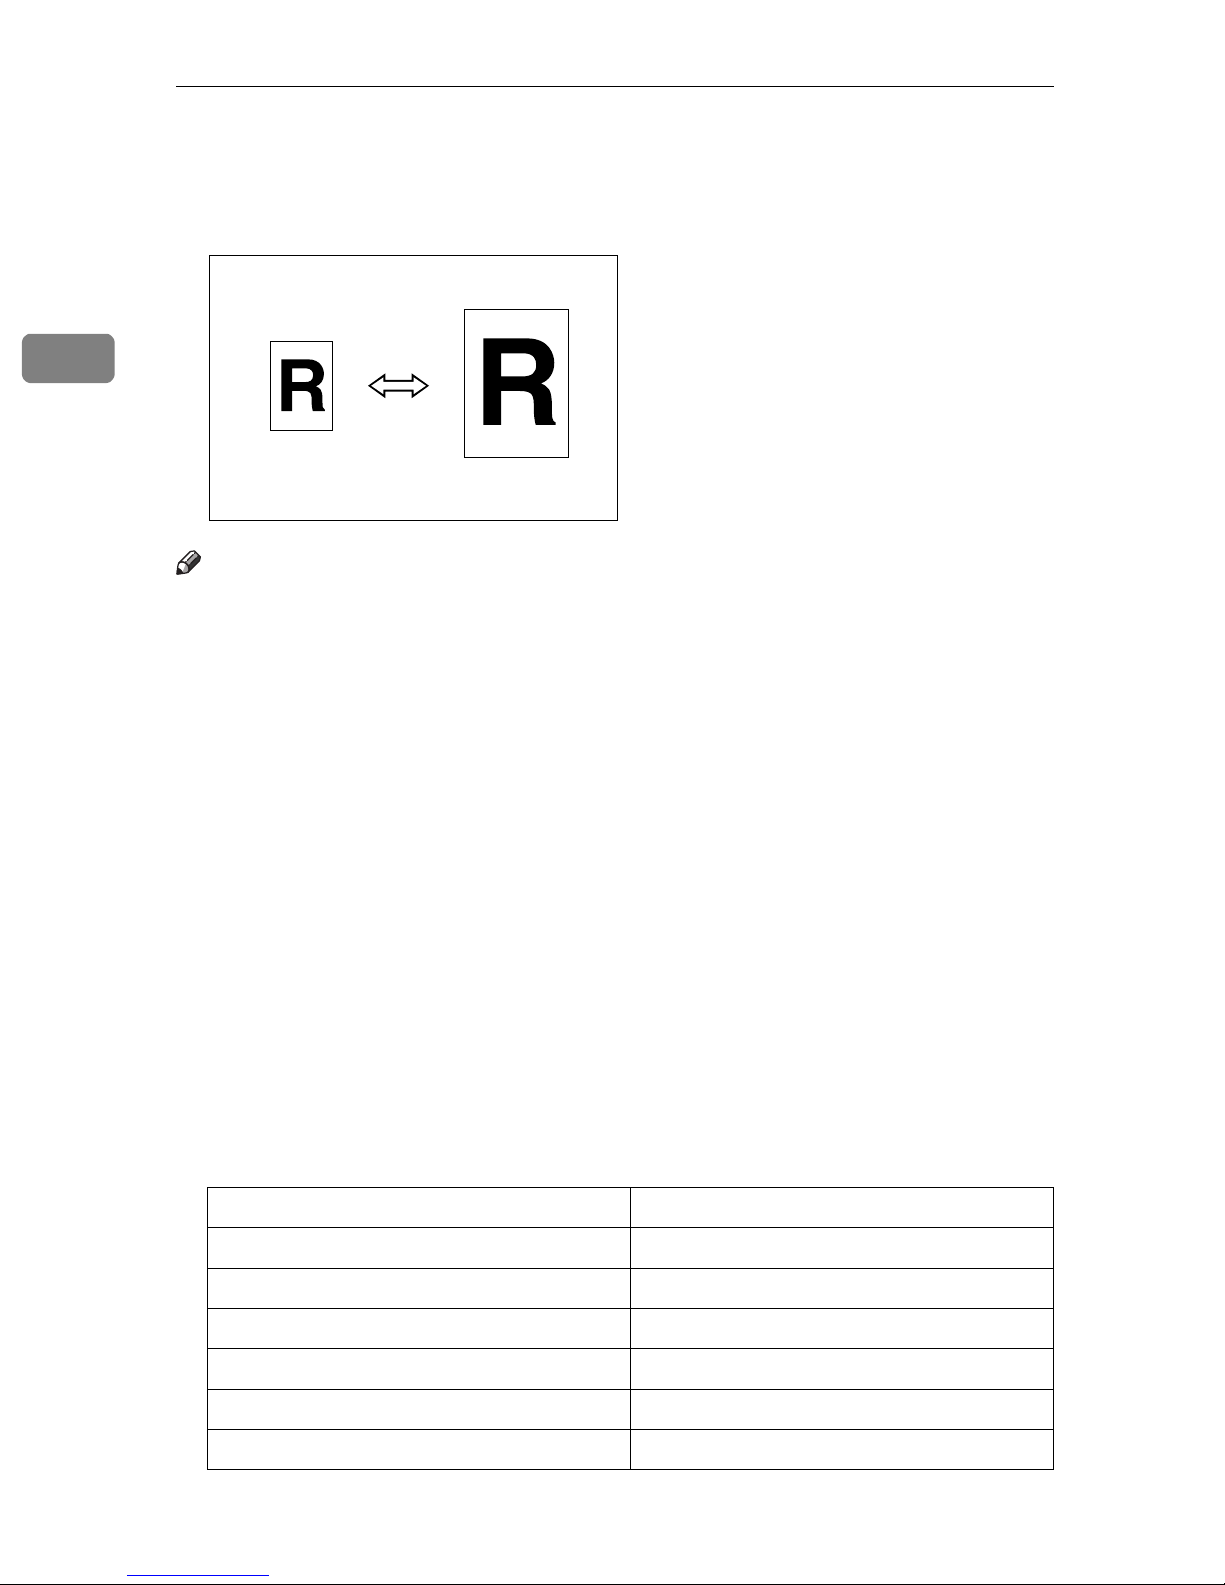
Preset Reduce/Enlarge
You can select a preset ratio for copying.
Note
❒
You can select one of 11 preset ratios (5 enlargement ratios, 6 reduction ratios).
❒
Use “Shrink&Center” to reduce the image to 93% of its original size with the
center as reference. You can register this function in a shortcut key on the initial display.
❒
You can change the preset ratios to other ratios you frequently use. See “Enlarge” in ⇒ P.315
tion Ratio
❒
You can set and display three kinds of ratio on the initial display. See “Short-
2
/2”
cut R/E” in ⇒ P.315
❒
You can specify which of
ority and displayed when the
ity” in ⇒ P.315
❒
You can select a ratio regardless of the size of an original or copy paper. With
“Reproduction Ratio
.
“Reproduction Ratio
[
Reduce
“Reproduction Ratio
[
Reduce/Enlarge
], [
Enlarge
1
/2”
1
and “Reduce” in ⇒ P.316
/2”
1
.
/2”
or
]
[
Input Ratio
key is pressed. See “R/E Prior-
]
]
.
“Reproduc-
is to be given pri-
some ratios, parts of the image might not be copied or margins will appear on
copies.
❒
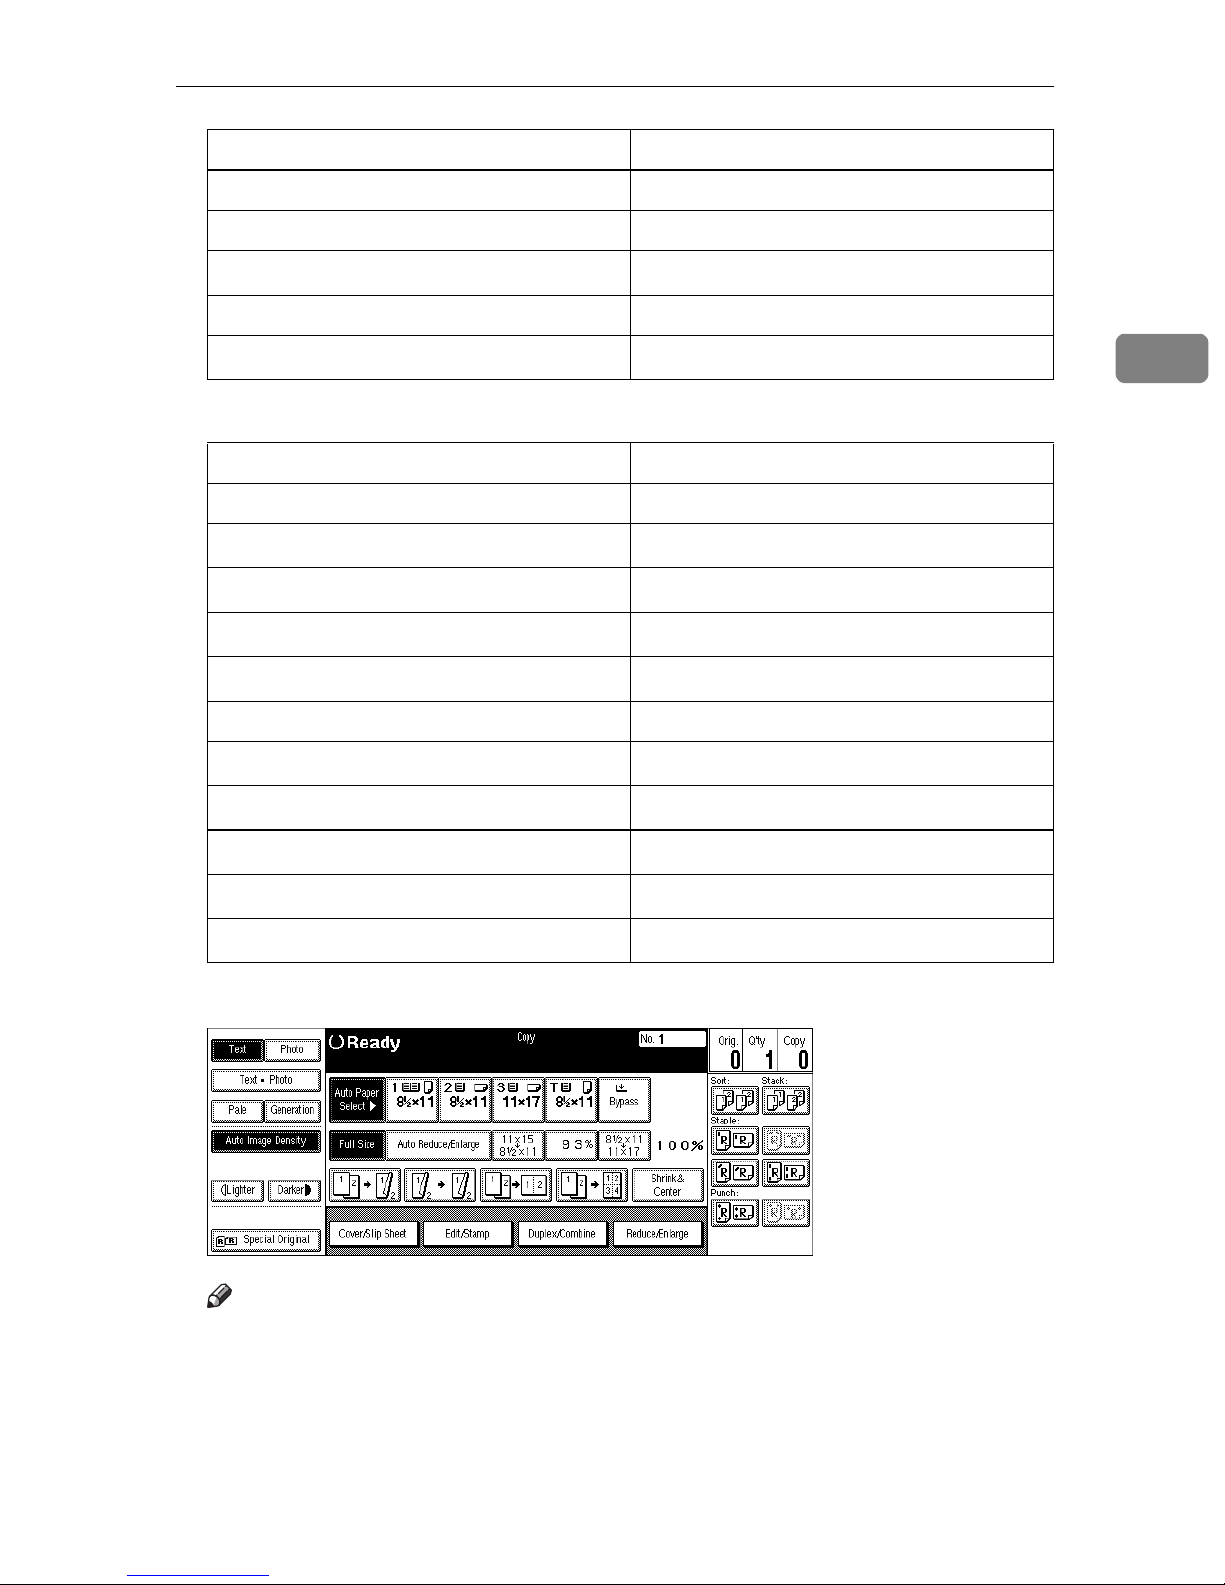
Copies can be reduced or enlarged as follows:
❖
Metric version
Ratio (%) Original → Copy paper size
400 (enlarge area by 16) -200 (enlarge area by 4) A5→A3
141 (enlarge area by 2) A4→A3, A5→A4
122 F→A3, A4→B4
115 B4→A3
93 --
94
Page 28
Preset Reduce/Enlarge
Ratio (%) Original → Copy paper size
82 F→A4, B4→A4
75 B4→F4, B4→F
71 (reduce area by
1
/2)
A3→A4, A4→A5
65 A3→F
50 (reduce area by
❖
Inch version
1
/4)
A3→A5, F→A5
Ratio (%) Original → Copy paper size
400 (enlarge area by 16) -200 (enlarge area by 4)
155 (enlarge area by 2)
129
121
1
5
/2" × 81/2"→11" × 17"
1
5
/2" × 81/2"→81/2" × 14"
1
8
/2" × 11"→11" × 17"
1
8
/2" × 14"→11" × 17"
93 -85
78
73
1
F→8
/2" × 11"
1
8
/2" × 14"→81/2" × 11"
11" × 15"→8
1
/2" × 11"
2
65
50 (reduce area by
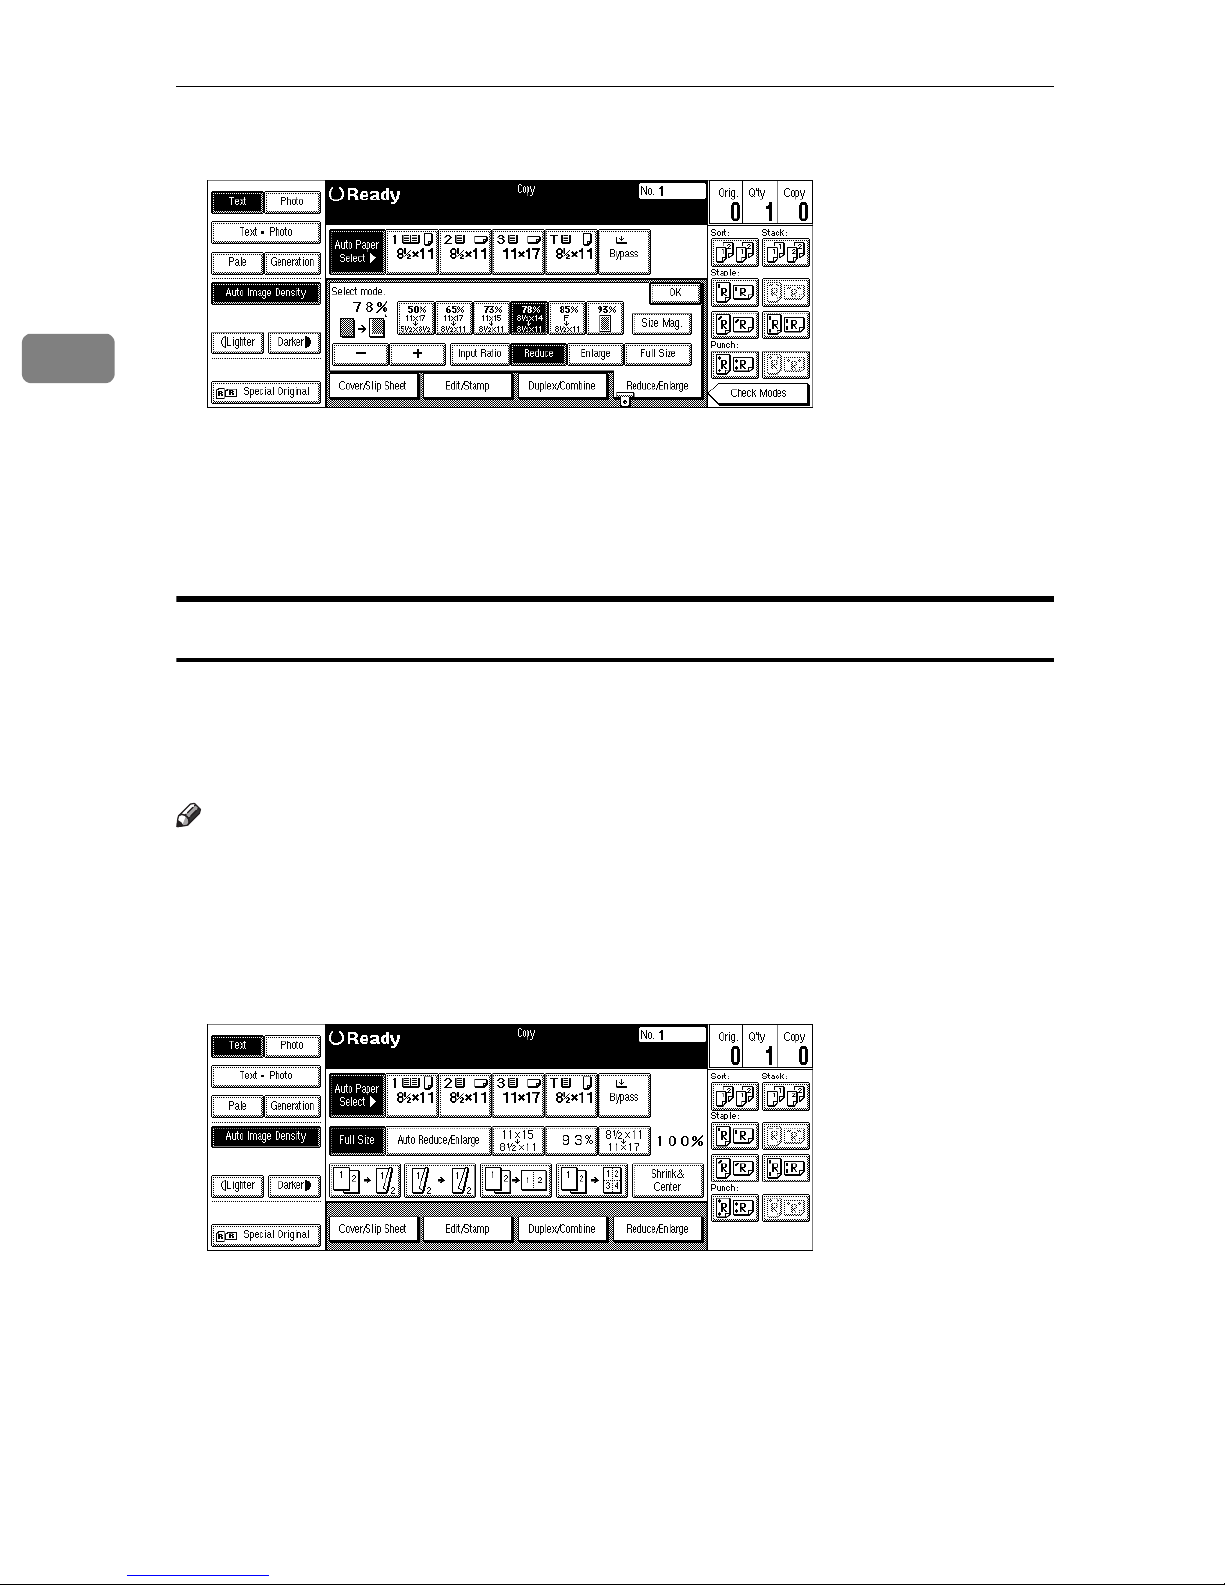
A Press the
Note
❒
To select a preset ratio on the initial display, directly press the shortcut reduce/enlarge key and go to step E.
1
/4)11"
[
Reduce/Enlarge
key.
]
11" × 17"→8
17"→51/2" × 81/2"
×
1
/2" × 11"
95
Page 29
Copying
2
B Press the
[
Enlarge
or
]
[
Reduce
key.
]
C Select a ratio.
D Press the
E Set your originals, then press the
Shrink&Center mode
Use “Shrink&Center” to reduce the image by 93% of its original size with the
center position as reference. You can register this function in a shortcut key on
the initial display. By combining it with the Reduce/Enlarge function, you can
also provide the Reduce/Enlarge copy with a margin.
[
OK
key.
]
{
Start
key.
}
Note
❒
You can register “Shrink&Center” in a shortcut key. See “Shortcut Keys” in
P.314
⇒
❒
You can change the Reduce/Enlarge ratio for “Shrink&Center”. See
“Shrink&Center Ratio” in ⇒ P.316
A Press the
“General Features
[
Shrink&Center
3
.
/3”
2
.
“Reproduction Ratio
key displayed on the initial display.
]
/2”
B If you do not wish to combine it with the Reduce/Enlarge function, set your
originals, then press the
{
Start
key.
}
96
Page 30
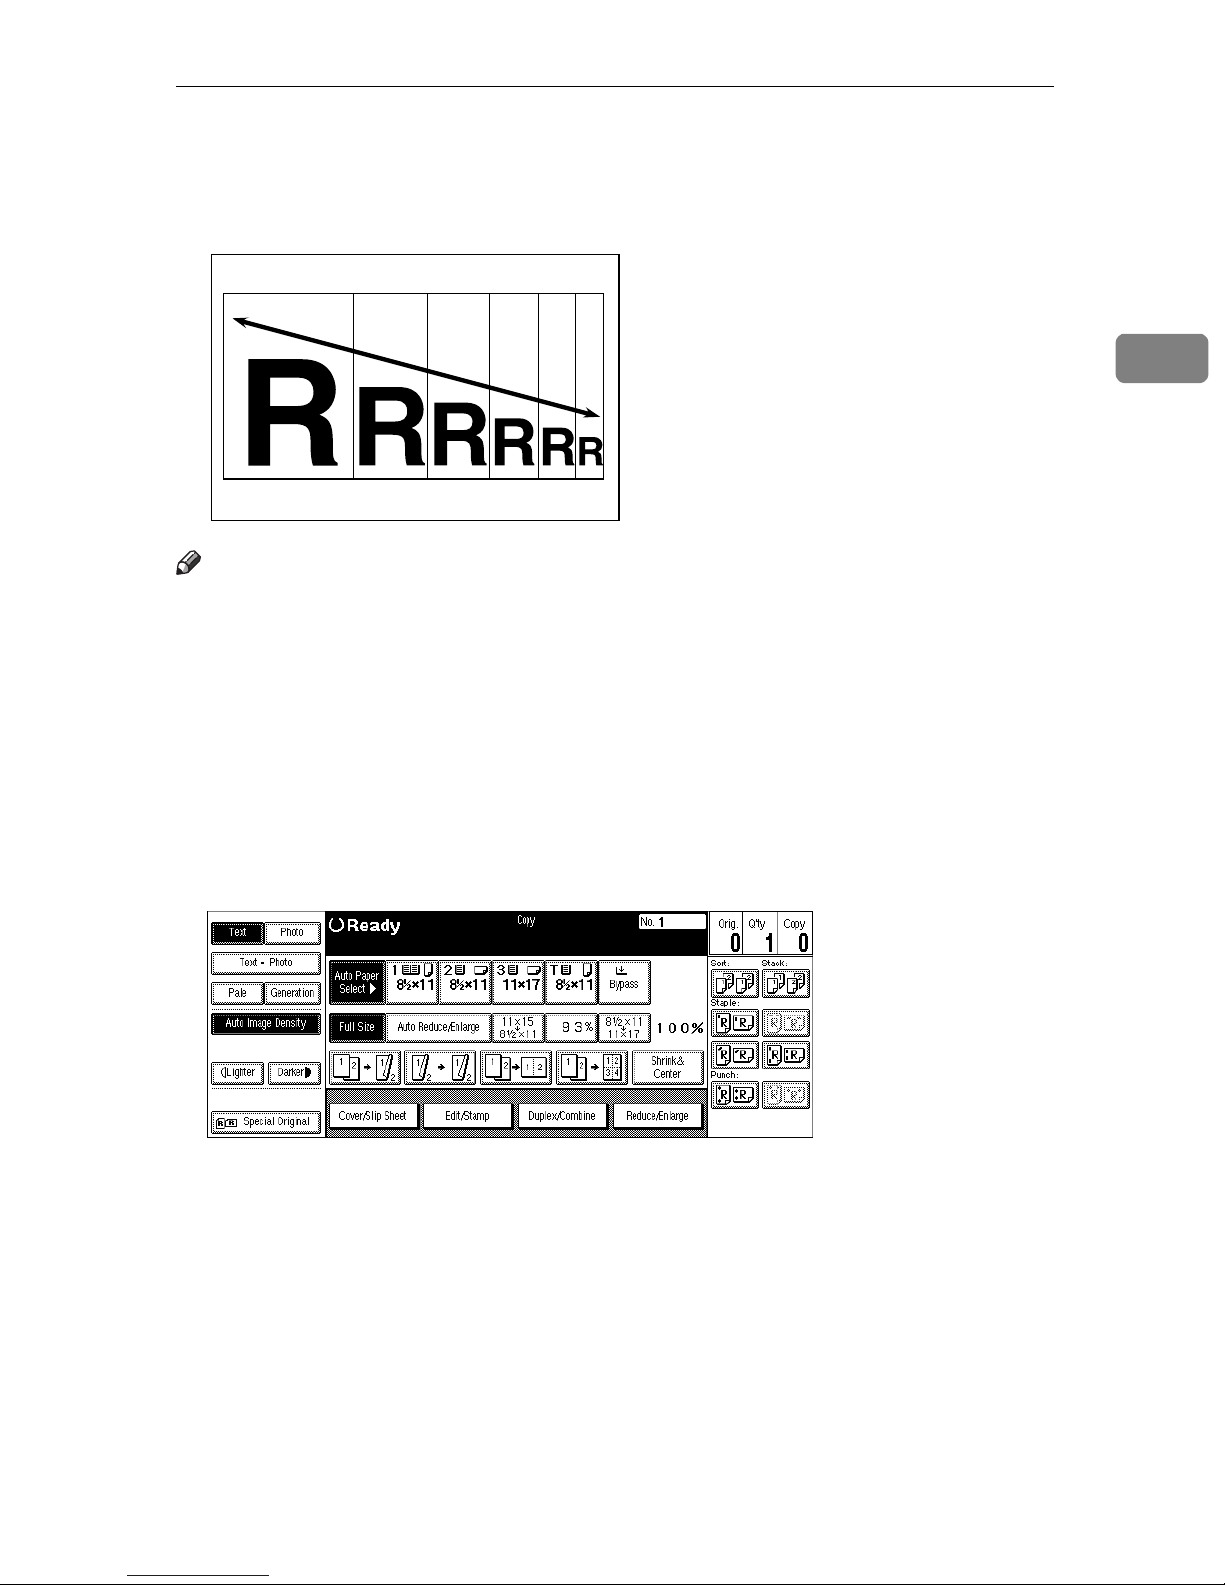
Zoom
You can change the reproduction ratio in 1% steps.
Note
❒
The following ratios can be selected:
• Metric version: 25 – 400%
Zoom
2
• Inch version: 25 – 400%
❒
You can select a ratio regardless of the size of an original or copy paper. With
some ratios, parts of the image might not be copied or margins will appear on
copies.
❒
You can select a preset ratio which is near the desired ratio, then adjust the
ratio with the
A Press the
[
Reduce/Enlarge
[n]
or
[o]
key.
key.
]
97
Page 31
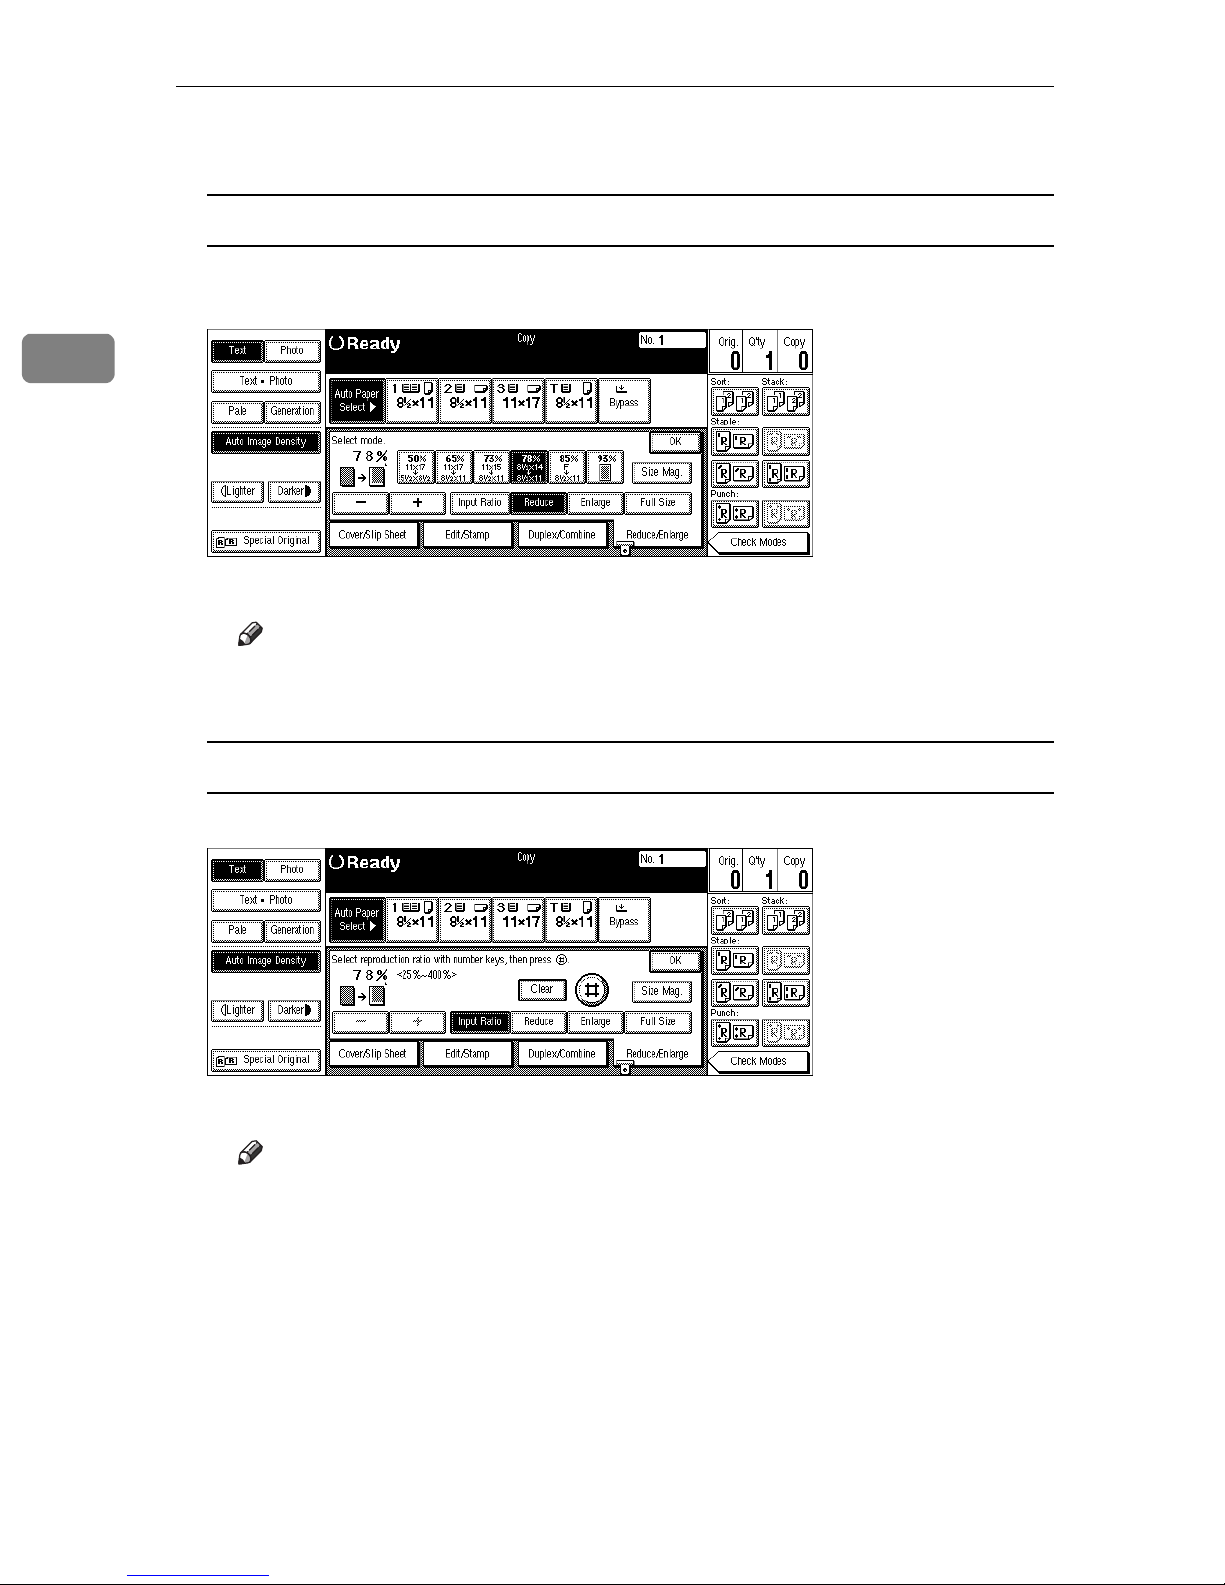
Copying
B Enter the ratio.
2
To select the ratio with the
A Select a preset ratio which is close to the desired ratio by using
or
[
Enlarge
B Adjust the ratios with the
Note
❒
To change the ratio in 1% steps, just press the
the ratio in 10% steps, press and hold down the
.
]
[n]
[n]
and
or
[o]
[o]
keys
key.
[n]
or
[n]
key. To change
[o]
or
[o]
key.
To enter the ratio with the number keys
[
Reduce
]
A Press the
B Enter the desired ratio with the number keys.
Note
❒
To change the ratio entered, press the
ter the new ratio.
C Press the
D Press the
[
Input Ratio
key.
[
]
#
key.
[
]
OK
C Set your originals, then press the
key.
]
{
Start
key.
}
[
Clear
or
]
{
Clear/Stop
key and en-
}
98
Page 32
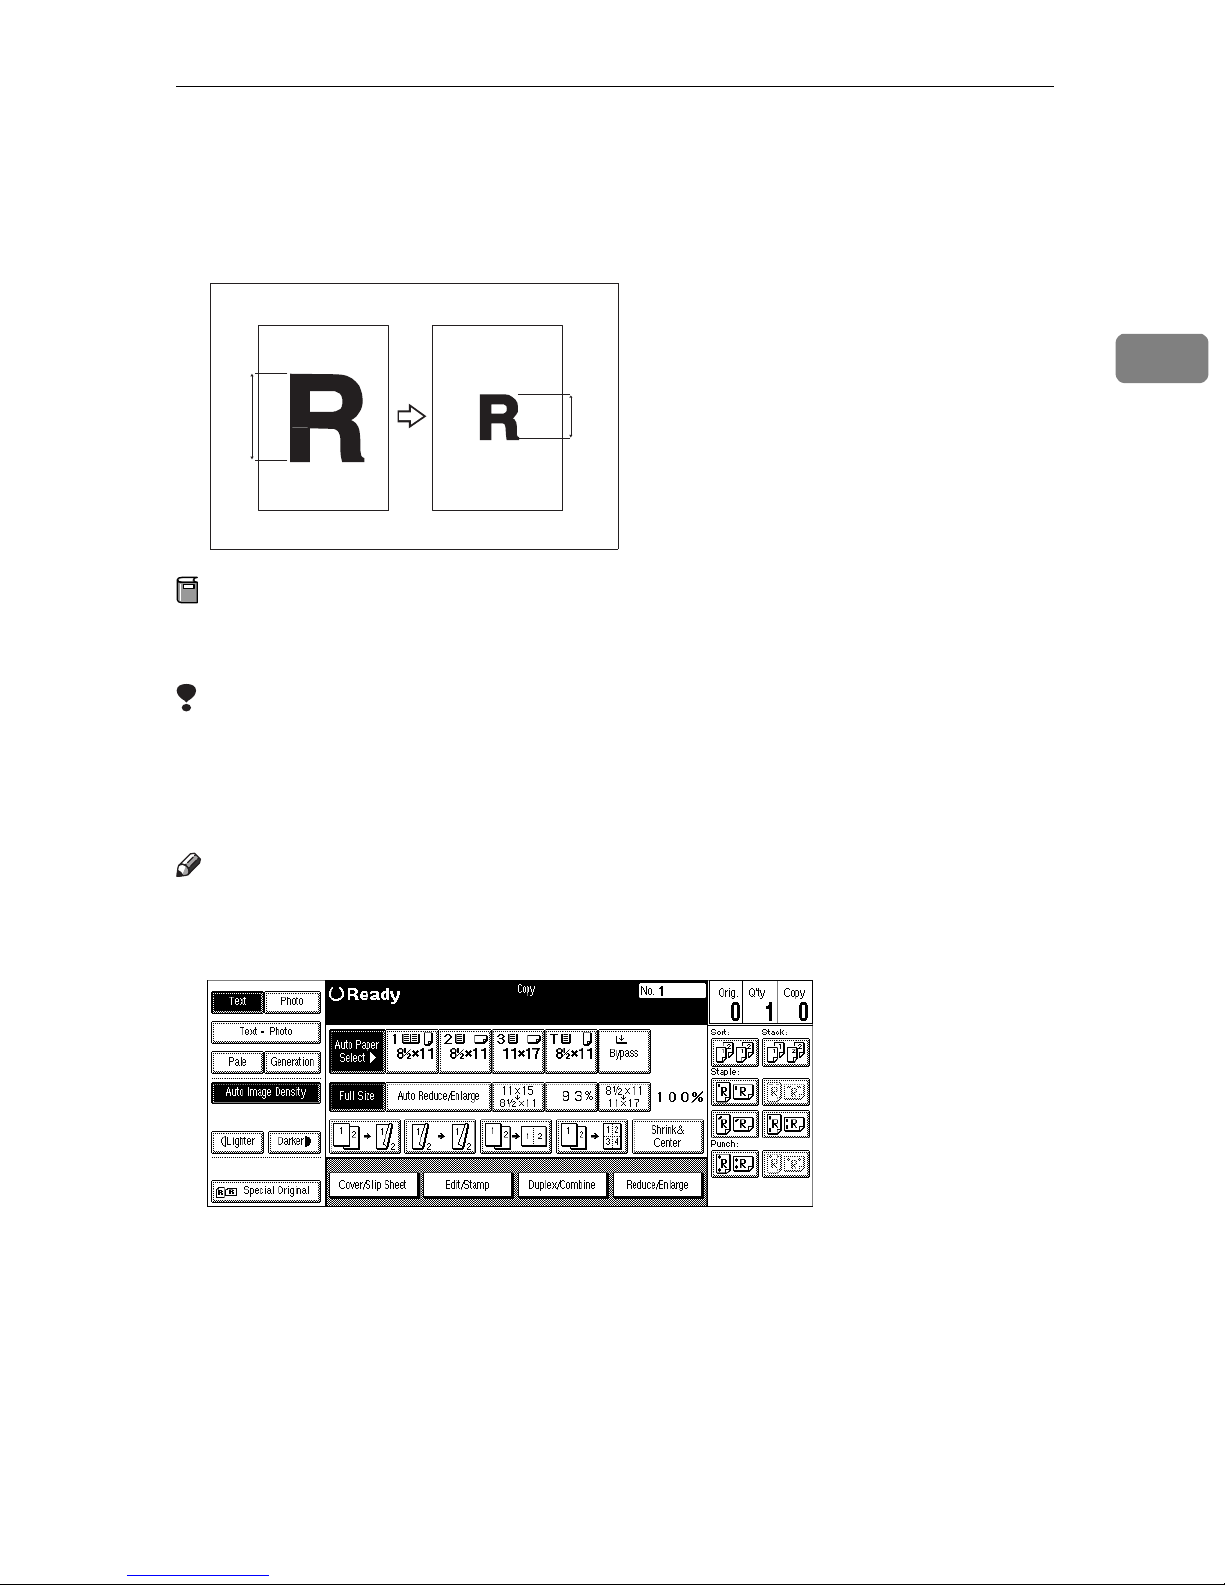
Size Magnification
Size Magnification
This function calculates an enlargement or reduction ratio based upon the
lengths of the original and copy.
A" a"
Preparation
Measure and specify the lengths of the original and copy by comparing “A”
with “a.”
2
Limitation
❒
If the calculated ratio is over the maximum or under the minimum ratio, it is
corrected within the range of the ratio automatically. However, with some ratios, parts of the image might not be copied or blank margins will appear on
copies.
Note
❒
A ratio is selected in the range of 25 to 400%.
A Press the
[
Reduce/Enlarge
key.
]
99
Page 33
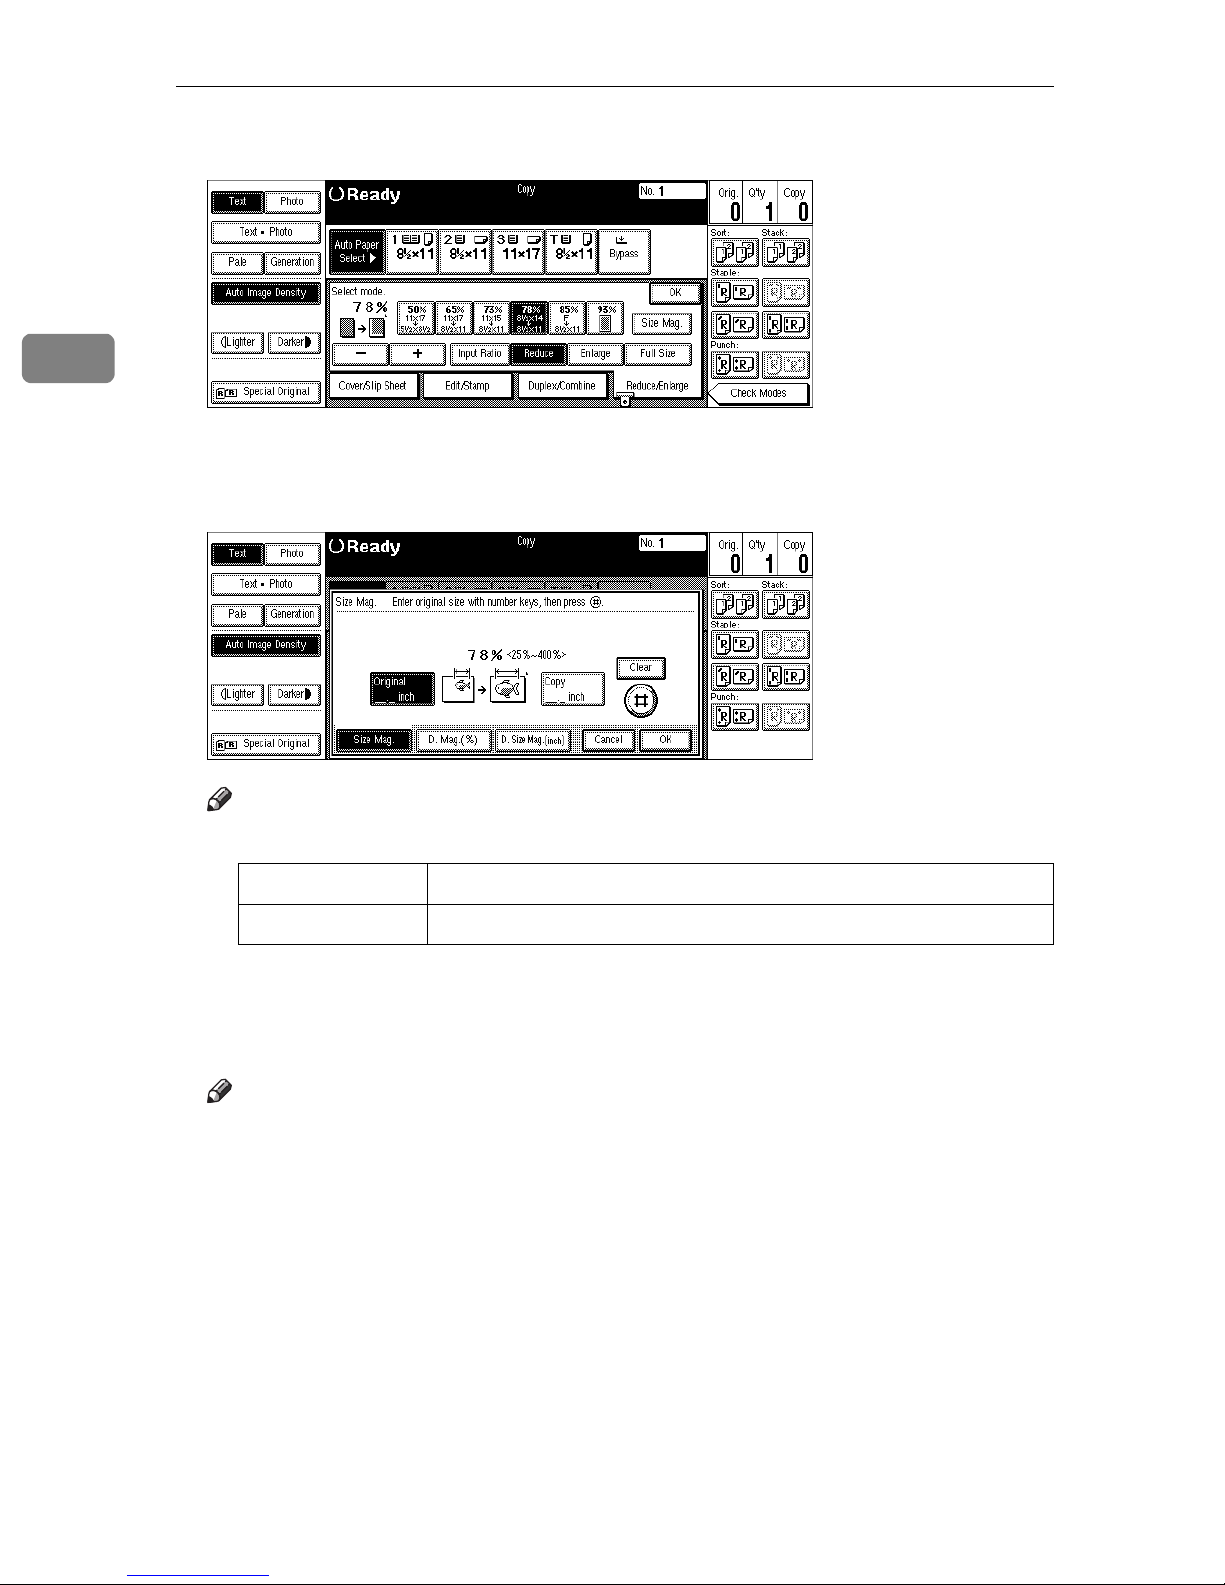
Copying
2
B Press the
[
Size Mag.
C Make sure that the
key.
]
[
Size Mag.
key is highlighted.
]
D Enter the length of the original with the number keys and press the
[
]
#
key.
Note
❒
You can enter sizes within the following ranges:
Metric version 1 – 999mm (in 1mm steps)
Inch version 0.1" – 99.9" (in 0.1" steps)
❒
To change the length entered, press the
the new length.
[
Clear
or
]
{
Clear/Stop
key and enter
}
E Enter the length of the copy with the number keys and press the
Note
❒
To change the length entered, press the
the new length.
❒
To change the length after pressing the
and enter the desired length.
F Press the
G Press the
[
OK
[
OK
key.
]
key.
]
H Set your original, then press the
{
Start
key.
}
[
or
]
Clear
key, select
[
]
#
{
Clear/Stop
key and enter
}
[
Original
[
or
]
]
#
key.
[
Copy
]
100
Page 34
Directional Magnification (%)
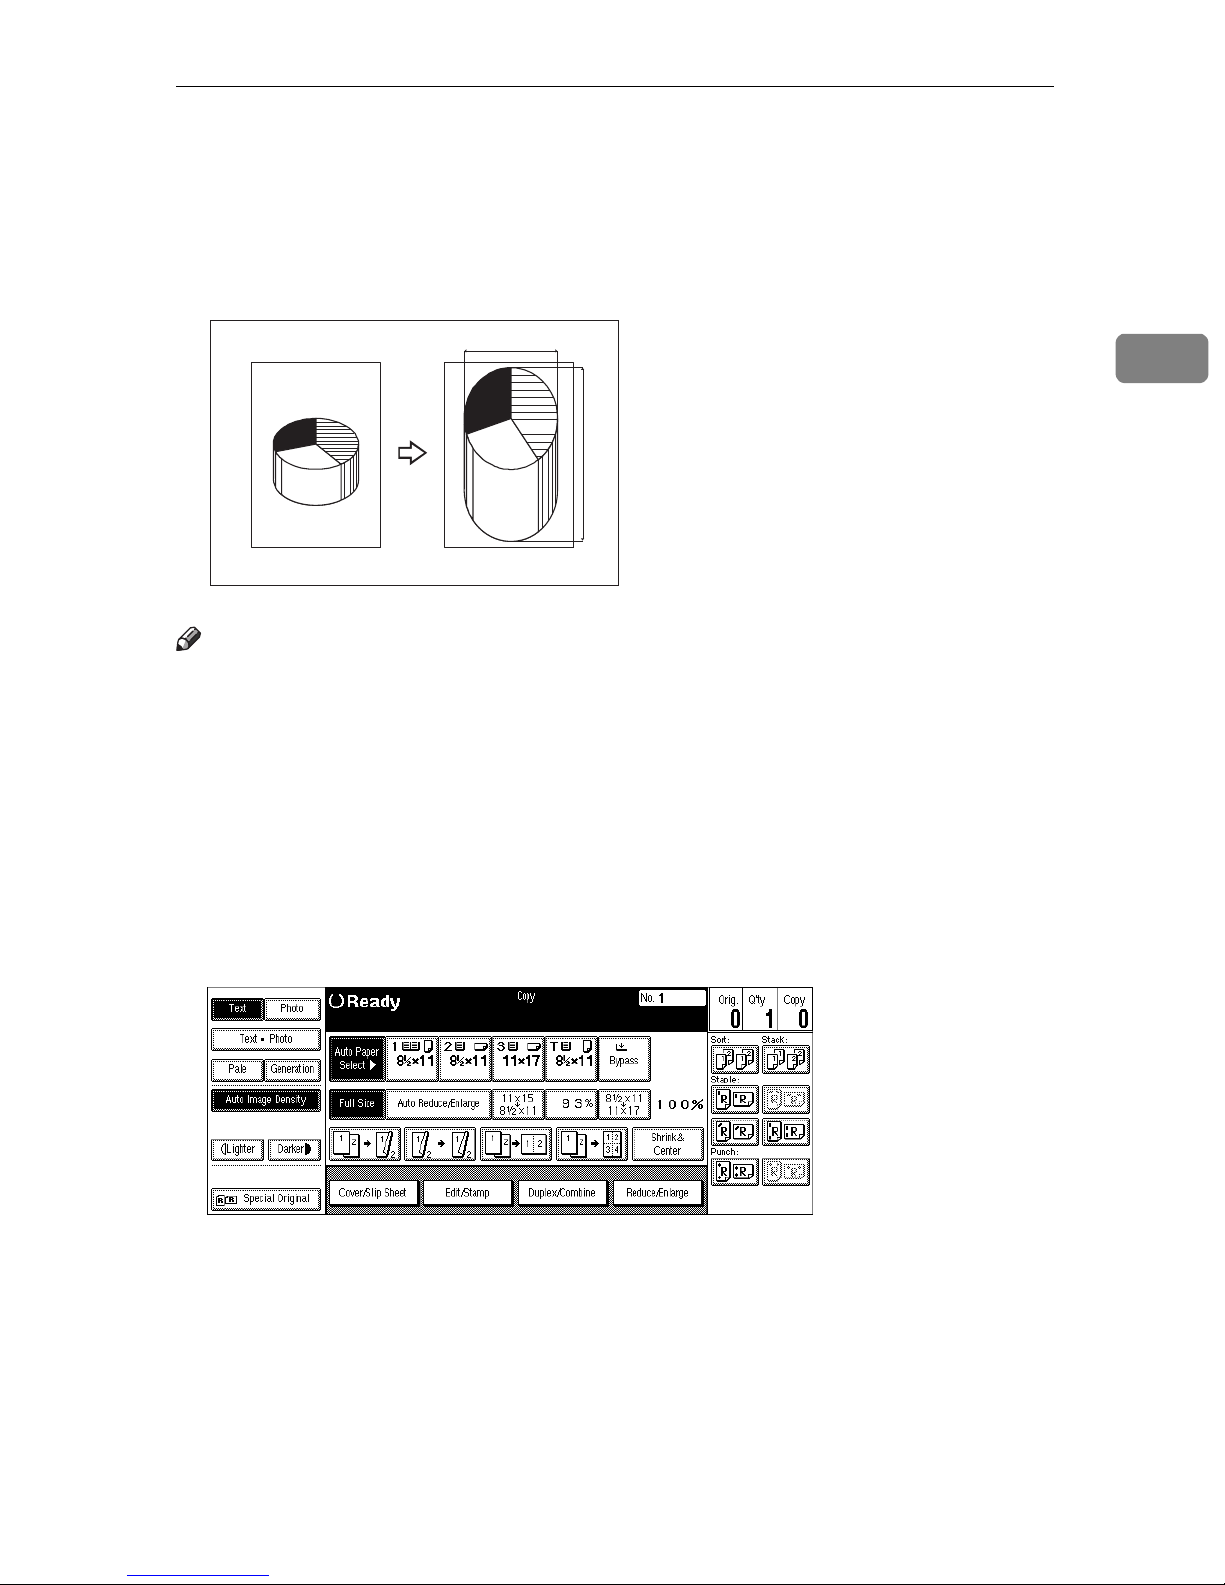
Directional Magnification (%)
Copies can be reduced or enlarged at different reproduction ratios horizontally
and vertically.
a%
b%
CP2P01EE
Note
❒
The following ratios can be selected:
2
• Metric version: 25 – 400%
• Inch version: 25 – 400%
❒
You can select a ratio regardless of the size of an original or copy paper. With
some ratios, parts of the image might not be copied or blank margins will appear on copies.
❒
You can also select a preset ratio which is close to the desired ratio by using
Reduce or Enlarge, then adjust the ratio with the
A Press the
[
Reduce/Enlarge
key.
]
[n]
or
[o]
key.
101
Page 35
Copying
2
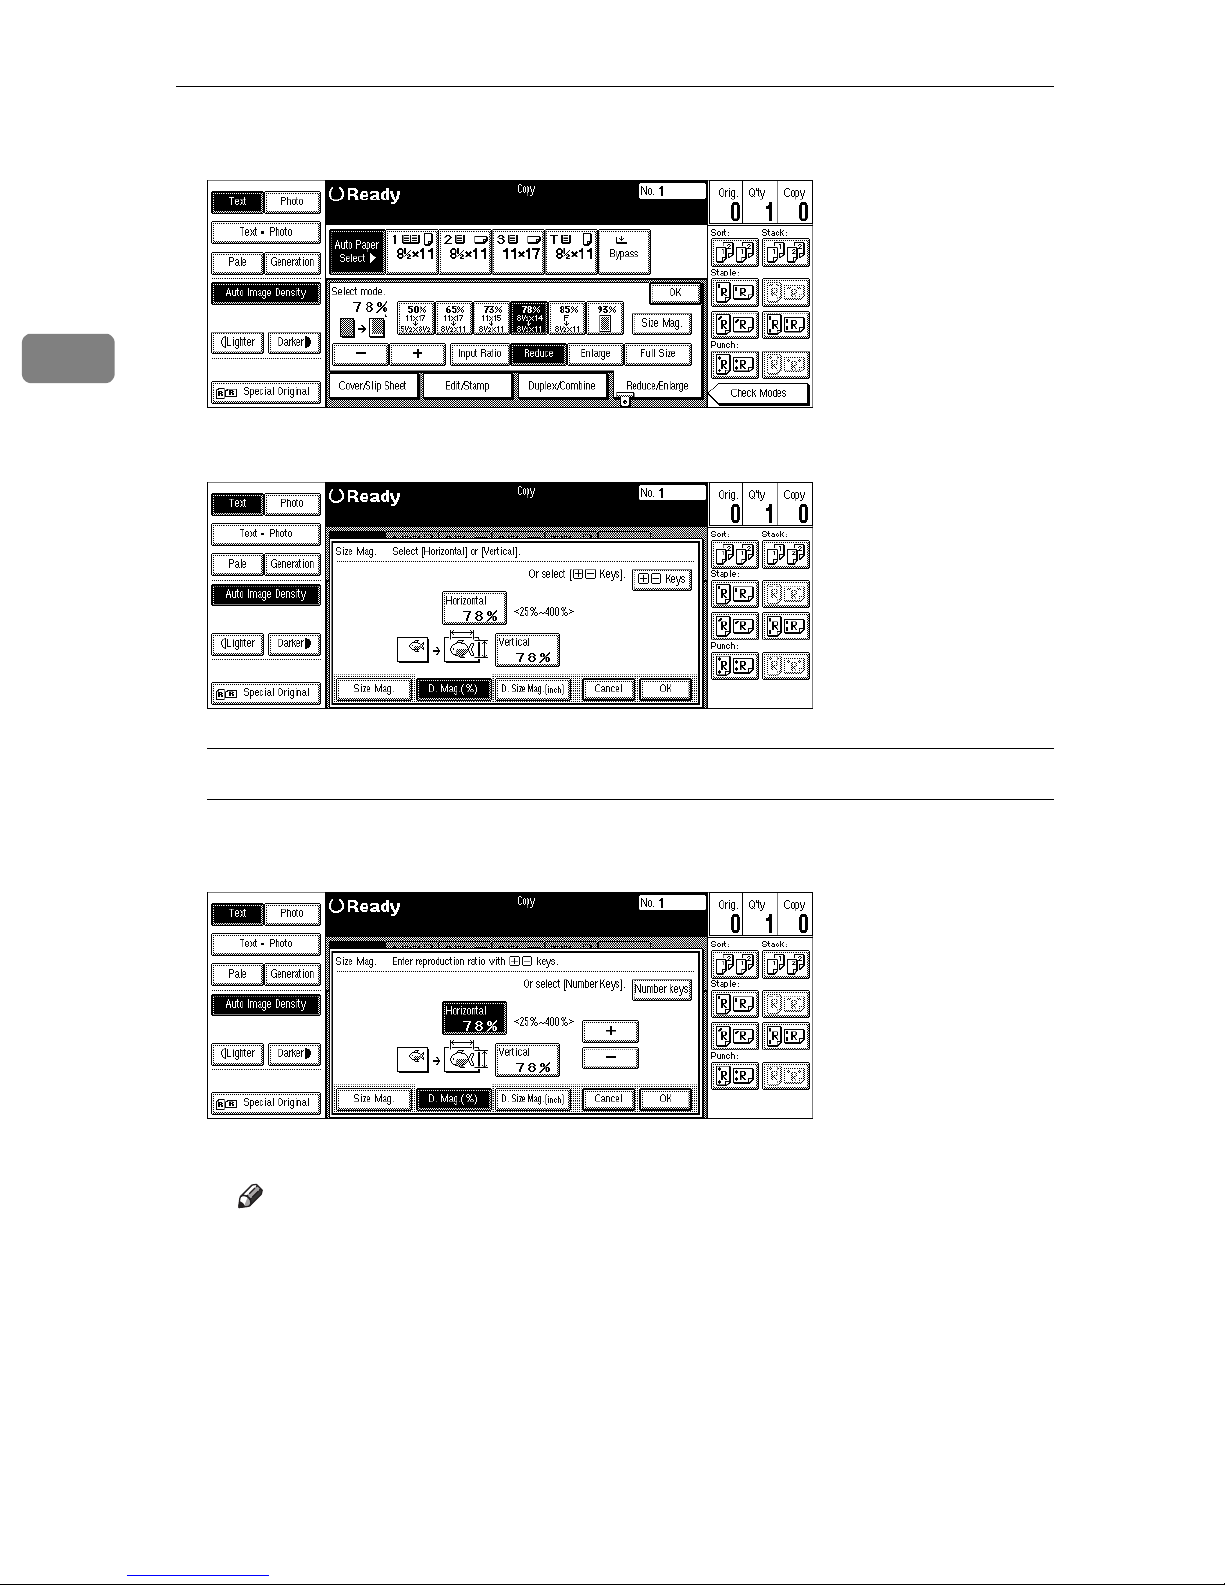
B Press the
C Press the
[
Size Mag.
[
D. Mag.(%)
key.
]
key.
]
key.
]
key.
]
or
[n]
[n]
[o]
or
To specify a ratio with the
[o]
no
[
[
key.
Keys
Horizontal
[n]
A Press the
B Press the
C Adjust the ratio using the
Note
❒
Pressing the
holding down the
❒
If you have incorrectly entered the ratio, readjust the ratio with the
or
[o]
and
or
[n]
key changes the ratio in 1% steps. Pressing and
key changes it in 10% steps.
[o]
[o]
keys
key.
[n]
D Press the
E Adjust the ratio with the
F Press the
[
Vertical
key.
[
]
OK
102
key.
]
[n]
or
[o]
key.
Page 36
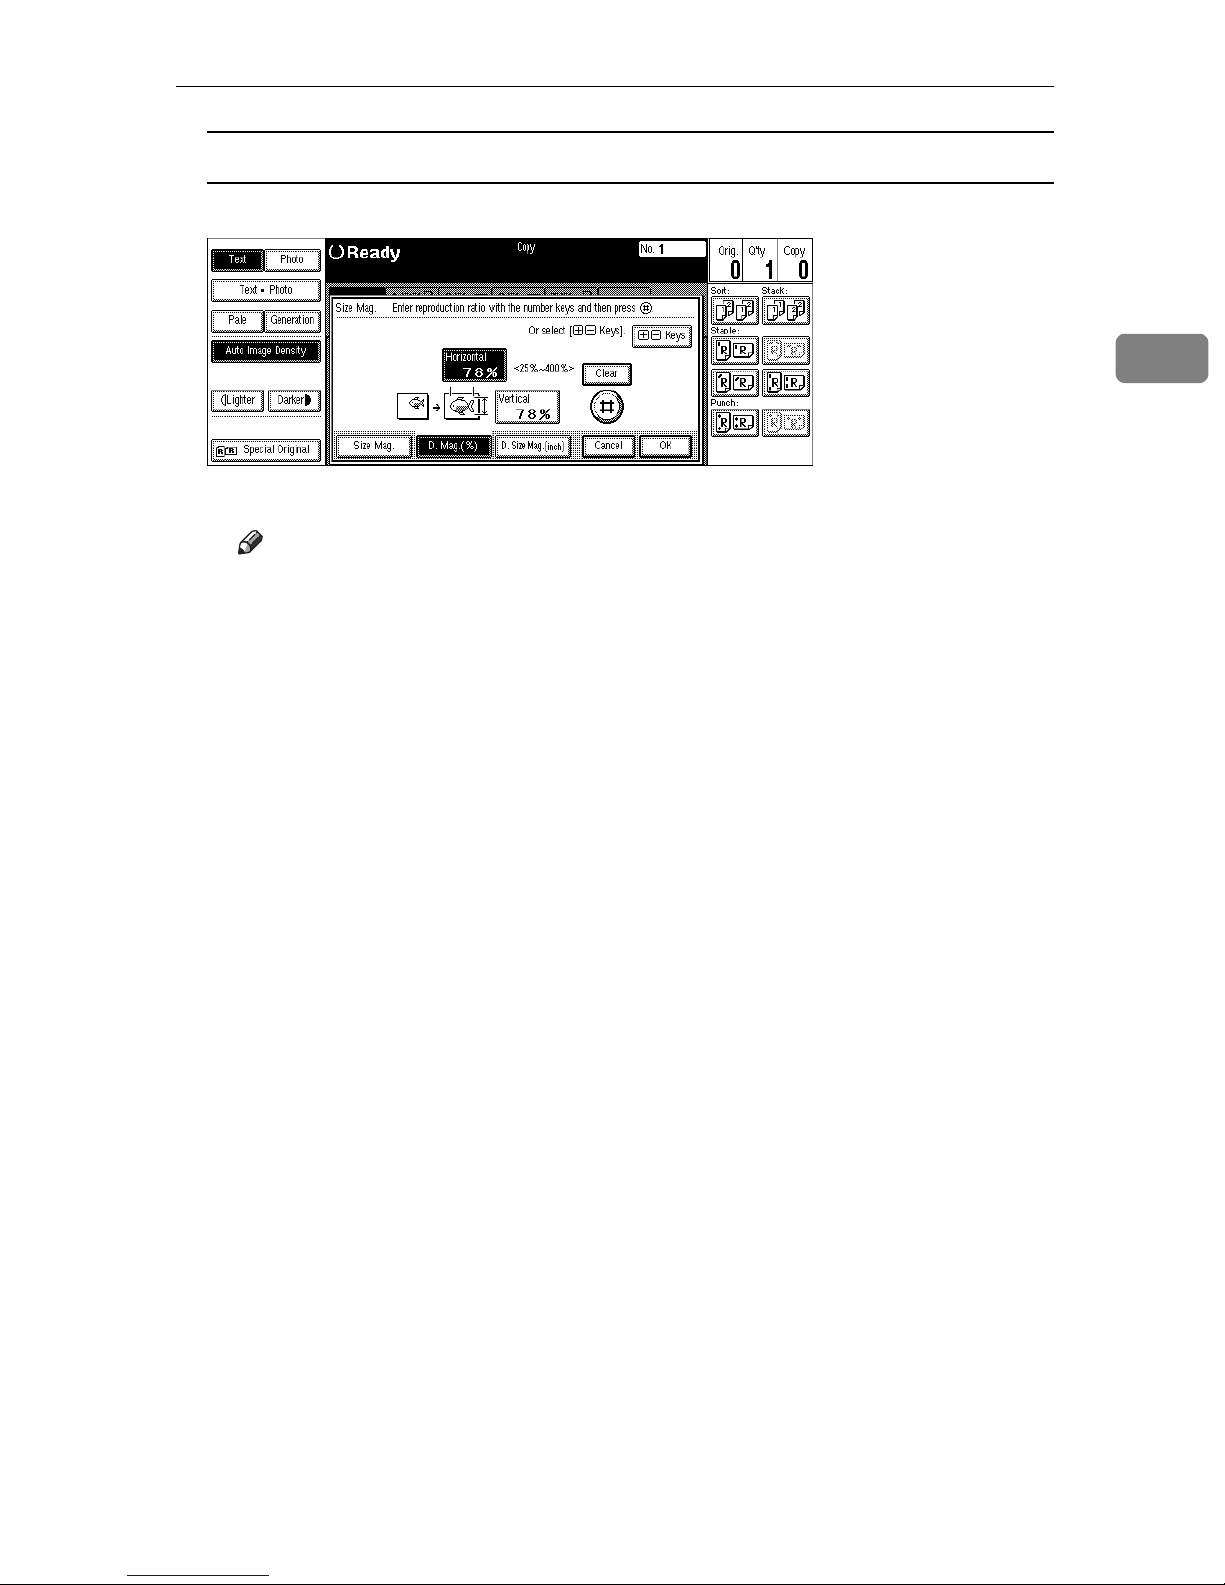
To enter the ratio with the number keys
Directional Magnification (%)
A Press the
B Enter the desired ratio with the number keys, followed by the
Note
❒
To change the ratio entered, press the
ter the new ratio.
C Press the
D Enter the desired ratio with the number keys, followed by the
E Press the
D Press the
[
Horizontal
[
Vertical
[
OK
key.
]
[
OK
key.
]
]
key.
]
key.
[
Clear
or
]
{
Clear/Stop
key.
[
]
#
key and en-
}
key.
[
]
#
2
E Set your originals, then press the
{
Start
key.
}
103
Page 37
Copying
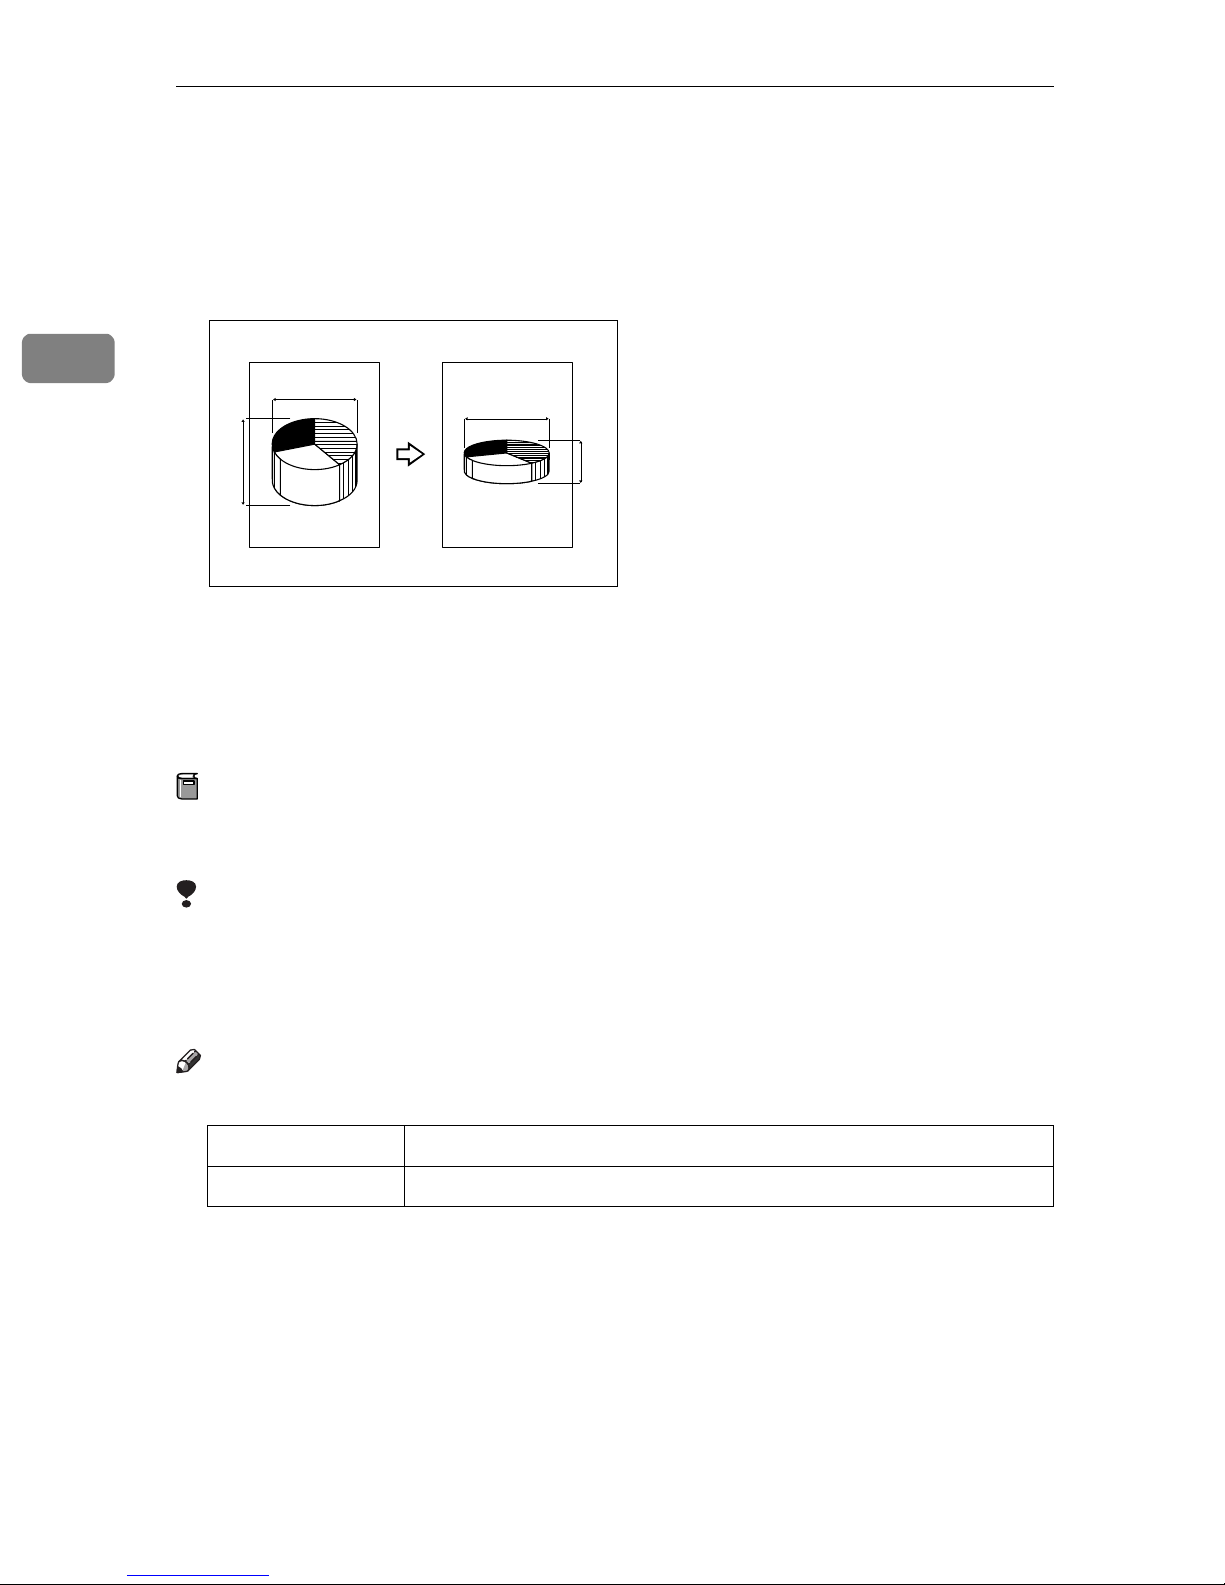
Directional Size Magnification (inch)
The suitable reproduction ratios will be automatically selected when you enter
the horizontal and vertical lengths of the original and copy image you require.
2
1
24
3
CP2M01EE
1: Horizontal original size
2: Vertical original size
3: Horizontal copy size
4: Vertical copy size
Preparation
Specify the vertical and horizontal sizes of the original and those of the copy,
as shown in the illustration.
Limitation
❒
If the calculated ratio is over the maximum or under the minimum ratio, it is
corrected within the range of the ratio automatically. However, with some ratios, parts of the image might not be copied or blank margins will appear on
copies.
Note
❒
You can enter sizes within the following ranges:
Metric version 1 – 999mm (in 1mm steps)
Inch version 0.1" – 99.9" (in 0.1" steps)
❒
The following ratios can be selected:
• Metric version: 25 – 400%
• Inch version: 25 – 400%
104
Page 38
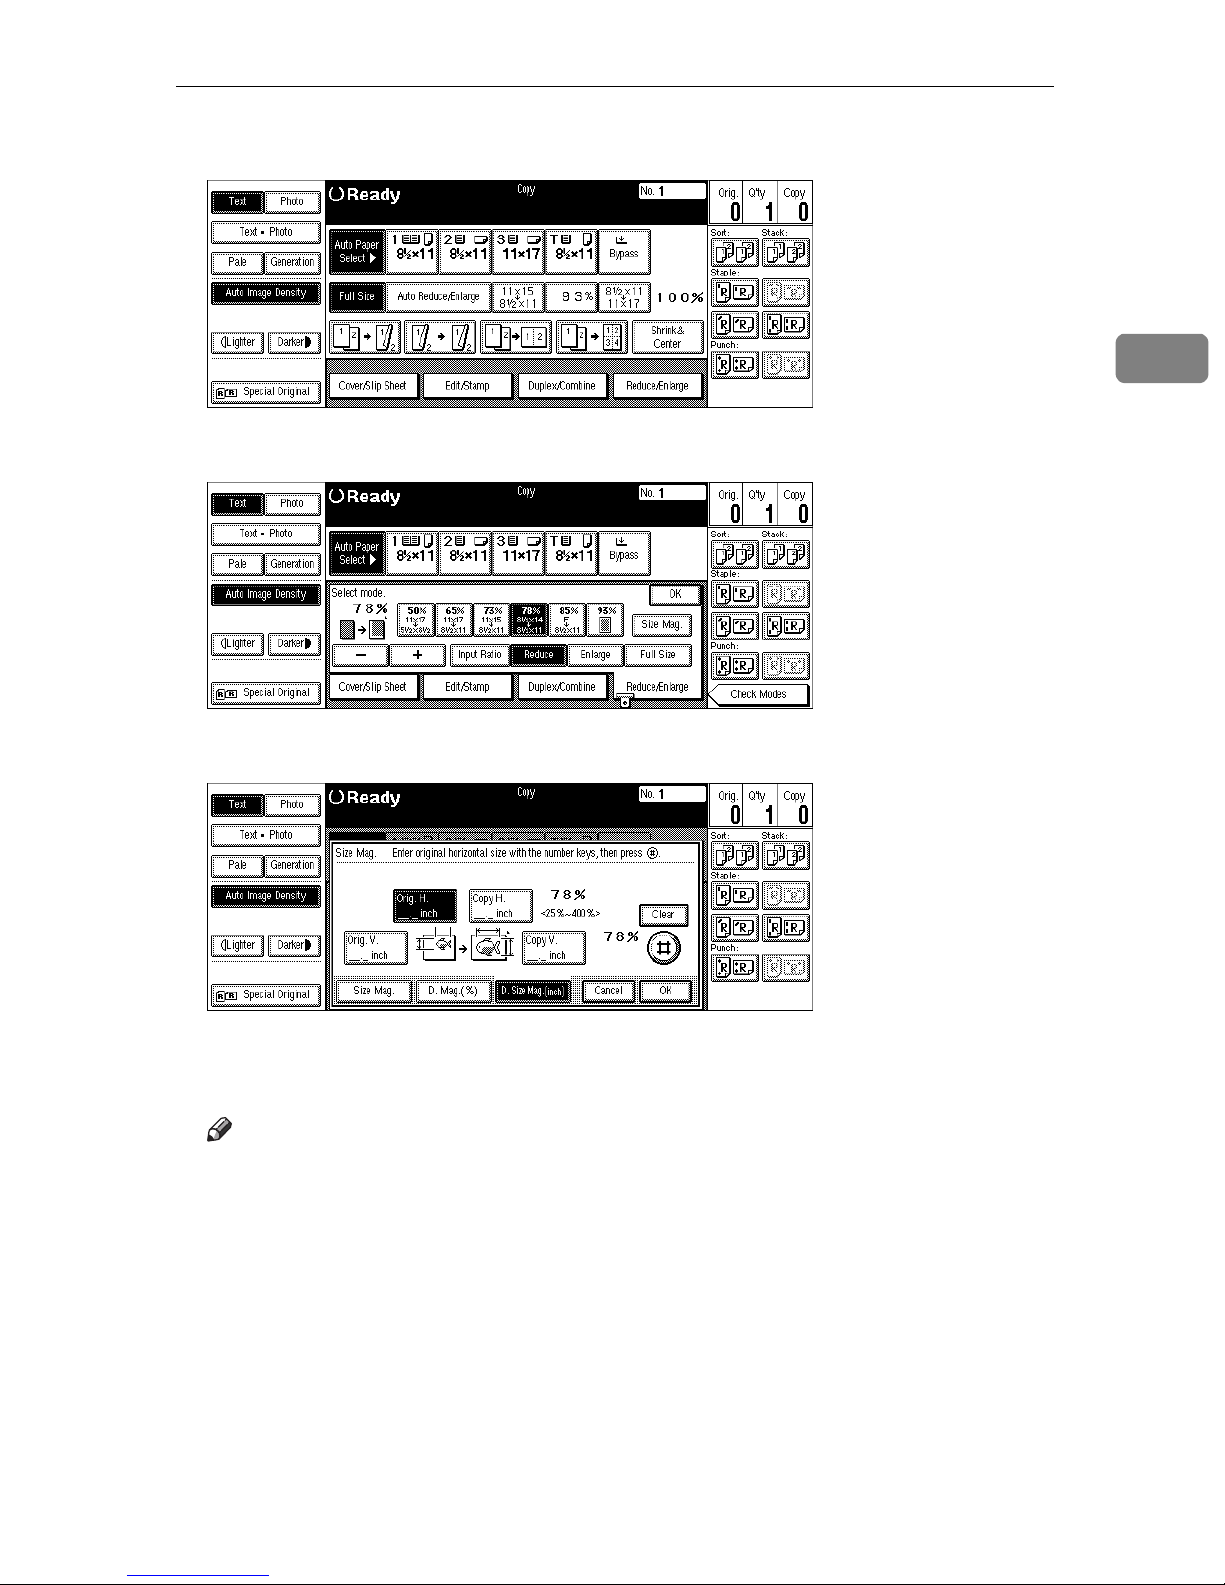
Directional Size Magnification (inch)
A Press the
B Press the
[
Reduce/Enlarge
key.
[
Size Mag.
]
key.
]
2
C Press the
[
D. Size Mag.(inch)
key.
]
D Enter the horizontal size of the original with the number keys, then press
the
❒
key.
[
]
#
Note
To change the value entered, press the
the new value.
[
Clear
]
or
{
Clear/Stop
key and enter
}
E Enter the horizontal size of the copy with the number keys, then press the
key.
]
[
#
F Enter the vertical size of the original with the number keys, then press the
key.
]
[
#
G Enter the vertical size of the copy with the number keys, then press the
key.
]
[
#
105
Page 39

Copying
❒
Note
To change the length, press the place you wish to change and enter the new
value.
2
H Press the
I Press the
[
OK
[
OK
key.
]
key.
]
J Set your originals, then press the
{
Start
key.
}
106
Page 40
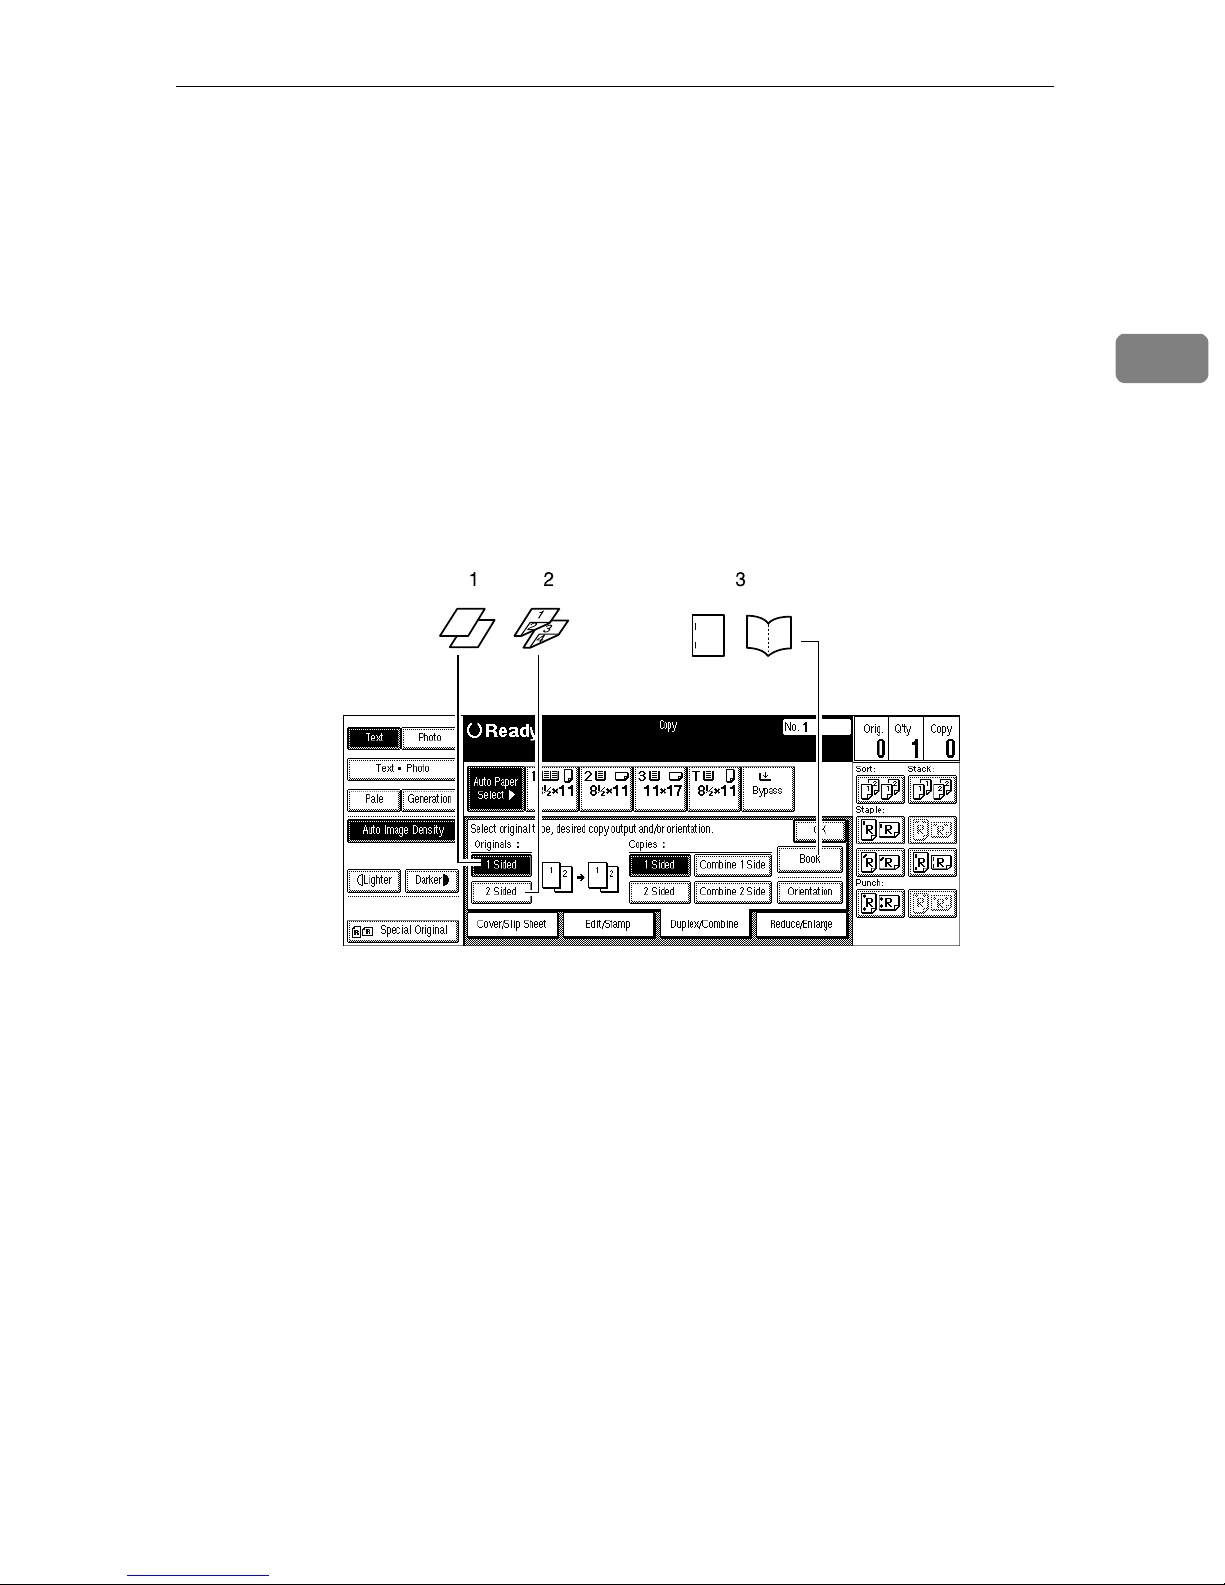
Duplex/Combine
Duplex/Combine
You can make copies in a variety of formats by combining the following modes:
• 1 Sided/2 Sided originals
• 1 Sided/2 Sided copies
•Duplex
•Combine
• Book
•Series
2
A Check your originals and select
1
2
1: 1-sided
2: 2-sided
3: Book
[
1 Sided
or
]
[
2 Sided
for the originals.
]
ZBQS100N
B Select
[
1 Sided
or
]
[
2 Sided
for copying.
]
107
Page 41
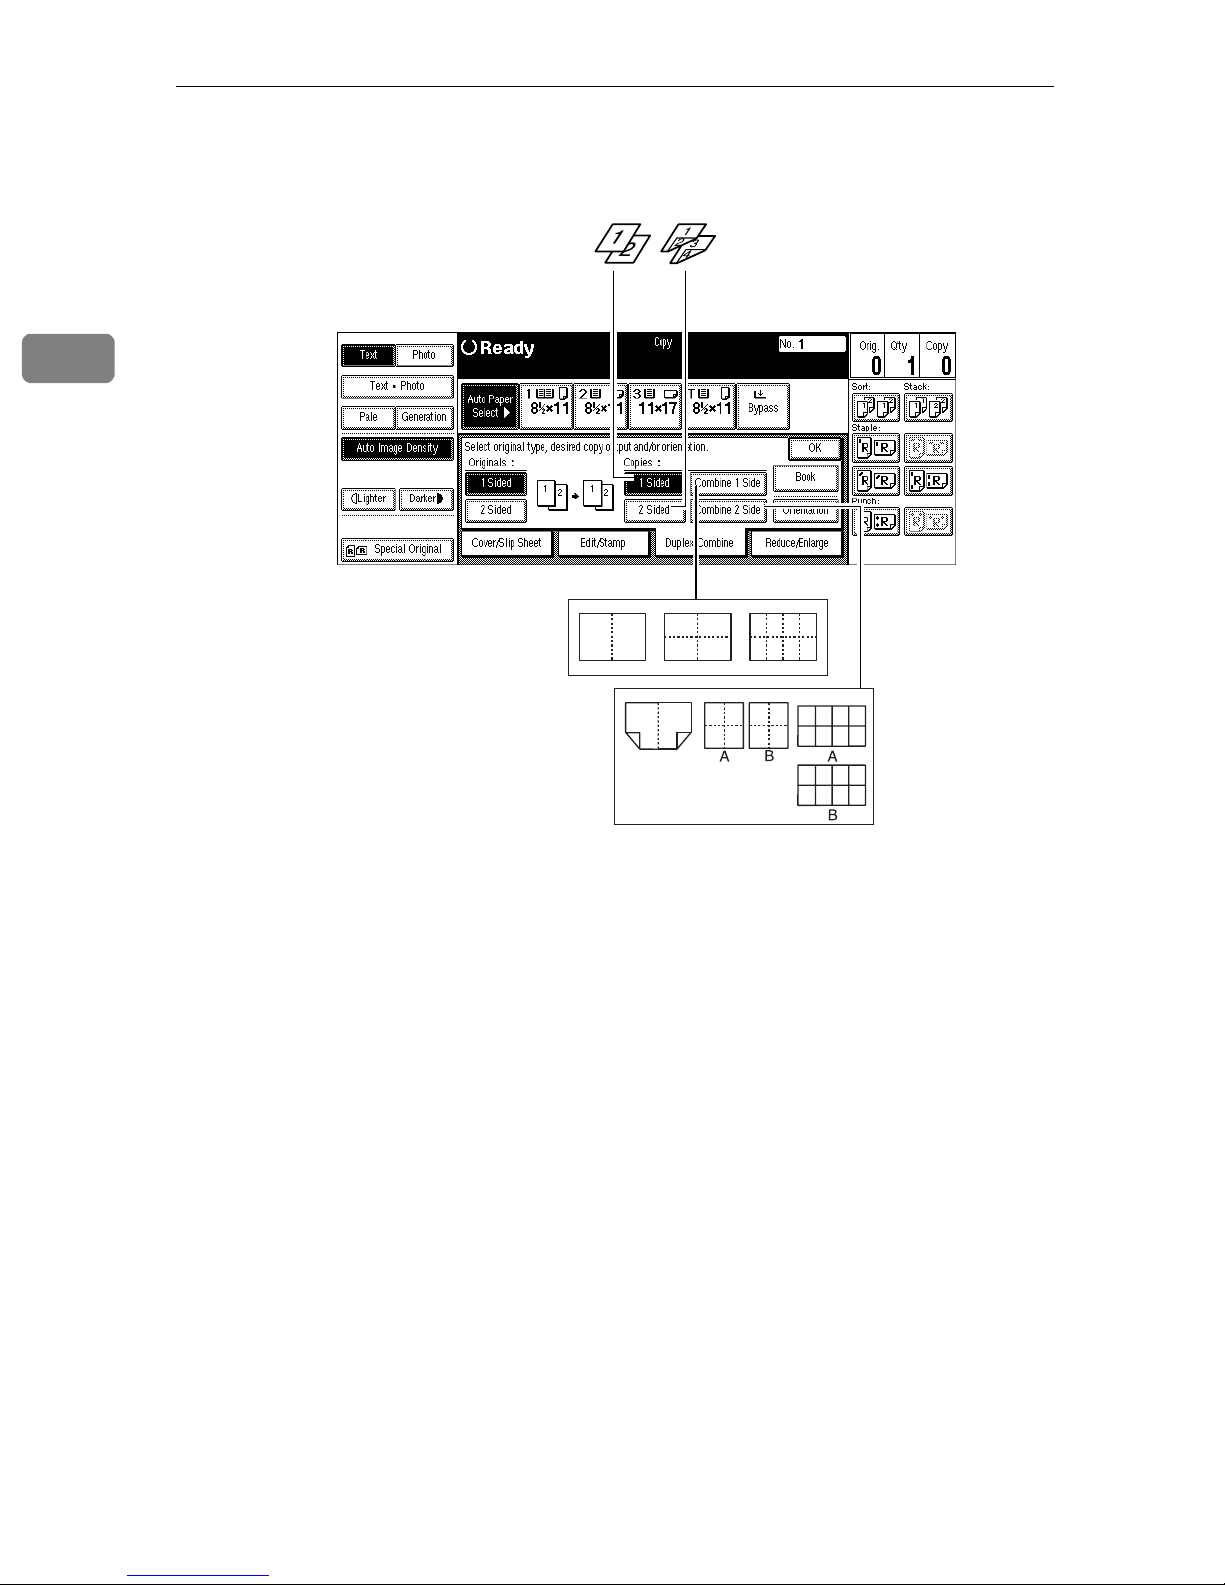
2
Copying
12
1 2
1
2 1234
34
5678
1: 1-sided
2: 2-sided
A: Front
B: Back
C Press the
[
OK
key.
]
21
4
3
1 2
34
5 6
78
1 234
5678
9
10 11 12
13 14 15 16
ZBQS110E
108
Page 42
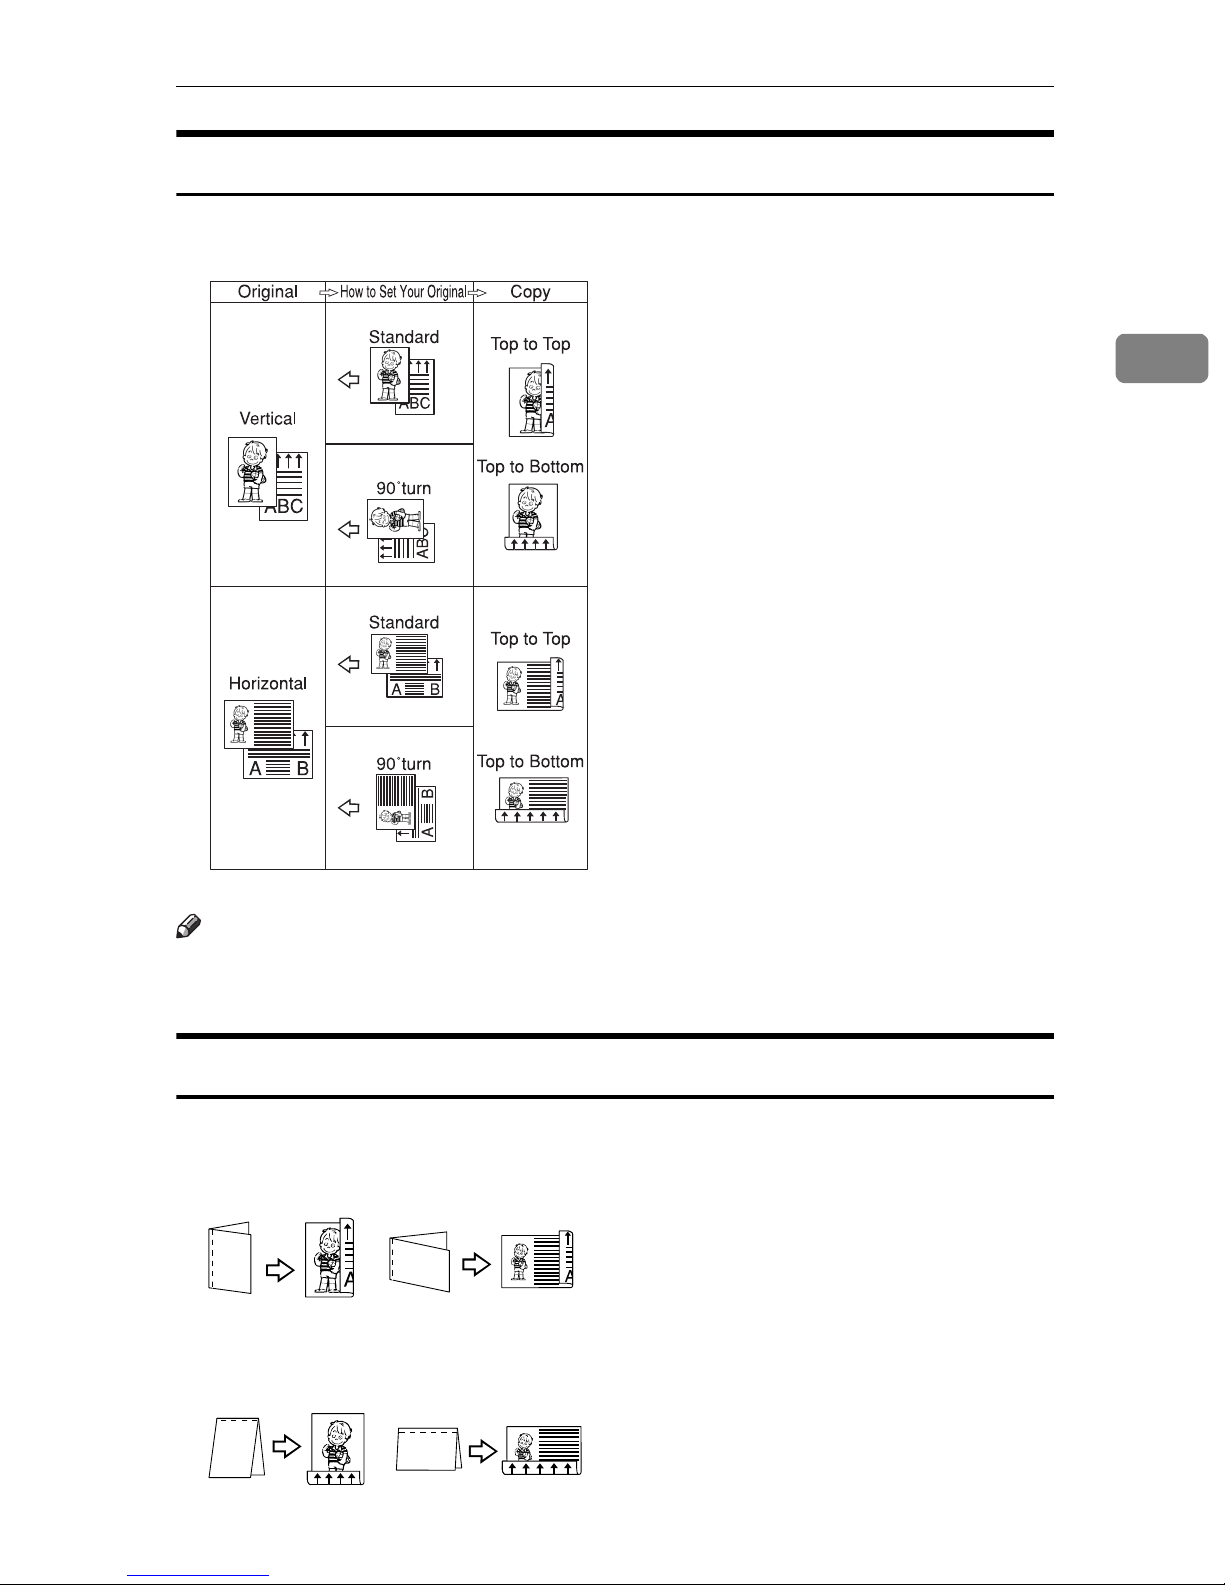
Duplex/Combine
Original Direction and Completed Copies
The resulting copy image will differ according to the direction in which you set
your original (lengthwise K or widthwise L).
2
GCRYOU1E
Note
❒
The illustrations show the directions of copied images on the front and back,
not the directions of delivery.
Originals and Copy Direction
You can select the orientation (
[
Top to Top
fying Orientation of Bound Originals”
• Top to Top
Duplex1
• Top to Bottom
], [
Top to Bottom
.
). See ⇒ P.110
]
“Speci-
Duplex2
109
Page 43
2
Copying
Specifying Orientat ion of Bound Originals
You can specify the orientation of bound originals (how you turn the pages). The
default setting is
Note
❒
You can change the orientation default with the User Tools. See “Copy Orientation in Duplex Mode” and “Original Orientation in Duplex Mode” in
P.313
“General Features
[
Top to Top
2
]
/3”
.
⇒
.
A Press the
B Press the
[
Duplex/Combine
key.
[
Orientation
]
key.
]
C Select an original orientation and a copy orientation.
D Press the
110
[
OK
key.
]
Page 44
Duplex
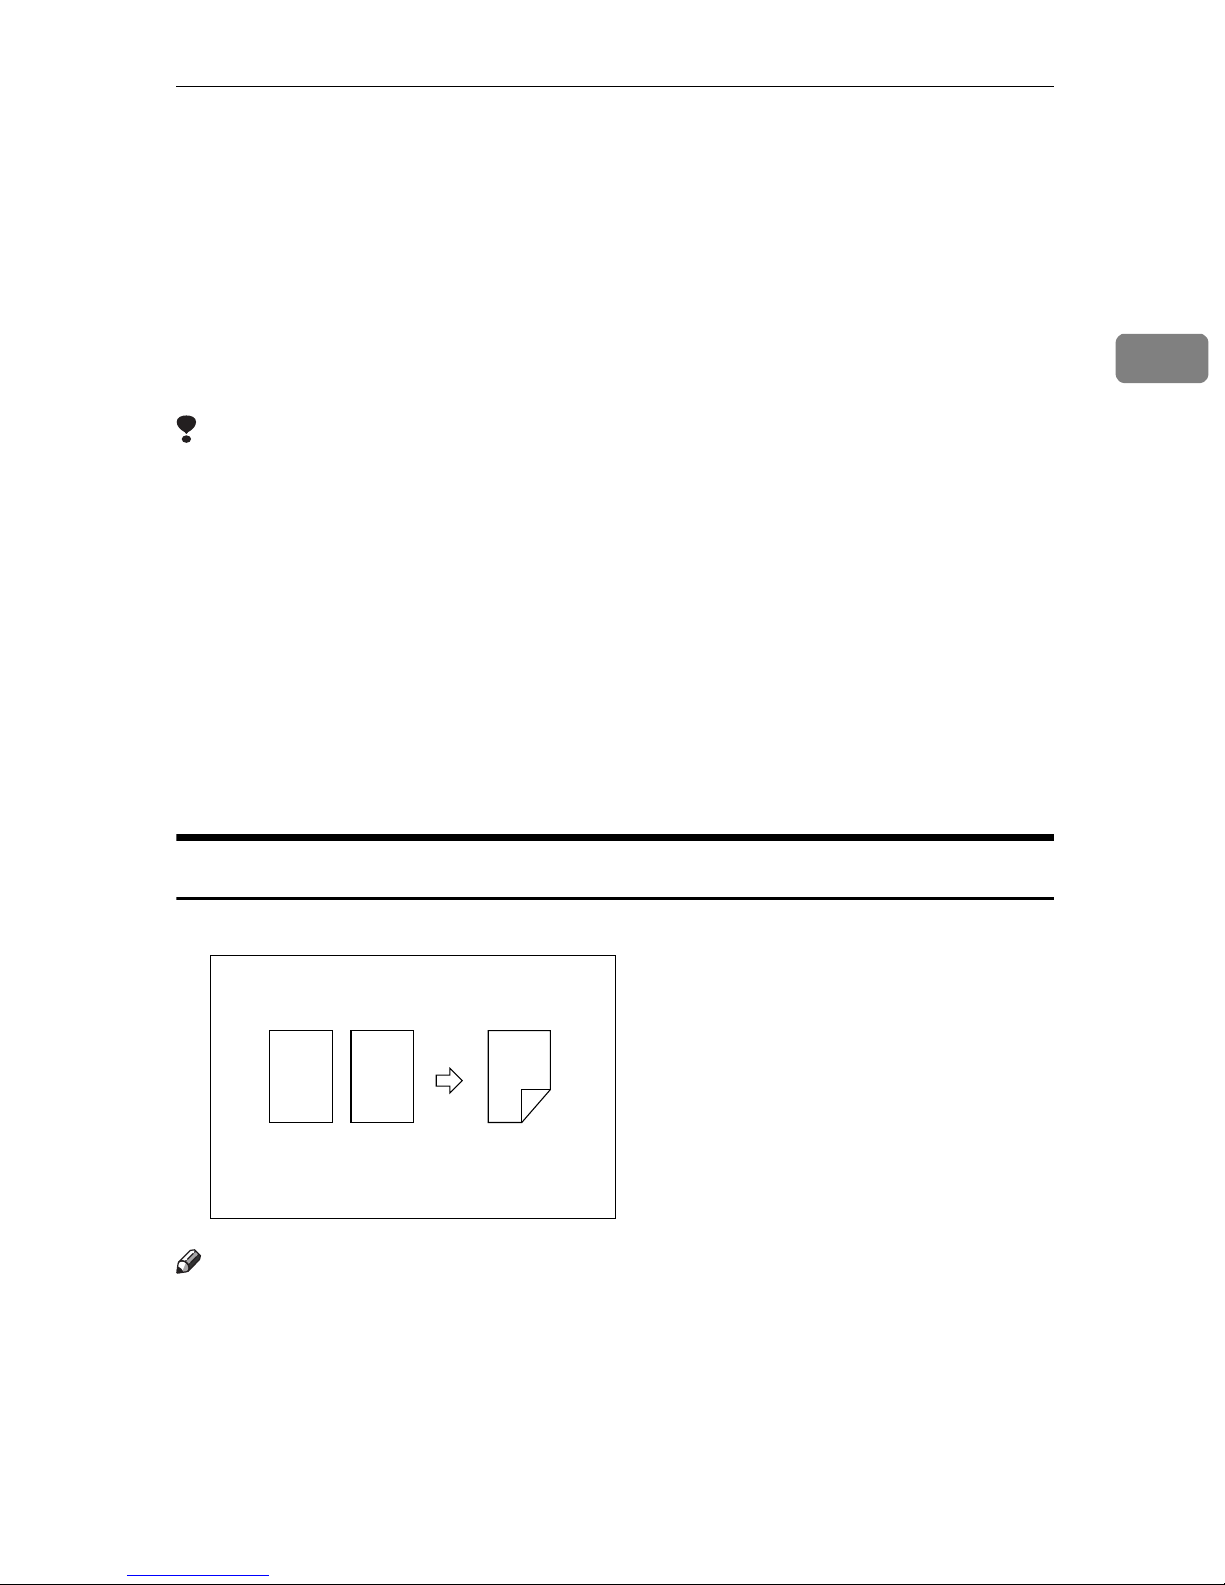
This function can be used in two ways:
❖
1 Sided → 2 Sided
This mode makes two-sided copies from one-sided originals.
❖
2 Sided → 2 Sided
This mode makes two-sided copies from two-sided originals.
Limitation
❒
You cannot use the following copy paper in this function:
• Paper smaller than A5K, 5
"L)
2
• Paper thicker than 105g/m
• Paper thinner than 64g/m
• Translucent paper
1
/2" × 81/2"K (possible on A5L, 51/2" × 81/
2
, 28 lb. Bond
2
, 17 lb. Bond
Duplex
2
• Adhesive labels
• OHP transparencies
• Postcards
❒
You cannot use the bypass tray with this function.
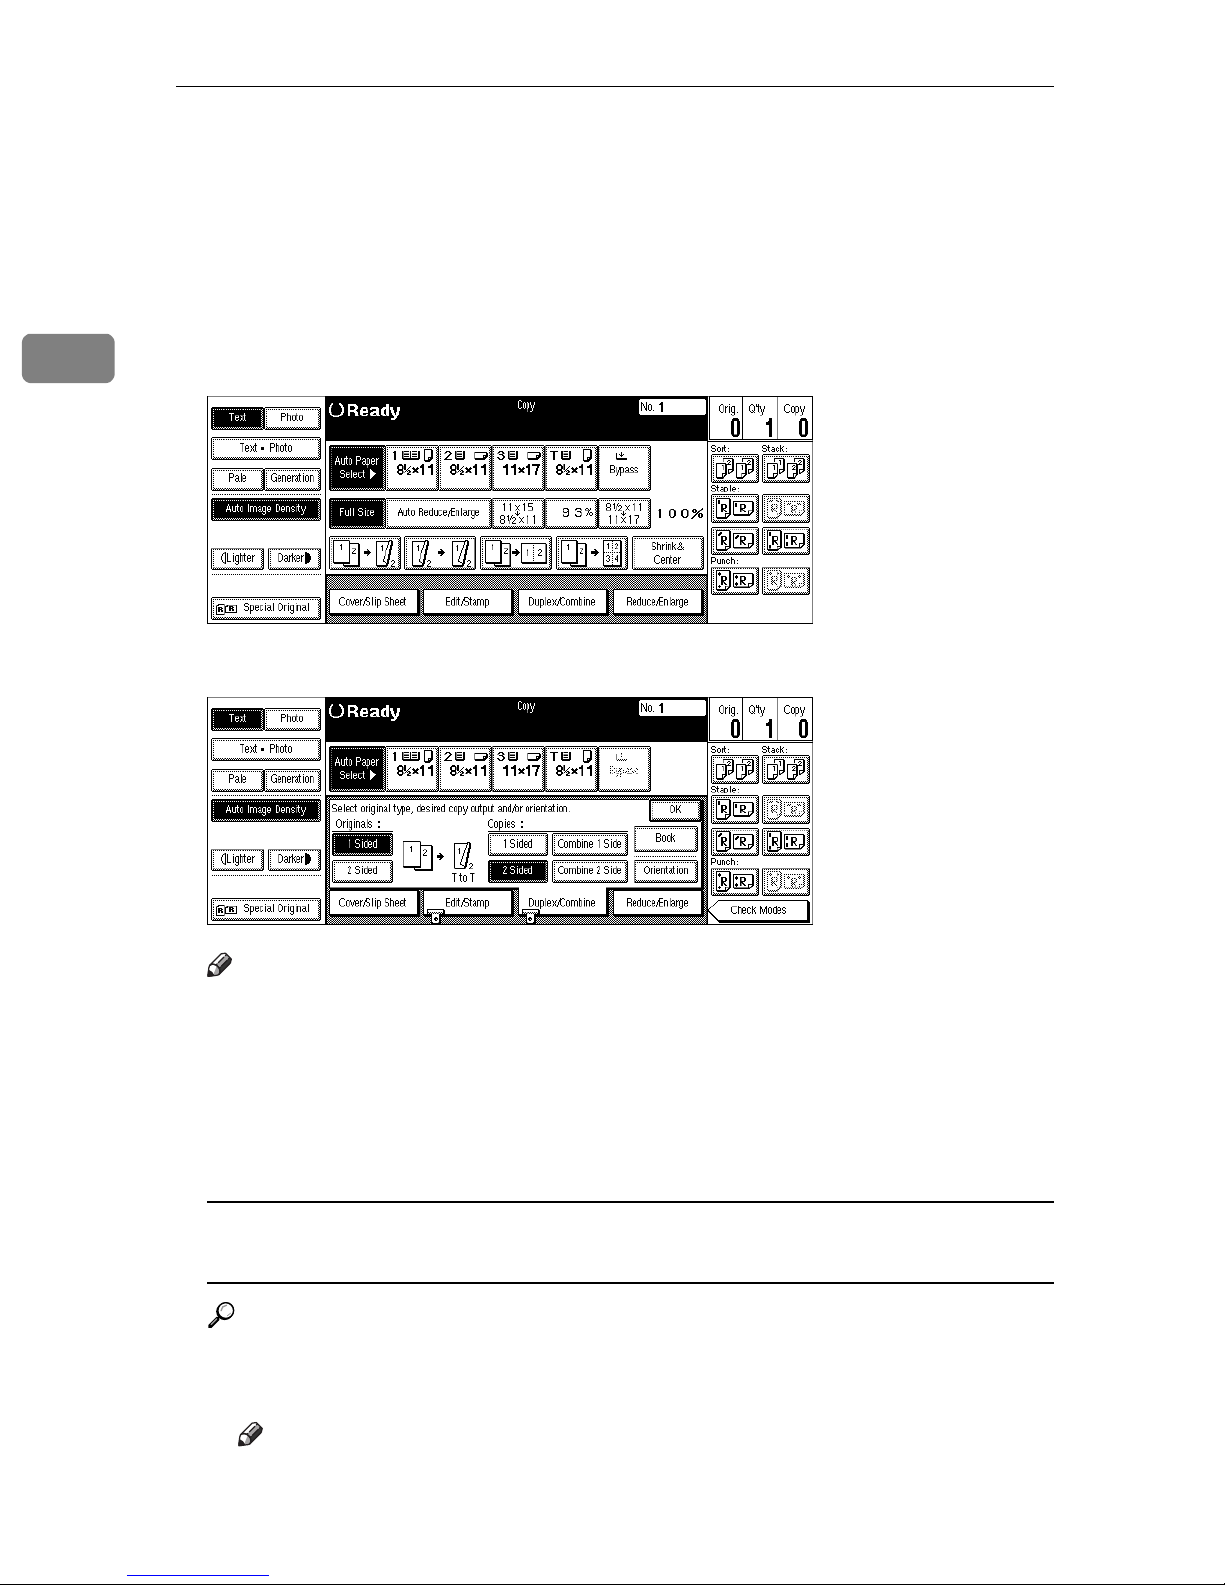
1 Sided → 2 Sided
12
1
2
Note
❒
If you set an odd number of 1-sided originals in the document feeder, the reverse side of the last page is left blank.
❒
If you set originals in the document feeder and select Sort mode, all the originals will be scanned before being copied. Therefore, the copy speed is faster
than that when Sort mode is not selected. See “Auto Sort Mode” in ⇒ P.329
“Input/Output”
.
111
Page 45
Copying
❒
When original images are copied, the images are shifted by a width of the
binding margin. You can adjust the binding margin or binding position. You
can also change their default values. See “Front Margin: Left/Right”, “Back
Margin: Left/Right”, “Front Margin: Top/Bottom” and “Back Margin: Top/
Bottom” in ⇒ P.317
❒
A binding margin can be automatically made on the back side. See “1 → 2 Duplex Auto Margin Adjust” in ⇒ P.317
“Page Format
1
.
/2”
“Page Format
1
/2”
.
2
A Press the
B Press the
[
Duplex/Combine
key for original, then press the
[
1 Sided
]
key.
]
[
2 Sided
key for copy.
]
112
Note
❒
To change the copy orientation to “Top to Bottom”, press the
key and select
Originals”
C Press the
[
OK
.
key.
]
[
Top to Bottom
. See ⇒ P.110
]
D Set your originals, then press the
{
Start
key.
}
“Specifying Orientation of Bound
[
Orientation
When setting an origi nal on the exposure glass or in the documen t feeder
using Batch (SADF) mode
Reference
P.36
⇒
A Set the original, then press the
❒
“Batch (SADF) mode”
Note
Start with the first page to be copied.
.
Start
key.
}
{
]
Page 46
Duplex
B Set the next original. When it is placed on the exposure glass, press the
{
Start
key.
}
C Press the
key after the last original has been scanned.
{
}
#
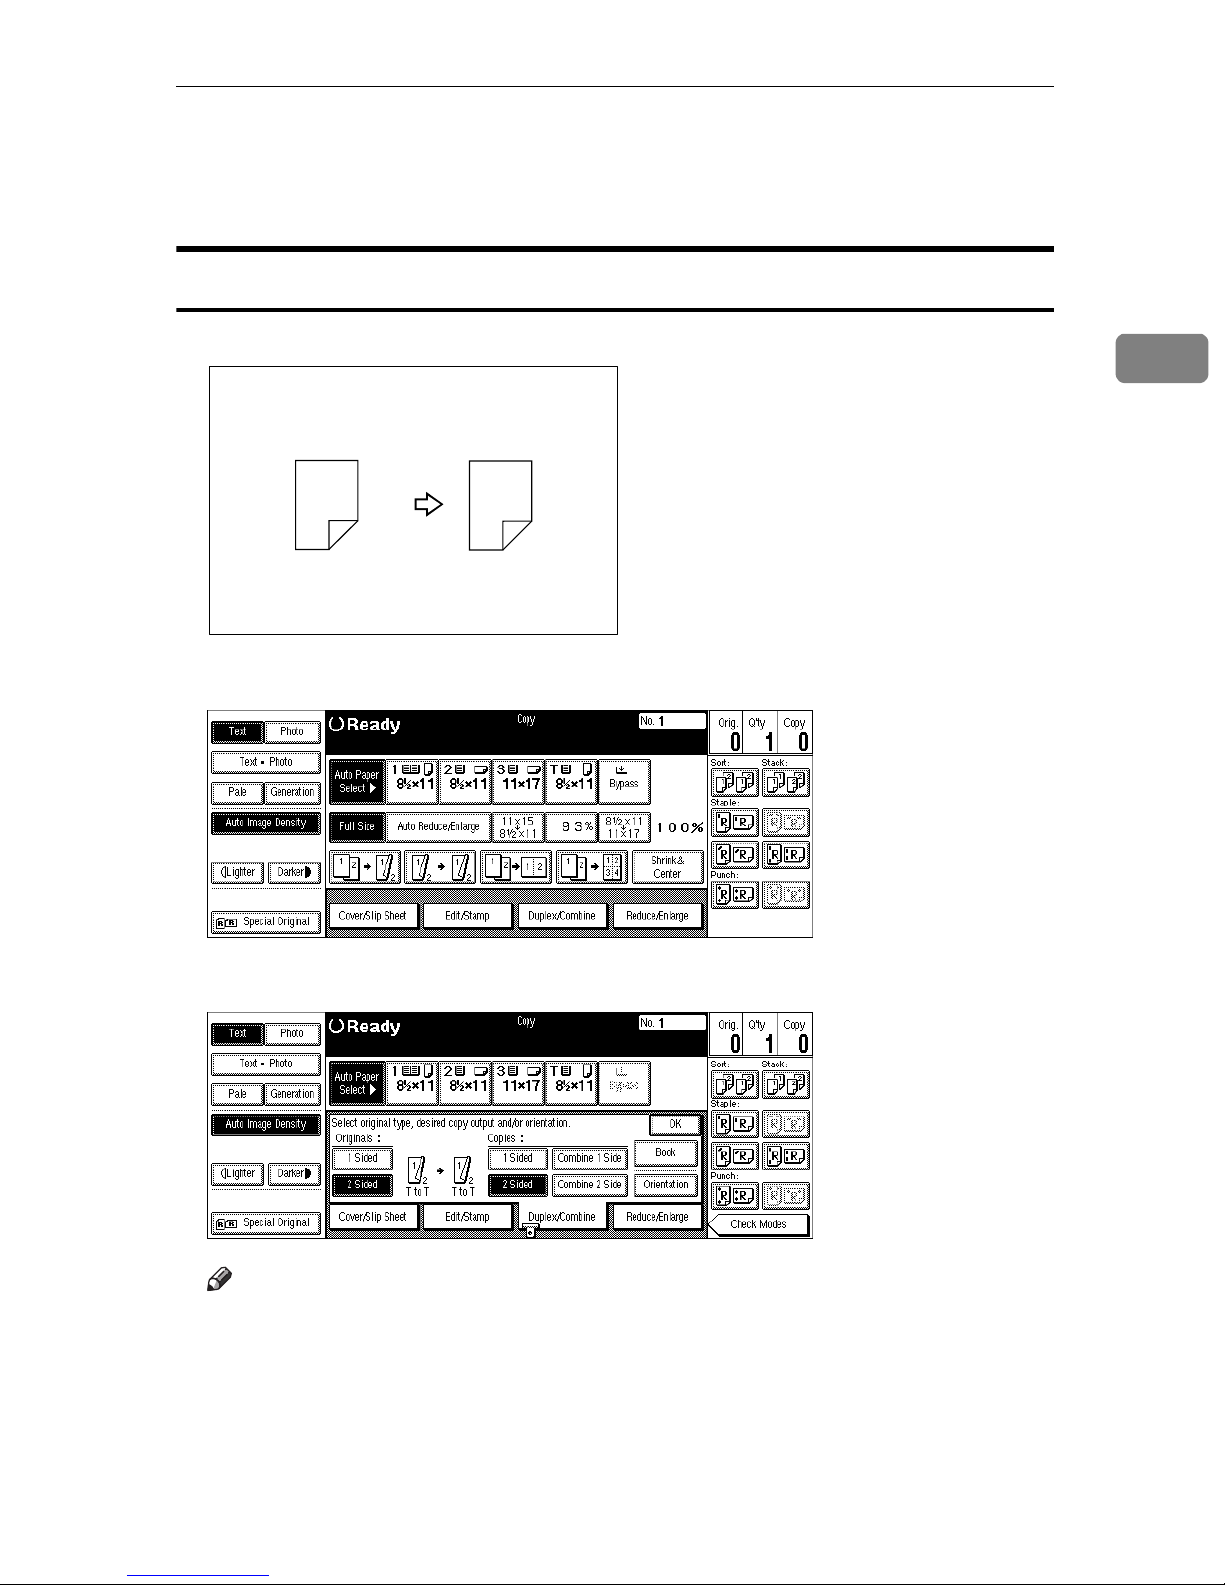
2 Sided → 2 Sided
1
2
A Press the
[
Duplex/Combine
1
]
2
2
key.
B Press the
Note
❒
To change the copy orientation to “Top to Bottom”, press the
key and select
Originals”
C Press the
[
2 Sided
[
OK
key for original, then press the
]
. See ⇒ P.110
]
.
key.
]
[
Top to Bottom
D Set your originals, then press the
{
Start
key.
}
[
2 Sided
“Specifying Orientation of Bound
key for copy.
]
[
Orientation
]
113
Page 47

Copying
When setting an origi nal on the exposure glass or in the documen t feeder
using Batch (SADF) mode
Reference
⇒
P.36
“Batch (SADF) mode”
.
2
A Set the original, then press the
Note
❒
Start with the first page to be copied.
B Set the next original. When it is placed on the exposure glass, press the
key.
Start
}
key after the last original has been scanned.
{
}
#
{
C Press the
{
Start
key.
}
114
Page 48

Combine
Combine
You can combine two or more originals into one copy. 1 Sided Combine mode is
for 1-sided copies, and 2 Sided Combine mode for 2-sided copies.
This function can be used in twelve ways:
❖
1 Sided 2 Pages → Combine 1 Side
Copies two 1-sided originals to one side of a sheet.
❖
1 Sided 4 Pages → Combine 1 Side
Copies four 1-sided originals together to one side of a sheet.
❖
1 Sided 8 Pages → Combine 1 Side
Copies eight 1-sided originals together to one side of a sheet.
❖
1 Sided 4 Pages → Combine 2 Side
Copies four 1-sided originals to the two-page spread on both sides of a sheet.
2
❖
1 Sided 8 Pages → Combine 2 Side
Copies eight 1-sided originals together to both sides of a sheet.
❖
1 Sided 16 Pages → Combine 2 Side
Copies 16 1-sided originals together to both sides of a sheet.
❖
2 Sided 2 Pages → Combine 1 Side
Copies one 2-sided original to one side of a sheet.
❖
2 Sided 4 Pages → Combine 1 Side
Copies two 2-sided originals to one side of a sheet.
❖
2 Sided 8 Pages → Combine 1 Side
Copies four 2-sided originals to one side of a sheet.
❖
2 Sided 4 Pages → Combine 2 Side
Copies two 2-sided originals together to both sides of a sheet.
❖
2 Sided 8 Pages → Combine 2 Side
Copies four 2-sided originals together to both sides of a sheet.
❖
2 Sided 16 Pages → Combine 2 Side
Copies eight 2-sided originals together to both sides of a sheet.
Limitation
❒
You cannot use the bypass tray with this function.
❒
If the calculated ratio is under the minimum ratio, it is corrected within the
range of the ratio automatically. However, with some ratios, parts of the image might not be copied.
115
Page 49
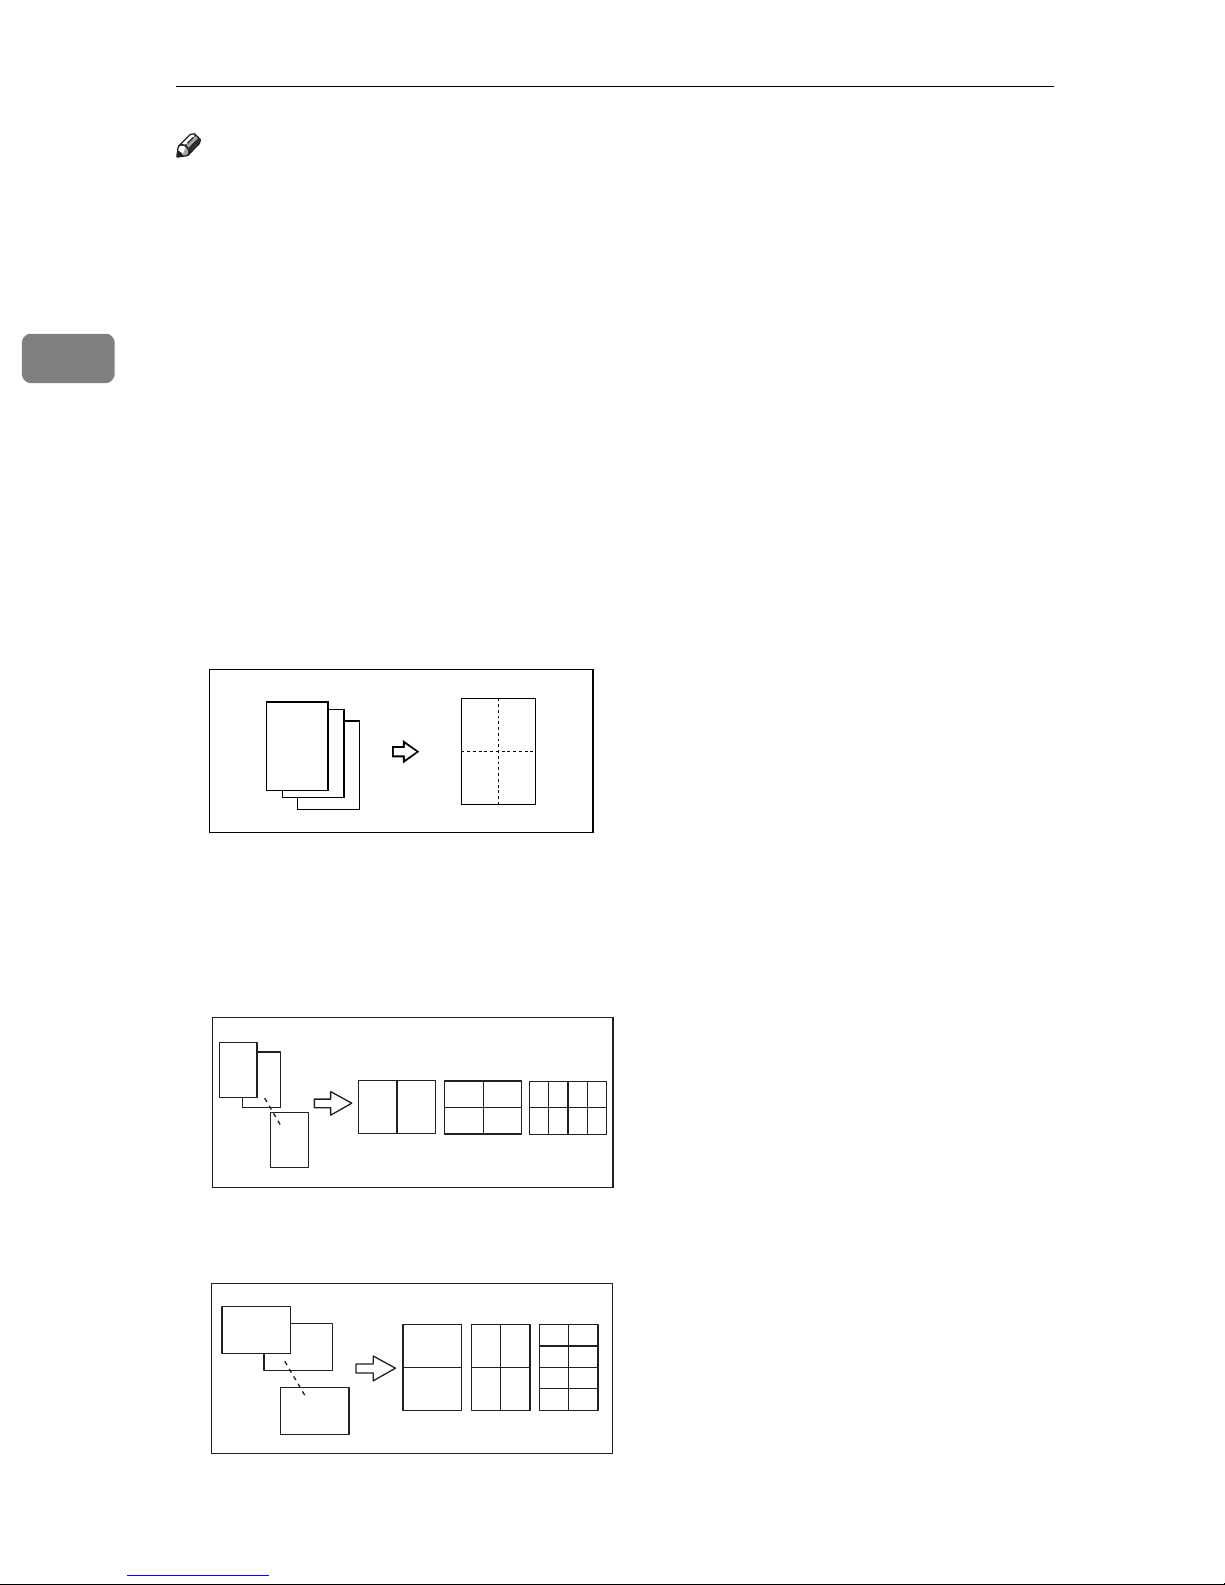
Copying
Note
❒
In this mode, the machine selects the reproduction ratio automatically. This
reproduction ratio depends on the copy paper sizes and the number of originals.
❒
The machine uses ratios in the following range:
• Metric version: 25 – 400%
2
• Inch version: 25 – 400%
❒
A separation line between originals can be printed with the User Tools. See
“Combine Separation Line” in ⇒ P.320
❒
Even if the direction of originals is different from that of the copy paper, the
“Page Format
2
/2”
.
machine will automatically rotate the image by 90° to make copies properly.
❒
When making copies in Combine mode, the border of each original can be automatically erased by 3mm, 0.1". See “Combine Orig. Shadow Erase” in
P.317
❒
If the number of originals placed is less than the number specified for com-
“Page Format
1
/2”
.
bining, the last page is copied blank as shown in the illustration.
1
2
3
❒
You can change the copy order in Combination mode. See “Copy Order In
Combine Mode” in ⇒ P.320
21
3
“Page Format
2
/2”
.
⇒
❒
Direction of the originals and arrangement of combined images
❖
Portrait (K) originals
1
2
1
2
8
❖
Landscape (L) originals
1
2
8
1
2
4
2
1
21
1234
3
5678
43
1
3
5
7
GCSHUY1E
2
4
6
8
GCSHUY2E
116
Page 50
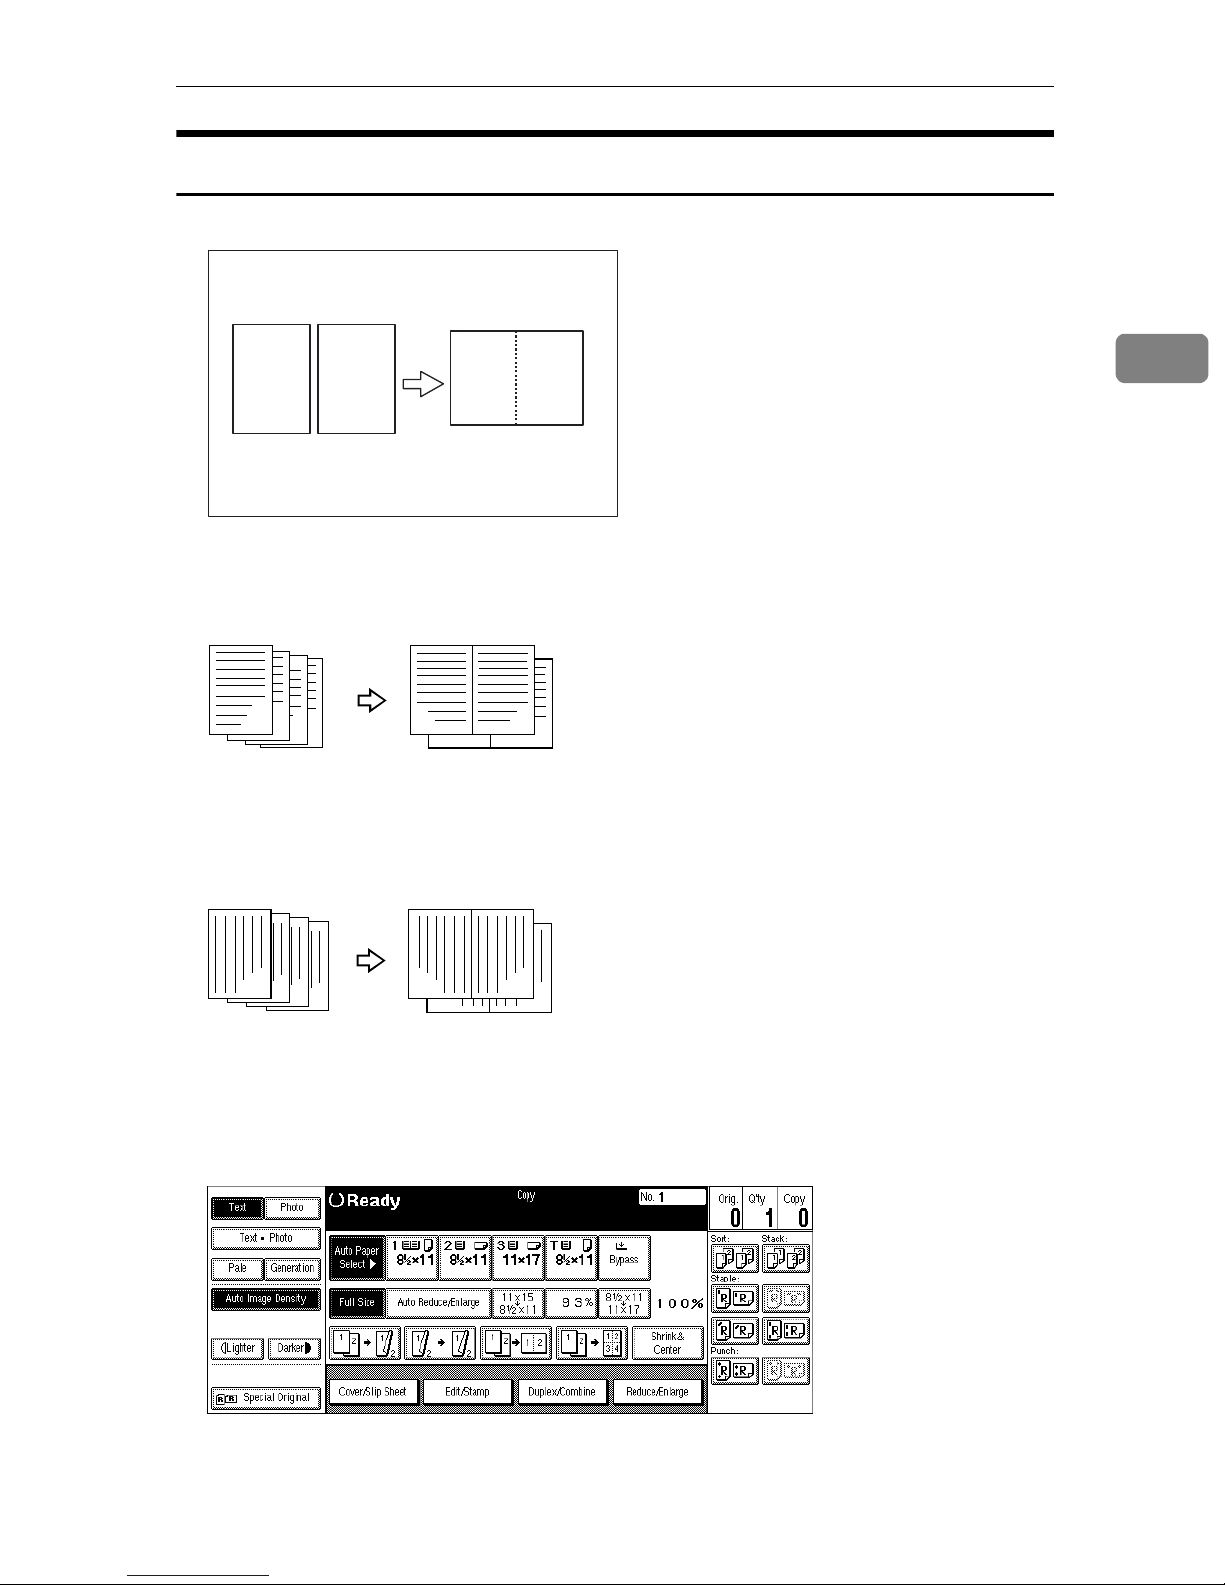
1 Sided 2 Pages → Combine 1 Side
Copies two 1-sided originals to one side of a sheet.
Combine
1 2
❖
Setting originals (Originals set in the document feeder)
1
2
GC SHVY 7J
• Originals read from left to right
1
2
3
4
1
3
2
Combine5
4
• Originals read from top to bottom
2
1
2
A Press the
3
4
[
Duplex/Combine
2
4
Combine6
key.
]
1
3
117
Page 51
Copying
2
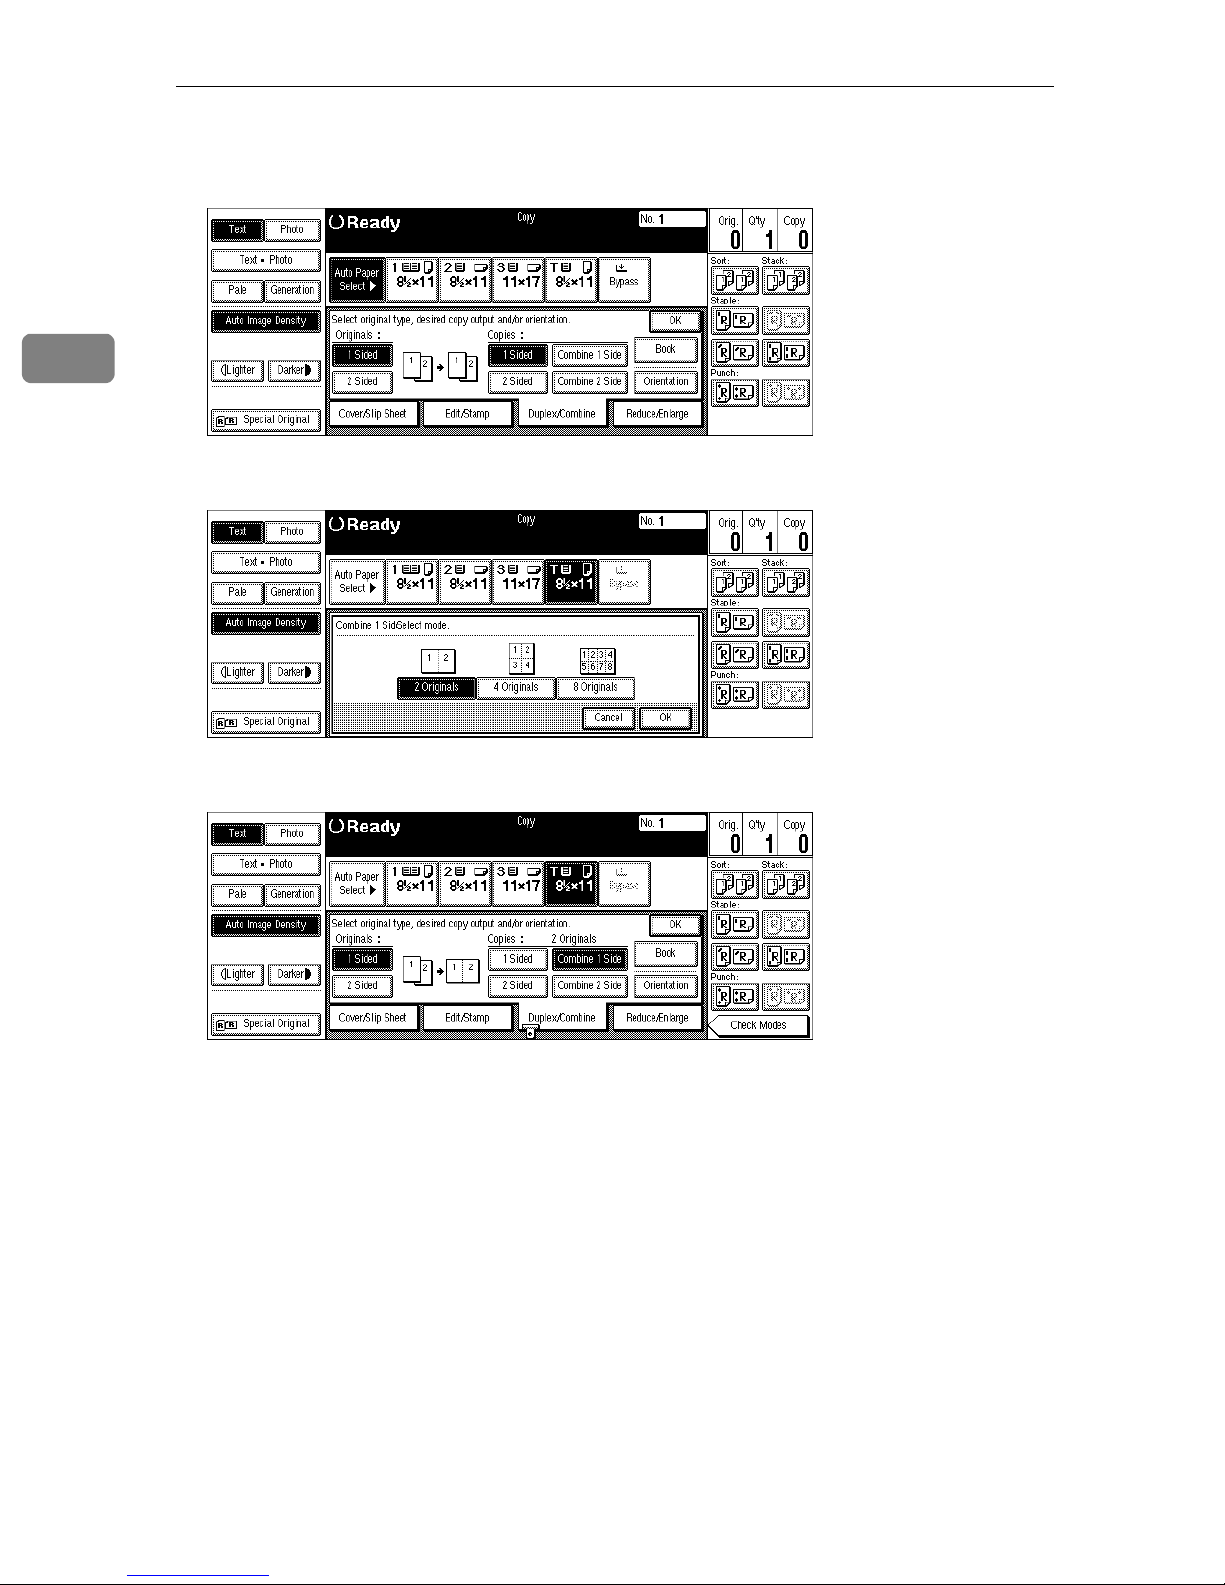
B Press the
the copy.
C Press the
[
1 Sided
[
2 Originals
]
key for the original, then press the
key, then press the
]
[OK]
key.
[
Combine 1 Side
key for
]
D Select the paper.
E Set your originals, then press the
{
Start
key.
}
118
Page 52
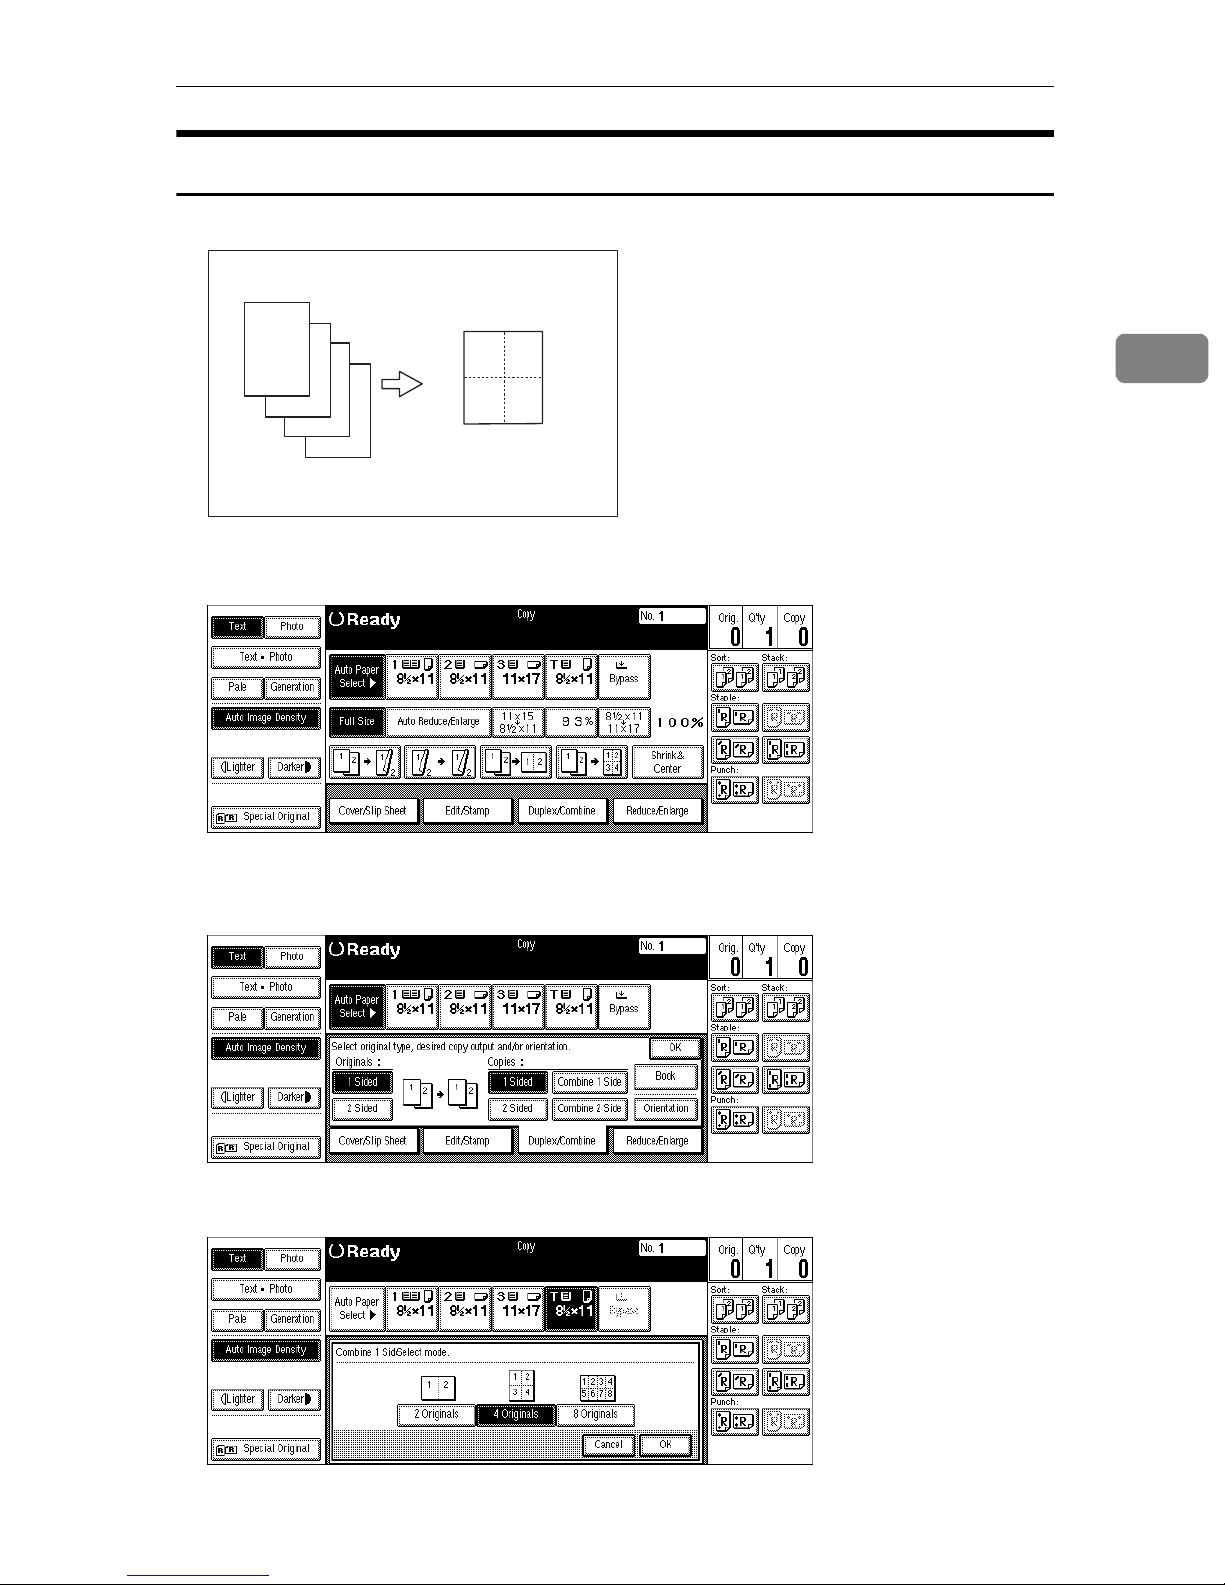
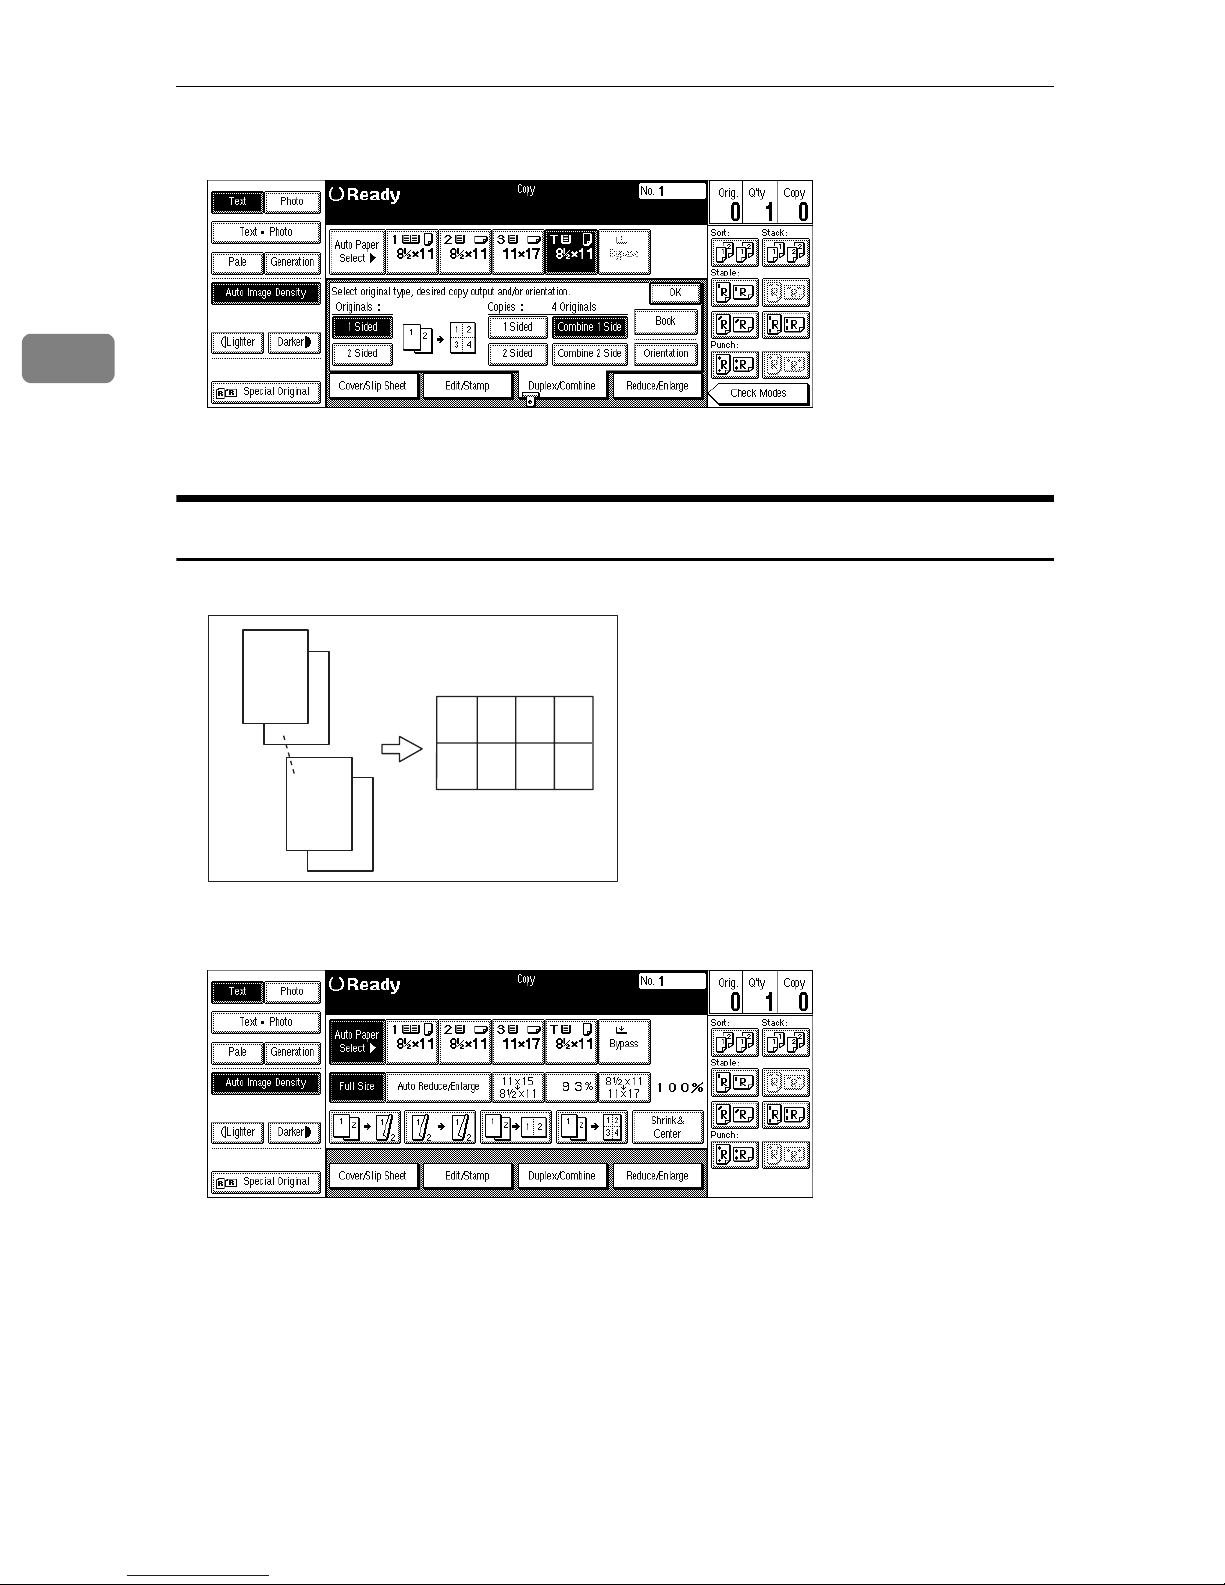
1 Sided 4 Pages → Combine 1 Side
Copies four 1-sided originals together to one side of a sheet.
1
2
3
4
1 2
34
GC SHVY 8J
Combine
2
A Press the
B Press the
the copy.
[
Duplex/Combine
key for the original, then press the
[
1 Sided
]
key.
]
[
Combine 1 Side
key for
]
C Press the
[
4 Originals
key, then press the
]
[OK]
key.
119
Page 53
2
Copying
D Select the paper.
E Set your originals, then press the
{
Start
key.
}
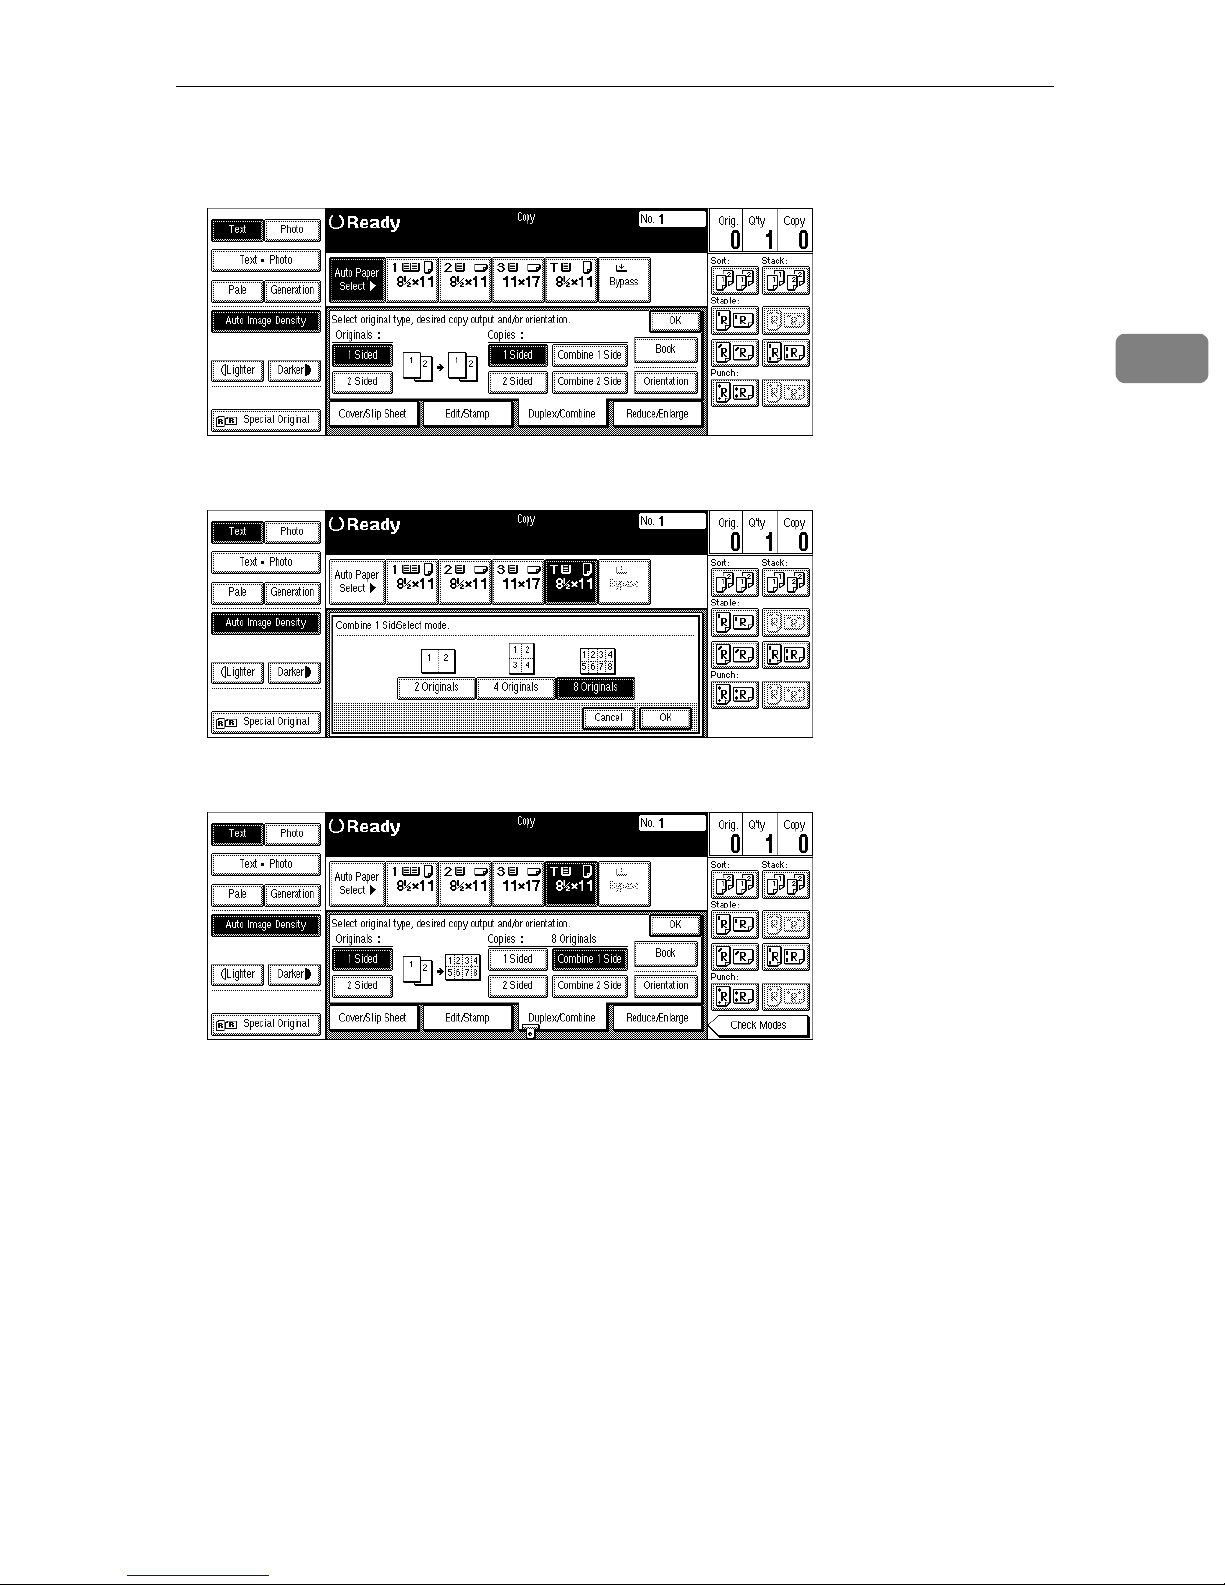
1 Sided 8 Pages → Combine 1 Side
Copies eight 1-sided originals together to one side of a sheet.
1
2
1 234
A Press the
7
8
[
Duplex/Combine
5678
GC SHVY 3J
key.
]
120
Page 54
Combine
B Press the
the copy.
C Press the
[
1 Sided
[
8 Originals
]
key for the original, then press the
key, then press the
]
[OK]
key.
[
Combine 1 Side
key for
]
2
D Select the paper.
E Set your originals, then press the
{
Start
key.
}
121
Page 55
2
Copying
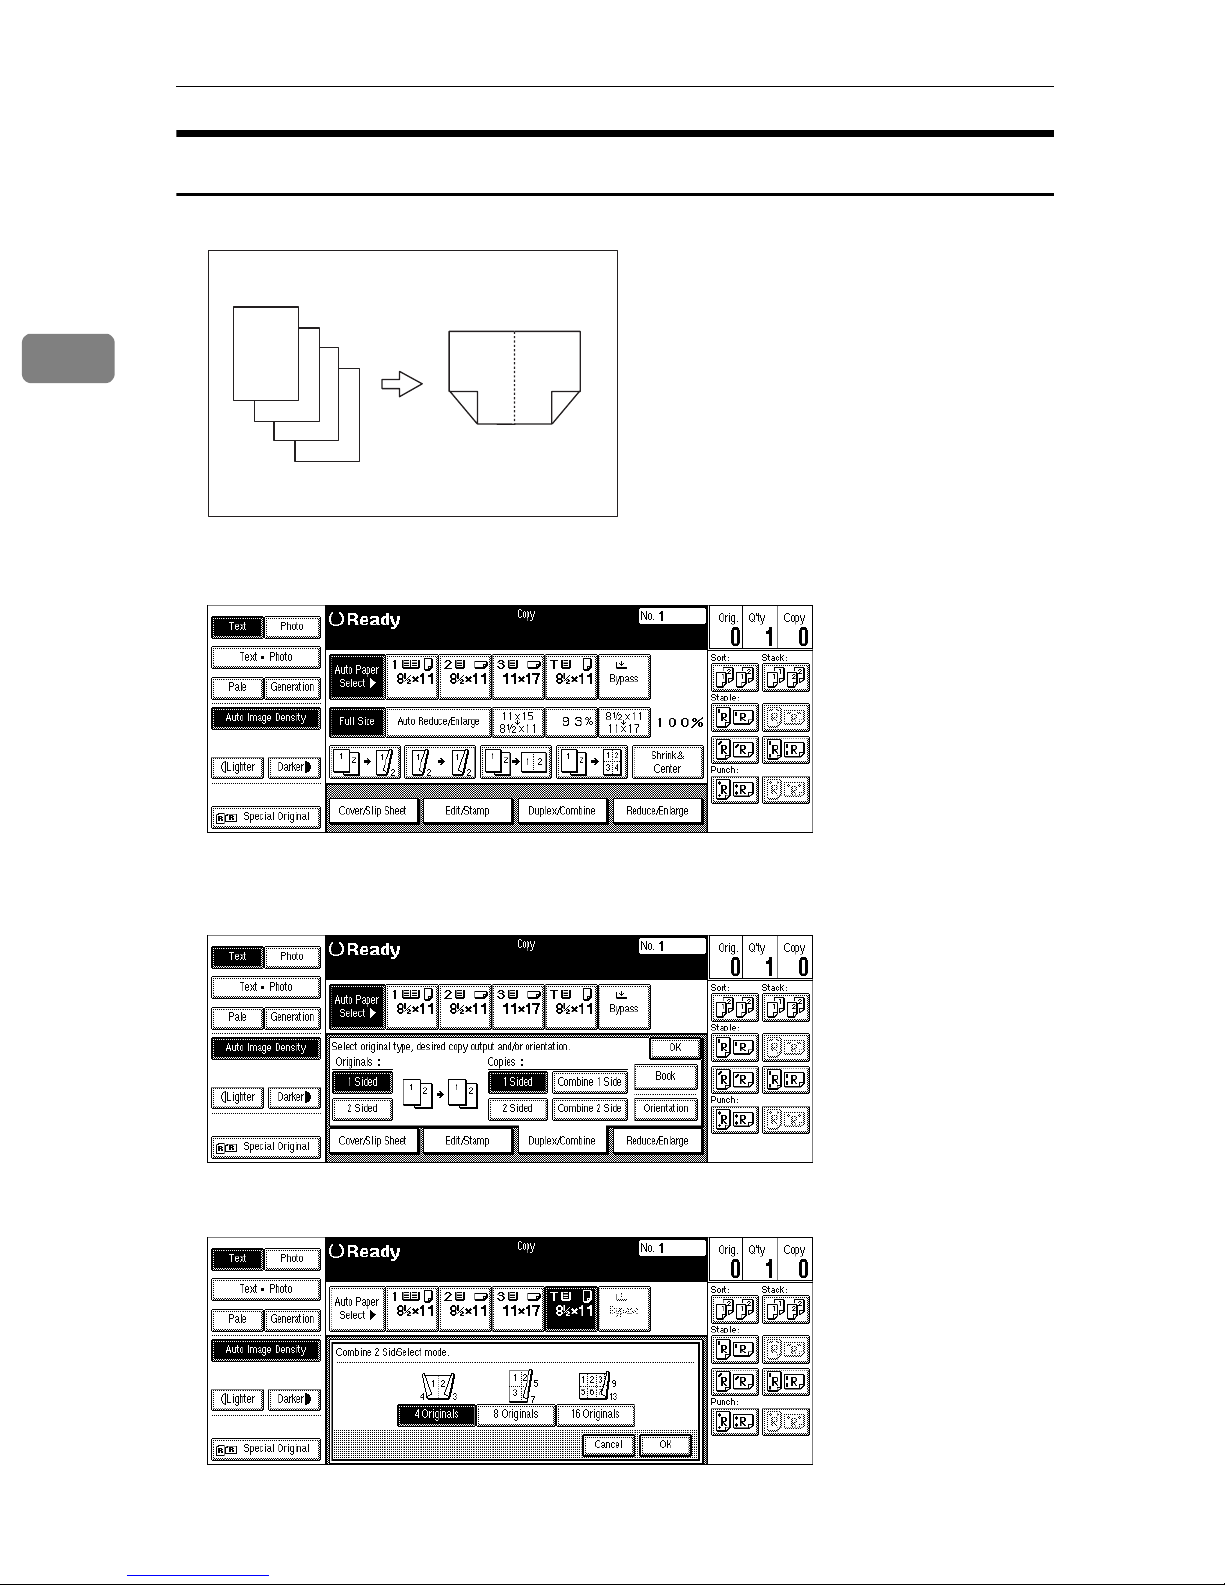
1 Sided 4 Pages → Combine 2 Side
Copies four 1-sided originals to the two-page spread on both sides of a sheet.
1
2
3
4
4
21
3
GC SHVY 9J
A Press the
B Press the
the copy.
[
Duplex/Combine
key for the original, then press the
[
1 Sided
]
key.
]
[
Combine 2 Side
key for
]
C Press the
[
4 Originals
122
key, then press the
]
[OK]
key.
Page 56
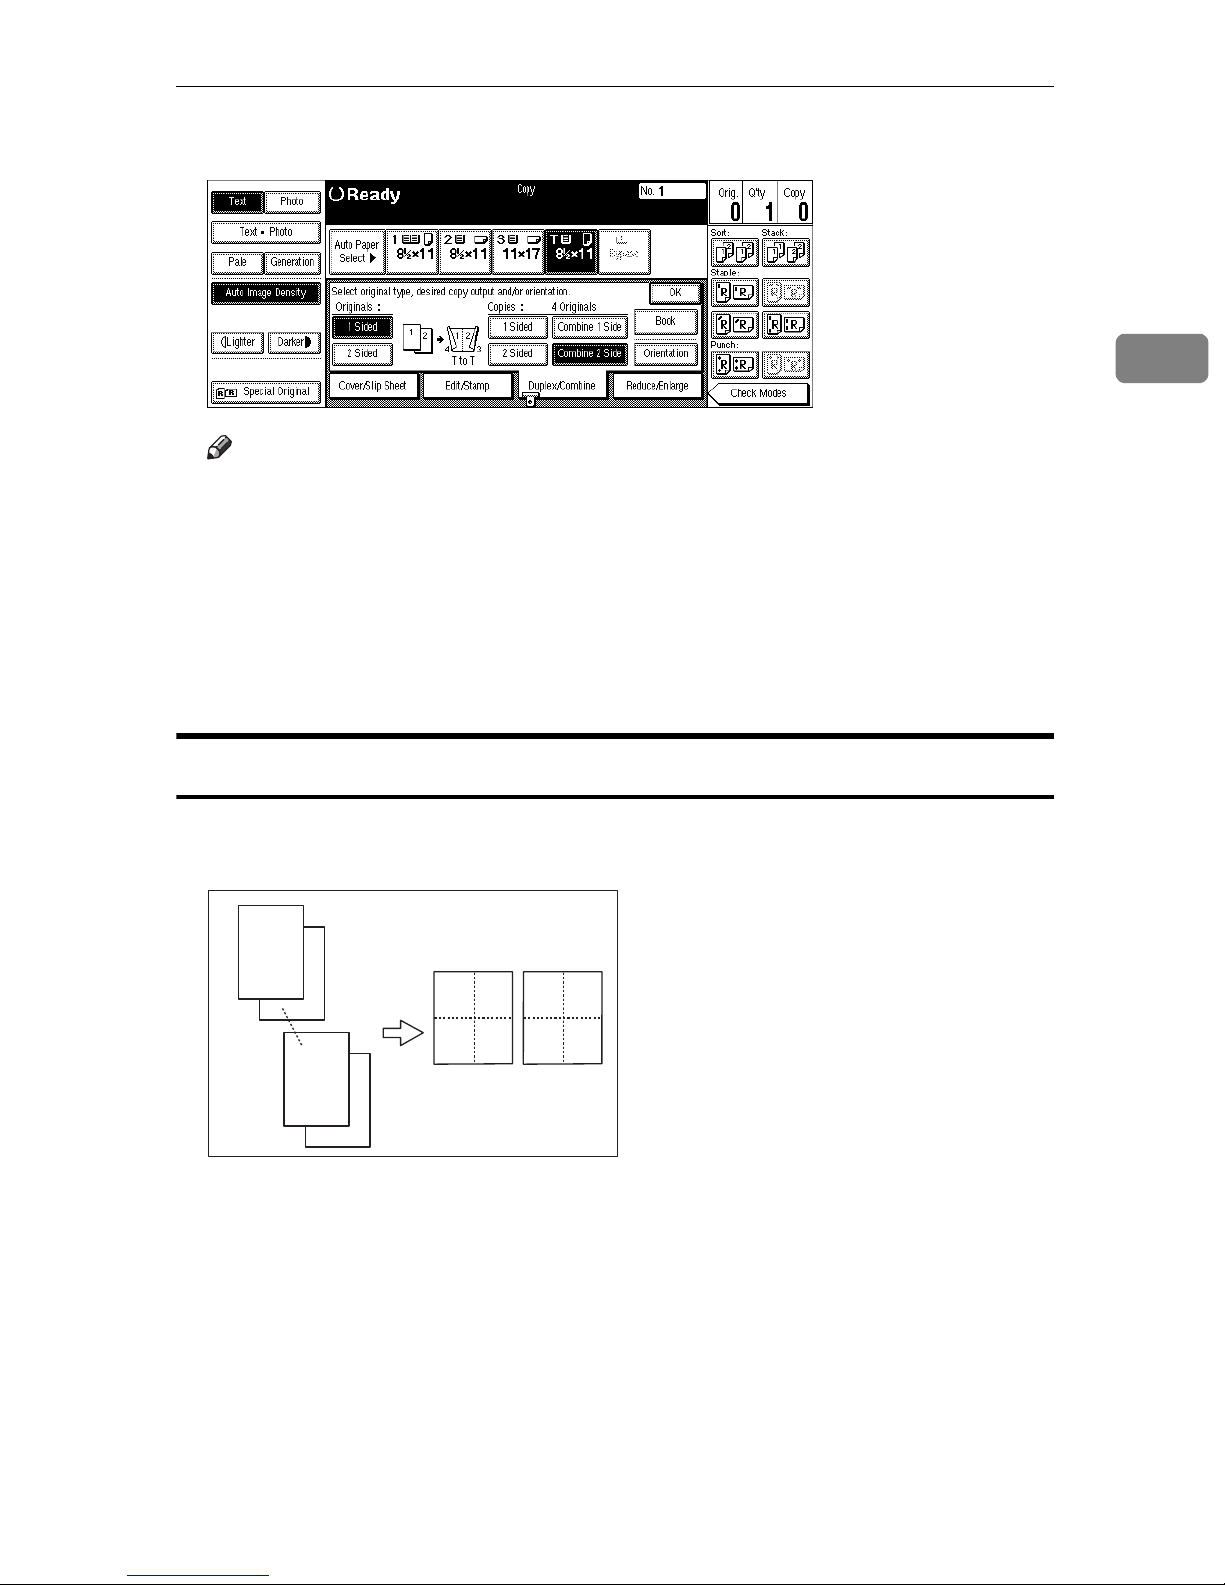
D Check the orientation.
Note
❒
To change the copy orientation to “Top to Bottom”, press the
key and select
Originals”
[
Top to Bottom
.
. See ⇒ P.110
]
Combine
[
Orientation
“Specifying Orientation of Bound
2
]
E Press the
[
OK
key.
]
F Select the paper.
G Set your originals, then press the
{
Start
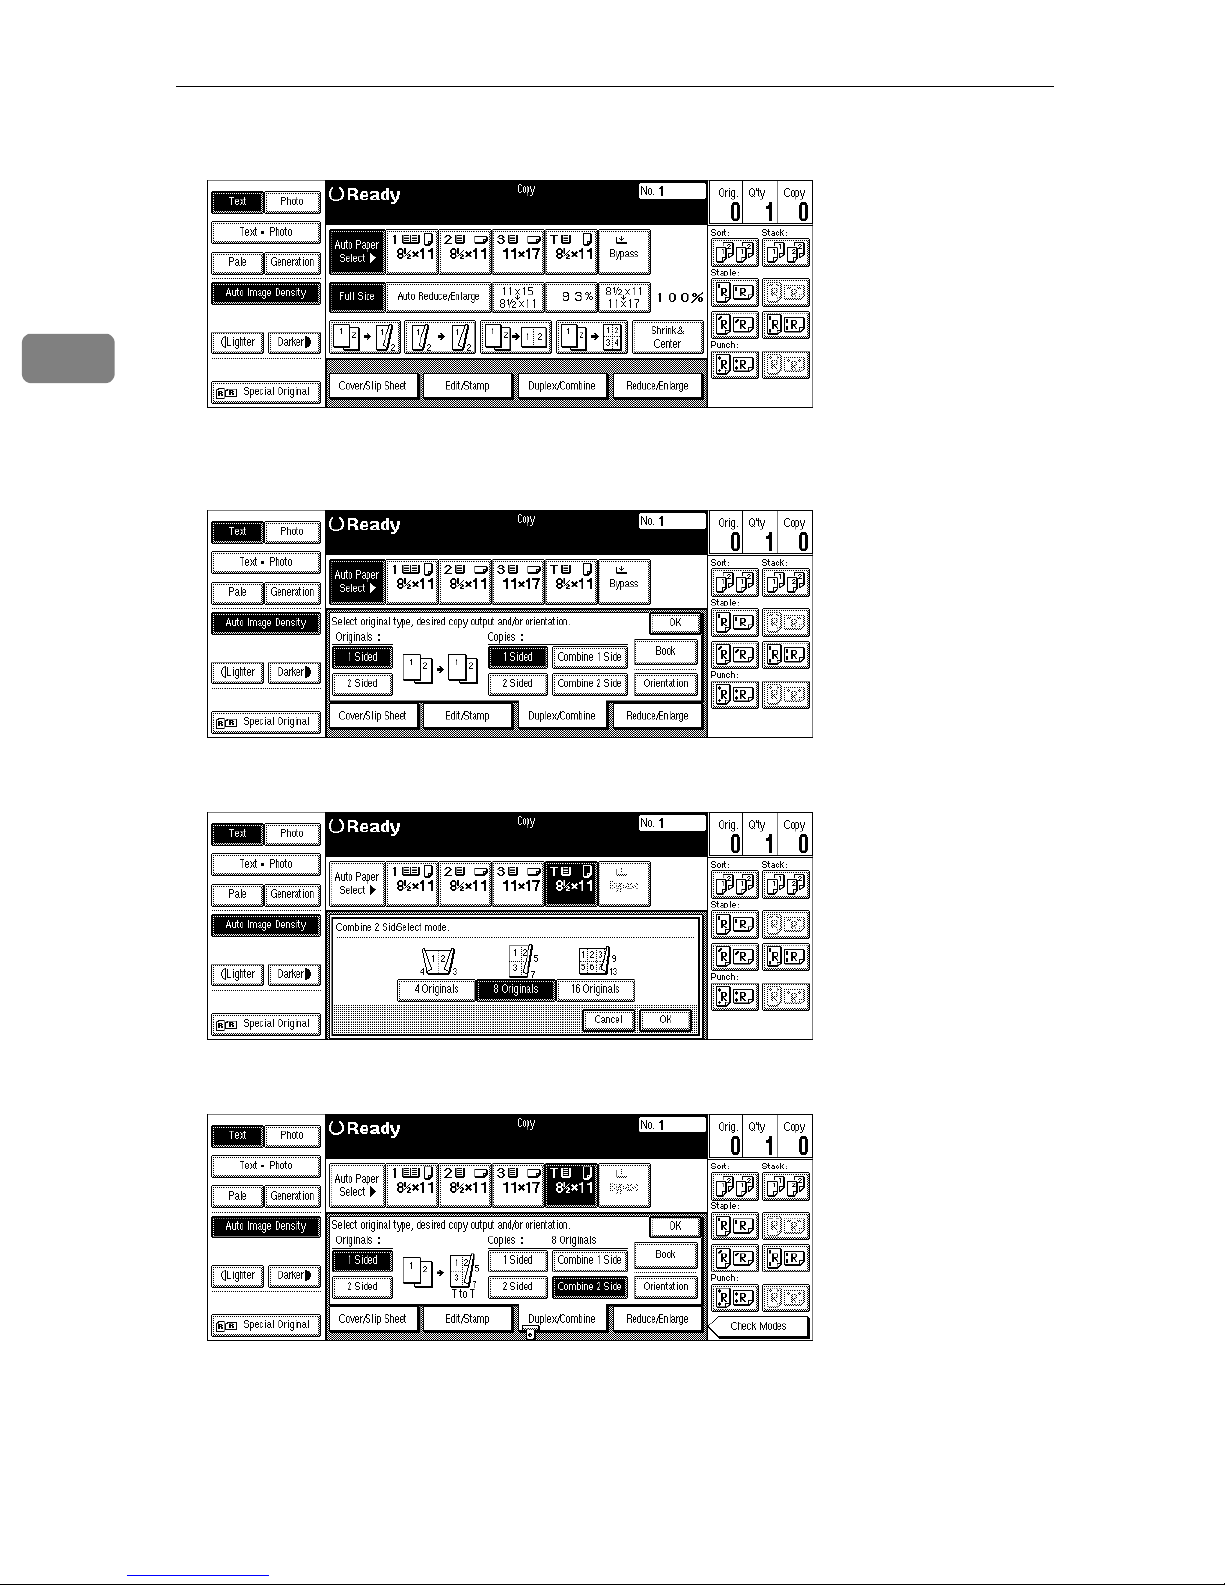
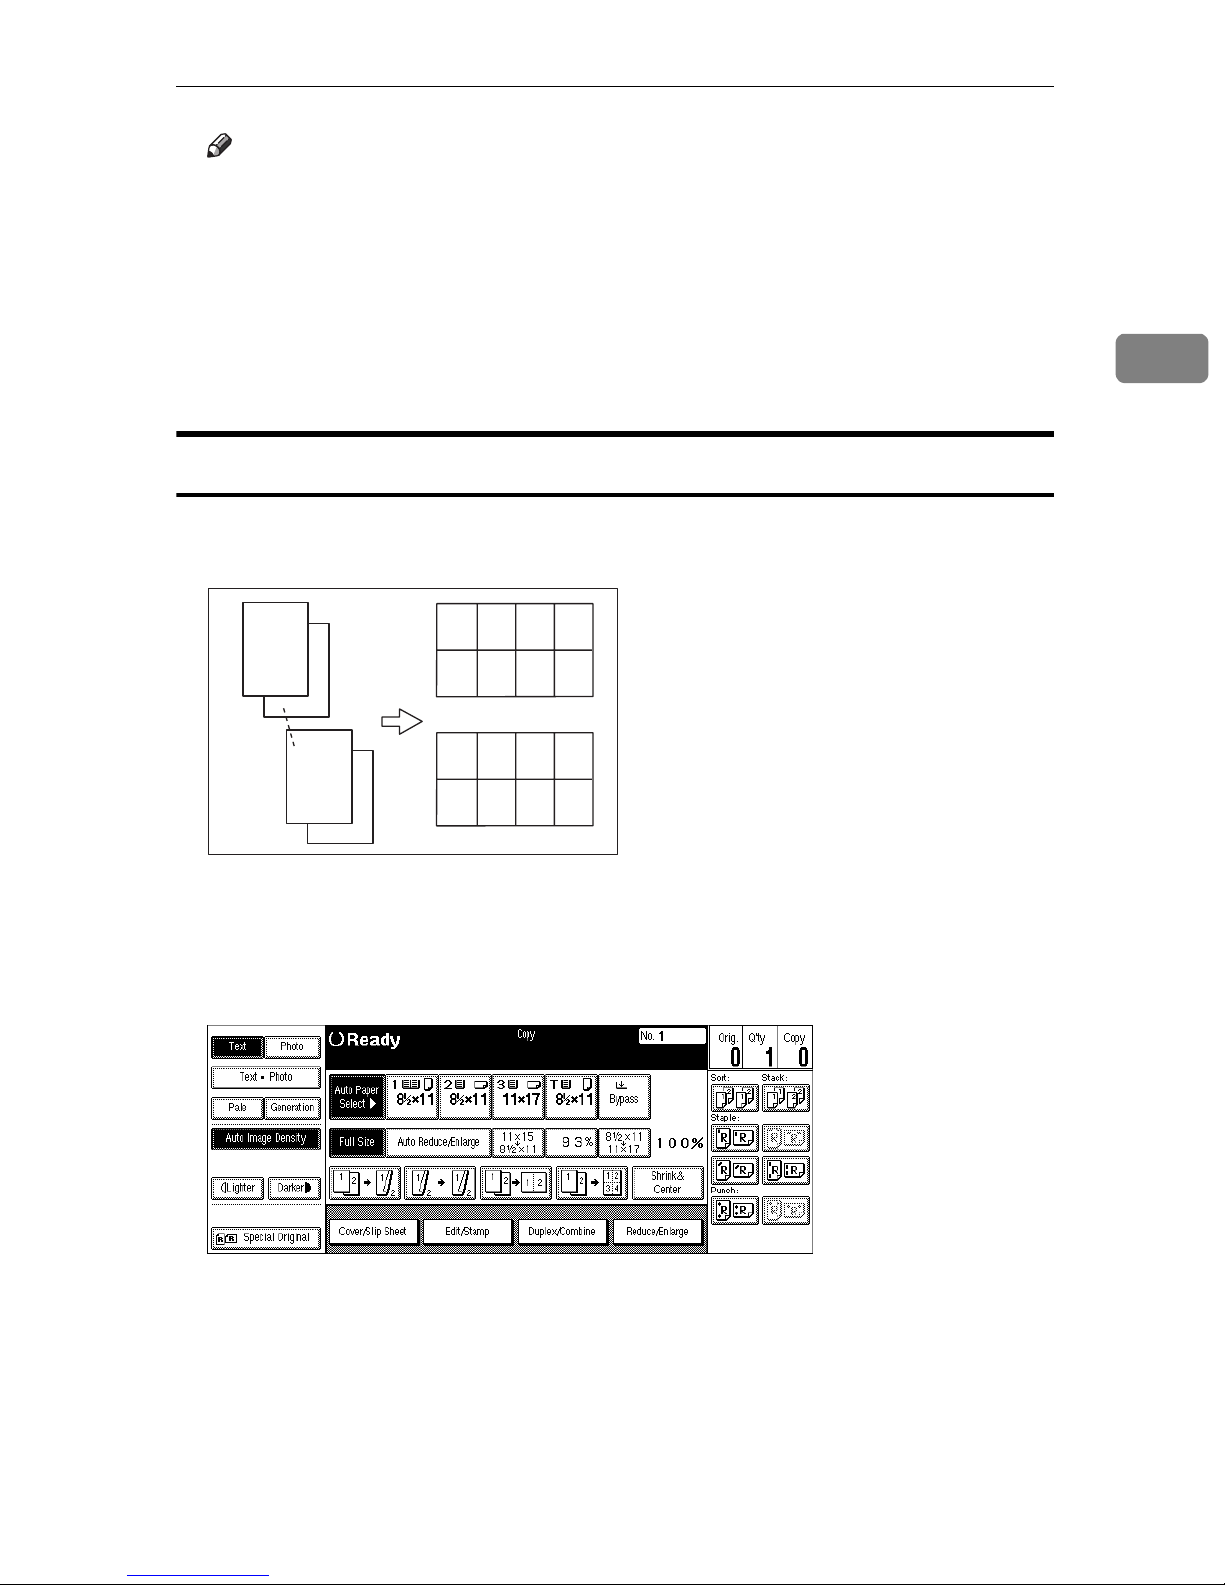
1 Sided 8 Pages → Combine 2 Side
Copies eight 1-sided originals together to both sides of a sheet.
1
2
1 2
7
8
34
12
5 6
78
GCSHVYAE
key.
}
1. Front
2. Back
123
Page 57
Copying
2
A Press the
B Press the
the copy.
[
Duplex/Combine
key for the original, then press the
[
1 Sided
]
key.
]
[
Combine 2 Side
key for
]
C Press the
[
8 Originals
key, then press the
]
D Check the orientation.
[OK]
key.
124
Page 58
Note
❒
To change the copy orientation to “Top to Bottom”, press the
key and select
Originals”
.
[
Top to Bottom
. See ⇒ P.110
]
“Specifying Orientation of Bound
Combine
[
Orientation
]
E Press the
[
OK
key.
]
F Select the paper.
G Set your originals, then press the
{
Start
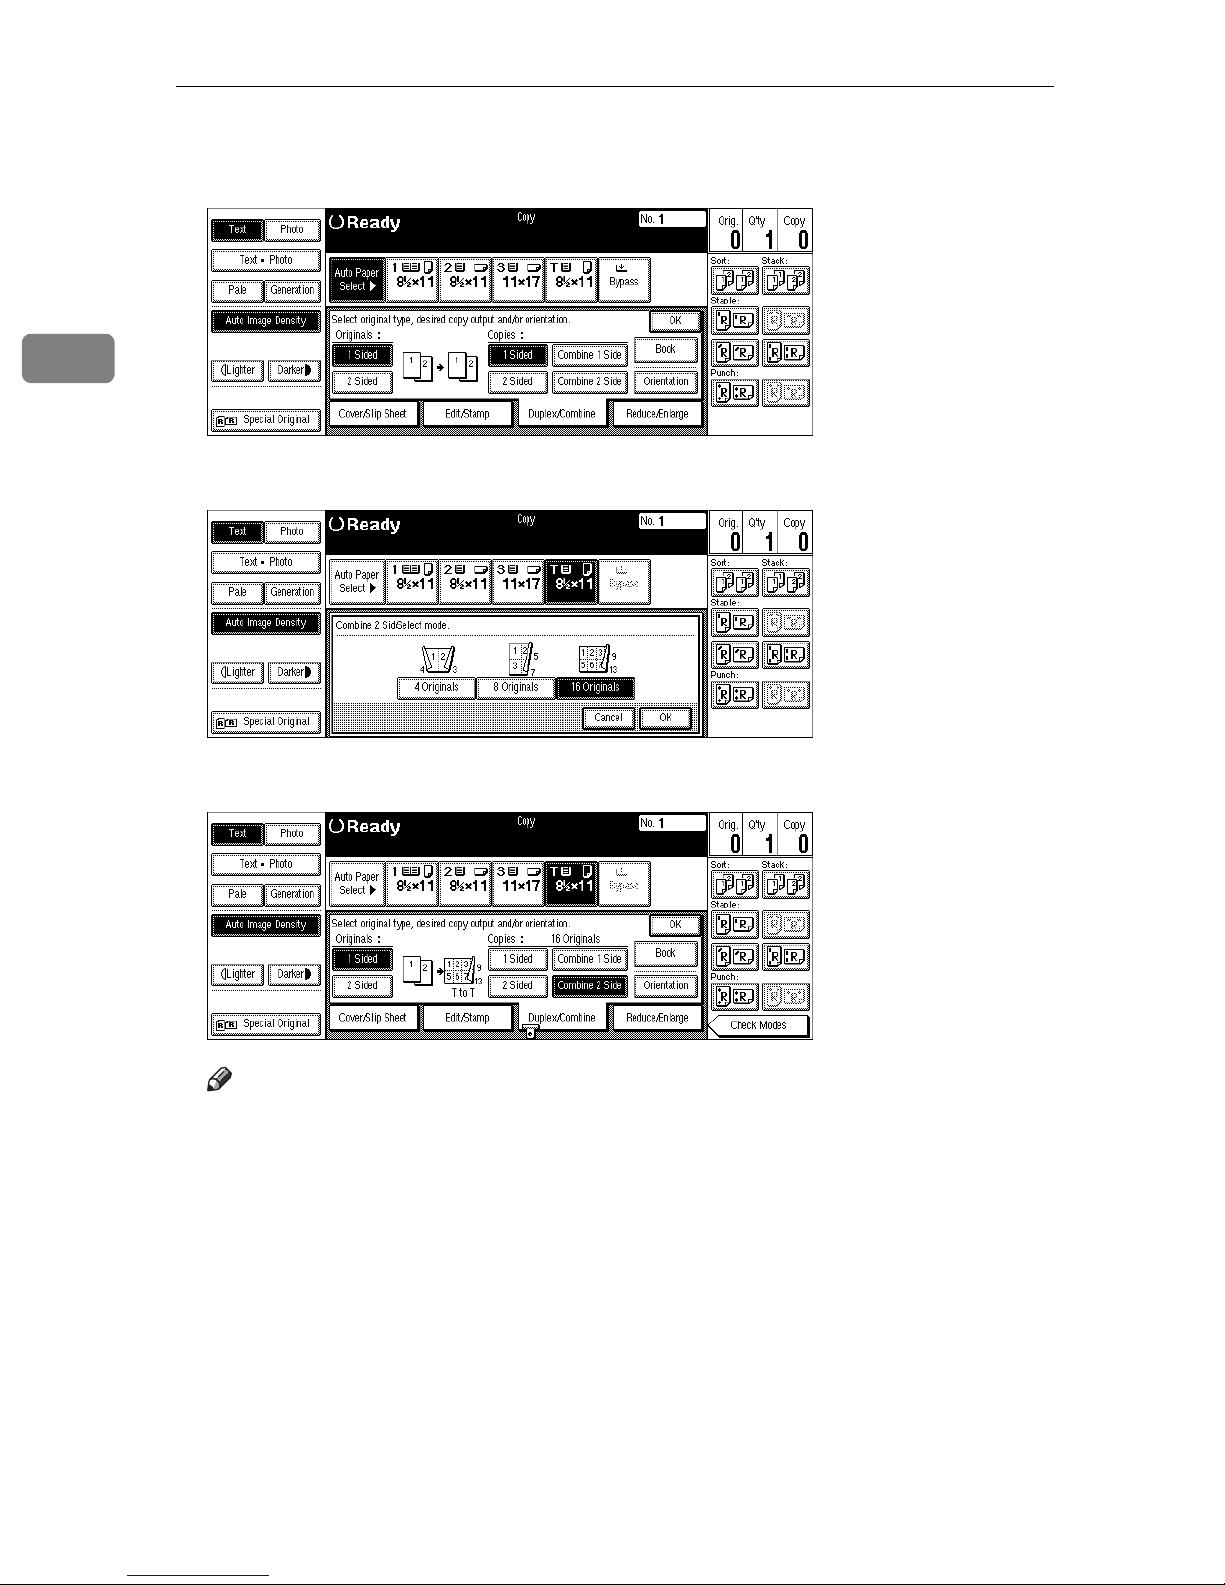
1 Sided 16 Pages → Combine 2 Side
Copies sixteen 1-sided originals together to both sides of a sheet.
1
2
15
16
1 234
5678
1
9 10 11 12
13 14 15 16
2
GCSHVY5E
key.
}
2
1. Front
2. Back
A Press the
[
Duplex/Combine
key.
]
125
Page 59
Copying
2
B Press the
the copy.
C Press the
key for the original, then press the
[
1 Sided
[
16 Originals
]
key, then press the
]
[OK]
key.
[
Combine 2 Side
key for
]
D Check the orientation.
Note
❒
To change the copy orientation to “Top to Bottom”, press the
key and select
Originals”
E Press the
[
OK
.
key.
]
[
Top to Bottom
. See ⇒ P.110
]
F Select the paper.
G Set your originals, then press the
{
Start
key.
}
[
Orientation
“Specifying Orientation of Bound
]
126
Page 60
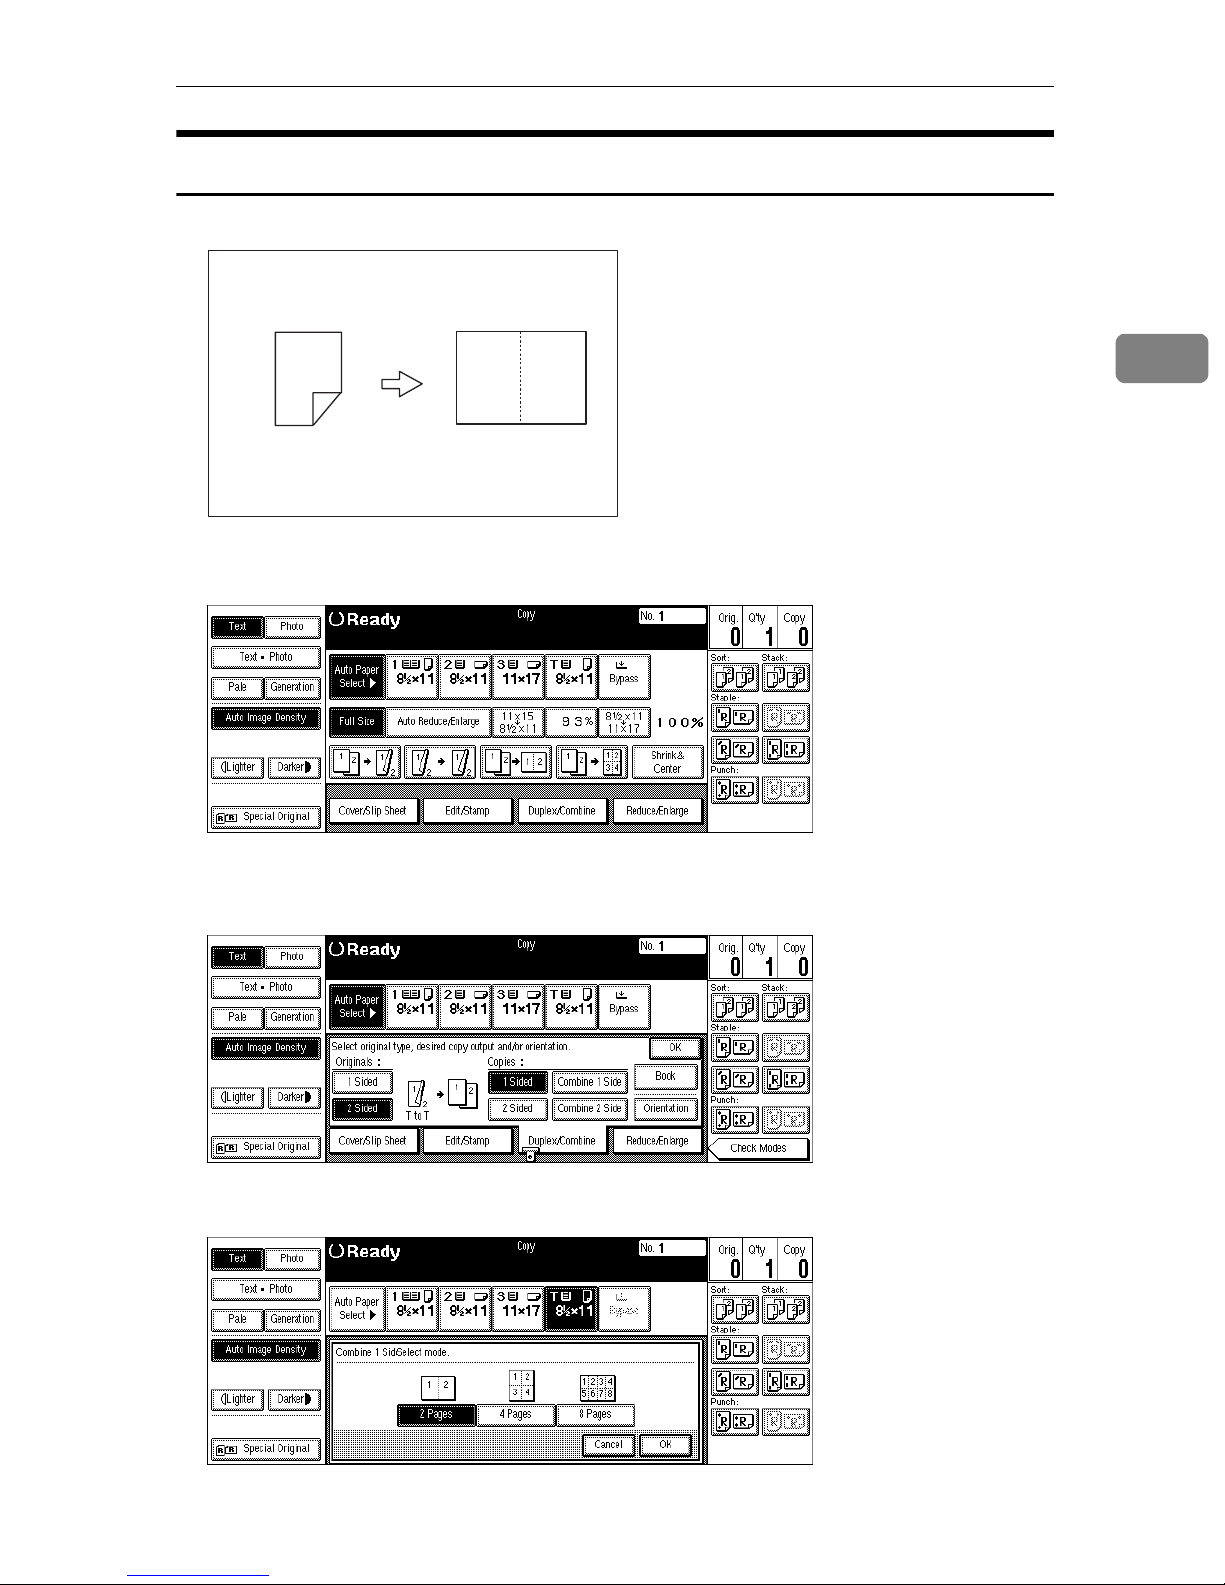
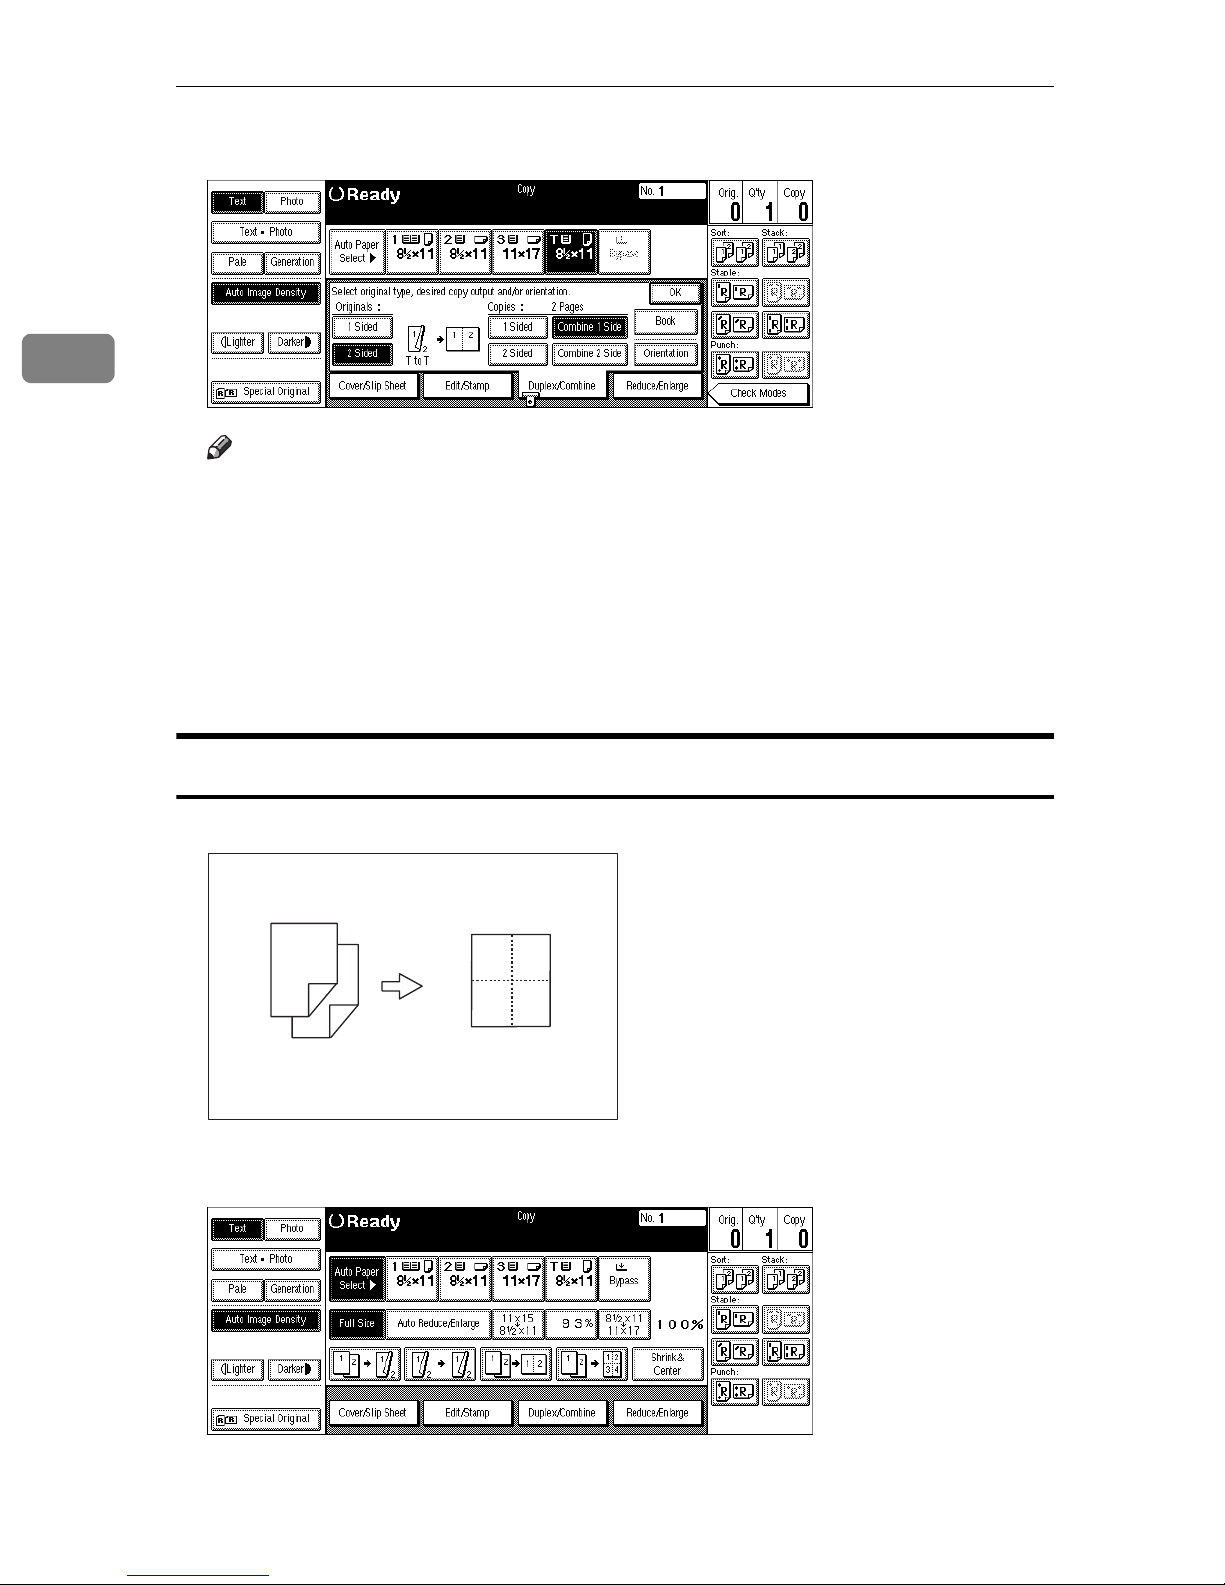
2 Sided 2 Pages → Combine 1 Side
Copies one 2-sided original to one side of a sheet.
1
1 2
2
GC SHVY OJ
Combine
2
A Press the
B Press the
the copy.
[
Duplex/Combine
key for the original, then press the
[
2 Sided
]
key.
]
[
Combine 1 Side
key for
]
C Press the
[
2 Pages
]
key, then press the
[OK]
key.
127
Page 61
2
Copying
D Check the orientation.
Note
❒
To change the copy orientation to “Top to Bottom”, press the
key and select
Originals”
[
Top to Bottom
.
. See ⇒ P.110
]
[
Orientation
“Specifying Orientation of Bound
]
E Press the
[
OK
key.
]
F Select the paper.
G Set your originals, then press the
{
Start
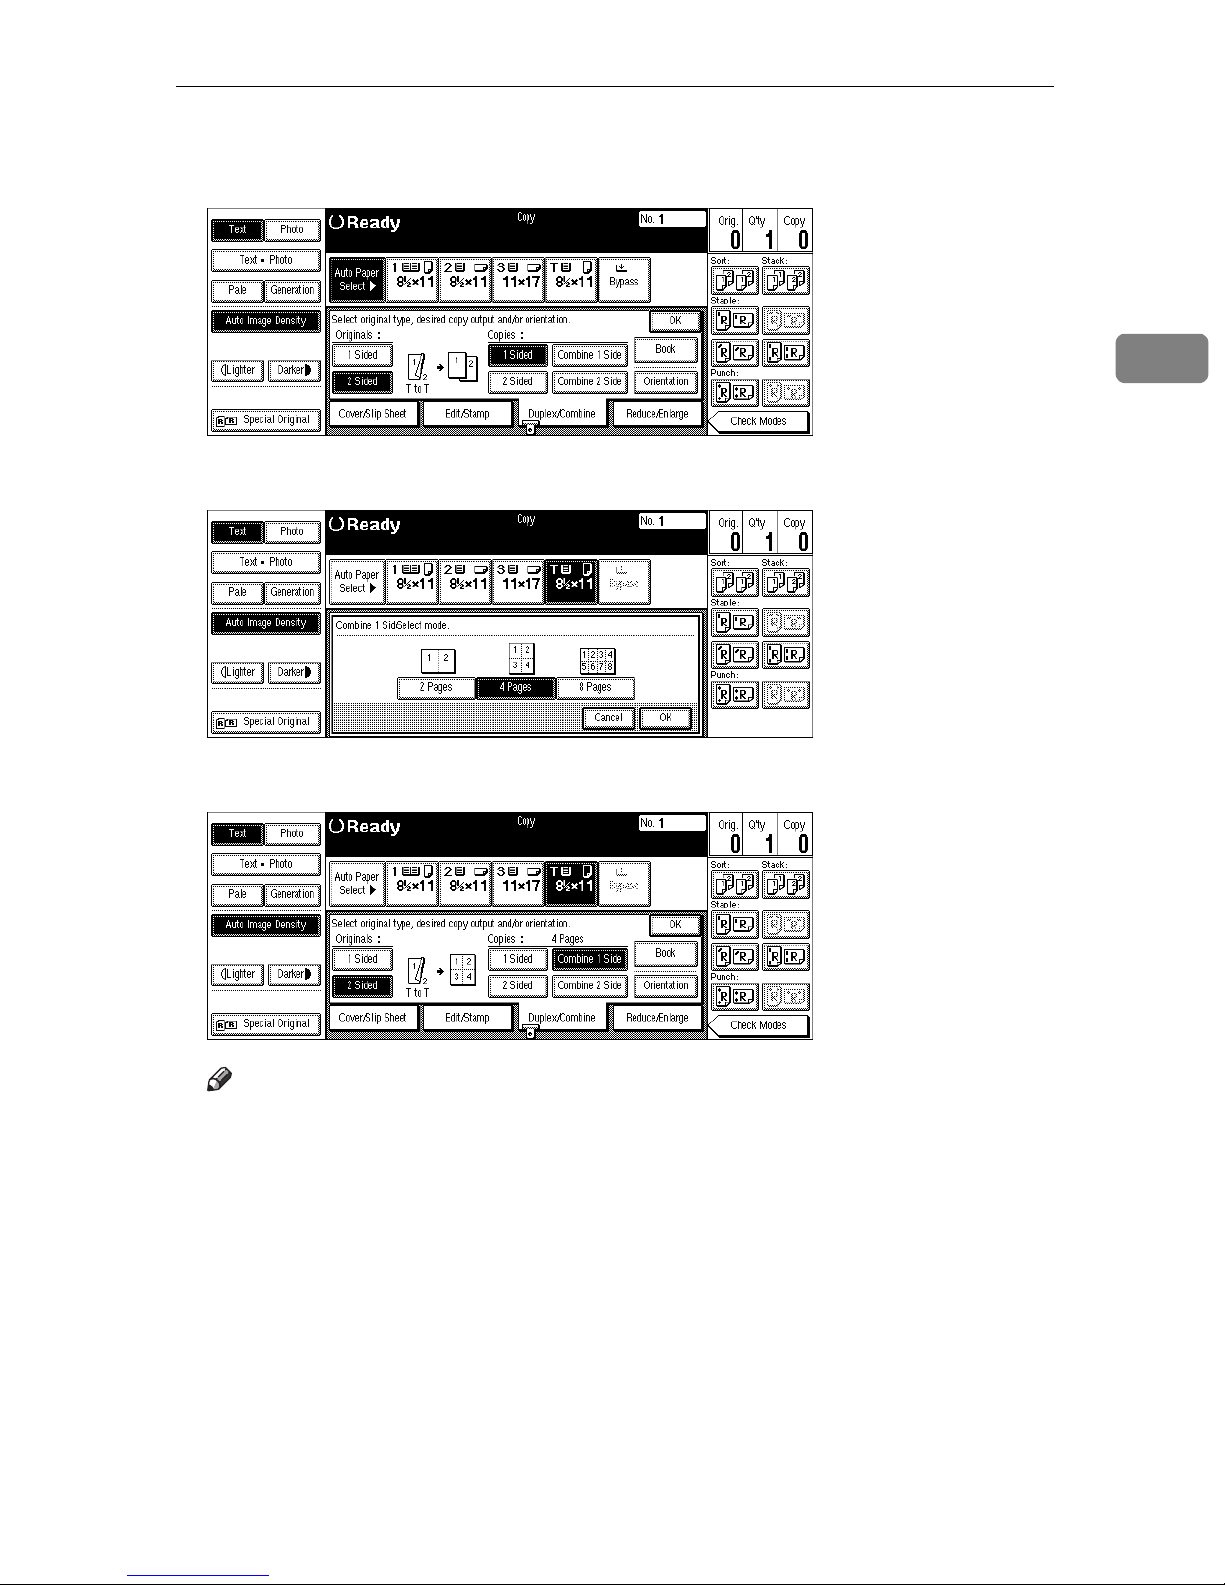
2 Sided 4 Pages → Combine 1 Side
Copies two 2-sided originals to one side of a sheet.
1
3
2
4
1 2
34
GC SHVY BJ
key.
}
A Press the
[
Duplex/Combine
128
key.
]
Page 62
Combine
B Press the
the copy.
C Press the
[
2 Sided
[
4 Pages
key for the original, then press the
]
key, then press the
]
[OK]
key.
[
Combine 1 Side
key for
]
2
D Check the orientation.
Note
❒
To change the copy orientation to “Top to Bottom”, press the
key and select
Originals”
E Press the
[
OK
.
key.
]
[
Top to Bottom
. See ⇒ P.110
]
F Select the paper.
G Set your originals, then press the
{
Start
key.
}
[
Orientation
“Specifying Orientation of Bound
]
129
Page 63
2
Copying
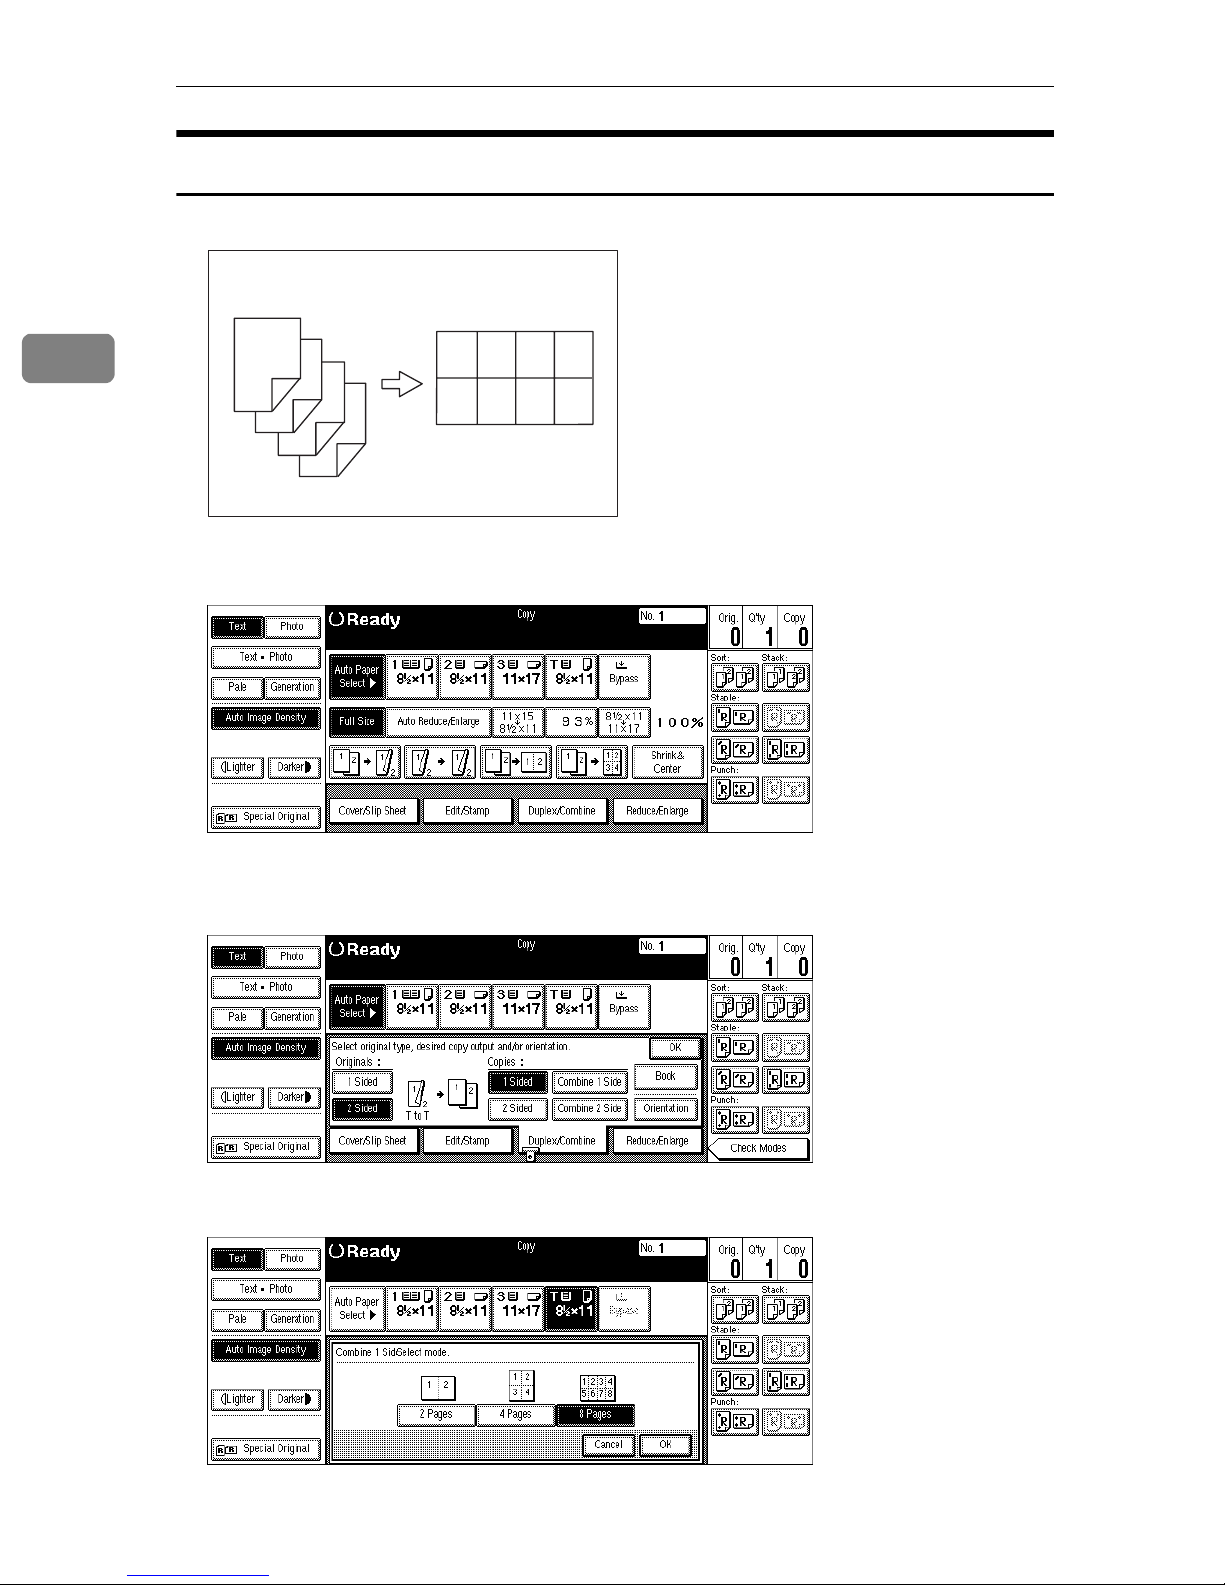
2 Sided 8 Pages → Combine 1 Side
Copies four 2-sided originals to one side of a sheet.
1
3
5
2
7
4
6
8
1 234
5678
GC SHVY 4J
A Press the
B Press the
the copy.
[
Duplex/Combine
key for the original, then press the
[
2 Sided
]
key.
]
[
Combine 1 Side
key for
]
C Press the
[
8 Pages
]
130
key, then press the
[OK]
key.
Page 64
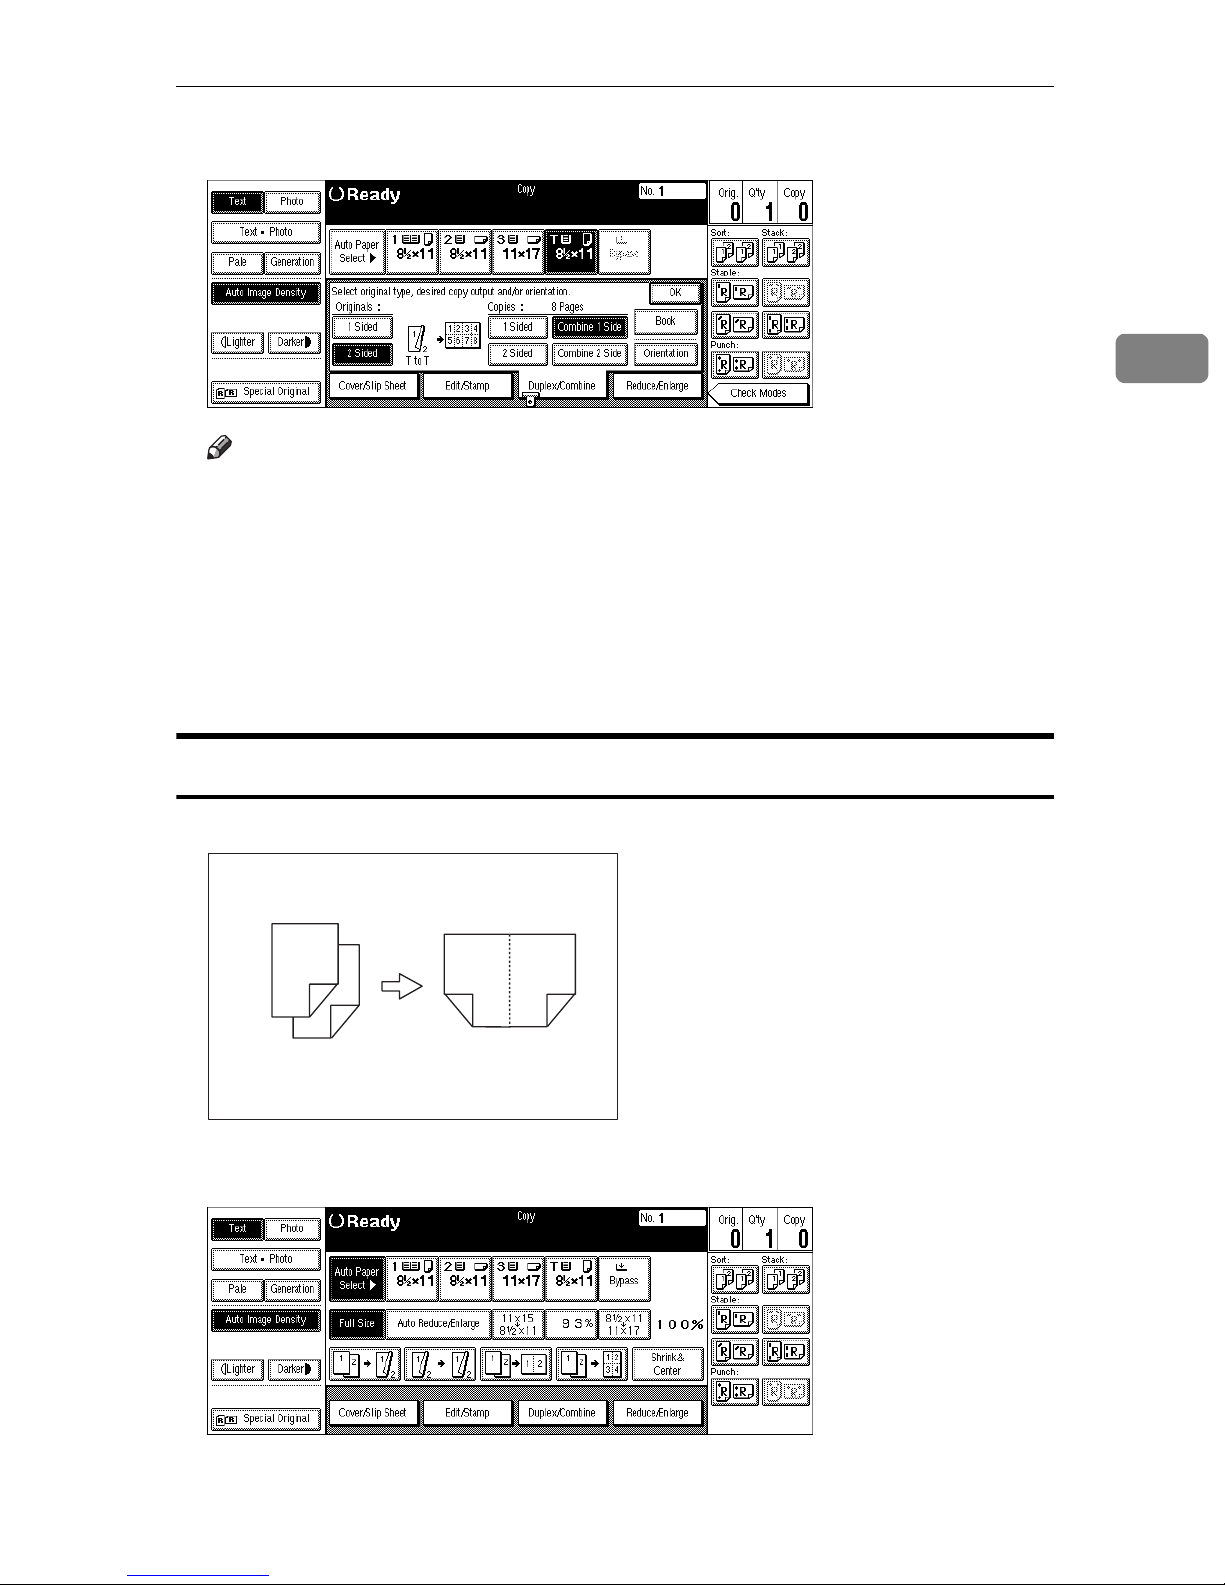
D Check the orientation.
Note
❒
To change the copy orientation to “Top to Bottom”, press the
key and select
Originals”
[
Top to Bottom
.
. See ⇒ P.110
]
Combine
[
Orientation
“Specifying Orientation of Bound
2
]
E Press the
[
OK
key.
]
F Select the paper.
G Set your originals, then press the
{
Start
2 Sided 4 Pages → Combine 2 Side
Copies 2-sided originals together to both sides of a sheet.
1
3
2
4
4
21
3
GC SHVY 1J
key.
}
A Press the
[
Duplex/Combine
key.
]
131
Page 65
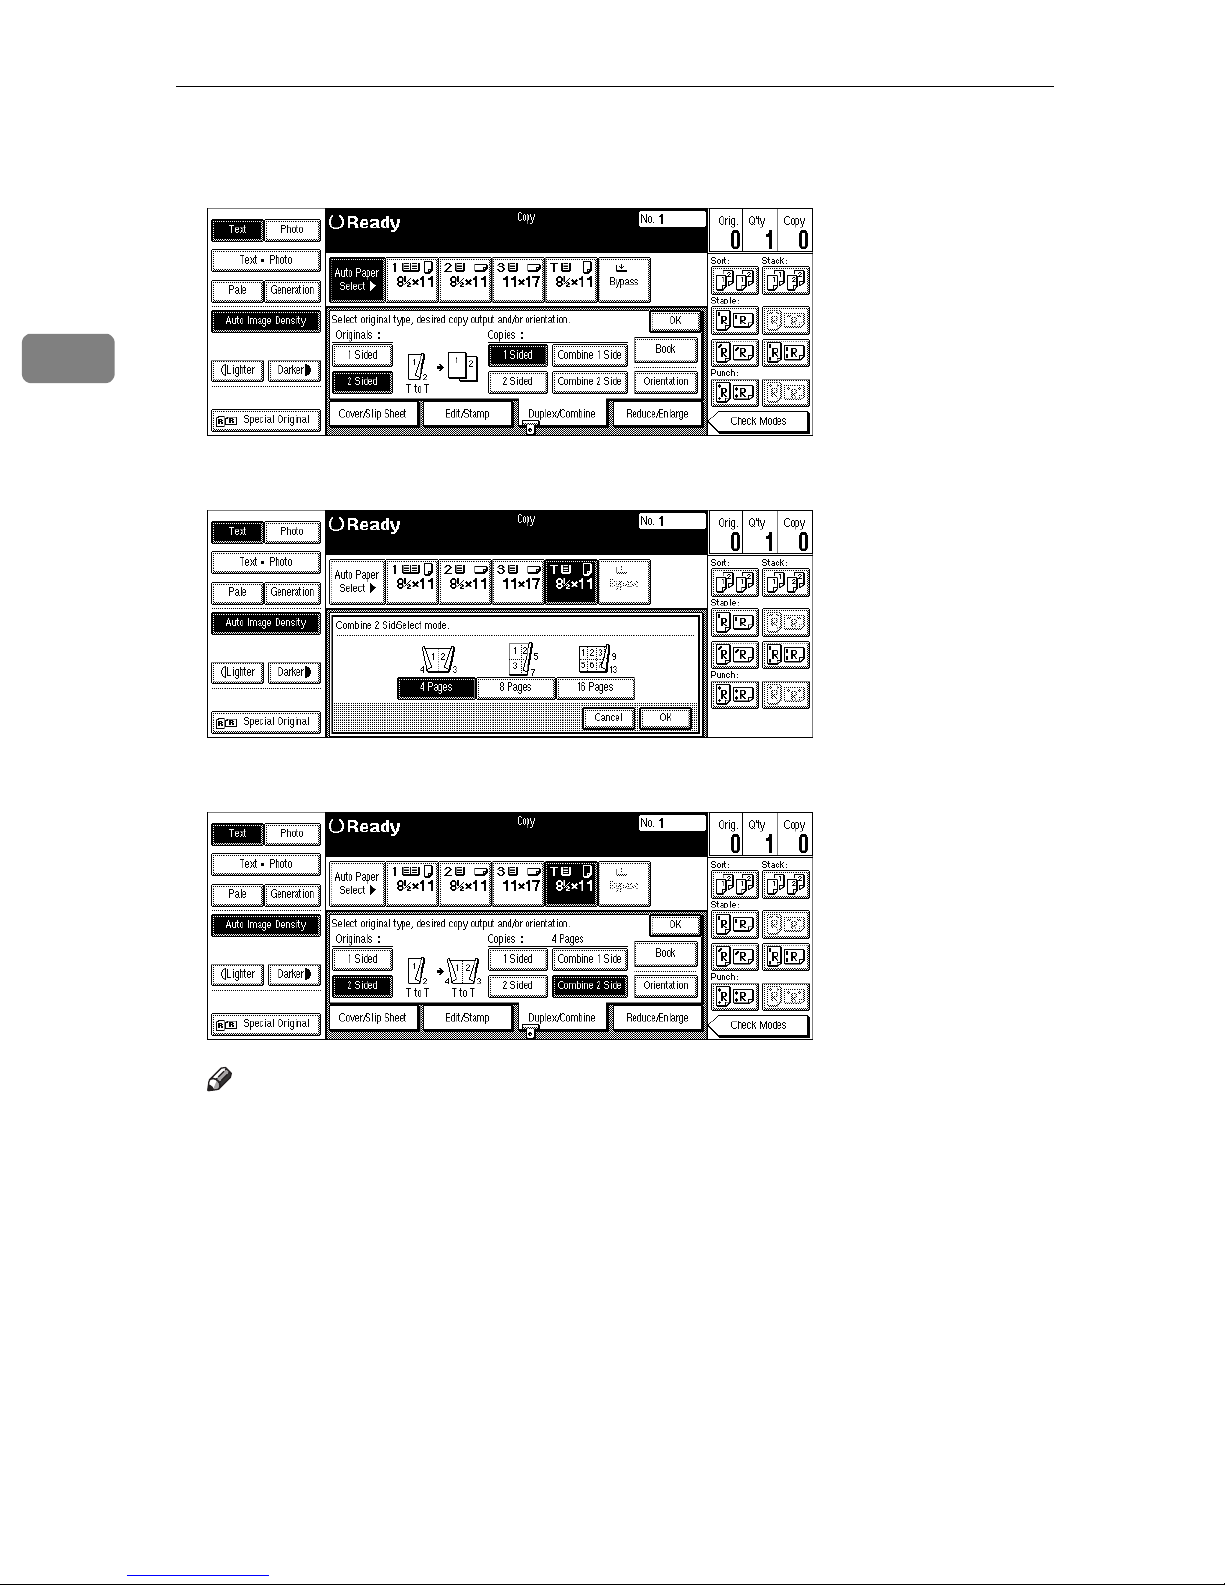
Copying
2
B Press the
the copy.
C Press the
[
2 Sided
[
4 Pages
key for the original, then press the
]
key, then press the
]
[OK]
key.
[
Combine 2 Side
key for
]
D Check the orientation.
Note
❒
To change the copy orientation to “Top to Bottom”, press the
key and select
Originals”
E Press the
[
OK
.
key
]
[
Top to Bottom
. See ⇒ P.110
]
F Select the paper.
G Set your originals, then press the
{
Start
key.
}
[
Orientation
“Specifying Orientation of Bound
]
132
Page 66
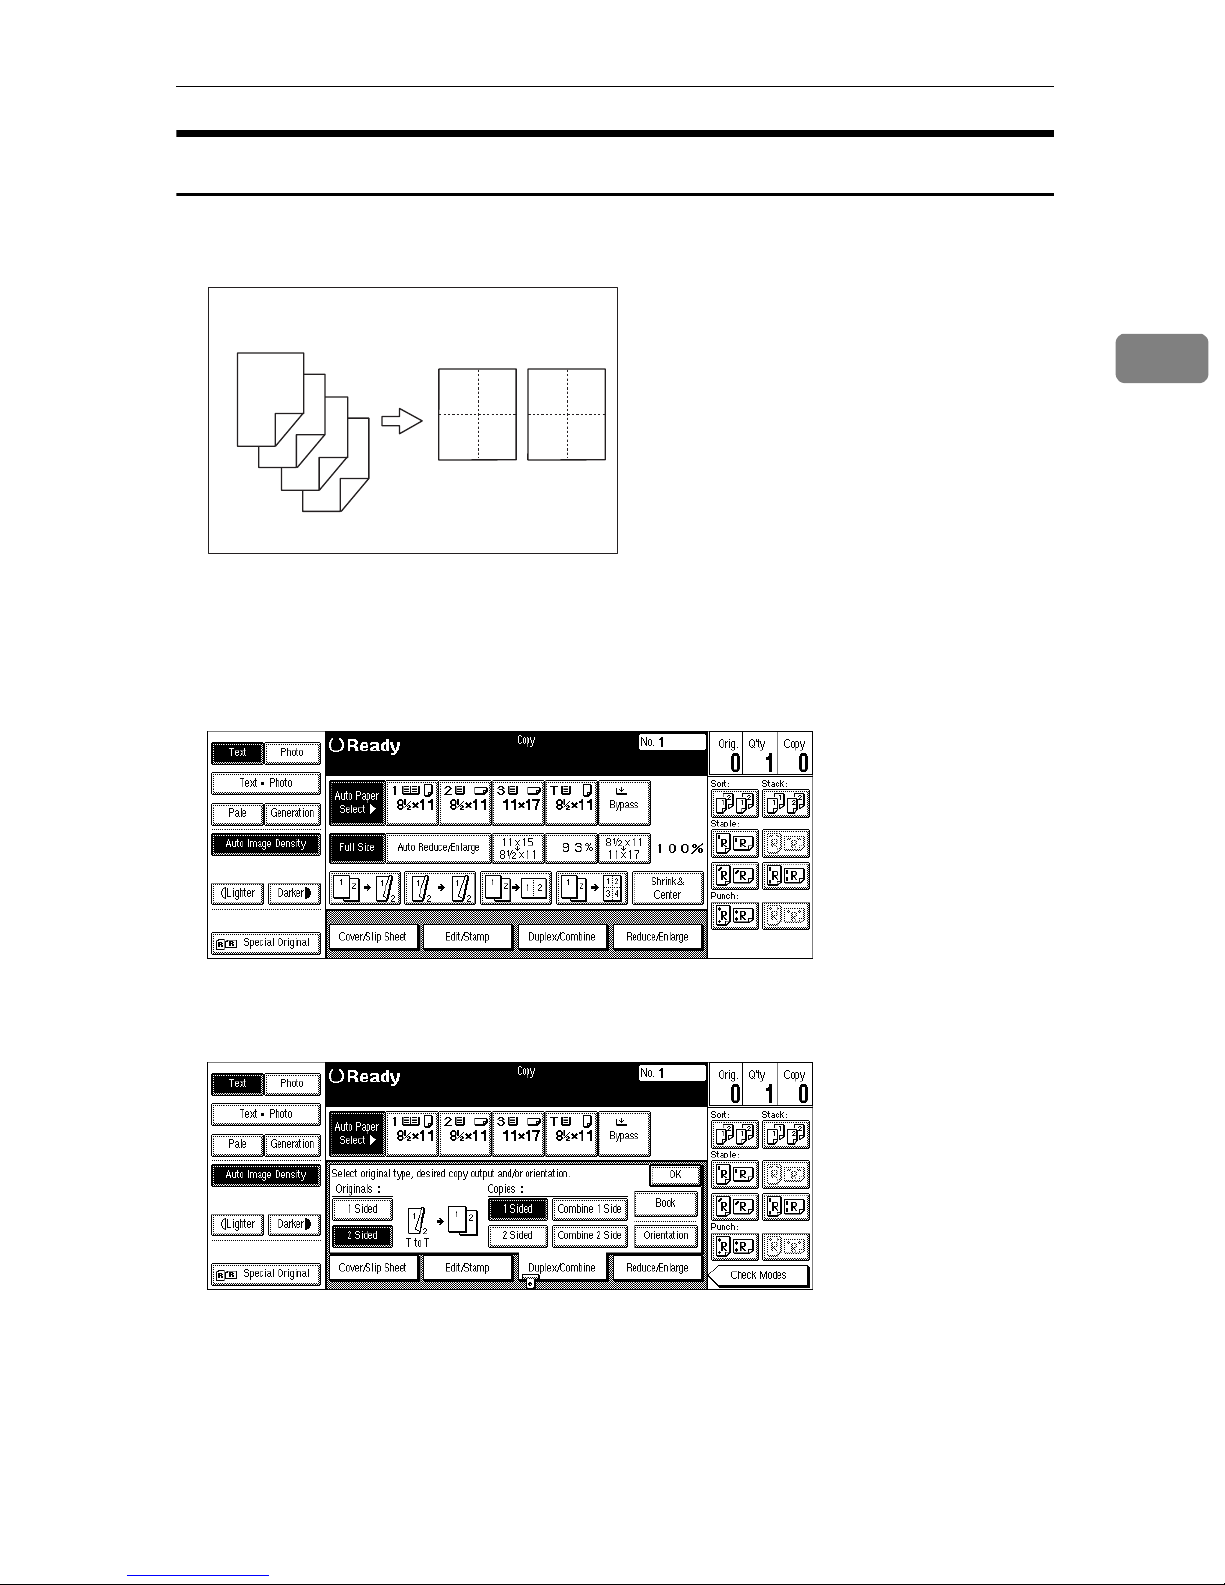
2 Sided 8 Pages → Combine 2 Side
Copies four 2-sided originals together to both sides of a sheet.
Combine
1
2
1. Front
2. Back
A Press the
3
5
7
4
6
8
[
Duplex/Combine
key.
]
5 6
78
GCSHVY2E
1 2
34
12
2
B Press the
[
2 Sided
key for the original, then press the
]
the copy.
[
Combine 2 Side
key for
]
133
Page 67
Copying
2
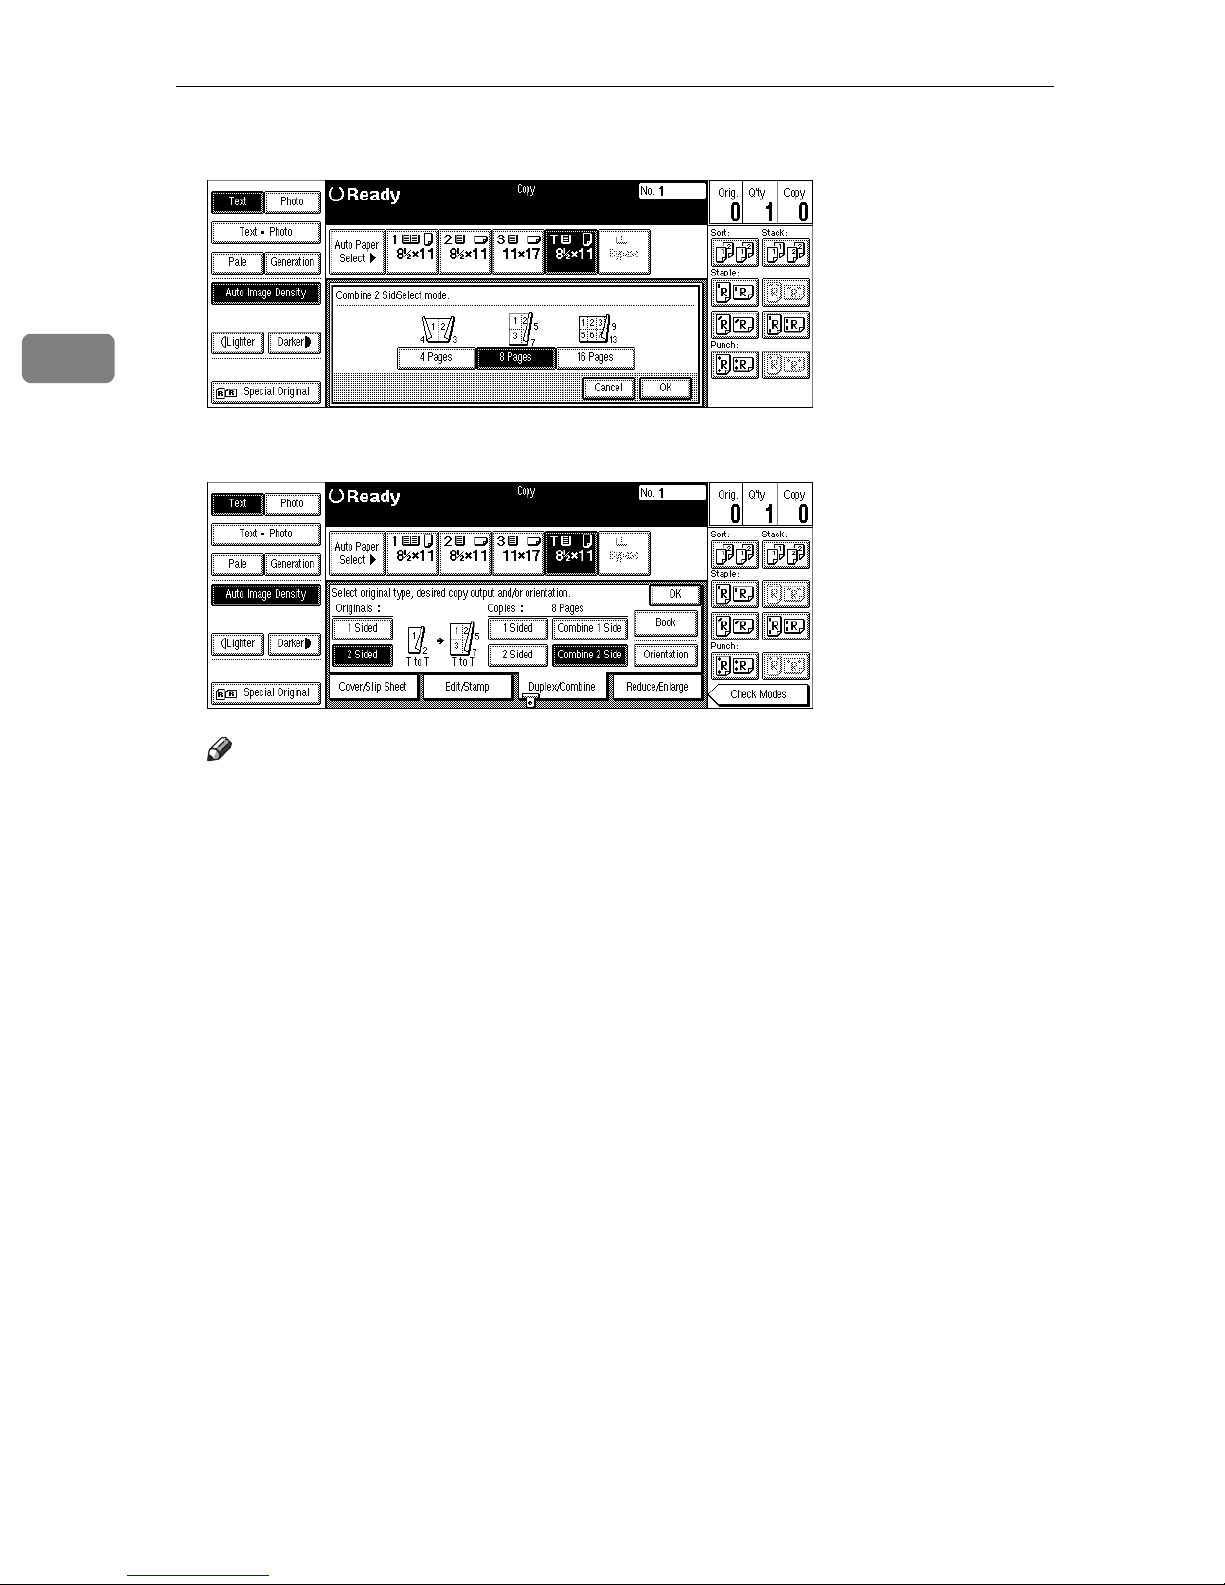
C Press the
[
8 Pages
key, then press the
]
D Check the orientation.
[OK]
key.
Note
❒
To change the copy orientation to “Top to Bottom”, press the
key and select
Originals”
E Press the
[
OK
.
key
]
[
Top to Bottom
. See ⇒ P.110
]
F Select the paper.
G Set your originals, then press the
{
Start
key.
}
[
Orientation
“Specifying Orientation of Bound
]
134
Page 68
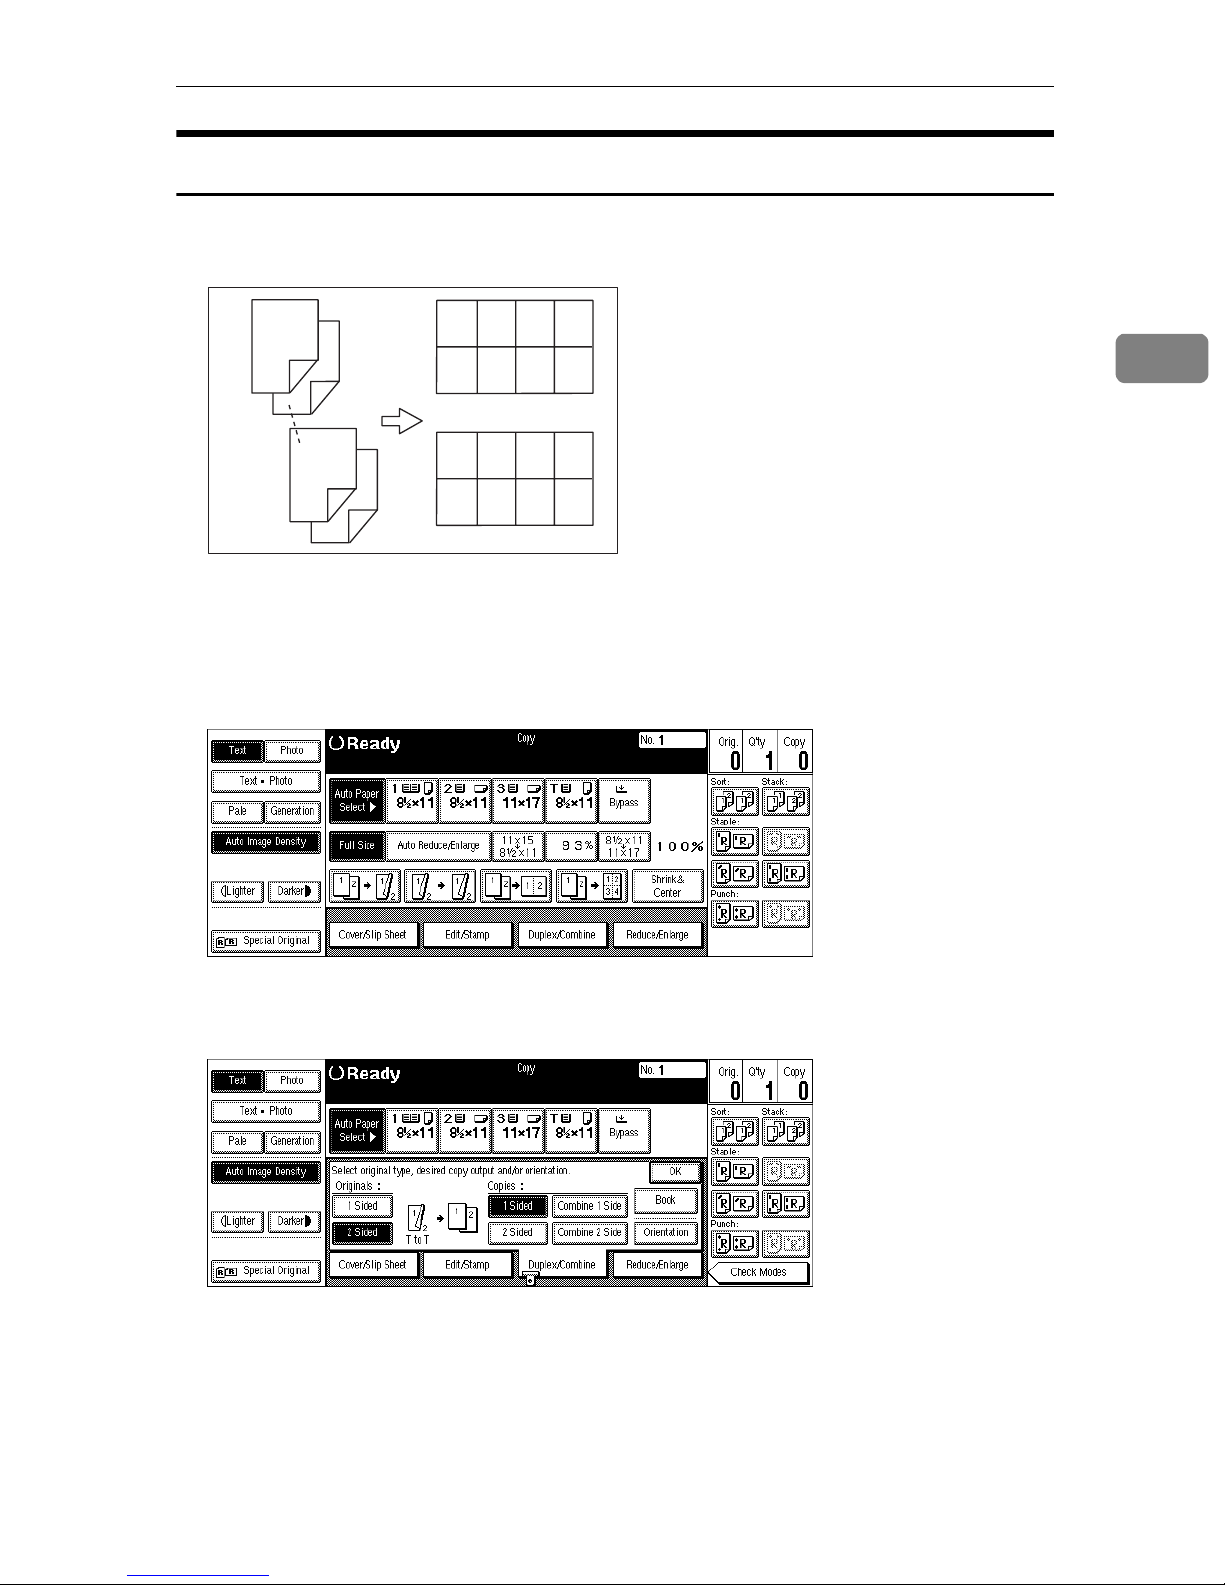
2 Sided 16 Pages → Combine 2 Side
Copies eight 2-sided originals together to both sides of a sheet.
Combine
2
1. Front
2. Back
A Press the
1
3
4
13
15
14
16
[
Duplex/Combine
13 14 15 16
1 234
5678
1
9 10 11 12
2
GCSHVY6E
key.
]
2
B Press the
[
2 Sided
key for the original, then press the
]
the copy.
[
Combine 2 Side
key for
]
135
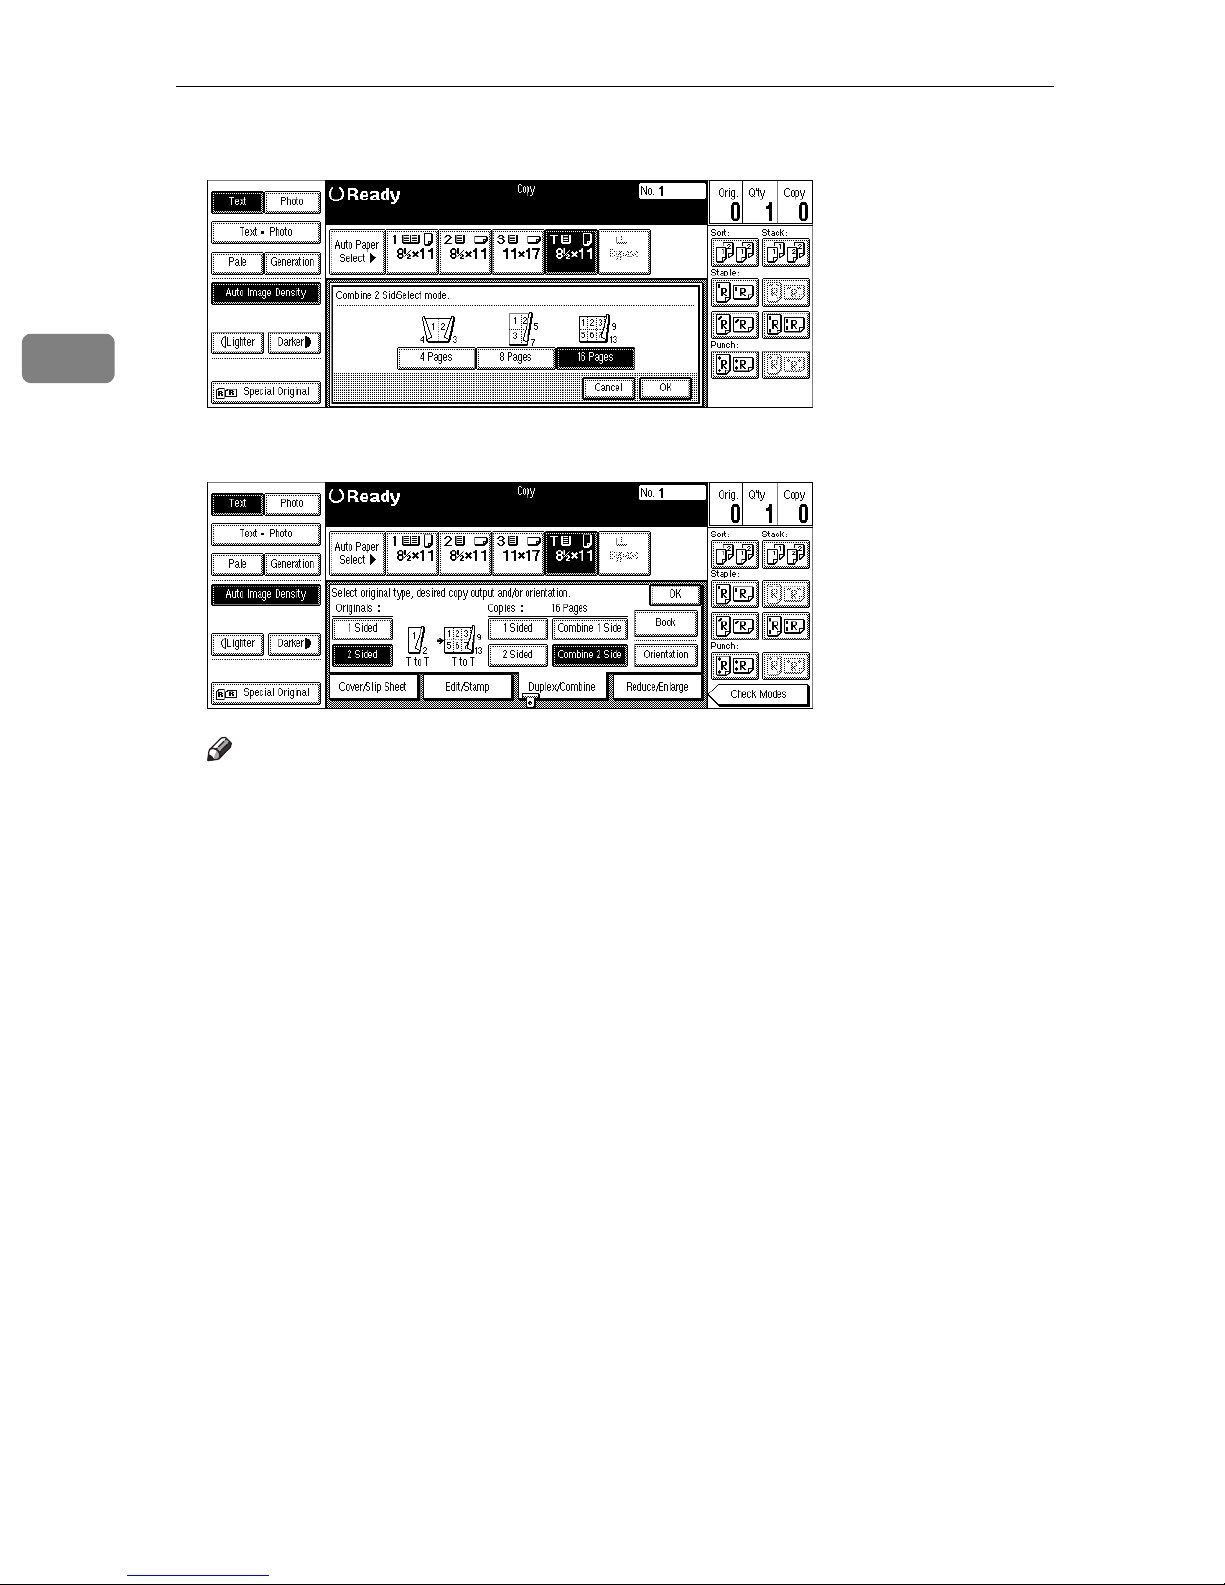
Page 69
Copying
2
C Press the
[
16 Pages
key, then press the
]
D Check the orientation.
[OK]
key.
Note
❒
To change the copy orientation to “Top to Bottom”, press the
key and select
Originals”
E Press the
[
OK
.
key.
]
[
Top to Bottom
. See ⇒ P.110
]
F Select the paper.
G Set your originals, then press the
{
Start
key.
}
[
Orientation
“Specifying Orientation of Bound
]
136
Page 70

Series/Book
Series/Book
Series copies are made by separately copying the front and back of a 2-sided
original or the two facing pages of a spread original onto two sheets of paper. A
book is made by copying two or more originals in page order.
The following types of Series and Book modes can be used:
Series Copies
❖
Book → 1 Sided
Copies the two facing pages of a spread original to make two 1-sided copies.
❖
2 Sided → 1 Sided
Copies the front and back of a 2-sided original to make two 1-sided copies.
Book
❖
Book → 2 Sided
Copies a spread two-page original onto both sides of a sheet.
❖
Multi → 2 Sided
Copies each spread two-page original as it is onto both sides of a sheet.
❖
Booklet
Make copies in page order for a folded booklet.
❖
Magazine
Copies two or more originals to make copies in page order (as when they are
folded and stacked).
2
137
 Loading...