

Page 1

Copying
56
2
Punch
The optional 2 tray finisher and the bridge unit are required to use this function.
This function is used to make punch holes in copies.
❖❖❖❖ 2 holes
❖❖❖❖ 3 holes
❖❖❖❖ 4 holes
AdonisC2_ENcopy122F_FM.book Page 56 Thursday, February 15, 2001 3:23 PM
Page 2
Punch
57
2
Note
❒ When using Punch and Combine, Double Copies, or Auto Reduce/Enlarge,
the message "Blank part will appear. Check orientation." may appear because
of the orientation of the original and the copy paper. If this occurs, change the
orientation of the copy paper.
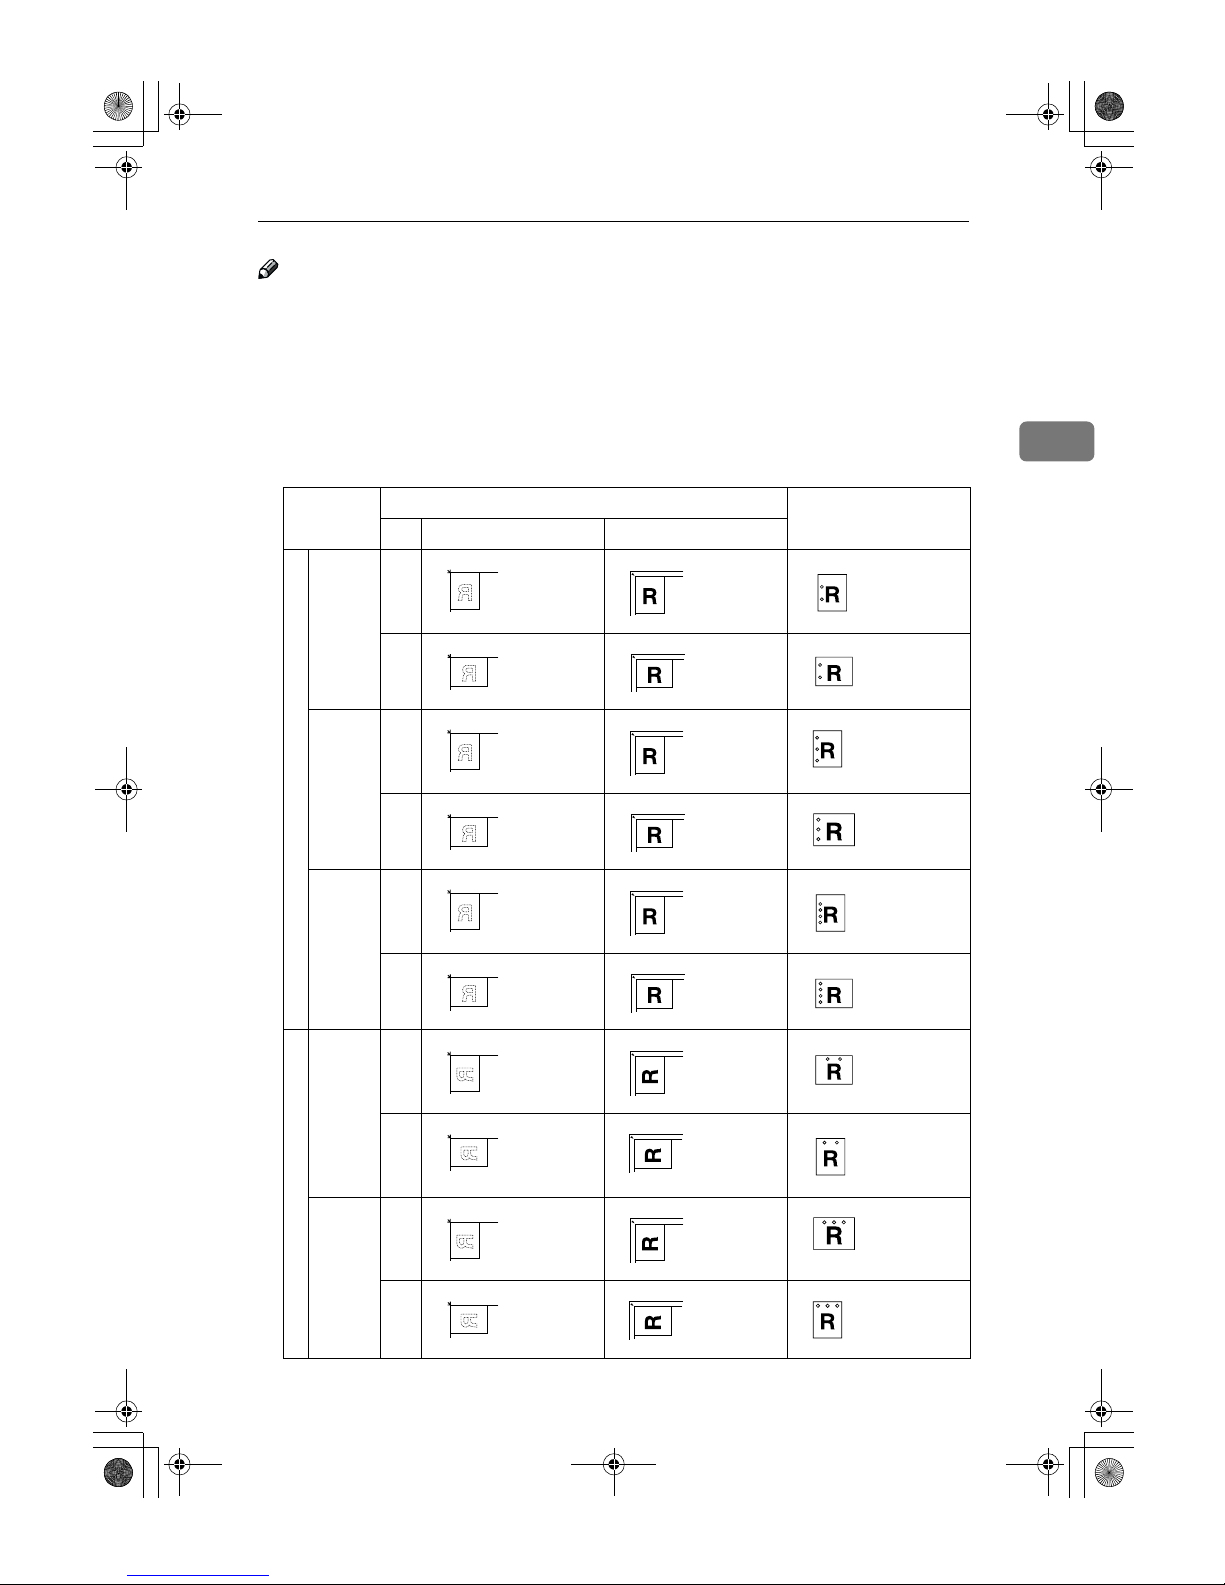
❒ The relationship between the direction in which you set the original and the
punch hole positions is as follows:
❖❖❖❖ Punch hole positions
Direction in which Original is Set Punch Hole Positions
Exposure glass Document feeder
Standard
2 holes
K
L
3 holes
K
L
4 holes
K
L
90º Turn
2 holes
K
L
3 holes
K
L
AdonisC2_ENcopy122F_FM.book Page 57 Thursday, February 15, 2001 3:23 PM
Page 3
Copying
58
2
❒ Punchable paper sizes are as follows:
❒ Since punch holes are made in each copy, the punch hole positions vary
slightly.
❒ The punch hole positions change according to the direction of the paper selected.
Reference
If the punch waste box fills up, ⇒ P.206 “y Removing Punch Waste”.
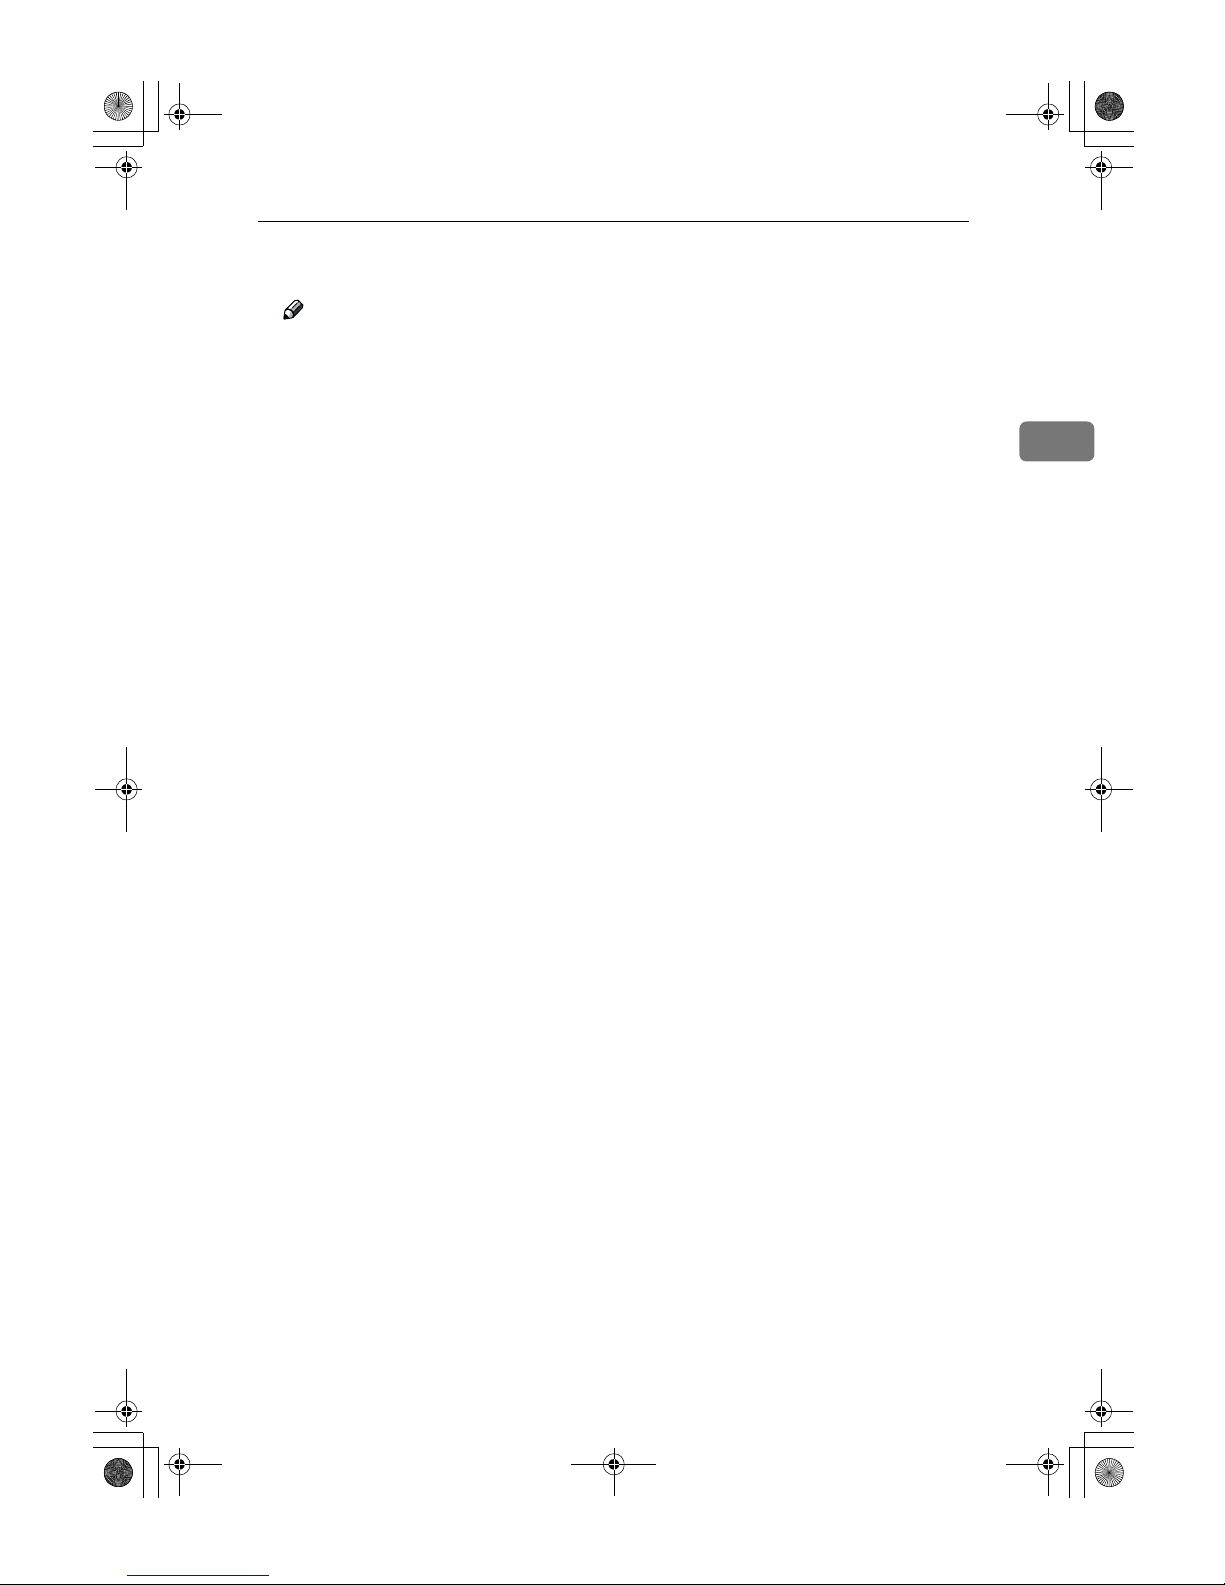
A
Select the Punch position.
Note
❒ When stapling copies, also select a stapling position. ⇒ P.50 “Staple”.
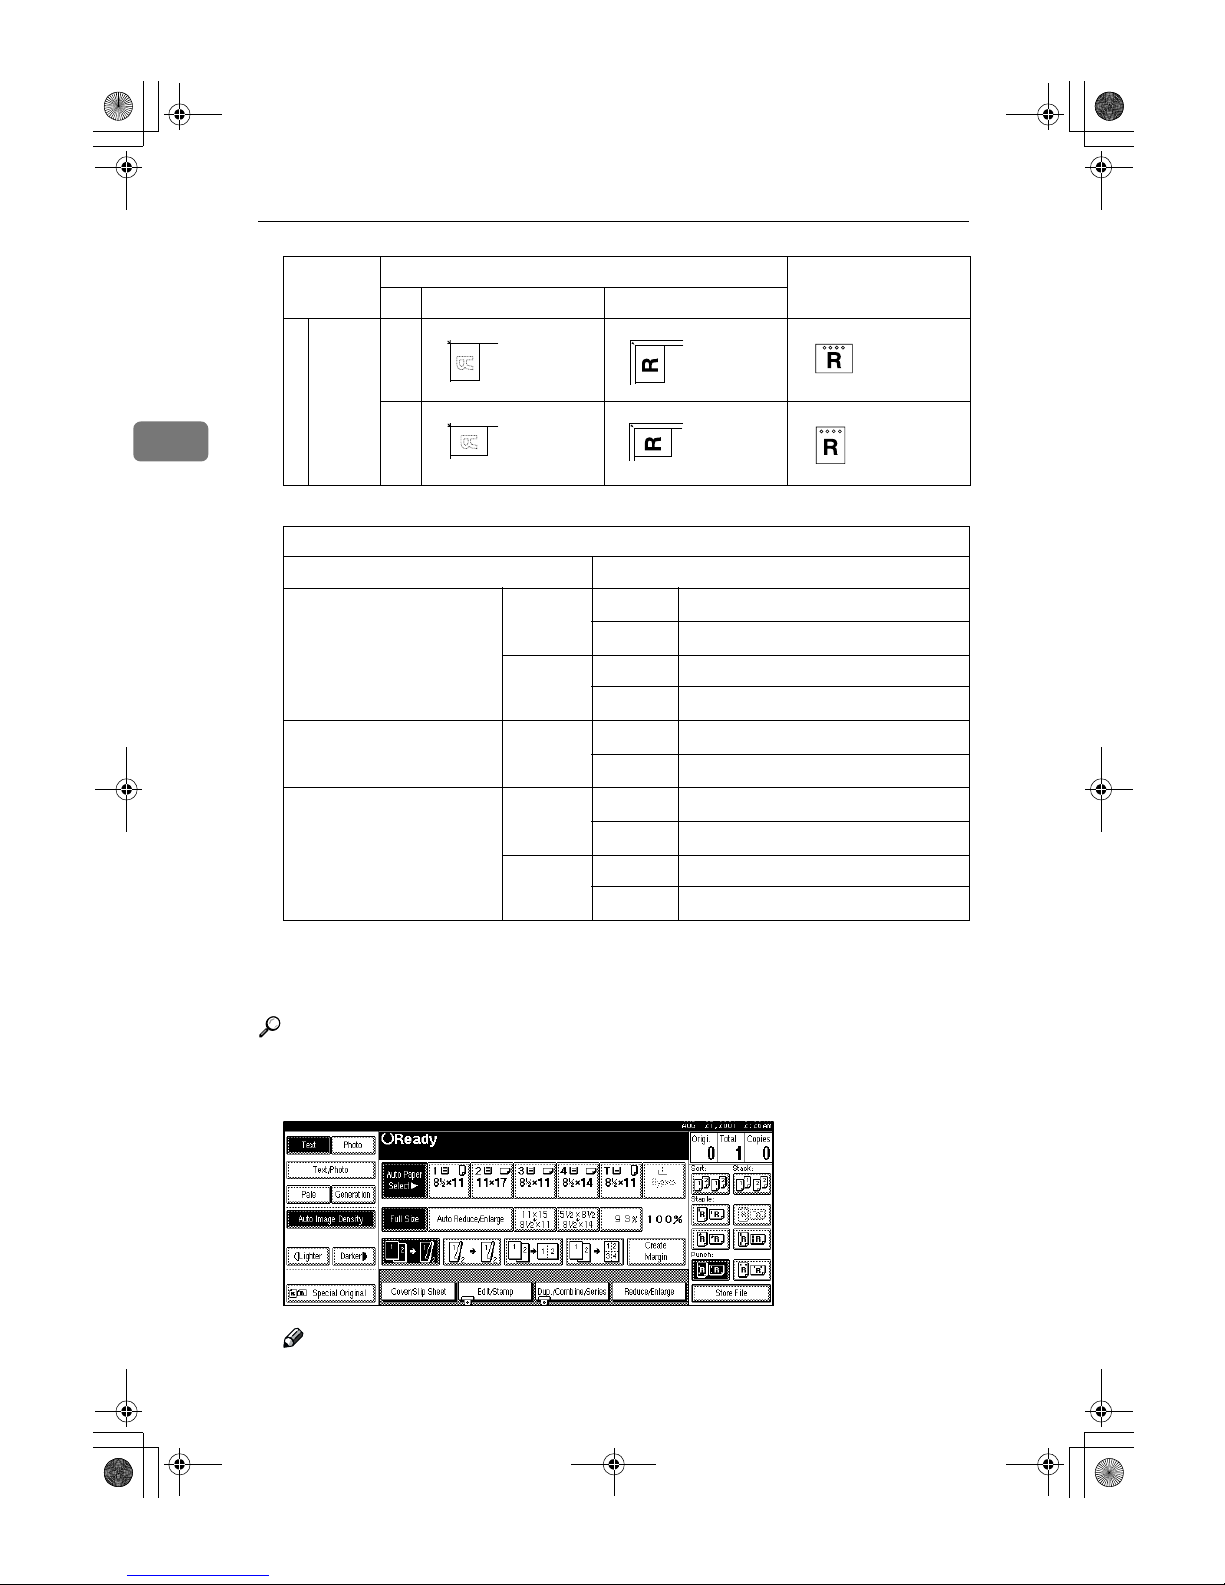
90º Turn
4 holes
K
L
With 2 Tray Finisher
Punch kit type
2 & 4 holes type 2 holes
L
A3-A5, 11" × 17"-5
1
/2" × 81/2"
K
A4-A5, 8
1
/2" × 11"-51/2" × 81/2"
4 holes
L
A3, B4, 11" × 17"
K
A4, B5, 81/2" × 11"
4 holes type 4 holes
L
A3-A5, 11" × 17"-5
1
/2" × 81/2"
K
A4-A5, 8
1
/2" × 11"-51/2" × 81/2"
2 & 3 holes type 2 holes
L
A3-A5, 11" × 17"-5
1
/2" × 81/2"
K
A4-A5, 8
1
/2" × 11"-51/2" × 81/2"
3 holes
L
A3, B4, 11" × 17"
K
A4, B5, 81/2" × 11"
Direction in which Original is Set Punch Hole Positions
Exposure glass Document feeder
AdonisC2_ENcopy122F_FM.book Page 58 Thursday, February 15, 2001 3:23 PM
Page 4
Punch
59
2
B
Enter the number of copy sets with the number keys.
Note
❒ To change the entered number, press the {Clear/Stop} key.
❒ If you wish to use the Sort function, press the [Sort] key.
C
Set your originals, then press the {{{{Start}}}} key.
AdonisC2_ENcopy122F_FM.book Page 59 Thursday, February 15, 2001 3:23 PM
Page 5
Copying
60
2
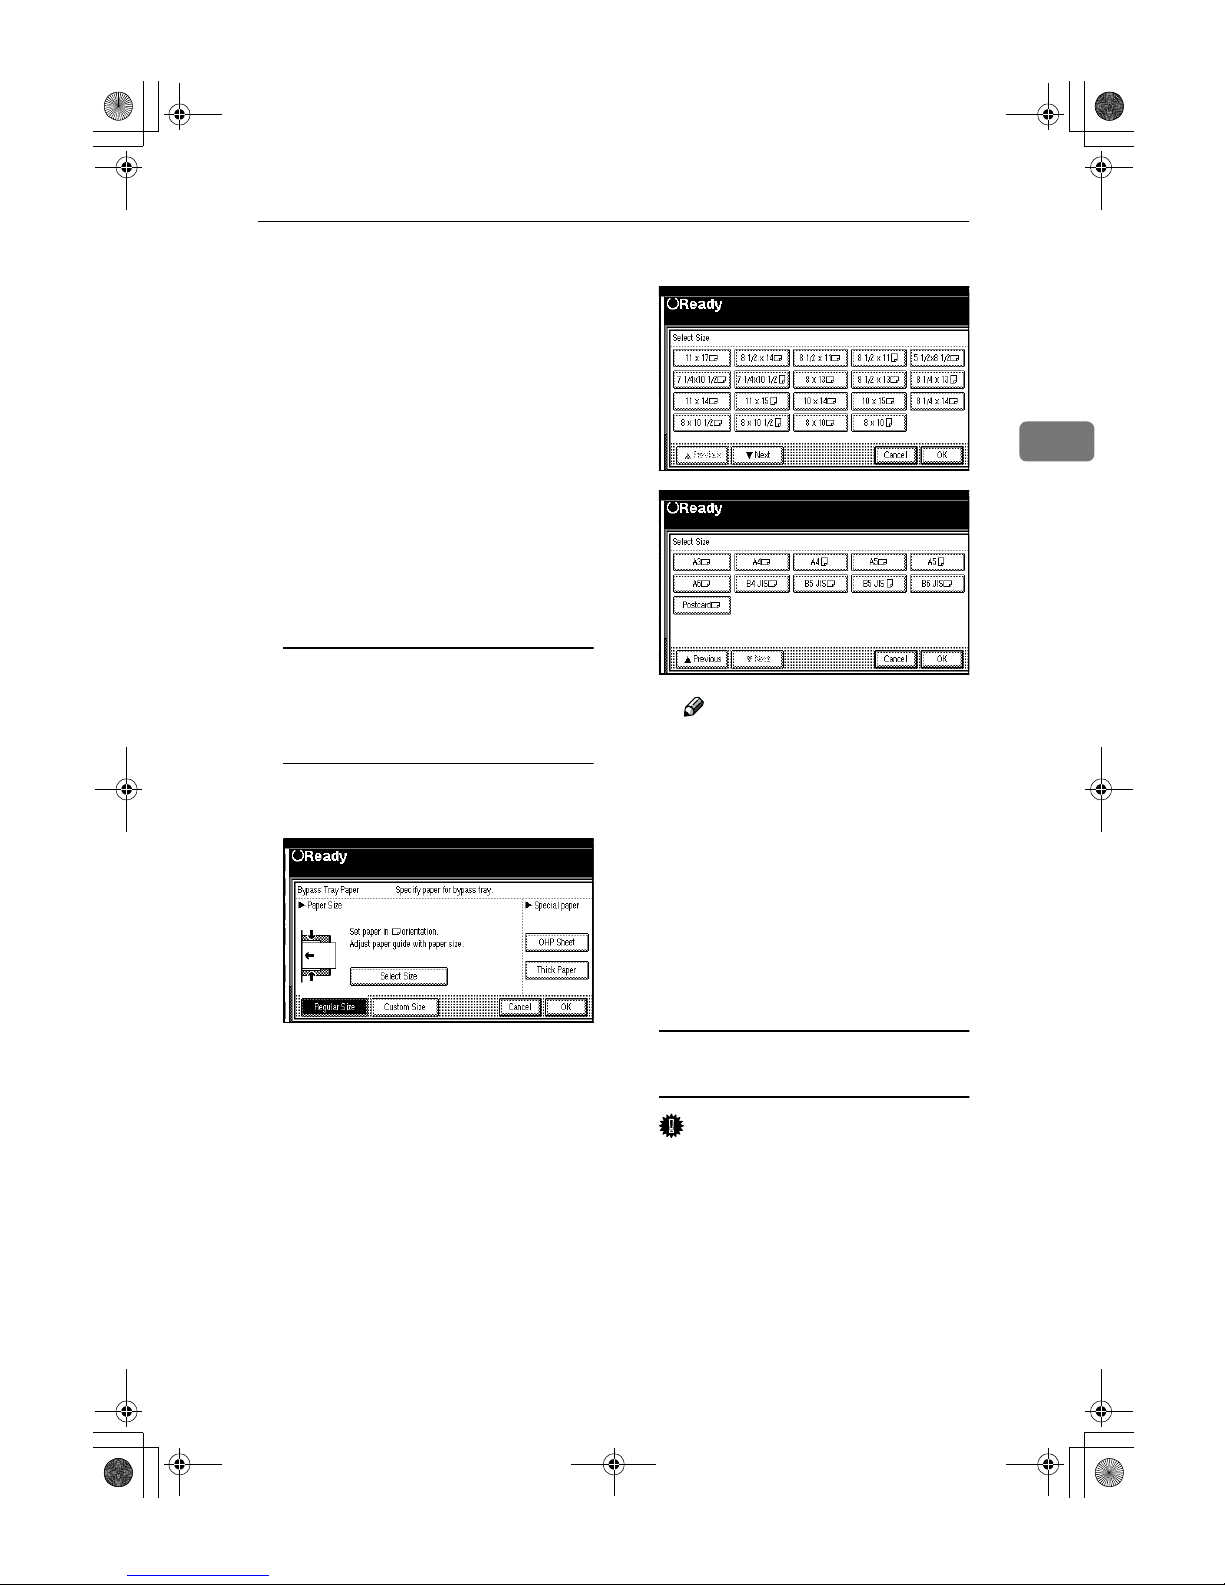
Copying from the Bypass Tray
Use the bypass tray to copy onto OHP
transparencies, adhesive labels, translucent paper, postcards, and copy paper that cannot be set in the paper
tray.
Note
❒ The machine can automatically de-
tect the following sizes as standard
size copy paper:
❒ If you do not use the standard size
copy paper, you should input vertical and horizontal dimensions.
The sizes that you can input are as
follows:
❒ When using paper larger than 433
mm in size, set it so that it is fed
straight into the machine.
❒ When using paper larger than 433
mm in size, the paper may become
wrinkled, and may not be fed into
the machine, or may cause paper
jams.
❒ To make copies onto OHP trans-
parencies or thick paper exceeding
128g/m
2
, 35 lb., specify the paper
type in ⇒ P.63 “When Copying onto
OHP Transparencies or Thick Paper”.
❒ The maximum number of sheets
you can set at a time depends on
the paper type. For details about
paper capacity of the bypass tray,
⇒ P.22 “Copy Paper”.
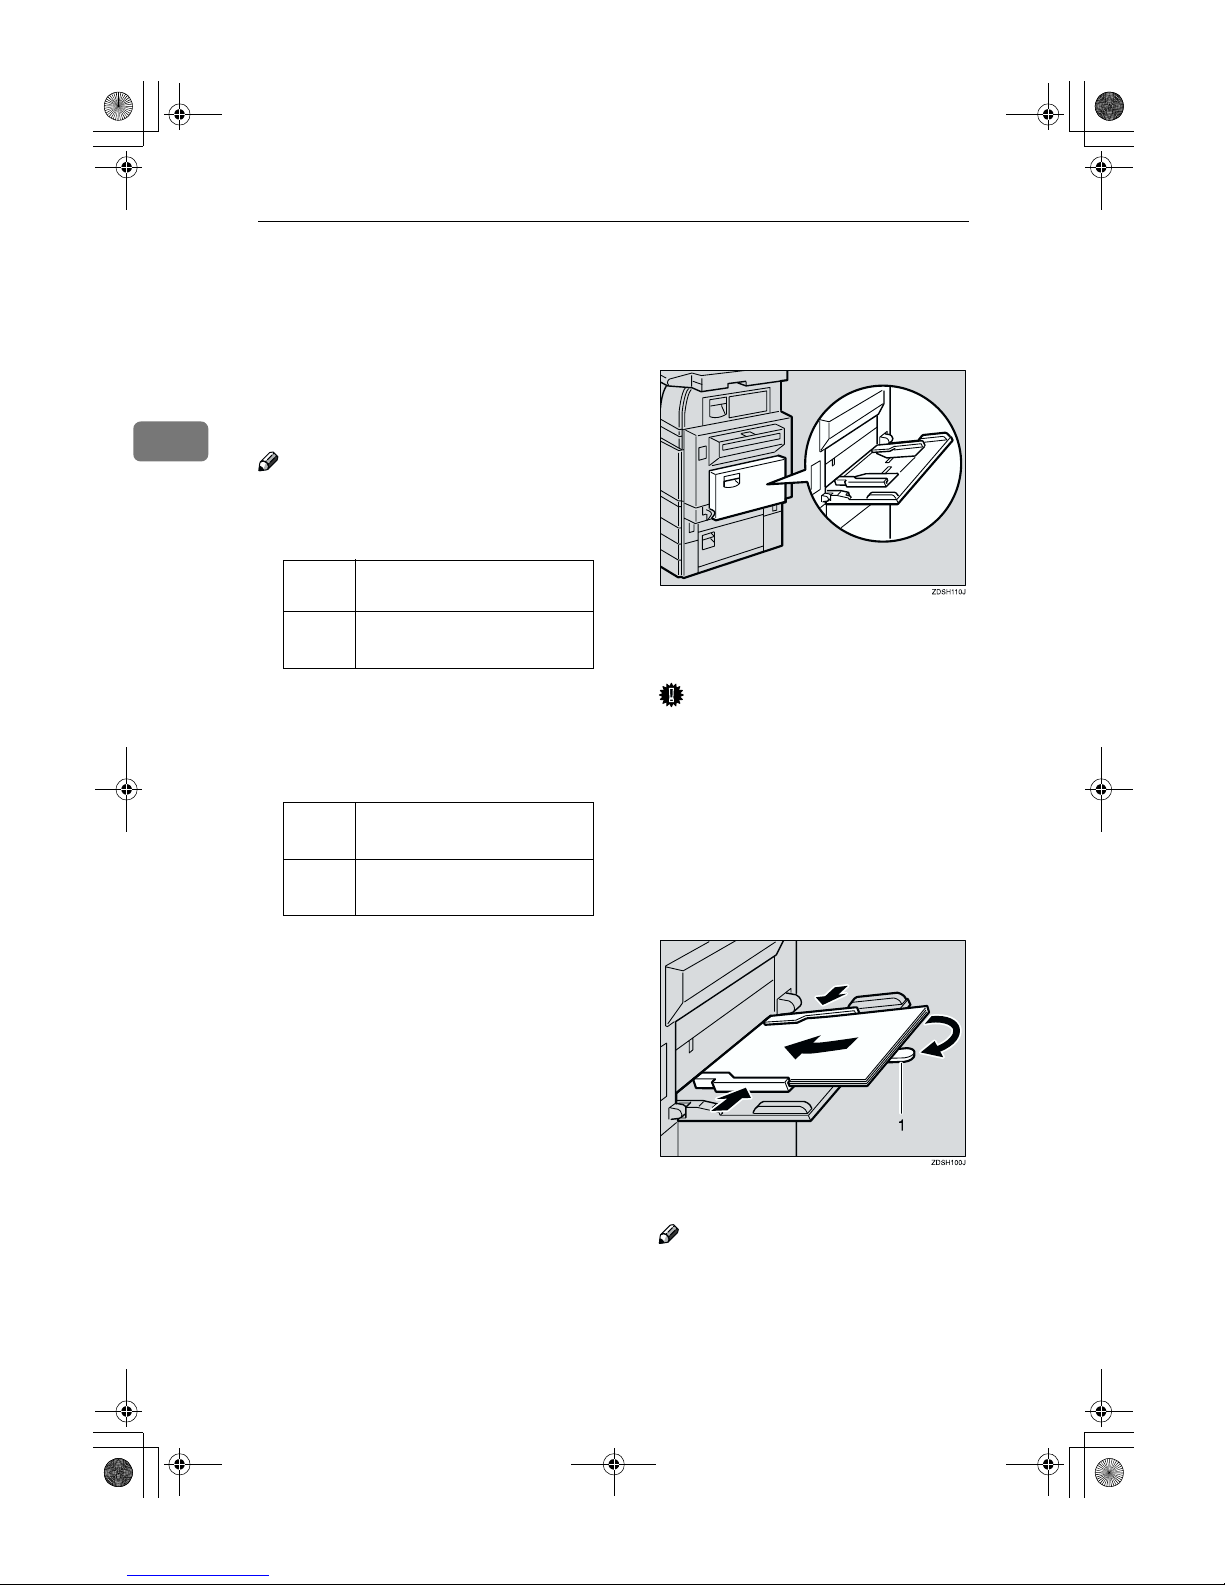
A
Open the bypass tray.
B
Adjust the guides to copy paper
size.
Important
❒ If the guides are not flush with
the copy paper, a skew image or
paper misfeeds might occur.
C
Lightly insert the copy paper face
up until the beeper sounds.
The k indicator on the display automatically goes on.
1.
Extender
Note
❒ The face side of the paper set is
copied on.
❒ Do not stack paper over the lim-
it mark, otherwise a skew image
or paper misfeeds might occur.
Metric
version
A3L, A4L, A5L, 81/2" × 13"
L
Inch
version
A3L, 11" × 17"L, 81/2" × 14"L,
8
1
/2" × 11"L, 51/2" × 81/2"
L
Metric
version
• Vertical: 100 – 297mm
• Horizontal: 148 – 600mm
Inch
version
• Vertical: 3.9" – 11.6"
• Horizontal: 5.8" – 23.4"
AdonisC2_ENcopy122F_FM.book Page 60 Thursday, February 15, 2001 3:23 PM
Page 6
Copying from the Bypass Tray
61
2
❒ If the beeper is turned off, light-
ly insert the copy paper until it
stops. Refer to the System Settings manual.
❒ When the document feeder is
open, set the direction of the
copy paper to L.
❒ Swing out the extender to sup-
port paper sizes larger than
A4L, 8
1
/2" × 11"L.
❒ Fan paper to get air between the
sheets and avoid a multi-sheet
feed.
❒ Before setting, adjust the paper
if curled or warped.
When copying onto standard size
paper (Thick Paper, Thin paper,
Transparent Paper, or OHP
transparecies)
A Press the {{{{#}}}} key.
B Press the [Select Size] key.
C Select the paper size.
Note
❒ The copy paper sizes that can
be selected are as follows:
• A3L, A4KL, A5KL,
A6L, B4L , B5KL ,
B6L, 11×17L, 8
1
/
2
×14L,
8
1
/
2
×11KL, 5
1
/
2
×8
1
/
2
L,
7
1
/
4
×10
1
/
2
L, 8×13L,
8
1
/
2
×13L , 8
1
/
4
×13K ,
11×14L , 11× 15K ,
10×14L, 10×15L,
8
1
/
4
×14L, 8×10
1
/
2
KL,
8×10KL
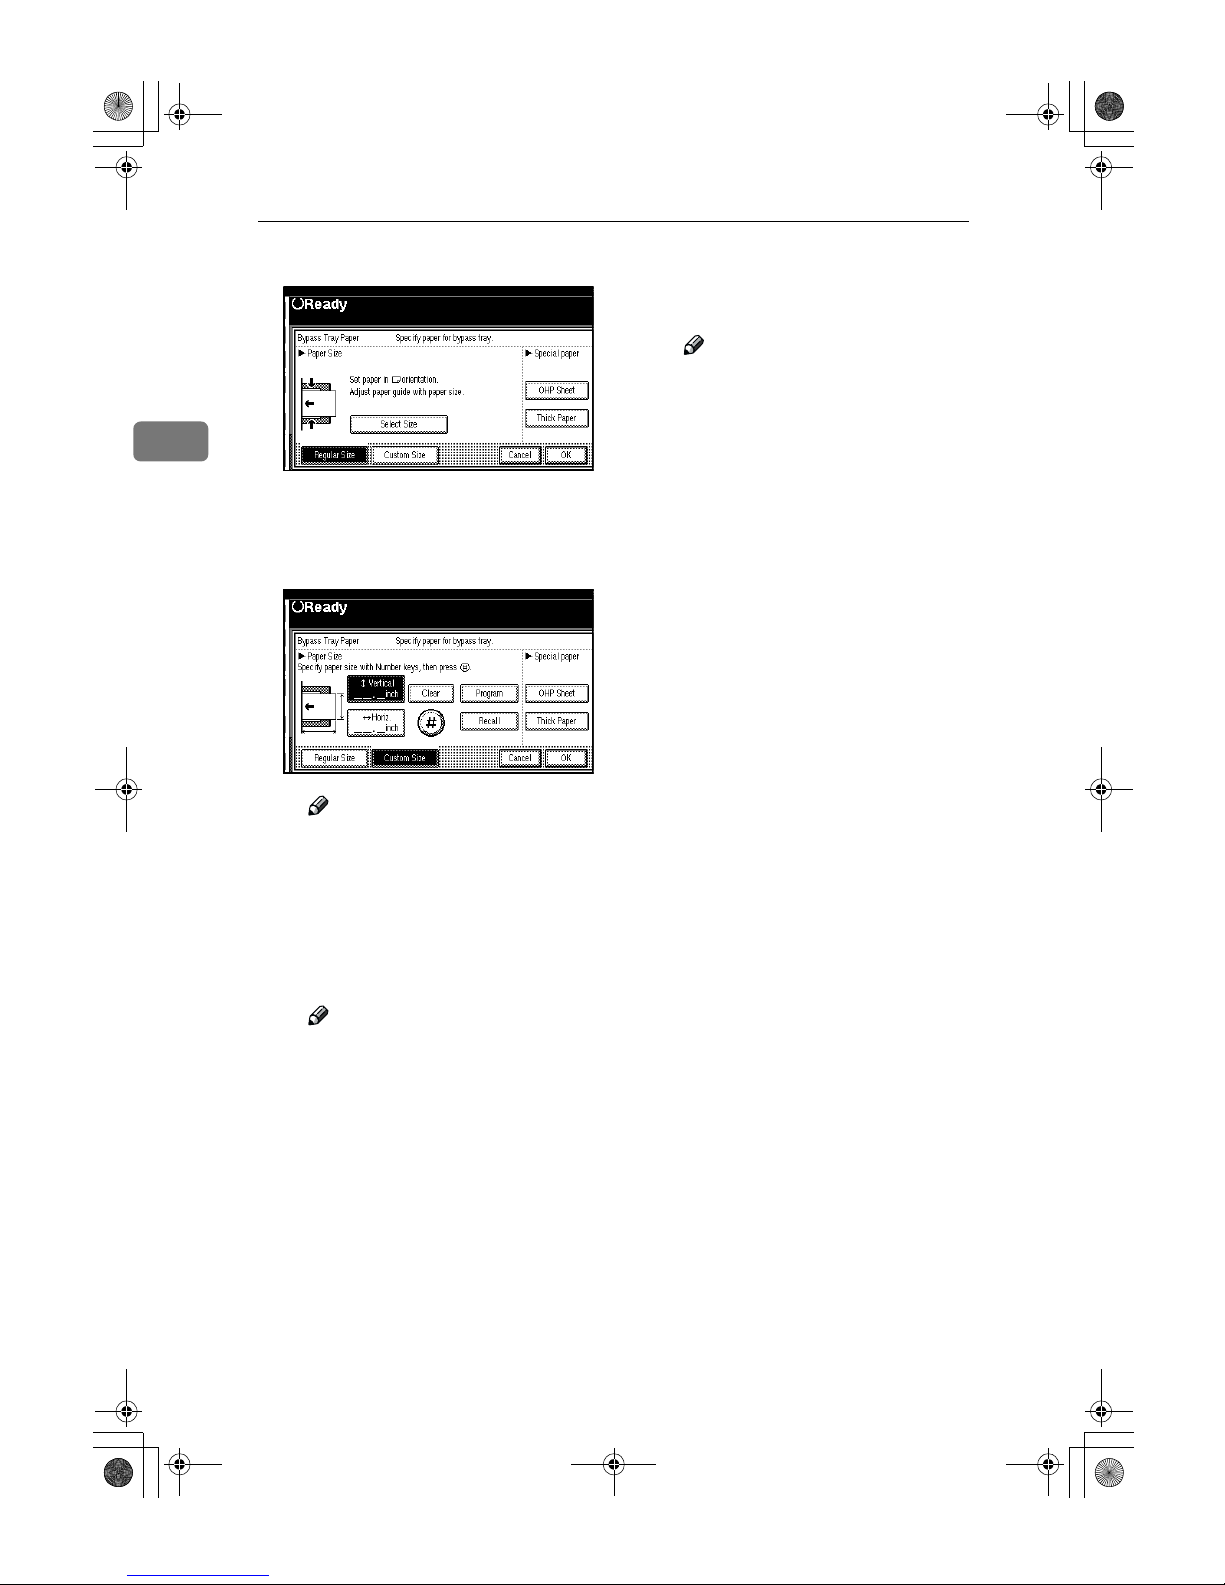
When copying onto custom size
paper
Important
❒ You should specify the size of
copy paper to avoid paper misfeeds.
A Press the {{{{#}}}} key.
AdonisC2_ENcopy122F_FM.book Page 61 Thursday, February 15, 2001 3:23 PM
Page 7
Copying
62
2
B Press the [Custom Size] key.
C Press the [Vertical mm] key and
enter the vertical size of the paper with the number keys, then
press the [#] key.
Note
❒ To change the number en-
tered, press the [Clear] or
{Clear/Stop} key and enter the
new number.
D Enter the horizontal size of the
paper with the number keys,
then press the [#] key.
Note
❒ If the [Horiz mm] key is not
highlighted, press the [
Horiz
mm] key.
❒ To change the number en-
tered, press the [Clear] or
{Clear/Stop} key and enter the
new number.
E To register the custom size en-
tered, press the [Store] key and
then press the [Cancel] key.
Note
❒ If you do not register the cus-
tom size, go to step F .
❒ Only one custom size can be
stored.
❒ To recall the custom size
stored, press the [Recall] key.
❒ If you do not register the cus-
tom size, the size you set is
deleted when modes are
cleared.
F Press the [OK] key.
D
Set your originals, then press the
{{{{Start}}}} key.
E
When your copy job is finished,
press the {{{{Clear Modes}}}} key to
clear the settings.
AdonisC2_ENcopy122F_FM.book Page 62 Thursday, February 15, 2001 3:23 PM
Page 8
Copying from the Bypass Tray
63
2
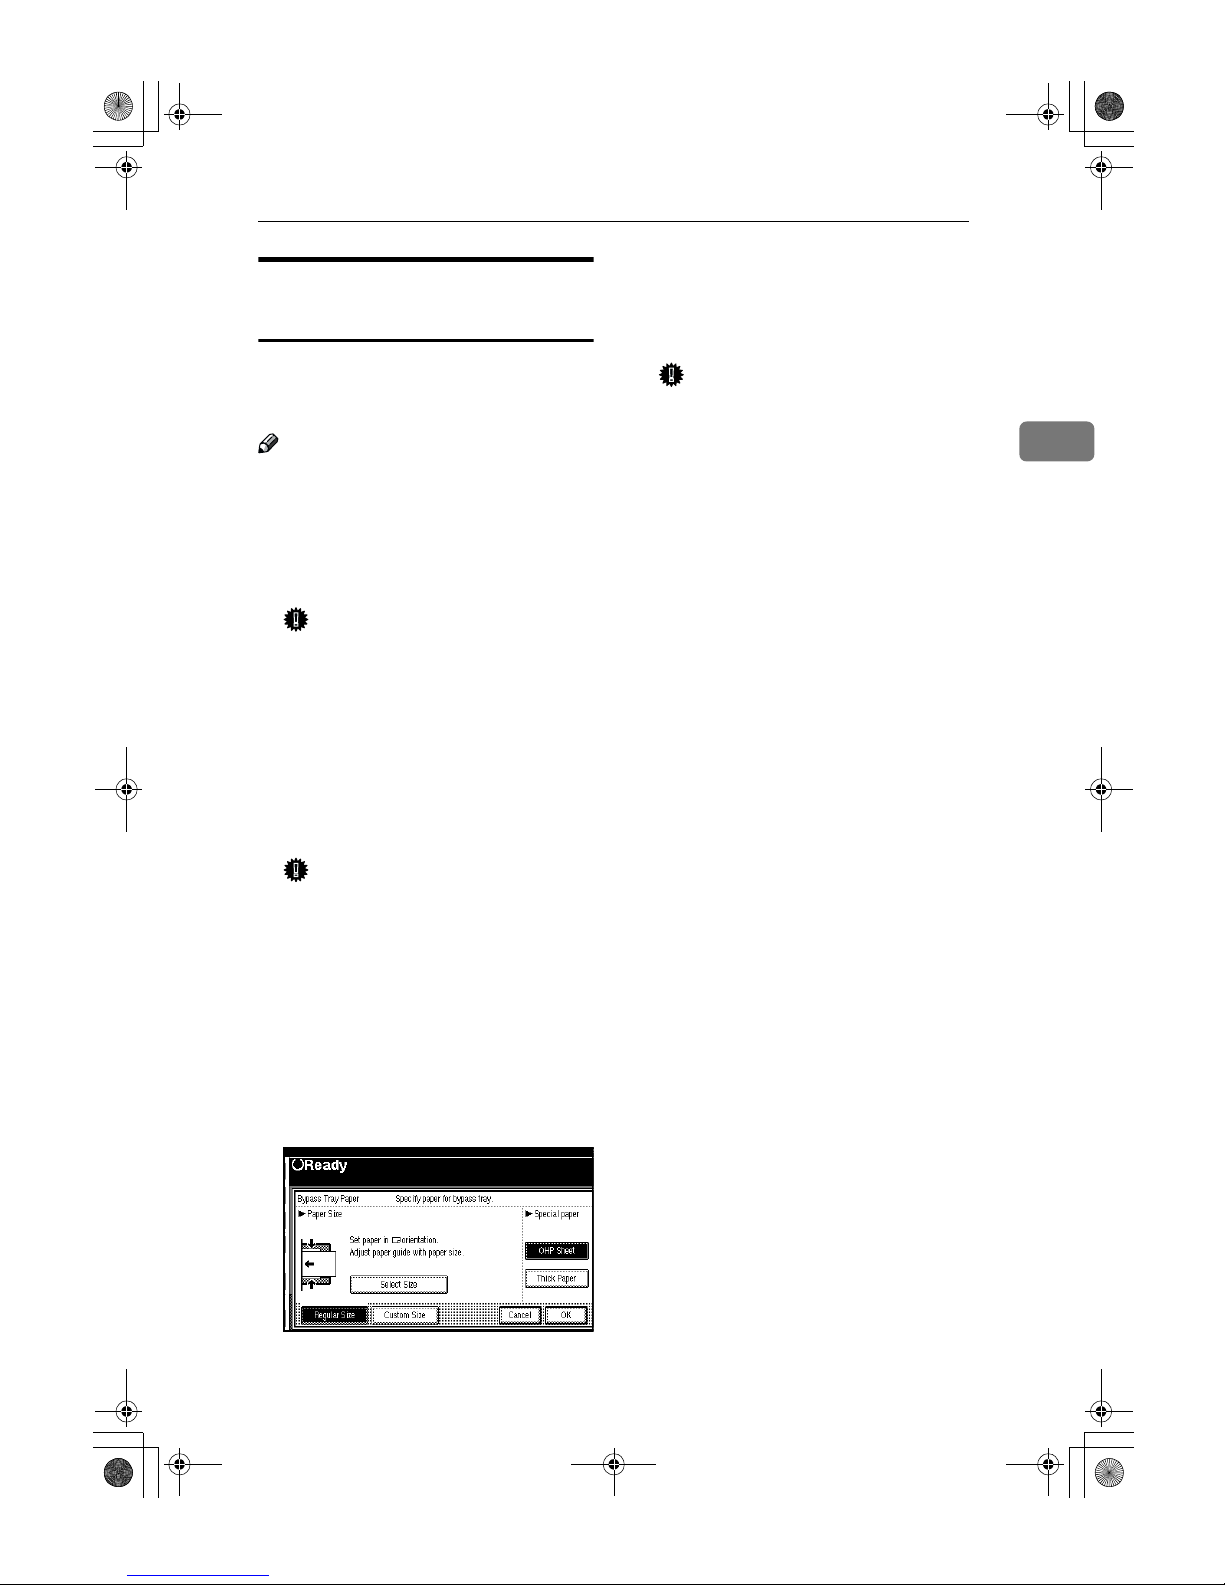
When Copying onto OHP
Transparencies or Thick Paper
To make copies onto OHP transparencies or thick paper, you need to
specify the paper type.
Note
❒ Select [Thick Paper] if the paper
weight is more than 128g/m
2
, 34
lb.
A
Open the bypass tray, and adjust
the guides to the paper size.
Important
❒ If the guides are not flush with
the copy paper, a skew image or
paper misfeeds might occur.
B
Lightly insert the OHP transparencies or thick paper face down
until the beeper sounds.
The k indicator on the display automatically goes on.
Important
❒ When you set an OHP transpar-
ency, make sure that its front
and back faces are properly positioned.
❒ To avoid paper misfeeds, fan
the paper before setting it in the
tray.
C
Press the {{{{#}}}} key.
D
Select [OHP Sheet] or [Thick Paper].
E
Press the [OK] key.
F
Set your originals and press the
{{{{Start}}}} key.
Important
❒ When copying onto OHP trans-
parencies, remove copied sheets
one by one.
G
When your copy job is finished,
press the {{{{Clear Modes}}}} key to
clear the settings.
AdonisC2_ENcopy122F_FM.book Page 63 Thursday, February 15, 2001 3:23 PM
Page 9
Copying
64
2
Programs
You can store frequently used copy
job settings in machine memory, and
recall them for future use.
❖❖❖❖ Storing Your Settings
You can store your settings you
frequently use.
❖❖❖❖ Deleting A Program
You can delete a stored program.
❖❖❖❖ Recalling A Program
You can recall a stored program.
Note
❒ You can store up to 10 programs.
❒ You can select the standard mode
or program No. 10 as the mode to
be set when modes are cleared or
reset is made, or immediately after
the operation switch is turned on.
❒ Paper settings are stored based on
paper size. So if you place more
than one paper tray of the same
size, the paper tray prioritized
with the User Tools (System Settings) will be selected first.Refer to
the System Settings manual.
❒ Programs are not cleared by turn-
ing the power off or by pressing
the {Clear Modes} key. They are
canceled only when you delete or
overwrite them with another program.
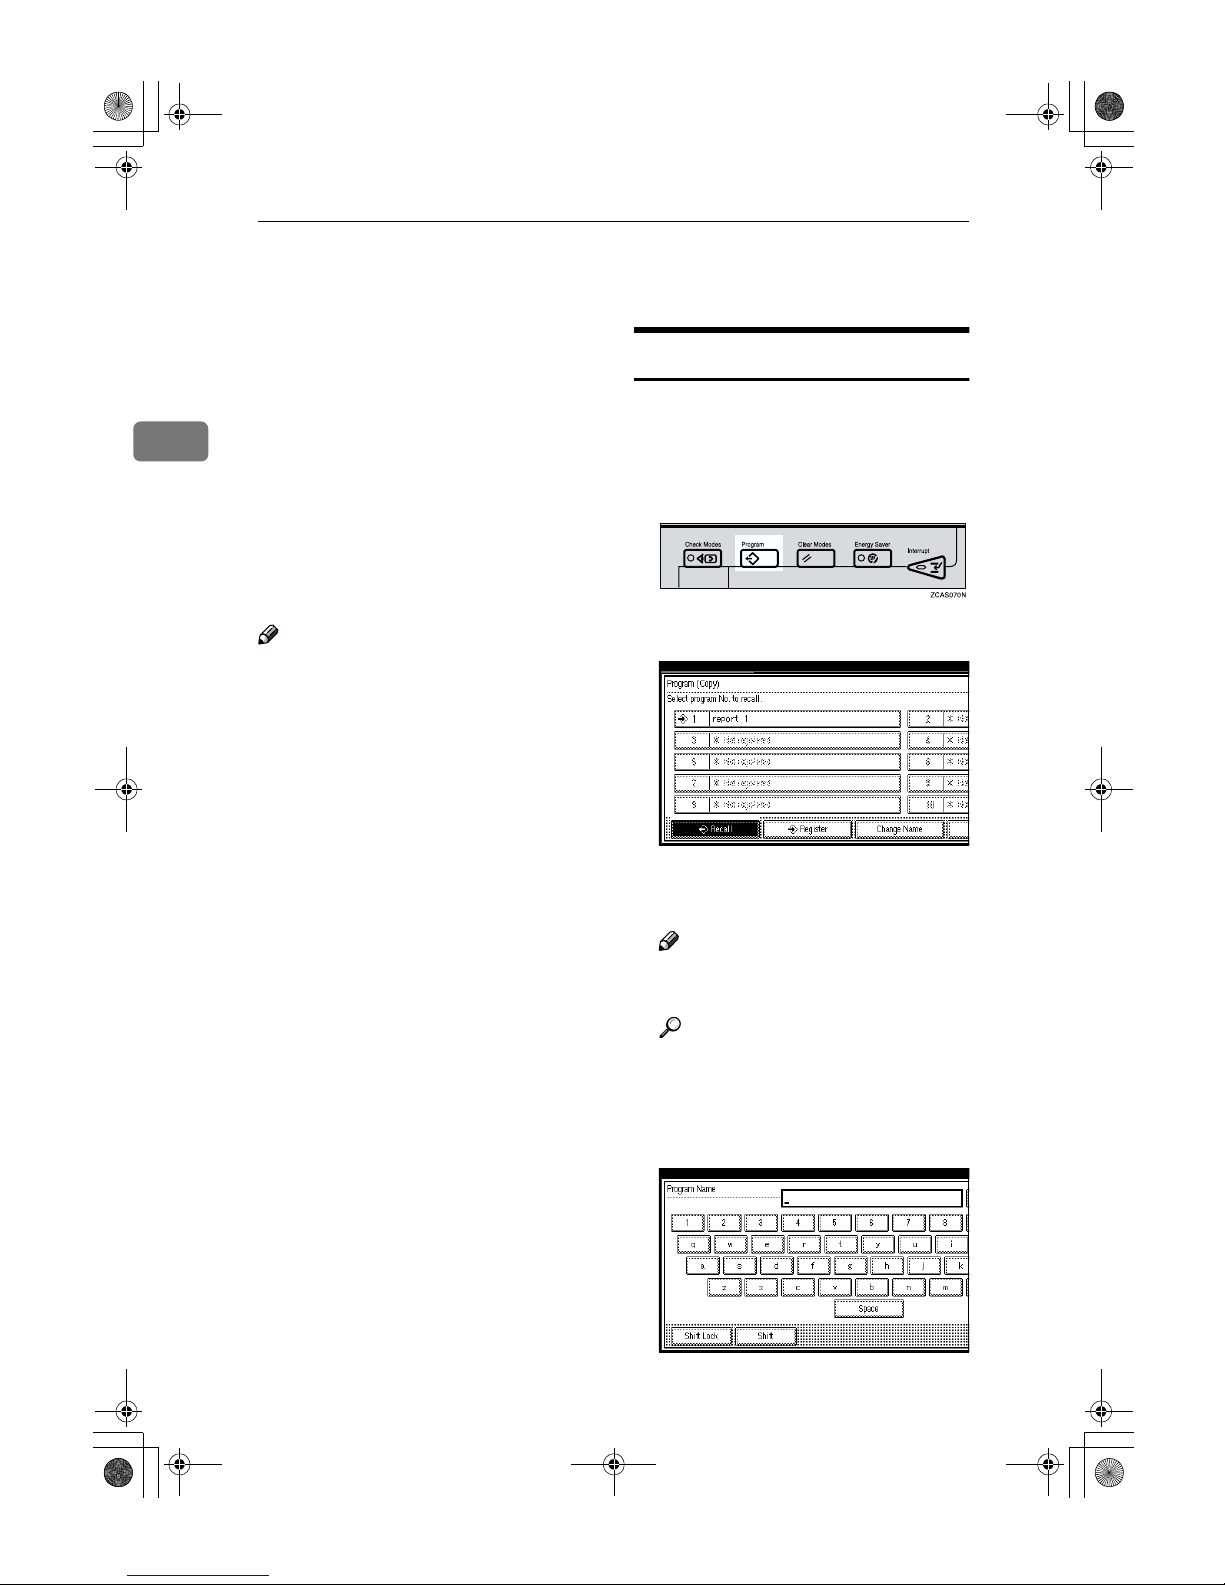
Storing a Program
A
Edit the copy settings so that all
functions you want to store in this
program are selected.
B
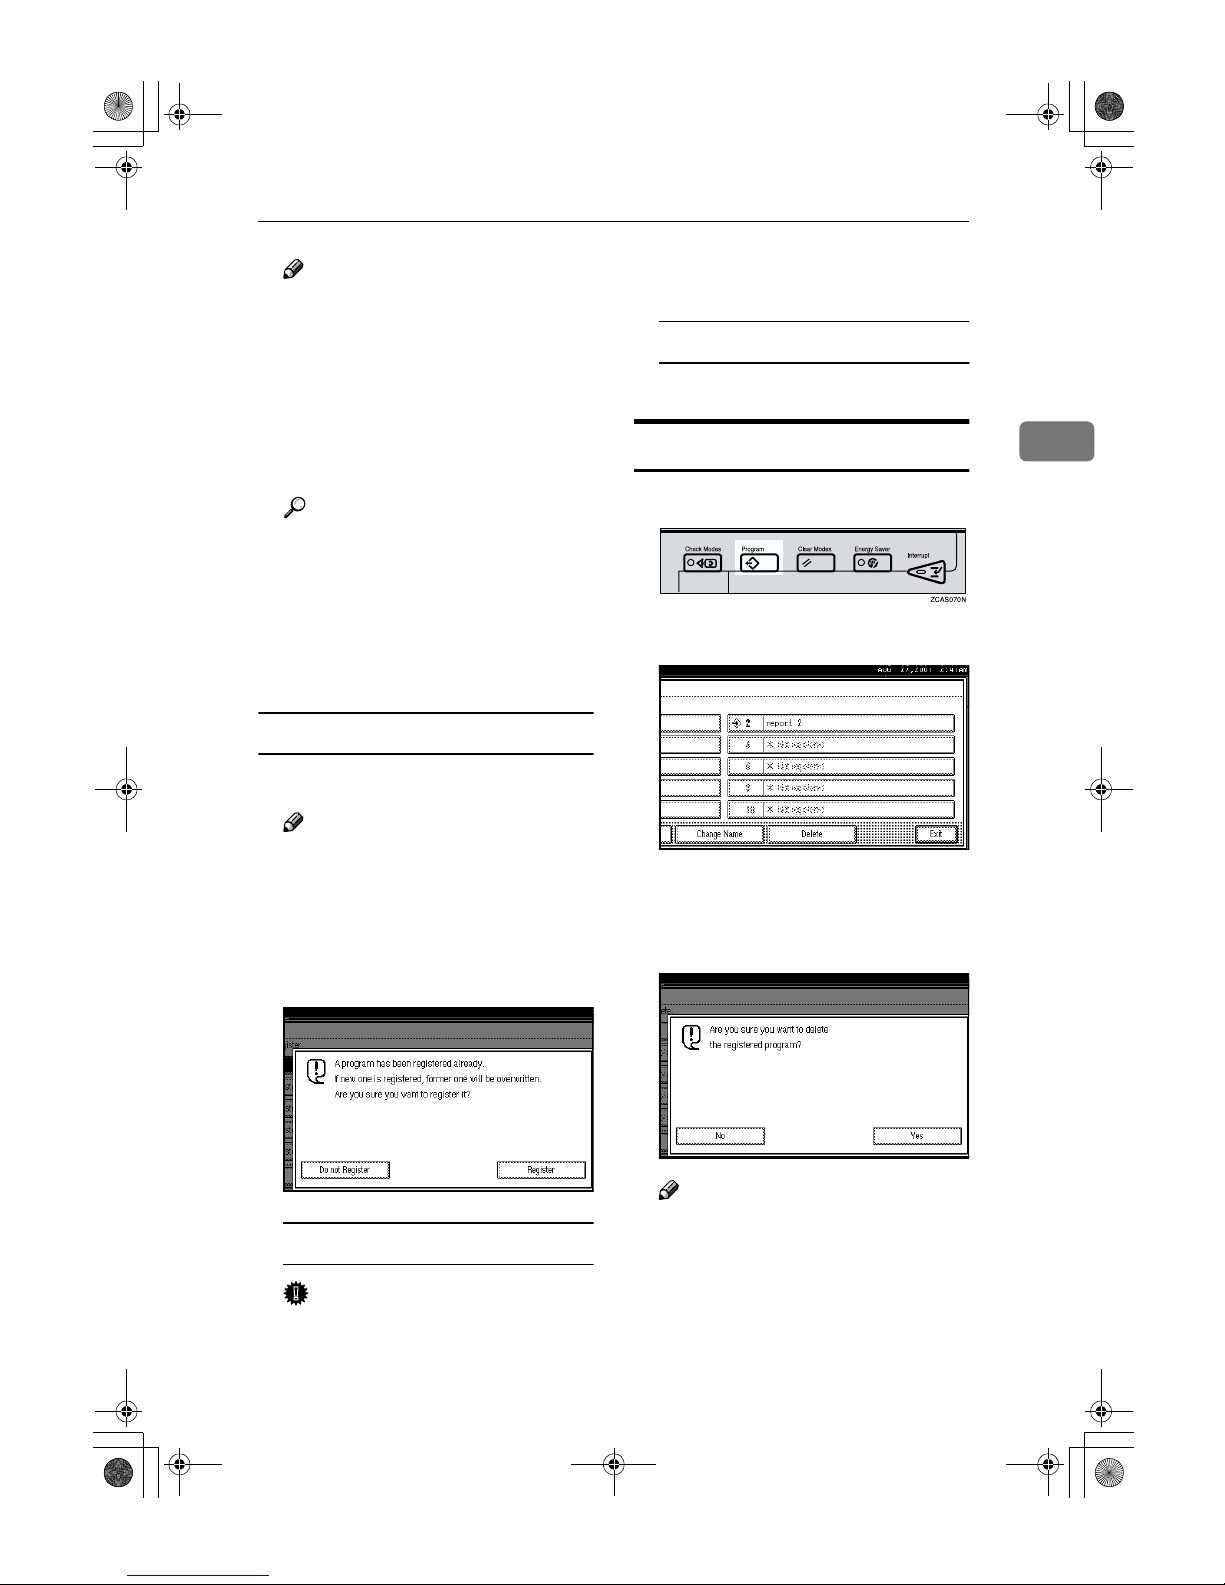
Press the {{{{Program}}}} key.
C
Press the [Register] key.
D
Press the program number you
want to store.
Note
❒ Program numbers with m al-
ready have settings in them.
Reference
⇒ P.65 “Changing a Stored Pro-
gram”.
E
Enter the program name with the
letter keys on the display panel.
AdonisC2_ENcopy122F_FM.book Page 64 Thursday, February 15, 2001 3:23 PM
Page 10
Programs
65
2
Note
❒ If you do not wish to enter the
program name, go to step F.
❒ You can register up to 40 char-
acters.
❒ To change the name entered,
press the [Backspace], [Delete] or
{Clear/Stop} key and enter new
letters.
Reference
For details on entering characters,
⇒
"Entering Text Characters" in
the System Settings manual.
F
Press the [OK] key.
When the settings are successfully
stored, the m indicator goes on.
Changing a Stored Program
A
Make sure the program settings.
Note
❒ When you want to check the
contents of the program, recall
the program. ⇒ P.66 “Recalling a
Program”.
B
Repeat steps AAAA to DDDD in Storing a
Program.
To overwrite the program
Important
❒ If you select [Register], the previ-
ous program is lost.
A Repeat steps EEEE and FFFF in Storing
a Program.
Not to overwrite the program
A Press the [Do not Register] key.
Deleting a Program
A
Press the {{{{Program}}}} key.
B
Press the [Delete] key.
C
Press the program number you
want to delete.
D
Press the [Yes] key.
Note
❒ To cancel the deletion, press the
[No] key.
AdonisC2_ENcopy122F_FM.book Page 65 Thursday, February 15, 2001 3:23 PM
Page 11
Copying
66
2
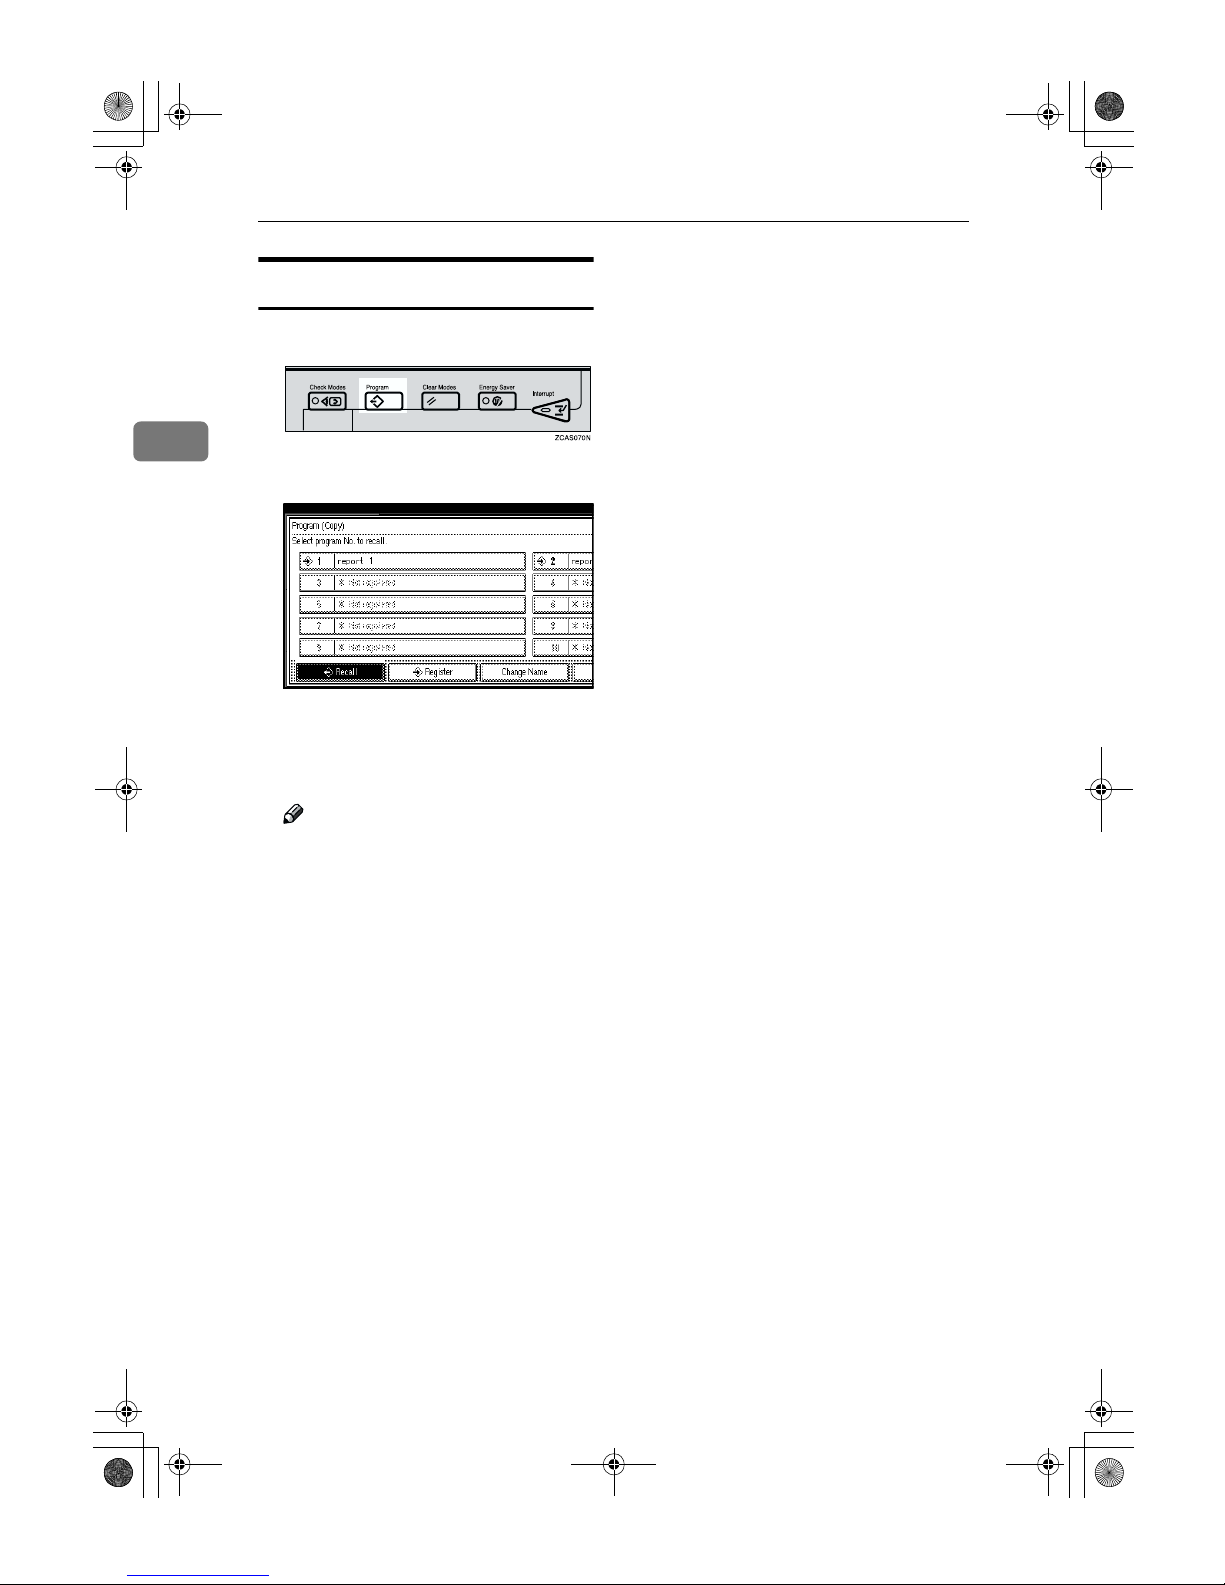
Recalling a Program
A
Press the {{{{Program}}}} key.
B
Press the [Recall] key.
C
Press the program number you
want to recall.
The stored settings are displayed.
Note
❒ Only programs with m contain
a program.
D
Set your originals, then press the
{{{{Start}}}} key.
AdonisC2_ENcopy122F_FM.book Page 66 Thursday, February 15, 2001 3:23 PM
Page 12
Job Preset
67
2
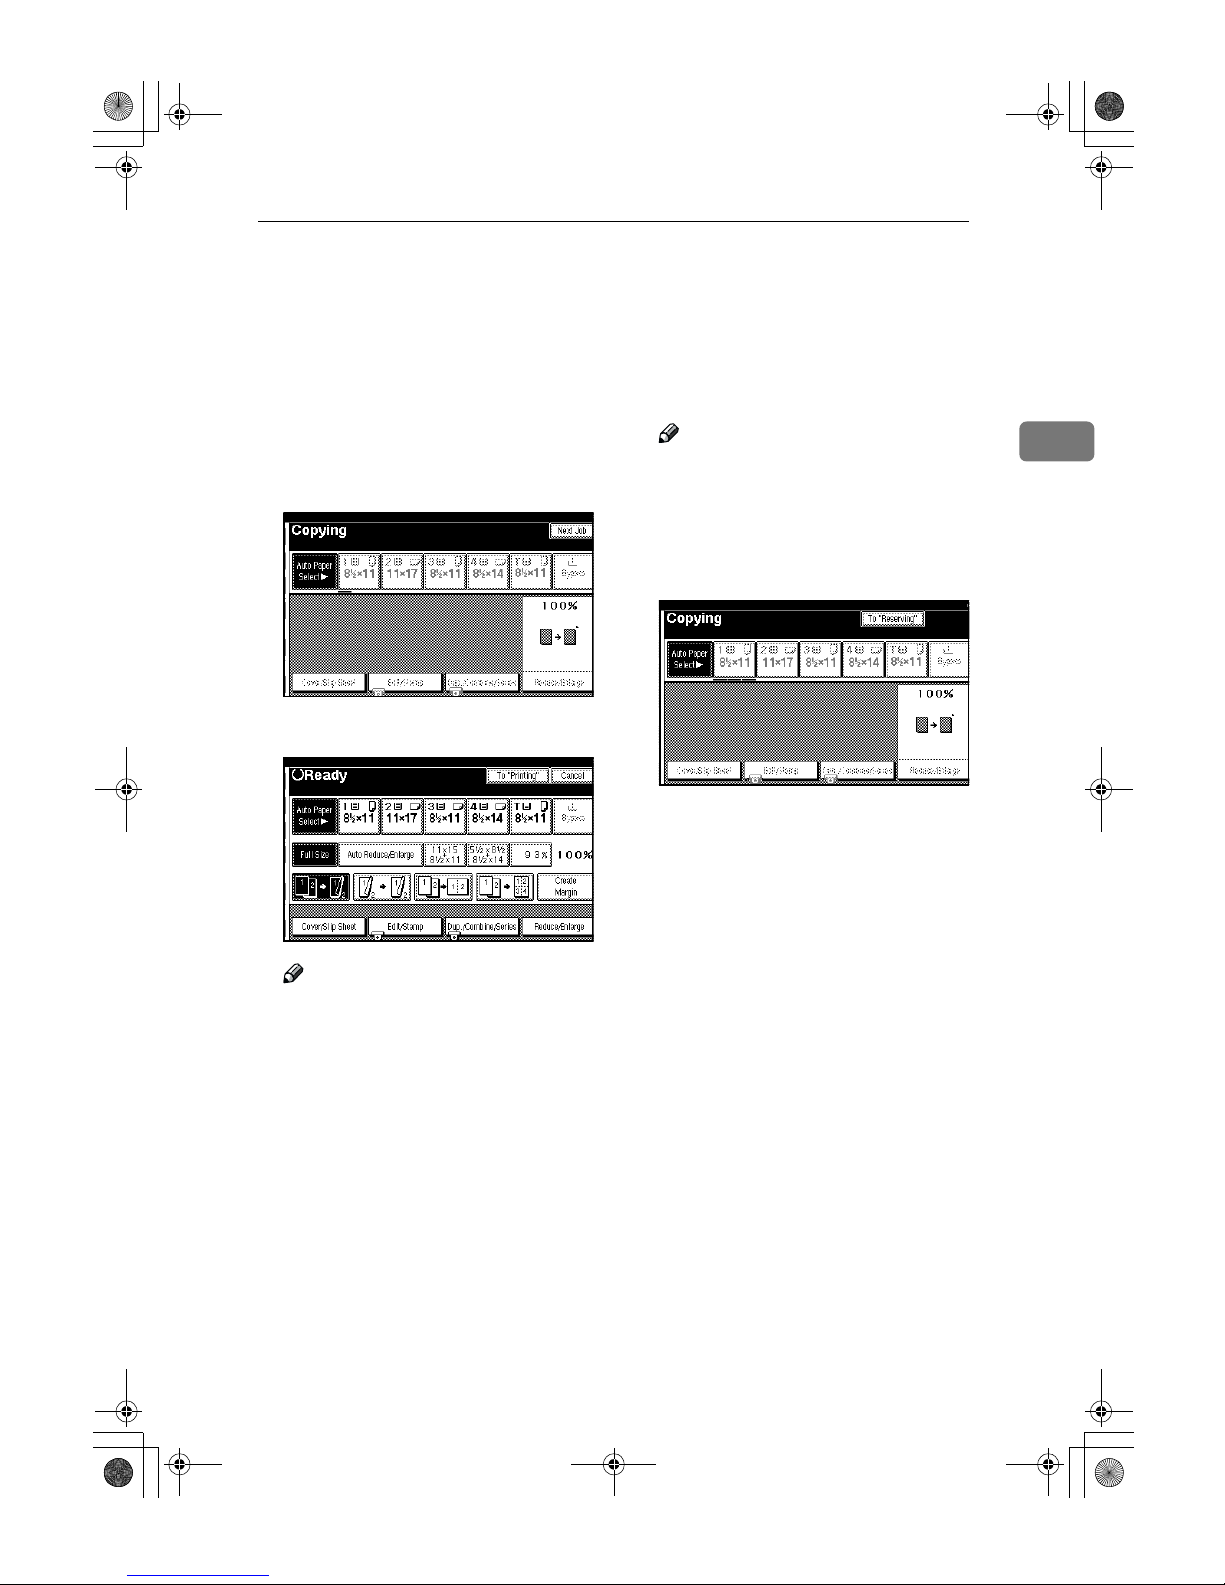
Job Preset
If a long copy job is in progress and
you do not wish to wait for it to finish,
you can use this function to set up the
next one copy job in advance. When
the current copy job is finished, your
copy job will be started automatically.
A
Press the {{{{Copy}}}} key.
B
Set up the next copy job.
Note
❒ To cancel this job, press the
[Cancel] key.
C
Set the originals in the document
feeder and press the {{{{Start}}}} key.
All originals are scanned.
D
Press the [To "Printing"] key.
After the current copy job, the next
job starts automatically.
Note
❒ You can switch the display to
the current copy job by pressing
the [To "Printing"] key. You can
switch the display to the preset
job by pressing the [To "Reserv-
ing"] key.
AdonisC2_ENcopy122F_FM.book Page 67 Thursday, February 15, 2001 3:23 PM
Page 13
Copying
68
2
Other Functions
Energy Saver Mode
If you do not operate the machine for
a certain period after copying, or
when you press the {Energy Saver}
key, the display disappears and the
machine enters Energy Saver mode.
When you press the {Energy Saver}
key again, the machine returns to the
ready condition. In Energy Saver
mode, the machine uses less electricity.
Note
❒ If you press the {Energy Saver} key
during the operation, the current
settings will be cleared.
❒ It takes about 3 seconds to return
to the ready condition from Energy
Saver mode.
Reference
⇒“Low Power Timer” in the Sys-
tem Settings manual.
Interrupt Copy
Use this function if you wish to interrupt a long copy job to make urgently
needed copies.
Limitation
❒ You cannot use the Interrupt Copy
function when scanning fax originals.
Note
❒ The procedure for making inter-
rupt copies depends on which
kind of operation the machine is
currently carrying out.
To interrupt an original being fed
A
Press the {{{{Interrupt}}}} key.
The Interrupt indicator goes on
and scanning stops.
B
Remove the originals that were
being copied and set the originals
you wish to copy.
C
Press the {{{{Start}}}} key.
The machine starts making your
copies.
D
When your copy job is finished,
remove your originals and copies.
E
Press the {{{{Interrupt}}}} key again.
The Interrupt indicator goes off.
F
When the display prompts you to,
replace the originals that were being copied before.
G
Press the {{{{Start}}}} key.
The previous copy job settings will
be restored and the machine will continue copying from where it left off.
AdonisC2_ENcopy122F_FM.book Page 68 Thursday, February 15, 2001 3:23 PM
Page 14

Other Functions
69
2
To interrupt copying after all originals
have been fed
A
Press the {{{{Interrupt}}}} key.
The Interrupt indicator goes on.
Note
❒ Copying will not stop yet.
B
Set your original.
C
Press the {{{{Start}}}} key.
The machine stops the original job
and starts copying your original.
D
When copying is complete, remove your originals and copies.
E
Press the {{{{Interrupt}}}} key again.
The Interrupt indicator goes off.
The previous copy job settings will
be restored and the machine will
continue copying from where it
left off.
Original Beeper
The beeper sounds and an error message is displayed when you leave
your originals on the exposure glass
after copying.
Note
❒ To cancel this function, ⇒ “Tone:
Original remains” in P.215 “Gener-
al Features
2
/4”.
Sample Copy
Use this function to check a copy set
before making a long copy run.
Limitation
❒ This function can be used only
when the Sort function has been
turned on.
A
Select Sort and any other functions, then enter the number of
copy sets to be made.
B
Set the originals.
C
Press the {{{{Sample Copy}}}} key.
One copy set is delivered for proof
copying.
D
After checking the finish, press
the [Print] key if the sample is acceptable.
The number of copies made is the
number you specified minus one
for the proof copy.
Note
❒ If you press the [Suspend] key
after checking the finish, return
to step A to adjust the copy settings as necessary. You can
change the settings for Staple,
Punch, Duplex, Copy Orientation, Stamp, Margin Adjust, and
Cover/Slip Sheet. However, depending on the combinations of
functions, some settings might
not be changed.
❒ You cannot use the Sample
Copy function after changing
the settings.
AdonisC2_ENcopy122F_FM.book Page 69 Thursday, February 15, 2001 3:23 PM
Page 15
Copying
70
2
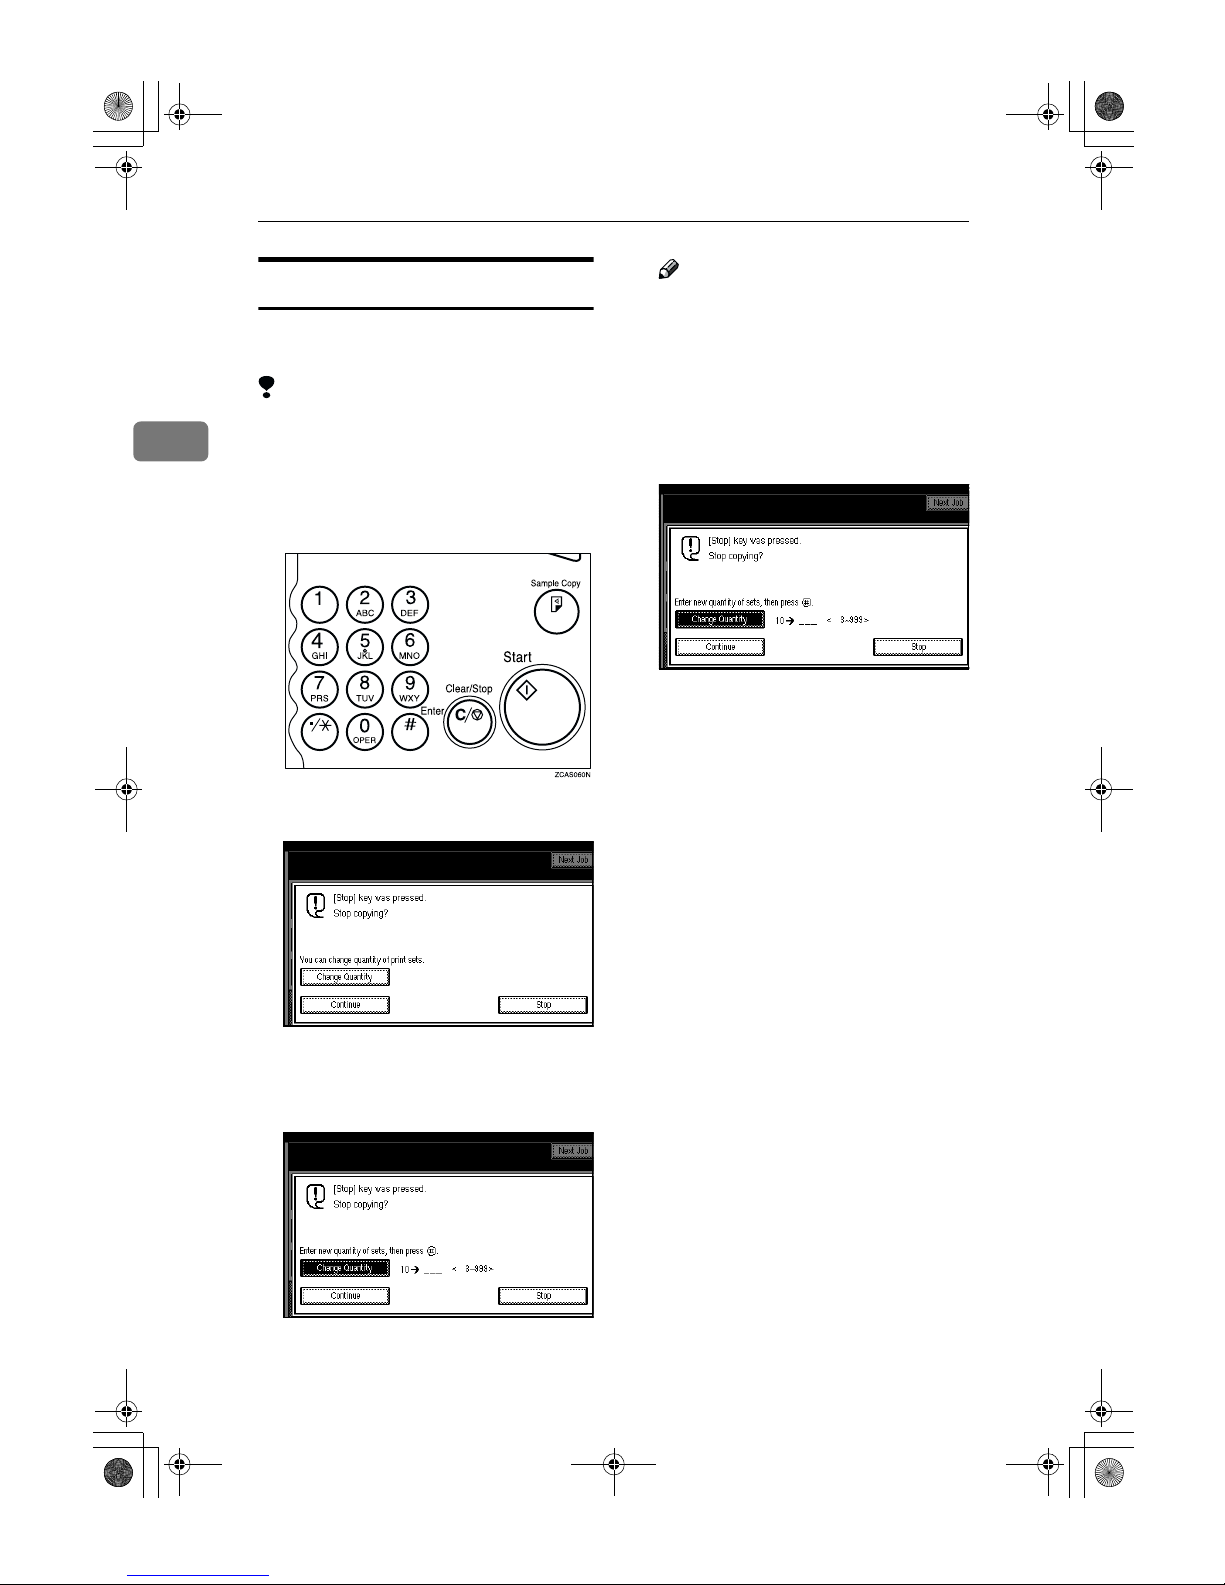
Changing the Number of Sets
You can change the number of copy
sets during copying.
Limitation
❒ This function can be used only
when the Sort function has been
turned on.
A
Press the {{{{Clear/Stop}}}} key when
“Copying” is displayed.
B
Press the [Change Quantity] key.
C
Enter the number of copy sets
with the number keys, then press
the {{{{#}}}} key.
Note
❒ The number of sets you can en-
ter differs depending on the
timing of pressing the {Clear/
Stop} key.
❒ To change the entered number,
press the {Clear/Stop} key.
D
Press the [Continue] key.
AdonisC2_ENcopy122F_FM.book Page 70 Thursday, February 15, 2001 3:23 PM
Page 16
Preset Reduce/Enlarge
71
2
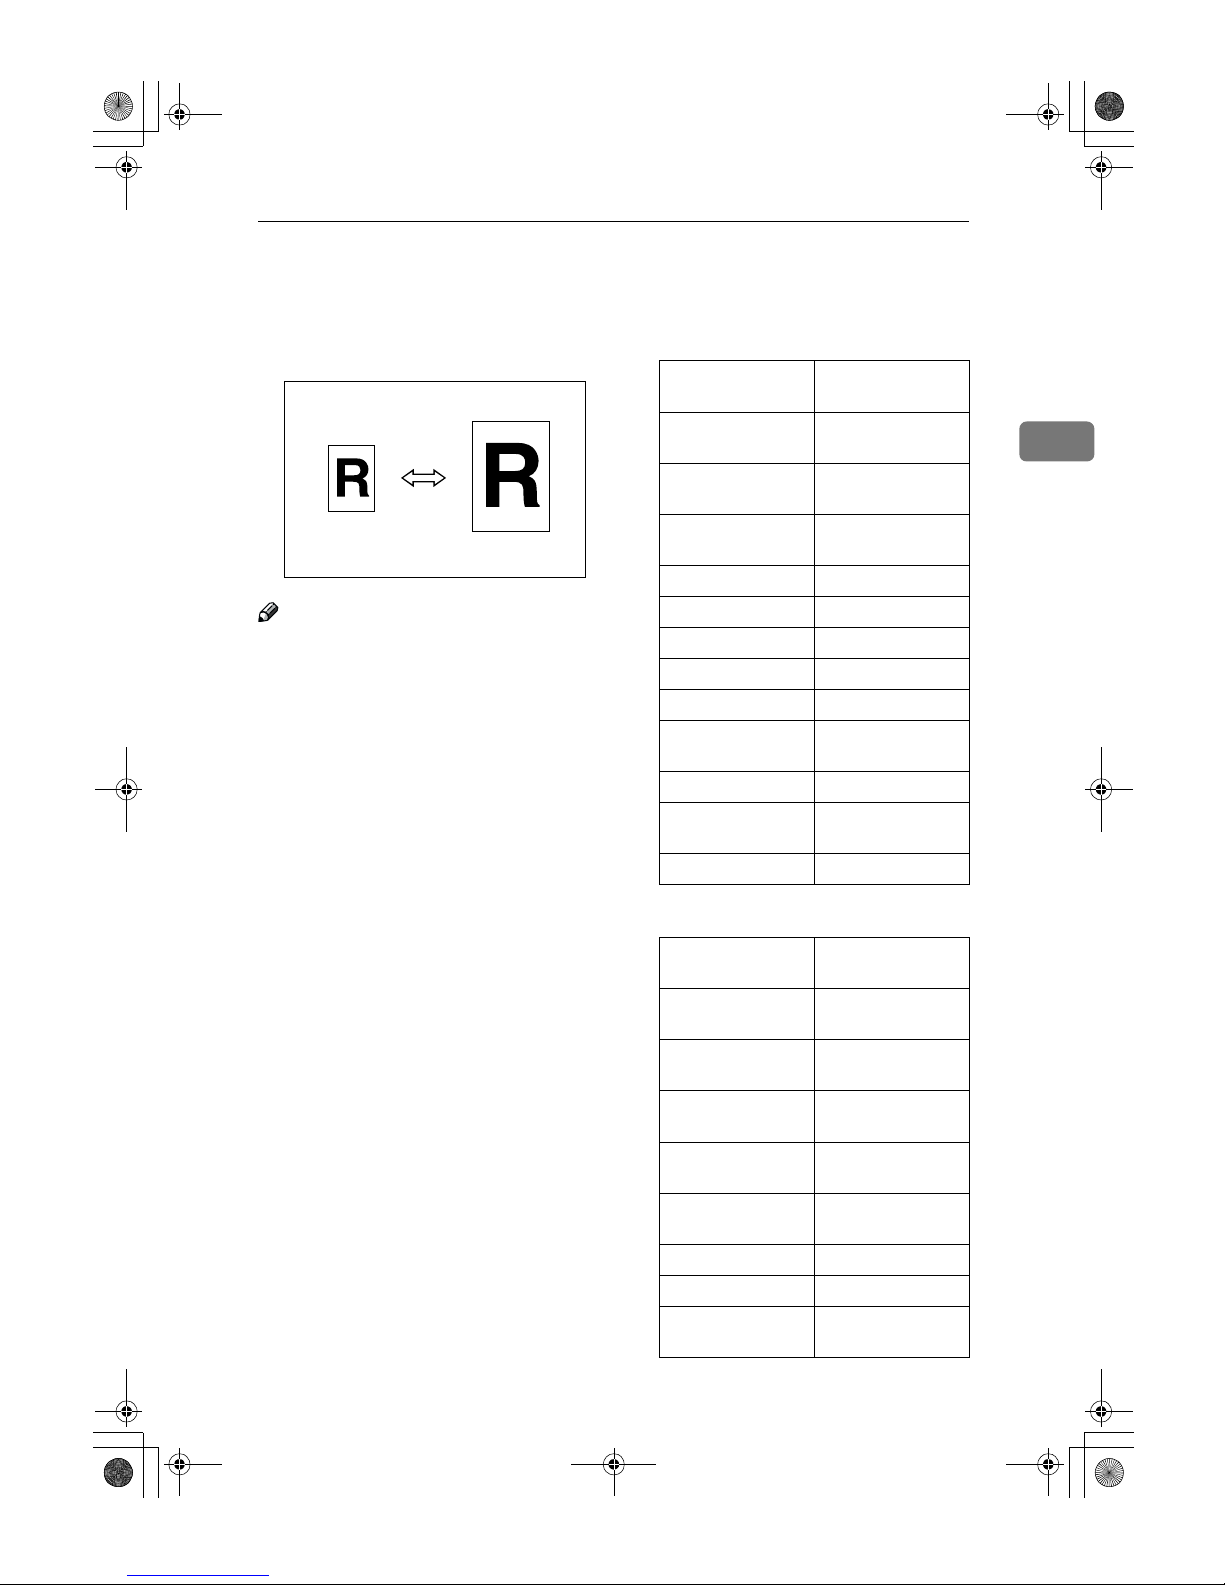
Preset Reduce/Enlarge
You can select a preset ratio for copying.
Note
❒ You can select one of 12 preset ra-
tios (5 enlargement ratios, 7 reduction ratios).
❒ Use “Create Margin” to reduce the
image to 93% of its original size
with the centre as reference. You
can register this function in a
shortcut key on the initial display.
❒ You can change the preset ratios to
other ratios you frequently use. ⇒
“Enlarge” in P.219 “Reproduction
Ratio
1
/2” and “Reduce” in P.220
“Reproduction Ratio
2
/2”.
❒ You can set and display three
kinds of ratio on the initial display.
⇒ “Shortcut R/E” in P.219 “Repro-
duction Ratio
1
/2”.
❒ You can specify which of [Reduce],
[Enlarge] or [Mag. Ratio] is to be given priority and displayed when
the [Reduce/Enlarge] key is pressed.
❒ You can select a ratio regardless of
the size of an original or copy paper. With some ratios, parts of the
image might not be copied or margins will appear on copies.
❒ Copies can be reduced or enlarged
as follows:
❖❖❖❖ Metric version
❖❖❖❖ Inch version
Ratio (%)
Original →→→→ Copy
paper size
400 (enlarge area
by 16)
--
200 (enlarge area
by 4)
A5→A3
141 (enlarge area
by 2)
A4→A3, A5→A4
122 F→A3, A4→B4
115 B4→A3
93 --
82 F→A4, B4→A4
75 B4→F4, B4→F
71 (reduce area by
1
/2)
A3→A4, A4→A5
65 A3→F
50 (reduce area by
1
/4)
A3→A5, F→A5
25 --
Ratio (%) Original →→→→ Copy
paper size
400 (enlarge area
by 16)
--
200 (enlarge area
by 4)
5
1
/2" × 81/2"→11" ×
17"
155 (enlarge area
by 2)
51/2" × 81/2"→81/2"
×
14"
129 81/2" × 11"→11" ×
17"
121 8
1
/2" × 14"→11" ×
17"
93 --
85 F→8
1
/2" × 11"
78 8
1
/2" × 14"→81/2" ×
11"
AdonisC2_ENcopy122F_FM.book Page 71 Thursday, February 15, 2001 3:23 PM
Page 17
Copying
72
2
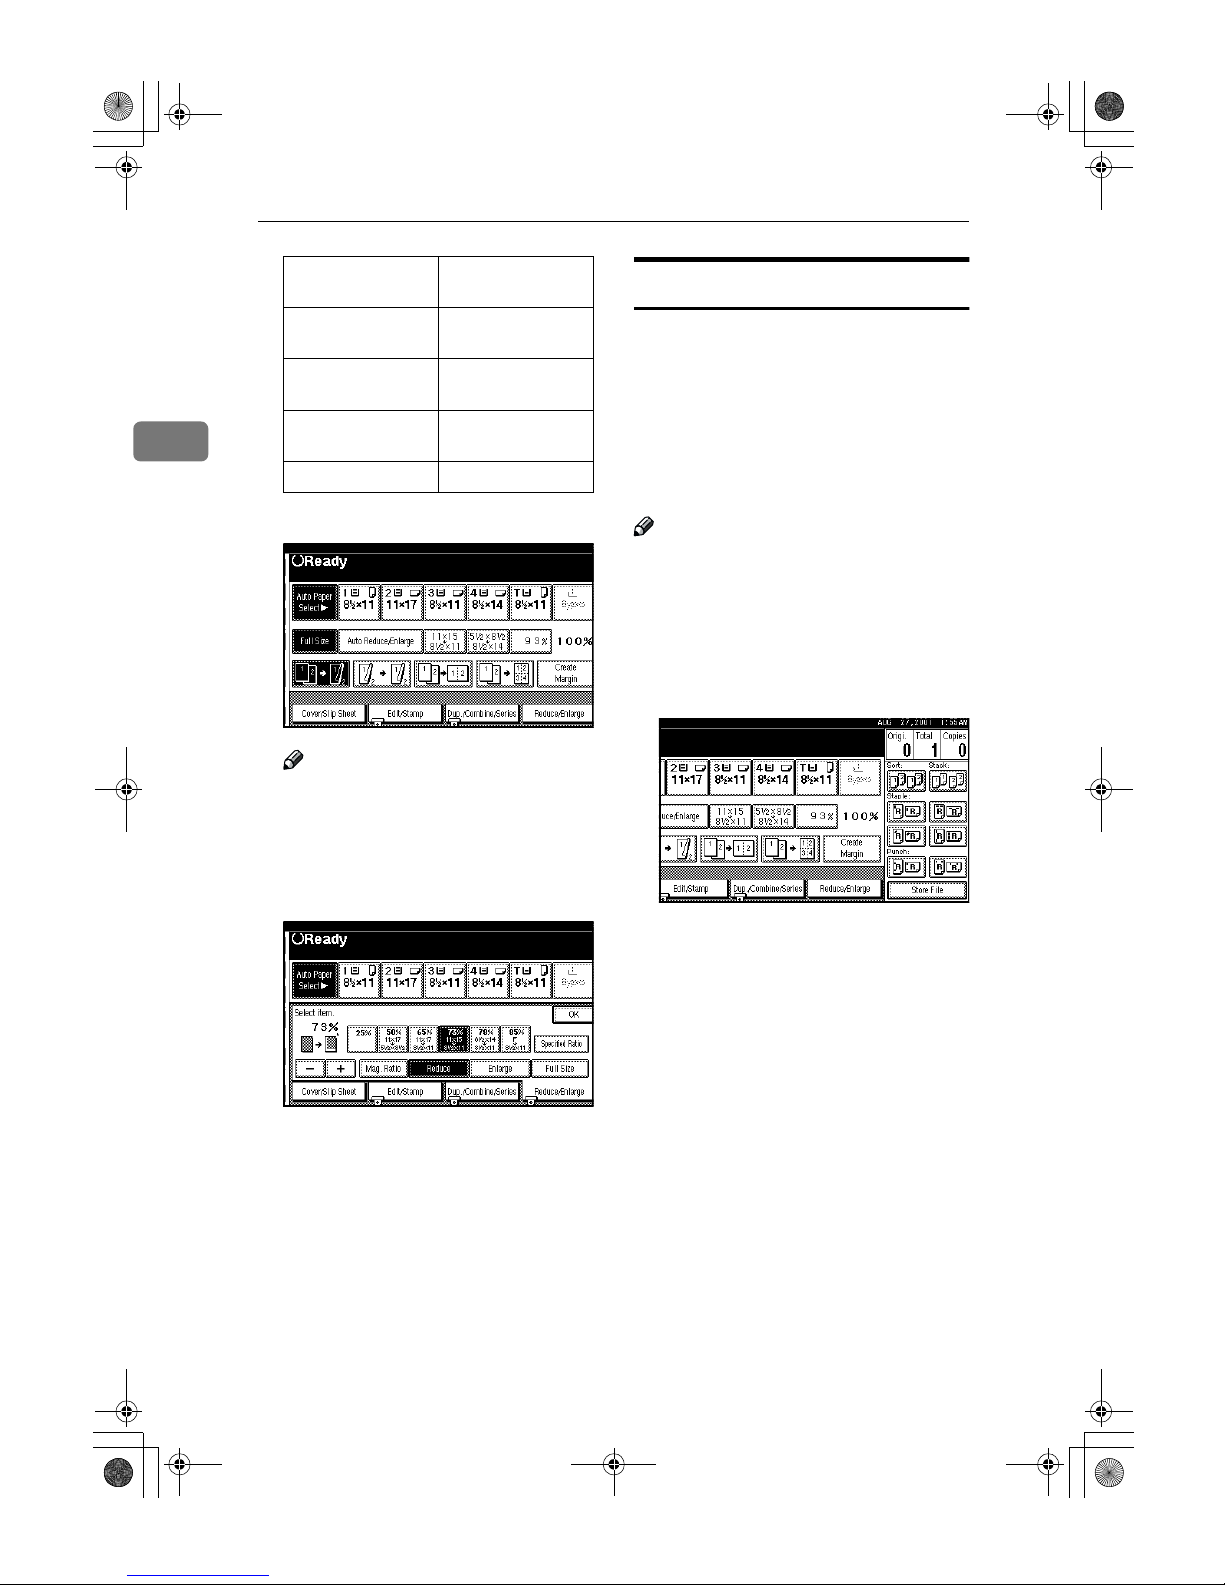
A
Press the [Reduce/Enlarge] key.
Note
❒ To select a preset ratio on the
initial display, directly press the
shortcut reduce/enlarge key
and go to step D.
B
Press the [Enlarge] or [Reduce] key.
C
Select a ratio.
D
Press the [OK] key.
E
Set your originals, then press the
{{{{Start}}}} key.
Create Margin mode
Use “Create Margin” to reduce the
image by 93% of its original size with
the centre position as reference. You
can register this function in a shortcut
key on the initial display. By combining it with the Reduce/Enlarge function, you can also provide the
Reduce/Enlarge copy with a margin.
Note
❒ You can register “Create Margin”
in a shortcut key.
❒ You can change the Reduce/En-
large ratio for “Create Margin”.
A
Press the [Create Margin] key displayed on the initial display.
B
If you do not wish to combine it
with the Reduce/Enlarge function, set your originals, then press
the {{{{Start}}}} key.
73 11" × 15"→81/2" ×
11"
65 11" × 17"→8
1
/2" ×
11"
50 (reduce area by
1
/4)
11" × 17"→5
1
/2" ×
8
1
/2"
25 --
Ratio (%) Original
→→→→
Copy
paper size
AdonisC2_ENcopy122F_FM.book Page 72 Thursday, February 15, 2001 3:23 PM
Page 18
Zoom
73
2
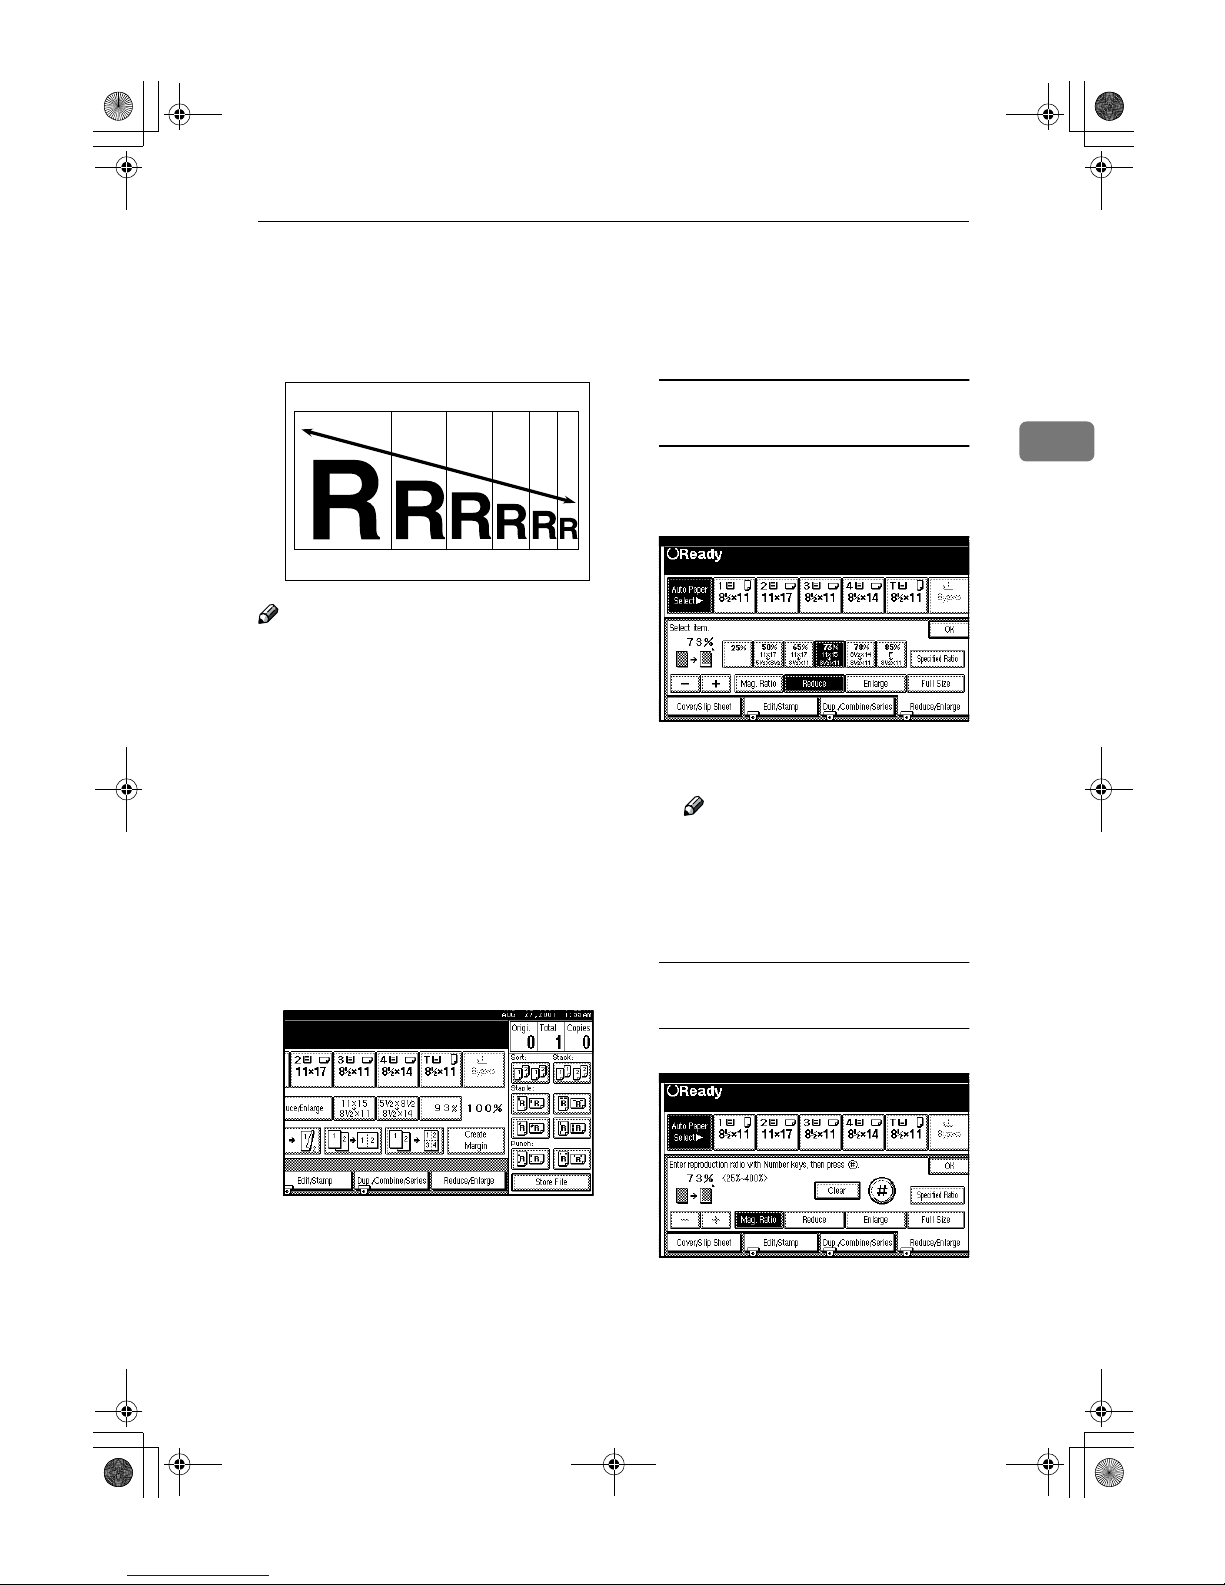
Zoom
You can change the reproduction ratio in 1% steps.
Note
❒ The following ratios can be select-
ed:
• Metric version: 25 – 400%
• Inch version: 25 – 400%
❒ You can select a ratio regardless of
the size of an original or copy paper. With some ratios, parts of the
image might not be copied or margins will appear on copies.
❒ You can select a preset ratio which
is near the desired ratio, then adjust the ratio with the [n] or [o]
key.
A
Press the [Reduce/Enlarge] key.
B
Enter the ratio.
To select the ratio with the [n]
and [o] keys
A Select a preset ratio which is
close to the desired ratio by using [Reduce] or [Enlarge].
B Adjust the ratios with the [nnnn]
or [oooo] key.
Note
❒ To change the ratio in 1%
steps, just press the [n] or
[o] key. To change the ratio
in 10% steps, press and hold
down the [n] or [o] key.
To enter the ratio with the number
keys
A Press the [Mag. Ratio] key.
AdonisC2_ENcopy122F_FM.book Page 73 Thursday, February 15, 2001 3:23 PM
Page 19
Copying
74
2
B Enter the desired ratio with the
number keys.
Note
❒ To change the ratio entered,
press the [Clear] or {Clear/
Stop} key and enter the new
ratio.
C Press the [#] key.
D Press the [OK] key.
C
Set your originals, then press the
{{{{Start}}}} key.
AdonisC2_ENcopy122F_FM.book Page 74 Thursday, February 15, 2001 3:23 PM
Page 20
Size Magnification
75
2
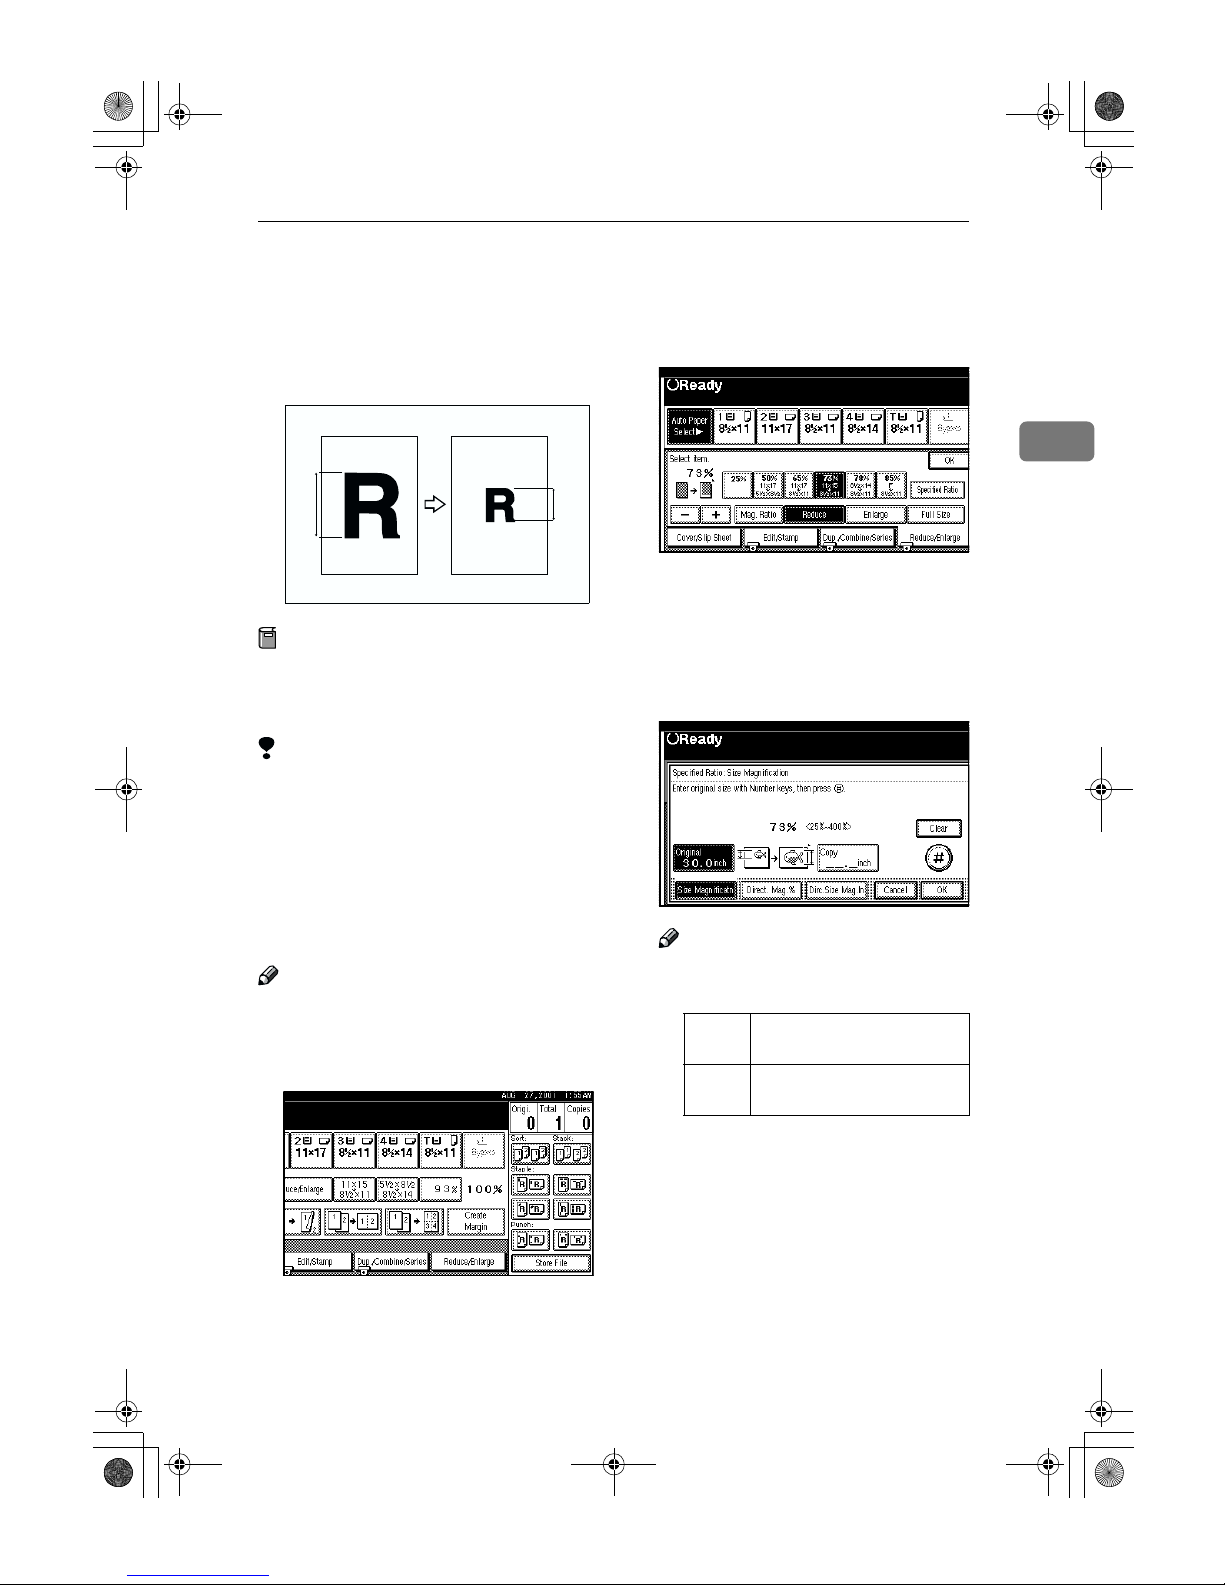
Size Magnification
This function calculates an enlargement or reduction ratio based upon
the lengths of the original and copy.
Preparation
Measure and specify the lengths of
the original and copy by comparing “A” with “a.”
Limitation
❒ If the calculated ratio is over the
maximum or under the minimum
ratio, it is corrected within the
range of the ratio automatically.
However, with some ratios, parts
of the image might not be copied
or blank margins will appear on
copies.
Note
❒ A ratio is selected in the range of 25
to 400%.
A
Press the [Reduce/Enlarge] key.
B
Press the [Specifid Ratio] key.
C
Make sure that the [Specifid Ratio]
key is highlighted.
D
Enter the length of the original
with the number keys and press
the [#] key.
Note
❒ You can enter sizes within the
following ranges:
❒ To change the length entered,
press the [Clear] or {Clear/Stop}
key and enter the new length.
Amm amm
Metric
version
1 – 999mm (in 1mm steps)
Inch
version
0.1" – 99.9" (in 0.1" steps)
AdonisC2_ENcopy122F_FM.book Page 75 Thursday, February 15, 2001 3:23 PM
Page 21

Copying
76
2
E
Enter the length of the copy with
the number keys and press the [#]
key.
Note
❒ To change the length entered,
press the [Clear] or {Clear/Stop}
key and enter the new length.
❒ To change the length after
pressing the [#] key, select [Orig-
inal] or [Copy] and enter the de-
sired length.
F
Press the [OK] key.
G
Press the [OK] key.
H
Set your original, then press the
{{{{Start}}}} key.
AdonisC2_ENcopy122F_FM.book Page 76 Thursday, February 15, 2001 3:23 PM
Page 22

Directional Magnification (%)
77
2
Directional Magnification (%)
Copies can be reduced or enlarged at
different reproduction ratios horizontally and vertically.
Note
❒ The following ratios can be select-
ed:
• Metric version: 25 – 400%
• Inch version: 25 – 400%
❒ You can select a ratio regardless of
the size of an original or copy paper. With some ratios, parts of the
image might not be copied or
blank margins will appear on copies.
❒ You can also select a preset ratio
which is close to the desired ratio
by using Reduce or Enlarge, then
adjust the ratio with the [n] or
[o] key.
A
Press the [Reduce/Enlarge] key.
B
Press the [Specifid Ratio] key.
C
Press the [Direct. Mag.%] key.
To enter the ratio with the number
keys
A Press the [Horizontal] key.
B Enter the desired ratio with the
number keys, followed by the
[#] key.
Note
❒ To change the ratio entered,
press the [Clear] or {Clear/
Stop} key and enter the new
ratio.
a%
b%
CP2P01EE
AdonisC2_ENcopy122F_FM.book Page 77 Thursday, February 15, 2001 3:23 PM
Page 23

Copying
78
2
C Press the [Vertical] key.
D Enter the desired ratio with the
number keys, followed by the
[#] key.
E Press the [OK] key.
To specify a ratio with the [n]
and [o] keys
A Press the [With nnnnoooo] key.
B Press the [Horizontal] key.
C Adjust the ratio using the [nnnn]
or [oooo] key.
Note
❒ Pressing the [n] or [o] key
changes the ratio in 1% steps.
Pressing and holding down
the [n] or [o] key changes it
in 10% steps.
❒ If you have incorrectly en-
tered the ratio, readjust the
ratio with the [n] or [o]
key.
D Press the [
Vertical
] key.
E Adjust the ratio with the [nnnn]
or [oooo] key.
F Press the [OK] key.
D
Press the [OK] key.
E
Set your originals, then press the
{{{{Start}}}} key.
AdonisC2_ENcopy122F_FM.book Page 78 Thursday, February 15, 2001 3:23 PM
Page 24

Directional Size Magnification (Inch)
79
2
Directional Size Magnification (Inch)
The suitable reproduction ratios will
be automatically selected when you
enter the horizontal and vertical
lengths of the original and copy image you require.
1: Horizontal original size
2: Vertical original size
3: Horizontal copy size
4: Vertical copy size
Preparation
Specify the vertical and horizontal
sizes of the original and those of the
copy, as shown in the illustration.
Limitation
❒ If the calculated ratio is over the
maximum or under the minimum
ratio, it is corrected within the
range of the ratio automatically.
However, with some ratios, parts
of the image might not be copied
or blank margins will appear on
copies.
Note
❒ You can enter sizes within the fol-
lowing ranges:
❒ The following ratios can be selected:
• Metric version: 25 – 400%
• Inch version: 25 – 400%
A
Press the [Reduce/Enlarge] key.
B
Press the [Specifid Ratio] key.
C
Press the [Dirc.Size Mag. In] key.
D
Enter the horizontal size of the
original with the number keys,
then press the [#] key.
Note
❒ To change the value entered,
press the [Clear] or {Clear/Stop}
key and enter the new value.
Metric
version
1 – 999mm (in 1mm steps)
Inch
version
0.1" – 99.9" (in 0.1" steps)
1
3
24
CP2M01EE
AdonisC2_ENcopy122F_FM.book Page 79 Thursday, February 15, 2001 3:23 PM
Page 25

Copying
80
2
E
Enter the horizontal size of the
copy with the number keys, then
press the [#] key.
F
Enter the vertical size of the original with the number keys, then
press the [#] key.
G
Enter the vertical size of the copy
with the number keys, then press
the [#] key.
Note
❒ To change the length, press the
place you wish to change and
enter the new value.
H
Press the [OK] key.
I
Press the [OK] key.
J
Set your originals, then press the
{{{{Start}}}} key.
AdonisC2_ENcopy122F_FM.book Page 80 Thursday, February 15, 2001 3:23 PM
Page 26

Duplex/Combine/Series
81
2
Duplex/Combine/Series
You can make copies in a variety of
formats by combining the following
modes:
• 1 Sided/2 Sided originals
• 1 Sided/2 Sided copies
• Duplex
• Combine
• Book
• Series
A
Press [Dup./Combine/Series] and
check your originals. And select
[1 Sided] or [2 Sided] for the originals.
1: 1-sided
2: 2-sided
3: Series/Book
B
Select [1 Sided] or [2 Sided] for
copying.
1: 1-sided
2: 2-sided
A: Front
B: Back
C
Press the [OK] key.
12
1 2
1
2 1234
5678
34
3
21
4
5 6
78
1 2
34
1 234
5678
9
10 11 12
13 14 15 16
AdonisC2_ENcopy122F_FM.book Page 81 Thursday, February 15, 2001 3:23 PM
Page 27

Copying
82
2
Original Direction and
Completed Copies
The resulting copy image will differ
according to the direction in which
you set your original (lengthwise K
or widthwise L).
Note
❒ The illustrations show the direc-
tions of copied images on the front
and back, not the directions of delivery.
Originals and Copy Direction
You can select the orientation ([Top to
Top], [Top to Bottom]). ⇒ P.82 “Specify-
ing Orientation of Bound Originals”.
• Top to Top
• Top to Bottom
Specifying Orientation of
Bound Originals
You can specify the orientation of
bound originals (how you turn the
pages). The default setting is [Top to
Top].
Note
❒
You can change the orientation default with the User Tools.
⇒
“Copy
Orientation in Duplex Mode” and
“Original Orientation in Duplex
Mode” in
P.215 “General Features 2/
4
”
.
A
Press the [Dup./Combine/Series] key.
GCRYOU1E
Duplex1
Duplex2
AdonisC2_ENcopy122F_FM.book Page 82 Thursday, February 15, 2001 3:23 PM
Page 28

Duplex/Combine/Series
83
2
B
Press the [Orientation] key.
C
Select an original orientation and
a copy orientation.
D
Press the [OK] key.
AdonisC2_ENcopy122F_FM.book Page 83 Thursday, February 15, 2001 3:23 PM
Page 29

Copying
84
2
Duplex
This function can be used in two
ways:
❖❖❖❖ 1 Sided →→→→ 2 Sided
This mode makes two-sided copies
from one-sided originals.
❖❖❖❖ 2 Sided →→→→ 2 Sided
This mode makes two-sided copies
from two-sided originals.
Limitation
❒ You cannot use the following copy
paper in this function:
• Paper smaller than A5K, 5
1
/2"
×
8
1
/2"K (possible on A5L, 51/
2
" × 81/2"L)
• Paper thicker than 105g/m
2
, 28
lb.
• Paper thinner than 64g/m
2
, 17
lb.
• Translucent paper
• Adhesive labels
• OHP transparencies
• Postcards
❒ You cannot use the bypass tray
with this function.
1 Sided
→→→→
2 Sided
Note
❒ If you set an odd number of 1-sid-
ed originals in the document feeder, the reverse side of the last page
is left blank.
❒ When original images are copied,
the images are shifted by a width
of the binding margin. You can adjust the binding margin or binding
position. You can also change their
default values. ⇒ “Front Margin:
Left/Right”, “Back Margin: Left/
Right”, “Front Margin: Top/Bottom” and “Back Margin: Top/Bottom” in P.222 “Edit
1
/2”.
❒ A binding margin can be automat-
ically made on the back side. ⇒ “1
sided → 2 sided Auto Margin: T to
T” in P.222 “Edit
1
/2”.
A
Press the [Dup./Combine/Series] key.
12
2
1
AdonisC2_ENcopy122F_FM.book Page 84 Thursday, February 15, 2001 3:23 PM
Page 30

Duplex
85
2
B
Press the [1 Sided] key for original,
then press the [
2 Sided
] key for
copy.
Note
❒ To change the copy orientation
to “Top to Bottom”, press the
[Orientation] key and select [Top
to Bottom]. ⇒ P.82 “Specifying
Orientation of Bound Originals”.
C
Press the [OK] key.
D
Set your originals, then press the
{{{{Start}}}} key.
When setting an original on the
exposure glass or in the
document feeder using Batch
mode
Reference
⇒ P.33 “Batch mode”.
A Set the original, then press the
{{{{Start}}}} key.
Note
❒ Start with the first page to be
copied.
B Set the next original. When it is
placed on the exposure glass,
press the {{{{Start}}}} key.
C Press the {{{{#}}}} key after the last
original has been scanned.
2 Sided →→→→ 2 Sided
A
Press the [Dup./Combine/Series] key.
B
Press the [2 Sided] key for original,
then press the [2 Sided] key for
copy.
Note
❒ To change the copy orientation
to “Top to Bottom”, press the
[Orientation] key and select [Top
to Bottom
]. ⇒ P.82 “Specifying
Orientation of Bound Originals”.
C
Press the [OK] key.
1
2
1
2
AdonisC2_ENcopy122F_FM.book Page 85 Thursday, February 15, 2001 3:23 PM
Page 31

Copying
86
2
D
Set your originals, then press the
{{{{Start}}}} key.
When setting an original on the
exposure glass or in the
document feeder using Batch
mode
Reference
⇒ P.33 “Batch mode”.
A Set the original, then press the
{{{{Start}}}} key.
Note
❒ Start with the first page to be
copied.
B Set the next original. When it is
placed on the exposure glass,
press the {{{{Start}}}} key.
C Press the {{{{#}}}} key after the last
original has been scanned.
AdonisC2_ENcopy122F_FM.book Page 86 Thursday, February 15, 2001 3:23 PM
Page 32
Combine
87
2
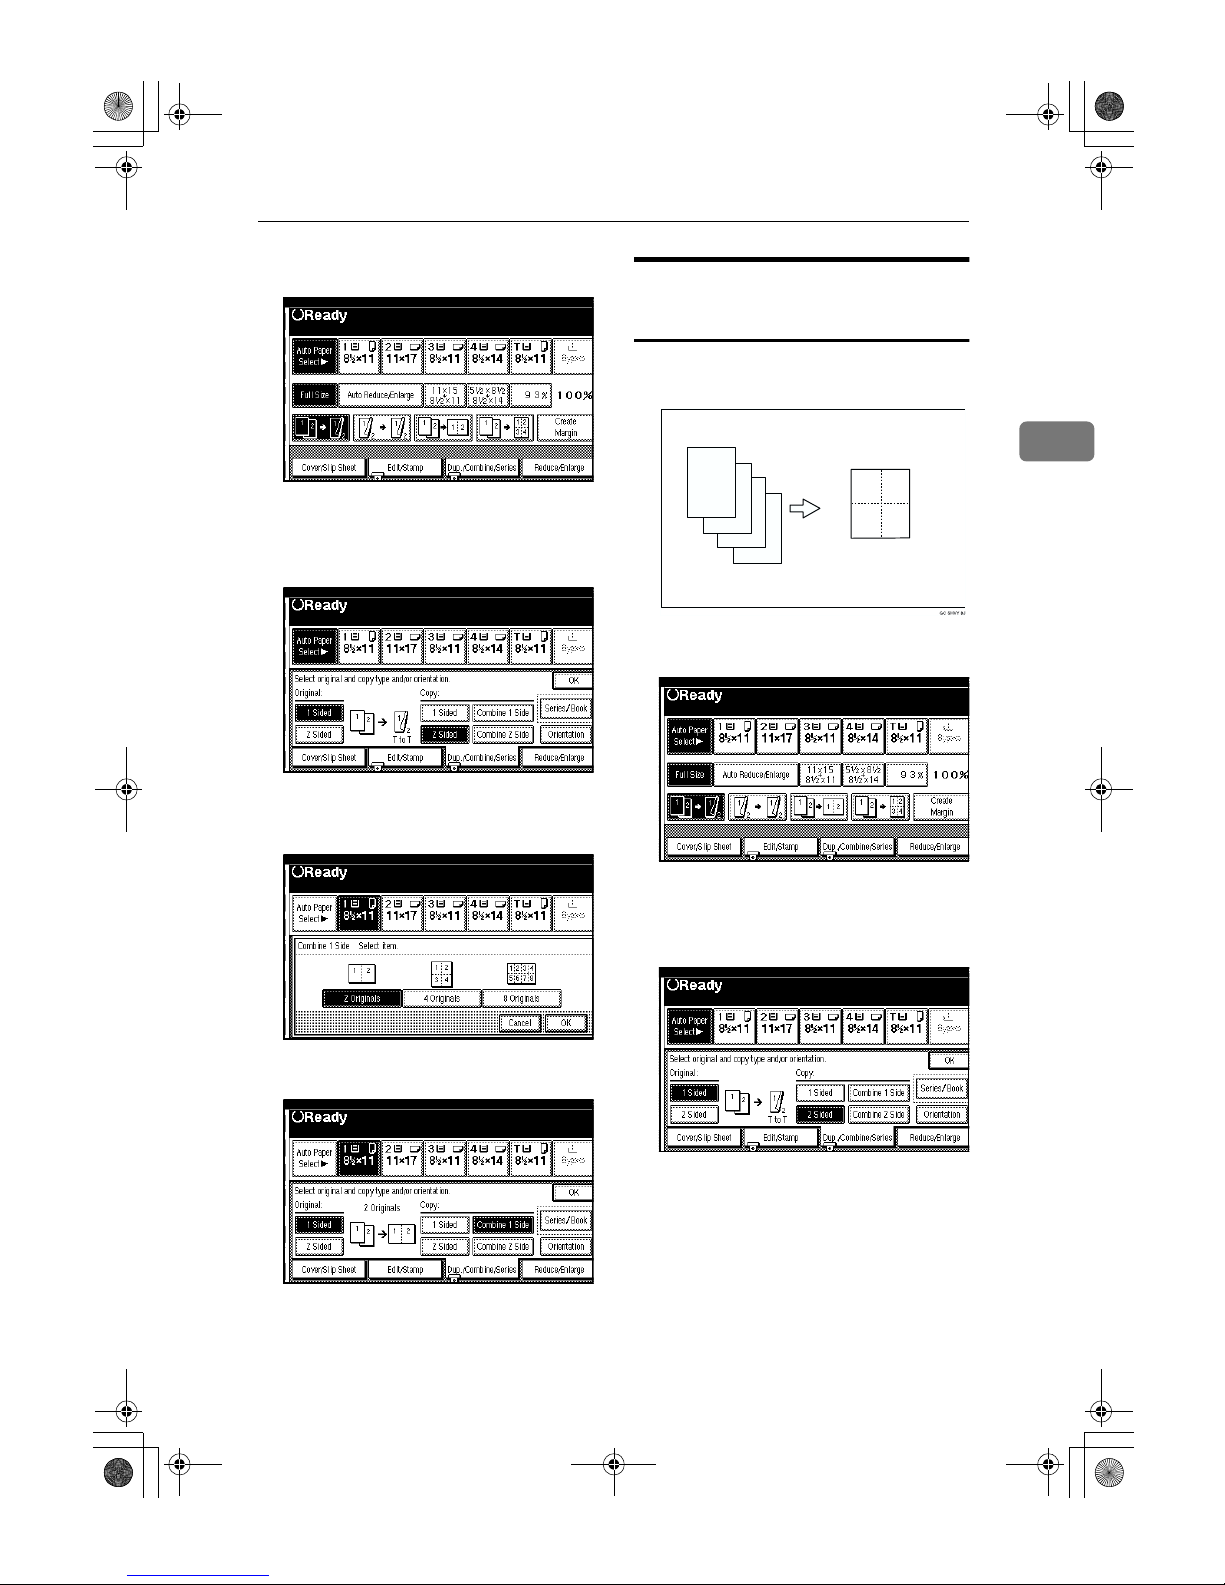
Combine
You can combine two or more originals into one copy. 1 Sided Combine
mode is for 1-sided copies, and 2 Sided Combine mode for 2-sided copies.
This function can be used in twelve
ways:
❖❖❖❖ 1 Sided 2 Pages →→→→ Combine 1 Side
Copies two 1-sided originals to
one side of a sheet.
❖❖❖❖ 1 Sided 4 Pages →→→→ Combine 1 Side
Copies four 1-sided originals together to one side of a sheet.
❖❖❖❖ 1 Sided 8 Pages →→→→ Combine 1 Side
Copies eight 1-sided originals together to one side of a sheet.
❖❖❖❖ 1 Sided 4 Pages →→→→ Combine 2 Side
Copies four 1-sided originals to the
two-page spread on both sides of a
sheet.
❖❖❖❖ 1 Sided 8 Pages →→→→ Combine 2 Side
Copies eight 1-sided originals together to both sides of a sheet.
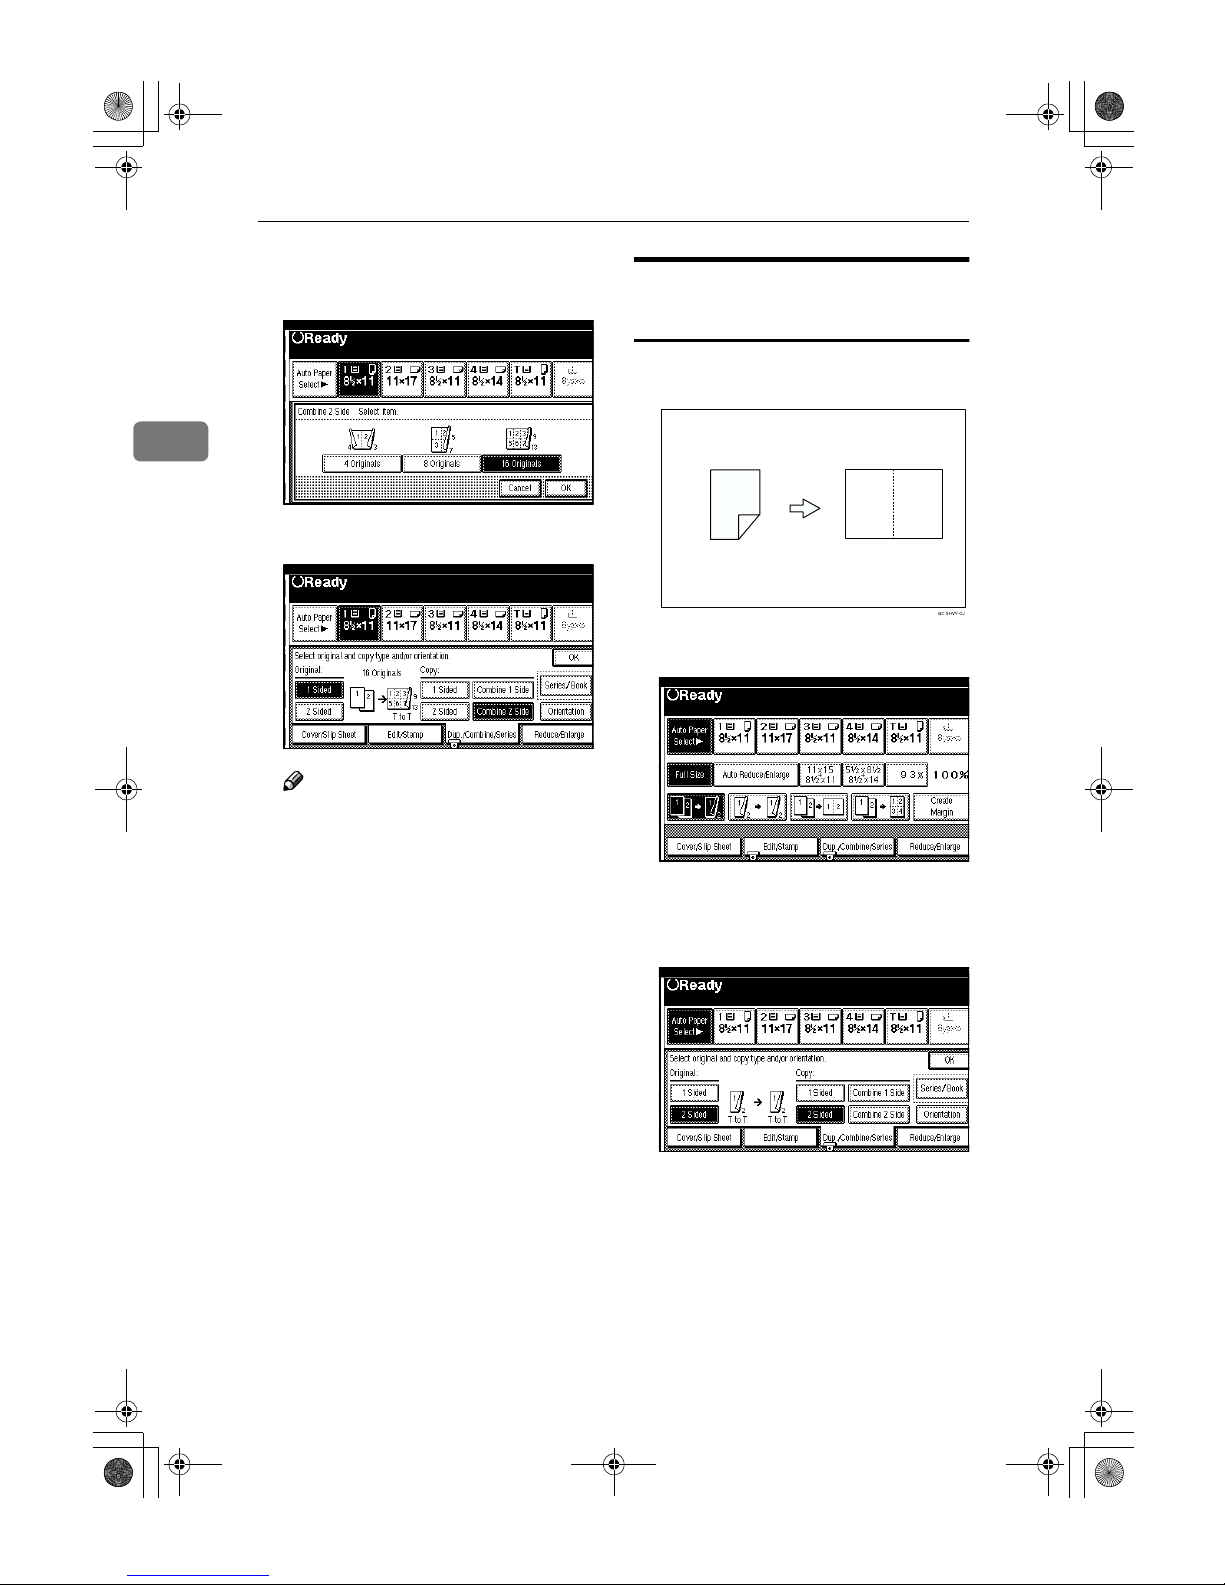
❖❖❖❖ 1 Sided 16 Pages →→→→ Combine 2 Side
Copies 16 1-sided originals together to both sides of a sheet.
❖❖❖❖ 2 Sided 2 Pages →→→→ Combine 1 Side
Copies one 2-sided original to one
side of a sheet.
❖❖❖❖ 2 Sided 4 Pages →→→→ Combine 1 Side
Copies two 2-sided originals to
one side of a sheet.
❖❖❖❖ 2 Sided 8 Pages →→→→ Combine 1 Side
Copies four 2-sided originals to
one side of a sheet.
❖❖❖❖ 2 Sided 4 Pages →→→→ Combine 2 Side
Copies two 2-sided originals together to both sides of a sheet.
❖❖❖❖ 2 Sided 8 Pages →→→→ Combine 2 Side
Copies four 2-sided originals together to both sides of a sheet.
❖❖❖❖ 2 Sided 16 Pages →→→→ Combine 2 Side
Copies eight 2-sided originals together to both sides of a sheet.
Limitation
❒ You cannot use the bypass tray
with this function.
❒ If the calculated ratio is under the
minimum ratio, it is corrected
within the range of the ratio automatically. However, with some ratios, parts of the image might not
be copied.
Note
❒ In this mode, the machine selects
the reproduction ratio automatically. This reproduction ratio depends on the copy paper sizes and
the number of originals.
❒ The machine uses ratios in the fol-
lowing range:
• Metric version: 25 – 400%
• Inch version: 25 – 400%
❒ A separation line between origi-
nals can be printed with the User
Tools. ⇒ “Separation Line in Combine” in P.224 “Edit
2
/2”.
❒ Even if the direction of originals is
different from that of the copy paper, the machine will automatically rotate the image by 90° to make
copies properly.
AdonisC2_ENcopy122F_FM.book Page 87 Thursday, February 15, 2001 3:23 PM
Page 33

Copying
88
2
❒ When making copies in Combine
mode, the border of each original
can be automatically erased by
3mm, 0.1". ⇒ “Erase Original
Shadow in Combine” in P.222 “Ed-
it
1
/2”.
❒ If the number of originals placed is
less than the number specified for
combining, the last page is copied
blank as shown in the illustration.
❒ You can change the copy order in
Combination mode. ⇒ “Copy Or-
der In Combine” in P.224 “Edit
2
/2”.
❒ Direction of the originals and ar-
rangement of combined images.
❖❖❖❖ Open to Left (KKKK) originals
❖❖❖❖ Open to Right (LLLL) originals
1 Sided 2 Pages →→→→ Combine 1
Side
Copies two 1-sided originals to one
side of a sheet.
❖❖❖❖ Setting originals (Originals set in the
document feeder)
• Originals read from left to right
• Originals read from top to bot-
tom
3
2
1
3
21
1
2
8
5678
1234
1
2
4
2
3
1
GCSHUY1E
1
3
5
7
2
4
6
8
1
1
2
8
2
21
43
GCSHUY2E
1 2
1
2
Combine5
3
4
1
2
4
3
2
1
Combine6
3
4
1
2
4
3
2
1
AdonisC2_ENcopy122F_FM.book Page 88 Thursday, February 15, 2001 3:23 PM
Page 34
Combine
89
2
A
Press the [Dup./Combine/Series] key.
B
Press the [1 Sided] key for the original, then press the [Combine 1
Side] key for the copy.
C
Press the [2 Originals] key, then
press the [OK] key.
D
Select the paper.
E
Set your originals, then press the
{{{{Start}}}} key.
1 Sided 4 Pages →→→→ Combine 1
Side
Copies four 1-sided originals together
to one side of a sheet.
A
Press the [
Dup./Combine/Series
] key.
B
Press the [1 Sided] key for the original, then press the [Combine 1
Side] key for the copy.
1 2
34
4
3
2
1
AdonisC2_ENcopy122F_FM.book Page 89 Thursday, February 15, 2001 3:23 PM
Page 35

Copying
90
2
C
Press the [4 Originals] key, then
press the [OK] key.
D
Select the paper.
E
Set your originals, then press the
{{{{Start}}}} key.
1 Sided 8 Pages →→→→ Combine 1
Side
Copies eight 1-sided originals together to one side of a sheet.
A
Press the [
Dup./Combine/Series
] key.
B
Press the [1 Sided] key for the original, then press the [Combine 1
Side] key for the copy.
1 234
5678
2
1
8
7
AdonisC2_ENcopy122F_FM.book Page 90 Thursday, February 15, 2001 3:23 PM
Page 36

Combine
91
2
C
Press the [8 Originals] key, then
press the [OK] key.
D
Select the paper.
E
Set your originals, then press the
{{{{Start}}}} key.
1 Sided 4 Pages →→→→ Combine 2
Side
Copies four 1-sided originals to the
two-page spread on both sides of a
sheet.
A
Press the [
Dup./Combine/Series
] key.
B
Press the [1 Sided] key for the original, then press the [Combine 2
Side] key for the copy.
4
3
2
1
3
21
4
AdonisC2_ENcopy122F_FM.book Page 91 Thursday, February 15, 2001 3:23 PM
Page 37

Copying
92
2
C
Press the [4 Originals] key, then
press the [OK] key.
D
Check the orientation.
Note
❒ To change the copy orientation
to “Top to Bottom”, press the
[
Orientation
] key and select [
Top
to Bottom]. ⇒ P.82 “Specifying
Orientation of Bound Originals”.
E
Press the [OK] key.
F
Select the paper.
G
Set your originals, then press the
{{{{Start}}}} key.
1 Sided 8 Pages →→→→ Combine 2
Side
Copies eight 1-sided originals together to both sides of a sheet.
1.
Front
2.
Back
A
Press the [Dup./Combine/Series] key.
B
Press the [1 Sided] key for the original, then press the [Combine 2
Side
] key for the copy.
1 2
34
GCSHVYAE
12
8
7
2
1
5 6
78
AdonisC2_ENcopy122F_FM.book Page 92 Thursday, February 15, 2001 3:23 PM
Page 38

Combine
93
2
C
Press the [8 Originals] key, then
press the [OK] key.
D
Check the orientation.
Note
❒ To change the copy orientation
to “Top to Bottom”, press the
[
Orientation
] key and select [
Top
to Bottom]. ⇒ P.82 “Specifying
Orientation of Bound Originals”.
E
Press the [OK] key.
F
Select the paper.
G
Set your originals, then press the
{{{{Start}}}} key.
1 Sided 16 Pages →→→→ Combine
2 Side
Copies sixteen 1-sided originals together to both sides of a sheet.
1.
Front
2.
Back
A
Press the [Dup./Combine/Series] key.
B
Press the [
1 Sided
] key for the orig-
inal, then press the [
Combine 2
Side
] key for the copy.
GCSHVY5E
1 234
5678
2
1
2
1
16
15
9 10 11 12
13 14 15 16
AdonisC2_ENcopy122F_FM.book Page 93 Thursday, February 15, 2001 3:23 PM
Page 39
Copying
94
2
C
Press the [16 Originals] key, then
press the [OK] key.
D
Check the orientation.
Note
❒ To change the copy orientation
to “Top to Bottom”, press the
[
Orientation
] key and select [
Top
to Bottom]. See ⇒ P.82 “Specify-
ing Orientation of Bound Originals”.
E
Press the [OK] key.
F
Select the paper.
G
Set your originals, then press the
{{{{Start}}}} key.
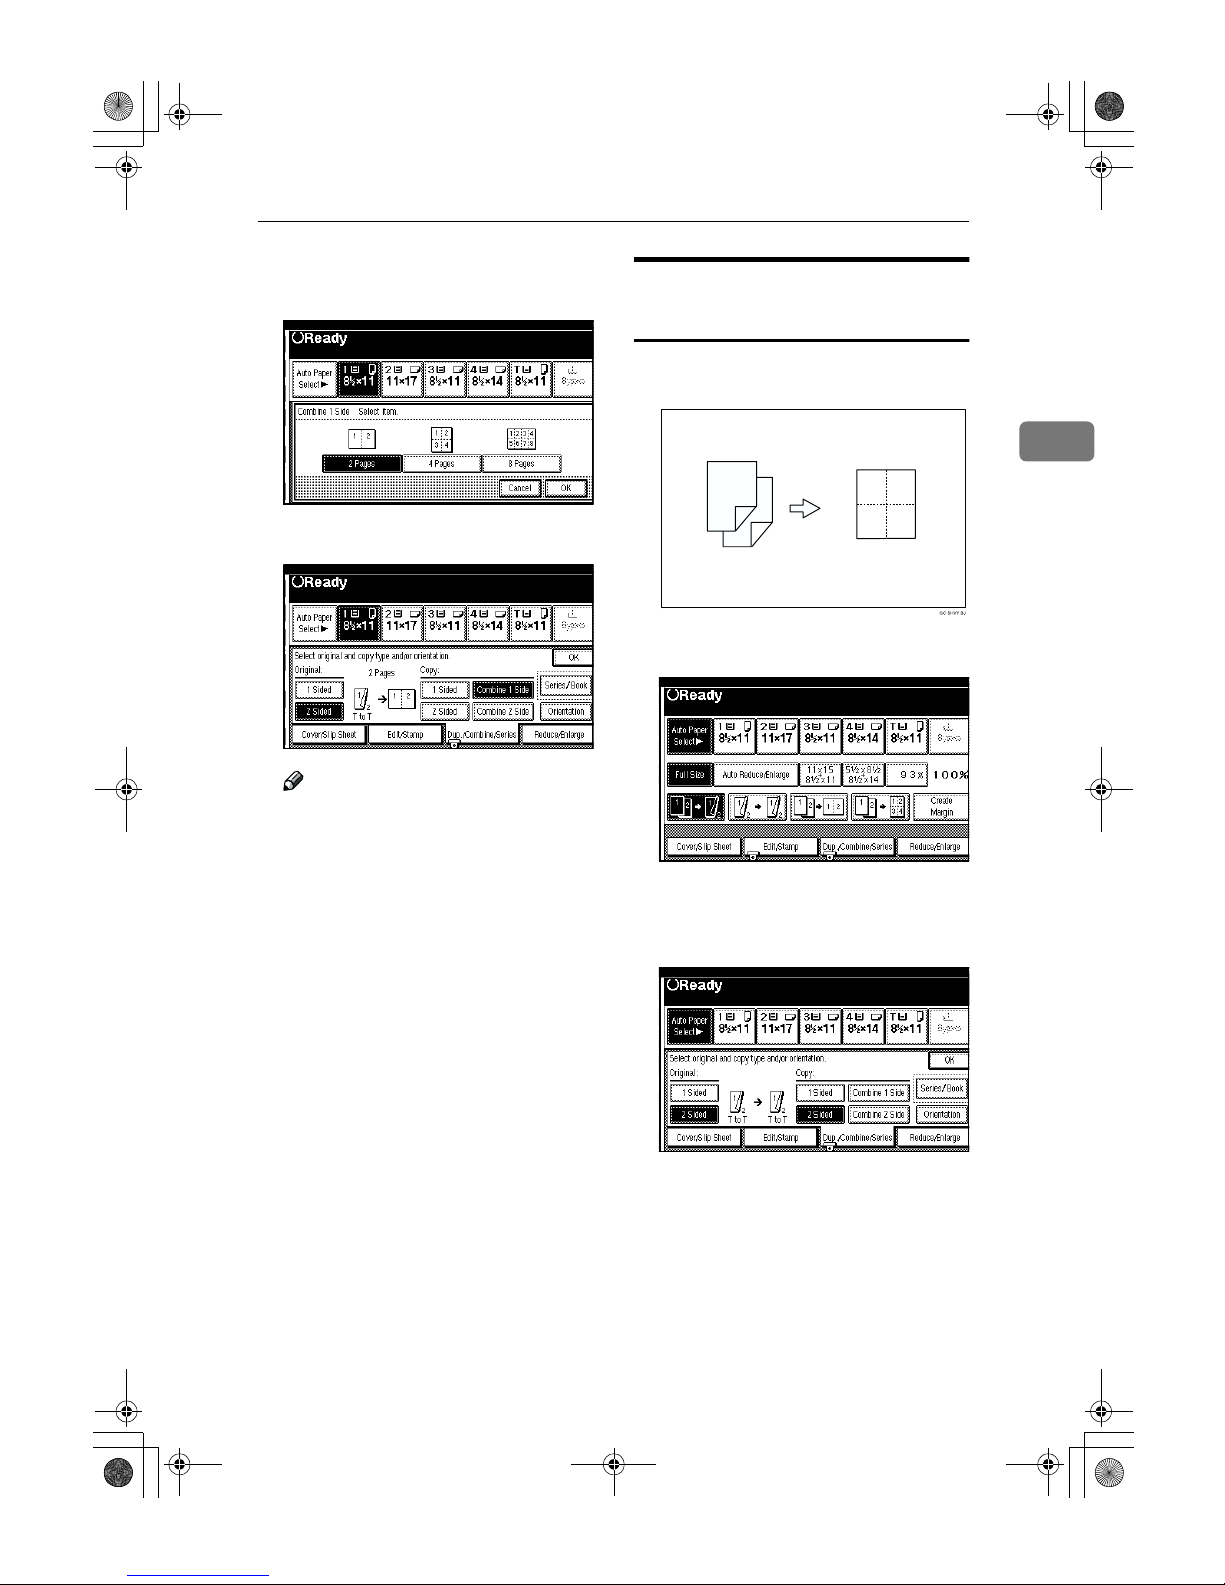
2 Sided 2 Pages →→→→ Combine 1
Side
Copies one 2-sided original to one
side of a sheet.
A
Press the [
Dup./Combine/Series
] key.
B
Press the [2 Sided] key for the original, then press the [Combine 1
Side] key for the copy.
1 2
2
1
AdonisC2_ENcopy122F_FM.book Page 94 Thursday, February 15, 2001 3:23 PM
Page 40
Combine
95
2
C
Press the [2 Pages] key, then press
the [OK] key.
D
Check the orientation.
Note
❒ To change the copy orientation
to “Top to Bottom”, press the
[
Orientation
] key and select [
Top
to Bottom]. ⇒ P.82 “Specifying
Orientation of Bound Originals”.
E
Press the [OK] key.
F
Select the paper.
G
Set your originals, then press the
{{{{Start}}}} key.
2 Sided 4 Pages →→→→ Combine 1
Side
Copies two 2-sided originals to one
side of a sheet.
A
Press the [
Dup./Combine/Series
] key.
B
Press the [2 Sided] key for the original, then press the [Combine 1
Side] key for the copy.
1 2
34
4
3
2
1
AdonisC2_ENcopy122F_FM.book Page 95 Thursday, February 15, 2001 3:23 PM
Page 41

Copying
96
2
C
Press the [4 Pages] key, then press
the [OK] key.
D
Check the orientation.
Note
❒ To change the copy orientation
to “Top to Bottom”, press the
[
Orientation
] key and select [
Top
to Bottom]. ⇒ P.82 “Specifying
Orientation of Bound Originals”.
E
Press the [OK] key.
F
Select the paper.
G
Set your originals, then press the
{{{{Start}}}} key.
2 Sided 8 Pages →→→→ Combine 1
Side
Copies four 2-sided originals to one
side of a sheet.
A
Press the [
Dup./Combine/Series
] key.
B
Press the [2 Pages] key for the original, then press the [Combine 1
Side] key for the copy.
8
7
6
5
4
3
2
1
1 234
5678
AdonisC2_ENcopy122F_FM.book Page 96 Thursday, February 15, 2001 3:23 PM
Page 42

Combine
97
2
C
Press the [8 Pages] key, then press
the [OK] key.
D
Check the orientation.
Note
❒ To change the copy orientation
to “Top to Bottom”, press the
[
Orientation
] key and select [
Top
to Bottom]. ⇒ P.82 “Specifying
Orientation of Bound Originals”.
E
Press the [OK] key.
F
Select the paper.
G
Set your originals, then press the
{{{{Start}}}} key.
2 Sided 4 Pages →→→→ Combine 2
Side
Copies two 2-sided originals together
to both sides of a sheet.
A
Press the [
Dup./Combine/Series
] key.
B
Press the [2 Sided] key for the original, then press the [Combine 2
Side] key for the copy.
4
3
2
1
3
21
4
AdonisC2_ENcopy122F_FM.book Page 97 Thursday, February 15, 2001 3:23 PM
Page 43

Copying
98
2
C
Press the [4 Pages] key, then press
the [OK] key.
D
Check the orientation.
Note
❒ To change the copy orientation
to “Top to Bottom”, press the
[
Orientation
] key and select [
Top
to Bottom]. ⇒ P.82 “Specifying
Orientation of Bound Originals”.
E
Press the [OK] key
F
Select the paper.
G
Set your originals, then press the
{{{{Start}}}} key.
2 Sided 8 Pages →→→→ Combine 2
Side
Copies four 2-sided originals together
to both sides of a sheet.
1.
Front
2.
Back
A
Press the [Dup./Combine/Series] key.
B
Press the [
2 Sided
] key for the orig-
inal, then press the [
Combine 2
Side
] key for the copy.
GCSHVY2E
12
8
7
6
5
4
3
2
1
5 6
78
1 2
34
AdonisC2_ENcopy122F_FM.book Page 98 Thursday, February 15, 2001 3:23 PM
Page 44

Combine
99
2
C
Press the [8 Pages] key, then press
the [OK] key.
D
Check the orientation.
Note
❒ To change the copy orientation
to “Top to Bottom”, press the
[
Orientation
] key and select [
Top
to Bottom]. ⇒ P.82 “Specifying
Orientation of Bound Originals”.
E
Press the [OK] key
F
Select the paper.
G
Set your originals, then press the
{{{{Start}}}} key.
2 Sided 16 Pages →→→→ Combine
2 Side
Copies eight 2-sided originals together to both sides of a sheet.
1.
Front
2.
Back
A
Press the [Dup./Combine/Series] key.
B
Press the [
2 Sided
] key for the original, then press the [Combine 2
Side] key for the copy.
GCSHVY6E
1 234
5678
2
1
9 10 11 12
13 14 15 16
4
3
2
1
16
15
14
13
AdonisC2_ENcopy122F_FM.book Page 99 Thursday, February 15, 2001 3:23 PM
Page 45

Copying
100
2
C
Press the [16 Pages] key, then press
the [OK] key.
D
Check the orientation.
Note
❒ To change the copy orientation
to “Top to Bottom”, press the
[
Orientation
] key and select [
Top
to Bottom]. ⇒ P.82 “Specifying
Orientation of Bound Originals”.
E
Press the [OK] key.
F
Select the paper.
G
Set your originals, then press the
{{{{Start}}}} key.
AdonisC2_ENcopy122F_FM.book Page 100 Thursday, February 15, 2001 3:23 PM
Page 46

Series/Book
101
2
Series/Book
Series copies are made by separately
copying the front and back of a 2-sided original or the two facing pages of
a spread original onto two sheets of
paper. A book is made by copying
two or more originals in page order.
The following types of Series and
Book modes can be used:
❖❖❖❖ Series Copies
• Book → 1 Sided
Copies the two facing pages of a
spread original to make two 1sided copies.
• Book → 2 Sided
Copies a spread two-page original onto both sides of a sheet.
• Front & Back→ 2 Sided
Copies each two-page spread
original as it is onto both sides
of a sheet.
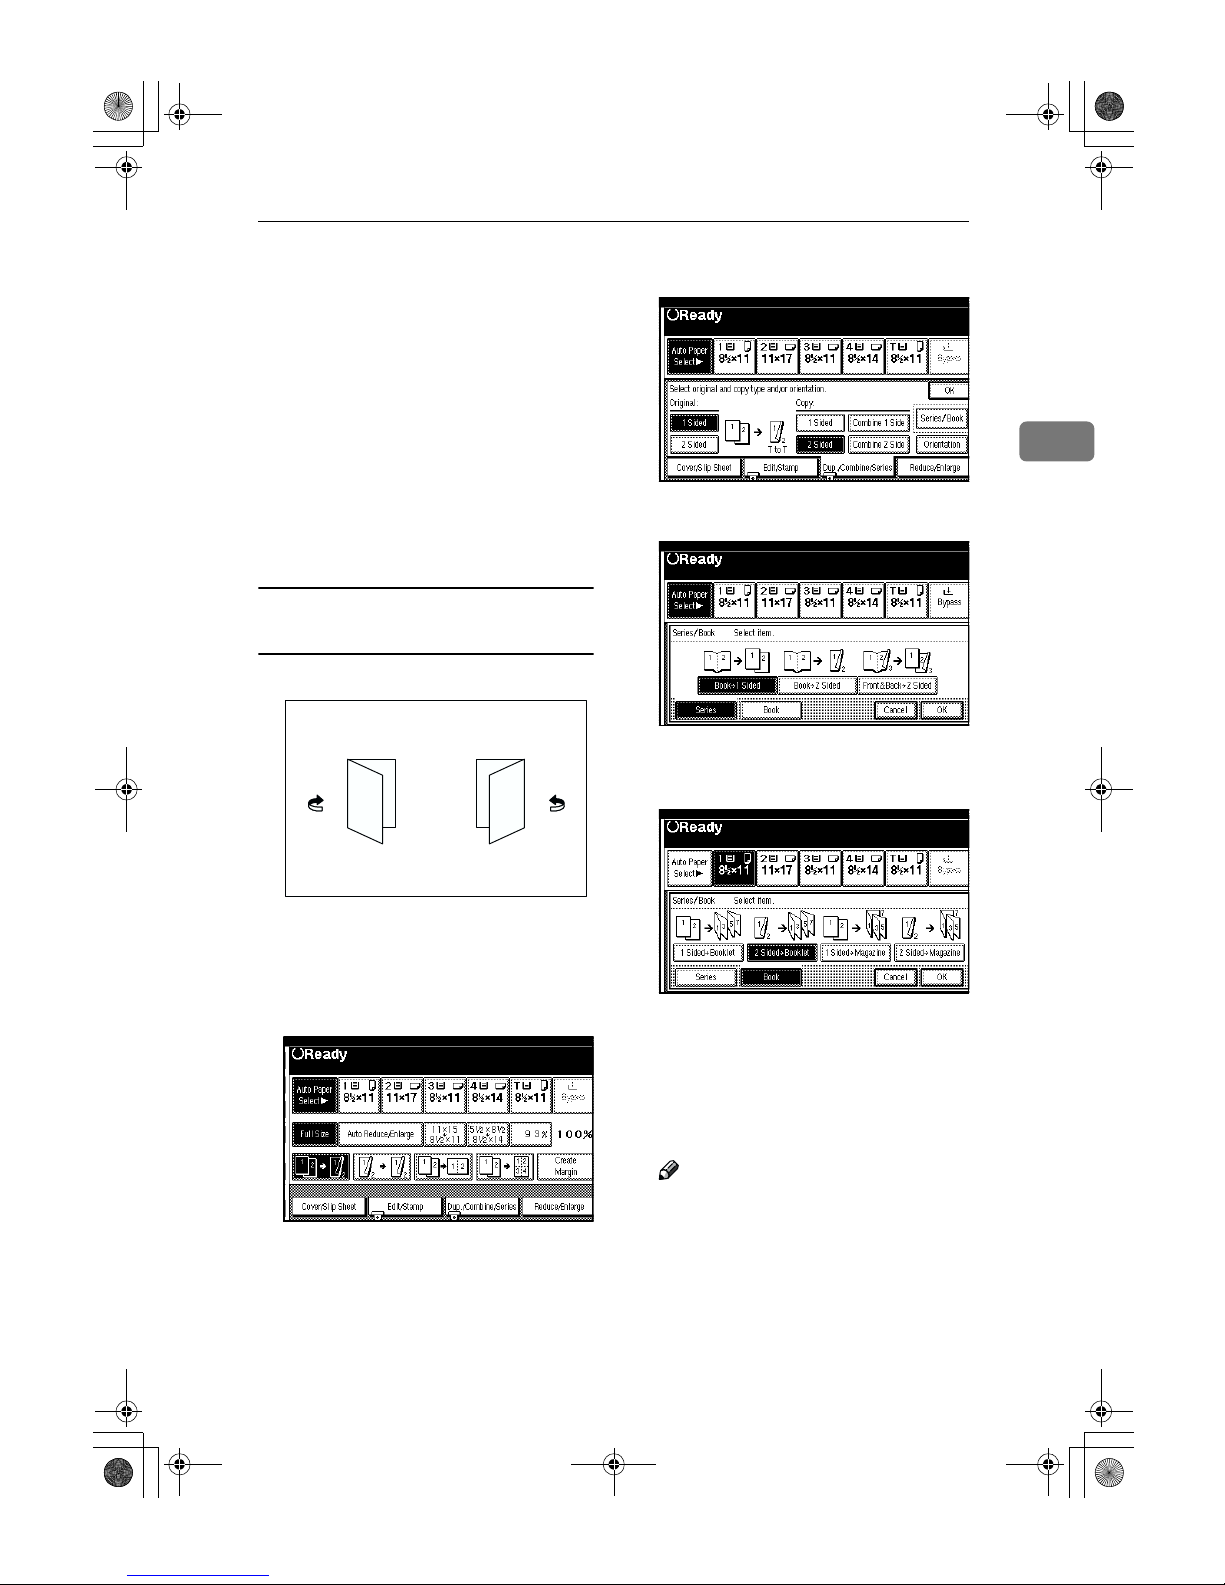
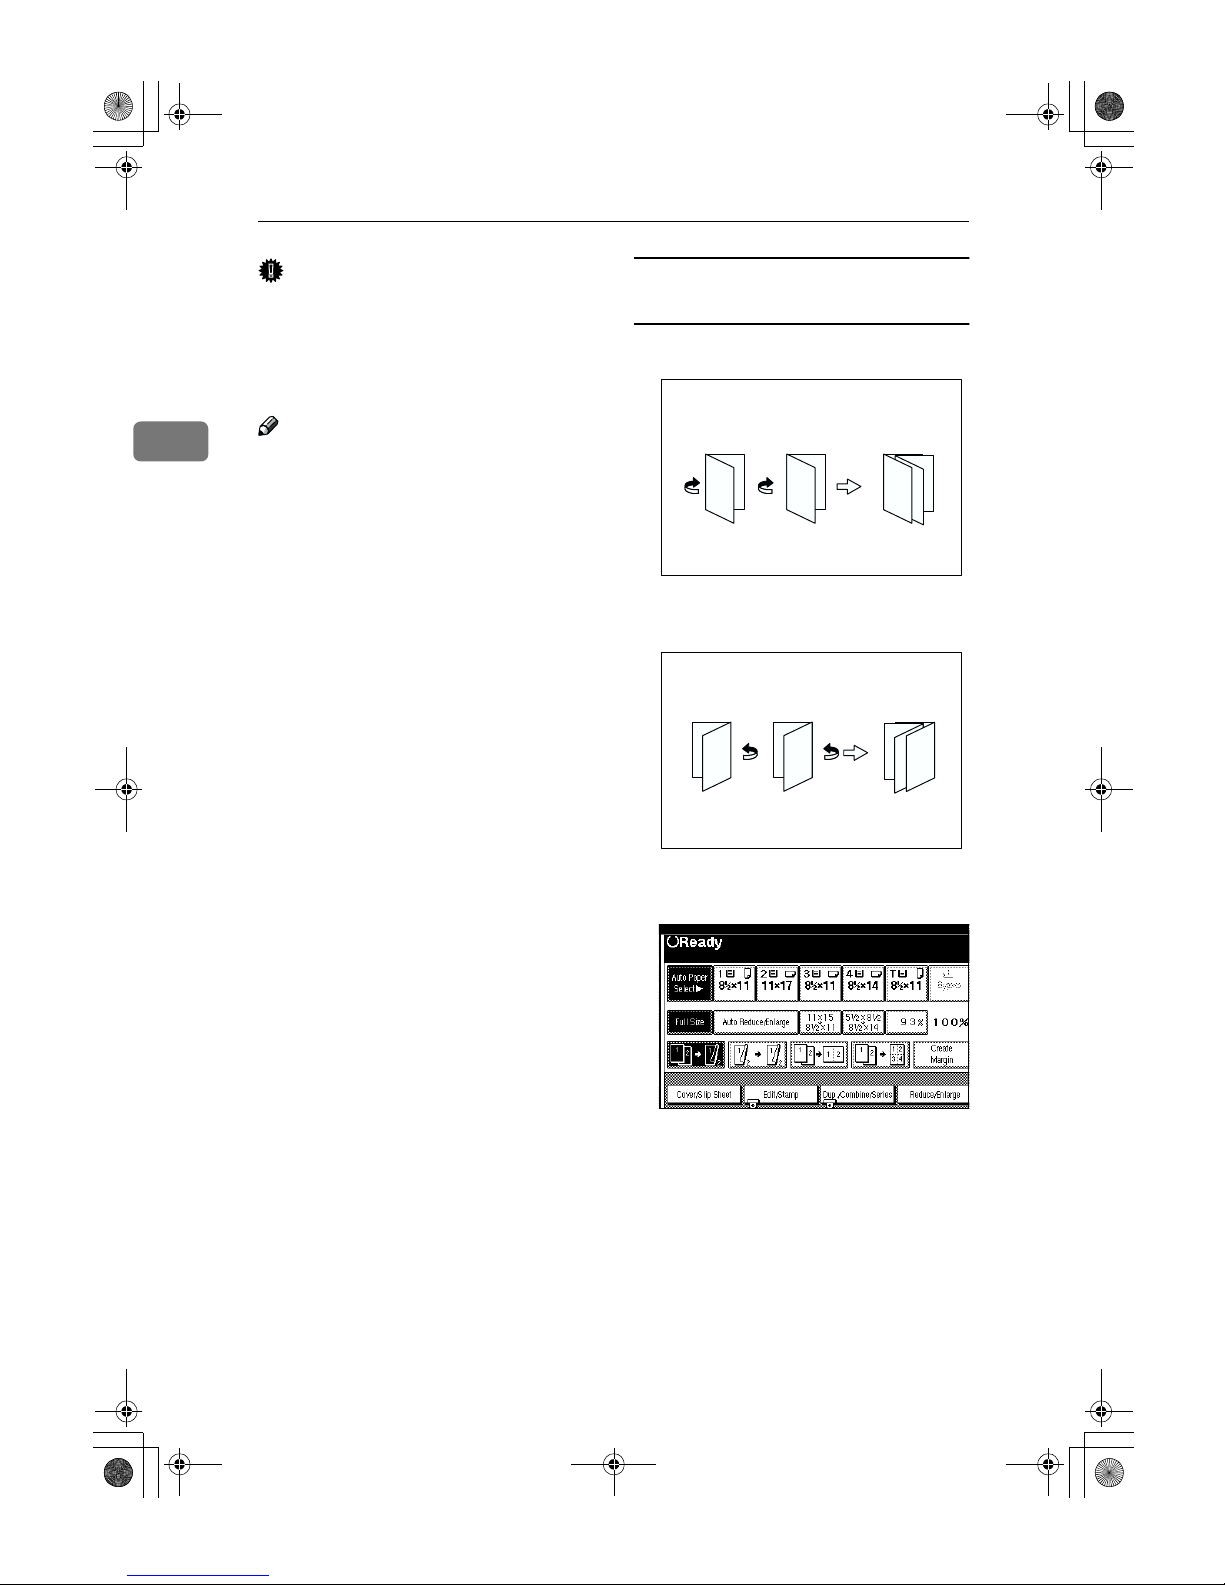
❖❖❖❖ Booklet
• 1 Sided → Booklet
Make copies in page order for a
folded booklet.
• 2 Sided → Booklet
Copies a 2-sided original in
page order for a folded booklet.
• 1 Sided → Magazine
Copies two or more originals to
make copies in page order (as
when they are folded and
stacked).
• 2 Sided → Magazine
Copies 2-sided originals to
make copies in page order (as
when they are folded and
stacked).
Series Copies
Book →→→→ 1 Sided
You can make one-sided copies from
two facing pages of a bound original
(book).
Limitation
❒ You cannot use the Book → 1 Sided
function from the document feeder.
Note
❒ See the following table when you
select original and copy paper sizes with 100% ratio:
❖❖❖❖ Metric version
❖❖❖❖ Inch version
Original Copy paper
A3
L
A4K × 2 sheets
B4
L
B5K × 2 sheets
A4
L
A5K × 2 sheets
Original Copy paper
11" × 17"
L
8
1
/2" × 11"K × 2
sheets
8
1
/2" × 11"
L
51/2" × 81/2"K × 2
sheets
12
12
AdonisC2_ENcopy122F_FM.book Page 101 Thursday, February 15, 2001 3:23 PM
Page 47

Copying
102
2
A
Press the [Dup./Combine/Series] key.
B
Press the [Series/Book] key.
C
Make sure that the [Series] key is
selected.
D
Press the [Book→→→→1 Sided] key, then
press the [OK] key.
E
Press the [OK] key.
F
Make sure that the [Auto Paper Se-
lect
] key is selected.
Note
❒ If the [Auto Paper Select] key is
not selected, press the [Auto Pa-
per Select] key.
G
Set your originals, then press the
{{{{Start}}}} key.
Book →→→→ 2 Sided
Copies a two-page spread original
onto both sides of a sheet.
Limitation
❒ You cannot use the Book
→
2 Sided
function from the document feeder.
Note
❒ See the following table when you
select original and copy paper sizes with 100% ratio:
❖❖❖❖ Metric version
❖❖❖❖ Inch version
Original Copy paper
A3
L
A4 (2-sided)
B4
L
B5 (2-sided)
A4
L
A5 (2-sided)
Original Copy paper
11" × 17"
L
81/2" × 11" (2-sided)
81/2" × 11"
L
51/2" × 81/2" (2-sided)
12
1
2
AdonisC2_ENcopy122F_FM.book Page 102 Thursday, February 15, 2001 3:23 PM
Page 48

Series/Book
103
2
A
Press the [Dup./Combine/Series] key.
B
Press the [Series/Book] key.
C
Make sure that the [Series] key is
selected.
D
Press the [Book→→→→2 Sided] key, then
press the [OK] key.
E
Press the [OK] key
F
Select the paper.
G
Set your originals, then press the
{{{{Start}}}} key.
Front & Back →→→→ 2 Sided
Copies each two-page spread original
as it is onto both sides of a sheet.
Limitation
❒ You cannot use the Front & Back →
2 Sided function from the document feeder.
Note
❒ See the following table when you
select original and copy paper sizes with 100% ratio:
❖❖❖❖ Metric version
❖❖❖❖ Inch version
Original Copy paper
A3
L
A4 (2-sided)
B4
L
B5 (2-sided)
A4
L
A5 (2-sided)
Original Copy paper
11" × 17"
L
81/2" × 11" (2-sided)
81/2" × 11"
L
51/2" × 81/2" (2-sided)
12
3
1
2
3
AdonisC2_ENcopy122F_FM.book Page 103 Thursday, February 15, 2001 3:23 PM
Page 49

Copying
104
2
A
Press the [Dup./Combine/Series] key.
B
Press the [Series/Book] key.
C
Make sure that the [Series] key is
selected.
D
Press the [Front & Back →→→→ 2 Sided]
key, then press the [OK] key.
E
Press the [OK] key.
F
Select the paper.
G
Set your originals, then press the
{{{{Start}}}} key.
Note
❒ Press the {#} key after all origi-
nals are scanned.
Copying Book Originals
Limitation
❒ You cannot use the bypass tray
with this function.
Note
❒ The machine sets the reproduction
ratio automatically to meet the paper size and copies the originals together onto the paper.
❒ The machine uses ratios in the
range of 25 to 400%.
❒ If the calculated ratio is under the
available minimum ratio, it will be
adjusted to the minimum ratio.
However, with some ratios, parts
of the image might not be copied.
❒ Even if the direction of originals is
different from that of the copy paper, the machine will automatically rotate the image by 90° to make
copies properly.
AdonisC2_ENcopy122F_FM.book Page 104 Thursday, February 15, 2001 3:23 PM
Page 50
Series/Book
105
2
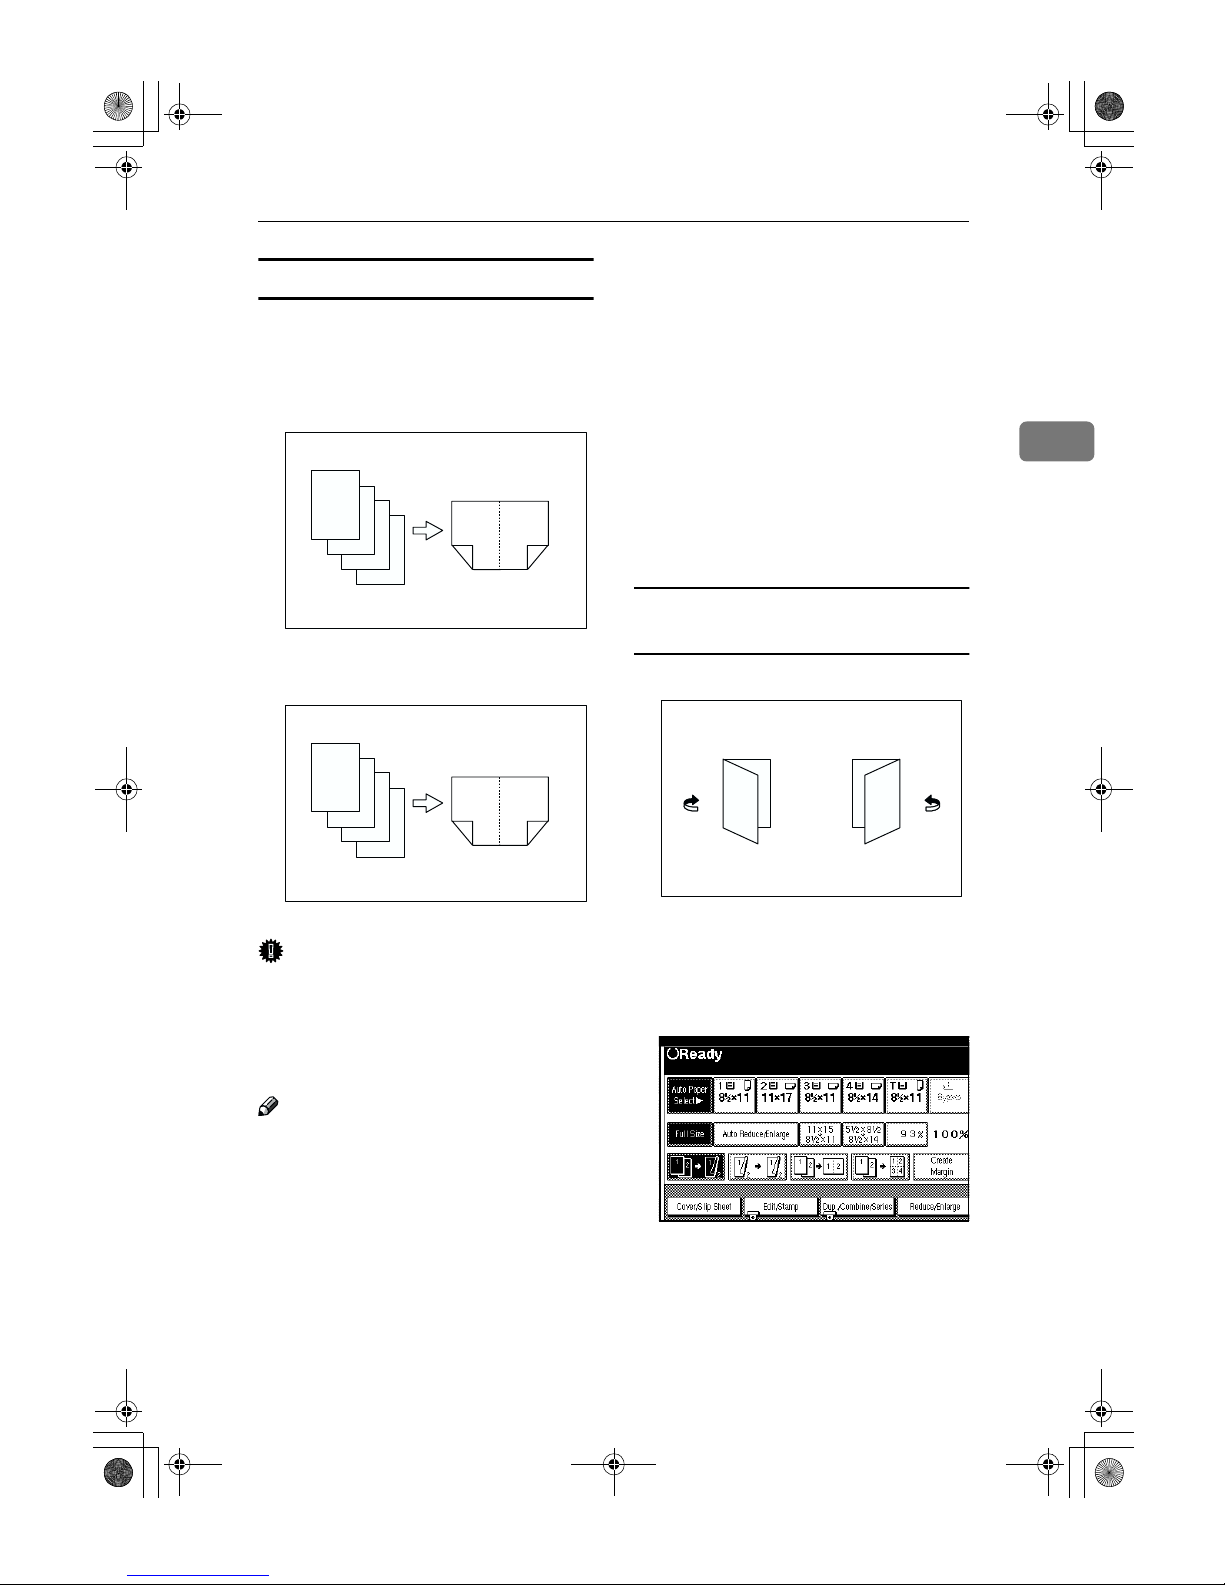
1 Sided →→→→ Booklet
Make copies in page order for a folded booklet as shown in the following
illustrations:
❖❖❖❖ Open to Left
❖❖❖❖ Open to Right
Important
❒ Before selecting this function, se-
lect “Open to left” or “Open to
right.” with the User Tools.
⇒
“Orientation: Booklet, Margine” in
P.224 “Edit
2
/2”.
Note
❒ Four originals are copied onto each
sheet of copy paper.
❒ In this mode, the machine sets the
reproduction ratio automatically
to meet the paper size and copies
the originals together onto the paper.
❒ A ratio is selected in the range of 25
to 400%.
❒ If the calculated ratio is under the
available minimum ratio, it will be
adjusted to the minimum ratio.
However, with some ratios, parts
of the image might not be copied.
❒ If the number of originals scanned
is less than a multiple of 4, the last
page is copied blank.
❒ You can have a 3mm, 0.1" bound-
ing margin around all four edges
of the original left blank (erased).
⇒
“Erase Original Shadow in
Combine” in P.222 “Edit
1
/2”.
How to fold copies to make a
booklet
1.
Open to Left
2.
Open to Right
A
Press the [Dup./Combine/Series] key.
GCBOOK0E
4
3
2
1
4
32
1
GCBOOK1E
4
3
2
1
1
23
4
GCBOOK2E
3
1
3
1
12
AdonisC2_ENcopy122F_FM.book Page 105 Thursday, February 15, 2001 3:23 PM
Page 51

Copying
106
2
B
Press the [Series/Book] key.
C
Press the [Book] key.
D
Press the [1 Sided →→→→ Booklet] key,
then press the [OK] key.
E
Press the [OK] key.
F
Select the paper.
G
Set your originals, then press the
{{{{Start}}}} key.
Note
❒ When placing one original on
the exposure glass or in the document feeder in Batch mode,
press the {#} key after all originals are scanned.
2 Sided →→→→ Booklet
Make 2 sided originals to copies in
page order for a folded booklet as
shown in the following illustrations:
❖❖❖❖ Open to Left
❖❖❖❖ Open to Right
Important
❒ Before selecting this function, se-
lect “Open to left” or “Open to
right.” with the User Tools.
❒ Two originals of 2 sided are copied
onto each sheet of copy paper.
❒ In this mode, the machine sets the
reproduction ratio automatically
to meet the paper size and copies
the originals together onto the paper.
❒ A ratio is selected in the range of 25
to 400%.
AdonisC2_ENcopy122F_FM.book Page 106 Thursday, February 15, 2001 3:23 PM
Page 52
Series/Book
107
2
❒ If the calculated ratio is under the
available minimum ratio, it will be
adjusted to the minimum ratio.
However, with some ratios, parts
of the image might not be copied.
❒ If the number of originals scanned
is less than a multiple of 4, the last
page is copied blank.
❒ You can have a 3mm, 0.1" bound-
ing margin around all four edges
of the original left blank (erased).
⇒ “Erase Original Shadow in
Combine” in P.222 “Edit
1
/2”.
How to fold copies to make a
booklet
1.
Open to Left
2.
Open to Right
A
Press the [Dup./Combine/Series] key.
B
Press the [Series/Book] key.
C
Press the [Book] key.
D
Press the [2 Sided →→→→ Booklet] key,
then press the [OK] key.
E
Press the [OK] key.
F
Select the paper.
G
Set your originals, then press the
{{{{Start}}}} key.
Note
❒ When placing one original on
the exposure glass or in the document feeder in Batch mode,
press the {#} key after all originals are scanned.
GCBOOK2E
3
1
3
1
12
AdonisC2_ENcopy122F_FM.book Page 107 Thursday, February 15, 2001 3:23 PM
Page 53

Copying
108
2
1 Sided →→→→ Magazine
Copies two or more originals to make
copies in page order when they are
folded and stacked.
❖❖❖❖ Open to Left
❖❖❖❖ Open to Right
Important
❒ Before selecting this function, se-
lect “Open to left” or “Open to
right.” with the User Tools.
⇒
“Orientation: Booklet, Magazine”
in P.224 “Edit
2
/2”.
Note
❒ Four originals are copied onto each
sheet of copy paper.
❒ In this mode, the machine sets the
reproduction ratio automatically
to meet the paper size and copies
the originals together onto the paper.
❒ A ratio is selected in the range of 25
to 400%.
❒ If the calculated ratio is under the
available minimum ratio, it will be
adjusted to the minimum ratio.
However, with some ratios, parts
of the image might not be copied.
❒ If the number of originals scanned
is less than a multiple of 4, the last
page is copied blank.
❒ You can have a 3mm bounding
margin around all four edges of
the original left blank (erased).
⇒
“Erase Original Shadow in Combine” in P.222 “Edit
1
/2”.
❒ The copying may take some time
after scanning originals.
How to fold and unfold copies to
make a magazine
❖❖❖❖ Open to Left
❖❖❖❖ Open to Right
GCBOOK3E
2
1
8
7
8
72
16
54
3
GCBOOK4E
2
1
8
7
1
27
83
45
6
GCBOOK5E
7 5
1
3
1
3
5
GCBOOK6E
3
1
55
3
7
1
AdonisC2_ENcopy122F_FM.book Page 108 Thursday, February 15, 2001 3:23 PM
Page 54

Series/Book
109
2
A
Press the [Dup./Combine/Series] key.
B
Press the [Series/Book] key.
C
Press the [Book] key.
D
Press the [1 Sided →→→→ Magazine] key,
then press the [OK] key.
E
Press the [OK] key.
F
Select the paper.
G
Set your originals, then press the
{{{{Start}}}} key.
Note
❒ When placing one original on
the exposure glass or in the document feeder in Batch mode,
press the {#} key after all originals are scanned.
2 Sided →→→→ Magazine
Copies two or more originals of 2 sided to make copies in page order when
they are folded and stacked.
❖❖❖❖ Open to Left
❖❖❖❖ Open to Right
AdonisC2_ENcopy122F_FM.book Page 109 Thursday, February 15, 2001 3:23 PM
Page 55
Copying
110
2
Important
❒ Before selecting this function, se-
lect “Open to left” or “Open to
right.” with the User Tools. ⇒
“Orientation: Booklet, Magazine”
in P.224 “Edit
2
/2”.
Note
❒ Two originals of 2 sided are copied
onto each sheet of copy paper.
❒ Four originals are copied onto each
sheet of copy paper.
❒ In this mode, the machine sets the
reproduction ratio automatically
to meet the paper size and copies
the originals together onto the paper.
❒ A ratio is selected in the range of 25
to 400%.
❒ If the calculated ratio is under the
available minimum ratio, it will be
adjusted to the minimum ratio.
However, with some ratios, parts
of the image might not be copied.
❒ If the number of originals scanned
is less than a multiple of 4, the last
page is copied blank.
❒ You can have a 3mm bounding
margin around all four edges of
the original left blank (erased). ⇒
“Erase Original Shadow in Combine” in P.222 “Edit
1
/2”.
❒ The copying may take some time
after scanning originals.
How to fold and unfold copies to
make a magazine
❖❖❖❖ Open to Left
❖❖❖❖ Open to Right
A
Press the [Dup./Combine/Series] key.
GCBOOK5E
7 5
1
3
1
3
5
GCBOOK6E
3
1
55
3
7
1
AdonisC2_ENcopy122F_FM.book Page 110 Thursday, February 15, 2001 3:23 PM
Page 56

Series/Book
111
2
B
Press the [Series/Book] key.
C
Press the [Book] key.
D
Press the [2 Sided →→→→ Magazine] key,
then press the [OK] key.
E
Press the [OK] key.
F
Select the paper.
G
Set your originals, then press the
{{{{Start}}}} key.
Note
❒ When placing one original on
the exposure glass or in the document feeder in Batch mode,
press the {#} key after all originals are scanned.
AdonisC2_ENcopy122F_FM.book Page 111 Thursday, February 15, 2001 3:23 PM
Page 57

Copying
112
2
Edit Image
Image Repeat
The original image is copied repeatedly.
Note
❒ The number of repeated images
depends on the original size, copy
paper size, and reproduction ratio.
See the following table:
❖❖❖❖ Original: A5KKKK/Copy paper: A4KKKK
or Original: A5LLLL/Copy paper A4LLLL
❖❖❖❖ Original: A5KKKK/Copy paper: A4LLLL
or Original: A5LLLL/Copy paper A4KKKK
❒ Part of a repeated image might not
be copied depending on copy paper size, copy paper direction or
reproduction ratio.
❒ You can insert separation lines be-
tween repeated images.
⇒
“Repeat
Separation Line” in
P.224 “Edit 2/2”
.
A
Select the size of the copy paper
and the reproduction ratio.
B
Press the [Edit/Stamp] key.
C
Press the [Edit Image] key.
D
Press the [Image Repeat] key.
E
Press the [OK] key.
4 repeats (71%) 16 repeats (35%)
2 repeats
(100%)
8 repeats
(50%)
32 repeats
(25%)
Repeat1
Repeat2
Repeat3
Repeat4
Repeat5
AdonisC2_ENcopy122F_FM.book Page 112 Thursday, February 15, 2001 3:23 PM
Page 58

Edit Image
113
2
F
Press the [OK] key.
G
Set your original, then press the
{{{{Start}}}} key.
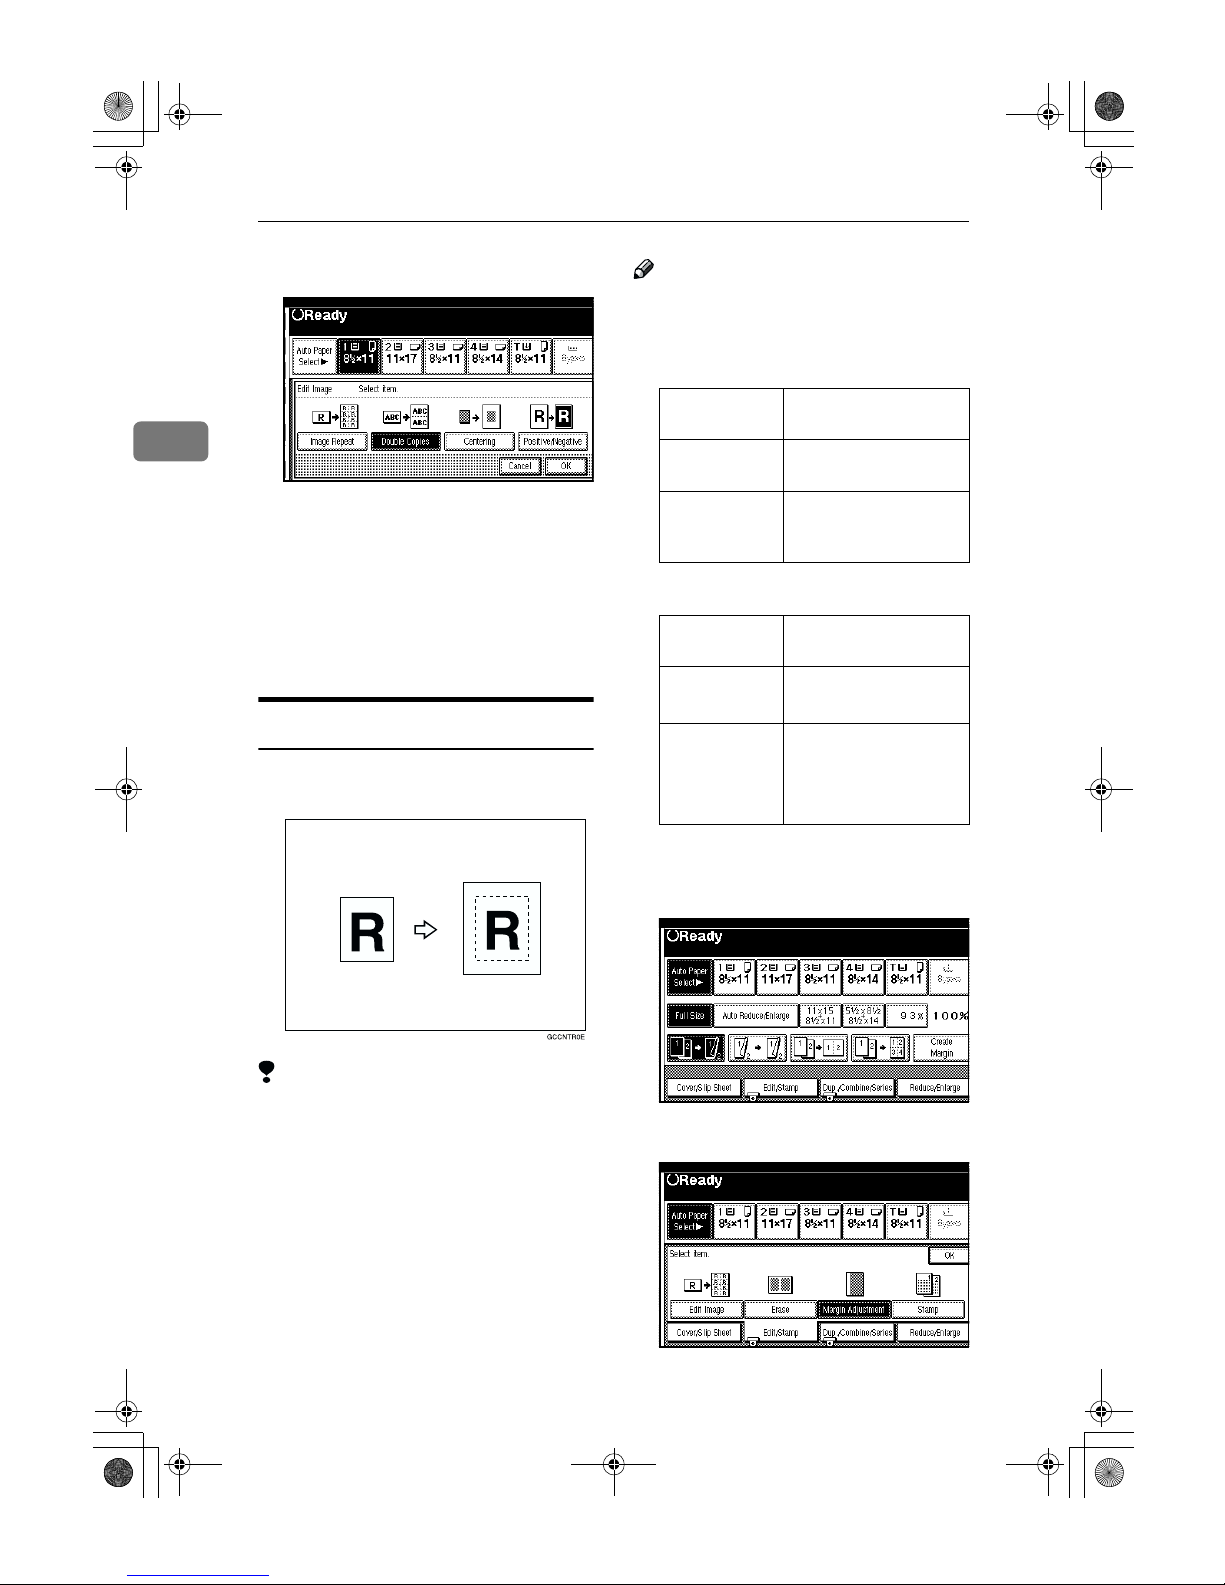
Double Copies
One original image is copied twice on
one copy as shown in the illustration.
Limitation
❒ The following originals cannot be
detected properly on the exposure
glass. Be sure to select the copy paper manually or set the originals in
the document feeder.
❒ You cannot use the bypass tray
with this function.
Note
❒ You can insert separation lines be-
tween repeated images. ⇒ “Dou-
ble Copies Separation Line” in
P.224 “Edit
2
/2”.
❒ See the following table when you
select original and copy paper sizes with 100% ratio:
❖❖❖❖ Metric version
❖❖❖❖ Inch version
A
Press the [Edit/Stamp] key.
B
Press the [Edit Image] key.
Metric
version
A5L, B6
KL
Inch
version
5
1
/2" × 81/2"
L
Original Size and
Direction
Copy Paper Size
and Direction
A5
L
A4
K
B6
L
B5
K
A4
K
A3
L
A5
K
A4
L
B6
K
B5
L
Original Size and
Direction
Copy Paper Size
and Direction
5
1
/2" × 81/2"
L
81/2" × 11"
K
5
1
/2" × 81/2"
K
81/2" × 11"
L
8
1
/2" × 11"
K
11" × 17"
L
AdonisC2_ENcopy122F_FM.book Page 113 Thursday, February 15, 2001 3:23 PM
Page 59
Copying
114
2
C
Press the [Double Copies] key.
D
Press the [OK] key.
E
Press the [OK] key.
F
Select the paper.
G
Set your originals, then press the
{{{{Start}}}} key.
Centering
You can make copies by moving the
image to the centre of the copy paper.
Limitation
❒ You cannot use the bypass tray
with this function.
❒ If the direction of originals is dif-
ferent from that of the copy paper,
the machine will not rotate the image by 90°(rotated copy).
❒ If the original size cannot be mea-
sured, the centring function will
not work.
Note
❒ The original sizes and directions
for centring are listed below.
❖❖❖❖ Metric version
❖❖❖❖ Inch version
A
Select the paper.
B
Press the [Edit/Stamp] key.
C
Press the [Edit Image] key.
Original
placed on:
Original size and
direction
Exposure glass A3L, B4L, A4KL,
B5
KL
Document
feeder
A3L, B4L, A4KL,
B5KL, A5KL,
B6KL, 11" × 17"
L
Original
placed on:
Original size and
direction
Exposure glass
11" × 17"L, 8
1
/2" ×
14"L, 8
1
/2" × 11"
KL
Document
feeder
A4KL, 11" × 17"L,
11" × 15"L, 8
1
/2" ×
14"L, 8
1
/2" × 11"K,
5
1
/2" × 81/2"
KL
AdonisC2_ENcopy122F_FM.book Page 114 Thursday, February 15, 2001 3:23 PM
Page 60

Edit Image
115
2
D
Press the [Centering] key.
E
Press the [OK] key.
F
Press the [OK] key.
G
Set your originals, then press the
{{{{Start}}}} key.
Positive/Negative
If your original is black and white,
copy images are inverted.
A
Press the [Edit/Stamp] key.
B
Press the [Edit Image] key.
C
Press the [Positive/Negative] key.
D
Press the [OK] key.
E
Press the [OK] key.
F
Select the paper.
G
Set your originals, then press the
{{{{Start}}}} key.
GCHATN1
E
R R
AdonisC2_ENcopy122F_FM.book Page 115 Thursday, February 15, 2001 3:23 PM
Page 61

Copying
116
2
Erase
This function erases the centre and/
or all four sides of the original image.
This is useful for avoiding shadows
on the copy image caused by the
bound originals, such as books.
This function can be used in three
ways:
❖❖❖❖ Border
This mode erases the edge margin
of the original image.
❖❖❖❖ Center
This mode erases the centre margin of the original image.
❖❖❖❖ Center/Border
This mode erases both the centre
and edge margins of the original
image.
Note
❒ You can change the width of the
erased margin as follows:
❒ The default setting of the erased
margin is as follows. You can
change this settings with the User
Tools. ⇒ “Erase Border Width”
and “Erase Center Width” in P.222
“Edit
1
/2”.
❒ The width of the erased margin
varies depending on the reproduction ratio.
❒ If the size of the original is differ-
ent from sizes listed in the following chart, the erased margin might
be shifted.
❖❖❖❖ Metric version
❖❖❖❖ Inch version
❒ The relationship between the orig-
inal orientation and the erased part
is as follows:
❒ 1: Erased part
❒ 2: 2–99mm
Metric
version
2 – 99mm (in 1mm steps)
Inch
version
0.2" – 3.9" (in 0.1" steps)
Metric
version
10mm
Inch
version
0.4"
Where Original Is Set
Paper Size and Orientation
Exposure glass A3L, B4L, A4KL,
B5
KL
Document
feeder
A3L, B4L, A4KL,
B5KL, A5KL,
B6KL, 11" × 17"
L
Where Original Is Set
Paper Size and Orientation
Exposure glass
11" × 17"L, 8
1
/2" ×
14"L, 8
1
/2" × 11"
KL
Document
feeder
A4KL, 11" × 17"L,
8
1
/2" × 14"L, 81/2" ×
11"KL, 5
1
/2" × 81/
2
"
KL
L
original
K
original
1
1
2
AdonisC2_ENcopy122F_FM.book Page 116 Thursday, February 15, 2001 3:23 PM
Page 62
Erase
117
2
Border Erase
This function erases the edge margins. You can set the same margin
width for all four sides, or you can set
different margin widths for each side.
Note
❒ If you want to erase the centre mar-
gin too, use the Centre/Border
function. ⇒ P.119 “Center/Border
Erase”.
A
Press the [Edit/Stamp] key.
B
Press the [Erase] key.
C
Press the [Border] key.
D
Set the erase border width.
Selecting [Same Width]
A Press the [Same Width] key.
B Set an erase border width with
the [nnnn] and [oooo] keys, fol-
lowed by the [OK] key.
Note
❒ To change the value entered,
press the [n] and [o] keys
and enter the new value.
Selecting [Diff. Width]
A Press the [Diff. Width] key.
AdonisC2_ENcopy122F_FM.book Page 117 Thursday, February 15, 2001 3:23 PM
Page 63

Copying
118
2
B Press the key for the border
you wish to change and set an
erase border width with the
[nnnn] and [oooo] keys.
Note
❒ To change the value entered,
press the [n] and [o] keys
and enter the new value.
C Press the [OK] key.
E
Press the [OK] key.
F
Set your originals, then press the
{{{{Start}}}} key.
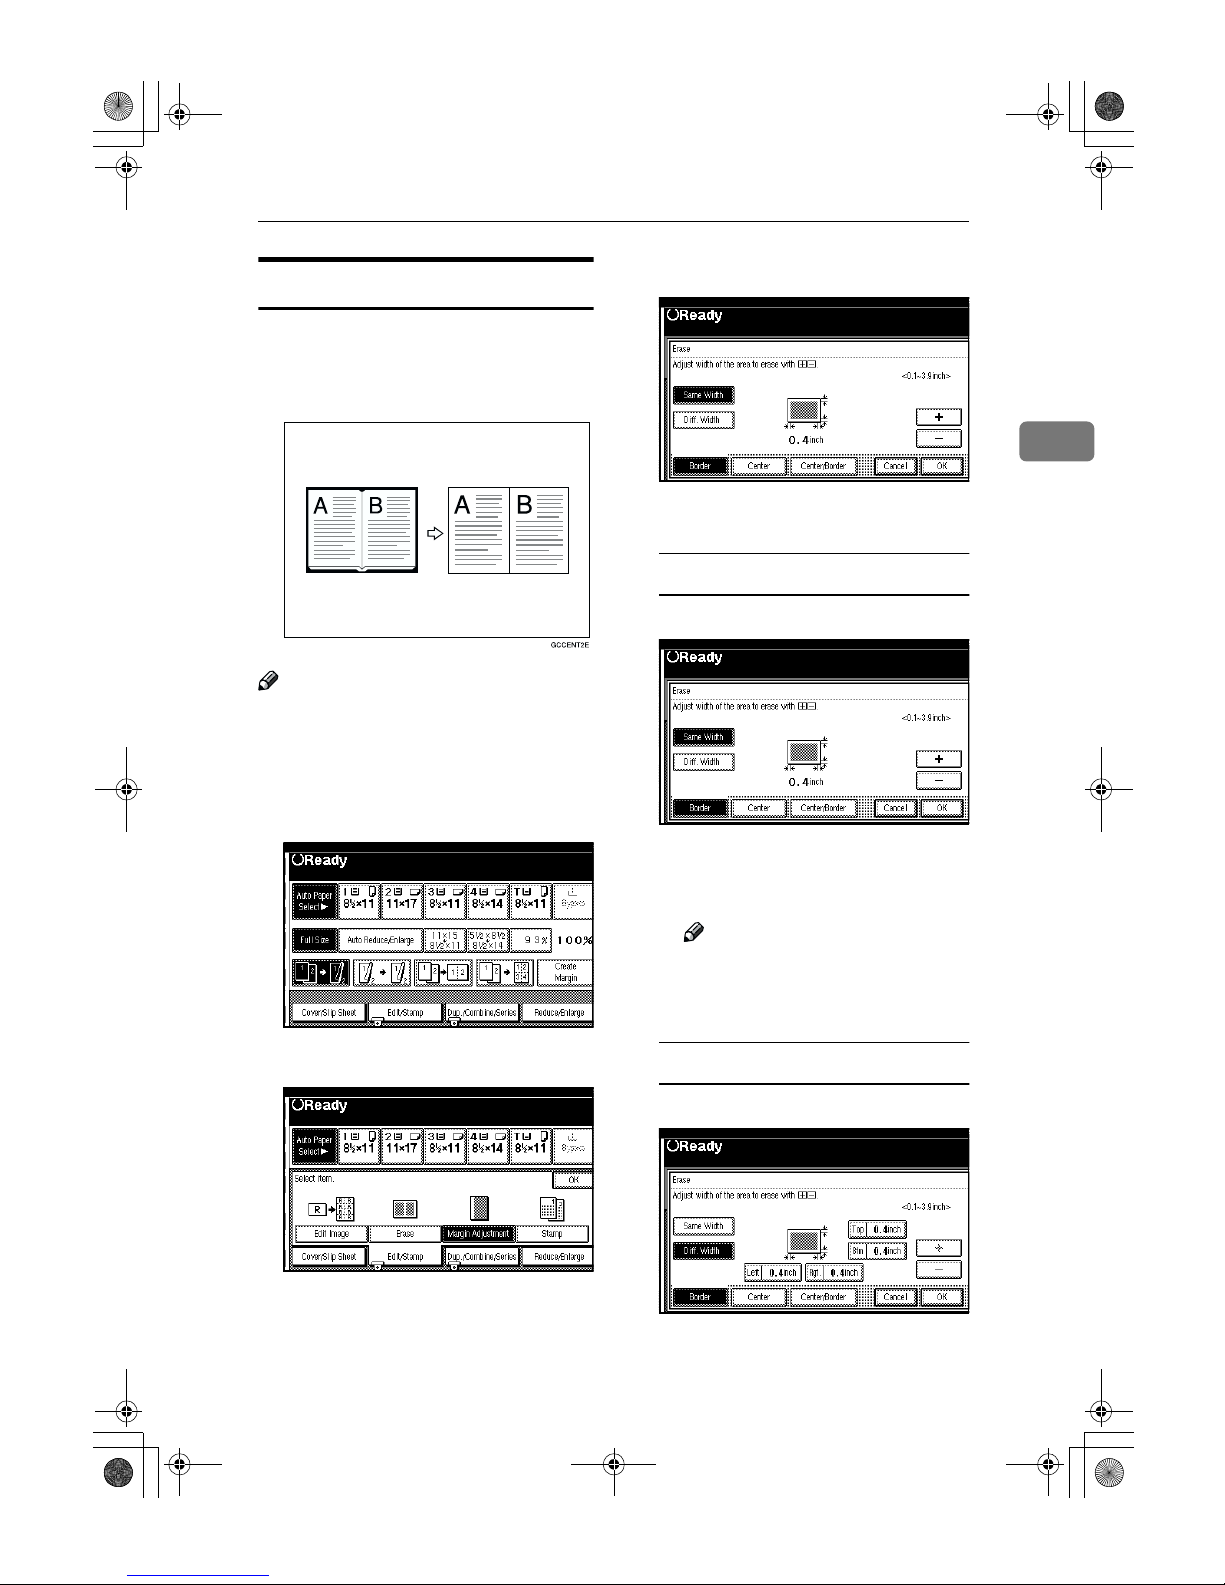
Center Erase
This function erases the centre margin.
Note
❒ If you want to erase the border
margin too, use the Center/Border
function. ⇒ P.119 “Center/Border
Erase”.
A
Press the [Edit/Stamp] key.
B
Press the [Erase] key.
C
Press the [Center] key.
D
Set the erase centre width with
the [nnnn] and [oooo] keys. Then press
the [OK] key.
Note
❒ To change the value entered,
press the [n] and [o] keys and
enter the new value.
E
Set your originals, then press the
{{{{Start}}}} key.
AdonisC2_ENcopy122F_FM.book Page 118 Thursday, February 15, 2001 3:23 PM
Page 64
Erase
119
2
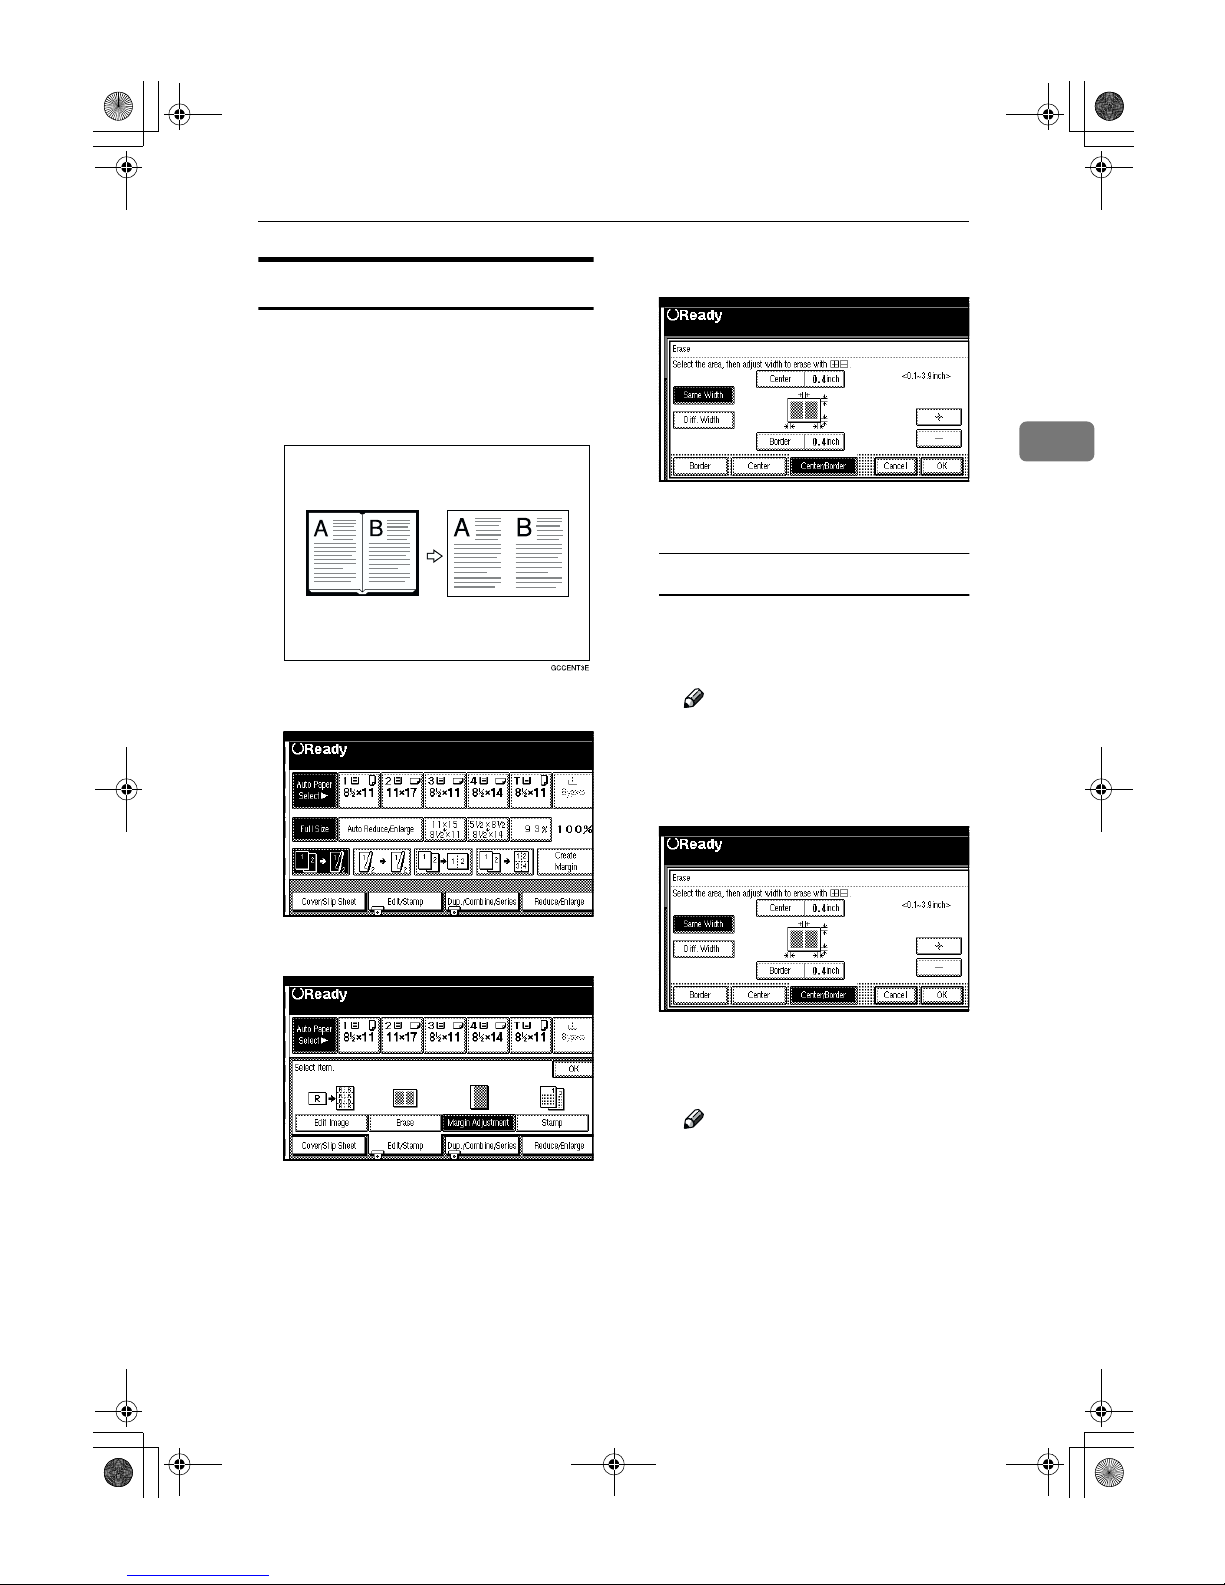
Center/Border Erase
This mode erases both the centre and
edge margins. You can set the same
margin width for all four sides and
centre, or you can set different margin
widths for each.
A
Press the [Edit/Stamp] key.
B
Press the [Erase] key.
C
Press the [Center/Border] key.
D
Set the erase margin width.
Selecting [Same Width]
A Press the [
Center
] key, then set
the erase centre width with the
[nnnn] and [oooo] keys.
Note
❒ To change the value entered,
press the [n] and [o] keys
and enter the new value.
B Press the [Same Width] key.
C Press the [Border] key, then set
the erase border width with the
[nnnn] and [oooo] keys.
Note
❒ To change the value entered,
press the [n] and [o] keys
and enter the new value.
D Press the [OK] key.
AdonisC2_ENcopy122F_FM.book Page 119 Thursday, February 15, 2001 3:23 PM
Page 65

Copying
120
2
Selecting [Diff. Width]
A Press the [Diff. Width] key.
B Press the key for the part you
wish to change and set an erase
margin width with the [nnnn] and
[oooo] keys.
Note
❒ To change the value entered,
press the [n] and [o] keys
and enter the new value.
C Press the [OK] key.
E
Press the [OK] key.
F
Set your originals, then press the
{{{{Start}}}} key.
AdonisC2_ENcopy122F_FM.book Page 120 Thursday, February 15, 2001 3:23 PM
 Loading...