

Page 1
2
Copying
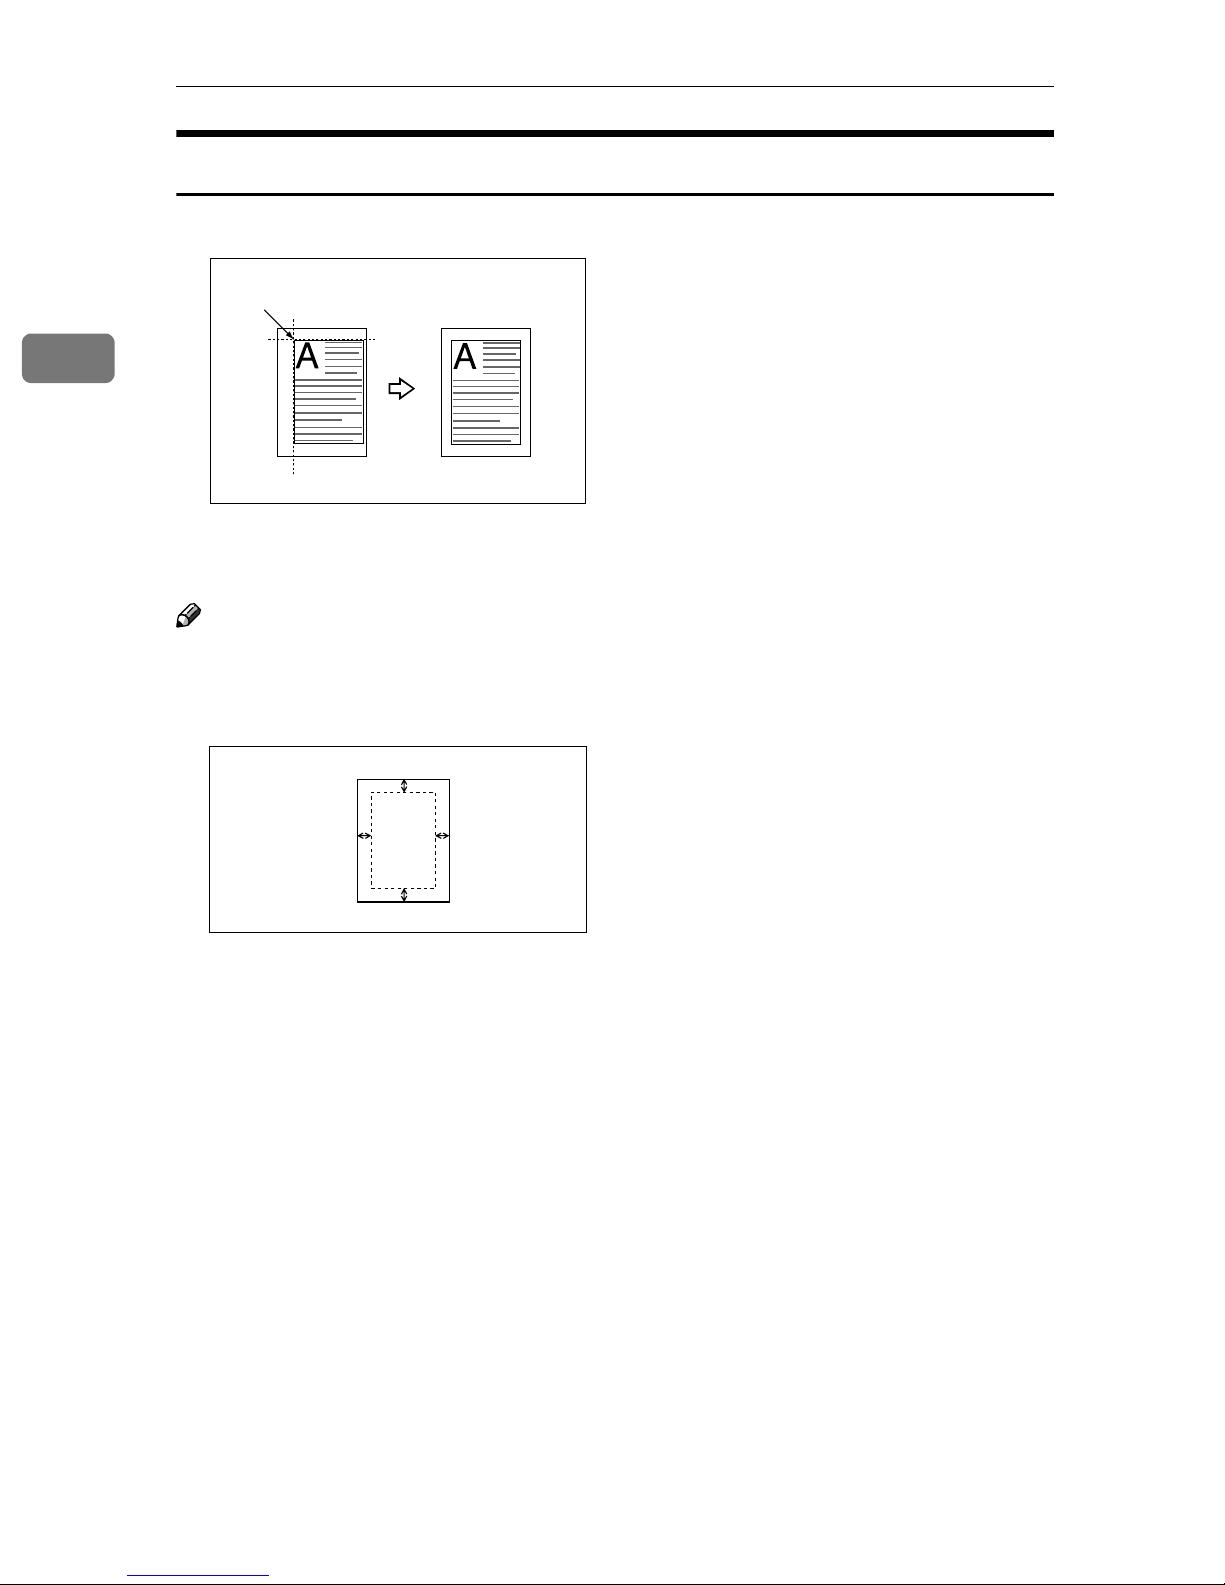
Scanning Position
You can move the scanned position of each originals.
1
1. Point where the machine starts
scanning.
Note
❒ You can move the scanned position up from 0 to 30 mm (in 1 mm increments),
0 to 1.2 inch (in 0.1 inch increments) upward, downward, left and right.
❒
1
4
3
2
1. Top: 0 – 30 mm (0" – 1.2")
2. Right: 0 – 30 mm (0" – 1.2")
3. Bottom: 0 – 30 mm (0" – 1.2")
4. Left: 0 – 30 mm (0" – 1.2")
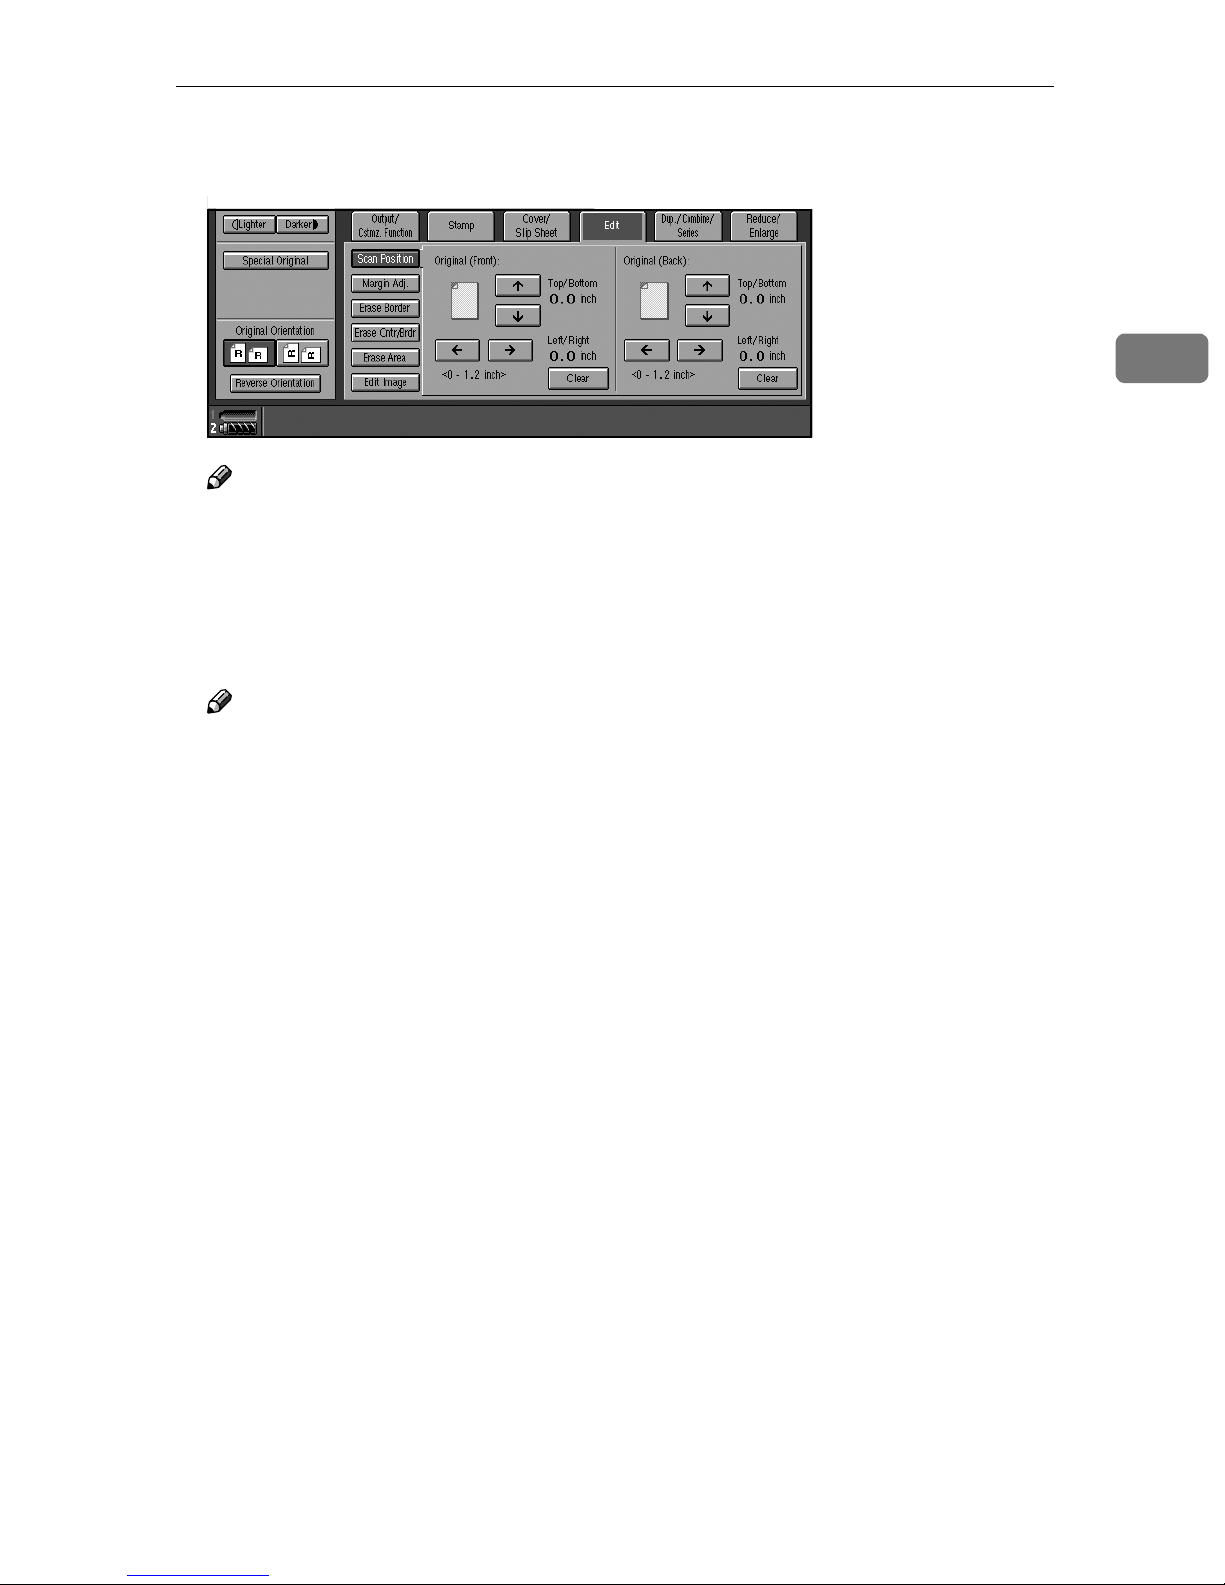
Press [Edit].
AAAA
Press [Scan Position].
BBBB
72
Page 2
Copy Functions
Set the scan position for the face of the original. Press [↑↑↑↑] or [↓↓↓↓] to set the
CCCC
top or bottom position. Press [←←←←] or [→→→→] to set the left or right position.
Note
❒ If you have incorrectly set the position, readjust with [↑↑↑↑], [↓↓↓↓], [←←←←], or [→→→→].
❒ If you do not need to set the scan position of the back of the original, pro-
ceed to step E.
Set the scan position for the back of the original. Press [↑↑↑↑] or [↓↓↓↓] to set the
DDDD
top or bottom position. Press [←←←←] or [→→→→] to set the left or right position.
2
Note
❒ The scan position set here for the back of originals is valid when you copy
2-sided originals.
Place originals, and then press the {{{{Start}}}} key.
EEEE
73
Page 3
Copying
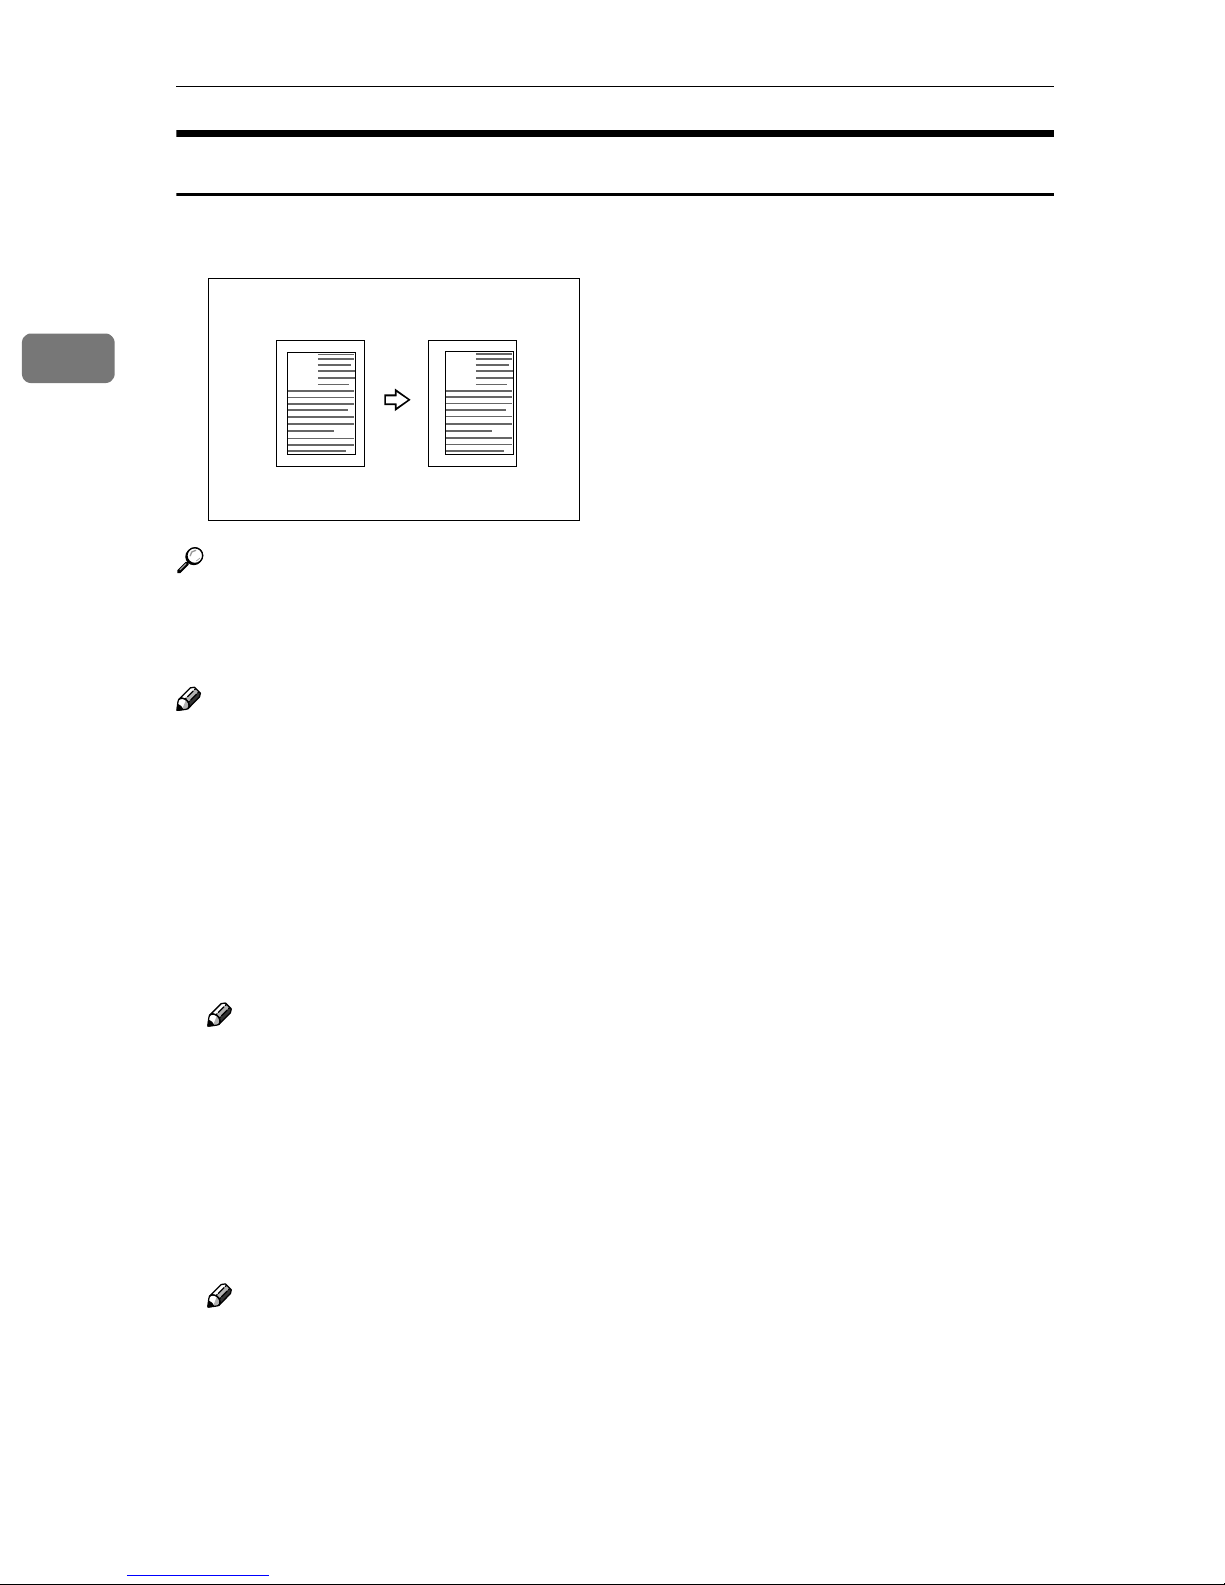
Margin Adjustment
You can shift the image to the left, right, top or bottom to make a binding margin.
2
A
Reference
For initial settings, see p.131 “Front Page Margin : Left/Right”, p.131 “Back
Side Margins : Left/Right”, p.132 “Front Side Margin : Top/Bottom”, and
p.132 “Back Side Margin : Top/Bottom”.
Note
❒ You can change the width of the binding margin up to 30 mm in 1 mm incre-
ments (1.2 inch in 0.1 inch steps) upward, downward, left and right.
Press [Edit].
AAAA
Press [Margin Adj.].
BBBB
Set a binding margin for a front page. Press [←←←←] and [→→→→] when setting the
CCCC
left and right margins, and [↓↓↓↓] and [↑↑↑↑] when setting the top and bottom mar-
gins.
A
Note
❒ To change the value entered, press [←←←←], [→→→→], [↓↓↓↓], and [↑↑↑↑] to set the new val-
ue.
❒ If you do not need to specify margins for the back side pages, proceed to
step E.
Set a binding margin for the back side pages. Press [←←←←] and [→→→→] when set-
DDDD
ting the left and right margins, and [↓↓↓↓] and [↑↑↑↑] when setting the top and bot-
tom margins.
Note
❒ Margin on the back side of the page is available only when [Duplex], [1 Sided
Combine] or [2 Sided Combine] is selected.
Place originals, and then press the {{{{Start}}}} key.
EEEE
74
Page 4
Copy Functions
Erase
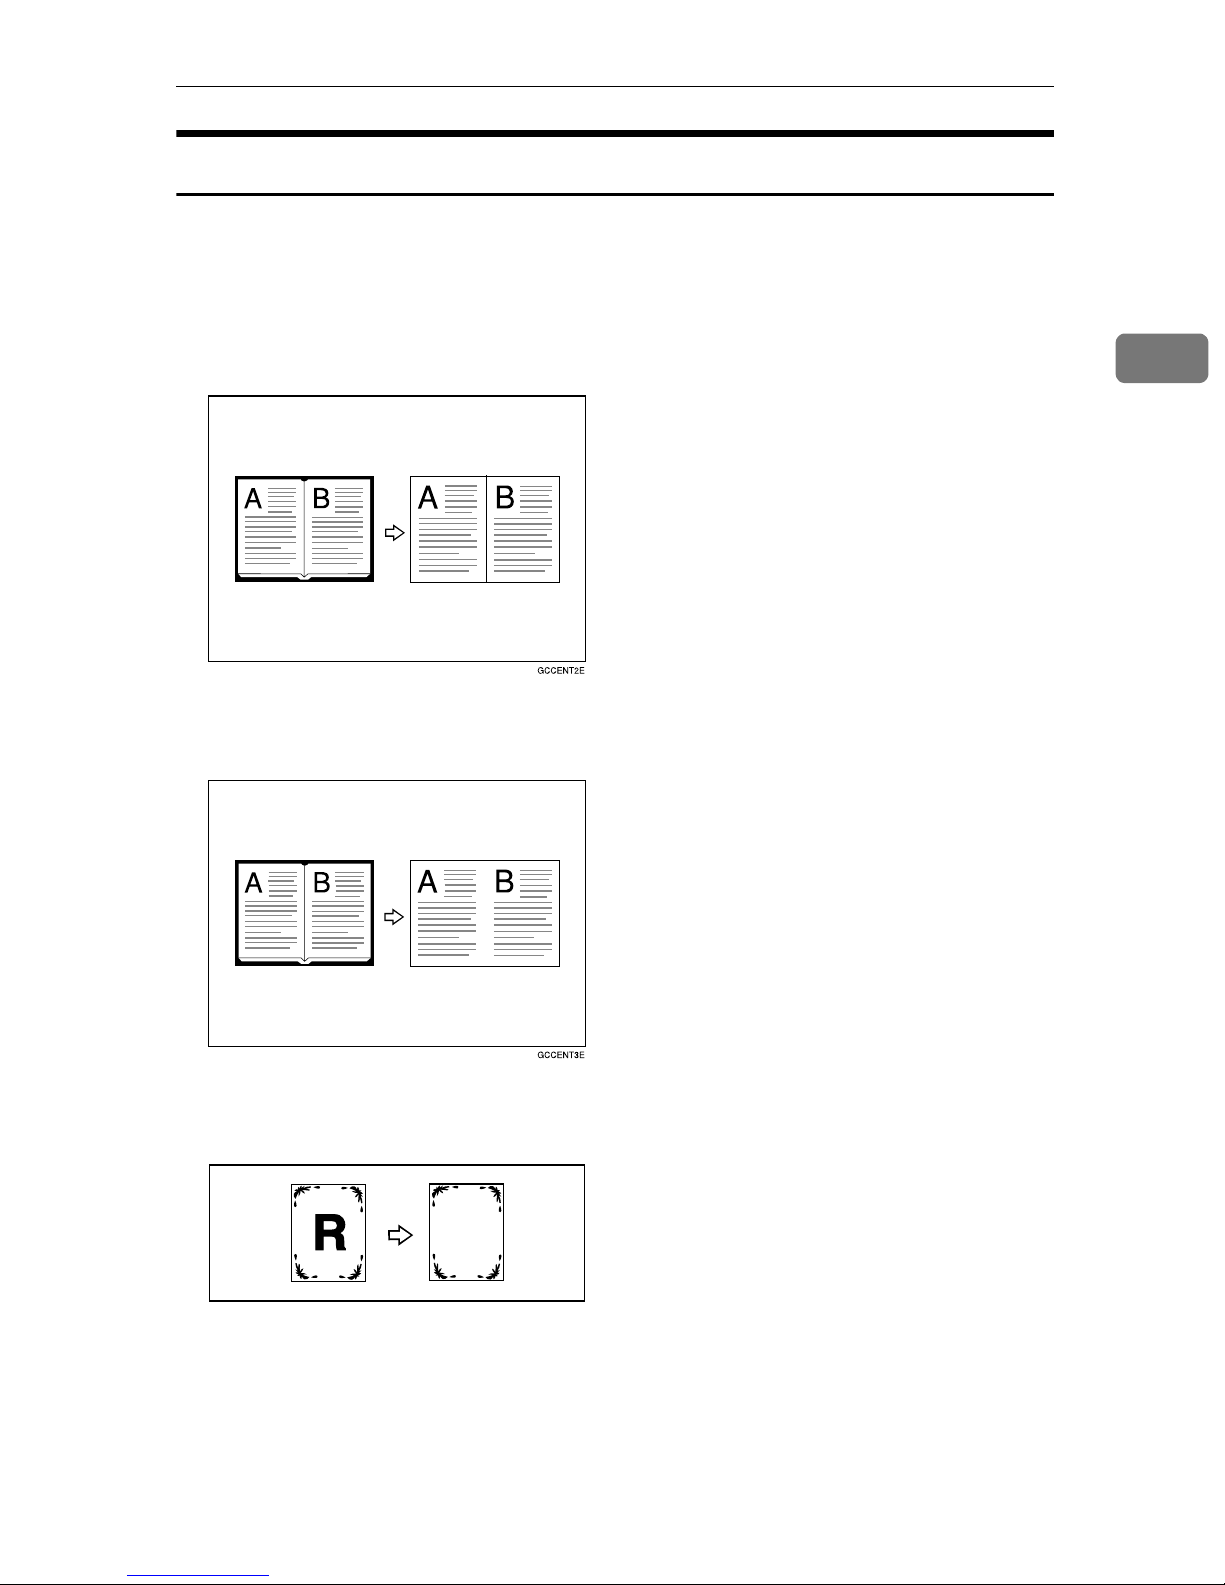
This function erases the center and/or all four sides of the original image. This
function also erases the inside or outside of a specified area.
This function has the following three types:
❖❖❖❖ Border
This mode erases edge margin of the original image.
2
❖❖❖❖ Center/Border
This mode erases both the center and edge margins from an original image.
❖❖❖❖ Inside
This mode blanks out a designated area of the copy image.
75
Page 5

Copying
❖❖❖❖ Outside
This mode blanks out all areas of the copy image except the area you specify.
2
Reference
The erase width in the [Border], [Center], and [Center/Border] modes is set to
10 mm (0.4") by default. You can change this settings with the User Tools.
See p.132 “Erase Border Width”.
Note
❒ The relation between the original orientation and the erased part is as follows:
L original K original
2
1
1
1. Erased part
2. 2 – 99 mm (0.1" – 3.9")
2
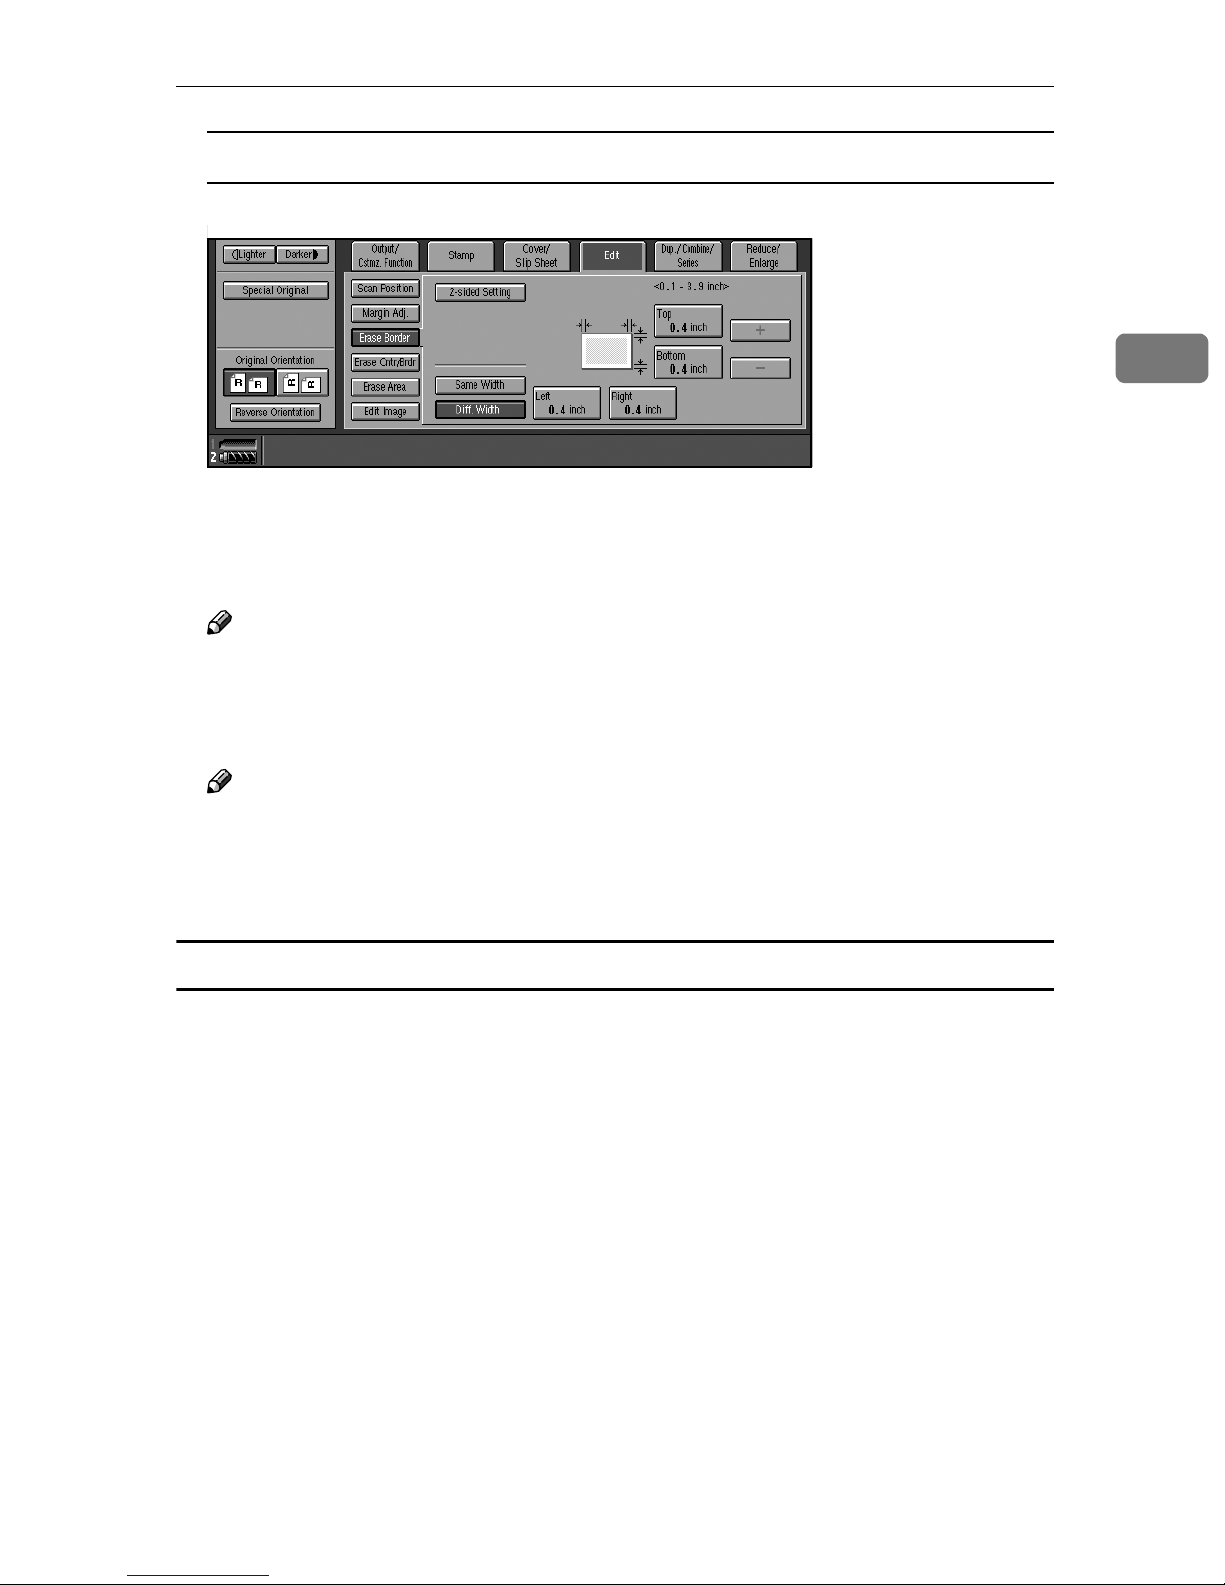
Border Erase
Press [Edit].
AAAA
Press [Erase Border].
BBBB
Set an erase border width.
CCCC
Selecting [Same Width]
A Press [Same Width].
B Set an erase border width using [nnnn] and [oooo].
Note
❒ To change the value entered, press [nnnn] and [oooo] to set the new value.
76
Page 6
Copy Functions
Selecting [Diff. Width]
A Press [Diff. Width].
B Press the key for the border you want to change, and then set an erase
border width using [nnnn] and [oooo].
Press [2-sided Setting], and then [Original (Back)].
DDDD
Note
❒ If you do not need to erase the border on the back of the original, proceed
to step F.
2
Set the border to be erased the back.
EEEE
Note
❒ Erasing the border on the back is valid only when you copy two-sided
originals.
Place originals, and then press the {{{{Start}}}} key.
FFFF
Center/border erase
Press [Edit].
AAAA
Press [Erase Cntr/Brdr.].
BBBB
Set the border to be erased.
CCCC
77
Page 7
2
Copying
Selecting [Same Width]
A Press [Same Width].
B Press [Center], and then set the erase center width using [nnnn] and [oooo].
C Press [Border], and then set the erase border width using [nnnn] and [oooo].
Selecting [Diff. Width]
A Press [Diff. Width].
B Press the key for the part you want to change, and then set an erase mar-
gin width with [nnnn] and [oooo].
Press [2-sided Setting] and [Original (Back)].
DDDD
Note
❒ If you do not need to erase the center or border on the back of the original,
proceed to step F.
Set the center or border to be erased on the back.
EEEE
Note
❒ Erasing the center or border on the back is valid only when you copy two-
sided originals.
Place originals, and then press the {{{{Start}}}} key.
FFFF
78
Page 8
Copy Functions
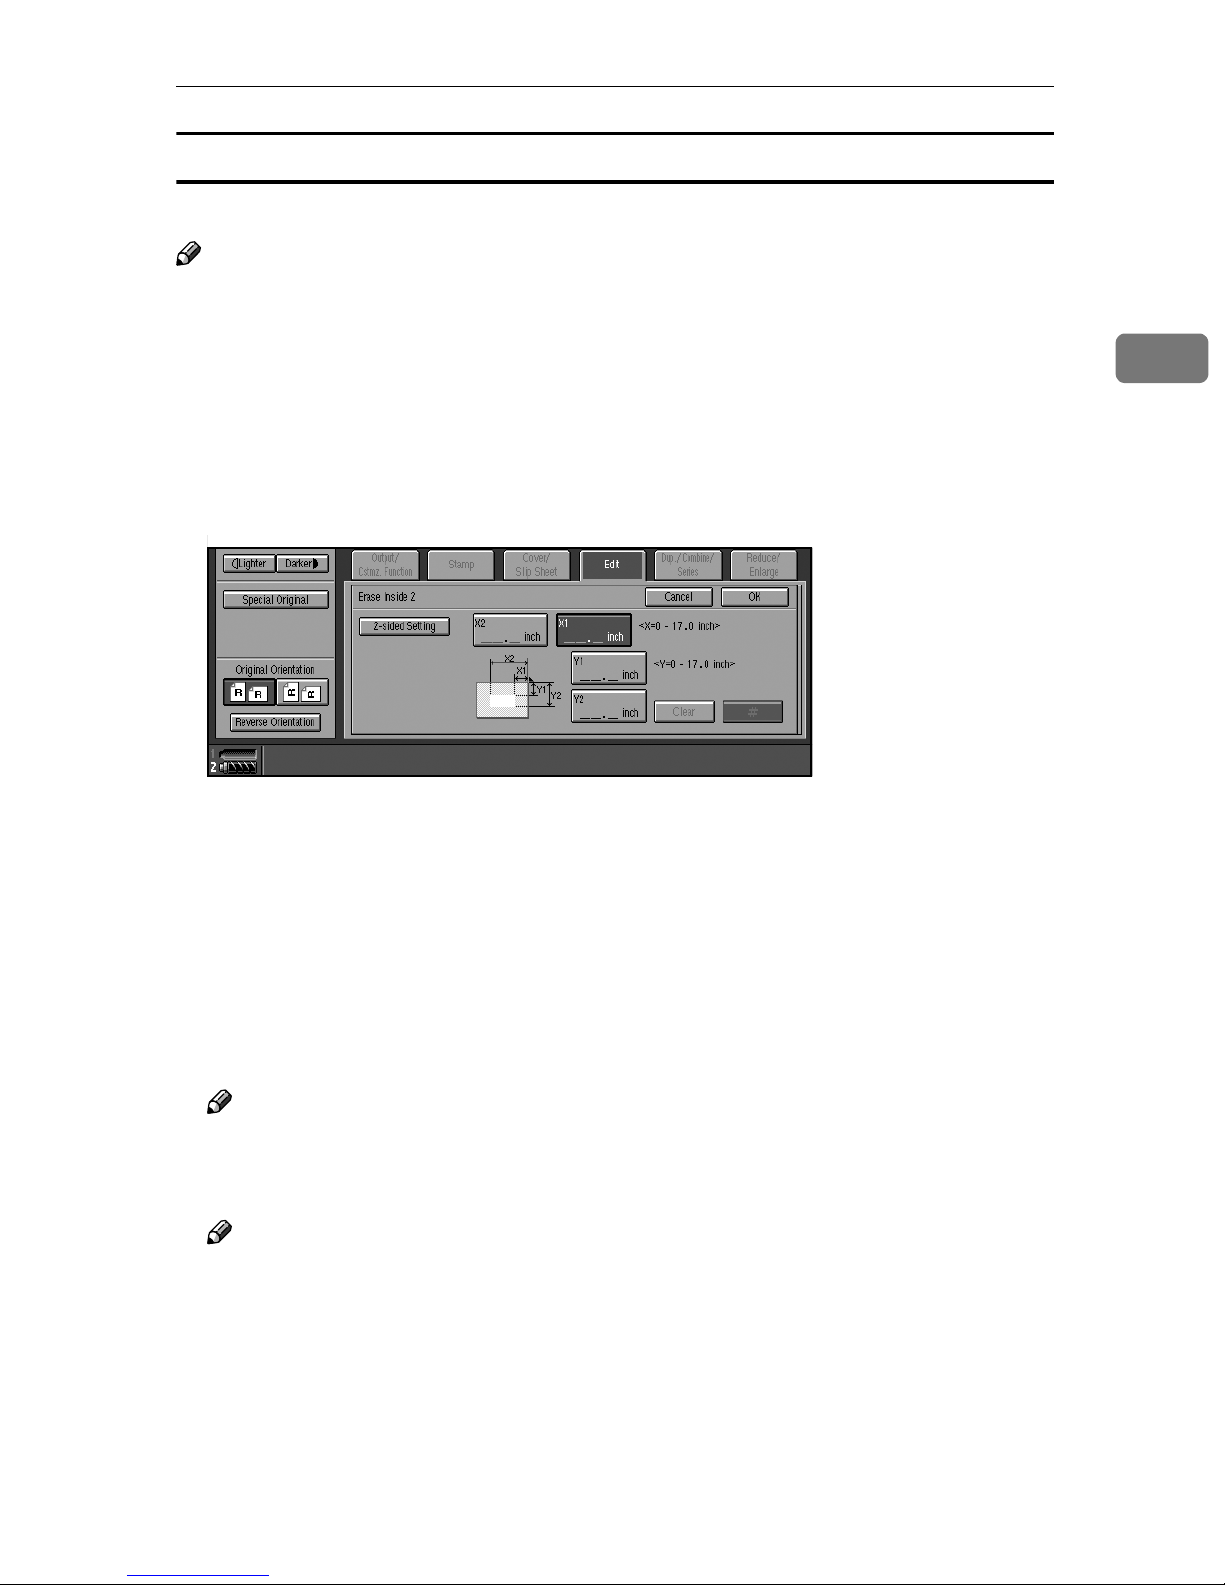
Inside erase
Decide where the machine starts (X1, Y1) and stops erasing (X2, Y2).
Note
❒ You can input lengths of 0 – 432 mm (0 – 17 inch).
Press [Edit].
AAAA
Press [Erase Area].
BBBB
Press [Erase Inside 1] or [Erase Inside 2].
CCCC
Enter the value of [X1] using the number keys, and then press [#] or the {{{{#}}}}
DDDD
key.
2
Enter the value of [Y1] using the number keys, and then press [#] or the {{{{#}}}}
EEEE
key.
Enter the value of [X2] using the number keys, and then press [#] or the {{{{#}}}}
FFFF
key.
Enter the value of [Y2] using the number keys, and then press [#] or the {{{{#}}}}
GGGG
key.
Press [2-sided Setting] and [Original (Back)].
HHHH
Note
❒ If you do not need to erase the image on the back, proceed to step K.
Enter the values of [X1], [Y1], [X2], and [Y2] for the back.
IIII
Note
❒ Erasing the image on the back of originals is valid when you copy two-sid-
ed originals.
Press [OK].
JJJJ
Place originals, and then press the {{{{Start}}}} key.
KKKK
79
Page 9
2
Copying
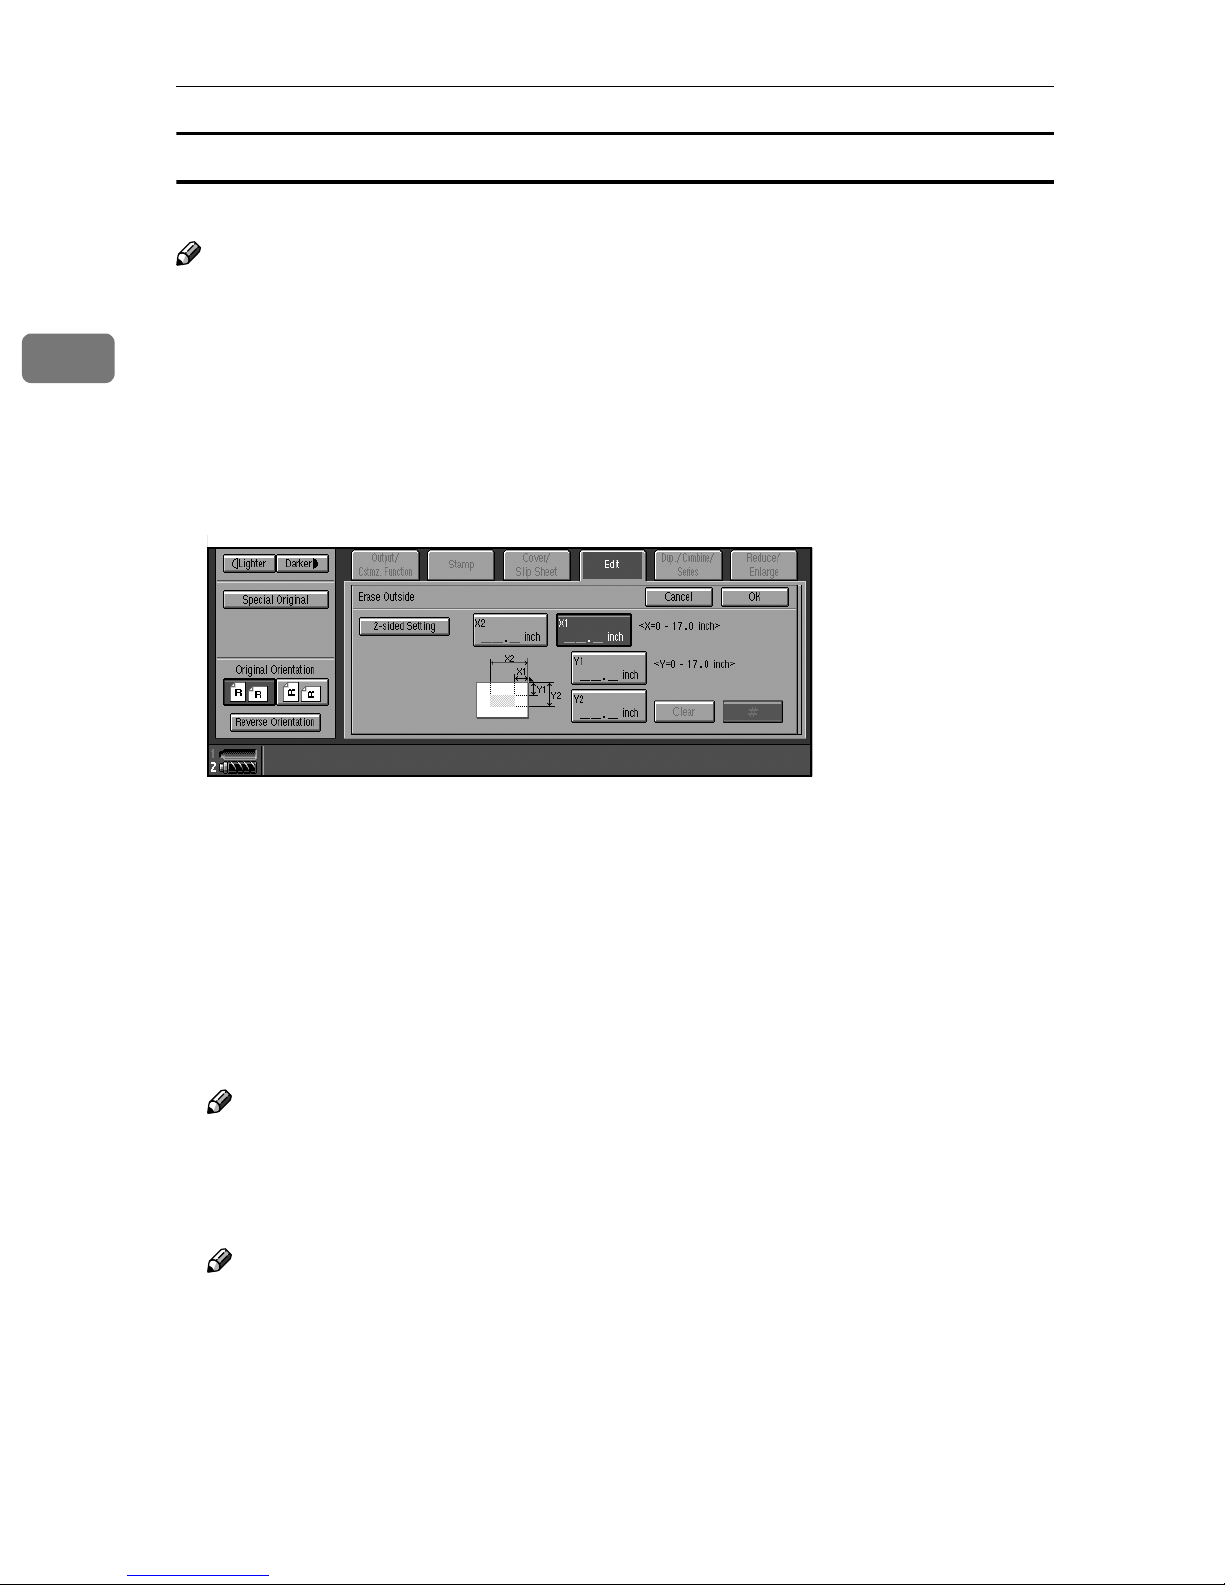
Outside erase
Decide where the machine starts (X1, Y1) and stops erasing (X2, Y2).
Note
❒ You can input lengths of 0 – 432 mm (0 – 17 inch).
Press [Edit].
AAAA
Press [Erase Area].
BBBB
Press [Erase Outside].
CCCC
Enter the value of [X1] using the number keys, and then press [#] or the {{{{#}}}}
DDDD
key.
Enter the value of [Y1] using the number keys, and then press [#] or the {{{{#}}}}
EEEE
key.
Enter the value of [X2] using the number keys, and then press [#] or the {{{{#}}}}
FFFF
key.
Enter the value of [Y2] using the number keys, and then press [#] or the {{{{#}}}}
GGGG
key.
Press [2-sided Setting] and [Original (Back)].
HHHH
Note
❒ If you do not need to erase the image on the back of originals, proceed to
step K.
Enter the values of [X1], [Y1], [X2], and [Y2] for the back.
IIII
Note
❒ Erasing the image on the back of originals is valid when you copy two-sid-
ed originals.
Press [OK].
JJJJ
Place originals, and then press the {{{{Start}}}} key.
KKKK
80
Page 10
Copy Functions
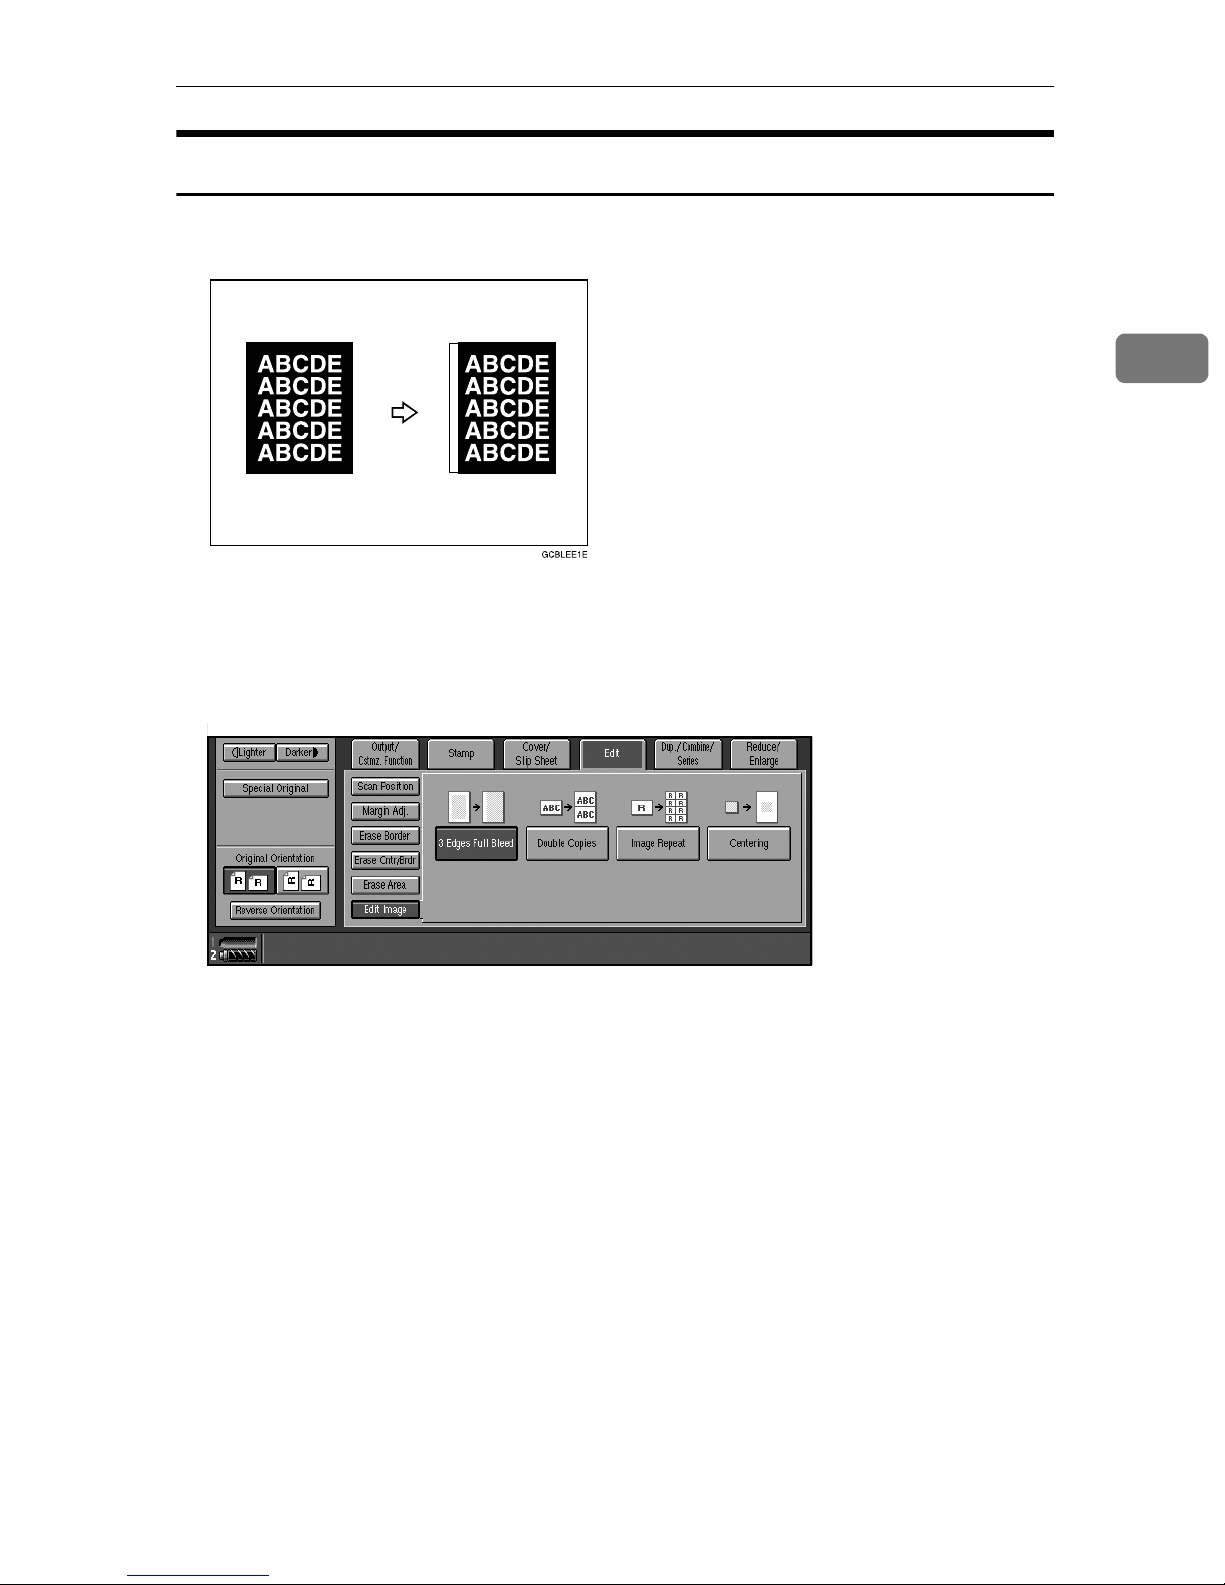
3 Edges Full Bleed
You can make full image copy by cutting down the top, bottom, and right side
margins. This function is useful for densely-filled originals.
Press [Edit].
AAAA
2
Press [Edit Image].
BBBB
Press [3 Edges Full Bleed].
CCCC
Place originals, and then press the {{{{Start}}}} key.
DDDD
81
Page 11
2
Copying
Double Copies
An original image is copied twice onto one copy, as shown in the illustration.
Note
❒ See the following table for original and copy paper sizes when using a 100%
ratio. Originals of size A5L (5
the exposure glass. Be sure to manually select such copy paper, or place the
originals in the ADF.
1
/2" × 81/2"L) cannot be detected properly on
❖❖❖❖ Metric version
Original size and orientation Copy paper size and orientation
A5L A4K
A4K A3L
A5K A4L
❖❖❖❖ Inch version
Original size and orientation Copy paper size and orientation
1
5
/2" × 81/2"L 81/2" × 11"K
1
5
/2" × 81/2"K 81/2" × 11"L
1
8
/2" × 11"K 11" × 17"L
Reference
For selecting a separation line, see p.133 “Double Copies Separation Line”.
Press [Edit].
AAAA
Press [Edit Image].
BBBB
Press [Double Copies].
CCCC
Select the paper size.
DDDD
Place originals, and then press the {{{{Start}}}} key.
EEEE
82
Page 12

Copy Functions
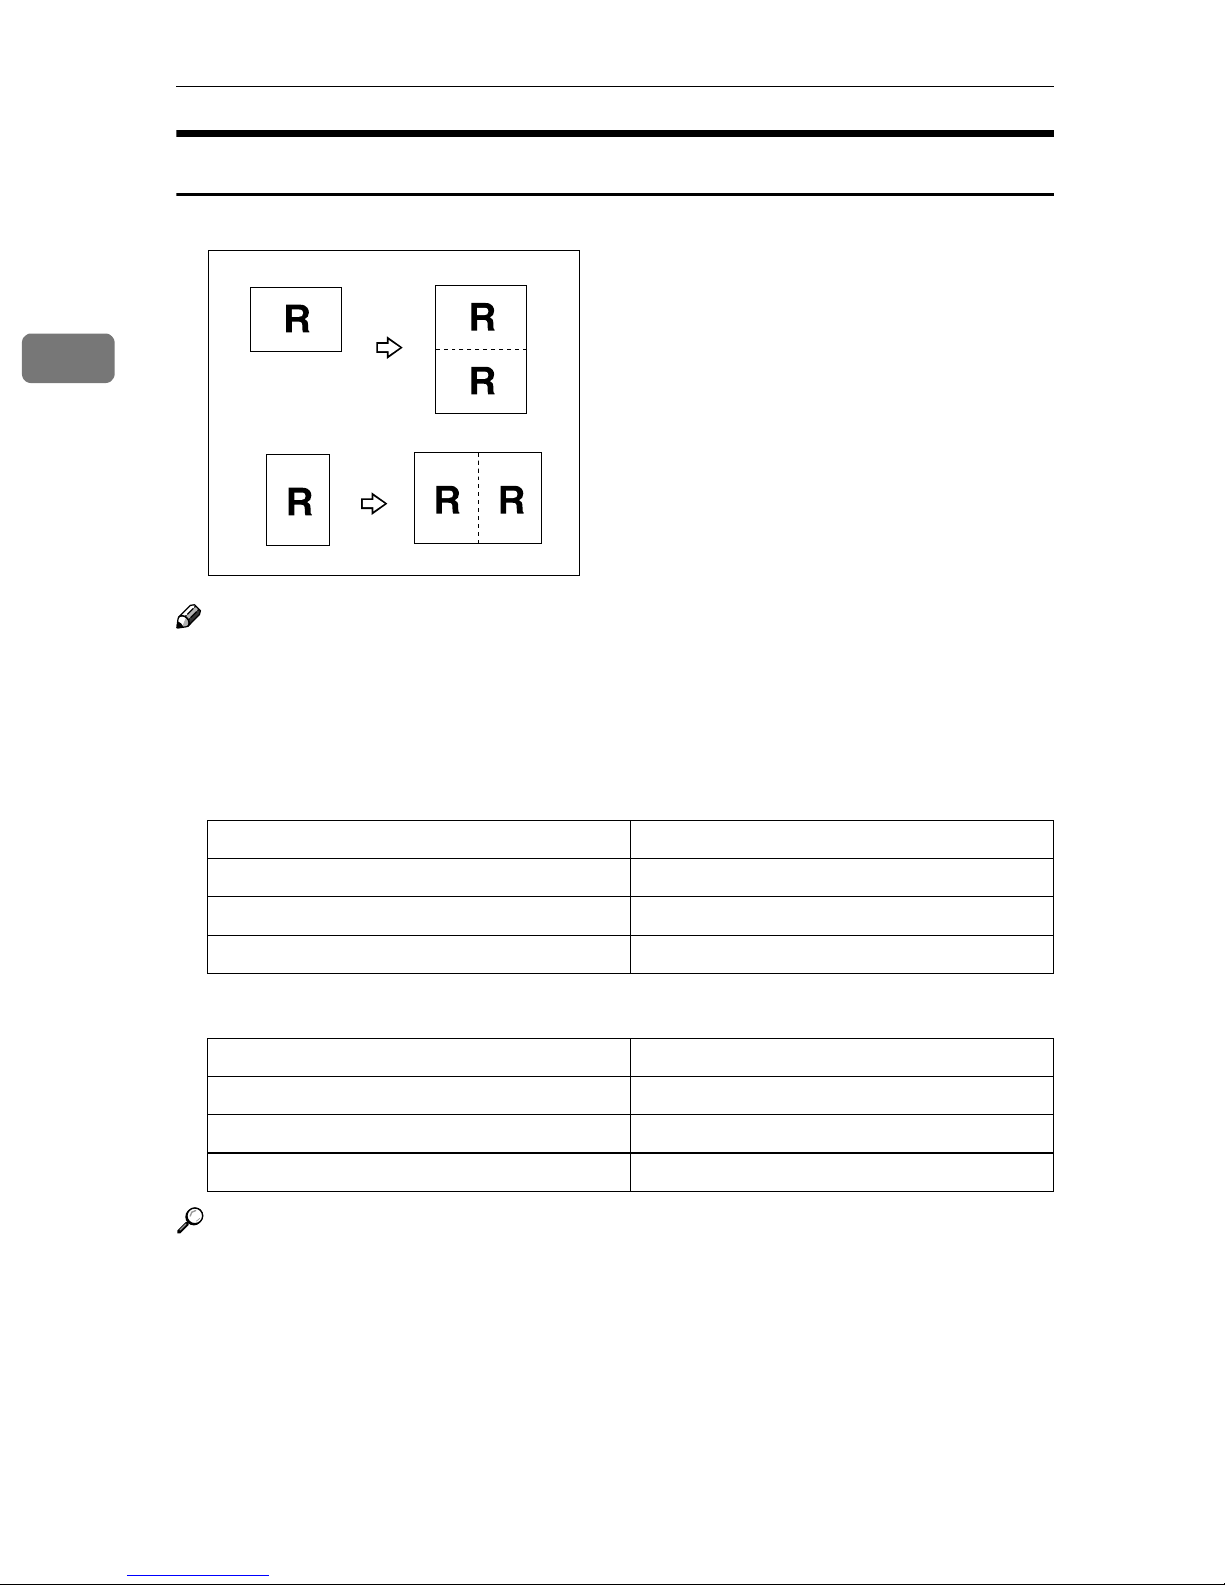
Image Repeat
The original image is copied repeatedly.
Note
❒ The number of repeated images depends on original size, copy paper size,
and reproduction ratio. See the following table.
Metric version Inch version
2
4 repeats
Repeat 1
16 repeats
Repeat 2
2 repeats
Original / Copy paper Original / Copy Paper
1
5
A5K/A4K
A5L/A4L
/2" × 81/2"K/81/2" × 11"K
1
5
/2" × 81/2"L/81/2" × 11"L
71% 65%
35% 32%
1
A5K/A4L
A5L/A4K
5
/2" × 81/2"K/81/2" × 11"L
1
5
/2" × 81/2"L/81/2" × 11"K
Repeat 3
100%
83
Page 13
Copying
Metric version Inch version
8 repeats
50%
Repeat 4
2
32 repeats
25%
Repeat 5
Reference
For selecting a separation line, see p.133 “Image Repeat Separation Line”.
Select the size of the copy paper and the reproduction ratio.
AAAA
Press [Edit].
BBBB
Press [Edit Image].
CCCC
Press [Image Repeat].
DDDD
Place an original, and then press the {{{{Start}}}} key.
EEEE
84
Page 14
Copy Functions
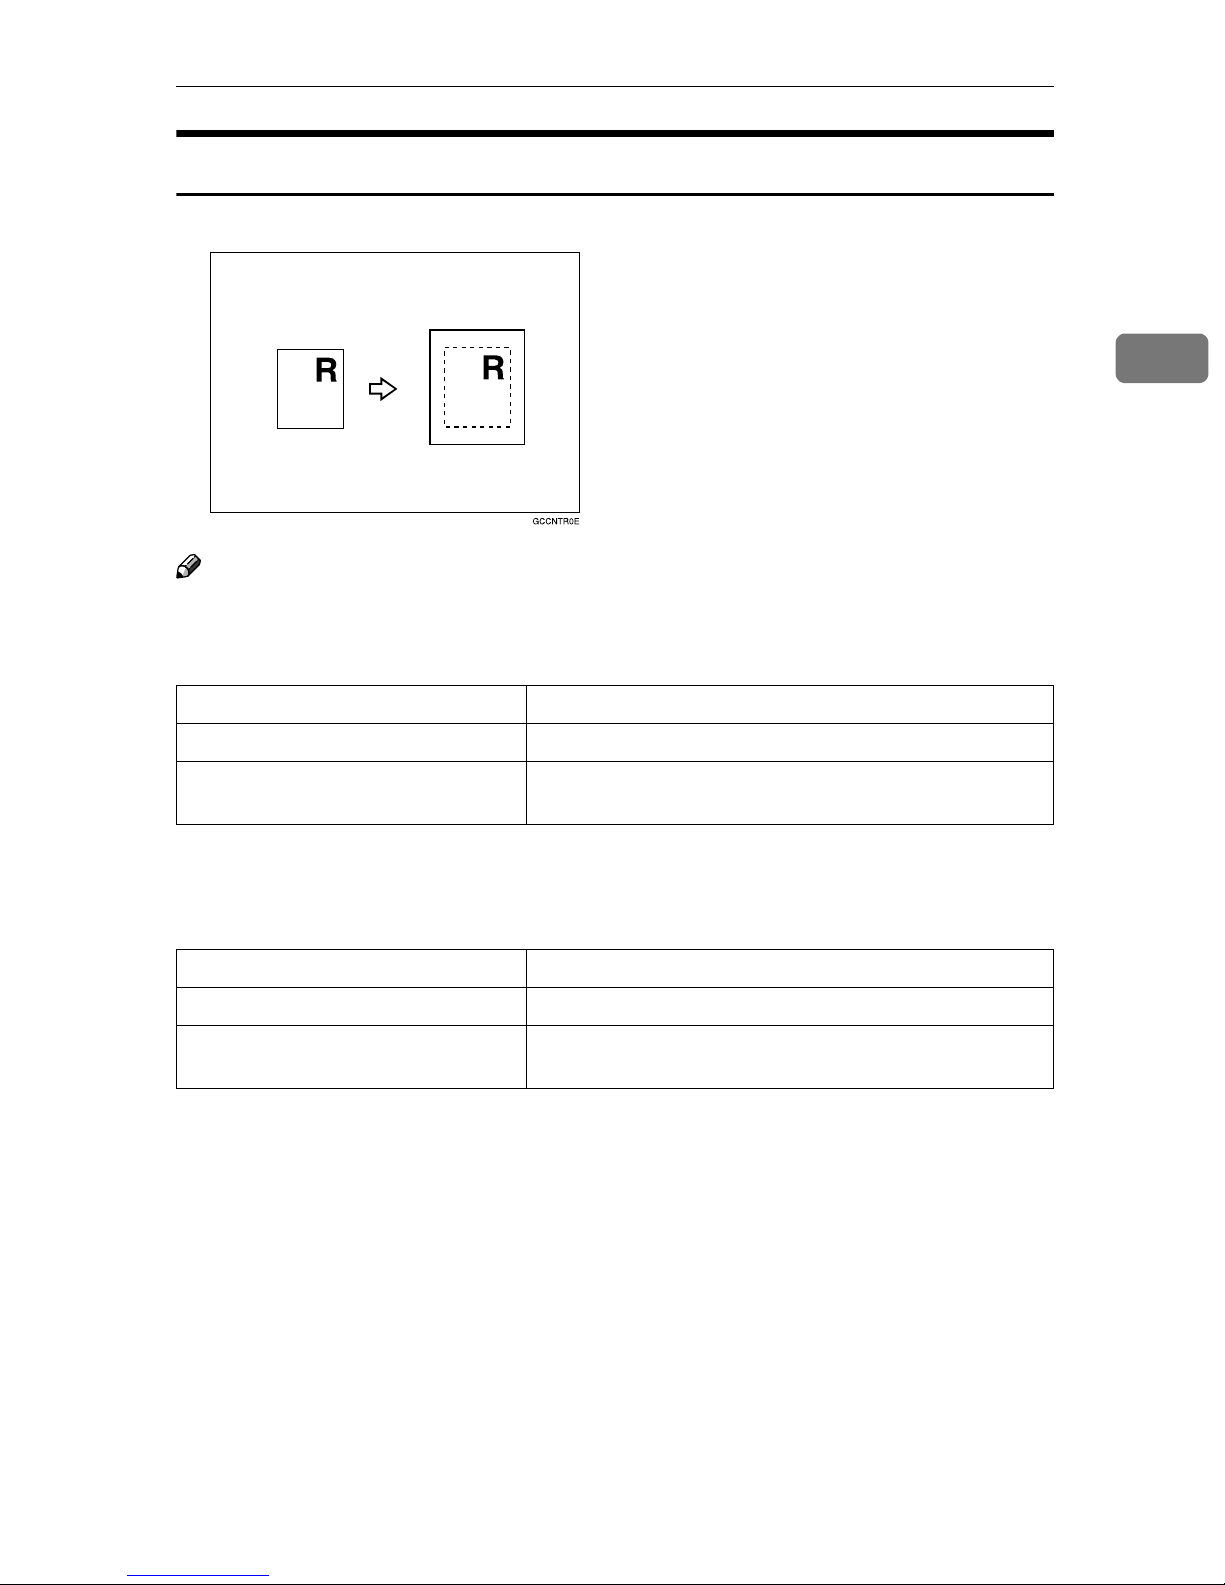
Centering
You can make copies with the image moved to the center of the paper.
Note
❒ Original sizes and orientations for centering are shown below.
2
❖❖❖❖ Metric version
Where Original Is Set Paper Size and Orientation
Exposure glass A3L, B4L, A4KL, 8
Document feeder A3L, B4L, A4KL, A5KL, 11" × 17"L, 82/1" ×
11"KL, 8
*1
You can select from 81/2" × 13", 81/4" × 13" and 8" × 13" with the User Tools (System
Settings). See “Original: <F/F4> Size Setting”, General Settings Guide.
1
/2" × 13" L
1
/2" × 13" L
*1
*1
❖❖❖❖ Inch version
Where Original Is Set Paper Size and Orientation
Exposure glass 11" × 17"L, 8
Document feeder A4KL, 11" × 17"L, 11" × 15"L, 8
11"KL, 5
*1
You can select from 81/2" × 13", 81/4" × 13" and 8" × 13" with the User Tools (System
Settings). See “Original: <F/F4> Size Setting”, General Settings Guide.
Select the paper.
AAAA
Press [Edit].
BBBB
1
/2" × 14"L, 81/2" × 11"KL
1
1
/2" × 81/2"KL, 81/2" × 13" L
/2" × 14"L, 81/2" ×
*1
Press [Edit Image].
CCCC
Press [Centring].
DDDD
Place originals, and then press the {{{{Start}}}} key.
EEEE
85
Page 15
2
Copying
Covers
Using this function, you can create cover sheets by adding additional pages of
different paper or copying existing pages on different paper.
Preparation
Before selecting this function, set the tray for the front cover paper. See “Front
Cover” or “Back Cover”, General Settings Guide.
Note
❒ When selecting [Copy], select whether the front and back covers are copied
one-sided or two-sided. See “Front Cover” or “Back Cover”, General Settings
Guide.
Reference
You can select the orientation of the back cover, Face up or Face down. See
p.131 “Copy Back Cover”.
To place paper when using the interposer, see “Loading Paper in the Interposer”, General Settings Guide.
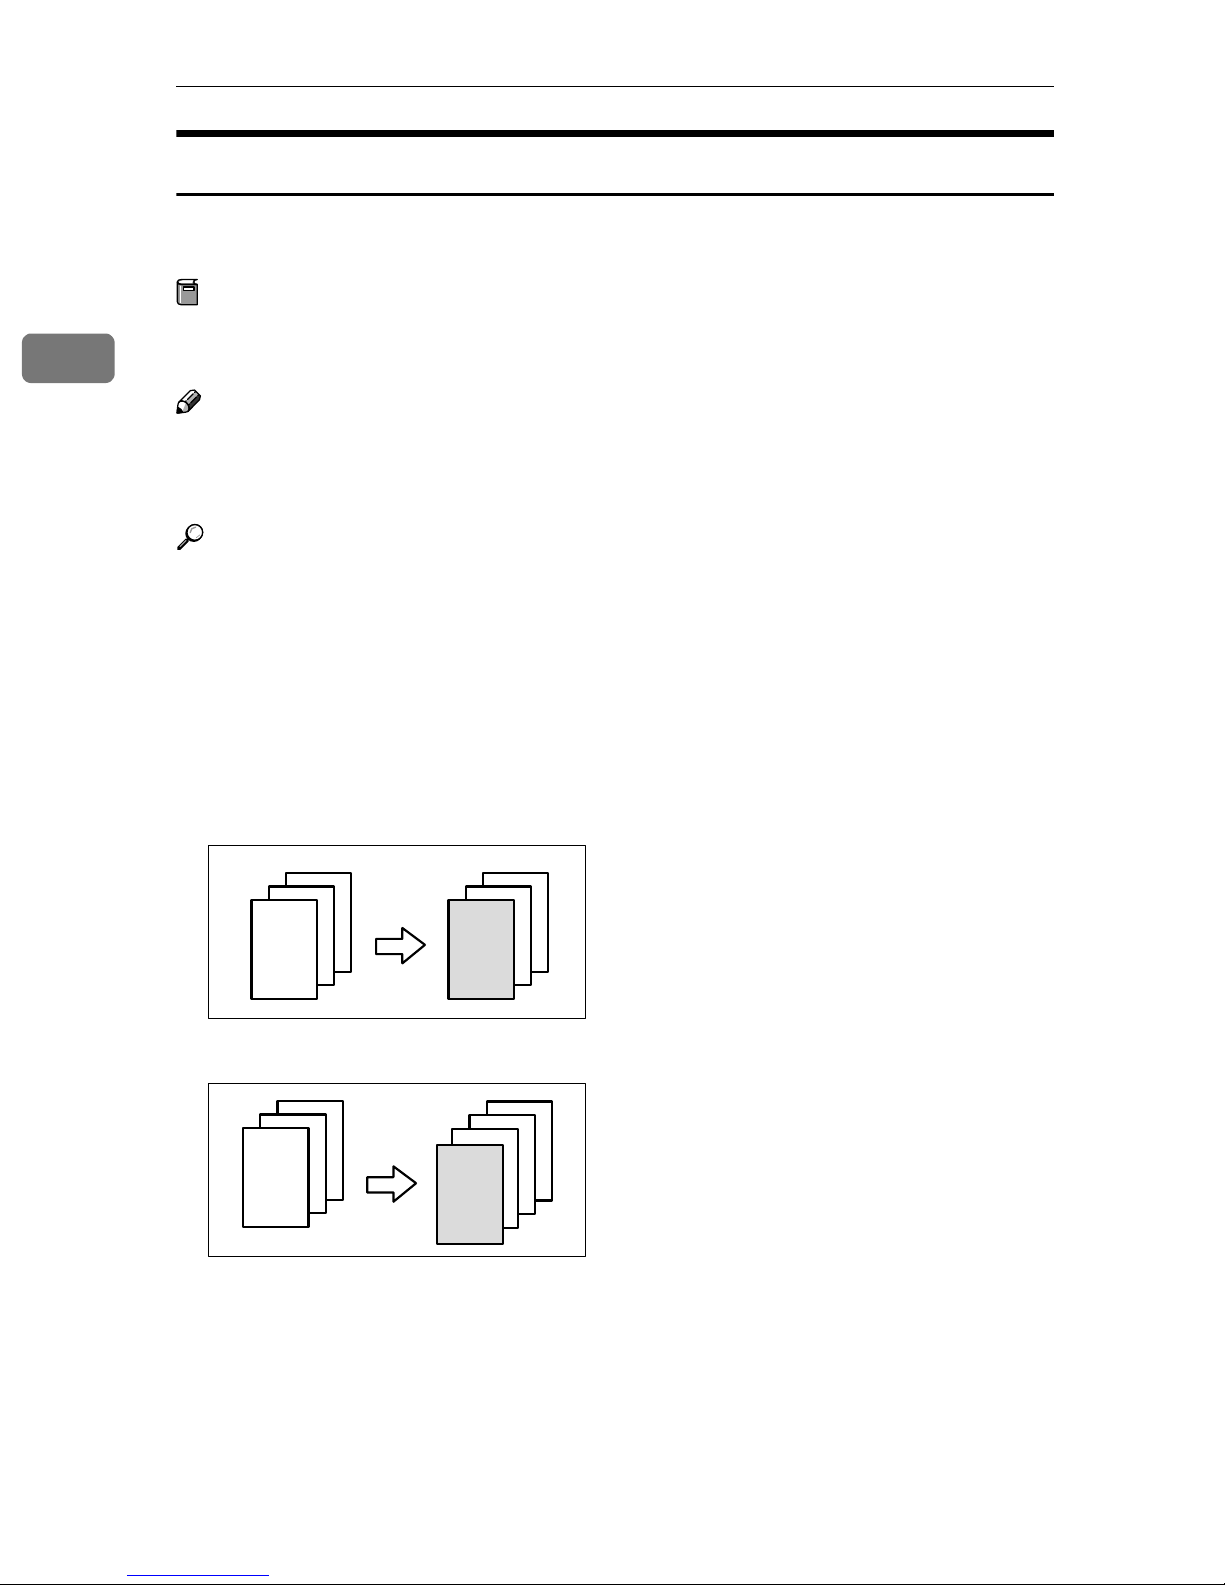
❖❖❖❖ Front Cover
The first page of your originals is copied on special cover paper, or a cover
sheet is inserted before the first copy.
• Copy
3
2
1
3
2
1
• Blank
3
2
1
3
2
1
86
Page 16

Copy Functions
❖❖❖❖ Back Covers
The first and last pages of the original are copied on separate paper for cover
use.
• Copy
4
3
2
1
• Blank
Reference
When you select Front Cover copier mode, you can make a combined copy
on the front cover. See p.135 “Front Cover Copy in Combine”.
Press [Cover/Slip Sheet].
AAAA
Select [Copy] or [Blank] for the front and back cover sheet.
BBBB
1
4
3
2
GCCOVE1J
2
Select the paper tray containing non-cover sheet paper.
CCCC
Place originals in the ADF, and then press the {{{{Start}}}} key.
DDDD
87
Page 17

2
Copying
Designate
The following functions are explained in this section:
❖❖❖❖ Designate: Copy
Use this function to designate certain pages of your original to be copied onto
slip sheets.
❖❖❖❖ Designate: Blank
Use this function to insert the slip sheet into certain pages of your original.
Note
❒ When selecting [Designate : Copy], set the same designation sheet as the copy
paper in the same orientation.
❒ You can not select the inteposer as the copy paper.
❒ Except to the tray selecting for copy paper, you can use for designation sheets.
❒ You can specify up to 100 designate locations.
Reference
To place paper when using the interposer. See “Loading paper in the Interposer”, General Settings Guide.
Press [Cover/Slip Sheet].
AAAA
Press [Designate].
BBBB
88
Page 18

Copy Functions
Press [Designate: Copy] or [Designate: Blank].
CCCC
Select the tray you want to use.
DDDD
Enter the number of the originals you want to copy onto slip sheets using
EEEE
the number keys, and then select the tray the slip sheets have been set.
Press the {{{{#}}}} key.
FFFF
2
To specify another page number, repeat steps
GGGG
Select the tray for the main sheet.
HHHH
When all settings have been made, press [OK].
IIII
Place originals, and then press the {{{{Start}}}} key.
JJJJ
and
EEEE
FFFF
.
Chapters
When using one-sided to two-sided copying, the page locations you specify with
this function will appear on the front of copy sheets beginning a new chapter.
Preparation
Before selecting this function, press [Dup./Combine/Series] and select “1 Sided”
for original, and “2 Sided” for copy.
Note
❒ You can specify up to 100 chapter locations.
❒ This function can be combined with the 2 Sided or Combine function.
GCSHOW0E
89
Page 19

2
Copying
Press [Cover/Slip Sheet].
AAAA
Press [Designate].
BBBB
Press [Chapter].
CCCC
Press the chapter number to set.
DDDD
Enter the page location of the first page of the first chapter using the num-
EEEE
ber keys, and then press the {{{{#}}}} key.
This display shows example settings.
Note
❒ To change the value entered, press the {{{{Clear}}}} key, and then enter the new
value.
To specify another page location, repeat step EEEE.
FFFF
Select the tray for main sheet.
GGGG
When you finish specifying the page location, press [OK].
HHHH
Note
❒ To change the number entered, select the desired item, and then enter the
new number.
Place originals, and then press the {{{{Start}}}} key.
IIII
90
Page 20

Designation Sheet Copy
You can copy designated pages onto slip sheets.
Copy Functions
4
3
2
1
Note
❒ When this function is combined with the 2 Sided function, the first page of the
designated pages is copied on the front side of a slip sheet.
❒ You can specify up to 100 locations.
Press [Cover/Slip Sheet].
AAAA
Press [Designate].
BBBB
Press [Designation Sheet Copy].
CCCC
4
3
2
1
GCCOVE2J
2
Enter the sheet number of the originals using the number keys, and then
DDDD
press the {{{{#}}}} key.
Press [Page to Page].
EEEE
Note
❒ If you do not need to copy consecutive originals, proceed to step G.
Enter the sheet number of the last original using the number keys.
FFFF
Select the tray for designate sheet are set, and then press the {{{{#}}}} key.
GGGG
To specify another page location, repeat step DDDD to GGGG.
HHHH
Select the tray for main sheets.
IIII
After all settings, press [OK].
JJJJ
Place originals, and then press the {{{{Start}}}} key.
KKKK
91
Page 21

Copying
Insert Designation Sheet
You can insert a slip sheet before or after the designated page.
2
1
5
9
Preparation
Before selecting this function, set the tray for slip sheets. See “Paper Tray Settings”, General Settings Guide.
Note
❒ Set the same slip sheet as the copy paper in the same orientation.
❒ You can specify up to 100 chapter locations.
Reference
When you use the interposer, see “Loading Paper in Interposer”, General Set-
tings Guide.
Press [Cover/Slip Sheet].
AAAA
1
5
9
GCDESG0E
Press [Designate].
BBBB
Press [Insert Designation Sheet Copy].
CCCC
Press the chapter number you want to select.
DDDD
Press [Before] or [After] to select to insert the designation sheet, and then en-
EEEE
ter the page number using the number key.
Press [Number of Sheets], and enter the number of the sheets to be inserted
FFFF
using the number key.
Select the tray for designation sheet.
GGGG
92
Page 22

Copy Functions
2
1
Press the {{{{#}}}} key.
HHHH
You can repeat ster EEEE to IIII to select where you want to insert it.
IIII
Select the tray for main sheets.
JJJJ
After finishing all, press [OK].
KKKK
Place the originals, and press the {{{{Start}}}} key.
LLLL
Slip Sheets
Every time an original page changes, a slip sheet is inserted. This function can
be used to insert a slip sheet automatically between each OHP transparency copied or used as a stack function. You can also copy onto inserted slip sheets.
2
1
1
2
3
Preparation
Before selecting this function, specify the paper tray for slip sheets. See “Slip
Sheet”, General Settings Guide.
If “1 Sided → 2 Sided”is selected, change it to “1 Sided → 1 Sided”.
Note
❒ Load slip sheets of the same size, and in the same orientation as the copy pa-
per or OHP transparency.
❖❖❖❖ When inserting slip sheets between OHP transparencies
• Copy
2
3
1
2
3
ZGCCOVE5
2
1
1
1
2
2
93
Page 23

Copying
2
1
• Blank
2
2
1
Press [Cover/Slip Sheet].
AAAA
Select [Copy] or [Blank] for the slip sheet.
BBBB
Select the paper tray that contains paper for copying originals.
CCCC
Place originals, and then press the {{{{Start}}}} key.
DDDD
2
1
Background Numbering
Use this function to have numbers printed on the background of copies.
Reference
You can change settings (e.g., size, density) of the numbers with the User
Tools. See p.136 “Background Numbering”.
Press [Stamp].
AAAA
Check that [Background No.] is selected.
BBBB
94
Page 24

Copy Functions
When you want to start the number another 1, press [Change].
CCCC
Enter the number to start counting from using the number keys, and then
DDDD
press the {{{{#}}}} key.
Place originals, and then press the {{{{Start}}}} key.
EEEE
Preset Stamp
2
Messages you use frequently can be stored in memory and stamped on copies.
One of the following eight messages can be stamped on copies with a frame
around it: “COPY”, “URGENT”, “PRIORITY”, “For Your Info.”, “PRELIMI-
NARY”, “For Internal Use Only”, “CONFIDENTIAL”, and “DRAFT”.
95
Page 25

2
Copying
Stamp position and original orientation
Note
❒ Only one message can be stamped at a time. You can combine a message of
the user stamp and that of the preset stamp.
Reference
You can change certain Preset Stamp settings (e.g., density) with the User
Tools. See p.136 “Preset Stamp”.
You can change the stamp language with the User Tools. See p.136 “Preset
Stamp”.
Press [Stamp].
AAAA
Press [Preset Stamp].
BBBB
96
Page 26

Copy Functions
Select the desired message.
CCCC
Press [All Pages] or [1st Page only] to select the print page.
DDDD
Note
❒ You can change the position, size, and density of the stamp. See p.97
“Changing stamp position, size, and density”.
Place originals, and then press the {{{{Start}}}} key.
EEEE
2
Changing stamp position, size, and density
Press [Change].
AAAA
Select the position for print, size, and density, and then press [OK].
BBBB
97
Page 27

2
Copying
User Stamp
Copies using the registered stamp.
Preparation
Before using this function, you have to program a user stamp.
See p.99 “To program the user stamp”.
Stamp position and original orientation
98
Page 28

Copy Functions
Note
❒ Only one message can be stamped at a time. You can combine a message of
the user stamp and that of the preset stamp.
Reference
You can change the stamp position and stamp page. See p.99 “To change the
stamp position”.
Press [Stamp].
AAAA
Press [User Stamp].
BBBB
Select the stamp type you require.
CCCC
Press [All Pages] or [1st Page only] to select the print page.
DDDD
Place originals, and then press the {{{{Start}}}} key.
EEEE
To change the stamp position
Press [Change].
AAAA
Select the desired position, and then press [OK].
BBBB
2
To program the user stamp
Note
❒ Maximum User Stamp area: 100 mm × 200 mm (3.9" × 7.8")
1. Placing the original on the expo-
sure glass
❒ Up to five frequently used messages can be stored in memory.
a
b
1
ZGVX040E
a: 10 – 297 mm (0.4" – 11.7")
b: 10 – 432 mm (0.4" – 17")
99
Page 29

Copying
Make sure the machine is in Copy mode.
AAAA
Press the {{{{User Tools}}}} key.
BBBB
ZJBS050N
2
Press [Copier/Document Server Features].
CCCC
The main menu of the Copier/Document Server Features appears.
Press [Stamp].
DDDD
Press [User Stamp].
EEEE
Press [Program/Delete Stamp].
FFFF
Press [
GGGG
❒ Stamp numbers with m already have settings made for them.
Note
Program
], and then press the stamp number (1–5) you want to program.
100
❒ If the stamp number is already being used, the machine will ask you if you
want to overwrite it — press [Yes] or [No].
Enter the user stamp name using the letter keys on the control panel. You
HHHH
can register up to 10 characters.
Reference
“Entering Text”, General Settings Guide.
Enter the horizontal size of the stamp (up to 17 inches) using the number
IIII
keys, and then press [#].
Enter the vertical size (up to 11.7 inches) in the same way as step
JJJJ
Place the user stamp on the exposure glass, and then press [Start Scanning].
KKKK
The original will be scanned, and the stamp will be registered.
Note
❒ Originals cannot be scanned from the ADF when programming the user stamp.
Press [Exit].
LLLL
IIII
.
Page 30

To delete the user stamp
Important
❒ You cannot restore a deleted stamp.
Make sure the machine is in Copy mode.
AAAA
Press the {{{{User Tools}}}} key.
BBBB
ZJBS050N
Press [Copier/Document Server Features].
CCCC
Press [Stamp].
DDDD
Press [User Stamp].
EEEE
Copy Functions
2
Press [Program/Delete Stamp].
FFFF
Press [Delete], and then press the number of the stamp (1–5) you want to de-
GGGG
lete.
A confirmation message appears.
Press [Yes].
HHHH
Press [Exit].
IIII
The display returns to the main menu of the Copier/Document Server Features.
Date Stamp
Use this function to print a date on copies.
101
Page 31

Copying
You can select from the following date formats:
• MM/DD/YYYY
• MM.DD.YYYY
• DD/MM/YYYY
• DD.MM.YYYY
2
Stamp position and original orientation
Reference
Select the stamp format with the User Tools. See p.137 “Stamp Format”.
You can change the font of the date stamp. See p.137 “Stamp Font”.
You can change the stamp size. See p.137 “Stamp Size”.
When the date is stamped on the dark images, you can superimpose the date
stamp. See p.137 “Superimpose”.
Press [Stamp].
AAAA
Press [Date Stamp].
BBBB
102
Page 32

Copy Functions
Press [All Pages] or [1st Page only] to select the print page.
CCCC
Note
❒ You can change the font and position of the Date Stamp. See p.103 “To
change the date format”.
Place originals, and then press the {{{{Start}}}} key.
DDDD
To change the date format
Press [Change Format].
AAAA
Select the desired date format, and then press [OK].
BBBB
To change the stamp position
Press [Change].
AAAA
Select the desired Date Stamp position, and then press [OK].
BBBB
Page Numbering
Use this function to print page numbers on your copies.
2
There are six types of Page Numbering (“n” is the total number of original pages):
• P1,P2,…Pn
• 1/n,2/n,...n/n
• -1-,-2-,...-n-
• P.1,P.2,...P.n
• 1, 2…n
• 1–1,1–2,..1–n
Note
❒ You can select whether the page numbering printed negative where it over-
laps black parts of the negative. See p.137 “Page Numbering”.
103
Page 33

2
Copying
Stamp position and orientation of originals
Reference
You can set the priority page number format. See p.137 “Stamp Format”.
You can change the font of the stamp. See p.138 “Stamp Font”.
You can change the stamp size. See p.138 “Stamp Size”.
You can set the position of the duplex back page number printed in Duplex
mode. See p.138 “Back Side Stamp Position in Duplex”.
You can set how pages are numbered when you use the Combine function and
Page Numbering function together. See
You can set not to print the page number on slip sheets when you use the Designate function. See p.138 “Stamp on Designated Slip Sheet”.
When you use [1 Sided Combine]/[2 Sided Combine], you can stamp page number per copy paper.
When the page number is stamped on the dark images, you can superimpose
the page number. See p.138 “Superimpose”.
You can change the initial settings for stamp position. See
104
p.138 “Page Numbering in Combine”.
p.138 “Stamp Position”
.
Page 34

Copy Functions
Press [Stamp].
AAAA
Press [Page Numbering].
BBBB
Select the format.
CCCC
Note
❒ You can specify the stamp position, pages to be stamped, and numbering.
See p.105 “Changing the stamp position”, and p.105 “Specifying the first
printing page and start number”.
2
Place originals, and then press the {{{{Start}}}} key.
DDDD
Changing the stamp position
Press the left bottom [Change].
AAAA
Select the desired position, and then press [OK].
BBBB
Specifying the first printing page and start number
If you selected (P1,P2…, -1-,-2-…, P.1, P.2…, 1, 2…, )
Note
❒ Below gives an example based on when (P1, P2...) is selected. The steps are
the same for other cases.
Press the right bottom [Change].
AAAA
105
Page 35

2
Copying
Press [First Page], and then enter the original sheet number to start printing
BBBB
from using the number keys.
Note
❒ To change the number entered, press [Clear], and then enter a new number.
Press [Numbering from], and then enter the number to start numbering from
CCCC
using the number keys.
Press [Numbering to], and then enter the number to end numbering with us-
DDDD
ing the number keys.
Note
❒ If you want to print to the last page, press [To the End].
Press the {{{{#}}}} key.
EEEE
When page designation is complete, press [OK].
FFFF
Note
❒ To change settings after pressing [OK], press the right bottom [Change], and
then enter the numbers again.
If you selected (1/5, 2/5…)
Press the right bottom [Change].
AAAA
Press [First Page], and then enter the original sheet number to start printing
BBBB
from using the number keys.
Note
❒ To change the number entered, press [Clear], and then enter a new number.
Press [Numbering from], and then enter the page number to start numbering
CCCC
from using the number keys.
Press [Numbering to], and then enter the number to end numbering with us-
DDDD
ing the number keys.
106
Page 36

Copy Functions
Press [Total Pages], and then enter the total number of original pages using
EEEE
the number keys.
Press the {{{{#}}}} key.
FFFF
Press [OK].
GGGG
Note
❒ To change settings after pressing [OK], press the right bottom [Change], and
then enter the numbers again.
If you selected (1–1, 1–2,…)
Press the right bottom [Change].
AAAA
Press [First Page], and then enter the original sheet number to start printing
BBBB
from using the number keys.
Note
❒ To change the number entered, press [Clear], and then enter a new number.
2
Press [First Chapter No.], and then enter the chapter number to start number-
CCCC
ing from using the number keys.
Press [Numbering from], and then enter the number to start numbering from
DDDD
using the number keys.
Press the {{{{#}}}} key.
EEEE
If page designation is complete, press [OK].
FFFF
Note
❒ To change settings after pressing [OK], press the right bottom [Change], and
then enter the numbers again.
107
Page 37

2
Copying
Stamp Text
You can stamp important text on copies up to 64 letters.
Introducing the New Product of this year
GCSTMT0E
Note
❒ If the Main Power is turned off, the text is cleared. To save the typed text, you
can register them. See p.112 “Programs”.
Press [Stamp].
AAAA
Press [Stamp Text].
BBBB
Press [Change Text].
CCCC
Enter stamp text, and then press [OK].
DDDD
Press [All Pages] or [1st Page only] to select the print page.
EEEE
Place originals, and then press the {{{{Start}}}} key.
FFFF
To change the stamp position
Press [Change].
AAAA
Select the desired position, and then press [OK].
BBBB
108
Page 38

Copy Functions
Copy face up
Use this function to reverse the order of copies.
Reference
If you want copies to be delivered face down when placing originals on the
exposure glass, select [Face down] for both ”Eject Copy Face Up/Down in
Glass Mode” of User Tools. See p.139 “Input/Output”.
Press [Output/Cstmz. Function].
AAAA
Press [Reverse Edition Face Up/Down].
BBBB
Place originals, and then press the {{{{Start}}}} key.
CCCC
Customize function
You can store the frequently used functions.
2
Preparation
You can register the function key which can use often for your convinience.
See p.130 “Customize Function: Copy”.
Press [Output/Cstmz. Function].
AAAA
Select the function you want to use by pressing the corresponding key.
BBBB
109
Page 39

2
Copying
Storing Originals in the Document Server
The Document Server enables you to save documents in memory and print them
as required.
Important
❒ Data stored in the machine might be lost if some kind of failure occurs. The
manufacturer shall not be responsible for any damage that might result from
loss of data.
Note
❒ Data stored in the Document Server is deleted after 3 days (72 hours), the de-
fault setting. You can set stored data to be automatically deleted, or specify a
period after which the stored data is automatically deleted. See “Auto Delete
File”, General Settings Guide.
Reference
For details about the Document Server, see “Document Server”, General Set-
tings Guide.
For information about functions you can use with Document Server, see p.141
“Combination Chart”.
Press [Store file].
AAAA
Enter a file name, user name, or password if neccessary.
BBBB
Select the user name registered
A Press [User Name].
B Select the user name, and press [OK].
Entering the user name not registered
A Press [User Name].
B Press [Non-programmed Name].
C Enter the new user name using the letter leys, and press OK.
110
Page 40

Storing Originals in the Document Server
Entering file names
A Press [File Name].
B Press [Delete All], and delete the default name.
Note: You can change the file name to use [Back Space].
C Enter the file name, and press [OK].
Setting password
A Press [Password].
B Enter the password using the number keys and press [OK].
Press [OK].
CCCC
Place originals.
DDDD
Reference
For more information about types of originals that can be placed and how
to place them, see p.10 “Placing Originals”.
2
Make scanning settings for the original.
EEEE
Press the {{{{Start}}}} key.
FFFF
Copies are delivered, and scanned data is stored on the hard disk.
Note
❒ To stop scanning, press the {{{{Stop}}}} key. To resume a paused scanning job,
press [Yes] in the confirmation dialog box. To delete saved images and can-
cel a job, press [No].
❒ To check a document that has been stored, press the {{{{Document Server}}}} key
to display the document selection screen.
111
Page 41

2
Copying
Programs
You can store frequently used copy job settings in memory and recall them for
future use.
Note
❒ You can store up to 25 programs.
❒ You can select standard mode or program No. 25 as the mode to be set when
modes are cleared or reset, or immediately after the operation switch is
turned on. See p.126 “Change Initial Mode”.
❒ Paper settings are stored based on size. So, if paper of the same size is set for
more than one tray, the paper tray prioritized with User Tools (System Settings) will be selected first. See “Paper Tray Settings”, General Settings Guide.
❒ Programs are not cleared by turning the power off or by pressing the {{{{Clear
Modes}}}} key. They are canceled only when you delete or overwrite them with
another program.
Storing a Program
Edit the copy settings.
AAAA
Press the {{{{Program}}}} key.
BBBB
Press [Register].
CCCC
ZJAS040N
Press the program number you want to store.
DDDD
Note
❒ Program numbers with m against them already have settings made for
them.
Reference
p.113 “Changing a stored program”
112
Page 42

Enter the program name using the letter keys on the display panel.
EEEE
You can enter up to 40 characters.
Reference
For details about entering characters, see “Entering Text”, General Settings
Guide.
Programs
Note
❒ If you do not want to enter the program name, proceed to step
Press [OK].
FFFF
When the settings are successfully stored, the mmmm indicator before the program number goes on, followed by the program name. The screen returns to
the initial copy display after a short time.
F
.
Changing a stored program
Check the program settings.
AAAA
Reference
When you want to check the contents of a program, recall the program. See
p.114 “Recalling a Program”.
Repeat steps AAAA to DDDD of “Storing a Program”.
BBBB
Press [Register].
CCCC
Repeat steps E and F of ”Storing a Program”.
2
Note
❒ This overwrites the previous program.
113
Page 43

2
Copying
Deleting a Program
Press the {{{{Program}}}} key.
AAAA
Press [Delete].
BBBB
Press the number of the program you want to delete.
CCCC
Press [Yes] in the confirmation dialog box.
DDDD
The program is deleted, and the screen returns to the initial copy display.
Recalling a Program
Press the {{{{Program}}}} key.
AAAA
Press [Recall].
BBBB
Press the number of the program you want to recall.
CCCC
Stored settings are displayed.
Note
❒ Only programs with m against them contain a program.
114
Page 44

3. Troubleshooting
If Your Machine Does Not Operate as You
Want
When a Message is Displayed
The following chart contains explanations of common messages. If other messages appear, follow the instructions as they are displayed.
Message Causes Solutions
Cannot detect original size. The size of the originals
placed is difficult to detect.
See p.9 “Sizes difficult to
detect”.
Original is not placed. Place originals.
Check original orientation. There is no copy paper in
the same orientation as the
originals.
Check paper size. Incorrect paper size is set. If you press the {{{{
It is over stapling capacity. The number of sheets per
set is over the staple capacity.
Cannot staple paper of this
size.
The Staple function cannot
be used with the paper size
selected.
Place the original on the exposure
glass. See p.13 “Placing Originals on
the Exposure Glass”.
If the original size is difficult to detect, select the size manually.
Do not use Auto Reduce/Enlarge
mode.
Place the original in the same orientation as the copy paper.
onto the selected paper will start.
Check the stapler capacity. See p.46
“Staple”.
Select a paper size that can be used
in Staple mode. See p.46 “Staple”.
}}}} key, copy
Start
Maximum number of sets
is .
Cannot copy. Original is
being scanned by other
functions.
The number of copies exceeds the maximum copy
quantity.
The Document Server or
Scanner function is in use.
You can change the maximum copy
quantity. See p.126 “Max. Number
of Sets”.
To cancel the job in process, press
[
], and then press the {{{{
Exit
}}}} or {{{{
Server
the {{{{
[
Stop
appears, press [
Scanner
}}}} key. When the message ”
Stop
] was pressed. Stop storing?”
}}}} key. Next, press
Stop
Document
].
115
Page 45

Troubleshooting
;;
yy
If You Cannot Make Clear Copies
Problem Causes Solutions
Copies appear dirty. The image density is too dark. Adjust the image density. See
p.31 “Adjusting Copy Image
Density”.
3
Auto Image Density is not selected.
The reverse side of an original
image is copied.
A shadow appears on copies
when copying pasted originals.
The same copy area is dirty
whenever making copies.
Copies are too light. The image density is too light. Adjust the image density. See
The image density is too dark. Adjust the image density. See
Auto Image Density is not selected.
The image density is too dark. Adjust the image density. See
The exposure glass or the ADF
belt is dirty.
Select Auto Image Density.
p.31 “Adjusting Copy Image
Density”.
Select Auto Image Density.
p.31 “Adjusting Copy Image
Density”.
Change the orientation of the
original.
Fix mending tape to the pasted part.
Clean them. See “Maintaining
Your Machine”, General Set-
tings Guide.
p.31 “Adjusting Copy Image
Density”.
Parts of the image are not copied.
Copies are blank. The original is not set correct-
A moiré pattern is produced
on copies.
R
116
Damp or rough grain copy paper is being used.
Toner cartridge is almost empty.
The original is not set correctly.
An incorrect paper size is selected.
ly.
Original has a dot pattern image or many lines.
Use dry paper without a
rough grain.
Add toner. See “Replacing
Toner”, General Settings
Guide.
Place originals correctly. See
p.7 “Placing Originals”.
Select the proper paper size.
Place originals correctly. See
p.7 “Placing Originals”.
Place the original on the exposure glass at a slight angle.
Page 46

If You Cannot Make Copies As You Want
If You Cannot Make Copies As You Want
This section explains causes and remedies when copy results are not as expected.
❖❖❖❖ Basic
Problem Causes Solutions
Copies are not stapled. There are staples jammed
in the stapler.
The number of copies exceeds the capacity of the
stapler.
Copy paper is curled. Turn the copy paper over in the
Staples are wrongly positioned.
You cannot combine several functions.
Paper frequently jams. The paper size setting is in-
Originals jam. Different size originals are
Originals are not set correctly.
Selected functions cannot
be used together.
correct.
placed in the ADF.
Remove jammed staples. See
al Settings Guide.
Check the stapler capacity. See p.145
“Staple”.
tray.
Check the correct position to place
the originals. See p.46 “Staple”.
Check the combination of functions
and make the settings again.
Gener-
Reference
p.141 “Combination Chart”
Set the paper size correctly. See “Pa-
per Tray Settings”, General Settings
Guide.
Check that the side fences and back
fence are set in the paper tray.
Set the Mixed 1&2 Sided function.
See p.71 “Mix 1 & 2 Sided”.
3
❖❖❖❖ Edit
Problem Causes Solutions
In Double Copies mode,
parts of the original image
are not copied.
In Border, Center, or Center/Border mode, parts of
the original image are not
copied.
The combination of original and copy paper is not
correct.
You set a wide erased margin.
Originals are not scanned
correctly.
Select A3L (11" × 17"L) for A4 K
1
/2" × 11"K) originals and A4L
(8
1
/2" × 11"L) for A5K (51/2" ×
(8
1
8
/2"K) originals.
Make the margin width narrower.
You can adjust it between 2–99 mm
(0.1"–3.9"). See p.132 “Erase Border
Width”and p.132 “Erase Center
Width”.
Place the originals correctly.
117
Page 47

Troubleshooting
Problem Causes Solutions
3
In Margin Adjustment
mode, parts of the original
image are not copied.
In Image Repeat mode, the
original image is not copied repeatedly.
You set a wide erased margin.
There is a lack of margin
space on the opposite side
of the binding position.
You selected copy paper
the same size as the originals, or you did not select
the proper reproduction
ratio.
Set a narrower margin with User
Tools. You can set the width between 0–30 mm (0"–1.2"). See p.131
“Front Page Margin : Left/Right”,
p.132 “Front Side Margin : Top/Bottom”, p.131 “Back Side Margins :
Left/Right”, and p.132 “Back Side
Margin : Top/Bottom”.
Select copy paper larger than the
originals.
Select the proper reproduction ratio.
❖❖❖❖ Combine
Problem Causes Solutions
You cannot make a book
from Booklet or Magazine
mode by folding copies.
When using Combine,
parts of the image are not
copied.
You selected a setting
(“Open to left”or “Open to
right”) that does not match
the orientation of originals.
You specified a reproduction ratio that does not
match the sizes of your
originals and copy paper.
Change the setting.
When you specify a reproduction
ratio using Manual Paper Select
mode, make sure that the ratio
matches your originals and the copy
paper.
Copies are not in correct order.
You placed the originals in
the incorrect order.
Note
❒ Select the correct reproduction
ratio before using Combine
mode.
When placing a stack of originals in
the ADF, the last page should be on
the bottom.
If you are placing originals on the
exposure glass, start with the first
page to be copied.
118
Page 48

If You Cannot Make Copies As You Want
❖❖❖❖ Duplex
Problem Causes Solutions
Copies are not in correct order.
When using 1 Sided Combine or 2 Sided Combine,
copy is made Top to Bottom even though From Left
to Right is selected.
You placed the originals in
the incorrect order.
The orientation of the originals is incorrect.
When placing a stack of originals in
the ADF, the last page should be on
the bottom.
If you are placing originals on the
exposure glass, start with the first
page to be copied.
Place the originals in the correct orientation. See p.10 “Original Orientation” .
❖❖❖❖ Stamp
Problem Causes Solutions
The stamp position is
wrong.
Nothing is stamped. The stamp size is larger
The stamp text in back side
copy is not stamped in Duplex mode.
The paper orientation is
wrong.
than the paper size.
The back side stamp position is incorrect with the
paper size.
Check the paper orientation and
stamp position.
Set the stamp size appropriately.
Reset the back side stamp position.
See p.138 “Back Side Stamp Position
in Duplex”.
3
When Memory Is Full
Message Causes Solutions & Reference
Memory is full. ## originals
have been scanned.
Press [
originals.
Do not remove remaining
originals.
] to copy scanned
Print
Note
❒ Copying will stop and this
message will be displayed
when memory is full.
Press [
printing.
[
Stop
Continue
] [
Continue
] to continue
]
The scanned original exceeds
the number of pages that can
be stored in memory.
The machine checks if the remaining original should be
copied, after the scanned original has been printed.
Press [
originals and clear the scanning data. Press [
] to clear the scanning data
List
and not copy.
To continue copying, remove
all copies, then press [
]. To stop copying, press
ue
[
].
Stop
] to copy scanned
Output
Print Inquiry
Contin-
119
Page 49

3
Troubleshooting
120
 Loading...