

Page 1
Operating Instructions
COPY REFERENCE
Read this manual carefully before you use this product and keep it handy for future
reference.
For safety, please follow the instructions in this manual.
Page 2
3. Document Server
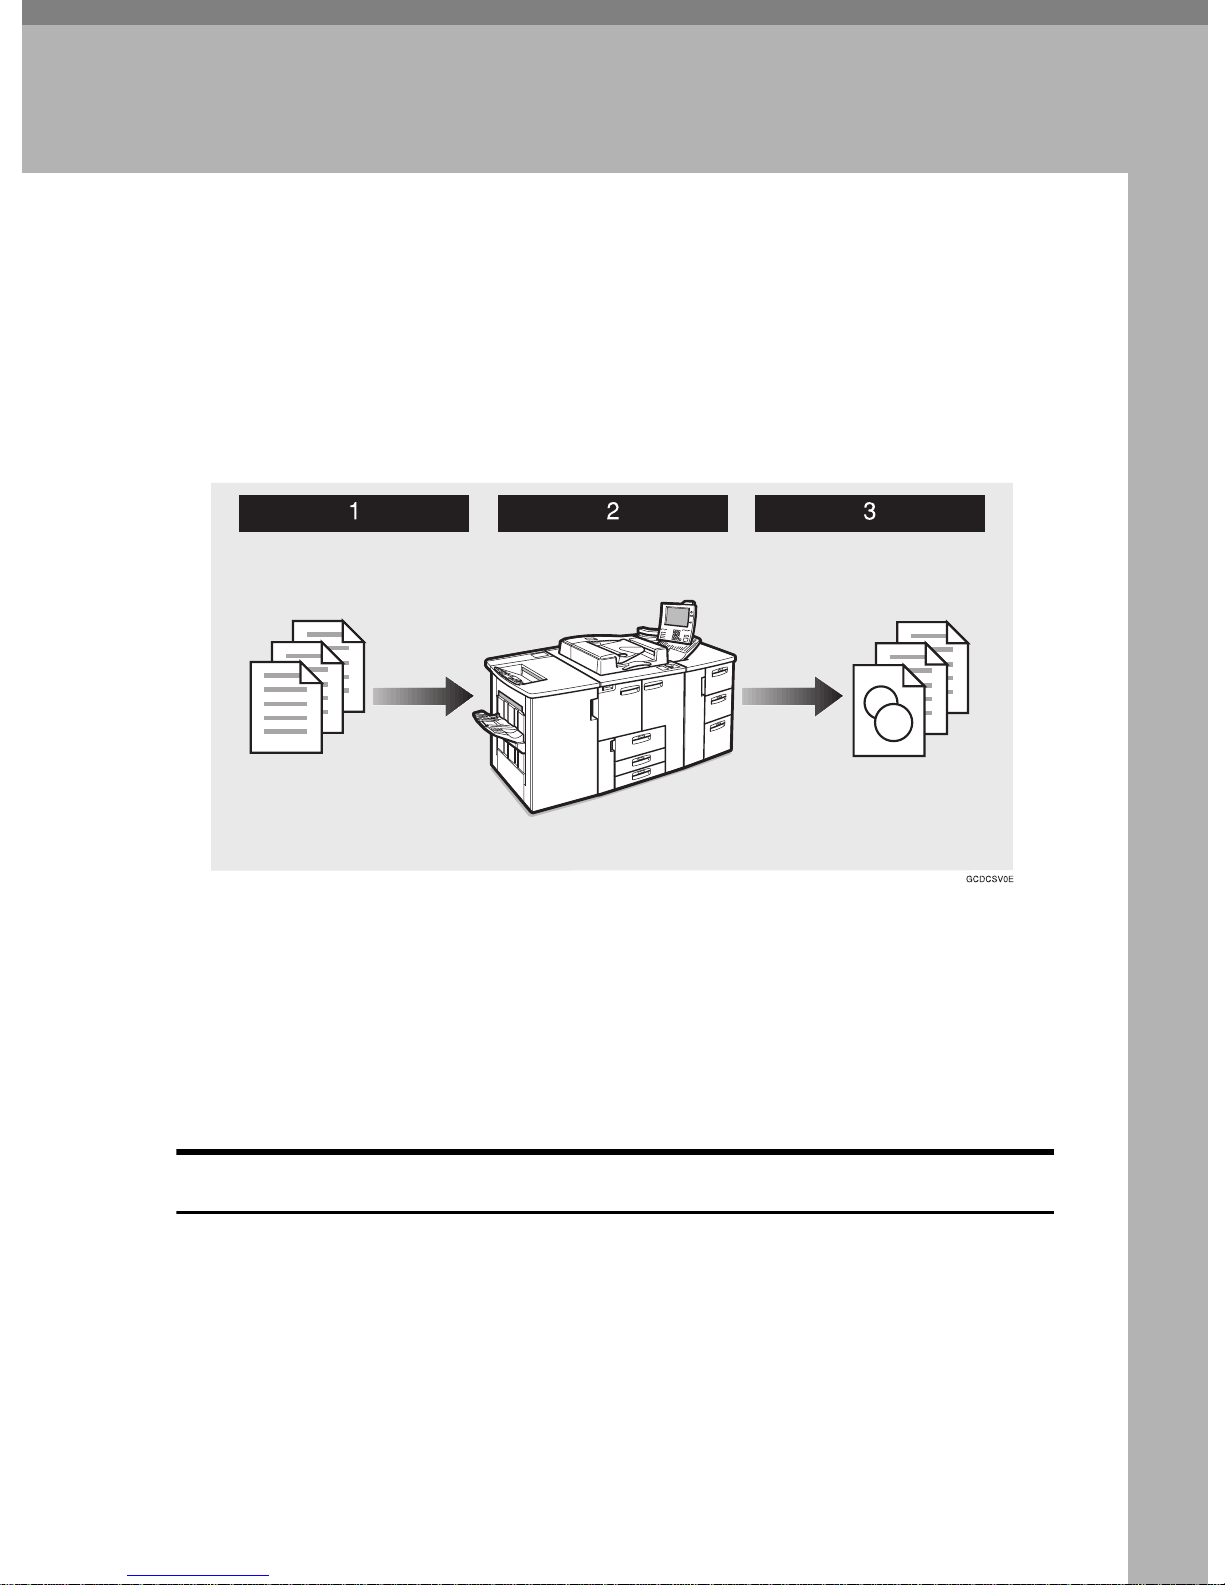
Overview
The Document Server enables you to save documents in the machine memory
and then edit and print them as you want.
There are two ways to save documents:
• Scanning from the ADF
• Scanning from the exposure glass
A Prepare the documents you want to save.
B Save the documents.
The documents are saved in the machine memory.
C Print the documents.
You can print saved documents with any settings you desire at any time.
Document Server Features
The following printing features are available with the Document Server.
❖
Scanning Originals
See ⇒ P.201
❖
Printing Saved Documents
See ⇒ P.206
“Scanning Originals”
“Printing Saved Documents”
197
Page 3

3
Document Server
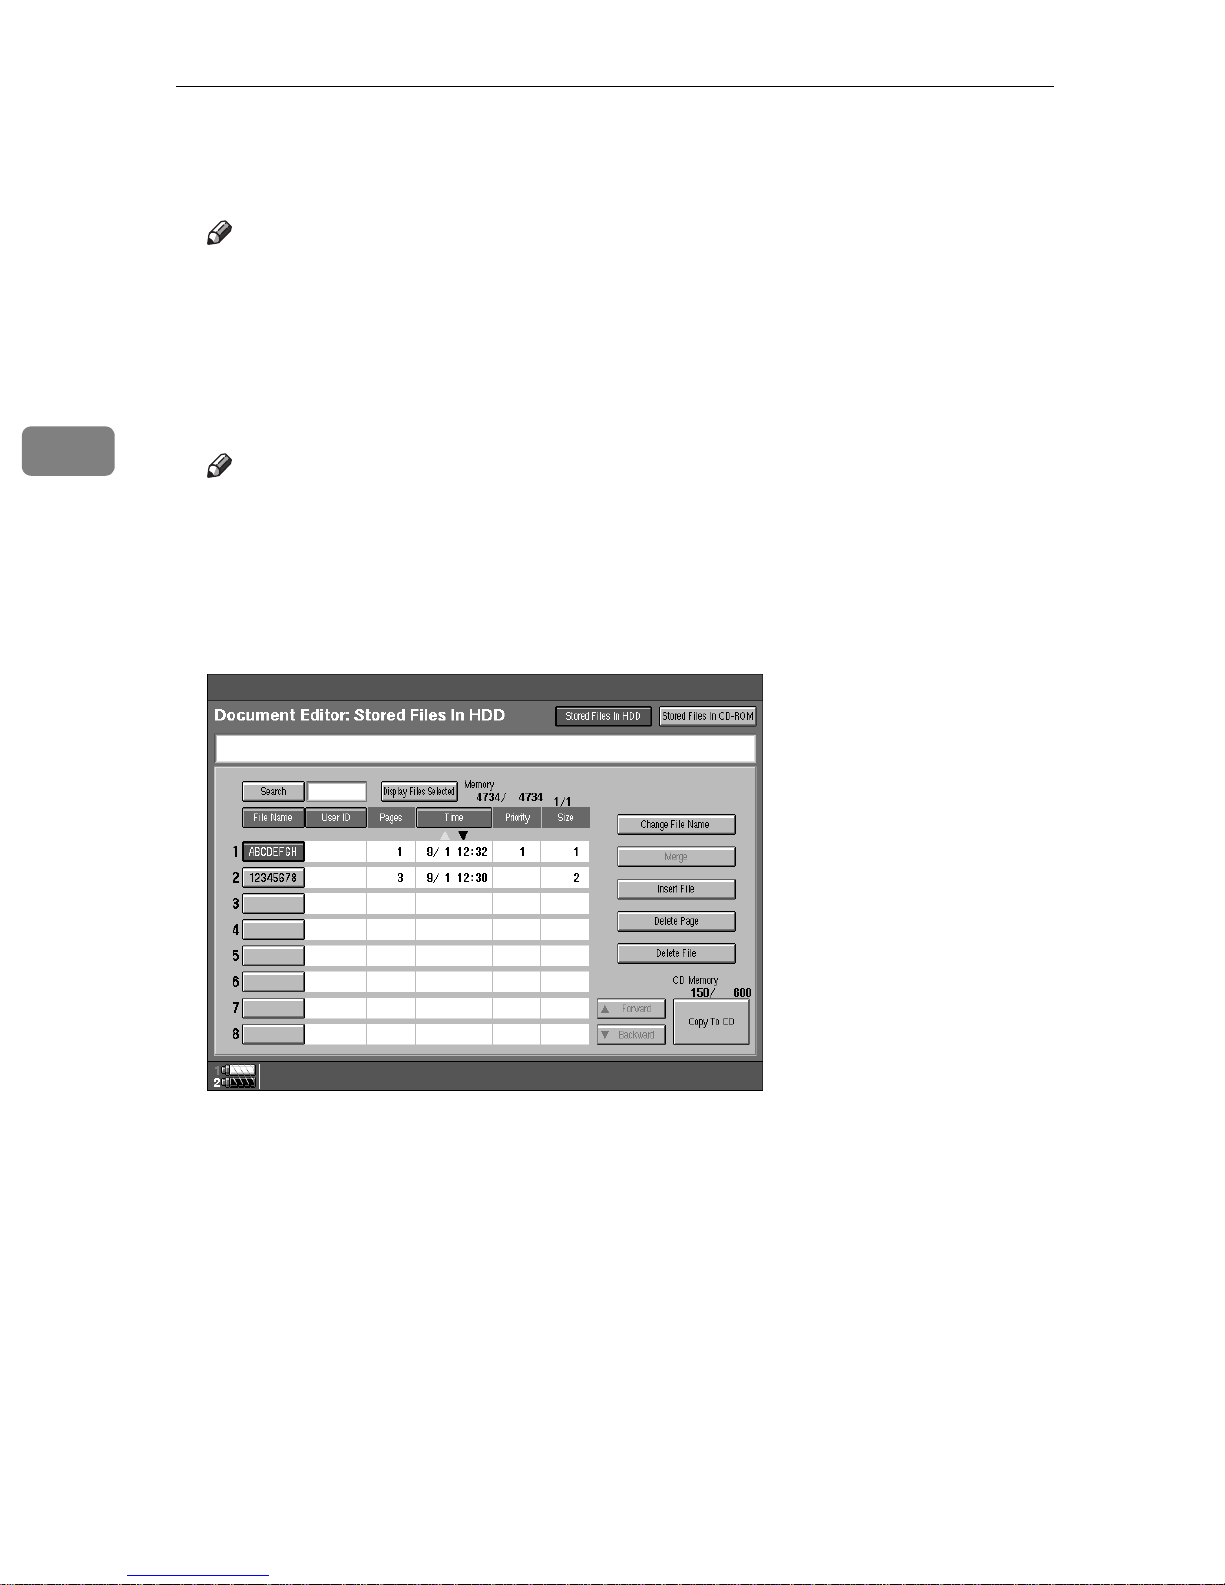
Document Server Editor Features
The following features are available with the Document Server Editor.
❖
Changing File Names
See ⇒ P.213
❖
Merging Documents
See ⇒ P.216
❖
Inserting Files
See ⇒ P.219
❖
Deleting Pages
See ⇒ P.222
❖
Deleting Saved Documents
See ⇒ P.226
“Changing File Names”
“Merging Documents”
“Inserting Files”
“Deleting Pages”
“Deleting Saved Documents”
❖
Moving/Copying Files
See ⇒ P.231
“Moving/Copying Files”
198
Page 4

Features and Benefits
Features and Benefits
On Demand Printing
Use to print any saved document as required.
❖
Your current situation might be…
• When you need to print multiple sets of documents double-sided and stapled together, you normally print the originals, make duplex copies and
then staple them together manually.
3
❖
With the Document Server
If you save your document in the Document Server, you can print it out at any
time with the necessary print settings, such as duplex and stapling. Your documents will not be confused with those of others in the exit tray.
Note
❒
Punching requires the installation of the optional Punch kit in the Finisher.
❒
You can specify a password to prevent others from printing a reading documents.
199
Page 5
Document Server
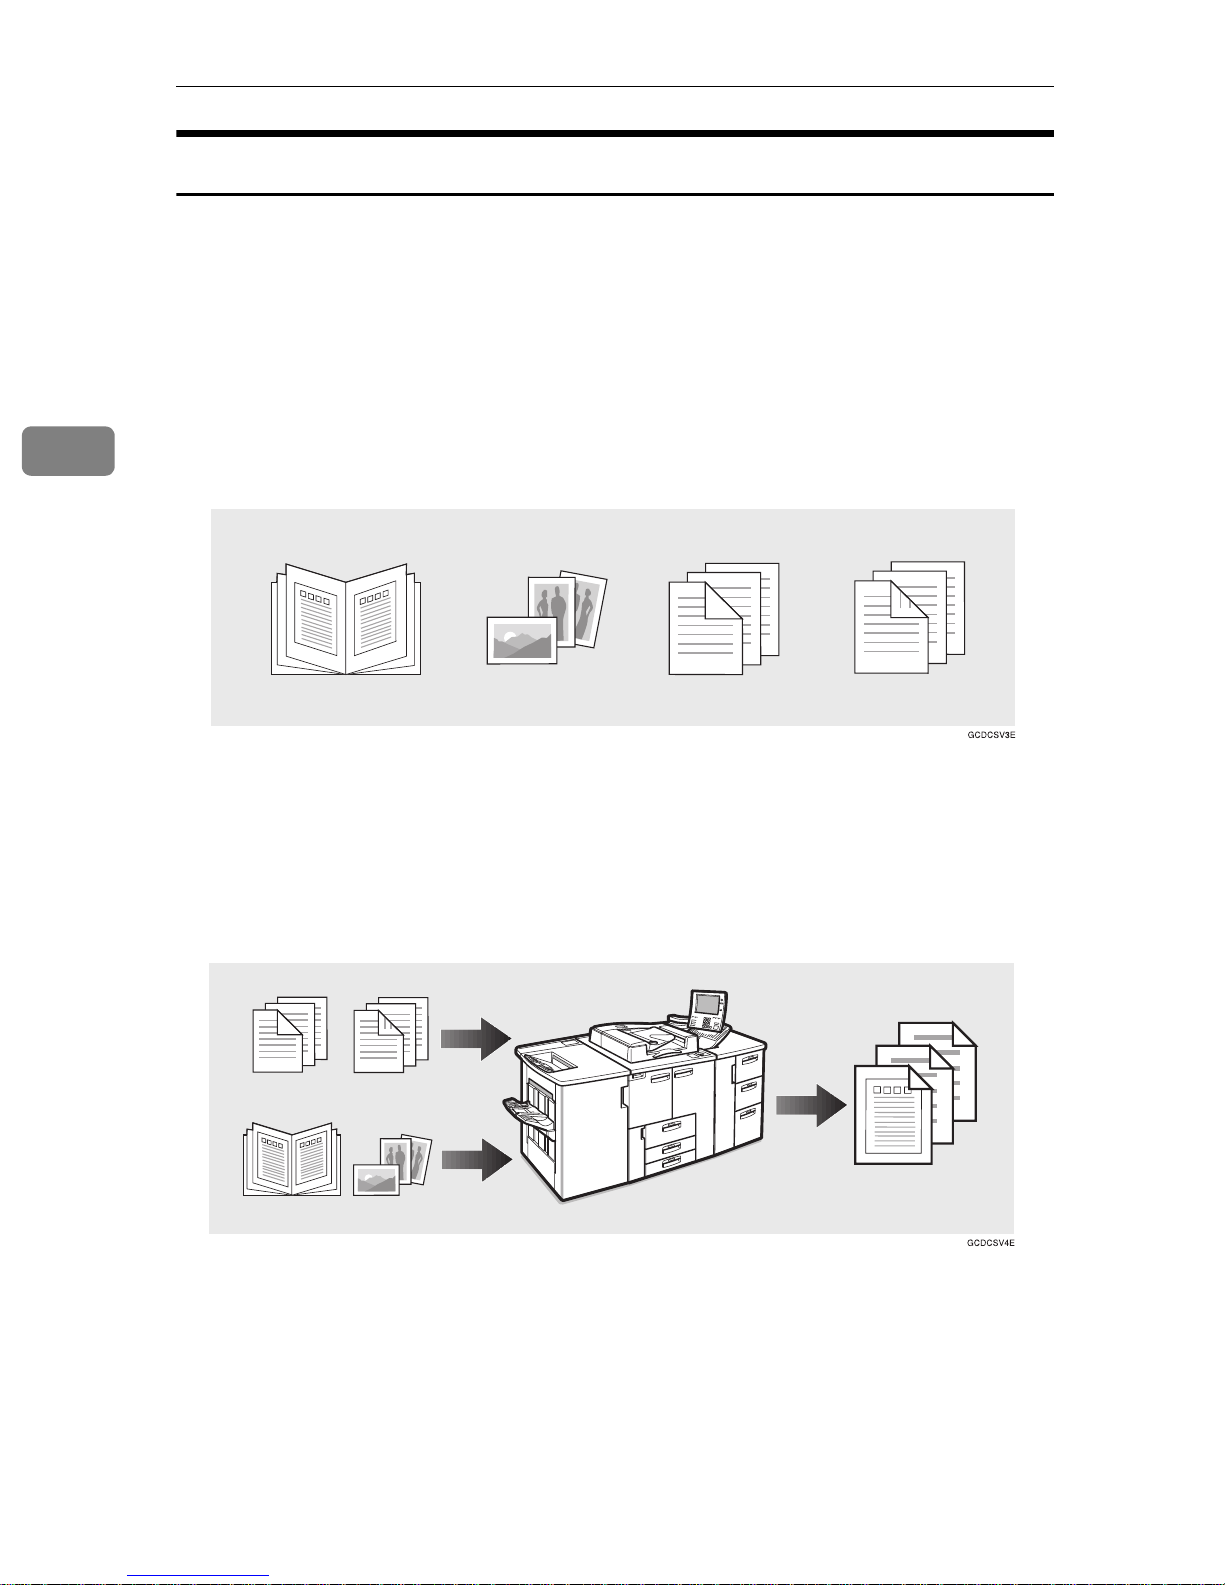
Scanned File Printing
You can combine multiple scanned documents into one print set.
❖
Your current situation might be…
You want to combine several originals that are different in density, size, and
paper weight, e.g.
• Damaged and pasted originals
• Photo originals
3
• One sided originals
• Two sided originals
❖
With the Document Server
You can save the originals individually by selecting the best settings for each
original, and then edit them as a file.
It doesn't matter whether the originals were scanned using the document
feeder (ADF) or the exposure glass. As you can specify the print order for several files, you can combine them as you want and print them as a file.
You can check the print result by printing a sample set before making a large
print run by pressing the
If you aren't satisfied with the print result of some pages of the set, you have
only to scan that part again.
200
{
Sample Copy
key.
}
Page 6
Scanning Originals
Scanning Originals
Use this feature to scan originals you want to save in the Document Server from
the machine control panel. The originals can be set either on the exposure glass
or into the document feeder (ADF).
The saved documents will automatically be named in the scanning order:
“Scan001”, “Scan002” and so on.
Note
❒
The maximum number of files you can store is 250 in the HDD, 50 in the CDR/RW (option).
❒
Make sure the machine's date setting is correct before scanning originals. See
“Date” and “Time” in the System Settings manual.
❒
Retain your original documents after storing them.
❒
You can set the timer to delete the documents stored in the document server.
See “Auto File Delete”⇒ P.332
“Document Server”
3
❒
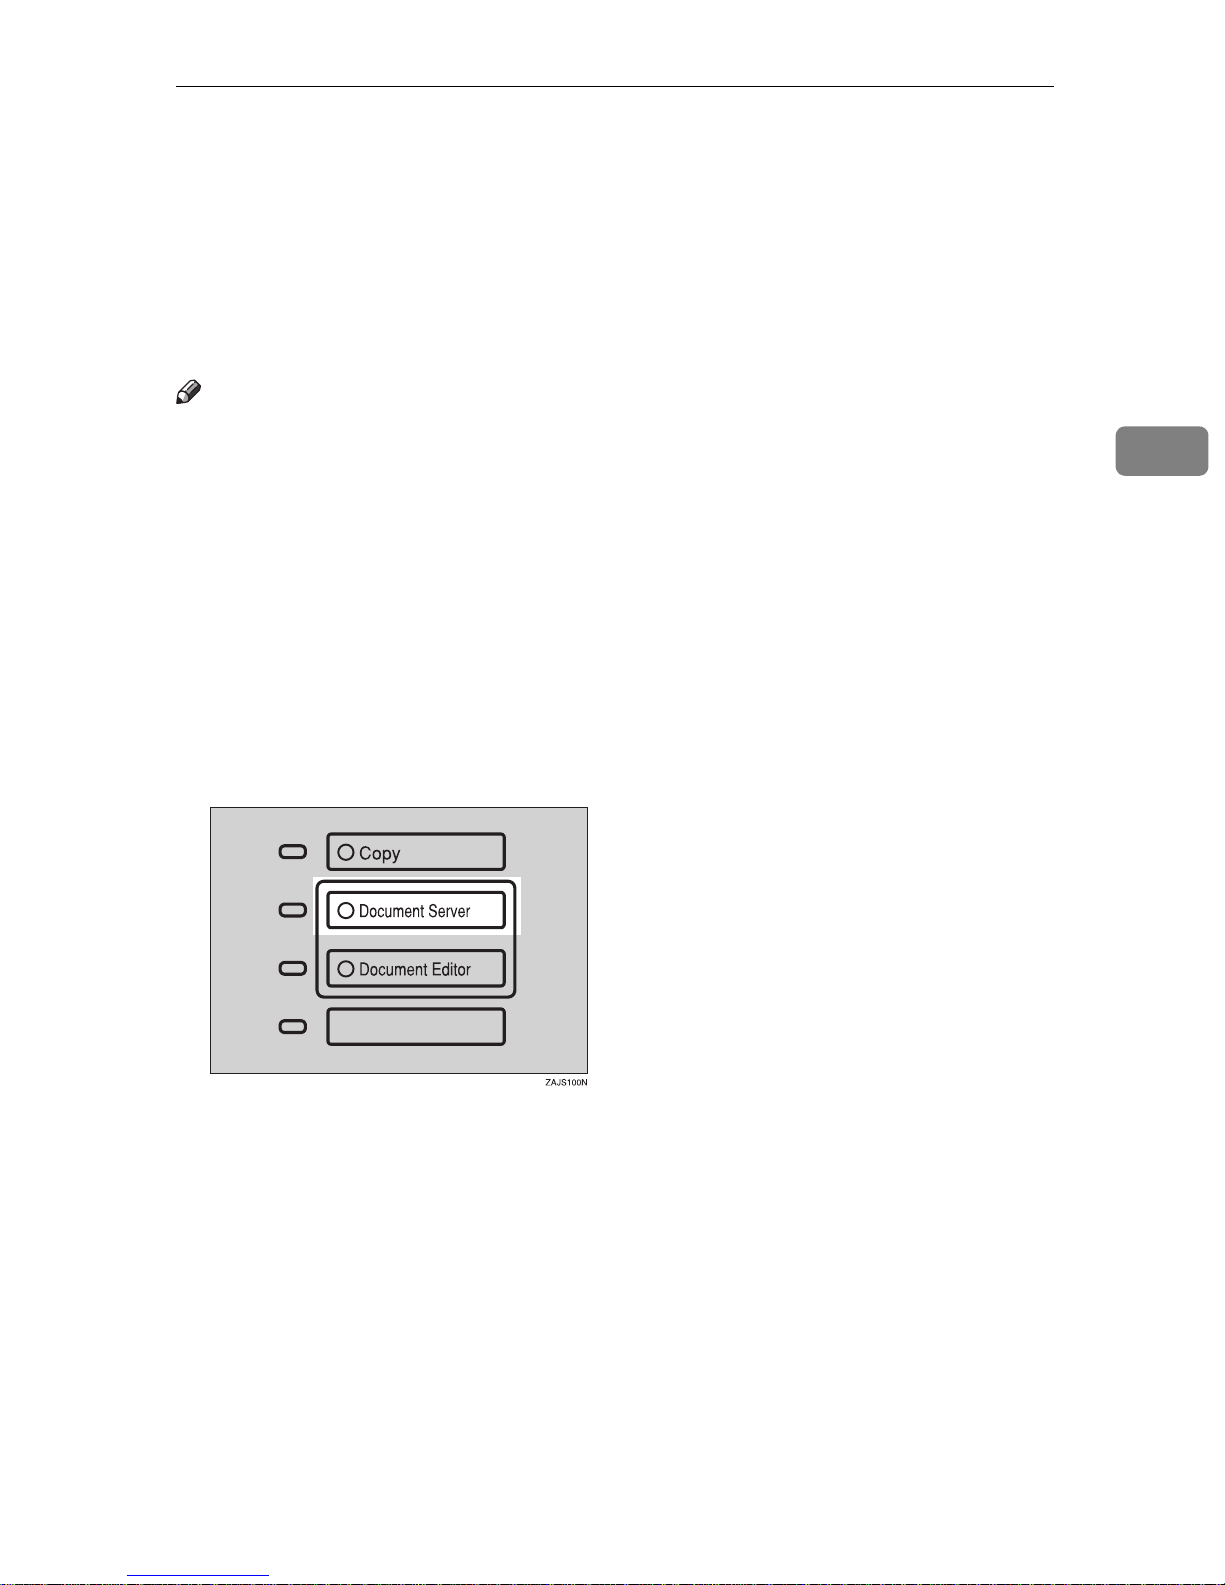
You can select whether
display with the User Tools .⇒ P.332
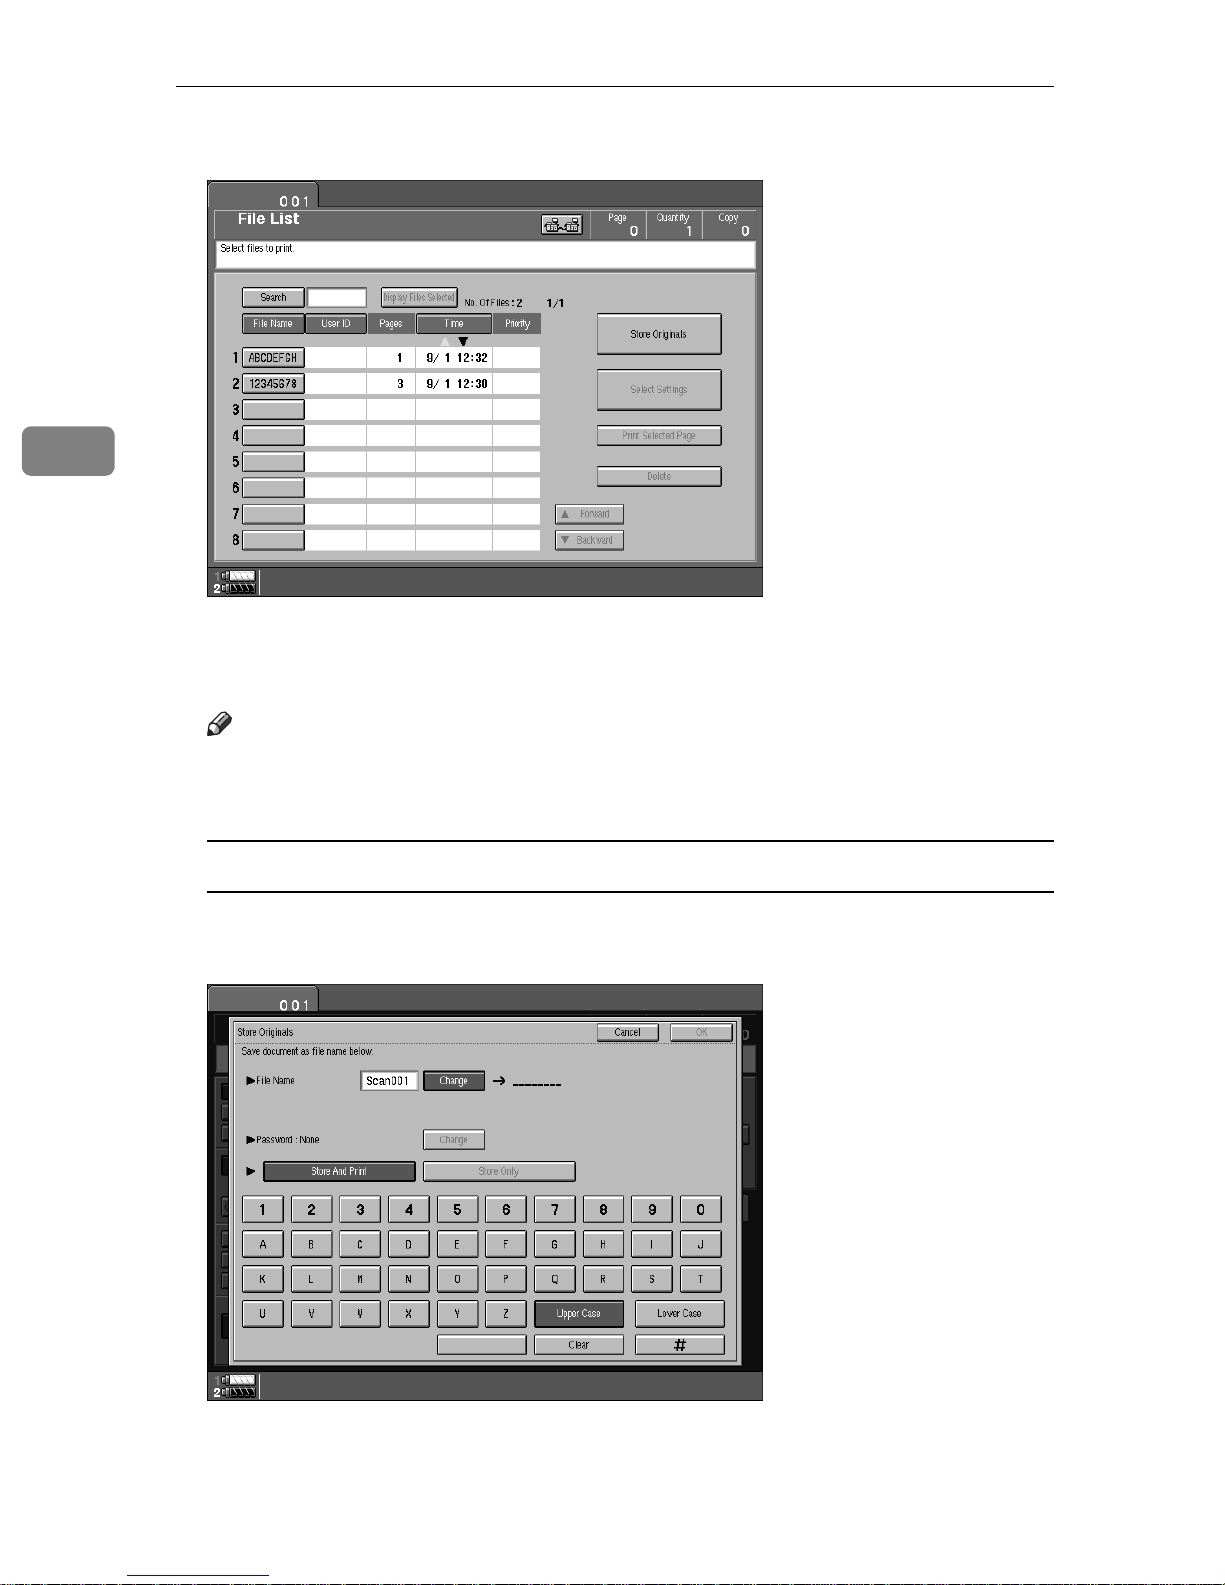
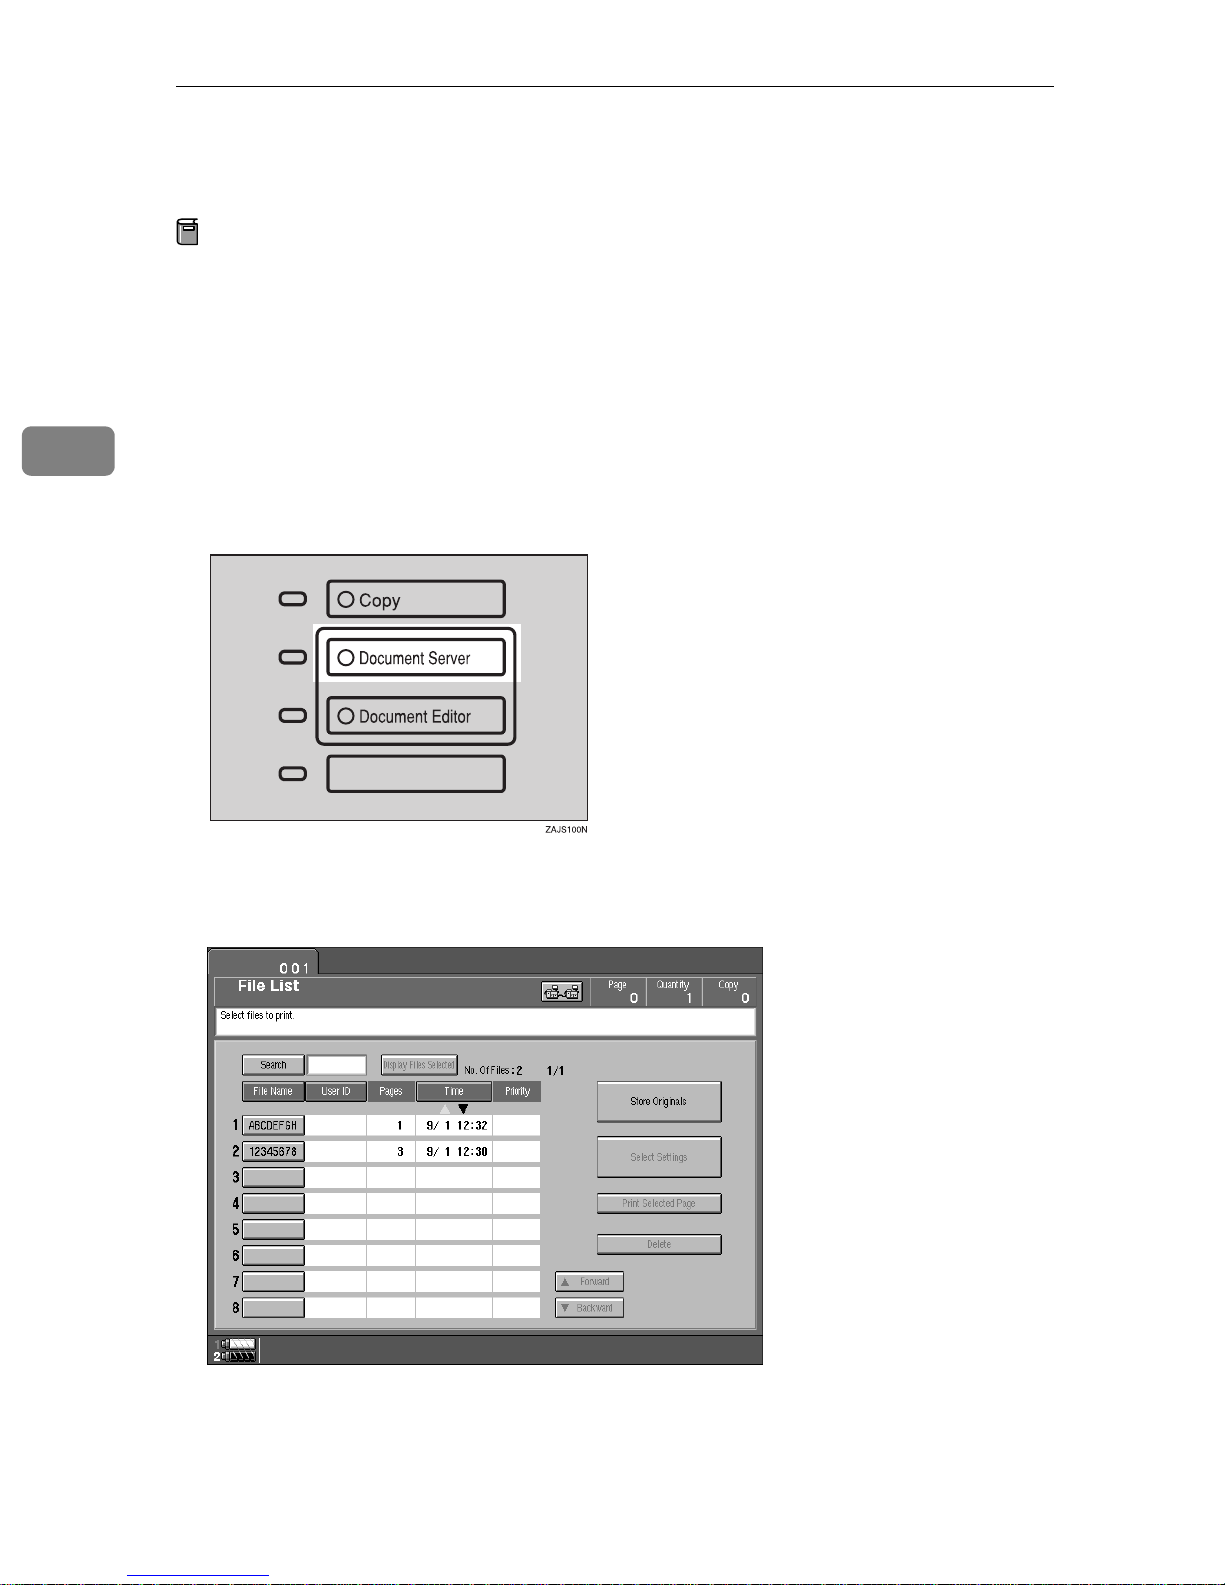
A Press the
The “File List” menu appears.
{
Document Serve r
[
Store And Print
key.
}
or
]
[
Store Only
“Document Server”
is displayed in the initial
]
201
Page 7
Document Server
3
B Press the
The “Store Originals” menu appears.
[
Store Originals
key.
]
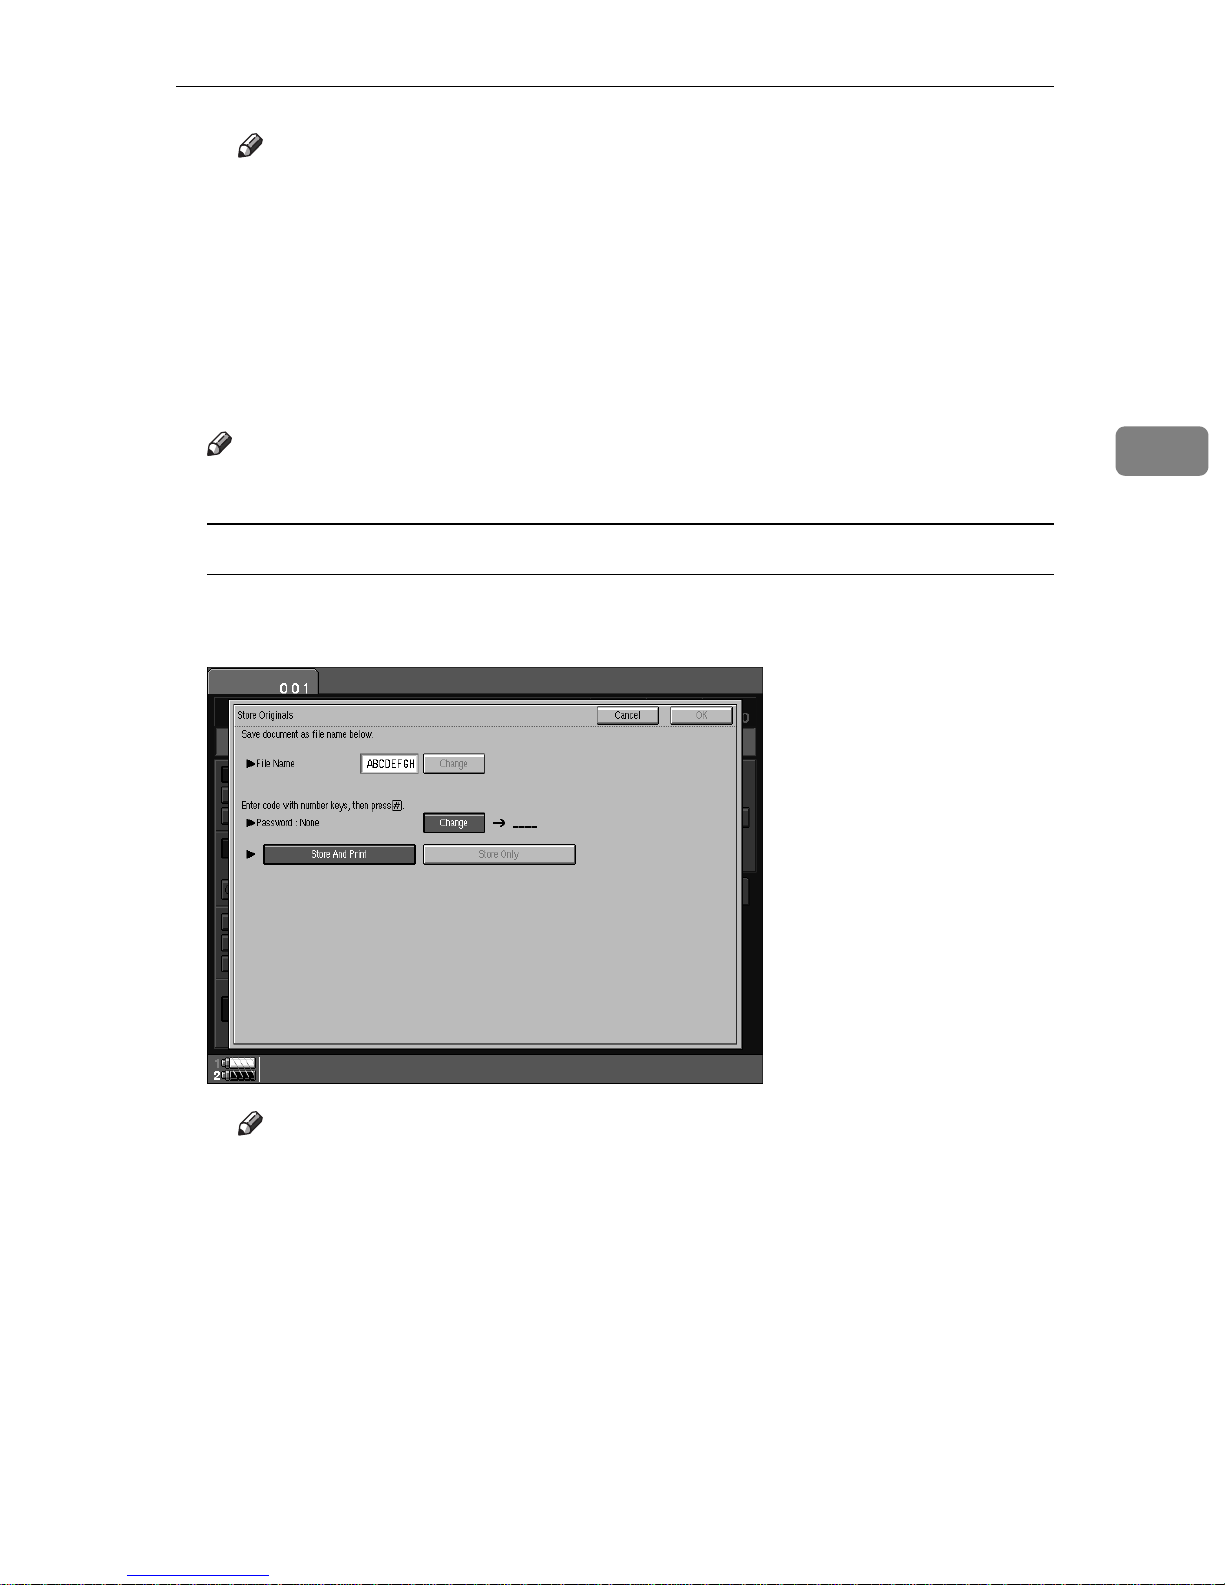
C Enter a file name.
Note
❒
If you do not wish to register a file name, go to step D.
❒
If you do not register a file name, it is stored automatically.
To set the file name
A Press the
B Enter the new file name using the letter keys on the display panel.
[
Change
key.
]
202
Page 8
Scanning Originals
Note
❒
You can enter up to 8 letters.
❒
To change the letter entered, press the
ter.
❒
You can register a file name identical to an existing file name. It is not
overwritten.
[
key and enter the new let-
]
Clear
C Press the
[
#
key.
]
D Enter your password.
Note
❒
If you do not wish to enter a password, go to step E.
To set the password
A Press the
B Enter the password using number keys (4 digits).
[
Change
key.
]
3
Note
❒
To change the number entered, press the
number.
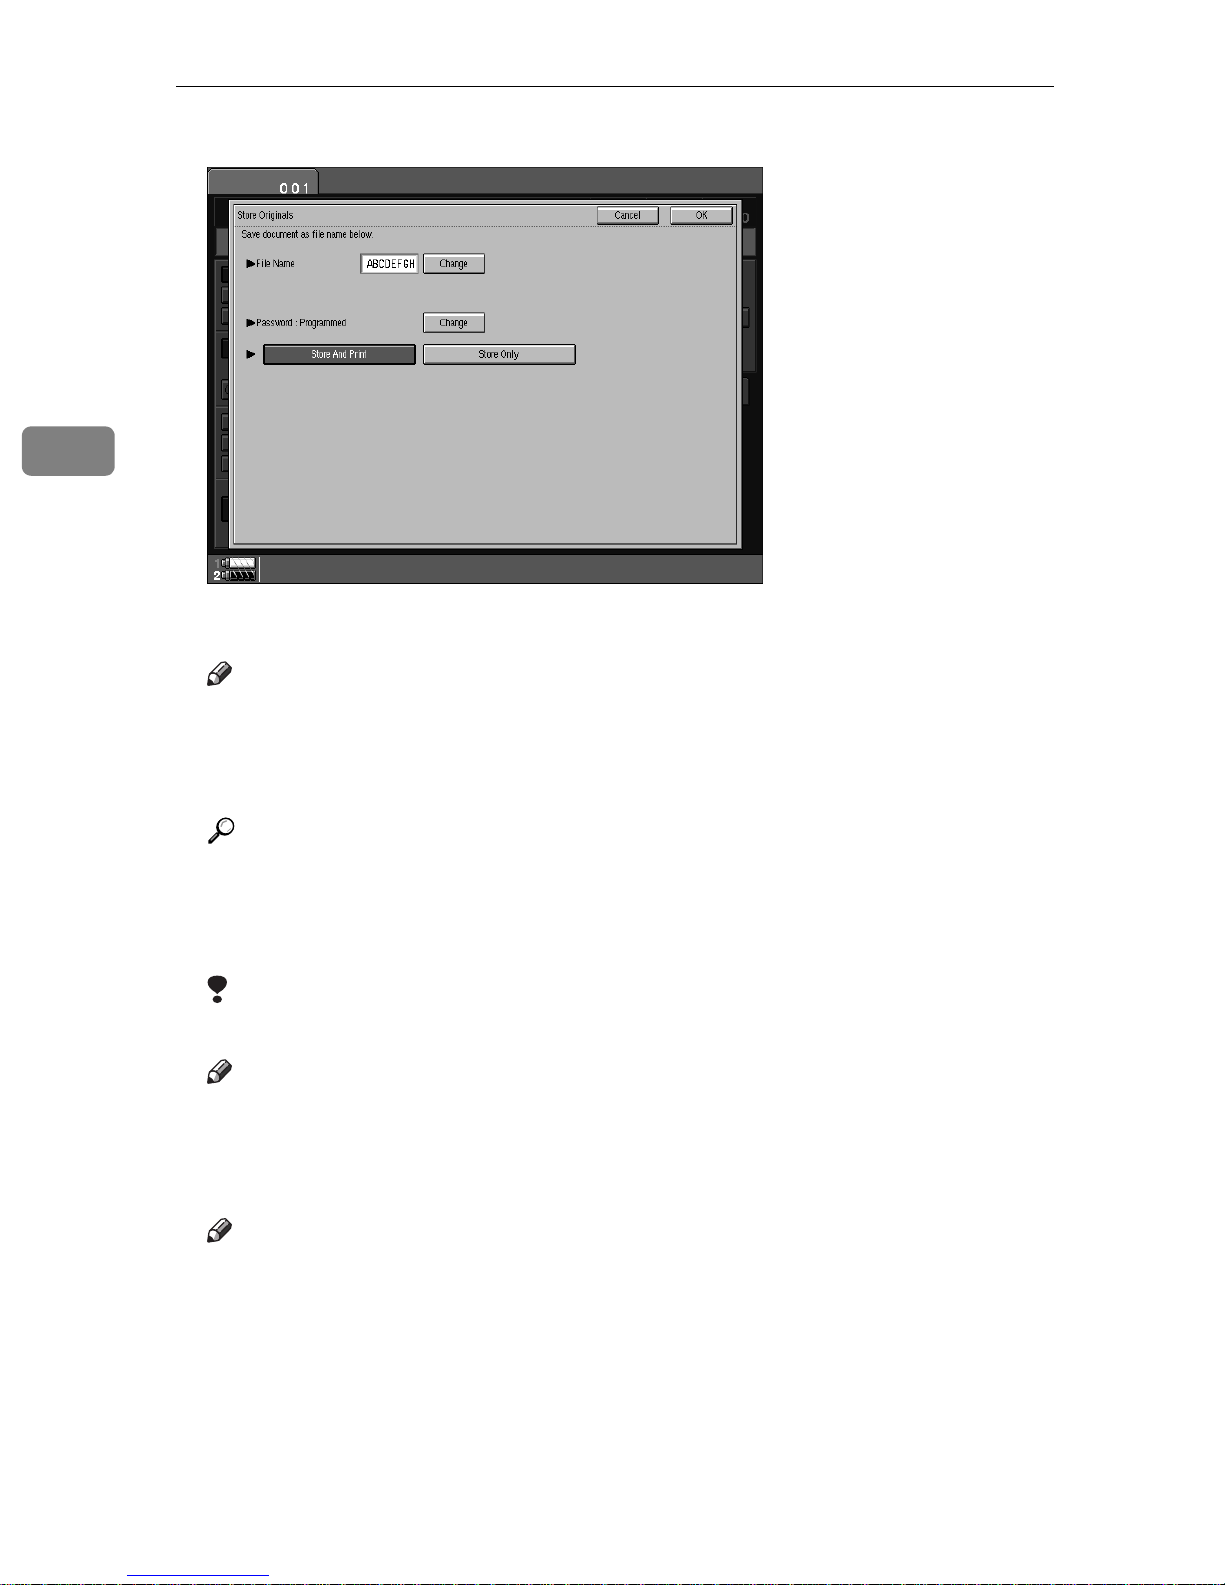
C Press the
E Select
[
Store And Print
{
}
#
key.
or
]
[
Store Only
Clear
}
{
.
]
key and enter the new
203
Page 9
3
Document Server
A
F Press the
Note
❒
To stop scanning originals, press the
[
OK
key.
]
[
Cancel
key.
]
G Set your originals either on the exposure glass or into the document feeder
(ADF).
Reference
For more information on the types of originals that can be set and how to
set them, see “Setting Originals” ⇒ P.26
“Setting Originals”
.
H Make any desired settings.
Limitation
❒
You cannot use the Booklet function.
Note
❒
The settings remain in the machine after scanning. You can change these
settings when you want to print next time.
I Press the
{
Start
key.
}
Note
❒
To stop scanning, press the
Press the
[
key to continue, and press the
]
Print
204
{
Stop
key. A message appears on the display.
}
[
key to store.
]
Stop
Page 10
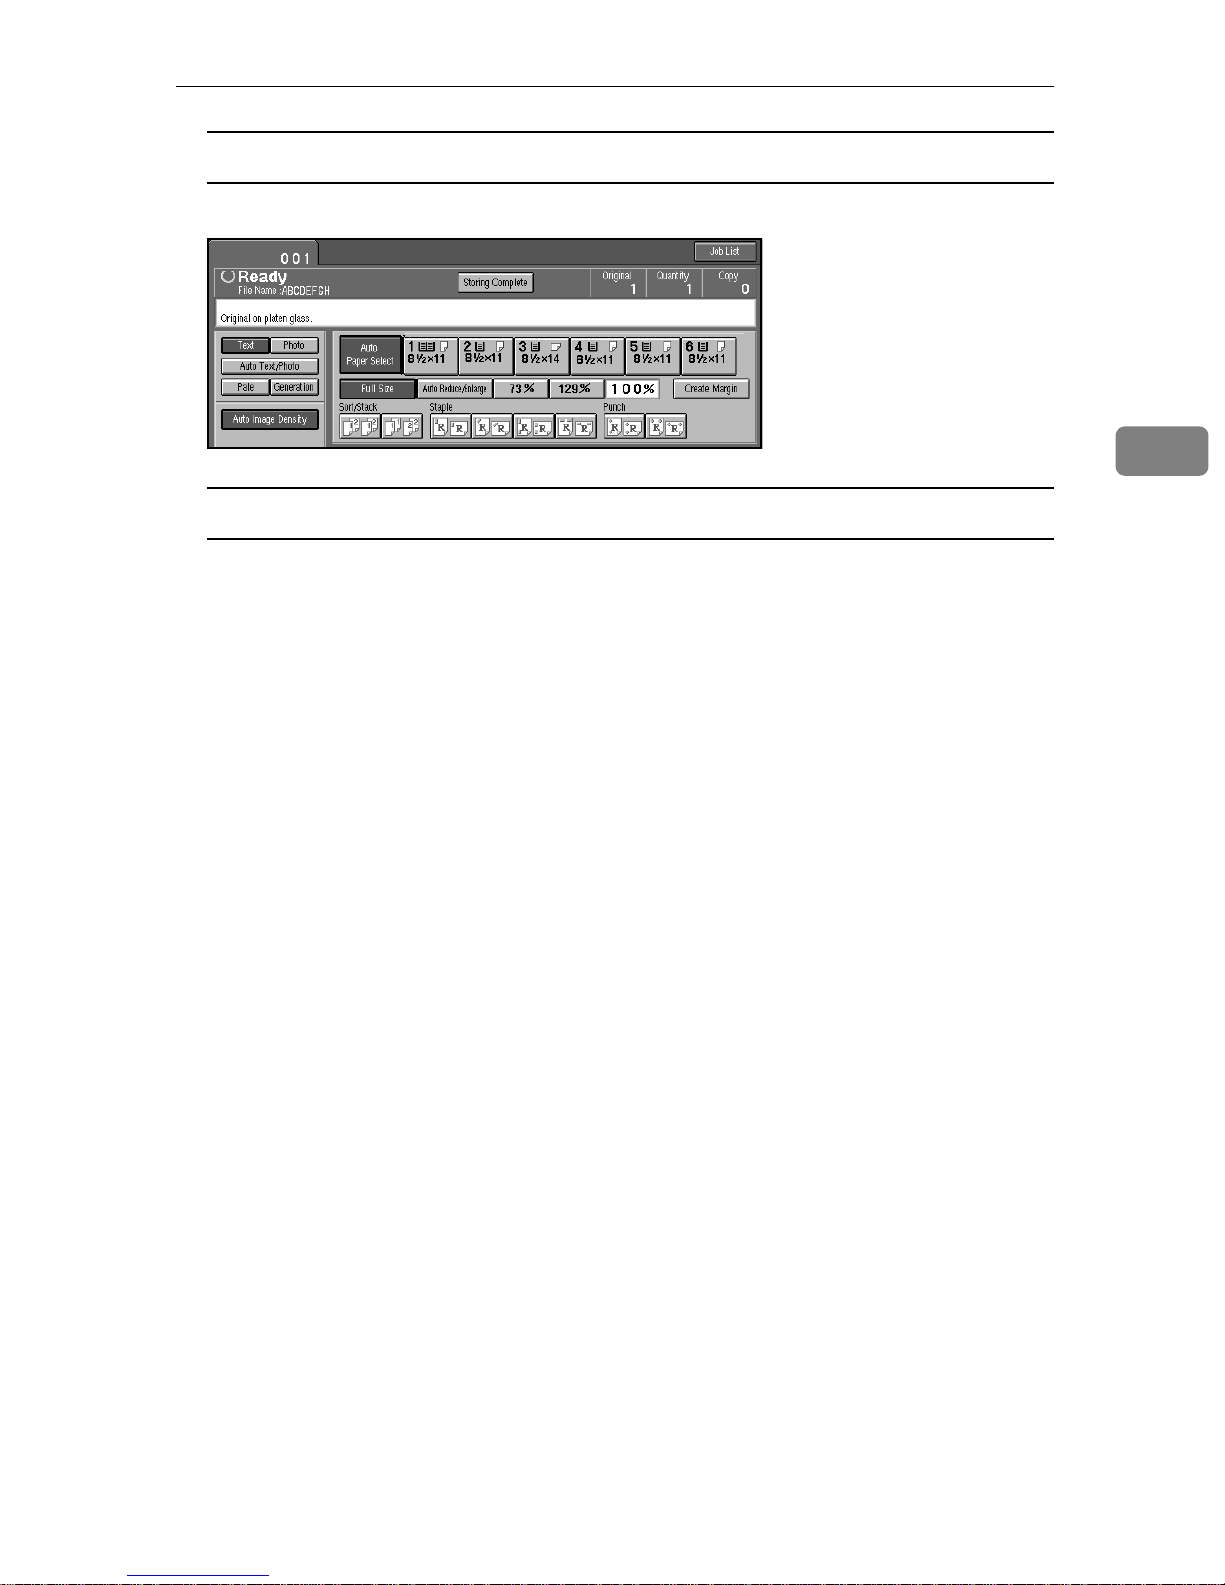
If you set the original on the exposure glass
Scanning Originals
A After scanning all pages, press the
{
Storing Complete
key.
}
If you set the original in the document feeder
A After scanning all pages, the “File List” display appears.
3
205
Page 11
Document Server
Printing Saved Documents
Preparation
If you select multiple files, the scan settings of the first selected file are used
when printing.
3
To check these settings, press the
feature .
You can print any of the documents saved in the Document Server.
Follow these steps to select a document and print it out.
A Press the
The “File List” menu appears.
{
Document Serve r
key.
}
[
Select Se t tin gs
key or use the Sample Copy
]
B Select the document you want to print.
Press the line for the document if it appears on the display.
206
Page 12
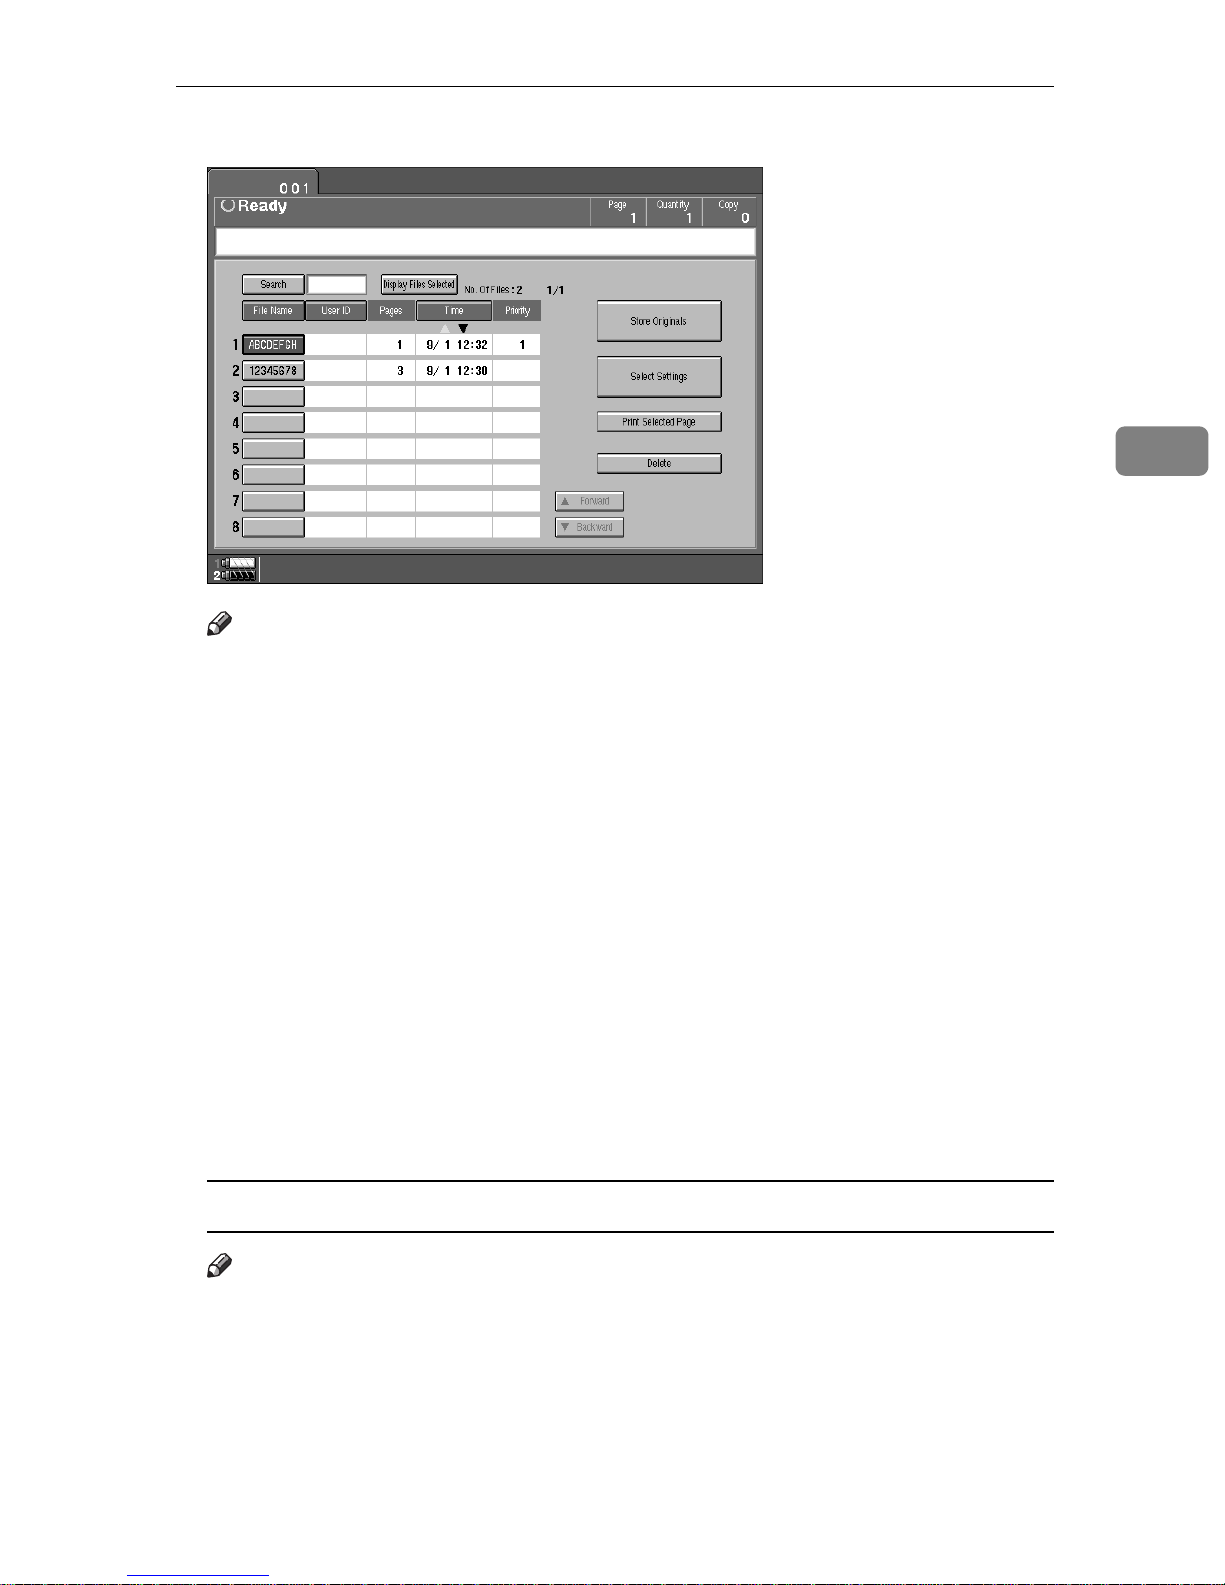
The selected line is highlighted.
Note
❒
You can select multiple files.
Printing Saved Documents
3
❒
If the file name you desire is not shown and more than 9 files are stored,
scroll through the list with the
Of Files” display shows the total number of files followed by which page
of the search results is currently shown.
❒
If you can't recognize the document by its name, you can print the first
page to check the contents. Press the line for the desired document, and
press the
❒
Press the selected line again to cancel the print job.
❒
If the “Enter Password” menu appears, enter your password using the
number keys then press the
the
[
❒
You can sort the files in alphabetical or reverse-alphabetical order. Press
the keys above the file list. See “File List Sort Priority” ⇒ P.332
Server”
❒
Press the
Clear
[
Print Selected Page
key.
]
[
Display Files Selected
T
[
Forward
key.
]
key. To delete an entered password, press
[
]
OK
key to display only the selected files.
]
and
]
U
[
Backward
keys. The “No.
]
“Document
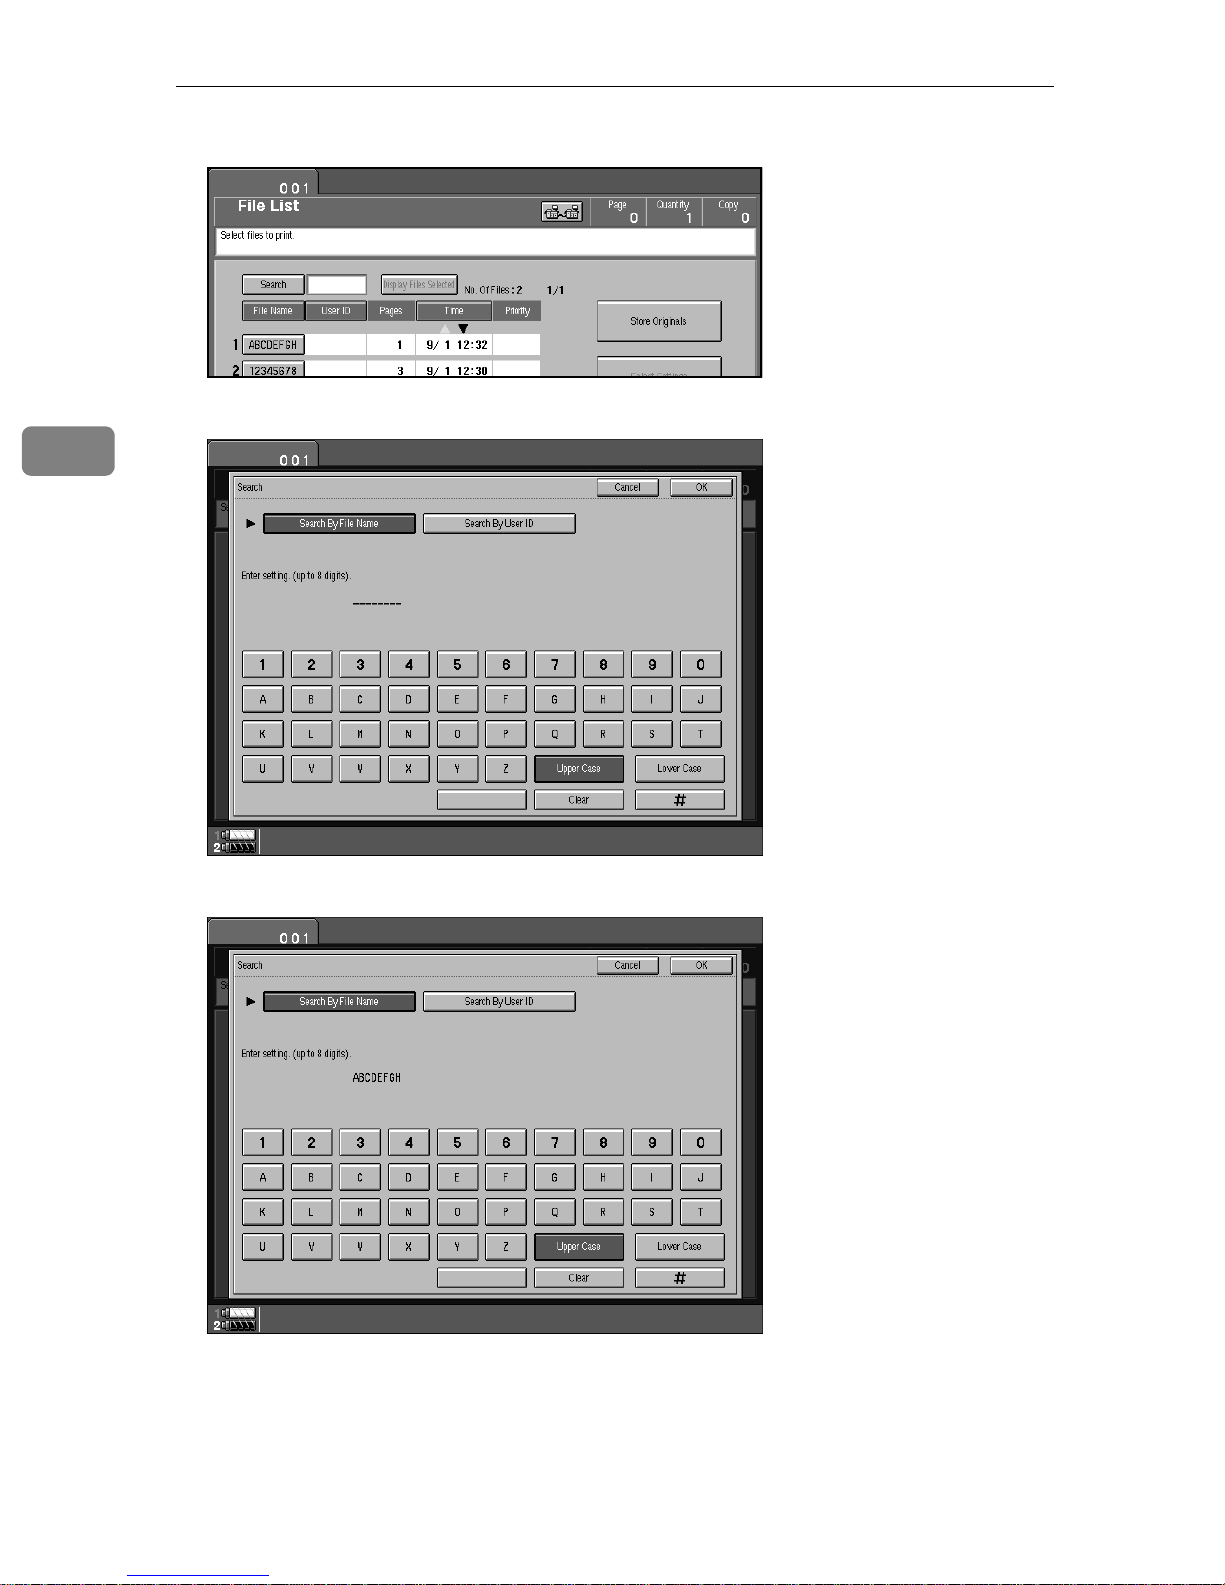
To search by file name
Note
❒
If you enter the filename (up to 8 letters), all the filenames beginning with
these letters are displayed. For example, if you enter “ABC”, then all filenames beginning with the “ABC” are displayed.
207
Page 13
Document Server
3
A Press the
B Enter the file name using the letter keys.
[
Search
key.
]
C Press the
Only the files beginning with the letters appears on the File List.
D Select the line for the document you want to print.
[
OK
key.
]
208
Page 14
When the “Enter Password” menu appears
A Enter your password using the number keys.
Note
❒
To delete an entered value, press the
the file, press the
[
Cancel
key.
]
[
Clear
Printing Saved Documents
key. To cancel selection of
]
B Press the
[
OK
key.
]
C To print more than one document, repeat step B to select the desired docu-
ments in the order you want to print them out.
The selected order is shown in the priority column next to the selected docu-
ment(s).
Note
❒
To change the print order, press the highlighted lines to deselect the files,
then select them again in the order you want to print.
❒
To cancel selection, press the
{
Clear Modes
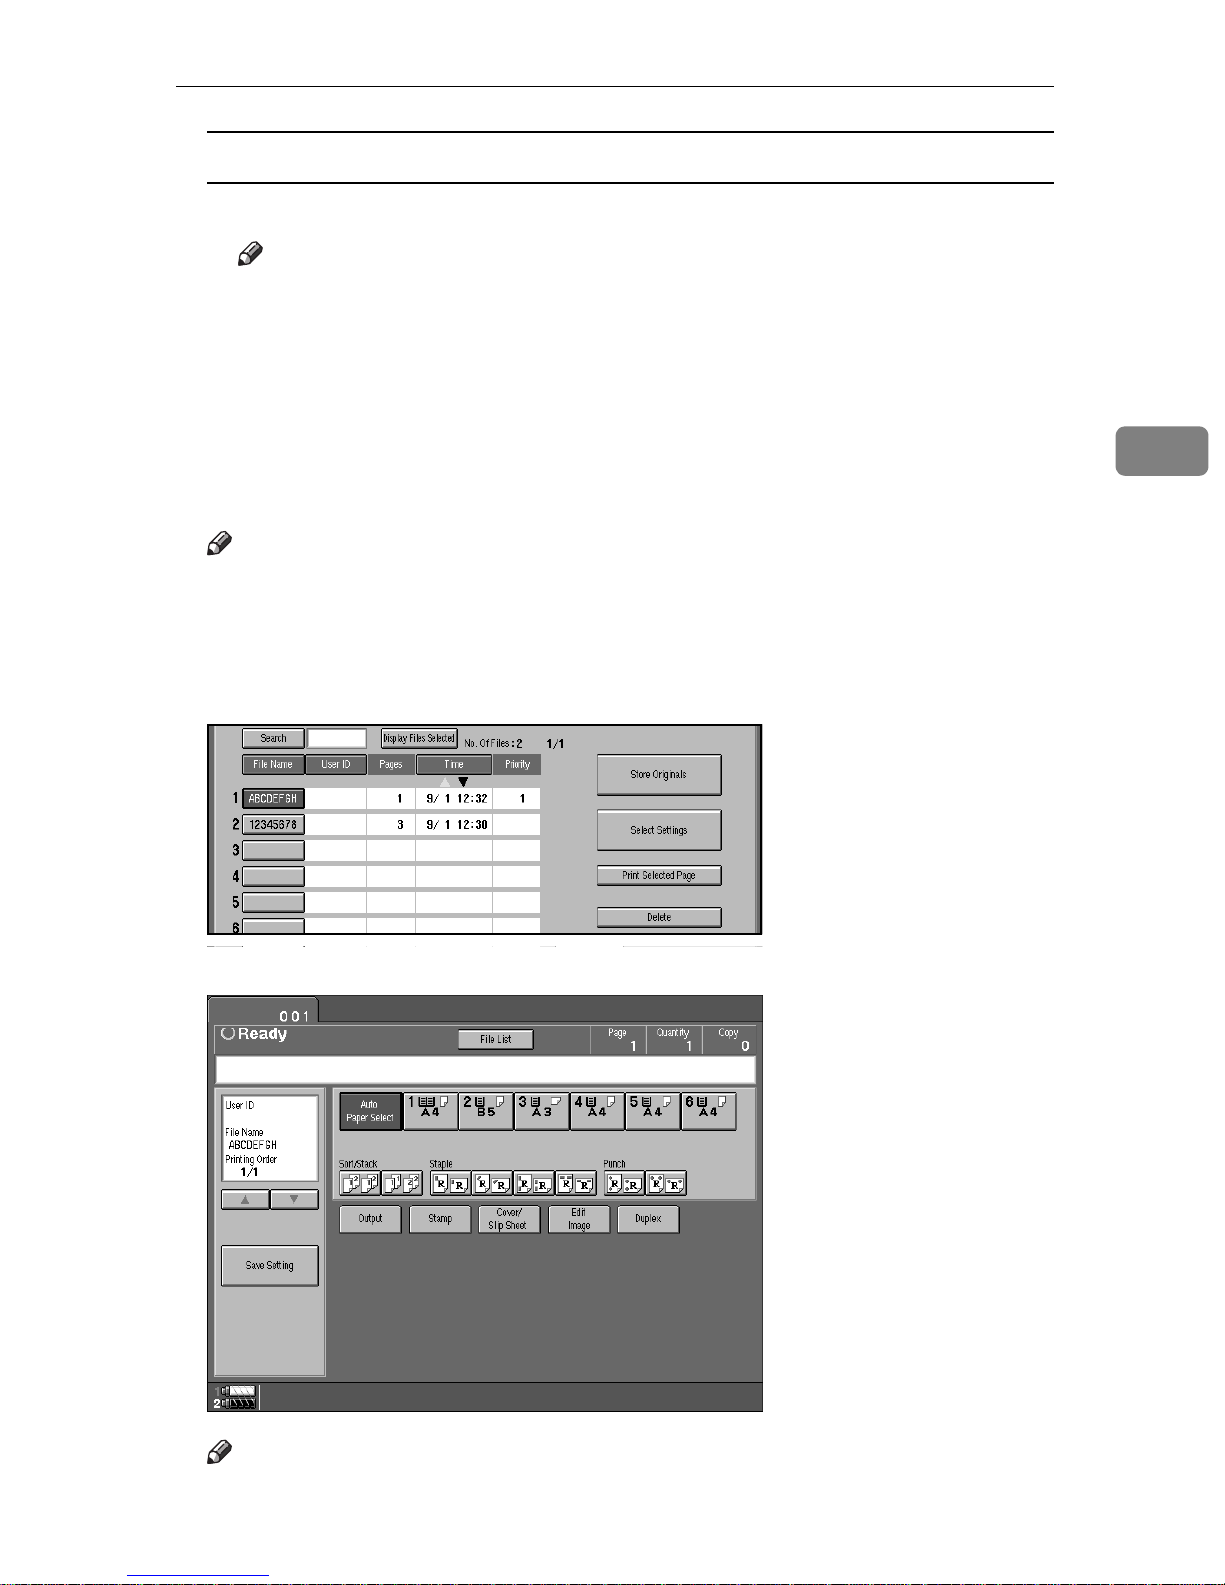
D If you need to change any of the print settings, press the
key.
}
[
Select Settings
key.
]
3
The “Set Job” menu appears.
Note
❒
To save the new settings, press the
[
Save Setting
key.
]
209
Page 15
Document Server
E Enter the required number of prints with the number keys.
Up to 9999 can be entered.
Note
❒
If you print more than one set using the Sort function, you can check the
print result by printing out only the first set ⇒ P.211
❒
To delete the entered value, press the
{
Clear
key.
}
“Sample Printing”
.
3
F Press the
The machine starts printing.
Note
❒
To pause the print job, press the
press the
printing.
❒
After the print job is completed, the “File List” menu appears.
{
Start
}
[
Print
key.
key. In the confirmation dialog,
}
{
Stop
key to resume printing or press the
]
[
Cancel
G To delete all the documents you have printed, press the
key to cancel
]
key.
[
Delete
]
210
Page 16
Printing Saved Documents
H Press the
Note
❒
If you do not want to delete the files, press the
❒
You cannot delete file that are currently begin used by other functions.
[
Delete
key.
]
[
Do Not Delete
key.
]
3
Sample Printing
If you print multiple sets using the Sort function, you can check if the print order
or the print settings are correct by printing out only the first set using the
key.
}
Copy
Limitation
❒
Sample Printing can be done only when you are using the Sort function.
A Press the
{
Sample Copy
key.
}
{
Sample
211
Page 17
Document Server
3
After the first set is printed out, press the
print job. Press the
where you can adjust the settings.
[
Cancel
key to cancel it and return to the “Set Job” menu
]
[
key to print the rest of the
]
Print
Print Selected Page
You can print the first page or the selected page of the document selected in the
“File List” menu to check the contents.
1st Page
You can print just the first page of the document to check the contents.
A Select the desired document(s), and press the
key.
}
key.
]
B Press the
C Press the
The first page is printed.
[
1st Page
{
Start
[
Print Selected Page
key.
]
Print Selected Page
You can print the specified page of the document to check the contents.
Limitation
❒
If the several documents are selected, you can not use the Print Selected Page
function.
A Select the desired document(s), and press the
B Press the
[
Selected Page
key.
]
[
Print Selected Page
key.
]
C Enter the first page number to be printed.
D Press the
E Press the
The first page is printed.
[∼]
{
Start
key.
key.
}
F Enter the last page number to be printed.
212
Page 18
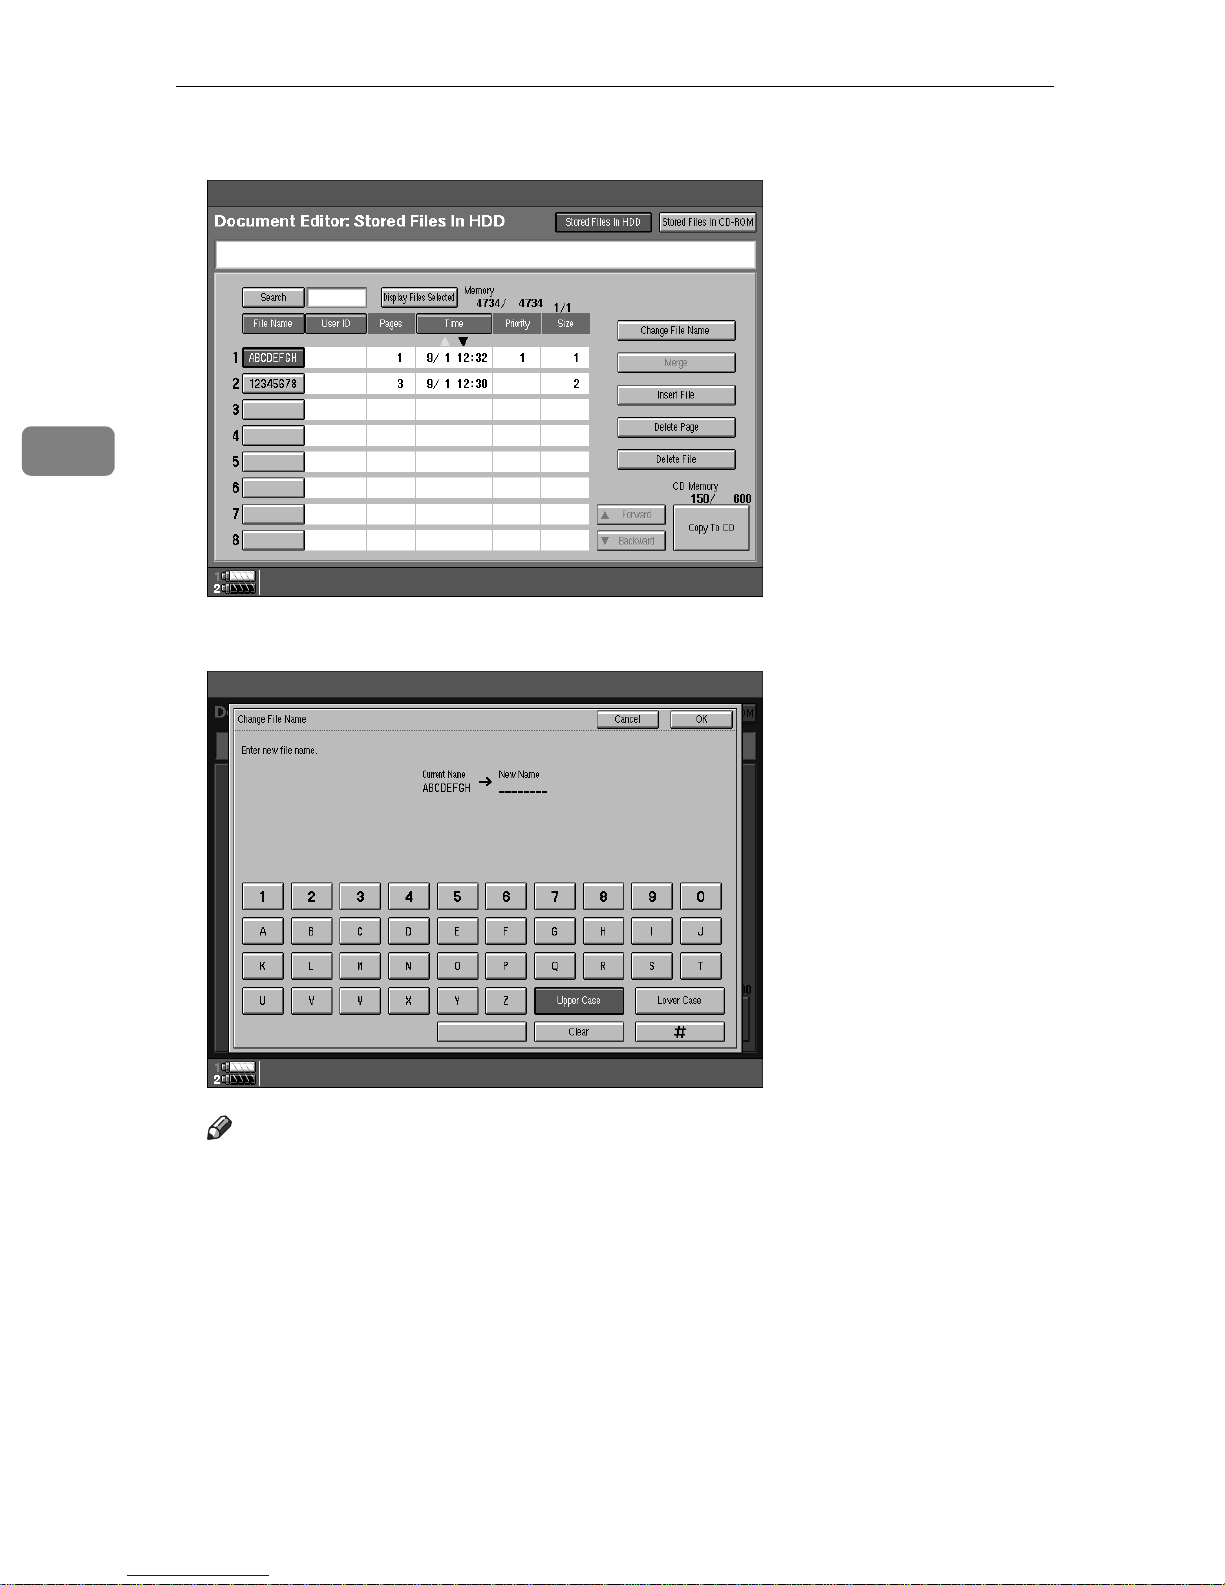
Changing File Names
Changing File Names
Follow these steps to edit the filenames of documents stored in the Document
Server.
Note
❒
You can register a file name identical to an existing file name. It is not over-
written.
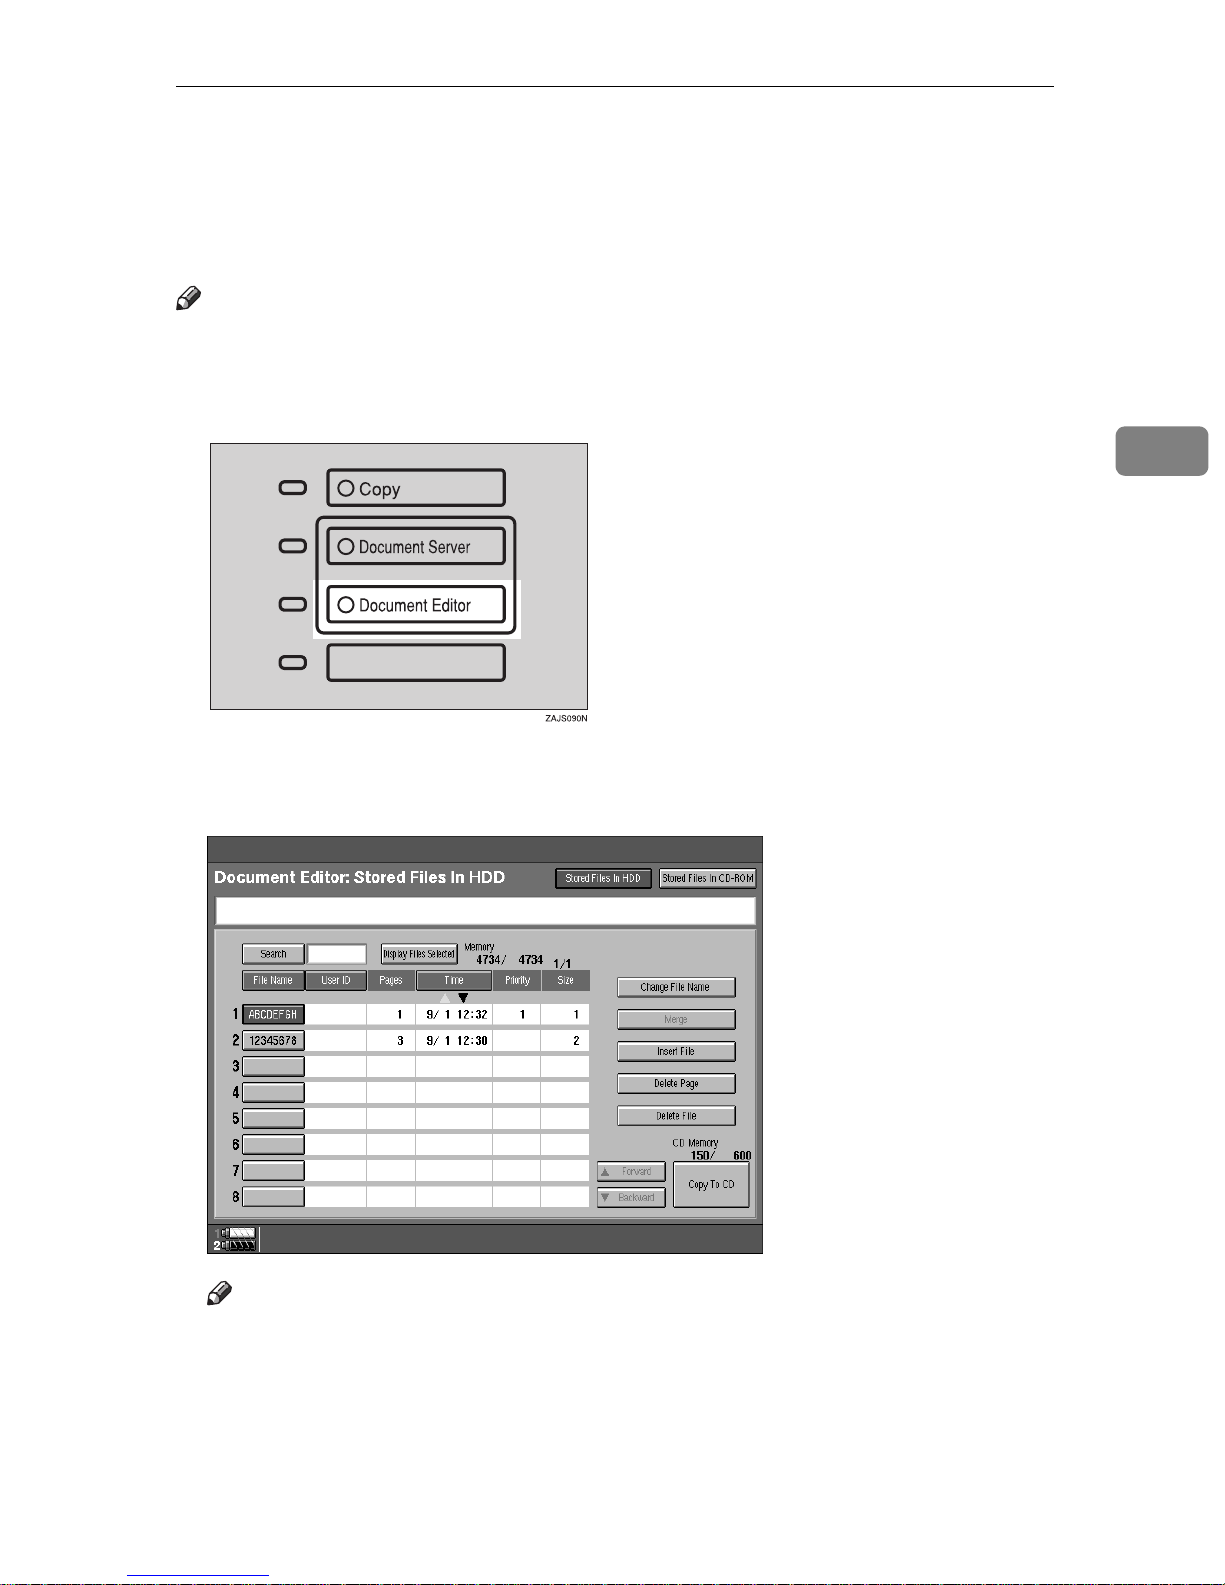
A Press the
{
Document Editor
key.
}
B Press the line showing the document you want to change the file name of.
The selected line is highlighted.
3
Note
❒
If you stored a password, enter the password using the letter keys on the
display panel. Then press the
menu appears”
.
key ⇒ P.209
[
]
OK
“When the “Enter Password”
213
Page 19
Document Server
3
C Press the
[
Change File Name
key.
]
D Enter the new file name using the letter keys. Then press the
[
]
#
key.
Note
❒
To delete entered letters, press the
❒
To cancel this operation, press the
214
[
Clear
[
Cancel
key.
]
key.
]
Page 20
Changing File Names
E Press the
Note
❒
If the selected file is currently being used by another function, you cannot
change the file name.
[
OK
key.
]
3
215
Page 21
Document Server
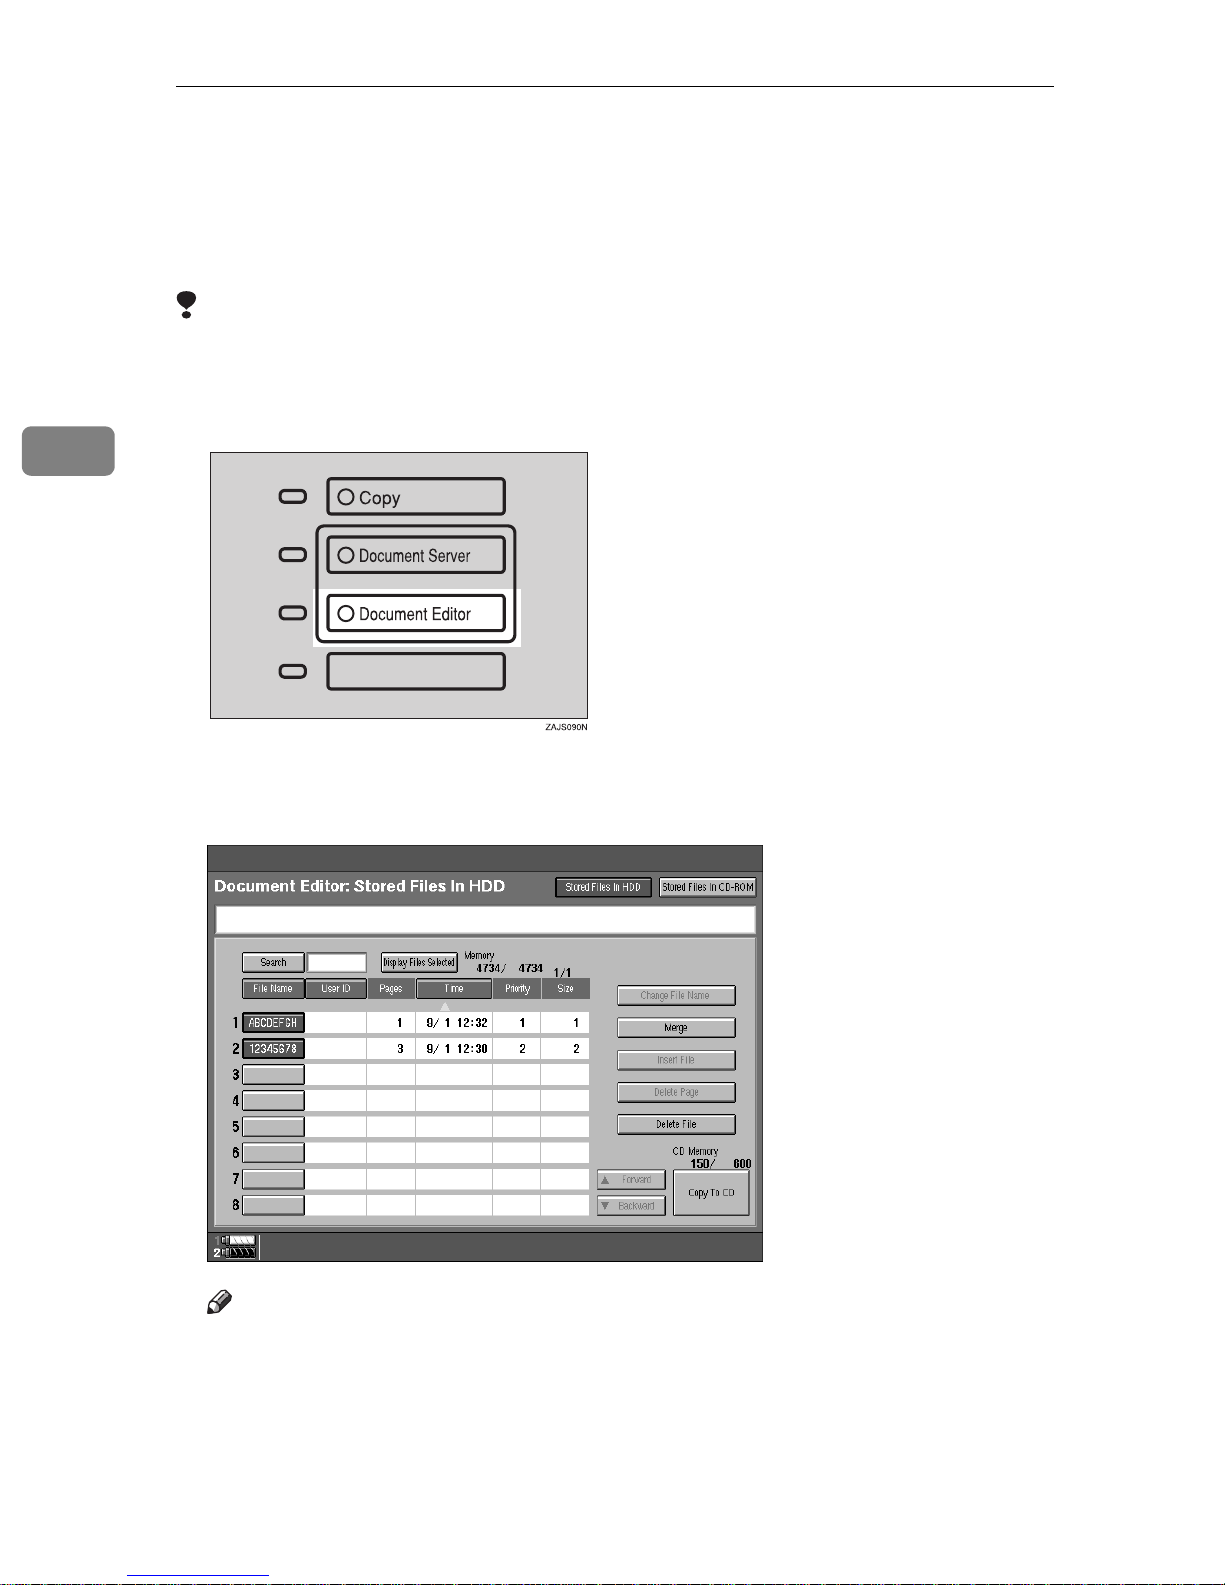
Merging Documents
You can merge the two or more stored documents.
Follow these steps to merge the documents.
Limitation
❒
If you want to merge multiple documents, it may take a certain time. And you
cannot operate during the time.
3
A Press the
{
Document Editor
key.
}
B Press the lines showing the documents you want to merge.
Selected lines are highlighted.
Note
❒
The documents are merged in the order you select them.
❒
The scan settings of the document you select first are applied to the merged
documents.
216
Page 22

Merging Documents
C Press the
[
Merge
key.
]
D Enter the new file name using the letter keys.
Note
❒
If you do not wish to register a file name, go to step E.
❒
If you do not register a new file name, the filename of the document selected first is stored automatically.
To change the file name
A Press the
[
Change
key.
]
3
B Enter the file name using the letter keys.
217
Page 23

Document Server
Note
❒
You can enter up to 8 letters.
❒
To change the letter entered, press the
ter.
[
Clear
key and enter the new let-
]
3
C Press the
E Press the
Note
❒
To cancel merging, press the
❒
You cannot recover the original two files from the merged file.
❒
You cannot merge documents that are correctly being used by another
function.
[
OK
[
]
#
key.
]
key.
[
Cancel
key.
]
218
Page 24
Inserting Files
You can insert a file into files already stored in the Document Server.
Follow these steps to insert your file.
Inserting Files
A Press the
{
Document Editor
key.
}
B Press the line showing the document to be inserted in.
The selected line is highlighted.
3
C Press the
[
Insert File
key.
]
219
Page 25

3
Document Server
D Select the file you want to insert into.
E Enter the page number to insert the file using number keys.
Note
❒
To change the entered number, press the
220
[
Clear
key.
]
Page 26

Inserting Files
F Press the
G Press the
Note
❒
To cancel insertion of the file, press the
[
Before The Specified Page
key.
]
[
OK
or
]
[
Following The Specified Page
[
Cancel
key.
]
key.
]
3
❒
You cannot recover the original file from the new file.
❒
You cannot insert files into a file that is currently being used by another
function.
221
Page 27

Document Server
Deleting Pages
Follow these steps to delete pages from a file stored on the Document Server.
Preparation
To check on the page numbers print the file. See⇒ P.206
uments”
“Printing Saved Doc-
3
A Press the
{
Document Editor
key.
}
B Press the line showing the document containing the pages you want to de-
lete.
The selected line is highlighted.
222
Page 28

Deleting Pages
C Press the
[
Delete Page
key.
]
D Enter the page number you want to delete using the number keys.
3
Note
❒
To stop deleting pages, press the
[
Exit
key.
]
223
Page 29

Document Server
3
E If you want to delete a series of pages, press the
page number you want to delete.
Note
❒
If you want to only 1 page, go to step F.
key. Then enter the last
[∼]
❒
If you enter the last page number, the file is deleted.
F Press the
[
Delete
key.
]
224
Page 30

Deleting Pages
G Press the
Note
❒
To cancel the delete operation, press the
❒
You cannot restore deleted pages.
[
Yes
key.
]
[
No
key.
]
3
❒
You cannot delete pages from a file that is currently being used by another
function.
225
Page 31

3
Document Server
Deleting Saved Documents
This chapter describes how to delete saved documents.
Important
❒
You can save up to 250 documents on the Document Server. No more docu-
ments can be saved when there are 250 documents stored so you should de-
lete any unnecessary documents.
❒
You can delete each document from the HDD automatically after a certain
times. To turn this feature on, See ⇒ P.332
Note
❒
You can delete all the saved documents in one operation. See ⇒ P.332
ment Server”
Follow these steps to delete saved documents.
“Document Server”
.
“Docu-
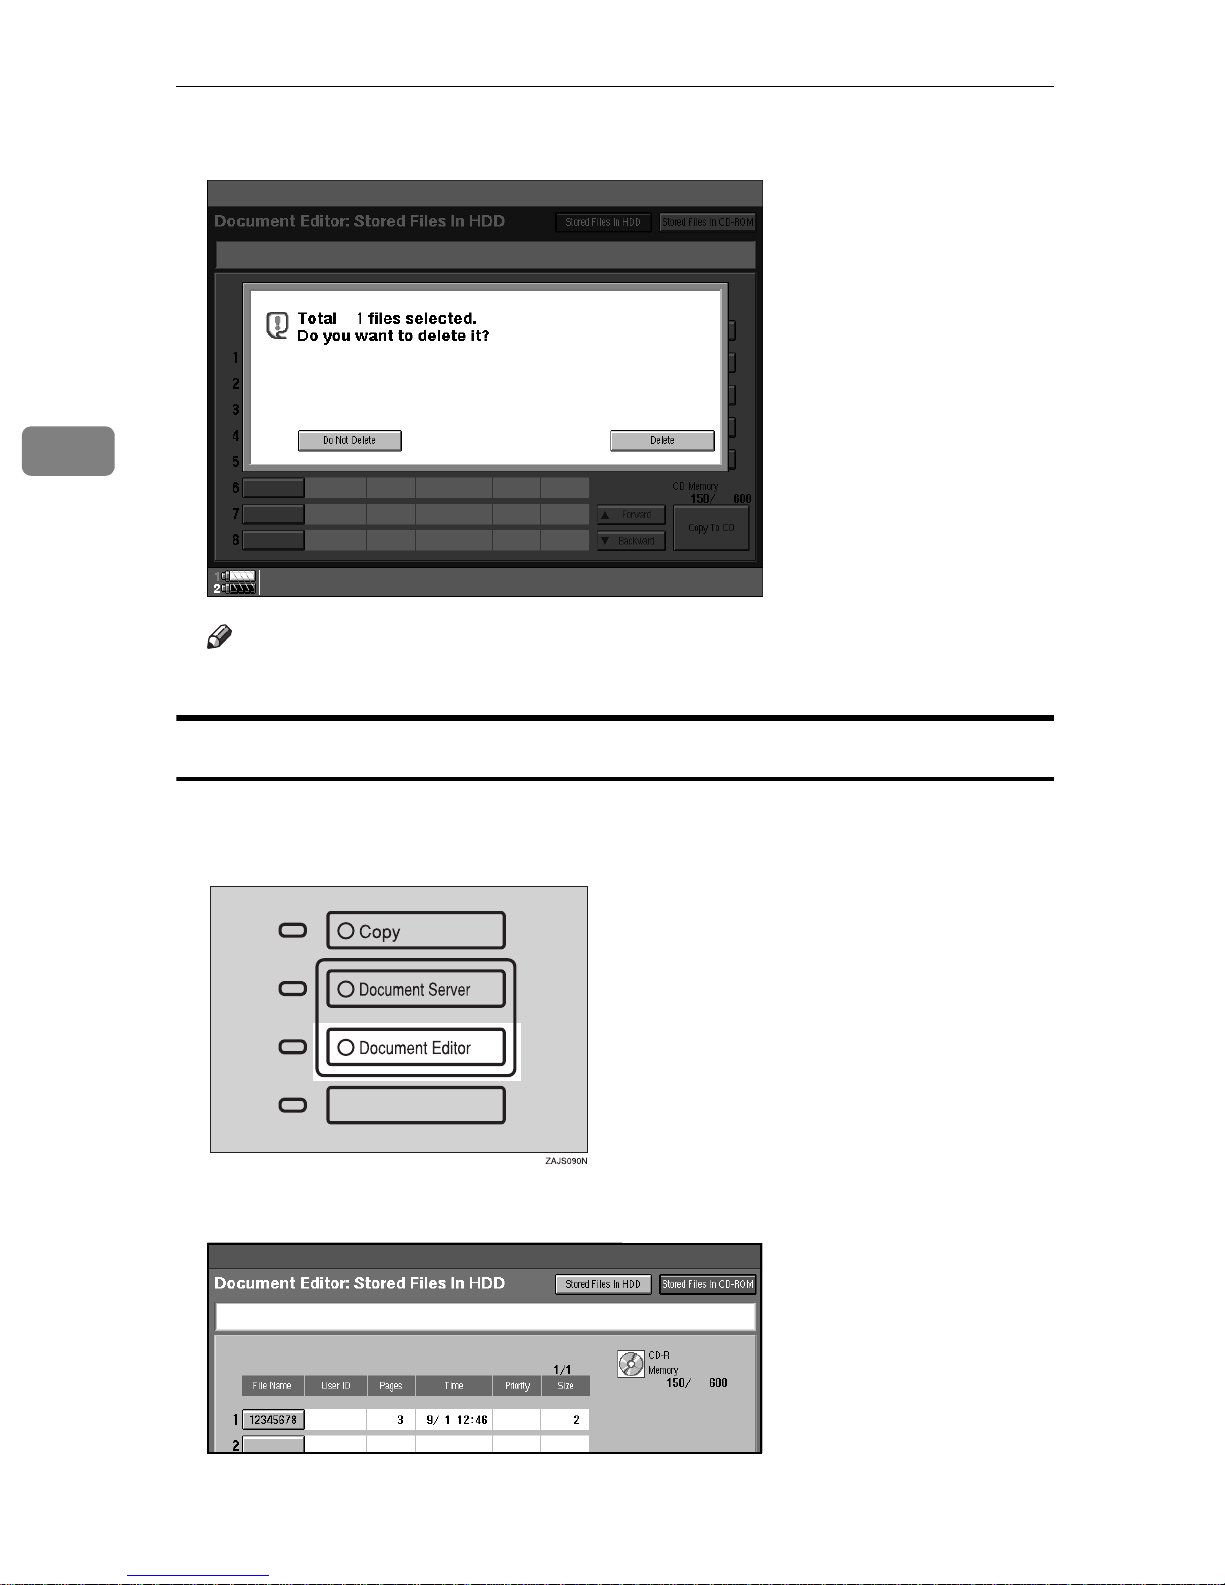
Deleting Saved Documents in HDD
A Press the
The “File List” menu appears.
{
Document Editor
key.
}
226
Page 32

Deleting Saved Documents
B Select a document you want to delete by touching the name of it.
The selected name is highlighted.
3
Note
❒
If the document name you desire is not shown in the display, scroll
through the list with the
❒
If you select a document which requires a password, the “Password” window appears. Input the password using the number keys then press the
key. If you input the wrong password, press the
]
[
OK
again. To cancel selection of a document, press the
❒
To cancel a selected document, press the highlighted line again.
U
[
Forward
or
]
T
[
Backward
keys.
]
[
Cancel
{
Clear
]
C Repeat step B if you want to select more than one document.
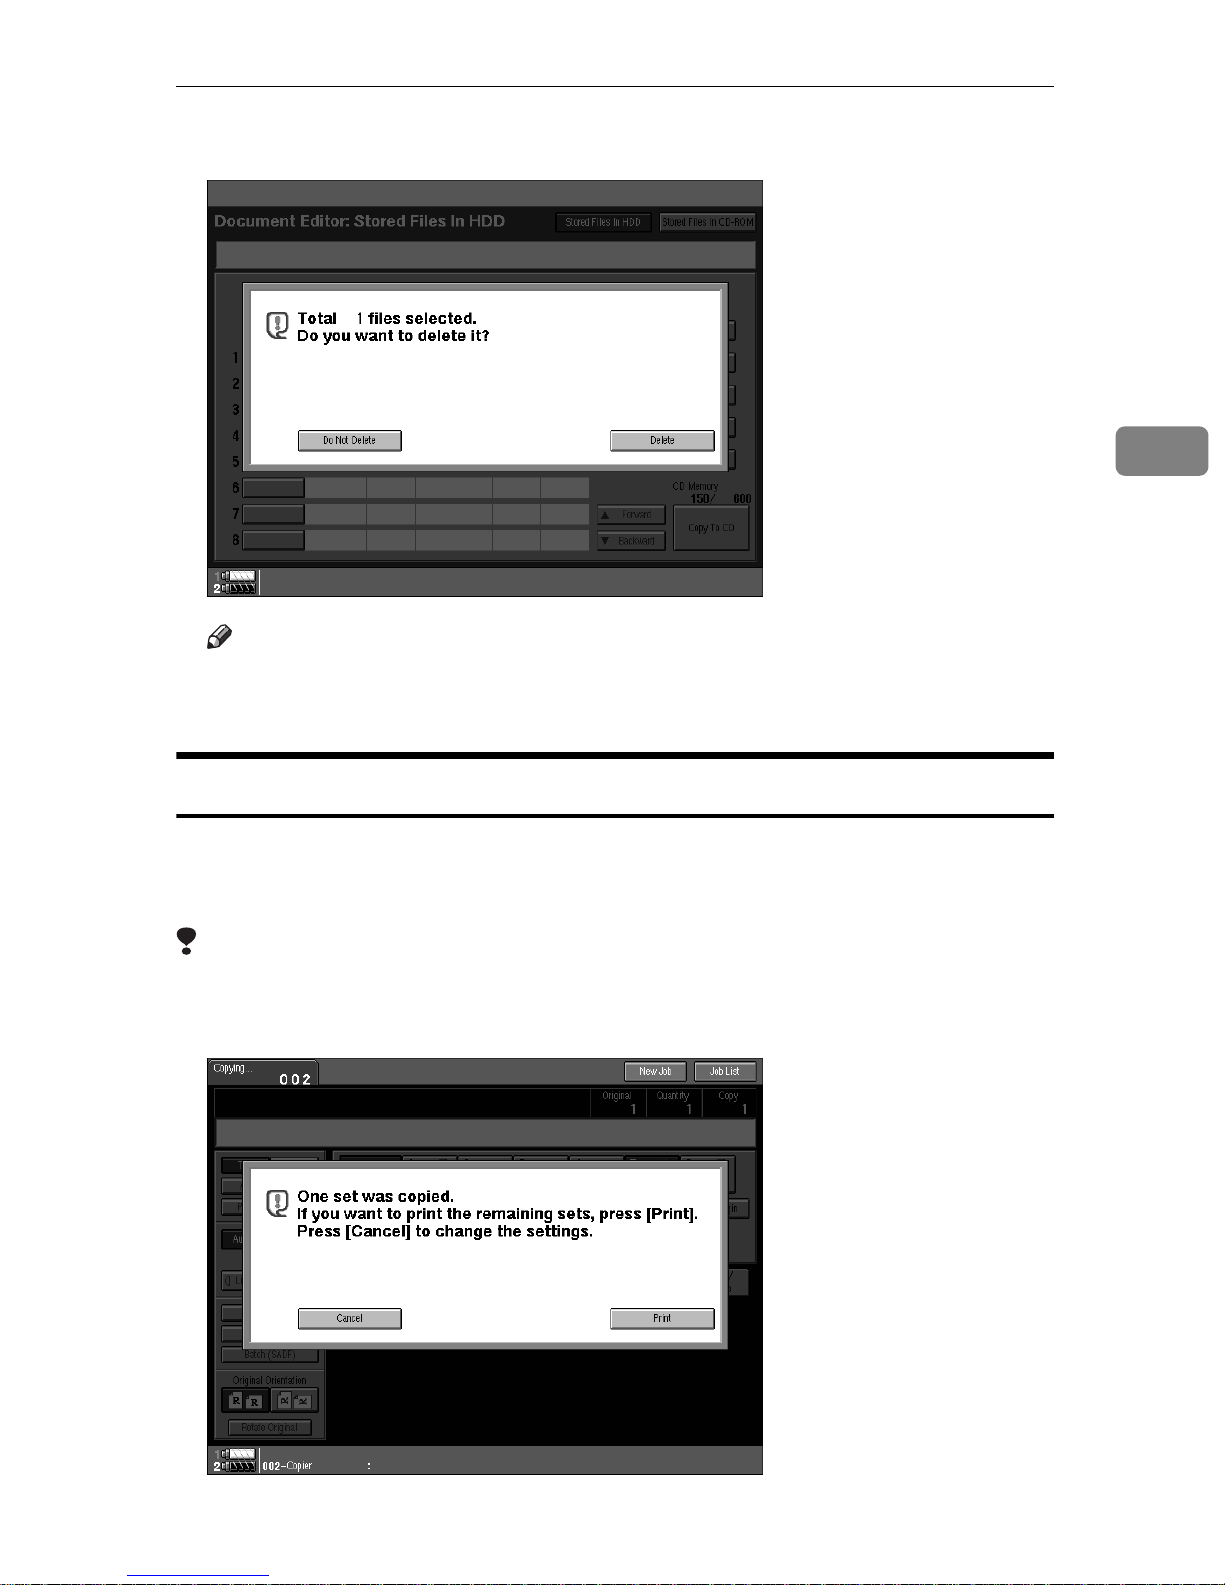
D Press the
[
Delete File
key.
]
key and try
}
key.
A confirmation dialog appears.
227
Page 33
Document Server
3
E Press the
Note
❒
You cannot delete files that are currently being used by other functions.
[
Delete
key to delete the document(s).
]
Deleting Saved Documents on the CD-ROM
A Press the
The "File List" menu appears.
B Press the
{
Document Editor
[
Stored Files in CD-ROM
key.
}
key.
]
228
Page 34

Deleting Saved Documents
C Select a document you want to delete by touching the name of it.
The selected name is highlighted.
Note
❒
If the document name you desire is not shown in the display, scroll
through the list with the
❒
If you selected a document which requires a password, the "Password"
window appears. Input the password using the number keys then press
the
try again. To cancel a selection of a document, press the highlighted line
again.
key. If you input the wrong password, press the
[
]
OK
U
[
Forward
or
]
T
[
Backward
keys.
]
{
Clear
key and
}
3
D Repeat step C if you want to select more than one document.
E Press the
A confirmation dialog appears.
[
Delete File
key.
]
229
Page 35

Document Server
3
F Press the
Note
❒
You cannot delete files that are currently being used by other functions.
[
Delete
key to delete the document(s).
]
230
Page 36

Moving/Copying Files
Moving/Copying Files
To use this function, the optional CD-R/RW is required.
This section describes how to move files from the HDD to the CD-ROM and
vice-versa.
Preparation
Make sure the CD-R/RW power is turned on.
Make sure the CD-R/RW disk is set in the CD-R/RW.
Make sure an unformatted CD-R/RW disk, or a disk previously used with
this machine is inserted in the CD-R/RW.
This equipment can be installed with an optional CD-R/RW. However, it is prohibited
by copyright law to store or make copies of such works as books, paintings or photographs as digital data or to make copies of CD-R/RW using the CD-R/RW except
when you are allowed to do so for personal use only by law or by the owner of the
copyright.
Important
❒
Do not turn the main machine power or CD-R/RW power off when the Doc-
ument Editor indicator is lit or data might be lost.
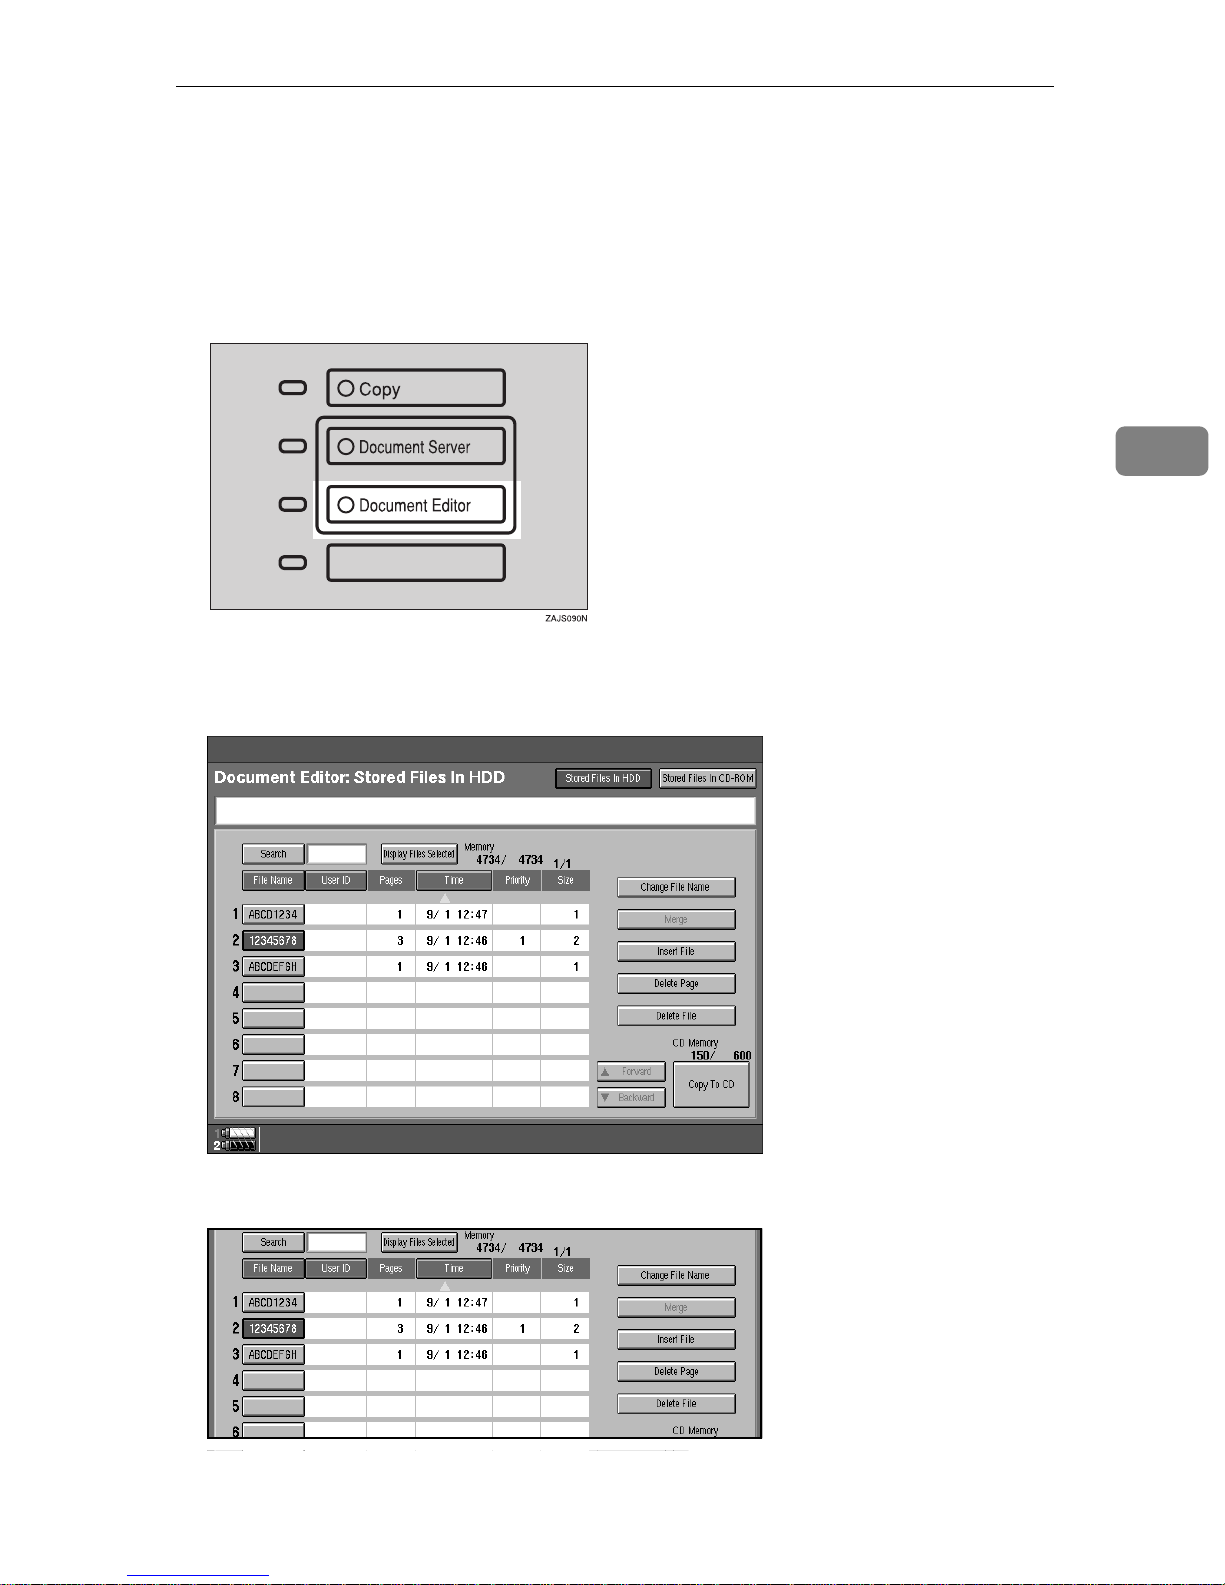
Moving/Copying files from HDD to CD-ROM
A Press the
{
Document Editor
key.
}
3
231
Page 37

Document Server
3
B Press the
[
Stored Files In HDD
key.
]
C Select the file you want to move or copy.
Note
❒
If the file size is larger than free space on the CD-ROM, you cannot move
or copy this file.
232
Page 38

Moving/Copying Files
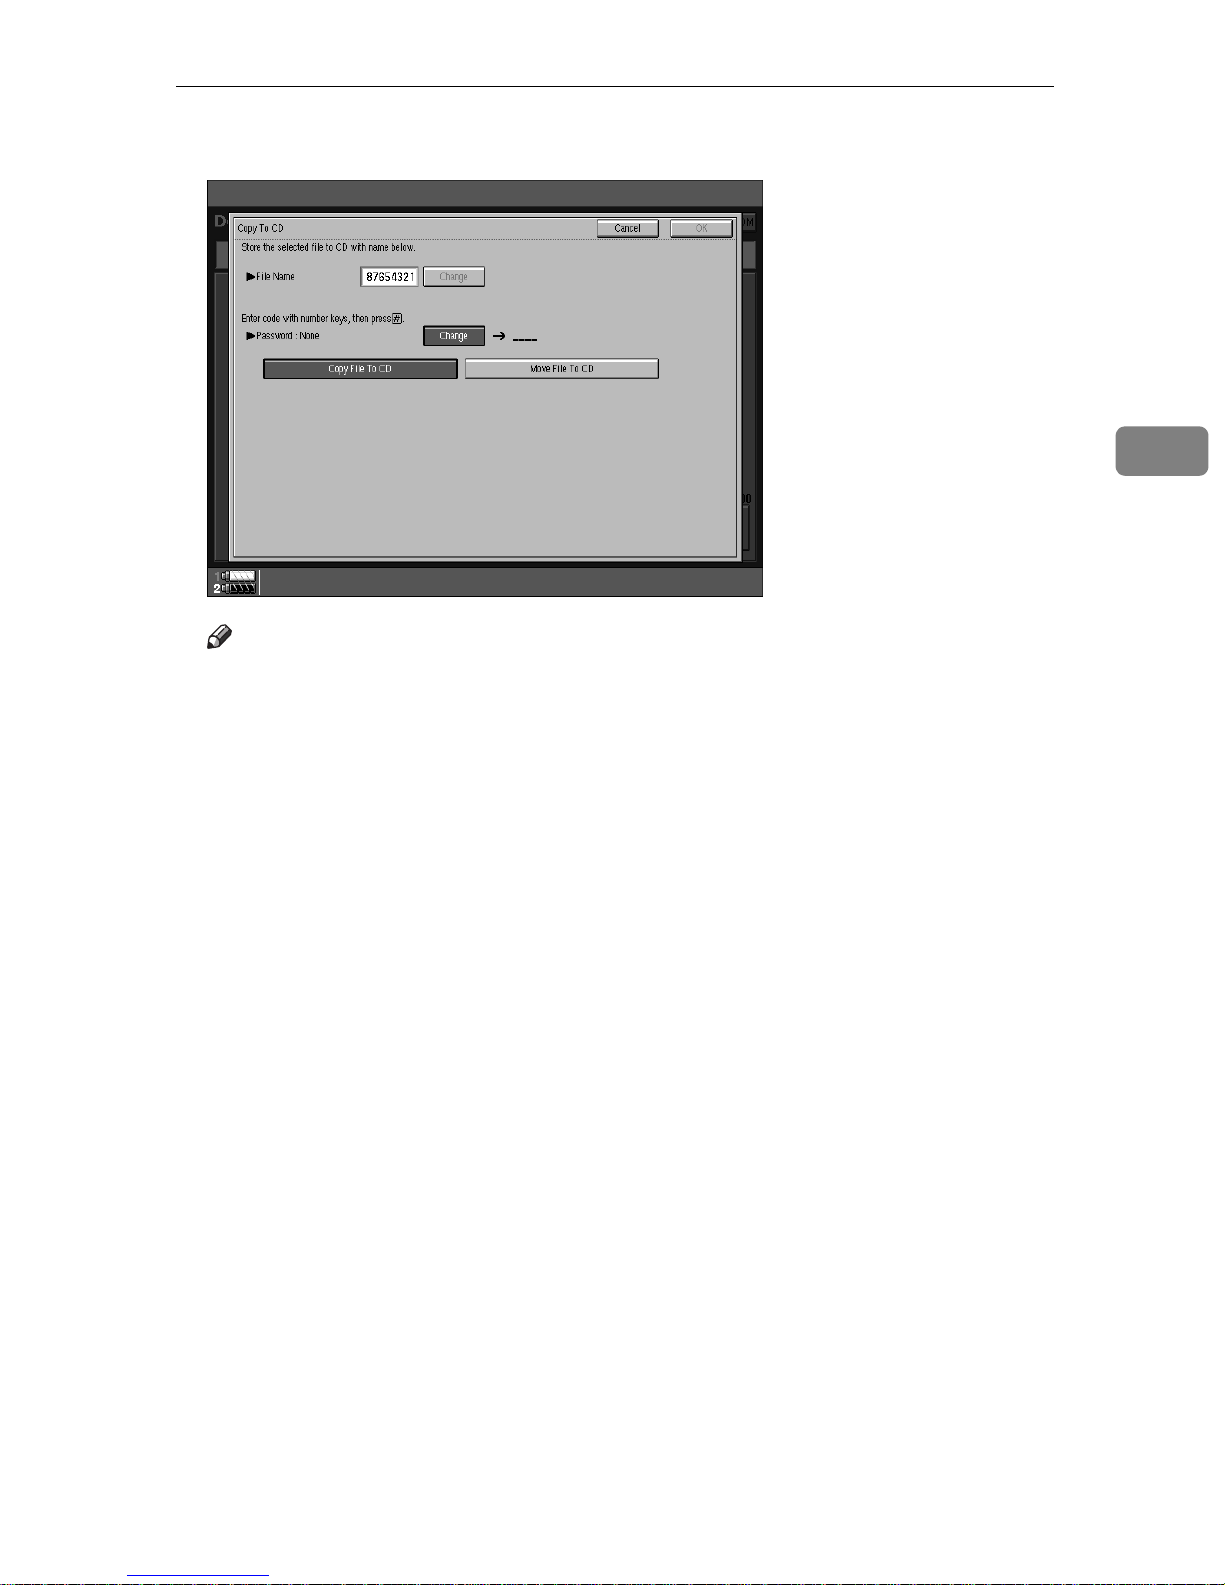
D Press the
[
Stored Files In CD-ROM
key.
]
E Enter the new file name using the letter keys.
Note
❒
If you do not wish to register a file name, go to step F.
3
To set the file name
A Press the
B Enter the file name using the letter keys on the display panel.
Note
❒
You can enter up to 8 letters.
[
Change
key.
]
❒
To change the letter entered, press the
❒
To cancel this operation, press the
C Press the
[
#
key.
]
[
Clear
[
Cancel
key and enter a new letter.
]
key.
]
233
Page 39

Document Server
F Enter your password using the number keys.
Note
❒
If you do not wish to change the password, go to step G.
To set the password
3
A Press the
B Enter your password using the number keys.
Note
❒
To delete an entered value, press the
[
Change
key.
]
{
Clear
key.
}
C Press the
G Press the
key.
{
}
#
[
Copy File To CD
or
]
[
Move File To CD
key.
]
234
Page 40

Moving/Copying Files
H Press the
Note
❒
To cancel this operation, press the
❒
You cannot move or copy files that are currently being used by other functions.
[
OK
key.
]
[
Stop
key.
]
3
Moving/Copying files from CD-ROM to HDD
A Press the
{
Document Editor
key.
}
235
Page 41

Document Server
3
B Press the
[
Stored Files In CD-ROM
key.
]
C Select the file you want to move or copy.
Note
❒
If the file size is larger than the free space on the HDD, you cannot move
or copy this file.
❒
If a document is being stored during the move or copy operation and the
HDD or CD-ROM runs out of space, the move or copy may not be successful.
236
Page 42

Moving/Copying Files
D Press the
[
Stored Files In HDD
key.
]
E Enter the new file name using the letter keys.
Note
❒
If you do not wish to register a file name, go to step F.
3
To set the file name
A Press the
B Enter the file name using the letter keys on the display panel.
Note
❒
You can enter up to 8 letters.
[
Change
key.
]
❒
To change the letter entered, press the
ter.
C Press the
[
#
key.
]
[
Clear
key and enter the new let-
]
237
Page 43

Document Server
F Enter your password using the number keys.
Note
❒
If you do not wish to change the password, go to step G.
To set the password
3
A Press the
B Enter your password using the number keys.
Note
❒
To delete an entered value, press the
[
Change
key.
]
{
Clear
key.
}
C Press the
G Press the
key.
{
}
#
[
Copy File To CD
or
]
[
Move File To CD
key.
]
238
Page 44

Moving/Copying Files
H Press the
Note
❒
To cancel this operation, press the
[
OK
key.
]
[
Stop
key.
]
3
❒
You cannot move or copy files that are currently in use by other functions.
239
Page 45

3
Document Server
240
Page 46

4. Connect Copy (Option)
What is Connect Copy?
Connect Copy is a feature that allows you to connect two machines using a cable.
When you set up your copy job on one machine (the master unit), data is transferred to the other machine (the sub-unit) so that copies can be made on both machines simultaneously.
Connect copy benefits
Connect Copy provides the following benefits:
❖
High-speed copying for greater productivity
For large volume copy runs, two connected machines form a single system that
can complete the job in a shorter time. If two 85 copies/minute (A4K, 8
1
11"K) machines are connected, a 170 copies/minute (A4K, 8
/2" × 11"K)
speed will be available.
Type 1
Type 1
Type 2 Type 2 210 copies/minute (A4K,
*1
*2
*1
Type 1: 85 copies/minute (A4K, 81/2" × 11"K) machine
Type 2: 105 copies/minute (A4K, 81/2" × 11"K) machine
Type 1 170 copies/minute (A4K,
1
8
/2" × 11"K)
Type 2
*2
190 copies/minute (A4K,
1
8
/2" × 11"K)
1
8
/2" × 11"K)
1
/2"
×
241
Page 47

Connect Copy (Option)
❖
Auto-backup system for less participation of operators
Even if one machine stops because of a paper jam, it has run out of toner, or
run out of paper, the other machine will take over and finish the job automat-
ically. If the stopped machine is recovered, the machines will allocate the job
again and continue using Connect Copy to complete the job in a way that re-
sults in maximum productivity.
Note
❒
You cannot make other copy jobs when the two machines are connected.
❒
The two machines automatically share the job for maximum productivity.
4
❒
❒
To use the two machines separately, press the
them.
key is described
[
Connect
key in this manual.
]
[
Connect
key to disconnect
]
242
Page 48
How Connect Copy Works
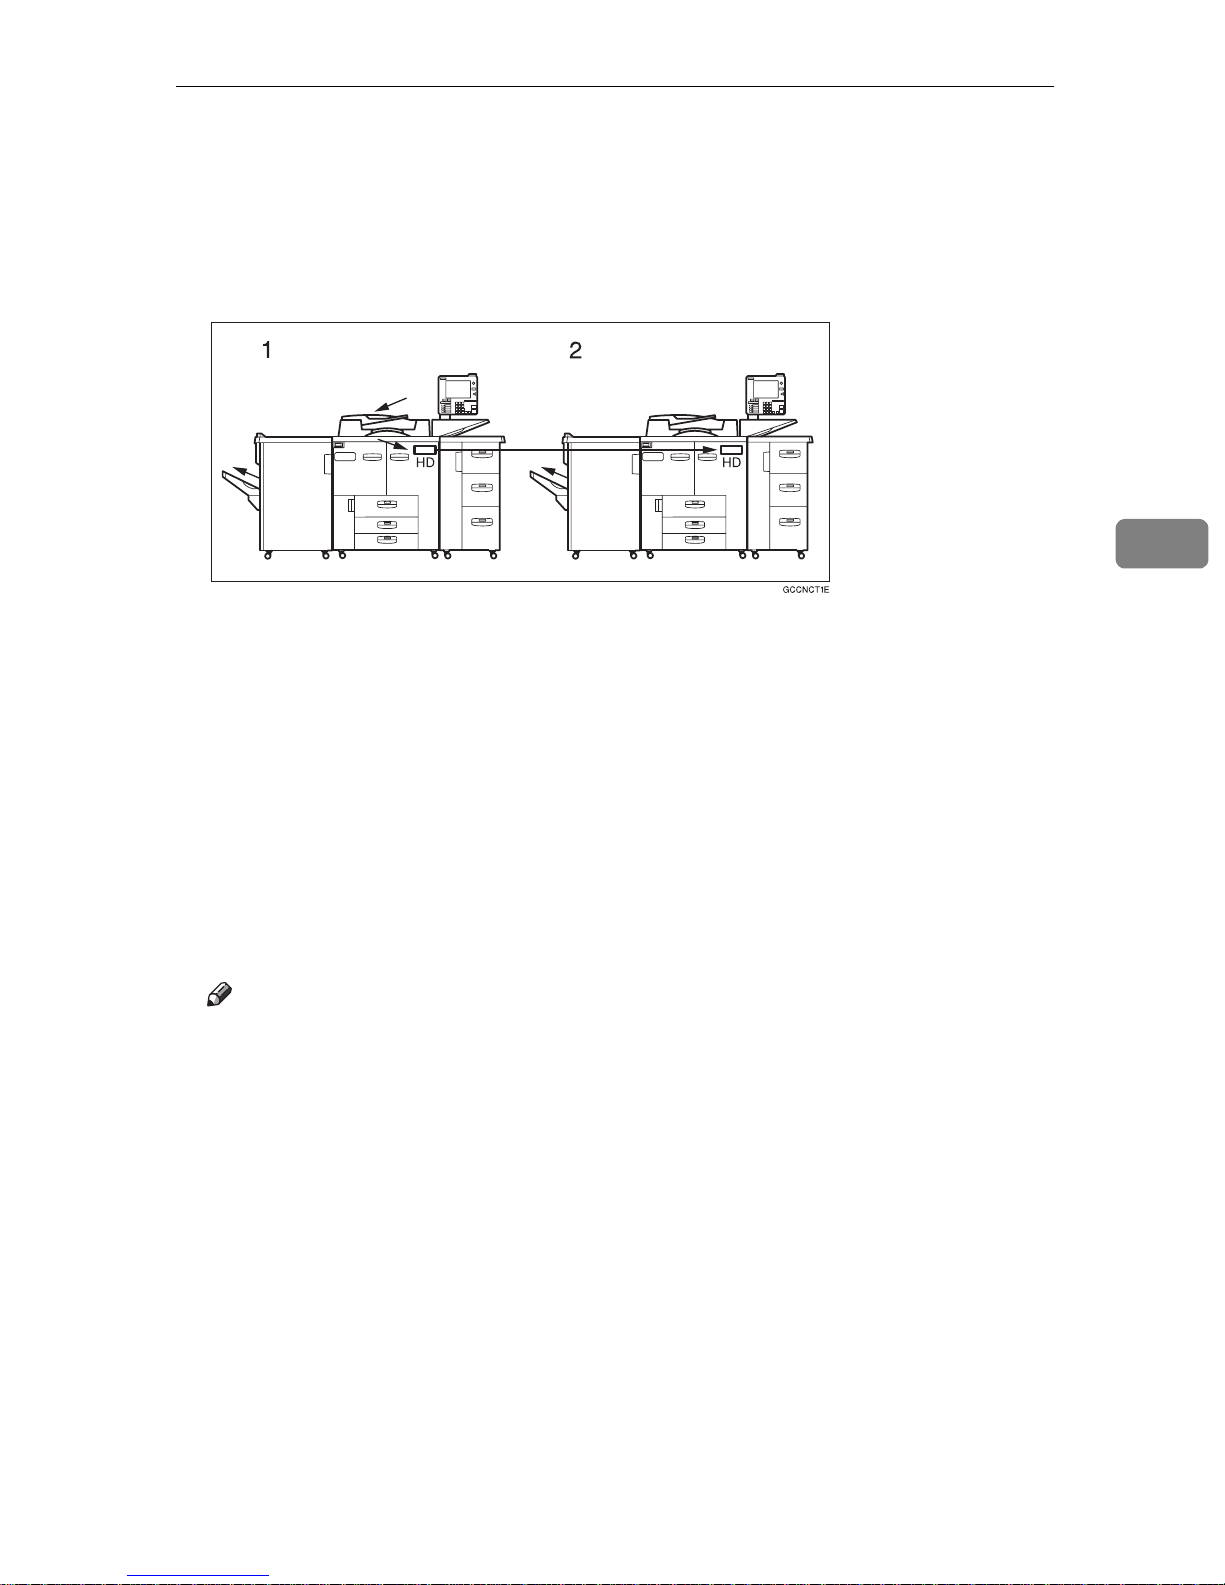
How Connect Copy Works
In this manual we refer to the two machines as the master unit and sub-unit respectively.
1. Master unit
4
2. Sub-unit
❖
Copy
As your original is scanned, the image data is stored on the master unit hard
disk and transferred simultaneously to the sub-unit hard disk. As soon as
scanning has finished, copying starts.
❖
Copy Server
The master unit transfers the image data stored in the hard disk to the sub-
unit hard disk.
As soon as transferal has completed, copying starts.
Note
❒
Transfer of image data may take some time.
The master unit is the machine at which you press the
Connect Copy mode. When you do this, the other machine becomes the subunit. You can use either machine as the master unit or sub-unit, but you cannot change the relationship without exiting Connect Copy mode first.
[
Connect
key to enter
]
243
Page 49

Connect Copy (Option)
Connectable Copier Models
• The master unit and sub-unit do not have to be the same speed models.
Master-unit Sab-unit
4
Type 1
Type 1
Type 2 Type 1
Type 2 Type 2
*1
*2
*1
Type 1: 85 copies/minute (A4K, 81/2" × 11"K) model
Type 2: 105 copies/minute (A4K, 81/2" × 11"K) model
Type 1
Type 2
*2
• You can still use Connect Copy even if no optional large capacity tray (LCT)
is available. However, the optional finisher must be installed in both units in
order to use Staple functions, and the punch kit must be installed in both units
in order to use the Punch function.
Functions Not Available with Connect Copy
The following functions are not available in Connect Copy mode:
• Job Preset
Interrupt Functions
• You cannot use Connect Copy when a job has been paused using the Interrupt function.
• You can use the Interrupt function on the sub-unit while in Connect Copy
mode, but only when the master unit is not scanning originals.
• You cannot use other functions in Connect Copy mode no matter how the
“Output Priority” of the User Tools (System Settings) is programmed.
• You cannot switch to other functions while in Connect Copy mode. To access
other functions you must exit Connect Copy mode.
• While you use other functions, you cannot use Connect Copy mode.
Before You Start
Both machines must have paper trays loaded with paper of the same size, direction and type that you wish to copy onto.
To make the most out of the Connect Copy feature, we recommend that :
• The paper tray settings of the master unit and sub-unit should match each
other.
244
Page 50

How Connect Copy Works
• The “Original Mode Level”of the User Tools (Copier/Document Server Features) settings should be the same on each unit. If they are not the same, the
copied images may differ. See ⇒ P.316
• The User Stamp settings should be the same on each unit. If they are not the
same, the copied images may differ. See “Program/Delete Stamp” .⇒ P.175
“Program/Delete User Stamp”
“Original Mode Level”
4
245
Page 51

4
Connect Copy (Option)
Connect Copy Display Panel
This section describes the displays on the master unit and sub-unit.
Note that when you enter Connect Copy mode, you must access all Connect
Copy features and menus through the master unit display panel.
Master unit Sub-unit
Initial display in standard copy modeInitial display in Connect Copy mode
246
Page 52

Master unit Sub-unit
Connect Copy Display Panel
4
Display when scanning originals on the master unitDisplay when copying/Interrupt copyingNumber of originals
How many original pages have been
scanned by the master unit so far.
Not displayed on sub-unit.
247
Page 53

4
Connect Copy (Option)
Master unit Sub-unit
How many sets/copies to make. Not displayed on sub-unit.
Copy quantity
Displays how many sets/copies made
by the master unit so far.
Copy counter
Only paper trays loaded with the paper of the same size, direction and type
installed in both the master unit and
sub-unit are displayed.
Displays how many sets/copies made
by the sub-unit so far.
Only paper trays loaded with the paper
of the same size, direction and type installed in both the master unit and subunit are available.
Other paper tray types will be grayed
out and you cannot select them.
Copy paper select
*1
When two or more pages are being copied using Sort and Staple, you can check how
many sets have been copied so far. To toggle the copy counter between the master
unit total and the total for both units, press the area that displays the number of copies. “Copy” means the number of sets made so far by the master unit and “Total”
means the total number of sets made so far by both units.
Note that you can only select the copy
paper from the master unit operation
panel.
248
Page 54

Using Connect Copy
Using Connect Copy
You can select Connect Copy mode from either of the two connected machines
by pressing the
and the other machine the sub-unit.
Limitation
❒
Once Connect Copy is selected, you must carry out all operations on the master unit.
[
Connect
A Make sure the machine is in copy mode.
key. The machine you use becomes the master unit,
]
4
Note
❒
If user codes are turned on, enter a user code programmed in the master
unit with the number keys (up to 8 digits) then press the
need to enter the user code for the sub-unit.
Reference
See ⇒ P.69
B Press the
When the key darkens, the two machines are connected.
[
Connect
“User Codes”
key on the machine that is to be the master unit.
]
.
key. You don't
[
]
#
249
Page 55

4
Connect Copy (Option)
❖
Master unit displa y
❖
Sub-unit display
Reference
If the
nect Copy”
If you press the
key. See ⇒ P.273
[
Connect
key is not visible or you cannot select it, see ⇒ P.269
]
.
250
key and see the message and press the
[
Connect
“If You Cannot Exit Connect Copy”
]
“Con-
[
Cancel
.
]
Page 56

C Set your originals in the master unit.
Using Connect Copy
Originals Set in the
document
feeder
R
R
R
R
Set on the
exposure
glass
set1EE
4
set2EE
Reference
See ⇒ P.26
“Setting Originals”
.
D Make any settings you require on the master unit.
Note
❒
Any copy settings that were set up before you entered Connect Copy mode
will still remain in effect. The Punch function requires the optional Punch
kit to be installed on both the master and sub-unit.
❒
To exit Connect Copy mode, press the
again.
[
Connect
key on the master unit
]
E Enter the number of copies you require with the number keys.
251
Page 57

Connect Copy (Option)
Note
❒
You can enter up to 9999 copies.
❒
If you make a mistake, press the
❒
Even though Connect Copy is selected, only the master unit will make copies in the following situations :
• When making a single copy set.
• When the original is a single sheet and you enter a low number of copies/sets.
{
Clear
key and enter a new number.
}
4
F Press the
Copying starts after the original has been scanned.
Note
❒
If you have set your originals in the document feeder (ADF), copying starts
simultaneously in the master unit and sub-unit after all originals have been
scanned.
❒
When using the Batch (SADF) mode, set your originals and press the
{
Start
originals while the Auto Feed indicator is lit. When all pages have been
scanned in, press the
unit and sub-unit. See “Batch SADF mode”. ⇒ P.32
❒
When scanning from the exposure glass, set the next page(s) when scanning has finished, then press the
scanned in, press the
unit and sub-unit.
❒
To stop originals being scanned or copied, press the
ter unit and follow the instructions on the display, press the
{
Start
key. After all the previously set originals are scanned in, set the next
}
key on the master unit.
}
key. Copying starts simultaneously in the master
{
}
#
key. Copying starts simultaneously in the master
{
}
#
{
Start
“Batch (SADF) mode”
key. When all pages have been
}
{
G Pick up your copies from the master unit and sub-unit.
key on the mas-
}
Stop
[
Yes
key.
]
Note
❒
The number of copy sets made by the master unit and sub-unit may differ.
❒
The master unit and sub-unit may not finish copying exactly at the same
time.
❒
When using the Sort/Staple function, copies are organized into copy sets.
If there is a paper misfeed in one machine during this process, it is not possible for the other machine to take over the copy set processing of the non
functional machine.
❒
When using Document Server functions, only the master unit will make
copies by the combination of the features.
252
Page 58

Using Connect Copy
Copy output order
-
❖
When copying in Sort/Staple mode
e.g., copying 6-sets of a 3-sheet original
• Copying with the master unit (face-down output)—sub-unit (face-down
output)
4
1. Master unit
2. Sub-unit
When using Sort/Staple, your copies sets are not split between the master
unit and sub-unit.
❖
When copying not in Sort/Staple mode
e.g., making 2 copies of each page of a 6–sheet original
• Copying with the master unit (face-down output)—sub-unit (face-up output)
1. Master unit
2. Sub-unit
Combine your copy stacks from the master unit and sub-unit as shown in
the diagram.
253
Page 59

4
Connect Copy (Option)
Auto Reset
-
The machine exits Connect Copy mode and automatically returns to the initial
condition a certain period of time after your job has finished. This function is
called “Auto Reset”.
Note
❒
After the time that is set in “Copy Reset Timer” on the master unit have
passed, the master unit exits Connect Copy mode.
❒
While the sub-unit is using Interrupt Copy functions, the Interrupt Copying
function is released after the time that is set “System Reset” in the sub-unit.
Reference
See “Copy Reset Timer” in the copy User Tools ⇒ P.314
See “System Reset” in the System Settings manual.
“General Features”
Auto Off
-
The machine turns itself off automatically a certain period of time after your job
has finished. This function is called “Auto Off”.
Note
❒
The Auto Off function is available only for the main unit.
Reference
See “Auto Off Timer” in the System Settings manual.
254
Page 60

Exiting Connect Copy Mode
Using Connect Copy
A Press the
The
[
Connect
Note
❒
Settings which were selected on the master unit while in Connect Copy
mode will not be cleared.
key on the master unit.
[
Connect
]
]
key will be deselected.
4
❒
Press the
the initial state.
❒
The sub-unit will return to the state which is before entering Connect Copy
mode.
Reference
If you cannot exit Connect Copy mode, see ⇒ P.273
Connect Copy”
{
Clear Modes
key to cancel the master unit settings and return to
}
“If You Cannot Exit
255
Page 61

Connect Copy (Option)
Relationship between Master Unit and
Sub-unit System Settings
This section describes which System Settings are used by the master unit and
sub-unit in Connect Copy mode.
Note
❒
In Connect Copy mode the
{
User Tools
cess the user tools on the sub-unit, you need to exit Connect Copy mode first.
Reference
See System Settings manual for details.
key on the sub-unit is disabled. To ac-
}
4
Symbol Meaning
✩
←
— Unrelated
★
Menu Master
General
Function Priority — — When the time set in the
The master unit and sub-unit use each setting
Both units use the master unit setting
Depends on the function
Sub-unit Remarks
unit
“Copy Reset Timer” of the
user tools (Copier/Document
Server Features) on the master unit passed and the Connect Copy is canceled, and
then the time set in the “System Reset”of the user tools
(System Setting) passed, it returns to the function defined
by the “Function Priority” of
the User Tools (System Set-
tings) setting.
Panel Tone
Ready Panel Tone
Copy Count Display — — The copy counter is always
System Reset —
256
✩✩
✩✩
★
displayed in count up mode.
Interrupt mode on the sub-
unit will be cleared by this
timer.
Page 62

Relationship between Master Unit and Sub-unit System Settings
Menu Master
unit
Function Reset Timer — — Other function will begin af-
Energy Saver Timer — — Energy Saver modes. When
Panel Off Timer — —
Auto Off Timer
Auto Tray Switching
Copier/Document Server
Output Tray
Printer Output Tray
Print Priority — — Other function will begin af-
✩
✩✩
✩✩
✩✩
Sub-unit Remarks
ter the connect copy mode is
canceled.
Connect Copy is exited, the
machine will enter Energy
Saver mode after certain peri-
od of time passed.
— Sub-unit will not be in Auto
Off mode during Connect
Copying.
ter the connect copy mode is
canceled.
4
Interleave Print Pages — —
Status Indicator
Language Priority
Screen Color Setting
Original: F/F4 Size Setting
Paper Tray Priority
Timer Settings
Date
Time
Weekly Timers: Monday to
Sunday
Key Operator Code for Off
Setting
✩✩
✩✩
✩✩
✩
✩✩
✩✩
✩✩
✩
——
—
— This function is not available
The date setting depends on
the master unit.
on the sub-unit in Connect
Copy mode. When Connect
Copy is exited, the power will
be switched off at the time
specified by the timer.
257
Page 63

Connect Copy (Option)
4
Menu Master
unit
Tray Paper Settings
Tray1: Paper Type
Tray2: Paper Type
Tray3: Paper Type
Tray4: Paper Type
Tray5: Paper Type
Tray6: Paper Type
Slip Sheet 1
Slip Sheet 2
Slip Sheet 3
Cover Sheet
Separation Sheet
Key Operator Tools
✩✩
✩✩
✩✩
✩✩
✩✩
✩✩
✩✩
✩✩
✩✩
✩✩
✩✩
Sub-unit Remarks
We recommend that the mas-
ter unit and sub-unit have the
same paper tray settings. This
is because only paper trays
with the same size, direction,
and type of paper can be used
in Connect Copy mode.
User Codes:
Copier/Document Server
Key Counter: Copier Access — —
Key Counter: Printer Access — —
Key Card: Copier Access
Key Card: Printer Access
Memory Allocation
Key Operator Access
AOF (Keep It On.) — — Function in Connect Copy
✩
✩
✩
✩✩
★★
— Access these settings on the
master unit. The master unit
settings override those of the
sub-unit.
—
—
Memory Allocation for the
copy function set in each unit
will be used for Connect
Copy mode.
mode. The power will go off
after you have exited Connect
Copy mode and the AOF De-
lay has elapsed.
Check/Reset/Printer Copy
Counter
258
——
Page 64

Relationship between Master Unit and Sub-Unit Copier/Document Server Features
Relationship between Master Unit and
Sub-Unit Copier/Document Server
Features
This section describes which Copier Feature settings are used by the master unit
and sub-unit in Connect Copy mode.
Note
❒
In Connect Copy mode the
{
User Tools
cess to the User Tools on the sub-unit, you need to exit Connect Copy mode
first.
key on the sub-unit is disabled. To ac-
}
Reference
See ⇒ P.314
Symbol Meaning
✩
←
— Unrelated
Menu Master
General Features
Auto Paper Select Priority
Auto Image Density Select
Priority
Original Mode Priority
“Settings You Can Change with the User Tools”
The master unit and sub-unit use each setting
Both units use the master unit setting
unit
✩
✩
✩
.
4
Sub-unit Remarks
— Trays with the same size and
direction of paper will be selected from the master unit
and sub-unit automatically.
—
—
Duplex Mode Priority
Copy Orientation in Duplex
Mode
Original Orientation In Du-
plex Mode
Initial Mode Set
Maximum Copy Quantity
Copy Reset Timer
✩
✩
✩
✩
✩
✩
—
—
—
—
—
— Connect Copy will be can-
celled according to the timer
on the master.
259
Page 65

Connect Copy (Option)
4
Menu Master
unit
Job List Screen Timeout
Paper Eject: Always Rotate
180
°
Manual Original Counter
Reset
Set Ratio
Preset Reduce/Enlarge
Preset Reduce/Enlarge Pri-
ority
Shortcut R/E
Create Margin Ratio
Original Mode Level
Image: Text
Image: Auto Text/Photo
✩
✩
✩
✩
✩
✩
✩
✩✩
✩✩
Sub-unit Remarks
—
←
—
—
—
—
—
Image: Photo
Image:Pale
Image: Generation
Display/Panel Tone
Original Mode Display
Special Original Display
Paper Type Display
Panel Features Default
Image Adjustment Priority
Staple Position
Original Tone
Job End Call
✩✩
✩✩
✩✩
✩✩
✩
✩
✩
✩
✩
✩
✩✩
—
— This function is available only
—
—
—
—
for the main unit. The sub-unit
display the type of paper
whether this function is selected or not.
When turned on, the tone
sounds only on the master
unit when copying is completed. Only if the “Panel Tone” of
the User Tools (System Settings) is on.
260
Page 66

Relationship between Master Unit and Sub-Unit Copier/Document Server Features
Menu Master
unit
Adjust Image
Copy Back Cover
Front Margin: Left/Right
Back Margin: Left/Right
Front Margin: Top/Bottom
Back Margin: Top/Bottom
1 → 2 Duplex Auto Margin
Adjust
Border Erase Width
Combine Orig. Shadow
Erase
Center Erase Width
Repeat Separation Line
Double Copies Separation
Line
✩
✩
✩
✩
✩
✩
✩
✩
✩
✩
✩
Sub-unit Remarks
←
←
←
←
←
←
←
←
←
←
←
4
Combine Separation Line
Copy Order In Combine
Mode
Copy Orientation In Book-
let/Magazine
Front Cover Copy In Com-
bine Mode
Designated Slip Sheet Copy
In Combine Mode
Stamp
Background Numbering
Size
Density
Superimpose
Preset Stamp
Stamp Language
Stamp Priority
✩
✩
✩
✩
✩
✩
✩
✩
✩
✩
←
←
←
←
←
←
←
←
←
←
The master unit setting will be
applied. However, set the
same settings in both
Stamp Format
Superimpose
✩
✩
←
←
261
Page 67

Connect Copy (Option)
4
Menu Master
unit
User Stamp
Program/Delete Stamp
Stamp Format
Date Stamp
Format
Font
Position Priority
Size
Superimpose
Page Numbering
Format
Font
Position Priority
✩
✩
✩
✩
✩
✩
✩
✩
✩
✩
Sub-unit Remarks
←
←
←
←
←
←
←
←
←
←
Set the same stamp in the both
unit.
Size
Duplex Back Page Number
Position
Page Numbering In Com-
bine Mode
Copy On Slip Sheet In Desig-
nate Mode
Superimpose
Position Priority: P1, P2
Position Priority: 1/5, 2/5
Position Priority: -1-, -2Position Priority: P.1, P.2
Position Priority: 1,2
Position Priority: 1-1, 1-2
Input/Output
SADF Auto Reset Timer
✩
✩
✩
✩
✩
✩
✩
✩
✩
✩
✩
✩
←
←
←
←
←
←
←
←
←
←
←
—
ADF Original Table Rise
Time
262
✩
—
Page 68

Relationship between Master Unit and Sub-Unit Copier/Document Server Features
Menu Master
unit
Face-up/down Eject From
Platen
Auto Sort Mode
Memory Full Auto Scan Re-
start
Shift Tray
Separation Sheet
Document Server
File List Sort Priority — —
Store Mode Priority
Auto File Delete
Delete All The Saved Files — —
Delete All The Saved Files In CD——
✩
✩
✩
✩
✩
✩
✩✩
Sub-unit Remarks
— The setting will be ignored
—
←
—
←
—
and the setting programmed
for Connect Copy will be
used.
4
CD Read/Write Speed Control
Key Operator Tools
Check/Reset/Print Copy
Counter
Program/Change/Delete
User Code
Connect Copy Master — —
——
——
——
263
Page 69

4
Connect Copy (Option)
264
 Loading...