

Page 1

GESKO
ikarus 1200s
Gebrauchsanleitung
instructions for use
Page 2

Page 3

GESKO ikarus 1200s
Funktion der Bedienelemente 3
Einleitung 4
1 Installation 5
1.1 Wandmontage 5
1.2 Einlegen der Batterien 5
1.3 Anschluss 5
2 Grundeinstellungen des ikarus 6
2.1 Programmiermenü 6
2.2 Einstellen der Lautsprecher-Lautstärke 10
2.3 Einstellen der Klingellautstärke 10
2.4 Warnung bei leeren Batterien 10
2.5 Statusanzeige an GESKO TK-Anlagen 10
3 Caller ID (Anruferidentifikation) 11
3.1 Uhrzeit und Datum 11
3.2 Die Anruferinformation 11
3.3 Die Displayanzeige 11
3.4 Überprüfung der Anruferaufzeichnungen 13
3.5 Ansehen der abgehenden Verbindungen 13
3.6 Löschen von Anrufereinträgen 13
3.7 Rückruf aus der Anruferliste 14
3.8 Speichern der Nummer des Anrufenden im Kurzwahlspeicher 14
4 Telefonieren mit dem ikarus 15
4.1 Freisprech-Modus 15
4.2 Einen Anruf tätigen 15
4.3 Einen Anruf entgegennehmen 15
4.4 Die Flash-Funktion 15
4.5 Die Funktion Halten 16
4.6 Wahlwiederholung 16
4.7 Pause-Funktion 16
4.8 Programmierung der Kurzwahlziele 17
4.9 Benutzung des Zielwahlspeichers 17
5 Konformitätserklärung und Garantie 18
6 Bohrschablone 20
Memo Cards 21
Deutsch
Bedienungsanleitung 1
- Stand Dezember 2002
Page 4

v
GESKO
ikarus 1200s
21
28
273
21
1211
226
23
5
29
1
t1
2
t2
3
t3
4
t4
5
t5
6
t6
7
t7
8
t8
9
t9
10
t10
1
2
3
4
5
6
7
8
9
10
PAGE
▼
▲
1 2
4
ghi
7
pqrs
*
CALL BACK DEL HOLD
▼
abc3def
5
6
jkl
mno
8
9
tuv
wxyz
#
0
PROG
R
14
15
13
16
7
17
18
19
20
8910262425 4
v
2 ikarus 1200s
Page 5

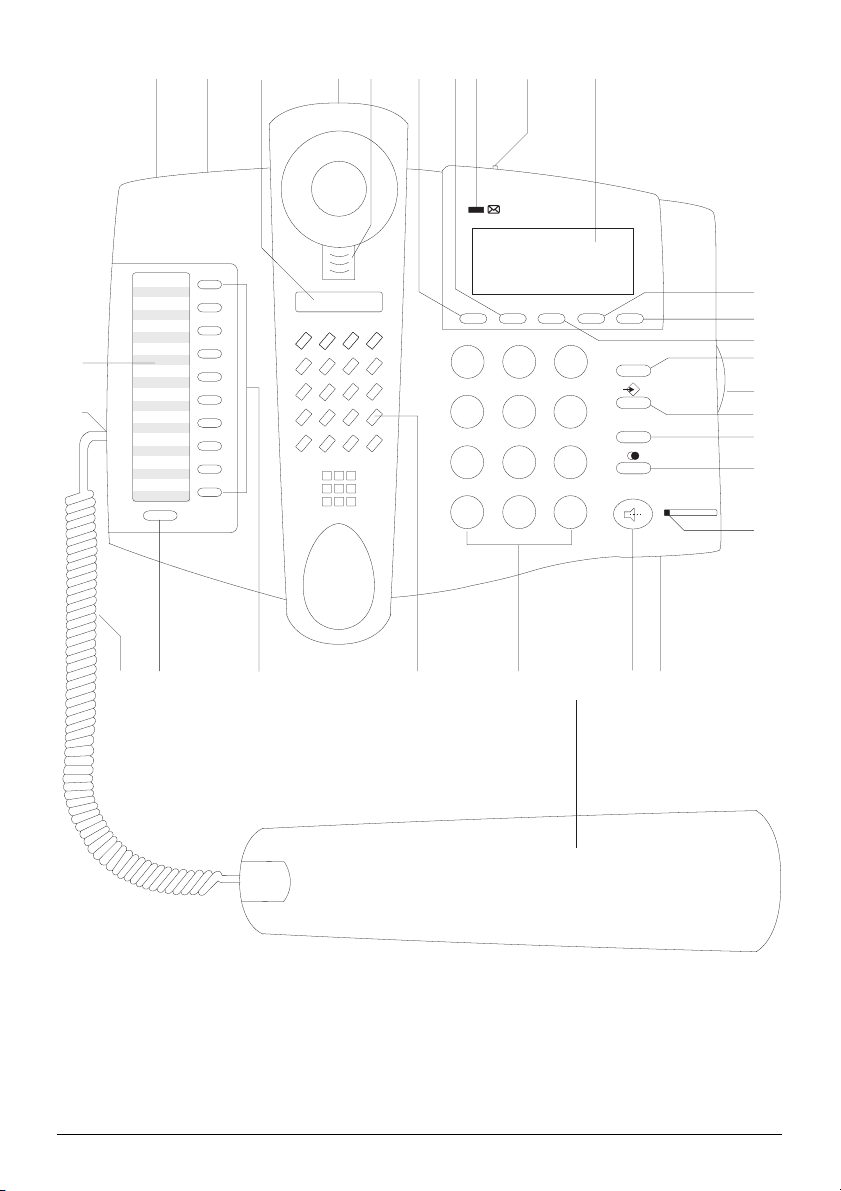
Funktion der Bedienelemente
1 Netzteilanschluss Runde Buchse zur Stromversorgung über das mitgelie-
ferte Netzteil
2 Telefonbuchse Verbindung des Telefonnetzes mit dem Telefon
3 Batteriefach Batteriefach für 4 Mignon-Zellen (AAA 1,5V)
4 Telefonhörer
5 Westernbuchse Verbindung der Hörerschnur mit dem Telefon
6 Schalter Ruftonlautstärke Einstellung der Ruftonlautstärke
7 Lautstärkeregler Einstellung der Lautstärke während des Lauthörens
8 Mikrofon Für den Freisprech-Modus
9 Lautsprechertaste Wählen, ohne den Hörer abzunehmen
10 Wähltasten Manuelle Wahl der Telefonnummern
11 Taste Anzeigen ▲ Vorwärtsblättern in der Anruferliste
12 Taste Anzeigen ▼ Rückwärtsblättern in der Anruferliste
13 Taste Rückruf CALL BACK Automatische Wahl aus der Anruferliste
14 Taste Bestätigung DEL Funktion 1: Bestätigen der Einstellung beim Program-
mieren
Funktion 2: Löschen aus der Anruferliste
15 Taste Halten HOLD Halten des Teilnehmers in der Leitung
16 Programmiertaste PROG Programmieren der Grundeinstellungen
17 Speichertaste Speichern der Kurzwahlziele
18 Flashtaste R Interne Weitervermittlung oder Nutzung von Leistungs-
merkmalen des Netzanbieters
19 Taste Wahlwiederholung Funktion 1: Erneute Wahl der zuletzt gewählten
Rufnummer
Funktion 2: Einfügen einer Wahlpause bei Kurzwahlzielen
20 LED Betriebszustand Leuchtdiode - leuchtet, wenn das Telefon in Betrieb ist
21 LED neuer Anruf Blinkende Leuchtdiode zur Anzeige von neuen Anrufen
22 Display Anzeige von Rufnummer, Datum und Uhrzeit
23 Liste für Wahlziele Eintragung der Inhaber der gespeicherten Zielwahlruf-
nummern
24 Zielwahltasten automatische Direktwahl aus dem Zielwahlspeicher
25 Taste Speicherebene Umschalten auf die zweite Zielwahlspeicherebene mit
weiteren 10 Speicherplätzen
26 Lautsprecher Hören, ohne den Hörer abzunehmen
27 Hörerführung Arretierung des Hörers bei Wandmontage
28 Sichtfeld Eintragung der eigenen Rufnummer
29 gewendelte Hörerschnur Verbindung des Hörers mit dem Telefon
Deutsch
Bedienungsanleitung 3
Page 6

Einleitung
Wir freuen uns, dass Sie sich für ein Produkt aus unserem Hause entschieden haben.
Mit dem GESKO ikarus 1200s haben Sie ein analoges Komforttelefon erworben, dass
Ihnen viel Komfort und Anwendungsmöglichkeiten bietet. Wie bei allen Produkten
aus unserem Hause sind wir ständig bemüht, diese zu verbessern bzw. zu erweitern.
So ist auch dieses GESKO ikarus 1200s mit vielen zusätzlichen Funktionen gegenüber
dem ikarus 1200 ausgestattet.
So können Sie mit diesem Telefon in Verbindung mit einer GESKO ISDN-TK-Anlage nun
auch Funktionen nutzen, die bisher nur Systemtelefonen vorbehalten waren. So erhalten Siez. B. eine Statusanzeige der weiteren Teilnehmer an der Telefonanlage.
Lesen Sie die nachfolgende Gebrauchsanleitung sorgfältig durch und nutzen Sie die
vielen neuen Möglichkeiten die Ihnen dieses Produkt bietet.
Unterschiede zum bisherigen ikarus 1200:
Statusanzeige in Verbindung mit einer ISDN TK-Anlage von GESKO.
12:00 1/01
12 13 15
Wenn Sie das Telefon ikarus 1200s an eine ISDN TK-Anlage von GESKO anschließen,
können Sie in der unteren Zeile des Displays sehen, welcher Teilnehmer an der TKAnlage gerade besetzt ist. Dafür müssen Sie einmalig eine Programmierung vornehmen, um der TK-Anlage mitzuteilen, welches Telefon eine Statusanzeige erhalten soll.
Dafür beachten Sie bitte Kapitel 2.5, „Statusanzeige an GESKO TK-Anlagen“.
Programmiermenü mit mehrsprachiger Menüführung
Die Programmierungen des Telefons sind über ein mehrsprachiges Programmiermenü
ausführbar. Im einzelnen sind einstellbar:
- Sprache (deutsch/englisch)
- LCD-Kontrast (0-3)
- Zeitanzeige (12/24 H)
- Uhrzeit und Datum
- eigene Vorwahl (sechsstellig)
- Flashzeit (100/300/600 ms)
- Wahlpause (1/3,6 Sek.)
- LED-Blinkzeit (Blinkrhythmus)
4 ikarus 1200s
Page 7

1 Installation
1.1 Wandmontage
Das ikarus 1200s kann auf den Schreibtisch gestellt oder an der Wand befestigt werden. Wenn Sie das Telefon an der Wand anbringen möchten, dann gehen Sie wie folgt
vor:
1.Stecken Sie die Führung des Handapparates (siehe Seite 2, Nr. 27) umgekehrt ein.
2.Markieren Sie die Bohrlöcher für die Befestigungsschrauben entsprechend der Bohrschablone, die sich in diesem Handbuch befindet.
3.Drehen Sie die Schrauben ein und hängen Sie das Telefon an.
1.2 Einlegen der Batterien
1.Bitte drehen Sie Ihr Telefon um. Sie sehen nun das Batteriefach auf der Unterseite.
2.Drehen Sie die mit einem Pfeil gekennzeichnete Schraube heraus.
3.Schieben Sie den Deckel des Batteriefaches auf.
4.Legen Sie vier Batterien vom Typ AAA 1,5V entsprechend der Hinweise im Batteriefach ein. Schließen Sie den Batteriefachdeckel wieder und schrauben Sie das Batteriefach wieder zu.
1.3 Anschluss
Der Anschluss Ihres ikarus an das Telefonnetz und an die Stromversorgung ist sehr
einfach.
An der oberen linken Seite des Telefons befindet sich die runde Buchse für das Netzteil. Direkt daneben finden Sie die Telefonbuchse (Westernbuchse). Schließen Sie Ihr
Telefon bitte folgendermaßen an:
1.Stecken Sie das beiliegende Telefonkabel mit dem kleinen Stecker in die Telefonbuchse des ikarus.
2.Stecken Sie das andere Ende des Telefonkabels in die Telefonsteckdose an der Wand.
3.Verbinden Sie das Netzteil mit dem Telefon, indem Sie den kleinen runden Stecker
in die Buchse am Telefon stecken.
4.Stellen Sie die Stromversorgung her, indem Sie das Netzteil in eine übliche Steckdose stecken.
5.An der linken Seite des Telefonapparates befindet sich eine weitere kleine Westernbuchse. Nehmen Sie bitte die beiliegende gewendelte Hörerschnur und schieben
Sie einen der beiden Stecker in diese Buchse und den anderen in die Buchse am
Handapparat.
Deutsch
Ihr neues Telefon ikarus ist nun betriebsbereit.
Bedienungsanleitung 5
Page 8

2 Grundeinstellungen des ikarus
2.1 Programmiermenü
Nach dem Einsetzen der Batterien und dem Anschluß Ihres ikarus an das Telefonnetz
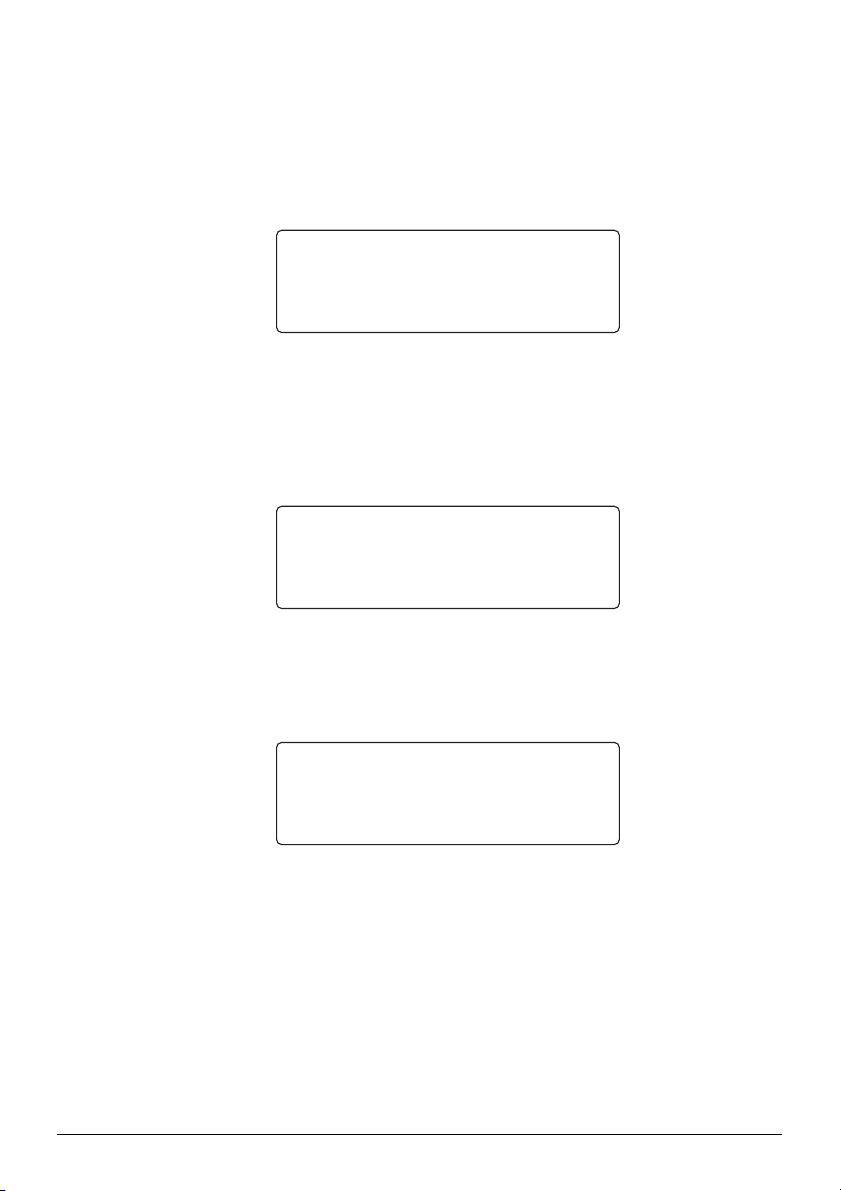
sowie an die Stromversorgung zeigt das Display folgendes Bild:
12:00 1/01
AM
TOTAL:00 NEU:00
Jetzt können Sie einige Einstellungen vornehmen. Drücken Sie die Taste PROG für
zwei Sekunden. Nacheinander werden Ihnen folgende Menüpunkte angeboten:
Eingabe der Sprache der Displayanzeigen
Nachdem Sie die PROG-Taste gedrückt haben, sehen Sie im Display:
SPRACHE
Drücken Sie auf die Taste DEL oder warten Sie einige Sekunden, um eine Auswahl
zwischen zwei Sprachen vorzunehmen: ENG = englisch oder GER = deutsch. Mit den
Tasten ▲ oder ▼ wechseln Sie zwischen den Sprachen.
ENG [GER]
Bestätigen Sie Ihre Auswahl mit der Taste DEL.
Bei der folgenden Beschreibung wird die Einstellung GER (deutsch) angenommen.
Einstellen des Displaykontrastes
Nachdem Sie die Sprache für die Displayanzeigen eingestellt haben, können Sie im
nächsten Schritt den Kontrast des Displays (LCD) in 4 Stufen verändern (0-3). Dazu
gehen Sie folgendermaßen vor:
Wenn Sie sich noch nicht im Programmiermenü befinden, drücken Sie die Taste PROG
für zwei Sekunden und dann die Taste DEL so oft, bis im Display LCD-KONTRAST
erscheint.
6 ikarus 1200s
Page 9

LCD KONTRAST
Drücken Sie DEL, dann blinkt „0“ im Display. Mit den Tasten ▲ oder ▼ stellen Sie
den Kontrast im Bereich 0-3 ein. Wählen Sie die für Sie beste Anzeige aus und
bestätigen Sie mit DEL.
12/24-Stunden-Anzeige
Die nächste Einstellmöglichkeit beftrifft die Anzeige der Uhrzeit. Sie können wählen
zwischen der 24-Stunden-Anzeige und dem 12-Stunden-Modus mit Anzeige von AM
und PM für vormittags und nachmittags.
Wenn Sie sich noch nicht im Programmiermenü befinden, drücken Sie die Taste PROG für
zwei Sekunden und dann die Taste DEL so oft, bis im Display ZEITANZEIGE erscheint.
ZEITANZEIGE
Drücken Sie auf die Taste DEL, um die Auswahl vorzunehmen.
[12H] 24H
Mit den Tasten ▲ oder ▼ wechseln Sie den Modus. Bestätigen Sie Ihre Auswahl mit der
Taste DEL.
Deutsch
Eingabe von Uhrzeit und Datum
Jetzt wird Ihnen angeboten, die Uhrzeit und das Datum manuell einzugeben.
Wenn Sie sich noch nicht im Programmiermenü befinden, drücken Sie die Taste PROG
für zwei Sekunden und dann die Taste DEL so oft, bis im Display ZEIT erscheint.
ZEIT
Die Anzeige der Stunden blinkt.
1.Wählen Sie durch Betätigung der Tasten ▲ oder ▼ die richtige Stundenangabe aus
und bestätigen Sie Ihre Auswahl mit DEL.
2.Sie können nun auf die gleiche Weise die Minuteneinstellung vornehmen. Wenn Sie
mit DEL bestätigt haben, wechselt die Blinkanzeige auf den Kalendertag.
Bedienungsanleitung 7
Page 10

3.Stellen Sie nun den Kalendertag und dann den Monat ein und vergessen Sie nicht,
mit DEL zu bestätigen.
– Es ist nicht notwendig, Datum und Uhrzeit manuell einzugeben, wenn Ihre Telefonge-
sellschaft oder Ihre TK-Anlage die aktuelle Uhrzeit und das Datum mitsendet. Wenn
Ihnen dieser Service zur Verfügung steht, dann werden diese Daten bei jedem externen Anruf aktualisiert. Während der Ruhe des Telefons werden Datum und Uhrzeit
intern permanent weitergezählt. Dabei kann es zu leichten Abweichungen der Uhrzeit kommen, die beim nächsten Anruf jedoch korrigiert werden.
Eingabe der eigenen Vorwahl
Hier können Sie die eigene Vorwahl eingeben. Dann wird bei einem Anruf aus Ihrem
Ortsnetz die Rufnummer ohne die Vorwahl angezeigt (wenn die Rufnummer mitgesendet wird).
- - - - - -
VORWAHL
Mit jeder Betätigung der Taste DEL rückt die Auswahl zur nächsten Ziffer vor.
Verändern Sie diese Ziffer durch Drücken der Tasten ▲ oder ▼ und speichern Sie
mit DEL. Die maximale Länge der eintragbaren Vorwahl beträgt 6 Ziffern.
Einstellen der Flashzeit
Im nächsten Schritt stellen Sie die Flashzeit Ihres Apparates ein. In Deutschland benötigen Sie insbesondere für die Nutzung der T-Net-Funktionen Ihres Netzanbieters eine
Flashzeit von 300ms. Wenn Sie Ihr ikarus an einer Nebenstellenanlage betreiben, dann
benötigen Sie in der Regel eine Flashzeit von 100 ms.
Wenn Sie sich noch nicht im Programmiermenü befinden, drücken Sie die Taste PROG
für zwei Sekunden und dann die Taste DEL so oft, bis im Display FLASH-ZEIT erscheint.
FLASH ZEIT
Drücken Sie auf die Taste DEL, um die Auswahl vorzunehmen. Je nachdem, wie Sie Ihr
Telefon einsetzen wollen, stellen Sie die richtige Flashzeit mit den Tasten ▲ oder ▼ ein.
600 300 [100]
Bestätigen Sie Ihre Auswahl mit der Taste DEL.
8 ikarus 1200s
Page 11

Einstellen der Pausenzeit
Sie können die Länge der Pausenzeit, die über die Taste WWH in die Wahl eingefügt
werden kann (siehe „Telefonieren mit dem ikarus / Pause-Funktion“), auf 1 Sekunde
oder 3,6 Sekunden einstellen.
Wenn Sie sich noch nicht im Programmiermenü befinden, drücken Sie die Taste PROG
für zwei Sekunden und dann die Taste DEL so oft, bis im Display PAUSE ZEIT erscheint.
PAUSE ZEIT
Drücken Sie auf die Taste DEL, um die Auswahl vorzunehmen. Wählen Sie durch Betätigung der Tasten ▲ oder ▼ die richtige Pausenzeit aus.
[3.6SEK] 1SEK
Bestätigen Sie Ihre Auswahl mit DEL.
LED-Blinkrhythmus
Nach der Pausenzeit stellen Sie ein, in welchem Rhythmus die Leuchtdiode blinkt, die
Ihnen das Vorhandensein neuer Anrufe signalisiert.
Wenn Sie sich noch nicht im Programmiermenü befinden, drücken Sie die Taste PROG
für zwei Sekunden und dann die Taste DEL so oft, bis im Display LED BLINK ZEIT
erscheint.
Deutsch
LED BLINK ZEIT
Drücken Sie auf die Taste DEL, um die Auswahl vorzunehmen. Je nachdem, wie schnell
die Leuchtdiode blinken soll, stellen Sie den Wert, wieviele Sekunden Pause bis zum
nächsten Aufleuchten vergehen sollen, mit den Tasten ▲ oder ▼ ein. ‘AUS’ bedeutet,
dass die Leuchtdiode dunkel bleibt und nicht blinkt.
AUS 1 2 [4] 8
Bestätigen Sie Ihre Auswahl mit DEL.
Bedienungsanleitung 9
Page 12

Damit ist die Grundeinstellung Ihres ikarus abgeschlossen. Das Display zeigt Ihnen
jetzt den Normalstatus an:
12:00 1/01
TOTAL:00 NEU:00
2.2 Einstellen der Lautsprecher-Lautstärke
An der rechten Seite Ihres Telefons finden Sie einen Drehregler zur Einstellung der
gewünschten Lautstärke des Lautsprechers für die Funktion Freisprechen/Lauthören.
2.3 Einstellen der Klingellautstärke
An der Rückseite des Telefons befindet sich ein Schalter, mit dem Sie die Lautstärke
der Signalisierung Ihres ikarus einstellen können. Sie haben die Auswahl zwischen HI
(laut), MI (mittel) und LO (leise).
2.4 Warnung bei leeren Batterien
Im Display in der oberen Zeile links wird das Symbol LOW eingeblendet, wenn die Ladung der Batterien nicht mehr ausreichend ist oder wenn keine Batterien eingelegt sind.
LOW
12:00 1/01
TOTAL:00 NEU:00
Wenn dieses Symbol eingeblendet wird, dann sollten die Batterien so bald wie möglich gewechselt werden. Das ist wichtig, damit alle Funktionen Ihres Telefones weiterhin korrekt zur Verfügung stehen.
Ihr ikarus wird auch nach Entfernung der Batterien einige Sekunden lang alle Informationen der Anruferliste behalten. Es empfiehlt sich aber, insbesondere dann, wenn
das Netzteil nicht an das Telefon angeschlossen ist, vor dem Batteriewechsel alle
Anruferinformationen anzusehen. Für den Batteriewechsel verfahren Sie bitte wie im
Abschnitt „Installation – Einlegen der Batterien“ beschrieben.
2.5 Statusanzeige an GESKO TK-Anlagen
Wenn Sie das ikarus 1200s an einer GESKO TK-Anlage betreiben, können Sie für dieses Telefon eine Statusanzeige aktivieren. Dann werden in der unteren Zeile des Displays die analogen Telefone angezeigt, die an der TK-Anlage angeschlossen und gerade besetzt sind.
12:00 1/01
12 13 15
10 ikarus 1200s
Page 13

Dafür müssen Sie einmalig folgende Programmierung in Ihrer TK-Anlage vornehmen:
Heben Sie an einem Mastertelefon (ein Telefon an Ihrer TK-Anlage, das als Master für
Programmierungen eingerichtet ist) den Hörer ab und wählen Sie nacheinander folgende
Prozeduren. Am Ende jeder Zeile legen Sie den Hörer auf und heben ihn für die nächste Zeile wieder ab.
✱✱
•
✱9000 eingeben. So starten Sie den Programmiermodus.
✱✱
✱✱
•
✱9389 XX eingeben. Dabei steht „XX“ für die interne Rufnummer des Telefones,
✱✱
das die Statusanzeige erhalten soll, also z. B. „11“ für den ersten Apparat.
• Wiederholen Sie die letzte Zeile für eventuelle weitere ikarus 1200s, die eine Statusanzeige erhalten sollen.
• Falls Sie an einem Telefon die Statusanzeige wieder ausschalten möchten, geben
Sie bitte
das die Statusanzeige nicht mehr erhalten soll.
✱✱
•
✱9999 eingeben. Damit beenden Sie den Programmiermodus.
✱✱
Genaue Erläuterungen zur Programmierung der Anlage vom Telefon erhalten Sie in
der Gebrauchsanleitung „Installation und Programmierung“ Ihrer GESKO TK-Anlage
im Kapitel 3.2.
✱✱
✱9388 XX ein. Dabei steht „XX“ für die interne Rufnummer des Telefones,
✱✱
3 Caller ID (Anruferidentifikation)
– Die Nutzung der Caller-ID Dienste Ihres regionalen Netzanbieters ist nur möglich,
wenn Sie sich dafür angemeldet haben.
3.1 Uhrzeit und Datum
Die automatische Übernahme der aktuellen Uhrzeit und des aktuellen Datums erfolgt
bei jedem ankommenden Ruf, bei dem die Anruferidentifikation einschließlich der
Uhrzeit und des Datums mitgesendet wird.
Deutsch
3.2 Die Anruferinformation
Wenn ein Anruf hereinkommt, dann empfängt Ihr ikarus die Daten des Anrufenden,
die von der Telefongesellschaft in der Zeit zwischen dem ersten und dem zweiten
Klingeln mitgesendet werden. Das Display zeigt die Rufnummer, das Datum und die
Zeit (wenn vorhanden) des Anrufes. Alle ankommenden Anrufnotizen werden in der
Reihenfolge der Anrufe gespeichert.
– Die Anruferidentifikation kann nicht vollständig empfangen und auf dem Display
angezeigt werden, wenn Sie den Hörer vor dem zweiten Klingelton abnehmen.
3.3 Die Displayanzeige
Verschiedene Nachrichten werden auf dem Display angezeigt, um den Status der Information zu vermitteln:
Bedienungsanleitung 11
Page 14

Telefonnummer des Anrufenden
Wenn die Telefonnummer verfügbar ist und mitgesendet wird, dann wird diese Nummer in der zweiten Zeile des Displays angezeigt. Falls das ikarus 1200s an einer
GESKO-Anlage angeschlossen ist und die Rufnummer im Kurzwahlspeicher der TKAnlage abgespeichert ist, wird in der unteren Zeile der Name des Anrufers angezeigt
(Super-CLIP).
12:00 1/01
0844292480
GESKO
Aktuelle Uhrzeit
Wenn sich Ihr ikarus im Ruhezustand befindet, dann wird im Display laufend die aktuelle Zeit und das aktuelle Datum angezeigt sowie die Summe aller in der Anruferliste
gespeicherten Rufe und die Anzahl aller neuen Rufe.
Wiederholung von Anrufen
Wenn ein ankommender Anruf bereits früher in die Anruferliste aufgenommen wurde
(der Anrufer hat schon einmal versucht, Sie zu erreichen), dann leuchtet am Display
das Symbol REPEAT auf, und nur die Informationen (Datum und Uhrzeit) des letzten
Anrufes werden gespeichert.
Anzeige neuer Anrufe
Wenn Sie neue Anrufe vorliegen haben, dann wird die rote Leuchtdiode links über
dem Display blinken. Das Symbol NEW wird kurzzeitig in der rechten oberen Ecke des
Displays angezeigt. Die Gesamtanzahl der neuen Anrufe wird unten im Display
zusammengefasst.
12:00 1/01
TOTAL:03 NEU:02
Wenn Sie sich alle neuen Anrufinformationen angesehen haben, dann hört die LED auf
zu blinken und auf dem Display ist die Gesamtzahl der Einträge in der Anruferliste
und die Anzahl der neuen Einträge (0 nach dem Ansehen der Liste) zu sehen:
12:00 1/01
TOTAL:03 NEU:00
12 ikarus 1200s
Page 15

Statusanzeige (an GESKO TK-Anlagen)
Wenn Sie das ikarus 1200s an einer GESKO TK-Anlage betreiben, werden in der unteren Zeile des Displays die analogen Telefone angezeigt, die an der TK-Anlage angeschlossen und gerade besetzt sind. Beachten Sie bitte, dass Sie die Programmierung
entsprechend vorgenommen haben (s. Kapitel 2.5).
12:00 1/01
12 13 15
3.4 Überprüfung der Anruferaufzeichnungen
Wenn Sie neue Anrufe erhalten haben, dann blinkt die Leuchtdiode neben dem Briefsymbol und im Display werden Sie über die Gesamtanzahl der Anrufe sowie über die
Anzahl der neuen Anrufe informiert, wenn sich Ihr ikarus im Ruhemodus befindet.
Um die Anruferliste durchzublättern, drücken Sie die Taste ▲ oder ▼. Mit der Information ENDE DER LISTE in der dritten Zeile des Displays werden Sie darauf aufmerksam
gemacht, dass Sie den Anfang oder das Ende der Liste erreicht haben. Falls die Rufnummer länger als 13 Ziffern ist, drücken Sie die Flash-Taste (R), um die restlichen 3
Ziffern anzuzeigen.
3.5 Ansehen der abgehenden Verbindungen
Sie können sich eine Liste der letzten 20 abgehenden Verbindungen anzeigen lassen.
Drücken Sie dafür die Taste PAGE (im Display erscheint WAHLLISTE) und anschlie-
ßend die Taste ▲ oder ▼, um die Verbindungen durchzublättern. Zusätzlich zur gewählten Rufnummer wird Datum, Uhrzeit und Dauer der Verbindung angezeigt. Falls
die Rufnummer länger als 13 Ziffern ist, drücken Sie die Flash-Taste (R), um die restlichen 3 Ziffern anzuzeigen.
Deutsch
3.6 Löschen von Anrufereinträgen
Die Taste DEL kann zum Löschen von Anruferinformationen benutzt werden.
Löschen von einzelnen Einträgen
1.Blättern Sie durch die Betätigung der Tasten ▲ oder ▼ zu dem Datensatz, den Sie
löschen möchten.
2.Drücken Sie die Taste DEL zweimal kurz hintereinander.
3.Nachdem Sie die gewünschte Information gelöscht haben, wird auf dem Display die
nächste Anruferinformation angezeigt.
– Das Löschen einer Eintragung kann nicht rückgängig gemacht werden – diese Eintra-
gung ist verloren.
Löschen der gesamten Anruferliste
1.Drücken Sie entweder die Taste ▲ oder ▼, um die Liste zu aktivieren.
Bedienungsanleitung 13
Page 16

2.Halten Sie die Taste DEL fünf Sekunden lang gedrückt.
3.Wenn die Nachricht ENDE DER LISTE auf der unteren Zeile des Displays erscheint,
dann sind alle Datensätze aus dem Speicher der Anruferliste gelöscht.
– Die Taste DEL ist kurzzeitig außer Funktion, wenn auf dem Display die Information
ENDE DER LISTE angezeigt wird.
3.7 Rückruf aus der Anruferliste
Sie können mit Ihrem ikarus direkt aus der Anruferliste telefonieren, ohne die Rufnummer eingeben zu müssen.
1.Wählen Sie in der Anruferliste mit der Taste ▲ oder ▼ den Teilnehmer aus, den Sie
anrufen möchten.
2.Nehmen Sie den Handapparat ab oder drücken Sie die Lautsprecher-Taste.
3.Betätigen Sie die Taste CALL BACK. Ihr IKARUS wählt nun automatisch die Telefonnummer aus der Anruferliste, die auf dem Display angezeigt wird.
Wenn Sie Ihr ikarus an eine Nebenstellenanlage angeschlossen haben, kann es nötig
sein, dass Sie vor der eigentlichen Rufnummer eine Ziffer oder Ziffernfolge (z.B. 0) für
den Amtszugang wählen müssen.
Gehen Sie dann bitte wie folgt vor:
1.Wählen Sie mit der Taste ▲ oder ▼ die Telefonnummer aus, die Sie zurückrufen
wollen. Das Telefon befindet sich im Ruhezustand.
2.Nehmen Sie den Hörer ab oder drücken Sie die Lautsprecher-Taste. Sie hören den
internen Wählton der Telefonanlage.
3.Geben Sie über die Tastatur die Ziffer bzw. Ziffernfolge ein, mit der Ihnen die Telefonanlage den Amtszugang schaltet. Sie hören den Wählton des öffentlichen Telefonnetzes.
4.Drücken Sie einmal eine der Tasten ▲ oder ▼, um zu der gewünschten Telefonnummer zurückzukehren.
5.Mit der Betätigung der Taste CALL BACK aktivieren Sie nun den automatischen
Anruf dieser Rufnummer.
– Wenn an Ihrer Nebenstelle die automatische Amtsholung aktiviert ist, dann können
Sie so vorgehen, wie eingangs beschrieben.
3.8 Speichern der Nummer des Anrufenden im Kurzwahlspeicher
Sie können die angezeigte Rufnummer des Anrufenden als Kurzwahlziel folgendermaßen abspeichern:
1. Wählen Sie mit der Taste ▲ oder ▼ die Telefonnummer aus, die Sie speichern möchten.
2. Drücken Sie die Taste .
3. Drücken Sie die Taste PAGE und wählen Sie dann den Speicherplatz 1 bis 0 mit den
Ziffern der Tastatur oder eine der Zielwahltasten 1 bis 10 als Speicherplatz aus.
14 ikarus 1200s
Page 17

4 Telefonieren mit dem ikarus
4.1 Freisprech-Modus
Das Telefon kann durch Abnehmen des Hörers oder im Freisprech-Modus benutzt
werden. Um den Freisprech-Modus zu benutzen, drücken Sie bei aufgelegtem Hörer
auf die Lautsprechertaste.
Wenn Sie ein Gespräch im Freisprech-Modus begonnen haben und Sie möchten nun
das Gespräch mit dem Hörer weiter führen, dann nehmen Sie einfach den Hörer ab
und führen das Gespräch über den Hörer weiter.
Wenn Sie das Gespräch über den Hörer führen und in den Freisprech-Modus wechseln
wollen, dann drücken Sie auf die Lautsprechertaste und legen den Hörer auf.
4.2 Einen Anruf tätigen
Um einen Anruf auszuführen, gehen Sie folgendermaßen vor:
1.Nehmen Sie den Hörer ab oder betätigen Sie die Lautsprechertaste (für den Freisprech-Modus). Sie hören den Wählton.
2.Geben Sie die Telefonnummer ein und warten Sie, bis sich Ihr Gesprächspartner
meldet.
3.Führen Sie Ihr Gespräch und legen Sie anschließend den Hörer wieder auf bzw.
betätigen Sie erneut die Lautsprechertaste (im Freisprech-Modus). Die Betriebsanzeige-LED erlischt.
– Sie können einen Anruf auch direkt aus der Anruferliste oder mit einer Kurzwahltaste
beginnen. Diese Möglichkeiten werden später noch beschrieben.
4.3 Einen Anruf entgegennehmen
Deutsch
Einen Anruf können Sie auf zwei verschiedenene Arten entgegennehmen:
1.Nehmen Sie den Hörer ab und führen Sie das Gespräch. Sie beenden das Gespräch,
indem Sie den Hörer wieder auflegen.
2.Drücken Sie die Lautsprechertaste und führen Sie das Gespräch (Freisprech-Modus).
Wenn Sie das Gespräch beenden wollen, betätigen Sie die Lautsprechertaste erneut.
4.4 Die Flash-Funktion
Mit der Flash-Funktion haben Sie die Möglichkeit, bestimmte Dienste Ihres lokalen
Netzanbieters oder Ihrer Nebenstellenanlage zu nutzen.
Makeln
1.Sie führen ein Gespräch.
2.Drücken Sie die Flash-Taste (R), um von Ihrem gegenwärtigen Gespräch zu einem
neu ankommenden Gespräch zu makeln.
3.Drücken Sie die Flash-Taste (R) noch einmal, um zu Ihrem ursprünglichen Gespräch
zurückzukehren.
– Wenn Ihre Telefongesellschaft diesen speziellen Service nicht anbietet, dann wird das
geführte Gespräch unterbrochen.
Bedienungsanleitung 15
Page 18

Weitergabe eines Gespräches ohne Ankündigung
1.Sie nehmen ein Gespräch entgegen und möchten den Anrufer mit einem anderen
Teilnehmer an Ihrer Nebenstellenanlage verbinden.
2.Drücken Sie die Flash-Taste (R). Sie hören den Wählton Ihrer Telefonanlage.
3.Wählen Sie die interne Rufnummer des anderen Teilnehmers.
4.Sie können nun Ihren Hörer auflegen.
Weitergabe eines Gespräches mit Ankündigung
1.Sie nehmen ein Gespräch entgegen und möchten den Anrufer mit einem anderen
Teilnehmer an Ihrer Nebenstellenanlage verbinden.
2.Drücken Sie die Flash-Taste (R). Sie hören den Wählton Ihrer Telefonanlage.
3.Wählen Sie die interne Rufnummer des anderen Teilnehmers.
4. Kündigen Sie ihm die Übergabe des Gepräches an und legen Sie den Hörer auf.
– Wenn der andere interne Teilnehmer besetzt ist (Sie hören den Besetztton) oder wenn
er das Gespräch nicht annehmen möchte, dann können Sie durch die erneute Betätigung der Flash-Taste (R) zu Ihrem externen Anrufer zurückkehren.
4.5 Die Funktion Halten
Während eines Gespräches kann die Verbindung gehalten werden, so dass es Ihrem
Gesprächspartner vorübergehend nicht möglich ist, am Gespräch teilzunehmen.
1.Drücken Sie die Taste HOLD, um das Gespräch zu halten.
2.Wenn Sie möchten, können Sie den Hörer auflegen.
3.Wenn Sie das Gespräch weiterführen möchten, nehmen Sie den Handapparat wieder auf oder betätigen die Lautsprechertaste.
4.Wenn der Hörer nicht aufgelegt wurde, dann betätigen Sie die Taste HOLD erneut,
um zu Ihrem Gespräch zurückzukehren.
4.6 Wahlwiederholung
Mit der Funktion Wahlwiederholung (diese wird mit der Taste Wahlwiederholung
eingeleitet) können Sie automatisch die zuletzt gewählte Telefonnummer noch einmal wählen – z. B., wenn beim ersten Anruf das Besetztzeichen zu hören war. Nachdem Sie den Hörer abgenommen oder die Lautsprechertaste betätigt haben, drücken
Sie die Taste Wahlwiederholung ( ). Die Rufnummer wird im Display angezeigt und
automatisch erneut gewählt.
4.7 Pause-Funktion
Mit der Taste können Sie bei der Wahl eine Pause von 1 Sekunde oder 3,6 Sekunden
einfügen (Programmierung siehe „Initialisierung des ikarus / Eingabe der Pausenzeit“).
Das ist wichtig, wenn Sie Ihr ikarus an einer analogen Nebenstellenanlage betreiben.
Wenn Sie die Kurzwahltasten belegen, müssen Sie die vollständige Tastaturfolge eingeben und speichern, die notwendig ist, um von Ihrer Nebenstelle aus nach extern zu
wählen. An einer analogen Nebenstellenanlage benötigen Sie im allgemeinen die Ziffer 0,
um eine Verbindung zur die Vermittlungsstelle zu erhalten. Manchmal ist es dann erforderlich, vor der eigentlichen Rufnummer eine Wahlpause einzufügen.
16 ikarus 1200s
Page 19

Bitte informieren Sie sich im Abschnitt „Programmierung der Kurzwahlziele“ sowie im
Handbuch Ihrer Nebenstellenanlage.
– Beim Betrieb des Telefones an einer ISDN-Telefonanlage ist es nicht notwendig, eine
Pause in die Rufnummer einzufügen.
4.8 Programmierung der Kurzwahlziele
Das Telefon ikarus 1200s verfügt über 20 Kurzwahlziele. Die Kurzwahlziele 1 bis 10
können direkt mit den Zielwahltasten 1 bis 10 erreicht werden, die Kurzwahlziele 11
bis 20 können mit der Taste PAGE und einer der Zielwahltasten erreicht werden.
Die Programmierung der Kurzwahlziele wird folgendermaßen
vorgenommen:
1.Nehmen Sie den Hörer ab oder drücken Sie die Lautsprecher-Taste.
2.Betätigen Sie die Taste .
3.Geben Sie die gewünschte Telefonnummer über die Zifferntastatur ein.
4.Betätigen Sie noch einmal die Taste .
5.Speichern Sie die Rufnummer auf eine der beiden Arten:
- Belegen eines Speicherplatzes 1 bis 10:
Wählen Sie mit einer der Zielwahltasten 1 bis 10 den Speicherplatz aus.
- Belegen eines Speicherplatzes 11 bis 20:
Drücken Sie die Taste PAGE und wählen Sie dann mit einer der Zielwahltasten
den Speicherplatz aus.
6.Notieren Sie sich den Namen des Inhabers der Telefonnumer auf dem Kärtchen für
die Kurzwahlziele (Memo Card), für die Speicherplätze 11 bis 20 verwenden Sie die
Felder ▼1 bis ▼10.
Deutsch
– Wenn Sie Ihr ikarus an eine analoge Telefonanlage angeschlossen haben, dann müs-
sen Sie nach der Amtsbelegung noch eine Wahlpause einfügen, damit die Wahl von
der TK-Anlage korrekt ausgeführt werden kann (s. Kapitel 4.7, „Pause-Funktion“). Dann
lautet die einzugebende Tastaturfolge:
/ Amtsbelegung (meist „0“) / Pause (Taste ) / vollständige Rufnummer /
/ Zielwahltaste 1...10 oder PAGE / Zielwahltaste 1...10.
– Die Telefonnummer kann direkt über eine nicht benötigte Rufnummer eingetragen
und gespeichert werden.
4.9 Benutzung des Zielwahlspeichers
1.Nehmen Sie den Hörer ab oder drücken Sie die Lautsprechertaste.
2.Drücken Sie eine Zielwahltaste 1. . . 10 für die Kurzwahlziele 1 bis 10 oder drücken
Sie die Taste PAGE und dann die entsprechende Zielwahltaste 1. . .10 für die Kurz-
wahlziele 11 bis 20.
Bedienungsanleitung 17
Page 20

5 Konformitätserklärung und Garantie
Hiermit erklärt die Firma GESKO Kommunikationssysteme GmbH, dass sich das Produkt ikarus 1200s in Übereinstimmung mit den grundlegenden Anforderungen und
den anderen relevanten Vorschriften der Richtlinie 1995/5/EG befindet.
Hierfür trägt das Produkt das CE-Zeichen.
18 ikarus 1200s
Page 21

G A R A N T I E
Gültig in der Bundesrepublik Deutschland.
Die nachstehenden Bedingungen, die Voraussetzungen und Umfang unserer
Garantieleistung umschreiben, lassen die Gewährleistungsverpflichtungen des Verkäufers aus dem Kaufvertrag mit dem Verbraucher unberührt. Für dieses Gerät
leisten wir Garantie gemäß der nachstehenden Bedingungen:
1. Wir beheben unentgeltlich nach Maßgabe der folgenden Bedingungen (Nr. 2-6)
Schäden oder Mängel am Gerät, die nachweislich auf einem Werksfehler beruhen,
wenn Sie uns unverzüglich nach Feststellung und innerhalb von 24 Monaten
nach Lieferung an den Endabnehmer gemeldet werden. Die Garantie erstreckt
sich nicht auf leicht zerbrechliche Teile, wie z.B. Glas oder Kunststoff bzw. Glühlampen. Eine Garantiepflicht wird nicht ausgelöst durch geringfügige Abweichungen von der Soll-Beschaffenheit, die für Wert und Gebrauchstauglichkeit des Gerätes unerheblich sind, durch Schäden aus chemischen und elektro-chemischen
Einwirkungen von Wasser sowie allgemein aus anomalen Umweltbedingungen.
2. Die Garantieleistung erfolgt in der Weise, daß mangelhafte Teile nach unserer
Wahl unentgeltlich instandgesetzt oder durch einwandfreie Teile ersetzt werden.
Instandsetzungen am Aufstellungsort können nur für stationär betriebene (feststehende) Großgeräte verlangt werden. Andere Geräte, für die unter Bezugnahme auf diese Garantie eine Garantieleistung beansprucht wird, sind unserer Vertragswerkstatt einzusenden. Dabei sind der ausgefüllte Garantiepaß und der Kaufbeleg mit Kauf- und/oder Lieferdatum vorzulegen. Ersetzte Teile gehen in unser
Eigentum über.
3. Der Garantieanspruch erlischt, wenn Reparaturen oder Eingriffe von Personen
vorgenommen werden, die hierzu von uns nicht ermächtigt sind oder wenn unsere Geräte mit Ergänzungs- oder Zubehörteilen versehen werden, die nicht auf
unsere Geräte abgestimmt sind.
4. Innerhalb der ersten 24 Monate ab Lieferung erbringen wir die Garantieleistung
ohne Berechnung von Nebenkosten (Fahrt- und Wegezeitkosten, Fracht- und Verpackungskosten).
5. Garantieleistungen bewirken weder eine Verlängerung der Garantiefrist noch setzen sie eine neue Garantiefrist in Lauf. Die Garantiefrist für eingebaute Ersatzteile endet mit der Garantiefrist für das ganze Gerät.
6. Sofern ein Schaden oder Mangel nicht beseitigt werden kann oder die Nachbesserung von uns abgelehnt oder unzumutbar verzögert wird, wird innerhalb von 24
Monaten ab Kauf-/Lieferdatum auf Wunsch des Endabnehmers entweder kostenfrei Ersatz geliefert, oder der Minderwert vergütet oder das Gerät gegen Erstattung des Kaufpreises, jedoch nicht über den marktüblichen Preis hinaus, zurückgenommen.
7. Weitergehende oder andere Ansprüche, insbesondere solche auf Ersatz außerhalb des Gerätes entstandener Schäden sind - soweit eine Haftung nicht zwingend gesetzlich angeordnet ist - ausgeschlossen.
Deutsch
Bedienungsanleitung 19
Page 22
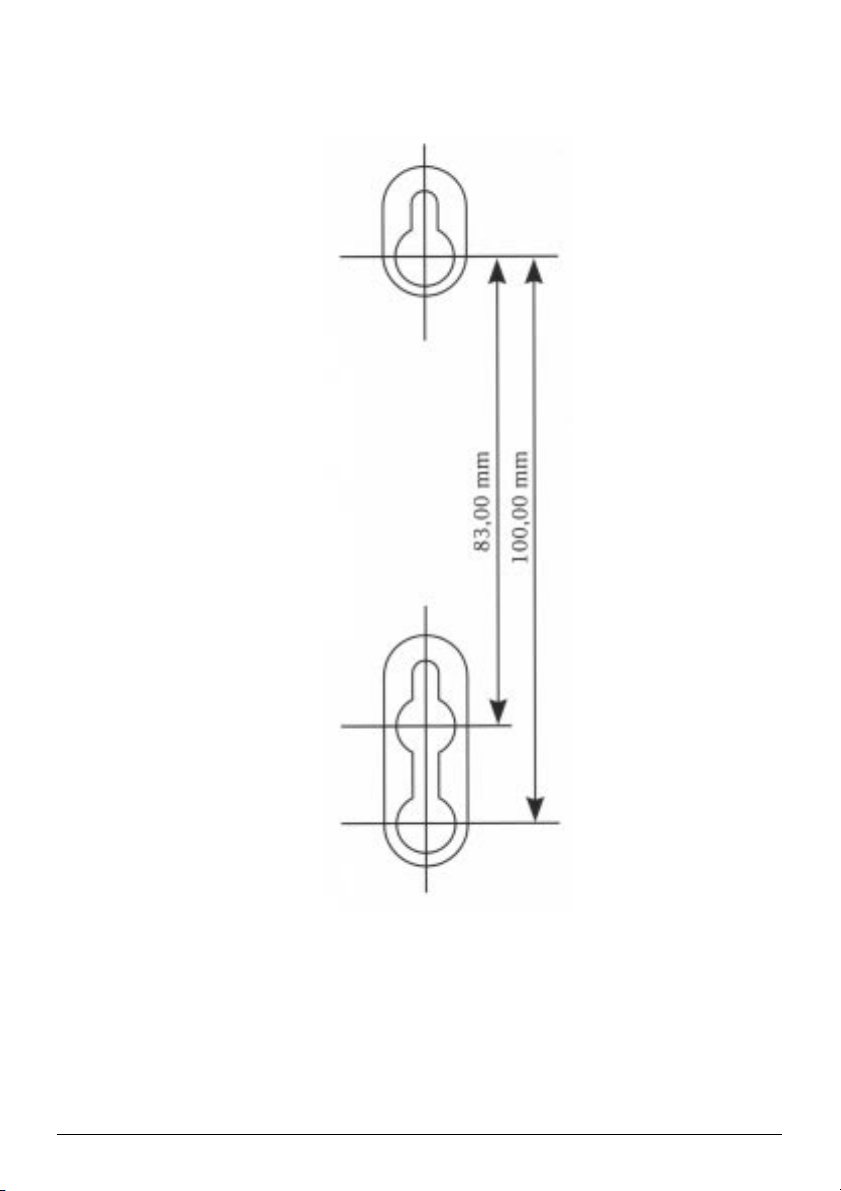
6 Bohrschablone
20 ikarus 1200s
Page 23
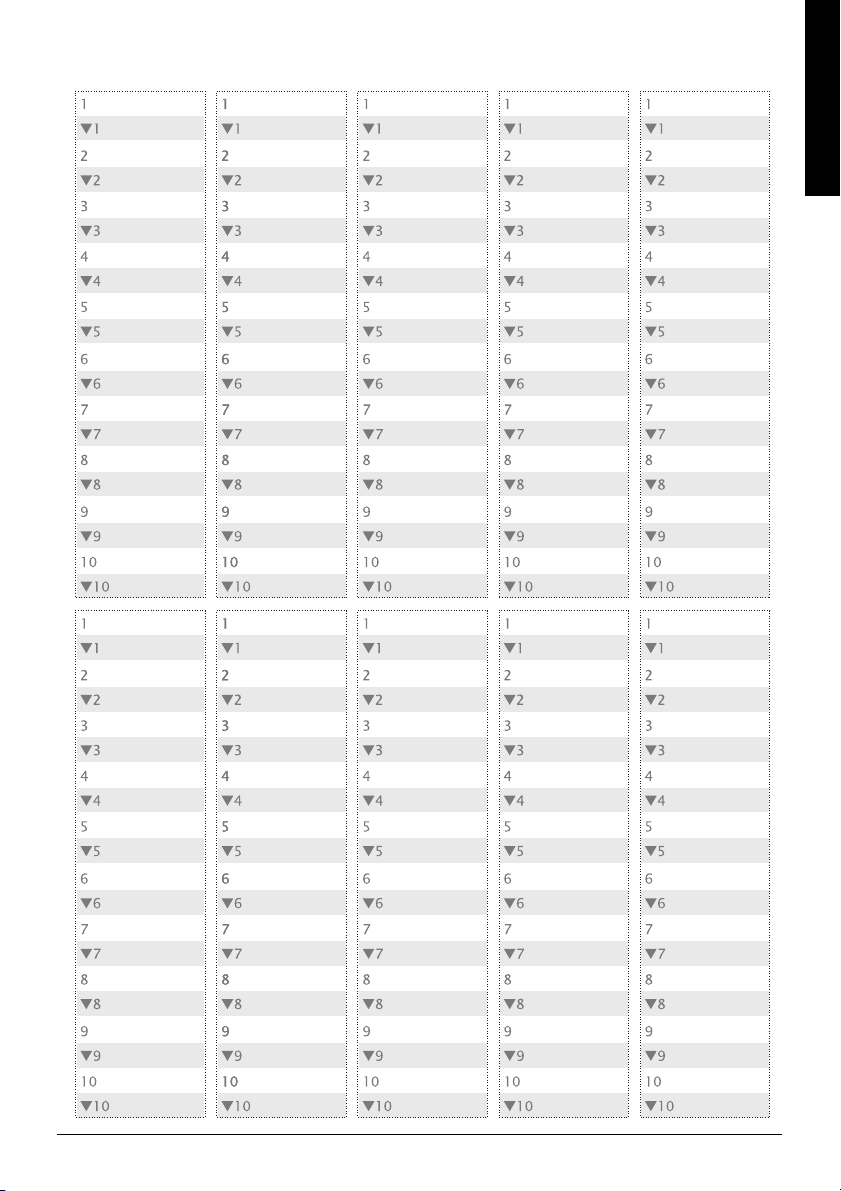
Memo Cards
Deutsch
Bedienungsanleitung 21
Page 24

22 ikarus 1200s
Page 25

GESKO ikarus 1200s
Function of the operational controls 3
Introduction 4
1 Installation 5
1.1 Wall installation 5
1.2 Insertion of batteries 5
1.3 Connection 5
2 Basic settings of the ikarus telephone 6
2.1 Programming menu 6
2.2 Setting the loudspeaker volume 10
2.3 Setting the ringing volume 10
2.4 Warning in case of empty batteries 10
2.5 Indicate status on GESKO telecommunication units 10
3 Caller ID (caller identification) 11
3.1 Time and date 11
3.2 Caller information 11
3.3 The display 11
3.4 Verification of caller information 13
3.5 Displaying outgoing calls 13
3.6 Deletion of caller entries 13
3.7 Call-back from caller list 14
3.8 Storing the number of a calling party in the short-code memory 14
4 Making calls with the ikarus telephone 15
4.1 Hands-free mode 15
4.2 Making a call 15
4.3 Answering a call 15
4.4 The flash function 15
4.5 The hold function 16
4.6 Last-number redialling 16
4.7 Pause function 16
4.8 Programming short codes 17
4.9 Using the speed dialling memory 17
5 Approval und CE mark, Guarantee 18
6 Drilling template 20
Memo Cards 21
English
Instructions for use 1
- Version December 2002
Page 26
v
GESKO
ikarus 1200s
21
28
273
21
1211
226
23
5
29
1
t1
2
t2
3
t3
4
t4
5
t5
6
t6
7
t7
8
t8
9
t9
10
t10
1
2
3
4
5
6
7
8
9
10
PAGE
▼
▲
1 2
4
ghi
7
pqrs
*
CALL BACK DEL HOLD
▼
abc3def
5
6
jkl
mno
8
9
tuv
wxyz
#
0
PROG
R
14
15
13
16
7
17
18
19
20
8910262425 4
v
2 ikarus 1200s
Page 27

Function of the operational controls
1 Power supply unit Round socket to establish the power supply by
means of the power supply unit provided
2 Telephone socket Connection betw. telephone network and teleph.
3 Battery compartment Battery compartment for 4 round cells (AAA 1.5 V)
4 Handset
5 Western socket Connection betw. handset cable and telephon
6 Volume switch Adjusting the ringing tone volume
7 Volume control Adjusting the volume during direct listening
8 Microphone For hands-free mode
9 Loudspeaker key Dialling without lifting the handset
10 Dialling keys Manual dialling of telephone numbers
11 Display key ▲ Scrolling up in the caller list
12 Display key ▼ Scrolling down in the caller list
13 Call-back key CALL BACK Automatic dialling from the caller list
14 Confirmation key DEL Function 1: Confirmation of settings during
programming
Function 2. Deleting numbers from the caller list
15 Hold key HOLD Putting the caller on hold
16 Programming key PROG Programming the basic settings
17 Memory key Storing short codes
18 Flash key R Internal call forwarding or using features
offered by the service provider
19 Last-number redialling key Repeating the last dialled telephone number
20 LED operating status Light emitting diode - lights up when telephone
is operating
21 LED new call Flashing light emitting diode to display new calls
22 Display Display of telephone number, date and time
23 List for speed dialling with Registering names of stored telephone
name keys numbers for speed dialling
24 Speed dialling name key Automatic direct selection from the memory for
speed dialling
25 Memory level key Changing over to the second speed dialling me-
mory level with 10 further memory locations
26 Speaker For handsfree conversation
27 Handset guide Reversed it acts as a hanger for the telephone’s
handset
28 Owner’s number card Displays owner’s telephone number
29 Coil cord Connects the handset to the main unit
English
Instructions for use 3
Page 28

Introduction
We are pleased to note that you decided to buy a product from our house. With the GESKO
ikarus 1200s you have purchased an analogous comfortable telephone, which offers you
a lot of comfort and possibilities of application. We are always trying to improve resp. to
extend them, which counts for all products from our house. So, also this GESKO ikarus
1200s has a lot of additional functions compared with the ikarus 1200.
Like this you can use functions with this telephone in combination with a GESKO
ISDN-telecommunication unit, which have been reserved for system telephones up to
now. Like this you receive an indicate status of the other participants of the
telecommunication unit.
Please read the following instructions for use and use the lots of new possibilities
which are given by this product.
Differences to the previous ikarus 1200
Indication status in combination with an ISDN telecommunication
unit from GESKO
12:00 1/01
AM
12 13 15
When you connect the telephone ikarus 1200s to an ISDN telecommunication unit
from GESKO, you can see on the under line of the display, which participant of the
telecommunication unit is engaged. Therefore you have to make a unique
programmation in order to inform the telecommunication unit, which telephone has
to receive an indication status. Please note therefore chapter 2.5 „Indicate status on
GESKO telecommunication units“.
Programmation menu with multilingual menu guide
The programmations of the telephone can be carried out by a multilingual
programmation menu. In detail one can adjust the following:
- Language (german/english)
- LCD-contrast (0-3)
- Announcement of time (12/24h)
- Time and date
- Own area code (6 points)
- Flash time (100/300/600 ms)
- Dial break (1/3,6 sec.)
- LED-indicating time (indicating rhythm)
4 ikarus 1200s
Page 29

1 Installation
1.1 Wall installation
The ikarus 1200s telephone may be placed on a desk or hung on the wall. If you
decide to hang your telephone on the wall, you should proceed as follows:
1.Insert the guiding device of the handset (see S. 2, No. 27) in reverse order.
2.Mark the drilling holes for the adjusting screws in accordance with the drilling
template provided in these instructions for use.
3.Insert the screws, tighten them and hang your telephone on the wall.
1.2 Insertion of batteries
1.Please turn your telephone around. You will now see the battery compartment on
the underside.
2.Unscrew the screw marked with an arrow.
3.Slide the lid of the battery compartment open.
4.Insert the four batteries type AAA 1.5 V following the instructions given on the
battery compartment. Close the lid of the battery compartment again and retighten
the screws.
1.3 Connection
Connecting the ikarus telephone to the telephone network and the power supply is
done quite easily.
You will see a round socket near the upper left-hand side of the telephone which is
reserved for the power supply unit. Directly next to this socket you will find the
telephone socket (Western socket). Please proceed as follows when connecting your
telephone:
1.Insert the supplied telephone cable with the small plug into the telephone socket
provided on the ikarus telephone.
2.Insert the other end of the telephone cable into the telephone wall outlet.
3.Connect the power supply unit to the telephone by inserting the small round plug
into the socket provided on the telephone.
4.Establish the power supply by inserting the power supply unit into a conventional
wall outlet.
5.There is another small Western socket near the left-hand side of the telephone.
Please insert one of the two plugs belonging to the coiled handset cord into this
socket and the other plug into the socket on the handset.
English
Now your ikarus telephone is ready for use.
Instructions for use 5
Page 30
2 Basic settings of the ikarus telephone
2.1 Programming menu
After heaving inserted the batteries and connected your ikarus telephone to the
telephone network and the power supply, you will see the following on the display:
12:00 1/01
AM
TOTAL:00 NEW:00
Now you can proceed with different settings. Press the PROG key for two seconds.
One after the other you will be offered the following menu items:
Entry of display language
After having pressed the PROG key, you will see the following on the display:
SET LANGUAGE
Press the DEL key or wait several seconds before choosing between two different
languages. ENG = English or GER = German. Using the keys ▲ or ▼, you can switch
between the two languages.
[ENG] GER
Confirm your selection by pressing the DEL key.
The following description assumes the setting ENG (English) was chosen.
Setting the display contrast
After having selected the language for the displays, you may change the contrast for
the display (LCD) in 4 different steps (0-3). You can proceed as follows:
Press the PROG key for two seconds if you are not yet in the programming menu and
then the DEL key several times until you will see LCD KONTRAST (LCD CONTRAST) on
the display.
6 ikarus 1200s
Page 31
LCD CONTRAST
Press DEL, “0“ will appear in the display. With the keys ▲ or ▼, you can set the
contrast between 0-3. Please choose the display suiting you best and confirm your
selection with DEL.
12/24-hour display
The next setting concerns the time display. You may choose between 24-hour display
and 12-hour mode displaying AM and PM for morning and afternoon.
Press the PROG key for two seconds if you are not yet in the programming menu and
then the DEL key several times until you will see HOUR DISPLAY on the display.
HOUR DISPLAY
Press the DEL key to confirm your selection.
[12H] 24H
You can change the mode with the keys ▲ or ▼. Confirm your selection by pressing
the DEL key.
English
Entry of time and date
You now have the choice to manually enter the time and date.
Press the PROG key for two seconds if you are not yet in the programming menu and
then the DEL key several times until you will see ZEIT (TIME) on the display.
SET TIME
The hour display will flash intermittently.
1.Select the correct hour by using the keys ▲ or ▼ and confirm your selection with
DEL.
2.You can now proceed with the minute setting in the same way. If you have confirmed
your selection with DEL, the flashing display will switch to the calendar day.
Instructions for use 7
Page 32
3.You may now set the calendar day and then the month. Please do not forget to
confirm your entry with DEL.
– It is not necessary to manually enter the date and time if your telephone company or
your private branch exchange transmits the actual time and date with the call. If you
have access to this service, these data will be updated with each external call. When
the telephone is in standby mode, date and time will be permanently updated internally. It is possible that slight deviations will occur regarding the time which will be
corrected when the next call comes in.
Setting the area code
You may input your own area code.
- - - - - -
SET AREA CODE
Press the keys ▲ or ▼ to select correct number of first digit, then press the DEL key
to shift to next digit. Do it so long until all digits are selected und then press DEL to
end the setting.
Setting the flash time
The next step explains how to set the flash time for your telephone. In Germany you
need a flash time amounting to 300 ms especially in order to make use of the T-Net
functions offered by your network provider. If you operate your ikarus telephone
from a private exchange branch, you normally need a flash time amounting of
approximately 100 ms.
Press the PROG key for two seconds if you are not yet in the programming menu and
then the DEL key several times until you will see FLASH ZEIT (FLASH TIME) on the
display.
SET FLASH TIME
Press the DEL key in order to confirm your selection. Depending on the way you wish
to use your telephone, you can set the correct flash time with the keys ▲ or ▼.
600 300 [100]
Press the DEL key to confirm your selection.
8 ikarus 1200s
Page 33
Setting the pause time
You may adjust the duration of the pause time which can be inserted into the dialling
process by means of the WWH key (further information about this function you will
find in the section “Making calls with the ikarus telephone”) to 1 second or 3.6 seconds.
Press the PROG key for two seconds if you are not yet in the programming menu and
then the DEL key several times until you will see PAUSE ZEIT (PAUSE TIME) on the
display.
SET PAUSE TIME
Press the DEL key to confirm your selection. Pressing the keys ▲ or ▼ will select the
correct pause time.
[3.6SEC] 1SEC
Confirm your selection with DEL.
LED flashing frequency
After having set the pause time, you can decide on the flashing frequency of the light
emitting diode which informs you about any new incoming calls.
Press the PROG key for two seconds if you are not yet in the programming menu and
then the DEL key several times until you will see LED BLINK ZEIT (LED FLASHING TIME)
on the display.
LED FLASH PERIOD
Press the DEL key to confirm your selection. Depending on the desired flashing
frequency of the light emitting diode, you can adjust the value for the pause duration
until the next flash will appear in seconds steps with the keys ▲ or ▼✎ ‘AUS’ (OFF)
means tha the light emitting diode remains dark and will not flash.
English
OFF 1 2 [4] 8
Press the DEL key to confirm your selection.
Instructions for use 9
Page 34
This completes the basic setting of your ikarus telephone. The display will now show
you the normal state, i.e.:
12:00 1/01
AM
TOTAL:00 NEW:00
2.2 Setting the loudspeaker volume
You will find a rotary control on the left-hand side of your telephone for adjusting the
required volume of the loudspeaker for the functions hands-free talking/direct
listening.
2.3 Setting the ringing volume
On the rear side of your telephone, you will find a switch to adjust the volume for the
signalling function of your ikarus telephone. You may choose between HI (high), MI
(medium) and LO (low).
2.4 Warning in case of empty batteries
The display in the upper line to the left will show the symbol LOW if the batteries are
no longer sufficiently charged or if no batteries are inserted at all.
LOW
12:00 1/01
AM
TOTAL:00 NEW:00
When you see this symbol, you should replace the batteries as soon as possible. This
is very important so that you may continue to use all functions offered satisfactorily.
Your ikarus telephone will maintain all information stored in the caller list for some
seconds even after taking out the batteries. It is recommended, however, to have a
look at the caller information, especially when the power supply unit is not connected
to the telephone. Please proceed as described in the section “Installation - Insertion of
batteries” when replacing the batteries.
2.5 Indicate status on GESKO telecommunication units
When you are using the ikarus 1200s on a GESKO telecommunication unit, you can
activate an indicate status for this telephone. Then the analogous telephones, which
are connected to the telecommunication unit and which are occupied at that moment,
are shown in the under line of the display.
12:00 1/01
AM
12 13 15
10 ikarus 1200s
Page 35

Therefore you once have to carry out the following programmation in your
telecommunication unit:
Please pick up the receiver at the master telephone (a telephone on your
telecommunication unit, which fits for master of programmations) and dial one after
the other the following procedures. At the end of each line please hang up and pick
up the receiver for the next line.
✱✱
• Dial
✱9000. By doing so you are starting the modus of programmation.
✱✱
✱✱
• Dial
✱9389 xx. „xx“ is standing for the internal telephone number of the phone,
✱✱
which has to hold the indicate status, for instance „11“ for the first apparatus.
• Repeat the last line for eventual further ikarus 1200s, which have to receive an
indicate status.
• If you want to switch off the indicate status on a telephone, please type
„xx“ is standing for the internal phone number of the telephone, which doesn‘t
have to receive the indicate status any more.
✱✱
• Dial
✱9999 and you are bringing to the end the programmation modus.
✱✱
You will find the exact explanations to program the telephone unit in the instructions
for use „Installation and programmation“ of your GESKO telecommunication unit in
chapter 3.2.
3 Caller ID (caller identification)
– You may only use the caller ID services offered by your local network provider if you
have beforehand been registered as a user of these services.
3.1 Time and date
✱✱
✱9388 xx.
✱✱
English
The current time and date will automatically be adopted for each incoming call
transmitted together with caller identification and time and date.
3.2 Caller information
The ikarus telephone will receive data pertaining to the calling person which is
transmitted by the telephone company between the first and second ringing tone.
The display will show the telephone number, the date and time (if available) in
connection with the call. All incoming call notices will be stored in the order of the
calls coming in.
– It is not possible to completely receive and show the user identification on the display
if the handset is picked up before the second ringing tone.
3.3 The display
Various messages will appear on the display in order to convey the status of the
information:
Instructions for use 11
Page 36
Telephone number of the calling party
If the telephone number is available and sent off with the call, this number will be
shown in the second line of the display. When you are using the ikarus 1200s on a
GESKO telecommunication unit and the calling number is stored in the speeddialmemory of the unit, the name of the caller is shown in the under line (Super-CLIP).
12:00 1/01
0844292480
GESKO
Current time
If the ikarus telephone is in standby mode, the display will continuously show the
current time and the current date and also the total of all calls stored in the caller list
as well as the number of new calls.
Call repetition
If an incoming call has already been included in the caller list (the caller has tried to
reach you earlier), the symbol REPEAT will appear on the display and only information
(date and time) regarding the last call will be stored.
Displaying new calls
If there are any new calls, the red light emitting diode to the left above the display will
flash. The symbol NEW will briefly be shown in the right-hand corner of the display.
The complete number of all new calls will be summarised in the lower part of the
display.
12:00 1/01
AM
TOTAL:03 NEW:02
After having read all new information regarding incoming calls, the LED stops flashing
and on the display you will see the total number of all entries in the caller list and the
number of new entries (0 after reading through the list):
12:00 1/01
AM
TOTAL:03 NEW:00
12 ikarus 1200s
Page 37

Indicate status (of GESKO telecommunication units)
When you are using the ikarus 1200s on a GESKO telecommunication unit, the
analogous telephones are shown in the under line of the display, which are connected
to the telecommunication unit and as well occupied at that moment. Please note that
you have made the corresponding programmation (see chapter 2.5).
12:00 1/01
AM
12 13 15
3.4 Verification of caller information
If you have received new calls, the light emitting diode next to the letter symbol will
flash and the display will show information about the total number of calls and about
the number of new calls provided your ikarus telephone is in standby mode. Press the
keys ▲ or ▼ to scroll through the caller list. The message ENDE DER LISTE (END OF
LIST) in the third line tells you that you have reached the beginning or the end of the
list. If the telephone number contains more than 13 digits, please press the flash key
(R) in order to display the remaining 3 digits.
3.5 Displaying outgoing calls
You may have a list of the last 20 outgoing calls displayed. Press the PAGE key (you
will see the expression WAHLLISTE (DIALLING LIST) in the display) and then press
the keys ▲ or ▼ to scroll through the calls. In addition to the number selected, you
will be shown the date, time and duration of your call. If the number contains more
than 13 digits, press the flash key (R) in order to display the remaining 3 digits.
3.6 Deletion of caller entries
The key DEL can be used to delete information about callers.
English
Deleting single entries
1.By pressing the keys ▲ or ▼, you can scroll to the data record you wish to delete.
2.Press the key DEL twice in short succession.
3.After having deleted the required information, the next caller information will be
shown on the display.
– It is not possible to undo an entry just deleted - this entry is irretrievably lost.
Deleting the complete caller list
1.Press the keys ▲ or ▼ to activate the list.
2.Keep the DEL key depressed for about five seconds.
3.When the message ENDE DER LISTE (END OF LIST) appears in the lower line of
the display, all data records have been deleted from the memory of the caller list.
Instructions for use 13
Page 38

– The DEL key is for the time being not functioning correctly if the information ENDE
DER LIST (END OF LIST) is shown on the display.
3.7 Call-back from caller list
It is possible to make calls with your ikarus telephone from the caller list without
having to enter the telephone number.
1.You may select the person you wish to call from the caller list with the keys ▲ or ▼.
2.Lift the handset or press the loudspeaker key.
3.Press the CALL BACK key, your ikarus telephone will now automatically dial the
telephone number from the caller list which is shown on the display.
If you are operating your ikarus from a private branch exchange, it may be necessary
to apply for an outgoing line by dialling one or several digits (e.g. 0) before the actual
number.
Please proceed as follows in such cases:
1.Select the telephone number you wish to call back with the keys ▲ or ▼. The
telephone is in standby mode.
2.Lift the handset or press the loudspeaker key. You will hear the internal dial tone of
your telephone system.
3.Enter the relevant digit or digits in order to apply for an outgoing call on the keypad.
You will then hear the ringing tone of the public telephone network.
4.Press the keys ▲ or ▼ once in order to return to the desired telephone number.
5.You may now activate the automatic dial procedure for this telephone number by
pressing the CALL BACK key.
– If your extension has been activated for automatically enabling outgoing calls, you
may proceed as described at the beginning.
3.8 Storing the number of a calling party in the short-code memory
It is possible to store the telephone number of the calling party shown in the form of
a short code. Please proceed as follows:
1. Select the telephone number to be stored by pressing the keys ▲ or ▼.
2. Press the key .
3. Press the PAGE key and then use the keypad to select a memory location between
1 and 0 or use one of the speed dialling name keys between 1 and 10 as the
relevant memory location.
14 ikarus 1200s
Page 39

4 Making calls with the ikarus telephone
4.1 Hands-free mode
It is possible to use the telephone either by lifting the handset or by making a call in
hands-free talking mode. Press the loudspeaker key with the handset hung up in
order to make a call in hands-free talking mode.
If you have started a call in the hands-free talking mode and now wish to continue
talking with the handset, you only need to pick up the handset and then you may
continue your call with the handset.
If you want to switch over from handset mode to hands-free talking, you need to
press the loudspeaker key and hang up the handset.
4.2 Making a call
Please proceed as follows when making a call:
1.Lift the handset or press the loudspeaker key (for hands-free talking mode). You
will hear the dial tone.
2.Enter the telephone number and wait until the called party replies.
3.Carry on with your call and hang up the handset or press the loudspeaker key again
(in hands-free talking mode) after finishing call. The LED for the operating mode
will go out.
– You can also initiate a call directly from the caller list or with a short-code dialling key.
These options will be described later on.
4.3 Answering a call
English
It is possible to answer a call in two different ways:
1.Lift the handset and carry on with your call. You will end the call by hanging up the
handset again.
2.Press the loudspeaker key and carry on with your call (hands-free talking mode).
Press the loudspeaker key again when you want to end the call.
4.4 The flash function
The flash function offers you the possibility to use certain services offered by your
local network provider or your private branch exchange.
Brokering
1.You are making a call.
2.Press the flash key (R) to switch from your current call to a new incoming call.
3.Press the flash key (R) again, to return to your original call.
– If your telephone company does not provide this special service, the original call will
be interrupted.
Instructions for use 15
Page 40

Transferring a call without announcement
1.You are answering a call and want to transfer the caller to another user of your
private branch exchange.
2.Press the flash key (R). You will hear the dial tone of your telephone system
3.Dial the internal number of the other user.
4.You may now replace your handset.
Transferring a call with announcement
1.You are answering a call and wish to transfer the caller to another user of your
private branch exchange.
2.Press the flash key (R). You will hear the dial tone of your telephone system.
3.Dial the internal number of the other user.
4. Announce the transfer of the call and then replace the handset.
– If the other internal user is busy (you will hear the busy tone) or if he/she does not
want to accept the call, you can return to your external caller by pressing the flash
key (R) again.
4.5 The hold function
It is possible to put a call on hold during a conversation so that the person you are
talking to is temporarily not able to participate in the conversation.
1.Press the HOLD key to put the call on hold.
2.You may now hang up the handset.
3.If you want to continue with your call, pick up the handset again or press the
loudspeaker key.
4.If the handset was not hung up, press the HOLD key again to return to your call.
4.6 Last-number redialling
The function last-number redialling (this will be initiated with the last-number redialling
key you can automatically redial the last number dialled – e.g. if there was a busy
tone during your first call. After having picked up the handset or pressed the
loudspeaker key, activate the last-number redialling key ( ). The telephone number
will be shown in the display and automatically redialled.
4.7 Pause function
The key enables you to insert a pause during dialling which lasts between 1 and
3.6 seconds (for programming details, please refer to the section “Initialising the
ikarus telephone / entry of pause time”). This function is important when you operate
your ikarus telephone from an analogue private branch exchange. When reserving
the short-code dialling keys, you need to enter and store the complete number which
you need to dial in order to make an external call from your private exchange branch.
You normally need to dial 0 in order to be connected with a switching centre, when
operating from a private exchange branch. Sometimes it is necessary to insert a dialling
pause before dialling the actual number.
16 ikarus 1200s
Page 41

Further information about this function you will find in the section “Programming
short codes” and in the manual of your private branch exchange.
– When operating a telephone from an ISDN telephone system, it is not necessary to
insert a pause between the individual digits of a number.
4.8 Programming short codes
In the telephone you can store 20 speed-dial numbers. The memory location between
1 and 10 are directed to the speed dialling name keys, press the PAGE key and then
a speed dialling name key to select a memory location between 11 and 20.
Programming short codes:
1.Lift the handset or press the loudspeaker key.
2.Press the key.
3.Enter the desired telephone number on the keypad.
4.Press the key again.
5.Press one of the speed dialling name keys between 1 and 10 to select a memory
location between 1 and 10 or press the PAGE key and then use one of the speed
dialling name keys between 1 and 10 relevant for the memory locations between
11 and 20.
6. Note the owner of the stored number on the memory card.
– If your ikarus telephone is operated from an analogue telephone system, you need to
enter the following: / exchange line / pause (key ) / complete telephone
number / / speed dialling name key or PAGE / speed dialling name key.
– The telephone number may be entered and stored directly via a telephone number
presently not needed.
4.9 Using the speed dialling memory
1.Lift the handset or press the loudspeaker key.
2.Select the party to be called on your telephone card and press the corresponding
speed dialling name key 1 ... 10. Or press the PAG E key and then the corresponding
speed dialling name key 1 ... 10.
English
Instructions for use 17
Page 42

5 Approval und CE mark, Guarantee
The company GESKO Kommunikationssysteme GmbH hereby declares that the product
ikarus 1200s corresponds to the basic standards and other relevant regulations of
guideline 1995/5/CE. For this the product carries the CE-mark.
18 ikarus 1200s
Page 43

G U A R A N T E E
Applicable in the Federal Republic of Germany.
The following conditions, which outline the essential requirements and scope of
our guarantee do not affect the consumer’s statutory rights resulting from the
sales agreement between the dealer and the consumer. We provide a guarantee for
this unit in accordance with the following conditions:
1. We will repair free of charge in accordance with the following conditions (Nos. 2
to 6) any damage or deficiencies to the equipment that is demonstrably the result
of an error at the factory if you inform us immediately after ascertaining it and
not more than 24 months after delivery to the end user. The guarantee does not
cover easily breakable components such as glass or plastic parts, or light bulbs.
Neither does the guarantee cover any minor deviations from the scheduled
construction which have no significant influence on the value or functionality of
the equipment, nor does it cover damage due to the chemical and electrochemical
influence of water as well as general damage due to unusual environmental
conditions.
2. Under this guarantee, we will repair defective components free of charge or replace
them by components in perfect order, as we see fit. Repairs at the place where the
equipment has been installed can only be requested in the case of major, stationary
(fixed) units. Other units covered under the terms of this guarantee must be sent
to our authorised workshop. The guarantee registration certificate (filled out) and
purchase receipt must be returned with the equipment, together with details of
purchase and/or delivery. Replaced components become our property.
3. The guarantee rights become invalid if repairs or made or equipment is interfered
with by persons who are not authorised to do so, or when our equipment is fitted
with adaptations or accessories that have not been co-ordinated with our
equipment.
4. Within the first 24 months following delivery, we will meet the guarantee conditions
without any charge for additional costs (travel expenses, the cost of travel-towork time, freight and packaging charges).
5. Activated guarantees effect neither an extension of the guarantee period nor do
they mean that a new guarantee period commences. The term of the guarantee
for any replacement parts inserted will end with the term of the guarantee for the
entire unit.
6. If the damage or deficiency cannot be eliminated, or the subsequent
reconditioning/improvement is rejected or unreasonably delayed by us, either a
replacement will be delivered free of charge (within 24 months of the date of
purchase/delivery) at the wish of the end user, or the loss in value compensated
or the unit will be taken back and the purchase price returned (though the amount
shall not exceed the usual market price).
7. More extensive or other claims (in particular claims for replacement due to damage
caused outside the unit) are ruled out - provided liability is not expressly legally
enforceable.
English
Instructions for use 19
Page 44
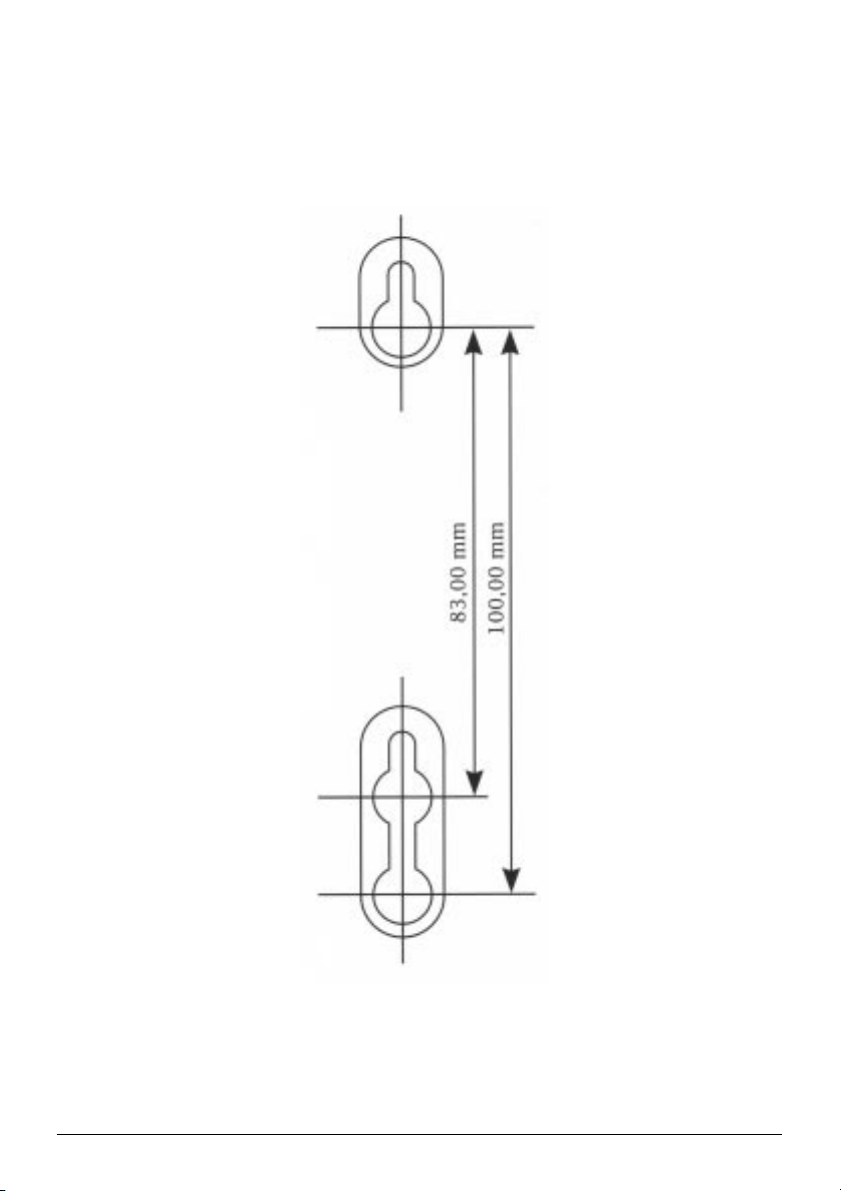
6 Drilling template
20 ikarus 1200s
Page 45
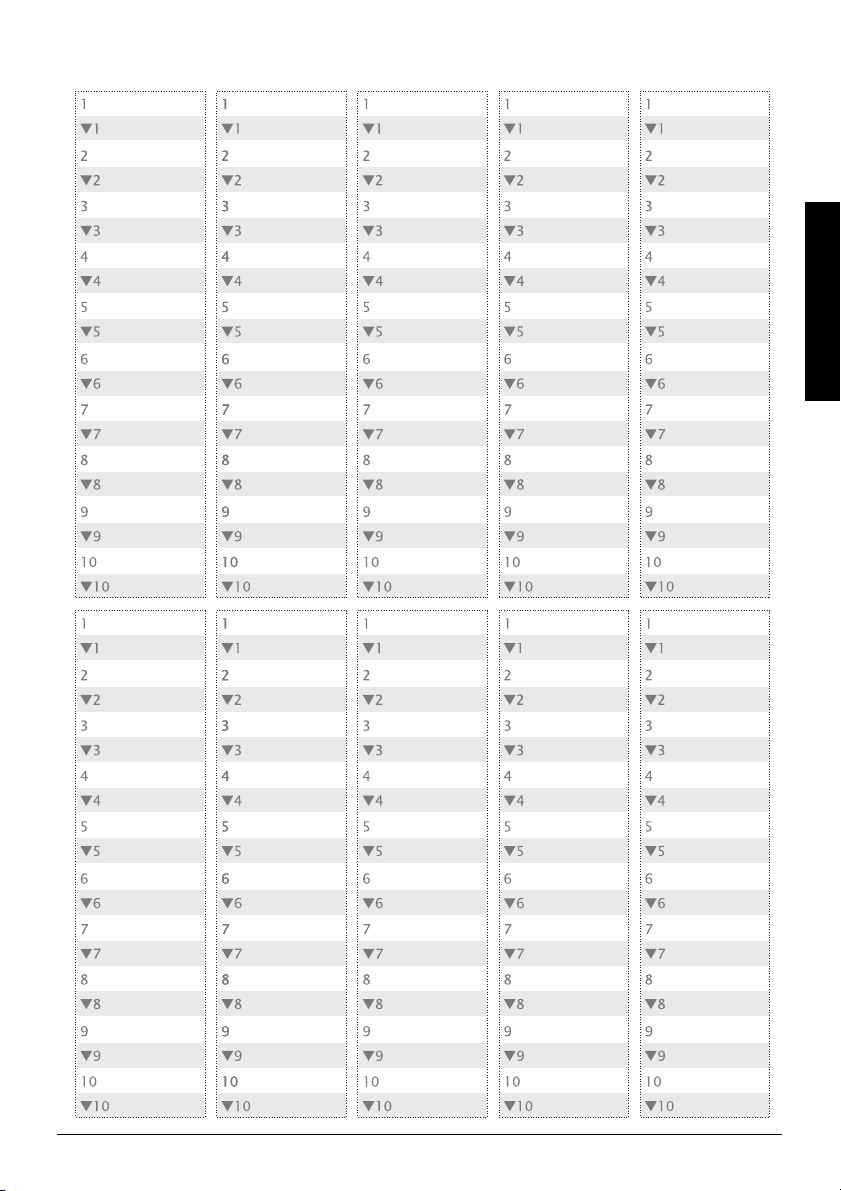
Memo Cards
English
Instructions for use 21
Page 46

22 ikarus 1200s
Page 47

Page 48

GESKO
Hotline:
0190 - 771502
(€ 1,24 / min.)
www.gesko.de
GESKO Kommunikationssysteme GmbH
Hopfenstr. 28 • D–85283 Wolnzach
EMail: [email protected]
Internet: http://www.gesko.de
Technische Modifikationen,
Modelländerungen und
Irrtümer sind vorbehalten.
Technical modifications,
model changes and
mistakes are excepted
 Loading...