

Page 1
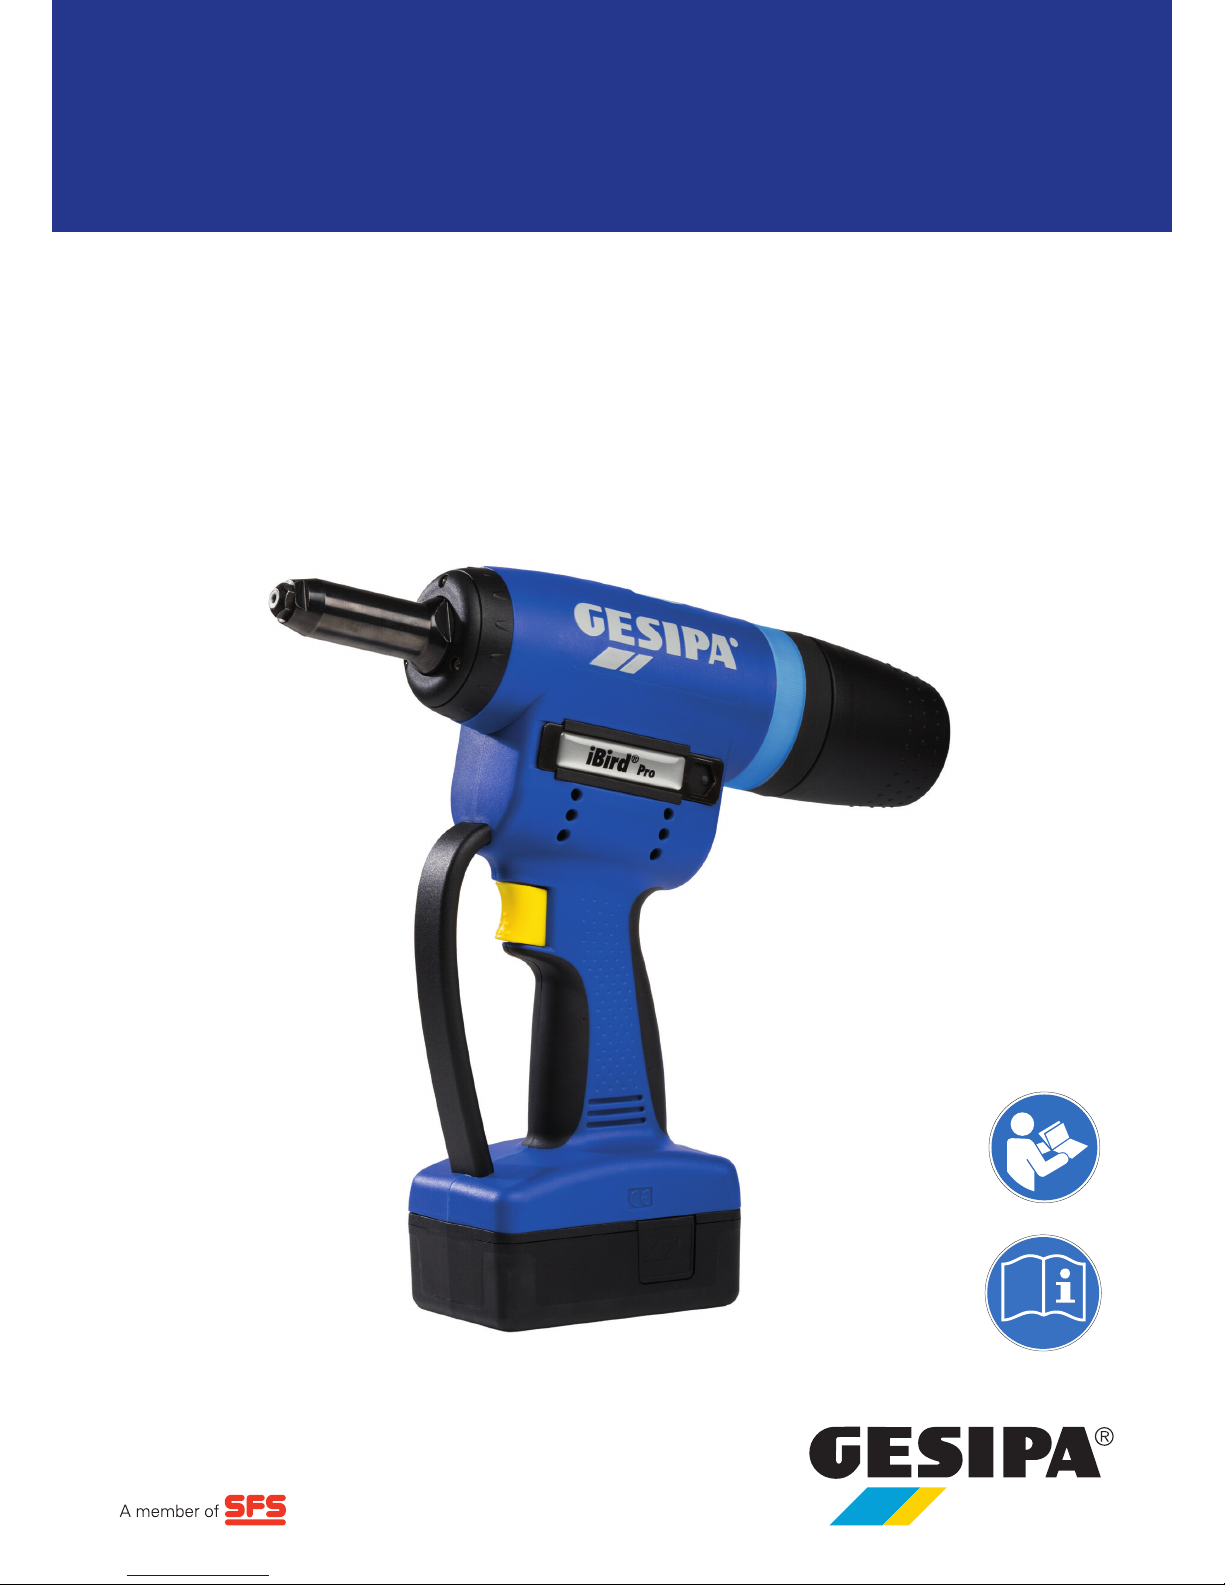
Bedienungsanleitung
Operating instructions
iBird
®
Pro
iBird® Pro-App
Version 1.0
Page 2

2
Index
1. Allgemein .................................................................................................... 3
2. Download der iBird
®
Pro-App ................................................................... 4
2.1 Allgemein ............................................................................................... 4
2.2 Registrieren und Download ................................................................... 4
2.3 Betriebs- und Bedienungsanleitung ....................................................... 4
3. Verbinden von App und Gerät .................................................................. 5
3.1 Direktverbindung über QR-Code ............................................................ 5
3.2 Manuelles Verbinden .............................................................................. 5
3.2.1 Android-Smartphone oder -Tablet ............................................. 5
3.2.2 iOS-Smartphone oder -Tablet .................................................... 6
3.3 Verbinden über Bluetooth ...................................................................... 6
4. Gerätesteuerung ........................................................................................ 7
4.1 Allgemein (Cockpit) ................................................................................ 7
4.2 Wartungsinformationen .......................................................................... 8
4.3 Ereignisverlauf ....................................................................................... 8
4.4 Einstellungen ......................................................................................... 8
4.4.1 Individuelle Farbeinstellung des Andonrings ............................. 8
4.4.2 Kippsensor ................................................................................ 9
4.5 Hilfe ........................................................................................................ 9
5. Setzprozess-Assistent (optional) .............................................................. 10
5.1 Nietkonfiguration einlernen .................................................................... 10
5.2 Nietkonfiguration verwenden ................................................................. 11
5.3 Joblisten definieren ................................................................................ 12
5.4 Joblisten verwenden .............................................................................. 12
6. Betrieb und Wartung .................................................................................. 13
Page 3

3
1. Allgemein
iBird® Pro
Mit dem iBird® Pro erweitert GESIPA® die Bird Pro-Serie um ein vernetztes Akk-Blindniet-Setzgerät. Der iBird
®
Pro ist speziell zur Integration in ein IoT/Industrie 4.0- und Lean Production-Umfeld
konzipiert.
Die mechanischen Eigenschaften entsprechen dem PowerBird® Pro.
Daher ist die Betriebsanleitung des PowerBird
®
Pro, die dem iBird® Pro in
gedruckter Form beigelegt ist, hinsichtlich Sicherheitshinweisen, Gebrauch und
Wartung unbedingt zu beachten.
Alles im Blick mit der iBird
®
Pro-App
Die kostenfreie, über die GESIPA
®
-Website erhältliche, iBird® Pro-App informiert jederzeit über die
Nietvorgänge sowie den Betriebsstatus des Gerätes.
Kinderleichtes Koppeln durch QR-Code, diverse Nietzähler, Countdown-Funktion, Füllstandanzeige,
Serviceanzeige sowie der Ereignisverlauf halten den Werker jederzeit, auch während der Arbeit,
auf dem Laufenden. Integrierte Tipps zur Handhabung sowie die sofort abrufbare Wartungs- und
Reparaturanleitung beantworten schnell und unkompliziert alle Fragen.
Prozesse absichern
Optional kann der iBird
®
Pro mit einer Premium-Sofware ausgerüstet werden. Der SetzprozessAssistent unterstützt bei der Beurteilung der Nietergebnisse. Hierzu können Nietkonfigurationen
eingelernt und zu Joblisten beliebig kombiniert werden. Dies vermeidet Fehlvernietungen, fehlende oder falsche Verbinder und hilft, die Prozesssicherheit zu steigern und damit einhergehend
nachgelagerte Qualitätskosten zu senken.
Der ins Gerät integrierte Signalring nach dem Andon-Prinzip ist einmalig in der Blindniettechnik.
Dieser visualisiert - auch im Funkschatten, ohne Verbindung zur App - die Informationen des Nietprozesses sowie des Gerätestatus unmittelbar dem Werkerumfeld. Die Farbauswahl ist dabei
individuell einstellbar.
Page 4
4
2. Download der iBird® Pro-App
2.1 Allgemein
Die iBird® Pro-App kann von der GESIPA®-Website heruntergeladen werden. Sie steht als Android
und iOS-Version zur Verfügung.
Smartphone oder Tablet so einstellen, dass der Download „fremder“ Apps erlaubt
ist. Bei Android erfolgt die Abfrage hierzu automatisch beim Download, bei
iOS-Geräten muss die Einstellung manuell wie folgt durchgeführt werden:
Einstellungen > Allgemein > Geräteverwaltung > „der GESIPA
®
App vertrauen“
Zum Download gelangt man über:
www.gesipa.com/app_download
oder dem QR-Code in der Kurzanleitung, die dem Gerät beigefügt ist.
2.2 Registrieren und Download
Registrieren Sie sich mit Name, E-Mail-Adresse und Firmenname. Anschließend erhalten Sie eine
E-Mail mit Ihren Zugangsdaten, um sich im geschützten Downloadbereich zum Downloaden der
App anzumelden.
Die Einstellungen Ihres Smartphones oder Tablets müssen den Download
„fremder“ Apps zulassen (siehe 2.1).
2.3 Betriebs- und Bedienungsanleitung
Die Betriebsanleitung für das Akku-Blindniet-Setzgerät ist dem Gerät in gedruckter Form beigelegt.
Die Sicherheitshinweise sowie die Gebrauchs- und Wartungsanweisungen sind zu beachten.
Die vorliegende Bedienungsanleitung der iBird® Pro-App kann von der GESIPA®-Website heruntergeladen und gedruckt werden.
Die Betriebs- und Bedienungsanleitung sind außerdem in der iBird® Pro-App hinterlegt.
Page 5
5
3. Verbinden von App und Gerät
Zum Verbinden des iBird® Pro mit der iBird® Pro-App den gelben Auslöseschalter drücken.
Das Gerät führt einen Leerhub aus und der Andonring des iBird
®
Pro leuchtet auf (Farbe kann
variieren, abhängig von der letzten Einstellung).
Der iBird® Pro schaltet nach ca. 10 min ab.
3.1 Direktverbindung über QR-Code
1. Öffnen der App auf Ihrem Smartphone oder Tablet.
2. Menüpunkt „Verbinden“ auswählen.
3. Menüpunkt „Direktverbindung“ auswählen.
4. QR-Code-Scanner auf dem Smartphone oder Tablet wird automatisch ausgeführt.
5. Scannen des QR-Codes am Gerät unterhalb des Auffangbehälters oder von einem der
mitgelieferten Labels.
Sobald der iBird
®
Pro eine Verbindung hergestellt hat, leuchtet der Andonring kurz blau auf.
Anschließend übermittelt der iBird
®
Pro alle Betriebsdaten an die App. Dies kann bis zu 30
Sekunden dauern.
Die mitgelieferten Labels enthalten den QR-Code des Gerätes. Kleben Sie diese
in die Betriebsanleitung, in den Gerätekoffer oder Fertigungslinie, damit Sie sich
jederzeit innerhalb der Funkreichweite mit dem iBird
®
Pro verbinden können.
3.2 Manuelles Verbinden
3.2.1 Android-Smartphone oder -Tablet
1. Menüpunkt „WLAN“ auswählen.
2. Es werden alle in der Funkreichweite befindlichen iBird® Pro aufgelistet.
3. iBird
®
Pro auswählen, mit dem die Verbindung hergestellt werden soll.
4. Passwort des iBird
®
Pro eingeben. Dieses befindet sich im Batterieschacht
des Gerätes oder auf den mitgelieferten Labels.
Sobald der iBird® Pro eine Verbindung hergestellt hat, leuchtet der Andonring kurz blau auf.
Anschließend übermittelt der iBird
®
Pro alle Betriebsdaten an die App. Dies kann bis zu 30
Sekunden dauern.
Page 6

6
3. Verbinden von App und Gerät
3.2.2 iOS-Smartphone oder -Tablet
1. Verfügbares WLAN über das Smartphone oder Tablet suchen.
2. Es werden alle in der Funkreichweite befindlichen iBird
®
Pro aufgelistet.
3. iBird
®
Pro auswählen, mit dem die Verbindung hergestellt werden soll.
4. Passwort des iBird
®
Pro eingeben. Dieses befindet sich im Batterieschacht des Gerätes oder
auf den mitgelieferten Labels.
Sobald der iBird® Pro eine Verbindung hergestellt hat, leuchtet der Andonring kurz blau auf.
Anschließend übermittelt der iBird
®
Pro alle Betriebsdaten an die App. Dies kann bis zu 60
Sekunden dauern.
3.3 Verbinden über Bluetooth
1. Menüpunkt „Bluetooth“ auswählen.
2. Eingabe des Bluetooth PIN des Gerätes in der App.
Sobald der iBird® Pro eine Verbindung hergestellt hat, leuchtet der Andonring kurz blau auf.
Anschließend übermittelt der iBird
®
Pro alle Betriebsdaten an die App. Dies kann bis zu 30
Sekunden dauern.
Page 7
7
4. Gerätesteuerung
Der iBird® Pro ist so konzipiert, dass er jederzeit im Funkschatten autark auch ohne Verbindung zur
App arbeiten kann. Alle Einstellungen und Werte sind im Gerät gespeichert. Sobald eine Verbindung zur App hergestellt werden kann, übermittelt der iBird
®
Pro die letzten Werte an die iBird®
Pro-App.
Mit einem iBird
®
Pro können sich gleichzeitig bis zu 3 Smartphones/Tablets gleichberechtigt ver-
binden.
Die hier gezeigten Darstellungen und Anordnungen können bei gleicher
Funkti onalität von Ihrem Smartphone oder Tablet abweichen (je nach Gerät
und Betriebssystem).
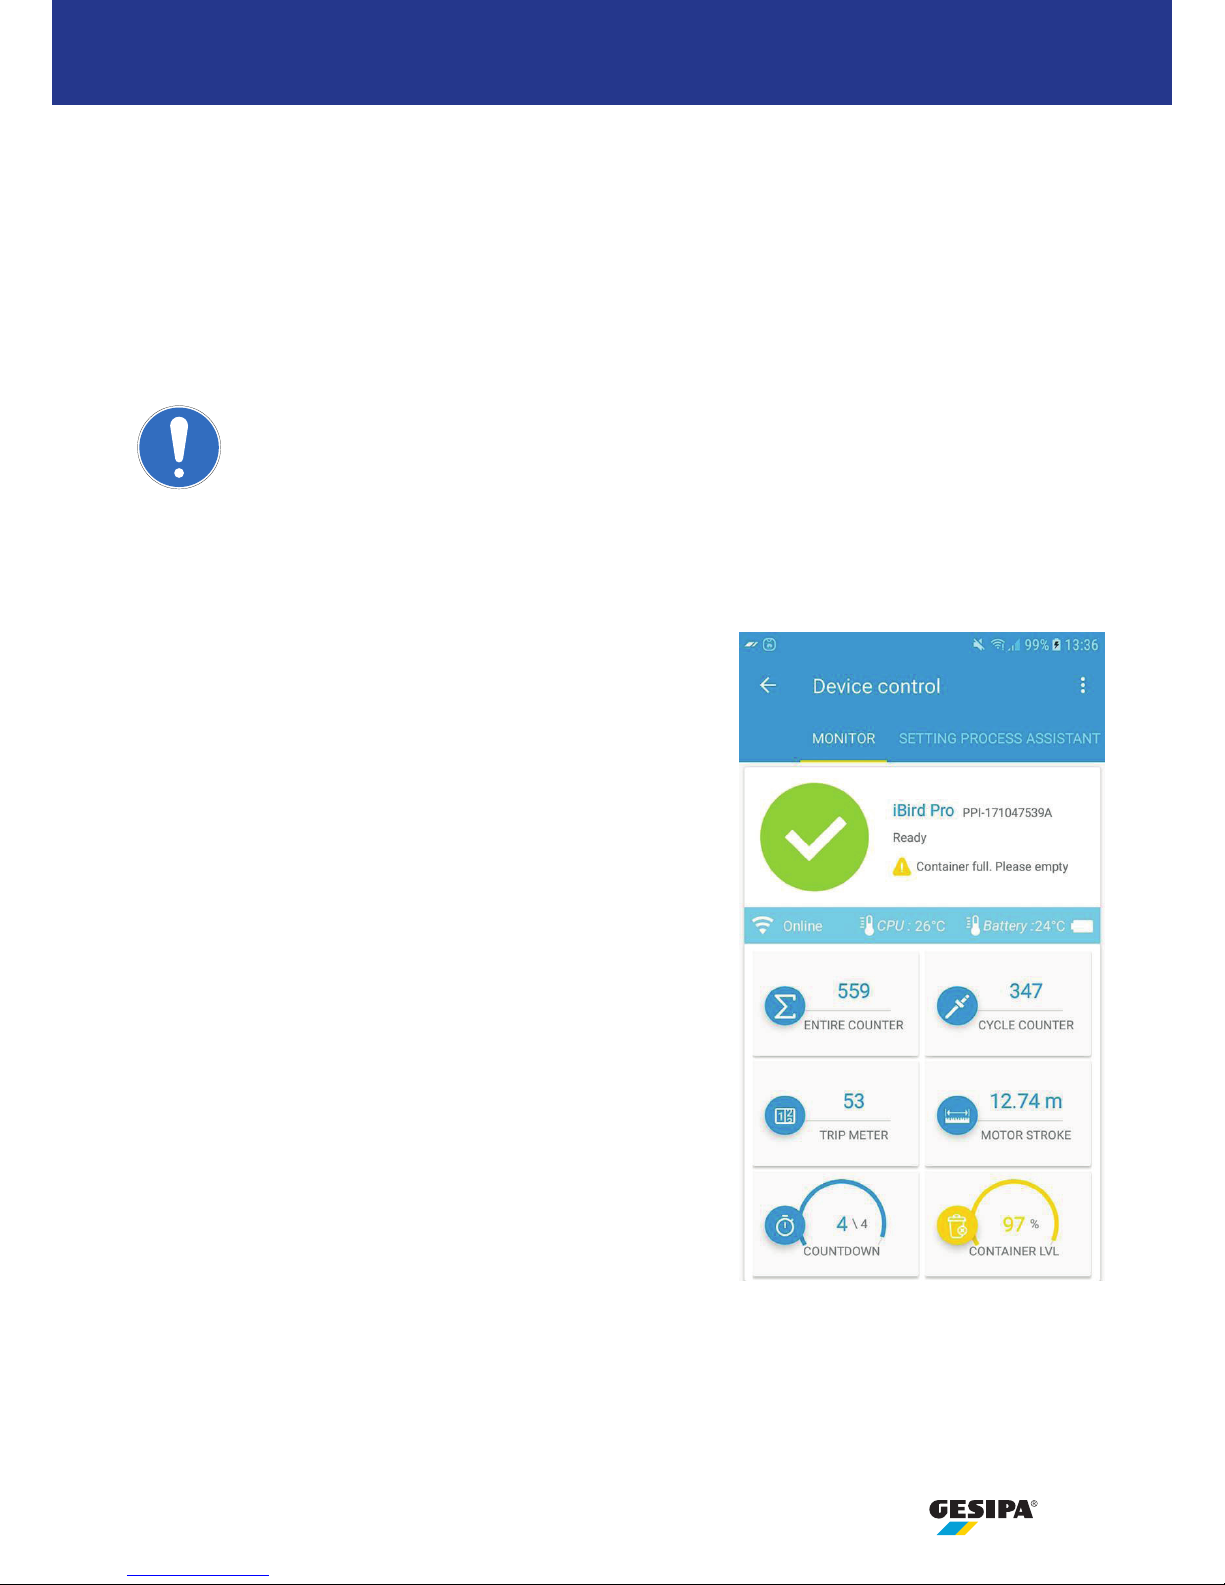
4.1 Allgemein (Cockpit)
Betriebsstatus
z.B. Setzergebnis, Verbindungsstatus, Gerätename,
Leerhub, Funkfeldstärke, Temperatur Steuerung,
Akku-Temperatur, Akkuladung
Gesamtzähler (nicht löschbar)
Gesamthübe des Gerätes inkl. Leerhübe
Setzzähler (nicht löschbar)
Zählt nur gesetzte Blindniete
Tageszähler
Wie Setzzähler, jedoch jederzeit nullbar
Motorweg (nicht löschbar)
Laufleistung des Motors unter Last
Countdown
Zählt abwärts bis Null, mit Repeat-Funktion,
Einstellen durch Antippen
Füllstand
Vorgegebener Durchschnittswert (100 Stück),
Nullen durch Antippen
Page 8
8
4. Gerätesteuerung
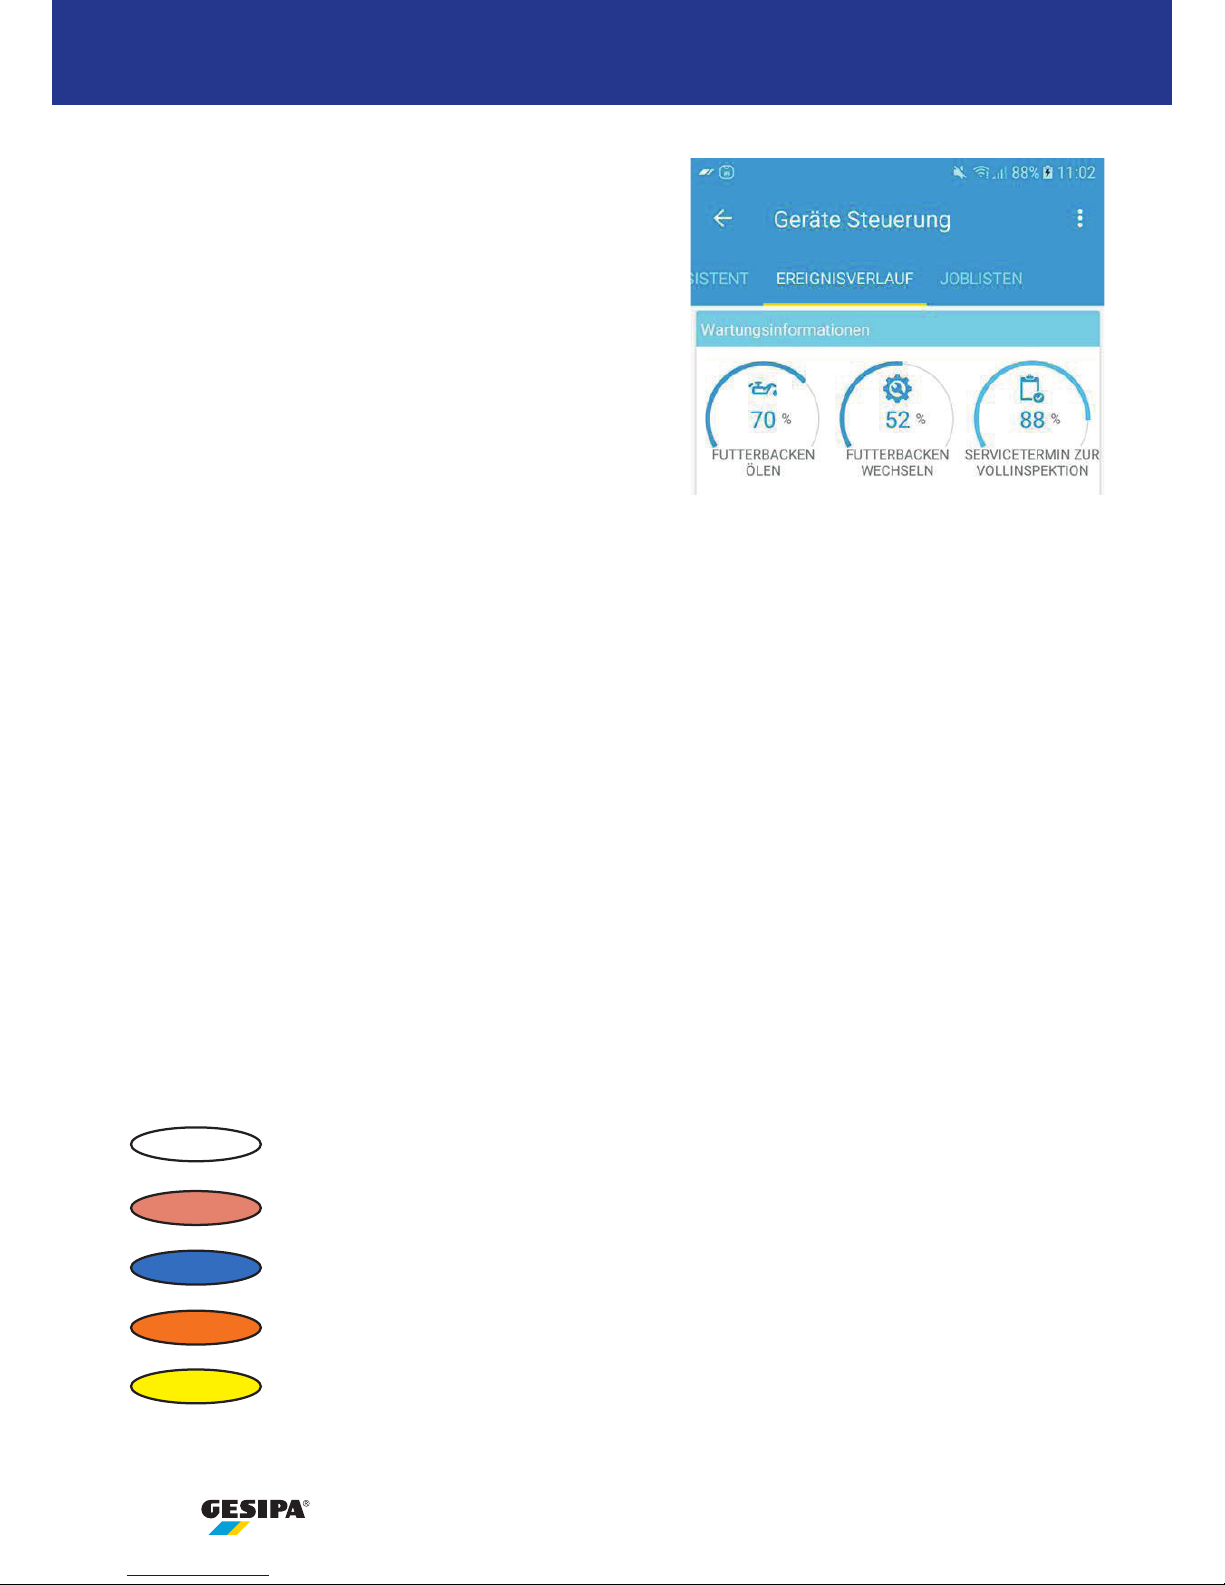
4.2 Wartungsinformationen
Serviceanzeigen
Die Serviceanzeigen basieren auf Durchschnittswerten
und können durch Antippen zurückgesetzt werden.
- Futterbacken reinigen und ölen (ca. 5.000 Stk.)
- Futterbacken wechseln (ca. 30.000 Stk.)
- Vollservice durch GESIPA
®
(ca. 2 Jahre,
siehe Betriebsanleitung Gerät)
4.3 Ereignisverlauf
Der Ereignisverlauf zeigt die letzten 20 Ereignisse an, wie z.B. „voller Auffangbehälter“, „Akku
leer“, aufgetretene Fehler oder anstehende Wartungen.
Zum Quittieren von Ereignissen auf das entsprechende Symbol klicken.
4.4 Einstellungen
4.4.1 Individuelle Farbeinstellung des Andonrings
Die Farbvorgaben des Andonringes können mit der iBird
®
Pro-App individuell betrieblichen
Vorgaben oder für Menschen mit Farbsehschwäche geändert werden.
Um die Akkureichweite zu verlängern, leuchtet der Andonring im Energiesparmodus nur bei
NOK-Nietvorgängen (rot).
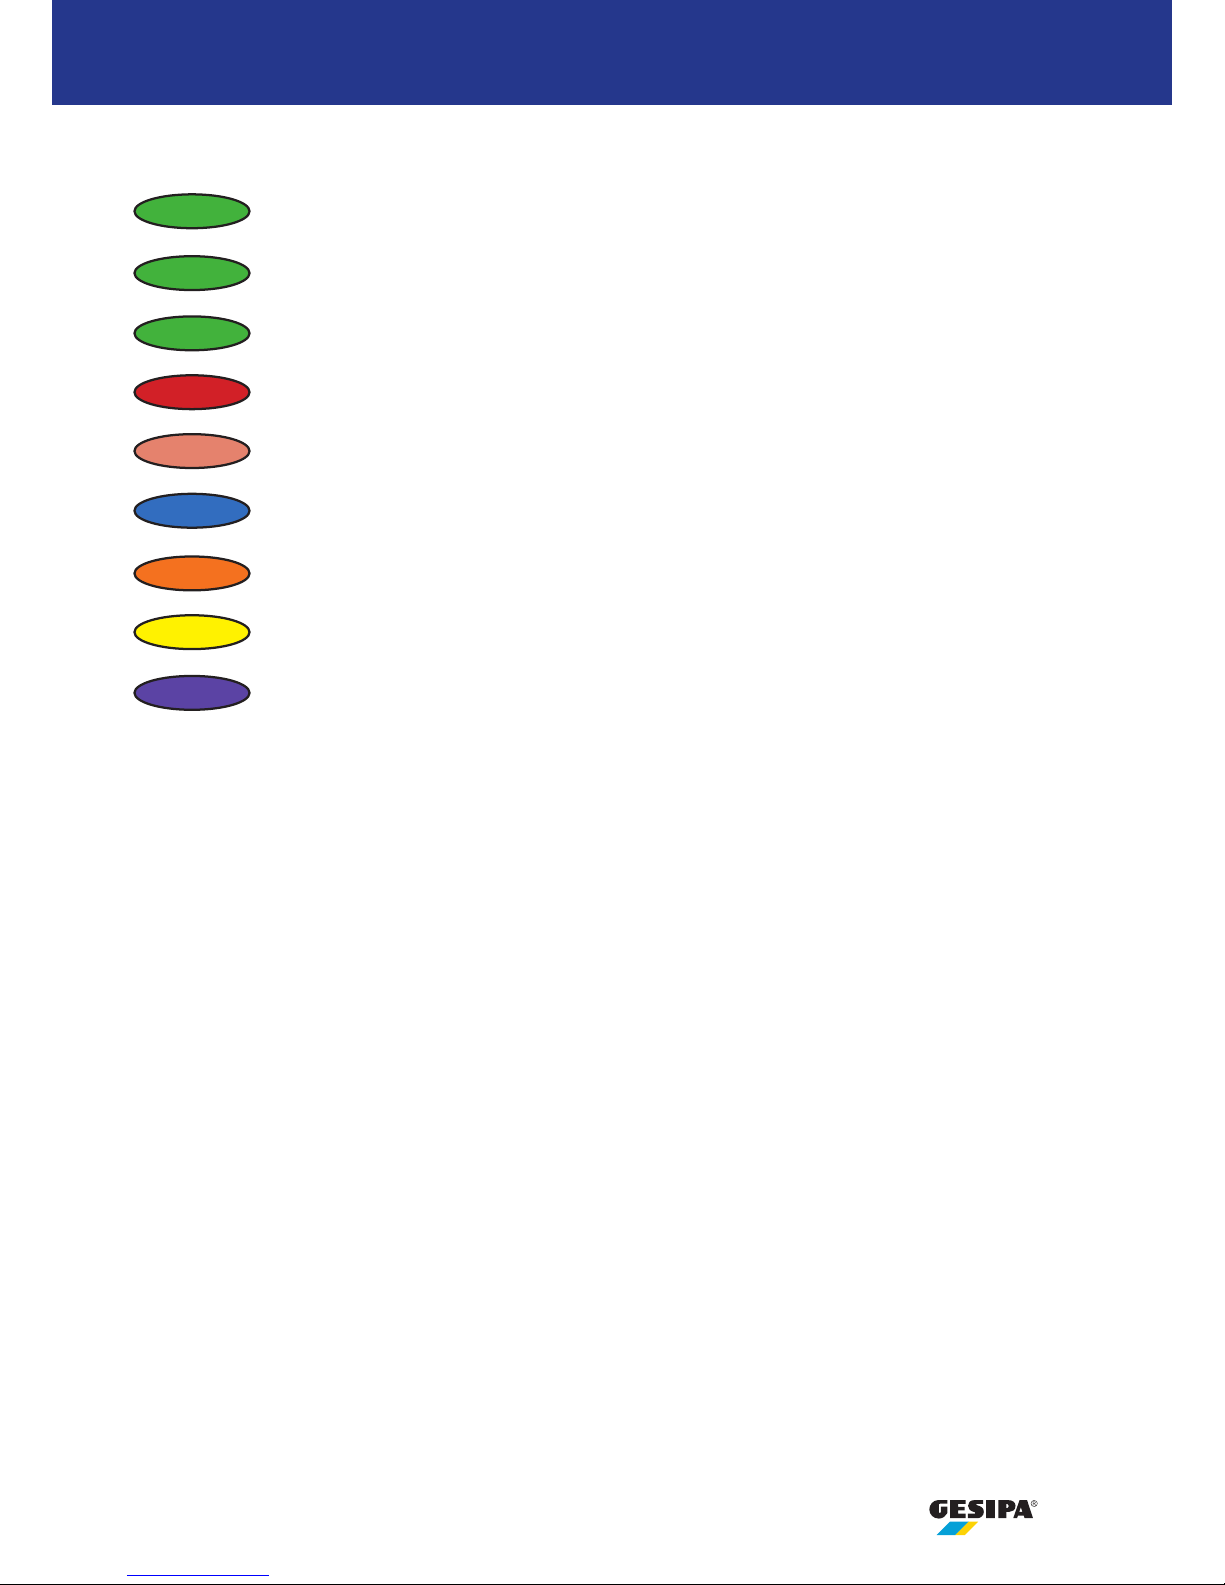
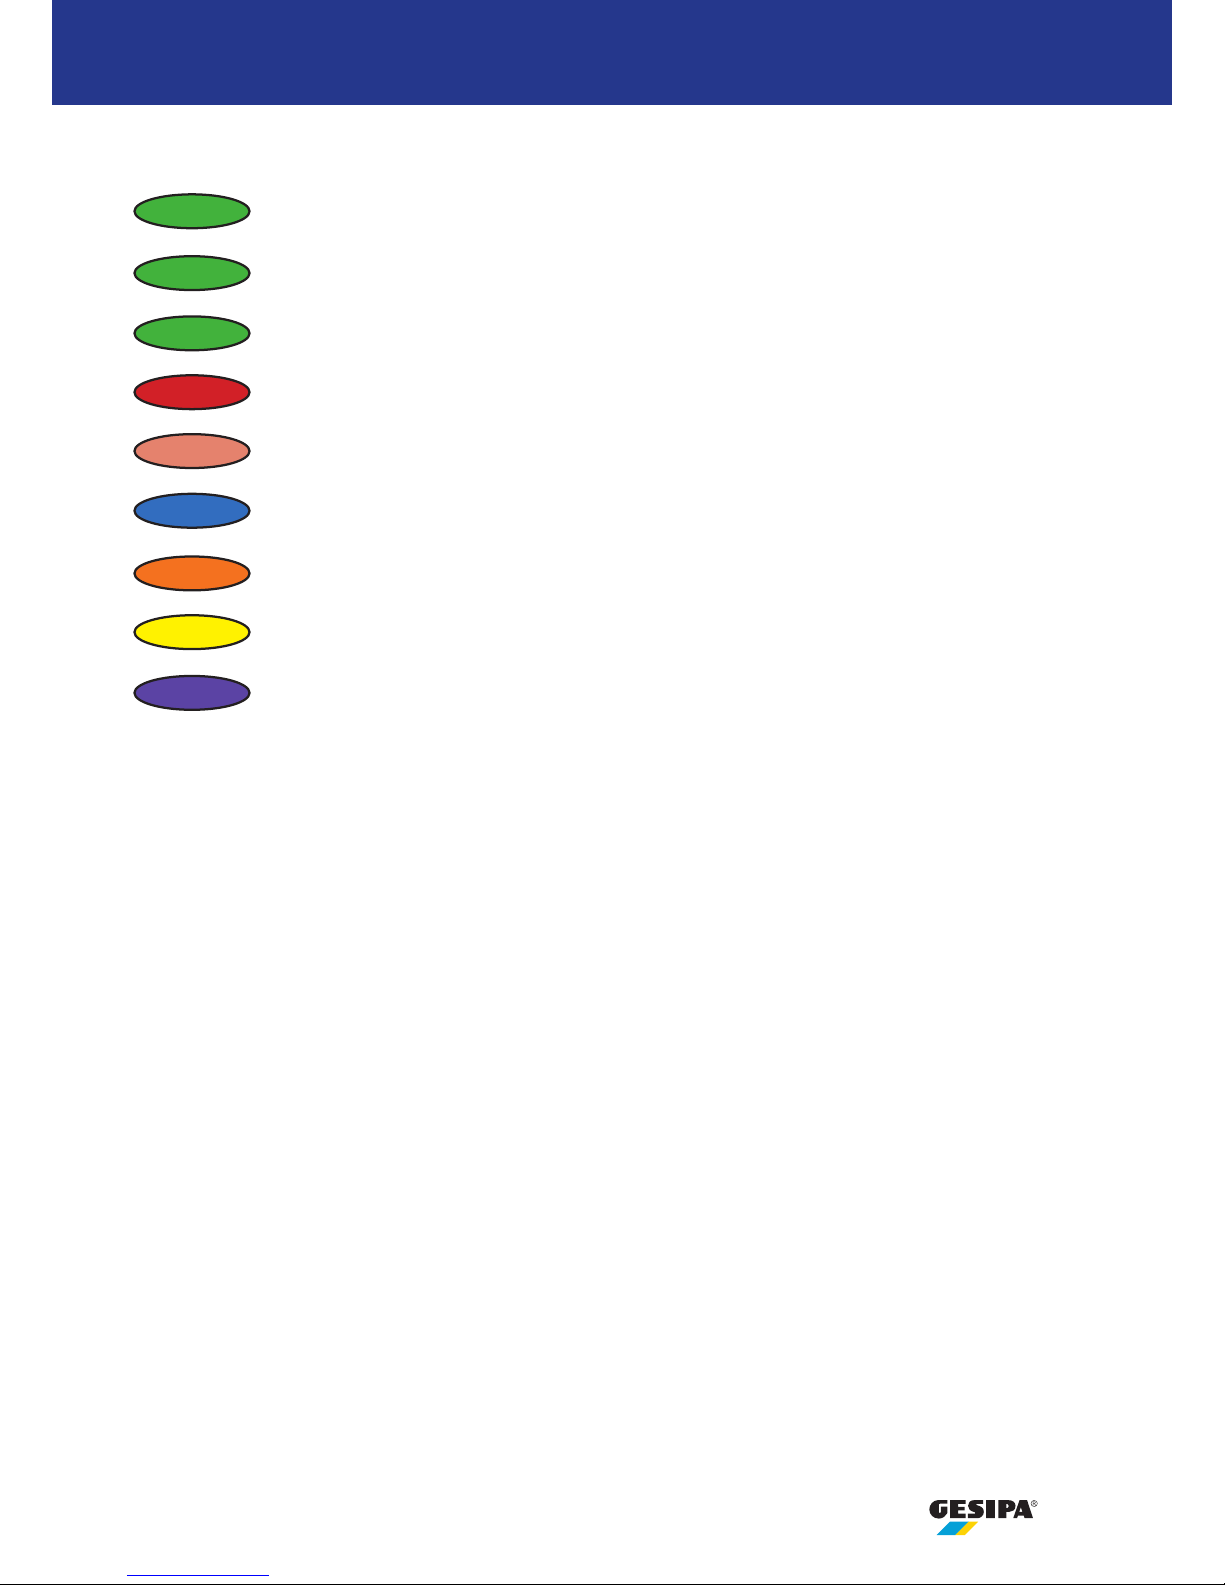
Standardeinstellung ohne Setzprozess-Assistent
Nietvorgang
Leerhub
Funkverbindung
Störung
Wartung erforderlich
weiß
rot (hell)
blau
orange
gelb
Page 9
9
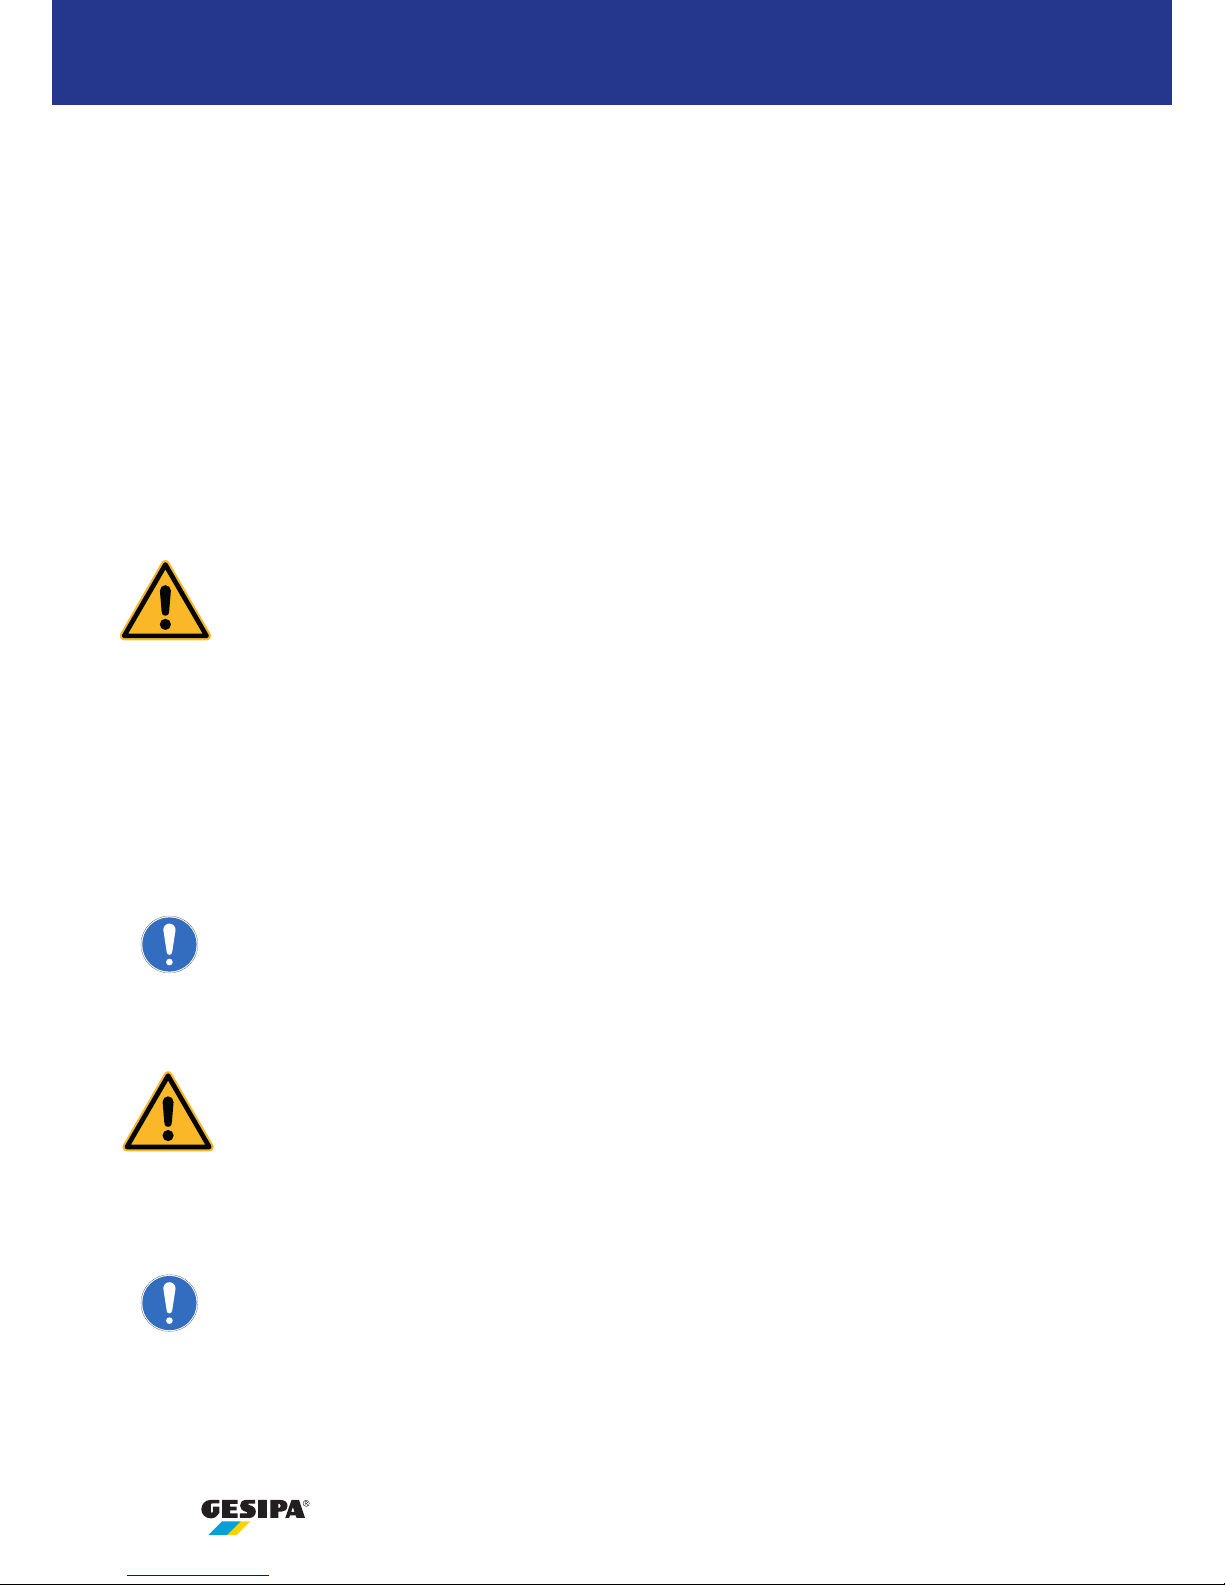
Standardeinstellung mit Setzprozess-Assistent
4. Gerätesteuerung
4.4.2 Kippsensor
Durch die Aktivierung des Kippsensors kann sichergestellt werden, dass der iBird
®
Pro nach jedem
Nietvorgang nach hinten gekippt werden muss (ca. 75-105°). Damit wird die Dornentsorgung in
den Auffangbehälter sichergestellt. Andernfalls wird das Gerät für den nächsten Nietvorgang nicht
freigegeben.
Bei Nietpositionen nach oben (ca. 75-105°) wird der nächste Nietvorgang sofort freigegeben.
4.5 Hilfe
Durch Antippen wird die Online-Hilfefunktion für jeweils die entsprechende Anzeige aufgerufen
(nicht für iOS verfügbar).
OK-Nietvorgang
Jobliste nächster Niet OK
Jobliste abgearbeitet OK
NOK-Nietvorgang
Leerhub
Funkverbindung
Störung
Wartung erforderlich
Einlernmodus
2x grün
3x grün
3x rot
grün
rot (hell)
blau
orange
gelb
lila
Page 10
10
5. Setzprozess-Assistent (optional)
Der Setzprozess-Assistent kann im Rahmen seiner Anwendungsgrenzen abweichende Nietprozesse erkennen und Sie bei der Beurteilung der Nietergebnisse unterstützen. Hierzu können Nietkonfigurationen eingelernt und diese zu Joblisten beliebig kombiniert werden. Der Andonring leuchtet
je nach Setzprozessbewertung und Farbeinstellung. In der iBird
®
Pro-App werden die Setzergeb-
nisse graphisch dargestellt ( unter Menüpunkt „Gerätesteuerung“).
Eine Nietkonfiguration besteht aus dem verwendeten Niet und dem damit zu verbindenden
Originalmaterial (Applikation).
Zum Freischalten des Setzprozess-Assistenten (Artikelnummer 157 0451) schalten Sie den iBird®
Pro ein (Drücken des gelben Auslöseknopfes). Legen Sie die NFC-Karte flach auf die Oberseite
des iBird
®
Pro im Bereich des Aufhängers wie auf der NFC-Karte dargestellt.
Jede NFC-Karte kann nur für ein Gerät verwendet werden. Nach Aktivierung des
Setzprozess-Assistenten für ein Gerät ist die Karte verbraucht und es können
keine weiteren Geräte aktiviert werden.
5.1 Nietkonfiguration einlernen
1. iBird® Pro einschalten (Drücken des gelben Auslöseknopfes).
2. Zum Einlernen einer Nietkonfiguration den Setzprozess-Assistenten in der iBird
®
Pro-App
einschalten.
3. Pluszeichen antippen.
Der Andonring des iBird
®
Pro leuchtet dauerhaft lila, solange der Einlernmodus
aktiv ist.
4. Durch Antippen die Nietkonfiguration auswählen, die eingelernt werden soll.
Durch Schritt 3 ist noch keine Nietkonfiguration ausgewählt, ein Antippen ist
immer erforderlich. Die ausgewählte Nietkonfiguration ist blau unterstrichen
(Android) oder blau hinterlegt (iOS).
5. Name für die Nietkonfiguration angeben.
6. Anzahl der einzulernenden Niete eingeben.
Der Standardwert ist 4, es können aber auch weniger oder mehr
Niete eingelernt werden.
7. Antippen „ANLERNEN STARTEN“. Die Anzahl der anzulernenden Niete wird heruntergezählt.
Der Einlernmodus wird automatisch beendet.
Page 11

11
5.2 Nietkonfiguration verwenden
Tippen Sie die Nietkonfiguration an, die Sie verwenden möchten. Beurteilen Sie das Nietergebnis.
Über den Drehregler können Sie die Toleranz für diese Nietkonfiguration einstellen.
Die letzten 5 Nietvorgänge werden schematisch dargestellt, wobei die ältesten Ergebnisse verblassen. Ergebnisse im Toleranzfeld werden durch einen blauen Punkt angezeigt, Ergebnisse
außerhalb durch einen roten Punkt.
5. Setzprozess-Assistent (optional)
Der iBird® Pro befindet sich immer in der zuletzt ausgeführten Nietkonfiguration.
Soll die neu eingelernte Nietkonfiguration verwendet werden, so ist diese durch
Antippen auszuwählen.
Der Einlernmodus kann verkürzt oder abgebrochen werden. Abbruch erfolgt
durch die iBird
®
Pro-App oder durch einen Leerhub des iBird® Pro. Es werden
keine Werte gespeichert. Das Abkürzen erfolgt durch Antippen der entsprechen den Funktion in der iBird
®
Pro-App. Werte der Nietkonfiguration werden auf
Basis der bis dahin eingelernten Niete berechnet.
Löschen von Nietkonfigurationen erfolgt durch Überschreiben.
Page 12
12
5. Setzprozess-Assistent (optional)
5.4 Joblisten verwenden
Tippen Sie die Jobliste an, die Sie verwenden möchten. Die Jobliste zeigt untereinander die ausgewählten Nietkonfigurationen mit der jeweils definierten Anzahl der zu vernietenden Niete an.
Durch zwei Pfeile am Zeilenanfang ist zu erkennen, in welchem Arbeitsschritt sich der iBird® Pro
befindet. Außerdem ist die aktive Zeile blau hervorgehoben.
Die verbleibende Nietanzahl für den jeweiligen Arbeitsschritt wird oben rechts angezeigt.
Erfolgreiches Beenden eines Arbeitsschrittes wird jeweils am Ende mit einem 3x grünen Blinken
am Andonring signalisiert (Standardeinstellung).
5.3 Joblisten definieren
1. iBird® Pro einschalten (Drücken des gelben Auslöseknopfes).
2. Zur Definition einer Jobliste den Setzprozess-Assistenten in der iBird
®
Pro-App einschalten und
die Joblisten aktivieren.
3. Pluszeichen antippen.
Durch Schritt 3 ist noch keine Jobliste ausgewählt, ein Antippen ist immer
erforderlich. Die ausgewählte Jobliste ist blau unterstrichen (Android) oder blau
hinterlegt (iOS).
4. Durch Antippen die Jobliste auswählen, die definiert werden soll.
5. Name der Jobliste eingeben.
6. „NEU“ antippen.
7. Nietkonfiguration auswählen.
8. Anzahl der zu verarbeitenden Niete mit der ausgewählten Nietkonfiguration eingeben und mit
OK bestätigen.
Schritte 6-8 so oft wiederholen, bis die Jobliste definiert ist.
9. „SPEICHERN“ antippen. Die Jobliste ist definiert.
Der iBird
®
Pro befindet sich in der zuletzt ausgeführten Jobliste. Soll die neu definierte
Jobliste verwendet werden, so ist diese durch Antippen auszuwählen.
Löschen von Joblisten erfolgt durch Überschreiben.
Page 13

13
6. Betrieb und Wartung
Unter dem Menüpunkt Betrieb und Wartung erhalten Sie zahlreiche Hinweise und Tipps zur Handhabung des iBird
®
Pro.
Darüber hinaus sind die Betriebs- und Bedienungsanleitung in der iBird
®
Pro-App hinterlegt.
Page 14

14
Index
1. General ........................................................................................................ 15
2. Download the iBird
®
Pro app .................................................................... 16
2.1 General .................................................................................................. 16
2.2 Register and download .......................................................................... 16
2.3 Operating instructions ............................................................................ 16
3. Connecting the app and device ................................................................ 17
3.1 Direct connection via QR-Code .............................................................. 17
3.2 Manual connection ................................................................................ 17
3.2.1 Android smartphone or tablet ................................................... 17
3.2.2 iOS smartphone or tablet .......................................................... 18
3.3 Connect via Bluetooth ........................................................................... 18
4. Tool control ................................................................................................. 19
4.1 General (Cockpit) .................................................................................... 19
4.2 Maintenance information ....................................................................... 20
4.3 Event history .......................................................................................... 20
4.4 Settings .................................................................................................. 20
4.4.1 Individual colour setting of the Andon ring ................................ 20
4.4.2 Tilt sensor .................................................................................. 21
4.5 Assistance .............................................................................................. 21
5. Setting process assistant (optional) ........................................................ 22
5.1 Teach-in riveting configuration ................................................................ 22
5.2 Use rivet configuration ........................................................................... 23
5.3 Define job list ......................................................................................... 24
5.4 Use job lists ........................................................................................... 24
6. Operation & maintenance ......................................................................... 25
Page 15

15
1. General
iBird® Pro
GESIPA® is expanding the Bird Pro series in the shape of the iBird® Pro, a networked batterypowered riveting tool. The iBird
®
Pro has been specifically designed for integration into an
IoT/Industry 4.0 and lean production environment.
The mechanical properties correspond to the PowerBird® Pro.
That is why the operating instructions of the PowerBird
®
Pro, which has been
enclosed within the iBird
®
Pro in printed format, must be observed in terms of
safety instructions, use and maintenance.
Overview of the iBird® Pro app
The free iBird
®
Pro app available from the GESIPA® website tells you everything you need to know
about the riveting processes and the operating status of the tool at all times.
Simply connecting via the QR code keeps operators up-to-date on the various rivet counters,
countdown function, fill level indicator, service indicator and the event history, even when on the
job, at all times.
Integrated tips for handling and immediately accessible maintenance and repair instructions
quickly and simply answer all questions.
Secure processes
An option is available to upgrade the iBird
®
Pro with premium software. The setting process
assistant supports the assessment of the riveting results. In addition, riveting configurations can
be taught in and combined with the job lists in any way. This prevents incorrect riveting, missing or
incorrect fasteners and helps to increase process safety and reduce subsequent quality costs.
The signal ring integrated into the tool according to the Andon principle is unique to blind riveting.
This instantly displays the information for the riveting process and the tool status to the operator
environment, even in blackspots without a connection to the app. The colour selection can be
customised.
Page 16
16
2. Download the iBird® Pro app
2.1 General
You can download the iBird® Pro app from the GESIPA® website. It is available for Android and iOS.
Adjust the smartphone or tablet so that „unfamiliar“ apps can be downloaded.
On Android, the prompt appears automatically when downloading; on iOS
devices, the settings must be adjusted manually as follows:
Settings > General > Device management > Trust GESIPA
®
app
To download, visit
www.gesipa.com/app_download
or use the QR code in the quick guide enclosed with the tool.
2.2 Register and download
Register your name, email adress and company name. You will then receive an email with your
login data to log in to the protected download area to download the app.
The settings of your smartphone or tablet must allow the download of
„unfamiliar“ apps (view 2.1).
2.3 Operating instructions
A printed version of the operating instructions for the blind riveting tool have been enclosed with
the tool. The safety information and the use and maintenance instructions must be observed.
These operating instructions for the iBird® Pro app can be downloaded and printed from the
GESIPA
®
website.
The operating instructions are also included in the iBird
®
Pro app.
Page 17
17
3. Connecting the app and device
To connect the iBird® Pro with the iBird® Pro app, press the yellow triggering button.
The tool will carry out a return stroke and the Andon ring of the iBird
®
Pro lights up (colour may
vary depending on the last setting).
The iBird® Pro switches off after approx. 10 min.
3.1 Direct connection via QR code
1. Open the app on your smartphone or tablet.
2. Select „Connect“ menu item.
3. Select „Direct connection“ menu item.
4. QR code scanner on the smartphone or tablet is performed automatically.
5. Scan the QR code on the tool under the spent mandrel container or on one of the labels
provided.
As soon as the iBird
®
Pro has established a connection, the Andon ring briefly lights up blue. The
iBird
®
Pro then transfers all operating data to the app. This can take up to 30 seconds.
The labels provided contain the tool´s QR code. Attach these to the operating
instructions, the tool case or the production line so that you can connect to
iBird
®
Pro at any time within range.
3.2 Manual connection
3.2.1 Android smartphone or tablet
1. Select „WiFi“ menu item.
2. All the iBird® Pro tools within range are listed.
3. Select the iBird
®
Pro which you want to connect to.
4. Enter password for the iBird
®
Pro. This can be found in the battery cover of the tool or on the
labels provided.
As soon as the iBird® Pro has established a connection, the Andon ring briefly lights up blue. The
iBird
®
Pro then transfers all operating data to the app. This can take up to 30 seconds.
Page 18

18
3. Connecting the app and device
3.2.2 iOS smartphone or tablet
1. Search for available WiFi via the smartphone or tablet.
2. All the iBird
®
Pro tools within range are listed.
3. Select the iBird
®
Pro which you want to connect to.
4. Enter password for the iBird
®
Pro. This can be found in the battery cover of the tool or on the
labels provided.
As soon as the iBird® Pro has established a connection, the Andon ring briefly lights up blue. The
iBird
®
Pro then transfers all operating data to the app. This can take up to 60 seconds.
3.3 Connect via Bluetooth
1. Select „Bluetooth“ menu item.
2. Enter the Bluetooth PIN of the tool in the app.
As soon as the iBird® Pro has established a connection, the Andon ring briefly lights up blue. The
iBird
®
Pro then transfers all operating data to the app. This can take up to 30 seconds.
Page 19
19
4. Tool control
The iBird® Pro has been designed so that it can work independently in blackspots without a
connection to the app. All settings and values have been saved in the tool. As soon as a connection to the app can be established, the iBird
®
Pro transfers the recent values to the iBird® Pro app.
With an iBird
®
Pro, up to 3 smartphones/tablets can be connected simultaneously.
The images and instructions shown here may differ for the same function on
your smartphone or tablet (depending on the tool and operating system).
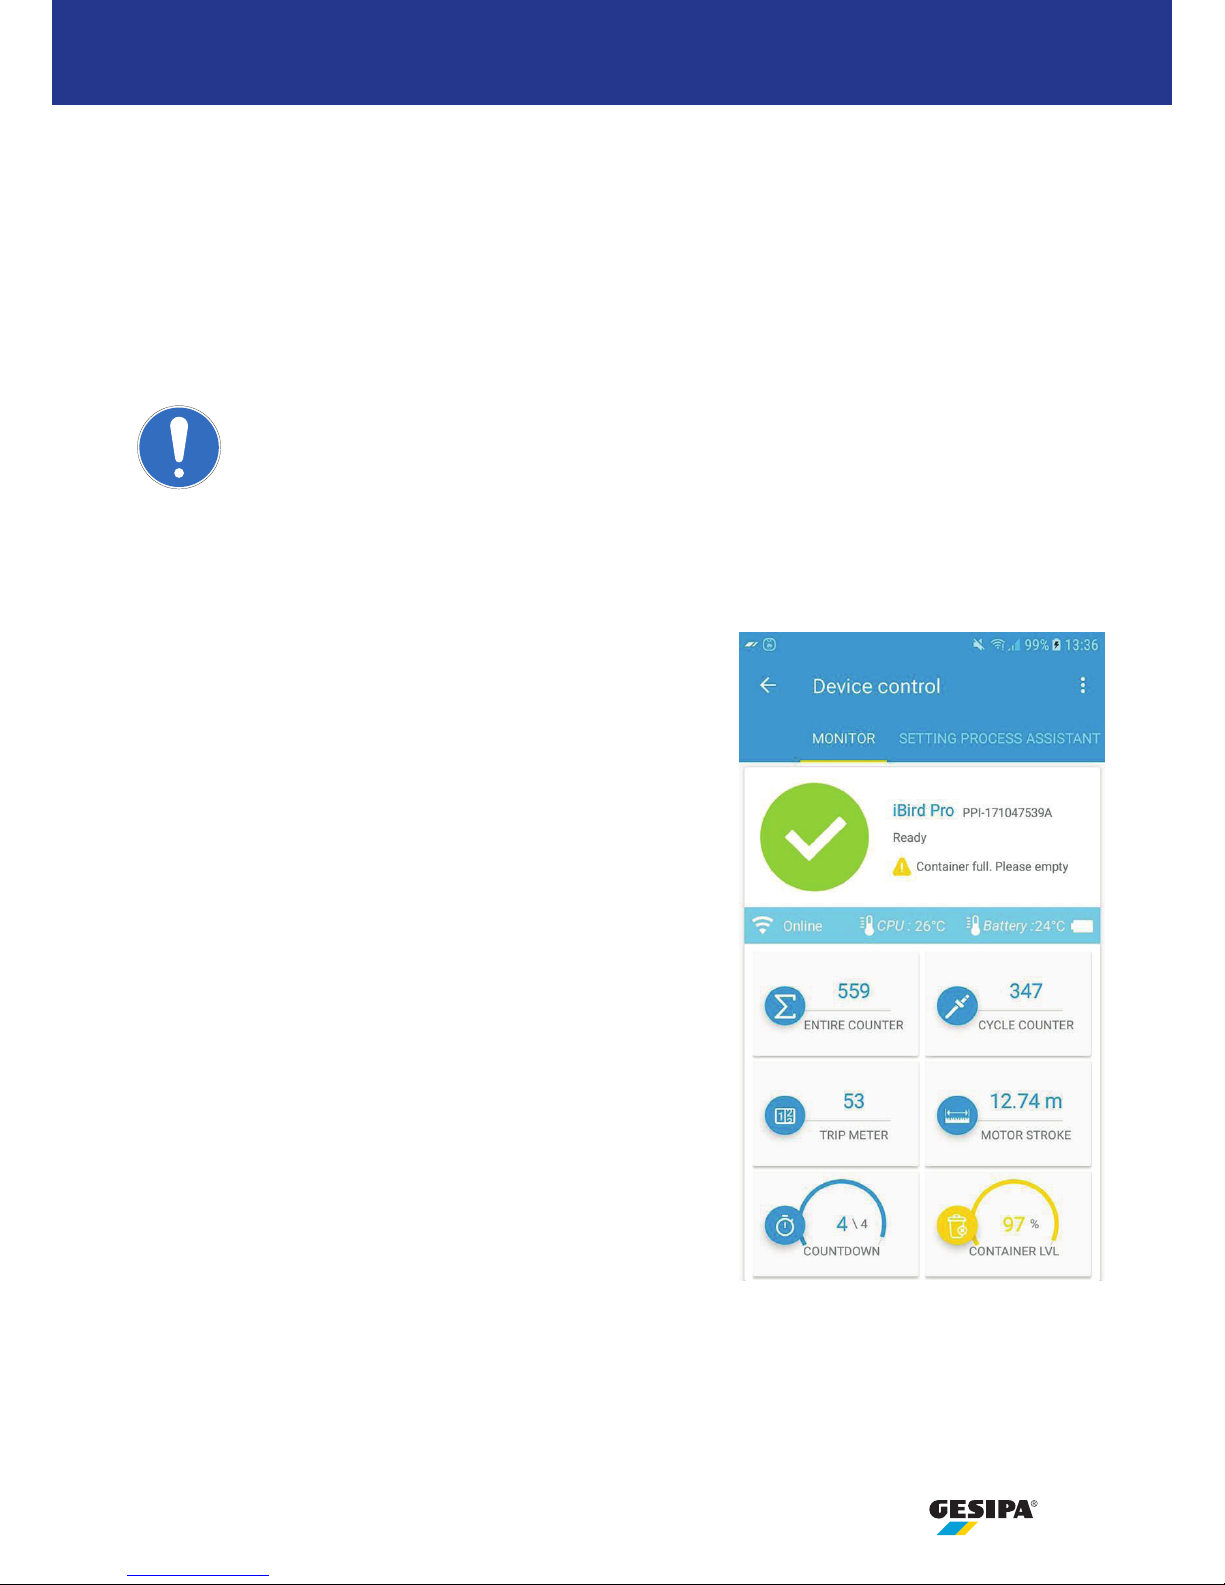
4.1 General (Cockpit)
Operating status
E.g. setting result, connection status, tool name,
return stroke, signal strength, temp. control,
temp. battery, battery charge
Total counter (not erasable)
Total tool strokes incl return strokes
Setting counter (not erasable)
Only counts set blind rivets
Day counter
Similar to setting counter, however can be set to zero
at any time
Motor run (not erasable)
Operational run of the motor under strain
Countdown
Counts backward to zero, with repeat function,
set by tapping
Fill level
Defined average value, set to zero by tapping
Page 20
20
4. Tool control
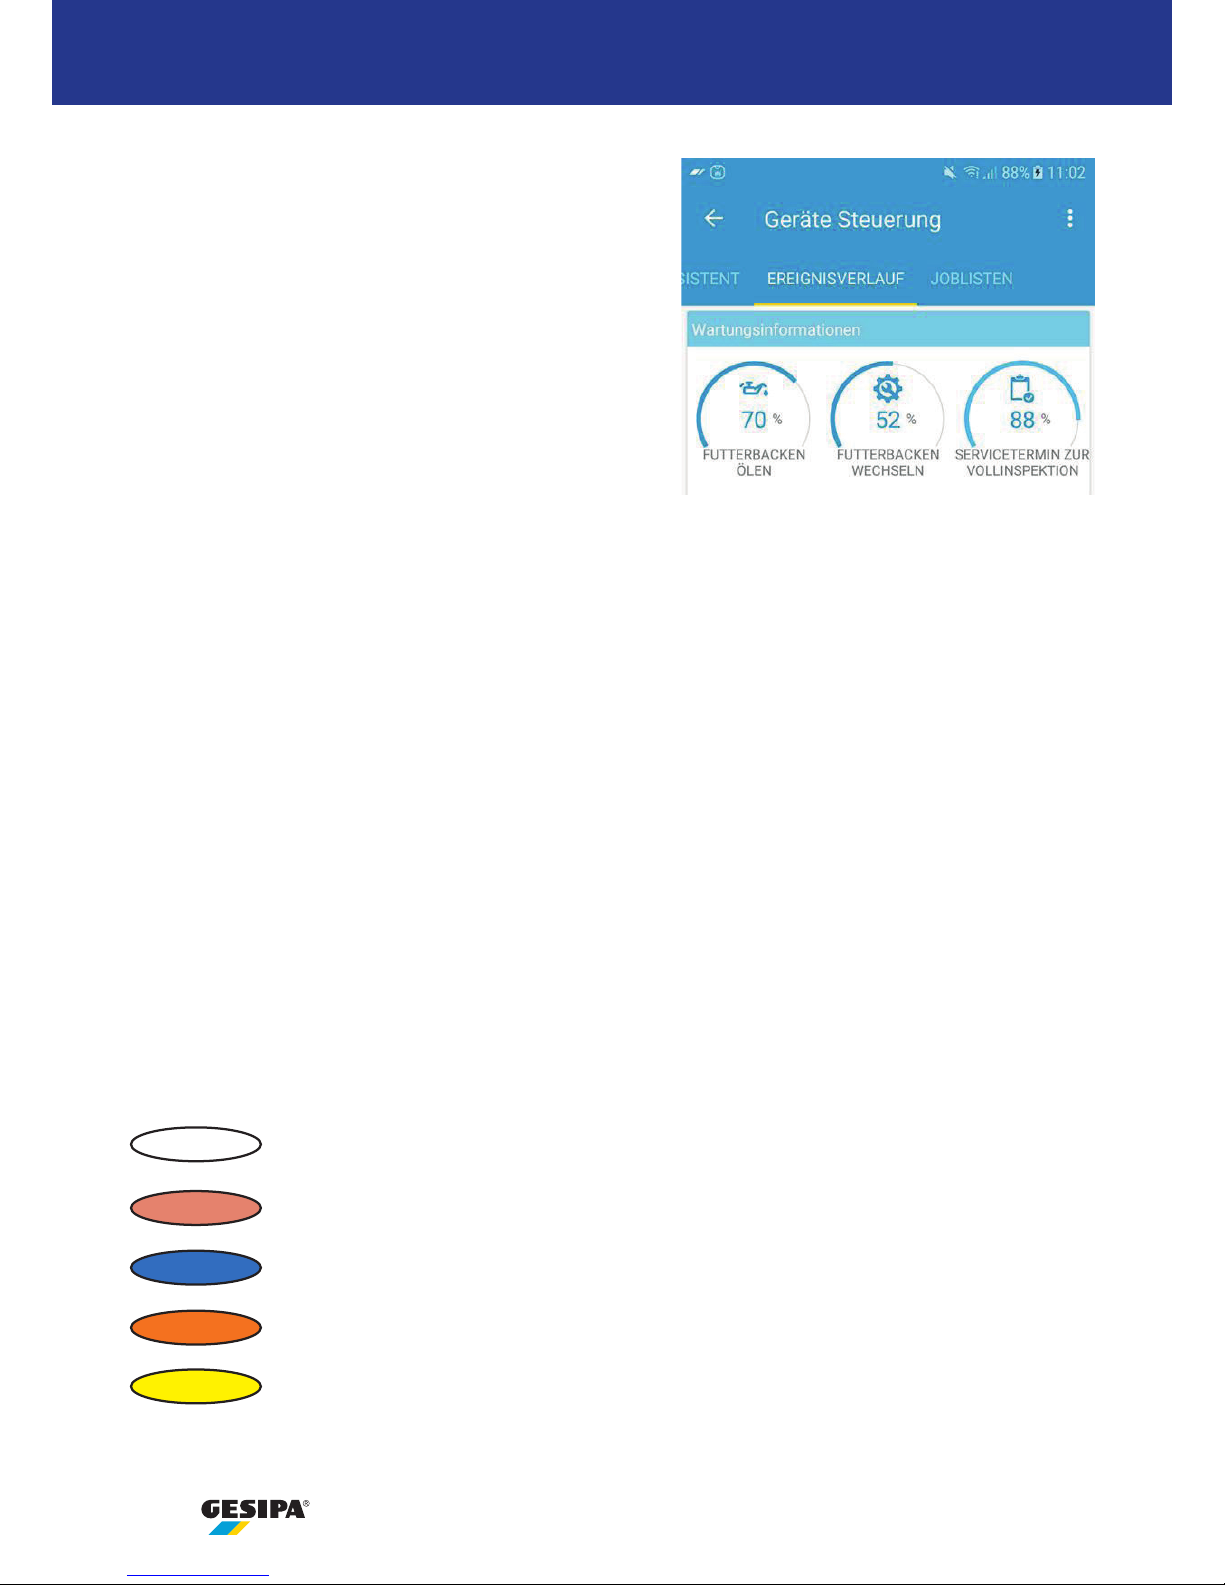
4.2 Maintenance information
Service announcements
The service announcements based on average
values and be reset by tapping.
- Clean and oil jaws (approx. 5,000 pieces)
- Change jaws (approx. 30,000 pieces)
- Full service by GESIPA
®
(approx. 2 years, see tool operating instructions)
4.3 Event history
The event history displays the last 20 events such as „full spent mandrel container“, „battery
discharged“, emerging errors or existing maintenance.
To exit the events, click on the corresponding symbol.
4.4 Settings
4.4.1 Individual colour setting of the Andon ring
Using the iBird
®
Pro app, the colour specifications can be changed individually to align with poten-
tial company guidelines or for people with colour-blindness.
To extend the battery life, the Andon ring only lights up in the energy saving mode during NOK
riveting processes (red).
Standard setting without setting process assistant
Riveting process
Return stroke
WiFi
Fault
Maintenance required
white
red (bright)
blue
orange
yellow
Page 21
21
Standard setting with the setting process assistant
4. Tool control
4.4.2 Tilt sensor
Activating the tilt sensor ensures that the iBird
®
Pro has to be tilted back after each riveting process (approx. 75-105°). This ensures that the mandrel is disposed of into the spent mandrel container. Otherwise, the tool is not released for the next riveting process.
For rivet positions upwards (approx. 75-105°), the next riveting process is released immediately.
4.5 Assistance
Tapping the online help function activates the corresponding display for each action (not available
for iOS).
OK riveting process
Job list next riveting Not OK
Job list processed OK
NOK riveting process
Return stroke
WiFi
Fault
Maintenance required
Teach-in mode
2x green
3x green
3x red
green
red (bright)
blue
orange
yellow
purple
Page 22
22
5. Setting process assistant (optional)
The setting process assistant can detect deviating riveting processes as part of its application
limits and support you with assessing the riveting results. In addition, riveting configurations can
be taught in and combined with the job lists in any way. The Andon ring lights up depending on
the setting process assessment and colour setting. In the iBird
®
Pro app, the setting results are
displayed in images ( under „Tool control“ menu item).
A rivet configuration is made up of the rivet used and the original material to be connected (application).
To activate the setting process assistant (article number 1570451), switch on the iBird® Pro (press
the yellow trigger button). Place the NFC card flat on the top of the iBird
®
Pro near the container
as shown on the NFC card.
Each NFC card can only be used for one tool. When activating the setting process
assistant for a tool, the card is used and no additional tools can be activated.
5.1 Teach-in riveting configuration
1. Switch on iBird® Pro (press the yellow trigger button).
2. To teach-in a rivet configuration, activate the setting process assistant in the iBird
®
Pro app.
3. Tap the plus sign.
The Andon ring on the iBird
®
Pro lights up in constant purple as long as the
teach-in mode is active.
4. Select the rivet configuration to be taught in by tapping.
If no rivet configuration has been selected by step 3, tapping is always required.
The selected rivet configuration is underlined in blue (Android) or indicated by a
blue background (iOS).
5. Enter name for the rivet configuration.
6. Enter number of rivets to be taught in.
The standard value is 4, however fewer or more rivets can be taught in.
7. Tap „Start teaching“. The number of rivets to be taught in is counted down. The teach-in mode
ends automatically.
Page 23
23
5.2 Use rivet configuration
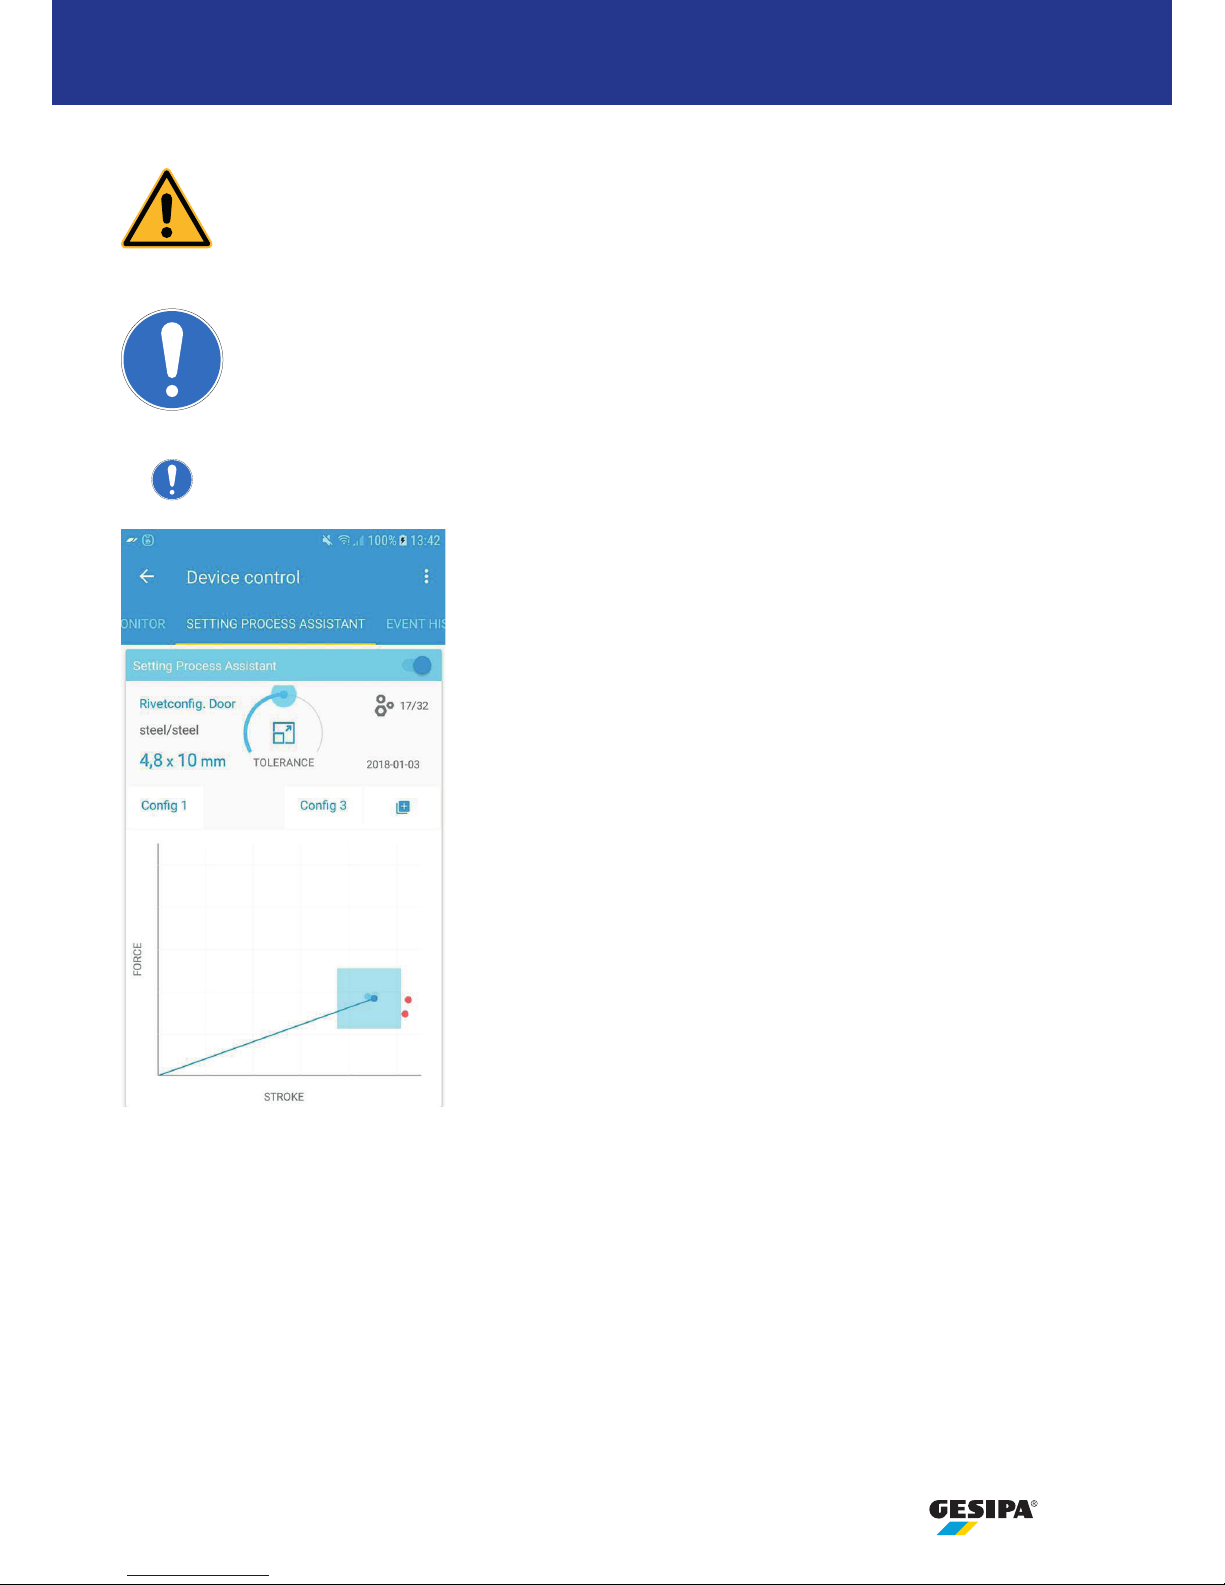
Tap the rivet configuration you would like to use. Assess the rivet result. You can set the tolerance
for this rivet configuration by means of the control dial.
The last 5 riveting processes are displayed schematically with the oldest results faded out.
Results in the tolerance field are displayed by a blue point; results outside of this are indicated by
a red point.
5. Setting process assistant (optional)
The iBird® Pro is always set to the rivet configuration performed most recently.
If the recently taught in rivet configuration is used, select this by tapping.
The teach-in mode can be shortened or cancelled. Cancel by using the iBird
®
Pro
app or by a return stroke of the iBird
®
Pro. No values are saved. Shorten by
tapping the corresponding function in the iBird
®
Pro app. Values of the rivet
configuration are calculated based on the rivets taught in up to that point.
Rivet configurations are deleted by overwriting.
Page 24
24
5. Setting process assistant (optional)
5.4 Use job lists
Tap the job list you would like to use. The job list displays the selected rivet configurations
together with each defined number of rivets being riveted.
The two arrows at the beginning of the line indicate which work step the iBird® Pro is in.
In addition, the active lines are highlighted in blue.
The remaining number of rivets for the respect work step is shown on the top right.
Successfully completing a work step is signalled at the end with a light flashing green 3 times on
the Andond ring (standard setting).
5.3 Define job list
1. Switch on iBird® Pro (press the yellow trigger button)
2. To define a job list, activate the setting process assistant in the iBird
®
Pro app and activate the
job lists.
3. Tap the plus sign.
If no job list has been selected by step 3, you need to tap on it. The selected job
list is underlined in blue (Android) or indicated by a blue background (iOS).
4. Select the job list to be defined by tapping.
5. Enter the name of the job list.
6. Tap „NEW“.
7. Select rivet configuration.
8. Enter the number of rivets to be processed with the selected rivet configuration confirm with
OK.
Repeat steps 6-8 as often as necessary until the job list is defined.
9. Tap „Save“. The job list is defined.
The iBird
®
Pro is set to the job list performed most recently. If the recently defined job
list is to be used, select this by tapping.
Job lists are deleted by overwriting.
Page 25

25
6. Operation & maintenance
You will find many tips and tricks for using the iBird® Pro under the menu item Operating & Maintenance.
In addition, the operating instructions are stored in the iBird® Pro app.
 Loading...