

Page 1

UVC-XP3-HR(-P)
Camera User
its environment. The camera is able to get the best
possible images in any situation and at any
temperatures within its operating specifications.
User guidelines
Use the following guidelines:
Manual
Content
Product description 1
User guidelines 1
Package contents 1
Installation 2
Video connections 2
Set the lens mode 2
Attach the lens 2
Connect power 3
Mount the camera 3
Connect the monitor 3
Programming 3
OSD controls 3
Main menu 3
Presets menu 4
Setup menu 4
Viewing menu 5
Exposure menu 7
White balance menu 8
Save/restore menu 8
Regulatory information 8
Menu Map 10
• Program as many camera settings as possible
before mounting the camera. Take appropriate
safety precautions while completing programming
after installation.
• Always use a 12 VDC or 24 VAC UL listed Class 2
power supply to power the camera.
Donotusethecameraoutsidethetemperaturerange
specifications:‐57to122°F(‐50to+50°C).
• If the light source where the camera is installed
experiences rapid, wide- variations in lighting, the
camera may not operate as intended.
WARNING: To reduce the risk of fire or electronic
shock, do not expose the camera to rain or moisture and
do not remove the cover or back.
Package contents
Check the package and contents for visible damage. If
any components are damaged or missing, do not
attempt to use the unit; contact the supplier immediately.
If the unit is returned, it must be shipped back in its
original packaging.
Package contents:
Multilingual Installation Sheet
Product description
This color video camera is the next generation in wide
dynamic range cameras. It uses the latest in UTC
Xposure image analysis technology.
The sensor architecture provides unequaled wide
dynamic range performance and improves how the
camera deals with low-light conditions.
Another revolutionary feature of the UltraView XP3 is
dual-temperature calibration. The UVC-XP3-HR is
calibrated at the factory, so the camera knows how to
adjust gain, white balance, and other settings based on
P/N UVC-XP3-HR • REV R3.0 • ISS 08-2011
CD with User Manual in several languages
Camera
C-mount adaptor
CAUTION: Use direct plug-in UL listed power supplies
marked Class 2 or LPS (limited power source) of the
required output rating as listed on the unit.
Page 2
Installation
This chapter provides information on how to install the
camera.
Video connections
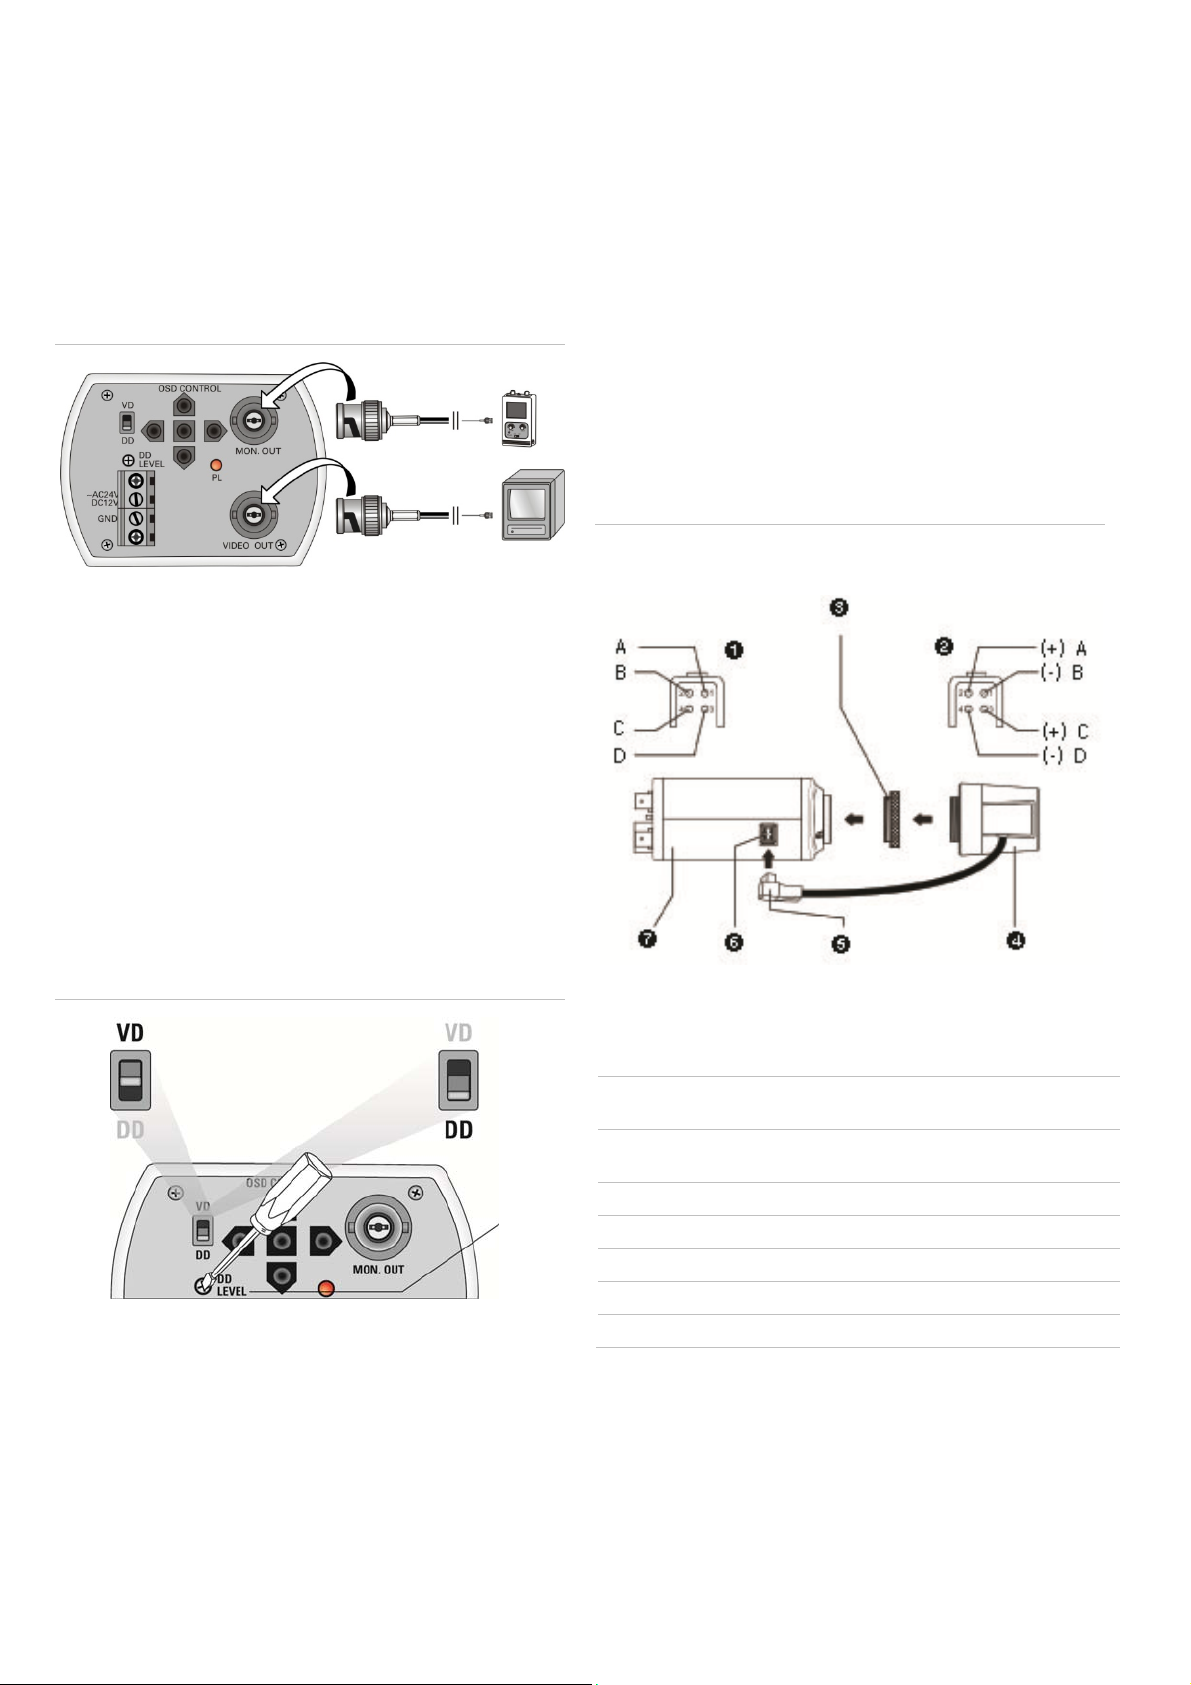
To make cable connections, do the following:
Figure 1: Making the video connections
1. Connect a coaxial cable terminated with BNC
connectors between the MON OUT connector of the
camera and the video in connector on a test or local
monitor.
Note: When the lens mode DIP switch is set to DD, you
can use the DD level screw (iris level adjustment) to
ensure the correct exposure of images for the camera’s
position and the lighting conditions. Use an insulated tool
to rotate the screw. Observe the results on the monitor
screen for the best setting.
Attach the lens
Refer to the instructions that came with the lens you
purchased for complete installation instructions of that
lens.
Note: For optimal performance, use an autoiris lens.
To install most lenses, see Figure 4 and do the following:
Figure 3: Attaching your lens
Video-type autoiris lens
leads
DC-type autoiris lens leads
2. Connect a coaxial cable terminated with BNC
connectors between the VIDEO OUT connector of
the camera and the video in connector on a monitor,
multiplexer, switcher, or other standard video device.
Set the lens mode
If your lens has a manual iris, ignore this switch. It is for
autoiris lenses only.
Figure 2: Lens mode DIP switch and iris level adjustment
1. Set to VD (video drive) for autoiris lenses with builtin amplifier
2. Set to DD (direct drive) for autoiris lenses without
amplifier
3. DD adjustment. See Note.
1. Video-type autoiris lens leads: A. Red (9 VAC); B. NC (no
connection); C. Black (ground); D. White (video)
2. DC-type autoiris lens leads: A. Damping coil (+); B. Damping coil
(-); C. Driving coil (+); D. Driving coil (-)
3. C-mount adapter (for C-mount lenses only
4. Lens (autoiris les shown; a manual iris has no cable)
5. Autoiris lens plug
6. Autoiris lens connector
7. Camera
1. If you are using a C-mount lens, screw on the
provided C-mount adapter.
2. Screw your customer-supplied lens onto the camera.
3. If you are using an autoiris lens, insert the autoiris
lens plug into the autoiris lens connector.
2 UVC-XP3-HR(-P) Camera User Manual
Page 3
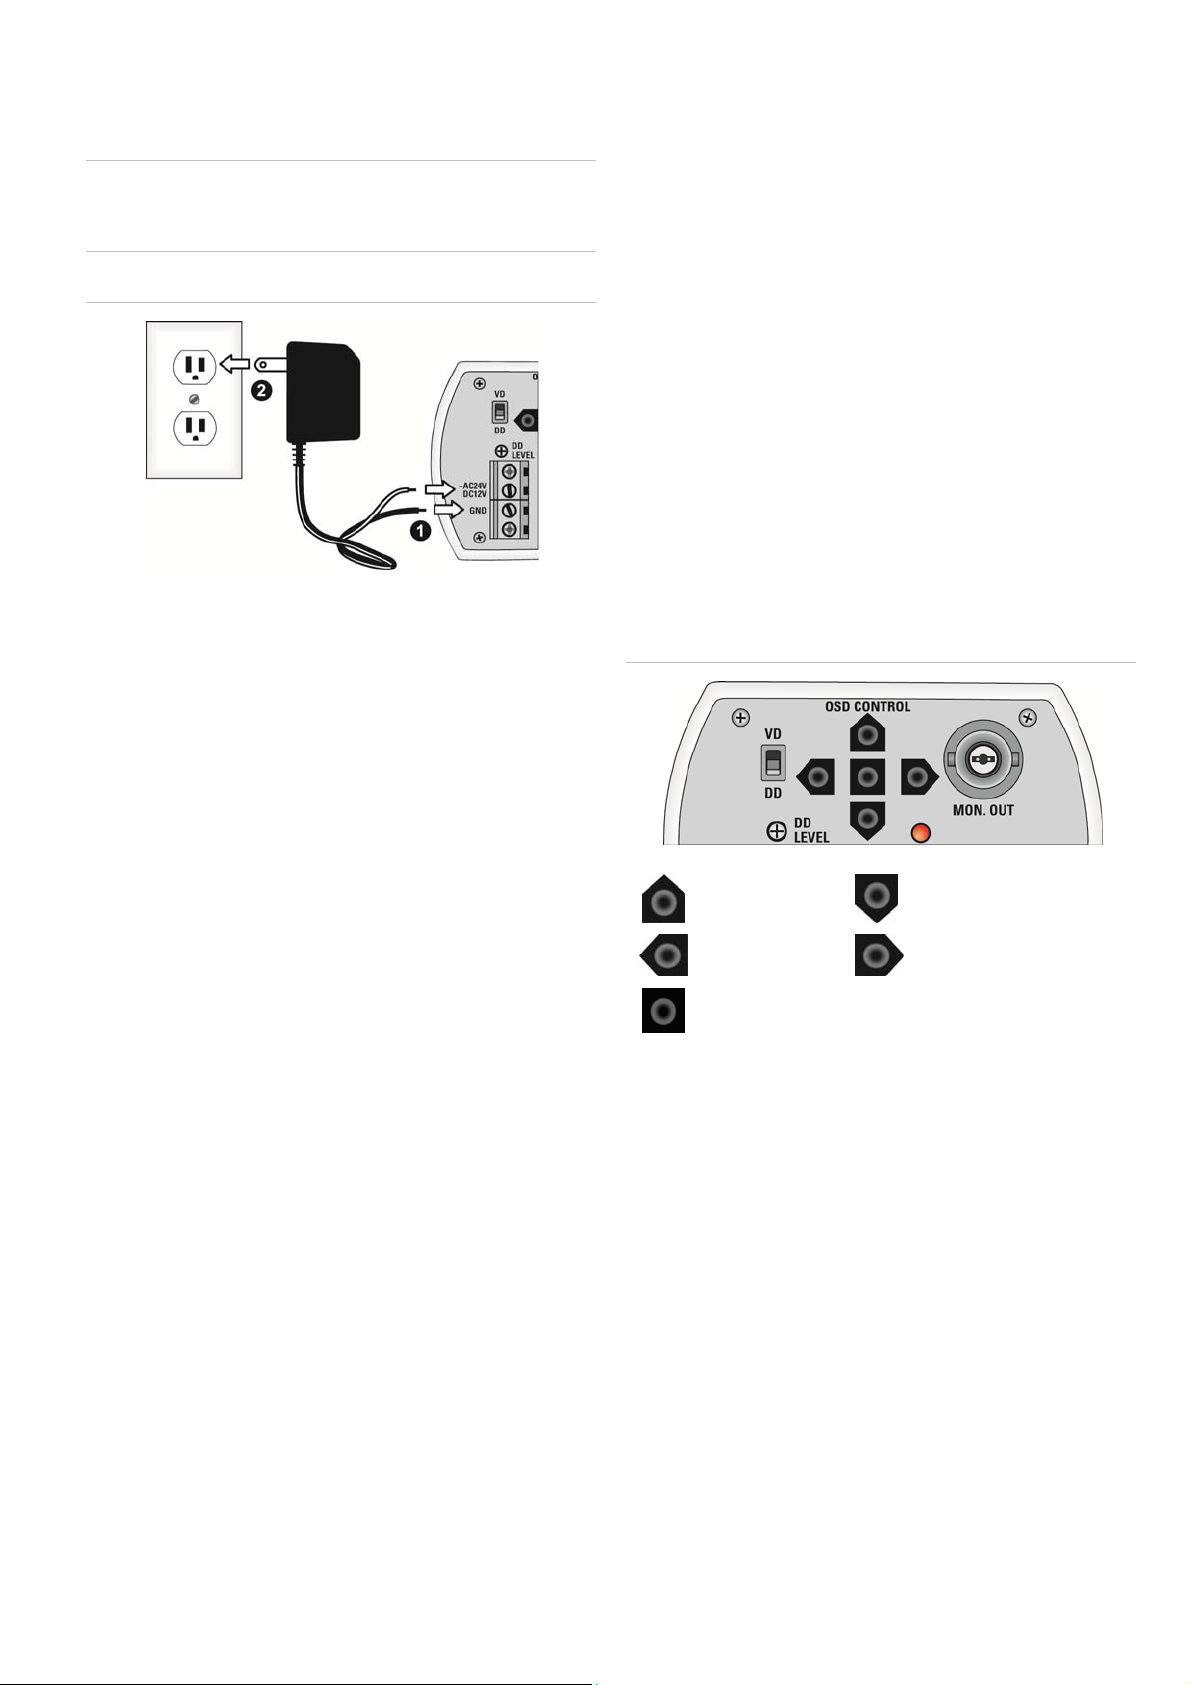
Connect power
See Figure 5 and do the following:
Caution: Use direct plug-in UL listed power supplies
marked Class 2 or LPS (limited power source) of the
required output rating as listed on the unit.
Figure 4: Power connection
1. With a screwdriver, loosen the GND and
~AC24V/DC12V terminal screws on the terminal
block.
3. Press Enter (see OSD control pad on page 9) to
display the Setup menu.
Programming
This chapter describes how to navigate the setup menus
to adjust the camera settings.
OSD controls
Use the OSD (onscreen display) setup menus to
program the camera. See Figure 5 below.
There is a menu map on the back page of the manual
that shows an overview of the menus (see “Menu Map”
on page 10.)
Note: If you do not press a button for two minutes, your
changes are saved, and the camera returns to its normal
function.
Figure 5: OSD menu controls
2. Connect a universal 12 VDC, 24 VAC power supply
to the terminal block.
Note: The terminal block is not polarity- sensitive. Either
power lead can be connected to either terminal
connector. There is no need for an isolated ground wire.
The two power terminals can accept any polarity and
any combination of power that equals 12 VDC or
24 VDC.
3. Retighten the terminal screws until snug, ensuring
that the power leads are secure.
4. Supply power to the unit by plugging the power
supply into a proper source.
Note: The power LED illuminates to show that the
camera is receiving power. If it does not illuminate,
check the terminal block connections and the power
source
Mount the camera
To mount the camera, attach the camera to the
mounting surface using the appropriate fasteners.
Up
Down
Left
Right
Enter
Note: Wherever the PREVIOUS PAGE option appears,
use it to leave the current menu and return to the
previous menu. Move to the PREVIOUS PAGE option
and press the center button.
Main menu
The camera is configured through the setup menus
which appear onscreen.
To access and navigate the main menu, press and hold
Connect the monitor
Program the cameras by attaching a standard video
monitor to the system.
the center button of the OSD (See Figure 6). Use the up
or down buttons to move between items, and press the
center button to select that item. Use the left and right
buttons to select the different options available for the
To connect the monitor, do the following:
item.
1. Plug the monitor output cable to the video monitor
output connector (see Figure 1 on page 2.)
2. Connect the BNC cable to the video monitor.
UVC-XP3-HR(-P) Camera User Manual 3
Page 4

Figure 6: Main menu
Table 1 lists the main menu options.
Table1:Mainmenuoptions
Menu option Function
Presets Configures the preset for the lighting condition.
Setup Configures camera ID, video I/O, type of lens,
motion detection, and wide dynamic range
options.
Viewing Configures flip, resolution, gamma correction,
image sharpness, and saturation settings.
Exposure Configures automatic gain control (AGC), AE
preferences, range, shutter limit, and advanced
exposure limits.
White balance Configures white balance (WB) mode, magenta
control, WB bias, and auto tracking white
balance.
Save/restore Displays firmware version, resets camera, saves
user settings, restores user settings, and restores
factory settings.
Exit Exits the OSD menu system.
Menu option Description
Fluor 1 This mode uses line lock to eliminate phase
roll under fluorescent lights. Dynamic range is
14 bits. It must be used with a 24 VAC power
supply.
Fluor 2 This mode uses a DC iris lens to reduce
phase roll under fluorescent lights. Dynamic
range is reduced to 12 bits in this mode. With
some fluorescent lights, the roll is slowed
down, but not completely eliminated. This
mode will not function correctly with a manual
iris lens.
Custom Whenever any menu items are changed,
Custom will be displayed.
Setup menu
From the Main menu, use the arrow buttons to select
Setup and press the center button. The Setup menu
screen appears.
Figure 7: Setup menu
Table 3 below lists the main menu options.
Presets menu
Table 2 lists the presets for common lighting conditions.
Select the option that suits your camera’s situation.
Table2:Presetmenuoptions
Menu option Description
Normal This is the camera default preset for general
lighting conditions out of the box. This mode
supports 14 bits of dynamic range and gives
priority to rendering the highlights in the
scene.
Indoor This preset supports 16 bits of dynamic range
and gives priority to rendering the shadows in
the scene. It is primarily used for typical indoor
scenes and when you want to see backlit
objects clearly in front of bright backgrounds
(as in a building lobby, for example).
Outdoor This preset offers the highest dynamic range
of 17 bits and gives priority to rendering the
highlights in the scene. This mode produces
flatter images than modes with lower dynamic
range.
Table3:Setupmenuoptions
Menu option Description
ID setup Configures camera identification and position.
See “Camera ID setup” on page 5 for setup
information.
Video I/O Configures video standard and sync options.
See “Video I/O” on page 5 for setup
information.
Lens select Configures the lens as autoiris or manual.
Motion detection Configures detection threshold, PTZ settings,
and the location and size of the detection
zone.
See “Motion detection” on page 5 for setup
information.
WDR setup Configures wide dynamic range.
Select one of the four options available: safe
area, center spot, Lower 1/3, or Full screen.
Previous page Returns to previous menu.
4 UVC-XP3-HR(-P) Camera User Manual
Page 5

Camera ID setup
From the Setup menu, use the arrow buttons to select ID
setup and press the center button. The Camera ID Setup
menu screen appears.
Figure 8: ID setup menu
Table 4 below lists the Camera ID setup menu options.
Table4:CameraIDsetupmenuoptions
Menu option Description
ID display Select on or off.
Camera ID Press the right button to move the cursor to
edit the camera ID. Use the up or down
buttons to cycle through the options and the
center button to select. When complete use
the up or down buttons to leave the editing
field.
ID position Select one of the position options: Up-Left, Up-
Center, Up-Right, Down-Left, Down-Right.
Previous page Select to return to the previous menu.
Video I/O
From the Setup menu, use the arrow buttons to select
Video I/O and press the center button. The Video I/O
menu screen appears.
Figure 9: Video I/O menu
Menu option Description
Input as a way to reduce the phase roll of
fluorescent lights.
LL - Line Lock. This is used to synch video for
AC Power Input so that the synch matches the
frequency of the power input. This will completely
eliminate the roll caused by fluorescent lights.
Previous Page Returns to previous menu.
Motion detection
From the Setup menu, use the arrow buttons to select
Motion detection and press the center button. The
Motion Detection menu screen appears.
Figure 10: Motion detection menu
Table 6 below lists the Motion Detection setup menu
options.
Table6:MotionDetectionsetupmenuoptions
Menu option Description
Motion Select one of the options:
Off - Turns off motion detection.
All Alarms - Not used.
GPI Trigger - Not used.
Motion Detection - Set activity threshold, digital
zoom, digital pan, and digital tilt.
Set Alarm Zone Select to launch Alarm zone setup menu. This
menu lets you select the location and size of the
detection zone. Use the arrow buttons to move
and size the selection box.
Table5 below lists the Video I/O menu options.
Table 5: Video I/O menu options
Menu option Description
Video Standard Select NTSC or PAL.
Sync Select one of the two options:
INT - Internal Synch. This is used with DC Power
UVC-XP3-HR(-P) Camera User Manual 5
Previous Page Select to return to the previous menu.
Viewing menu
From the Main menu, use the arrow buttons to select
Viewing and press the center button. The Viewing menu
screen appears.
Page 6

A
Figure 11: Viewing menu
Menu option Description
Flip Configures horizontal flip.
Select on or off option.
Resolution Configures resolution.
Select high or normal option. The High
option oversharpens the image for higher
resolution.
dvanced Viewing Gamma correction, image sharpness, and
saturation settings.
Table7:Gammamodemenuoptions
Menu option Description
Gamma mode The automatic value is 0.45. Adjust the
value manually to change the picture
contrast on the monitor if the controls on the
monitor are not giving sufficient adjustment.
Select one of the three options: Auto,
Manual, Off
Previous page Returns to previous menu.
Sharpness
From the Advanced viewing menu, use the arrow
buttons to select Sharpness and press the center button.
The Sharpness screen appears.
Figure 13: Sharpness menu
For gamma correction setup, see “Gamma
correction” below.
For image sharpness setup, see
“Sharpness” below.
For saturation settings, see “Saturation”
below.
Previous page Returns to previous menu.
Gamma correction
From the Advanced viewing menu, use the arrow
buttons to select Gamma and press the center button.
The Gamma menu screen appears.
Figure 12: Gamma menu
Table 8 below lists the Sharpness menu options.
Table8:Sharpnessmenuoptions
Menu option Description
Noise reduction Noise is unwanted signals on the data lines.
Select on or off.
Sharpness scale Use the left or right buttons to raise or lower
the sharpness.
Previous page Select to return to previous menu.
Saturation
From the Advanced viewing menu, use the arrow
buttons to select Saturation and press the center button.
The Saturation screen appears.
Figure 14: Saturation menu
Table 7 below lists the Gamma menu options.
Table 9 on page 7 lists the Saturation setup options.
6 UVC-XP3-HR(-P) Camera User Manual
Page 7

A
A
A
Table9:Saturationmenuoptions
Menu option Description
BIAS scale Use the left and right buttons to raise or
lower the image sharpness level.
IRE saturation IRE is the measurement of composite video
signals. This value shows the usable light
level.
Enter a value between 100 and 130.
Previous page Returns to previous menu.
Exposure menu
From the Main menu, use the arrow buttons to select
Exposure and press the center button. The Exposure
screen appears.
Figure 15: Exposure menu
Figure 16: Advanced exposure menu
Table 11 below lists Advanced Exposure setup options.
Table11:Advancedexposuremenuoptions
Menu option Description
Frame repeat Off, 2X, Set, or Freeze.
Day/night setup Day/night setup settings.
Day/night setup” below for setup
See “
information.
Transitions Normal, Fast, or Slow.
Previous page Returns to previous menu.
Table 12 lists the Exposure setup options.
Table10:Exposureoptions
Menu option Description
GC Configures auto gain control (AGM). The image
E preferences Highlights or Shadows.
Range CTLR Normal, High, or Custom.
Shutter limit Configures shutter limit.
dvanced
exposure menu
Previous page Select to return to previous menu.
quality is automatically adjusted in low light
conditions.
Select one of the options: Medium, High, Custom,
Low.
Select one of the options: X2, X4, X8, X16, X32,
Off.
Configures frame repeat, day/night setup,
transitions.
See “Advanced Exposure” belowfor setup
information.
Advanced Exposure
From the Advanced Exposure menu, use the arrow
buttons to select Advanced Exposure and press the
center button.
Day/night setup
From the Advanced exposure menu, use the arrow
buttons to select Day/night setup and press the center
button.
Figure 17: Day/night setup menu
Table 12 below lists the Day/Night setup options.
Table12:Day/Nightsetupoptions
Menu option Description
D/N control Select on or off.
Night mode Use this option in monochrome or low light
situations.
Select one of the three options: Color, B/W,
B/W and Burst. Burst allows the camera to
display color menus on top of black and white
video.
Gain boost Used in low light levels.
Select on or off.
Previous page Returns to previous menu.
UVC-XP3-HR(-P) Camera User Manual 7
Page 8

A
A
White balance menu
From the Main menu, use the arrow buttons to select
White balance and press the center button.
Figure 18: White balance menu
Table 13 below lists the White Balance menu option s.
Table13:White
Menu option Description
Mode ATW Xtend (Auto tracking white balance) -
dvanced white
balance menu
Previous page Returns to previous menu.
Advanced white balance
From the White balance menu, use the arrow buttons to
select Advanced White Balance and press the center
button.
balance
options
The default white balance range of the XP3
camera is between 2800 and 7500 Kelvin
depending on the color temperature of the
scene illumination. It can be manually adjusted
to between 2000 and 11000 Kelvin.
AWB (Auto white b a l a n c e ) – use this mode to
set a specific white balance. Typically this is
done by placing a white object in front of the
camera, letting the white balance adjust , and
then hitting the AWB set command to lock in
the white value. The camera will use this value
as the default white balance setting.
Manual - Use this mode to set the camera to a
specific color temperature. The camera will not
adjust to white balance changes in the scene
over time.
Advanced white balance settings.
See “Advanced white balance” below for setup
information.
Table 14 below lists the Advanced White Balance menu
options.
Table14:Advancedwhitebalanceoptions
Menu option Description
Magenta control Select one of the options: on, off, custom.
WB BIAS scale Use the left or right buttons to raise or lower
the WB BIAS.
TW slew scale Use the left or right buttons to raise or lower
the ATW slew.
Previous page Returns to previous menu.
Save/restore menu
From the Main menu, use the arrow buttons to select
Save/restore and press the center button.
Figure 20: Save/restore menu
Table 15 below lists the Save/restore menu option s.
Table15:Save/restoreoptions
Menu option Description
System info menu Displays firmware version.
Reset camera Performs camera reset.
Save user settings Saves all current changes.
Restore user settings Discards all current changes.
Restore factory settings Resets all settings to factory levels.
Previous page Returns to previous menu.
Regulatory information
Figure 19: Advanced white balance menu
8 UVC-XP3-HR(-P) Camera User Manual
Copyright
Trademarks and
patents
© 2011 UTC Fire & Security. All rights reserved.
UVC-XP3-HR_R3.0 08-2011
Interlogix, UltraView brand and logo are
trademarks of UTC Fire & Security.
Other trade names used in this document may be
trademarks or registered trademarks of the
manufacturers or vendors of the respective
products.
Page 9

Manufacturer UTC Fire & Security Americas Corporation, Inc.
2955 Red Hill Avenue, Costa Mesa, CA
92626-5923, USA
Authorized EU manufacturing representative:
UTC Fire & Security B.V.
Kelvinstraat 7, 6003 DH Weert, The Netherlands
FCC compliance
Certification
European Union
directives
This equipment has been tested and found to
comply with the limits for a Class A digital device,
pursuant to part 15 of the FCC Rules. These
limits are designed to provide reasonable
protection against harmful interference when the
equipment is operated in a commercial
environment. This equipment generates, uses,
and can radiate radio frequency energy and, if
not installed and used in accordance with the
instruction manual, may cause harmful
interference to radio communications.
You are cautioned that any changes or
modifications not expressly approved by the party
responsible for compliance could void the user ’s
authority to operate the equipment.
N4131
12004/108/EC (EMC directive): Hereby, UTC Fire
& Security declares that this device is in
compliance with the essential requirements and
other relevant provisions of Directive
2004/108/EC.
2002/96/EC (WEEE directive): Products marked
with this symbol cannot be disposed of as
unsorted municipal waste in the European Union.
For proper recycling, return this product to your
local supplier upon the purchase of equivalent
new equipment, or dispose of it at designated
collection points. For more information see:
www.recyclethis.info.
Contact information
For contact information see: www.interlogix.com or
www.utcfssecurityproducts.eu.
UVC-XP3-HR(-P) Camera User Manual 9
Page 10

Menu Map
10 UVC-XP3-HR(-P) Camera User Manual
 Loading...