

Page 1
HiTech Handheld
123
6
9
8
5
4
7
ST
0
BY
OFF
STAY AWAY
NO DELAY
CHIME
STATUS
BYPASS
COMMAND
8341G01A.DS4
Wireless Touchpad
Document Number: 466-1012 Rev. B
November 1997
60-597
INSTALLATION
INSTRUCTIONS
Product Summary
The HiTech Handheld Wireless Touchpad is a pocketsized, lightweight, portable touchpad that uses ITI Learn
Mode™ technology to control an ITI control panel.
The touchpad gives you the flexibility to arm and
disarm the system, bypass sensors, control lights, send
emergency alarms, and check the system’s status at your
convenience.
The touchpad features include the following:
ν Automatic Low battery reports to the panel
ν Red/Green indicator light that responds differently
to regular keypresses and panic button keypresses
ν Police, Fire, and Auxiliary panic buttons
ν Automatic supervisory reports to the panel every 64
minutes
ν Long life (5–8 years) 3 VDC lithium battery
ν Operating temperature range: 10° to 120°F
ν Wall-mounting option
ν Learn Mode technology makes panel programming
easy
ν Convenient size and attractive style
ν Compatible with all ITI Learn Mode panels,
including CareTaker® Plus, Commander 2000™,
Concord, and SX-V Special.
HiTech Handheld Wireless Touchpad
Installation Guidelines
Observe the following guidelines when using and
mounting the touchpad:
ν Refer to the appropriate Reference Manual for
guidelines on typical range for using this and other
wireless devices.
ν Avoid moist areas.
ν Avoid excessive metal or electrical wiring, including
furnace and utility rooms.
ν Avoid exceeding the touchpad’s operating
temperature limits of 10° to 120°F (-12.2° to 49°F)
Note: If the touchpad is wall mounted or alw ays kept at
the installation site, set upper sensor number 89
to ON. If the touchpad will occasionally be
removed from the site (i.e. kept in an automobile), set upper sensor number 89 to OFF.
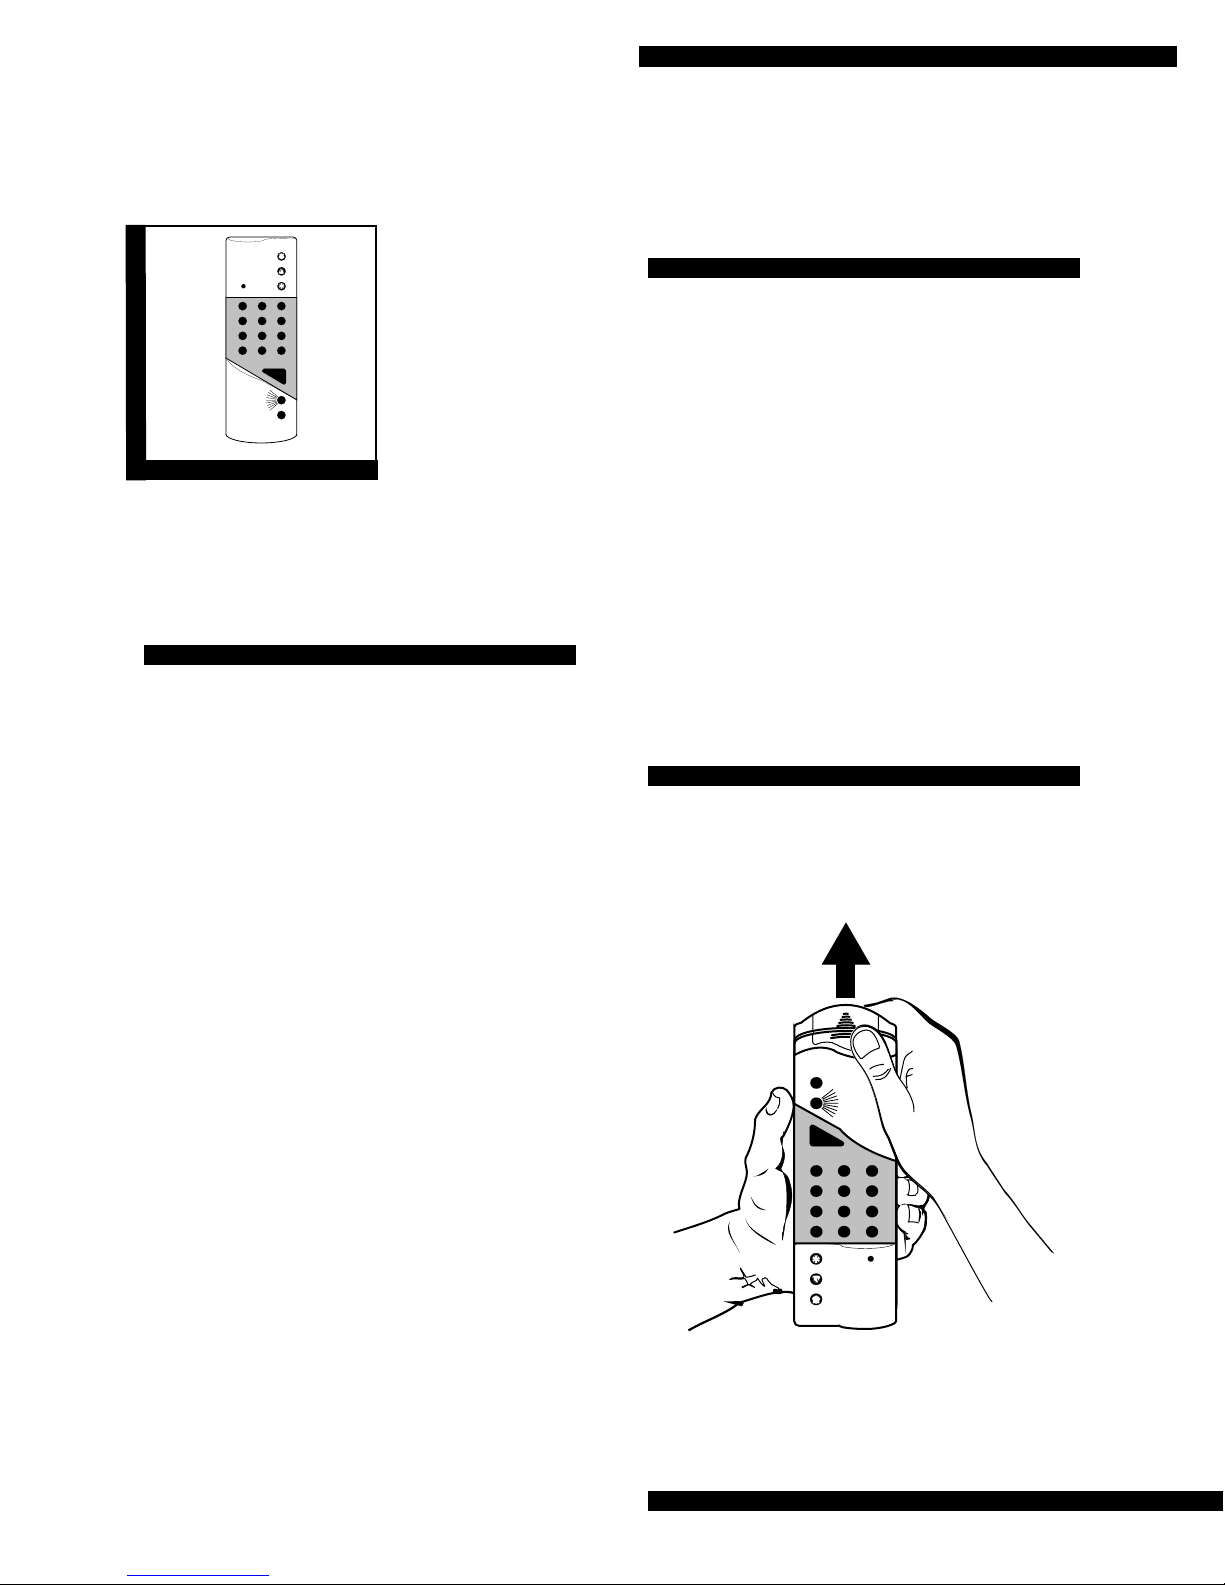
Installing the Battery
To install the battery:
1. Remove the battery cover by pressing down on the
arrowhead and sliding it out (see Figure 1).
COMMAND
0
ST
BY
BYPASS
9
6
3
STATUS
8
7
CHIME
5
4
NO DELAY
1
2
STAY AWAY
OFF
8341G02A.DS4
Figure 1. Removing the battery cover
Page 1
Page 2
HiTech Handheld Wireless Touchpad
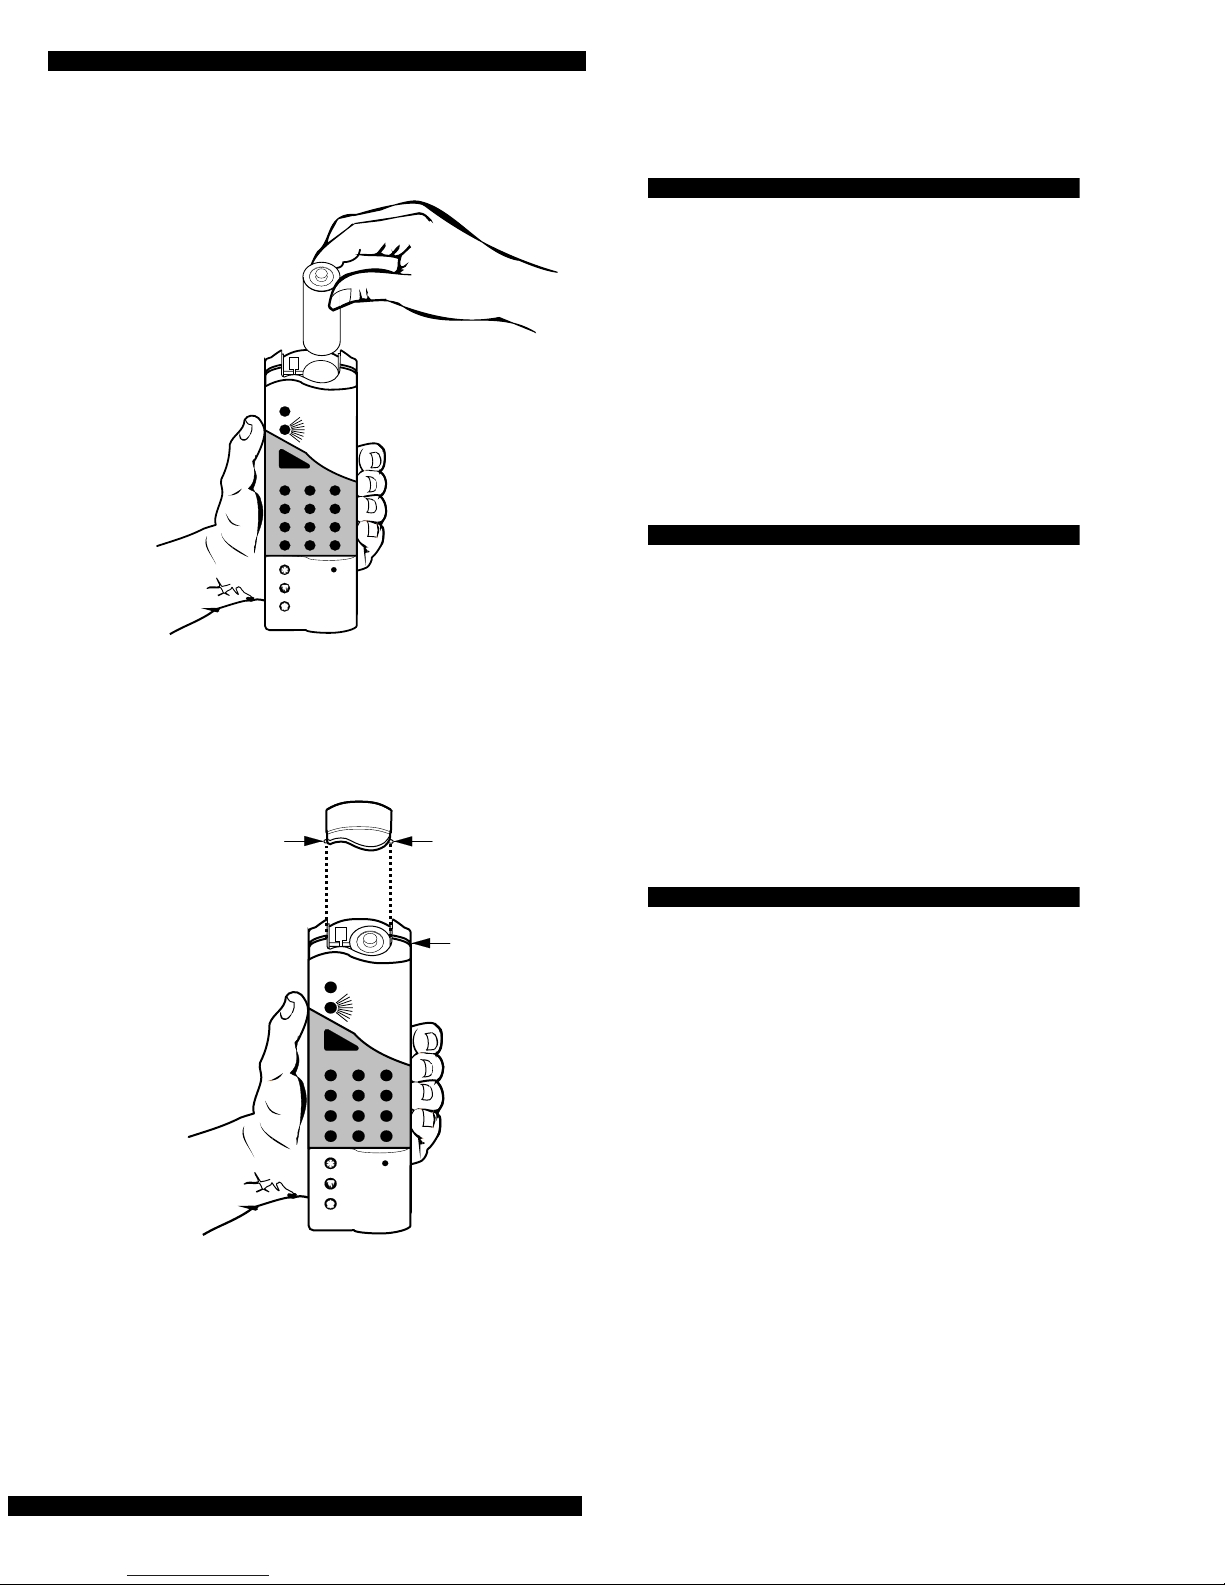
2. Drop the battery into the chamber with the knob
(+) end visible (see Figure 2).
COMMAND
0
ST
BY
BYPASS
STATUS
9
8
7
CHIME
6
5
4
NO DELAY
1
3
2
STAY AWAY
OFF
8341G03A.DS4
Figure 2. Placing the battery in the chamb er
3. Line up the battery cover’s two exposed tabs with
the seam of the touchpad’s front and back cover
(see Figure 3).
Adding the Touchpad to a Panel
Before the touchpad can communicate with a panel, you
must add the touchpad to panel memory.
To add the Touchpad to panel memory:
1. Refer to the appropriate panel’s installation instructions on “entering program mode” and “adding” or
“programming a wireless touchpad.”
2. Press BYPASS when the proc edure prompts for the
touchpad activation.
Mounting the Touchpad
To mount the Touchpad:
1. Test the touchpad at the desired location before
mounting and evaluate the touchpad’s performance.
2. Secure the mounting bracket to the desire d surface,
using the two screws from the accessory pack (see
Figure 4).
3. Place the bottom end of the touchpad into the bottom of the mounti ng bracket and press the t ouchpad
into place (see Figure 5).
EXPOSED
TAB
EXPOSED
TAB
TOUCHPAD
SEAM
COMMAND
0
ST
BY
BYPASS
9
6
3
STATUS
8
7
CHIME
5
4
NO DELAY
1
2
STAY AWAY
OFF
8341G04A.DS4
Figure 3. Lining up the battery cover
4. Press down on the cover and slide it into place.
5. If the red light turns on steady (indicating a powerup trouble condition), remove the battery and reinstall it. Repeat until the red indicator light remains
off when the cover is replaced.
Testing the Touchpad
Remind the user to test their system and this touchpad
weekly. The Owner’s Manual describes how to test the
system.
To test the Touchpad after installation:
1. To avoid an emergency response, notify the central
station that you will be testing.
2. Arm and disarm the panel from various
points to determine the touchpad’s range in
the installation site.
Note: The green light flashe s with each press of a n um-
ber key or function key. The red/green light
flashes with each press of a panic button.
3. Press STATUS to check the current arming
level.
4. Bypass sensors using direct and indirect
bypass.
Page 2
Page 3

HiTech Handheld Wireless Touchpad
5. Press and hold each panic button for two sec-
onds, until the red/green indicator light stops
flashing and the appropriate alarm sounds.
6. To mute the touchpad: press the
1 and 2 but-
tons at the same time, until you hear confirmation beeps.
Press various buttons to test the mute feature.
7. Turn off mute by pressing the 1 and 2 buttons
at the same time, until you hear confirmation
beeps.
8. Turn all lights on or off by pressing
MAND + 0 with the Security Pro 2000 or by
pressing
LIGHTS-ON or LIGHTS-OFF twice
COM-
with the Security Pro 4000.
9. Turn individual lights on or off with the
Security Pro 4000 by pressing
LIGHTS-OFF + [unit number]. Unit numbers
LIGHTS-ON or
range from 1 to 9.
Note: Refer to the appropriate
instructions on using the touchpad with a specific
panel.
Owner’s Manual
for
Table 1. Touchpad Light Control
Panel
CareTaker
Plus 3.0
CareTaker
Plus
1.0—2.1
Commander
2000 4.0
Concord
SX-V
Special
*
Pressing the LIGHTS-ON and LIGHTS-OFF but-
COMMAND
+ 0
✓✓✓✓ *
✓✓ †
✓
✓
✓
tons followed by a unit number n controls the lights
assigned to unit number n. Unit numbers range
from 1 to 9.
Light Buttons
On Off On/Off + n
✓✓ ✓
†
✓
Specifications
Battery Power Supply: 3.0 VDC lithium battery
(operating life: 5-8 years). Use either a Duracell®
DL123A, Eveready® EL123A, Panasonic® CR123A, or
Sanyo® CR123A.
Note: The 5-8 year battery life has not been verified by UL.
Operating Temperature Range: 10° to 120°F
(-12.2° to 49°C)
Dimensions: 6.1” L x 2.1” W x 0.86” H
(15.49 cm x 5.33 cm x 2.18 cm)
Compatibility: All Learn Mode panels, including:
CareTaker® Plus, Concord, Commander 2000™, and SX-
V Special.
Note: The HiTech Touchpad controls lights differently
with various panels and software versions (see
Table 1).
† Pressing the LIGHTS-ON button toggles all lights
on or off, the same as pressing COMMAND + 0.
Page 3
Page 4

HiTech Handheld Wireless Touchpad
FCC Notice
This device complies with FCC Rules Par t 15. Operation is subject to the following two
conditions:
This device may not cause harmful interference.
This device must accept any interference that may be received, including interference
that may cause undesired operation.
Changes or modifications not expressly approved by Interactive Technologies, Inc. can
void the users authorit y to operate the equipment.
Page 4
ITI, Commander 2000, SX-V, and CareTaker are registered trademarks of Interactive
Technologies, Inc. Learn Mode is a trademark of Interactive Technologies, Inc.
Page 5

Page 6

 Loading...