

Page 1

X350 3D-Printer Quick Start Guide
German RepRap GmbH
https://www.germanreprap.com
English versions are available at https://wiki.germanreprap.com/en/
Page 2

X350 3D-Printer Quick Start Guide
Seite: /29
Stand: 2016/03/24 13:55
Page 3

X350 3D-Printer Quick Start Guide
Seite: /29
Stand: 2016/03/24 13:55
© German RepRap GmbH /29
Inhaltsverzeichnis
X350 3D-Printer Quick Start Guide ............................................................................................... 2
Technische Daten ........................................................................................................................... 4
Content ........................................................................................................................................... 4
System requirements ...................................................................................................................... 5
Starting up ...................................................................................................................................... 5
Instructions ................................................................................................................................. 5
Setting up the printer ................................................................................................................. 5
Levelling the printing bed ........................................................................................................... 7
Stripping container, setup and removal ..................................................................................... 8
Case fan control ......................................................................................................................... 9
Network setup ............................................................................................................................ 9
Inserting filament ..................................................................................................................... 10
Directly at the device ........................................................................................................... 10
Through the network ............................................................................................................ 11
Removing the filament ............................................................................................................. 12
Changing the filament .............................................................................................................. 12
Software installation ................................................................................................................. 12
Printing with SD card ................................................................................................................ 13
Removing the printed object .................................................................................................... 14
Cleaning the printing head (extruder) ...................................................................................... 14
Material selection .......................................................................................................................... 14
Download datasheets ............................................................................................................... 15
Materialinfo ................................................................................................................................... 15
ABS (Acrylonitrile butadiene styrene-copolymer) ......................................................................... 15
Specification ................................................................................................................................. 16
Source ........................................................................................................................................... 16
PLA (Polylactic acid) ...................................................................................................................... 16
Specification ................................................................................................................................. 17
Source ........................................................................................................................................... 17
Troubleshooting ............................................................................................................................ 17
Support ......................................................................................................................................... 18
Documentation ......................................................................................................................... 18
Telephone ................................................................................................................................. 18
Support tickets / E-mail ............................................................................................................ 18
Forum (Community) ................................................................................................................. 19
Important notes ............................................................................................................................. 19
Return / Original wrapping ............................................................................................................ 20
Operation ...................................................................................................................................... 20
Other matters ............................................................................................................................... 20
Toxic fumes ................................................................................................................................... 20
Safety cut-off ................................................................................................................................ 20
Maintenance ................................................................................................................................. 20
Safety notes ................................................................................................................................... 21
Power supply ................................................................................................................................. 22
Cleaning ........................................................................................................................................ 22
Playing children ............................................................................................................................ 22
Mains voltage ................................................................................................................................ 22
Humidity, solar radiation, heat, open fire ..................................................................................... 22
Ventilation ..................................................................................................................................... 23
Long absence, thunderstorms, accessibility of the power plug ..................................................... 23
Installation site ............................................................................................................................. 23
Disposal ........................................................................................................................................ 23
Page 4

X350 3D-Printer Quick Start Guide
Seite: /29
Stand: 2016/03/24 13:55
© German RepRap GmbH /29
Rechtliche Hinweise ...................................................................................................................... 24
Software-Changes / Use of applications ........................................................................................ 25
Contact ......................................................................................................................................... 25
Links ............................................................................................................................................. 26
Page 5

X350 3D-Printer Quick Start Guide
Seite: 2/29
Stand: 2016/03/24 13:55
© German RepRap GmbH 2/29
Page 6
X350 3D-Printer Quick Start Guide
Seite: 3/29
Stand: 2016/03/24 13:55
© German RepRap GmbH 3/29
X350 3D-Printer Quick Start Guide
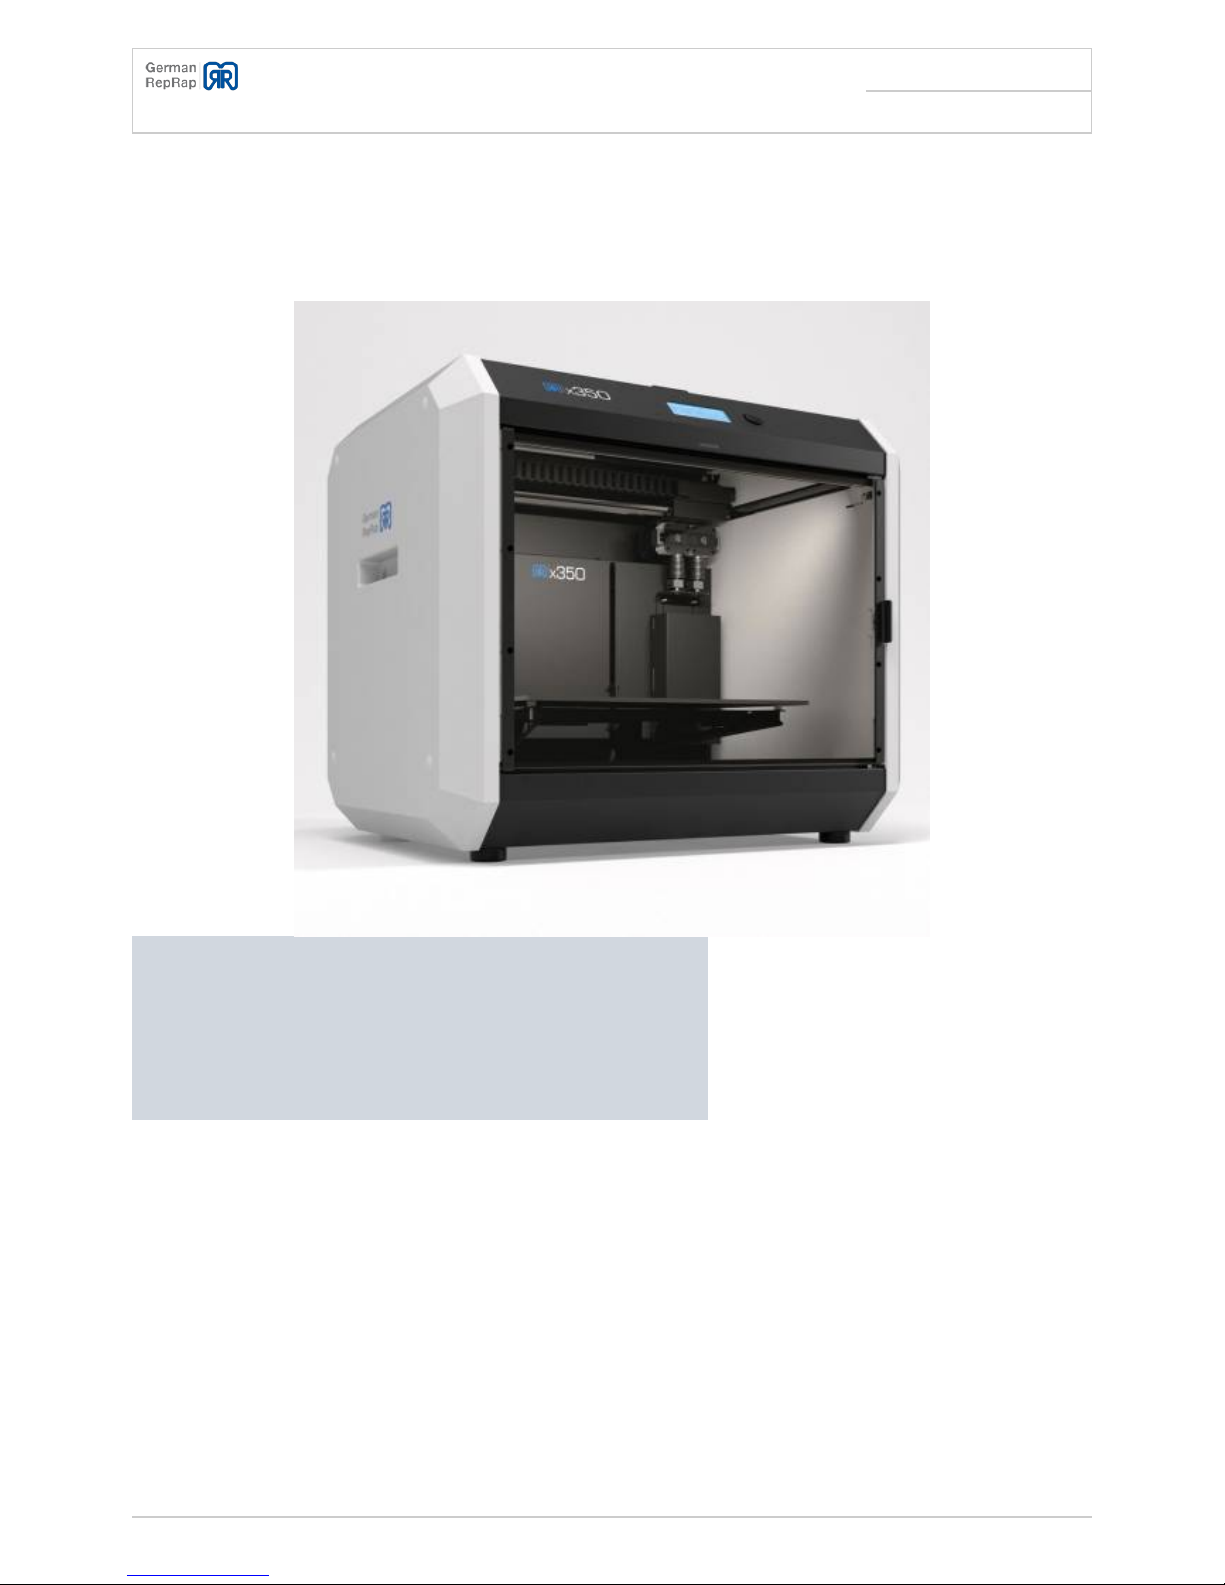
Congratulations for purchasing your professional X350 desktop 3D printer
Please note that the most recent version of this manual is
always available on our websites. At the time of delivery, it
may happen that the included instruction manual is
out-dated, and there is more current information on the
online documentation.
The stable construction and the high quality components make the X350 the ideal printer for
industrial applications. The X350 is a reliable workhorse, regardless of whether you print for one hour
or for several hours.
The landscape format printing bed allows for a more efficient use of the printing area, as most printed
objects are not square. The integrated web interface is a highlight, as it enables printing through the
wireless network or the LAN, and control through a browser interface. The X350 will print stand-alone,
or integrated into the wireless network or the LAN while being controlled through a browser interface.
The X350 will print stand-alone, or integrated into the wireless network or the LAN while being
controlled through a browser interface.
The German RepRap X350 3D printer is ready to use in just a few minutes, thanks to the user-friendly
Page 7

X350 3D-Printer Quick Start Guide
Seite: 4/29
Stand: 2016/03/24 13:55
© German RepRap GmbH 4/29
tried and tested software Simplify3D™, an innovative filament management system with an
automated feeder, and the easy to level 3-point printing bed.
The X350 runs with our most recent drive technology. The DD3-Extruder and the Full-Metal-Hot end
are easy to control. The highlights: No adjusting necessary, and a variable contact pressure for soft
materials.
Technische Daten
Material: ABS (Acrylonitrile butadiene styrene-copolymer), PLA (Polylactic acid), PS (Polystyrol), PP
●
(Polypropylen), PVA (Polyvinylalkohol), Wood, Laybrick in 1,75mm
Material management: innovative filament management
●
Dimensions: (B / H / T) 600 x 444 x 517 mm
●
Printing volume: (X / Y / Z) 350 x 200 x 210 mm
●
Operating voltage: 110/230V Wechselspannung
●
POWER CONSUMPTION: 250 W
●
Power consumption: ca. XXX W
●
Setup: Prefabricated unit / Ready-to-print
●
Technology: FFF (Fused Filament Fabrication)
●
Layer thickness: ab 0,02mm
●
Printing speed: 10 - 150 mm/s
●
Traverse speed: 10 - 300 mm/s
●
Printing bed: 3-Punktauflage, beheizbar bis max. 120°C
●
Network: WLAN/Ethernet
●
Weight: ca. 29kg
●
Nozzle: 0,4mm
●
Content
X350 3D-Printer
●
1 * Coil holder
●
LCD Display (installed)
●
SD-Card reader (installed)
●
Heated ceramic printing bed (installed)
●
Simplify3D™ Software
●
4GB SD-Card
●
Spatula
●
Cleaning brush
●
Nozzle tool
●
Quick Start Guide
●
Ethernet network cable
●
Power cord
●
Filament sample
●
Page 8
X350 3D-Printer Quick Start Guide
Seite: 5/29
Stand: 2016/03/24 13:55
© German RepRap GmbH 5/29
System requirements
These system requirements are exclusive to the use with the included software Simplify3D™.
Intel Pentium 4 or better
●
2GB RAM or more
●
USB from 1.1 optional
●
Windows XP or newer
●
Mac OS X 10.6 or newer
●
Ubuntu/Debian Linux
●
OpenGL 2.0
●
Starting up
Instructions
During shipment of the X350 it may happen that the limit switches shift. This should be checked, and
adjusted.
Warning: Do not fasten the screws too tightly!
The heated printing bed (ceramic) of the X350 is covered in a PET film. ABS and PLA stick to this film
very well. However, this film can get damaged, or lose adhesion after some use. In this case, you can
acquire a new film from us.
The processing PLA (Polylactic acid) is also possible without the PET film on the printing bed. You can
find further details about that in the Overview of filament types in our Wiki, or in the section of the
same name within this instruction manual.
Setting up the printer
The printer is to be plugged into a 230V power outlet via the power cord. The included network cable
allows you to connect the printer to the home network. This is also necessary if you want to use the
printer through the wireless network later. For the first setup, an Ethernet connection is required.
Page 9
X350 3D-Printer Quick Start Guide
Seite: 6/29
Stand: 2016/03/24 13:55
© German RepRap GmbH 6/29
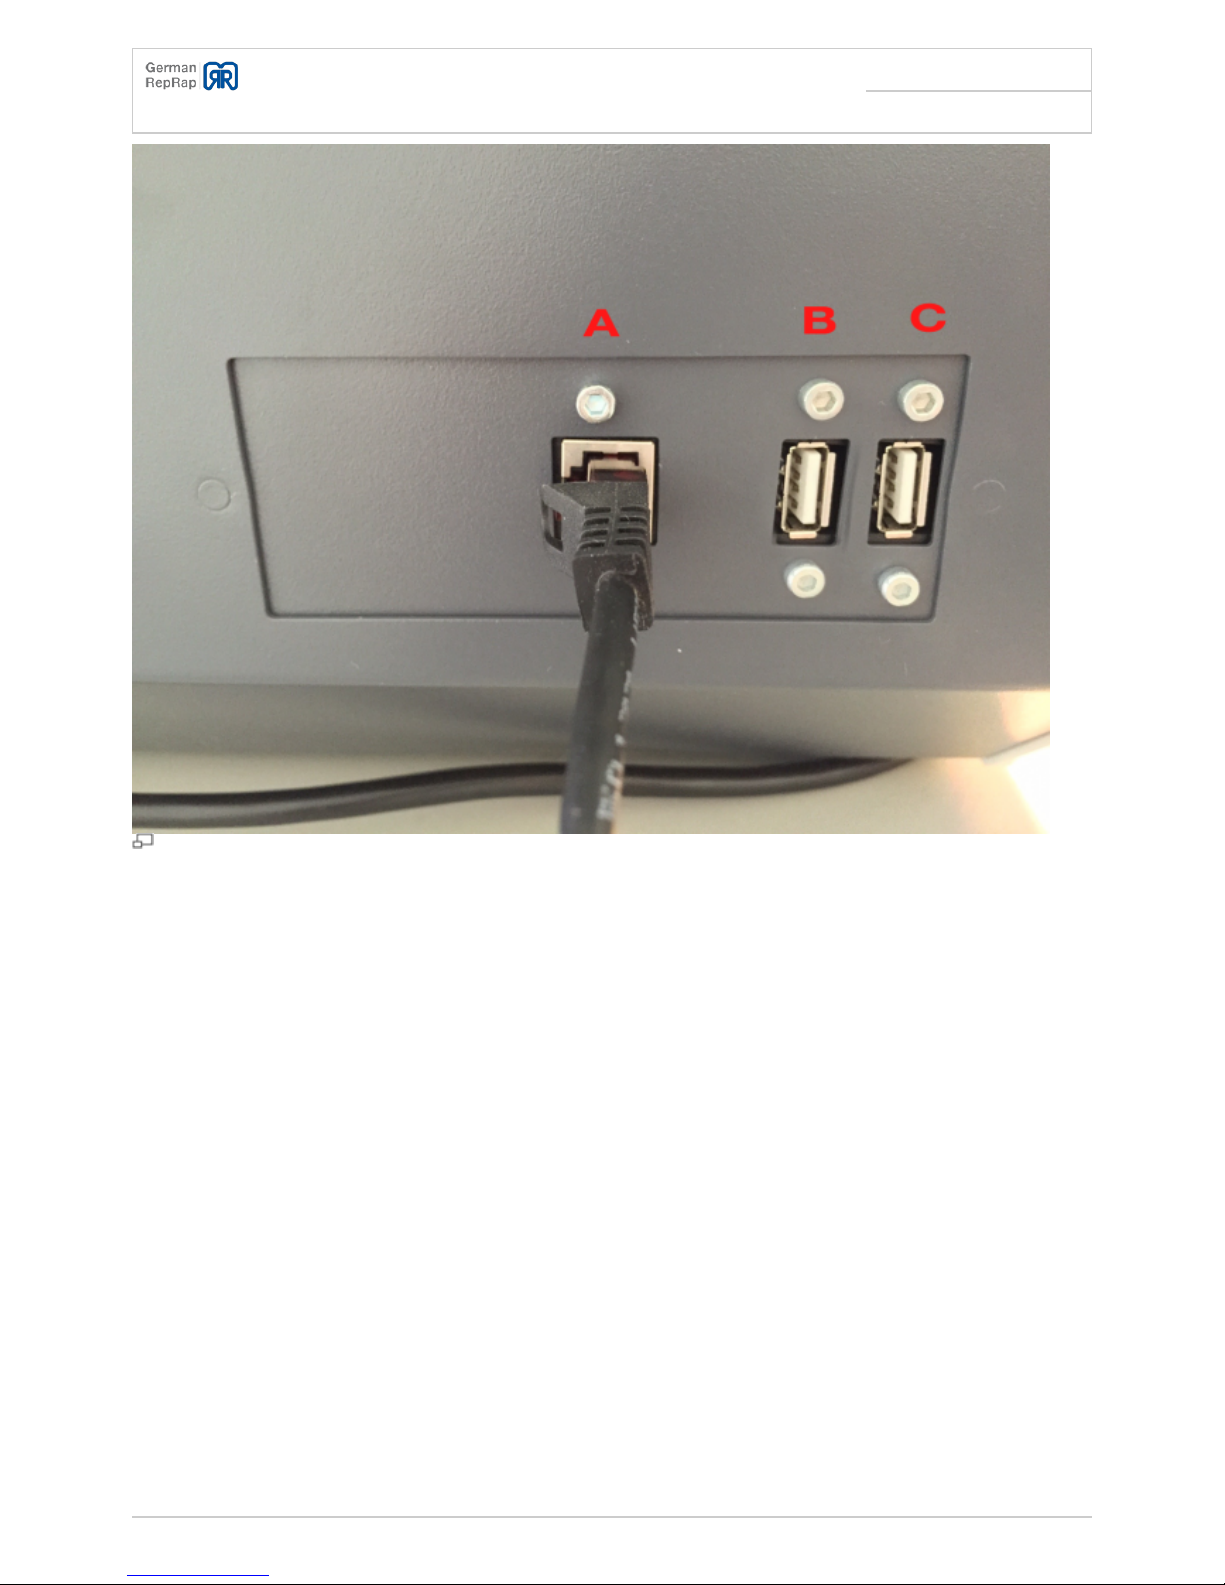
Data ports
Page 10
X350 3D-Printer Quick Start Guide
Seite: 7/29
Stand: 2016/03/24 13:55
© German RepRap GmbH 7/29
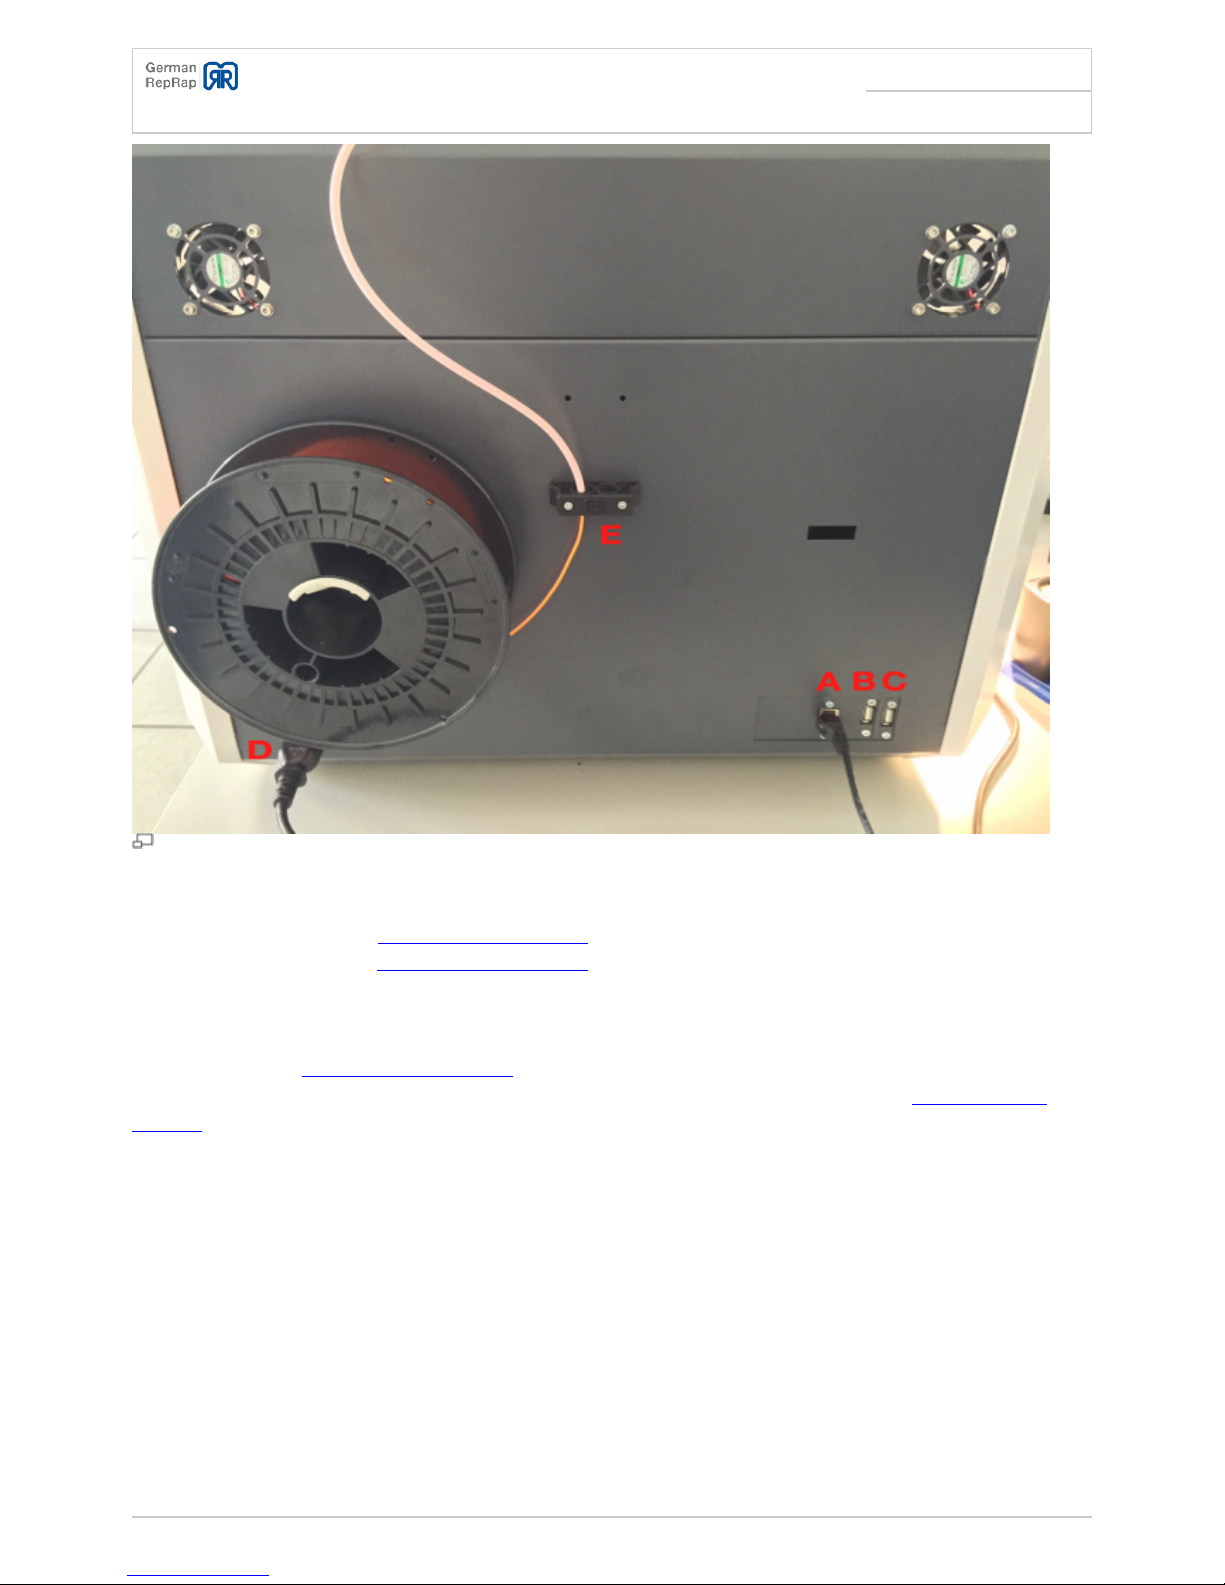
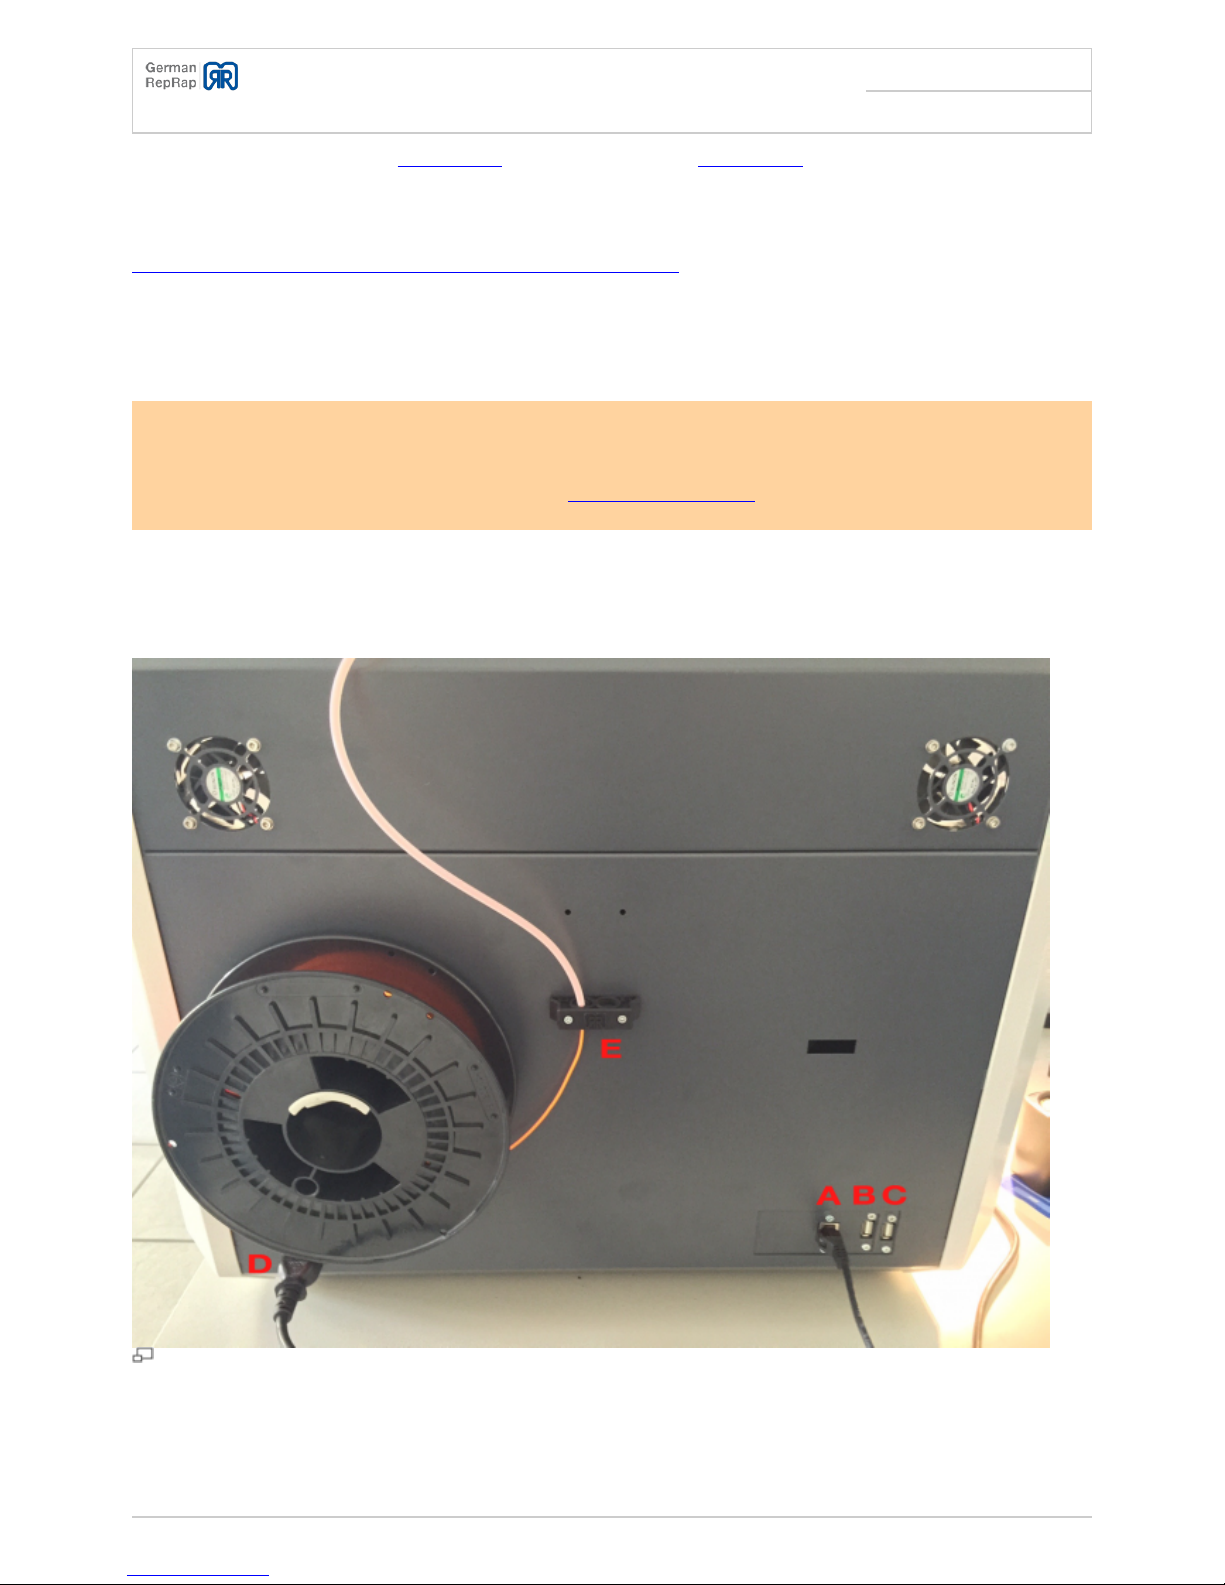
Ports on the rear
A - Network port
●
B - USB port for internal 3DPrintBox V2 manual
●
C - USB port for internal 3DPrintBox V2 manual
●
D - 230V connector
●
E - Filament feed
●
The USB ports for 3DPrintBox V2 manual may be used to attach USB webcams or similar devices with
later software versions. These will then be available in the operating system of the 3DPrintBox V2
manual.
Levelling the printing bed
In order to level the printing bed, the following steps are necessary.
Heat up the printing bed to room temperature
●
Set the z-axis to its home-position using the control panel: Press the button →”Position” → “Home Z”
●
Wait at least 10-15 minutes to let the printer acclimatise
●
If necessary, turn off the holding torque of the motors using the control panel: Press the button →
●
“Quick Settings” → “Turn off motors”
Page 11
X350 3D-Printer Quick Start Guide
Seite: 8/29
Stand: 2016/03/24 13:55
© German RepRap GmbH 8/29
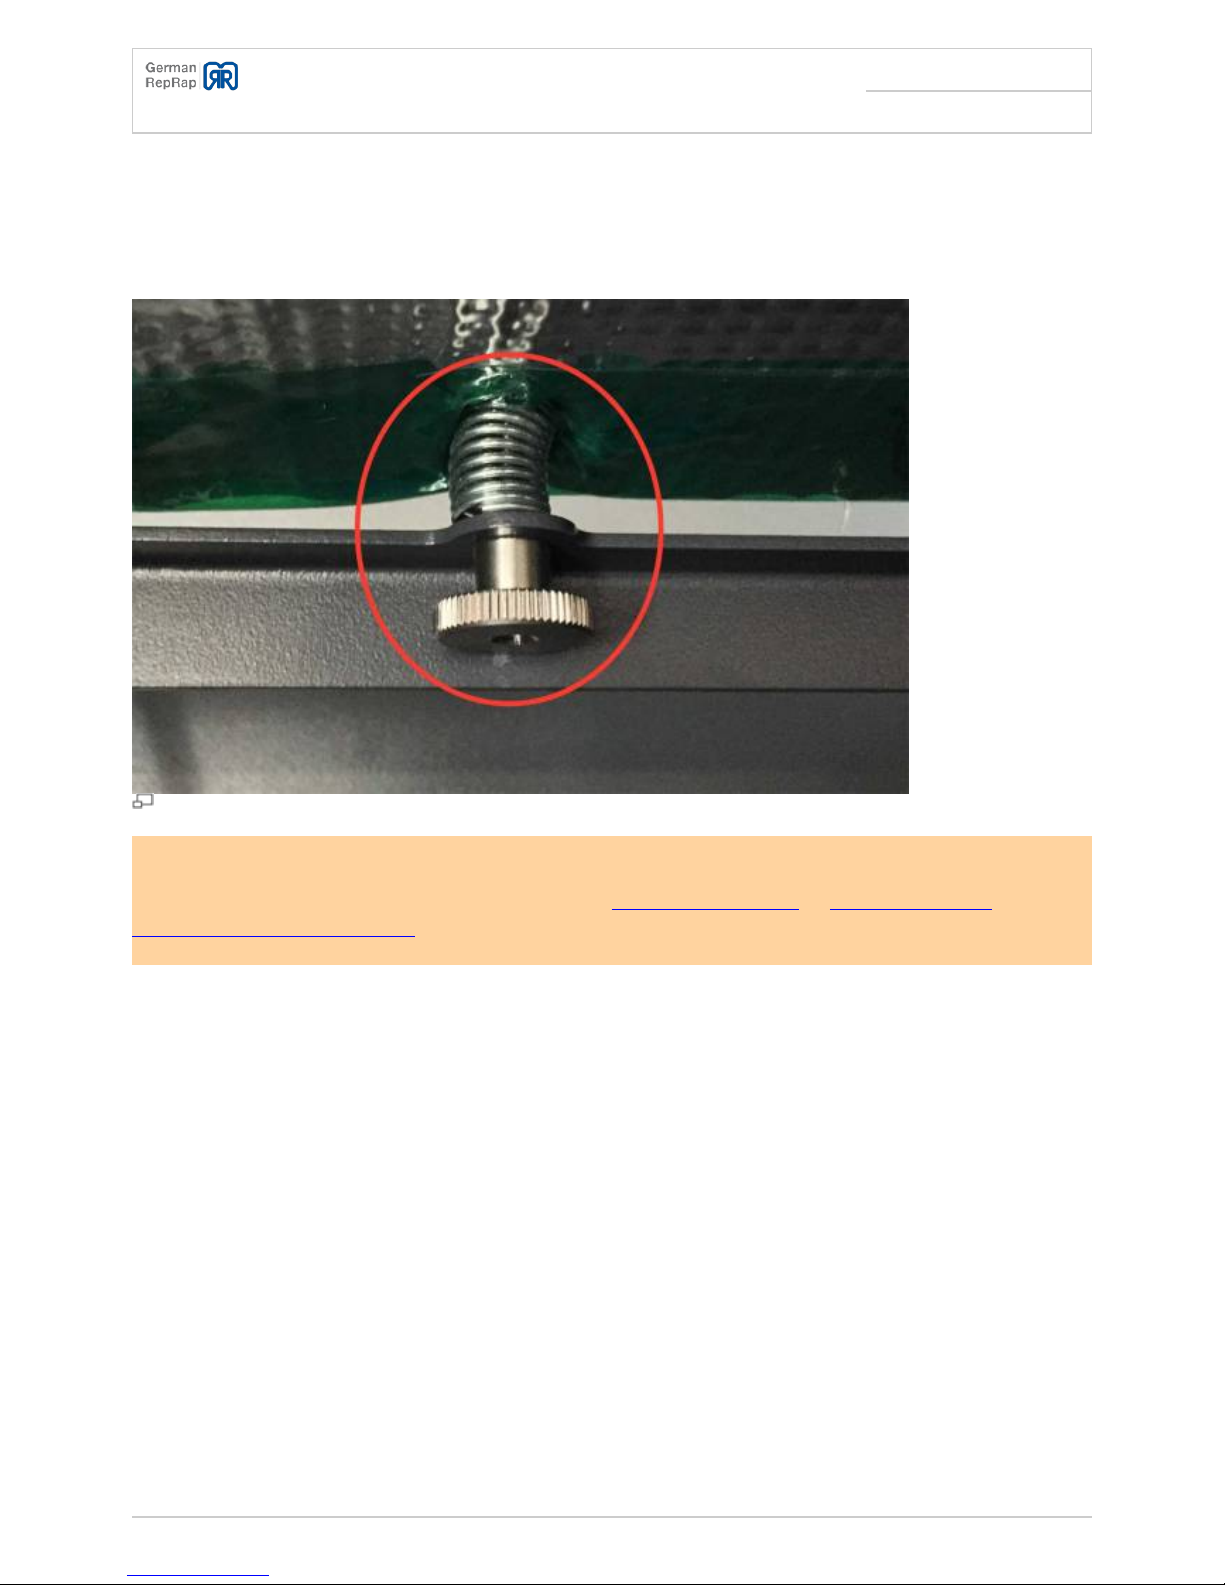
Now move the printing head close to each holding point above the adjusting screws, and fasten or
●
loosen the knurled nut a bit until only one sheet of paper (80g/sqm, copy paper) would fit between
the nozzle tip and the printing bed.
Also check other randomly chosen positions for the printing head
●
Repeat until the distance is identical in any position.
●
Printing bed adjusting screws
Re-level the printing bed if you set the temperature of the printing bed to an entirely different value.
This is the case, for example, when switching from PLA (Polylactic acid) to ABS (Acrylonitrile
butadiene styrene-copolymer) or vice versa.
Stripping container, setup and removal
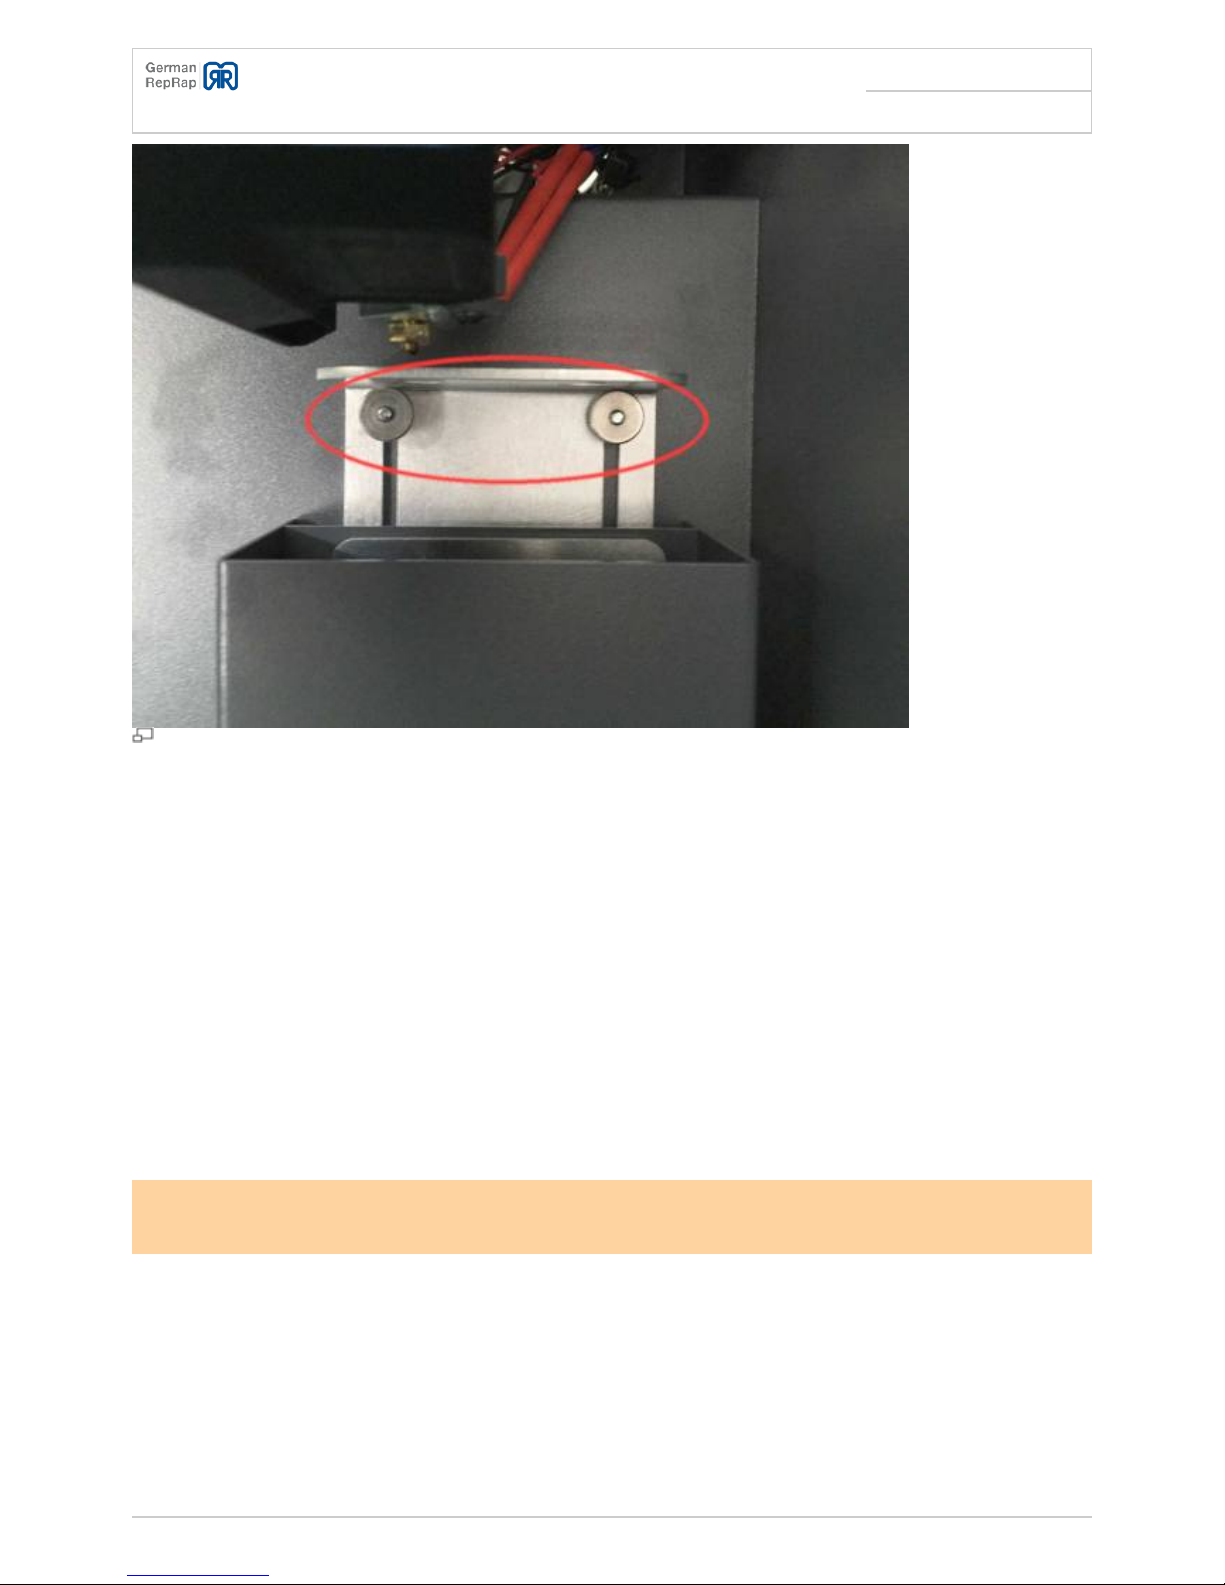
Adjust the distance of the perforated plate so that the nozzle has a distance of about 1mm to the
plate. Use the knurled nut to adjust the height.
Page 12
X350 3D-Printer Quick Start Guide
Seite: 9/29
Stand: 2016/03/24 13:55
© German RepRap GmbH 9/29
Waste container
Case fan control
Both of the case fans that are installed in the upper printer can be controlled through Gcode:
M806 S<220-255> - Turn on fan, whereby 220 = 86% fan speed, 255 = 100% fan speed
●
M807 - Turn off fan
●
Changes with Firmwareversion 3.1:
M106 P1 S<220-255> - Turn on fan, whereby 220 = 86% fan speed, 255 = 100% fan speed
●
M107 P1 - Turn off fan
●
The fan will only reliably start spinning at a set fan speed of 86%.
If the printing bed temperature is at 60 degrees (PLA) and the fan speed is at 100%, the temperature
in the printing space will be 30 degrees. If the printing bed temperature is at 110 degrees (ABS) and
the fan speed is at 100%, the temperature in the printing space will be 55 degrees.
Network setup
Page 13
X350 3D-Printer Quick Start Guide
Seite: 10/29
Stand: 2016/03/24 13:55
© German RepRap GmbH 10/29
The X350 printer contains a 3DPrintBox. The manual for the 3DPrintBox includes all information about
the network setup and software updates. Please ignore instructions about the connection to the
3DPrintBox, as it is already installed and integrated.
http://wiki.germanreprap.com/en/handbuch/3dprintbox_v2
Inserting filament
Please do NOT let the extruder remain at temperature for a longer time if you are not using it. This
may lead to so-called “linking” of plastics and can clog your extruder, which is very hard to clean out.
This effect is most often observed when using PLA (Polylactic acid).
The coil with the printing material is hanged in the coil holder in the back, and the end of the wire is
cleanly cut with a wire cutter. Then the wire is lead through the filament conduct and pushed
forwards to the extruder.
E - Filament insertion
Directly at the device
Page 14
X350 3D-Printer Quick Start Guide
Seite: 11/29
Stand: 2016/03/24 13:55
© German RepRap GmbH 11/29
In order to lead the filament into the extruder, take the following steps:
Heat up the extruder manually using the control panel: Press the button → “Extruder” → “Temp.1”
●
Wait until the Extruder has reached the target temperature
●
In the menu, select: “Position” → “Extr. Position”
●
After activating the menu point, turn the control wheel clockwise in order to pull in or lead the
●
filament, and counter-clockwise to eject the filament
When you are done, please turn off the extruder heating
●
Through the network
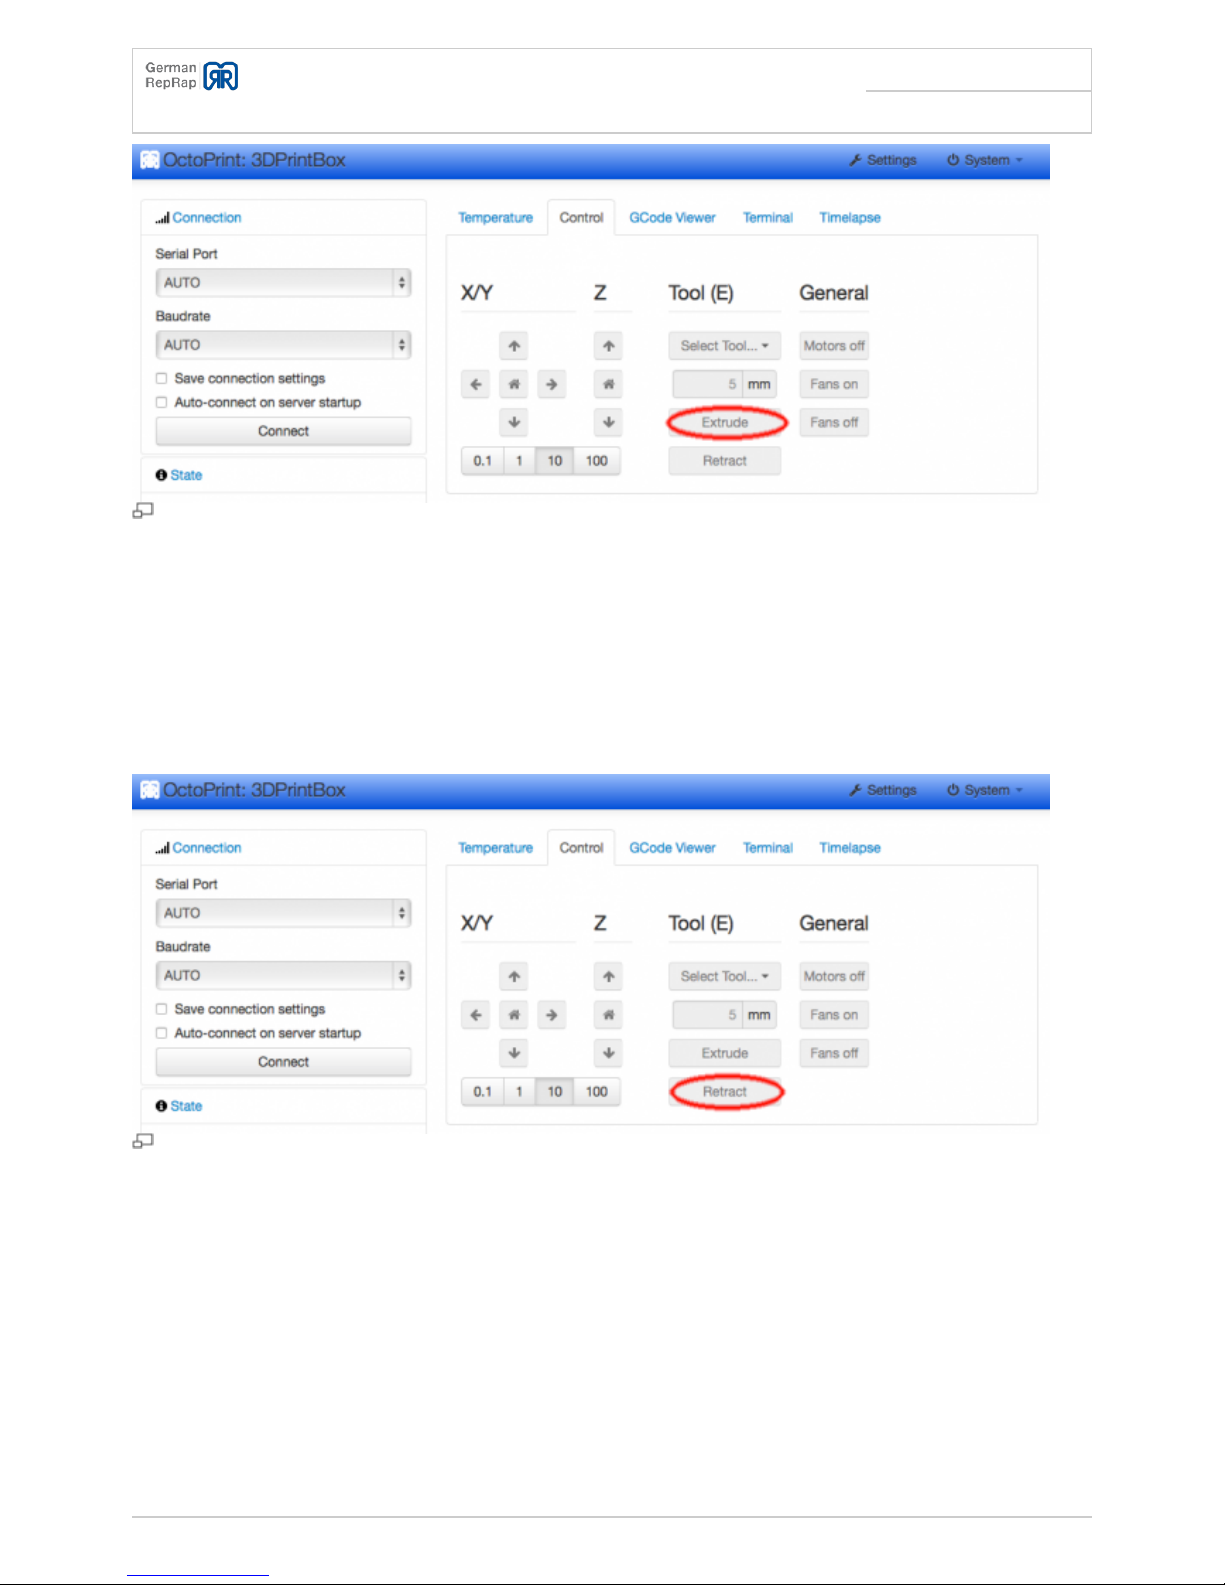
Heat up the Hot-End through the web interface. Once the target temperature is reached, you can lead
the inserted filament via the web interface manually, until it exits the nozzle. Afterwards, turn off the
extruder heating.
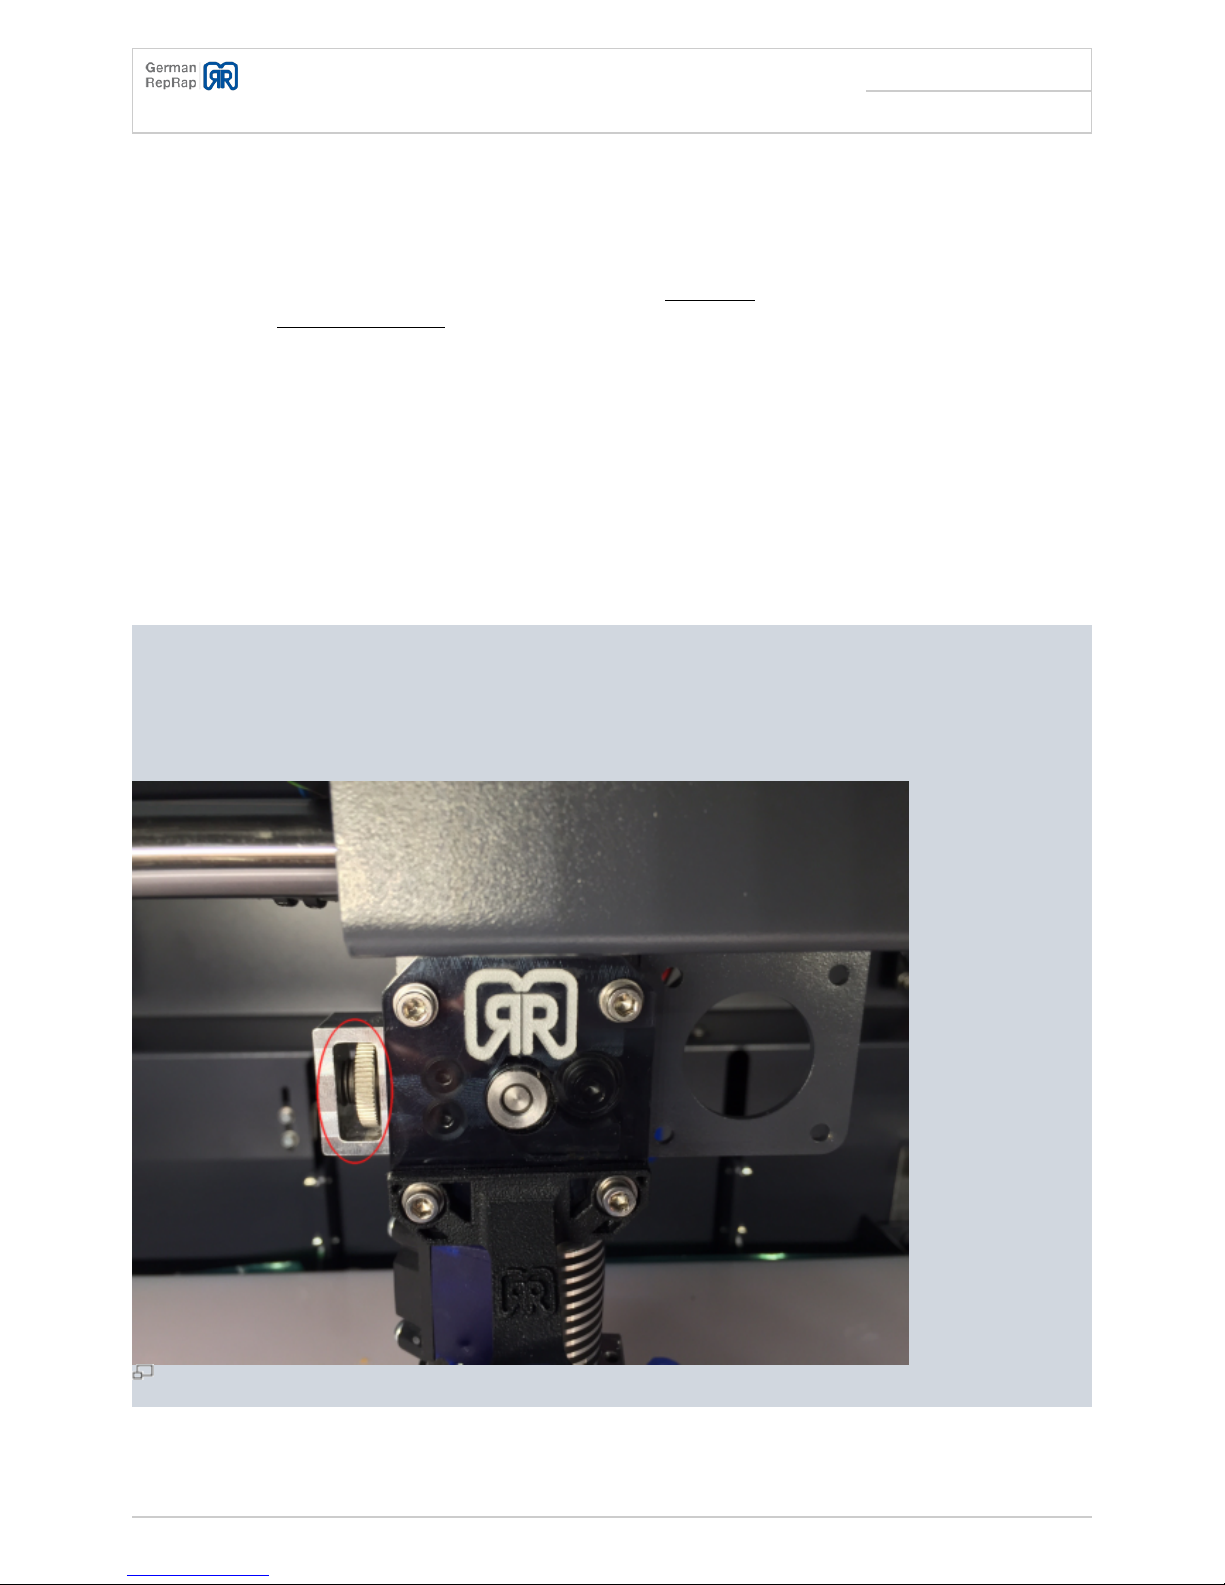
If the extruder doesn't properly lead the filament, you can adjust the contact pressure on the filament
using the adjusting wheel at the extruder. Depending on the material it may be necessary to adjust
the contact pressure to the material in order to achieve a flawless leading of the filament. To do that,
turn the adjusting wheel at the extruder.
Adjusting wheel
Page 15
X350 3D-Printer Quick Start Guide
Seite: 12/29
Stand: 2016/03/24 13:55
© German RepRap GmbH 12/29
Manual extrusion
Removing the filament
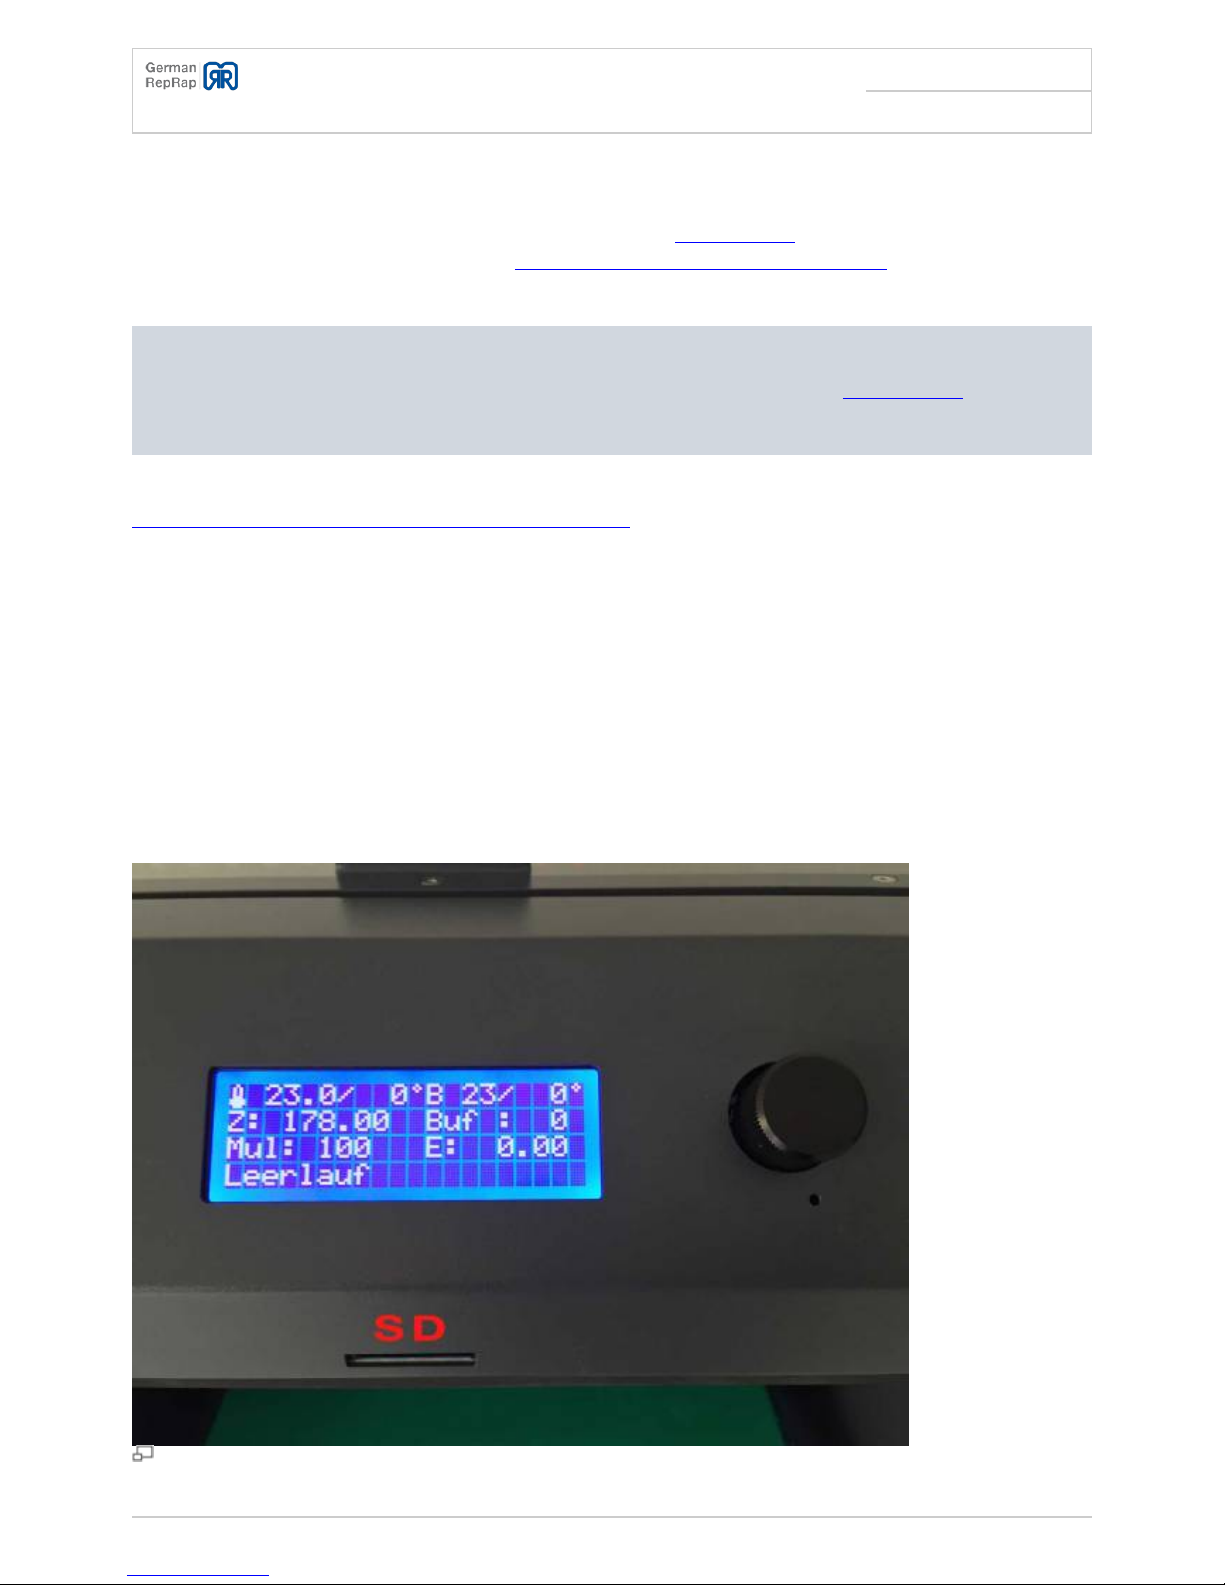
In order to “unload” the filament, take the steps in reverse. Heat up the extruder until it reaches the
target temperature, and let it spin backwards until you can pull the wire out of the filament lead by
hand. Afterwards, turn of the extruder heating.
Manual retract
Changing the filament
The filament change is in principle done the same way as loading or unloading the wire. However, you
have to adjust the temperature of the extruder to the “higher grade” material. For example, if you
change PLA to ABS, you need a temperature of 250°C. Once you inserted the new material, extrude it
by hand until there are no remains of the previous material coming out of the nozzle anymore.
Afterwards, turn the extruder heating off.
Page 16
X350 3D-Printer Quick Start Guide
Seite: 13/29
Stand: 2016/03/24 13:55
© German RepRap GmbH 13/29
Software installation
The X350 3D-Printer comes with a license of the software Simplify3D™ You can download the correct
version for your operating system under https://www.simplify3d.com/downloads/ after entering the
license key. Launch the installation in accordance with the installation instructions you find there.
As the X350 has NO direct interface for USB-PC connection, instructions about printing via USB in the
following section are not applicable. The generated Gcode is exported from Simplify3D™ as a file, and
then fed to the printer via SD-card or via the network.
An instruction on Simplify3D™ can be found here:
http://wiki.germanreprap.com/en/software/simplify3d
Printing with SD card
Other than the option to load Gcode files on the printer through the network, there is also the
possibility to save the Gcode from Simplify3D on an SD-card (FAT32 format, max. 4GB).
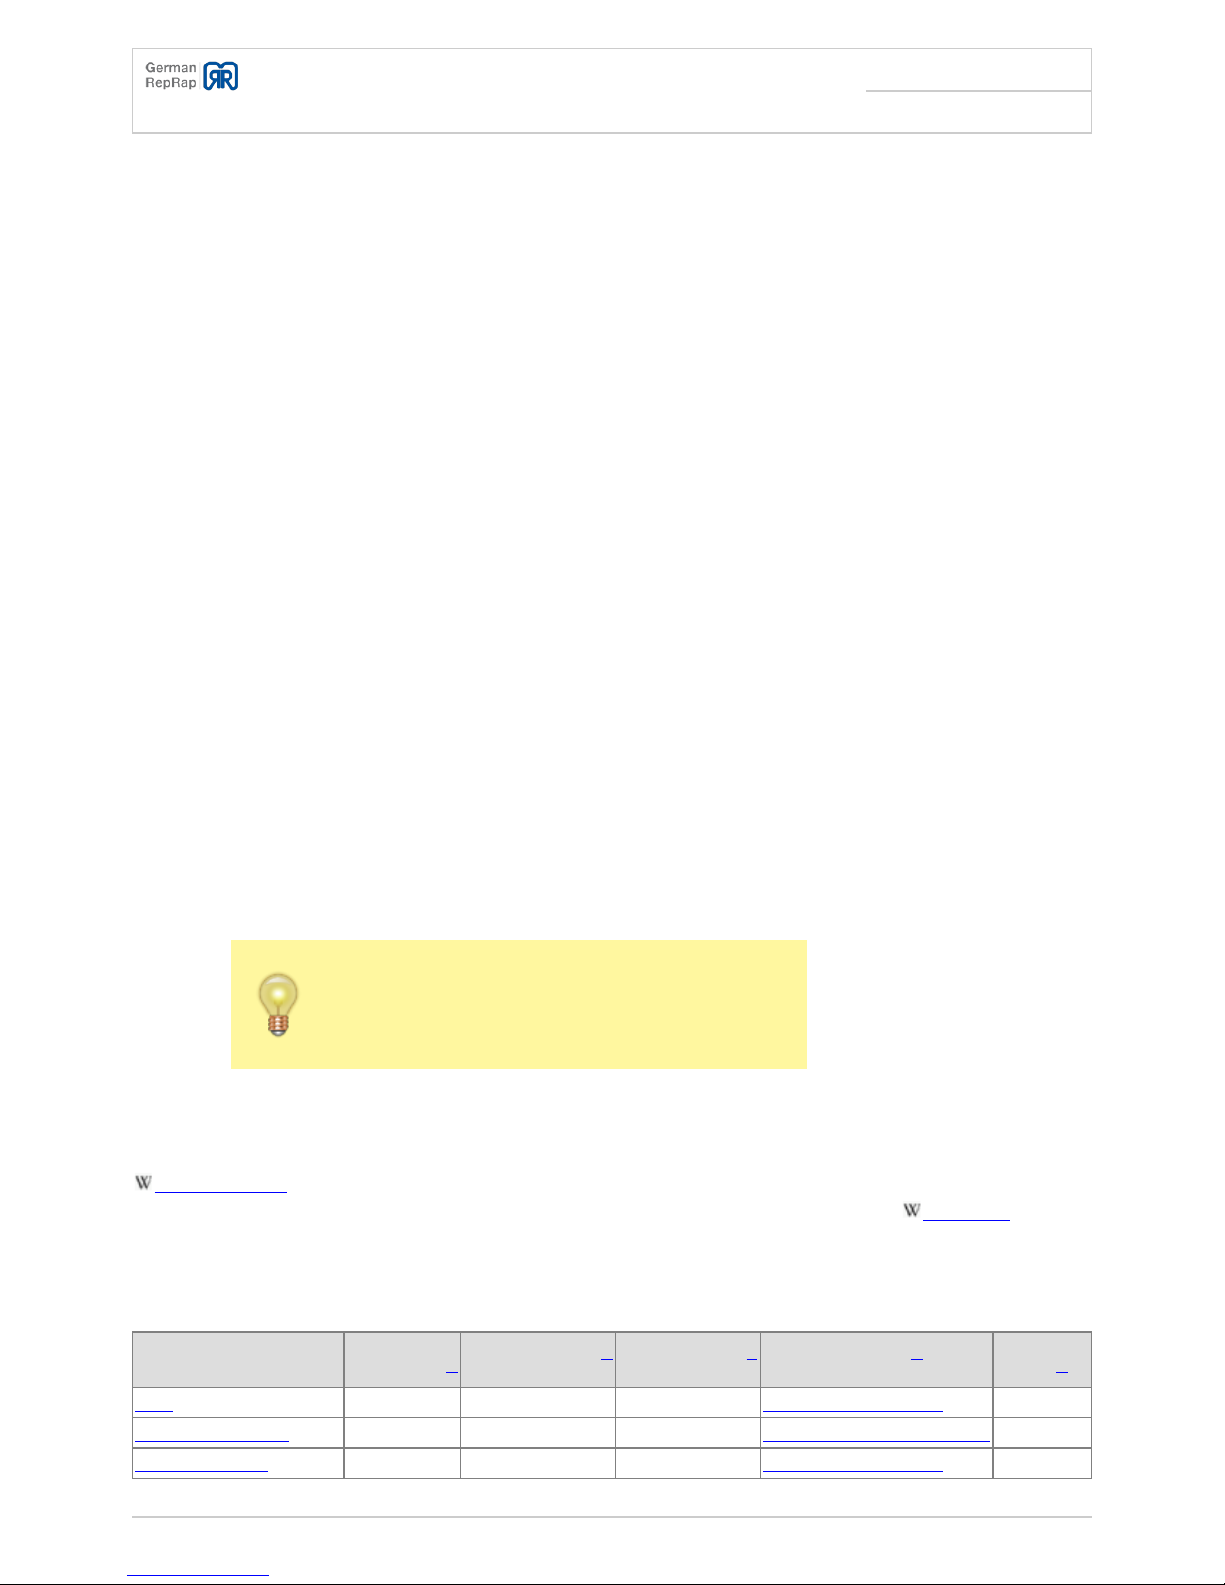
This SD card can then be inserted into the card reader in the front of the printer. Usually the printer
will then display the content of the SD-card. You can then select the correct file and start the printer
with pressing the button.
SD-Card slot
Page 17
X350 3D-Printer Quick Start Guide
Seite: 14/29
Stand: 2016/03/24 13:55
© German RepRap GmbH 14/29
If the content of the SD-card is not displayed after inserting it into the card reader, the file may also
be selected through the menu on the LCD display: Press the button →”SD-Card” → “Print file” → Select
file.
Removing the printed object
In order to remove a printed object upon completion, take the following steps:
Let the printing bed cool down
●
Carefully check if the piece can be removed easily by hand
●
If it sticks too strongly, use the included spatula to carefully loosen the object from the printing bed
●
Cleaning the printing head (extruder)
After some time the nozzle and the heating block of the Hot-End may get dirty. In order to clean it,
take the following steps:
Put the printing head into an easily reachable and comfortable position
●
Heat up the Hot-End to the temperature of the respective used material
●
Clean the nozzle and the heating block from below with the included brass brush
●
Material selection
The temperatures listed here are based on our printers and
should be treated as a recommendation only. Please tweak
them to your own needs as required.
3D printers need materials to create object from like “common” printers. Depending on the printers
technology you are able to use different types of materials.
Thermoplastic, also known as a thermosoftening plastic, is a polymer that turns to a liquid when
heated and freezes to a very glassy state when cooled sufficiently. Thermoplastic polymers differ
from thermosetting polymers (Bakelite) in that they can be remelted and remoulded. Many
thermoplastic materials are addition polymers; e.g., vinyl chain-growth polymers such as polyethylene
and polypropylene.
Filament type
Melting
point (°C)
1)
Extruder (°C)2)Printbed (°C)
3)
Surface
4)
Stable
(°C)
5)
ABS 220° ~230° - 255° ~ 110° - 115° Carbon/PET/Kapton ~ 140°
PLA - Polyactose 200° ~180° - 220° ~ 55° - 65° Carbon/PET/Kapton/Glas ~ 60°
PS - Polystyrol 210° ~190° - 220° ~ 80° - 100° Carbon/PET/Kapton –
Page 18
X350 3D-Printer Quick Start Guide
Seite: 15/29
Stand: 2016/03/24 13:55
© German RepRap GmbH 15/29
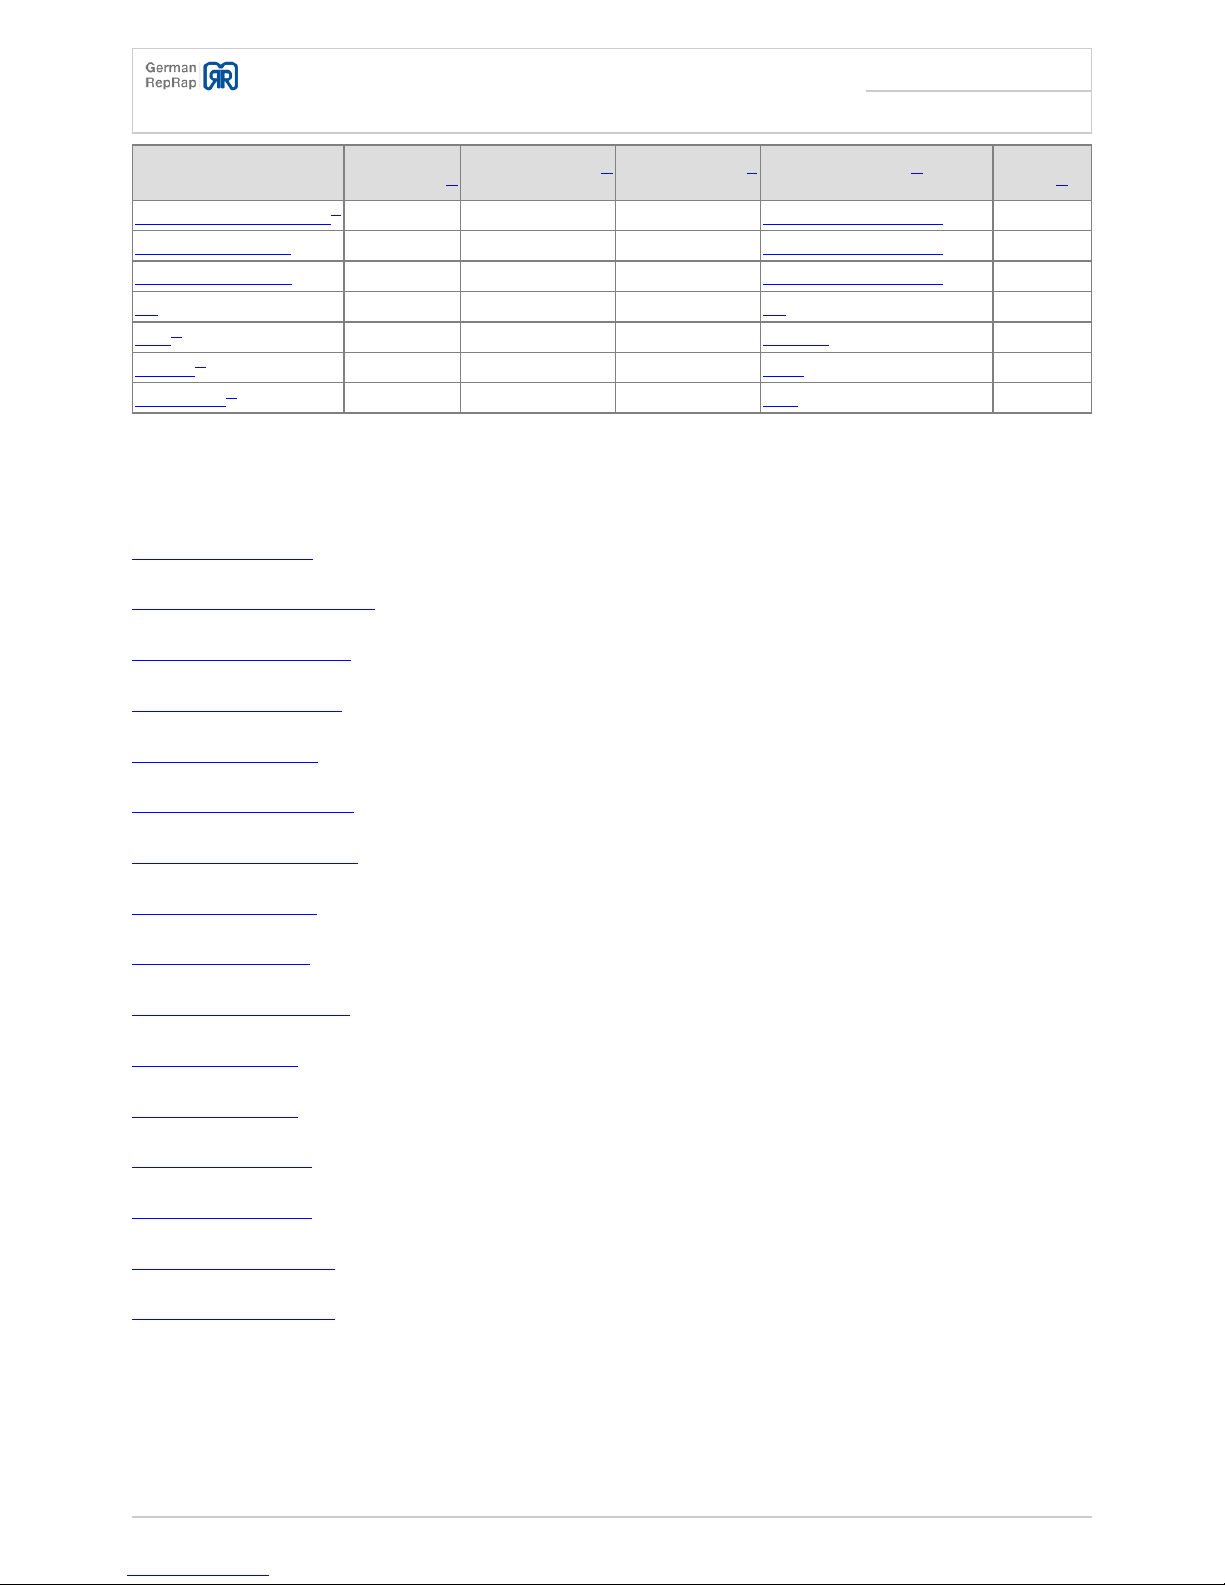
Filament type
Melting
point (°C)
1)
Extruder (°C)2)Printbed (°C)
3)
Surface
4)
Stable
(°C)
5)
PVA - Polyvinylalkohol6)210° ~190° - 220° ~ 55° - 115° Carbon/PET/Kapton –
LAYWOOD - Holz 210° ~180° - 230° ~ 0° - 80° Carbon/PET/Kapton ~ 60°
LAYBRICK - Stein 160° ~165° - 210° ~ 0° - 80° Carbon/PET/Kapton ~ 70°
PP 210° ~210° ~ 0° - 80° PP ~ 150°
PA6
7)
240° ~245° - 265° ~ 130° Kapton –
TPU93
8)
190°C ~190°C-215°C cold Glas > 120°C
Carbon20
9)
235°C ~252°C ~45°C PET –
Download datasheets
ABS datasheet (en)
Smart ABS datasheet (en)
Bendlay datasheet (en)
Carbon datasheet (en)
HiPS datasheet (de)
Laybrick datasheet (en)
Laywood datasheet (en)
PA6 Datenblatt (en)
PLA datasheet (en)
PLA soft datasheet (en)
PP datasheet (en)
PS datasheet (en)
PVA datasheet (de)
PVA datasheet (en)
TPU93 datasheet (en)
TPU93 datasheet (de)
Materialinfo
Page 19
X350 3D-Printer Quick Start Guide
Seite: 16/29
Stand: 2016/03/24 13:55
© German RepRap GmbH 16/29
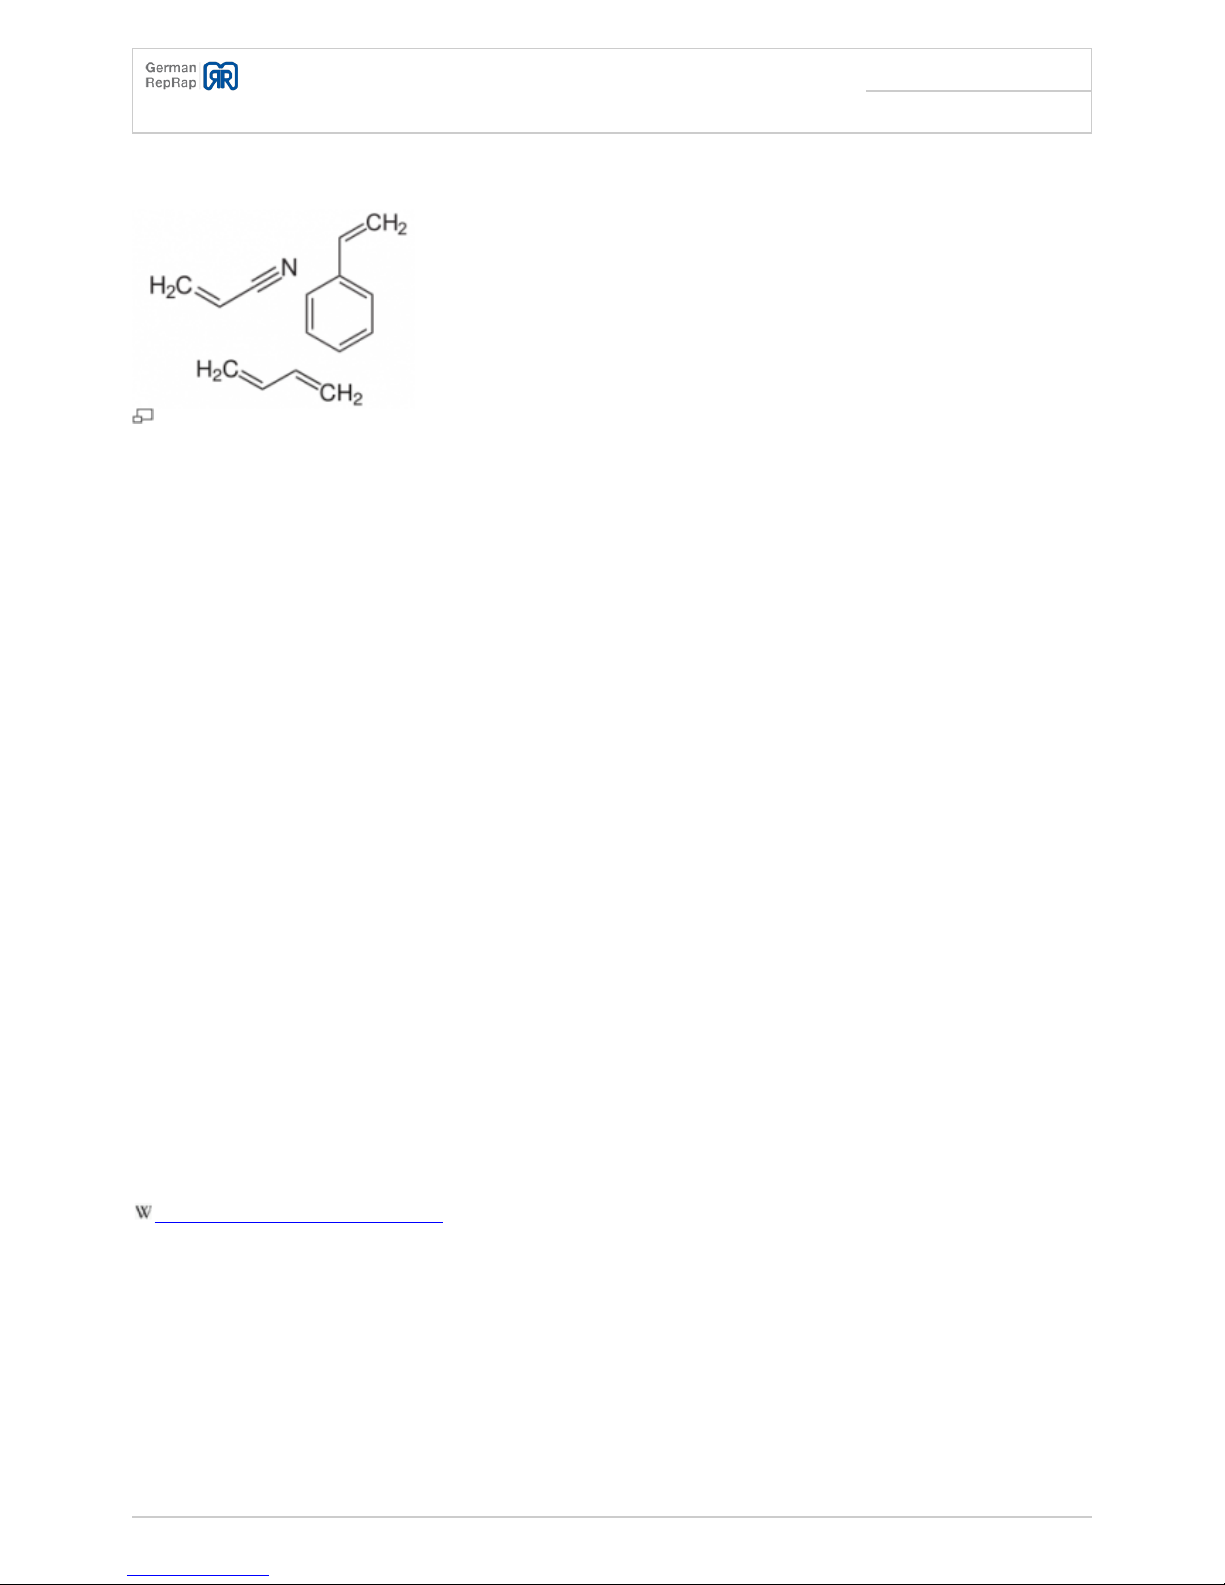
ABS (Acrylonitrile butadiene styrene-copolymer)
Acrylonitrile butadiene
styrene-copolymer (ABS)
Acrylonitrile butadiene styrene-copolymer (short ABS) is a synthetic terpolymer of three
different kinds of monomers, acrylonitrile, 1.3 butadiene and styrene and belongs to the amorphous
thermoplastics. The proportions can vary from 15 to 35% acrylonitrile, 5 to 30% butadiene and 40 to
60%.
Specification
The following specification refers to the ABS distributed by us.
Density: 1,05 g/cm3
●
Melt mass flow rate MFR: 5-9 (220 °C/10 kg), g/1 0 min
●
Melt volume rate MVR: 5-9 (220 °C/10 kg), cm 3/10 min
●
Tensile strength: 2400 MPa (23°C)
●
Impact strentgth: 130 (bei 23°C), 100 (bei – 30 °C) kJ/ m2
●
Notched bar impact test Izod: 25 (bei 23°C), 12 (bei -30° C) kJ/m2
●
VIcat- softening temperature: ~ 100 °C
●
Melting temperature: from ~ 220 °C
●
Source
Acrylonitrile butadiene styrene
PLA (Polylactic acid)
Page 20
X350 3D-Printer Quick Start Guide
Seite: 17/29
Stand: 2016/03/24 13:55
© German RepRap GmbH 17/29
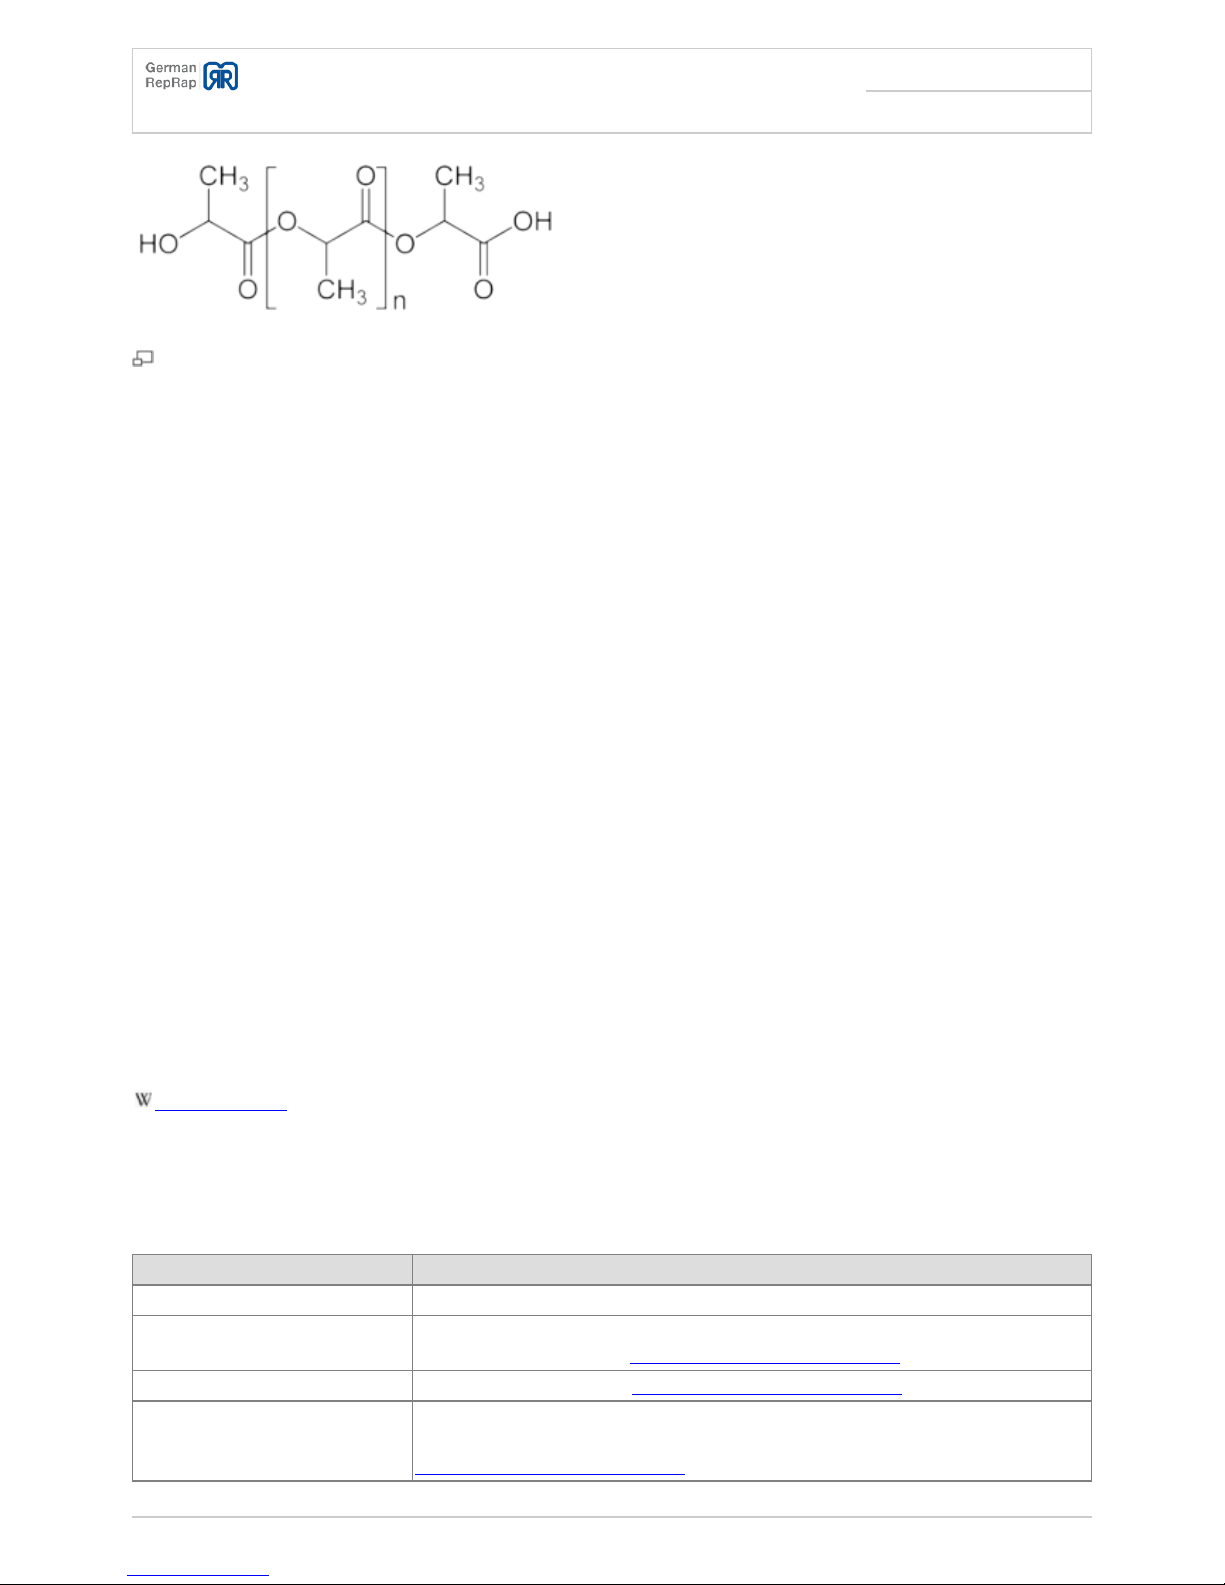
PLA (Polylactic acid)
Polylactic acid or polylactide (short PLA) are plastics, malleable by heat supply (also called
thermoplastics). They are made of many chemically bound lactic acid molecules, so they belong to
the polymers. Polylactide plastics are biocompatible.
Specification
The following specification refers to the PLA distributed by us.
Density: 1,24 g/cm3
●
Melt mass flow rate MFR: n/a (220 °C/10 kg), g/10 min
●
Melt volume rate MVR: n/a (220 °C/10 kg), cm 3/10 min
●
Tensile strength: n/a MPa (23°C)
●
Impact strentgth: n/a kJ/ m2
●
Notched bar impact test Izod: n/a kJ/m2
●
VIcat- softening temperature: n/a* °C
●
Melting temperature: from ~ 180 °C
●
Source
Polylactic acid
Troubleshooting
Problem Solution
Device doesn't turn on Check the power supply
Hot-End doesn't heat up
Check if the Hot-End plug connection is firm enough, and if needed,
contact our support at [email protected]
Printing bed doesn't heat up Contact our support at [email protected]
Printer stops printing
mid-process
Please check the following things: Power supply, SD card may be faulty,
Gcode may be invalid, otherwise contact our support at
Page 21
X350 3D-Printer Quick Start Guide
Seite: 18/29
Stand: 2016/03/24 13:55
© German RepRap GmbH 18/29
Problem Solution
There is no material coming
out of the nozzle, or the
material flow is inconsistent
Rectify contact pressure at the extruder, clean Hot-End, check filament
feed
The printed object comes
loose from the printing bed
Clean the printing bed, if necessary lubricate it with acetone (NOT if
you have a BuildTak overlay), printing overlay may be worn out (PET
film), distance between nozzle and printing board may be wrong
Support
We provide support and all the documentation.
Documentation
You'll find all the documentation online at http://wiki.germanreprap.com . Please register with the site
at wiki.germanreprap.com in order to be able to automatically send notifications and changes of
documents you are interested in via email.
Telephone
Our hotline is staffed from Monday to Friday (excluding public holidays) between 10:30 - 16:00 and
can be reached at +49 9001 RepRap ( +49 9001 737727)
10)
. We answer your technical
questions and provide consulting for more complex setups.
0.99 € per minute from a landline in Germany, prices may vary depending on your landline telephone,
VOIP or mobile phone provider
Support tickets / E-mail
Please use our support pages at https://support.germanreprap.com to lodge a new ticket and check
the status of an old one, all free of charge.
Page 22
X350 3D-Printer Quick Start Guide
Seite: 19/29
Stand: 2016/03/24 13:55
© German RepRap GmbH 19/29
Alternatively you can send an email to [email protected] which generates a ticket, also
free of charge.
Forum (Community)
At https://forum.germanreprap.com you can interact with our 3D printing community in different
languages and exchange tips and tricks.
Page 23

X350 3D-Printer Quick Start Guide
Seite: 20/29
Stand: 2016/03/24 13:55
© German RepRap GmbH 20/29
Important notes
Return / Original wrapping
Please retain this documentation and the original package of this printer in case you need to ship it
for repairs or to a new address. 3D printers are inherently sensitive to bumping or knocking and are
best protected in their original box. Returns that are not properly packaged cannot be repaired under
warranty.
Operation
Do not cut the power while the printer is active. This can lead to the loss of data as well as damage
some electronic components.
Other matters
All information in this guide is current at the time of printing. We reserve the right to amend the
hardware, software or the documentation without prior notice. The latest information will always be
available at http://www.germanreprap.com.
Toxic fumes
Depending on the plastic being used there is a danger of toxic fumes developing if the printer is
running too hot for that filament. Always make sure to set the correct temperature for the plastic used.
The maximum temperature is generally printed on the filament spool and can also be looked up on
our website. (http://www.germanreprap.com).
Safety cut-off
The device has a thermal protection mechanism built-in. If the temperature exceeds the safe working
limit the printer turn itself off after issuing a warning message.
Page 24
X350 3D-Printer Quick Start Guide
Seite: 21/29
Stand: 2016/03/24 13:55
© German RepRap GmbH 21/29
Maintenance
Every 12 months the printer has to be serviced by trained personnel. This includes checking the
safety devices as well as all mechanical components. German RepRap offers this as a service. Please
contact us via [email protected] for more details.
Work on a mains power supply should only be carried out by trained specialists. It is essential to note
the safety regulations. Property or personal damage may be caused by improper installation, which
the installer bears liability for.
Proper handling of the chemicals necessary for maintenance and care is obligatory, as well as
complying with the regulations and operation notes regarding the chemicals. Directions of the
manufacturer must be followed at all times and appropriate protective clothing has to be worn.
Property or personal damage may be caused by improper use of the chemicals, which the operator
alone bears liability for.
Page 25
X350 3D-Printer Quick Start Guide
Seite: 22/29
Stand: 2016/03/24 13:55
© German RepRap GmbH 22/29
Safety notes
Power supply
Always ensure that the power lead has not been damaged. Disconnect the device immediately if the
power lead shows any sign of damage. Have the power supply inspected by an authorised electrician.
Only use the power supply that came with the printer. An electric shock from a faulty power lead can
be fatal!
Only use the power supply if your mains voltage is 100-110V or 220-240V AC. Only use the correct
power lead for your mains socket.
Cleaning
Pull the power plug before cleaning the device. Use a dry cloth and only clean the surface.
Handling the chemicals necessary for maintenance and servicing has to take place properly and
under adherence to of for this valid regulations and application notes to the chemicals. To the
specifications of the manufacturers absolutely for this is to be responded, it is appropriate protective
clothing to be carried, and the dosage regulations are to be kept exactly.Special and personal injury
can be caused by inappropriate handling chemicals, for which alone the operator is responsible.
Playing children
Touching the internal parts of the power supply can cause an electric shock!
Mains voltage
Only operate the device with the indicated supply voltage (visible on the backside of the device or on
the external power supply) The device must not be connected to the mains until all connections were
double checked.
There is a fire hazard if the mains voltage is too high!
Page 26

X350 3D-Printer Quick Start Guide
Seite: 23/29
Stand: 2016/03/24 13:55
© German RepRap GmbH 23/29
Humidity, solar radiation, heat, open fire
Protect the device from extreme humidity, dripping and splash water (do not place any liquid-filled
containers such as beverages on it). Do not place the device near a heater, do not expose it to
extended direct sunlight and do not operate it in damp rooms. Only use the device in a moderate, not
a tropical climate. Do not put any open flames such as candles on the device!
Ventilation
The heat arising in the device is sufficiently discharged. Nevertheless do not install the device in a
closet or in a shelf with insufficient ventilation. Never cover the ventilation slots of the device, if there
are any.
Do not place any object on the device. To allow heat to dissipate, please allow at least 30cm above,
20cm to each side and 30cm behind the device unobstructed.
The device only complies the declaration of conformity if the transparent case is assembled and the
door closed while operating.
Long absence, thunderstorms, accessibility of the power
plug
To completely disconnect the device from mains power just pull the power plug out of the mains
socket. Make sure this socket is accessible. In case of longer absence and possible thunderstorms,
switch off the device with the power switch and then disconnect it from the mains. This also applies
for USB appliances connected to the device.
Installation site
Every electronic device develops heat. The heating of the device is within the permitted range though.
Sensitive surfaces may discolor over time due to heat exposure. Moreover, the rubber feet of the
device may cause color changes on furniture surfaces. If applicable, please place the device on a solid,
appropriate and plane base!
Please mind the practicability when choosing the installation site (sufficient working height).
Page 27

X350 3D-Printer Quick Start Guide
Seite: 24/29
Stand: 2016/03/24 13:55
© German RepRap GmbH 24/29
Disposal
Electronic equipment may not be disposed in the domestic waste - in accordance with Directive
2002/96/EG of the European Parliament and the Council of 27th of January 2003 about electric and
electronic equipment it has to be professionally disposed. At the end of its use please dispose this
device at one of the public collection point intended for this.
Page 28

X350 3D-Printer Quick Start Guide
Seite: 25/29
Stand: 2016/03/24 13:55
© German RepRap GmbH 25/29
Rechtliche Hinweise
Software-Changes / Use of applications
Modifications to the software or using software not supplied by German RepRap GmbH void the
warranty of the device. Shipping costs as well as costs for repairs caused by using unsupported
software are billed to the customer.
Only use the software packages provided by German RepRap GmbH through their website as well as
the original CD-ROM that came with the device.
German RepRap GmbH cannot be held liable for the loss of data on any internal or external storage
medium.
The device has been pre-installed with software and works as can be reasonably expected. It cannot
be guaranteed that the software is error-free. As long as it is possible to use the printer as designed
an error in the software does not constitute a faulty device and hence provides no grounds to a
warranty claim. The warranty only covers faults in the software that would prevent the normal use of
the printer.
Limitations of the software caused by hardware faults, the environment the printer is being used in,
operating error or similar reasons are not considered software faults.
Contact
German RepRap GmbH
Kapellenstr. 9
85622 Feldkirchen bei München
Germany
Tel: +49 89 2488986 0
Fax: +49 89 2488986 99
Mail: [email protected]
Hilfe: [email protected]
Web: http://www.germanreprap.com
Page 29
X350 3D-Printer Quick Start Guide
Seite: 26/29
Stand: 2016/03/24 13:55
© German RepRap GmbH 26/29
Links
X350 Flyer
Download CE Konformitätserklärung
Simplify3D™
1)
manufacturer’s information
2)
, 3) , 5) our recommendation
4)
cover of printbed
6)
material is hygroscopic and therefore limited storable
7)
material is hygroscopic and therefore limited storable, in case of bubbles during pint it can be dried
in an oven at about 80°C for ca. 3-4 hours
8)
Material kann nur mit dem DD3 Extruder verarbeitet werden!
9)
Sollte dauerhaft nur mit einer Edelstahldüse verarbeitet werden, da extrem abrasiv
10)
0.99€/minute from a landline in Germany, prices may vary depending on your landline telephone,
VOIP or mobile phone provider
From:
http://wiki.germanreprap.com/ - German RepRap Wiki
Permanent link:
http://wiki.germanreprap.com/en/x350/quick_start
Last update: 2016/03/14 16:45
 Loading...