

Page 1
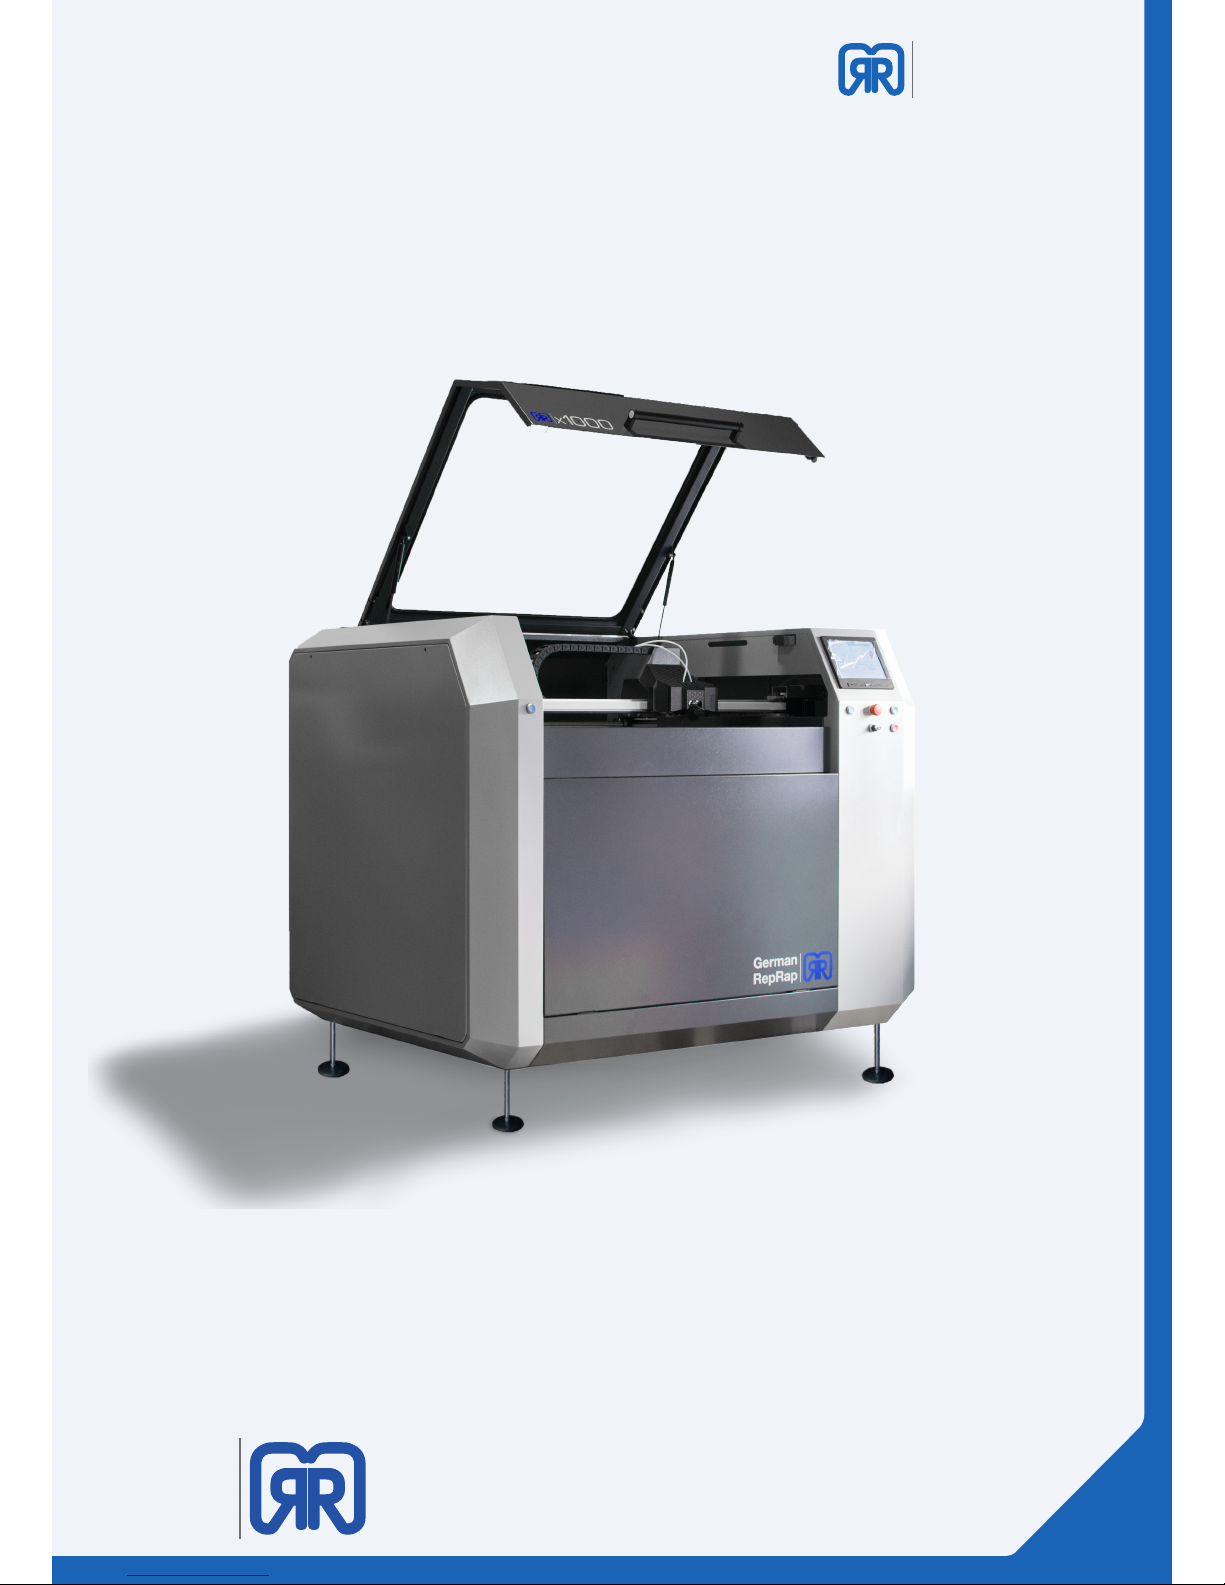
Congratulations on your purchase of your personal
X1000 3D printer
x
1000
German
RepRap
3D PRINTER MADE IN GERMANY
X1000 3D printer manual
Page 2

X1000
3D printer manual
German
RepRap
Table of content
1. General information
1.1 specications ................................................................................................................................04
1.2 System requirements................................................................................................................05
1.3 Additional options .....................................................................................................................05
2. 2.Operating modes of the X 1000
2.1 Red/ Stand-by .............................................................................................................................06
2.2 Green/ work mode ....................................................................................................................07
2.3 Two-hand circuit/removal position ..................................................................................... 07
2.4 Emergency stop ........................................................................................................................ 08
2.5 Maintenance mode ................................................................................................................... 08
3. Network and printer set up
3.1 Connection via router ..............................................................................................................09
3.2 Direct connection ...................................................................................................................... 09
3.3 Setup routine ...............................................................................................................................11
3.4 How to activate the printer and establish a connection ............................................. 16
4. Workow and operation
4.1 Simplify 3D
4.2 Features ......................................................................................................................................... 18
4.3 Quick Start Guide ....................................................................................................................... 19
4.4 The Interface Layout ................................................................................................................. 21
5. Repetier Server
5.1 Web interface .............................................................................................................................. 26
5.2 Dashboard .................................................................................................................................... 27
5.3 Device panel ................................................................................................................................ 28
5.4 Device panel operation ........................................................................................................... 28
5.5 EEPROM ......................................................................................................................................... 31
5.6 LOG-Files ....................................................................................................................................... 32
5.7 Firmwareupdate ............................................................................................. 33
6. Tool heads and cosumables
6.1 Tool head wiring ......................................................................................................................... 34
6.2 How to set up the second extruder ....................................................................................35
6.3 How to replace the hot end and the extruder .................................................................36
6.4 How to change the laments ................................................................................................. 38
7. CO2 extinguishing system
7.1 General information ..................................................................................................................42
7.2 7.2 Manual triggering ............................................................................................................... 43
7.3 Recommissioning after trigger ............................................................................................. 43
8. Tipps & Tricks
8.1 How to determine the X1000s MAC address .................................................................... 44
8.2 How to update Repetier-Server ........................................................................................... 44
8.3 PVA solution for enhanced adhesion .................................................................................45
02/51
Page 3

X1000
3D printer manual
German
RepRap
9. Download area
10. Important notices
Return shipment/ original package ............................................................................................ 46
Operation ..............................................................................................................................................46
Miscellaneous ...................................................................................................................................... 46
Toxic threat ........................................................................................................................................... 46
Safety switch ........................................................................................................................................46
Maintenance ........................................................................................................................................ 46
11. Safety notes
Power supply ....................................................................................................................................... 47
Cleaning ................................................................................................................................................ 47
Playing children .................................................................................................................................. 47
Mains voltage ...................................................................................................................................... 47
Humidity, solar radiation, heat, open ames ........................................................................... 47
Ventilation ............................................................................................................................................47
Long absence, tempest, power plug reachability ................................................................. 47
Installation site ....................................................................................................................................48
Disposal ................................................................................................................................................. 48
12. Legal disclaimers
Software modications/ use of applications ........................................................................... 48
Rev.Nr. 0.4
03/51
Page 4
X1000
3D printer manual
German
RepRap
1. General information
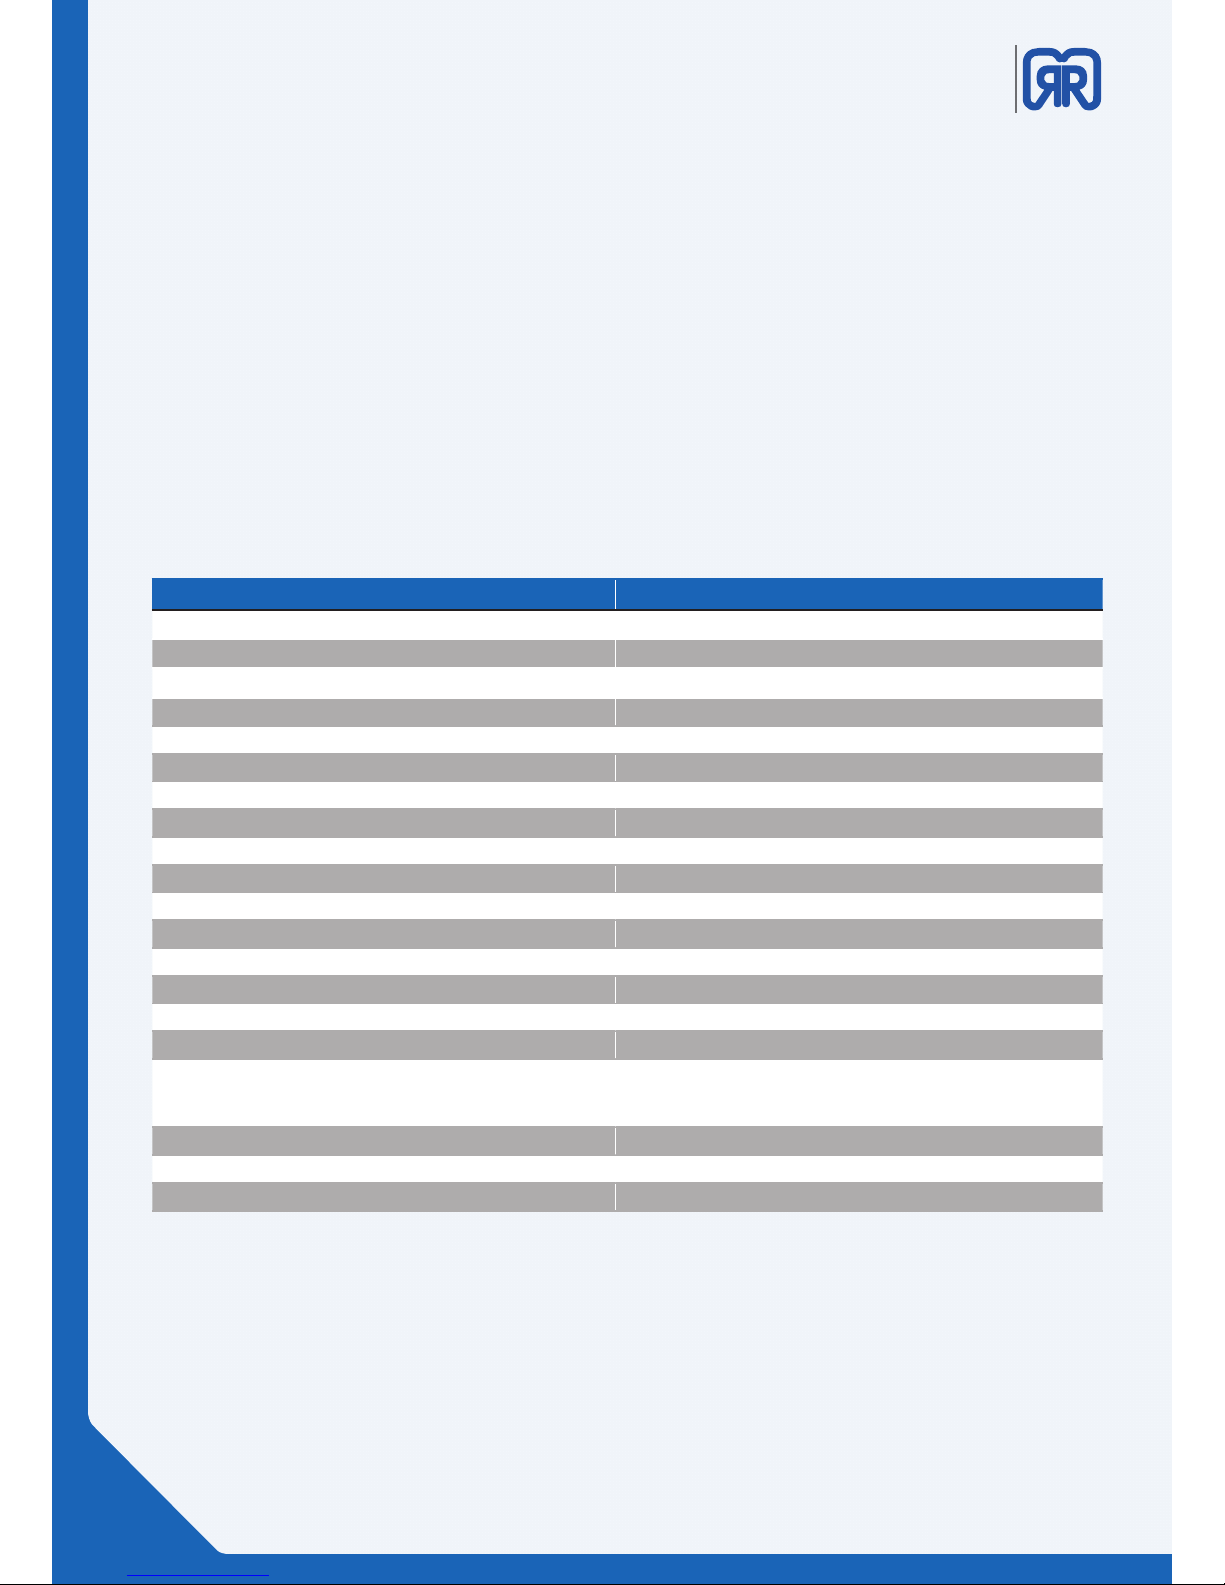
1.1 specications
The X1000 is a professional 3D printer, especially designed for processing various plastic materials with extra-large work area and optional double extruder. With a layer thickness up to 0.1
mm und a printing surface of 1000x800x600 mm, this 3D printer can produce either big models
or several small objects with the highest precision.
A closed switch gear cabinet, an emergency stop switch and an optional CO2 based dual re
protection system ensure that the requirements derived from an industrial work environment
are completely satised.
specication data
working space ( X - Y - Z) 1000 x 800 x 600 mm
printing speed 10 - 150 mm/s
traverse speed 10 - 300 mm/s
layer thickness (minimal) 0,1 mm (depending on nozzle)
lament/nozzle diameter (standard) 1,75mm / 0,8 mm
material PLA, Performance PLA, Laywood, PVA, PET-G, TPU64D
extruder type DD3 Dual
extruder temperature (max) 290° C
data transfer LC Touch display, WLAN, Ethernet
software Simplify3D
power consumption 2500 W
Operating voltage* three phase AC current 400V (CEE 3L+N+PE)
Ambient temperature 15-26° C
external dimensions (WxDxH) 1725 x 1500 x 1320 mm
weight 400 kg
marking DIN 10218-2
options
Heating bed, dual extruder
CO2 based dual re protection system
available nozzles 0,4 / 0,6 mm
available nozzle material brass, hardened steel
printing technology Fused Filament Fabrication (FFF)
04/51
Page 5
X1000
3D printer manual
German
RepRap
Note that the minimum system requirements listed below are for Simplify3D and Repetier-server only. These
applications are provided with the printer.
• Intel Pentium 4 or better
• 2GB Ram or more
• USB 1.1 optional
• Windows XP or newer
• Mac OS X 10.6 or newer
• Ubuntu/Debian Linux
• OpenGL 2.0
Please note that you must use one of the following browsers to establish a connection with your X1000 3D
printer.
• Chrome
• Firefox
1.2 System requirements
Microsoft´s Internet Explorer is not supported
1.3 Additional options
In addition to the standard version the following options are available:
• Heating bed
• Dual extruder
• CO2 based dual re protection system
For an inquiry please contact our sales partner from your region.
05/51
Page 6
X1000
3D printer manual
German
RepRap
Never turn on the heating bed while operating in standby mode!
After some time, the printer will switch into DRY-Run mode, so that you
must restart the device if you want to start a new print job
2. 2. Operating modes of the X 1000
The X1000 provides various modes that enable you to perform dierent functions depending on your
current task.
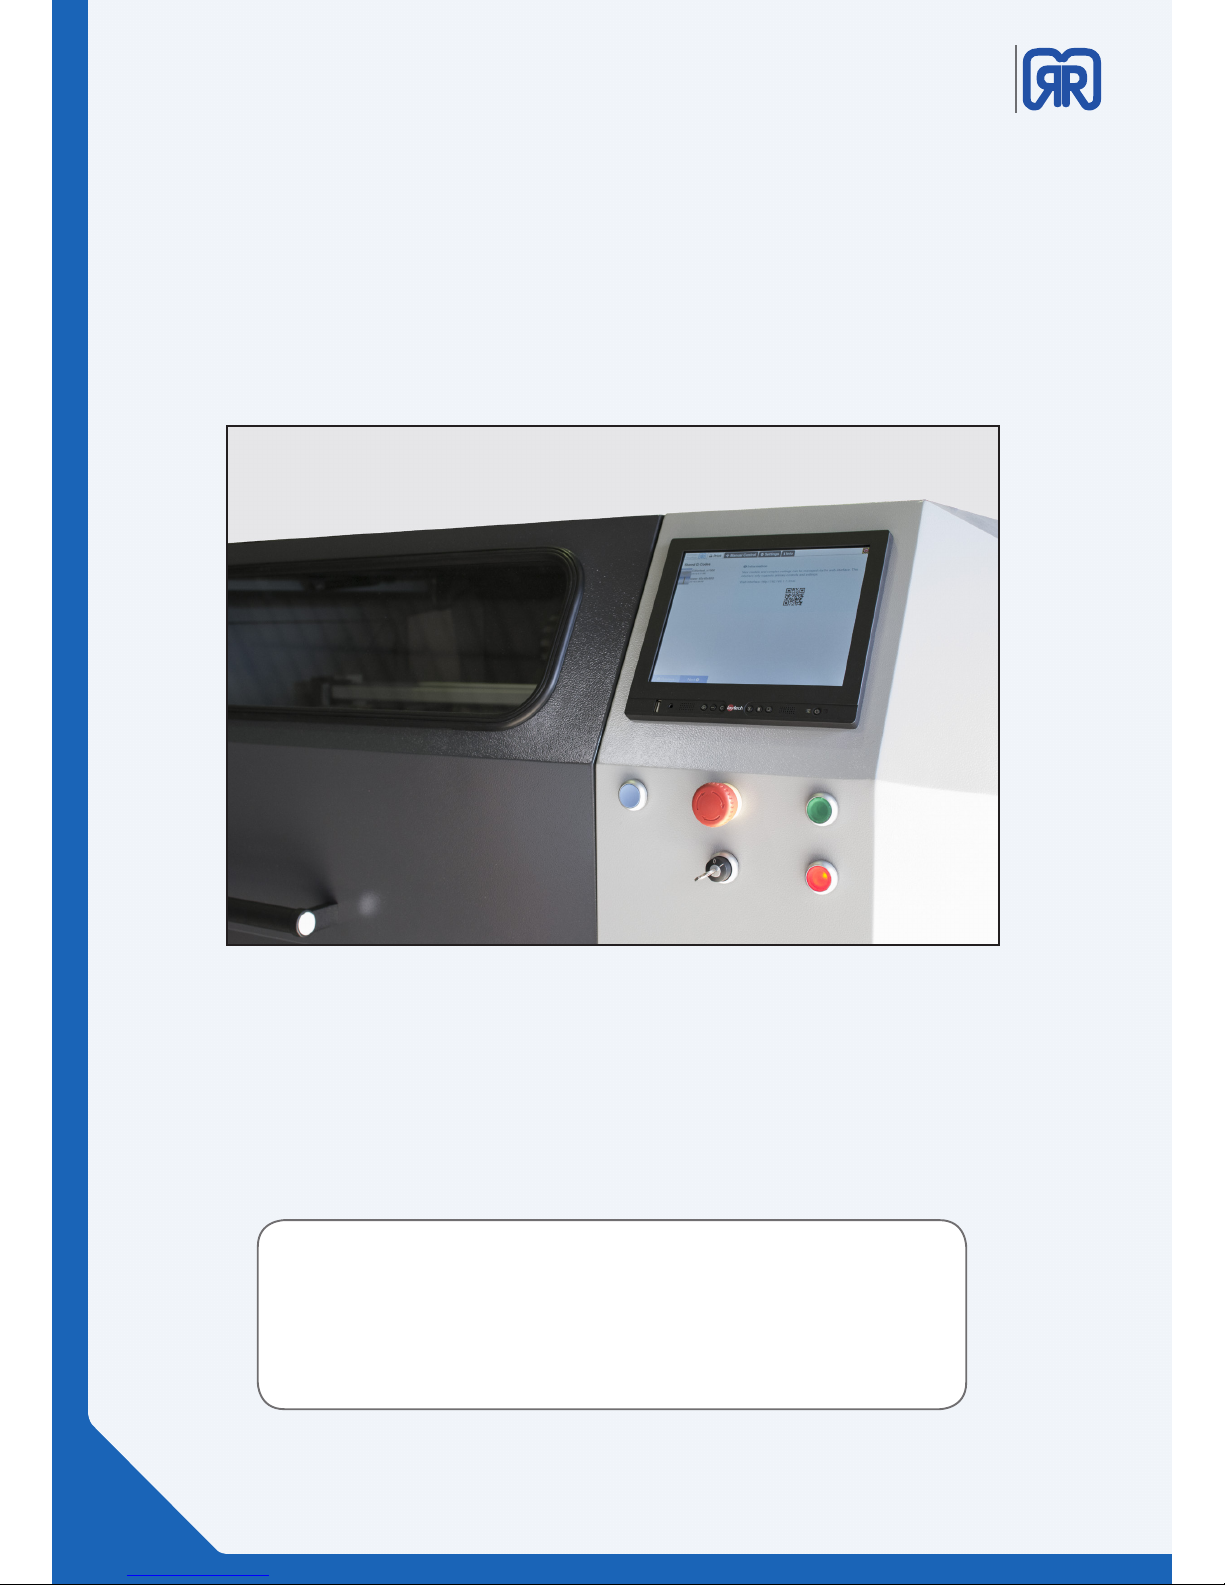
2.1 Red/ Stand-by
When the X1000 is connected to the mains you can reach the stand-by mode by turning on the printer
using the key. After a short initialization phase the startup screen appears on the LCD display and the red
light will light up.
X1000 Standby
In this mode, you can keep the lid of the X1000 open and heat up the extruder heads and let material
extrude simultaneously. All other functions (like traversing the axis) are blocked for safety reasons. In
addition, the standby mode allows you thread new laments easily, to clean the nozzle or even to replace
it completely. Furthermore, the Repetier server is already booted when operating in standby mode, this
means that you can already upload G-codes to the X1000.
06/51
Page 7
X1000
3D printer manual
German
RepRap
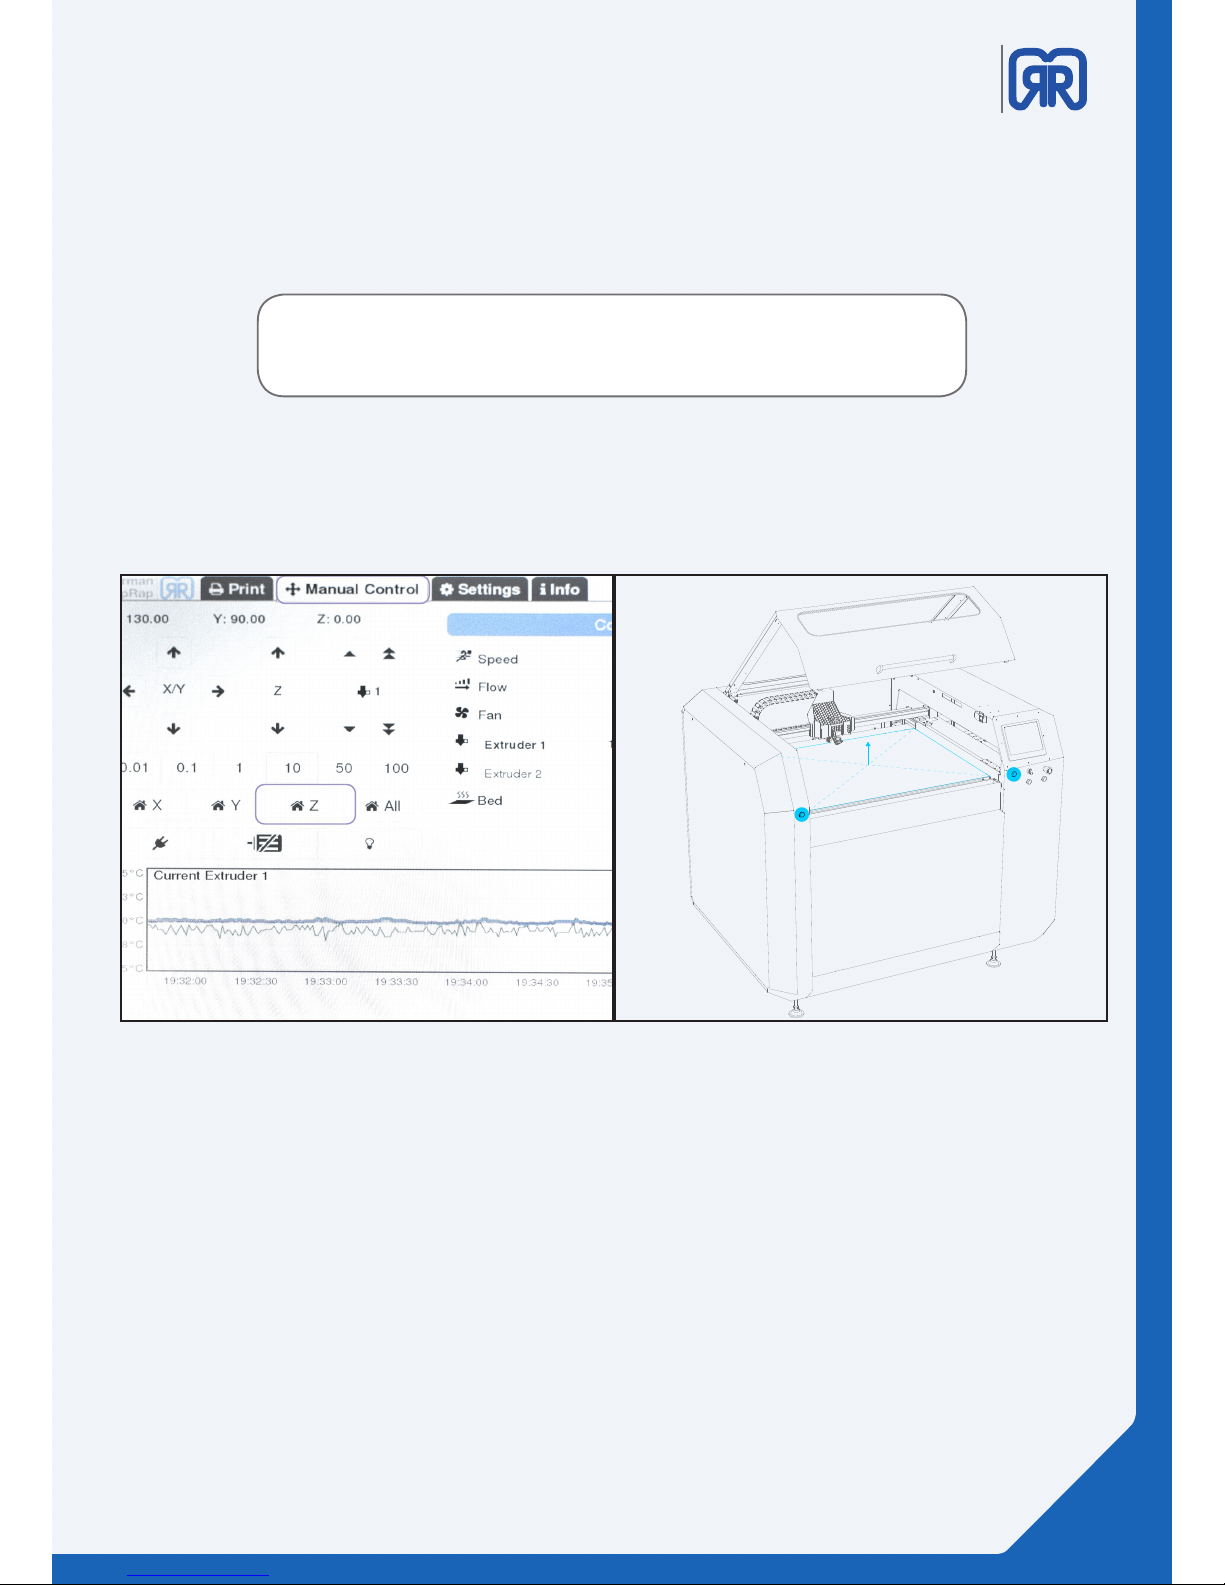
2.3 Two-hand circuit/removal position
After successfully completing a large 3d print you can lift the printing bed up to access is more easily using
the two-hand circuit.
2.2 Green/ work mode
To switch from standby mode to work mode to w After successfully booting the X1000 you must rst close
its lid. Then you must press the green switch underneath the LCD display.
When the green switch is light up the lid will be locked automatically
and the device is now ready to start a 3D print.
two-hand circuitLCD menu, manual control
To do this, proceed as follows:
• Switch into standby mode by pressing the red button
• Open the maintenance lid
• Execute the order “home z” via LCD display or web browser
• The device will stand completely still
• Now press the two blue buttons shown on the picture above simultaneously
• The axes will traverse as long as both buttons are pushed, but not further than the machine zero
07/51
Page 8
X1000
3D printer manual
German
RepRap
Allow the building platform to cool down, the object will be much
easier to remove.
The X1000 has two machine zeros. Besides the actual one the other
one is located half way up the building platform. When operating the
two-hand circuit this prevent pushing the printed object into the maintenance lid.
2.4 Emergency stop
If you press the emergency stop, the printer will shut down immediately.
Warning: RISK OF BURN:
The heating bed as well as the extruder heads will remain hot even
some time after an emergency shut down!
2.5 Maintenance mode
When operating in maintenance mode, it is possible to work with an open maintenance lid. This mode is
intended for repair and maintenance work only!
The maintenance mode must be set up by a trained professional only!
08/51
Page 9
X1000
3D printer manual
German
RepRap
3. Network and printer set up
To establish a connection with the X1000 you must rst check your computer´s network settings and adapt
them, if necessary. The you can launch the setup routine and put the printer into operation.
3.1 Connection via router
If necessary, contact your network administrator about integrating the
X1000 into your network.
If your network settings are DHCP based, the X1000 is automatically assigned an IP address. If this is the case
the X100 just has to be connected through a patch cable to your network.
Then you can see the printer´s assigned IP address as well as the MAC address on the LCD display.
3.2 Direct connection
To establish a direct connection between the X1000 and your computer you must proceed as follows:
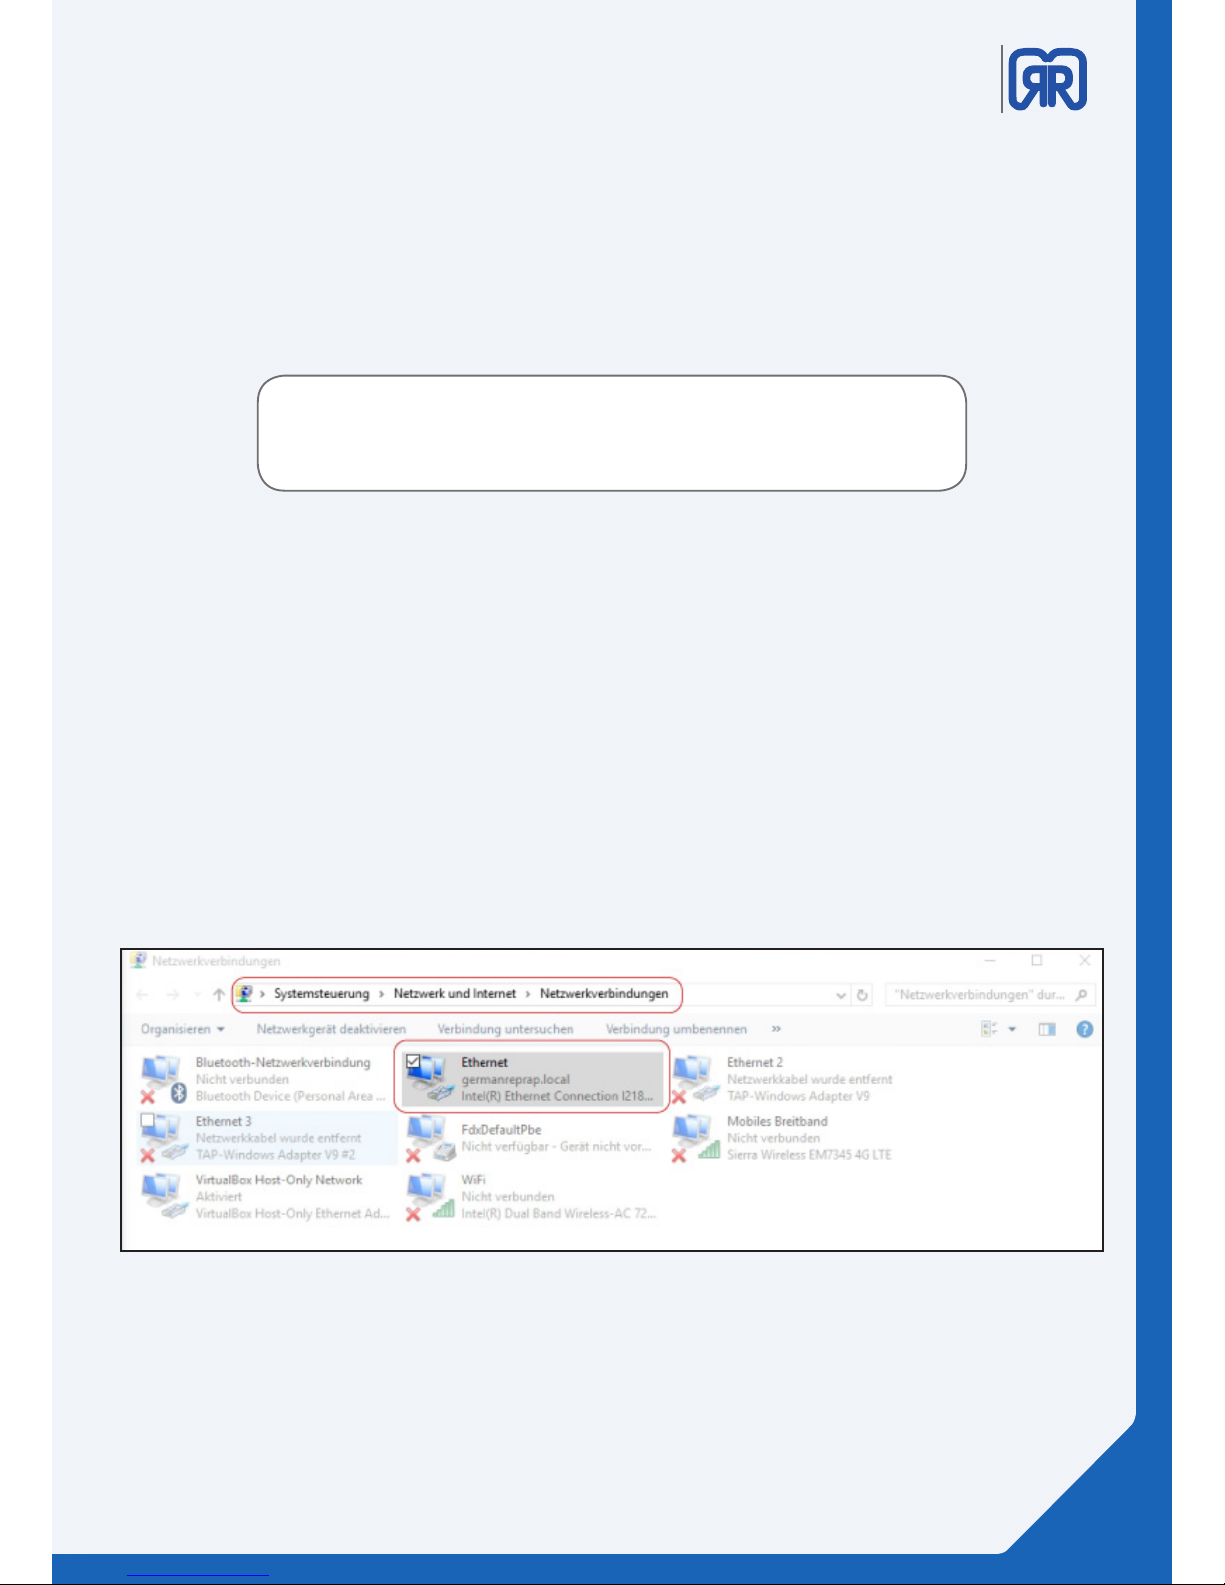
• In the computer´s control panel navigate to network settings
• Click on the network adapter the X1000 is connected to
Choosing network adapter
09/51
Page 10
X1000
3D printer manual
German
RepRap
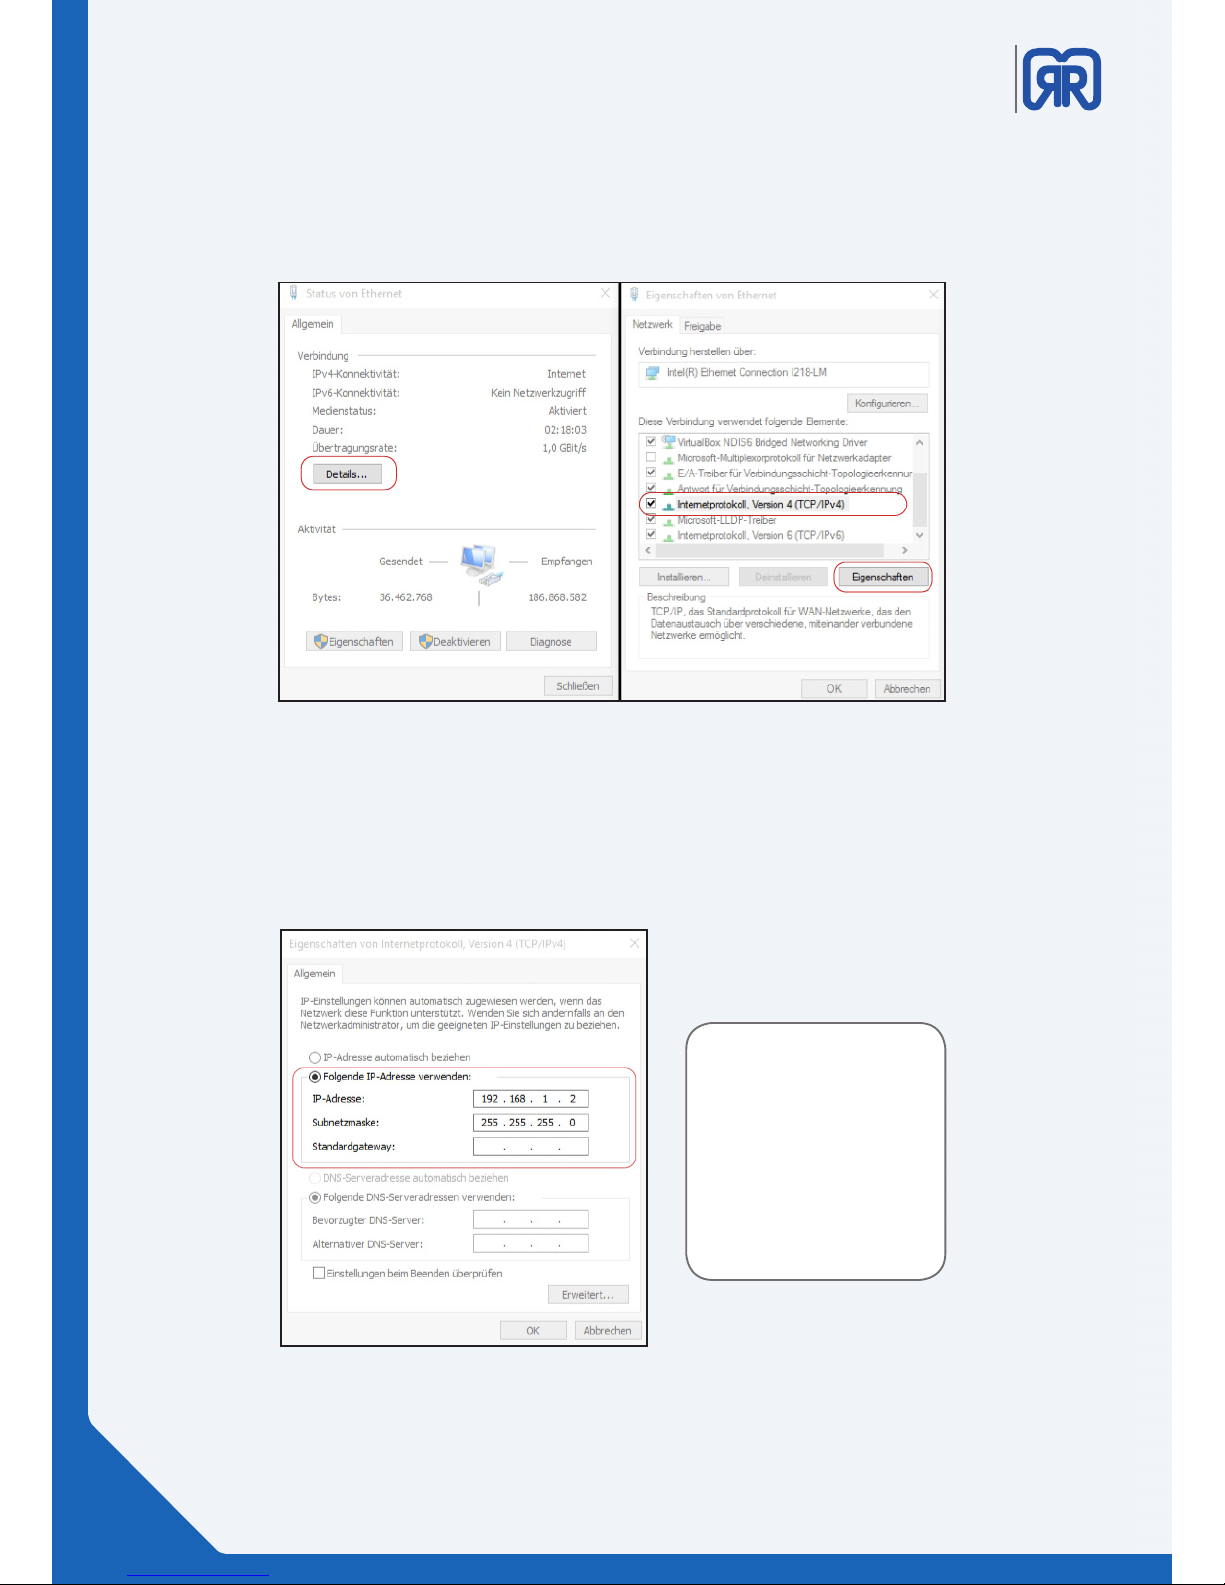
• In the pop up window chose “details”
• In the shown list mark “internet protocol, version 4 (TCP/IP)” and click on properties
Network adapter properties
• Enter the following ip address to establish a connection to the 3d printer:
192.168.1.2
Info:
By using this method you
assign a static ip address
in the same name space
as your 3D printer to your
computer
Entering static IP address
10/51
Page 11
X1000
3D printer manual
German
RepRap
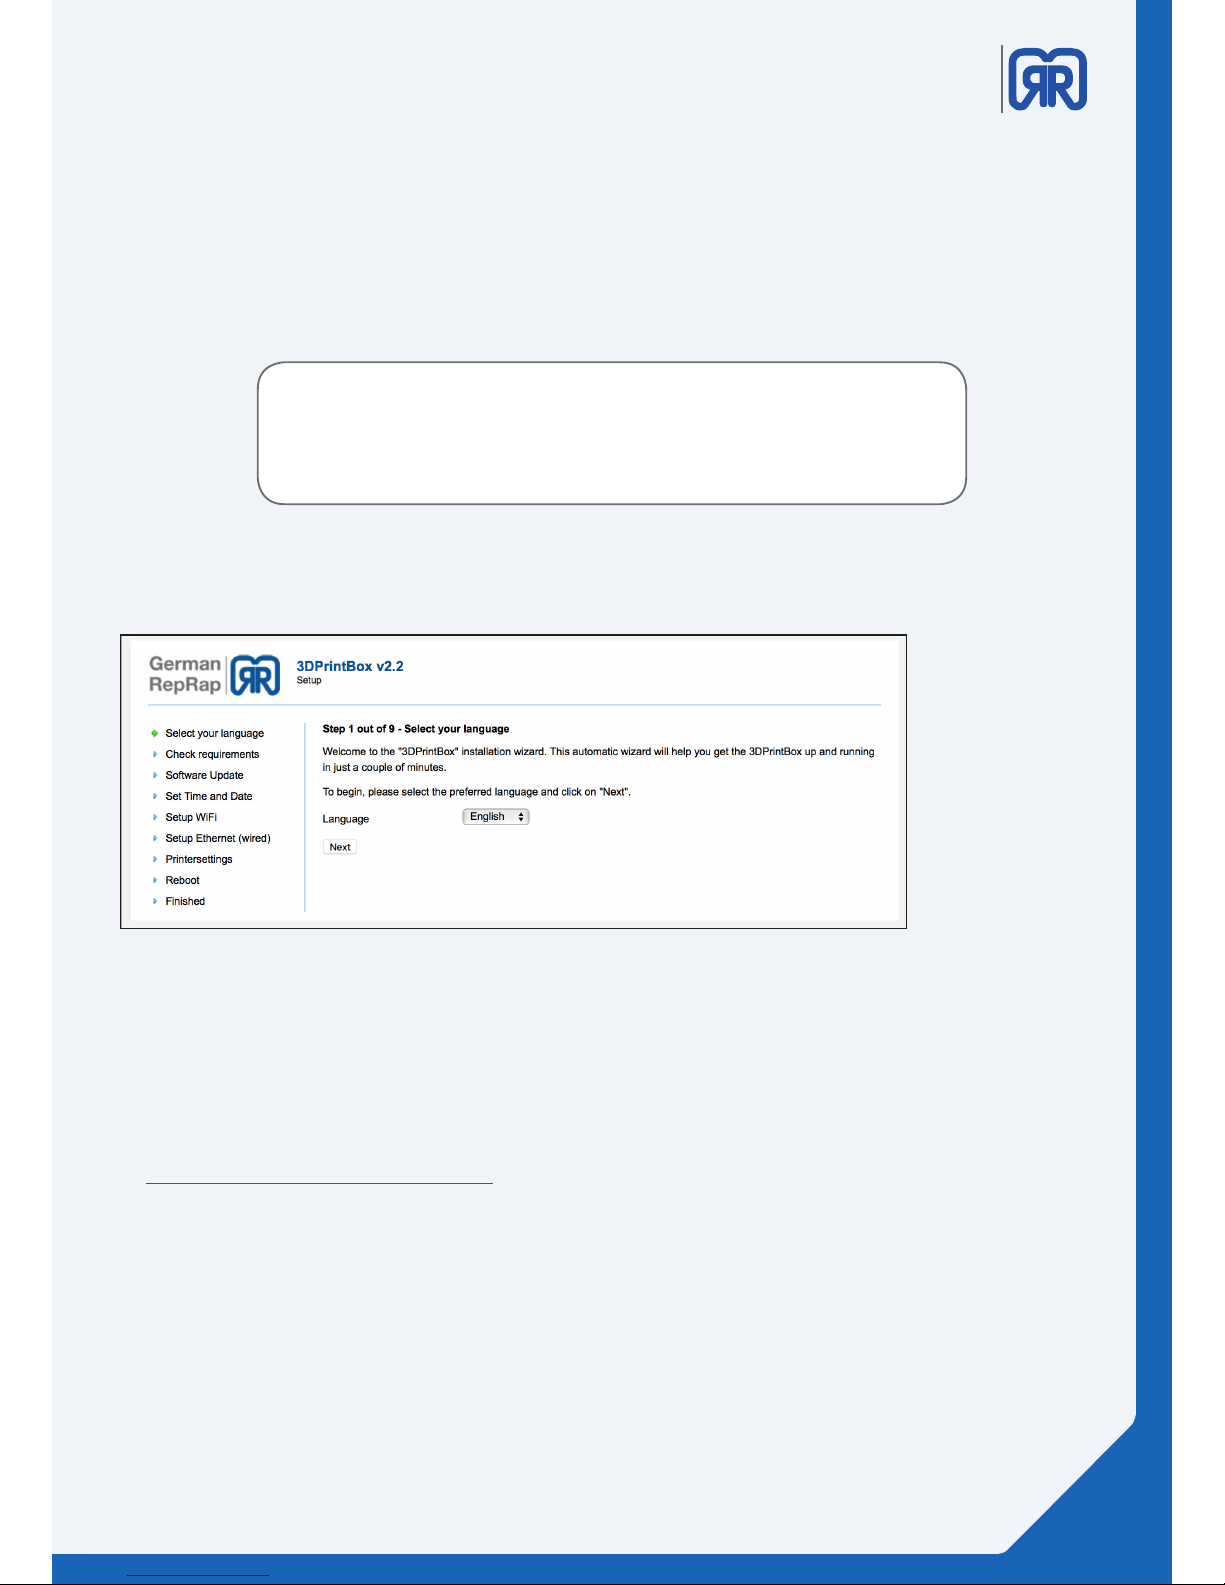
3.3 Setup routine
To congure your 3d printer afterwards you must launch the setup routine. Enter the pre-assigned ip
address of your 3d printer into your browser to establish a connection. The rst step of the set up routine
will appear thereafter :
• 192.168.1.1/setup.php
If you already assigned an ip address to your printer and you want to
restart the setup routine, you must use your new ip to establish a connection XXX.XXX.X.X/setup.php .
Step 1:
In the rst step, you chose the language of the installation assistant
Setup routine step one
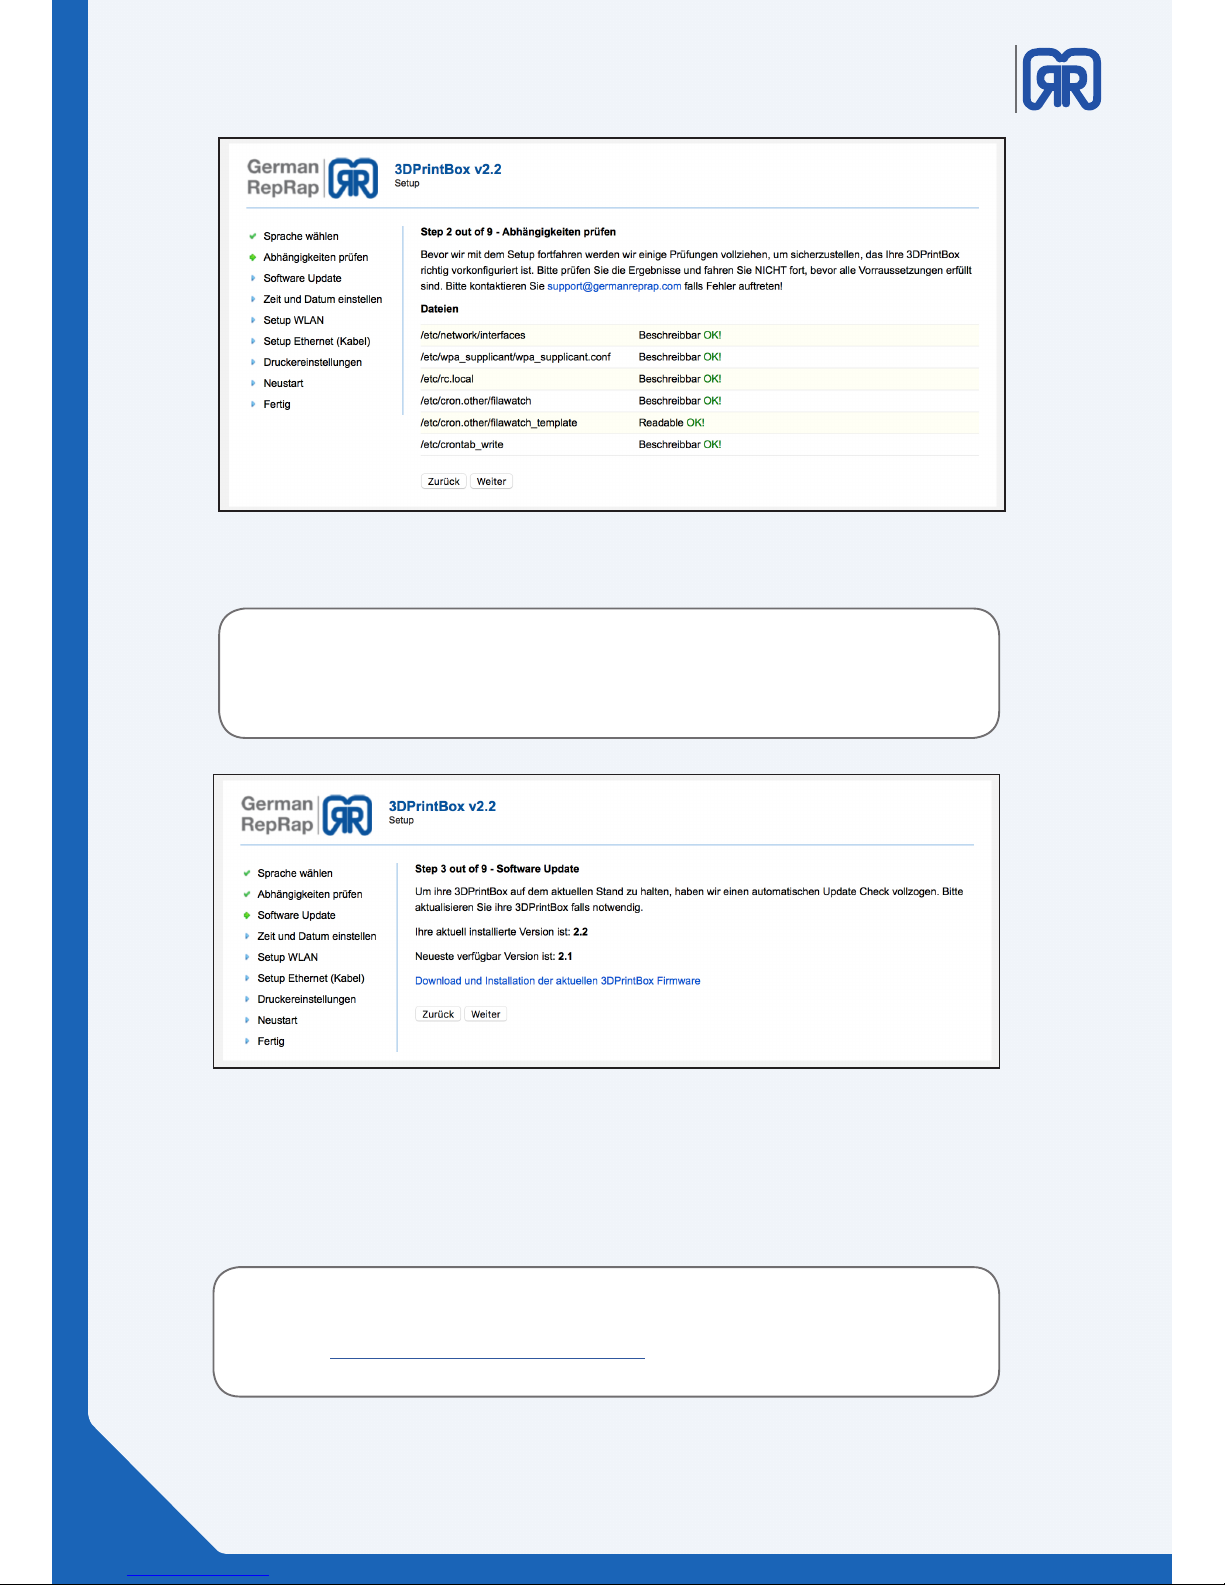
Step 2:
Please contact the support if an error message occurs during the second step or if not all bullet points are
checked with the result “OK”.
https://www.germanreprap.com/support/
11/51
Page 12
X1000
3D printer manual
German
RepRap
Step 3:
Setup routine step two
Attention!
Please perform software updates only after consultation with the
support. Unauthorized updates can damage the device!
Setup routine step three
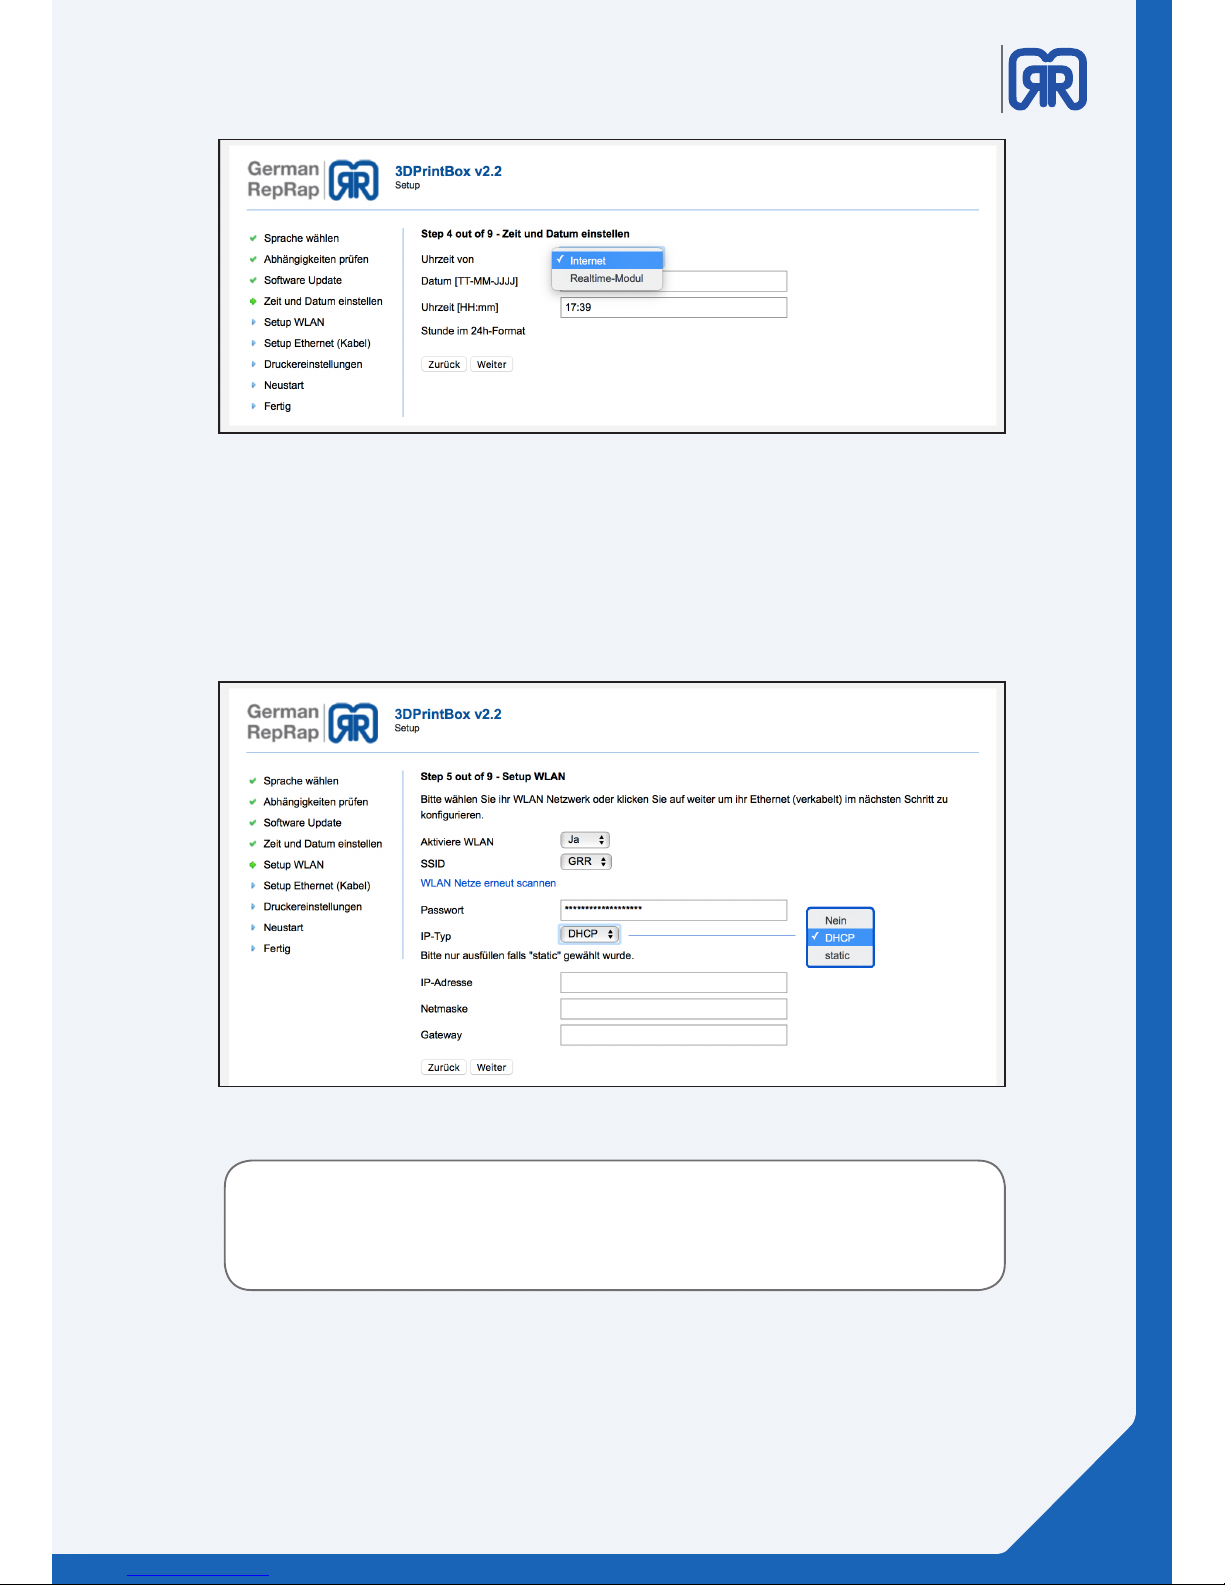
Step 4:
In the fourth step, you set the time and the date. You can get them set automatically over the internet. If you
do not have an internet connection, you can also set them both manually.
For some devices, there is a real-time module available. For an inquiry
please contact the support via:
https://www.germanreprap.com/support/
12/51
Page 13
X1000
3D printer manual
German
RepRap
Step 5:
Here you can connect your printer to a WLAN. Please press the button “Scan Wi” to have all available
wireless networks displayed. Here you can also choose between a static ip address or the use of DHCP.
Setup routine step four
Setup routine step ve
Tip:
Create a screenshot of these settings for later reference.
13/51
Page 14
X1000
3D printer manual
German
RepRap
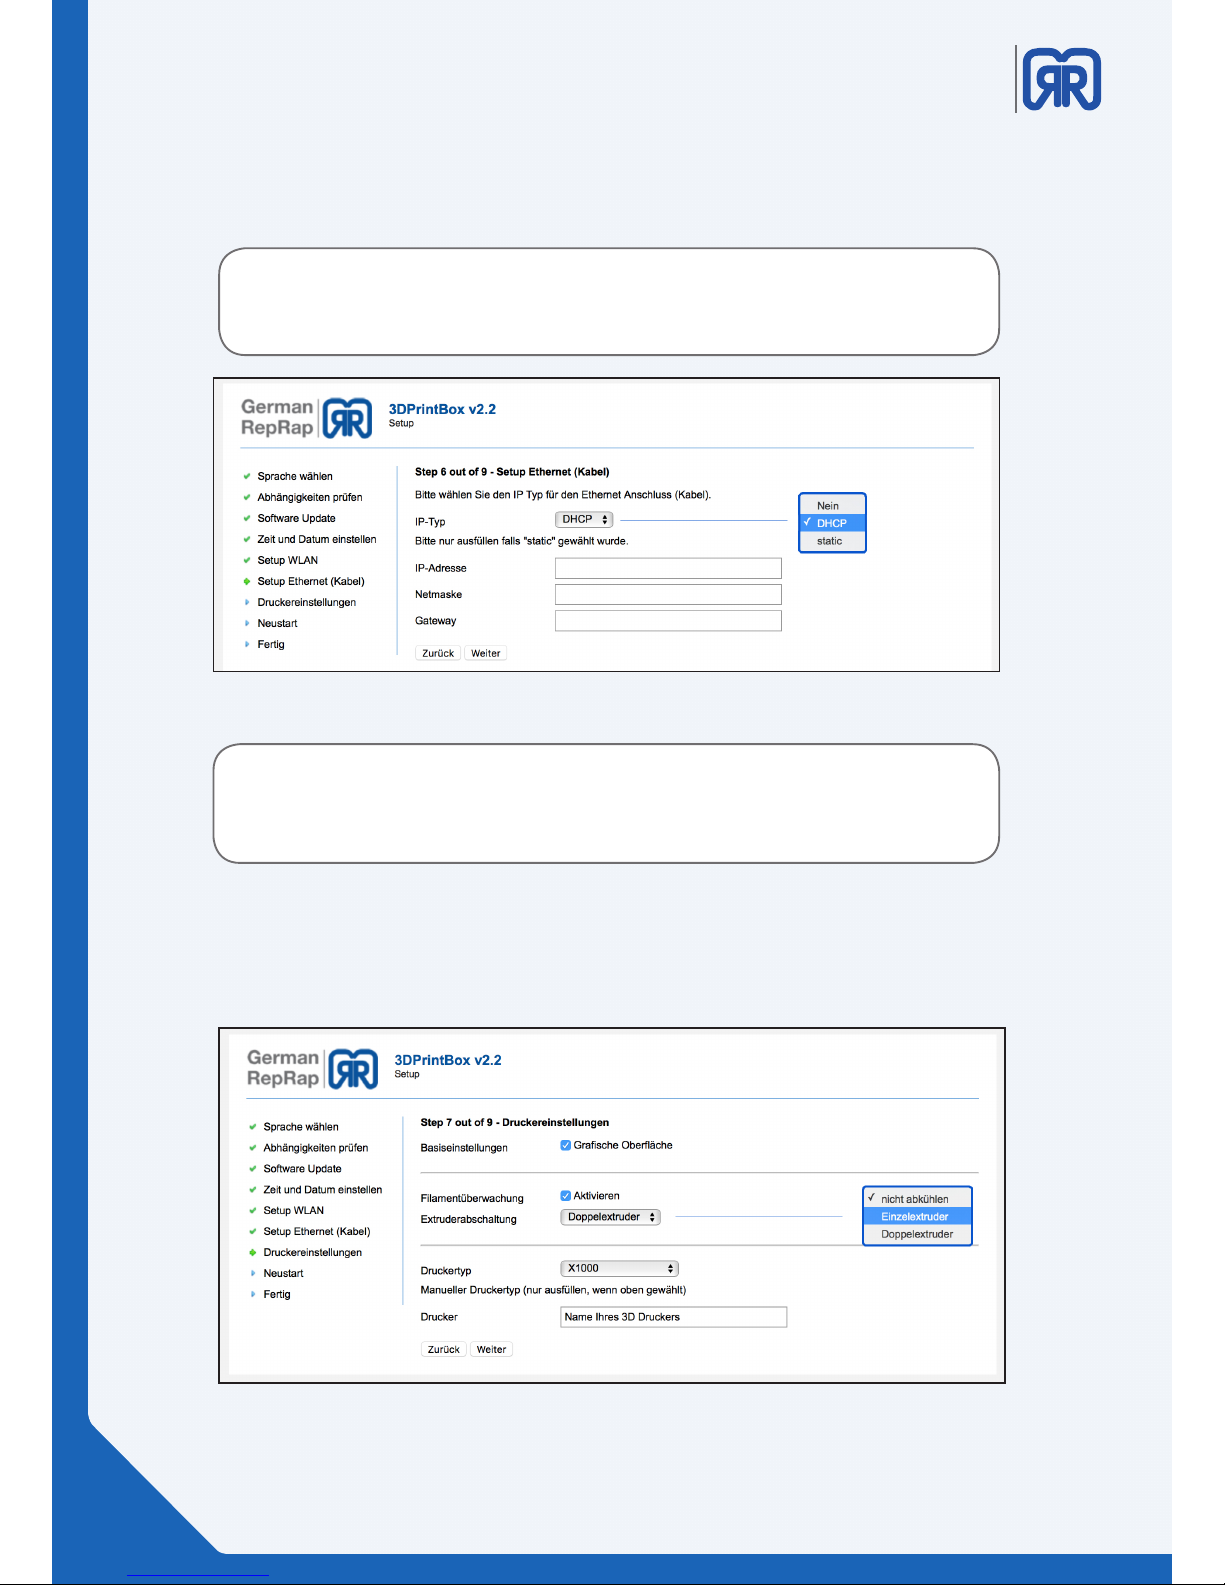
Step 6:
In the sixth step you will dene the settings of your network connection. If you assign a static ip address, the
fallback (192.168.1.2) will be overwritten.
Setup routine step six
Please consult your IT department about the possible setting
opportunities.
If you enter incorrect data into this windows it might be impossible to reconnect to the printer without the help of our support.
Step 7:
Here you can activate the checkboxes at “Grasche Oberäche” and “Filamentüberwachung”, depending on
your conguration, for single - or double extruder.
Setup routine step seven
14/51
Page 15
X1000
3D printer manual
German
RepRap
Step 8:
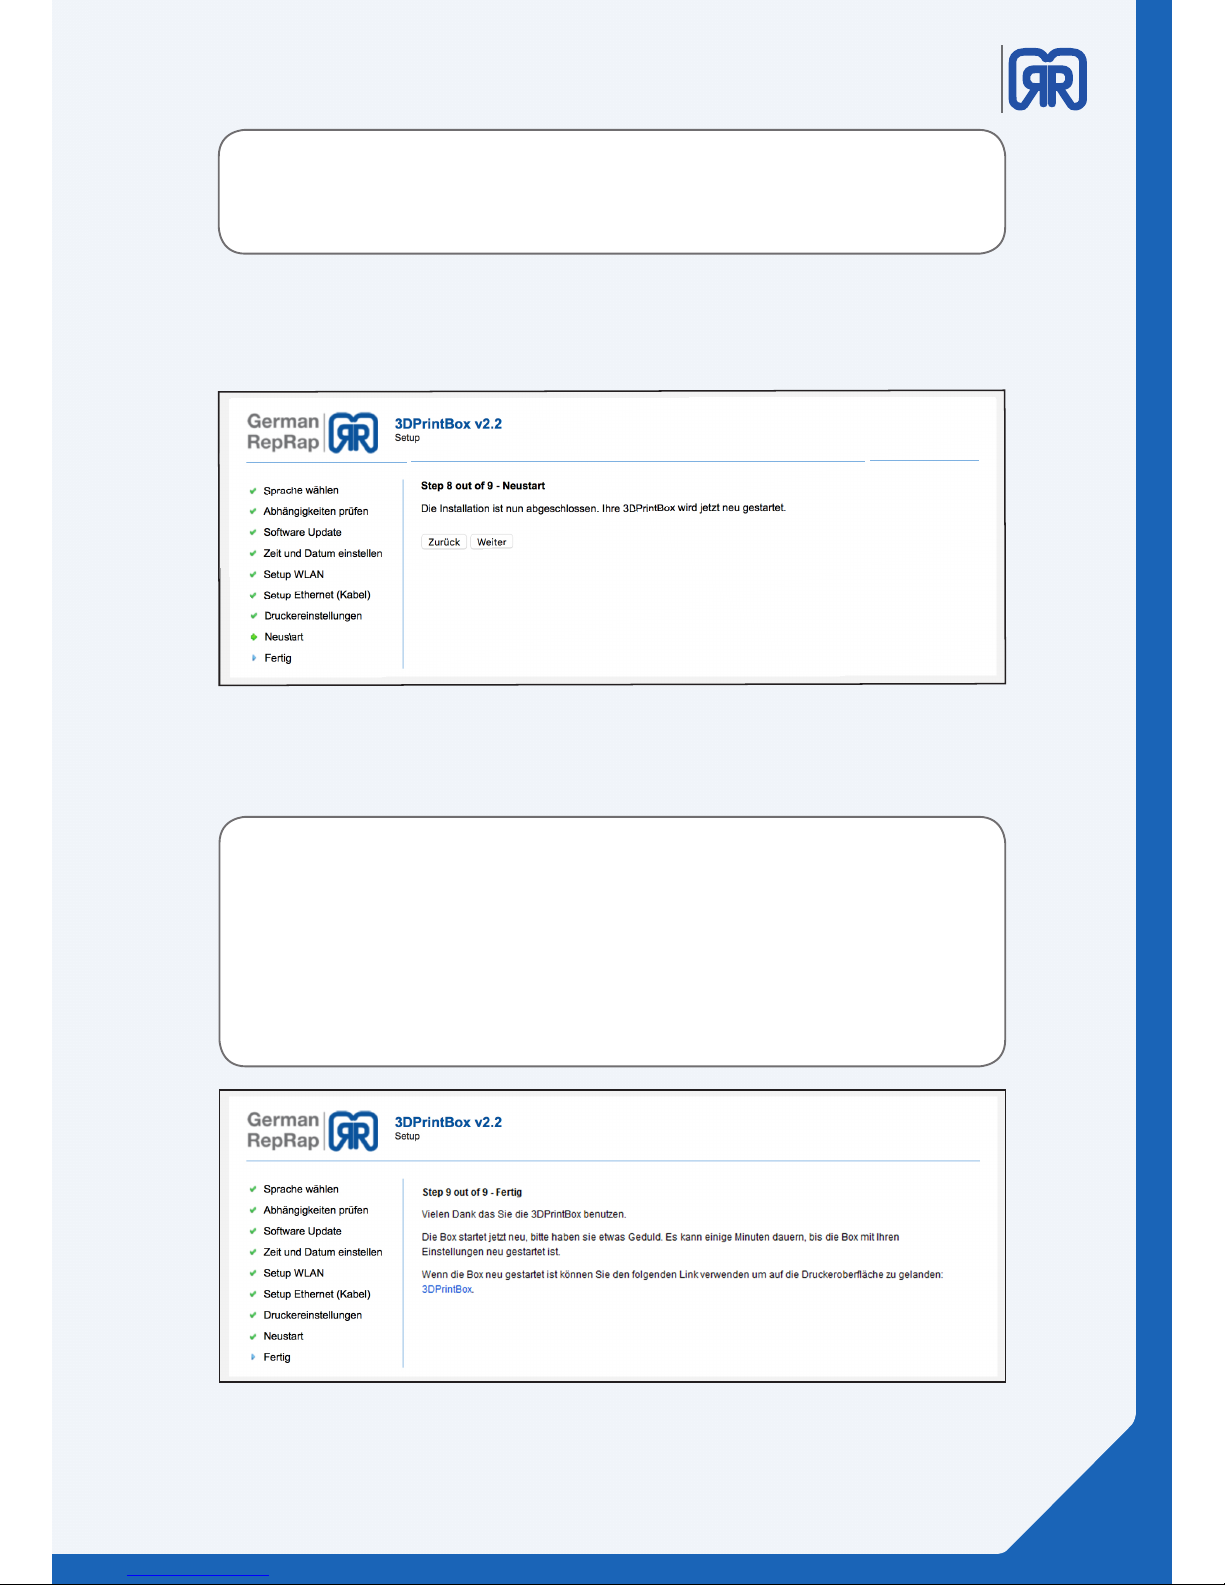
Conrm these settings by clicking on “weiter”. Your print box will reboot afterwards.
Setup routine step eight
After performing a software update with a new image the printer´s display will
remain black. You must restart the setup routine to reactivate the “Grasche
Oberäche”.
Step 9:
Setup routine step nine
Important:
After successfully completing the setup routine, you must restart the device
twice to make sure that all changes have been correctly initialized.
Start the device using the key and wait until it is completely booted. Then shut
it down and repeat the procedure.
15/51
Page 16
X1000
3D printer manual
German
RepRap
3.4 How to activate the printer and establish a connection
After customizing the network settings and completing the setup routine you are now ready to establish the
connection to the X 1000 3D printer.
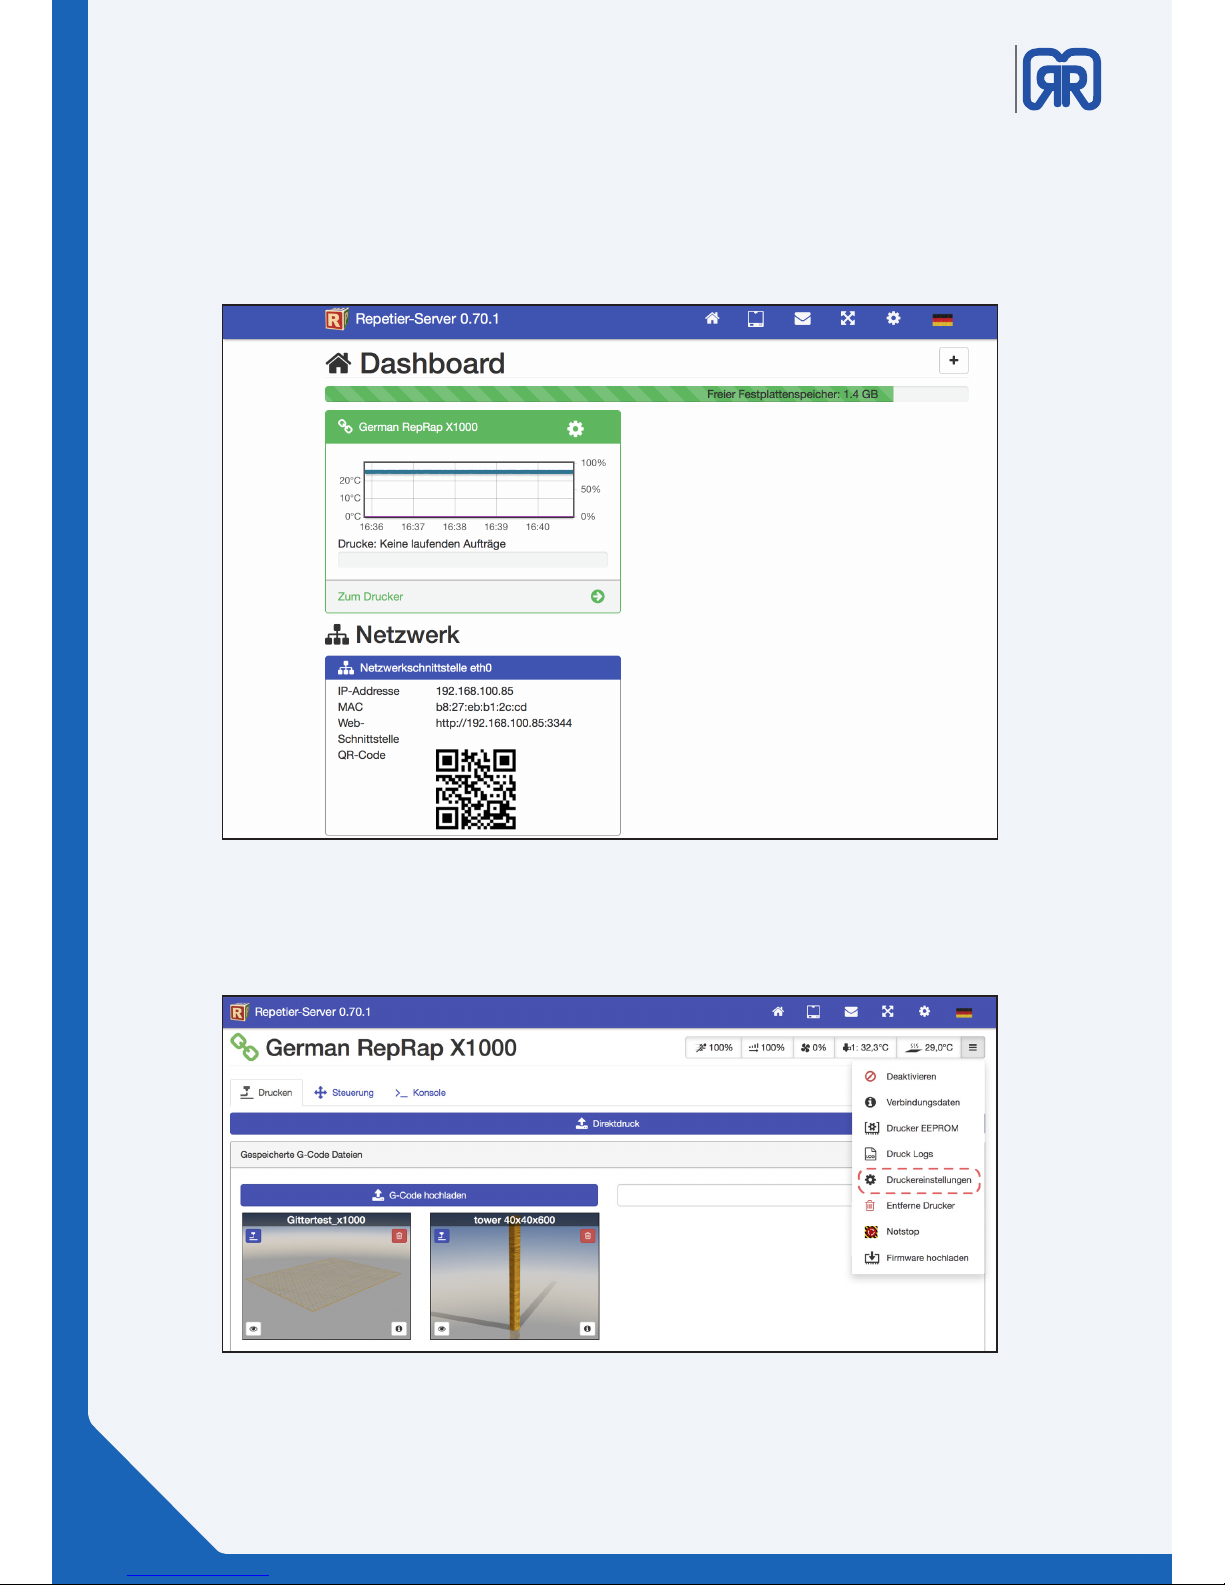
To do this enter the printer´s ip address in your browser (e.g. 192.168.1.2)
You will be presented the start screen (dashboard) of the Repetier-Server.
To ensure that everything has been installed correctly click on your 3D printer and then on the right bar on
“Druckereinstellungen”.
Repetier-Server Dashboard
Printer settings, Repetier-Server
16/51
Page 17
X1000
3D printer manual
German
RepRap
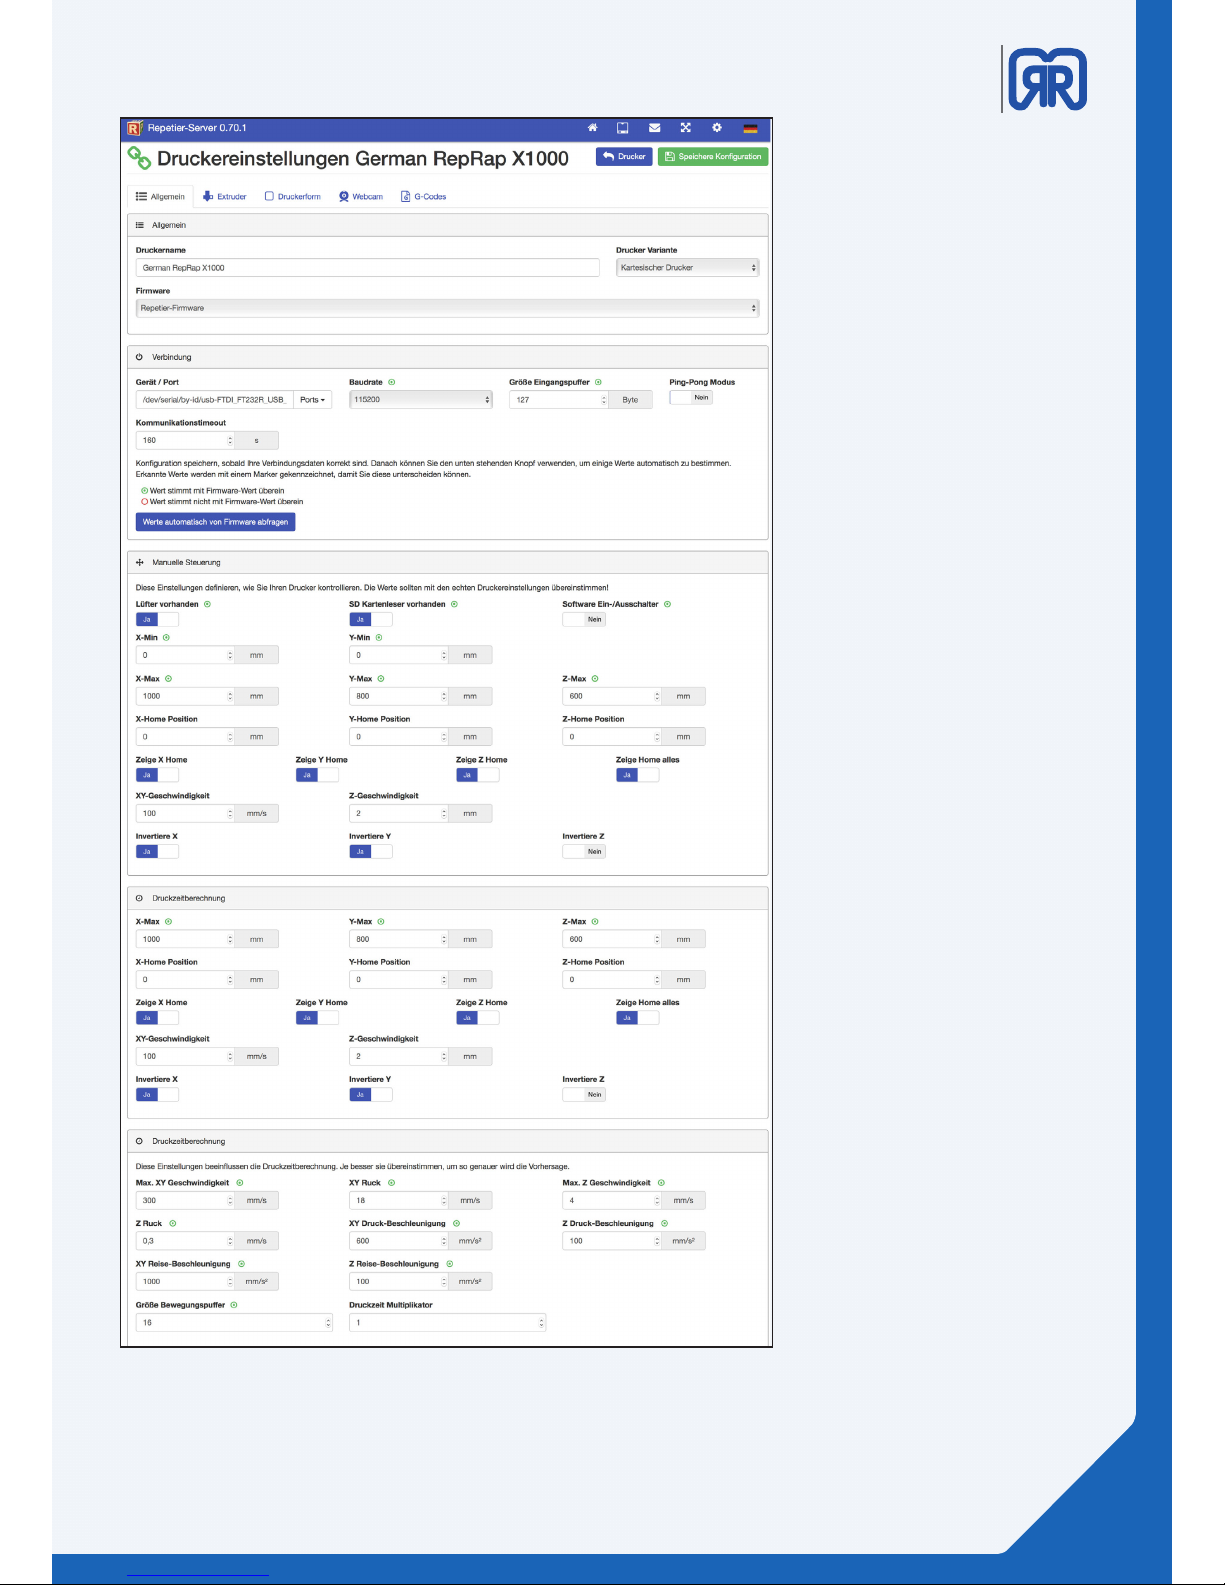
Under the tab “Verbindung” chose
/dev/serial/by-id/usb-FTID form
the “Geräte/Port” dropdown
menu.
Also, ensure that the baud rate is
set to 15200 and the “Communication-timeout” is enabled.
Attention: Wir empfehlen einen
Wert von 160, dieser kann bei
bestimmten Geometrien jedoch
abweichen.
Gerne berät Sie hierbei einer
unserer Fachhändler.
General printer settings X1000
17/51
Page 18
X1000
3D printer manual
German
RepRap
4. 4 Workow and operation
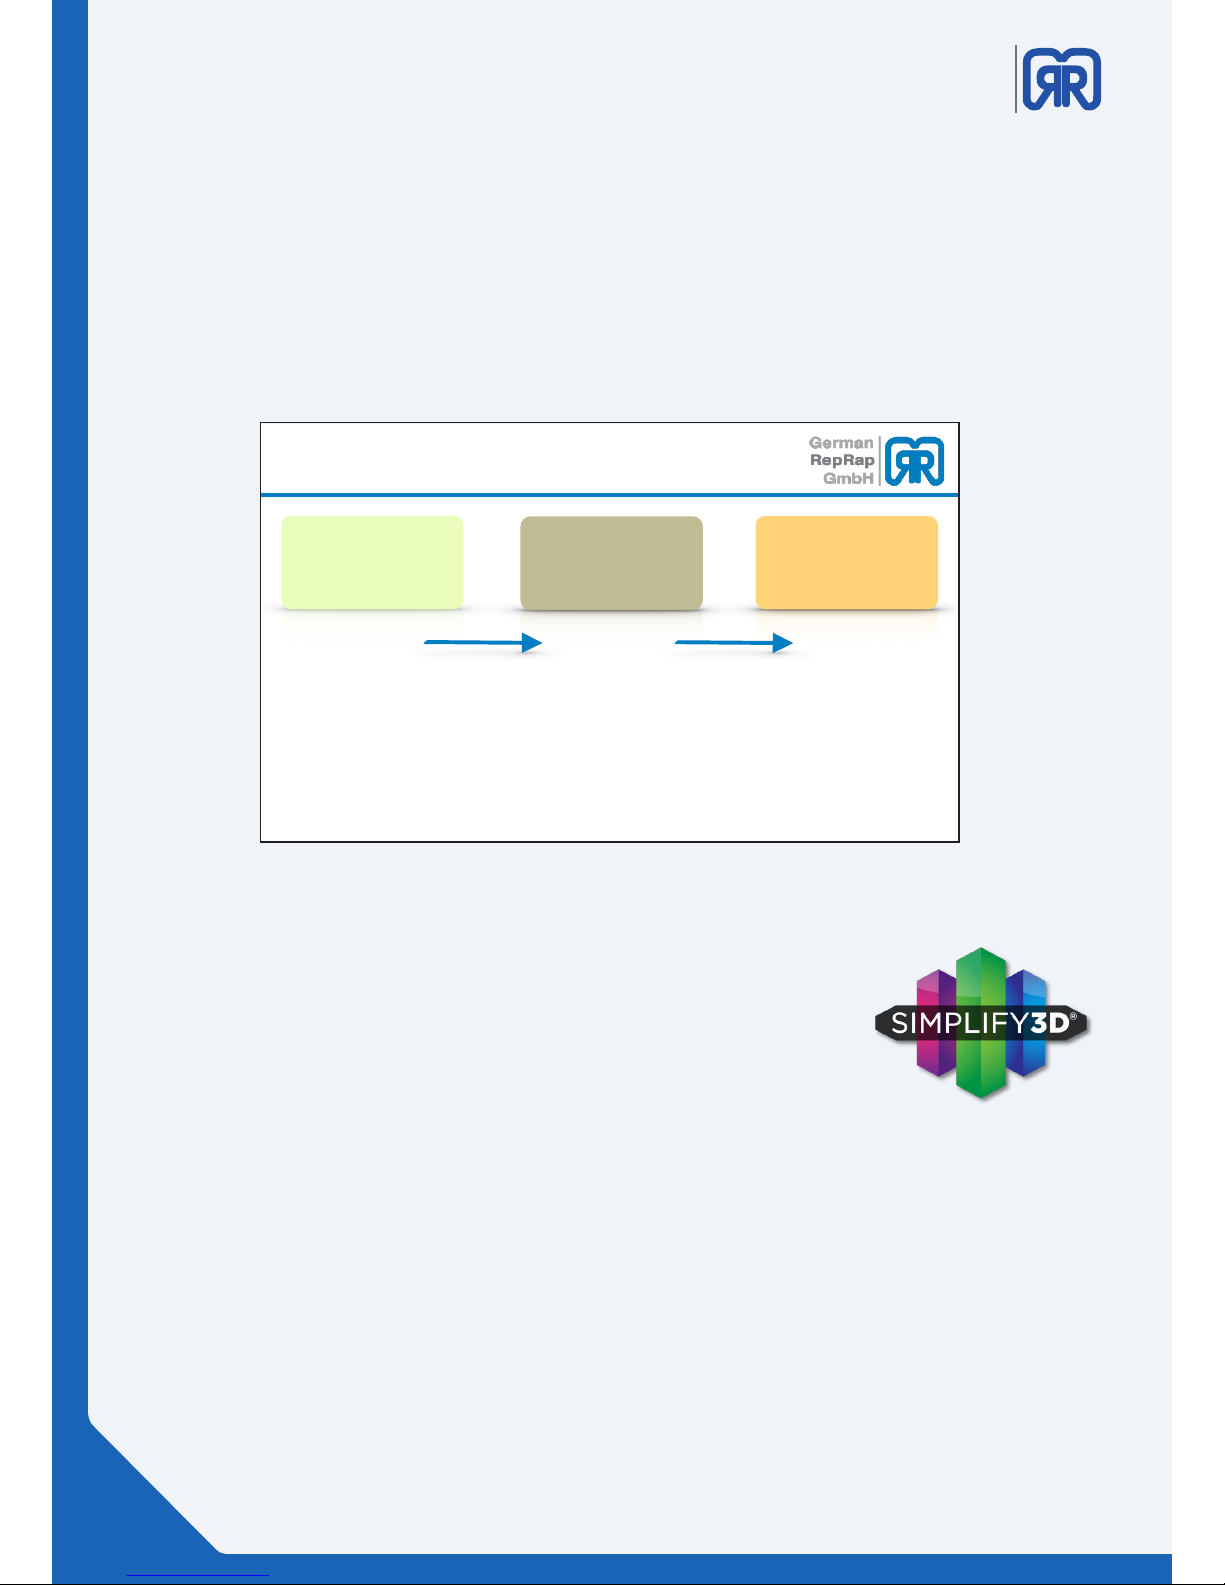
The following steps are required for a successful 3D print:
• Creation of a 3D CAD model
• Export of the CAD model into the STL format
• STL check and, if necessary STl repair
• Generation of a G-Code using a coding software like Simplify3D
• Starting the G Code. Either directly via a PC, a SD card or over a network connection
4.2 Features
• One integrated software suite contains everything you need to print high quality parts
• Customizable settings and advanced processes put the controls into your hands
• Support for dual-extruders, multi-part printing and even multiple processes within one part
EINFÜHRUNG CAD
3D CAD
•
Im CAD wird ein 3D Modell
z.B.: Auf Grundlage einer
2D Zeichnung oder durch
einen 3D Scan erstellt
STL export 3D Druck
•
Aus dem 3D CAD-Modell
muss eine .STL-Datei
erstellt und anschließend
überprüft werden.
•
Aus der STL-Datei wird
ein G-Code erstellt und
dieser an den 3D Drucker
geschickt.
Individual work steps
4.1 Simplify 3D
Simplify3D™ Software contains everything you need to begin making parts on
your new 3D printer. Import and manipulate geometry, repair models, generate
G-Code instructions, verify toolpaths, manually control your machine, and print
parts all from the same program!
18/51
Page 19

X1000
3D printer manual
German
RepRap
4.3 Quick Start Guide
System requirement
• mindestens Intel Pentium 4
• mindestens 2GB Arbeitsspeicher
• mindestens Windows XP
• OS X 10.6 oder neuer
• Ubuntu Linux 12.10 oder neuer
• OpenGL 2.0 oder neuer
• Dauerhafte Internetverbindung zur Installation und Betrieb der Software
Installing Simplify3D™ Software
After buying your Simplify3D license you receive a code so you can create an account on:
https://www.simplify3d.com/redeem/
In the next step you receive and email for the verification of your account. After that you can manage your
license online and download software packages.
Please check your spam-folder if you haven‘t reveived any email.
Windows
Unzip and double-click the .exe file to install. You may need to right-click and choose Run as administrator
depending on your permissions and trust settings. The Windows installation requires Microsoft Visual C++
2010 Redistributable, which should be automatically detected and installed if necessary.
Mac OS X 10.6.8+
Unzip and double-click the .app bundle to install. Enter your administrator password and follow the onscreen prompts.
Linux
The Linux installer comes with both 32 and 64-bit options. After choosing the appropriate version for your
operating system, unzip the file and launch the .run installation package. It is recommended to launch this
program as super-user by openingTerminal cd‘ing to the directory where you unzipped the file, and then
typing:
sudo ./Simplify3D*installer.run
and entering the administrator password.
19/51
Page 20
X1000
3D printer manual
German
RepRap
Launching the Software
The installer will guide you through the installation steps. The last step is a prompt to open and launch your
Simplify3D™ Software for the first time.
The software must be activated through an Internet conn
ection after installation. You can deactivate a specific machine at any time by going to Help > Deactivate
Product.
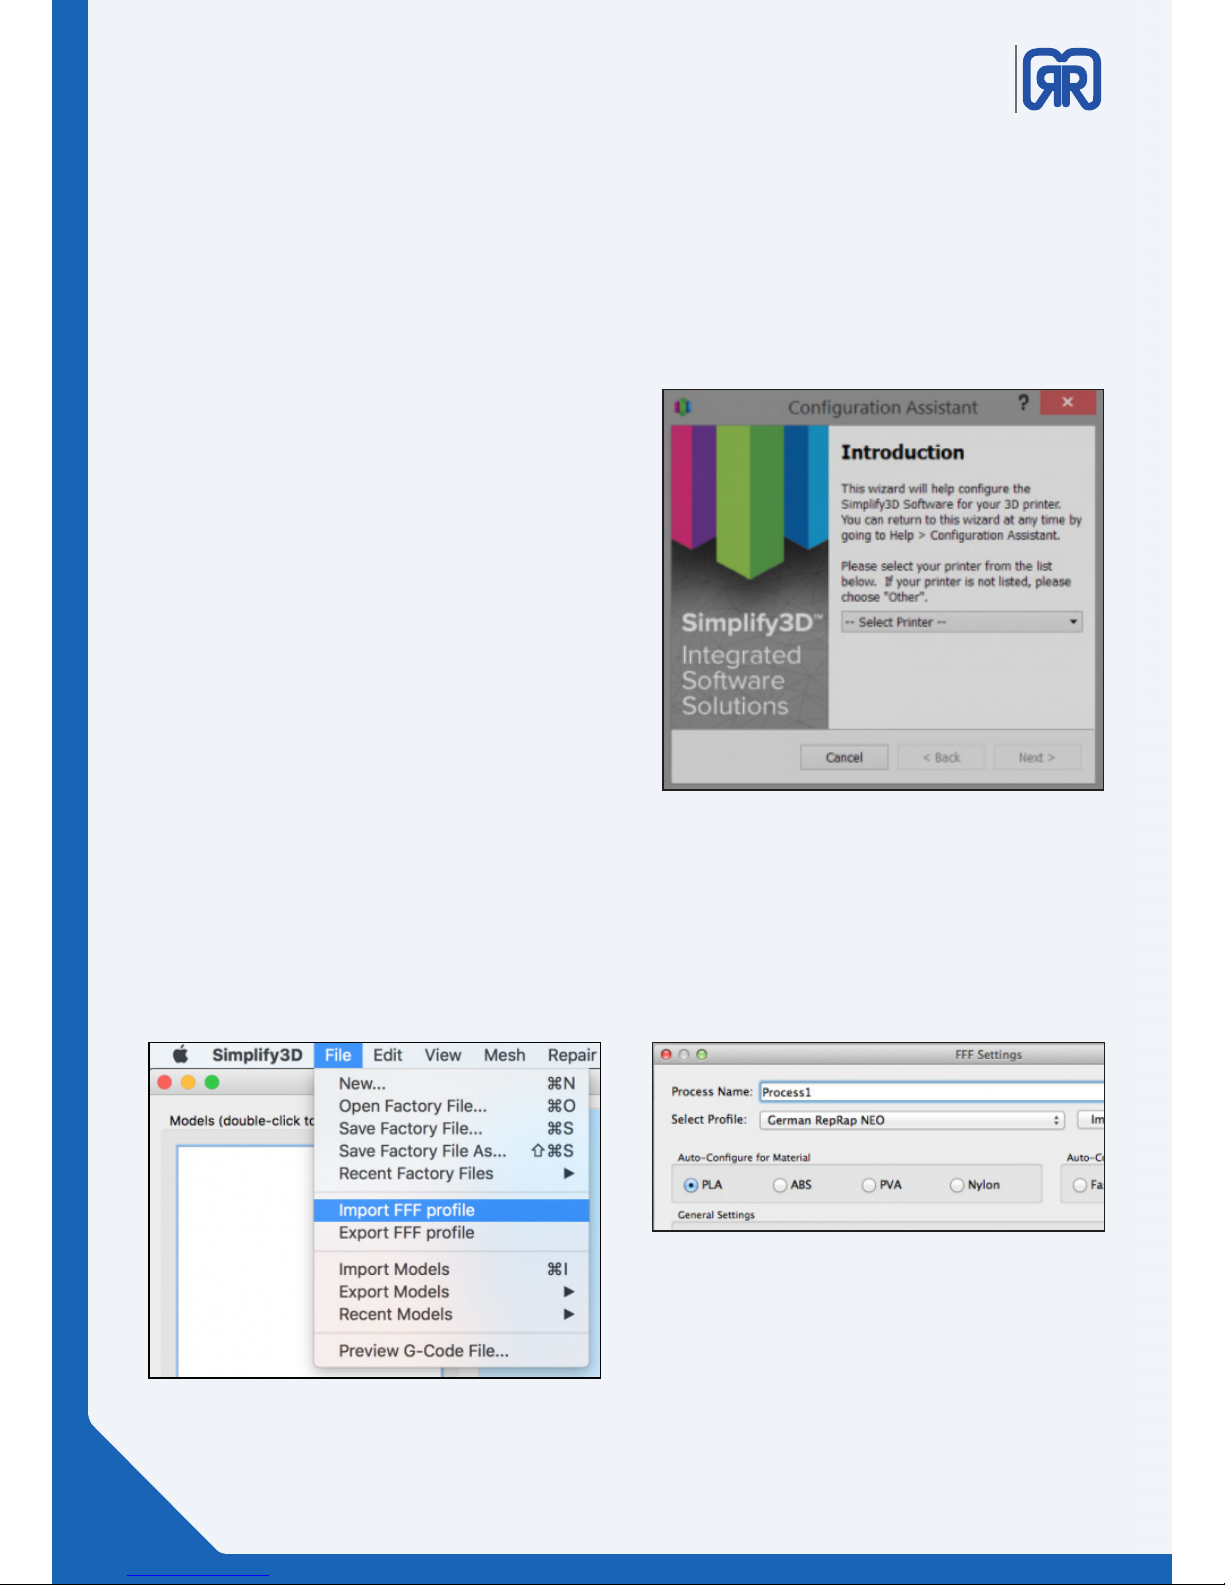
The configuration Assistant
When you open Simplify3D™ for the first time, you
will be greeted by the Configuration Assistant. Select
your printer from the numerous printers listed in the
drop down menu and the Assistant will automatically
configure all of your settings.
If you want to access the Configuration Assistant after installation to change your settings to a
dierent printer, it can be located in the horizontal
Menu Bar under Help > Conguration Assistant.
Conguration assistent
Import proles manually
Furthermore our profiles are available directly to download.
To import the downloaded profile, follow these steps:
• Click on menu “File” “Import FFF-Profile” and choose the downloaded file.
• Open the FFF settings window and check if the profile is visible.
Import prole
Select prole
20/51
Page 21
X1000
3D printer manual
German
RepRap
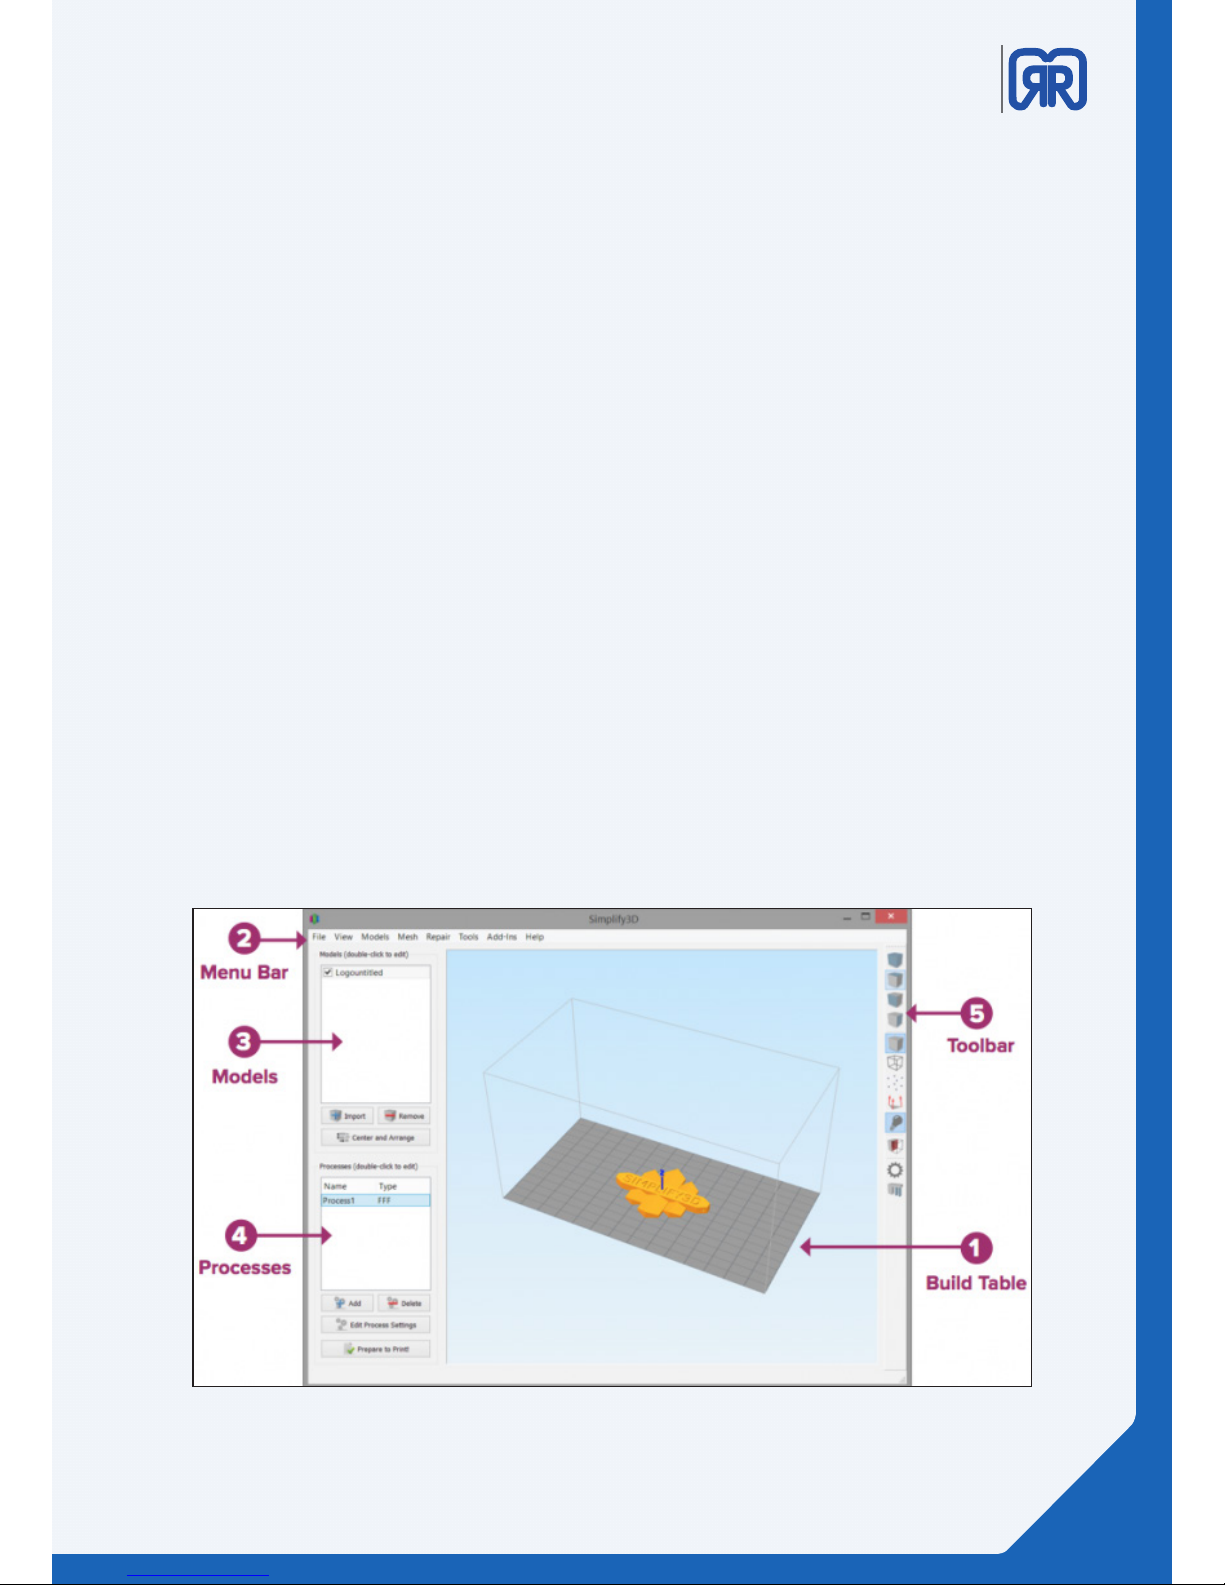
4.4 The Interface Layout
1. Build Table -
This is the interactive 3D environment where you will be viewing and working with your 3D content before
printing. This is the “main stage” and primary viewing area. The gray grid is scaled proportionally to the size
of your build volume and is determined based on your printer selection with the Configuration Assistant.
Use these mouse shortcuts for dierent views:
• Rotate View – Left-click and drag
• Pan View – Right-click and drag
• Zoom – Scrolling or gesture zoom (or Shift-left-click and drag up and down)
2. Menu Bar
• Primary navigation to all aspects of Simplify3D™ Software.
3. Models
• When you import 3D models, they are listed in this section above the buttons/commands that enable
you to work with your models.
4. Processes
• The build operations to create your 3D print are listed here, along with buttons/commands enabling
you to work with process functions.
5. Toolbar
• This toolbar contains quick access buttons for frequently used tools. You can move the toolbar
anywhere you wish by clicking and dragging the top dotted line.
Interface Layout
21/51
Page 22
X1000
3D printer manual
German
RepRap
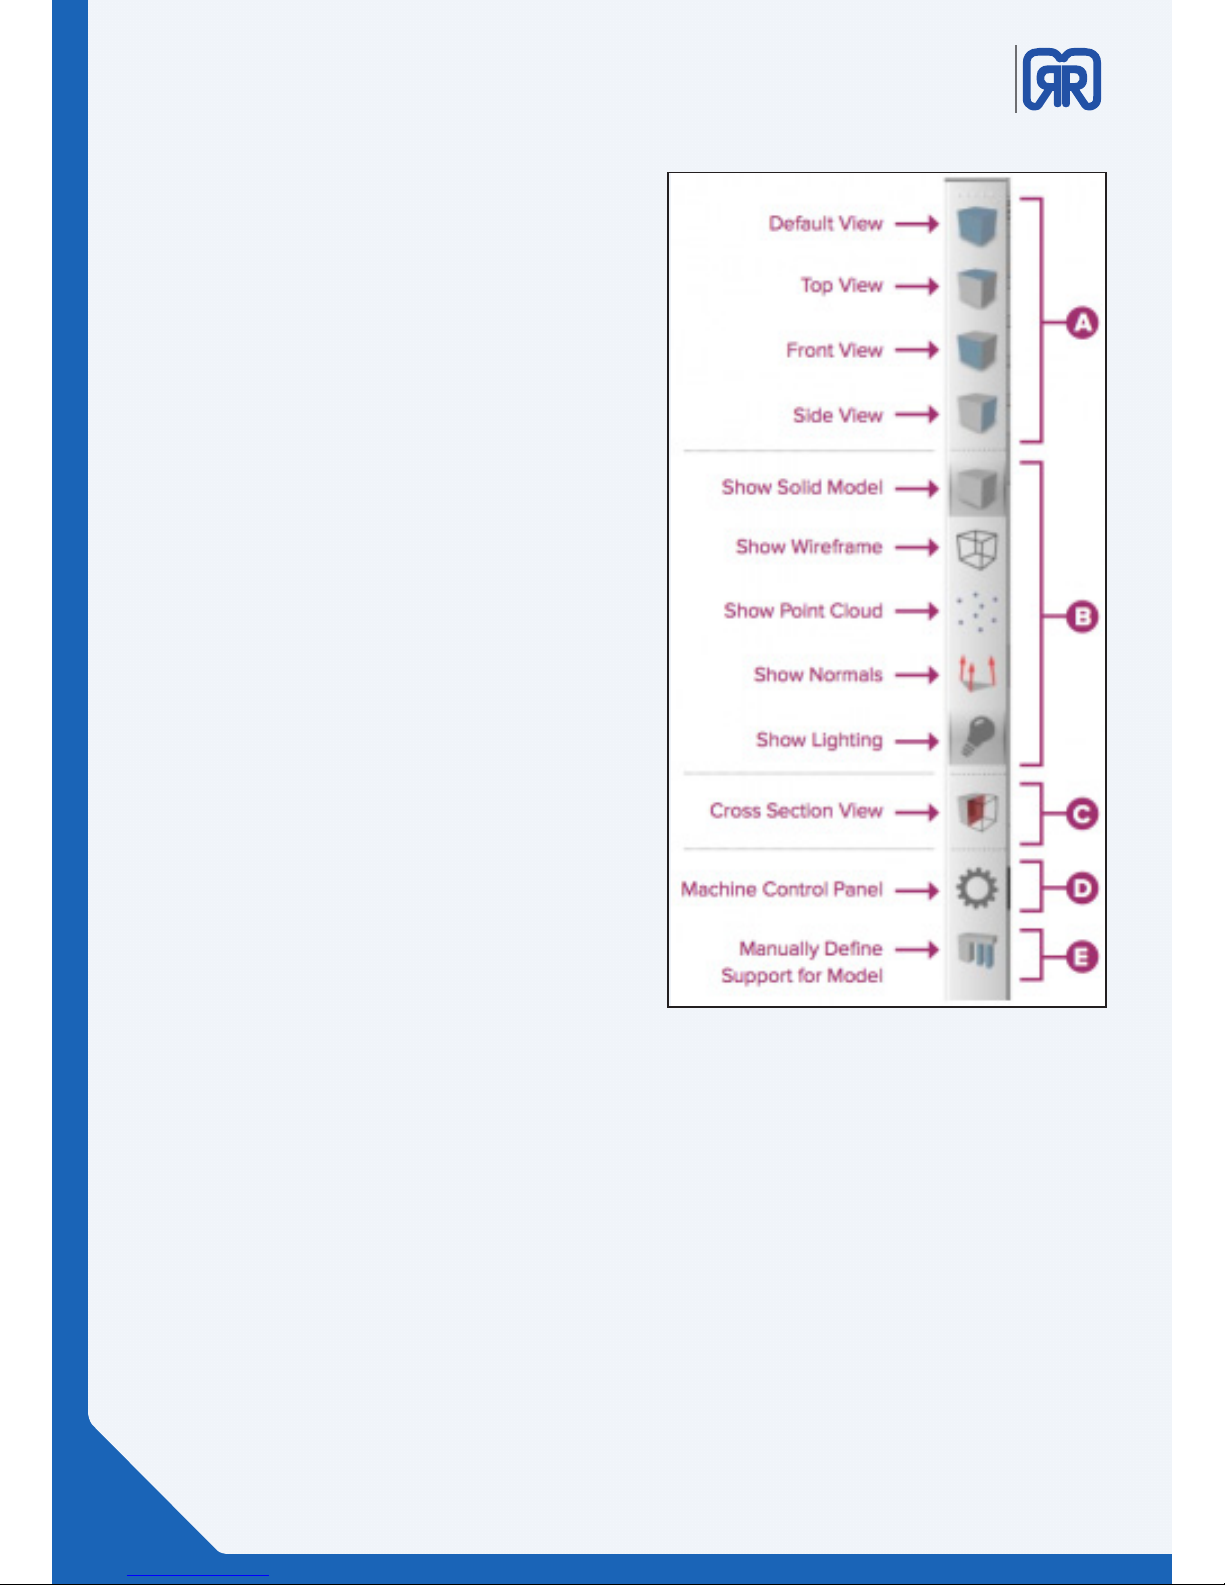
Toolbar
A. View
The first four buttons are preset viewing positions,
allowing you to quickly change to the default, top,
front, or side view.
B. Model Render
These tools control how you view the attributes of
your 3D models. You can add a wireframe or a point
cloud to your model, enable or disable the lighting
and the solid rendering of the model, or display the
surface normals of the model.
C. Cross Section Tool
The Cross Section tool gives you the ability to cut a
model in half to look inside it. The tool allows you to
cut your model from all three axes and can also be
accessed in the Preview Mode.
D. Maschine Control Panel - Maschinensteuerung
Simplify3D™ Software can connect to virtually any
printer through the Machine Control Panel (MCP).
Another way to access the MCP is through the top
menu bar under Tools > Machine Control Panel. The
MCP allows you to view your extruder and build
plate temperatures, preheat your nozzles, jog your
machine’s motors, and access the software-printer
communication log.
E. Support
The Manually Define Support tool provides the
freedom to customize your support structure under
or inside any part of a model.
Toolbar Simplify3D
3D Printing Workflow
The first step in the 3D printing process is to import the model you want to build. Save the 3D model file on
your computer or storage device as an .stl or .obj file.
Helpful mouse and keyboard shortcuts to move, scale, or rotate your model:
• Move Model – Ctrl-left-click and drag (or Command-left-click on Mac)
• Scale Model – Ctrl-right-click and drag up or down (or Command-right-click on Mac)
• Rotate Model – Alt-left-click and drag right or left (or Option-Left Click on Mac)
22/51
Page 23
X1000
3D printer manual
German
RepRap
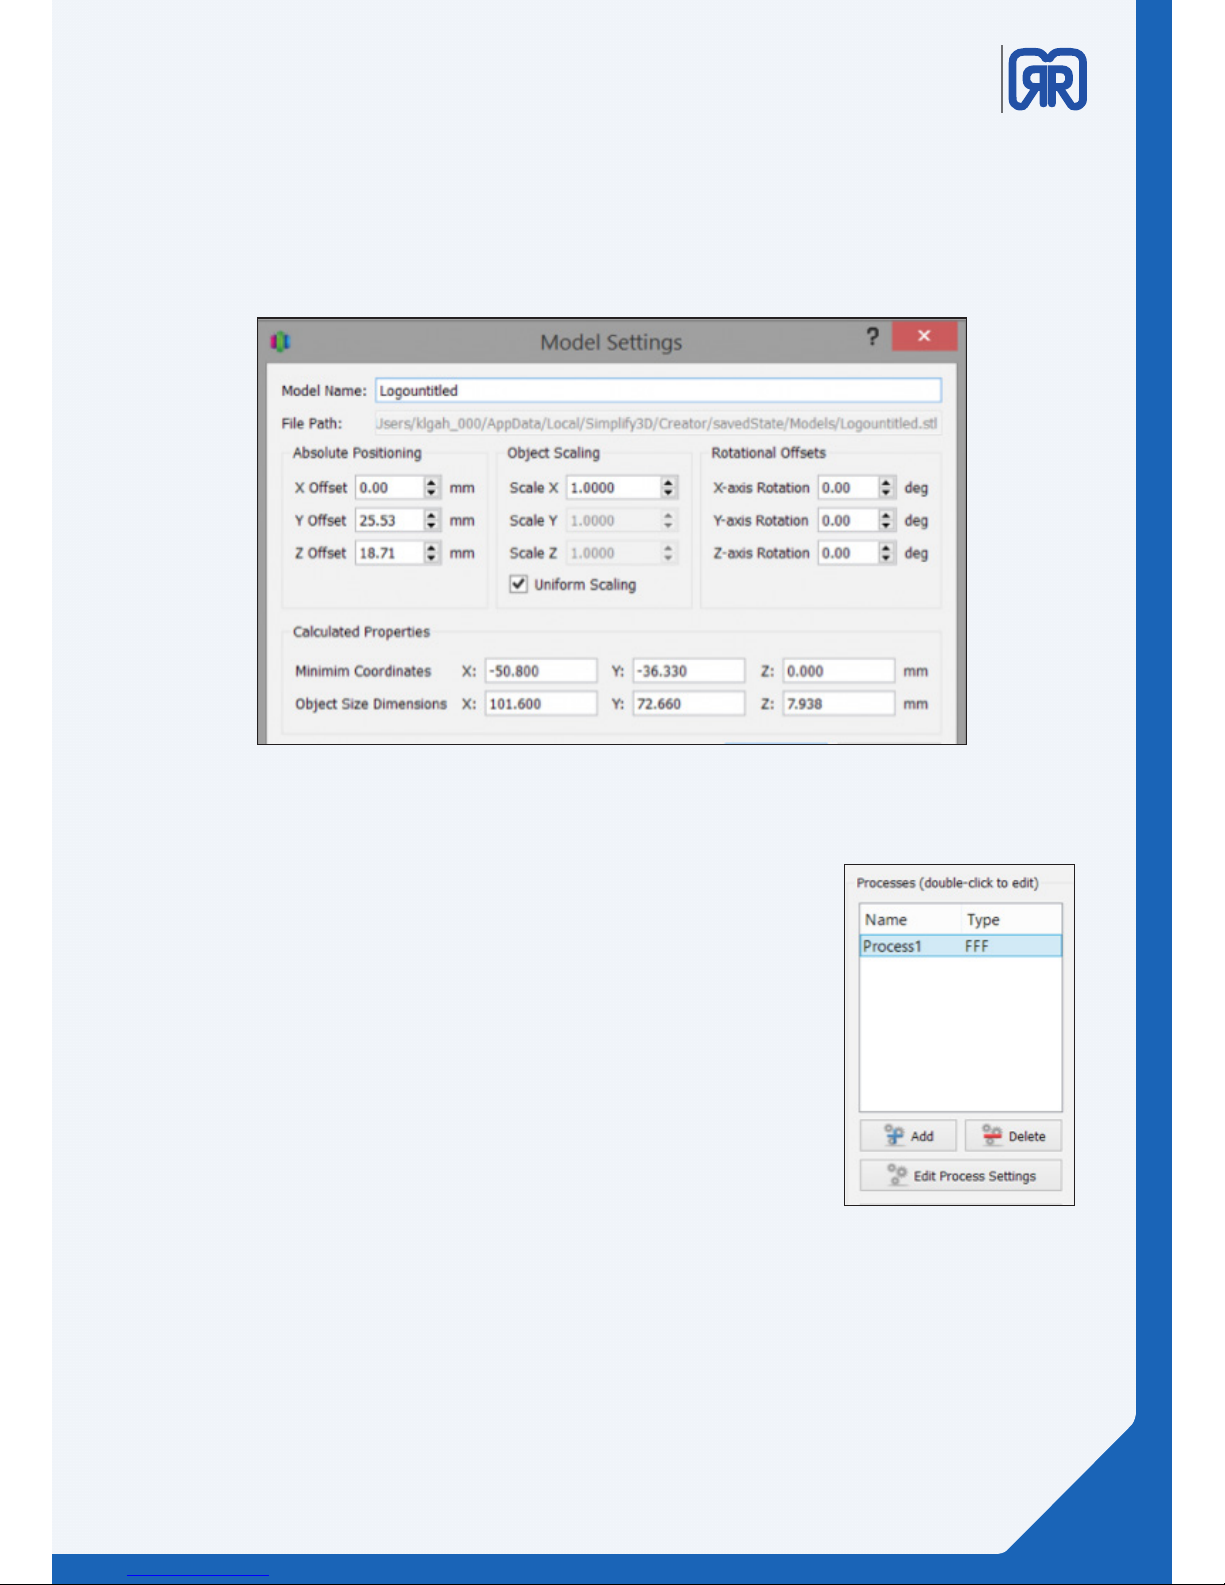
Advanced model settings:
Double click on any model (either in the Models list or on the Build Table) to bring up the Model Settings
box. Enter numbers or use the up-down arrows to adjust the positioning, scaling, or rotation of your model.
A helpful feature is that you can see your model change in real time on the Build Table.
Modell settings
Settings and Processes for 3D Printing
In the first step of the workflow, you imported a model. The next step is
to define a Process that specifies how your model will be constructed. A
Process is a collection of settings including speed, size, support material,
quality levels, etc. Some models are built with one process, while more
complicated models may involve multiple processes throughout the build
sequence.
The first Process will be configured automatically based on the printer
selected in the Configuration Assistant. You’re free to make any adjustments you desire, but it’s a great starting point!
To make adjustments to your Process, double-click on the Process or click
Edit Process Settings. This will open the FFF (Fused Filament Fabrication)
Settings window.
Processes
Advanced model settings:
23/51
Page 24
X1000
3D printer manual
German
RepRap
FFF settings
The FFF (Fused Filament Fabrication) Settings window contains all the Processes that specify how your
model will be constructed:
• Select Profile – Allows you to choose a pre-configured printer profile.
• Auto-Configure for Material – Allows you to select the material you will be printing with.
• Auto-Configure for Print Quality – Allows you to select a pre-configured print quality.
• Infill Percentage – Changes the interior solidity of your 3D print. 0% is completely hollow and
• 100% is completely solid. A value in the range of 20-50% is a good place to start.
• Include Raft – Generates a raft structure underneath your part. Rafts are used to improve the
• bond to your build platform and may help reduce warping on large models.
• Generate Support – Turns on support material for your 3D print. Support structures are similar
Click Show Advanced at the bottom of the FFF Settings window to view additional options and settings that
are available within Simplify3D™ Software.
Previewing G-Code Files
“Slicing” is the term used to describe the process of translating a digital
model into line-by-line printer instructions called “G-code.” The software
slices the model into G-Code based on the variables you have selected in the
FFF (Fused Filament Fabrication) Settings window.
These advanced setting should be modied by advanced users only!
We recommend visiting our Simplify 3D training to get familiar with the
advanced setting.
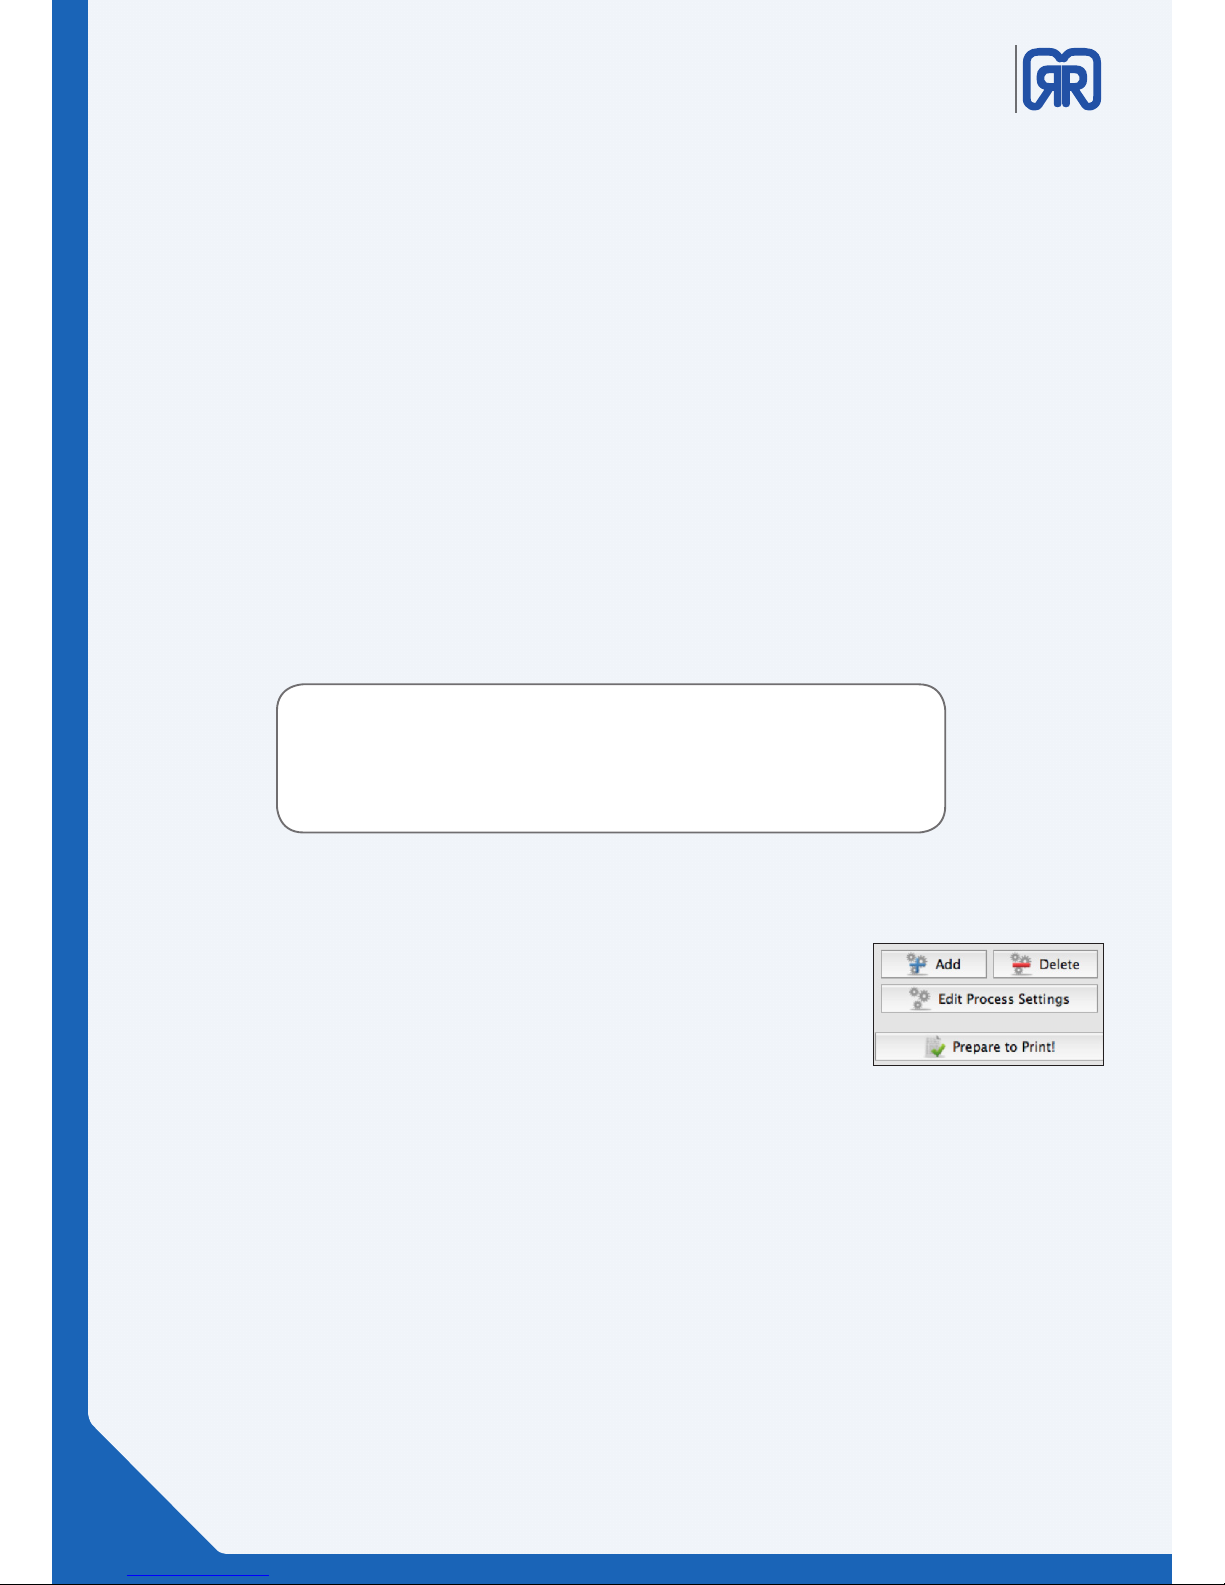
After you have finalized your Process settings, click Prepare to Print! to trigger the preparation of G-Code.
Simple models will be sliced in seconds, while complex models may take several minutes.
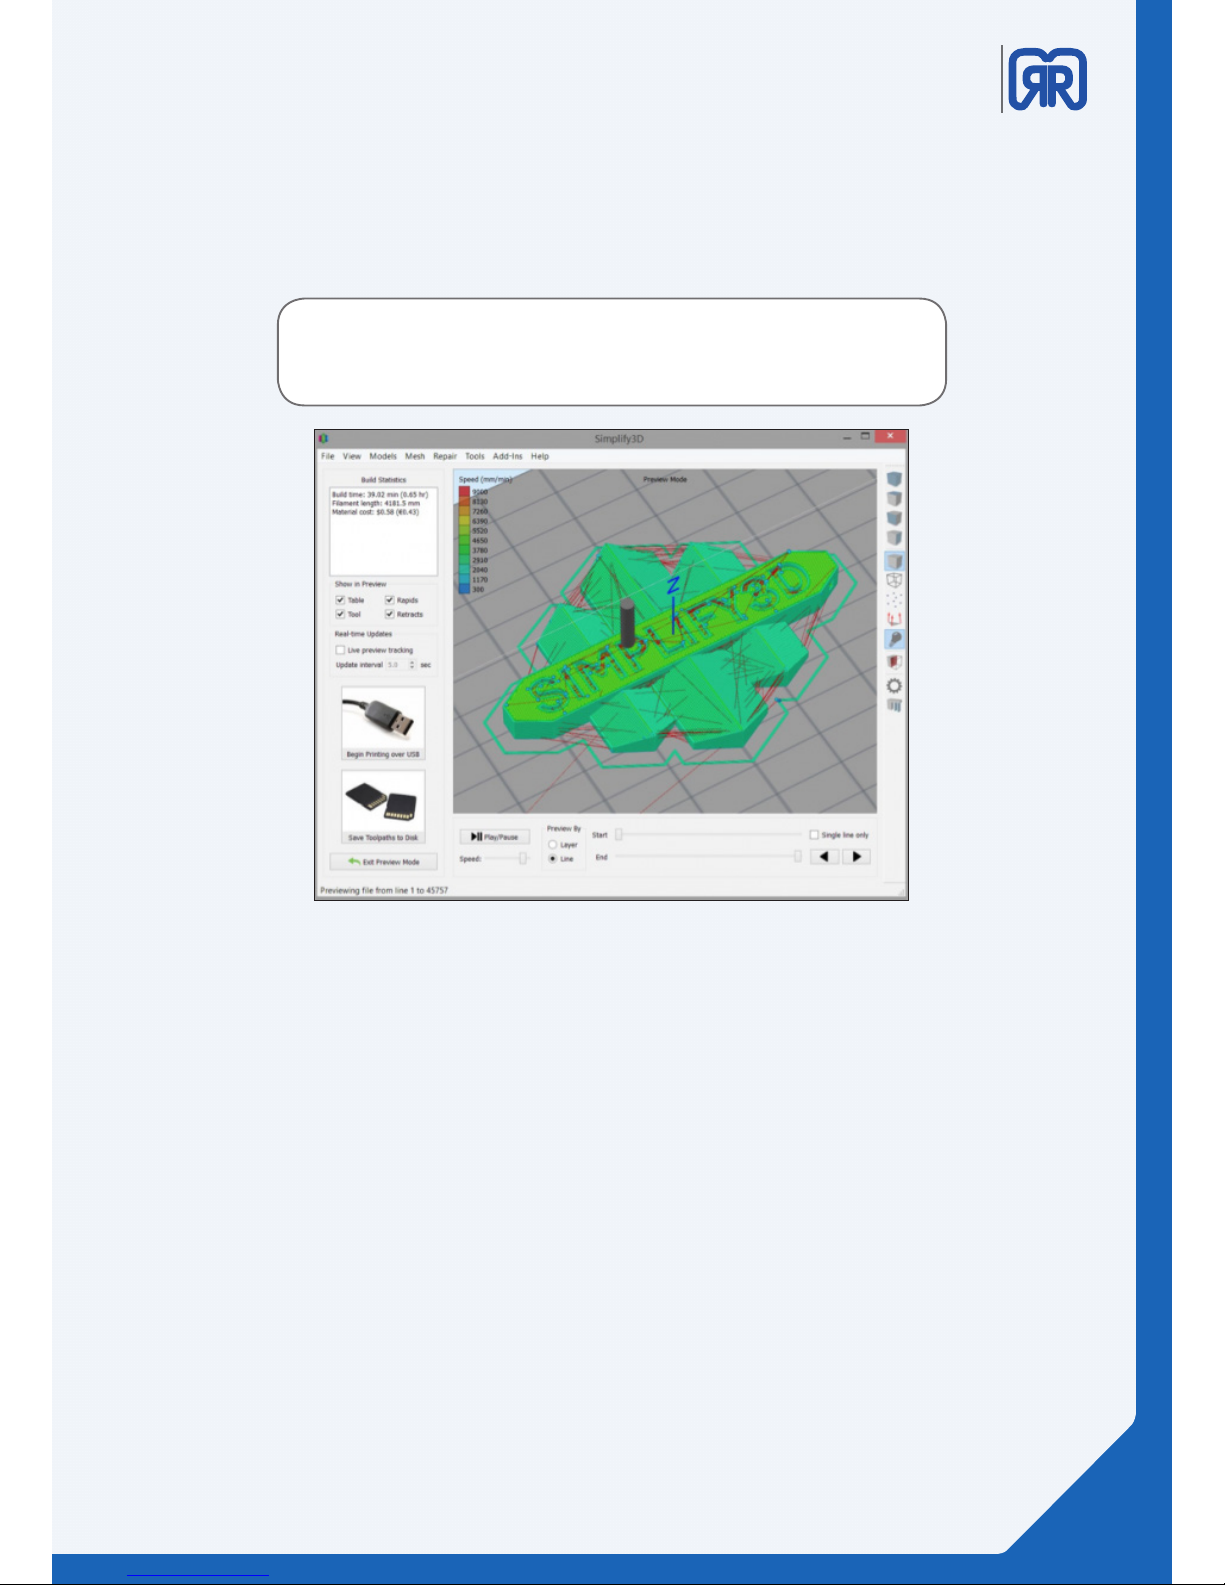
When your G-Code has been created, the software window will transition automatically to Preview Mode.
The animated Preview Mode in the Simplify3D™ Software allows you to inspect all aspects of your print operation prior to execution. The software takes your generated G-Code and virtually displays line by line how
your model will be constructed.
Prepare to print
24/51
Page 25
X1000
3D printer manual
German
RepRap
Printing on Your Machine
When you are happy with the preview, there are two options to begin your print:
Begin Printing over USB
• If you are using a USB connection, you have the option to view the build sequence real-time on
your monitor by selecting Live Preview Tracking. For additional information on USB communication,
access the Machine Control Panel to view a broad range of information that is transmitted via USB.
Save Toolpaths to Disk
• This saves your print file to a user-defined location, such as a folder on your computer or an SD card.
Congratulations! You have now completed your first 3D print using Simplify3D™ Software. You’ll soon be
ready to explore other options and create many exciting models.
G-Code preview
Play/Pause button animates the preview line by line.
Start and End Slider Bars allow you to move through the preview manually. (Hint: leave the Start button positioned at left and drag the End button to the right side to see the entire build).
The preview can be illustrated by Line or by Layer by clicking on either selection.
Tip: A useful setting is to select Preview by Layer and also place
a checkmark in Single Layer Only. Together, these selections will
allow you to view a single layer at a time.
25/51
Page 26
X1000
3D printer manual
German
RepRap
Resources within the software
You will learn so much about your printer by making your first part! Once you feel comfortable with the
basics and are ready for more options, advanced settings can be found by clicking Show Advanced in the
bottom left corner of the FFF Settings window. This reveals the all of the detailed settings that Simplify3D™
Software is implementing behind the scenes, as well as providing customization options for many settings
you may want to adjust. If you want more information about any particular setting, hover the mouse cursor
over that element to display a tooltip describing the functionality.
Simplify3D oers a lot of learning support:
Support
Tutorials
Video tutorials
Print qualitiy und Troubleshooting
Forum
5. Repetier Server
Repertier-Server is an application for operating the X1000 3D printer and initiating 3D prints. You can access
your printer from everywhere so it is possible to upload and manage G-Codes from remote. Here it is also
possible to check the print progress of your objects and to send individual commands to the 3D printer. In
addition to this it provides an easy way to upload rmware updates.
5.1 Web interface
The web interface provides full control of the X1000, no matter if you work via a computer, a tablet or even a
smartphone.
To access the web interface, enter the following adress into your web browser:
• IPadress.of.your.3Dprinter:3344
• E.g: 192.168.100.1:3344
26/51
Page 27
X1000
3D printer manual
German
RepRap
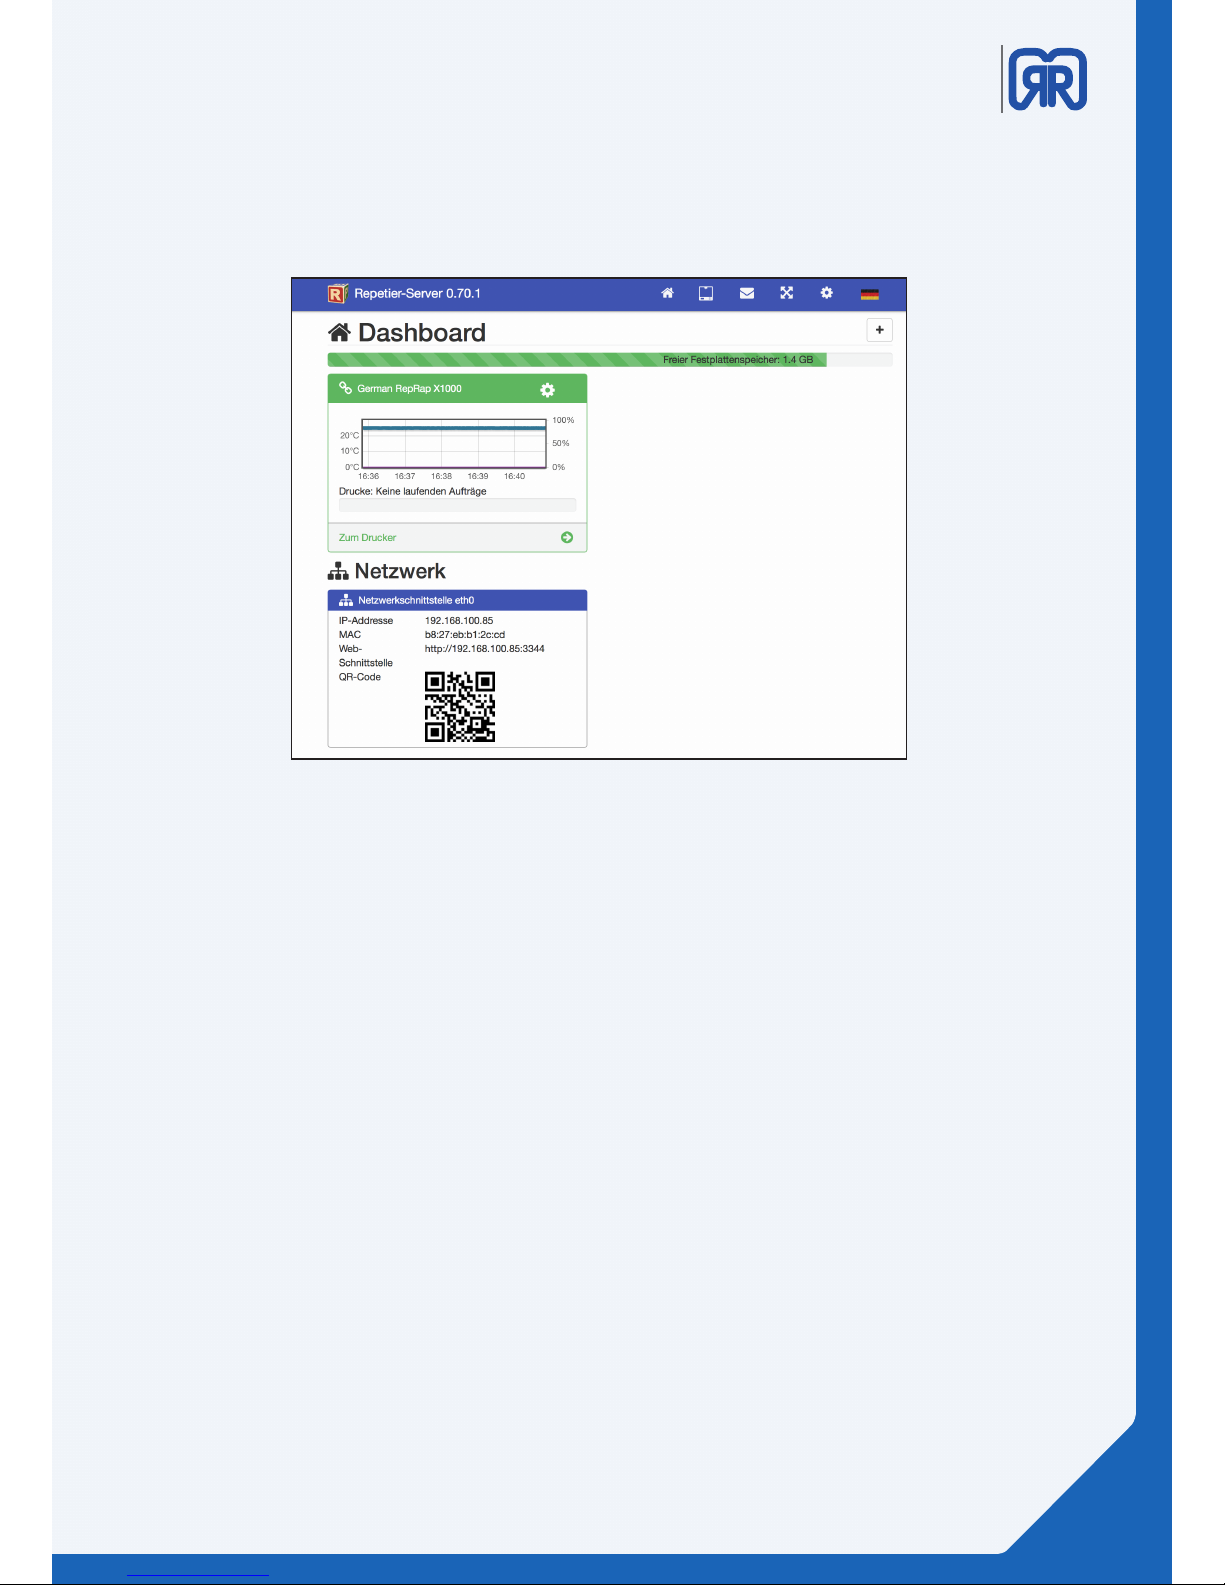
Dashboard . Repetier-Server
• The color of the printer name´s bar represents its connection status (green= online, red= oine, gray
= deactivated, orange = connected without communication).
• Using the Cog symbol allows you to activate/deactivate or to delete the printer. You can also edit,
exchange or download the printer settings.
• The temperature curve displays the current temperature of the extruder.
• Underneath the temperature curve you nd the current print job and its progress.
• You can access the printer directly by clicking the button “zum Drucker”.
• The green bar on top edge of the window shows the amount of free disc space on the Repetier-
Server.
• In the bottom area under the heading of “Netzwerk” you can see the printer´s IP address and MAC
address. There are also an URL and a QR code shown which you can use to connect another device to
the 3D printer like a Smartphone or a tablet.
5.2 Dashboard
The dashboard represents the rst overview page of the Repetier-Server. The following information for all
your 3D printers are displayed here:
27/51
Page 28
X1000
3D printer manual
German
RepRap
5.3 Device panel
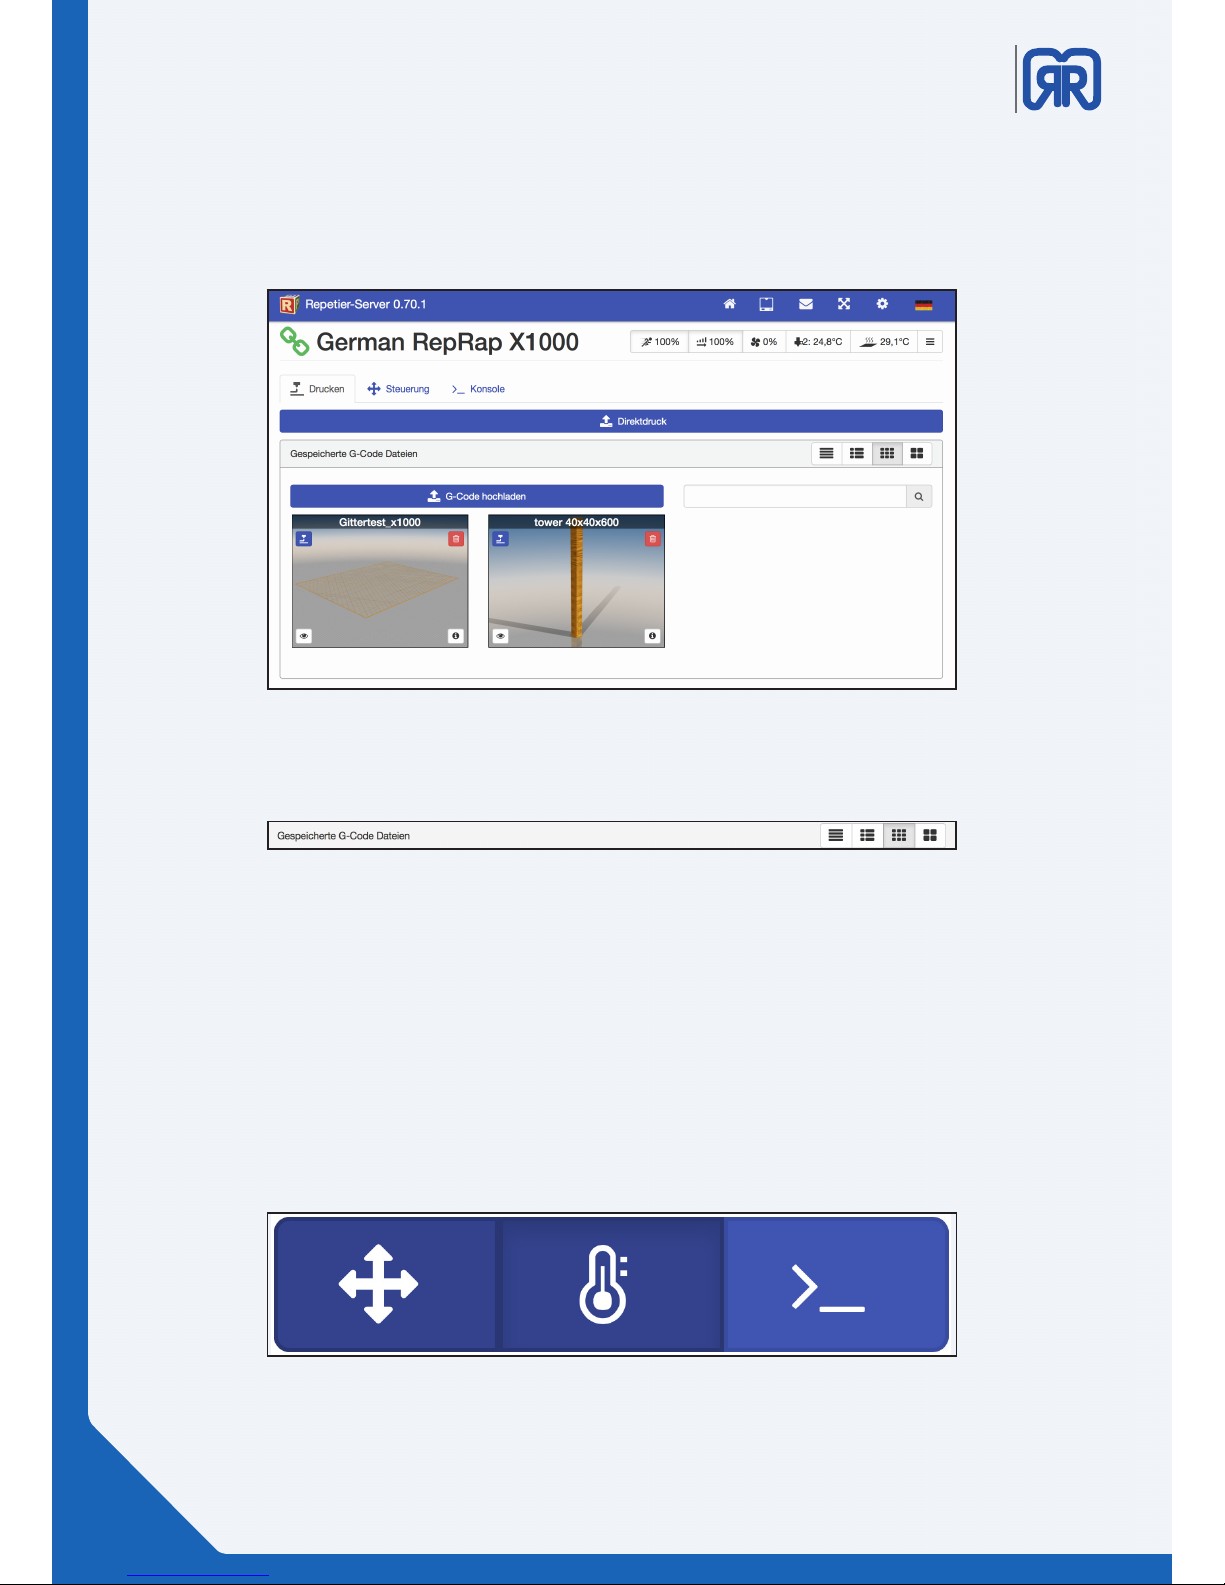
To operate your 3D printer or to upload G-codes, click on the button “zum Drucker” on the dashboard. Here
you have the option to upload G-codes to either print them directly or later. To do this use the functions
“Direktdruck” and “G-code hochladen”, respectively.
Device panel, Repetier-Server
Depending on your chosen view, you get dierent information displayed about your print jobs. Use the
search mask to browse your G-code database for print jobs.
G-Code view, Repetier-Server
5.4 Device panel operation
You can use this menu item to manually operate your 3D printer. You can manually traverse the axis or
regulate the heating bed.
The controls are separated into 3 categories:
• General working area
• Extruder and temperature curves
• Macros, to dene your own commands
Categories, Repetier-Server
28/51
Page 29
X1000
3D printer manual
German
RepRap
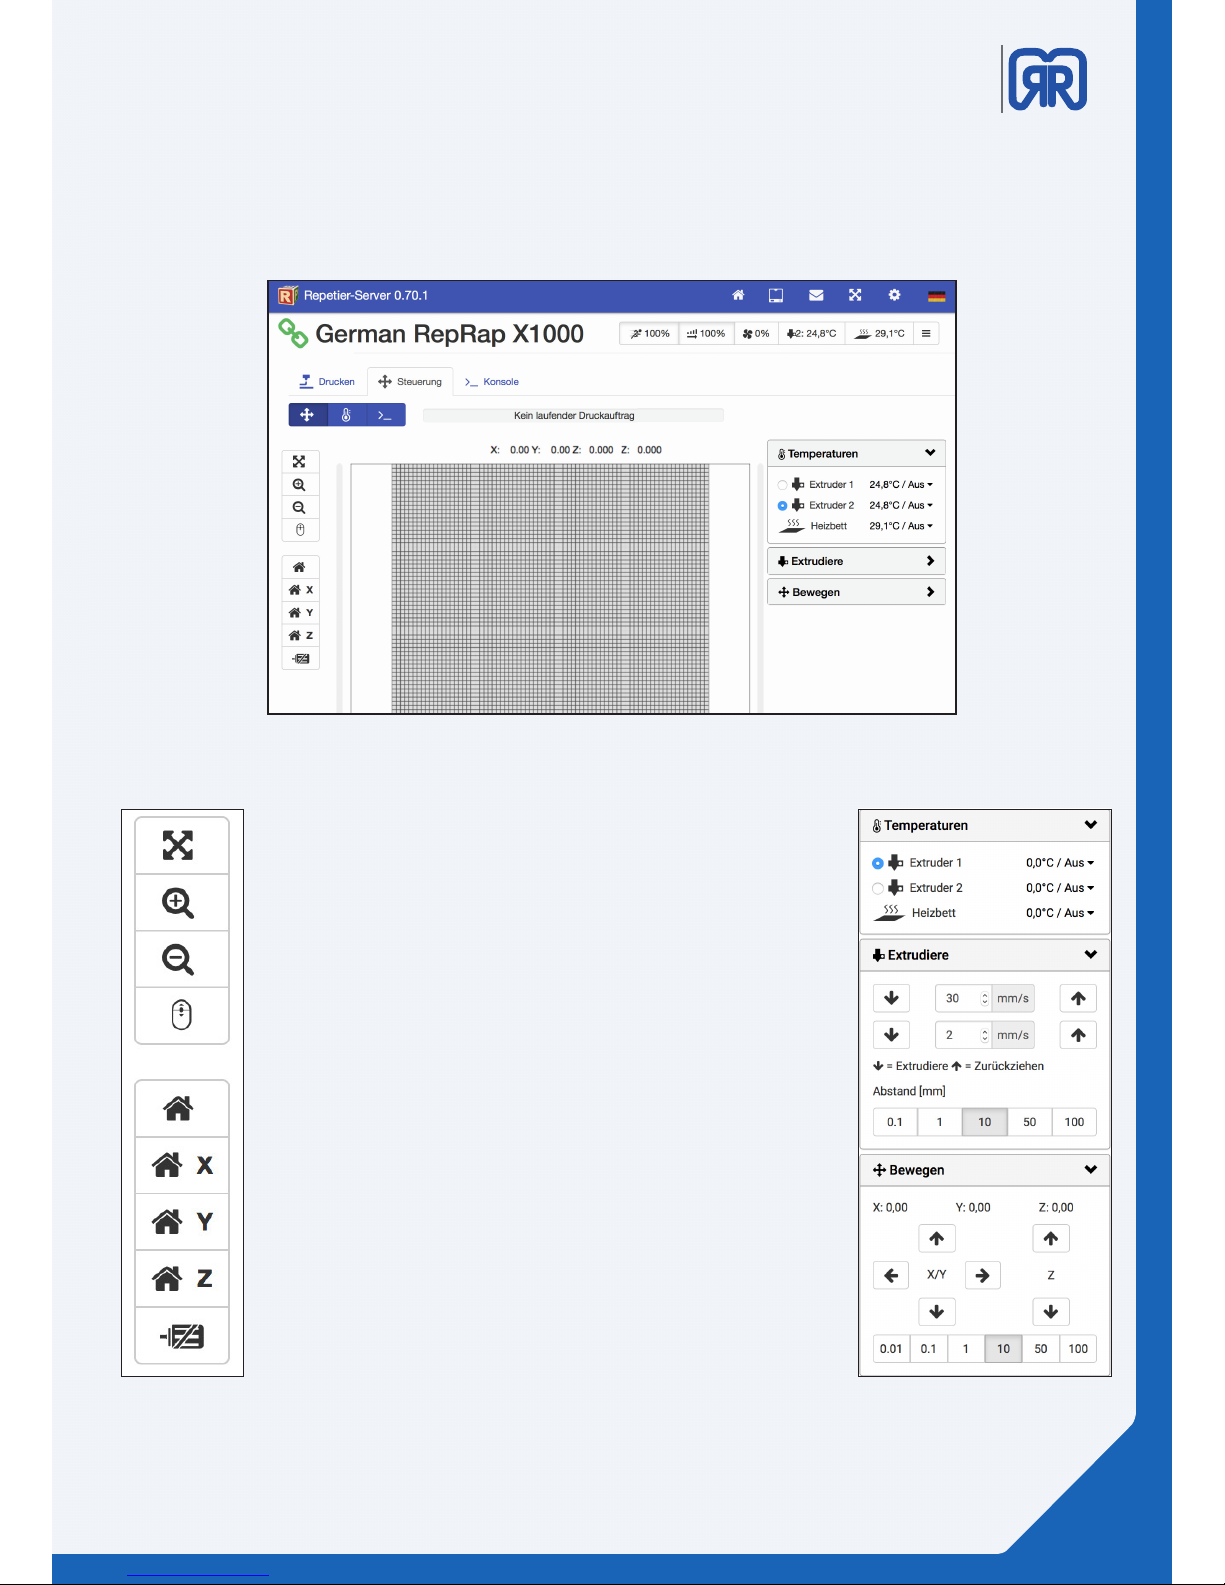
Manual control, Repetier-Server
Left:
Use the upper buttons to navigate through the virtual print space.
With the home symbols, you can move all or one specic axis to
its machine zero. You can shut down the engines by pressing the
lowest button.
Right:
On the right side, you can nd the conguration options for the
dierent heating elements of your 3d printer. Here you can heat
up the corresponding extruder heads or the heating bed and have
their temperatures displayed.
Under the tab “extrudiere” you can extrude lament or retract it
from the tool head. These operations are dened by speed (mm/s)
and the chosen distance (mm). This function is especially useful for
lament change.
Under the tab “bewegen” you can manually traverse the printer`s
axis.
This is either done by clicking on the corresponding arrow or via
the slide controls, which are arranged around the virtual print bed,
by pulling them to the required position.
29/51
Page 30
X1000
3D printer manual
German
RepRap
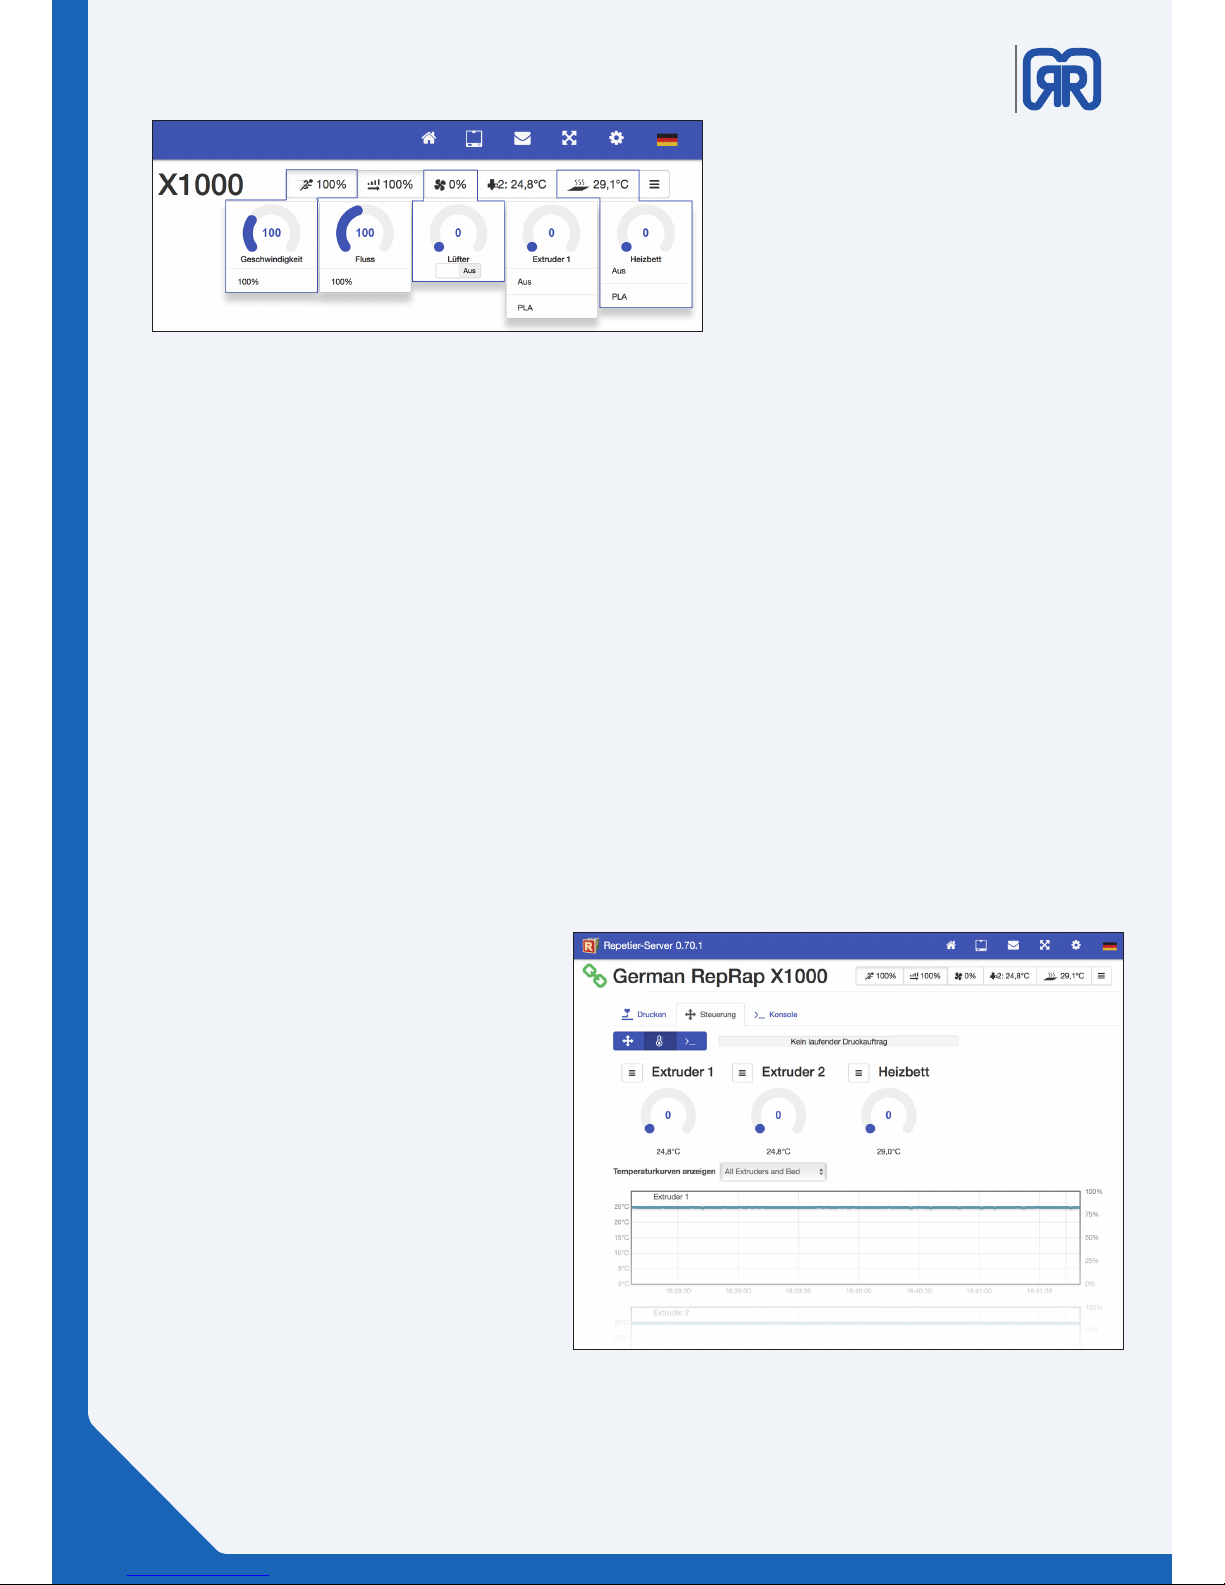
• Speed: Here you can adjust the working speed of your 3D printer. You can speed the printing process
up or slow it down. The used speed is calculated proportionally to the value which is stored in
the G-Code (100% = original speed; 150% = 50% faster than saved in the G-Code). The ow of the
extruder is automatically adjusted to the speed by the software, you don’t have to tweak it manually.
• Flow: The amount of lament that is extruded is determined by the ow. If the application rate is too
low, you can increase the output manually (in the past experience, 110% has shown good results).
Ideally, your slicing software should contain the correct value for the necessary extrusion multiplier.
• Fan: Here you can activate and control a fan in the work space. If your G-Code already contains orders
for the fan control it will over ride your manual conguration.
• Extruder: Here you can turn on your extruder and turn it o or control its temperature. In the register
Druckereinstellungen/Extruder/Extruder you can predene the temperatures that will be shown in
the dropdown menu.
• Heated bed: Turn the heating bed on or switch it o and control its temperature. In the register Dru-
ckereinstellungen/Extruder/Extruder you can predene the temperatures that will be shown in the
dropdown menu.
Extruder and temperature curves, Repetier-Server
Quick settings, Repetier-Server
Use the toolbar to change the following
parameters. The method to do this is
always the same. You can either move the
slider to the desired position or directly
click on the desired value and change it
manually.
As well as all the functions previously
motioned here you also get to see temperature cures for all heating elements. This
view is especially useful to exclude malfunctions of the heating elements.
30/51
Page 31
X1000
3D printer manual
German
RepRap
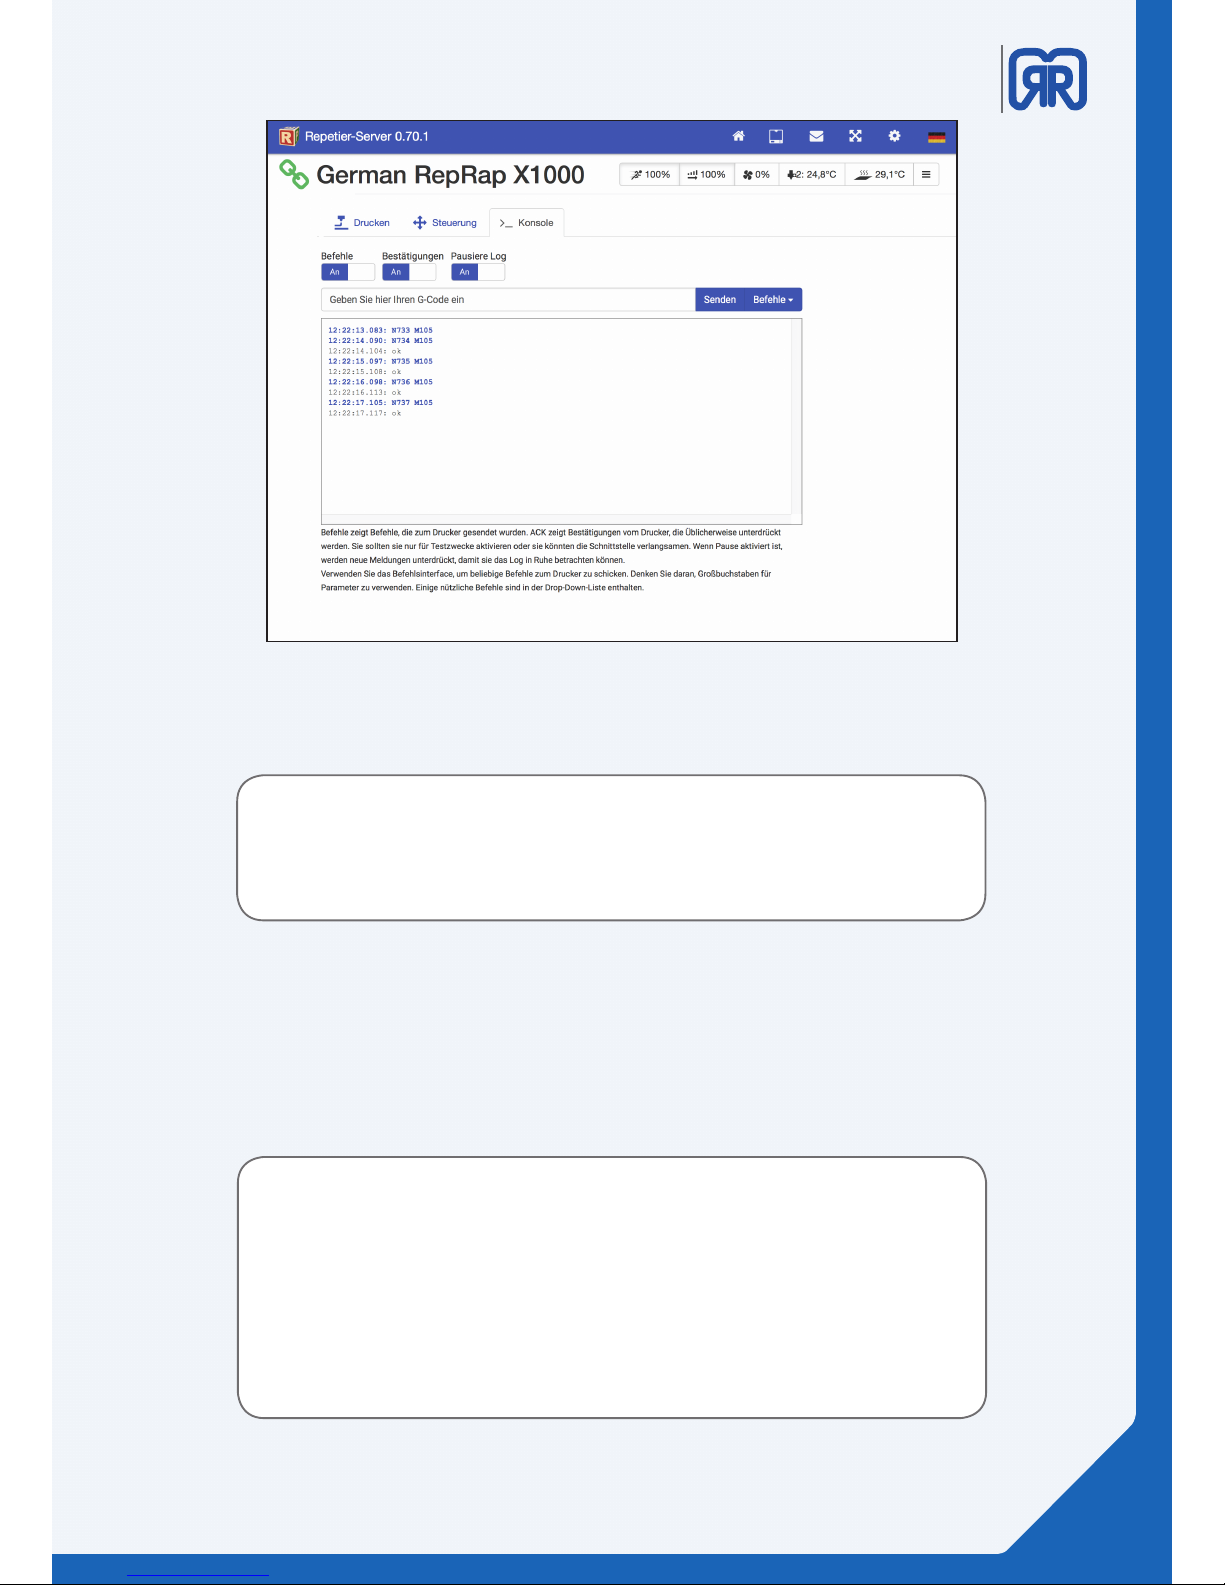
Under the tab “Konsole” you can view logs of all orders and conrmations that are sent to the 3D
printer. To do this just activate the corresponding switch.
This tool is especially useful to nd possible faults of the device. By activating pause
new messages will be suppressed, so that you can read your desired text section in your
leisure.
Console, Repetier-Server
Please note:
I the EEPROM arena you have direct access to the printer´s rmware, therefor care should
be taken when changing values.
You should generally only modify these settings after consulting the support.
Incorrectly registered values can lead to a malfunctioning device or could even damage
the 3D printer.
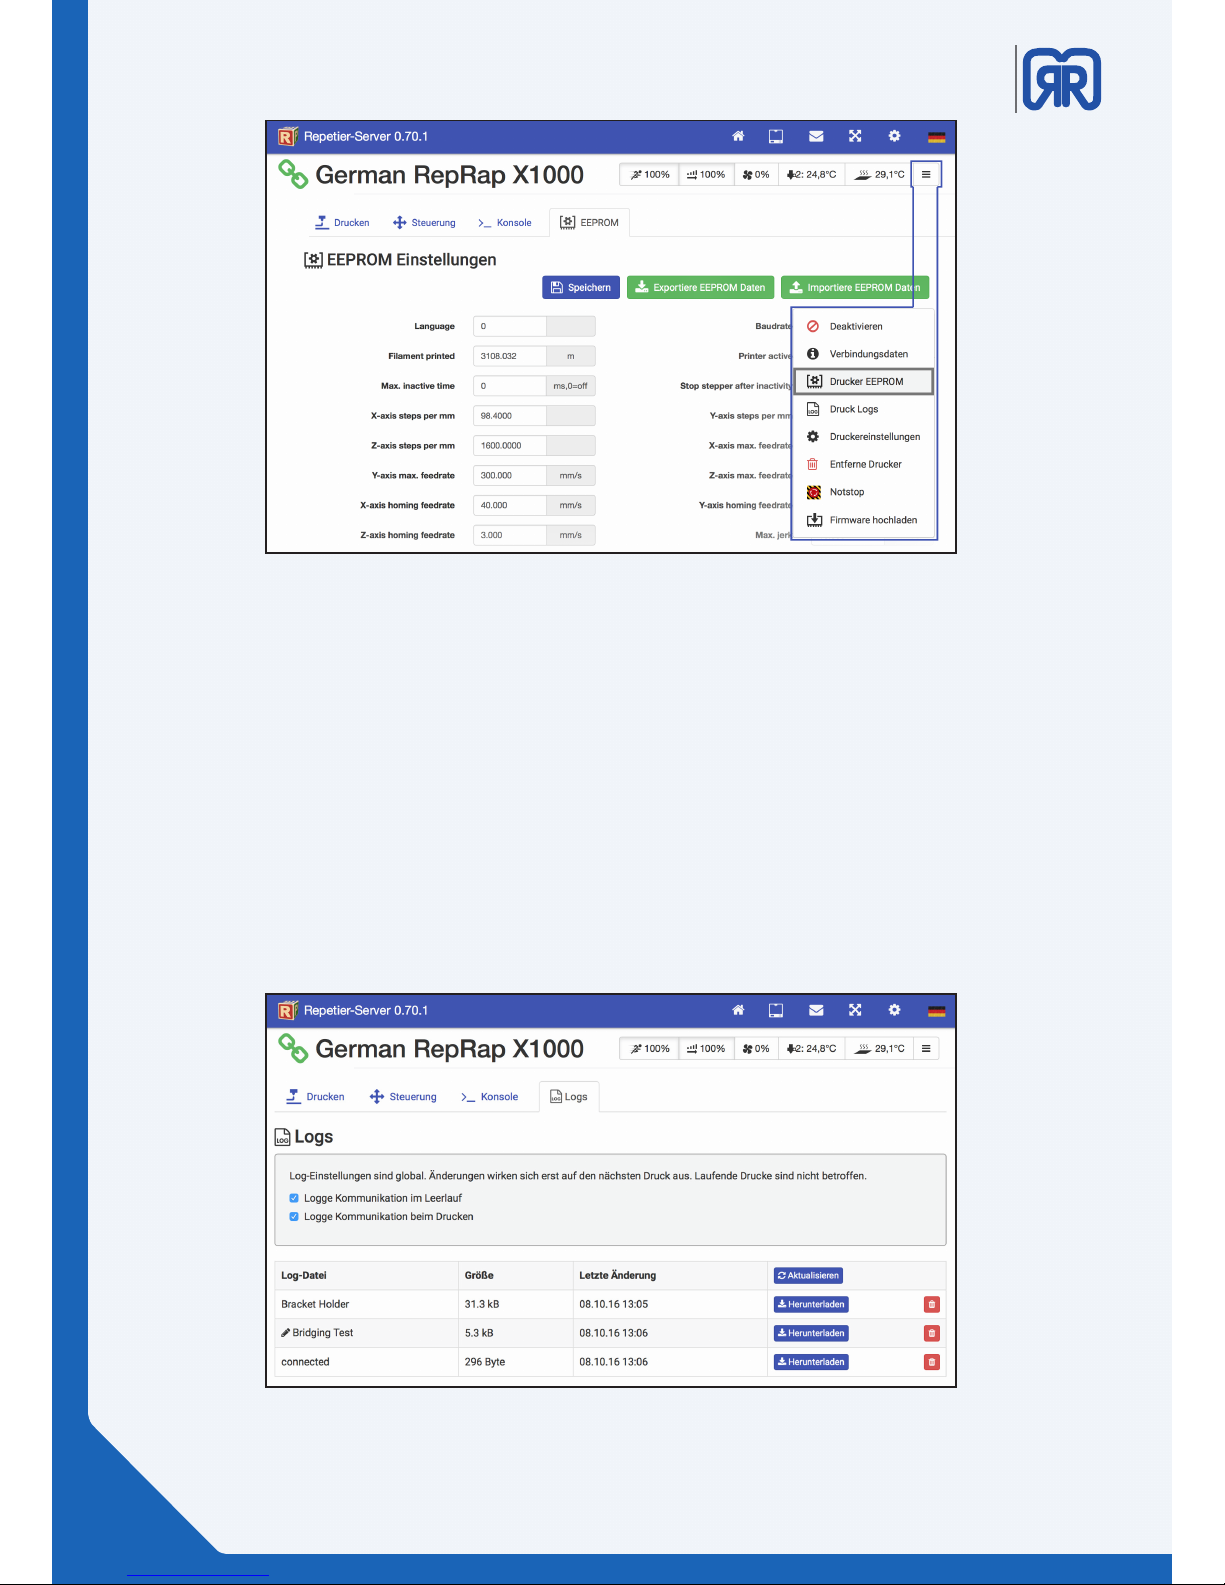
5.5 EEPROM
You can use the drop-down menu on the right side to reach the EEPROM settings. Here you can nd important machine parameters like the size of the print bed.
Changed values will be highlighted in green until they are saved. Incorrectly registered values will be highlighted in red. Use the button “speichern” to adopt your changes.
31/51
Page 32
X1000
3D printer manual
German
RepRap
EEPROM , Repetier Server
Before changing values in EEPROM, create a backup of your existing les. Use the button “Exportiere
EEPROM Daten” to save your settings as a .epr le. Following this, you must save the imported settings.
5.6 LOG-Files
Repetier-Server can record the communication with the 3D printer and provide a protocol of it as a text le.
A maximum of 5 log les can be stored. From then on each further task will delete the oldest entry.
To record a 3D print you just must check the two boxes It is not possible to log already started print jobs. You
must restart your 3D printer if you want to record a specic print job.
Log-les, Repetier-Server
32/51
Page 33
X1000
3D printer manual
German
RepRap
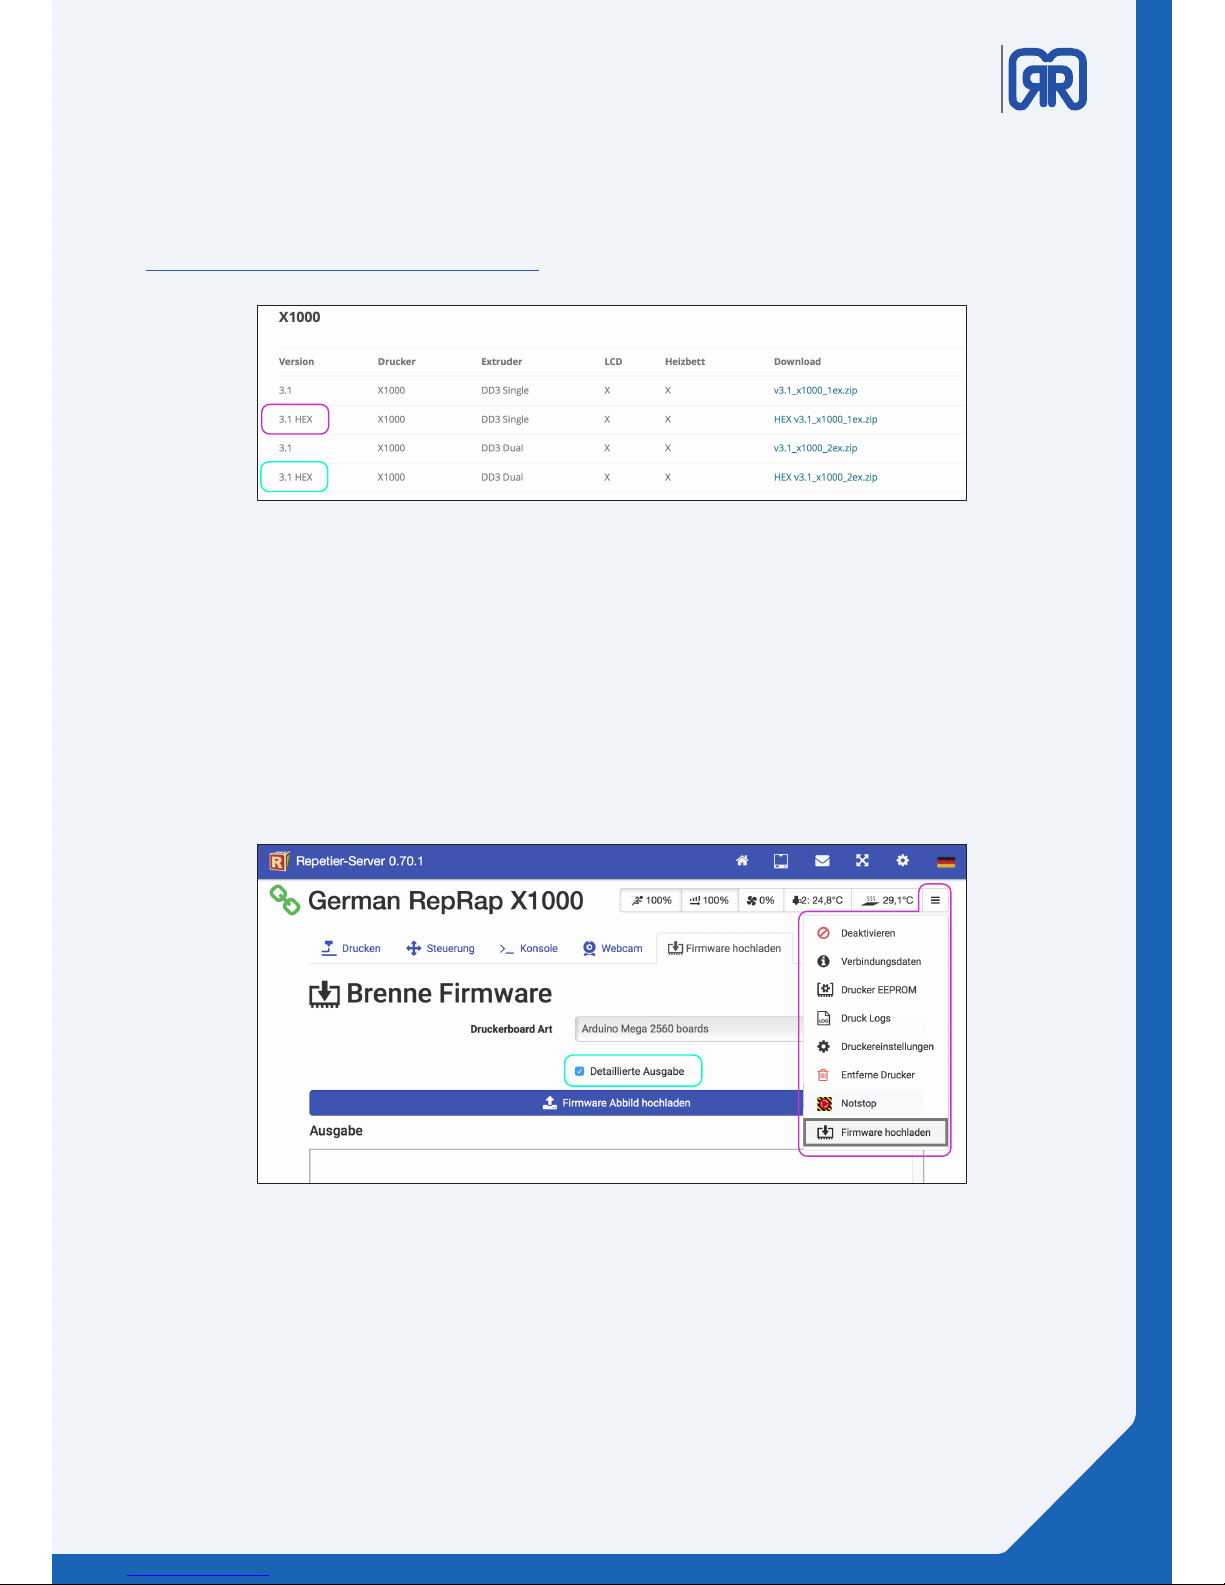
5.7 Firmwareupdate
The easiest way to perform a rmware update is to use Repetier-Server. First you must download the
rmware of your 3D printer as a HEX le and unzip it:
https://www.germanreprap.com/rmware/
Chose the printer you want to update from the Repetier-Server main window. Click on the 3 bars on the top
right corner to open the advanced settings and click on “rmware hochladen”:
• Tick the checkbox labeled as “detailierte Ausgabe”
• In older versions the checkbox is labeled as “gesprächige Augabe”
• Make sure that under “Durckerboard Art” the Arduino 2560 Borad is chosen
• Under “Firmware Abbild hochladen” you can select the path of the HEX le
• The upload and installation will then be executed
Firmware download
33/51
Firmware Upload X1000, Repetier-Server
Page 34
X1000
3D printer manual
German
RepRap
6. Tool heads and cosumables
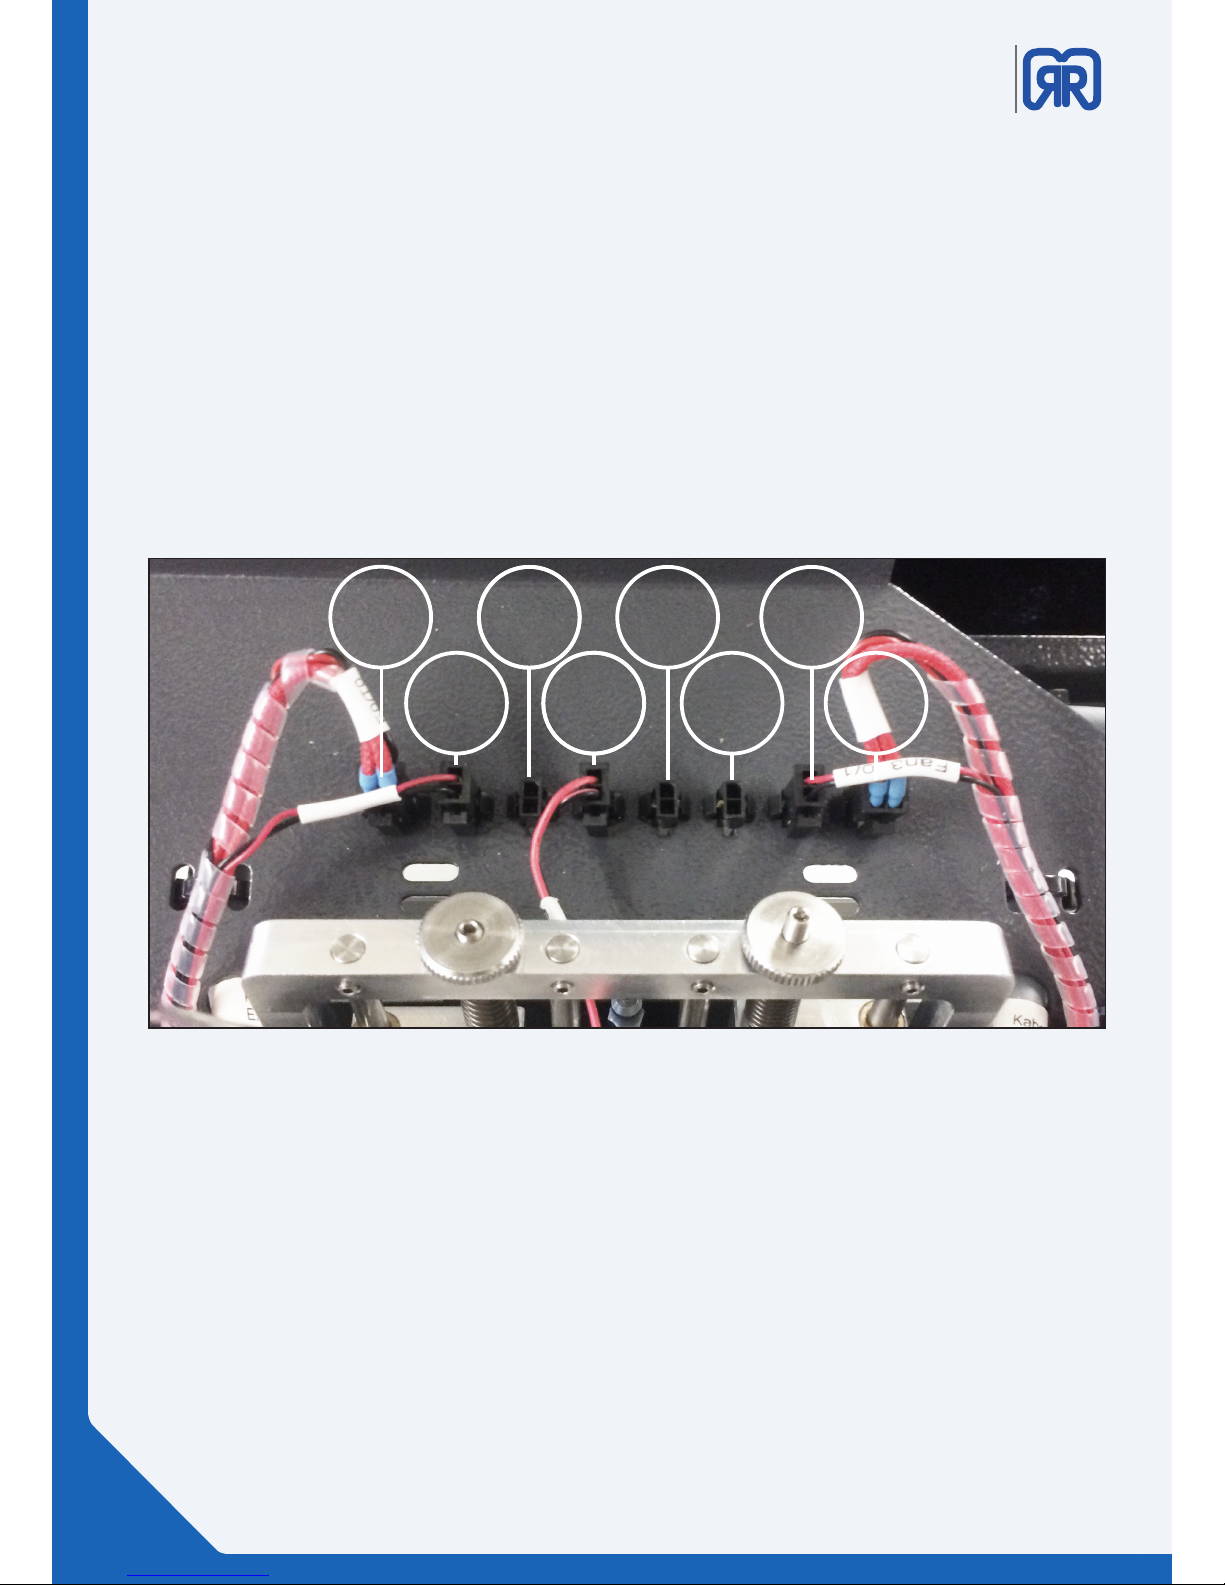
6.1 Tool head wiring
• 1 : E0/T0 – extruder heater and thermistor
• 2 : Fan 4/24V fan to cool the hotends
• 3 : FIL 0
• 4 : FAN - adjustable cooling fan
• 5 : 24V - an empty 24V slot
• 6 : FIL1
• 7 : Fan 5 / 24V fan to cool the hotends
• 8 : E1 / T1 - extruderheater and thermistor
1
2
3
4
5
6
7
8
Wiring X1000, tool slides
34/51
Page 35
X1000
3D printer manual
German
RepRap
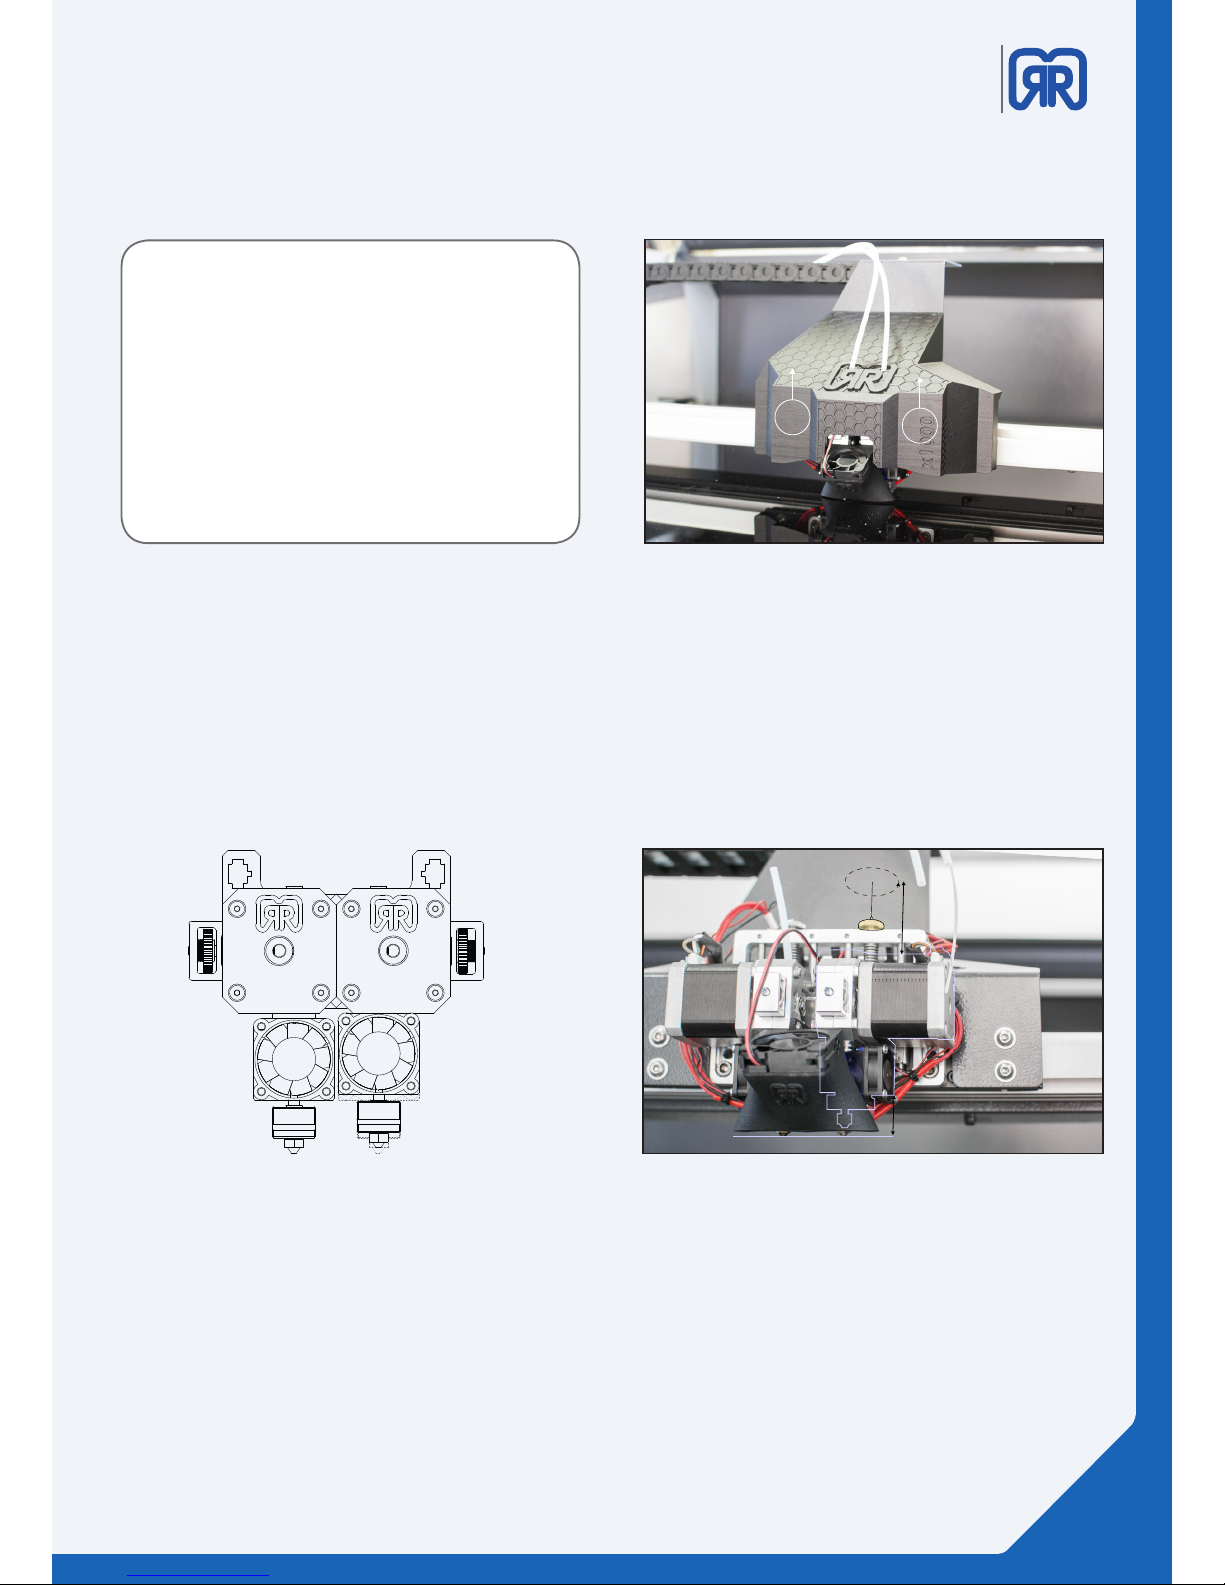
Adjusting extruder height
The left extruder is already set to working height and
serves as a reference point for the calibration of the
second/right extruder. Traverse the print bed to the
“Home position” and measure the distance between
the rst extruder and the print bed with an appropriate tool like a dial gauge or a feeler gauge. Use the
marked knurled screw in the picture to transfer the
height to the second extruder.
If the X1000 is delivered with two extruders, the left/
rst extruder sits lower compared to the right/second
extruder. This is intentional. We recommend for new
users to make their rst 3D printing experience with
only one extruder.
6.2 How to set up the second extruder
Follow this illustrated guide to put the second extruder into operation:
To put the second extruder into operation, the cover
of the extruders must be removed rst. Afterwards
the second extruder can be lifted or lowered by
using the knurled screw (highlighted in yellow).
Before you start setting up the second extruder
please note that you must heat up both nozzles to
the material specic temperature. Then you must
remove the clamped lament from the extruder and
clean up the hot end`s brass nozzle. You can use a
brass brush for this.
Even trace amounts of impurities could make it
impossible to align both nozzles correctly. If you are
having troubles with dripping lament allow the
hotends to cool after removing the lament.
Cover removal
Left extruder for reference height
35/51
Page 36
X1000
3D printer manual
German
RepRap
6.3 How to replace the hot end and the extruder
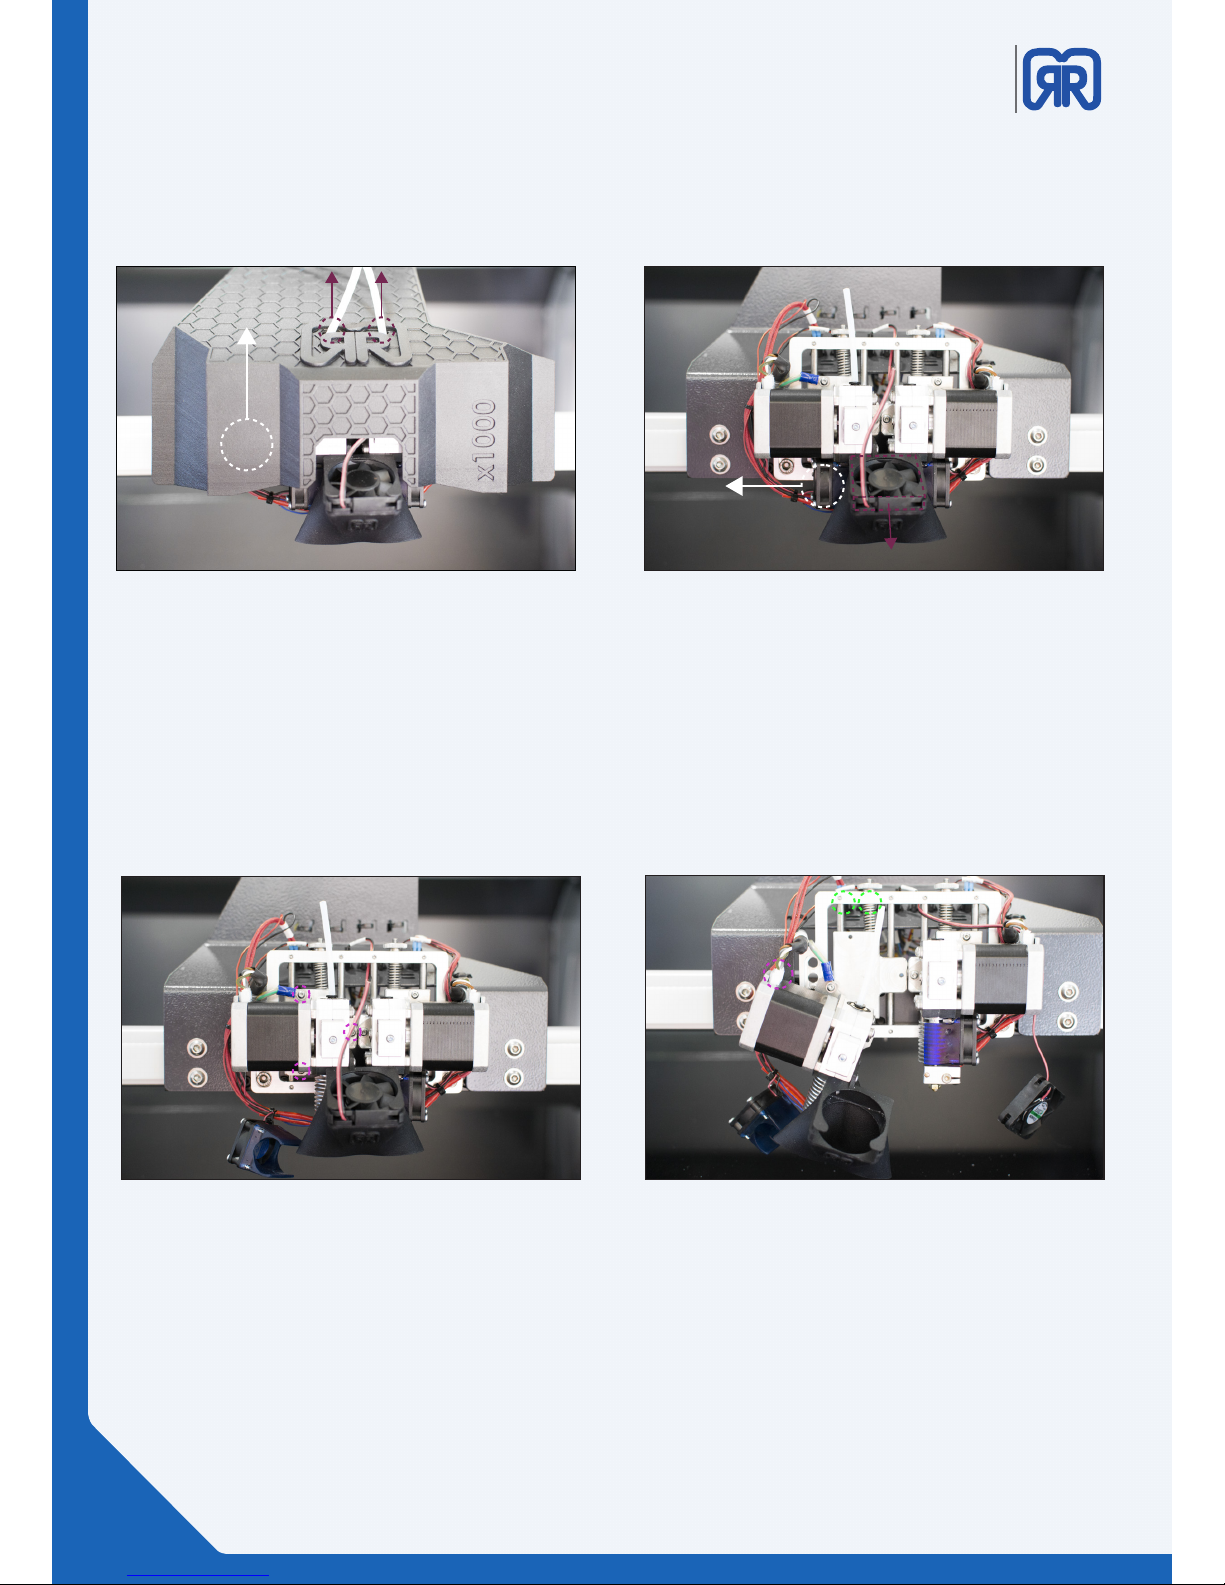
Follow this illustrated guide to exchange a hot end or the entire extruder:
The X1000`s cover is magnetically attached First, pull
out the color marked tubes of the black cladding and
then lift the cladding up and o.
Then you take away the object fan (red) and the fan
for the hot end cooling (white).
Caution!
Be careful when pulling o the hot end fan. It ts
rmly on the heat sink.
The extruder unit is mounted to the tool slide with 3
screws. Remove these screwes carefully.
Caution: After removing the last screw, the
Extruder is completely free. Take care that it
does not fall on the glass plate!
Disconnet all marked plugs that still connected the
Extruder (pink). Also, unplug the wiring which runs
from the hot end to the tool slide. (green)
Check the picture on the next site
For a detailed view of the wiring.
Remove cover Remove fan
Remove marked screws
Removing cable ties
36/51
Page 37
X1000
3D printer manual
German
RepRap
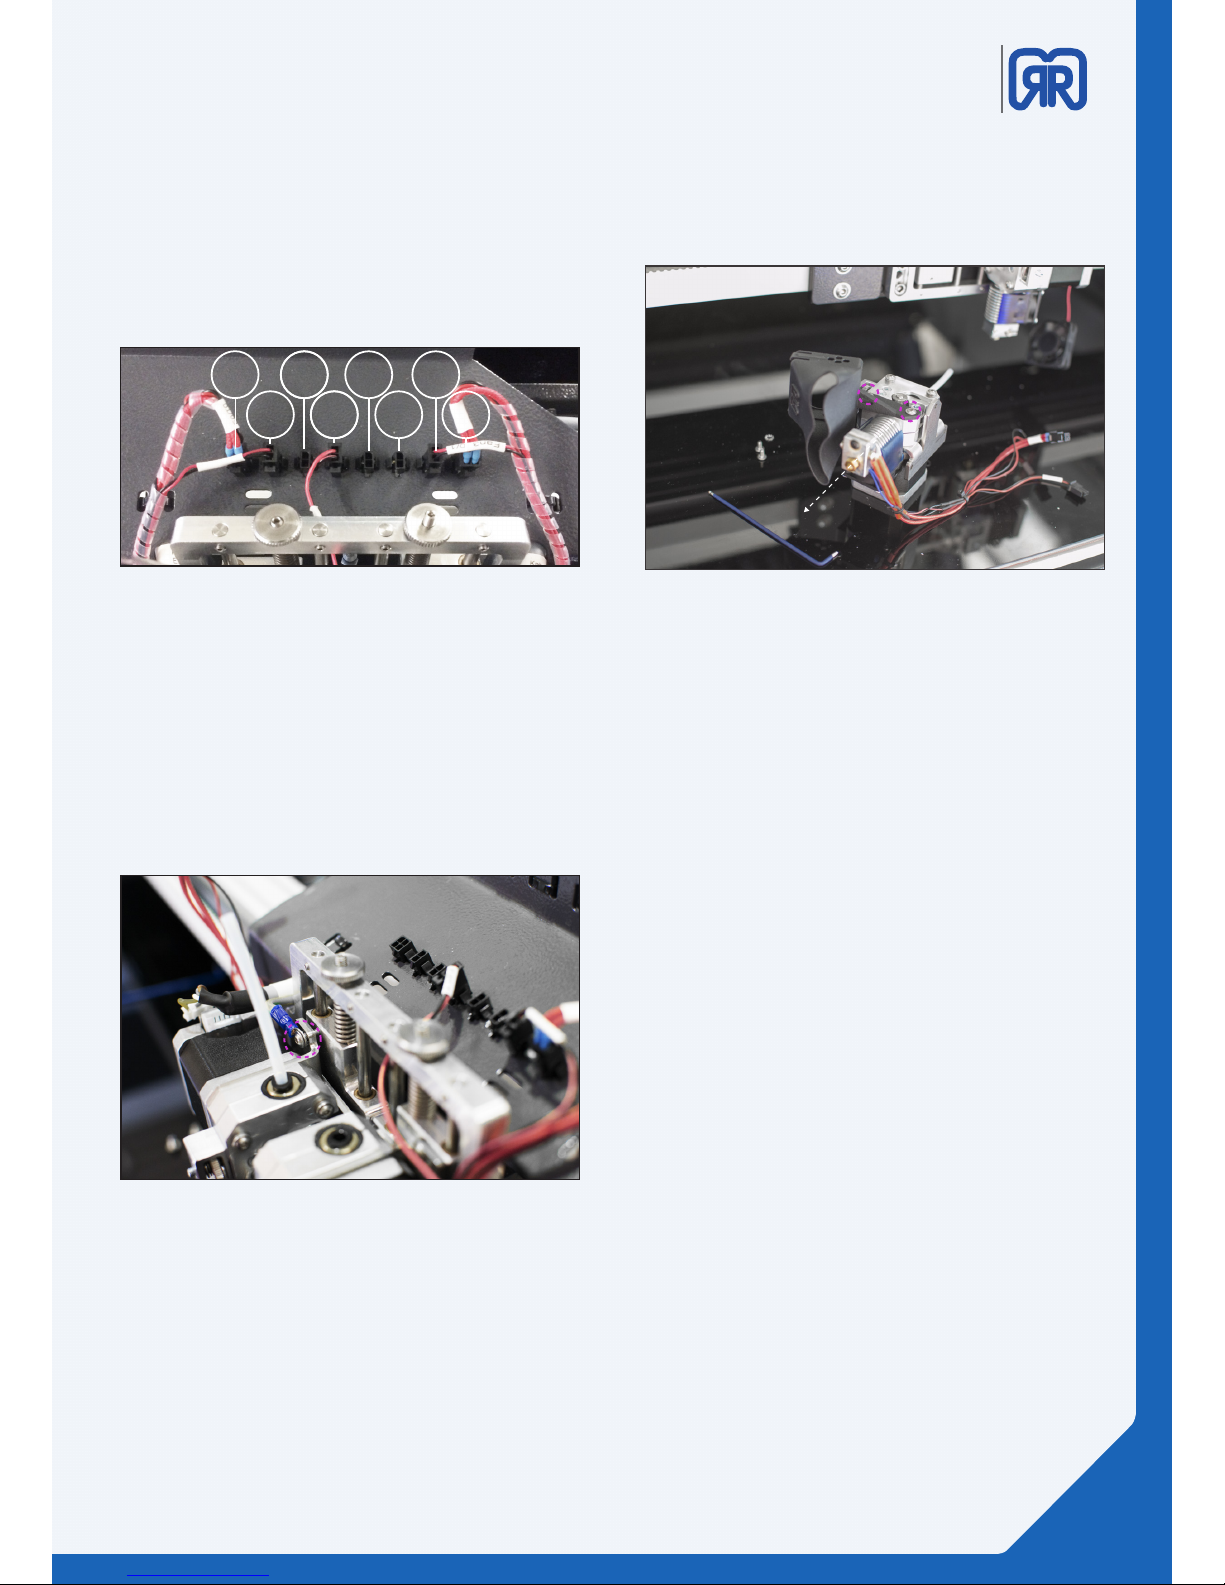
For replacing the rst extruder remove slots 1 and 2.
For the second extruder remove slot 7 and 8.
Slot 4 powers the object fan
After all cables are pulled the extruder can be put on
the glass Plate like shown in the picture
To replace the hot end you must rst loosen the
marked screws. The hot end then can be easily
pulled out of the extruder unit.
The assembly is done in the vice versa order.
Please ensure that serrated washer is installed
between the grounding lung and the holder metal
sheet.
1
2
3
4
5
6
7
8
Detail: assembly
Tool slide wiring
Removing the hot end
37/51
Page 38
X1000
3D printer manual
German
RepRap
When working with PLA lament please use a temperature of about 200° C. It is normal and sometimes inevitable
that during the heating process lament will drip out of the
nozzle.
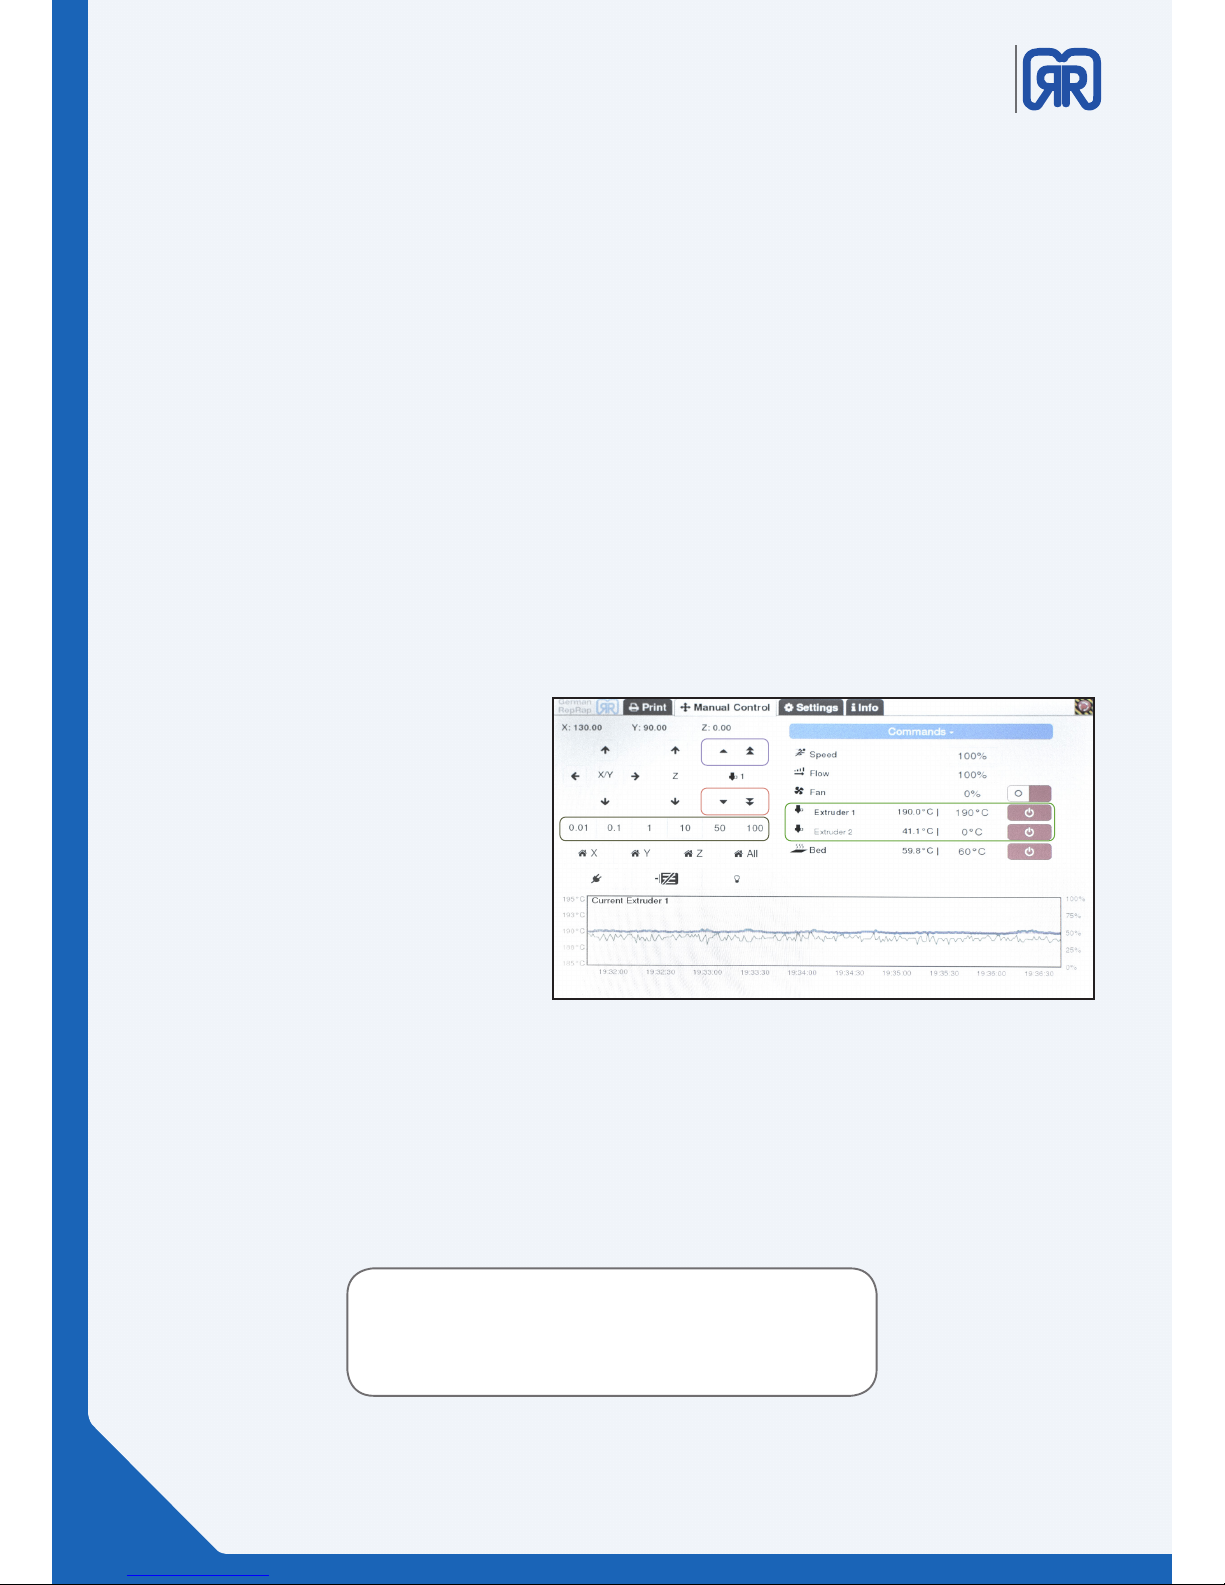
First, use the tab “manuelle Kontrolle” of the LCD display to extrude a small amount of lament (ca
20mm). Then you must push out at least 60mm lament with the “retract” order.
Thereby all of the old lament will be released from the extruder.
As the next step the cladding from the tool slide must be removed. It is xed magnetically and can be
removed by lifting it up and o. Now you must pull apart the hose for the guidance of the lament. Now
you can pull out the old lament residues easily.
6.4 How to change the laments
when changing the laments, two cases must be distinguished:
• Exchange the laments in the idle state
• Exchange the laments when the lament sensor has triggered
Exchange in the idle state
To insert lament into the extruder and to perform a lament exchange you must rst heat the extruder to
the material specic temperature. For your rst 3D prints we recommend the use of PLA lament. This is a
very easy to use, biocompatible plastic material.
For easy handling traverse the tool slide via the display to the following coordinates in the working mode
(green):
X: 500mm
Y: 600mm
Then change to the working mode (red) and open the X1000`s maintenance cover. Turn on the extruder`s
heating elements and wait until they reached the desired temperature.
• Green: Turn on the desired
extruder on or o
• Brown: Chose the desired traver-
sing distance
• Red: Let material extrude (lament
will be pressed through the
extruder)
• Violet: Performs a retract (Filament
will be pushed out of the
extruder)
X1000 LCD Display, manual control
38/51
Page 39
X1000
3D printer manual
German
RepRap
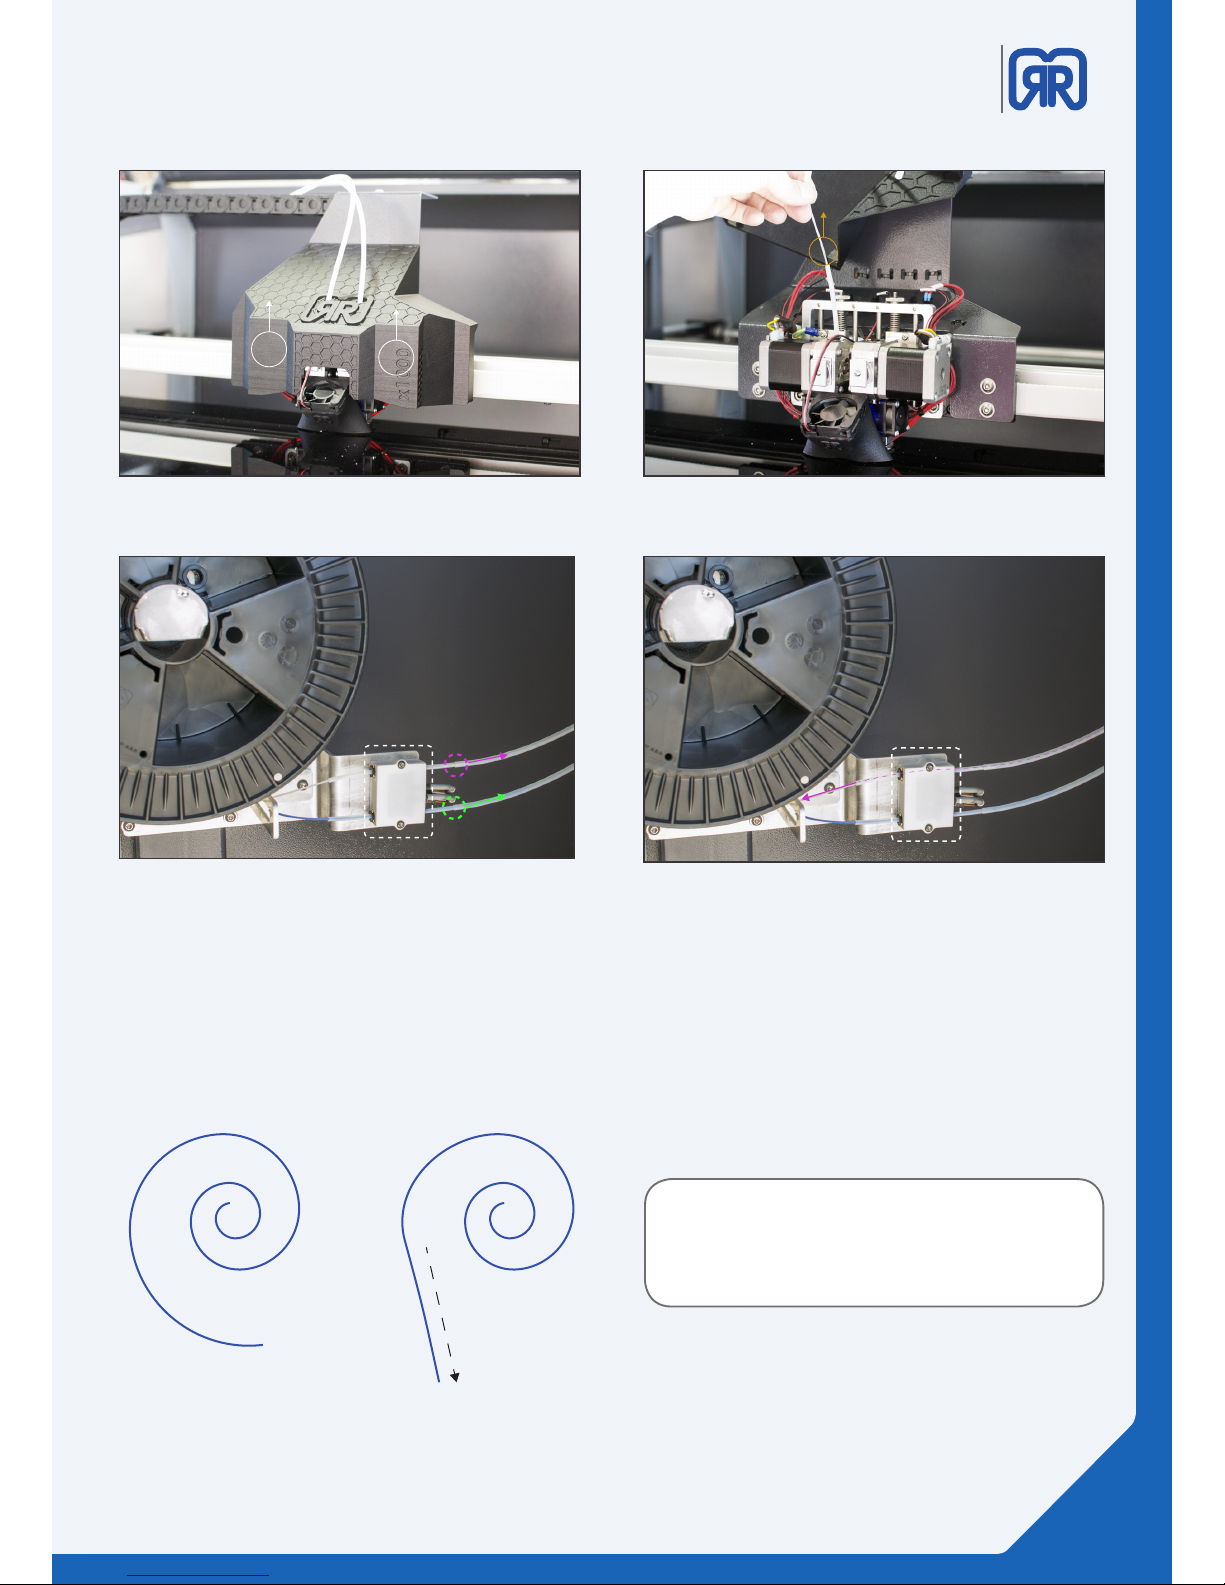
Then open the material tray on the right side of the X1000. Here you can nd the consumables as well as the
lament monitoring. On the pictures above you can see the lament monitoring (white bordered). The feed
for extruder 1 (EX0) is marked in pink, the feed for extruder 2 (EX1) is marked in green in the pictures above.
Now pull the lament that need changing out of the guidance hose and coil it on the spool
Tip:
It is easier to thread the laments, when you smooth
the tail and cut it o diagonally.
Removing the cladding Pulling lament out of the extruder
Filament monitoring X1000
Removing the lament from extruder 1
39/51
Page 40
X1000
3D printer manual
German
RepRap
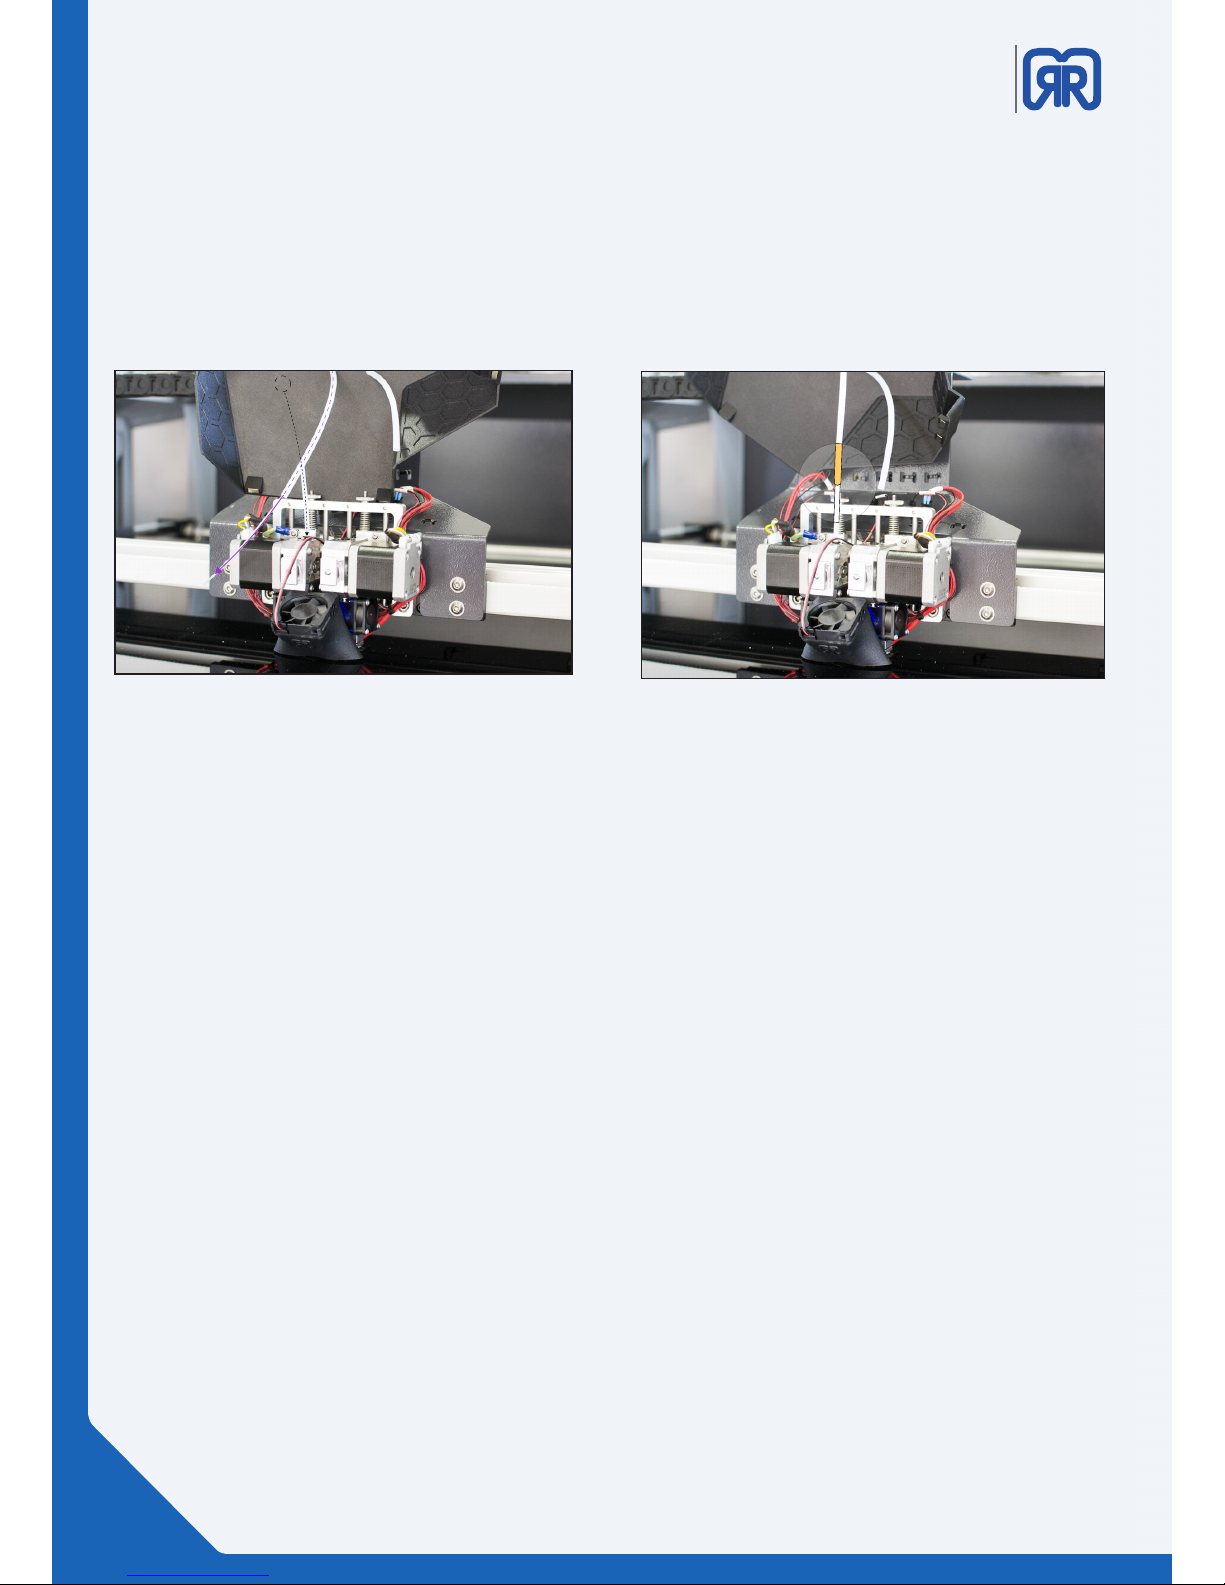
After removing the old lament successfully, you can mount the new lament spool and thread the lament
through the sensor and the guidance hose until it appears at the tool head. Make certain that the extruder is
already heated to the right temperature before you insert the lament into the extruder.
Insert the lament as far as possible into the DD3 extruder and hold it also in position in the meantime. Now
you can, via the LCD display for example, let the extruder extract material until the new lament appears on
the bottom end of the extruder.
Threading lament X1000
Assembling guidance hose
Please make sure that the hose for the material guidance is reassembled correctly, before positioning the
cladding on the tool slide again
Exchange the laments when the lament sensor has triggered
The lament monitoring checks in real time if the X1000 possesses enough material for processing. If the
whole lament is used up during a print job, the device respond as follows:
• The heating bed will remain turned on to maintain the grip of the 3D object
• The tool head will turn o to, to prevent a clogging of the nozzle
• The tool slide will traverse to a parking position for a better handling
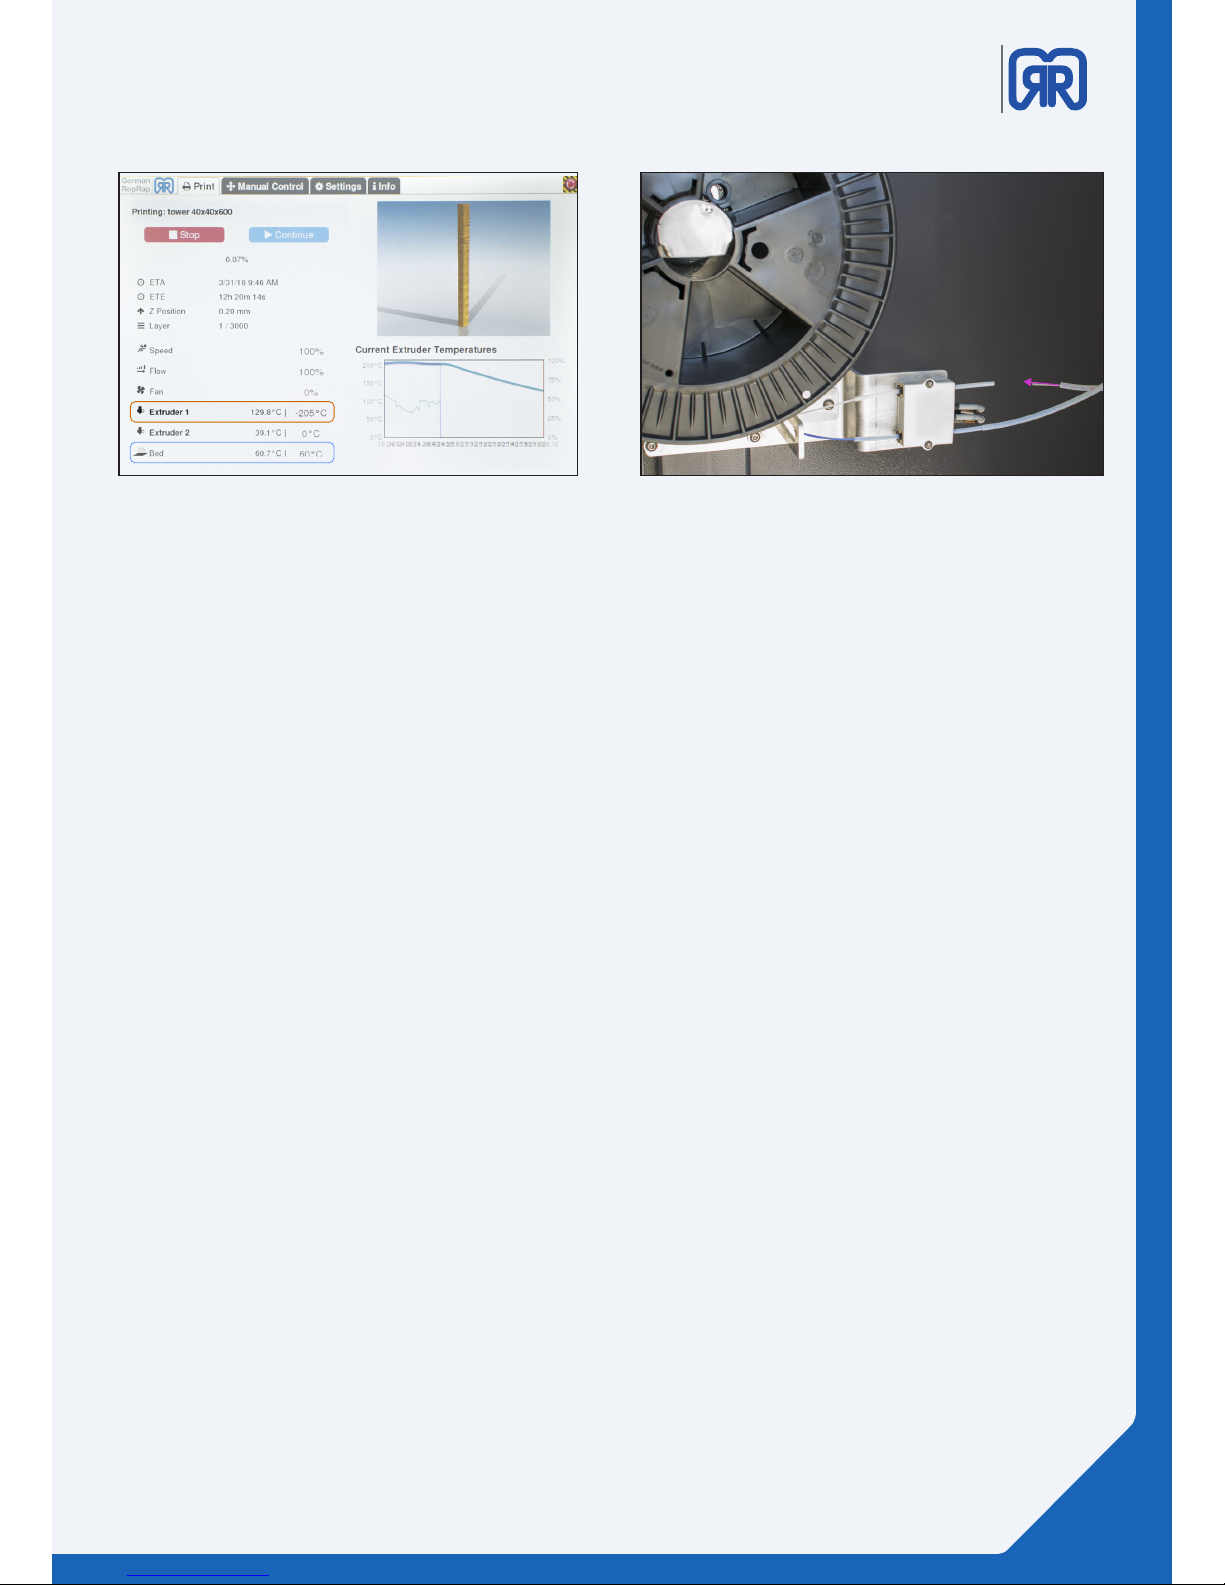
• The display will show the last set temperature with a negative sign. (e.g. -195°) This serves as a cache
for the used temperature. After the lament change the extruder will heat up again to the saved tem-
perature.
Please consult the previous chapter “Exchange in the idle state” before continuing.
The following procedure only diers slightly from the method described beforehand.
40/51
Page 41
X1000
3D printer manual
German
RepRap
To change the lament while monitoring is triggered use the following method:
• Turn o the heating bed manually and switch into standby mode (red)
• Open the material tray on the right side of the X1000 and remove the empty spool
• Mount the new spool and thread the lament only through the monitoring unit
• The extruder will then heat up to the saved temperature
• Wait until the temperature is reached and extrude about 20 mm lament
• Then use the order “retract” to pull about 60 mm lament out of the extruder
• This should release it completely from the extruder
• Remove the tool head cover of the extruder slide and pull apart the material guidance tube
• You are now able to completely pull out the old lament of the extruder and the guidance tube
At the material tray:
• Now that the guidance tube is unobstructed push the lament through the complete tube until you
can handle it at the tool head.
At the tool head:
• Insert the lament as far as possible into the extruder and hold it also in position in the meantime
• Let the extruder extract material until the new lament appears on the bottom end of the extruder.
• Reassemble the tube for the material guidance and put on the cover on the tool slide again
Continue the 3D print:
• Close the maintenance hood and switch into work mode (green)
• Restart the heating bed
• Then press “Home X” and “Home Y”
• IMPORTANT: Perform this command twice to avoid misalignments in the 3D object
• Now you can press “Fortsetzen on the display to continue your 3D print”
41/51
LCD display, triggered lament sensor Removing lament, triggered lament sensor
Page 42
X1000
3D printer manual
German
RepRap
If you want to change form PLA to PTAG lament, the nozzle must be heated up to the
higher material specic temperature. There could else problems occur when changing the
laments.
ATTENTION: If you want to use dierent types of laments consecutively, ush the nozzle
thoroughly before using the next type of lament” Then let at least 500 mm material
extrude to ensure that the nozzle will not get clogged.
General tips for the lament change:
Tip:
It is easier to thread the laments, when you smooth the tail and cut it o diagonally.
Tip:
Make sure that the extruder is not heated up for too long when it does not transport
lament, otherwise the hot end might clog
7. CO2 extinguishing system
7.1 General information
Even though the Co2 extinguishing system is an optional feature, we strongly recommend its purchase
for all costumers. In a case of emergency only gas will be used for re extinguishing so that the device is
optimally protected.
We also recommend the installation of the CO2 warn system to be protected against unintentional triggering.
Please review the user guide of the manufacturer on the cycles for maintenance and
inspection of the extinguishing system.
In case of activation the printer´s location must be immediately aerated. The X1000´s case
is not hermetically sealed so that Co2 can escape the device!
42/51
Page 43
X1000
3D printer manual
German
RepRap
German RepRap GmbH is a sales partner of ROTAREX FIRETEC. Please directly contact the
manufacturer on questions regarding the extinguishing system.
During initial commissioning the CO2 extinguishing system will be set active by a technician.
7.2 7.2 Manual triggering
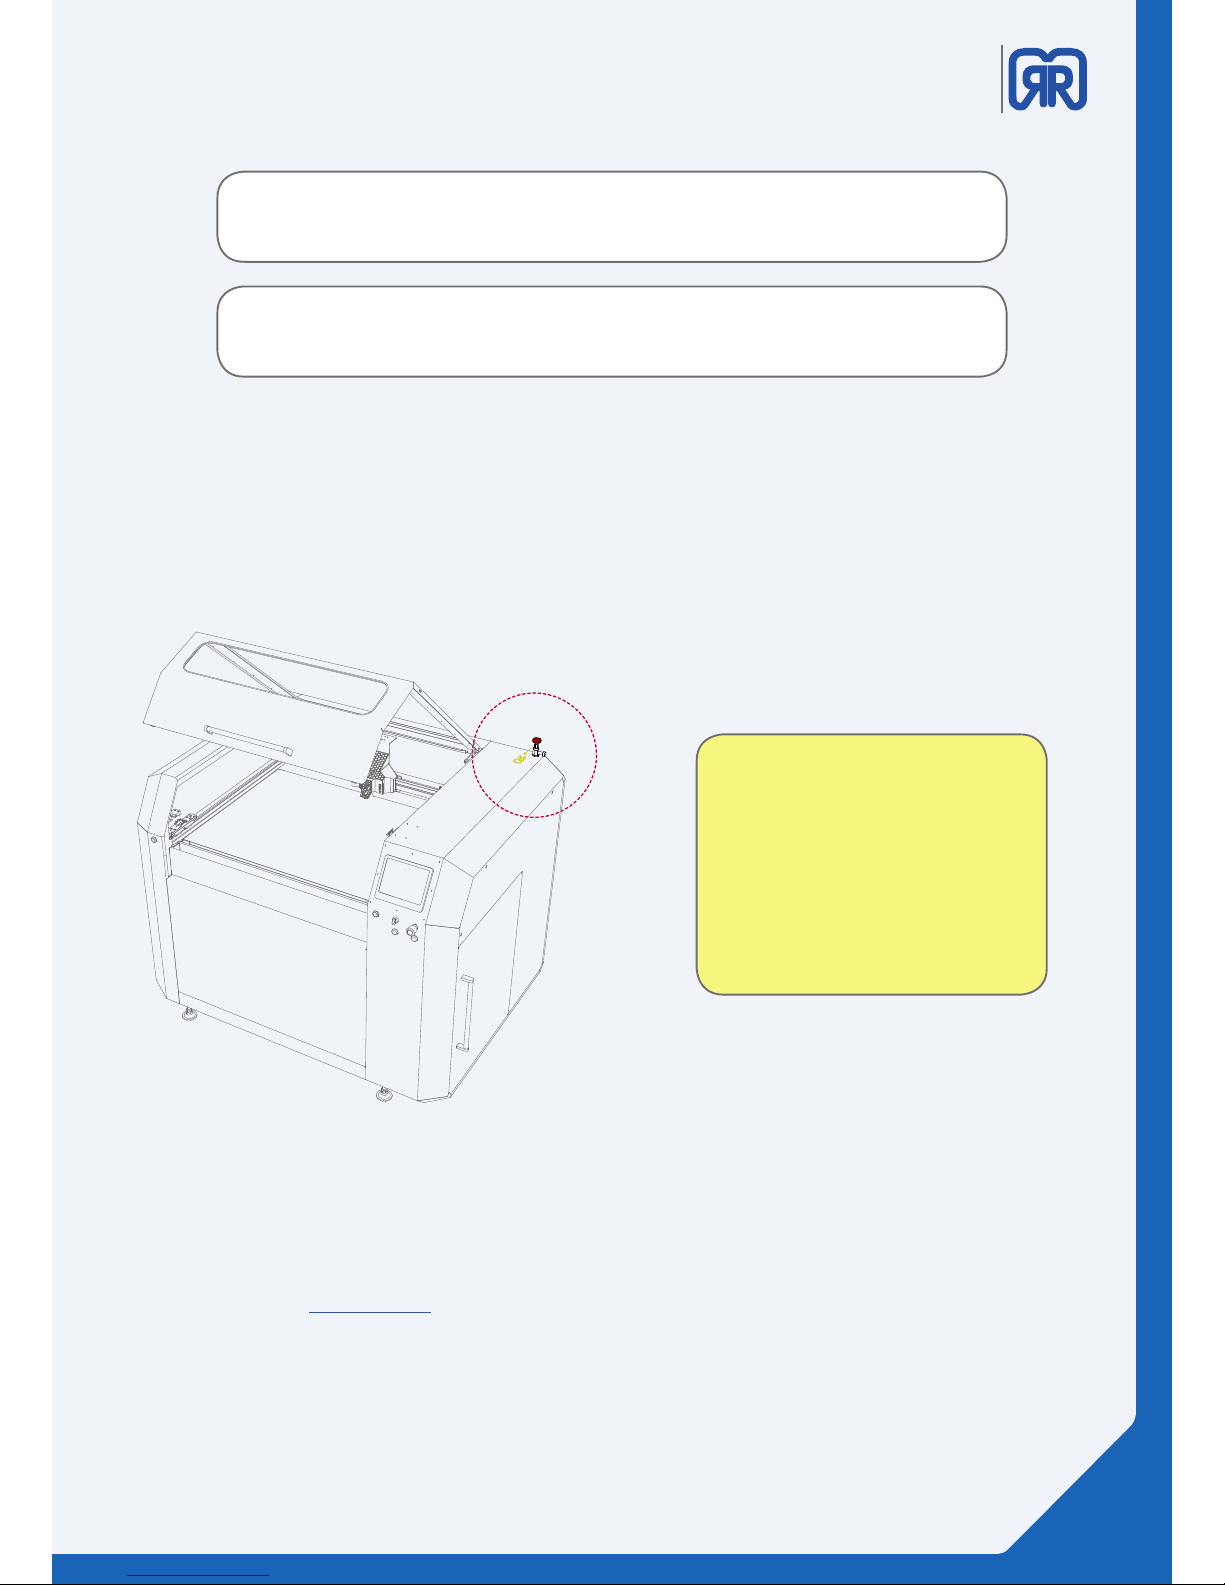
To trigger to CO2 extinguishing system manually pull the yellow safety bracket o the red lever on
the right side rear corner. After pulling the lever the device will be disconnected from mains and the
complete work space and sitch cabinet will be ooded with CO2. Unplug the X1000 thereafter.
Only operate the device in the spaceand room requirements stipulated by
the manufacturer!
7.3 Recommissioning after trigger
Please contact our service partner for your region to have this arranged.
43/51
CO2 extinguishing system, manual triggering
Page 44
X1000
3D printer manual
German
RepRap
8. Tipps & Tricks
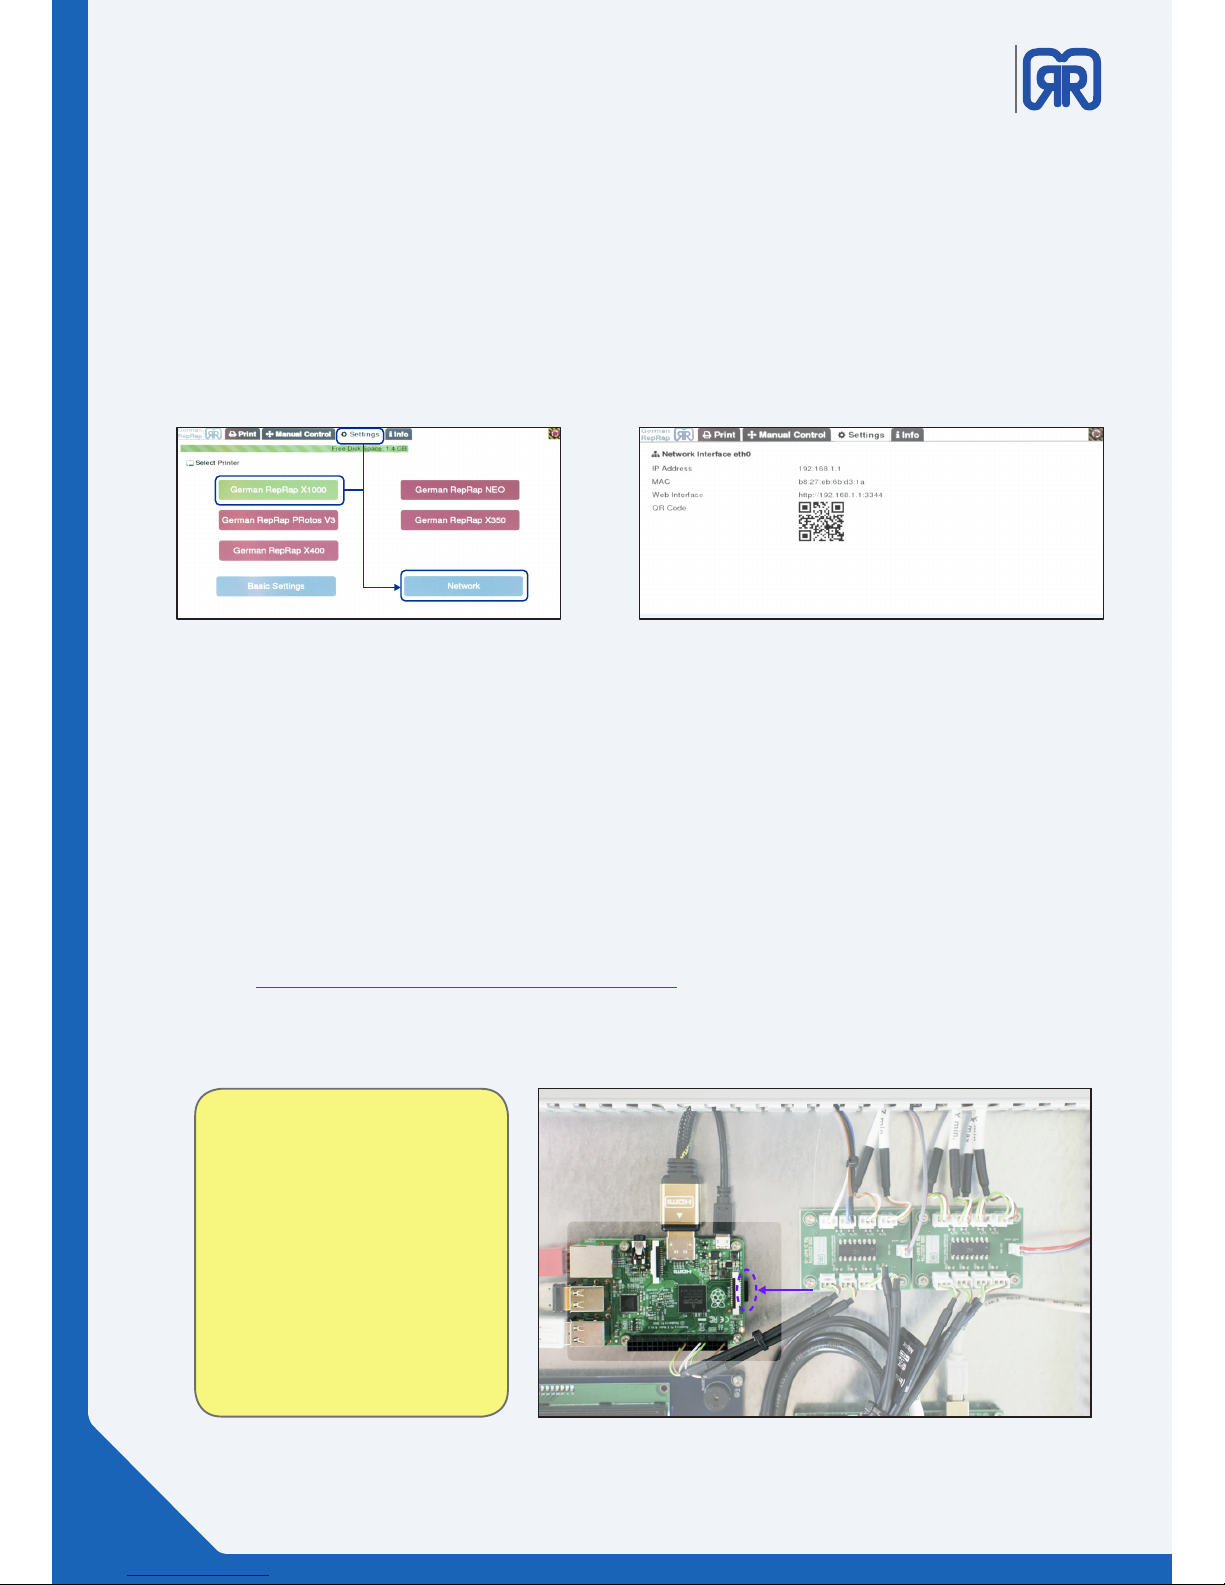
8.1 How to determine the X1000s MAC address
The MAC address of your X1000 can be identied via the device´s LCD display.
To do this choose your 3D printer from the tab “settings”. Then click on “Network”. The IP address as well
as the MAC address are displayed here.
You are also shown an URL that enables access to the X1000´s web interface. The also displayed QR code
can be used to access the web interface via mobile device.
Identifying MAC address X1000
Network settings X1000
8.2 How to update Repetier-Server
To perform a Repetier-Server update please always use the SD card provided. In case of a fault of the
SD card please use one with the exact same specications. The new card must have at least the same
storage space as the original one. The format must be FAT 16 or FAT 32.
The storage card (Micro-SD) and the corresponding adapter are located in the X1000´s switch cabinet
which can be found on the back side of the printer (see picture below). To remove the card, press on it
gently like shown in the picture.
Under Windows you can use the WIN 32 Disk Imager to load the image onto the SD card.
https://sourceforge.net/projects/win32diskimager/
After the installation just chose the image to write and which SD card to write to, the program will take
care of the rest.aus. Den Rest erledigt das Programm selbstständig.
Attention!
Never perform a Repetier-Server
upgrade without consulting the
support. Only use updates which
were approved by us!
SD-Karte entfernen
44/51
Page 45
X1000
3D printer manual
German
RepRap
8.3 PVA solution for enhanced adhesion
Drop an approximate 10 cm long piece of PVA into half a liter of warm water and wait until it is completely dissolved. Apply an thin layer of this solution on the heating bed with a ne brush. When the lm
is dried it improves the adhesion between printed object and print bed.
For large objects this procedure is obligatory!
Store the pre-made PVA solution in a sealed container
so it can be used in the next print jobs. After the application, the brush should be put into cold water so it is
immediately ready for the next use.
9. Download area
Here you can nd all the les and documents that you need to operate your X1000.
https://www.germanreprap.com/rmware/#x1000
Simplify Proles
CO2 based dual re protection system
Saftey notes
Repetier-Server
Reptier-Server Image
45/51
Page 46
X1000
3D printer manual
German
RepRap
10. Important notices
On the following pages, you will nd important information and tips about the assembly, operation, installation site and connection of the device. Please read these instructions and tips carefully before you start operating the device.
Return shipment/ original package
Please keep the original packaging in case a return is necessary. Because of their design, 3D printers are
highly sensitive to impact and are therefore suciently protected only when transported in the original
packaging. When using improper shipping, the guarantee and liability claim for the device shall lapse.
Operation
During operations never cut o the power o the unit. This may result in data loss and damages to the
software applications.
Miscellaneous
The information contained within this manual are current at the time of printing. We reserve the right,
however, to make changes at any time and without notice. If there should be a new software available for
your device that has consequences for this manual (like changes in the menus or functions), we will provide
an updated version of the manual under http://german-reprap.com if we feel that it is necessary.
Toxic threat
Depending on the processed laments an overheating of the material can pose a toxic threat. The recommended operating temperatures must be strictly complied with. You can nd these information on the
labels of the laments or on our website at http://german-reprap.com.
Safety switch
The printer is equipped with a built-in thermal protector. It will be automatically switched o with an error
message on overheating when reaching a specic temperature.
Maintenance
The printer must be maintained annually by trained sta. The technical protective equipment and all mechanical components must be checked for functionality. We also oer a maintenance service. Please send your
inquiry to [email protected]
All work on the 230V mains may only be performed by a qualied electrical specialist. All relevant
safety regulations must be complied with. The originator of improper installation will be liable for
damage caused to property and personnel.
The use of the chemicals that are used to maintain and care the device must be complied with the
applicable regulations appropriately.
Manufactures specications must be observed unconditionally, as well as the use of recommended
protective clothing and the compliance of dosage instructions. The originator of improper chemical
usage will be liable for damage caused to property and personnel.
As part of your responsibility for your fellow human beings, please save this manual for eventual questions
and give it in case of a resell to the new owner.
46/51
Page 47

X1000
3D printer manual
German
RepRap
11. Safety notes
Power supply
Do not allow the power cord or plug to become damaged. Unplug the device immediately if the cord shows
any sign of defect. Before recommissioning the printer, the power supply must be checked by a qualied
electrician. Only use the provided power supply!
Cleaning
Unplug the device before you start cleaning. Use a dry cloth and clean the surface of the device only. The
use of the chemicals that are used to maintain and care the device must be complied with the applicable
regulations appropriately.
Manufactures specications must be observed unconditionally, as well as the use of recommended protective clothing and the compliance of dosage instructions. The originator of improper chemical usage will be
liable for damage caused to property and personnel.
Playing children
There is danger to life through an electric shock when touching the internal parts of the device!
Mains voltage
The device must only be operated under voltage of 230V. You can see this on the backside of the device and
on the external power supply. All connections must be double checked before connecting the device to the
mains and put into operations.
Humidity, solar radiation, heat, open ames
Protect the device from extreme humidity, dripping and splash water. Do not place any objects lled with
liquid or with open re like beverages or candles on the device. Do not install the device next to a radiator or
in a humid room. Do not expose it to the direct sunlight or operate it in tropical climate.
Ventilation
Ventilation
Even though the heat arising in the device is suciently dissipated you should never install it in a shelf or a
closet without enough ventilation. Do not block the device´s cooling vents and don’t place any objects on
it. To let the arisng heat dissipate easily you should leave a clearance of 20cm on the sides and 30cm behind
the device if the chapters “assembly” and “commissioning” do not state otherwise.
Long absence, tempest, power plug reachability
To completely disconnect the device from the mains you must unplug the power supply. Therefore, the
device should be installed next to an easy to reach wall outlet so it can be unplugged easily in case of emergency. In case of long term absence or tempest you should unplug the device as a precaution. We recommend this for all devices that are plugged to the printer, even via USB.
47/51
Page 48

X1000
3D printer manual
German
RepRap
Installation site
Like every electronic device this printer generates heat. Even though the heat radiation meets the statutory
requirements, sensible surfaces might be discolored over the time. Therefore, we recommend to install the
printer on an even and sturdy surface. You should also care for a good reachability and an adequate working
height.
Disposal
Electronic equipment may not be disposed in domestic waste. In accordance with directive 2002/96/EG of
the European Parliament and the Council of 27th January 2003 about electric and electronic equipment it
must be professionally disposed. At the end of its use please dispose this device at a public colleting point
intended for this.
12. Legal disclaimers
Software modications/ use of applications
Modications to the printer´s software or the use of unauthorized applications not supplied by German
RepRap GmbH will void the device´s warranty. Shipping costs as well as the repair cost caused by using
unsupported software are billed to the customer.
Only use the software packages provided by German RepRap GmbH via download at their website at http://
www.germanreprap.com.
German RepRap GmbH cannot be held liable for the loss of data on any external or internal storages. The
device has been preinstalled with software and works as can be reasonably expected. It cannot be guaranteed that the software is error free. If it is possible to use the printer as designed an error in the software
does not constitute a faulty device and hence provides no grounds to a warranty claim. The warranty only
covers faults that would prevent the normal usage of the printer.
Limitations of the software caused by hardware faults, the environment the printer is being used in, operating errors or similar reasons are not considered software faults.
Contact
German RepRap GmbH
Kapellenstr. 9
85622 Feldkirchen bei München
Deutschland
Tel: +49 89 2488986 0
Fax: +49 89 2488986 99
Mail: [email protected]
Hilfe: [email protected]
Web: http://www.germanreprap.com
48/51
Page 49

X1000
3D printer manual
German
RepRap
Extract from the risk assessment
General cautiousness (6.3.2)
The power- , pneumatic- and control- , and data lines from and to the printer must be laid protected against
damage. Substances that are on the ground must be picked up with a suitable device and disposed professionally.
Residual risk (6.3.3)
During electrical operation, certain parts inevitably carry lethal voltages. There are also circuits in the switch
cabinet that carry dangerous voltages even when the main switch is turned o. If this danger note is not
heeded, Death or severe injury and damage to the equipment can be the consequences! Therefore, the
access to electronic devices, switch cabinets and power distributors is permitted only for specialists.
Electronic devices, switch cabinets and power distributors carry the following warning label:
The specialists must be completely familiar with the content of this manual. When any work is carried out on
electronic devices these ve electro technical safety regulations must be followed (EN50110):
1. Disconnect
2. Prevent from being switched back on.
3. Determine unstressedness
4. Earth and short circuit, if possible
5. Insulating of adjacent live parts and elements
National security guidelines must be heeded and complied with!
It should also be noted that the safe and reliable operation of the device requires appropriate transportation, correct storage, installation and assembly and diligent handling and maintenance.
Noise (6.3.4)
The noise emission is below 70dB
Removing of products (6.3.5)
For removing heavy objects auxiliary equipment might be required
Potential hazard from the CO2 device (6.3.7)
Please observe the regulations of the manufacturer regarding the minimum space.
Risk of re (6.3.10)
Operation only under supervision
Daily cleaning of the device and the workplace
Keep a re extinguisher ready.
The servo drive of the axes can become very hot; these must be cleaned regularly.
49/51
Page 50

X1000
3D printer manual
German
RepRap
Risk of burn (6.3.11)
Warning:
Risk of burn by the motors, the heated work area as well by the extruded material. Carry gloves if necessary.
Mechanical risks by the stepper motors (6.3.12)
Note: There is a risk of trapping and crushing when setting up the device!
Lid (6.3.13)
The wear and tear on the gas chamber can lead to uncontrolled movement. Daily visual and functionality
tests are prerequisites for a safe operation.
Transport 7.1
The transport is carried out by German RepRap GmbH. The device can by moved by the assembled wheels.
Packed delivery:
Machine weight: 400 Kg
Local requirements for the delivery: forklift, lift truck when a transport via the assembled wheels is not
possible.
• The transport route to the installations site must be of adequate dimensions. Doorways must be at
least 5 cm wider and taller than the package including the transport vehicle.
• The weight of the package including its transporting vehicle must not exceed the maximum weight
load capacity of the used transportation ground.
• The forklift must provide a lifting capacity of at least 150 Kg and a fork length of at least 1000mm
• A lift truck must provide the same properties. The travel path must be free from bumps and barriers.
• The transportation path to the installation site must be kept free form obstacles.
• Transportation via crane is not provided
Forklifts and lift trucks must be operated by trained personnel only. They must have a valid driving license
for the specic device and must be informed about the dangers.
Before starting the work make sure that the assembly instructions and the manual have been read and
understood.
You can attach the transport section of this manual to the package to exclude ambiguities.
50/51
Page 51

X1000
3D printer manual
German
RepRap
Requirements regarding the installation room and the surface conditions
Rigid, at and free of tilts
The choice of the installation site must take the weight of the device into account.
Repair, maintenance (7.4)
Tasks like maintenance measures and repair jobs must be performed by manufacturer´s trained personnel
(Section 5.2.5). This tasks must not be performed by the customer.
Diese Tätigkeiten dürfen NICHT vom Kunden durchgeführt werden
Maintenance measures on machines and devices in areas of potential hazardous movement may not be performed until
1 The hazardous movement has stopped
and
2 the power supply is interrupted.
And
3 Unauthorized, erroneous or inadvertent operation to cause hazardous movement is prevented
(locking the mains disconnecting device, separation of connectors, xation of moving parts via brake,
backstop, check valve or braces)
and
4.the possibility of dangerous movements caused by stored energy is excluded (via pressure release,
locking, lowering, easing of tension)
and
5. physical, chemical and biological emission is ruled out.
The components necessary for troubleshooting must be set up outside the danger zone.
The EC Machinery Directive and the Machinery Ordinance dene the security guidelines regarding maintenances of machines and devices. To ensure safety during maintenance work it advises the following
Maintenance work must be performed on shut down devices and machines.
Maintenance points must be located outside of danger zones.
There must be interfaces to connect diagnostic fault nding equipment.
Components, which must be changed frequently must be designed in a way that allows easy and safe
montage and dismantling.
Machines and devices must be equipped with an Installation which allows a separation from any power
supply. These installations must be clearly marked and be secured against unintentional activation.
After energy is cut o, it must be possible to dissipate any residual energy without risk.
Dismantling, putting out of order (7.5)
The device will be dismantled and decommissioned by the customer according to the instructions in the
manual. The process must be described in the manual.
Disposal (7.6)
The incurred process waste must be separated into recyclable material and hazardous substances in accordance with local laws and practices.
The device itself must also be separated into recyclable material and hazardous substances in accordance
with local laws and practices.
51/51
 Loading...