

Page 1
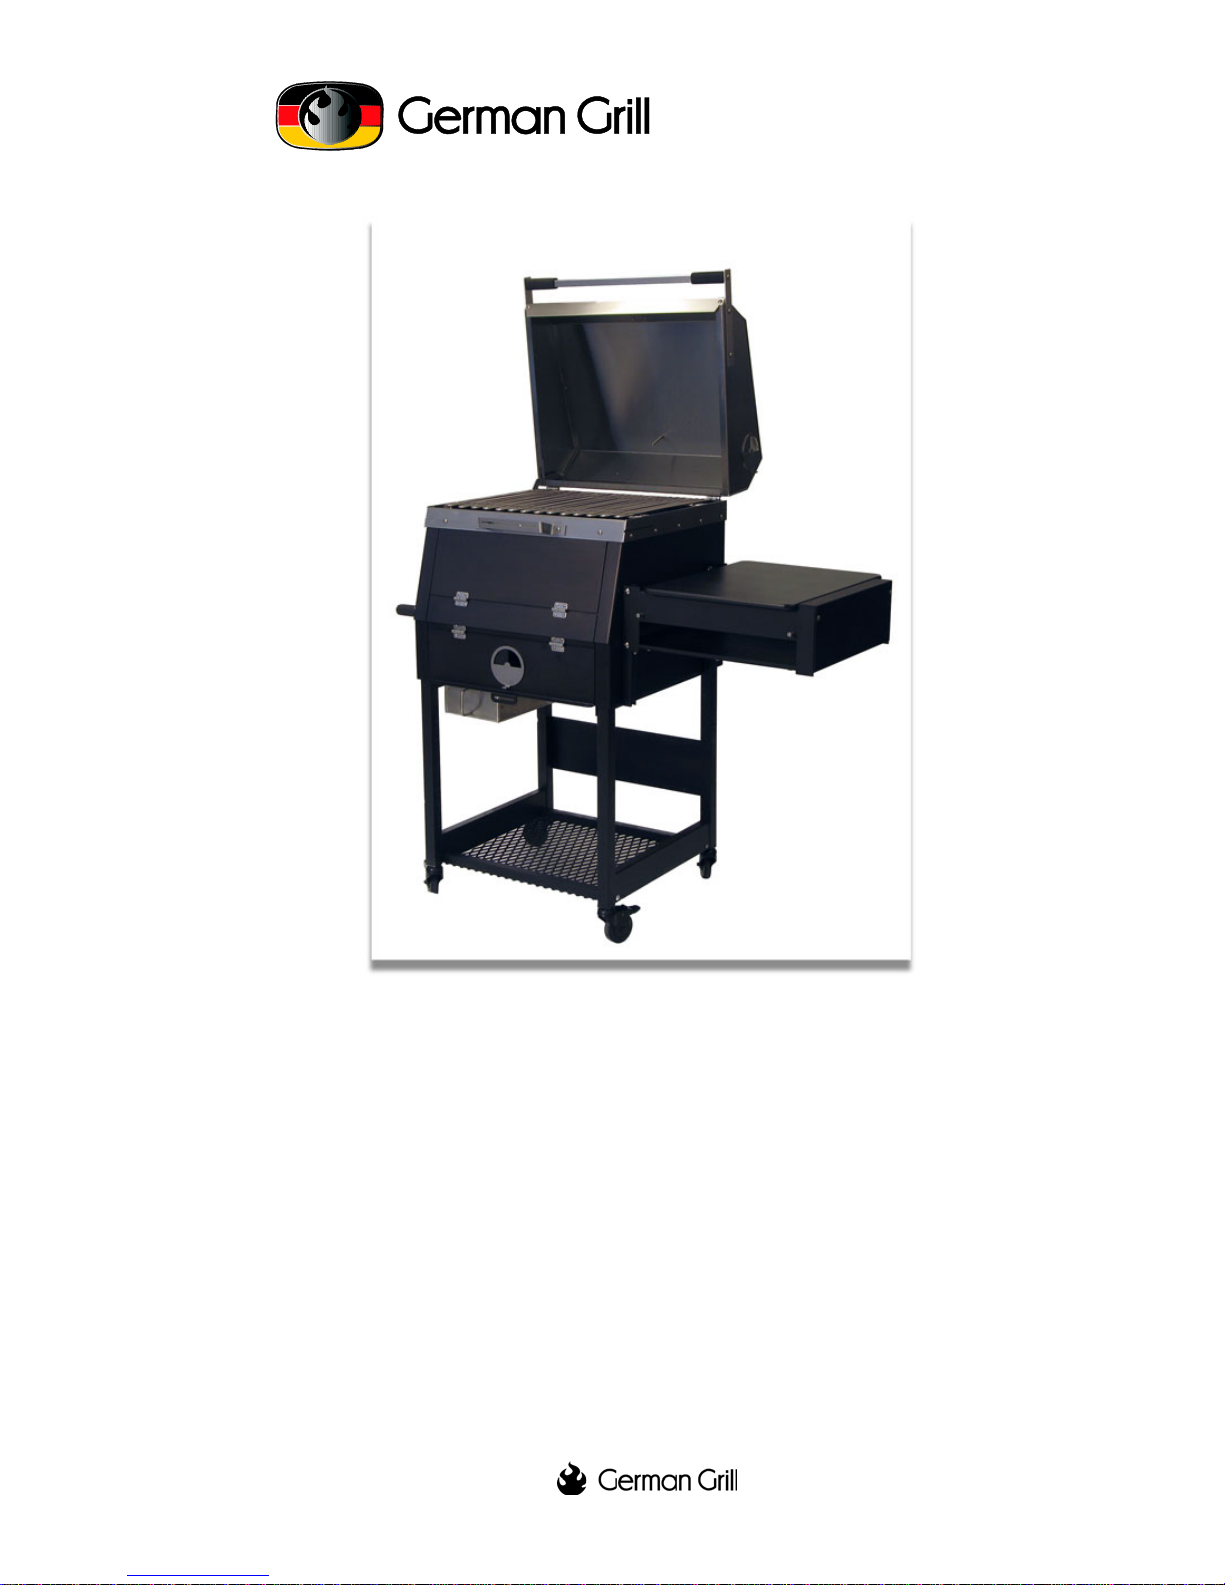
Assembly, Use and Maintenance
DO NOT OPERATE YOUR GRILL UNTIL YOU HAVE READ THIS GUIDE
505-00200 Rev A
B1 Charcoal Grill
2009-02
Page 2

Copyrights and Disclaimer
© 2009, German Grill LLC, All Rights Reserved
Information in this document is provided in connection with German Grill LLC (German
Grill) products as a service to our customers and may be used for information purposes
only. German Grill assumes no responsibility for errors or omissions in these materials.
German Grill may make changes to specifications and product descriptions at any time,
without notice. German Grill makes no commitment to update the information and shall
have no responsibility whatsoever for conflicts or incompatibilities arising from future
changes to its specifications and product descriptions.
No license, express or implied, by estoppels or otherwise, to any intellectual property
rights is granted by this document. Except as provided in German Grill’s Terms and
Conditions of Sale for such products, German Grill assumes no liability whatsoever.
THESE MATERIALS ARE PROVIDED AS IS WITHOUT WARRANTY OF ANY
KIND, EITHER EXPRESSED OR IMPLIED, RELATING TO SALE AND/OR USE OF
GERMAN GRILL PRODUCTS INCLUDING LIABILITY OR WARRANTIES
RELATING TO FITNESS FOR A PARTICULAR PURPOSE, CONSEQUENTIAL OR
INCIDENTAL DAMAGES, MERCHANTABILITY, OR INFRINGEMENT OF ANY
PATENT COPYRIGHT OR OTHER INTELLECTUAL PROPERTY RIGHT.
GERMAN GRILL FURTHER DOES NOT WARRANT THE ACCURACY OR
COMPLETENESS OF THE INFORMATION, TEXT, GRAPHICS OR OTHER ITEMS
CONTAINED WITHIN THESE MATERIALS. GERMAN GRILL SHALL NOT BE
LIABLE FOR ANY SPECIAL, INDIRECT, INCIDENTAL, OR CONSEQUENTIAL
DAMAGES, INCLUDING WITHOUT LIMITATION, LOST REVENUES OR LOST
PROFITS, WHICH MAY RESULT FROM THE USE OF THESE MATERIALS.
German Grill products are not intended for use in medical, lifesaving or life sustaining
applications. German Grill customers using or selling German Grill products for use in
such applications do so at their own risk and agree to fully indemnify German Grill for
any damages resulting from such improper use or sale.
German Grill is a trademark of German Grill LLC.
Product names or services listed in this publication are for identification purposes only,
and may be trademarks of third parties. Third-party brands and names are the property of
their respective owners.
German Grill believes the printed matter contained herein to be accurate from date of
publication and reserves the right to make changes as necessary without notice
Reader Response: German Grill strives to produce quality documentation and welcomes
your feedback. Please send comments and suggestions to [email protected]
technical questions, visit our website or call us toll free at (888) 261-5740.
. For
Page 3

Table of Contents
1. SAFETY & GENERAL INFORMATION .................................................. III
1.1. Table of Precautions ........................................................................ iii
1.2. Table of Warnings ........................................................................... iv
1.3. Table of Dangers .............................................................................. v
1.4. Warranty ....................................................................................... vi
1.5. Patents and Trademarks .................................................................. vi
2. OVERVIEW ......................................................................................... 2
2.1. The grilling system .......................................................................... 2
3. THE MECHANICAL COMPONENTS ........................................................ 3
3.1. Cover ............................................................................................ 3
3.2. Cooking grate ................................................................................. 3
3.3. Coal basket .................................................................................... 4
3.4. Front access door ............................................................................ 4
3.5. Vents ............................................................................................ 5
3.6. Ash Pan ......................................................................................... 5
3.7. Paper door, grate, and starter chimney .............................................. 6
3.8. Lift arm and handle ......................................................................... 6
3.9. Firebox .......................................................................................... 6
4. OPERATING INSTRUCTIONS ............................................................... 8
4.1. Theory of the grill ........................................................................... 8
4.2. Lighting the charcoal ....................................................................... 9
4.3. Controlling the heat ........................................................................ 11
4.4. Two-zone grilling ........................................................................... 12
4.5. Grilling for a crowd. ........................................................................ 13
4.6. "Barbecuing" ................................................................................. 14
4.7. Grilling, Barbecuing, Smoking, and Broiling: ...................................... 14
5. MAINTENANCE ................................................................................. 16
5.1. Cleanup ........................................................................................ 16
5.2. Major overhaul .............................................................................. 16
Page 4

FligħtTransport Installation Guide
Safety & General Information
Contacting German Grill
Offices
Sales/Service: 5833 Ewing Ave S, Edina, MN 55410
Shop: 1511 Marshall St NE, Minneapolis, MN 55413
Customer Support
Toll Free US: .......................... (888) 261-5740
International: ................... +1 (952) 920-9965
Fax: ................................ +1 (952) 513-4675
Website: ............................... www.GermanGrill.com
Email: ................................... [email protected]
1. Safety & General Information
The following symbols are used in this manual to indicate instructions that require special attention:
Exercise caution when you see this symbol. It indicates actions that
could be harmful to the user or to the equipment.
!
Caution
Warning
Danger
Observe Standard Precautions
All persons having access to this equipment must observe all standard precautions as
defined in national statutory health and safety legislation.
1.1. Table of Precautions
!
!!
Caution
Caution
Exercise extreme caution when you see this symbol. It indicates
safety tips, general cautions and actions that can cause injury or
damage.
Follow the instructions carefully. If you do not follow danger
warnings you will expose yourself and others to serious injury or
you may cause damage to property.
Be sure the ash pan is in place when using the grill. The pan
!
!
will seal the grill properly to control airflow, and will prevent
hot coals and ash from falling through.
Don’t use sharp objects, power tools or metal cleaning
abrasives to clean the grates, the outside of the grill, or to
scrape the insides clean. This will scratch the surface and
may cause it to rust over time.
Page 5
Get someone else to help you when you assemble or move
!
Caution
!
Caution
!
Caution
the grill. Some of the components are heavy and awkward
for one person to handle. We don’t want you to hurt yourself
or damage the equipment.
Open the cover when you light the charcoal. The cover
should be open and the cooking grate should be flipped up or
completely removed while the charcoal is lighting.
Burn one large load of charcoal in your new grill before you
attempt to cook any food. The ceramic coating will outgas as
it heats up the first time, and will impart a bad taste to food.
1.2. Table of Warnings
To control a flare up (grease fire) place the lid on the grill.
!
Warning
!
Warning
Do not attempt to pour water on the fire. A squirt bottle will
usually work for very small fires, but the easiest method is
simply to close off the oxygen supply by closing both air
vents and lowering the lid.
Always put the charcoal in the coal basket and do not place
it directly in contact with the bottom of the grill. The
charcoal will not burn properly unless there is airspace under
it, and the intense heat may corrode the grill and shorten its
life.
!
Warning
!
Warning
!
Warning
!
Warning
!
Warning
!
Warning
Never touch the grill to test if it is hot. Assume that the
entire grill is hot whenever it is in use.
Never place combustible materials (for example, paper
plates, oven mittens, plastic bottles) on the cover of the grill
or near the firebox when the grill is lit.
Use long handled tools to tend the grill. You may get burned
if you use standard kitchen utensils. Grills generate much
more heat than conventional stoves.
Protect your hands with oven mitts or heat resistant gloves
to be safe. Welder’s gloves are inexpensive and work great!
Use reasonable precautions at all times when cooking or
cleaning your grill. There should always be someone in
attendance while the grill is lit.
Watch children and pets so they do not burn themselves as
they move or play near the grill. Place the grill in an area
where people will not be forced to walk around it.
Page 6
FligħtTransport Installation Guide
1.3. Table of Dangers
!!
Danger
!!
Danger
!!
Danger
!!
Danger
!!
Danger
!!
Danger
!!
Danger
!!
Danger
!!
Danger
Safety & General Information
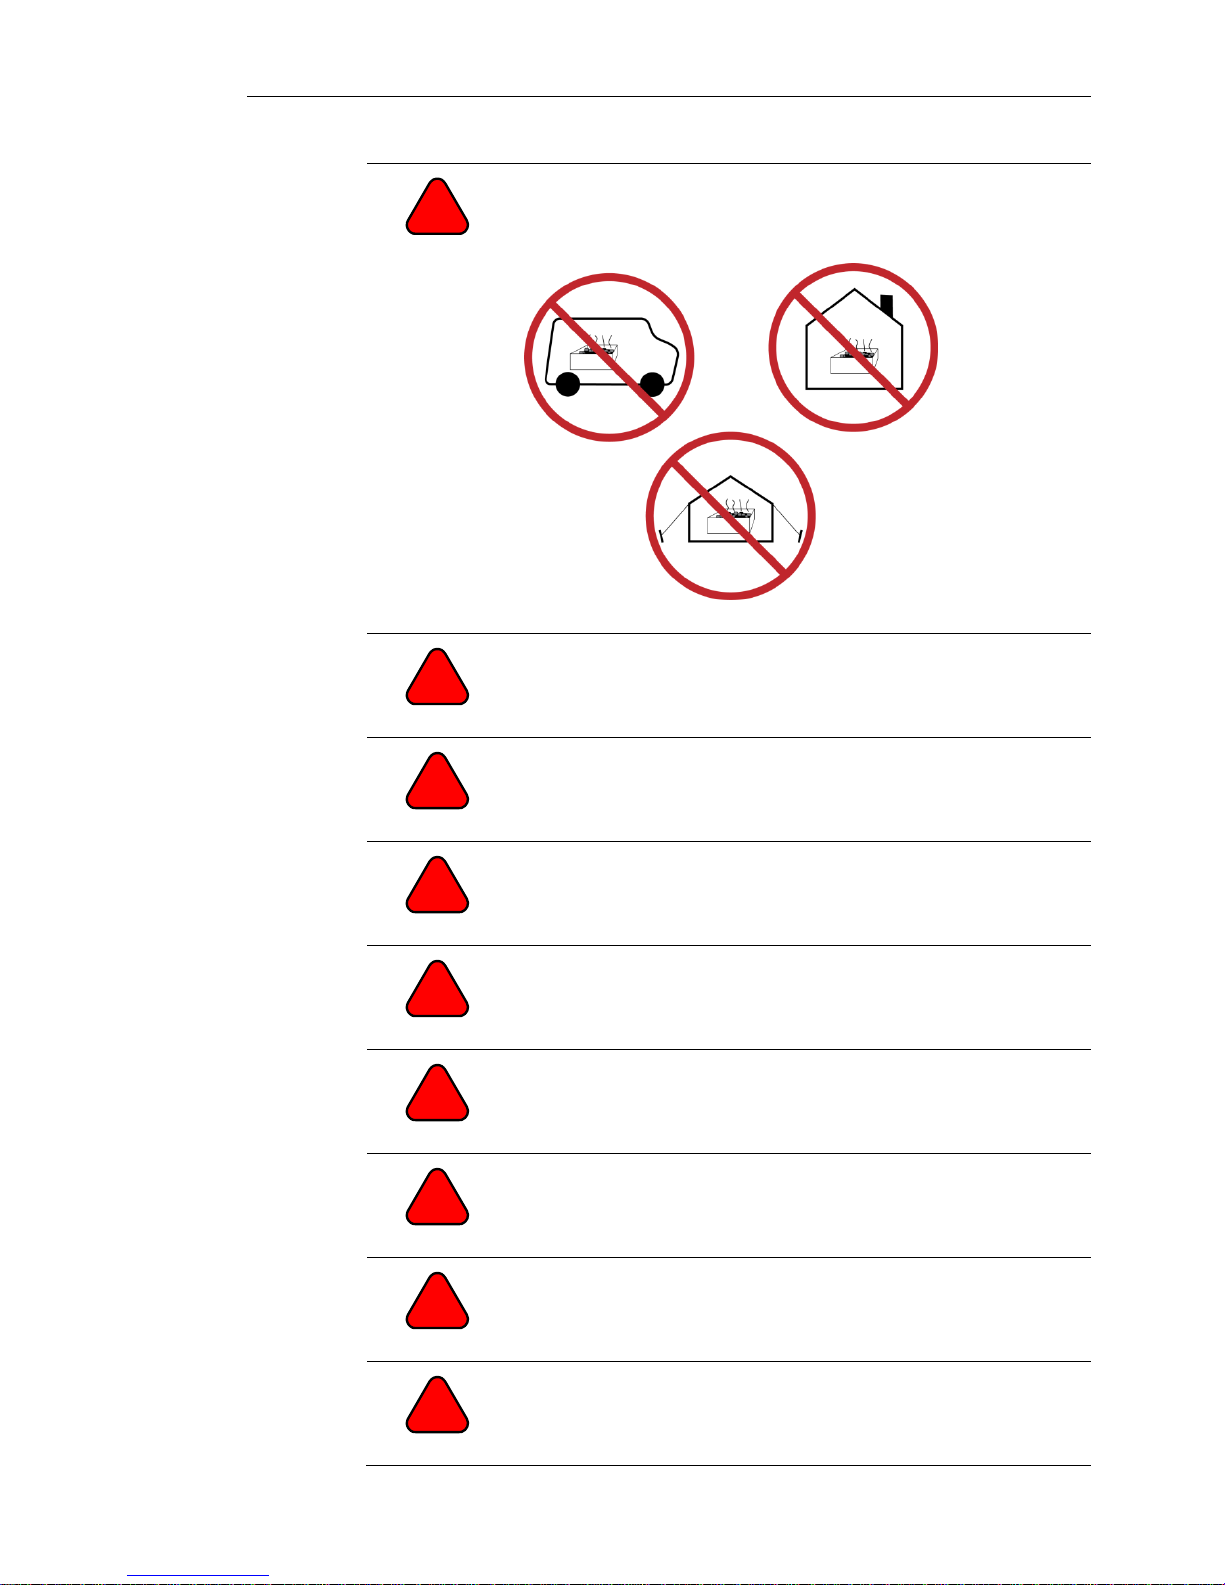
Never, ever, (EVER!) use a charcoal grill indoors or in any
enclosed space. The fumes from the burning charcoal can
make you very ill or even kill you if they build up to high
levels. Do not use the grill indoors for cooking or heating.
Do not use gasoline, alcohol, paint thinner or any flammable
liquid to start the charcoal. Keep flammable liquids 20 feet
away from the grill with the cap tightly in place in case they
are accidentally tipped over.
Do not add starter fluid or any flammable liquid to a fire that
is already lit. Do not add charcoal that has been soaked in
lighter fluid to a lit fire. If you need more charcoal, simply
add the briquettes on the lit fire and they will light quickly.
Do not use or attempt to light the grill in extremely strong
winds. Find a sheltered spot in the lee of a building or other
structure. Hot ashes and live sparks can blow out of the grill
in extreme winds.
Do not move the grill while it is hot—it may tip and spill hot
coals, and you may burn yourself or others. If the grill is hot,
leave it where it is until it is cold. Let the grill cool completely
before you put the vinyl cover on.
Do not use the grill within three feet (one meter) of
combustible materials such as a wood, paper, cloth or
plastic. Do not bring combustible materials within three feet
of the grill.
Do not remove the spent ashes until they are completely
stone cold and out. It may take several hours for all of the
charcoal to burn out. When in doubt, clean the grill the
following day.
Do not use the grill in extremely high winds. Live coals or
sparks could blow out of the grill and cause fire or other
damage.
Never dump hot coals where they may be a fire hazard or
where someone might step on them.
Page 7

1.4. Warranty
German Grill warrants this product against faulty materials or workmanship for two years
under the terms of our current Standard Warranty and Support Agreement provided that
the product was purchased directly from us or from one of our authorized resellers. Please
contact German Grill Customer Service or go to our website
www.germangrill.com/support/downloads for additional information or to obtain a copy
of the Warranty Agreement.
1.5. Patents and Trademarks
German Grill is a registered trademark. Patents are pending on all technologies used in
this grill.
Page 8

2. Overview
2.1. The grilling system
The grill is designed to solve the three biggest issues most people have with using charcoal for grilling:
lighting, adjusting the heat, and cleaning up.
Lighting the charcoal. You light the charcoal (or wood) with no smelly starter fluid, no red hot
chimneys, or any other crude methods. You light the fire with a few sheets of newspaper. The hardware
and the process are designed into the grill. Your charcoal lights faster than with chimneys or starter
fluids. You can light a 100 briquette load in about 15 minutes—and 100 briquettes is a VERY hot, longlasting fire! (By comparison, a kettle grill typically holds less than half that amount of charcoal.) But
you don't have to use a large load—and less charcoal lights even faster. So your live fire is ready in
about the same time it takes to heat up a gas grill. If you're in a hurry, add more loads of newspaper and
give it another boost of heat. As you stuff in more paper, it lights itself from the hot coals above and you
are ready even sooner.
You control the heat and the fire. Once you've got heat, you can instantly raise and lower the charcoal
fire from extreme sear to slow-cook. You adjust a live charcoal flame with a simple handle just like you
adjust a gas flame with a knob. The variable heat gives you more options for different foods and
different techniques. The live fire, smoke, and coals give you intense flavors.
Cleanup. The grill has a lot of moving parts, but you don't have to touch anything dirty or greasy. So
you stay clean while cooking. The functions from lighting through cleanup have been thought through
to keep you from getting dirty as you use the grill. Grill cleanup is easy. All ash, coals and general
messiness falls into a removable pan at the bottom. All internal surfaces are flat so they are easy to
scrape clean. And we include a custom tool designed to work with the grate and the firebox for cleanup.
It's all about the process. From lighting—to grilling—to cleanup: Process will set you free!
2
505-00100 Rev A
Page 9
3
3. The mechanical components
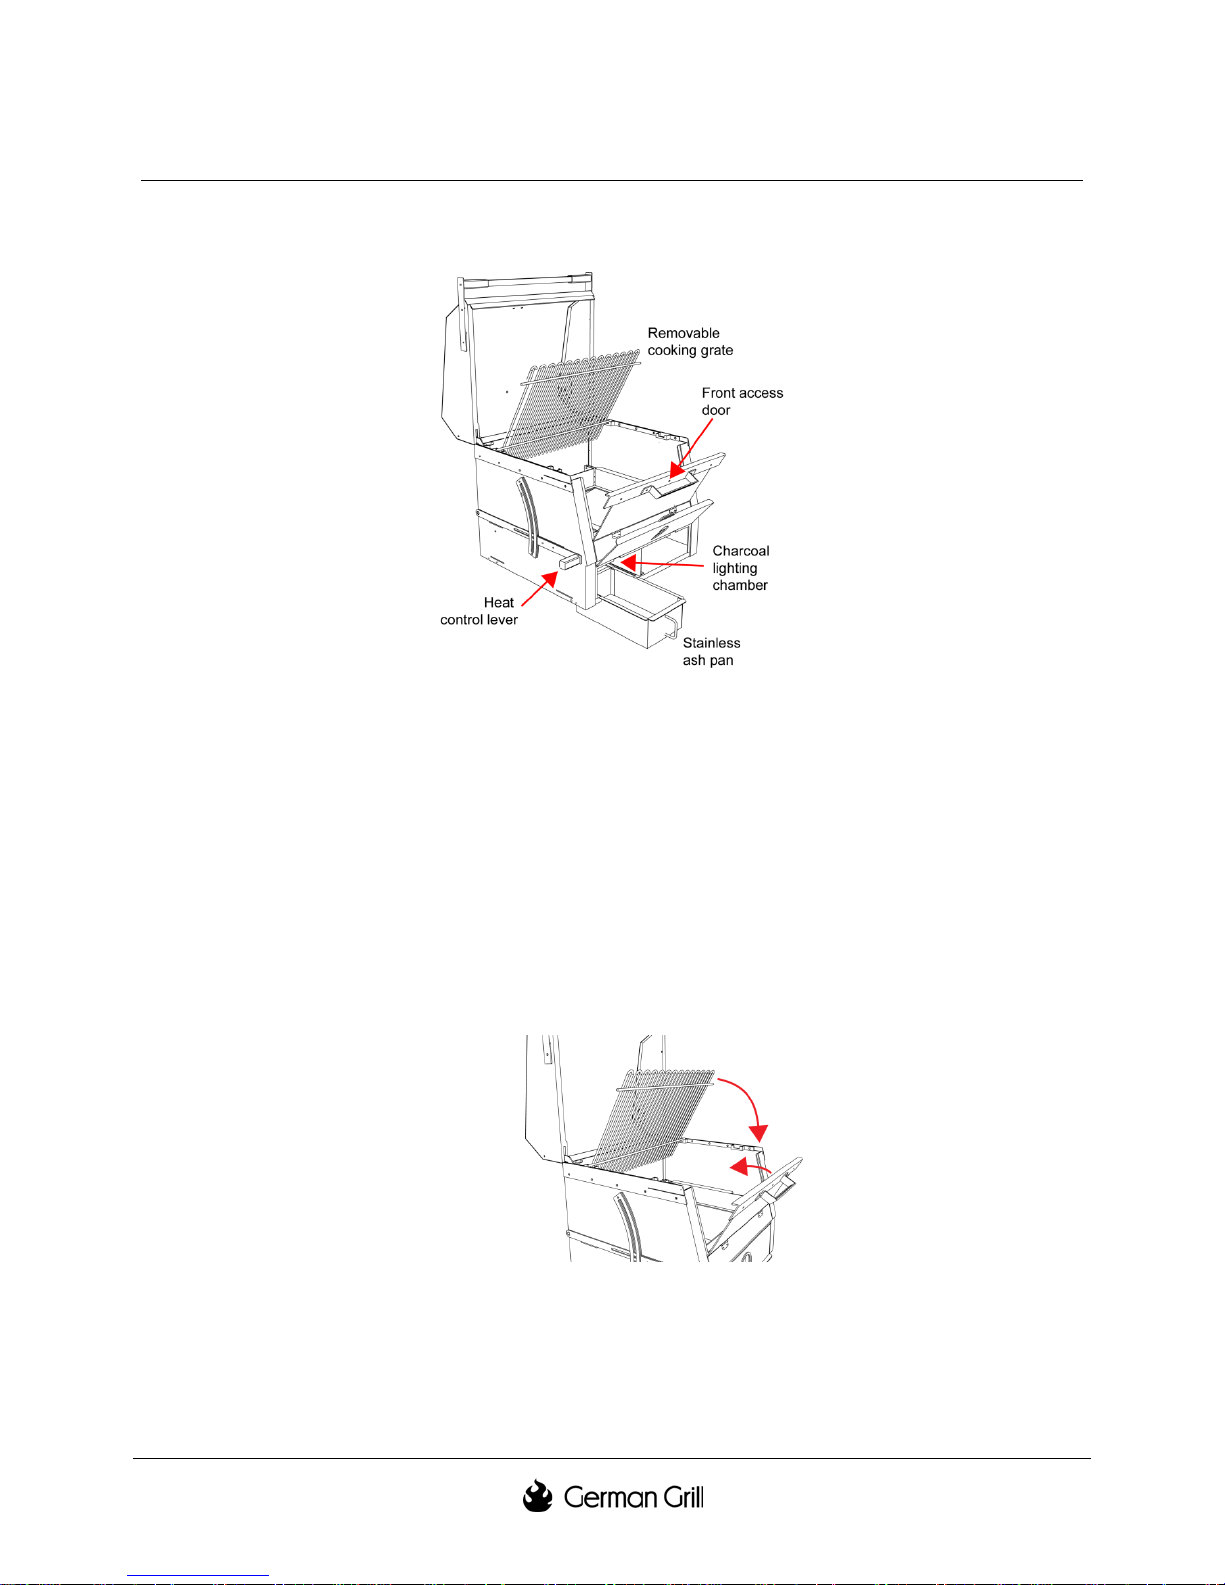
Your grill is an engineered system of components. Here are diagrams of these components with their
functions explained:
Figure 3-1: Major components of the grill
3.1. Cover
The cover is hand-finished stainless steel with a large vent to control airflow while barbecuing. The
professional quality 750° F cooking thermometer is inserted into a collet in the top of the cover and the
stem extends into the cooking chamber to give an accurate temperature reading. The thermometer
should be removed during periods of long storage to extend its useful life.
3.2. Cooking grate
The cooking grate is hand-welded stainless. It has two hinge pins on the rear that drop into the slotted
brackets and pins on the front that support it in use. It’s easiest to open the front access door before you
lower the cooking grate into position. This will prevent pinching your fingers.
Figure 3-2: Open the front door before you lower the cooking grate.
505-00100 Rev A
Page 10
Warning
Warning
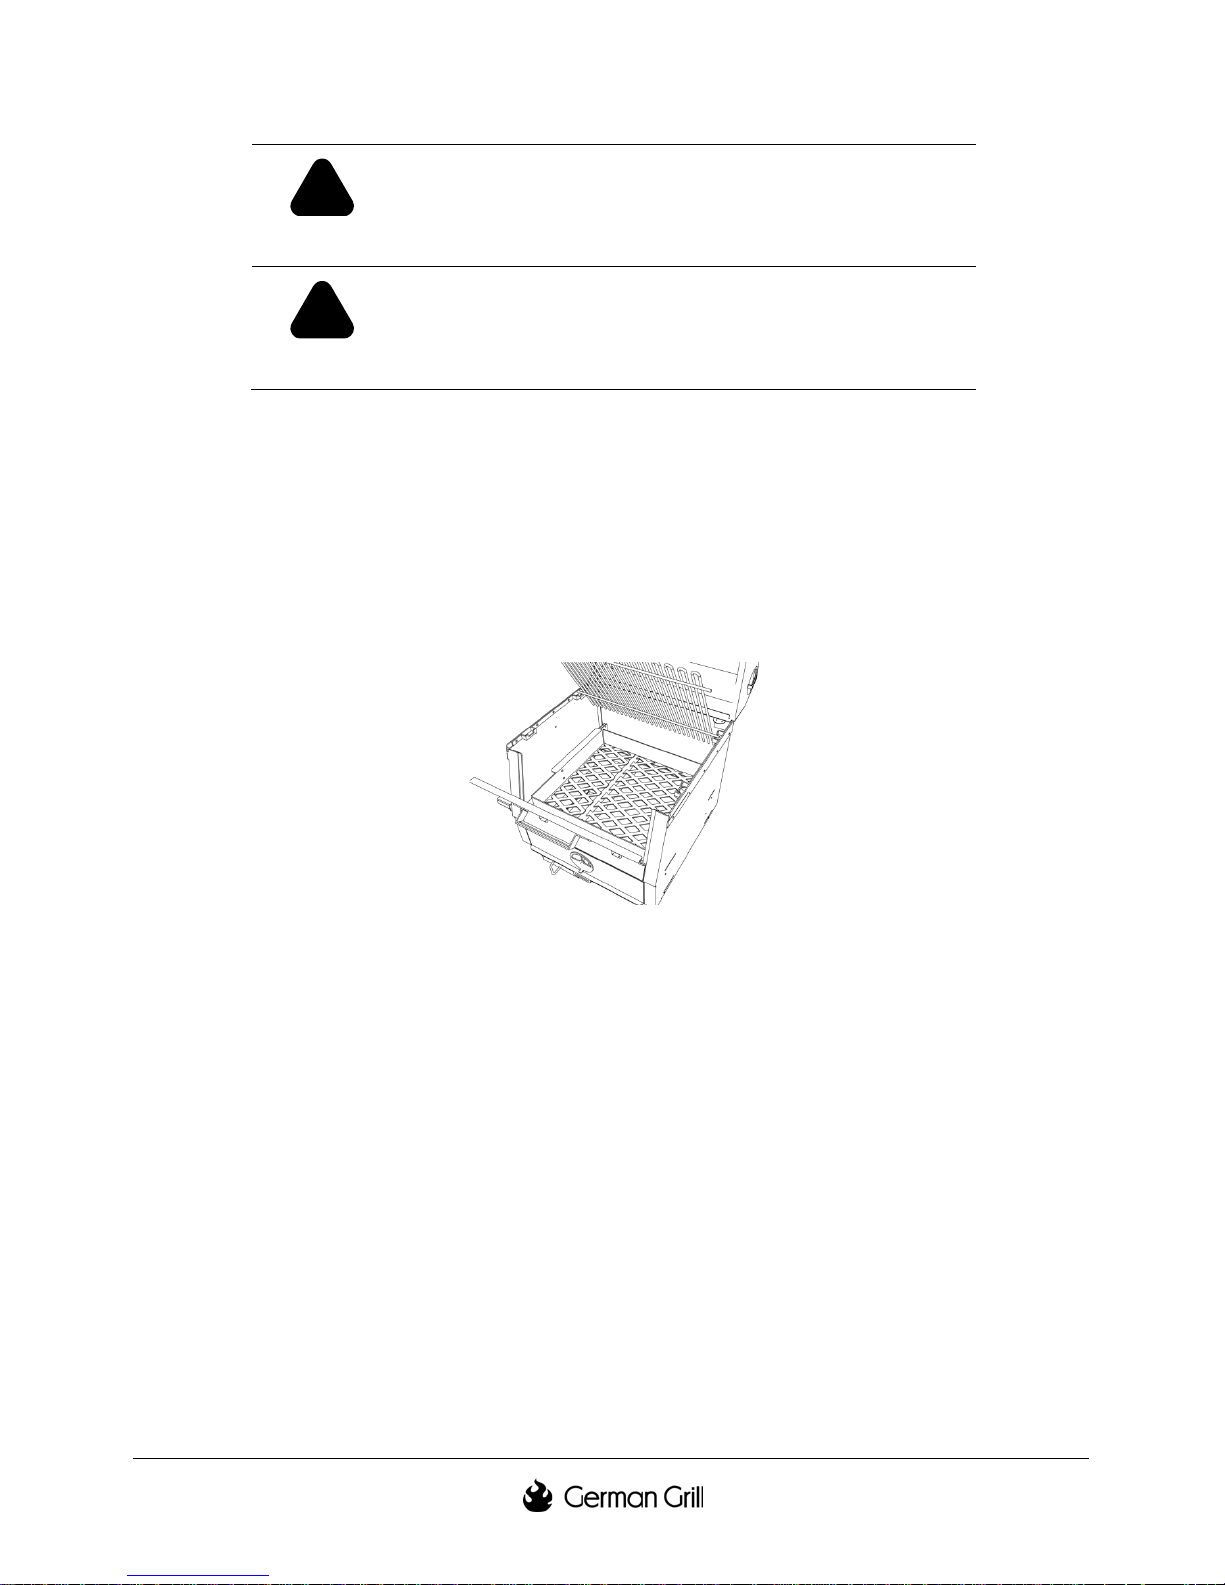
3.3. Coal basket
The coal basket holds the live charcoal fire and can be raised and lowered. It also insulates the coals
from direct contact with the firebox. The chamber formed at the left side of the ash pan is engineered to
light the charcoal quickly by funneling all of the heat energy from the burning paper in the starter
chimney directly through the charcoal. Push the lift arm all the way down when you light the charcoal.
It will light most efficiently if the coal basket is solidly down on the bottom of the firebox.
The two coal grates are replaceable parts and are not painted or finished because there is no finish that
will stand up to the heat. The grates are made of thick steel and will last for many years. If yours should
rust through, just contact us and we’ll send you a new one at no charge.
Never drop the cooking grate from its upright position. Lower
!
!
it slowly. The grate is heavy. If you drop it on your fingers
you can hurt yourself.
Remember to lower the cooking grate into position before
you try to close the grill cover. It makes a terrible noise if
you do it the other way.
Figure 3-3: Coal basket with removable grates
3.4. Front access door
You can open the front access door at any time—even while you are barbecuing. The door has a friction
fit latch that does not require any adjustment.
TIP: You can look up through the access door to see the bottom of the food on the grill to check that it’s
ready to turn.
4
505-00100 Rev A
Page 11
5
3.5. Vents
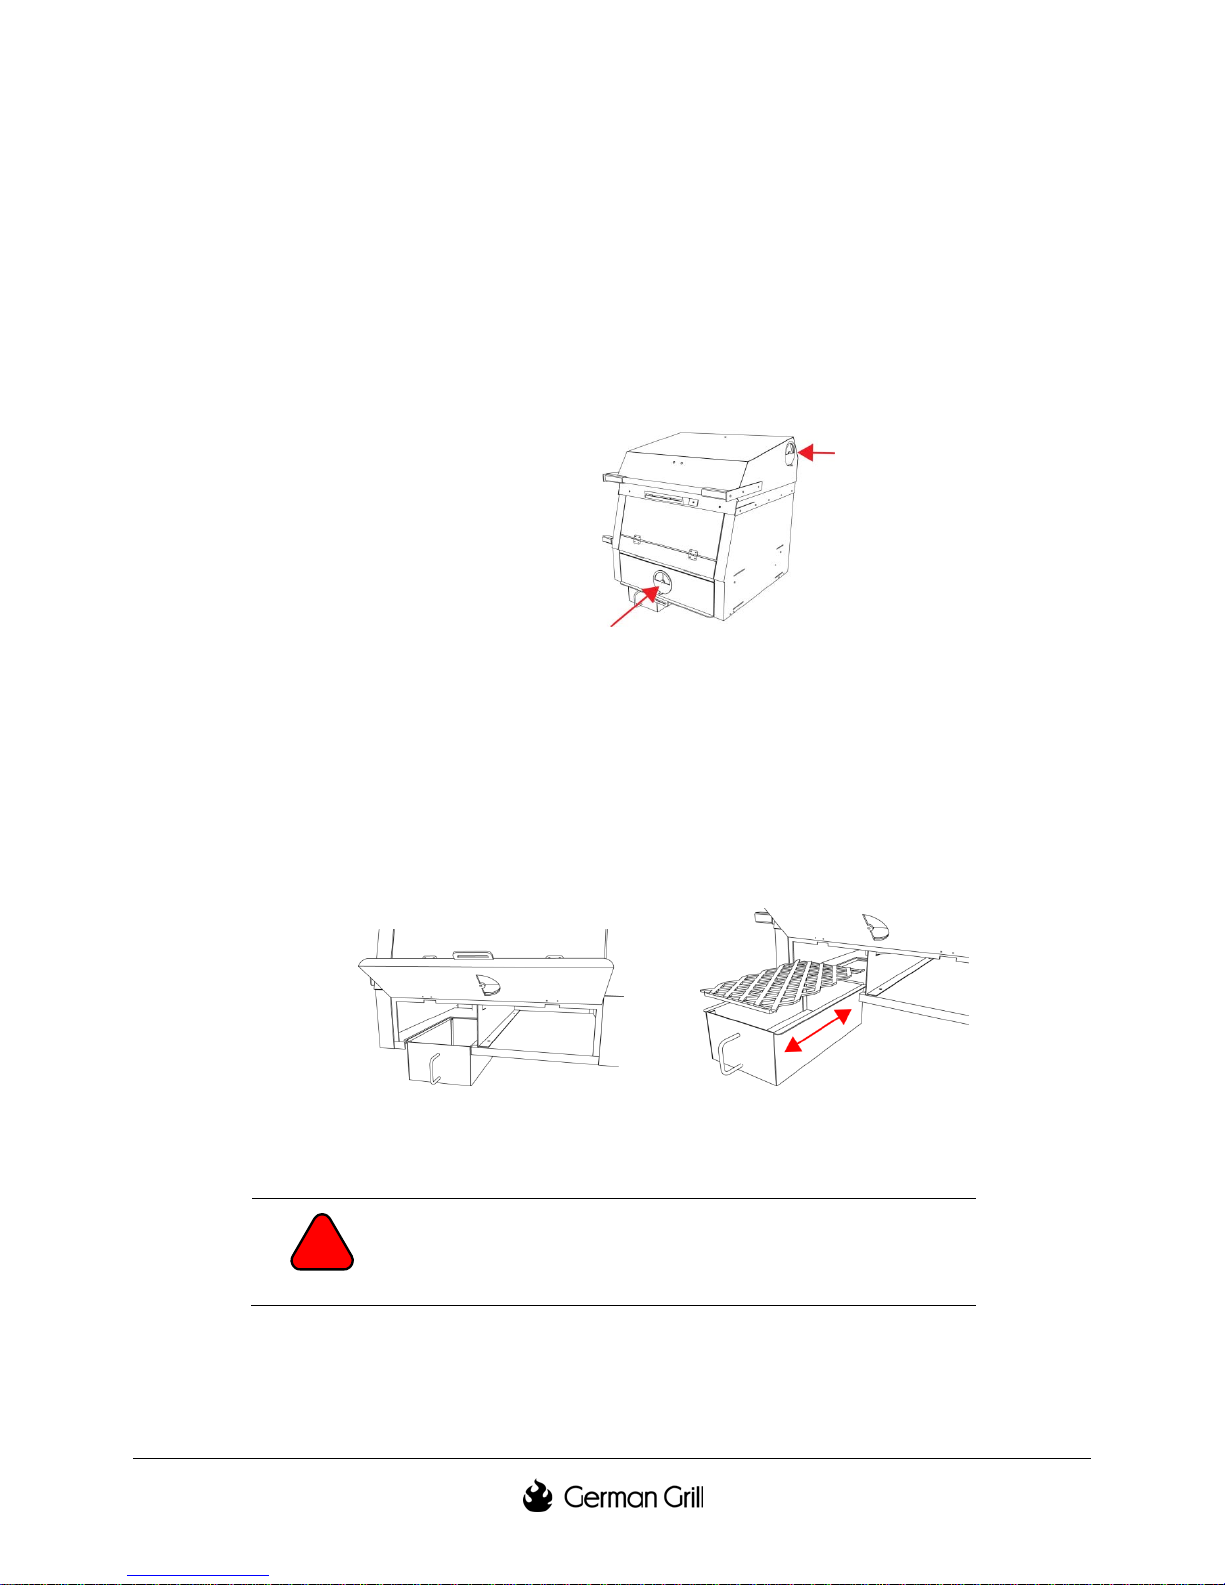
The lower vent controls the convective heat transfer and airflow past the food. The top vent has much
less affect on this than the lower vent. It is more effective to control the incoming supply of air, not the
rate that it exhausts through the top. Close both vents to extinguish the charcoal for reuse. Close both
vents to prevent water from entering the grill. (We highly recommend that you purchase a vinyl cover to
extend the life of your grill, especially if you live in a coastal area.) The top vent is large enough to get a
look at the food in the grill without opening the cover.
Figure 3-4: Vents to control the heat
3.6. Ash Pan
The ash pan collects all spent ashes, burned bits and other crud from the grilling process. It is solid
stainless steel and has a handle for easy dumping. The pan does not hold water. This is by design, so
that you don’t get a pan full of water and mud in the event that rain gets into the grill.
ALWAYS make sure that there are no live coals or hot ashes in the pan before you dispose of the
contents. Coals can stay hot for many hours if they are buried deeply and insulated by the dry ash in the
pan. We have burned up several paper charcoal bags by dumping what we thought were spent coals into
them. This can be a very hazardous situation. Be careful!
!!
Danger
Figure 3-5: Removable ash pan with paper grate
Never dump hot coals where they may be a fire hazard or
where someone might step on them. Do not use a paper bag
to dispose of the ashes.
505-00100 Rev A
Page 12
3.7. Paper door, grate, and starter chimney
This is the key to lighting your charcoal inside the grill. After you lower the coal basket and add your
charcoal, place crumpled newspaper into the lighting chimney through this door. Light the paper with a
match or lighter and your charcoal will be hot in 15 or so minutes. If you are in a hurry, keep adding
paper to supply another boost of heat to the charcoal.
3.8. Lift arm and handle
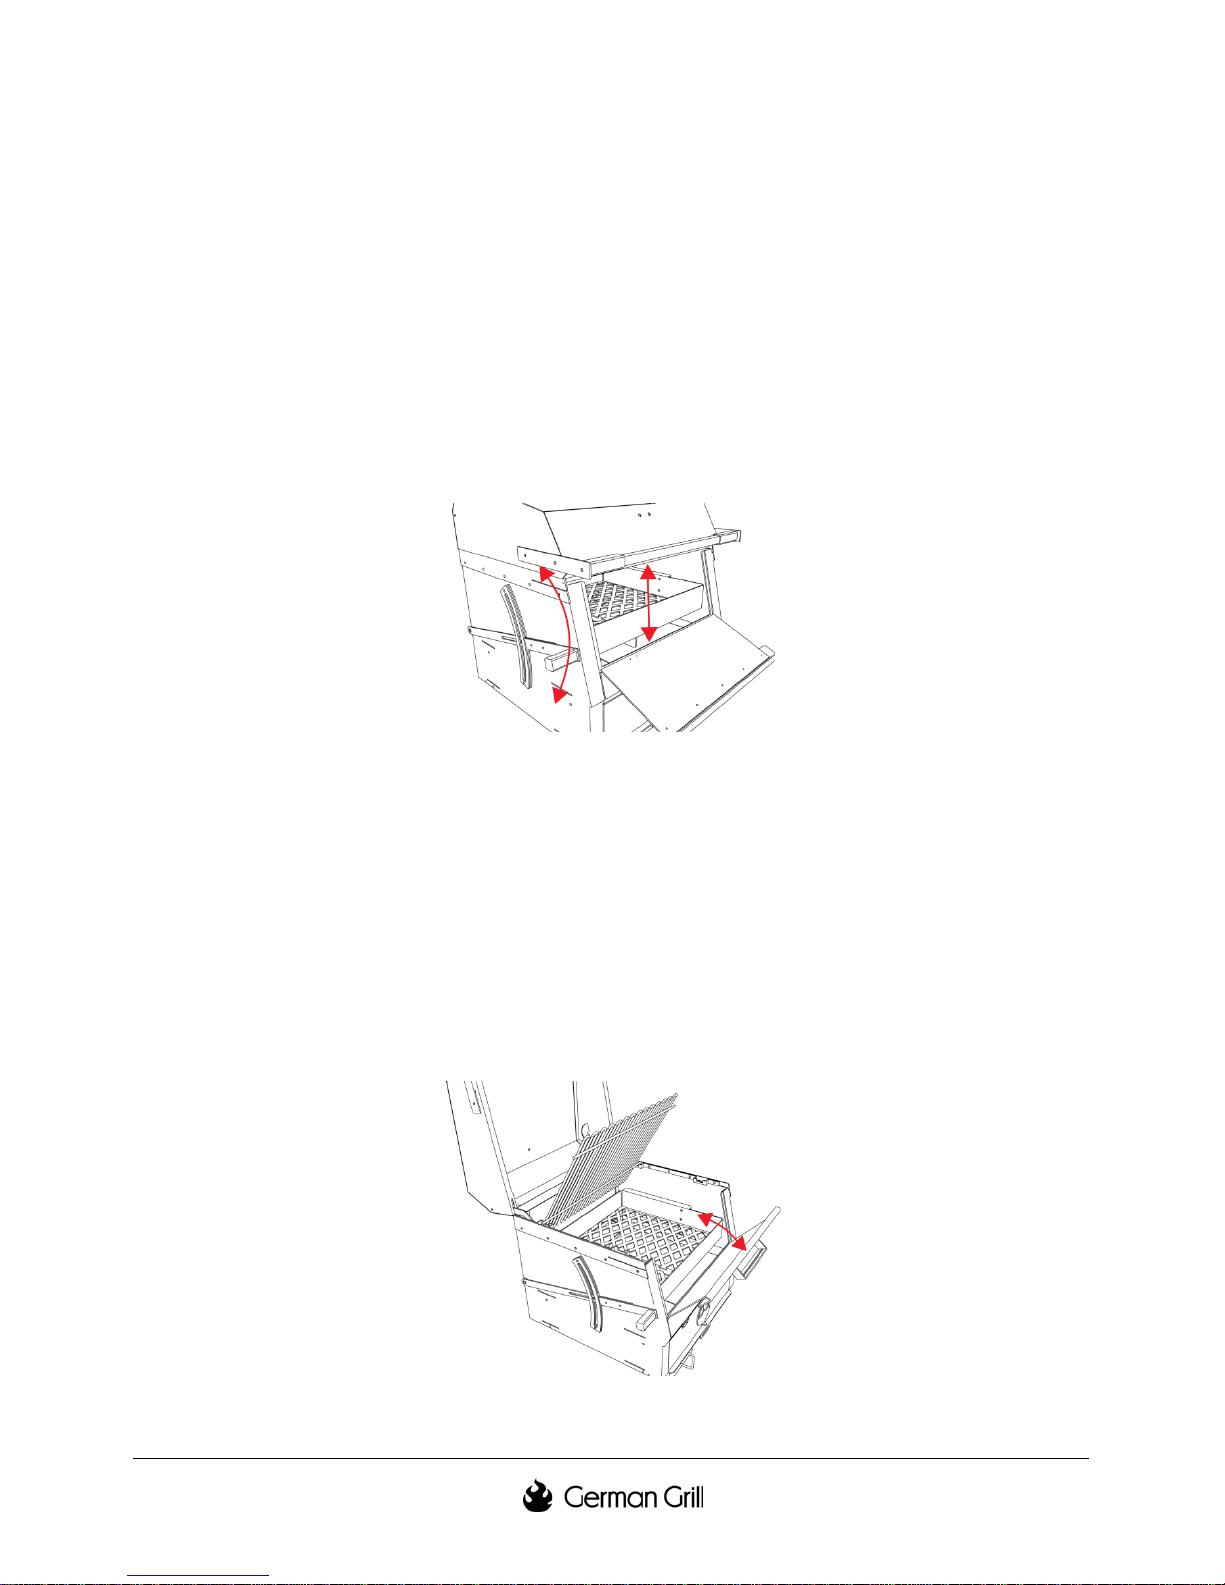
The lift arm is used to raise and lower the coal basket inside the grill. The lift arm has a custom spring
that will offset most of the effort of raising and lowering. The lift handle can be adjusted to increase or
decrease the friction against the plate. Most people prefer the tension adjusted so that the coal basket
remains in position wherever you release the handle.
Figure 3-6: Lift handle raises and lowers the charcoal fire
3.9. Firebox
The firebox is the main assembly of the grill and all parts mount to it. It is coated with a high
temperature ceramic based paint that heat cures and becomes very durable as the grill is fired up.
The coating on the firebox will smoke the first time the grill is lit. Do not cook food on the grill until
you have fired up a full load of 100 coals at least once. The ceramic paint on the firebox must be heated
to 600° F in order to bond to the metal and form a tough coating. There may also be a fine coating of oil
and polishing compounds on some parts. This will also burn off with the first firing.
Though the firebox is not in direct contact with the coals, and does not become extremely hot, it is
certainly hot enough to burn you if you touch it while the grill is in use. Be careful. Watch your children
and pets while the grill is hot.
Figure 3-7: Front access door can be opened at any time
6
505-00100 Rev A
Page 13

7
Burn a full load of charcoal in your new grill before you cook
!
Caution
any food on it. This will set the ceramic coating and burn off
any oil or residue from the manufacturing process.
505-00100 Rev A
Page 14

4. Operating Instructions
4.1. Theory of the grill
Grilling, at its most fundamental level, is simply trying to control the transfer of heat from charcoal to
food. But this happens in a very complex way because of the interaction of fire, smoke, hot air and hot
metal. There are three types of heat transfer going on: radiant heat (hold your hand anywhere around
the coals and feels the heat), convective heat (feel the hot air coming out of the vents) and conductive
heat (the sizzle when a cold steak hits hot steel).
• You can vary the distance from the fire in real time. (RADIANT) The charcoal fire is in a
steel basket that can be raised and lowered—from slow-cook to intense-sear. You control the
radiant heat using a simple lever. You don't have to move the food around, turn cranks, or
move the grate to a different level.
• You have access to create any size or pattern of fire. (RADIANT + CONVECTIVE) The
front of the grill opens wide—like a wood stove—so you can arrange your fire any way you
want. You can add (or subtract) coals, throw in wood chips, or move coals around to change
both the radiant and convective heat flow. You have clear access to the firebox without
touching your food or opening the top cover. (You can even look up through the bottom of the
grate and see if the steaks are ready to turn.) And when the meal is done, and the evening is
winding down, you can open it up and use the grill as a fireplace.
• You get oversize vents that are easy to operate. (CONVECTIVE) The vents control the
convective heat by changing the airflow past the food. Open for sear, closed for smoke. The
vents are easy to see and easy to operate because they are located on the sides and on the front.
• The grate is a large thermal mass that holds real heat. (CONDUCTIVE) When the food
hits this grate you get smoke and sizzle—conductive heat. You get deep, dark char marks that
are the signature of a fine cook using a fine tool.
8
505-00100 Rev A
Page 15
9
4.2. Lighting the charcoal
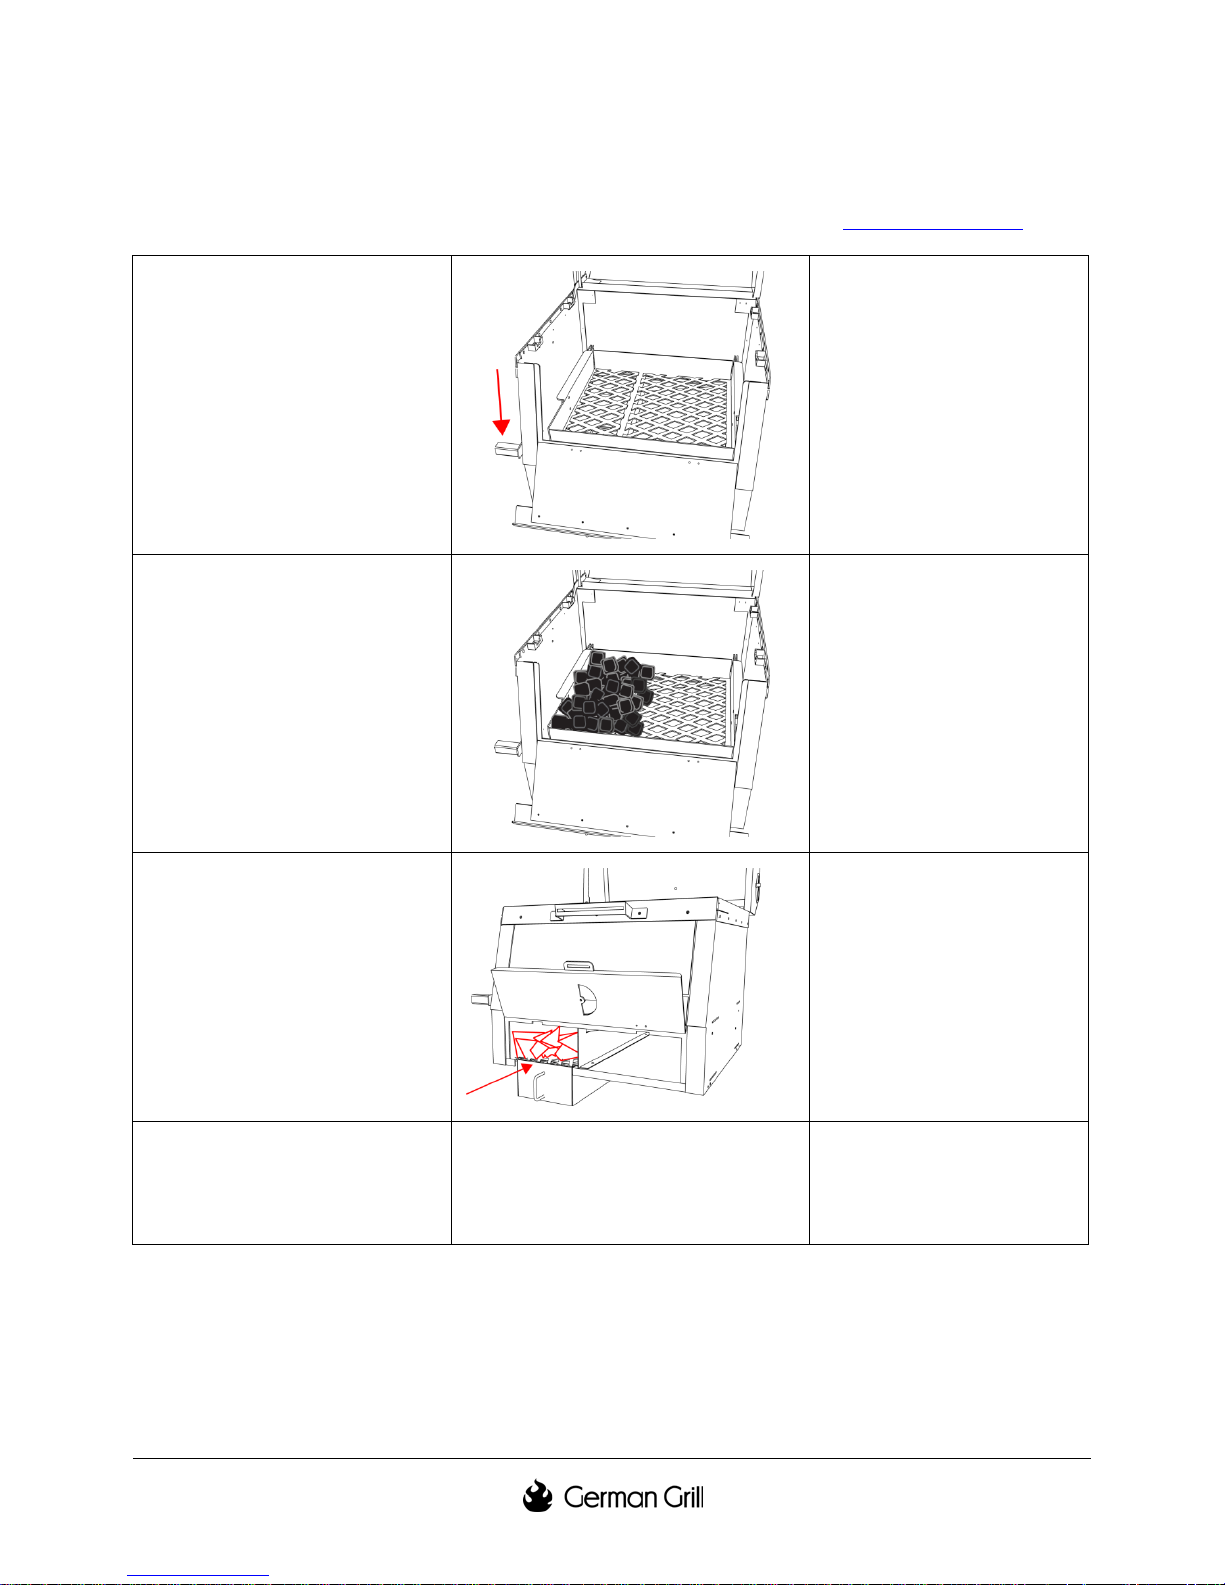
It is fast and easy to light the charcoal inside the grill. Follow these steps and you will be grilling in no
time. There is a short video explaining the lighting process on our website www.germangrill.com
1 Open the front access door,
remove the cooking grate, and
make sure the lift arm is
completely lowered.
3 Add the charcoal to the left
side of the coal basket.
The coal basket should be
resting fully on the bottom of
the grill in order to light the
charcoal quickly. We remove
the cooking grate simply
because it is easier to pour in
the charcoal. You can leave it
in place and it won’t hurt
anything.
How much do you need?
100+ chunks (left side full to
the top) to grill at high heat
with a single layer.
40-50 chunks to barbecue
(cover closed).
20-30 chunks to slow cook.
The most common mistake
with this grill is lighting too
much charcoal.
4 Add crumpled paper through
the door in the lighting
chimney.
00:00 ●●● 00:15
Five or six sheets. Make sure
that the paper is evenly
distributed and loosely
crumpled so it will burn hotter
with less smoke. If the light is
uneven, or you want to speed
things up, simply add a few
more sheets of paper.
The lighting time varies with
humidity and temperature, but
is usually 15 minutes or less.
505-00100 Rev A
Page 16
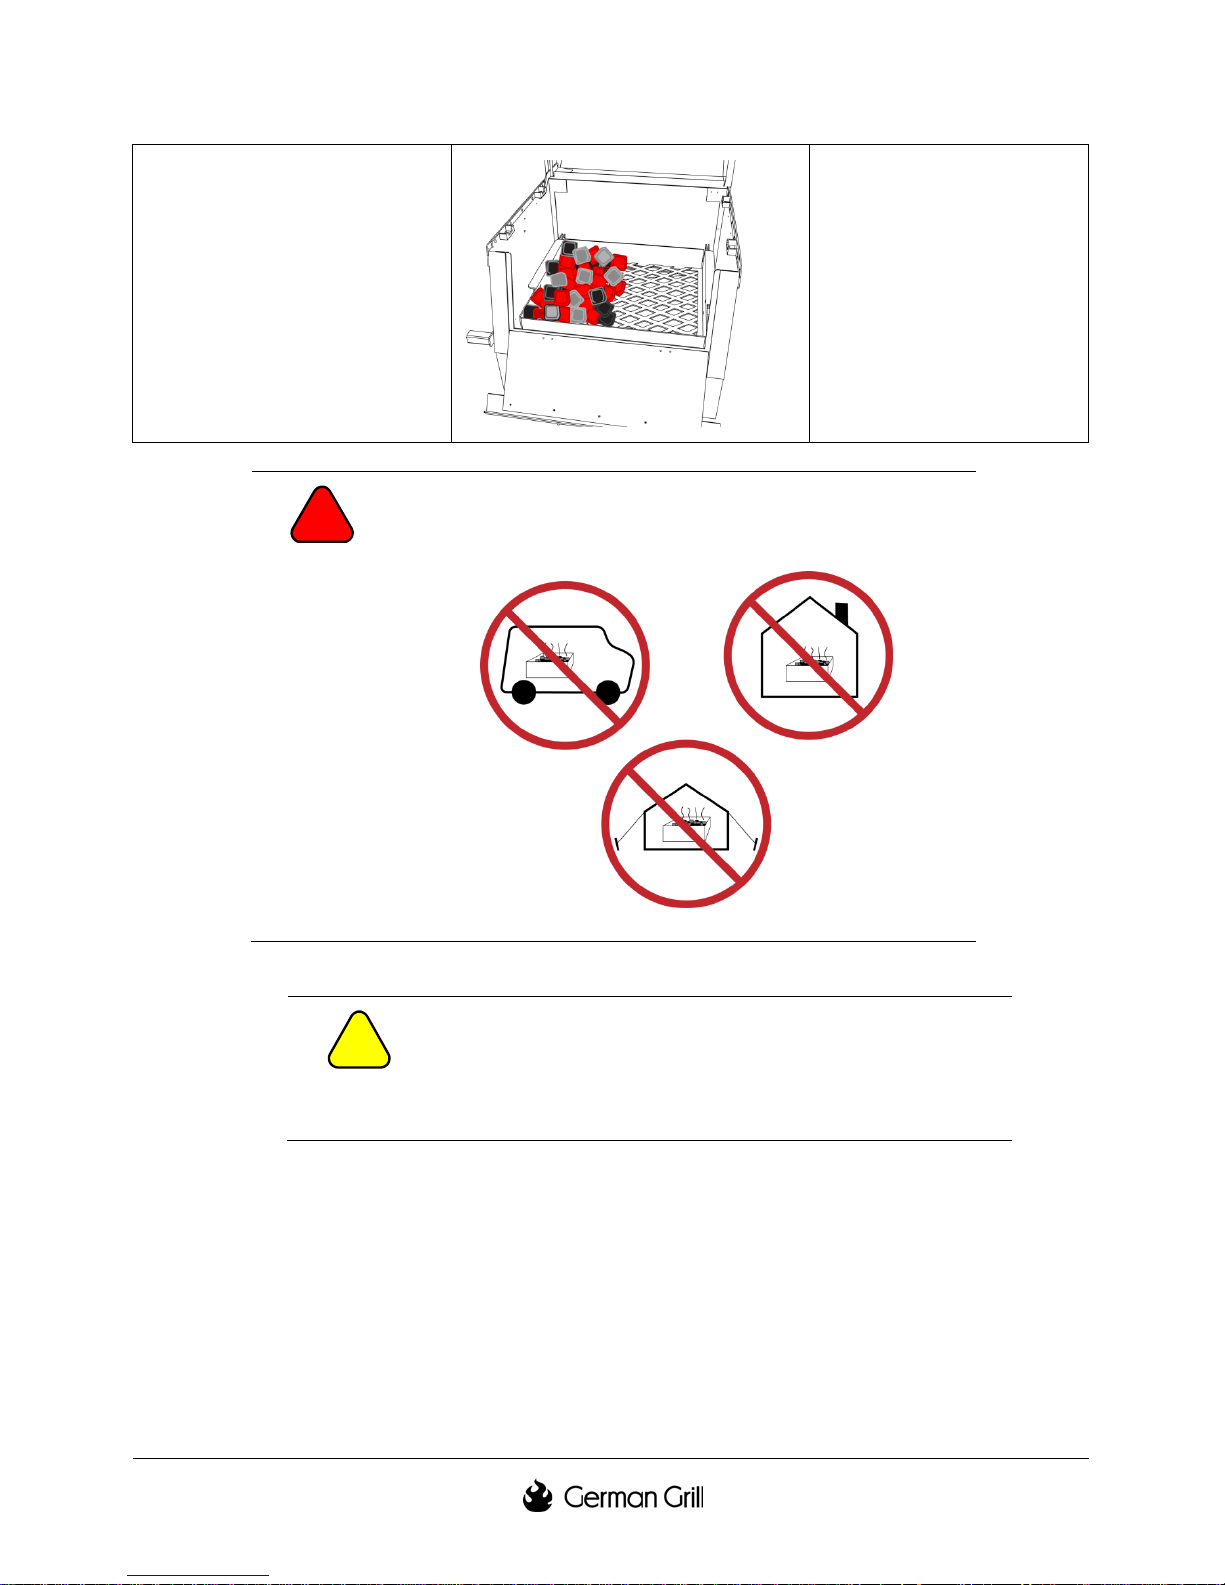
5 Once the coals are hot, you
can arrange them in any pattern
that you choose.
Never light a charcoal grill in an enclosed area. The coals
!!
Danger
give off invisible gases that are harmful. Do not use the
charcoal grill to provide space heating for a house, trailer,
tent or other enclosed area.
For example, you can spread
the coals evenly across the
coal basket to grill steaks or
seafood. You can leave coals
where they are and you will
have a perfect two-level fire for
classic barbecuing with the
cover closed. Be sure to add a
foil pan to catch dripping fat or
juices.
Do not cook on the grill until it has been fired up with a
!
Caution
complete 100 briquette load of charcoal at least one time.
The high temperature coating on the firebox will give off a
nasty smell the first time it gets hot. After the firebox has
been hot, the finish will change chemically, and it will be
much more durable and will not smoke again.
10
505-00100 Rev A
Page 17

11
4.3. Controlling the heat
The charcoal fire is contained in a movable basket under the cooking grate. The entire bed of coals is
raised and lowered with a lever on the side of the grill. You don't have to turn cranks, move the food or
reset the grate to a different notch. The heat control motion is a simple lever that is smooth and
instantaneous. You control the heat of a live charcoal fire across a complete range of heat settings—just
like the temperature knob on a gas grill.
At the "hot" end of the spectrum the coals are up directly under the food grate to generate intense
radiant heat. If you like your steaks "Black and blue" (sometimes called "Pittsburg Style"
them prepared as if they came out of an 1800 degree steakhouse roaster, you can do it with the German
Grill. Use the lever to "blast" foods for a few seconds: to add a final char to meats, toast bread, crisp a
pizza, caramelize fruits, or sear vegetables.
At the "medium" range of the spectrum, the coals are centered in the firebox for familiar barbecue
temperatures and cooking times. Use this setting and your usual kettle techniques with hamburgers,
chicken, steaks and shrimp.
At the "cool" end of the spectrum move the lever down to provide constant low temperatures and
indirect heat for ribs, brisket, and other slow cooking foods.
Radiant Heat and the Lift Arm. Radiant heat energy (infra-red) varies as the square of the distance from
the source. This means that as you change the distance from fire to food, the change in heat energy is
much faster than the change in distance. For example, if you raise the coals from 8 inches below the
food to 4 inches below, you only halved the distance, but you get four times the radiant heat energy.
Your grill will allow you to vary the heat a multiple of roughly six times the heat energy from the
bottom of the stroke to the top. This is what we mean when we say you can give your food a "blast" of
radiant heat to brown, caramelize and generally take advantage of Maillard reactions.
1
) or want
1
Black and Blue = black and crusty on the outside, red and barely warm in the center.
505-00100 Rev A
Page 18
4.4. Two-zone grilling
The grill is designed to be versatile and can be configured for direct grilling, barbecuing, smoking and
many other configurations. You can fire up as much charcoal as you need—up to 200 briquettes will fit
in the coal basket—but watch it, that's a lot of heat!
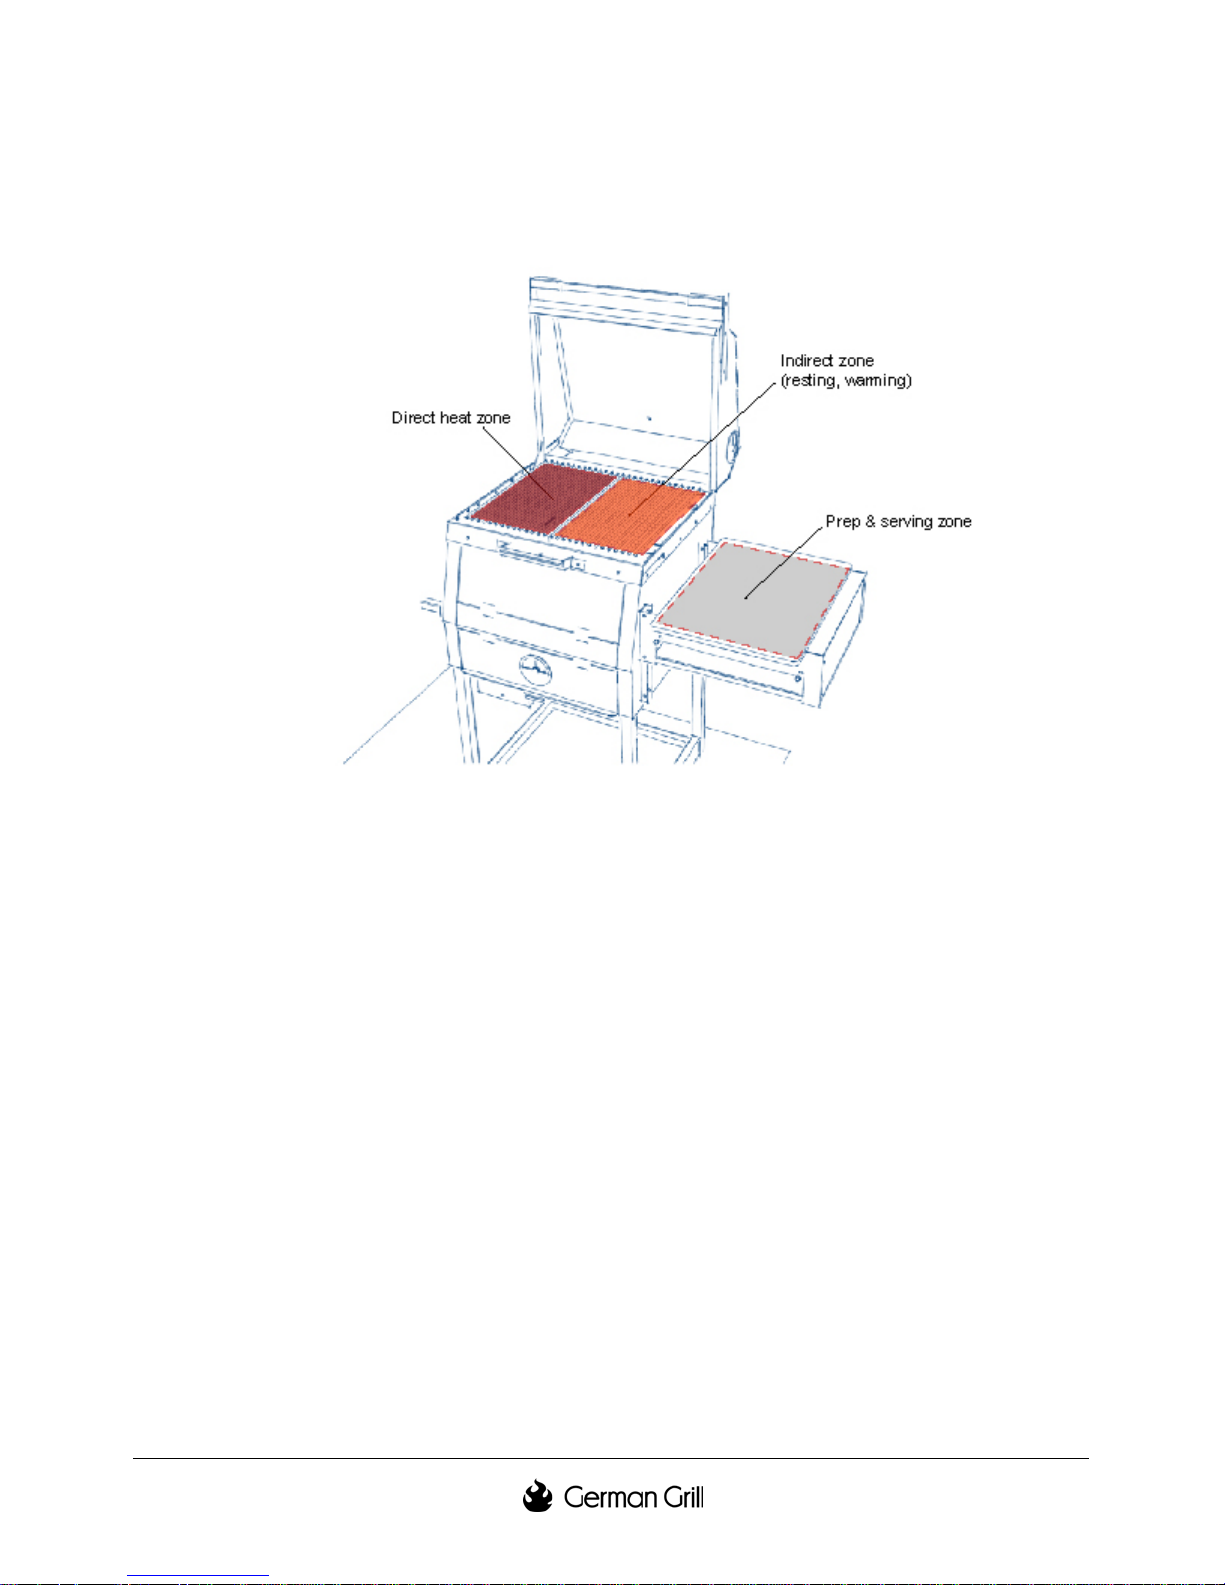
Figure 4-1: Two-zone grilling setup
Classic two-zone grilling. This is the way we usually configure our grill. For a party of up to 10 people
or so, this is perfect.
Before you light the charcoal, put a drip pan or piece of foil under the right side of the cooking grate
(it's a small step that you will appreciate at cleanup). Add your coals on the left, as usual. After you
light the coals, leave them on the left side of the coal basket. You can spread them in any pattern you
like and make the direct heat zone whatever size you need for the task at hand. Proceed as with any two
zone fire - with the amazing flexibility of the heat control lever.
Workflow in this configuration. There is a logical workflow from left to right as you are grilling. You
can move a lot of food across this grill in a short length of time. We have grilled hundreds of steaks at
festivals and parties in just a few hours, and you will intuitively "get" how this works once you try it a
few times. Here's a simplified explanation of how we use the grill for production:
Let's assume that you have a nice load of charcoal already lit in the two-zone configuration, direct heat
on the left, with a drip pan on the right:
• Raise the handle for heat high so you have a nice hot cooking grate.
• Prep your foods in the kitchen on the cutting board. The cutting board drops into the side
worktable on the right side.
• Start the food on the left side of the grate for searing and crisping. Rotate it 90 degrees for
crosshatch char marks.
• Flip and repeat - still on the direct zone to the left.
12
505-00100 Rev A
Page 19
13
• Move it to the right side to rest and reabsorb juices. The drip pan under this side keeps things
clean. Keep flipping it as it rests.
• Then back to the cutting board for carving and service
• Meanwhile another cutting board of meat is on its way from the kitchen.
• Repeat until everybody is happy.
There are many variations on this flow. You can drop the lever, open the front and add more charcoal at
any time. You can raise and lower the lever as the coals die. You can drop the coal basket to kill a flareup.
4.5. Grilling for a crowd.
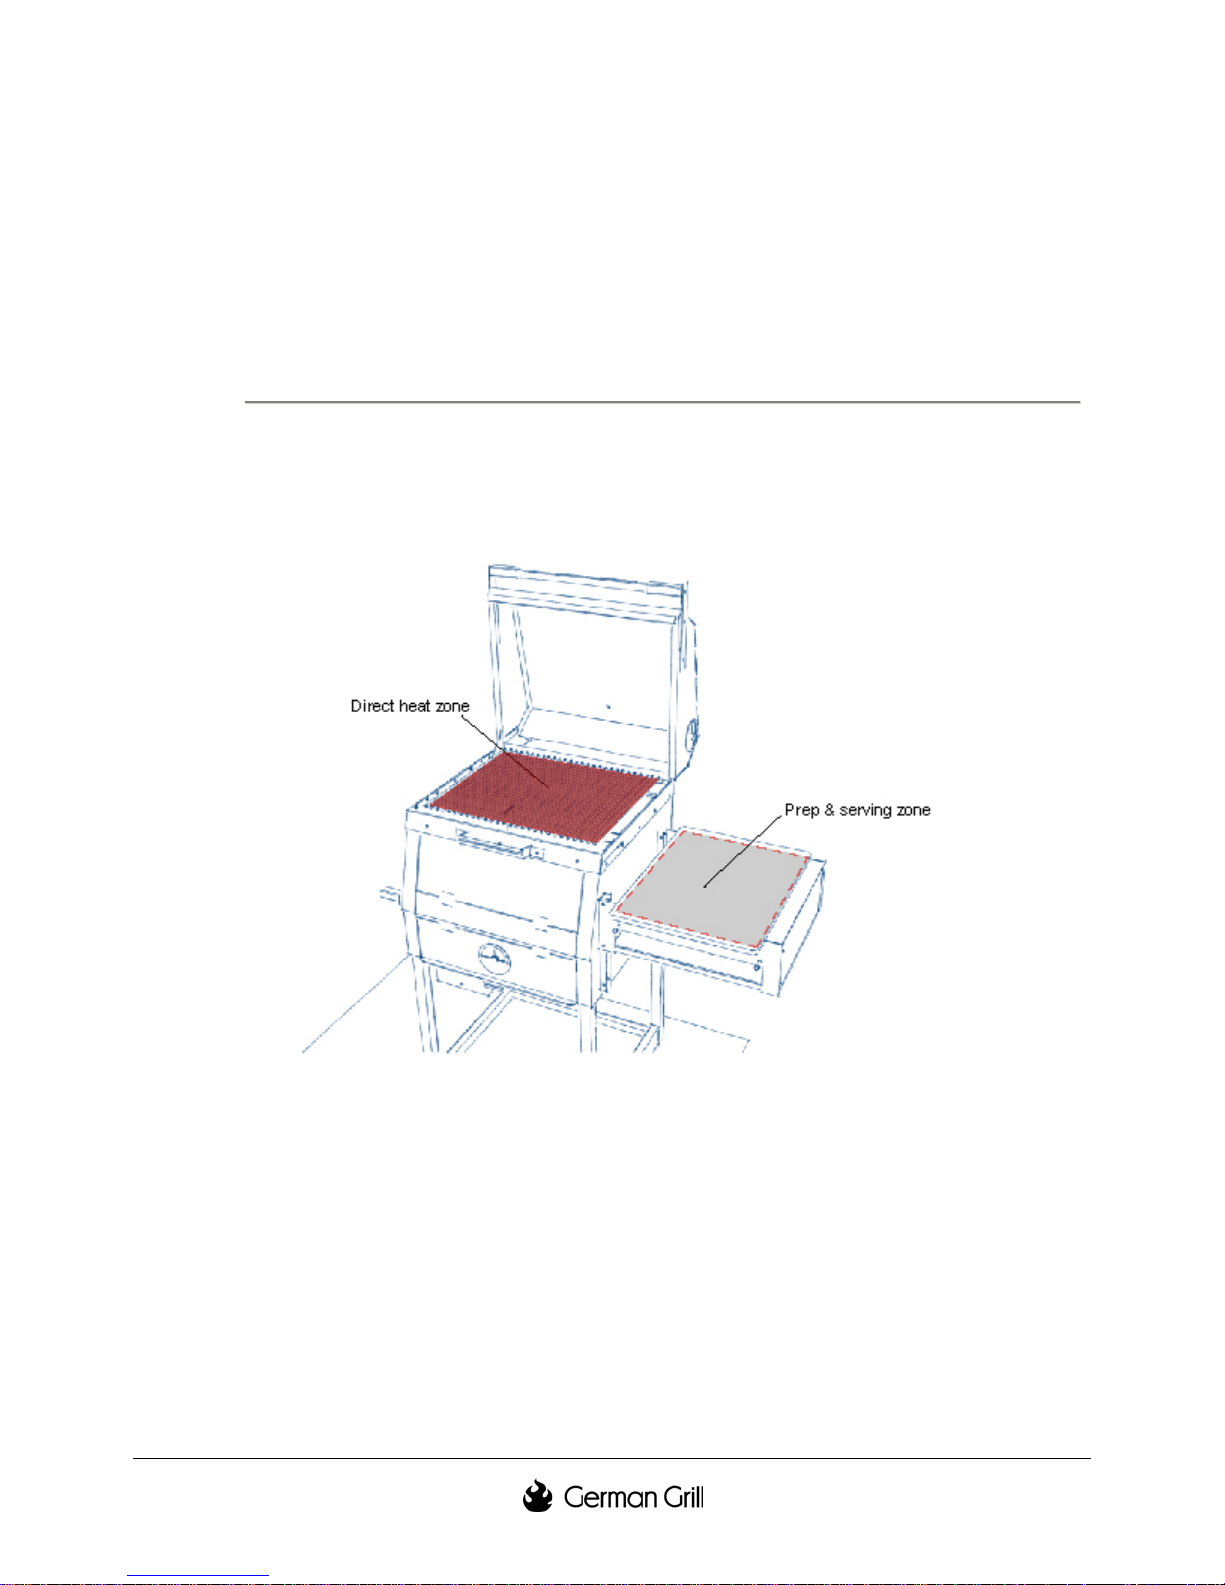
If you are grilling up a storm, you can configure the entire 400 square inches of the grate for direct heat.
After you light the initial load of charcoal on the left side, spread the lit charcoal evenly across the coal
basket. Add another layer of coals if you need a super hot, long lasting fire. The second layer will
quickly light from the coals beneath. (Remember that you can raise the coal basket to optimize the heat
of even a single layer of charcoal, so you may not need as much as you may think. Lighting too much
charcoal is the number one issue with new users.) Now you have a continuous bed of coals under the
entire cooking surface.
You have a lot of heat, and you have control, but be careful, our best advice for successful grilling is
watch it like a hawk!
505-00100 Rev A
Figure 4-2: Single zone high-heat grilling setup
Page 20
4.6. "Barbecuing"
If you're making beer can chicken, turkey, ribs, brisket, etc... You can use the grill to make slow
cooked, smoky masterpieces. This is comparable to the type of cooking usually done on a kettle type
grill.
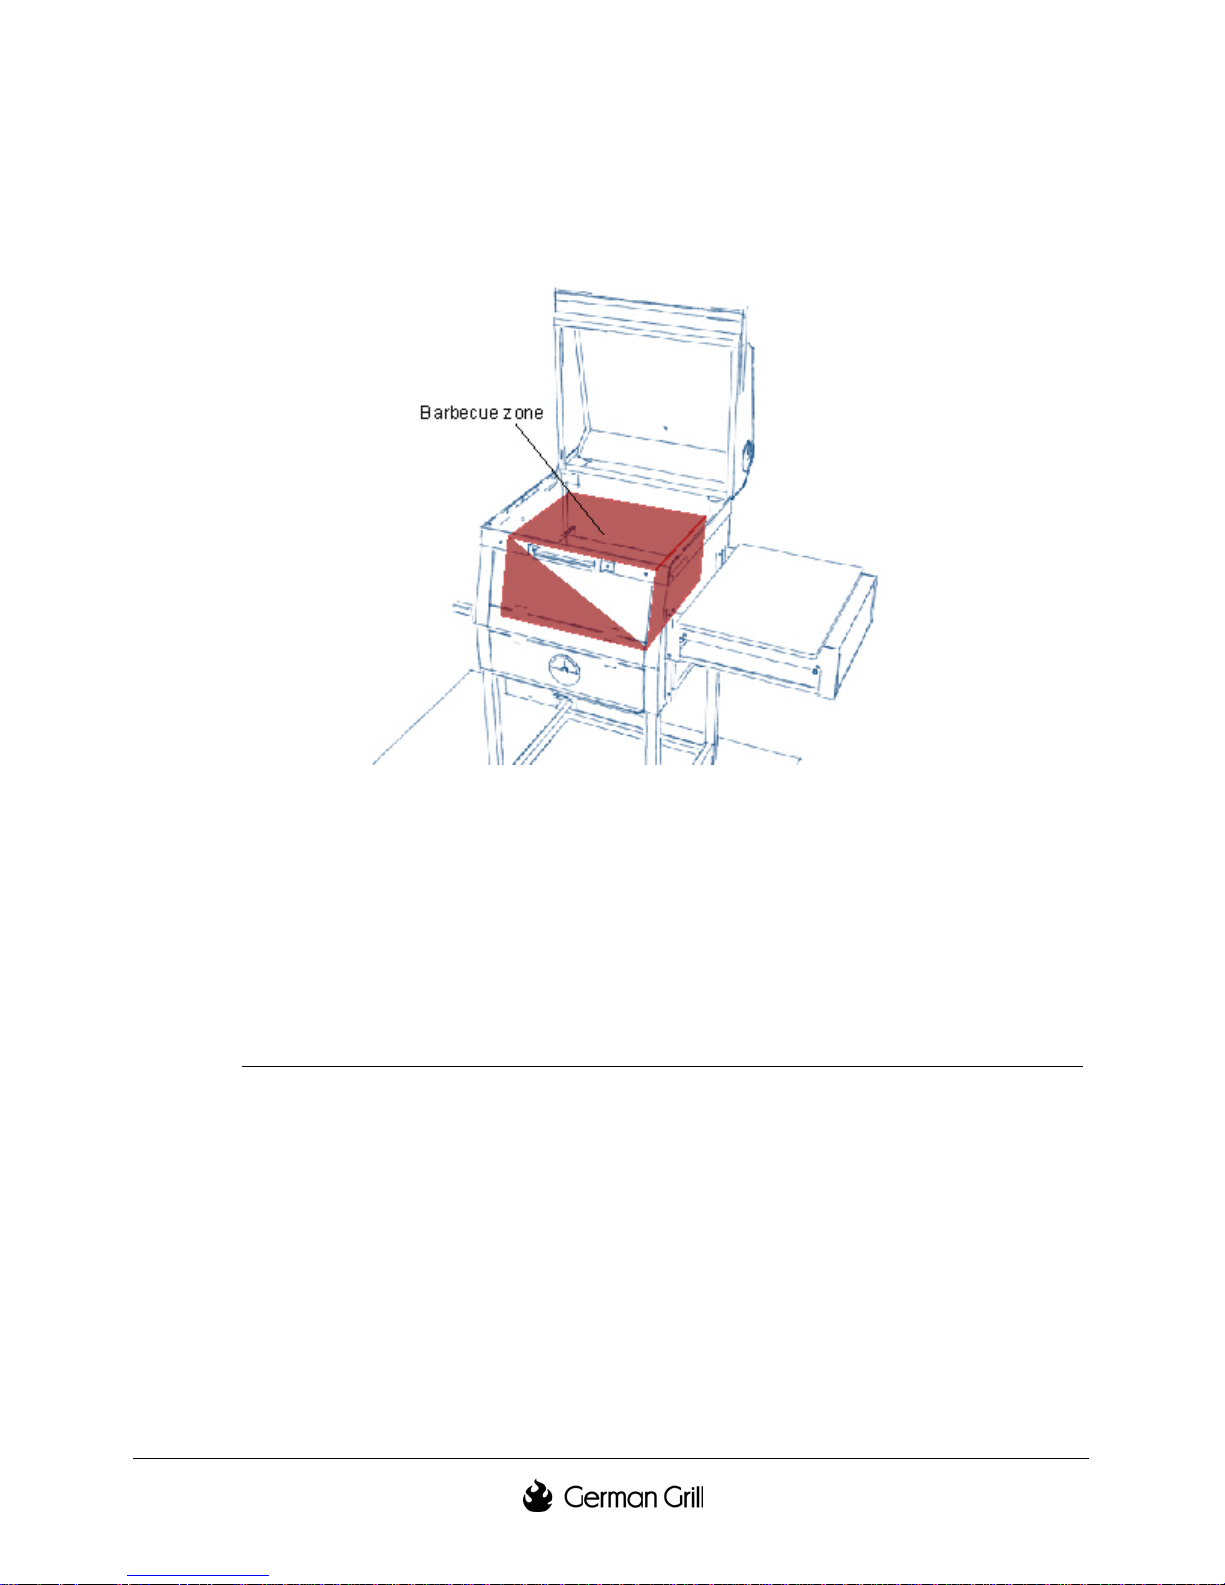
Figure 4-3: Barbecuing inside the grill using the slow-cook rack
Remove the cooking grate. Add a small load of charcoal and light it as you normally would. (If you
want a long slow burn, pour in the charcoal and stuff newspaper only in the front of the lighting
chamber. It will light one end of the pile of charcoal and increase the interior temperature more
gradually yielding a longer, lower burn). Place a drip pan and the slow cook rack in the right side of the
coal basket. Place your food on the rack to the right of the coals. Close the cover and adjust the vents
for whatever temperature you need.
4.7. Grilling, Barbecuing, Smoking, and Broiling:
Here's how the various cooking methods seem to relate to the German grill.
Grilling. Direct heat, expensive meat, constant attention. You should use a fairly large load of charcoal
(lighting chamber full to the top) and after the light, spread the coals evenly under the cooking grate.
Your will probably have enough coals for a single layer across the entire grilling surface. If you need
more energy, you can add another layer of charcoal on top of the bottom layer. It will quickly light, and
by varying the control lever, you have an amazing amount of heat at your control.
Only grill tender meats such as steak, hamburger (pre-chewed steak), chops, shrimp and fish filets. You
would also grill vegetables, mushrooms, and pizza.
Don't close the cover; grilling is a radiant heat process and convective heat is a minor factor. Most of
these foods are fairly juicy and will dry out and be ruined if you cook them too slow. They are also
fairly thin so that the inside can heat up before the outside turns to black crunch. Properly done, you
14
505-00100 Rev A
Page 21

15
heat the grate for deep char marks, raise the coals to brown, then lower to finish. The high heat sears the
outside, gives great flavor and seals the juiciness inside. With this grill, you are controlling a lot of heat
and the interior temperature of a steak can rise more than 10 degrees per minute. So the difference
between a perfect, rare steak, and shoe leather, is less than three minutes.
Barbecuing. Indirect heat, thicker meat, less attention. To barbecue, you want medium-high heat, but
not directly under the food; and you want the cover closed to get smoky, convective cooking. Your grill
is engineered for this. Use less charcoal than when you are grilling (lighting chamber roughly half full)
or the temperature under the hood will shoot up to 700 degrees when you close the cover. After the
light, you leave the coals stacked on the left. The grill automatically creates an indirect cooking zone on
the right side. You should barbecue meats that have to cook longer because they are thicker such as
chicken, sausage, filets, small turkeys and roasts. These cuts are also usually "messier" in that they drip
fats down into the grill and make a mess inside. We always place an aluminum foil drip pan under the
food. It fits nicely into the rear of the coal basket.
Smoking. Lowest heat, cheaper meats, low maintenance. You can "smoke" on the German grill. We use
a technique where we light one end of a chain of charcoal and it burns at a low smoky rate for up to
three hours like a cigar. (For the light, only put paper in one end of the chimney. After a few coals are
lit.) You can also use a modified Minion method that burns from the top of the stack down. (Light a
small load, move it back, add fresh charcoal and rake the lit on top.) But either way, you have to add
wood chips to generate the smoke, and more charcoal through the front access door to keep the heat
going long enough. (Remember that you can do this without opening the cover and losing more heat.)
You will generate a passable "smoke ring" on brisket, ribs and roasts, but you can't get the tenderness of
a true smoker without one additional step. You must wrap the meats in aluminum foil for an hour or
more with some liquid inside the package and put them in the oven or back on the grill. Do this in order
to get the meat hot enough (for long enough) to get to the "melting" point of the collagens. This can
only be done using moist heat. The melting point occurs around 170 degrees F and it has to stay there
for an hour or more without drying out. Use a foil drip pan on the indirect side. Throw the meat over
direct coals for a few minutes after it comes out of the foil to dry it out and char the crust again.
Broiling. Broiling is the same as grilling, except the fire is over the food instead of under it. Don't try to
broil on the German grill ☺.
505-00100 Rev A
Page 22

5. Maintenance
5.1. Cleanup
Cooking grate. Do not use sharp objects or abrasives. Remember that the grate is a solid chunk of
stainless steel. It will not rust or corrode—no matter what it looks like. And when it's at 800 degrees
while you are grilling, it's absolutely sterile. Wire brush the top, flip it up and scrape the crud off the
bottom using the tool. If you want to take it out and wash the cooking grate, scrub it like any other cast
iron pan. You don't even have to use soap as it removes the "seasoning" of oils that have seeped into the
grate.
If you want to clean the cooking grate more thoroughly, scrape it with the cleaning tool then use an
environmentally friendly oven cleaner. Take the grate out of the grill when you spray on the oven
cleaner. All the different brands seem to work just fine, but they may damage the coatings on the
firebox and internals. After about 15 minutes, scrub the grate with a mild abrasive pad. After you wash
it, you can spray with PAM, or rub it down with olive oil.
Firebox. Don't worry too much about the firebox. It will get dirty, but it's easy to keep things under
control. Every time you grill, just tip up the grate, raise the basket and scrape the ashes and other crud
down the chimney. Notice that all of the inner surfaces of the firebox are flat, and we have tried to
minimize the hardware protruding inside. There are no curves or nooks and crannies. The design makes
it easy to scrape the inside using your flat-bladed spatula and move everything down into the ash pan.
You shouldn't use abrasives or sharp tools on the firebox - the firebox is painted, not plated, and, while
you can't damage anything, there is no need to clean it down to bare metal unless you plan to tear it
down and repaint everything.
Cover. Use a specialty stainless or other household cleaner for minor wipe down. (Some of these
cleaners contain a wax that will smoke when you light up again.) Use oven cleaner and a rag to make it
sparkle. Be gentle, we spent a lot of time putting that beautiful finish on the stainless steel.
Cart and Cabinet. Use a household cleaner. The cart and cabinets have two coats of very tough
powder paint and are easy to clean with common detergents and rags. The worktable cutting board can
be removed from the cart or cabinet and brought inside to be cleaned. We recommend that you store the
cutting board inside while the grill is not being used.
5.2. Major overhaul
The entire grill comes apart. You can lay out all 14 major pieces. 10 pieces can be cleaned, 4 pieces can
be scraped and repainted. Clean or repaint each piece. Put it back together. This will take one Saturday
morning—depending on how long you let the paint dry. Contact us if you need any replacement parts.
We can supply anything you may need including the original hardware, the paint we use at the factory,
or other parts. If you do repaint, fire up the grill to 800 degrees with a full 100 lumps to cook off the
paint fumes before you use it for food.
16
505-00100 Rev A
 Loading...