

Page 1
English User Manual
Page 2
English User Manual
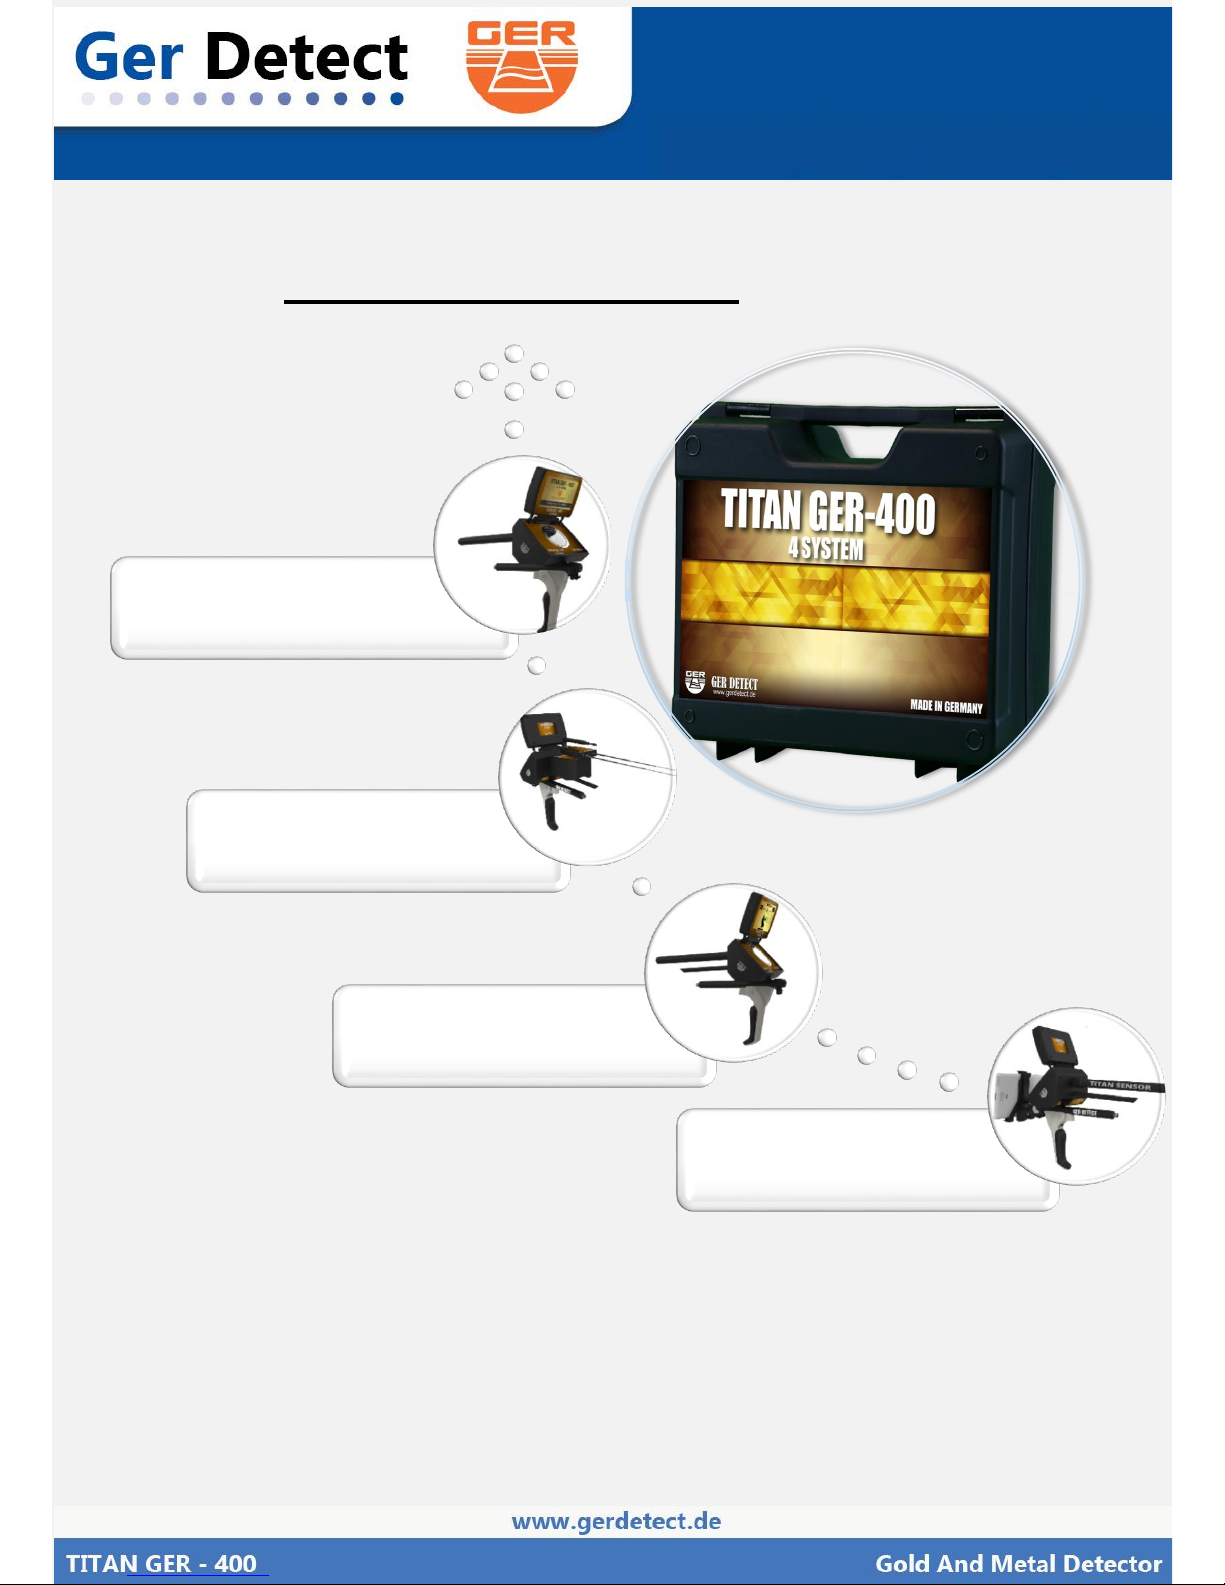
3D Imaging System
Ionic Search System
Long Range System
MagnetoMeter System
400 -TITAN GER
4 System 1 Device
Page 3
English User Manual
Critical Warning
Please be sure that all precautions
taken against risks
Do not use your device while it is
raining or on extremely wet floor
Turn on your device after you make
sure that all parts are in place
Make sure that the device battery
is fully charged before searching
If the battery start to give a peep
sound, close the device and
recharge the battery
Do not start the pulse induction
system without connecting the coil
cable to the device, other ways the
device will stop in the middle of
opening
It is recommended to read the user
manual before start working on the
device to understand everything
and to avoid mistakes doing the
search
After the device start make sound
and turn off automatically put the
battery on charge and do not try to
start the device without charging
the battery
Overview
Dear customer, thank you for
choosing the TITAN GER – 400
This device enables you to detect
underground gold &Treasures
TITAN GER – 400 designed to
reach 45 meters under the ground
and 2500 meters front range
In addition, it contain five systems
to confirm your target
and identify the target
underground and its depth
Be aware of high voltage resources, and
do not use any charger other than the
original charger that come with the
device
Main unit of the device is under
warranty against all electronic
breakdowns for two (2) years
Any damages caused by user errors
(laying open the main unit, hits, harms
etc.) are not within this warranty
Battery and antenna are also not within
this warranty
You should follow the instructions in
this user manual strictly to minimize the
faults and to use your device correctly
Page 4
English User Manual
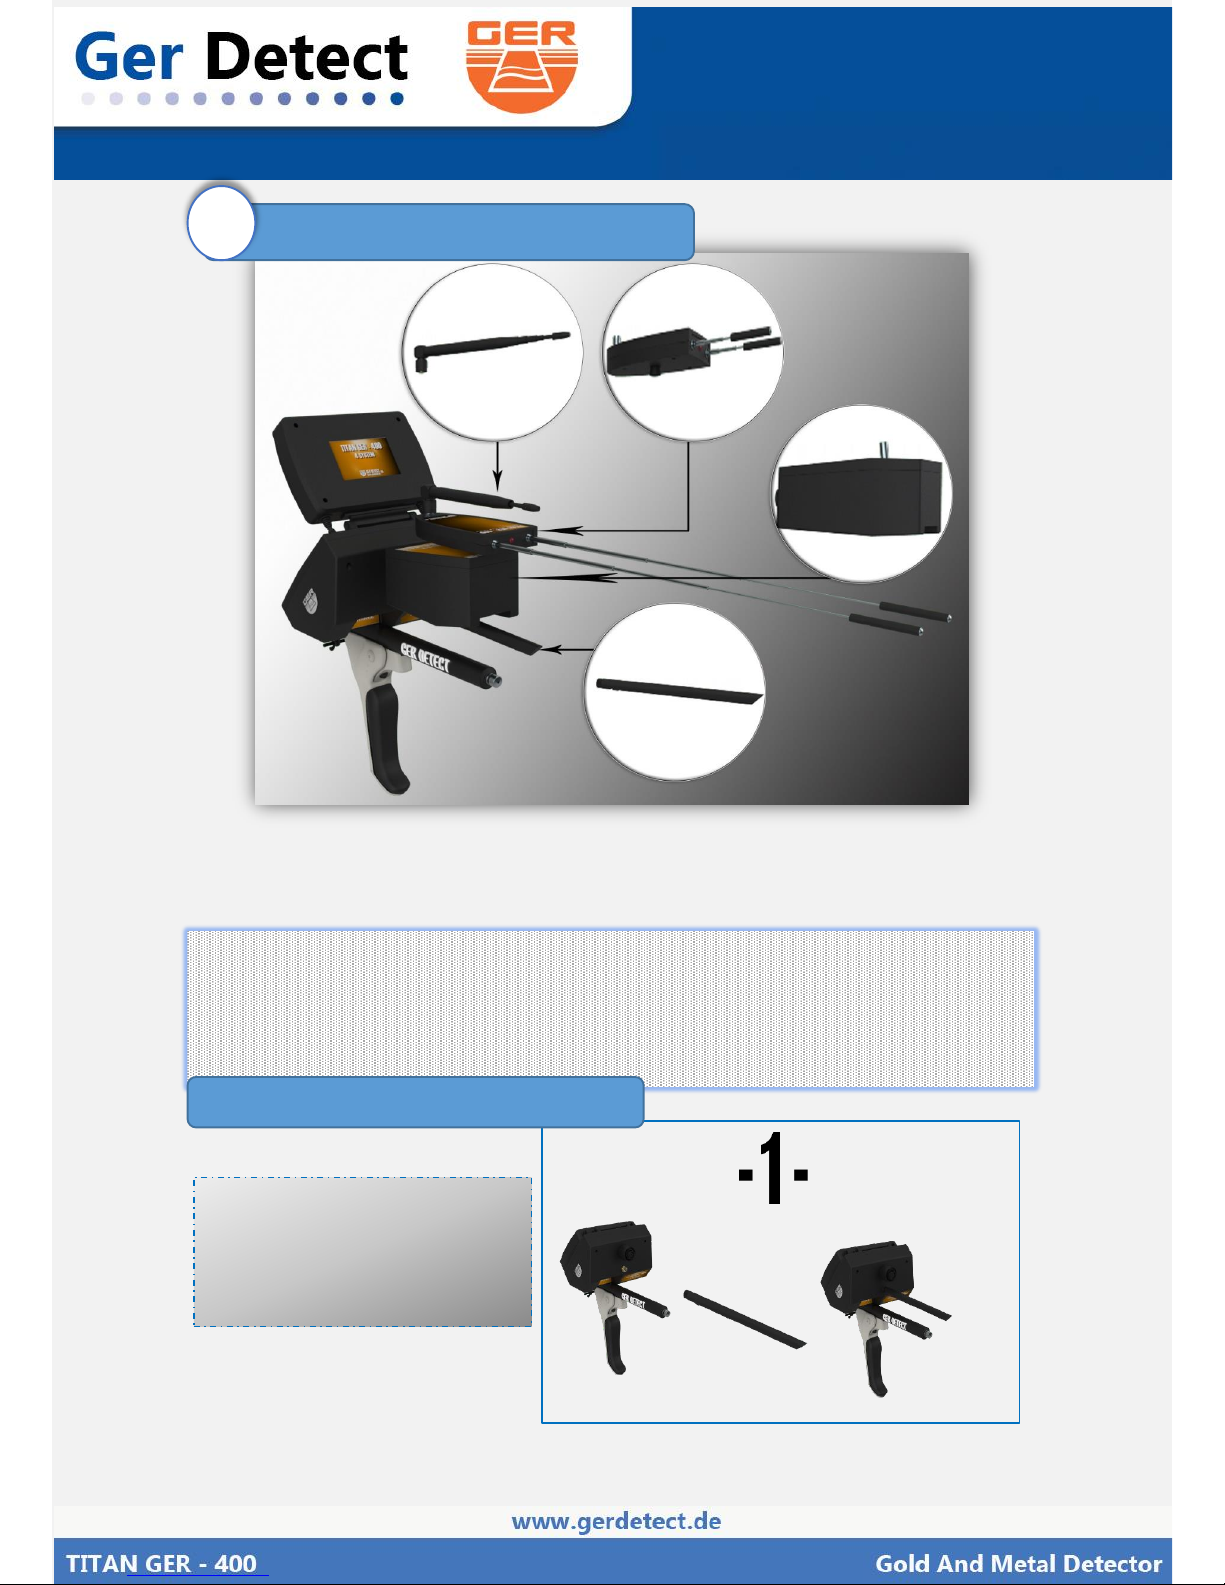
Figer (1) the long range system components
The Long Range System
1
Signal Recipient
Signal Transmitter
Dispatcher Antenna
Recipient Antenna
This system specializes to cover vast areas and locate the target with in 1
meter Square up to depths of 45 meters below the surface of the ground and
Front Range up to 2,500 meters.
Connect the Dispatcher
Antenna
Figer (2) Dispatcher Antenna
The long-range system parts
Page 5
English User Manual
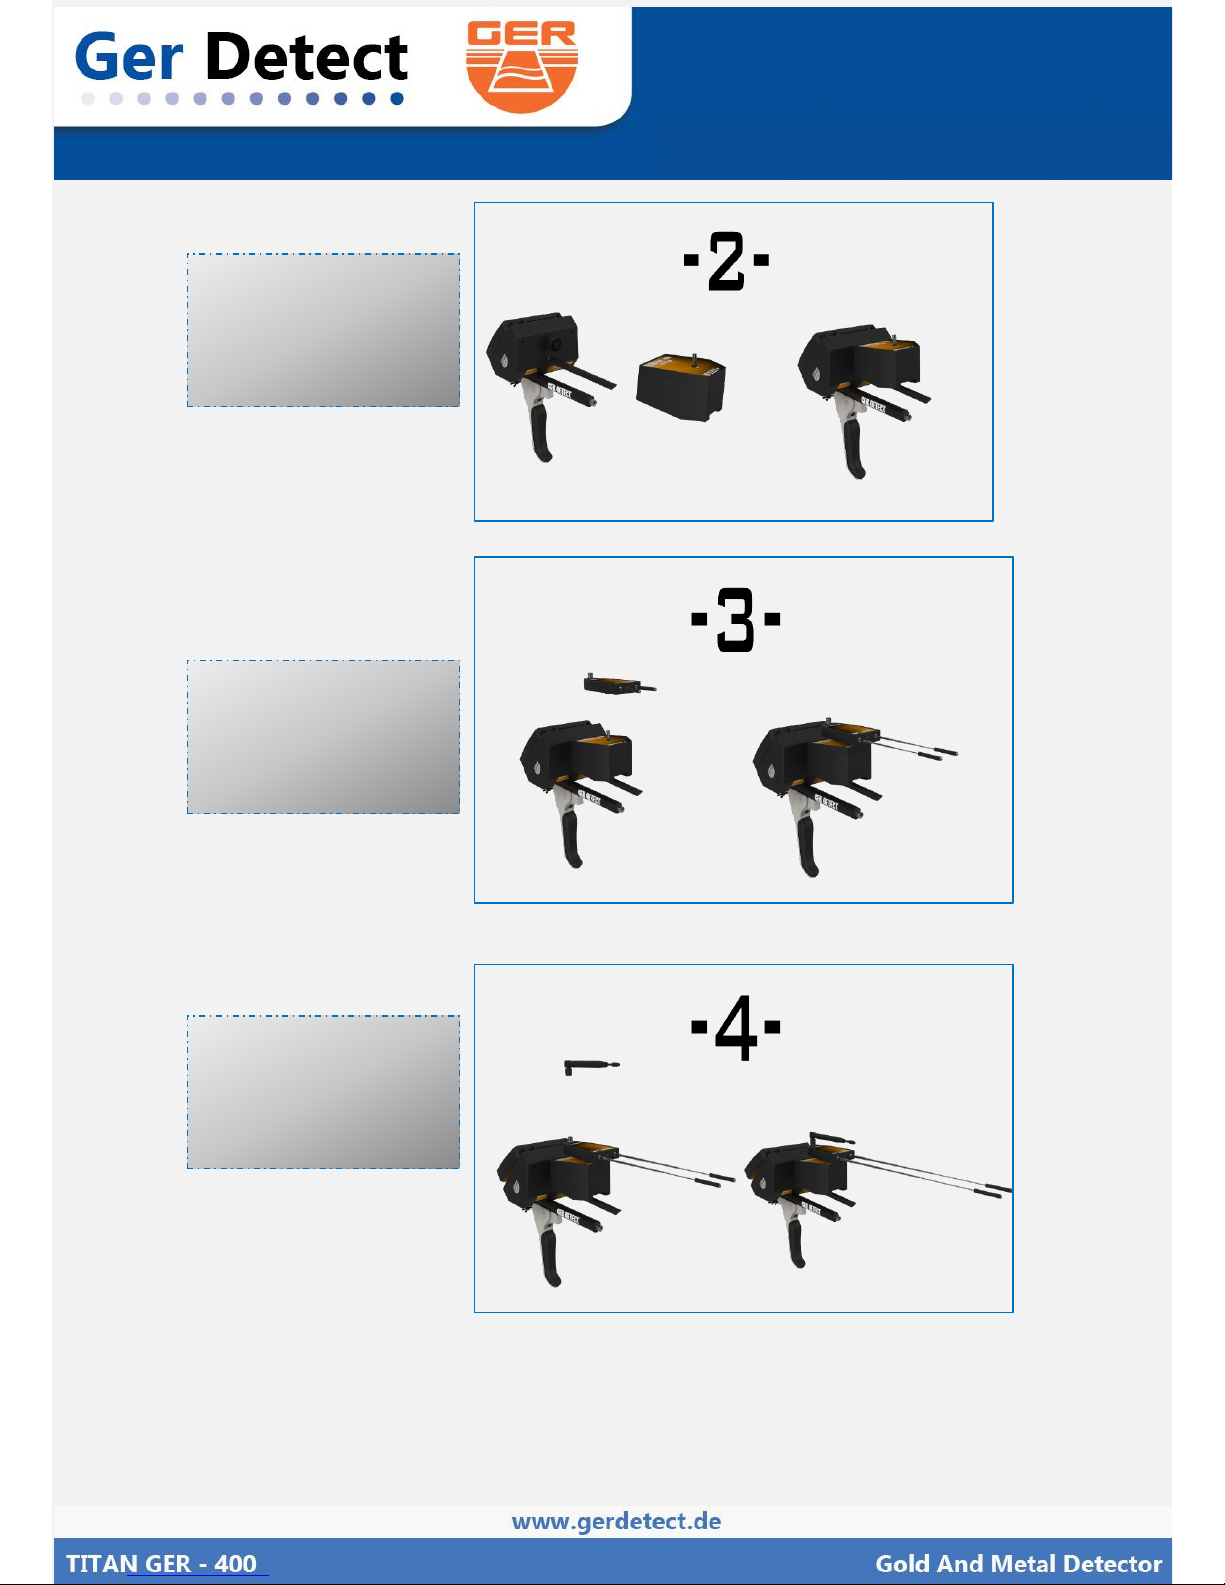
Figer (3) : Signal Transmitter
Figer (4) : Signal Recipient
Figer (4) : Recipient Antenna
Connect the Signal
Transmitter
Connect the Signal
Recipient
Connect the Recipient
Antenna
Page 6
English User Manual
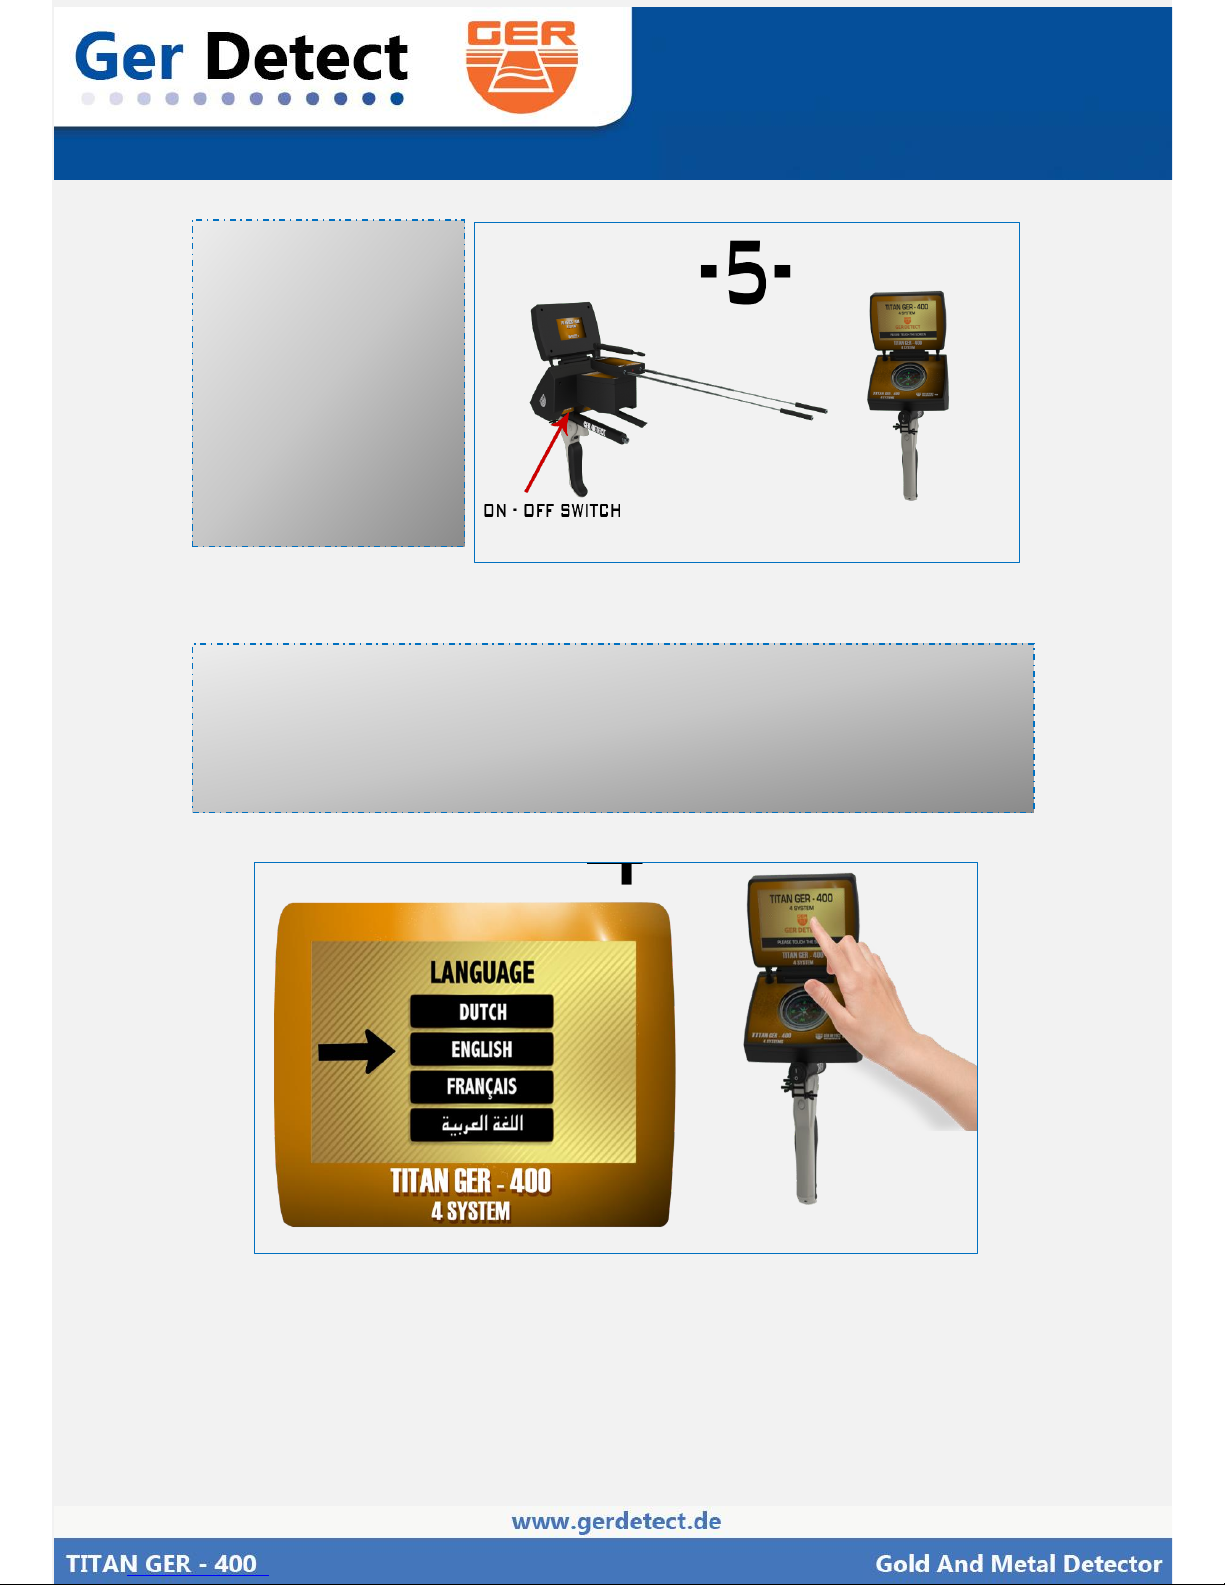
Figer (5) : Battery & ON / OFF switch
- Connect the Battery
to the Device
- Open the Device
Screen and Start The
Device Through
ON / OFF switch
CLICK ON THE SCREEN OF THE DEVICE TO DISPLAY THE LANGUAGES LIST
THE DEVICE WORKS ON FOUR LANGUAGES:
(DUTCH-ENGLISH-FRENCH-ARABIC )
Figer (6) : languages list
Page 7
English User Manual
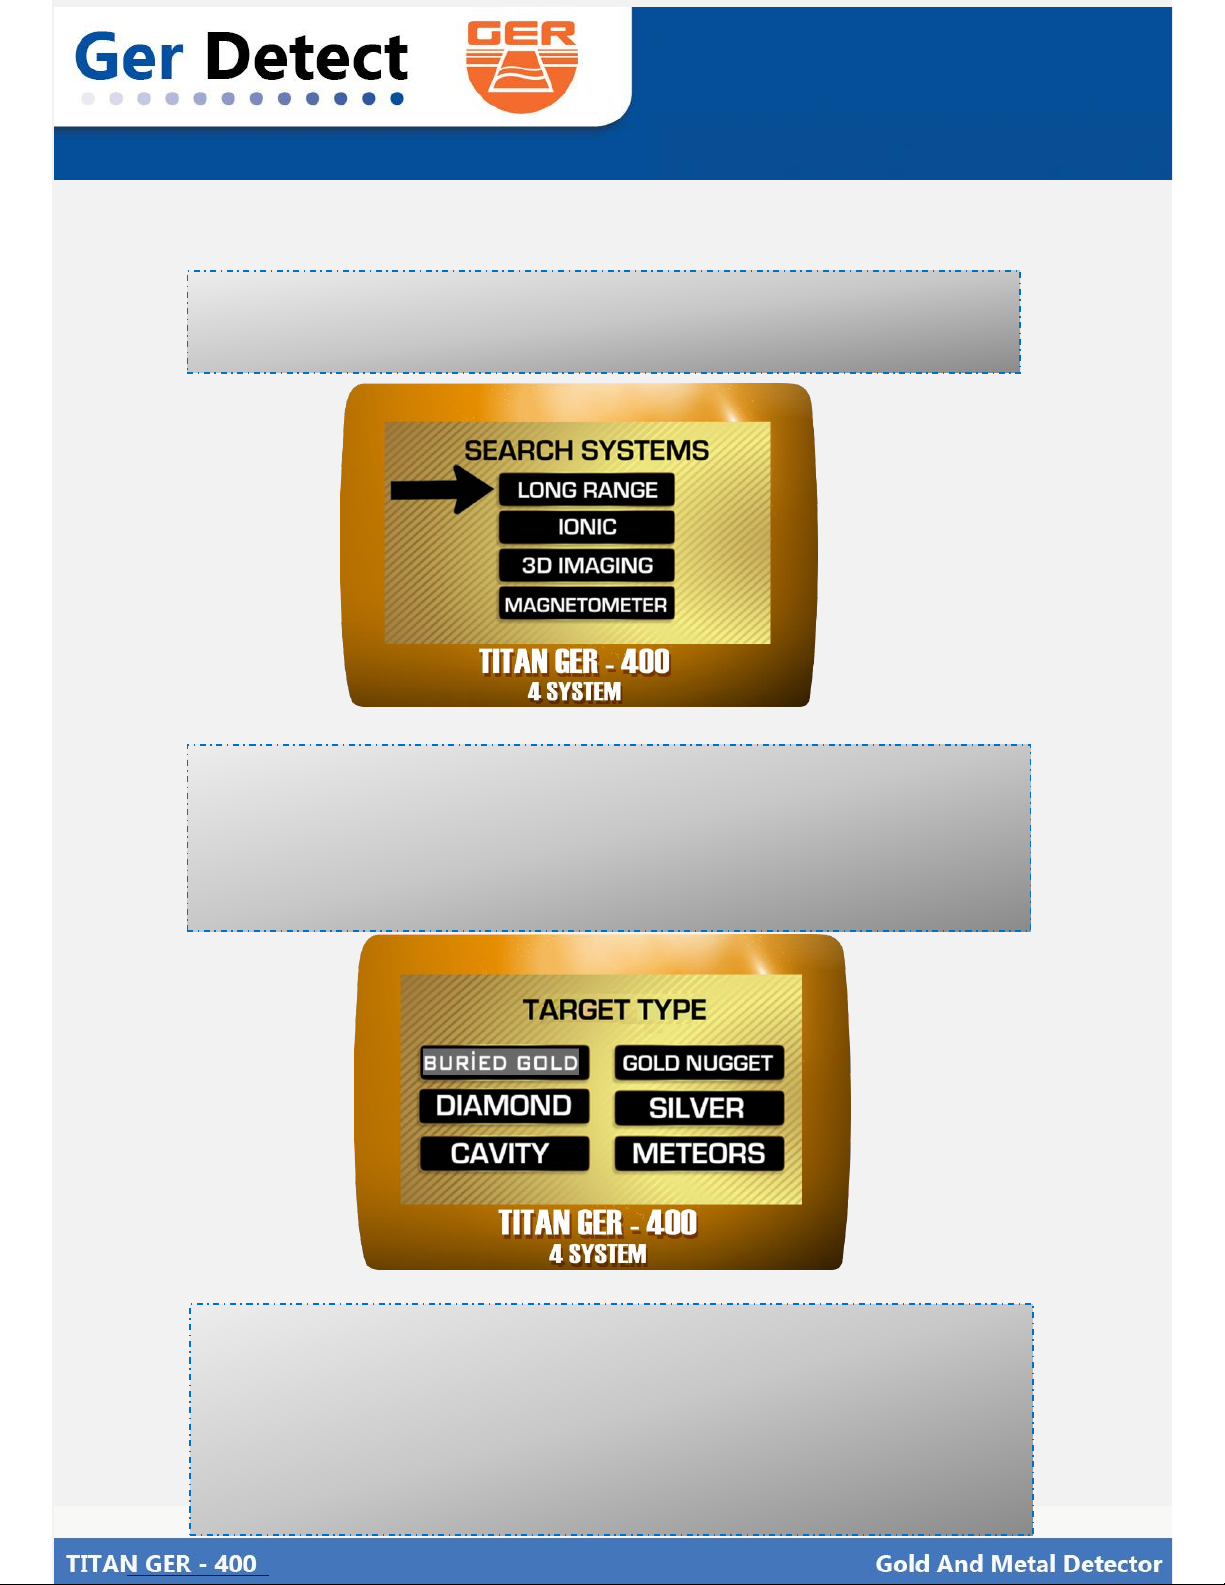
Figer (7) : search systems menu
After selecting the language, you want to work in (English for example)
The search systems menu will appear (Select long-range search system )
After selecting the long-range system, the metals that this system can
detect will appear :
Choose the metal to be search for from a list of metals through pressure on
the metal name,
(BURIED GOLD FOR EXAMPLE)
Figer (8) : metals menu
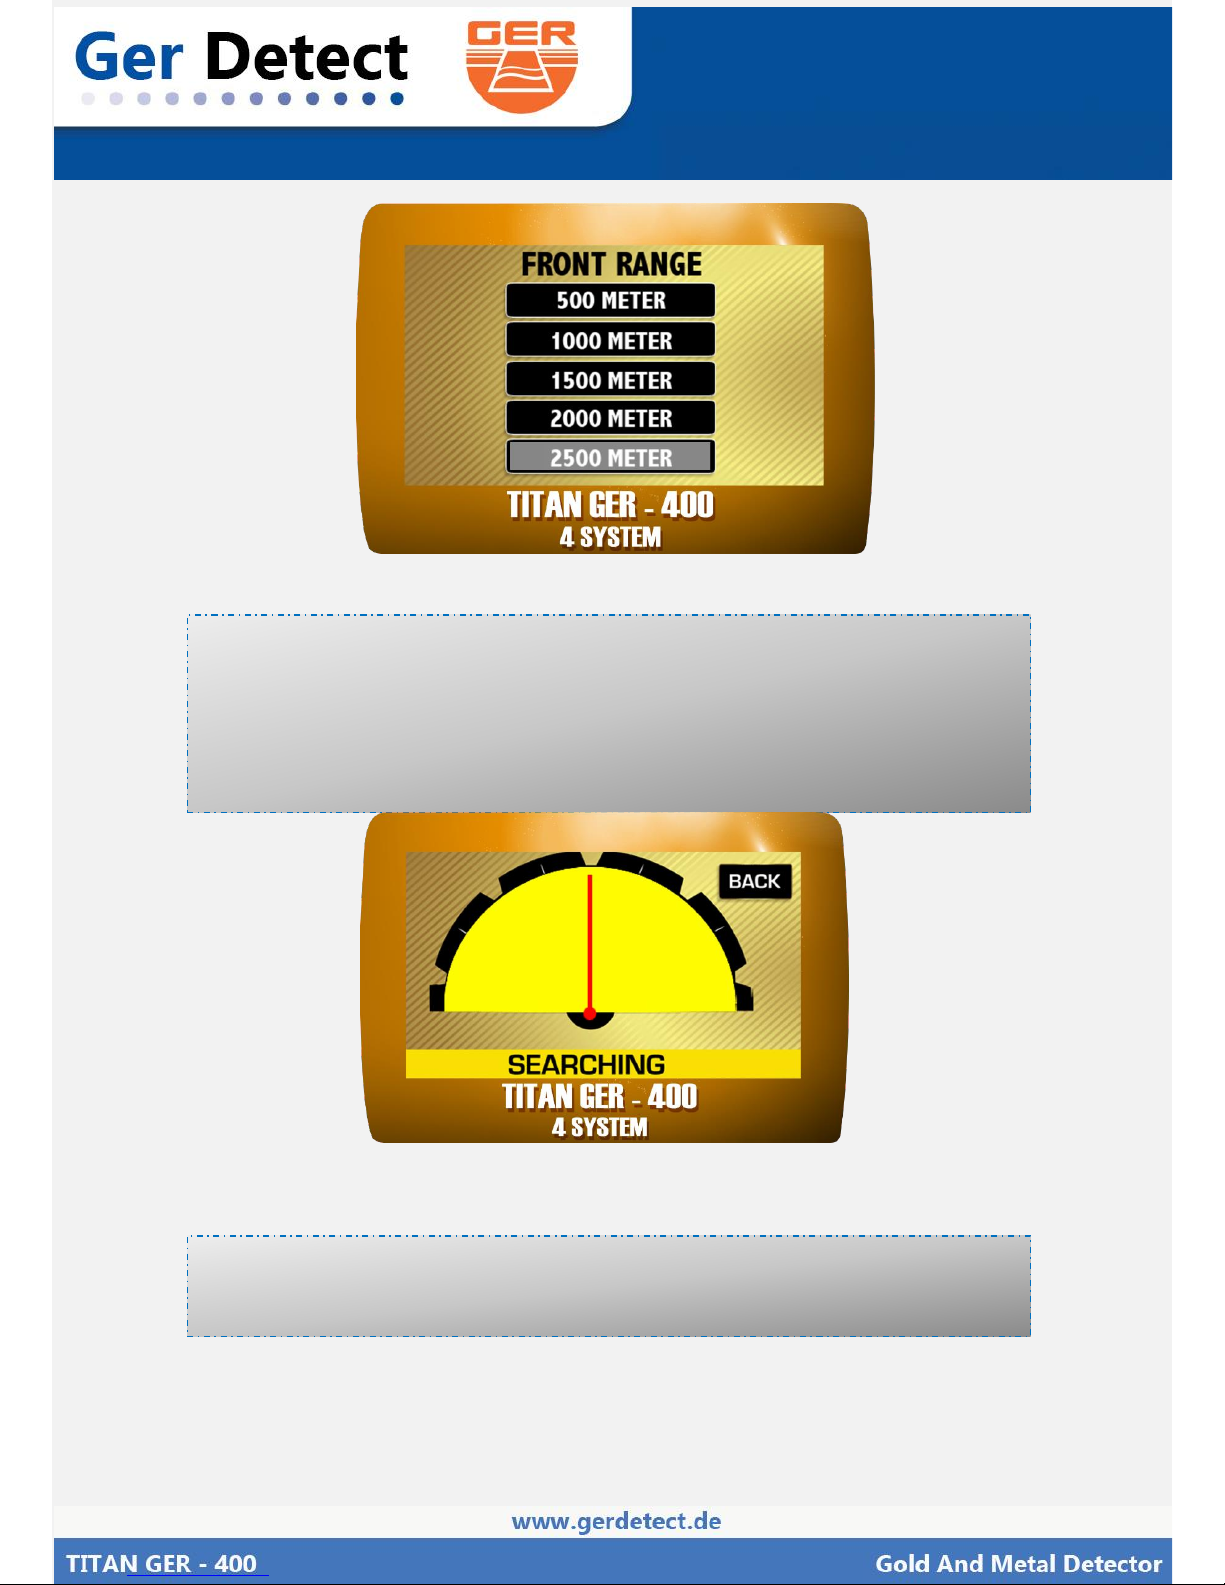
After selecting, the metal to be searched for, the Front Range Options will
appear
Choose the Front Range according to the area you want to reach
You can select between
(0500 M - 1000 M - 1500 M - 2000 M - 2500 M)
Choose 2500 M for example.
Page 8
English User Manual
Figer (9) : Front Range Options
After selecting the Front Range, the search screen will appear which contain
an indicator, which will guide you directly to the target. Make sure that the
antenna is pointing ahead
Adjust the antenna with the indicator on the screen to receive accurate
signal
Figer (10) : search screen
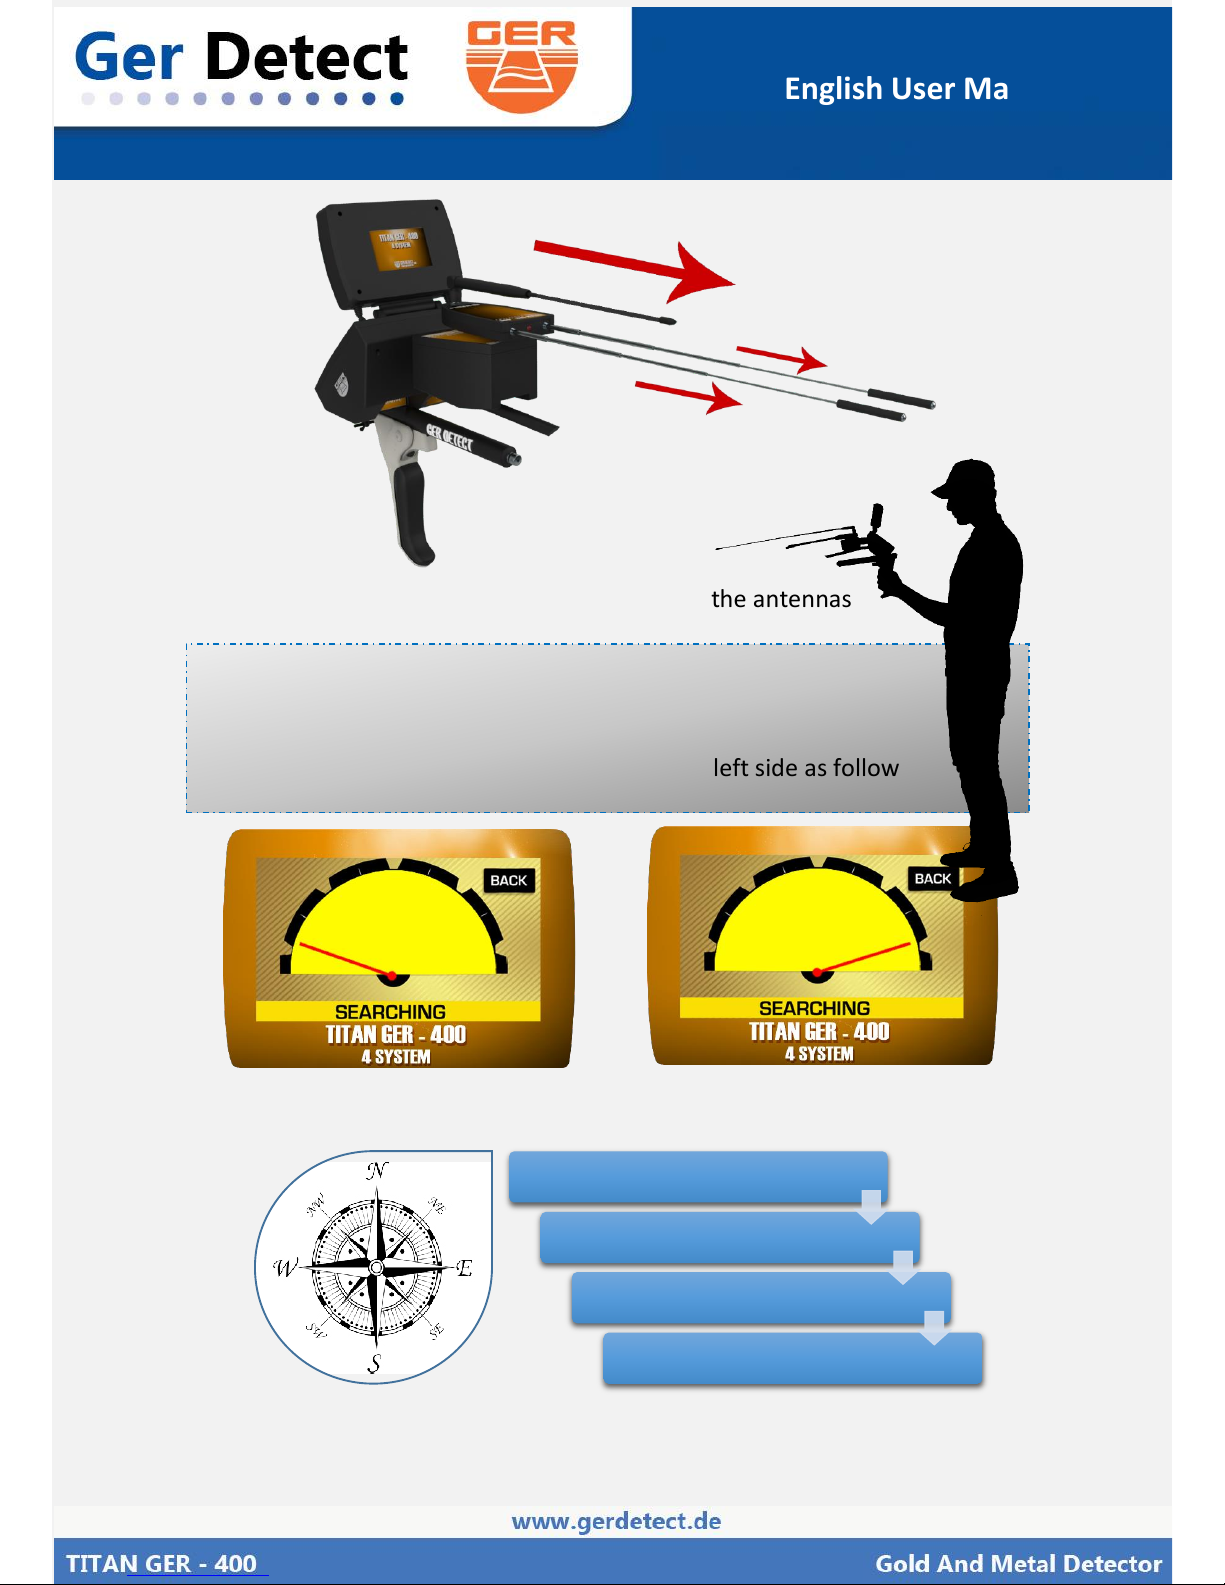
Increase the length of the antennas receiving a signal
To able the device to detects targets even to 2500 meters
Page 9
English User Manual
Figer (11) : Increasing the length of the antennas
Star the search by holding the device as follow:
If the target on the right side the indicator
Will Point to the right side and the seam to the left side as follow
Figer (11) : indicator in left side
Figer (12) : indicator in right side
North to South
South to North
East to West
West to East
After detecting the target, confirm the target from four direction
Page 10
English User Manual
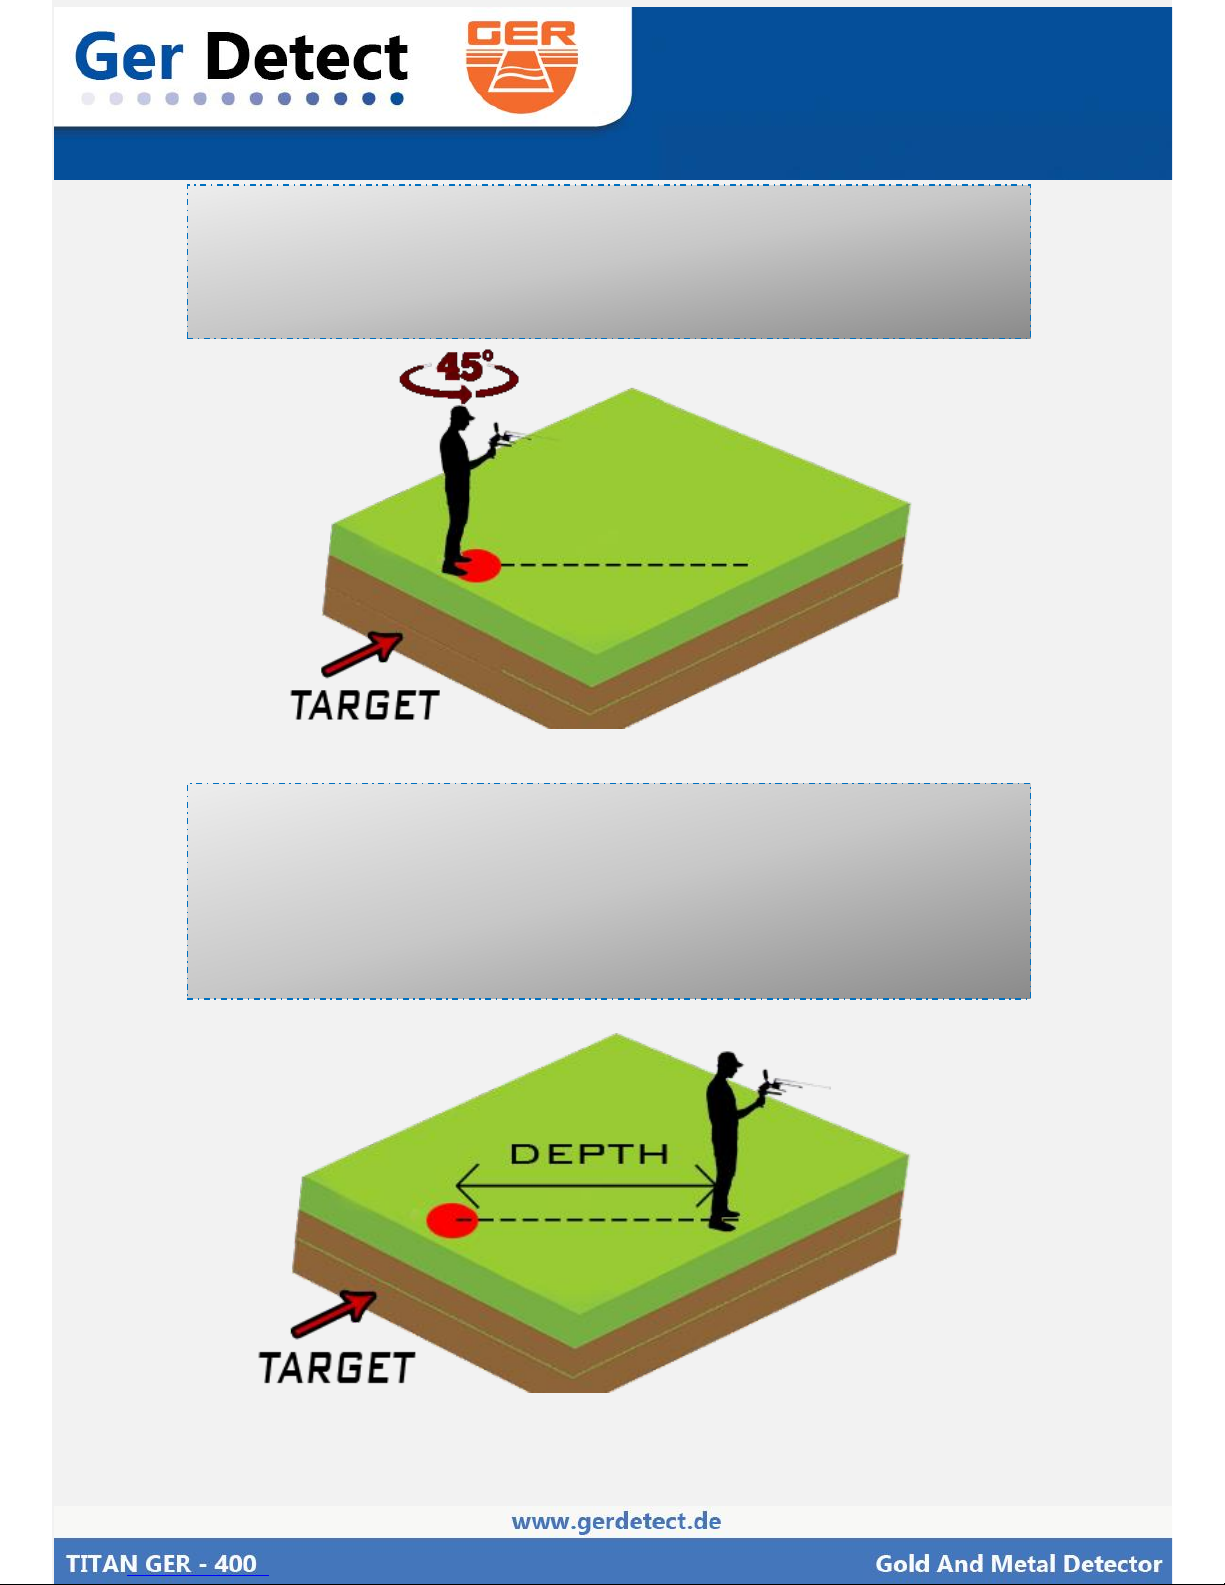
To determine the depth of the discovered target Stand above target and
turn
45 degrees
Walk straight ahead until the antenna reverse to the back
Figer (13) : determine the depth
Measure the distance between the antennas reversing back and the target
center point.
The distance between the antennas reversing back and the center point is
equal the target depth
For example, if the distance is 10 m the depth of the target is 10.
Figer (14) : determine the depth
Page 11
English User Manual
The Ionic Search System
2
Recipient Antenna
Dispatcher Antenna
This system specializes to cover vast areas and locate the target with
In
1 meter Square up to a depths of 45 meters below the surface of
The ground and Front Range up to
2500 meters vertical
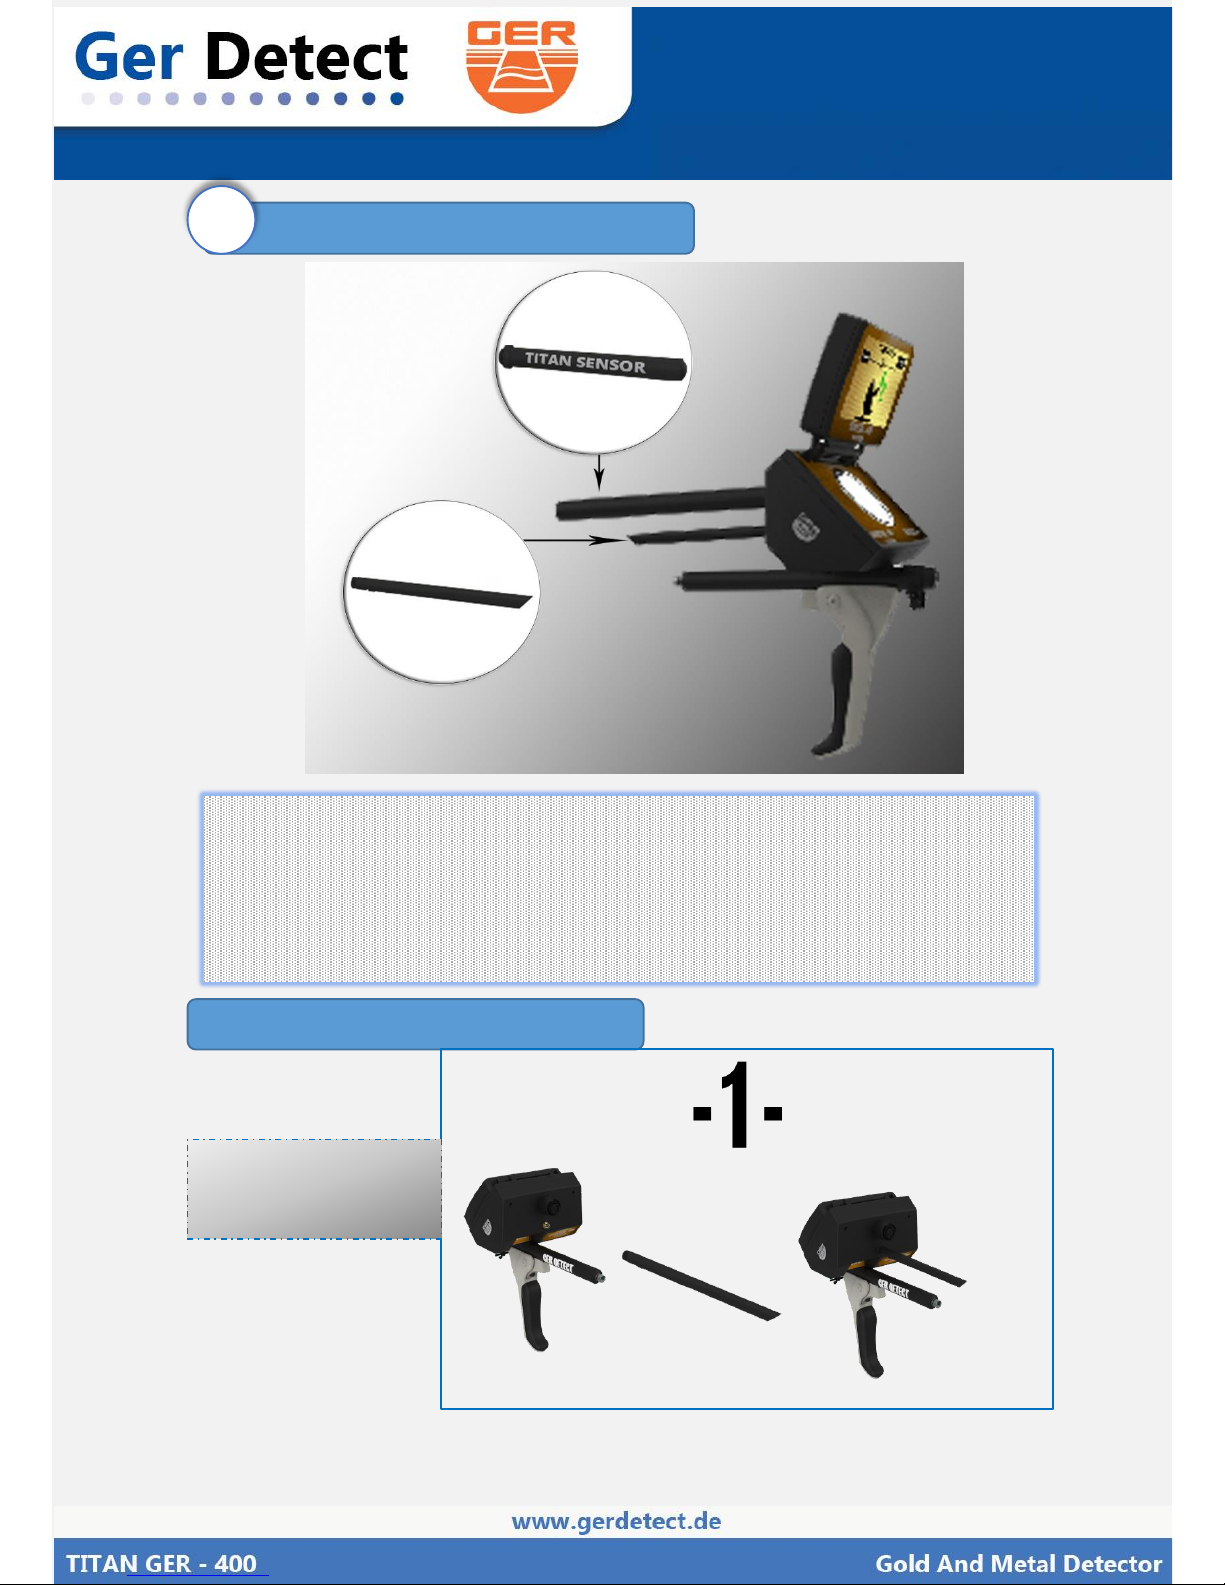
Connect component
Connect the
Dispatcher Antenna
Figer (15) Dispatcher Antenna
Page 12
English User Manual
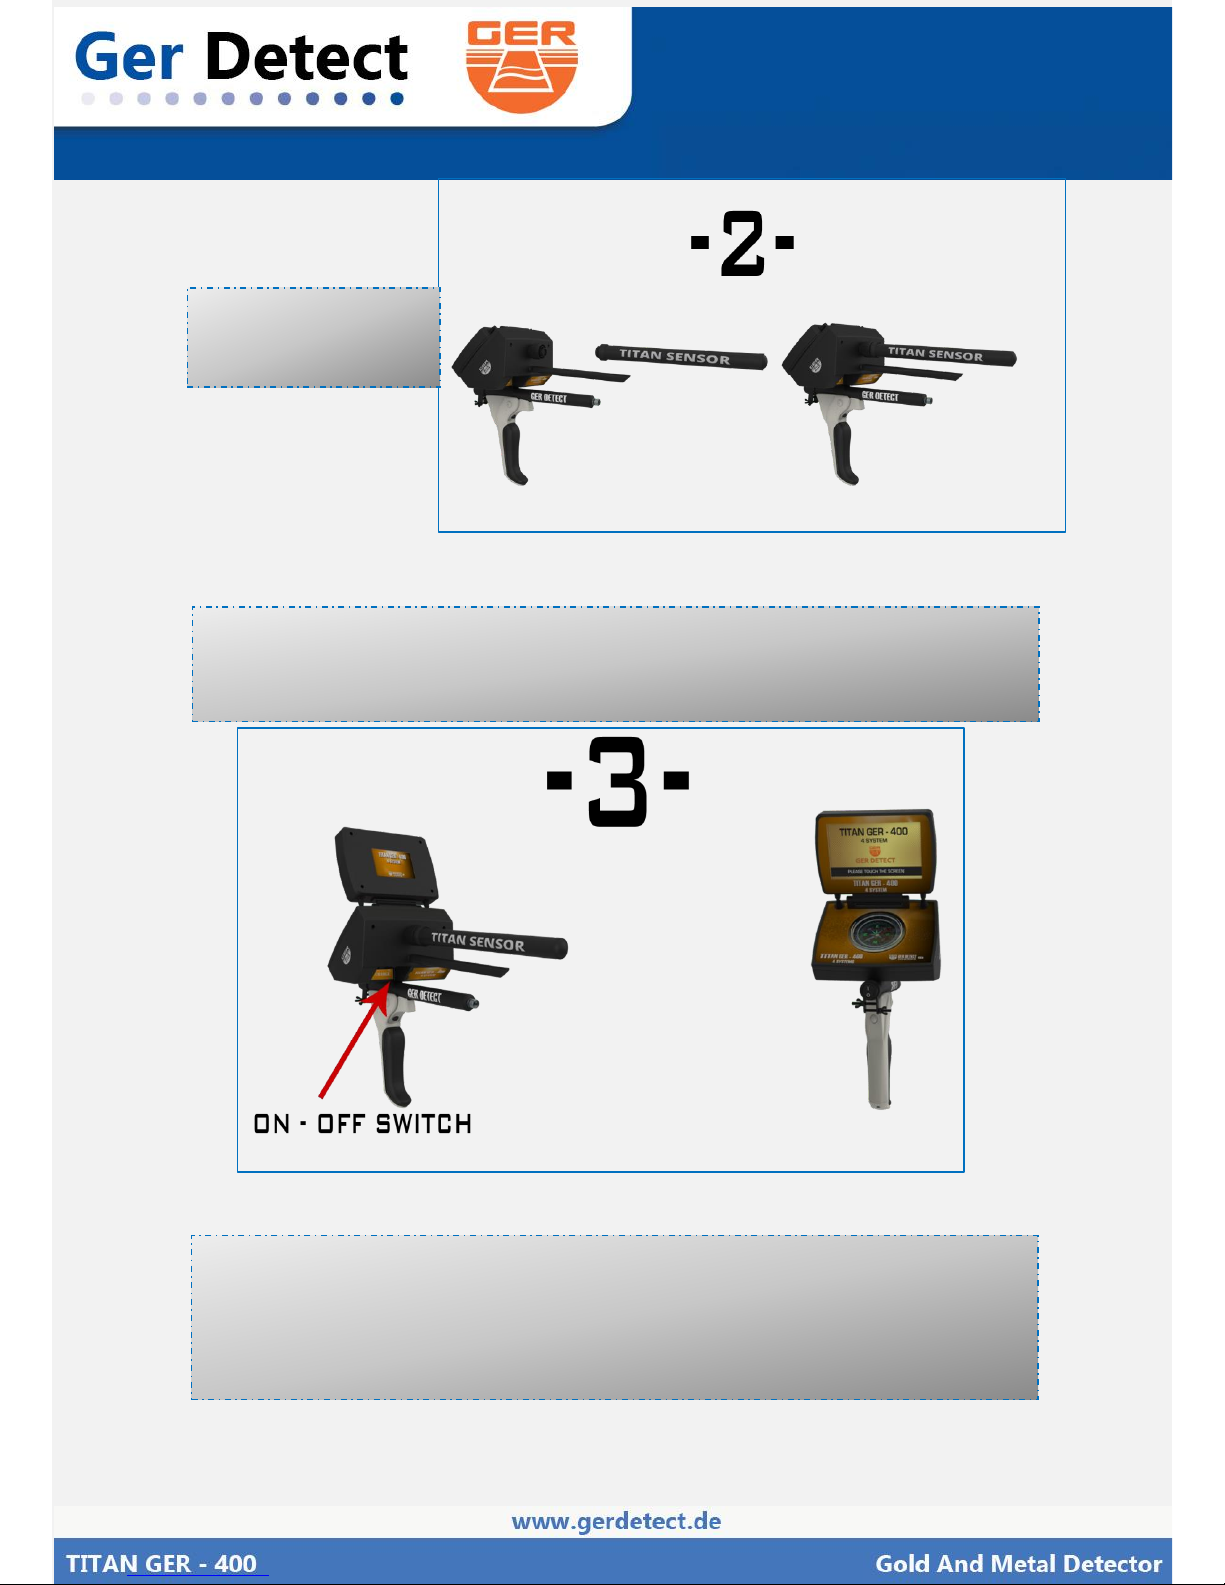
Connect the Ionic
Sensor
Figer (15) Dispatcher Antenna
Figer (16) Battery & ON / OFF switch
- Connect the Battery to the Device
- Open the Device Screen and Start the Device through ON / OFF switch
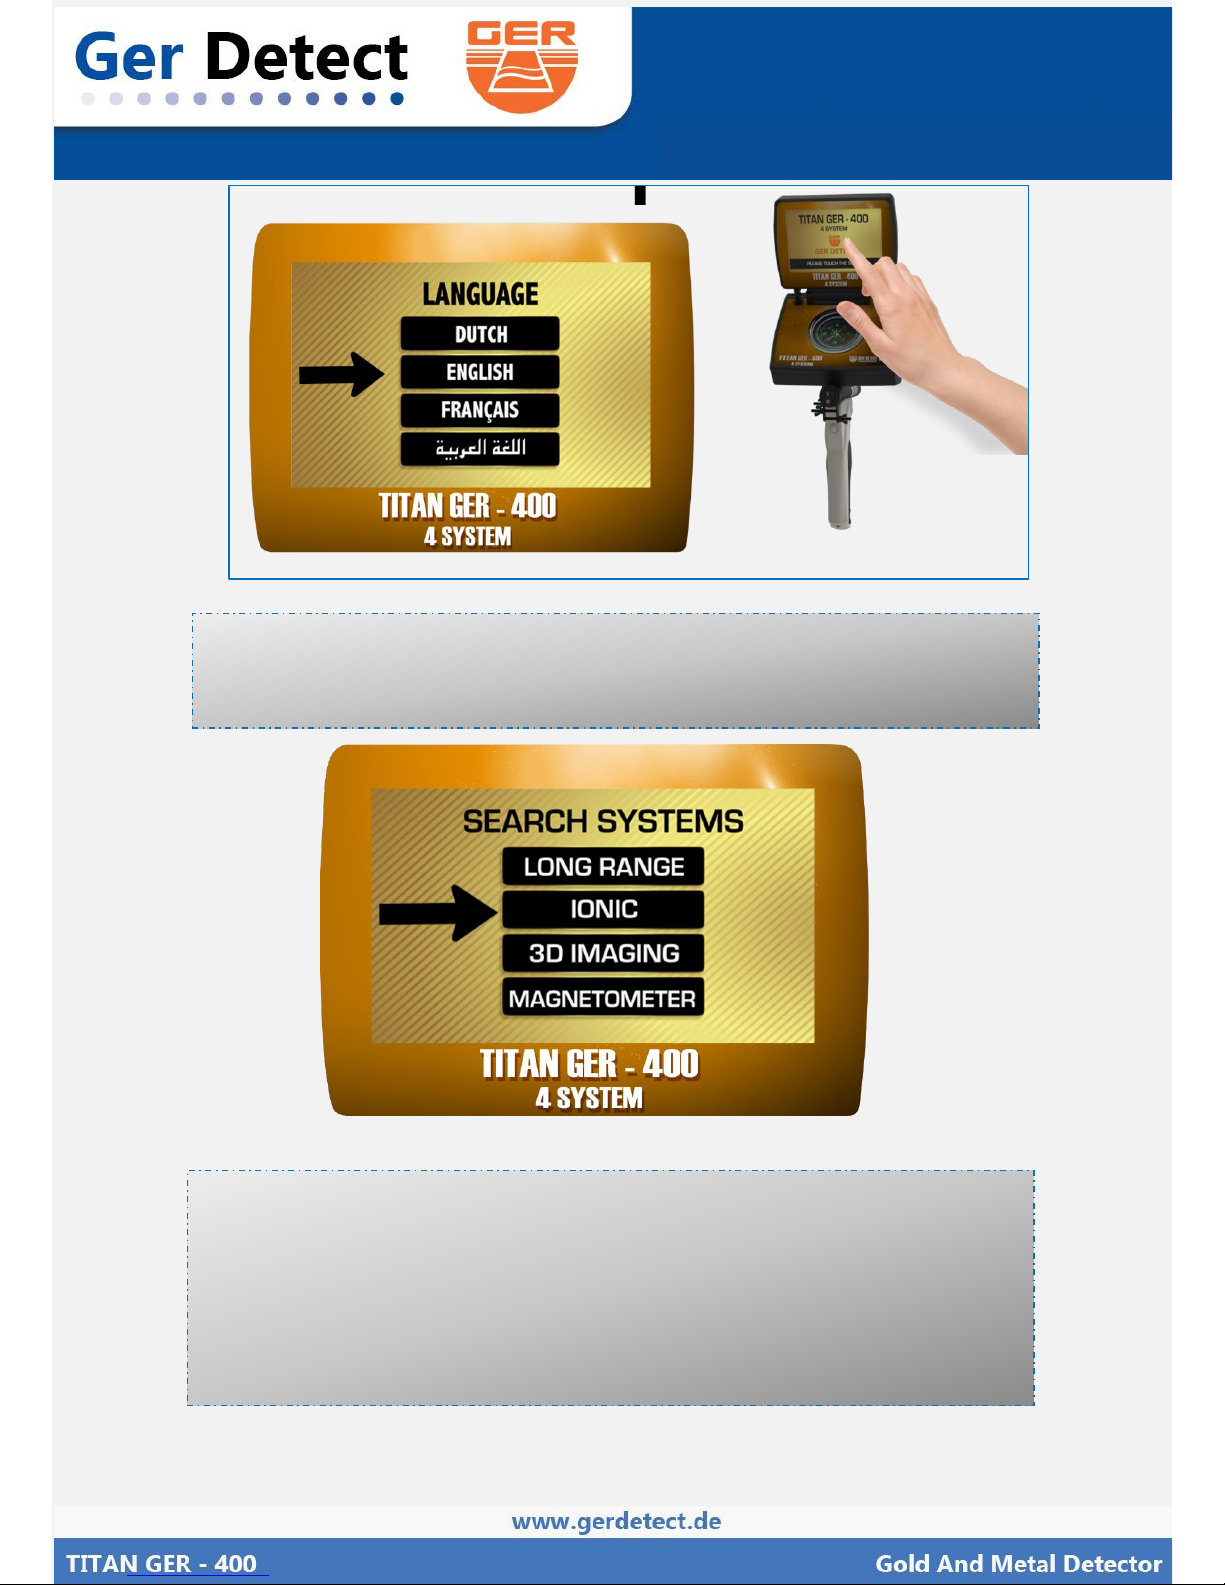
Click on the screen of the device to display the languages list
the device works on four languages:
(DUTCH-ENGLISH-FRENCH-ARABIC)
Page 13
English User Manual
Figer (17) languages list
After selecting the language, you want to work in (English for example)
The search systems menu will appear, Select
IONIC search system
Figer (18) search systems menu
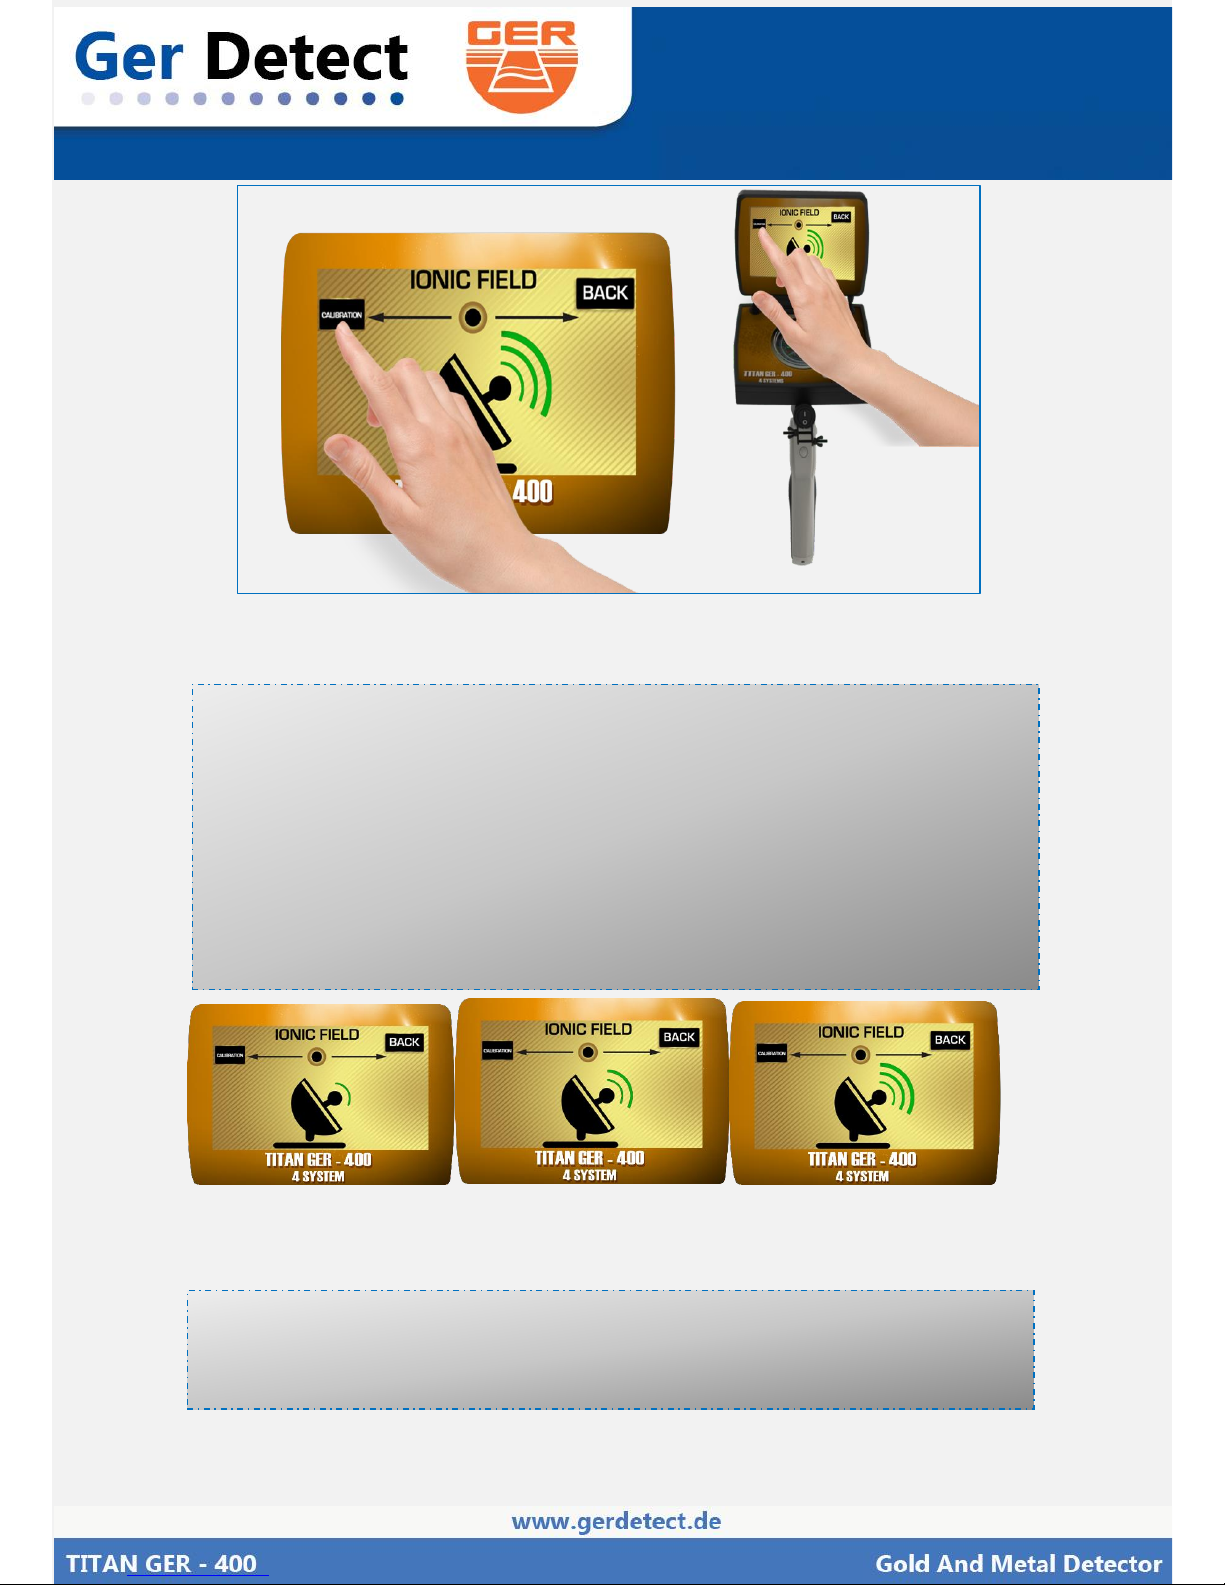
After selecting the ionic system, the search screen will appear.
Point the device to the ground if the device start to make a sound you must
calibrate
The device with the ground by pressing on the
calibration button
as follow:
Page 14
English User Manual
Figer (18) calibration button
After you finish the calibration, start the search by moving the device
180 degrees right and left.
When the device detect a target, it will start to make a sound.
In addition, the indicter will start to move to alert you about the target
discovered.
The sound will start Accelerating when you will be close to the target.
Figer (19) indicter movment
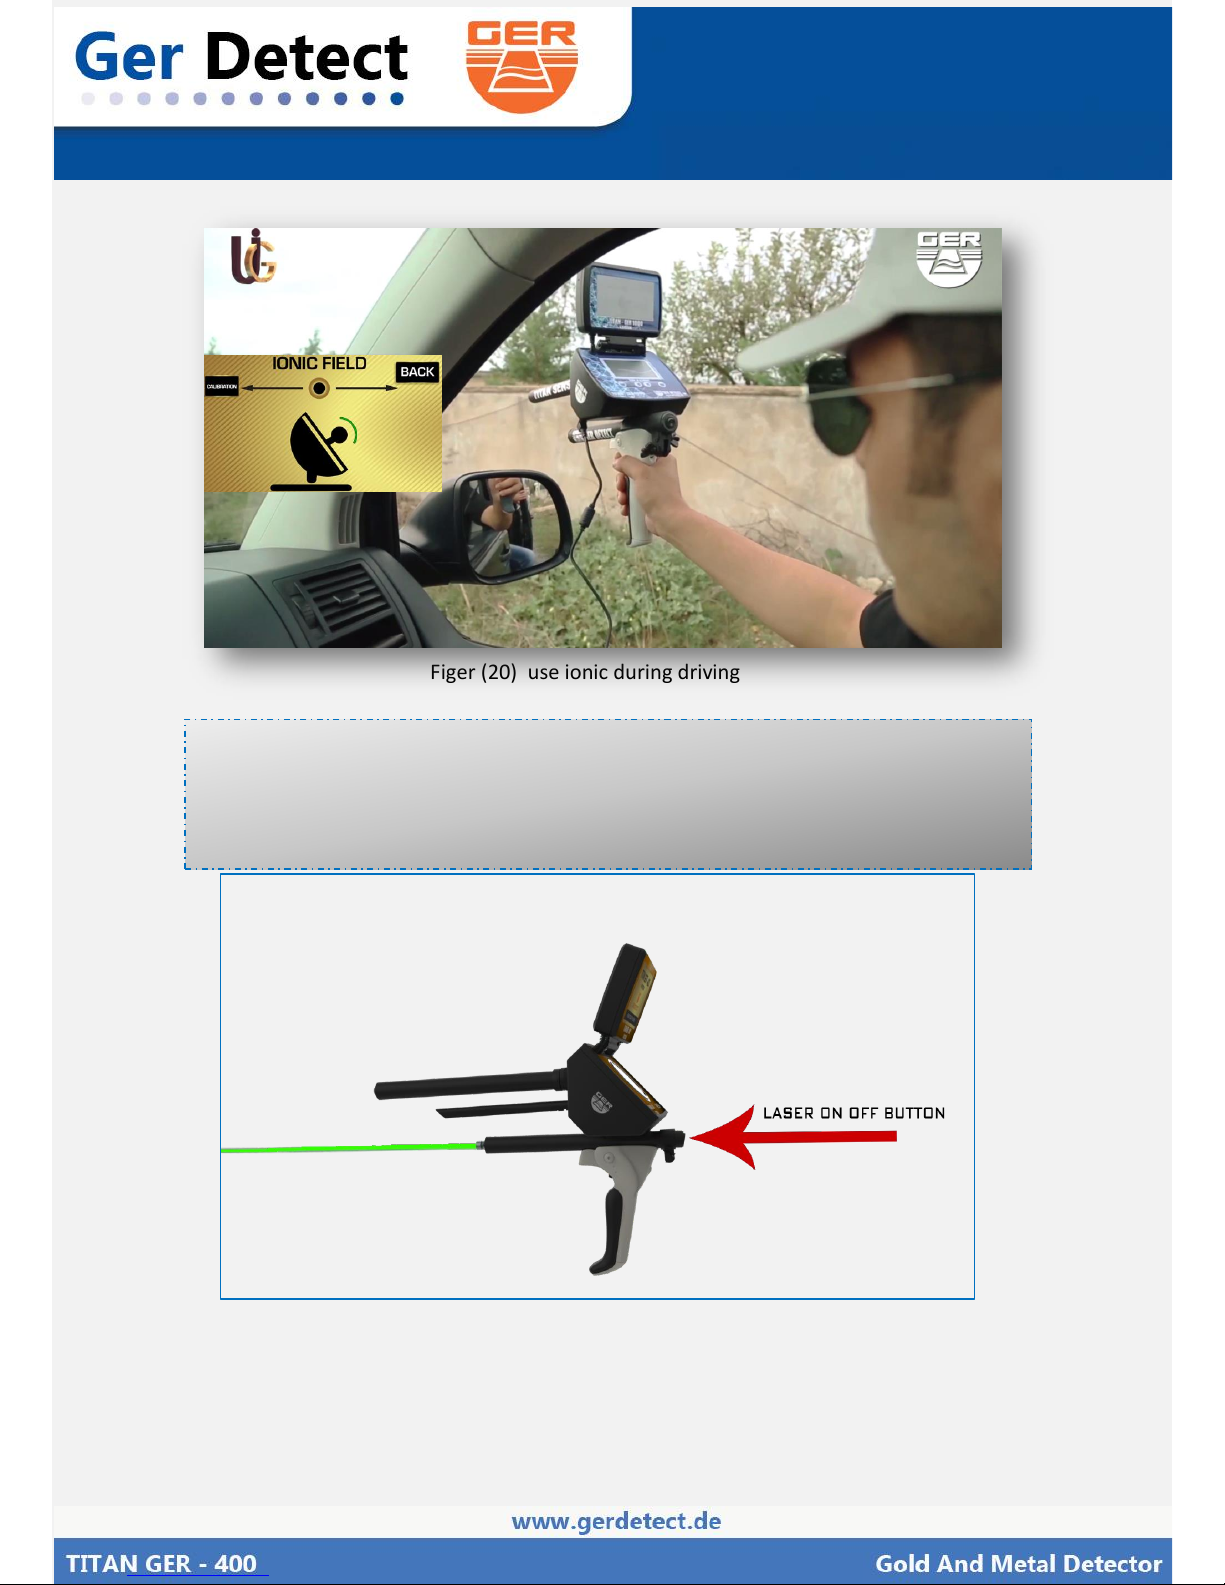
YOU CAN ALSO USE THE IONIC SEARCH SYSTEM DURING THE DRIVING IN
A MOVING VEHICLE... AS FOLLOW:
Page 15
English User Manual
Figer (20) use ionic during driving
In the event of lack of vision, you can operate the laser to locate the target
place.
Through the laser ON OFF, button
Figer (21) operating laser
Page 16
English User Manual
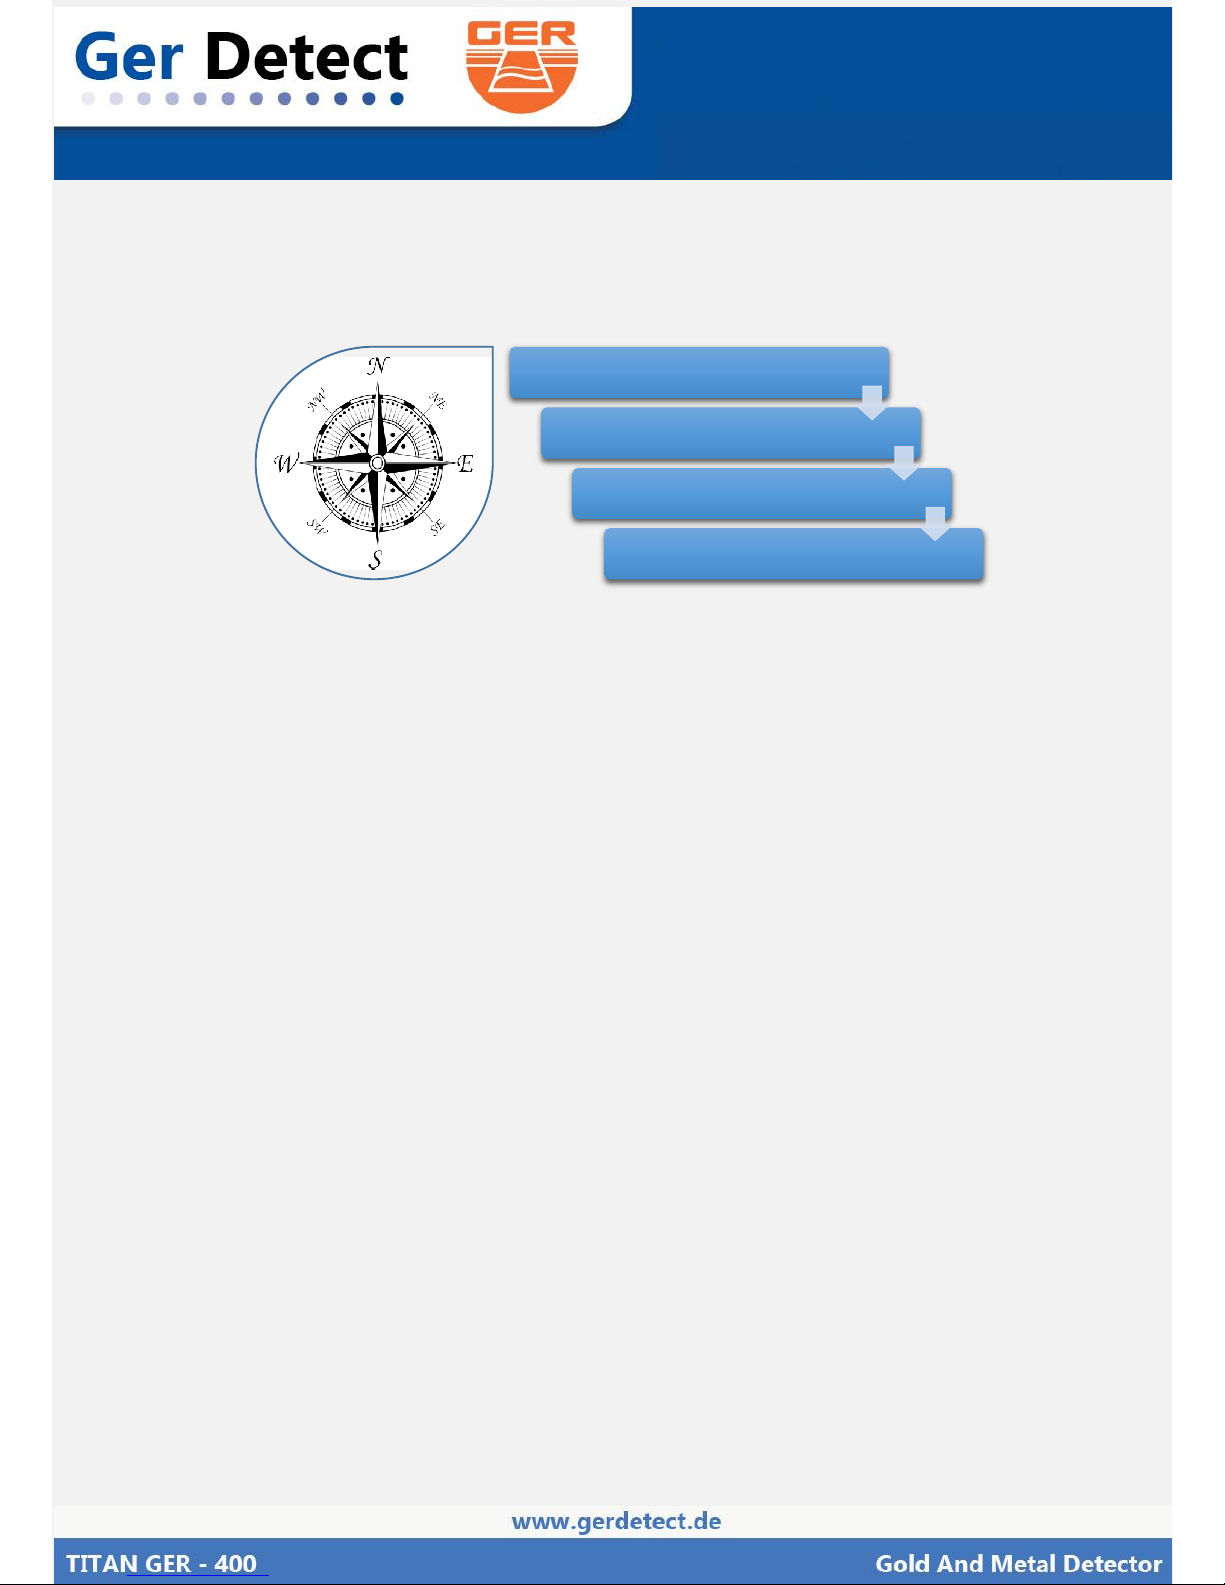
After detecting the target, confirm the target from four direction
North to South
South to North
East to West
West to East
Page 17
English User Manual
3D Imaging System
3
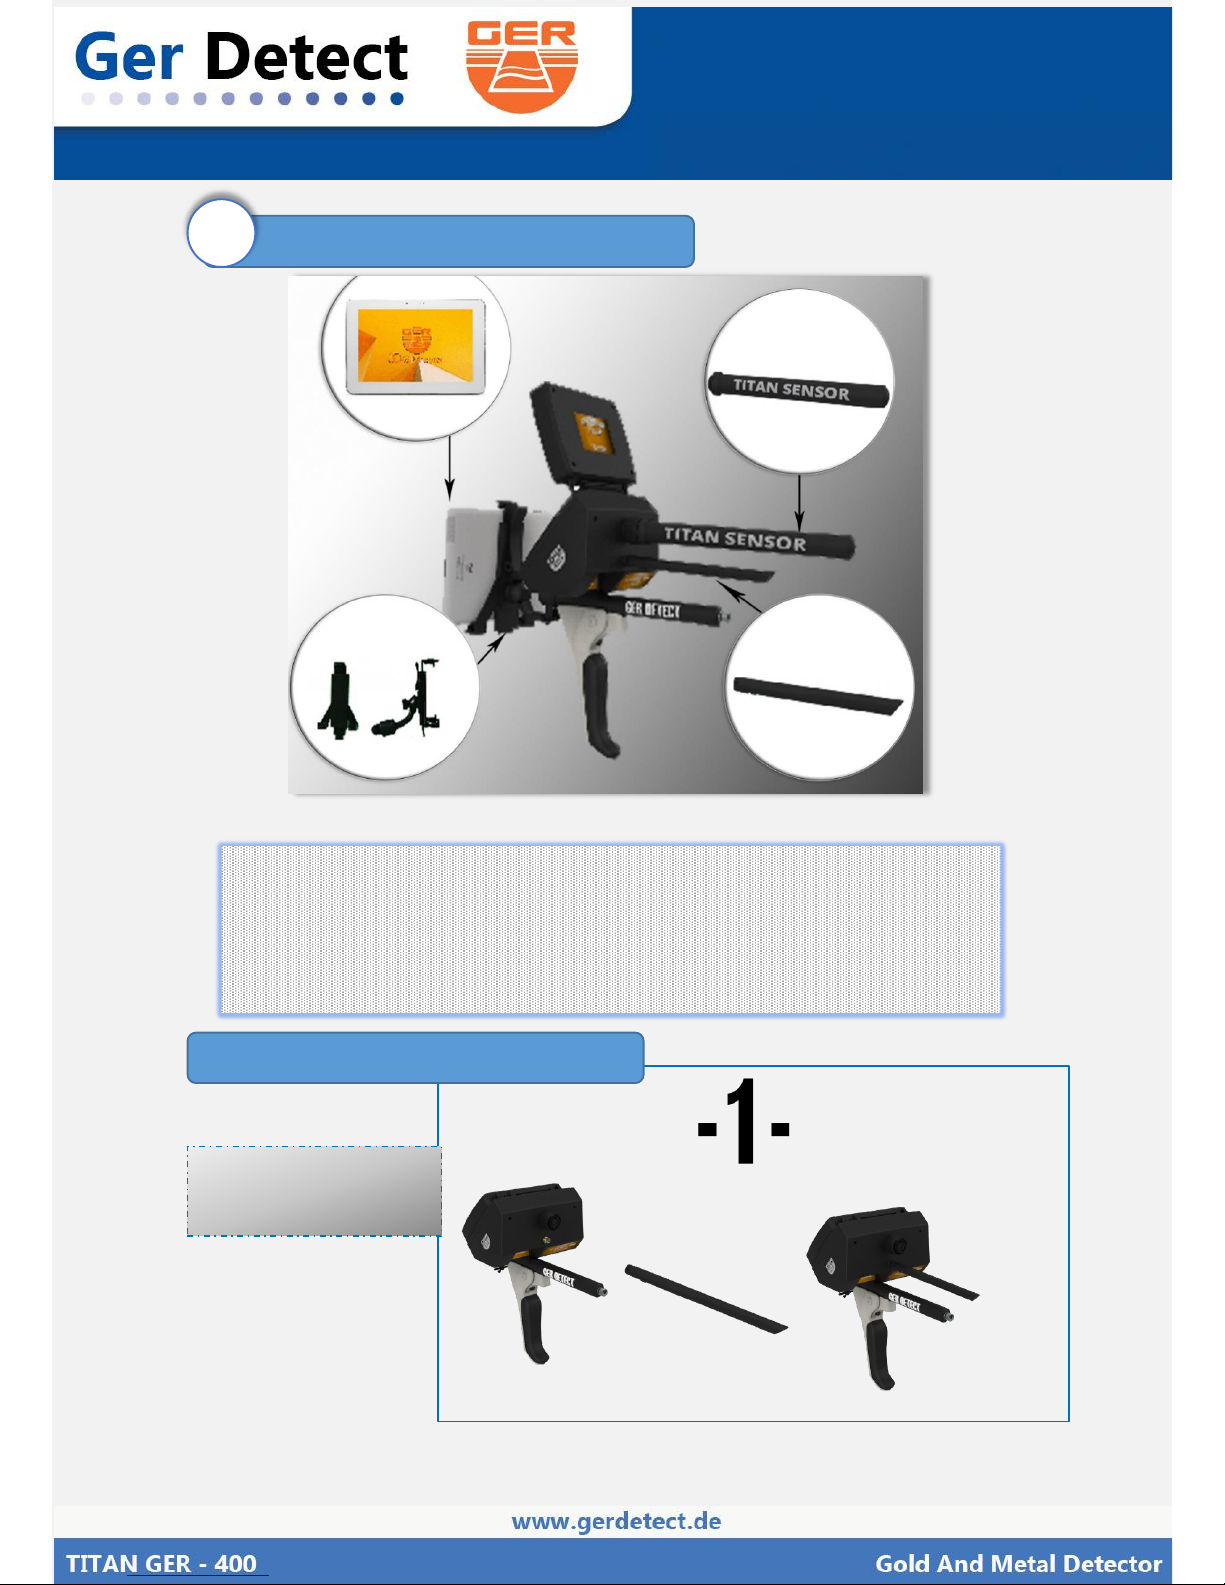
This system specializes to show you the area scanned on the tablet
screen in three-dimensional photo and through which you can specify
the target size, shape and depth of the target underground up to 45
meters.
3D Sensor
Dispatcher Antenna
Tablet Holder
Tablet
Figer (21) 3D Imaging System cpmponents
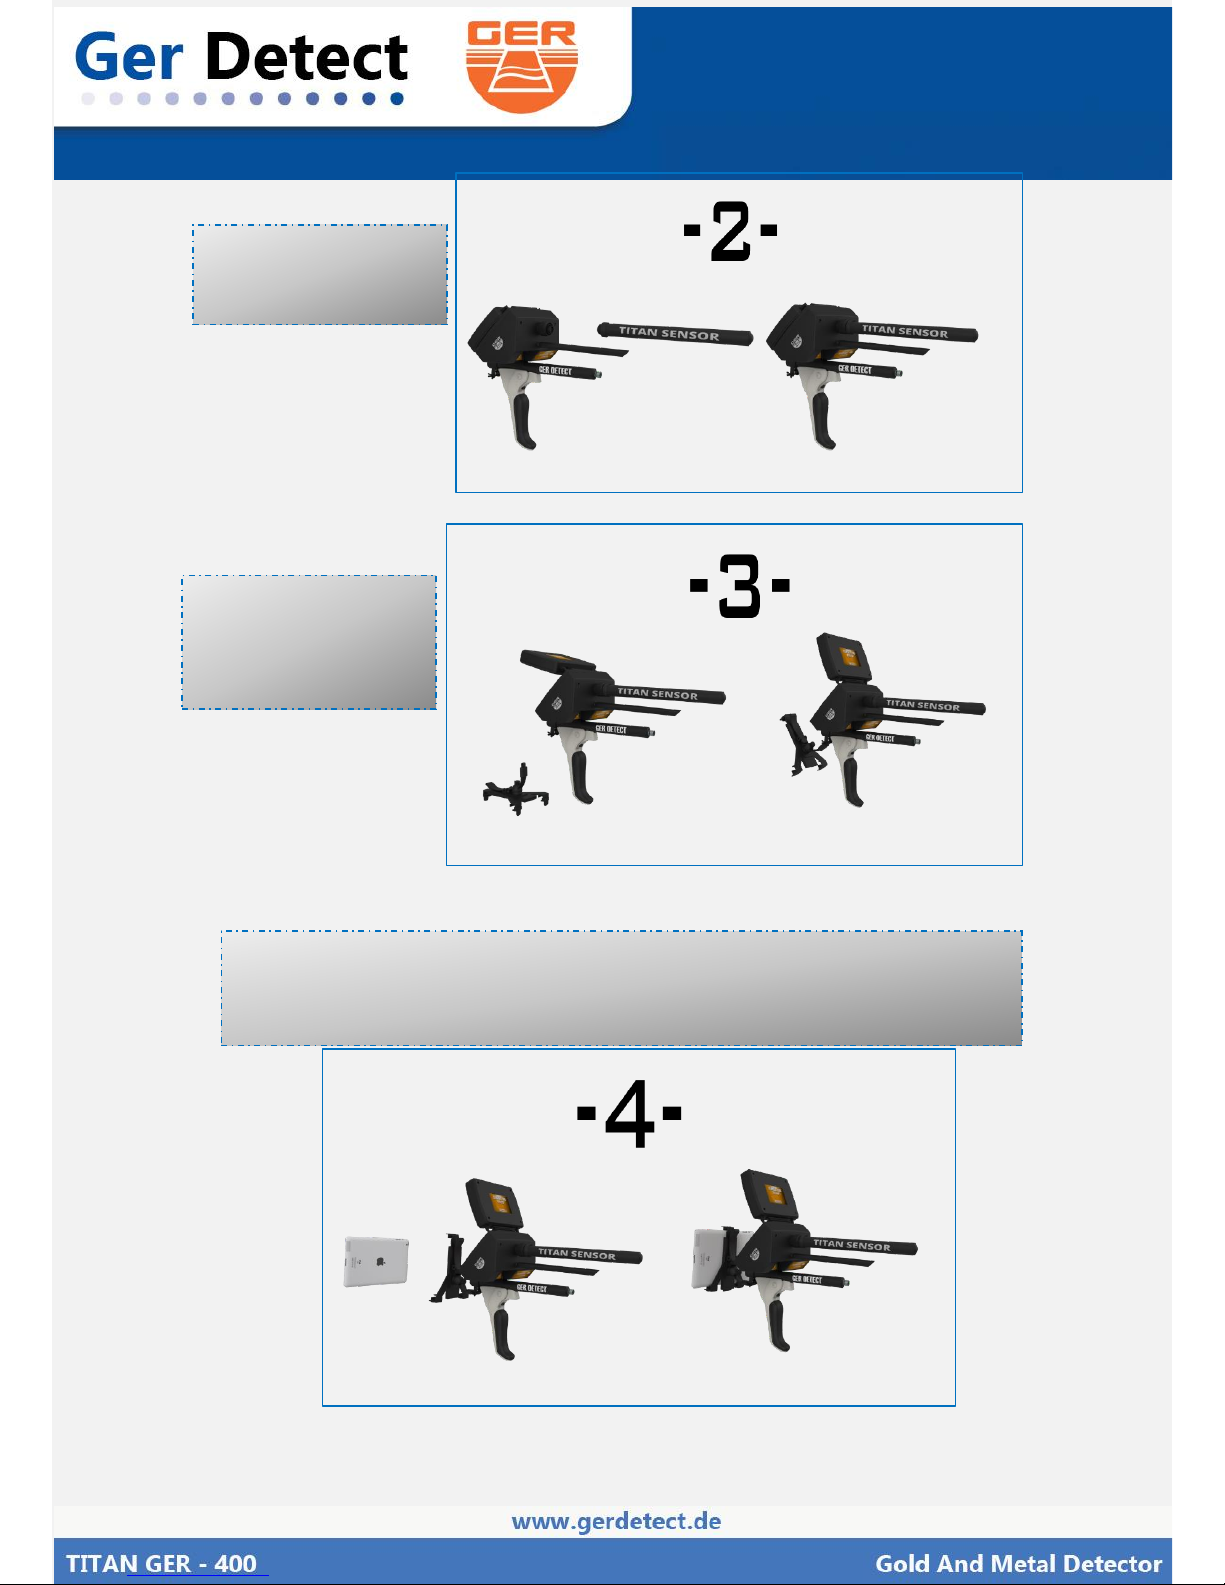
Connect component
Figer (22) Dispatcher Antenna
Connect the
Dispatcher Antenna
Page 18
English User Manual
Connect the 3D
Imaging Sensor
Figer (23) Imaging Sensor
Install the Tablet
Holder To The
Device
Figer (24) Tablet Holder
Figer (25) Fixing the tablet
Fix the tablet that supplied with the device on the tablet holder which
Contains analysis program to display the photo
Page 19
English User Manual
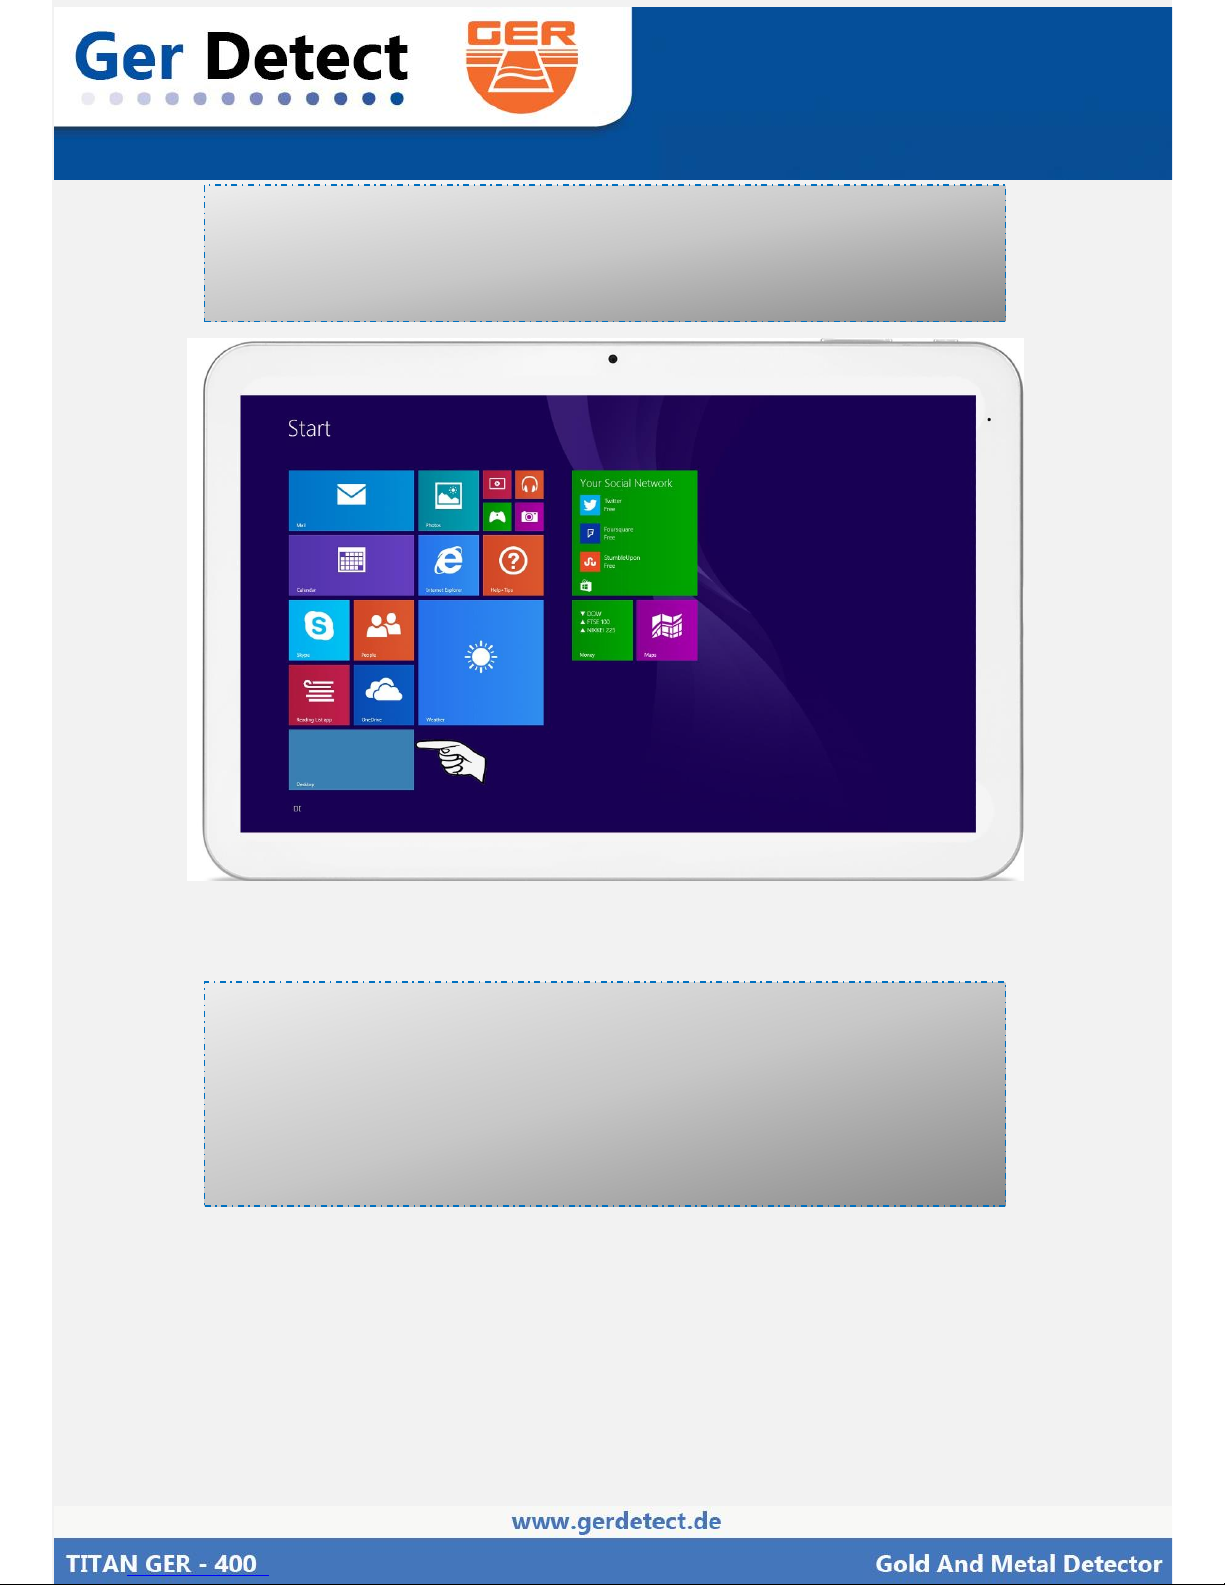
- Turning to the tablet to make a Bluetooth connection between
the device and the analysis program.
-
Click on the Desktop option
Figer (26) Turning tablet on
The desktop screen will appear.
1- Touch the arrow to revel the hidden icons.
2- Click on the Bluetooth icon.
3- Chose add a Bluetooth device
Page 20
English User Manual
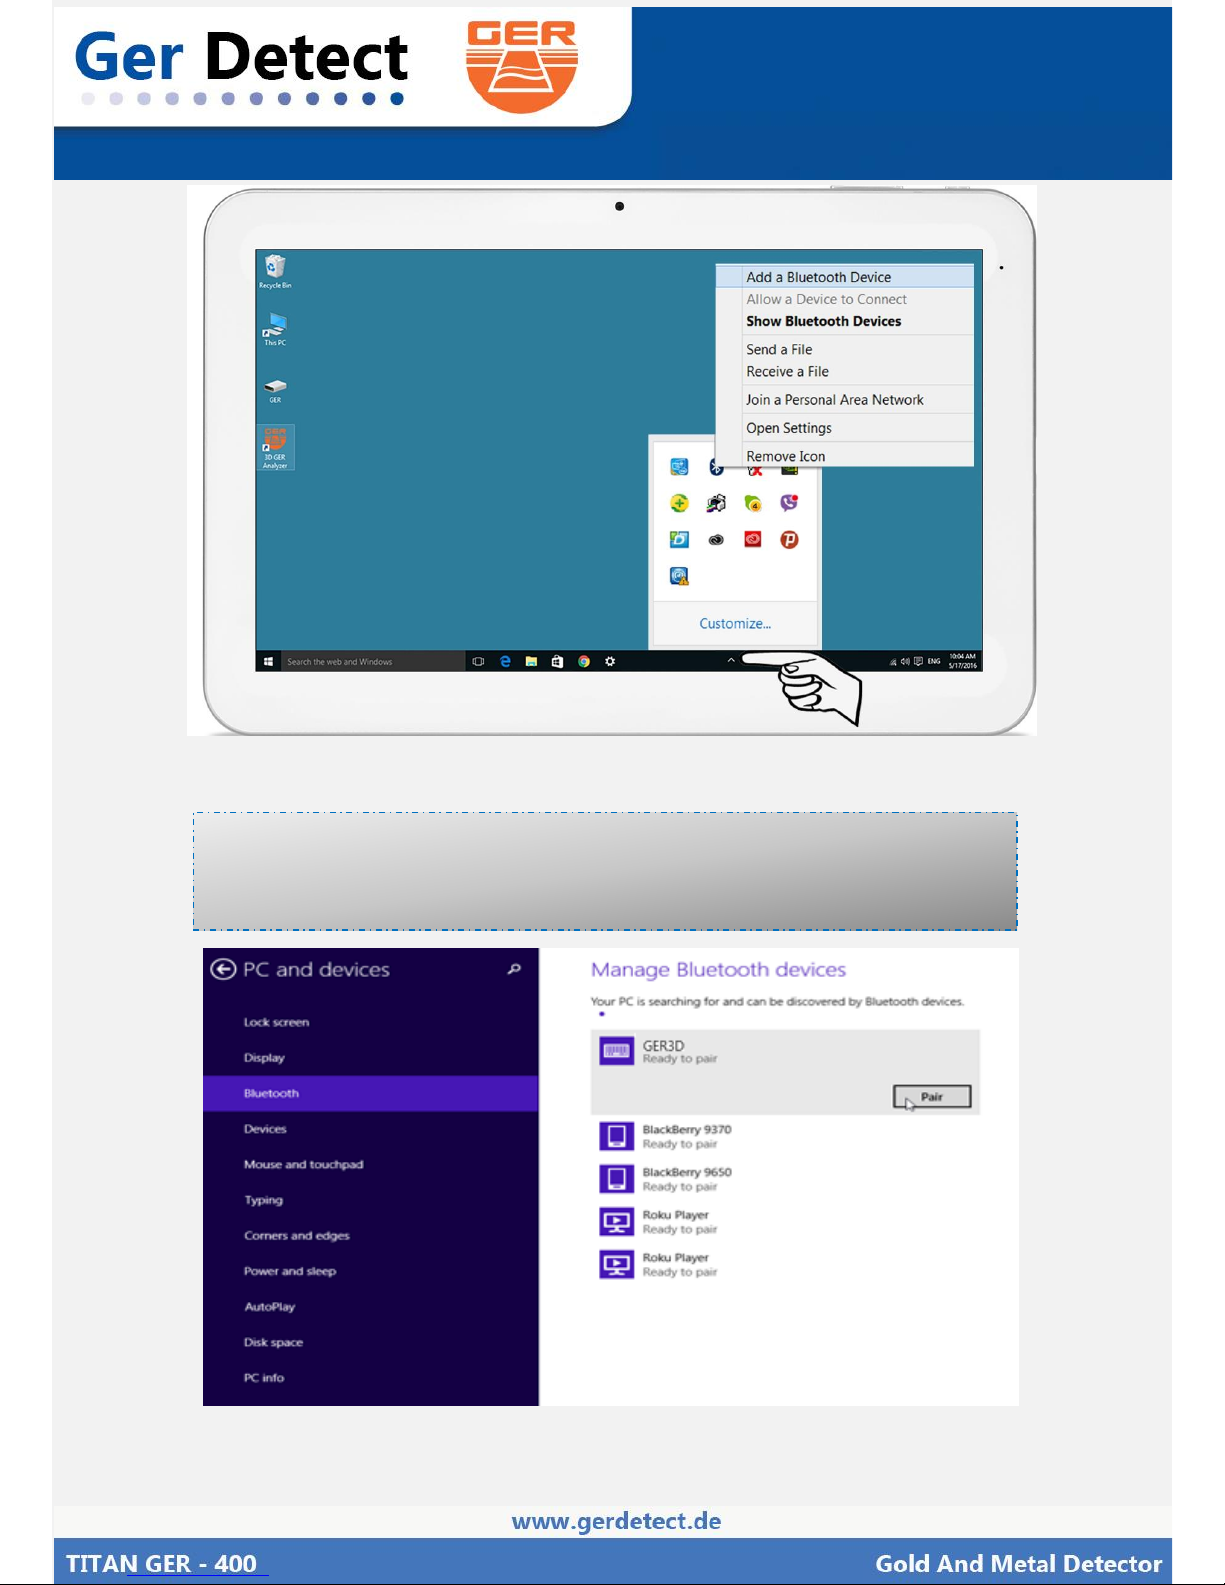
Figer (27) tablet desktop screen
The tablet will start to search for any devices with Bluetooth in the area.
When the device Bluetooth appear click on pair.
Figer (28) search for devices
Page 21
English User Manual
NOTE: The Bluetooth password is 1000
Now
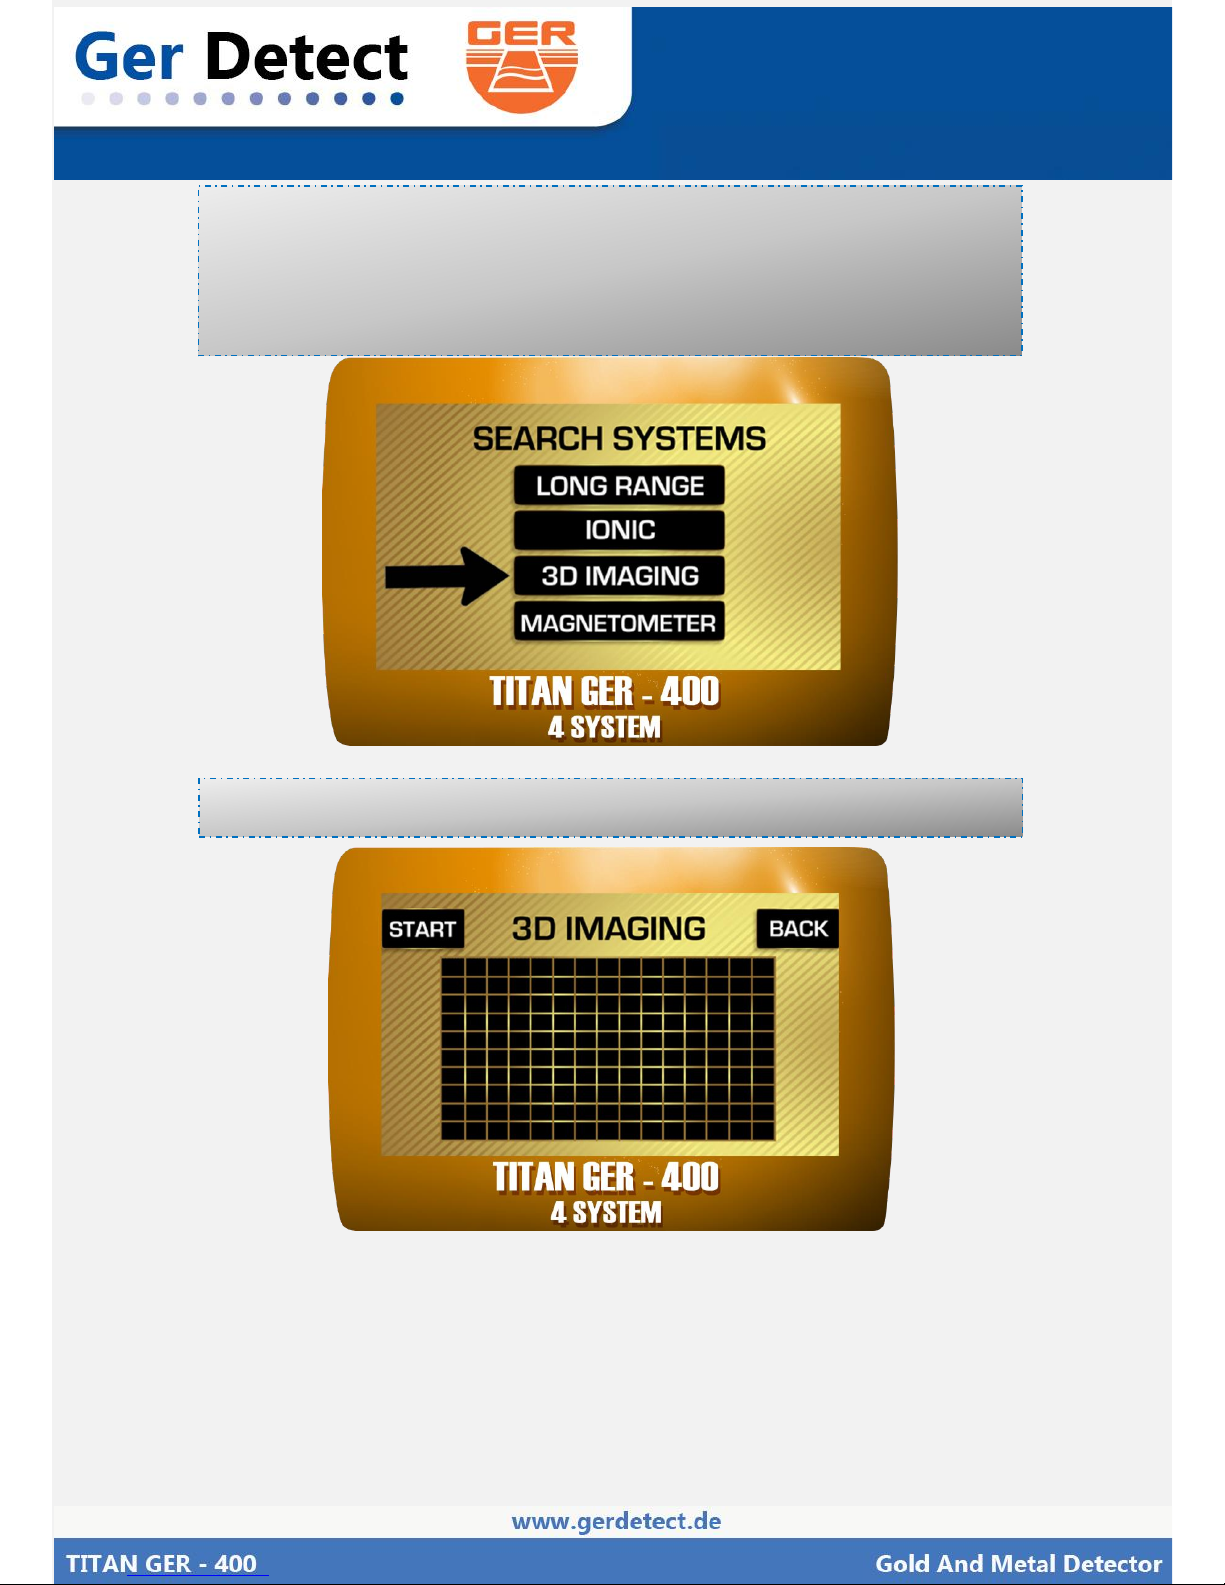
select the 3D IMAGING system from the systems menu in the device.
Figer (29) systems menu
After selecting the 3D imaging system, the search screen will appear.
Figer (30) search screen
Page 22
English User Manual
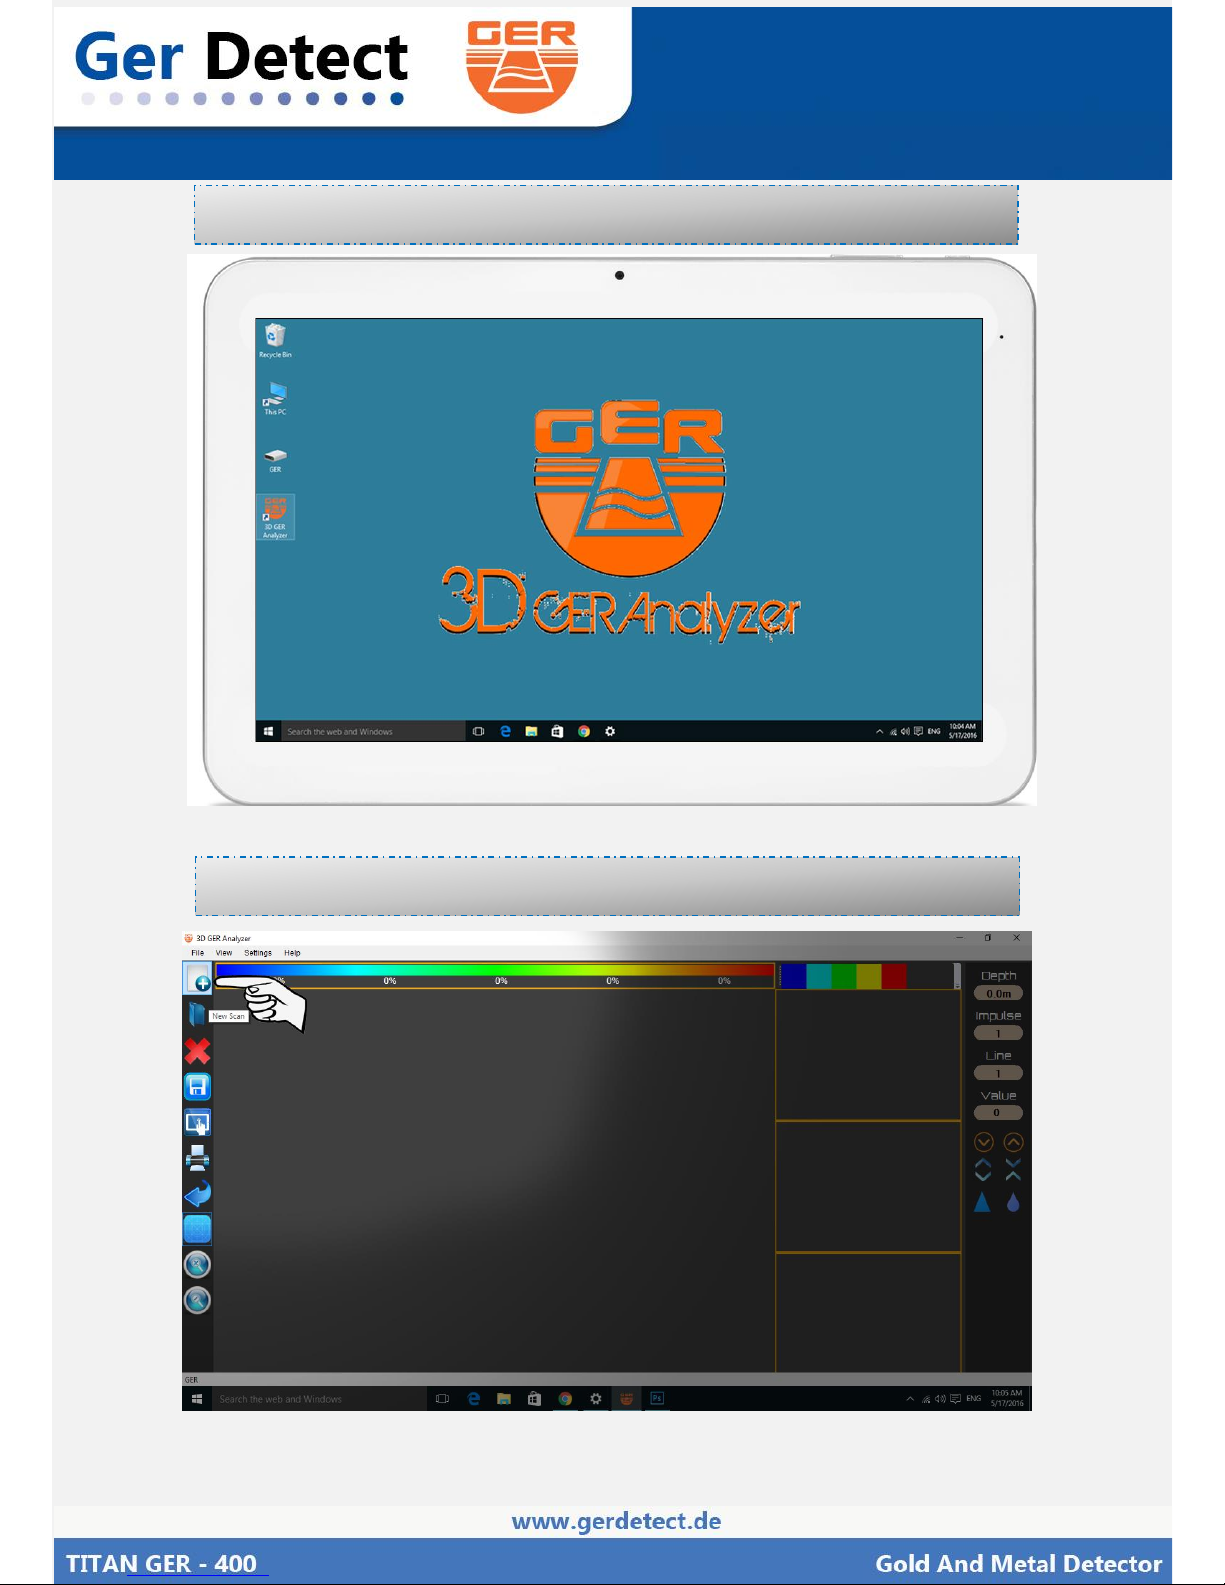
Open the 3D GER Analyzer that installed on the tablet
Figer (31) Openning the 3D GER
Start a new project to scan the ground by clicking on new scan
Figer (32) Start new scan
Page 23
English User Manual
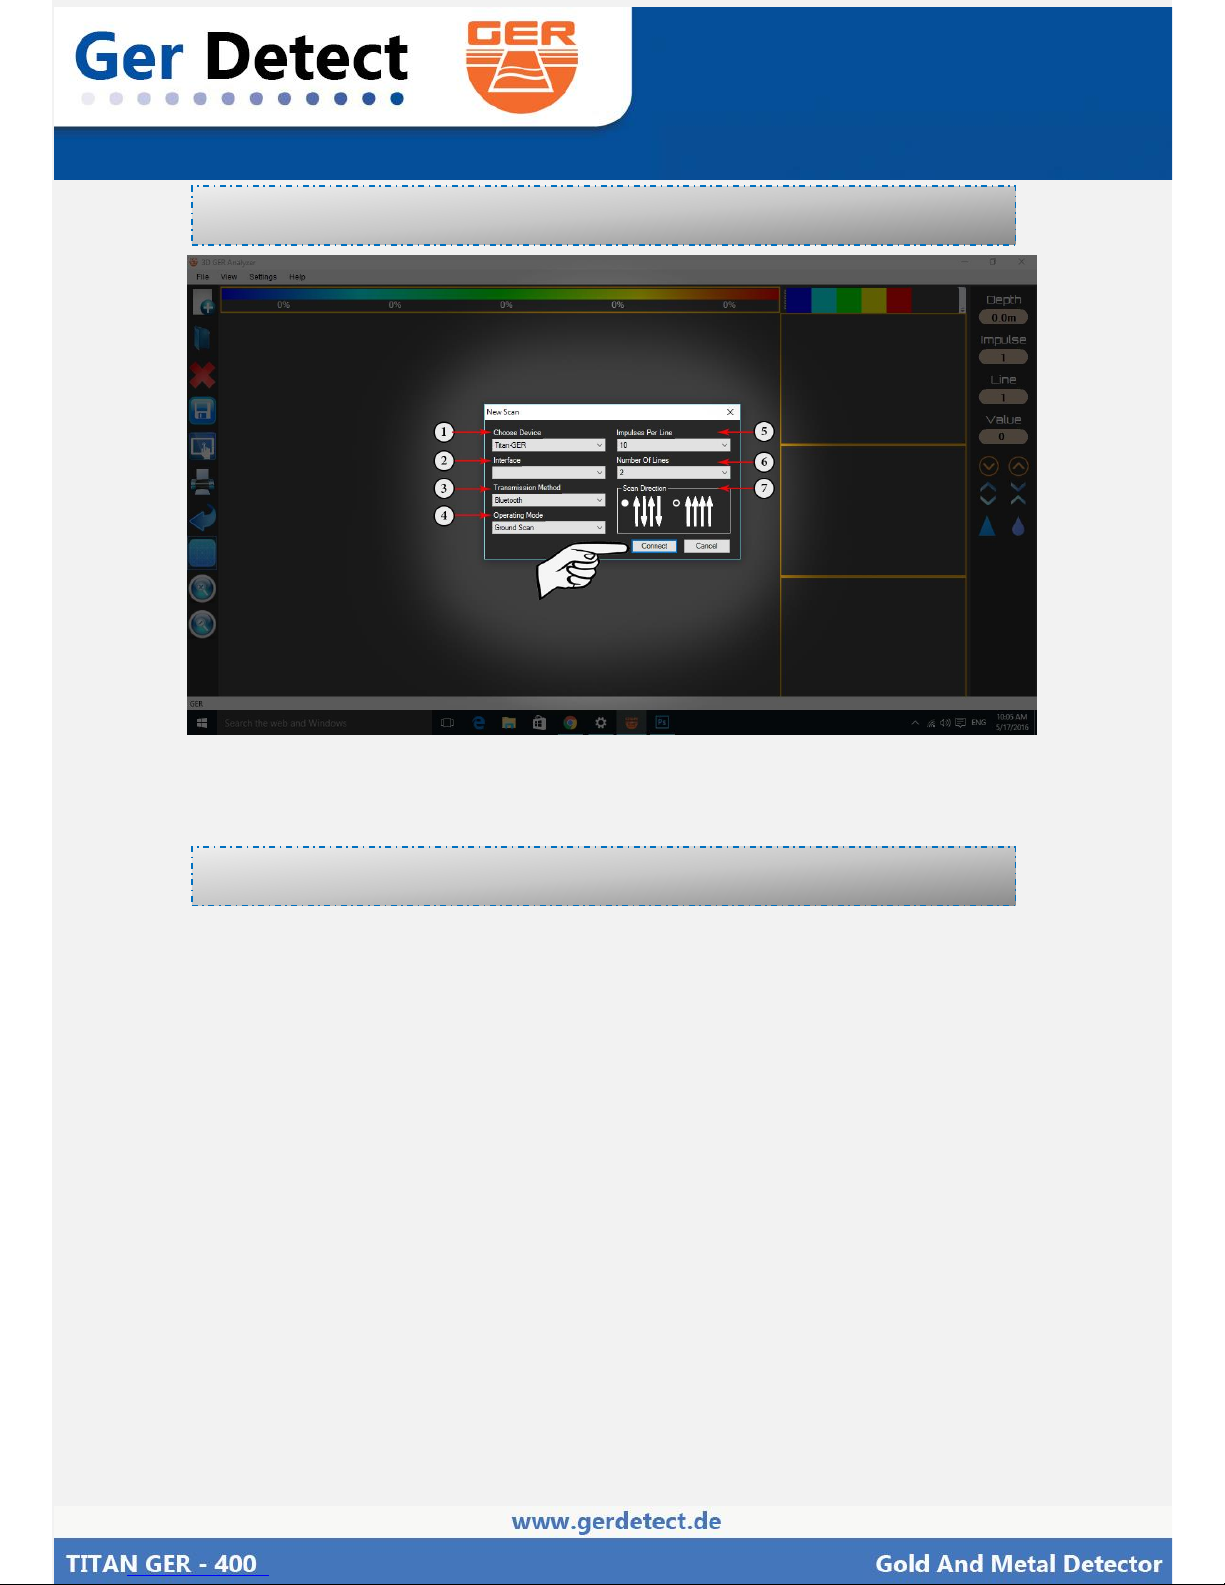
1- CHOSE DEVICE : TITAN GER
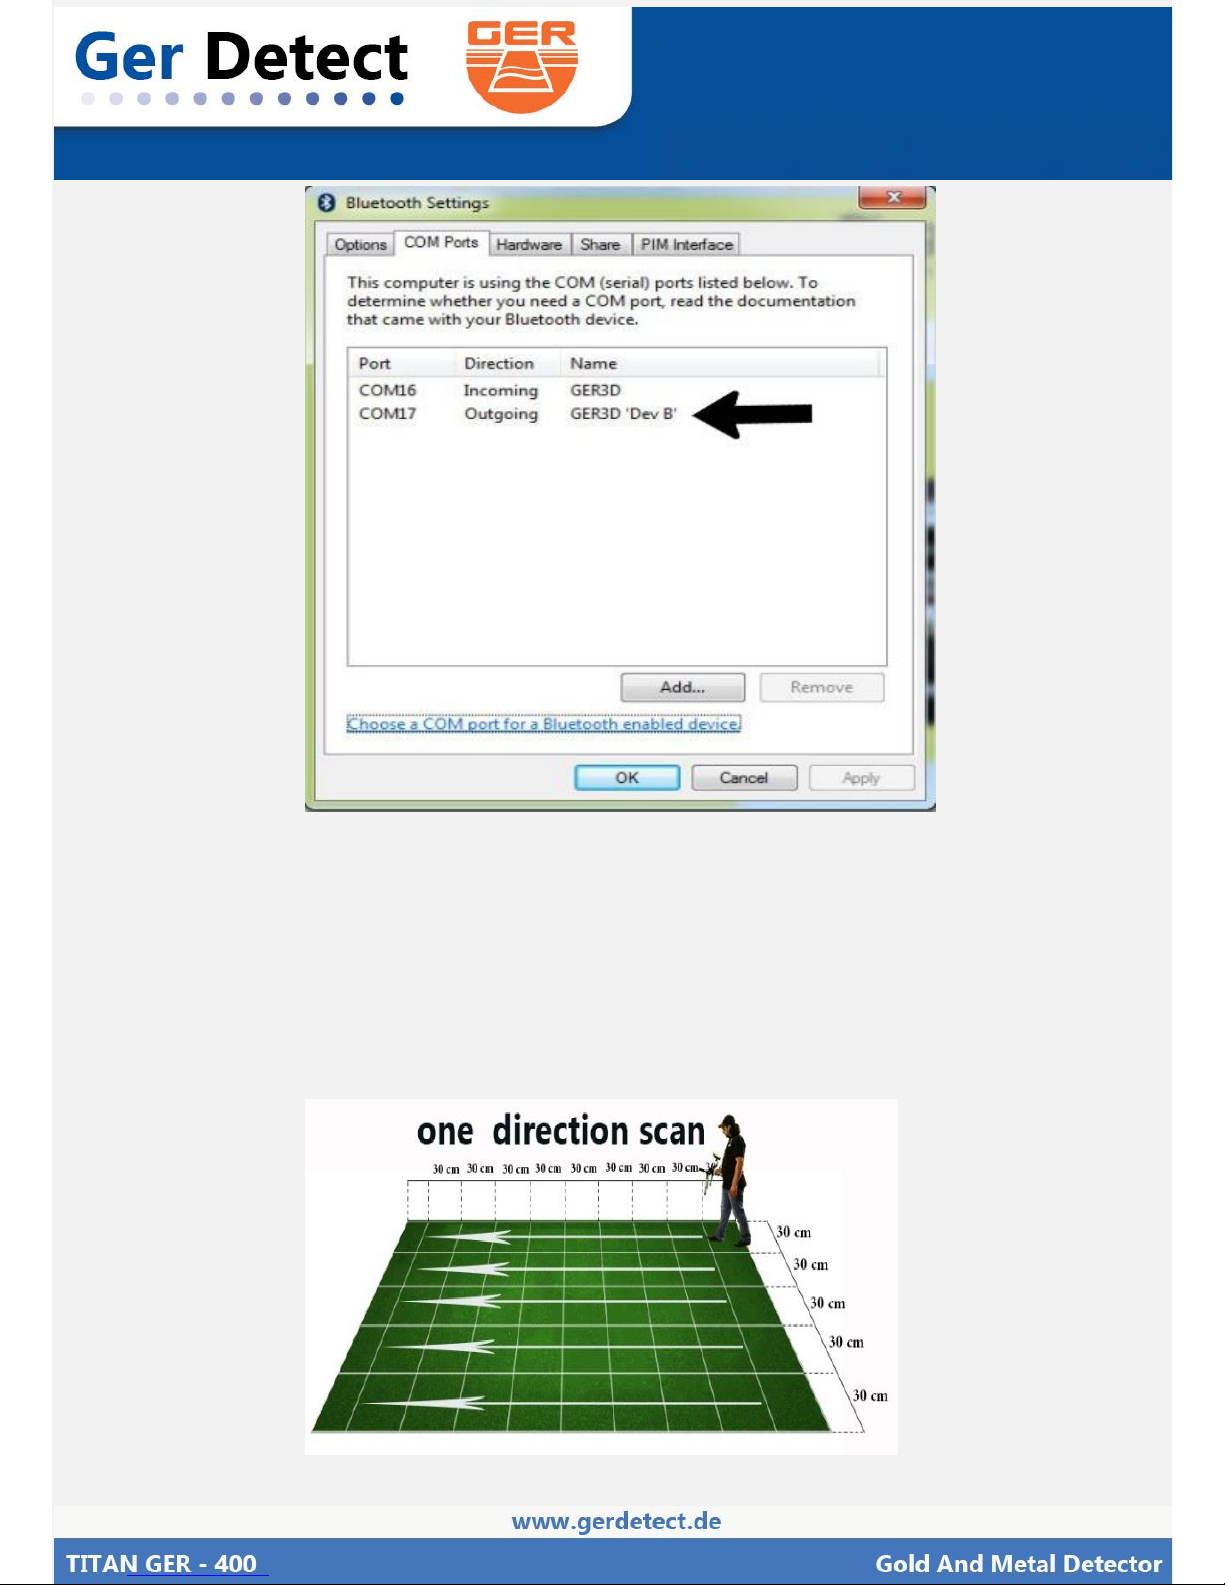
2- INTER FACE : OPEN THE BLUETOOTH SETTINGS AND ENTER THE
COM NUMBER ( OUT GOING ) FOR EXAMBLE COM 17
The connection settings window will appear on the screen.
Figer (33) connection settings
Enter the settings as follow
Page 24
English User Manual
3- TRANSMISSION METHOD : BLUETOOTH
4- OPERATING MODE : GROUND SCAN
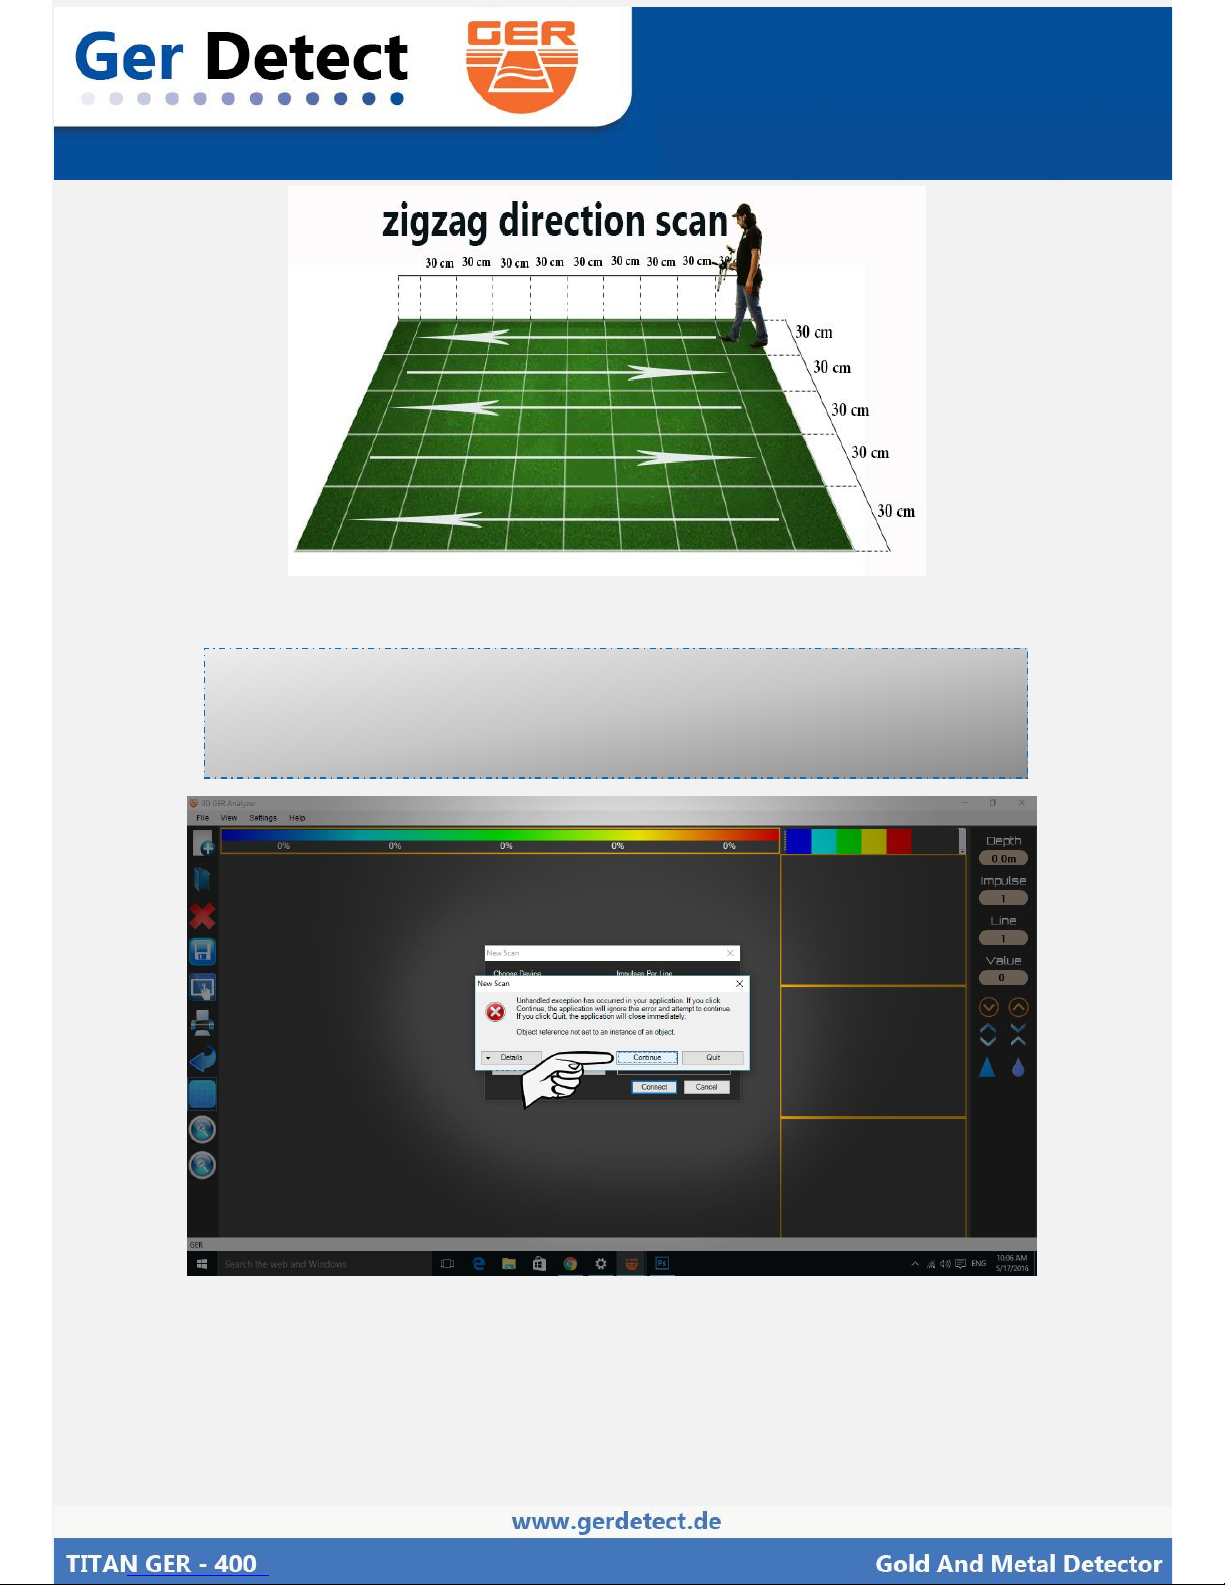
5- IMPULSES PER LINE : 10 TO 50 ( EACH IMPULSE = 30 CM )
6- NUMBER OF LINES : 1 TO 15 ( EACH IMPULSE = 30 CM )
7- SCAN DIRECTION : OPTIONAL
Figer (34) connection settings
Page 25
English User Manual
After you enter the sittings, click on connect and shift to the device.
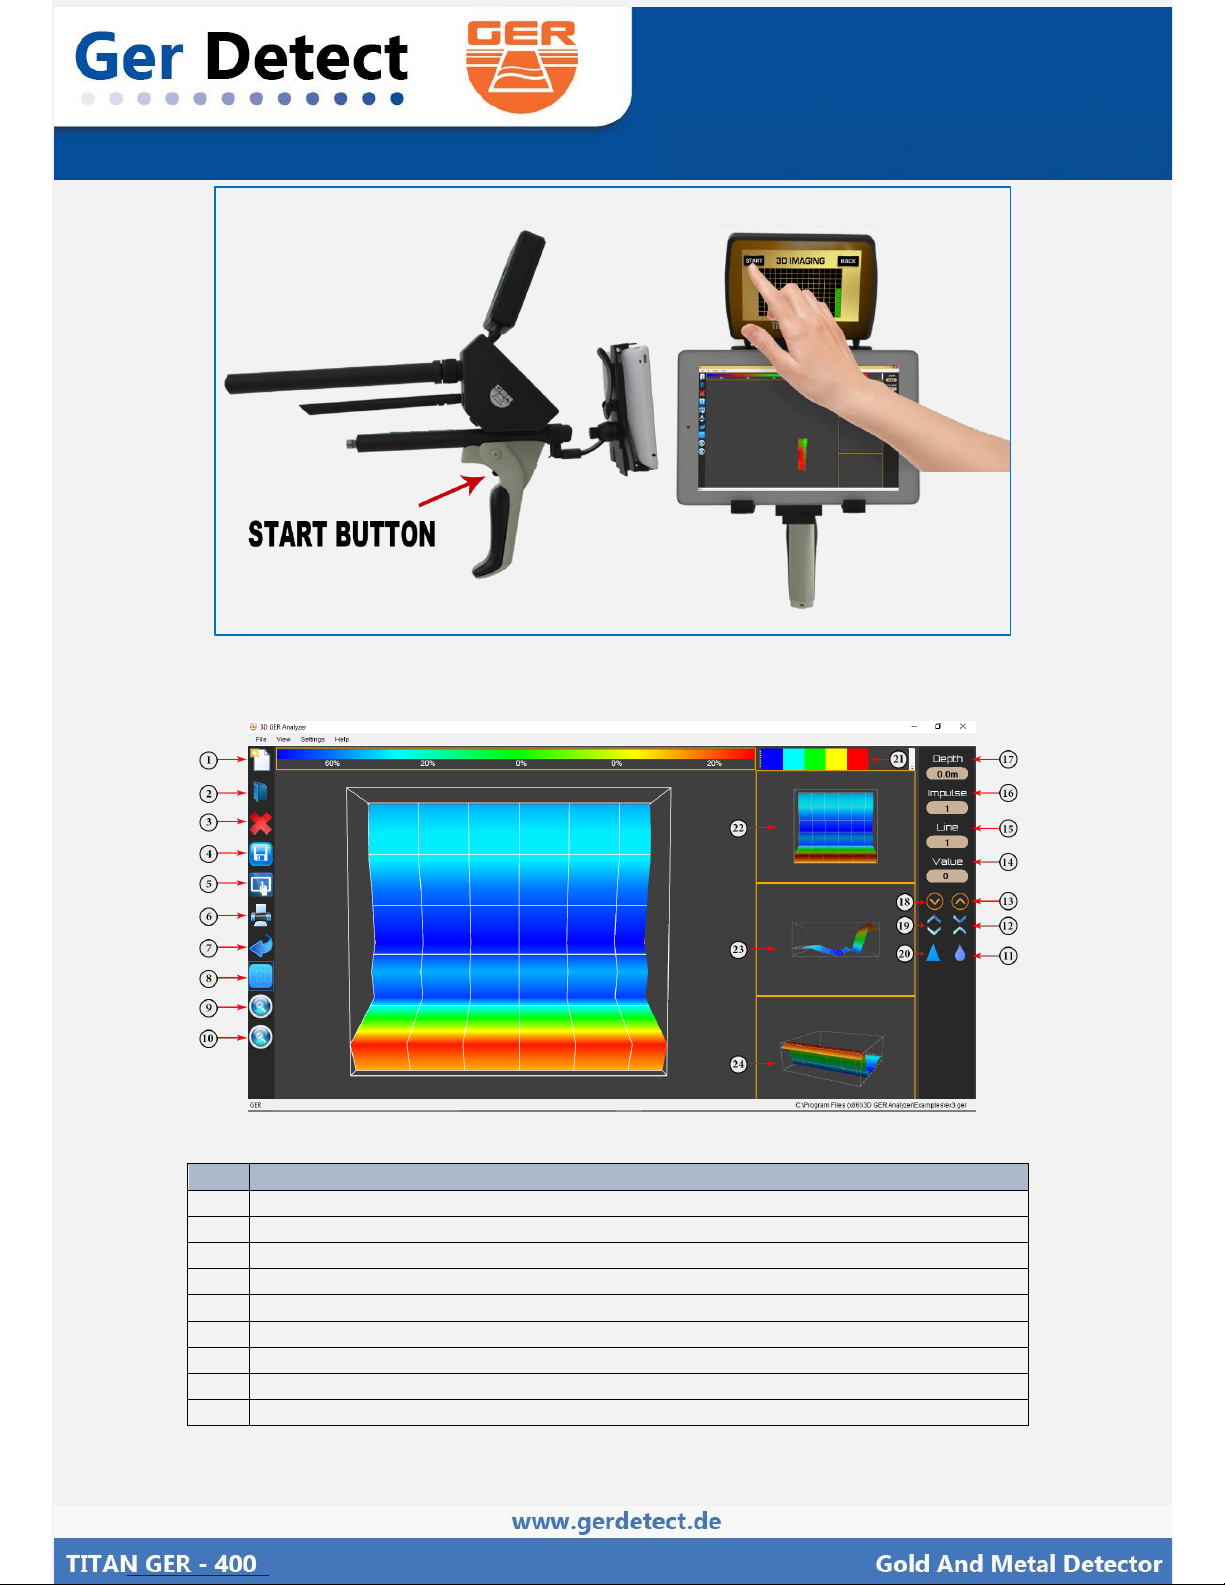
Therefore, the device will start taking pictures as follow:
Page 26
English User Manual
NO
Explaining
1
Start new scan and disconnect after scanning finish
2
Open file from your tablet already existing in your tablet
3
Cancel the scanning or delete the photo
4
Save the photo as a .GER file to re-open it any time you want
5
Save as a photo with no option to change anything in the photo shape
6
Print report allowed you to see the where about of the metal and the other elements
7
To return the photo as it is was before you start analyzing
8
To hide and appear the grid which Represent the number of photo in the scan
9
zoom to make the picture bigger
Figer (35) startting taking pictures
Page 27
English User Manual
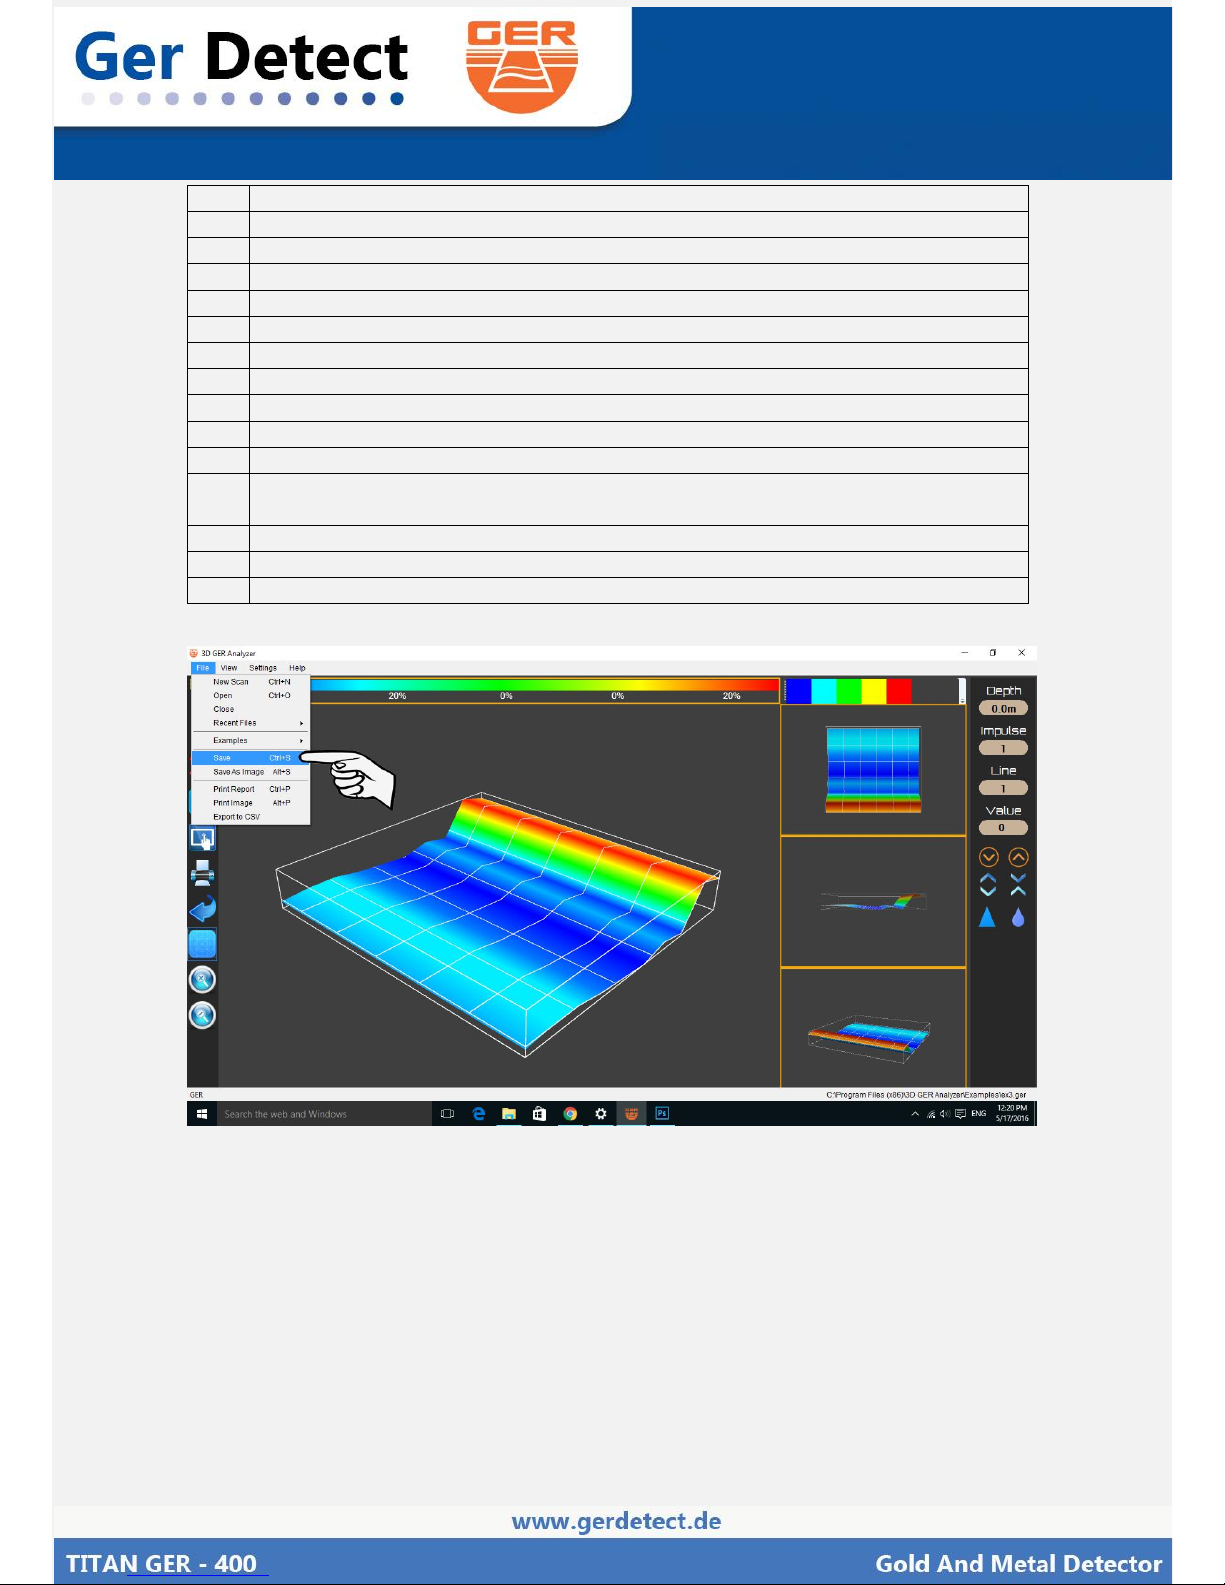
10
Miniature to make the picture smaller
11
A Tool you use it in case of not clear target to see the correct shape ( - )
12
A Tool you use it in case of not clear target to see the correct shape ( + )
13
to make the target in high size
14
to make the target in low size
15
move between the grid squares to pin point the area that you want to know its depth
16
move between the grid squares to pin point the area that you want to know its depth
17
The value which will deferent between the metals and the cavity and the ground
18
when you pin point the target will allowed you to now in which line is your target exactly
19
when you pin point the target will allowed you to now in which line is your target exactly
20
Depth when you can see the target exact depth
21
This options allowed you to see the target in 2D & 3D shape and you can hide the soil for
example or the metals and keep the cavity
22
Another way to see the target from down
23
Another way to see the target from the side
24
Another way to see the target from the angle
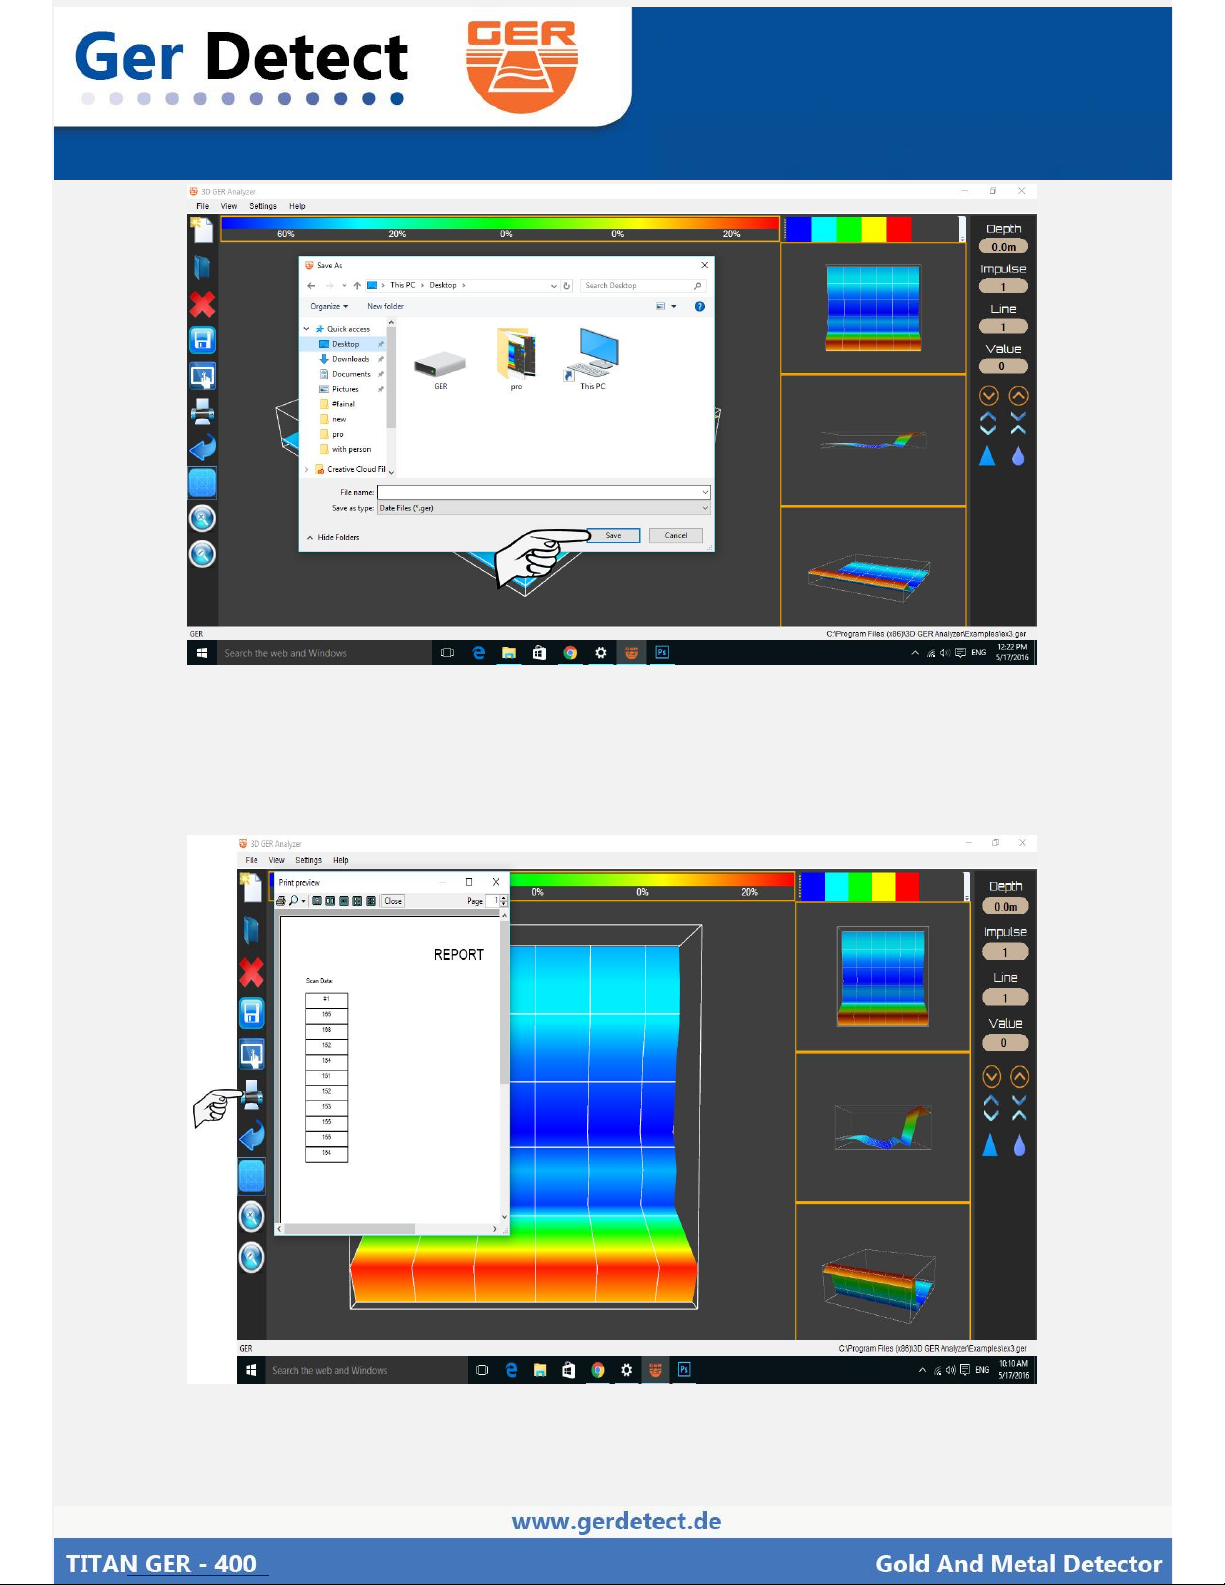
After you finish the scanning you can save the scan on the tablet as a
project to be able to analyze again also you can save it as a photo
Page 28
English User Manual
Figer: press save after you choice type
If you want to have printed report you can press on the print icon, the report will appear, and you
can print it (the number in the report it is the value of the ground – metals – cavities
Page 29
English User Manual
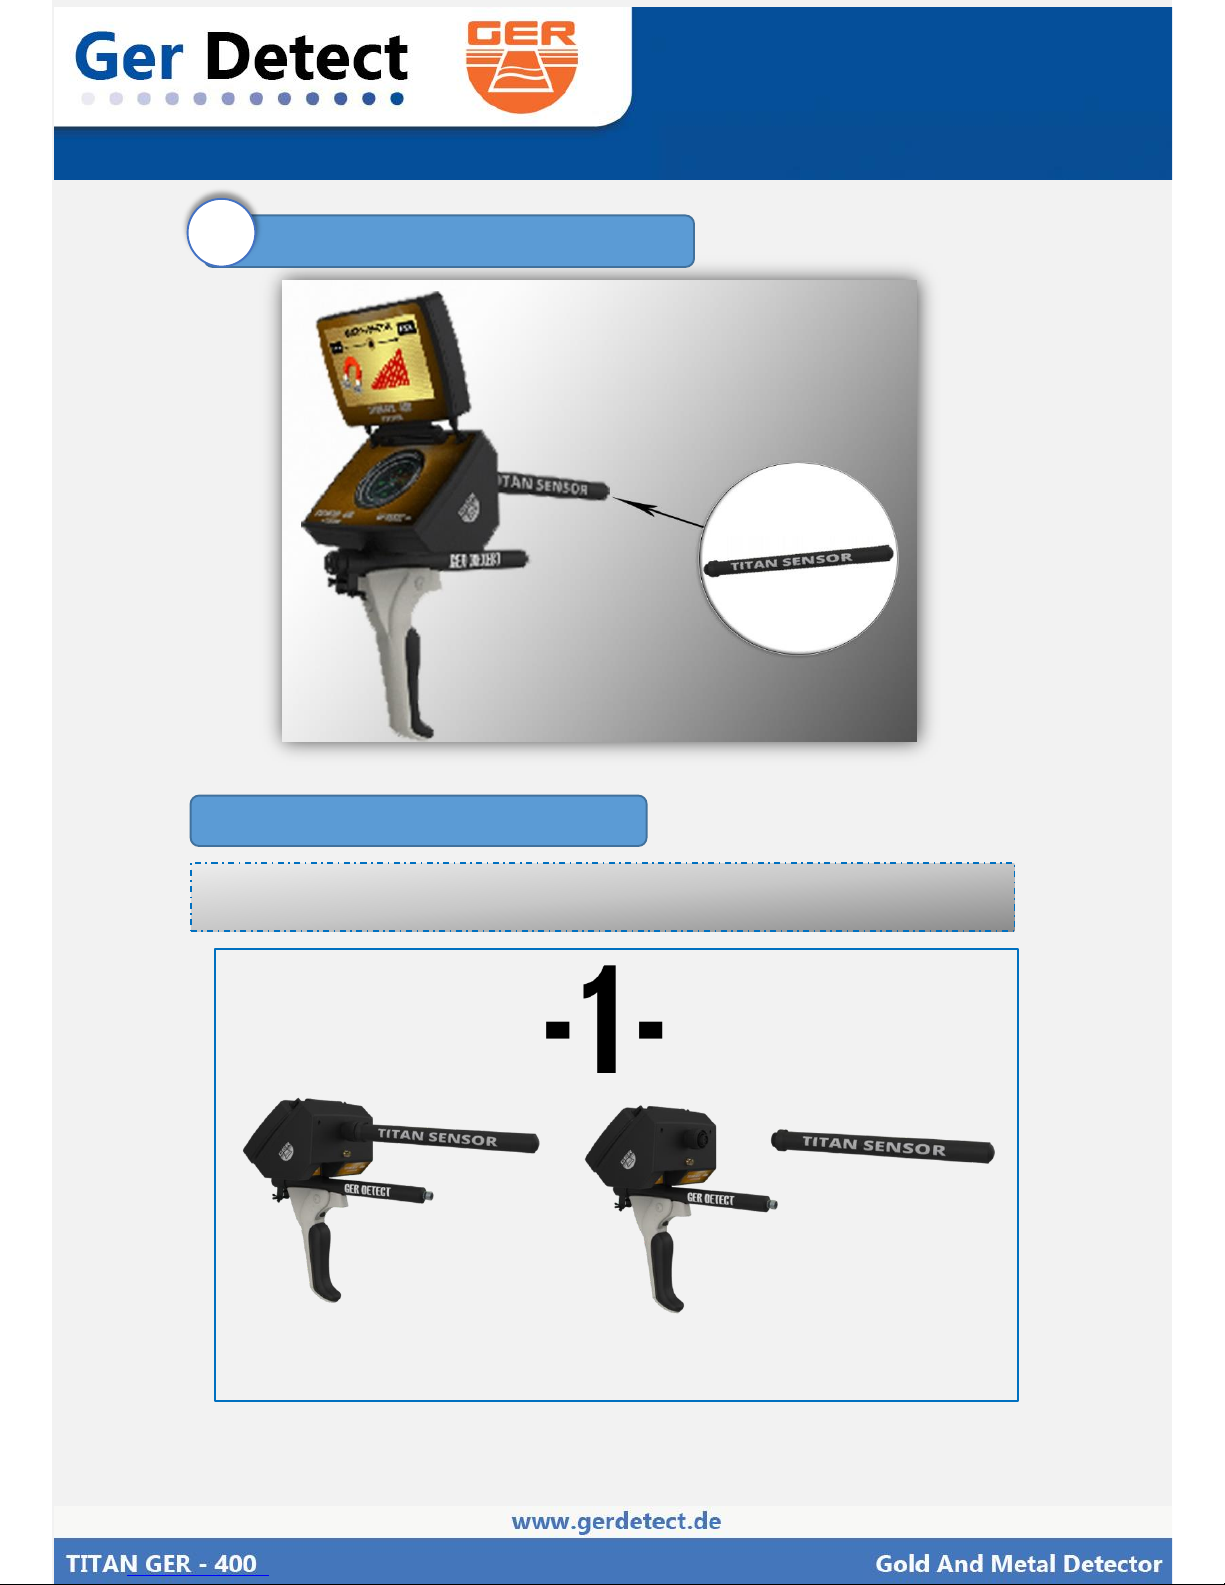
The Magnetometer System
4
Magnetometer
Sensor
Figer (36) magnetometer system components
Connect the Sensor to the Device
Connect component
Figer (37) Connecting Sensor
Page 30
English User Manual
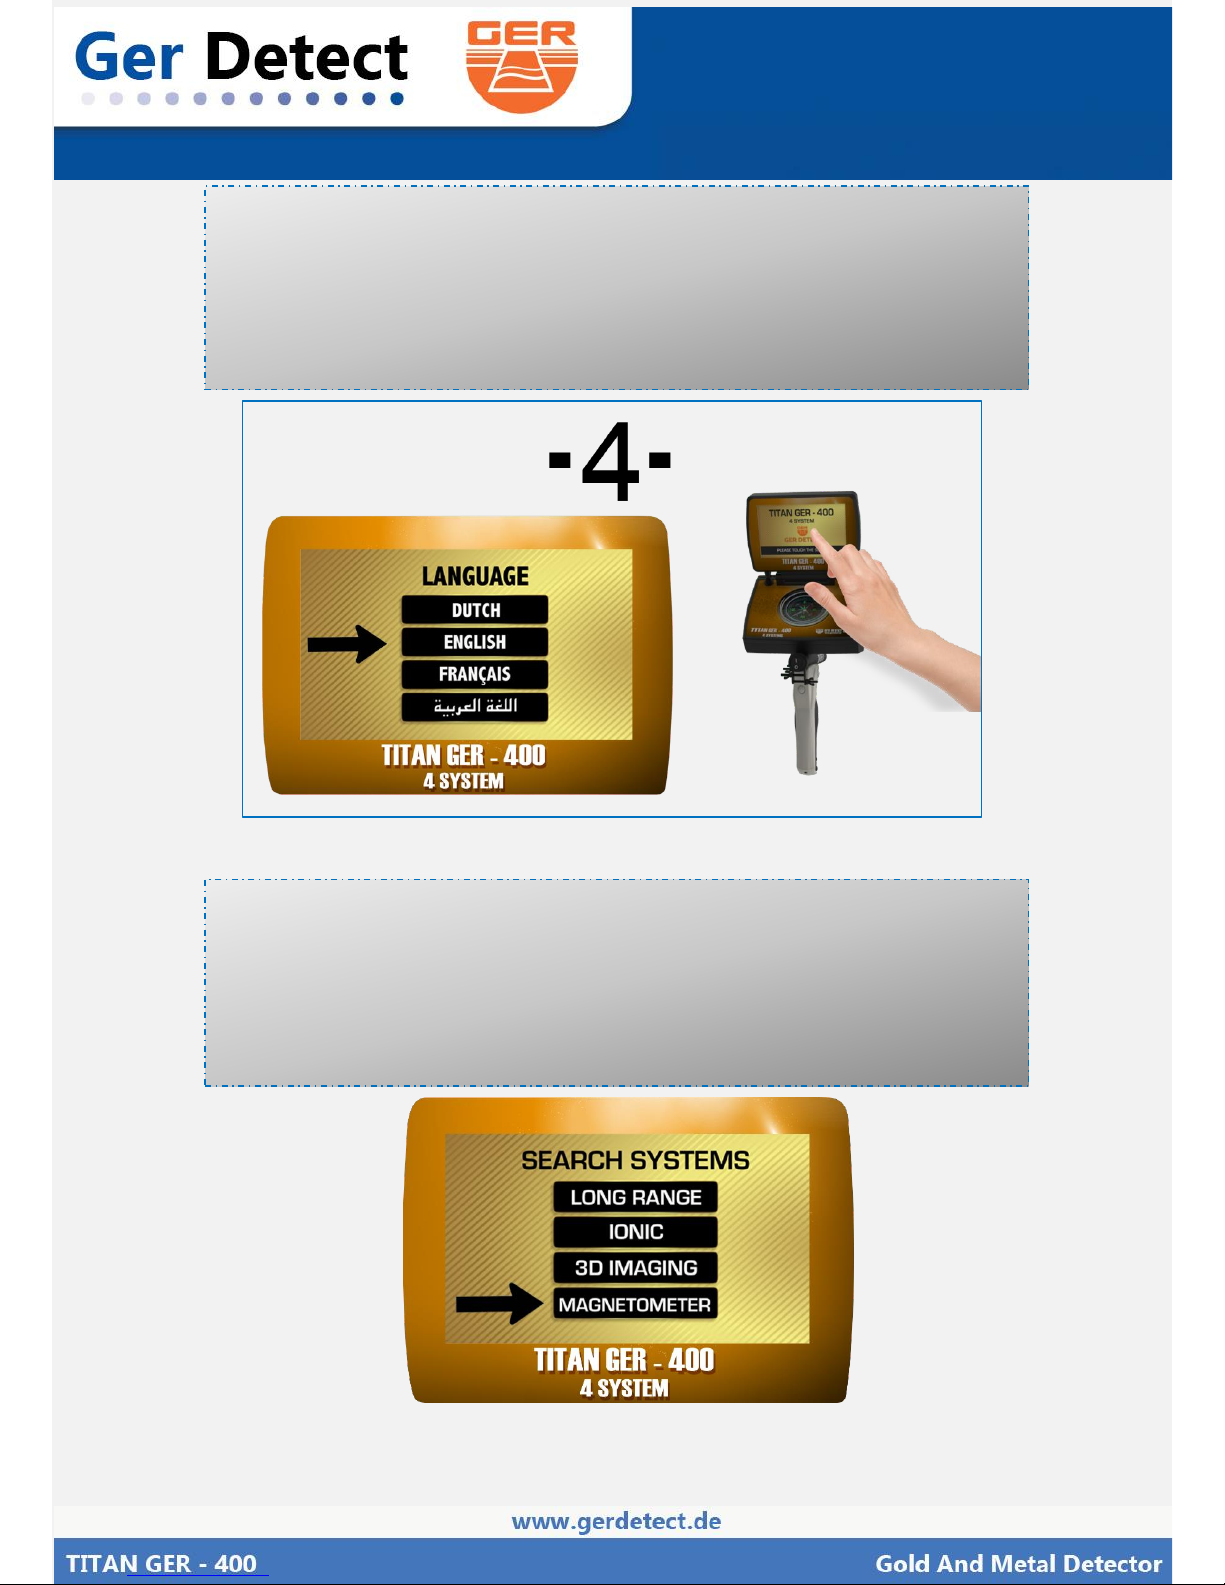
Click on the screen of the device to display the languages list
The device works on four languages:
(DUTCH-ENGLISH-FRENCH-ARABIC)
Figer (39) languages list
After selecting the language, you want to work in (English for example)
The search systems menu will appear
Select
MAGNETOMETER search system
Figer (39) search systems menu
Page 31
English User Manual
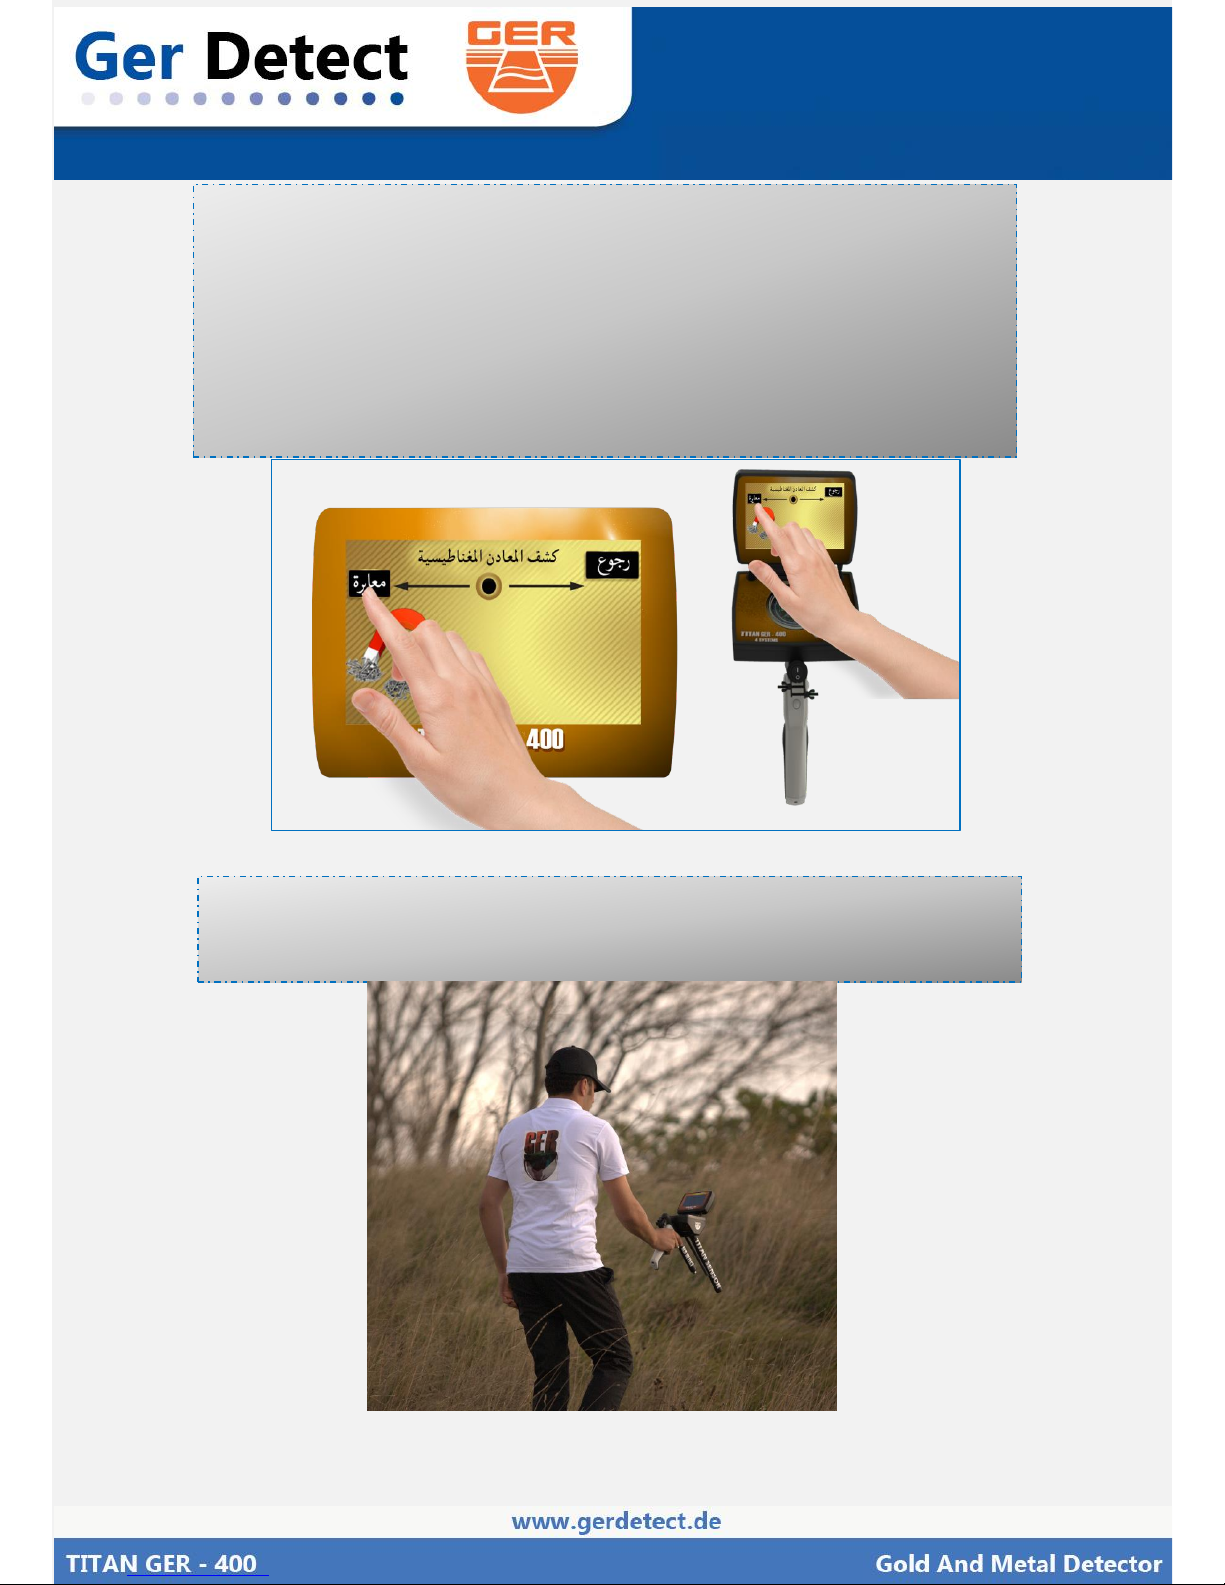
After selecting the magnetometer system, the search screen will appear.
Point the device to the ground if the device start to make a sound you
must calibrate
The device with the ground by pressing on the
calibration button as
follow:
Figer (40) calibration button
After you finish the calibration, start the search by moving the device
forward and back agents the ground
Figer (41) moving the device
Page 32
English User Manual
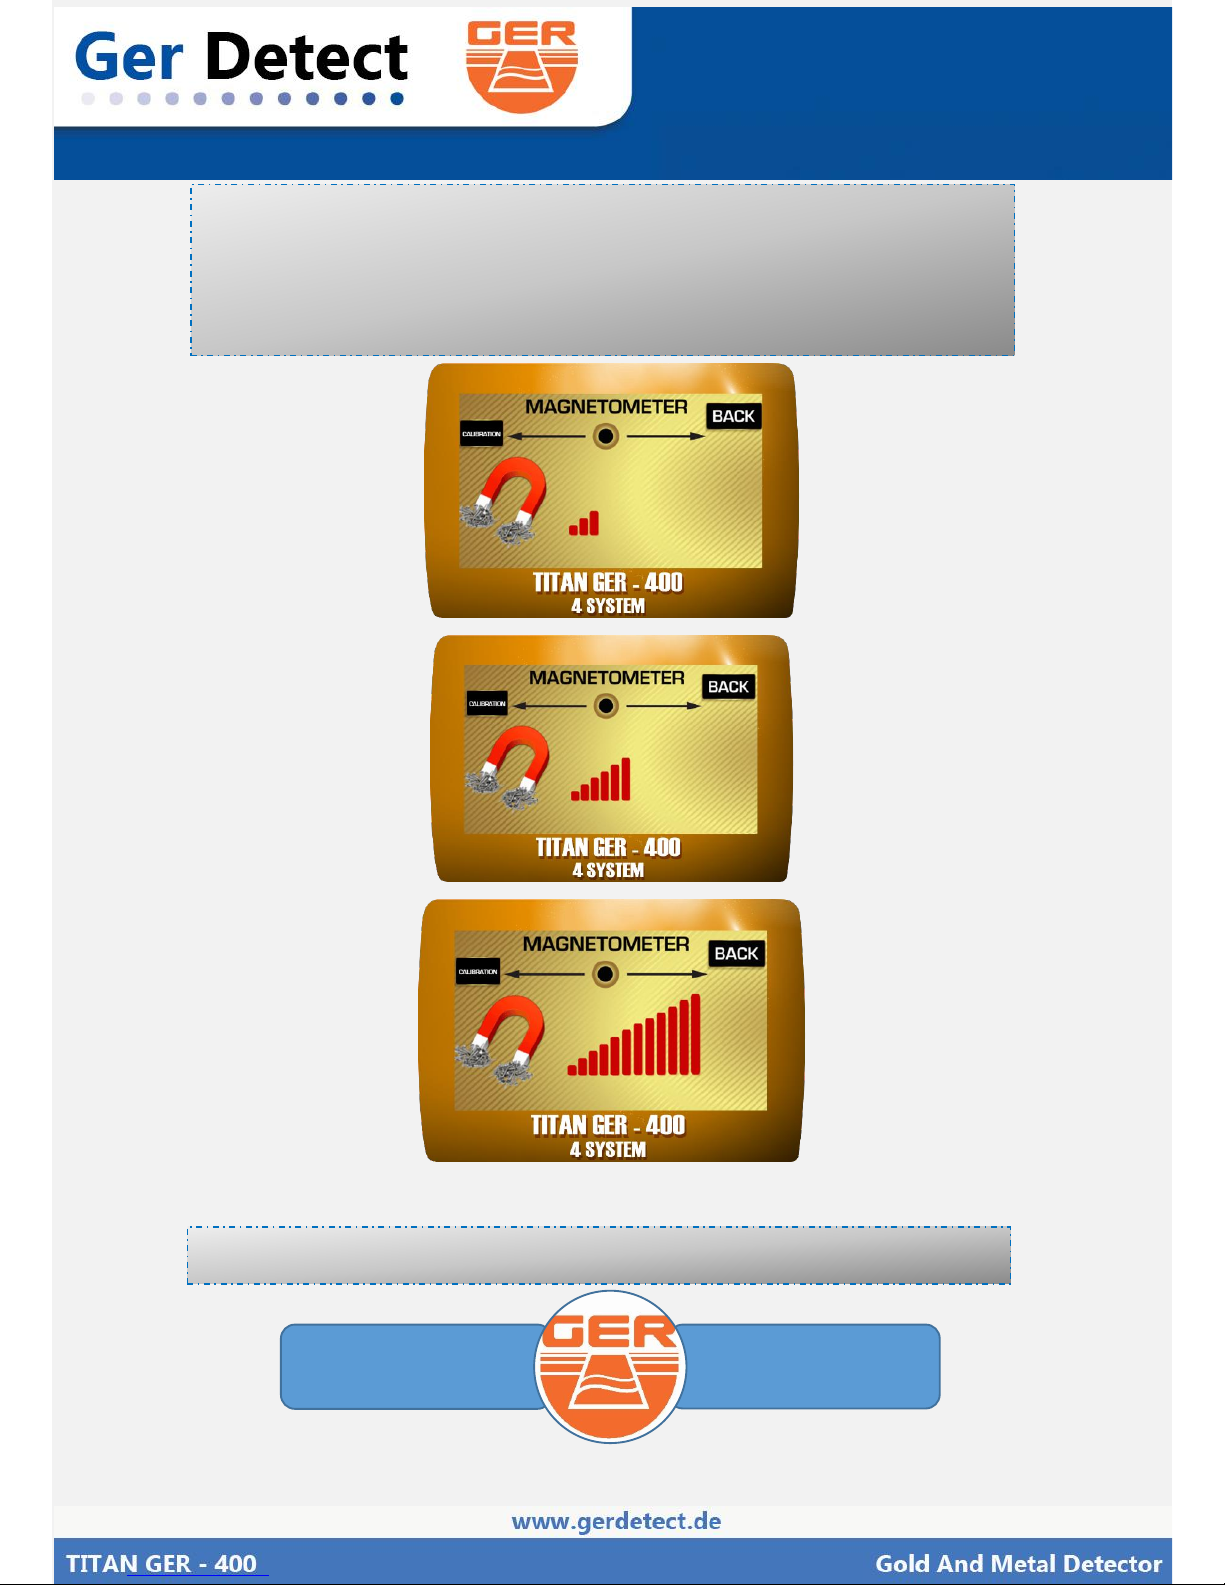
When the device detect a target, it will start to make a sound.
In addition, the indicter will start to move to alert you about the target
discovered.
Figer (42) indicter movement
The sound will start Accelerating when you will be close to the target.
We wish you the best of
luck in your searching
Thanks for choosing our
products
Page 33
English User Manual
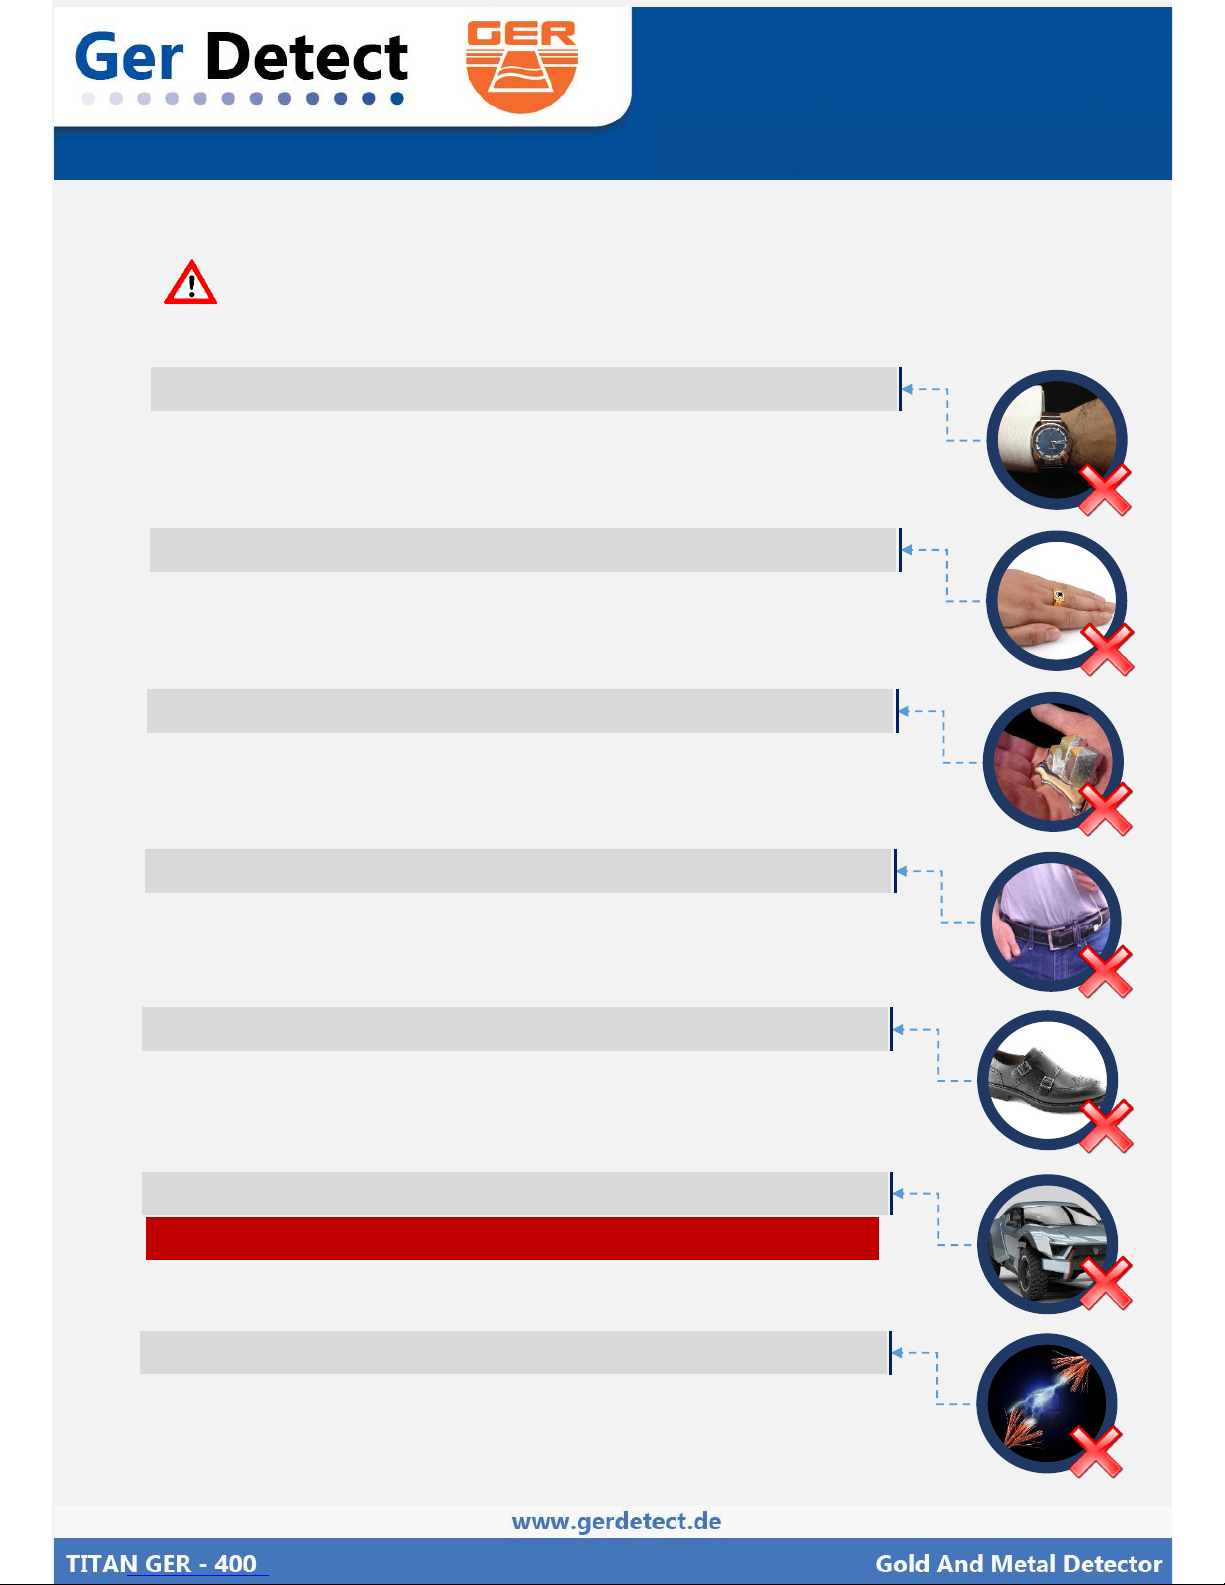
Warning
If you want the device work well without errors you have to follow next steps
When using the device please do not wear the watch
When using the device please do not wear the jewelry
When using the device please get away from metal, lighter and mobile phone
Please take off the belt
The shoes shoud not contain any metal
Stay away from the car
Stay away from electrical ground power lines or any surfacing electric
Only you can use the ionic system, while you are driving the car
 Loading...