

Page 1
Wicker Park ONE-PIECE TOILET
DIRECTIONS FOR BOWL ASSEMBLY
This water closet has been designed for easy installation. Conventional
fittings have been used throughout so that the working parts and operation of
this assembly may be easily understood.
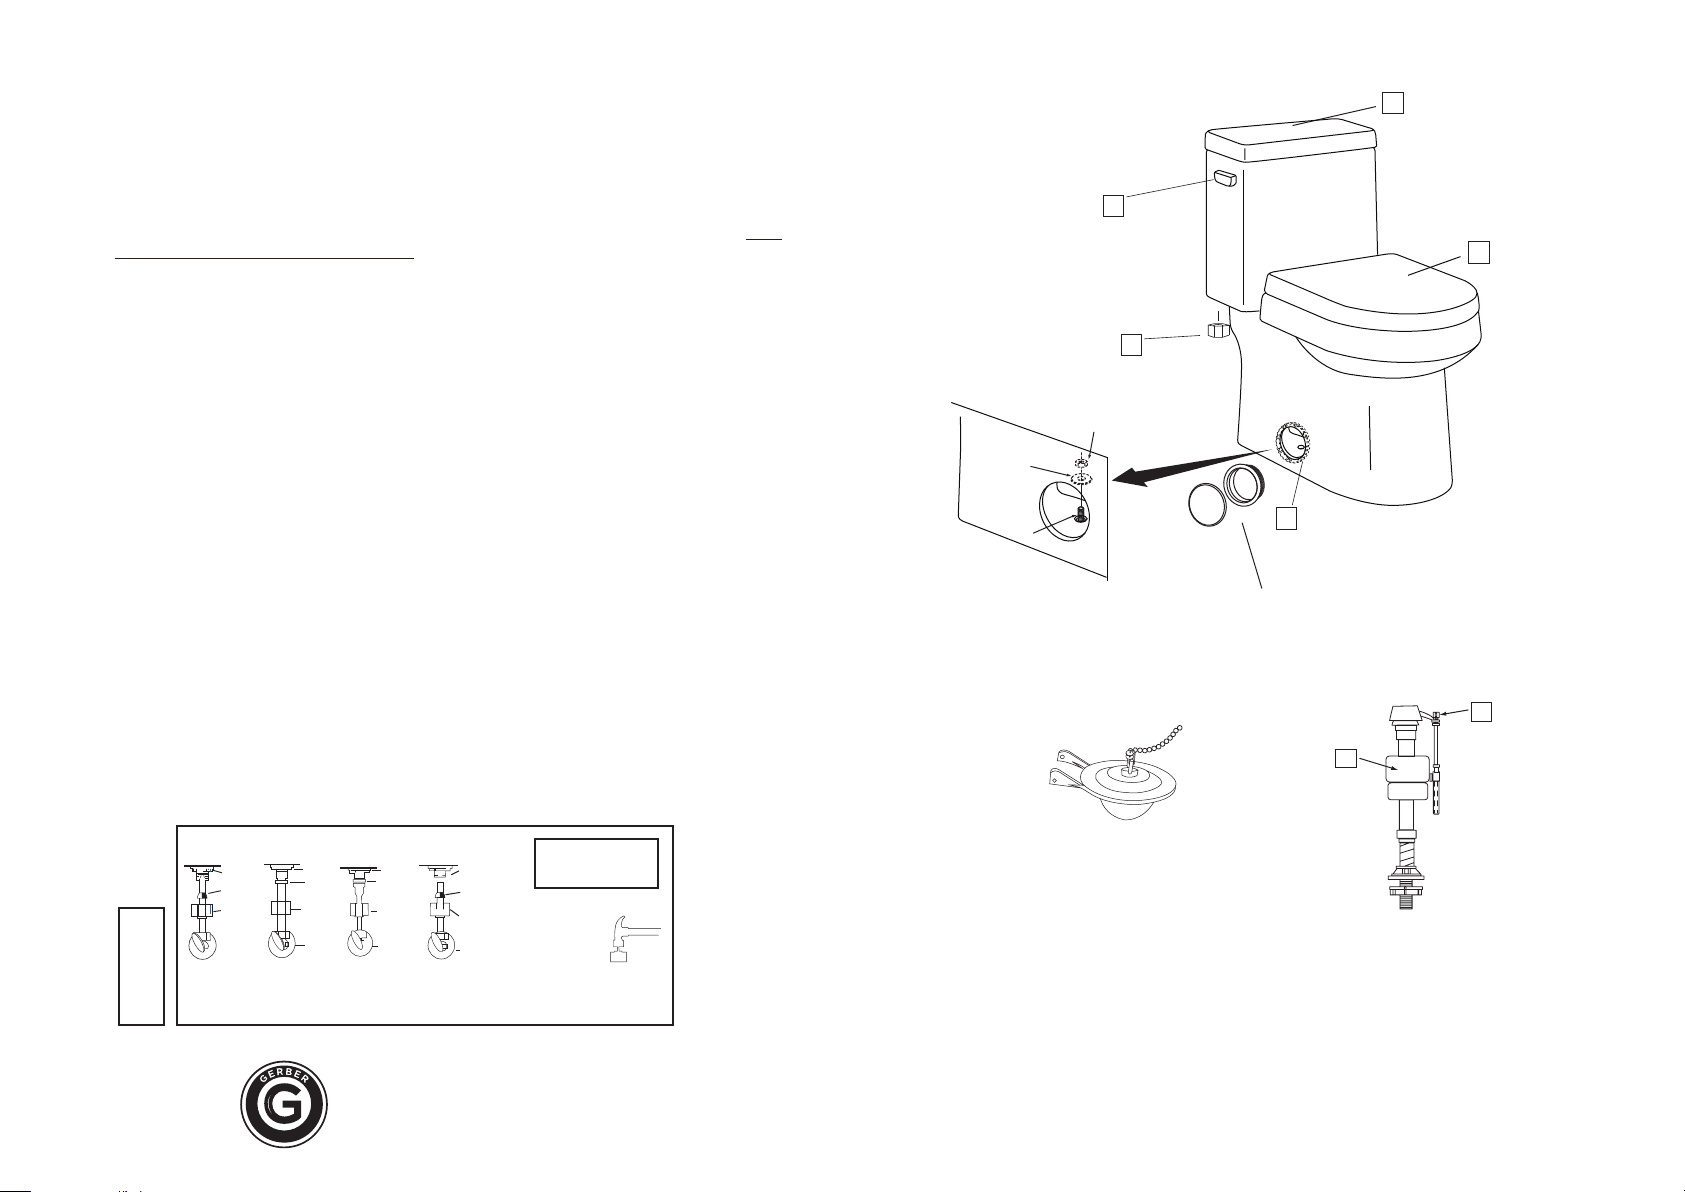
1. Cover plates (A) are provided to be used as indicated in the illustration.
2. The fill valve coupling nut (C) is provided to connect the water supply line to the fill valve. USE
NO PIPE DOPE! HAND TIGHTEN ONLY! OVERTIGHTENING MAY SPLIT THE FILL VALVE
AND WILL VOID THE WARRANTY!
3. Make sure refill tube adaptor is attached to the top of the flush valve overflow tube.
Note: Flow from the refill tube must be positioned directly over the overflow tube.
4. IMPORTANT: Always clear sand and rust from system.
• Remove valve top by lifting arm and rotating top 1/8 turn counterclockwise.
•
• Replace TOP by engaging lugs and rotating 1/8 turn clockwise. MAKE CERTAIN TOP IS
5. Adjust water level in tank to marked water line. Turn the water level adjustment screw (F) to move
the float cup (G) up or down.
6. Check action and nut tightness (left hand thread) of tank lever (B). Also, check looseness of flapper
chain (there should be slight slack in chain when at rest) and seal of flush valve flapper.
7. Install seat cover (D) per manufacturer’s instructions.
DO NOT USE IN-TANK DROP-IN TOILET BOWL CLEANERS CONTAINING
CHLORINE OR BLEACH. Use of in-tank drop-in cleaners containing chlorine or
bleach VOIDS FLUIDMASTER™ WARRANTY and WILL RESULT IN DAMAGE to tank
components and may cause flooding and property damage.
While holding a container over the uncapped valve to prevent splashing,
turn water supply on and off a few times. Leave water supply off.
TURNED TO THE LOCKED POSITION. VALVE MAY NOT TURN ON IF TOP IS NOT
FULLY TURNED TO THE LOCKED POSITION.
99-858-WH Tank Lever
Levier du réservoir
Palanca del tanque
99-850 Coupling Nut
Écrou de raccordement
B/C Tuerca de union
NUT
TUERCA
ECROU
WASHER
ARANDELA
RONDELLE
BOLT
TORNILLO
BOULON
B
C
99-857 floor bolt cover plates (2 each)
Cubiertas de para los pernos del suelo (2)
Plaque cache-boulon de cuvette en (2ch.)
TC-21-221 TANK COVER
CUBIERTA DEL TANQUE
E
COUVERCLE DU RÉSERVOIR
99-859 SEAT AND COVER
ASIENTO Y CUBIERTA
D
SIÈGE DE TOILETTES
A
DO NOT EXPOSE PLASTIC TRIM PARTS TO STRONG OXIDIZING AGENTS,
CHLORINE, OR ACID LEVELS OF LOWER THAN 5.0 pH. SOME BOWL/TILE
CLEANERS CONTAIN SUCH AGENTS.
TANK TYPE BOWL CLEANERS CAN CAUSE TANK COMPONENT FAILURE AND
DAMAGE. OUR WARRANTY EXCLUDES SUCH FAILURES.
CAUTION:
DO NOT
USE
CONE
WASHER
OR
O-RING
WITH
PLASTIC
SUPPLY
LINE.
METAL/COPPER
TUBING
GALVANIZED
PIPE (SEE NO TE)
LOCK NUT
CONE
WASHER
COUPLING
NUT
WATER
SHUT-OFF
These parts must be used as illustrated to insure
water-tight connection. Use of existing a coupling
nut may result in water leakage. Water supply tube
or pipe must extend at least 1/2'' inside threaded
shank of valve(does not apply to flanged tubing).
P
R
O
F
E
S
S
I
O
N
METAL FLANGED
TUBING
LOCK NUT
O-RNG
COUPLING
NUT
WATER
SHUT-OFF
E
C
N
A
GERBER
M
R
O
F
R
A
E
L
P
®
LOCK NUT
EXISTING
WASHER
EXISTING
COUPLING
NUT
WATER
SHUT-OFF
Use existing
coupling nut
and washer.
METAL SPIRAL
TUBING
LOCK NUT
EXISTING
CONE
WASHER
COUPLING
NUT
WATER
SHUT-OFF
Use existing spiral cone
washer. Fluidmaster cone
washer may not seal
completely on spiral type
supply line.
CAUTION: Overtightening of
LOCK NUT or COUPLING NUT
could result in breakage and
potentiial flooding.
FOR GALVANIZED
PIPE ONLY. you
must break out
the center of
COUPLING NUT
by striking it lightly with ahammer
or blunt end of screw driver handle.
Discard center portion. Also,use
O-RING instead of cone washer.
Float Cup
Coupelle flottante
Flotador
Flapper Assembly Replaced by 99-788
FLUIDMASTER ™ is the trademark of Fluidmaster lnc.
F
G
Replaced by 99-300
8CGE0073 One-piece, rev. 08-14
Water Level
Adjusting Screw
La vis de réglage de
niveau d’eau
El tornillo de reglaje del
nivel de agua
 Loading...